Pro Exchange 2013 SP1 PowerShell Administration: For Exchange On-Premises and Office 365 (2014)
Chapter 11. Office 365 and Exchange Online
Office 365 and Exchange Online are subscription-based online offerings built around Office-related software and services. While many consid’er today’s Office 365 and Exchange Online programs as well established, they were officially launched as recently as June 2011. Office 365 is the succesor to Business Productivity Online Suite (BPOS). BPOS was launched in 2008 as a package of individually hosted Microsoft products, such as Exchange, SharePoint, and at that time, Live Meeting. At the time of this writing, Office 365 offers software and cloud-based services founded on the following products:
· Microsoft Exchange for email
· Microsoft Lync for communications and conferencing
· Microsoft SharePoint for social networking and collaboration
· Microsoft Office WebApps for online Microsoft Office Suite
· OneDrive for cloud file storage
· Yammer for social networking
· Microsoft Office desktop application licenses
What products and services are available to your organization depends on the subscription. The Office 365 subscriptions and packages change quite frequently; current Office 365 subscriptions are described and can be compared at http://bit.ly/O365BusinessPlans. This is also the location to start your Office 365 journey by selecting one of the business plans. Some plans offer the option of a trial run.
![]() Note When there are references to Exchange Online (EXO), these are for the Exchange environment that is part of Office 365. Exchange Online is also the name of a specific Office 365 business plan, solely offering hosted Exchange email services. For clarity, we’ve used Office 365 to refer to the service in general and Exchange Online to mean the Exchange environment in Office 365.
Note When there are references to Exchange Online (EXO), these are for the Exchange environment that is part of Office 365. Exchange Online is also the name of a specific Office 365 business plan, solely offering hosted Exchange email services. For clarity, we’ve used Office 365 to refer to the service in general and Exchange Online to mean the Exchange environment in Office 365.
At the Microsoft Exchange Conference in 2014, the Office team announced adoption of a cloud-first strategy. This means that changes and new features will be introduced in Office 365 first. This is because the high level of standardization in the Office 365 platform allows for introducing or rolling back small, gradual changes. When they are deemed suitable for on-premises usage, changes will be made available for the on-premises Exchange Server product in the form of a cumulative update or service pack. However, owing to scale, some features might never make it to the on-premises world, such as Delve (formerly known by its code name, Oslo), which went live in Office 365 in September, 2014. Delve offers personalized features to search and discover relevant contents across Office 365 by using machine learning. It searches your e-mail messages, meetings, contact information, connected social networks and documents to show the end user relevant information. Delve is available through all Office 365 subscriptions plans. More information on Delve can be found at http://bit.ly/DelveStart.
Because of the nature of Outlook WebApp and the Outlook client, this cloud-first strategy also means client changes will become available in Outlook WebApp first, as the Outlook client requires a hotfix or service pack to add new or changed functions. Also, the functionality of Office 365 may leverage all server products, even when you are not directly using them, making an on-premises situation more difficult—for example, SharePoint might not be present on-premises or might not be integrated with on-premises Exchange.
When considering Office 365, organizations need to make sure the platform suits their present and future business requirements, and that they can embrace the consequences of switching to a cloud-based solution, either partially or in full. For example, while you can configure some aspects of your cloud-based tenant, such as password expiration settings, cloud-based tenants are bound to retention periods that are set by the provider.
Deployment Options
Organizations can choose among three deployment options when they want to migrate to Office 365.
· Cloud-only or all-in, whereby companies solely utilize software and services from the cloud—in this case, Office 365 (see Figure 11-1).
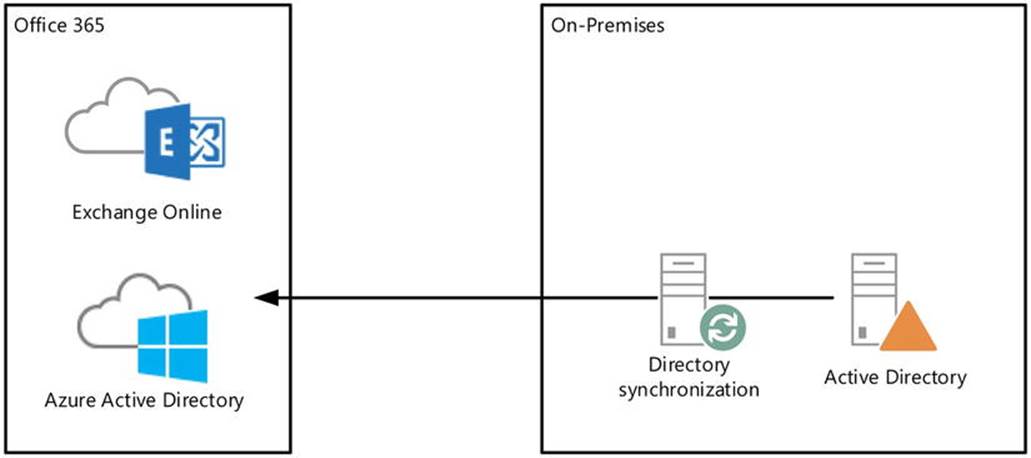
Figure 11-1. Full cloud deployment of Exchange
· None, where companies keep utilizing their on-premises software and services (see Figure 11-2).
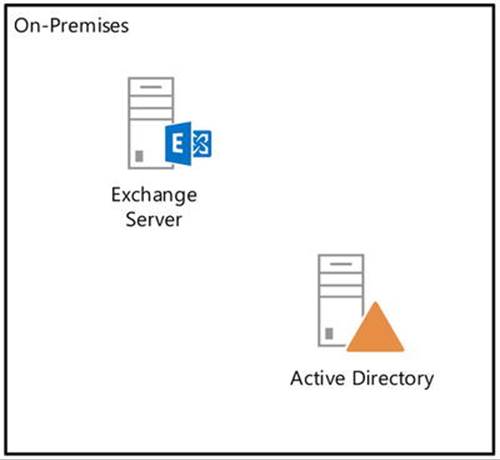
Figure 11-2. Exclusive on-premises deployment of Exchange
· Hybrid, where companies utilize a mixed model, using and optionally integrating on-premises software and services with Office 365 or cloud services. In this model, companies can have both on-premises mailboxes and mailboxes in Office 365 (see Figure 11-3).
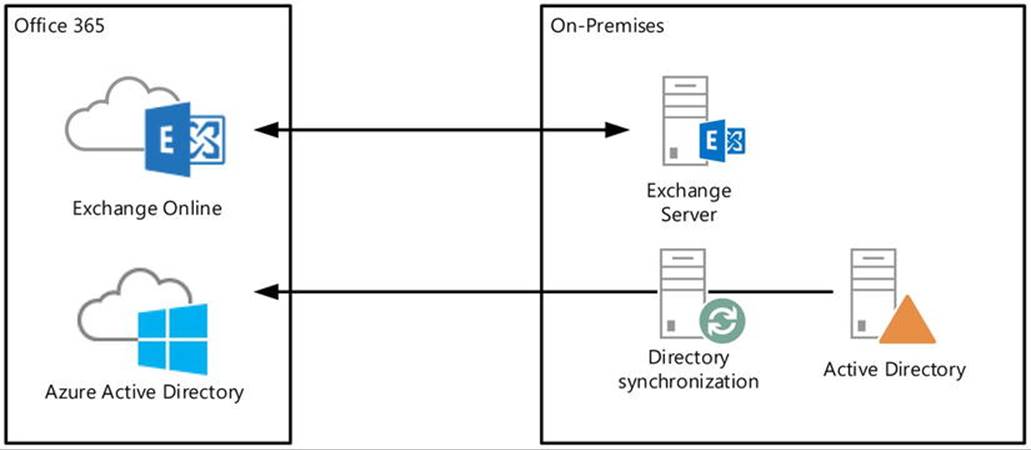
Figure 11-3. Hybrid deployment of Exchange
The depicted directory synchronization server, presently known as Windows Azure Active Directory synchronization server (WAADsync), is optional but highly recommended when using an Exchange hybrid situation. It provisions objects and synchronizes information such as email addresses in Windows Azure Active Directory, using information from the on-premises Active Directory. This is one-way traffic for the majority of attributes, and as a consequence you need to manage cloud-based mailboxes, contacts, and other mail-related objects on-premises, letting WAADsync provision the objects and propagate the attribute changes in Windows Azure Active Directory and Exchange Online. WAADsync also enables the same sign-on experience using password synchronization. (But there’s more on this later in the chapter).
![]() Caution When using the Exchange hybrid and WAADsync, management is performed on-premises. WAADsync will handle the provisioning and synchronization of information in Windows Azure Active Directory and Exchange Online.
Caution When using the Exchange hybrid and WAADsync, management is performed on-premises. WAADsync will handle the provisioning and synchronization of information in Windows Azure Active Directory and Exchange Online.
To assist organizations with a move to Office 365 or help to integrate cloud components with their on-premises environment, Microsoft has made available the Exchange deployment assistant. After answering a few basic questions, such as what version of Exchange is currently used and what deployment option you will be using, this tool generates step-by-step instructions for migrating or connecting to Office 365. The Exchange deployment assistant can be found at http://bit.ly/exchangeda. It gets updated regularly to reflect changes in the migration process, which may occur frequently.
Also, when you want to implement an Exchange hybrid deployment and are still running an Exchange 2007 environment, you need to use an Exchange 2010 or Exchange 2013-based hybrid server. These servers can handle client traffic for on-premises down-level servers, as well as redirect or proxy requests to Office 365. Table 11-1 lists the hybrid deployment scenarios that are supported.
Table 11-1. Hybrid Deployments Supportability Matrix
|
On-Premises |
Exchange 2010 SP3 Hybrid Server |
Exchange 2013 SP1 Hybrid Server |
|
Exchange 2013 SP1 |
Not supported |
Supported |
|
Exchange 2010 SP3 |
Supported |
Supported |
|
Exchange 2007 SP3 RU10 |
Supported |
Supported |
|
Exchange 2003 |
Supported |
Not supported |
![]() Note If required to run an Exchange hybrid server, elegible cloud tenants can request a free product key through the Office 365 Management Portal or via http://aka.ms/hybridkey.
Note If required to run an Exchange hybrid server, elegible cloud tenants can request a free product key through the Office 365 Management Portal or via http://aka.ms/hybridkey.
![]() Caution Cumulative updates are necessary for maintaining currency, as Exchange builds are supported for two release cycles. This also applies to Exchange hybrid and the Edge servers, meaning that when an Exchange 2013 Cumulative Update “N” is released, the support for hybrid servers running Exchange 2013 Cumulative Update “N-2” ends.
Caution Cumulative updates are necessary for maintaining currency, as Exchange builds are supported for two release cycles. This also applies to Exchange hybrid and the Edge servers, meaning that when an Exchange 2013 Cumulative Update “N” is released, the support for hybrid servers running Exchange 2013 Cumulative Update “N-2” ends.
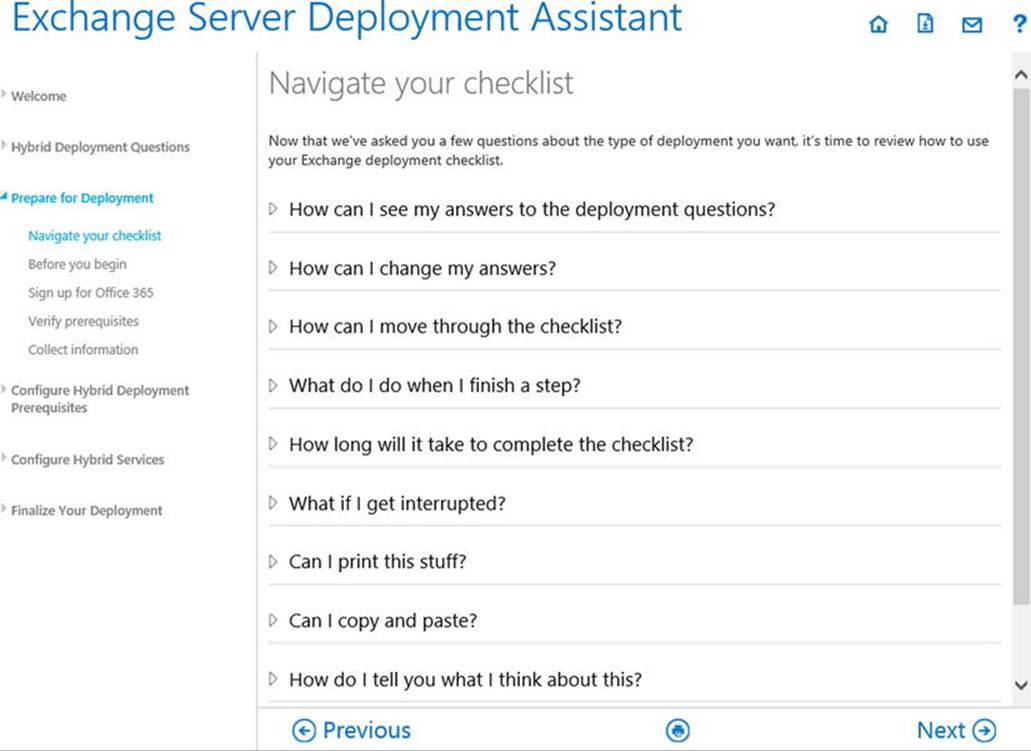
Figure 11-4. Exchange Server’s deployment assistant
The initial setup and configuration of Office 365 and its related components are covered in the step-by-step instructions generated by the deployment assistant. Because of all the possible variations in deployment and the Office 365 update cadence, those instructions might easily fill a book themselves. Therefore, this chapter will focus on some of the more common topics involved in migrating to or administering Office 365 or an Exchange hybrid deployment.
![]() Tip The Office 365 service is under constant development. To receive notifications when changes are made to Office 365-related URLs or IP addresses, subscribe to the RSS feed located at http://go.microsoft.com/fwlink/p/?linkid=236301.
Tip The Office 365 service is under constant development. To receive notifications when changes are made to Office 365-related URLs or IP addresses, subscribe to the RSS feed located at http://go.microsoft.com/fwlink/p/?linkid=236301.
Connecting to Office 365
Many of the examples used in the previous chapters of this book apply not only to Exchange 2013 on-premises but also to Office 365. However, your cloud tenant is subject to limitations as configured through RBAC, so cmdlets or parameters might not be available.
Most administrators will use the Exchange Control Panel (ECP) when administering Office 365 for everyday tasks. But, as with on-premises Exchange, using PowerShell sometimes proves a better option, as repetitive tasks might become tedious when performed through the ECP. In some situations, using PowerShell might even be required, such as for enabling customization of your cloud tenant using Enable-OrganizationCustomization.
When connecting to Office 365 for Exchange administration, be aware that there are two separate environments to connect to:
· Exchange Online, which can be managed through a remote PowerShell session.
· Windows Azure Active Directory, which can be managed using the Windows Azure Active Directory module for PowerShell.
Exchange Online
When you connect to Exchange Online using PowerShell, you will encounter an Exchange Management Shell (EMS) session that’s similar to when you connect to an on-premises Exchange 2013 environment. The only difference is that you will have access to a RBAC-imposed subset of cmdlets and parameters that are appropriate for your cloud tenant, as Exchange Online is a shared environment. You will also get access to some additional cmdlets specific to Exchange Online, such as Get-InboundConnector.
![]() Note At the time of this writing, Exchange 2013 offers 792 cmdlets while Exchange Online makes 521 cmdlets available. Only 383 of these latter cmdlets are available for both on-premises Exchange 2013 and Exchange Online.
Note At the time of this writing, Exchange 2013 offers 792 cmdlets while Exchange Online makes 521 cmdlets available. Only 383 of these latter cmdlets are available for both on-premises Exchange 2013 and Exchange Online.
To connect to Exchange Online, you use the following cmdlets and see the screen as shown in Figure 11-5:
$o365Cred= Get-Credential
$o365Session= New-PSSession -ConfigurationName Microsoft.Exchange
-ConnectionUri https://ps.outlook.com/powershell/ -Credential $o365Cred
-Authentication Basic -AllowRedirection
Import-PSSession $o365Session
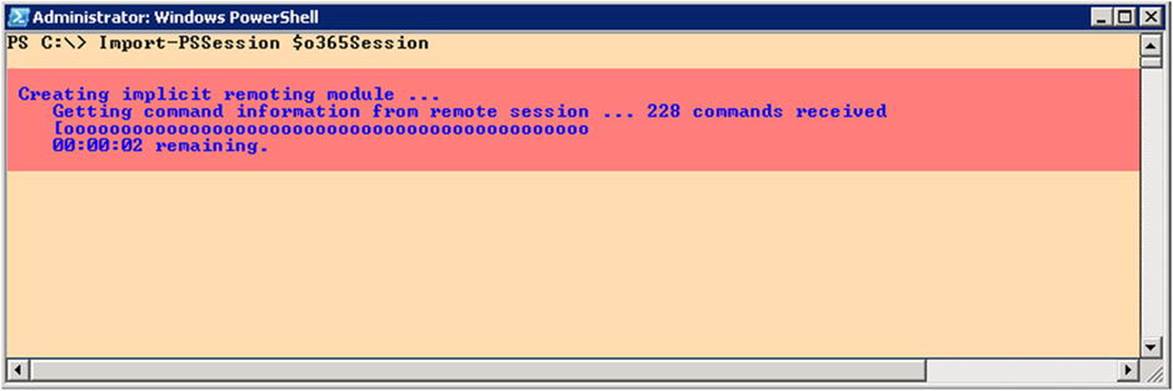
Figure 11-5. Connecting to Exchange Online
When prompted, you enter your cloud tenant’s administrative credentials.
To make this information available in every session, you edit your PowerShell profile and include the cmdlets to connect to Exchange Online as a function. Your regular PowerShell profile is contained in the PowerShell variable $profile. You can add a function Connect-EXO, which is then available in every PowerShell session you start, as follows:
1. In PowerShell session, enter $profile. This will display the full filename of the profile file. For example,
C:\Users\administrator.CONTOSO\Documents\WindowsPowerShell\
Microsoft.PowerShell_profile.ps1
2. When the file does not exist, create it and optionally create the path.
3. Add the following contents to Microsoft.PowerShell_profile.ps1:
Function Connect-EXO {
$o365Cred= Get-Credential
$o365Session= New-PSSession -ConfigurationName Microsoft.Exchange
-ConnectionUri https://ps.outlook.com/powershell/ -Credential $o365Cred
-Authentication Basic -AllowRedirection
Import-PSSession $o365Session
}
4. Save and close the file.
5. Open a new PowerShell session.
6. Enter the following command: Connect-EXO.
You can also extend the PowerShell integrated scripting environment with menu options to connect to various remote or local environments. An example of how to accomplish this can be found at http://bit.ly/ConnectISE.
![]() Tip The cmdlet Import-PSSession provides a parameter prefix that allows you to prefix cmdlets for the related session. This means you can use the same cmdlets, albeit with a prefix for the noun. This may come in handy when you are connected to multiple Exchange environments or to Office 365 tenants. For example, if you use Import-PSSession $o365Session -Prefix EXO, the noun of the imported Exchange Online-related cmdlets will be prefixed with EXO—for example, Get-EXOMailbox, Set-EXOMailbox, and Get-EXOMailUser. These cmdlets work identically to their normal counterparts—that is, Get-Mailbox, Set-Mailbox and Get-MailUser.
Tip The cmdlet Import-PSSession provides a parameter prefix that allows you to prefix cmdlets for the related session. This means you can use the same cmdlets, albeit with a prefix for the noun. This may come in handy when you are connected to multiple Exchange environments or to Office 365 tenants. For example, if you use Import-PSSession $o365Session -Prefix EXO, the noun of the imported Exchange Online-related cmdlets will be prefixed with EXO—for example, Get-EXOMailbox, Set-EXOMailbox, and Get-EXOMailUser. These cmdlets work identically to their normal counterparts—that is, Get-Mailbox, Set-Mailbox and Get-MailUser.
Windows Azure Active Directory
Connecting to Windows Azure Active Directory requires installing the related PowerShell module. You can download and install the x64 version of the module via http://bit.ly/WAADM. After installing the module, you can start the Windows Azure Active Directory module for the PowerShell shortcut. To connect to Windows Azure Active Directory, you use the following cmdlet:
Connect-MSOLService
When prompted, you enter your cloud tenant’s administrative credentials. From here, you have Windows Azure Active Directory cmdlets at your disposal—for example, you can use New-MSOLUser to create user objects, Set-MSOLUserLicense to assign licenses, or cmdlets to configure federation.
Autodiscover
Chapter 3 covered Autodiscover and explained how this process works in an on-premises Exchange environment. When you’re using cloud-only mailboxes, the client process is similar, but instead of pointing the public DNS record for Autodiscover to your on-premises environment, you create a CNAME record to the Office 365 environment; for example,
autodiscover.contoso.com CNAME autodiscover.outlook.com
When using Exchange hybrid mode, you can have mailboxes residing on-premises and also mailboxes residing in Office 365. In this situation, the Autodiscover record can point to either the on-premises environment or the Office 365, as Autodiscover supports redirection. When the mailbox is located elsewhere, the --targetAddress (external email address) configured attribute will be leveraged for redirection. These mail-enabled users will be created in Office 365 for on-premises mailboxes.
![]() Note The targetAddress attribute is used primarily to redirect mail flow. It is essential when exchanging address book information using multiple forests in something called global address list syncronization (GALsync). Autodiscover will leverage this attribute to redirect lookups.
Note The targetAddress attribute is used primarily to redirect mail flow. It is essential when exchanging address book information using multiple forests in something called global address list syncronization (GALsync). Autodiscover will leverage this attribute to redirect lookups.
To redirect Autodiscover and mail flow, the email domain and service name space of the cloud tenant are used—for example, contoso.onmicrosoft.com, as shown in Figure 11-6.
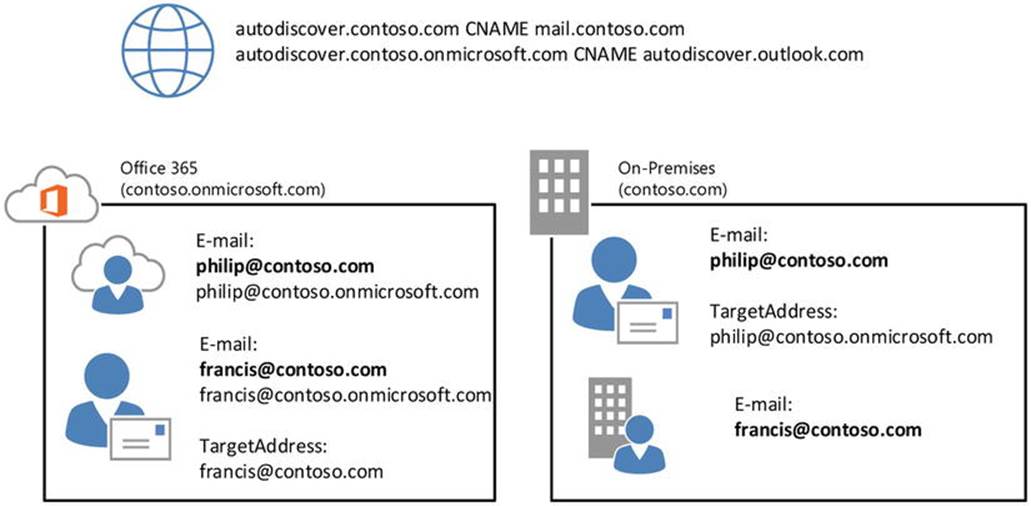
Figure 11-6. Autodiscover redirection using targetAddress
In Figure 11-6, Philip is a user with a mailbox in Office 365. His email address is philip@contoso.com. When Outlook does an Autodiscover lookup, it contacts contoso.com for Autodiscover. That request is processed by the on-premises Exchange Server 2013 infrastructure, which finds a mail-enabled user object with that address. It also discovers that its target address is configured as philip@contoso.onmicrosoft.com, and it will return that value to the client. The client can now try to use contoso.onmicrosoft.com for Autodiscover, and this request will successfully be processed by Office 365.
![]() Note When moving mailboxes from or to Office 365, the targetAddress attribute is updated by the mailbox replication service (MRS) that coordinates the move.
Note When moving mailboxes from or to Office 365, the targetAddress attribute is updated by the mailbox replication service (MRS) that coordinates the move.
DNS Checks
The DNS checker in the Office 365 Admin Center might notify you if your Autodiscover record is not pointing to autodiscover.outlook.com. However, you might not be synchronizing all the on-premises mailboxes as identities to Office 365; you may need to redirect Autodiscover for mail-enabled users yourself, or you may have Autodiscover set up for other trusted Exchange organizations. In such cases, you can leave the Autodiscover record pointing to the on-premises environment. The downside of doing this is that all Autodiscover queries related to cloud-based identities will access your environment first, including services like free/busy.
Optionally, you can turn off the DNS checks in the Office 365 Admin Center, via the Domains option, as shown in Figure 11-7.

Figure 11-7. Office 365 Admin Center DNS checks
Federation
Your organization and users might need to exchange information with other organizations. For example, companies agreeing to a form of partnership or preparing for an upcoming merger might want to share their calendaring information. Another example is contractors or vendors who want to share product information with the organizations they work for or with.
In earlier versions of Exchange, some information could be shared between Exchange organizations by using something called the inter-organization replication tool (IORepl). Because it was limited to information stored in public folders, and because it was replicated information, there were some downsides to using it; for example, you could only use public folder contents such as free/busy information. Also, because replication was involved, the information was not live. Replication was MAPI-based and required forest trusts to prevent its easily traveling on the public network, which is not secure.
Exchange 2007 introduced Exchange Web Services (EWS). Together with the Availability service, it does not require setting up replication; rather, it enables a web-like exchange of information by using a secure http and a service account to authenticate the lookup in the remote organization. However, trust and provisioning of contact objects for external organizations were still required for initiating and directing the lookup.
![]() Tip The default availability period for lookup is different from that for Exchange 2007 (42 days) or Exchange 2010 and Exchange 2013 (62 days). This may result in failed availability requests—for example, when using Exchange 2013 with Exchange 2007 in co-existence scenarios or as a hybrid server. To align these values, extend the default availability lookup period of Exchange 2007. To do this, edit the $exinstall\ClientAccess\ExchWeb\EWS\web.config file on all your Exchange 2007 CAS, and add the following item to the AppSettings section:<add key="maximumQueryIntervalDays" value="62" />.
Tip The default availability period for lookup is different from that for Exchange 2007 (42 days) or Exchange 2010 and Exchange 2013 (62 days). This may result in failed availability requests—for example, when using Exchange 2013 with Exchange 2007 in co-existence scenarios or as a hybrid server. To align these values, extend the default availability lookup period of Exchange 2007. To do this, edit the $exinstall\ClientAccess\ExchWeb\EWS\web.config file on all your Exchange 2007 CAS, and add the following item to the AppSettings section:<add key="maximumQueryIntervalDays" value="62" />.
Starting with Exchange 2010, federation was introduced to allow the secure sharing of information between Exchange organizations (see Figure 11-8). After configuration, the federation delegation uses organization relationships among its partners. For organizations to federate, they establish a trust relationship via the Windows Azure Active Directory authentication system. Formerly known as Microsoft federation gateway (MFG), the Windows Azure Active Directory authentication system functions as an online trust broker. This approach does away with the earlier requirement of having to configure trusts and set up accounts for sharing information. If you trust the Windows Azure Active Directory authentication system, and it has verified your domain, you are good to go.
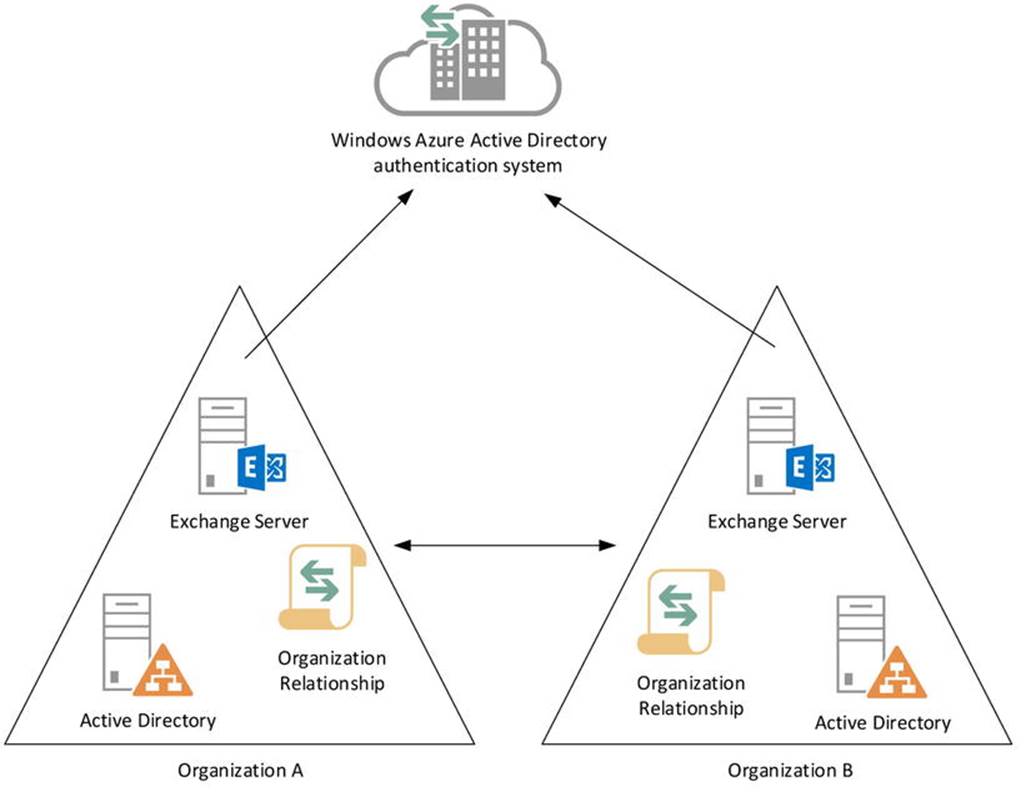
Figure 11-8. Federation through the Windows Azure AD authentication system
![]() Note Cloud-only organizations in Office 365—those using the small business plans included—are already trusted and enabled for federation.
Note Cloud-only organizations in Office 365—those using the small business plans included—are already trusted and enabled for federation.
Before Exchange Exchange 2010 Service Pack 2, organizations were required to manually set up and configure the federation and do all the other steps that the hybrid configuration wizard (HCW) now performs to configure the mail flow, such as configuring the connectors in their on-premises environments or in their Office 365 cloud tenants, or establishing better Exchange Online protection.
When you’re setting up a hybrid configuration in Exchange 2013, the supported procedure is the HCW. This tool configures the federation automatically, allowing organizations running the Exchange hybrid to share information between mailboxes in the on-premises Exchange 2013 and the cloud-based mailboxes.
![]() Caution The HCW must run successfully for your Exchange hybrid deployment to be supported.
Caution The HCW must run successfully for your Exchange hybrid deployment to be supported.
The HCW in Exchange 2013 works according to the following sequence:
1. Using the HCS, you define the desired state. Part of the process is proving ownership of the domain names you want to enable for federation by creating TXT records in the public DNS containing hash secrets. So, be prepared to make changes in the public DNS when running the HCW.
Under the hood, the desired hybrid configuration is then stored in Active Directory using the cmdlet Set-HybridConfiguration. The location of the information is below the Configuration container at CN=Hybrid Configuration,CN=<Exchange Organization Name>,CN=Microsoft Exchange,CN=Services.
2. At the completion of the HCW, you run Update-HybridConfiguration. This triggers the hybrid configuration engine.
3. The engine reads the desired state.
4. The engine discovers the current on-premises Exchange and Office 365 configuration.
5. Based on the desired state and the current on-premises Exchange and Office 365 configuration state, the engine determines the delta and executes tasks to realize the desired state. Depending on the delta, these tasks may include:
· Managing accepted domains for mail flow and Autodiscover requests. Your Office 365 tenant will have a domain in the form of <domain name>.onmicrosoft.com. This address space is added to the default email address policy, and secondary email addresses are stamped with this address for internal routing—that is, between the on-premises environment and Office 365.
· Configuring an on-premises certificate for secure messaging between the on-premises environment and Office 365 using TLS.
· Configuring the federation and defining the organizational relationships between the on-premises environment and Office 365, and vice-versa.
· Configuring the secure mail flow on on-premises CAS and Mailbox servers or Edge servers, and Exchange Online Protection (EOP) in Office 365. You also have the option to always route outbound messages through your on-premises organization using theEnable centralized mail transport option. (There’s more on mail flow later in this chapter).
· Configuring the OAuth authentication (as of Exchange 2013 Cumulative Update 5 and up). (There’s more on this later in this chapter).
![]() Note One thing the HCW does not configure is your public MX record. If you want to direct inbound messages via Exchange Online Protection, you need to reconfigure the MX record and point it to the < domain>.mail.protection.outlook.com, where you replace the dot in your domain name with a dash—for example, myexchangelabs-com.mail.protection.outlook.com.
Note One thing the HCW does not configure is your public MX record. If you want to direct inbound messages via Exchange Online Protection, you need to reconfigure the MX record and point it to the < domain>.mail.protection.outlook.com, where you replace the dot in your domain name with a dash—for example, myexchangelabs-com.mail.protection.outlook.com.
When the wizard is finished, your organization is ready to start federating with other trusted organizations.
When free/busy lookups are performed for federated organizations, the Availability service follows the same route as Autodiscover, as described in the Autodiscover section earlier in this chapter. In this process, the organization relationship definitions are consulted to check if one exists for the target domain. If not, no lookup is performed. If one exists, Exchange requests a token from the Windows Azure AD authentication system, which it uses in sending requests to the server handling the target domain. Of course, if the target organization does not trust the Windows Azure AD authentication system, no token is returned and the lookup fails. When successful, the Exchange server in the target domain receives the request with the authorization token, after which information is returned to the requester, following permitted sharing policies.
![]() Caution The federation scenario for on-premises Exchange 2013 with other organizations running Exchange hybrid doesn’t work for cloud-based mailboxes. Because the on-premises Exchange server performing the availability lookup has an organizational relationship with the on-premises Exchange organization of the partner, it will not proxy the request to Office 365 after receiving a targetAddress redirect to @<tenant>.onmicrosoft.com address. A workaround is to create an organizational relationship with <tenant>.onmicrosoft.com for partners and to use those addresses for email or to configure them as targetAddress on locally stored contacts objects. However, this is far from ideal, as it requires you to know which partner mailboxes are cloud-based and which are not.
Caution The federation scenario for on-premises Exchange 2013 with other organizations running Exchange hybrid doesn’t work for cloud-based mailboxes. Because the on-premises Exchange server performing the availability lookup has an organizational relationship with the on-premises Exchange organization of the partner, it will not proxy the request to Office 365 after receiving a targetAddress redirect to @<tenant>.onmicrosoft.com address. A workaround is to create an organizational relationship with <tenant>.onmicrosoft.com for partners and to use those addresses for email or to configure them as targetAddress on locally stored contacts objects. However, this is far from ideal, as it requires you to know which partner mailboxes are cloud-based and which are not.
Each time the HCW runs, as well as when you’re updating the hybrid configuration, it logs its steps in a text file stored in $ExInstall\Logging\Update-HybridConfiguration. When for some reason the configuration fails, the file provides pointers to the cause of the problem. You can also use the remote connectivity analyzer (RCA) to troubleshoot connectivity issues that might be preventing your setting up Exchange hybrid. You can find the RCA at http://exrca.com.
After running the HCW succesfully, you can verify the federation trust configuration of your on-premises Exchange organization by running the Test-FederationTrust cmdlet from an on-premises EMS session. Each step of the test should result in success, as shown in Figure 11-9.
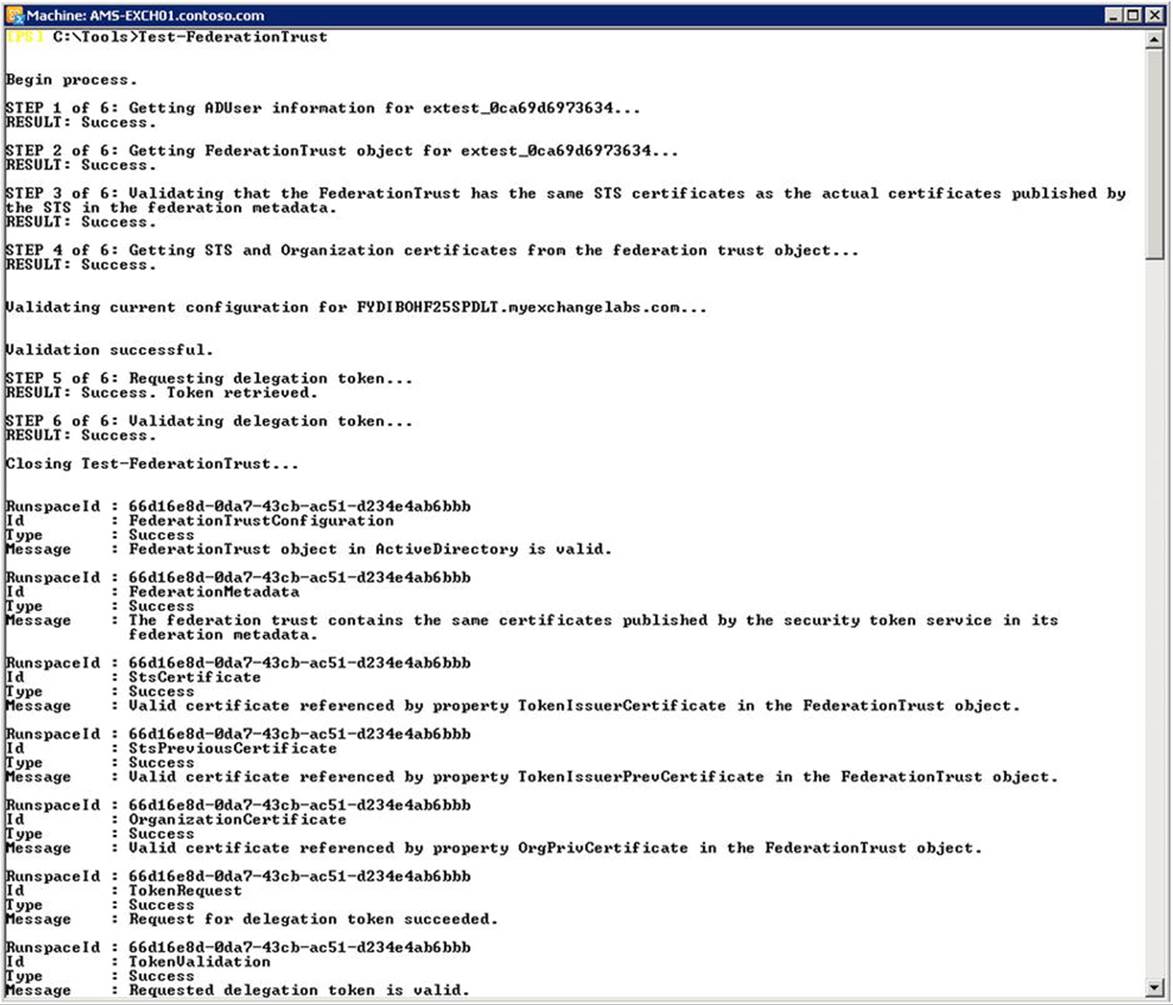
Figure 11-9. Validating Windows Azure AD authentication system trust
Sharing of Information
Sharing information is possible on two levels in Exchange 2013 and Office 365:
· Organization relationships, or organizational sharing as it is named in Office 365, allow federated organizations to share calendar information with other federated organizations.
· Sharing policies allow user sharing of calendar information.
Because your on-premises Exchange organization is separate from your cloud-based tenant, you will have two locations where organizational relationships and sharing policies are defined. These settings are not synchronized. Running HCW will configure the sharing policies for your on-premises organization, as well as for the cloud tenant.
You can inspect and configure the current sharing policy by using the ECP, navigating to Organization ![]() Sharing, as shown in Figure 11-10.
Sharing, as shown in Figure 11-10.
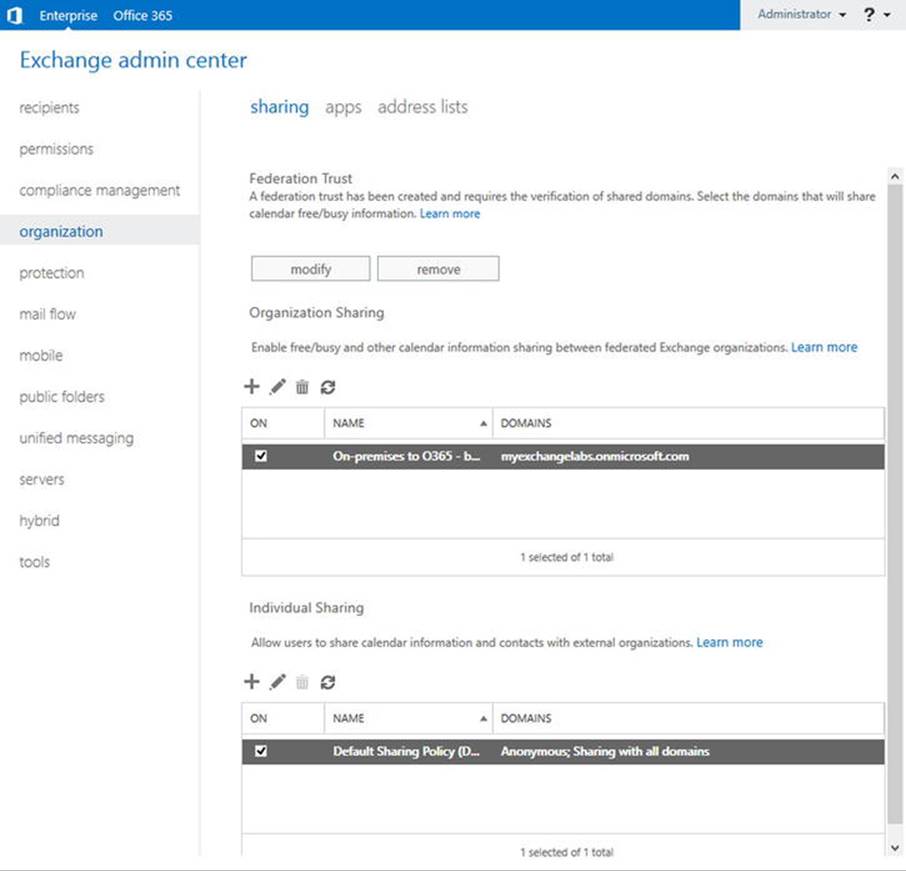
Figure 11-10. Configuring your sharing policies through ECP
As you can see in Figure 11-10, the HCW has created an on-premises organizational relationship “On-Premises to Office 365 - <GUID>” for the domain myexchangelabs.onmicrosoft.com, which is the domain of the tenant in Office 365. The GUID postfix in the name is the organization’s GUID. This value matches the GUID property of Get-OrganizationConfig—for example, (Get-OrganizationConfig).Guid.
Organizational Relationships
You can view the configured organizational relationship by using the cmdlet Get-OrganizationRelationship. If you run this cmdlet in a remote EMS session, you will see the existing organizational relationships, such as the one created by the HCW wizard. This is the counterpart of the organizational relationship it has created on-premises, as shown in Figure 11-10. If you pipe the output to format-list (fl), you can inspect all its properties, using Get-OrganizationalRelationship | fl, as shown in Figure 11-11.
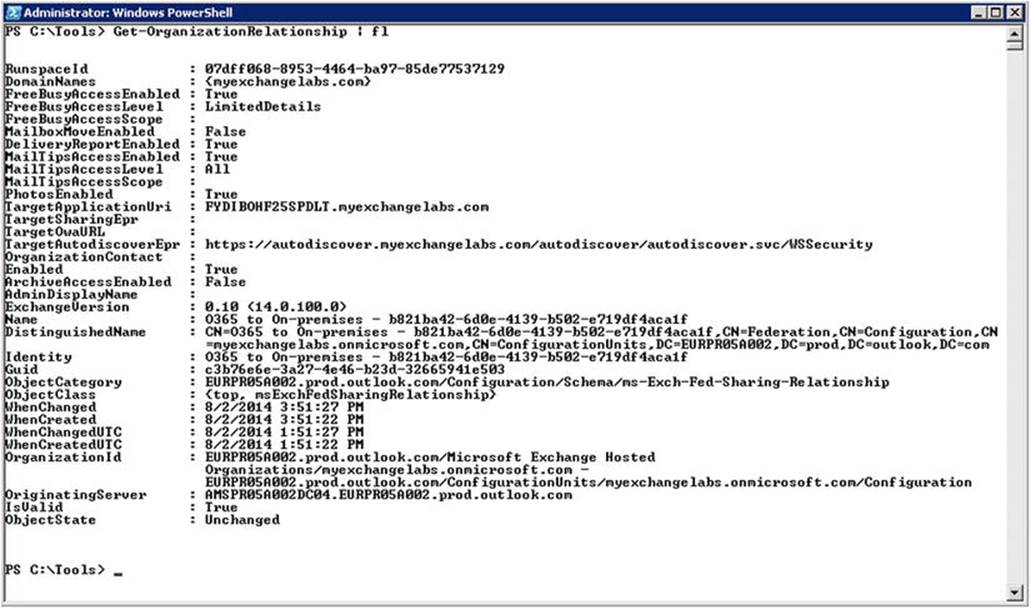
Figure 11-11. Inspecting the configuration of organizational relationships
In Figure 11-11, you can see that the cloud-based mailboxes can access certain shared information from the on-premises mailboxes by using the on-premises address space, myexchangelabs.com. The information that is shared with the address spaces configured through theDomainNames property is defined with the following properties:
· FreeBusyAccessEnabled sets if the organization wants to share free/busy information.
· FreeBusyAccessLevel sets the amount of detail that is shared as part of the free/busy information. Possible options are:
· None when no free/busy access is shared.
· AvailabilityOnly when only free/busy with time information is shared.
· LimitedDetails when free/busy is shared with time, subject, and location information.
· FreeBusyAccessScope can be used to limit the information sharing to a certain security group. When this is not set, the free/busy settings in the organizational relationship apply to the whole organization.
· MailboxMoveEnabled sets if mailboxes can be moved to the external organization.
· DeliveryReportEnabled sets if the organization wants to share delivery report information. This needs to be enabled in both organizations when they want to perform cross-organization message tracking.
· ArchiveAccessEnabled sets whether the organization has been configured to provide access to remote personal archives. This needs to be enabled in your on-premises organizational relationship setting for the related tenant in Office 365 when using Exchange Online Archiving (EOA), for example.
· MailTipsAccessEnabled sets if the mail tips information is returned when requested by users in the external organization.
· MailTipsAccessLevel sets the amount of detail that is returned with the mail tips. Options are:
· None when no mail tips information is to be returned.
· Limited when only mail tips are to be returned that can prevent nondelivery reports (NDR) or automatic replies such as out-of-office notifications (OOF). Custom, large audience, and moderated recipient mail tips are not returned.
· All when all mail tips are to be returned. The external organization is treated as external, which is important to know when setting transport rules. It also means that the external organization will receive external out-of-office notifications.
· MailTipsAccessScope can be used to return mail tips only for certain security groups. When this is not set, the mail tips settings in the organization relationship are applied to the whole organization.
· PhotosEnabled sets if photo data is returned to the external organization.
When the HCW is running, you are only asked to provide the level of free/busy information to be shared between the on-premises environment and Office 365. It is recommended you not change the default settings as configured, as rerunning the wizard would likely reset those values.
Custom Organizational Relationships
It is possible to create a custom organizational relationship with another federated partner. You can accomplish this through ECP, via Organization ![]() Sharing
Sharing ![]() Organization Sharing. You select the New button and enter the relationship details, such as name, domain name of the organization you want to share with, and what level of information you want to share, as shown in Figure 11-12.
Organization Sharing. You select the New button and enter the relationship details, such as name, domain name of the organization you want to share with, and what level of information you want to share, as shown in Figure 11-12.
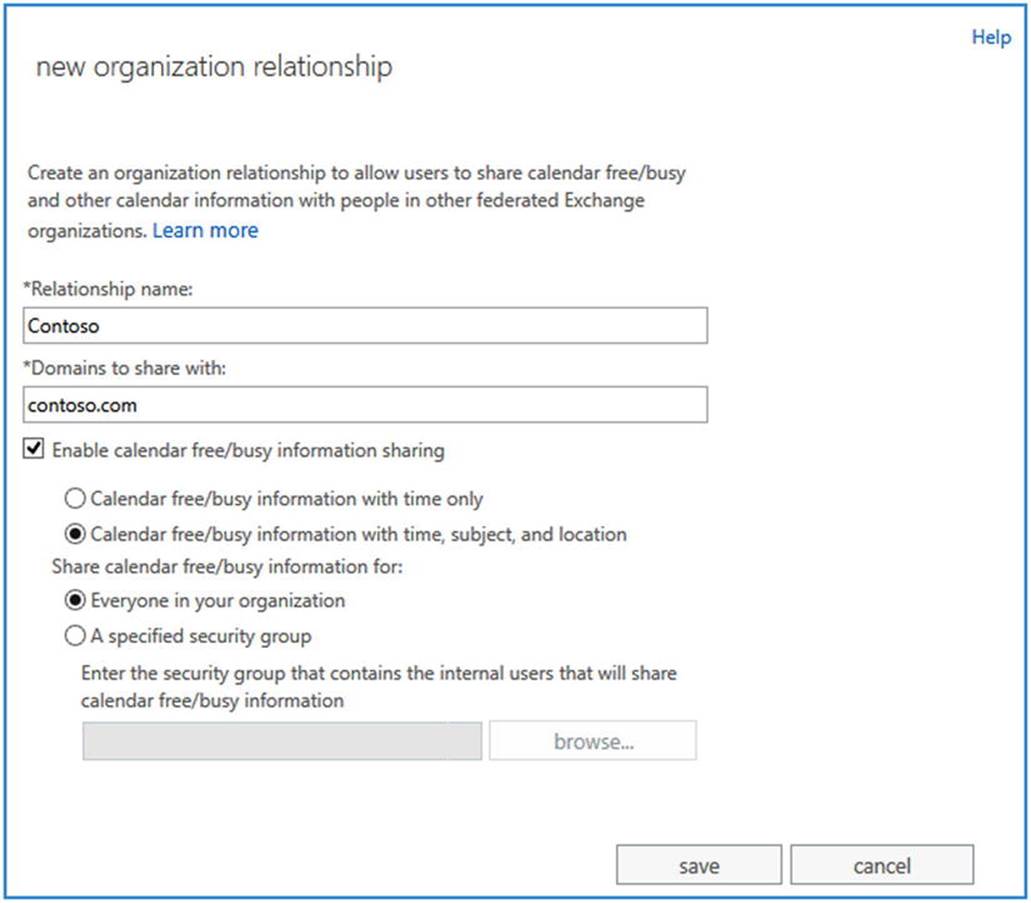
Figure 11-12. Creating a custom organizational relationship
![]() Note Although the field caption is “Domains to share with,” you can enter a single domain name. However, you can add additional domain names after you have saved the relationship.
Note Although the field caption is “Domains to share with,” you can enter a single domain name. However, you can add additional domain names after you have saved the relationship.
To accomplish the same thing using the EMS, you use the New-OrganizationalRelationship cmdlet. The federated partner might have more than one domain name registered for federation, which you may also need to include in your organizational relationship definition.
For example, if you want to make sure you include all domain names that myexchangelabs.com has set up for federation, you can use Get-FederationInformation. To retrieve the domain names for a domain-named myexchangelabs.com, you use Get-FederationInformation -DomainName myexchangelabs.com, as shown in Figure 11-13.
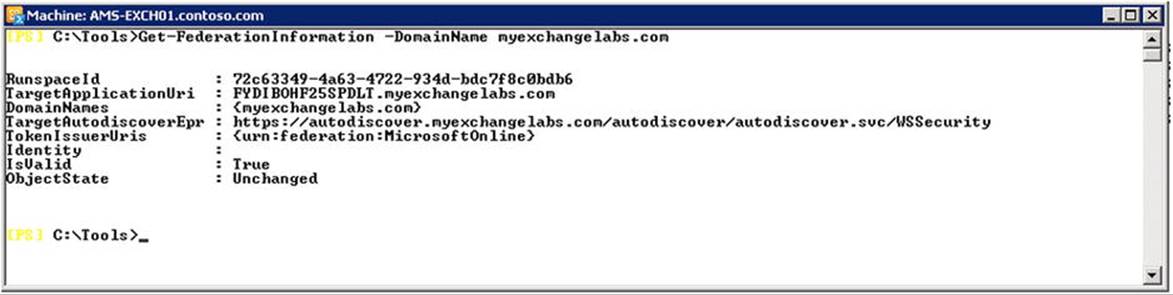
Figure 11-13. Viewing the federation information for domain names
![]() Note If you are setting up an organizational relationship with an on-premises organization, you may need to overrule the Autodiscover or Exchange Web Services URL when defining that organizational relationship. You can view the registered settings using Get-FederationInformation, inspecting the TargetApplicationUri (Web Services) and TargetAutodiscoverEpr (Autodiscover) properties.
Note If you are setting up an organizational relationship with an on-premises organization, you may need to overrule the Autodiscover or Exchange Web Services URL when defining that organizational relationship. You can view the registered settings using Get-FederationInformation, inspecting the TargetApplicationUri (Web Services) and TargetAutodiscoverEpr (Autodiscover) properties.
In Figure 11-13, you see that only myexchangelabs.com was registered by the owner of myexchangelabs.com. You can create an organizational relationship for all these domains in one step by using the following cmdlet:
Get-FederationInformation -DomainName fabrikam.com | New-OrganizationRelationship
-Name 'Fabrikam' -FreeBusyAccessEnabled $true -FreeBusyAccessLevel LimitedDetails
Should you need to update the list of domain names in an organizational relationship, you can use the same trick with Set-OrganizationRelationship, as follows:
Get-FederationInformation -DomainName fabrikam.com | Set-OrganizationRelationship
-Identity 'Fabrikam'
![]() Tip Before you can customize sharing for your cloud tenant, you may be required to enable the tenant customization using the cmdlet Enable-OrganizationCustomization. To accomplish this, connect to a remote EMS session and run the cmdlet.
Tip Before you can customize sharing for your cloud tenant, you may be required to enable the tenant customization using the cmdlet Enable-OrganizationCustomization. To accomplish this, connect to a remote EMS session and run the cmdlet.
Should you need to alter one of the other sharing settings, you can use Set-OrganizationRelationship with the parameters as descibed earlier for Get-OrganizationRelationship. For example,
Set-OrganizationRelationship -Identity 'Fabrikam'
-FreeBusyAccessEnabled:$true -FreeBusyAccessLevel AvailabilityOnly
-MailTipsAccessEnabled:$true -MailTipsAccessLevel All
You can also restrict the sharing to certain groups by using the FreeBusyAccessScope parameter. For example, to configure the organizational relationship “Fabrikam” to only share the information of a member of the group called “Fabrikam Sales,” you use:
Set-OrganizationRelationship -Identity 'Fabrikam' -FreeBusyAccessScope 'Fabrikam Sales'
Note that you need to maintain these organizational relationships in your on-premises Exchange environment, as well as for your Office 365 tenant.
![]() Note When deploying the Exchange 2013 hybrid server in a pre-Exchange 2013 environment, you need to perform one additional step, which is to define the method that the Availability service should use to look up free/busy information so that down-level CAS traffic is proxied through the Exchange 2013 hybrid server. This is done using the Add-AvailabilityAddressSpace cmdlet. For example, to define the access method for an external trusted organization using the domain fabrikam.com, which for Exchange Web Services FQDN is mail.fabrikam.com, you use:
Note When deploying the Exchange 2013 hybrid server in a pre-Exchange 2013 environment, you need to perform one additional step, which is to define the method that the Availability service should use to look up free/busy information so that down-level CAS traffic is proxied through the Exchange 2013 hybrid server. This is done using the Add-AvailabilityAddressSpace cmdlet. For example, to define the access method for an external trusted organization using the domain fabrikam.com, which for Exchange Web Services FQDN is mail.fabrikam.com, you use:
Add-AvailabilityAddressSpace -ForestName fabrikam.com -AccessMethod InternalProxy
-UseServiceAccount:$true -ProxyUrl https://mail.fabrikam.com/EWS/Exchange.asmx.
You can configure the OWA URL when users with cloud-based mailboxes use the on-premises OWA URL to redirect to—for example, mail.contoso.com. When cloud-based mailbox users use this URL, they might receive an error message that the Outlook WebApp address is invalid. Instead, they should use something like https://outlook.com/owa/contoso.com.
To redirect those users, you configure the TargetOWAUrl property of the organizational relationship between on-premises and Office 365—for example, “On-premises to O365 - <GUID>.” Here are the steps:
1. Create a CNAME record for the cloud-based OWA mail access and point it to outlook.com:
cloudmail CNAME outlook.com
2. Use Set-OrganizationRelationship with TargetOWAUrl to redirect users; for example,
Get-OrganizationRelationShip 'On-premises to O365 *' | Set-OrganizationRelationship
-TargetOWAUrl http://cloudmail.fabrikam.com/owa
At some point, you may want to test your organizational relationship. To do so, you use Test-OrganizationRelationship, specifying the name of the organizational relationship object to use as Identity and the mailbox to consult as UserIdentity. For example, to test an organizational relationship named “EighTwOne” in the current Exchange organization to access a mailbox named francis@myexchangelabs.com, you use:
Test-OrganizationRelationship -UserIdentity francis@myexchangelabs.com -Identity EighTwOne
As you can see in Figure 11-14, the organizational relationship is valid, but there are warning related to a case mismatch between the configured TargetApplicationUri on the relationship and the ApplicationUri on the federation trust (Get-FederationTrust), as well as a problem verifying the relationship. In this example, you could fix that by enabling WS-Security on the Autodiscover and Web Services by running the following cmdlets:
Get-OrganizationRelationship | Set-OrganizationRelationship
-TargetApplicationUri http://fydibohf25spdlt.myexchangelabs.com

Figure 11-14. Testing the organizational relationship
After configuring the organizational relationship and enabling the sharing of free/busy information, you can schedule meetings with recipients in that domain (see Figure 11-15). You will notice that the relationship is working when you are not confronted with the free/busy information bar of the recipient displaying an arced “No information available” bar.
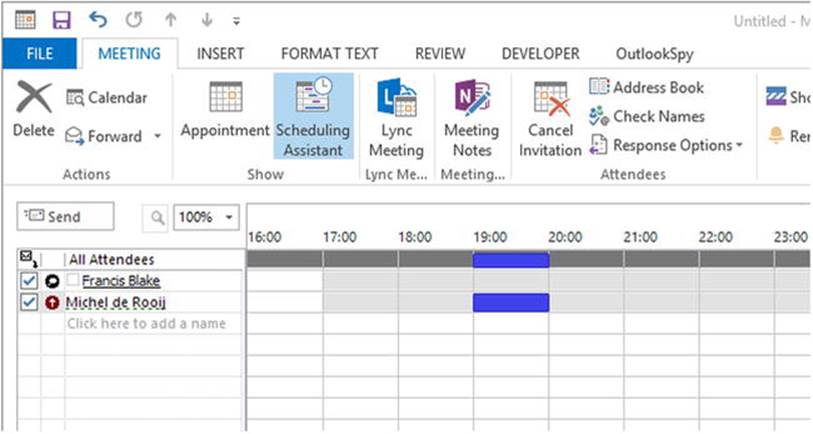
Figure 11-15. Scheduling meetings with other federated organizations
![]() Tip If your free/busy lookups stop working, check if the federation trust is still okay by using Test-FederationTrust. If it reports “Failed to validater delegation token,” try to refresh the metadata of the on-premises federation trust by using Get-FederationTrust | Set-FederationTrust -RefreshMetaData:$true.
Tip If your free/busy lookups stop working, check if the federation trust is still okay by using Test-FederationTrust. If it reports “Failed to validater delegation token,” try to refresh the metadata of the on-premises federation trust by using Get-FederationTrust | Set-FederationTrust -RefreshMetaData:$true.
Sharing Policies
Whereas organizational relationships define how information is shared, sharing policies, or individual sharing, as it is called in ECP, define the user calendar-sharing options. This includes sharing calendar or contact information with users of both federated organizations and non-federated organizations. In the latter case, Internet publishing is used instead.
The sharing policies define what users are allowed to share, and the action of sharing that information is end-user initiated. When you want to manage the sharing policies through the ECP, you navigate to Organization ![]() Sharing. In the bottom area named “Individual Sharing,” you will find the currently configured sharing policies, as shown in Figure 11-16.
Sharing. In the bottom area named “Individual Sharing,” you will find the currently configured sharing policies, as shown in Figure 11-16.
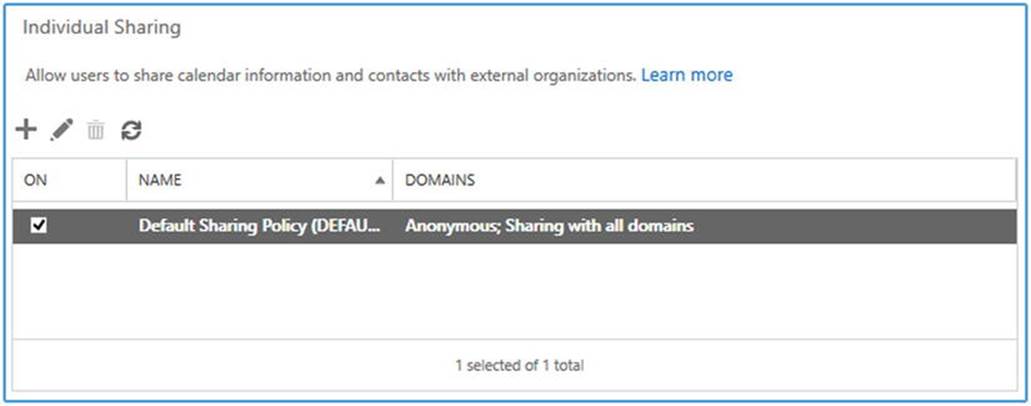
Figure 11-16. Default sharing policy for calendar information
When using the EMS, you can retrieve the list of current sharing policies by using Get-SharingPolicy. You’ll see that, out of the box, there is one sharing policy already configured: the default sharing policy. To inspect the configuration of this policy, you use Get-SharingPolicy | fl Name, Domains, Enabled, as shown in Figure 11-17.
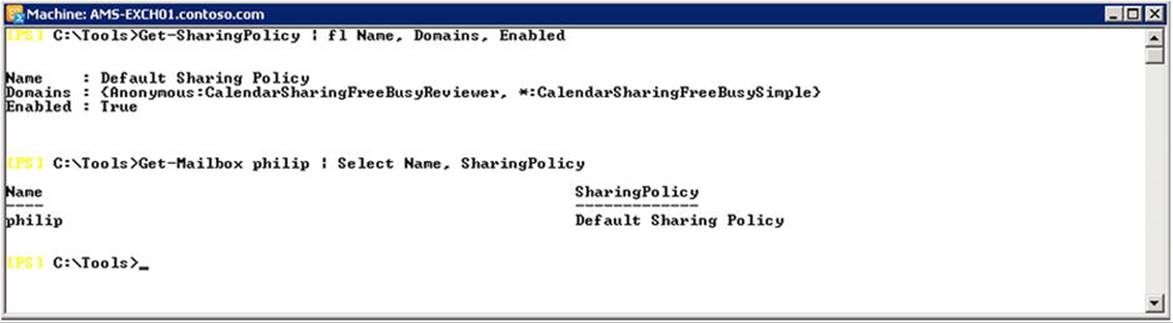
Figure 11-17. View of the sharing policies and sharing policy assignment
In Figure 11-17, you can see that there are two entries configured in the default sharing policy: Anonymous:CalendarSharingFreeBusyReviewer and *:CalendarSharingFreeBusySimple. The format of these entries is Domain:Action[,Action], whereby:
· The domain “Anonymous” applies to everyone outside your organization.
· The domain “*” represents everyone inside your organization.
· Action can be one of the following values:
· CalendarSharingFreeBusySimple enables sharing of free/busy hours only.
· CalendarSharingFreeBusyDetail enables sharing of free/busy hours, subject, and location.
· CalendarSharingFreeBusyReviewer enables sharing of free/busy hours, subject, location, and the body of the message or calendar item.
· ContactsSharing enables sharing of contacts.
So, the default policy is configured to allow users to share free/busy hours, subject, location, and the body of the message or calendar item with external users, and to share free/busy hours with any internal domain.
![]() Caution For anonymous calendar and contact sharing features to work, verify that AnonymousFeaturesEnabled is set to True on the OWA virtual directory. To enable this for all OWA virtual directories, you use Get-OwaVirtualDirectory | Set-OwaVirtualDirectory -AnonymousFeaturesEnabled $true.
Caution For anonymous calendar and contact sharing features to work, verify that AnonymousFeaturesEnabled is set to True on the OWA virtual directory. To enable this for all OWA virtual directories, you use Get-OwaVirtualDirectory | Set-OwaVirtualDirectory -AnonymousFeaturesEnabled $true.
Let’s create a new sharing policy named “Custom Sharing Policy,” and allow users to share CalendarSharingFreeBusyReviewer and contact information with the domain eightwone.com. For this you need to run New-SharingPolicy as follows:
New-SharingPolicy -Name 'Custom Sharing Policy'
-Domains 'eightwone.com:CalendarSharingFreeBusyReviewer,ContactsSharing'
Now, suppose you want to allow CalendarSharingFreeBusySimple sharing with all other external domains and make this sharing policy the new default policy. You need to run Set-SharingPolicy, as follows:
Set-SharingPolicy -Identity 'Custom Sharing Policy'
-Domains @{Add='Anonymous:CalendarSharingFreeBusySimple'} -Default:$true
Each mailbox is assigned one sharing policy. This will be the default sharing policy unless you have configured another sharing policy as the default. To assign a mailbox a different sharing policy, you use Set-Mailbox with the SharingPolicy parameter. For example, to assign your new “Custom Sharing Policy” to a mailbox called francis@myexchangelabs.com, you use the following, as shown in Figure 11-18:
Set-Mailbox -Identity francis@myexchangelabs.com -SharingPolicy 'Custom Sharing Policy'
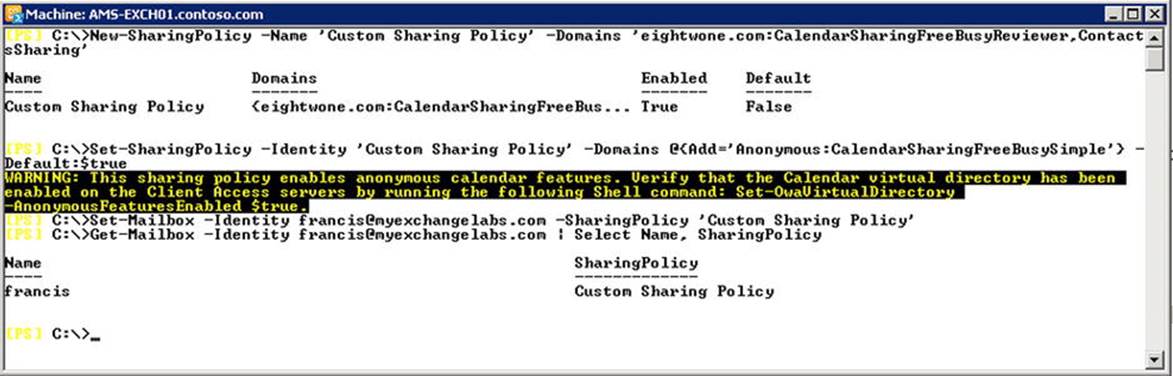
Figure 11-18. Creating a custom sharing policy and assigning it to a mailbox
Now, if the user wants to share his calendar or contacts folder, he can use the Share Calendar or Share Contacts folder options from Outlook. For calendar sharing, he may choose a lower level of detail than allowed by the policy by adjusting the Details option, as shown in Figure 11-19.
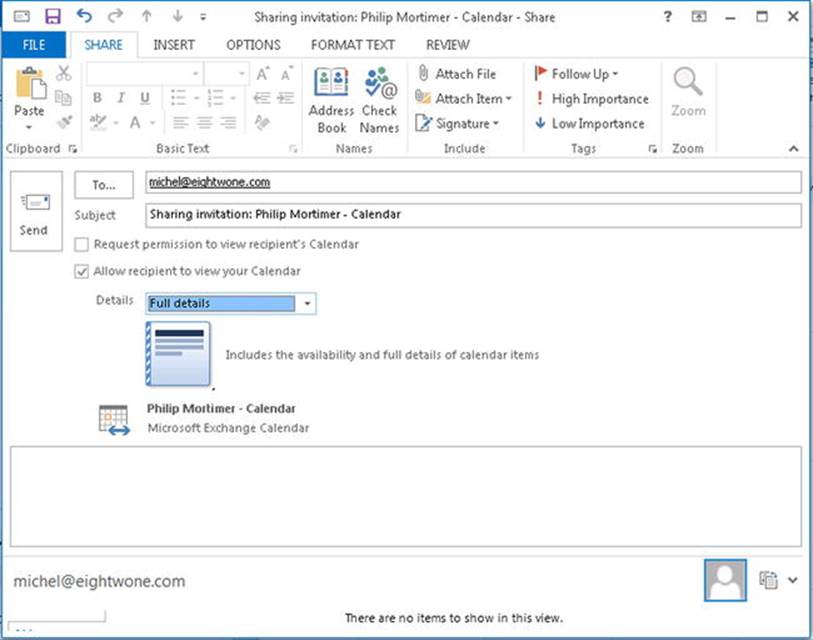
Figure 11-19. Sharing a calendar from Outlook
Note that Outlook is unaware of the sharing policy settings. When a user tries to share more details than permitted, she will receive an error message as soon as she tries to send the email with the sharing link. Also, when the intended recipient is not part of a trusted organization, the user is notified and she will need to use Internet Calendar Publishing instead (see next section).
![]() Note The link sent to recipients to access the calendar or contacts is obfuscated but is not password protected.
Note The link sent to recipients to access the calendar or contacts is obfuscated but is not password protected.
After sending the link to contacts in the internal organization, you can configure the permissions on the Calendar or Contacts folder by using the Calendar Permissions or Contacts Permissions button, as shown in Figure 11-20.
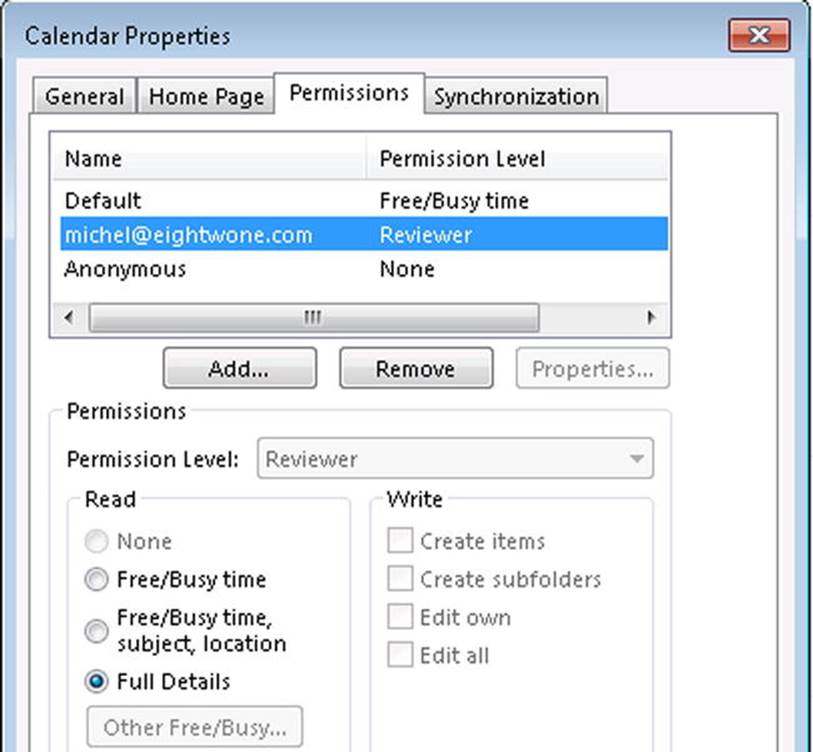
Figure 11-20. Changing the calendar sharing permissions in Outlook
Internet Calendar Publishing
To share calendar information with non-federated or non-Exchange recipients, users can be allowed to publish their calendar online, depending on the effective sharing policy configuration.
To allow outbound traffic to go from the Mailbox server through an Internet proxy, you may need to configure this proxy on your Mailbox servers so they can reach the Internet. For example,
Get-MailboxServer | Set-ExchangeServer -InternetWebProxy http://proxy.contoso.com
If your web proxy uses a different port, you can specify this as well; for example,
Get-ExchangeServer | Set-ExchangeServer -InternetWebProxy http://proxy.contoso.com:8080
You can clear the Internet web proxy setting by using $null as the value.
![]() Caution When configuring InternetWebProxy, make sure you use the http scheme in the URL, not https. When you specify https, federation-related cmdlets going through the defined proxy will not work.
Caution When configuring InternetWebProxy, make sure you use the http scheme in the URL, not https. When you specify https, federation-related cmdlets going through the defined proxy will not work.
Next, you need to verify that the calender publishing is enabled on the CAS servers and the external URL is configured. For example, to configure the external URL and calendar publishing on CAS servers AMS-EXCH01 and AMS-EXCH02, you use Set-OwaVirtualDirectory, as follows:
'AMS-EXCH01','AMS-EXCH02' | ForEach-Object { Set-OwaVirtualDirectory -Identity "$_\owa (Default Web Site)" -ExternalUrl 'https://mail.contoso.com' -CalendarEnabled $true }
After that, the user can publish his calendar, or parts of it, on the publicly available URL, based on the OWA external URL. When you are initiating the sharing of the calendar publishing from Outlook by using Publish Online, the OWA is opened and you can configure the calendar publishing. To do so, when prompted, you enter your credentials.
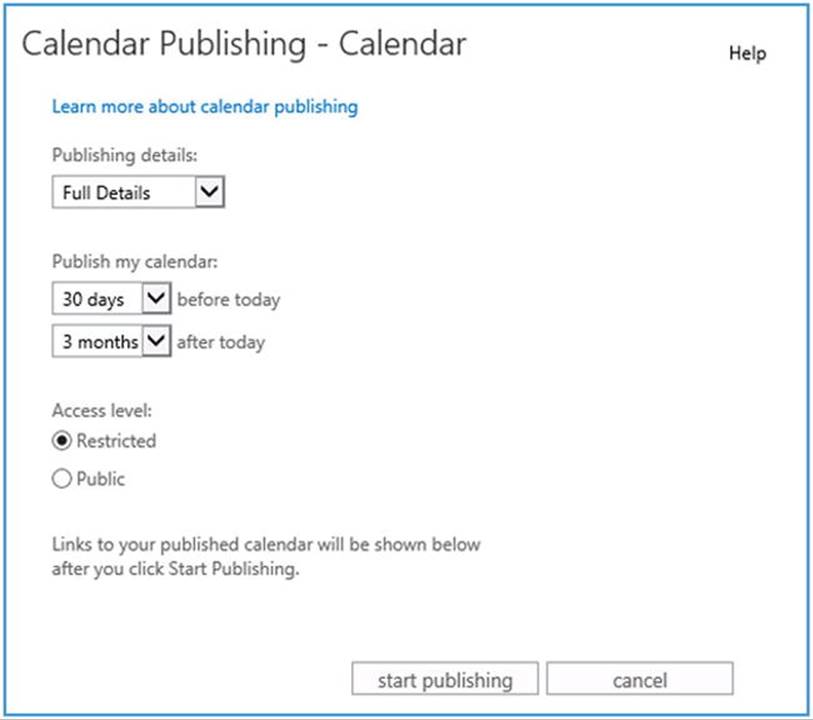
Figure 11-21. Enabling Internet Calendar Publishing
The calendar is published as an iCalendar ICS file and as an HTML page. The URL is based on the Internet web proxy setting and access level as specified. When Public is selected, the URL is relatively simple; as with Restricted, a GUID and hash are added to make the URL less obvious. However, selecting Public or Restricted does not change the permissions on the file itself. For example, the location to access the iCalendar file of philip@myexchangelabs.com would be as follows:
· Public: http://mail.myexchangelabs.com/owa/calendar/philip@myexchangelabs.com/ Calendar/calendar.ics
· Restricted (the hashes will vary): http://mail.myexchangelabs.com/owa/calendar/58b843d23d124ae2af0fc1e338e1357f @myexchangelabs.com/865a2dcb67814672b2e9fec0240a4f9c9679842447551712479/ calendar.ics
Although less likely to be guessed or memorized, the URL is not secure because http is used, despite your specifying https with the Internet WebProxy setting, and so the .ICS file remains unprotected. You could tighten security on the /owa/calendar folder on the CAS servers, or the reverse-proxy, if applicable, by disallowing anonymous access and enabling Digest or Basic authentication. Basic should be used only when SSL is required to access the ICS file, or else passwords will travel the wire in clear text.
![]() Note ICS (iCal) is a calendar file format that is compatible with many applications, including Outlook.
Note ICS (iCal) is a calendar file format that is compatible with many applications, including Outlook.
Should you need to manually add ICS calendars to Outlook, you can open up the Calendar view, right-click Calendars, and select Add Calendar ![]() From Internet, as shown in Figure 11-22. Then you are asked to provide the location of the ICS file.
From Internet, as shown in Figure 11-22. Then you are asked to provide the location of the ICS file.
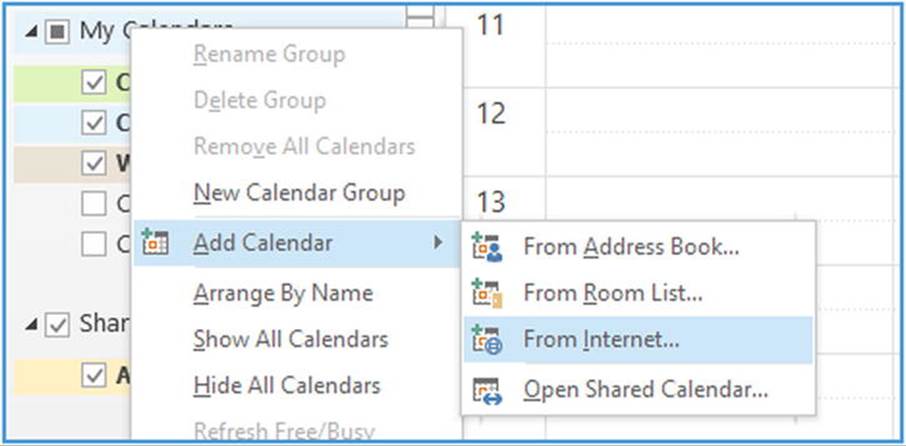
Figure 11-22. Manually adding Internet Calendar to Outlook
OAuth Authentication
OAuth is an authentication protocol that provides applications or services a secure way to delegate access to their resources. In the world of Exchange 2013, this means allowing applications such as Lync Server 2013 and SharePoint Server 2013 to authenticate to Exchange 2013 or vice-versa, using OAuth. For this purpose, those applications are configured as partner applications. Configuring OAuth enables cross-application functionality, such as cross-product In-Place eDiscovery.
Configuring OAuth in an on-premises environment involves running the Configure-EnterpriseApplication.ps1 script, located in $exscripts folder—for example, C\Program Files\Microsoft\Exchange\v15\Scripts. For instance, to configure OAuth for Lync, you use:
$exscripts\Configure-EnterprisePartnerApplication.ps1
-AuthMetaDataUrl https://lync.contoso.com/metadata/json/1 -ApplicationType Lync
In this example, you replace the AuthMetaDataUrl value with the URL through which your AuthMetaData for Lync is published.
If you want to integrate your Exchange hybrid deployment with Office 365, you need to configure OAuth as well. OAuth enables organizations to use features across premises, such as in-place discovery or in-place archiving. For example, OAuth enables searching on-premises mailboxes with cloud-based personal archives.
Unfortunately, the HCW in Exchange 2013 Service Pack 1 did not configure OAuth between on-premises and Office 365. If you are using this version of Exchange 2013, you need to manually configure OAuth as documented at http://bit.ly/OAuthConfig. At the time of this writing, Exchange 2013 Cumulative Update 6 is available. The HCW of Exchange 2013 Cumulative Update 5 and later includes the steps to configure OAuth automatically (see Figure 11-23).
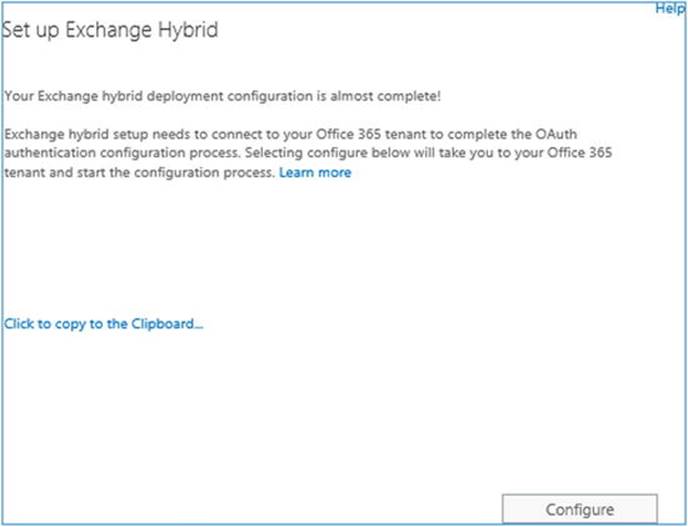
Figure 11-23. OAuth prompt in the HCW
This process involves redirection to a website where you will be asked to download and run two application manifests of around 20 MB each that will configure OAuth. These manifests should be run from an Exchange server, as they depend on some Exchange components. Also, you need to make sure your browser is not locked down, as you must be allowed to download and run these two applications.
Alternatively, you can follow the manual procedure; a link was provided earlier in this section.
![]() Caution OAuth configuration is required for organizations exclusively running Exchange 2013. Organizations running a mix of Exchange 2013 and Exchange 2010 or Exchange 2007 will not use OAuth for authentication and will rely instead on the federation trust. When this situation is detected, the wizard will skip the OAuth configuration option.
Caution OAuth configuration is required for organizations exclusively running Exchange 2013. Organizations running a mix of Exchange 2013 and Exchange 2010 or Exchange 2007 will not use OAuth for authentication and will rely instead on the federation trust. When this situation is detected, the wizard will skip the OAuth configuration option.
After setting up OAuth, you can test OAuth from the on-premises environment to Office 365 and vice versa by using Test-OAuthConnectivity and specifying the remote service URI, as well as a mailbox you want to use for testing. You can specify the application to test using service—for example, EWS, AutoD for Autodiscover, Sharepoint, or generic.
Test-OAuthConnectivity -Service EWS -TargetUri https://outlook.office365.com/ews/exchange.asmx
-Mailbox <mailbox>-Verbose
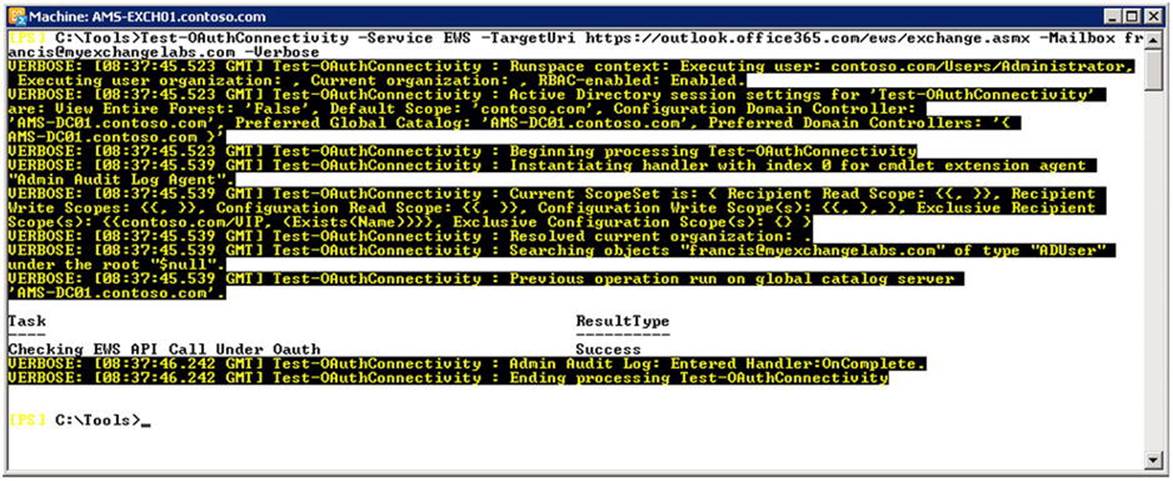
Figure 11-24. Testing the OAuth configuration
When testing this configuration from a remote EMS session in Office 365, you use your local service URI—for example, https://mail.myexchangelabs.com/EWS/Exchange.asmx—in combination with an on-premises mailbox.
Access Management
One of the consequences of operating multiple environments with separate identities is having to authenticate to each platform when accessing each’s resources. When you are using a combination of on-premises Active Directory and Office 365, this situation is no different. The on-premises identity is a different one from that stored in Azure Active Directory. However, to mitigate the situation and make the end-user experience easier when alternating between on-premises and Office 365 resources, there are two options:
· Password synchronization (same sign-on) can be used to synchronize passwords so users can utilize the same account name and password in the on-premises environment as in Office 365.
· Federated identities (single sign-on) allows users to access Office 365 by using their on-premises credentials.
Windows Azure Active Directory Synchronization Tool
![]() Note At the time of this writing, Microsoft published the next version of the WAADsync tool and rebranded it Azure Active Directory Sync (AADsync). Some enhancements in this version are support for synchronization with multiple forests, including the option for password synchronization. The new tool should provide at least the same functionality as WAADsync.
Note At the time of this writing, Microsoft published the next version of the WAADsync tool and rebranded it Azure Active Directory Sync (AADsync). Some enhancements in this version are support for synchronization with multiple forests, including the option for password synchronization. The new tool should provide at least the same functionality as WAADsync.
Originally, Microsoft offered a tool called DirSync to provision objects in Office 365 (or formerly, Business Productivity Online Suite), using information from on-premises environments for cloud tenants. However, password synchronization was not an option; as a result, passwords could differ and there were separate policies effective for each environment.
In February 2014, version 6382.0 of WAADsync was released, in which Microsoft introduced the password synchronization feature. Thus, the password hash from the on-premises Active Directory is sychronized with Azure Active Directory, in addition to carrying other attributes. This creates a seamless sign-in logon experience.
![]() Note Before you implement WAADsync, it is recommended you use a tool called IdFix to identify erroneous users, contacts, and groups that may be in your Active Directory and that could lead to synchronization problems. Running IdFix upfront allows you to remediate the situation ahead of time. You can download the IdFix tool at http://bit.ly/IdFixTool.
Note Before you implement WAADsync, it is recommended you use a tool called IdFix to identify erroneous users, contacts, and groups that may be in your Active Directory and that could lead to synchronization problems. Running IdFix upfront allows you to remediate the situation ahead of time. You can download the IdFix tool at http://bit.ly/IdFixTool.
Password policies for the on-premises environment override password policies configured in Office 365, except for cloud-only users. Be advised that the passwords of synchronized users in Office 365 are set to never expire, meaning those users can log on to Office 365 while having an expired on-premises password.
When you are configuring WAADsync, you will be asked at some point if you want to enable Exchange hybrid deployment. Check this box, as it will allow WAADsync to write back specific attributes from Office 365 to the on-premises environment (see Figure 11-25). This is used, for example, when deploying Exchange Online Archiving or when offboarding mailboxes.
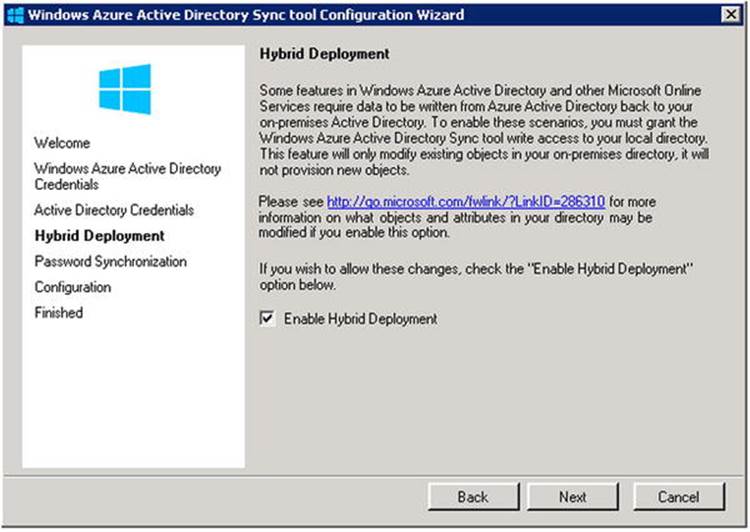
Figure 11-25. Enabling hybrid deployment in WAADsync
The attributes that are written back from Office 365 to the on-premises environment are listed in Table 11-2.
Table 11-2. WAADsync Hybrid Deployment Write-Back Attributes
|
Attribute |
Purpose |
|
msExchArchiveStatus |
Personal archive status for users using cloud-based personal archives—i.e., Exchange Online Archiving. |
|
msExchUserHoldPolicies |
In-place hold status of mailboxes. |
|
ProxyAddresses (LegacyExchangeDN as X500) |
Email addresses of mailboxes to provision mail-enabled users (MEUs) on-premises. Those MEUs can be used as targets when offboarding mailboxes, but also to provision address books. |
|
SafeSendersHash BlockedSendersHash SafeRecipientHash |
Filtering and online safe and blocked sender information. |
|
msExchUCVoiceMailSettings |
Voice-mail status for users having cloud-based voice mail configured. |
![]() Note To prevent nondelivery reports when replying to old email messages (as those messages will be using the x500 address stored in the named cache file instead of the SMTP address presented), the legacyExchangeDN is written back as a secondary x500 address on the mail-enabled user. This is the reverse of provisioning mail-enabled users for mailbox move targets, performed by WAADsync and scripts like Prepare-MoveRequest.ps1, for example. This prevents nondelivery messages when you are offboarding mailboxes.
Note To prevent nondelivery reports when replying to old email messages (as those messages will be using the x500 address stored in the named cache file instead of the SMTP address presented), the legacyExchangeDN is written back as a secondary x500 address on the mail-enabled user. This is the reverse of provisioning mail-enabled users for mailbox move targets, performed by WAADsync and scripts like Prepare-MoveRequest.ps1, for example. This prevents nondelivery messages when you are offboarding mailboxes.
After you’ve implemented WAADsync, you’ll find it runs every three hours, meaning attribute changes in your local Active Directory will be synchronized with Azure Active Directory in, at most, three hours’ time. The exception to this are password changes, which are replicated every two minutes.
Alternatively, you can force manual synchronization, as shown in Figure 11-26, as follows:
1. On the server running WAADsync, start a PowerShell session.
2. Import the WAADsync module using Import-Module WAADsync.
3. Execute the cmdlet Start-OnlineCoexistenceSync
.
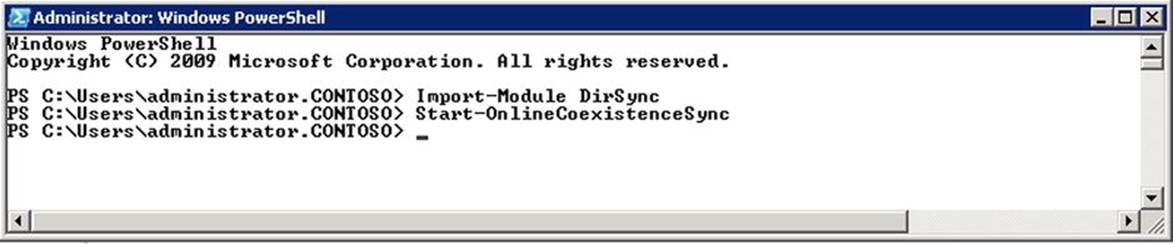
Figure 11-26. Manually synchronizing Active Directory with Azure Active Directory
To inspect the synchronization status in Office 365, you can check the portal at Dashboard ![]() Users and Groups
Users and Groups ![]() Active Users in the Active Directory synchronization section, as shown in Figure 11-17.
Active Users in the Active Directory synchronization section, as shown in Figure 11-17.

Figure 11-27. Checking WAADsync status from Office 365
To inspect the status of the local agent, you check the application log by using the event viewer and watching for events generated by directory synchronization, as shown in Figure 11-28. Another option is to use a script developed by Mike Crowley, which will generate a short report on the status of the WAADsync tool. (You can download the script at http://bit.ly/WAADsyncReport).
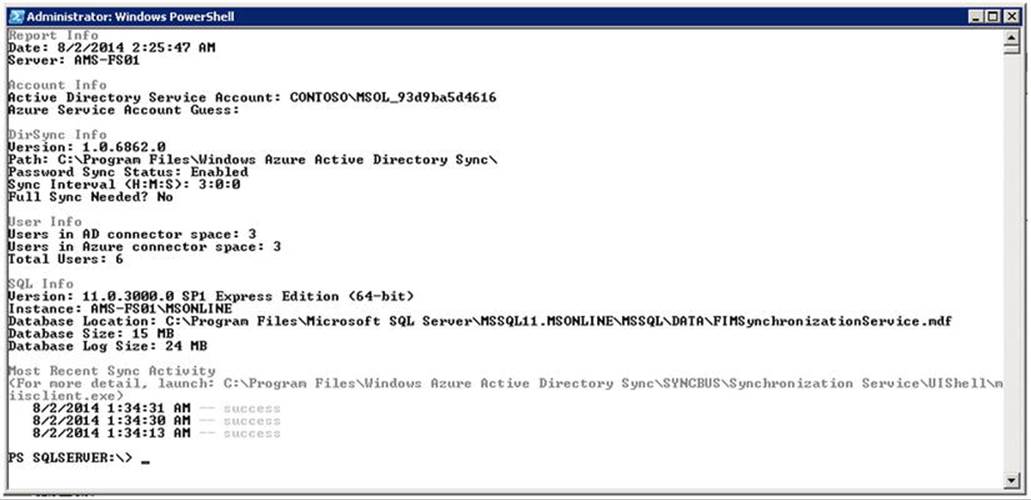
Figure 11-28. WAADsync report script output
Filtering WAADsync
By default, WAADsync will synchronize all users to Windows Azure Active Directory. Under the hood, WAADsync is a stripped-down version of Microsoft ForeFront Identity Manager. The tool to configure the synchronization is included when you deploy WAADsync, and it is called miisclient.exe. When you use the x64 version of WAADsync, miisclient.exe is located in C:\Program Files\Windows Azure Active Directory Sync\SYNCBUS\Synchronization Service\UIShell.
To limited the synchronization to a specific OU, you switch to the Management Agents view. Select the Active Directory Connector and open up the Properties. Select Configure Directory Partitions, where you can configure from which directory partitions to synchronize objects. Select Containers. You may be asked to enter your on-premises credentials. After that, you can select the containers that you want to synchronize with Windows Azure Active Directory, or deselect the containers you do not want to sync.
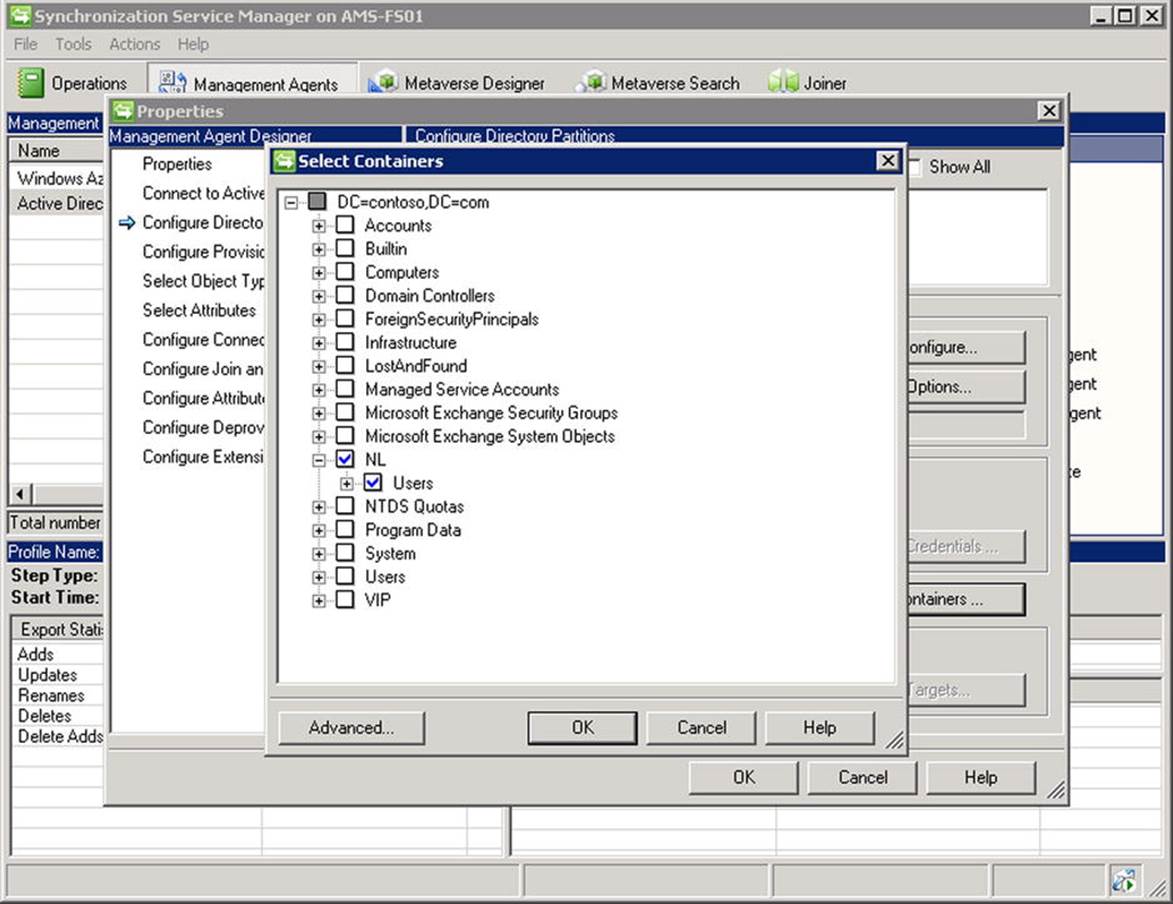
Figure 11-29. WAADsync OU filtering
In the Properties list of the management agent named Active Directory Connector, in the Configure Directory Partitions section, you can also select the domains you want to synchronize when want to filter on a specific domain.
Finally, you can filter by using attributes. In the Properties list of the management agent named Active Directory Connector, you select Configure Connector Filter. Scroll down and select the user in the Data Source Object Type list. There, you can add custom filters. For example, to exclude users who have their extensionAttribute1 configured, you select New. Then, in the Filter for the user, you select the data source attribute extensionAttribute1 and set the operator to Is Present. When you are done, you select Add Condition and click OK. When it’s finished, you select the Management Agent, select Run, and then run Full import Full Sync.
![]() Caution Be cautious when editing the default WAADsync configuration. While modification of WAADsync configuration is supported up to certain limits, incorrectly configuring WAADsync may result in wrong objects being synchronized to your tenant.
Caution Be cautious when editing the default WAADsync configuration. While modification of WAADsync configuration is supported up to certain limits, incorrectly configuring WAADsync may result in wrong objects being synchronized to your tenant.
Synchronization Interval
You can adjust the default interval by editing the Microsoft.Online.DirSync.Scheduler.exe.config file, which by default is located in C:\Program Files\Windows Azure Active Directory Sync. You open up the file in your favorite editor and change the line that reads<add key="SyncTimeInterval" value="3:0:0" /> to your required interval—for example,
1 hour:<add key="SyncTimeInterval" value="1:0:0" />
Keep in mind the Active Directory replication time; don’t go below 15 minutes, or use 30 minutes minimum just to be safe.
You then restart the Windows Azure AD syncronization service to make the change effective:
Restart-Service 'Windows Azure Active Directory Sync Service'
Single Sign-On
When using a combination of on-premises Active Directory and Office 365 such as Exchange hybrid, you’ll find that the on-premises identity is a different identity from the one stored in or synchronized to Azure Active Directory. To allow Office 365 users to log on using their on-premises credentials, you can implement the Active Directory federation services, or ADFS.
As we saw earlier, WAADsync with password synchronization (same sign-on) can be used to synchronize passwords, allowing users to use the same account and password combination as in Office 365. With a security token service (STS) such as ADFS, those users can access Office 365 by using their on-premises credentials (single sign-on).
![]() Note When deploying ADFS, it is recommended you implement it together with WAADsync and before using the HCW.
Note When deploying ADFS, it is recommended you implement it together with WAADsync and before using the HCW.
Implementing single sign-on by using ADFS has some benefits over using same sign-on:
· No password change delays.
· Disabling an on-premises account becomes effective immediately in Office 365 as well.
· Password policy follows on-premises definition—for example, complexity, minimum length, and so on.
· Access control uses network location (IP ranges) or multi-factor authentication.
· Support for third-party software, such as interoperability with a Shibboleth-based federation solution.
The first version of ADFS came in 2005 with Windows Server 2003 R2. The availability of current versions of ADFS depends on the operating system you’re using, as listed in Table 11-3.
Table 11-3. ADFS Version Overview
|
ADFS |
Platform |
|
2.0 |
Installable software for Windows Server 2008 and Windows Server 2008 R2. Download from http://bit.ly/ADFS20DL. |
|
2.1 |
Installable server role in Windows Server 2012. |
|
3.0 |
Installable server role on Windows Server 2012 R2. |
![]() Note Like regular software, ADFS needs to be managed, and it will receive updates. For the built-in versions, these updates will come in the form of Windows update fixes. For ADFS 2.0, or actually 2.0 RTW (where RTW stands for “Release to Web” to indicate it is an installable package), update rollups are available. At the time of this writing, ADFS 2.0 Update Rollup 3 is available at http://support.microsoft.com/kb/2790338.
Note Like regular software, ADFS needs to be managed, and it will receive updates. For the built-in versions, these updates will come in the form of Windows update fixes. For ADFS 2.0, or actually 2.0 RTW (where RTW stands for “Release to Web” to indicate it is an installable package), update rollups are available. At the time of this writing, ADFS 2.0 Update Rollup 3 is available at http://support.microsoft.com/kb/2790338.
An ADFS implementation consists of one or more of the following components:
· ADFS server, responsible for authenticating users against Active Directory and issuing tokens or claims to requesters.
· ADFS proxy server, responsible for authenticating users against Active Directory via an ADFS server. This allows organizations to protect ADFS from direct Internet-based access. An ADFS proxy server is optional. An organization can also use reverse proxy solutions, existing ForeFront Threat Management Gateway (TMG) implementations included, the Web Application Proxy (WAP) role as found in Windows Server 2012 R2, or load balancing solutions like Kemp Loadmasters or F5 BIG-IP LTM to sit between the Internet and their ADFS servers.
· ADFS configuration database, used by ADFS servers to store information such as trusted partners, certificates, and service configurations. This information can be stored in Windows internal database (WID) for up to five ADFS servers or you can use a central Microsoft SQL server database. This decision is made at installation time.
To make the ADFS solution highly available, organizations need to implement multiple ADFS servers and ADFS proxy servers for availability and load balancing, using a load balancing solution or DNS round robin. The first is preferred, since DNS round robin is not a highly available solution.
![]() Tip ADFS components may be critical to your environment. When the ADFS is unavailable, users will not be able to authenticate and use the services hosted in Office 365. Therefore, it is recommended you have at least two ADFS servers and two ADFS proxy servers when applicable.
Tip ADFS components may be critical to your environment. When the ADFS is unavailable, users will not be able to authenticate and use the services hosted in Office 365. Therefore, it is recommended you have at least two ADFS servers and two ADFS proxy servers when applicable.
Your on-premises ADFS endpoint will be accessed through a hostname. Typical hostnames are sts.<domain name> or fs.<domain name>. This name also needs to be registered in your internal DNS when you are using split-DNS for local client lookups.
Since the SSL will be used to access your ADFS infrastructure, you need to obtain a valid third-party certificate with this hostname. This certificate needs to be installed on the ADFS servers and any ADFS proxy servers or other reverse proxy if you are doing layer-7 load balancing and use a SAN certificate for Exchange, ADFS, and perhaps other published services.
The concept of authentication using ADFS is depicted in Figure 11-30.
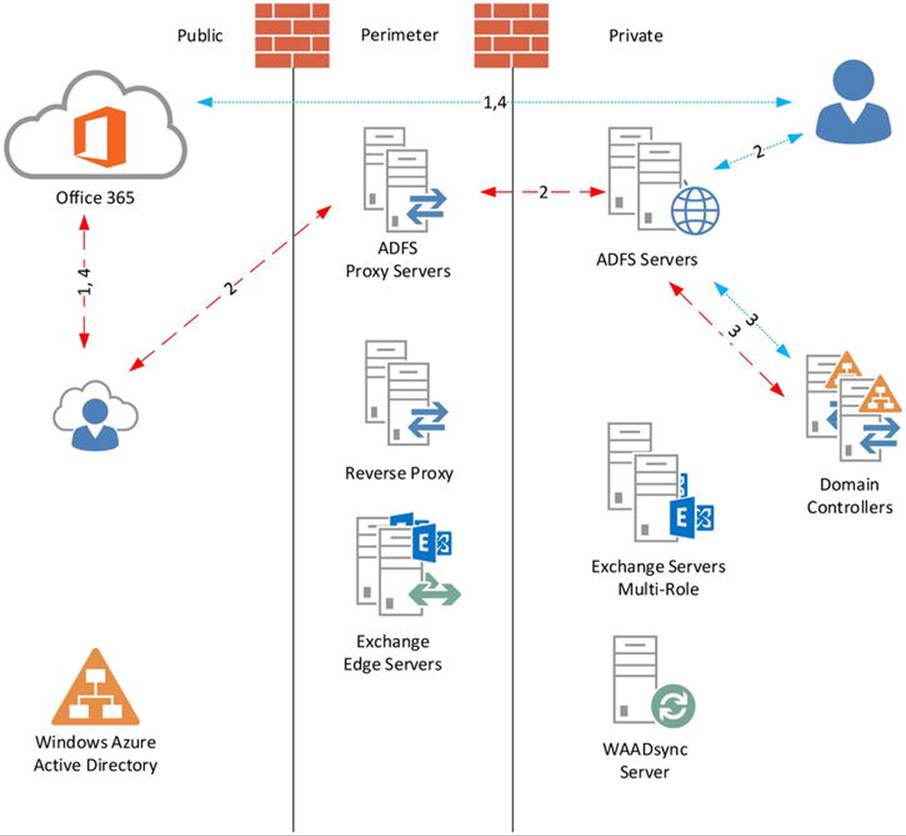
Figure 11-30. ADFS authentication concept and flow
The authentication flow for external users accessing Office 365 services is as follows:
1. User accesses Office 365 resource—for example, Exchange Online. Exchange Online notices the request is unauthenticated and redirects the request to the Windows Azure Active Directory authentication system. The Windows Azure AD notices the request is unauthenticated and, based on the domain name of the ID provided, redirects the request to the published ADFS URL.
2. The user needs to authenticate to the ADFS proxy server, which proxies the request to the internal ADFS server.
3. ADFS authenticates to the on-premises Active Directory. The user receives a signed security token and claim that will grant the user access to the resource.
4. The user accesses the Office 365 resource, authenticating itself using the token and claim received from ADFS.
The flow for domain users is similar, but because they are already logged on to the on-premises Active Directory, and thus have a Kerberos ticket, the Windows Azure AD authentication system directs them to the on-premises ADFS infrastructure instead of the public endpoint. (Further discussion of ADFS and claims-based authentication is beyond the scope of this book. For those looking for more information, see http://bit.ly/ADFSdocs).
When you have implemented ADFS, you can test your configuration by using the Exchange remote connectity analyzer (ExRCA), available on http://exrca.com. On the tab Office 365, there is an option for Office 365 Single Sign-On Test. This will allow you to test your setup remotely, as shown in Figure 11-31.
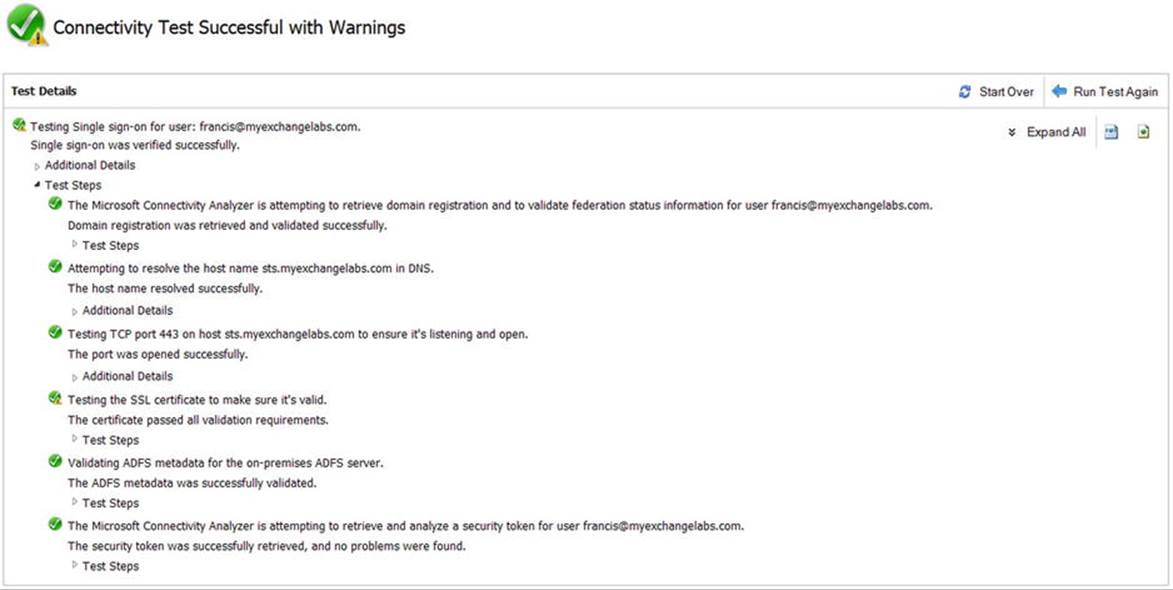
Figure 11-31. Testing ADFS single sign-on by using remote connectivity rnalyzer
![]() Tip When running WAADsync and ADFS 3.0 with hotfix KB2919355 applied, you can configure an alternative login ID. This allows you to provision the User Principal Name in Windows Azure AD with your primary email address, permitting users to log on to AFDS-enabled applications using their email addresses instead of domain\user combinations. The procedure is described at http://bit.ly/AlternateLoginID.
Tip When running WAADsync and ADFS 3.0 with hotfix KB2919355 applied, you can configure an alternative login ID. This allows you to provision the User Principal Name in Windows Azure AD with your primary email address, permitting users to log on to AFDS-enabled applications using their email addresses instead of domain\user combinations. The procedure is described at http://bit.ly/AlternateLoginID.
ADFS Primary Server
When you have ADFS running and use the Windows internal database for the ADFS configuration database, one of these servers will be the primary federation server and the other servers will be secondary federation servers. The primary federation server will perform read/write operations on the database. The other servers will host read-only copies, replicating information from the primary federation server copy. Figure 11-32 shows the relationships.
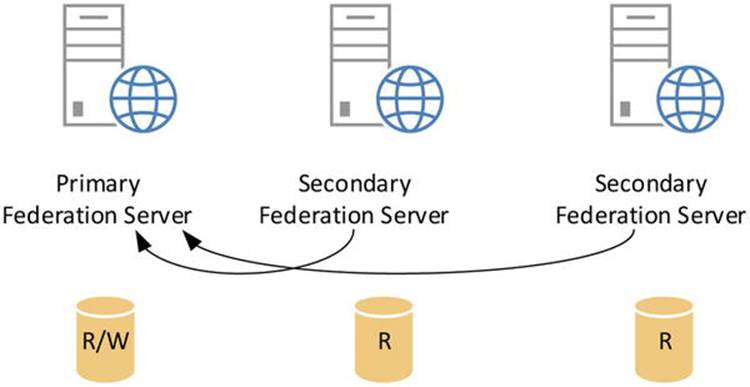
Figure 11-32. ADFS federation server database synchronization
![]() Note The default interval for secondary federation servers to replicate updates from the primary federation server is five minutes. You can configure the pulling interval on the local node using Set-ADFSSyncproperties -PollDuration <number of seconds>. Restarting the ADFS service will also trigger a sync request.
Note The default interval for secondary federation servers to replicate updates from the primary federation server is five minutes. You can configure the pulling interval on the local node using Set-ADFSSyncproperties -PollDuration <number of seconds>. Restarting the ADFS service will also trigger a sync request.
Should your primary server become unavailable, you may need to promote one of the secondary servers to primary. To do so, you proceed as follows:
1. Log on to the secondary sever you want to promote.
2. Open a PowerShell session.
3. Load the ADFS PowerShell module:
Add-PSSnapIn Microsoft.ADFS.PowerShell
4. Configure the role as primary:
Set-ADFSSyncProperties -Role PrimaryComputer
Next, you need to reorient the other secondary servers to the new primary server:
1. Log on to the secondary server.
2. Open a PowerShell session.
3. Load the ADFS PowerShell module:
Add-PSSnapIn Microsoft.ADFS.PowerShell
4. Configure the role as secondary, assuming:
Set-ADFSSyncProperties -Role SecondaryComputer
-PrimaryComputer fs2.contoso.com
You also need to perform this procedure on the former primary server should it become available again.
![]() Note When using SQL server for ADFS configuration database, there is no primary and secondary federation servers and all ADFS servers have read/write access to the same database.
Note When using SQL server for ADFS configuration database, there is no primary and secondary federation servers and all ADFS servers have read/write access to the same database.
Enabling OWA for ADFS
Exchange 2013 Service Pack 1 and later are claims-aware and include support for ADFS authentication on OWA and ECP. This allows authenticated users to seamlessly access OWA without being required to authenticate.
Assuming ADFS has been set up and configured correctly, you need to enable and configure the ADFS authentication on Exchange. On headlines, the process is as follows:
1. Set up and validate ADFS.
2. Add both OWA and ECP as relying trust parties in ADFS.
3. When not present, add claims descriptions for UPN, primary SID, and group SID.
4. Enable the Exchange organization for for ADFS.
5. Enable ADFS authentication on the OWA and ECP virtual directories.
For step-by-step instruction, visit http://bit.ly/EX2013SP1ADFSOWA. This site also contains instructions should you use pre-authentication software.
ADFS Service Monitoring
When using ADFS in combination with a load balancer solution, you might want to ensure that the ADFS service is responding before forwarding the traffic to the ADFS server or ADFS proxy server. This is better than the commonly used ICMP test (“ping”), which is more a matter of testing the availability of the network stack of that server than testing the service you are load balancing.
If your load balancer is capable of service monitoring, the way to implement this depends on the load balancer used. However, the building blocks are often the same:
· Use an HTTPS GET request.
· Specify the URL to use to check for “service health.”
For ADFS Servers, use: /adfs/fs/federationserverservice.asmx.
For ADFS Proxy Servers, use: /adfs/ls/idpInitiatedSignon.aspx.
· Check if the request returns a 200 OK.
Figure 11-33. Load balancer ADFS service monitor
![]() Note You can also use this information as input for regular monitoring products.
Note You can also use this information as input for regular monitoring products.
ADFS Client Access Policy Builder
ADFS contains support for claim rules that allow you to configure ADFS to restrict authentication to external network addresses. This enables organizations to block access to certain Office 365 services for particular networks or for members of certain groups.
The procedure to configure this is quite labor-intensive and prone to error owing to the regular expressions you might need to use. Fortunately, the ADFS product team publishes a graphic tool to create and configure these client access policies, baptized the “Client Access Policy Builder.”
![]() Note Office 365 currently supports only IPv4 addresses.
Note Office 365 currently supports only IPv4 addresses.
The first step lets you prepare the ADFS configuration database with rules for the required claim types. Next, you choose one of the five pre-configured scenarios:
· Block all external access to Office 365.
· Block all external access to Office 365 except for Exchange ActiveSync.
· Block all external access to Office 365, except for for browser-based applications.
· Block all external access to Office 365 for members of one or more groups.
· Block external access to Office 365 for Outlook clients.
Figure 11-34. ADFS Client Access Policy Builder
Of course, these scenarios are not exhaustive. If your specific requirements are not covered by the default options, you can use the tool to create a starting point or for learning by example. For instructions related to manually creating network- or application-based restrictions in ADFS using claim rules, see http://bit.ly/ADFSFilter. You can download the ADFS Client Access Policy Builder at http://bit.ly/ADFSCAPB. The tool needs to be run on the ADFS server.
Multi-Factor Authentication
Authentication is based on something you know (e.g., your password), something you have (e.g., security token or smart card), or who you are (biometrics). By having two factors instead of one, the identities are more secure than they would be otherwise. Multi-factor authentication (MFA) is the form of authentication whereby the user identifies him or herself by using more than one factor. Multi-factor authentication should be considered for accessing cloud-based services, especially for administrator-type accounts. The multi-factor authentication option was added to the Office 365 service for Enterprise plans in February 2014. It is optional and does not require any additional subscription.
![]() Note Multi-factor authentication is currently not available for Small Business and Dedicated Office 365 plans.
Note Multi-factor authentication is currently not available for Small Business and Dedicated Office 365 plans.
To enable users for multi-factor authentication, you open up the Office 365 Admin Center, and navigate to Users and Groups ![]() Active Users. There, you will find the option Set Multi-factor Authentication Requirements: Setup. When you have enabled a user for multi-factor authentication, that user needs to complete the setup process. The process is initiated when the user accesses Office 365 using a browser. Alternatively, you can direct the user to http://aka.ms/MFASetup, where the user can complete the initial setup process.
Active Users. There, you will find the option Set Multi-factor Authentication Requirements: Setup. When you have enabled a user for multi-factor authentication, that user needs to complete the setup process. The process is initiated when the user accesses Office 365 using a browser. Alternatively, you can direct the user to http://aka.ms/MFASetup, where the user can complete the initial setup process.
![]() Caution Not every application supports multi-factor authentication. At the time of this writing, Office applications such as Outlook, Lync, and OneDrive for Business, as well as PowerShell, are not supported. In November 2014 it was announced that the November 2014 updates for Office 356 ProPlus and Office 2013 will contain support for Multi-Factor Authentication when connecting to Office 365 A private preview program. The updated authentication features initially will be available through a private preview program. Multi-Factor Authentication support for PowerShell was announced for 2014. General availability of the updated authentication features for on-premises Exchange is announced for 2015. The consequence is that multi-factor authentication-enabled administrators can only use the Office 365 Admin Center for management tasks. The suggestion is to create a special-purpose account with a strong password to run PowerShell cmdlets or scripts in the Office 365 tenant.
Caution Not every application supports multi-factor authentication. At the time of this writing, Office applications such as Outlook, Lync, and OneDrive for Business, as well as PowerShell, are not supported. In November 2014 it was announced that the November 2014 updates for Office 356 ProPlus and Office 2013 will contain support for Multi-Factor Authentication when connecting to Office 365 A private preview program. The updated authentication features initially will be available through a private preview program. Multi-Factor Authentication support for PowerShell was announced for 2014. General availability of the updated authentication features for on-premises Exchange is announced for 2015. The consequence is that multi-factor authentication-enabled administrators can only use the Office 365 Admin Center for management tasks. The suggestion is to create a special-purpose account with a strong password to run PowerShell cmdlets or scripts in the Office 365 tenant.
Figure 11-35. Configuring multi-factor authentication in Office 365
The way the user can authorize the logon by confirming his identity is called the contact method. The following contact methods are available:
· Mobile phone or office phone numbers for receiving authorization codes through calls.
· Mobile phone numbers for receiving authorization codes through text messages.
· Mobile App on smartphone.
Mobile App is available on Windows Phone, iOS, and Android. An additional benefit, apart from Mobile App being perhaps more convenient for an end user, is that it prevents additional costs that would be incurred as part of other contact methods, such as calling mobile phone or office numbers, or sending text messages.

Figure 11-36. Multi-factor authentication on Mobile App
The Mobile App needs to be set up, linking the owner of the phone to the cloud identity in Windows Azure Active Directory. To accomplish this, the owner enters a verification code in the app or scans an on-screen QR code as part of the multi-factor authentication setup process. The owner is then asked to verify that the process is working by testing the verification process using the app.
![]() Note The multi-factor authentication app requires Internet access to receive the verification request. The on-screen six-digit number can be used as a fallback mechanism if the smartphone does not have Internet access. Also, the Mobile App is configured to receive push notifications, whereby the user is automatically prompted to verify her identity. When it is not able to receive those notifications, the user can check for pending authentication requests using “Check for auth.”
Note The multi-factor authentication app requires Internet access to receive the verification request. The on-screen six-digit number can be used as a fallback mechanism if the smartphone does not have Internet access. Also, the Mobile App is configured to receive push notifications, whereby the user is automatically prompted to verify her identity. When it is not able to receive those notifications, the user can check for pending authentication requests using “Check for auth.”
Of course, administrators can also manage multi-factor authentication from PowerShell by using the Windows Azure AD module for Windows PowerShell. This not only allows organizations to configure multi-factor authentication for existing users using PowerShell but also to enhance the current provisioning process with multi-factor authentication options.
By pre-configuring multi-factor authentication, administrators can prevent users from having to go through the initial setup process and hence be able to use their currently configured mobile phone or office number for verification.
Configuring MFA using the WAAD Module
To configure multi-factor authentication using the WAAD module for PowerShell, you open up a Windows Azure AD module for Windows PowerShell session and connect to your Office 365 tenant, with the following:
Connect-MSOLService
Next, you define a strong authentication object, as follows:
$st= New-Object Microsoft.Online.Administration.StrongAuthenticationRequirement
$st.RelyingParty= '*'
Now you can enable users for MFA by using Set-MSOLUser with the StrongAuthenticationRequirements parameter, passing it the strong authentication object created earlier. For example, to enable MFA for user michel@myexchangelabs.com, you would use:
Set-MsolUser –UserPrincipalName michel@myexchangelabs.com
–StrongAuthenticationRequirements @($st)
To disable MFA, you clear the StrongAuthenticationRequirements attribute:
Set-MsolUser –UserPrincipalName michel@myexchangelabs.com –StrongAuthenticationRequirements @()
Administrators can also predefine the contact methods for users by configuring the StrongAuthenticationRequirement attribute state and providing least one contact method through the StrongAuthenticationMethods parameter:
$st= New-Object Microsoft.Online.Administration.StrongAuthenticationRequirement
$st.RelyingParty= '*'
$st.State= 'Enforced'
$m1 = New-Object -TypeName Microsoft.Online.Administration.StrongAuthenticationMethod
$m1.IsDefault = $true
$m1.MethodType = "OneWaySMS"
So, $st now contains a state of preconfigured authentication requirement and $m1 has one contact method, in this case OneWaySMS. Possible values for MethodType are:
· OneWaySMS text code to mobile phone.
· TwoWayVoiceMobile call my mobile phone.
· TwoWayVoiceOffice call my office phone.
· TwoWayVoiceAlternateMobile call an alternate mobile phone number.
· PhoneAppOTP show one-time code in app—that is, six-digit number. OTP stands for “one-time password.”
· PhoneAppNotification notify me through an app using in-app verification.
When you specify OneWaySMS, TwoWayVoiceMobile, or TwoWayVoiceOffice contact methods, the currently configured mobile phone or office phone number attributes on the user object will be used.
Now, to apply this to user michel@myexchangelabs.com, you use:
Set-MsolUser –UserPrincipalName michel@myexchangelabs.com
–StrongAuthenticationRequirements @(st) –StrongAuthenticationMethods @($m1)
![]() Note When users have configured PhoneAppNotification, by default they will also have the PhoneAppOTP contact method configured, which serves as a fallback for situations when there is no data coverage.
Note When users have configured PhoneAppNotification, by default they will also have the PhoneAppOTP contact method configured, which serves as a fallback for situations when there is no data coverage.
If you want to add another authentication contact method—for example, to have the user receive a call on his mobile phone—you add it as an element to the StrongAuthenticationMethods attribute:
$m2 = New-Object -TypeName Microsoft.Online.Administration.StrongAuthenticationMethod
$m2.IsDefault = $false
$m2.MethodType = "TwoWayVoiceMobile"
Set-MsolUser –UserPrincipalName michel@test.com –StrongAuthenticationRequirements @($st) –StrongAuthenticationMethods @($m1, $m2)
At some point, administrators may want to receive a report on which users are multi-factor authentication-enabled and what contact methods they have configured. The StrongAuthenticationMethods attribute contains the configured method. Using this knowledge, you can construct a cmdlet to get a list of MFA-enabled users and their configured methods; for example,
Get-MsOlUser | Where-Object {$_.StrongAuthenticationRequirements} | Select UserPrincipalName, @{name="MFA"; expression={$_.StrongAuthenticationRequirements.State}}, @{name="Methods"; expression={($_.StrongAuthenticationMethods).MethodType}} | ft -AutoSize
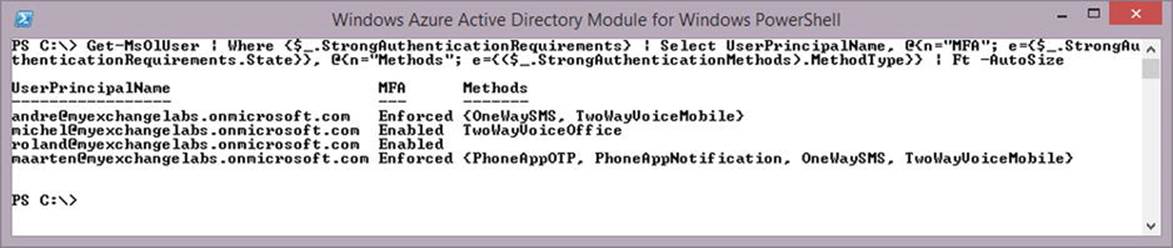
Figure 11-37. Reporting the multi-factor authentication status of users
![]() Tip You can shorten the custom output field headers Name and Expression to N and E, respectively—for example, Select @{name="MFA"; expression={$_.StrongAuthenticationRequirements.State}} is identical to Select @{n="MFA"; e={$_.StrongAuthenticationRequirements.State}}.
Tip You can shorten the custom output field headers Name and Expression to N and E, respectively—for example, Select @{name="MFA"; expression={$_.StrongAuthenticationRequirements.State}} is identical to Select @{n="MFA"; e={$_.StrongAuthenticationRequirements.State}}.
App Passwords
Unfortunately, few applications support MFA at the time of this writing. Among those that do are Outlook, Lync, and Exchange ActiveSync clients, the Windows 8 mail app included. App passwords are service-generated passwords that you need to use just as you would a regular password when authenticating any apps to Office 365. These app passwords are 16 characters and are non-user configurable.
![]() Tip Use a per-device app password, such as one password for all applications on your tablet and another password for all applications on your laptop. This allows you to invalidate the password that is used on a single device with one step, should the device get compromised or lost.
Tip Use a per-device app password, such as one password for all applications on your tablet and another password for all applications on your laptop. This allows you to invalidate the password that is used on a single device with one step, should the device get compromised or lost.
On the organization level, you can can disable app password usage for users. The generated password does not expire, so some organizations may require disallowing app passwords, should their security policy stipulate that.
Onboarding and Offboarding Mailboxes
Examining your Office 365 tenant, you may see that you have some mailboxes on-premises and some mailboxes in Office 365. If you just completed setting up your Office 365 tenant, all your mailboxes might still be located on-premises. So, how do you get those mailboxes to the cloud? This is onboarding. And what if you want to move some cloud-based mailboxes back to on-premises? That is offboarding.
![]() Note This section applies to Exchange hybrid deployments. Mailbox moves oves that are part of a cutover - also known as big-bang - migration are one way and are migrated in bulk, using Exchange Online Admin Center’s built-in migration feature or using third-party software. Cloud-based mailboxes might be relocated to the cloud as the host deems necessary, and should not be something for administrators to worry about—that’s one of the joys of the cloud services.
Note This section applies to Exchange hybrid deployments. Mailbox moves oves that are part of a cutover - also known as big-bang - migration are one way and are migrated in bulk, using Exchange Online Admin Center’s built-in migration feature or using third-party software. Cloud-based mailboxes might be relocated to the cloud as the host deems necessary, and should not be something for administrators to worry about—that’s one of the joys of the cloud services.
Like cross-forest mailbox moves, the target environment needs to have a mail-enabled user that will function as a target for the mailbox move. In on-premises cross-forest migrations, this task is performed by a script called Prepare-MoveRequest.ps1 or by identity management solutions like ForeFront Identity Manager, which can provision mail-enabled user objects in the target environment through what is called a GALsync. In a typical Exchange hybrid deployment, the mail-enabled user objects are provisioned in Windows Azure AD via the directory synchronization process done by WAADsync.
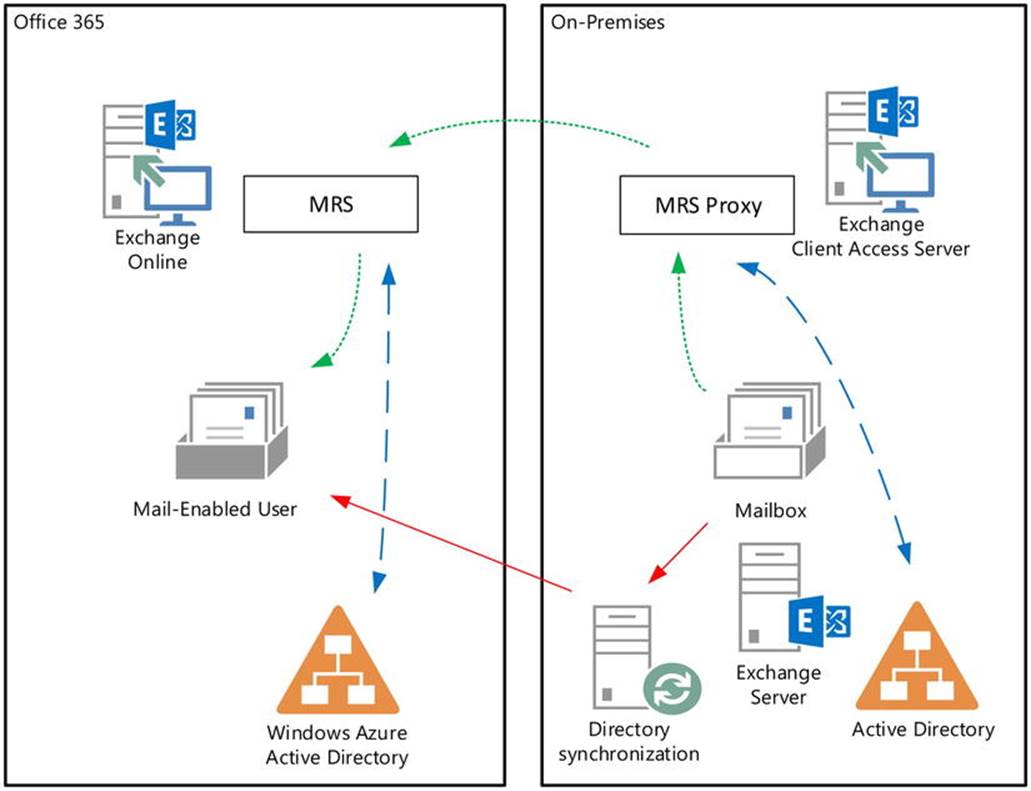
Figure 11-38. Onboarding a mailbox
When you are performing regular mailbox moves within the same organization, a service called Microsoft Exchange mailbox replication coordinates the move. When you are performing cross-forest moves or moves between on-premises and Exchange Online (also known as remotemoves), something called the MRS proxy on the Client Access servers proxies the traffic related to the move, acting as the counterpart to the MRS. Both MRS and MRS proxy update the Active Directory in their respective environments with information such as the database hosting the mailbox, then converting the mailbox user objects to mail-enabled user objects (or vice-versa) when the move has been completed.
By default, the MRS proxy functionality is disabled, so before you can perform any remote moves, you need to enable MRS proxy from the EAC via Servers ![]() Virtual Directories and configure the properties of EWS (default website) entries. Alternatively, you can use EMS:
Virtual Directories and configure the properties of EWS (default website) entries. Alternatively, you can use EMS:
Get-WebServicesVirtualDirectory -Server <Server> |
Set-WebServicesVirtualDirectory -MRSProxyEnabled:$true
To enable MRS proxy on all Client Access servers, you use:
Get-WebServicesVirtualDirectory | Set-WebServicesVirtualDirectory -MRSProxyEnabled:$true
![]() Note The hybrid configuration wizard in Exchange 2013 Cumulative Update 5 and later will automatically configure the MRS proxy setting on the Web Services virtual directories.
Note The hybrid configuration wizard in Exchange 2013 Cumulative Update 5 and later will automatically configure the MRS proxy setting on the Web Services virtual directories.
Remote moves can be initiated from the source or the target environment, effecting a push or pull mailbox move. Depending on the origin of the move request, the MRS proxy is enabled on the remote end as the source Exchange Client Access servers (pull) or the “target” the Exchange Client Access servers (push). When you are moving mailboxes between Exchange on-premises and Exchange Online, the move is always initiated from Exchange Online. For this reason, you always need to enable MRS proxy for Exchange on-premises.
![]() Note With the exception of Exchange Server 2003 as a source, mailbox moves are online and users restart their client only after the move has completed successfully. Also, because onboarding and offboarding use native Exchange mailbox moves, and the mailbox signature is preserved, there is no need to resynchronize the OST offline cache file.
Note With the exception of Exchange Server 2003 as a source, mailbox moves are online and users restart their client only after the move has completed successfully. Also, because onboarding and offboarding use native Exchange mailbox moves, and the mailbox signature is preserved, there is no need to resynchronize the OST offline cache file.
Onboarding Mailboxes Using EAC
We start with onboarding, though offboarding is, in principle, the same process with the source and target environments switched and the cmdlet a little bit different. From the Office 365 Admin Center, you can initiate moves to or from Exchange Online via Recipients ![]() Migration. Click the + sign and you will have the option to Migrate to Exchange Online or to Migrate from Exchange Online (see Figure 11-39).
Migration. Click the + sign and you will have the option to Migrate to Exchange Online or to Migrate from Exchange Online (see Figure 11-39).
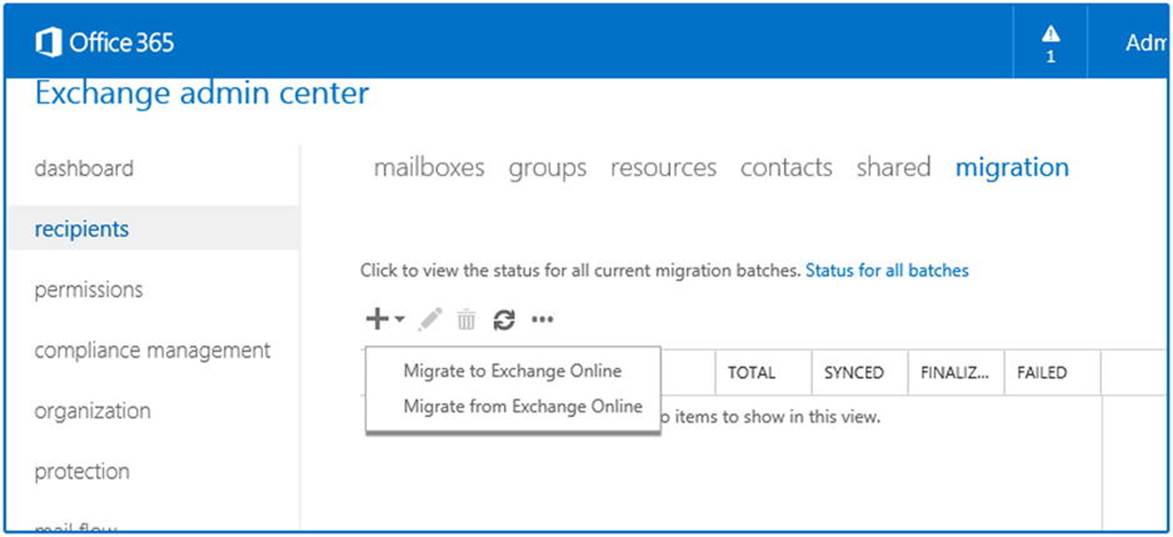
Figure 11-39. Migrating mailboxes to or from Exchange Online using EAC
You select the option Remote Move Migration. After that, you can provide the identities of the mailboxes you would like to move across, after which the remote move will be initiated. But before that, let’s see what is configured on the mailbox and mail-enabled user before and after the remote move.
To do that, let’s inspect the email addresses stamped on the on-premises mailbox using a sample user named Olrik. Note that, in the example that follows, the following is the case:
· myexchangelabs.com is the managed email domain.
· myexchangelabs.onmicrosoft.com is the default routing domain, created by Office 365.
· is the coexistence domain used for email routing; this domain is added when activating DirSync in your tenant.
[PS] >get-mailbox Olrik | fl WindowsEmail*,EmailAddr*,ExternalEmail*,legacyExchangeDN
WindowsEmailAddress : olrik@myexchangelabs.com
EmailAddresses : {x500:/o=ExchangeLabs/ou=Exchange Administrative Group(FYDIBOHF23SPDLT)/cn=Recipients/cn=f2970c513a2b49dc8de37a83766d4fda-Olrik,
smtp:olrik@myexchangelabs.mail.onmicrosoft.com, smtp:olrik@myexchangelabs.onmicrosoft.com,
SMTP:olrik@myexchangelabs.com}
EmailAddressPolicyEnabled : True
LegacyExchangeDN : /o=Litware/ou=Exchange Administrative Group
(FYDIBOHF23SPDLT)/cn=Recipients/ cn=1caf9bcc4ccd4e2db9ced9192c87736b-Olrik
The mail-enabled user in Windows Azure Active Directory, as provisioned by WAADsync, is as follows:
[PS] >get-mailuser Olrik | fl WindowsEmail*,EmailAddr*,ExternalEmail*,legacyExchangeDN
WindowsEmailAddress : olrik@myexchangelabs.com
EmailAddresses : {SMTP:olrik@myexchangelabs.com,
smtp:olrik@myexchangelabs.mail.onmicrosoft.com,
smtp:olrik@myexchangelabs.onmicrosoft.com}
EmailAddressPolicyEnabled : False
ExternalEmailAddress : SMTP:olrik@myexchangelabs.com
LegacyExchangeDN : /o=ExchangeLabs/ou=Exchange Administrative Group (FYDIBOHF23SPDLT)/cn=Recipients/ cn=f2970c513a2b49dc8de37a83766d4fda-Olrik
As you can see, each entry has a unique legacyExchangeDN and the mailbox already contains an x500 address pointing to the legacy Exchange domain name of the mail user. The external email address (targetAddress) of the mail-enabled user points to the on-premises mailbox.
Now, you define the remote move request further by providing the credentials of an on-premises account with sufficient privileges to access and read the mailbox. Then, you will be asked to confirm the migration endpoint. When you have multiple regions publishing Exchange, you select the public FQDN of the endpoint closest to the mailbox.
![]() Tip When you have a KEMP load balancer and you get an error message stating, “The connection to the server <endpoint> could not be completed” while you are defining the migration batch, check if the KEMP support article at http://bit.ly/KempCont100Err applies to your situation (my thanks to Michael van Horenbeeck for this tip).
Tip When you have a KEMP load balancer and you get an error message stating, “The connection to the server <endpoint> could not be completed” while you are defining the migration batch, check if the KEMP support article at http://bit.ly/KempCont100Err applies to your situation (my thanks to Michael van Horenbeeck for this tip).
You are then asked to name the batch, which allows for easy reference when grouping multiple move requests. You are also asked to provide the target delivery domain. This is the email address currently configured on the mailbox and that contains the specified domain name, which will be configured as targetAddress (external email address) on the mail-enabled user. This is the mail-enabled user that remains after the mailbox has been moved successfully and the mailbox user has been converted to a mail-enabled user. In this step, you also have the option of only moving the personal archive (when you are moving to an Exchange Online Archiving plan, for example).
![]() Caution You need to remove any secondary email addresses from the mailbox that are using a domain name that is not part of the accepted domains in your Office 365 tenant. This includes local addresses, such as <alias>@contoso.local. If you do not do this, the move will fail and the error report will say “You can’t use the domain because it’s not an accepted domain for your organization.”
Caution You need to remove any secondary email addresses from the mailbox that are using a domain name that is not part of the accepted domains in your Office 365 tenant. This includes local addresses, such as <alias>@contoso.local. If you do not do this, the move will fail and the error report will say “You can’t use the domain because it’s not an accepted domain for your organization.”
On the final screen, you have the option of configuring a recipient who will receive the migration report. Additionally, you can select if you want the batch to run immediately or on demand. You can also choose to suspend the move when the contents have been copied but before finalizing the move by updating Active Directory (SuspendWhenReadyToComplete). The batch can then be resumed at a later time, copying over the last deltas and finalizing the move.
Via the Migration menu, you can monitor the progress of the migration batch. Via the Details option, you can check the progress of the individual mailbox moves and view the results of the move.
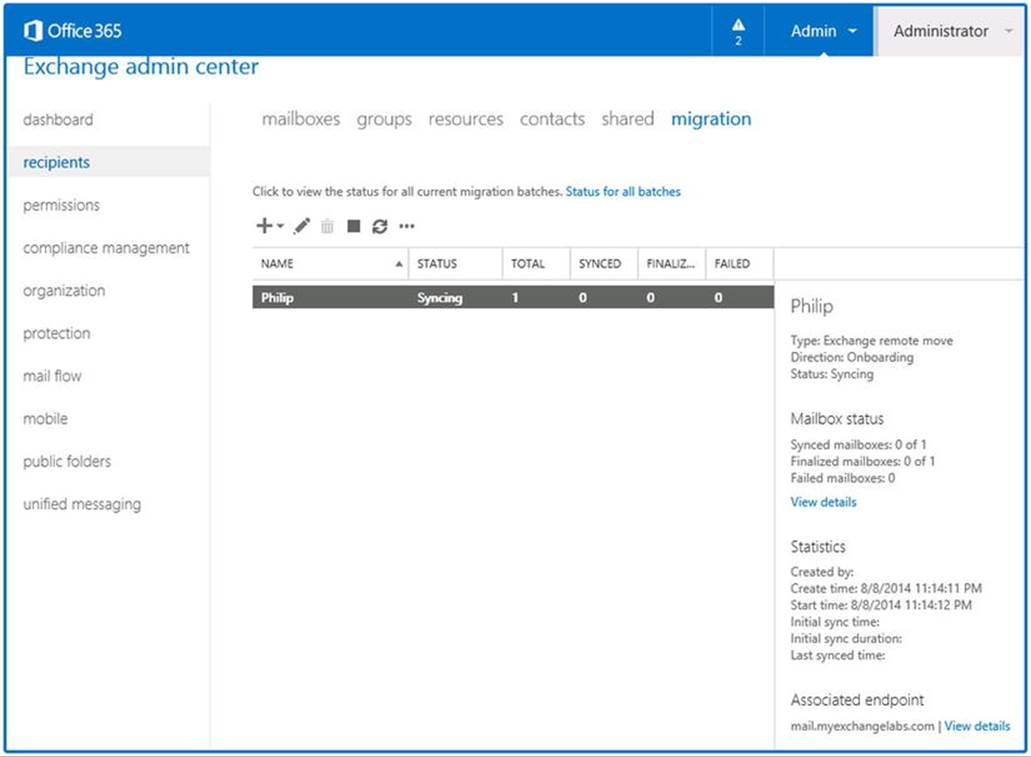
Figure 11-40. Migrating mailboxes to or from Exchange Online using EAC
When the move is successful, you are prompted to restart the Outlook client, after which users can access their mailboxes from the new location. If you keep getting this dialog box when starting Outlook, and you are running the Lync client, close the Lync because it may keep a session open to your mailbox, preventing updates to your Outlook profile from propagating.
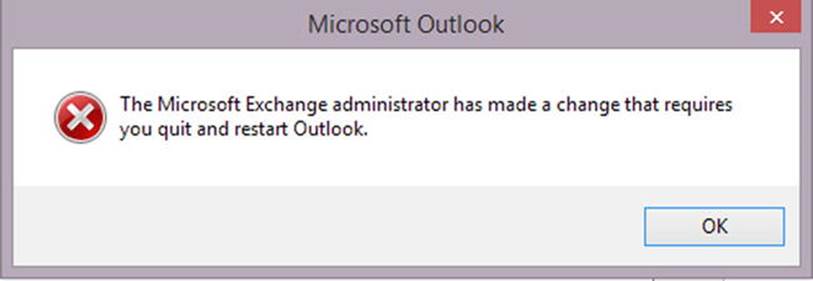
Figure 11-41. Exchange configuration change prompt in Outlook
You may also be required to re-enter your credentials when you are not using a single sign-on solution. The reason for this is that when you are saving the password in Outlook, it is stored for the endpoint being used for mailbox access. With the mailbox onboarding, the endpoint used to access the mailbox is switched from an on-premises FQDN to office365.outlook.com for Office 365, so the password must be provided.
If you follow the Autodiscover process, the on-premises Exchange environment is consulted, but Autodiscover gets instructed to look up olrik@myexchangelabs.mail.onmicrosoft.com instead. This leads to Exchange Online, which is where you just moved this mailbox to.
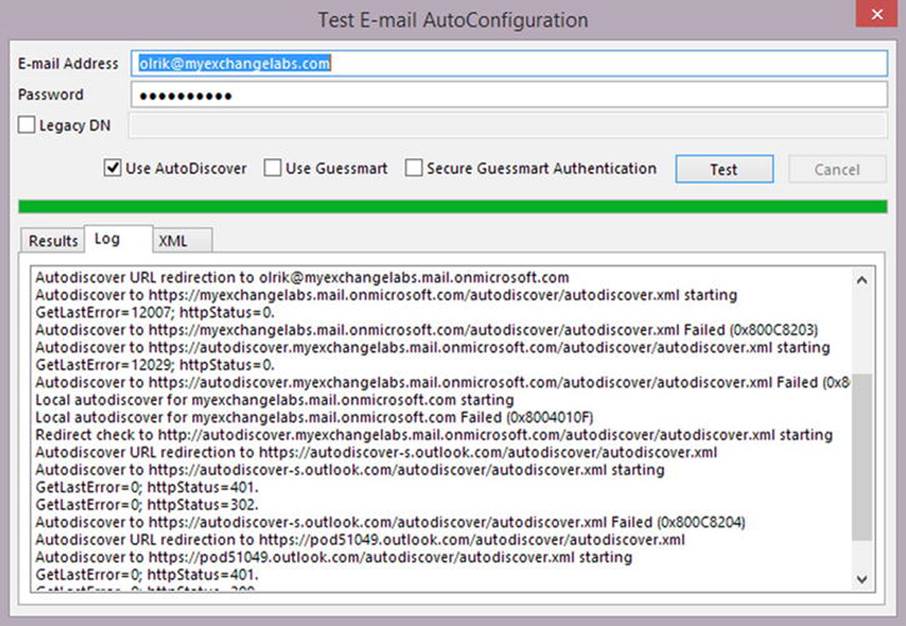
Figure 11-42. The Autodiscover redirect after onboarding a mailbox
You can also verify that Outlook is connected to Exchange Online by opening up the Outlook connection status window, right-clicking the Outlook system tray icon, and selecting Connection Status, as shown in Figure 11-43.
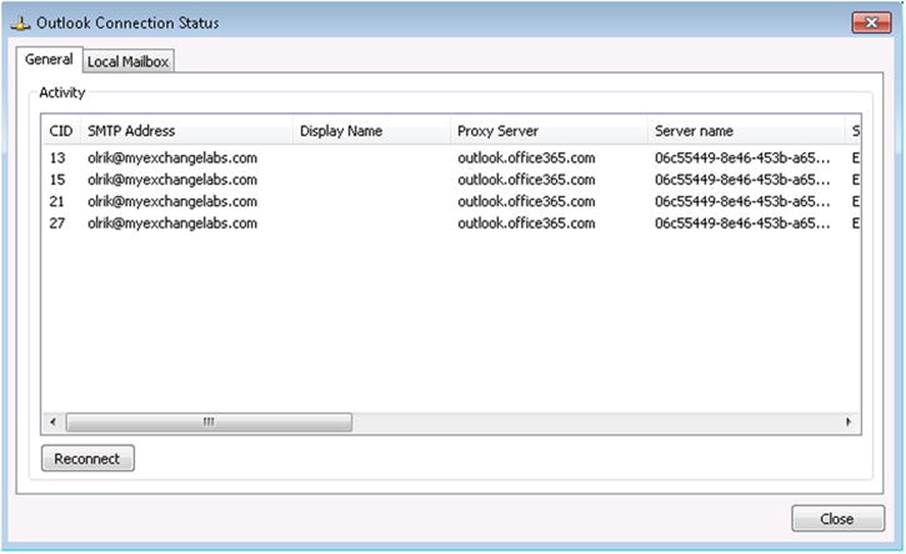
Figure 11-43. Window for Outlook connection status
![]() Tip To test if the requirements for a successful migration are met, you can use the Test-MigrationServerAvailability cmdlet. You can optionally add the -Verbose switch to add extra information to the output, which might prove useful when you are troubleshooting:Test-MigrationServerAvailability -ExchangeRemoteMove
Tip To test if the requirements for a successful migration are met, you can use the Test-MigrationServerAvailability cmdlet. You can optionally add the -Verbose switch to add extra information to the output, which might prove useful when you are troubleshooting:Test-MigrationServerAvailability -ExchangeRemoteMove
-EmailAddress olrik@myexchangelabs.com -Autodiscover -Credentials (Get-Credential)
Onboarding Mailboxes Using EMS
Onboarding and offboarding mailboxes is also possible using Exchange Management Shell. To perform a cross-forest mailbox move, you open up a session to Exchange Online and use New-MoveRequest providing the following parameters:
· Identity is the identity of the mailbox to move—for example, the UserPrincipalName.
· Remote is to specify that a remove move will be performed.
· RemoteHostName is to specify the endpoint FQDN to access for migration.
· RemoteCredential is to provide on-premises credentials with mailbox access.
· TargetDeliveryDomain is to specify the email domain name of the secondary address to stamp as the external email address (targetAddress) to route traffic from the mail-enabled user to the mailbox. A typical value would be <tenant name>.mail.onmicrosoft.com.
· SuspendWhenReadyToComplete (optional) is to indicate the move should be suspended when the mailbox contents have been copied successfully and the move can be finalized.
· BadItemLimit (optional) increases the tolerance for bad items by allowing migration to skip this maximum number of corrupt items.
· LargeItemLimit (optional) allows migration of a certain number of messages that are larger than the current message size limit. The current message size limit in Office 365 is 35 MB (25 MB + MIME overhead).
· PrimaryOnly (optional) allows you to move only the primary mailbox. When not specified, any configured personal archive mailboxes are moved as well.
· ArchiveOnly (optional) allows you to move only the personal archive of the mailbox.
So, in an Exchange Management Shell session, to move a mailbox to Exchange Online, the cmdlet you need to use is:
$cred= Get-Credential
New-MoveRequest -Identity <Identity> -Remote -RemoteCredential <Credentials>
-RemoteHostName <On-Premises Endpoint> -TargetDeliveryDomain <Domain>
For example, to onboard a mailbox called philip@myexchangelabs.com through endpoint mail.myexchangelabs.com, you use the following cmdlet:
$cred= Get-Credential
New-MoveRequest -Identity olrik@myexchangelabs.com -Remote -RemoteCredential $cred
-TargetDeliveryDomain myexchangelabs.mail.onmicrosoft.com
-RemoteHostname mail.myexchangelabs.com
When prompted, you provide on-premises credentials with sufficient access.
To track the progress of the move, you use Get-MoveRequest and Get-MoveRequestStatistics, as shown in Figure 11-44.

Figure 11-44. Inspecting the mailbox move status
![]() Tip Exchange Online client access is throttled, including mailbox moves. When planning mailbox moves, use an average 0.3-1 GB/hour rate per mailbox, but an exact number is impossible owing to the many variables (e.g., MRS proxy hardware, available bandwidth, or number of items). To enhance throughput, increase the number of concurrent moves. When the MRS proxy server becomes the bottleneck, add more MRS proxy servers. In addition, you can use the SuspendWhenReadyToComplete option when you need to plan the time of completion. To make a reasonable estimate of the time, perform some trial migrations and check those reports for throughput rates.
Tip Exchange Online client access is throttled, including mailbox moves. When planning mailbox moves, use an average 0.3-1 GB/hour rate per mailbox, but an exact number is impossible owing to the many variables (e.g., MRS proxy hardware, available bandwidth, or number of items). To enhance throughput, increase the number of concurrent moves. When the MRS proxy server becomes the bottleneck, add more MRS proxy servers. In addition, you can use the SuspendWhenReadyToComplete option when you need to plan the time of completion. To make a reasonable estimate of the time, perform some trial migrations and check those reports for throughput rates.
After waiting for the WAADsync cycle, again check the email addresses stamped on the on-premises mail-enabled user, as updated by the WAADsync write-back actions:
[PS] >Get-RemoteMailbox Olrik | fl WindowsEmail*,EmailAddr*,ExternalEmail*,legacyExchangeDN
WindowsEmailAddress : olrik@myexchangelabs.com
EmailAddresses : {x500:/o=Litware/ou=Exchange Administrative Group
(FYDIBOHF23SPDLT)/cn=Recipients/
cn=1caf9bcc4ccd4e2db9ced9192c87736b-Olrik,
X500:/o=ExchangeLabs/ou=Exchange Administrative Group
(FYDIBOHF23SPDLT)/cn=Recipients/
cn=f2970c513a2b49dc8de37a83766d4fda-Olrik,
smtp:olrik@myexchangelabs.mail.onmicrosoft.com,
smtp:olrik@myexchangelabs.onmicrosoft.com,
SMTP:olrik@myexchangelabs.com}
EmailAddressPolicyEnabled : True
LegacyExchangeDN : /o=Litware/ou=External (FYDIBOHF25SPDLT)/cn=Recipients/
cn=ae9c9a3bcc0d4c10ab593fb6a622c239
The cmdlet Get-RemoteMailbox will not show the external email address, as Get-MailUser would. However, you can inspect its value using, for example, the Get-ADUser cmdlet from the Active Directory module:
[PS] >Get-ADUser Olrik -Properties targetAddress | select TargetAddress
SMTP:olrik@myexchangelabs.mail.onmicrosoft.com
![]() Note targetAddress is not one of the default properties returned by Get-ADUser, so you need to have it returned using Properties.
Note targetAddress is not one of the default properties returned by Get-ADUser, so you need to have it returned using Properties.
The mailbox user in Office 365 contains the following addresses:
[PS] >Get-Mailbox Olrik | fl WindowsEmail*,EmailAddr*,ExternalEmail*,legacyExchangeDN
WindowsEmailAddress : olrik@myexchangelabs.com
EmailAddresses : {x500:/o=Litware/ou=External (FYDIBOHF25SPDLT)/cn=Recipients/
cn=ae9c9a3bcc0d4c10ab593fb6a622c239,
SMTP:olrik@myexchangelabs.com,
smtp:olrik@myexchangelabs.mail.onmicrosoft.com,
smtp:olrik@myexchangelabs.onmicrosoft.com
X500:/o=Litware/
ou=Exchange Administrative Group (FYDIBOHF23SPDLT)/cn=Recipients/
cn=1caf9bcc4ccd4e2db9ced9192c87736b-Olrik}
EmailAddressPolicyEnabled : False
LegacyExchangeDN : /o=ExchangeLabs/
ou=Exchange Administrative Group (FYDIBOHF23SPDLT)/cn=Recipients/
cn=f2970c513a2b49dc8de37a83766d4fda-Olrik
As you can see, the legacyExchangeDN of the mail-enabled user has been added as the secondary x500 address to the mailbox and the targetAddress of the mail-enabled user is now set and pointing to the namespace used by Exchange Online for internal email routing, ending in .mail.onmicrosoft.com.
After the mailbox is onboarded, the on-premises mail-enabled user is called a “remote mailbox,” or an on-premises mail-enabled user with an associated Office 365-based mailbox. It functions identically to a mail-enabled user and its recipient type is also MailUser. Remote mailboxes should be managed using Get-Command -Noun RemoteMailbox cmdlets—for example, Get-RemoteMailbox. Get-MailUser will not work and will result in a “recipient not found” error.
In the on-premise EAC, these remote mailboxes appear as in Recipients ![]() Mailboxes as mailboxes of the type Office 365. This could be confusing, but may simplify management of on-premises and Office 365-based mailboxes by using a single Admin Center.
Mailboxes as mailboxes of the type Office 365. This could be confusing, but may simplify management of on-premises and Office 365-based mailboxes by using a single Admin Center.

Figure 11-45. Remote mailboxes show up in Exchange on-premises listings
![]() Caution Like on-premises mailbox moves, you need to clean up the move requests by using Remove-MoveRequest. For example, to clear out all completed move requests, use Get-MoveRequest -MoveStatus Completed | Remove-MoveRequest.
Caution Like on-premises mailbox moves, you need to clean up the move requests by using Remove-MoveRequest. For example, to clear out all completed move requests, use Get-MoveRequest -MoveStatus Completed | Remove-MoveRequest.
Onboarding Multiple Mailboxes
Of course, you can move multiple mailboxes at once by selecting multiple mail-enabled users and piping them to New-MoveRequest or by using CSV files containing identities. For example, to move all mailboxes where the customAttribute1 (extensionAttribute1) contains “YES,” you select all mail users satisfying that criterion, after which you can pipe those objects to New-MoveRequest, as follows:
$cred= Get-Credential
Get-MailUser -Filter { customAttribute1 -eq 'YES'} | New-MoveRequest -Remote
-RemoteCredential $cred -TargetDeliveryDomain myexchangelabs.mail.onmicrosoft.com
-RemoteHostname mail.myexchangelabs.com -BatchName 'Attr1Yes'
![]() Note The credential you need to provide with New-MoveRequest -RemoteCredential is that of an on-premises account with sufficient permissions.
Note The credential you need to provide with New-MoveRequest -RemoteCredential is that of an on-premises account with sufficient permissions.
In the example just given, BatchName was used. This puts a common label on all these move operations, allowing you to address all related move requests by specifying the batch name; for example,
Get-MoveRequest -BatchName 'Attr1Yes' | Get-MoveRequestStatistics
![]() Tip For a complete overview of all possible properties you can use with Filter, see http://bit.ly/ExFilterProperties.
Tip For a complete overview of all possible properties you can use with Filter, see http://bit.ly/ExFilterProperties.
As mentioned earlier, with Office 365, the move request is initiated from Exchange Online. Consequently, you are limited in the way you can select mailboxes to move by using on-premises criteria, such as organizational unit, because you depend on the attributes synchronized by WAADsync.
One way to tackle this problem is to create a CSV in the source environment that contains the identities of all mailbox users in a specific organizational unit or some other criterion. You can then use this CSV with the Office 365 Admin Center to create a migration batch, or use it withNew-MoveRequest to move all these mailboxes at once.
To use a CSV file holding the identities of all mailboxes from a certain organizational unit (OU), including subcontainers, you first get the mailboxes specifying the organizational unit to filter on OU, and export those entries to a CSV file named Users.csv. You then use the canonical name when specifying OrganizationalUnit and export the alias as Identity, since New-MoveRequest will not take Alias as pipeline input for identity:
Get-Mailbox -OrganizationalUnit contoso.com/NL | Select @{name='Identity';expression={$_.Alias}}
| Export-CSV .\Users.csv -NoTypeInformation
Now, you switch to an Exchange Online session and use the CSV file as input:
$cred= Get-Credential
Import-CSV .\users.csv | New-MoveRequest -Remote
-RemoteCredential $cred -TargetDeliveryDomain myexchangelabs.mail.onmicrosoft.com
-RemoteHostname mail.myexchangelabs.com -BatchName 'UsersNL'
Another way to approach this is to connect to on-premises Exchange and Exchange Online at the same time, and use session prefixes to alternate between them. As mentioned earlier in “Connecting to Office 365,” you can use prefixes when importing sessions, which are added in front of the cmdlet nouns—for example, Get-CloudMailbox.
To do this, you open up an on-premises Exchange Management Shell session and connect to Office 365. You use a noun prefix of Cloud for all cmdlets related to this Exchange Online session:
$o365Cred= Get-Credential
$o365Session= New-PSSession -ConfigurationName Microsoft.Exchange
-ConnectionUri https://ps.outlook.com/powershell/ -Credential $o365Cred
-Authentication Basic -AllowRedirection
Import-PSSession $o365Session -Prefix Cloud
You can now repeat the above move operation, this time using the Cloud cmdlets instead of a CSV file:
$Aliases= Get-Mailbox -OrganizationalUnit contoso.com/NL | Select @{name='Identity';expression={$_.Alias}}
$cred= Get-Credential
$Aliases| New-CloudMoveRequest -Remote
-RemoteCredential $cred -TargetDeliveryDomain myexchangelabs.mail.onmicrosoft.com
-RemoteHostname mail.myexchangelabs.com -BatchName 'UsersNL'
Keep in mind that all cmdlets now need to use Cloud as well; for example,
Get-CloudMoveRequest -BatchName 'UsersNL' | Get-CloudMoveRequestStatistics
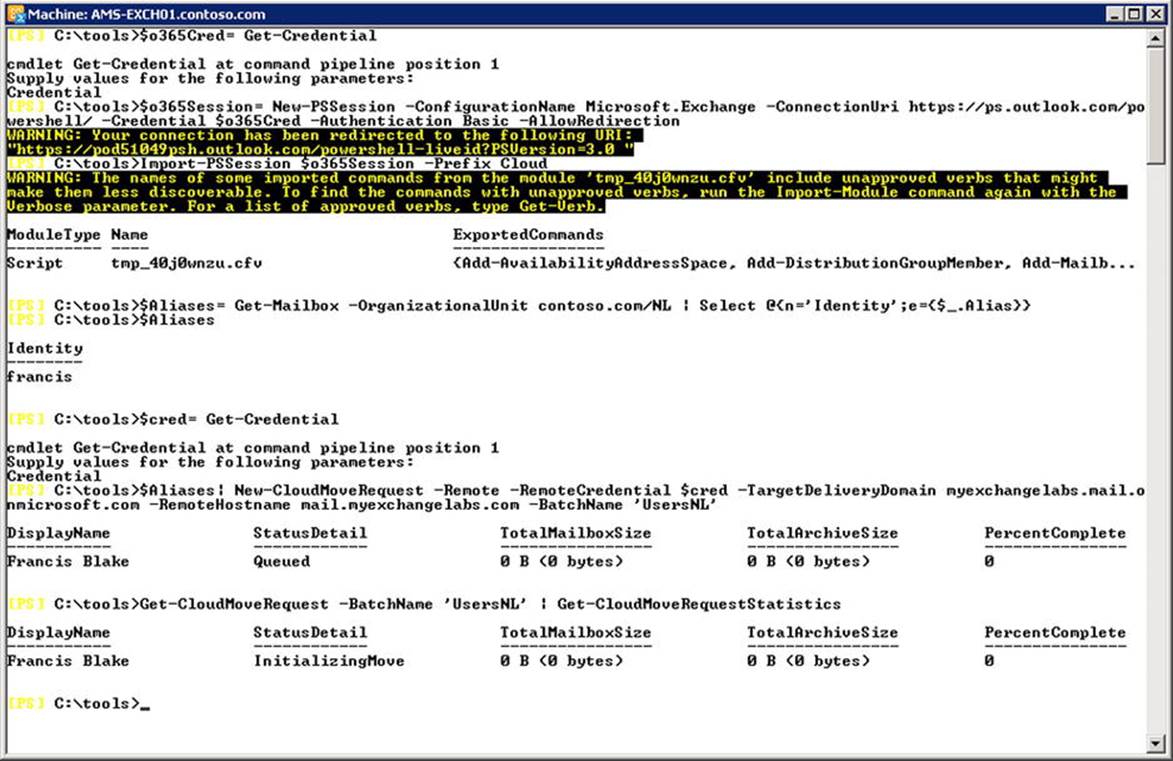
Figure 11-46. Moving mailboxes based on organizational unit information
![]() Tip There are two ways to filter identities: using the Filter parameter or piping the output through a filter—that is, Where-Object (or one of its aliases, Where or ?). It is recommended you filter as early as possible, limiting the resulting set returned from Active Directory by having Get-MailUser utilize an LDAP-based query. When you do not use Filter, but filter through Where instead, all mail-user objects from Active Directory are returned and processed, which is less efficient and less friendly for Active Directory. However, the Filter parameter is limited, and using Where allows you to create more complex filters, so pick a method that suits your needs.
Tip There are two ways to filter identities: using the Filter parameter or piping the output through a filter—that is, Where-Object (or one of its aliases, Where or ?). It is recommended you filter as early as possible, limiting the resulting set returned from Active Directory by having Get-MailUser utilize an LDAP-based query. When you do not use Filter, but filter through Where instead, all mail-user objects from Active Directory are returned and processed, which is less efficient and less friendly for Active Directory. However, the Filter parameter is limited, and using Where allows you to create more complex filters, so pick a method that suits your needs.
Offboarding Mailboxes
As mentioned earlier, the process of offboarding mailboxes is similar to onboarding. In the Office 365 Admin Center, you select Migrate from Exchange Online instead of Migrate to Exchange Online. The dialogs that follow are similar to those for onboarding, with the following differences:
· TargetDeliveryDomain to specify the on-premises target delivery domain. This will be stamped on the mail-enabled user in Office 365, which will remain.
· Outbound to indicate that the move is going outbound (from the perspective of Exchange Online)
· RemoteTargetDatabase to specify the name of the on-premises database to move the mailbox to.
· RemoteArchiveTargetDatabase (optional) to specify the name of the on-premises database to move personal archives to.
When using Exchange Management Shell, the cmdlet you need to use for offboarding is as follows:
New-MoveRequest -Identity <Identity> -Outbound -RemoteCredential <Credentials>
-RemoteTargetDatabase <Database> -RemoteHostName <On-Premises Endpoint>
-TargetDeliveryDomain <Domain> -RemoteTargetDatabase <Database>
-RemoteArchiveTargetDatabase <Database>
Let’s offboard the olrik@myexchangelabs.com user and move him back to on-premises. In this example, you use MDB1 as the target database and MDB2 as the archive database:
$cred= Get-Credential
New-MoveRequest -Identity olrik@myexchangelabs.com -Outbound -RemoteCredential $cred
-TargetDeliveryDomain myexchangelabs.com -RemoteHostname mail.myexchangelabs.com
-RemoteTargetDatabase MDB1 -RemoteArchiveTargetDatabase MDB2
![]() Caution When onboarding or offboarding mailboxes, there will be a significant amount of traffic between your on-premises environment and Office 365. Take note that if you have network devices sitting between MRS and MRS proxy that have some form of intrusion or detect some denial of service, after which they start to throttle or even block traffic, you may need to disable this to keep the process working at maximum speed. A classic example of software with such a built-in feature is ForeFront Threat Management Gateway, with its Flood Mitigation option.
Caution When onboarding or offboarding mailboxes, there will be a significant amount of traffic between your on-premises environment and Office 365. Take note that if you have network devices sitting between MRS and MRS proxy that have some form of intrusion or detect some denial of service, after which they start to throttle or even block traffic, you may need to disable this to keep the process working at maximum speed. A classic example of software with such a built-in feature is ForeFront Threat Management Gateway, with its Flood Mitigation option.
Incrementally Managing Mailbox Moves
To stage your mailbox moves, you can specify the -SuspendWhenReadyToComplete switch when creating the move request. When the transfer of mailbox contents is complete and if SuspendWhenReadyToComplete was specified, the move will get suspended automatically and the status detail will display “Auto Suspended.”
You can resume any suspended moves by using Resume-MoveRequest. When specified like that, the last changes of the move are copied, after which the mailbox is briefly locked to finalize the move with adjustments to Active Directory attributes that are related to the mailbox user and mail-enabled user.
You can also use Resume-MoveRequest to resume a suspended move request and specify -SuspendWhenReadyToComplete again. This will copy the last changes, after which the move request changes to AutoSuspended again. This provides a convenient way to provision mailboxes and periodically perform incremental copies of the mailbox contents, which will keep the final delta to a minimum when you are actually planning to finalize the mailbox move.
![]() Caution From the store’s point of view, mailboxes being staged are disconnected. Therefore, they are subject to mailbox deletion retention time, which is 30 days in Office 365. After this period, mailboxes for which the move has not been completed will be removed. When a mailbox is removed, it is re-created when the move is resumed. In this case, all items that were already transferred are copied again.
Caution From the store’s point of view, mailboxes being staged are disconnected. Therefore, they are subject to mailbox deletion retention time, which is 30 days in Office 365. After this period, mailboxes for which the move has not been completed will be removed. When a mailbox is removed, it is re-created when the move is resumed. In this case, all items that were already transferred are copied again.
Exchange Online Archiving
With the potential mix of on-premises mailboxes and mailboxes in Office 365 comes the flexibility for organizations to find cost-effective business solutions. The personal archive feature introduced with Exchange 2010, called in-place archive in Exchange 2013 and Office 365, adds that flexibility, as an organization can choose to host its mailboxes on-premises while also hosting its in-place archive in Office 365. Some of the Exchange Online plans and Office 365 Enterprise plans offer unlimited storage in the user’s in-place archive for a small additional fee; alternatively, organizations can pick the standalone Exchange Online Archiving subscription, as shown in Figure 11-47.
Figure 11-47. Exchange Online Archiving
To use Exchange Online Archiving, you need to deploy Exchange hybrid with WAADsync. In discussing the WAADsync tool earlier, it was mentioned that by checking the Hybrid Deployment option during WAADsync configuration, you would allow WAADsync to write back several attributes to the on-premises environment. One of those attributes is msExchArchiveStatus. When an on-premises mailbox user has msExchArchiveStatus set to 1, that is an indication there is an in-place archive configured in Office 365.
Creating an Exchange Online Archive is a two-stage process. First, the on-premises mailbox gets enabled for an Exchange Online Archive. This is made effective in the next WAADsync cycle, which picks up the on-premises configuration change and provisions an in-place archive in Office 365. This archive is not immediately present, but when it has been created, the msExchArchiveStatus is set. In the next WAADsync cycle, that attribute is written back to the on-premises Active Directory and the user is able to access his in-place archive.
To enable an in-place archive in Office 365, you can use the Offic e 365 Admin Center, or use Enable-Mailbox with RemoteArchive from the Exchange Management Shell. You also need to specify ArchiveDomain, which functions similar to TargetDeliveryDomainwhen moving mailboxes, and it points to the environment hosting the archive. For this purpose, you can use your coexistence domain; the cmdlet to trigger creation of a remote archive for user Francis, for example, would be the following:
Enable-Mailbox Francis -RemoteArchive -ArchiveDomain myexchangelabs.onmicrosoft.com
Now, you wait for the WAADsync cycle or you manually run it to trigger creation of the in-place archive. When you consult the archive-related properties of the mailbox, you can see that the archive status has changed from None to Hosted Pending, indicating thatmsExchArchiveStatus is still not set:
Get-Mailbox Francis | ft DisplayName, ArchiveGuid, ArchiveStatus,
ArchiveDomain, ArchiveState -AutoSize
After the second WAADsync cycle, the on-premises msExchArchiveStatus becomes 1. You can take a peek at the WAADsync by using miisclient.exe. On the Operations pane, wait for the last Active Directory Connector | Export, log entry and check if there have beenupdates in the Export Statistics pane. The entry is clickable, allowing you to identify the actual write-back of msExchArchiveStatus:
Figure 11-48. Write-back status of the in-place archive
When you are getting the archive properties of the on-premises mailbox, you will see the archive status now show as Active, indicating the completed provisioning of the archive, as shown in Figure 11-49.
Figure 11-49. Remote archive status changes following WAADsync cycles
The end user with an Exchange Online Archive will notice that, if the Outlook Connection Status window is opened, it will show that his or her Outlook client is connected to his on-premises Exchange environment, as well as to Exchange Online. To make the user experience seamless, it is recommended you employ the same sign-on or single sign-on.
Mail Flow
Mail flow describes how email is routed in an organization and between the organization and external destinations, such as the Internet or partners. With Office 365, you need to configure routing between your organization and Office 365, especially with Exchange hybrid deployments where you want communications between on-premises mailboxes and cloud-based mailboxes to be secure.
Chapter 4 discussed mail flow and how to configure it for Exchange on-premises deployments by using send and receive connectors. In Office 365, you also can define connectors, but only on the Exchange Online Protection (EOP) level, and you need to use the Set-OutboundConnector and Set-InboundConnector cmdlets. When using these cmdlets in Exchange Online, you are actually configuring the connectors on the Edge servers that are part of Exchange Online Protection.
![]() Note Exchange Online Protection (EOP) was formerly known as ForeFront Online Protection for Exchange (FOPE) and is a hosted message hygiene service offered by Microsoft. Depending on your Office 365 plan, EOP may or may not be included.
Note Exchange Online Protection (EOP) was formerly known as ForeFront Online Protection for Exchange (FOPE) and is a hosted message hygiene service offered by Microsoft. Depending on your Office 365 plan, EOP may or may not be included.
The Exchange hybrid configuration wizard will take care of configuring the mail flow between your Exchange on-premises and Exchange Online. What it does not do is reconfiguring your public MX record, which determines if inbound messages will land on-premises or in Exchange Online. However, both inbound mail flows will work, as both environments are set up to accept the same managed domain name and the connectors are configured to transport mail between the on-premises and the Exchange Online organization. Exchange Online depends on the mail-enabled users in Exchange on-premises to redirect the email to the coexistence domain, as shown in Figure 11-50.
Figure 11-50. Inbound email routed via on-premises
![]() Note One benefit of routing your email through Exchange Online Protection is that the email with other Exchange Online Protection users (also those from other organizations) is traveling securely within the EOP infrastructure.
Note One benefit of routing your email through Exchange Online Protection is that the email with other Exchange Online Protection users (also those from other organizations) is traveling securely within the EOP infrastructure.
All you need is a quick walkthrough for when Exchange hybrid is configured, and you’ll keep the inbound email entering your on-premises organization. In this example, the sender is contoso.com and the recipient is either philip@contoso.com, who has his mailbox in Exchange Online, or francis@contoso.com, who has his mailbox on-premises. Here’s how it works:
1. The mail transfer agent that wants to deliver the mail looks up the MX record for contoso.com. This points to mail.contoso.com, so it hands it off to the on-premises third-party gateway.
2. The gateway processes the message and delivers it to Exchange on-premises.
3. Exchange on-premises knows the mailbox francis@contoso.com and delivers the message. For philip@contoso.com, however, it finds a matching mail-enabled user. This has a targetAddress directing the message tophilip@contoso.mail.onmicrosoft.com. For that address space a send connector is present, Outbound to Office 365, which is configured to securely deliver messages. Exchange looks up the MX record for contoso.mail.onmicrosoft.com, which points to the mail.protection.outlook.com (Exchange Online Protection), where it delivers the message.
4. Exchange Online Protection uses an internal connector for the internal address space mail.onmicrosoft.com domain, and hands off the message to Exchange Online.
5. The message is delivered to philip@contoso.mail.onmicrosoft.comSPI_AMP#x2014;that is, philip@contos.com.

Figure 11-51. Inbound email delivered via EOP
When the MX record is configured to deliver inbound mail to Exchange Online Protection, the following occurs:
1. The mail transfer agent that wants to deliver the mail looks up the MX record for contoso.com. This points to mail.protection.outlook.com (EOP), so it hands it off to the EOP.
2. Exchange on-premises has a matching outbound connector for domain *, Outbound to <Organization GUID>, which is configured to securely delivers message to a smart host, mail.myexchangelabs.com. It delivers the message to this smart host.
3. Exchange on-premises knows mailbox francis@contoso.com and delivers the message. For philip@contoso.com, it will again use the configured targetAddress philip@contoso.mail.onmicrosoft.com and use the send connectoroutbound to Office 365. After the MX lookup, Exchange delivers the message to mail.protection.outlook.com (EOP).
4. Exchange Online Protection delivers the message destined for the internal address space mail.onmicrosoft.com to Exchange Online.
5. The message is delivered to philip@contoso.mail.onmicrosoft.comSPI_AMP#x2014;that is, philip@contos.com.
Regarding outbound traffic, organizations must decide if they want to let all outbound email traffic flow through their Exchange on-premises organization. This is configured by selecting the Centralized Mail Transport option when configuring your Exchange hybrid deployment using the hybrid configuration wizard.
![]() Note In the hybrid configuration wizard, the centralized mail transport is hidden from view, and you need to make it visible by selecting More Options.
Note In the hybrid configuration wizard, the centralized mail transport is hidden from view, and you need to make it visible by selecting More Options.
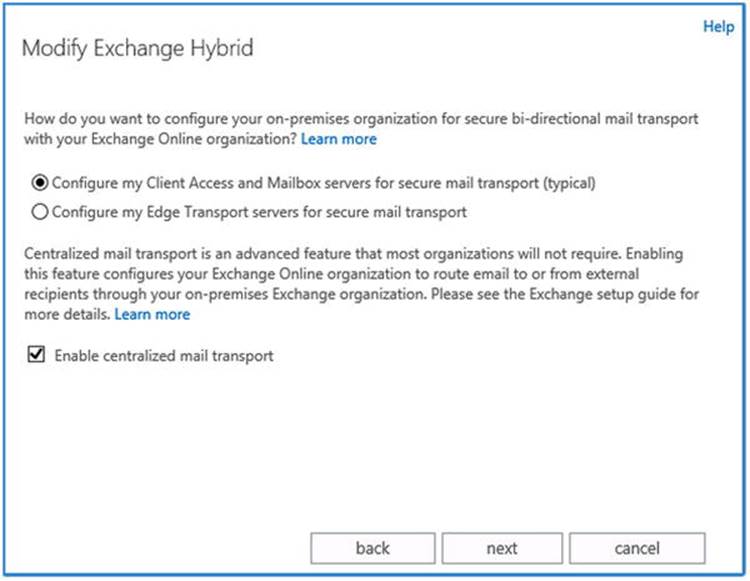
Figure 11-52. Configuring the centralized mail transport
One scenario in which the centralized mail transport is beneficial is when you want to secure transport with partners. By forcing the traffic to flow through your organization, you create a single point of administration for secure email transport with those partners.
Now, let’s look at the mail flow of both situations—when using the decentralized mail transport and when using the centralized mail transport. In both scenarios, philip@contoso.com is sending mail to an external recipient—say, joe@fabrikam.comSPI_AMP#x2014;from his mailbox in Exchange Online. Since outbound mail from Exchange on-premises is not affected by the centralized mail transport setting, that is not shown, as illustrated in Figure 11-53.
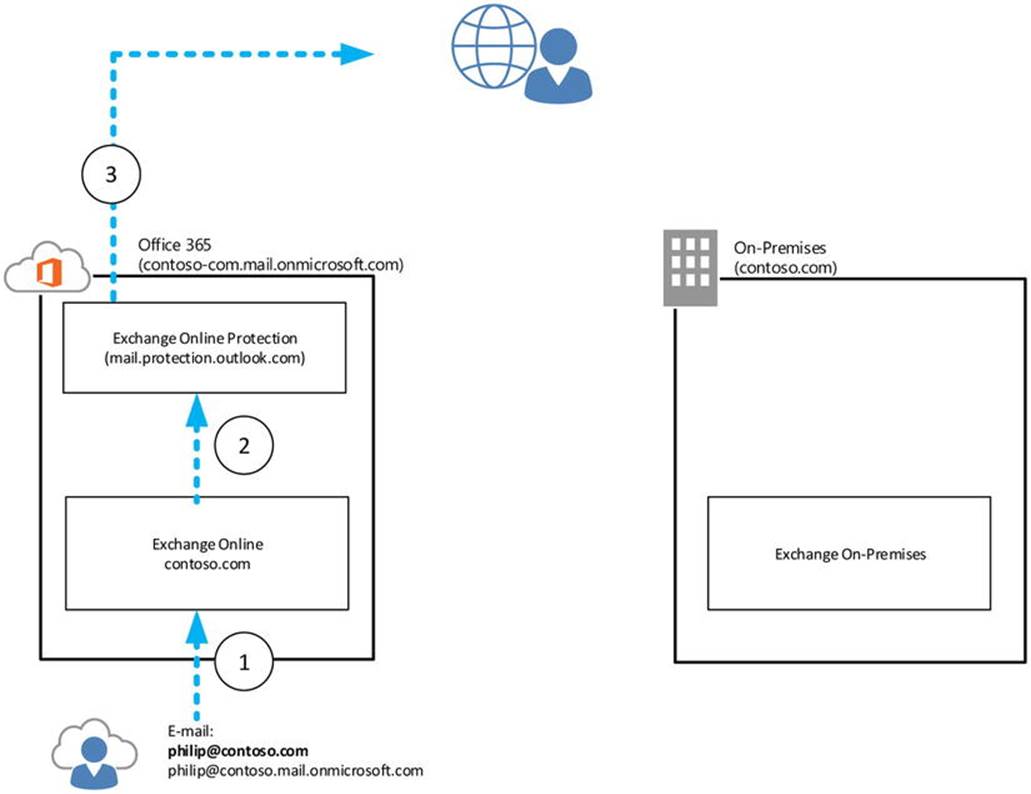
Figure 11-53. Decentralized mail transport
When your Exchange hybrid is configured to not use the centralized mail transport, here’s what happens:
1. The user philip@contoso.com submits a message to joe@fabrikam.com in Exchange Online.
2. Exchange Online sees that it is not authorized for fabrikam.com and routes the message to Exchange Online Protection for delivery.
3. Exchange Online Protection determines that fabrikam.com is external, does an MX lookup, and delivers the message to the configured host, as shown in Figure 11-54.
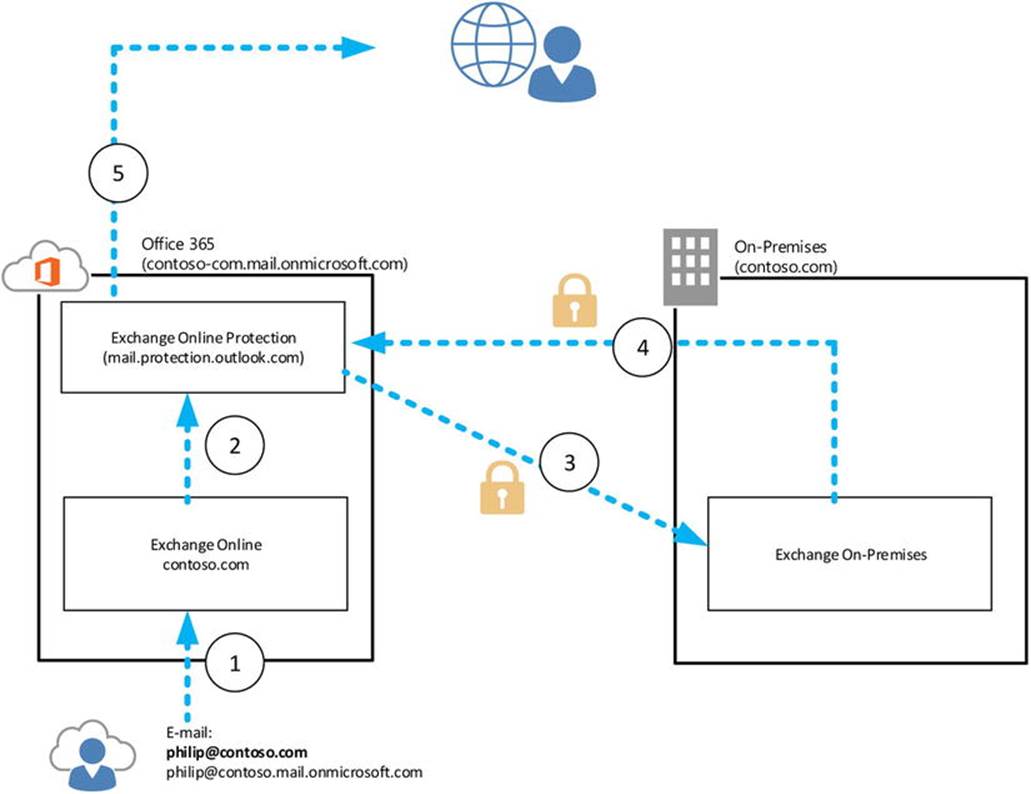
Figure 11-54. Centralized mail transport
![]() Note If the recipient is someone with an Exchange on-premises mailbox—for example, @contoso.com—then Exchange Online Protection routes those messages through a connector “Outbound to <Organization Guid>,” which is configured to securely deliver messages to smarthost mail.contoso.com for contoso.com.
Note If the recipient is someone with an Exchange on-premises mailbox—for example, @contoso.com—then Exchange Online Protection routes those messages through a connector “Outbound to <Organization Guid>,” which is configured to securely deliver messages to smarthost mail.contoso.com for contoso.com.
When your Exchange hybrid is configured to use central mail transport, the following occurs:
1. The user philip@contoso.com submits a message to joe@fabrikam.com in Exchange Online.
2. Exchange Online sees it is not authorized for fabrikam.com and hands off the message to Exchange Online Protection for delivery.
3. Exchange Online Protection finds a matching connector “Outbound to <Organization Guid>,” which is configured to always route all messages via on-premises (Get-OutboundConnector property RouteAllMessagesViaOnPremises), using smart hostmail.contoso.com.
4. Assuming you have configured outbound email to be deliverd to Exchange Online Protection and there is no connector for fabrikam.com, the message is delivered to Exchange Online Protection.
5. Exchange Online Protection determines fabrikam.com is external, does an MX lookup, and delivers the message.
![]() Tip The connectors configured by the hybrid configuration wizard to securely transport messages between Exchange on-premises and Exchange Online use transport layer security (TLS). If the mail transport does not work, verify that there are no appliances sitting between your Exchange on-premises and the Internet that may tamper with SMTP traffic, such as fixup/mailguard by Cisco PIX. Your SMTP logs will show a line similar to : 220 *******, where it is supposed to be given the STARTTLS command. More information on this athttp://bit.ly/MailGuard.
Tip The connectors configured by the hybrid configuration wizard to securely transport messages between Exchange on-premises and Exchange Online use transport layer security (TLS). If the mail transport does not work, verify that there are no appliances sitting between your Exchange on-premises and the Internet that may tamper with SMTP traffic, such as fixup/mailguard by Cisco PIX. Your SMTP logs will show a line similar to : 220 *******, where it is supposed to be given the STARTTLS command. More information on this athttp://bit.ly/MailGuard.
Reporting
Office 365 has some built-in report-generating capabilities. Unfortunately, these reports are not available for on-premises usage. You can find the reports in the Office 365 Admin Center under “Reports,” but there are some specific PowerShell-based reporting cmdlets as well. Note that whether you have reporting capabilities depends on your Office 365 plan and role—for example, password administrators in Office 365 have reporting options that are diferent from those global administrators have.
Service Health
The service health dashboard in Office 365 offers an overview of the current status of the Office 365 service and all its underlying components. It also provides historical information, which is helpful when users do not report problems immediately, but instead say things along the line of “I could not access my mailbox last Saturday.” The information icons are clickable and lead to getting background information on problems. See Figure 11-55.
Figure 11-55. Office 365 service health report
You can subscribe to an RSS feed that will contain updates on the service status using the RSS button shown in Figure 11-55. If you want to know if there is any maintenance planned, check the Planned Maintenance option. It’s helpful to give yourself or your end users a heads-up on possible service interruptions.
Tenant Reports
Table 11-4 is a list of currently (as of this writing) available Exchange Online-related reports available in Office 365 Admin Center. As Office 365 is under constant modification, the list may be subject to change.
Table 11-4. Office 365 Reports
|
Category |
Reports |
|
|
Active and inactive mailboxes New and deleted mailboxes New and deleted groups Mailbox usage Types of mailbox connections |
|
Devices |
Browser used Operating system used |
|
Auditing |
Mailbox access by non-owners Role group changes Mailbox content search and hold Mailbox litigation holds |
|
Protection |
Top senders and recipients Top malware for mail Malware detections Spam detections Sent and received mail |
|
Rules |
Top rule matches for mail Rule matches for mail |
|
DLP |
Top DLP policy matches for mail Top DLP rule matches for mail DLP policy matches by severity for mail DLP policy matches, overrides, and false |
Some reports offer the option of exporting the information to a CSV file, allowing you to further process the information.
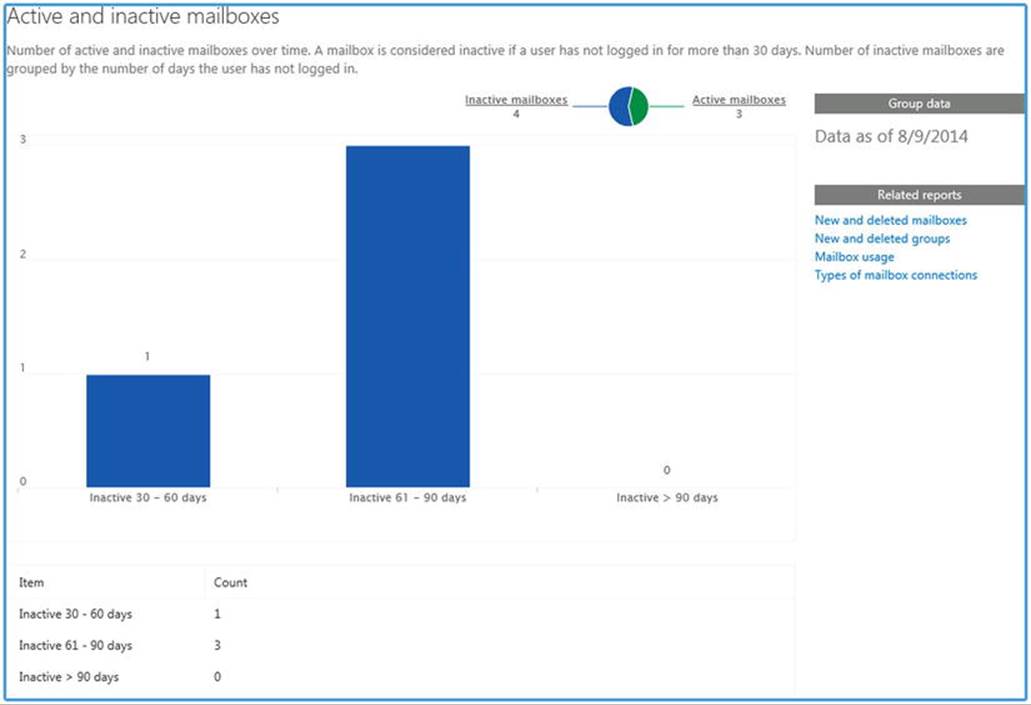
Figure 11-56. Office 365 active and inactive mailboxes report
When connected to Exchange Online in Office 365, you have additional reporting and tracking commands at your disposal. These are listed in Table 11-5.
Table 11-5. Office 365 Reporting Commands
|
Command |
Description |
|
Get-ConnectionByClientTypeReport/ Get-ConnectionByClientTypeDetailsReport |
View details about the different types of clients that are connected to mailboxes in your organization. The client types indicate different protocols; for example, Outlook WebApp, MAPI, POP3, IMAP4, Exchange ActiveSync, and Exchange Web Services. |
|
Get-GroupActivityReport |
View the number of distribution groups that were created and deleted. |
|
Get-LastLogonStats |
Connect to Office 365 and export a list of all your Office 365 mailbox-enabled users’ last logon date/time to a CSV file. The script can be downloaded from http://bit.ly/GetLastLogonStats. |
|
Get-MailboxActivityReport |
View the number of mailboxes that were created and deleted. |
|
Get-MailboxUsageReport/ Get-MailboxUsageDetailReport |
View the number of mailboxes in your organization that are within 25% of the maximum mailbox size, and the number of mailboxes that are over the maximum size. |
|
Get-MailDetailDlpPolicyReport |
View the details of messages that matched the conditions defined by any data loss prevention (DLP) policies. |
|
Get-MailDetailMalwareReport/ Get-MailDetailSpamReport |
View the details of malware or spam messages. |
|
Get-MailDetailTransportRuleReport |
View the details of messages that matched the conditions defined by any transport rules. |
|
Get-MailFilterListReport |
View possible values for various parameters that can be supplied to other reporting cmdlets. |
|
Get-MailTrafficPolicyReport |
View statistics about messages that were affected by data loss prevention (DLP) policies and transport rules. |
|
Get-MailTrafficReport |
View details about message traffic. |
|
Get-MailTrafficSummaryReport |
View summary information about message traffic in your organization. |
|
Get-MailTrafficTopReport |
View a report of the highest volume senders, recipients, malware recipients, and spam recipients in your organization. |
|
Get-MessageTrace/ Get-MessageTraceDetail |
Trace messages as they pass through the Office 365 tenant; show additional details for a message trace event. |
|
Get-MxRecordReport |
View information about the mail exchanger (MX) records that are configured for a specified domain. |
|
Get-OutboundConnectorReport |
View the outbound connectors that are used to deliver mail to specific domains. |
|
Get-RecipientStatisticsReport |
View the recipient statistics report. |
|
Get-ServiceDeliveryReport |
View information about the message delivery path for a specified recipient. |
|
Get-StaleMailboxReport/ Get-StaleMailboxDetailReport |
View the number of mailboxes that haven’t been accessed for at least 30 days. |
For example, Get-MailTrafficReport will output traffic summary, as shown in Figure 11-57.
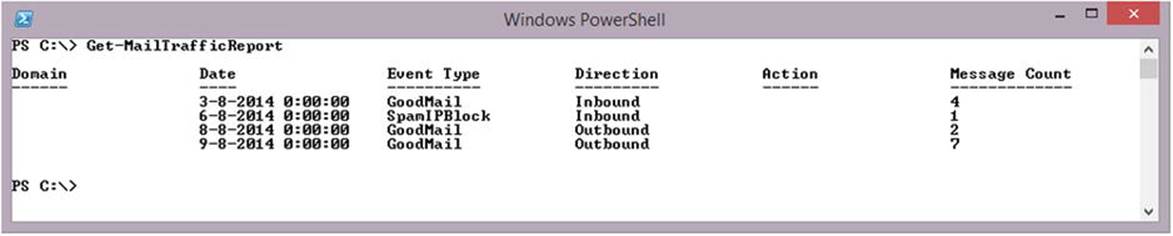
Figure 11-57. Mail traffic report for Office 365
Don’t forget that while Office 365 has some nice built-in reporting features and cmdlets that, alas, are not available for Exchange on-premises, you can build your own such reports using PowerShell.
![]() Note Developers can utilize the Office 365 reporting web service to create custom reports. More on this can be found at http://msdn.microsoft.com/en-us/library/jj984321.aspx.
Note Developers can utilize the Office 365 reporting web service to create custom reports. More on this can be found at http://msdn.microsoft.com/en-us/library/jj984321.aspx.
Message Tracking
In Exchange on-premises, you can use the Get-MessageTrackingLog cmdlet to track messages processed in the Exchange on-premises environment. Of course, in Office 365, your tenant is part of a shared infrastructure and therefore tracking could raise privacy issues. Also, Exchange Online uses Exchange Online Protection (EOP) for secure messaging and message hygiene. Without adjustments to the built-in message tracking functionality, email would always be received or delivered to Exchange Online, which makes troubleshooting more difficult. This is where the Exchange Online-only cmdlet Get-MessageTrace comes into play. This command extends message tracking to EOP, and it is to be used for message tracking in Exchange Online. Get-MessageTrackingLog is not available, however.
Here’s a short list of the possible parameters you can use with Get-MessageTrace and how they compare to the parameters you can use with Get-MessageTrackingLog:
· StartDate and EndDate work identically; they enable you to restrict the results to a specific date range.
· RecipientAddress filters results on recipient email address. You can specify multiple values using a comma, and you can use wildcards such as *@myexchangelabs.com.
· SenderAddress is similar to RecipientAddress, but filters on sender email address instead. Like RecipientAddress, you can use wildcards.
· FromIP is new. For inbound messages, it filters on the source IP address—that is, the public IP address of the SMTP server delivering the message. For outbound messages, the trace would return a blank value.
· MessageTraceID can be used in combination with RecipientAddress to uniquely identify a message trace and obtain more details. A message trace ID is generated for every message processed.
· MessageId filters works identical, and filters on the Message-ID header field of the message.
· Status filters on the delivery status of the message—that is, None, Failed, Pending, Delivered, or Expanded. This is similar to Get-MessageTrackingLog’s EventId parameter. It is not identical, as internal routing of messages will be obfuscated.
· ToIP is new. For outbound messages, this filters on the public IP address of the resolved MX record for the destination domain. For inbound messages, the trace would return a blank value.
![]() Note You can only track messages from the last 30 days.
Note You can only track messages from the last 30 days.
For example, to retrieve all message traces of messages received through an SMTP host homed at 131.107.35.27, between November 1, 2014, and November 30, 2014, sent to philip@myexchangelabs.com, you would use something like this:
Get-MessageTrace -StartDate 11/1/2014 -EndDate 11/30/2014 -FromIP 131.107.35.27 -Recipient philip@myexchangelabs.com | Format-Table -AutoSize Received, SenderAddress, RecipientAddress, Subject
To see all the messages traces of email coming from an email domain named “microsoft.com” in the past seven days, showing only the last ten trace events, you would use:
Get-MessageTrace -StartDate (Get-Date).AddDays(-7) -EndDate (Get-Date)
-SenderAddress '*@microsoft.com' | Select Received, MessageId, Status |
Sort Received -Descending | Select -First 10 | Format-Table -AutoSize
The output of these examples is shown in Figure 11-58.
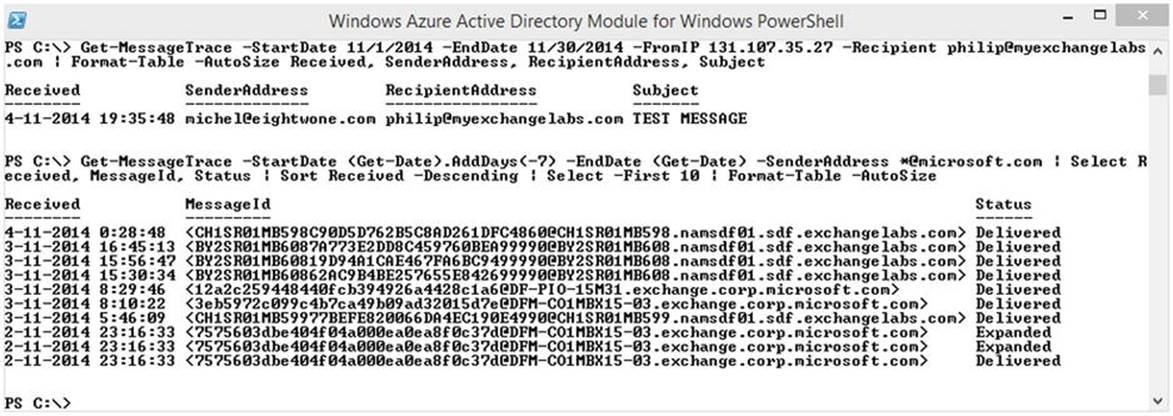
Figure 11-58. Office 365 report on message trace
Summary
This chapter guided you through the deployment options for Office 365 and how to connect to Office 365. It discussed the importance of setting up Autodiscover, and showed features like federated organizations, as well as how to configure organization-wide settings that determine what information can be shared between federated organizations. It also showed how to publish calendaring information for non-federated scenarios and how to set up OAuth to provide cross-product authentication.
In this chapter also was how to set up and configure directory synchronization to Azure Active Directory, how to configure Active Directory federation services in Exchange, and how to enable multi-factor authentication for users.
Next, we showed how to onboard and offboard mailboxes from Exchange on-premises to/from Office 365, how to deploy Exchange Online Archiving, and how to configure mail-flow options when deploying Exchange hybrid.
The chapter concluded with a survey of reporting options and advice on using message tracking in Office 365.
All materials on the site are licensed Creative Commons Attribution-Sharealike 3.0 Unported CC BY-SA 3.0 & GNU Free Documentation License (GFDL)
If you are the copyright holder of any material contained on our site and intend to remove it, please contact our site administrator for approval.
© 2016-2026 All site design rights belong to S.Y.A.