Exam Ref 70-342 Advanced Solutions of Microsoft Exchange Server 2013 (2015)
Chapter 1. Configure, manage, and migrate Unified Messaging
Unified Messaging provides a voice interface in Exchange Server 2013, providing features including voicemail and audio access to individual mailboxes. The Unified Messaging features are part of the Client Access and Mailbox roles in Exchange, and are available in every Exchange 2013 deployment. This is a big change from the previous two versions of Exchange where Unified Messaging was a separate role. Both the Client Access and Mailbox Server Roles contain parts of Unified Messaging, with the former hosting the Unified Messaging Call Router service, and the latter hosting the Unified Messaging service itself.
Important: Have you read page xix?
It contains valuable information regarding the skills you need to pass the exam.
In this chapter, you explore how to configure Unified Messaging to talk to a typical Internet Protocol Private Branch Exchange (IP-PBX) using the Session Initiation Protocol (SIP). SIP is the modern phone system equivalent of the Simple Mail Transfer Protocol (SMTP) used for email. Coverage of topics that you should expect to be on the exam include understanding how to set up Unified Messaging, along with areas of consideration when designing for high availability.
This chapter also discusses managing Unified Messaging after it is in use within the organization. Tasks once deployed include managing settings and features for individual users and configuration of policies, along with managing additional language packs. Alongside the management of Unified Messaging, this chapter covers troubleshooting various aspects of a Unified Messaging deployment such as troubleshooting security settings, monitoring call statistics, or troubleshooting SIP communications.
To ensure that you are equipped with the right knowledge to perform an upgrade of Exchange where a deployment of a previous version of Unified Messaging is already in place, this chapter covers migration of Unified Messaging to Exchange 2013, including the necessary preparation, planning, and considerations for coexistence. Additionally, this chapter also covers how to move Unified Messaging enabled mailboxes, move voice services, and removing the legacy Unified Messaging environment.
Objectives in this chapter:
![]() Objective 1.1: Configure Unified Messaging (UM)
Objective 1.1: Configure Unified Messaging (UM)
![]() Objective 1.2: Manage Unified Messaging
Objective 1.2: Manage Unified Messaging
![]() Objective 1.3: Troubleshoot Unified Messaging
Objective 1.3: Troubleshoot Unified Messaging
![]() Objective 1.4: Migrate Unified Messaging
Objective 1.4: Migrate Unified Messaging
Understanding Unified Messaging
Before you explore how to configure Unified Messaging in Exchange Server 2013, take a few moments to gain a better understanding of what it offers, and how it fits into the overall Exchange Server product.
Unified Messaging provides a voice interface to the Exchange Server. This forms a key tenet of integrating Exchange into a Unified Communications solution, the theory being that a single set of communications systems work together providing the user with a streamlined experience no matter how they access the system. From an administrator perspective, the Unified Messaging role provides administrators with a feature set that they would otherwise require third-party products for, allowing an organization that has chosen to implement the Microsoft stack (often referred to as a Microsoft Shop) the ability to fully function just using Microsoft products, often allowing the removal of old expensive systems.
Features provided with Unified Messaging include:
![]() Voice mail A comprehensive voice mail system using existing mailboxes as the underlying store for voice mail messages. This feature-rich voice mail includes basic functionality like enabling message waiting indicators on desk phones and integration with Microsoft Lync.
Voice mail A comprehensive voice mail system using existing mailboxes as the underlying store for voice mail messages. This feature-rich voice mail includes basic functionality like enabling message waiting indicators on desk phones and integration with Microsoft Lync.
![]() Transcription of voice messages In supported locales the Exchange Server can process the audio recording and insert a transcription of the message for the recipient to read in Outlook, allowing the user to quickly triage voice mail.
Transcription of voice messages In supported locales the Exchange Server can process the audio recording and insert a transcription of the message for the recipient to read in Outlook, allowing the user to quickly triage voice mail.
![]() Protected Voice Mail When enabled, Protected Voice Mail allows private messages to be encrypted using Active Directory Rights Management Services. This provides the same enterprise-grade protection offered for Office documents and standard email messages.
Protected Voice Mail When enabled, Protected Voice Mail allows private messages to be encrypted using Active Directory Rights Management Services. This provides the same enterprise-grade protection offered for Office documents and standard email messages.
![]() Missed call notifications In addition to just allowing callers to record voice mail, Unified Messaging also provides notifications when a call is missed. When a call is transferred to voicemail, but the caller neglects to leave a voicemail message, a notification is sent instead.
Missed call notifications In addition to just allowing callers to record voice mail, Unified Messaging also provides notifications when a call is missed. When a call is transferred to voicemail, but the caller neglects to leave a voicemail message, a notification is sent instead.
![]() Call Answering Rules Those familiar with rules in Outlook will find the concept of Call Answering Rules straightforward. Multiple rules can be configured specifying conditions, such as the calendar status of the call recipient, with actions to be taken. This includes diverting the call to a colleague, presenting a menu of options to the caller, or Exchange can even attempt to reach the call recipient on alternative phone numbers before transferring to voice mail.
Call Answering Rules Those familiar with rules in Outlook will find the concept of Call Answering Rules straightforward. Multiple rules can be configured specifying conditions, such as the calendar status of the call recipient, with actions to be taken. This includes diverting the call to a colleague, presenting a menu of options to the caller, or Exchange can even attempt to reach the call recipient on alternative phone numbers before transferring to voice mail.
![]() Play on phone Outlook 2007, 2010 and Outlook 2013 along with Outlook Web App allows the voice mail recipient to choose to play the voice message on the desk phone (or another number, if allowed) rather than through the PC speakers. This functionality extends to the Outlook Web App options pages and allows the user to initiate a call from OWA to record greetings. This is a big improvement over navigating the voice mail options menus via a desk phone.
Play on phone Outlook 2007, 2010 and Outlook 2013 along with Outlook Web App allows the voice mail recipient to choose to play the voice message on the desk phone (or another number, if allowed) rather than through the PC speakers. This functionality extends to the Outlook Web App options pages and allows the user to initiate a call from OWA to record greetings. This is a big improvement over navigating the voice mail options menus via a desk phone.
![]() Outlook Voice Access Unified Messaging is not just about providing access to voice mail in the email client. Outlook Voice Access provides functionality allowing a user to call into their mailbox from any phone and manipulate their own mailbox. The user can either via speech recognition, or using the phone keypad, request the server to read messages, reply to messages, or even adjust appointments. A great example of how this can work is if a person is running late for a meeting, they can dial into Outlook Voice Access and ask Exchange to push the meeting back 15 minutes. All attendees will receive an updated invitation.
Outlook Voice Access Unified Messaging is not just about providing access to voice mail in the email client. Outlook Voice Access provides functionality allowing a user to call into their mailbox from any phone and manipulate their own mailbox. The user can either via speech recognition, or using the phone keypad, request the server to read messages, reply to messages, or even adjust appointments. A great example of how this can work is if a person is running late for a meeting, they can dial into Outlook Voice Access and ask Exchange to push the meeting back 15 minutes. All attendees will receive an updated invitation.
![]() Auto attendant Most people have called a company and instead of speaking directly to a person, have been greeted by a computer presenting options to direct the call. For example, “If you are calling to open a new account, please press one; if you are calling to enquire about your bill, please press two.” This functionality is called an auto attendant and is included within Unified Messaging. The Exchange auto attendant features include the common keypad-operated menus along with speech recognition. Trees of menus can be combined through the use of multiple, linked auto attendants and if enabled, callers can search the global address list and then be directed straight to the right person. Auto attendants are not necessary for a Unified Messaging implementation.
Auto attendant Most people have called a company and instead of speaking directly to a person, have been greeted by a computer presenting options to direct the call. For example, “If you are calling to open a new account, please press one; if you are calling to enquire about your bill, please press two.” This functionality is called an auto attendant and is included within Unified Messaging. The Exchange auto attendant features include the common keypad-operated menus along with speech recognition. Trees of menus can be combined through the use of multiple, linked auto attendants and if enabled, callers can search the global address list and then be directed straight to the right person. Auto attendants are not necessary for a Unified Messaging implementation.
![]() Inbound fax support When Unified Messaging was first introduced within Exchange Server 2007, Unified Messaging was capable of interpreting fax messages directly and delivering them to a user mailbox. While inbound fax support is still included, Exchange 2013 requires a third-party product to be used to perform the fax conversation. This works by, after detecting a fax, Exchange performing a redirect to the fax solution.
Inbound fax support When Unified Messaging was first introduced within Exchange Server 2007, Unified Messaging was capable of interpreting fax messages directly and delivering them to a user mailbox. While inbound fax support is still included, Exchange 2013 requires a third-party product to be used to perform the fax conversation. This works by, after detecting a fax, Exchange performing a redirect to the fax solution.
Because Exchange Server 2013 always includes the Unified Messaging services as part of the Mailbox and Client Access Server roles, the installation is no more complicated than a standard installation of Exchange Server 2013.
During the installation of prerequisites for Exchange Server, some unusual prerequisites are required, including the Desktop Experience and the Microsoft Unified Communications Managed API Core Runtime. In the context of Unified Messaging, these prerequisites begin to make a lot of sense.
The Unified Communications Managed API Core Runtime is particularly important because this bundle provides the core software that underpins the voice functionality of Exchange 2013, including Automatic Speech Recognition and Text-to-Speech (TTS).
 Exam Tip
The PowerShell cmdlets and parameters lend themselves well to exam questions. Ensure that you understand the differences between relevant UM cmdlets and the usage of various parameters.
Objective 1.1: Configure Unified Messaging (UM)
The basic configuration of Unified Messaging is necessary to enable your Exchange infrastructure to communicate with your telephone system, and requires an understanding of both your Exchange environment and your phone system.
This objective covers how to:
![]() Configure an IP gateway
Configure an IP gateway
![]() Configure a UM call router
Configure a UM call router
![]() Create and configure an auto attendant
Create and configure an auto attendant
![]() Configure a call answering rule
Configure a call answering rule
![]() Design Unified Messaging for high availability
Design Unified Messaging for high availability
![]() Create a dial plan
Create a dial plan
Configuring an IP gateway
In computing terms an IP gateway can mean many things. In the context of Unified Messaging, it represents the phone system’s last hop before it reaches Microsoft Exchange Unified Messaging. In most cases, this will be the IP address of the IP-PBX, or if it is an analogue or IP-PBX system that is not compatible directly with the Unified Messaging service, a gateway device that translates from one phone system language to another, often called a session border controller.
The UM IP gateway object
The IP gateway is used by Exchange Server 2013 to ensure it understands the mapping between each phone system and the relevant configuration, such as dial plans in Exchange Server. Dial plans are covered later in detail later, but simply put, they are used to group extensions together.
In Figure 1-1, you see an example of a simple phone system connected to Exchange. The IP-PBX connects directly to Exchange Server and is defined as the IP gateway. Upon connection, the Exchange 2013 server will verify that it has a definition in Active Directory.
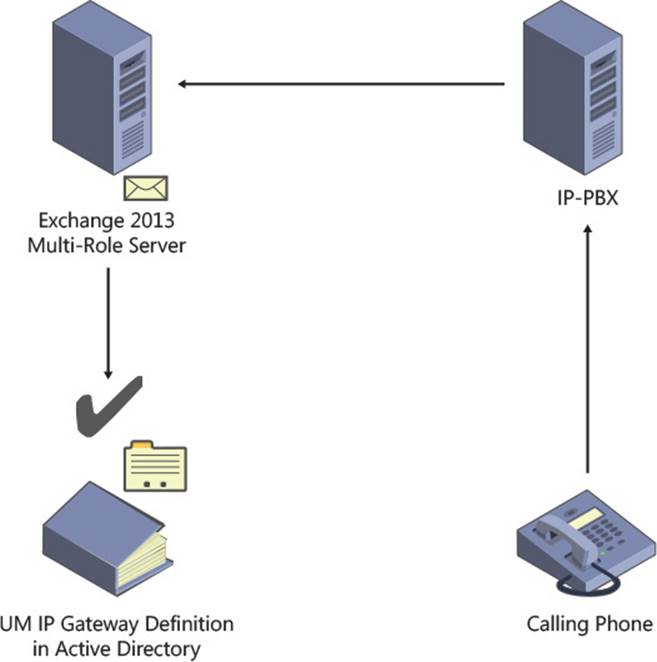
FIGURE 1-1 An example of an IP gateway connected to an Exchange 2013 server
What you need to know before configuring an IP gateway
When configuring an IP gateway in Exchange Server, you will need to know a number of details about the device before you can add it to Exchange:
![]() A descriptive name you will use to name the IP gateway in Exchange Unified Messaging.
A descriptive name you will use to name the IP gateway in Exchange Unified Messaging.
![]() The IP address or Fully Qualified Domain Name (FQDN) of the device.
The IP address or Fully Qualified Domain Name (FQDN) of the device.
![]() The dial plan that the IP gateway should be associated with.
The dial plan that the IP gateway should be associated with.
![]() Whether the IP gateway supports outgoing calls from Exchange Unified Messaging.
Whether the IP gateway supports outgoing calls from Exchange Unified Messaging.
![]() Whether the IP gateway can process Message Waiting Indicator (MWI) notifications, used to light up or extinguish the Message Waiting lamp on IP phones.
Whether the IP gateway can process Message Waiting Indicator (MWI) notifications, used to light up or extinguish the Message Waiting lamp on IP phones.
Important: Using the FQDN for the Address of the IP Gateway
If you are using the SIP Secured or Secured encryption setting on the associated dial plan, you must use the Fully Qualified Domain Name for the address of the IP gateway. This is because a valid, matching SSL certificate is required, and the SSL certificate name must match the IP gateway address.
The IP gateway, whether it is a gateway device providing an interface between both systems, or if it is an IP-PBX, will need to be configured too. This configuration will typically include:
![]() The Fully Qualified Domain Name of the Exchange 2013 Client Access Servers it will route calls to, sometimes defined as another IP gateway in the IP-PBX, or a trunk.
The Fully Qualified Domain Name of the Exchange 2013 Client Access Servers it will route calls to, sometimes defined as another IP gateway in the IP-PBX, or a trunk.
![]() Definitions for the numbers that will be routed to the UM servers. These may be contact objects in the case of a Lync/Skype for business system.
Definitions for the numbers that will be routed to the UM servers. These may be contact objects in the case of a Lync/Skype for business system.
![]() Configuration of the IP gateway can be accomplished using either the Exchange Admin Center, which is the web browser user interface for managing Exchange 2013, or via the Exchange Management Shell, which is the command line interface based upon PowerShell.
Configuration of the IP gateway can be accomplished using either the Exchange Admin Center, which is the web browser user interface for managing Exchange 2013, or via the Exchange Management Shell, which is the command line interface based upon PowerShell.
Via the Exchange Admin Center the basic settings can be configured. The settings that can be configured include:
![]() The name of the IP gateway.
The name of the IP gateway.
![]() The address of the IP gateway.
The address of the IP gateway.
![]() Whether outgoing calls are allowed through the IP gateway.
Whether outgoing calls are allowed through the IP gateway.
![]() If the Message Waiting Indicator signals are allowed.
If the Message Waiting Indicator signals are allowed.
Via the Exchange Management Shell the same settings can be configured, using the Set-UMIPGateway cmdlet, and in addition a wider range of settings are exposed for configuration:
![]() Port This parameter specifies the port that the IP gateway is expected to listen on. By default Unified Messaging expects the IP gateway to listen on TCP port 5060. If this is not the case, a port can be specified here and Exchange Unified Messaging will attempt to contact the IP gateway on the alternative port.
Port This parameter specifies the port that the IP gateway is expected to listen on. By default Unified Messaging expects the IP gateway to listen on TCP port 5060. If this is not the case, a port can be specified here and Exchange Unified Messaging will attempt to contact the IP gateway on the alternative port.
![]() IPAddressFamily This allows IP version 4 and/or IP version 6 to be used. By default, IPv4Only is chosen. If IPv6 is chosen, IP version 6 will be used first, then in the event of failure, IP version 4 will be used. If IPv6only is chosen, the call will fail if the inbound or outbound request to or from the IP gateway does not support IP version 6.
IPAddressFamily This allows IP version 4 and/or IP version 6 to be used. By default, IPv4Only is chosen. If IPv6 is chosen, IP version 6 will be used first, then in the event of failure, IP version 4 will be used. If IPv6only is chosen, the call will fail if the inbound or outbound request to or from the IP gateway does not support IP version 6.
![]() ForceUpgrade This allows the UM IP gateway object definition to be upgraded.
ForceUpgrade This allows the UM IP gateway object definition to be upgraded.
![]() DelayedSourcePartyInfoEnabled This allows the incoming call from the IP gateway to be delayed if the SIP invite request contains no calling party and diversion information.
DelayedSourcePartyInfoEnabled This allows the incoming call from the IP gateway to be delayed if the SIP invite request contains no calling party and diversion information.
![]() Simulator This parameter allows an administrator to specify that client will attempt to connect to the server directly, rather than an actual IP gateway device. This is used for testing.
Simulator This parameter allows an administrator to specify that client will attempt to connect to the server directly, rather than an actual IP gateway device. This is used for testing.
![]() Status This parameter allows the IP gateway to be disabled. This is typically used to disable one of multiple gateways when it the IP-PBX team need to perform maintenance on it.
Status This parameter allows the IP gateway to be disabled. This is typically used to disable one of multiple gateways when it the IP-PBX team need to perform maintenance on it.
Additional IP gateway configuration cmdlets available
The Exchange Management Shell is always used under the hood by the GUI to make configuration changes to Microsoft Exchange, and in most cases only the most common actions are available via the GUI. To make complex or non-routine configuration changes, the Exchange Management Shell is usually required. In the previous section you saw an example of the range of parameters available for configuring all relevant attributes for the IP gateway definition.
As you saw,a range of cmdlets are available that expose the full range of functionality. These are as follows:
![]() New-UMIPGateway Used to create a new IP gateway configuration object in Microsoft Exchange.
New-UMIPGateway Used to create a new IP gateway configuration object in Microsoft Exchange.
![]() Remove-UMIPGateway Used to delete configuration settings for the IP gateway in Microsoft Exchange.
Remove-UMIPGateway Used to delete configuration settings for the IP gateway in Microsoft Exchange.
![]() Disable-UMIPGateway Used to rapidly prevent a UM IP gateway from being available for use within Microsoft Exchange.
Disable-UMIPGateway Used to rapidly prevent a UM IP gateway from being available for use within Microsoft Exchange.
![]() Enable-UMIPGateway Used to rapidly enable a UM IP gateway previously disabled.
Enable-UMIPGateway Used to rapidly enable a UM IP gateway previously disabled.
![]() Get-UMIPGateway Used to retrieve either all UM IP gateways configured within the Exchange organization, or examine settings for a particular gateway.
Get-UMIPGateway Used to retrieve either all UM IP gateways configured within the Exchange organization, or examine settings for a particular gateway.
![]() Set-UMIPGateway As described in the previous section, used to make core configuration changes to an IP gateway configuration within Microsoft Exchange, or when combined with Get-UMIPGateway can be used for making changes en-mass.
Set-UMIPGateway As described in the previous section, used to make core configuration changes to an IP gateway configuration within Microsoft Exchange, or when combined with Get-UMIPGateway can be used for making changes en-mass.
More Info: The Parameters
Each gateway cmdlet listed above has a set of parameters. These can be discovered from the Exchange Management Shell using the Get-Help cmdlet followed by the cmdlet you want to know more about. Use the Online parameter with Get-Help to view the list of parameters and their descriptions, along with examples of use on the Microsoft TechNet website.
Configuring an IP gateway using the Exchange Admin Center
To create a new IP gateway, open the Exchange Admin Center, as shown in Figure 1-2, and complete the following steps:
1. Log in as an administrative user and navigate to the Unified Messaging section.
2. Select the UM IP Gateways tab.
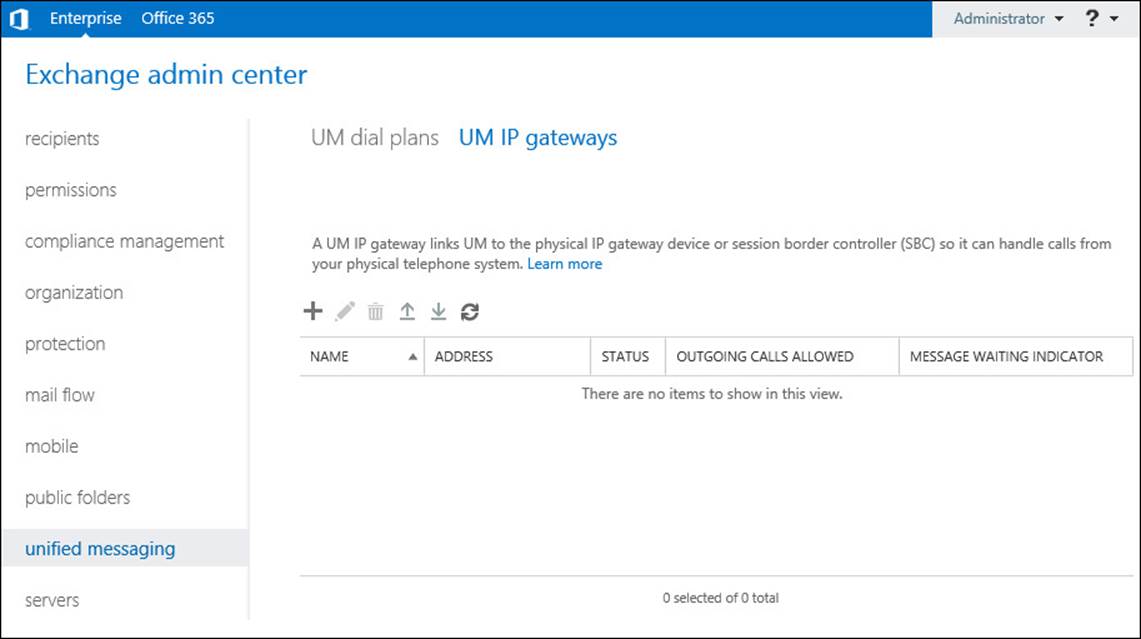
FIGURE 1-2 The Exchange Admin Center in the UM IP Gateways section with no IP gateways defined
3. To add a new UM IP gateway, choose the Add (+) button. This opens the New UM IP Gateway window, shown in Figure 1-3.
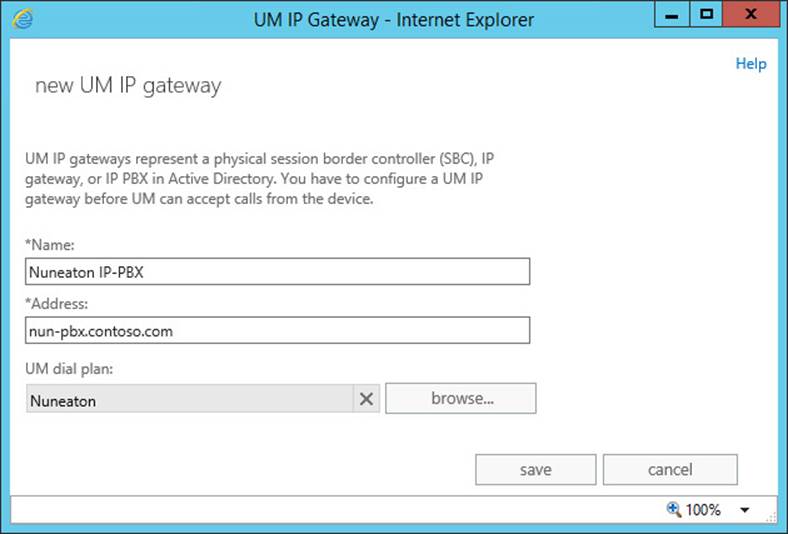
FIGURE 1-3 Creating a new UM IP gateway using the Exchange Admin Center
4. In the Name text box, enter the descriptive name chosen. This is for the administrator reference.
5. In the Address text box, enter the IP address or Fully Qualified Domain Name.
6. Select the correct UM dial plan to associate with this UM IP gateway.
After creating a UM IP gateway within the Exchange Admin Center, its properties can be altered either via the Exchange Admin Center or via the Exchange Management Shell. Before examining a UM IP gateway, it is important to understand what changes can be made.
The toolbar icons in the UM IP Gateway tab, shown in Figure 1-4, provide additional options after selecting an individual UM IP gateway. The option to Add a new IP gateway is always shown first on the left. The other options are to Edit, Delete, Disable, Enable IP gateways, followed by the ability to refresh the list. These toolbar icons correspond to being able to use the New-UMIPGateway, Set-UMIPGateway, Disable-UMIPGateway, Enable-UMIPGateway cmdlets and the refresh button calls the Get-UMIPGateway command to retrieve the full list of UM IP gateways configured.

FIGURE 1-4 A UM IP gateway selected with toolbar icons providing access to common functionality
For each UM IP gateway, a number of columns are disabled. These are based on the output of Get-UMIPGateway and represent the current attributes configured in Exchange.
To make configuration changes to the attributes of an individual UM IP gateway, click the Edit button to open the properties window for the selected UM IP gateway, as shown in Figure 1-5. You can alter the basic configuration of the UM IP gateway.
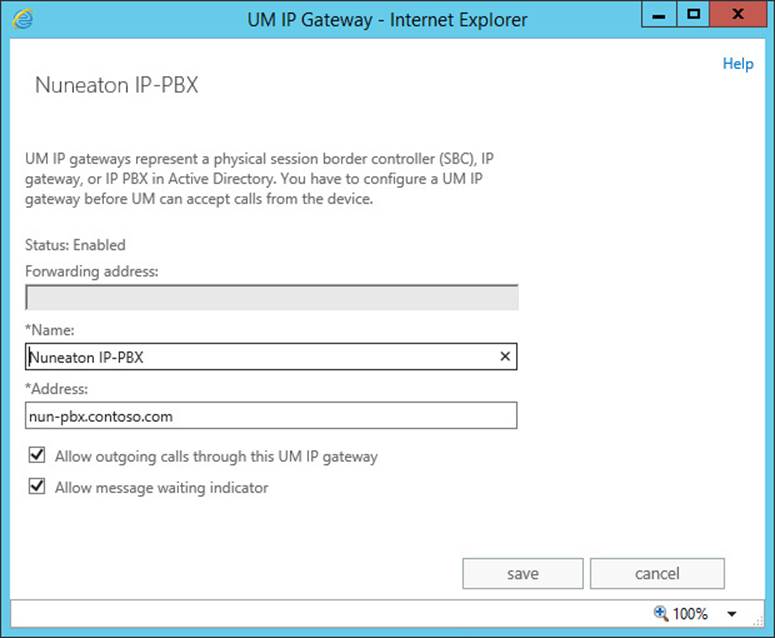
FIGURE 1-5 Editing the UM IP gateway via the Exchange Admin Center
Configuring an IP gateway using the Exchange Management Shell
To create a new IP gateway using the Exchange Management Shell, you will use the New-UMIPGateway cmdlet. In addition to defining the name, address, and associated dial plan for the UM IP gateway, you can define the IP address family settings at the time of creation if you need to change the default. This example creates a UM IP gateway with the same settings as used in the previous section.
# Creating a New UM IP gateway
New-UMIPGateway -Name "Nuneaton IP-PBX" -Address nun-pbx.contoso.com -UMDialPlan
"Nuneaton"
To view the configuration of the newly defined UM IP gateway, use the following.
# Get UM IP gateway configuration
Get-UMIPGateway -Identity "Nuneaton IP-PBX"
To make a configuration change, such as updating the address value, use the following.
# Set UM IP gateway configuration
Set-UMIPGateway -Identity "Nuneaton IP-PBX" -Address nun-pbx.contoso.com
Configuring the UM call router
The UM call router is newly introduced with Exchange Server 2013. In previous versions of Exchange, the Unified Messaging service was responsible for dealing with and diverting calls where necessary.
Changes to the architecture of Exchange Server in Exchange 2013 mean that the UM call router service is necessary to ensure that the server hosting the active copy of the mailbox performs all relevant actions for the user.
UM Call Router role within Exchange Unified Messaging
The UM call router service runs on each server hosting the Client Access role. The Client Access role in Exchange 2013 typically is a protocol-aware proxy, or performs redirection, and this concept applies to Unified Messaging. The UM call router performs the redirection functions for traffic arriving from IP gateway devices.
Understanding call redirection via the UM call router
Understanding how this works requires a very basic understanding of the protocol used for Voice over IP (VoIP) signaling, the Session Initiation Protocol (SIP).
SIP traffic does not contain any call audio but the traffic instead is a text-based conversation between the two systems, and is used to provide some information about the call, such as the caller, and information about the number or person they are calling. Only after the initial transaction in the SIP message completes does the dialog box start, and the two systems use Session Description Protocol (SDP) within the SIP dialog box to decide what Real Time Protocol (RTP) audio codec to use for the audio streams.
The UM call router will only participate in the initial SIP message because, as the role it fulfils is to redirect, it will use the information provided about the recipient to look up the mailbox server that hosts the recipient’s mailbox, and then respond with a 302 redirect message providing the Fully Qualified Domain Name of the mailbox server and port. The conversation with the UM call router ends at this point.
Ports and addresses used by the UM call router
The ports that the UM call router can listen for communications from an IP gateway are set by default to the following ports:
![]() Port 5060, used for unencrypted TCP traffic.
Port 5060, used for unencrypted TCP traffic.
![]() Port 5061, used for traffic secured by TLS.
Port 5061, used for traffic secured by TLS.
As Unified Messaging in Exchange Server 2013 fully supports IP version 6, the UM call router is able to accept connections from IP gateway devices using either IP version 4, or IP version 6. This can be configured based on requirements.
SIP traffic can use both TCP unencrypted and be secured by the TLS protocol. The choice typically depends on your security requirements and the supported methods that your IP gateway can use. Microsoft Lync/Skype for business must use TLS, however some third-party IP-PBX systems must use TCP.
Configuring the UM call router using the Exchange Management Shell
All configuration for the UM call router service must be performed using the Exchange Management Shell. There are very few options available for configuration and most organizations will not need to change the default settings.
Because both the UM call router service and the UM service share a common history, they have similar options within each services’ respective Get/Set-UMCallRouterSettings and Get/Set-UMService cmdlets. Naturally the UM service cmdlets have the vast majority of attributes available.
When making modifications to the UM call router service, the following parameters are available using the Set-UMCallRouterSettings cmdlet:
![]() Server This parameter is used to define the Client Access Server that the cmdlet will make configuration changes against.
Server This parameter is used to define the Client Access Server that the cmdlet will make configuration changes against.
![]() SipTcpListeningPort This parameter defines the TCP/IP port that the UM call router service will listen on for incoming requests from an IP gateway using an unencrypted protocol.
SipTcpListeningPort This parameter defines the TCP/IP port that the UM call router service will listen on for incoming requests from an IP gateway using an unencrypted protocol.
![]() SipTlsListeningPort This parameter specifies the TCP/IP port that the UM call router service listens for encrypted communications on.
SipTlsListeningPort This parameter specifies the TCP/IP port that the UM call router service listens for encrypted communications on.
![]() UMStartupMode This parameter is used to define if the UM call router service will use just the TCP mode, just the TLS mode, or startup in Dual mode where it listens on both ports.
UMStartupMode This parameter is used to define if the UM call router service will use just the TCP mode, just the TLS mode, or startup in Dual mode where it listens on both ports.
![]() Dial Plans This parameter, when using Microsoft Lync/Skype for business, is used to list all of the Unified Messaging dial plans that this UM call router will service. It can contain multiple dial plans.
Dial Plans This parameter, when using Microsoft Lync/Skype for business, is used to list all of the Unified Messaging dial plans that this UM call router will service. It can contain multiple dial plans.
![]() IPAddressFamily and IPAddressFamilyConfigurable These parameters can be used to alter whether the IP address family is configurable, and if it should listen on IPv4Only, IPv6Only or Any. By default this is set to Any.
IPAddressFamily and IPAddressFamilyConfigurable These parameters can be used to alter whether the IP address family is configurable, and if it should listen on IPv4Only, IPv6Only or Any. By default this is set to Any.
Additional parameters are available, however these are marked as reserved for Microsoft Internal Use. Usually this means they are used within Microsoft Office 365, which also runs Microsoft Exchange Unified Messaging services.
In the example below, the Set-UMCallRouterSettings cmdlet is used to change the UM Startup mode from the default TCP to Dual, then restart the UM call router service to apply the changes.
# Altering the UM Startup mode to Dual
Set-UMCallRouterSettings -Server LJD-E1501 -UMStartupMode Dual
Restart-Service MSExchangeUMCR
Creating and configuring an auto attendant
Auto attendants are used in many organizations that need to deal with volumes of inbound calls and transfer calls to the right person, or right part of the organization easily, and without requiring an operating to handle each and every call.
Features provided by auto attendants
The most common use for the auto attendant is to provide a menu to the caller offering them some high-level options. The call is then transferred either to people, or another automated system (often to another automated attendant).
The options, known as prompts allow up to nine options to be presented to callers. They typically match with auto attendants that are using dial pad entry rather than voice entry, and of course to avoid annoying callers more than necessary.
The attendant voice language support is tied directly to the language packs installed on the Exchange environment. Each auto attendant has a single language defined.
By default, the auto attendant will announce itself as the Microsoft Exchange auto attendant to callers; however for many customers this is not desired. The most basic feature to replace this is to define a company name, which will then be used via the Text-to-Speech (TTS) engine in Unified Messaging to read the company name instead. Many organizations will prefer to use either whoever has the most appropriate sounding voice in the company, or use a professional to record a set of custom greetings. If these are defined and uploaded, these will be used.
Auto attendants also have the ability to, based on your definition of business hours in your region, play a different set of prompts to the caller. This is useful because some departments within the organization may only operate during business hours, and sometimes a different extension will deal with enquires outside of normal hours.
For each prompt a label is defined. The label itself can be associated with a custom prompt or will be read to the caller using the TTS functionality. If the auto attendant has been configured to respond to voice commands, the labels defined will be used to match what the caller asks for. Otherwise, the caller will be expected to press a number on the dial pad of their phone.
Finally, auto attendants can provide functionality called dial by name. This allows access to the caller to, depending on configuration, get transferred to someone or leave a voice message. The caller can have access to the following:
![]() The whole Global Address List, useful for internal callers.
The whole Global Address List, useful for internal callers.
![]() People within the same dial plan as the auto attendant, which is useful for switchboard-style functionality when a caller phones a particular office.
People within the same dial plan as the auto attendant, which is useful for switchboard-style functionality when a caller phones a particular office.
![]() A particular address list, allowing curation of a list of people that callers are allowed to search through.
A particular address list, allowing curation of a list of people that callers are allowed to search through.
If people using the dial by name feature can’t find who they want, the ability to transfer to an operator still exists; likewise Exchange Unified Messaging also allows callers to choose from multiple matches; for example if two people named John Smith work for the same organization.
Defining an auto attendant
An auto attendant is stored as an object in Active Directory within the Configuration partition alongside organization-wide settings for Exchange. This means that each UM auto attendant is, by design, available to all Exchange Servers within the organization.
Although each auto attendant is stored within a dedicated UM auto attendant container, logically an auto attendant is associated with a dial plan. When managing auto attendants from the Exchange Admin Center, each auto attendant appears to be stored within the configuration of a dial plan. Although this is an abstraction because the UM auto attendants are not child Active Directory objects within dial plans, it does illustrate the relationship and how they are intended to be managed.
From the Exchange Management Shell, the auto attendant related tasks are managed through dedicated auto attendant cmdlets, reflecting their nature as standalone configurations that are mapped to dial plans. However, this does not change the fact that dial plans can have many auto attendants mapped, but an individual auto attendant can only be mapped to a single dial plan.
Example auto attendant defined
In the following examples, the process to create an auto attendant is shown using both the Exchange Admin Center and using the Exchange Management Shell. Both methods will create an auto attendant with the following configuration:
![]() Associated with a dial plan named Nuneaton.
Associated with a dial plan named Nuneaton.
![]() Named customer services.
Named customer services.
![]() Does not respond to voice commands.
Does not respond to voice commands.
![]() An access number of +44 1234 555 555.
An access number of +44 1234 555 555.
![]() Uses the UK English for the voice interface.
Uses the UK English for the voice interface.
![]() A business name of Contoso.
A business name of Contoso.
![]() Uses the default business hours and non-business hours greetings.
Uses the default business hours and non-business hours greetings.
![]() No informational announcement.
No informational announcement.
![]() Business hours defined as 9:00 until 17:00.
Business hours defined as 9:00 until 17:00.
![]() Business hours menu enabled with the following options:
Business hours menu enabled with the following options:
![]() Press 1 to speak to Sales on extension 10001.
Press 1 to speak to Sales on extension 10001.
![]() Press 2 to speak to Billing on extension 10002.
Press 2 to speak to Billing on extension 10002.
![]() Press 3 to speak to Customer Care on extension 10003.
Press 3 to speak to Customer Care on extension 10003.
![]() Dial by name disabled.
Dial by name disabled.
Creating an auto attendant using the Exchange Admin Center
In this example, you will apply the definition for a Unified Messaging auto attendant to our Exchange Server environment using the Exchange Admin Center.
You start by creating the new auto attendant object.
1. To find the user interface for creating, managing, and removing auto attendants, navigate to the Unified Messaging section of the Exchange Admin Center, and select the UM Dial Plans tab.
2. Select the dial plan for the auto attendant from the list, and then select the Edit (pencil) icon to open the Dial Plan properties, as shown in Figure 1-6.
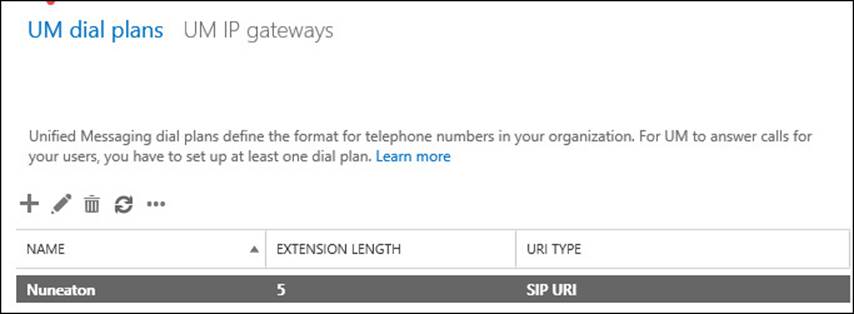
FIGURE 1-6 The list of existing dial plans
3. On the Dial Plan properties page, scroll down to the UM Auto Attendants section. To create a new UM auto attendant shown in Figure 1-7, select Add.

FIGURE 1-7 The management UI for viewing the list of existing UM auto attendants
4. The New UM auto attendant page will open. On this page you can create the basic configuration of the auto attendant, including:
![]() The name of the auto attendant.
The name of the auto attendant.
![]() Whether or not the auto attendant is created as enabled.
Whether or not the auto attendant is created as enabled.
![]() Whether or not the auto attendant will be voice-command enabled, or whether it will require the caller to use the dial pad for navigation.
Whether or not the auto attendant will be voice-command enabled, or whether it will require the caller to use the dial pad for navigation.
![]() The access numbers that will be associated with the auto attendant, for example the customer services number that the IP-PBX system will forward to Unified Messaging.
The access numbers that will be associated with the auto attendant, for example the customer services number that the IP-PBX system will forward to Unified Messaging.
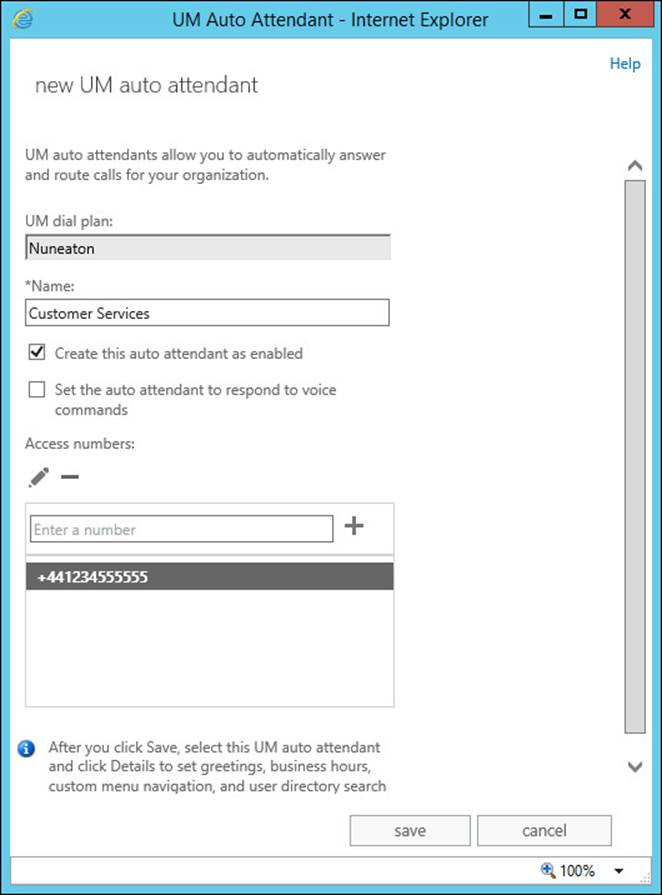
FIGURE 1-8 Using the new UM Auto Attendant Wizard to configure the basic settings
5. After entering the relevant details, choose Save.
Configuring an auto attendant using the Exchange Admin Center
The newly created auto attendant will require additional configuration after creation to meet the defined requirements. To add this information, complete the following steps:
1. Select the new auto attendant from the list of auto attendants on the opened Dial Plan page, and select Edit to open the newly defined auto attendant.
2. The first change is to define the Language and Company Name, on the General tab. Select General, and scroll down to the relevant sections. In Figure 1-9, English (United Kingdom) has been selected from the Language For Automated Voice Interface drop-down list, and the Business Name Contoso entered.

FIGURE 1-9 Configuring the General properties of the new auto attendant
3. The next settings that must be chosen are on the Business Hours tab. Select the Configure Business Hours option, and use the mouse to select the correct business hours to match the organizations’ working day and working week, as shown in Figure 1-10.
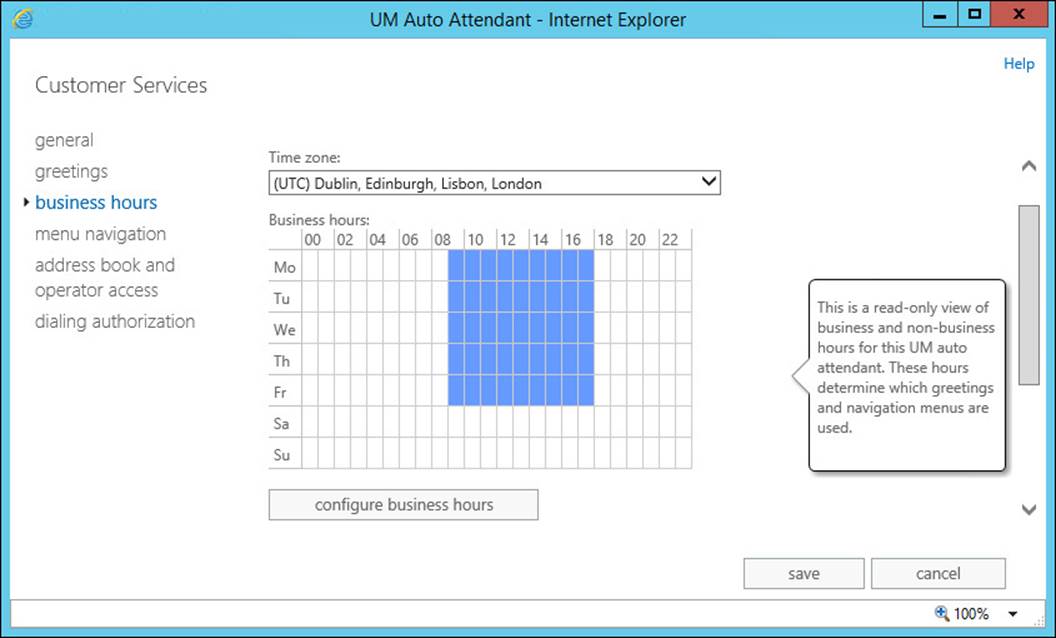
FIGURE 1-10 Editing the business hours for the auto attendant
4. The Menu Navigation tab, shown in Figure 1-11, provides the main configuration options for the auto attendant. This is the location where you define the menu structure that the user will hear. Select the Enable Business Hours Menu Navigation check box to make the menu active and enabled during the defined hours. Next, use the Add button to create each prompt to meet the specification defined.
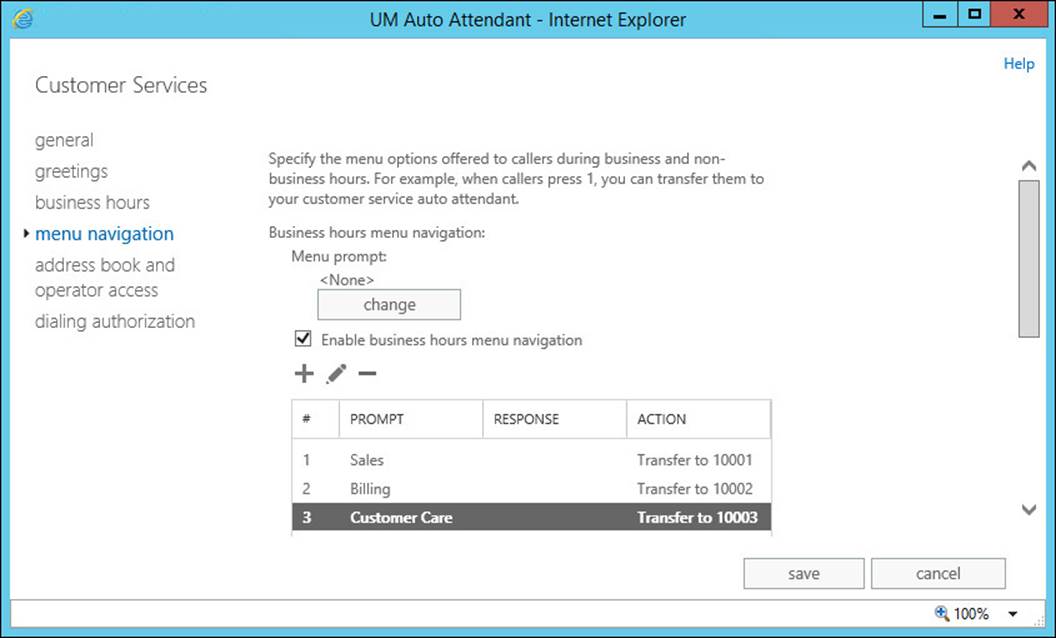
FIGURE 1-11 Using the EAC to edit the menu prompts
5. Finally, your specification has defined that inbound calls will not have the option to search the Global Address List. Therefore, you need to disable this feature within the auto attendant. To disable this feature, select the Address Book And Operator Access tab, and then clear both check boxes under Options For Contacting Users, as shown in Figure 1-12.

FIGURE 1-12 Functionality to enable a caller to search the GAL is disabled
Creating an auto attendant using the Exchange Management Shell
The same auto attendant can be created with the same settings using the Exchange Management Shell. To create a new auto attendant with the same settings required, the following PowerShell code can be used.
# Create a new auto attendant
New-UMAutoAttendant -UMDialPlan 'Nuneaton' -Name 'Customer Services'
-SpeechEnabled:$false -PilotIdentifierList @('+441234555555') -Status Enabled
Configuring an auto attendant using the Exchange Management Shell
Because the Exchange Admin Center uses the same PowerShell commands under the hood, the same two-step approach must be used to perform post-creation configuration.
In the following example, the key mapping and business hours schedule can look complex because both use arrays to pass a list containing multiple values to a single parameter.
# Configure the auto attendant
Set-UMAutoAttendant -Identity 'Customer Services' -BusinessHoursKeyMapping @('1,Sales,1
0001,,,,,,,','2,Billing,10002,,,,,,,','3,Customer Care,10003,,,,,,,')
-BusinessHoursSchedule @('Mon.09:00-Mon.18:00','Tue.09:00-Tue.18:00','Wed.09:00-
Wed.18:00','Thu.09:00-Thu.18:00','Fri.09:00-Fri.18:00') -InfoAnnouncementEnabled False
-BusinessName 'Contoso' -BusinessHoursKeyMappingEnabled:$true -CallSomeoneEnabled:$false
-InfoAnnouncementFilename '' -Language 2057
Tip: Exchange Management Shell Commands
Learn how to perform complex Exchange Management Shell commands via the Exchange Admin Center. In the EAC, select the Help icon in the upper-right corner, and then select Show Command Logging. The EAC provides a line-by-line report of the equivalent commands that would be required via the Exchange Management Shell.
Configuring a call answering rule
Call answering rules are similar to rules used in Outlook to automatically move messages and give users the ability to decide for themselves how inbound callers who are transferred to voice mail should be dealt with.
Although call answering rules can be configured by administrators using PowerShell, call answering rules are generally managed by a user in the Outlook Web App options page.
Just like Outlook Rules, a user can configure multiple rules within their mailbox and, based on a number of parameters, perform a different action rather than just send the caller to voice mail.
The flow for call answering rules is simple. If a call answering rule is defined, and the conditions match the incoming call, the rule will be used. Otherwise the call will go to voice mail. A call answering rule can use the following conditions when determining if it should be triggered, including:
![]() If the user has Out of Office set.
If the user has Out of Office set.
![]() If the user’s calendar is set to Free, Busy, Tentative, or Out of Office.
If the user’s calendar is set to Free, Busy, Tentative, or Out of Office.
![]() In the case that the user has multiple extensions, perform an action based on the extension that the call was received by.
In the case that the user has multiple extensions, perform an action based on the extension that the call was received by.
![]() The time window that the call fits into.
The time window that the call fits into.
![]() Who is calling.
Who is calling.
![]() Or a catch-all to trigger on all incoming voicemails.
Or a catch-all to trigger on all incoming voicemails.
Once a condition has been met, a number of actions can be performed against the inbound call including:
![]() Transfer of the call to an extension.
Transfer of the call to an extension.
![]() Transfer of the call to an external number, if allowed by administrator policy.
Transfer of the call to an external number, if allowed by administrator policy.
![]() Automatically attempt to ring a number of alternative numbers and if answered, transfer the call (an automatic “Find me” option).
Automatically attempt to ring a number of alternative numbers and if answered, transfer the call (an automatic “Find me” option).
![]() Present an auto-attendant style menu to the caller.
Present an auto-attendant style menu to the caller.
Self-service configuration as a user
The primary method for configuring call answering rules is via the Outlook Web App options pages, and where possible users should manage their own call answering rules to avoid unnecessary administrator intervention.
The interface for call answering rule management is located within the Phone section of OWA options, underneath the Voice Mail tab. As shown in Figure 1-13, users are provided a list of call answering rules underneath a toolbar providing the ability to Add, Edit, Delete, and change the rule order.
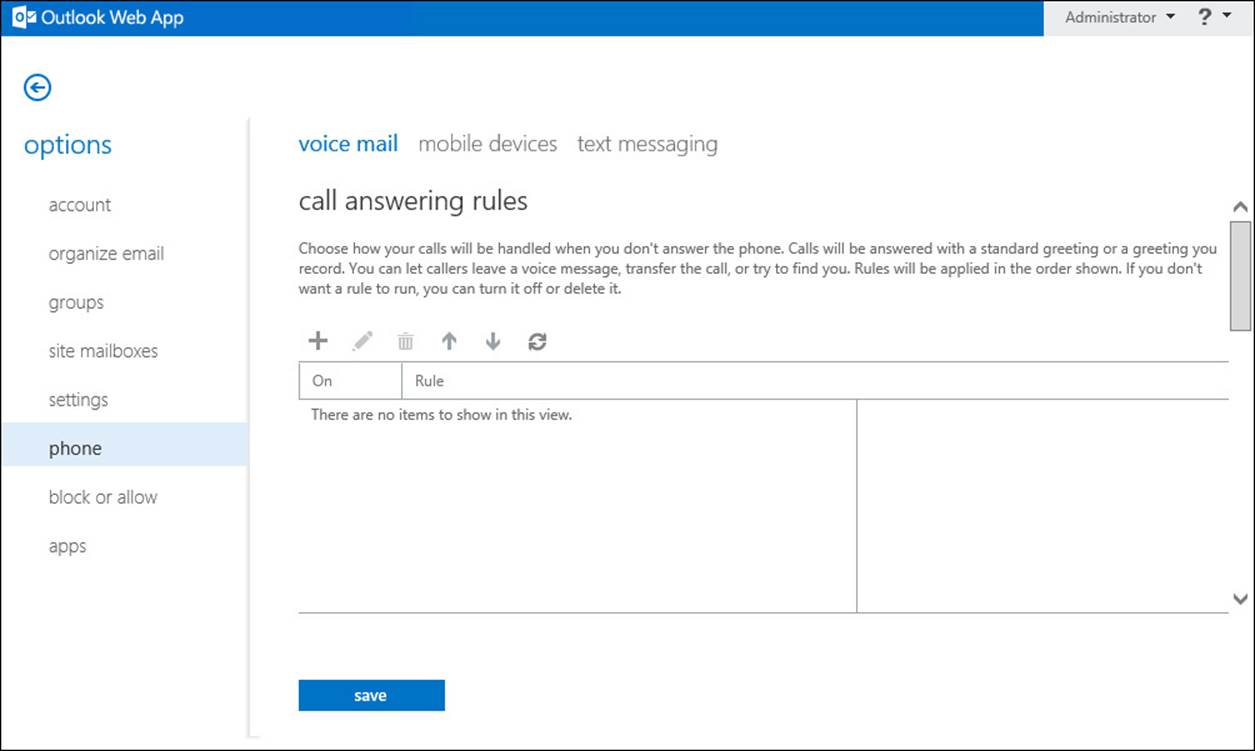
FIGURE 1-13 The Outlook Web App Options pages with the Call Answering Rules panel selected
The interface to create a new call answering rule, shown in Figure 1-14, will look familiar to users who have created Outlook rules, and administrators who have used the Exchange Admin Center to create transport rules. In the following example, a new call answering rule is created by a user. This rule will only be active when the user has their Out of Office message enabled and will give the caller the option to leave a message as normal, or transfer to the Sales team to have their query dealt with immediately.
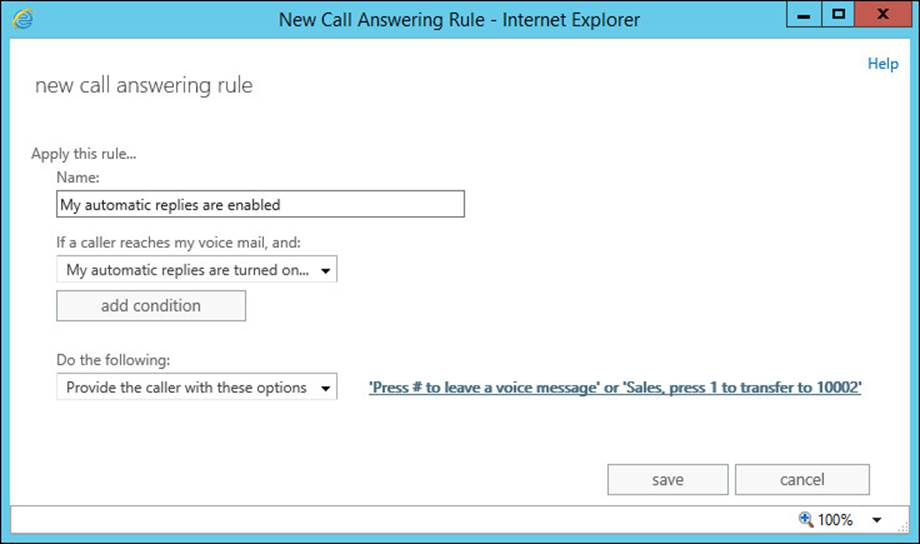
FIGURE 1-14 Creating a new call answering rule
Although the GUI interface is aimed squarely at users, administrators can access the UI as the user by assigning themselves the Helpdesk role via the RBAC Permissions management.
Administrator configuration via PowerShell
A range of cmdlets are available for managing call answering rules as an administrator via PowerShell:
![]() New-UMCallAnsweringRule Used to add a new UM call answering rule to an individual user’s mailbox.
New-UMCallAnsweringRule Used to add a new UM call answering rule to an individual user’s mailbox.
![]() Remove-UMCallAnsweringRule Used to delete unwanted UM call answering rules on behalf of users.
Remove-UMCallAnsweringRule Used to delete unwanted UM call answering rules on behalf of users.
![]() Get-UMCallAnsweringRule Used to list UM call answering rules for a particular mailbox.
Get-UMCallAnsweringRule Used to list UM call answering rules for a particular mailbox.
![]() Set-UMCallAnsweringRule Used to alter an existing UM call answering rule.
Set-UMCallAnsweringRule Used to alter an existing UM call answering rule.
![]() Enable-UMCallAnsweringRule and Disable-UMCallAnsweringRule Used to switch on and switch off UM call answering rules respectively.
Enable-UMCallAnsweringRule and Disable-UMCallAnsweringRule Used to switch on and switch off UM call answering rules respectively.
In the following example, you use the Set-UMCallAnsweringRule cmdlet to alter the call answering rule you created. You will add an additional option, giving callers the option to be transferred to the billing department as well as sales.
# Configure UM call answering rules
Set-UMCallAnsweringRule -Name 'My automatic replies are enabled' -Mailbox 'John Smith'
-KeyMappings "4,10,,,0,,0,,","1,1,Sales,,0,,0,10002,","1,2,Billing,,0,,0,10003,"
Designing Unified Messaging for high availability
High availability within Exchange is typically implemented by ensuring that there are multiple servers available within an Exchange environment that can take over operations if a single server fails. This ensures that the availability of the Exchange system meets the business requirements that mandated high availability.
The exact level of availability required often depends on the defined service level agreement (SLA), recovery time objective (RTO), and recovery point objective (RPO). Exchange Server 2013 has a fairly well defined method for implementing high availability through the use of multi-role servers, Database Availability Groups (DAGs), and multiple database copies. This often allows the architect of an Exchange solution to exceed the business requirements at no extra cost.
In Exchange 2013 the software that interacts with a user’s mailbox are all contained within the Mailbox role, including the ability to render Outlook Web App, send and receive mail, mount and read the mailbox database, and (as you might imagine) perform Unified Messaging related tasks.
Unified Messaging high availability
As mentioned in the UM call router section earlier on, the Client Access role acts as a proxy or redirector, and helps with high availability by allowing an IP gateway to contact one of many Client Access Servers, and then be redirected to the Mailbox server currently hosting the recipient’s mailbox. The overall concept is often described as, “Every server is an island.” This makes the concept of UM high availability simple because there will always be a UM server within close proximity of a user mailbox. The UM server will be on the same server.
When designing architecture for Exchange 2013 and sizing various roles, bear in mind that because each Mailbox server is in effect running multiple roles, you cannot perform a sizing exercise for Unified Messaging in isolation. Instead, it must follow resulting guidelines from the overall sizing exercise for Exchange. Therefore, an Exchange 2013 server sized for mailboxes according to Microsoft recommendations will provide the following capacity:
![]() A limit of 100 concurrent Unified Messaging calls per server.
A limit of 100 concurrent Unified Messaging calls per server.
![]() A requirement of one free CPU core per voice mail transcription, otherwise the voice mail transcription will be skipped.
A requirement of one free CPU core per voice mail transcription, otherwise the voice mail transcription will be skipped.
These limits impact the capacity planning for Exchange if you are looking to scale up, and host a very large number of mailboxes per server. In a large organization with (for example) a few thousand mailboxes per server, it would be unusual to receive over 100 concurrent voice mail messages at the same time.
If voice mail transcription is important to your organization though, and you do not expect to have enough free CPU cores, you may need to scale out rather than scaling up.
More Info: Preferred Architecture
Microsoft provides the preferred architecture (PA) blueprint for deploying a highly available Exchange Server 2013 environment in a scalable and cost efficient manner. The resulting deployment is in line with the way the product is designed and takes into account high availability for Unified Messaging. Read more about preferred architecture at http://blogs.technet.com/b/exchange/archive/2014/04/21/the-preferred-architecture.aspx.
UM-specific considerations
In addition to normal design considerations for high availability of Exchange Server 2013, such as mailbox placement in relation to clients, you also need to consider the overall impact of your design for the organization’s voice traffic. In particular, consider how a highly available environment with mailboxes distributed across a large number of Exchange servers will impact the way UM IP gateway devices interact with Exchange. This is particularly relevant if your design is multi-site. The following scenarios must be considered:
![]() If a mailbox becomes active in a different site to the IP gateway that will forward the call to voicemail, the UM call router will redirect the SIP traffic to the server with the active mailbox. Ensure that:
If a mailbox becomes active in a different site to the IP gateway that will forward the call to voicemail, the UM call router will redirect the SIP traffic to the server with the active mailbox. Ensure that:
![]() The Wide Area Network (WAN) links across sites have sufficient bandwidth for the number of concurrent calls expected.
The Wide Area Network (WAN) links across sites have sufficient bandwidth for the number of concurrent calls expected.
![]() Quality of Service (QoS) is in place across both the local network and the WAN link to ensure that voice traffic has a high priority.
Quality of Service (QoS) is in place across both the local network and the WAN link to ensure that voice traffic has a high priority.
![]() Latency across the WAN link is not high. In general, if you are replicating a Database Availability Group across the WAN it should be sized accordingly and be a good, reliable link. However, many organizations segment replication traffic, but the voice traffic may traverse the normal LAN.
Latency across the WAN link is not high. In general, if you are replicating a Database Availability Group across the WAN it should be sized accordingly and be a good, reliable link. However, many organizations segment replication traffic, but the voice traffic may traverse the normal LAN.
![]() Networks used by IP-PBX systems are often restricted with a firewall to prevent traffic from the LAN accessing the voice networks. Ensure that IP gateway devices like IP-PBX systems can access all possible Exchange Client Access Servers running the UM call router service and all possible Exchange Mailbox Servers hosting UM mailboxes in the same dial plan. Also ensure the Exchange servers can connect to the IP gateway devices.
Networks used by IP-PBX systems are often restricted with a firewall to prevent traffic from the LAN accessing the voice networks. Ensure that IP gateway devices like IP-PBX systems can access all possible Exchange Client Access Servers running the UM call router service and all possible Exchange Mailbox Servers hosting UM mailboxes in the same dial plan. Also ensure the Exchange servers can connect to the IP gateway devices.
![]() Most IP gateway devices will use secured SIP communications. This means that a valid SSL certificate will need to be in place on each server. Many deployments for Exchange 2013 will use a third-party SSL certificate for HTTPS access using a public DNS name. For Unified Messaging you are likely to need valid certificates issued by an internal CA, with each server having a certificate with the Fully Qualified Domain Name of the Exchange Server itself.
Most IP gateway devices will use secured SIP communications. This means that a valid SSL certificate will need to be in place on each server. Many deployments for Exchange 2013 will use a third-party SSL certificate for HTTPS access using a public DNS name. For Unified Messaging you are likely to need valid certificates issued by an internal CA, with each server having a certificate with the Fully Qualified Domain Name of the Exchange Server itself.
By following these design considerations, it should be possible to implement a reliable Exchange 2013 Unified Messaging infrastructure that provides high availability.
Create a dial plan
Dial plans are the telephony equivalent of site objects in Active Directory. A dial plan usually contains the block of numbers available for a logical or physical building or campus, and is associated with many other Unified Messaging related configuration objects.
You’ve already seen in section one that each IP gateway is associated with a dial plan and an auto attendant is associated with a dial plan. In addition, each mailbox enabled for Unified Messaging is associated with a dial plan so you can see that without at least one dial plan it is not possible to configure Exchange Unified Messaging. It is the building block of configuration that most other configuration rests on.
The relationship between a UM dial plan and an IP-PBX dial plan
UM dial plans can map directly to the dial plans defined on your IP-PBX. They typically represent the same information, such as a block of numbers for the site.
If you have a complicated IP-PBX set up, for example a number of dial plans that break up number blocks within the same site, such as one dial plan using 1000-1050 and a second dial plan using 1051-1100, you may want to consider defining a single Unified Messaging dial plan that encompasses both IP-PBX dial plans. The simpler you can make the configuration, the better.
Other relevant information needs to be collected from your IP-PBX to allow you to create a dial plan with the correct settings. This information includes:
![]() The extension length or number of digits.
The extension length or number of digits.
![]() The type of dial plan.
The type of dial plan.
![]() The VoIP security mode, either SIP-secured or unsecured.
The VoIP security mode, either SIP-secured or unsecured.
![]() The audio language to match the users of the IP-PBX dial plan.
The audio language to match the users of the IP-PBX dial plan.
![]() The region code, for example 44 to represent the United Kingdom of Great Britain and Northern Ireland.
The region code, for example 44 to represent the United Kingdom of Great Britain and Northern Ireland.
Types of UM dial plan
Defining the UM dial plan with the correct type is critical if you want to ensure the UM IP gateway or IP-PBX sending calls to Unified Messaging will be understood. There are three key types of UM dial plan available:
![]() Telephone Extension This is expected in the same extension format length defined in the dial plan, for example a five-digit extension such as 10001.
Telephone Extension This is expected in the same extension format length defined in the dial plan, for example a five-digit extension such as 10001.
![]() SIP Uniform Resource Identifier (URI) This is typically used on more modern systems and looks like a user principal name or email address, for example john.smith@contoso.com.
SIP Uniform Resource Identifier (URI) This is typically used on more modern systems and looks like a user principal name or email address, for example john.smith@contoso.com.
![]() E.164 number E.164 is a standard for phone numbers and works internationally. A + symbol prefixes the country/region code, then the full number is quoted, for example +44 1234 510 001.
E.164 number E.164 is a standard for phone numbers and works internationally. A + symbol prefixes the country/region code, then the full number is quoted, for example +44 1234 510 001.
Determining the correct dial plan type will depend entirely on the configuration of your IP-PBX. For example, Lync/Skype for business uses the SIP URI format.
Creating a dial plan using the Exchange Admin Center
In this example you create a new dial plan for another site, Oxford. A different dial plan will be chosen to demonstrate that each dial plan could perhaps relate to a different IP-PBX. Many organizations have a multitude of systems.
To create a new dial plan, navigate to the Unified Messaging section of the Exchange Admin Center and select the UM Dial Plans tab. A list of existing UM dial plans will be shown. In Figure 1-15, you see the Nuneaton dial plan listed. Select the Add option from the toolbar.
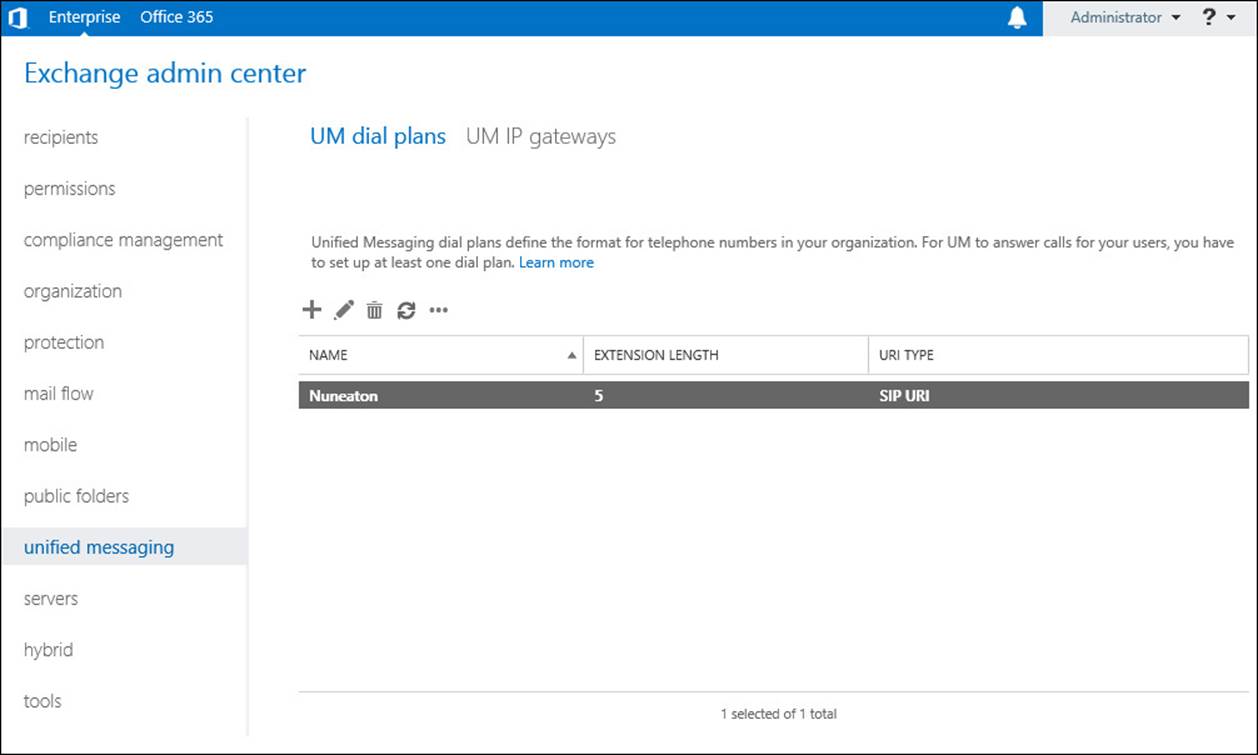
FIGURE 1-15 The list of UM dial plans is shown in the EAC
The new UM Dial Plan page, shown in Figure 1-16, is displayed. The core settings will be entered, including:
![]() The Name: Oxford.
The Name: Oxford.
![]() The extension digits for the site, which in this case is five digits and would be suitable for extensions, such as 10001.
The extension digits for the site, which in this case is five digits and would be suitable for extensions, such as 10001.
![]() A dial plan type of telephone extension is selected. This will mean the IP-PBX or UM IP gateway is not Lync/Skype for business and instead is probably a third-party IP-PBX.
A dial plan type of telephone extension is selected. This will mean the IP-PBX or UM IP gateway is not Lync/Skype for business and instead is probably a third-party IP-PBX.
![]() The VoIP Security Mode of unsecured is selected. This indicates that the IP-PBX will attempt to contact the UM call router and UM service via unencrypted channels; you will need to ensure that the UM Startup mode for each server reflects this.
The VoIP Security Mode of unsecured is selected. This indicates that the IP-PBX will attempt to contact the UM call router and UM service via unencrypted channels; you will need to ensure that the UM Startup mode for each server reflects this.
![]() Because Oxford is a site in the United Kingdom of Great Britain and Northern Ireland, the Audio Language English (United Kingdom) is selected, and Country/Region Code of 44 is entered.
Because Oxford is a site in the United Kingdom of Great Britain and Northern Ireland, the Audio Language English (United Kingdom) is selected, and Country/Region Code of 44 is entered.
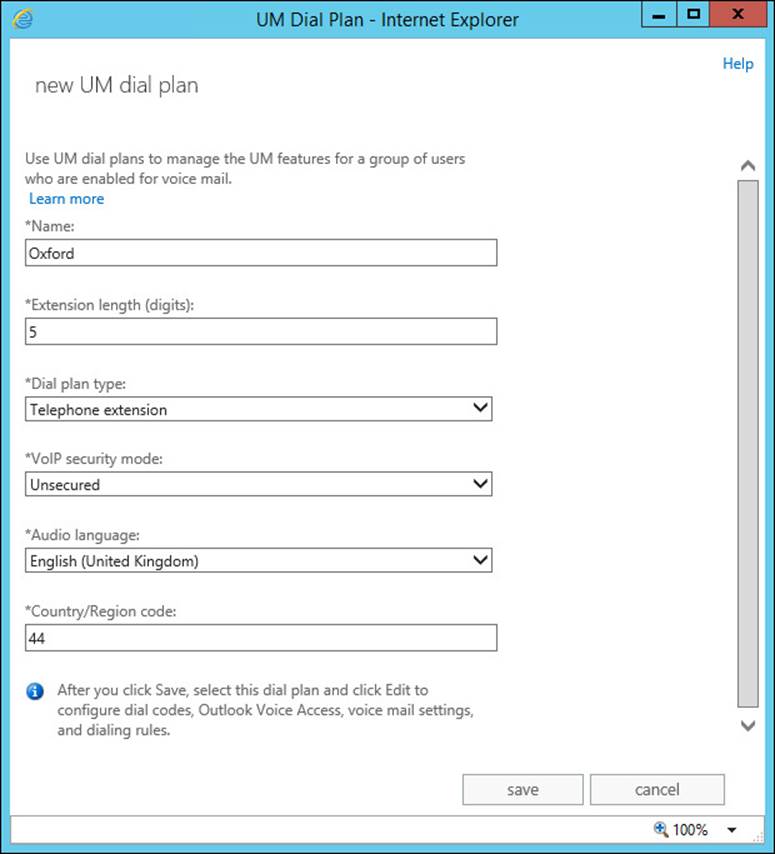
FIGURE 1-16 Creating a new UM dial plan
Creating a dial plan using the Exchange Management Shell
Creating the new dial plan using PowerShell is straightforward. Using the same options shown previously, you can specify parameters to match each chosen option, as shown here.
# Create a new Dial Plan
New-UMDialPlan -Name 'Oxford' -URIType 'TelExtn' -NumberOfDigitsInExtension 5
-VoIPSecurity 'Unsecured' -DefaultLanguage en-GB -CountryOrRegionCode '44'
 Thought experiment: Providing a menu to inbound callers
In this thought experiment, apply what you’ve learned about this objective. You can find answers to these questions in the “Answers” section at the end of this chapter.
Your manager at Contoso has asked if you can configure the system so that callers will receive a menu when they call a particular extension, and also if they try calling the Finance Manager’s voice mail.
1. Which feature in Exchange will allow you to provide a menu to callers?
2. Should you use the same feature when someone reaches the Finance Manager’s voice mail? If not, which feature would be most appropriate and how would you configure it as an administrator?
Objective summary
![]() A dial plan is very similar to an Active Directory site and usually represents the number range used, and is configured to match the IP-PBX on site at the same location.
A dial plan is very similar to an Active Directory site and usually represents the number range used, and is configured to match the IP-PBX on site at the same location.
![]() IP gateways are either the IP-PBX, or a device that bridges communications between Exchange UM and the PBX system.
IP gateways are either the IP-PBX, or a device that bridges communications between Exchange UM and the PBX system.
![]() The call router redirects SIP traffic from the IP gateway to the Mailbox server hosting the Active copy of the Mailbox.
The call router redirects SIP traffic from the IP gateway to the Mailbox server hosting the Active copy of the Mailbox.
![]() Auto attendants are tied to dial plans and can be configured to provide a menu to inbound callers or access to the GAL.
Auto attendants are tied to dial plans and can be configured to provide a menu to inbound callers or access to the GAL.
![]() Call answering rules are similar to Outlook rules and allow users to decide what happens to inbound voicemail calls based on a number of conditions, like if they are Out of Office, and then perform actions like present a menu, or transfer a call.
Call answering rules are similar to Outlook rules and allow users to decide what happens to inbound voicemail calls based on a number of conditions, like if they are Out of Office, and then perform actions like present a menu, or transfer a call.
Objective review
Answer the following questions to test your knowledge of the information in this objective. You can find the answers to these questions and explanations of why each answer choice is correct or incorrect in the “Answers” section at the end of this chapter.
1. You configure a new IP gateway for TLS-secured communications using the IP address 192.168.1.1 and port 5061. You are unable to receive voice mail messages. Why is this?
A. The IP address configured is incorrect.
B. The FQDN of the IP gateway should have been specified instead.
C. A firewall is configured in between the IP gateway and the UM server.
D. The port chosen is not suitable for secured communications.
2. Which types of UM dial plan must be associated with one or more Exchange 2013 servers?
A. SIP
B. E.164
C. Extension
D. All types
3. A call is forwarded from the UM IP gateway to Exchange Server 2013, and reaches the UM call router. What is the next step before the voice mail reaches the user mailbox?
A. The UM call router establishes an audio connection with the IP gateway.
B. The UM call router proxies the connection to a Mailbox Server.
C. The UM call router always redirects the call to the UM service on the same server, regardless of where the Mailbox is located.
D. The UM call router redirects the inbound call to the UM service on the server where the Mailbox is located.
Objective 1.2: Manage Unified Messaging
Configuration of core Unified Messaging features does not enable any functionality for users within an Exchange environment. To allow calls received by Unified Messaging to be directed to user mailboxes, users must have configuration settings applied. This configuration often requires updating and modification as needs change or users move within an organization.
This objective covers how to:
![]() Assign a dial plan to a user.
Assign a dial plan to a user.
![]() Move users between dial plans.
Move users between dial plans.
![]() Enable and disable UM features for a user.
Enable and disable UM features for a user.
![]() Set up protected voice mail.
Set up protected voice mail.
![]() Configure UM mailbox policy
Configure UM mailbox policy
![]() Manage UM language packs
Manage UM language packs
Assigning a dial plan to a user
In the same way that an IP gateway is assigned to a dial plan, a dial plan must be assigned to users. This provides the configuration link between an IP-PBX and the eventual user who receives a voice mail.
A user mailbox can only be assigned to a single dial plan at any one time. Dial plans are not assigned directly to a user but are assigned by associating a user with a UM mailbox policy. Each dial plan has at least one UM mailbox policy, because a default UM mailbox policy is created for each dial plan when the dial plan is created.
From one day to the next, a user is not likely to change dial plans. A dial plan for a user will be assigned in a number of circumstances:
![]() The user starts with the organization and is assigned a new AD account, mailbox, and phone extension.
The user starts with the organization and is assigned a new AD account, mailbox, and phone extension.
![]() The user moves and is assigned a different phone extension, typically in circumstances like moving office or changing job roles within the organization.
The user moves and is assigned a different phone extension, typically in circumstances like moving office or changing job roles within the organization.
![]() A new IP-PBX system is installed and users are being migrated from the old IP-PBX to the new IP-PBX.
A new IP-PBX system is installed and users are being migrated from the old IP-PBX to the new IP-PBX.
The assignment of a dial plan is therefore performed when you move a user between dial plans, and when you enable Unified Messaging features.
Moving users between dial plans
The first example of assigning a dial plan is when a user who already has a Unified Messaging enabled mailbox, needs to change to a new dial plan.
In an example scenario, John Smith, will be moving from the Nuneaton office, which uses a third-party IP-PBX to the Oxford office, which uses a Lync/Skype for business IP-PBX.
To move a user between the two dial plans, you must perform the following steps:
1. Disable Unified Messaging for the user in Exchange.
2. Enable the user on the new IP-PBX system’s dial plan and ensure the new details, such as telephone extension, are recorded.
3. Enable Unified Messaging for the user in Exchange, selecting a new UM dial plan and UM mailbox policy.
4. Disable the user on the old IP-PBX system’s dial plan, if required.
The move between dial plans is not transparent and does have impact on the user. During the move between dial plans, the user will be unable to receive new voicemail or use features like play on phone.
Because messages are stored in the mailbox for the user, existing voice mail messages will not be impacted, along with customizations like custom greetings. However, when re-enabling Unified Messaging, the user will receive a new PIN number for UM access.
Note: A Secondary Dial Plan
To maintain consistency during a migration between IP-PBX systems, or when a user changes offices, a secondary dial plan may be assigned to the user. This prevents the need to remove Unified Messaging and re-enable it. The following Microsoft TechNet article explains how to assign a secondary dial plan and can be found at http://technet.microsoft.com/en-us/library/ff629383(v=exchg.150).aspx.
Enabling and disabling UM features for a user
Whether it is the first time you are assigning a dial plan to a user, or you are moving a user between dial plans, you will need to use the same set of features to perform this configuration. For each user you make these changes to, you will need to know some basic information.
When a call within a particular dial plan reaches Exchange Unified Messaging, it still needs to know which mailbox within the dial plan to forward the call to, and what kind of features the user should be allowed to access or configure.
Therefore, you will need to know some basic information including:
![]() The UM mailbox policy to assign to the user, along with the associated UM dial plan.
The UM mailbox policy to assign to the user, along with the associated UM dial plan.
![]() The user’s telephone extension number.
The user’s telephone extension number.
![]() Whether to create a new, randomly generated PIN number, or whether to set a PIN manually. Regardless of which option is chosen, the user will be sent an email with the new PIN.
Whether to create a new, randomly generated PIN number, or whether to set a PIN manually. Regardless of which option is chosen, the user will be sent an email with the new PIN.
![]() Whether the user must reset the PIN number on first login.
Whether the user must reset the PIN number on first login.
The use of Unified Messaging also has licensing implications. Each UM-enabled user requires an Enterprise Client Access License (or equivalent).
Enabling Unified Messaging for a user via the Exchange Admin Center
To enable Unified Messaging for an individual user, complete the following steps:
1. Navigate to the Exchange Admin Center and choose the Recipients section.
2. Select the Mailboxes tab, and select the user that must be enabled for Unified Messaging.
3. As shown in Figure 1-17, the action pane on the right side of the Exchange Admin Center will show a range of tasks applicable for the selected user. Within the Phone And Voice Features section, Unified Messaging will be shown as Disabled. Choose the Enable link.
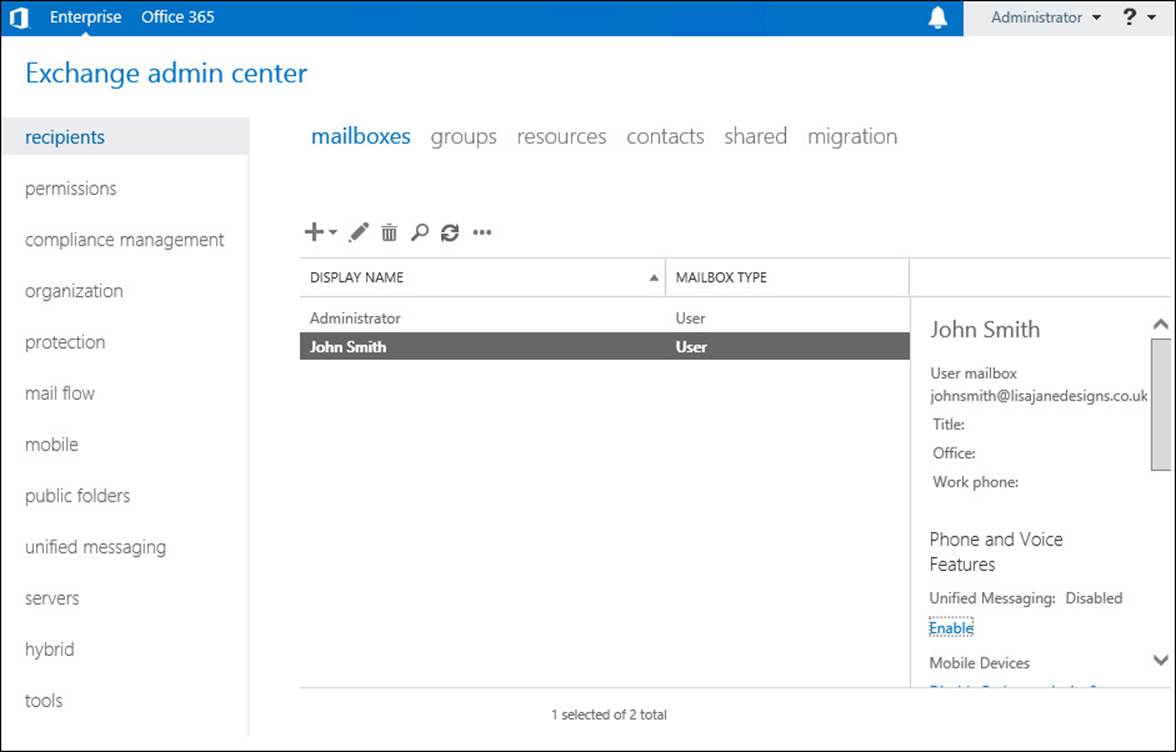
FIGURE 1-17 Enabling phone and voice
4. The Enable UM Mailbox Wizard opens in a new window as shown in Figure 1-18. The first page requires that you select an appropriate UM mailbox policy. Choose Browse to select a UM mailbox policy, and then select Next.
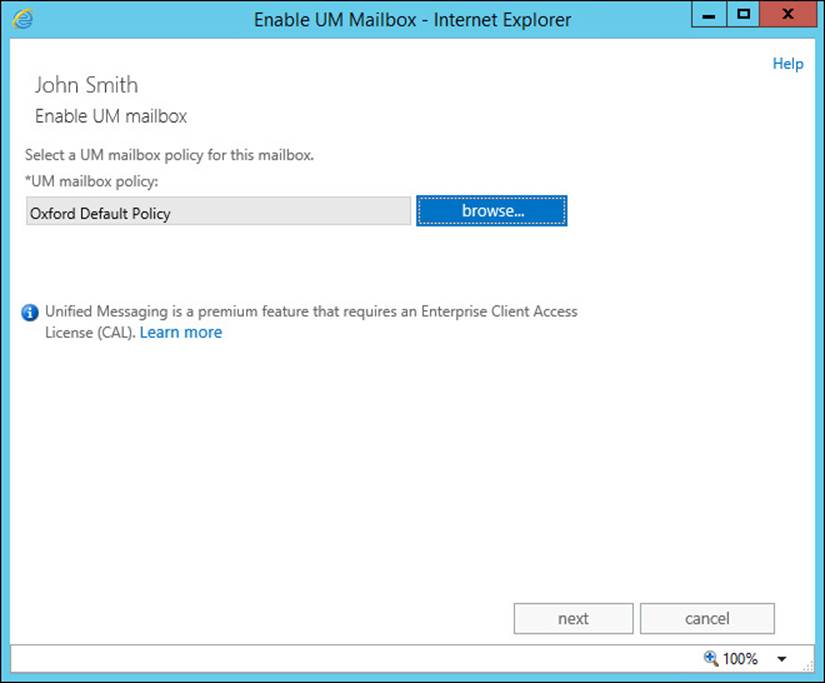
FIGURE 1-18 Selecting a UM mailbox policy for a newly enabled UM mailbox
5. The last page of the Enable UM Mailbox Wizard, shown in Figure 1-19, requires entry of unique information for the user and must match the dial plan that the user is assigned to. For example, a dial plan expecting five-digit extensions will require a five-digit extension entered into the wizard. Enter the extension number, and choose appropriate PIN settings.
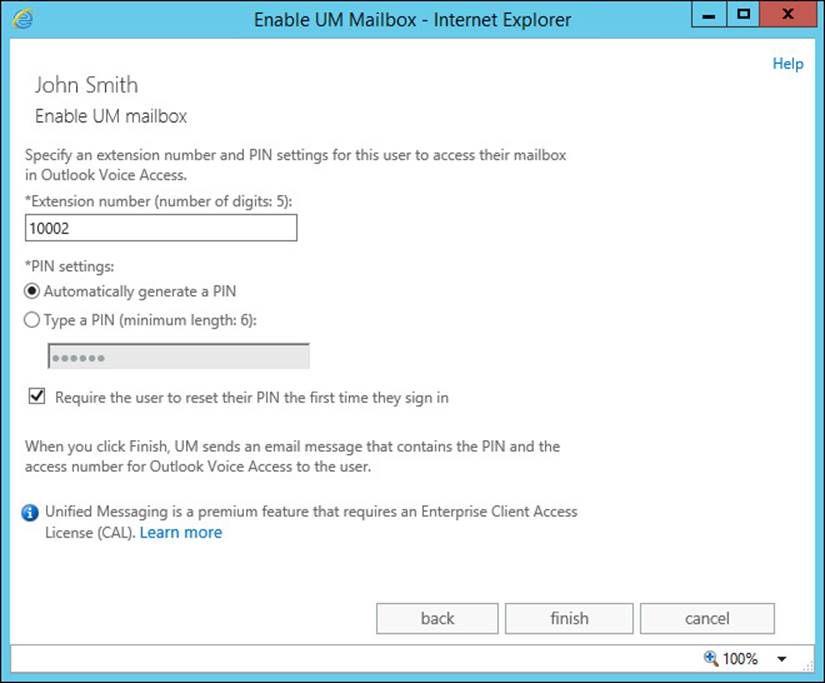
FIGURE 1-19 The Enable UM Mailbox Wizard allows the extension and PIN to be entered
6. Click Finish. After completing the wizard, the mailbox should be enabled for Unified Messaging.
Enabling Unified Messaging for a user via the Exchange Management Shell
PowerShell is especially useful in cases where many users must have mailboxes enabled for Unified Messaging at once. This is a common scenario where UM is being enabled after Exchange mailboxes are in use within the organization.
The following PowerShell command enables the mailbox for John Smith to use Unified Messaging with the same settings used in the Exchange Admin Center.
Enable-UMMailbox -Identity 'John Smith' -UMMailboxPolicy 'Oxford Default Policy'
-Extensions '10002' -PinExpired:$true
Disabling Unified Messaging for a user via the Exchange Admin Center
Removing Unified Messaging from a user mailbox is straightforward and does not affect their ability to use other Exchange functionality. For example, disabling Unified Messaging will not prevent them from using ActiveSync or Outlook, and the user can still access previously received voice mail messages. They simply do not have a link to the phone system any longer.
Important: A Possible Business Impact
When moving users between dial plans, it is worth reiterating that during the disable and subsequent re-enable, the user will be unable to receive voice mail. This could have a business impact as unanswered calls will be met with a call failed tone while Unified Messaging is disabled for that particular user.
To perform the action of disabling Unified Messaging for a user via the Exchange Admin Center:
1. Navigate to Recipients, and then select the Mailboxes tab.
2. Select the user to disable Unified Messaging for and then, underneath Phone And Voice features, select Disable next to Unified Messaging. As shown in Figure 1-20, a warning will be displayed asking the administrator to confirm the action.
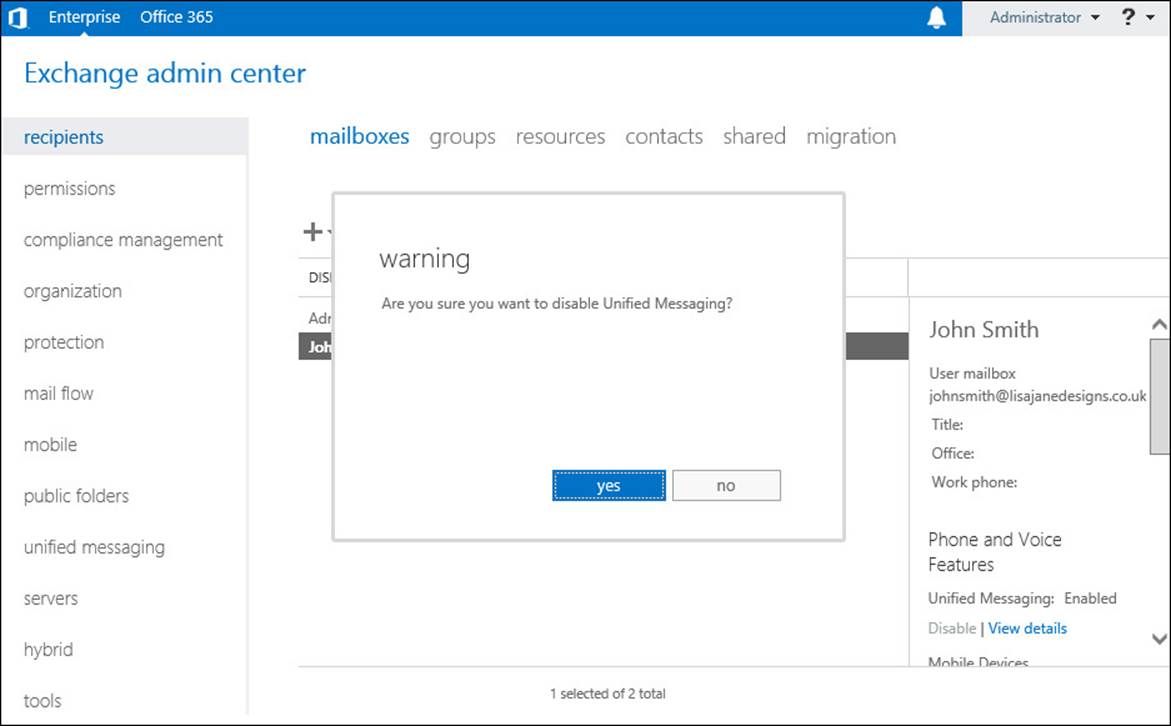
FIGURE 1-20 A warning shown before disabling UM
3. Click Yes to confirm the action. Unified Messaging will be immediately disabled for the user.
Disabling Unified Messaging for a user via the Exchange Management Shell
Disabling Unified Messaging via PowerShell is simple and requires no additional options. The following Disable-UMMailbox cmdlet with the mailbox name specified will, after confirmation, disable UM features for the user.
Disable-UMMailbox -Identity 'John Smith'
Setting up protected voice mail
Protected voice mail allows voice mail messages to be marked as private so that a voice mail message can only be opened by the intended recipient. This functionality uses core Windows Server technology to ensure compatibility across a range of supported clients, and offers a wide range of functionality, more than most users need.
The foundation of protected voice mail is the Windows Server Information Rights Management (RIM) features. IRM in Windows provides the facility to protect content so that only the right people can see the content, and because it is deeply integrated into Windows and Microsoft Office, it provides a high degree of control over what people can do with the content. Because it is deeply integrated with Windows and makes use of the existing identity foundation within Active Directory, it is near transparent to users of the systems.
IRM is made available to Exchange 2013 either via on-premises servers running Active Directory Rights Management Services, or in the cloud via Azure Active Directory Rights Management Services. IRM can be used elsewhere in Exchange, either server-side in transport rules that protect content based on certain criteria, or by users applying IRM templates within Outlook or Outlook Web App.
When used with Exchange Unified Messaging, IRM provides the following functionality:
![]() Voice mail messages marked as Private stored in Exchange are encrypted.
Voice mail messages marked as Private stored in Exchange are encrypted.
![]() Voice mail messages can only be opened by the intended recipient using their Active Directory credentials.
Voice mail messages can only be opened by the intended recipient using their Active Directory credentials.
![]() The recipient of a voice mail message cannot save the voice mail message or attached audio file.
The recipient of a voice mail message cannot save the voice mail message or attached audio file.
![]() The recipient of a voice mail message cannot forward the voice mail message or audio.
The recipient of a voice mail message cannot forward the voice mail message or audio.
![]() Voice messages are protected, but fax messages and other types of message created via Outlook Voice Access, such as email or calendar appointments, will not be protected.
Voice messages are protected, but fax messages and other types of message created via Outlook Voice Access, such as email or calendar appointments, will not be protected.
Before Protected Voice Mail can be used, the IRM functionality must already be installed and configured. A minimal on-premises deployment requires the following:
![]() A Windows Server 2008 R2, 2012, or 2012 R2 server with the Active Directory Rights Management Services server role.
A Windows Server 2008 R2, 2012, or 2012 R2 server with the Active Directory Rights Management Services server role.
![]() A SQL Database server to support the Active Directory Rights Management Services role.
A SQL Database server to support the Active Directory Rights Management Services role.
![]() The Active Directory Rights Management Services client installed on workstations. The AD RMS client is included with Windows 7, Windows 8 and Windows 8.1.
The Active Directory Rights Management Services client installed on workstations. The AD RMS client is included with Windows 7, Windows 8 and Windows 8.1.
Protected voice mail settings
Settings for protected voice mail can be configured either using the Exchange Admin Center or Exchange Management Shell. Settings are stored within UM mailbox policies, which means that different groups of users within each dial plan can have different protected voice mail settings enabled.
The following configuration settings are available:
![]() Protect Authenticated Voice Mail Allows users logged into Outlook Voice Access to send protected messages to other UM users by marking the message as Private, or optionally ensure all authenticated voice mail is protected.
Protect Authenticated Voice Mail Allows users logged into Outlook Voice Access to send protected messages to other UM users by marking the message as Private, or optionally ensure all authenticated voice mail is protected.
![]() Protect Unauthenticated Voice Mail Allows callers to mark a message as Private, or protect all unauthenticated voice mail.
Protect Unauthenticated Voice Mail Allows callers to mark a message as Private, or protect all unauthenticated voice mail.
![]() Require Play On Phone Prevents voice mail messages from being played via the PC and instead enforces the use of play on phone, where the UM server initiates a call to the user’s phone number to play the voice mail message.
Require Play On Phone Prevents voice mail messages from being played via the PC and instead enforces the use of play on phone, where the UM server initiates a call to the user’s phone number to play the voice mail message.
![]() Allow Voice Responses To Email And Calendar Items Allows a protected voice message to be sent as a reply via Outlook Voice Access.
Allow Voice Responses To Email And Calendar Items Allows a protected voice message to be sent as a reply via Outlook Voice Access.
![]() Protected Voice Mail Text Specifies the text to add to the voice mail email message when a voice mail has been protected.
Protected Voice Mail Text Specifies the text to add to the voice mail email message when a voice mail has been protected.
Setup of protected voice mail using the Exchange Admin Center
Configuration for protected voice mail is within UM mailbox policies, meaning that different groups of users within a single UM dial plan can have different settings applied.
In this example, you will use the Exchange Admin Center to protect messages marked as Private by unauthenticated callers, and mark all authenticated callers messages as protected. You will ensure that protected messages are played on the phone, allow protected voice responses via Outlook Web App, and add a simple message stating that the user must have a supported client to listen to protected voice mail.
To change the protected voice mail setting:
1. Open the UM dial plan within Unified Messaging’s UM Dial Plans tab, and then open the Default UM mailbox policy for the dial plan, as shown in Figure 1-21.
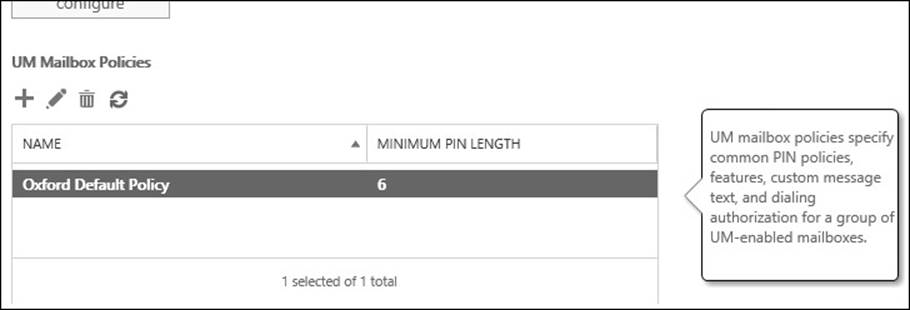
FIGURE 1-21 A list of UM mailbox policies is shown
2. Navigate to the Protected Voice Mail tab, shown in Figure 1-22. Select Private from the Protect Voice Messages From Unauthenticated Callers drop-down list.
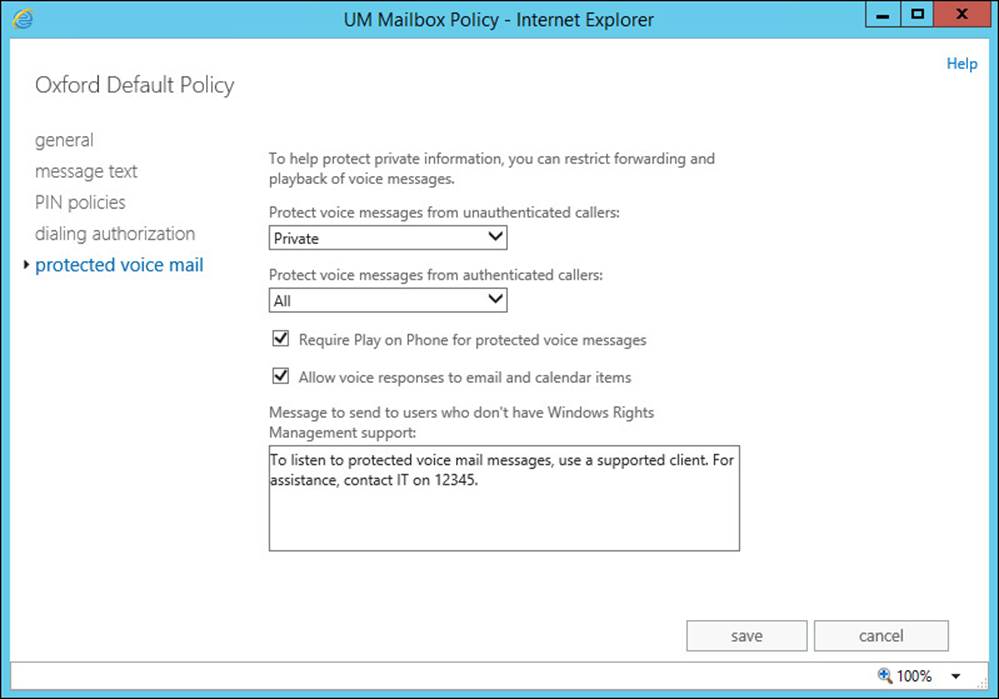
FIGURE 1-22 The Protected Voice Mail tab of the UM Mailbox Policy is shown
3. From the Protect Voice Messages From Authenticate Callers drop-down list, select All.
4. Ensure both Require Play On Phone For Protected Voice Messages and Allow Voice Responses To Email And Calendar Items check boxes are selected.
5. Enter an appropriate message of less than 512 characters within the Message To Send To Users Who Don’t Have Window Rights Management Support text box.
Setup of protected voice mail using the Exchange Management Shell
To perform the same configuration from Exchange Management Shell, use the Set-UMMailboxPolicy cmdlet, as shown in the following example.
Set-UMMailboxPolicy -Identity 'Oxford Default Policy'
-ProtectUnauthenticatedVoiceMail 'Private' -ProtectAuthenticatedVoiceMail 'All'
-AllowVoiceResponseToOtherMessageTypes:$true -RequireProtectedPlayOnPhone:$true
-ProtectedVoiceMailText 'To listen to protected voice mail messages, use a supported
client. For assistance, contact IT on 12345.'
In both examples, the configuration will only be applied and usable if IRM is already setup and configured within the organization.
Configuring UM mailbox policy
The purpose of a UM mailbox policy is to enable different features to groups of users within a single UM dial plan. A UM dial plan can contain multiple UM mailbox policies, and a UM mailbox policy can be assigned to multiple users.
A user can only be assigned a single UM mailbox policy; and a UM mailbox policy can only be associated with a single dial plan.
UM features that can be controlled via UM mailbox policies
A wide range of features are controlled by UM mailbox policies, from the user features that are enabled, PIN policies in place, text provided to new UM users, where calls can be placed and the aforementioned protected voice mail settings.
The settings available include:
![]() The name of the UM mailbox policy.
The name of the UM mailbox policy.
![]() The time limit allowed for the personal greeting, which is heard by callers to voice mail.
The time limit allowed for the personal greeting, which is heard by callers to voice mail.
![]() User features, such as:
User features, such as:
![]() Whether voice mail preview is enabled.
Whether voice mail preview is enabled.
![]() Whether users can configure their own call answering rules.
Whether users can configure their own call answering rules.
![]() If the Message Waiting Indicator lamp will be controlled on behalf of the user.
If the Message Waiting Indicator lamp will be controlled on behalf of the user.
![]() If the user is allowed to access Outlook Voice Access.
If the user is allowed to access Outlook Voice Access.
![]() Whether missed call notifications will be sent as email messages to the user.
Whether missed call notifications will be sent as email messages to the user.
![]() Whether or not the Play on Phone functionality is available.
Whether or not the Play on Phone functionality is available.
![]() If inbound faxes are enabled, along with a fax server URI.
If inbound faxes are enabled, along with a fax server URI.
![]() Whether or not Microsoft analysis of voice mail messages is enabled, a feature that allows Microsoft to randomly analyze voice mails for the purpose of improving language packs.
Whether or not Microsoft analysis of voice mail messages is enabled, a feature that allows Microsoft to randomly analyze voice mails for the purpose of improving language packs.
![]() Message text for the following notifications:
Message text for the following notifications:
![]() When a user is enabled for Unified Messaging.
When a user is enabled for Unified Messaging.
![]() When a user’s UM PIN is reset.
When a user’s UM PIN is reset.
![]() When a new voice mail is received.
When a new voice mail is received.
![]() When a new fax message is received.
When a new fax message is received.
![]() PIN policies including:
PIN policies including:
![]() The minimum PIN length in digits.
The minimum PIN length in digits.
![]() How often a PIN can be re-used (PIN recycle count).
How often a PIN can be re-used (PIN recycle count).
![]() Whether common PIN patterns, like 1234 are allowed.
Whether common PIN patterns, like 1234 are allowed.
![]() The enforced PIN lifetime in days before the PIN must be changed.
The enforced PIN lifetime in days before the PIN must be changed.
![]() The number of PIN failures before the PIN must be reset.
The number of PIN failures before the PIN must be reset.
![]() The number of PIN failures before Outlook Voice Access is locked out.
The number of PIN failures before Outlook Voice Access is locked out.
![]() Whether or not a user can make or transfer calls to other numbers within the same dial plan from within Unified Messaging.
Whether or not a user can make or transfer calls to other numbers within the same dial plan from within Unified Messaging.
![]() Whether a user can make or transfer calls to any internal extension from Unified Messaging.
Whether a user can make or transfer calls to any internal extension from Unified Messaging.
![]() The rules for allowed in-country/region external calls that can be transferred or initiated from Unified Messaging.
The rules for allowed in-country/region external calls that can be transferred or initiated from Unified Messaging.
![]() The rules for allowed international calls that can be transferred or initiated from Unified Messaging.
The rules for allowed international calls that can be transferred or initiated from Unified Messaging.
Configuring a UM mailbox policy using the Exchange Admin Center
In this example, you’ll examine the needs of a typical organization and how these needs might be met using UM mailbox policies. A dial plan is configured within Unified Messaging named Nuneaton. This dial plan contains all users at the Nuneaton site who are UM-enabled.
There are two types of users as far as Unified Messaging is concerned. The majority of users have a fairly relaxed configuration and are allowed to access all standard Unified Messaging features. It has been decided that some users must not be able to access all Unified Messaging features; therefore a new UM mailbox policy has been added within the configuration for the UM dial plan, named Nuneaton Restricted Policy, shown in Figure 1-23.
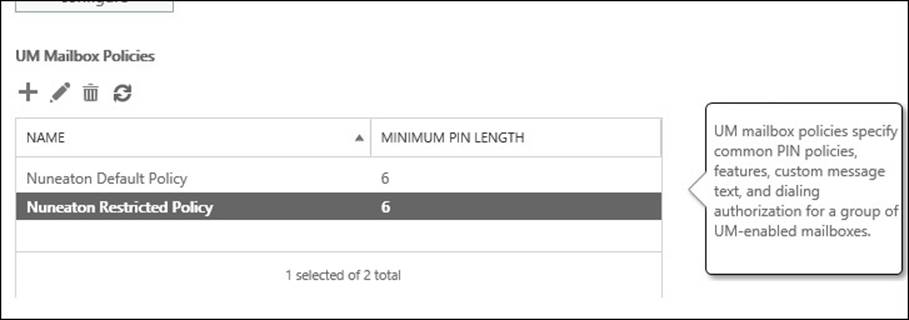
FIGURE 1-23 The UM mailbox policy list shows both of the policies for the Nuneaton UM dial plan
To meet the organization requirements, the UM mailbox policy must be amended to prevent access to Voice Mail Preview, Call Answering Rules, and Outlook Voice Access. Additionally, the default setting to disable inbound fax messages must remain disabled.
Open the UM mailbox policy in the Exchange Admin Center, and select the General tab, as shown in Figure 1-24. Then, within the User Features section, make the configuration changes.
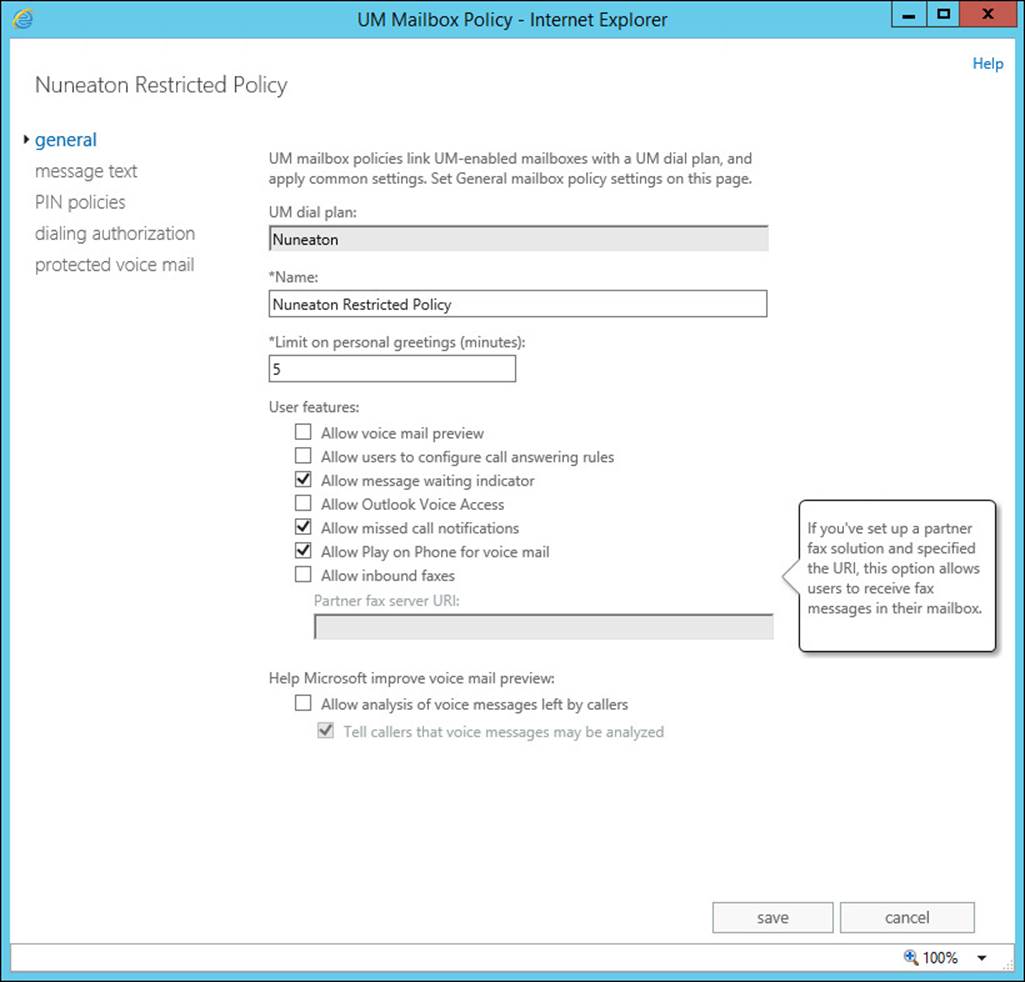
FIGURE 1-24 The General properties window for the UM Mailbox Policy
Managing UM language packs
The purpose of Unified Messaging language packs is to allow Exchange 2013 to speak and understand the language throughout the global different regional differences. For example, the built-in United States language pack will not speak in a way that audiences in the United Kingdom will prefer, nor will the US language pack understand the regional twang of a resident of Birmingham, UK with much accuracy. The built-in US language pack will stand even less chance of understanding the Polish or German language and certainly cannot interact with callers in either language.
Therefore, to extend the functionality of Unified Messaging, add-on language packs must be installed onto Exchange 2013 servers.
Where to install UM language packs
There are two basic deployment strategies for Unified Messaging language packs:
![]() Install the UM language packs required on all servers that host UM-enabled mailboxes.
Install the UM language packs required on all servers that host UM-enabled mailboxes.
![]() Install the UM language packs that match the regions the servers and associated dial plans reside in.
Install the UM language packs that match the regions the servers and associated dial plans reside in.
The first strategy usually works the best because it removes the possibility that a mailbox moved between regions will move to a server that does not have the correct language pack installed.
A full list of available language packs, the country/region and culture ID is available at the following page on TechNet: http://technet.microsoft.com/en-us/library/bb124728(v=exchg.150).aspx. Additionally, each individual UM language pack can be obtained fromhttp://go.microsoft.com/fwlink/p/?linkId=266542.
Viewing installed UM language packs
The list of installed UM language packs can be viewed via the Exchange Admin Center by navigating to the Servers main tab. Select the Exchange Server that you want to view the list of language packs, then choose to view the properties for the server.
In the Server properties window, select the Unified Messaging tab, as shown in Figure 1-25. The installed languages will be shown under the Prompt Languages heading.
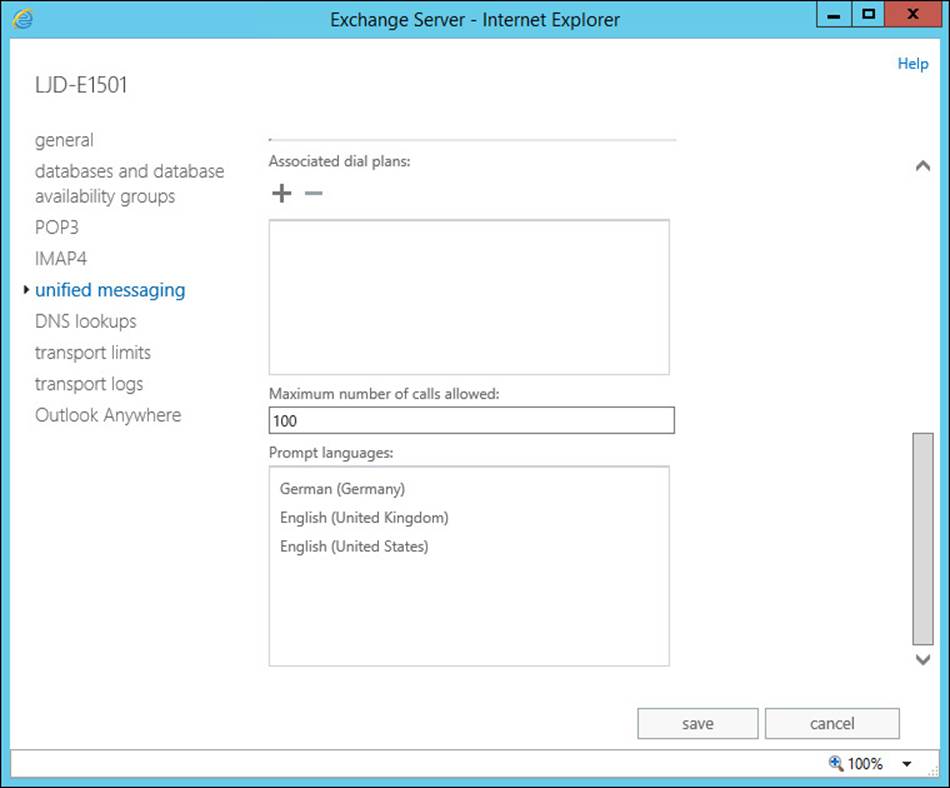
FIGURE 1-25 Prompt Languages for the UM server listed
The same information can be obtained using the Exchange Management Shell. Execute the following PowerShell cmdlet.
Get-UMService -identity <Server Name>
The PowerShell output will show the installed language packs.
Installing a UM language pack
There are two ways to install a Unified Messaging language pack. The easiest way, if the intention is to install on a single server, is to run the downloaded executable. For example, to install the Australian English language pack download UMLanguagePack.en-AU.exe from the Microsoft website. After downloading, run the file as an elevated user. On the Setup Progress page, the Exchange Server GUI setup will be shown on a progress bar, as shown in Figure 1-26, and the UM language pack will install.
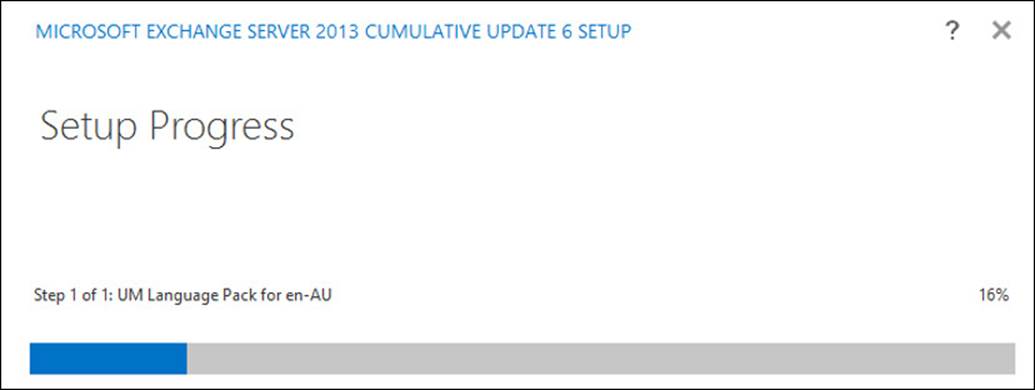
FIGURE 1-26 The Exchange Server Setup program installs the UM Language Pack via the GUI
If multiple language packs must be installed it is often faster and more accurate to install the language packs via the command line, using the Exchange Server Setup.exe. Use Setup.exe with the /AddUmLanguagePack switch, specifying the languages to install, the location of the downloaded language packs, and confirm that the license terms are accepted.
setup.exe /AddUmLanguagePack:en-AU,en-GB /s:C:\Exchange\UMLanguagePacks /
IAcceptExchangeServerLicenseTerms
Removing a UM language pack
Language packs might need to be removed and reinstalled during the life of an Exchange Server install, for example when a newer version of a UM language pack is released.
To remove a UM language pack, the Exchange Server command line Setup.exe must be used, with the /RemoveUMLanguagePack switch. The following is an example.
setup.exe /RemoveUmLanguagePack:en-AU
This removes the installed language pack from the server. Before attempting this procedure, ensure that the language pack is not used by the server in any UM dial plans bound to the UM service, or bound to the UM call router service.
 Thought experiment: New office opens in Poland
In this thought experiment, apply what you’ve learned about this objective. You can find answers to these questions in the “Answers” section at the end of this chapter.
The organization you manage Exchange for opens a new office in Poland. They will continue to use the existing Lync/Skype for business phone system that is in place globally and already has working Unified Messaging dial plans in place. Your Exchange organization consists of two Database Availability Groups with the UM dial plans already assigned to all Exchange Servers, and the users for the office in Poland will have mailboxes on the first DAG.
1. What is the minimum you need to do to ensure that Polish users can interact with Outlook Voice Access in their native language?
2. What steps might you perform if you want to set the default prompt language and limit the number of servers that require the Polish language pack installed?
Objective summary
![]() A dial plan is the equivalent of an Active Directory site and usually maps to a logical location within an organization, or at the very minimum an IP-PBX system.
A dial plan is the equivalent of an Active Directory site and usually maps to a logical location within an organization, or at the very minimum an IP-PBX system.
![]() Moving users between UM dial plans requires the user to have UM disabled and then re-enabled on their mailbox.
Moving users between UM dial plans requires the user to have UM disabled and then re-enabled on their mailbox.
![]() Protected Voice Mail uses IRM to prevent unauthorized users from accessing private voice mail messages, and requires a working AD RMS infrastructure in place.
Protected Voice Mail uses IRM to prevent unauthorized users from accessing private voice mail messages, and requires a working AD RMS infrastructure in place.
![]() UM mailbox policies contain user specific settings, and one user can be assigned one UM mailbox policy.
UM mailbox policies contain user specific settings, and one user can be assigned one UM mailbox policy.
![]() A UM mailbox policy must be assigned to a single dial plan, and a dial plan can contain multiple UM mailbox policies.
A UM mailbox policy must be assigned to a single dial plan, and a dial plan can contain multiple UM mailbox policies.
![]() Language packs contain voice prompts and the diction to understand a caller speaking the associated language and are installed as an add-on to Exchange Server deployments.
Language packs contain voice prompts and the diction to understand a caller speaking the associated language and are installed as an add-on to Exchange Server deployments.
Objective review
Answer the following questions to test your knowledge of the information in this objective. You can find the answers to these questions and explanations of why each answer choice is correct or incorrect in the “Answers” section at the end of this chapter.
1. Two groups of users within the same dial plan need different features enabled; the first group requires access to voice preview, whereas the second group must not have voice preview enabled. How should you accomplish this?
A. Create a new UM dial plan with voice preview disabled. Edit the dial plan settings for the second group of users and assign them to the new UM dial plan. Disable voice preview within the dial plan.
B. Create a new UM mailbox policy with voice preview disabled. Assign the new UM mailbox policy to a new UM dial plan, and update the UM dial plan for each user in the second group.
C. Create a new UM mailbox policy with voice preview disabled within the original UM dial plan. Update the UM mailbox policy for the second group of users.
D. Create a new UM dial plan with voice preview disabled. Disable Unified Messaging for the second group of users and re-enable UM with the new dial plan.
2. A user often visits two different offices and has an extension at both offices. Each office has a different PBX system with different UM dial plans. What is the correct way for an administrator to allow the user to receive voice mail to calls received at either office?
A. Configure the user account so that a secondary dial plan and telephone extension is specified.
B. Set up the PBX system so that instead of sending calls to voice mail the call is forwarded to the other office extension.
C. Request the user contact the helpdesk when arriving at each office so that the dial plan can be altered.
D. Assign the additional extension to the UM mailbox.
Objective 1.3: Troubleshoot Unified Messaging
Sometimes things go wrong, both during and after implementation. Therefore, from time to time, it is necessary to perform troubleshooting steps to help understand the root cause of the issue.
This objective covers how to:
![]() Troubleshoot and configure mutual Transport Layer Security (MTLS).
Troubleshoot and configure mutual Transport Layer Security (MTLS).
![]() Monitor calls and call statistics.
Monitor calls and call statistics.
![]() Troubleshoot and configure Quality of Service (QoS).
Troubleshoot and configure Quality of Service (QoS).
![]() Troubleshoot SIP communication.
Troubleshoot SIP communication.
Troubleshooting and configuring mutual Transport Layer Security (MTLS)
Communications between servers rely on mutual TLS to help ensure the connection between both systems is secure. This means that when one server acts as a client, not only does the responding server need to present a valid SSL certificate, but the server acting as the client must participate in the certificate Exchange.
In this scenario, one side of the conversation will be the UM IP gateway and the other side of the communication will be an Exchange Server. Not only do both the UM IP gateway and Exchange server need to have SSL certificates installed, but the SSL certificates need to be configured with the correct names, typically the Fully Qualified Domain Name of each server. They also must both use certificates from certificate authorities both sides trust.
A typical deployment of Exchange Unified Messaging and an IP-PBX relies on a common internal certificate authority (CA) to issue certificates for VoIP use. There are often many SSL certificates issued for various parts of an IP-PBX system to ensure communications are properly secured. Third-party SSL certificates are also used typically with Exchange for standard client communications and within the IP-PBX solution for communication with mobile and external users or partners.
The most common Exchange misconfiguration for Unified Messaging relates to the SSL certificate names. For general client communications, a subject alternative name (SAN) certificate, sometimes known as a Unified Communications Certificate, is used and issued by a third-party certificate authority.
This certificate does not usually contain the actual Fully Qualified Domain Name of each individual Exchange Server and does not require it for client access, therefore an additional SSL certificate is often required.
View installed SSL certificates
As a first step to troubleshoot whether the Exchange configuration for MTLS are set up correctly, you will examine the installed SSL certificates on relevant Exchange Servers. This will tell you a number of key configuration settings:
![]() Certificate issuer
Certificate issuer
![]() Certificate principal name and subject alternative names
Certificate principal name and subject alternative names
![]() Certificate assigned services
Certificate assigned services
Complete the following steps:
1. Start by opening the Exchange Admin Center and navigating to Servers.
2. Select the Certificates tab. The Certificates tab allows you to examine all Exchange Server certificates in use within the Exchange organization, including those used for Exchange server to Exchange server communications, TLS communications for SMTP, HTTPS, POP3, IMAP4, and of course Unified Messaging.
3. From the Select Server drop-down list, select the server that appears to have issues establishing a MTLS connection. After selecting a server, the list of Exchange Server certificates should be displayed.
4. Upon selecting each certificate from the list, the Issuer will be displayed in the right-side action column. In the example in Figure 1-27, there is an obvious initial issue with the certificate selected if it will be used for Unified Messaging. The certificate is a self-signed certificate, issued by the Exchange Server itself.
5. For the certificate to be valid for MTLS use, the issuer will need to be one that both the Exchange Server and the UM IP gateway trust as a certificate authority. For certificates used externally, this is usually a third-party certificate authority, and for internal use, such as an internal UM IP gateway, an Enterprise certificate authority is often sufficient.
6. To further examine the selected certificate, choose the Edit (pencil) icon from the toolbar to open the Exchange Certificate properties window.
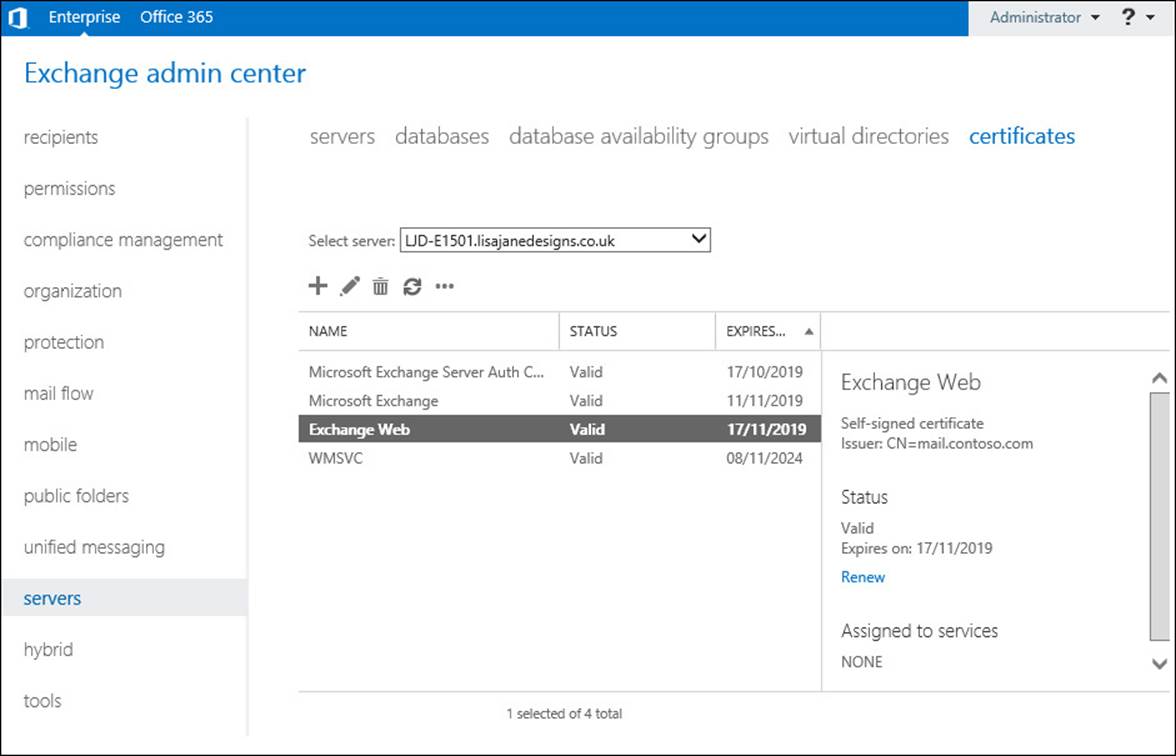
FIGURE 1-27 The list of installed SSL certificates on the Exchange Server is shown
The Exchange Certificates properties window is composed of two tabs. The first tab, General, allows examination of the certificate principal name and subject alternative names. The full list of names is within the Subject Alternative Names list box. In Figure 1-28, the list of names does not include the Fully Qualified Domain Name of the Exchange Server itself. This is not unusual for the certificate used for client access because this will usually be a single SSL certificate installed on all Exchange Servers sharing the common HTTPS names.
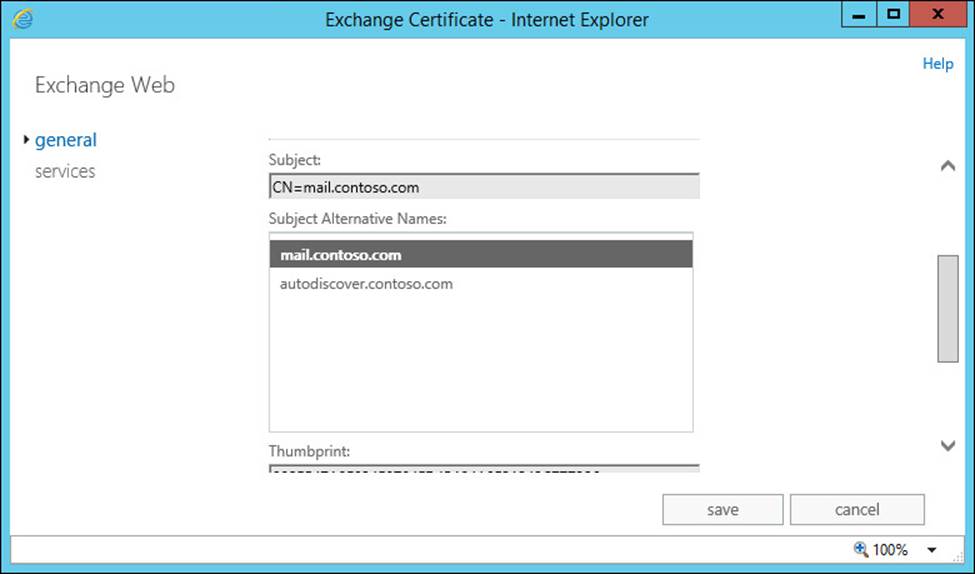
FIGURE 1-28 Subject alternatives names for the installed SSL certificate are shown
For Unified Messaging though, expect a certificate from a valid issuer that includes the FQDN for the server itself.
The second tab is named Services. This tab, shown in Figure 1-29, shows the services that the SSL certificate is currently enabled for use with. For the purposes of Unified Messaging, the following services are relevant:
![]() Microsoft Exchange Unified Messaging, used by the Mailbox role.
Microsoft Exchange Unified Messaging, used by the Mailbox role.
![]() Unified Messaging Call Router, used by the Client Access role.
Unified Messaging Call Router, used by the Client Access role.
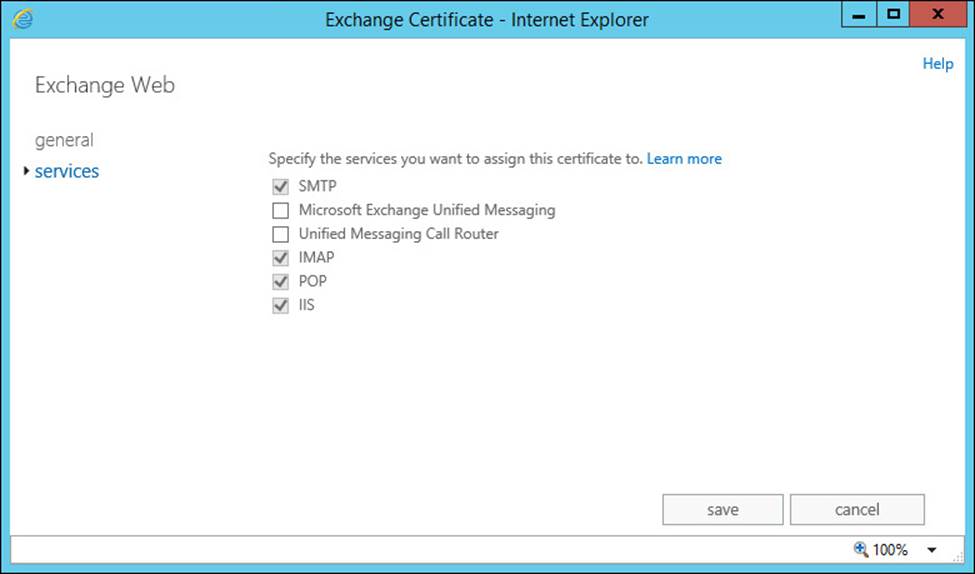
FIGURE 1-29 Assigned services for the SSL certificate
If the certificate is from a valid issuer, and has valid names but is not enabled for the UM-related services, it will not be available for MTLS use, and in combination with adjusting the UM services startup mode to Dual or SIP Secure must be set before use.
Creating a replacement SSL certificate for secured SIP communications
In the previous example, the certificates installed and available on the Exchange Server were not valid for Unified Communications use, nor enabled. To remediate this issue, a new certificate must be created with the correct issuer and options, and then enabled correctly.
To perform these steps via the Exchange Admin Center:
1. Navigate to Servers and the Certificates tab, and then choose New Certificate. On the first page of the New Exchange Certificate Wizard, the following options will be presented:
![]() Create A New Request For A Certificate From A Certificate Authority
Create A New Request For A Certificate From A Certificate Authority
![]() Create A Self-Signed Certificate
Create A Self-Signed Certificate
2. For a UM-compatible certificate, choose to create a new request for a certificate from a certificate authority, then choose Next.
3. On the second page of the wizard, you must enter a friendly name for the certificate. The friendly name has no effect on the operation of the certificate and helps the administrator of Exchange understand the purpose and use. Select a friendly name and then continue through the wizard.
Note: Certificate Management for a Large Number of Servers
When managing a large number of Exchange Servers, certificate management can take time. To assist with easy identification, always select a descriptive name for the certificate friendly name that is consistent across servers and services. A UM certificate could have a name like Enterprise CA Exchange UM (server.contoso.com), whereas the third-party SSL certificate used across all servers for Client Access could have a name like Third-Party Exchange Web (mail.contoso.com).
4. On the next page of the wizard, a prompt asks you to Specify The Servers You Want To Apply This Certificate To. Add and Remove buttons allow the administrator to select Exchange Servers within the organization. Select the servers that will have the certificate applied to.
5. If issuing a UM certificate from an internal CA, for simplicity create a single certificate for each UM server. This process involves creating a single UM certificate for each individual server.
6. On the final input page of the wizard, the domains to be used for the certificate are shown. Default input from the wizard includes the domain name; for example, contoso.com and service name for HTTPS servers. Add a new name for the FQDN of the server, for exampleserver01.contoso.com. Set the server name as the default, and then remove the service names like autodiscover.contoso.com that you will not use for Unified Messaging.
7. After completing the certificate request, a Base 64 encoded certificate request will be generated with the file extension REQ. The request file is plain text and can be pasted into a certificate authority request form, or uploaded when prompted. The resulting public certificate file, usually with the extension CRT is imported via the Exchange Admin Center and matches up with the Private Key stored on the Exchange Server to make up the complete private and public parts of the SSL certificate.
If multiple certificates must be created, it is faster to use the Exchange Management Shell to make multiple requests. The New-ExchangeCertificate cmdlet is used to create a new SSL certificate request and performs the same underlying actions that the New Exchange Certificate Wizard does. In the following example, a new certificate request is created with the same options and stored in the $Request string variable, then exported to a file. The Import-ExchangeCertificate cmdlet is then used to import the certificate file that is provided later on by the certificate authority.
$Request = New-ExchangeCertificate -GenerateRequest -FriendlyName 'Exchange UM
(server01.contoso.com)' -SubjectName 'C=GB, O=Contoso, CN=server01.contoso.com'
-DomainName server01.contoso.com -Server 'server01' -KeySize '2048'
-PrivateKeyExportable:$true
Set-Content -path 'C:\Certificates\ExchangeUM.REQ' -Value $Request
Import-ExchangeCertificate -FileData ([Byte[]]$(Get-Content -Path C:\Certificates\
ExchangeUM.CRT -Encoding byte -ReadCount 0))
Ensuring the SSL certificate is enabled for UM use
Just creating a new SSL certificate and correctly importing it onto the right servers on its own is not enough to ensure it can, and will be, used for Exchange Unified Messaging. An Exchange Server can have a large number of SSL certificates, valid and otherwise, however only the SSL certificates that have been assigned to specific services will be used.
The procedure within the Exchange Admin Center to assign the newly create certificate for use is similar to the procedure used to view the services that the certificate is being used for.
1. Navigate to the Exchange Admin Center, and select the Servers section.
2. Select the Certificates tab. The newly created SSL certificate should be listed by its friendly name.
3. Choose to Edit the certificate, which opens the Exchange Certificate properties window. Select the Services tab. Under Specify The Services You Want To Assign This Certificate To, select the check boxes that are appropriate for your server’s role:
![]() For a client access server, select Unified Messaging Call Router.
For a client access server, select Unified Messaging Call Router.
![]() For a mailbox server, select Microsoft Exchange Unified Messaging.
For a mailbox server, select Microsoft Exchange Unified Messaging.
![]() For a multi-role server, select both Unified Messaging Call Router and Microsoft Exchange Unified Messaging.
For a multi-role server, select both Unified Messaging Call Router and Microsoft Exchange Unified Messaging.
4. Choose Save to apply the settings. If you haven’t already, ensure that the Startup Type for Unified Messaging is set to Dual or SIP Secured before assigning the SSL certificate.
If the new SSL certificate, or multiple SSL certificates are being applied to multiple servers, or the preferred approach is to use the Exchange Management Shell, the same task can be accomplished using the Enable-ExchangeCertificate cmdlet. This cmdlet uses the thumbprint of the SSL certificate rather than its name to ensure that the correct certificate is chosen, so the Get-ExchangeCertificate cmdlet must be run first to retrieve a list of installed SSL certificates on the relevant server. After recording the correct certificate thumbprint, the services to enable must be chosen. Short acronyms are used to choose the relevant services to enable. UM relates to the mailbox role and the UMCallRouter relates to the client access role. The example below enables the SSL certificate on a multi-role server.
Get-ExchangeCertificate
Enable-ExchangeCertificate -Services 'UM,UMCallRouter' -Identity '<Certificate
Thumbprint>'
Monitoring calls and call statistics
Typically the team that manages the organization’s phone system and the team that manages the Exchange infrastructure are different teams, which can make understanding who is accessing Unified Messaging, and how often they access the system, hard to gauge without the right tools. Exchange Unified Messaging includes two tools to provide this information to Exchange administrators. If UM administrators and PBX administrators are in the same team, or work closely together, a clear picture of calls and call statistics can be built.
Reasons to monitor calls and call statistics
The sizing for Exchange Server 2013 assumes a certain maximum load of 100 concurrent calls. Therefore, for larger organizations that move mailboxes and databases between servers for other reasons, it is important to keep abreast of the overall load Unified Messaging places on the Exchange infrastructure.
Incoming calls that have issues are not likely to be reported directly to the Exchange administrators, if at all. For example, if an auto attendant is failing or has issues with audio quality, new business may be missed and customers may not be able to reach representatives at the organization. Callers who cannot get through to the person they intended to call and wish to leave a voicemail, could be seeing occasional dropped calls. These will not be apparent immediately because the person initiating the call is not an employee and has no way of logging a service request with the help desk. They may simply call the next company on their list.
It might instead be that an executive in your organization is unsure if the system was available over a specific period of time; perhaps the person they were expecting to leave a message with lost their cell signal during that period and made the suggestion that the organization’s system was at fault. Using the monitoring capabilities within Exchange, an administrator can use the records to verify that Exchange wasn’t (or maybe was) at fault.
Tools available for call monitoring and statistics
Unified Messaging includes three tools for monitoring Unified Messaging; call statistics, call logs, and current active calls. The last 90 days of call statistics and call logs are kept, and monthly statistics are kept for a default of 12 months.
Viewing call statistics
The Exchange Admin Center provides a user interface to select the information you want to view by different categories and then display it on-screen immediately. The following options are available when viewing call statistics through the EAC:
![]() Show one of the following:
Show one of the following:
![]() Daily statistics for the last 90 days.
Daily statistics for the last 90 days.
![]() The monthly statistics, covering up to the last 12 months.
The monthly statistics, covering up to the last 12 months.
![]() All statistics available.
All statistics available.
![]() All UM dial plans, or statistics from a particular UM dial plan.
All UM dial plans, or statistics from a particular UM dial plan.
![]() Statistics from all UM IP gateways or statistics from just one UM IP gateway.
Statistics from all UM IP gateways or statistics from just one UM IP gateway.
To view call statistics, navigate to the Exchange Admin Center and select the Unified Messaging section. Choose the UM Dial Plans tab, and select the More button from the tool bar. On the drop-down menu, shown in Figure 1-30, select Call Statistics.
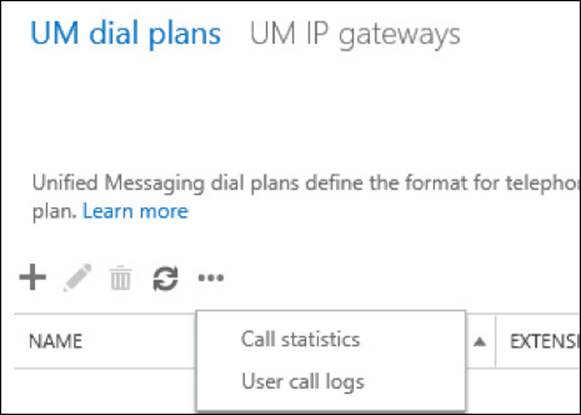
FIGURE 1-30 The menu option for Call Statistics and User Call Logs
The Call Statistics window will open. This provides the opportunity to select the data based on the parameters and extract data to view. The columns returned include:
![]() The date for the row shown
The date for the row shown
![]() Total calls received that day
Total calls received that day
![]() Voice messages received
Voice messages received
![]() Missed calls
Missed calls
![]() Outlook Voice Access calls
Outlook Voice Access calls
![]() Outgoing calls placed
Outgoing calls placed
![]() Auto attendant calls received
Auto attendant calls received
![]() Inbound fax calls.
Inbound fax calls.
![]() Other unclassified calls.
Other unclassified calls.
![]() Failed or rejected calls.
Failed or rejected calls.
![]() Statistics for audio quality.
Statistics for audio quality.
For each row of data, additional information can be shown, such as audio quality details for a particular day, or an export of all call logs for a day (row) shown, which can then be imported for further analysis into Microsoft Excel.
The same statistics can be retrieved via the Exchange Management Shell. This is useful in a scenario such as automated retrieval of statistics. The equivalent cmdlet for retrieving call statistics is Get-UMCallSummaryReport. In the example below, the daily call statistics are retrieved for the Nuneaton UM dial plan.
Get-UMCallSummaryReport -GroupBy Day -UMDialplan Nuneaton
Viewing call logs
Unified Messaging call logs provide the ability to view information about calls to and from a particular UM-enabled mailbox. Call logs for each user are stored for up to 90 days. Call logs are also available for view via the Exchange Admin Center in the same More drop-down list on the UM Dial Plans tab of the Unified Messaging section that call statistics is found.
After selecting user call logs from the menu, the Unified Messaging Reports window will open. This provides a single option, which is to select a user. Only UM-enabled users will be shown and can be selected. After selecting a user mailbox, a list of all call records will be shown, with the following columns:
![]() Date and time of the call.
Date and time of the call.
![]() Duration of the call.
Duration of the call.
![]() The type of the call, such as:
The type of the call, such as:
![]() Call Answering Where the call was received by UM and a voice mail was recorded.
Call Answering Where the call was received by UM and a voice mail was recorded.
![]() Call Answering Missed Call Where the call was received by UM, but the caller did not record a voice mail.
Call Answering Missed Call Where the call was received by UM, but the caller did not record a voice mail.
![]() Subscriber Access Where the user called into Outlook Voice Access.
Subscriber Access Where the user called into Outlook Voice Access.
![]() Auto Attendant If the call was answered by an auto attendant.
Auto Attendant If the call was answered by an auto attendant.
![]() Play On Phone When the user chose to initiate playback of the voice mail from Outlook or OWA to a phone extension or phone number.
Play On Phone When the user chose to initiate playback of the voice mail from Outlook or OWA to a phone extension or phone number.
![]() Find Me When a call answering rule was configured to attempt to call one or more additional numbers and forward the call to the user at one of those numbers if answered.
Find Me When a call answering rule was configured to attempt to call one or more additional numbers and forward the call to the user at one of those numbers if answered.
![]() Unauthenticated Pilot Number A failed attempt to access Outlook Voice Access.
Unauthenticated Pilot Number A failed attempt to access Outlook Voice Access.
![]() Greetings Recording When the user updates or records their greetings messages.
Greetings Recording When the user updates or records their greetings messages.
![]() None Other types of undefined call.
None Other types of undefined call.
![]() The Calling Number attempting to reach the user.
The Calling Number attempting to reach the user.
![]() The number the caller dialed, the Called Number.
The number the caller dialed, the Called Number.
![]() The UM IP gateway that passed the call to Microsoft Exchange.
The UM IP gateway that passed the call to Microsoft Exchange.
![]() Audio quality statistics.
Audio quality statistics.
The entire set of rows can be exported and for each row, the audio quality can be examined in detail by selecting the Audio Quality Details button. The same data can be extracted by using the Exchange Management Shell. The following is an example.
Get-UMCallDataRecord -Mailbox John.Smith@contoso.com
Viewing active calls
In some circumstances, for example before failing over a server, or to gain a snapshot of how many calls are active while troubleshooting an active issue, you might want to view a point-in-time snapshot of the active UM calls on an Exchange Server.
This cannot be accomplished using the Exchange Admin Center, but can be accomplished using the Exchange Management Shell, or by using the Windows Performance Console. The Performance Console uses the current calls counter for the object MSExchangeUMGeneral to display a tracking view of active calls.
To view the current active calls using the Exchange Management Shell, use the Get-UMActiveCalls cmdlet. The Server, IPGateway, and DialPlan parameters allow the information returned to be scoped to relevant information. The following is an example.
Get-UMActiveCalls -Server Server01
Troubleshooting and configuring Quality of Service
By configuring Quality of Service, Unified Messaging can play its part in ensuring that network packets for voice traffic are guaranteed delivery, and best efforts are provided to maintain transmission quality. To utilize Quality of Service within an organization, each device that passes traffic must participate, including the IP-PBX, UM IP gateway, network routers, and switches, and of course the Exchange Servers.
Differentiated Services Code Point (DSCP) marking is used to mark values on packets to ensure that each hop along the data path understand the importance of the traffic and treat the traffic accordingly.
Controls to set DSCP marking for Quality of Service are not built directly into Exchange Server but are built into the foundation products that support UM and Exchange. The first cornerstone of QoS is built into Windows Server itself, via the QoS Packet Scheduler, which switches the ability to use QoS on or off. The second cornerstone of QoS is built into one of the prerequisite packages for Exchange Server, the Microsoft Unified Communications Managed API (UCMA).
Configuring Quality of Service for Unified Messaging
Quality of Service for Unified Messaging is configured on Exchange Servers by using a combination of the Registry Editor and Group Policy editor to create a new policy that applies to all relevant Exchange Servers; or by editing the local policy on an individual server.
To create the Registry settings, open the Registry Editor, and navigate to the following key: HKEY_LOCAL_MACHINE\Software\Microsoft\RTC\Transport. Create a new DWORD entry named QoSEnabled, and set the value to 1.
To configure the Group Policy for the local server:
1. Open the GPEDIT.MSC tool while logged into the server using an account that is a member of the local Administrators group.
2. Expand Computer Configuration, and then within Policies, expand Administrative Templates, Network, QoS Packet Scheduler, DSCP.
3. Within DSCP, first select Controlled Load Service Type, and open its properties window. Choose Enable, and enter a DSCP Value of 24.
4. Select Guaranteed Service Type, and open its properties window. Select Enable, and enter a DSCP value of 40.
5. To complete the configuration, restart the Unified Messaging Services.
Important: Check with Your Vendor
Check with your UM IP gateway, IP-PBX or networking vendor as to their preferred value for the Guaranteed Service Type. Although Microsoft Lync expects 40, some vendors expect audio traffic to be marked as 46.
Troubleshooting Quality of Service
To verify that QoS is enabled end-to-end throughout the path that the packets will take between the UM server and an endpoint, you must have visibility into all relevant areas of the network.
For an Exchange Admin, there are two key tasks to perform to verify if QoS is correctly configured on a Unified Messaging server, and traffic is being transmitted with the correct DSCP marking.
To verify that QoS is correctly configured on an Exchange Unified Messaging server:
1. Log into the server and open the Registry Editor.
2. Open HKEY_LOCAL_MACHINE and expand the Software\Policies\Microsoft\Windows\Psched\DiffservByteMappingConforming key.
3. Locate the following two values:
![]() SERVICETYPE_GUARANTEED (DSCP 40, 0x28)
SERVICETYPE_GUARANTEED (DSCP 40, 0x28)
![]() SERVICETYPE_CONTROLLEDLOAD (DSCP 24, 0x18)
SERVICETYPE_CONTROLLEDLOAD (DSCP 24, 0x18)
If both values are set, the Unified Messaging server will attempt to tag traffic according to the QoS policy set.
The second task to perform to verify that Unified Messaging related packets are being transmitted with the required DSCP markers is to monitor traffic between endpoints using a packet monitor. Microsoft provides a monitoring tool for sniffing local network traffic, called Microsoft Message Analyzer. This supersedes the older NetMon tool and provides a wider range of templates.
Microsoft Message Analyzer can be downloaded and installed from the Microsoft Download website.
Troubleshooting SIP communication
Session Initiation Protocol (SIP) is the text-based communications protocol used by Voice over IP (VoIP) communications in Exchange UM to set up communications between VoIP endpoints.
If SIP communication cannot function, no Unified Messaging calls will be received. It is therefore important to understand where to check when things do not go as planned.
Key ports to check
SIP communication uses (unless you reconfigure the UM service and UM call router service) the following ports for communication, and subsequent Real Time Protocol (RTP) communications.
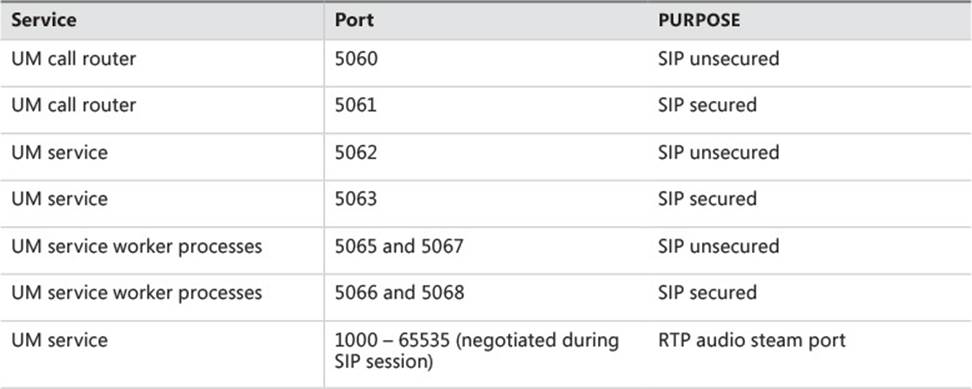
Ensure that the Windows Firewall configuration allows incoming traffic on these ports. The installation of Exchange Server 2013 will add these exclusions, however security conscious administrators, or security teams who have implemented Group Policies to control firewall rules may have made changes, particularly to the ranges used for the RTP audio streams.
Additionally, although it is not supported to implement firewall devices with rules other than Any/Any (effectively the same as no firewall) between Exchange Servers, it is supported to implement firewall rules between the UM IP gateway and the Exchange UM servers.
Verify that the firewall devices along the path between both UM servers and UM call routers and the UM IP gateways allow traffic to these ports, and the respective ports that the UM service will place outbound calls to.
Tools available for troubleshooting SIP communications
Microsoft provides a number of tools to use when attempting to troubleshoot traffic between the Exchange UM-related servers and the UM IP gateway devices. The primary tool to utilize on the Exchange UM server is the Microsoft Message Analyzer, available from the Microsoft Download website.
The Microsoft Message Analyzer captures and decodes the SIP traffic if the communications are not MTLS secured. This typically means that for Lync/Skype for business servers, troubleshooting should be initiated from the IP-PBX side.
Lync/Skype for business includes a VoIP-focused traffic logging tool that can record and display a SIP conversation and allow troubleshooting to be conducted. Part of the Lync Server Resource Kit, the Lync Logging Tool in combination with Snooper will allow the specified types of communication (for example, SIP traffic) to be captured.
 Thought experiment: Providing reports to management
In this thought experiment, apply what you’ve learned about this objective. You can find answers to these questions in the “Answers” section at the end of this chapter.
You have been asked to provide a regular report to management showing the number of UM calls received each month and provide access to the phone team so they can match up voice mails received to inbound phone calls.
1. What solution will allow you to automate exporting reports without needing to generate the reports manually?
2. The user call logs will provide the information that the phone team needs. Apart from giving Organization Admin access, what role could you grant to the phone team?
Objective summary
![]() The most common issues with Unified Messaging usually relate to network communications.
The most common issues with Unified Messaging usually relate to network communications.
![]() SSL certificates must be trusted and configured correctly on both the UM IP gateway and each Exchange 2013 server participating in UM communications.
SSL certificates must be trusted and configured correctly on both the UM IP gateway and each Exchange 2013 server participating in UM communications.
![]() Call statistics provide a summary of the organizations calls. Call logs provide information about calls to and from a user mailbox.
Call statistics provide a summary of the organizations calls. Call logs provide information about calls to and from a user mailbox.
![]() Quality of Service requires network and IP-PBX systems to be configured, as well as the UM server, and ensures voice traffic is given appropriate priority.
Quality of Service requires network and IP-PBX systems to be configured, as well as the UM server, and ensures voice traffic is given appropriate priority.
![]() SIP communications are the key to setup of traffic between servers and require specific ports to be open on the UM servers, UM call routers, and the UM IP gateway.
SIP communications are the key to setup of traffic between servers and require specific ports to be open on the UM servers, UM call routers, and the UM IP gateway.
Objective review
Answer the following questions to test your knowledge of the information in this objective. You can find the answers to these questions and explanations of why each answer choice is correct or incorrect in the “Answers” section at the end of this chapter.
1. You need to verify if the installed SSL certificate for server01.contoso.com will work with your Lync/Skype for business system with MTLS. Which certificates are valid? (Choose all that apply.)
A. Self-signed certificate with the FQDN of the server.
B. Certificate issued by an internal Enterprise CA including the FQDN of the server.
C. Certificate issued by a third-party including the HTTPS name (mail.contoso.com).
D. Third-party certificate including the FQDN of the server.
2. SIP secured communications appear to fail. You ask the networking team to check that the correct ports are open. Which port is not required for SIP secured communications?
A. 5060
B. 5061
C. 5063
D. 5068
Objective 1.4: Migrate Unified Messaging
When an organization moves from an older version of Exchange Server and already uses Unified Messaging, much of the key configuration will already be in place and working. In such scenarios a properly executed migration will be required to ensure that users do not experience downtime during the Exchange upgrade.
This objective covers how to:
![]() Prepare to migrate.
Prepare to migrate.
![]() Plan a migration strategy.
Plan a migration strategy.
![]() Plan a coexistence strategy.
Plan a coexistence strategy.
![]() Move UM mailboxes between sites.
Move UM mailboxes between sites.
![]() Redirect the SIP gateway to Exchange.
Redirect the SIP gateway to Exchange.
![]() Decommission the legacy system.
Decommission the legacy system.
Prepare to migrate
The deployment of and migration to Exchange Server 2013 includes UM software within both the Client Access and Mailbox roles. This means the foundation for the migration will be in place before the migration of UM-enabled mailboxes takes place. This differs to older versions of Exchange Server, as in Exchange 2007 and Exchange 2010 organizations would typically use standalone Exchange Unified Messaging servers. Therefore, from 2007 to 2010 many organizations would continue to deploy these as standalone roles.
Preparation for the migration is instead based on understanding the services in use within the organization, and ensuring the new Exchange 2013 servers are configured correctly to allow a smooth migration. The specifics of implementing certificates, UM dial plans, and other core configuration objects have already been covered in depth earlier in this chapter so the focus here is solely on the high level areas that must be taken into account, along with the order of proceedings for success.
In preparation for migration, look to collect information about the following areas within the existing Exchange 2007 or Exchange 2010 Unified Messaging services:
![]() Is SIP secured (MTLS) in use on the existing UM services? Record the startup mode configured on each server.
Is SIP secured (MTLS) in use on the existing UM services? Record the startup mode configured on each server.
![]() Record the Unified Messaging related SSL certificates that are currently in place, including the names in use and each certificate issuer. For example, is the SSL certificate issued by a third-party, issued by an internal/Enterprise certificate authority, or even a self-signed certificate?
Record the Unified Messaging related SSL certificates that are currently in place, including the names in use and each certificate issuer. For example, is the SSL certificate issued by a third-party, issued by an internal/Enterprise certificate authority, or even a self-signed certificate?
![]() Check with the administrators responsible for the network and firewalls. Are custom firewall rules in place to allow traffic between UM IP gateway devices and Exchange UM servers? What are the rules?
Check with the administrators responsible for the network and firewalls. Are custom firewall rules in place to allow traffic between UM IP gateway devices and Exchange UM servers? What are the rules?
![]() Have custom ports been configured for SIP use, rather than standard ports such as 5060 and 5061? If custom ports have been configured for the UM service, investigate if there is a need for this configuration, or if it was an arbitrary choice.
Have custom ports been configured for SIP use, rather than standard ports such as 5060 and 5061? If custom ports have been configured for the UM service, investigate if there is a need for this configuration, or if it was an arbitrary choice.
![]() If upgrading from Exchange 2007, are fax services in use? Exchange 2010 and above require a fax provider instead, so if the organization uses this functionality and will continue to do so, preparation will include selecting a compatible third-party solution to integrate with Exchange 2013.
If upgrading from Exchange 2007, are fax services in use? Exchange 2010 and above require a fax provider instead, so if the organization uses this functionality and will continue to do so, preparation will include selecting a compatible third-party solution to integrate with Exchange 2013.
![]() If upgrading from Exchange 2010 and fax services are in use, ensure that the current third-party solution supports Exchange 2013. If an upgrade is required, take time to understand the steps to perform (and at which point to perform the steps) during the upgrade.
If upgrading from Exchange 2010 and fax services are in use, ensure that the current third-party solution supports Exchange 2013. If an upgrade is required, take time to understand the steps to perform (and at which point to perform the steps) during the upgrade.
![]() What dial plans are in use within the organizations and what Exchange UM servers is each dial plan assigned to? E.164 and extension-based dial plans will not be bound to any Exchange 2013 server; but SIP-based dial plans will need to be bound to particular Exchange 2013 UM servers.
What dial plans are in use within the organizations and what Exchange UM servers is each dial plan assigned to? E.164 and extension-based dial plans will not be bound to any Exchange 2013 server; but SIP-based dial plans will need to be bound to particular Exchange 2013 UM servers.
![]() Record each UM IP gateway and associated Hunt Groups that are configured on the existing Exchange 2007 or 2010 systems. Ensure that the system is supported with Exchange 2013 before attempting to migrate. Many IP-PBX systems require updates.
Record each UM IP gateway and associated Hunt Groups that are configured on the existing Exchange 2007 or 2010 systems. Ensure that the system is supported with Exchange 2013 before attempting to migrate. Many IP-PBX systems require updates.
![]() Any auto attendant will also need recording to ensure that functionality is tested before and after migration.
Any auto attendant will also need recording to ensure that functionality is tested before and after migration.
![]() Finally, use the current UM-enabled mailbox count and call statistics as input to Exchange sizing.
Finally, use the current UM-enabled mailbox count and call statistics as input to Exchange sizing.
As part of the preparation for the Unified Messaging migration, the core Exchange Server 2013 implementation must take place. For UM migration this will require that both the Client Access and Mailbox server roles installed within the organization to ensure the UM call router and UM service is available.
Planning a migration strategy
A migration to Exchange 2013 Unified Messaging will usually be an intra-forest migration. An intra-forest migration is when the new version of Exchange is installed into the same forest as the old version of Exchange.
The benefit of an intra-forest migration is that most configuration is stored in Active Directory rather than on individual Exchange Unified Messaging servers. Therefore, UM dial plans and UM-enabled mailboxes (and other configuration) are available and ready for the Exchange 2013 servers to consume. Mailboxes moved as part of an intra-forest migration will not need re-enabling for Unified Messaging.
Other organizations, particularly those that are consolidating forests after a merger or acquisition, will perform a cross-forest migration. A cross-forest migration requires re-creation of the same UM dial plans, UM mailbox properties, auto attendants, UM IP gateways, and other associated configuration before mailboxes can be migrated cross-forest. A mailbox moved as part of a cross-forest migration will need to have Unified Messaging re-enabled after the mailbox move successfully completes.
Migrations from earlier versions of Exchange, to Exchange Server 2013 Unified Messaging, follow standard upgrade and migration procedures. Mailboxes are moved using the latest version of the tools, either in the Exchange Admin Center or via the Exchange Management Shell. This allows administrators to either use Move Requests, or new with Exchange 2013, Migration Batches.
As with all mailbox moves, the same standard considerations apply. A mailbox move will consume approximately the same amount of disk space in log files as the mailbox size; therefore moving 50 mailboxes that are 10 GB in size in a single operation will consume at least 500 GB of log space, in addition to at least 500 GB of space in the mailbox databases. This space is not permanently used and will be reclaimed after the next time the database is backed up or (in the case of Exchange Native Protection with circular logging) as soon as the logs are replayed on other nodes. The potential log space requirements during migration often require administrators to factor in a longer period of coexistence as part of the migration strategy.
In addition to moving user mailboxes, include migrating system mailboxes as part of the migration strategy from Exchange 2010. These are often hidden from view but available when using Get-Mailbox with the Arbitration parameter. The system mailbox is used for the storage of UM prompts, announcements, and auto attendant menus.
Planning a coexistence strategy
When mailboxes will continue to function as normal from a user perspective on both the old and new versions of Exchange, the organization is in a period of coexistence. This requires that software that communicates with Exchange server is capable of working correctly with both the older version and Exchange Server 2013.
For many organizations, the IP-PBX system, fax system or other third-party device, such as a dedicated session border controller (SBC) will require software updates to ensure compatibility with Exchange 2013. It is the responsibility of the administrator planning for coexistence to examine the matrixes from third-party vendors to understand their requirements when implementing coexistence. This may require devices are upgraded to an interim software version, or implementing side-by-side systems during this period. The configuration of the IP-PBX software and how it can coexist can be worthy of its own book, so to help meet this challenge, a dedicated gateway device may come to the rescue.
During the coexistence period, IP gateways that communicate with Exchange will remain configured to initially communicate with the legacy version of Exchange. The same SIP redirect messages issued by the UM call router are used by the UM services to redirect the IP gateway to the correct Exchange server version capable of receiving the call and directing it to the correct mailbox.
Where possible, coexistence is preferred to a cutover migration because it allows staged moves of users and rollback of any changes. A smaller initial pilot group of users can be migrated to Exchange 2013 for user acceptance testing purposes before migrating larger groups.
Moving UM mailboxes between sites
With previous versions of Exchange, the endpoint for the UM IP gateway would always be the configured UM server matching the dial plan and Exchange Server version. This relationship between dedicated UM server roles and UM IP gateways, allowed mailbox migrations throughout the organization to take place without affecting UM services. An inbound call to a user mailbox would reach the UM server where the call would be answered and the voice message received.
In Exchange Server 2013, the UM call router will redirect the inbound call to the server hosting the active copy of the user’s mailbox. This requires careful planning of UM dial plan server assignments for SIP-based dial plans, but also can have unexpected effects on call quality. Moving a UM mailbox between sites will mean that the SIP traffic between the IP gateway and the Exchange mailbox server will need to traverse the WAN link.
When planning for UM mailbox moves between sites, ensure that consideration has been taken for the effect on the underlying WAN, and appropriate measures have been put into place before attempting the mailbox moves. These measures including enabling Quality of Service, bandwidth planning, latency testing, and ensuring firewall devices are configured correctly.
Redirecting the SIP gateway to Exchange
After successfully migrating mailboxes from the legacy version of Exchange, to Exchange 2013, existing UM IP gateways will need to be reconfigured. During coexistence SIP gateway traffic will have been redirected automatically to Exchange 2013 servers, therefore the networking software has been tried and tested.
The SIP gateway will however need to be updated so that the Exchange 2013 Unified Messaging servers will be the new endpoint. Before making the configuration change, ensure that the UM dial plans are correctly associated with both the UM call router and the UM services.
Decommissioning the legacy system
Before removing old versions of Unified Messaging from the organization, ensure that supporting Exchange migration steps have taken place, including migrating all UM-enabled mailboxes to Exchange Server 2013. For example, if the UM server is also an Exchange 2010 transport server, all related transport migration must be performed according to relevant guidance for that role.
After ensuring that calls are not being received by the legacy Exchange 2007 or 2010 server, the following steps must be taken to correctly decommission the legacy system:
1. Using the Exchange Management Console, navigate to Servers, Unified Messaging, and select the UM server to decommission. In the Actions pane, disable all incoming calls to the server.
2. With the incoming calls disabled, the server can now be removed for the existing Unified Messaging dial plan (or multiple dial plans) it was associated with. Use the Exchange Server 2013 management tools to remove the UM server from the dial plan.
3. Uninstall all Unified Messaging language packs currently installed on the Exchange UM server, before proceeding with the full uninstallation of Microsoft Exchange.
Always ensure that a Unified Messaging server that is no longer in use is properly decommissioned and uninstalled. As with all Exchange Servers, not only is the server installed onto the Windows Server but it is installed into Active Directory. Following the correct procedure for uninstallation ensures clean removal and is the only supported way to remove the server from the Exchange organization.
Thought experiment: Exchange Server consolidation
In this thought experiment, apply what you’ve learned about this objective. You can find answers to these questions in the “Answers” section at the end of this chapter.
You are planning a migration from Exchange 2007 to Exchange 2013, and as part of the design a centralized Exchange infrastructure will be implemented at your main datacenter, rather than Exchange 2007 servers at every site. The existing environment has a 1-to-1 relationship between IP gateways and UM servers, whereas the new environment will use a single Database Availability Group with eight multi-role servers.
1. What impact could this have on audio quality and how might you mitigate this?
2. What network areas should you investigate if you want to ensure that communications between IP-PBX systems and the new Exchange 2013 servers will succeed?
Objective summary
![]() Exchange 2013 Unified Messaging is always installed with Exchange, so your preparation may include installation of the new UM version.
Exchange 2013 Unified Messaging is always installed with Exchange, so your preparation may include installation of the new UM version.
![]() Use the information available in the legacy Exchange environment to help you plan your new implementation. Use UM mailbox counts and statistics to aid sizing.
Use the information available in the legacy Exchange environment to help you plan your new implementation. Use UM mailbox counts and statistics to aid sizing.
![]() Most migrations involve a degree of coexistence, so ensure you co-ordinate upgrades to dependencies carefully.
Most migrations involve a degree of coexistence, so ensure you co-ordinate upgrades to dependencies carefully.
![]() Move SIP gateway configuration to Exchange 2013 last.
Move SIP gateway configuration to Exchange 2013 last.
Objective review
Answer the following questions to test your knowledge of the information in this objective. You can find the answers to these questions and explanations of why each answer choice is correct or incorrect in the “Answers” section at the end of this chapter.
1. The IP gateway is configured to connect to Exchange 2007 using an IP address. When a user is migrated to Exchange 2013, the calls to UM never reach the UM call router service on an Exchange 2013 server. Firewall rules are correct. Which of the following is a possible resolution?
A. Reconfigure the IP gateway to use the IP address of the Exchange 2013 server instead of the Exchange 2007 server.
B. Reconfigure the IP gateway so it can use DNS resolution.
C. Update the settings on the IP gateway to use the DNS name of the Exchange 2007 server.
D. Verify that the SSL certificates are correctly configured on the Exchange 2013 servers.
2. The final mailbox has been migrated to Exchange 2013 and your colleague switches off the final Exchange 2010 UM servers without uninstallation. What issues may an administrator see if the servers are not uninstalled correctly? (Choose all that apply.)
A. No issues, this is the correct way to decommission the server.
B. The UM servers may still appear in Exchange management tools and cause timeouts.
C. A future upgrade to a newer Exchange version may not be possible without remediation.
D. SSL certificate generation will fail.
Answers
This section contains the solutions to the thought experiments and answers to the objective review questions in this chapter.
Objective 1.1: Thought experiment
1. Use the auto attendant feature to provide a menu to inbound callers.
2. Call answering rules can be used to provide a menu on an individual user’s voice mail. The helpdesk role can allow an administrator to configure this or this action can be performed using PowerShell.
Objective 1.1: Review
1. Correct answer: B
A. Incorrect: The underlying IP address must be correct, however the MTLS session will not be able to begin using an IP address.
B. Correct: MTLS will use a FQDN of a server or device with a matching SSL certificate.
C. Incorrect: While a firewall may cause problems with establishing communications, the FQDN of the server should be specified first before further troubleshooting.
D. Incorrect: The port chosen, 5061 is suitable for MTLS communications. 5060 is used for unsecured communications.
2. Correct answer: A
A. Correct: SIP dial plans must be associated with Exchange 2013 Servers.
B. Incorrect: E.164 dial plans cannot be associated with an Exchange 2013 Server.
C. Incorrect: Extension dial plans cannot be associated with an Exchange 2013 Server.
D. Incorrect: Only SIP dial plans can be associated with Exchange 2013 Servers.
3. Correct answer: D
A. Incorrect: The SIP protocol does not initiate audio, and the UM Call Router will redirect the traffic rather than initiate an audio call.
B. Incorrect: Although some traffic is proxied by a Client Access server, UM traffic is redirected.
C. Incorrect: While in the scenario where the UM call router answering the call is the same server as the one hosting the active copy of the mailbox being called, this is not always going to be true in larger organizations.
D. Correct: The UM call router will lookup the location of the active copy of the user mailbox and redirect the SIP call to the Mailbox server.
Objective 1.2: Thought experiment
1. Install the Polish language pack on all Exchange Servers in both Database Availability Groups and allow users to select their preferred language
2. Install the Polish language pack on the DAG nodes that will host mailboxes for the Polish users. Create a new UM dial plan and set the default language to Polish, and assign the UM dial plan to the same DAG nodes and the Polish user mailboxes.
Objective 1.2: Review
1. Correct answer: C
A. Incorrect: The Voice Preview setting is configured via the UM mailbox policy, not a UM dial plan. Additionally, to switch UM dial plans, the user must have UM disabled and re-enabled.
B. Incorrect: The Voice Preview setting is indeed configured via a UM mailbox policy but a new UM dial plan is not required.
C. Correct: A new UM mailbox policy can be added to the existing UM dial plan with Voice Preview disabled, and users can simply be switched to use the new UM mailbox policy.
D. Incorrect: The Voice Preview setting is configured via the UM mailbox policy, not a UM dial plan.
2. Correct answer: A
A. Correct: A secondary dial plan allows the user to receive voice mail from two separate IP-PBX systems.
B. Incorrect: Although this technique may work, it may involve additional expense to route calls externally between systems or introduce complex troubleshooting.
C. Incorrect: The user will only be able to receive voice mail for one number at a time using this approach, and it increases the user and IT team workload.
D. Incorrect: Adding the extension alone will not allow the user to receive voice mail. They must also have a matching dial plan.
Objective 1.3: Thought experiment
1. You can use the Exchange Management Shell to generate reports. Any task that can be performed via the Exchange Admin Shell can be contained within a script and then automated as a scheduled task.
2. The UM Management role group will provide access to the UM features within Exchange Server without providing the phone team full access to Exchange.
Objective 1.3: Review
1. Correct answers: B and D
A. Incorrect: A self-signed SSL certificate cannot be used for MTLS with Lync/Skype for business.
B. Correct: An Enterprise CA trusted by both systems with the FQDN of the server is valid.
C. Incorrect: The UM services will use a FQDN rather than the defined HTTPS URLs and the communication will fail.
D. Correct: A third-party CA trusted by both systems including the FQDN of the server is valid.
2. Correct answer: A
A. Correct: This port is used for unsecured SIP communications by the UM call router service.
B. Incorrect: This port is used for SIP secured communications by the UM call router service.
C. Incorrect: This port is used for SIP secured communications by the UM service.
D. Incorrect: This port is used for SIP secured communications by the UM worker process.
Objective 1.4: Thought experiment
1. Audio quality may suffer when the WAN links between sites are congested. Consider implementing Quality of Service before your migration begins.
2. IP-PBX systems will now need to communicate over WAN links to the central datacenter. Ensure that routing rules and firewall rules allow traffic to flow both ways, and the correct ports are open.
Objective 1.4: Review
1. Correct answer: B
A. Incorrect: This may allow the UM call to succeed for the user migrated, but is likely to break UM for Exchange 2007 users.
B. Correct: The redirect from the Exchange 2007 server will refer the IP gateway to a FQDN and port number of an Exchange 2013 UM call router.
C. Incorrect: As the issue appeared to be the DNS-based redirection, this change may break communications with the Exchange 2007 UM server as well.
D. Incorrect: As the IP gateway is using an IP address to communicate with the Exchange 2007 server, MTLS is not configured and working.
2. Correct answers: B and C
A. Incorrect: The issues described in B and C are one of numerous issues that may occur.
B. Correct: The list of Exchange servers returned by management tools will include the switched off UM servers and the tools may attempt to contact and interrogate the servers, causing timeouts and error messages.
C. Correct: Just like Exchange 2013 cannot be installed into an organization that still has Exchange 2003 servers, the UM servers that have not been uninstalled properly will still appear to exist within the organization. This may prevent a future upgrade.
D. Incorrect: SSL certificate generation does not depend on the availability of existing servers.
All materials on the site are licensed Creative Commons Attribution-Sharealike 3.0 Unported CC BY-SA 3.0 & GNU Free Documentation License (GFDL)
If you are the copyright holder of any material contained on our site and intend to remove it, please contact our site administrator for approval.
© 2016-2026 All site design rights belong to S.Y.A.