Exam Ref 70-342 Advanced Solutions of Microsoft Exchange Server 2013 (2015)
Chapter 5. Implement and manage coexistence, hybrid scenarios, migration, and federation
This final chapter of the book looks in more detail at a number of features of Exchange Server that were mentioned in the other chapters. While other chapters focus on specific features and how they operate in Exchange Online or on-premises, this chapter looks at setting up coexistence between Exchange 2013 on-premises and Exchange Online, which is part of Office 365.
Note that it is possible to migrate to Exchange Online without any coexistence and this is known as a cutover migration. All of the mailboxes are moved to the cloud and mail flow is redirected to Exchange Online rather than on-premises, typically overnight or over a weekend, and can be suitable for some small companies. There is generally little complexity in doing a cutover migration, but it is not the best solution for moving email to Exchange Online for a lot of companies that are considering this type of migration. Therefore, this chapter covers the more complex scenarios for migrations to Exchange Online, and other coexistence scenarios with other companies.
Objectives in this chapter:
![]() Objective 5.1: Establish coexistence with Exchange Online
Objective 5.1: Establish coexistence with Exchange Online
![]() Objective 5.2: Deploy and manage Exchange federation
Objective 5.2: Deploy and manage Exchange federation
![]() Objective 5.3: Implement on-premises coexistence with legacy systems
Objective 5.3: Implement on-premises coexistence with legacy systems
![]() Objective 5.4: Set up a cross-forest coexistence solution
Objective 5.4: Set up a cross-forest coexistence solution
![]() Objective 5.5: Migrate legacy systems
Objective 5.5: Migrate legacy systems
![]() Objective 5.6: Troubleshoot issues associated with hybrid scenarios, coexistence, migration, and federation
Objective 5.6: Troubleshoot issues associated with hybrid scenarios, coexistence, migration, and federation
Objective 5.1: Establish coexistence with Exchange Online
The hosted Exchange Server 2013 deployment from Microsoft is Exchange Online. It exists as part of Office 365 with SharePoint Online and Lync Online, as well as a directory (called Azure Active Directory) and numerous other features such as Azure RMS and Office 365 Message Encryption, to mention a few.
This objective will look at how to coexist your Exchange on-premises organization with Exchange Online. This is known as hybrid coexistence and uses the Hybrid Coexistence Wizard to set the pieces up. The Hybrid Coexistence Wizard exists in both Exchange 2010 and 2013. We will look at it from the viewpoint of 2013 only. Even though they look different, they do similar things.
This objective covers how to:
![]() Deploy and manage hybrid configuration
Deploy and manage hybrid configuration
![]() Evaluate limitations of the Hybrid Configuration Wizard
Evaluate limitations of the Hybrid Configuration Wizard
![]() Configure requirements for single sign-on (SSO)
Configure requirements for single sign-on (SSO)
![]() Design and configure Active Directory Federation Services (AD FS)
Design and configure Active Directory Federation Services (AD FS)
Deploying and managing hybrid configuration
Hybrid coexistence is linking Exchange Online to Exchange on-premises, and vice versa. This coexistence configuration changes and sets a number of settings including send connectors, remote domains, and digital certificates. The configuration is also stored in an object called the HybridConfiguration, and so cmdlets like New-HybridConfiguration and Get-HybridConfiguration can be run, as well as the wizard that you will concentrate on here.
To be able to run the Hybrid Coexistence Wizard and set up hybrid coexistence, you need to have an Exchange on-premises organization that is running Exchange Server 2007 and/or Exchange Server 2010 and/or Exchange Server 2013. To run the hybrid wizard for an Exchange on-premises organization that contains Exchange Server 2003 servers, you need to use the Exchange Server 2010 Hybrid Wizard. When enabling Exchange Server in a hybrid configuration, every server in the organization need to meet certain prerequisites. For Exchange Server 2007 on-premises, the minimum version is 2007 SP3 RU10, and for Exchange Server 2010 on-premises, the minimum supported version is Service Pack 3.
For Exchange Server 2013 on-premises, the minimum supported version to support hybrid is the previous cumulative update. By the time this book goes to press, the latest CU will be CU7, which means the Exchange Server 2013 on-premises will need to be CU6 or CU7 only. Once later CUs are released, this will change with them.
Hybrid deployments are supported in all Office 365 plans that support Windows Azure Active Directory synchronization. All Office 365 Enterprise, Government, Academic, Business, and Midsize plans support hybrid deployments. Office 365 Small Business, Office 365 Business and Home plans don’t support hybrid deployments. The Business Premium and Business plans are new as of October 1, 2014 and are therefore not covered in the exam. The Midsize plan will cease to exist from October 1, 2015 by which time the current users of it will have transitioned their users to a different license. Midsize cannot be configured as a new Office 365 tenant from October 1, 2014.
The remaining requirements for hybrid is that you own the domain name that you are using for Exchange Server, install some software to sync directories, and use a digital certificate that Exchange Online trusts. For the domain ownership requirement, all accepted domains in Exchange will need to be registered in Office 365 with the exception of any internal only domain, such as .local domains. Any domains that you cannot register in Office 365 must not exist on users’s mailboxes as email addresses. There is typically a bit of email and directory cleaning up to do for most organizations when they move to the cloud. Also, for each domain that you register in Office 365, you need to ensure that the AutoDiscover records for that domain point to an on-premises Exchange Server 2013 Client Access Server (CAS) role. If you do not have external AutoDiscover, you need to put this in place correctly. Tools such as http://exrca.com can be used to check that this is working correctly.
To configure hybrid configuration, you need to complete the following steps once you have the above prerequisites in place:
![]() Sign up for a new Office 365 subscription with a license that supports directory synchronization. If you already have an Office 365 subscription (also known as an Office 365 tenant), sign into that tenant as the Global Administrator. The user you create during sign-up is the first global administrator. Other users can be added and assigned this role after you sign in.
Sign up for a new Office 365 subscription with a license that supports directory synchronization. If you already have an Office 365 subscription (also known as an Office 365 tenant), sign into that tenant as the Global Administrator. The user you create during sign-up is the first global administrator. Other users can be added and assigned this role after you sign in.
![]() Add your on-premises domains to the Office 365 portal. The domains will require verification, which will require you to add a record to the public DNS server for that domain. You cannot use any domain that you cannot verify. At the end of the verification wizard, the Office 365 portal will tell you a few DNS record values to change. You should not do this DNS modification at this time because these DNS records probably already exist and point to your on-premises infrastructure. These DNS records that you are required to add are for tenants that do not already exist and are not being migrated in from an existing system.
Add your on-premises domains to the Office 365 portal. The domains will require verification, which will require you to add a record to the public DNS server for that domain. You cannot use any domain that you cannot verify. At the end of the verification wizard, the Office 365 portal will tell you a few DNS record values to change. You should not do this DNS modification at this time because these DNS records probably already exist and point to your on-premises infrastructure. These DNS records that you are required to add are for tenants that do not already exist and are not being migrated in from an existing system.
![]() Activate the Directory Synchronization option on the user’s page. This happens typically after you have added your custom domains and before you enable the optional single sign-on (AD FS) feature.
Activate the Directory Synchronization option on the user’s page. This happens typically after you have added your custom domains and before you enable the optional single sign-on (AD FS) feature.
![]() Ensure that all of your users in the on-premises Active Directory have a user principle name (UPN) that has an Internet routable domain name associated with it. That is, if your Active Directory is contoso.local, this will default to the user principle name domain value. This can be changed in bulk with tools such as IDFix, ADModify.NET, and PowerShell. It can also be changed on a user-by-user basis in the Active Directory tools, but this is time consuming and not recommended. If you cannot change the UPN suffix because it is in use with other on-premises software, or populated with inconsistent data, see http://blogs.office.com/2014/05/06/alternate-login-id-for-office-365-reduces-dependence-on-upn/ for information on using a different attribute from Active Directory for users to log in to Office 365 with.
Ensure that all of your users in the on-premises Active Directory have a user principle name (UPN) that has an Internet routable domain name associated with it. That is, if your Active Directory is contoso.local, this will default to the user principle name domain value. This can be changed in bulk with tools such as IDFix, ADModify.NET, and PowerShell. It can also be changed on a user-by-user basis in the Active Directory tools, but this is time consuming and not recommended. If you cannot change the UPN suffix because it is in use with other on-premises software, or populated with inconsistent data, see http://blogs.office.com/2014/05/06/alternate-login-id-for-office-365-reduces-dependence-on-upn/ for information on using a different attribute from Active Directory for users to log in to Office 365 with.
![]() Look for other configurations within your Active Directory such as multiple forests or non-Microsoft directories. Also be aware that bad data will not sync to the cloud, and it needs to be fixed in a similar way to updating an object’s UPN attribute in the previous bullet. A blog post on preparing to install DirSync can be found at http://blogs.office.com/2014/04/15/synchronizing-your-directory-with-office-365-is-easy/, though this was written before the Azure Active Directory Synchronization software (AADSync) was released, and so some of the information with regard to multiple forests is inaccurate.
Look for other configurations within your Active Directory such as multiple forests or non-Microsoft directories. Also be aware that bad data will not sync to the cloud, and it needs to be fixed in a similar way to updating an object’s UPN attribute in the previous bullet. A blog post on preparing to install DirSync can be found at http://blogs.office.com/2014/04/15/synchronizing-your-directory-with-office-365-is-easy/, though this was written before the Azure Active Directory Synchronization software (AADSync) was released, and so some of the information with regard to multiple forests is inaccurate.
![]() Once your directory is cleaned up, duplicate users are removed, and no objects remain with .local UPN suffixes, you can then install the DirSync software. At the time of writing there are two options for this. There is the AADSync software or the Azure Directory Synchronization software (DirSync). The newer of these two, AADSync, is what you will see in screen shots in this book because it is about to replace the DirSync software. It now has all of the same features as this software and more (such as support for multiple forests), and therefore using DirSync ongoing is not recommended. Instructions for installing AADSync can be found at http://msdn.microsoft.com/en-us/library/azure/dn757602.aspx and the software can be downloaded from http://aka.ms/aadsyncdownload. Instructions for the older DirSync software can be found athttp://technet.microsoft.com/en-us/library/jj151800.aspx and it can be downloaded from http://go.microsoft.com/fwlink/?LinkID=278924.
Once your directory is cleaned up, duplicate users are removed, and no objects remain with .local UPN suffixes, you can then install the DirSync software. At the time of writing there are two options for this. There is the AADSync software or the Azure Directory Synchronization software (DirSync). The newer of these two, AADSync, is what you will see in screen shots in this book because it is about to replace the DirSync software. It now has all of the same features as this software and more (such as support for multiple forests), and therefore using DirSync ongoing is not recommended. Instructions for installing AADSync can be found at http://msdn.microsoft.com/en-us/library/azure/dn757602.aspx and the software can be downloaded from http://aka.ms/aadsyncdownload. Instructions for the older DirSync software can be found athttp://technet.microsoft.com/en-us/library/jj151800.aspx and it can be downloaded from http://go.microsoft.com/fwlink/?LinkID=278924.
 Exam Tip
The exam questions will refer to the DirSync software for a while, but apart from a few PowerShell cmdlets and the setup program, DirSync and AADSync function in much the same way.
Once the domains are verified in Office 365, and one of the two DirSync software options has been installed on an on-premises server, and is syncing to Office 365 successfully, it is time to prepare for the hybrid configuration. The full steps for completing the above can be found via links on the admin portal at Office 365 (http://portal.office.com). The detailed steps are not written in this book because they change over time. An example of this is the release of AADSync as this software is in the process of replacing DirSync.
Preparing for hybrid configuration
Once the on-premises Active Directory has synced to Azure Active Directory, the Users page of the Office 365 portal will list both the original administrator account, and each of the users synced from the on-premises directory. If any users are missing from here, they failed to sync, and the issue will need to be resolved on-premises in Active Directory.
Hybrid configuration provides the following options to integrate your Exchange Servers on-premises with Exchange Online in Office 365:
![]() Mail routing between on-premises and cloud-based organizations.
Mail routing between on-premises and cloud-based organizations.
![]() Mail routing with a shared domain namespace. For example, both on-premises and cloud-based organizations use the @contoso.com SMTP domain.
Mail routing with a shared domain namespace. For example, both on-premises and cloud-based organizations use the @contoso.com SMTP domain.
![]() A unified global address list, also called a shared address book.
A unified global address list, also called a shared address book.
![]() Free/busy and calendar sharing between on-premises and cloud-based organizations.
Free/busy and calendar sharing between on-premises and cloud-based organizations.
![]() Centralized control of mail flow. The on-premises organization can control mail flow for the on-premises and cloud-based organizations.
Centralized control of mail flow. The on-premises organization can control mail flow for the on-premises and cloud-based organizations.
![]() The ability to move existing on-premises mailboxes to the cloud-based organization and back again to on-premises as required.
The ability to move existing on-premises mailboxes to the cloud-based organization and back again to on-premises as required.
![]() Centralized mailbox management using the on-premises Exchange Management Console (EMC) or the Exchange Control Panel in Exchange Server 2010, or by using the Exchange Admin Center (EAC) in Exchange Server 2013. Both versions will do centralized mailbox management using Exchange Management Shell (EMC)
Centralized mailbox management using the on-premises Exchange Management Console (EMC) or the Exchange Control Panel in Exchange Server 2010, or by using the Exchange Admin Center (EAC) in Exchange Server 2013. Both versions will do centralized mailbox management using Exchange Management Shell (EMC)
![]() Message tracking, MailTips, and multi-mailbox search between on-premises and cloud-based organizations.
Message tracking, MailTips, and multi-mailbox search between on-premises and cloud-based organizations.
To create a hybrid configuration to link your Exchange Servers on-premises to your Exchange Online tenant, you need to configure a hybrid server. This is an Exchange Server 2013 server that does not store any mailboxes, but is used as the target for AutoDiscover, and optionally other protocols such as OWA and SMTP. You can build a hybrid server on Exchange 2010, but this will not be covered in this book. The main reason for using Exchange 2010 is that you have Exchange 2003 installed, and therefore cannot install Exchange Server 2013. If you have the choice between 2010 and 2013, choose 2013 as the server version to install.
Note: Hybrid Server License
The hybrid server is provided license free, and the license key needed for the server can be obtained from http://aka.ms/hybridkey. The license key is available after you to login with your Office 365 global administrator account. The operating system license is not free, and Windows needs to be licensed on this server.
The hybrid server is the link for mail flow and free/busy. It is also the source server for mailbox moves to and from Office 365. Advanced hybrid configurations can be built where mailbox moves do not start from the hybrid server, and are sometimes used in multi-site Exchange deployments where you do not want a hybrid server installed in each location, but do not want to move all mailboxes via the one hybrid server location. Typically the hybrid server is installed as a pair, and accessed via a load balancer. This helps ensure high availability of the hybrid server during maintenance and unexpected outages.
You do not need to dedicate a server to the hybrid role, and an existing server can be used, but it is recommended to use dedicated servers for the role.
All of the steps to complete the Hybrid Configuration Wizard are started from the Exchange Control Panel website on-premises, but a connection from the machine that you run the wizard on to both Exchange Online and Exchange Server on-premises is required. It is recommended that if you are using Internet Explorer, do not use In-Private Browsing mode.
1. Ensure that you are running the latest version of Exchange Server on the server that you will connect to. At the time of writing, this is Exchange Server 2013 CU6. There is an issue in CU5 that means the Hybrid Configuration Wizard will fail, so do not use CU5. If you are using CU6, you need to run the fix it at http://support.microsoft.com/kb/2997355/en-us to ensure the wizard will work.
2. Login to Exchange Control Panel (https://servername/ecp) as an Exchange administrator.
3. Click the Office 365 link to the top right and login to the correct Office 365 tenant. You are now logged into both the on-premises server, and Office 365 from the same browser session. Note that if you are using Internet Explorer, you need to add your ECP URL and *.office365.comto your trusted sites list for this to work. Figure 5-1 shows the single browser tab connected to Office 365, and also shows the Exchange Online administration console, with a link to Enterprise on the top left, which is not present if you are administering Office 365 directly viahttp://portal.office.com.
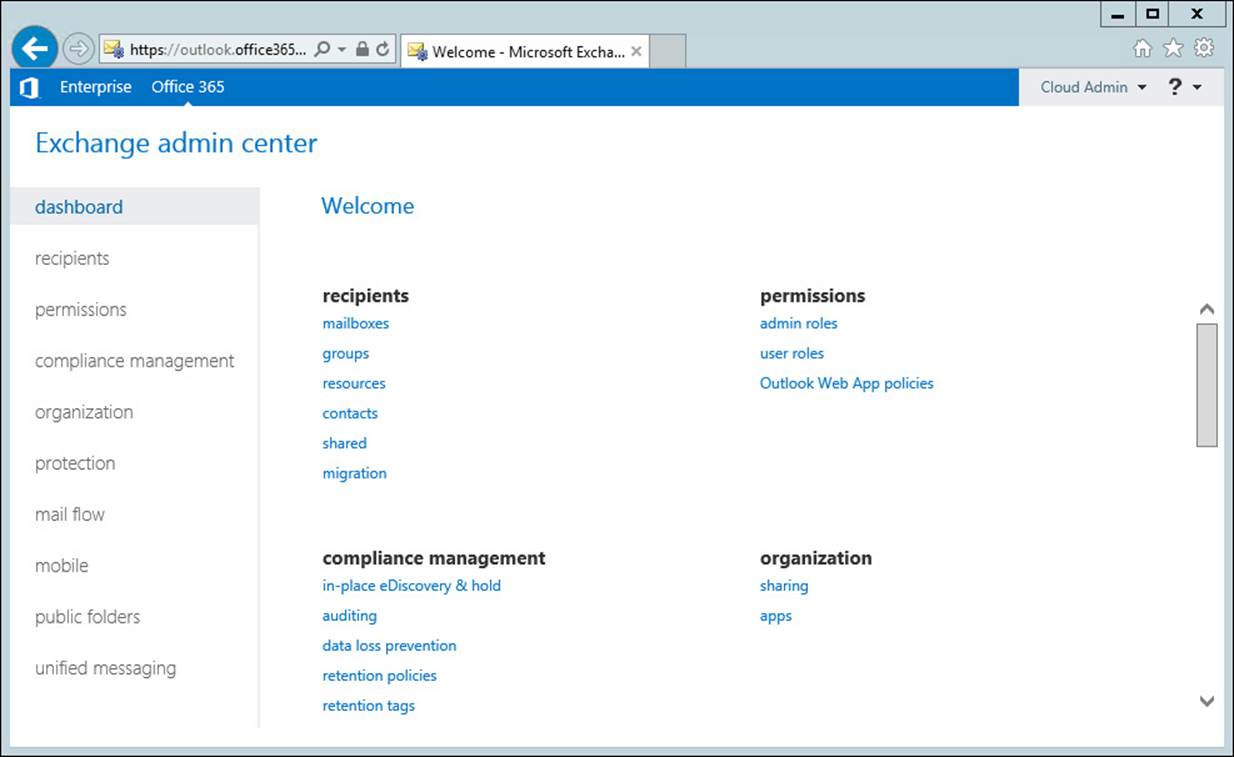
FIGURE 5-1 ECP and Office 365 connected in one administration webpage
When you have the connection made to both on-premises and Office 365, you can start to run the Hybrid Configuration Wizard. The Hybrid Configuration Wizard performs the following steps:
1. Creates a federation trust.
2. Configures the Client Access Servers for hybrid.
3. Configures send and receive connectors for mail flow on-premises.
4. Configures inbound and outbound connectors for mail flow in Exchange Online.
5. Configures the MRS proxy settings for remote mailbox moves.
6. Configures OAuth between Exchange on-premises and Exchange Online (if you are running CU5 or later and running the wizard on the Exchange Server that is being configured for hybrid mode). If you are not running the wizard on the server, you can configure OAuth from the instructions found at http://technet.microsoft.com/library/dn594521.aspx.
Creating a federation trust
Creating a federation trust is setting up an authenticated connection for each of your domains between your on-premises server and Exchange Online. It is used for sharing information between Exchange organizations, and so you might have done this already for your Exchange organization. In Exchange Server 2013, this step can be run in advance of the Hybrid Configuration Wizard from the Sharing tabl on the Organization in ECP. This is shown in Figure 5-2 and Figure 5-3. If you do not have a trust in place, you will see the Enable button, but if you do, you will see the details of the trust as shown. The federation trust that will be created will be for your tenant domain, tenant.mail.onmicrosoft.com. A federation trust for your domains will be created in Office 365 as part of the process the wizard goes through.
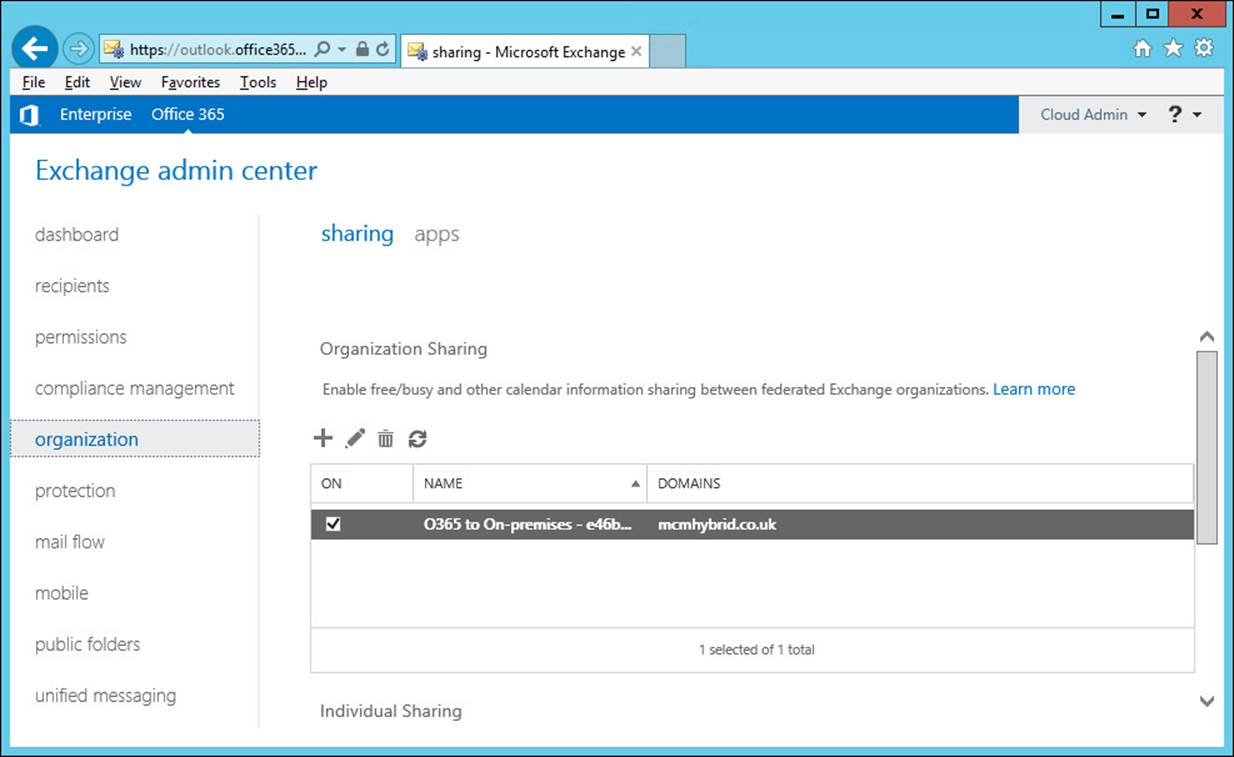
FIGURE 5-2 The federation trust shown on the Office 365 side of the administration console after it has been completed
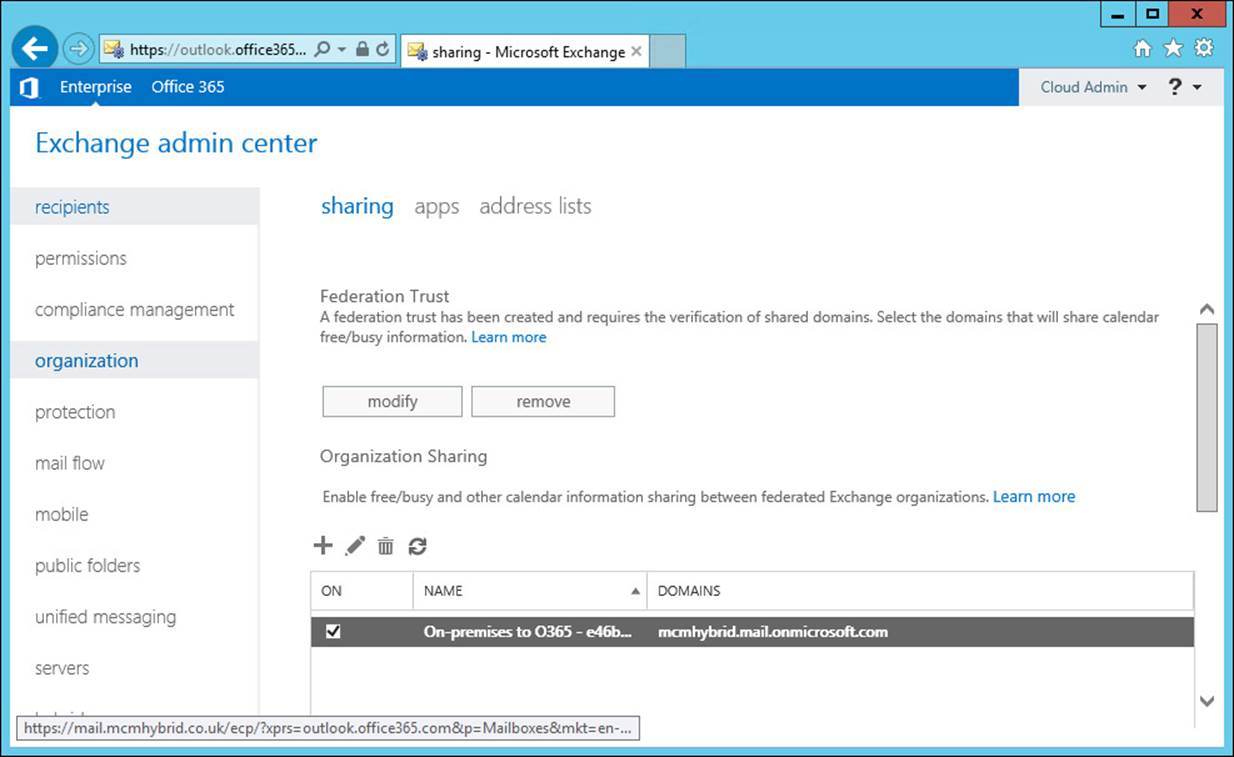
FIGURE 5-3 Federation trust as viewed from the on-premises administration page
The federation trust requires that you can prove ownership of the domain. Adding a record to the public DNS server that hosts the domain does this. The Hybrid Configuration Wizard will first verify the domain ownership, if this has not been completed. This is covered in more detail inObjective 5.2 of this chapter, which looks at federation as a stand-alone concept.
Configuring the Client Access Servers for hybrid
One of the first steps the Hybrid Configuration Wizard will do is configure a selected CAS server as the endpoint that Exchange Online will use to connect to for free/busy. This involves the setting up of a federation trust if one does not exist already, and an organization relationship between your tenant in Exchange Online and Exchange on-premises.
Configuring send and receive connectors for mail flow on-premises and inbound and outbound connectors in Exchange Online
Mail flow between Exchange on-premises and Exchange Online (and in the opposite direction) is direct between the two endpoints. It is not supported to have any SMTP gateway device between the hybrid servers and Exchange Online.
The mail flow is always encrypted with TLS. The send and receive connectors in Exchange on-premises, the Inbound connector into Exchange Online, and the Outbound connector from Exchange Online back to on-premises are configured to reject email that is not encrypted or comes from the wrong source. In Exchange 2013, the send and receive connectors can coexist with normal Internet mail flow connectors because email is always being sent to the tenant address space (tenantname.mail.onmicrosoft.com), or received from a server that holds the Microsoft digital certificate. Email from servers with different certificate names or address spaces will be rejected. Therefore, changes in certificates on your hybrid server can stop mail flow, and repeating the Hybrid Configuration Wizard, or modifying the connectors by hand to the new certificate details is required.
Configuring the MRS proxy settings for remote mailbox moves
One of the final steps that the Hybrid Configuration Wizard will do is enable the MRSProxy setting on all CAS servers with an ExternalURL set for Exchange Web Services. Therefore, when you run the Hybrid Configuration Wizard, all of the CAS servers in Internet-facing sites (those that have an ExternalURL set for the Exchange WebServicesVirtualDirectory) need to be online and reachable from the server that is running the Hybrid Configuration Wizard. If some servers are across a WAN from the server on which you are running the Hybrid Configuration Wizard, you might find that the wizard can take an hour or more per virtual directory, and that multiple hours for running the wizard can be expected. Figure 5-4 shows the error message you get in the Hybrid Configuration Wizard when a CAS server is offline or otherwise unreachable from the server running the wizard.

FIGURE 5-4 An error in the Hybrid Configuration Wizard
Errors in the Hybrid Configuration Wizard are recorded to a log file and a verbose .extra file. It is worth running the hybrid wizard and looking at the latest log files in the Exchange Server installation folder /V15/Logging/Update-HybridConfiguration to get an idea of the process that is performed.
Configuring OAuth between Exchange on-premises and Exchange Online
The exam will not cover OAuth between Exchange on-premises and Exchange Online because this is a new feature that first arrived in CU5. OAuth can be configured from the instructions at http://technet.microsoft.com/library/dn594521.aspx, or automatically at the end of the Hybrid Configuration Wizard if you are running the Hybrid Configuration Wizard on the hybrid server.
OAuth is used to authenticate communications between two entities without the need for knowledge of user names or passwords. An example of OAuth in the real world would be logging into a website (not Facebook) with your Facebook login details. You authenticate to Facebook successfully and it tells the other website that you are authenticated and allowed to access the third-party site. In Exchange Server as of CU5, OAuth is used to do cross-forest eDiscovery search. This is when a user runs a search in one forest (say Exchange Online), but wants to query mailboxes in another forest (for example Exchange on-premises).
OAuth does not replace federation trusts, though both of them authenticate servers across the hybrid configuration. If you have any Exchange 2010 servers publically available, do not enable OAuth until CU7 is available because OAuth, if configured, will attempt to connect to 2010 using OAuth and fail, when it should use the federation trust.
Using the Hybrid Configuration Wizard
The wizard starts with the Setup page shown in Figure 5-5, and continues through the process. Some of the screens are shown for information.
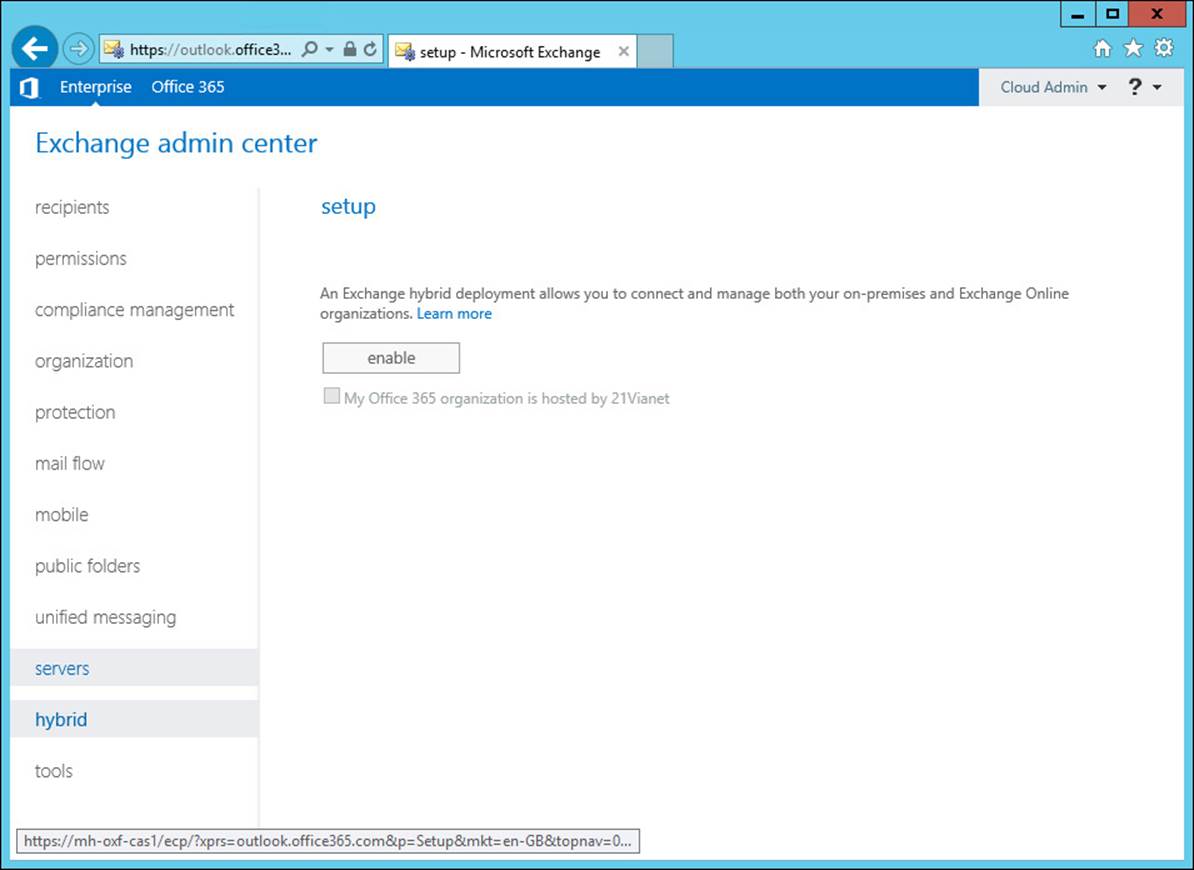
FIGURE 5-5 Starting the Hybrid Configuration Wizard
After you start the wizard, and it has confirmed that you are logged into Office 365, as well as on-premises Exchange Server, you will be asked if you want to set up Exchange hybrid. If you have run the wizard already, you will be asked if you want to update it. When updating, all of the previous settings are maintained.
Figure 5-6 shows the choice of whether to use Client Access and Mailbox servers, or Edge Servers for secure email transport. As an option, you can route all outbound email from Office 365 out via the on-premises servers. By default, outbound email from Office 365 leaves the Internet direct from Office 365.
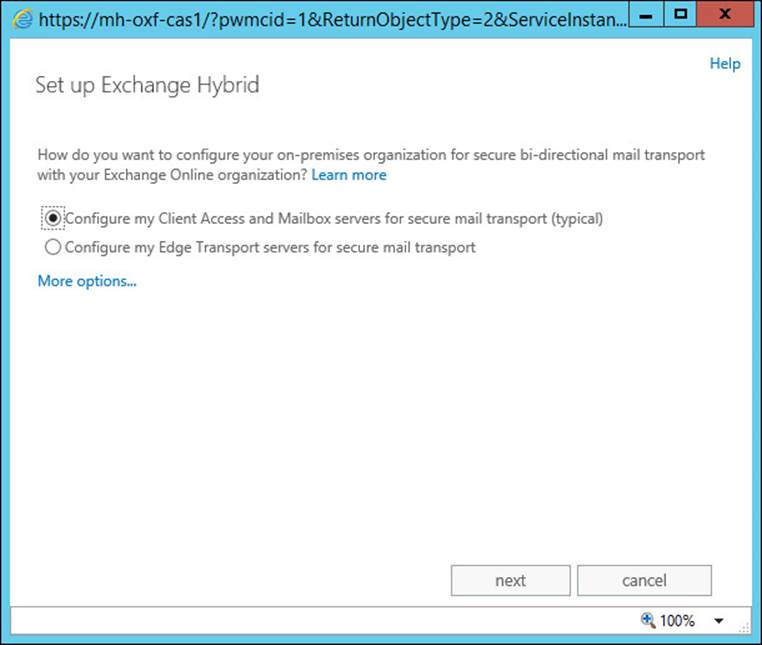
FIGURE 5-6 Choosing mail flow options
Next in the process, choose the Exchange Servers on-premises that you will receive connections from Exchange Online Protection for inbound mail flow. Then choose the sending Mailbox servers.
Every Exchange Server on-premises that you selected in the mail flow screens need to have the same digital certificate installed. The certificate will have a display name (also the same), and Figure 5-7 shows the screen where you select the certificate. This certificate needs to be issued by a trusted third-party certificate authority and be valid at the current date and time. That is, the certificate has a valid from date and an expiry date, and the current date must be within this timeframe.
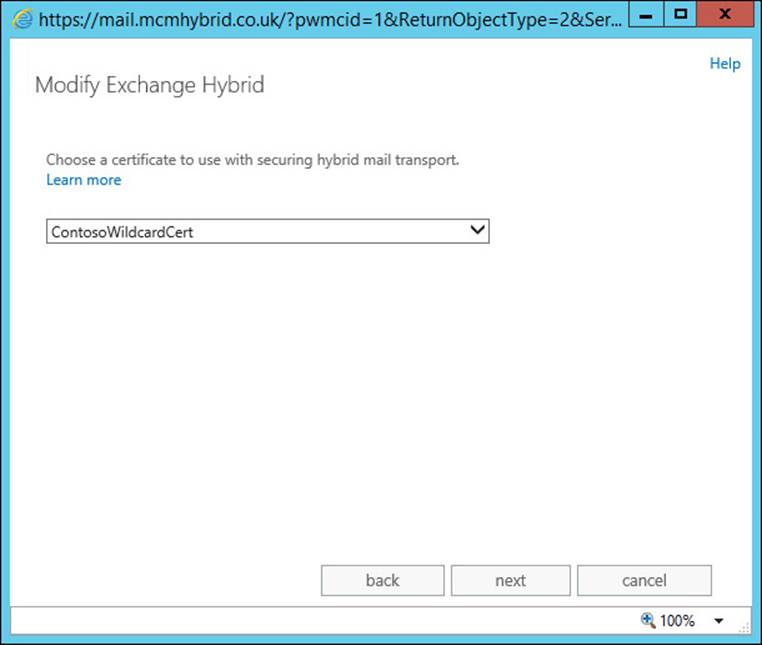
FIGURE 5-7 Selecting the digital certificate for the Hybrid Configuration Wizard
The on-premises Exchange Server (CAS) that will receive email from Exchange Online Protection (EOP) needs to be accessible from EOP, and ideally by way of an MX or A record. This is not your normal MX record for mail flow though because this is used exclusively for mail flow between EOP and on-premises. The value of this A or MX record in the form of an FQDN is entered into the wizard (and shown in Figure 5-8).
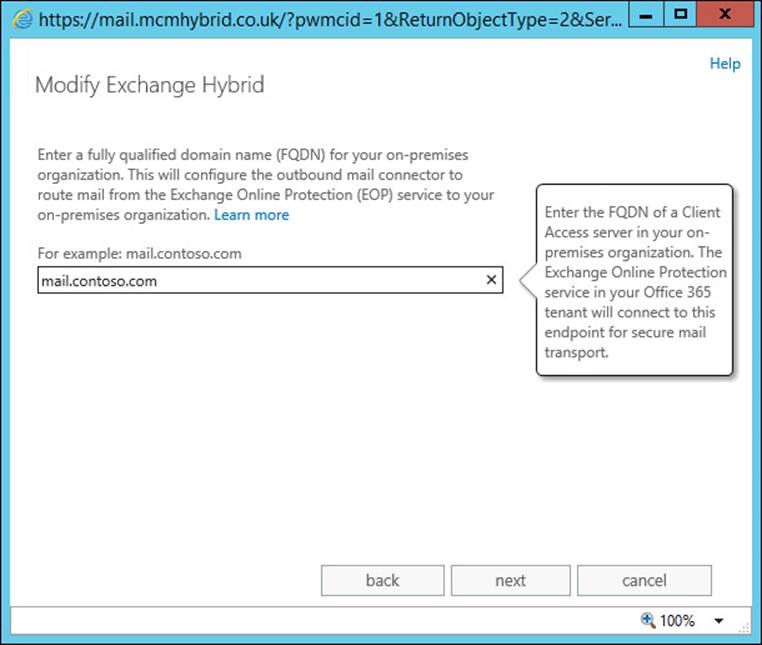
FIGURE 5-8 Setting the inbound mail flow address
Finally, you need to provide the username of an on-premises Exchange administrator and a Global Administrator for Office 365. The Hybrid Configuration Wizard will connect to both Exchange on-premises and Exchange Online as these users, and configure hybrid Exchange for you.Figure 5-9 shows this configuration process as it proceeds.
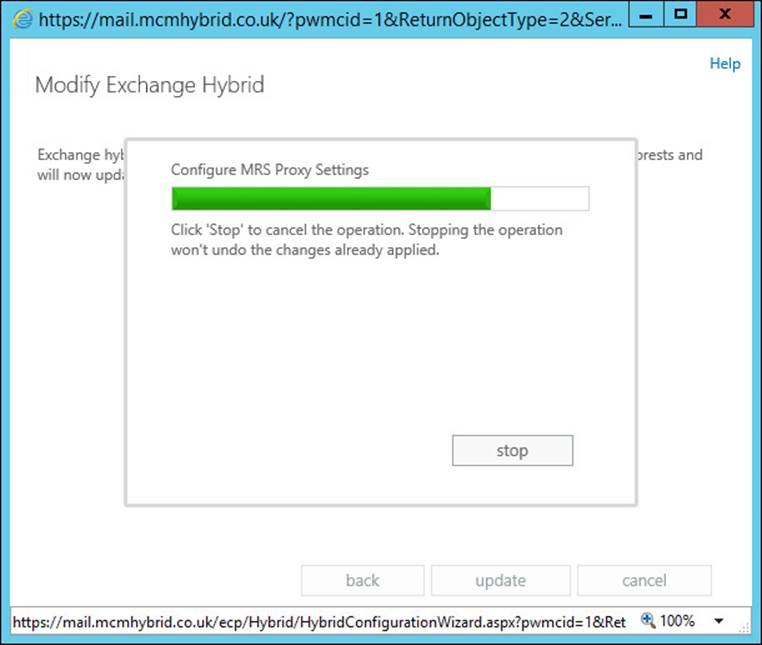
FIGURE 5-9 The Hybrid Configuration Wizard process completing
Once the Hybrid Configuration Wizard is complete, you will be presented with Figure 5-10, showing that the entire process has completed successfully.
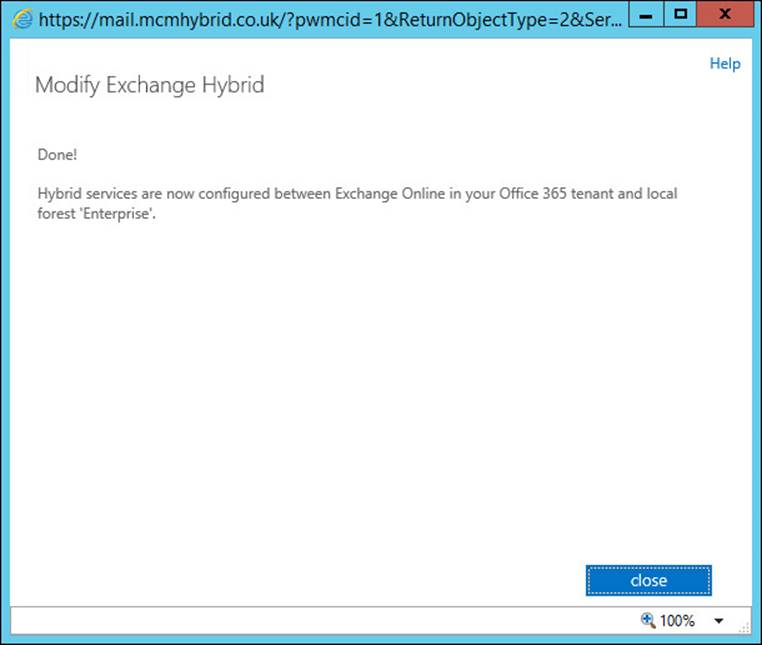
FIGURE 5-10 The end of the Hybrid Configuration Wizard with the process being successful
Evaluating limitations of the Hybrid Configuration Wizard
The Microsoft Certified Professional exam that you are reading this book to study for is based, at the time of writing, on the RTM (release to manufacturing) version of Exchange Server 2013 Service Pack 1. It does not take into consideration any of the changes made in later cumulative updates to Exchange Server 2013, which at the time of writing (Nov 2014), cumulative update 7 is expected to be released within a month. Therefore, some of the limitations of the Hybrid Configuration Wizard described here are resolved with later versions of the product, but some of the limitations are not. It is important to point out that there are support requirements for hybrid Exchange in that you are required to be running the latest, or n-1 version of the cumulative update for support reasons. Therefore, at the time of writing, only CU6 and CU5 (the one previous version) are supported. Note that Exchange 2013 Service Pack 1 is CU4, and so it is no longer supported for hybrid Exchange.
Important: Supportability
Microsoft requires that hybrid Exchange customers ensure that their hybrid servers are running the latest version of Exchange Server, or the one previous release of Exchange Server (known as n-1). Therefore, upon cumulative update 7 being released, all hybrid Exchange customers should be running CU7 or CU6 only.
The following are some of the limitations of the Exchange Hybrid Configuration Wizard that need to be considered when setting up hybrid Exchange.
![]() Proxy servers Connectivity to Exchange Online is required from each of the hybrid Exchange Servers. If any network traffic to or from these servers over the HTTPS protocol goes via a web proxy server, there is no guarantee that the functions of hybrid will work. Therefore, ensure that the hybrid Exchange Servers can reach the URLs and IP addresses listed at http://technet.microsoft.com/en-us/library/hh373144.aspx.
Proxy servers Connectivity to Exchange Online is required from each of the hybrid Exchange Servers. If any network traffic to or from these servers over the HTTPS protocol goes via a web proxy server, there is no guarantee that the functions of hybrid will work. Therefore, ensure that the hybrid Exchange Servers can reach the URLs and IP addresses listed at http://technet.microsoft.com/en-us/library/hh373144.aspx.
![]() Firewalls As with the proxy servers, connectivity is required to Exchange Online Protection for mail flow (TCP port 25), and both MRS and free/busy (TCP port 443). The Hybrid Configuration Wizard will set up connectors to EOP and expect to be able to reach Exchange Online for free/busy, but it will not test that it actually can do that. Therefore, the URLs and IP addresses listed at http://technet.microsoft.com/en-us/library/hh373144.aspx must be reachable from the hybrid servers.
Firewalls As with the proxy servers, connectivity is required to Exchange Online Protection for mail flow (TCP port 25), and both MRS and free/busy (TCP port 443). The Hybrid Configuration Wizard will set up connectors to EOP and expect to be able to reach Exchange Online for free/busy, but it will not test that it actually can do that. Therefore, the URLs and IP addresses listed at http://technet.microsoft.com/en-us/library/hh373144.aspx must be reachable from the hybrid servers.
![]() Multi-forest The hybrid wizard does not configure hybrid if you have multiple forests connecting to the same Office 365 tenant, or single forests split across multiple tenants. The DirSync software had the same limitations, but the recently released AADSync software solves these issues, though you will need to manually configure the mail flow connectors to reach multiple tenants, if you have one forest to multiple Exchange Online tenants.
Multi-forest The hybrid wizard does not configure hybrid if you have multiple forests connecting to the same Office 365 tenant, or single forests split across multiple tenants. The DirSync software had the same limitations, but the recently released AADSync software solves these issues, though you will need to manually configure the mail flow connectors to reach multiple tenants, if you have one forest to multiple Exchange Online tenants.
![]() Service checking The Hybrid Configuration Wizard will build the pieces needed, but will not check that they are working apart from the validity of the digital certificate. Therefore, although the wizard completed, there is no guarantee that pieces such as AutoDiscover, federation, and mail flow are working.
Service checking The Hybrid Configuration Wizard will build the pieces needed, but will not check that they are working apart from the validity of the digital certificate. Therefore, although the wizard completed, there is no guarantee that pieces such as AutoDiscover, federation, and mail flow are working.
![]() Policies The Hybrid Configuration Wizard does not copy policies and other Exchange on-premises configuration such as transport rules, message classification, OWA policies, and settings to Exchange Online. So upon finishing hybrid, you need to duplicate any of these settings in Exchange Online if you still want them to apply to migrated mailboxes.
Policies The Hybrid Configuration Wizard does not copy policies and other Exchange on-premises configuration such as transport rules, message classification, OWA policies, and settings to Exchange Online. So upon finishing hybrid, you need to duplicate any of these settings in Exchange Online if you still want them to apply to migrated mailboxes.
![]() Authentication OAuth is not configured at the end of the Hybrid Configuration Wizard unless you are using the latest versions. But OAuth did not exist for the product in the RTM timeframe, and so would not be covered in the exam. OAuth was introduced in CU4 (Service Pack 1), and the automation of OAuth came in the CU5 update to the Hybrid Configuration Wizard.
Authentication OAuth is not configured at the end of the Hybrid Configuration Wizard unless you are using the latest versions. But OAuth did not exist for the product in the RTM timeframe, and so would not be covered in the exam. OAuth was introduced in CU4 (Service Pack 1), and the automation of OAuth came in the CU5 update to the Hybrid Configuration Wizard.
![]() MRSProxy The wizard does not configure the MRSProxy endpoints. Prior to CU4, the MRSProxy endpoint was not enabled for remote moves. The latest version of the wizard resolves this issue about enabling the endpoint for remote moves, but still requires the creation of, and checking, that the MRSProxy endpoint is actually reachable.
MRSProxy The wizard does not configure the MRSProxy endpoints. Prior to CU4, the MRSProxy endpoint was not enabled for remote moves. The latest version of the wizard resolves this issue about enabling the endpoint for remote moves, but still requires the creation of, and checking, that the MRSProxy endpoint is actually reachable.
Configuring requirements for single sign-on (SSO)
To login to Office 365, and therefore Exchange Online, requires a username and password. Office 365 allows for three different configurations of user accounts, each with their own advantages and disadvantages. The following list summarizes the user account type, and the impact this has on logging into Office 365.
![]() Cloud Identity This user account is created in Office 365, and exists only in Azure Active Directory. It is not related to any user account that may exist for the user in any other system, and it has a password that is associated with this account only. This type of user is the easiest to set up because it requires no extra hardware or software installation on-premises. It does require the user to remember multiple usernames and passwords because their login to Office 365 is not the same as their login to anything they may have on-premises. The username and password could be set to be the same, but they will have different expiry dates, and need changing at different times. So, setting them the same will cause user confusion.
Cloud Identity This user account is created in Office 365, and exists only in Azure Active Directory. It is not related to any user account that may exist for the user in any other system, and it has a password that is associated with this account only. This type of user is the easiest to set up because it requires no extra hardware or software installation on-premises. It does require the user to remember multiple usernames and passwords because their login to Office 365 is not the same as their login to anything they may have on-premises. The username and password could be set to be the same, but they will have different expiry dates, and need changing at different times. So, setting them the same will cause user confusion.
![]() Synchronized Identity This user account exists on-premises and the editable copy of this account is within the Active Directory on-premises. Using either the DirSync or AADSync software, this user is replicated to Azure Active Directory, and the user’s password is hashed twice, and replicated to the cloud as well. When the user logs into Office 365, the entered password is hashed twice using the same hash, and if the entered and now hashed information is the same as that replicated from on-premises, the user is logged in. Note that Office 365 does not see, or can determine the user’s password, but uses a hash of the user’s password to determine if the password is correct. This user type requires DirSync or AADSync installed on a single machine on-premises, and every three hours user changes are replicated to the cloud. Within two seconds of the user changing their password on-premises, the password hash is replicated to Azure Active Directory. On-premises the user requires a UPN that is Internet routable (that is, it looks like a valid email address), and a server to run the DirSync software.
Synchronized Identity This user account exists on-premises and the editable copy of this account is within the Active Directory on-premises. Using either the DirSync or AADSync software, this user is replicated to Azure Active Directory, and the user’s password is hashed twice, and replicated to the cloud as well. When the user logs into Office 365, the entered password is hashed twice using the same hash, and if the entered and now hashed information is the same as that replicated from on-premises, the user is logged in. Note that Office 365 does not see, or can determine the user’s password, but uses a hash of the user’s password to determine if the password is correct. This user type requires DirSync or AADSync installed on a single machine on-premises, and every three hours user changes are replicated to the cloud. Within two seconds of the user changing their password on-premises, the password hash is replicated to Azure Active Directory. On-premises the user requires a UPN that is Internet routable (that is, it looks like a valid email address), and a server to run the DirSync software.
![]() Federated Identity This is the same user account as in the synchronized identity. It is created on-premises and replicated to the cloud, but this time the password is not hashed and replicated to the cloud (or if it is, it is not used for login). When the user enters their username, the domain portion of the name is read, and the user directed to the publically available AD FS server infrastructure created on-premises. The on-premises AD FS server authenticates the user and tells Microsoft Online (Office 365, Azure, Intune) that the user can login. Therefore, Microsoft is not responsible for user authentication, but the on-premises Active Directory, via the AD FS servers are. For this configuration, you need to have the pieces listed in the rest of this section in place. This is the most complex of the three user authentication options to set up, but the user is logging in with the same username and password, and also from the same source authentication system that they logged into their PC with. Therefore, they are already signed in, and do not require a second login for Office 365.
Federated Identity This is the same user account as in the synchronized identity. It is created on-premises and replicated to the cloud, but this time the password is not hashed and replicated to the cloud (or if it is, it is not used for login). When the user enters their username, the domain portion of the name is read, and the user directed to the publically available AD FS server infrastructure created on-premises. The on-premises AD FS server authenticates the user and tells Microsoft Online (Office 365, Azure, Intune) that the user can login. Therefore, Microsoft is not responsible for user authentication, but the on-premises Active Directory, via the AD FS servers are. For this configuration, you need to have the pieces listed in the rest of this section in place. This is the most complex of the three user authentication options to set up, but the user is logging in with the same username and password, and also from the same source authentication system that they logged into their PC with. Therefore, they are already signed in, and do not require a second login for Office 365.
To implement AD FS, and therefore single sign-on, you require the following:
![]() Active Directory Federation Services (AD FS) installed on-premises.
Active Directory Federation Services (AD FS) installed on-premises.
![]() A Web Application Proxy (WAP) installed on-premises (usually in the perimeter network). The WAP server is the AD FS proxy server that comes with Windows Server 2012 R2. If you are using Windows Server 2012 or 2008 R2, you will have an AD FS proxy server installation instead of a WAP installation. WAP acts as an AD FS proxy for inbound connections from the Internet to the AD FS server (rather than publishing the AD FS server direct to the Internet). It also provides other web proxy services that are not needed for single sign-on, and so are not discussed here. Therefore, the WAP server role feature and earlier AD FS proxy roles are to be considered analogous for the purposes of single sign-on.
A Web Application Proxy (WAP) installed on-premises (usually in the perimeter network). The WAP server is the AD FS proxy server that comes with Windows Server 2012 R2. If you are using Windows Server 2012 or 2008 R2, you will have an AD FS proxy server installation instead of a WAP installation. WAP acts as an AD FS proxy for inbound connections from the Internet to the AD FS server (rather than publishing the AD FS server direct to the Internet). It also provides other web proxy services that are not needed for single sign-on, and so are not discussed here. Therefore, the WAP server role feature and earlier AD FS proxy roles are to be considered analogous for the purposes of single sign-on.
![]() A digital certificate issued for the namespace of the AD FS server. This certificate needs to be trusted by Office 365, and so must be issued by a trusted third-party certificate authority. The name on the certificate can be a subject alternative name, and so the name can be included on your existing Exchange certificate, or by using a wildcard certificate.
A digital certificate issued for the namespace of the AD FS server. This certificate needs to be trusted by Office 365, and so must be issued by a trusted third-party certificate authority. The name on the certificate can be a subject alternative name, and so the name can be included on your existing Exchange certificate, or by using a wildcard certificate.
![]() A load balancer is recommended because it is highly recommended to have more than one AD FS server, and more than one WAP/AD FS Proxy server. If either the single WAP, or AD FS server should go offline, the users will not be able to login to Office 365 because the AD FS system is required for login. Therefore, a load balancer in front of the WAP/AD FS proxy server in the perimeter, and a second load balancer in front of the AD FS servers, is highly recommended.
A load balancer is recommended because it is highly recommended to have more than one AD FS server, and more than one WAP/AD FS Proxy server. If either the single WAP, or AD FS server should go offline, the users will not be able to login to Office 365 because the AD FS system is required for login. Therefore, a load balancer in front of the WAP/AD FS proxy server in the perimeter, and a second load balancer in front of the AD FS servers, is highly recommended.
![]() The final requirement is to enable single sign-on in Office 365. This is done from the Users, Active Users area of the admin portal. The steps to complete this process require installing the Windows Azure Active Directory Module for Windows PowerShell, and using PowerShell to connect to the AD FS server and to Office 365, and then to change the domains you want to use from a managed domain to a federated domain. Federated domains use an AD FS server for login, managed domains rely on the Microsoft Online authentication system.
The final requirement is to enable single sign-on in Office 365. This is done from the Users, Active Users area of the admin portal. The steps to complete this process require installing the Windows Azure Active Directory Module for Windows PowerShell, and using PowerShell to connect to the AD FS server and to Office 365, and then to change the domains you want to use from a managed domain to a federated domain. Federated domains use an AD FS server for login, managed domains rely on the Microsoft Online authentication system.
Designing and configuring Active Directory Federation Services (AD FS)
To design and configure AD FS for single sign-on with Office 365, you need to install the AD FS server, and the WAP or AD FS proxy server. The AD FS servers need access to the Active Directory domain controllers. They can be installed as a role on a domain controller for use in lab or test environments. Installing AD FS on a domain controller can also reduce server count and operating system licenses when installing AD FS in a small organization, but that limits the AD FS server to using Active Directory only from the local domain controller, and not from all of the domain controllers installed in the current site, thus reducing availability of AD FS. The WAP/AD FS proxy server cannot be installed on a domain controller, nor can it be installed on the AD FS server itself. You have a minimum server requirement for AD FS of at least two servers, and for high availability, at least two more because you should have at least two WAP/AD FS proxy servers, and two AD FS servers.
AD FS design
Typically the WAP/AD FS proxy server is installed in the perimeter network. This means there will be a firewall between it and the Internet, and between the proxy and the AD FS server as well. The AD FS system communicates over HTTPS, so only TCP port 443 needs to be open from the WAP/AD FS proxy to the AD FS server (or more typically to the load balancer in front of the AD FS servers), and also TCP port 443 open from the Internet to the WAP/AD FS proxy. A suggestion of a network topology for AD FS is shown in Figure 5-11.
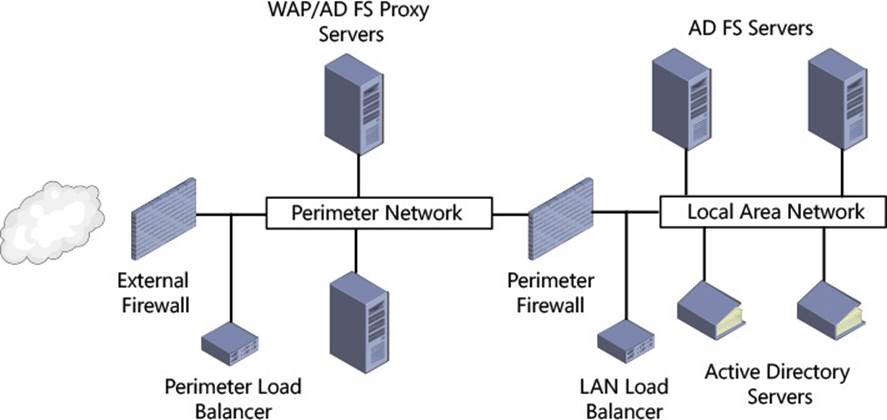
FIGURE 5-11 A suggested AD FS network diagram
In addition to the TCP port 443 (HTTPS) rules on the firewalls, you would probably include rules for server management and remote access from the LAN to the perimeter network as per your requirements. But all you need for AD FS is HTTPS published from the WAP/AD FS proxy (or perimeter network load balancer) to the Internet, and the same published from the AD FS server (or LAN network load balancer) to the WAP/AD FS proxy on the perimeter network. The return traffic to these network paths needs to traverse the firewalls as well.
Users will access AD FS by way of connecting to the service that they need to authenticate on to. Users do not start by browsing to the AD FS server. The user will connect in this case to Office 365 and attempt to login. When they enter their login name, the domain they enter will be seen as a federated domain, and the user will be redirected to the AD FS server. If the user is on the Internet, or on the LAN, they will be directed to the same URL. Therefore, the AD FS server needs to be reachable via that same URL (configured during the set up of AD FS) from both the LAN and the Internet. This is done via DNS.
In public DNS you will add an A record for the external IP address of the WAP/AD FS proxy server, and in internal DNS you will add a record for the IP address of the AD FS server on the LAN. When you have load balancers, you will use the virtual IP address that they host that is load balancing the AD FS infrastructure. For example, in Figure 5-12 you can see a similar network to Figure 5-11, but this time, example IP addresses are shown. For example, you would use 192.168.10.10 as the A record value for the AD FS server in internal DNS (this IP is on the LAN load balancer), and 131.107.2.200 as the A record for the same server name but in public DNS (this IP is on the external firewall, publishing the perimeter load balancer).
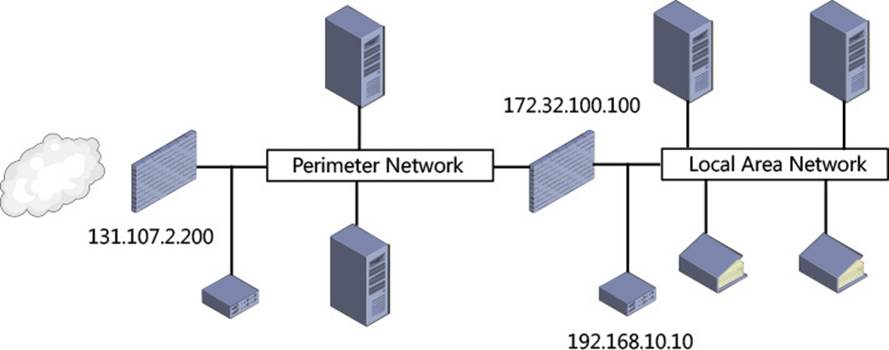
FIGURE 5-12 IP address examples in AD FS
The WAP/AD FS proxy servers need to be able to resolve the AD FS server name to the AD FS servers, or the load balancer in front of the AD FS servers. Therefore, if the perimeter network can do DNS resolution to the internal DNS servers, this will work fine. If the perimeter network cannot resolve internal DNS, a HOSTS entry will be required on each WAP/AD FS proxy server for the IP address that the AD FS servers are published into the perimeter on. In the example in Figure 5-12, this would be 172.32.100.100, which is on the perimeter network and publishes the load balancer on the LAN.
A common name for AD FS servers in DNS is sts.domain.com. The sts portion stands for “secure token service,” which is what an AD FS server is providing. You are not restricted to using this name though, and other names that are typically used are login.domain.com, or adfs.domain.com. Whatever name you use that value needs to be resolvable from the LAN, the perimeter, and the Internet. It is the same name that you need on your digital certificate. Therefore, the A record in DNS in all of the preceding examples, and the subject name or alternative subject name on the certificate, needs to use this name. In the example in the “AD FS server configuration” section below, you are going to use sts.contosochemists.co.uk.
AD FS server configuration
This section summarizes the steps to install the AD FS server on a Windows Server 2012 R2 server (sometimes unofficially known as AD FS 3.0), and a Web Application Proxy server, also on a different Windows Server 2012 R2 server. Once installed, the WAP server will be configured to connect to the AD FS server.
Before you begin, it is a good idea to install the digital certificate that contains the AD FS server FQDN onto both the AD FS server and the WAP/AD FS proxy server. The same certificate is used in all cases, and the private key needs to be available for these services to use. You can install the certificate into the personal store by importing the PFX file that contains the digital certificate and private key using the MMC certificates snap in. Make sure you use the local computer account certificate snap in and not the current user, which is the default. AD FS 3.0 has no requirement on IIS, and so IIS is not installed on these servers.
The AD FS server needs to be joined to a domain in the forest that it will authenticate against. The AD FS server role can be installed from Server Manager. The first few dialog boxes of the installation are self-explanatory, and common to all role installations. Once the role is installed, you can start the AD FS server configuration. The WAP/AD FS proxy server does not need to be joined to the domain. The WAP feature of Windows Server 2012 R2 is part of the Remote Access role.
To install the AD FS server role, start Server Manager, and add the Active Directory Federation Services role, as shown in Figure 5-13.
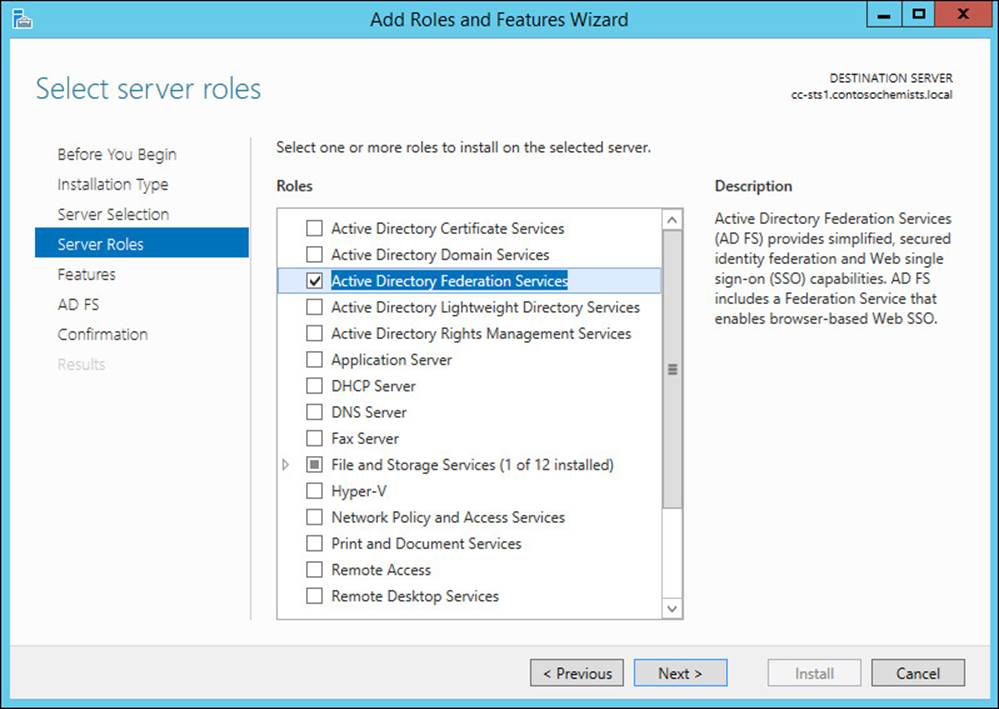
FIGURE 5-13 Installing the AD FS server role
Once the role is installed, the configuration of the service can take place. The requirements for completing the installation are a domain admin account, and a publically trusted digital certificate that is already installed on the server. If you were creating a new AD FS server environment, you would choose the option to create the first federation server in a federation server farm. If you were adding the second or third server, you would add these to the farm.
Note: Standalone Server Farms
If you are installing AD FS server on Windows 2012 or earlier, you can create a standalone server farm. This allows only one server in the farm, and does not provide any redundancy or options for high availability. You will see from the above choices that this is not an option in Windows Server 2012 R2.
Therefore, even if you are just creating a lab environment, you should always create a server farm because you have the ability to add more servers if you want, or need to. Avoid creating standalone AD FS server deployments.
On the Specify Service Properties page, select your trusted digital certificate (or import it if you have not installed it already), and then select the correct service name from the second drop-down list. Finally, add a display name, which users will see at login. This is shown in Figure 5-14.
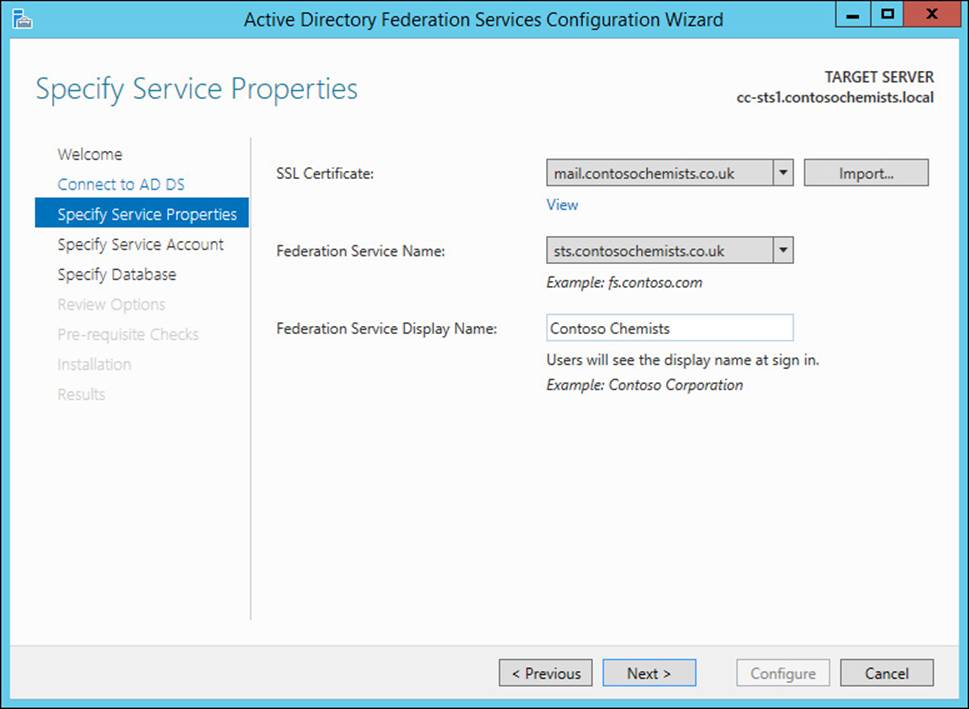
FIGURE 5-14 Setting the AD FS server farm certificate, service, and display name
If you have a wildcard certificate, you will be allowed to enter your choice of service name. Remember the service name is the value in DNS that resolves to both the WAP server from the Internet, and the AD FS server from the LAN.
On the Specify Service Account page, you might get a warning about group managed service accounts, and needing to run the PowerShell Add-KdsRootKey -EffectiveTime (Get-Date). AddHours(-10). This is only possible with a Windows Server 2012 R2 Active Directory schema. If you do not have this schema level, you can use an existing domain user account. This account needs to be a domain user (not administrator), and have a non-expiring password. This user account would be similar in concept to most service accounts that you create in Active Directory.
For your configuration database, most deployments can use Windows Internal Database, but if your AD FS sizing requires SQL Server, or you want to use other features of SQL Server such as database mirroring, you can select the database here. The wizard needs the rights to create and configure the database on the SQL Server. To size your AD FS deployment, use the Excel spreadsheet at http://download.microsoft.com/download/3/1/3/31312F45-4AB3-4B54-8E23-6326BAF4F5BC/ADFS-capacity-planning-sizing-spreadsheet-DLC.xlsx, and for sizing in terms of CPU and memory, view the table at http://msdn.microsoft.com/en-us/library/azure/jj151831.aspx.
The remaining screens of the wizard are just summary pages and configuration checks. On confirming these, the service will be configured. Once AD FS is installed, you can check that it is operational by browsing to https://sts.domain.com/AD FS/ls/idpinitiatedsignon.htm, where sts.domain.com is the URL for the AD FS server from a browser on the LAN. DNS updates should already have been completed to ensure that sts.domain.com resolves to the AD FS Server correctly. If DNS is correct, and the server installation is successful, you should see the view shown in Figure 5-15.
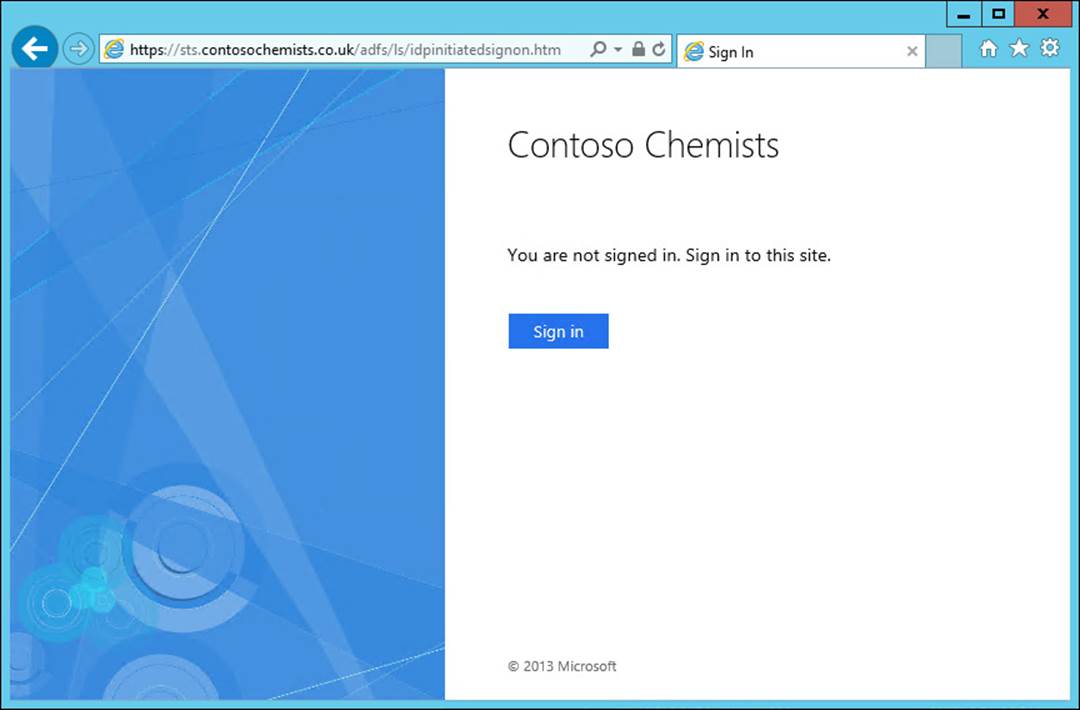
FIGURE 5-15 The AD FS server forms based login screen
On the LAN, the AD FS server FQDN should be added to the Local Intranet zone in Internet Explorer, and once it is, clicking the Sign In button will result in automatic sign in when browsed from a domain joined client PC.
Web Application Proxy configuration
To install the WAP server, install the Remote Access role on the server (as shown in Figure 5-16). On the role services page, select the Web Application Proxy (Figure 5-17). You will be shown the features required for the WAP role service, which you need to confirm to complete the selection of the role service.
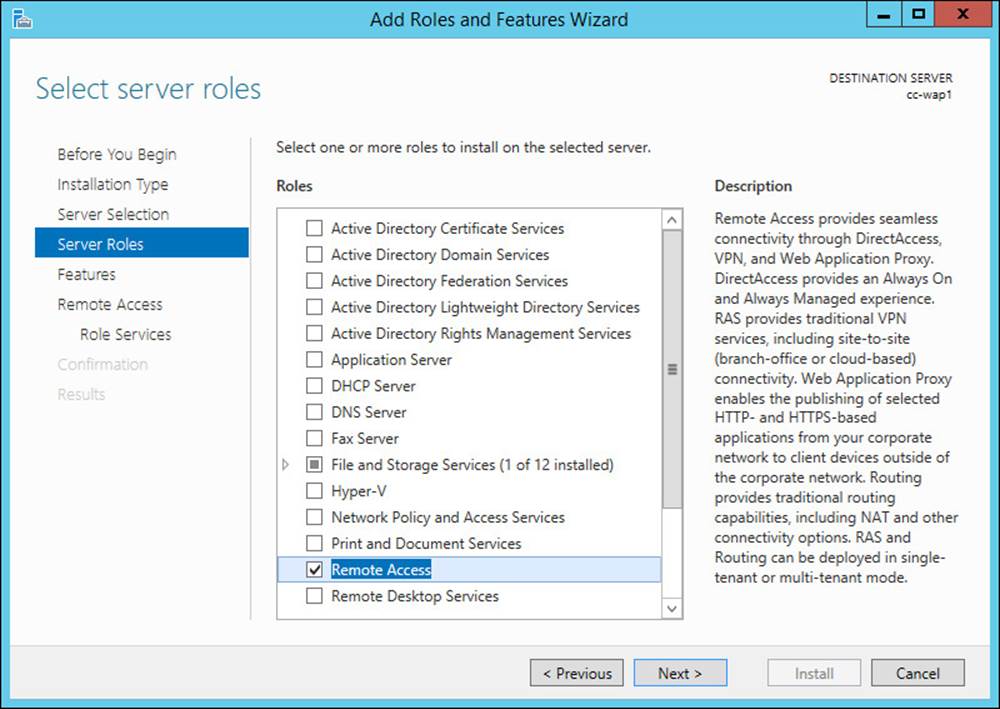
FIGURE 5-16 Installing the Web Application Proxy by way of the Remote Access role

FIGURE 5-17 Installing the Web Application Proxy role service
Once the WAP role service is installed, and the AD FS server is also installed, make sure that you can browse to the AD FS server. This will check that you have the correct firewall ports open (TCP 443), and that name resolution is working. You should be able to browse the URLhttps://sts.domain.com/AD FS/ls/idpinitiatedsignon.htm where sts.domain.com is the URL for the AD FS server. You should see the same login page as when testing the AD FS server was working. It is a blue graphic to the left, and a sign-in form to the right. This is shown earlier in Figure 5-15.
If the WAP server can reach the AD FS server login page, you can continue the WAP configuration. This is started from Server Manager. It requires three pieces of information. The first piece of information is the service name, for example sts.domain.com. It also requires a username and password of an administrator account on the AD FS servers. If the service name and credentials are correct, select the AD FS proxy certificate that you have already installed on the WAP server. Then on the final screen of the wizard, you will be shown the PowerShell that you could use to do this again, should you want to install multiple servers. Configuring the AD FS proxy takes a minute or two, and then you should be able to browse the same URL as used earlier, but this time from the Internet, through the external firewall to the WAP server. The WAP server is proxying the connection to the AD FS server, and not completing the authentication itself.
Configuring Office 365 to use single sign-on
The final step in configuring single sign-on to Office 365 is to change the domain that you have already added to Office 365 so that it requires federated sign-on. This involves connecting with PowerShell to both Office 365, and the AD FS server. The PowerShell cmdlets are the Windows Azure Active Directory Module for Windows PowerShell, and these can be downloaded from the Office 365 administration portal. To run them on Windows Server, you need the 64-bit version, though at the time of writing, the 32-bit version had reached end of life and was not getting any further updates. Therefore, the 64-bit version should be the version you always install. The installation of the PowerShell cmdlets might have a few additional requirements based on the version of Windows you are running them on, such as specific .NET Framework versions, or the Microsoft Online Services Sign-In Assistant, but the installation will prompt you through these requirements as you complete the installation.
When you have the Windows Azure Active Directory Module for Windows PowerShell installed, you can start PowerShell, and run the following cmdlets. The first set of these cmdlets are useful to keep saved to a PS1 file because connecting to Office 365 via remote PowerShell is a frequent administration task when you have a service in the cloud.
$cred = Get-Credential
Write-Host "Username: " $cred.username
Connect-MsolService -Credential $cred
Write-Host "...connected to Office 365 Azure Active Directory"
This code results in a prompt asking you for your Office 365 administrator credentials. It then uses these credentials (stored in the $cred variable) to connect you to Office 365. The code also writes this information to the screen so that you can tell whom you are logged in as because you can open multiple PowerShell windows, and each could be logged in as a different user!
Once you are logged in, you should run Get-MsolDomain to check that you have added all of the domains that you want to have federated users under (Figure 5-18 shows this output). A federated user is one whose login is federated to the AD FS server on-premises. All of the users in a given federated domain will use single sign-on, and you cannot have some users in a domain using AD FS, and the others in the same domain not using AD FS. Federated users also require that their login name contain the federated domain. For example, if you own contoso.com, and you register contoso.com as a domain in Office 365, it will work for users either created in the service, or users created on-premises and synced with DirSync/AADSync. If they are created on-premises, the user needs the user principal name (UPN) value to contain this domain, so a userbill@contoso.com would be a correct UPN value, but bill@contoso.local, or another value, would either not be valid (.local is not Internet routable, so not valid for Office 365), or if not registered in Office 365, could not be synced to the cloud.
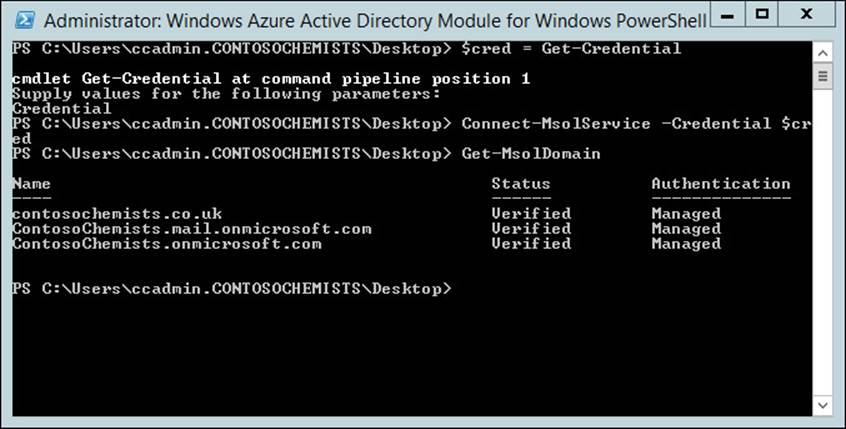
FIGURE 5-18 Get-MsolDomain shown in a Remote PowerShell session to Office 365
Once you have verified that Get-MsolDomain returns all of your required domains for single sign-on, and your users have synced to the cloud with one of the listed domains, you are ready to change the domain from managed to federated.
To change the domain, first ensure that the PowerShell session is connected to the AD FS server. You do this with the Set-MsolADFSContext PowerShell cmdlet. The full cmdlet is shown here.
Set-MsolADFSContext -Computer <AD FS server FQDN>
Once you have made a connection to the AD FS server, and even if you are running the cmdlets on the AD FS server, you need to run the above cmdlet. Then you are ready to change your domains from managed to federated. The cmdlet for doing this is Convert-MsolDomainToFederated, and the name of the domain. If you have more than one domain, you must run the cmdlet with the -SupportMultipleDomain switch as well. An example of running this in PowerShell for a company with a .com, a .co.uk, and a .fr domain would be as follows.
Convert-MsolDomainToFederated -DomainName contoso.com -SupportMultipleDomain
Convert-MsolDomainToFederated -DomainName contoso.co.uk -SupportMultipleDomain
Convert-MsolDomainToFederated -DomainName contoso.fr -SupportMultipleDomain
This process (shown in Figure 5-19) will connect to both the primary AD FS server and Office 365, and generate self-signed certificates for encrypting and sharing the token information, and then swap the certificates with the other party. As part of Office 365, you need to ensure that you know the expiry date of the certificate, and using the above cmdlet to update the AD FS token signing certificates before they expire. Alternatively, you can download the Microsoft Office 365 Federation Metadata Update Automation Installation Tool (http://gallery.technet.microsoft.com/scriptcenter/Office-365-Federation-27410bdc). This tool is a Windows PowerShell script that you run on your AD FS server to keep the certificates in sync between Office 365 and AD FS server.
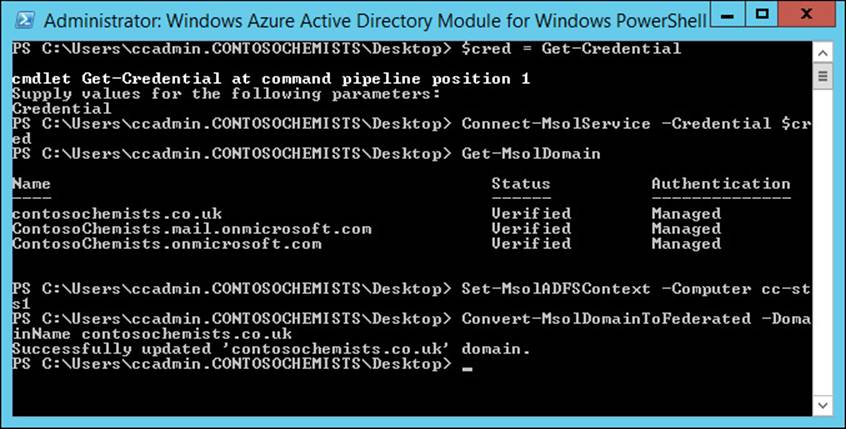
FIGURE 5-19 Converting a domain to federated
Once the domain has been changed to federated and confirmed with Get-MsolDomain, you should be able to visit http://portal.office.com, and login as a user with this domain. Upon entering the username (and before entering the password), you will be redirect to the AD FS server URL. If you are running Internet Explorer on a domain joined PC on the LAN, you will automatically be logged in (if the AD FS server URL is in the Local Sites zone). If you watch the address bar in the browser, you should see it redirecting to the AD FS server, and back to Microsoft Online to log you in.
 Thought experiment: Evaluating sign-in options
In this thought experiment, apply what you’ve learned about this objective. You can find answers to these questions in the “Answers” section at the end of this chapter.
You manage Exchange Server for a large organization and you have a hybrid configuration in place for a small pilot of 100 users. Some of the pilot users are reporting back that the need to login to each Office 365 service separately is considered reduced functionality and recommend changes if the company went beyond the pilot into production.
1. How can you tell what authentication scheme you are currently using?
2. You want to pilot AD FS. What do you need to put together to make this pilot work?
Objective summary
![]() The Hybrid Configuration Wizard is a feature of Exchange on-premises that allows the on-premises organization and an Office 365 Exchange Online tenant to appear as a single organization.
The Hybrid Configuration Wizard is a feature of Exchange on-premises that allows the on-premises organization and an Office 365 Exchange Online tenant to appear as a single organization.
![]() Hybrid configuration will set up secure mail flow between the on-premises organization and the Exchange Online tenant, as well as federated free/busy sharing.
Hybrid configuration will set up secure mail flow between the on-premises organization and the Exchange Online tenant, as well as federated free/busy sharing.
![]() Support for hybrid configuration requires that Exchange on-premises remains within the current or previous version of Exchange Server 2013.
Support for hybrid configuration requires that Exchange on-premises remains within the current or previous version of Exchange Server 2013.
![]() The hybrid wizard only links mail flow and free/busy. Features of Exchange, such as rules and policies, need to be added to Exchange on-premises, and Exchange Online manually.
The hybrid wizard only links mail flow and free/busy. Features of Exchange, such as rules and policies, need to be added to Exchange on-premises, and Exchange Online manually.
![]() AD FS allows for single sign-on. It is not a requirement of hybrid to have AD FS and federated logins.
AD FS allows for single sign-on. It is not a requirement of hybrid to have AD FS and federated logins.
Objective review
Answer the following questions to test your knowledge of the information in this objective. You can find the answers to these questions and explanations of why each answer choice is correct or incorrect in the “Answers” section at the end of this chapter.
1. You run the Hybrid Configuration Wizard and it fails during the MRSProxy stage. What is the likely reason?
A. You are running Exchange Server 2010 and Exchange Server 2013 client access servers.
B. You are running Exchange Server 2003 and Exchange Server 2013 client access servers.
C. Not all of your client access servers are online or reachable from the hybrid server.
D. AutoDiscover is not implemented correctly, and the client access servers cannot be located.
2. You want to ensure that all of your emails to the Internet from your Exchange Online users go via the on-premises infrastructure. What do you need to set up?
A. You need to select centralized mail flow during the Hybrid Configuration Wizard.
B. You need to delete the connectors made by the Hybrid Configuration Wizard, and replace them with manually created connectors.
C. You cannot do this feature with Exchange Online.
D. You need to have your MX records pointing at your on-premises infrastructure.
3. You had a working AD FS server that has been working for one year, and today it stopped authenticating users. Which of the following would be your first consideration given that it has been installed for one year?
A. The token signing certificate has expired.
B. The Windows Server is not activated and has shut down.
C. Your third-party digital certificate has expired.
D. Your user accounts passwords have expired.
Objective 5.2: Deploy and manage Exchange federation
Federation is the configuration in Exchange Server that allows the sharing of information between different Exchange organizations. It is also used between the on-premises organization and Exchange Online to share the same information when Exchange Online is running in hybrid mode with Exchange on-premises.
To set up this sharing, and allow different domains to share free/busy, message tracking, and other features such as contacts, you need to first create a federation trust, and then an organization relationship to connect two organizations to allow sharing.
This objective covers how to:
![]() Manage federation trusts with Microsoft federation gateways
Manage federation trusts with Microsoft federation gateways
![]() Manage sharing policies
Manage sharing policies
![]() Design certificate and firewall requirements
Design certificate and firewall requirements
![]() Manage organization relationships
Manage organization relationships
Managing federation trusts with Microsoft federation gateway
The federation trust is a configuration of Exchange Server that allows two or more external organizations, also running Exchange Server, to securely communicate to share free/busy information (also known as calendar availability). The sharing of this information can only happen between two parties by prior arrangement, and the federation trust is the underlying connection that brokers the communications between the parties involved.
To create a federation trust to allow for calendar, and other sharing between Exchange organizations, involves proving ownership of your domain names, and then creating a trust between your on-premises server and the Microsoft authentication platform called Azure Active Directory. Later, when you want to share information with another Exchange organization, you both swap information via Azure Active Directory that acts as a broker for your communications. If a sharing request is received by your organization, it must have come from one of your partner organizations, and the request must contain proof within it of whom it came from. That proof is cryptographically signed, and is only available via the other organization’s federation trust with Azure Active Directory. Therefore, a spoofed sharing request will not contain the correct proofs, and so will fail to elicit any information.
Note: Change of Name
The objective domain for the exam, and therefore the title of this section, refers to the authentication broker as the Microsoft federation gateway. This has recently been named the Azure Active Directory (or Azure AD) after the actual product that hosts the authentication system.
To create a federation trust in Exchange Control Panel, follow these steps:
1. On an Exchange 2013 server in your on-premises organization, navigate to Organization, Sharing.
2. Click Enable to start the Enable Federation Trust Wizard.
3. After the wizard completes, click Close.
4. In the Federation Trust section of the Sharing tab, click Modify.
5. In Sharing-Enabled Domains, next to Step 1, click Browse.
6. In Select Accepted Domains, select the primary shared domain from the list, and then click OK. This will present the Edit Sharing Domains dialog box, as shown in Figure 5-20.
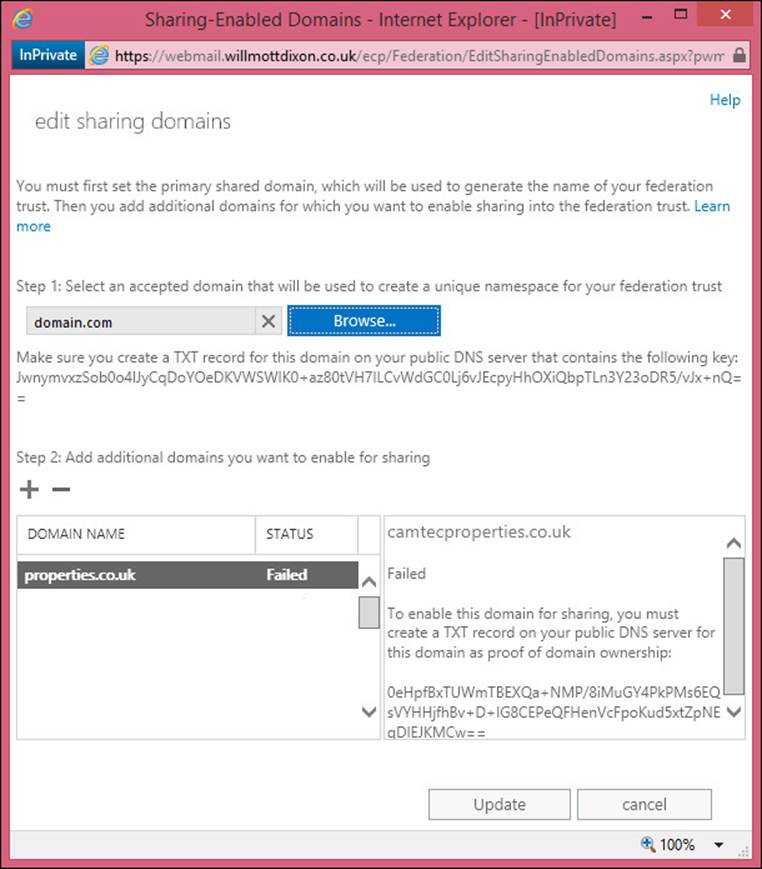
FIGURE 5-20 Adding domains to a federation trust
The domain you select for Step 1 is used to configure the OrgID for the federation trust. The value used in Exchange 2013 is uniquely generated. In Exchange 2010, you needed to create a subdomain of your accepted domain, and then create a federation trust with this name. Therefore, if you specify the federated domain contoso.com as your organization’s primary SMTP domain, the account namespace FYDIBOHF25SPDLT.contoso.com will be automatically created as the OrgID for the federation trust, if you are doing this for the first time on an Exchange 2013 server. If an OrgID already exists, having been created in Exchange 2010, it is probably in the form of service.contoso.com where contoso.com is one of your accepted domains and “service” is a value for a subdomain you are not already using, or likely to use.
1. Make a note of the federated domain proof that’s generated for the primary shared domain. You’ll use this string to create a TXT record on your public DNS server. It is recommended that you copy this long text string directly from the Exchange Server into your DNS console to avoid typographical errors because the string value needs to match in DNS that which Exchange Server asks you to use. If the TXT record is created by using an incorrect federated domain proof string, the Windows Azure AD authentication system won’t be able to verify proof of domain ownership, and you won’t be able to add it to the federated organization identifier.
2. Click Add to add additional domains to the federated trust for email addresses that will be used by users in your organization that require federated sharing features. For example, if you have users that use a subdomain in their email address, such as sales.contoso.com, you would add the sales.contoso.com domain to the federation trust. A federated domain proof string will be created for each additional domain selected. You must create separate TXT records on your public DNS for each additional domain.
3. Using the federated domain proof strings provided for each domain (use Get-FederatedDomainProof -DomainName <fqdn> to retrieve this from the shell), create TXT records for each of these domains on your public DNS server. Wait for your DNS providers update schedule to pass before moving onto the next step. Depending upon your provider, this could take up to 24 or more hours if they make the changes for you, or just a few minutes if you enter the records directly into a service that does immediate updates.
4. After the TXT records are created and replicated, click the Modify button in Exchange Control Panel, Organization. This time you will be able to click OK, and Microsoft will check each DNS proof string against the public DNS server. The federation trust will be created if all of the proof strings are found in DNS.
5. Once the trust is created, you can remove the proof strings from DNS if you want.
It is possible to do the above using the Exchange Management Shell. For the instructions on doing this see http://technet.microsoft.com/en-GB/library/jj657462(v=exchg.150).aspx. If you need to retrieve the federated domain proof that is shown in the console, but have closed the console, it is possible to retrieve this information using Get-FederatedDomainProof in the shell.
Once you have a federation trust in place, and the self-signed certificate that it uses for the trust has replicated around all of your Exchange Servers, you can modify the trust. Modifying the trust is similar to creating it if you add new domains because you need to prove your ownership of them. If you remove a federated domain, and then choose to add it later, you will need to go through the proof of ownership process via public DNS again.
In Exchange 2010 RTM federation trusts were created using a public certificate, and against the Microsoft Live ID authentication platform, and not the Azure Active Directory authentication platform. Therefore, it is recommended that organizations that created a federation trust back when Exchange 2010 was released, and before Exchange 2010 Service Pack 1 was installed, should delete and recreate their federation trust. When two organizations need to share information, and the authentication of this is via federation trusts, they both need to use the same authentication platform.
Important: Refreshing Federation Metadata
There have been issues recorded where the federation data stored in the Azure Active Directory authentication platform has become stale and out of date. If sharing via a federation trust was working and now is not, it is recommended to run Get-FederationTrust | Set-FederationTrust -RefreshMetadata $True.
If you have a web proxy enabled in your organization, Exchange Server will need to either bypass the proxy server, or the proxy server will need to transparently allow requests from the Exchange Server without authentication requests. If the web proxy requires authentication, the error shown in Figure 5-21 will appear in Exchange Control Panel as you configure the federation trust.
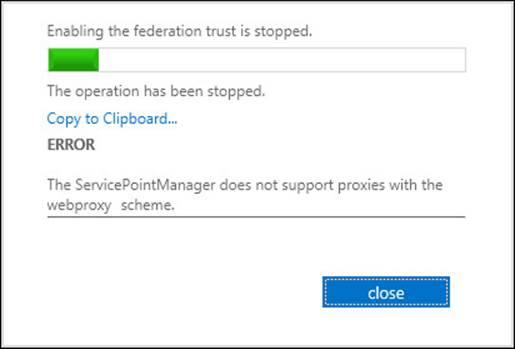
FIGURE 5-21 Authenticating proxy error when creating a federation trust
To create a federation trust and bypass the proxy, ensure that Exchange Server has a direct route to the Internet, or that the proxy server that it has to use, will not require authentication when connections come from the Exchange Server. The Exchange Server proxy setting for federation trusts is set using Set-ExchangeServer <server_name> -InternetWebProxy <proxy_url>, and not via Internet Explorer or netsh where most applications’ proxy settings are configured.
Managing sharing policies
Sharing policies are configurations in Exchange Server that allow other organizations and individuals to access some of your information in your mailbox (chiefly calendars and contacts). By having access to this information, they can collaborate with you in their business, or manage schedules on a personal level.
Exchange Server supports sharing of calendars from either the personal level, which requires sharing policies, or at a corporate level (multiple users in the organization to the partner organization), which requires organization relationships. Therefore, the easiest way to see if you need to set up a federation trust and an organizational relationship is a factor of the number of users at each end. If you want to share one or two users’ calendars to individual users on the Internet, you can use a sharing policy, and no federation trust is required. If you want to share some or all of the user’s calendars in your organization, to some or all of the users in a different Exchange organization, it is easier to complete with a federation trust and an organization relationship.
A federation trust, as previously described, configures settings in Azure AD for your domains. Then, when users need to access your users free/busy or calendar information, they can be authenticated via the federation trust. To control which users can access what level of free/busy information within a domain, you create an organization relationship. Organization relationships, though similar in final result to a sharing policy, are different and are covered later in this chapter.
In summary, the following outlines whether you need a sharing policy or an organization relationship:
An organization relationship is required when:
![]() A federation trust is needed.
A federation trust is needed.
![]() You do anything that recommends the external domain needs to be federated.
You do anything that recommends the external domain needs to be federated.
![]() Sharing free/busy information (including subject and location) with external organizations for a set of many users.
Sharing free/busy information (including subject and location) with external organizations for a set of many users.
A sharing policy is needed when:
![]() Sharing calendar folders with free/busy or free/busy information and subject and location.
Sharing calendar folders with free/busy or free/busy information and subject and location.
![]() Sending sharing invitations to external recipients.
Sending sharing invitations to external recipients.
![]() The sharing applies to all external domains.
The sharing applies to all external domains.
Sharing policies are assigned to mailboxes, and the settings in the policy control what the user can do. There are two sharing policies by default. These are called Default Sharing Policy and Anonymous Calendar Sharing. Both allow the sharing on a one-to-one basis, or your free/busy information, but only the free/busy state, and not the subject of the meeting or the location of the meeting. The Default Sharing Policy is assigned to all domains and requires a federation trust between the parties to be used. The Anonymous Calendar Sharing policy does not require any authentication, so does not require a federation trust, but on Exchange on-premises requires the creation of a /owa/calendar URL that the recipients of the calendar sharing invitations can go to.
So with either or both of the above options, the prerequisites required for a federation trust or /owa/calendar URL require the user that is assigned one of the two previous policies so that they can share their calendar or free/busy information. By default, all mailboxes are assigned the Default Sharing Policy, and so can share their calendar with other federated Exchange organizations.
You will need to create additional sharing policies if you want to share more than just free/busy information (that is, subject and location), and if you have specific requirements for different domains. This is because the default policy is simple free/busy information and all domains. In the default policy, this can be seen on the Domains value, which reads “*:CalendarSharingFreeBusySimple”, if you view the sharing policy with Get-SharingPolicy | Format-List.
Exam Tip
A given mailbox can only have one policy assigned. If you want different policies for different domains, you need to create all of the domains and combinations of sharing restrictions in the same policy.
The steps to create a sharing policy are to login to ECP, select an organization, and then select the sharing tab (which you are on by default). From here, click the Add icon in the Individual Sharing area. The top area of the page is for organizations with federation trusts, and an organization relationship between them. When you create a new policy, you need a name and one or more sharing rules for the policy. A sharing rule is a combination of a domain (or all domains) and the level of sharing you want to allow. That is if you want to share free/busy, free/busy time and subject and location, or the entire calendar appointment information. You can also share your contacts folder as well. This is shown in Figure 5-22.
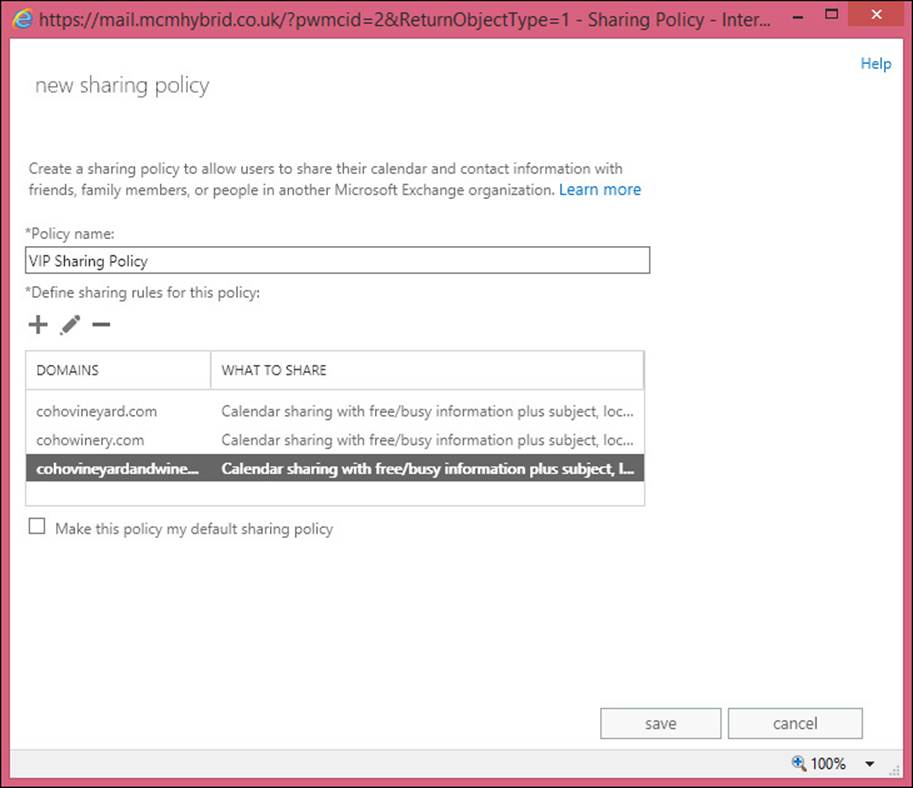
FIGURE 5-22 The New Sharing Policy dialog box
Modifying sharing policies and deleting sharing policies (if they have been removed from all mailboxes) are simple tasks to complete. When you have the sharing policy the way you want it configured, you need to assign it to one or more mailboxes. For example, to use Exchange Management Shell to assign the previously created policy to all users with VIP in their job description, you would use the following.
Get-User | Where {$_.Title -ilike "*VIP*"} | Set-Mailbox -SharingPolicy "VIP Sharing Policy"
If the remote domain in the sharing policy is an Exchange organization, a federation trust needs to be put in place. Following this trust, the sharing policy can be used. If the remote domain is running a version of version of Exchange Server before 2010 on-premises, a 2013 server will need to be installed as well because cross-forest sharing via federation trusts only works between two Exchange 2013 or 2010 CAS servers.
For sharing policies to anonymous users on the Internet, you could assign the mailbox the Anonymous Calendar Sharing Policy, but federated sharing will fail. Instead, you need to create a new policy that allows both federated sharing to your selected remote domains and anonymous sharing. To create a new sharing policy to allow calendar sharing with anonymous Internet users and specific domains via a federation trust, you can use a cmdlet similar to the following:
New-SharingPolicy -Name "Anonymous and Contoso" -Domains 'Anonymous: CalendarSharingFreeBusySimple', 'contoso.com: CalendarSharingFreeBusySimple' -Enabled $true
This policy allows free/busy (but not subject and location) sharing with contoso.com via a federation trust if they are an Exchange Server organization. It also allows the same level of free/busy sharing to anonymous domains (those without a federation trust—that is, those running Exchange Server 2003 and earlier, or non-Exchange Server email domains).
When you create an anonymous sharing policy, you are told to check that you have created the calendar URL in OWA. The cmdlet to do this is on all of your Exchange CAS servers is as follows.
Get-OwaVirtualDirectory | Set-OwaVirtualDirectory -AnonymousFeaturesEnabled $true
The Anonymous Features setting of OWA enables the /owa/calendar URL and needs to be run against each OWA virtual directory in the site that contains mailboxes that have anonymous sharing policies. The cmdlets to create this policy assign it to a single mailbox, and set the OWA virtual directory policy, as shown in Figure 5-23.
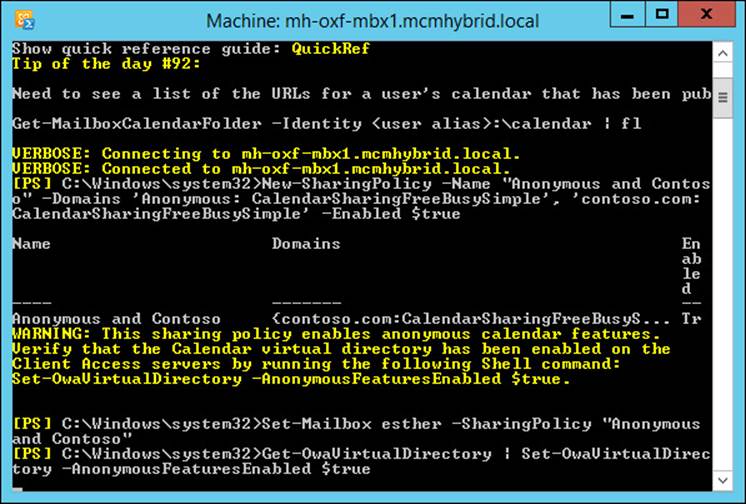
FIGURE 5-23 Cmdlets to create an anonymous sharing policy, assign the policy to one user and set the OWA virtual directory AnonymousFeaturesEnabled setting to True
To share a calendar or free/busy information from the user’s perspective, once the required policies (that is, a federated trust and sharing policy, or if anonymous, a sharing policy) are in place, they need to share their calendar or grant free/busy permissions to the specific user. By default, calendars include the Anonymous permission, but do not grant any rights to it. If you share to Internet users with an anonymous policy, you need to ensure that Anonymous has permissions to access your calendar. The Outlook view of default calendar permissions can be seen in Figure 5-24.
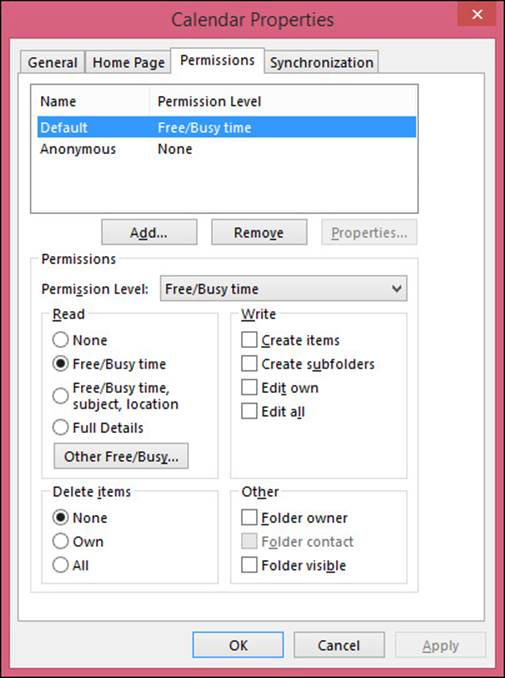
FIGURE 5-24 Outlook calendar permissions
The default permissions are authenticated users (shown in the dialog box as Default), and have free/busy permissions, and Anonymous users have no permissions. If a user clicks the Share Calendar button on the Outlook toolbar, they see Figure 5-25.
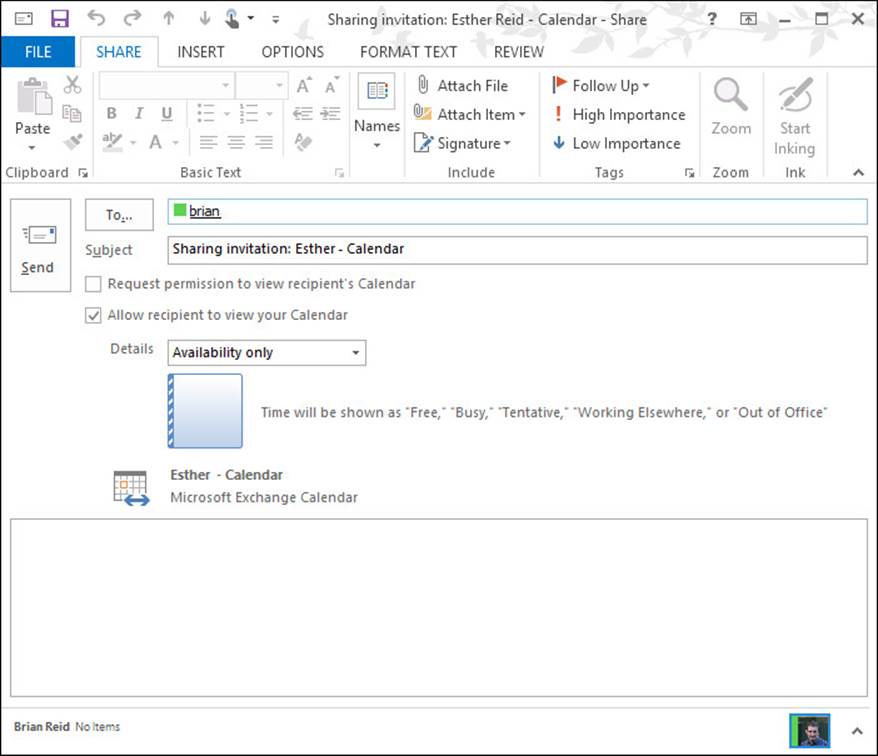
FIGURE 5-25 Sharing a calendar to an Internet user
If permission is not available for the level of access desired (for example free/busy), you will see an error message like the one in Figure 5-26, and a prompt about publishing your calendar.
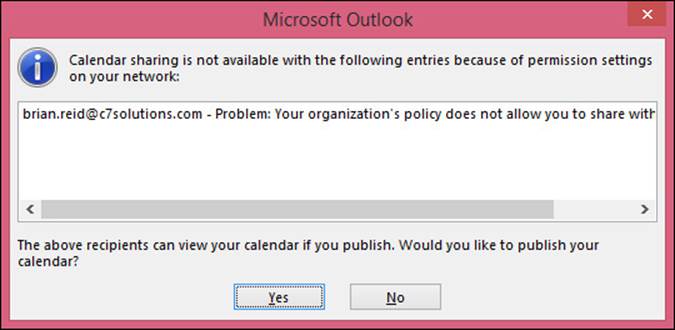
FIGURE 5-26 Error when calendar sharing is not possible
When calendar publishing is available, the Yes button takes you to your OWA URL, and also the Calendar Publishing options (you can use the Publish Online button in Outlook to go directly here). Here you choose the time window you want to publish, the level of details to be published, and whether or not it is restricted to a set of users or public. Public sharing means the calendar URL can be searched for. Restricted means the user has to receive the URL to use the calendar, but this does not stop them from sharing the same URL with others! There will be two URLs displayed once you start publishing, one for subscribing to the calendar (viewing the changes as they are made), which is an .ics file, and one for viewing a static view of the calendar in a web browser (an .html link). For example, you can open the .ics file in Outlook and view the user’s calendar, as well as any update within your normal calendar in Outlook. You will see that the URL to the .ics file and the .html file is the OWA URL for the site the user is in, and the /Calendar/ subfolder. A redacted view of this information can be seen in Figure 5-27, where some of the calendar URL has been removed so that it cannot be subscribed to.

FIGURE 5-27 Publishing a calendar anonymously to individual users
The default sharing policy in Exchange Online is to allow anonymous sharing of calendars and to allow free/busy, as well as the subject and location. The AnonymousCalendarFeatures setting is already enabled on all OWA virtual directories in Exchange Online because virtual directory administration by the tenant administrator is not possible. If you do not want to allow users to publish calendars with external users, create a new sharing policy without anonymous rights, and assign it as required.
Designing certificate and firewall requirements
Federated sharing features require that the Client Access servers in your organization have outbound access to the Internet by using HTTPS. You must allow outbound HTTPS access (port 443 for TCP) to all Exchange 2013 Client Access servers in the organization.
For an external organization to access your organization’s free/busy information, you must publish at least one Client Access server to the Internet. This requires inbound HTTPS access from the Internet to the Client Access server. Client Access servers in Active Directory sites that don’t have a Client Access server published to the Internet can use Client Access servers in other Active Directory sites that are accessible from the Internet. The Client Access servers that aren’t published to the Internet must have the external URL of the virtual directory of the Exchange Web Service set with the URL that’s visible to external organizations.
As users external to your organization need to connect to your Internet published CAS server over HTTPS to complete a sharing connection, the certificate on the Internet facing CAS server needs to be a valid certificate from a trusted issuer and in date. The subject name of the certificate needs to match the URL used to reach the server. The name of the server that the external party will need to connect to will be listed in the calendar sharing invite that is sent to that user. This invitation will contain the external URL for the Exchange Web Services virtual directory in the site that the user’s mailbox is located.
Managing organization relationships
Once the federation trust is completed, that is once the federation trust is enabled, the DNS proof values obtained and added to external DNS, and the federation trust completed, you can create organization relationships. An organization relationship is used to create a relationship with an external Exchange Server 2010 or Exchange Server 2013 organization, or an organization in Exchange Online, for the purposes of accessing calendar and free/busy. When you configure hybrid mode, an organization relationship is created between the on-premises organization and the Exchange Online organization for the same company as part of the Hybrid Configuration Wizard.
The organization relationships can be created, modified, and deleted in both ECP and the shell. Figure 5-28 shows the New Organization Relationship dialog box, which is the same as running New-OrganizationRelationship from the shell. In Figure 5-28, everyone in the company is allowed to share their free/busy info with users at Woodgrove Bank.
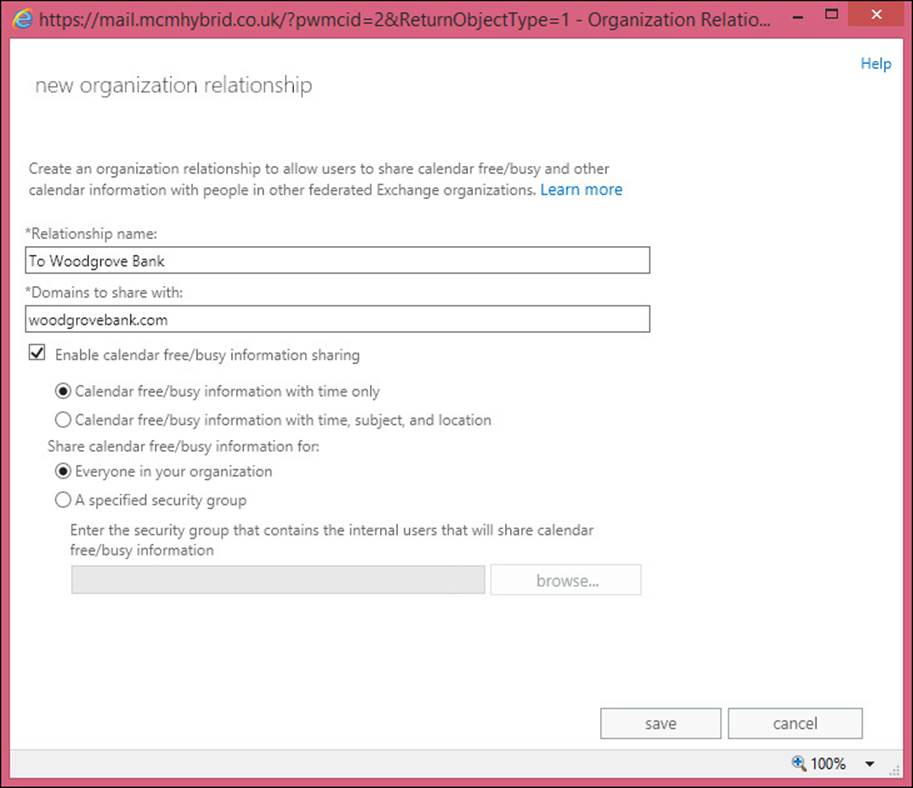
FIGURE 5-28 Configuring an organization relationship
Woodgrove Bank would have needed to create an organization relationship as well before this will work because the request for the free/busy information comes from a CAS server at Woodgrove Bank, and is authenticated by the Azure Active Directory by way of their federation trust. That server is granted a token to use when accessing a CAS server belonging to the organization that is shown in the screen shot. Therefore, any organization with a federation trust cannot access your free/busy or calendar information unless you have a federation trust and have created an organization relationship for that organization. The token Woodgrove Bank obtained from Azure Active Directory can only be read by the recipient organization, and the request for free/busy or calendar info comes direct from Woodgrove Bank encrypted via the token. Only the recipient organization can read the data encrypted with this token, and so the recipient organization will only grant the request if the information is cryptographically valid.
As well as allowing everyone in an organization to share free/busy and/or calendar information with a remote organization, you can restrict it to members of a security group if you wish. Then only the free/busy of the mailboxes in that group will be seen by the other party in the organization relationship.
As well as obtaining a token from Azure Active Directory, the remote organization will access a CAS on your organization via AutoDiscover. Therefore, if AutoDiscover is not working, you will find that organization relationships do not work either.
Important: Organization Relationship Timeouts
The New Organization Relationship dialog box will fail to complete if the domain listed has not completed a federation trust, or the endpoint of the trust is not reachable via AutoDiscover.
The “On-premises to O365 - guid” organization relationship that you might see in your organization is the one created as part of the Hybrid Configuration Wizard. This organization relationship should not be modified, and if deleted, should be recreated via the Hybrid Configuration Wizard.
Thought experiment: Sharing calendars
In this thought experiment, apply what you’ve learned about this objective. You can find answers to these questions in the “Answers” section at the end of this chapter.
You manage Exchange for a group of organizations that have three independent forests and Exchange Server organizations on-premises. You have been tasked with ensuring that the three Exchange organizations, which all run Exchange Server 2013, are able to share calendar information with each other.
1. What do you need to configure in each Exchange organization?
Objective summary
![]() A federation trust is used to obtain tokens to authenticate to remote Exchange Server 2010 and higher forests for the purpose of retrieving free/busy, calendar, MailTips, mailbox delivery reports, and other settings.
A federation trust is used to obtain tokens to authenticate to remote Exchange Server 2010 and higher forests for the purpose of retrieving free/busy, calendar, MailTips, mailbox delivery reports, and other settings.
![]() An organizational relationship controls the specific sharing settings between two federated Exchange organizations.
An organizational relationship controls the specific sharing settings between two federated Exchange organizations.
![]() A sharing policy allows users to publish their calendars to other users. Do not confuse publishing calendars and sharing calendars in Outlook. Sharing a calendar is just setting permissions on your calendar and asking another user to do the same, either within the organization or over a federation trust. A sharing policy is for publishing calendars.
A sharing policy allows users to publish their calendars to other users. Do not confuse publishing calendars and sharing calendars in Outlook. Sharing a calendar is just setting permissions on your calendar and asking another user to do the same, either within the organization or over a federation trust. A sharing policy is for publishing calendars.
![]() The Hybrid Configuration Wizard creates a federation trust between the on-premises Exchange organization and the Exchange online organization.
The Hybrid Configuration Wizard creates a federation trust between the on-premises Exchange organization and the Exchange online organization.
Objective review
Answer the following questions to test your knowledge of the information in this objective. You can find the answers to these questions and explanations of why each answer choice is correct or incorrect in the “Answers” section at the end of this chapter.
1. What Exchange Management Shell cmdlet do you use to get the TXT string you need to enter into public DNS for a federation trust if you have closed the Federation Trust Wizard?
A. Get-HybridConfiguration -GetFederationTrustString AllDomains
B. Get-FederationTrustString -DomainName <fqdn>
C. Get-TXTRecord -FQDN <fqdn>
D. Get-FederatedDomainProof -DomainName <fqdn>
2. An Office 365 administrator wants to allow users to publish their calendars online. What do they need to do in Exchange Online?
A. Nothing is required because anonymous sharing is the default.
B. They need to create a new sharing policy for anonymous usage and update the OWA virtual directories for their tenant in the cloud.
C. They need to create a new sharing policy and assign it to the users who need it.
D. This feature is not available in Exchange Online.
3. You need to restrict calendar sharing between a remote organization to a select group of users. How would you do this?
A. Ensure that the allowed users share their calendar with the remote domain and the others do not.
B. Create an organization relationship that is restricted to members of a security group.
C. You cannot restrict organization relationships more specifically than to the entire domain.
D. Use Add-MailboxFolderPermission to change the permissions on calendar of the recipient mailbox to publish it to the Internet.
Objective 5.3: Implement on-premises coexistence with legacy systems
When you install a new version of Exchange Server into an organization, it is highly likely that you will keep both the old and new version in place for at least a short while. Keep both versions even if this is just the short period of time between installing, moving some users as a pilot program, and then moving the rest of the users before the old system is decommissioned. This should cover the period of time when users will expect to be able to communicate with those mailboxes that have been migrated, and those migrated users will expect to be able to communicate with those that have not yet been migrated.
And coexistence is not just for the users. During the period of coexistence, you need to ensure that:
![]() Emails are delivered to the correct users.
Emails are delivered to the correct users.
![]() When a user logs in to Exchange, the user reaches the correct mailbox on the correct version.
When a user logs in to Exchange, the user reaches the correct mailbox on the correct version.
![]() All of the users’ existing devices continue to work while their mailbox is moved between versions of Exchange Server.
All of the users’ existing devices continue to work while their mailbox is moved between versions of Exchange Server.
This objective will look at the considerations to make in Exchange Server to support migrating from Exchange 2007 or Exchange Server 2010, to Exchange Server 2013. You cannot directly migrate from Exchange 2003 to Exchange 2013, and so this scenario (which is migrating to Exchange Server 2010 and decommission 2003, and then migrating to 2013) is not covered as a separate topic.
This objective covers how to:
![]() Plan namespaces for coexistence
Plan namespaces for coexistence
![]() Configure proxy redirect
Configure proxy redirect
![]() Plan firewall configuration for coexistence
Plan firewall configuration for coexistence
![]() Plan for mail flow requirements
Plan for mail flow requirements
Planning namespaces for coexistence
For users and devices to be able to access their mailboxes, they need to be able to login to the correct location. It is generally correct to say that, if a user logs into the later version of Exchange, then Exchange will know whether the correct configuration is in place and how to route the user to their mailbox on the older or legacy version of Exchange Server. But if the user who has been migrated to the newer version logs into the older version, they will not be able to access their mailbox.
Therefore, to ensure that users can access their mailbox regardless of whether it has been migrated to the latest version, users always need to login to the latest version. The URL that the user uses to login, especially to services such as Outlook Web App, is usually pretty ingrained, and if you change the URL, the user can accidently use the old one. Therefore, it is common that the URL used to access the service is moved to the new version once initial testing on the new version shows that it is working fine.
This URL used by the user, or the URL entered into the device, is known as the namespace. For coexistence with Exchange Server 2007, an additional namespace is required. Coexistence between Exchange Server 2013 and 2010 does not require any additions to the namespace. If you coexist with 2007, 2010, and 2013, as you have 2007, you need the additional namespace to support coexistence.
Take a look at an example. Contoso has two offices, one in Oxford and one in Nuneaton. Users in the head office at Oxford are accustomed to using oxford-mail.contoso.com to reach their mailbox, and users in Nuneaton expect to access their mailbox via nuneaton-mail.contoso.com. When they login, they see their 2007 mailbox. Exchange 2013 is installed in Oxford and the “oxford-mail” DNS entry is changed to point to the Exchange 2013 endpoint. The user browses to oxford-mail.contoso.com/owa and gets the 2013 style login page. They enter their credentials, and Exchange queries Active Directory for the right to login and access their mailbox settings. Exchange Server 2013 sees that this user is on 2007 in the Oxford office, and so redirects the browser to a new namespace specifically for the 2007 mailboxes. An example for this namespace, which must be resolved by DNS to the Exchange 2007 endpoint in the correct site, could be oxford-legacy.contoso.com. The user does not need to remember this URL because they are redirected automatically. Equally, a namespace such as nuneaton-legacy.contoso.com will need to be created and used for the 2007 servers in Nuneaton when 2013 is installed in that site. All of these names will need to be on a digital certificate as well as autodiscover.contoso.com (which always is pointed at the latest version of Exchange, and so does not need a legacy namespace).
You can see from this example that when you have mailboxes in a site on Exchange 2007, you require a second namespace to be able to reach those servers and mailboxes before you migrate them to Exchange 2013. If you took the same example with Exchange 2010, you would not need an additional legacy namespace. The reason is that Exchange 2013 is able to connect directly to Exchange 2010 Client Access Servers in the same site, and does not require the user to be redirected to the legacy server version. That is, when a user on an Exchange 2010 server browses tooxford-mail.contoso.com, the Exchange 2013 Server proxies the connection to the Exchange 2010 Server in the same site, and the user sees their mailbox. If the user’s Exchange 2010 mailbox is in a remote site, Exchange 2013 will either proxy or redirect the connection depending upon the protocol. Table 5-1 outlines how Exchange 2013 connects to a mailbox on a legacy version of Exchange Server.
A few of the above can be clarified further:
![]() Before you migrate mailboxes to 2013, you will need to update the digital certificate on 2007 to contain the current URL and the legacy URL. Then when you are ready to have users connect initially to 2013, you need to change the ExternalURL for Outlook Web App (OWA) and Exchange Web Services (EWS) on all of the Exchange 2007 servers that are affected by this change to 2013. For example, in the earlier scenario of oxford-mail.contoso.com and oxford-legacy.contoso.com, if you had not yet installed Exchange 2013 in Nuneaton, users of nuneaton-mail.contoso.com are still hitting a 2007 server first, and so there is no requirement to change their ExternalURL.
Before you migrate mailboxes to 2013, you will need to update the digital certificate on 2007 to contain the current URL and the legacy URL. Then when you are ready to have users connect initially to 2013, you need to change the ExternalURL for Outlook Web App (OWA) and Exchange Web Services (EWS) on all of the Exchange 2007 servers that are affected by this change to 2013. For example, in the earlier scenario of oxford-mail.contoso.com and oxford-legacy.contoso.com, if you had not yet installed Exchange 2013 in Nuneaton, users of nuneaton-mail.contoso.com are still hitting a 2007 server first, and so there is no requirement to change their ExternalURL.
![]() The AutoDiscover SCP should point to the 2013 namespace for all servers. The servers that return the best AutoDiscover information are those running the latest version of Exchange Server.
The AutoDiscover SCP should point to the 2013 namespace for all servers. The servers that return the best AutoDiscover information are those running the latest version of Exchange Server.
![]() Because Exchange Server 2013 will redirect to Exchange Server 2007 for OWA and never proxy the connection, all Exchange Server 2007 Client Access Servers need to be Internet reachable for Internet users, and LAN reachable for LAN users.
Because Exchange Server 2013 will redirect to Exchange Server 2007 for OWA and never proxy the connection, all Exchange Server 2007 Client Access Servers need to be Internet reachable for Internet users, and LAN reachable for LAN users.
Full details of all the different options can be found online at http://blogs.technet.com/b/exchange/archive/2014/03/12/client-connectivity-in-an-exchange-2013-coexistence-environment.aspx.
In summary, coexistence with Exchange 2013 is considerably easier than it was with Exchange 2003 because a lot of the service and protocol connections are proxied and not redirected to legacy namespaces.
Configuring proxy redirect
The exam objective domain contains the title, “Configure proxy redirect.” Proxy and redirect are different things, and of them, only redirection needs configuring because proxy works automatically. As seen in Table 5-1 in the previous section, most protocols use proxy to connect from Exchange 2013 to the legacy version. Redirect is only used for OWA 2007 and only OWA 2010 when there is an ExternalURL in place. So you will look at just these two scenarios.
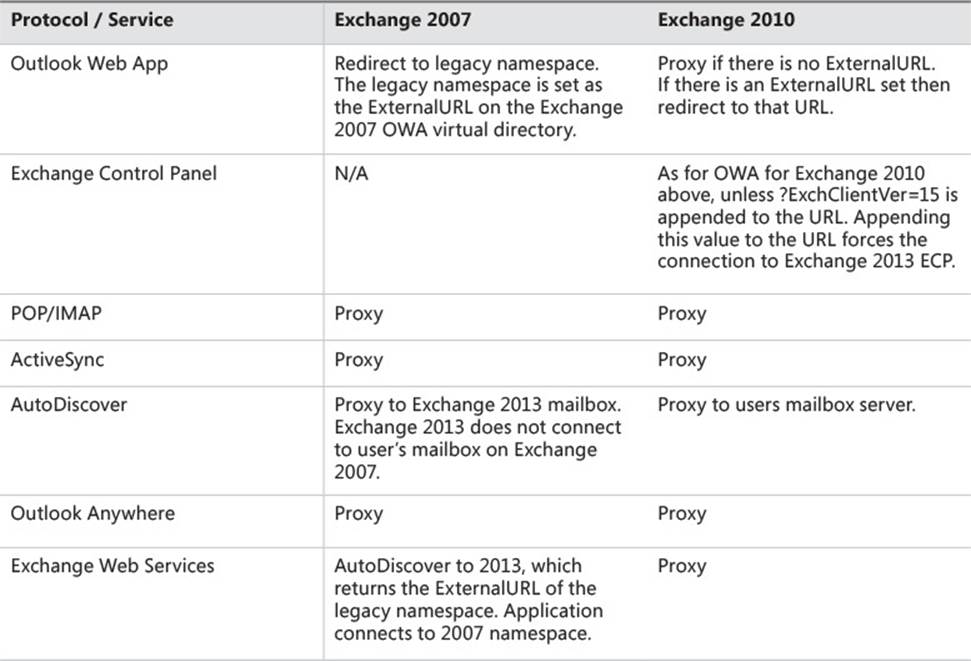
TABLE 5-1 How different Exchange protocols and services connect to legacy Exchange Servers
For OWA access for 2007 mailboxes the user will have a URL that they enter into their browser or a bookmark/favorite that they have saved. Therefore, keeping the same URL is highly recommended. To ensure a valid redirect back to Exchange 2007 once the URL they use is pointed to Exchange 2013, you need to change the ExternalURL on OWA on all the Exchange 2007 CAS servers in the site to the same value. This value would be the chosen legacy namespace value, which in most documentation is called legacy.domain.com, but does not need to actually have the word legacy in it at all. It just needs to be a unique value that DNS can resolve and that the chosen value is in the digital certificate that is bound to the Default Web Site in IIS on the 2007 server. This certificate should ideally contain both the legacy namespace and the primary namespace (oxford-mail.contoso.com and oxford-legacy.contoso.com in the ongoing example in the previous section). Containing both names allows you to update the certificate before you change the ExternalURL, and swap the endpoint from 2007 to 2013, thus reducing the work needed to change the endpoint location.
For Exchange 2010 mailboxes, an OWA login to 2013 will redirect to the ExternalURL of the OWA virtual directory in the site that the user’s mailbox is located in. If the user is located in the same site as the Exchange 2013 server (that is the ExternalURL for 2013 is the same as the ExternalURL for 2010), the user’s mailbox will be accessed via a proxy from Exchange 2013.
Planning firewall configuration for coexistence
For users to be able to access Exchange Server from the Internet, you will need to publish one or more Exchange Client Access Servers to the Internet. This publishing is either direct (via a network address translation (NAT) firewall) to the IP address of the Exchange CAS Server, or by publishing a load balancer that is forwarding the data to an array of Exchange Client Access Servers.
If the protocol that you are connecting over is proxied to the legacy server, there are no additional ports to open in the external firewall. Exchange Server 2013 and the legacy Exchange Server on the LAN must have no blocked ports between them because Exchange Server is not supported with firewalls between Exchange Servers on the internal network.
If the protocol you are connecting over is redirected, you need to publish the legacy server to an external IP address that is resolved to the legacy namespace. Figure 5-29 shows this example.
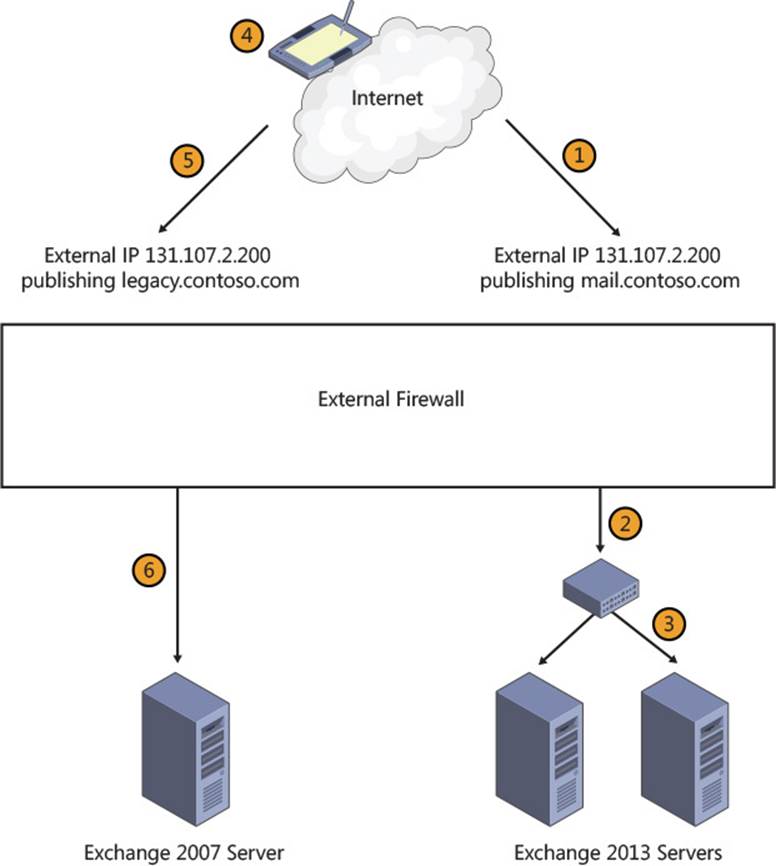
FIGURE 5-29 Publishing Exchange Server for redirection
In Figure 5-29, you can see the following sequence of events where a user is redirected to OWA on Exchange 2007.
1. The user enters https://mail.contoso.com/owa into a browser on their device on the Internet. The name is resolved to the external IP address 131.107.2.100.
2. The external firewall is publishing the load balancer that distributes load across the Exchange 2013 servers on TCP 443. The connection from the user traverses the firewall to the load balancer.
3. The load balancer sends the data to one of the Exchange 2013 servers. The server authenticates the user and sees that they have a mailbox on Exchange 2007. The ExternalURL for Exchange 2007 in the user’s site is legacy.contoso.com and the user is connecting to OWA. The server then redirects the user via a 302 browser redirect to go instead to https://legacy.contoso.com/owa.
4. The device is told to go to https://legacy.contoso.com/owa, and so DNS is queried for the IP address of this URL and it resolves to 131.107.2.200.
5. The device connects to 131.107.2.200, and the firewall is publishing the Exchange 2007 Client Access server on this IP address, and also over TCP port 443.
6. The connection for https://legacy.contoso.com/owa is passed through to the Exchange Server, and the user can access their email.
Planning for mail flow requirements
The previous few sections have not discussed transport and SMTP coexistence. That is because, even though mail flow is very important, it does not need to change when the user changes endpoints, nor does it typically involve a new namespace. Typically you either change your firewall to publish TCP 25 from the old servers to the new servers, and so there are no changes to your MX records or the settings at your anti-spam cloud vendor, or you update your firewall to a second IP address (which is recommended to allow you to test the changeover). Then when you are ready to change the SMTP endpoint, you update the A record that the MX record points to, or update your settings at your anti-spam cloud vendor to use the new IP address. The old publishing rule and IP address on the firewall can typically be closed a few days later.
Other changes that you often need to make for mail flow coexistence are for internal mail flow. You will probably have some applications or printers/scanners that send email. These applications and devices will need to use the 2013 servers, and stop using the old servers. To do this you will typically need to create receive connectors on Exchange Server 2013 Client Access Servers bound to the Frontend Transport service that treats emails from these devices or applications differently. If the device or application sends anonymous email to Exchange for users within the Exchange organization, you need to do nothing extra because Exchange 2013 will receive anonymous emails for its accepted domains automatically (unlike Exchange 2010, which needed configuring). But when the application or device needs to send email to the Internet, it either needs to authenticate to the Client Access Server (on TCP port 587), or you need to create a new receive connector that allows relay to the Internet, and is restricted to the IP range of the application and devices that will use it. The following is an Exchange Management Shell cmdlet that will create a connector and set relay permissions against it so that an application or device on 192.168.10.10 or 192.168.10.11 can send email to the Internet. Relay permissions are granted by the connector authentication being ExternallyAuthoritative.
New-ReceiveConnector "Relay Connector" -TransportRole Frontend -Server EXCHCAS1
-Bindings 0.0.0.0:25
-RemoteIPRanges 192.168.10.10,192.168.10.11 -Banner "220 Contoso Relay Enabled SMTP
Server on EXCHCAS1"
-PermissionGroups Anonymous -AuthMechanism Tls,ExternalAuthoritative.
ExternallyAuthoritative means anything running on those servers can email the Internet. If you want to restrict it further, you would want the application to authenticate with a username and password. Then only that application on that server would be able to send emails externally. In this cmdlet, the Banner property is useful for testing purposes. If you connect to the Exchange Server that the cmdlet was run on from the application server whose IP address was listed over TCP port 25, you should see the banner returned to you as shown in Figure 5-30. If you have connected to the wrong Exchange Server, or the application or device IP was different, you would not see the banner and would know you had connected to the wrong receive connector. The connector also offers TLS as defined in the cmdlet, and which can be seen with the STARTTLS verb in Figure 5-30.
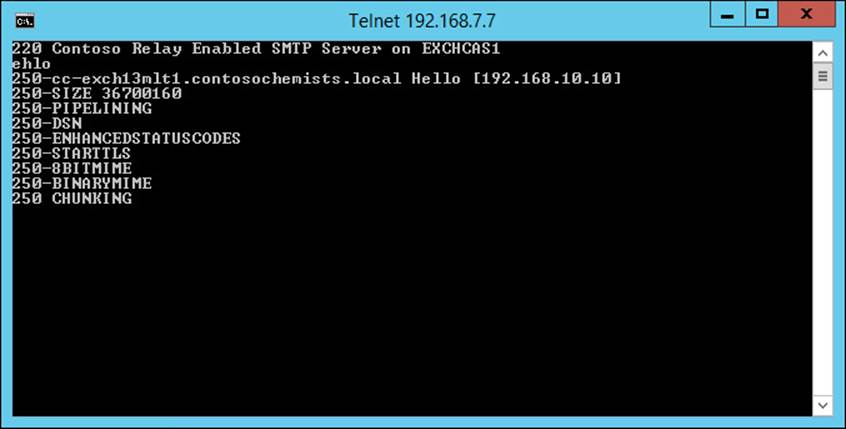
FIGURE 5-30 A banner being shown when connecting from the application server to the Exchange Server and the correct relay connector being verified
Thought experiment: Upgrading Exchange Server
In this thought experiment, apply what you’ve learned about this objective. You can find answers to these questions in the “Answers” section at the end of this chapter.
You manage an Exchange Server 2010 organization and want to install an Exchange Server 2013 server so that you can test the new version with only your mailbox being migrated. You want to ensure that the installation of Exchange Server 2013 does not impact the existing Exchange Server 2010 users.
1. How will you ensure that you can move your mailbox to Exchange Server 2013?
2. How will you ensure that other users’ mailboxes are not impacted by this change?
Objective summary
![]() Exchange Server 2007 coexistence with Exchange Server 2013 for Outlook Web App requires a legacy namespace.
Exchange Server 2007 coexistence with Exchange Server 2013 for Outlook Web App requires a legacy namespace.
![]() Exchange Server 2010 coexistence with Exchange Server 2013 does not require a legacy namespace, unless Exchange Server 2010 is in a remote site and proxying connections from Exchange Server 2013 will not work and redirection to the legacy namespace is required.
Exchange Server 2010 coexistence with Exchange Server 2013 does not require a legacy namespace, unless Exchange Server 2010 is in a remote site and proxying connections from Exchange Server 2013 will not work and redirection to the legacy namespace is required.
![]() Exchange Web Services for Exchange Server 2007 coexistence will return the ExternalURL of the EWS endpoint suitable for the 2007 mailbox (the legacy namespace) if the AutoDiscover endpoint is correctly connected to Exchange 2013.
Exchange Web Services for Exchange Server 2007 coexistence will return the ExternalURL of the EWS endpoint suitable for the 2007 mailbox (the legacy namespace) if the AutoDiscover endpoint is correctly connected to Exchange 2013.
![]() All other protocols will proxy through Exchange 2013 and not require the client to change the endpoint.
All other protocols will proxy through Exchange 2013 and not require the client to change the endpoint.
![]() Firewall changes are needed for scenarios where redirection occurs but not where proxy occurs.
Firewall changes are needed for scenarios where redirection occurs but not where proxy occurs.
Objective review
Answer the following questions to test your knowledge of the information in this objective. You can find the answers to these questions and explanations of why each answer choice is correct or incorrect in the “Answers” section at the end of this chapter.
1. Which of the following subject and subject alternative names would be needed on a digital certificate for a 2007 to 2013 migration?
A. legacy.contoso.com; mail.contoso.com; legacy-autodiscover.contoso.com; autodiscover.contoso.com.
B. legacy.contoso.com; mail.contoso.com; legacy.mail.contoso.com; autodiscover.contoso.com
C. mail.contoso.com; autodiscover.contoso.com
D. legacy.contoso.com; mail.contoso.com; autodiscover.contoso.com
2. Do you need a legacy namespace for an ActiveSync client with a mailbox on Exchange 2007 when the URL that is registered in the device points to Exchange 2013 endpoint?
A. Yes
B. No
3. What is the TCP port on the server recommended for client SMTP connections?
A. 25
B. 475
C. 587
D. 2525
Objective 5.4: Set up a cross-forest coexistence solution
With Exchange Server being the typical email server product installed in most organizations, there may be requirements to link or merge Exchange Server when installed in multiple forests. This is especially the case when different companies merge or are involved in takeovers, but is useful when partner organizations want to share information. It is also useful when an organization needs to create a new Active Directory forest, and to migrate services to the new forest. This objective looks at the things you need to be aware of from the viewpoint of coexisting multiple forests.
This objective covers how to:
![]() Set up cross-forest availability
Set up cross-forest availability
![]() Design certificate and firewall requirements
Design certificate and firewall requirements
![]() Set up cross-forest mail flow
Set up cross-forest mail flow
![]() Design and configure AutoDiscover
Design and configure AutoDiscover
![]() Set up shared namespaces
Set up shared namespaces
Setting up cross-forest availability
Previously in this book, you looked at free/busy between different organizations and on-premises and Office 365 when using federation trusts. Availability between any Exchange 2010 or 2013 organization can be provided by way of a federation trust. If the organization only has Exchange Server 2007 in use, or both forests use the same domain name, or there is no Internet connectivity to Azure Active Directory to get a federation trust token, you need to configure the availability service for cross-forest topologies.
There are two types of cross-forest topologies. The first is where the source and target forests are trusted at an Active Directory level, and so that users in one forest can access resources in the other forest with their username and password from the source forest. The second type of topology is one where there is no forest trust in place.
With a forest trust in place, it is possible to grant availability to the user level. That is a user can share their calendar for free/busy (or free/busy, subject, and location) for a given user in the remote forest. When the forests are not trusted, you need to set up a configuration that allows the source forest to query the target forest for availability, but you cannot restrict it down to which users you want to grant availability for. All users are accessible to the source forest.
Exam Tip
If you want to implement bi-directional availability, that is Forest A can query free/busy in Forest B, and Forest B can query free/busy in Forest A, you need to run the below cmdlets in both directions because the availability cmdlets work in a single direction.
If Forest A can retrieve availability from Forest B, and Forest B can retrieve availability from Forest C, this does not mean Forest A can see availability for Forest C. To do this, cross-forest availability between A and C will need to be put in place (and probably between C and A in reverse to allow availability in the opposite direction).
The cmdlets used to configure cross-forest availability differ depending upon whether the forests are trusted or not. To link two trusted forests for cross-forest availability, use the following single line of PowerShell to set up the initial permissions in Forest A, with a service account from Forest B.
Get-MailboxServer | Add-ADPermission -Accessrights Extendedright -Extendedrights "ms
-Exch-EPI-Token-Serialization" -User "<Remote Forest B>\Mailbox servers"
Then run the following cmdlet in Forest A to link the forests.
Add-AvailabilityAddressSpace -Forestname ForestB.com -AccessMethod PerUserFB -UseServiceAccount:$true
AutoDiscover must be working so that a mailbox server in Forest A can find the correct endpoint for ForestB.com.
To configure bidirectional cross-forest availability, repeat these steps in the target forest.
When the two forests are not trusted, it is only possible to query availability in the target forest and return the free/busy setting that is applied to the default account. Figure 5-24 earlier in this book shows the calendar properties dialog box and the permissions applied to the default user. When the forests are not trusted, the only free/busy that can be retrieved is that assigned to the default user. Specific settings for specific users in the other forest cannot be assigned. To configure cross-forest availability when the two forests are not trusted at an Active Directory level, use the following cmdlets. The first cmdlet runs in the target forest.
Set-AvailabilityConfig -OrgWideAccount "ForestB.com\User"
The second and third cmdlets run in the source forest. The output from these cmdlets can be seen in Figure 5-31.
$fbUser = Get-Credential (Enter the credentials for organization-wide user in Contoso.
com domain)
Add-AvailabilityAddressspace -Forestname ForestB.com -Accessmethod OrgWideFB
-Credential:$fbUser
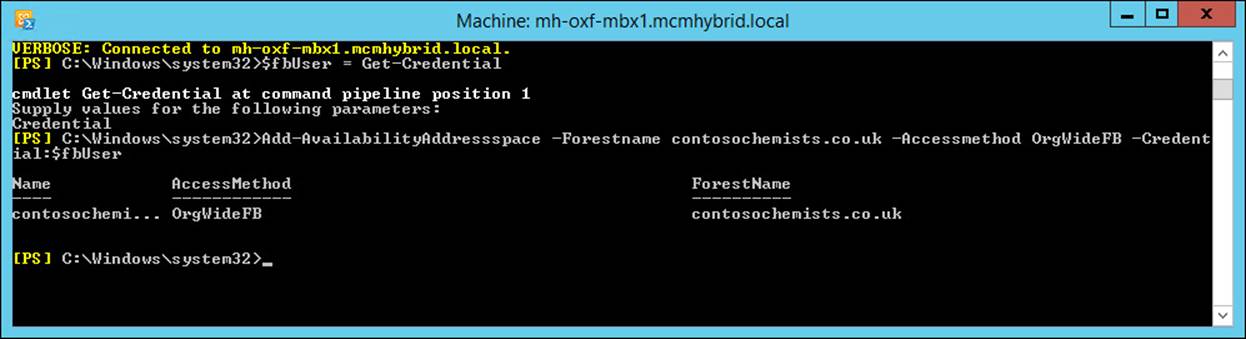
FIGURE 5-31 Configuring untrusted cross-forest availability lookups from the source forest
As previously mentioned, AutoDiscover must be working for cross-forest availability to work. Availability has a time out of 10 seconds. Therefore, AutoDiscover, and then the availability lookup, must complete in less than 10 seconds or the lookup to the remote forest may fail. If the two forests are trusted, an SCP can be exported from the target forest and installed into the source forest. This is done using Export-AutoDiscoverConfig, and more details on this can be found at http://technet.microsoft.com/en-us/library/aa996849.aspx.
Finally, to do cross-forest availability, there must be a contact object in the source forest for each mailbox in the remote forest that could be queried. In a lab environment, it is possible to manually create these contacts to prove that the concept works; in a production environment, a tool such as Forefront Identity Manager will be needed to maintain contact objects in the source forest for each change of mailbox in the target forest.
Note: Cross-Forest Availability White Paper
A paper describing the steps to configure and troubleshoot cross-forest availability is available at http://blogs.technet.com/b/exchange/archive/2011/03/04/3412075.aspx.
Designing certificate and firewall requirements
Like a lot of Exchange Server, there are certificate and firewall implementation considerations when crossing forests. This, for availability, is similar to previously described requirements. Regarding certificates on CAS servers in the target, they must be valid and trusted by the source mailbox servers. That is they must have the EWS ExternalURL on the certificate because the subject, or subject alternative name, and the certificate, must be issued by a provider that the source Exchange Server trusts.
Availability is a web service, and so for firewalls, any firewall between the forests will need to allow TCP 443 access from all of the source mailbox servers to the CAS server in the target that is returned by the AutoDiscover lookup.
Setting up cross-forest mail flow
Mail flow between two forests can be as simple as mail flow between two different organizations on the Internet. That is, you just configure MX records in the DNS server that the source forest queries, which points to the destination forest. If the MX records you use are the public MX records for the remote forest, your mail flow will follow the path of Internet outbound email when leaving your organization, and will be seen as part of the general Internet inbound email entering the other organization.
Using features such as TLS, and knowledge of the source IP address, it is possible to distinguish the inbound email from one organization and consider it apart from the general flow of Internet email, and thus treat it differently. For example, if you know the source IP address of Forest A, you can create a transport rule in Forest B to say that email sourced from the IP address that is Forest A’s outbound email, or source IP address is to automatically get a Spam Confidence Level (SCL) of -1. Therefore, the email from Forest A will never end up in the user’s Junk Email folder. Other techniques you could use include.
![]() Specific receive connectors In the target forest, you create a receive connector where the RemoteIPRanges value is set to the source forests outbound IP address. As long as that organization connects directly to you, and you see the SMTP data coming from this IP range, your receiving Exchange Server in the target forest will receive it via the new connector. The permissions on this new connector can include settings such as how the email is authenticated (ExternalAuthoritative), or has a permission assigned to the connector so that the messages are not checked for spam.
Specific receive connectors In the target forest, you create a receive connector where the RemoteIPRanges value is set to the source forests outbound IP address. As long as that organization connects directly to you, and you see the SMTP data coming from this IP range, your receiving Exchange Server in the target forest will receive it via the new connector. The permissions on this new connector can include settings such as how the email is authenticated (ExternalAuthoritative), or has a permission assigned to the connector so that the messages are not checked for spam.
![]() Direct delivery If the two forests can reach each other for SMTP traffic without going via the Internet, you can create receive connectors on servers that they can reach that are not your normal inbound from the Internet receive connectors. To route messages to these servers specifically, you need to create a send connector on the source organization using the name or IP address of the receiving transport server at the target forest. This receiving server needs to run the CAS role in Exchange Server 2013 because this role contains the Frontend Transport service, which is designed to accept and route messages to the correct mailbox role server. This CAS server will need to have a receive connector created on it with the correct RemoteIPRange setting if you want to distinguish inbound messages by source IP address.
Direct delivery If the two forests can reach each other for SMTP traffic without going via the Internet, you can create receive connectors on servers that they can reach that are not your normal inbound from the Internet receive connectors. To route messages to these servers specifically, you need to create a send connector on the source organization using the name or IP address of the receiving transport server at the target forest. This receiving server needs to run the CAS role in Exchange Server 2013 because this role contains the Frontend Transport service, which is designed to accept and route messages to the correct mailbox role server. This CAS server will need to have a receive connector created on it with the correct RemoteIPRange setting if you want to distinguish inbound messages by source IP address.
![]() Office 365 If the remote company uses Office 365, the tenant administrator of that organization can create inbound connectors of type Partner to receive emails from the source IP address of that other forest into the target forest, and allow them to be treated as emails of a specific type, and not be candidates for spam checking.
Office 365 If the remote company uses Office 365, the tenant administrator of that organization can create inbound connectors of type Partner to receive emails from the source IP address of that other forest into the target forest, and allow them to be treated as emails of a specific type, and not be candidates for spam checking.
In summary, cross-forest mail flow is nothing more than the correct combination of send and receive connectors on-premises, and inbound and outbound connectors in Office 365.
Designing and configuring AutoDiscover
Clients and Exchange Servers, as well as Exchange Online, use AutoDiscover to find endpoints to connect to for finding and connecting to mailboxes. This has previously been mentioned in context with federation trusts, moving mailboxes to Office 365 (as part of the hybrid wizard), and in this section on doing cross-forest free/busy.
To design and configure AutoDiscover for any of these services, and for basic client connectivity to Exchange functionality, which it is used for most of all, requires a few things to be set up. These are:
![]() An A record in public DNS (and if using split DNS, in private DNS as well is recommended)
An A record in public DNS (and if using split DNS, in private DNS as well is recommended)
![]() A digital certificate with the value of the A record as its subject, or more often, subject alternative name on it
A digital certificate with the value of the A record as its subject, or more often, subject alternative name on it
![]() TCP port 443 published on an external firewall
TCP port 443 published on an external firewall
![]() And usually a load balancer
And usually a load balancer
The AutoDiscover service is a web service that runs on all Exchange Client Access Servers. It is available from the /Autodiscover/Autodiscover.xml endpoint on the Default Web Site (it is also available from /Autodiscover/Autodiscover.svc, but this is primarily used by the Lync client). In addition to the URL of the service, AutoDiscover is available on a few well known DNS namespaces, and also can be queried from the Active Directory for domain joined PCs. The exact behavior of the client depends upon the individual client and version because some clients (iPhone) will do AutoDiscover once on account setup and never again, and others (Outlook) will do it frequently. Some versions of clients will work differently too. Outlook 2010 domain joined will look up the Active Directory service connection point (SCP), whereas some versions of Outlook 2013 will query the SCP and DNS at the same time.
The well-known endpoints for AutoDiscover are as follows, and should be queried in the following order.
1. Domain joined clients query the SCP to determine the location of the AutoDiscover endpoint. If not domain joined, the client should only do the rest of the list until it gets a valid response.
2. https://domain.com/autodiscover/autodiscover.xml (where domain.com is the SMTP domain in the user’s email address).
3. https://autodiscover.domain.com/autodiscover/autodiscover.xml.
4. HTTP redirection. This goes to the two URLs above, but over the HTTP protocol and not HTTPS, and looks to see if they are being redirected to a different website. The client should prompt if this is the case, though there are known redirections that the client does not prompt for, such as redirections to Office 365.
5. DNS SRV query.
6. An XML file on the local machine. The path is configured by a registry key.
7. Cached URL in the Outlook profile (an Outlook 2013 feature).
AutoDiscover stops when a valid response is received. A valid response is one where the client connects to the above URLs (in order) and sees if they need to login. Upon successful login, they post data that should elicit a response in the form of XML. The XML contains the settings that the client needs to located services on the Exchange Server.
The SCP value in the Active Directory defaults to https://client_access_server_name/autodiscover/autodiscover.xml, and is added during the Client Access Server installation. The domain joined client will search the Active Directory for the SCP and list them by the Active Directory site that the client is located in. They will then connect to the first returned value from the Active Directory, which is usually the oldest server (first installed). It is recommended that Set-ClientAccessServer cmdlet is run to update all of the values in the Active Directory (or per site) to point to a load balancer in front of an array of CAS servers to provide high availability for AutoDiscover. An example of the cmdlet that can be run to do this is as follows (one for the Exchange 2010 servers in your organization, and one for the Exchange 2013 servers).
# [Run from 2010 PowerShell]
Get-ExchangeServer | Where {($_.AdminDisplayVersion -Like "Version 14*")
-And ($_.ServerRole -Like "*ClientAccess*")} | Set-ClientAccessServer
-AutoDiscoverServiceInternalUri https://autodiscover.contoso.com/Autodiscover/
Autodiscover.xml
# [Run from 2013 PowerShell]
Get-ExchangeServer | Where {($_.AdminDisplayVersion -Like "Version 15*")
-And ($_.ServerRole -Like "*ClientAccess*")} | Set-ClientAccessServer
-AutoDiscoverServiceInternalUri https://autodiscover.contoso.com/Autodiscover/Autodiscover.xml
The URL to use needs to point to a CAS server, or preferably a load balancer in front of a CAS server farm. The URL does not need to match the URLs that AutoDiscover uses when doing a DNS lookup, rather than an SCP lookup, but can be the same as shown here.
For non-domain joined clients, or clients that are domain joined but are not currently on a network where the domain is reachable, you need to provide the DNS lookup method to find AutoDiscover. The best solution is to offer the autodiscover.domain.com A record pointing to a firewall that is publishing the Exchange Client Access Servers. The firewall rule that publishes OWA is typically used because the servers that offer OWA also offer AutoDiscover. There are other scenarios, such as the SRV record and HTTP redirects, that are typically not needed for a simple AutoDiscover deployment, and so these can be read about further in the AutoDiscover Whitepaper at http://technet.microsoft.com/en-us/library/jj591328.aspx (this refers to Exchange 2010, but the concept is the same for Exchange 2013).
Setting up shared namespaces
Finally, for this objective you will look at shared namespaces. With shared namespaces, more than one Exchange organization shares the email domain. When there is a shared email domain, the users at two different Exchange organization have email addresses that end with the same domain extension. For example, one Exchange organization has users with email addresses that end @contoso.com, and a second Exchange organization has the same domain extension. These are typically required in company mergers and acquisitions, as well as when two separate organizations have a shared parent company name.
Shared namespaces are in contrast to MX records for mail flow delivery. An MX record will point to a defined location, and so all email for the domain will go to where the MX record is pointing. If a domain is shared between two or more organizations, the following needs to be considered:
![]() Email from the first SMTP environment where the MX record delivers the email needs to be able to get to the second location, if there is not a valid mailbox for it in the first.
Email from the first SMTP environment where the MX record delivers the email needs to be able to get to the second location, if there is not a valid mailbox for it in the first.
![]() Once email reaches the last SMTP environment, it should not route back to the first environment if no mailbox was located for the user. This will cause mail loops for unresolved recipients.
Once email reaches the last SMTP environment, it should not route back to the first environment if no mailbox was located for the user. This will cause mail loops for unresolved recipients.
![]() Users in the first location should be able to look up users in both their, and the other locations, in their address book.
Users in the first location should be able to look up users in both their, and the other locations, in their address book.
![]() Users in the second (or other) locations must be able to send email back to the first location.
Users in the second (or other) locations must be able to send email back to the first location.
In terms of Exchange Server, this has been the same since Exchange Server 2007. In Exchange Server, you create an accepted domain. This tells Exchange that it can accept email for this domain and deliver it to any mailbox with that email address stamped on it within the organization. Also, Exchange Server has the concept of different types of accepted domains. These types are authoritative, internal relay, and external relay. They behave as follows:
Authoritative accepted domains This accepted domain type can be added to an email address policy, and Exchange can automatically stamp email addresses on mailboxes based on this policy. This domain type also says that the recipient must exist within the Active Directory or the email is considered invalid. Therefore if a mailbox exists in this forest for kim@contoso.com and an email arrives for that address, it will be delivered. But if there is no mailbox or other recipient type (contact, distribution group), it will be rejected.
Internal relay accepted domains This type of accepted domain can also be added to email address policies, but there is no requirement for there to be an object with any given recipient address in the Active Directory that the Exchange organization is part of. That means that if an email arrives in an Exchange organization for kim@contoso.com, and there is no mailbox for kim@contoso.com, the Exchange Server will attempt to deliver it to another SMTP server. To deliver to another system, there must be an explicit send connector for that domain going to the other SMTP server, or the email will loop back to the current organization’s MX record endpoint. If the mailbox exists though, the message will be delivered. That means you cannot have two kim@contoso.com mailboxes, one in each forest, and expect delivery to both. That still requires a distribution group, and multiple unique mailboxes.
External relay accepted domains This type of accepted domain, unlike the other two, cannot be added to an email address policy. You can, however, add email addresses with the domain name of this accepted domain type to recipients manually. If an email arrives in an organization that has contoso.com as an external relay accepted domain addressed to kim@contoso.com, and if the object exists locally, it will be delivered. If not, the Edge Server on the network edge will deliver the message to the next organization via a send connector on the Edge Server. The email does not need to enter the actual organization to be delivered onward. In an internal relay accepted domain (the previous example), the message is always forwarded by the receiving mailbox server, and so even if you have an Edge Server in front of an organization with internal relay domains, the message will traverse the Edge Server to the internal servers, and be redirected from the Internal servers.
Therefore, you need to pick your accepted domain type to ensure valid onward routing. The final organization in the chain of email systems should always be authoritative (or the equivalent for that SMTP system) so that unresolved recipients at the end of the chain do not get routed around to the start of the chain again. But all the other email systems on the route are going to be either internal relay, where you do not need to create mail contacts for each valid object in the next or later hops, or authoritative accepted domains where all users in the later hops must be listed in the first organization.
Figure 5-32 and Figure 5-33 show two organizations, both contoso.com for their email address space, but separate Active Directory forests and Exchange organizations. Also shown are the objects that are needed to make mail flow work. Note that AutoDiscover will not work for these organizations unless the contact in the first organization routes to a separate address space in the second, and not the same address space.
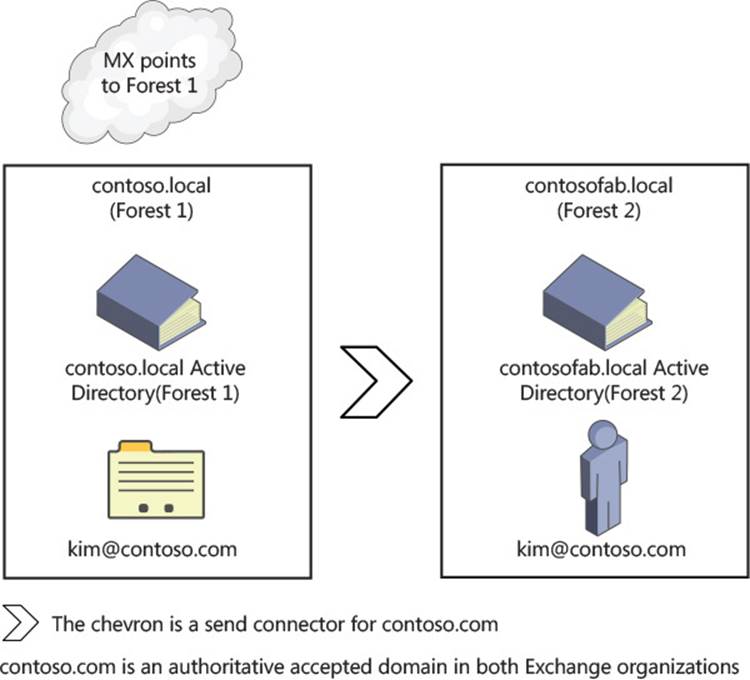
FIGURE 5-32 Authoritative accepted domains
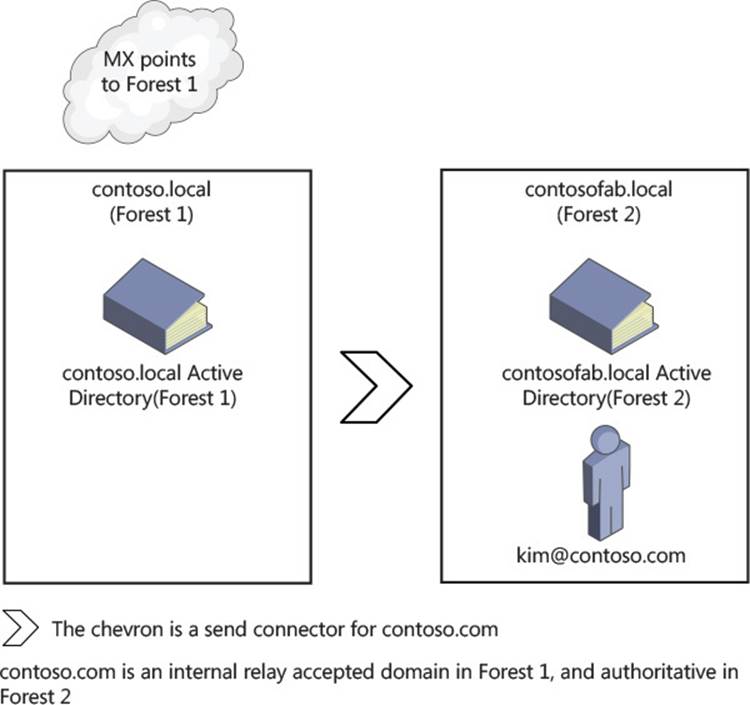
FIGURE 5-33 Internal relay accepted domains
Without a contact the use of the same SMTP domain in both organizations will result in failures when querying AutoDiscover to find mailboxes in the second forest. With a contact object, AutoDiscover will connect to the second forest when the first forest returns a redirection based on the SMTP address of the contact (in Figure 5-32). In Figure 5-33, there is no contact, so no redirection is returned and AutoDiscover will fail in this scenario. Therefore, if both Forest 1 and Forest 2 are Exchange 2007 or later forests where AutoDiscover is needed, the domain type can be either authoritative or internal relay, but the contact or mail user object in the first forest needs to have the email addresses stamped on the object (kim@contoso.com in our example). But the target of the contact (the external address) should be a different domain so that AutoDiscover information can be queried additionally. For example, the contact should have the external address as kim@contoso-fabrikam.com, and kim@contoso.com as an additional email address. Email will arrive in Forest 1 and be rerouted to kim@contoso-fabrikam.com. Kim in the second forest needs kim@contoso-fabrikam.com as an additional email address, but kim@contoso.com as her primary address. Therefore, all email that she sends comes from the primary address, and the secondary address is just for mail routing between the organizations. AutoDiscover will query thecontoso.com domain and find a mail contact for Kim with an external address of kim@contoso-fabrikam.com. AutoDiscover will now repeat its steps, but for the contoso-fabrikam.com domain, and thus successfully located Kim’s mailbox in Forest 2.
Note: Shared Namespaces in Office 365
Office 365 works using the above described scenario. When a mailbox is migrated to Office 365, a mail user object is created on-premises (a remote mailbox if in hybrid mode) that has an external address in the form of kim@contoso-fabrikam.mail.onmicrosoft.com (the Office 365 tenant domain). But the primary email address of the object in Office 365 is kim@contoso.com. This allows mail flow and AutoDiscover to work.
Thought experiment: Shared free/busy
In this thought experiment, apply what you’ve learned about this objective. You can find answers to these questions in the “Answers” section at the end of this chapter.
You manage Exchange for a few different companies as their messaging consultant. You want IT staff in those companies to be able to see your calendar free/busy so they can book your time for consultancy.
1. What Exchange free/busy sharing options do you have available to you?
2. Which is the easiest to set up?
Objective summary
![]() Free/busy can be queried in remote Exchange organizations by way of AvailabilityAddressSpace or organizational relationships.
Free/busy can be queried in remote Exchange organizations by way of AvailabilityAddressSpace or organizational relationships.
![]() AutoDiscover is very important for cross-forest scenarios, and so needs to be working.
AutoDiscover is very important for cross-forest scenarios, and so needs to be working.
![]() Considerations need to be made for mail flow cross-forest because the email typically must be considered internal, not rejected, or spam filtered, and often guaranteed encrypted.
Considerations need to be made for mail flow cross-forest because the email typically must be considered internal, not rejected, or spam filtered, and often guaranteed encrypted.
![]() Different accepted domain settings control how messages are delivered or rejected based on the existence, or lack of, mail recipient objects in the Active Directory.
Different accepted domain settings control how messages are delivered or rejected based on the existence, or lack of, mail recipient objects in the Active Directory.
Objective review
Answer the following questions to test your knowledge of the information in this objective. You can find the answers to these questions and explanations of why each answer choice is correct or incorrect in the “Answers” section at the end of this chapter.
1. Which types of accepted domain will always forward messages if they are not resolved to local recipients?
A. Authoritative
B. Internal Relay
C. External Relay
D. Edge Server Relay
2. What cmdlet is used to update the AutoDiscover SCP value for a given Exchange Server?
A. Set-ClientAccessServer
B. Set-ExchangeServer
C. Set-MailboxServer
D. Set-AutoDiscoverVirtualDirectory
Objective 5.5: Migrate legacy systems
This exam objective looks at the migration from Exchange Server 2007 and Exchange Server 2010 to Exchange Server 2013. It is also possible to migrate other email products into Exchange Server, and Exchange contains tools to migrate from a PST file into a mailbox. There is a large partner market for tools to migrate from outside of Exchange Server into Exchange, both from archiving products, PST files, and other email systems (typically IMAP and POP-based systems).
This objective looks at the parts of the migration that have not been covered in depth in other sections. Where a migration is actually a feature covered elsewhere, you will see a pointer back to that content.
This objective covers how to:
![]() Determine transition paths to Exchange
Determine transition paths to Exchange
![]() Migrate public folders
Migrate public folders
![]() Migrate mailboxes
Migrate mailboxes
![]() Upgrade policies
Upgrade policies
![]() Plan to account for discontinued features
Plan to account for discontinued features
![]() Transition and decommission server roles
Transition and decommission server roles
Determining transition paths to Exchange
Exchange Server 2013 can be migrated to from Exchange Server 2007 and Exchange Server 2010. There is no support to install Exchange Server 2013 and Exchange Server 2003 in the same Exchange organization. This is because Microsoft supports n-2 (that is the current version and the two previous versions) for upgrading and Exchange Server 2003 is n-3. It is also out of its support period as well. That does not mean you cannot migrate from Exchange 2003 to Exchange 2013, it is just that there is not a direct path to this with the built-in Exchange Server 2013 migration tools.
Migrating from Exchange Server 2007 and Exchange Server 2010 to Exchange Server 2013 can happen in the same Active Directory forest and therefore the same Exchange organization. You can install Exchange Server 2013 servers as long as Exchange Server 2007 is at Update Rollup 10 for Exchange Server 2007 Service Pack 3 on all Exchange 2007 servers in the organization. Any Exchange Server 2010 servers need to be at least Service Pack 3 on all servers. Exchange 2013 installation will check that this prerequisite is met. If you have any Edge role Exchange servers, they need to be at the minimum versions as well.
Important: Edge Role Versions
Be aware that updates to the version of the Edge role server are not written back to the Active Directory apart from the time EdgeSync is created. Therefore, an Edge role server could be equal to, or in excess of, the minimum version required. But if EdgeSync was not recreated, the version of the installation as recorded in the Active Directory will be wrong, and Exchange 2013 will not install.
Exchange 2007 SP3 Update Rollup 13 or later on the Exchange 2007 Hub Transport server is required if you want EdgeSync to work with an Exchange Server 2013 Service Pack 1 or later Edge role.
Because Exchange Server 2003 cannot be installed in the same Exchange organization as Exchange Server 2013, the only upgrade path with the built-in migration tools in Exchange Server is to upgrade to a supported version of Exchange Server (2010 SP3 is recommended), and decommission Exchange Server 2003 before starting the 2010 to 2013 migration. These are two separate migrations. If you use a third-party migration service or software to do this for you direct from 2003 to 2013, they will do this by creating a second Active Directory forest for Exchange Server 2013, implementing cross-forest coexistence for mail flow as described earlier, and then use their own mailbox migration software to migrate the mailbox data and public folder data. At the end of a 2003 to 2013 direct migration, you will have more than one Active Directory forest to manage and additional hardware for new Active Directory domain controllers. This needs to be kept in mind compared to the double-hop migration.
Migrating from PST files can be done using the New-MailboxImportRequest cmdlet, and this can be a way to migrate from an email system that has local PST file storage, or where the data can be exported to a PST file.
Finally, most other email systems support IMAP or POP for mailboxes. Exchange 2013 does not contain an IMAP or POP inbound migration product. The IMAP toolset in Exchange is Exchange Online, and for migrating to Office 365. Therefore, to migrate from IMAP or POP (or a web-based email product such as Gmail), a third-party migration tool is required.
Migrating public folders
In previous versions of Exchange Server, a public folder migration was simple. You ensured that your public folders where replicated to a public folder database on the new version of Exchange, and you removed the replica from the old version. Once replication was complete (which happened in the background automatically), you could decommission the public folder database on the old version of Exchange.
With Exchange Server 2013, it is nowhere near as simple! The single change that caused the complexity with the migration is that there are no more public folder databases. Public folders are now kept in mailboxes. This allows the public folders to benefit from DAG replication and high availability just by ensuring the public folder mailbox is replicated in a DAG, but there is now no support for multiple copies of a replica that can all be independently accessed. This change requires that public folder migration is now a cutover migration.
A public folder cutover migration involves scaling and sizing for the amount of data you need to migrate, and this may require waiting for cumulative update 7 or later, if you have a very large public folder databases because this version of Exchange 2013 has much better public folder scaling support. The cutover involves making one or more public folder mailboxes in 2013, creating a CSV file of the folder to mailbox mapping (that is, /Sales/Oxford public folder goes to pfMailbox1 but /Sales/Nuneaton goes to pfMailbox2). A mailbox should not exceed 50 GB and room for growth should be allowed, so the mapping ensures that you keep busy public folders away from each other to spread the performance impact. Large public folders can be distributed to different public folder mailboxes to distribute the content. Once the mapping file is done, the public folder move request can be started. Once this finishes, it can be refreshed to update just the latest changes to the folders. Finally, the cutover happens, and users are locked out of the legacy folders. A final migration occurs to grab the latest changes, and the new public folder mailboxes are live. Users with mailboxes on Exchange Server 2013 can access the modern public folders, users with mailboxes on older versions of Exchange Server cannot. Therefore, migrating to public folders on Exchange Server 2013 requires that the mailboxes are migrated first.
Whilst you still have mailboxes on Exchange 2007 or Exchange 2010, you have two options regarding public folders and migration. The first option is to decommission public folders. If this is the desire of the company, make sure that the Offline Address Book is distributed via the OAB URL on the Client Access Server, and not stored in a public folder, and that organization forms are no longer in use. Outlook 2003 does not work with Exchange 2013, so the requirement of Outlook 2003 to connect to a public folder on startup is not an issue because you will already have migrated away from this client. The second option is to maintain an Exchange Server 2010 or 2007 infrastructure to host the public folders on, and ensure that users on 2013 have access to the legacy public folders. This legacy access has changed since the release of Exchange Server 2013. In Exchange Server 2013 Cumulative Update 7 and later legacy public folder access is going to work the same way Exchange Online mailboxes can access legacy on-premises public folders.
From the release of Exchange Server 2013 CU1, legacy access to public folders was done in the client (Outlook), and the client connected to the public folders directly on the legacy version of Exchange in the same way they did in previous versions. In Exchange 2013 CU5 and later, support exists to provide an AutoDiscover response to the client for a proxy mailbox on the legacy server. The client then repeats the AutoDiscover query, this time for the proxy mailbox, and gets back a connection method to the legacy public folder, and then is able to connect to it. Exchange Server 2013 CU7 and later will not support the direct connect method, though it may remain working for a while. From CU7 and later the supported method of connectivity from a 2013 mailbox to legacy public folders is via the AutoDiscover route. Steps for configuring Exchange Server 2013 CU5 and later for legacy public folder access can be seen at http://blogs.technet.com/b/exchange/archive/2014/11/07/on-premises-legacy-public-folder-coexistence-for-exchange-2013-cumulative-update-7-and-beyond.aspx.
Migrating mailboxes
When you move a mailbox, you’re moving it from a source mailbox database to a target mailbox database. The target mailbox database can be on the same server, on a different server, in a different domain, in a different Active Directory site, or in another forest. From the viewpoint of Exchange 2013, the source mailbox must be Exchange 2007 or 2010, or Exchange Online (where you can migrate mailboxes away from Office 365).
For a migration, Exchange Server 2013 migration tools are to be used. You would not use the 2007 or 2010 migration tools to move to Exchange 2013, but only the Exchange 2013 tools to pull the mailbox to Exchange Server 2013. In a single forest, this migration does not change the Active Directory object. Cross-forest migrations require that the new Active Directory object be created in the new forest using a provisioning tool. Microsoft supports Forefront Identity Manager to do this, and Prepare-MoveRequest.ps1 script.
Once the Active Directory object is provisioned (in a cross-forest migration), or if staying in the same forest, you are ready to migrate, there are two ways to do a migration in Exchange Server 2013. The first way is in ECP where you create migration batches (shown in Figure 5-34) that allow you to add a group of users to a migration, to either a different database (2007, or 2010, or 2013 migrations on-premises are just migrations from one database to another), or from another forest (if migrating cross-forest from 2007, 2010, or 2013). Remember you cannot migrate from 2003 to 2013 even cross-forest, without third-party migration tools. You can move users via a CSV file, which contains a single column called EmailAddress, and contains the SMTP address of each user, one per row, that you want to migrate. In ECP you can add the users you want to migrate directly in the dialog box if you do not have a CSV file to import.
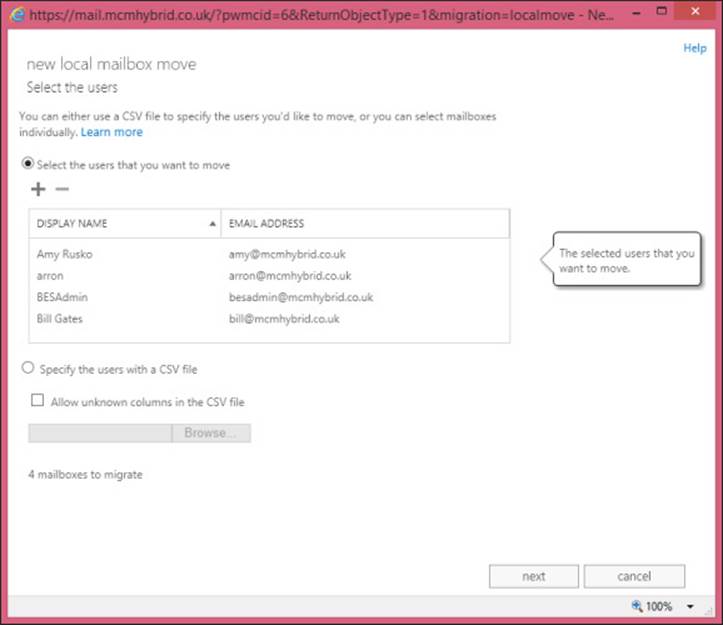
FIGURE 5-34 The local mailbox move dialog box in Exchange Control Panel
Once the CSV or users are added, the following screens in the wizard will ask the migration batch name (which is used to start and stop the migration for all of the users in the batch in a single action), control whether or not to move the archive mailbox, and optionally the database for the mailbox and the archive. If the databases are not set, Exchange Server will move the mailbox and/or archive to any database in the current site of the Exchange Server the move is being run on. You can stop databases being selected during move requests with Set-MailboxDatabase db_name -IsExcludedFromProvisioning $True. A migration batch will then allow you to set start and completion times, for example to start manually at a later date, or straight away and to complete automatically or manually, as well as email a report to the administrator running the batch.
The second way to do a migration into Exchange 2013 is using Exchange Management Shell. Here there are two cmdlets that can be used, the first being New-MigrationBatch, which does the same as discussed above, though it requires a list of users from a CSV file. Additionally, it allows for incremental syncs every 24 hours to be enabled or not, as well as other options not available in ECP. An example migration batch cmdlet for a local move, as used in a migration, could be as follows.
New-MigrationBatch -Name PilotUsersGroup2 -Local -CSVData ([System.IO.File]::ReadAllBytes("C:\ExchangeMigrations\MCMHybrid-NewMigrationBatch.csv")) -AllowIncrementalSyncs $true -AutoComplete:$false -NotificationEmails brian@mcmhybrid.co.uk
Cmdlets such as Start-MigrationBatch and Complete-MigrationBatch are used to start and finish batches that use -AutoComplete set to $False.
Note: Migrating to Exchange Online
The same cmdlet is used to perform migrations to and from Exchange Online.
Also available for migrations is the New-MoveRequest cmdlet introduced in Exchange 2010. This cmdlet can use the BatchName property to allow you to manage a number of individual moves in one group, similar to a MigrationBatch. Unlike the migration batch, it is not used for moves to Exchange Online, nor does it generate an email report when complete.
To move cross-forest and to Exchange Online, one or more migration endpoints need to be created. These use AutoDiscover to locate the settings they offer, and are specified during a remote move. They are not needed for local moves.
Once the move is in progress, it can be managed from both the web console and the shell. Controls that can be placed on moves include suspending a move and resuming a suspended move, for example when you are doing moves over the night or weekend, and you want to pause them during the business day due to network and server load. You can also report on the state of the move with Get-MigrationUserStatistics for batch moves, or Get-MoveRequestStatistics for move requests.
Upgrading policies
When you migrate Exchange between versions, some objects that where created in previous versions will need to be updated. This was required for an Exchange 2003 to 2007, or 2010 migration, but apart from the Offline Address Book and a federation mailbox, there is nothing that needs to be upgraded during a 2007, or 2010 to Exchange Server 2013 migration. It is worth noting that transport and journal rule migrations from 2007 will happen automatically, but will be updated to version specific rules, which will therefore require rule administration on specific versions of Exchange Server from that point onward. This is the same consideration that needed to be made for an Exchange 2010 upgrade.
You might find that when migrating to Exchange Server 2013, the email address policies are not correctly upgraded, as they should have been when migrating to 2007 or 2010 during that project. The same is true for routing group connectors that still exist, and should have been deleted during the 2007 or 2010 migration. These address policies can be upgraded as per the instructions for Exchange Server 2007. You will need to use the previous version of Exchange Server before it is removed to delete the routing group connectors.
Planning to account for discontinued features
There are some features that are discontinued in Exchange 2013, and so if you use these features you need to mitigate, or migrate as required. There is a sizable list, some of which are items removed in the architecture, such as Hub Transport and UM roles because these have been built into the Mailbox and CAS roles. But other features and options are removed, such as the Microsoft Management Console for administering the server, and support for Outlook 2003.
The full list can be found at http://technet.microsoft.com/en-GB/library/jj619283.aspx.
Transitioning and decommissioning server roles
Once you have Exchange Server 2013 sized correctly for your organization, and then installed, you can transition to the new servers. This is done by updating DNS internally, and updating firewall rules and/or DNS externally so that user’s connections are made to Exchange Server 2013 first. Exchange Server will then proxy or redirect the user’s connections as appropriate for the protocol, and the location of the user’s mailbox as previously covered. Once the user’s mailbox is migrated to Exchange Server 2013, the user’s connection will be proxied from the Client Access Server that receives the connection to the mailbox server that holds the users active mailbox.
Once all of the mailboxes, and if applicable, public folders, are migrated off of the legacy version of Exchange, you can start the decommissioning process. This ends with the uninstallation of the server using Control Panel Add/Remove Programs so that the legacy software is cleanly uninstalled from both the server and the Active Directory. But before the server is uninstalled, it is best to log traffic to the server looking for valid connection attempts. It is likely that some applications, especially SMTP and other clients that do not use AutoDiscover, will still be connecting to the server. Legacy versions of Exchange Server do a considerable amount of logging, and these logs can be used to look for connection attempts.
If an attempt is found in the logs, it will typically contain the mailbox name or the source IP address. This will allow the cause of the connection to be mitigated. Eventually, you can get to a point in time where you suspect no connectivity. At this time it is recommended to turn the server off for a few weeks and see if anything breaks! You can always turn on a server that is off quite quickly, quicker than reinstalling it anyway.
Important: Keeping Legacy Exchange Around?
Once you have uninstalled all of a given version of Exchange Server from an Exchange organization, you cannot install more of that version again. Therefore, keep an Exchange Server 2007 and/or 2010 server, all roles installed on it, until you are sure you do not need to reinstall a server of the same version. This server with all of the roles on it will allow future installs of that version if needed.
Finally you can uninstall the server, which must be uninstalled from the computer, and this process removes its settings from the Active Directory as well. Just turning off an Exchange Server will cause problems later on.
Thought experiment: Decommissioning Exchange 2003
In this thought experiment, apply what you’ve learned about this objective. You can find answers to these questions in the “Answers” section at the end of this chapter.
You are planning a migration to Exchange Server 2013 from Exchange Server 2010, when you find that you cannot install Exchange Server 2013 because it detects Exchange Server 2003 in the organization.
1. What do you need to do?
2. Upon solving the issue in question one, you find the Exchange Server 2013 installation says you still have Exchange Server 2010 SP1 servers installed. What might be the cause of this, and how can you mitigate it?
Objective summary
![]() Exchange Server 2013 cannot be installed in the same Exchange organization (that is, the same Active Directory forest) as Exchange Server 2003.
Exchange Server 2013 cannot be installed in the same Exchange organization (that is, the same Active Directory forest) as Exchange Server 2003.
![]() Exchange Server can move mailboxes from other supported versions of Exchange Server and via PST files. Third-party products are used for migrating from other sources.
Exchange Server can move mailboxes from other supported versions of Exchange Server and via PST files. Third-party products are used for migrating from other sources.
![]() Public folders for Exchange Server 2013 are stored in one or more mailboxes, known as public folder mailboxes. These mailboxes require a cutover migration from public folder databases of previous versions.
Public folders for Exchange Server 2013 are stored in one or more mailboxes, known as public folder mailboxes. These mailboxes require a cutover migration from public folder databases of previous versions.
![]() Mailbox moves are always from the higher version of Exchange using either the console or shell to start the move.
Mailbox moves are always from the higher version of Exchange using either the console or shell to start the move.
![]() Ensure that all decommissioned servers are correctly uninstalled at the end of their life.
Ensure that all decommissioned servers are correctly uninstalled at the end of their life.
Objective review
Answer the following questions to test your knowledge of the information in this objective. You can find the answers to these questions and explanations of why each answer choice is correct or incorrect in the “Answers” section at the end of this chapter.
1. From what versions of Exchange Server can you upgrade to Exchange Server 2013 directly?
A. Exchange Server 2000
B. Exchange Server 2003
C. Exchange Server 2007
D. Exchange Server 2010
2. You want to distribute your mailboxes randomly across all of your Exchange Server 2013 databases, so that load and performance are randomly distributed, but you want to exclude selected databases on which you will store the mailboxes of employees that have left. Which of the following will configure a database to be excluded in this way?
A. Set-Mailbox db_name -IsExcludedFromProvisioning $True
B. Set-MailboxDatabase db_name -IsExcludedFromProvisioning
C. Set-Mailbox db_name -IsExcludedFromProvisioning $True
D. Set-MailboxDatabase db_name -IsExcludedFromProvisioning $True
3. Which of the following New-MigrationBatch cmdlets are valid?
A. New-MigrationBatch -Name PilotUsersGroup2 -Online -CSVData ([System.IO.File]::ReadAllBytes(“C:\ExchangeMigrations\NewMigrationBatch.csv”)) -AllowIncrementalSyncs $true -AutoComplete:$false -NotificationEmails brian@mcmhybrid.co.uk
B. New-MigrationBatch -Name PilotUsersGroup2 -Local -CSVData ([System.IO.File]::ReadAllBytes(“C:\ExchangeMigrations\MCMHybrid-NewMigrationBatch.csv”)) -AllowIncrementalSyncs $true -AutoComplete:$false -NotificationEmails brian@mcmhybrid.co.uk
C. New-MigrationBatch -Name PilotUsersGroup2 -Remote -TXTData ([System.IO.File]::ReadAllBytes(“C:\ExchangeMigrations\NewMigrationBatch.txt”)) -AllowIncrementalSyncs $true -AutoComplete:$false -NotificationEmails brian@mcmhybrid.co.uk
D. New-MoveRequest -Name PilotUsersGroup2 -Online -CSVData ([System.IO.File]::ReadAllBytes(“C:\ExchangeMigrations\NewMigrationBatch.csv”)) -AutoComplete:$false -NotificationEmails brian@mcmhybrid.co.uk
Objective 5.6: Troubleshoot issues associated with hybrid scenarios, coexistence, migration, and federation
This last objective looks at how you can troubleshoot the various features of Exchange Server that you have looked at in the rest of this chapter.
This objective covers how to:
![]() Troubleshoot transport
Troubleshoot transport
![]() Troubleshoot Exchange federation trust and organization relationships
Troubleshoot Exchange federation trust and organization relationships
![]() Troubleshoot client access
Troubleshoot client access
![]() Troubleshoot SSO/AD FS
Troubleshoot SSO/AD FS
![]() Troubleshoot DirSync
Troubleshoot DirSync
![]() Troubleshoot cross-forest availability
Troubleshoot cross-forest availability
Troubleshooting transport
To understand SMTP, mail flow and transport is the best place to start so that you can have a grip on being able to troubleshoot it. If you are having mail flow issues, the best steps are to isolate the issue to the area where the problem is occurring. For example, does the message arrive with your server, or is the problem in mail flow happening within your organization?
The best way to troubleshoot mail flow is to enable all of the mail flow logging that you can. In Exchange Server 2013, there are log files for every transport service, some of which are enabled, and some of which are not. Typically, those that generate a small amount of logging are enabled, and the more verbose log generators are disabled. Exchange transport will delete logs when they exceed a period of typically 30 days, or 1 GB per log folder, whichever comes first. These sizes can be changed using Set-TransportService should you exist in an organization with such massive mail flow that the logging size is not sufficient, or the duration not long enough for your needs.
Individual transport services, such a Frontend Transport, or Mailbox Transport can have their verbose logging enabled to assist with troubleshooting. This is done with the Set- cmdlet for the service name, for example Set-FrontEndTransportService, and the Set-MailboxTransportService as two examples, and then using the protocol logging level cmdlet. This changes per protocol, for example MailboxDeliveryConnectorProtocolLoggingLevel (Mailbox Transport service) and IntraOrgConnectorProtocolLoggingLevel (Frontend Transport service). To work out which property to set, you can use Get-FrontendTransportService server_name | FL *logginglevel*. This will return all of the properties containing LoggingLevel because the protocol logging always contains logging level. The logging level is “none” by default, and can be changed to “verbose.” Note that this will generate a lot of logs, and so testing the issue on a lab environment is recommended.
Message tracking logs are also a good friend for troubleshooting, as are agent logs because both of these logs, as well as the connectivity logs, can help you track down message locations.
Apart from message logging, the other place that transport is best looked at for troubleshooting is back pressure (http://technet.microsoft.com/en-us/library/bb201658.aspx). This is when the server runs out of resources, or close to runs out, and the server will stop sending and receiving, typically anonymous emails first (those from the Internet and applications that do not log in). If the issue does not go away, the server will stop message flow for authenticated messages as well. The most common reason for back pressure is disk space, though available memory can often play a part. Releasing disk space and adding more memory will solve the issue for a while, or full time depending upon the scope of the initial issue. If you are going into back pressure frequently, and you resolve it and it happens again, your server is typically undersized, or you do not have enough servers for the load of email you are sending.
Troubleshooting Exchange federation trust and organization relationships
Earlier in this chapter you looked at federation trusts and organization relationships. As you saw then, the federation trust is a connection that is made to the Microsoft federation gateways (now known as the Azure Active Directory) to retrieve a token for the endpoint Exchange Server that they are attempting to reach. This source Exchange Server needs to have set up its own federation trust first before it can do this. To set up a trust you need to add to external DNS the TXT record that Exchange Server tells you to use. Do not delete and recreate the federation trust, otherwise you will need to repeat the DNS configuration.
Once the trust is made it is okay to keep in place, unless it was made during the Exchange Server 2010 RTM timeframe, in which case it should be recreated because these were made and stored in the Microsoft Live ID authentication system, and not Azure Active Directory. You can use Get-FederationInformation -DomainName domain.com to retrieve information from the authentication authority. If the TokenIssuerURIs reads “urn:federation:MicrosoftOnline,” that domain is stored in Azure Active Directory.
When you have hybrid mode running, and an organization email address space, say contoso.com, is located in two locations, online and on-premises, the federation trust will only return a token to access on-premises. The users in the cloud cannot have their free/busy viewed by remote organizations unless they lookup the tenant routing address space (that is user@contoso.onmicrosoft.com). This is a limitation of federation trusts.
A federation trust can be tested using the Test-FederationTrust cmdlet. This, like a lot of the Test- cmdlets, requires that the test mailbox has been created. To create the test mailbox, change to the $exscripts folder and run New-TestCasConnectivityUser.ps1. You need to enter a password. This PowerShell script needs to be run once per Active Directory site. This creates a mailbox called extest_<randomdigits>@domain, and permissions it needs are granted to it.
Federation trusts require access to the Microsoft Online datacenters to set up and retrieve the trust information. Therefore, the Exchange Servers in your organization either need access to the Internet, or if there is a proxy server before the Internet, it cannot require authentication.
The federation trust is created on one Exchange Server, and the self-signed certificate that is created is replicated to the other servers. Therefore, if the replication fails, or a new server is installed and replication has not completed, you may have federation trust issues with that particular server. Get-ExchangeCertificate will return the certificates Exchange Server is aware of on a particular server.
Finally, AutoDiscover is used to locate the EWS endpoint for connecting to partner organizations. Therefore, if you cannot look up external DNS, or connect over TCP 443 to the Internet, you will fail to reach the endpoint that you need to reach for federation trusts to be used.
Troubleshooting SSO/AD FS
Active Directory Federation Services (AD FS) is a complex product and justice to troubleshooting it cannot be done here. However, the topics you need to look at to cover most of the issues you might see are:
![]() Firewalls You need inbound TCP port 443 connectivity to the WAP server, and from that to the AD FS server. This connectivity needs to be on the address published for the federation name in DNS (the federation name is something like sts.domain.com).
Firewalls You need inbound TCP port 443 connectivity to the WAP server, and from that to the AD FS server. This connectivity needs to be on the address published for the federation name in DNS (the federation name is something like sts.domain.com).
![]() Certificates The AD FS server and the WAP server need to be loaded with the trusted third-party certificate that the other party in the federation relationship trusts, and that is also trusted by the clients and devices that will use this AD FS farm. Microsoft will trust certificates issued by the list on http://support.microsoft.com/kb/929395.
Certificates The AD FS server and the WAP server need to be loaded with the trusted third-party certificate that the other party in the federation relationship trusts, and that is also trusted by the clients and devices that will use this AD FS farm. Microsoft will trust certificates issued by the list on http://support.microsoft.com/kb/929395.
![]() Connectivity It is important to check that connectivity to both the AD FS server on the LAN, and via the Internet, is available at all times. Depending upon the product used and the type of authentication in place, different endpoints are connected to. For example, a web browser will connect to the nearest endpoint, but Outlook via Exchange Online will always connect to the WAP server, and then through that to the AD FS server (this will change from Feb 2015 with the multifactor authentication updates to Office 365 (http://blogs.office.com/2014/11/12/office-2013-updated-authentication-enabling-multi-factor-authentication-saml-identity-providers/). You can use the Remote Connectivity Analyzer to check AD FS, as well as numerous other settings, such as AutoDiscover, from the Internet. The Remote Connectivity Analyzer instructions can be found at http://support.microsoft.com/kb/2650717.
Connectivity It is important to check that connectivity to both the AD FS server on the LAN, and via the Internet, is available at all times. Depending upon the product used and the type of authentication in place, different endpoints are connected to. For example, a web browser will connect to the nearest endpoint, but Outlook via Exchange Online will always connect to the WAP server, and then through that to the AD FS server (this will change from Feb 2015 with the multifactor authentication updates to Office 365 (http://blogs.office.com/2014/11/12/office-2013-updated-authentication-enabling-multi-factor-authentication-saml-identity-providers/). You can use the Remote Connectivity Analyzer to check AD FS, as well as numerous other settings, such as AutoDiscover, from the Internet. The Remote Connectivity Analyzer instructions can be found at http://support.microsoft.com/kb/2650717.
![]() Login failure The AD FS application event logs on the AD FS server (when using AD FS on Windows Server 2012 R2) will record information about a failure to issue a token for a user, and thus the user’s inability to login. The logs will record a lot of known information about the user, and why the token was not issued (for example, invalid password). Earlier versions of AD FS required debugging enabled to get this information.
Login failure The AD FS application event logs on the AD FS server (when using AD FS on Windows Server 2012 R2) will record information about a failure to issue a token for a user, and thus the user’s inability to login. The logs will record a lot of known information about the user, and why the token was not issued (for example, invalid password). Earlier versions of AD FS required debugging enabled to get this information.
Troubleshooting DirSync
The Azure Directory Synchronization tool is best considered an appliance. That is, you install it and forget about it. The Miisclient.exe tool, found in the Syncbus folder on the installation path, can be used to see if it is failing to sync users, though the first indication of that is usually failing to find the user in Office 365, or that the user’s settings in Office 365 are incorrect.
Because DirSync is just an appliance, it will take the information in the Active Directory, ensure it is valid, and push it to the cloud. Therefore, if the data is not valid, that is the most likely time for it to fail. The most common reasons for objects in the Active Directory not being valid are duplicates or invalid settings, such as UPN being set to something like domain.local (when domain.local is the Active Directory forest name).
Therefore, the steps to install DirSync include a series of steps for tidying up your directory. IDFix is the recommended tool to use for this. Once you have a successful sync, failure to sync later on is usually due again to duplicate entries, or invalid data being added. If users in Exchange Online cannot find users in the global address list when in hybrid mode, this is a good source of the issue.
The DirSync tool also syncs password hashes to Azure, and troubleshooting this is covered in http://support.microsoft.com/kb/2855271.
Finally, if the synchronization stops working, it is often due to a password expiring. On-premises, the DirSync tool is run with an Enterprise admin account, but all this does is to create its own account that has the permissions it needed. The account needed for Office 365 though needs to be made before the software is installed, and it needs to be a Global Admin. Ideally it will not have an expiring password. If the DirSync software stops after 90 days that is the most likely reason that synchronization stops working. Via Remote PowerShell to Office 365, you can run “Set-MsolUser -UserPrincipalName sync-account@tenant.onmicrosoft.com -PasswordNeverExpires $true,” as shown in Figure 5-35.
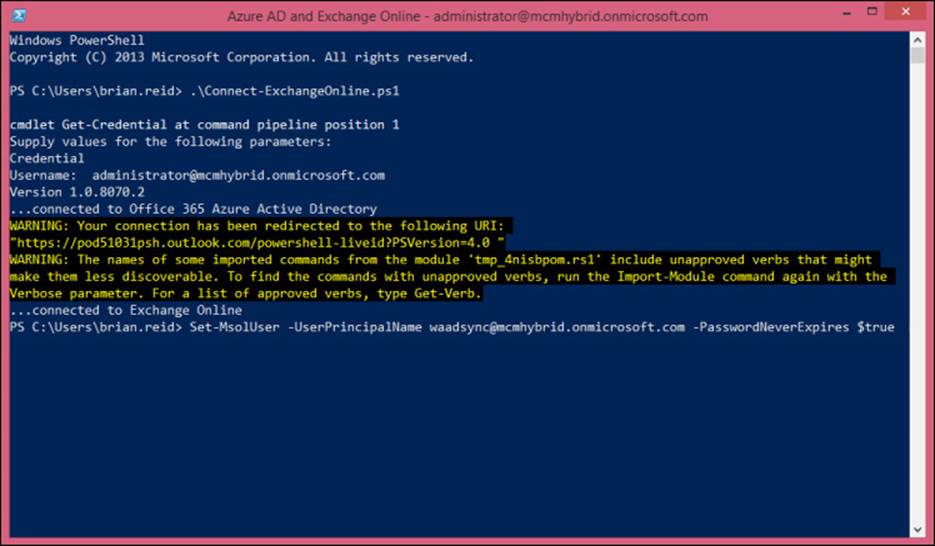
FIGURE 5-35 Disabling required password change for the account used for DirSync
Troubleshooting cross-forest availability
There is a considerable amount of things that can go wrong with cross-forest availability, not least AutoDiscover, firewalls, certificates, namespaces, permissions, users, and contacts! Therefore, this book just points you in the direction of the troubleshooting whitepaper athttp://blogs.technet.com/b/exchange/archive/2011/03/04/3412075.aspx.
Thought experiment: Troubleshooting Exchange hybrid mode
In this thought experiment, apply what you’ve learned about this objective. You can find answers to these questions in the “Answers” section at the end of this chapter.
You manage an Exchange organization that has got on-premises and Exchange Online coexistence in place. You want to be sure you know how to fix issues that might arise. Therefore what would you do for the following?
1. How would you troubleshoot mail flow to Office 365 that did not leave the on-premises organization?
2. You want to check that DirSync is operating correctly.
3. You want to be able to check that AD FS is working for all users. How can you do this easily?
Objective summary
![]() The best resources for troubleshooting are knowing the product or feature very well and then using sensible resources online.
The best resources for troubleshooting are knowing the product or feature very well and then using sensible resources online.
Objective review
Answer the following questions to test your knowledge of the information in this objective. You can find the answers to these questions and explanations of why each answer choice is correct or incorrect in the “Answers” section at the end of this chapter.
1. Which of the following are the correct URLs for the tool used to check remote connectivity to Office 365, and Exchange, Lync, and AD FS on-premises?
A. http://exrca.com/
B. http://testconnectivity.microsoft.com/
C. http://testexchangeconnectivity.microsoft.com/
D. http://exrca.onmicrosoft.com
Answers
This section contains the solutions to the thought experiments and answers to the objective review questions in this chapter.
Objective 5.1: Thought experiment
1. To tell what authentication scheme you are currently using, you could login to remote PowerShell for Office 365 and run Get-MsolDomain. If any domain is listed as federated, and users have usernames in that domain, you are using AD FS. If a domain is listed as managed, you need to see from the Users page in the Office 365 administrators portal if you are syncing users for that domain from an on-premises AD. If you are, you are probably using DirSync with Password Sync, though you could have separate passwords and manage them separately in the Office 365 portal. If users are logging into the pilot with an onmicrosoft.com username, you are not using AD FS or password sync.
2. To put together a working pilot with AD FS server, you need an available public IP address, firewall, and DNS changes, a number of servers installed with Windows Server, and then AD FS and WAP/AD FS proxy. Optionally, but highly recommended, are load balancers and multiple AD FS and WAP servers. Finally, you need to ensure that your users log in with a domain name that you will change to federated.
Objective 5.1: Review
1. Correct answer: C
A. Incorrect: You can run mixed versions of Exchange Server with Exchange Server 2013, as long as they are 2007 SP3 RU12 or Exchange Server 2010 SP3 or higher.
B. Incorrect: You can run mixed versions of Exchange Server with Exchange Server 2013, as long as they are 2007 SP3 RU12 or Exchange Server 2010 SP3 or higher.
C. Correct: All of your servers need to be online and reachable before you run the Hybrid Configuration Wizard.
D. Incorrect: AutoDiscover is not used to locate servers for administration purposes, but used for users to locate their mailbox settings.
2. Correct answer: A
A. Correct: The Hybrid Configuration Wizard centralized mail flow is required for this feature.
B. Incorrect: Though you could delete the connectors and make your own, this would not be the correct way to achieve this aim.
C. Incorrect: This is not correct. You can do this with centralized mail flow.
D. Incorrect: Your MX records are for inbound mail flow and not outbound, as this question is asking.
3. Correct answers: A and C
A. Correct: The token signing certificate is valid for one year.
B. Incorrect: Non-activated servers will not shut down after one year.
C. Correct: This might be the answer, though you might have a multi-year certificate, but it is a good step to check.
D. Incorrect: This would not stop AD FS from working. AD FS would tell you your password had expired and would need changing.
Objective 5.2: Thought experiment
1. Each Exchange organization will need the following done to ensure that they are able to share calendar information between them:
A. Ensure AutoDiscover is operational for each organization and for each domain that could be used to access a user’s calendar. AutoDiscover should resolve to a 2013 CAS role server.
B. Create a federation trust in each Exchange organization. Ensure that there are no authenticating web proxies between the Exchange Server and the Internet, and that the Exchange Server has unfiltered access to HTTPS on the Internet.
C. Get the domain proof text with Get-FederatedDomainProof for each domain.
D. Add a TXT record to public DNS that has the proof string for each domain as the value of the TXT record.
E. Wait until DNS changes are published, and complete the federation trust. Select the primary domain and add any additional domains to the trust.
F. Create an organizational relationship in each Exchange organization for the other two Exchange organizations. Allow calendar sharing and do not restrict permissions.
G. Test the federation trust and organization relationship by viewing a calendar of a user in a different forest. Repeat the test for all of the forests.
Objective 5.2: Review
1. Correct answer: D
A. Incorrect: Even though the Hybrid Configuration Wizard configures federation trusts, it only does it for the on-premises to Exchange Online domains. Therefore, you do not change the federation trust with the HybridConfiguration cmdlets.
B. Incorrect: This is not a valid cmdlet.
C. Incorrect: Even though this would appear to be a valid cmdlet becaue the TXT record is required, the value is not obtained via this invalid cmdlet.
D. Correct: This cmdlet will retrieve the TXT record value required.
2. Correct answer: A
A. Correct: The default behavior in Exchange Online is to allow anonymous calendar sharing.
B. Incorrect: The default sharing policy is already configured for anonymous and the tenant administrator does not have access to the OWA virtual directories in Exchange Online.
C. Incorrect: The default sharing policy is already configured for anonymous access.
D. Incorrect: This is not correct. Anonymous sharing is available in Exchange Online.
3. Correct answer: B
A. Incorrect: Organization relationships are used to set this sharing in place and not permissions on calendars.
B. Correct: A security group is used to restrict the right to access calendar or free/busy information on the organization relationship.
C. Incorrect: This is not true. You can restrict to the membership of a single group.
D. Incorrect: Organization relationships are used to set this sharing in place and not permissions on calendars.
Objective 5.3: Thought experiment
1. To move your mailbox you can either install Exchange Server 2013 in the same organization as Exchange Server 2010 and use the 2013 tools to move the mailbox, or you can export your mailbox to a PST and import again into a new forest. If using a new forest you need to configure shared namespace mail flow routing. You will need to ensure that Exchange Server 2010 is running Service Pack 3 or later for coexistence to work.
2. If using the same forest, you will not update the endpoints for mail and AutoDiscover etc. to point to Exchange Server 2013, as you will use a different namespace to connect to your mailbox. For AutoDiscover, editing the HOSTS file on your computer will direct your client alone to the correct Exchange Server endpoint.
Objective 5.3: Review
1. Correct answer: D
A. Incorrect: This digital certificate contains a legacy namespace for AutoDiscover, which is not required.
B. Incorrect: This digital certificate contains two legacy namespaces, legacy.contoso.com and legacy.mail.contoso.com. Only one is required and either one would do, but legacy.contoso.com requires less configuration on DNS (it is not a subzone) and so is recommended.
C. Incorrect: This digital certificate does not contain a legacy namespace as required for Exchange 2007 coexistence.
D. Correct: This is a correct example for a 2007 coexistence digital certificate.
2. Correct answer: B
A. Incorrect: You do not need a legacy namespace because Exchange 2013 will proxy the connection to the Exchange 2007 server.
B. Correct: Legacy namespaces are required for OWA 2007 only because this is the only protocol that redirects. The rest proxy, and so do not require additional namespaces.
3. Correct answer: C
A. Incorrect: Though port 25 can receive authenticated client connections, port 587 is recommended for client-to-server communications because 25 is reserved for SMTP server to SMTP server communications.
B. Incorrect: Port 475 is the Mailbox Transport Delivery service port for Exchange Transport delivering to the mailbox, and is not for client communications.
C. Correct: TCP port 587 is recommended for mail user agents (MUA) connecting to mail transport agents (MTA). An MUA is SMTP speak for an SMTP client and an MTA is an SMTP server, such as Exchange Server.
D. Incorrect: Port 2525 is used by Exchange Server 2013 transport service when both the CAS and Mailbox role are installed on the same server.
Objective 5.4: Thought experiment
1. You can make use of calendar sharing (anonymous, via the Internet), organizational relationships via federation trusts, and availability address space sharing.
2. All things being equal, federated trusts and organizational relationships are the easiest to set up and maintain. They also allow your partner organization to share their calendars or free/busy with other organizations if they set up relationships as well.
Objective 5.4: Review
1. Correct answers: B and C
A. Incorrect: Authoritative accepted domains will deliver to a valid recipient or reject the message.
B. Correct: Internal relay accepted domains will forward the message to the MX record or preferably a send connector that routes to the next hop when a message address cannot be resolved locally.
C. Correct: External relay accepted domains are the same as internal relay accepted domains (answer B) with regard to delivering to a valid recipient, or forwarding onward to the next hop.
D. Incorrect: This is not a valid domain type.
2. Correct answer: A
A. Correct: “Set-ClientAccessServer -AutoDiscoverServiceInternalUri https://autodiscover.contoso.com/Autodiscover/Autodiscover.xml” is an example of this cmdlet.
B. Incorrect: Set-ExchangeServer does not set the SCP.
C. Incorrect: Set-MailboxServer does not set the SCP.
D. Incorrect: Set-AutoDiscoverVirtualDirectory does not set the SCP.
Objective 5.5: Thought experiment
1. You can install an Exchange Server 2003 server using the RecoverServer installation switch and then uninstall it correctly. This will clean up the Active Directory. It is possible to remove servers from Active Directory with AdsiEdit, but this is not supported. Ideally you would look in the Exchange Server 2013 installation log file for the cause of the failure and you might get further information in the log as to the reason why it has failed to install.
2. You would need to check the version of all your Exchange 2010 servers that are installed. Pay particular attention to any Edge Servers because they may have been SP1 at time of install and when EdgeSync was implemented, but are now the correct version. Also, incorrectly uninstalled (that is, turned off and not uninstalled) servers remain in the Active Directory and need to be removed properly or recovered and uninstalled.
Objective 5.5: Review
1. Correct answers: C and D
A. Incorrect: Exchange Server 2000 needs to be migrated to a separate forest and with either PST migration or third-party tools. It can be migrated via Exchange Server 2007 or Exchange Server 2010.
B. Incorrect: Exchange Server 2003 needs to be migrated to a separate forest and with either PST migration or third-party tools. It can be migrated via Exchange Server 2007 or Exchange Server 2010.
C. Correct: This upgrade is allowed.
D. Correct: This upgrade is allowed.
2. Correct answer: D
A. Incorrect: This cmdlet uses Set-Mailbox and not Set-MailboxDatabase.
B. Incorrect: IsExcludedFromProvisioning requires a $True or $False switch.
C. Incorrect: This cmdlet uses Set-Mailbox and not Set-MailboxDatabase.
D. Correct: This cmdlet will work.
3. Correct answer: B
A. Incorrect: Online is not a valid move type.
B. Correct: This cmdlet will work.
C. Incorrect: TXTData and a text file is not a valid file format or file type. It is CSVData and a .csv file with a single column called EmailAddress.
D. Incorrect: This cmdlet uses New-MoveRequest, but all of the parameters are from New-MigrationBatch.
Objective 5.6: Thought experiment
1. You would use Exchange Server 2013 features such as Get-Queue, Get-MessageTrackingLog, and protocol logging for the transport service.
2. You would open the Miisclient.exe program on the DirSync server and look for errors in the sync client. Errors could be fixed using IDFix or any other Active Directory tool or script.
3. The Remote Connectivity Analyzer for remote users, and using clients and a web browser to access Office 365 from on-premises.
Objective 5.6: Review
1. Correct answers: A, B, and C
A. Correct: This URL takes you to the Remote Connectivity Analyzer.
B. Correct: This URL takes you to the Remote Connectivity Analyzer.
C. Correct: This URL takes you to the Remote Connectivity Analyzer.
D. Incorrect: This is not a valid URL
All materials on the site are licensed Creative Commons Attribution-Sharealike 3.0 Unported CC BY-SA 3.0 & GNU Free Documentation License (GFDL)
If you are the copyright holder of any material contained on our site and intend to remove it, please contact our site administrator for approval.
© 2016-2026 All site design rights belong to S.Y.A.