Exam Ref 70-342 Advanced Solutions of Microsoft Exchange Server 2013 (2015)
Chapter 4. Configure and manage compliance, archiving, and discovery solutions
In this chapter you will look at managing compliance, archiving, and discovery solutions. Specifically we will look at Exchange Server archiving, which is not to be confused with journaling. Sometimes these two terms are used to describe each other. You will also look at the new data loss prevention product in Exchange Server and Exchange Online, and also the Message Records Management (MRM) feature set. With the MRM feature set, you will only look at the newer aspects of this, which are known as retention policies. You will then finish the chapter with a review on how eDiscovery is performed, and how the individual compliance features can be set up. Begin by taking a look at archiving.
Objectives in this chapter:
![]() Objective 4.1: Configure and manage an archiving solution
Objective 4.1: Configure and manage an archiving solution
![]() Objective 4.2: Design and configure Data Loss Prevention (DLP) solutions
Objective 4.2: Design and configure Data Loss Prevention (DLP) solutions
![]() Objective 4.3: Configure and administer Message Records Management (MRM)
Objective 4.3: Configure and administer Message Records Management (MRM)
![]() Objective 4.4: Perform eDiscovery
Objective 4.4: Perform eDiscovery
![]() Objective 4.5: Implement a compliance solution
Objective 4.5: Implement a compliance solution
Objective 4.1: Configure and manage an archiving solution
In Exchange Server 2010, a new feature was added called the archive mailbox. The idea behind the archive mailbox came about because Exchange storage on a disk is designed to use just a bunch of disks (JBOD) disk configurations, and replicate the data for redundancy across a Database Availability Group (DAG), and not to require the use of a storage area network (SAN) or a redundant array of independent disks (RAID). This means that the cost of implementing the storage for Exchange Server can be considerably reduced compared to Exchange Server 2007 or 2003. Also, due to changes in the database structure for Exchange, the size of the mailboxes can be increased. This increase in possible mailbox size means more storage is required, and with more data being transferred electronically, and the desire of users to keep more content for longer, this also means more storage is being consumed.
But this is contrary to a common mailbox configuration of small quotas, which typically come about either historically because of small (a few GBs) mailbox size in older versions of Exchange, or because Exchange is hosted on expensive storage. Therefore, users typically take content out of Exchange Server and store them in .pst files all over the network. The network is a place that is not designed to hold .pst files because they are not designed to be accessed over the network.
Therefore, how do you keep the data in Exchange, and keep a business requirement of small quotas because disk storage is probably still too expensive for large mailboxes? In the timeframe of the release of Exchange 2010, the solution was to have an archive mailbox. It was not until Service Pack 1 for Exchange 2010 that the archive mailbox could be located on a different database than the primary mailbox, or even for the archive to be stored in the cloud in Exchange Online.
With storage of the archive being on a different disk from the storage of the mailbox, it became possible to hold current data on the expensive, fast storage that Exchange was running on, to move the older data to an archive, which was running on cheaper storage or where less copies were kept on the DAG or even online, and so the cost of holding a large mailbox was becoming realized. Additionally, the added advantage of removing .pst files came to the fore. Instead of holding the .pst files on some network storage somewhere (and taking up space there), it could be held on Exchange and accessed from Outlook anywhere, not just on the LAN, and replicated and subject to eDiscovery searches in Exchange, rather than being isolated silos of information that could not easily be discovered.
To that end, this section of the chapter will look at some aspects of configuring the archive mailbox in Exchange 2013. The exam objective domain covers the following four items in the order given, though this is not really the best way to consider them from a practical use scenario.
This objective covers how to:
![]() Set up online archiving (Office 365)
Set up online archiving (Office 365)
![]() Create archive policies
Create archive policies
![]() Set up on-premises archiving
Set up on-premises archiving
![]() Plan storage for an archiving solution
Plan storage for an archiving solution
Setting up online archiving (Office 365)
As mentioned above, it is possible to store your archive mailbox in Office 365. Before you look at setting this up, it is important to note that you can have the following mailbox configurations:
![]() Mailbox on-premises, no archive.
Mailbox on-premises, no archive.
![]() Mailbox on-premises, archive on-premises.
Mailbox on-premises, archive on-premises.
![]() Mailbox on-premises, with the archive mailbox in Office 365.
Mailbox on-premises, with the archive mailbox in Office 365.
![]() Mailbox in Office 365, no archive.
Mailbox in Office 365, no archive.
![]() Mailbox in Office 365, with the archive mailbox also in Office 365.
Mailbox in Office 365, with the archive mailbox also in Office 365.
Note that the combination of a mailbox in Office 365 and archive on-premises is not possible. You can have the mailbox on-premises and the archive with it, or in the cloud, but if you have a cloud mailbox in Office 365, the archive needs to be in Office 365 with your mailbox.
To have an Exchange Online archive that is your mailbox archive in Office 365, you need to have purchased a license for online archiving. There are many Exchange Online licenses, or SKU (stock keeping unit), but not all of them provide an Exchange Online archive. The simplest way is to purchase the Exchange Online Archiving SKU, which is, at the time of writing, $3 USD per user per month. The details of this product can be found at http://products.office.com/en-us/exchange/microsoft-exchange-online-archiving-archiving-email, and a local price rather than US dollars can be found by changing the country/region option at the top right. Exchange Online Archiving is also available for a 30-day trial for 25 users. This product is the archive only and nothing else.
Other ways to purchase an online archive is to purchase either of the two Exchange Online products. Exchange Online is the product that provides mailboxes in Office 365. For Exchange Online there are two license options (or plans) known as P1 and P2. These Exchange Online plans are described at http://products.office.com/en-us/exchange/compare-microsoft-exchange-online-plans. It can be seen from this page that both the P1 and P2 plan contains Online Archive, but that the P2 license allows for unlimited storage for that archive. That is, the P1 plan allows for 50 GB of storage across both the mailbox and online archive, and you cannot store more than 50 GB. The P2 plan allows for a 50 GB mailbox and an unlimited archive.
In comparison to Exchange Online licenses, Office 365 licenses are typically packages of licenses from other products that can be bought separately, such as Exchange Online, Lync Online, and SharePoint Online, and a full copy of Microsoft Office Business, or Microsoft Office Professional Plus. Therefore, if you buy an Office 365 license that contains an Exchange Online P2 license, you get archiving and unlimited storage, whereas if you purchase an Office 365 license that contains an Exchange Online P1 plan, you get 50 GB mailbox storage. Examples of Office 365 licenses that include the P2 Exchange Online SKU are the E3 and E4 (the “E” stands for Enterprise) licenses, or the Academic E1 for Faculty licenses.
If you have an existing Office 365 subscription you can check if you have the ability to create online archives by logging into http://portal.office.com (as Global Admin or Billing Admin) and clicking Purchase Services on the left-hand menu, and then clicking View Current Subscriptions on the right. This can be seen in Figure 4-1.
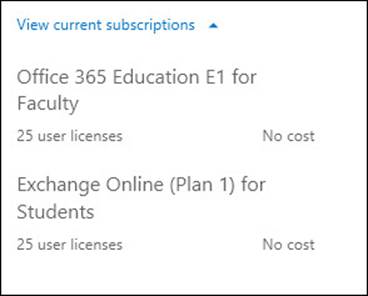
FIGURE 4-1 Viewing your current subscriptions in Office 365
In Figure 4-1, this organization has an academic plan that includes 25 licenses for Exchange Online (Plan 1). This is the Exchange Online P1 plan, which does not include the unlimited archive option. The other subscription in Figure 4-1 is an Office 365 subscription. To see the details of this subscription (which plans it includes), you need to look under the licenses for any user.
For existing and already licensed users, you can click on the user’s name in the Office 365 portal, and then select the license’s tab. This is shown for a single user in Figure 4-2. This shows that the Office 365 Education E1 for Faculty license is a group of products that contains the Exchange Online P1 license, and so from the viewpoint of online archives, is limited to a shared storage maximum of 50 GB across both the mailbox and archive.
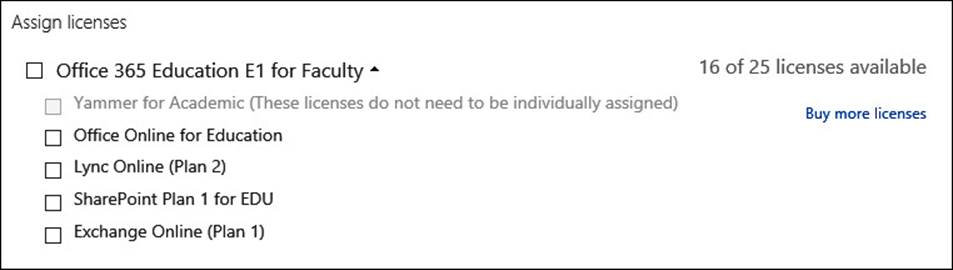
FIGURE 4-2 Viewing individual licenses assigned to users
When you create a user in Office 365 you get the option to set the license as part of the creation process. This can be seen in Figure 4-3. If users are created on-premises and synced to Office 365 using DirSync, licensing needs to be done via remote Windows PowerShell (for bulk updates), or individually in the Office 365 portal before an archive can be created.
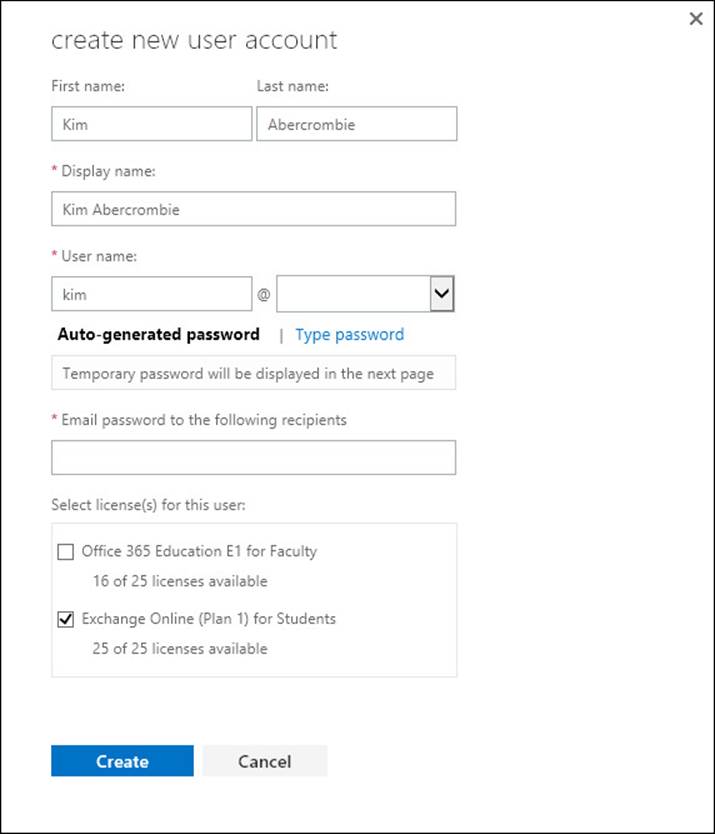
FIGURE 4-3 Creating a user and assigning a license at the same time
Note: Reading User’s Licenses
You can also read a user’s licenses with Remote PowerShell.
Once you have a license or a trial subscription with the online archive feature included in it, you can go about setting up the online archive. How you do this depends upon where the user’s mailbox is. It is easier to set up the online archive when the user’s mailbox is a cloud-based mailbox, rather than an on-premises mailbox. If there is an on-premises Exchange organization with hybrid mode enabled, but the mailbox is stored in the cloud, then this adds a bit of extra configuration to the online archive setup process. Therefore, you will look at setting up the archive from these three different viewpoints separately. Later in the book you will look at archives stored on the on-premises Exchange Server.
Archives for cloud mailboxes
A cloud mailbox is one that was created using the Office 365 portal, or New-MSOLUser in Remote PowerShell. It is not a user account that is created on-premises, and exists in the Office 365 by way of DirSync. Users that exist in the cloud by way of DirSync need to be modified on-premises, but cloud users and mailboxes are modified in the cloud. Therefore, to create an archive for a cloud user you complete the following steps:
1. Add an Exchange Online Archiving license if you need an unlimited archive and the current license does not include the rights to an unlimited archive. If you want just a 50 GB mailbox + archive maximum then you do not need to purchase new licenses.
2. Enable the archive in the Office 365 portal or via Remote PowerShell.
3. Use the archive.
Step 2 is the step where the actual configuration of the archive takes place. If you are using Remote PowerShell to administer Office 365, start a PowerShell session and either type the following cmdlets to connect to Exchange Online, or save the following cmdlets in Notepad to a .ps1 file Connect-ExchangeOnline.ps1 and then run the script by typing Connect-ExchangeOnline.ps1. This code will connect you to Exchange Online and Azure Active Directory, which is the directory where your cloud users are kept.
#Script to connect to Exchange Online
$cred = Get-Credential
Write-Host "Username: " $cred.username
$host.ui.RawUI.WindowTitle = "Azure AD and Exchange Online - " + $cred.username
Connect-MsolService -Credential $cred
Write-Host "...connected to Office 365 Azure Active Directory"
$ExchangeSession = New-PSSession -ConfigurationName Microsoft.Exchange -ConnectionUri
https://ps.outlook.com/powershell -Credential $cred -Authentication Basic -AllowRedirection
$ExchangeSessionResults = Import-PSSession $ExchangeSession
Write-Host "...connected to Exchange Online"
Note that in this code, the $ExchangeSession line, which prints to three lines, is all one line of code.
To run the code you need to install the Office 365 remote administration PowerShell cmdlets. The latest version of these can be downloaded from http://aka.ms/aadposh. These also require the Microsoft Online Services Sign-In Assistant for IT Professionals to be installed. The download page for that is also reachable from http://aka.ms/aadposh.
Once you run the script you will need to enter your global admin credentials and password, and then you will be connected to Exchange Online and Azure Active Directory. The above script shows you the username in the title bar of the window as well. This is shown in Figure 4-4, and is useful if you are a consultant and have different windows open that are connected to different Office 365 tenants at the same time.
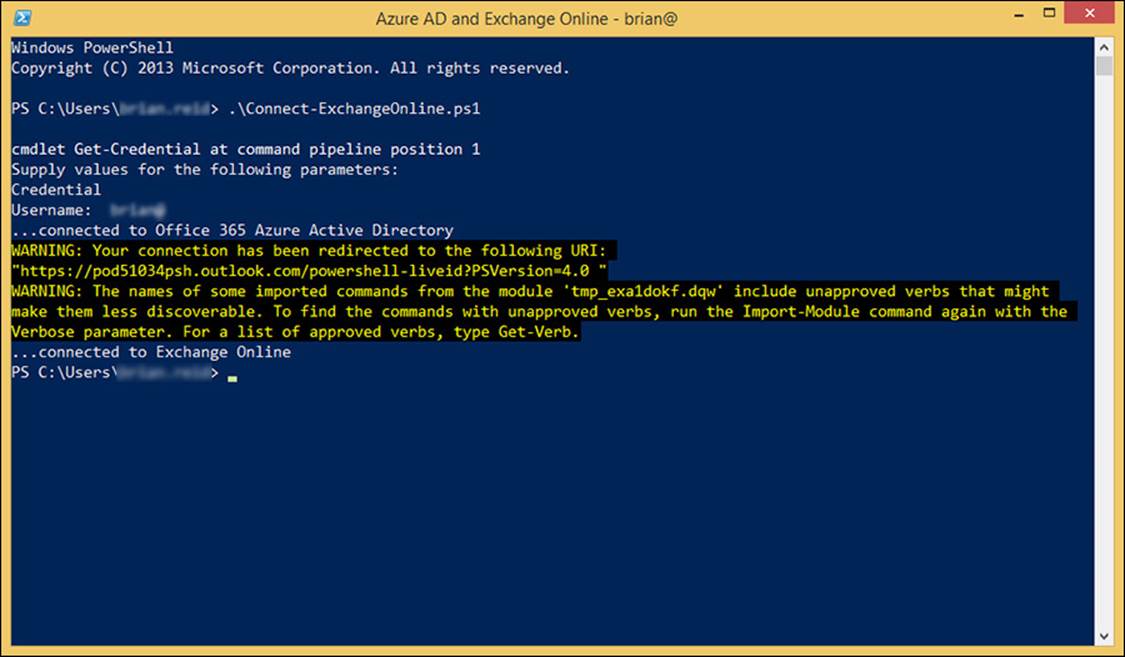
FIGURE 4-4 Remote PowerShell connected to Azure Active Directory and Exchange Online
You do not need to install any software for the Exchange Online cmdlets to work because they are all remote, and are downloaded on the fly when you connect.
Once you are connected over Remote PowerShell type Get-MsolUser to list all of your users and type Get-Mailbox to list all of your mailboxes. Cloud mailboxes with not have the LastDirSyncTime property set, so they can be found with Get-MsolUser | ft UserPrincipalName,LastDirSyncTime.
To enable an existing mailbox to have an archive you run Enable-Mailbox <name> -Archive. For <name> you can use their user principal name (UPN) from Get-MsolUser, or other naming info that Exchange can use, such as email address, display name, or alias.
To see who has an archive already, run Get-Mailbox -Archive. To see info about the archive, try a cmdlet such as Get-Mailbox <name> | Format-List Name,*archive*, which will return all of the archive information for the mailbox. You should see values such as ArchiveStatus being Active and ArchiveState being Local. Figure 4-5 shows some of the same information.
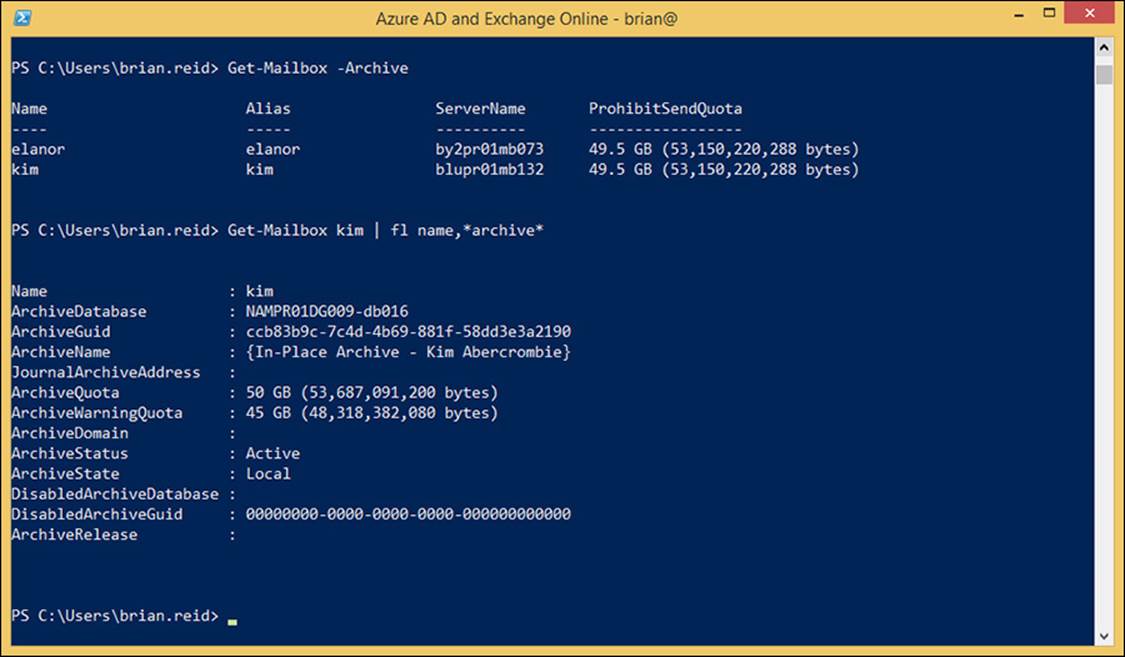
FIGURE 4-5 Remote PowerShell to Exchange Online showing archive mailboxes and further info
To configure an online archive in the Office 365 portal you still need the licenses as discussed above, and you still need to have Global Admin rights. You login using a web browser to http://portal.office.com, but unlike Remote PowerShell, you do not need to install any software.
To enable an archive for a user, locate the user from the Users sidebar menu, and then locate Active Users, and select the row for the user of interest. The row for the user should read “In cloud” under the Status column. Do not click the user’s name because that will take you into licensing. On the right, click Edit Exchange Properties, as shown at the bottom of the figure in Figure 4-6.
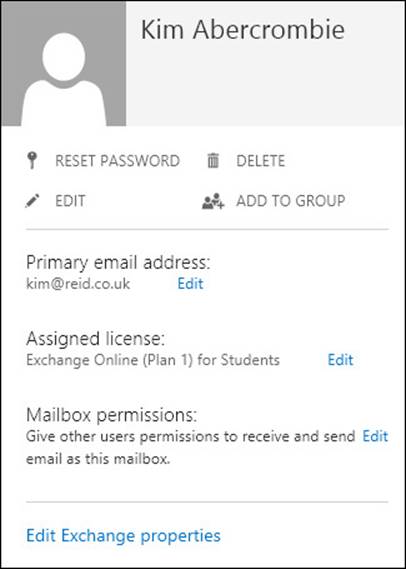
FIGURE 4-6 Viewing a user’s properties in the Office 365 portal
Clicking Edit Exchange Properties will take you to the recipient details for that user in Exchange Control Panel (ECP) for Exchange Online (https://outlook.office365.com/ecp/). This info can also be accessed via ECP directly, rather than via the Office 365 portal.
Click the Mailbox Features menu item, and scroll down to the Archiving section. Here you will see an entry saying Archiving: Disabled, and a link underneath it to enable it. To turn on an online archive for a user, click Enable Here.
To bulk enable the archive for a lot of users, use Remote PowerShell. For example, if you wanted to enable the archive for all users who have an Oxford office, you would run the following.
Get-User | where {$_.City -eq "Oxford"} | Enable-Mailbox -Archive
This is where some of the power of PowerShell can be seen.
Archives for remote mailboxes in hybrid mode
When you have users in Exchange on-premises, and have hybrid mode already enabled so that you have linked your on-premises deployment to your Office 365 tenant, you can move your on-premises mailboxes to Office 365. The steps for doing this are covered in the next section because you are going through this process in order of increasing complexity.
Any user account that exists in Office 365 because the user properties were synced from the on-premises Active Directory to the Azure Active Directory is still modified by making changes to the on-premises object. Therefore, for users who’s mailbox is stored in Office 365 but are in hybrid mode, the user object is still managed from the local on-premises Active Directory. Therefore, to enable an online archive for these users, you need to update the local Active Directory and have those changes synced to the cloud. Only when those changes are synced to the cloud does the archive get created.
Just like cloud users, both PowerShell and ECP can be used to make these changes to the Active Directory, but unlike the cloud users, it is Exchange Management Shell in the on-premises environment, or ECP for the on-premises environment. Start with PowerShell, or specifically start Exchange Management Shell on an Exchange 2010 or 2013 on-premises server.
Like the remote PowerShell cmdlets looked at above, you can use similar cmdlets here. To see which mailboxes in the cloud have an archive already, run Get-RemoteMailbox -Archive, and to see info about the archive, try a cmdlet such as Get-RemoteMailbox <name> | Format-List Name,*archive*, which will return all of the archive information for the mailbox. You should see values such as ArchiveStatus showing as Active and ArchiveState being HostedProvisioned. Figure 4-7 shows some of the same information.
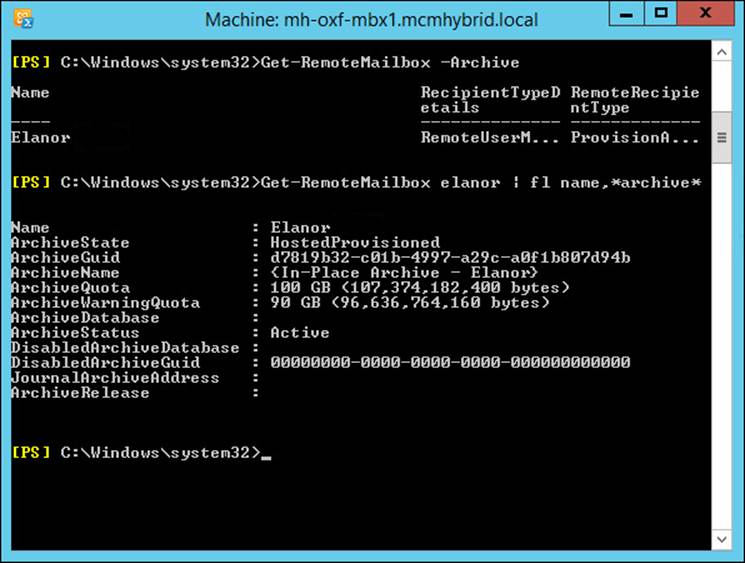
FIGURE 4-7 Viewing a remote mailbox from Exchange on-premises
Figure 4-7 shows that the user already has an archive that is both hosted and provisioned. When you first set up an archive for a user (by using Enable-RemoteMailbox -Archive) it can take up to six hours to appear in this state of HostedProvisioned. This is because the setting to enable the archive is made where the user’s account exists, which is on-premises. Azure DirSync will replicate these changes to your Azure Active Directory tenant that you get with Office 365 once every three hours. When the change reaches Azure AD it is replicated almost immediately to the directory used by Exchange Online. Once the change is in this directory, it is picked up by processes in Exchange Online, and the archive is provisioned.
Once the archive is provisioned, the changes to the user’s properties (such as the ArchiveState and the ArchiveDatabase) are updated and written back to Azure Active Directory (these can be seen via Remote PowerShell to Exchange Online). Three hours later, at the next scheduled DirSync interval, some of these changes are written back to the on-premises Active Directory, and can be seen in Exchange PowerShell on the on-premises Exchange Control Panel. The user can use the archive once it is provisioned and before information about it is synced back to the on-premises Exchange server. However, it cannot be further administered until this information is synced back to the on-premises Active Directory.
The process for creating an archive in Exchange Control Panel has the exact same behind-the-scenes process as described earlier because the Exchange Control Panel runs Enable- RemoteMailbox -Archive for you when you enable an archive for a mailbox that is already in the cloud. To enable an archive for a mailbox in Office 365, when in hybrid mode, open Exchange Control Panel on-premises and click on Recipients. Then select the remote mailbox (they will have “Office 365” as their mailbox type) and click Enable, under In-Place Archive on the right. This is shown for a user in Figure 4-8. Notice there is no option to create an archive in the on-premises deployment. The only supported location for a remote mailbox to have an archive is also remote in Office 365.
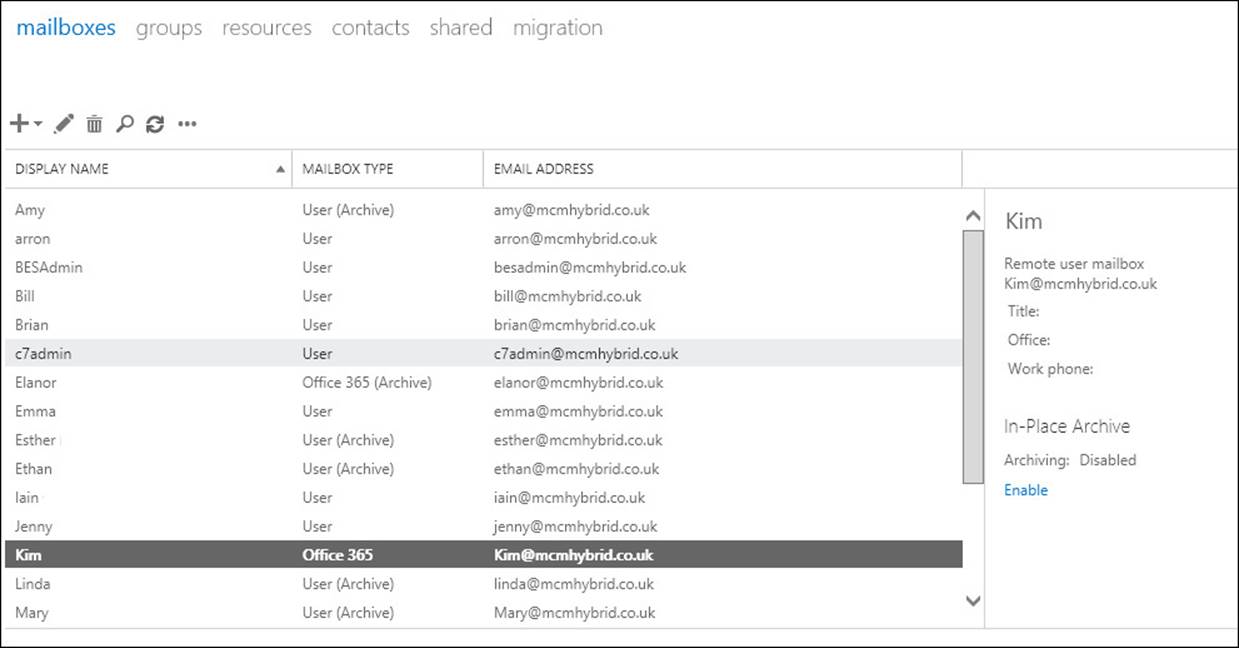
FIGURE 4-8 Enabling archives for remote mailboxes in Exchange Server on-premises
Archives in Office 365 for on-premises mailboxes
The final option to look at for creating an archive in Office 365 is for users with on-premises mailboxes. For this configuration you need to configure hybrid mode, and this is discussed in detail in the next chapter. Once you have a working hybrid configuration, you create the archives in a similar way to the cloud user, but like the remote mailbox you do the work on-premises.
From the Exchange Management Shell, to see who has an archive already, run Get-Mailbox -Archive. To see info about the archive, try a cmdlet such as Get-Mailbox <name> | Format-List Name,*archive*, which will return all of the archive info for the mailbox. You should see values such as ArchiveStatus indicating if the archive exists or not, and if it has already been provisioned in the cloud, and ArchiveState being Local. Figure 4-9 shows some of the same information.
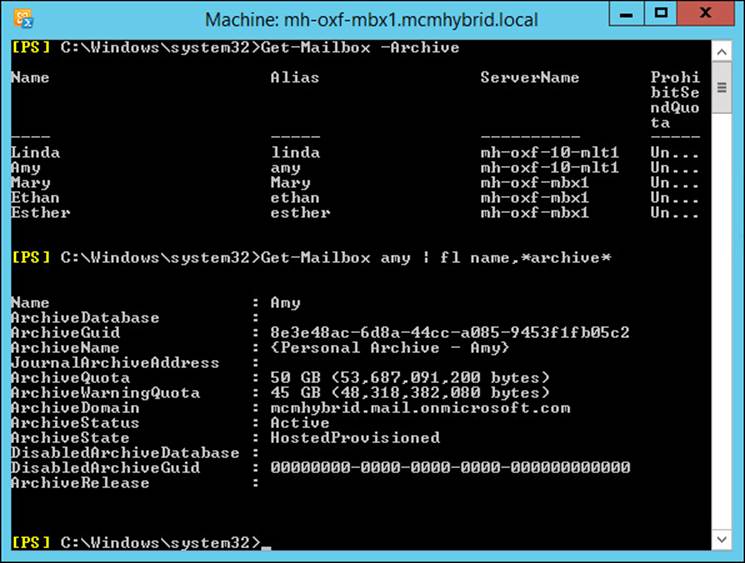
FIGURE 4-9 Viewing on-premises mailboxes with hosted archives
To enable a mailbox to have a remote archive, the cmdlet is slightly different than the earlier examples because here it is possible to have an archive on-premises or in Office 365. To create an archive in Office 365 for an on-premises mailbox you use Enable-Mailbox <name> -RemoteArchive -ArchiveDomain tenant.mail.onmicrosoft.com. The ArchiveDomain value is the Office 365 tenant email routing domain, which will be your tenant’s name followed by mail.onmicrosoft.com. You can get the tenant mail routing domain from Get-RemoteDomain.
Again, you need to wait for the archive settings to synchronize to Office 365, for the archive to be provisioned, and for the new settings to sync back to the on-premises Active Directory, which on a normal DirSync schedule is somewhere between three and six hours before the user can see and use the archive. The creation process via Exchange Management Shell can be seen in Figure 4-10. In this figure you can see the output of Get-RemoteDomain to show you the tenant routing domain, the Enable-Mailbox -RemoteArchive cmdlet, and the archive settings on the mailbox when this is complete, but before the three to six hours (if DirSync is working) have gone by, notice that the ArchiveState is HostedPending, and the ArchiveStatus is None. The user will not see an archive in Outlook or OWA until ArchiveStatus reads Active.
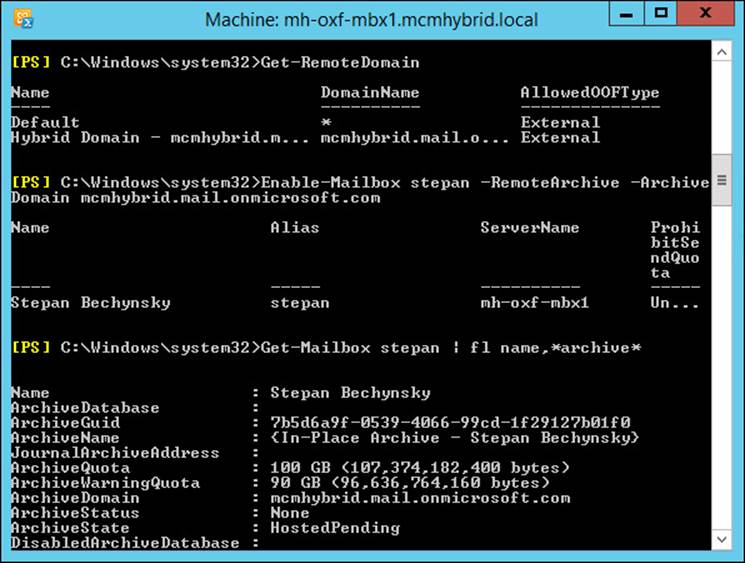
FIGURE 4-10 Creating a remote archive for an on-premises mailbox
Note: Archive names
The name of the Online Archive product set has changed over the years since its launch. Depending upon when the archive was created, it could have a different name. For example, in Figure 4-10, the archive name is In-Place Archive - Display Name, after its current branding, but in Figure 4-9, on an archive created in 2013, it is called Personal Archive - Display Name. It has also been called Online Archive, if you go back a few years. In Exchange 2013, its correct name is the In-Place Archive, and if the archive is in the cloud and the mailbox on-premises, this is Exchange Online Archiving.
To create an archive in Office 365 for an on-premises mailbox using Exchange Control Panel, you first need to login to Office 365 from ECP using the Office 365 link in the blue banner at the top of the page. In Internet Explorer, this requires that both the Exchange Online portal athttps://outlook.office365.com, and the ECP URL be added to the Trusted Sites zone.
Once you have logged into Office 365, you can create archives both on-premises or in Office 365 for on-premises mailboxes. Figure 4-11 shows the archive creation dialog box.
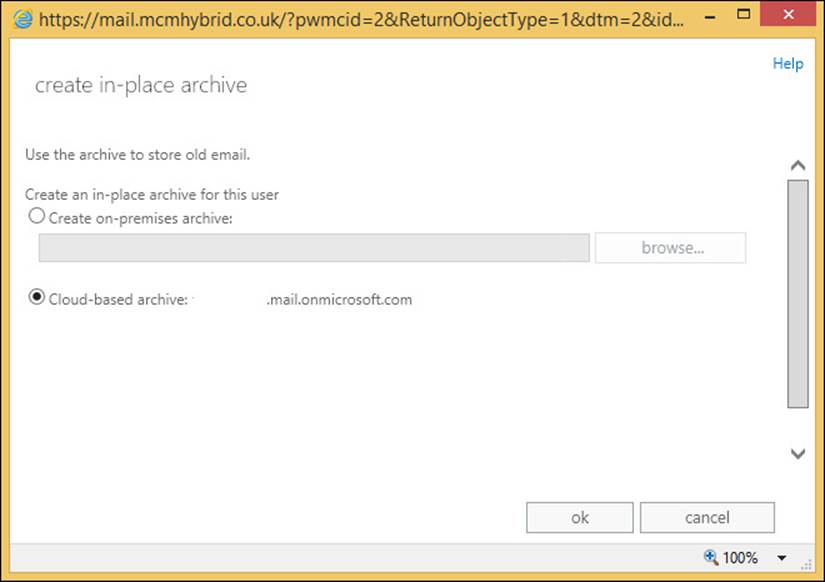
FIGURE 4-11 Creating an archive in Office 365 for an on-premises mailbox
When you already have an existing archive for an on-premises mailbox, you can move it to Office 365 from ECP using the move mailbox process and selecting to move the archive mailbox only.
Important: Restoring functionality in CU6
If you are running Cumulative Update 6 for Exchange Server 2013, you need to run the script that can be downloaded from http://www.microsoft.com/en-us/download/details.aspx?id=44050 to restore the Exchange Online functionality.
Creating archive policies
When you enable an archive for a mailbox, as well as the archive configuration, a retention policy called the Default MRM Policy is configured on the mailbox. This can be seen in Figure 4-12, where the cmdlet Get-Mailbox brian | fl RetentionPolicy is run. It shows no retention policy on the mailbox, followed by enabling a remote archive, followed by querying the user’s retention policy again. The second time, immediately after the archive is requested, the retention policy can be seen as Set.
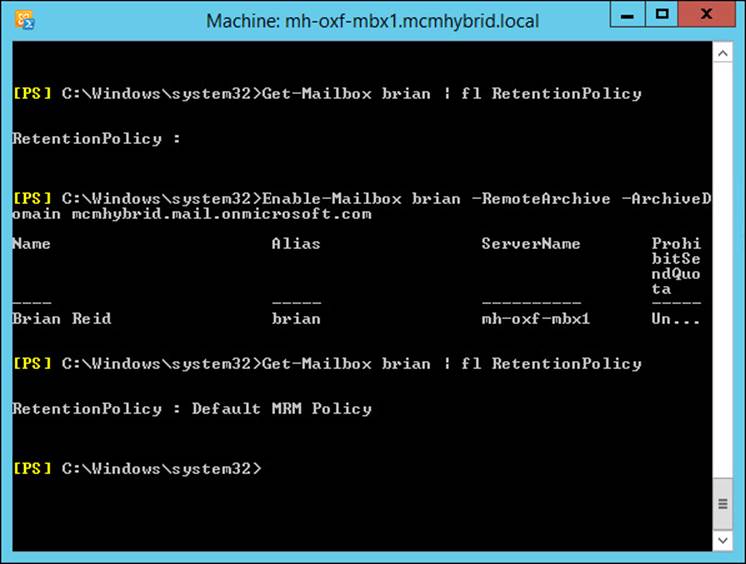
FIGURE 4-12 Seeing a retention policy applied after the archive is enabled
This policy is the default policy for Exchange Server 2013, and is applied automatically when an archive is provisioned. In Exchange 2010, the default policy was called the Default Archive and Retention Policy. Both the Default MRM Policy and the 2010 default policy are identical and contain the name settings. There is a third hidden retention policy (hidden in ECP) that sets retention on arbitration mailboxes.
If you want to apply different archive policies to users, you either modify the Default MRM Policy by changing the different retention tags that it includes, or you create a new retention policy and customize the tags found inside that policy. Later in this chapter you will look at creating and customizing retention policies and retention tags, but the exam objective domain covers the creating and customizing of archive policies, and archive tags before it covers retention policies.
This order is worth considering because an archive policy is a retention policy, just one that moves items to the archive rather than deleting them. To see your archive policies in Exchange Management Shell along with some useful information, run the following one line cmdlet.
Get-RetentionPolicyTag | where {$_.RetentionAction -eq "MoveToArchive"} | FL Name,Type,AgeLimitForRetention,RetentionAction
This returns all of the MoveToArchive retention tags. As can be seen from Figure 4-13, there are five retention tags that move items to the archive.

FIGURE 4-13 Archive policies
You can see from the output of these archive policies tags, one retention tag has the type value as All. This retention tag will apply automatically to all messages in a mailbox, and only one retention tag of type All exists by default.
It is worth at this point discussing the terminology used here. A retention tag is a setting that controls how long content is held for before being deleted or archived. A tag can be a default tag (Type=All) and applies to all items in a mailbox, or applies to a specific folder, or be Type=Personal, which is available for the user to use themselves and is not applied by default. In comparison, a retention policy (and not a retention tag) is a collection of tags. The collection of tags that make the policy can be applied to a mailbox. Therefore, the Default MRM Policy, which is applied to mailboxes when the archive is enabled, is just a collection of tags. It is the tags that control the archiving or deleting.
Because a retention policy consists of a series of retention tags, if you want to customize the options available to the user, you create new tags and add them to the user’s policy. A single policy can only have one tag of type All that deletes content, and one tag of type All that archives content. The policy can have one tag that applies to a given folder (that is you could have two tags that archive the Conversation History folder at 30 days and 120 days, but only one of these tags could belong to one policy). The other could belong to a different policy. A policy can contain as many personal tags as you need.
To create new MoveToArchive tags you can either use PowerShell (New-RetentionPolicyTag <name> -Type All|Personal|<FolderName> -RetentionAction MoveToArchive -AgeLimitFor Retention XX [in days]), or use Exchange Control Panel, as shown in Figure 4-14.
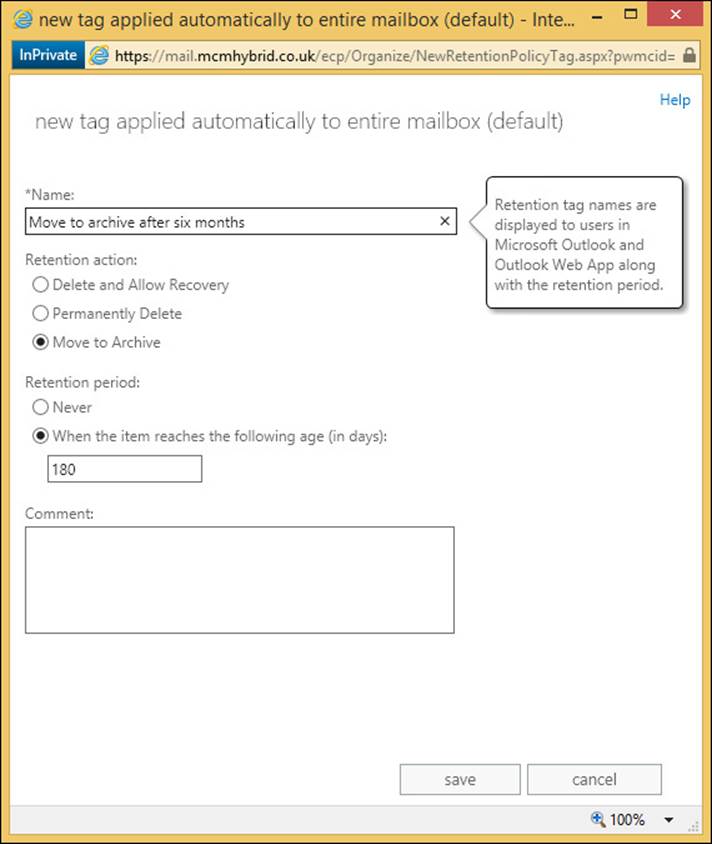
FIGURE 4-14 Creating an archiving retention tag
In Exchange Control Panel, click on the Compliance Management menu, and then click Retention Tags. From the new icon, choose the type of tag you want to create from the following list:
![]() Applied Automatically To Entire Mailbox (Default) [Type=All]
Applied Automatically To Entire Mailbox (Default) [Type=All]
![]() Applied Automatically To A Default Folder [Type= Calendar, Contacts, DeletedItems, Drafts, Inbox, JunkEmail, Journal, Notes, Outbox, SentItems, Tasks, ManagedCustomFolder, RssSubscriptions, SyncIssues, ConversationHistory, Personal, RecoverableItems, NonIpmRoot, LegacyArchiveJournals]
Applied Automatically To A Default Folder [Type= Calendar, Contacts, DeletedItems, Drafts, Inbox, JunkEmail, Journal, Notes, Outbox, SentItems, Tasks, ManagedCustomFolder, RssSubscriptions, SyncIssues, ConversationHistory, Personal, RecoverableItems, NonIpmRoot, LegacyArchiveJournals]
![]() Applied By Users To Items And Folders (Personal) [Type=Personal]
Applied By Users To Items And Folders (Personal) [Type=Personal]
Each of the dialog boxes for each of the above options are slightly different. For example, a default folder tag cannot be used for archiving, and personal tags come with the note that you need an Enterprise Client Access License, the Exchange Online Archiving License. The P2 Exchange Online plan includes the Exchange Online Archiving License, but the standard Exchange CAL for on-premises mailboxes does not cover this functionality.
Once the tag is created it can be added to a retention policy. If you made a default deletion tag, it can only be added to a new policy because each policy can only have one default deletion tag and one default archiving tag (or you remove the existing default tags and add your new one). You can add any number of personal tags as you require, though as they are for users to select from, don’t have too many because it will confuse the user interface and the user’s ability to select them sensibly.
To add a new retention policy, or a tag to an existing policy, go to the Retention Policies tab on ECP. Figure 4-15 shows the error when you try to add two or more default retention tags to the same retention policy.

FIGURE 4-15 Error on adding more than one default retention tag to a retention policy
Setting up on-premises archiving
Planning archive storage is covered in the next section, but once you have done that, you enable an on-premises archive for an on-premises mailbox with Enable-Mailbox <name> -Archive for random database distribution (a database in the site that you run the cmdlet in will be chosen), or Enable-Mailbox <name> -Archive -Database <db_name> to select a specific database.
To complete the task of creating an archive for a user using ECP you select the user, and click Enable, under In-Place Archive.
Planning storage for an archiving solution
Since the release of Exchange Server 2010 Service Pack 1, the database that you store the archive mailbox in has not needed to be the same database as the primary mailbox. Other than that, the database that stores archive mailboxes is just a mailbox database and has nothing different about it compared to any other mailbox database. Therefore, the following statements are all valid with regard to archive mailboxes:
![]() Archive mailboxes can be protected with Database Availability Groups (DAGs).
Archive mailboxes can be protected with Database Availability Groups (DAGs).
![]() Archive mailboxes can be stored on the same database as the mailbox.
Archive mailboxes can be stored on the same database as the mailbox.
![]() Archive mailboxes can be stored on a different database as the mailbox.
Archive mailboxes can be stored on a different database as the mailbox.
![]() The mailbox database and archive mailbox database can be on different servers within the same Exchange organization.
The mailbox database and archive mailbox database can be on different servers within the same Exchange organization.
What needs to be taken into consideration though is the impact on storage. Just like a mailbox database, the archive mailbox will grow, but how soon will depend upon the archive policies in place. If the rate of email arriving in a user’s mailbox is stable over time, it will mean that eventually the archive policy will be archiving the same amount of email that is arriving into the primary mailbox database. Therefore, it is more likely that the archive database will grow, and the primary database will stay the same size, or grow at a lower rate (given mail flow staying the same). This should be taken into consideration on database sizing, and therefore it is usually recommended to distribute archive mailboxes across the same databases as primary mailboxes to spread the load evenly, unless different storage profiles on hardware of DAG replication are required for the archive mailbox.
 Thought experiment: Planning an archive migration to Office 365
In this thought experiment, apply what you’ve learned about this objective. You can find answers to these questions in the “Answers” section at the end of this chapter.
As the School of Fine Art’s storage administrator, you want to investigate the requirements for setting up Exchange Online Archiving so that the large mailbox storage, which contains a fair share of old emails, can be moved to the cloud.
1. You currently have an Exchange Standard CAL and Enterprise CAL for each faculty member, and a standard CAL for each student. What different options could you evaluate that are already included with your Exchange Server license?
2. What do you need to put in place to integrate Exchange Server and Exchange Online Archive?
3. You decide to move your students’ email that is more than one semester old to the Exchange Online Archive. How will you achieve this?
Objective summary
![]() Archiving in Exchange Server requires an Enterprise CAL for on-premises archives, or an Exchange Online Archive license per user for an archive stored in Office 365.
Archiving in Exchange Server requires an Enterprise CAL for on-premises archives, or an Exchange Online Archive license per user for an archive stored in Office 365.
![]() The Exchange P1 and P2 plans in Office 365 contain the rights to do archives, but the P2 plan is an unlimited archive.
The Exchange P1 and P2 plans in Office 365 contain the rights to do archives, but the P2 plan is an unlimited archive.
![]() Cloud mailboxes can have an archive in Office 365, but not on-premises.
Cloud mailboxes can have an archive in Office 365, but not on-premises.
![]() On-premises mailboxes can have an archive on-premises or in the cloud.
On-premises mailboxes can have an archive on-premises or in the cloud.
![]() Hybrid mode and DirSync are prerequisites for archiving in Office 365 with on-premises mailboxes.
Hybrid mode and DirSync are prerequisites for archiving in Office 365 with on-premises mailboxes.
![]() Retention policies and retention tags with the MoveToArchive action are used to automate the moving of messages to the archive based on their original arrival date.
Retention policies and retention tags with the MoveToArchive action are used to automate the moving of messages to the archive based on their original arrival date.
Objective review
Answer the following questions to test your knowledge of the information in this objective. You can find the answers to these questions and explanations of why each answer choice is correct or incorrect in the “Answers” section at the end of this chapter.
1. Which of the following retention tag actions can place emails in the archive?
A. MoveToArchive
B. Archive
C. CopyToArchiveAndDeleteFromSource
D. All
2. What will the Exchange Management Shell cmdlet Enable-Mailbox <name> -RemoteArchive -ArchiveDomain tenant.mail.onmicrosoft.com do?
A. It will create an In-Place Archive on Office 365 for a mailbox in Office 365
B. It will create an In-Place Archive on Office 365 for a mailbox on-premises
C. It will create an In-Place Archive on-premises for a mailbox in Office 365
D. It will create an In-Place Archive on-premises for a mailbox on-premises
3. What is the default retention policy that is applied?
A. Default Archive Policy
B. Default Archive and Retention Policy
C. Default MRM Policy
Objective 4.2: Design and configure Data Loss Prevention (DLP) solutions
One of the new features in Exchange Server 2013 is the Data Loss Prevention (DLP) feature. This is a feature that examines the subject and body of messages to look for patterns and sequences of data that could be considered to be the sort of data that you would not want to send (or receive) by email. For example, an email containing a number of credit cards (or even one), or an email with multiple names and addresses on it. You wouldn’t want to send the first of these emails because it’s probably not encrypted, and you wouldn’t want to send the second email because it might be an accidental or even malicious privacy leak. For both examples, email is not the way to send this information.
Before Exchange Server 2013, this information inspection and then restriction of the message could be done with transport rules and regular expression (RegEx) filtering, but it is complex to write, and with a slight variation in the RegEx or in the data, it might get through.
In Exchange Server 2013, there is a new component known as the deep text extraction engine, and a new set of transport rule predicates that can react to the results of the text extraction engine. These predicates, or conditions, then have the option to fire an action to reject or require approval of the message, or do anything else a transport rule can do.
The DLP feature also comes with the ability to monitor, but not act upon, the findings of the deep text extraction engine, which is auditing rather than enforcing, as well as alerting the user in Outlook 2013 (or OWA after Service Pack 1). Creating DLP rules from templates, custom rules, and reporting are also facets of the feature.
This objective covers how to:
![]() Set up pre-built rules
Set up pre-built rules
![]() Set up custom rules
Set up custom rules
![]() Design a DLP solution to meet business requirements
Design a DLP solution to meet business requirements
![]() Set up custom policies
Set up custom policies
Setting up pre-built rules
There are almost fifty DLP templates that ship with Exchange Server 2013, and these will cover health, finance, and PII (personally identifiable information), as well as a handful of other scenarios specific to certain legal requirements and laws in different parts of the world. As these templates already exist, and just require enabling in Exchange, these are the best ways to get a start on the DLP feature set.
The templates are available in both Exchange Online and Exchange 2013 on-premises and are accessible from both ECP and PowerShell, but in this scenario ECP is much easier to use for the setting up and configuring of the DLP templates and resulting rules.
To create a new set of DLP rules (which is typically five new transport rules with a related DLP function), you navigate to Compliance Management, and then the Data Loss Prevention tab. On this screen you can customize the text shown in Outlook/OWA for the user when they add text to their emails that hits the DLP criteria (policy tips). If you are using Exchange Server 2013 Service Pack 1 or later you can upload a standard document format and have Exchange look for the sending of the text of that document (the document fingerprints feature). Finally, on this screen you will see a list of the DLP policies that are configured. If you are using Exchange Online (as shown in Figure 4-16) it will give you some on screen figures and reports for DLP matches and false positives.
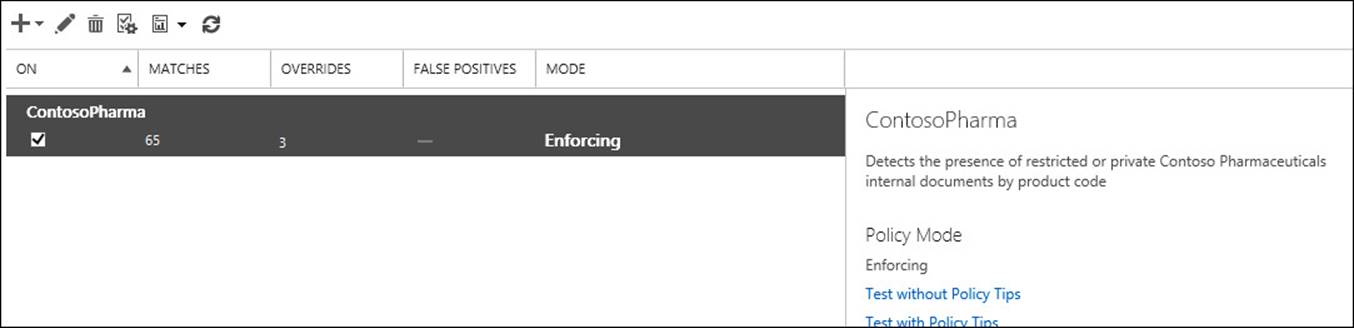
FIGURE 4-16 DLP policies and reporting as shown in Exchange Online
The example shown in Figure 4-16 is a custom example, which you will look at later because by default there are no DLP policies in the list.
To add a new DLP policy, and the transport rules that comprise that policy, you click the + icon, and choose New DLP Policy From Template. From here you can pick from the approximately 50 templates to choose from. Figure 4-17 shows you the setting up of a template to find French financial data. The default template allows users to override the rules as well as warning the user about the content of the message if between 1 and 10 matches are found in an email. The default rule also blocks the message if 10 or more matches are discovered in a single email, though of course the user can override this. These actions and count values can all be changed.
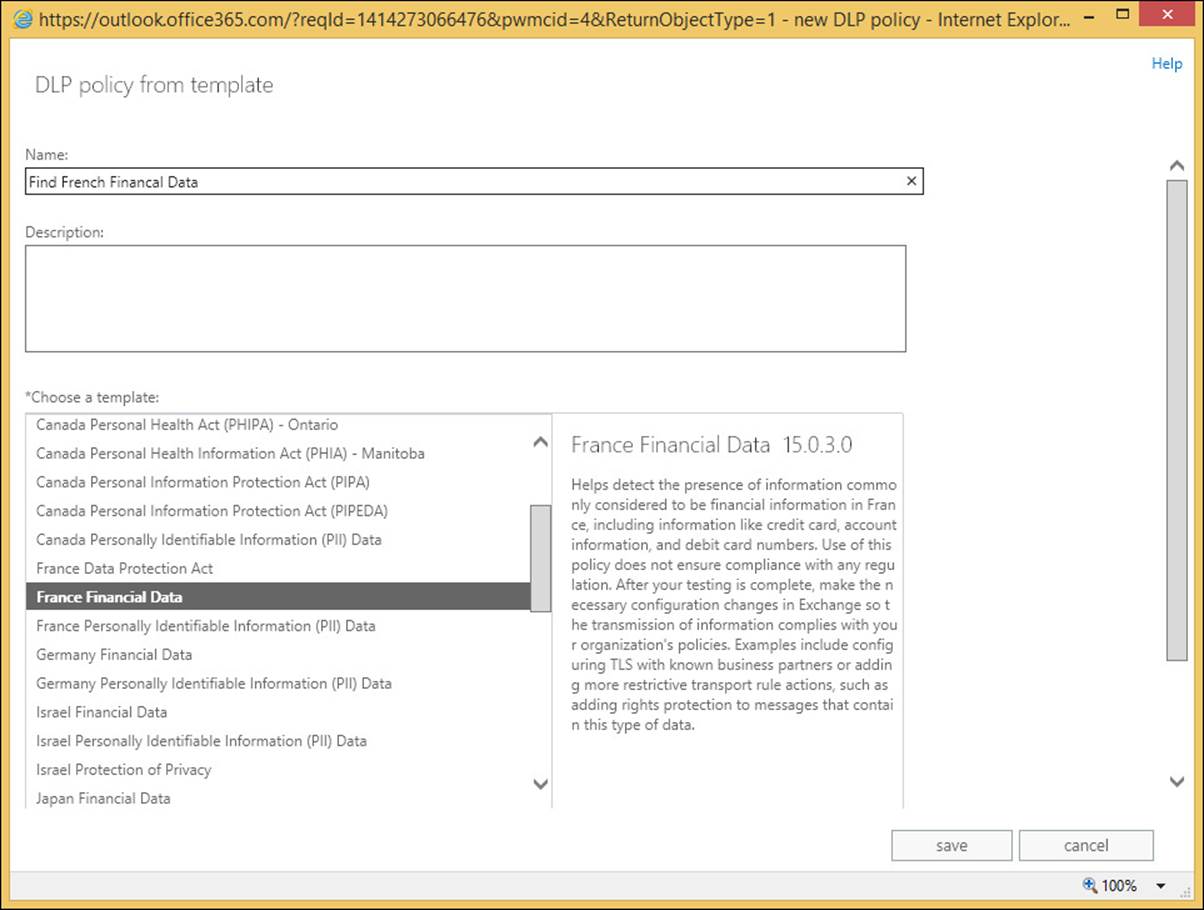
FIGURE 4-17 Creating a DLP policy from a template
In the example in Figure 4-17, the description reads as follows (this will give you a good idea of the purpose of the template):
Helps detect the presence of information commonly considered to be financial information in France, including information like credit card, account information, and debit card numbers. Use of this policy does not ensure compliance with any regulation. After your testing is complete, make the necessary configuration changes in Exchange so the transmission of information complies with your organization’s policies. Examples include configuring TLS with known business partners or adding more restrictive transport rule actions, such as adding rights protection to messages that contain this type of data.
When you have selected the correct template, and have given the policy a name, you click Save, and then wait while the policy and related transport rules for the DLP template are created.
Upon creation of the policy, the first thing you will see is that the policy starts in a mode called Testing Without Policy Tips. A Policy Tip is a notification to a user of Outlook 2013 (via Exchange Web Services) that their email contains content that might be against policy. These tips are also present in OWA from Service Pack 1 and later. So note that by default there is no notification to the user. The “testing” part of this mode indicates that the policy is being tested and that if violations of the rules are found, they will not be enforced. Thus, the policy is running but no user will be affected by it. Administrators can use this state to audit the impact of this policy and see if it has any matches. If so, to whom, and therefore the sort of business impact this will generate if Policy Tips or enforcement of the policy was enabled.
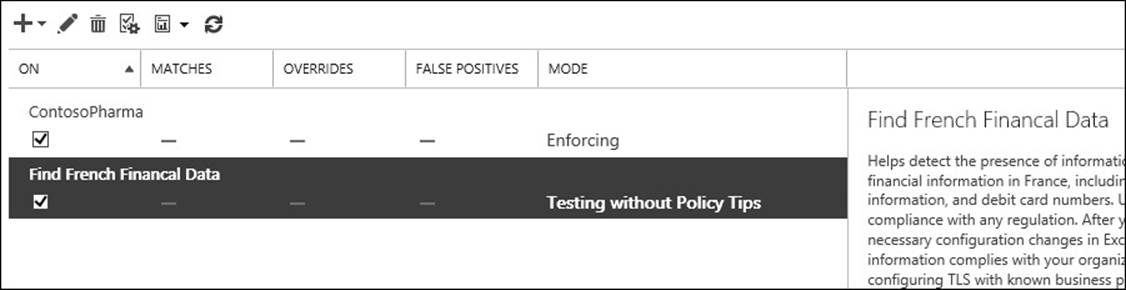
FIGURE 4-18 A newly added policy in mode
Before you enforce the policy, it is worth making it clear here that the policy is now working and scanning all emails. Because the policy is written to the Active Directory for storage, in Exchange on-premises you will need to wait for replication to complete around your entire Exchange organization before all Exchange Servers will pick up this change from the Active Directory and start examining emails. Just because you are not yet blocking content does not mean the policy is not being run against current messages being sent.
Before you enforce a policy, you will look at what the parts are so that we can customize it if your business requirements mandate it. In Exchange Control Panel, change to the Mail Flow section, and the Rules tab. Here you will see one or more transport rules for each policy. Typically, you will see five transport rules for each policy as described above. Each rule here can be customized and enabled or disabled. Back on the Compliance Management/Data Loss Prevention page, you can enable all of the rules in the policy (or disable them) in one go rather than enabling or disabling on a per transport rule basis. The individual transport rules for the Find French Financial Data policy created above can be found in Figure 4-19.
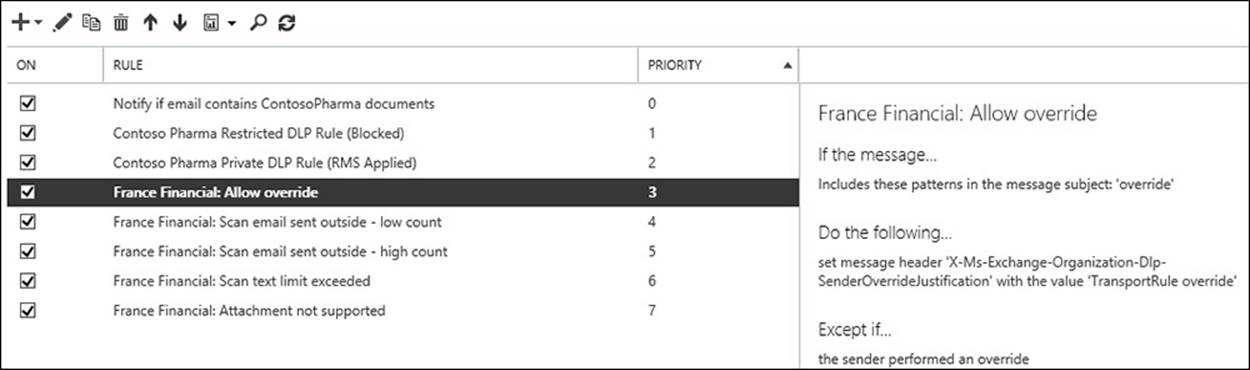
FIGURE 4-19 The Transport Rules page with the DLP policy rules shown
In Figure 4-19, the transport rules #3 to #7 are the five rules created by the new DLP policy. Any other transport rules that were already configured will have a higher priority number and remain in place.
You can see from Figure 4-19 that the transport rules look for the following:
1. Has the user overridden the fact that a DLP hit was found? This is a scenario that can occur once Testing With Policy Tips or Enforcing mode are enabled. In Outlook or OWA, the user is alerted that they are in violation of a DLP policy by way of a Policy Tip, or in any other email client by way of an NDR message back when they sent the message that contained the data that was to be blocked. If the user is allowed to override the decision in the third rule (the High Count rule), this first rule allows for that, and allows the message to skip further DLP processing by way of adding a message header.
2. Notify the user that DLP violations were found, but less than 10 of them (Low Count), and allow the user to send the message.
3. Notify the user that DLP violations were found, but 10 or more of them were found (High Count), and block the user from sending the message, but allow the user to override this decision. The word “override” is added to the subject in any email client, or the user is allowed to select the override option if they are using Outlook 2013/OWA.
4. The fourth rule is what to do if the message is too large. This is important as any content in violation of the DLP rules might be at the bottom of the large email and thus not scanned.
5. The final rule is what to do if the message contains attachments that Exchange Server cannot scan. This is important because any content in violation of the DLP rules might be in the attachment that Exchange Server does not have an indexing filter for, and thus not scanned.
Any of these rules can be modified, such as not allowing overrides (in which case the first transport rule for the policy can be deleted), or changing the count values, or encrypting with Rights Management Services (RMS), or moderating emails that are too large or with attachments that cannot be scanned. Figure 4-20 shows changing the last rule in the policy to have the message moderated by the user’s manager in the Active Directory if it cannot be indexed.

FIGURE 4-20 Enabling moderation on the Attachment Not Supported DLP policy rule
Setting up custom rules
Because DLP policies are just a collection of rules that act on the results of the deep text extraction engine, it is possible to modify the existing rules and create new ones.
If this is the case, what then is the DLP Policy? The DLP Policy is a collection of the transport rules that you work on, enable, and disable as a single unit. Therefore, if you created a policy for US financial data, there would be five transport rules that are not being enforced (testing without Policy Tips). You could change each of the five rules to either of the two enforcing options (testing with Policy Tips, or enforced) individually, but it would be done one at a time and you could end up configuring one differently from the others. Therefore, the place to enable a DLP Policy is in the Data Loss Prevention area of ECP, as all the related rules would be enabled together. Also, the best place to modify individual DLP rules, and add or remove rules, is also via the compliance management area of ECP because then you add or remove the rules from the policy.
To add or remove a rule, navigate to Exchange Control Panel, Compliance Management, Data Loss Prevention, highlight the policy, and click the Edit icon. The resulting dialog box is shown in Figure 4-21.
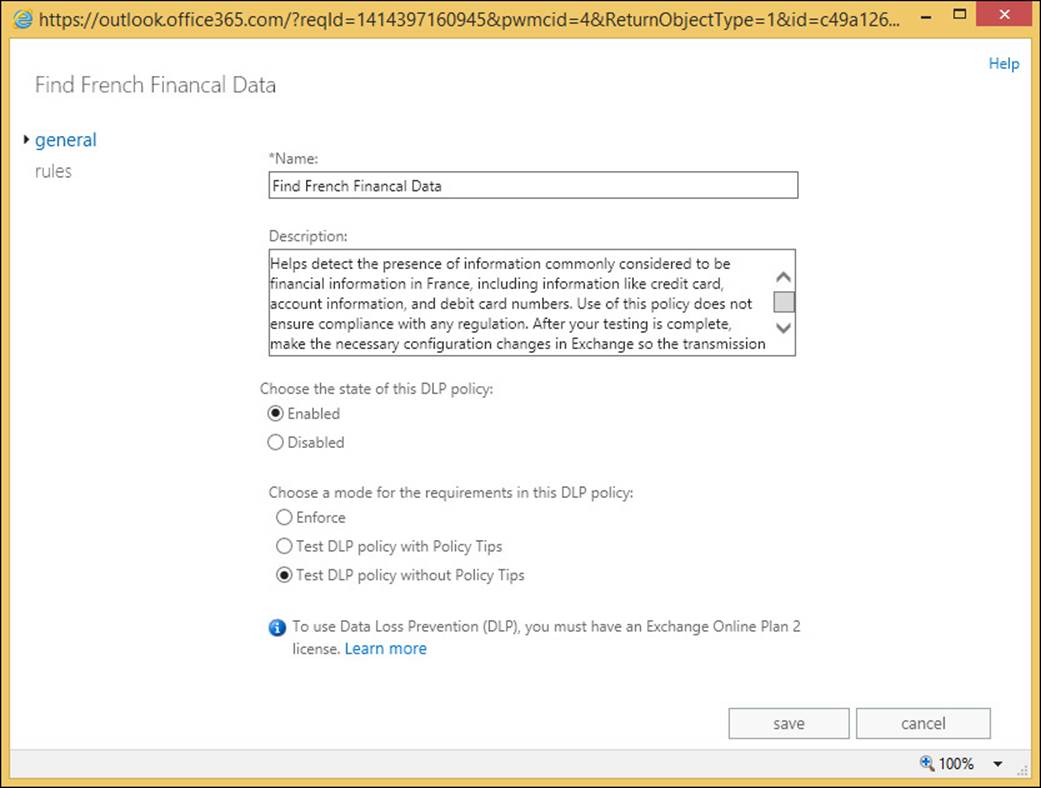
FIGURE 4-21 The DLP Policy editing dialog box
From the General tab you can change the policy to Enforce or Test DLP Policy With Policy Tips. Enforcing the policy will result in all of the rules in the policy being set to this level. From this point onward, any email that is found to match the policy will be rejected if the rule action is Notify The Sender With A Policy Tip, and the setting for this action includes Block The Message. Typically, on the built-in DLP templates, this action and property is found on the High Count rule.
If the policy is changed to Test DLP Policy With Policy Tips, users in Outlook 2013 and OWA (with Exchange 2013 SP1 or later) will be told their email contains DLP content, but they will not be blocked from sending it. This enforcement level can be looked at as a user education feature.
Note: Getting DLP working in Outlook
The exam objective domain does not cover how to get DLP working in Outlook, and so it is not covered in detail in this book. In brief, Outlook learns about DLP Policies via Exchange Web Services. So AutoDiscover needs to be working and it will download policy updates once every 24 hours, and only on opening a new email in Outlook. Therefore, changes to the policy on the server might not appear on the client immediately. To force the change to the client, look up the PolicyNudges registry key online or in KB2823261.
On the Rules tab of the Policy Edit dialog box (Figure 4-22) you can edit the DLP rules as well as remove them, or add new ones. Though the resulting dialog box that appears for a new rule or an edit looks the same as the dialog box for transport rules in general, it is keeping the relationship between the rule and the DLP Policy so that actions that are policy wide will affect this rule. Create the rule in the transport rules area unrelated from the policy, and it will have the same effects and actions, but will not appear as a rule related to the policy, and will not be managed by the policy (and if running Exchange Online, will not show additional reporting for the policy on matches, overrides, and false positives).
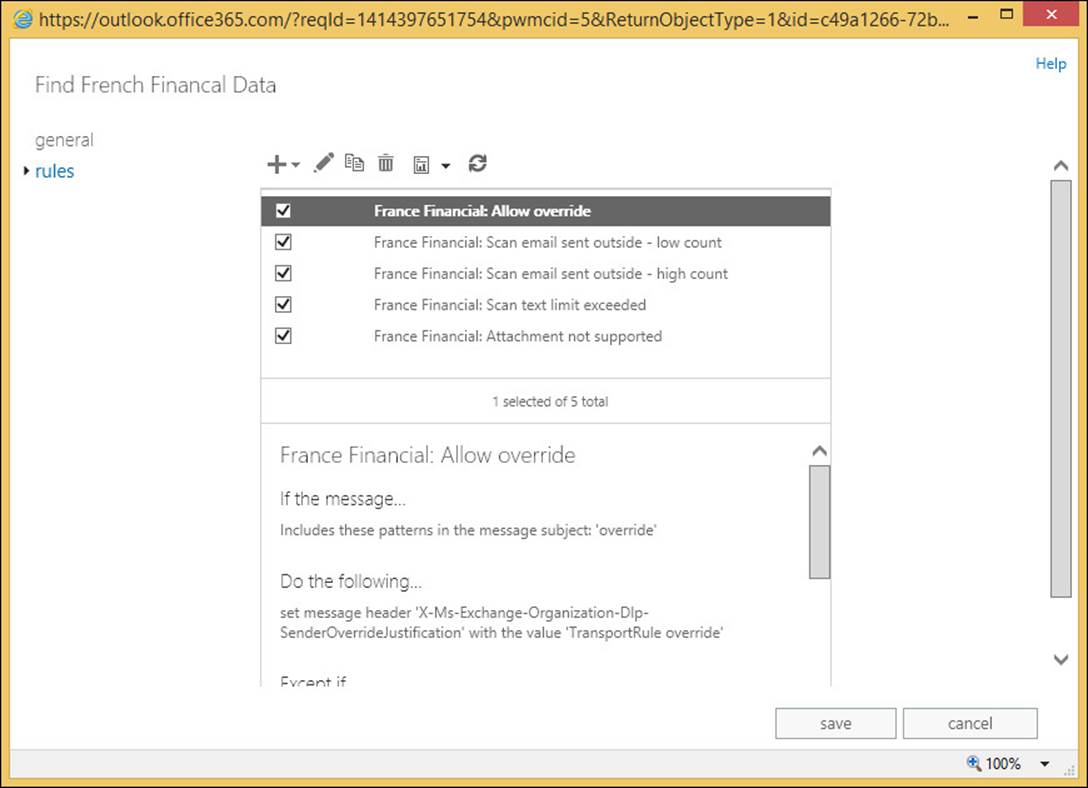
FIGURE 4-22 Editing DLP rules via the DLP Policy dialog box
For example, to remove the override function from the DLP Policy, you would disable or remove the first rule in the set, and then edit the High Count rule to Block The Message, but not to give the option to allow overrides. You would change the NDR text as well because that says that you can override the message, but if the override rule (the first one in the policy typically) is disabled, then you cannot override the rule.
Another common modification to DLP rules is to change the count value. The default rule in the template of a low count rule is set to fire the rule if less than 10 matches are found in an individual email. A high count rule exceeds 10 matches. Figure 4-23 shows the count value being modified. This can be reached by editing the high or low count rule, and then clicking The Message Contains Sensitive Information property in the rule.
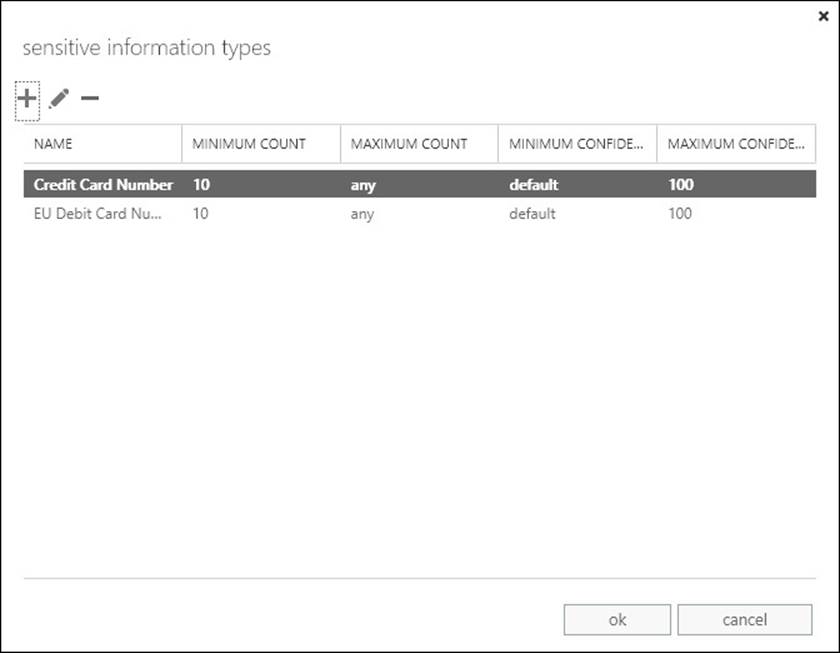
FIGURE 4-23 Modifying the count values for a DLP rule
As well as count values, you can change the confidence level. If the confidence level is reduced, more emails will be found meeting the policy, but more false positives will be found as well. Confidence is the DLP engines ability to say if a match is really a match. For example the number 4111-1111-1111-1111 in an email may look like a credit card number, but if the word “expiry” was found near it as well as the brand name of a credit card company, then the server’s DLP engine would have a higher confidence that the match was found. The rule will only fire if the confidence level determined by the DLP engine that the text was a match exceeds the confidence level of the rule. The default confidence level takes the confidence coded into the DLP engine. If the DLP engine thinks something is a match then the rule will fire.
Designing a DLP solution to meet business requirements
To design a DLP solution for your business, you need to know what your business requirements are with regards to sending and receiving information, and to determine what information, if sent, would be considered a potential loss of data. For some businesses, this data loss could be an act that would be illegal, or face considerable financial penalties, or loss of customer confidence. A search on the Internet for loss of confidence keywords and the names of some well-known retailers in your country/region that this has happened to, will show you just what we are talking about.
As well as deciding what templates to use to make up your policy, you also need to consider the enforcement level. You should always start with Testing Without Policy Tips to get an idea if enforcing the policy will actually block any data. You should also consider the languages used by your users, and then to customize the Policy Tips that will be displayed. The Outlook client will display a language appropriate tip, if one is available.
Finally, you need to consider the actions to take for the rules that you are enforcing. The default actions in the template of warning via Policy Tips for less than 10 matches, and blocking for more than 10, might not be appropriate.
In Exchange Server 2013 Service Pack 1 and later, as well as in Exchange Online, there is a DLP action called Generate Incident Report And Send It To. This will generate an email with the information that the rule found, and why the rule fired on this email, and send it to the mailbox of choice. This is a good way to audit DLP incidents on-premises (where there is no reporting without installing third-party software or trawling the message tracking logs). For an incident report you can also choose what to include in the report.
Setting up custom policies
As well as setting up a DLP Policy via the templates, you can add DLP actions to a standard transport rule. Table 4-1 details the different transport rule conditions, and Table 4-2 details the actions that are related to DLP. In the Apply This Rule If column, the PowerShell cmdlet is listed for reference as well.
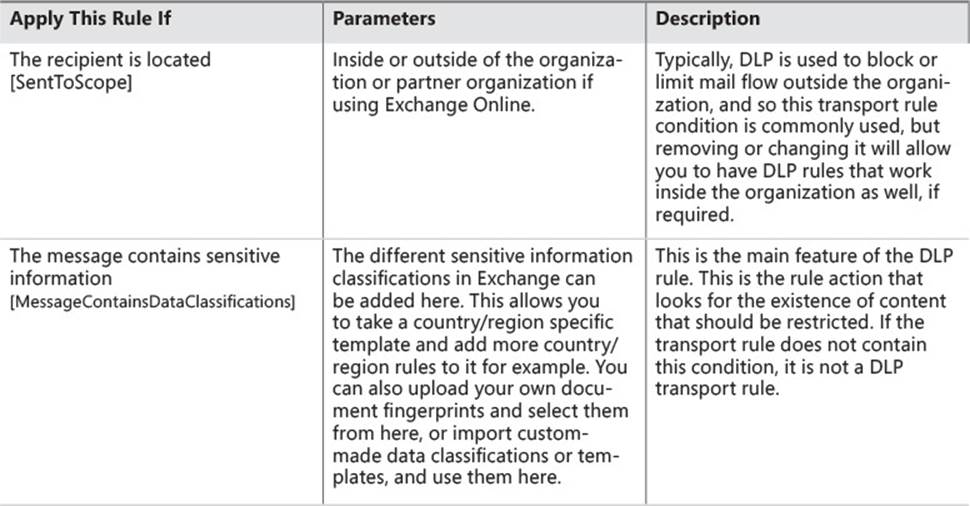
TABLE 4-1 Transport rule conditions for Data Loss Prevention
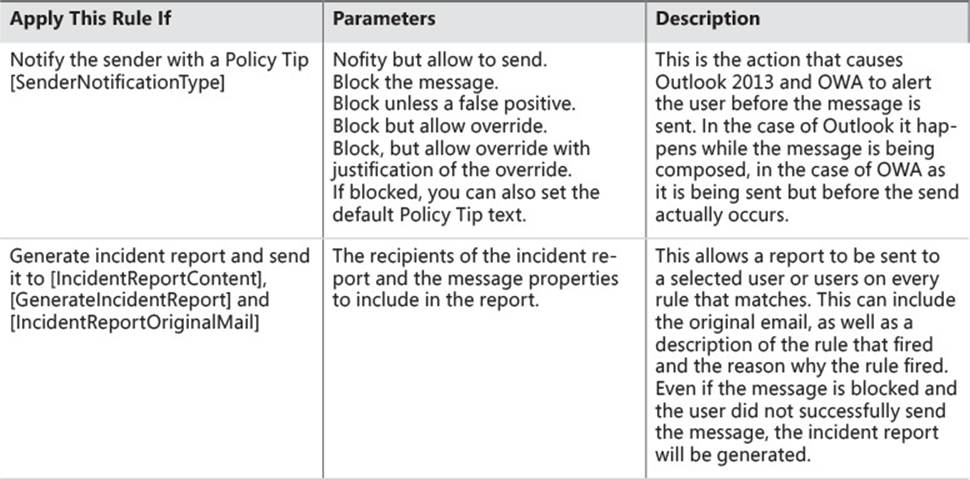
TABLE 4-2 Transport rule actions for Data Loss Prevention
 Exam Tip
As settings can be changed in Exchange Server and Exchange Online using both Exchange Control Panel and Exchange Management Shell (on-premises) or Remote PowerShell (Exchange Online), it is important to be aware of the cmdlets used to configure settings, as well as the way to complete the task in ECP.
 Thought experiment: Blocking credit cards in email
In this thought experiment, apply what you’ve learned about this objective. You can find answers to these questions in the “Answers” section at the end of this chapter.
You manage the Exchange Online service for Margie’s Travel, and have previously enabled a financial DLP Policy suitable for your country/region. As per recommendations, you enabled the policy, but left it in Test DLP Policy Without Policy Tips so that it was auditing matches to the policy without notifying users. After a few weeks you noticed a trend that showed a number of emails per day contained credit card numbers being sent from your organization to the Internet.
1. How do you enable the DLP rules to start to notify users that their actions are not appropriate for the content that they are sending?
2. What considerations do you need to take before you enable a full block of sending emails that match policy?
3. How would you enable a pilot or test phase for the impact of this data on your business before enabling it for all users?
Objective summary
![]() The Exchange Server Data Loss Prevention (DLP) feature uses text analysis and transport rules to audit or enforce restrictions to sending email.
The Exchange Server Data Loss Prevention (DLP) feature uses text analysis and transport rules to audit or enforce restrictions to sending email.
![]() Because it is based on transport rules, any rule condition, action, or exception can be utilized in addition to the DLP conditions and actions. For example, you could moderate messages rather than block them.
Because it is based on transport rules, any rule condition, action, or exception can be utilized in addition to the DLP conditions and actions. For example, you could moderate messages rather than block them.
![]() DLP rules should be modified via the DLP Policy dialog box, and not via Transport Rules directly.
DLP rules should be modified via the DLP Policy dialog box, and not via Transport Rules directly.
![]() Incident reports became available with all of the headers and options in Exchange 2013 Service Pack 1.
Incident reports became available with all of the headers and options in Exchange 2013 Service Pack 1.
![]() Use the default template settings for testing DLP, but for real world usage, customize the rules, actions, and properties to suit your business requirements.
Use the default template settings for testing DLP, but for real world usage, customize the rules, actions, and properties to suit your business requirements.
Objective review
Answer the following questions to test your knowledge of the information in this objective. You can find the answers to these questions and explanations of why each answer choice is correct or incorrect in the “Answers” section at the end of this chapter.
1. Which transport rule condition is required for a DLP rule?
A. HasClassification
B. SentToScope
C. Description
D. MessageContainsDataClassifications
E. UseLegacyRegex
2. Why should you modify DLP rules via the compliance management pages in ECP, and not the mail flow pages?
A. Changing a rule in the mail flow pages will not take effect
B. Changing a rule in the mail flow pages will take longer and might result in simple errors, such as missing a setting on a rule
Objective 4.3: Configure and administer Message Records Management (MRM)
In an earlier section of this chapter, you looked at archiving policies and described them as retention policies with a specific action. In this section, you will look at the other actions that make up retention policies, and how to create them and apply them to other users.
This objective covers how to:
![]() Design retention policies
Design retention policies
![]() Configure retention policies
Configure retention policies
![]() Create and configure custom tags
Create and configure custom tags
![]() Assign policies to users
Assign policies to users
![]() Configure the Managed Folder Assistant
Configure the Managed Folder Assistant
![]() Remove and delete tags
Remove and delete tags
Designing retention policies
Retention policies are used to ensure that data is kept only for a certain length of time. To ensure that data is held regardless of a user’s action to delete the data, you need to look at the legal/litigation hold or In-Place Hold features of Exchange Server, and these are covered in the next objective of this chapter.
When a retention policy is applied to a mailbox, all messages are affected with the settings of the policy. When the message is older than the duration set by the policy, the action on the message takes effect. To achieve this, the policy is made up of the following:
![]() Retention policy This is a collection of retention tags. There are two retention polices in Exchange 2013 by default, the Default MRM Policy that can be applied to user’s mailboxes, and the ArbitrationMailbox policy that is only visible in PowerShell and used to keep the content of arbitration mailboxes manageable.
Retention policy This is a collection of retention tags. There are two retention polices in Exchange 2013 by default, the Default MRM Policy that can be applied to user’s mailboxes, and the ArbitrationMailbox policy that is only visible in PowerShell and used to keep the content of arbitration mailboxes manageable.
![]() Retention tag These are the parts of retention policies that control the duration of the retention. To make a retention policy, you need to have the retention tags made first.
Retention tag These are the parts of retention policies that control the duration of the retention. To make a retention policy, you need to have the retention tags made first.
To design a retention policy, you need to make a retention tag for each duration, as well as a folder and action that you want to manage data for. You can have as many retention policies as you need, and you can place a retention tag into multiple retention policies, but a tag can only affect a user or be selected by a user, if it is in the policy that is applied to the user’s mailbox.
Note: The effect of removing retention tags from the policy
In the event that a user actively tags messages with a retention tag, and then that tag is removed from the policy, the messages are still affected by this retention tag but no more messages can be tagged with that retention tag.
It is worth at this point discussing the terminology used here. A retention tag is a setting that controls how long content is held for before being deleted or archived. A tag can be a default tag (Type=All) and apply to all items in a mailbox, or apply to a specific folder, or be Type=Personal, which is available for the user to use themselves, and is not applied by default. In comparison, a retention policy (and not a retention tag) is a collection of tags, and the collection of tags that make the policy can be applied to a mailbox. Therefore, the Default MRM Policy, which is applied to mailboxes when the archive is enabled, is just a collection of tags, and it is the tags that control the archiving or deleting.
To create a retention tag, you need to decide the scope of the tag. A tag can apply to all items in a mailbox, all items in a folder, or any item that a user wants it to apply to. The more specific tags take effect over the more general tags. That is, if a mailbox retention tag (of Type=All) is applied to a policy to delete email after five years, and a user applies a personal tag (Type=Personal) specifically to an individual message that will never delete that message, this message will not be deleted while the tag is applied to it, even if the message arrived in the mailbox over five years ago.
The retention tag that applies to all of the items in a mailbox is known as a default tag, and only one default tag can be added to a retention policy. Therefore, the number of different default durations you need for your organization will typically determine the number of retention policies that you create.
A retention tag that applies to a given folder can be added to a retention policy in addition to the one default tag added, but you can only add one tag for each folder. That means if you want a policy to delete the Lync Conversation History folder after six months, you could create a default folder tag for the Conversation History folder for 180 days, but you could not add any more retention tags for the same folder to the same retention policy. Figure 4-24 shows the error you get if you add two folder tags for the same folder to the same policy.
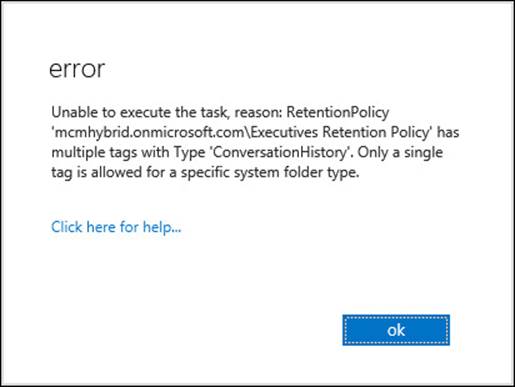
FIGURE 4-24 Adding two retention tags for the same folder to a policy
The final retention tag that you can have is the personal tag. This requires an Exchange Enterprise CAL or Exchange Online P2 plan to be used because it can apply to any message anywhere, and not just those in standard folders. Users apply personal tags when they need to so that they can override the default tags. If there are no personal tags in a policy (for example if the user is not licensed to have personal tags, or if overriding the policy is not allowed), the user cannot apply their own tags, and therefore are subject to the retention policy of the organization as applied to their mailbox.
For each tag you have an action that can be applied. The Move To Archive action was covered earlier in this book, and this section covers the rest. These are Delete, Allow Recovery (DeleteAndAllowRecovery in the shell), and Permanently Delete (PermanentlyDelete in the shell). In Exchange Management Shell you will also see the following values for RetentionAction: MoveToDeletedItems, MoveToFolder, MarkAsPastRetentionLimit, and MoveToArchive. MarkAsPastRetentionLimit cannot be set in ECP, but will cross out messages in Outlook 2007 and label them as expired in later versions of Outlook. The MarkAsPastRetentionLimit property will not delete or archive them.
Configuring retention policies
The exam objective domain discusses creating policies before creating tags, but this is not the way that it works because a retention policy is just a collection of tags. But as this book follows the exam objective domain, it is written in this order, though you would create the tags first.
Once you have designed your policy, preferably on paper or a whiteboard because creating it on the server and applying it could result in unexpected message loss, you can proceed with the creation of the retention tags, and then the policy. You will probably create one policy for the overall default retention period that you need (or you would customize the Default MRM Policy), and then additional policies for every group of mailboxes that the default policy is not suitable for. The only value you set for a retention policy is a name, and this is displayed to the Exchange Administrator only. The remaining settings are adding the retention tags to this policy. Figure 4-25 shows a retention policy that will ultimately be applied to the executive mailboxes being created.
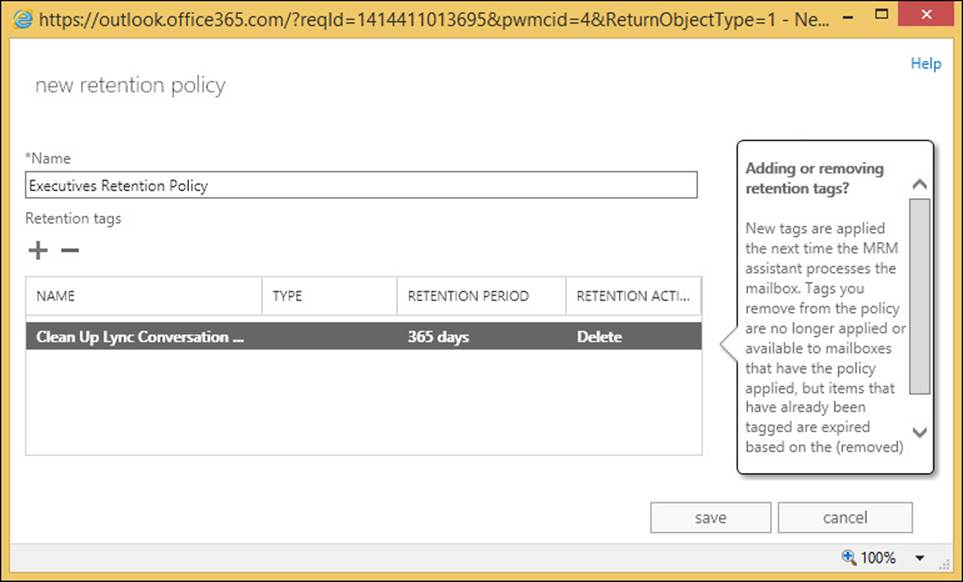
FIGURE 4-25 Creating a new retention policy
Creating and configuring custom tags
The majority of the work in creating a retention policy goes into the retention tag creation process. You only really need to create one default tag that applies to all items in the mailbox. All the other retention tags are additional to this default policy. Typically, Exchange administrators will create a retention policy tag for the deleted items and junk email folders, as well as sent items. For companies with more complex rules of retention, further folders are added to the policy. Remember that if the default policy tag is the same as any folder policy in terms of age and action, a specific folder policy tag is not required.
Finally, you would create the personal tags if you have the licenses to do this, and the business need to allow users to override administrator defaults.
Previously this chapter discussed the Type setting for the policy tag, and that we can only have one of the same type in a given retention policy, but if you are creating more than one policy, you might have more than one retention tag of the same type. Retention tags can be used in more than one policy. For example, imagine a scenario where you have two policies: general staff and executive staff. The design of the system calls for a seven-year retention period, but you decide that only executive staff can have the option to override this. Therefore, you would need two retention policies, but the mailbox default retention tag of PermanentlyDelete at 2557 days can be applied to both policies. The executive policy would then get extra personal tags added.
If you add retention tags to a policy that deletes content, and you allow personal tags, you should consider whether or not you have a retention tag of type personal that has no action or duration (see Figure 4-26). Users can set this tag on emails that they know they need to keep beyond the default time and action of the folder they are located in. By default there is a personal tag already created in Exchange Server called Never Delete, which covers this exact scenario.
Note: Tagging messages in a tagged folder
When a message is tagged with a retention tag, it overrides the settings of the folder it resides in. You need to remove the tag from the message (or apply a different tag) to change the action on the message.
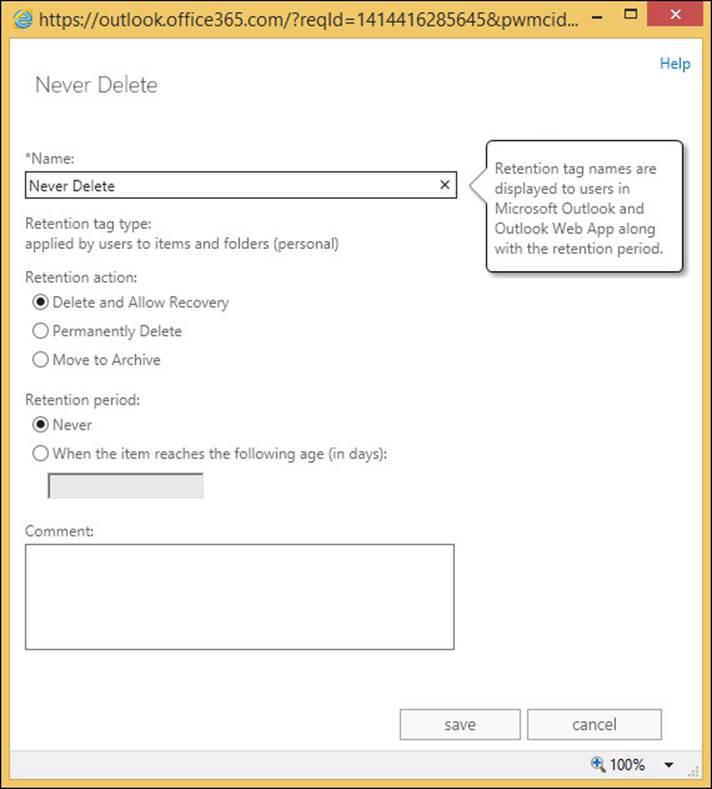
FIGURE 4-26 The Never Delete personal retention tag
The Delete And Allow Recovery tag will move messages into the Recovery Deleted Items folder. This is the same action as the user performs when they empty the Deleted Items folder. If the system is configured to allow the recovery of deleted items (and typically this is set to 14 days per database), the user has a second chance to recover these items. Note that items that this retention policy applies to, does not need to be in the Deleted Items folder to be deleted. The item will go from whatever folder it is in, to the Recover Deleted Items folder directly.
The Permanently Delete tag action will purge the message from the mailbox, and so it cannot be recovered. Therefore, if you are testing this tag out and you apply a six-month PermanentlyDelete tag to a policy as the mailbox default, any item older than this period of time will be purged from the mailbox. Use this tag with care.
Typically, the time of the action of the retention policy is based on when the item arrived in the mailbox because most items in your mailbox arrived there as an inbound email. For items such as calendar items, they are based on the date the item was created.
The default mailbox tag will apply to the Calendar folder (and calendar and tasks items in other folders) by default. So if you wish to maintain a calendar or tasks folder for a different duration than the mailbox default, you need to create and add to the retention policy a folder policy for the calendar and tasks folders.
Exam Tip
Know what you can add to a retention policy. Know that you can add one mailbox retention tag that deletes messages (or deletes and allows recovery) and one default that allows archiving. Understand that if you have added both to a policy, the archive tag should have a lower age limit than the deletion tag, otherwise the message will be deleted on that number of days since creation/arrival in mailbox, and therefore cannot be archived to the In-Place Archive on a later number of days because it has already been deleted.
Assigning policies to users
Once you have the retention tags created and the correct tags applied to your policies, you can assign polices to users. Take care when doing this because unrecoverable changes to the mailbox could occur with regards to the removal of messages and other data.
You can apply a retention policy to a mailbox in two ways. The first way is via the Exchange Control Panel, and the second is via PowerShell. Let’s look at both.
To set a single mailbox to use a retention policy in ECP, select the mailbox on the recipient’s page, and click the Edit icon. From the dialog box, select the Mailbox Features page, and then apply a retention policy to the mailbox. This is shown in Figure 4-27.
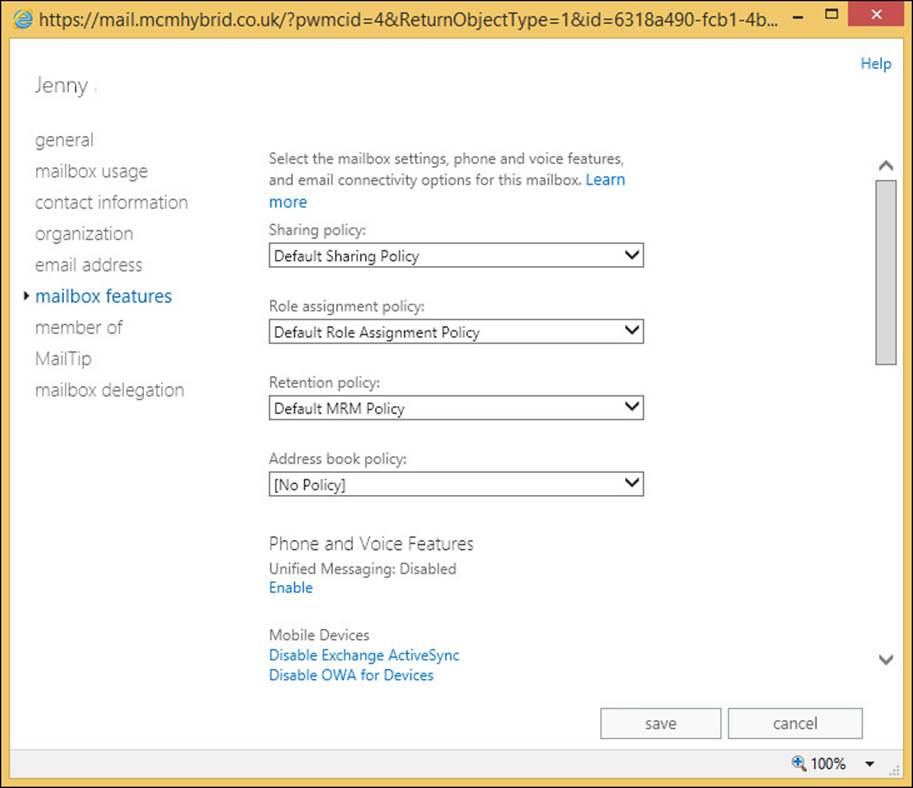
FIGURE 4-27 Applying a retention policy to a mailbox in Exchange Control Panel
To add a policy to one or more users in PowerShell, start Exchange Management Shell for on-premises mailboxes, or Remote PowerShell connected to Exchange Online for mailboxes in Office 365, and use Set-Mailbox <name> -RetentionPolicy <PolicyName> to do a single mailbox. Use any PowerShell query to return more than one mailbox, and pipe that into the Set-Mailbox -RetentionPolicy <PolicyName> cmdlet.
One retention policy is the default retention policy, and by default this is the Default MRM Policy. This is applied automatically to all Exchange Online mailboxes on creation, and to all on-premises mailboxes when an archive is assigned to them. You can change this default retention policy using Set-RetentionPolicy <PolicyName> -IsDefault $true.
Configuring the Managed Folder Assistant
Once a user is assigned a policy (or they get an archive) then the Managed Folder Assistant will begin to process the messages in their mailboxes. This processing will happen once a day, and never more frequently. At the time of processing, each message is evaluated against the current policy of the mailbox, or any folder policy or personal policy on the item. Messages that are ready for archiving are moved to the In-Place Archive (if one exists), and messages that are ready to be deleted or purged based on their creation or arrival dates, are deleted or moved to the recover deleted items folder.
Therefore, you do not need to schedule the Managed Folder Assistant, nor start it manually, as was needed in Exchange 2010. You can use the Start-ManagedFolderAssistant against selected mailboxes to add the mailbox to the processing list for the assistant rather than waiting for it to be picked up by the assistant automatically. This is ideal for testing scenarios, but should not be needed for mailboxes in a normal working environment, unless you want to force the assistant to reprocess a mailbox because the wrong policy was applied!
The default policy in Exchange Online is the Default MRM Policy. This policy contains only a two-year archive tag, and some personal tags, as well as a 30-day deleted items folder tag. Therefore, although the mailboxes in Exchange Online get the default retention policy automatically, the only immediate impact is that the deleted items folder is a 30-day folder by default. Therefore, take caution at moving users to the cloud who use their deleted items folder for archiving content.
Figure 4-28 shows the notice at the top of any email that was in the Deleted Items folder after your mailbox was moved to Office 365 (unless you set a different DeletedItems folder policy, or applied a different retention policy to the mailbox).
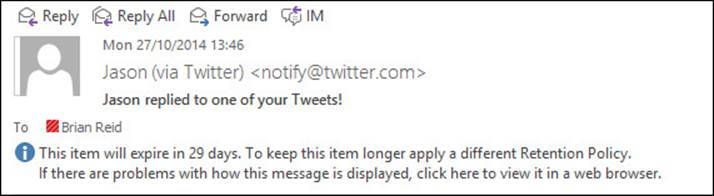
FIGURE 4-28 The headers of an Exchange Online message in Outlook when the message is in Deleted Items
The Managed Folder Assistant runs once every day and will check all mailboxes automatically. This can be changed using Set-MailboxServer and the ManagedFolderWorkCycle property. By default it is daily, and so all mailboxes should get processed once a day and will get added to the processing list within the day that they have a retention policy applied or updated.
You can use the following to report on the ManagedFolderWorkCycle setting for all of your mailbox servers in your organization. You cannot view or change this setting in Exchange Online.
Get-MailboxServer | Format-Table Name,ManagedFolderWorkCycle* -Auto
Removing and deleting tags
The tags that are available to users are controlled by what is in the policy that is applied to the user’s mailbox. As an Exchange administrator, you have two options to control tags after a policy has been applied. You can either change the tags in the user’s policy, or apply a new policy. Both options will result in a new set of tags being available that are different than the earlier set. There could be some overlap if some tags are left in the existing policy, or if the newly assigned policy has some of the tags that where in the old policy. In the case where the tag remains in the policy and therefore is available to the user, it will still affect the user’s content as it did before, and if it is a personal tag, the user can still assign it to their content.
If users have the ability to apply personal tags to their content, they have ultimate control over the retention settings on content. If you remove a personal tag from a user’s policy, that user is not able to apply that tag any more, but the content that is already tagged with the now unavailable tag remains with that tag until it has a new tag assigned. Also, because the tag has been removed from the policy, but is still stored in the Active Directory, the Managed Folder Assistant knows what the tag’s properties are and will process the message based on this information.
If a tag is deleted from the Active Directory, as well as being removed from all of the policies it was allocated to, the Managed Folder Assistant now does not have information regarding what the tag should do, and so will actively remove that tag from the mailbox items during the processing cycle. This is considerably more resource intensive than just removing a tag from a policy because removing a tag does not actually affect items.
Finally, for removing and deleting tags, there is a scenario to consider where you do not remove or delete the tag, but you move the item from folder to folder, where sometimes these folders are tagged or where the items themselves are tagged. There are three simple rules for retention tags when items are moved:
![]() If a mailbox item moved from one folder to another, it inherits any tags applied to the folder into which it’s moved.
If a mailbox item moved from one folder to another, it inherits any tags applied to the folder into which it’s moved.
![]() If an item is moved to a folder that doesn’t have a tag assigned, the default policy tag is applied to it.
If an item is moved to a folder that doesn’t have a tag assigned, the default policy tag is applied to it.
![]() If the item has a tag explicitly assigned to it, the tag always takes precedence over any folder-level tags, or the default tag.
If the item has a tag explicitly assigned to it, the tag always takes precedence over any folder-level tags, or the default tag.
A good example of this last example exists in Exchange Online. If an item is deleted it goes into the deleted items folder, where it gains the retention tag applied to Deleted Items from the default policy. If the item is then moved back into another folder it will keep its 30-day deletion tag because there are no other default deletion tags in the default retention policy in Exchange Online.
Thought experiment: Protecting temporary employee data
In this thought experiment, apply what you’ve learned about this objective. You can find answers to these questions in the “Answers” section at the end of this chapter.
You are the storage administrator for Fourth Coffee and you bring a number of temporary employees into the company for busy seasonal periods. For these users you want to ensure that though you have a large number of new employees, you do not want to have unconstrained growth of storage from these mailboxes.
1. What different options do you have to ensure that a temporary employee cannot store more than two months worth of email?
2. What would your retention policy settings be for these temporary employees?
Objective summary
![]() Retention policies ensure that messages are removed or archived from Exchange after a given duration.
Retention policies ensure that messages are removed or archived from Exchange after a given duration.
![]() Retention policies do not ensure that data is held for a given duration.
Retention policies do not ensure that data is held for a given duration.
![]() Retention policies contain retention tags. There are two types of retention tag, the archive tag and the deletion tag.
Retention policies contain retention tags. There are two types of retention tag, the archive tag and the deletion tag.
![]() Archive tags move content to the users In-Place Archive if one exists. If there is no In-Place Archive, the tag has no effect
Archive tags move content to the users In-Place Archive if one exists. If there is no In-Place Archive, the tag has no effect
![]() Deletion tags delete content. The tag setting allows for permanent deletion (no recovery), or a recovery period where the content can be recovered from the Recover Deleted Items folder in Outlook or OWA.
Deletion tags delete content. The tag setting allows for permanent deletion (no recovery), or a recovery period where the content can be recovered from the Recover Deleted Items folder in Outlook or OWA.
![]() You can have retention policies that apply to the mailbox or to folders. Archive tags and deletion tags can apply to the mailbox, but only deletion tags can apply to folders. Personal tags (both archive and deletion) can be at the user’s discretion to assign.
You can have retention policies that apply to the mailbox or to folders. Archive tags and deletion tags can apply to the mailbox, but only deletion tags can apply to folders. Personal tags (both archive and deletion) can be at the user’s discretion to assign.
![]() Only one mailbox level archive tag, and one mailbox level deletion tag can be applied to a retention policy. Only one folder level deletion tag can be applied, per folder, to a retention policy. As many personal tags as you require can be added to a policy.
Only one mailbox level archive tag, and one mailbox level deletion tag can be applied to a retention policy. Only one folder level deletion tag can be applied, per folder, to a retention policy. As many personal tags as you require can be added to a policy.
![]() Archiving and deletion of messages is run by the Managed Folder Assistant based on the time of item creation or arrival in the mailbox. Therefore, you need to have archive policies of a shorter duration than deletion policies, or the item will be deleted before it is archived.
Archiving and deletion of messages is run by the Managed Folder Assistant based on the time of item creation or arrival in the mailbox. Therefore, you need to have archive policies of a shorter duration than deletion policies, or the item will be deleted before it is archived.
Objective review
Answer the following questions to test your knowledge of the information in this objective. You can find the answers to these questions and explanations of why each answer choice is correct or incorrect in the “Answers” section at the end of this chapter.
1. You have the following retention tags. You need to create a policy that will ensure that messages in the Deleted Items folder are kept for two weeks, and messages over two years old are archived. You also need to ensure that the mailbox and archive do not hold messages that are over five years old. Which of the following tags do you add to your policy? (Choose all that apply.)
A. Name: “Keep Deleted Items for 2 Weeks”; AgeLimitForRetention:2; RetentionAction: DeleteAndAllowRecovery;Type=DeletedItems
B. Name: “Keep Deleted Items for 2 Weeks”; AgeLimitForRetention:14; RetentionAction: DeleteAndAllowRecovery;Type=DeletedItems
C. Name: “Archive After Two Years”; AgeLimitForRetention:730; RetentionAction: MoveToArchive;Type=All
D. Name: “Archive After Two Years”; AgeLimitForRetention:730; RetentionAction: MoveToArchive;Type=Mailbox
E. Name: “Delete After Five Years”; AgeLimitForRetention:1826; RetentionAction: PermanentlyDelete;Type=All
F. Name: “Delete After Five Years”; AgeLimitForRetention:1095; RetentionAction: PermanentlyDelete;Type=All
2. How many retention policies can you apply to a mailbox?
A. One
B. Two, one archive policy and one delete policy
C. Three, one archive and two delete
D. As many as your business requirement needs
Objective 4.4: Perform eDiscovery
Exchange Server eDiscovery is a set of features that allow the discovery manager class of user to find, and if required, remove content from some, or all of the user’s mailboxes. At its core is the search functionality, which uses the indexing functions of Exchange Server. The same functions that help the user locate the contents in their mailbox are used to help the discovery managers locate content they need to find.
In this objective you will look at configuring eDiscovery, as well as some of the associated features that enable holding data so that it is not deleted from the mailbox database until a configured time period has gone by. You will also look at journaling to ensure that a copy of all messages, sent and received, are copied to separate storage.
This objective covers how to:
![]() Plan and delegate RBAC roles for eDiscovery
Plan and delegate RBAC roles for eDiscovery
![]() Enable a legal/litigation hold
Enable a legal/litigation hold
![]() Perform a query-based In-Place Hold
Perform a query-based In-Place Hold
![]() Design and configure journaling
Design and configure journaling
![]() Perform multi-mailbox searches in Exchange Administration Center (EAC)
Perform multi-mailbox searches in Exchange Administration Center (EAC)
![]() Evaluate how to integrate In-Place federated searches with Microsoft SharePoint
Evaluate how to integrate In-Place federated searches with Microsoft SharePoint
Planning and delegating RBAC roles for eDiscovery
To enable eDiscovery searches, permissions must be granted to allow users to have the rights to search other user’s mailboxes for discovery purposes. By default, no users or admins have the right to do eDiscovery, and so therefore users can only search mailboxes that they can open. An eDiscovery manager does not get permission to open a mailbox, but will get permission to search the mailbox using the eDiscovery tools in Exchange Control Panel.
Though the administrator is not able to do eDiscovery by default, they are able to add users or their own account if required to the RBAC role group that provides eDiscovery. This group is called Discovery Management. Members of this group get two roles. The first role is to perform eDiscovery (the Mailbox Search role), and the second role grants the rights to enable Legal Hold on a mailbox (Legal Hold role).
Important: eDiscovery Security Considerations
Members of the Discovery Management role group can access sensitive message content. Specifically, these members can use In-Place eDiscovery to search all mailboxes in your Exchange organization, preview messages (and other mailbox items), copy them to a Discovery mailbox, and export the copied messages to a .pst file. In most organizations, this permission is granted to legal, compliance, or Human Resources personnel.
If you have a limited scope of mailboxes that you want to allow search and Legal Hold to be performed against, you can create a custom management scope for either or both roles mentioned above. Creating a custom scope is covered in the RBAC objective in chapter 3.
Regardless of whether you use the default role group, or a custom role group with a custom scope, once it is enabled you need to add the users who will get these roles. This is done from EAC or PowerShell for Exchange Server on-premises, or Exchange Online. When you are using Exchange on-premises you can also directly add users to the role group in Active Directory. In ECP the user is added to the role group via Permissions, and then Admin Roles. In Exchange Management Shell, or Remote PowerShell to Exchange Online, you would use the following cmdlet.
Add-RoleGroupMember -Identity "Discovery Management" -Member <mailbox_alias>
Enabling a legal/litigation hold
In an earlier objective you looked at retention hold. That is a technology to ensure that content does not stay too long in a mailbox, but it does not stop a user actively deleting content. The legal hold features in Exchange Server 2013 and Exchange Online ensure that the content is kept in the mailbox database until the In-Place Hold policy expires, or if the mailbox is using Legal Hold, the content is kept forever (Exchange Online) or until the mailbox is deleted (Exchange on-premises). Note that if the user who is subject to Legal Hold deletes content, the item remains in the mailbox database even though the user now cannot access it as they think it has been deleted. For users that edit content, the hold process keeps previous copies of the item in immutable storage.
Note: OWA, Legal Hold and Delegates
Ensure that you are running Exchange Server 2013 Cumulative Update 7 to cover an issue with Outlook Web App and mailboxes that are on hold where the mailbox is delegated to users who are not on hold.
To enable a user to be on Legal Hold (which was known as Litigation Hold in Exchange 2010), you need to have an Enterprise CAL for that user in Exchange on-premises, or a P2 plan mailbox in Exchange Online. Once you have the correct license, a hold can be enabled with Set-Mailbox or Exchange Control Panel. To enable Legal Hold using PowerShell, run the following cmdlet. This cmdlet also sets a time limit to the hold of two years.
Set-Mailbox elanor -LitigationHoldEnabled $true -LitigationHoldDuration 730
If you use LitigationHoldEnabled without LitigationHoldDuration being set, you enable a permanent legal hold that means all content in the mailbox is kept forever.
To enable Legal Hold in Exchange Control Panel, select your user in the recipients page and view the In-Place Hold value on the properties pane to the right. To then enable, or disable, hold for a mailbox, click the Edit icon when the user is highlighted, and change to the mailbox features tab and scroll down to click Enable under Litigation Hold.
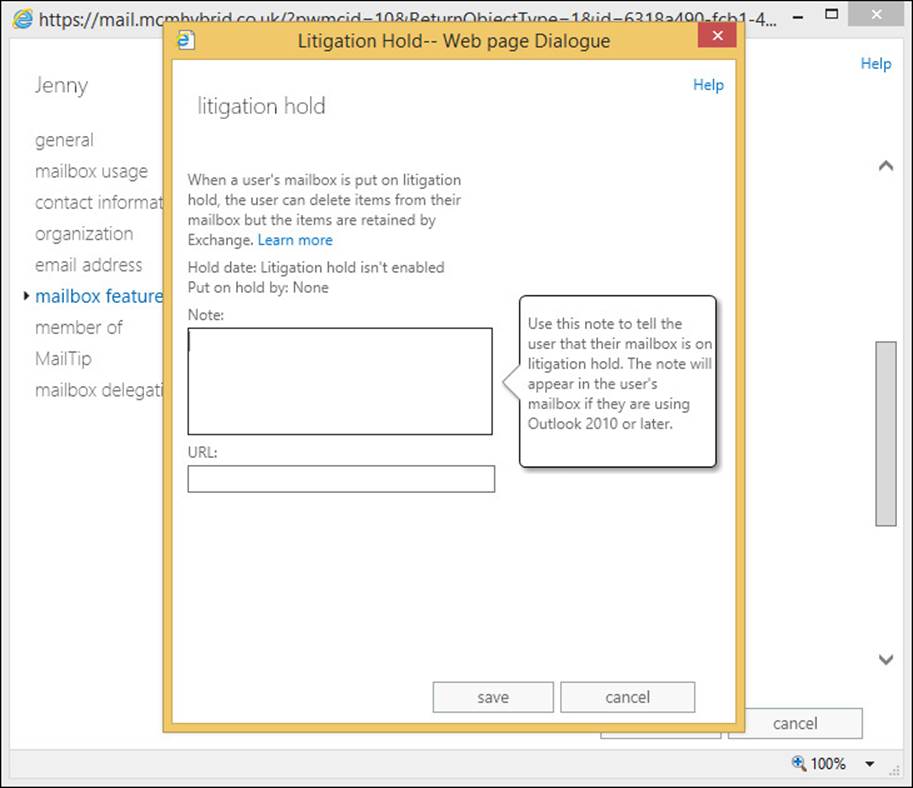
FIGURE 4-29 Enabling Legal Hold on a mailbox
Performing a query-based In-Place Hold
With the ability to search mailboxes via eDiscovery for ad-hoc queries, it is also possible to place mailboxes on hold for certain content and keywords. This allows you to have a Legal Hold scenario where the contents of the mailbox in its entirety are not placed on hold, but only where the keywords that are specified are placed on hold. Then when a user deletes or modifies an item in their mailbox, the item is inspected for the hold keyword. If present, the item is preserved for the hold duration. If the keyword is not present, the item is purged from the mailbox. If the user is subject to more than five keyword-based In-Place Holds, all items are held because that is less resource hungry than searching out many keywords and holding them.
To perform an In-Place Hold, you login as a discovery manager and navigate to the In-Place eDiscovery & Hold page of the compliance management section of Exchange Control Panel. Exchange Management Shell can also be used to do this using New-MailboxSearch.
The first step for a query-based In-Place Hold is to start a Filter Based On Criteria search from Compliance Management, In-Place eDiscovery & Hold. To place mailboxes on hold for an In-Place Hold, you need to specify the mailboxes, and you cannot do an In-Place Hold for all mailboxes. You also need to run this hold wizard as a member of the Discovery Management role group.
As you can see from Figure 4-30, when you choose to create a keyword in the In-Place Hold search, you can use keywords such as And, Or, Not, and Near. As you are searching as part of the hold wizard, you can set start and end dates for the search, as well as the sender, recipients, and message classes.
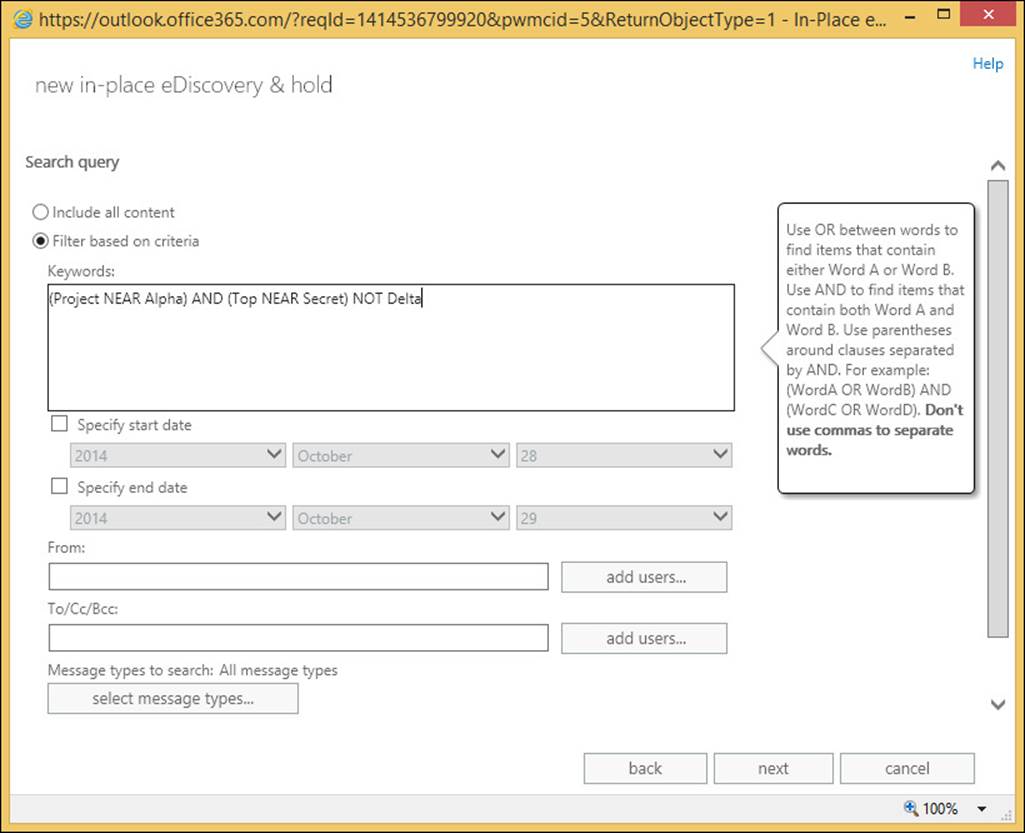
FIGURE 4-30 Creating an In-Place Hold
Once the search query is complete, you move onto the next screen of the wizard where you set the hold period. This is either indefinitely, or for a specific period of time. For example, you would use the time-based hold if your organization requires that all messages be retained for at least seven years. You can use a time-based In-Place Hold, along with a retention policy to make sure items are deleted in seven years.
When you click Finish, you are returned with an estimate of the search results. From the main search and eDiscovery page you can preview the search results. They appear in an OWA style view similar to Figure 4-31.
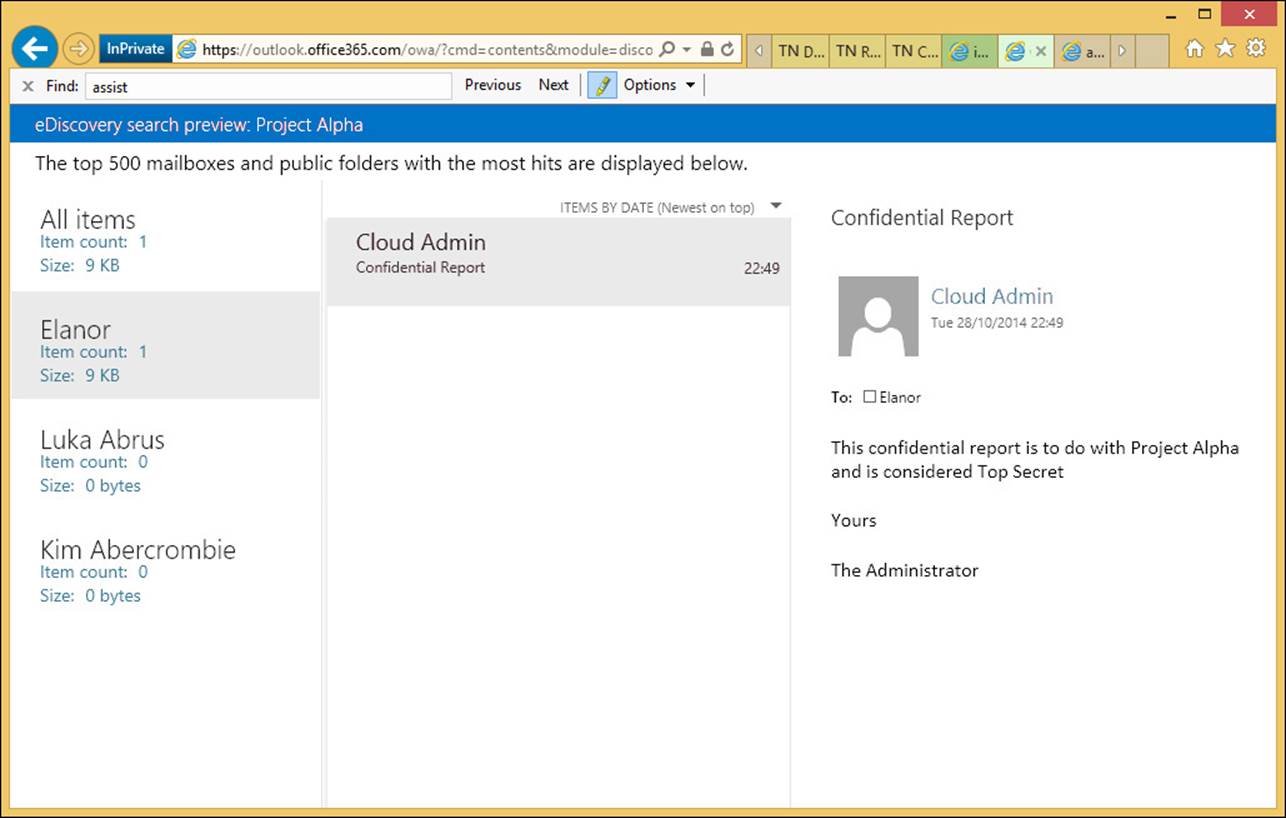
FIGURE 4-31 Preview search results for In-Place Hold queries
If a full search is run from this hold search estimate, the content is copied to the discovery mailbox, and other features of the search, such as the folder that the item is held in, are visible.
Designing and configuring journaling
Up until now in this objective, you have been looking at the In-Place compliance features. That is, where the items are held in the user’s mailbox, and the search looks for items across that, and potentially other mailboxes, as required. Journaling is not In-Place compliance because the messages are copied to another mailbox with additional information stored on them for compliance reasons.
There are two types of journaling in Exchange Server on-premises, and one type in Exchange Online. On-premises Exchange Server can have journaling set up at the mailbox database level, and then every item that is sent or received from that mailbox database is copied to the journal target. Exchange Online and Exchange on-premises also support rules-based journaling. Rules-based journaling is a transport agent that copies all messages to the journal target when the sender or the recipient of the message falls into the scope of the rule.
Regardless of the method of the journaling, the final result is the same. A journal report is created that is sent to the journal target, and this report contains a list of the recipients, expanded from any distribution list, as well as the sender, and a copy of the message attached. If the message is RMS protected, optionally, a clear text copy of the message can be attached to the journal report as well. This is based on the state of the JournalReportDecryptionEnabled setting in Set-IRMConfiguration.
The journal report is an email message that is sent to the journal target address. The target address is either a local mailbox or an SMTP address provided to you by a third-party journaling service.
Important: Office 365 and Journaling Restrictions
You can’t designate an Office 365 mailbox as a journaling mailbox for on-premises mailboxes or mailboxes in Office 365. If you’re running a hybrid deployment with your mailboxes split between on-premises servers and Office 365, you can designate an on-premises mailbox as the journaling mailbox for your Office 365, and on-premises mailboxes, or use a third-party service.
Journaling is useful for compliance because it will tell you not just the message sent, but who sent and received the message, and specifically it will expand the recipients into individual addresses. For example, imagine an email was sent to the sales department distribution list. This list contained 100 mailboxes. If you use eDiscovery search, you will see that the message was sent to sales@contoso.com, but not who was a member of that group at the time the message was sent. Because journaling covers the typical compliance requirement of who sent/received what, to where and when, it is a common scenario for Exchange Server deployments.
Journal reports will also record the Bcc addresses that the email was sent to. To see what a journal report looks like, take a look at Figure 4-32. This shows a journal report open in Outlook Web App. The report shows the message sender that it was sent to a single recipient and Cc’d to a distribution list, and this list is expanded to its members.
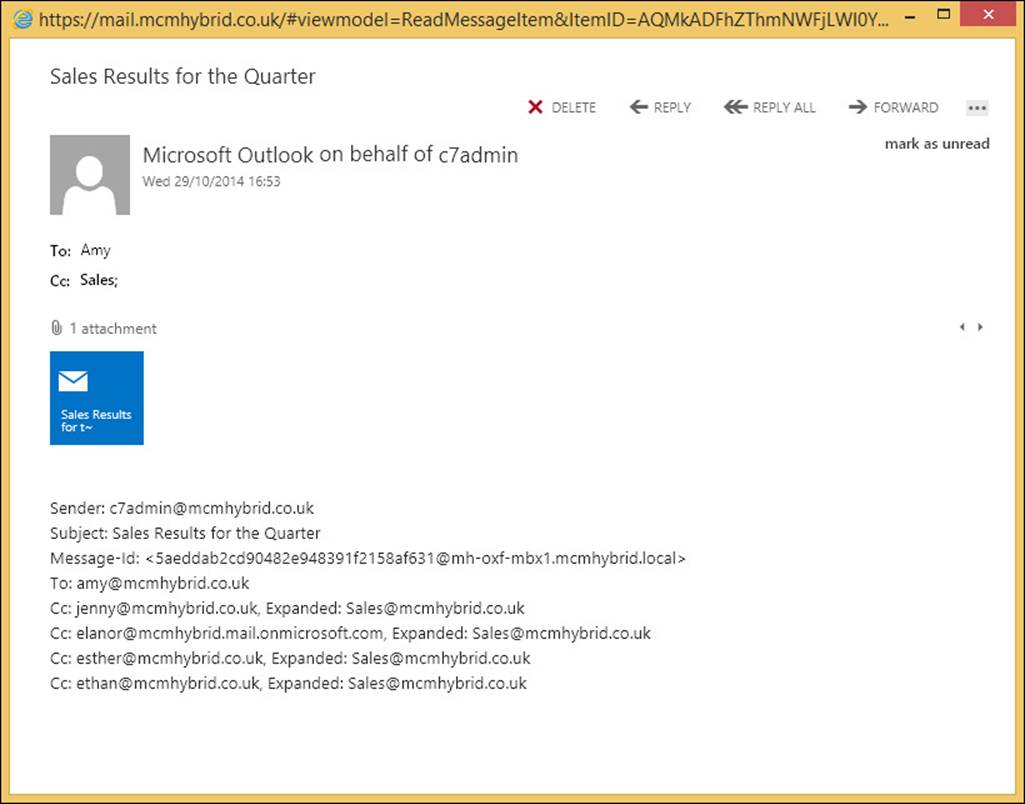
FIGURE 4-32 A journal report viewed in Outlook Web App
Note: eDiscovery and Message Recipients
Changes in Exchange Online to mail flow, around the middle of 2014, have resulted in the recipient details being stored in the message header. This means that an eDiscovery search performed in Office 365 will now show the recipients and any distribution list expanded. If the eDiscovery search covers the sender’s mailbox, any Bcc recipients are stored in hidden headers on the sender’s mailbox and exposed through eDiscovery search. It is planned that this functionality will appear in Exchange Server 2013 on-premises with Cumulative Update 7. This book was written before the release of CU7, and so this may not happen. This functionality would not be examined on the version of the exam in general release at the time of writing, but could be added to future updates of the exam.
To configure journaling you need an Exchange Standard CAL for database level journaling, and to do journal rules, you need an Enterprise CAL. Journaling in Exchange Online requires a P2 license.
To set up database journaling, you use the Set-MailboxDatabase Exchange Management Shell cmdlet, and the JournalRecipient parameter. For example, to journal all messages sent and received from all databases in an Exchange organization (2007, 2010 and 2013), from an Exchange 2013 Exchange Management Shell prompt you would use the following.
Get-MailboxDatabase -IncludePreExchange2013 | Set-MailboxDatabase -JournalRecipient <target_email_address>
To configure a journal rule (or rules) you need to decide the name of the rule, the target of the journal report, and the scope of the messages to journal. The scope is either internal emails, external emails, or both. Internal emails are those who’s accepted domains are listed in Exchange, or those domains where there is a Remote Domain setting stating that the domain’s internal property is set to true. The journal rule scope can also be Global, which means both internal and external emails are journaled.
In addition to the name, target, and scope of the journal rule, you need to decide who is covered by the rule. This is the most complex bit of journal rules. If you set the Recipient property to a single mailbox, only that mailbox is journaled. However, if you set the Recipient property to a distribution list, all of the members of the list are subject to journaling, but not just emails to the distribution list. Emails to that distribution list will be journaled, but only because they have been sent to people on this distribution list.
The following Exchange Management Shell cmdlet will journal all emails (scope is global) sent to or from members of the sales@contoso.com distribution list, and then send the journal report to a third-party journaling service.
New-JournalRule -Name "Sales Journal" -Recipient sales@contoso.com -JournalEmailAddress contoso@relecloud.com -Scope Global -Enabled $True
To configure a journal rule in ECP, you would navigate to Compliance Management, Journal Rules, and then click Add Icon. In the journal rule, provide a name for the journal rule, and then complete the following text boxes.
![]() Send Journal Reports To Type the address of the journaling mailbox that will receive all of the journal reports.
Send Journal Reports To Type the address of the journaling mailbox that will receive all of the journal reports.
![]() If The Message Is Sent To Or Received From Specify the recipient that the rule will target. You can either select a specific recipient, or apply the rule to all messages.
If The Message Is Sent To Or Received From Specify the recipient that the rule will target. You can either select a specific recipient, or apply the rule to all messages.
![]() Journal The Following Messages Specify the scope of the journal rule. You can journal only the internal messages, only the external messages, or all messages regardless of origin or destination.
Journal The Following Messages Specify the scope of the journal rule. You can journal only the internal messages, only the external messages, or all messages regardless of origin or destination.
Then finally, you click Save to create the journal rule. This is shown in Figure 4-33, and in Figure 4-34, you can see where to enable database journaling.
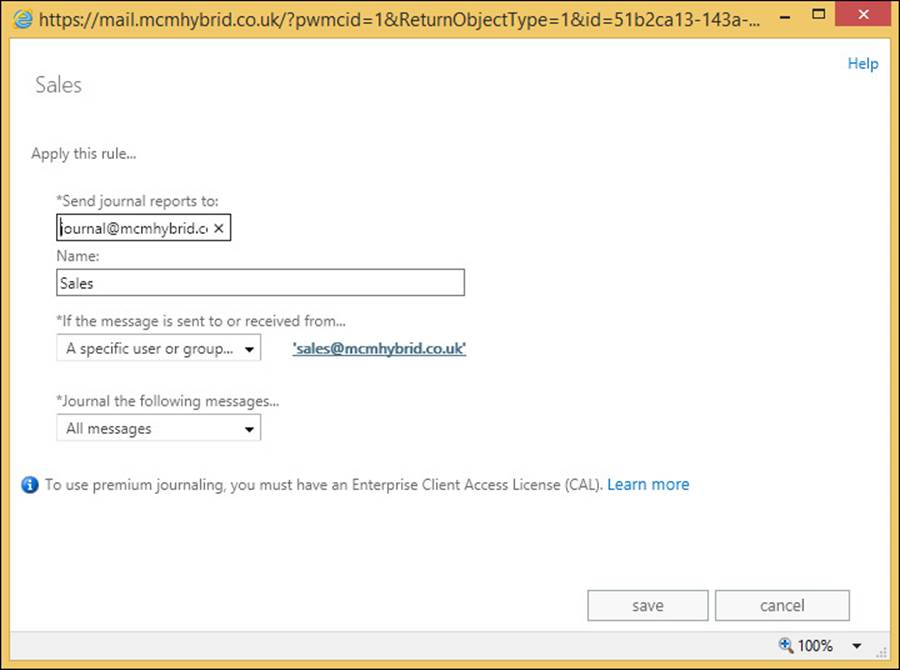
FIGURE 4-33 Setting a journal rule in Exchange Control Panel
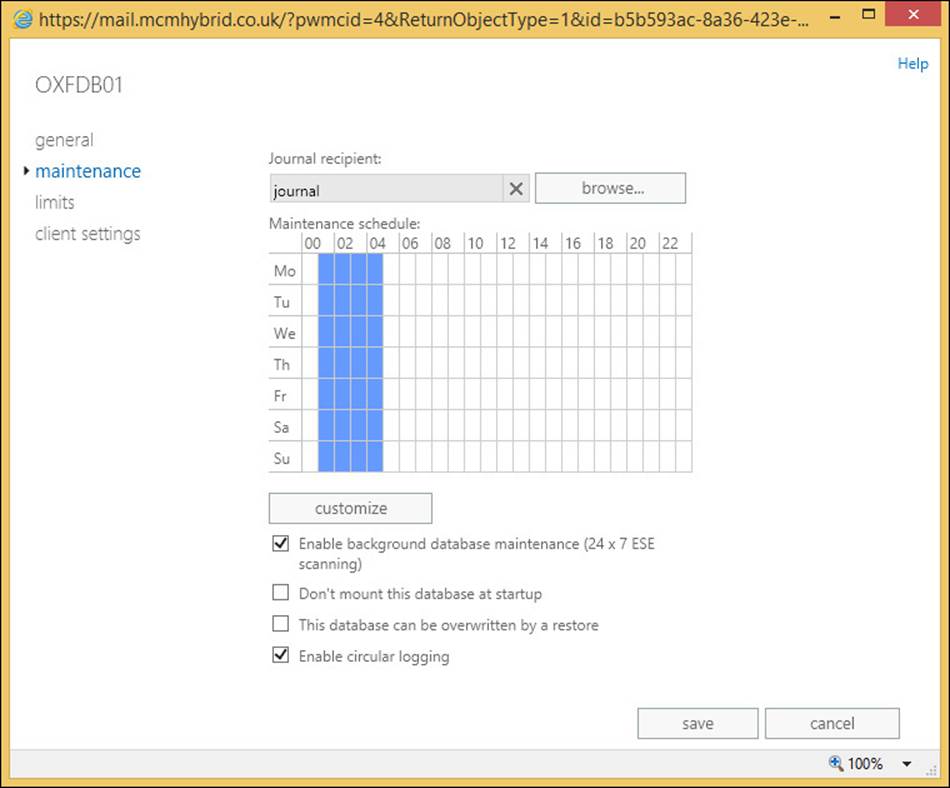
FIGURE 4-34 Setting the mailbox database journal value on the mailbox database properties maintenance page
In addition to setting up journaling, either by rules or by database journaling, it is important to configure the mailbox that will receive NDR messages from the journal. As journaling is important for compliance reasons, it is very important to be sure that if a journal report recipient starts to reject messages, there is some record of this. To enable this, create a recipient that is used for receiving these reports, and ensure that this mailbox is not subject to journaling. If you do set this mailbox to be covered by a journal rule, or place it in a database that is journaled, this mailbox will not be journaled. Then, when you have this journal report NDR mailbox in place, you configure the transport config settings of the Exchange organization to use this mailbox to receive journal report NDR messages. You should then ensure that this mailbox is frequently checked to make sure it has no content in it.
To set the transport configuration to know which mailbox to use for journal report NDRs, run the following cmdlet.
Set-TransportConfig -JournalingReportNdrTo journalndr@mcmhybrid.co.uk
Note: Enabling the Journal NDR Mailbox
If you have Exchange Online enabled as well, ensure that you run the Set-TransportConfig setting to enable the journal NDR mailbox in the cloud, as well as on-premises. You can use the same mailbox, so run the same cmdlet in both on-premises and Exchange Online.
Performing multi-mailbox searches in Exchange Administration Center (EAC)
To perform a search across many mailboxes using ECP, you need to be a member of the Discovery Management role group, or a custom role group with the Mailbox Search role assigned to that group. If you have a custom role, you can only search the mailboxes that fall into the scope of your role.
To access the user interface for multiple mailbox search, you need to browse to the /ecp URL and you will see the Compliance Management page. Any other pages that you see will be due to other access roles and permissions that you have. If you are a member of the Discovery Management role group you can also enable litigation hold, and so will be able to see the recipients and public folder screens, as well as allow this activity to take place. You can see the user interface in Figure 4-35.
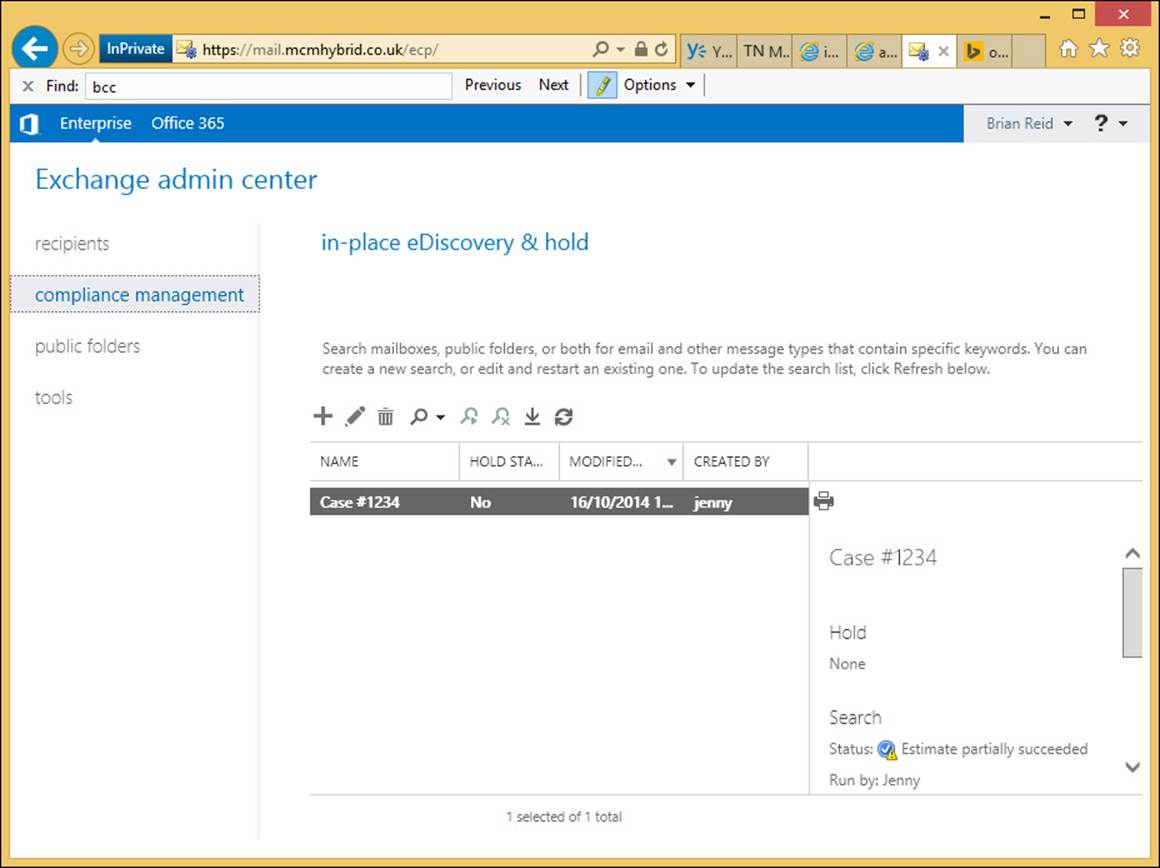
FIGURE 4-35 The Discovery Manager view of Exchange Control Panel
To create a new search you would follow the instructions listed above under In-Place Hold, apart from not selecting the In-Place Hold setting on the fourth screen of the search wizard. If you do a search of all mailboxes, you cannot select any hold settings anyway.
Upon finishing the search, it will queue for processing, and then an estimate of the search results will be returned. If the Exchange organization is a 2010/2013 co-existence organization, the search will remain queued if the federation arbitration mailbox has not been moved to Exchange Server 2013.
Once the search estimate is returned, you can decide if your keywords and scope of search are correct based on the number of hits. If that does not help, you can preview the results, as shown in Figure 4-31, earlier in this chapter. If you are happy with the estimate and the preview, you should proceed to completing the entire search. This is completed from the search icon, and then Copy Search Results. You will see the dialog on Figure 4-36.
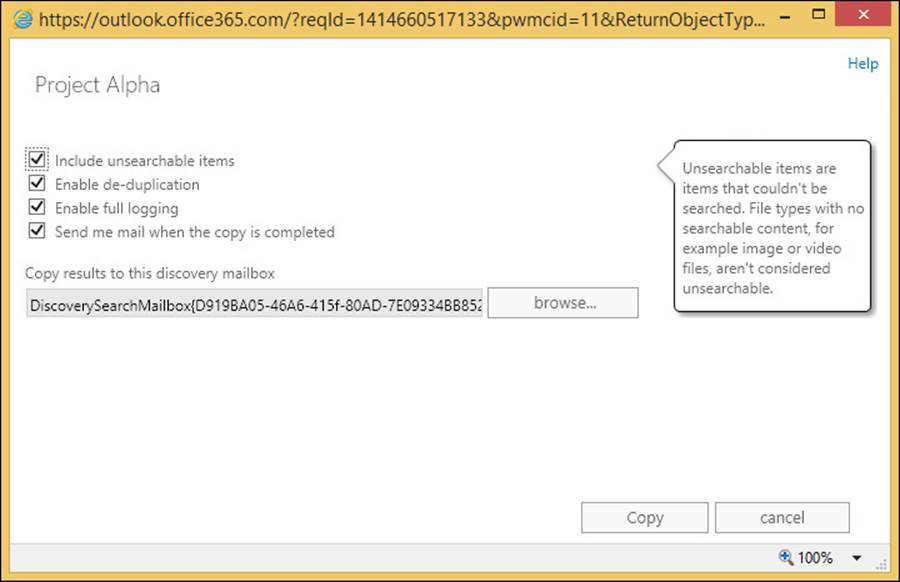
FIGURE 4-36 Search, Copy search results dialog box
There are four options to choose from, and the option to select which discovery mailbox to copy the result to. There is one discovery mailbox created when Exchange Server 2010 or 2013 is first installed, but additional discovery mailboxes can be created with the New-Mailbox <name> -Discovery cmdlet. You might want to have multiple discovery mailboxes to allow search results to be copied from mailboxes to a local discovery mailbox, rather than the default one, which might be across a distant WAN link.
Because the search is based on what Exchange Server search tools find, if there are items that Exchange Server cannot search, you can choose to include them in the results. This is the Unsearchable Items option. If you are expecting a large result, enable deduplication to keep the size of the search results as small as possible without adjusting the search keywords. The full logging option will add a log file of the actions the search took, to the discovery mailbox.
Once the search is complete, you can opt to be notified by email, and if not, you need to login to ECP to view the state of the search, which you will see on the right-hand side once the search results are selected. This will allow you to view the discovery mailbox where the search results will be stored in a folder named after the search name, and the date and time the search was conducted. Therefore, if you run the search multiple times you will get multiple date/time folders under the same search name. Other searches performed against the discovery mailbox will also be visible. An example result set is shown in Figure 4-37, which also shows an RMS protected email being rendered visible in the results set, as IRM for eDiscovery was enabled.
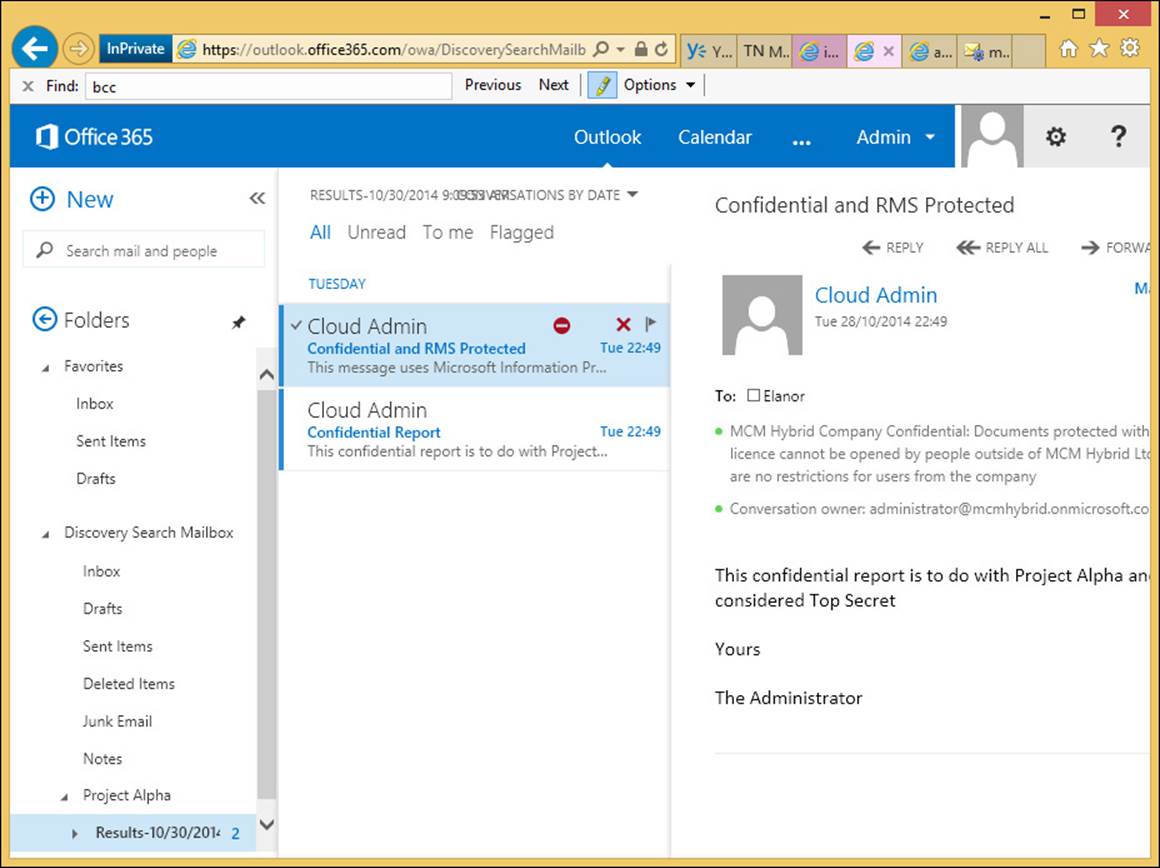
FIGURE 4-37 Viewing search results in the Discovery Search Mailbox
Other options for the eDiscovery search include stopping the search and resuming it at a later time. Once the search is finished, the results can be exported to an Outlook Data File, which is also called a PST file, for shipping to anyone outside of the scope of the Exchange environment who needs to see the results. PST files can be opened in Outlook, and also in third-party eDiscovery and reporting applications.
The export process does not require a local installation of Outlook on the machine on which the PST export is performed, but needs to be Windows 7, Windows 8 or Windows 8.1, be running Microsoft .NET Framework 4.5 and Internet Explorer 8 or later. The latest versions of the Mozilla and Chrome browsers are also supported. The software needed to do the export is installed via Click To Run technology, so there is no upfront software installation needed. The export dialog box looks like the one shown in Figure 4-38.
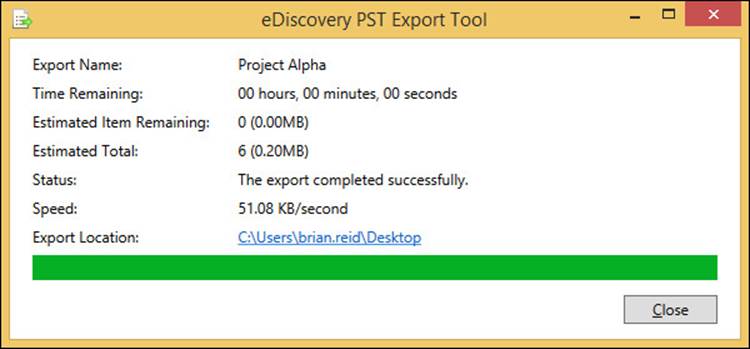
FIGURE 4-38 The PST export process for eDiscovery
In addition to the PST files that contain the search results, two other files are also exported:
![]() A configuration file (.txt file format) that contains information about the PST export request, such as the name of the eDiscovery search that was exported, the date and time of the export, whether deduplication and unsearchable items were enabled, the search query, and the source mailboxes that were searched.
A configuration file (.txt file format) that contains information about the PST export request, such as the name of the eDiscovery search that was exported, the date and time of the export, whether deduplication and unsearchable items were enabled, the search query, and the source mailboxes that were searched.
![]() A search results log (.csv file format) that contains an entry for each message returned in the search results. Each entry identifies the source mailbox where the message is located. If you’ve enabled de-duplication, this helps you identify all mailboxes that contain a duplicate message.
A search results log (.csv file format) that contains an entry for each message returned in the search results. Each entry identifies the source mailbox where the message is located. If you’ve enabled de-duplication, this helps you identify all mailboxes that contain a duplicate message.
Evaluating how to integrate in-place federated searches with Microsoft SharePoint
The ability to search for and successfully find content is the core of any eDiscovery product. To be able to use one product across a number of different data sources makes the search process easier and means that there are less products to install to cover the scope of documents within a given organization.
When Exchange Server 2013 is installed, it can be configured to integrate with both Lync Server 2013 and SharePoint Server 2013. From a compliance viewpoint, all Lync Server does is to save conversations to the Conversation History folder in the user’s mailbox from the Lync Server to the Exchange Server. Once it is stored in Exchange, Exchange eDiscovery can be used to query Lync conversations.
Underlying Exchange’s search engine is a technology called FAST that Microsoft acquired a number of years ago, and was first used in Exchange in the 2013 product. The SharePoint product has used it for a number of versions, but as they both use the same underlying search it is now possible to allow SharePoint to run searches both against its content and Exchange Server, and therefore also against Lync Server’s content that has been placed in the user’s Exchange mailbox.
More Info: Integration Functionality
This is not the full scope of the integration functionality between Lync 2013, SharePoint 2013, and Exchange 2013 Servers. For more information, view the Exchange Server TechNet documentation at http://technet.microsoft.com/en-us/library/jj150480.aspx.
To integrate Exchange and SharePoint searches, the Exchange for SharePoint eDiscovery Center needs to be set up and configured. The full steps in PowerShell, and the command prompt for doing this, can be found in the Exchange Server documentation. In summary, the steps that need to be performed include configuring the server to server authentication, so that Exchange and SharePoint can be configured as partner applications to each other. This is done using OAuth, an authentication mechanism that is present in the 2013 versions of these two products. If you have an earlier version of either of these products, this will not work because the authentication protocol required is not available.
The SharePoint eDiscovery Center can be configured in Office 365 as well. The instructions for doing this can be found at https://support.office.com/Article/Set-up-an-eDiscovery-Center-in-SharePoint-Online-a18f8975-aa7f-43b4-a7d6-001d14744d8e.
Thought experiment: Configuring eDiscovery Across Exchange, Lync and SharePoint
In this thought experiment, apply what you’ve learned about this objective. You can find answers to these questions in the “Answers” section at the end of this chapter.
You are the CIO for Contoso Pharmaceuticals. Your company keeps data on both SharePoint and Exchange, and a Lync deployment is currently taking place. You need to ensure that each product has the ability to be searched for eDiscovery purposes.
1. What features in the three products are you going to be interested in getting your team to look at further?
2. Why would you choose to use a retention policy and a hold policy at the same time?
Objective summary
![]() RBAC is the only way in Exchange Server 2013 to assign both user and administrator rights that are not in the product by default. Though the Discovery Management role exists by default, it gives eDiscovery rights to all mailboxes in your organization, and so custom scopes in RBAC may be required to limit the scope of the eDiscovery user.
RBAC is the only way in Exchange Server 2013 to assign both user and administrator rights that are not in the product by default. Though the Discovery Management role exists by default, it gives eDiscovery rights to all mailboxes in your organization, and so custom scopes in RBAC may be required to limit the scope of the eDiscovery user.
![]() Retention holds ensure that data is removed once it reaches a certain age. Legal holds ensure that it is persisted in the database until it reaches a certain age.
Retention holds ensure that data is removed once it reaches a certain age. Legal holds ensure that it is persisted in the database until it reaches a certain age.
![]() Litigation Hold was the name of the feature in Exchange 2010, and though now called In-Place Hold, the cmdlets to modify the setting remain as they were in 2010.
Litigation Hold was the name of the feature in Exchange 2010, and though now called In-Place Hold, the cmdlets to modify the setting remain as they were in 2010.
![]() Exchange Server 2013 allows time based holds as well as holding content for ever
Exchange Server 2013 allows time based holds as well as holding content for ever
![]() Exchange Server 2013 has the ability to hold all data (Legal Hold) or keyword-based data (eDiscovery Search and In-Place Hold).
Exchange Server 2013 has the ability to hold all data (Legal Hold) or keyword-based data (eDiscovery Search and In-Place Hold).
![]() Journaling is copying messages that are sent and received to an alternative storage location. In Exchange on-premises this can be a dedicated mailbox database, but in Exchange Online it needs to be either on-premises or a third-party service.
Journaling is copying messages that are sent and received to an alternative storage location. In Exchange on-premises this can be a dedicated mailbox database, but in Exchange Online it needs to be either on-premises or a third-party service.
![]() Journaling stores the recipient information at the time of sending. Prior to Cumulative Update 7, eDiscovery searches would not be able to tell you this information, and so you would typically need to be able to do both a search and have a journal to get the recipients at the time of sending. Starting with Cumulative Update 7, you may be able to solve your compliance needs without a journal.
Journaling stores the recipient information at the time of sending. Prior to Cumulative Update 7, eDiscovery searches would not be able to tell you this information, and so you would typically need to be able to do both a search and have a journal to get the recipients at the time of sending. Starting with Cumulative Update 7, you may be able to solve your compliance needs without a journal.
Objective review
Answer the following questions to test your knowledge of the information in this objective. You can find the answers to these questions and explanations of why each answer choice is correct or incorrect in the “Answers” section at the end of this chapter.
1. You need to enable journaling and Legal Hold to ensure your compliance scenario. Why is this?
A. Because Legal Hold only tracks items in Exchange that are not delivered as messages, and journaling keeps a copy of all messages.
B. Because Legal Hold will show you all of the messages, but not the actual recipients at the time the message was sent.
C. Journaling only works to external third-party storage, and so eDiscovery searches allow you to query Exchange Server before you query the third-party service.
D. Because journaling only stores the data on a single mailbox database, and therefore the performance of searching this mailbox is poor.
2. How would you ensure that the trusted members of your help desk that deal with the company executives are able to do eDiscovery searches on those mailboxes, and other help desk members are not?
A. You cannot segregate these roles.
B. You would deny membership of the Discovery Management role group to those members of the Executives group.
C. You would place the executives on Office 365, and the remaining mailboxes on-premises because you cannot search across both environments.
D. You would create a custom exclusive scope for discovery searches, and add the trusted employees to the role group that uses this exclusive scope.
3. What will the “(alpha NEAR beta NOT gamma) AND (alpha NEAR omega)” search keyword find? (Choose two.)
A. Alpha Beta Gamma Omega
B. Alpha Beta
C. Alpha Omega
D. Alpha Beta Omega
E. Alpha Omega Beta Zeta
Objective 4.5: Implement a compliance solution
The final objective of this chapter looks at tying together some of the other pieces of compliance, and user assistance features in Exchange Server. As with a lot of what has been covered in this chapter, these features work in exactly the same way in Exchange Online.
This objective looks at transport rules for compliance, mail tips to notify the user of anything you need to notify them about the recipient of when sending messages, and the use of message classifications to help inform users how they should treat the contents of a message they receive.
This objective covers how to:
![]() Design and configure transport rules for ethical walls
Design and configure transport rules for ethical walls
![]() Configure MailTips
Configure MailTips
![]() Create, configure, and deploy message classifications
Create, configure, and deploy message classifications
![]() Design and configure transport rules to meet specified compliance requirements
Design and configure transport rules to meet specified compliance requirements
Designing and configuring transport rules for ethical walls
Ethical walls in Exchange Server are a way to ensure one group of users cannot communicate with another within the same organization, or occasionally between partner organizations, or those that have some association that requires that the two parties cannot communicate, but all the while to allow communication with any other party.
A few examples that are commonly used to describe ethical walls are banking, and stock and share trading organizations. There will be parts of the organization who will be able to be aware of future information that if they use this in a trading capacity in advance of that information becoming publically available, are breaking laws of insider trading. Within organizations that do both the preparatory work for future deals, and can also trade publically in these companies, there ought to be a way to ensure that the two teams cannot communicate. In some countries/regions and financial jurisdictions, these requirements may be enshrined in law.
Therefore, in Exchange Server, apart from journaling and other compliance features to audit communications, the use of transport rules will allow for the creation of ethical walls. Transport rules make ethical walls easy to achieve with minimal administrative overhead, but it must always be remembered that the rules work in one direction, and so you may require two rules for each ethical wall to stop the sender on one side communicating with a recipient on the other, and vice versa.
To create an ethical wall you need to start with some property that will allow you to identify the sender. In Exchange Server or Exchange Online, the properties can be based on anything in Active Directory (or Azure Active Directory for Exchange Online), or they can be based on group membership. Therefore, create a group, or set a property, in the directory that applies to all of the users who would be senders on one side of the wall. Create a second group, or apply a different value, to the same property or use a different property in the directory to identify the user population on the other side of the wall. From a management perspective, using the same property on both sides, with different values, or two different groups with a common naming convention, is probably the easiest to manage. Creating a wall with senders identified by a directory property and the recipients, by say, group membership, will work but could be harder to manage the maintenance of.
In Figure 4-39, you can see the properties from Active Directory of a user where the Company field has been set to Contoso Research.
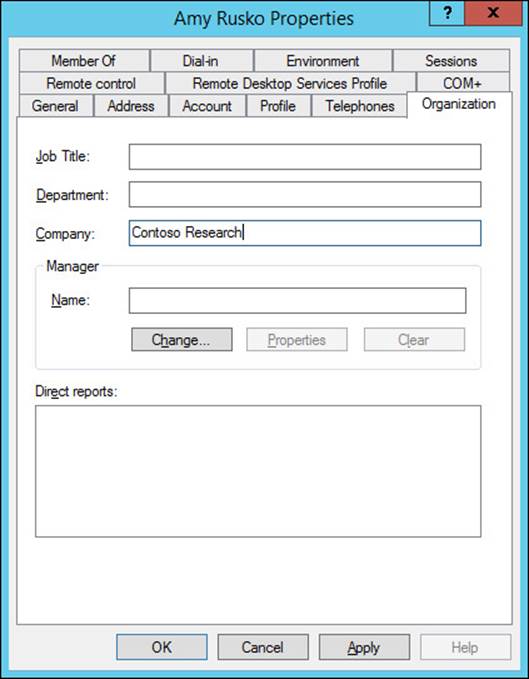
FIGURE 4-39 The Company text box of the Active Directory user account populated
Once you have determined a way to identify both groups of users, you can create a transport rule. One rule will block emails from one group of users to the other, and a second rule will do the reverse. There may be scenarios where a rule is needed in a single direction only.
Figure 4-40 shows a transport rule that generates a custom non-deliverable message when users who’s company is Contoso Research, emails someone who’s title is Futures Trader. The custom non-deliverable error was created using the New-SystemMessage Exchange Management Shell cmdlet. If you have an Exchange hybrid organization, you need to create the custom message and transport rule in both Exchange on-premises and in Exchange Online. The PowerShell is the same for both, so create it on one and copy and paste the cmdlet code to the second environment.
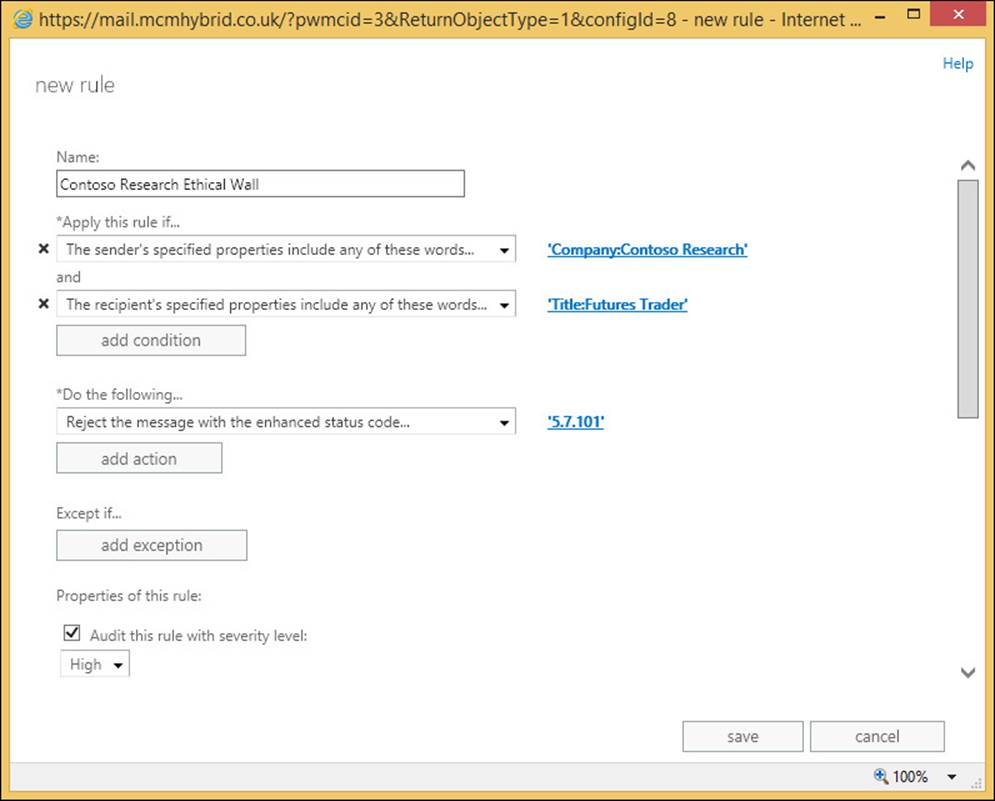
FIGURE 4-40 A transport rule for an ethical wall using a custom delivery status notification (DSN)
Some examples of New-SystemMessage for ethical rules can be found in the following:
# Create a system message with a unique code 5.7.101 that has both English and French replies. Returned reply is based upon the users language settings in Active Directory
New-SystemMessage -Internal $true -Language En -DSNCode 5.7.101 -Text "Contoso Research
employees are not allowed to email future trading floor staff"
New-SystemMessage -Internal $true -Language Fr -DSNCode 5.7.101 -Text "Employés Contoso
recherche ne sont pas autorisés à envoyer un courriel à l'avenir personnel de salle des marchés"
The organizations IT services help desk knowledge base tool should be updated with the error code used (5.7.101 in the above example) so that if a user queries why they received an NDR then valid knowledge on the issue relevant to the company can be obtained. The NDR that the sender receives will read “Remote Server returned ‘550 5.7.101 TRANSPORT.RULES.RejectMessage; the message was rejected by organization policy’” where the error code is the same as the New-SystemMessage created.
Configuring MailTips
MailTips are messages that appear at the top of the Outlook 2010 or 2013 compose window based on the recipients that have been added to an email as it is being composed. Outlook Web App in Exchange Server 2010 and 2013 also show these messages during the composing of a new message. Figure 4-41 shows a custom MailTips in Outlook Web Access.
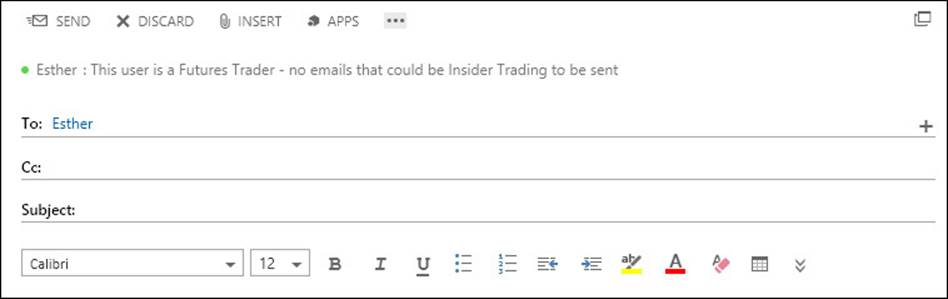
FIGURE 4-41 Outlook Web App showing a custom MailTip
MailTips are automatically generated for a few different scenarios, and can be manually set, in multiple languages if required, on certain mailboxes. The following are the automatic MailTips that you can see, though note that MailTips can be disabled and some are disabled by default.
![]() Invalid Internal Recipient If the recipient cannot be resolved to a valid object in the directory. Typically shown when mailboxes are migrated to different Exchange organizations and the user sends an email to a previously existing user who either has not been migrated to the new environment, or when they were migrated their LegacyExchangeDN attribute was not populated with a value related to their old LegacyExchageDN. OWA does not display this MailTip.
Invalid Internal Recipient If the recipient cannot be resolved to a valid object in the directory. Typically shown when mailboxes are migrated to different Exchange organizations and the user sends an email to a previously existing user who either has not been migrated to the new environment, or when they were migrated their LegacyExchangeDN attribute was not populated with a value related to their old LegacyExchageDN. OWA does not display this MailTip.
![]() Mailbox Full Recipient is over quota, so there is no point emailing them as they will not get it and you will just get an error back.
Mailbox Full Recipient is over quota, so there is no point emailing them as they will not get it and you will just get an error back.
![]() Automatic Replies You see the recipient’s Out Of Office notification.
Automatic Replies You see the recipient’s Out Of Office notification.
![]() Restricted Recipient You cannot email this recipient because they have a restriction on their mailbox permissions, which means that you are not able to email them. Note that you cannot get this MailTip for transport rules, just mailbox permissions.
Restricted Recipient You cannot email this recipient because they have a restriction on their mailbox permissions, which means that you are not able to email them. Note that you cannot get this MailTip for transport rules, just mailbox permissions.
![]() External Recipients This is disabled by default, but if enabled will tell you that the recipient is outside of your organization. This is useful for a reminder to indicate that the email may be more public than you may intend. This is especially useful when an internal distribution group contains external recipients. You enter the distribution list name, but you are told of the possible data exposure that might occur due to the list containing external recipients. To set external recipients in partner organizations to appear as internal recipients, use the Set-RemoteDomain –IsInternal $true value for the partner domain.
External Recipients This is disabled by default, but if enabled will tell you that the recipient is outside of your organization. This is useful for a reminder to indicate that the email may be more public than you may intend. This is especially useful when an internal distribution group contains external recipients. You enter the distribution list name, but you are told of the possible data exposure that might occur due to the list containing external recipients. To set external recipients in partner organizations to appear as internal recipients, use the Set-RemoteDomain –IsInternal $true value for the partner domain.
![]() Large Audience Each night at 13:00, the Group Metrics feature of Exchange Server (running on the server that generates the offline address book) calculates the size of each distribution group. This information is used for the next 24 hours to tell users if they are emailing a group that exceeds 25 users. Set-TransportConfig can be used to change this value to a number suitable to identifying large groups in your organization. The change takes place the next time the group metrics process is run.
Large Audience Each night at 13:00, the Group Metrics feature of Exchange Server (running on the server that generates the offline address book) calculates the size of each distribution group. This information is used for the next 24 hours to tell users if they are emailing a group that exceeds 25 users. Set-TransportConfig can be used to change this value to a number suitable to identifying large groups in your organization. The change takes place the next time the group metrics process is run.
![]() Moderated Recipient This tells you the recipient is subject to a moderation rule or property, and that the user may not see your message, as it will go to the moderators first.
Moderated Recipient This tells you the recipient is subject to a moderation rule or property, and that the user may not see your message, as it will go to the moderators first.
![]() Reply All On Bcc This occurs when you reply all to an email that you received via Bcc. The other recipients of the message in the To and Cc fields will not know that you received the message, but if you reply all then they will know. This MailTip alerts you to this possible revealing of information.
Reply All On Bcc This occurs when you reply all to an email that you received via Bcc. The other recipients of the message in the To and Cc fields will not know that you received the message, but if you reply all then they will know. This MailTip alerts you to this possible revealing of information.
![]() Oversize Message This is shown when the contents of the message exceed the allowed external send size limit, or the default receive size limit. If the sender or recipient has individual size limits, these will be used instead.
Oversize Message This is shown when the contents of the message exceed the allowed external send size limit, or the default receive size limit. If the sender or recipient has individual size limits, these will be used instead.
![]() Custom MailTip Will display a message set by the administrator when the recipient is being sent to. Custom MailTips can have multiple languages, and if the client Outlook or OWA language matches a MailTip translation, that language is shown, otherwise the default MailTip is displayed.
Custom MailTip Will display a message set by the administrator when the recipient is being sent to. Custom MailTips can have multiple languages, and if the client Outlook or OWA language matches a MailTip translation, that language is shown, otherwise the default MailTip is displayed.
MailTips are generated via the Exchange Web Services and so both AutoDiscover and the correct InternalURL or ExternalURL for EWS is needed to ensure the user can reach the EWS endpoint and download the MailTip. The request for the MailTip happens after the user enters the recipient address into Outlook or OWA, and the request is valid for ten seconds. If the server cannot be reached in 10 seconds, or there is no response, the client stops the request and does not display the MailTip. If an email is left in a composing/drafts state for over two hours, the MailTip will be refreshed after two hours.
To set a custom MailTip you can either use the following example Exchange cmdlets, or Exchange Control Panel. In ECP, only the default MailTip can be edited, specific language tips need to be added in the shell.
Set-Mailbox <name> -MailTip "text to display" -MailTipTranslations @{Add="XX: Text in
the XX language","YY:Text in the YY language where XX and YY are two letter language
codes"
Set-DistributionGroup <group_name> -MailTip "text to display" -MailTipTranslations @
{Add="XX: Text in the XX language","YY:Text in the YY language where XX and YY are two
letter language codes";
Exam Tip
MailTips can be set for mailboxes, groups, resource mailboxes, contacts, or shared mailboxes.
Creating, configuring, and deploying message classifications
Outlook and OWA allow users to set a property on a message called the message classification. This classification is stored on the message as a message header, and this header stays with the message while it is sent internal to the organization. Upon receipt of the message, the user is shown the text of the classification at the top of the email. The text can be customized to suit the organization into which Exchange is installed, and language specific versions can be generated. Outlook and OWA will show the default classification text if they cannot show a language specific version.
Because the classification is stored on the message as a header, it can be read by transport rules as well, and additional actions can be performed. For example, if you create an Internal Only classification, you can use transport rules to generate an NDR if the recipient is external.
Other examples might be to add certain disclaimers, or to encrypt the message at Exchange, or to use the Office 365 Message Encryption feature in Office 365. Setting a message header by way of transport rules, and then forwarding the message outbound via Exchange Online Protection enable Office 365 Message Encryption (OME). The user could set a message classification called Encrypt For External Recipients, and then a transport rule sees this classification, and then sets the OME headers so that the message gets encryption applied at send time. OME is part of the E3 subscription in Office 365.
To create a message classification, you use Exchange Management Shell and the New-MessageClassification cmdlet. You need to provide a name for the classification and a display name. The display name is what users see in Outlook or OWA. The name is what you use to refer to the classification within Exchange administration. If you set a Locale parameter to the classification, you can add multiple languages to the classification, and have Outlook or OWA display the version of the clients default language, or the default text if the specific locale is not present. The following is an example cmdlet for creating the message classification discussed above.
New-MessageClassification -Name EncryptForExternalRecipients -DisplayName "Encrypt for External Recipients" -SenderDescription "The external recipient will be required to login to a secure website to view this message"
When you create a message classification it is given a unique ID called a ClassificationID. This ClassificationID is the value that is stamped on the message header when the classification is added to a message. If you have two Exchange forests and need to share the same classification across the forests, you need to make the classification in one forest, then use Get-MessageClassification to retrieve the ClassificationID, and then make the classification in the second forest by setting the ClassificationID in the New-MessageClassification cmdlet, rather than allowing a new ClassificationID to be set. This means that the classification created in the second forest can display the same text for the same classification. If you have Exchange Online and on-premises in a hybrid environment, you need to create your classifications in this way so that the ClassificationID for the classification matches at both locations. If you move to Exchange Online a while after creating a message classification, you need to export the classifications and create them in Exchange Online to match the GUID used. Any transport rules used that act on that classification can then be created as well.
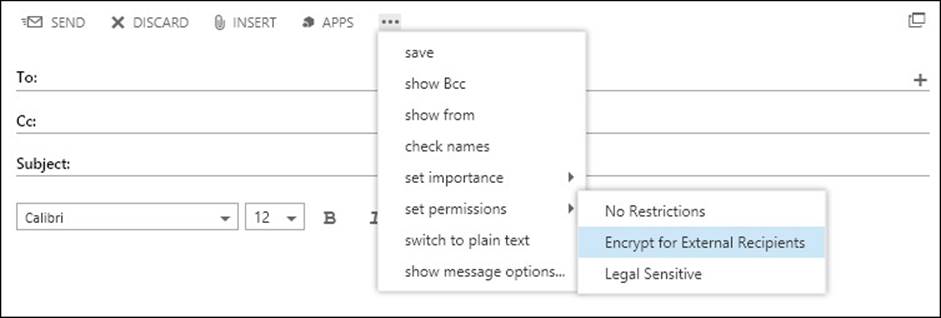
FIGURE 4-42 OWA showing the classification of the message to the sender
After you create a new message classification, you can specify the message classification as a transport rule predicate. Before Microsoft Outlook users can apply the message classification to messages, you must update the user systems with the message classification XML file created by the Export-OutlookClassification.ps1 script. This export is not needed for OWA users because the classifications appear in OWA automatically.
The Export-OutlookClassification.ps1 script file is located in the %ExchangeInstallPath%Scripts directory on an Exchange Server. To export from Exchange Online you need to copy this script from an on-premises installation, and run it in your Remote PowerShell window connected to Exchange Online. The export creates an XML file that needs to be copied to each Outlook client so that Outlook knows what classifications to display in the user interface. The XML file needs to be copied to a folder that Outlook can access, and the easiest way to do this is to use Group Policy preferences as that you can move files around the network to your domain joined machines. For non-domain joined machines, you need to copy the file using another method of your choice. Once you have the file available to Outlook, you need to set some registry keys at HKEY_CURRENT_USER\Software\Microsoft\Office\15.0\Common\Policy (where 15.0 means Outlook 2013, other version numbers can be used too):
![]() “AdminClassificationPath”=”c:\\temp\\temp\\classifications.xml”
“AdminClassificationPath”=”c:\\temp\\temp\\classifications.xml”
![]() “EnableClassifications”=dword:00000001
“EnableClassifications”=dword:00000001
![]() “TrustClassifications”=dword:00000001
“TrustClassifications”=dword:00000001
The sender, using Outlook or OWA, can set the message classification. In Outlook, the user clicks the File tab when composing a new message, and selects the classification from the Set Permissions button. In OWA, the user clicks the ellipsis button, and chooses the classification from the list shown under Permissions. Note that the RMS templates appear in the same place; so do not name a template and a classification with the same (or similar) names, to avoid confusion.
Designing and configuring transport rules to meet specified compliance requirements
Each organization will have specific requirements that they need to meet for legal compliance. As an exchange administrator of that organization, it is your responsibility with your legal department to ensure that you are doing what is required by the laws of the country/region that you trade in, and possibly other countries/regions that you do business in.
From the viewpoint of transport rules, you can use these to enforce a considerable amount of restrictions on email, and to audit on the actions of these transport rules. Because there are a considerable number of rules, they are not covered here (they are detailed in the product documentation), but you will look at the process of designing a rule for compliance reasons.
First, in terms of rules, there is a priority to the rule. Rules will be processed in this order. Therefore, if a rule with a higher priority (lower number) deletes a message, it will not be processed by a later rule. Equally, if a rule causes a message to be moderated, it will be sent to the moderators at that time, and will not have later rules processed on it. If the moderator approves the message, it will return to the message flow pipeline, and the later runs will be run against the message.
New to Exchange Server 2013 is a rule action to stop further processing of messages. This allows you to have rules to ensure later rules are skipped. With any rule, the version number of the rule matches the lowest version of Exchange that the rule will run on. Versioned rules came with Exchange Server 2010 (version 14), and are also valid in Exchange Server 2013 (version 15). Though the stop processing further rules is a feature that is only available in Exchange Server 2013, if you add this property to a rule that is already a version 14 rule, it will remain version 14. This is because Exchange Server 2010 Service Pack 3 can process this rule and honor its requirement, even though you cannot set this rule property from the Exchange Server 2010 shell. Other rules though are valid in Exchange Server 2013 only, and cannot be processed by a 2010 server. These rules are version 15 rules.
If you have an Exchange Server installation that has 2007, 2010, and 2013 installed (you cannot have 2003 and 2013 in the same organization), you will have 2007 rules (no version) and versioned rules that run on 2010/2013. The non-versioned rules from 2007 are copied to the first 2010 hub transport role server, or 2013 mailbox role server that is installed. After this time changes to 2007, rules are not copied to 2010/2013 servers, and 2010/2013 versioned rules are not copied to 2007 servers. The actual rules are stored in the Active Directory and the 2007 rules occupy a different location within the directory than the 2010/2013 versioned rules. Therefore, if you have multiple versions of Exchange Server installed, be aware that though rules run on the first 2010 hub transport server or 2013 mailbox server, the message goes through, rules can be executed on other machines if the rule has not yet run against that message. Therefore, rules will run on 2007 as well as 2010/2013 if the message goes through 2007 and 2010 (or later) servers. If a rule is version 14, it will run on either 2010 or 2013 servers, but if it is a version 15 rule it will only run on a 2013 server.
Note: Rules and Version Numbers
The actual version number of the rule is in the format of 15.w.x.y. In this, the 15 is the major version (where 15 is 2013), and then X is the cumulative update needed to run that rule. So as new rule actions and conditions are added to Exchange, you will need to ensure that the version of Exchange Server installed, and the message that goes through, is capable of processing the rule as expected.
When you create a rule, you need to provide a condition or predicate that determines on what conditions or events the rule will fire. A rule can be written to fire on all messages, but also on specific conditions of the message, such as sender or sender property, like the one from the ethical walls example above. When a single rule has more than one condition listed, the rule will only fire if all the conditions are true. If a condition is a multiple property condition (such as word in Active Directory property), any of the words need to be valid for the condition to fire.
After you have set the conditions, you can set the actions. These are the things that happen if the rule conditions all evaluate to true. Like conditions, you can have more than one. If you do, all of the actions will fire.
Finally, for a rule you can have exceptions. This controls the times when, though the condition might be true, if the exception is also true, the rule does not fire. Unlike conditions where every predicate needs to be true for the rule to fire, with exceptions, if any one exception is true, the rule will not fire at all.
Figure 4-43 shows a rule being created where it has multiple predicates, actions, and a single exception. The rule shows that a disclaimer is added (the action) if both conditions are true, though only one of the two words in the first condition need to be found in the subject for the condition to be true. The rule in the figure also has a single exception shown. Note that to create a rule as shown in the figure, you need to create a new blank rule and select More Options to ensure that all of the options for the rule are visible. In the initial rule creation dialog box, not every action is shown.
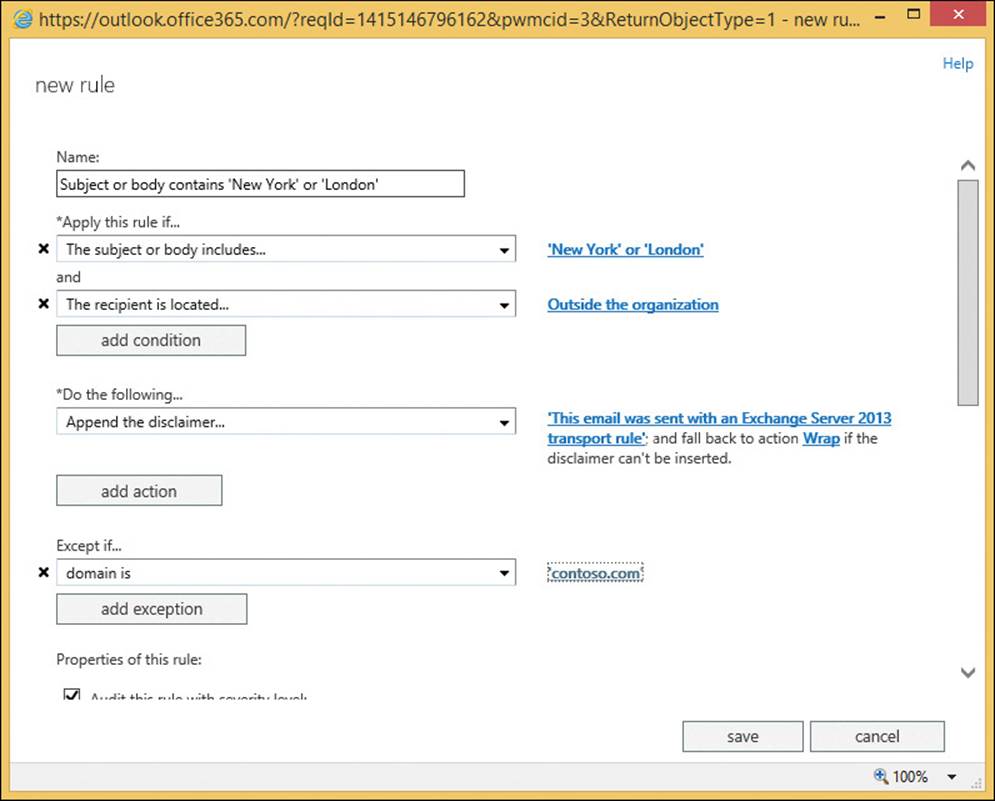
FIGURE 4-43 Creating a transport rule in Exchange Server 2013
Thought experiment: Compliance for Exchange Server
In this thought experiment, apply what you’ve learned about this objective. You can find answers to these questions in the “Answers” section at the end of this chapter.
You manage the Exchange infrastructure for City Power & Light. You need to ensure that users are not able to send information about individual customers out of the company.
1. What technologies in Exchange Server can you use to do this?
2. Your organization works closely with Litware, Inc. to provide your legal services. How can you ensure that your legal classifications placed on messages appear at Litware, Inc?
3. You need to move the OAB generating mailbox to a different server. What impact will this have on the Group Metrics feature?
Objective summary
![]() Ethical walls are ways to ensure groups of users cannot email each other.
Ethical walls are ways to ensure groups of users cannot email each other.
![]() MailTips provide informational messages to Outlook and OWA users based on times when they might receive a non-deliverable email in response to sending their message, and optionally, when the sender needs to know additional information about the recipient.
MailTips provide informational messages to Outlook and OWA users based on times when they might receive a non-deliverable email in response to sending their message, and optionally, when the sender needs to know additional information about the recipient.
![]() Message classification is a way for users to tag messages so that the internal recipient can see a predetermined property of the message, and hopefully act on that message.
Message classification is a way for users to tag messages so that the internal recipient can see a predetermined property of the message, and hopefully act on that message.
![]() Because the server can read message classifications, transport rules can be used to enable certain restrictions and properties on the message.
Because the server can read message classifications, transport rules can be used to enable certain restrictions and properties on the message.
![]() Transport rules are version specific and will only run on servers that are that version or later.
Transport rules are version specific and will only run on servers that are that version or later.
Objective review
Answer the following questions to test your knowledge of the information in this objective. You can find the answers to these questions and explanations of why each answer choice is correct or incorrect in the “Answers” section at the end of this chapter.
1. Which of the following object types support MailTips? (Choose all that apply.)
A. Mailboxes
B. Security Groups (not mail enabled)
C. Dynamic Distribution Groups
D. Mail Users
E. Public Folders
F. Servers
2. How do you ensure that a partner organization can make use of the message classifications that you have set? (Choose two.)
A. They cannot use your message classifications.
B. They work without any configuration because the email message contains the required information to display the text of the classification.
C. They need to take an export of your classifications, and import them into their Exchange environment to ensure the display text and GUID match.
D. They need to ensure that the internal Exchange Server message headers that store message classifications are not stripped off by the header firewall.
3. You have an Exchange Server 2007 and 2013 co-existence organization. This will remain in co-existence for a while due to the number of mailboxes that need to be moved. How will you manage transport rules during this time?
A. Ensure all mail flow goes through a 2013 server.
B. Ensure that you do not create any transport rules on Exchange Server 2013, and instead only make them on a 2007 server.
C. Ensure that you do not create any transport rules on Exchange Server 2013, and instead only make them on a 2007 server. Then when you have made them, export them from 2007, and import them to 2013 again.
D. Ensure all mail flow goes through a 2007 server.
Answers
This section contains the solutions to the thought experiments and answers to the objective review questions in this chapter.
Objective 4.1: Thought experiment
1. The Enterprise additional CAL that you have for faculty members allows you to archive mailboxes on-premises, or in Office 365 without additional licenses. Students with just a standard CAL will need at least an Exchange Online Archive license per student.
2. Before you can implement Exchange In-Place Archiving, you need to configure a full hybrid configuration. This requires an Office 365 tenant with at least the EOA license allocated to it, DirSync enabled, and the Hybrid Configuration Wizard ran in Exchange on-premises.
3. You would create a retention tag for the duration of your semester in days, and set the action of this tag to MoveToArchive. The tag would apply to the entire mailbox (Type=All). You would then create a School of Fine Art - Students retention policy, and add the new retention tag to this policy. You would apply the policy to all student mailboxes before you give them an archive. This means that the Default MRM Policy archive would not be applied because the students already have one.
Objective 4.1: Review
1. Correct answer: A
A. Correct: The MoveToArchive is the correct action to use.
B. Incorrect: This is not a valid action.
C. Incorrect: This is not a valid action.
D. Incorrect: The All property is a type and not an action.
2. Correct answer: B
A. Incorrect: The cmdlet needed for this answer to be correct would be Enable- Mailbox <name> -Archive.
B. Correct: This cmdlet creates an archive in Office 365 for an on-premises mailbox.
C. Incorrect: You cannot have this option.
D. Incorrect: The cmdlet needed for this answer to be correct would be Enable- Mailbox <name> -Archive.
3. Correct answer: C
A. Incorrect: This is not a valid default policy name.
B. Incorrect: This is the default policy in Exchange 2010.
C. Correct: This is the default archive and retention policy in Exchange 2013.
Objective 4.2: Thought experiment
1. To change the DLP policy from testing without Policy Tips, to testing with Policy Tips, you would edit the settings of the policy from ECP, Compliance Management, Data Loss Prevention, and then edit the policy. It is not recommended to change the rules at the Mail Flow, rules area of ECP (though you could make the individual changes at that location).
2. You would want to be sure that any change did not affect a valid business process. For example, if credit card numbers are being sent via email, it might be that there is already an Enforced TLS send connector in place, or that you are sending them to some internal application with an address space outside of Exchange Server (so they appear to be going outside). The DLP Policy would impact this or other legitimate business processes, and before enforcing the rule and stopping the business process, you would need to have a valid and secure alternative process, or an exception made for the current process.
3. You would add a second DLP Policy to Exchange for the same template, and then you would edit the rules of the policy to fire only for the pilot group. Then you would enforce this DLP Policy. Then it will only affect users in your pilot group.
Objective 4.2: Review
1. Correct answer: D
A. Incorrect: The HasClassification transport rule condition is looking for message classifications and not data classifications.
B. Incorrect: The SentToScope transport rule condition is typically used in DLP rules, but it is not the rule type that makes a DLP rule. SentToScope is where the message is sent to, and is typically set to NotInOrganization.
C. Incorrect: The Description parameter of the transport rule outlines what the rule does, but does not actually cause the rule to do anything.
D. Correct: This is the cmdlet used in a transport rule to look up the data classifications contained in the email, and to act upon certain data classifications.
E. Incorrect: LegacyRegEx is a transport rule type from Exchange 2010. RegEx is used in custom DLP rules, but only when creating your own data classifications, which is not in the exam’s objective domain, and so knowing how to create your own classifications is beyond the scope of this book.
2. Correct answer: B
A. Incorrect: The two views of the transport rules are showing the same rules. Changes can be made anywhere, but to change in the compliance management pages is recommended.
B. Correct: The two views of the transport rules are showing the same rules. Changes can be made anywhere, but to change in the compliance management pages is recommended.
Objective 4.3: Thought experiment
1. To ensure short periods of storage of email for temporary employees, you would use a retention tag that deletes content after the time period, with the possible consideration of permanent delete, or delete and allow recovery depending upon the needs to be able to recover data. You also need to ensure mailbox quotas are in use because without a quota, a user could still store too much info within the retention period.
2. You would need to create the following policy, with the tags listed being part of this policy, and then apply this policy to all temporary employees. In this example you have an employee naming convention where login names that start with “T-” are temporary employees.
A. Retention Policy: Temporary Seasonal Staff Retention Policy
B. Default deletion retention tag of two months applied to the mailbox (Type=All)
C. Optional Junk Email folder tag for a shorter time period
D. No personal tags in this retention policy
E. No archive tags in this retention policy
F. Apply to all temporary staff with Get-Mailbox -ResultSize Unlimited | Where {$_.SamAccountName -ilike “T-*”} | Set-Mailbox -RetentionPolicy “Temporary Seasonal Staff Retention Policy”
Objective 4.3: Review
1. Correct answers: B, C, and E
A. Incorrect: The AgeLimitForRetention is a counter set in days, therefore two days is not sufficient for this solution.
B. Correct: These are the correct settings for the Deleted Items requirement.
C. Correct: These are the correct settings for the Archive requirement.
D. Incorrect: This tag uses an incorrect Type value.
E. Correct: These are the correct settings for the Delete After Five Years (1826 days) requirement.
F. Incorrect: This retention policy value of 1095 days is only for three years. The two-year move to archive is independent of the five-year delete, and is not added together to get a five-year delete.
2. Correct answer: A
A. Correct: Each mailbox can only have one retention policy.
B. Incorrect: You can create one archive tag that applies to a mailbox, and one deletion tag that applies to the same, but these are tags and not policies as asked by the question.
C. Incorrect: Do not mix up retention tags and retention policies. You can have one policy with the number of tags that you need in it.
D. Incorrect: Do not mix up retention tags and retention policies. You can have one policy with the number of tags that you need in it.
Objective 4.4: Thought experiment
1. You will need to look at the eDiscovery search functionality in Exchange Server, as well as the ability to hold data with the In-Place Hold functionality using retention policies and legal hold or In-Place search holds. You will need to ensure OAuth is configured between Exchange Server 2013 and Lync Server 2013 so that Lync conversations are persisted in the Exchange Mailbox, and finally you will need to look into the Exchange for SharePoint eDiscovery Center, as well as any SharePoint compliance features needed for that product.
2. You would choose to use a retention policy and hold policy at the same time because they are different, but complementary, things. The retention policy ensures that email is deleted once it exceeds a given age. The hold policy ensures that everything is persisted in the mailbox until it reaches a given age. With both policies in place, you can be sure that content that you may be best not keeping (as it is beyond any legal requirement to hold), is removed and so that any legal case against you that requires providing matching data that you hold will not return this old data (because you do not hold it anymore), but also ensuring that newer data is kept for the legally required duration if one exists.
Objective 4.4: Review
1. Correct answer: B
A. Incorrect: Both journaling and Legal Hold are able to copy all items.
B. Correct: Prior to CU7 (the IT Pro exam is not based on this later release) the only way to do recipients at time of message is journaling.
C. Incorrect: Both can store data in Exchange on-premises.
D. Incorrect: Search is based on the Exchange indexes, so performance is not based on the size of the database. Though a large mailbox is more likely to return extra results and take longer to export, the fact that journaling can be split across many databases means performance can be improved if required.
2. Correct answer: D
A. Incorrect: You can segregate these roles. Custom scopes in RBAC will allow this.
B. Incorrect: You cannot deny someone membership of a group to block their access to what the group can do.
C. Incorrect: eDiscovery searches in Exchange Hybrid are cross-forest, and so a search on-premises can include Office 365 mailboxes, and visa versa.
D. Correct: The exclusive scope would ensure that only the executive help desk team could manage the executives, including discovery searches.
3. Correct answers: D and E
A. Incorrect: This “message” contains “gamma” and the search says not to include “gamma.”
B. Incorrect: This search does not include “omega” and the query requires “omega” near “alpha.”
C. Incorrect: This search does not include “beta” and the query requires “beta” near “alpha.”
D. Correct: This search includes the required keywords.
E. Correct: This search includes the required keywords. The additional words do not take away from the result set.
Objective 4.5: Thought experiment
1. There are a number of valid answers to this question, but DLP, RMS, Rules, and MailTips are valid answers to this question. DLP fingerprinting of standard forms, RMS so that the content cannot be read outside the organization, transport rules to look for key worlds, and then automate the applying of actions such as RMS to the email. MailTips can be used to notify the user of a potential issue in advance of the user clicking Send.
2. You need to ensure that your message classifications are exported to an XML file and that classification is imported into the new organization.
3. The OAB generating mailbox server is used to calculate the number of users in a group each evening. This information is used for the following 24 hours until group metrics is regenerated.
Objective 4.5: Review
1. Correct answers: A, C, and D
A. Correct: Mailboxes (user mailboxes, resource mailboxes, and room mailboxes) can have MailTips.
B. Incorrect: Security groups are not mailbox recipients and so cannot have MailTips enabled for them. You can make a security group be an object in the address book by mail enabling it, and then you can set a MailTip on it.
C. Correct: Dynamic Distribution Groups support MailTips.
D. Correct: MailTips can be set on mail user objects.
2. Correct answers: C and D
A. Incorrect: They can use your classifications if they import your classifications and ensure that the Send and Receive connectors between your organization and theirs do not remove the Exchange Server internal forest, and organization headers.
B. Incorrect: The classification is an internal header on Exchange, and so the other organization, without specific configuration, will not see the message header.
C. Correct: The header in the message contains a GUID. Therefore, the display name of the classification needs to be added to the Active Directory of the recipient organization, and the GUID of the classification needs to match.
D. Correct: Because the header that contains the GUID is an internal header, it will be removed by the header firewall. Therefore, the send connector outbound from your organization, and the receive connector at the inbound organization need to ensure these internal headers are not stripped off. Hybrid mode to Exchange Online does this as part of the connectors, and so would need to be done for all other cross-forest partner organizations.
3. Correct answer: C
A. Incorrect: When two mailboxes are on the same 2007 server the mail flow will not go through a 2013 mailbox server, and so 2013 rules will never be applied.
B. Incorrect: This will partly work, though any changes made to the rules after the first 2013 server is installed will not be automatically replicated to the area of the Active Directory that 2013 uses to store rules.
C. Correct: The rules made on 2007 will work in 2013, but only if exported and imported again after each change. This ensures that any 2013 rule changes that might have occurred are removed upon this importing of the 2007 rules.
D. Incorrect: Mail flow between two mailboxes in the same 2013 DAG or Active Directory site will not ever go via a 2007 hub transport server.