Microsoft Hyper-V PowerShell Automation (2015)
Chapter 2. Managing Your Hyper-V Virtual Infrastructure
Managing Hyper-V virtual infrastructure components is an integral part of a Hyper-V administrator's day-to-day activities. Performing these administrative tasks manually is time-consuming and leads to a reduction in productivity; replacing these repetitive tasks with PowerShell leads to better consistency (no typos or execution of incorrect tasks). This also helps a senior administrator delegate these tasks to other members in the team and audit the tasks performed by those individuals so that he or she can concentrate on other important tasks that lead to a better learning curve and improve the creative ability of the administrator to automate complex tasks.
In the current chapter and Chapter 3, Managing Your Hyper-V Virtual Machines, we will explore the various PowerShell cmdlets in depth that can be used to automate these set of repetitive tasks performed by an administrator.
In this chapter, we will cover the following:
· Extracting information about Hyper-V hosts and the associated virtual machines
· Creating, deleting, starting, and stopping virtual machines
· Configuring properties on virtual machines
Extracting information about Hyper-V hosts and the associated virtual machines
Microsoft offers the ability to extract information related to the Hyper-V infrastructure using PowerShell. It is now possible to perform virtual machine management from the command line using the Hyper-V PowerShell module.
Let's start exploring the ways in which you can extract information related to a Hyper-V host.
For Hyper-V deployments that are not clustered, host-level information can be extracted by the Get-VMHost cmdlet:
Get-VMHost | fl *
Open up a PowerShell prompt in your Windows Server 2012 R2 Hyper-V server in the Run as Administrator mode and type the following cmdlets:
· Get-ClusterNode: This cmdlet shows details of the nodes in the cluster
· Get-ClusterNode | select @{l='ComputerName';e={$_.name}}: This cmdlet shows the names of the Hyper-V hosts in the cluster
· Get-VMHost –computername <HVHostName>: This cmdlet shows details of the Hyper-V hosts
Now, by combining all the preceding cmdlets together, we can extract host-level information:
Get-ClusterNode | select @{l='ComputerName';e={$_.name}} | Get-VMHost | fl *
As you can see in the preceding command, we used the Get-ClusterNode cmdlet to first get a list of all the nodes in the Hyper-V cluster. Next, we created a custom property for computername and passed it to the Get-VMHost cmdlet to extract information about all the Hyper-V hosts in the cluster.
Once you type the cmdlet, you will be able to see lots of details regarding the host. If you were to do this manually, it would need you to open up a GUI and access the console properties one by one and extract the required information. The following screenshot shows details with respect to the host:
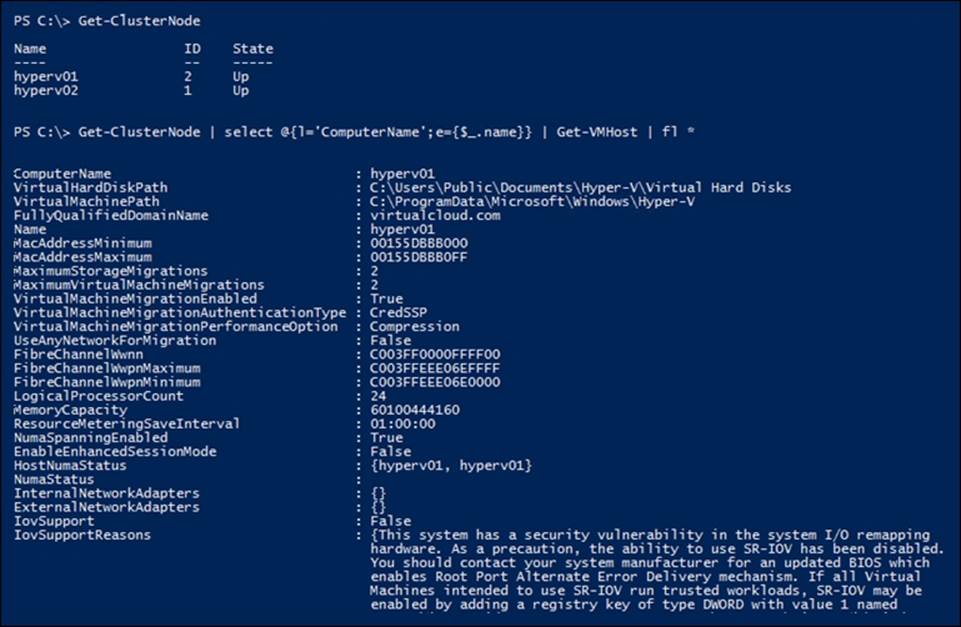
As you can see in the preceding screenshot, we get the default virtual machine disk and machine path, properties for virtual machine migrations, the processor count, host memory size, and even detailed properties on network adapters and the status of NUMA.
You might have noticed that some of the properties that relate to the NUMA node and network adapters appear in curly braces. This indicates that there are subproperties inside them and you can extract this information by expanding their properties.
Let's explore these properties using the expandproperty parameter in the select-object cmdlet.
Type the next set of cmdlets in the PowerShell prompt to extract details of the Hyper-V host NUMA node:
Get-VMHost | select -ExpandProperty hostnumastatus
The following screenshot shows the output:

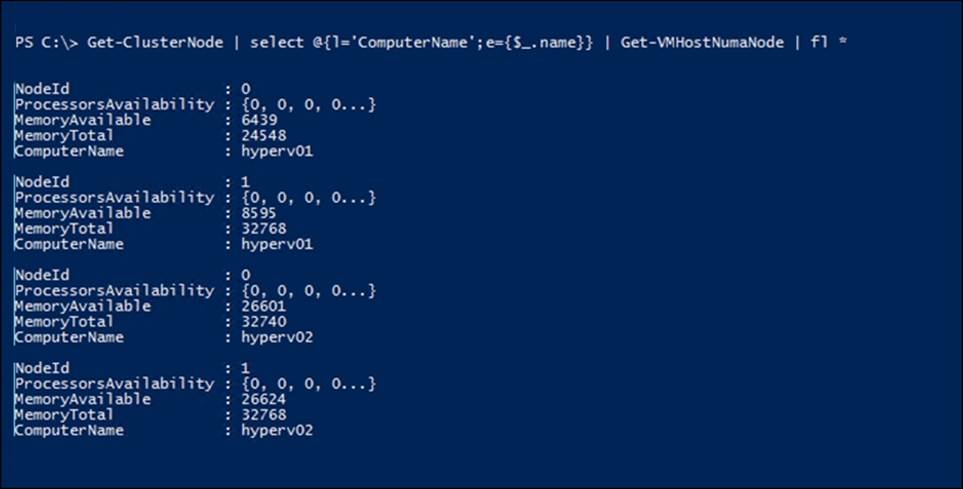
You can also extract the information seen in the preceding screenshot using the Get-VMHostNumaNode cmdlet:
Get-ClusterNode | select @{l='ComputerName';e={$_.name}} | Get-VMHostNumaNode | fl *
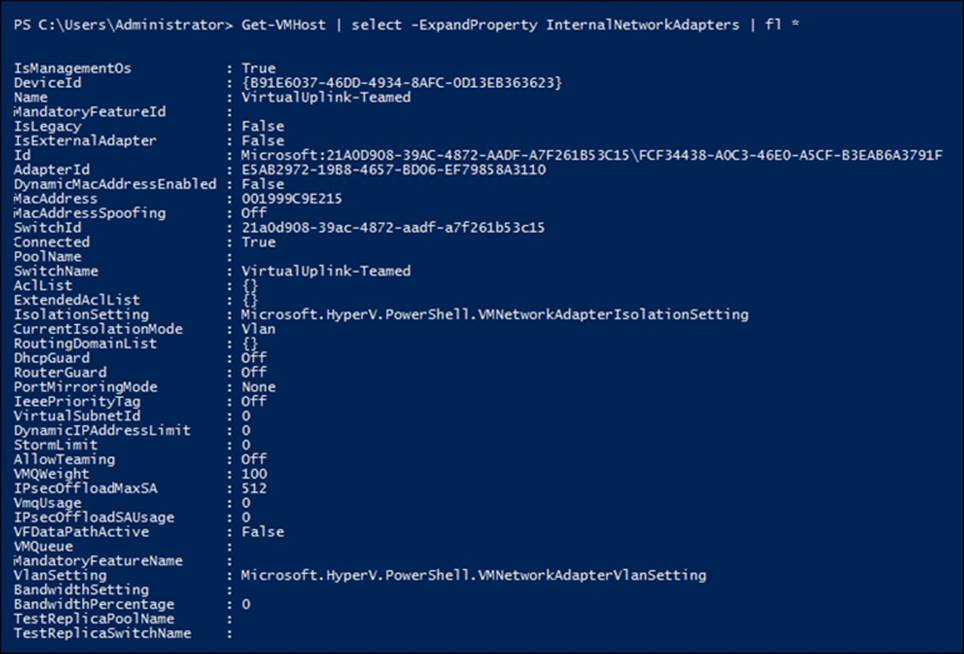
Next, let's extract information about the internal and external network adapters of the Hyper-V hosts using the technique shown in the previous example:
Get-VMHost | select -ExpandProperty InternalNetworkAdapters | fl *
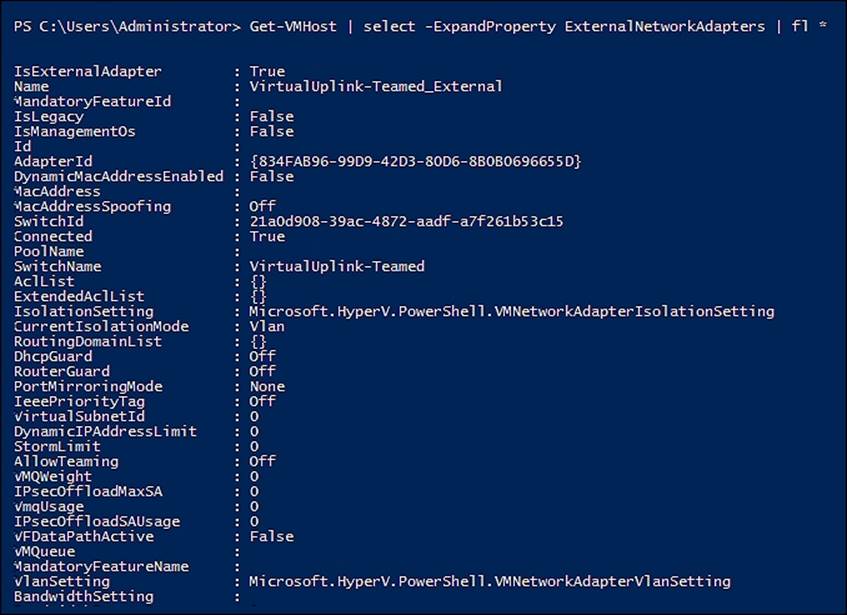
Similarly, you can extract information about the external network adapters too using the following cmdlet:
Get-VMHost | select -ExpandProperty ExternalNetworkAdapters | fl *
Likewise, we can also extract a variety of information about the virtual machines running on Hyper-V hosts.
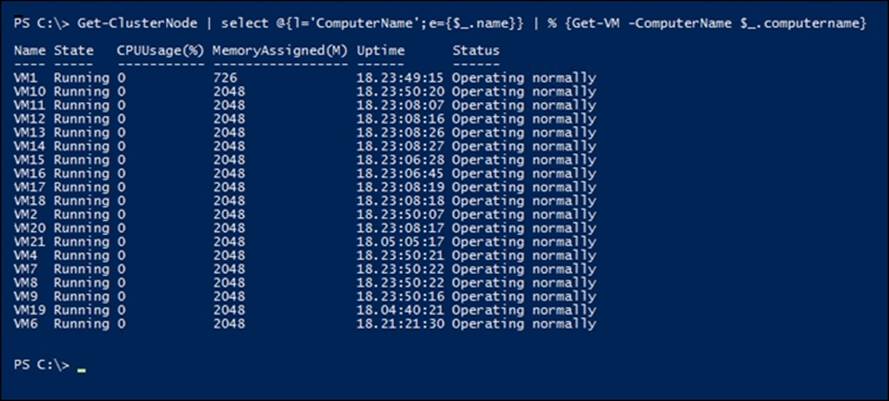
Type the following cmdlet to extract the list of all the virtual machines that reside on Hyper-V cluster nodes:
Get-ClusterNode | select @{l='ComputerName';e={$_.name}} | % {Get-VM -ComputerName $_.computername}
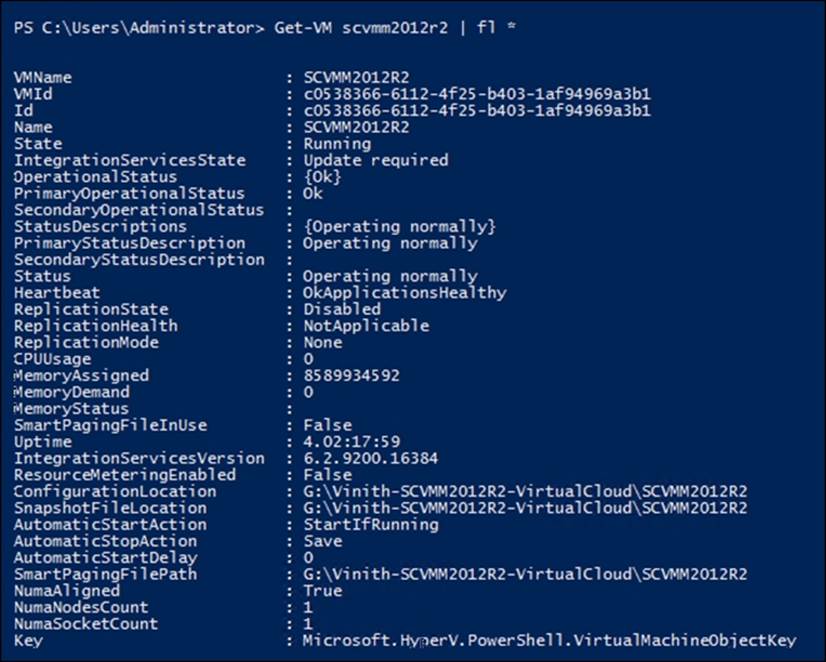
You can also extract information about individual virtual machines using the following syntax. In the following example, I'll redirect the cmdlet towards a single virtual machine and extract information about it:
Get-VM <Virtual machine Name> | fl *
Similarly, there are other sets of cmdlets that can be used to extract information about a virtual machine, which includes its BIOS, DVD dive information, firmware, integration service, and so on.
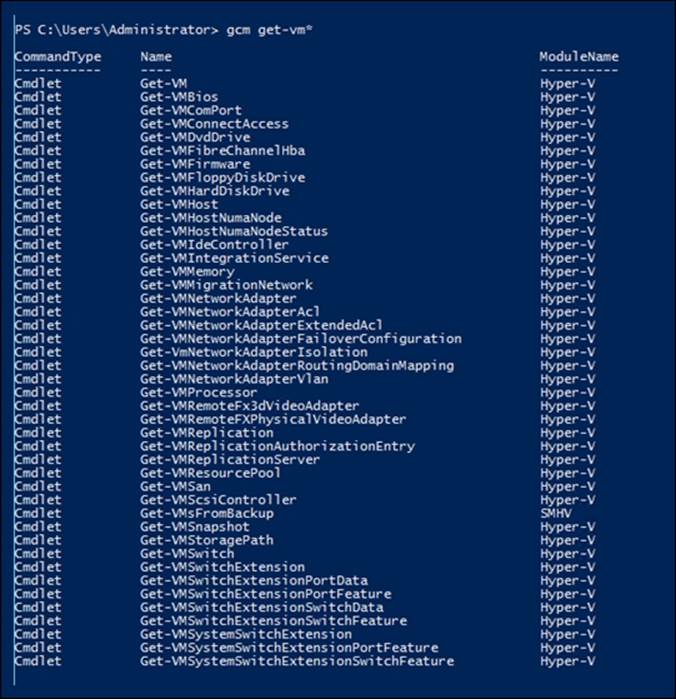
To get a list of all the cmdlets that can be used to extract information about the Hyper-V infrastructure and that includes the virtual machines and the Hyper-V host, type the following cmdlet in the command line:
Get-Command get-vm*
PowerShell has an autocomplete feature; so if you type Get-VM and press Tab, it will rotate through the various autocomplete options. Also, note that after you select your desired cmdlet, pressing Space, then -, and then pressing Tab again will rotate through the parameters that are available:
Creating, deleting, starting, and stopping virtual machines
Creating, deleting, starting, or stopping a virtual machine is one of the most repetitive tasks that a Hyper-V administrator needs to perform, but with PowerShell, all these tasks can be scripted and made simpler to execute.
Creating a virtual machine
Creating a virtual machine is relatively simple with PowerShell using the New-VM PowerShell cmdlet. Before you execute the commands to create a VM, let's look at Get-VM, which gives the list of all the VMs that are present on the Hyper-V host cluster. The following command gets the nodes that are part of the Hyper-V cluster. It creates a value by property and name called ComputerName and passes it to the Get-VM cmdlet:
Get-ClusterNode | select @{l='ComputerName';e={$_.name}} | Get-VM
Windows Server 2012 R2 introduced the concept of generation 1 and generation 2 virtual machines, and the same can be created with PowerShell:
Then, we use the New-VM cmdlet to create virtual machines with the prefix VMtest followed by the Hyper-V hostname, which comes from the pipeline. The following example gets the details of all the nodes of the Hyper-V cluster:
Get-ClusterNode | select @{l='ComputerName';e={$_.name}} | % {New-VM -Name VMtest$($_.computername) –Generation 2 -MemoryStartupBytes 2GB -ComputerName $_.computername }
The following screenshot illustrates the output of the preceding command:

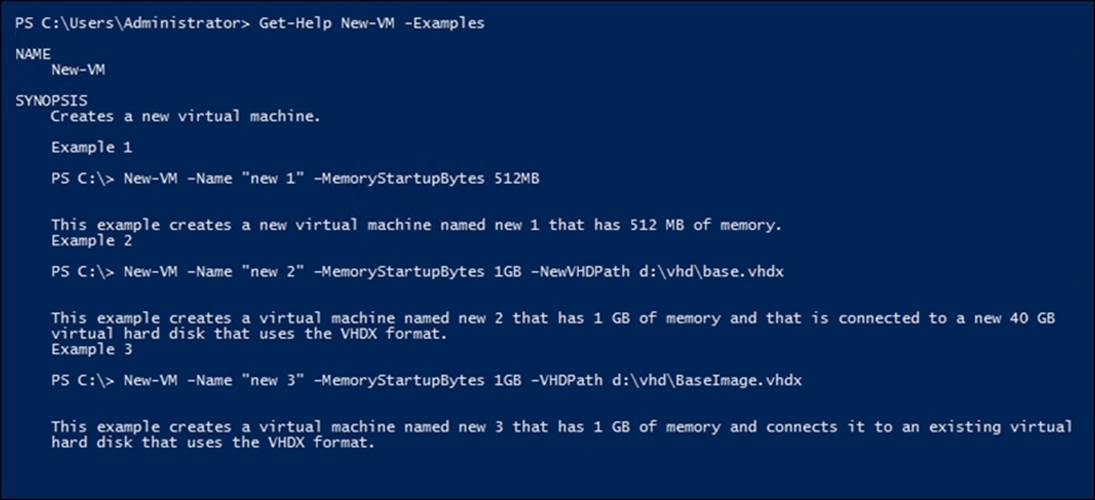
As you can see in the preceding example, I created two virtual machines, vmtesthyperv01 and vmtresthyperv02, on both the nodes of the Hyper-V cluster. The New-VM cmdlet accepts different parameters and can be customized based on user needs. For more details on the New-VM cmdlet, explore detailed examples using the following syntax:
Get-Help New-VM -Examples
Creating a virtual machine with the New-VM cmdlet comes into play when you need to create a large number of virtual machines with similar specifications. With the simple PowerShell magic of the for-each loop, you can create hundreds of virtual machines with asingle cmdlet that use a differencing disk. You can also start the virtual machine when it gets created:
1..100 | % {
New-VHD –ParentPath c:\Base.vhdx –Path c:\Diff_VM_$_.vhdx –Differencing;
New-VM -Name vm$_ -MemoryStartupBytes 2GB –VHDPath c:\Diff_VM_$_.vhdx;
Start-VM vm$_
}
Deleting a virtual machine
Deleting a virtual machine is relatively simple with PowerShell. Using the Remove-VM PowerShell cmdlet, just type the cmdlet in your PowerShell window to delete the two virtual machines we created in the previous example.
The following example gets the details of all the nodes of the Hyper-V cluster. Next, we use the Remove-VM cmdlet to remove virtual machines with the prefix VMtest followed by the Hyper-V hostname that comes from the pipeline:
Get-ClusterNode | select @{l='ComputerName';e={$_.name}} | % {Remove-VM -Name VMtest$($_.computername) –ComputerName $_.computername }

You can also delete a set of virtual machines without any user intervention by a single PowerShell cmdlet using the for-each loop. The following command will delete 100 virtual machines that had the prefix VM in front of them:
1..100 | % {
Remove-VM -Name vm$_ -Force
}
Starting and stopping a virtual machine
Starting and stopping a virtual machine is relatively simple with PowerShell using the Start-VM or Stop-VM PowerShell cmdlet. All you need to do is type the cmdlet in your PowerShell window.
In the following example, we will get the details of all the virtual machines on each of the Hyper-V hosts that are a part of the Hyper-V cluster, and start them:
Get-ClusterNode | select @{l='ComputerName';e={$_.name}} | % {Get-VM -ComputerName $_.computername | Start-VM}
The following screenshot illustrates the output of the preceding command:

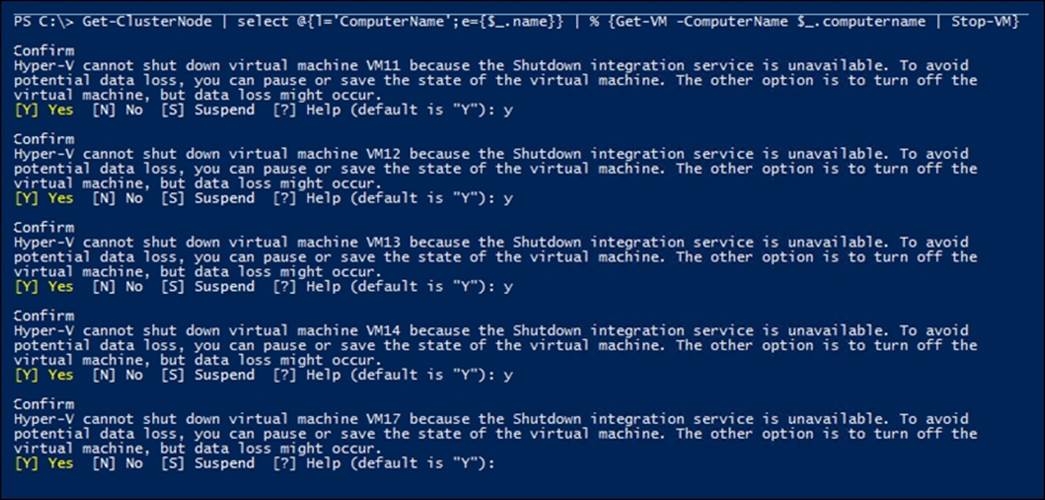
We follow a similar exercise to stop the virtual machines. To do this, we just need to replace the Start-VM cmdlet with Stop-VM. As you can see in the following command, once we issue the cmdlet, it confirms the action and stops / shuts down the VM:
Get-ClusterNode | select @{l='ComputerName';e={$_.name}} | % {Get-VM -ComputerName $_.computername | Stop-VM}
The output is displayed in the following screenshot:
Configuring properties on virtual machines
Configuring properties on virtual machines can be done using PowerShell cmdlets that have the Set verb in them. To get a list of all the PowerShell cmdlets that can be used to set a virtual machine's properties, type command shown in the following screenshot, in the PowerShell prompt:
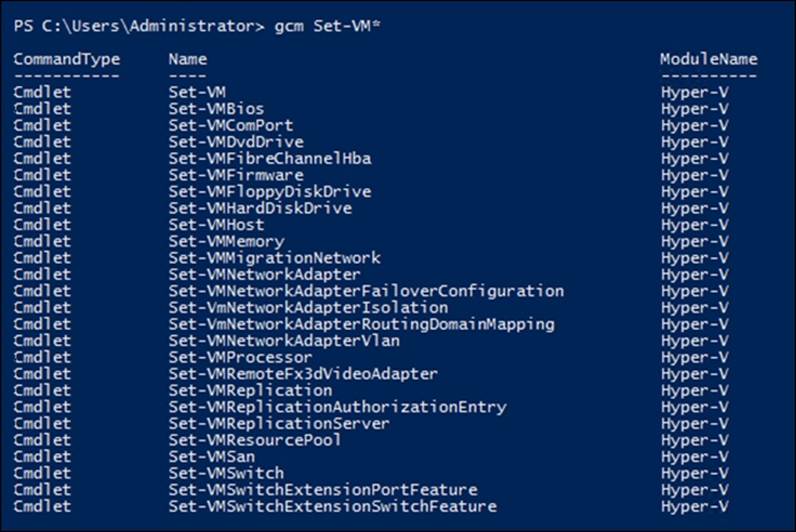
As you can see in the preceding screenshot, there are a number of properties that can be set for the virtual machine, including the BIOS, DVD drive, virtual machine memory, and also network adapter properties. Also, there is a Set-VMHost cmdlet that allows you to set some of the properties related to the Hyper-V host. Let's go through these cmdlets one by one.
Type the following cmdlet in the PowerShell prompt to change the automatic stop action of all the VMs running on both nodes of the Hyper-V cluster:
Get-ClusterNode | select @{l='ComputerName';e={$_.name}} | % {Get-VM -ComputerName $_.computername | Set-VM -AutomaticStopAction shutdown }
Note
The VMs need to be in the shutdown state to change AutomaticStopAction.
The following screenshot shows this command:

The command shown in the preceding screenshot sets the automatic stop action on all the virtual machines to shutdown.
Next, let's change the virtual machine's start up order for all the virtual machines running on both nodes of the Hyper-V cluster by typing the following cmdlet in a PowerShell prompt:
Get-ClusterNode | select @{l='ComputerName';e={$_.name}} | % {Get-VM -ComputerName $_.computername | Set-VMBios -StartupOrder @("Floppy", "LegacyNetworkAdapter", "CD", "IDE")}
The following screenshot displays this command:

The command shown in the preceding screenshot sets the virtual machine's startup order to an order that starts from a floppy to a legacy network adapter to CD and then IDE. For generation 2 virtual machines, you will need to use the Get-VMFirmware and Set-VMFirmware cmdlets instead. The following example shows how you can use the Get-VMFirmware cmdlet to extract firmware details of a generation 2 VM:
Get-VMFirmware testvm

Similarly, you can change firmware properties of a virtual machine using the Set-VMFirmware cmdlet. The following cmdlet allows you to set the Secure Boot property on the VM:
Set-VMFirmware "testvm" -EnableSecureBoot Off
![]()
Now, if we perform a Get-VMFirmware test, we will see that the SecureBoot option for the VM has been disabled:

Next, let's see how we can make configuration changes to virtual processors in a virtual machine. For the following cmdlet example to work, the virtual machines should be in the stopped state:
Get-ClusterNode | select @{l='ComputerName';e={$_.name}} | % {Get-VM -ComputerName $_.computername | Set-VMProcessor -Count 2 -Reserve 10 -Maximum 75 -RelativeWeight 200}

The command shown in the preceding screenshot configures all the virtual machines with two virtual processors, a reserve of 10 percent, a limit of 75 percent, and a relative weight of 200. The reserve property specifies the percentage of processor resources to be reserved for a particular virtual machine (allowed values range from 0 to 100). The maximum parameter specifies the maximum percentage of resources available to the virtual machine processor to be configured (allowed values range from 0 to 100). The relative weight specifies the priority for allocating the physical machine's processing power to a virtual machine that is relative to others (allowed values range from 1 to 10,000).
Next, let's see how you can play around with names pipes using the Set-VMComPort cmdlet. The following cmdlet, when executed, sets the second VM's COM port on all the virtual machines to a defined value:
Get-ClusterNode | select @{l='ComputerName';e={$_.name}} | % {Get-VM -ComputerName $_.computername | Set-VMComPort Number 2 -Path "\\.\pipe\TestPipe"}

The command shown in the preceding screenshot configures the second COM port on all the virtual machines specified by the number 2 to connect to the named pipe TestPipe on the local computer. The named pipe option connects the virtual serial port to a Windows-named pipe on the host operating system or a computer on the network.
Next, let's see how you can configure virtual machines to use an ISO file:
Get-ClusterNode | select @{l='ComputerName';e={$_.name}} | % {Get-VM -ComputerName $_.computername | Get-VMDvdDrive | Set-VMDvdDrive -path "\\smb3share\vol_Vinith_Infra\en_sql_server_2012_enterprise_edition_x86_x64_dvd_813294.iso"}

The command shown in the preceding screenshot configures the virtual DVD drives of all the virtual machines to use the SQL 2012 installation ISO as its media.
The command, shown in the following screenshot, retrieves the Fibre Channel host bus adapter on a virtual machine and sets the world wide names property in them:

Next, let's configure a virtual machine's HBA adapters using PowerShell:
Get-ClusterNode | select @{l='ComputerName';e={$_.name}} | % {Get-VM -ComputerName $_.computername | Get-VMFibreChannelHba | Set-VMFibreChannelHba –GenerateWwn}

The command shown in the preceding screenshot configures a Fibre Channel host bus adapter to be generated automatically on all virtual machines with world-wide names.
Next, let's have a look at an example of how you can enable Secure Boot on a VM. Note that this option can be configured only on generation 2 virtual machines. In the following example, we will configure Secure Boot on all virtual machines in our Hyper-V cluster, assuming that they all belong to generation 2:

The example shown in the preceding screenshot enables secure boot functionality on the virtual machine on your Hyper-V cluster.
Next, let's look at an example to configure a virtual machine to use a virtual floppy drive (VFD). We will use the logic illustrated in the previous example to set a floppy drive on a set of virtual machines. A VFD is used by some applications in legacy virtual machines.
Note
Generation 2 virtual machines do not support floppy drives.

The command shown in the preceding screenshot connects C:\Test.vfd to the virtual floppy disk of the virtual machine testvm. Next, let's look at an example that shows how we can configure a virtual machine to use a VHD. The following example moves the VHD on all the virtual machines from IDE 1.0 to IDE 1.1.
The following screenshot assumes that you have a hard disk on the 1.0 controller:

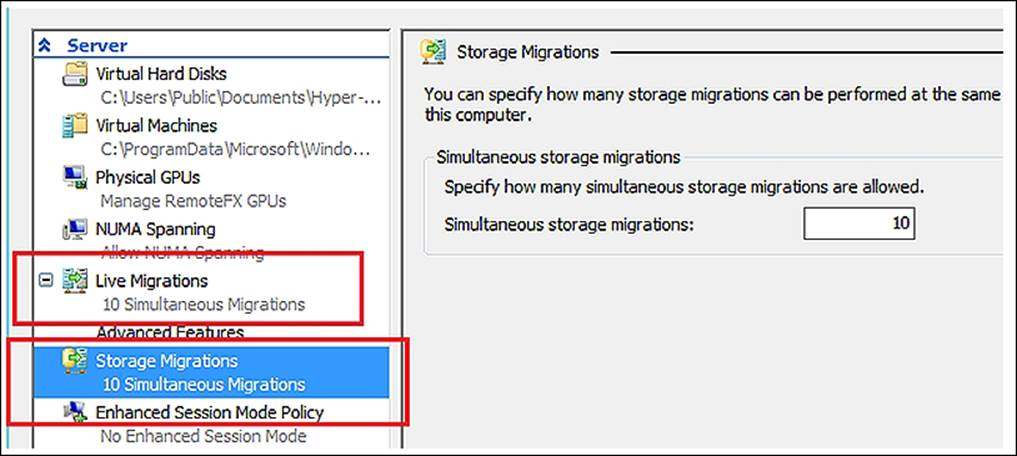
The examples we covered in this section dealt with Hyper-V VMs. Now, let's look at examples to configure properties on the Hyper-V host itself. We will configure our Hyper-V host to allow maximum number of live and storage migrations. The following example sets all the Hyper-V hosts that are part of the Hyper-V cluster to allow 10 simultaneous live and storage migrations:
Get-ClusterNode | select @{l='ComputerName';e={$_.name}} | % {Set-VMHost -MaximumVirtualMachineMigrations 10 –MaximumStorageMigrations 10}

You can verify that the configuration change for 10 live and storage migrations is successfully set by accessing the Hyper-V settings via the Hyper-V manager's GUI console:
You can also extract this information from a cmdlet, shown as follows:
Get-ClusterNode | select @{l='ComputerName';e={$_.name}} | % {Get-VMHost} | select ComputerName, MaximumStorageMigrations, MaximumVirtualMachineMigrations
Next, let's configure the remote video adapter on VMs:

The example shown in the preceding screenshot sets the maximum resolution of the RemoteFX adapter on all virtual machines to 1920 x 1200. Note that the RemoteFx Video adapter should be added to the virtual machine for this cmdlet to work:

The example shown in the preceding screenshot configures the entire virtual storage area network (SAN) with the specified WorldWideNodeName and WorldWidePortName values.
Managing VHDs on virtual machines
To get a list of cmdlets that can be used to manage VHDs, type the following command in your PowerShell window:
Get-Command *vhd*
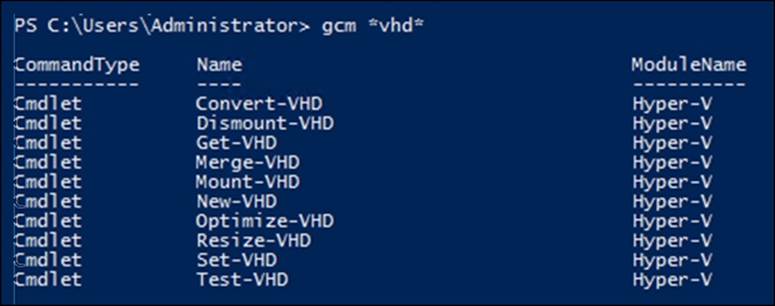
Let's go through some of these cmdlets, shown in the following screenshot, to manage a virtual hard disk. Hyper-V allows you to convert the format, version type, and block size of a VHD file.
The Convert-VHD cmdlet allows you to do this. Type the following cmdlet to convert all the virtual hard disks at a specified location from type .vhdx to .vhd.

The following example converts a set of disks present at a location, from the source disk of the .VHDX format to a destination-fixed disk of the .VHD format; VHDtype specifies the type of converted VHD:

Note
Allowed values for the parameter, VHDtype, are Fixed, Dynamic, and Differencing. The default type is determined by the type of source VHD.
The Dismount-VHD or Mount-VHD cmdlet allows you to dismount or mount an attached VHD. Type the cmdlet shown in the following screenshot to mount and dismount a set of VHDs present at a user-specified location:

The command shown in the preceding screenshot dismounts an attached VHD where the path to the VHD file path is c:\clustrstorage\volume2\testvhdx.vhdx:

The example shown in the preceding screenshot mounts a VHD where the path to the VHD file is C:\ClusterStorage\Volume2\testvhdx.vhdx:
The example shown in the preceding screenshot mounts a set of VHDs present at a location in the read-only mode.
Get-VHD C:\ClusterStorage\Volume2\*.vhdx | % {Mount-VHD –Path $_.path –PassThru | Get-Disk | Get-Partition | Get-Volume}

The example shown in the preceding screenshot attaches a set VHD to the system from a predefined location and gets the volumes associated with it.
Get-VHD C:\ClusterStorage\Volume2\*.vhdx
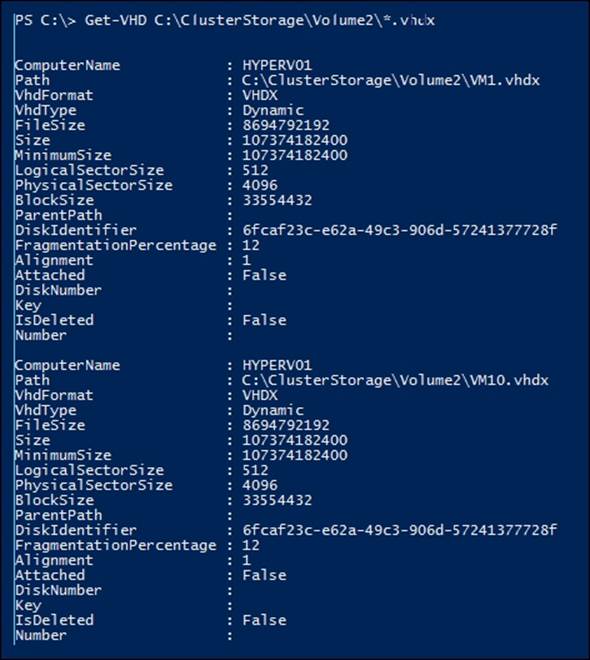
The command shown in the preceding screenshot gets the details of VHDs that are stored at a predefined location.
Get-VHD C:\ClusterStorage\Volume2\*.vhdx | % {Mount-VHD –Path $_.path –PassThru | Get-Disk}
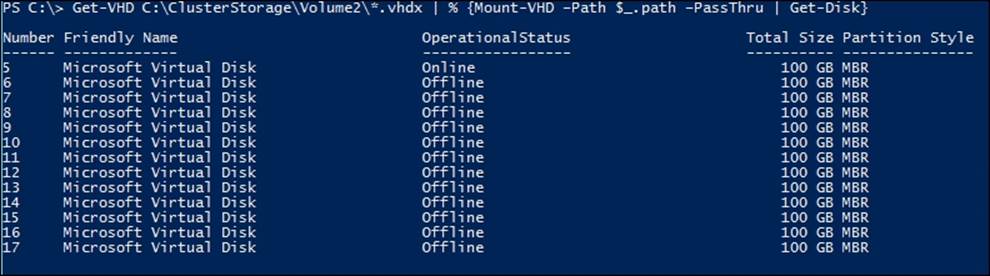
The example shown in the preceding screenshot gets the VHD details attached to the system with the associated disk numbers.
Get-ClusterNode | select @{l='ComputerName';e={$_.name}} | % {Get-VM -ComputerName $_.computername | Select-Object vmid | Get-VHD | ft}
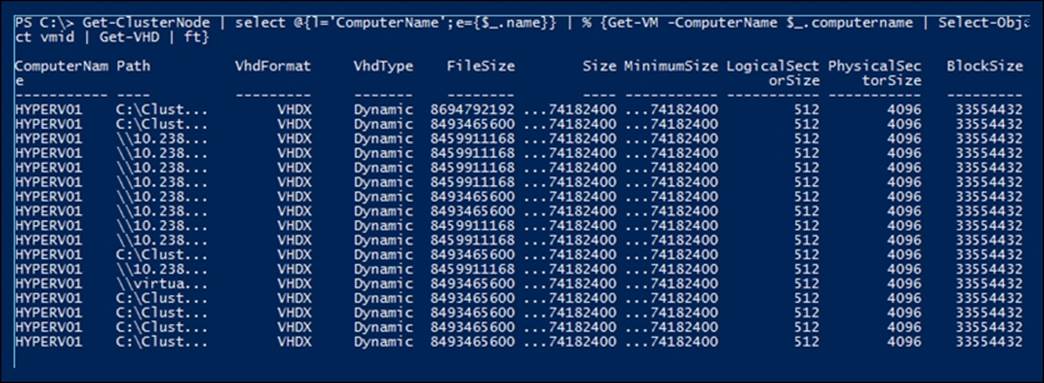
The example shown in the preceding screenshot gets the VHD objects associated with all the virtual machines that are a part of the Hyper-V cluster using the pipeline feature for the Path parameter.
Merge-VHD C:\ClusterStorage\Volume1\VM4\VM4_48706D46-8C3C-414B-B535-DA905237BE81.avhdx

The example shown in the preceding screenshot merges the avhdx file present at a location to its parent VHD. The Merge-VHD cmdlet merges VHDs in a differencing VHD chain. The merge happens from a specified source-child disk to a specified destination child disk. Merge is an offline operation; the VHD chain must not be attached when this is initiated.

The example shown in the preceding screenshot runs the compact operation in the Retrim mode on a set of VHDs present at a location.
Note
Before executing the next cmdlet, make sure that the drive is dismounted/offline or is in the read-only mode.
Optimize-VHD –Path c:\test\dynamic.vhdx –Mode Quick

The example shown in the preceding screenshot runs the compact operation in the Quick mode on a set of VHDs.

The example shown in the preceding screenshot shrinks the VHDX files present at a location to a size of 150 GB (assuming that the VHD object associated with the file path has a minimum size less than or equal to 150 GB).
Note
Before executing the next cmdlet, make sure that the drive is dismounted / offline or is in the read-only mode.
Get-VHD C:\ClusterStorage\Volume2\*.vhdx | % {Resize-VHD –Path $_.path –ToMinimumSize}

The example shown in the preceding screenshot shrinks the VHDX files present at a predefined location to its minimum possible size.

This example shown in the preceding screenshot sets the physical sector size of all the VHDX files present at a location to 512 bytes.
Get-VHD C:\ClusterStorage\Volume2\*.vhdx | % {Test-VHD –Path $_.path}
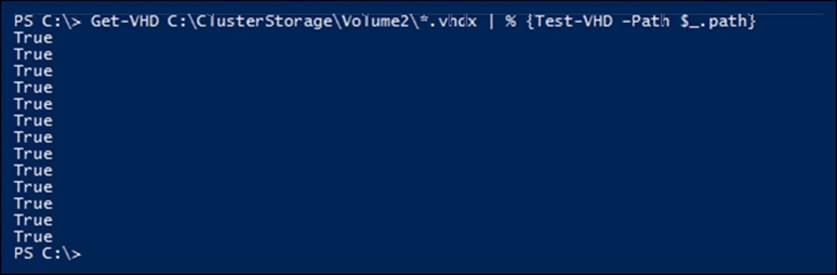
The example shown in the preceding screenshot tests whether the VHD chain at a location is in a usable state.
Summary
In this chapter, we covered important cmdlets related to configuring and extracting properties about virtual machines and their associated Hyper-V hosts. In the next chapter, we will cover the other set of relevant cmdlets that can be used to automate Hyper-V administrative tasks in detail.