Microsoft Hyper-V PowerShell Automation (2015)
Chapter 3. Managing Your Hyper-V Virtual Machines
In this chapter, we will continue to explore the PowerShell cmdlets available in the Hyper-V PowerShell module to manage virtual machine infrastructure components. This chapter has been subdivided into smaller sections and we will be covering the following topics:
· Managing virtual switches and virtual network adapters in virtual machines
· Managing virtual machine migrations
· Managing virtual machine imports, exports, and snapshots
· Managing virtual machine backups with Hyper-V Replica
· Managing virtual machine connect
We will start by taking a deep dive into cmdlets, which can help us manage the virtual machine switches and network adapters; this will help us to understand the various ways to automate network configuration for virtual machines. Next, we will explore the cmdlets that allow a Hyper-V admin to manage virtual machine migrations across hosts and clusters. After that, we will explore cmdlets that allow us to export, import, and use snapshot-based technology on virtual machines, which aids in the quick testing of installed applications on virtual machines and also serves as a backup mechanism. Next, we will also explore the cmdlets related to Hyper-V Replica—a new disaster recovery technology—which allows an administrator to back up a virtual machine to a secondary site and maintain its high availability when the primary data center goes offline. Lastly, we will explore virtual machine connect—a new feature that uses the VMBus as a connection path and allows the administrator to connect to virtual machines without using a network connection.
Managing virtual switches and virtual network adapters
The Hyper-V PowerShell module comes with a set of cmdlets, which can be used to manage the virtual machine network adapters and virtual switches. Virtual machine networks and switches form the core networking component of virtual machines. Virtual switch is a software-based network switch that helps in connecting virtual machines to virtual and physical networks. They can be of three types: external, internal, and private. Once the virtual switches are created, the virtual network adapters created for a virtual machine can be tagged to these virtual switches, allowing the virtual machine to connect to both physical and virtual networks. The virtual network adapters assigned to a virtual machine require it to have the required drivers provided by integration services to be installed on it.
Open a PowerShell prompt, and type the cmdlets shown in the following screenshot to get a list of all the cmdlets that are available to manage the virtual network and virtual switches:
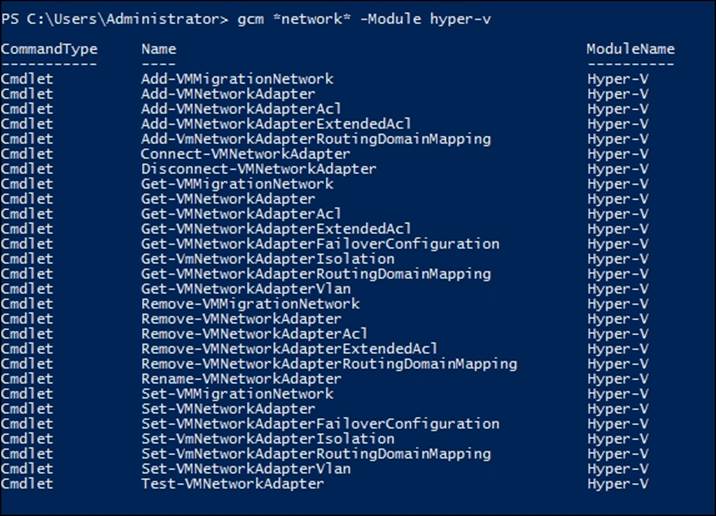
Let's explore these cmdlets and look at their real-world applications.
Managing a virtual machine's migration networks
Let's look at how to add an IPv4 address range as a possible live migration network on the local Hyper-V host by using a subnet mask:
1. Open a PowerShell prompt and type the command shown in the following screenshot:

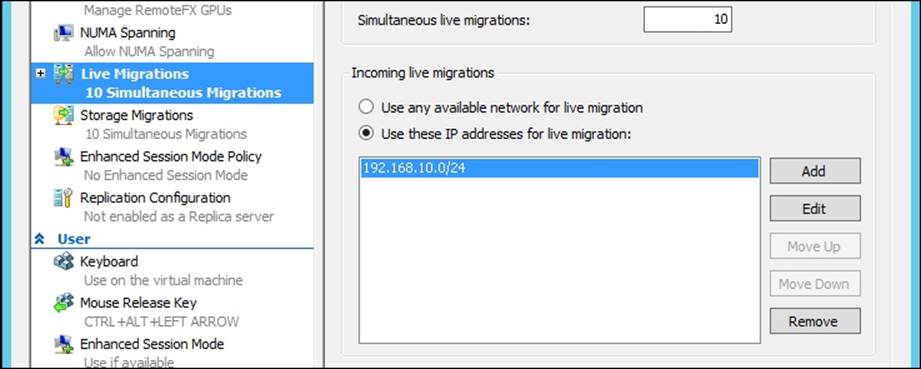
2. Once we execute the cmdlet shown in the preceding screenshot, we will be able to see that the network has been added as a live migration network in the Hyper-V manager:
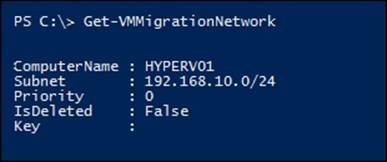
This can also be attained by executing the Get-VMMigrationNetwork cmdlet:
3. Similarly, one can use the Remove-VMMigrationNetwork cmdlet to remove the virtual machine migration network that has been assigned to the Hyper-V host.
4. The command shown in the following screenshot removes all the networks starting with the address, 192.168, for the migration:

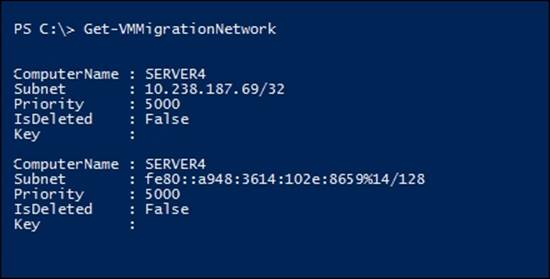
5. To get a list of all the virtual machine's live migration networks on the system, type the cmdlet shown in the following screenshot:
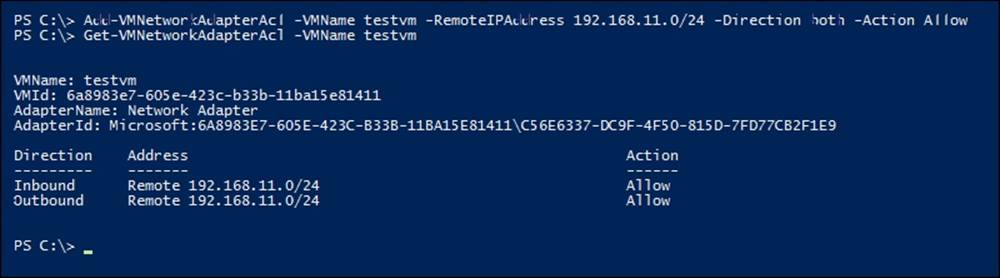
Next, we will look at an example, which adds an Access Control List (ACL) to allow the virtual machine, testvm, to send and receive from traffic on the IP subnet, 192.168.11.0/24. Executing this cmdlet creates an ACL that can be applied to specific traffic that is passing through a virtual machine network.
6. You can also use the Get-NetworkadapterAcl cmdlet to verify the changes that were made:
Configuring virtual machine network adapters with a virtual switch
Now, we will look at the cmdlets that can be used to manage virtual machine migration networks, and later, we will look at some examples on how you can use the Connect and Disconnect network adapter cmdlets to assign a network adapter to a virtual switch.
The InternetAccess cmdlet will connect a virtual network adapter named Internet present in virtual machines Test1 and Test2 to a virtual switch named. For the command shown in the following screenshot to work, the prerequisite is that there should be a network adapter named Internet present on both these virtual machines:

Another use case would be to connect all the virtual machine network adapters present on a virtual machine to a virtual switch. The next example shows how this can be done by using the PowerShell pipeline. The cmdlet shown in the following screenshot illustrates how you can connect all the virtual network adapters in a virtual machine, Test1, to a virtual switch, InternetAccess:

Similarly, let's look at another use case to disconnect all the virtual machine networks from a virtual switch that is available on all the virtual machines hosted on the Hyper-V host. The cmdlet shown in the following screenshot disconnects all the virtual network adapters whose switch name is InternetAccess in all the virtual machines on the local Hyper-V server:

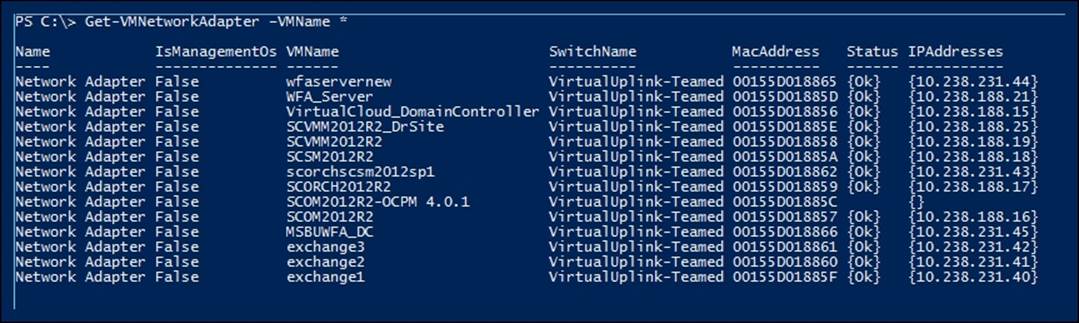
Next, we will take a look at an easy way to extract all the virtual networks attached to the virtual machine. Executing the cmdlet shown in the following screenshot gives more details about the virtual switch MAC addresses and also the IP addresses:
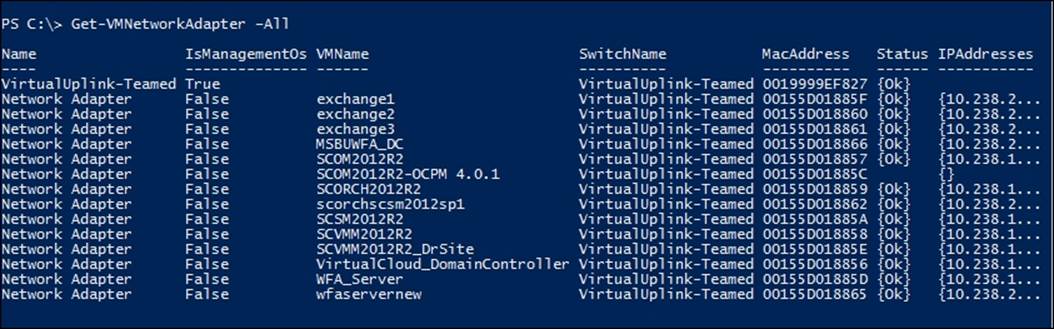
The cmdlet shown in the preceding screenshot when run with the –All switch gives details on all the virtual network adapters on both the virtual machines and the management switches:
Configuring virtual machine network failover settings
Hyper-V allows an administrator to configure failover capabilities for a virtual machine's network adapter IP address after the Hyper-V Replica recovers the virtual machine at the disaster recovery site; these failover details can be extracted and set up by using the next cmdlet. The cmdlet shown in the following screenshot configures a failover IPv4 address for the virtual network adapter, NetworkAdapter01, on a virtual machine, VM01:

The cmdlet shown in the following screenshot clears the current failover IPv4 settings on the virtual network adapter, NetworkAdapter01, for a virtual machine, VM01:

The cmdlet shown in the following screenshot clears the current failover IPv6 settings on a virtual network adapter NetworkAdapter01 for a virtual machine, VM01:

The cmdlet shown in the following screenshot obtains the failover IP address configuration of all the virtual network adapters attached to a virtual machine named VM01:
![]()
Adding, removing, and renaming virtual machine network adapters
Adding a new virtual machine network adapter to a virtual machine is relatively simple by using the Add-VMNetworkAdapter cmdlet. The cmdlet shown in the following screenshot adds a network adapter, New Network, to a virtual machine named SCOM2012R2_1:

You can also remove the virtual machine network adapter attached to a virtual machine by using the Remove-VMNetworkAdapter cmdlet. The example shown in the following screenshot removes the network adapter, Network Adapter, from a virtual machine namedSCOM2012R2_1:

Similarly, the example shown in the following screenshot renames all the virtual network adapters of a virtual machine, SCOM2012R2, to NewNetwork:

Configuring a virtual machine's network adapter VLANs
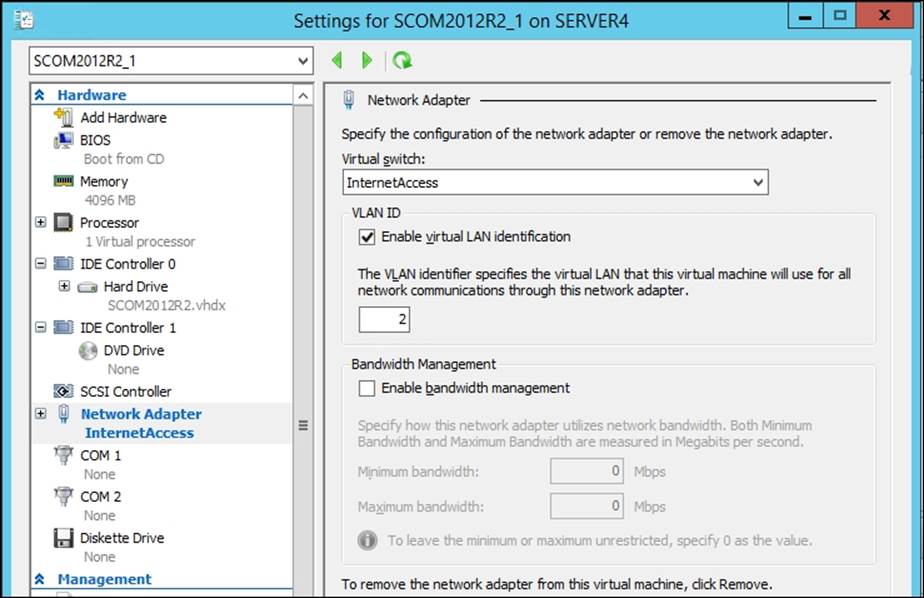
Hyper-V PowerShell cmdlets also allow the administrator to assign a VLAN to a virtual machine network. The cmdlet shown in the following screenshot sets the virtual network adapter(s) in the virtual machine, scom2012r2_1, to the Access mode; also, the traffic sent by this virtual machine is tagged with the VLAN ID, 2:

The Get-VMNetworkAdapterVlan cmdlet can also be used to extract the preceding information. We can also untag virtual machines from a VLAN. The example shown in the following screenshot gets the virtual machine, scom2012r2, and sets the virtual network adapters in the virtual machine to the Untagged mode:

Configuring Hyper-V virtual switches and their properties
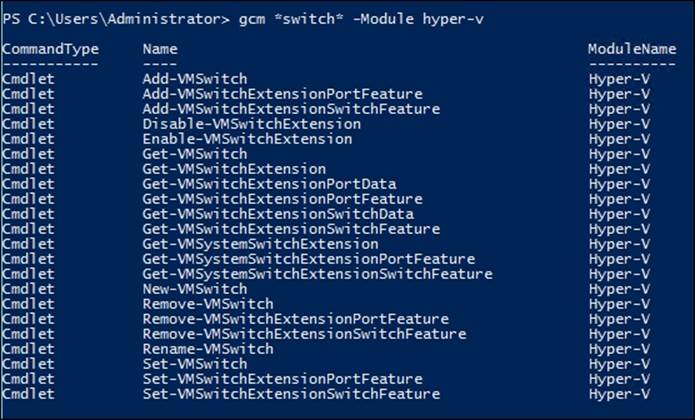
Now that we have explored the cmdlets for managing virtual network adapters, let's look at the cmdlets to manage and configure Hyper-V virtual switches. The Hyper-V PowerShell module also comes with cmdlets to manage virtual machine switches. To get the list of cmdlets that can be used to manage the virtual switch, type the command shown in the following screenshot in a PowerShell prompt:
Next, let's look at some of the cmdlets from each of the sections shown in the preceding screenshot. You can add a VM switch to a resource pool using the Add-VMSwitch cmdlet. Grouping the VM switches to resource pools allows them to be managed more easily. The example shown in the following screenshot adds a virtual switch, Test, to the Ethernet resource pool, Engineering Department:

Next, let's look at another example where we assign a virtual machine switch named Test on the Hyper-V host to the Engineering Department resource pool using the PowerShell pipeline. The example shown in the following screenshot adds a virtual switch, Test, to the Ethernet resource pool, Engineering Department:

Let's see an example of how to work with port security for a virtual machine switch. The example shown in the following screenshot adds a feature to the virtual machine, VM2. The feature here is port security that is supported by the extension—Microsoft Virtual Ethernet Switch Native Extension:

Let's see an example of how to add some features to a virtual switch. The example shown in the following screenshot illustrates how you can add a feature to the virtual switch, External:

You can also enable and disable a virtual machine switch extension using PowerShell. The next example shows how you can do this. The following example disables the WFP, "Microsoft Windows Filtering Platform", on the virtual switch, Internal Switch:

The example shown in the following screenshot enables the WFP, "Microsoft Windows Filtering Platform", on a virtual switch named External:

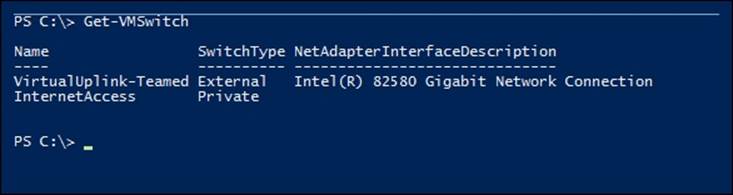
The example shown in the following screenshot gets virtual switches from one or more virtual Hyper-V hosts:
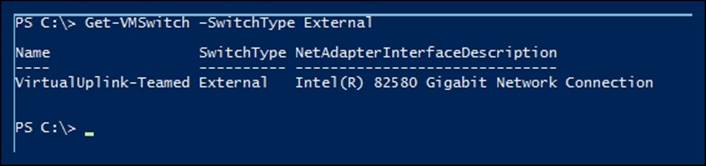
The example shown in the following screenshot gets all the virtual switches that connect to the external network:
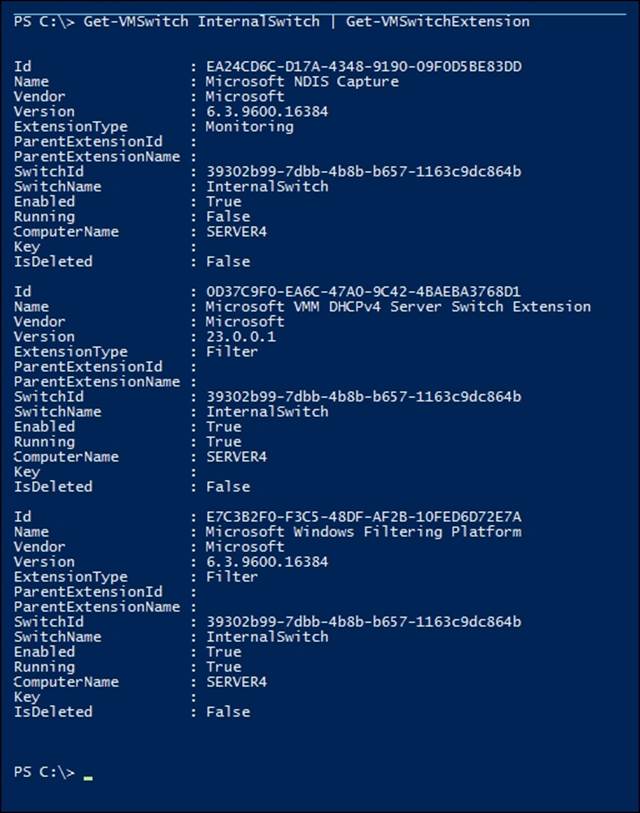
The example shown in the following screenshot gets all the virtual switch extensions available to the virtual switch, InternalSwitch:
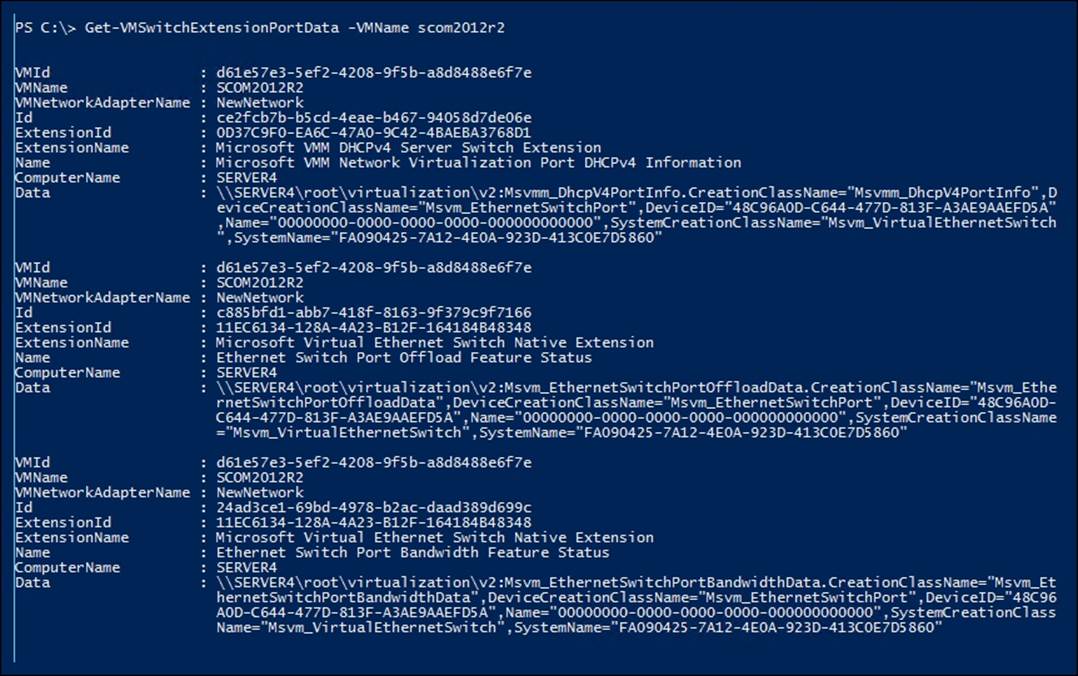
The example shown in the following screenshot gets the port data of the VM switch extension for the virtual machine, scom2012r2:
The example shown in the following screenshot gets a feature configured on the virtual machine, scom2012r2, by the Ethernet Switch Port security settings:

The example shown in the following screenshot gets the switch data from a virtual switch extension that is configured on the virtual switch, External:

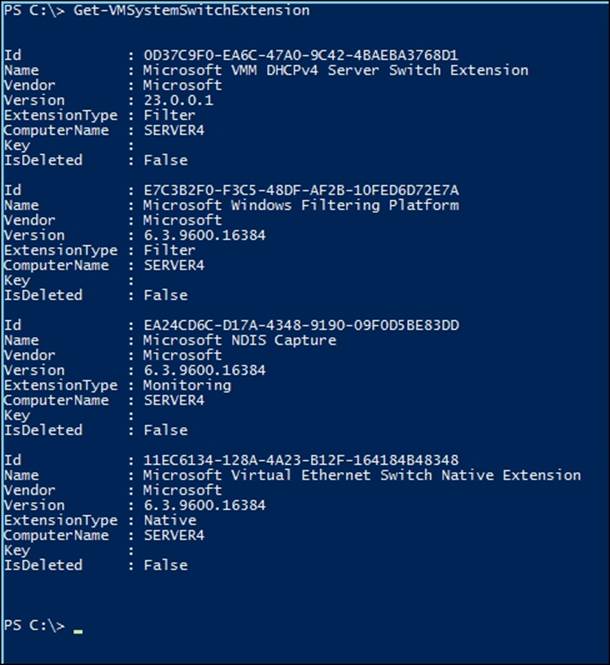
The example shown in the following screenshot gets all the virtual switch extensions that are installed on the system:
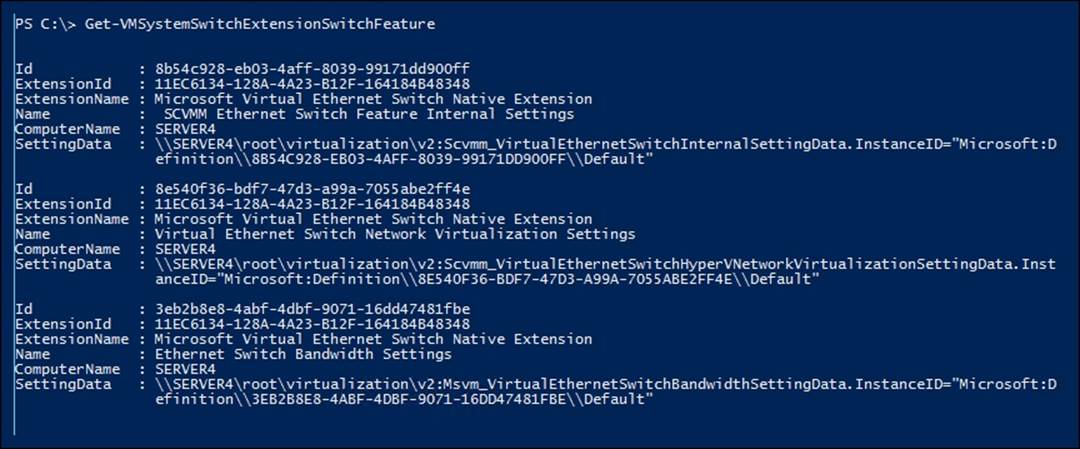
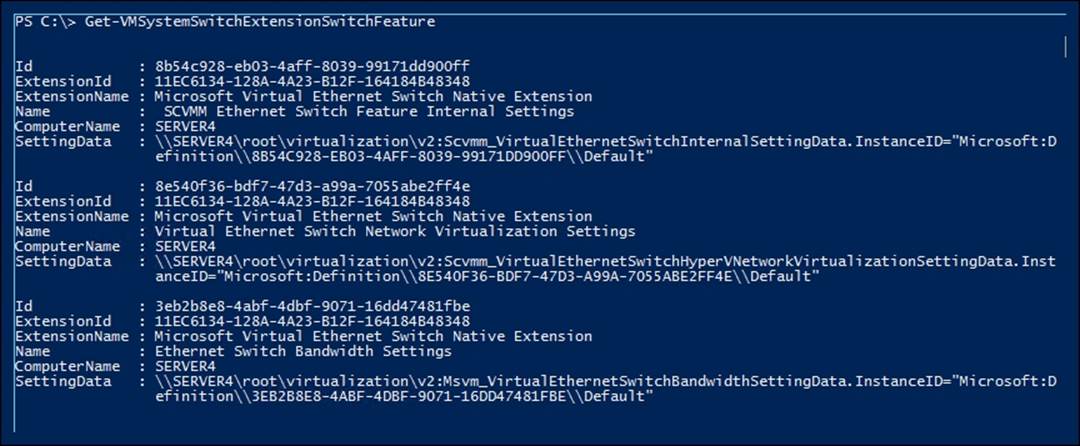
The example shown in the following screenshot gets the features that are configured on a virtual switch:
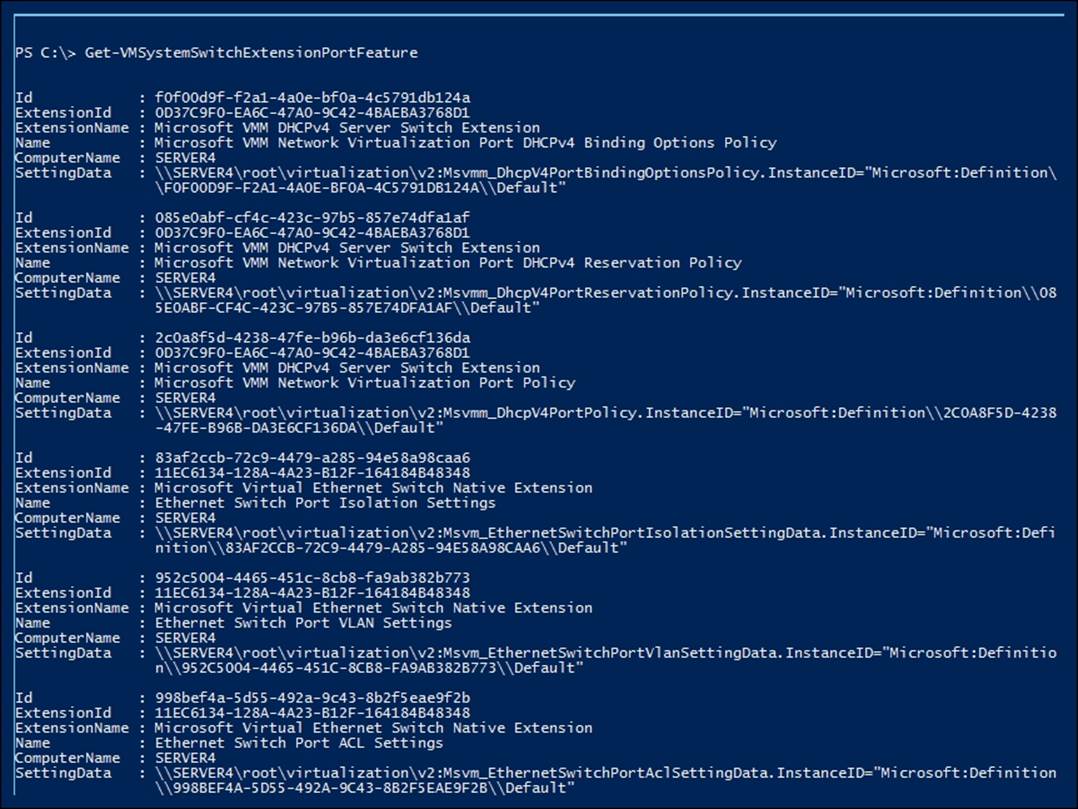
The example shown in the following screenshot gets all port-level features, supported by various virtual switch extensions, which are installed on the system and can be configured on a virtual network adapter on Hyper-V:
The example shown in the preceding screenshot gets all the virtual switch extensions that support switch-level features that can be configured on a virtual switch:
The example shown in the following screenshot removes a feature configured on the virtual network adapter(s) of a virtual machine:

The example shown in the following screenshot converts a virtual switch named WA to an internal switch:

The example shown in the following screenshot sets the minimum bandwidth allocation threshold to 500 Mbps on a virtual switch named CA, for all virtual machines without explicit minimum bandwidth configuration:

The example shown in the following screenshot configures a feature on a virtual network adapter on a virtual machine, VM2:

The feature shown in the following screenshot configures a feature on a virtual switch, External:

Creating and removing Hyper-V virtual switches
Now, let's create a new virtual machine switch for handling Quality of Service (QoS) traffic for a Hyper-V host using the New-VMSwitch cmdlet. The previous example creates a new QoS switch, which binds to a network adapter called Team-NIC2-VMNetwork andsupports a weight-based minimum bandwidth:

The example shown in the following screenshot removes a virtual switch named QoS Switch:
![]()
The example shown in the following screenshot renames the virtual switch, QoS Switch, as IIS Switch:

Managing virtual machine migrations
Hyper-V PowerShell cmdlets allow you to move the virtual machine from one host to another. It not only allows you to move only the virtual machine, but also the virtual machine and the associated storage, if needed.
Type the following command to get the list of all cmdlets that can be used to move the virtual machine from one Hyper-V host to another:
gcm *move* -Module hyper-v
The following screenshot shows the output of the preceding command:

As you can see, there are two cmdlets present—one to move a virtual machine and the other to move the virtual machine along with the virtual machine storage. The command shown in the following screenshot migrates a live virtual machine live called "New Virtual Machine" to a remote Hyper-V host named server2:
![]()
The command shown in the following screenshot moves a virtual machine, Test VM, to a remote computer server and places the files associated with the virtual machine in the specified locations under D:\TestVM on the remote computer:

The command shown in the following screenshot moves the virtual machine, Test VM, to the remote computer, remoteServer, and moves all the files associated with the virtual machine to D:\TestVM on the remote computer:

The command shown in the following screenshot moves all the files associated with a virtual machine, Test VM, to D:\TestVM:

Managing virtual machine imports, exports, and snapshots
Exporting virtual machines allows you to have a backup of the virtual machine that is stored safely at a predefined location and can be later imported if the live VM goes offline or is corrupted. Taking snapshots of virtual machines allows you to create a state as backup of the virtual machine. It also allows the application admin to test configuration changes on a VM after installing an application or applying a hotfix. These differences from the snapshot can be either applied to the virtual machine to go back to a state in time or can be merged with the current state of the virtual machine.
Importing and exporting virtual machines
Using the Hyper-V PowerShell cmdlets, you can either import, export, or take virtual machine snapshots. The Import-VM cmdlet imports a virtual machine from a file. The next example shows how you can use this cmdlet to import a virtual machine into your environment.
The following example imports the virtual machine by copying its files to the default virtual machine and the virtual hard drive storage locations of the Hyper-V host. The imported virtual machine will be given a new unique identifier and not the one in the configuration file. This is useful when you want to import multiple copies of a virtual machine since each virtual machine must have a unique identifier. The following screenshot shows how the Import-VM cmdlet imports a virtual machine into your environment:
![]()
The example shown in the following screenshot imports the virtual machine from its configuration file. The virtual machine is registered in place, so its files are not copied:

Importing a virtual machine to a different Hyper-V host can be a bit tricky, as there can be compatibility issues between the destination Hyper-V host and the current Hyper-V host from which the virtual machine was exported.
The following example shows a similar example. Here, we are trying to import a virtual machine, which was exported from a different Hyper-V host. This led to an error, asking us to run the Compare-VM cmdlet to find out the virtual machine's incompatibilities with the Hyper-V host:

Next, we use the Compare-VM cmdlet to save the compatibility report:
![]()
Formatting the compatibility report reveals that the virtual network adapter was connected to the switch, Production, during the export, and the current Hyper-V host has no switch by that name:
$report.Incompatibilities | Format-Table –AutoSize
The following screenshot displays the output:

Next, we disconnect the network adapter, which caused an error as per the compatibility report. To disconnect the virtual network adapter, run the following cmdlet:
$report.Incompatibilities[0].Source | Disconnect-VMNetworkAdapter
![]()
Once the incompatibilities are fixed, we again generate a new compatibility report to determine if the virtual machine is compatible with the Hyper-V host:
Compare-VM –CompatibilityReport $report
![]()
We can see that there are no incompatibility messages in the output of $report:
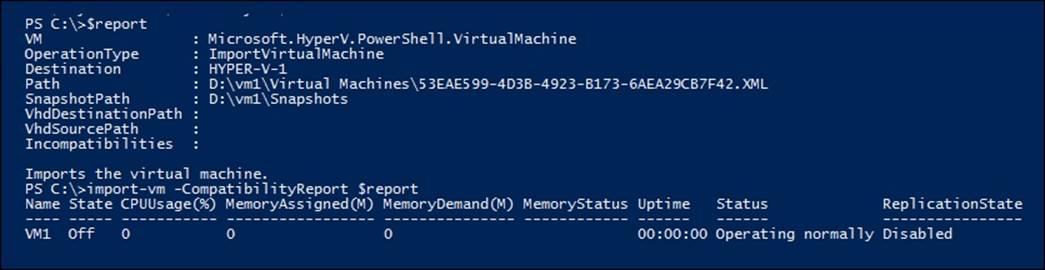
Now, when we try to import the virtual machine whose configuration was not earlier compatible with the Hyper-V host, we see that the virtual machine gets imported successfully:

Similarly, to export a virtual machine, you can use the Export-VM cmdlet. The Export-VM cmdlet exports a virtual machine to disk. This cmdlet creates a folder at a specified location with three subfolders: Snapshots, Virtual Hard Disks, and Virtual Machines. TheSnapshots and Virtual Hard Disk folders contain the snapshots and the virtual hard disks of the specified virtual machine respectively. The Virtual Machines folder contains the configuration XML of the specified virtual machine. The example shown in the following screenshot exports the virtual machine, Test, to the root of the D drive:

The example shown in the following screenshot exports all the virtual machines to the root of the D drive. Each virtual machine will be exported to its own folder:

Managing virtual machine snapshots
The virtual machine snapshot nomenclature in PowerShell has been changed to Checkpoint-VM. To get the list of all cmdlets that can be used to checkpoint a VM, type the command shown in the following screenshot in a PowerShell prompt:

Let's start exploring some of these cmdlets. Let's start with the cmdlet, which allows you to take a VM snapshot of the Checkpoint-VM cmdlet. The Checkpoint-VM cmdlet creates a snapshot of a virtual machine. Type the command shown in the following screenshot in a PowerShell prompt to checkpoint a VM.
The command shown in the following screenshot checks the virtual machine, Test, on the Hyper-V host, Server1, and creates a snapshot of it:

Another example of checkpointing a VM is shown in the following command line:
CheckpointVM –Name Test –Computername Server1 –Snapshotname "My New Snapshot"
There are a number of cmdlets, which are available to manage the virtual machine snapshots. To get a list of all the cmdlets that can be used to manage the virtual machine snapshots, type the command shown in the following screenshot in a PowerShell prompt:

The example shown in the following screenshot exports a snapshot, Base Image, of the virtual machine, TestVM, to D:\:
![]()
The example shown in the following screenshot gets all the snapshots of the virtual machine, TestVM:

The example shown in the following screenshot gets all the standard snapshots of the virtual machine, TestVM:

The example shown in the following screenshot gets the immediate parent of a snapshot before applying the updates to the virtual machine, TestVM:

The example shown in the following screenshot gets the immediate child snapshots of $snapshot before applying updates to the virtual machine, TestVM:

The example shown in the following screenshot deletes all the snapshots of the virtual machine, TestVM, whose names start with Experiment:

Note that removing a snapshot takes a little while, depending on how old the snapshot is and how much data has changed between the dates of the merge. The following example deletes all the snapshots of the virtual machine, TestVM, that are older than 90 days:

The example shown in the following screenshot renames the snapshot, Configuration 2, of the virtual machine, TestVM, to Configuration 2: applied all updates:

The example shown in the following screenshot restores the snapshot, Base image, of the virtual machine, TestVM:

The example shown in the following screenshot applies the most recent snapshot to all the virtual machines with no confirmation prompts:

Managing virtual machine backups with Hyper-V Replica
Hyper-V Replica was a new feature introduced in Windows Server 2012. In Windows 2012 R2, some new enhancements were introduced into Hyper-V Replica, which include the replica frequency throttling and the feature to extend the replica.
The example shown in the following screenshot configures the replication of testvm on the local Hyper-V host and directs replication traffic to port 80 on a replica server named server04.test.com, using Kerberos as the type of authentication:

The example shown in the following screenshot configures the replication of all the virtual machines on the local Hyper-V host and directs replication traffic to port 80 on a replica server named server04.test.com, using Kerberos as the type of authentication:

The example shown in the following screenshot gets the replication settings of all the replication-enabled virtual machines on the local Hyper-V host:
The example shown in the following screenshot gets the replication settings of all the virtual machines in the Replicating state:

The example shown in the following screenshot gets the replication configuration of the local replica server:

The example shown in the following screenshot imports the initial replication files for a virtual machine named VM01 from the location, d:\VMImportLocation\VM01:

The example shown in the following screenshot gets the replication monitoring details of a virtual machine named VM01:

The example shown in the following screenshot gets the replication monitoring details of all the virtual machines that have a replication health as Warning:

Virtual machine replication can be removed by using the Remove-VMReplication cmdlet. The example shown in the following screenshot removes the replication relationships from all the replication-enabled virtual machines on the local Hyper-V host:

The example shown in the following screenshot resets the replication statistics of all the replication-enabled virtual machines on the local Hyper-V host:
![]()
The example shown in the following screenshot resynchronizes replication of the virtual machine, VM01:

The example shown in the following screenshot schedules the resynchronization of the replication for the virtual machine, VM01, to start at 5:00 AM on August 1, 2012:

The example shown in the following screenshot configures the recovery history and the application-consistent recovery points of the virtual machine, VM01:

The example shown in the following screenshot reverses the replication of the virtual machine, VM01:

The example shown in the following screenshot configures the local host as a replica server and specifies Kerberos for authentication:
Set-VMReplicationServer $true –AllowedAuthenticationType Kerberos

The example shown in the following screenshot starts initial replication over the network for all the virtual machines on the local Hyper-V host for which the initial replication is pending:
![]()
The example shown in the following screenshot starts initial replication over the network for the virtual machines whose destination path is mentioned, on the local Hyper-V host for which initial replication is pending:
![]()
The example shown in the following screenshot stops the initial replication of all the virtual machines whose initial replication is in progress on the local replica server:

The example shown in the following screenshot stops all ongoing replications of virtual machines on the local Hyper-V server:

The example shown in the following screenshot suspends replication of all virtual machines on the local Hyper-V host:

Throttling the Hyper-V Replica traffic involves changing the port used for the Hyper-V Replica from the default 80 to 443 (which can be done in the GUI or via Windows PowerShell). Then, use QoS to limit bandwidth at different times of the day for that port. This effectively throttles the transmission of the write logs.
We need to use the NetQoS policy to throttle the replica traffic; this can be done via PowerShell using the New-NetQosPolicy cmdlet. Based on the destination port (the port on which the replica server has been configured to receive replication traffic—maybe it's port 80 in your case) or the destination subnet, you can specify a throttling value, (-ThrottleRateActionBitsPerSecond), or assign a weight, MinBandwidthWeightAction.
The New-NetQosPolicy cmdlet creates a new network QoS policy. A QoS policy consists of two main parts: match conditions (also known as filters) and actions. Match conditions such as the name by which an application is run on Windows Server 2012 and later versions or a TCP port number decide to what traffic the policy is relating. Parameters such as DSCPAction and ThrottleRateAction determine how the policy will handle the matched traffic. Besides match conditions and actions, there are also some general parameters such as NetworkProfile and Precedence that the users can customize for a QoS policy. These are shown in the following screenshot:
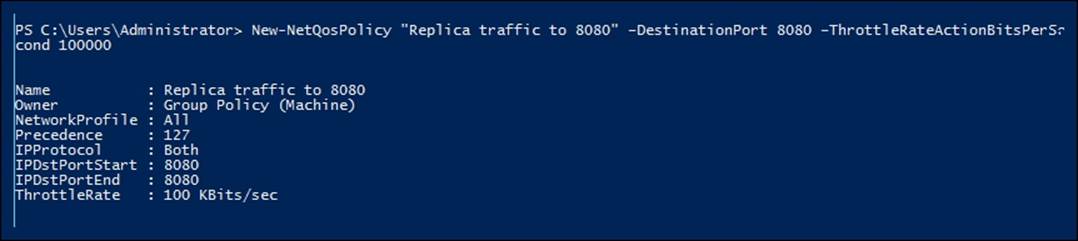
The illustrated solution of replica shown in the preceding screenshot throttling would be to limit traffic based on the destination port. In this case, all the traffic from the Hyper-V host to a specific destination port gets throttled.
Windows 2012 R2 introduced some major enhancements in Hyper-V Replica. A new feature is extended replication. In extended replication, your replica server forwards changes that occur on the primary virtual machines to a third server—the extended replica server. After a planned or unplanned failover from the primary server to the replica server, the extended replica server provides further business continuity protection. You can configure extended replication by using the –Extended option in Windows PowerShell.
Managing virtual machine connections
With Windows Server 2012 R2 Hyper-V, Hyper-V is able to redirect local resources to a virtual machine session using the Virtual Machine Connection tool. This enhanced session mode connection uses the remote desktop connection session via the virtual machine bus (VMBus). Therefore, the network connectivity to the virtual machine is not required.
Let's look at the cmdlets that will be used to manage the virtual machine connect feature:

The preceding command gets a list of all the users who have access to connect to any virtual machine on the local computer. The following example assumes that the Grant-VMConnectAccess cmdlet has been run previously for at least one user account:

The command shown in the following screenshot provides a user with virtual\administrator access to connect to a virtual machine named exchange1:

The command shown in the following screenshot revokes the access of user, virtual\administrator, to connect to a virtual machine named exchange1:

Summary
In this chapter, we covered some of the most commonly used administrative tasks and saw the PowerShell way of automating them. In the next chapter, we will look at ways to create reusable PowerShell scripts for day-to-day Hyper-V management activities using the cmdlet concepts that you learned in the previous and current chapters.
All materials on the site are licensed Creative Commons Attribution-Sharealike 3.0 Unported CC BY-SA 3.0 & GNU Free Documentation License (GFDL)
If you are the copyright holder of any material contained on our site and intend to remove it, please contact our site administrator for approval.
© 2016-2026 All site design rights belong to S.Y.A.