Mastering Hyper-V 2012 R2 with System Center and Windows Azure (2014)
Chapter 11. Windows Azure IaaS and Storage
Microsoft has long provided solutions an organization can run in its own datacenters, such as Windows Server, Exchange, SQL Server, and more. Microsoft has also long provided public solutions such as Hotmail (now Outlook.com), Windows Update, MSN, Xbox Live, Bing, and Office 365. These services are all Software as a Service (SaaS) type solutions, which means they offer a complete service online. Just as the private cloud gained momentum, so too did the public cloud, the idea of services and applications being available over the Internet. Organizations could bring their own services or entire virtual machines. Microsoft's offering in this space is Windows Azure, which has constantly been evolving, with new capabilities added regularly.This chapter will focus on a relatively new offering in Windows Azure, Infrastructure as a Service (IaaS), which allows customers' virtual machines to be hosted on Microsoft infrastructure accessed over the Internet. Additionally, we'll explore Windows Azure Storage and how it can benefit organizations in different ways.
In this chapter, you will learn to
· Explain the difference between Platform as a Service and Infrastructure as a Service
· Connect Windows Azure to your on-premises network
· Move data between on-premises and Windows Azure
Understanding Public Cloud “as a Service”
I briefly introduced the core types of cloud services in Chapter 1, but Figure 11.1 shows the key types of cloud services again so we can review them as they relate to Windows Azure. The image shows the main elements of a service and the boundaries of responsibility for the different cloud service options.
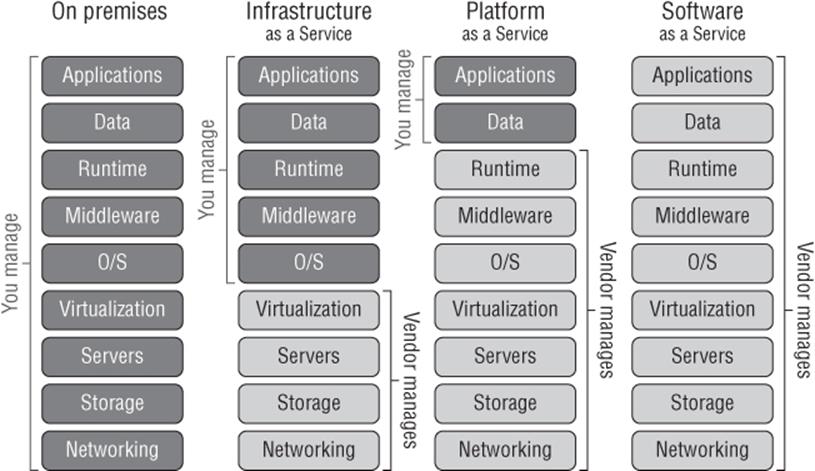
Figure 11.1 The key types of public cloud services
As you move from on-premises to Infrastructure as a Service (IaaS) to Platform as a Service (PaaS) and finally to Software as a Service (SaaS), the elements of the solution that you, as an organization, are responsible for decrease, until with SaaS there is no infrastructure management at all. Instead, only basic administration may be required, such as deciding which accounts should have which capabilities in the service.
IaaS can be thought of as a virtual machine in the cloud. The provider has a virtual environment and you purchase virtual machine instances, and you then manage the operating system, the patching, the data, and the applications within them. The most well-known example of IaaS today is Amazon's Elastic Computing 2 (EC2), which offers organizations the ability to run operating systems inside Amazon's virtual environment, Microsoft introduced an IaaS component to Windows Azure in 2012.
PaaS provides a framework in which custom applications can run. Organizations need to focus only on writing the very best application within the guidelines of the platform capabilities and everything else is taken care of. There are no worries about patching operating systems, updating frameworks, backing up SQL databases, or configuring high availability. The organization just writes the application and pays for the resource used. Windows Azure is the classic example of a PaaS and was the original focal point for Windows Azure.
SaaS is the ultimate in low maintenance. The complete solution is provided by the vendor. There is nothing to write or maintain by the organization other than configuring who in the organization should be allowed to use the software. Commercial examples of SaaS would be Outlook.com, which is a messaging service on the Internet. The enterprise example could be Office 365, which provides a cloud-hosted Exchange, SharePoint, and Lync service all accessed over the Internet with no application or operating system management for the organization.
The first type of cloud solution, Infrastructure as a Service, differs from an on-premises solution where you are responsible for everything because IaaS enables your focus to shift to the components within a virtual machine. This is because IaaS basically provides the ability to host virtual machines. You can see in Figure 11.1 that the IaaS provider is responsible for the networking, storage, server, and virtualization layer and then you are responsible for all aspects of the operating system within the VM, the middleware, the runtime, data, and of course the application. While it may seem like IaaS gives the most flexibility, the trade-off is that the amount of management still required is high. Many organizations, however, may first tip their toe into the cloud using IaaS and then move onto the other types to cut down on management and gain benefits offered with PaaS and SaaS.
Platform as a Service changes the amount of management for your organizations drastically. With PaaS, you only have to worry about the application you manage and the data, leaving everything else to the PaaS provider. I should point out that although you manage the data, the provider likely still provides services to actually replicate and protect the data.
Finally, with Software as a Service you are responsible for nothing. You just use the cloud-based software. Not every system can be SaaS because some organizations have their own custom code, but the goal for many organizations is a combination of PaaS and IaaS, and there will always be some systems on premises.
Unless your organization enjoys IT infrastructure management, the end goal would be SaaS for everything. With SaaS, the complete service is provided, backed up, updated, and maintained completely for you. Your only work is the basic administration, but there are only certain types of solution available as SaaS. Popular examples include solutions such as messaging, collaboration, and customer relationship management. There are times when even if a SaaS is available, there may be limitations in its flexibility because, remember, the vendor is providing this service for thousands of different customers on a shared infrastructure, which will limit the amount of customization possible. This means even if a solution is available as SaaS, it may not be a good fit for some organizations.
If a SaaS solution is not available, then the next best choice is PaaS because you can focus on just your application, providing you write the application using languages supported by the PaaS offering and stay within its guidelines. The challenge for many organizations is that they have legacy applications that don't fit within the guidelines and the developers long since left the company, leaving no documentation and no hope of making the application work in a PaaS environment. Additionally, many organizations run applications by third parties who don't follow the guidelines for the application to run in PaaS. This means that although PaaS is a great solution, many applications are simply not a fit.
Then you get to IaaS, which is just a VM in the sky essentially. Providing the operating system you wish to use is supported by the IaaS supplier, your application should be able to be moved up to the IaaS environment without modification. This is why IaaS is really the big focus for public cloud computing right now. It enables pretty much anything to run, but there are still some restrictions that may mean some services stay on premises. These restrictions could be technical, such as scalability or the type of functionality needed, or they could be legal, such as restrictions on certain types of data leaving the company's premise or leaving the country (IaaS vendors don't have datacenters in every country, which means outside of primary locations, a company's actual hosting may be provided in a datacenter geographically located in another country). It could even simply be a matter of trust. Many organizations are not comfortable with hosting some types of workloads and data off premises because of security concerns.
I think of IaaS as a great “on-ramp” to the public cloud. If an organization wants to start with public cloud services, then start with IaaS. Test specific workloads, and then work from there, such as using other types of services and more important workloads.
When Public Cloud Services Are the Best Solution
I don't think there is a right or wrong answer for this. I know some companies want to move their entire infrastructure to public cloud services and get out of the infrastructure business completely. Other companies want to use the public cloud for disaster recovery purposes. Others want to use it for test/dev scenarios. Still others want to use it for specific projects. And some don't want to get anywhere near it! Each of these companies has specific drivers and factors that guide its public cloud strategy, and once again, they could be based on technical considerations. They can also be based on personal preference, which may not be grounded in very much fact but they are still very real factors in the decision process to leverage the public cloud.
At this point I want to take a step back and talk about a key advantage of the public cloud over on-premises solutions, and that is you pay for what you use. It's consumption-based pricing. There are various units that are used for pricing with Windows Azure, such as computer minutes (a change from the per-hour billing Windows Azure used to use), which vary in price depending on the size of the virtual machine that is running and various other configurations. The key point is that if I run 10 four-vCPU virtual machines in Windows Azure for 4 hours a month, I pay for only those 4 hours instead of having the cost of running servers all month, which would be the case if they were run on premises.
You also pay for storage, for SQL Server storage, and for bandwidth used out of the Windows Azure datacenters. Notice that you don't pay for inbound (ingress) traffic into Windows Azure. On the compute side, you are paying for when the virtual machine is deployed. If the VM is idle or if it is running at full capacity, you pay the same unless you completely deprovision it, which I will cover in more detail later. That is why it's important that you don't create instances and forget to deprovision them.
Many organizations may have certain tasks that perhaps run only once a month but require huge amounts of compute or storage when they run. It is a waste to have all that computer and storage fabric idle for most of the month. This would be a great type of application to run on Windows Azure because you would deploy only the application and scale to many instances during those critical few days each month. There are other types of business that may get really busy on a particular day of the year, and only on that day do those organizations require thousands of instances of their website VMs and application VMs, while the rest of the year they may need only a hundredth of those instances or perhaps run on premises during that time. The sidebar “Super Bowl Sunday and the American Love of Pizza” takes a look at a great use of Windows Azure.
Super Bowl Sunday and the American Love of Pizza
I'll be up front; I'm English, and I don't understand the American football game. I've tried to watch it a couple of times. I even watched the 2006 Super Bowl—it seemed like it took 5 hours for 2 minutes of action, then a 5-minute commercial break, and then a different set of players coming out and moving the ball a couple of yards. It would be hard to get me to watch it again, but nonetheless, it's very popular in the United States. As Americans watch the Super Bowl, they like to eat pizza, and what's interesting is that the Super Bowl represents a perfect storm for pizza ordering peaks. During the Super Bowl, people throughout the entire United States—across all four time zones—are in sync and ordering at the same times, during breaks between the first and second quarters, at halftime, and between the third and fourth quarters.
These three spikes require 50 percent more compute power to handle the ordering and processing than a typical Friday dinner time, which is the high point for pizza ordering.
Normally systems have to be built to handle the busiest time, so our pizza company would have to provision capacity of 50 percent more than would ever be needed just for that one day. Remember also that it's 50 percent more than is needed for dinner time on Friday, which itself is much more than is needed any other time of the week. This would be a hugely expensive and wasteful exercise. Instead, Windows Azure is used.
During normal times, there could be 10 web instances and 10 application instances handling the website and processing. On Friday between 2 p.m. and midnight, this increases to 20 instances of each role, and then on Super Bowl Sunday between 12 p.m. and 5 p.m., this increases to 30 instances of each role. I'm making up the numbers of instances, but the key here is that the additional instances exist only when needed and therefore the customer is charged extra only when additional resources are needed and not at other times. This elasticity is key to public cloud services.
To be clear, I totally understand the eating pizza part!
The pizza scenario is a case of Predictable Bursting, which is a known period of increased utilization and is one of the scenarios that is perfect for cloud computing. Figure 11.2 shows the four main scenarios in which cloud computing is clearly the right choice. There are many other scenarios that work great in the cloud as well, but these four are uniquely suited because there are periods of utilization, and with the public cloud, you pay only for what you use.

Figure 11.2 The key types of highly variable workloads that are a great fit for consumption-based pricing
In the Growing Fast scenario, a particular service's utilization is growing very rapidly and a traditional on-premises infrastructure may not be able to scale fast enough to keep up with demand. Leveraging the “infinite” scale of the public cloud removes the danger of not being able to keep up with demand.
With Unpredictable Bursting, there may be big bursts in utilization, but the exact timing cannot be planned, and with the On and Off scenario, services are needed at certain times but completely turned off at other times. This could be in the form of monthly batch processes that run for only 8 hours a month, or it could be used by a company such as a tax return accounting service that runs for three months out of the year.
While the use of the public cloud is a no-brainer in these four cases, there are still many other scenarios (some I hinted at in the beginning of this section) in which a public cloud solution is a good option. Additionally, while these four scenarios are great for the public cloud, some are also a good fit for hybrid solutions with a mix of on-premises and public cloud services. Consider the various bursting scenarios like our pizza example. The normal baseline could be handled on premises but the bursts could be expanded out to use public cloud capacity.
For startup organizations, there is a saying, “Fail fast.” This does not mean the goal of the startup is to fail but rather if it is going to fail, it's better to fail fast because less money is wasted than would be in a long drawn-out failure. The public cloud is a great option for startups because very little up-front capital expenditure is needed to buy servers and datacenter space. Instead, the startup has just operating expenses, paying for the amount of service it actually uses. This is why startups like services such as Office 365 for their messaging and collaboration. Not only do they not need infrastructure, they don't need messaging administrators to maintain it. Public cloud IaaS is a great solution for virtual machines because, once again, no up-front infrastructure is required and companies pay for what they use. As the company grows, its utilization goes up and so does its operating expenditure, but it's proportional to the business. This type of pay-as-you-go model is also attractive to potential financers because there is less initial outlay and therefore reduced risk.
If your organization needs a highly available application but you don't have the infrastructure to support the level of availability required, Windows Azure is a great fit. This can similarly apply to disaster recovery, and I've actually seen a lot of organizations interested. Some organizations have a main datacenter but not a second datacenter that can be used for disaster recovery. In this case, leveraging a public cloud IaaS can be a good option for a disaster recovery plan. There are a lot of considerations. First, for the smoothest failover, the hypervisor used on premises should match that in the public cloud, which for Windows Azure would be Hyper-V. Otherwise, there are messy conversions when moving between the hypervisors. You also need to consider the best way to keep the virtual machines in Windows Azure IaaS current.
If you have an application that has a fairly short lifetime (maybe related to a specific promotion or advertising campaign), Windows Azure is a great fit. The resources are spun up in Windows Azure for the duration of the workload and then deleted.
Another popular type of workload is development and test workloads, which are lower priority workloads but also tend to be constantly provisioned and deprovisioned, resulting in a lot of overhead for the on-premises infrastructure and IT team. By moving these workloads to the public cloud, you remove that overhead, and if the organization does not currently have private cloud solutions, then the end user experience will also be simpler, which will result in faster provisioning times. I would urge caution here though, because the point of testing is to ensure that an application works as anticipated. The operating system, application, and the data would look the same running on premises or in a public cloud IaaS, and if the same hypervisor is used, the hardware would also look the same. However, the actual underlying networking and the underlying storage is different, and so while initial development and testing can be performed in a nonproduction-like environment, the final user acceptance testing should be performed on premises to ensure that there is not some difference in storage or networking or even the compute that will affect the functionality of the application.
There are some technical limitations to Windows Azure today that relate to elements of compute, network, and storage (and I will cover them in this chapter). However, outside of those, there is really not a workload that couldn't run in Windows Azure IaaS.
The decision about whether a workload is a better fit for on premises or the public cloud really comes down to how well architected and managed an organization's on-premises resources are and what workloads it's been architected to support. If an organization has implemented an on-premises private cloud, helping to maximize resource utilization, pool all resources, ease the ongoing management, and give very fast provisioning capabilities, then many scenarios will be able to be handled efficiently using the on-premises private cloud solution, but there may be specific scenarios where the public cloud is a better fit. If, on the other hand, an organization has not implemented a good management infrastructure, has not pooled resources, and has many siloed resource islands, which has led to limited scalability and slow provisioning, then the public cloud will be a great fit for many more workloads and scenarios. In the next chapter, I will talk in more detail about architecting the right solution.
Windows Azure 101
The focus of this chapter is on Windows Azure IaaS and storage, but Windows Azure does have other capabilities. I want to briefly cover the major ones so you at least have some basic knowledge of the breadth of Windows Azure functionality.
Figure 11.3 shows there are three main building blocks to the Windows Azure platform and then networking to enable various types of connectivity and traffic management. First is Windows Azure Compute itself. It provides the primary compute capabilities of Windows Azure, such as virtual machines, cloud services, and websites plus the Fabric Controller, which actually manages all the virtual machines and hosts that provide the Windows Azure platform. Windows Azure Data Services, as the name suggests, provides storage, backup, and SQL Server capabilities in the cloud, including relational databases, which are not available in the core Windows Azure component. Finally, Windows Azure App Services provides services such as access control and directory services, Service Bus for communication between components both within Azure and outside of Azure, and caching capabilities. There is also a Windows Azure Marketplace that allows buying and selling Windows Azure applications, components, and data sets.
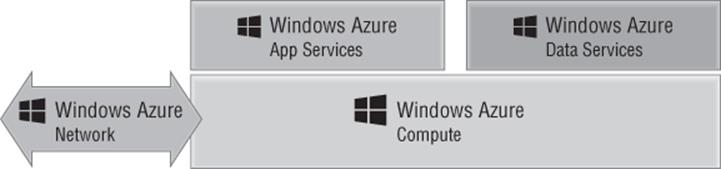
Figure 11.3 The three main building blocks of the Windows Azure Platform: Windows Azure Compute, App Services, and Data Services
In the next sections, I'll cover servers, storage, load balancing, and all of the goodness needed to actually run applications for all of these components. Microsoft has many datacenters distributed throughout the world where Windows Azure applications can run. There are currently four datacenters in the United States and two each in Europe and Asia. When an application is deployed to Windows Azure, the customer can select where the application should be deployed. All datacenters in Windows Azure are paired to protect the data replicated between them in the event of a site failure.
In the following sections, I'll cover the main services available in Windows Azure, but keep in mind that it is a constantly changing service. For the most up-to-date list of available services and to get more details, I recommend viewing www.windowsazure.com/en-us/services/.
Windows Azure Compute
The main building block of the Windows Azure platform is Windows Azure itself, which provides key capabilities to enable cloud-based hosting of applications and data. Windows Azure has evolved, and so have the names of the different types of services and where they sit in the hierarchy, which is why if you looked at Windows Azure a year ago, the components would have seemed different from those I describe today.
The fundamental building block of everything is the virtual machine; this is the part that actually runs the applications, which could be a website, some custom middleware code, or some legacy application. All of the compute capabilities are enabled through virtual machines that vary in size. While virtual machines are directly accessible and used with Windows Azure IaaS, other services such as PaaS, websites, networking, and so on are also built using virtual machines, although they may not be visible to you. The IaaS virtual machines are something I will be focusing on in this chapter.
There is also a Web role, with the sole purpose of acting as the web server for your web applications such as ASP.NET, Classic ASP, PHP, Python, and Node.js applications. The Web role leverages Internet Information Services (IIS) to run the web applications. If you request five instances of a Web role for your web application, behind the scenes five virtual machines running IIS are created and load balanced, all running your web code. If in the future you want additional instances, you just request additional instances and Windows Azure automatically creates new instances of the Web role, deploys your custom code, and adds those new instances to the load balancing. Separate from Web roles is the concept of Windows Azure Web Sites, which provide a fast way to deploy a web application.
For backend applications that are not IIS web applications but leverage PaaS, the Worker role is used, which can run many different types of tasks. Just as with the Web role, when you deploy your application, you just tell Windows Azure how many instances of the role you want and Windows Azure distributes your application to all instances and balances load. Using Worker roles, you could run applications such as Java Virtual Machines and Apache Tomcat, which is really where the Windows Azure flexibility can be seen.
You can have any combination of Web roles, Worker roles, and VMs for your application running inside a cloud service. Some applications may have only Web roles, some may have Web and Worker roles, some could be just VMs. The point is that the flexibility is there to create roles that meet the needs of the application you are deploying.
Windows Azure Compute also features a Mobile Services set of services that are designed to provide the backend for mobile applications running on Windows, iOS, and Android platforms. There are numerous services available, but some of the most useful allow integration into authentication services such as Microsoft and Facebook accounts plus the ability to push notifications to devices.
Windows Azure does not automatically scale instances of all roles. For example, if you had five IaaS VMs and the instances were running at full capacity, it would not add two more automatically. Because you are charged for each instance, that type of automatic scaling behavior could be a problem. Instead, through the Windows Azure website it is easy to request additional instances of a role, which are instantly deployed, or you can leverage System Center App Controller on premises, or you can programmatically request new instances, allowing you to write your own auto-scaling functionality. There are also third-party solutions such as AzureWatch from www.paraleap.com, which automatically scale based on defined thresholds. At the time of this writing, Windows Azure does feature an auto-scale capability for web applications, but this is currently in preview, although it allows scaling within defined minimum and maximum instance numbers.
Then there is the Fabric Controller itself. Windows Azure seems like magic. As a customer, I deploy my application and Windows Azure just spins up as many instances as I tell it to. I can scale up or scale down at any time. My service is always available per the Windows Azure 99.95 percent monthly service-level agreement (SLA), and the operating systems and dependent services are constantly patched and tuned. This magic is enabled by the Windows Azure Fabric Controller, which itself is a distributed application running on Windows Azure that has a fabric agent running on all the virtual machines (except for those that are IaaS VMs) and hosts that make up the Windows Azure Compute fabric. The Fabric Controller constantly monitors, and if it sees a problem, it can spin up new instances of a role. If a request is made for more instances of a role, then the Fabric Controller creates the new instances and adds them to the load balancer configuration. The Fabric Controller handles all patching and updates (again, apart from those VMs that are IaaS VMs), and this is a key reason that to be covered by the 99.95 percent SLA, you must deploy at least two instances of any role. The Fabric Controller will take down one instance to patch, and then once it's running again, it will take down the other. As you have more and more instances, more instances can be patched simultaneously based on groupings of role instances called upgrade domains. When patching occurs, all instances within an upgrade domain are brought down and updated at the same time, and then once the update is complete, the next upgrade domain is updated, and so on.
Windows Azure Data Services
The ability to store data is critical to any service, and Windows Azure Data Services provides numerous types of storage that's available to Azure-based services but also to on-premises solutions.
Windows Azure provides two primary types of storage:
1. Binary Large Object (BLOB) This is just a unstructured collection of bytes that can be used to store basically anything, including large media files. Currently BLOBs can scale up to 200 TB.
2. Tables This can actually be confusing. These are not tables in the relational table sense. For relational database needs, SQL Database is used. A Windows Azure Table is simply a structured store based on key values that is designed to store large amounts of data for massive scale solutions and requires some basic structure but doesn't need relationships between data. Windows Azure Tables can be thought of as a NoSQL implementation, which is a growing class of database management systems that don't use Structure Query Language (SQL) or implement relational table capabilities.
3. Windows Azure Drive I said Windows Azure provides two primary types of storage, but the Windows Azure Drive is a feature that allows a BLOB to actually be used as a virtual hard disk (VHD) and formatted as an NTFS volume. This allows applications to interact with the BLOB as an actual volume, but it's not actually a different type of storage.
Any data stored in Windows Azure is replicated three times within the same datacenter, and Windows Azure BLOB and Table contents are geo-replicated to another datacenter hundreds of miles away to provide resiliency against major site-level disasters. The geo-replication is not synchronous but is performed very quickly, which means there should not be much difference between the data content at the primary location and the geo-replicated location at any given time. Read access is available to the geo-replicated copy of the storage if required. Applications interact with storage using HTTP or HTTPS, and for the Tables, the Open Data (OData) Protocol is used, which actually builds on web technologies to provide flexible ways to interact with data.
Microsoft also provides an Import/Export capability that gives you a clean way to transport large amounts of data where transportation over the network is not practical. With the Import/Export service, the data is copied to a 3.5 inch SATA HDD that is encrypted with BitLocker. The drive is then shipped to the Microsoft datacenter where the data is imported and available in your Azure account.
Where a relational database capability is required, Windows Azure SQL Databases should be used, which provides relational data through a subset of SQL Server capability in the cloud. This gives Windows Azure applications full access to a relational database where needed. A separate pricing model is used for SQL Azure, different than one used for the Computer and Storage components of Windows Azure. It's also priced differently than normal storage because you are really paying for the SQL service rather than raw storage. There are two types of database available: Web Edition, which has a 10 GB maximum database size, and Business Edition, which has a 150 GB maximum database size. Billing is based on database size in gigabyte increments. SQL Reporting is also available.
There are other types of services available. For insight into your big data, Windows Azure features HDInsight, which is a Hadoop-based service that bring great insight into structured and unstructured data. A shared cache service is available to provide improved storage performance. Another service that is gaining traction is Windows Azure Backup, which provides a vault hosted in Windows Azure to act as the target for backup data that is encrypted during transmission and encrypted when stored in Windows Azure. This provides an easy-to-implement cloud-based backup solution. Currently, Windows Server Backup and System Center Data Protection Manager can utilize Windows Azure Backup as a target. Hyper-V Recovery Manager also falls within the Data Services family of services.
Windows Azure App Services
The Windows Azure App Services component encompasses various technologies that can be used to augment the Windows Azure applications. At the time of this writing, there are a number of technologies that make up the Window Azure App Services:
1. Queues These are used for a number of purposes but primarily for reliable and persistent messaging between applications within Windows Azure. A common use for Queues is for the communication between Web roles and Worker roles. Queues have very basic functionality, which makes them fast, but they don't have familiar characteristics such as First In, First Out (FIFO). Instead, the developers implement their own features on top of the Windows Azure Queue feature.
2. Content Delivery Network (CDN) There are Windows Azure datacenters all around the globe as I've already discussed, but there are certain types of data you may want available even closer to the consumer for the very best performance of high-bandwidth content. The Content Delivery Network (CDN) allows BLOB data within Windows Azure Storage to be cached at points of presence (PoPs) managed by Microsoft, which are far greater in number than the Windows Azure datacenters themselves. The first person in a region to download the content would use the CDN to pull down the data, which would obtain the data originally from the Windows Azure Storage BLOB at one of the major datacenters. This content is now stored at that CDN PoP and the data is sent to the first user. The second person to view the data in that location would now pull the data directly from the PoP cache, getting a fast response. Usage of the CDN is optional, and it has its own SLA with a pay-as-you-go pricing structure based on transactions and amount of data. Many organizations leverage the CDN for delivering their high-bandwidth data even if it's separate from an actual Windows Azure application, and it's easy to enable.
3. Windows Azure Active Directory This provides an identity and access management solution that integrates with on premises where required and is leveraged by many Microsoft solutions (such as Office 365) in addition to your own custom solutions. Multifactor authentication is available, enabling your mobile phone to act as part of the authentication process by sending a text with a code required to complete the logon to your mobile phone or even phoning the mobile phone and requiring a key to be pressed.
4. Service Bus This supports multiple messaging protocols and provides reliable message delivery between on-premises and cloud systems. There can typically be problems with on-premises, mobile, and other solutions to communicate with services on the Internet because of firewalls and IP address translation. Communication is enabled through the Service Bus component.
5. Media Services These are focused on providing high-quality media experiences such as streaming of HD live video and also the various types of encoding and content protection.
6. Scheduler As the name suggests, the scheduler enables jobs to run on a defined schedule.
Windows Azure Network
I am going to go into a lot of detail about the Windows Azure virtual networks and the options to connect later in this chapter, so I'm going to skip that for now, but there is another component, Traffic Manager. Traffic Manager allows organizations to define how geographically distributed users should be routed to where applications have been deployed over multiple Windows Azure global datacenters and if that distribution should change based on various times of the day. It could also help redirect incoming requests if one datacenter is not available, almost like network load balancing.
Capabilities of Azure IaaS and How It Is Purchased
I would like to start with a completely strange example of Windows Azure IaaS in action. My goal is to stress a very important point that will aid in your understanding of exactly what IaaS is: IaaS simply provides virtual machines in the cloud. What you do with those virtual machines is pretty much up to you providing the usage is within the capabilities exposed by the IaaS provider. Remember, in our private cloud it was possible to create capability profiles that defined which features were available and what a virtual machine could look like, such as, for example, how may vCPUs it could have, how much memory, how many disks. Just as with a private cloud, you can choose what storage to expose and what the networking will look like. This is exactly the same with Windows Azure IaaS, and as with any IaaS solution, you create virtual machines within the capabilities allowed and then within the virtual machines, you install operating systems that are supported by Windows Azure IaaS or use some of the provided templates in Windows Azure IaaS or even use your own. Behind the scenes, at the time of this writing, Windows Azure actually runs on Windows Server 2012 Hyper-V.
To stress this, one of the first projects I ask people to perform is to spin up a Minecraft server in Windows Azure IaaS. If you don't know what Minecraft is, go ask some kids. They'll tell you it's a popular building game. A Minecraft server allows multiple people to play together to build worlds. It's is actually a Java application and was never designed to run in a public cloud service, so it's a great example to show that you really can run almost anything in an IaaS solution and, specifically, in Windows Azure IaaS. It also helps demonstrate some of the key concepts that I will go into more detail about throughout the rest of this chapter.
Before you get started, you will need a Windows Azure account. Your organization may already have Windows Azure, but they may not want you to create a Minecraft server using their corporate account, so there are other options:
· If you have an MSDN subscription, depending on the subscription level, you have Windows Azure included quota. Activate this subscription via the MSDN subscription site, and under your My Account details, you will see the subscription benefits. One of these is Windows Azure, and there is a link to activate it. Once it's activated, you will have a certain amount of Windows Azure credit each month. For example, MSDN Visual Studio Ultimate subscriptions receive $150 of Windows Azure credit each month and reduced prices for the consumption of resources as detailed at www.windowsazure.com/en-us/offers/ms-azr-0049p.
To put this into perspective, at the time of this writing, it costs around $45 to run a single vCPU VM in Windows Azure for an entire month. This means I could run three small virtual machines all month in Windows Azure with the Ultimate MSDN subscription.
· Sign up for a one-month free trial with $200 of credit (that was the cost at the time I was writing this) at www.windowsazure.com/en-us/pricing/free-trial/. This is a great way to learn Windows Azure for free.
Once you have a subscription, you manage Windows Azure via https://manage.windows-azure.com. Through this portal you can perform nearly every aspect of Windows Azure management. At the top of the portal, your credit status is shown, as in Figure 11.4. If you click the View More Details line, you will get detailed information on your usage. Previously, you had to supply a credit card number even if you had included Windows Azure credit, but Microsoft removed this requirement and instead will now simply shut down your services if you run out of credit. If you want to remove the spending limit, this can be done via the account page by using a credit card, but it does mean you could be billed if you go over the included credit amount.
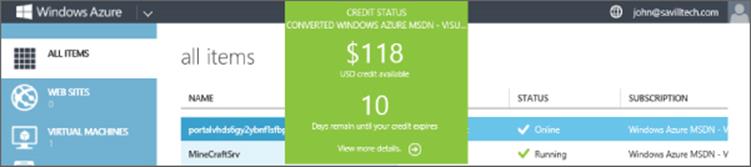
Figure 11.4 Basic credit status of your Windows Azure account
Now that you have a Windows Azure subscription, I want you to follow the step-by-step tutorial I have at http://youtu.be/KzESaLpV8l8, which walks through every step of creating a new virtual machine in Windows Azure, adding a data disk, installing Minecraft, enabling endpoints, and then connecting. It will probably take about 30 minutes, but I really recommend that you stop and do this now. Even if you don't want to play Minecraft (your kids will think you are a hero if you do this for them), the video walks you through key elements of using Windows Azure IaaS. In the next section, I will get into the details of creating virtual machines. But for now, I want to stress some key points to keep in mind:
· An extra-small Azure virtual machine (VM) would be fine for fewer than 10 users; however, consider a small VM for more than that, and unless you are very short on credit, I recommend using a small VM for even fewer than 10 users.
· Use the Windows Server 2012 Datacenter gallery image. Use the version with the latest release date, which is just a patch level.
· Create a separate data disk to store the Minecraft server executable and its data files. You will need to initialize and format this disk using Disk Management (diskmgmt.msc).
· Install the 64-bit version of Java. At the time of this writing, the Java Runtime Environments were available from the following location:http://www.oracle.com/technetwork/java/javase/downloads/jre7-downloads-1880261.html
· Download Minecraft_Server.exe from https://minecraft.net/download and save to the Minecraft folder you create on your data drive.
· Create a firewall exception for TCP port 25565, which is what Minecraft listens on.
· Create an endpoint for the VM in the Azure portal for public and private port 25565 to enable external communication to the port on the VM. I cover this in detail in the next section.
· Add your Minecraft account name to the ops.txt file to make yourself an operator on the server.
· To run the Minecraft server I use the following command, which gives Minecraft 1 GB of memory instead of 100 MB. Save this to a start.bat file and use it to initialize.
"C:\Program Files\Java\jre7\bin\javaw.exe" -Xms1024m -Xmx1024m -jar "Minecraft_Server.exe"
You now have an up-and-running Minecraft server that you can access using the name you specified during the VM instance creation, as shown in Figure 11.5. There really was nothing special that was Windows Azure IaaS specific except creating the endpoint to allow connectivity over the Internet. (And thanks to my son for creating the likeness of me on his Windows Azure Minecraft server.) Notice also in the figure that through the Windows Azure portal I can see the various resource usage states of the virtual machine. This helps me check whether my son's playing when he should be doing homework. Notice that you have full console access to this virtual machine and can pretty much do anything you want within the capabilities of Windows Azure IaaS.
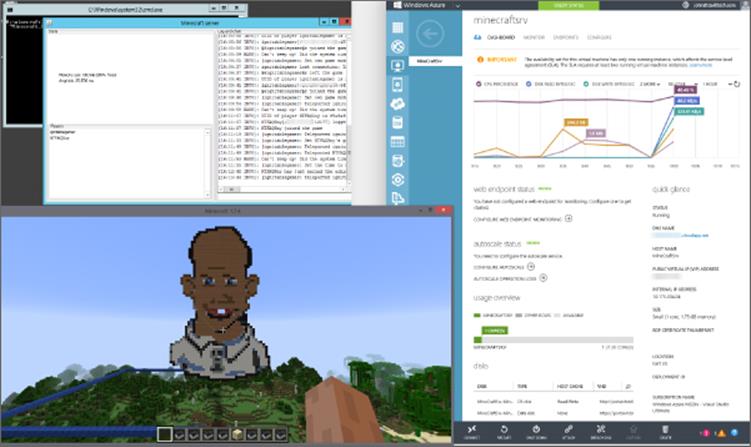
Figure 11.5 A connection to my Minecraft server running in Windows Azure
It should be noted that the Windows Azure IaaS virtual machine is not the same as the previously available VM role that was part of PaaS; that was a stateless virtual machine that had no persistent state. The Windows Azure IaaS virtual machine is a fully persistent solution.
I want to look at the capabilities of Windows Azure IaaS in more detail starting with the list of supported operating systems. Windows Azure IaaS supports only 64-bit operating systems and specifically these:
· Windows Server 2008 R2 SP1
· Windows Server 2012
· Windows Server 2012 R2
· A number of Linux distributions, which is constantly expanding but includes Oracle Linux, openSUSE, SUSE Linux Enterprise Server, Ubuntu Server, and OpenLogic (CentOS)
One easy way to check supported operating systems is to look at the templates provided in Windows Azure itself. Figure 11.6 shows the image selection screen you see when creating a new virtual machine. Note that there are categories not only for Windows but also for the various distributions of Linux. You do not have to use these templates. You can create your own sysprep'd images, but do not put an unattend.xml answer file in the image (Windows Azure needs to create that when deploying) and do not install the Windows Azure Integration Components. Once your image is ready, you upload them to Windows Azure and use them. The included Windows Azure templates are just there to help you get started. Microsoft has a step-by-step guide on uploading your own VHD to Windows Azure at the following location:
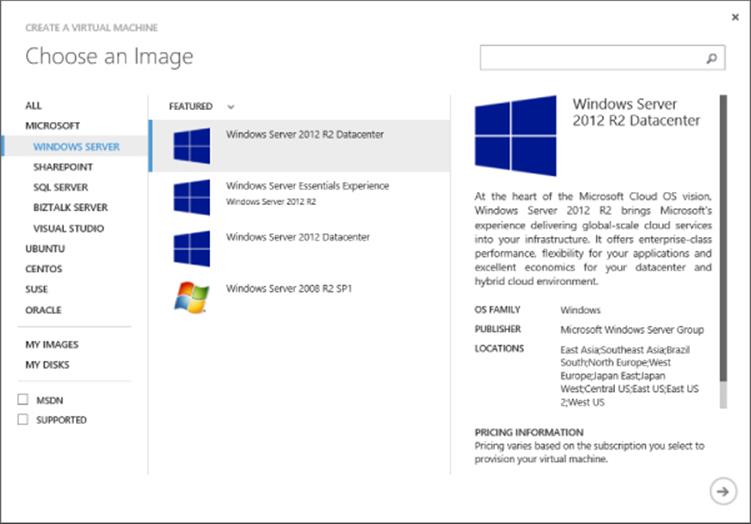
Figure 11.6 The template selection in Windows Azure
www.windowsazure.com/en-us/manage/windows/common-tasks/upload-a-vhd/
Regarding what can run in the Windows Azure IaaS virtual machine, remember, it is just a virtual machine. However, this does not mean vendors support their applications running in Windows Azure IaaS. Notice that Microsoft actually has templates in Windows Azure IaaS for SharePoint, SQL Server, Visual Studio, and BizTalk, but that does not mean that's the only Microsoft software that is supported. Microsoft has a full list at http://support.microsoft.com/kb/2721672/en-us, which also shows which components of System Center can run in Windows Azure IaaS and which roles of Windows Server run in Windows Azure. Remember, there is a difference between what is supported and what works, but do you really want to run something for production purposes that is not supported by the vendor of the application?
I want to point out that currently there is no Windows Azure management agent installed in Windows Azure IaaS virtual machines and no additional Windows Azure–specific software installed. This may change in the future, but there are no definite plans.
The virtual machines created can be one of a set of defined sizes. You cannot create custom combinations of vCPUs and memory. At the time I was writing this, the virtual machine sizes shown in Table 11.1 were available. These do change over time, though, and you can see the latest list at the following location:
Table 11.1 Windows Azure IaaS virtual machine sizes
Size |
CPU Cores |
Memory |
OS Disk Size |
Maximum Number of Disks |
ExtraSmall |
Shared |
768 MB |
127 GB, 20 GB Temp |
1 |
Small (A1) |
1 |
1.75 GB |
127 GB, 70 GB Temp |
2 |
Medium (A2) |
2 |
3.5 GB |
127 GB, 135 GB Temp |
4 |
Large (A3) |
4 |
7 GB |
127 GB, 285 GB Temp |
8 |
ExtraLarge (A4) |
8 |
14 GB |
127 GB, 605 GB Temp |
16 |
A5 |
2 |
14 GB |
127 GB, 135 GB Temp |
4 |
A6 |
4 |
28 GB |
127 GB, 285 GB Temp |
8 |
A7 |
8 |
56 GB |
127 GB, 605 GB Temp |
16 |
Source: http://msdn.microsoft.com/en-us/library/windowsazure/dn197896.aspx
http://msdn.microsoft.com/en-us/library/windowsazure/dn197896.aspx
The sizes also refer to the number of data disks that can be connected, which can be up to 1 TB in size each and have a 500 IOPs limit. The actual cores used in Windows Azure are not the highest-performing cores, but they are the more power efficient options. For example, you can view the exact type by looking in Task Manager at the processor details. The exact cores will vary based on the datacenter and generation of the servers being used, but my current virtual machine is using AMD Opteron Processor 4171 HE cores.
Notice that the different-sized virtual machines have different sizes for the temporary storage disk, which can be used for any temporary data (think scratch space) that does not need to be persisted (that is, sustained).
The Windows pagefile is also stored on this temporary storage. Anytime the VM is moved, such as for patching, upgrades, or simply because of a node problem, the contents of the temporary disk will be lost. Figure 11.7 shows the view of my Minecraft Azure IaaS virtual machine, which has the standard 127 GB operating system disk, the 70 GB temporary disk, and a 100 GB data disk I added.
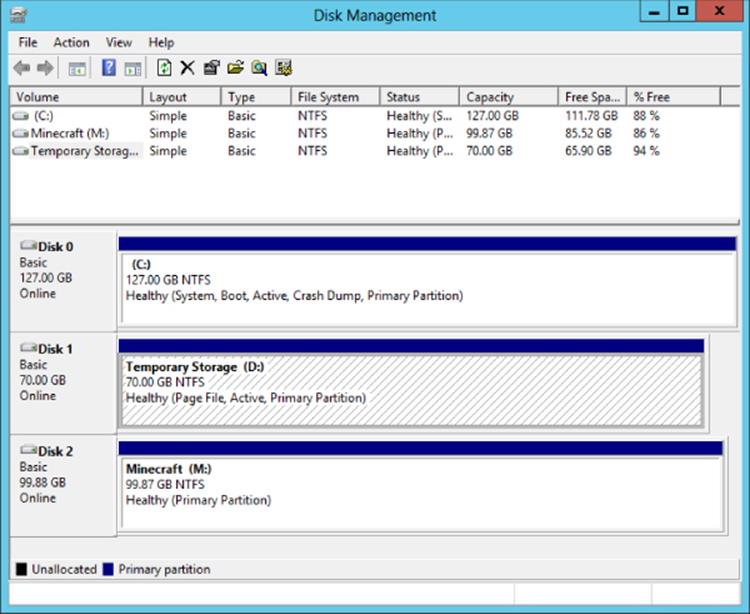
Figure 11.7 Disk view within a Windows Azure IaaS virtual machine
If you walked through the Minecraft tutorial, you will have noticed that you did not specify an IP address or a number of network adapters. A Windows Azure IaaS VM can have only a single network adapter, and its IP address is allocated by the Windows Azure fabric using DHCP. There is some control of the virtual networks in Windows Azure that I will cover later, but you can never specify a static IP address. The IP address must be allocated by Windows Azure. Additionally, the single adapter can have only a single IP address, the one set by Windows Azure. If you set the IP address statically, at some point you will lose access to your virtual machine. The good news is that using Azure Virtual Networks, you can do some clever things to make sure a virtual machine always gets the same IP address within ranges you configure. For communication, you can use TCP, UDP, and any IP-based protocol within the virtual network in Windows Azure, but you cannot perform broadcast communications.
Virtual machines and other Windows Azure constructs live within a cloud service, which can be thought of as a management, configuration, security, service model, and networking (unless you use virtual networks) boundary. In the case of IaaS virtual machines, each VM actually lives within a Virtual Machine role, and currently a Virtual Machine role can contain only one VM. Each cloud service supports up to 50 virtual machines at the time of this writing. Each cloud service has a virtual IP address (VIP), which is an Internet-routable address used to access services running in the cloud service (unless you enable site-to-site or point-to-site connectivity into virtual networks). It is using this VIP and an endpoint that allows RDP connections to virtual machines in Windows Azure and other services. Another great capability is the Windows Azure load balancer, which allows incoming traffic over the VIP to be distributed among multiple virtual machines in the cloud service; for example, port 80 could be load balanced for the VIP, which actually is directed to 10 virtual machines.
Hopefully at this point it is very clear that Windows Azure IaaS is giving you various sized virtual machines that you can pretty much do anything you wish with providing you stay within the capabilities of Windows Azure IaaS that I briefly covered earlier. The next question is, How much does it cost?
Azure is not broken into separate buckets of credit. You have a certain amount of Azure credit and you can use it however you want: for storage, VMs, websites, SQL databases, services, and so on. You are charged for the services you use under your Azure account, and different services and different sizes of service vary in their price. The easiest way to understand the cost of various services is to use the Windows Azure pricing calculator available at www.windows-azure.com/en-us/pricing/calculator/. The calculator allows you to specify the quantity you need of all the different services and then shows the monthly price. Note that discounts are available as part of various plans and agreements with Microsoft. Figure 11.8 shows part of the virtual machine section of the pricing calculator where I have requested pricing to run 10 small Windows and 10 small Linux virtual machines along with 2 medium SQL Server instances. I also specified 203 GB of egress (outbound) traffic from Windows Azure. It shows me the estimated monthly price of the requested virtual elements.
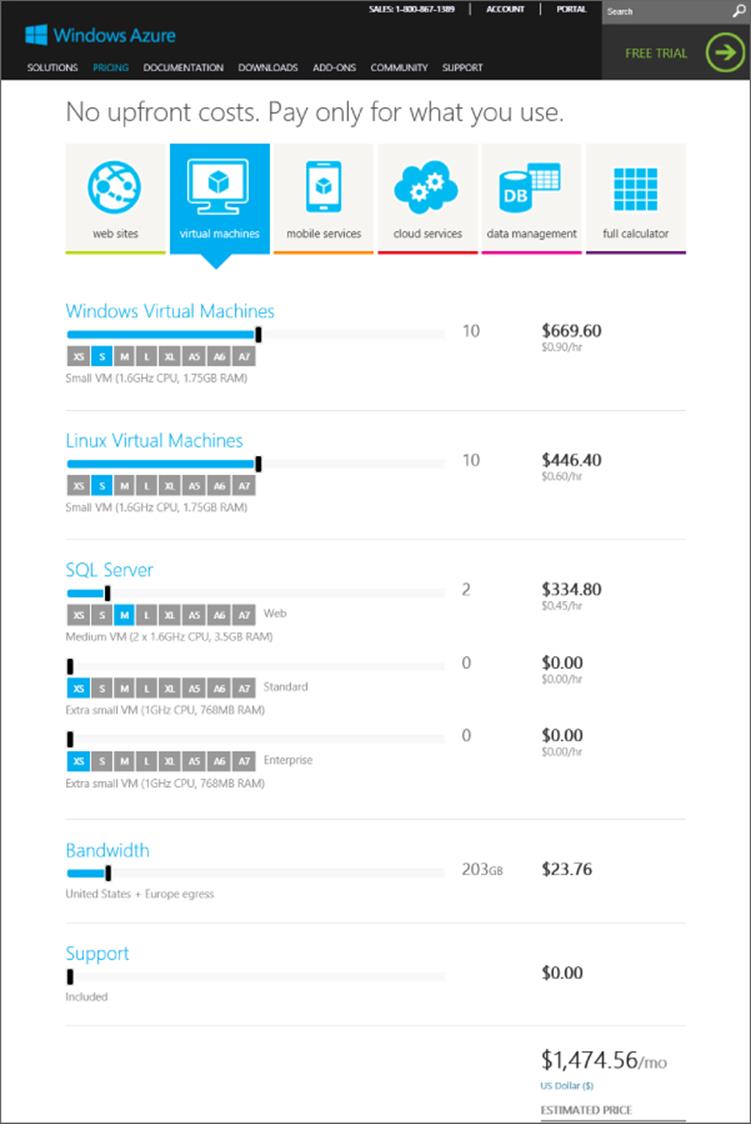
Figure 11.8 Sample of the Windows Azure pricing calculator
You may wonder why the price of a Linux virtual machine is less than the price of a Windows Server virtual machine if all that is being provided is the virtual machine. You are actually getting more than that with a Windows Server virtual machine. The Windows Server license is part of the price of the VM instance, which means you don't need to separately license the Windows Server operating system running in Windows Azure. That is not the case for any paid Linux distributions or other applications such as SQL Server, which have to be separately licensed unless when creating the virtual machine you select a SQL Server or Biztalk Server image that includes the SQL Server/Biztalk Server license as part of the virtual machine price. Also note that if you want to manage virtual machines running in Windows Azure with System Center, you need to license System Center accordingly.
If you intend to host a long term SQL Server in Windows Azure it is likely cheaper to install a regular Windows Azure Windows Server virtual machine and then install SQL Server and use your own SQL license. If you need SQL Server short term, such as for a project then using the Windows Azure SQL image with included SQL Server license is likely more cost effective than buying a license.
There is an important point about virtual machines and how the billing works. Prior to June 2013, a virtual machine was charged while it existed, whether it was running or not. A big change was announced in June 2013 at TechEd related to Windows Azure—stopped virtual machines would no longer be billed and billing would be per minute instead of rounded to the nearest hour. This makes it sound like all you have to do is shut down the virtual machine and you stop paying for it, but this is not really the case.
There are actually two different types of shutdown for a Windows Azure IaaS VM. A virtual machine can be stopped and it can be deallocated. It's only when a virtual machine is deallocated that billing stops, but this also affects the IP address of the virtual machine.
If you stop a VM from within the guest OS of the VM or you use the Stop-AzureVM cmdlet with the -StayProvisioned parameter, the VM stays allocated in the Windows Azure fabric. This means the VM still has reserved resources, and it will keep the IP address it was dynamically assigned via DHCP (Dynamic IP, or DIP). A VM shut down this way is considered stopped, but not deallocated, which means it will continue to be billed. Its status in the Windows Azure portal will show as Stopped.
If you stop a VM from the Windows Azure portal by using the Shut Down button, then the VM is actually deallocated from Windows Azure resources. It no longer has resources reserved, and it loses its network configuration—and therefore its IP address lease. When you start the VM, it's reprovisioned in Windows Azure, resources are assigned, a network adapter is added, and it gets a new IP lease, which means its IP address will change. This type of deprovisioning also happens when the Stop-AzureVM cmdlet is used without the -StayProvisioned parameter. The VM will show as Stopped (Deallocated) and VMs in this status will not incur any billing.
An important point is that each cloud service has a virtual IP (VIP), which is the external IP address. If every VM in a cloud service is in a Stopped (Deallocated) state, then the cloud service might lose its VIP, and when VMs are restarted, it could get a new VIP. If consistency of the VIP is important, then ensure that at least one VM in each cloud service stays provisioned.
Here's a summary:
· Shutdown within the VM or Stop-AzureVM -StayProvisioned: Billing continues for the VM, and it keeps resources reserved, including keeping its leased IP address.
· Shutdown from Windows Azure Portal or Stop-AzureVM without -StayProvisioned: Billing stops for the VM, and all resources are deprovisioned, including network adapters, which means the IP address lease is lost.
I want to quickly cover one scenario that commonly comes up, and that is Desktop as a Service (DaaS), the idea of offering desktop environments in the public cloud. Windows Azure does not currently offer DaaS, but there is nothing to stop you from creating your own for your organization. Microsoft actually has guidance on the configuration of Remote Desktop Services (RDS) in Windows Azure, which will give you a session-based desktop experience. This guidance can be found at the following location:
http://msdn.microsoft.com/en-us/library/windowsazure/dn451351.aspx
What you cannot do is to run Windows client operating systems in Windows Azure and any other public cloud service for that matter. This is not a technical limitation but rather a licensing one. There is no way to license a Windows client to run in a public cloud environment. That is why any DaaS offerings you see are based around sessions running on Windows Server as opposed to connections to an actual Windows client operating system. The good news, as discussed in the previous chapter, is using session-based services actually gives the same end-user experience and a higher density of users, so it's actually a win-win.
Creating Virtual Machines in Azure IaaS
Now that you understand the basics of Windows Azure IaaS, I want to take you through the actual creation of a virtual machine using the Windows Azure management portal, explain some of the options, and then walk through a simple creation using PowerShell.
As previously mentioned, the management of Windows Azure is performed through the Windows Azure management portal at https://manage.windowsazure.com. Through the portal, you have access to all the various datacenters that can host Windows Azure services, and where you wish to host your Windows Azure infrastructure is one of the first things you need to decide. You should pick the location closest to where the services will be consumed because this will result in the lowest network latencies.
There are two constructs required to create a virtual machine: a cloud service to contain the virtual machine and a storage account to host the VHD file that will be used by the virtual machine. During the creation of the virtual machine, you can create a new cloud service and an automatically generated storage account, or you can created them in advance manually. Additionally, if you have already created a virtual machine, the automatically created cloud service and storage account from the previous virtual machine can be reused. Both the cloud service and the storage account can be used by more than just the virtual machines, but they can also be used for the various other types of role available within Windows Azure. They both need to reside in the same Windows Azure region because it would not be performant to have virtual machines running in one datacenter using storage in another datacenter.
The Windows Azure management portal is very intuitive, and the only information needed to create a cloud service is to select the region (or affinity group) and a name for the cloud, which will be <something>.cloudapp.net. This needs to be unique for all of Windows Azure, which means TestApp is not likely to be available, so it's best to pick something that includes your company name, for example. In the example in Figure 11.9, I used the name of this book for a new cloud service and East US for the region. Creating a storage account is a similar intuitive process; simply give a unique name for the storage account URL and pick the location. You can also select the replication options for the storage account, which can be locally redundant or geo-redundant. The same name can be used for the cloud service and the storage account because the cloud service is part of cloudapp.net DNS domain, while the storage account is part of core.windows.net DNS domain.
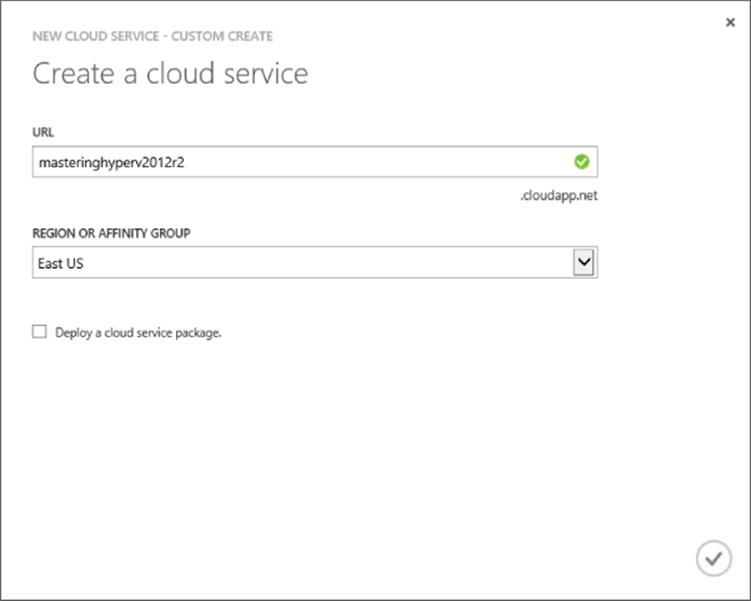
Figure 11.9 Selecting the region and URL for a new cloud service
When creating both the cloud service and the storage account, I mentioned selecting a Windows Azure region or an affinity group. There are many times you want to ensure that different aspects of your Windows Azure service are located in the same datacenter to optimize performance. By creating an affinity group and then placing resources in it, you ensure close proximity. Additionally, you must use an affinity group when using virtual networks. It's therefore a good idea to use affinity groups from the start rather than select regions for each of your resources. To create an affinity group, perform the following steps:
1. In the Windows Azure management portal, select the Settings navigation node item.
2. Select the Affinity Groups tab.
3. Click the Add button.
4. Enter a name for the new affinity group (which must be unique in Windows Azure), a description, and the region that will host the affinity group and therefore all the resources that are placed into it (more on resources later). This is shown in Figure 11.10.
5. Click the tick icon to complete creation.
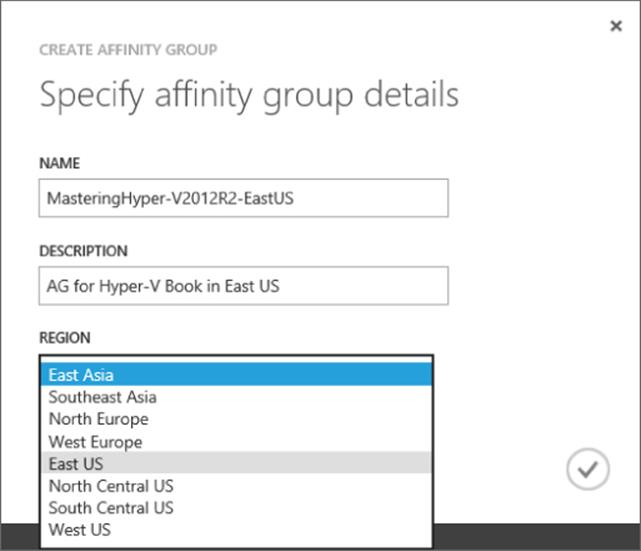
Figure 11.10 Creating a new affinity group
Note that once you create resources, you cannot just move them between datacenters. You would need to export out the resources and import them into the new region, so pick your regions carefully when creating new services. Once the affinity group is created, you will be able to select it when creating other types of resources, such as cloud services and storage accounts.
Notice at the bottom of the Windows Azure management portal is a status bar that has the actions related to management such as New and on the right, a number of status icons. The far right green icon shows operations that are running or recently completed such as creating and deleting objects. Click the icon to get details such as those shown in Figure 11.11. Some of the notifications can be dismissed and others will show more details via an information icon.
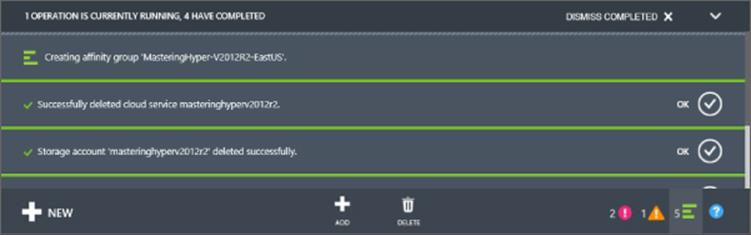
Figure 11.11 Viewing the recently completed and currently running operations in Windows Azure
When a cloud service is empty, no VIP will be assigned and no details will appear. It is only when a cloud service contains a resource that it is actually truly provisioned and has its common properties. Likewise, the storage account has to have containers. However, when a virtual machine is created and the storage account is selected, a VHDs container will automatically be created for you. You are ready then to create a virtual machine:
1. Log in to the Windows Azure management portal.
2. Select the virtual machines navigation node.
3. Click the New action at the bottom left of the portal, which will automatically expand to Compute ⇒ Virtual Machine. Select the From Gallery option.
4. The Create A Virtual Machine Wizard will start. Select the image you wish to use—for example, Windows Serve 2012 R2 Datacenter—and click the Next arrow.
5. Select the version release date required, which is basically a certain patch level. Enter a name for the virtual machine, which has to be unique only within the specific cloud service. Select a size for the new virtual machine and enter a new username and password for the administrator of the new virtual machine. You cannot use Administrator or common names like John. An example is shown in Figure 11.12. Click the Next arrow.
6. The next screen allows configuration of where this virtual machine will be located. By default, the option to create a new cloud service will be selected, but in the previous steps you created a new cloud service in the affinity group, so that's what you should select. When the existing cloud service is selected, the cloud service DNS name and region will automatically be selected. Select the storage account that was created and leave Availability Set as (None). See Figure 11.13 for an example. Click the Next arrow.
7. The default endpoints for the virtual machine will be displayed. Leave these as they are, but notice that there is an endpoint for the Remote Desktop Protocol (RDP) to allow remote connectivity and also for PowerShell. Click the tick arrow to complete the virtual machine creation. Figure 11.14 shows this screen.
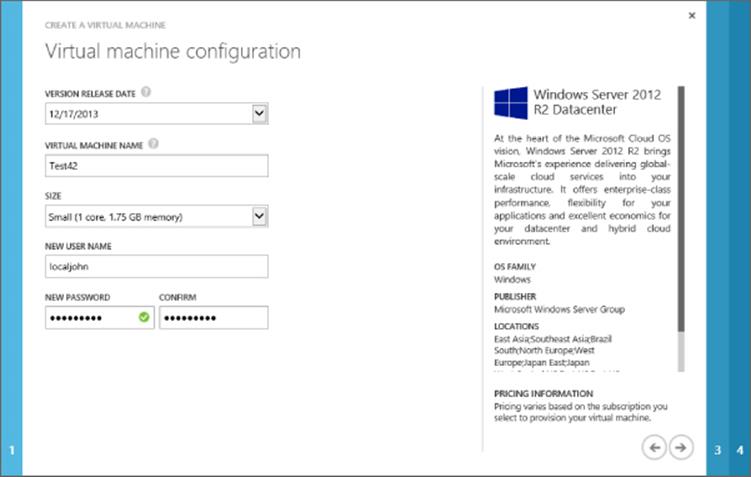
Figure 11.12 Selecting the basic information for the new virtual machine
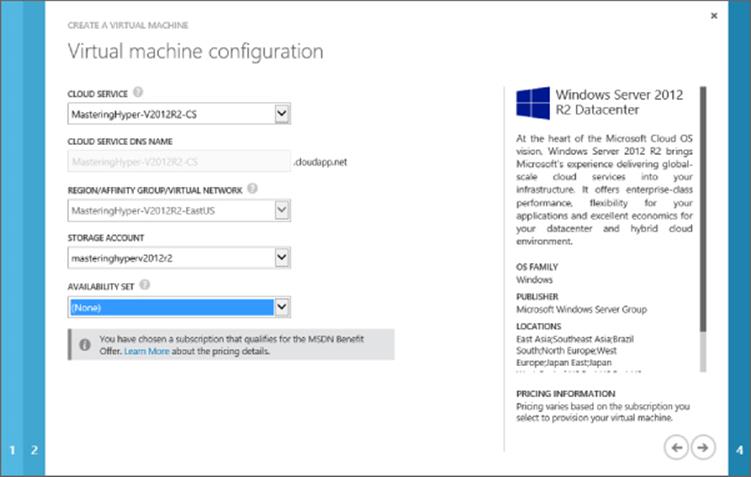
Figure 11.13 Specifying the cloud service and storage details
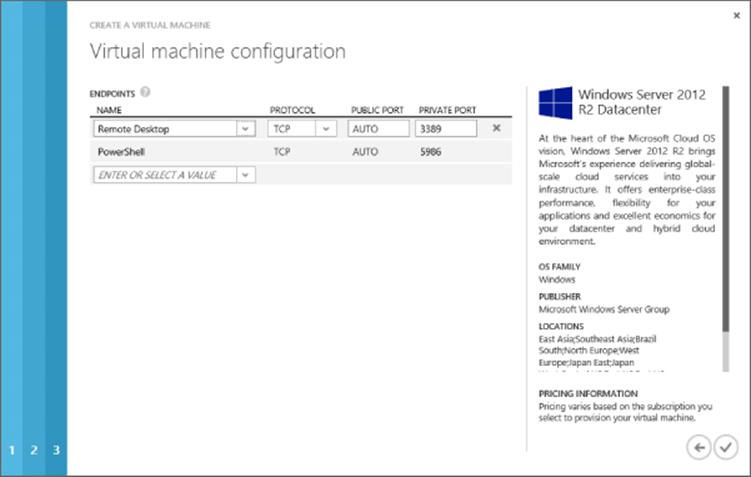
Figure 11.14 Confirming the endpoints
The virtual machine will now be provisioned. This will take some time as the template is copied into a BLOB in Windows Azure Storage in the specified account, specialization is performed on the copied VHD, and the virtual machine is made available. Once the provisioning process is complete, select the virtual machine in the virtual machines view of the Windows Azure management portal to get details about it and also access to actions. The Dashboard page shows performance information about the virtual machine, its status, and the internal IP and the external IP address for the cloud service it is contained within. The Monitor tab gives more detailed performance statistics, on the Configure tab, you can change the size of the virtual machine (which will require a reboot) plus define an availability set. The Endpoints tab allows the various connections available to virtual machines to be defined via the VIP of the cloud service. Both the endpoint and availability set deserve some more detail.
Consider a cloud service that has a single VIP that is available over the Internet, and may contain many virtual machines. You wish to connect various services over the Internet to the virtual machines, which are using TCP or UDP and a specific port. Consider a Remote Desktop Connection from a client computer that normally uses TCP port 3389, as shown in Figure 11.15. The problem is you may have 20 virtual machines in a single cloud service that all share the Internet IP address, the VIP, which means you cannot just connect to the VIP via port 3389 because you don't know which virtual machine the connection will be forwarded to. This is what endpoints solve. A virtual machine has endpoints defined that provide a mapping of a port offered via the cloud service's VIP and then the port it is forwarded to for a specific virtual machine in the cloud service. In the example in Figure 11.15, you can see that both virtual machines listen on port 3389. However, each has a different endpoint configured using a different public port on the VIP. Therefore, when connecting to the VIP on port 52577, the endpoints are examined and the forwarding logic knows traffic on 52577 should be forwarded to port 3389 on VM1. This means different virtual machines cannot use the same port on the VIP and the Windows Azure management portal will stop you from doing this.
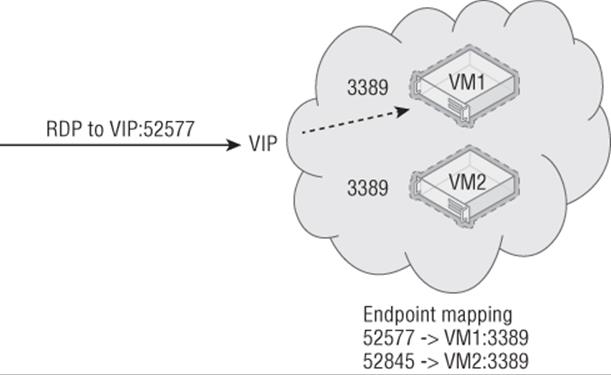
Figure 11.15 Example of endpoints in action
By default, when a virtual machine is created, an endpoint for Remote Desktop and PowerShell is configured automatically. Additionally, endpoints can be added via the Endpoints menu for a virtual machine, and in the Minecraft tutorial, an endpoint was added for the Minecraft service. Remember to also enable firewall exceptions within the virtual machine for the standard port to allow the traffic in, which is just a normal operational step.
In addition to standard endpoints, it possible to add an endpoint to a load-balanced set. A load-balanced set allows multiple virtual machines to be part of a single port on the VIP, and traffic is load balanced between all the virtual machines that are part of the load-balanced set. Consider three virtual machines all running web servers. A load-balanced set would be created for port 80, which would point to all three of the virtual machines and then distribute the traffic accordingly, provided the target virtual machine was available. Virtual machines must be in the same cloud service to be part of a load-balanced set. When you are adding an endpoint, you can select a load-balanced set or create a new one. The concept is shown in Figure 11.16.
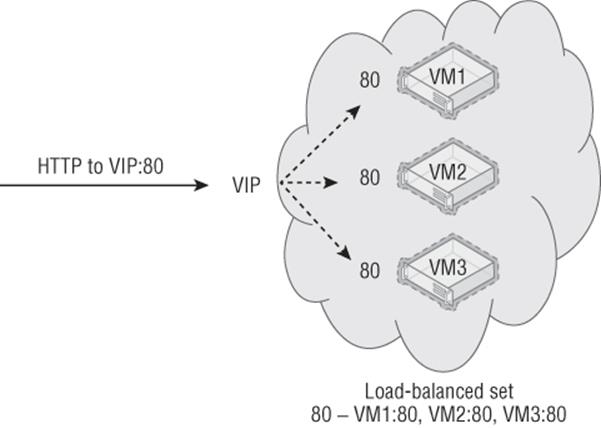
Figure 11.16 Load-balanced set in action
An availability set is an important concept if you want high availability in Windows Azure. Consider that Windows Azure actually comprises many datacenters and those datacenters have many racks of servers. Each of those racks can be considered a point of failure, a fault domain, which includes the servers, power, networking, and so on. While Microsoft takes every precaution, there is the chance a rack could fail, which will cause a brief interruption of virtual machines/services running on that rack. Additionally, Microsoft does perform maintenance, which will result in virtual machines in the rack being shut down. To avoid a single point of failure, you may deploy two instances of a service (for example, deploying two domain controllers into Windows Azure), but you have no guarantee that those two instances are not running in the same rack and therefore a rack failure would affect both instances. By placing virtual machines in an availability set, you place the virtual machines into separate fault domains and therefore separate racks, and, thus prevent a single failure from affecting all the instances in the availability set. Availability sets can be created when the virtual machine is created, or a virtual machine can be added to an availability set using the Configure tab in the virtual machine's properties, where you can select an availability set or create a new one, as shown in Figure 11.17.
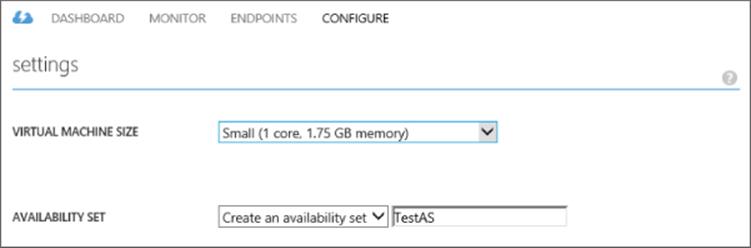
Figure 11.17 Adding a virtual machine to a new availability set
The number of fault domains that the virtual machines in an availability set will be split over is not exact. The availability set guarantees that not all virtual machines in it will go down at the same time. This means if there were three VMs in an availability set, it might be possible that two of them are in the same fault domain. The fault domain can be viewed by looking at the Cloud Services view containing the virtual machines and looking at the Instances tab. There should be different values for the fault domains; for example, if there were two virtual machines in an availability set, one virtual machine would have a fault domain of 0 and the other a fault domain of 1. Notice in the example shown in Figure 11.18 that I have three VMs in the availability set and two of them are in the same fault domain. It's therefore important to make sure availability sets contain only virtual machines that are performing exactly the same function. If you mix the functions of virtual machines into a single availability set, then the virtual machines performing the same function could end up in the same fault domain, which would be a very bad thing. Notice there is also an Update Domain column. An update domain is a logical unit that defines how services are updated to minimize the number of instances of a service updated concurrently. Update domains don't apply to IaaS because updates are applied by the administrator manually to the virtual machines rather than automatically by Windows Azure.
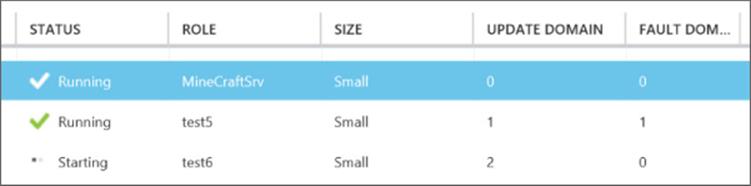
Figure 11.18 Viewing the fault domain virtual machines are in
The first action you are likely going to want to perform to your new virtual machine is to connect to it. To do so you'll use the Connect action, which will open an RDP configuration file that will launch an RDP connection to the new virtual machine. If you save the RDP file and then edit it, you will see that it's configured with the cloud service name and the endpoint port for the specific virtual machine—for example, MasteringHyper-V2012R2-CS.cloudapp.net:52577. You can now connect to your virtual machine using the username and password you specified during the virtual machine creation. The RDP file can also be fetched using PowerShell:
$mySvc = "MasteringHyper-V2012R2-CS"
$myVM = "Test42"
Get-AzureRemoteDesktopFile -ServiceName $mySvc -Name $myVM -Launch
Once connected, you will have full console access. If you open the Disk Management tool (diskmgmt.msc), you will see two disks: the 127 GB operating system disk and the temporary storage disk, which by default contains the pagefile. If you look at the Storage area in the Windows Azure portal, select the storage account of the virtual machine, and select the Containers tab, you will see the default vhds folder. Within the vhds folder, you will be able to see the operating system VHD for the new virtual machine, as shown in Figure 11.19. Note that the temporary storage drive is not shown because this VHD is stored on the local Hyper-V host storage rather than in Windows Azure Storage, which is why the temporary storage drive is only a temporary drive whose content should not be considered persistent.
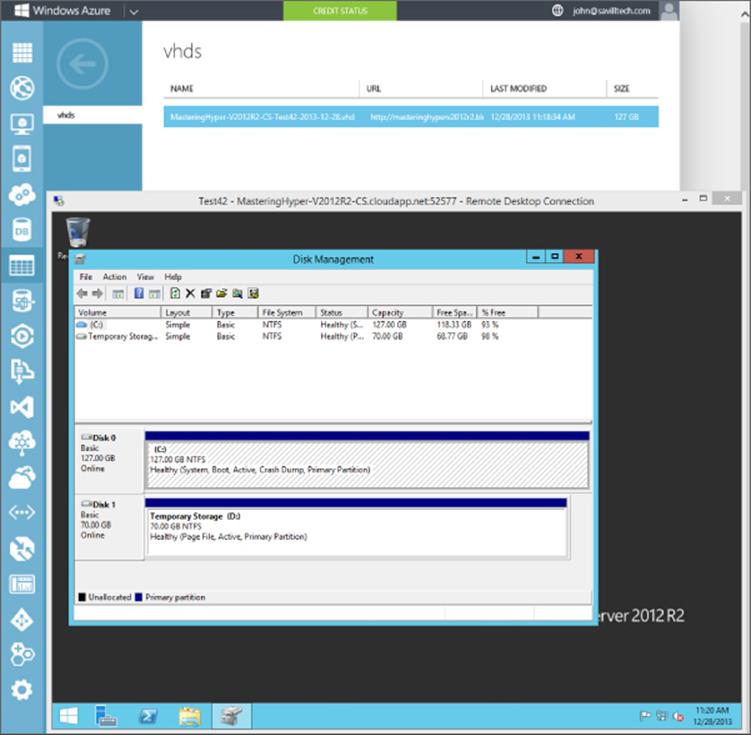
Figure 11.19 Looking at the storage for a virtual machine
The usage of Windows Azure Storage is a great benefit for the virtual machines for multiple reasons. The Hyper-V host has a virtualized storage driver that works with a component, RDSSD, which consists of some local cache, and then it communicates to Windows Azure Storage (xStore), which has a number of BLOBs. The BLOBs are formatted as fixed VHDs and exist within specific storage accounts. Windows Azure holds an infinite lease on the BLOBs that are considered disks in the storage account to prevent them from ever being accidentally deleted. The fact that fixed VHD is used may cause concern because you pay for used storage and you may create a 1 TB VHD but initially use only a small amount of storage. The good news is that the BLOB is actually sparsely stored, which means only blocks written to it are actually stored and therefore you pay only for data written rather than the total size of the VHD. This means you can safely always use 1 TB as the size for your VHDs. Additionally, if you delete content, TRIM is supported, which means when data is deleted, the TRIM command is sent to the storage subsystem on the Hyper-V host, which then marks the blocks as no longer needed, and in Windows Azure Storage, the blocks are actually deallocated so you stop paying for the deleted data.
Windows Azure Storage ensures that every piece of data is replicated three times to provide protection from data loss, and asynchronous data replication is also available to replicate the data to another datacenter, and it's then replicated three times at that datacenter. Another advantage of using Windows Azure Storage is that all existing tools for Windows Azure Storage work without modification with the VHD-formatted BLOBs making management very simple. A great tool for working with Windows Azure Storage is CloudXplorer from ClumsyLeaf software, which you can download at http://clumsyleaf.com/products/cloudxplorer. CloudXplorer is free and easy to use. The only information needed to connect to your Windows Azure Storage account is the name of the storage account and the access key. This information is available on the Dashboard page of the storage account in the Windows Azure management portal when you click the Manage Access Keys action at the bottom of the screen. This will open a dialog containing the account name and the access key, including a copy icon to copy the data into the Clipboard and then it can easily be used in CloudXplorer. CloudXplorer actually understands the VHD formatted BLOB and will show the contents, as shown in Figure 11.20.

Figure 11.20 Browsing a Windows Azure Storage account using CloudXplorer
When a virtual machine is created in Windows Azure IaaS, it has the operating system VHD, but you likely don't want to store application data on this disk. Additional disks can be added to a virtual machine, and a reboot is not required because the disks are added to the virtual SCSI controller, which supports hot-adding storage.
Additional disks are added through the dashboard view of a virtual machine via the Attach action by selecting the Attach Empty Disk option. When you add a disk, it will be a data disk type. You can specify a name for the disk and a size up to 1 TB (although 1,023 GB is the maximum size, not 1,024 as would be expected). The type of caching can also be configured, as shown in Figure 11.21. Once the options are configured, click the tick icon to complete the addition, which will generate a new BLOB in Windows Azure Storage and attach the disk to the virtual machine.
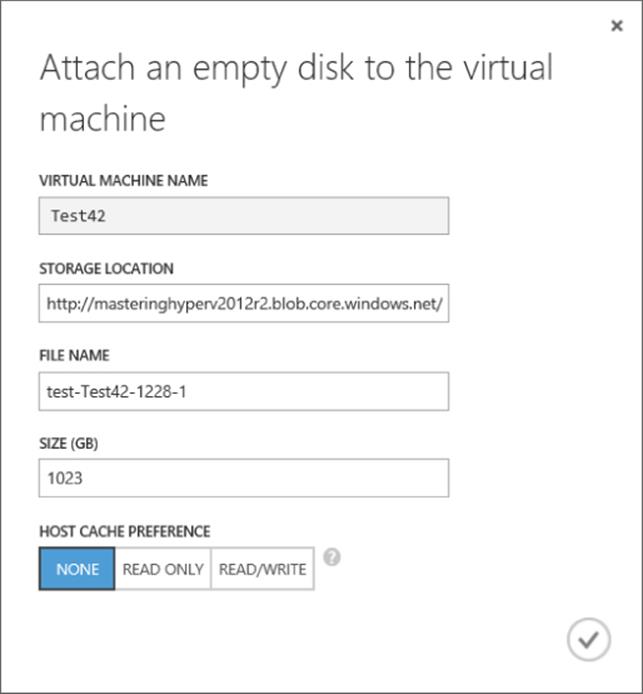
Figure 11.21 Options for a new data disk attached to a virtual machine
There are two types of disk available: the OS disk used to store the operating system and a data disk used to store data. The caching options available differ depending on the type of disk. For an OS disk, caching can be Read/Write or Read Only (Read/Write is the default). For an operating system disk that has many small IOs using Read/Write, caching gives the best performance. For other types of disks or workloads such as a SQL database, no caching is desired and all IOs should persist to storage directly. This is why data disks have the Read/Write and Read Only cache options but also a None option, which is the default and results in no caching. Caching options can be changed with PowerShell for existing disks using Set-AzureOSDisk or Set-AzureDataDisk. Microsoft has a nice blog post on Azure Storage at the following location:
http://blogs.msdn.com/b/windowsazurestorage/archive/2012/06/28/exploring-windows-azure-drives-disks-and-images.aspx.
The number of disks that can be attached to a virtual machine varies depending on the size of the virtual machine, as shown earlier in Table 11.1. Suppose you add 16 disks 1 TB in size to a virtual machine. You will have 16 separate disks in the virtual machine. But what if you wanted an actual 16 TB volume? The Windows operating system has the ability to create striped volumes that effectively join multiple disks together. Once you have added all the disks to the Azure virtual machine, log into the virtual machine and start the disk management tool, diskmgmt.msc. Select one of the disks, select the Create Striped Volume action, and ensure that all disks are included in the selection. Select the Quick Format option to minimize time to format, and once it's complete, you will have a single volume of 16 TB that can be used. For Linux operating systems, you can use the MD capability or LVM to get the stripe. You don't need to use any kind of RAID, such as mirroring or parity, because each of the disks is already fault tolerant through the three copies stored in the Windows Azure datacenter.
At this point you have a virtual machine with numerous configurations available. If a virtual machine is no longer required, you can use the Delete option within the virtual machine's dashboard view. With the Delete option comes the option to keep or delete its associated VHD files. If you don't delete the VHDs during the virtual machine deletion, when you later want to delete them, you will need to delete them via the Disks tab under Virtual Machines because if you try to delete within the Containers view in Storage, it will notify you that a lease exists on the BLOB.
While the Windows Azure management portal is a great interface for managing Windows Azure virtual machines, if users also access virtual machines in a private cloud, remember that you can leverage System Center App Controller to give access to virtual machines both on and off premise. I go into detail on this in Chapter 9, “Implementing the Private Cloud and SCVMM.” I do want to point out that I'm often asked about more granular access control for users in Windows Azure and if App Controller adds more granular user access, and the answer is it does not. App Controller only allows the same levels as those in the Windows Azure management portal, which really is not very much. If you need more granular access, you are looking at creating a custom solution.
Managing with PowerShell
I went into detail on the creation of virtual machines using the Windows Azure web-based management portal. Virtual machines can also be created using PowerShell, and there is even an Integration Pack for System Center Orchestrator. I want to focus on PowerShell but if you are heavily leveraging System Center Orchestrator, keep in mind that the Integration Pack is available.
The first step is to download the Windows Azure PowerShell module, which is available from the Windows Azure downloads page at www.windowsazure.com/en-us/downloads/?fb=en-us. It can be found at the bottom of the downloads page in the Command Line Tools section. Once you click the Windows Azure PowerShell link, the Web Platform Installer will launch, enabling you to click Install to complete the Windows Azure PowerShell module installation. There are a number of prerequisites, which will automatically be downloaded and installed.
The installation of the Windows Azure command-line tools adds shortcuts to the Start Screen or Start Menu (depending on your operating system) for PowerShell with the Windows Azure module loaded. These shortcuts can be found by typing Azure on the Start screen, or the module can be imported into existing PowerShell sessions. Depending on your PowerShell environment, configuration may require a change to the execution policy to allow the remotely signed cmdlets to execute. The following command changes the execution policy; it must be run from an elevated PowerShell prompt (right-click the PowerShell prompt on the search results and select Run As Administrator from the options, which will launch PowerShell with Administrator: at the start of the PowerShell window title). Run the command below, and when prompted, press Y:
Set-ExecutionPolicy RemoteSigned
If the PowerShell environment was not launched via the Windows Azure PowerShell program, then the first step is to actually import the Windows Azure PowerShell module, which is accomplished using the following command:
Import-Module "C:\Program Files (x86)\Microsoft SDKs\Windows Azure\PowerShell\Azure\Azure.psd1"
Once they are imported, all the available cmdlets in the Windows Azure module can be seen using this command:
Get-Command –Module Azure
Running this command will give you an idea of the full capability of the PowerShell module for Windows Azure because you see nearly 200 cmdlets, which are not limited to just Windows Azure IaaS virtual machines. There are also cmdlets specific to web roles, storage, PHP, SQL databases, Services, and much more.
Before any actual cmdlets can be used against your Windows Azure subscription, you first have to configure your PowerShell environment to know what your Windows Azure subscription is and to provide a secure way to communicate with it. There are ways to achieve this manually, which are documented at the following location:
http://msdn.microsoft.com/en-us/library/windowsazure/jj554332.aspx
However, I recommend using the Get-AzurePublishSettingsFile cmdlet, which will open a browser window and let you sign in to your Windows Azure subscription and then automatically download the full configuration file. Once this configuration file is downloaded, it is imported using the Import-AzurePublishSettingsFile <file>.publishsettings cmdlet, as in this example:
Get-AzurePublishSettingsFile
Download the file from the site and enter your credentials in the web browser. The file will be saved in the Downloads folder, and the file name will vary based on your subscription name. For my subscription, the file name is WindowsAzureSavillTechMSDN-credentials.publishsettings.
Import-AzurePublishSettingsFile C:\Users\john\Downloads\WindowsAzureSavillTechMSDN-credentials.publishsettings
At this point you are ready to use Windows Azure from PowerShell. The first step is to check that you are truly using the Windows Azure subscription you think you are by using the Get-AzureSubscription cmdlet:
PS C:\Users\john> Get-AzureSubscription
SubscriptionName : Windows Azure MSDN - Visual Studio Ultimate
SubscriptionId : xxxxxxxx-xxxx-xxxx-xxxx-xxxxxxxxxxxx
ServiceEndpoint : https://management.core.windows.net/
ActiveDirectoryEndpoint :
ActiveDirectoryTenantId :
IsDefault : True
Certificate : [Subject]
CN=Windows Azure Tools
[Issuer]
CN=Windows Azure Tools
[Serial Number]
XXXXXXXXXXXXXXXXXXXXXXXXXXXXXX
[Not Before]
12/28/2013 1:19:05 PM
[Not After]
12/28/2014 1:19:05 PM
[Thumbprint]
XXXXXXXXXXXXXXXXXXXXXXXXXXXXXXXXXXXXXXXXXXX
CurrentStorageAccountName :
CurrentCloudStorageAccount :
ActiveDirectoryUserId :
To view your storage accounts, use the Get-AzureStorageAccount cmdlet because, providing you have created a virtual machine before, there will be an implicitly created storage account to use. Make a note of the value of the StorageAccountName attribute that will be shown. You need to configure the Azure subscription with a default storage account to make creating a virtual machine easy:
Set-AzureSubscription -SubscriptionName "<your subscription name from
Get-AzureSubscription SubscriptionName attribute" ´
-CurrentStorageAccountName "<storage account name from
Get-AzureStorageAccount StorageAccountName attribute>"
At this point I will assume you have created a virtual machine using the Windows Azure web portal and saw the nice list of virtual machine templates available in the gallery. That gallery is just scratching the surface of what is really available. Run the following command to see every template that is really available:
Get-AzureVMImage | ft Label,ImageName,LogicalSizeInGB -AutoSize
I'm going to simply create a new virtual machine using the Windows Server 2012 R2 image, and I'm going to create that in my existing cloud service (all cloud services can be found with Get-AzureService and all locations can be found with the Get-AzureLocationcmdlet) and my existing affinity group (Get-AzureAffinityGroup to list). In the following code, I use my existing cloud service, I set a password, and then I create the virtual machine from the template. The first command fetches all images into an array variable; then when creating the actual VM, I use the index number of the actual element I want:
$images = Get-AzureVMImage
$mySvc = "MasteringHyper-V2012R2-CS"
$myAG = "MasteringHyper-V2012R2-EastUS"
$myPwd = "P@ssw0rd"
New-AzureQuickVM -Windows -name "Test43" -ImageName $images[46].ImageName ´
-ServiceName $mySvc -AffinityGroup $myAG –AdminUserName AdminJohn -Password $myPwd
The command will take some time, but it will be visible in the Windows Azure portal and the cmdlet will show the various actions taken and their successful completion.
Adding disks to an existing virtual machine is simple. The following command adds two data disks:
$mySvc = "MasteringHyper-V2012R2-CS"
$myVM = "Test43"
Get-AzureVM -Name $myVM -ServiceName $mySvc |
Add-AzureDataDisk -CreateNew -DiskSizeInGB 1023 ´
-DiskLabel 'datadisk1' -LUN 0 |
Add-AzureDataDisk -CreateNew -DiskSizeInGB 1023 ´
-DiskLabel 'datadisk2' -LUN 1 |
Update-AzureVM
There are so many other commands available. Anything you can do in the management portal can be done with PowerShell and more. Here are a few more bonus ones:
# Get VM Details for all VMs in a specific cloud
Get-AzureVM -ServiceName $mySvc
# Restart a VM
Restart-AzureVM -ServiceName $mySvc -Name $myVM
# Shutdown a VM
Stop-AzureVM -ServiceName $mySvc -Name $myVM
# Start a VM
Start-AzureVM -ServiceName $mySvc -Name $myVM
Windows Azure Virtual Networks
Previously in this chapter, when I introduced the different types of cloud services, I explained that a cloud service was a boundary for many things, including network communication between virtual machines within it. Additionally, the internal IP address given to each virtual machine (the dynamic IP, or DIP) has to be assigned via DHCP, and Windows Azure controls that IP address assignment. This means if you have multiple cloud services in Windows Azure, you will have islands of communication as shown in Figure 11.22.
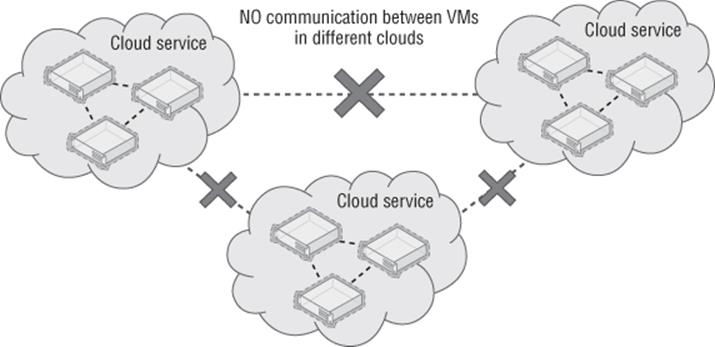
Figure 11.22 Islands of communication between virtual machines
Additionally, using the default networking there is no way to add communications to your on-premises networks, nor can you use any DNS service other than the Azure-provided DNS, which provides name resolution between virtual machines in the same cloud service only. The only external connectivity available to virtual machines it out to the Internet.
Windows Azure Virtual Networks solves this by enabling networks to be defined within an affinity group that has the following benefits:
· You can use a private IPv4 space you specify, and different virtual subnets can be created within the virtual network.
· The virtual network can be connected to your on-premises network using site-to-site VPN, and it can also support point-to-site VPN connections.
· You have the ability to use custom DNS such as an on-premises DNS server, a DNS server deployed to Windows Azure IaaS, or even a public DNS service. This allows DNS resolution outside just those resources within a cloud service.
When you put these capabilities together, it means your on-premises network can now be extended out into Windows Azure, bringing seamless connectivity that is not using the cloud service VIP and removes the need to use the endpoints defined for the virtual machines. Figure 11.23 shows the new connectivity when using a virtual network.
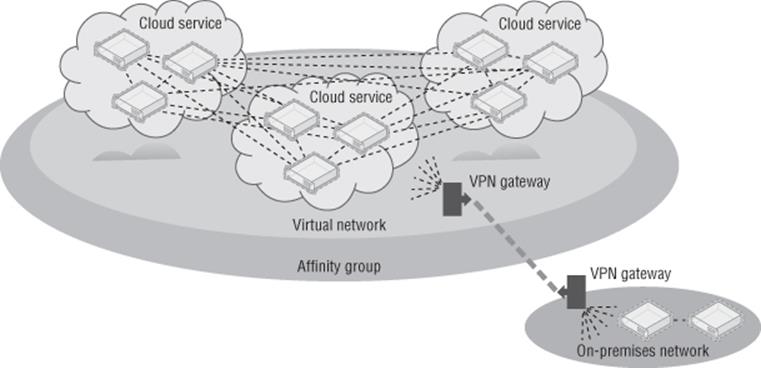
Figure 11.23 Connectivity when using virtual networks
Note that multiple virtual networks can be created within an affinity group but a virtual network cannot cross affinity groups and therefore cannot cross regions. All cloud services within the affinity group can then access the same virtual networks, and when virtual machines are created, the virtual subnet they should be connected to is selected. (I will cover this in more detail later in this section.) This enables virtual machines in different cloud services to communicate provided they are connected to the same virtual network, which also means the cloud service they are part of is in the same affinity group.
The valid IP address ranges you can specify to use for a virtual network are those defined in RFC 1918 that are the private, non-Internet routable addresses. No other IP addresses can be used in Windows Azure. Those usable address ranges are as follows:
· 10.0.0.0 to 10.255.255.255 (10/8 prefix)
· 172.16.0.0 to 172.31.255.255 (172.16/12 prefix)
· 192.168.0.0 to 192.168.255.255 (192.168/16 prefix)
When deciding which IP network to use in Windows Azure, always consider that even if you don't want to connect Windows Azure to your on-premises network today, you may want to in the future. Therefore, use an IP network that is not used on premises so connectivity and routing will be possible in the future. If my organization used the 10.0.0.0/8 IP range on premises, I would like to use the 172.16.0.0/12 range in Windows Azure to avoid any risk of overlap. Once you decide on the IP address range you wish to use for the Windows Azure network, you can divide it into subnets for use by different types of services. For example, I like to create different subnets for my Windows Azure infrastructure servers, such as domain controllers, and another for my Windows Azure application services such as SQL servers. The Windows Azure gateway to provide VPN also requires its own IP subnet. A subnet can be as large as /8 and as small as /29 (using CIDR subnet definitions). Remember, this is showing the number of bits in the IP address that defines the network. A /8 means a subnet mask of 255.0.0.0, and I don't think you would ever have a subnet anywhere close to this size. Gateway functionality between subnets in a virtual network is provided automatically by the virtual network, but you cannot ping the gateway for each subnet, nor will tracert-type utilities work.
Within a virtual network subnet, the first and last IP addresses of a subnet are reserved as part of the protocol for network addresses (host ID all 0s) and broadcast addresses (host ID all 1s), respectively. Windows Azure also reserves the first three IP addresses in each subnet (binary 01, 10, and 11 in the host ID portion of the IP address). This can be seen in Figure 11.24, where I show an example virtual network I have defined that has three subnets. Note that in the example, my virtual network is a small address space, 10.7.115.0/24, and within it I've divided some of that space into subnets. The gateway subnet is the easiest example to understand: 10.7.115.0/29. Normally this would allow six usable IP addresses, 10.7.115.1 to 10.7.115.6. However, it shows that only three IP addresses are usable, .4 to .6. This is because Windows Azure has reserved the first three usable addresses, .1 to .3, for its own purposes. Subnets cannot overlap each other. Note that IPv6 is currently not supported.

Figure 11.24 IP subnets in a virtual network
Once you define subnets and virtual machines are added to a subnet, the virtual machine's IP address will be allocated from the IP address range from that subnet as an infinite lease. Even though DHCP is used to assign the IP address to the virtual machine, the actual IP address will never change while the virtual machine is provisioned, that is, while you are paying for it. This does mean you have to be careful to never deprovision the virtual machine, such as shutting it down from the Windows Azure management portal, because this will result in the virtual machine getting a new virtual network adapter and a new MAC when it is subsequently started, and therefore a new IP address. If you want to ensure that your virtual machine's dynamic IP address (DIP) never changes, then never deprovision it. There are some tricks to help with keeping IP addresses for virtual machines, which I'll cover shortly.
Within a virtual network, most IP-based protocols—such as TCP, UDP, and ICMP—will work. However, multicast, broadcast, IP-in-IP encapsulated packets, and GRE packets are blocked. The GRE blocking is logical when you consider that behind the scenes Windows Azure is leveraging Hyper-V Network Virtualization, which itself uses GRE.
If you have multiple virtual networks, there is currently no way to connect them in Windows Azure; that is, there is no way to have Windows Azure act as a network router for the different virtual networks. The only currently available solution would be to route traffic between virtual networks by connecting the Windows Azure virtual networks to your on-premises location and let the on-premises infrastructure route between them, as shown in Figure 11.25 along with an example communication between two virtual machines in different virtual networks. This is far from ideal, especially because you have to pay for egress (outbound) traffic from Windows Azure and the communication is traveling via the Internet to your datacenter and back again. I would expect at some point in the future Microsoft will add the ability to link virtual networks in Windows Azure and route accordingly, but there is no promise or timeline for that.
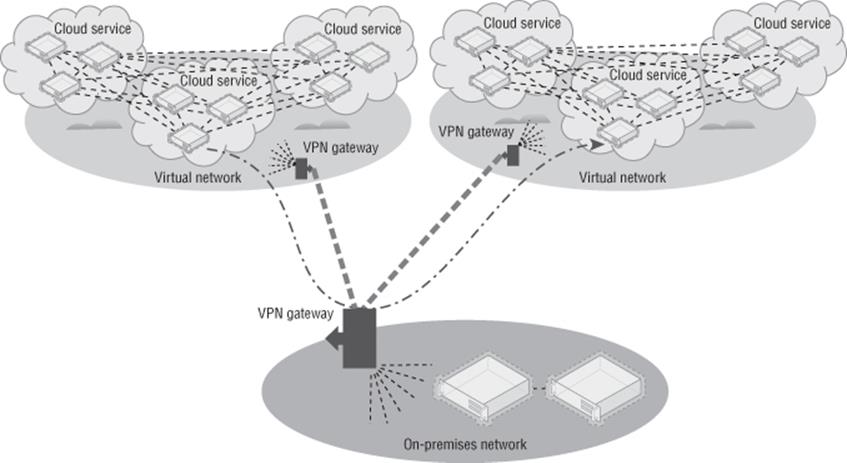
Figure 11.25 Routing between virtual networks using your on-premises network
This really is all a virtual network is. You have an IP address space you define and then divide into subnets, and virtual machines are then assigned to the subnets when they are created. You cannot move existing virtual machines into a subnet or move a virtual machine out of a subnet. The configuration must be done at the time of virtual machine creation. I am referring exclusively to virtual machines, but PaaS Web and Worker roles can also leverage virtual networks.
Walking through the creation of a virtual network will help solidify your understanding, and I can also share a few hints I have found useful to optimize IP address allocation. I am assuming you already have an affinity group created that will contain the new virtual network. Follow these steps:
1. In the Windows Azure portal, select the Networks navigation item.
2. Select the New action and select the Custom Create option for Virtual Network menu item.
3. Enter a name for the new virtual network and select the affinity group. Make the name for the virtual network something that will identify the network. Click the Next arrow.
4. Specify the DNS servers the virtual network will use. If you don't have this information, leave it blank. Also select the option to configure a site-to-site VPN, as shown in Figure 11.26. Note that the option to enable a point-to-site VPN is also available and this can be set post-creation. Click the Next arrow.
5. The next page can initially be confusing as to what it is asking, but this is where you enter the details for your on-premises infrastructure: a name for your on-premises location, the IP address for your Internet facing gateway device that will be used by Windows Azure to connect to when creating the VPN, and the IP address space used on premises in your organization so Windows Azure knows how to route accordingly. This IP address can be changed later. If I use 172.16.0.0/12 on premises, I would configure this as shown in Figure 11.27.
6. The final screen allows configuration of the subnets available in the virtual network. By default, a subnet has been added at the start of the IP address space, but I prefer to modify this because I like to have the gateway subnet at the start of the IP address space. To make this happen, you have to do a few things. Also you can change the actual address space used from the default 10.0.0.0/8 to anything you want by just clicking in the Starting IP field and changing it as required.
7. Change the name of subnet added by default to a useful name, such as InfraVMs, and change the starting IP to x.x.x.9 instead of x.x.x.0; for example, I set mine to 10.0.0.9. I will use this for my domain controllers that will also be DNS servers in Windows Azure. I use a dedicated subnet just for these servers so that even if the virtual machines get deallocated at some point in the future and lose their IP address because only my domain controllers are in this subnet, no one else will take their address and I can safely specify the IP addresses as DNS servers for the entire virtual network. Because I will have three or fewer domain controllers, I set the address count to /29, which gives me three usable IP addresses.
8. Click the Add Gateway Subnet action (shown in Figure 11.28), which will now take the start of the address space, 10.0.0.0, because it needs at least two IP addresses, and because I started at .9 for my previous subnet, the gateway can fit in the gap I left. Sneaky!
9. I would now create additional subnets for my application servers and so on. There is a bug in Windows Azure web site that limits the size of the address counts to only one more than the previous subnet, which is a pain point. Using PowerShell works around this, but be aware of this limitation (it may be fixed by the time you read this, hopefully).
10.Click the tick icon to complete the virtual network creation.
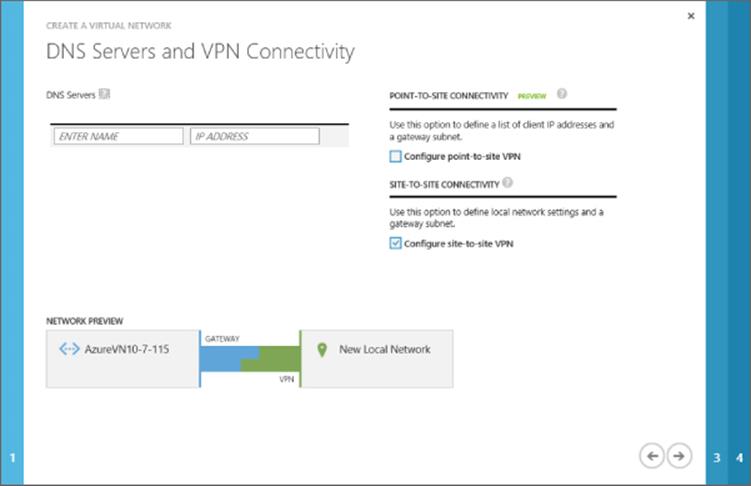
Figure 11.26 Enabling site-to-site VPN configuration for the new virtual network
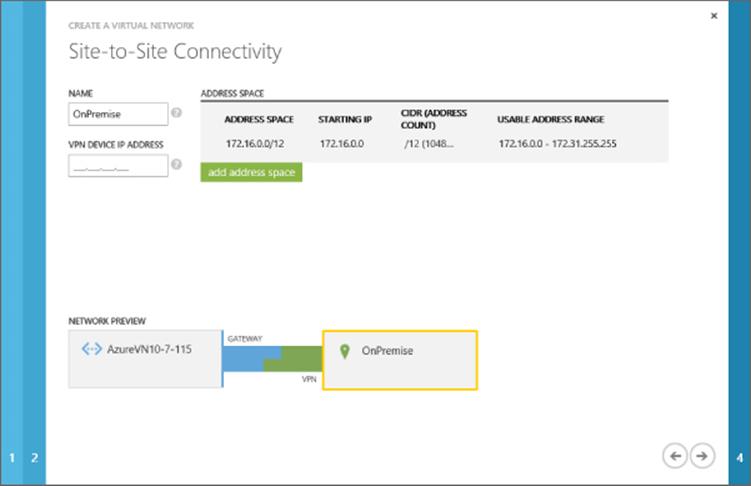
Figure 11.27 Specifying the on-premises details that will be used for a site-to-site VPN connection
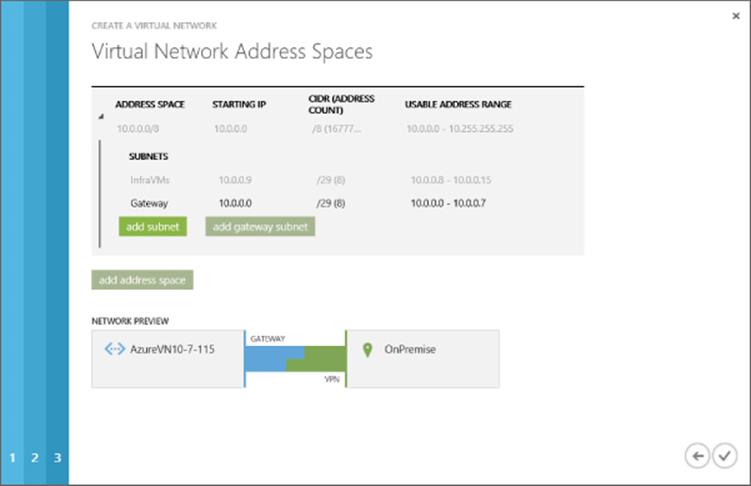
Figure 11.28 Forcing the gateway subnet to the start of the IP address range and carving out a special subnet just for my Azure DC/DNS servers to lock in their IP addresses
The virtual network will take a few seconds to provision and will then be ready to use. Notice on the Networks page of the management portal that by default it shows the Virtual Networks view but also available are the Local Networks view and DNS Servers view. Additional local networks can be created and existing local networks can be modified, such as changing the gateway IP address for the network and also its address space, as shown in Figure 11.29, by clicking the Edit action. If you did not select the option to configure site-to-site when creating the virtual network (which creates the local site via the wizard), then you would have to manually create the local site if you later wanted to add a site-to-site VPN to an existing virtual network. The DNS Servers view allows you to add and remove DNS servers, which can be used by the virtual networks. All of this configuration (such as creating the virtual network, creating the local network, and configuring DNS) can be done through PowerShell. For example, to add a DNS server I use the following command:
New-AzureDns -Name 'PremDNS' -IPAddress '192.168.1.10'
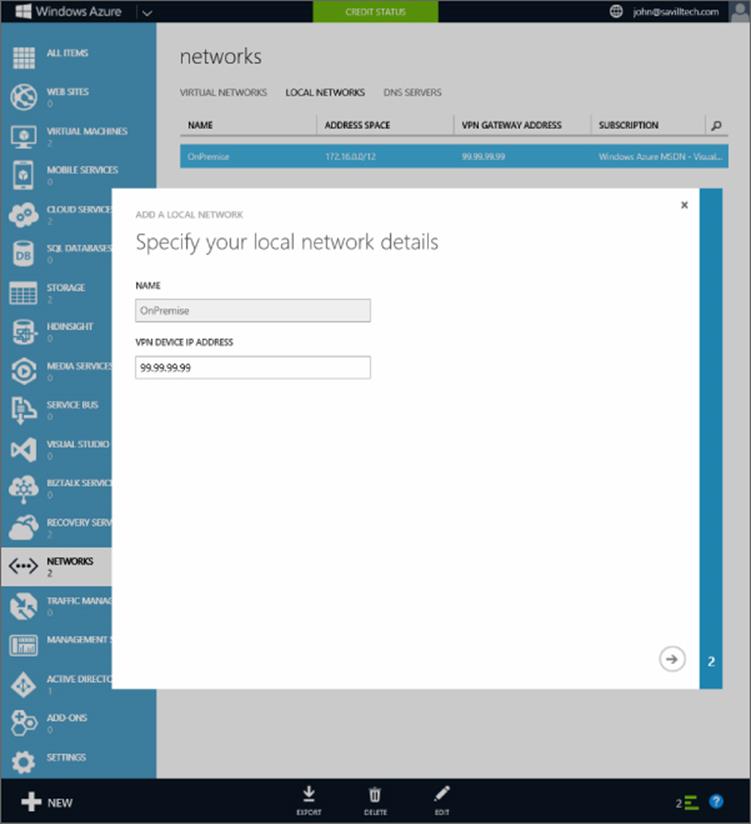
Figure 11.29 Modifying a local network
To dump out the entire configuration of a virtual network, use the following command, which gives a huge amount of information and can actually be used to modify and then reimport the configuration:
Get-AzureVNetConfig | select -ExpandProperty xmlconfiguration
Here is an example output:
PS C:\> Get-AzureVNetConfig | select -ExpandProperty xmlconfiguration
<?xml version="1.0" encoding="US-ASCII" standalone="no"?><!DOCTYPE WileyML3G [<!ENTITY % wileyml3g.ent SYSTEM "http://v.wiley.com:3535/dtds/wileyml3g/wiley.ent">%wileyml3g.ent;]>
<NetworkConfiguration xmlns:xsd="http://www.w3.org/2001/XMLSchema"
xmlns:xsi="http://www.w3.org/2001/XMLSchema-instance" x
mlns="http://schemas.microsoft.com/ServiceHosting/2011/07/NetworkConfiguration">
<VirtualNetworkConfiguration>
<Dns/>
<LocalNetworkSites>
<LocalNetworkSite name="OnPremise">
<AddressSpace>
<AddressPrefix>172.16.0.0/12</AddressPrefix>
</AddressSpace>
<VPNGatewayAddress>99.99.99.99</VPNGatewayAddress>
</LocalNetworkSite>
</LocalNetworkSites>
<VirtualNetworkSites>
<VirtualNetworkSite name="AzureVN10-7-115"
AffinityGroup="MasteringHyper-V2012R2-EastUS">
<AddressSpace>
<AddressPrefix>10.0.0.0/8</AddressPrefix>
</AddressSpace>
<Subnets>
<Subnet name="InfraVMs">
<AddressPrefix>10.0.0.9/29</AddressPrefix>
</Subnet>
<Subnet name="AppVMs">
<AddressPrefix>10.0.0.16/28</AddressPrefix>
</Subnet>
<Subnet name="GatewaySubnet">
<AddressPrefix>10.0.0.0/29</AddressPrefix>
</Subnet>
</Subnets>
<Gateway>
<ConnectionsToLocalNetwork>
<LocalNetworkSiteRef name="OnPremise">
<Connection type="IPsec"/>
</LocalNetworkSiteRef>
</ConnectionsToLocalNetwork>
</Gateway>
</VirtualNetworkSite>
</VirtualNetworkSites>
</VirtualNetworkConfiguration>
</NetworkConfiguration>
Back in the Virtual Networks view, a virtual network can be selected and further configured via the Configure tab of the virtual network. On this tab you can specify DNS servers, which will be configured to the virtual machines via the DHCP. The various types of VPN connectivity can be enabled and also the subnets can be updated, but you cannot change a subnet that has resources using it.
Creating the actual VPN connection will be covered in the next section, so the only task left is to use the virtual network, and specifically subnets, with your virtual machines. The process to create a virtual machine is exactly the same except in the Virtual Machine Configuration page of the Create A Virtual Machine Wizard, you select a virtual network instead of a region or affinity group and select the desired subnet for the VM, as shown in Figure 11.30. You would also select a storage account and cloud service as per normal.
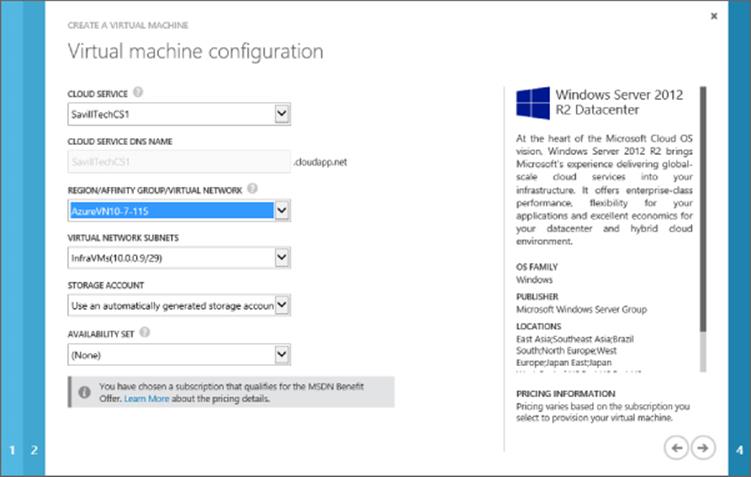
Figure 11.30 Assigning a virtual machine to a virtual network and subnet
The selection of the cloud service may initially cause some confusion. When you create the virtual network, it is placed within an affinity group. You may also already have cloud services in that same affinity group. However, those cloud services will not be usable with the virtual network if they already have resources deployed to them. This is because those resources would already have IP addresses and therefore the cloud services are already using an automatically generated IP range. Only a new cloud service that does not have resources can be used with a virtual network, or you need to create a new cloud service as part of the virtual machine creation.
The virtual network is now being used, and if you look at the virtual machine's IP configuration, you will see it has an IP address from the IP range of the subnet and the DNS configuration will use the DNS servers configured for the virtual network.
Linking On-Premises Networks with Azure IaaS
In an earlier section I discussed endpoints as a way to connect to services running in virtual machines via the cloud service's VIP. If you require a lot of connectivity between on-premises and virtual machines in Windows Azure, using the endpoints it not practical, plus the traffic is sent over the Internet and may not be encrypted, depending on the type of traffic. A better solution is to create a site-to-site (s2s) VPN connection between on-premises and Windows Azure that then avoids the endpoints completely and allows direct communication between the systems.
Once your virtual networks are created in Windows Azure, it's actually easy to enable the site-to-site VPN to bring cross-premises connectivity. If you followed the steps in the previous section, when creating the virtual network, you already configured your local on-premises network and specified the public IP address for your local network, so you are basically already done. If you did not check the option for site-to-site connectivity during the virtual network creation, you need to perform the following additional steps:
· Navigate to the Networks area in the Windows Azure management portal. Select Local Networks and create a new local network, configuring the IP address range used on premises and the public IP address.
· In the Networks area, select Virtual Networks and select your virtual network. Click the Configure tab. Check the box for site-to-site connectivity and select the local network definition from the displayed list.
You are now ready to create the actual gateway, which is achieved by clicking Create Gateway and then either Dynamic Routing or Static Routing on the Dashboard page of the virtual network in the Windows Azure management portal. Which one you choose, Dynamic Routing or Static Routing, depends on the gateway on your premises. If you are using Windows Server 2012 RRAS locally, then you would select the Dynamic Routing option. The Windows Azure gateway creation will take around 5 minutes, and behind the scenes two virtual machines that are the Windows Azure side of the VPN gateway are being created in an active-passive configuration for redundancy.
Once the configuration is completed, click the Download VPN Device Script link (see Figure 11.31), which will give a list of supported devices—such as those from Cisco and Juniper plus Microsoft's own RRAS—that will actually generate a complete configuration script that can be used to complete the configuration on your local network infrastructure. Once your side of the VPN gateway is configured, you can click the Connect action on the virtual network Dashboard to trigger a connection and you should now have cross-premises connectivity. You can also trigger the connection from your on-premises side. If you are using RRAS, you can use the following command:
Connect-VpnS2SInterface -Name <Azure Gateway IP address>
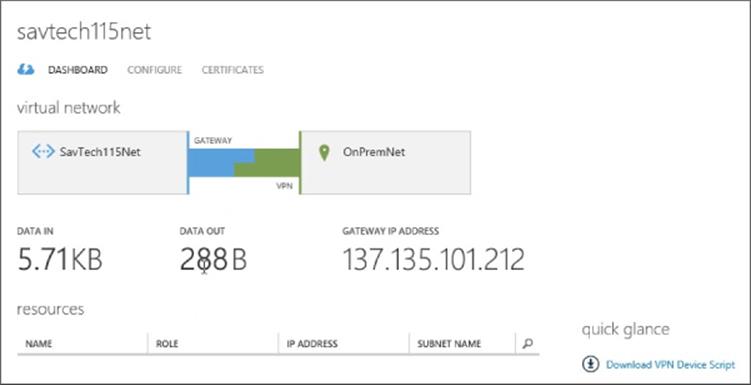
Figure 11.31 A completed gateway connection
I actually walk through the entire process in a video at http://youtu.be/O8wUnt4mDUc, which I recommend if you are setting this up for the first time. You can expect bandwidth transfers over the VPN of about 80 Mbps. This is limited by the fact that IPsec is used, and on the Windows Azure side effectively one processor core is used to handle the VPN connection and the IPsec calculations.
The next question I always hear when I talk about this is how to add a second VPN connection to a Windows Azure virtual network to provide connectivity to another datacenter for normal operations or perhaps for disaster recovery if the main datacenter fails. At the time of this writing, you can't. A virtual network can have only a single gateway. I know the Windows Azure team is aware of the need to have more than one gateway, but I know of no committed time frame. If you have another datacenter that needs connectivity to the Windows Azure resources via the VPN, your primary datacenter that has the VPN connection to the virtual network will act as the routing hub, as shown in Figure 11.32, which shows an example VM in Datacenter 2 talking to a VM in Windows Azure. This is not ideal, but it works. If you need protection if the main datacenter fails, the only recommendation right now is to have the PowerShell ready to delete and re-create the gateway on the Windows Azure side to use your gateway in the second datacenter. There is nothing stopping your datacenter from having VPN connections to multiple Windows Azure virtual networks, as discussed previously in this chapter.
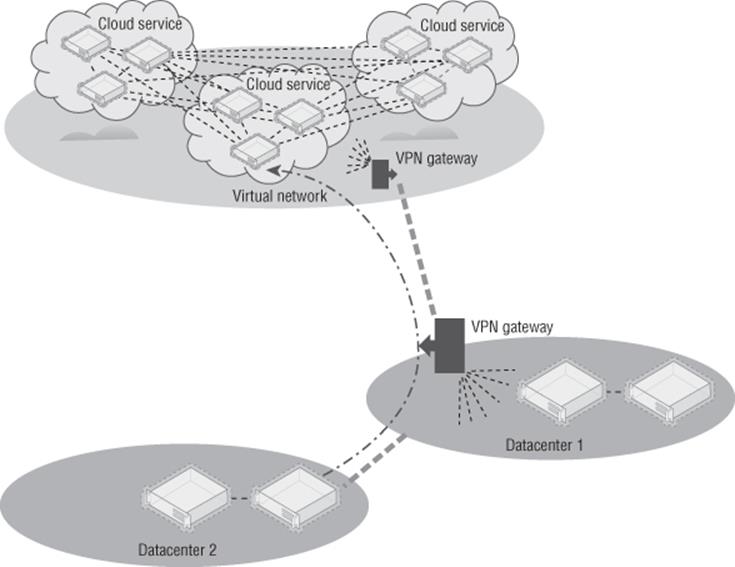
Figure 11.32 Multiple datacenters connecting to Windows Azure
Many organizations place domain-joined resources and even place domain controllers in Windows Azure. I recommend creating a separate Active Directory site for the IP range used by Windows Azure. If you want to have a failover cluster stretch between your on-premises and Windows Azure, there are a number of complications. I wrote up how to make it work at the following location: this is especially useful if you want to leverage cross-premise SQL AlwaysOn.
http://windowsitpro.com/hybrid-cloud/extend-failover-cluster-windows-azure
At this point Windows Azure is an extension of your datacenter, and you should use it in ways that make the most sense for your organization. There is also a point-to-site VPN capability available to give specific machines connectivity to Windows Azure. It leverages a special client component that is downloaded from the Windows Azure management portal and the clients connecting using the VPN client component receive an IP address from a pool defined as part of the Windows Azure point-to-site VPN configuration. If you need this kind of point-to-site VPN, it is available as an option, and Microsoft has plenty of documentation, including a nice blog post at the following location:
http://blogs.msdn.com/b/piyushranjan/archive/2013/06/01/point-to-site-vpn-in-azure-virtual-networks.aspx
For most virtualization-type communications in the datacenter, though, you will want to use the site-to-site VPN options, which is why I'm not covering point-to-site in detail.
Migrating Virtual Machines between Hyper-V and Azure IaaS
A huge “better together” with Windows Azure and Microsoft Hyper-V on premises is the compatibility aspect of the virtual machines enabling virtual machines to be moved between on-premises and Windows Azure and back again. There are some considerations:
· At the time of this writing, Windows Azure does not support VHDX, so your virtual hard disks should be VHD.
· At the time of this writing, Windows Azure has a 1,023 GB size limit, so keep the VHD files at 1,023 GB or less.
· Windows Azure only supports fixed VHD files, but dynamic VHDs are automatically converted to fixed when uploaded using Add-AzureVHD.
· App Controller enables a virtual machine stored in the library to be deployed to Windows Azure directly.
· Windows Azure virtual machines can have only a single network address and its IP must be configured using DHCP.
· Windows Azure is currently based on Windows Server 2012 Hyper-V and not Windows Server 2012 R2.
· Windows Azure does not currently support Generation 2 virtual machines which means use Generation 1 virtual machines only.
Primarily to move virtual machines, the VHD file(s) for the virtual machine will be uploaded or downloaded from Windows Azure and then a new virtual machine will be created that uses the VHD file(s). The process to perform an on-premises to Windows Azure migration is as follows:
1. Upload the VHD(s) to Windows Azure using the Add-AzureVhd cmdlet. For example, here I create a test VHD and then upload it:
2. $sourceVHD = "D:\Temp\vhdtst.vhd"
3. $destinationVHD = https://masteringhyperv2012r2.blob.core.windows.net/vhds/vhdtst.vhd"
4. New-VHD -Path $sourceVHD -Dynamic -SizeBytes 10GB
5. Add-AzureVhd -LocalFilePath $sourceVHD -Destination $destinationVHD ´
-NumberOfUploaderThreads 5
6. Once the file is uploaded, it must be configured as an OS or data disk using Add-AzureDisk. To make a disk an OS disk, add the -OS <Windows or Linux> switch. I will make my disk a data disk:
7. Add-AzureDisk -DiskName 'vhdtst' -MediaLocation $destinationVHD ´
-Label 'vhdtst'
8. Now the disk is added to an existing VM (or a new VM could be created using the uploaded VHD if it was an OS disk). Normally when using Add-AzureDataDisk, the -CreateNew switch is used, but since I have an existing disk, I will import it by name and add it to the virtual machine:
9. $mySvc = "MasteringHyper-V2012R2-CS"
10. $myVM = "Test42"
11. Get-AzureVM -Name $myVM -ServiceName $mySvc |
12. Add-AzureDataDisk -Import -DiskName vhdtst -LUN 2 |
Update-AzureVM
In this example I used a data disk, but it would be exactly the same process if I used an OS disk except I would have use the -OS <OS> switch when performing the addition to Windows Azure, as previously mentioned.
To retrieve a VHD from Windows Azure, the process is similar. Download the VHD and then create a virtual machine locally that uses it. To download the VHD, perform the following:
$sourceVHD = ´
"https://masteringhyperv2012r2.blob.core.windows.net/vhds/test-Test42-1228-1.vhd"
$destinationVHD = "D:\temp\test-Test42-1228-1.vhd"
Save-AzureVhd -Source $sourceVHD -LocalFilePath $destinationVHD ´
-NumberOfThreads 5
Hopefully this showed that it's fairly simple to move VHDs into and out of Windows Azure. PowerShell is just one option, but you can use it in pretty much any other environment, including automated processes to bulk-move virtual machines.
Leveraging Azure Storage
This chapter has gone into a lot of detail about using Windows Azure Storage on Windows Azure IaaS virtual machines. Now I want to briefly cover other ways Windows Azure Storage can be used. Specifically, I want to tell you about two key usages that I've found to be the most interesting for my customers.
The first is backup, because with Windows Azure Storage, you effectively have a limitless amount of offsite storage and Windows Azure provides the ability to create backup vaults that can then be used by backup applications, including Windows Backup (which is built into Windows Server) and also System Center Data Protection Manager (DPM). In the case of System Center DPM, the Windows Azure backup acts as a secondary, offsite backup target that is in addition to the disk-based primary backup target.
Microsoft has detailed instructions on configuring the Windows Azure backup vault, creating the certificate required, and downloading and installing the Windows Azure backup agent at the following location:
www.windowsazure.com/en-us/manage/services/recovery-services/configure-a-backup-vault/
My goal is to ensure that you knew about the capability because it's an easy way to get offsite backups and architect a backup solution where a certain number of days' backups are kept onsite and then an additional duration kept in the public cloud.
Using Windows Azure Storage for backups is a great use case but if things go well, you will never actually use it, and it's not helping solve organizations' number 1 pain point with data, namely, that there is too much of it and it's getting harder and harder to store and manage it. Figure 11.33 shows a typical organization's amount of data over time, and as you can see, it is exponentially increasing. However, also notice that the actual working set of data that is really used is much smaller and grows much more slowly.
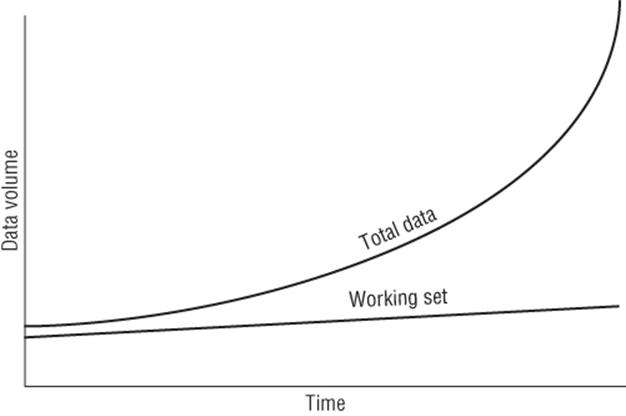
Figure 11.33 Typical organizational data volume over time
Microsoft acquired StorSimple, which is a storage appliance that has a certain amount of local storage, both HDD and SSD, but can also leverage Windows Azure Storage. The StorSimple appliance acts as an iSCSI target and then at a block level leverages tiers of storage, including using deduplication and compression to store the data. The more frequently accessed data will be stored on a higher tier; for example, the most-used data will be stored in the SSD tier, less-used data would be stored in the HDD tier, while rarely used data will be stored in Windows Azure Storage. This reorganizing of data happens automatically using algorithms built into StorSimple. What this means is that all the data that exists, but is rarely used, would be uploaded to Windows Azure Storage and then deleted from the local storage, keeping the most-used data local (plus also storing in Windows Azure for protection), which gives the highest performance while providing essentially an infinite total capacity size. To the end user all the data looks like it's available locally on the StorSimple appliance because even data moved to Windows Azure Storage keeps a local thumbprint (representing the Windows Azure stored data) on the StorSimple storage, like a stub file but at a data block level.
If data that has been offloaded to Windows Azure is accessed, then the StorSimple device will automatically download it and make it available, but obviously this would impact storage performance because the data has to be downloaded over the Internet. It is also possible to pin certain data to always be kept locally (near) or configure it to be offloaded to Windows Azure as soon as possible (far). Figure 11.34 shows a view of the local capacity of a StorSimple device. Notice that there is SSD Linear (not deduplicated), SSD Dedupe (deduplicated), and then HDD (which is deduplicated and compressed). What is not shown is the final Windows Azure Storage tier. Data stored in Windows Azure Storage is not only deduplicated and compressed, it's also encrypted using a key known only to the StorSimple appliance. Initially data is written to the SSD Linear tier and then over time deduplicated in SSD, and then, depending on its usage, it may get moved to the HDD tier or even Windows Azure Storage.
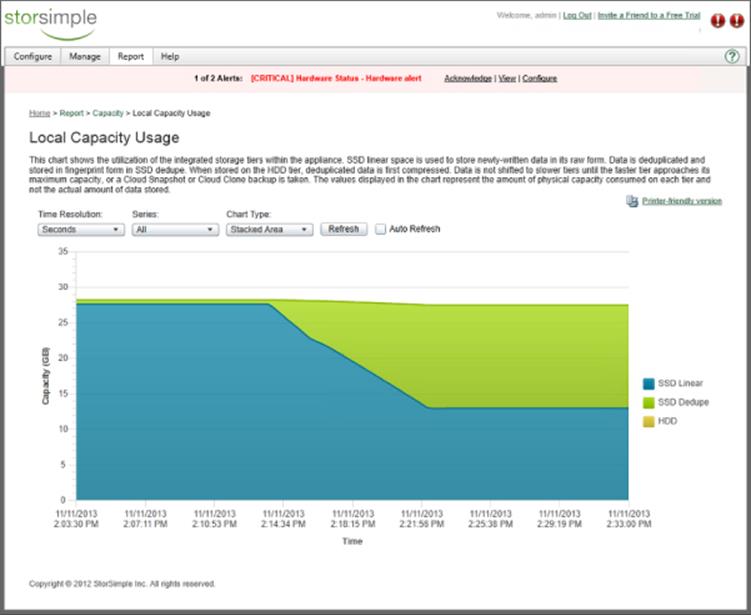
Figure 11.34 StorSimple Local Capacity Usage report
This automatic tiering may sound familiar. Storage Spaces in Windows Server 2012 R2 does something similar with its HDD and SSD tiers. Currently StorSimple is based on Linux, but I expect this to change. I also don't think it would be much of a “leap” for the StorSimple algorithms used to offload to Windows Azure to find their way into the next version of Windows Server and become part of Storage Spaces, adding the Windows Azure Storage tier to Storage Spaces. Then the StorSimple appliances could just be based on Windows Server vNext. This is all pure conjecture on my part, but it would make complete sense because Microsoft pushes Storage Spaces and it now owns StorSimple.
The StorSimple appliances come in different sizes, and to help you use Windows Azure Storage more easily, Microsoft is actually giving them away if you purchase certain amounts of Windows Azure credit. There are key scenarios in which StorSimple is a great solution. It's great as a storage for file servers and archive servers. It can be used for low- to mid-range Hyper-V VM storage and SQL workloads, including SharePoint. It should not be used for high disk IOPs Hyper-V and SQL scenarios because it will not deliver the storage performance that is required. It should also not be used as a backup target because once it hits 80 percent full of its local storage, all future writes have to basically go directly to Windows Azure, which means at that point the storage performance would be terrible during the backup. Exchange is not recommended to run on StorSimple.
Windows Azure Storage can be used in many other ways, through custom applications and more, but the backup scenario and StorSimple are powerful and easy ways to quickly get real benefits.
The Bottom Line
1. Explain the difference between Platform as a Service and Infrastructure as a Service. The key difference relates to who is responsible for which elements of the solution. With Platform as a Service, solutions are written for a supplied platform within certain guidelines. The platform then ensures availability and protection for the application, and there is no operating system or fabric management required. The key point is that the application must be written to work with the PaaS platform. With Infrastructure as a Service, a virtual machine is provided, which means the provider manages the compute, storage, and network fabric but the user of the virtual machine is responsible for the operating system and everything within it and also patching it. The benefit of IaaS is that you have complete access to the operating system, so normal applications can run in IaaS without requiring customization. A key principal of IaaS is that you should not have to modify the application to work on it.
1. Master It What is Software as a Service?
2. Connect Windows Azure to your on-premises network. To create connectivity between Windows Azure and your local network, there are a number of requirements. First, virtual networks need to be defined in Windows Azure in affinity groups. Virtual machines are created and configured at the time of creation to use a specific subnet in the virtual network. A site-to-site gateway is created between Windows Azure and your on-premises network, which permits seamless connectivity.
1. Master It Can Windows Server 2012 RRAS be used on the local premises side of the VPN gateway?
3. Move data between on-premises and Windows Azure. Windows Azure is built on Windows Server Hyper-V and specifically leverages the VHD format currently. A virtual machine that uses VHD can be copied to Windows Azure storage and used with a new Windows Azure virtual machine or added to an existing virtual machine. Similarly, VHD files used in Windows Azure virtual machines can be downloaded to on-premises and used with Hyper-V virtual machines.
1. Master It What PowerShell cmdlets are used to copy VHDs to and from Windows Azure?
2. Master It Can dynamic VHDs be used in Windows Azure?
All materials on the site are licensed Creative Commons Attribution-Sharealike 3.0 Unported CC BY-SA 3.0 & GNU Free Documentation License (GFDL)
If you are the copyright holder of any material contained on our site and intend to remove it, please contact our site administrator for approval.
© 2016-2026 All site design rights belong to S.Y.A.