Mastering Hyper-V 2012 R2 with System Center and Windows Azure (2014)
Chapter 2. Virtual Machine Resource Fundamentals
This chapter covers the primary building blocks of a virtual machine: the motherboard, processor, memory, and storage resources. We will look at the mechanics behind how these building blocks are virtualized on the physical host and explore the configuration options available for each of the virtualized resources when it's assigned to a virtual machine. We will also take a look at the advantages and limitations of the different options in the different common usage scenarios. By thoroughly understanding the fundamentals of virtual machine resources, you will be able to architect correctly the optimal virtual machine configuration based on the requirements available. You will also understand why the many other technologies are needed and how they should be utilized when they are explained later in this book.
In this chapter, you will learn to
· Describe how the resources of a virtual machine are virtualized by the hypervisor
· Use processor and memory advanced configuration options
· Explain the difference between VHD/VHDX and pass-through storage
Understanding VMBus
Before we get into virtual machine resources, I want to cover the Hyper-V architecture in more detail than the high-level overview in Chapter 1, “Introduction to Virtualization and Microsoft Solutions.” It is important to understand how the various resources for virtual machines are actually engineered and enabled. Figure 1.4 shows the hypervisor running directly on the hardware with all the virtual machine resource access serviced through the hypervisor. If you look carefully at the figure, I showed only the processor and memory resources being managed by the hypervisor, and this was deliberate. There are other resources that must be available for a full functioning environment, such as storage and networking. The mechanisms to communicate with the processor and memory in a system are quite standardized, removing the need for many different sets of code to handle the different types of processors and memory found in a system. This is not the case with storage controllers and network devices. Each vendor typically has it own specific implementation and must provide a driver to enable the operating system to correctly communicate with the hardware. There are literally thousands of these drivers for Windows, with most written by the independent hardware vendor (IHV). All these different types of storage and networks need to be usable by Hyper-V, and therefore the drivers need to be available. There are two different architectures for type 1 hypervisors: monolithic and microkernelized, as shown in Figure 2.1.
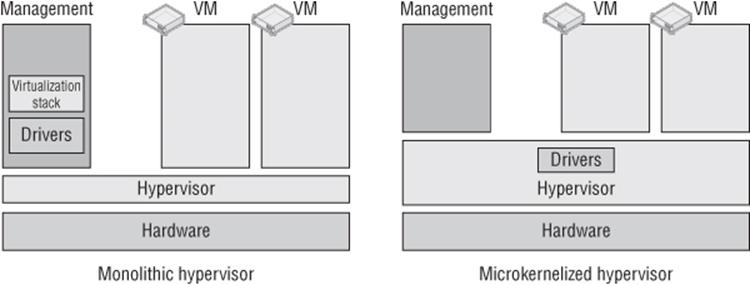
Figure 2.1 The monolithic and microkernelized hypervisors
With a monolithic hypervisor, the drivers that are responsible for communication with the hardware sit in the actual hypervisor, which is a fairly complex kernel, basically a mini operating system. The virtual machines access the hardware via these specialized device drivers, which actually results in very good performance because the virtual machines can go directly to all hardware via these drivers in the hypervisor. However, there are issues. The first is that these shared drivers are specifically written for the hypervisor; that limits the hardware that is supported by a monolithic hypervisor, and virtualization solutions that use a monolithic hypervisor typically have a small hardware compatibility list. This shared driver base leads to the main concern, which is security and stability. With a shared driver for all the virtual machines, if a malware driver was placed in the hypervisor, all the partitions would be vulnerable to attack and snooping, plus if a driver is updated in the hypervisor that has an issue, it will cause problems for all the virtual machines.
Consider the Windows ecosystem with the huge number of hardware partners and the thousands of different storage controllers and network adapters that organizations may wish to use. Trying to create hypervisor drivers for all the different hardware would not be practical, and drastically reducing the supported hardware when using Hyper-V would also not be popular. So Microsoft choose the microkernelized hypervisor model, and this is why there is a Windows Server management/parent partition. With the microkernelized hypervisor model used by Hyper-V, all the Windows drivers created by vendors for their hardware can still be used and actually run in the management partition, removing the need for Hyper-V–specific drivers and not reducing the range of hardware usable with Hyper-V. This also keeps drivers out of the hypervisor, removing the security and stability concerns that relate to a monolithic hypervisor.
In actual fact, the hypervisor really just governs the allocation of CPU cycles and RAM and no other types of devices, such as storage and network. The parent partition hosts a virtualization stack that includes management components running in normal user mode. The Virtual Machine Management Service (VMMS) manages the state of virtual machines and launches the Virtual Machine Worker processes (VMWPs). There's one for each child partition running, and it controls the state changes of the child partition, enables certain types of emulated hardware, and enables management activities such as stopping and starting. Figure 2.2 shows Task Manager running on a Hyper-V server with a single vmms.exe instance but many vmwp.exe instances that correspond to each VM. In the background is a PowerShell command, which helps identify the worker process for a specific virtual machine. You need the parent partition along with the hypervisor to do anything useful such as creating child partitions. While you can install the hypervisor on its own, it won't really do much without a Windows Server 2012 R2 parent partition.
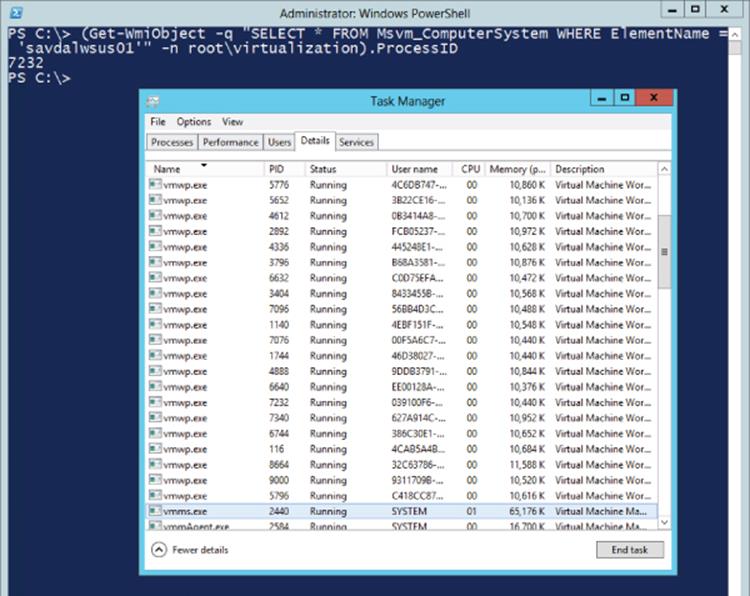
Figure 2.2 Task Manager showing a single vmms.exe instance and many vmwp.exe instances
Components also run in kernel mode, such as the virtual machine bus (VMBus), which enables communication between a number of virtual service providers (VSPs) that enable support for non-CPU and memory hardware such as storage and networking. Each VSP corresponds to a number of virtual service clients (VSCs) running in the child partitions; for example, we have a virtual service provider and consumer for a network, a pair for storage, and so on. When a child partition wishes to access hardware resources that are not CPU or memory, its VSC makes a request to the VSP hosted in the VMBus on the parent partition, and the VSP performs the actual communication to the physical hardware. This is shown in Figure 2.3, which is an updated version of Figure 2.1 to show more clearly how the various types of hardware resource are actually serviced. The VMBus is not shared between all the child partitions, and there is one channel between each child and the parent so no communication or data can be seen by other child partitions running on the same server. This VMBus does not incur any significant performance penalty even though child partitions wanting to access hardware now essentially communicate via the VSC to a VSP on the VMBus hosted on the parent partition, which communicates to the hardware. This is because the VMBus is actually a pure memory bus running at a kernel level, so there is practically no latency introduced, and by using this model, Microsoft keeps the hypervisor small and secure while still allowing full hardware support for the breadth of the Microsoft hardware ecosystem.

Figure 2.3 Hyper-V VMBus architecture
Essentially, the parent partition hosts all the VM support components that are not part of the hypervisor, and if the parent partition reboots or is unavailable, none of the child partitions are available either. There are components to the Hyper-V solution I did not show in Figure 2.3 to avoid confusion. There is a virtualization infrastructure driver (VID, vid.sys) that runs in the parent kernel mode and enables management services to the VMMS and VMWP that run in the user mode. The VID talks to the Windows Hypervisor Interface Library (WinHv) that communicates directly with the hypervisor via the hypercall interface, which communicates with the WinHv that runs in each VM (winhv.sys). There are a lot of moving parts, but for the most part you don't need to know about them. Things just work. It is, however, important to understand the VMBus and the role it plays in enabling very fast access to non-processor and non-memory resources via the parent partition.
The Anatomy of a Virtual Machine
Consider the fundamental objectives of a virtualization environment. One objective is to enable multiple operating system instances to simultaneously execute on a single physical system, which enables the many benefits covered in Chapter 1. Another objective is to divide up and share the resources available on the physical host to many virtual machines, which act as their own, self-contained systems that are completely isolated from the other virtualized systems running on the host. Each virtual machine believes it is the sole user of the hardware it is running on. Within each virtual machine an operating system is installed, and into that operating system, applications are installed and configurations implemented to enable services to the organization.
Operating systems are written to run on hardware and expect certain components to be present that can be interacted with, such as the computer's BIOS, storage controller, input/output systems, and network device. Drivers are included in the operating system to see certain types of device like network and storage controllers to enable installation and startup of the operating system. It's also possible to add additional drivers for hardware that does not have drivers included as part of the operating system. This fundamental presence of hardware components does not apply to a virtual machine. The entire environment of a virtual machine is synthetic, with abstracted resources allotted to the virtual machine and many resources utilizing the VMBus as previously explained. However, the key aspects of a computer must be present for an operating system to install and function.
Generation 1 Virtual Machine
All of the synthetic resources and devices that are exposed by Hyper-V provide the highest level of performance and functionality, but if an operating system cannot natively use them, then that operating system cannot be installed or started on that synthetic hardware. Even today with Hyper-V, there are large numbers of Windows 2000, Windows 2003, and Windows XP virtual machines running virtualized, and these operating systems are not virtualization aware. The use of the VMBus architecture within a guest operating system requires deep integration with other operating system components; it's not as simple as installing an additional storage or network driver during installation.
It is therefore often required to provide certain types of hardware as emulated, which means Hyper-V components provide to virtual machines what appear to be standard types of hardware such as an Intel 82371AB/EB IDE controller, an Intel 21140 Ethernet adapter, a PS/2 keyboard and mouse, and a complete virtual motherboard with BIOS. Behind the scenes, though, the Hyper-V solution is running code to pretend this hardware exists. Providing emulated hardware requires an additional workload in the hypervisor, predominantly provided by the worker process for the virtual machine, vmwp.exe.
Remember that the vmwp.exe runs in the user mode space of the parent partition, which means as emulated hardware is used, its performance will be poorer than the synthetic equivalents (which run purely in kernel mode and don't have the additional overhead of emulating physical pieces of hardware). The emulated hardware requires many context switches between user mode and kernel mode for the actual real hardware communications via the management partition's I/O stack, and the communication path is far more convoluted. Additionally, the interface to the emulated devices assumes things about a physical machine. For instance, setting up an IDE transfer involves seven I/O port writes, each of which is a separate round-trip to the emulator in the vmwp.exe and a huge performance penalty. This performance penalty is why synthetic hardware is always preferred over emulated hardware, but sometimes there isn't a choice, and for some types of hardware that is rarely used or primarily triggered by the user, the difference in performance is not noticeable (consider mouse or keyboard type hardware).
The term generation 1 virtual machine may be completely new to you. Prior to Windows Server 2012 R2 Hyper-V, it would have just been called a virtual machine. There is now a new type of virtual machine, which I will cover in the section, “Generation 2 Virtual Machine,” and that is why there is now a name distinction. Consider the generation 1 virtual machine as the virtual machine you have known and loved since Windows Server 2008 Hyper-V but with a few improvements. Unless you are deploying all brand-new virtual machines on Windows Server 2012 R2 with the latest operating systems, you will continue to use generation 1 virtual machines for some time, and this is not a problem at all. Remember that generation 1 virtual machines fully support the VMBus and synthetic hardware but also provide support for emulated hardware when required.
Virtual Motherboard and BIOS
At the core of a virtual machine is the virtual motherboard and the basic input/output system (BIOS). This provides the environment needed to initially start the virtual machine, choose the boot device, and hand over control to the operating system installed. Microsoft uses the American Megatrends Inc. BIOS for the virtual machines. However, you don't access the BIOS of a virtual machine the same way you access the BIOS of a physical machine (for example, by pressing the Esc or Delete key). Instead, the options related to BIOS startup and boot order are configured through the virtual machine properties using the BIOS area, as shown in Figure 2.4. Notice that the figure shows that the Num Lock state can be set as well as the types of boot devices supported in a generation 1 virtual machine (CD, IDE, legacy network Adapter, and floppy). The types of network adapters will be covered in the next chapter, but for now know that a legacy network adapter is an emulated network adapter instead of the synthetic network adapter which utilizes the VMBus. Typically, you never want to use the legacy network adapter except for a very specific use case, booting over the network.
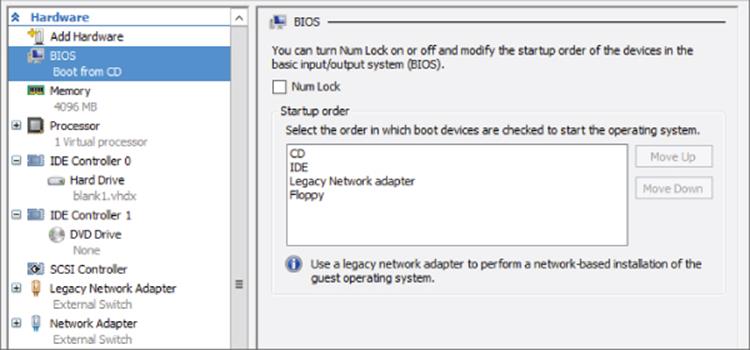
Figure 2.4 The BIOS configurations possible for a generation 1 virtual machine. The boot order can be changed using the Move Up and Move Down buttons.
There are many other system devices enabled in the guest operating system through the virtual motherboard provided by Hyper-V. They can be seen in the System Devices section in Device Manager (devmgmt.msc), but typically they are not items you will interact with.
What about the Time?
A physical motherboard has a small battery and a real-time clock (RTC) to track time, but the way most operating systems work is to read the time from the RTC at startup and then use their own internal routines to calculate passed time. The problem for a virtual machine is that the routines used to calculate time do not work correctly due to the way virtual machine resources are actually delivered, which means time drifts in a virtual machine. To solve this problem, Hyper-V uses a time synchronization integration service that keeps the time correct within the virtual machine. There is a potential to see some time anomalies when a virtual machine is first booted or resumed from a saved state or checkpoint (point-in-time saved view of a virtual machine), but these should quickly be resolved once the time synchronization integration service loads, which will correct the issue. Even if the virtual machine is in a different time zone or is part of a domain that synchronizes time from domain controllers, you should leave the time synchronization integration service enabled. The time synchronization service will work well with other time sources. Run the command to check the time source for your operating system. A Hyper-V virtual machine should show the following:
C:\>w32tm /query /source
VM IC Time Synchronization Provider
The guidance for domain controllers has changed over the years. The recommendation was to disable time synchronization completely and then to disable only part of the service with the following command:
reg add HKLM\SYSTEM\CurrentControlSet\Services\W32Time\TimeProviders\VMICTimeProvider /v Enabled /t reg_dword /d 0
Once again, though, the recommendation is to just disable the time synchronization integration service completely, as documented in the time service section at the following location:
http://technet.microsoft.com/en-us/library/virtual_active_directory_domain_controller_virtualization_hyperv(WS.10).aspx
My recommendation is to regularly check back, but fundamentally, Hyper-V has gotten better at controlling the drift, hence minimizing the time synchronizations needed for virtual machines that already synchronize from another source.
IDE Controller
I'm going to cover processors and memory in great detail later in this chapter. The other “must have” component for a system is storage (technically, you don't need a network; a system is just not typically very useful without it). Generation 1 virtual machines must boot from storage connected to the IDE controller, which as previously explained emulates an Intel 82371AB/EB IDE controller. This enables almost any operating system to be installed in a Hyper-V virtual machine because the Intel 82371AB/EB IDE controller is common and the driver is built in to every major operating system.
There are two IDE controllers provided in a generation 1 virtual machine: IDE controller 0 and IDE controller 1. Each IDE controller can have up to two devices attached, which can be a hard drive or a DVD drive. Typically the only time a DVD drive is used is when there is an option to install the operating system into a new virtual machine by attaching an operating system installation ISO to the drive, although mapping to a physical DVD drive in the host is also possible. It's also possible to install or update the Hyper-V Integration Services, which are provided as an ISO.
Two IDE controllers with two devices each allows a maximum of four storage devices to be connected, which may seem limited. In most virtual machines you will use the IDE controller only for the boot hard disk and all data drives will be connected to the synthetic SCSI controller instead.
Something seemingly obvious may be occurring to you. In this chapter, I have been continually saying that emulated hardware is bad, that it is provided by a user mode process (vmwp.exe) in the parent partition (which gives poor performance), and wherever possible, to avoid using it. Now I'm saying every single Hyper-V virtual machine has to boot from a hard disk attached to the emulated IDE controller. Doesn't that mean every virtual machine will have terrible disk performance for the operating system disk? Yes, a little, but mostly no because the architects of Hyper-V did something very clever with the IDE controller.
The IDE controller had to emulate a common IDE controller to provide compatibility with all operating systems where the components needed to use synthetic, VMBus-enabled devices that would not natively be available. Once an operating system is installed in a Hyper-V virtual machine, one of the first steps is to install Hyper-V Integration Services, which enlightens the operating system to its virtualized state and allows it to leverage the synthetic devices available via the VMBus. It also enables tighter integration between Hyper-V and the operating system, such as time synchronization, data exchange, backup services, shutdown, and more. Once the integration services have been installed and loaded, the IDE controller switches under the covers from being an emulated IDE device to actually being a synthetic device that uses the VMBus and the VSC/VSP model via a component in the guest called the fast pass filter (storflt). It therefore matches the performance of the synthetic SCSI controllers that are also available. This means that providing Hyper-V Integration Services is installed, there is not a performance difference between using the IDE or SCSI controller in a virtual machine once the operating system has booted, but the SCSI controller does offer additional functionality, which is why its use is still preferred where possible for assets such as data disks.
SCSI Controller
By default, a generation 1 virtual machine does not have a SCSI controller, but up to four SCSI controllers can be added to a virtual machine using the Add Hardware area of the virtual machine's property page as shown in Figure 2.5. Once a virtual machine has four SCSI controllers, the option to add additional SCSI controllers will be grayed out. The SCSI controller is a pure synthetic device fully leveraging the kernel, in-memory VMBus, which gives essentially the highest, bare-metal storage performance. The term bare-metalrefers to a system that does not use virtualization. When something is compared to bare-metal, the comparison is to a nonvirtualized environment, and in this case, studies have shown there is no performance loss from using storage attached to the SCSI controller compared to the raw performance capabilities of the underlying storage.
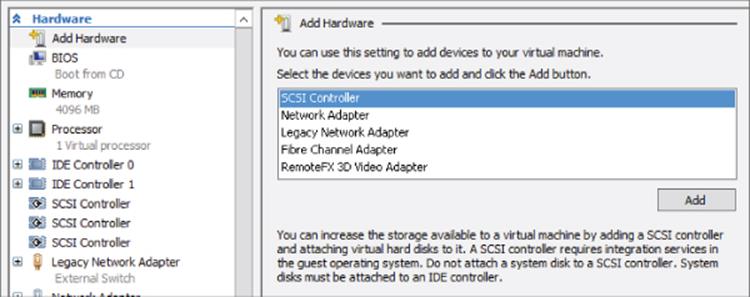
Figure 2.5 Adding a SCSI controller to a generation 1 virtual machine
Each SCSI controller supports up to 64 hard drives attached, which equates to a maximum of 256 disks attached via the SCSI bus. Like the IDE controller, those hard disks can be virtual hard disks or mapped to physical hard disks on the host (pass-through storage). The SCSI controller also supports the hot-add/hot-plug of disks to a running virtual machine, which is a capability not available on the IDE controller. The SCSI controller offers even more functionality in Windows Server 2012 R2:
· Shared VHDX between multiple virtual machines
· Dynamic resizing of VHDX files
Always use SCSI-connected disks where possible in the virtual machine and restrict use of IDE-connected disks to the operating system and DVD drive.
COM Ports
Generation 1 virtual machines include two COM ports, COM 1 and COM 2, which can be connected to a named pipe either local to the Hyper-V host or on a remote computer. The use of COM ports is generally deprecated and is typically restricted to certain types of guest kernel debug scenarios.
USB Ports
If you are looking at a virtual machine settings dialog, you may wonder where USB devices are found. How do you map a USB device attached to the Hyper-V host directly through to a virtual machine? You won't find it, and the reality is you don't want to find it.
There are two scenarios for USB devices to be accessed in a virtual machine:
· As part of a user's session to a virtual machine
· Always available to the virtual machine, such as, for example, a USB dongle that must be available for a piece of software or service to function
Hyper-V does not allow the pass-through of a USB attached device on a host to a virtual machine. This would break the desired abstraction of the virtual machine from the hardware and therefore stop virtual machine mobility. This does not mean there are not solutions though.
For the first scenario, a USB device available as part of a user's session on a virtual machine, the solution is to use the Remote Desktop Protocol (RDP) capability to pass a locally attached USB device on the user's local device directly through to the remote virtual machine. With Windows Server 2012 and the RemoteFX technology, it is possible to redirect almost any USB device over RDP.
The second scenario, for a USB device to always be connected to a virtual machine even when a user is not logged on, requires the use of third-party solutions that enable USB over IP. The solutions work by having a physical server that has all the USB devices connected to it and runs a service that enables the USB devices to be accessed remotely over IP. The virtual machines then run a client piece of software that connects to the USB device over IP and looks to the VM like a local USB device. The benefit to these types of solutions is that the virtual machine can still be moved between hosts without losing connectivity to the USB device. There are many solutions available, but the two I have seen in customers' environments are described at the following locations:
http://www.silexamerica.com/products/usb_device_connectivity/sx-2000u2.html
http://www.digi.com/products/usb/anywhereusb#overview
Generation 2 Virtual Machine
Earlier I made a statement, “Each virtual machine believes it is the sole user of the hardware it is running on,” and the point was that the operating system was unaware it was running on a hypervisor, which is why there was so much emulated hardware in a generation 1 virtual machine. The various PS/2 keyboard and mouse devices, the IDE controller, the legacy network adapter for PXE boot, PCI controllers, and so on were required so operating systems could work in a virtual environment because they were inherently ignorant to virtualization, unable to natively use virtualized or synthetic devices. This was true when virtualization was first introduced and needed to support operating systems such as Windows NT 4 and Windows 2000, but the reality for modern operating systems such as Windows Server 2012 and even recent Linux distributions is that they natively understand virtualization and are fully virtualization enlightened. They can use virtual devices without additional drivers installed and don't require “physical hardware” elements to be present. Modern operating systems are designed to run in physical and virtual environments.
The generation 2 virtual machine was introduced in Windows Server 2012 R2 Hyper-V. It is focused on the new generation of operating systems that are natively enlightened to virtualization and don't require the emulated components such as IDE controllers, PS/2 IO devices, COM ports, legacy network adapters, floppy drives, and all the other emulated motherboard components (such as PCI-to-ISA bridge). A generation 2 virtual machine removes these emulated components to offer a simpler, streamlined virtual machine that also enables the latest operating system features by switching from BIOS to a Unified Extensible Firmware Interface (UEFI) such as Secure Boot (enabled by default). Secure Boot ensures a secure handoff from the UEFI to the operating system without any other party, such as malware, injecting itself between the hardware and the operating system.
Generation 2 virtual machines can boot from SCSI controller-connected hard disks and DVD drives and also from the synthetic network adapter to enable PXE boot scenarios. There is no IDE controller, floppy drive, or legacy network adapter option for a generation 2 virtual machine.
There are also no COM ports available via the Hyper-V Manager graphical interface. If a COM port is required in a generation 2 virtual machine for remote kernel debugging, then one can be added using the Set-VMComPort PowerShell cmdlet. There are, however, better options for virtual machines than using a serial port, such as using synthetic debugging. If the COM port has no named pipe associated at boot time, then the COM port will not be visible in the virtual machine. Remember also that kernel debugging is not compatible with Secure Boot, so if you need to perform kernel debugging (and many of us won't!), then turn of Secure Boot using Set-VMFirmware -EnableSecureBoot Off. In Figure 2.6, you see a generation 1 virtual machine next to a generation 2 virtual machine showing Device Manager and also the BIOS mode and version. Notice the large amount of hardware that is not present in a generation 2 virtual machine because this hardware is not required for an operating system that is natively virtualization enlightened.
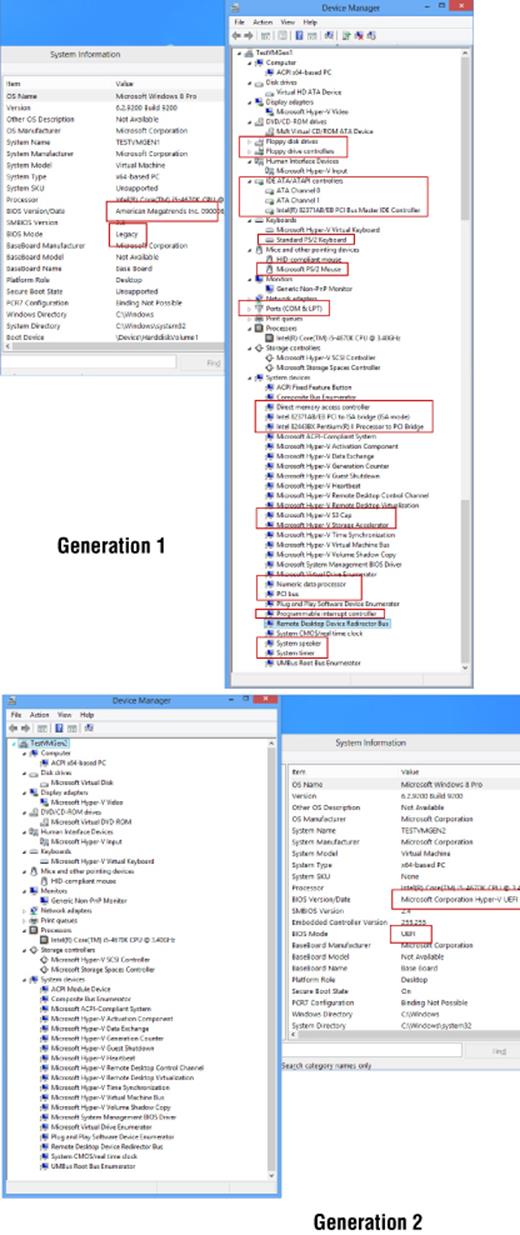
Figure 2.6 Generation 1 compared to generation 2 hardware
At time of this writing, the following operating systems can be installed in a generation 2 virtual machine:
· Windows Server 2012
· Windows Server 2012 R2
· Windows 8 64-bit
· Windows 8.1 64-bit
The biggest restriction is the need for the operating system to natively fully support UEFI, which is not available prior to Windows 8/Windows Server 2012, and only the 64-bit versions of Windows support UEFI. For a good overview of UEFI support with Windows, see
http://msdn.microsoft.com/en-us/windows/hardware/gg463149.aspx
The main benefits to using a generation 2 virtual machine are the ability to boot from the synthetic SCSI controller or network device and, by leveraging the UEFI Secure Boot capability, the minimized risks associated with boot-time malware. There is also a performance improvement in the time to install an operating system and the time to boot an operating system for a generation 2 virtual machine compared to a generation 1 virtual machine, but once the virtual machine has been booted, there is no performance difference. The choice of generation 1 vs. generation 2 is made when the virtual machine is created and cannot be changed. A single Hyper-V server can have a mix of generation 1 and generation 2 virtual machines.
When deciding to use generation 1 or generation 2, my advice would be to use generation 2 where possible, providing you do not need backward compatibility with Windows Server 2012 Hyper-V. Compatibility is not required with other public cloud services either, such as Windows Azure Infrastructure as a Service (IaaS), which at the time of writing does not support generation 2 virtual machines; this will change over time.
Converting a Generation 1 Virtual Machine to Generation 2
The question of converting a generation 1 virtual machine to a generation 2 virtual machine comes up often, and the reality is that you really don't need to in most cases. Generation 1 virtual machines will continue to work and perform the same as a generation 2 virtual machine. But what if you really want to? You can't, or at least not without a huge amount of work.
A generation 1 virtual machine is BIOS based, which equates to a certain disk configuration such as an NTFS system partition. A generation 2 virtual machine is UEFI based and uses a FAT32 system partition. This alone prohibits moving virtual hard disks between generation 1 and generation 2 virtual machines. Also remember that generation 1 machines boot from the IDE controller and generation 2 machines boot from the SCSI controller.
The only way to move from generation 1 to generation 2 is to boot the virtual machine from Windows PE, capture the partitions to a WIM file, then redeploy to a generation 2 virtual machine, but this amount of effort is really not worth the benefit, and generation 2 is best saved for new virtual machines.
Processor Resources
With the core fabric of a virtual machine understood, it's time to move on to the processor, which is one of the most interesting and used resources for a virtual machine. It's important to understand some of the terminology related to processor resources and how this relates to virtualization and Hyper-V.
There is a difference between the number of processors, cores, and logical processors and the amount of memory supported by Windows Server 2012 R2 and that supported by Hyper-V. With new processors having multiple processing cores and technologies such as hyperthreading, adding more complexity to understanding processors, a review of logical and virtual processors is important. Motherboards have one or more sockets, which can have processors installed. This is why the terms socket and processor are sometimes used interchangeably. Each processor has one or more processing cores. Early processors had only one core, but multicore processors became predominant starting with dual-core processors, then quad-core, and today there are 10-core processors available. Each core acts like a separate processor with the ability to perform its own execution of program instructions, though the cores share a common bus interface and certain types of processor cache, as explained in Chapter 1.
In many types of program instruction execution, not all of the core's execution resources are utilized, and so Intel introduced a hyperthreading technology that makes a single processor core look like two processor cores, known as logical processors, and allows two instruction threads to run on each processor core. This increases overall throughput by allowing the processor to switch between the two instruction threads to keep the cores busy because it's common for instruction threads to stall waiting on a resource. With hyperthreading, if one thread stalls, the other thread can be executed. There is still only a single execution resource on the core, so hyperthreading does not double performance; the actual improvement varies, but between a 10 to 15 percent performance improvement is an accepted value.
Figure 2.7 shows Task Manager on one of my Windows Server 2012 R2 boxes. It has four Intel Xeon processors, which are eight-core processors, and has hyperthreading enabled. Notice that the socket count is 4 and the core count is 32, while the logical processor count is 64 because the hyperthreading splits each core into two logical processors.
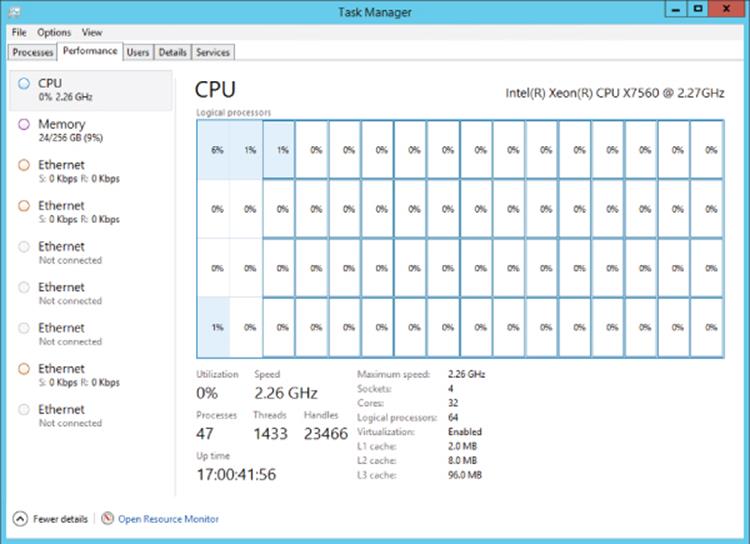
Figure 2.7 Task Manager in Logical Processor view showing the physical processors and logical processor details
Prior to Windows Server 2012, there were different capabilities and scalability in the different SKUs (editions) of Windows Server. This changed with Windows Server 2012. Windows Server 2012 Standard and Datacenter have the same scalability and capabilities, supporting up to 320 logical processors addressable by the hypervisor and 4 TB of memory. Each virtual machine can be allocated up to 64 virtual processors. These scalability numbers did not change with Windows Server 2012 R2 Hyper-V because, in reality, they really didn't need to. With the Windows Server 2012 Hyper-V scalability capability of 64 vCPUs per virtual machine, Microsoft found that over 99 percent of the world's SQL Server instances could now be virtualized on Hyper-V.
Having multiple logical processors is very useful for virtualization. To take advantage of many logical processors on a normal system, the applications being used have to be written to take advantage of multiple threads of execution or many applications would be used at the same time, which the operating system would distribute over the available logical processors. With virtualization, each virtual machine is assigned a certain number of virtual processors (vCPUs), which then map to logical processors. A single logical processor can be used by multiple virtual processors because the logical processors' capacity is divided up among the utilizing virtual processors as computations are required. This works in a similar manner to the time slicing that occurs in between applications in an operating system sharing the processors. As virtual processors need to perform computations, they are scheduled on an available logical processor.
Prior to Windows Server 2012, there was a supported ratio of 8 virtual processors for every 1 logical processor (8:1) for all workloads except for Windows VDI environments, where a ratio of 12:1 was supported. This was stipulated to ensure that hosts were not overcommitted in terms of virtual processors assigned to virtual machines. For example, with a ratio of 8:1, if a system had a total of 8 logical processors, then up to 64 vCPUs could be assigned in total for all the virtual machines running on that host. Note that a single virtual machine can never be assigned more virtual processors than the number of logical processors present in the server. Taking the same 8 logical processors, this means a single virtual machine could not have more than 8 virtual processors assigned. However, I could have 8 virtual machines all with 8 virtual processors (or any other smaller combinations, providing the total does not exceed 64 virtual processors). The supportability ratio of virtual processors to logical processors was removed in Windows Server 2012. If you test the environment and it works, then it will be supported by Microsoft. You still cannot have more virtual processors in a virtual machine than logical processors that exist in the server. A Hyper-V host supports up to 2,048 virtual processors.
Even though the supported ratio has been removed, this does not mean careful planning is not required when architecting your Hyper-V environment. Virtualization cannot magically enable more processing resources than are physically available. For virtual machines with very low CPU utilization, such as around 10 percent, planning on 8 virtual processors to 1 logical processor would be fine and would yield an average utilization of around 80 percent on the physical core. If virtual machines have high processor utilization, a ratio of 8:1 would yield poor performance because virtual machines constantly wait for cycles on the physical cores.
Some applications, such as SQL Server and Exchange, have their own supported ratios of virtual processor to logical processor, which can be as low as 1:1. I will cover this in more detail later in this chapter. Because of the fairly low additional performance hyperthreading actually yields, though, I prefer to count processor cores only when thinking about my virtual to physical ratios. If I have a Hyper-V host with 4 processor cores, I would consider 32 my maximum number of virtual processors, even if hyperthreading was enabled. Figure 2.8 shows a high-level view of mapping of physical processors to cores to logical processors to virtual processors. Note that there is no concept of processor affinity in Hyper-V. You cannot force a certain virtual processor to always map to the same logical processor. That could lead to poor performance waiting for the processor to be available, and it also breaks the goal of abstracting the virtual resource from the physical resource.
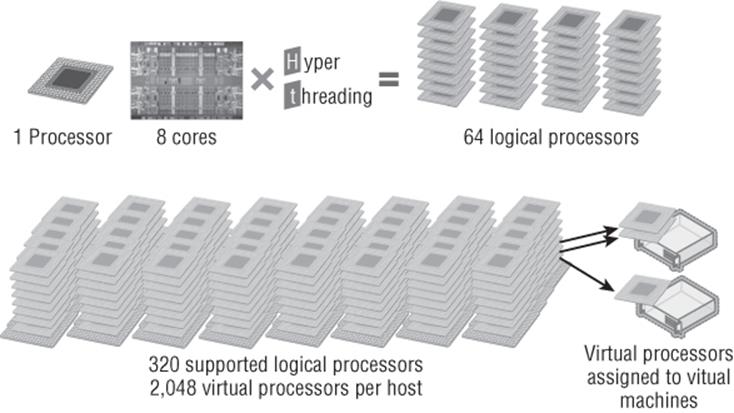
Figure 2.8 A view of logical processor to virtual processor mapping
Should I Turn Off Hyperthreading?
Note that hyperthreading causes no harm and may help performance unless it pushes the number of logical processors above 320, which is the maximum number supported by Hyper-V. If hyperthreading means there are now more than 320, hyperthreading-provided logical processors will be used potentially instead of physical cores by the hypervisor. Therefore, if hyperthreading pushes the number of logical processors above 320, turn it off in the servers' BIOS/UEFI.
Virtual Processor to Logical Processor Scheduling
How a virtual machine's virtual processors are assigned to logical processors for computations is actually very interesting. Consider the simplest possible scenario, a single virtual processor on a virtual machine. When the virtual processor needs to perform a computation, the hypervisor schedules the computation to an available logical processor, as shown in Figure 2.9.
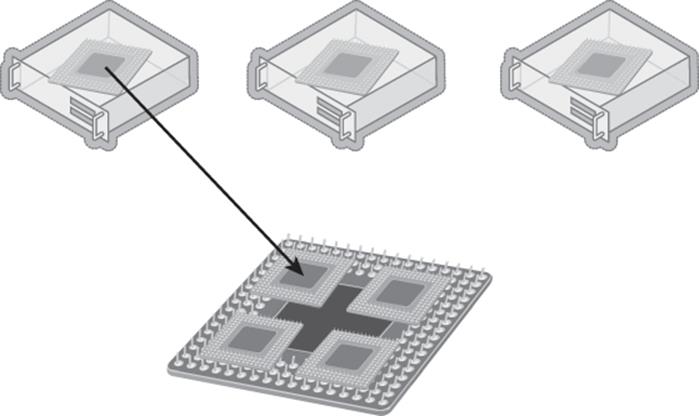
Figure 2.9 A virtual processor from a single- processor VM assigned to a logical processor on the host
This gets more complicated for a virtual machine with multiple virtual processors, a symmetric multiprocessing (SMP) environment. The problem is that operating systems believe that all their processors are available to run at the same time because the operating system would exclusively own the hardware and can allow interdependencies between different computations on different processors. This is a problem in a virtual environment because many different virtual processors are using the same logical processors. This means the virtual processor scheduler in the hypervisor could have a problem. Consider Figure 2.10, where two of the virtual machines now have multiple processors. If the processor scheduler has to schedule all the virtual processors in a VM to logical processors at the same time, the virtual processor scheduler suddenly becomes inefficient. Even virtual processors not currently doing work would be scheduled on the logical processor as a set, and none of the virtual processors in a VM can be scheduled until there are an equal number of logical processors available to ensure that the computations for the VM can take place simultaneously. Consider a heavily used server and that virtual machines can have up to 64 virtual processors. Trying to group and schedule processors in this way is highly problematic. This type of scheduling is known as gang scheduling because when a multiprocessor virtual machine needs to schedule a processor, all of the virtual processors are “ganged” together and scheduled together against the available logical processors.
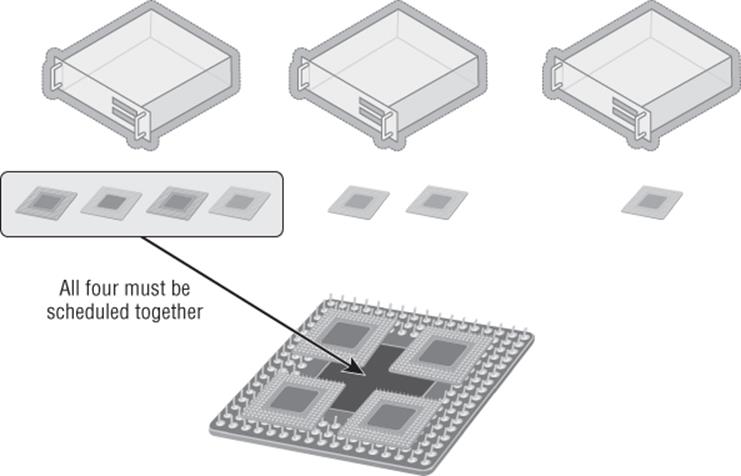
Figure 2.10 A virtual machine with multiple virtual processors being scheduled to the available logical processors
Here's a great analogy: Consider going out to dinner with a group of friends. You sit down, open the menu, and know exactly what you want to eat. You then have to proceed to sit there for 15 minutes until everyone else has decided what they will order because you have to all order at the same time. You are gang scheduled.
Nobody has been able to create a perfect gang scheduler that does not lead to delays and inefficiencies. It is because of this gang scheduling that with some hypervisors, you need to minimize the number of virtual processors per virtual machine as much as possible.
Hyper-V does not use gang scheduling and instead takes an alternate approach to handling multiprocessor virtual machines and the scheduling to logical processors. Remember, the problem is that operating systems believe that all their processors are available to run at the same time. Rather than trying to work around this problem, Microsoft actually fixed the operating system kernel itself so that the operating system no longer makes the assumption that all processors will be scheduled at the same time. This allows Hyper-V to be able to schedule virtual processors from a multiprocessor virtual machine independently of each other, which allows virtual processors to be scheduled only as they have workload, known as free processor scheduling. This fix was made in Windows Server 2008, which is why Windows Server 2000 supports only a single processor. A targeted change was made to the kernel in Windows Server 2003 Service Pack 2 and Windows XP Service Pack 3 that allows for two virtual processors to be configured. Because gang scheduling is not used with Hyper-V, there is no guidance to limit the number of virtual processors in a virtual machine where possible. There is still some overhead with having lots of idle processors, but it is fairly minimal and has nowhere near the impact as a hypervisor that uses gang scheduling. In my lab environment, nearly all my virtual machines have two processors and some have eight.
Using the same dinner analogy for Hyper-V would allow you to order dinner whenever you were ready and then get your food. This would be, however, poor dining etiquette on your part and would likely get you excluded from future dinner events and subject you to lots of future solo dining.
The exact number of virtual processors supported for each guest operating system for Hyper-V is documented and updated at
http://technet.microsoft.com/en-us/library/hh831531.aspx
but the primary numbers are shown in Table 2.1. Note that Windows Server 2000 is not listed on the Microsoft site because it is no longer a supported operating system; only one processor was supported.
Table 2.1 Maximum number of virtual processors
|
Operating System |
Number of Virtual Processors |
|
Windows Server 2008 R2 and above |
64 |
|
Windows Server 2008 SP2 |
4 |
|
Windows Server 2003 [R2] SP2 |
2 |
|
Modern supported Linux distributions (RHEL 5.9+, SUSE 11 SP2+, Ubuntu 12.04+) |
64 |
|
Windows 8 and above |
32 |
|
Windows 7 |
4 |
|
Windows XP SP3/Windows Vista SP2 |
2 |
It's important to understand that gang scheduling is not bad; but rather there's just not an efficient algorithm to use it at this time. In the future, a perfect algorithm may be created, and then I would not be surprised to see Hyper-V implement some type of gang scheduling.
Processor Assignment
When assigning processors to a virtual machine, between 1 and 64 (or the number of logical processors in the system) can be assigned. Additionally, it is possible to set three other values that help control the processor resource usage. These are Virtual Machine Reserve (Percentage), Virtual Machine Limit (Percentage), and Relative Weight, and they are described in the following list:
1. Virtual Machine Reserve (Percentage) The amount of the processor that is reserved for this virtual machine and therefore always available. If a host has 4 logical processors and the virtual machine has 1 virtual processor and the reserve is set to 50 percent, then it means half of one of the logical processors is always available to this virtual machine. Note that it does not mean it's the same core or all from the same core, but the hypervisor will ensure that the virtual machine always has the equivalent of half of a logical processor of processing available to this virtual machine. If the virtual machine is not using the full reserve, other virtual machines may access the processor resource. However, as soon as the virtual machine with the reserve needs the CPU, it will take priority and be guaranteed its full allocation. The Percent Of Total System Resources value shows what percentage of the overall system resources the reserve that's assigned equates to. If a virtual machine has been assigned 8 virtual processors with a 25 percent reserve and the server has 16 logical processors in total, this means the percent of total system resources reserved is 12 percent (12.5 percent really).
2. Virtual Machine Limit (Percentage) The maximum amount of processor that the virtual machine can use. The default is 100 percent, which means this virtual machine can use the entire resources of the allocated processors. Note that in times of resource contention, the virtual machine may not get a full 100 percent but will always get its reserve amount.
3. Relative Weight Used to determine the importance of a virtual machine getting shares of the CPU time in times of resource contention. For example, a virtual machine with a weight of 200 would get twice the number of CPU cycles that a virtual machine with a weight of 100 would.
Note that while the number of processors of a virtual machine cannot be changed once the virtual machine has been started, it is possible to modify the Virtual Machine Reserve (Percentage), Virtual Machine Limit (Percentage), and Relative Weight values while the virtual machine is running. This allows the ability to tweak the processor resources for a virtual machine dynamically. This would let you assign extra processors to a virtual machine than normally would be required but set the Virtual Machine Limit (Percentage) value to something like 50 percent so that only half the capacity could be used. If more processor is required while the virtual machine is running, that value can be increased. It should be noted that typically operating systems will not “waste” processor resources, so this type of limiting is typically not required unless you have a heavily overcommitted system or a virtual machine with rogue processes.
Solving “Hanging” Problems for Very Large Hyper-V Virtual Machines
For a virtual machine with more than 32 virtual processors, I would sometimes see the virtual machine hang within 30 seconds of logging on (the same time Server Manager started and used processor resources). After investigation, I found that the problem was basically that a large number of the logical processors in the Hyper-V host had gone into a C3 sleep state, which is a deep sleep state to save power when the processor is idle. The problem seemed to be caused by all these logical processors trying to wake at the same time and getting into contention with each other. The solution for me was to simply disable the C3 sleep state on my processors on the Hyper-V host using the following command:
reg.exe add HKLM\System\CurrentControlSet\Control\Processor /v Capabilities /t REG_DWORD /d 0x0007e066
Then I would reboot the server and my problem was solved.
Windows Server 2012 R2 Hyper-V has another processor-related setting that is set on a per-virtual-machine basis. This setting is “Migrate to a physical computer with a different processor version.” It is not possible to migrate a virtual machine between Intel and AMD processors using migration technologies due to the completely different architecture and instruction sets of the processor. However, by default you also can't migrate between servers with different versions of the same processor family. This is because although both servers may have Intel processors, the different processors may have different capabilities and instructions, which is a problem because some applications perform tests when they start to check the capabilities of the processor. If an application checks the processor and decides it has a certain set of instructions and is then moved using migration technologies to a server with a different processor that does not support a particular instruction, when the application makes the call, the application may crash. To resolve this problem, Hyper-V adds the ability to hide many higher-level functions of processors in the guest operating systems. This means you can move guest operating systems between nodes in a cluster even if the processor versions are different because the virtual operating systems are exposed only to the generic instructions that are present in all versions of the processor family. Note that the functionality does not scan the processors and expose the lowest common set of functionality of all the processors in the cluster; it just limits to a generic basic set lower than all the processors in the cluster. This can also be set using PowerShell with the following command:
Set-VMProcessor -CompatibilityForMigrationEnabled $true
Prior to Windows Server 2012 Hyper-V, there was also a setting to enable running older operating systems such as NT 4, but this option has been removed from the Hyper-V manager graphical user interface. The problem for older operating systems is that modern processors return more information about the capabilities than can be handled by the operating system and it will blue screen (this was fixed in Windows NT 4.0 SP6). This option can still be set, but it must be configured using PowerShell:
Set-VMProcessor -CompatibilityForOlderOperatingSystemsEnabled $true
A great way to understand these two settings is by leveraging the Coreinfo utility from SysInternals, which can list all features for a processor. You'll find it at the following location:
http://technet.microsoft.com/en-us/sysinternals/cc835722.aspx
When running coreinfo on a processor without any compatibility enabled, I see all the features available for the operating system. An enabled feature shows an * instead of a -. When I run coreinfo on the same virtual machine but after settingCompatibilityForMigrationEnabled, all the items in bold changed from * to -, which meant they were now hidden, as shown in the following listing. In this example, it was SSSE3, SSE4.1, SSE4.2, and POPCNT that were hidden. Running withCompatibilityForOlderOperatingSystemsEnabled removed the entire Logical Processor to Cache Map section from the returned data, which means it was hidden from the operating system. It is important to use these features only when required because you are removing capability from the processor, which you don't want to do unless you absolutely have to.
S:\Tools>coreinfo
Coreinfo v3.2 - Dump information on system CPU and memory topology
Copyright (C) 2008-2012 Mark Russinovich
Sysinternals - www.sysinternals.com
Intel(R) Xeon(R) CPU E5530 @ 2.40GHz
Intel64 Family 6 Model 26 Stepping 5, GenuineIntel
HTT * Hyperthreading enabled
HYPERVISOR * Hypervisor is present
VMX - Supports Intel hardware-assisted virtualization
SVM - Supports AMD hardware-assisted virtualization
EM64T * Supports 64-bit mode
SMX - Supports Intel trusted execution
SKINIT - Supports AMD SKINIT
NX * Supports no-execute page protection
SMEP - Supports Supervisor Mode Execution Prevention
SMAP - Supports Supervisor Mode Access Prevention
PAGE1GB - Supports 1 GB large pages
PAE * Supports > 32-bit physical addresses
PAT * Supports Page Attribute Table
PSE * Supports 4 MB pages
PSE36 * Supports > 32-bit address 4 MB pages
PGE * Supports global bit in page tables
SS * Supports bus snooping for cache operations
VME * Supports Virtual-8086 mode
RDWRFSGSBASE - Supports direct GS/FS base access
FPU * Implements i387 floating point instructions
MMX * Supports MMX instruction set
MMXEXT - Implements AMD MMX extensions
3DNOW - Supports 3DNow! instructions
3DNOWEXT - Supports 3DNow! extension instructions
SSE * Supports Streaming SIMD Extensions
SSE2 * Supports Streaming SIMD Extensions 2
SSE3 * Supports Streaming SIMD Extensions 3
SSSE3 * Supports Supplemental SIMD Extensions 3
SSE4.1 * Supports Streaming SIMD Extensions 4.1
SSE4.2 * Supports Streaming SIMD Extensions 4.2
AES - Supports AES extensions
AVX - Supports AVX intruction extensions
FMA - Supports FMA extensions using YMM state
MSR * Implements RDMSR/WRMSR instructions
MTRR * Supports Memory Type Range Registers
XSAVE - Supports XSAVE/XRSTOR instructions
OSXSAVE - Supports XSETBV/XGETBV instructions
RDRAND - Supports RDRAND instruction
RDSEED - Supports RDSEED instruction
CMOV * Supports CMOVcc instruction
CLFSH * Supports CLFLUSH instruction
CX8 * Supports compare and exchange 8-byte instructions
CX16 * Supports CMPXCHG16B instruction
BMI1 - Supports bit manipulation extensions 1
BMI2 - Supports bit maniuplation extensions 2
ADX - Supports ADCX/ADOX instructions
DCA - Supports prefetch from memory-mapped device
F16C - Supports half-precision instruction
FXSR * Supports FXSAVE/FXSTOR instructions
FFXSR - Supports optimized FXSAVE/FSRSTOR instruction
MONITOR - Supports MONITOR and MWAIT instructions
MOVBE - Supports MOVBE instruction
ERMSB - Supports Enhanced REP MOVSB/STOSB
PCLULDQ - Supports PCLMULDQ instruction
POPCNT * Supports POPCNT instruction
SEP * Supports fast system call instructions
LAHF-SAHF * Supports LAHF/SAHF instructions in 64-bit mode
HLE - Supports Hardware Lock Elision instructions
RTM - Supports Restricted Transactional Memory instructions
DE * Supports I/O breakpoints including CR4.DE
DTES64 - Can write history of 64-bit branch addresses
DS - Implements memory-resident debug buffer
DS-CPL - Supports Debug Store feature with CPL
PCID - Supports PCIDs and settable CR4.PCIDE
INVPCID - Supports INVPCID instruction
PDCM - Supports Performance Capabilities MSR
RDTSCP - Supports RDTSCP instruction
TSC * Supports RDTSC instruction
TSC-DEADLINE - Local APIC supports one-shot deadline timer
TSC-INVARIANT - TSC runs at constant rate
xTPR - Supports disabling task priority messages
EIST - Supports Enhanced Intel Speedstep
ACPI - Implements MSR for power management
TM - Implements thermal monitor circuitry
TM2 - Implements Thermal Monitor 2 control
APIC * Implements software-accessible local APIC
x2APIC - Supports x2APIC
CNXT-ID - L1 data cache mode adaptive or BIOS
MCE * Supports Machine Check, INT18 and CR4.MCE
MCA * Implements Machine Check Architecture
PBE - Supports use of FERR#/PBE# pin
PSN - Implements 96-bit processor serial number
PREFETCHW * Supports PREFETCHW instruction
Logical to Physical Processor Map:
*- Physical Processor 0
-* Physical Processor 1
Logical Processor to Socket Map:
** Socket 0
Logical Processor to NUMA Node Map:
** NUMA Node 0
Logical Processor to Cache Map:
*- Data Cache 0, Level 1, 32 KB, Assoc 8, LineSize 64
*- Instruction Cache 0, Level 1, 32 KB, Assoc 4, LineSize 64
*- Unified Cache 0, Level 2, 256 KB, Assoc 8, LineSize 64
*- Unified Cache 1, Level 3, 8 MB, Assoc 16, LineSize 64
-* Data Cache 1, Level 1, 32 KB, Assoc 8, LineSize 64
-* Instruction Cache 1, Level 1, 32 KB, Assoc 4, LineSize 64
-* Unified Cache 2, Level 2, 256 KB, Assoc 8, LineSize 64
-* Unified Cache 3, Level 3, 8 MB, Assoc 16, LineSize 64
Logical Processor to Group Map:
** Group 0
NUMA Support
Consider the ability to now have virtual machines with 64 virtual processors and up to 1 TB of memory. I don't know of a physical processor with 64 logical processors on the market today, even with hyperthreading, which means a virtual machine with more virtual processors than can be provided by a single processor will receive resources from multiple physical processors. A multiprocessor motherboard has multiple sockets where processors can be installed and a corresponding number of memory slots directly linked to each of the sockets. A processor and the memory that is directly attached and managed by the processor is known as a non-uniform memory access (NUMA) node, and there is typically a 1:1 relationship between sockets and NUMA nodes, although some of the latest hardware does have more than one NUMA node per socket. A motherboard with four sockets would normally have banks of memory for each socket and would therefore have four NUMA nodes. A processor can access the local memory in its NUMA node faster than nonlocal memory, which means for best performance, processes running on a processor should use memory within that processor's NUMA node.
Windows Server 2012 introduced a new set of configurations for virtual machine processors, NUMA, but the reality is you should never touch these. Most likely bad things will happen and Hyper-V will make the right configurations for your environment without any manual intervention. However, I do want to cover what these settings are for and why NUMA is important. Note that Windows Server 2008 R2 Hyper-V host was NUMA aware and would always try to ensure that virtual processors and memory were assigned within the same NUMA nodes, but this NUMA topology was not made available to the virtual machine, which wasn't a problem considering virtual machines could only have four vCPUs and were therefore not likely to use more than one NUMA node.
Operating systems are aware of the NUMA nodes and the configuration, which enables the most optimal resource usage. With the large virtual machines possible in Hyper-V, the NUMA topology is also projected to the virtual machine, which is known as virtual NUMA or vNUMA. vNUMA uses the standard ACPI Static Resource Affinity Table (SRAT), which means the NUMA topology should be usable by any NUMA-aware operating system, including Linux. This NUMA awareness is also a benefit for enterprise applications such as SQL, MySQL, and IIS that utilize resources based on NUMA configuration.
Virtual Machine NUMA Configuration
Figure 2.11 shows the NUMA configuration options available for the processor configuration of a virtual machine. These options are hidden away for good reason. In nearly all scenarios, you should not change these values. Hyper-V will do the best job of setting the right NUMA topology based on the physical Hyper-V host. There are, however, a few scenarios where you may need to change these values, which are related to the number of processors, memory, and number of nodes on a single socket.
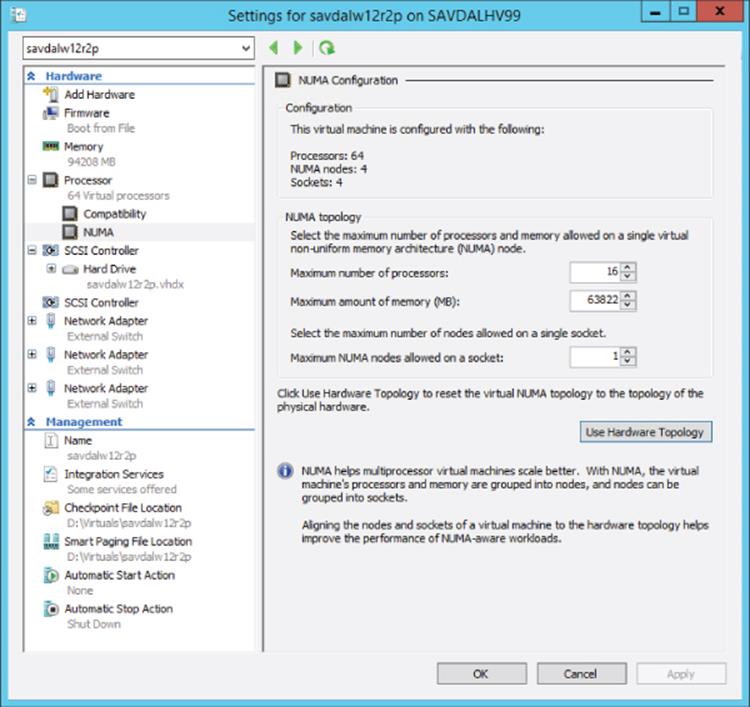
Figure 2.11 Configuration options for the NUMA configuration of a virtual machine
Consider a large Hyper-V environment with many different types of servers, with the physical servers having different NUMA topologies and where virtual machines may be live migrated between the servers. In this case, the NUMA configuration should be changed to match the smallest NUMA topology among all the servers to which the virtual machine may be migrated. For example, suppose I have two servers:
· Server 1 NUMA topology –Maximum number of processors is 16 and maximum amount of memory is 63822
· Server 2 NUMA topology – Maximum number of processors is 8 and maximum amount of memory is 22720
If a virtual machine was created on Server 1, that is the NUMA topology that would be configured for the virtual machine. If the virtual machine was then moved to Server 2, the VM would have incorrect NUMA configuration and will not have optimal resource assignments because what it believes is a single NUMA node would actually span multiple NUMA boundaries. It would therefore make sense to manually set the NUMA topology of the virtual machine to match that of Server 2. Hopefully, in the future the management solutions for Hyper-V will look at all the nodes in a cluster and automatically configure virtual machines with a NUMA topology that matches the smallest NUMA configuration in the cluster, but at time of this writing, this does not occur. Additionally, in most clusters the hosts all have the same NUMA topology, so in practice this is not a big issue. Another challenge with automated NUMA configuration is that with Shared Nothing Live Migration, virtual machines can be migrated outside of a cluster, which means any management solution would not be able to consider that. For most scenarios, virtual machines are created on the server they will run on, which means they will have the most optimal configuration and there are no manual actions necessary.
Notice there is the Use Hardware Topology button. If you change the settings and realize you don't know what the values were originally, you can click this button and the values will be reset back to the Hyper-V recommended values for that server.
Note that if a virtual machine uses Dynamic Memory, the vNUMA is disabled for the virtual machine.
NUMA Spanning
As previously discussed, the best performance comes from processes running on processor cores using local memory within the NUMA node rather than having to “span” NUMA nodes, which means the memory required is connected to another processor; it's known as foreign memory or remote memory and has a higher latency than local memory. There are two types of NUMA spanning configurations: configuration at a host level and configuration at a virtual machine level.
By default, Windows Server 2012 enables NUMA spanning at the host level, which provides the most flexibility because virtual machines can access and use memory in any NUMA node, but it may result in lower performance compared to forcing virtual machines to use memory on the same NUMA node as the processor cores. By disabling NUMA spanning at the host level, you disable it for all virtual machines on the host and you ensure that virtual machines' virtual NUMA nodes are backed by memory from one NUMA node giving the best performance. However, it could also mean there is a potential that virtual machines may not be able to start if the required amount of memory for the VM is not available on a single NUMA node. And it means you may not be able to live migrate virtual machines to other nodes if the target node cannot satisfy the NUMA requirements.
The NUMA spanning option should only be changed when, as an administrator, you feel comfortable with NUMA and the implications of disabling and also have an additional management suite that can help ensure best configuration. In reality, the best practice should be to leave NUMA spanning enabled, and that is what I recommend. To configure NUMA spanning, open the Hyper-V Settings page and deselect the NUMA spanning option, as shown in Figure 2.12, to disable NUMA spanning.

Figure 2.12 Changing the NUMA spanning option for a Hyper-V server
Note that System Center Virtual Machine Manager allows NUMA spanning to be configured on a per-virtual-machine basis, which behind the scenes is manually configuring virtual machine assignments to specific NUMA nodes, but this is not something you would ever want to try to perform manually. If you value having your workload always perform predictably, and you accept that your virtual machine may not start when memory is fragmented, turn off spanning for that guest. If you value having your workload start up predictably, with perhaps nonoptimal performance, leave spanning turned on. It's probably the right choice for most people to once again leave the NUMA spanning enabled for most virtual machines.
Note that whether NUMA spanning is enabled or disabled, the hypervisor will always make a best effort to be as efficient as possible and schedule the virtual processor on the appropriate physical NUMA node, backing the memory of the virtual machine. Hyper-V will also make an effort to not fragment memory among multiple NUMA nodes, if at all possible. NUMA spanning allows a way out only if there is no other option but to fragment. However, if no logical processor in the physical NUMA node is available, then the hypervisor may temporarily schedule the virtual processor to a remote logical processor in another NUMA node. Running a virtual processor on a remote NUMA node is still more efficient than not running it at all if no local NUMA node resource is available. Again, NUMA spanning does not change this behavior. The NUMA spanning configuration is primarily controlling if the memory for a virtual NUMA node can be sourced from multiple physical NUMA nodes if necessary (which is NUMA spanning enabled).
Memory Resources
When you're looking at resources used in virtual environments, memory is the other major type of resource, along with processor, that typically dictates the number of virtual machines that can be supported on a host. While logical processors are shared by virtual processors by rapid context switching, the same technique does not work with memory. The context—the content of memory itself—cannot be swapped in and out fast enough to simulate simultaneous execution. For Windows 2008 and Windows Server 2008 R2 before Service Pack 1, the amount of memory that was assigned to a virtual machine could not be modified while the virtual machine was running. This means if a Hyper-V server had 16 GB of memory, and assuming 1 GB was kept for the Windows Server parent partition, then 15 GB could be assigned to virtual machines running on the server. That 15 GB could be consumed by 1 virtual machine with 15 GB of memory assigned or 30 virtual machines each using 512 MB of memory. In this model, each virtual machine must be assigned the most memory it will ever need. At any specific point in time, however, much of this memory may be unneeded. For example, half of the VMs on a host may require their full assignment, but the other half may be experiencing an idle period and not require anywhere near their full allotment of memory. This can lead to a lot of wasted memory during normal utilization, which reduces the number of virtual machines that can be hosted on each server.
Windows Server 2008 R2 Service Pack 1 introduced a new memory optimization feature, Dynamic Memory. This new technology allows the amount of memory allocated to a virtual machine to increase and decrease based on the amount of memory the processes running in the guest operating system actually need at any given moment in time. Dynamic Memory is different from memory overcommit used by other hypervisors. Memory overcommit strategies tell the VM it has a very large amount of memory in the hopes that not all VMs try to write to all the visible memory. If that were to happen, memory would have to be swapped with some other storage—say compressed memory, shared memory, or disk data—which can drastically impact VM performance.
Dynamic Memory uses three settings for each virtual machine: an initial, a maximum, and (in Windows Server 2012 and beyond) a minimum amount of memory. Hyper-V can intelligently add or remove memory to or from a virtual machine based on its real-time demand for memory and memory availability on the host. The virtual machine is initially allocated the amount of memory defined as the startup RAM, and then based on how the processes inside the virtual machine are using the memory, additional memory is allocated if available, possibly reallocated from other virtual machines with a lesser need or removed from the virtual machine. Figure 2.13 shows the actual dialog to configure memory in Windows Server 2012. Note that if the Enable Dynamic Memory check box is not selected, the virtual machine uses static memory and will use the amount defined in the Startup RAM setting. Checking Enable Dynamic Memory allows the Dynamic Memory setting to be changed. The value defined in Startup RAM is still used as the initial amount of memory, but Minimum RAM and Maximum RAM values are also available. Maximum RAM is the size to which the memory for the virtual machine can grow. The default Maximum RAM is 1,048,576 MB, the maximum Hyper-V allows. However, this can be configured to a more reasonable limit based on the expected and tolerated memory use to prevent depriving other virtual machines of memory if things go wrong and memory use grows unchecked. Minimum RAM was introduced in Windows Server 2012 and allows configuration of the virtual machine to shrink below its Startup RAM value. This is useful if you have an application that needs a certain amount of memory to initially launch but then no longer needs that amount.
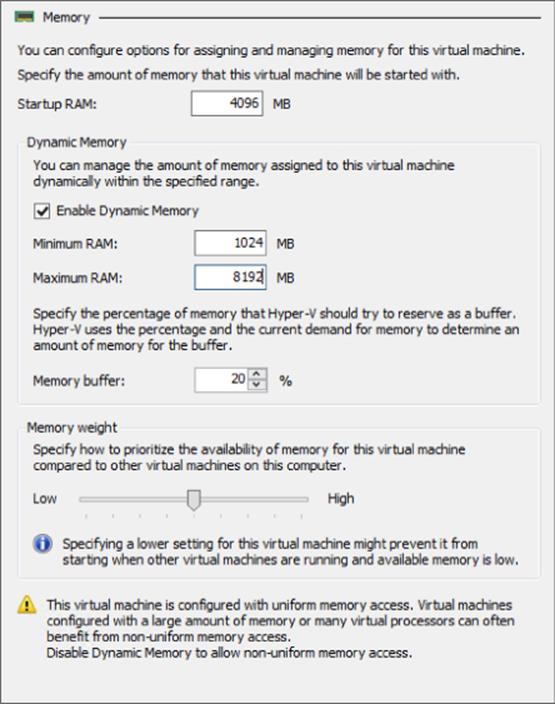
Figure 2.13 Configuring dynamic memory settings for a virtual machine
Also in the figure are the option to set a percentage to use as an available memory buffer and a memory weight slider, which is the memory priority compared to other virtual machines running on the host. The memory buffer allows you to keep some extra memory assigned to the VM beyond its immediate need. This accomplishes two things. First, it's not desirable to let the operating system totally exhaust all memory before adding additional RAM, which may take a few seconds to be added and used. In those few seconds the performance of the virtual machine could be severely adversely affected, and it would have started to page out pages of memory to its pagefile. The pagefile is a file on disk that can be used by an OS's virtual memory manager to temporarily store pages from RAM when physical memory is low. This can deteriorate performance because disk is much slower than RAM to use. Second, it provides some extra memory to be used for cache and other memory consumers that use otherwise available memory behind the scenes.
To avoid this memory starvation and provide extra memory for caches, Dynamic Memory provides some memory beyond a virtual machine's instantaneous demand, up to the Maximum RAM setting (i.e., Hyper-V will never assign more than Maximum RAM). By default, this amount is 20 percent of demand. When the virtual machine has less than this available memory percentage, then more memory is added if physically available in the Hyper-V host to bring the virtual machine back to the desired percentage of available memory. The memory buffer can be changed to a desired amount based on the needs of the virtual machine and can be modified while the virtual machine is running.
The other slider is used to set a priority of memory allocation in times when there is not enough physical RAM available to meet all the desired amounts for the VMs. Just as with CPU allocation, a VM with a higher memory priority will receive additional memory before VMs of a lower priority.
One aspect of Dynamic Memory that makes it special in terms of its memory optimization technique is how the decision to add or remove memory is made. I used the word intelligently earlier because Dynamic Memory does not just give more memory to a virtual machine if its free memory is low, but rather it's based on how much memory the workload needs. Figure 2.14 shows part of a Task Manager view of a Windows Server 2008 R2 server that has 8 GB of RAM. On first glance, this virtual machine only has 4 MB of free memory, so it would seem to need more memory. But this is not really the case.
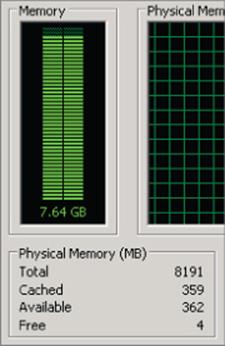
Figure 2.14 An operating system with only 4 MB of free memory but still plenty of available memory
Windows XP, Windows Server 2003, and earlier operating systems tried to use as little memory as possible, and so it was common to see systems with large amounts of free memory. Windows Vista, Windows Server 2008, and later operating systems use all the memory that they can use for cache purposes to help improve performance by preloading programs into memory. If memory is available, it makes sense to use it to try to improve performance. Leaving memory free does not benefit anyone, which is why it's rare to see a high Free Memory value on Windows Server 2008 and above. It is because nearly all memory is always used that memory overcommit technologies like allocate on first write (which assign memory as the virtual machine actually writes data) don't work well with modern operating systems and why Hyper-V does not use that memory optimization technique. The memory used for caching can be used by applications whenever needed, so the memory used for cache is largely still available, and therefore looking at free memory is fairly meaningless. We need to consider the available memory (which includes most of the memory being used for cache), which can be seen in Figure 2.14 as well.
Dynamic Memory uses the commit value for memory to identify the amount of memory that is used, and therefore its memory demand, and is key to the intelligence it brings with memory allocation. Hyper-V Integration Services has a Dynamic Memory virtual service client (VSC) in the guest OS that communicates with its corresponding virtual service provider (VSP) in the parent partition to report its use of memory and specifically its amount of available memory. Based on the amount of available memory in the guest, the desired memory buffer configured for the virtual machine and the amount of physical RAM available in the host additional memory may be allocated to the guest. This type of intelligent memory allocation is only possible because of the guest OS insight provided by the Dynamic Memory VSC. It would not be possible if it was just the hypervisor looking at which memory is being used by a virtual machine externally because it would not be possible to tell if the memory was being used by an application or just for disposable purposes like precaching.
While adding memory to a virtual machine is fairly simple—more memory is simply presented to the guest OS for it to consume—the process to remove memory that is no longer needed is more complex. It is not possible to just take memory away from a guest operating system's memory manager and expect it to continue to function. The guest was probably using the memory (remember that little memory is actually free in a modern operating system) and, even it were truly free, expects it to be usable in the future. Moreover, even if memory could be taken from a virtual machine, it would be very difficult to know what memory is safest to take back! Hyper-V uses a process called ballooning to get around these problems and remove memory.
Ballooning is a clever way to get the guest operating system to decide which memory it no longer really needs and discontinue use of that memory. A “balloon” of memory is allocated by a kernel mode device driver under Hyper-V's control. When Hyper-V wants memory back from a Dynamic Memory VM, it requests the balloon driver to allocate memory inside that VM. The driver, running inside the guest OS, allocates the memory and grows the “balloon” to a certain size. When a modern OS receives a memory allocation request, it uses insights into existing memory content and workload activity to decide where that memory can best come from. Free memory, cache memory, and unused or inactive application memory are all typical targets. If none of those are available, the guest OS may choose to page out memory content to the guest OS pagefile to generate free memory. The key is that the guest OS rather than some outside process that does not understand how memory is being used, gets to intelligently decide which pages should be given in the most unobtrusive way with the least hit to performance. Once the memory is allocated to the balloon driver, these addresses are communicated to the virtualization manager, which tells the hypervisor it can now effectively unmap those address ranges from physical RAM because the balloon driver will never actually touch them and no other part of the guest OS is allowed to. The memory has been reclaimed by Hyper-V and can be used with other virtual machines.
If the virtual machine needs additional memory in the future, then the VM management can “deflate” the balloon, either fully or by a certain amount. Physical RAM is provided by Hyper-V at its previous locations and then the balloon driver frees the previously allocated RAM back to the guest OS. This process is shown in Figure 2.15.
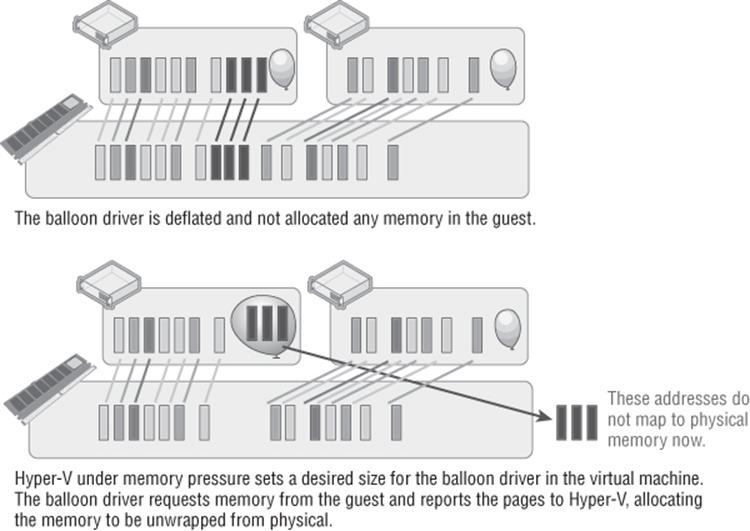
Figure 2.15 The inflation of the balloon driver to allow Hyper-V to reclaim memory from a virtual machine
It is still critical to understand and plan placement of virtual machines based on expected memory usage and set realistic maximum values. Poor planning will result in the host running out of memory and virtual machines not getting enough RAM.
While Dynamic Memory is great for client operating systems in Virtual Desktop Infrastructure implementations, it also works well for many server workloads. I've seen many organizations use Dynamic Memory on all types of server workloads like file servers, domain controllers, System Center servers, and more and get huge memory savings. Using Dynamic Memory can enable running many more virtual machines on a server thanks to the optimized use of memory.
There are also some types of services that need special considerations when using Dynamic Memory and those that should not use it. I've included some of the main ones in the following list. Ultimately check with the application vendors for their support of Dynamic Memory:
· Linux VMs were not able to utilize Dynamic Memory until the release of Windows Server 2012 R2, which provides updated Linux Integration Services. This allows recent distributions of Linux to leverage Dynamic Memory, but older releases without updated Integration Services may not be able to.
· The Exchange 2010 and above Mailbox server role actually checks the amount of memory when the mailbox server starts and then does not recheck, so it will not take advantage of additional memory if it's added to the virtual machine after the mailbox service has started.
· The Enterprise SKU of SQL Server supports the hot-add of memory into the operating system, which is how SQL Server treats Dynamic Memory. That means for SQL Server to leverage additional memory, you must be running the Enterprise SKU of SQL Server. With SQL Server Enterprise edition, the physical memory is checked every second, and if the memory has increased, the target memory size for SQL Server is recalculated, which is how the additions from Dynamic Memory will be seen. Because SQL Server has its own caching mechanisms regarding free memory, the buffer percentage should be set to 5 percent for a SQL Server virtual machine instead of the default 20 percent.
· Like SQL Server, Java also has its own caching mechanisms, which means the buffer percentage should be set to 5 percent for virtual machines running Java workloads instead of the default 20 percent.
It should be clear that Dynamic Memory is not a memory overcommit technology. Dynamic Memory gives a virtual machine an initial amount of memory and then, as the virtual machine uses the memory for processes, additional memory is added if available in the host. This assures the best use of memory while not running the risk of overcommitting the amount of memory available to virtual machines.
The maximum amount of memory that can be assigned to a virtual machine with Windows Server 2012 Hyper-V is 1 TB. There is one other memory-related setting for a virtual machine: the Smart Paging file location. Smart Paging files were necessary because of the change in Windows Server 2012 that introduced the Minimum RAM configuration memory option for a virtual machine. The new minimum RAM capability introduces a potential problem. Consider the following scenario on a host that is fully utilized from a memory perspective:
1. A virtual machine has been running for a period of time, and the amount of physical RAM allocated is set to its Minimum RAM value, 512 MB. The additional memory it was allocated when it started (startup RAM, which was 1 GB) has been taken by Hyper-V through the balloon driver process.
2. The virtual machine is restarted or the host is restarted.
3. To restart, the virtual machine needs 1 GB of memory, but it only has 512 MB available, and in this worst-case scenario, the Hyper-V host has no spare memory and no memory can be reclaimed from other virtual machines running on the host.
This one and only scenario is where the new Smart Paging feature is utilized:
· The virtual machine is being restarted (also caused by host restart).
· There is no available physical memory.
· No memory can be reclaimed from other virtual machines running on the host.
At this time, a Smart Paging file will be created for the virtual machine in the location specified in the configuration of the virtual machine and will be used by the virtual machine as memory to complete startup. As soon as possible, that memory mapped to the Smart Paging file will be ballooned out and the Smart Paging file will be no longer used and deleted. The target time to stop using the Smart Paging file is as soon as possible and no longer than 10 minutes. The Smart Paging feature is only used to provide reliable restart of virtual machines and is not used to provide overcommit after boot.
Why Page Sharing Technologies Are Not Used with Hyper-V
When virtualization technologies are used, it's common to run many operating system instances (often similar versions) on one physical piece of hardware. On my main server I have 18 virtual machines all running Windows Server 2012 R2. The operating system version is the same, which means a large part of their memory content will have the same data as other virtual machines running the same guest operating system.
The idea of page sharing is storing only duplicate pages of memory from all the virtual machines once stored in physical RAM, basically Single Instance Storage for virtual machine memory. One way this can work is that a process in the hypervisor looks at every page of memory for every virtual, creates a hash value for each page of memory, and then compares the hash values. If a duplicate hash is found, a bit-by-bit comparison of the memory pages is performed to make sure the memory pages really are identical, and then the content is stored only once in memory and the duplicate virtual machine page addresses just point to the singly stored page. We are now sharing the page. This seems like a great idea, but unfortunately the reality is that with newer operating systems, Windows Server 2008 and later, it does not work well for many reasons.
First, page sharing works best on empty pages. However, as you saw in the previous section with Windows Vista and above, memory is rarely left empty and is used to cache as much as possible.
Second, memory pages are getting bigger, much bigger. In the past, memory pages were 4 KB in size, so the chances of finding 4 KB pages now with the same content across operating systems is quite possible and therefore physical memory space will be saved. Processors have supported large memory pages for a long time now, and a 2 MB memory page size is commonly recommended, which is what Windows Vista and Windows Server 2008 and above use by default (along with newer Linux operating systems). The chances of finding duplicate 2 MB memory pages is very slight, which is why as operating systems adopt large memory pages, memory sharing technologies lose their benefit.
Another factor is that Windows Vista and above use address space load randomization, which is a security technology that loads key components of the Windows kernel and user space into 1 of 256 possible locations. This makes it harder for malware to attack the kernel based on the components' location in memory because the locations will vary on different instances of the OS and at each reboot. This means duplicate instances of the same operating system will not have the same content in the same locations for this memory content, which will minimize the effectiveness of page sharing, but this is only for a small part of the operating system content.
Virtual Storage
I previously covered the IDE controller and the SCSI controller, which support storage to be attached, and there are primarily two types of storage, virtual hard disks and pass-through storage. Before I even start discussing the technologies I want to be very clear:always use virtual hard disks! While pass-through storage was required in some scenarios in Windows Server 2008 R2 Hyper-V, it really should never be needed with the new VHDX format in Windows Server 2012 Hyper-V, so don't use it. I will, however, cover it briefly simply for completeness.
Processor and memory are very important resources to virtual machines, but storage is also critical. There are ways to enable a Windows Server 2008 R2 and above Hyper-V virtual machine to boot from a SAN by attaching to the LUN from the Hyper-V host and then mapping the disk directly to the VM using the pass-through disk capability of Hyper-V. In most cases, though, virtual machines will have some dedicated storage.
VHD
The most common and recommended storage for a virtual machine is the use of a virtual hard disk, which prior to Windows Server 2012 was the VHD format. In Windows Server 2008 R2, the VHD format is a core part of the operating system and from a performance analysis there is only a negligible difference from using a pass-through disk. VHDs can be mounted using Windows Server 2008 R2 and above disk management tools, and physical computers can boot from VHDs using the Boot from VHD feature available in Server 2008 R2 and Enterprise and above versions of Windows 7.
A VHD can be up to 2 TB in size, and there are a number of different types of VHDs available:
· Dynamically expanding: This is the most popular format. Essentially the virtual hard disk is created using a minimal amount of disk space, and as the disk is used, the file expands on the file system to accommodate the data written to the disk up to the size specified as the size for the virtual hard disk. This option is the most efficient use of the disk space because space is not used on the physical hard drives unless needed. In Windows Server 2008, there was a performance penalty with dynamic disks, such as when a write was performed, the file had to grow. However, the VHD implementation was rewritten in Windows Server 2008 R2, and this performance penalty is negligible. A dynamically expanding disk does not shrink if data is deleted unless a compact operation is performed. This type of disk is also commonly referred to as thinly provisioned because it starts off thin and grows as data is written to it.
· Fixed size: In this case, the size specified for the virtual hard disk is allocated and used when the disk is created, and so if a 127 GB fixed size virtual hard disk is created, a 127 GB VHD file is created on the Hyper-V server. This is likely to lead to a less fragmented virtual hard disk.
· Differencing: A differencing hard disk is linked to a parent virtual hard disk and only stores the changes from the parent hard disk. As writes are made, the differencing (child) disk will have the writes committed, while read operations will be sourced from the parent VHD unless an update was made to the original data or its new data, in which case the data will be read from the differencing disk. Once a VHD becomes a parent disk, it becomes read-only. A differencing disk has a name of AVHD instead of VHD and will grow as data is written, behaving very similar to a dynamic disk.
Figure 2.16 gives an overview of the types of VHD and how they function.
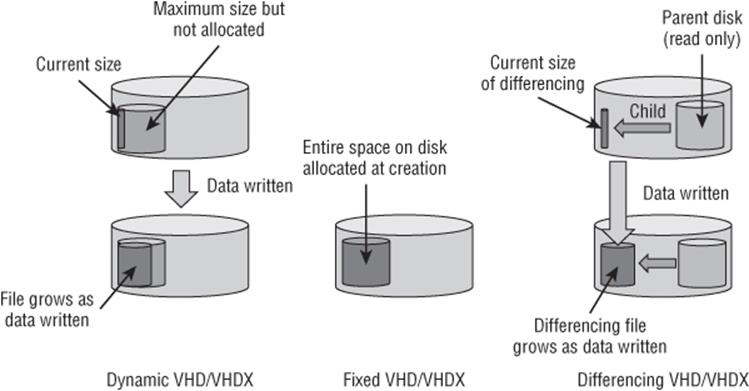
Figure 2.16 The key types of VHD disk
Although there is little performance difference between a dynamic and fixed VHD in Windows Server 2008 R2, the recommendation for production environments is to use a fixed VHD. The primary reason is that when dynamic VHDs are used, there is always the possibility that the underlying storage runs out of space, so as the dynamic VHD tries to grow, it will fail, causing unpredictable results. If systems have very well-defined processes to monitor disk space usage and alert as required, then the use of dynamic VHDs in production may be possible. VHD is a published standard by Microsoft and is used by other vendors, like Citrix. The specification can be found on the Microsoft Download Center website; just search for “VHD specification” at www.microsoft.com/download.
Virtual machines can have a number of VHDs attached to them, but a single VHD cannot be used by multiple virtual machines at the same time. Hyper-V supports both an IDE bus and a SCSI bus to connect VHDs to virtual machines. While the IDE bus must be used for DVD drives and the disk the virtual machine will boot from, for all other VHDs, the SCSI bus is recommended for best performance and maximum flexibility.
It is possible to perform conversions between dynamic and fixed VHDs using Hyper-V Manager and command-line tools. The conversion process actually creates a new VHD and copies over the content from the source VHD to the target.
VHDX
The VHDX format was introduced in Windows Server 2012 to address some of the scalability and, to a lesser extent, performance challenges of the VHD implementation. VHD can still be used in Windows Server 2012 Hyper-V, but the recommendation is to always use VHDX unless backward compatibility is required with Windows Server 2008 R2 Hyper-V or, at the time of this writing, Windows Azure IaaS (which currently supports only VHD).
The same capabilities for VHD apply to VHDX, such as Boot from VHDX, the three types of VHDX (dynamic, fixed, and differencing), and native mounting and use within Windows Server 2012. VHDX essentially builds on VHD and provides new scalability and options.
VHDX supports a maximum virtual hard disk size of 64 TB, 32 times that of the VHD format. In all my years of consulting with the largest companies in the world, I have never seen an NTFS volume bigger than 14 TB. That means there is no workload that could not be contained within the new VHDX format, removing the few cases where pass-through storage was previously required because of size limitations with VHD. While it is true that the new ChkDsk features introduced in Windows Server 2012 will allow larger NTFS volumes because volumes can now have any corruption fixed with only seconds of downtime instead of hours or days, I still don't believe it will be common for any organization to require single volumes bigger than 64 TB.
VHDX also leverages an improved logging mechanism for updates to the VHDX metadata, which protects against corruption in the case of unplanned events such as power loss. In addition, VHDX features the ability to have custom metadata stored, which can be useful to store user notes about a virtual hard disk. The TRIM function is supported for VHDX files, which allows space to be reclaimed providing the hardware is TRIM-compatible.
VHDX files automatically align with the underlying physical structure of the disk, giving the most optimal performance, and also leverage larger block sizes for dynamic and differencing disk, giving better performance. When you're using dynamic VHDX files, the performance difference is even more negligible than with VHD, making dynamic the default choice when provisioning new VHDX files. However, the same guidance with VHD does apply if you don't have a good monitoring solution in place; to ensure that you don't run out of physical disk space, you would still use fixed VHDX format.
When VHDX is combined with the SCSI controller in Windows Server 2012 R2, the VHDX can be dynamically resized while being used by a running virtual machine, allowing the disk to be expanded and even shrunk provided there is sufficient unpartitioned space in the volume.
VHDX files can also be shared by multiple virtual machines in Windows Server 2012 R2 that are stored on a cluster shared volume or provided by a scale-out file server. I will cover this and dynamic resize in more detail in Chapter 4, “Storage Configurations.”
If you have VHD disks, they can be converted to VHDX using Hyper-V Manager via the Edit Disk action and using the Edit Virtual Disk Wizard, which allows the Convert action. An alternative is using PowerShell with the Convert-VHD cmdlet, as in the command Convert-VHD .\test.vhd .\test.vhdx.
Creating a Virtual Hard Disk
Virtual hard disks can be created in a number of ways. Using Hyper-V Manager, you can create disks using the New – Hard Disk option, which I will walk you through in the following steps. Additionally, the same wizard is launched if you select to create a new virtual hard disk on a disk controller within a virtual machine settings dialog.
1. Select the New – Hard Disk option from Hyper-V Manager.
2. Click Next to open the New Virtual Hard Disk Wizard introduction screen.
3. Select the type of disk format: VHD or VHDX. Always use VHDX if possible. Click Next.
4. Select whether the disk is fixed size (the default if VHD is selected on the previous screen), dynamically expanding (the default if VHDX is selected on the previous screen) or differencing, and click Next.
5. Select a name for the new virtual hard disk and location, and then click Next.
6. If a fixed or dynamic disk is being created, you can use the Configure Disk screen to choose a size for the new disk or to copy the content from an existing physical or virtual hard disk, as shown in Figure 2.17. The default size is 127 GB, but you should change this to meet your needs. Click Next.
7. A summary of the choices will be shown. Click Finish to create the new virtual hard disk.
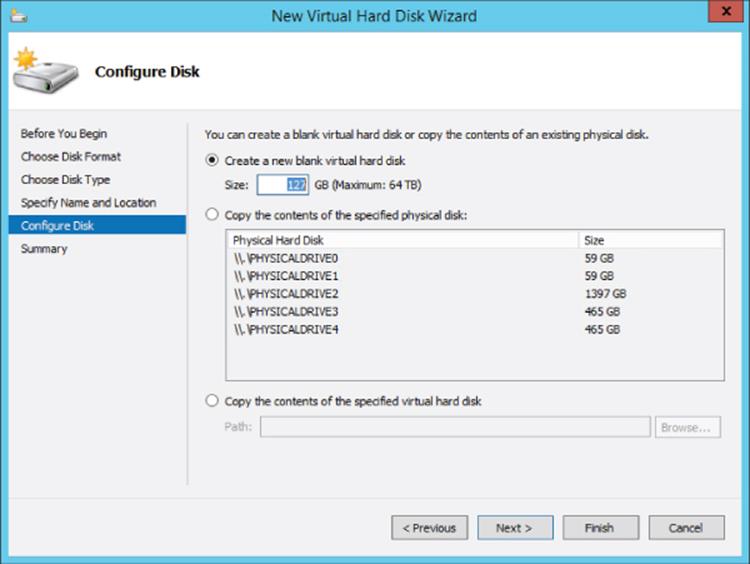
Figure 2.17 Selecting the size or source content for a new virtual hard disk
Also in Hyper-V Manager is the Edit Disk action, which when launched allows a virtual hard disk to be selected and then have actions such as the following performed on it:
· Compact: Reduces the size of the virtual hard disk. This is useful if large amounts of data within the virtual hard disk have been deleted and the dynamic disk should have physical space reclaimed.
· Convert: Allows conversion between virtual hard disk formats (VHD/VHDX) and between provisioning type (fixed/dynamic). The conversion works by creating a new virtual hard disk and copying the content so it will consume extra space on disk during the conversion process and may take a long time.
· Expand: Expands the capacity of a virtual hard disk.
The Inspect Disk action in Hyper-V Manager gives the basic information about a selected virtual hard disk, as shown in Figure 2.18. For a dynamic virtual hard disk, it shows its maximum size but also the amount of space currently used on disk.
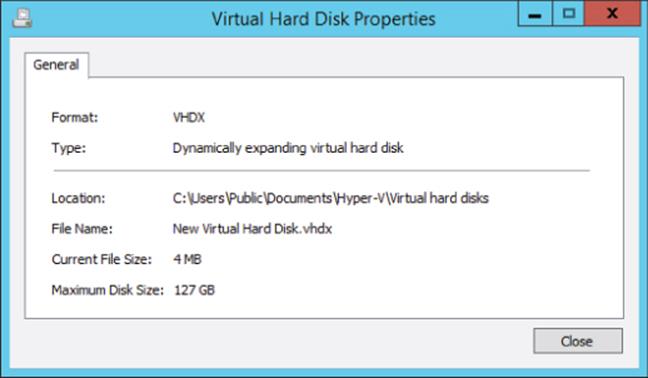
Figure 2.18 The basic information about a virtual hard disk shown by the Inspect Disk option
While graphical tools are highly intuitive for automation, a scripting language is typically leveraged, and PowerShell is the command-line interface and scripting language of choice for Microsoft.
Here are some of my favorite PowerShell commands related to virtual hard disks. Note that you do not have to specify if a disk is VHD or VHDX. Simply setting the file type to VHD or VHDX lets the commands know the type of virtual hard disk to create. I'll show later in the book how to create new virtual hard disks as part of a virtual machine creation.
Here's the command to create a fixed VHDX file:
New-VHD -Path D:\Virtuals\newfix.vhdx -Fixed -SizeBytes 10GB
To create a dynamic VHDX file, use this command:
New-VHD -Path D:\Virtuals\newdyn.vhdx -Dynamic -SizeBytes 1TB
The command to create a differencing VHDX file is as follows:
New-VHD -ParentPath D:\Virtuals\newfix.vhdx ´
-Path D:\Virtuals\newdif.vhdx -Differencing ´
-SizeBytes 1000000000
Here is the command to create a VHDX using very large block sizes:
New-VHD –Path D:\Virtuals\LargeBlockSize.vhdx –BlockSizeBytes 128MB ´
–LogicalSectorSize 4KB –SizeBytes 1TB
A virtual hard disk can be added to a virtual machine using the Add-VMHardDiskDrive PowerShell cmdlet, as in this example:
Add-VMHardDiskDrive -VMName Demo1 -Path D:\Virtuals\newdyn.vhdx ´
-ControllerType SCSI
Pass-Through Storage
As I mentioned, one option is to use a pass-through disk, where a virtual machine has connectivity mapped directly to physical disks. However, this requires the physical disk to be used exclusively by a single virtual machine, and the benefits of abstracting the virtual machine from hardware is lost because the virtual machine is now directly linked to a physical piece of hardware. Other features, such as using checkpoints that provide a point-in-time saved state of a virtual machine, are not possible.
The Hyper-V host cannot access a disk that is passed-through to a VM. It becomes exclusively usable by the virtual machine. The disk must be offline on the Hyper-V host to be connected to a virtual machine. Pass-through disks may be used for very high I/O applications like SQL Server, but this is typically not actually required given the continued improvements in VHDX performance. Prior to VHDX, the use of pass-through storage was required if a volume larger than 2 TB was required because of the VHD size limit, but this is no longer a limiting factor because of VHDX.
The Bottom Line
1. Describe how the resources of a virtual machine are virtualized by the hypervisor. The hypervisor directly manages the processor and memory resources with Hyper-V. Logical processors are scheduled to satisfy computer requirements of virtual processors assigned to virtual machines. Multiple virtual processors can share the same logical processor. Virtual machines are assigned memory by the hypervisor from the memory available in the physical host. Dynamic memory allows memory to be added and removed from a virtual machine based on resource need. Other types of resources, such as network and storage, are provided by the management partition through a kernel mode memory bus known as a VMBus. This allows existing Windows drivers to be used for the wide array of storage and network devices typically used.
1. Master It How is Dynamic Memory different from Memory Overcommit?
2. Correctly use processor and memory advanced configuration options. The compatibility configuration of a virtual machine processor should be used when a virtual machine may be moved between hosts with different versions of the same processor family. The processor compatibility option hides higher-level features from the guest operating system, enabling migrations without downtime to the virtual machine. Processor reserve and limit options ensure that a virtual machines coexists with other virtual machines without getting too many or too few resources. Dynamic Memory configurations allow the startup, minimum, and maximum amounts of memory for a virtual machine to be configured. It's important to note that the maximum amount of memory configured is available only if sufficient memory exists within the host.
1. Master It When should the NUMA properties of a virtual machine be modified?
3. Explain the difference between VHD/VHDX and pass-through storage. VHD and VHDX files are virtual hard disks that are files on a file system or share accessible to the Hyper-V host. They provide abstraction of the storage seen by the virtual machine and the underlying physical storage. Pass-through storage directly maps a virtual machine to a physical disk accessible from the host, which limits Hyper-V functionality and breaks one of the key principals of virtualization: the abstraction of the virtual machine from the physical fabric.
1. Master It Why would VHD still be used with Windows Server 2012 Hyper-V?
All materials on the site are licensed Creative Commons Attribution-Sharealike 3.0 Unported CC BY-SA 3.0 & GNU Free Documentation License (GFDL)
If you are the copyright holder of any material contained on our site and intend to remove it, please contact our site administrator for approval.
© 2016-2026 All site design rights belong to S.Y.A.