Microsoft Office for iPad Step by Step (2015)
Part 1: Get started with Microsoft Office for iPad
CHAPTER 1 Office for iPad basics
CHAPTER 2 Get connected
CHAPTER 3 Create and manage files
1. Office for iPad basics
In this chapter
![]() Install Office for iPad apps
Install Office for iPad apps
![]() Configure iPad and Office app settings
Configure iPad and Office app settings
![]() Update Office apps
Update Office apps
![]() Remove and reinstall Office apps
Remove and reinstall Office apps
Microsoft Office for iPad is the collective name for a group of individual apps you can use on your iPad to display, create, and work with different kinds of information. The Office for iPad family includes three core apps:
![]() Word for iPad
Word for iPad
![]() Excel for iPad
Excel for iPad
![]() PowerPoint for iPad
PowerPoint for iPad
Another useful Office app that is available for the iPad is Microsoft OneNote for iPad. This book includes coverage of all four of these Office apps, which are widely used in home, business, and school environments.
Practice files
No practice files are necessary to complete the practice tasks in this chapter.
Other Microsoft products that are available for the iPad include the Microsoft SharePoint Newsfeed and Yammer networking tools, the Skype and Skype for Business (formerly Microsoft Lync) online communication apps, the Microsoft Outlook Web App enterprise communication app, and apps that help you access and manage content in Microsoft OneDrive and OneDrive for Business online storage locations.
This chapter provides information about the environment necessary to support the Office apps on an iPad. It then guides you through procedures related to installing, configuring, updating, removing, and reinstalling Office apps and configuring iPad settings for features and functions that can be used in the Office apps.
Install Office for iPad apps
The Office for iPad apps are free, as are the features necessary to display, create, and edit Word documents, Excel workbooks, PowerPoint presentations, and OneNote notebooks. All you need is a free Microsoft account (which you probably already have). You can use Word for iPad, Excel for iPad, PowerPoint for iPad, and OneNote for iPad to open and explore Office files regardless of whether the files were originally created on a computer running Windows, a Mac computer, or an iPad.
You install the individual Office apps from the App Store. After you sign in to an app by using your Microsoft account credentials, you can get right to work.
 Important
You have the option of unlocking premium app features by associating the apps with an Office 365 account. Premium features include advanced change-tracking features, unlimited use of paragraph styles, and advanced chart, table, and picture formatting tools.
 See Also
For information about Microsoft accounts and Office 365 accounts, see “Microsoft account options” and “Office 365 subscription options” later in this topic.
Hardware requirements
The Office apps can be installed on any iPad running iOS 7 or iOS 8 (the current version at the time of this writing). Each app requires about 450 megabytes (MB) of local storage space (on the iPad) to install. The documents, workbooks, presentations, and other files you create or work with require additional storage space, but you can store those either locally on the iPad or in a remote storage location such as a OneDrive, SharePoint, or Dropbox site.
See Also
For information about remote storage locations, see “Connect to additional storage locations” in Chapter 2, “Get connected.”
 Tip
Tip
If your iPad doesn’t have enough free space to install the Office apps you want, you can regain space by deleting other apps, or by moving photos, music, and other files to remote storage locations. If you want to make an entirely clean start, you can restore the iPad to its original state and then install the most recent version of iOS. Always synchronize iPad content with your computer before you restore an iPad to its original state.
iTunes support for the iPad
You can manage the content, software, and data on iPads and other Apple devices by installing iTunes on your computer. When your iPad is connected to the computer, clicking or tapping the iPad icon on the toolbar displays information that includes the total storage capacity and the iOS version.
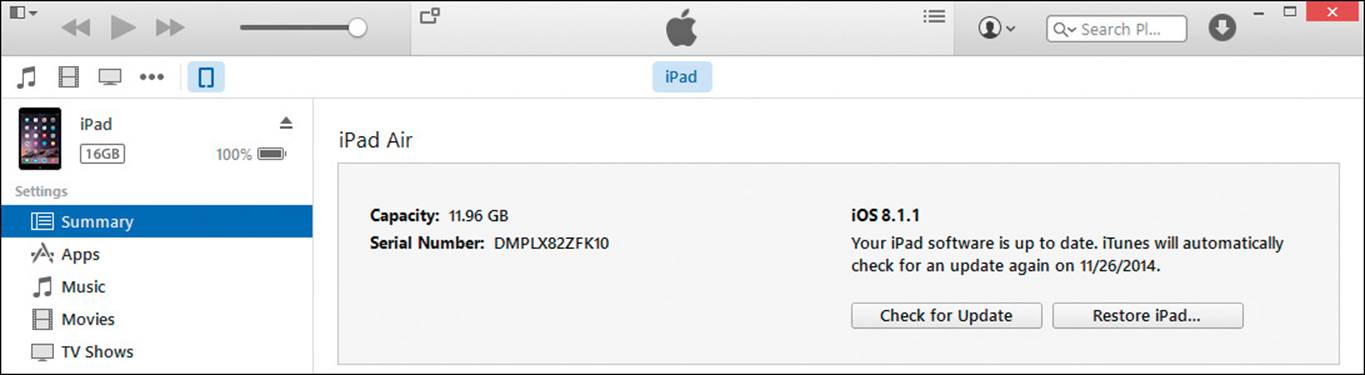
iTunes provides information about your connected device
From the Summary page, you can also configure backup settings and other options. Two notable options for the iPad-to-computer connection are:
![]() Open iTunes when this iPad is connected This option is selected by default. Clear it if you want to start iTunes manually.
Open iTunes when this iPad is connected This option is selected by default. Clear it if you want to start iTunes manually.
![]() Sync with this iPad over Wi-Fi Select this option to save yourself the trouble of connecting the iPad to the computer by using a USB cable.
Sync with this iPad over Wi-Fi Select this option to save yourself the trouble of connecting the iPad to the computer by using a USB cable.
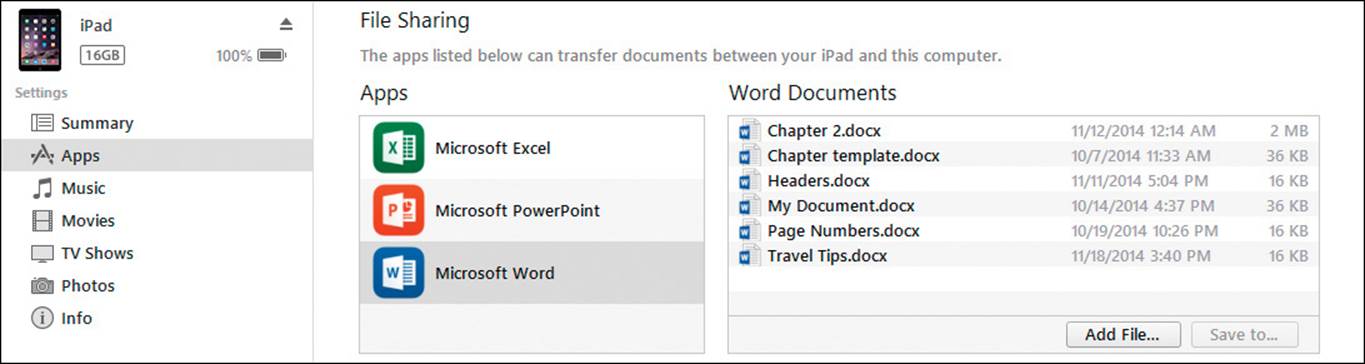
From the File Sharing area at the bottom of the Apps page, you can add files from your computer to the iPad and save files from the iPad to your computer.
Connected devices are available from the toolbar
SEE ALSO You can learn about and install iTunes from itunes.apple.com.
There are several ways to find out about your iPad’s operating system version and available storage space. You can check directly on the iPad or, if the iPad is connected to a computer, from iTunes or the file explorer system on the computer.
To display information about your iPad operating system and storage space
1. On the Home Screen, tap the Settings icon to start the Settings app.
2. In the Settings list, tap General.
3. At the top of the General page, tap About.
The Available entry displays the available storage space. The Version entry displays the installed iOS version.
4. Return to the General page.
5. About halfway down the General page, tap Usage to display the total used and available storage space on the device.
6. On the Usage page, tap Manage Storage to display the totals and the storage space consumed by each app and its related documents and data.
7. Tap any app to display a breakdown of the content stored for that app.
Or
1. Connect the iPad to a computer that iTunes is installed on.
2. Start iTunes if it doesn’t start automatically.
3. On the iTunes toolbar, tap or click the iPad button.
Important
The iPad button isn’t labeled, other than by an icon that looks like an iPad device.
The first section of the Summary page displays the total storage capacity on the left side, and the iOS version on the right side. The bar at the bottom of the window displays used and available storage space.
![]()
Colored blocks indicate the portion of storage used by photos, apps, and other content
See Also
For information about deleting apps to free up storage space, see “Remove and reinstall Office apps” later in this chapter.
Installation options
You always install the Office apps from the App Store. To install an app directly from the App Store, you must first locate it by searching for the app and then identifying it among the related results. This approach seems straightforward, but many apps have been released that support or resemble the Office apps, so you might have to scroll through a lot of search results to identify the actual app you want to install.
A more direct path to the Office apps is through the Office website. You can learn about and link to the App Store listings for all the Office apps that are available for a specific mobile device (in this case, the iPad) from the Office website for mobile devices at office.microsoft.com/mobile.

The Office for Mobile Devices website provides information for iPad, iPhone, Windows Phone, and Android phone users
When you start an app installation, the app icon is automatically added to the iPad Home Screen. Until the app is ready to use, the icon is screened (dark) and labeled with the installation status rather than the app name.
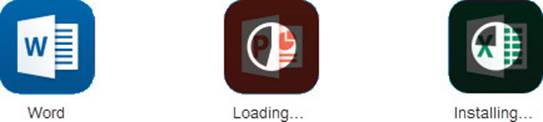
The Installing status appears during the initial app installation and subsequent updates
When the app is ready for use, the icon is unshaded and labeled with the app name.
To locate Office for iPad apps in the App Store
1. Display any view of the App Store (Featured, Top Charts, Near Me, Purchased, or Updates).
2. In the Search box in the upper-right corner, enter Office 365 or the name of the specific app you want to locate.
3. Tap a corresponding search term in the Results list.
4. Scroll the page if necessary to locate the official apps.
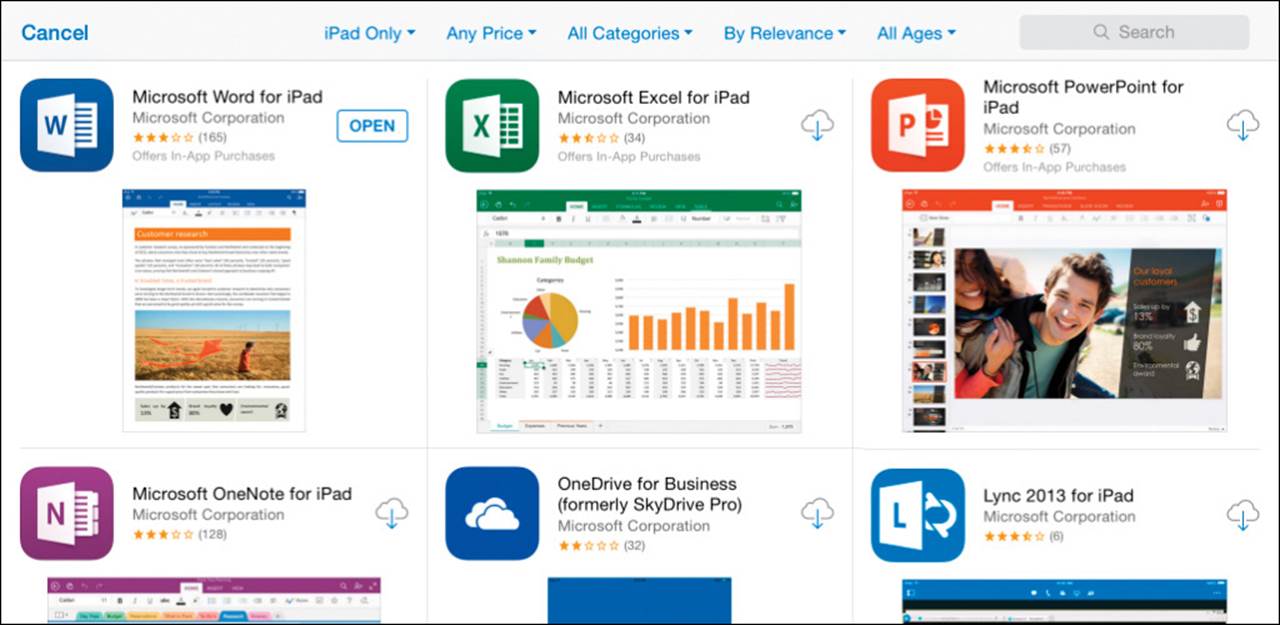
The official app installation links feature the app icons and names shown here
Tip
If you’re accustomed to working with Office programs on other platforms, you might notice that the names of the iPad app versions of Word, Excel, PowerPoint, and OneNote don’t include version numbers (such as 2013) like the desktop programs. The Office for iPad apps automatically update when new versions become available. The current version is shown on the app page in the App Store and on the splash screen that appears after the installation of an update.
To install Office for iPad apps from the App Store
1. In the App Store, locate the app you want to install.
2. To begin the installation, do one of the following:
• In the upper-right corner of the app listing, tap the Install icon.
• Tap the app listing, and then on the app information page, tap the Install icon to begin the installation.
Tip
The Install icon depicts a downward-pointing arrow on a cloud. If an app is already installed on the iPad, the app information page displays an Open button instead of an Install icon.
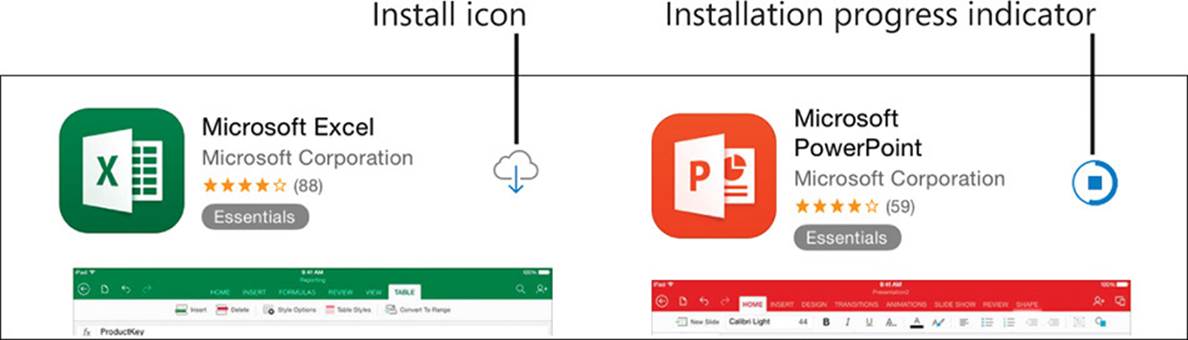
The Install icon changes to indicate the progress of the installation
To install Office for iPad apps from the Office website
1. On the iPad, using Safari or another web browser, go to office.microsoft.com/mobile.
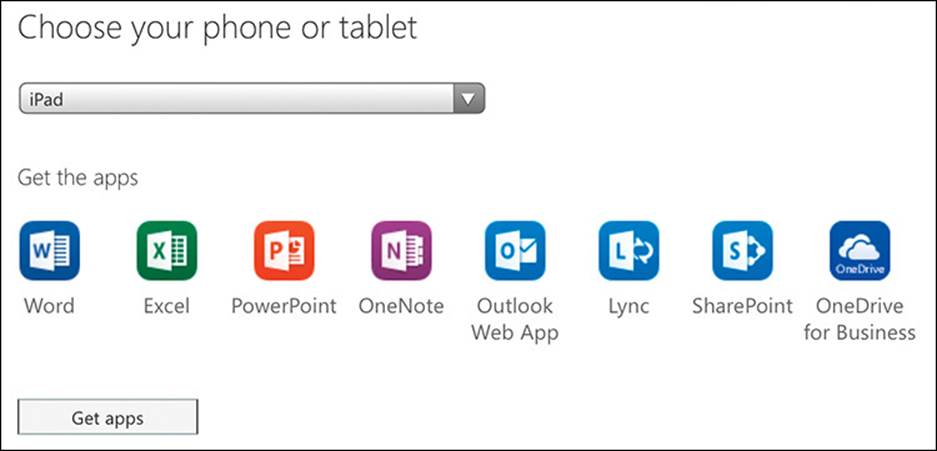
2. With iPad selected at the top of the page, scroll to the Introducing Office for iPad section, and then tap Get Word, Get Excel, or Get PowerPoint to open the information page for the selected app in the App Store.
3. On the app’s information page, tap the Install icon.
Microsoft account options
If you use Skype, OneDrive, Xbox Live, Outlook.com, or a Windows Phone, you already have a Microsoft account. (Microsoft account credentials are also used by many non-Microsoft products and websites.) If you don’t already have a Microsoft account, you can register any existing account as a Microsoft account, sign up for a free Outlook.com or Hotmail.com account and register that as a Microsoft account, or create an alias for an Outlook.com account and register the alias.
Tip
Many software programs and websites authenticate transactions by using Microsoft account credentials. For that reason, it’s a good idea to register a personal account that you control, rather than a business account that your employer controls, as your Microsoft account. That way, you won’t risk losing access if you leave the company.
You can start the process of creating a Microsoft account while signing in to an Office app, or you can create the account independently of the sign-in process.
See Also
For information about creating a Microsoft account while signing in to an Office app, see “Start and activate apps” in Chapter 2, “Get connected.” You can learn about Microsoft accounts, register an existing email address, or sign up for a new Microsoft account atwww.microsoft.com/account.
To create a Microsoft account from any computer
1. If necessary, sign out of the current computer user’s Microsoft account.
Important
If the current user is signed in to a Microsoft account on the computer or iPad, the management page for that account appears instead of the Create An Account page. To create a new account, first sign out of the existing account.
2. Go to https://signup.live.com to display the Create an account page.
Tip
You can use a different password for the Microsoft account than the one you use to access your email.
3. If you want to register an existing email account as a Microsoft account, enter your identifying information, the email address you want to register, and the password you want to assign to the Microsoft account.
Or
If you want to obtain a new email account for use as a Microsoft account, tap or click Or get a new email address. Then enter your identifying information, the email address you want to create (choose Outlook.com or Hotmail.com in the list), and the password you want to assign to the account.
Tip
The site immediately checks whether the email address you enter is available. If the requested address is already taken, the site recommends other email addresses based on your name and the address you requested.
4. Enter the code shown at the bottom of the page to verify that a person is creating the account (rather than a computer program), and then tap or click the Create account button.
Office 365 subscription options
Office 365, which was originally available only to businesses, now has many subscription options designed for individual home and business users, students, households, small businesses, midsize businesses, enterprises, government agencies, academic institutions, and nonprofits; in other words, whatever your needs may be, there is an Office 365 subscription option that will be a close fit. Subscription prices range from about $2 to $22 per user per month (and some versions are free).
Many of the Office 365 subscription options include licensing for the desktop Office programs and unlock the premium features of the Office for iPad apps. Most subscriptions that include licensing permit each user to run Office on up to five devices, including computers running Windows, Mac computers, tablets, and iPads.
See Also
For information about associating Office for iPad apps with an Office 365 subscription, see “Start and activate apps” in Chapter 2, “Get connected.”
If you have an Office 365 subscription, you can find out whether you have the licensing necessary to activate the premium app features on the Software page of the Office 365 portal, which you can access at portal.microsoftonline.com.
You can access your licensed software from the Office 365 Settings page of the Office 365 portal
If you intend to run Office apps only on your iPad and don’t need a higher-level subscription, you can subscribe to Office 365 Personal for about $6 per month. An Office 365 Personal subscription allows you to install and use full versions of the following software:
![]() The current versions of Microsoft Access, Excel, OneNote, Outlook, PowerPoint, Publisher, and Word on one computer running Windows
The current versions of Microsoft Access, Excel, OneNote, Outlook, PowerPoint, Publisher, and Word on one computer running Windows
Or
The current versions of Excel, OneNote, Outlook, PowerPoint, and Word for Mac on one Mac computer
![]() Office apps on one iPad or Windows tablet
Office apps on one iPad or Windows tablet
![]() Office apps on Android phones, iPhones, and Windows Phones
Office apps on Android phones, iPhones, and Windows Phones
An Office 365 Personal subscription also provides 1 terabyte (TB) of online storage and 60 minutes of international Skype calling per month.
Important
You can purchase desktop versions of Office programs for use on a computer running Windows or a Mac computer. These stand-alone versions don’t include the licensing necessary to activate the premium features of the Office apps on an iPad.
If you don’t already have an Office 365 subscription for business or personal use and want to try out the premium features on your iPad, you can sign up to try Office 365 Home for free for a month. (Specific versions are also available to educational institutions and government organizations for 30-day trials.)
An Office 365 subscription must be associated with either your Microsoft account credentials or the credentials provided to you by your organization.
To check your Office for iPad app licensing in the Office 365 portal
1. On the iPad or a computer, using Safari or another web browser, go to portal.microsoftonline.com.
If you’re already signed in to Office 365 on the iPad or computer, your name or account picture appears near the right end of the Office 365 toolbar and you can skip to step 3.
2. If you aren’t signed in to Office 365, enter your organizational account credentials, and then tap or click Sign in.
3. In the Office 365 portal, tap or click the Settings button to the right of your name or account picture.
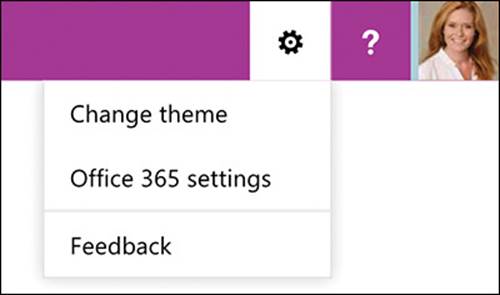
The Settings button is shaped like a gear
4. On the Settings menu, tap Office 365 settings.
5. On the Office 365 settings page, tap Software.
6. In the left pane of the Software page, tap Phone & tablet, and then in the Tablet list, tap iPad to display the iPad apps that you’re licensed to use.
To sign up for a free 30-day trial of Office 365 Home
1. On your iPad or any computer, go to office.microsoft.com/try.
2. On the Try Office 365 page, tap or click Start your free month.
3. On the Microsoft account sign-in page, provide your Microsoft account credentials, and then tap or click Sign in.
See Also
For information about obtaining a Microsoft account, see “Microsoft account options” earlier in this topic and “Start and activate apps” in Chapter 2, “Get connected.”
4. Select an existing payment method or add a new payment method, and then tap or click Next.
You will not be charged for the 30-day free trial period, but payment information is necessary in the event that you extend the subscription.
5. On the Review and confirm page, note the trial period end date and the monthly Office 365 Home subscription price thereafter. Then tap or click Purchase to start your subscription.
Tip
Set a calendar reminder for the trial period end date so you have time to cancel or change the subscription before you’re charged. You can manage the details of your subscription or cancel anytime at www.office.com/myaccount.
See Also
Current information about Office 365 subscription options is available from the Office website at office.microsoft.com.
Configure iPad and Office app settings
As a rule, settings for iPad apps are configured centrally from the iPad Settings app rather than from each individual app. Some of the settings that affect your Office app experience are specific to the iPad, including the following:
![]() Wi-Fi An active Internet connection is necessary to install the app and updates, to validate your Microsoft account and Office 365 subscription, to view online content (such as Help file content) from within the apps, and to connect to online storage resources.
Wi-Fi An active Internet connection is necessary to install the app and updates, to validate your Microsoft account and Office 365 subscription, to view online content (such as Help file content) from within the apps, and to connect to online storage resources.
![]() General You can configure many user experience settings, such as those that do the following:
General You can configure many user experience settings, such as those that do the following:
• Make features and commands easier to access for people with limited vision, hearing, or dexterity.
• Specify the length of time before the iPad screen automatically locks.
• Require a passcode to install or delete apps; purchase content, upgrades, or subscriptions from within apps; or use the AirDrop functionality to transfer files to nearby devices.
• Permit or restrict access to app content and website content based on content ratings.
• Control whether apps can access the microphone (for use when dictating content in Word).
• Provide access to alternative on-screen keyboards so you can easily enter characters from other alphabets or add emoticons to your content.
Make sure that you’re familiar with the available options so that you recognize areas within the apps that would benefit from changes.
![]() iCloud Manage your iCloud Drive storage options and app sharing settings.
iCloud Manage your iCloud Drive storage options and app sharing settings.
![]() iTunes & App Store Turn on or off the option to automatically install purchased apps on all the devices registered to your iTunes account.
iTunes & App Store Turn on or off the option to automatically install purchased apps on all the devices registered to your iTunes account.
![]() Photos & Camera Configure storage locations for pictures that you can insert in Word documents, PowerPoint presentations, and other Office files.
Photos & Camera Configure storage locations for pictures that you can insert in Word documents, PowerPoint presentations, and other Office files.
Each configurable app you install on your iPad has a page in the Settings app. The iPad versions of the Office apps have far fewer configurable settings than the desktop versions that you might be familiar with. Each app has a Reset option that you can use to delete the credentials associated with the app and any locally stored files.
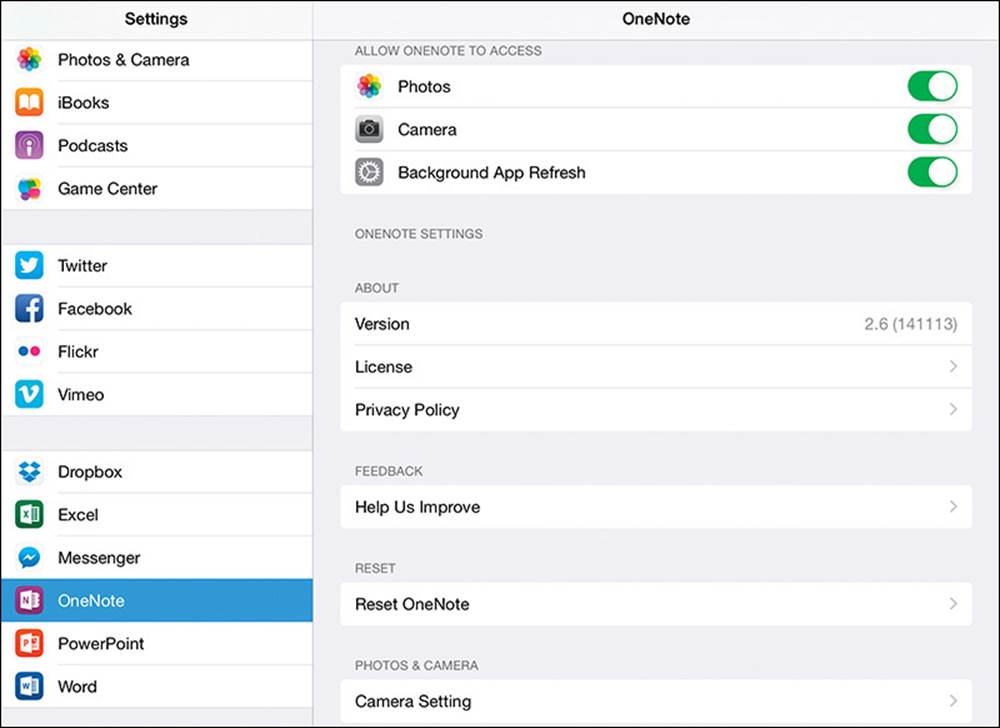
Office app settings are configured from the iPad Settings app rather than from the individual apps
To display the configurable settings for an Office app
1. Start the Settings app.
2. Scroll to the bottom of the Settings list, and locate the app name in the list.
3. Tap the app name to display the related settings in the right pane.
 See Also
For information about app updates, see “Update Office apps” later in this chapter.
To install an alternative on-screen keyboard
1. Start the Settings app and display the General page.
2. On the General page, tap Keyboard, and then tap Keyboards.
The Keyboards page displays the currently installed keyboards.
3. On the Keyboards page, tap Add New Keyboard.
More than 60 keyboards are available, representing different languages and character styles.
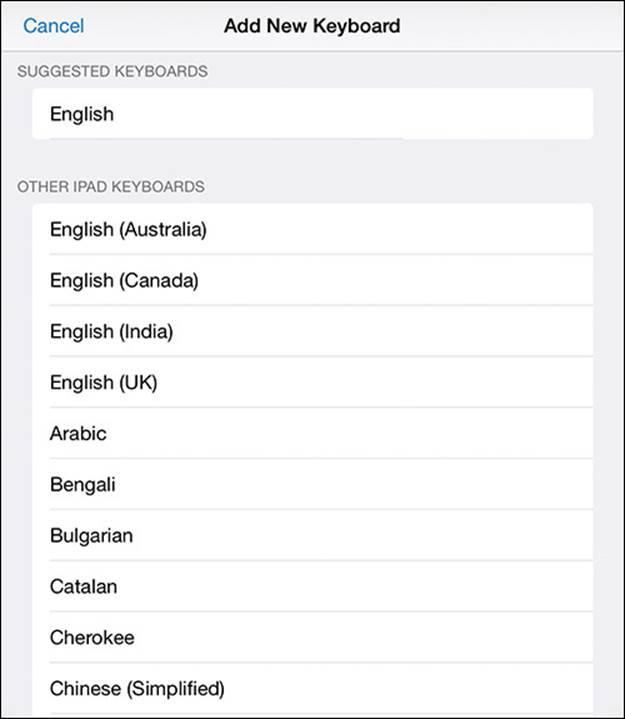
The Add New Keyboard page displays keyboards that aren’t currently installed on your iPad
4. Tap the keyboard you want to install.
 Tip
Tip
From the Emoji keyboard, you can enter emoticons rather than letters and numbers. You can switch between installed keyboards by tapping the globe icon in the lower-left corner of the on-screen keyboard. As you switch keyboards, the name of the new keyboard appears briefly on the spacebar.
Update Office apps
From time to time, Microsoft releases updates to the Office apps, usually for the purpose of adding functionality but sometimes to fix or avoid problems.
When you install an Office app such as Word, Excel, or PowerPoint on your iPad from the App Store, you’re installing the most recent version that is available. When the iPad is online, the App Store periodically checks for any available app updates and downloads them to the iPad.
After updates are downloaded, the number of currently available updates appears in a red circle on top of the App Store icon. Updates that have been downloaded but not installed are shown in the Pending Updates section of the Updates page of the App Store.
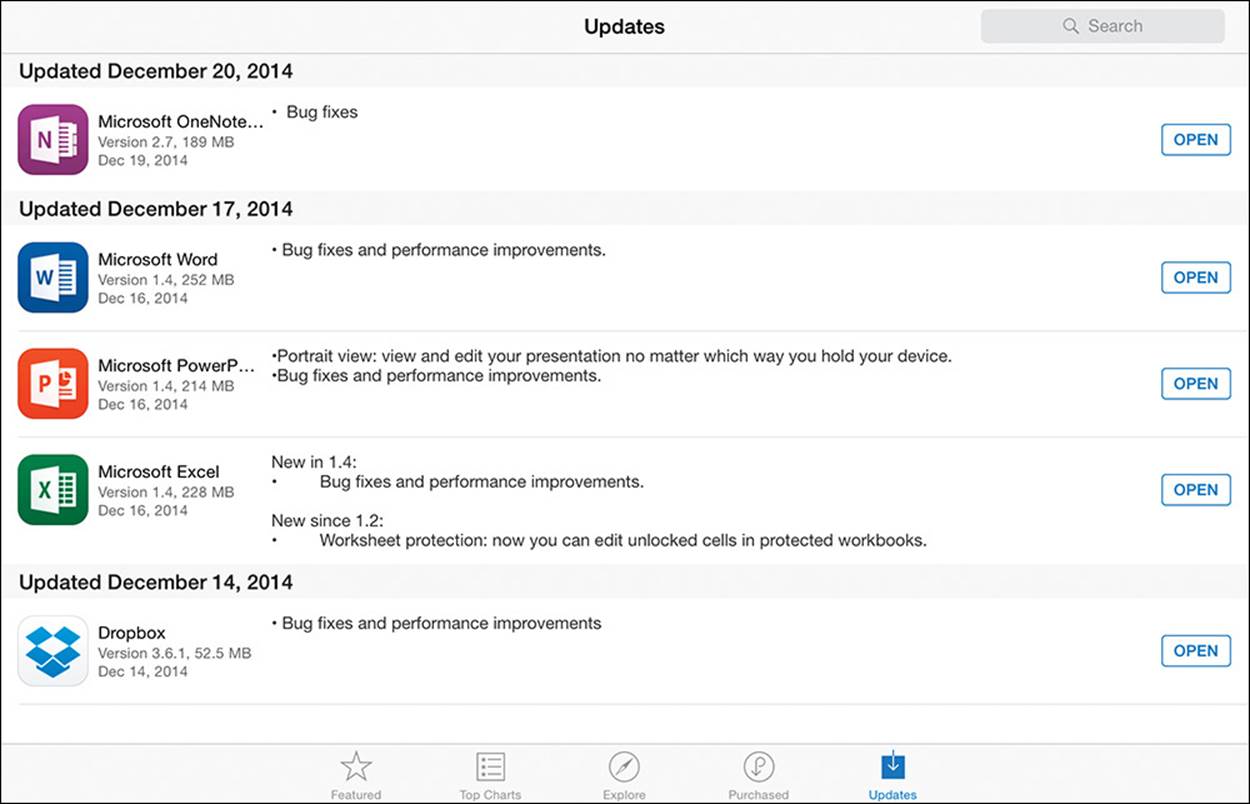
Information about recent updates is available from the Updates page of the App Store
You can install updates from this page, or you can configure the iPad to automatically install downloaded updates. The automatic installation option is useful if you want to be certain that you have the most current version of all apps on your iPad for optimal functionality and security.
Tip
Information about available and recently installed updates is available from the Updates page of the App Store. A history of all the updates installed for an individual app is available from the app’s information page.
When you start an Office app after installing an update, a splash screen describes the changes implemented by the update.
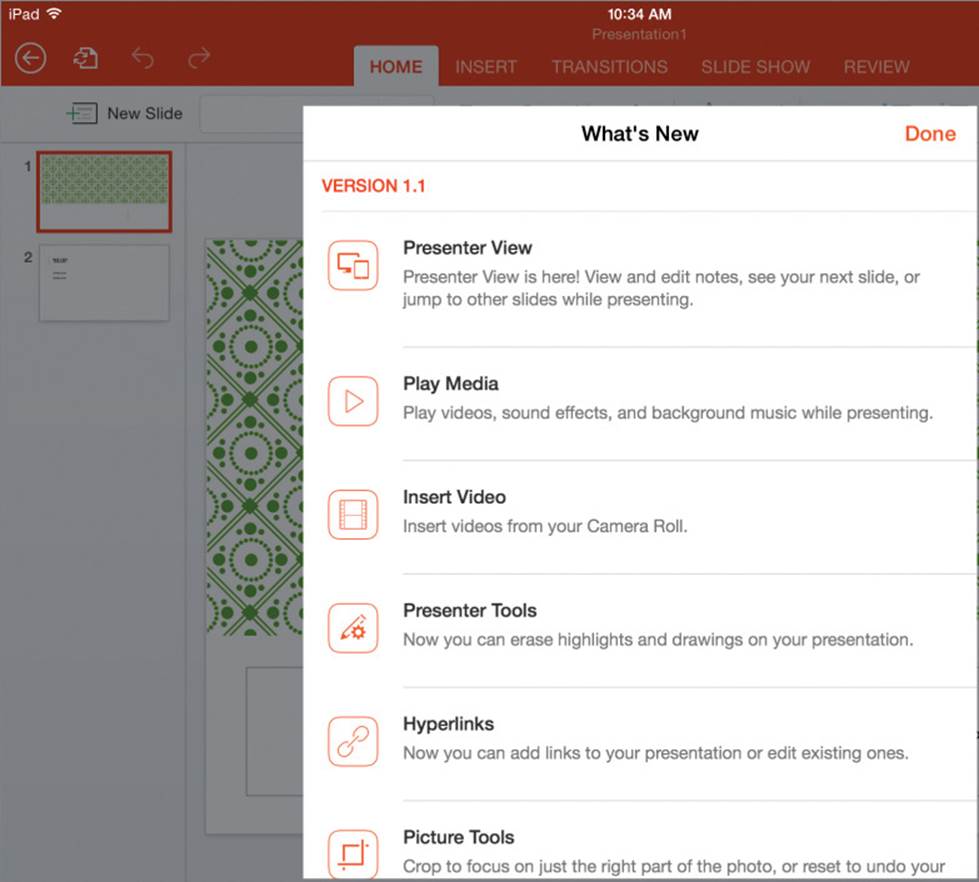
The splash screen provides the version number and the name and description of each new product feature
To display a list of downloaded updates
1. Open the App Store.
2. At the bottom of the App Store window, tap the Updates icon.
To manually install an update
1. On the Updates page of the App Store, locate the pending update you want to install.
2. Tap the Update button to the right of the update description.
To configure your iPad to automatically install updates
1. Start the Settings app.
2. In the Settings list, tap iTunes & App Store.
3. In the Automatic Downloads list, tap the slider to the right of Updates.
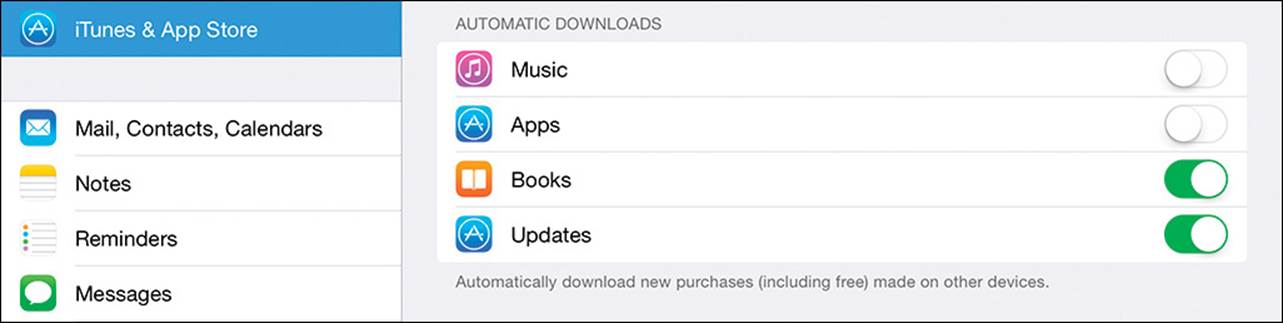
A green background on the Updates slider indicates that automatic updates are turned on
Tip
If you have multiple iPads connected to your App Store account, turning on the Automatic Download feature for apps instructs the App Store to automatically propagate any app that you install on one device to the other devices.
To display the version history of a specific app
1. Open the App Store.
2. At the bottom of the App Store window, tap the Purchased icon.
3. On the Purchased page of the App Store, locate the app you want to display version history for. Tap the app name to display the app information page.
 Important
The app information page opens only when you tap the app name, not when you tap the Open or Install button to the right of the name.
4. In the Details view of the page, scroll to the Version History heading, and then tap Show Version History.
Installed app versions are listed in order from most recent to least recent.
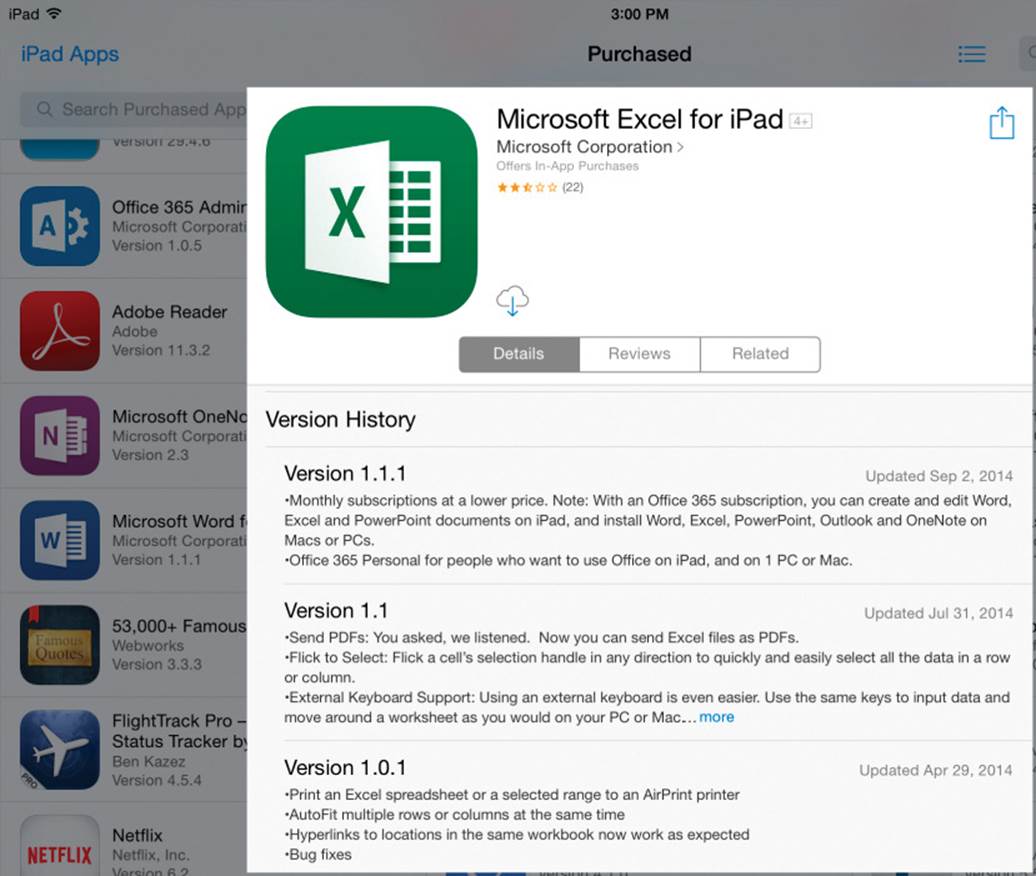
The version number, update date, and description of changes is provided for each update
Tip
You can display information about the app only from the app information page in the App Store, not from within the app itself. Program design decisions like this help to minimize the local storage space requirements of the app so it runs efficiently on the iPad and other mobile devices.
Remove and reinstall Office apps
If at some point you want or need to remove an Office app from your iPad, you can do so in the same way that you do any other app. The process of removing an app from an iPad is referred to as deleting the app. You can delete apps from the Home Screen or from the Settings app.
Deleting an app from one device doesn’t affect the state of the app on any other devices. If you’ve installed the app on multiple iPads, either manually or through the Automatic Downloads feature, the app will remain active on the other iPads. Deleted apps remain in the list of purchased apps and can be easily reinstalled from the Purchased page of the App Store, or from iTunes when the iPad is connected to a computer.
To remove an app from your iPad
1. On the Home Screen, locate the page or folder containing the app icon.
2. Tap and hold any app icon to activate all the app icons on the screen for editing.
3. In the upper-left corner of the icon that represents the app you want to delete, tap the ×.
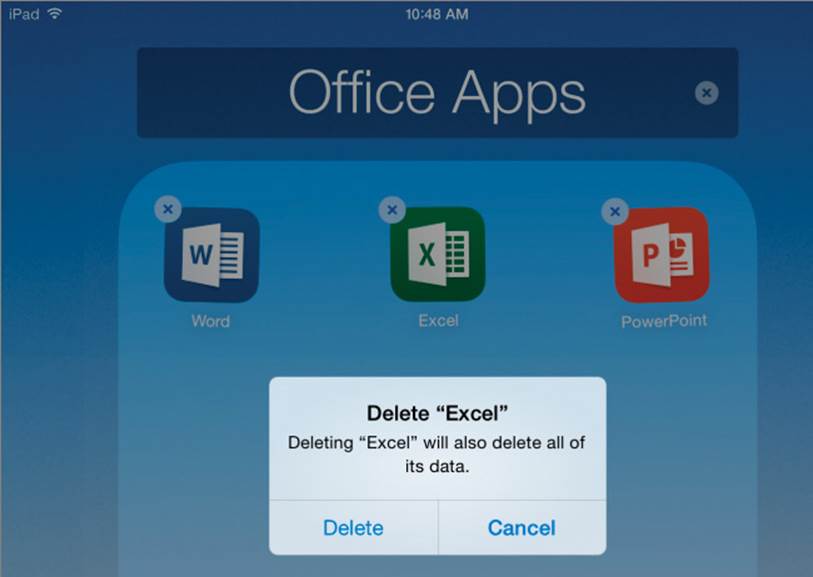
When an icon is active, you can reposition it or delete the related app
4. In the Delete “App” message box, tap Delete.
5. Press the Home button to deactivate the remaining icons.
Or
1. Start the Settings app and display the General page.
2. On the General page, tap Usage.
3. In the Storage list, tap the app you want to remove.
4. In the Delete App message box, tap Delete App.
Important
Deleting an app removes the app from the iPad and also deletes any locally stored files associated with that app. If you want to keep files, move or send them to an alternative storage location before deleting the app.
To reinstall a deleted app
1. Display the Purchased page of the App Store.
2. At the top of the Purchased page, tap Not on This iPad.
3. Locate the app you want to reinstall, and tap the Install icon for the app.
4. Accept any required installation terms.
Skills review
In this chapter, you learned how to:
![]() Install Office for iPad apps
Install Office for iPad apps
![]() Configure iPad and Office app settings
Configure iPad and Office app settings
![]() Update Office apps
Update Office apps
![]() Remove and reinstall Office apps
Remove and reinstall Office apps
Practice tasks

No practice files are necessary to complete the practice tasks in this chapter.
Install Office for iPad apps
Perform the following tasks:
1. Display the Office for Mobile Devices website on your iPad and review the Office apps that are available for iPad devices.
2. Locate all the available Office apps in the App Store.
3. Install Word, Excel, PowerPoint, and OneNote on your iPad, if you haven’t already done so.
Configure iPad and Office app settings
Perform the following tasks:
1. Display the configurable settings for Word. Tap each setting that displays an arrow to display information about the setting options.
2. Display and explore the configurable settings for Excel.
3. Display and explore the configurable settings for PowerPoint.
4. Display and explore the configurable settings for OneNote.
Update Office apps
Perform the following tasks:
1. Display the list of all pending and installed updates.
2. On the Updates page of the App Store, review all pending and recently installed updates.
3. From the Updates page, install any pending updates for Office apps.
4. Display the version history of the Word for iPad app.
5. If you want to, configure the iPad to automatically install downloaded updates.
Remove and reinstall Office apps
Perform the following tasks:
1. Begin the process of deleting an Office app.
2. When prompted to delete the app or cancel the process, cancel the process.
Or
If you want to, delete the app and then reinstall it.
Important
Deleting the app will also delete your locally stored files that are associated with that app.
3. Display the list of purchased apps.
4. On the Purchased page of the App Store, locate the Excel for iPad app.
5. From the Purchased page, display the Excel information page and review the app version history.