Microsoft Office for iPad Step by Step (2015)
Part 5: Microsoft OneNote for iPad
12. Locate and share notebook content
In this chapter
![]() Display notes in different ways
Display notes in different ways
![]() Find information in notebooks
Find information in notebooks
![]() Protect and share information
Protect and share information
![]() Synchronize notebook content
Synchronize notebook content
The primary point of recording information in a OneNote notebook (or recording it anywhere, for that matter) is so you can release it from your active memory (to make room for more information) but retain it for later reference. In other words, if you write it down, you can forget it—all you have to remember is where you wrote it down.
One of the great things about OneNote is that no matter how neatly or messily you store information, it’s still easy to find what you’re looking for when you need it. It’s also easy to share that information with other people or invite them to contribute information to your notebook. You can provide different people with differing levels of access to notebook content.
This chapter guides you through procedures related to displaying different views of notebook content, searching for information in notebooks, password-protecting notebook sections, sharing notebooks and notebook pages, and synchronizing local notebooks with server versions.
Practice files
For this chapter, use the practice files from the iPadOfficeSBS\Ch12 folder. For practice file download instructions, see the Introduction.
Display notes in different ways
Sometimes it is more convenient to have the entire section and page structure of a notebook visible. At other times, you might prefer to display only the content of a specific page, or to display the note content in a larger format.
Switch notebook views
OneNote for iPad provides two preconfigured views of notebook content—Normal view and Full Page view—that make it easy to switch quickly between viewing all the notebook elements and viewing only the page content.
Normal view displays the active ribbon tab and the notebook section tabs above the page, and the page navigator to the right of the page. When you’re in Normal view, the button at the right end of the ribbon displays two outward pointing arrows, and tapping the button switches to Full Page view.
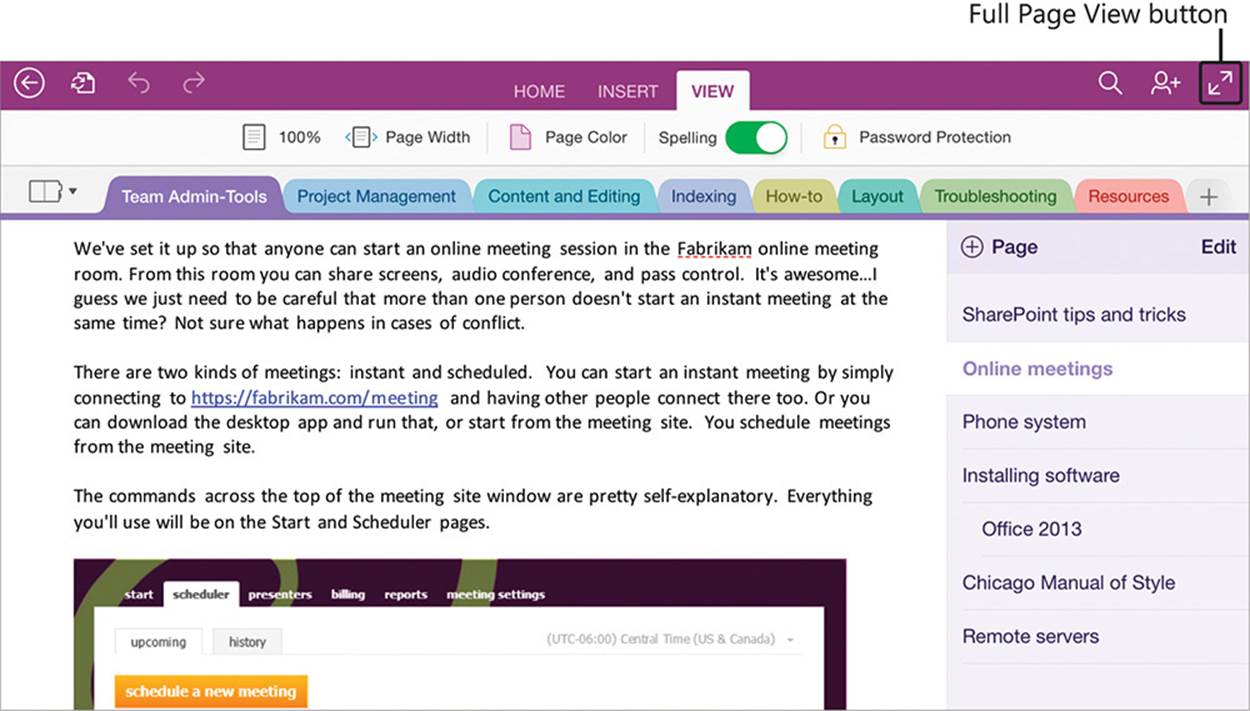
A notebook page in Normal view
Full Page view hides the ribbon, the section tabs, and the page navigator so you can focus on the content of the current page. When you’re in Full Page view, the button at the right end of the ribbon displays two inward-pointing arrows, and tapping the button switches to Normal view.
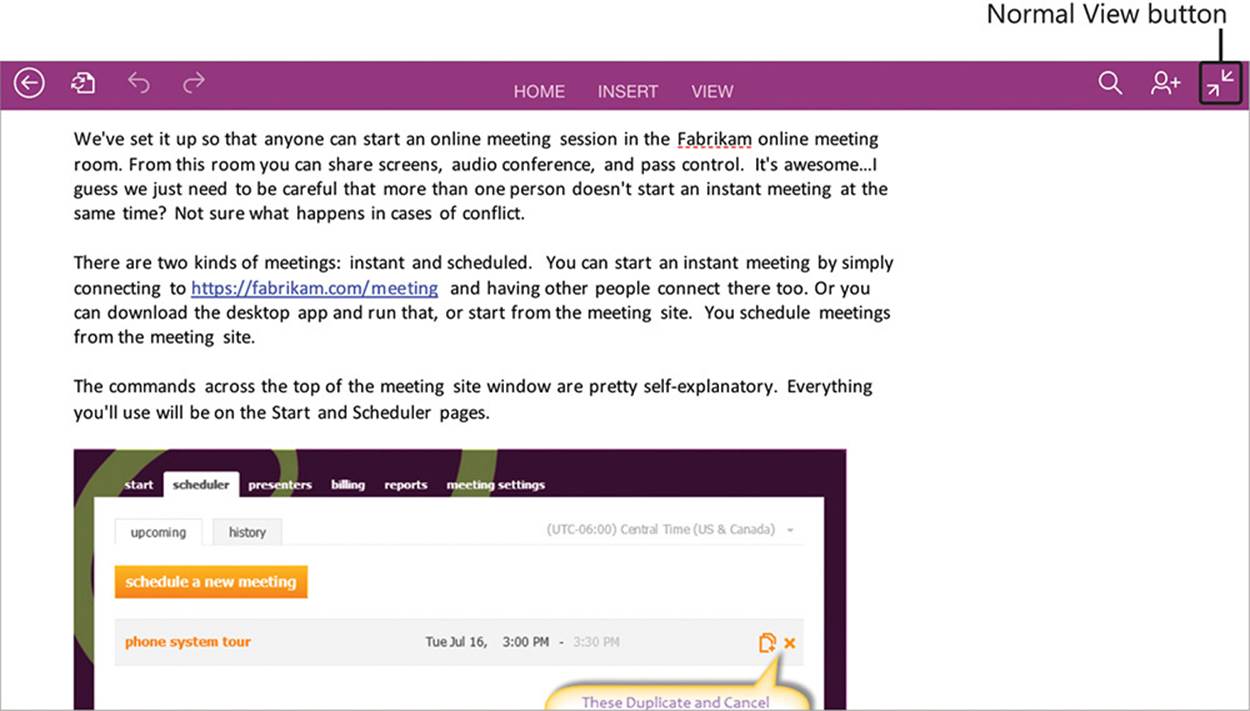
A notebook page in Full Page view
When working in Full Page view, you have direct access only to the menus and commands that are available from the ribbon header. You can display individual menus and tabs in Full Page view without switching to Normal view.
 Tip
Tip
OneNote maintains the most recently selected view when you switch between notebooks.
To change the notebook view
1. To switch from Normal view to Full Page view, tap the Full Page View button at the right end of the ribbon.
2. To switch from Full Page view to Normal view, tap the Normal View button at the right end of the ribbon.
To work with content in Full Page view
1. Perform any of these actions as you would in Normal view:
• Tap to position the cursor to enter content.
• Double-tap to select content and display shortcut bars.
• Tap the commands that are available on the shortcut bars.
2. Use any of these features as you would in Normal view:
• File menu commands
• Search functionality
• Share functionality
3. To access a command on the ribbon without displaying other hidden notebook elements:
a. Tap any tab title on the ribbon header to display the tab.
b. Tap the command and complete the associated operation.
c. Tap the title of the displayed tab to hide the tab.
Fit content to the page
In addition to changing the structure within which the content of a page is displayed, you can adjust the magnification level to display the content at its actual size or to fit the width of the page, whether the notebook is in Normal view or Full Page view.
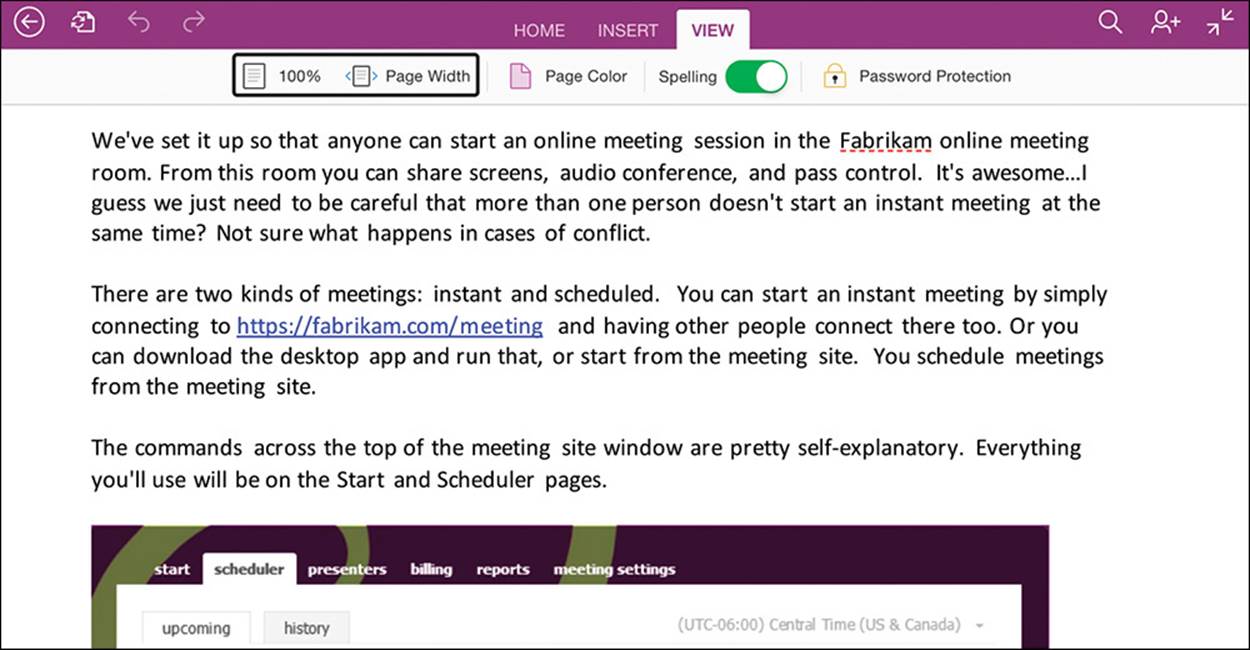
Page content magnified to page width
Zoom by touch
In OneNote for iPad, you can manually change the magnification level of the page content by pinching or spreading your fingers on the iPad screen. When you use this method to zoom in on or out from the content, a marker appears between your fingers and displays the current magnification level (ranging from Minimum to Maximum with specific percentages in between).
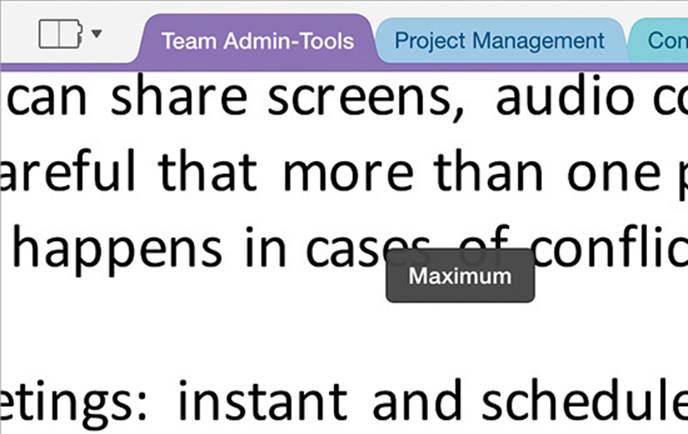
The magnification level appears when you pinch or stretch the page
OneNote for iPad is programmed to change the magnification of only the page content, not the entire app window, when you use manual zoom techniques.
Find information in notebooks
The purpose of storing information in a OneNote notebook is not only so that you no longer have to remember it but also so that you can easily retrieve the information later, from any computer or device that is running OneNote. You can easily search for keywords or specific information stored in any of your OneNote notebooks and narrow down the results by location. You can also attach tags (icons that have specific meanings) to content to help you locate information about the related topic on a page.
Tag information for reference and retrieval
You can tag individual paragraphs to provide a visual indicator of some sort of information about the content of the paragraph. For example, you might want to tag information that you need to follow up on, that is linked to a specific project, or that is a high priority. You can apply multiple tags to a paragraph; the tags appear within the note container to the left of the first line of the paragraph.
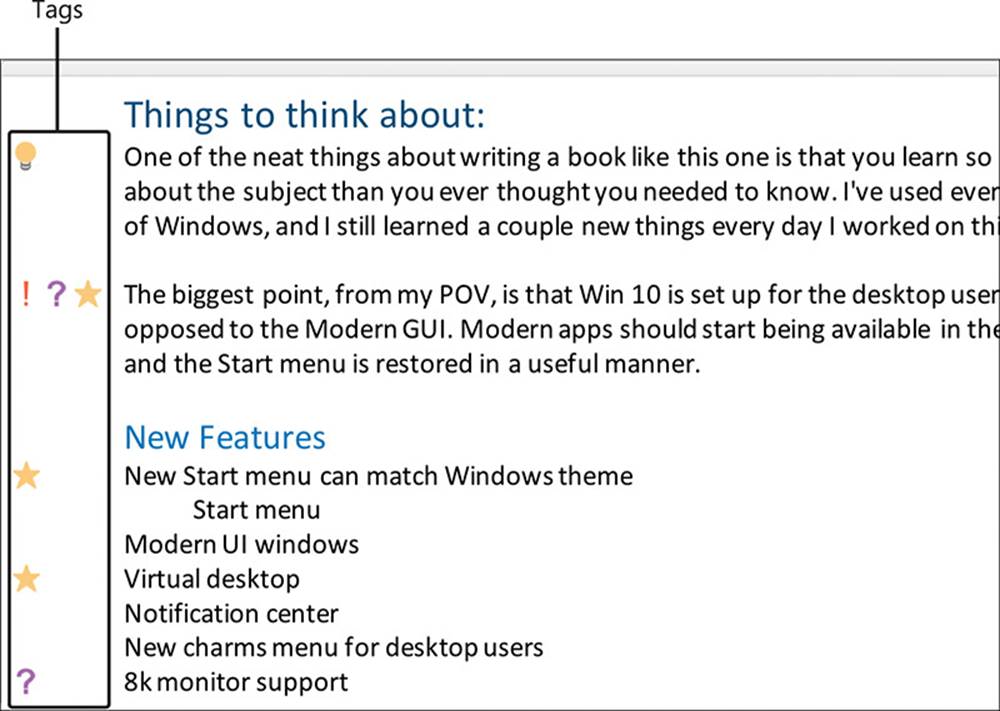
Tagging paragraphs provides visual feedback
In OneNote for iPad you can apply any of 27 standard tags. Three common tags are available directly from the Home tab of the ribbon, and all the tags are available on the menu that expands when you tap the adjacent Tag button.
 Important
Tags provide only a visual cue in OneNote for iPad, but they are extremely useful in OneNote for Windows, because you can generate summaries of tagged content by storage location or time period. You can also link To Do tags to your Outlook task list and update the task status from either location.
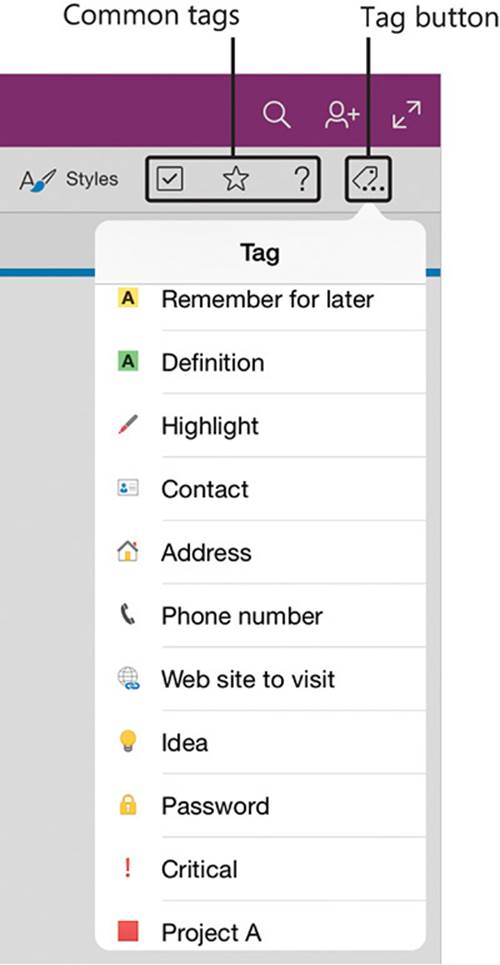
Inserting tags from the Home tab
To tag a paragraph
1. Tap anywhere in the paragraph.
2. On the Home tab, tap the To Do, Important, or Question button.
Or
On the Home tab, tap the Tag button. Then on the Tag menu, tap the tag you want.
To remove a tag from a paragraph
1. Tap anywhere in the paragraph.
2. On the Home tab or Tag menu, tap the tag you want to remove.
Search for text
In OneNote for iPad, you can search for text that was entered directly on a page or that appears in files that were printed to OneNote.
Tip
In OneNote 2013, you can search for spoken words in audio and video recordings and for printed words in images.
The default search settings locate information stored in any open notebook. This is very convenient because you don’t have to remember where you stored the information or navigate through a series of notebooks, sections, and pages to get to it.
As you enter text in the search box, OneNote highlights matches on all pages within the search scope, displays the total number of pages that contain the search term at the right end of the search box, and displays links to those pages in the Search Results pane. The Search Results pane displays the results in two groups: pages that have the search result in the title and pages that have the search result only on the page (but not in the title).
Tip
A search result group header is shown only if the search returns pages in that group. A page will appear in only one group.
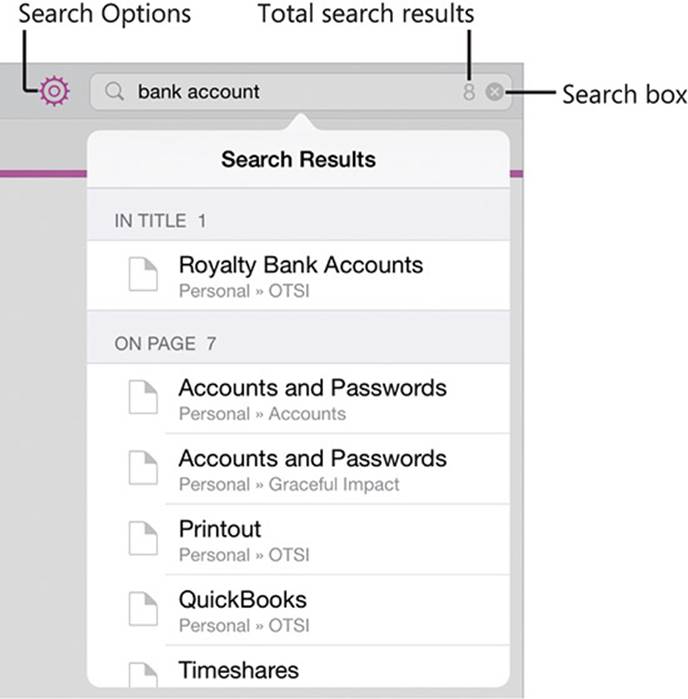
Search results appear alphabetically in groups
Search results are listed within each group in alphabetical order by page title. The specific location of the page (notebook and section) is shown below the page title. This can be helpful in determining the relevance of the search results on that page, so you can quickly find the page that contains the information you’re looking for.
By default, OneNote locates all pages that contain the words entered in the search box in any order, in all open notebooks. You can get more-focused results by adding search terms, specifying that you want to match only exact phrases, or narrowing the scope of the search to only the current notebook, section, or section group.
Tip
The current search scope appears in the search box until you enter the first character of the search term.
To search within the default or most recent scope
1. On the ribbon header, tap the Search button to activate the search box.
2. Enter the word or words you want to find.
To narrow or expand the search parameters
1. If you want to expand the search to return more results, do any of the following:
• Remove words from the search term.
• Remove word endings (such as ed, ing, or s).
• Search all notebooks.
2. If you want to narrow the search to return fewer results, do any of the following:
• Add words to make the search term more specific.
• Add a space after a root word that you want to match exactly.
• Enclose phrases that should be exact matches in quotation marks.
• Search only the current notebook or section.
To modify the search scope
1. Tap the Search Options button.
2. On the Options menu, below Search In, tap This Section, This Section Group, This Notebook, or All Notebooks.
Tip
OneNote retains the search term in the search box until you clear it and retains the selected search scope until you change it. These remain stored even when you switch notebooks or exit OneNote.
To clear the search term
1. Tap the Search button, and then tap in the search box.
2. Tap the Delete button that appears at the right end of the search box.
Protect and share information
OneNote can provide an excellent platform for the collaborative collection of information. People can access the information in a OneNote notebook from many different computer systems and devices and can store or link to almost any type of information.
When you create a OneNote notebook in a remote storage location, that notebook is accessible only to people who have specific user credentials with permission to access that location. When you create a notebook by using OneNote for iPad, you might do so in a shared storage location that other people already have access to, such as a SharePoint document library, or you might create it in a more private location that is accessible only to you, such as your personal OneDrive site. If you want to share information that is stored in a notebook, you can grant permission for people to view or edit the notebook.
Protect notebook sections
Before you share a notebook with other people, consider whether any sections of the notebook contain information that you want to keep private or provide to only specific people. If so, it isn’t necessary to move those sections out of the notebook; you can hide the content of any section by assigning a password to the section and then locking it. You can password-protect only sections, not individual pages.
You can assign the same password to multiple sections or assign unique passwords to different sections. You must lock all password-protected sections of a notebook at the same time. You can unlock sections individually.
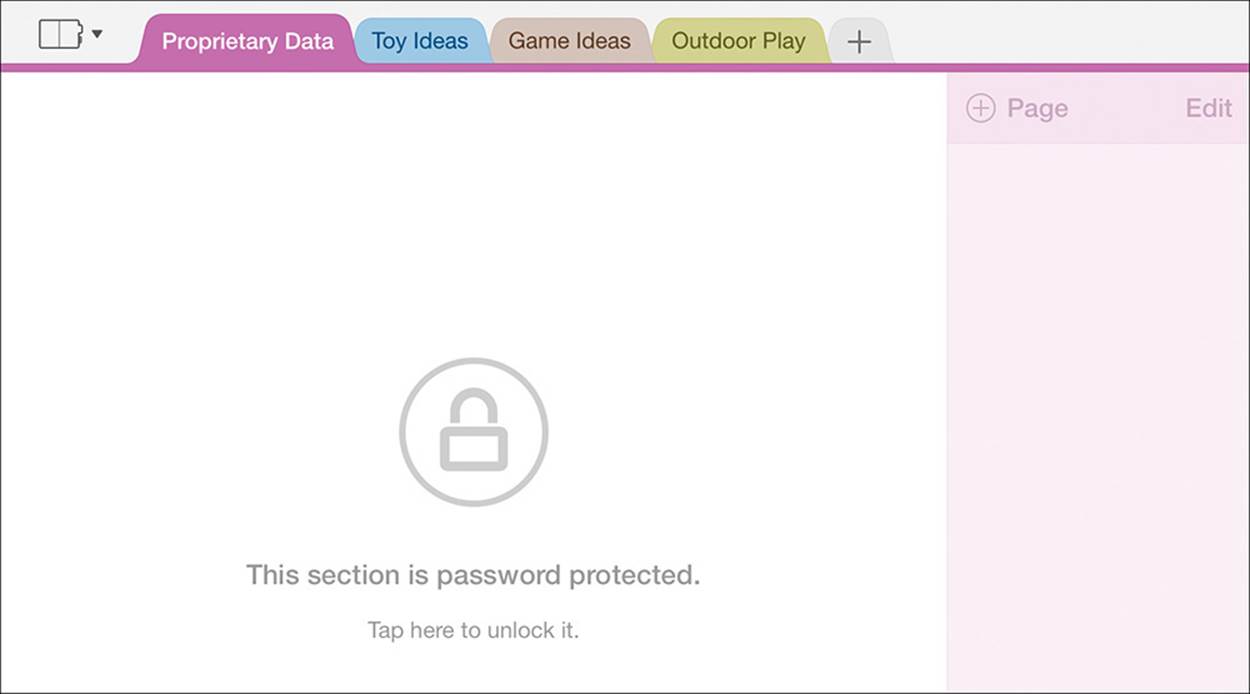
The pages and page content of a locked section are hidden
If you want to allow other people to access a password-protected section, you can share the password with those people. The password protection becomes effective for all users (including you) after the notebook synchronizes with the server. The section can be unlocked only by entering the correct password.
 See Also
For information about synchronization, see “Synchronize notebook content” later in this chapter.
To password-protect a notebook section
1. Display the section you want to protect.
2. On the View tab, tap Password Protection. Then, on the Password Protection menu, tap Protect This Section.
Or
Tap the section tab, tap Password on the shortcut bar, and then tap Protect.
3. In the Password Protection box, enter and reenter a password for the section, and then tap Done.
Important
Take any necessary precautions to ensure that you can remember or locate the password, because you will not be able to unlock the section without it.
To lock all protected sections in a notebook
1. On the View tab, tap Password Protection.
2. On the Password Protection menu, tap Lock Protected Sections.
Or
1. Display a protected section.
2. Tap the section tab, tap Password on the shortcut bar, and then tap Lock All.
To unlock a protected section
1. Display the section you want to unlock, and then tap the lock icon in the center of the page.
2. In the Protected Section box, enter the password assigned to the section, and then tap Unlock.
To change the password assigned to a protected section
1. Unlock the section.
2. On the View tab, tap Password Protection. Then, on the Password Protection menu, tap Change Password.
Or
Tap the section tab, tap Password on the shortcut bar, and then tap Change.
3. In the Change Password box, enter the password that is currently assigned to the section, enter and reenter the new password, and then tap Change.
To remove a section password
1. Unlock the section.
2. On the View tab, tap Password Protection. Then, on the Password Protection menu, tap Remove Password.
Or
Tap the section tab, tap Password on the shortcut bar, and then tap Remove.
3. In the Remove Password box, enter the password assigned to the section, and then tap Remove.
Share notebook content
There are several ways in which you can share the content of a notebook that is stored in a shared location:
![]() You can send a link to the notebook in an email message, instant message, or other online communication. You have the option of sending a link that permits read-only access or a link that permits read/write access.
You can send a link to the notebook in an email message, instant message, or other online communication. You have the option of sending a link that permits read-only access or a link that permits read/write access.
When you send a link, message recipients can open the notebook by clicking or tapping the link. Thereafter, it will appear in their lists of open notebooks.
![]() You can attach a PDF version of a notebook page to an email message.
You can attach a PDF version of a notebook page to an email message.
Sending a PDF file is a convenient way to share information with people who don’t use OneNote or can’t access your storage location.
Multiple people can work in a shared OneNote notebook at the same time.
Tip
At the time of this writing, OneNote for iPad doesn’t support printing directly from a notebook. You can print a page, page group, or section of a notebook by opening it in a desktop version of OneNote.
To send a PDF file of a notebook page to other people
1. Display the notebook page you want to share.
2. At the right end of the ribbon, tap the Share button.
3. On the Share menu, tap Email Page.
OneNote creates a PDF file of the active page. The Mail app creates an email message with the PDF file attached and automatically sets the file name and message subject to the page title.
4. In the message window, enter the recipient information, modify the subject if you want to, and enter any additional message content.
5. In the upper-right corner of the message window, tap Send.
See Also
For information about creating and sending links to notebooks, see “Distribute files” in Chapter 3, “Create and manage files.”
Synchronize notebook content
OneNote periodically synchronizes all local copies of a shared notebook with the server copy to distribute content changes to all users. The most recent synchronization date and time for each open notebook are shown on the Notebooks page of the Backstage view.
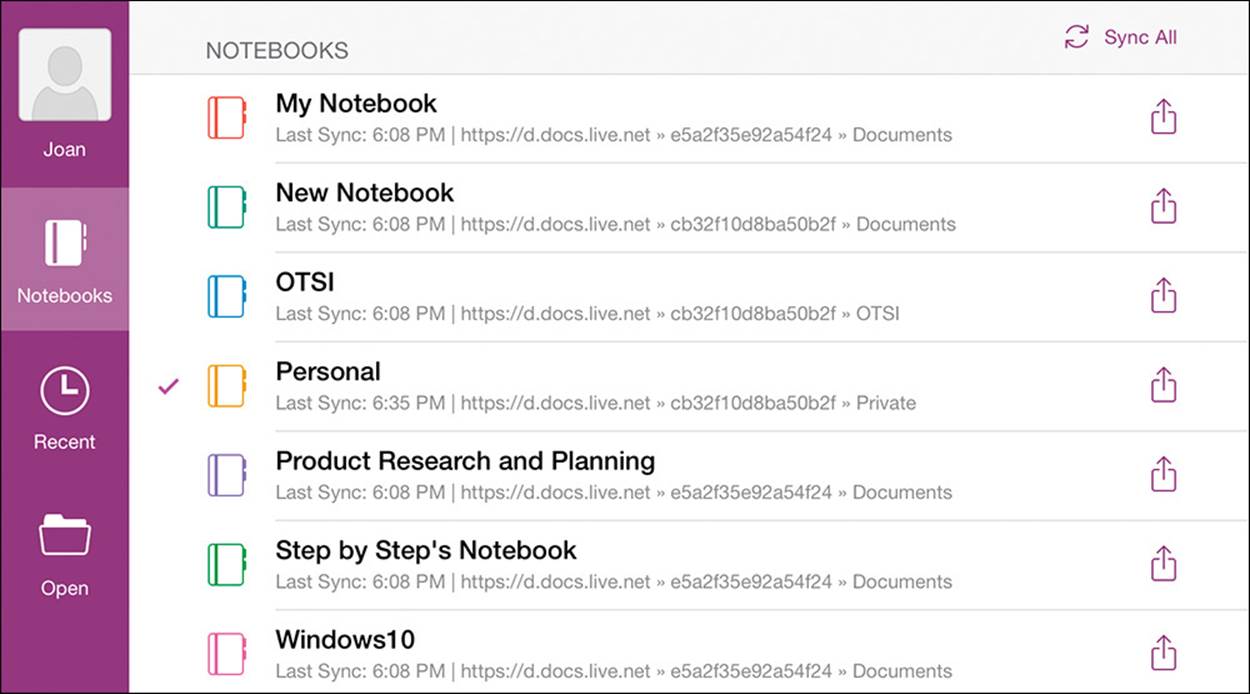
Synchronization data for all open notebooks
If you prefer, you can manually synchronize one or all open notebooks any time that your iPad is online. For example, if a colleague mentions that he or she just updated the content of a shared notebook and you want to review the updated content, you can synchronize the notebook and have immediate access to the changes.
To synchronize the current notebook
1. On the ribbon, tap the File button.
2. On the File menu, tap Sync This Notebook.
To synchronize any one open notebook
1. In the notebook header, tap the Notebooks button.
2. On the Notebooks menu, tap the File Actions button to the right of the notebook you want to synchronize.
3. On the notebook-specific menu, tap Sync Now.
Or
1. On the Notebooks page of the Backstage view, tap the File Actions button to the right of the notebook you want to synchronize.
2. On the Notebook Options menu, tap Sync Now.
To synchronize all open notebooks
1. Display the Notebooks page of the Backstage view.
2. In the upper-right corner of the page, tap Sync All.
Skills review
In this chapter, you learned how to:
![]() Display notes in different ways
Display notes in different ways
![]() Find information in notebooks
Find information in notebooks
![]() Protect and share information
Protect and share information
![]() Synchronize notebook content
Synchronize notebook content
Practice tasks

The practice file for these tasks is located in the iPadOfficeSBS\Ch12 folder.
Display notes in different ways
Start OneNote, open the ShareNotes notebook, and then perform the following tasks:
1. Display the notebook in Normal view and navigate to the Display Notes section.
2. Display the Change Views page in Full Page view.
3. Use touch to zoom out to the minimum magnification level, so that the text appears smaller. Then zoom in to the maximum magnification level, so that the text appears larger.
4. Display the View tab and tap the button to display the text at 100 percent. Then tap the button to fit the page content to the width of the page.
5. Switch back to Normal view.
Find information in notebooks
Open the ShareNotes notebook if it isn’t already open, and then perform the following tasks:
1. In the Add Tags section, on the Tag Practice page, add an Important tag and a Remember for later tag to the paragraph.
2. Remove only the Important tag from the paragraph.
3. Search the notebook for all instances of the word tag. Note the number of search results.
4. Modify the search scope to return only instances of the word that are in the Find Text section.
5. Narrow the search results to instances of the exact phrase tags summary.
6. Clear the search term.
Protect and share information
Open the ShareNotes notebook if it isn’t already open, and then perform the following tasks:
1. Assign the password P@ssw0rd (using the number zero instead of the letter O) to the Protect Notebooks section.
2. Assign the password Top%Secret to the Lock Sections section.
3. Lock both of the protected sections.
4. Unlock the Protect Notebooks section, and change its password to Top%Secret.
5. Unlock the Lock Sections section, and remove its password.
6. Email the Share Content page of the Lock Sections section to yourself as a PDF.
7. Email a read-only link to the notebook to yourself.
Synchronize notebook content
Open the ShareNotes notebook if it isn’t already open, and then perform the following tasks:
1. Rename the Welcome section Synchronize Notebooks.
2. On the Notebooks page of the Backstage view, note the date and time each open notebook was last synchronized with the server.
3. Synchronize only the ShareNotes notebook with the server and note the change on the Notebooks page of the Backstage view.
4. Synchronize all open notebooks with the server.
5. If you want to, close all the open notebooks related to the practice tasks for this book.
Appendix. Touchscreen and keyboard shortcuts
The standard method of working with content in the Office for iPad apps is to tap the relevant commands. You can perform some tasks faster by using specific gestures or on-screen keyboard shortcuts or, if your iPad is connected to an external keyboard, by pressing specific key combinations.
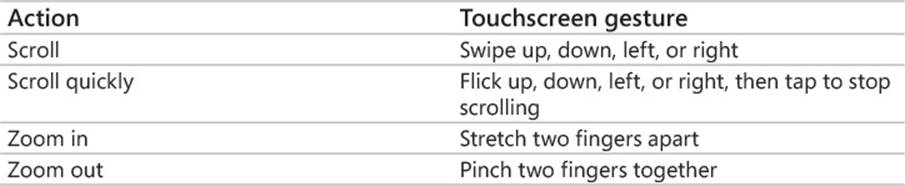
Touchscreen gestures
You can use the gestures described in the following table to move around in a file when working in Word for iPad, Excel for iPad, PowerPoint for iPad, or OneNote for iPad.
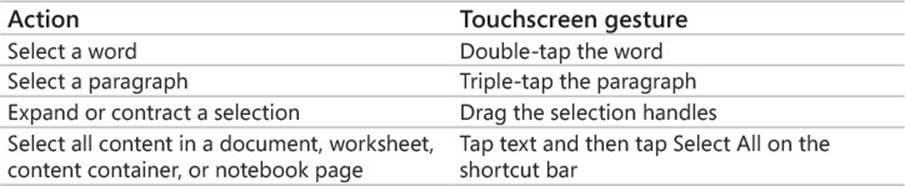
You can use the gestures described in the following table to work with text content on document pages, in text boxes, and on notebook pages in the Office for iPad apps.
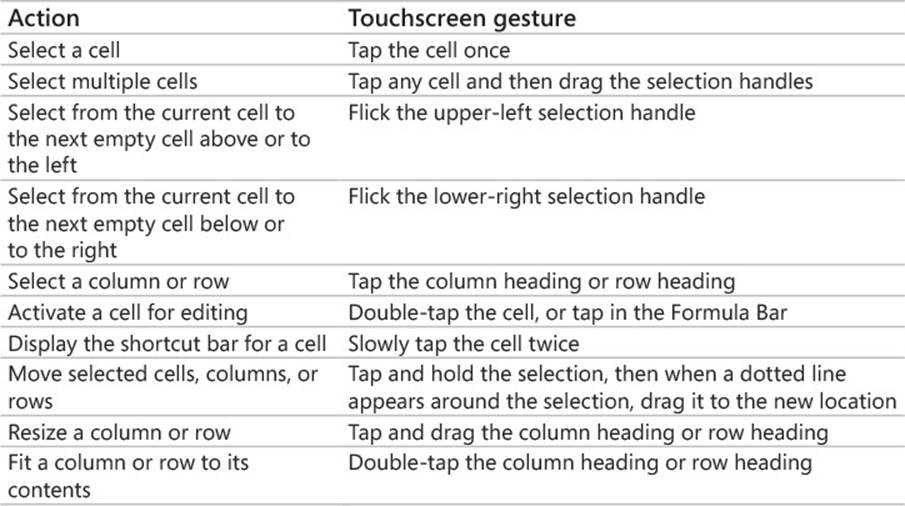
You can use the gestures described in the following table to work with workbook structural elements and content in Excel for iPad.
On-screen keyboard tips
The on-screen keyboard appears when you tap an area of a document, worksheet, slide, or notebook page in which you can enter text. This keyboard has several forms.
Tip
If your iPad is connected to an external keyboard, the on-screen keyboard doesn’t appear.
![]() The standard on-screen keyboard displays the alphabet in QWERTY keyboard format and the most common punctuation symbols.
The standard on-screen keyboard displays the alphabet in QWERTY keyboard format and the most common punctuation symbols.
As you tap letters on the keyboard, common words beginning with the letters you’ve entered are shown above the top row of letters; the most likely match is in the center. You can tap a word to enter it and display the next predicted words. This predictive technology is so good that it will frequently predict all or most of the sentence you’re entering.
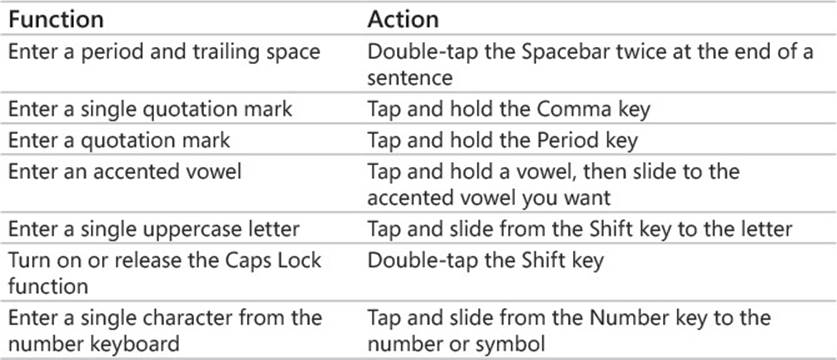
Entering a lot of text from the standard on-screen keyboard can be an arduous task. To simplify the process and tap fewer times to achieve the result you want, you can use the shortcuts described in the following table.
![]() The number keyboard displays one row of numbers and two rows of common symbols. You switch to the number keyboard by tapping the Number key (labeled .?123) on either side of the standard keyboard or symbol keyboard.
The number keyboard displays one row of numbers and two rows of common symbols. You switch to the number keyboard by tapping the Number key (labeled .?123) on either side of the standard keyboard or symbol keyboard.
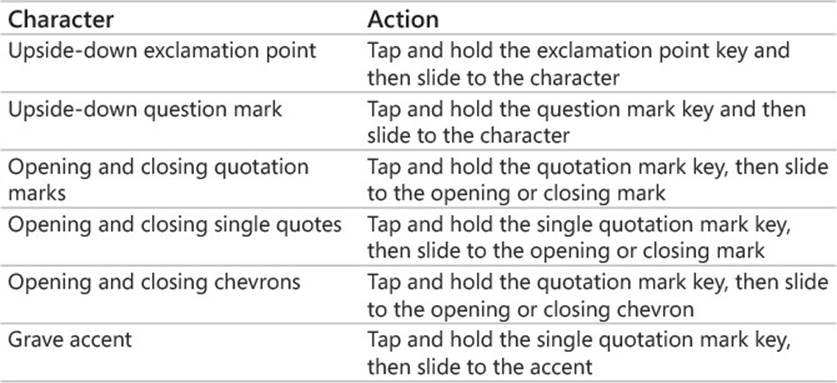
On the number keyboard, use the shortcuts described in the following table to enter special characters.
![]() The symbol keyboard displays three rows of symbols. You switch to the symbol keyboard by tapping the Symbol key (labeled #+=) on the left or right side of the number keyboard.
The symbol keyboard displays three rows of symbols. You switch to the symbol keyboard by tapping the Symbol key (labeled #+=) on the left or right side of the number keyboard.
![]() The function keyboard (available only in Excel) displays symbols commonly used in formulas on the left, arrow keys in the center, and a calculator-style number pad on the right. You switch to the function keyboard by tapping the Function button (labeled 123) at the right end of the status bar, which appears above the keyboard in Excel.
The function keyboard (available only in Excel) displays symbols commonly used in formulas on the left, arrow keys in the center, and a calculator-style number pad on the right. You switch to the function keyboard by tapping the Function button (labeled 123) at the right end of the status bar, which appears above the keyboard in Excel.
To display additional symbols on the function keyboard, tap and hold any key that has a green upper-right corner. Slide to the symbol you want to enter, and lift your finger from the screen to enter the selected symbol.
Tip
Tap the Alphanumeric button (labeled Abc) at the right end of the status bar to switch from the function keyboard to the standard keyboard.
The on-screen keyboard takes up a significant percentage of the iPad screen. You can display more of the file content by splitting the keyboard into two halves.
![]() To split the keyboard, either drag with two fingers from the center of the keyboard to the sides of the screen, or tap and hold the Keyboard key and then slide to the Split command.
To split the keyboard, either drag with two fingers from the center of the keyboard to the sides of the screen, or tap and hold the Keyboard key and then slide to the Split command.
![]() To rejoin the keyboard halves, either drag the halves with two fingers to the center of the screen, or tap and hold the Keyboard key and then slide to the Dock & Merge command.
To rejoin the keyboard halves, either drag the halves with two fingers to the center of the screen, or tap and hold the Keyboard key and then slide to the Dock & Merge command.
To hide the on-screen keyboard, tap the Keyboard key.
External keyboard shortcuts
The Bluetooth technology built into the iPad makes it easy to wirelessly connect an external keyboard to your iPad. A Bluetooth symbol appears next to the power meter in the upper-right corner of your iPad screen when Bluetooth is turned on. The symbol is gray when the iPad isn’t connected to a device, and black when it is.
To access Bluetooth settings, open the Settings app and then tap Bluetooth in the first group of settings. From the Bluetooth page, you can turn on the Bluetooth function, see Bluetooth devices that you’ve approved for connection, and manage the connections and settings for those devices.
When you turn on Bluetooth, your iPad becomes discoverable. When you subsequently turn on your external Bluetooth keyboard, the two devices should “discover” each other. The keyboard will appear in the device list on the Bluetooth page, and you can tap it to connect to it.
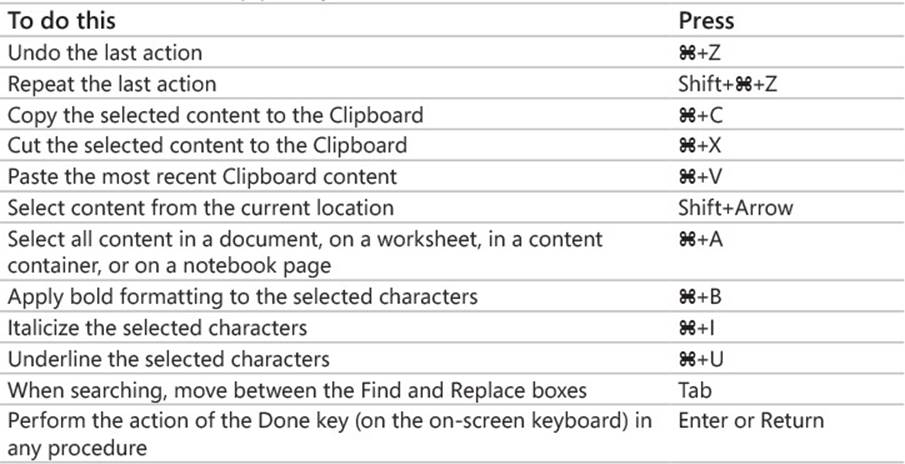
If you’re working with an external keyboard connected to your iPad, you might find it much easier to enter text into documents, workbooks, presentations, and notebooks by typing than by tapping. You can also use iPad versions of many of the classic Office keyboard shortcuts, including those described in the following table.
General Office app keyboard shortcuts
Word for iPad keyboard shortcuts
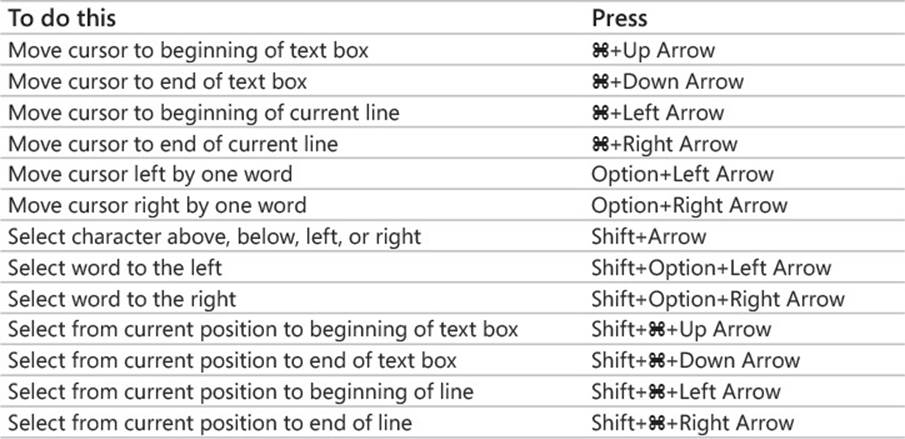
In addition to the general Office keyboard shortcuts, you can use the shortcuts described in the following table when working in a document in Word for iPad.

Excel for iPad keyboard shortcuts
In addition to the general Office keyboard shortcuts, you can use the shortcuts described in the following table when working in a worksheet in Excel for iPad.

PowerPoint for iPad keyboard shortcuts
In addition to the general Office keyboard shortcuts, you can use the shortcuts described in the following table when working in a text box in PowerPoint for iPad.
All materials on the site are licensed Creative Commons Attribution-Sharealike 3.0 Unported CC BY-SA 3.0 & GNU Free Documentation License (GFDL)
If you are the copyright holder of any material contained on our site and intend to remove it, please contact our site administrator for approval.
© 2016-2026 All site design rights belong to S.Y.A.