Microsoft Office for iPad Step by Step (2015)
Part 5: Microsoft OneNote for iPad
CHAPTER 11 Store information in digital notebooks
CHAPTER 12 Locate and share notebook content
11. Store information in digital notebooks
In this chapter
![]() Create, open, and close notebooks
Create, open, and close notebooks
![]() Configure notebook storage structure
Configure notebook storage structure
![]() Add information to notebooks
Add information to notebooks
![]() Manage pages and sections
Manage pages and sections
OneNote is a very useful program that you can use to store many types of information and then access that information from any device. OneNote is equally useful for home and business purposes and is available for a wide variety of computer, tablet, and smartphone systems.
After you spend a short time using OneNote for iPad, you’ll undoubtedly find it a convenient way to store many types of information, such as task lists, itineraries, frequent flyer accounts, supplier contact information, meeting notes, research findings, technical data, and printouts of contracts, receipts, and other documents you want to archive for future reference.
Practice files
For this chapter, use the practice files from the iPadOfficeSBS\Ch11 folder. For practice file download instructions, see the Introduction.
This chapter guides you through procedures related to creating and opening notebooks, adding sections to notebooks, adding pages to sections, adding content to pages, managing notebook content, and closing notebooks.
The OneNote feature set
OneNote is available for use on many platforms, including Windows, Windows Phone, Mac, iPad, iPhone, Android, and Internet browsers. The Windows version of OneNote has significantly more features than any of the others.
Here is a brief comparison of the features you can use in the iPad, Office Online, and Windows versions of OneNote. More information about all the current versions is available at www.onenote.com.
OneNote for iPad features
When using OneNote for iPad, you can perform the following tasks:
![]() Create notebooks in cloud storage locations.
Create notebooks in cloud storage locations.
![]() Create, rename, and delete sections.
Create, rename, and delete sections.
![]() Change the background colors of individual pages.
Change the background colors of individual pages.
![]() Embed files, PDF printouts, local or photo stream images, Office Lens images, and links in notes.
Embed files, PDF printouts, local or photo stream images, Office Lens images, and links in notes.
![]() Format paragraphs and characters, and apply basic styles.
Format paragraphs and characters, and apply basic styles.
![]() Classify notes by applying predefined tags.
Classify notes by applying predefined tags.
![]() Manage the password protection of notebook sections.
Manage the password protection of notebook sections.
![]() Move and reorder sections, pages, and subpages.
Move and reorder sections, pages, and subpages.
OneNote for iPad doesn’t have any premium features that require an Office 365 subscription.
OneNote Online features
You can use OneNote Online to do the following:
![]() Move and resize note containers.
Move and resize note containers.
![]() Delete individual sections or entire notebooks.
Delete individual sections or entire notebooks.
![]() Locate edits made by other authors in a shared notebook.
Locate edits made by other authors in a shared notebook.
![]() Display content created or modified by specific authors.
Display content created or modified by specific authors.
![]() Change the color of a section, which affects the section tab and page navigator background.
Change the color of a section, which affects the section tab and page navigator background.
![]() Play audio and video recordings that were embedded in notes by using a desktop version of OneNote.
Play audio and video recordings that were embedded in notes by using a desktop version of OneNote.
For more information about OneNote Online, visit technet.microsoft.com/en-us/library/onenote-online-service-description.aspx.
OneNote for Windows features
The Windows version of OneNote has the most functionality. You can use OneNote 2013 on a computer running Windows to do the following:
![]() Change the color of a notebook, which affects the notebook cover.
Change the color of a notebook, which affects the notebook cover.
![]() Change the display name of the notebook. This doesn’t change the name of the folder that contains the notebook content.
Change the display name of the notebook. This doesn’t change the name of the folder that contains the notebook content.
![]() Create and delete section groups.
Create and delete section groups.
![]() Create pages based on content-driven or artistic templates.
Create pages based on content-driven or artistic templates.
![]() Merge note containers, and select full notebook pages.
Merge note containers, and select full notebook pages.
![]() Edit embedded files from within OneNote.
Edit embedded files from within OneNote.
![]() Integrate tagged tasks with your Outlook task list, and send content from Outlook to OneNote.
Integrate tagged tasks with your Outlook task list, and send content from Outlook to OneNote.
![]() Record and embed audio and video recordings directly on a page, and coordinate the playback of recordings with your written notes.
Record and embed audio and video recordings directly on a page, and coordinate the playback of recordings with your written notes.
![]() Capture and insert screen clips from within OneNote.
Capture and insert screen clips from within OneNote.
![]() Search notes by tag, by author, or by date, and search the content of audio recordings and the text in images.
Search notes by tag, by author, or by date, and search the content of audio recordings and the text in images.
![]() Generate a summary of tagged notes by storage location or date.
Generate a summary of tagged notes by storage location or date.
![]() Insert mathematical equations into notes.
Insert mathematical equations into notes.
![]() Draw or handwrite notes (by using your finger or a stylus).
Draw or handwrite notes (by using your finger or a stylus).
Create, open, and close notebooks
OneNote stores information in files that are referred to as notebooks. You can store all your information in one notebook or create multiple notebooks for different purposes. For example, you could store general business information in one notebook, sensitive business information in a second notebook, and personal information in a third notebook.
In some versions of OneNote, you can create and work with notebooks that are stored locally on your computer or remotely in a connected storage location such as a OneDrive site or SharePoint site. In OneNote for iPad, you can work only with notebooks that are stored remotely.
Create notebooks
When creating a notebook in OneNote for iPad, you must create it on a OneDrive site or SharePoint site. A benefit of creating a notebook in one of these remote storage locations is that you can get to the information from any location or device. If you want to share some or all of the information in your notebook with other people, you can do that, too.
To create a notebook
1. Start OneNote and display the Backstage view.
2. On the File bar, tap Notebooks.
3. On the Notebooks page of the Backstage view, tap Create Notebook.
4. In the Create Notebook box, enter a name for the new notebook in the Name box.
5. If the Location box doesn’t display the storage location you want to use, tap the box. Then on the Location page that appears, tap the storage location you want.
6. In the Create Notebook box, tap the Create button to create and open a notebook that has the basic storage structure as a starting point.
 See Also
For information about creating and configuring structural elements of a notebook, see “Configure notebook storage structure” later in this chapter.
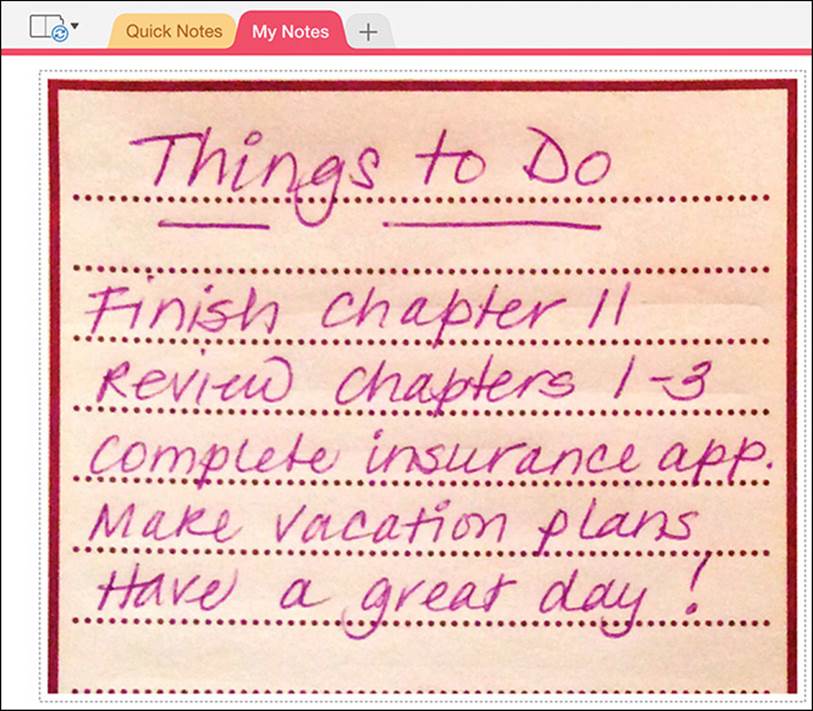
OneNote gets you started
The first time you start OneNote for iPad, the app creates a notebook for you on the OneDrive site that is associated with your user account. This notebook includes a built-in section named Quick Notes that contains a bit of information about how and why to use OneNote and some sample content.
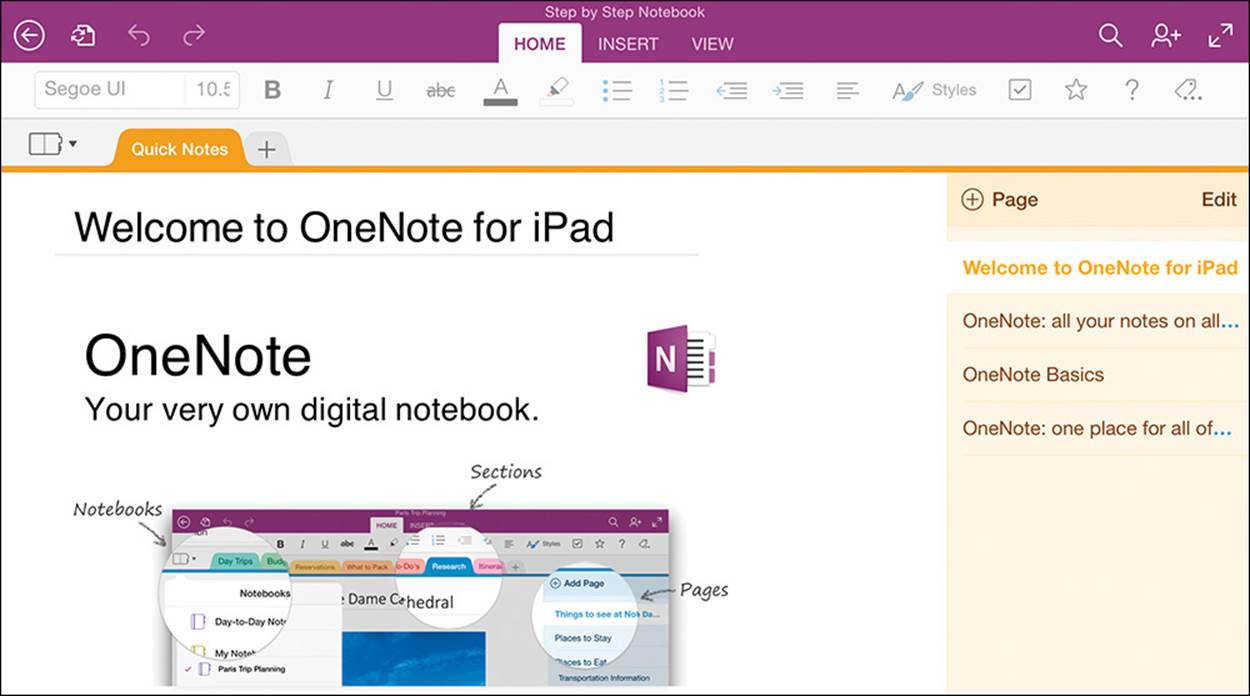
You can retain the Quick Notes section for later reference
Some of the information in the Quick Notes section applies to versions of OneNote other than OneNote for iPad. You can add, remove, and update information in the Quick Notes section if you want to.
Open and switch among notebooks
The first time you open an existing notebook in OneNote for iPad, you must open it from its source location, which can be any storage location you’re connected to. When you open a notebook from a remote storage location, OneNote creates a copy on the device you’re working on, and synchronizes the local copy with the server copy. Because of this feature, you can access information that is stored in a notebook even when you’re offline, from any device on which you’ve previously opened the notebook.
If you store or reference information in multiple notebooks, OneNote can maintain active connections to all of them when it’s running. You can display the content of only one notebook in the main app window at a time, but all the connected notebooks are “open” and synchronizing content, and you can easily switch among them. The currently open notebooks are shown on the Notebooks page of the Backstage view and the Notebooks menu in the OneNote app window.
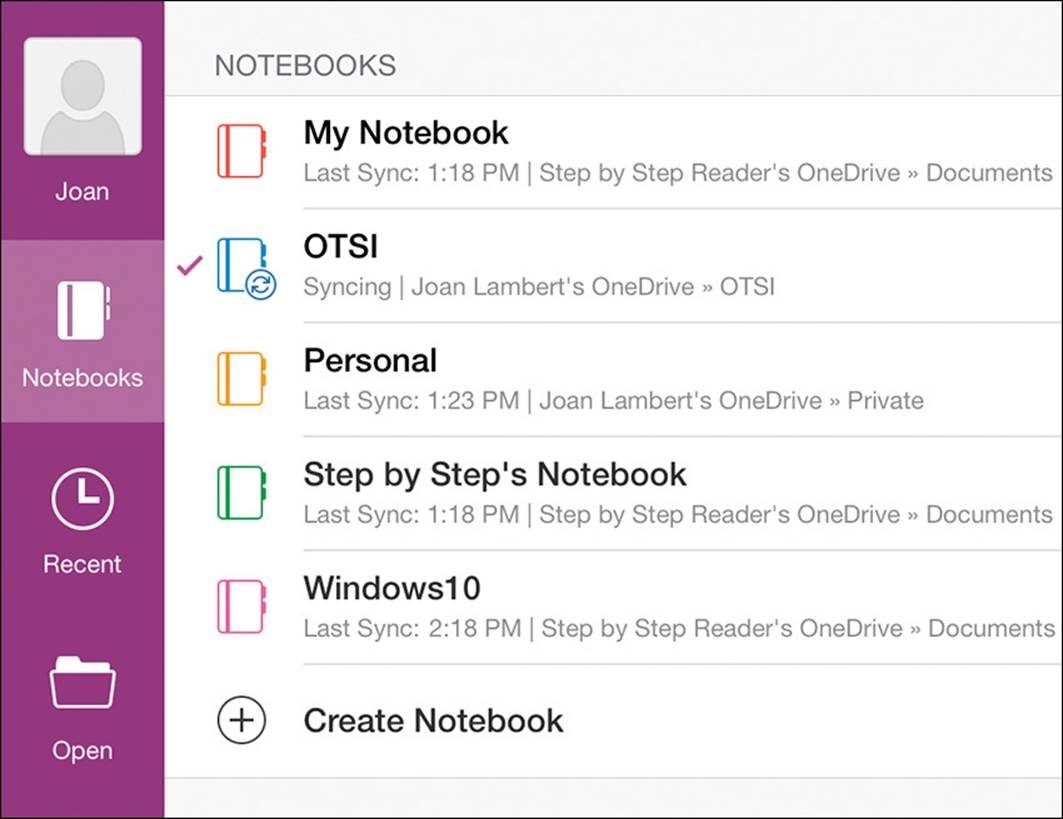
Open or create notebooks from the Notebooks page of the Backstage view
To open an existing notebook for the first time
1. Start OneNote and display the Backstage view.
2. On the File bar, tap Open to display the storage locations you’re connected to.
3. If the storage location the notebook is stored in doesn’t already appear in your Places list, connect to it.
See Also
For information about connecting to storage locations, see “Connect to additional storage locations” in Chapter 2, “Get connected.”
4. Tap the storage location. If necessary, tap through the folder structure until you reach the notebook. Then tap the notebook.
5. If OneNote prompts you to enter user credentials, enter the account name and password for the account that has permission to access the notebook.
To switch to a different open notebook
1. Start OneNote and display the Backstage view.
2. On the File bar, tap Notebooks.
3. In the list of open notebooks on the Notebooks page of the Backstage view, tap the notebook you want to display.
Or
1. With any notebook displayed in OneNote for iPad, tap the Notebooks button at the left end of the notebook header to display the currently open notebooks.

You can manage currently open notebooks from the Notebooks menu
2. On the Notebooks menu, tap the notebook you want to display.
Close and reopen notebooks
It isn’t necessary to close a notebook before exiting OneNote. It’s simplest to leave all the notebooks that you use open all the time so that you can easily search their content. The notebooks will continue to synchronize in the background and you’ll have access to current content when you need it. If you no longer need access to the information that is stored in a notebook—for example, if its content pertains only to a completed project—you can close it to keep the Notebooks menu and the Notebooks page of the Backstage view tidy.
After you close a notebook, it remains available to reopen from the Recent page of the Backstage view, or from its original storage location. If you want to ensure that you can quickly access a closed notebook at a later time, you can pin it to the Recent page and it will always be available from the Pinned section at the top of the page.
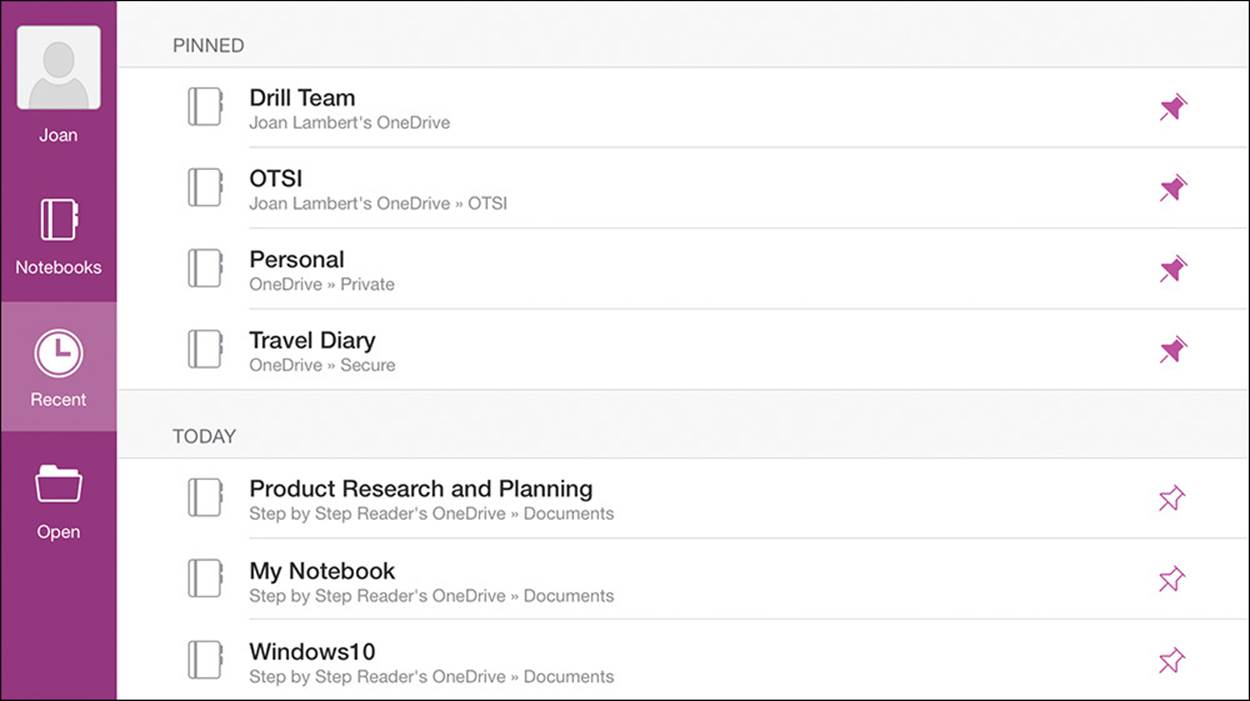
Pinned notebooks are convenient to access
To close a notebook
1. On the Notebooks page of the Backstage view, tap the File Actions button for the notebook you want to close.
2. On the Notebook Options menu, tap Close Notebook.
Or
1. At the left end of the notebook header, tap the Notebooks button.
2. On the Notebooks menu, tap the File Actions button for the notebook you want to close.
3. On the notebook-specific menu, tap Close Notebook.
To reopen a notebook
1. On the Recent page of the Backstage view, tap the notebook you want to open.
See Also
For information about sharing notebooks and synchronizing notebook content, see “Protect and share information” and “Synchronize notebook content” in Chapter 12, “Locate and share notebook content.”
Configure notebook storage structure
The notebook storage structure in OneNote reflects that of a physical tabbed notebook such as those used by students. You can divide notebooks into one or more sections. Each section contains one or more pages. You store information on individual pages.
A new notebook contains one section and one page. You can add sections and pages to provide a structure for the content you intend to store in the notebook.
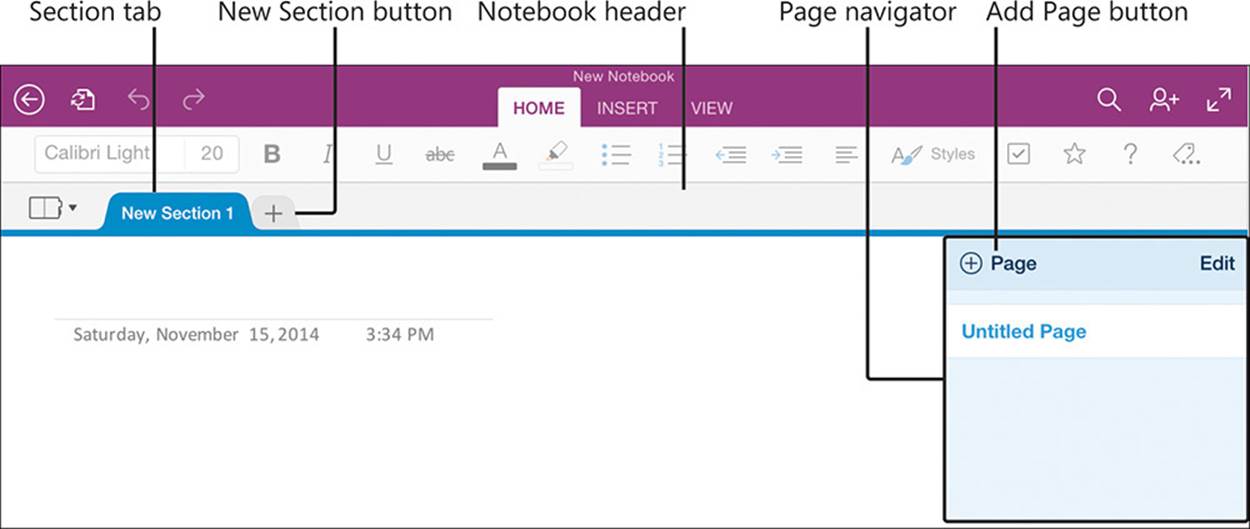
The OneNote user interface elements
As you add sections, you can name them in a way that is appropriate for the content. Be sure to give each section a meaningful name so you can easily identify it when you’re sending content to OneNote from another program.
 Tip
Tip
In some versions of OneNote, you can optionally group sections into elements called section groups, which provide another layer of organizational structure. You can’t create section groups in OneNote for iPad, but you can navigate through section groups that already exist in notebooks created in other versions of OneNote.
When you’re adding content to a notebook, you can create blank pages or pages that already contain content. If you have a clear idea of the kind of information you’re going to store in a notebook, you might find it simplest to build the notebook structure and then add content within that structure. But it isn’t necessary to build the structure first—if you prefer, you can send content to your notebook and then organize pages and sections by moving or copying them. Whatever works best for you will work with OneNote.
To create a section
1. In the notebook header, tap the New Section button.
To rename a section
1. In the notebook header, double-tap the tab of the section you want to rename.
Or
Tap the section tab, and then tap Rename to activate the title for editing.
The shortcut bar displays options for working with the selected title
2. Enter the new section name, and then tap the Done key on the on-screen keyboard.
Tip
If you’re working with an external keyboard connected to your iPad, you can press the Enter key to perform the action of the Done key in any procedure.
To create a page
1. Display the section in which you want to create the page.
2. At the top of the page navigator, tap the Add Page button.
To change a page to a subpage
1. At the top of the page navigator, tap the Edit button.
2. Tap the selector to the left of the page name.
3. On the action bar at the top of the page navigator, tap the Demote button.
Tip
To change a subpage to a standard page, follow the same process but tap the Promote button.
To name or rename a page or subpage
1. In the page navigator, tap the page or subpage.
2. In the title area at the top of the page, replace the page title.
Add information to notebooks
You can use OneNote for iPad to create and gather notes in a variety of ways.
Enter and format text
To enter text on a page, you can tap the on-screen keyboard or type on an external keyboard. You can use the dictation functionality of the iPad to dictate notes verbally, which can be a great time-saver after you become accustomed to the process. These processes are the same as those that you use to enter content in a document when using Word for iPad, so you’re probably already familiar with them from the Word coverage earlier in this book.
See Also
For information about keyboard and dictation text-entry methods, including keyboard shortcuts and dictation commands, see “Enter text in documents” in Chapter 4, “Create professional documents.”
If you want to keep track of the dates on which you enter specific notes, you can quickly insert the current date on your notebook page in mm/dd/yy format by tapping the Date button on the Insert tab. You can reference information that exists on a website rather than recording separate notes about it by linking from a placeholder on the notebook page to the webpage on the Internet.
See Also
For information about inserting hyperlinks to a webpage, see “Reference additional information” in Chapter 6, “Enhance document content.”
Formatting options for notebook page content include only the basics:
![]() You can apply a limited number of purpose-specific styles, including styles for a page title, six heading levels, normal paragraphs (the default), citations, quotes, and code.
You can apply a limited number of purpose-specific styles, including styles for a page title, six heading levels, normal paragraphs (the default), citations, quotes, and code.
![]() You can format characters by applying bold, italic, underline, and strikethrough font styles, changing the font color, and highlighting content.
You can format characters by applying bold, italic, underline, and strikethrough font styles, changing the font color, and highlighting content.
![]() You can format paragraphs in these ways:
You can format paragraphs in these ways:
• Change the paragraph indent in half-inch increments.
• Create bulleted lists that use the default bullet characters.
• Create numbered lists that use the default numbering formats.
The style and formatting options are available from the Home tab of the ribbon. You use the same methods to apply the available styles and formatting to page content in OneNote for iPad that you use in Word for iPad.
See Also
For more information, including step-by-step procedures for applying styles and formatting, see “Align, space, and indent paragraphs” and “Change the appearance of text” in Chapter 4, “Create professional documents,” and “Present content in lists” in Chapter 5, “Add visual elements to documents.”
Work with notebook containers
When you enter information onto a notebook page, the information is stored inside a note container rather than directly on the page. A page can contain multiple note containers; tapping an empty area of the page that is not in or near an existing note container creates a new one.
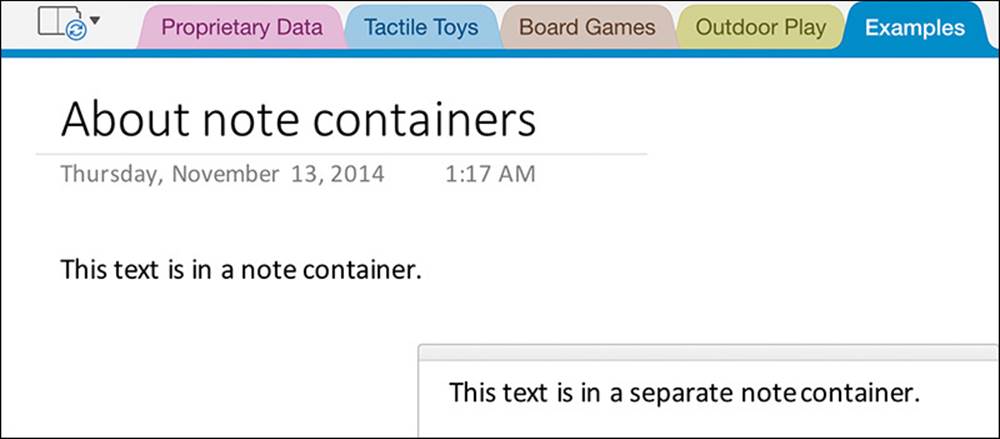
Two note containers on a page
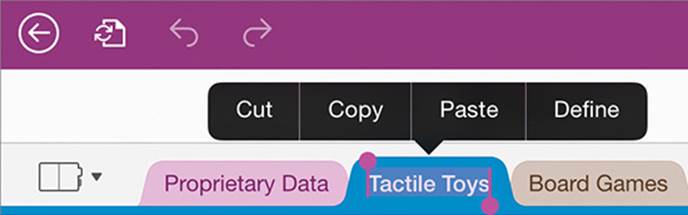
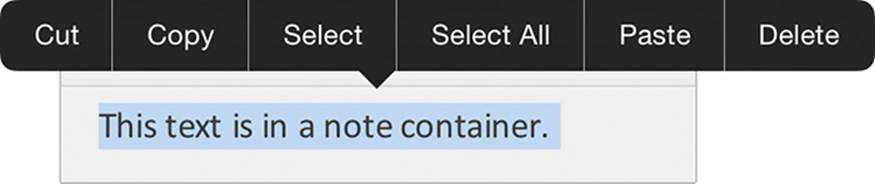
In OneNote for iPad, it’s generally simplest to keep all your page content in one note container because you can’t manipulate the containers as you can in OneNote for Windows. Double-tapping the header of a note container selects it and displays a shortcut bar of commands for manipulating the content.
Options for working with a selected note container
 Important
When you select a note container it might appear as though you actually selected the content. You can easily differentiate between the selection of a note container and its content: selecting only the content displays handles, whereas selecting the container does not.
In the Windows version of OneNote, you can move and merge note containers by dragging them on the page. This functionality is not currently available in OneNote for iPad; however, you can move a note container by moving its content.
Like the other Office for iPad apps, OneNote automatically saves the changes you make to a notebook. You can undo all the changes you’ve made to a Word document, Excel workbook, or PowerPoint presentation in the current app session by restoring the file to its most recently opened state. However, due to the way that OneNote stores information, you can’t restore OneNote notebooks. This can be both good and bad—you can enter notes and then exit the notebook without losing them, but you must take care when modifying content that you don’t delete information you might need later.
Organize notes in tables
Certain types of information that you store in a notebook will be easier to track if you organize it in tables. OneNote for iPad includes limited table functionality, but it does provide the option of inserting and then populating a table. The initial table created by OneNote for iPad when you insert a blank table is two columns wide by two columns high. You can insert additional rows or columns as necessary. OneNote for iPad doesn’t include any special formatting options for tables.
To insert a blank 2-by-2 table
1. On the Insert tab, tap the Table button.
To add rows or columns to a table
1. To insert a single row or column, tap to position the cursor in a table cell adjacent to where you want to insert the row or column.
Or
To insert multiple rows or columns, select the number of existing rows or columns you want to insert adjacent to where you want to insert the new rows or columns.
2. On the Table tool tab, tap the Insert button.
3. On the Insert menu, tap Rows Above, Rows Below, Columns Left, or Columns Right.
To remove rows or columns from a table
1. To remove a single row or column, tap to position the cursor anywhere in that row or column.
Or
To remove multiple rows or columns, select cells in the rows or columns you want to remove.
2. On the Table tool tab, tap the Delete button.
3. On the Delete menu, tap Rows or Columns.
To delete a table
1. Tap to position the cursor anywhere in the table.
2. On the Table tool tab, tap the Delete button.
3. On the Delete menu, tap Table.
Tip
If you are working with an external keyboard connected to your iPad, you can create a table while inserting information. To do so, enter content and then press the Tab key to move to or create the next cell in the row, and the Return key in the last cell of the table to create a new row.
Insert images
One of the great things about OneNote is that you can store not only your own notes, but also many other types of information. Pictures, of course, are worth a million words—and when you’re using OneNote for iPad, you have the advantage of working on a device that you can use to easily capture images at the same time you’re taking notes.
You can insert photos that you’ve already taken with your iPad or another device and stored on your iPad or in your photo stream, or you can capture and insert photos from within OneNote. This simplifies the process of documenting something because you can intersperse pictures among your written notes as appropriate.
Your iPad has its own camera app, but OneNote for iPad also comes with its own picture-management app, Office Lens. Office Lens has been specially engineered to enhance images of text, but you can use it to work with any photo.
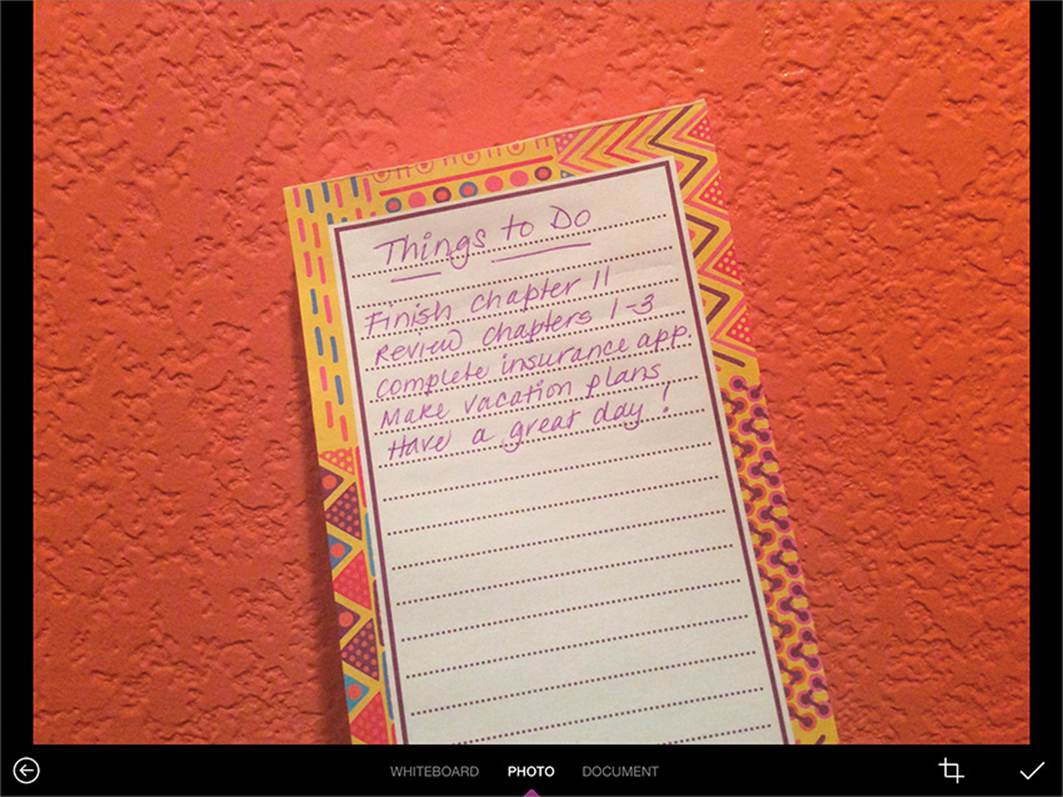
A photo captured from within OneNote and displayed in Office Lens
When you capture images of whiteboards, printed documents, sticky notes, or other items that display text, Office Lens can enhance the image to make the text content easier to read. You can crop and straighten the image, and when you’re happy with the result, Office Lens inserts the enhanced image into your notebook.
Tip
If you prefer to use the standard iPad camera app rather than Office Lens, you can turn off Office Lens from the iPad settings for OneNote.
Office Lens crops, straightens, and sharpens text images
The Office Lens app is simple to use—it includes only four controls.
![]() The Back button returns to the active notebook page without inserting the photo.
The Back button returns to the active notebook page without inserting the photo.
![]() The Whiteboard, Photo, and Document modes analyze the photo and crop, straighten, and sharpen it to different standards.
The Whiteboard, Photo, and Document modes analyze the photo and crop, straighten, and sharpen it to different standards.
![]() The Crop button displays handles that you can drag to designate the area of the photo you want to keep.
The Crop button displays handles that you can drag to designate the area of the photo you want to keep.
![]() The Finish button accepts the current settings and inserts the photo on the notebook page.
The Finish button accepts the current settings and inserts the photo on the notebook page.
To select or insert an existing photo from your iPad or photo stream
1. Tap to position the cursor where you want to insert the photo on the page.
2. On the Insert tab, tap the Pictures button.
3. On the Photos menu, tap the storage area that contains the photo you want to insert.
4. Locate the photo and tap it.
If you’re using the default OneNote for iPad camera setting, the photo opens in Office Lens and you can enhance it before you insert it on the page. If you’ve turned off the option to use Office Lens, the photo appears on the page.
Important
OneNote for iPad doesn’t include picture configuration options such as those that are available in Word and PowerPoint. You can reposition a photo by dragging it but you can’t specify the text wrapping or format the photo.
To capture a picture or text image from within OneNote
1. Tap to position the cursor where you want to insert the photo on the page.
2. On the Insert tab, tap the Camera button.
3. Position the iPad so the image you want to capture is in focus on the screen.
4. Tap the Capture button (the circle).
If you’re using the default OneNote for iPad camera setting, the photo opens in Office Lens; otherwise it appears on the page.
To enhance and insert a photo from Office Lens
1. If you want Office Lens to automatically enhance the image content, tap the Whiteboard and Document buttons to preview the results, and then tap the mode that best fits your needs.
2. If you want to crop or straighten the photo, tap the Crop button to display the original image with crop handles positioned where Office Lens senses that the image corners should be.
3. Drag the handles to define the area of the final image and its bottom edge, from which Office Lens calculates the alignment of the image.
4. Tap the Finish button to insert the photo.
To turn off Office Lens
1. Start the Settings app.
2. Near the bottom of the Settings list, tap OneNote.
3. On the OneNote page, in the Photos & Camera section, tap Camera Setting.
4. On the Camera Setting page, tap the Use Office Lens slider to change its background to white.
Insert files from cloud storage locations
In OneNote for iPad, you can insert files from a cloud storage location into your notes. Different types of files create different results. For example:
![]() Inserting a Word document displays a labeled document icon on the page. You can display the file content and then open the file for editing.
Inserting a Word document displays a labeled document icon on the page. You can display the file content and then open the file for editing.
![]() Inserting a graphic file displays the graphic on the page.
Inserting a graphic file displays the graphic on the page.
![]() Inserting a video file displays a labeled generic icon. You can play the video recording.
Inserting a video file displays a labeled generic icon. You can play the video recording.
You can change the icon label from the file name to something more descriptive, but note that the labels wrap after approximately 13 characters.
Important
At the time of this writing, OneNote for iPad supports inserting files only from iCloud and Dropbox storage locations.
You can search your cloud storage location for files that contain specific terms. To simplify the process of locating a file in your iCloud storage, you can sort the search results by Date, Name, or Tags.
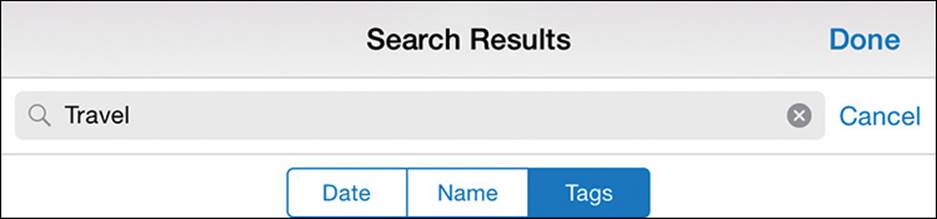
The sorting options for search results
To insert a file from iCloud or Dropbox storage
1. Tap to position the cursor where you want to insert the file content on the page.
2. On the Insert tab, tap File.
A window displays your iCloud storage.
3. If you’re inserting a file from iCloud, you can do the following:
• To switch between the file thumbnail and file list views of your iCloud storage, tap the button that represents the view you want.
• To search for a specific file, tap the Search box and enter the search parameter.
• To change the sort order of files, tap Date, Name, or Tags.
4. If you want to insert a file from Dropbox, you can do the following:
• To display your Dropbox storage, tap Locations in the upper-left corner of the window, and then tap Dropbox.
• To search for a specific file in the Dropbox window, tap the Search box and enter the search parameter.
5. Locate and then tap the file you want to insert.
To change a file icon label
1. Tap the icon, and then on the shortcut bar, tap Rename.
2. In the Rename box, enter the label you want, and then tap Save.
To preview a file from an embedded icon
1. Double-tap the icon.
Or
Tap the icon, and then on the shortcut bar, tap Open.
2. Flick to scroll through the file.
3. To close the preview, tap Done in the upper-left corner of the window.
Send, print, and link content to notes
When you are using the Windows version of OneNote in conjunction with other programs in the Office suite, there are many additional ways you can store information in OneNote for safekeeping. For example, you can:
![]() Send email messages directly from Outlook to a OneNote notebook.
Send email messages directly from Outlook to a OneNote notebook.
![]() Link tagged tasks in a notebook to your Outlook task list.
Link tagged tasks in a notebook to your Outlook task list.
![]() Take meeting notes in personal or shared notebooks.
Take meeting notes in personal or shared notebooks.
![]() Create notes that are linked directly to specific locations in a Word document or PowerPoint presentation.
Create notes that are linked directly to specific locations in a Word document or PowerPoint presentation.
![]() Print any Office file to a OneNote notebook.
Print any Office file to a OneNote notebook.
Although you can’t perform these same actions in OneNote for iPad, you can work with the content of notebooks that are stored in shared locations in the iPad and Windows versions of OneNote.
To open a file for editing from a preview window
1. In the upper-right corner of the preview window, tap the File Actions button.
2. In the window that opens, tap the icon of the app you want to open the file in.
To manage cloud storage providers
1. On the Insert tab, tap the File button.
2. In the upper-left corner of the window, tap Locations. Then on the Locations menu, tap More.
3. In the Manage Storage Providers window, do either of the following:
• To make your storage location with a cloud storage provider available, tap the provider’s slider to change its background color to green.
• To remove a cloud storage provider from the Locations menu, tap the provider’s slider to change its background color to white.
4. In the upper-right corner of the Manage Storage Providers window, tap Done.
Manage pages and sections
From time to time you might find it necessary to modify the storage structure of a notebook or move content around within the notebook. Fortunately, it’s much easier to move information around in an electronic notebook than it is in a physical notebook.
You can rearrange notebook elements in the following ways:
![]() Move pages within a section, to another section in the same notebook, or to a section in any open notebook.
Move pages within a section, to another section in the same notebook, or to a section in any open notebook.
![]() Move sections within a notebook or to any other notebook that you have open. When you move a section to a different notebook, it is inserted as the last section in the notebook, and the section tab appears to the right of the other section tabs in the notebook header.
Move sections within a notebook or to any other notebook that you have open. When you move a section to a different notebook, it is inserted as the last section in the notebook, and the section tab appears to the right of the other section tabs in the notebook header.
You can also assign background colors to notebook pages to provide a visual indicator of the purpose or status of a page—for example, a green background to indicate that the page content is final or an orange background to indicate that a page contains confidential information.
Tip
Changing the page background color in OneNote for iPad doesn’t affect the color of the page tab in the page navigator.
You control the movement of pages by activating the edit functions in the page navigator.
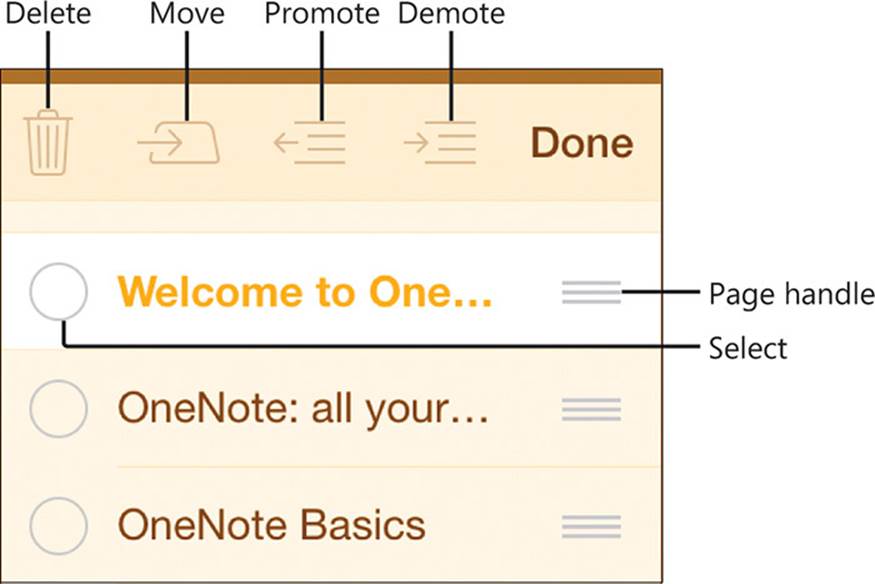
Tap Edit at the top of the page navigator to activate the edit functions
After you finish organizing your notebook content, you might find that you have extra or empty notebook elements. You can delete any notebook element other than a section group and the notebook itself from within OneNote for iPad.
Tip
You can delete notebooks and section groups when working with a notebook in the Windows version of OneNote.
To change the color of the active page or subpage
1. On the View tab, tap the Page Color button.
2. On the Page Color menu, tap the color swatch you want to apply to the page.
Or
On the Page Color menu, tap the No color button to remove the page background color.
To move a page within a section
1. At the top of the page navigator, tap Edit.
2. In the page navigator, tap and hold the handle of the page you want to move, and then drag it vertically to the new location.
To move one or more pages to a different section or notebook
1. At the top of the page navigator, tap Edit.
2. In the page navigator, select the pages you want to move.
Tip
To select a page, tap the empty circle that precedes the page name. A check mark appears when the page is selected.
3. On the action bar at the top of the page navigator, tap the Move button to display a window showing the sections and section groups available in the current notebook.
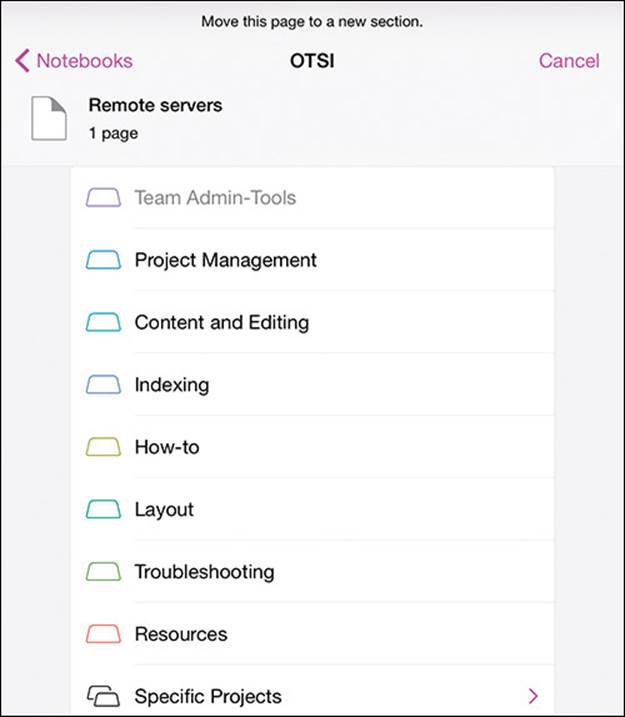
You might need to swipe the list to display all the sections and section groups in the notebook
4. To move the selected pages to a different section of the current notebook, tap the section you want to move them to.
Or
To move the pages to a different notebook, tap Notebooks to display a window showing the currently open notebooks; tap the notebook, the section group if appropriate, and then the section you want to move the pages to.
Tip
When you move a page to a different section, it is inserted as the last page in the section, at the bottom of the page navigator for that section. When you move a section to a different notebook, it is inserted as the last section in the notebook, to the right of the existing section tabs in the notebook header.
To move a section within a notebook
1. In the notebook header, tap and hold the tab of the section you want to move, until the tab changes to a lighter color.
2. Drag the section tab laterally to the location you want it in relation to the other section tabs.
To move a section to a different notebook
1. Display the section you want to move.
2. Tap the section tab once.
3. On the shortcut bar, tap Move to display a window showing the currently open notebooks and any section groups they contain.
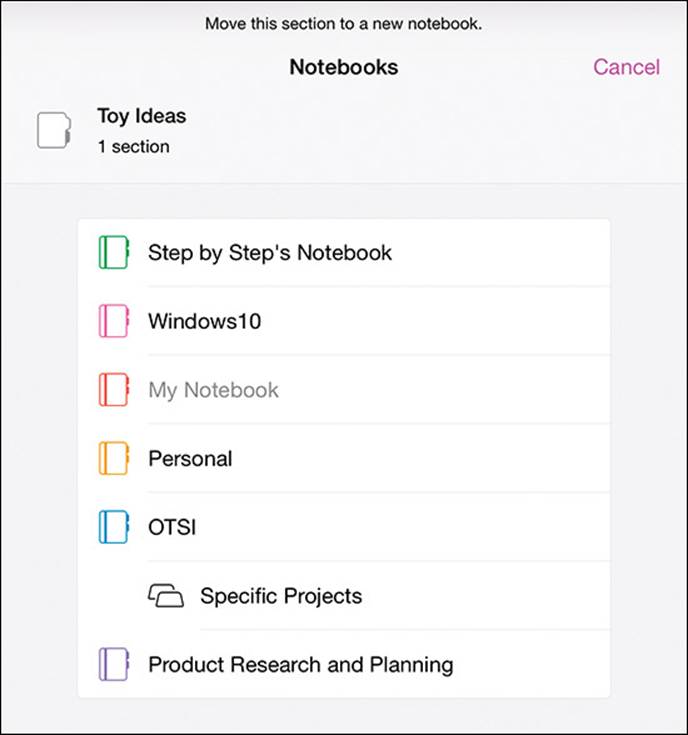
The section you’re moving is identified above the notebook list
4. In the Notebooks window, tap the notebook you want to move the section to.
To delete a page
1. Display the section that contains the page you want to delete.
2. In the page navigator, swipe left or right on the tab of the page you want to delete, and then tap Delete.
Important
OneNote stores your deleted pages in the Recycle Bin of the OneDrive site or SharePoint site the notebook is stored on. You can restore deleted pages from that Recycle Bin until they are permanently deleted (usually after 60 days).
To delete a section
1. Display the section you want to delete.
2. In the notebook header, tap the active section tab.
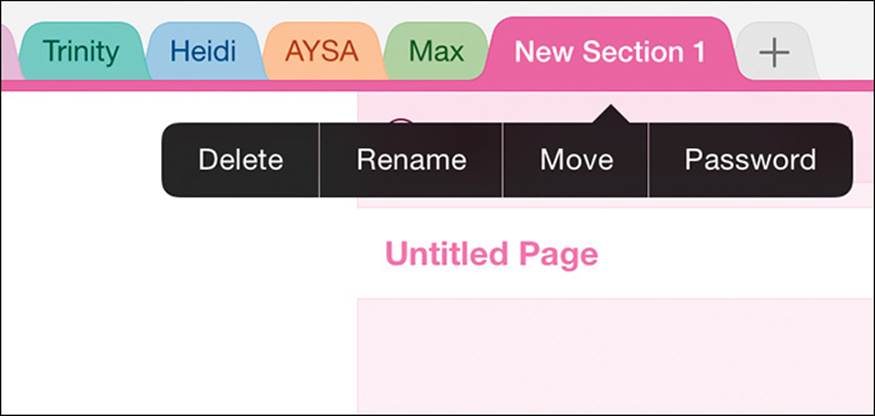
When you tap the tab once, the shortcut bar displays options relevant to the section
Important
Tap a section tab once to display the shortcut bar, or twice to activate the section tab for editing.
3. On the shortcut bar, tap Delete.
Skills review
In this chapter, you learned how to:
![]() Create, open, and close notebooks
Create, open, and close notebooks
![]() Configure notebook storage structure
Configure notebook storage structure
![]() Add information to notebooks
Add information to notebooks
![]() Manage pages and sections
Manage pages and sections
Practice tasks

The practice files for these tasks are located in the iPadOfficeSBS\Ch11 folder.
Create, open, and close notebooks and configure storage structure
Start OneNote, and then perform the following tasks:
1. Create a new notebook in your OneDrive storage location and name it My Notes.
2. Without closing your new notebook, open the StoreNotes notebook from the practice file folder.
3. Close the StoreNotes notebook, and then reopen it from the list of recent notebooks.
4. Switch to the My Notes notebook.
5. Rename the Welcome section as Practice One, and create a new section named Practice Two. Move the Practice Two section so it immediately follows the Practice One section.
6. In the Practice Two section, rename the untitled page as Page 1 and create a new page named Page 2.
7. Make Page 2 a subpage of Page 1, and rename it as Subpage One.
8. Exit OneNote without closing the open notebooks.
Add information to notebooks
Open the StoreNotes notebook if it isn’t already open, and then perform the following tasks:
1. In the Add Content section, on the Text Practice page, enter the following text just below the page title: Taking notes on the iPad is easy. Keep track of important information, and access it from anywhere.
2. Tap halfway down the page to create a second note container. In the new note container, insert a 2-by-2 table.
3. In the first column of the table, enter January in the first row and February in the second row. In the second column, enter Garnet in the first row and Amethyst in the second row.
4. Add a third row to the end of the table. In the new row, enter March in the first column and Aquamarine in the second column.
5. Insert a row at the top of the table. In the new row, enter Month in the first column and Birthstone in the second column. Select the two cells, and then apply bold formatting to the words so they look like column headings.
6. Switch to the Image Practice page. From within OneNote, use your iPad and the Office Lens utility to capture an image of something (such as a notepad, whiteboard, or sticky note) that has handwritten text on it.
7. Enhance and crop the image by using Office Lens. Insert the modified image below the title of the Image Practice page.
8. Exit OneNote without closing the open notebooks.
Manage pages and sections
Open the StoreNotes notebook if it isn’t already open, and open the MoveNotes notebook. Then perform the following tasks:
1. Display the StoreNotes notebook.
2. In the My Pages section of the notebook, change the color of Page A to any shade of blue. Then change the color of Page B to any shade of green.
3. Move Page C above Page A.
4. Move Page A and Page B to the Practice Pages section of the notebook.
5. Move the Practice Pages section so that it precedes the My Pages section.
6. Move the Practice Pages section to the MoveNotes notebook. Then create a copy of the Practice Pages section in the StoreNotes notebook.
7. In the StoreNotes notebook, delete the My Pages section. Then in the Practice Pages section, delete Page B.
8. Exit OneNote without closing the open notebooks.
All materials on the site are licensed Creative Commons Attribution-Sharealike 3.0 Unported CC BY-SA 3.0 & GNU Free Documentation License (GFDL)
If you are the copyright holder of any material contained on our site and intend to remove it, please contact our site administrator for approval.
© 2016-2026 All site design rights belong to S.Y.A.