Office 2016 For Seniors For Dummies (2016)
Part IV
Outlook
 For a guide to organizing your mail in Outlook, visit www.dummies.com/extras/office2016forseniors.
Part V
PowerPoint
 For five great PowerPoint tricks, visit www.dummies.com/extras/office2016forseniors.
Chapter 17
Presenting the Show
Get ready to . . .
![]() Display a Slide Show Onscreen
Display a Slide Show Onscreen
![]() Use the Slide Show Tools
Use the Slide Show Tools
![]() Print Copies of a Presentation
Print Copies of a Presentation
![]() Package a Presentation for Distribution
Package a Presentation for Distribution
![]() Make a Video of the Presentation
Make a Video of the Presentation
Presenting … your show!
The whole point of a PowerPoint presentation is to deliver a show to an audience. That audience might be in the same room with you or a thousand miles away. Folks might watch it simultaneously or pull it up on their own PCs at their convenience.
This chapter explains how to display a presentation on your own computer screen. That’s useful if you’re going to be there in-person when the audience views the show, like during a club meeting or religious service. I also show you how to package a presentation to move it to a different PC as well as how to make printouts for yourself and your audience.
You also discover here how to make a self-running CD that you can send to people so they can view the presentation on their own computers, and how to make a video of your presentation.
Display a Slide Show Onscreen
Slide Show view is the view that you use when showing the presentation to others. (Read more about PowerPoint views in Chapter 14.) One slide appears onscreen at a time, completely filling the screen. You might have used this view already — to check your work — while you were creating the presentation.
You can start Slide Show view from the first slide or from the current slide. Table 17-1 summarizes the methods of doing each.
Table 17-1 Methods of Entering Slide Show View
|
From First Slide |
From Current Slide |
|
|
Shortcut key(s) |
Press F5 |
Press Shift+F5 |
|
Slide Show tab |
Slide Show ⇒ From Beginning |
Slide Show ⇒ From Current Slide |
|
View buttons (bottom right of screen) |
N/A |
Slide Show View button |
Then, after you’re in Slide Show view, you can show your presentation. Here’s how:
· Move to the next slide (in any of these ways):
· Click the mouse.
· Press any key on the keyboard (except Backspace or the left arrow).
· Right-click to display a shortcut menu and then choose Next. Figure 17-1 shows this shortcut menu.
· Move to the previous slide (in any of these ways):
· Press Backspace or the left arrow on the keyboard.
· Right-click to display a shortcut menu and choose Previous. Refer to Figure 17-1.
· Jump to a specific slide:
· Right-click to display a shortcut menu and choose See All Slides.
· Click the slide you want to display. See Figure 17-2.
· End the show (in any of these ways):
· Click through to the end of the slide show (black screen) and then click one more time.
· Press the Esc key.
· Right-click to display a shortcut menu and then choose End Show.
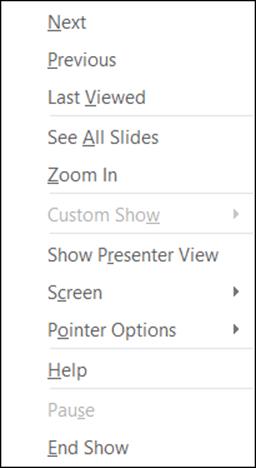
Figure 17-1
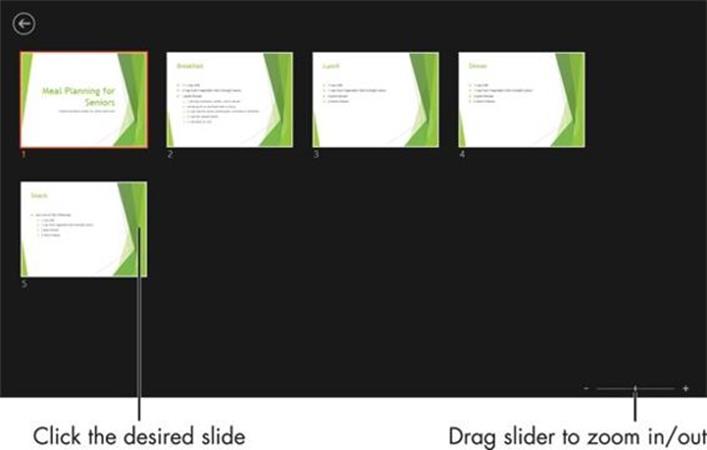
Figure 17-2
Use the Slide Show Tools
When you’re working in Slide Show view, a very faint set of buttons appears in the lower-left corner. When you roll your mouse over these buttons, they brighten up so you can see them better. Figure 17-3 shows the buttons on this toolbar.
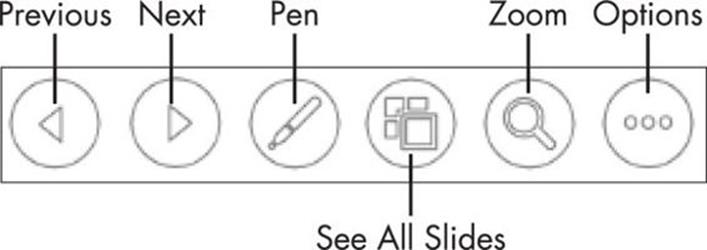
Figure 17-3
 I enhanced Figure 17-3 to show all the buttons in their “bright” mode at once, so you can see them better. In reality, a button lights up only when you point at it, and you can point at only one at a time.
The buttons are
· Previous: A left-pointing arrow. Use this to go to the previous slide.
· Next: A right-pointing arrow. Use this to go to the next slide.
· Pen: Opens the Pen menu, which you can use to control a mouse-controlled “pen” that draws on the slides. There are three options: Laser Pointer (does not leave marks on the slide), Pen (leaves a thin line), and Highlighter (leaves thick, semi-transparent line). You can also choose an ink color. See Figure 17-4.
· Show All Slides: Opens the same pane as in Figure 17-2, showing thumbnails of all slides. Click a slide to jump to it.
· Zoom: Changes the mouse pointer to a large rectangular magnifier. Drag it around onscreen to the area you want to magnify and then click. Press Esc to return to regular viewing.
· Options: Opens a menu containing several miscellaneous commands for working in Slide Show view. See Figure 17-5.
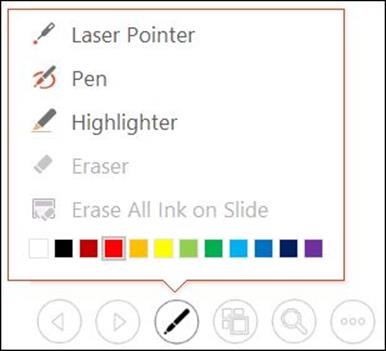
Figure 17-4
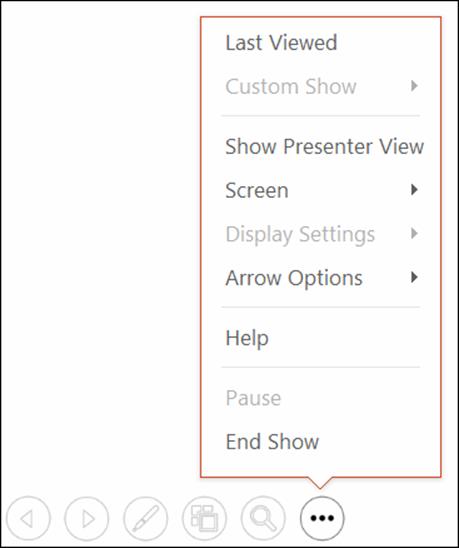
Figure 17-5
You might wonder why there are so many different methods of doing the same things. For example, why is there a navigation button that does nothing but duplicate the functionality of a right-click menu? And why are there Previous and Next buttons for moving between slides when there are at least three other methods of doing the same thing? (Refer to Table 17-1.)
PowerPoint allows you to lock down or disable certain navigation methods in Slide Show view so that people interacting with your presentation at an unattended computer won’t inadvertently (or purposely) disable or damage the presentation. When one method is disabled, you might need to rely on another method to do what needs to be done.
 One of the choices on the Options menu is Presenter View. If you have two monitors, you can use Presenter View to show the slides full-screen on one monitor while you use a specialized view for managing the slide show on the other monitor.
Print Copies of a Presentation
There are many uses for printouts of a presentation. You might want to print the slides themselves, for example (one big slide per page), to use as a kind of low-tech delivery system. If you don’t have a computer or projector available, you can just hold up each slide, one by one! You might also want copies of the presentation to give to your audience, or a copy of the presentation to refer to while you speak.
When you print in PowerPoint, you’re given a choice of the type of printout you want. Here are the choices available:
· Full Page Slides: A full-page copy of one slide per sheet.
· Notes Pages: One slide per page, but with the slide occupying only the top half of the page. The bottom half is devoted to any speaker notes you typed into PowerPoint.
· Outline View: A text-only version of the presentation, structured as an outline, with the slide titles as the top-level outline items.
· Handouts: Multiple slides per page (two to nine, depending on your choice of settings), suitable for giving to the audience to take home.
Different numbers of slides per page have different layouts. For example, if you choose three slides per page, the layout has lines next to each slide for the audience to take notes on.
To print any of these types of printouts, follow these steps:
1. (Optional) If you want to print only certain slides, select them. The easiest view to do this in is Slide Sorter.
2. Choose File ⇒ Print. The Print settings appear. See Figure 17-6.
3. (Optional) If you want to print more than one copy, change to a higher number in the Copies box. The default number of copies is 1.
4. Under Printer, make sure the correct printer is chosen. Click the selected printer name and make another choice from the menu that appears if needed.
5. In the Settings area, if you do not want to print all the slides, enter the slide numbers in the Slides box. Use a dash for ranges (1-3 selects slides 1, 2, and 3, for example), or use commas to separate individual noncontiguous slides.
6. The default is to print full-page slides. If you want something else, such as handouts or notes pages, click Full Page Slides to open a menu from which you can choose another option. See Figure 17-7.
7. Click the Print button. The presentation prints.
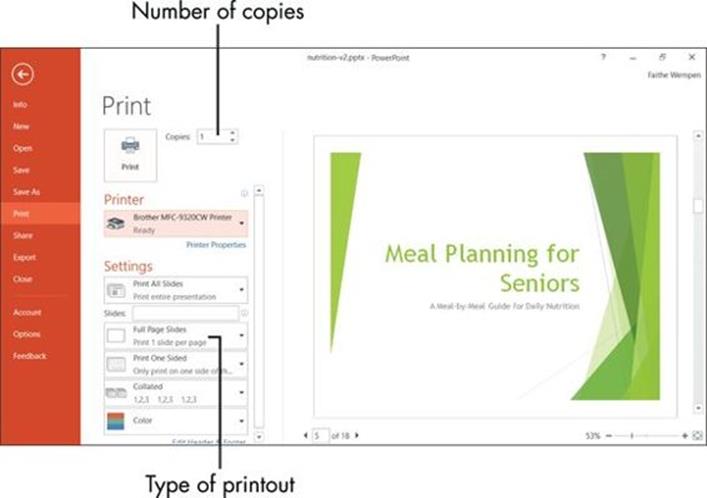
Figure 17-6
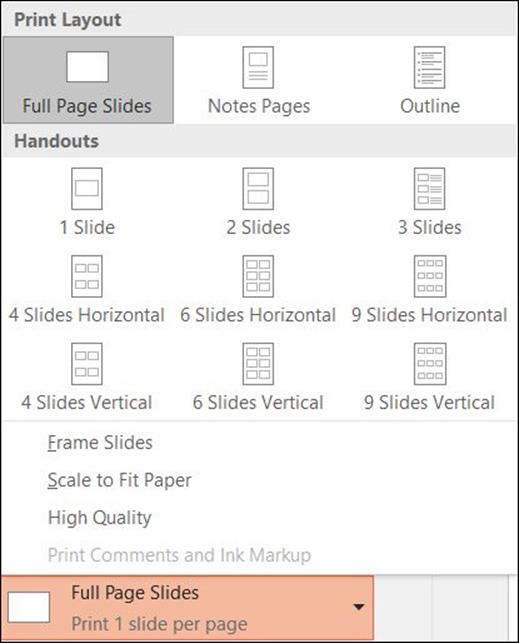
Figure 17-7
If you want to create handouts that can be edited in Word, choose File ⇒ Export ⇒ Create Handouts ⇒ Create Handouts. Then choose a format in the dialog box that appears and click OK. Once they’re in Word, you can modify them as needed and then print them from there.
Package a Presentation for Distribution
The PC you play your presentation on might not always be the one you create it on. For example, if you’re traveling to different clubs or organizations to give the same speech, each one might have its own computer system attached to its projector. If you have a laptop, you can bring your presentation with you, but you might find it easier to simply bring the presentation on a flash drive (a portable device used for storing files) or a CD.
If your presentation consists only of text and pictures, it’s self-contained in a single PowerPoint file (with a .pptx or .ppt extension), so you can just copy that file to your flash drive — or email it to yourself as an email attachment, or use some other method to carry it with you.
However, if you have multimedia content, such as video clips, those may not be embedded in the PowerPoint file: They may be linked. Linked content is not stored in the main data file, but rather a link is created from the clip to your PowerPoint file, so that when the presentation plays, the content from the linked file is accessed. That means if you copy the PowerPoint file, you won’t automatically copy the linked content. If you didn’t know that in advance, you could run into a situation where you arrive at the site where you’re going to give your speech only to find out that you didn’t have all the presentation available!
There are other little gotchas, as well, about showing a presentation on a PC other than the one it was created on. For example, any fonts that the presentation uses must be available on the PC on which you’re showing it. If those fonts aren’t available, PowerPoint will try to substitute a similar font, but its definition of “similar” and yours might not be the same!
You can get around these problems by allowing PowerPoint to “pack” and copy the presentation file to another location. When it does so, it automatically also copies all the fonts, linked files, and other associated content needed to ensure a trouble-free show. You can package it to a folder on your hard drive and then copy that folder anywhere you like, or you can burn the package directly to a CD.
Here’s how to pack a presentation to a CD:
1. Choose File ⇒ Export ⇒ Package Presentation for CD ⇒ Package for CD. The Package for CD dialog box opens. See Figure 17-8.
2. (Optional) If you want to put additional presentations on the same CD, click Add, select the presentation to include, and click Add to place it on the list. Use the up- and down-arrow buttons to the left of the list to reorder the presentations if needed.
3. In the Name the CD field, type the label you want to assign to the CD.
4. Insert a blank, writeable CD into your PC’s CD drive.
5. Click the Copy to CD button. If a warning appears about linked files, click Yes.
6. Wait for PowerPoint to copy the presentation to the CD.
7. A message appears asking whether you want to copy the same files to another CD. If so, insert another CD and click Yes. Otherwise, click No.
8. Click Close to close the Package for CD dialog box.

Figure 17-8
When you make a CD or copy to a folder (coming up next), the PowerPoint Viewer utility is included. This utility allows the presentation to run without PowerPoint being installed on the computer.
Here’s how to pack a PowerPoint presentation if you want to copy the files to a folder (for example, to transfer later to a flash drive or portable hard disk), rather than to a CD:
1. Choose File ⇒ Export ⇒ Package Presentation for CD ⇒ Package for CD. The Package for CD dialog box opens. Refer to Figure 17-8.
2. (Optional) If you want to put additional presentations on the same CD, click Add, select the presentation to include, and click Add to place it on the list. Use the up- and down-arrow buttons to the left of the list to reorder the presentations if needed.
3. Click the Copy to Folder button. The Copy to Folder dialog box opens.
4. In the Folder Name field, type the name of the folder you want to create.
5. In the Location field, type the path to the location where you want to store the new folder.
 Click Browse to select a location by browsing if you prefer.
6. Click OK to accept the location. The files are copied to that location.
7. Click Close to close the Package for CD dialog box.
Make a Video of the Presentation
You can save your presentation as a video, which you can then distribute using email, CD, or another method. You could, for example, create a PowerPoint presentation with pictures of your grandchildren and distribute it to your friends and family along with a holiday greeting.
By saving the presentation as a video, you lose the interactive capabilities; you can’t choose how fast to advance the slides, for example, and you can’t use a mouse to click on anything. Therefore, before making a video of the presentation, you should have it set up exactly the way you want it to self-run, including setting how long each slide is displayed onscreen. (Do this from the Transitions tab by setting a number of seconds in the After box, as Chapter 16 explains.) If you don’t already have timings set, a default time will be spent on each slide (5 seconds, or whatever you specify when making the video).
When your presentation is exactly the way you want it, make the movie by following these steps:
1. Choose File ⇒ Export ⇒ Create a Video. The Create a Video options appear. See Figure 17-9.
2. (Optional) The default resolution is Presentation Quality, the highest resolution available. If you want a lower resolution, click Presentation Quality and choose a different resolution from the menu (Internet Quality or Low Quality).
Unless the presentation is so large that it won’t fit on a single DVD at the default resolution, you should keep the resolution set to Presentation Quality.
3. (Optional) The default is to use any timings and narrations previously set up for the presentation. If you don’t want to use these, click Use Recorded Timings and Narrations, and select Don’t Use Recorded Timings and Narrations from the menu.
4. (Optional) Adjust the Seconds to Spend on Each Slide value if needed. The default is 5 seconds. This value will be used whenever a slide does not already have a timing set.
5. Click Create Video. The Save As dialog box appears.
6. If desired, change the file format and/or save location. The default format is MPEG-4 Video (.mp4).
7. Click Save. PowerPoint creates the video.
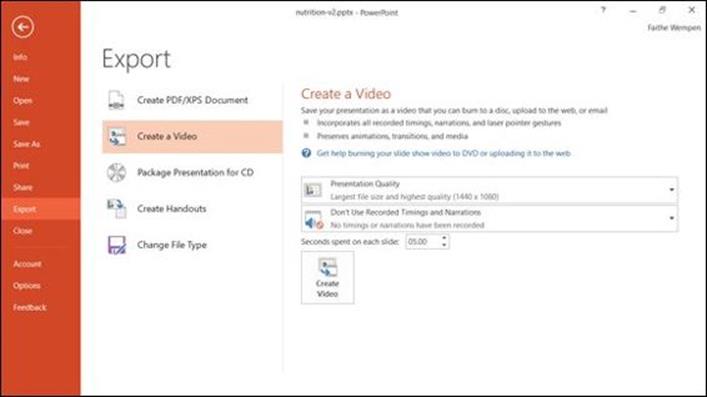
Figure 17-9
After making the video, test your video by double-clicking it from File Explorer; it plays in your default video player (probably Windows Media Player).
All materials on the site are licensed Creative Commons Attribution-Sharealike 3.0 Unported CC BY-SA 3.0 & GNU Free Documentation License (GFDL)
If you are the copyright holder of any material contained on our site and intend to remove it, please contact our site administrator for approval.
© 2016-2026 All site design rights belong to S.Y.A.