Microsoft Office 2016 At Work For Dummies (2016)
Chapter 4
Formatting Sections, Pages, and Documents
In This Chapter
![]() Setting the margins
Setting the margins
![]() Setting page size and orientation
Setting page size and orientation
![]() Creating page headers and footers
Creating page headers and footers
![]() Creating page and section breaks
Creating page and section breaks
![]() Setting up multicolumn documents
Setting up multicolumn documents
![]() Applying a page border
Applying a page border
![]() Applying page background shading
Applying page background shading
![]() Adding line numbers
Adding line numbers
Some types of formatting cannot be applied to individual words or paragraphs, but only to entire pages and sections at once. For example, you can’t set the paper size or orientation for individual paragraphs. This chapter looks at a variety of these document-wide settings.
The term “document-wide” is not entirely accurate to describe these types of formatting, however. It’s true that normally a document would have only one paper size, for example, or only one number-of-columns setting. However, Word enables you to create section breaks in documents, and have different document-wide settings on either side of the break. A section break enables you to, for example, store an envelope in the same document file as a business letter. This chapter explains how to create and use section breaks to allow for flexibility in your document layouts.
Set margins
Margins are the empty spaces on each side of the page. A normal amount of margin (or at least what Word calls “Normal”) is 1” on all sides. You might want to change the margins to accommodate special situations, though. (Helpful hint: if you’re a student, don’t try to make your research paper seem longer by increasing the margins. Teachers are wise to that trick.)
Word comes with several margin presets, such as Narrow (0.5” all around) and Wide (1” at top and bottom, 2” on left and right). You can also set custom margins, where you get to specify an exact number for each side of the page individually.
 Margins apply to the entire document. If you need part of the document to have different margins from the rest, create a section break, as explained in “Create section breaks” later in this chapter.
![]() On the Layout tab, click the Margins button.
On the Layout tab, click the Margins button.
![]() Click one of the presets. You’re done.
Click one of the presets. You’re done.
OR
![]() Click Custom Margins to open the Page Setup dialog box to the Margins tab.
Click Custom Margins to open the Page Setup dialog box to the Margins tab.
![]() Enter the desired value in the Top, Bottom, left, and Right boxes.
Enter the desired value in the Top, Bottom, left, and Right boxes.
The Gutter and Gutter Position settings are for situations where you are printing a double-sided publication that will be bound like a book. The margin closest to the binding should be somewhat larger than the rest to accommodate the binding; depending on whether it’s an odd- or even-numbered page, that extra gutter amount should be either on the left or right side of the page. Using the Gutter setting ensures that each page has the gutter on the correct side.
![]() Click OK.
Click OK.
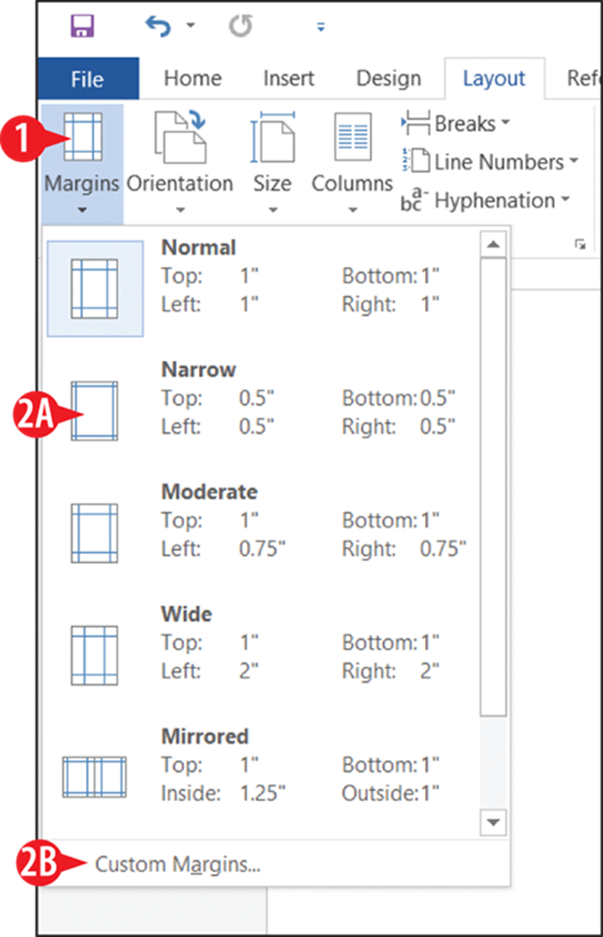
Figure 4-1: Choose a margin preset from the Margins button’s drop-down list.
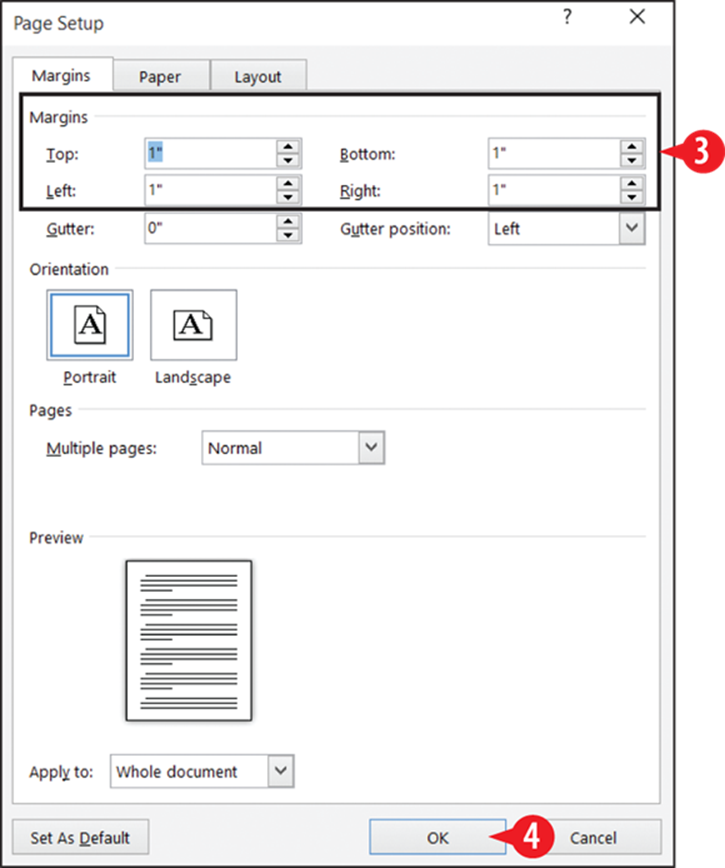
Figure 4-2: Set custom margins in the Page Setup dialog box, on the Margins tab.
Set page size and orientation
Page size is the paper size on which you’ll be printing your work. You have a page size even if you aren’t printing, though; documents that appear onscreen have a page size too, of course. The default page size in Word is Letter, which is 8.5” x 11”.
Page orientation is the direction that the text runs on the page. The default is portrait, in which the lines of text are parallel to the narrower edge of the paper. The alternative is landscape, in which the lines are parallel to the wider edge.
Set page size
You can choose a page size preset from the Size drop-down list on the Layout tab, or you can set a custom page size if none of the ones on the list match the page size you want.
![]() On the Layout tab, click the Size button.
On the Layout tab, click the Size button.
![]() Click one of the presets. You’re done.
Click one of the presets. You’re done.
OR
![]() Click More Paper Sizes to open the Page Setup dialog box to the Paper tab.
Click More Paper Sizes to open the Page Setup dialog box to the Paper tab.
![]() Open the Paper size drop-down list and choose a preset. This list of presets is more extensive than the list on the Size button.
Open the Paper size drop-down list and choose a preset. This list of presets is more extensive than the list on the Size button.
OR
![]() Enter the paper’s measurements in the Width and Height text boxes.
Enter the paper’s measurements in the Width and Height text boxes.
If you don’t know what the paper size is called, it may be difficult locating it by name on the list in step 3A. You may find it quicker to enter its measurements in step 3B.
![]() Click OK.
Click OK.
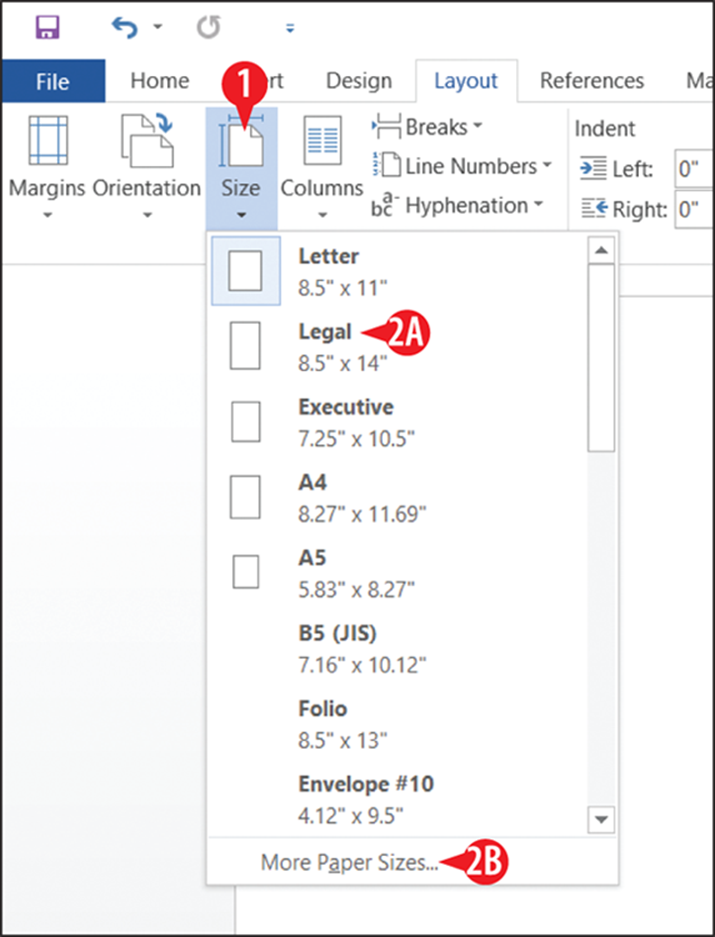
Figure 4-3: Choose a paper size preset from the Size button’s drop-down list.
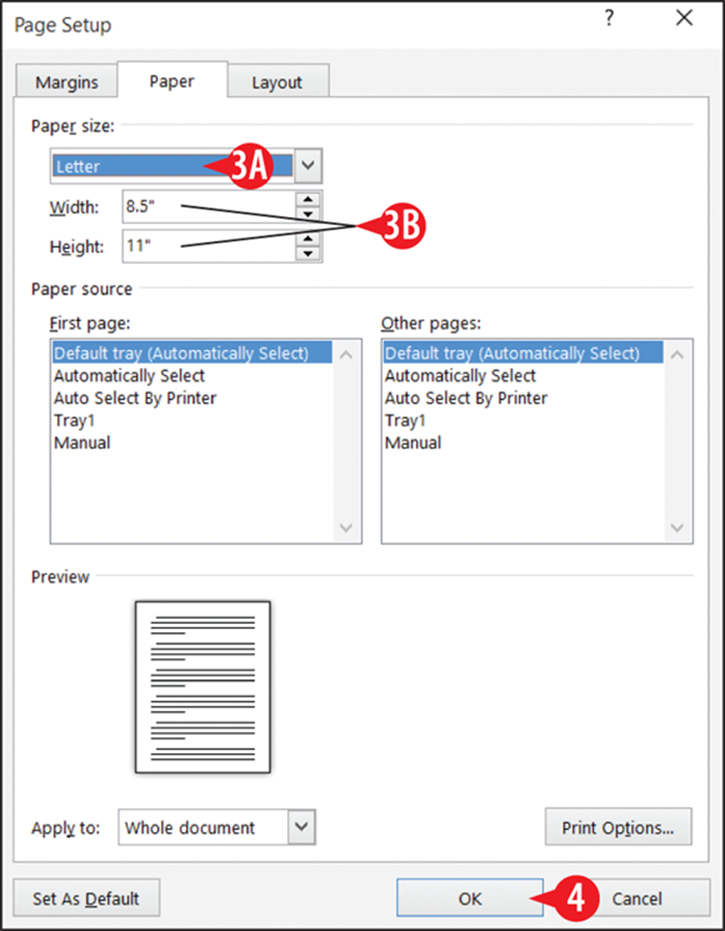
Figure 4-4: Choose a custom paper size in the Page Setup dialog box, on the Paper tab.
When printing a multipage document, you might want the first page to pull paper from a different paper tray in your printer. For example, it is common in multipage business letters for the first page to be on letterhead and subsequent pages to be on plain paper. In the Paper source area of the dialog box (refer to Figure 4-4) you can choose a different paper source for the first page and for other pages.
Set page orientation
Page orientation is pretty simple; there aren’t any options for it. Here’s how you do it:
![]() On the Layout tab, click Orientation.
On the Layout tab, click Orientation.
![]() Click Portrait or Landscape.
Click Portrait or Landscape.
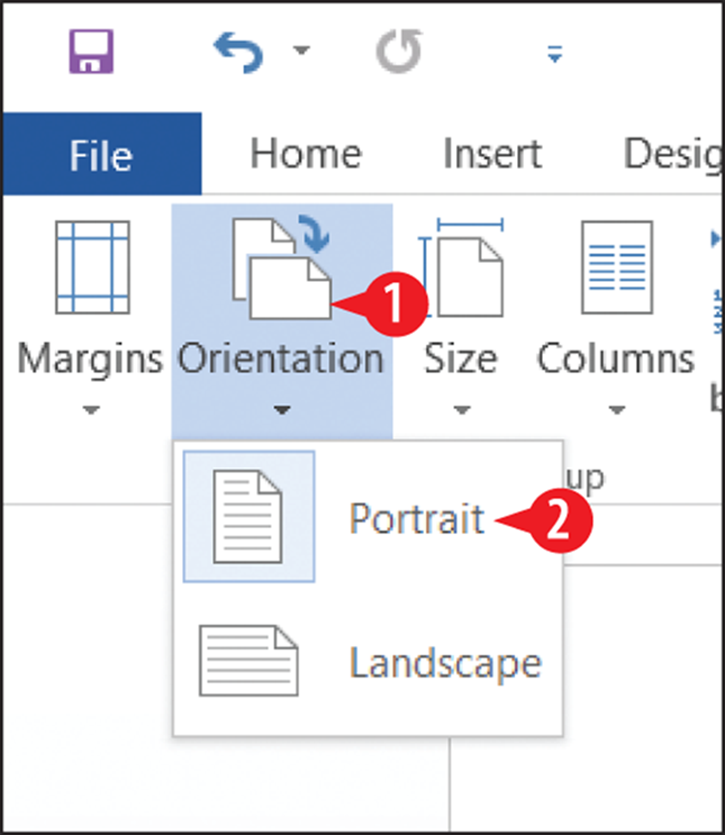
Figure 4-5: Switch between portrait and landscape orientations.
Use page headers and footers
Headers and footers contain content that repeats at the top and bottom of each page, respectively, outside of the top and bottom margins. Every document has a header and footer area, which are both empty by default. The header and footer appear in Print Layout view, Read Mode, and Web Layout view, and also on the printed page. (If you’re in Draft view, you might want to switch to Print Layout view to follow along in this section more easily.)
You can place text in the header and footer that repeats on every page, and you can insert a variety of codes in them that display information such as page numbers, dates, and times.
Number the pages
Have you ever dropped a stack of papers that needed to stay in a certain order? If the pages were numbered, putting them back together was fairly simple. If not, what a frustrating, time-consuming task.
Fortunately, Word makes it very easy to number your document pages. And you can choose from a variety of numbering styles and formats. When you number pages in Word, you don’t have to manually type the numbers onto each page. Instead, you place a code in the document that numbers the pages automatically. Sweet!
When you use the Page Number feature in Word, it automatically inserts the proper code in either the header or the footer so that each page is numbered consecutively.
Page numbers are visible only in Print Layout view, Read Mode, Print Preview, and on the printouts themselves. You don’t see the page numbers if you’re working in Draft view or Web Layout view, even though they’re there.
To number pages, follow these steps:
![]() On the Insert tab, click Page Number. A menu appears.
On the Insert tab, click Page Number. A menu appears.
![]() Point to Top of Page or Bottom of Page, depending on where you want the page numbers. A submenu appears.
Point to Top of Page or Bottom of Page, depending on where you want the page numbers. A submenu appears.
![]() Click one of the presets. The document enters header/footer mode, and the new page number appears in either the header or footer.
Click one of the presets. The document enters header/footer mode, and the new page number appears in either the header or footer.
The Plain Number 1, 2, and 3 presets are identical except for the placement of the page number, on the left, center, or right, respectively.
4. If you want to further edit the header or footer, do so. Otherwise, double-click in the main part of the document to exit from header/footer mode.
In step 4 you can also click Close Header and Footer on the Header & Footer Tools Design tab to return to normal editing.
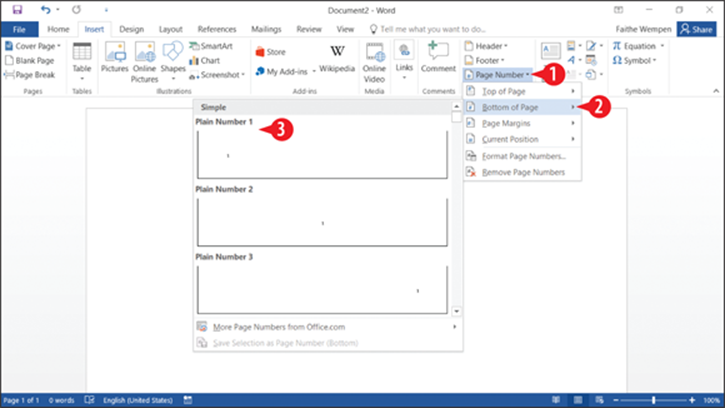
Figure 4-6: Choose a page number position.
Here are some additional things you can do with page numbers in Word from the Page Number button’s list (Figure 4-6):
· Point to Page Margins for a selection of presets in which the page numbers appear in the right or left margin area.
· Point to Current Position for a selection of presets that enable you to place the page number code in the body of the document rather than in the header or footer.
· Click Format Page Numbers to open a dialog box in which you can select a page number format. Format in this context does not mean font, size, or color; instead it means the numbering format, like Arabic numerals (1, 2, 3) versus Roman numerals (I, II, III).
· Click Remove Page Numbers to remove all page numbering codes.
Type text in the header or footer area
In addition to a page number, you can put other content in the header and footer areas of your document. For example, if you’re typing the minutes of a club meeting, you might want to put the club’s name in the header so that it appears across the top of each page.
Here are two ways of putting content into them: You can use presets to insert codes and formatting, or you can type text and insert codes manually into the headers and footers.
To use a preset, do the following:
![]() On the Insert tab, click the Header button, or click the Footer button.
On the Insert tab, click the Header button, or click the Footer button.
![]() Click one of the presets that appears on the list.
Click one of the presets that appears on the list.

Figure 4-7: Choose a header or footer preset.
To create your own header or footer, follow these steps:
1A. In Page Layout view, double-click the top or bottom margin area of the page.
OR
1B. On the Insert tab, click the Header button or the Footer button and then choose Edit Header or Edit Footer from the menu that appears.
The Header & Footer Tools Design tab appears on the Ribbon.
2. Position the insertion point where you want the header or footer text to appear.
The header and footer have preset tab stops: a center tab stop in the center, and a right-aligned tab stop at the right. So, in step 2, if you want to place something in the center, press Tab once; if you want to place something on the right, press Tab twice.
3. Type the text that you want to appear.
![]() (Optional) If you want to switch between the header and footer, click Go to Header or Go to Footer.
(Optional) If you want to switch between the header and footer, click Go to Header or Go to Footer.
![]() Click Close Header and Footer.
Click Close Header and Footer.

Figure 4-8: Type text into the header or footer area.
In a complex document, you can get very fancy with headers and footers using some of the advanced options on the Header & Footer Tools Design tab, as shown in Figure 4-9. For example:
![]() You can choose to have a different header and footer on the first page. That might be useful if the first page is a cover sheet or title page.
You can choose to have a different header and footer on the first page. That might be useful if the first page is a cover sheet or title page.
![]() You can also have different headers and footers on odd and even pages. That’s handy when you’re printing a double-sided booklet, for example, so the page numbers can always be on the outside edges.
You can also have different headers and footers on odd and even pages. That’s handy when you’re printing a double-sided booklet, for example, so the page numbers can always be on the outside edges.
![]() You can also create section breaks (covered later in this chapter) and have a different header and footer in each section. When you use multiple headers and footers in a document, you can move between them by clicking the Previous and Next buttons.
You can also create section breaks (covered later in this chapter) and have a different header and footer in each section. When you use multiple headers and footers in a document, you can move between them by clicking the Previous and Next buttons.
![]() To adjust the header and footer size and positioning, use the settings in the Position group. You can specify a Header from Top and Footer from Bottom position there. For example, if you want a taller header section, increase the Header from Top setting.
To adjust the header and footer size and positioning, use the settings in the Position group. You can specify a Header from Top and Footer from Bottom position there. For example, if you want a taller header section, increase the Header from Top setting.

Figure 4-9: Use the Header & Footer Tools Design tab to set options for your headers and footers.
Insert a page number code in a header or footer
If you already have the header or footer open for editing (steps 1 and 2 of the previous procedure), you can easily insert a page number code at the insertion point’s current position by doing the following:
![]() On the Header & Footer Tools Design tab, click Page Number.
On the Header & Footer Tools Design tab, click Page Number.
![]() Click Current Position.
Click Current Position.
![]() Click Plain Number.
Click Plain Number.
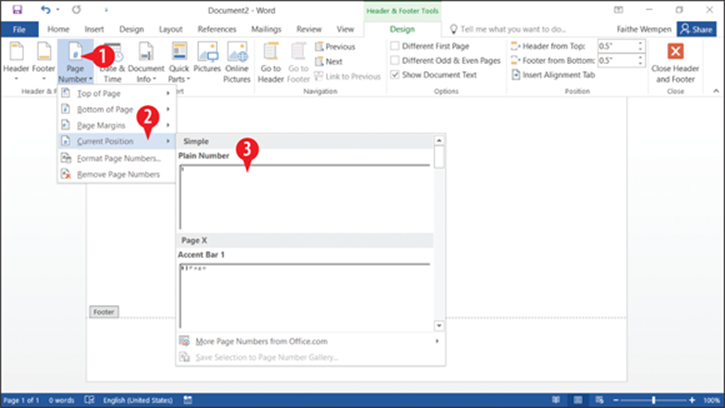
Figure 4-10: You can insert a page numbering code at the insertion point.
Insert a date or time code in a header or footer
If you want to insert a date or time code that automatically updates, do the following:
![]() On the Header & Footer Tools Design tab, click Date & Time.
On the Header & Footer Tools Design tab, click Date & Time.
![]() Click the desired format.
Click the desired format.
![]() Mark the Update automatically check box.
Mark the Update automatically check box.
![]() Click OK.
Click OK.
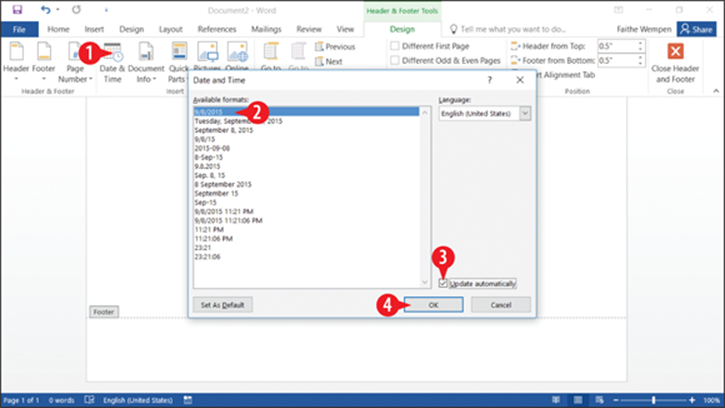
Figure 4-11: Insert an automatically updating date and time code in the header or footer.
Create page breaks
Word automatically creates a page break when you reach the bottom of a page. That’s called a soft page break because it is variable. If you delete some content on the previous page, the page break point changes. You can also create hard page breaks, which are manually created breaks that don’t change when the document content changes. For example, you might insert a hard page break to start a new chapter of a story on a new page.
The easiest way to create a hard page break is to press Ctrl+Enter. That way you don’t even have to take your hands off the keyboard. You can also choose Layout, Breaks, Page.
To delete a hard page break, move the insertion point to the top of the page that follows the break, and then press Backspace.
If you have a hard time finding the page break to delete it, switch to Draft view.
Create section breaks
Word has a lot of settings that are considered document-wide—in other words, they affect every page of the document. These include vertical page alignment, page size and orientation, line numbering, newspaper-style columns, page watermarks, and headers and footers. These settings are stored in the document’s end-of-file marker.
However, there are plenty of times when you might want different document-wide settings in a certain portion of a document, like a different number of columns or a different chapter title in the footer. For those situations, you can create section breaks. A section break is a divider that separates one section of a document from another. A section break can store all the same settings as an end-of-file marker, so you can have different document-wide settings on each side of the section break.
It’s important to understand that a section break is not the same thing as a page break, although some types of section break also serve as page breaks. There are five types of section breaks:
· New page: Starts a new section on a new page.
· Continuous: Starts a new section on the same page.
· Even page: Starts a new section on a new page, and that page must be even-numbered.
· Odd page: Starts a new section on a new page, and that page must be odd-numbered.
· New column: Starts the new section in a new column. This is relevant only in a multicolumn layout. (See “Set up a multicolumn document” later in this chapter.)
If you select text before you insert a section break, you actually get two section breaks, one on each side of the selection. This places the selection in its own separate section from the rest of the document. If you do not select text before inserting a section break, you get a single break at the insertion point.
To create a section break, follow these steps:
1A. Select the content that you want to be in its own section.
OR
1B. Position the insertion point where you want the section break to occur.
![]() On the Layout tab, click Breaks. A menu opens.
On the Layout tab, click Breaks. A menu opens.
![]() Click the desired section break type from the Section Breaks area of the menu.
Click the desired section break type from the Section Breaks area of the menu.
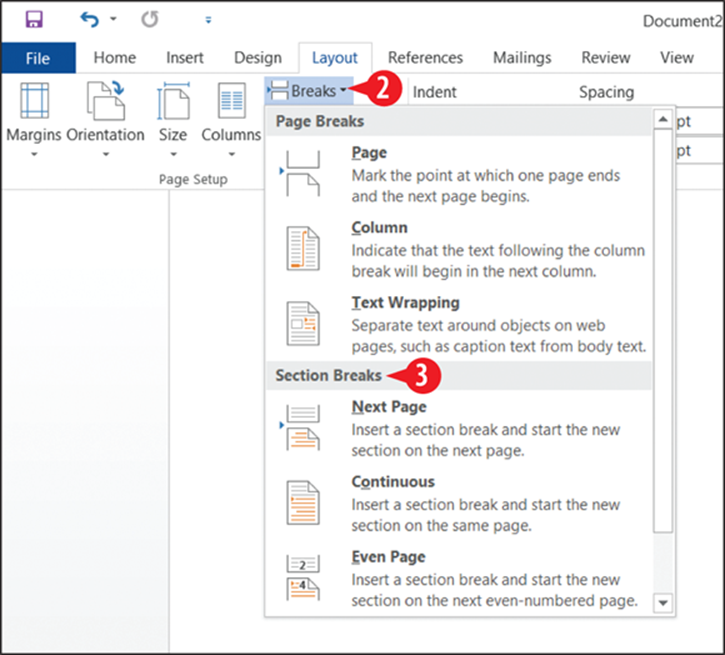
Figure 4-12: Choose a section break type from the Breaks button’s menu.
To delete a section break, position the insertion point just below the section break and then press Backspace. If you have trouble locating the section break, switch to Draft view. Both page and section breaks appear as horizontal lines in Draft view, as shown in Figure 4-13.
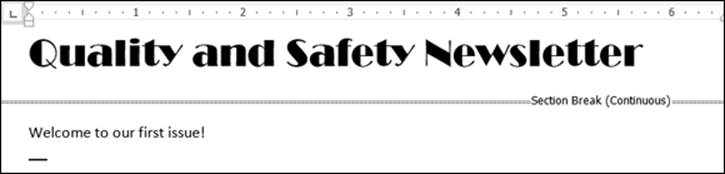
Figure 4-13: Section breaks are easily visible in Draft view.
Set up a multicolumn document
There are two kinds of multicolumn layouts you can create in Word: tabular and newspaper-style.
A tabular layout is a table that’s used for text positioning. Create a table, as you will learn in Chapter 5, and remove the borders from all cells. The text lines up neatly in the table columns, and your audience is none the wiser that you used a table to make the layout. A tabular layout can coexist in a document with normal text without using section breaks. Tabular layouts are good for aligning the entries in multiple columns with one another, such as a grid of names and addresses.
Newspaper columns, which I cover here, are entirely different. Text snakes down a narrow column from top to bottom, and then starts up again at the top of the next column. In order to use varying numbers of newspaper-style columns in different parts of a document, you have to employ section breaks. Newspaper columns are good for creating newsletters, brochures, and other graphical publications.
Follow these steps to use multiple newspaper-style columns:
1A. To affect only certain paragraphs, select them.
OR
1B. Position the insertion point within the section that you want to affect. If the document has no section breaks, the setting will apply to the entire document.
![]() On the Layout tab, click Columns.
On the Layout tab, click Columns.
![]() Click the desired number of columns.
Click the desired number of columns.
![]() The Left and Right settings in Figure 4-14 represent two-column layouts where one column is wider than the other.
The Left and Right settings in Figure 4-14 represent two-column layouts where one column is wider than the other.
![]() If you want more control over the column widths, choose More Columns from the menu, and then specify exact column widths in the Columns dialog box.
If you want more control over the column widths, choose More Columns from the menu, and then specify exact column widths in the Columns dialog box.
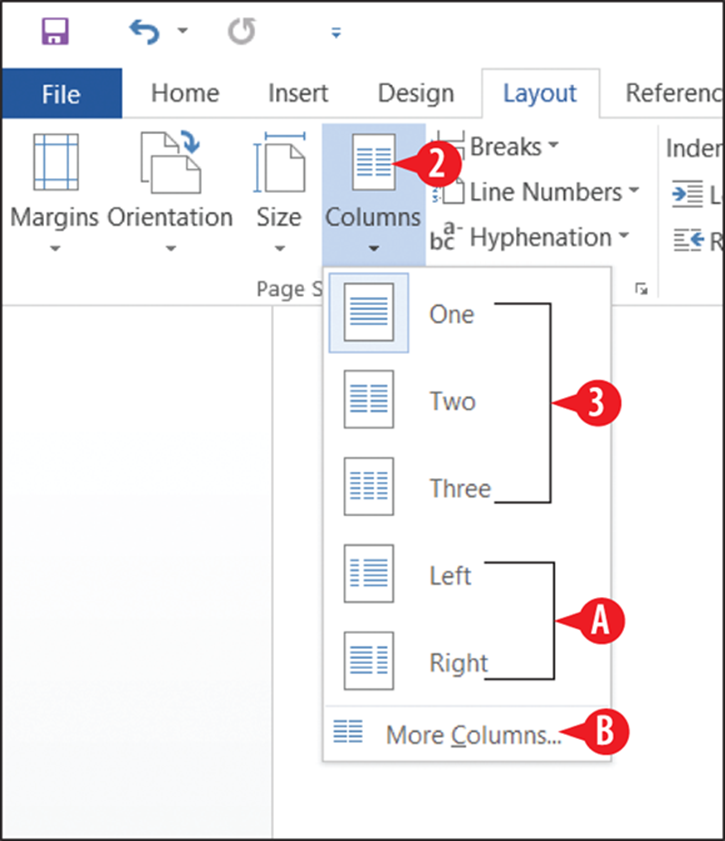
Figure 4-14: Select a number of columns.
If you selected certain paragraphs in step 1A, Word creates two new section breaks in step 3: one at the beginning of the selected text and one at the end of it. The setting you choose in step 3 applies only to the section between those two breaks.
To return a section to using only one column, repeat the steps, selecting One as the number of columns.
Create a page border
A page border is a decorative border around the entire page. It is positioned according to the margin settings for that page. So, for example, if you have 1” margins set up for all sides of the document, the border will appear 1” from the edge on all sides.
Create a simple page border
You can apply a border to an entire page in much the same way you did with a paragraph in Chapter 3. You can use any combination of line style, weight, and color you like.
To create a page border, follow these steps:
![]() On the Design tab, click Page Borders. The Borders and Shading dialog box opens with the Page Border tab displayed.
On the Design tab, click Page Borders. The Borders and Shading dialog box opens with the Page Border tab displayed.
![]() Choose a line style from the Style list.
Choose a line style from the Style list.
![]() Choose a color from the Color list.
Choose a color from the Color list.
![]() Choose a line thickness from the Width list.
Choose a line thickness from the Width list.
![]() Click OK.
Click OK.
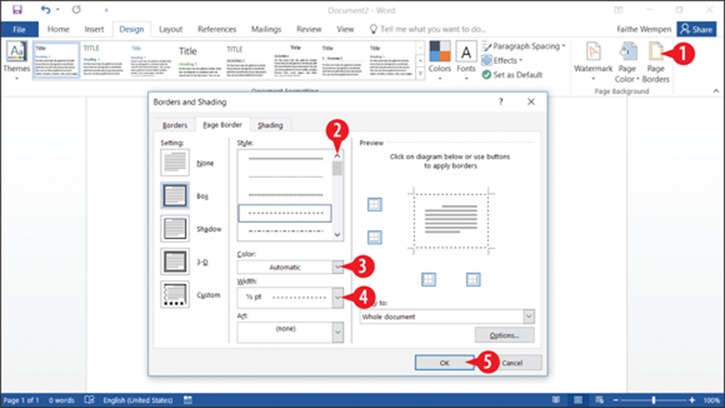
Figure 4-15: Set the options for a page border.
Apply BorderArt
BorderArt uses a repeated graphic image to create a page border. You can select an image and then select a size at which the image should appear. That size determines the border thickness.
To apply BorderArt, follow these steps: 1.
1. On the Design tab, click Page Borders. The Borders and Shading dialog box opens with the Page Border tab displayed.
![]() Open the BorderArt list and click the desired image.
Open the BorderArt list and click the desired image.
![]() In the Width box, use the arrow buttons to increase or decrease the size.
In the Width box, use the arrow buttons to increase or decrease the size.
![]() Check the border in the Preview area to see how it will appear.
Check the border in the Preview area to see how it will appear.
![]() Click OK.
Click OK.
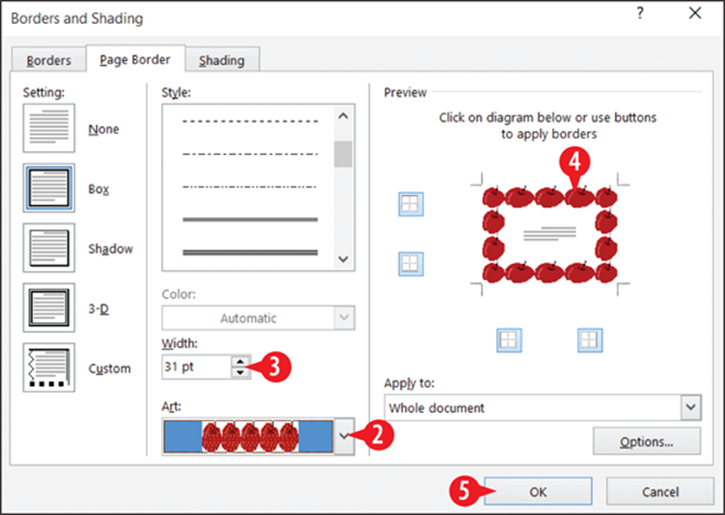
Figure 4-16: Create a graphical border with BorderArt.
To turn off BorderArt, repeat the steps but choose (none) in step 2.
Apply a page background color
Pages have no background by default. That’s usually a good thing, because printer ink is expensive, and you’d go broke printing a colored background on every page. Sometimes, though, you might want a background, such as in a document that you plan to distribute online rather than in print.
To color the background, follow these steps:
![]() On the Design tab, click Page Color.
On the Design tab, click Page Color.
![]() Click the desired color from the Theme Colors or Standard Colors section.
Click the desired color from the Theme Colors or Standard Colors section.
OR
![]() Click More Colors, and then select a color from the Colors dialog box and click OK.
Click More Colors, and then select a color from the Colors dialog box and click OK.
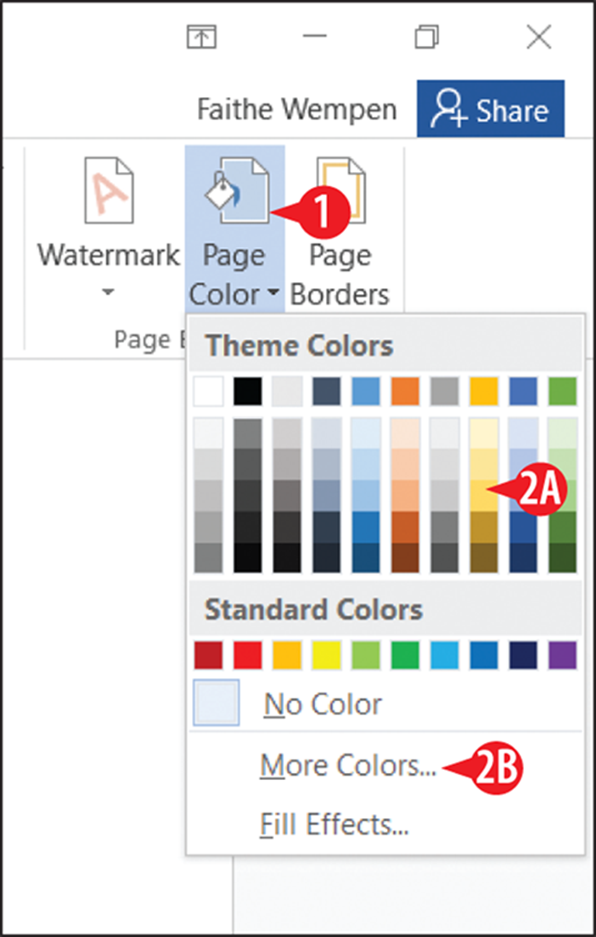
Figure 4-17: Choose a page background color.
Add line numbers
Line numbering can help people refer to specific locations in the document more easily when they are collaborating on drafts. Some legal documents also make use of line numbers.
Line numbering is a document-wide setting (although you can apply it on a section-by-section basis, as with most other document formatting).
You can enable line numbering at a basic level by choosing a setting from the Line Numbers button’s drop-down list on the Layout tab, as shown in Figure 4-18. Turn line numbering off by choosing None from this list. (See ![]() in Figure 4-18.)
in Figure 4-18.)
For additional numbering options, do the following:
![]() On the Layout tab, click Line Numbers, and then click Line Numbering Options. The Page Setup dialog box opens to the Layout tab.
On the Layout tab, click Line Numbers, and then click Line Numbering Options. The Page Setup dialog box opens to the Layout tab.
![]() Click the Line Numbers button.
Click the Line Numbers button.
![]() Mark the Add line numbering check box.
Mark the Add line numbering check box.
![]() Set any line numbering options as desired.
Set any line numbering options as desired.
![]() Click OK.
Click OK.
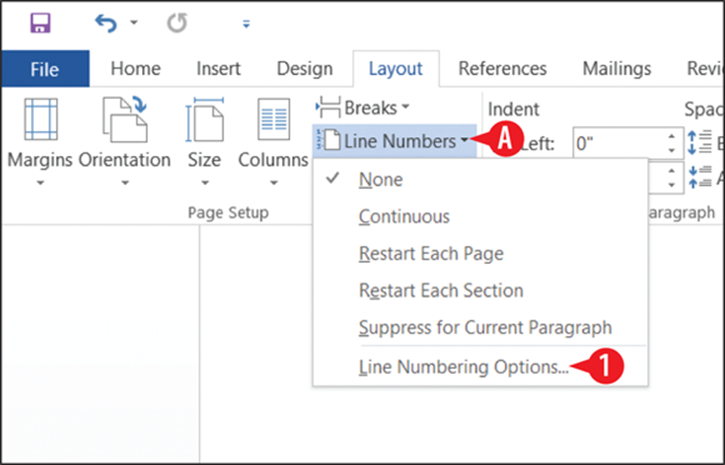
Figure 4-18: Choose a line numbering setting.
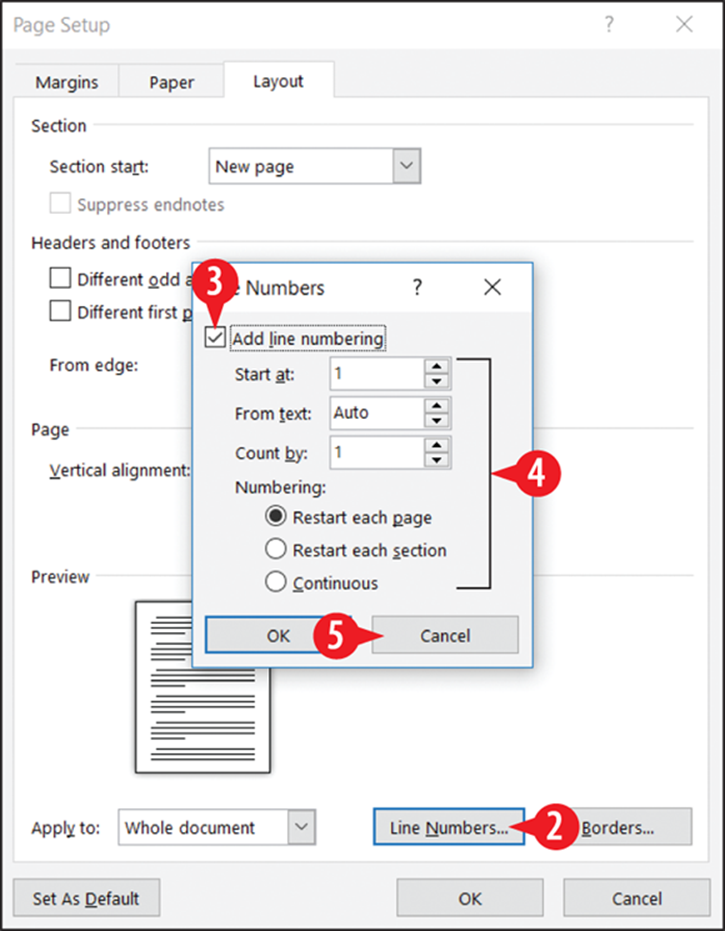
Figure 4-19: Access the Line Numbers button from the Layout tab.