PowerShell in Depth, Second Edition (2015)
Part 3. PowerShell scripting and automation
Chapter 23. PowerShell workflows
This chapter covers
· Defining a workflow and learning when to use it
· Understanding workflow syntax
· Running a workflow
· Troubleshooting a workflow
Workflows are an important new feature that was introduced in PowerShell v3. They’re an incredibly rich, complex technology that we can’t possibly cover comprehensively in this chapter—they deserve their own book. But they are a type of tool you can create and make great use of, which is why we want to include this chapter as an introduction to them.
We view workflows as a hardcore programming topic, and that’s another reason we won’t try to give them full coverage in this chapter. Instead, we’re going to skim them lightly, showing you enough to create a basic workflow on your own, and we’ll continue to assume that you’re an administrator and not a professional developer. You have plenty of time to explore on your own, using this chapter as your starting point.
23.1. Workflow overview
Workflows are a type of PowerShell command, just as cmdlets and functions are types of commands. In fact, one of the easiest ways to understand workflows is to contrast them with their closest cousin: functions.
Functions are declared with the function keyword, as you’ve seen several times in earlier chapters; workflows are declared with the workflow keyword. Functions are executed by PowerShell itself; workflows are translated to the .NET Framework’s Windows Workflow Foundation (WWF) and executed by WWF external to PowerShell. Both functions and workflows execute a given set of commands in a specific sequence, but workflows—thanks to WWF—include detailed logging and tracking of each and include the ability to retry steps that fail because of an intermittent network hiccup, for example, or some other transitory issue. Functions do one thing at a time; workflows can do one thing at multiple times—they can do parallel multitasking. Functions start, run, and finish; a workflow can pause, stop, and restart. If you turn off your computer in the middle of a function, the function is lost; if you do so as a workflow is running, the workflow can potentially be recovered and resumed automatically.
Note
Probably the most important take away from this chapter is that although workflows are written using a PowerShell-like syntax, they aren’t PowerShell. As we said earlier, workflows translate to the WWF engine and execute externally to PowerShell.
Table 23.1 illustrates some of the differences between a function and a workflow.
Table 23.1. Function or workflow
|
Function |
Workflow |
|
Executed by PowerShell |
Executed by workflow engine |
|
Logging and retry attempts through complicated coding |
Logging and retry attempts part of the workflow engine |
|
Single action processing |
Supports parallelism |
|
Run to completion |
Can run, pause, and restart |
|
Data loss possible during network problems |
Data can persist during network problems |
|
Full language set and syntax |
Limited language set and syntax |
|
Run cmdlets |
Run activities |
Workflow is incorporated into the shell by PSWorkflow; that module extends PowerShell to understand workflows and to execute them properly. The module is autoloaded when you define a workflow in either the console or the PowerShell ISE.
Tip
We don’t recommend executing PowerShell workflows from the ISE. You’d experience problems, especially when a remote machine is rebooting and you’re expecting the workflow to wait on the reboot.
Workflows are exposed as commands, meaning you execute them just like any other PowerShell commands. For example, if you created a workflow named Do-Something, you’d just run Do-Something to execute it or Do-Something –AsJob to run it in PowerShell’s background job system. Executing a workflow as a job is cool, because you can then use the standard Job cmdlets (like Get-Job and Receive-Job) to manage them. There are also Suspend-Job and Resume-Job commands to pause and resume a workflow job—these cmdlets only work with workflow-related jobs. They won’t work on standard background jobs or WMI jobs, for instance.
Note
Most of the workflow samples in this chapter are designed to illustrate concepts and not intended as practical, production-worthy workflows. Also, when it comes to naming your workflows you should keep to the standard verb-noun naming convention, even though we didn’t always do so in this chapter. Take this chapter as an example of “Do as I say, not as I do.”
23.2. Workflow basics
A workflow is a set of commands, technically known as activities, which you want to execute to fulfill a larger IT task. For example, you might have a checklist of tasks when building a new server:
1. Create a standard folder hierarchy.
2. Add standard Windows roles and features.
3. Configure event log settings.
4. Configure key services.
5. Configure the page file.
6. Reboot.
7. Create a baseline XML configuration report.
You can construct a workflow of PowerShell expressions to complete these tasks and execute it against any number of remote computers. Workflows are intended for a chain of long-running, unattended tasks that’s robust enough to survive network interruptions and persistent enough to survive reboots—something they accomplish by saving their status to disk in a process called checkpointing. Workflows are designed for performance and scalability through connection pooling, parallel command execution, and connection throttling. Workflows can even be suspended and restarted. If you think of PowerShell as a management engine for servers in a cloud, this workflow concept begins to make a lot of sense.
Workflows have been around for quite a while as part of the .NET Framework and received a major overhaul in version 4.0. In the past, you needed to use Visual Studio to build and deploy a workflow in a complex XAML file format, which limited who had access to this technology. But with PowerShell v3 and later, any IT pro can create a workflow using PowerShell commands. You don’t have to be a developer and you don’t need Visual Studio.
Note
The whole point of PowerShell workflow is to give an IT pro the tools to build workflows without developing something in Visual Studio. You should approach PowerShell workflows as “wrappers” for the underlying workflow engine. These wrappers attempt to simplify much of the underlying complexity. If you’re a .NET developer, you’ll most likely continue creating workflows as you have in the past. This chapter is targeted at the IT pro looking to get started with workflows and leverage their PowerShell skills.
A workflow looks a lot like a PowerShell function:
Workflow DeployServer {
#my workflow commands
}
But don’t think you can simply take a function and change it to a workflow. Not only are there a substantial number of significant technical differences, there’s a paradigm shift you need to adopt.
In the past, you’d run scripts or functions interactively to manage servers and desktops in your environment. Long-running tasks could be thrown into a background task. Or you might’ve leveraged PowerShell Remoting to distribute the workload. But typically everything came back to the machine that launched the command. With workflow, the idea is to provide a command framework to one or more remote computers and then let it go. Although you can run workflows locally, the intent is that you’ll be managing remote computers, providing a set of instructions that they can execute on their own.
23.2.1. Common parameters for workflows
Just by using the workflow keyword, you give your workflow command a large set of built-in common parameters. We’re not going to provide an extensive list, but here are some of the more interesting ones (and you can consult PowerShell’s about_ WorkflowCommonParameters documentation for the complete list):
· -PSComputerName—A list of computers to execute the workflow on
· -PSParameterCollection—A list of hash tables that specify different parameter values for each target computer, enabling the workflow to have variable behavior on a per-machine basis
· -PSCredential—The credential to be used to execute the workflow
· -PSPersist—Forces the workflow to save (“checkpoint”) the workflow data and state after executing each step (we’ll show you how you can also do this manually)
In addition, there are a variety of parameters that let you specify remote connectivity options, such as –PSPort, -PSUseSSL, -PSSessionOption, and so on; these correspond to the similarly named parameters of remoting commands like Invoke-Command and New-PSSession.
The values passed to these parameters are accessible as values within the workflow. For example, a workflow can access $PSComputerName to get the name of the computer that particular instance of the workflow is executing against right then.
23.2.2. Activities and stateless execution
Workflow is built around the concept of activities. Each PowerShell command that you run within a workflow is a single, stand-alone activity. It may look like a cmdlet and have the same name and (mainly) the same set of parameters (see about_Activity-CommonParameters), but when you create a workflow you’re dealing with a workflow activity, not a PowerShell cmdlet. This is the source of a lot of the confusion around workflows that we mentioned earlier.
So the big thing to get used to in a workflow is that each command, or activity, executes entirely on its own. Because a workflow can be interrupted and later resumed, each command has to assume that it’s running in a completely fresh, brand-new environment. That means variables created by one command can’t be used by the next command—which can get a bit difficult to keep track of, especially if you’re accustomed to traditional PowerShell functions, which don’t work that way at all. Workflow does support an InlineScript block, which will execute all commands inside the block within a single PowerShell session. Everything within the block is, essentially, a stand-alone mini-script.
Now, this isn’t to say that variables don’t work at all—that’d be pretty pointless. For example, consider the script in the following listing.
Listing 23.1. Example workflow with variables
workflow Test-Workflow {
$a = 1
$a
$a++
$a
$b = $a + 2
$b
}
Test-Workflow
Run the code in listing 23.1, and you should see the output 1, 2, and 4, with each number on its own line. That’s the expected output, and seeing that will help you verify that the workflow is operating on your system. Now try the example in the next listing.
Listing 23.2. Example workflow that won’t work properly
workflow Test-Workflow {
$obj = New-Object -TypeName PSObject
$obj | Add-Member -MemberType NoteProperty `
-Name ExampleProperty `
-Value 'Hello!'
$obj | Get-Member
}
Test-Workflow
The script in listing 23.2 doesn’t produce the intended results, in that the object in $obj won’t have an ExampleProperty property containing “Hello!” That’s because Add-Member runs in its own space, and its modification to $obj doesn’t persist to the third command in the workflow. To make this work, you could wrap the entire set of commands as an InlineScript, forcing them to all execute at the same time, within a single PowerShell instance. Our next listing shows this example.
Listing 23.3. Example workflow using InlineScript
workflow Test-Workflow {
InlineScript {
$obj = New-Object -TypeName PSObject
$obj | Add-Member -MemberType NoteProperty `
-Name ExampleProperty `
-Value 'Hello!'
$obj | Get-Member
}
}
Test-Workflow
Try each of these three examples and compare their results. Workflows do take a bit of getting used to, and these simple examples will help you to grasp the main differences in workflows.
23.2.3. Persisting state
The state of a workflow consists of its current output, the task that it’s currently executing, and other information. It’s important that you help a workflow maintain this state, especially when kicking off a long-running command that might be executed. To do so, run the Checkpoint-Workflow command (or the Persist workflow activity). You can force this to happen after every single command is executed by running the workflow with the –PSPersist switch. State information is saved to disk by WWF so that the workflow can be resumed after a power failure or other problem or if you intentionally need to pause the workflow.
23.2.4. Suspending and resuming workflows
A workflow can suspend itself by running Suspend-Workflow within the workflow. You might do this, for example, if you’re about to run some high-workload command that can only be run during a maintenance window. Before running the command, you check the time, and if you’re not in the window, you suspend the workflow. Someone would need to manually resume the workflow (or schedule the resumption in Task Scheduler) by running Resume-Job and providing the necessary job ID.
23.2.5. Workflow limitations
Workflows are intended, by design, to run without any user interaction, usually via a workflow Remoting session. As a result, they’re configured to allow only a subset of the full PowerShell language. Technically, you’re executing a series of workflow actions that happen to look like cmdlets, which leads to some limitations and “gotchas” that you must be aware of when creating a workflow.
Note
When you write a workflow, you use PowerShell commands and scripts that look familiar. But when the workflow is executed, PowerShell must translate all of them to a language understood by WWF, which runs the workflow. So only those things that can be translated to WWF can be used within a workflow.
First and foremost, all objects and data must be serializable or your workflow will fail. In other words, if a command can’t return the data as serialized XML, it can’t be used in a workflow. One good test to see if a command’s output is serializable is to see if the command fails when run through Invoke-Command. If it does, it’ll most likely also fail when used within a workflow.
Workflows can be designed to use cmdlet binding and parameters, but within the workflow you must use full command and parameter names. Positional parameters aren’t allowed in PowerShell v3, for example:
PS C:\> Workflow Test { Param([string]$path) dir $path }
At line:1 char:42
+ Workflow Test { Param([string]$path) dir $path }
+ ~~~~~
Positional parameters are not supported in a Windows PowerShell Workflow.
To invoke this command, use explicit
parameter names with all values. For example: "Command -Parameter
<value>".
+ CategoryInfo : ParserError: (:) [], ParseException
+ FullyQualifiedErrorId : PositionalParametersNotSupported
This code failed because it tried to use a positional parameter. Here’s the correct syntax:
PS C:\> Workflow Test { Param([string]$path) dir -Path $path }
Note
The code will work as written in PowerShell v4.
As you can see, aliases are allowed, but we still recommend adhering to the best practice of using full command names. Here’s a more complete, albeit simple, example:
Workflow Test {
Param([string]$path)
Get-Childitem -Path path -Recurse -File |
Measure-Object -Property length -sum -Average |
Add-Member -MemberType NoteProperty -Name Path -Value Path -PassThru
}
Other limitations you might face include the following:
· Workflows don’t use Begin, Process, and End script blocks. One implication of this is that you can’t pipe anything into a workflow. Parameter attributes like ValueFromPipeline aren’t allowed.
· Workflows don’t use traps for error handling but rather use Try/Catch.
· There’s no built-in event handling with a workflow. Though it’s possible to build your own eventing, doing so will be a complicated task. We don’t think eventing is appropriate for a workflow anyway. If you think of a workflow as a chain of activities, eventing doesn’t play a role.
· PowerShell workflows aren’t designed to be interactive. As such, you can’t use Write-Host commands. You won’t get an error until you try to run a workflow that uses it, although you can use Write-Verbose and Write-Progress. This also means you generally can’t use Read-Host either. Think of workflows as system-run and isolated scripts.
· Workflows can’t use comment-based help like advanced functions. You can include as much internal documentation as you like with comment blocks, but you can’t do formal help like you would with advanced functions. If you need to include help, you’ll need to create an external help file using the Microsoft Assistance Markup Language (MAML) format.
You’ll also need to be careful about what you use for variable names because there are more restrictions. As a rule of thumb, any keyword in VB.NET isn’t allowed as a variable name. But hopefully you won’t have to worry too much about this. If you use a “bad” variable name, the workflow will fail with an error like this:
The workflow 'ParamDemo' could not be started: The following errors were
encountered while processing the workflow tree:
'DynamicActivity': The private implementation of activity '1:
DynamicActivity'
has the following validation error: Compiler error(s) encountered
processing
expression "end".
Expression expected.
At line:327 char:21
+ throw (New-Object
System.Management.Automation.ErrorRecord $ ...
+ ~~~~~~~~~~~~~~~~~~~~~~~~~~~~~~~~~~~~~~~~~~~~~~~~~~~~~~~~~~~~~~~~~~~~~~~
+ CategoryInfo : InvalidArgument: (System.Manageme...etersDic
tionary:PSBoundParametersDictionary) [],
RuntimeException
+ FullyQualifiedErrorId : StartWorkflow.InvalidArgument
The error message, which we’ve boldfaced, states where the error occurred. This says you can’t use $end as a variable name. A simple rename and perhaps a find and replace are all that’s required.
A number of cmdlets aren’t appropriate or even legal when used in a workflow. The most likely commands to avoid, or those that will throw an exception when you try to invoke the workflow, are as follows:
|
Add-History |
Add-PSSnapin |
Clear-History |
Clear-Variable |
|
Complete-Transaction |
Connect-PSSession |
Debug-Process |
Disable-PSBreakpoint |
|
Disconnect-PSSession |
Enable-PSBreakpoint |
Enter-PSSession |
Exit-PSSession |
|
Export-Alias |
Export-Console |
Export-ModuleMember |
Export-PSSession |
|
Format-Custom |
Format-List |
Format-Table |
Format-Wide |
|
Get-Alias |
Get-CimSession |
Get-ControlPanelItem |
Get-Credential |
|
Get-FormatData |
Get-History |
Get-PSBreakpoint |
Get-PSCallStack |
|
Get-PSSnapin |
Get-Transaction |
Get-Variable |
Import-Alias |
|
Import-PSSession |
Invoke-Command |
Invoke-History |
New-Alias |
|
New-Module |
New-Object |
New-PSDrive |
New-PSSession |
|
New-PSSession-ConfigurationFile |
New-PSSessionOption |
New-Variable |
Out-Default |
|
Out-GridView |
Out-Host |
Out-Null |
Pop-Location |
|
Push-Location |
Read-Host |
Receive-PSSession |
Register-CimIndicationEvent |
|
Remove-CimSession |
Remove-PSBreakpoint |
Remove-PSDrive |
Remove-PSSnapin |
|
Remove-TypeData |
Remove-Variable |
Set-Alias |
Set-Location |
|
Set-PSBreakpoint |
Set-PSDebug |
Set-StrictMode |
Set-Variable |
|
Show-Command |
Show-ControlPanelItem |
Show-EventLog |
Start-Transaction |
|
Trace-Command |
Undo-Transaction |
Update-FormatData |
Update-TypeData |
|
Use-Transaction |
Write-Host |
Note
Even though the commands in this list should be avoided, it may be possible to use some of them within an InlineScript block.
In addition, for performance purposes, some cmdlets execute only locally in a workflow. That said, you might be able to execute them remotely using an InlineScript activity, which we’ll cover later in the chapter. The following commands are always executed locally:
|
Add-Member |
Compare-Object |
ConvertFrom-CSV |
|
ConvertFrom-Json |
ConvertFrom-StringData |
Convert-Path |
|
ConvertTo-CSV |
ConvertTo-HTML |
ConvertTo-Json |
|
ConvertTo-XML |
Foreach-Object |
Get-Host |
|
Get-Member |
Get-Random |
Get-Unique |
|
Group-Object |
Measure-Command |
Measure-Object |
|
New-PSSessionOption |
New-PSTransportOption |
New-TimeSpan |
|
Out-Default |
Out-Host |
Out-Null |
|
Out-String |
Select-Object |
Sort-Object |
|
Update-List |
Where-Object |
Write-Debug |
|
Write-Error |
Write-Host |
Write-Output |
|
Write-Progress |
Write-Verbose |
Write-Warning |
Finally, workflow activities typically run isolated. You should minimize sharing variables across activities. This also means you have to pay close attention to scope. Don’t assume PowerShell will “find” a variable as it does in a normal script or function. There are some specific rules regarding scope that we’ll cover later in the chapter.
Workflows will take a bit more planning than a normal PowerShell script or function. We mentioned it earlier, but don’t try to take an existing function and slap on the Workflow keyword. Even if it runs without error, you most likely aren’t taking advantage of some cool features.
23.2.6. Parallelism
WWF is designed to execute tasks in parallel, and PowerShell exposes that capability through a modified ForEach scripting construct and a new Parallel construct. They work a bit differently.
With Parallel, the commands inside the construct can run in any order. Within the Parallel block, you can use the Sequence keyword to surround a set of commands that must be executed in order. That batch of commands may begin executing at any point, for example:
Workflow Test-Workflow {
"This will run first"
parallel {
"Command 1"
"Command 2"
sequence {
"Command A"
"Command B"
}
}
}
The output here might be
"This will run first"
Command 1
Command A
Command B
Command 2
“Command B” will always come after “Command A,” but “Command A” might come first, second, or third—there’s no guarantee. The commands actually execute at the same time, meaning “Command 1,” “Command 2,” and the sequence may all kick off at once, which is what makes the output somewhat nondeterministic. This technique is useful for when you have several tasks to complete, don’t care about the order in which they run, and want them to finish as quickly as possible.
The parallelized ForEach is somewhat different. In this situation you can execute a set of activities in parallel for every object in a collection of objects. Here’s what it looks like:
Workflow Test-Workflow {
Param ([string[]]$computername)
Foreach –parallel ($computer in $computerName) {
Do-Something –PScomputerName $computer
}
}
Here, WWF may launch multiple simultaneous Do-Something commands, each targeting a different computer. Execution should be roughly in whatever order the computers are stored in $ComputerName, although because of varying execution times the order of the results is nondeterministic.
Note
The –Parallel parameter for ForEach is valid only in a workflow.
Here’s an example that might make this concept easier to visualize. We have a simple workflow that writes a number multiplied by 2:
Workflow Demo-ForEachParallel {
foreach -parallel ($i in (1..20)) {
Write-Verbose -message "$((Get-Date).TimeOfDay) $i * 2 = $($i*2)"
Start-Sleep -seconds (Get-Random -Minimum 1 -Maximum 5)
}
}
We inserted a random sleep command to simulate the workflow actually doing something. This is what you can expect when you run it:
PS C:\> Demo-ForEachParallel -Verbose
VERBOSE: [localhost]:14:17:32.2171668 20 * 2 = 40
VERBOSE: [localhost]:14:17:32.2251678 19 * 2 = 38
VERBOSE: [localhost]:14:17:32.2301687 18 * 2 = 36
VERBOSE: [localhost]:14:17:32.2351650 17 * 2 = 34
VERBOSE: [localhost]:14:17:32.2401696 16 * 2 = 32
VERBOSE: [localhost]:14:17:32.2451692 15 * 2 = 30
VERBOSE: [localhost]:14:17:32.2512203 14 * 2 = 28
VERBOSE: [localhost]:14:17:32.2651769 13 * 2 = 26
VERBOSE: [localhost]:14:17:32.2711768 12 * 2 = 24
VERBOSE: [localhost]:14:17:32.2761756 11 * 2 = 22
VERBOSE: [localhost]:14:17:32.2811816 10 * 2 = 20
VERBOSE: [localhost]:14:17:32.2861792 9 * 2 = 18
VERBOSE: [localhost]:14:17:32.3001807 8 * 2 = 16
VERBOSE: [localhost]:14:17:32.3061793 7 * 2 = 14
VERBOSE: [localhost]:14:17:32.3101798 6 * 2 = 12
VERBOSE: [localhost]:14:17:32.3151774 5 * 2 = 10
VERBOSE: [localhost]:14:17:32.3201788 4 * 2 = 8
VERBOSE: [localhost]:14:17:32.3441826 2 * 2 = 4
VERBOSE: [localhost]:14:17:32.3401815 3 * 2 = 6
VERBOSE: [localhost]:14:17:32.3491854 1 * 2 = 2
From the timestamp you can see that all 20 numbers were processed essentially at the same time. But there may be situations where you want to process in parallel but in a more controlled manner. Starting with PowerShell v4, you can throttle this activity. Here’s a revised version of the demo workflow.
Workflow Demo-ForEachThrottle {
foreach -parallel -throttlelimit 4 ($i in (1..20)) {
write-verbose -message "$((Get-Date).TimeOfDay) $i * 2 = $($i*2)"
Start-Sleep -seconds (Get-Random -Minimum 1 -Maximum 5)
}
}
We boldfaced the one change. Now, PowerShell will process the collection of numbers in batches of 4.
PS C:\> Demo-ForeachThrottle -Verbose
VERBOSE: [localhost]:14:21:42.3276999 4 * 2 = 8
VERBOSE: [localhost]:14:21:42.4256579 3 * 2 = 6
VERBOSE: [localhost]:14:21:42.4407110 2 * 2 = 4
VERBOSE: [localhost]:14:21:42.4506479 1 * 2 = 2
VERBOSE: [localhost]:14:21:44.4668354 5 * 2 = 10
VERBOSE: [localhost]:14:21:46.4700108 6 * 2 = 12
VERBOSE: [localhost]:14:21:46.4800734 7 * 2 = 14
VERBOSE: [localhost]:14:21:46.5170116 8 * 2 = 16
VERBOSE: [localhost]:14:21:47.5061695 9 * 2 = 18
VERBOSE: [localhost]:14:21:47.5471064 10 * 2 = 20
VERBOSE: [localhost]:14:21:50.5174319 11 * 2 = 22
VERBOSE: [localhost]:14:21:50.5723722 12 * 2 = 24
VERBOSE: [localhost]:14:21:50.5823687 13 * 2 = 26
VERBOSE: [localhost]:14:21:51.5665379 14 * 2 = 28
VERBOSE: [localhost]:14:21:52.5856140 15 * 2 = 30
VERBOSE: [localhost]:14:21:53.5356970 16 * 2 = 32
VERBOSE: [localhost]:14:21:54.6407847 17 * 2 = 34
VERBOSE: [localhost]:14:21:54.6517802 18 * 2 = 36
VERBOSE: [localhost]:14:21:54.6608001 19 * 2 = 38
VERBOSE: [localhost]:14:21:55.6838838 20 * 2 = 40
Again, the timestamps should make it clear four numbers were processed at any one time.
23.3. General workflow design strategy
It’s important to understand that the entire contents of the workflow get translated into WWF’s own language, which only understands “activities.” With the exception of a few commands listed in section 23.2.5, Microsoft has provided WWF activities that correspond to most of the core PowerShell cmdlets. That means most of PowerShell’s built-in commands—the ones available before any modules have been imported—work fine.
That isn’t the case with add-in modules, though. Further, because each workflow activity executes in a self-contained space, you can’t even use Import-Module by itself in a workflow. You’d basically import a module, but it’d go away by the time you tried to run any of the module’s commands.
The solution is to think of a workflow as a high-level task coordination mechanism. You’re likely to have a number of InlineScript blocks within a workflow, because the contents of those blocks execute as a single unit, in a single PowerShell session. Within an InlineScript, you can import a module and then run its commands. Each Inline-Script block that you include runs independently, so think of each one as a stand-alone script file of sorts: Each should perform whatever setup tasks are necessary for it to run successfully. You’ll see an example of this approach later in this chapter.
23.4. Example workflow scenario
For an example scenario, let’s pretend you have a new in-house corporate application update that needs to be deployed. You’ve already taken care of getting the necessary executables deployed to your client computers, but the developers neglected to make a few critical configuration changes as part of the installer. It’s up to you to make those changes. You need to do the following:
· Add an HKEY_LOCAL_MACHINE\SOFTWARE\Company\LOBApp\Settings Registry key, adding the setting Rebuild with a value of 0 (zero).
· Register a new PowerShell Remoting endpoint (or “session configuration”) named LOBApp. There’s already a local session configuration file stored on each computer that defines this endpoint’s capabilities; the file should be in C:\C-orpApps\LOBApp\LOBApp.pssc.
· Set the service named LOBApp to start automatically, and ensure that the service is started.
· Run Set-LOBRebuildMode –Mode 1. That command is located in a module named LOBAppTools, which is already deployed to the client computers.
None of these steps need to be done in any particular order. Keep in mind that the contents of your workflow are intended to be remoted, so you can assume that everything you’re doing is running “locally,” and they’ll be deployed to the remote computers and executed there.
Warning
Don’t try the following workflow now because we’re using made-up stuff in the example, and you won’t be able to follow along.
23.5. Writing the workflow
The following listing shows the workflow to accomplish this example scenario.
Listing 23.4. A sample workflow
workflow Set-LOBAppConfiguration {
parallel {
InlineScript {
New-Item -Path HKLM:\SOFTWARE\Company\LOBApp\Settings
New-ItemProperty -Path HKLM:\SOFTWARE\Company\LOBApp\Settings `
-Name Rebuild `
-Value 0
}
InlineScript {
Set-Service -Name LOBApp -StartupType Automatic
Start-Service -Name LOBApp
}
InlineScript {
Register-PSSessionConfiguration `
-Path C:\CorpApps\LOBApp\LOBApp.pscc `
-Name LOBApp
}
InlineScript {
Import-Module LOBAppTools
Set-LOBRebuildMode -Mode 1
}
}
}
You can see that listing 23.4 follows the general strategy of breaking each distinct task into its own InlineScript block, allowing each block to execute independently and in this workflow simultaneously in parallel. Each script block can assume it’s accessing local resources, because the contents of the workflow will be remoted out to whatever machines you target. Run it like so:
PS C:\> Set-LOBAppConfiguration –PSComputerName one,two,three
This code runs the workflow on computers named “ONE,” “TWO,” and “THREE.” InlineScript is probably one of the techniques you’ll use most in workflows, and we’re going to give it more coverage later in this chapter.
23.6. Workflows vs. functions
We pointed this out earlier in the chapter, but it bears repeating: Workflows seem so similar to functions that it can be tempting to assume they’re just a fancy kind of function. In many respects, it’s safe to think of them that way, which is one of their most appealing aspects! After all, if you already know a lot about functions, you can move that knowledge right into workflows with little additional learning. That said, a few major differences exist. Specifically, workflows don’t permit any of the following things that are legal in functions:
Note
We know we’ve listed some of these restrictions earlier, but we want to outline them again because we’ve found that they cause confusion in workflows. This is also a good place for us to consolidate the various differences into a comprehensive list.
· You can’t use the BEGIN, PROCESS, and END script blocks that we’ve been using in our advanced functions.
· You can’t use subexpressions, like $myvar = "$($service.name)", although you can use them in a cmdlet or pipelined expression as we did earlier. This restriction is lifted in PowerShell v4.
· You can’t access drive-qualified variables like $env:computername; use Get-Content ENV:ComputerName instead. This restriction is lifted in PowerShell v4.
· Variable names may only contain letters, digits, -, and _.
· You can’t execute methods of objects. This is tricky, but there’s a good reason: To execute a method, you need a live object. If the workflow resumes from interruption, all you’ll have is a persisted, deserialized object, which has no methods. If you create an object within anInlineScript block, you can execute its methods within that block, because the block ensures that the commands all execute together.
· You can’t assign values to object properties—again, doing so assumes a live object, which you won’t necessarily have.
· You can’t dot-source scripts or use the invocation (&) operator.
· Advanced function parameter validation (like Mandatory and other attributes we’ve used) aren’t supported on workflows that are contained within other workflows. Technically, they’re not allowed at all, but PowerShell “fakes it” for the outermost workflow. Our recommendation is to not try to use them.
· Positional parameters aren’t permitted on commands within a PowerShell v3 workflow (the restriction is lifted in PowerShell v4). This forces you to follow what you should be doing anyway and list the parameter name for every parameter you use. This means Dir C:\ won’t work, but Dir -Path C:\ will.
· The old trap error-handling statement isn’t supported. Use Try...Catch... Finally instead.
· The Switch statement doesn’t work the same within a workflow; we recommend not using it at all in a workflow.
· Workflows can’t use comment-based help. If you want to include help for a workflow command, you must create an external XML file in the appropriate MAML format; we won’t be covering that topic in this book.
· Within a workflow, you can’t change the value of a variable that has already been defined in a parent scope. In a normal PowerShell function, doing so creates a new local-scope variable of the same name; in a workflow, you get an error. PowerShell adds a new $workflow scope identifier to provide access to a workflow’s scope from any child scope. For example, $workflow:myvar will provide access to the $myvar variable defined in the workflow scope. This syntax is mandatory for any child scope; were one of them to try to modify $myvar without specifying $workflow:myvar, it would get an error.
Note
This isn’t a comprehensive list of things that are legal in a function but not in a workflow, but the list does cover every function-related thing we’ve shown you in this book (including stuff in upcoming chapters).
Again, most of these restrictions come from the fact that a workflow is eventually translated into an external language usable by WWF, meaning a workflow can’t contain anything for which there’s no WWF equivalent.
23.7. Specific workflow techniques
Although we’ve touched on a couple of these already, we want to cover these techniques in more depth because we think you’re going to be using them a lot.
23.7.1. Sequences
A workflow is intended for a series of potentially long-running tasks. You may need to do step A, then B, then C and in that order. One way to guarantee that order is to use a sequence in your workflow. A sequence is a self-contained script block. The script block must finish before any other sequences are executed. The next listing is a sample workflow that illustrates this concept.
Listing 23.5. Workflow sequences
Workflow DemoSequence {
write-verbose -message ("{0} starting" -f (Get-Date).TimeofDay)
$a=10
$b=1
"Variables Pre-Sequence"
"`$a = $a"
"`$b = $b"
"`$c = $c"
Sequence {
"{0} sequence 1" -f (Get-Date).TimeOfDay
$workflow:a++
$c=1
start-sleep -seconds 1
}
Sequence {
"{0} sequence 2" -f (Get-Date).TimeofDay
$workflow:a++
$workflow:b=100
$c++
start-sleep -seconds 1
}
Sequence {
"{0} sequence 3" -f (Get-Date).TimeofDay
$workflow:a++
$workflow:b*=2
$c++
start-sleep -seconds 1
}
"Variables Post-Sequence"
"`$a = $a"
"`$b = $b"
"`$c = $c"
write-verbose -Message ("{0} ending" -f (Get-Date).TimeOfDay)
}
Let’s run listing 23.5 so you can see how it behaves:
PS C:\> demosequence –Verbose
VERBOSE: [localhost]:08:12:12.5756488 starting
Variables Pre-Sequence
$a = 10
$b = 1
$c =
08:12:12.8564498 sequence 1
08:12:14.1668659 sequence 2
08:12:15.2744786 sequence 3
Variables Post-Sequence
$a = 13
$b = 200
$c =
VERBOSE: [localhost]:08:12:16.5224938 ending
The workflow writes the starting values for variables a, b, and c. Each sequence modifies these variables in a different way. Sometimes a new value is assigned directly; other times a value is assigned the $workflow: prefix to illustrate the effect of scope in a workflow. We’ve also added a brief sleep statement so that you can see from the time stamp that the workflow runs in sequence.
Sequences should be self-contained. It’s possible to reference variables outside the sequence scope, but you must include the $workflow: prefix. We’ve boldfaced those variables in the listing. The $workflow: prefix allows you to modify variables a and b in each sequence. We left variable c alone, and as you can see from the output, the workflow never picked up the value for $c from the last sequence. In other words, the variables set in sequences are scope-specific unless you use the $workflow: prefix, which acts in much the same way as $global: would in a regular script or function.
You can nest sequences within sequences as well as the other syntax elements we’ll be covering in this chapter.
23.7.2. InlineScript
Another option you might want to use is InlineScript. This script block is essentially just an Invoke-Command sequence that runs out-of-process in relation to the rest of the workflow, but depending on how you need to use parameters and variables, you might find it helpful. Listing 23.6 shows a simple workflow using InlineScript. As we’ve stated before, this is a useful tool within workflows, because in most cases it lets you include any PowerShell commands—not just those that can be translated to WWF—inside a workflow. You’ll also need to useInlineScript if you want to call external PowerShell scripts or use a .NET class or method. Each InlineScript is executed as a single unit: It’s transmitted to the target computer and executed, and the results are sent via XML back to the initiating machine.
Listing 23.6. Demo of InlineScript
Workflow Get-ARPCache {
$data = InlineScript {
$results = arp -a | where {$_ -match 'dynamic'}
[regex]$rxip="(\d{1,3}\.){3}\d{1,3}"
[regex]$rxmac="(\w{2}-){5}\w{2}"
foreach ($line in $results) {
[pscustomobject][ordered]@{
IP=$rxip.Match($line).Value
MAC=$rxmac.Match($line).Value
}
} #foreach
} #inlinescript
$data | Sort-Object -Property IP
} #workflow
This workflow is designed to get the ARPCache and turn the results into custom objects. Because the workflow needs to use a .NET method like Match, these commands should be placed in an InlineScript block. This is a completely self-contained unit that writes results to the pipeline. The workflow saves this output to $data. Then at the end of the workflow, $data is sorted on the IP property.
This example doesn’t try to access data outside of the script block via variables, but often you might need to do just that. As we’ve shown in a few examples earlier, you handle variable scope in InlineScript with $using. The next listing illustrates this concept.
Listing 23.7. InlineScript with $using
Workflow DemoNotUsing {
Param([string]$log="System",[int]$newest=10)
#creating a variable within the workflow
$source="Service Control Manager"
Write-verbose -message "Log parameter is $log"
Write-Verbose -message "Source is $source"
InlineScript {
<#
What happens when we try to access
out of scope variables?
#>
"Getting newest {0} logs from {1} on {2}" -f $newest,$log,$pscomputername
get-eventlog -LogName $log -Newest $newest -Source $source
} #inlinescript
Write-verbose -message "Ending workflow"
} #close workflow
In a traditional PowerShell function you might think this code would work with no problem. The workflow can access variables $log and $source at the beginning. But within InlineScript is a totally new scope, and PowerShell doesn’t look outside the scope for the variables as you might expect, so this workflow will fail.
PS C:\> DemoNotUsing -log application –Verbose
VERBOSE: [localhost]:Log parameter is application
VERBOSE: [localhost]:Source is Service Control Manager
Getting newest logs from on localhost
Get-EventLog : Cannot bind argument to parameter 'LogName' because it is
null.
At DemoNotUsing:7 char:7
+
+ CategoryInfo : InvalidData: (:) [Get-EventLog],
ParameterBindingValidationException
+ FullyQualifiedErrorId :
ParameterArgumentValidationErrorNullNotAllowed,Microsoft.P
owerShell.Commands.GetEventLogCommand
+ PSComputerName : [localhost]
VERBOSE: [localhost]:Ending workflow
The solution is to use the $using variable prefix introduced in PowerShell v3. This tells PowerShell to use the variable from the current scope—that is, the workflow. The following listing shows a revised version. We’ve boldfaced the changes.
Listing 23.8. Revised InlineScript with $using
Workflow DemoUsing {
Param([string]$log="System",[int]$newest=10)
#creating a variable within the workflow
$source="Service Control Manager"
Write-verbose -message "Log parameter is $log"
Write-Verbose -message "Source is $source"
InlineScript {
<#
this is the way to access out of scope variables.
#>
"Getting newest {0} logs from {1} on {2}" -f $using:newest,$using:log,
$pscomputername
get-eventlog -LogName $using:log -Newest $using:newest `
-Source $using:source
} #inlinescript
} #close workflow
Now watch what happens when you run the workflow in listing 23.8:
PS C:\> DemoUsing -log system –Verbose
VERBOSE: [localhost]:Log parameter is system
VERBOSE: [localhost]:Source is Service Control Manager
Getting newest 10 logs from system on localhost
Index Time EntryType Source InstanceID Message
----- ---- --------- ------ ---------- ------
948 Jun 10 15:54 Information Service Contro... 3221232498 The fol...
911 Jun 10 07:22 Information Service Contro... 3221232498 The fol...
852 Jun 07 13:44 Information Service Contro... 3221232498 The fol...
820 Jun 07 13:35 Information Service Contro... 1073748869 A servi...
806 Jun 07 09:28 Information Service Contro... 1073748864 The sta...
803 Jun 07 08:25 Information Service Contro... 1073748864 The sta...
791 Jun 06 13:04 Information Service Contro... 1073748864 The sta...
787 Jun 06 11:58 Information Service Contro... 1073748864 The sta...
760 Jun 04 12:55 Information Service Contro... 1073748864 The sta...
752 Jun 04 10:52 Information Service Contro... 3221232498 The fol...
Note
For the sake of our demonstration, we hardcoded the variable $source, which will only work with the system event log.
When PowerShell encountered $using, it looked for a variable in the current scope, and thus everything worked as planned. You can’t use the $workflow prefix in an InlineScript block. You must use $using.
You’re able to use InlineScript to execute commands that won’t run anywhere else in a workflow. But you should still use full command and parameter names as a best practice.
23.8. Running a workflow
Workflows are loaded into PowerShell the same as functions—that is, by dot-sourcing a script file. Starting with PowerShell v3, a workflow is a new command type, which means you can use Get-Command to list them:
Get-Command –commandtype workflow
You run a workflow like any other cmdlet or function. You’ve done that in some of the examples earlier. You can pass parameters and take advantage of tab completion for parameter names, even automatic parameters like PSComputername. One thing you aren’t likely to do is save the results to a variable. Typically you’ll be using workflows for unattended and configuration-related tasks where you aren’t expecting any output. You might also want to set up a workflow as a scheduled job.
Because workflows are designed for robustness and to survive temporary interruptions like reboots or network glitches, running workflows offers a few intriguing options. Often, these features we’re going to discuss work together.
23.8.1. Workflow jobs
Normally you can just run a workflow interactively and hope for the best. But you can also run a workflow as a background job, which offers a number of advantages such as suspending and restarting the job. You don’t have to add any extra code to your workflow. In PowerShell v3 the job infrastructure was enhanced to work with the new job type. All you need to do is run your workflow with the –AsJob parameter:
PS C:\> MyWorkflow –pscomputername server01,server02 –AsJob
PowerShell will automatically import the PSWorkflow module, which adds the necessary type information to manage the job with the Job cmdlets.
23.8.2. Suspending and restarting a workflow
If you start your workflow as a job, you can suspend and resume it at any time. Here’s a quick demonstration with an ad hoc workflow:
PS C:\> workflow Test-MyWorkflow {
>> get-service -name w*
>> start-sleep -seconds 20
>> get-process -name powershell*
>> }
>>
PS C:\> Test-MyWorkflow –asjob
Id Name PSJobTypeName State HasMoreData Location Command
-- ---- ------------- ----- ----------- -------- -------
2 Job2 PSWorkflowJob Running True localhost Test-MyWo...
If you’re fast enough, you can suspend or pause this job with the Suspend-Job cmdlet introduced alongside workflows in PowerShell v3:
PS C:\> Suspend-Job 2
Id Name PSJobTypeName State HasMoreData Location Command
-- ---- ------------- ----- ----------- -------- -------
2 Job2 PSWorkflowJob Suspending True localhost Test-MyW...
Starting in PowerShell v4 you can also have your workflow automatically suspend on a terminating error. Here’s a sample workflow to illustrate this concept:
Workflow Demo-Problem {
Param([string]$Path)
Write-Verbose -Message $((Get-Date).TimeOfDay) Starting $workflowcommandname"
Try {
$files = Get-ChildItem -Path $Path -File -ErrorAction Stop
}
Catch {
#left blank
}
$files | Measure-Object -Property length -Sum
}
When you run the workflow, use the new Suspend value for the –ErrorAction parameter:
PS C:\> demo-problem c:\foo -ErrorAction Suspend
The running command stopped because the preference variable
"ErrorActionPreference" or common parameter is set to Stop: Cannot
find path 'C:\foo' because it does not exist.
+ CategoryInfo : InvalidResult: (:) [],
ActionPreferenceStopException
+ FullyQualifiedErrorId : ActivityActionFailed
+ PSComputerName : [localhost]
Id Name PSJobTypeName State HasMoreData Location Command
-- ---- ------------- ----- ----------- -------- -------
116 Job116 PSWorkflowJob Suspended True localhost demo-...
The assumption is that you can correct whatever caused the problem and interrupted the workflow.
No matter how your workflow is suspended, when you’re ready to resume simply call the Resume-Job cmdlet:
PS C:\> Resume-Job 2
Receiving the results, assuming something was written to the pipeline, is no different than any other job:
PS C:\> Receive-Job 2
If you prefer to give your job a name, do so when you launch the workflow:
PS C:\> Test-MyWorkflow -asjob -JobName Demo
Everything else remains the same.
You can also suspend a workflow from within by using the Suspend-Workflow activity. When you invoke this activity, a job will automatically be created. You don’t have to use –AsJob.
PS C:\> workflow Test-MyWorkflowSuspend {
>> $s=get-service -name w*
>> suspend-workflow
>> "resuming"
>> $p=get-process -name Powershell*
>> $s
>> $p
>> }
>>
PS C:\> Test-MyWorkflowSuspend
Id Name PSJobTypeName State HasMoreData Location Command
-- ---- ------------- ----- ----------- ------- -------
8 Job8 PSWorkflowJob Suspended True localhost Test-MyWor...
This job will remain even if you reboot the computer. You can get the same job in a new PowerShell session, provided you remember to reimport the PSWorkflow module in PowerShell v3 (PowerShell v4 will autoload the module) and are using the same credentials and elevation of privileges. If you don’t, you can’t “see” the job. Here’s the session after you reboot the computer:
PS C:\> get-job Job8
Id Name PSJobTypeName State HasMoreData Location Command
-- ---- ------------- ----- ----------- -------- -------
6 Job8 PSWorkflowJob Suspended True localhost Test-MyWorkfl...
Notice that you used the job name. In the new session, the job ID numbers can change. But this is in fact the job you suspended, so now you can resume it:
PS C:\> Resume-Job Job8
Once it’s completed, you can receive the results like any other job.
23.8.3. Workflow credentials
When running workflows against remote computers, PowerShell will use your current credentials, which must have administrative rights on the remote computer. You can specify alternate credentials when invoking the workflow using the ubiquitous PSCredential parameter:
PS C:\> Configure-Desktop –pscomputername Desk1,Desk2,Desk3 –pscredential
![]() mydomain\administrator
mydomain\administrator
You don’t have to include any code to handle the parameter or its value. It just works. This means you should be able to use workflows even in a workgroup environment, assuming you have taken steps to configure PowerShell Remoting for a workgroup, such as updating theTrustedHosts value.
You can use a credential object created with Get-Credential as an alternative. If you just supply the username, you’ll be prompted for the password.
23.9. A practical example
Many of the examples in this chapter have been simple and far from practical. Our goal is to illustrate some complex concepts with simple commands. The workflow in our next listing is one that you should be able to try on your own in a nonproduction environment.
Listing 23.9. A practical workflow
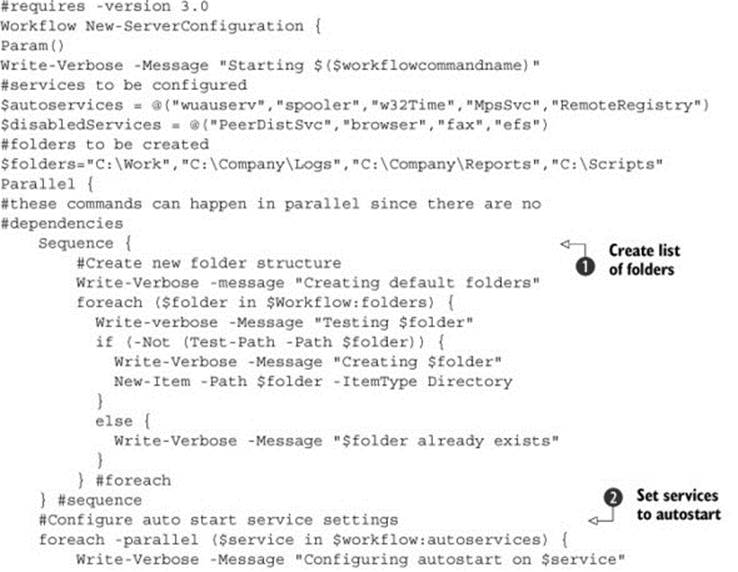
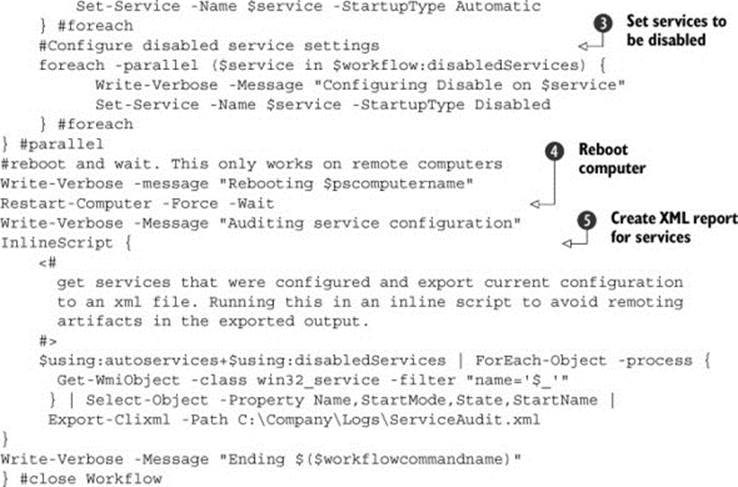
The workflow in listing 23.9 is designed to automate some tasks you might otherwise manually perform when configuring a new system. Here you want to create some default local folders and configure some services. The tasks ![]() ,
, ![]() , and
, and ![]() have no dependencies, which means they can take place in parallel. But notice that in
have no dependencies, which means they can take place in parallel. But notice that in ![]() and
and ![]() you’re using another nested parallel structure with Foreach. Some services you’re setting to autostart and some to be disabled, but you can set each group of services simultaneously! You’re not using –parallel with Foreach in
you’re using another nested parallel structure with Foreach. Some services you’re setting to autostart and some to be disabled, but you can set each group of services simultaneously! You’re not using –parallel with Foreach in ![]() because you want to test and create each folder sequentially.
because you want to test and create each folder sequentially.
After all the parallel tasks are completed, the workflow reboots the computer ![]() and waits for it to come back on the network. This won’t work if you run the workflow against the local host. You can only wait for reboots on remote computers. When a connection can be made again, the workflow ends by joining the array of service names together and creating an XML report
and waits for it to come back on the network. This won’t work if you run the workflow against the local host. You can only wait for reboots on remote computers. When a connection can be made again, the workflow ends by joining the array of service names together and creating an XML report ![]() using service information gathered from WMI.
using service information gathered from WMI.
You can run the workflow against a remote computer like this:
PS C:\> New-ServerConfiguration -verbose -PSComputerName novo8
VERBOSE: [novo8]:Starting New-ServerConfiguration
VERBOSE: [novo8]:Creating default folders
VERBOSE: [novo8]:Configuring autostart on RemoteRegistry
VERBOSE: [novo8]:Configuring autostart on MpsSvc
VERBOSE: [novo8]:Configuring autostart on w32Time
VERBOSE: [novo8]:Configuring autostart on spooler
...
Notice that there’s no code within the workflow for handling Remoting or the remote computer name. Workflows implicitly use PowerShell Remoting. When you specify a computer name, a Remoting connection is made to the workflow endpoint and the workflow actions are executed.
Developing a workflow takes time, patience, and testing. Before you sit down to write one, ask yourself if it’s the right solution to your problem. Even the workflow you just saw could’ve been written as a traditional script or function, as long as you didn’t need the reboot.
When writing workflows, start simple and spend time learning how to use the various workflow elements like Parallel and InlineScript.
23.10. Invoke-AsWorkflow
Two workflow-related modules are available in PowerShell v3 and v4:
PS C:\> Get-Command *workflow* | format-table –AutoSize
CommandType Name ModuleName
----------- ---- ----------
Function New-PSWorkflowSession PSWorkflow
Cmdlet New-PSWorkflowExecutionOption PSWorkflow
Workflow Invoke-AsWorkflow PSWorkflowUtility
The PSWorkflowUtility module is interesting because it consists of a single workflow: Invoke-AsWorkflow. Let’s examine the syntax of Invoke-AsWorkflow:
PS> Get-Command Invoke-AsWorkflow –Syntax
Invoke-AsWorkflow [-CommandName <string>] [-Parameter <hashtable>]
[<WorkflowCommonParameters>] [<CommonParameters>]
Invoke-AsWorkflow [-Expression <string>] [<WorkflowCommonParameters>] <CommonParameters>]
Supplying a command name, with or without parameters, causes the command to be run as an InlineScript within the workflow. If an expression is supplied, then Invoke-Expression is run.
What sort of commands can you pass to Invoke-AsWorkflow?
According to the help file, “The Invoke-AsWorkflow workflow runs any command or expression as a workflow. These workflows use the standard workflow semantics, have all workflow common parameters, and have all benefits of workflows, including the ability to stop, resume, and recover.” This includes cmdlets, cmdlets with parameters, expressions, advanced functions (if you import them as a module), and even scripts.
Using a cmdlet is straightforward:
PS C:\> Invoke-AsWorkflow -CommandName Get-Process
If you need to pass parameters to the command, use a hash table of parameter names and values. Here are some examples:
PS C:\> Invoke-AsWorkflow -CommandName Get-Process -Parameter
![]() @{Name="PowerShell"}
@{Name="PowerShell"}
PS C:\> Invoke-AsWorkflow -CommandName Get-Eventlog -Parameter
![]() @{Logname='System';Newest=10;EntryType='Error'}
@{Logname='System';Newest=10;EntryType='Error'}
The option to use an expression enables command-line tools to be run:
PS C:\> Invoke-AsWorkflow -Expression "ipconfig /all" -AsJob
Though the help file doesn’t explicitly mention them, Invoke-AsWorkflow supports the workflow parameters, including –AsJob, that you’ve already seen.
If you create a simple advanced function like this:
function testfunction28 {
[CmdletBinding()]
param (
[string]$name
)
Get-Process -Name $name
}
the function should be saved as a PSM1 file. In our example, we called the module Test and saved it in the usual module location. The module can be imported and run as follows:
Import-Module Test
Get-Command -Module test
Invoke-AsWorkflow -CommandName testfunction28 `
-Parameter @{Name="powershell"} –pscomputername $computers
The rules we discussed earlier regarding the use of and restrictions on the InlineScript elements still apply. If you need to run a script, you must supply the full path to the script file even if it’s in the current folder:
Invoke-AsWorkflow -CommandName C:\scripts\Miscellaneous\get-names.ps1
A command like this will fail:
Invoke-AsWorkflow -CommandName .\get-names.ps1
Using Invoke-AsWorkFlow is great for a “quick and dirty” workflow solution where you want to leverage an existing script or carefully constructed one-liner.
23.11. PSWorkflowSession
Moving on to the PSWorkflow module, we find two cmdlets:
· New-PSWorkflowSession
· New-PSWorkflowExecutionOption
These can be used together in a similar manner to the Remoting or CIM cmdlets used to configure sessions. The options are similar, but not necessarily identical, across all Remoting approaches. We suggest reviewing the help files for information on the options you can use.
Using workflow sessions is similar to Remoting sessions, but you must remember that the commands are running on the remote machine. That means that you have to import the module containing your workflow into your remote session. Here’s an example of using a workflow session:
$w1 = New-PSWorkflowSession -ComputerName "dc02", "server02", "w12standard"
A PSWorkflowSession object is created that spans a number of computers. This session isn’t much different than other Remoting sessions except that it’s designed specifically to execute workflows. You can enter the session interactively, but most likely you’ll use Invoke-Command.
First, you need a script block to run with your workflow:
$sb ={
workflow Get-OS {
Get-WmiObject -Class Win32_OperatingSystem |
Select-Object -Property Caption
}
Get-OS
}
You’ll most likely have modules with your workflows that need to be be imported into the session. All that remains is to invoke the script block in the workflow session:
Invoke-Command -Session $w1 -ScriptBlock $sb
Tip
Be sure you include the command to run the script block!
Invoke-Command is used to run the workflow script block against the computers defined in the session. When you execute the workflow, you can use any of the workflow parameters you need, such as –AsJob. Remember, though, that everything is running within the session. But you can disconnect and reconnect like any other PowerShell Remoting session.
An alternative is to create the endpoint locally:
$wf = New-PSWorkflowSession
Then continue as before, perhaps importing a module with your workflows:
Invoke-Command -Session $wf -ScriptBlock {Import-module MyWorkflows}
Finally, execute the workflow within the session connecting to remote systems as necessary:
Invoke-Command -Session $wf -ScriptBlock {Set-Config –pscomputername
![]() $using:servers –pscredential $using:cred }
$using:servers –pscredential $using:cred }
This command assumes you’ve previously defined an array of computer names and a saved administrative credential. Whether you run the workflows via a local or remote endpoint might depend on what the workflow does, whether you’re running as a job, how many machines you need to manage, and whether you might need to disconnect and reconnect, among other considerations.
We’ve said repeatedly that PowerShell workflow isn’t simply another way to script. It requires a new paradigm for many IT pros. In many cases it may be easier to use the Remoting capabilities of the individual cmdlets rather than creating a workflow.
23.12. Troubleshooting a workflow
Because workflows tend to run unattended, troubleshooting or debugging can be problematic. Here’s a short list of suggestions:
· We hope it goes without saying, but try to avoid problems in the first place by manually testing and verifying the individual steps in an interactive session.
· Test parts of your workflow using Invoke-AsWorkflow. Yes, the code will run in essentially an InlineScript block, but you can use all the other workflow parameters and it’ll also verify that you can access the workflow endpoint on remote computers.
· Include Write-Verbose statements to indicate workflow progress and state.
· Verify that the remote computers are running PowerShell v3 or v4, with Test-WSMan.
· If using syntax elements like InlineScript or Sequence, make sure each script block can execute independently. Watch your scope!
As a last resort, you can turn to tracing in the PSDiagnostics module. When you run a workflow, because it uses WSMAN you can trace its calls. First, turn on tracing:
PS C:\> Enable-PSWSManCombinedTrace
Next, run your workflow to either completion or error:
PS C:\> get-data -pscomputername novo8
At this point disable tracing:
PS C:\> Disable-PSWSManCombinedTrace
All of the trace information is stored in a Windows event log file, pstrace.etl, which can be found under $pshome\Traces\. Use Get-WinEvent to retrieve the data:
PS C:\> Get-WinEvent -Path $pshome\traces\PSTrace.etl -oldest | format-
![]() table TimeCreated,LevelDisplayname,Message -wrap -auto | more
table TimeCreated,LevelDisplayname,Message -wrap -auto | more
Because there will be a lot of data, you might prefer to direct results to Out-Gridview:
PS C:\> Get-WinEvent -Path $pshome\traces\PSTrace.etl -oldest | Select
![]() TimeCreated,LevelDisplayname,Message | out-gridview
TimeCreated,LevelDisplayname,Message | out-gridview
You can see the result in figure 23.1.
Figure 23.1. Trace information in Out-GridView
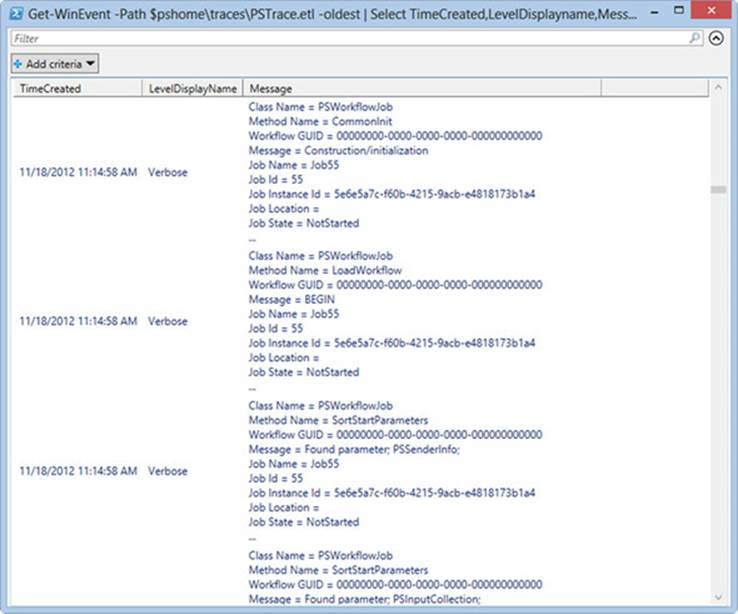
We’re not implying it’ll be easy to figure out what the trace information is trying to tell you, but it’s a start.
Support for debugging workflows using the standard debugging techniques explained in chapter 31 was introduced in PowerShell v4.
23.13. Summary
In this chapter we provided an overview of workflows and how they differ from PowerShell scripts. Workflows have a lot of configuration parameters available, and this chapter explored the most important. One big advantage of workflows is their ability to be stopped and restarted—which also includes surviving reboots. Workflows are made more powerful by being integrated with the PowerShell job engine. We provided an example workflow and a look at using the workflow-related cmdlets.
This chapter has only scratched the surface. The capabilities are so new they haven’t been fully explored by the PowerShell community. Expect the use of workflows to be a major area of productivity gain over the life of PowerShell v3 and later versions.
PowerShell workflows aren’t the answer to all of your problems, but in the right place—when you need to perform robust, parallel, long-running tasks—they’re a boon. Many IT pros have avoided workflows through a misguided sense of them being too hard to follow. Work through the examples in this chapter, as well as the series of articles Richard did for the Scripting Guy blog (the first one is at http://blogs.technet.com/b/heyscriptingguy/archive/2012/12/26/powershell-workflows-the-basics.aspx, with the rest following at approximately weekly intervals) and you’ll be well on the way to mastering PowerShell workflows.
All materials on the site are licensed Creative Commons Attribution-Sharealike 3.0 Unported CC BY-SA 3.0 & GNU Free Documentation License (GFDL)
If you are the copyright holder of any material contained on our site and intend to remove it, please contact our site administrator for approval.
© 2016-2026 All site design rights belong to S.Y.A.