Windows Server 2012 R2 Pocket Consultant: Storage, Security, & Networking (2014)
Chapter 10. Administering network printers and print services
§ Managing the Print and Document Services role
§ Getting started with Print Management
§ Installing printers
§ Configuring printer properties
§ Configuring print server properties
§ Managing print jobs on local and remote printers
As an administrator, you need to take two main steps to enable users throughout a network to access print devices connected to Windows Server 2012 R2. First, you need to set up a print server, and then you need to use the print server to share print devices on the network.
This chapter covers the essentials of setting up shared printing and describes how users access printers on the network. You’ll also find advice on administering printers and troubleshooting printer problems, which is where we’ll begin.
Managing the Print and Document Services role
A provides a central location for sharing printers on a network. When many users require access to the same printers, you should configure print servers in the domain. In earlier releases of the Windows Server operating system, all servers were installed with basic print services. With Windows Server 2012 R2, you must specifically configure a server to be a print server.
Using print devices
Two types of print devices are used on a network:
§ Local print device. A print device that’s physically attached to a user’s computer and employed only by the user who’s logged on to that computer.
§ Network print device. A print device that’s set up for remote access over the network. This can be a print device attached directly to a print server or a print device attached directly to the network through a network interface card (NIC).
NOTE
The key difference between a local printer and a network printer is that a local printer isn’t shared. You can easily make a local printer a network printer. To learn how to do this, see Starting and stopping printer sharing later in this chapter.
You install new network printers on print servers or as separate print devices attached to the network. A print server is a workstation or server configured to share one or more printers. These printers can be physically attached to the computer or connected to the network. The disadvantage of running a print server with a workstation operating system instead of a server operating system is the limited number of allowed connections. With Windows Server 2012 R2, you don’t have to worry about operating system–enforced connection limits.
You can configure any Windows Server 2012 R2 system as a print server. The print server’s primary job is to share print devices on the network and to handle print spooling. The main advantages of print servers are that printers have a centrally managed print queue and you don’t have to install printer drivers on client systems.
You don’t have to use a print server, however. You can connect users directly to a network-attached printer. When you do this, the network printer is handled much like a local printer attached directly to the user’s computer. The key differences are that multiple users can connect to the printer and that each user has a different print queue. Each individual print queue is managed separately, which can make administration and problem resolution difficult.
Printing essentials
An understanding of how printing works can go a long way when you’re trying to troubleshoot printer problems. When you print documents, many processes, drivers, and devices work together to print the documents. If you use a printer connected to a print server, the key operations are as follows:
§ Printer driver. When you print a document in an application, your computer uses a printer driver to handle the printing process. If the print device is attached to your computer physically, the printer driver is accessed from a local disk drive. If the print device is located on a remote computer, the printer driver might be downloaded from the remote computer. The availability of printer drivers on the remote computer is configurable by operating system and chip architecture. If the computer can’t obtain the latest printer driver, an administrator probably hasn’t enabled the driver for the computer’s operating system. For more information, see Managing printer drivers later in this chapter.
§ Local print spool and print processor. The application from which you print uses the printer driver to translate the document into a file format that the selected print device can understand. Your computer then passes the document to the local print spooler. The local spooler in turn passes the document to a print processor, which creates the raw print data necessary for printing on the print device.
§ Print router and print spooler on the print server. The raw data is passed back to the local print spooler. If you’re printing to a remote printer, the raw data is then routed to the print spooler on the print server. On Windows Server 2012 R2 systems, the printer router, Winspool.drv, handles the tasks of locating the remote printer, routing print jobs, and downloading printer drivers to the local system if necessary. If any of these tasks fails, the print router is usually the culprit. See Solving spooling problems and Setting printer access permissions later in this chapter to learn about possible fixes for this problem. If these procedures don’t work, you might want to replace or restore Winspool.drv.
The main reason for downloading printer drivers to clients is to maintain a single location for installing driver updates. This way, instead of having to install a new driver on all the client systems, you install the driver on the print server and enable clients to download the new driver. For more information on working with printer drivers, see Managing printer drivers later in this chapter.
§ Printer (print queue). The document goes from the print spooler to the printer stack—which in some operating systems is called the print queue—for the selected print device. When in the queue, the document is referred to as a print job—a task for the print spooler to handle. The length of time the document waits in the printer stack is based on its priority and position within the printer stack. For more information, see Scheduling and prioritizing print jobs later in this chapter.
§ Print monitor. When the document reaches the top of the printer stack, the print monitor sends the document to the print device, where it’s actually printed. If the printer is configured to notify users that the document has been printed, you get a confirmation message.
The specific print monitor used by Windows Server 2012 R2 depends on the print device configuration and type. You might also have monitors from the print device manufacturer. This dynamic-link library (DLL) is required to print to the print device. If it’s corrupted or missing, you might need to reinstall it.
§ Print device. The print device is the physical device that prints documents on paper. Common print device problems and display errors include Insert Paper Into Tray X, Low Toner, Out Of Paper, Out Of Toner or Out Of Ink, Paper Jam, and Printer Offline.
Group Policy can affect your ability to install and manage printers. If you’re having problems and believe they’re related to Group Policy, you should examine the key policies in the following locations:
§ Computer Configuration\Administrative Templates\Printers
§ User Configuration\Administrative Templates\Control Panel\Printers
§ User Configuration\Administrative Templates\Start Menu And Taskbar
REAL WORLD
Windows Server 2012 R2 is a 64-bit operating system and a print queue running on this operating system cannot function without a native 64-bit printer driver. Because of this, you should verify the availability of required 64-bit print drivers before migrating print queues from servers running 32-bit operating systems to Windows Server 2012 R2. Keep in mind that if your organization has older printers still in use, those printers might have third-party 32-bit drivers and there might not be 64-bit equivalents.
Configuring print servers
You configure a server as a print server by adding the Print and Document Services role and configuring this role to use one or more of the following role services:
§ Print Server. Configures the server as a print server and installs the Print Management console. You can use the Print Management console to manage multiple printers and print servers, to migrate printers to and from other print servers, and to manage print jobs.
§ Line Printer Daemon (LPD) Service. Enables UNIX-based computers or other computers using the Line Printer Remote (LPR) service to print to shared printers on the server.
§ Internet Printing. Creates a website where authorized users can manage print jobs on the server. It also lets users who have Internet Printing Client installed to connect and print to shared printers on the server by using the Internet Printing Protocol (IPP). The default Internet address for Internet Printing is http://ServerName/Printers, where ServerName is a placeholder for the internal or external server name, such as http://PrintServer15/Printers or http://www.cpandl.com/Printers.
§ Distributed Scan Server. Establishes the server as a scan server, which is used to run scan processes. Scan processes are rules that define scan settings and control delivery of scanned documents on your network. The Scan Management snap-in is installed when you install this role service. Scan Management enables you to manage Web Services on Devices (WSD)–enabled scanners, scan servers, and scan processes.
You can add the Print and Document Services role to a server by following these steps:
1. In Server Manager, tap or click Manage, and then tap or click Add Roles And Features, or select Add Roles And Features in the Quick Start pane. This starts the Add Roles And Features Wizard. If the wizard displays the Before You Begin page, read the Welcome text, and then select Next.
2. On the Installation Type page, Role-Based Or Feature-Based Installation is selected by default. Select Next.
3. On the Server Selection page, you can choose to install roles and features on running servers or virtual hard disks. Either select a server from the server pool or select a server from the server pool on which to mount a virtual hard disk (VHD). If you are adding roles and features to a VHD, tap or click Browse, and then use the Browse For Virtual Hard Disks dialog box to locate the VHD. When you are ready to continue, select Next.
4. On the Select Roles page, select Print And Document Services. When you are ready to continue, select Next three times.
5. On the Select Role Services page, select one or more role services to install. To allow for interoperability with UNIX, be sure to add LPD Service. Tap or click Next.
6. When you install Internet Printing, you must also install Web Server (IIS) and some related components. You are prompted to automatically add the required role services. Select Add Features to continue.
NOTE
If the server on which you want to install the Print And Document Services role doesn’t have all the required binary source files, the server gets the files via Windows Update by default or from a location specified in Group Policy. You also can specify an alternate path for the required source files by clicking the Specify An Alternate Source Path link, entering that alternate path in the box provided, and then tapping or clicking OK. For network shares, enter the UNC path to the share, such as \\CorpServer82\WinServer2012\. For mounted Windows images, enter the Windows Imaging (WIM) path prefixed with WIM: and including the index of the image to use, such as WIM:\\CorpServer82\WinServer2012\install.wim:4.
7. After you review the installation options and save them as necessary, select Install to begin the installation process. The Installation Progress page tracks the progress of the installation. If you close the wizard, select the Notifications icon in Server Manager, and then select the link provided to reopen the wizard.
8. When Setup finishes installing the Print And Document Services role, the Installation Progress page will be updated to reflect this. Review the installation details to ensure that all phases of the installation were completed successfully.
9. When you install Distributed Scan Server, you’ll get a notification that additional configuration is required. Select the link provided to open Scan Management, which you can use to specify scanners to manage. In Scan Manage- ment, expand the Scan Management node in the left pane, press and hold or right-click the Managed Scanners node, and then select Manage to open the Add Or Remove Scanners dialog box. Use the Add Or Remove Scanners dialog box to identify the distributed scanners in your organization.
When you install Distributed Scan Server, a security group called Scan Operators is added to the Users container in Active Directory Domain Services (AD DS) for the current logon domain. Any users who need to manage the Distributed Scan service should be added to this group.
REAL WORLD
You have several additional options for adding required binaries. At an elevated command prompt, you can enter DISM /Online /Enable-Feature /FeatureName:PrintServer /All /LimitAccess /Source:E:\Sources\SxS, where E: is a mounted ISO or DVD. At an elevated shell prompt, you can enter Enable- WindowsOptionalFeature -Online –FeatureName “PrintServer” -All -LimitAccess Source “E:\Sources\SxS”, where E: is a mounted ISO or DVD.
Enabling and disabling file and printer sharing
File and printer sharing settings control access to file shares and printers that are attached to a computer. You can manage a computer’s file and printer sharing configuration by following these steps:
1. In File Explorer, select Network in the left pane. On the toolbar in Network Explorer, select Network, and then select Network And Sharing Center.
2. In Network And Sharing Center, select Change Advanced Sharing Settings in the left pane. Select the network profile for the network for which file and printer sharing should be enabled. Typically, this is the Domain profile.
3. Standard file and printer sharing controls network access to shared resources. To configure standard file sharing, do one of the following:
o Select Turn On File And Printer Sharing to enable file and printer sharing.
o Select Turn Off File And Printer Sharing to disable file and printer sharing.
Getting started with Print Management
Print Management should be your tool of choice for working with printers and print servers. After you install the Print and Document Services role, Print Management is available on the Tools menu in Server Manager as a stand-alone console. You can also add Print Management as a snap-in to any custom console you create.
By using Print Management, shown in Figure 10-1, you can install, view, and manage the printers and Windows print servers in your organization. Print Management also displays the status of printers and print servers. When you expand a server-level node and select the Printers node, you get a list of printers the server is hosting. If you are accessing the selected print server by using a Remote Desktop connection, you might also find entries for printers being redirected from your logon computer. Redirected printers are listed clearly as such with a (redirected) suffix.
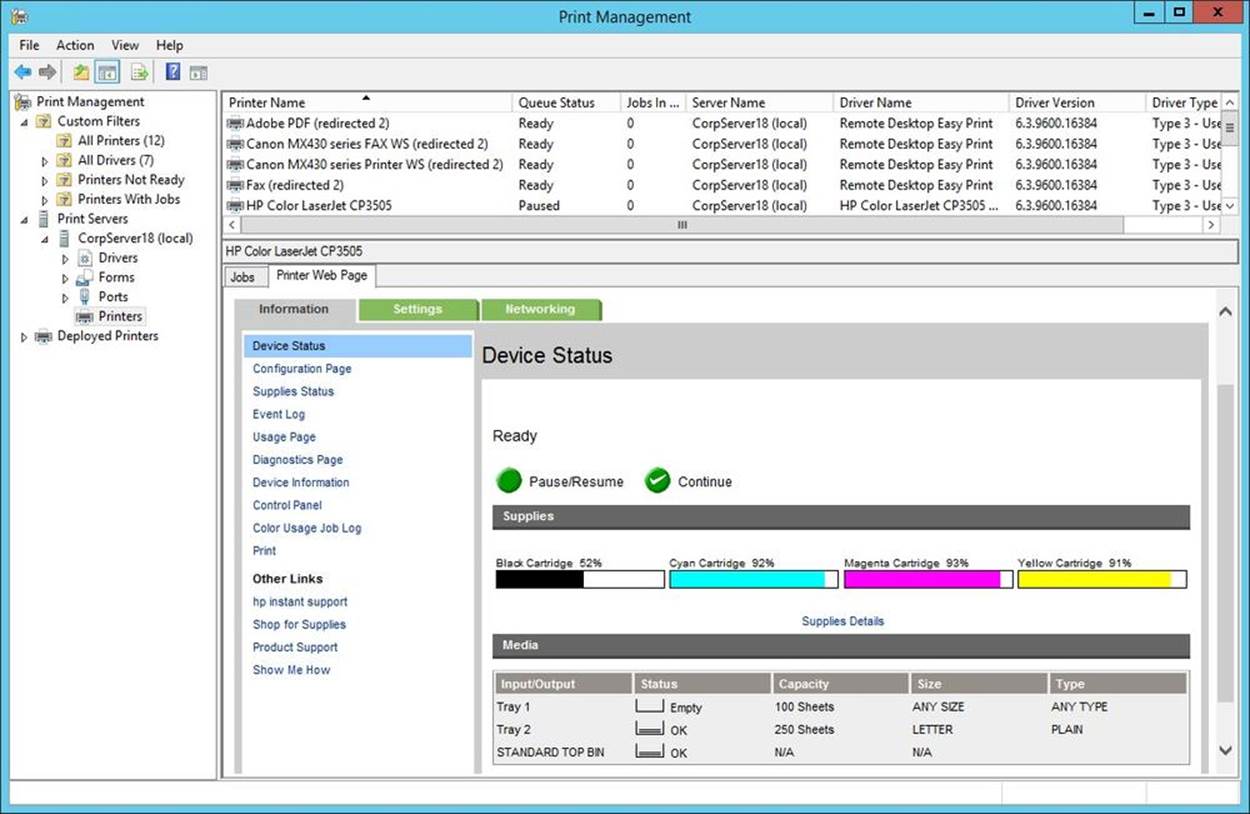
Figure 10-1. Use Print Management to work with print servers and printers throughout your organization.
By default, Print Management enables you to manage local print servers. You can manage and monitor other print servers in the organization by adding them to the console. Additionally, to manage a remote print server, you must be a member of the local Administrators group on the print server or a member of the Domain Admins group in the domain of which the print server is a member.
When you select a print server’s Printers node, the main pane lists the associated printer queues by printer name, queue status, number of jobs in a queue, and server name. If you press and hold or right-click Printers, and then tap or click Show Extended View, you can turn on Extended view. Extended view makes it easy to track the status of both printers and print jobs by displaying information about the status of a print job, its owner, the number of pages, the size of the job, when it was submitted, its port, and its priority.
In addition, when a printer has a webpage, Extended view displays a Printer Web Page tab that lets you directly access the printer’s webpage. This webpage provides details about the printer’s status, its physical properties, and its configuration, and it sometimes allows remote administration.
You can add print servers to Print Management by following these steps:
1. In Print Management, press and hold or right-click the Print Servers node in the left pane, and then tap or click Add/Remove Servers.
2. In the Add/Remove Servers dialog box, shown in Figure 10-2, you’ll find a list of the print servers you previously added.
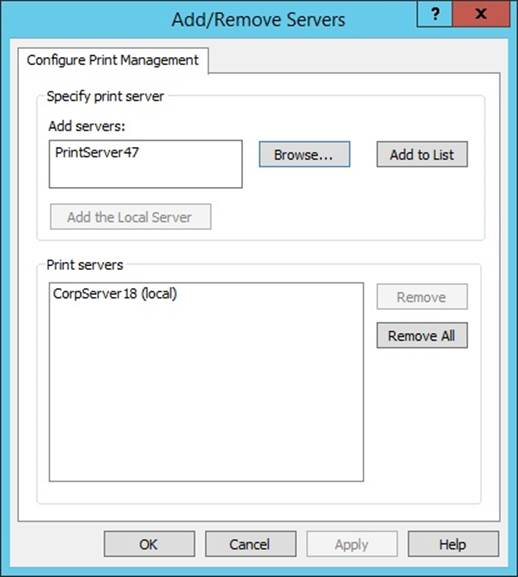
Figure 10-2. Add print servers to Print Management so that you can manage and monitor them.
Do one of the following, and then tap or click Add To List:
o In the Add Servers list, enter or paste the names of the print servers you want to add. Use commas to separate computer names.
o Tap or click Browse to display the Select Print Server dialog box. Tap or click the print server you want to use, and then tap or click Select Server.
3. Repeat the previous step as necessary, and then tap or click OK.
You can remove print servers from Print Management by following these steps:
1. In Print Management, press and hold or right-click the Print Servers node in the left pane, and then tap or click Add/Remove Servers.
2. In the Add/Remove Servers dialog box, you’ll find a list of the print servers that are being monitored. Under Print Servers, select one or more servers, and then tap or click Remove.
Installing printers
The following sections examine techniques you can use to install printers. Windows Server 2012 R2 makes it possible for you to install and manage printers anywhere on the network. To install or configure a new printer on Windows Server 2012 R2, you must be a member of the Administrators, Print Operators, or Server Operators group. To connect to and print documents to the printer, you must have the appropriate access permissions. See Setting printer access permissions later in this chapter for details.
Using the autoinstall feature of Print Management
Print Management can automatically detect all network printers located on the same subnet as the computer on which the console is running. After detection, Print Management can automatically install the appropriate printer drivers, set up print queues, and share the printers. To automatically install network printers and configure a print server, follow these steps:
1. Start Print Management by tapping or clicking Tools in Server Manager, and then tapping or clicking Print Management.
2. In Print Management, expand the Print Servers node by double-tapping or double-clicking it.
3. Press and hold or right-click the entry for the local or remote server with which you want to work, and then tap or click Add Printer to start the Network Printer Installation Wizard.
4. On the Print Installation page, select Search The Network For Printers, and then tap or click Next.
5. The wizard searches the local subnet for network printers. If printers are found, you’ll get a list of printers by name and IP address (see Figure 10-3). Tap or click a printer to install, tap or click Next, and then continue this procedure to install the automatically detected printer.
If a printer you want to use is not listed, you should ensure that the printer is powered on and is online and then repeat this procedure. If a printer you want to use is powered on and online but is not listed, see Installing network-attached print devices to complete the installation.
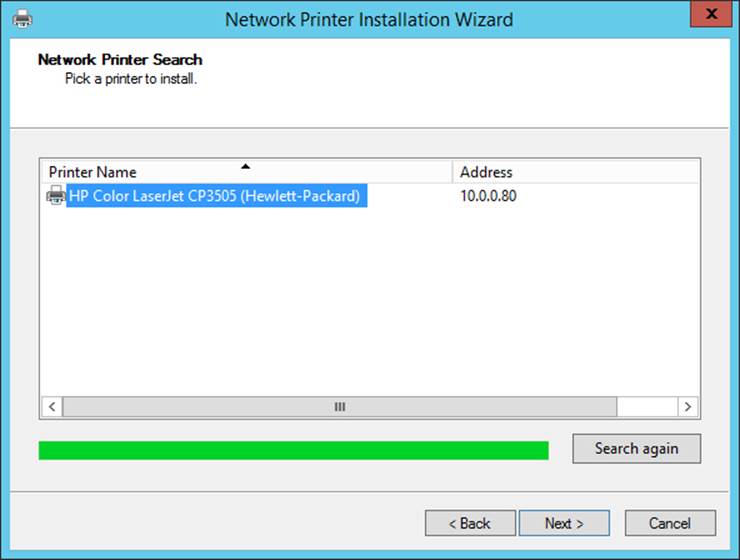
Figure 10-3. Printers located by the wizard are listed by name and IP address.
6. The wizard automatically detects the TCP/IP port configuration of the selected printer and then communicates with the printer to obtain the information required to configure the printer. Afterward, the wizard sets the default name and share name of the printer as shown in Figure 10-4. The printer is configured as a shared resource as well.
The printer name is the name you use when you work with the printer in Print Management. The share name is the name users use when they work with the printer.
Optionally, enter information in the Location and Comment text boxes that will help users locate and identify the printer. For example, you might want to specify the printer location as: Room 314 in Building 7.
NOTE
The printer name and share name can be up to 256 characters and can include spaces. In a large organization, you’ll want the share name to be logical and helpful in locating the printer. For example, you might want to give the name Twelfth Floor NE to the printer that points to a print device in the northeast corner of the twelfth floor.
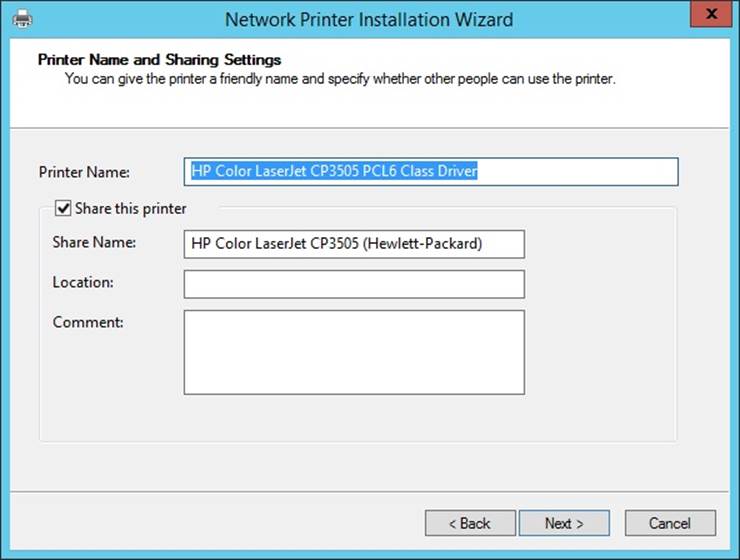
Figure 10-4. Set the printer name and share name.
7. The next page lets you review the settings. When you’re ready to complete the installation, tap or click Next.
8. When you share a printer, Windows Server automatically makes drivers available so that users can download them when they first connect to the printer. The status page should confirm that printer driver and printer installation were successful. If there was a problem with the installation, note the errors provided. For example, someone might have powered off the printer while you were trying to configure it. If so, you’ll need to power the printer back on and repeat this procedure.
9. If you’d like to print a test page on the printer, select the Print Test Page check box, and then tap or click Finish. Otherwise, just tap or click Finish.
10.By default, the printer share is not listed in Active Directory. Listing the printer share in Active Directory enables users to search for and find the printer more easily. If you want the printer share to be listed in Active Directory, select the Printers node in the left pane, press and hold or right-click the printer in the main window, and then select List In Directory.
11.By default, print jobs are sent to the print server where they are rendered and then sent to the printer. You can change this behavior by using Branch Office Direct Printing. With Branch Office Direct Printing, print jobs are rendered on client computers and then sent directly to the printer. If you want to enable direct printing, select the Printers node in the left pane, press and hold or right-click the printer in the main window, and then select Enable Branch Office Direct Printing.
Installing and configuring physically attached print devices
Most physically attached print devices are connected to a computer directly through a USB cable. You can configure physically attached printers as local print devices or as network print devices. The key difference is that a local device is accessible only to users logged on to the computer and a network device is accessible to network users as a shared print device. Remember that the workstation or server you’re logged on to becomes the print server for the device you’re configuring. If the computer is sleeping or turned off, the printer will not be available.
You can install physically attached print devices locally by logging on to the print server you want to configure; you can install the print devices remotely through Remote Desktop. If you’re configuring a local Plug and Play printer and are logged on to the print server, installing a print device is a snap. After the printer is installed, you need to configure it for use.
You can install and configure a print device by following these steps:
1. Power on the printer, and then connect the print device to the server by using the appropriate cable.
2. If Windows Server automatically detects the print device, Windows begins installing the device and the necessary drivers. If the necessary drivers aren’t found, you might need to insert the printer’s driver disc into the CD/DVD drive.
3. If Windows Server doesn’t detect the print device automatically, you need to install the print device manually as described in the next set of instructions.
4. After you install the printer, you can configure the printer. In Print Management, expand the Print Servers node and the node for the server with which you want to work. When you select the Printers node for the server you are configuring, you’ll find a list of available printers in the main pane. Press and hold or right-click the printer you want to configure, and then tap or click Manage Sharing. This displays the printer’s Properties dialog box with the Sharing tab selected, as shown in Figure 10-5.
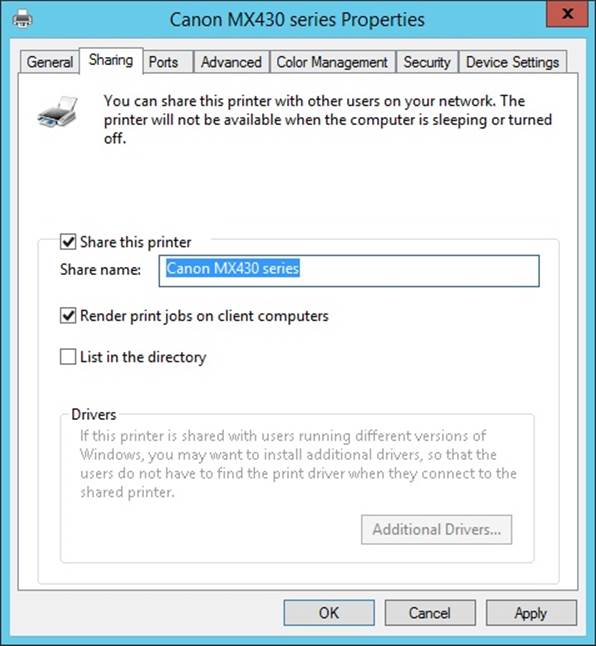
Figure 10-5. Configure the printer by using the Properties dialog box.
5. When you select the Share This Printer check box, Windows Server sets the default share name to the name of the printer. You can enter a different name for the printer share in the Share Name text box.
6. By default, the Render Print Jobs On Client Computers check box is selected, which configures the printer for Branch Office Direct Printing. With Branch Office Direct Printing, print jobs are rendered on client computers and then sent directly to the printer. If you want print jobs to be sent to the print server for rendering and then sent to the printer, clear the Render Print Jobs On Client Computers check box.
7. Listing the printer share in Active Directory enables users to search for and find the printer more easily. If you want the printer share to be listed in Active Directory, select the List In The Directory check box.
8. Tap or click OK.
Sometimes Windows Server won’t detect your printer. In this case, follow these steps to install the print device:
1. In Print Management, expand the Print Servers node and the node for the server with which you want to work.
2. Press and hold or right-click the server’s Printers node, and then tap or click Add Printer to start the Network Printer Installation Wizard.
3. On the Printer Installation page, shown in Figure 10-6, select Add A New Printer Using An Existing Port, and then choose the appropriate LPT, COM, or USB port. You can also print to a file. If you do, Windows Server 2012 R2 prompts users for a file name each time they print. Tap or click Next.
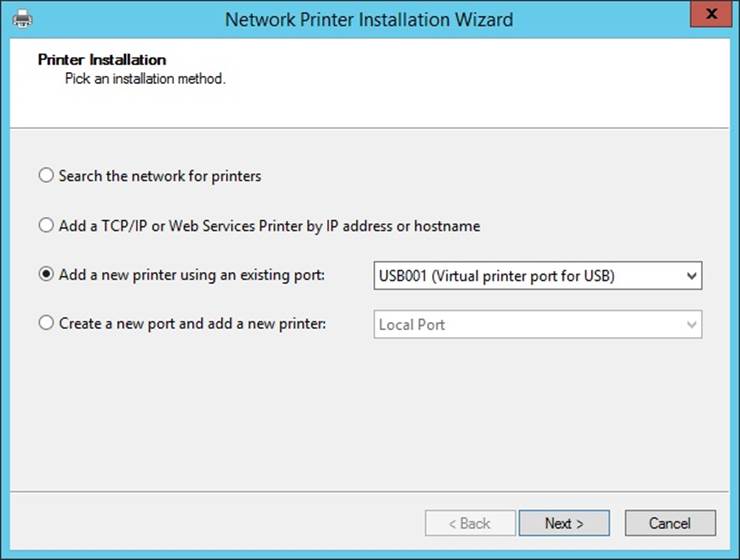
Figure 10-6. Choose the existing port to use.
4. On the Printer Driver page, shown in Figure 10-7, choose one of the following options:
o If Windows detected the printer type on the selected port and a compatible driver was found automatically, a printer driver is listed that reflects the printer manufacturer and model and the Use The Printer Driver That The Wizard Selected option is selected by default. To accept this setting, tap or click Next.
o If a compatible driver is not available and you want to choose an existing driver installed on the computer, select the Use An Existing Driver On The Computer option. After you choose the appropriate driver from the selection list, tap or click Next.
o If multiple drivers are available for a printer, such as both PCL and PostScript drivers, and you want to use a driver other than the selected default, select the Use An Existing Driver On The Computer option. After you choose the appropriate driver from the selection list, tap or click Next.
o If a compatible driver is not available and you want to install a new driver, select Install A New Driver, and then tap or click Next. You must now specify the print device manufacturer and model. This enables Windows Server 2012 R2 to assign a printer driver to the print device. After you choose a print device manufacturer, choose a printer model.
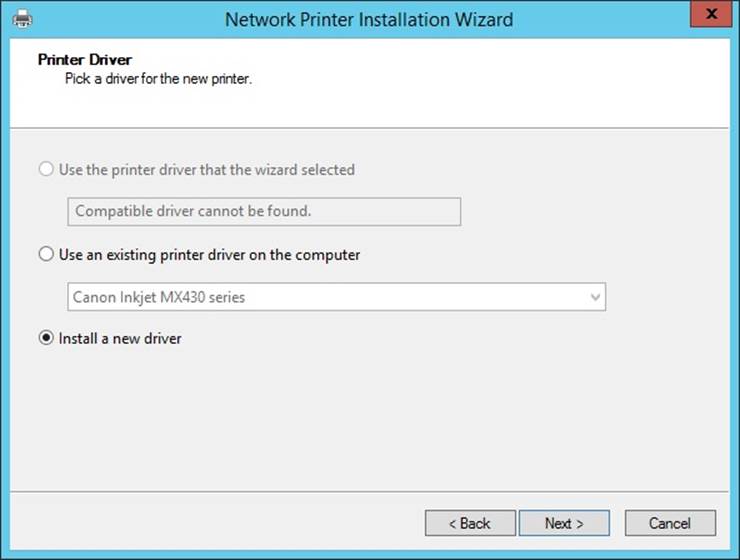
Figure 10-7. Select the driver to use for the printer or install a new driver.
REAL WORLD
If the device manufacturer and model you’re using aren’t displayed in the list, tap or click Windows Update. Windows will then connect to the Windows Update website to update the list of printers to show additional models. This automatic driver provisioning process can take several minutes. When the update process is complete, you should then be able to select your printer manufacturer and model. If you can’t, download the driver from the manufacturer’s website, and then extract the driver files. Tap or click Have Disk. In the Install From Disk dialog box, tap or click Browse. In the Locate File dialog box, locate the .inf driver file for the device, and then tap or click Open.
NOTE
If a driver for the specific printer model you’re using isn’t available, you often can select a generic driver or a driver for a similar print device. Consult the print device documentation for pointers.
5. Assign a name to the printer. This is the name that will be listed in Print Management.
6. Specify whether the printer is available to remote users. To create a printer accessible to remote users, select the Share This Printer option, and then enter a name for the shared resource. In a large organization you’ll want the share name to be logical and helpful in locating the printer. For example, you could give the name Twelfth Floor NE to the printer that points to the print device in the northeast corner of the twelfth floor.
7. If you like, you can enter a location description and comment. This information can help users find a printer and determine its capabilities. Tap or click Next.
8. The final page lets you review the settings. When you’re ready to complete the installation, tap or click Next.
9. After Windows installs the printer driver and configures the printer, you’ll get a status page. Ensure that the driver and printer installation succeeded before continuing. If there were errors, you need to correct any problems and repeat this process. To test the printer, select Print Test Page, and then tap or click Finish.
When the Network Printer Installation Wizard finishes installing the new printer, the Printers folder will have an additional icon with the name set the way you specified. You can change the printer properties and check printer status at any time. For more information, see Configuring printer properties later in this chapter.
TIP
If you repeat this process, you can create additional printers for the same print device. All you need to do is change the printer name and share name. Having additional printers for a single print device makes it possible for you to set different properties to serve different needs. For example, you could have a high-priority printer for print jobs that need to be printed immediately and a low-priority printer for print jobs that aren’t as urgent.
Installing network-attached print devices
A network-attached print device is attached directly to the network through a network adapter card or a wireless network card. Network-attached printers are configured as network print devices so that they’re accessible to network users as shared print devices. Remember that the server on which you configure the print device becomes the print server for the device you’re configuring.
Install a network-attached print device by following these steps:
1. In Print Management, expand the Print Servers node and the node for the server with which you want to work.
2. Press and hold or right-click the server’s Printers node, and then tap or click Add Printer to start the Network Printer Installation Wizard.
3. On the Printer Installation page, select Add A TCP/IP Or Web Services Printer By IP Address Or Hostname, and then tap or click Next.
4. On the Printer Address page, choose one of the following options in the Type Of Device list:
o Autodetect. Choose this option if you are unsure of the printer device type. Windows Server will try to detect the type of device automatically.
o TCP/IP Device. Choose this option if you are sure the printer is a TCP/IP device.
o Web Services Printer. Choose this option if you are sure the printer is a Web Services for Devices (WSD) capable printer.
o Web Services Secure Printer. Choose this option if you are sure the printer supports WSD Secure Printing.
REAL WORLD
With WSD Secure Printing, print servers can create a private secure channel to the print device on the network without the need for additional security technologies such as IPsec. However, users and computers that work with the secure printer must be members of an Active Directory domain. You use the domain settings to manage printer permissions and Active Directory Domain Services acts as the trust arbitrator between the print server and the printer.
5. Enter the host name or IP address for the printer, such as 192.168.1.90. With the Autodetect and TCP/IP Device options, the wizard sets the port name to the same value, but you can also choose to use a different value.
TIP
The port name doesn’t matter as long as it’s unique on the server. If you’re configuring multiple printers on the print server, be sure to record the port-to-printer mapping.
6. The Auto Detect The Printer Driver To Use check box is selected by default. When you tap or click Next, the wizard attempts to contact the printer and automatically configure the print device. If the wizard is unable to detect the print device, be sure that the following are true:
o You selected the correct type of print device.
o The print device is turned on and connected to the network.
o The printer is configured properly.
o You entered the correct IP address or printer name.
7. If the device type, IP address, or printer name is incorrect, tap or click OK to close the warning dialog box. Next, tap or click Back, and then reenter the required printer information.
8. On the Printer Driver page, choose one of the following options:
o If Windows detected the printer type on the selected port and a compatible driver was found automatically, a printer driver is listed that reflects the printer manufacturer and model and the Use The Printer Driver That The Wizard Selected option is selected by default. To accept this setting, tap or click Next.
o If a compatible driver is not available and you want to choose an existing driver installed on the computer, select the Use An Existing Driver option. After you use the selection list to choose the appropriate driver, tap or click Next.
o If a compatible driver is not available and you want to install a new driver, select Install A New Driver, and then tap or click Next. Specify the print device manufacturer to enable Windows Server to assign a printer driver to the print device. After you choose a print device manufacturer, choose a printer model.
REAL WORLD
If the device manufacturer and model you’re using aren’t displayed in the list, tap or click Windows Update. Windows will then connect to the Windows Update website to update the list of printers to show additional models. This feature is part of the automatic driver provisioning feature. It can take several minutes to retrieve the updated list. You should then be able to select your printer manufacturer and model. If you can’t, download the driver from the manufacturer’s website, and then extract the driver files. Tap or click Have Disk. In the Install From Disk dialog box, tap or click Browse. In the Locate File dialog box, locate the .inf driver file for the device, and then tap or click Open.
9. Assign a name to the printer. This is the name that will be listed in Print Management.
10.Specify whether the printer is available to remote users. To create a printer accessible to remote users, select the Share Name option, and then enter a name for the shared resource. In a large organization, you should use a share name that is logical and helpful in locating the printer. For example, Twelfth Floor NE would be a good name for the printer that points to the print device in the northeast corner of the twelfth floor.
11.If you like, you can enter a location description and comment. This information can help users find a printer and determine its capabilities. Tap or click Next.
12.The final page lets you review the settings. When you’re ready to complete the installation, tap or click Next.
13.After Windows installs the printer driver and configures the printer, you’ll get a status page. Ensure that the driver and printer installation succeeded before continuing. If there were errors, you need to correct any problems and repeat this process. To test the printer, select Print Test Page, and then tap or click Finish. To install another printer, select Add Another Printer, and then tap or click Finish.
14.By default, the printer share is not listed in Active Directory. Listing the printer share in Active Directory makes it possible for users to search for and find the printer more easily. If you want the printer share to be listed in Active Directory, select the Printers node in the left pane, press and hold or right-click the printer in the main window, and then select List In Directory.
15.By default, print jobs are sent to the print server where they are rendered and then sent to the printer. You can change this behavior by using Branch Office Direct Printing. With Branch Office Direct Printing, print jobs are rendered on client computers and then sent directly to the printer. If you want to enable direct printing, select the Printers node in the left pane, press and hold or right-click the printer in the main window, and then select Enable Branch Office Direct Printing.
When the Network Printer Installation Wizard finishes installing the new printer, the Printers folder will have an additional icon with the name set the way you specified. You can change the printer properties and check printer status at any time. For more information, see Configuring printer properties later in this chapter.
TIP
If you repeat this process, you can create additional printers for the same print device. All you need to do is change the printer name and share name. Having additional printers for a single print device makes it possible for you to set different properties to serve different needs. For example, you could have a high-priority printer for print jobs that need to be printed immediately and a low-priority printer for print jobs that aren’t as urgent.
Connecting to printers created on the network
After you create a network printer, remote users can connect to it and use it much as they do any other printer. You need to set up a connection on a user-by-user basis or have users do this themselves. To create a connection to the printer on a Windows 7 system, follow these steps:
1. With the user logged on, tap or click Start, and then tap or click Devices And Printers. In Devices And Printers, tap or click Add A Printer to start the Add Printer Wizard.
2. Select Add A Network, Wireless Or Bluetooth Printer. The wizard searches for available devices.
3. If the printer you want is listed in the Select A Printer list, tap or click it, and then tap or click Next.
4. If the printer you want is not listed in the Select A Printer list, tap or click The Printer That I Want Isn’t Listed. On the Find A Printer By Name Or TCP/IP Address page, do one of the following:
o To browse the network for shared printers, choose Find A Printer In The Directory, Based On Location Or Feature, and then tap or click Next. Tap or click the printer to use, and then tap or click Select.
o To specify the printer to use by its share path, choose Select A Shared Printer By Name. Enter the UNC path to the shared printer, such as \\PrintServer12\Twelfth Floor NE, or the Web path to an Internet Printer, such as http://PrintServer12/Printers/IPrinter52/.printer.
o To specify a printer to use by TCP/IP address or host name, select Add A Printer Using A TCP/IP Address Or Hostname, and then tap or click Next. Choose a device type, and then enter the host name or IP address for the printer, such as 192.168.1.90. If you select the Autodetect or TCP/IP Device options, the wizard will set the port name to the same value, but you can also choose a different value. Tap or click Next.
5. On the Type A Printer Name page, the printer name is set for you. You can accept the default name or enter a new name. Tap or click Next to install the printer, and then tap or click Finish. The user can now print to the network printer by selecting the printer in an application. The Device And Printers folder on the user’s computer shows the new network printer as well.
To create a connection to the printer on a Windows 8.1 system, follow these steps:
1. In Devices And Printers, tap or click Add A Printer. The Add Printer Wizard attempts to detect the printer automatically.
If the wizard finds the printer with which you want to work, tap or click it in the list provided, follow the prompts, and skip the rest of the steps in this procedure.
If the wizard doesn’t find the printer, tap or click The Printer That I Want Isn’t Listed, and then complete the rest of this procedure.
2. In the Add Printer Wizard, tap or click Add Bluetooth, Wireless Or Network Discoverable Printer.
3. In the list of available printers, select the printer you want to use, and then tap or click Next.
4. If prompted, install the printer driver on your computer. Complete the additional steps in the wizard, and then tap or click Finish. You can confirm the printer is working by printing a test page.
If you have trouble connecting to the printer, try the following as part of troubleshooting:
§ Be sure that a firewall isn’t blocking connectivity to the printer. You might need to open a firewall port to enable access between the computer and the printer.
§ Be sure the printer is turned on and connected to the same network as the computer. If your network consists of multiple subnets connected together, try to connect the printer to the same network subnet. You can determine the subnet by looking at the computer’s IP address.
§ Be sure the printer is configured to broadcast its presence on the network. Most network printers automatically do this.
§ Be sure the printer has an IP address and proper network settings. If DHCP is configured on the network, DHCP assigns IP addresses automatically as printers connect to the network.
Deploying printer connections
Connecting to printers is fairly easy, but you can make the process even easier by deploying printer connections through Group Policy. You can deploy printer connections to computers or users via the Group Policy objects (GPOs) that Windows applies. Deploy the connections to groups of users when you want users to be able to access the printers from any computer they log on to. Deploy the connections to groups of computers when you want all users of the computers to access the printers. For per-computer connections, Windows adds or removes printer connections when the computer starts. For per-user connections, Windows adds or removes printer connections when the user logs on.
To deploy printer connections to computers, you must follow these steps:
1. In Print Management, expand the Print Servers node and the node for the server with which you want to work.
2. Select the server’s Printers node. In the main pane, press and hold or right-click the printer you want to deploy, and then tap or click Deploy With Group Policy. This displays the Deploy With Group Policy dialog box, shown in Figure 10-8.
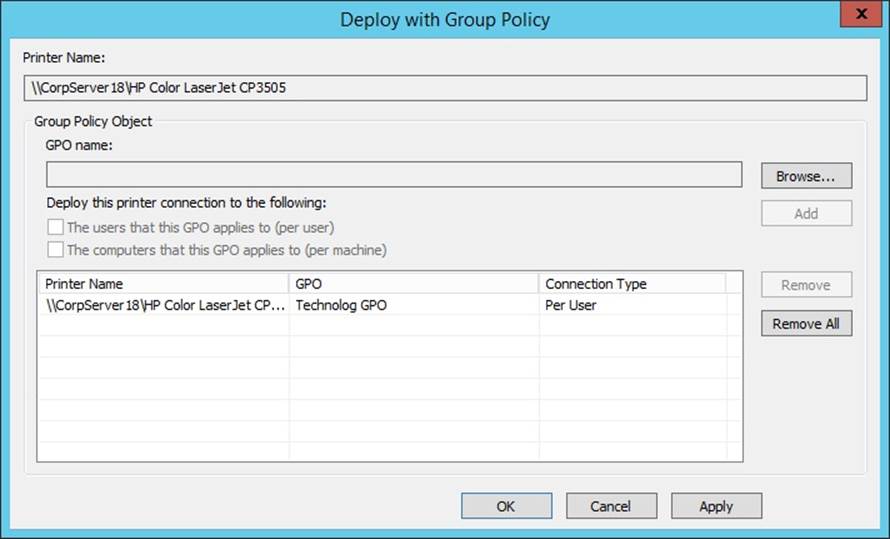
Figure 10-8. Select the GPO to use for deploying the printer connection.
3. Tap or click Browse. In the Browse For Group Policy Object dialog box, select the GPO to use, and then tap or click OK.
4. Do one or both of the following:
o To deploy to the printer connection on a per-user basis, under Deploy This Printer Connection To The Following, select The Users That This GPO Applies To.
o To deploy to the printer connection on a per-computer basis, under Deploy This Printer Connection To The Following, select The Computers That This GPO Applies To.
5. Tap or click Add to create a print connection entry.
6. Repeat steps 3–5 to deploy the printer connection to other GPOs.
7. Tap or click OK to save the changes to the GPO. In the confirmation dialog box, ensure that all operations were completed successfully. If an error occurred, tap or click Details to get more information about the error. The most common errors involve editing permissions for the GPO with which you are working. If the account you are using doesn’t have appropriate permissions, you need to use an account with additional privileges. Tap or click OK.
Configuring point and print restrictions
In Group Policy, the Point And Print Restrictions setting controls security warnings and elevation prompts when users point and print and when drivers for printer connections need to be configured. This setting is found in the Administrative Templates for Computer Configuration under the Printers node.
Table 10-1 summarizes how the Point And Print Restrictions setting is used. Note that prior to Windows 7 and Windows Vista Service Pack 2, Point And Print Restrictions were implemented by using User Configuration policy. If you configure Point And Print Restrictions in User Configuration policy, the settings will be ignored by computers running Windows Vista Service Pack 2, Windows 7, and later versions of Windows.
Table 10-1. Point and print restrictions
|
When the Policy Setting Is |
The Policy Works As Follows |
|
Enabled |
Clients can point and print to any server. You can configure Clients to show or hide warning and elevation prompts when users point and print and when a driver for an existing printer connection needs to be updated. |
|
Not Configured |
Clients can point and print to any server in the forest. Clients also will not show a warning and elevation prompt when users point and print or when a driver for an existing printer connection needs to be updated. |
|
Disabled |
Clients can point and print to any server. Clients also will not show a warning and elevation prompt when users point and print or when a driver for an existing printer connection needs to be updated. |
By default, Windows allows a user who is not a member of the local Administrators group to install only trustworthy printer drivers, such as those provided by Windows or in digitally signed printer driver packages. When you enable the Point And Print Restrictions setting, you also make it possible for users who are not members of the local Administrators group to install printer connections deployed in Group Policy that include additional or updated printer drivers that are not in the form of digitally signed printer driver packages. If you do not enable this setting, users might need to provide the credentials of a user account that belongs to the local Administrators group.
You can enable and configure the Point And Print Restrictions setting in Group Policy by following these steps:
1. In the Group Policy Management Console, press and hold or right-click the GPO for the site, domain, or organizational unit with which you want to work, and then tap or click Edit. This opens the policy editor for the GPO.
2. In the Group Policy Management Editor, expand the Administrative Templates for Computer Configuration, and then select the Printers node.
3. In the main pane, double-tap or double-click Point And Print Restrictions.
4. In the Point And Print Restrictions dialog box, shown in Figure 10-9, select Enabled.
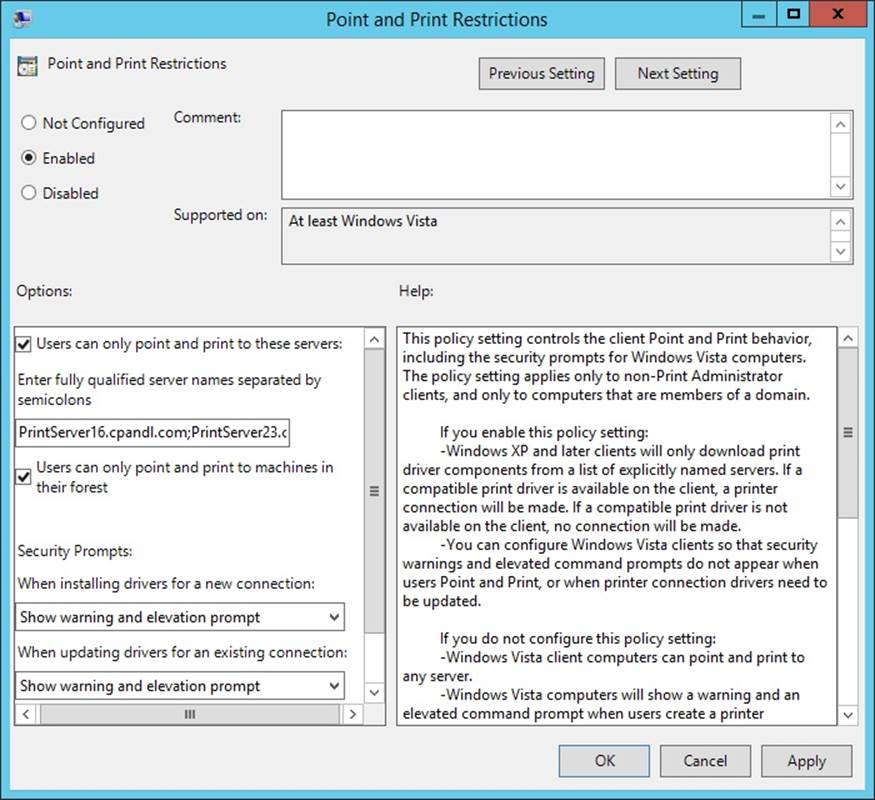
Figure 10-9. Configure point and print restrictions.
5. When you enable point and print restrictions, you can configure policy so that users can point and print only to a named list of servers. To enforce this restriction, select the related check box and enter a list of fully qualified server names separated by semicolons. To remove this restriction, clear the related check box.
6. When you enable point and print restrictions, you can configure policy so that users can point and print only to servers in their forest. To enforce this restriction, select the related check box. To remove this restriction, clear the related check box.
7. When you install drivers for a new connection, clients can show or not show a warning or elevation prompt. Use the related selection list to choose the option you want to use.
8. When you update drivers for an existing connection, clients can show or not show a warning or elevation prompt. Use the related selection list to choose the option you want to use.
9. Tap or click OK to apply the configuration.
Moving printers to a new print server
You can use the Printer Migration Wizard to move print queues, printer drivers, printer processors, and printer ports from one print server to another. This is an efficient way to consolidate multiple print servers or replace an older print server.
When you move printers, the server on which the printers are currently located is the source server, and the server to which you want to move the printers is the destination server. With this in mind, you can move printers to a new print server by following these steps:
1. In Print Management, press and hold or right-click the source server, and then tap or click Export Printers To A File. This starts the Printer Migration Wizard.
2. On the initial page, note the printer-related objects that will be exported, and then tap or click Next.
3. On the Select The File Location page, tap or click Browse. In the dialog box provided, select a save location for the printer migration file. After you enter a name for the file, tap or click Save.
4. Printer migration files are saved with the .printerExport extension. Tap or click Next to save the printer settings to this file.
5. After the wizard completes the export process, tap or click Open Event Viewer to review the events generated during the export process. If an error occurred during processing, you can use the event entries to determine what happened and possible actions to take to resolve the problem. When you have finished, exit the Event Viewer.
6. On the Exporting page, tap or click Finish to exit the Printer Migration Wizard.
7. In Print Management, press and hold or right-click the destination server, and then tap or click Import Printers From A File. This launches the Printer Migration Wizard.
8. On the Select The File Location page, tap or click Browse. In the dialog box provided select the printer migration file you created in steps 3 and 4, and then tap or click Open.
9. Tap or click Next. Note the objects that will be imported, and then tap or click Next. On the Select Import Options page, choose one of the following options in the Import Mode list:
o Keep Existing Printers. When you choose this option and existing printer queues have the same names as those you are importing, the wizard creates copies to ensure that the original printer queues and the imported printer queues are both available.
o Overwrite Existing Printers. When you choose this option and existing printer queues have the same names as those you are importing, the wizard overwrites the existing printer queues with the information from the printer queues you are importing.
10.On the Select Import Options page, choose one of the following options in the List In The Directory list:
o List Printers That Were Previously Listed. Choose this option to specify that only printers that were previously listed are listed in Active Directory.
o List All Printers. Choose this option to specify that all printers are listed in Active Directory.
o Don’t List Any Printers. Choose this option to specify that no printers are listed in Active Directory.
11.Tap or click Next to begin the import process. After the wizard completes the import process, tap or click Open Event Viewer to review the events generated during the import process. If an error occurred during processing, you can use the event entries to determine what happened and possible actions to take to resolve the problem. When you have finished, exit the Event Viewer.
12.On the Importing page, tap or click Finish to exit the Printer Migration Wizard.
Monitoring printers and printer queues automatically
Printer filters display only the printers, printer queues, and printer drivers that meet specific criteria. Through automated notification, you can use printer filters to automate monitoring of printers.
In Print Management, you can view existing filters by expanding the Custom Filters node. If you expand the Custom Filters node and then select a filter, the main pane shows all printers or print drivers that match the filter criteria. Print Management includes the following default printer filters:
§ All Printers. Lists all printers associated with print servers that have been added to the console
§ All Drivers. Lists all printer drivers associated with print servers that have been added to the console
§ Printers Not Ready. Lists all printers that are not in a Ready state, such as those with errors
§ Printers With Jobs. Lists all printers associated with print servers that have active or pending print jobs
You can create a new custom filter by follow these steps:
1. In Print Management, press and hold or right-click the Custom Filters node, and then tap or click Add New Printer Filter to start the New Printer Filter Wizard.
2. On the Printer Filter Name And Description page, enter a filter name and description. If you’d like the number of matching items to be displayed after the filter name, select the Display The Total Number Of Printers check box. Tap or click Next.
3. On the Define A Filter page, define the filter by specifying the text box, condition, and value to match in the first row. If you want to further narrow the possible matches, define additional criteria in the second, third, and subsequent rows. Tap or click Next when you are ready to continue.
NOTE
When you use filters for monitoring and notification, you use the Queue Status text box the most. This text box enables you to receive a notification when a printer has a specific status. You can match the following status values: Attention Required, Busy, Deleting, Door Open, Error, Initializing, IO Active, Manual Feed Required, No Toner Ink, Not Available, Offline, Out of Memory, Out of Paper, Output Bin Full, Page Punt, Paper Jam, Paper Problem, Paused, Printing, Processing, Ready, Toner Ink Low, Waiting, and Warming Up
TIP
When you are matching conditions in a filter, you can match an exact condition that does exist or one that does not exist. For example, if you want to be notified only of conditions that need attention, you can look for Queue Status conditions that are not exactly the following: Deleting, Initializing, IO Active, Printing, Processing, Waiting, Warming Up, and Ready.
4. On the Set Notifications (Optional) page, you can specify whether to send an email message, run a script, or take both actions when the specified criteria are met. Tap or click Finish to complete the configuration.
You can modify an existing custom filter by following these steps:
1. In Print Management, expand the Custom Filters node. Select and then press and hold or right-click the filter with which you want to work. On the shortcut menu, tap or click Properties.
2. In the filter’s Properties dialog box, use the options provided to manage the filter settings. This dialog box has the following three tabs:
o General. Shows the name and description of the printer filter. Enter a new name and description as necessary.
o Filter Criteria. Shows the filter criteria. Enter new filter criteria as necessary.
o Notification. Shows the email and script options. Enter new email and script options as necessary.
Solving spooling problems
Windows Server 2012 R2 uses the Print Spooler service to control the spooling of print jobs. If this service isn’t running, print jobs can’t be spooled. Use the Services console to check the status of the Print Spooler. Follow these steps to check and restart the Print Spooler service:
1. On the Tools menu in Server Manager, tap or click Computer Management.
2. If you want to connect to a remote computer, press and hold or right-click the Computer Management entry in the console tree, and then tap or click Connect To Another Computer. You can now choose the system whose services you want to manage.
3. Expand the Services And Applications node, and then tap or click Services.
4. Select the Print Spooler service. The Status should be Started. If it isn’t, press and hold or right-click Print Spooler, and then tap or click Start. The Startup Type should be Automatic. If it isn’t, double-tap or double-click Print Spooler and set Startup Type to Automatic.
TIP
Spoolers can become corrupted. Symptoms of a corrupted spooler include a frozen printer or one that doesn’t send jobs to the print device. Sometimes the print device might print pages of garbled data. In most of these cases, you can resolve the problem by stopping and starting the Print Spooler service. Other spooling problems might be related to permissions. See Setting printer access permissions later in this chapter.
Configuring printer properties
The sections that follow explain how to set commonly used printer properties. After you install a network printer, you can set its properties by following these steps:
1. In Print Management, expand the Print Servers node and the node for the server with which you want to work.
2. Select the server’s Printers node. In the main pane, press and hold or right-click the printer with which you want to work, and then tap or click Properties. You can now set the printer properties.
Adding comments and location information
To make it easier to determine which printer to use and when, you can add comments and location information for printers. Comments provide general information about the printer, such as the type of print device and who is responsible for it. Location describes the actual site of the print device. After set, applications can display these text boxes. For example, Microsoft Word displays this information in the Comment and Where text boxes when you select Print from the File menu.
You can add comments and location information to a printer by using the text boxes on the General tab of the printer’s Properties dialog box. Enter your comments in the Comment text box. Enter the printer location in the Location text box.
Listing printers in Active Directory
Listing printers in Active Directory makes it easier for users to locate and install printers. You can list a printer in Active Directory by doing one of the following:
§ Press and hold or right-click the printer’s name, and then tap or click List In Directory.
§ Open the printer’s Properties dialog box, and then tap or click the Sharing tab. Select the List In Directory check box, and then tap or click OK.
Managing printer drivers
In a Windows Server 2012 R2 domain you should configure and update printer drivers only on your print servers. You don’t need to update printer drivers on Windows clients. Instead, you configure the network printer to provide the drivers to client systems as necessary.
Updating a printer driver
You can update a printer’s driver by following these steps:
1. Open the printer’s Properties dialog box, and then tap or click the Advanced tab.
2. In the Driver list, you can select the driver from a list of currently installed drivers. Use the Driver list to select a new driver from a list of known drivers.
3. If the driver you need isn’t listed or if you obtained a new driver, tap or click New Driver to start the Add Printer Driver Wizard. Tap or click Next.
4. If the device manufacturer and model you’re using aren’t displayed in the list, tap or click Windows Update. Windows connects to the Windows Update Web site to update the list of printers to show additional models. This feature is part of the automatic driver provisioning feature. It can take several minutes to retrieve the updated list. You should then be able to select your printer manufacturer and model.
5. If the device manufacturer and model you’re using still aren’t displayed in the list, choose Have Disk to install the new driver from a file or disc. In the Install From Disk dialog box, enter the folder path to the printer driver file or tap or click Browse to find the printer driver file by using the Locate File dialog box. Tap or click OK.
6. Tap or click Next, and then tap or click Finish.
Configuring drivers for network clients
After you install a printer or change drivers, you might want to select the operating systems that should download the driver from the print server. By enabling clients to download the printer driver, you provide a single location for installing driver updates. This way, instead of having to install a new driver on all the client systems, you install the driver on the print server and enable clients to download the new driver.
You can enable clients to download the new driver by following these steps:
1. Press and hold or right-click the icon of the printer you want to configure, and then tap or click Printer Properties.
2. Tap or click the Sharing tab, and then tap or click Additional Drivers.
3. In the Additional Drivers dialog box, select operating systems that can download the printer driver. As necessary, insert the Windows Server 2012 R2 installation media, printer driver discs, or both for the selected operating systems. The Windows Server 2012 R2 installation media has drivers for most Windows operating systems.
Setting a separator page and changing print device mode
Separator pages have two uses on Windows Server 2012 R2 systems:
§ You can use them at the beginning of a print job to make it easier for users to find a document on a busy print device.
§ You can use them to change the print device mode, such as whether the print device uses PostScript or Printer Control Language (PCL).
To set a separator page for a print device, follow these steps:
1. On the Advanced tab of the printer’s Properties dialog box, tap or click Separator Page.
2. In the Separator Page dialog box, enter the name of the separator file to use. Typically, you’ll want to use one of these available separator pages:
o Pcl.sep. Switches the print device to PCL mode and prints a separator page before each document
o Pscript.sep. Sets the print device to PostScript mode but doesn’t print a separator page
o Sysprint.sep. Sets the print device to PostScript mode and prints a separator page before each document
NOTE
Sysprintj.sep is an alternate version of Sysprint.sep. If fonts for Japanese are available and you want to use them, you can use Sysprintj.sep.
3. To stop using the separator page, open the Separator Page dialog box and remove the file name.
NOTE
When you work with a local server, tap or click the Browse button in the Separator Page dialog box to open the %SystemRoot%\Windows\System32 folder for browsing. In this case, you can browse and select the separator page to use. In contrast, when you work with a remote server, the Browse button is typically not available, so you must enter the exact file name for the separator page.
Changing the printer port
You can change the port used by a print device at any time by using the Properties dialog box for the printer you’re configuring. Open the Properties dialog box, and then tap or click the Ports tab. You can now add a port for printing by selecting its check box or remove a port by clearing its check box. To add a new port type, tap or click Add Port. In the Printer Ports dialog box, select the port type, and then tap or click New Port. Enter a valid port name, and then tap or click OK. To remove a port permanently, select it, and then tap or click Delete Port.
Scheduling and prioritizing print jobs
You can use the Properties dialog box for the printer you’re configuring to set default settings for print job priority and scheduling. Open the dialog box, and then tap or click the Advanced tab. You can now set the default schedule and priority settings by using the text boxes shown inFigure 10-10. Each of these text boxes is discussed in the sections that follow.
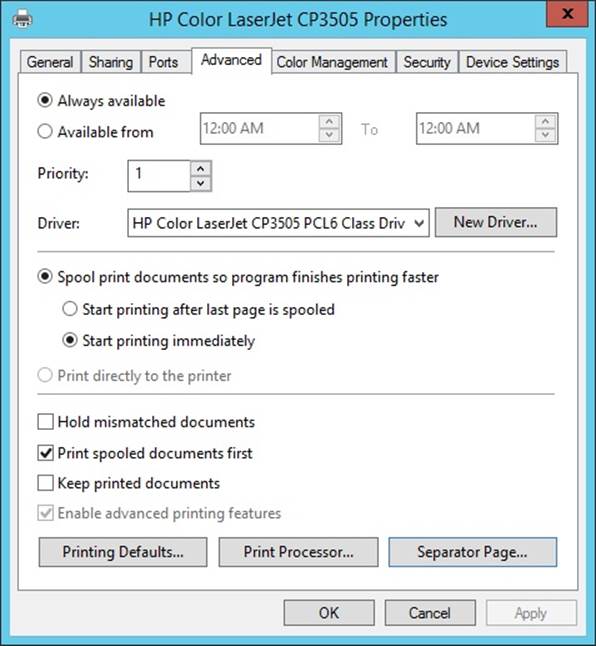
Figure 10-10. You configure print job scheduling and priority on the Advanced tab.
Scheduling printer availability
Printers are always available or available only during the hours specified. You set printer availability on the Advanced tab. Select Always Available to make the printer available at all times. Select Available From to set specific hours of operation.
TIP
As I mentioned before, you can create additional printers for the same print device. All you need to do is change the printer name and share name. To handle long print jobs that would interfere with the normal use of a printer, you might want to create a new printer for a print device and then set the availability to off-hours for your location. That printer could then be used for long print jobs that you don’t want to run during the normal workday. The key to success with this approach is to ensure that the off-hours printer is clearly named as such and that users know how to use the various printers.
Setting printer priority
You can set the default priority for print jobs in the Priority box on the Advanced tab. Print jobs always print in order of priority. Jobs with higher priority print before jobs with lower priority.
Configuring print spooling
For print devices attached to the network, you usually want the printer to spool files rather than print files directly. Print spooling makes it possible to use a printer to manage print jobs.
Enabling Spooling
To enable spooling, use one of the following options:
§ Spool Print Documents So Program Finishes Printing Faster. Select this option to spool print jobs.
§ Start Printing After Last Page Is Spooled. Select this option if you want the entire document to be spooled before printing begins. This option ensures that the entire document makes it into the print queue before printing. If for some reason printing is canceled or not completed, the job won’t be printed.
§ Start Printing Immediately. Select this option if you want printing to begin immediately when the print device isn’t already in use. This option is preferable when you want print jobs to be completed more quickly or when you want to ensure that the application returns control to users as soon as possible.
Other Spooling Options
You can disable spooling by selecting the Print Directly To The Printer option. The following additional check boxes let you configure other spooling options:
§ Hold Mismatched Documents. If you select this option, the spooler holds print jobs that don’t match the setup for the print device. Selecting this option is a good idea if you frequently have to change printer form or tray assignments.
§ Print Spooled Documents First. If you select this option, jobs that have completed spooling will print before jobs in the process of spooling, regardless of whether the spooling jobs have higher priority.
§ Keep Printed Documents. Typically, documents are deleted from the queue after they’re printed. To keep a copy of documents in the printer, select this option. Use this option if you’re printing files that can’t easily be re-created. In this way, you can reprint the document without having to re-create it. For details, see Pausing, resuming, and restarting individual document printing later in this chapter.
§ Enable Advanced Printing Features. When you enable this option, you can use advanced printing options (if available), such as Page Order and Pages Per Sheet. If you note compatibility problems when using advanced options, you should disable the advanced printing features by clearing this check box.
Starting and stopping printer sharing
You set printer sharing in the Properties dialog box of the printer you’re configuring. Press and hold or right-click the icon of the printer you want to configure, and then tap or click Manage Sharing. This opens the printer’s Properties dialog box with the Sharing tab selected. You can use this tab to change the name of a network printer and to start sharing or stop sharing a printer. Printer sharing tasks that you can perform include the following:
§ Sharing a local printer (thus making it a network printer). To share a printer, select Share This Printer, and then specify a name for the shared resource in the Share Name text box. Tap or click OK when you have finished.
§ Changing the shared name of a printer. To change the shared name, just enter a new name in the Share Name text box, and then tap or click OK.
§ Stopping the sharing of a printer. To quit sharing a printer, clear the Share This Printer check box, and then tap or click OK.
Setting printer access permissions
Network printers are shared resources. As such, you can set access permissions for them. You set access permissions in the Properties dialog box of the printer you’re configuring. Open the printer’s Properties dialog box, and then tap or click the Security tab. Permissions that you can grant or deny for printers are Print, Manage Documents, and Manage This Printer. Table 10-2 summarizes the capabilities of these permissions.
Table 10-2. Printer permissions used by Windows Server 2012 R2
|
Permission |
|
Manage Documents |
Manage This Printer |
|
Print documents |
X |
X |
X |
|
Pause, restart, resume, and cancel own documents |
X |
X |
X |
|
Connect to printers |
X |
X |
X |
|
Control settings for print jobs |
X |
X |
|
|
Pause, restart, and delete print jobs |
X |
X |
|
|
Share printers |
X |
||
|
Change printer properties |
X |
||
|
Change printer permissions |
X |
||
|
Delete printers |
X |
The default permissions are used for any new network printer you create. These settings are as follows:
§ Members of the Administrators, Print Operators, and Server Operators groups have full control over printers by default. This makes it possible for you to administer a printer and its print jobs.
§ The creator or owner of the document can manage his or her own document. This enables the person who printed a document to change its settings and to delete it.
§ Everyone can print to the printer. This makes the printer accessible to all users on the network.
As with other permission sets, you create the basic permissions for printers by combining special permissions into logical groups. Table 10-3 shows special permissions used to create the basic permissions for printers. By using Advanced permission settings, you can assign these special permissions individually if necessary.
Table 10-3. Special permissions for printers
|
Special Permissions |
|
Manage Documents |
Manage This Printer |
|
|
X |
X |
|
|
Manage Documents |
X |
||
|
Manage This Printer |
X |
||
|
Read Permissions |
X |
X |
X |
|
Change Permissions |
X |
X |
|
|
Take Ownership |
X |
X |
Auditing print jobs
Windows Server 2012 R2 lets you audit common printer tasks by following these steps:
1. Open the printer’s Properties dialog box, and then tap or click the Security tab. Tap or click Advanced to open the Advanced Security Settings dialog box.
NOTE
Actions aren’t audited by default. You must first enable auditing by establishing a group policy to audit the printer.
2. On the Auditing tab, add the names of users or groups you want to audit by using the Add button and remove names of users or groups by using the Remove button.
3. Select the events you want to audit by selecting the check boxes under the Successful and Failed headings, as appropriate.
4. Tap or click OK.
Setting document defaults
Document default settings are used only when you print from applications that are not based on Windows, such as when you print from the command prompt. You can set document defaults by following these steps:
1. Open the printer’s Properties dialog box, and then tap or click the General tab.
2. Tap or click Preferences.
3. Use the text boxes on the tabs provided to configure the default settings.
Configuring print server properties
Windows Server 2012 R2 enables you to control global settings for print servers by using the Print Server Properties dialog box. In Print Management, press and hold or right-click the server entry for the print server with which you want to work, and then tap or click Properties. If the print server isn’t listed, you can add it in the Add/Remove Servers dialog box. To open the dialog box, press and hold or right-click Print Servers, and then tap or click Add/Remove Servers.
The sections that follow examine some of the print server properties that you can configure.
Locating the Spool folder and enabling printing on NTFS
The Spool folder holds a copy of all documents in the printer spool. By default, this folder is located at %SystemRoot%\System32\Spool\Printers. On the NTFS file system, all users who access the printer must have Modify permission on this directory. If they don’t, they won’t be able to print documents.
If you’re experiencing problems, check the permission on this directory by following these steps:
1. Access the Print Server Properties dialog box.
2. Tap or click the Advanced tab. The location of the Spool folder is shown in the Spool Folder text box. Note this location.
3. Press and hold or right-click the Spool folder in Windows Explorer, and then tap or click Properties.
4. Tap or click the Security tab. Now you can verify that the permissions are set appropriately.
Managing high-volume printing
Printers used in corporate environments can print hundreds or thousands of documents daily. This high volume puts a heavy burden on print servers and can cause printing delays, document corruption, and other problems. To alleviate some of this burden, you should do the following:
§ Use network-attached printers rather than directly attached printers. Network-attached printers use fewer system resources (namely CPU time) than do other printers.
§ Use Branch Office Direct Printing to render print jobs on client computers, and then send the print jobs directly to a printer. Otherwise, print jobs are sent to the print server where they are rendered, and then sent to the printer.
§ Dedicate the print server to handle print services only. If the print server is handling other network duties, it might not be very responsive to print requests and management. To increase responsiveness, you can move other network duties to other servers.
§ Move the Spool folder to a drive dedicated to printing. By default, the Spool folder is on the same file system as the operating system. To further improve disk input/output (I/O), use a drive that has a separate controller.
Enabling print job error notification
Print servers can beep to notify users when a remote document fails to print. By default, this feature is turned off because it can be annoying. If you want to activate or remove notification, access the Advanced tab of the Print Server Properties dialog box, and then select or clear the check box labeled Beep On Errors Of Remote Documents.
Managing print jobs on local and remote printers
You manage print jobs and printers by using the print management window. If the printer is configured on your system, you can access the print management window by using one of the following techniques:
§ Access the Devices And Printers folder on the print server you want to manage. Double-tap or double-click the icon of the printer with which you want to work. If the printer isn’t configured on your system, you can manage the printer remotely by using the Network console. Double-tap or double-click the icon of the print server with which you want to work, and then double-tap or double-click the Devices And Printers folder or the Printers folder.
§ In Print Management, double-tap or double-click the Print Servers node, and then double-tap or double-click the entry for the print server itself. Select Printers. Press and hold or right-click the printer with which you want to work, and then tap or click Open Printer Queue.
§ In Print Management, press and hold or right-click the Printers node, and then tap or click Show Extended View. With the printer selected in the upper pane, the upper and lower panes in the main window provide functionality similar to that of the print management window.
Viewing printer queues and print jobs
You can now manage print jobs and printers by using the print management window shown in Figure 10-11. The print management window shows information about documents in the printers. This information tells you the following:
§ Document Name. The document file name, which can include the name of the application that printed it.
§ Status. The status of the print job, which can include the document’s status and the printer’s status. Document status entries you’ll find include Printing, Spooling, Paused, Deleting, and Restarting. Document status can be preceded by the printer status, such as Printer Off-Line.
§ Owner. The document’s owner.
§ Pages. The number of pages in the document.
§ Size. The document size in kilobytes or megabytes.
§ Submitted. The time and date the print job was submitted.
§ Port. The port used for printing, such as LPT1, COM3, File, or IP address (if applicable).
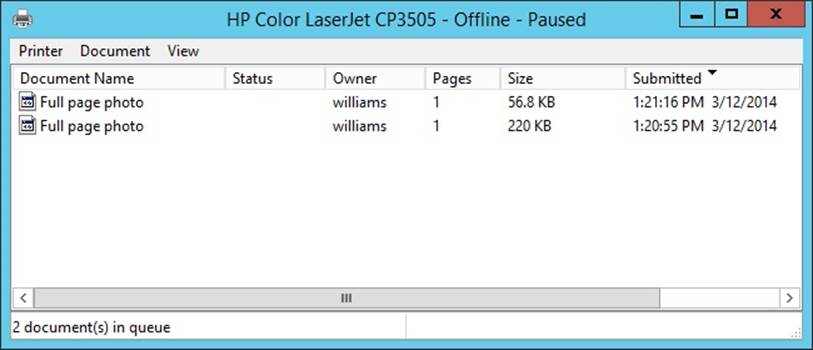
Figure 10-11. You manage print jobs and printers by using the print management window.
Pausing the printer and resuming printing
Sometimes you need to pause a printer. You do this by using the print management window and selecting the Pause Printing option from the Printer menu. (A check mark indicates that the option is selected.) When you pause printing, the printer completes the current job and then puts all other jobs on hold.
To resume printing, select the Pause Printing option a second time. This should remove the check mark next to the option.
Emptying the print queue
You can use the print management window to empty the print queue and delete all its contents. To do this, choose Cancel All Documents from the Printer menu. Emptying the print queue is especially useful when a printer has had an issue and users have printed the same documents multiple times.
Pausing, resuming, and restarting individual document printing
You set the status of individual documents by using the Document menu in the print management window. To change the status of a document, press and hold or right-click the document, and then use one of the following options on the shortcut menu to change the status of the print job.
§ Pause. Puts the document on hold and lets other documents print
§ Resume. Tells the printer to resume printing the document from where it left off
§ Restart. Tells the printer to start printing the document again from the beginning
Removing a document and canceling a print job
To remove a document from the printer or cancel a print job, select the document in the print management window. Press and hold or right-click the document, and tap or click Cancel or press the Delete key.
NOTE
When you cancel a print job that’s currently printing, the print device might continue to print part or all of the document. This occurs because most print devices cache documents in an internal buffer and the print device might continue to print the contents of this cache.
Checking the properties of documents in the printer
Document properties can tell you many things about documents that are in the printer, such as the page source, orientation, and size. You can check the properties of a document in the printer by doing either of the following:
§ Press and hold or right-click the document in the print management window, and then tap or click Properties.
§ Double-tap or double-click the document name in the print management window.
Setting the priority of individual documents
Scheduling priority determines when documents print. Documents with higher priority print before documents with lower priority. You can set the priority of individual documents in the printer by following these steps:
1. Press and hold or right-click the document in the print management window, and then tap or click Properties.
2. On the General tab, use the Priority slider to change the document’s priority. The lowest priority is 1 and the highest is 99.
Scheduling the printing of individual documents
In a busy printing environment, you might need to schedule the printing of documents in the printer. For example, you might want large print jobs of low priority to print at night. To set the printing schedule, follow these steps:
1. Press and hold or right-click the document in the print management window, and then tap or click Properties.
2. On the General tab, select the Only From option, and then specify a time interval. The time interval you set determines when the job can print. For example, you can specify that the job can print only between midnight and 5:00 A.M.