Windows Server 2012 R2 Pocket Consultant: Storage, Security, & Networking (2014)
Chapter 11. Data backup and recovery
§ Creating a backup and recovery plan
§ Backing up your data: the essentials
§ Performing server backups
§ Managing encryption recovery policy
§ Backing up and restoring encrypted data and certificates
Because data is the heart of the enterprise, protecting it is crucial. And to protect your organization’s data, you need to implement a data backup and recovery plan. Backing up files can protect against accidental loss of user data, database corruption, hardware failures, and even natural disasters. Your job as an administrator is to make sure that backups are performed and that backups are stored in a secure location.
Creating a backup and recovery plan
Data backup is an insurance plan. Important files are accidentally deleted all the time. Mission-critical data can become corrupt. Natural disasters can leave your office in ruin. With a solid backup and recovery plan, you can recover from any of these events. Without one, you’re left with nothing to fall back on.
Figuring out a backup plan
It takes time to create and implement a backup and recovery plan. You need to figure out what data needs to be backed up, how often the data should be backed up, and more. To help you create a plan, consider the following questions:
§ How important or sensitive is the data on your systems? Knowing the importance of data can go a long way toward helping you determine whether you need to back it up, in addition to when and how it should be backed up. For critical data, such as a database, you should have redundant backup sets that cover several backup periods. For sensitive data, you should be sure that backup data is physically secure or encrypted. For less important data, such as daily user files, you won’t need such an elaborate backup plan, but you do need to back up the data regularly and ensure that the data can be recovered easily.
§ What type of information does the data contain? Data that doesn’t seem important to you might be very important to someone else. The type of information the data contains can help you determine whether you need to back up the data, in addition to when and how the data should be backed up.
§ How often does the data change? The frequency of change can affect your decision on how often certain data should be backed up. For example, data that changes daily should be backed up daily.
§ Can you supplement backups with shadow copies? Shadow copies are point-in-time copies of documents in shared folders. These point-in-time copies make recovering documents easy because you can quickly go back to an older version in case a document is deleted or overwritten accidentally. You should use shadow copies in addition to standard backups, not to replace backup procedures.
§ How quickly do you need to recover the data? Recovery time is an important factor in a backup plan. For critical systems, you might need to get back online swiftly. To make this possible, you might need to alter your backup plan.
§ Do you have the equipment to perform backups? You must have backup hardware to perform backups. To perform timely backups, you might need several backup devices and several sets of backup media. Backup hardware includes hard disk drives, tape drives, optical drives, and removable disk drives. In most environments, hard disk drives have become the preferred back up media.
§ Who will be responsible for the backup and recovery plan? Ideally, someone should be a primary contact for the organization’s backup and recovery plan. This person might also be responsible for performing the actual backup and recovery of data.
§ What’s the best time to schedule backups? Scheduling backups when system use is as low as possible will speed up the backup process. However, you can’t always schedule backups for off-peak hours, so you need to carefully plan when key system data is backed up.
§ Do you need to store backups off site? Storing copies of backups off site is essential to recovering your systems in the event of a natural disaster. In your off-site storage location, you should also include copies of the software you might need to install to reestablish operational systems.
REAL WORLD
Recovery time objective (RTO) and recovery point objective (RPO) are important factors to consider. RTO represents the time to recover, which might be two hours for one server and four hours for another server. RPO represents your potential data loss, which might be one business day of data with one server or two business days with another server. A high RTO environment is an environment in which you can recover server functionality quickly after an outage. A high RPO environment is an environment in which the data recovered is as up to date as possible.
The frequency of your full server backups will vary according to the speed of your backup system and the amount of data you need to back up. The frequency at which you can create backups controls both the RPO and the RTO available to you. For example, with nightly backups, your RPO will be one business day, meaning that any server outage will likely result in the loss of an entire business day of data. Meanwhile, your RTO, indicating how long it actually takes to recover, will vary according to the amount of data you have to restore, the speed of your backup system, the load and available resources of the server on which you are performing a restore, and what I like to call the X factor—the X factor being any unforeseen issues you might encounter, such as a failure of the backup system itself or a tape in a set, and so forth.
Basic types of backup
There are many techniques for backing up files. The techniques you use depend on the type of data you’re backing up, how convenient you want the recovery process to be, and more.
If you view the properties of a file or directory in File Explorer, you’ll find an attribute called archive. You often use this attribute to determine whether a file or directory should be backed up. If the attribute is on, the file or directory might need to be backed up. You can perform the following basic types of backups:
§ Normal/full backups. All files that have been selected are backed up, regardless of the archive attribute’s setting. When a file is backed up, the archive attribute is cleared. If the file is later modified, this attribute is set, indicating that the file needs to be backed up.
§ Copy backups. All files that have been selected are backed up, regardless of the archive attribute’s setting. Unlike in a normal backup, the archive attribute on files isn’t modified. This enables you to perform other types of backups on the files at a later date.
§ Differential backups. Designed to create backup copies of files that have changed since the last normal backup. The presence of the archive attribute indicates that the file has been modified, and only files with this attribute set are backed up. However, the archive attribute on files isn’t modified. This enables you to perform other types of backups on the files at a later date.
§ Incremental backups. Designed to create backups of files that have changed since the most recent normal or incremental backup. The presence of the archive attribute indicates that the file has been modified, and only files with this attribute set are backed up. When a file is backed up, the archive attribute is cleared. If the file is later modified, this attribute is set, indicating that the file needs to be backed up.
§ Daily backups. Designed to back up files by using the modification date on the file itself. If a file has been modified on the same day as the backup, the file will be backed up. This technique doesn’t change the archive attribute of files.
As part of your backup operations, you’ll probably want to perform full backups on a weekly basis and supplement this with daily, differential, or incremental backups. You might also want to create an extended backup set for monthly and quarterly backups that includes additional files that aren’t being backed up regularly.
TIP
You’ll often find that weeks or months go by before anyone notices that a file or data source is missing. This doesn’t mean the file isn’t important. Although some types of data aren’t used often, they’re still needed. So don’t forget that you might also want to create extra sets of backups for monthly or quarterly periods, or for both periods, to ensure that you can recover historical data.
Differential and incremental backups
The difference between differential and incremental backups is extremely important. To understand the distinction, examine Table 11-1. As you will find, with differential backups you back up all the files that have changed since the last full backup (which means that the size of the differential backup grows over time). With incremental backups, you back up only files that have changed since the most recent full or incremental backup (which means the size of the incremental backup is usually much smaller than a full backup).
Table 11-1. Incremental and differential backup techniques
|
Day of Week |
Weekly Full Backup with Daily Differential Backup |
Weekly Full Backup with Daily Incremental Backup |
|
Sunday |
A full backup is performed. |
A full backup is performed. |
|
Monday |
A differential backup contains all changes since Sunday. |
An incremental backup contains changes since Sunday. |
|
Tuesday |
A differential backup contains all changes since Sunday. |
An incremental backup contains changes since Monday. |
|
Wednesday |
A differential backup contains all changes since Sunday. |
An incremental backup contains changes since Tuesday. |
|
Thursday |
A differential backup contains all changes since Sunday. |
An incremental backup contains changes since Wednesday. |
|
Friday |
A differential backup contains all changes since Sunday. |
An incremental backup contains changes since Thursday. |
|
Saturday |
A differential backup contains all changes since Sunday. |
An incremental backup contains changes since Friday. |
After you determine what data you’re going to back up and how often, you can select backup devices and media that support these choices. These options are covered in the next section.
Selecting backup devices and media
Many tools are available for backing up data. Some are fast and expensive, and others are slow but very reliable. The backup solution that’s right for your organization depends on many factors, including the following:
§ Capacity. The amount of data you need to back up on a routine basis. Can the backup hardware support the required load given your time and resource constraints?
§ Reliability. The reliability of the backup hardware and media. Can you afford to sacrifice reliability to meet budget or time needs?
§ Extensibility. The extensibility of the backup solution. Will this solution meet your needs as the organization grows?
§ Speed. The speed with which data can be backed up and recovered. Can you afford to sacrifice speed with server or service downtime to reduce costs?
§ Cost. The cost of the backup solution. Does it fit your budget?
Common backup solutions
Capacity, reliability, extensibility, speed, and cost are the issues driving your backup plan. If you understand how these issues affect your organization, you’ll be on track to select an appropriate backup solution. Some of the most commonly used backup solutions include the following:
§ Tape drives. Tape drives are the most common backup devices. Tape drives use magnetic tape cartridges to store data. Magnetic tapes are relatively inexpensive but aren’t highly reliable. Tapes can break or stretch. They can also lose information over time. The average capacity of tape cartridges ranges from 24 gigabytes (GB) to 160 GB. Compared with other backup solutions, tape drives are slow. Still, the selling point is the low cost.
§ Digital audio tape (DAT) drives. DAT drives are quickly replacing standard tape drives as the preferred backup devices. Many DAT formats are available. The most commonly used formats are Digital Linear Tape (DLT) and Super DLT (SDLT). With SDLT 320 and 600, tapes have a capacity of either 160 GB or 300 GB uncompressed (320 GB or 600 GB compressed). Large organizations might want to look at Linear Tape Open (LTO) tape technologies. LTO-3, LTO-4, and LTO-5 tapes have uncompressed capacity of 400 GB, 800 GB, and 1500 GB, respectively (and compressed capacity of twice that).
§ Autoloader tape systems. Autoloader tape systems use a magazine of tapes to create extended backup volumes capable of meeting an enterprise’s high-capacity needs. With an autoloader system, tapes within the magazine are automatically changed as necessary during the backup or recovery process. Most autoloader tape systems use DAT tapes formatted for DLT, SDLT, or LTO. Typical DLT drives can record up to 45 GB per hour, and you can improve that speed by purchasing a tape library system with multiple drives. In this way, you can record on multiple tapes simultaneously. In contrast, most SDLT and LTO drives record over 100 GB per hour, and by using multiple drives in a system you can record hundreds of GB per hour. An example enterprise solution uses 16 LTO drives to achieve data-transfer rates of more than 13.8 terabytes (TB) per hour and can store up to 500 tapes, for a total storage capacity of more than 800 TB.
§ Disk drives. Disk drives provide one of the fastest ways to back up and restore files. With disk drives, you can often accomplish in minutes what takes a tape drive hours. When business needs mandate a speedy recovery, nothing beats a disk drive. The drawback to disk drives is a relatively high cost compared to tapes (though you’d also need to compare the initial hardware investment).
§ Disk-based backup systems. Disk-based backup systems provide complete backup and restore solutions by using large arrays of disks to achieve high performance. High reliability can be achieved when you use redundant array of independent disks (RAID) to build in redundancy and fault tolerance. Typical disk-based backup systems use virtual library technology so that Windows perceives them as autoloader tape library systems, which makes them easier to work with. An example enterprise solution has 128 virtual drives and 16 virtual libraries per node for total storage of up to 7.5 TB per node. When fully scaled, this enterprise solution can store up to 640 TB and transfer up to 17.2 TB per hour.
NOTE
Disks and disk-based backup systems can be used between the servers you are backing up and an enterprise autoloader. Servers are backed up to disk first (because this is very fast compared to tape) and later backed up to an enterprise autoloader. Having data on tapes also makes it easier to rotate backup sets to off-site storage. That said, tape backups are increasingly being replaced with disk backups. If you back up to disk arrays, you can move data off site by replicating the data to a secondary array at an alternative data center and that data center can be in your private cloud or a third-party service’s cloud.
Before you can use a backup device, you must install it. When you install backup devices other than standard tape and DAT drives, you need to tell the operating system about the controller card and drivers that the backup device uses.
Buying and using backup media
Selecting a backup device is an important step toward implementing a backup and recovery plan. But you also need to purchase the tapes, disks, or both that enable you to implement your plan. The number of tapes or disks you need depends on how much data you have to back up, how often you need to back up the data, and how long you need to keep additional data sets.
The typical way to use backup tapes is to set up a rotation schedule whereby you rotate through two or more sets of tapes. The idea is that you can increase tape longevity by reducing tape usage and, at the same time, reduce the number of tapes you need to ensure that you have historic data on hand when necessary.
One of the most common tape-rotation schedules is the 10-tape rotation. With this rotation schedule, you use 10 tapes divided into two sets of 5 (one for each weekday). The first set of tapes is used one week, and the second set of tapes is used the next week. On Fridays, full backups are scheduled. On Mondays through Thursdays, incremental backups are scheduled. If you add a third set of tapes, you can rotate one of the tape sets to an off-site storage location on a weekly basis.
The 10-tape rotation schedule is designed for the 9-to-5 workers of the world. If you’re in a 24 hours a day, seven days a week environment, you’ll definitely want extra tapes for Saturday and Sunday. In this case, use a 14-tape rotation with two sets of 7 tapes. On Sundays, schedule full backups. On Mondays through Saturdays, schedule incremental backups.
As disk drives have become more affordable, many organizations have been using disk backup instead of tape backup. With disks, you can use a rotation schedule similar to the one you use with tapes. You will, however, need to modify the way you rotate disks to accommodate the amount of data you are backing up. The key task to remember is to periodically rotate disks to off-site storage.
Selecting a backup utility
Many backup and recovery solutions are available for use with Windows Server 2012 R2. When selecting a backup utility, you need to keep in mind the types of backups you want to perform and the types of data you are backing up. Windows Server 2012 R2 includes the following installable backup and recovery features:
§ Windows Server Backup. A basic and easy-to-use backup and recovery utility. When this feature is installed on a server, you can open the tool by using the Tools menu in Server Manager.
§ Backup Command-Line Tools. A set of backup and recovery commands accessible through the Wbadmin command-line tool. You run and use Wbadmin from an elevated, administrator command prompt. Enter wbadmin /? for a full list of supported commands. Windows PowerShell cmdlets for managing backups are also available.
§ Windows Server Backup Module for Windows PowerShell. A set of backup and recovery cmdlets accessible through Windows PowerShell. You run and use these cmdlets from an elevated, administrator Windows PowerShell prompt. Enter get-help *wb* for a full list of supported cmdlets.
§ Microsoft Online Backup Service. This service is an add-on that can be downloaded and installed from within Windows Server Backup to schedule backups from a server to Microsoft’s Internet cloud-based service. Online backups are possible only for fixed NTFS volumes that don’t use BitLocker Drive Encryption. Volumes cannot be shares and must also be configured for read/write access.
§ Repair Your Computer. You can restore a server by using repair options if you cannot access recovery options provided by the server manufacturer.
NOTE
Windows Server Backup and the backup command-line tools are available only for management of backups when you add the Windows Server Backup feature to a server. If you add server administration tools to a server, you might be able to open Windows Server Backup. However, you won’t be able to use Windows Server Backup to configure and manage backups.
Windows Server Backup is the feature you’ll use the most. You can use Windows Server Backup to perform full or copy backups. You cannot use Windows Server Backup to perform differential backups. Windows Server Backup uses the Volume Shadow Copy Service (VSS) to create fast, block-level backups of the operating system, files and folders, and disk volumes. After you create the first full backup, you can configure Windows Server Backup to automatically run full or incremental backups on a recurring basis.
When you use Windows Server Backup, you need separate, dedicated media for storing archives of scheduled backups. You can back up to external and internal disks, DVDs, and shared folders. Although you can recover full volumes from DVD backups, you cannot recover individual files, folders, or application data from DVD backups.
NOTE
You cannot back up to tape by using Windows Server Backup. If you want to back up to tape, you need a third-party backup utility.
You can use Windows Server Backup to easily recover individual folders and files. Rather than manually restoring files from multiple backups if the files are stored in incremental backups, you can recover folders and files by choosing the date on which you backed up the version of the item or items you want to restore. Windows Server Backup also works with the Windows Recovery tools, making it easier for you to recover the operating system. You can recover to the same server or to a new server that has no operating system. Because Windows Server Backup uses VSS, you can easily back up data from compliant applications, such as Microsoft SQL Server and Windows SharePoint Services.
Windows Server Backup also includes automatic disk management. You can run backups to multiple disks in rotation simply by adding each disk as a scheduled backup location. After you configure a disk as a scheduled backup location, Windows Server Backup automatically manages the disk storage, ensuring that you no longer need to worry about a disk running out of space. Windows Server Backup reuses the space of older backups when creating newer backups. To help ensure that you can plan for additional storage needs, Windows Server Backup displays the backups that are available and the current disk usage information.
Backing up your data: the essentials
Windows Server 2012 R2 provides Windows Server Backup for creating backups. You use Windows Server Backup to archive files and folders, restore archived files and folders, create snapshots of the system state for backup and restore, and schedule automated backups.
Installing the Windows backup and recovery utilities
The Windows Server backup and recovery tools are available in all editions of Windows Server 2012 R2. However, you cannot install the graphical components of these utilities on core installations of Windows Server 2012 R2. On servers running with a core installation, you need to use the command line, Windows PowerShell, or manage backups via a remote session from another computer.
You can install the Windows backup and recovery tools by following these steps:
1. In Server Manager, select Add Roles And Features on the Manage menu. This starts the Add Roles And Features Wizard. If the wizard displays the Before You Begin page, read the introductory text, and then tap or click Next.
2. On the Installation Type page, Role-Based Or Feature-Based Installation is selected by default. Tap or click Next.
3. On the Server Selection page, you can choose to install roles and features on running servers or virtual hard disks. Either select a server from the server pool or select a server from the server pool on which to mount a virtual hard disk (VHD). If you are adding roles and features to a VHD, tap or click Browse and then use the Browse For Virtual Hard Disks dialog box to locate the VHD. When you are ready to continue, tap or click Next twice.
4. On the Select Features page, select Windows Server Backup. Tap or click Next.
5. Tap or click Install. When the wizard finishes installing the selected features, tap or click Close. From now on, Windows Server Backup and the related command-line tools and the Windows Server Backup module for Windows PowerShell are available for managing backups.
Getting started with Windows Server Backup
You can start Windows Server Backup by selecting the related option on the Tools menu in Server Manager. Alternatively, enter Wbadmin.msc in the Everywhere Search box or at a prompt.
When you start Windows Server Backup, you’ll get a message about online backup. If you want to use online backups, you need to sign up for the service, register your server, and download the Microsoft Online Backup Service agent. With the Windows Server Backup node selected, you can start this process by clicking the Continue button. Before using the service, I would suggest determining what your costs would be to use the service and to compare those costs to other options.
In Windows Server Backup, shown in Figure 11-1, select the Local Backup node to work with backups. The first time you use Windows Server Backup, you’ll get a warning that no backup has been configured for the computer. You clear this warning by creating a backup by using the Backup Once feature, located on the Action menu, or by scheduling backups to run automatically by using the Backup Schedule feature.
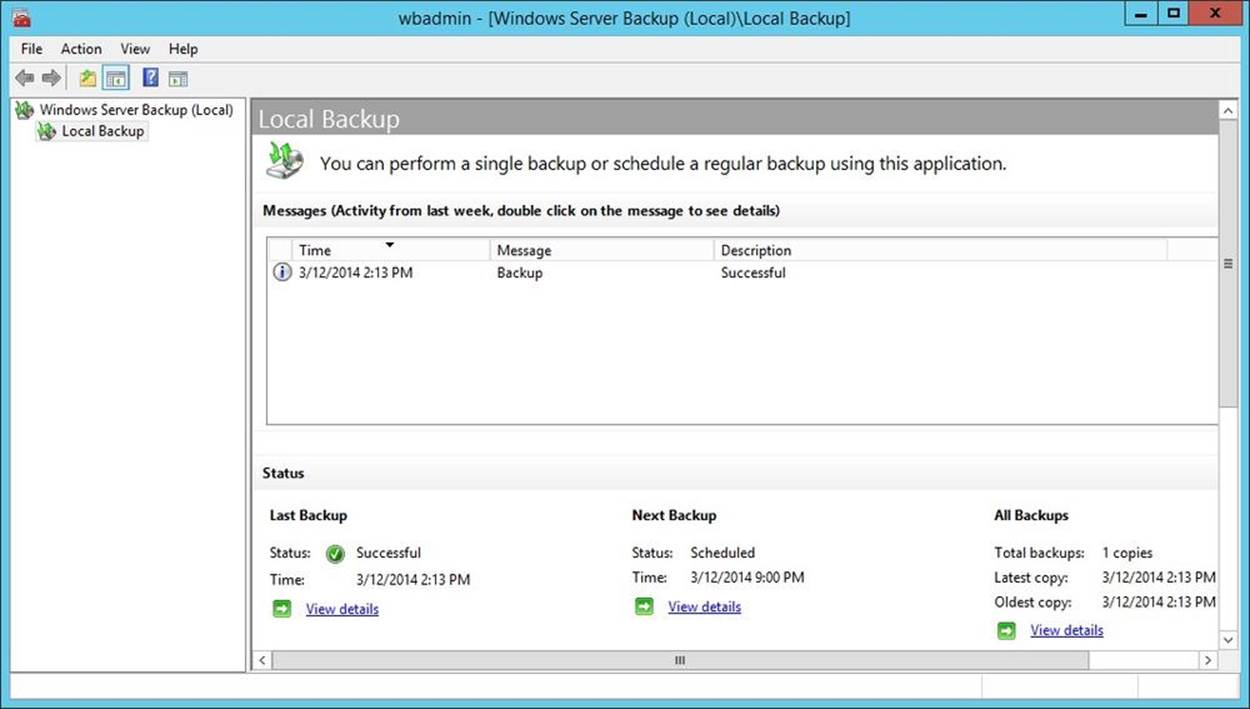
Figure 11-1. Windows Server Backup provides a user-friendly interface for backup and restore.
To perform backup and recovery operations, you must have certain permissions and user rights. Members of the Administrators and Backup Operators groups have full authority to back up and restore any type of file, regardless of who owns the file and the permissions set on it. File owners and those who have been given control over files can also back up files, but they can do so only for files they own or for which they have Read, Read & Execute, Modify, or Full Control permissions.
NOTE
Keep in mind that although local accounts can work only with local systems, domain accounts have domain-wide privileges. Therefore, a member of the local Administrators group can work only with files on the local system, but a member of the Domain Admins group can work with files throughout the domain.
Windows Server Backup provides extensions for working with the following special types of data:
§ System state data. Includes essential system files needed to recover the local system. All computers have system state data, which must be backed up in addition to other files to restore a complete working system.
§ Application data. Includes application data files. You must back up application data if you want to be able to fully recover applications. Windows Server Backup creates block-level backups of application data by using VSS.
Windows Server Backup enables you to perform full, copy, and incremental backups. Although you can schedule a full or incremental backup to be performed one or more times each day, you cannot use this feature to create separate run schedules for performing both full and incremental backups. Further, you cannot select the day or days of the week to run backups. This occurs because each server has a single master schedule that is set to run one or more times daily. If your servers have a single master schedule, you can work around this limitation by configuring Windows Server Backup to perform daily incremental backups and then creating a scheduled task via the Task Scheduler that uses the Wbadmin command-line tool to create a full backup on the day of the week or month you want to use.
When you use Windows Server Backup, the first backup of a server is always a full backup. This is because the full backup process clears the archive bits on files so that Windows Server Backup can track which files are updated subsequently. Whether Windows Server Backup performs full or incremental backups subsequently depends on the default performance settings you configure. You can configure the default performance settings by following these steps:
1. Start Windows Server Backup. In the Actions pane or on the Action menu, tap or click Configure Performance Settings. This displays the Optimize Backup Performance dialog box, shown in Figure 11-2.
2. Do one of the following, and then tap or click OK:
o Choose Normal Backup Performance to perform full backups of all attached drives.
o Choose Faster Backup Performance to perform incremental backups of all attached drives.
o Choose Custom. In the option lists provided, specify whether to perform full or incremental backups for individual attached drives.
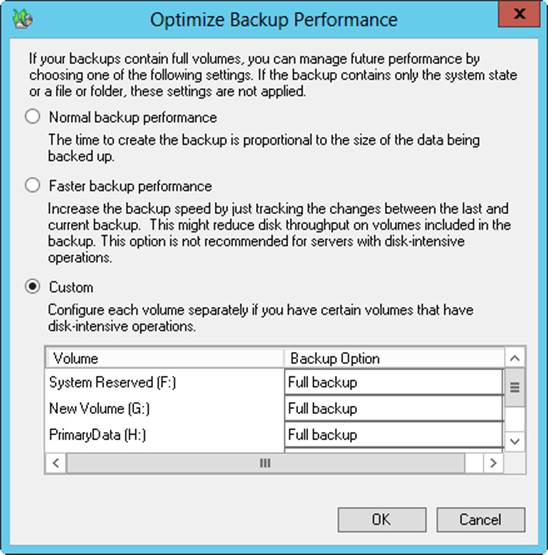
Figure 11-2. Configure the default backup settings.
3. After you configure the default performance settings, you can start a full or copy backup by tapping or clicking Backup Once on the Action menu or in the Actions pane. You can configure a backup schedule by tapping or clicking Backup Schedule on the Action menu or in the Actions pane.
Getting started with the Backup Command-Line utility
Wbadmin is the command-line counterpart to Windows Server Backup. You use Wbadmin to manage all aspects of backup configuration that you would otherwise manage in Windows Server Backup. This means you can typically use either tool to manage backup and recovery.
After you install the Backup Command-Line Tools feature as discussed earlier in the chapter, you can use Wbadmin to manage backup and recovery. Wbadmin is located in the %SystemRoot%\System32\ directory. This directory is in your command path by default, so you do not need to add it. You can run Wbadmin by following these steps:
1. Open an elevated, administrator command prompt. One way to do this is to enter cmd in the Everywhere Search box, press and hold or right-click Command Prompt in the Apps list, and then tap or click Run As Administrator.
2. In the Command Prompt window, enter the necessary command text or run a script that invokes Wbadmin.
REAL WORLD
By default with Windows Server 2012 R2, the command prompt and the administrator command prompt are options on the shortcut menu that is displayed when you right-click in the lower left corner or press Windows key + X. The alternative is for the Windows PowerShell prompt and the administrator Windows PowerShell prompt to be displayed on this menu. To configure which options are available, on the desktop, press and hold or right-click the taskbar, and then select Properties. In the Taskbar And Navigation Properties dialog box, on the Navigation tab, select or clear the Replace Command Prompt With Windows PowerShell check box as appropriate.
Wbadmin has a number of associated commands, which are summarized in Table 11-2.
Table 11-2. Wbadmin management commands
|
Command |
Description |
|
DELETE SYSTEMSTATEBACKUP |
Deletes the system state backup or backups from a specified location. |
|
DISABLE BACKUP |
Disables scheduled daily backups so that they no longer run. |
|
DELETE BACKUP |
Deletes one or more backups. |
|
ENABLE BACKUP |
Enables or modifies a scheduled daily backup. |
|
GET DISKS |
Lists the disks that are currently online for the local computer. Disks are listed by manufacturer name, type, disk number, GUID, total space, used space, and associated volumes. |
|
GET ITEMS |
Lists items contained in a specified backup. |
|
GET STATUS |
Reports the status of the currently running backup or recovery job. |
|
GET VIRTUAL MACHINES |
Lists the currently configured virtual machines. |
|
GET VERSIONS |
Lists details about the available backups stored in a specific location, including the backup time and backup destination. |
|
START BACKUP |
Starts a one-time backup by using the specified parameters. If no parameters are passed and scheduled backups are enabled, the backup uses the settings for scheduled backups. |
|
START RECOVERY |
Initiates a recovery of volumes, applications, or files by using the specified parameters. |
|
START SYSTEMSTATEBACKUP |
Starts a system state backup by using the options specified. |
|
START SYSTEMSTATERECOVERY |
Starts a system state recovery by using the specified parameters. |
|
STOP JOB |
Stops the currently running backup or recovery job. Stopped jobs cannot be restarted from where they were stopped. |
When you are working with Wbadmin, you can get help on available commands:
§ To view a list of management commands, enter wbadmin /? at the command prompt.
§ To view the syntax for a specific management command, enter wbadmin Command /?, where Command is the name of the management command you want to examine, such as wbadmin stop job /?.
When you work with Wbadmin, you’ll find that just about every command accepts parameters and specific parameter values that qualify what you want to work with. To understand more clearly how this works, consider the following syntax example:
wbadmin get versions [-backupTarget:{VolumeName | NetworkSharePath}]
[-machine:BackupMachineName]
The brackets tell you that –backupTarget and –machine are optional. Thus, you could enter the following to get information on recoverable backups on the local computer:
wbadmin get versions
You could enter the following to get information on recoverable backups stored on the F drive:
wbadmin get versions -backupTarget:f:
Or you could enter the following to get information on recoverable backups stored on the F drive on Server96:
wbadmin get versions -backupTarget:f: -machine:server96
Many Wbadmin commands use the –backupTarget and –machine parameters. The backup target is the storage location with which you want to work and can be expressed as a local volume name, such as F:, or as a network share path, such as \\FileServer32\backups\Server85. The –machine parameter identifies the computer you want to work with for backup or recovery operations.
Working with Wbadmin commands
You use Wbadmin commands to manage the backup configuration of your servers. These commands work with a specific set of parameters. The following sections provide an overview of the available commands and their most commonly used syntaxes.
Using general-purpose commands
The following general-purpose commands are provided for getting information about backups and the system with which you are working:
§ GET DISKS. Lists the disks that are currently online for the local computer. Disks are listed by manufacturer name, type, disk number, GUID, total space, used space, and associated volumes.
wbadmin get disks
§ GET ITEMS. Lists items contained in a specified backup.
§ wbadmin get items -version:VersionIdentifier
§ [-backupTarget:{VolumeName | NetworkSharepath}]
[-machine:BackupMachineName]
§ GET STATUS. Reports the status of the currently running backup or recovery job.
wbadmin get status
§ GET VERSIONS. Lists details about the available backups stored in a specific location, including the backup time and backup destination.
§ wbadmin get versions [-backupTarget:{VolumeName | NetworkSharepath}]
[-machine:BackupMachineName]
Using backup management commands
You can manage backups and their configurations by using the following commands and command-line syntaxes:
§ DELETE SYSTEMSTATEBACKUP. Deletes the system state backup or backups from a specified location.
§ wbadmin delete systemstateBackup [-backupTarget:{VolumeName}]
§ [-machine:BackupMachineName]
§ [-keepVersions:NumberOfBackupsToKeep | -version:VersionIdentifier |
§ -deleteOldest]
[-quiet]
§ DISABLE BACKUP. Disables scheduled daily backups so that they no longer run.
wbadmin disable backup [-quiet]
§ ENABLE BACKUP. Enables or modifies a scheduled daily backup.
§ wbadmin enable backup [-addTarget:{BackupTargetDisk}]
§ [-removeTarget:{BackupTargetDisk}]
§ [-schedule:TimeToRunBackup]
§ [-include:VolumesToInclude]
§ [-allCritical]
[-quiet]
§ START BACKUP. Starts a one-time backup by using the specified parameters. If no parameters are passed and scheduled backups are enabled, the backup uses the settings for scheduled backups.
§ wbadmin start backup [-backupTarget:{TargetVolume | TargetNetworkShare}]
§ [-include:VolumesToInclude]
§ [-allCritical]
§ [-noVerify]
§ [-user:username]
§ [-password:password]
§ [-inheritAcl:InheritAcl]
§ [-vssFull]
[-quiet]
§ STOP JOB. Stops the currently running backup or recovery job. Stopped jobs cannot be restarted from where they were stopped.
wbadmin stop job [-quiet]
Using recovery management commands
You can recover your computers and data by using the following commands and command-line syntaxes:
§ START RECOVERY. Initiates a recovery of volumes, applications, or files by using the specified parameters:
§ wbadmin start recovery -version:VersionIdentifier
§ -items:VolumesToRecover | AppsToRecover | FilesOrFoldersToRecover
§ -itemType:{volume | app | file}
§ [-backupTarget:{VolumeHostingBackup | NetworkShareHostingBackup}]
§ [-machine:BackupMachineName]
§ [-recoveryTarget:TargetVolumeForRecovery | TargetPathForRecovery]
§ [-recursive]
§ [-overwrite:{Overwrite | CreateCopy | skip}]
§ [-notRestoreAcl]
§ [-skipBadClusterCheck]
§ [-noRollForward]
[-quiet]
§ START SYSTEMSTATEBACKUP. Starts a system state backup by using the options specified:
§ wbadmin start systemstateBackup -backupTarget:{VolumeName}
[-quiet]
§ START SYSTEMSTATERECOVERY. Starts a system state recovery by using the specified parameters:
§ wbadmin start systemstateRecovery -version:VersionIdentifier
§ -showSummary
§ [-backupTarget:{VolumeName | NetworkSharePath}]
§ [-machine:BackupMachineName]
§ [-recoveryTarget:TargetPathForRecovery]
§ [-authSysvol]
[-quiet]
Performing server backups
As part of your planning for each server you intend to back up, you should consider which volumes you want to back up and whether backups will include system-state recovery data, application data, or both. Although you can manually back up to shared volumes and DVD media, you need a separate, dedicated hard disk for running scheduled backups. After you configure a disk for scheduled backups, the backup utilities automatically manage the disk usage and automatically reuse the space of older backups when creating new backups. After you schedule backups, you need to check periodically to ensure that backups are being performed as expected and that the backup schedule meets current needs.
When you create or schedule backups, you need to specify the volumes you want to include, and this affects the ways you can recover your servers and your data. You have the following options:
§ Full server (all volumes with application data). Back up all volumes with application data if you want to be able to fully recover a server, along with its system state and application data. Because you are backing up all files, the system state, and application data, you should be able to fully restore your server by using only the Windows backup tools.
§ Full server (all volumes without application data). Back up all volumes without application data if you want to be able to restore a server and its applications separately. With this technique, you back up the server by using the Windows backup tools but exclude locations where applications and application data are stored. Then you back up applications and related data by using third-party tools or tools built into the applications. You can fully recover a server by using the Windows backup utilities, and then use a third-party utility to restore backups of applications and application data.
§ Critical volumes/bare metal recovery. Back up only critical volumes if you want to be able to recover only the operating system.
§ Noncritical volumes. Back up only individual volumes if you want to be able to recover only files, applications, or data from those volumes.
As part of the backup process, you also need to specify a storage location for backups. Keep the following in mind when you choose storage locations:
§ When you use an internal hard disk for storing backups, you are limited in how you can recover your system. You can recover the data from a volume, but you cannot rebuild the entire disk structure.
§ When you use an external hard disk for storing backups, the disk will be dedicated for storing your backups and will not be visible in File Explorer. Choosing this option will format the selected disk or disks, removing any existing data.
§ When you use a remote shared folder for storing backups, your backup will be overwritten each time you create a new backup. Do not choose this option if you want to store multiple backups for each server.
§ When you use removable media or DVDs for storing backups, you can recover only entire volumes, not applications or individual files. The media you use must be at least 1 GB in size.
The sections that follow discuss techniques for performing backups. The procedures you use to back up servers with Windows Server Backup and Wbadmin are similar.
Configuring scheduled backups
With Windows Server Backup, you can schedule automated backups for a server by following these steps:
1. In Windows Server Backup, tap or click Backup Schedule on the Action menu or in the Actions pane to start the Backup Schedule Wizard. Tap or click Next.
2. On the Select Backup Configuration page, note the backup size listed under the Full Server option, as shown in Figure 11-3. This is the storage space required to back up the server data, applications, and the system state. To back up all volumes on the server, select the Full Server option, and then tap or click Next. To back up selected volumes on the server, select the Custom option, and then tap or click Next.
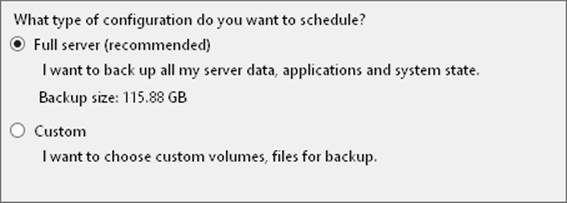
Figure 11-3. Note the backup size before you continue.
NOTE
Volumes that contain operating system files or applications are included in the backup by default and cannot be excluded. Unfortunately, this means that on a server on which you installed Windows Server 2012 R2 on the D drive, you must also back up the entire C drive because the C drive in this case includes the boot manager and other boot files.
3. If you select Custom, the Select Items For Backup page is displayed. Tap or click Add Items. As shown in Figure 11-4, you can select the check boxes for the volumes you want to back up and clear the check boxes for the volumes you want to exclude. Select the Bare Metal Recovery option if you want to be able to fully recover the operating system. Select the System State option if you want to back up the system state. If the server is a Hyper-V host, you’ll have a Hyper-V option and can expand the Hyper-V node to select individual virtual servers to back up by using their saved state and the host component. Tap or click OK, and then tap or click Next.
TIP
After you select items, you might want to tap or click Advanced Settings before continuing. You can then use the options on the Exclusions tab to identify locations and file types that should not be backed up. You also can then use the options on the VSS Settings tab to specify whether you want to create a full backup or a copy backup. Keep in mind that when you select anything less than a full volume for backup, the backup is performed file by file rather than as an image.
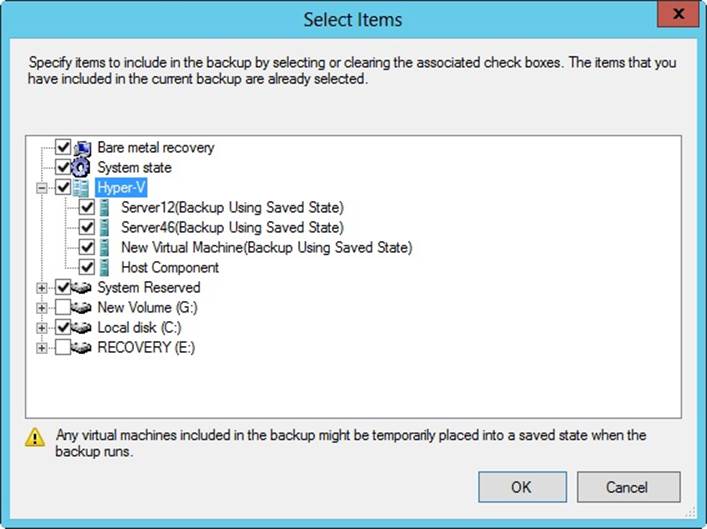
Figure 11-4. Select the items to include in the backup.
4. On the Specify Backup Time page, shown in Figure 11-5, you can specify how often and when you want to run backups. To perform backups daily at a specific time, choose Once A Day, and then select the time to start running the daily backup. To perform backups multiple times each day, choose More Than Once A Day. Next, tap or click a start time under Available Time, and then tap or click Add to move the time under Scheduled Time. Repeat this process for each start time you want to add. Tap or click Next when you are ready to continue.
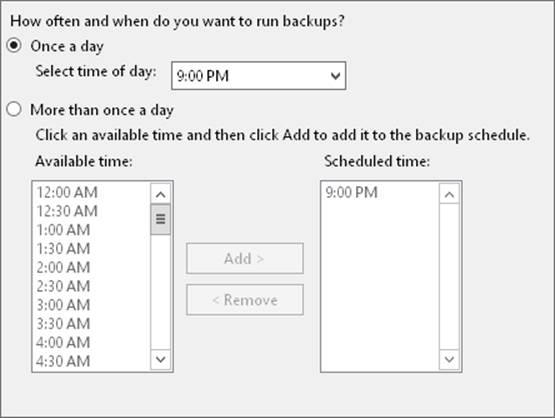
Figure 11-5. Select the time to start running the backup.
5. On the Specify Destination Type page, you have these options:
o Back Up To A Hard Disk That Is Dedicated For Backups. Enables you to specify a dedicated hard disk for backups. Although you can use multiple disks for backups, any disk you select will be formatted, and then dedicated only to backups. This option is recommended because you’ll get the best performance. If you select this option, tap or click Next, select the disk or disks to use, and then tap or click Next again.
o Back Up To A Volume. Enables you to write backups to individual volumes on a hard disk. Because any volume you select is not dedicated to backups, it can be used for other purposes. However, the performance of any of the selected volumes is reduced while backups are being written. If you select this option, tap or click Next, use the Add and Remove options to select the volumes to use, and then tap or click Next again.
o Back Up To A Shared Network Folder. Enables you to specify a shared network folder for backups. With this option, you can have only one backup at a time because each new backup overwrites the previous backup. If you select this option, tap or click Next. When prompted, tap or click OK. Enter the UNC path to the network share, such as \\FileServer25 \Backups\Exchange. If you want the backup to be accessible to everyone who has access to the shared folder, select Inherit under Access Control. If you want to restrict access to the shared folder to the current user and members of the Administrators and Backup Operators groups, select Do Not Inherit under Access Control. Tap or click Next. When prompted to provide access credentials, enter the user name and password for an account authorized to access and write to the shared folder.
6. On the Confirmation page, review the details, and then tap or click Finish. The wizard formats the disk. The formatting process might take several minutes or considerably longer depending on the size of the disk.
7. On the Summary page, tap or click Close. Your backups are now scheduled for the selected server.
With Wbadmin, you can schedule backups by using the ENABLE BACKUP command. ENABLE BACKUP accepts the following parameters:
§ –addTarget. Sets the storage location for backups according to the GUID of the disk you want to use. The GUID of a disk is listed as the disk identifier in the output of the Wbadmin GET DISKS command.
§ –removeTarget. Sets the storage location to remove from the backup schedule according to the GUID of the disk you want to use. The GUID of a disk is listed as the disk identifier in the output of the Wbadmin GET DISKS command.
§ –include. Sets a comma-delimited list of volume drive letters, volume mount points, and GUID volume names to back up.
§ –allCritical. Includes all operating system volumes in the backup automatically.
§ –quiet. Specifies that you want to run the command with no prompts to the user.
To understand how ENABLE BACKUP is used, consider the following examples:
Schedule a backup for C and D at 9:00 P.M. daily
wbadmin enable backup -addTarget:{06d88776-0000-0000-0000-000000000000}
-schedule:18:00 –include:c:,d:
Schedule a backup for all operating system volumes at 6:00 A.M. and 9:00 P.M. daily
wbadmin enable backup -addTarget:{06d88776-0000-0000-0000-000000000000}
-schedule:06:00,18:00 –allCritical
Modifying or stopping scheduled backups
After you’ve configured scheduled backups on a server, you can modify or stop the scheduled backups by following these steps:
1. Start Windows Server Backup. Tap or click Backup Schedule on the Action menu or in the Actions pane to start the Backup Schedule Wizard. Tap or click Next.
2. On the Modify Scheduled Backup Settings page, tap or click Modify Backup if you want to add or remove backup items, times, or targets, and then follow steps 3–7 in the section Configuring scheduled backups earlier in the chapter. If you want to stop the scheduled backups from running, tap or click Stop Backup, tap or click Next, and then tap or click Finish. When prompted to confirm, tap or click Yes, and then tap or click Close.
NOTE
Stopping backups releases backup disks for ordinary use. Backup archives are not deleted from the backup disks and remain available for use in recovery.
With Wbadmin, you can modify scheduled backups by using the ENABLE BACKUP command. For targets, you must use the –addTarget and –removeTarget parameters to modify the target disks. For the run schedule and included volumes, you just set the new values you want to use. Consider the following examples:
Adding a new target to scheduled backups
wbadmin enable backup -addTarget:{41cd2567-0000-0000-0000-000000000000}
Removing a target from scheduled backups
wbadmin enable backup -removeTarget:{06d88776-0000-0000-0000-000000000000}
Modifying the run schedule and included volumes
wbadmin enable backup -schedule:03:00 –include:c:,d:,e:
Creating and scheduling backups with Wbadmin
One way to create manual backups is to use the Wbadmin START BACKUP command. START BACKUP accepts the following parameters:
§ –backupTarget. Sets the storage location for the backup as either a drive letter or UNC path to a shared folder on a remote server.
§ –include. Sets a comma-delimited list of volume drive letters, volume mount points, and GUID volume names to back up.
§ –allCritical. Includes all operating system volumes in the backup automatically.
§ –inheritAcl. Specifies that you want the backup folder at the remote shared folder to inherit the security permissions of the shared folder. If you do not specify this parameter, the backup folder is accessible only to the user you specify in the –user parameter, administrators, and backup operators.
§ –noVerify. Specifies that you do not want to verify backups written to removable media. If you do not specify this parameter, backups written to removable media are verified.
§ –password. Sets the password to use when connecting to the remote shared folder.
§ –quiet. Specifies that you want to run the command with no prompts to the user.
§ –user. Sets the user name to use when connecting to the remote shared folder.
§ –vssFull. Specifies that you want to perform a full backup by using VSS, which ensures that all server and application data is backed up. Do not use this parameter if you are using a third-party backup utility to back up application data.
To understand how START BACKUP is used, consider the following examples:
Performing a full backup of the server
wbadmin start backup -backupTarget:f: -vssfull
Backing up C and D to F
wbadmin start backup -backupTarget:f: -include:c:,d:
Backing up all critical volumes
wbadmin start backup -backupTarget:f: -allCritical
Backing up C and D to a remote shared folder
wbadmin start backup -backupTarget:\\fileserver27\backups -include:c:,d: -user:williams
If you want to create a schedule to run backups at different times on different days, you can use Task Scheduler to create the necessary tasks to run this command on the schedule you set. You can use Task Scheduler and Wbadmin to schedule tasks to run backups by following these steps:
1. In Computer Management, tap or click Task Scheduler. You are connected to the local computer by default. As necessary, connect to the computer that you want to access.
2. Press and hold or right-click the Task Scheduler node, and then tap or click Create Task. This opens the Create Task dialog box.
3. On the General tab, enter the name of the task, and then set security options for running the task.
o If the task should run under a user other than the current user, tap or click Change User Or Group. In the Select User Or Group dialog box, select the user or group under which the task should run, and then provide the appropriate credentials when prompted later.
o Set other run options as necessary. By default, tasks run only when a user is logged on. If you want to run the task regardless of whether a user is logged on, select Run Whether User Is Logged On Or Not. You can also elect to run with highest privileges and configure the task for earlier releases of Windows.
4. On the Triggers tab, tap or click New. In the New Trigger dialog box, select On A Schedule in the Begin The Task list. Use the options provided to set the run schedule, and then tap or click OK.
5. On the Actions tab, tap or click New. In the New Action dialog box, select Start A Program in the Action list.
6. In the Program/Script text box, enter %windir%\System32\wbadmin.exe.
7. In Add Arguments, enter the START BACKUP command you want to use along with its parameters, such as the following:
8. start backup -backupTarget:f: -include:c:,d:,e:\mountpoint,
\\?\volume{be345a23-32b2-432d-43d2-7867ff3e3432}\
9. Tap or click OK to close the New Action dialog box.
10.On the Conditions tab, specify any limiting conditions for starting or stopping the task.
11.On the Settings tab, choose any additional optional settings for the task.
12.Tap or click OK to create the task.
Running manual backups
You can use Windows Server Backup to back up servers manually by following these steps:
1. Start Windows Server Backup. Tap or click Backup Once on the Action menu or in the Actions pane to start the Backup Once Wizard.
2. If you want to back up the server by using the same options you use for the Backup Schedule Wizard, select Scheduled Backup Options, tap or click Next, and then tap or click Backup to perform the backup. Skip the remaining steps.
3. If you want to back up the server by using different options, select Different Options, and then tap or click Next.
4. On the Select Backup Configuration page, note the backup size listed under the Full Server option. This is the storage space required to back up the server data, applications, and the system state. To back up all volumes on the server, select the Full Server option, and then tap or click Next. To back up selected volumes on the server, tap or click Custom, and then tap or click Next.
5. If you select Custom, the Select Items For Backup page is displayed. Tap or click Add Items. Select the check boxes for the volumes you want to back up, and clear the check boxes for the volumes you want to exclude. Select the Bare Metal Recovery option if you want to be able to fully recover the operating system. Tap or click OK, and then tap or click Next.
TIP
After you select items, you might want to tap or click Advanced Settings before continuing. You can then use the options on the Exclusions tab to identify locations and file types that should not be backed up. You also can then use the options on the VSS Settings tab to specify whether you want to create a full backup or a copy backup.
6. On the Specify Destination Type page, do one of the following:
o If you want to back up to local drives, select Local Drives, and then tap or click Next. On the Backup Destination page, select the internal or external disk or DVD drive to use as the backup target. When stored on a DVD, backups are compressed and you can recover only full volumes. As a result, the size of the backup on a DVD might be smaller than the volume on the server. Tap or click Next.
o If you want to back up to a remote shared folder, select Remote Shared Folder, and then tap or click Next. On the Specify Remote Folder page, enter the UNC path to the remote folder, such as \\FileServer43\Backups. If you want the backup to be accessible to everyone who has access to the shared folder, select Inherit under Access Control. If you want to restrict access to the shared folder to the current user, administrators, and backup operators, select Do Not Inherit under Access Control. Tap or click Next. When prompted to provide access credentials, enter the user name and password for an account authorized to access and write to the shared folder.
7. Tap or click Next, and then tap or click Backup. The Backup Progress dialog box shows you the progress of the backup process. If you tap or click Close, the backup will continue to run in the background.
Recovering your server from hardware or startup failure
Windows Server 2012 R2 includes an extensive diagnostics and resolution architecture. These features can help you recover from many types of hardware, memory, and performance issues and either resolve them automatically or help users through the process of resolving them.
Windows Server 2012 R2 includes more reliable and better-performing device drivers to prevent many common causes of hangs and crashes. Improved I/O cancellation for device drivers ensures that the operating system can recover gracefully from blocking calls and that there are fewer blocking disk I/O operations.
To reduce downtime and restarts required for application installations and updates, Windows Server 2012 R2 can use the update process to mark in-use files for update, and then automatically replace the files the next time the application is started. In some cases, Windows Server 2012 R2 can save the application’s data, close the application, update the in-use files, and then restart the application. To improve overall system performance and responsiveness, Windows Server 2012 R2 uses memory efficiently, provides ordered execution for groups of threads, and provides several process-scheduling mechanisms. By optimizing memory and process usage, Windows Server 2012 R2 ensures that background processes have less performance impact on system performance.
Windows Server 2012 R2 provides improved guidance on the causes of unresponsive conditions. By including additional error-reporting details in the event logs, Windows Server 2012 R2 makes it easier to identify and resolve issues. To automatically recover from service failures, Windows Server 2012 R2 uses service recovery policies more extensively than its predecessors. When recovering a failed service, Windows Server 2012 R2 automatically handles both service and nonservice dependencies. Any necessary dependent services and system components are started prior to starting the failed service.
In earlier versions of Windows, an application crash or hang is marked as not responding, and it is up to the user to exit and then restart the application. Windows Server 2012 R2 attempts to resolve the issue of unresponsive applications by using Restart Manager. Restart Manager can shut down and restart unresponsive applications automatically. Thanks to Restart Manager, you might not have to intervene to try to resolve issues with frozen applications.
Failed installation and nonresponsive conditions of applications and drivers are also tracked through Action Center, and the built-in diagnostics display a warning message. By tapping or clicking the Action Center icon in the system tray, you can view recent messages. If you tap or click a message, Windows Server 2012 R2 opens the Message Details page in Action Center, which might provide a solution for the problem.
You also can view a list of current problems at any time by following these steps:
1. In Control Panel, under the System And Security heading, tap or click Review Your Computer’s Status.
2. In Action Center, a list of known problems is displayed. For some issues, you’ll be able to select a related View Message Details button to display a Message Details page. If a solution is available, tap or click the link provided to download the solution or visit a related website to get more information.
While you are working with Action Center, you can have Windows Server check for solutions to problems by tapping or clicking the Check For Solutions link on the Maintenance panel.
Windows Server 2012 R2 attempts to resolve issues related to running out of virtual memory by providing Resource Exhaustion Detection And Recovery. This feature monitors the systemwide virtual memory commit limit and alerts you if the computer is running low on virtual memory. To help you to correct this issue, it also identifies the processes consuming the largest amount of memory, enabling you to close any or all of these high resource–consuming applications directly from the Close Programs To Prevent Information Loss dialog box. The resource exhaustion alert is also logged in the system event log.
In early versions of Windows, corrupted system files are one of the most common causes of startup failure. Windows Server 2012 R2 includes built-in diagnostics to automatically detect corrupted system files during startup and guide you through automated or manual recovery. To resolve startup problems, Windows Server 2012 R2 uses the Startup Repair tool (StR), which is installed automatically and started when a system fails to boot. Once started, StR attempts to determine the cause of the startup failure by analyzing startup logs and error reports. Then StR attempts to fix the problem automatically. If StR is unable to resolve the problem, it restores the system to the last known working state and then provides diagnostic information and support options for further troubleshooting.
Hardware problems addressed by built-in diagnostics include error detection and disk failure detection. If a device is having problems, hardware diagnostics can detect error conditions and either repair the problem automatically or guide the user through a recovery process. With disk drives, hardware diagnostics can use fault reports provided by disk drives to detect potential failures and alert you before they happen. Hardware diagnostics can also help guide you through the backup process after alerting you that a disk might be failing.
Performance problems addressed by built-in diagnostics include slow application startup, slow boot, slow standby/resume, and slow shutdown. If a computer is experiencing degraded performance, performance diagnostics can detect the problem and provide possible solutions for resolving the problem. For advanced performance issues, you can track related performance and reliability data in the Performance Diagnostics console, which includes a performance monitor and a reliability monitor.
Memory problems addressed by built-in diagnostics include both memory leaks and failing memory. A memory leak occurs if an application or a system component doesn’t completely free areas of physical memory after it is done with them. If you suspect that a computer has a memory problem that is not being automatically detected, you can run Windows Memory Diagnostics manually during startup by selecting the related option. If the Windows Memory Diagnostics option is not provided during startup, you can run the program by following these steps:
1. Start Windows Memory Diagnostics. One way to do this is to enter mdsched.exe in the App Search box, and then press Enter.
2. Choose whether to restart the computer now and run the tool immediately or schedule the tool to check for problems at the next restart.
3. Windows Memory Diagnostics runs automatically after the computer restarts, by using the standard test mix and performing two test passes by default.
You can change the run options by using the F1 key. Three different levels of memory testing can be performed, including Basic, Standard, and Extended. Use a basic test to quickly check the memory. Use the standard test to perform a standard test of the memory. Use the extended test when you want to perform more extensive testing. Set the number of test passes by using the Pass Count option.
To detect system crashes possibly caused by failing memory, memory diagnostics work with the Microsoft Online Crash Analysis tool. If a computer crashes because of failing memory, and memory diagnostics detect this, you are prompted to schedule a memory test the next time the computer is restarted.
Recovering from a failed start
If Windows Server 2012 R2 fails to start, the server typically will go into recovery mode during the next startup. After preparing automated recovery and attempting to diagnose the server, you’ll see an Automatic Repair screen. From this screen, you can select Restart to shut down and start the computer again or Advanced Options to display additional options that might help you repair the server.
If you elect to restart the computer, Windows will do a full restart, which can sometimes resolve the problem. If you choose Advanced Options, you’ll have the following options:
§ Continue. Exits the repair menu, and continues to load the operating system
§ Use Another Operating System. Exits the repair menu, and enables you to select the operating system to load (if multiple operating system are installed)
§ Troubleshoot. Displays the Advanced Options menu
§ Turn Off Your PC. Exits the repair menu, and shuts down the server
If you select, Troubleshoot, the Advanced Options screen has the following options:
§ System Image Recovery. Enables you to recover the server by using a system image file. The image file can come from a remote computer.
§ Command Prompt. Enables you to access a command prompt and work with the commands and tools available in the recovery environment.
§ Startup Settings. Enables you to change the startup behavior and start the server in safe mode. Here, you click Restart to restart the computer in safe mode so that you can disable driver signature enforcement, early-launch anti-malware protection, and automatically restart on system failure. You can also enable low-resolution video mode, debugging mode, boot logging, and safe mode.
Starting a server in safe mode
Many startup problems occur because something on the system has changed; for example, a device might have been incorrectly installed. The system configuration or registry might have been updated improperly, causing a conflict. Often you can resolve startup issues by using safe mode to recover or troubleshoot system problems. When you have finished using safe mode, be sure to restart the server by using a normal startup. You will then be able to use the server as you usually would.
In safe mode, Windows Server 2012 R2 loads only basic files, services, and drivers. The drivers loaded include those for the mouse, monitor, keyboard, mass storage, and base video. The monitor driver sets the basic settings and modes for the server’s monitor; the base video driver sets the basic options for the server’s graphics card. No networking services or drivers are started unless you choose the Safe Mode With Networking option. Because safe mode loads a limited set of configuration information, it can help you troubleshoot problems.
You can start a server in safe mode by following these steps:
1. If the computer won’t start as usual, the Recovery screen is displayed during startup. On the Recovery screen, tap or click Troubleshoot.
2. On the Advanced Options screen, tap or click Startup Settings. Next, on the Windows Startup Settings screen, tap or click Restart.
3. Use the arrow keys to select the safe mode you want to use, and then press Enter. The safe mode option you use depends on the type of problem you’re experiencing. The key options are as follows:
o Repair Your Computer. Loads the Startup Repair tool. Choose this option to restart the server and go back to the Recovery screen.
o Safe Mode. Loads only basic files, services, and drivers during the initialization sequence. The drivers loaded include the mouse, monitor, keyboard, mass storage, and base video. No networking services or drivers are started.
o Safe Mode With Networking. Loads basic files, services, and drivers, in addition to services and drivers needed to start networking.
o Safe Mode With Command Prompt. Loads basic files, services, and drivers, and then starts a command prompt instead of the Windows graphical interface. No networking services or drivers are started.
TIP
In Safe Mode With Command Prompt, you can start the Explorer shell from the command-line interface by pressing Ctrl+Shift+Esc and entering explorer.exe in the New Process window on the File menu of Task Manager.
o Enable Boot Logging. Enables you to create a record of all startup events in a boot log.
o Enable Low-Resolution Video. Enables you to start the system in low-resolution 640 × 480 display mode, which is useful if the system display is set to a mode that can’t be used with the current monitor or the system has a bad driver.
o Last Known Good Configuration. Starts the computer in safe mode by using registry information that Windows saved at the last shutdown, including the HKEY_CURRENT_CONFIG (HKCC) hive. This registry hive stores information about the hardware configuration with which you previously and successfully started the computer.
o Debugging Mode. Starts the system in debugging mode, which is useful only for troubleshooting operating system bugs.
o Directory Services Restore Mode. Starts the system in safe mode, and enables you to restore the directory service. This option is available on Windows Server 2008 R2 and later domain controllers.
o Disable Automatic Restart On System Failure. Prevents Windows Server from automatically restarting after an operating system crash.
o Disable Driver Signature Enforcement. Starts the computer in safe mode without enforcing digital signature policy settings for drivers. If a driver with an invalid or missing digital signature is causing startup failure, this option resolves the problem temporarily so that you can start the computer and resolve the problem by getting a new driver or changing the driver signature enforcement settings.
o Disable Early Launch Anti-Malware Driver. Starts the computer in safe mode without running the boot driver for the computer’s anti-malware software. If the boot driver for the computer’s anti-malware software is preventing startup, you need to check the software developer’s website for an update to resolve the boot problem or configure the software without boot protection.
o Start Windows Normally. Starts the computer with its regular settings.
4. If a problem doesn’t reappear when you start in safe mode, you can eliminate the default settings and basic device drivers as possible causes. If a newly added device or updated driver is causing problems, you can use safe mode to remove the device or reverse the update.
Backing up and restoring the system state
In Windows Server 2012 R2, there are approximately 50,000 system state files, which use approximately 4 GB of disk space in the default installation of an x64-based computer. The fastest and easiest way to back up and restore a server’s system state is to use Wbadmin. With Wbadmin, you can use the START SYSTEMSTATEBACKUP command to create a backup of the system state for a computer, and the START SYSTEMSTATERECOVERY command to restore a computer’s system state.
TIP
When you select a system state restore on a domain controller, you have to be in the Directory Services Restore mode. To learn how to restore Active Directory, see the next section.
To back up a server’s system state, enter the following at an elevated command prompt:
wbadmin start systemstatebackup -backupTarget:VolumeName
Here VolumeName is the storage location for the backup, such as F:.
To restore a server’s system state, enter the following at an elevated command prompt:
wbadmin start systemstaterecovery -backupTarget:VolumeName
Here VolumeName is the storage location that contains the backup you want to recover, such as F:. Additionally, you can do the following:
§ Use the –recoveryTarget parameter to restore to an alternate location.
§ Use the –machine parameter to specify the name of the computer to recover if the original backup location contains backups for multiple computers.
§ Use the –authSysvol parameter to perform an authoritative restore of the SYSVOL.
You can also recover the system state by using a backup that includes the system state or by performing a recovery.
Restoring Active Directory
When restoring system state data to a domain controller, you must choose whether you want to perform an authoritative or nonauthoritative restore. The default is nonauthoritative. In this mode, Active Directory and other replicated data are restored from backup and any changes are replicated from another domain controller. Thus, you can safely restore a failed domain controller without overwriting the latest Active Directory information. On the other hand, if you’re trying to restore Active Directory throughout the network by using archived data, you must use an authoritative restore. With an authoritative restore, the restored data is restored on the current domain controller and then replicated to other domain controllers.
CAUTION
An authoritative restore overwrites all Active Directory data throughout the domain. Before you perform an authoritative restore, you must be certain that the archive data is the correct data to propagate throughout the domain and that the current data on other domain controllers is inaccurate, outdated, or otherwise corrupted.
To restore Active Directory on a domain controller and enable the restored data to be replicated throughout the network, follow these steps:
1. Make sure the domain controller server is shut down.
2. Restart the domain controller server, and enter safe mode.
3. Select Directory Services Restore Mode.
4. When the system starts, use the Backup utility to restore the system state data and other essential files.
5. After restoring the data but before restarting the server, use the Ntdsutil.exe tool to mark objects as authoritative. Be sure to check the Active Directory data thoroughly.
6. Restart the server. When the system finishes startup, the Active Directory data should begin to replicate throughout the domain.
Restoring the operating system and the full system
As discussed previously, Windows Server 2012 R2 includes startup repair features that can recover a server in case of corrupted or missing system files. The startup repair process can also recover from some types of boot failures involving the boot manager. If these processes fail and the boot manager is the reason you cannot start the server, you can use the Windows Server 2012 R2 installation disc or system recovery options to restore the boot manager and enable startup.
System recovery options are available only with full server installations and not with Server Core installations. With Server Core installations, you need to use the installation disc to initiate recovery.
System recovery options include the following tools:
§ System Image Recovery. Enables you to recover a server’s operating system or perform a full system recovery. With an operating system or full system recovery, make sure your backup data is available and that you can log on with an account that has the appropriate permissions. With a full system recovery, keep in mind that data that was not included in the original backup will be deleted when you recover the system, including any in-use volumes that were not included in the backup.
§ Windows Memory Diagnostics Tools. Enables you to diagnose a problem with the server’s physical memory. Three different levels of memory testing can be performed: basic, standard, and exhaustive.
You can also access a command prompt. This command prompt gives you access to the command-line tools available during installation in addition to these other programs:
§ Startup Repair Wizard (X:\Sources\Recovery\StartRep.exe). Typically, this tool is started automatically on boot failure if Windows detects an issue with the boot sector, boot manager, or Boot Configuration Data (BCD) store.
§ Startup Recovery Options (X:\Sources\Recovery\Recenv.exe). Enables you to start the Startup Recovery Options Wizard. If you previously entered the wrong recovery settings, you can provide different options.
As an administrator, you can perform command-line troubleshooting by following these steps:
1. If the computer won’t start as usual, the Recovery screen is displayed during startup. On the Recovery screen, tap or click Troubleshoot.
2. On the Advanced Options screen, tap or click Command Prompt.
3. When prompted to choose an account, tap or click the Administrator account. Next, enter the password for the Administrator account, and tap or click Continue.
4. Use the command prompt to perform troubleshooting. For example, you could run the Startup Repair Wizard by entering x:\sources\recovery\startrep.exe.
You can recover a server’s operating system or perform a full system recovery by using a backup image you created earlier with Windows Server Backup. With an operating system recovery, you recover all critical volumes but do not recover nonsystem volumes. If you recover your full system, Windows Server Backup reformats and repartitions all disks that were attached to the server. Therefore, you should use this method only when you want to recover the server data onto separate hardware or when all other attempts to recover the server on the existing hardware have failed.
NOTE
When you recover the operating system or the full system, make sure that your backup data is available and that you can log on with an account that has the appropriate permissions. With a full system recovery, keep in mind that existing data that was not included in the original backup will be deleted when you recover the system. This includes any volumes that are currently used by the server but were not included in the backup.
You can recover the operating system by using a backup image by following these steps:
1. If the computer won’t start as usual, the Recovery screen is displayed during startup. On the Recovery screen, tap or click Troubleshoot.
2. On the Advanced Options screen, tap or click System Image Recovery.
3. When prompted to choose an account, tap or click the Administrator account. Next, enter the password for the Administrator account, and tap or click Continue. This starts the Re-Image Your Computer Wizard.
4. On the Select A System Image Backup page, tap or click Use The Latest Available System Image (Recommended), and then tap or click Next. Or tap or click Select A System Image, and then tap or click Next.
5. If you select an image to restore, do one of the following on the Select The Location Of The Backup page:
o Tap or click the location that contains the system image you want to use, and then tap or click Next. Afterward, tap or click the system image you want to use, and then tap or click Next.
o To browse for a system image on the network, tap or click Advanced, and then tap or click Search For A System Image On The Network. When you are prompted to confirm that you want to connect to the network, tap or click Yes. In the Network Folder text box, specify the location of the server and shared folder in which the system image is stored, such as \\FileServer22\Backups, and then tap or click OK.
o To install a driver for a backup device that doesn’t show up in the location list, tap or click Advanced, and then tap or click Install A Driver. Insert the installation media for the device, and then tap or click OK. After Windows installs the device driver, the backup device should be listed in the location list.
6. On the Choose Additional Restore Options page, do the following optional tasks, and then tap or click Next:
o Select the Format And Repartition Disks check box to delete existing partitions and reformat the destination disks to be the same as the backup.
o Select Only Restore System Drives to restore only the drives from the backup that are required to run Windows: the boot, system, and recovery volumes. If the server has data drives, they will not be restored.
o Tap or click Install Drivers to install device drivers for the hardware to which you are recovering.
o Tap or click Advanced to specify whether the computer is restarted and the disks are checked for errors immediately after the recovery operation is completed.
7. On the Confirmation page, review the details for the restoration, and then tap or click Finish. The wizard then restores the operating system or the full server as appropriate for the options you selected.
Restoring applications, nonsystem volumes, and files and folders
Windows Server 2012 R2 provides separate processes for system state and full server recovery and the recovery of individual volumes and files and folders. You can use the Recovery Wizard in Windows Server Backup to recover nonsystem volumes and files and folders from a backup. Before you begin, you should be sure that the computer you are recovering files to is running Windows Server 2012 R2. If you want to recover individual files and folders, you should be sure that at least one backup exists on an internal or external disk or in a remote shared folder. You cannot recover files and folders from backups saved to DVDs or removable media.
With this in mind, you can recover nonsystem volumes, files and folders, or application data by following these steps:
1. Start Windows Server Backup. In the Actions pane or on the Action menu, tap or click Recover to start the Recovery Wizard.
2. On the Getting Started page, specify whether you will recover data from the local computer or from another location, and then tap or click Next.
3. If you are recovering data from another location, specify whether the backup you want to restore is on a local drive or in a remote shared folder, tap or click Next, and then specify location-specific settings. When you are recovering from a local drive, on the Select Backup Location page, select the location of the backup from the drop-down list. When you are recovering from a remote shared folder, on the Specify Remote Folder page, enter the path to the folder that contains the backup. In the remote folder, the backup should be stored at \\BackupServer\WindowsImageBackup\ComputerName.
4. If you are recovering from another location, on the Select Server page, select which server’s data you would like to recover. Tap or click Next.
5. On the Select Backup Date page, select the date and time of the backup you want to restore by using the calendar and the time list. Backups are available for dates shown in bold. Tap or click Next.
6. On the Select Recovery Type page, do one of the following:
o To restore individual files and folders, tap or click Files And Folders, and then tap or click Next. On the Select Items To Recover page, under Available Items, tap or click the plus sign (+) to expand the list until the folder you want is visible. Tap or click a folder to display the contents of the folder in the adjacent pane, tap or click each item you want to restore, and then tap or click Next.
o To restore noncritical, nonoperating system volumes, tap or click Volumes, and then tap or click Next. On the Select Volumes page, you’ll find a list of source and destination volumes. Select the check boxes associated with the source volumes you want to recover, and then select the location to which you want to recover the volumes by using the Destination Volume lists. Tap or click Next. If prompted to confirm the recovery operation, tap or click Yes. Skip steps 7 and 8.
o To restore application data, tap or click Applications, and then tap or click Next. On the Select Application page, under Applications, tap or click the application you want to recover. If the backup you are using is the most recent, you might encounter a check box labeled Do Not Perform A Roll-Forward Recovery Of The Application Databases. Select this check box if you want to prevent Windows Server Backup from rolling forward the application database that is currently on your server. Tap or click Next. Because any data on the destination volume will be lost when you perform the recovery, make sure that the destination volume is empty or does not contain information you will need later.
7. Next, you can specify whether you want to restore data to its original location (nonsystem files only) or an alternate location. For an alternate location, enter the path to the restore location or tap or click Browse to select it. With applications, you can copy application data to an alternate location. You cannot, however, recover applications to a different location or computer.
8. For file and folder recovery, choose a recovery technique to apply when files and folders already exist in the recovery location. You can create copies so that you have both versions of the file or folder, overwrite existing files with recovered files, or skip duplicate files and folders to preserve existing files. You also can restore the original security permissions to files and folders being recovered.
9. On the Confirmation page, review the details, and then tap or click Recover to restore the specified items.
Managing encryption recovery policy
If you’re an administrator for an organization that uses the Encrypting File System (EFS), your disaster-recovery planning must include additional procedures and preparations. You need to consider how to handle issues related to personal encryption certificates, EFS recovery agents, and EFS recovery policy. These issues are discussed in the sections that follow.
Understanding encryption certificates and recovery policy
File encryption is supported on a per-folder or per-file basis. Any file placed in a folder marked for encryption is automatically encrypted. Files in encrypted format can be read only by the person who encrypted the file. Before other users can read an encrypted file, the user must decrypt the file.
Every file that’s encrypted has a unique encryption key. This means that encrypted files can be copied, moved, and renamed just like any other file—and in most cases these actions don’t affect the encryption of the data. The user who encrypted the file always has access to the file if the user’s private key is available in the user’s profile on the computer or the user has credential roaming with Digital Identification Management Service (DIMS). For this user, the encryption and decryption process is handled automatically and is transparent.
EFS is the process that handles encryption and decryption. The default setup for EFS makes it possible for users to encrypt files without needing special permission. Files are encrypted by using a public/private key that EFS generates automatically on a per-user basis. By default, Windows uses the Advanced Encryption Standard (AES) algorithm for encrypting files with EFS. Internet Information Services 7 and later can use an AES provider for encrypting passwords by default.
Encryption certificates are stored as part of the data in user profiles. If a user works with multiple computers and wants to use encryption, an administrator needs to configure a roaming profile for that user. A roaming profile ensures that the user’s profile data and public-key certificates are accessible from other computers. Without this, users won’t be able to access their encrypted files on another computer.
TIP
An alternative to a roaming profile is to copy the user’s encryption certificate to the computers the user uses. You can do this by using the certificate backup and restore process discussed in Backing up and restoring encrypted data and certificates later in this chapter. Just back up the certificate on the user’s original computer, and then restore the certificate on each of the other computers the user logs on to.
EFS has a built-in, data-recovery system to guard against data loss. This recovery system ensures that encrypted data can be recovered if a user’s public-key certificate is lost or deleted. The most common scenario in which this occurs is when a user leaves the company and the associated user account is deleted. Although a manager might have been able to log on to the user’s account, check files, and save important files to other folders, encrypted files will be accessible afterward only if the encryption is removed by the manager acting as the user who encrypted the files or, if while logged on as the user, the manager moves the files to a FAT or FAT32 volume (where encryption isn’t supported).
To access encrypted files after the user account has been deleted, you need to use a recovery agent. Recovery agents have access to the file encryption key that’s necessary to unlock data in encrypted files. However, to protect sensitive data, recovery agents don’t have access to a user’s private key or any private key information.
Recovery agents are designated automatically, and the necessary recovery certificates are generated automatically as well to ensure that encrypted files can always be recovered.
EFS recovery agents are configured at two levels:
§ Domain. The recovery agent for a domain is configured automatically when the first Windows Server 2012 R2 domain controller is installed. By default, the recovery agent is the domain administrator. Through Group Policy, domain administrators can designate additional recovery agents. Domain administrators can also delegate recovery agent privileges to designated security administrators.
§ Local computer. When a computer is part of a workgroup or in a standalone configuration, the recovery agent is the administrator of the local computer by default. You can designate additional recovery agents. Further, if you want local recovery agents in a domain environment rather than domain-level recovery agents, you must delete the recovery policy from the Group Policy for the domain.
You can delete recovery policies if you don’t want them to be available. However, deleting recovery policies is not recommended because there can be severe unintentional consequences.
Configuring the EFS recovery policy
Recovery policies are configured automatically for domain controllers and workstations. By default, domain administrators are the designated recovery agents for domains, and the local administrator is the designated recovery agent for a standalone workstation.
Through Group Policy, you can view, assign, and delete recovery agents by following these steps:
1. Access the Group Policy console for the local computer, site, domain, or organizational unit with which you want to work. For details on working with Group Policy, see Chapter 6.
2. Expand Computer Configuration, Windows Settings, Security Settings, and Public Key Policies, and then tap or click Encrypting File System to access the configured Recovery Agents in Group Policy.
3. The pane at the right lists the recovery certificates currently assigned. Recovery certificates are listed according to who they are issued to, who issued them, their expiration date and purpose, and more.
4. To designate an additional recovery agent, press and hold or right-click Encrypting File System, and then tap or click Add Data Recovery Agent. This starts the Add Recovery Agent Wizard, which you can use to select a previously generated certificate that has been assigned to a user and mark it as a designated recovery certificate. Tap or click Next. On the Select Recovery Agents page, tap or click Browse Directory, and in the Find Users, Contacts, And Groups dialog box, select the user you want to work with. Tap or click OK, and then tap or click Next. Tap or click Finish to add the recovery agent.
5. To delete a recovery agent, select the recovery agent’s certificate in the right pane, and then press Delete. When prompted to confirm the action, tap or click Yes to permanently and irrevocably delete the certificate. If the recovery policy is empty (meaning it has no other designated recovery agents), EFS is turned off so that users can no longer encrypt files.
NOTE
Before you can designate additional recovery agents, you should set up a root certificate authority (CA) in the domain. Afterward, you must use the Certificates snap-in to generate a personal certificate that uses the EFS Recovery Agent template. The root CA must then approve the certificate request so that the certificate can be used. You can also use Cipher.exe to generate the EFS recovery agent key and certificate.
Backing up and restoring encrypted data and certificates
You can back up and restore encrypted data like you can any other data. The key thing to remember is that you must use backup software that understands EFS, such as the built-in backup and restore tools. You must be careful when using this type of software, however.
The backup or restore process doesn’t necessarily back up or restore the certificate needed to work with the encrypted data. The user’s profile data contains that certificate. If the user’s account exists and the profile still contains the necessary certificate, the user can still work with the encrypted data.
If the user’s account exists and you previously backed up the user’s profile and then restored the profile to recover a deleted certificate, the user can still work with the encrypted data. Otherwise, there’s no way to work with the data, and you need to have a designated recovery agent access the files, and then remove the encryption.
Being able to back up and restore certificates is an important part of any disaster-recovery* plan. The next sections examine the techniques you can use to perform these tasks.
Backing up encryption certificates
You use the Certificates snap-in to back up and restore personal certificates. Personal certificates are saved with the Personal Information Exchange (.pfx) format.
To back up personal certificates, follow these steps:
1. Log on as the user to the computer where the personal certificate you want to work with is stored. Tap or click Start, enter mmc in the Search box, and then press Enter. This opens the Microsoft Management Console (MMC).
2. In the MMC, select File, and then select Add/Remove Snap-In. This opens the Add Or Remove Snap-Ins dialog box.
3. In the Available Snap-Ins list, select Certificates, and then tap or click Add. Select My User Account, and then tap or click Finish. This adds the Certificates snap-in to the Selected Snap-Ins list. The focus for the snap-in is set to the currently logged-on user account.
4. Tap or click OK to close the Add Or Remove Snap-Ins dialog box.
5. Expand Certificates—Current User, expand Personal, and then select Certificates. Press and hold or right-click the certificate you want to save, tap or click All Tasks, and then tap or click Export. This starts the Certificate Export Wizard. Tap or click Next.
6. Select Yes, Export The Private Key. Tap or click Next twice.
7. On the security page, use the options provided to specify security principals that should have access to the certificate. The default security principal is the Administrator account. Afterward, enter and confirm a password for opening the certificate. Tap or click Next.
8. Tap or click Browse. Use the dialog box provided to specify a file location for the certificate file, and then tap or click Save. Be sure that this location is secure, because you don’t want to compromise system security. The file is saved with the .pfx extension.
9. Tap or click Next, and then tap or click Finish. If the export process is successful, you’ll get a message box confirming this. Tap or click OK to close the message box.
Restoring encryption certificates
When you have a backup of a certificate, you can restore the certificate to any computer on the network—not just the original computer. The backup and restore process is, in fact, how you move certificates from one computer to another.
Follow these steps to restore a personal certificate:
1. Copy the Personal Information Exchange (.pfx) file onto removable media, such as a flash drive or a floppy disk, and then log on as the user to the computer where you want to use the personal certificate.
NOTE
Log on to the target computer as the user whose certificate you’re restoring. If you don’t do this, the user won’t be able to work with his encrypted data.
2. Access the Certificates snap-in for My User Account as described previously.
3. Expand Certificates—Current User, and then press and hold or right-click Personal. Tap or click All Tasks, and then tap or click Import. This starts the Certificate Import Wizard.
4. Tap or click Next, and then insert the removable media.
5. Tap or click Browse. In the Open dialog box, locate the personal certificate on the removable media. Be sure to select Personal Information Exchange as the file type. After you locate the file, select it, and then tap or click Open.
6. Tap or click Next. Enter the password for the personal certificate, and then tap or click Next again.
7. The certificate should be placed in the Personal store by default. Accept the default by tapping or clicking Next. Tap or click Finish. If the import process is successful, you’ll get a message box confirming this. Tap or click OK.