Windows Server 2012 R2 Pocket Consultant: Storage, Security, & Networking (2014)
Chapter 8. Running DHCP clients and servers
§ Understanding DHCP
§ Installing a DHCP server
§ Configuring DHCP servers
§ Managing DHCP scopes
§ Managing the address pool, leases, and reservations
§ Backing up and restoring the DHCP database
You can use Dynamic Host Configuration Protocol (DHCP) to simplify administration of Active Directory domains, and in this chapter you’ll learn how to do that. You use DHCP to dynamically assign TCP/IP configuration information to network clients. This not only saves time during system configuration, but also provides a centralized mechanism for updating the configuration. To enable DHCP on the network, you need to install and configure a DHCP server. This server is responsible for assigning the necessary network information.
Understanding DHCP
DHCP gives you centralized control over IP addressing and more. After DHCP is installed, you rely on the DHCP server to supply the basic information necessary for TCP/IP networking. This basic information can include the following: IP address, subnet mask, and default gateway; primary and secondary Domain Name System (DNS) servers; primary and secondary Windows Internet Name Service (WINS) servers; and the DNS domain name. DHCP servers can assign a dynamic IP version 4 (IPv4) address, a dynamic IP version 6 (IPv6) address, or both addresses to any of the network interface cards (NICs) on a computer.
Using dynamic IPv4 addressing and configuration
A computer that uses dynamic IPv4 addressing and configuration is called a DHCPv4 client. When you start a DHCPv4 client, a 32-bit IPv4 address can be retrieved from a pool of IPv4 addresses defined for the network’s DHCP server. The address is assigned to the client for a specified time period known as a lease. When the lease is approximately 50 percent expired, the client tries to renew it. If the client can’t renew the lease at that time, it tries again before the lease expires. If this attempt fails, the client tries to contact an alternate DHCP server. IPv4 addresses that aren’t renewed are returned to the address pool. If the client is able to contact the DHCP server but the current IP address can’t be reassigned, the DHCP server assigns a new IPv4 address to the client.
The availability of a DHCP server doesn’t affect startup or logon (in most cases). DHCPv4 clients can start and users can log on to the local computer even if a DHCP server isn’t available. During startup, the DHCPv4 client looks for a DHCP server. If a DHCP server is available, the client gets its configuration information from the server. If a DHCP server isn’t available and the client’s previous lease is still valid, the client pings the default gateway listed in the lease. A successful ping tells the client that it’s probably on the same network it was on when it was issued the lease, and the client continues to use the lease as described previously. A failed ping tells the client that it might be on a different network. In this case, the client uses IPv4 autoconfiguration. The client also uses IPv4 autoconfiguration if a DHCP server isn’t available and the previous lease has expired.
IPv4 autoconfiguration works like this:
1. The client computer selects an IP address from the Microsoft-reserved class B subnet 169.254.0.0 and uses the subnet mask 255.255.0.0. Before using the IPv4 address, the client performs an Address Resolution Protocol (ARP) test to be sure that no other client is using this IPv4 address.
2. If the IPv4 address is in use, the client repeats step 1, testing up to 10 IPv4 addresses before reporting failure. When a client is disconnected from the network, the ARP test always succeeds. As a result, the client uses the first IPv4 address it selects.
3. If the IPv4 address is available, the client configures the NIC with this address. The client then attempts to contact a DHCP server, sending out a broadcast every five minutes to the network. When the client successfully contacts a server, the client obtains a lease and reconfigures the network interface.
As part of your planning, you need to consider how many DHCP servers should be installed on the network. Typically, you’ll want to install at least two DHCP servers on each physical network segment. Windows Server 2012 R2 includes DHCP failover for IPv4. DHCP failover enables high availability of DHCP services by synchronizing IPv4 address leases between two DHCP servers in one of two modes:
§ Load Balance. When you load balance the servers, you specify the percentage of the load each server should handle. Typically, you use a 50/50 approach to make each server equally share the load. You also could use other approaches, such as 60/40 to make one server carry 60 percent of the load and the other 40 percent of the load.
§ Hot Standby. With hot standby, one of the servers acts as the primary server and handles the DHCP services. The other acts as a standby server in case the primary fails or runs out of addresses to lease. A specific percentage of available IP addresses are reserved for the hot standby—5 percent by default.
The configuration of DHCP failover is simple and straightforward, and it does not require clustering or any advanced configuration. To configure DHCP failover, all you need to do is complete the following steps:
1. Install and configure two DHCP servers. The servers should be on the same physical network.
2. Create a DHCPv4 scope on one of the servers. Scopes are pools of IPv4 or IPv6 addresses you can assign to clients through leases.
3. When you establish the other server as a failover partner for the DHCPv4 scope, the scope is replicated to the partner.
Using dynamic IPv6 addressing and configuration
Both IPv4 and IPv6 are enabled by default when networking hardware is detected during installation. As discussed in Chapter 7, IPv4 is the primary version of IP used on most networks, and IPv6 is the next generation version of IP. IPv6 uses 128-bit addresses. In a standard configuration, the first 64 bits represent the network ID, and the last 64 bits represent the network interface on the client computer.
You can use DHCP to configure IPv6 addressing in two key ways:
§ DHCPv6 stateful mode. In DHCPv6 stateful mode, a client acquires its IPv6 address in addition to its network configuration parameters through DHCPv6.
§ DHCPv6 stateless mode. In DHCPv6 stateless mode, a client uses autoconfiguration to acquire its IP address and acquires its network configuration parameters through DHCPv6.
A computer that uses dynamic IPv6 addressing, configuration, or both mechanisms is called a DHCPv6 client. As with DHCPv4, the components of the DHCPv6 infrastructure consist of DHCPv6 clients that request configuration, DHCPv6 servers that provide configuration, and DHCPv6 relay agents that convey messages between clients and servers when clients are on subnets that do not have a DHCPv6 server.
Unlike in DHCPv4, you must also configure your IPv6 routers to support DHCPv6. A DHCPv6 client performs autoconfiguration based on the following flags in the Router Advertisement message sent by a neighboring router:
§ Managed Address Configuration flag, which is also known as the M flag. When set to 1, this flag instructs the client to use a configuration protocol to obtain stateful addresses.
§ Other Stateful Configuration flag, which is also known as the O flag. When set to 1, this flag instructs the client to use a configuration protocol to obtain other configuration settings.
Windows includes a DHCPv6 client. The DHCPv6 client attempts DHCPv6-based configuration depending on the values of the M and O flags in the Router Advertisement messages it receives. If there is more than one advertising router for a given subnet, the additional router or routers should be configured to advertise the same stateless address prefixes and the same values for the M and O flags. All current Windows desktop and server operating systems include IPv6 clients and, therefore, accept the values of the M and O flags in router advertisements they receive.
You can configure an IPv6 router to set the M flag to 1 in router advertisements by entering the following command at an elevated command prompt, where InterfaceName is the actual name of the interface:
netsh interface ipv6 set interface InterfaceName managedaddress=enabled
Similarly, you can set the O flag to 1 in router advertisements by entering the following command at an elevated command prompt:
netsh interface ipv6 set interface InterfaceName otherstateful=enabled
If the interface name contains spaces, enclose the related value in quotation marks, as shown in the following example:
netsh interface ipv6 set interface "Wired Ethernet Connection 2" managedaddress=enabled
Keep the following in mind when you are working with the M and O flags:
§ If the M and O flags are both set to 0, the network is considered not to have DHCPv6 infrastructure. Clients use router advertisements for non-link-local addresses and manual configuration to configure other settings.
§ If the M and O flags are both set to 1, DHCPv6 is used for both IP addressing and other configuration settings. This combination is known as DHCPv6 stateful mode, in which DHCPv6 assigns stateful addresses to IPv6 clients.
§ If the M flag is set to 0 and the O flag is set to 1, DHCPv6 is used only to assign other configuration settings. Neighboring routers are configured to advertise non-link-local address prefixes from which IPv6 clients derive stateless addresses. This combination is known as DHCPv6 stateless mode.
§ If the M flag is set to 1 and the O flag is set to 0, DHCPv6 is used for IP address configuration but not for other settings. Because IPv6 clients typically need to be configured with other settings, such as the IPv6 addresses of DNS servers, this combination typically is not used.
Windows obtains dynamic IPv6 addresses by using a process similar to dynamic IPv4 addresses. Typically, IPv6 autoconfiguration for DHCPv6 clients in stateful mode works like this:
1. The client computer selects a link-local unicast IPv6 address. Before using the IPv6 address, the client performs an ARP test to make sure that no other client is using this IPv6 address.
2. If the IPv6 address is in use, the client repeats step 1. Keep in mind that when a client is disconnected from the network, the ARP test always succeeds. As a result, the client uses the first IPv6 address it selects.
3. If the IPv6 address is available, the client configures the NIC with this address. The client then attempts to contact a DHCP server, sending out a broadcast every five minutes to the network. When the client successfully contacts a server, the client obtains a lease and reconfigures the network interface.
This is not how IPv6 autoconfiguration works for DHCPv6 clients in stateless mode. In stateless mode, DHCPv6 clients configure both link-local addresses and additional non-link-local addresses by exchanging Router Solicitation and Router Advertisement messages with neighboring routers.
Like DHCPv4, DHCPv6 uses User Datagram Protocol (UDP) messages. DHCPv6 clients listen for DHCP messages on UDP port 546. DHCPv6 servers and relay agents listen for DHCPv6 messages on UDP port 547. The structure for DHCPv6 messages is much simpler than for DHCPv4, which had its origins in Bootstrap Protocol (BOOTP) to support diskless workstations.
DHCPv6 messages start with a 1-byte Msg-Type field that indicates the type of DHCPv6 message. This is followed by a 3-byte Transaction-ID field determined by a client and used to group together the messages of a DHCPv6 message exchange. Following the Transaction-ID field, DHCPv6 options are used to indicate client and server identification, addresses, and other configuration settings.
Three fields are associated with each DHCPv6 option. A 2-byte Option-Code field indicates a specific option. A 2-byte Option-Len field indicates the length of the Option-Data field in bytes. The Option-Data field contains the data for the option.
Messages exchanged between relay agents and servers use a different message structure to transfer additional information. A 1-byte Hop-Count field indicates the number of relay agents that have received the message. A receiving relay agent can discard the message if the message exceeds a configured maximum hop count. A 15-byte Link-Address field contains a non-link-local address that is assigned to an interface connected to the subnet on which the client is located. Based on the Link-Address field, the server can determine the correct address scope from which to assign an address. A 15-byte Peer-Address field contains the IPv6 address of the client that originally sent the message or the previous relay agent that relayed the message. Following the Peer-Address field are DHCPv6 options. A key option is the Relay Message option. This option provides an encapsulation of the messages being exchanged between the client and the server.
IPv6 does not have broadcast addresses. The use of the limited broadcast address for some DHCPv4 messages has been replaced with the use of the All_DHCP_Relay _Agents_and_Servers address of FF02::1:2 for DHCPv6. A DHCPv6 client attempting to discover the location of the DHCPv6 server on the network sends a Solicit message from its link-local address to FF02::1:2. If there is a DHCPv6 server on the client’s subnet, it receives the Solicit message and sends an appropriate reply. If the client and server are on different subnets, a DHCPv6 relay agent on the client’s subnet that receives the Solicit message forwards it to a DHCPv6 server.
Checking IP address assignment
You can use ipconfig to check the currently assigned IP address and other configuration information. To obtain information for all network adapters on the computer, enter the command ipconfig /all at the command prompt. If the IP address has been assigned automatically, you’ll notice an entry for Autoconfiguration IP Address.
In the following example, the autoconfiguration IPv4 address is 169.254.98.59:
Windows IP Configuration
Host Name .................: DELTA
Primary DNS Suffix ........: microsoft.com
Node Type .................: Hybrid
IP Routing Enabled.........: No
WINS Proxy Enabled.........: No
DNS Suffix Search List.....: microsoft.com
Ethernet adapter Ethernet:
Connection-specific DNS Suffix...:
Description ................: Intel Pro/1000 Network Connection
Physical Address............: 23-15-C6-F8-FD-67
DHCP Enabled................: Yes
Autoconfiguration Enabled...: Yes
Autoconfiguration IP Address: 169.254.98.59
Subnet Mask ................: 255.255.0.0
Default Gateway ............:
DNS Servers ................:
Understanding scopes
Scopes are pools of IPv4 or IPv6 addresses you can assign to clients through leases. DHCP also provides a way to permanently assign a lease on an address. To do this, you need to create a reservation by specifying the IPv4 address to reserve and the media access control (MAC) address of the computer that will hold the IPv4 address. The reservation thereafter ensures that the client computer with the specified MAC address always gets the designated IPv4 address. With IPv6, you can specify that a lease is temporary or nontemporary. A nontemporary lease is similar to a reservation.
You create scopes to specify IP address ranges that are available for DHCP clients. For example, you could assign the IP address range 192.168.12.2 to 192.168.12.250 to a scope called Enterprise Primary. Scopes can use public or private IPv4 addresses on the following networks:
§ Class A networks. IP addresses from 1.0.0.0 to 126.255.255.255
§ Class B networks. IP addresses from 128.0.0.0 to 191.255.255.255
§ Class C networks. IP addresses from 192.0.0.0 to 223.255.255.255
§ Class D networks. IP addresses from 224.0.0.0 to 239.255.255.255
NOTE
The IP address 127.0.0.1 is used for local loopback (and so are any other IP addresses in the 127.x.y.z address range).
Scopes can also use link-local unicast, global unicast, and multicast IPv6 addresses. Link-local unicast addresses begin with FE80. Multicast IPv6 addresses begin with FF00. Global (site-local) unicast addresses include all other addresses except :: (unspecified) and ::1 (loopback) addresses.
A single DHCP server can manage multiple scopes. With IPv4 addresses, four types of scopes are available:
§ Normal scopes. Used to assign IPv4 address pools for class A, B, and C networks.
§ Multicast scopes. Used to assign IP address pools for IPv4 class D networks. Computers use multicast IP addresses as secondary IP addresses in addition to a standard IP address.
§ Superscopes. Containers for other scopes that are used to simplify management of multiple scopes and also support DHCP clients on a single physical network where multiple logical IP networks are used.
§ Failover scopes. Scopes split between two DHCP servers to increase fault tolerance, provide redundancy, and enable load balancing.
With IPv6, only normal scopes are available. Although you can create scopes on multiple network segments, you’ll usually want these segments to be in the same network class, such as all IP addresses that are class C.
TIP
Don’t forget that you must configure DHCPv4 and DHCPv6 relays to relay DHCPv4 and DHCPv6 broadcast requests between network segments. You can configure relay agents with the Routing and Remote Access Service (RRAS) and the DHCP Relay Agent Service. You can also configure some routers as relay agents. These services can be installed as part of the Remote Access role. On a server with no other policy and access role services configured, you can install the Remote Access role by using the Add Roles And Features Wizard.
Installing a DHCP server
Dynamic IP addressing is available only if a DHCP server is installed on the network. By using the Add Roles And Features Wizard, you install the DHCP server as a role service, configure its initial settings, and authorize the server in Active Directory Domain Services (AD DS). Only authorized DHCP servers can provide dynamic IP addresses to clients.
Installing DHCP components
On a server running Windows Server 2012 R2, follow these steps to enable the server to function as a DHCP server:
1. DHCP servers should be assigned a static IPv4 and IPv6 address on each subnet to which they are connected and will service. Be sure that the server has static IPv4 and IPv6 addresses.
2. In Server Manager, tap or click Manage, and then tap or click Add Roles And Features, or select Add Roles And Features in the Quick Start pane. This starts the Add Roles And Features Wizard. If the wizard displays the Before You Begin page, read the Welcome text, and then tap or click Next.
3. On the Installation Type page, Role-Based Or Feature-Based Installation is selected by default. Tap or click Next.
4. On the Server Selection page, you can choose to install roles and features on running servers or virtual hard disks. Either select a server from the server pool or select a server from the server pool on which to mount a virtual hard disk (VHD). If you are adding roles and features to a VHD, tap or click Browse, and then use the Browse For Virtual Hard Disks dialog box to locate the VHD. When you are ready to continue, tap or click Next.
NOTE
Only servers running Windows Server 2012 R2 and that have been added for management in Server Manager are listed.
5. On the Select Roles page, select DHCP Server. If additional features are required to install a role, you’ll get an additional dialog box. Tap or click Add Features to close the dialog box and add the required features to the server installation. When you are ready to continue, tap or click Next three times.
6. If the server on which you want to install the DHCP Server role doesn’t have all the required binary source files, the server gets the files via Windows Update by default or from a location specified in Group Policy.
NOTE
You also can specify an alternate path for the required source files. To do this, click the Specify An Alternate Source Path link, enter that alternate path in the box provided, and then tap or click OK. For network shares, enter the UNC path to the share, such as \\CorpServer82\WinServer2012\. For mounted Windows images, enter the Windows Imaging (WIM) path prefixed with WIM: and including the index of the image to use, such as WIM:\\CorpServer82\WinServer2012\install.wim:4.
7. After you review the installation options and save them as necessary, tap or click Install to begin the installation process. The Installation Progress page tracks the progress of the installation. If you close the wizard, tap or click the Notifications icon in Server Manager, and then tap or click the link provided to reopen the wizard.
8. When Setup finishes installing the DHCP Server role, the Installation Progress page will be updated to reflect this. Review the installation details to ensure that all phases of the installation were completed successfully.
9. As stated in the Post-Deployment Configuration task panel, additional configuration is required for the DHCP server. Tap or click the Complete DHCP Configuration link to start the DHCP Post-Install Configuration Wizard.
10.The Description page states that the DHCP Administrators and DHCP Users groups will be created in the domain for delegation of DHCP Server administration. Additionally, if the DHCP server is joined to a domain, the server will be authorized in Active Directory. Tap or click Next.
11.On the Authorization page, do one of the following to specify the credentials to use to authorize the DHCP server in Active Directory:
o Your current user name is shown in the User Name text box. If you have administrator privileges in the domain that the DHCP server is a member of and you want to use your current credentials, tap or click Commit to attempt to authorize the server by using these credentials.
o If you want to use alternate credentials or if you are unable to authorize the server by using your current credentials, select Use Alternate Credentials, and then tap or click Specify. In the Windows Security dialog box, enter the user name and password for the authorized account, and then tap or click OK. Tap or click Commit to attempt to authorize the server by using these credentials.
o If you want to authorize the DHCP server later, select Skip AD Authorization, and then tap or click Commit. Keep in mind that in domains, only authorized DHCP servers can provide dynamic IP addresses to clients.
12.When the wizard finishes the post-install configuration, review the installation details to ensure that tasks were completed successfully, and then tap or click Close.
13.Next, you need to restart the DHCP Server service on the DHCP server so that the DHCP Administrators and DHCP Users groups can be used. To do this, tap or click DHCP in the left pane of Server Manager. Next, in the main pane, on the Servers panel, select the DHCP server. Finally, on the Services panel, press and hold or right-click the entry for the DHCP Server, and then tap or click Restart Service.
14.To complete the installation, you need to do the following:
o If the server has multiple network cards, review the server bindings and specify the connections that the DHCP server supports for servicing clients. See Configuring server bindings later in this chapter.
o Configure server options to assign common configuration settings for DHCPv4 and DHCPv6 clients, including 003 Router, 006 DNS Servers, 015 DNS Domain Name, and 044 WINS/NBNS Servers. See Setting scope options later in the chapter.
o Create and activate any DHCP scopes that the server will use, as discussed in Creating and managing scopes later in the chapter.
Starting and using the DHCP console
After you install a DHCP server, you use the DHCP console to configure and manage dynamic IP addressing. In Server Manager, tap or click Tools, and then tap or click DHCP to open the DHCP console. Alternatively, enter Dhcpmgmt.msc in the Everywhere search box or at a prompt.
The main window for the DHCP console is shown in Figure 8-1. You’ll notice that the main window is divided into two panes. The left pane lists the DHCP servers in the domain according to their fully qualified domain name (FQDN). You can expand a server listing to show subnodes for IPv4 and IPv6. If you expand the IP nodes, you’ll find the scopes and options defined for the related IP version. The right pane shows the expanded view of the current selection.
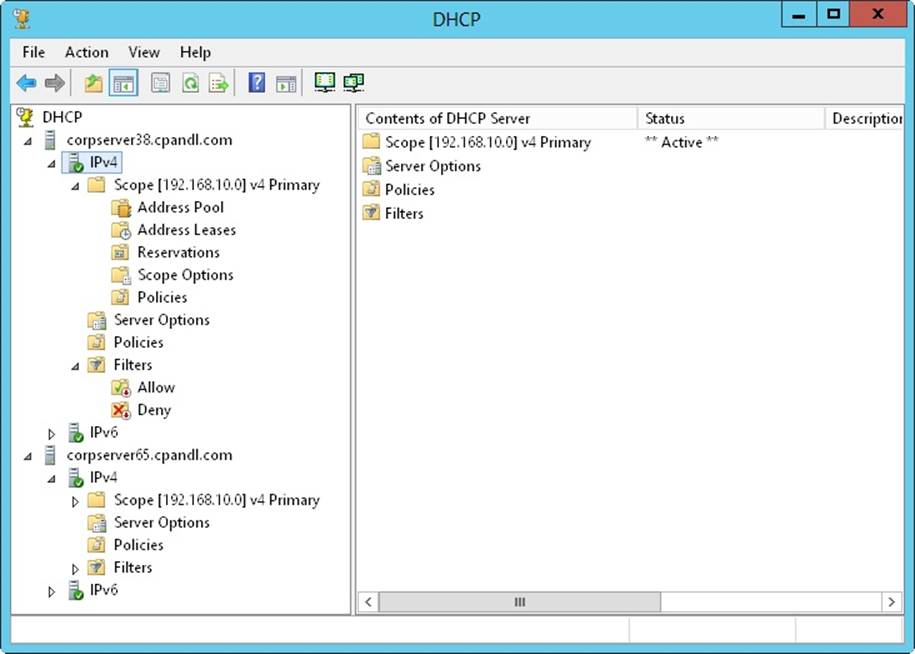
Figure 8-1. Use the DHCP console to create and manage DHCP server configurations.
Icons on the various nodes show the current status of the nodes. For server and IP nodes, you might find the following icons:
§ A server icon with a green circle with a check mark indicates that the DHCP service is running and the server is active.
§ A server icon with red circle with an X through it indicates that the console can’t connect to the server. The DHCP service has been stopped or the server is inaccessible.
§ A red down arrow indicates that the DHCP server hasn’t been authorized.
§ A blue warning icon indicates that the server’s state has changed or a warning has been issued.
For scopes, you might find the following icons:
§ A red down arrow indicates that the scope hasn’t been activated.
§ A blue warning icon indicates that the scope’s state has changed or a warning has been issued.
Connecting to remote DHCP servers
When you start the DHCP console, you are connected directly to a local DHCP server, but you won’t find entries for remote DHCP servers. You can connect to remote servers by following these steps:
1. Press and hold or right-click DHCP in the console tree, and then tap or click Add Server to open the dialog box shown in Figure 8-2.
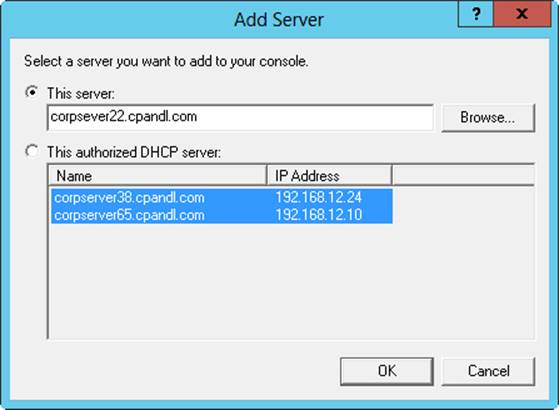
Figure 8-2. If your DHCP server isn’t listed, you need to add it to the DHCP console by using the Add Server dialog box.
2. Select This Server, and then enter the IP address or computer name of the DHCP server you want to manage.
3. Tap or click OK. An entry for the DHCP server is added to the console tree.
TIP
When you work with remote servers, you might find that you can’t select certain options. A simple refresh of the server information might resolve this problem. To refresh the server information press and hold or right-click the server node, and then select Refresh.
Starting and stopping a DHCP server
You manage DHCP servers through the DHCP Server service. As with any other service, you can start, stop, pause, and resume the DHCP Server service in the Services node of Computer Management or from the command line. You can also manage the DHCP Server service in the DHCP console. Press and hold or right-click the server you want to manage in the DHCP console, point to All Tasks, and then tap or click Start, Stop, Pause, Resume, or Restart, as appropriate.
NOTE
You also can use Server Manager to start and stop a DHCP server. Tap or click DHCP in the left pane of Server Manager. Next, in the main pane, on the Servers panel, select the DHCP server. Finally, on the Services panel, press and hold or right-click the entry for the DHCP Server, and then tap or click Start Service, Stop Service, Pause Service, Resume Service, or Restart Service, as appropriate.
Authorizing a DHCP server in Active Directory
Before you can use a DHCP server in the domain, you must authorize it in Active Directory. By authorizing the server, you specify that the server is authorized to provide dynamic IP addressing in the domain. Windows Server 2012 R2 requires authorization to prevent unauthorized DHCP servers from serving domain clients. This in turn ensures that network operations can run smoothly.
Only Enterprise Admins can authorize DHCP servers. In the DHCP console, you authorize a DHCP server by pressing and holding or right-clicking the server entry in the tree view, and then selecting Authorize. To remove the authorization, press and hold or right-click the server, and then select Unauthorize.
At an elevated, administrator Windows PowerShell prompt, you can use Add-DhcpServerInDC to authorize DHCP servers. Use the –DnsName parameter to specify the name of the server to authorize or the –IpAddress to specify the IP address ofthe server to authorize as shown in the following examples:
Add-DhcpServerInDC –DnsName CorpSvr03.cpandl.com
Add-DhcpServerInDC –IpAddress 192.168.1.1
Use Remove-DhcpServerInDC to remove the authorization. The basic syntax is the same.
Configuring DHCP servers
After you install a new DHCP server, you need to configure and optimize the server for the network environment. A separate set of options are provided for IPv4 and IPv6.
Configuring server bindings
A server with multiple NICs has multiple local area network connections and can provide DHCP services on any of these network connections. However, you might not want DHCP to be served over all available connections. For example, if the server has both a 100–megabits per second (Mbps) connection and a 1–gigabit per second (Gbps) connection, you might want all DHCP traffic to go over the 1-Gbps connection.
To bind DHCP to a specific network connection, follow these steps:
1. In the DHCP console, press and hold or right-click the server with which you want to work, and then tap or click Add/Remove Bindings.
2. Select the IPv4 or IPv6 tab as appropriate for the type of binding with which you want to work.
3. The Bindings dialog box displays a list of available network connections for the DHCP server. If you want the DHCP Server service to use a connection to service clients, select the check box for the connection. If you don’t want the service to use a connection, clear the related check box. If there are no network connections listed for the protocol with which you are working, ensure that the server has a static address for that protocol.
4. Tap or click OK when you have finished.
Updating DHCP statistics
The DHCP console provides statistics concerning IPv4 and IPv6 address availability and usage. In the DHCP console, you can view these statistics by expanding the node for the server with which you want to work, pressing and holding or right-clicking IPv4 or IPv6 as appropriate for the type of address with which you want to work, and then tapping or clicking Display Statistics.
By default, these statistics are updated only when you start the DHCP console or when you select the server and then tap or click the Refresh button on the toolbar. If you monitor DHCP routinely, you might want these statistics to be updated automatically, which you can do by following these steps:
1. In the DHCP console, expand the node for the server with which you want to work, press and hold or right-click IPv4 or IPv6 as appropriate for the type of address with which you want to work, and then tap or click Properties.
2. On the General tab, select Automatically Update Statistics Every and enter an update interval in hours and minutes. Tap or click OK.
Auditing and troubleshooting DHCP
Windows Server 2012 R2 is configured to audit DHCP processes by default. Auditing tracks DHCP processes and requests in log files.
You can use audit logs to help you troubleshoot problems with a DHCP server. Just as you enable and configure logging separately for IPv4 and IPv6, the two protocols use different log files. The default location for DHCP logs is %SystemRoot% \System32\DHCP. In this directory, you’ll find a different log file for each day of the week. The IPv4 log file for Monday is named DhcpSrvLog-Mon.log, the log file for Tuesday is named DhcpSrvLog-Tue.log, and so on. The IPv6 log file for Monday is named DhcpV6SrvLog-Mon.log, the log file for Tuesday is named DhcpV6SrvLog-Tue.log, and so on.
When you start the DHCP server or a new day arrives, a header message is written to the log file. This header provides a summary of DHCP events and their meanings. Stopping and starting the DHCP Server service doesn’t clear a log file. Log data is kept for a week. For example, the DCHP Server service clears and starts over Monday’s log the following Monday. You don’t have to monitor space usage by the DHCP Server service. The service is configured to monitor itself and restricts disk space usage by default.
You can enable or disable DHCP auditing by following these steps:
1. In the DHCP console, expand the node for the server with which you want to work, press and hold or right-click IPv4 or IPv6 as appropriate for the type of address with which you want to work, and then tap or click Properties.
2. On the General tab, select or clear the Enable DHCP Audit Logging check box, and then tap or click OK.
By default, DHCP logs are stored in %SystemRoot%\System32\DHCP. You can change the location of DHCP logs by following these steps:
1. In the DHCP console, expand the node for the server with which you want to work, press and hold or right-click IPv4 or IPv6 as appropriate for the type of address with which you want to work, and then tap or click Properties.
2. Tap or click the Advanced tab. Audit Log File Path shows the current folder location for log files. Enter a new folder location, or tap or click Browse to select a new location.
3. Tap or click OK. Windows Server 2012 R2 now needs to restart the DHCP Server service. When prompted to restart the service, tap or click Yes. The service will be stopped and then started again.
The DHCP server has a self-monitoring system that checks disk space usage. By default, the maximum size of all DHCP server logs is 70 megabytes (MB), with each individual log being limited to one-seventh of this space. If the server reaches the 70-MB limit or an individual log grows beyond the allocated space, logging of DHCP activity stops until log files are cleared or space is otherwise made available. Typically, this happens at the beginning of a new day when the server clears the previous week’s log file for that day.
Registry keys that control log usage and other DHCP settings are located under HKEY_LOCAL_MACHINE\SYSTEM\CurrentControlSet\Services\DHCPServer \Parameters.
The following keys control the logging:
§ DhcpLogFilesMaxSize. Sets the maximum file size for all logs. The default is 70 MB.
§ DhcpLogDiskSpaceCleanupInterval. Determines how often DHCP checks disk space usage and cleans up as necessary. The default interval is 60 minutes.
§ DhcpLogMinSpaceOnDisk. Sets the free space threshold for writing to the log. If the disk has less free space than the value specified, logging is temporarily disabled. The default value is 20 MB.
DhcpLogMinSpaceOnDisk is considered an optional key and is not created automatically. You need to create this key as necessary and set appropriate values for your network.
Integrating DHCP and DNS
DNS is used to resolve computer names in Active Directory domains and on the Internet. Thanks to the DNS dynamic update protocol, you don’t need to manually register DHCP clients in DNS. The protocol allows the client or the DHCP server to register the forward-lookup and reverse-lookup records in DNS as necessary. When configured by using the default setup for DHCP, current DHCP clients automatically update their own DNS records after receiving an IP address lease. You can modify this behavior globally for each DHCP server or on a per-scope basis.
Name protection is an additional feature in Windows Server 2012 R2. With name protection, the DHCP server registers records on behalf of the client only if no other client with this DNS information is already registered. You can configure name protection for IPv4 and IPv6 at the network adapter level or at the scope level. Name protection settings configured at the scope level take precedence over the settings at the IPv4 or IPv6 level.
Name protection is designed to prevent name squatting. Name squatting occurs when a computer not based on the Windows operating system registers a name in DNS that is already registered to a computer running a Windows operating system. By enabling name protection, you can prevent name squatting by computers not based on the Windows operating system. Although name squatting generally does not present a problem when you use Active Directory to reserve a name for a single user or computer, it usually is a good idea to enable name protection on all Windows networks.
Name protection is based on the Dynamic Host Configuration Identifier (DHCID) and support for the DHCID RR (resource record) in DNS. The DHCID is a resource record stored in DNS that maps names to prevent duplicate registration. DHCP uses the DHCID resource record to store an identifier for a computer along with related information for the name, such as the A and AAAA records of the computer. The DHCP server can request a DHCID record match and then refuse the registration of a computer with a different address attempting to register a name with an existing DHCID record.
You can view and change the global DNS integration settings by following these steps:
1. In the DHCP console, expand the node for the server with which you want to work, press and hold or right-click IPv4 or IPv6, and then tap or click Properties.
2. Tap or click the DNS tab. Figure 8-3 shows the default DNS integration settings for DHCP. Because these settings are configured by default, you usually don’t need to modify the configuration. However, if you only want host (A) records to be dynamically updated instead of both host (A) and pointer (PTR) records, select the Disable Dynamic Updates For DNS PTR Records check box.
IMPORTANT
The default configuration, which registers and maintains both A and PTR records, assumes that you’ve configured reverse lookup zones for your organization. If you haven’t, attempts to register and update PTR records will fail. You can prevent repeated failed attempts to register and update PTR records by disabling dynamic updates for PTR records. If you disable this option in the IPv4 properties, you are disabling the option for all IPv4 scopes. Alternatively, you can use scope properties to disable the option on a per scope basis.
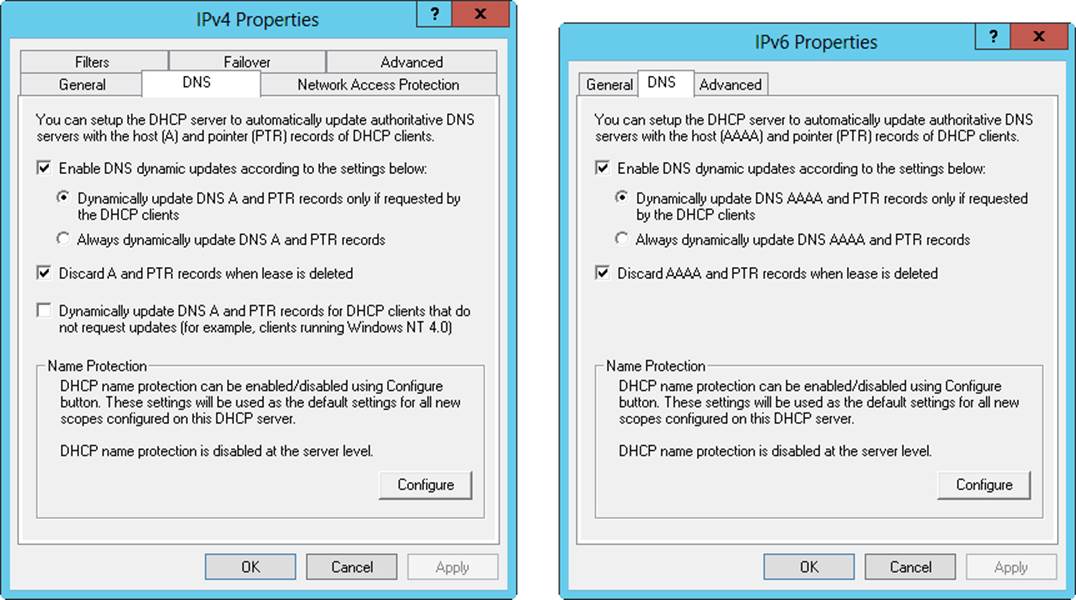
Figure 8-3. The DNS tab shows the default settings for DNS integration with DHCP.
3. Optionally, you can enable or disable the name protection feature. With name protection, the DHCP server registers records on behalf of the client only if no other client with this DNS information is already registered. To enable or disable name protection, tap or click Configure. In the Name Protection dialog box, select or clear Enable Name Protection, and then tap or click OK.
You can view and change the per-scope DNS integration settings by following these steps:
1. In the DHCP console, expand the node for the server with which you want to work, and then expand IPv4 or IPv6.
2. Press and hold or right-click the scope with which you want to work, and then tap or click Properties.
3. Tap or click the DNS tab. The options available are the same as those shown in Figure 8-3. Because these settings are configured by default, you usually don’t need to modify the configuration.
4. Optionally, you can enable or disable the name-protection feature. Tap or click Configure. In the Name Protection dialog box, select or clear Enable Name Protection, and then tap or click OK.
Integrating DHCP and NAP
Network Access Protection (NAP) is designed to protect the network from clients that do not have the appropriate security measures in place. The easiest way to enable NAP with DHCP is to set up the DHCP server as a Network Policy Server. To do this, you need to install the Network Policy And Access Services role, configure a compliant policy for NAP and DHCP integration on the server, and then enable NAP for DHCP. This process enables NAP for network computers that use DHCP, but it does not fully configure NAP for use.
You can create a NAP and DHCP integration policy by following these steps:
1. On the server that you want to designate as the Network Policy Server, use the Add Roles And Features Wizard to install the Network Policy And Access Services role. You should install the Network Policy Server role service at a minimum.
2. In the Network Policy Server Console (Nps.msc), available from the Tools menu in Server Manager, select the NPS (Local) node in the console tree, and then tap or click Configure NAP in the main pane to start the Configure NAP Wizard.
3. In the Network Connection Method list, choose Dynamic Host Configuration Protocol (DHCP) as the connection method you want to deploy on your network for NAP-capable clients. As shown in Figure 8-4, the policy name is set to NAP DHCP by default. Tap or click Next.
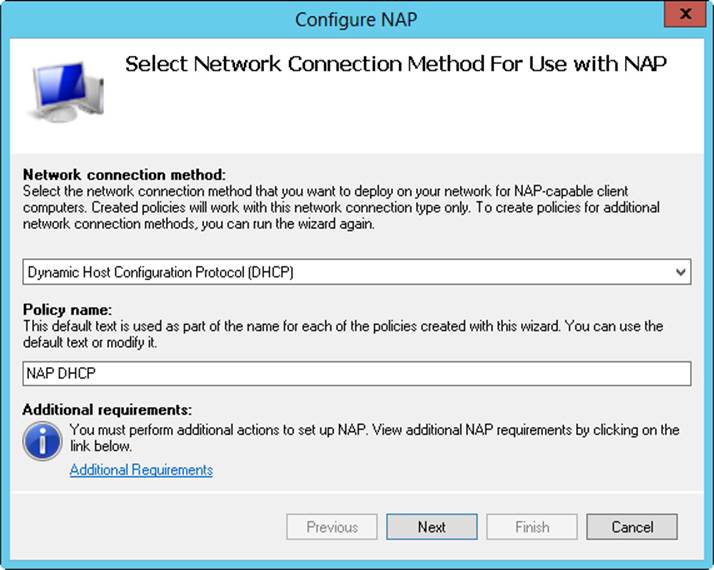
Figure 8-4. Configure Network Access Protection policy for the local DHCP server.
4. On the Specify NAP Enforcement Servers Running DHCP Server page, you need to identify all remote DHCP servers on your network by doing the following:
o Tap or click Add. In the New RADIUS Client dialog box, enter a friendly name for the remote server in the Friendly Name text box. Then enter the DNS name of the remote DHCP server in the Address text box. Tap or click Verify to ensure that the DNS name is valid.
o In the Shared Secret panel, select Generate, and then tap or click the Generate button to create a long shared-secret keyphrase. You need to enter this keyphrase in the NAP DHCP policy on all remote DHCP servers. Be sure to write down this keyphrase, or copy it to Notepad and save it in a file stored in a secure location. Tap or click OK.
5. Tap or click Next. On the Specify DHCP Scopes page, you can identify the DHCP scopes to which this policy should apply. If you do not specify any scopes, the policy applies to all NAP-enabled scopes on the selected DHCP servers. Tap or click Next twice to skip the Configure Machine Groups page.
6. On the Specify A NAP Remediation Server Group And URL page, select a Remediation Server, or tap or click New Group to define a remediation group and specify servers to handle remediation. Remediation servers store software updates for NAP clients that need them. In the text box provided, enter a URL for a webpage that provides users with instructions on how to bring their computers into compliance with NAP health policy. Be sure that all DHCP clients can access this URL. Tap or click Next to continue.
7. On the Define NAP Health Policy page, use the options provided to determine how NAP health policy works. In many cases, the default settings work fine, though you may want to use the Allow option while you fine-tune policy. With the default settings, NAP-ineligible clients are denied access to the network, and NAP-capable clients are checked for compliance and automatically remediated, which allows them to get needed software updates that you’ve made available. Tap or click Next, and then tap or click Finish.
You can modify NAP settings globally for each DHCP server or on a per-scope basis. To view or change the global NAP settings, follow these steps:
1. In the DHCP console, expand the node for the server with which you want to work, press and hold or right-click IPv4, and then tap or click Properties.
2. On the Network Access Protection tab, shown in Figure 8-5, tap or click Enable On All Scopes or Disable On All Scopes to enable or disable NAP for all scopes on the server.
NOTE
When the local DHCP server is also a Network Policy Server, the Network Policy Server should always be reachable. If you haven’t configured the server as a Network Policy Server or the DHCP server is unable to contact the designated Network Policy Server, you’ll get an error stating this on the Network Access Protection tab.
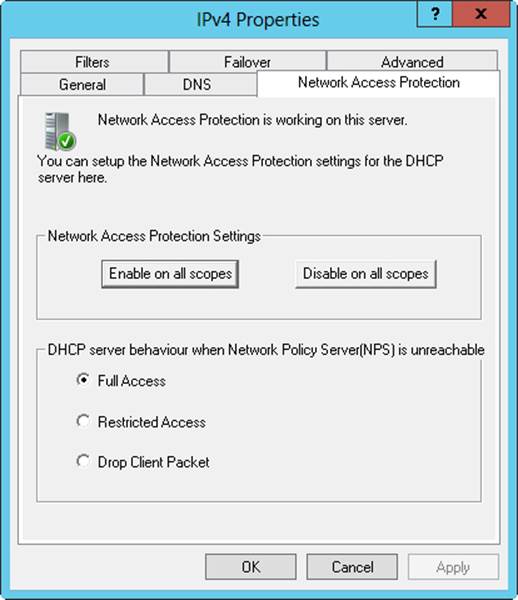
Figure 8-5. The Network Access Protection tab controls the protection options for DHCP.
3. Choose one of the following options to specify how the DHCP server behaves if the Network Policy Server is unreachable, and then tap or click OK to save your settings:
o Full Access. Gives DHCP clients full (unrestricted) access to the network. This means clients can perform any permitted actions.
o Restricted Access. Gives DHCP clients restricted access to the network. This means clients can work only with the server to which they are connected.
o Drop Client Packet. Blocks client requests, and prevents the clients from accessing the network. This means clients have no access to resources on the network.
You can view and change the NAP settings for individual scopes by following these steps:
1. In the DHCP console, expand the node for the server with which you want to work, and then expand IPv4.
2. Press and hold or right-click the scope with which you want to work, and then tap or click Properties.
3. On the Network Access Protection tab, tap or click Enable For This Scope or Disable For This Scope to enable or disable NAP for this scope.
4. If you’re enabling NAP and want to use a NAP profile other than the default, tap or click Use Custom Profile on the Network Access Protection tab, and then enter the name of the profile, such as Alternate NAP DHCP.
5. Tap or click OK to save your settings.
Avoiding IP address conflicts
IPv4 address conflicts are a common cause of problems with DHCP. No two computers on the network can have the same unicast IP address. If a computer is assigned the same unicast IPv4 address as another, one or both of the computers might become disconnected from the network. More specifically, the computer already using the IPv4 address can continue using the address and any other computer that tries to use that IPv4 address is blocked from using it.
To better detect and avoid potential conflicts, you can enable IPv4 address conflict detection by following these steps:
1. In the DHCP console, expand the node for the server with which you want to work, press and hold or right-click IPv4, and then tap or click Properties.
2. On the Advanced tab, set Conflict Detection Attempts to a value other than 0. The value you enter determines the number of times the DHCP server checks an IP address before leasing it to a client. The DHCP server checks IP addresses by sending a ping request over the network.
REAL WORLD
A unicast IPv4 address is a standard IP address for class A, B, and C networks. When a DHCP client requests a lease, a DHCP server checks its pool of available addresses and assigns the client a lease on an available IPv4 address. By default, the server checks only the list of current leases to determine whether an address is available. It doesn’t actually query the network to determine whether an address is in use. Unfortunately, in a busy network environment, an administrator might have assigned this IPv4 address to another computer or an offline computer might have been brought online with a lease that it believes hasn’t expired, even though the DHCP server believes the lease has expired. Either way, you have an address conflict that will cause problems on the network. To reduce these types of conflicts, set the conflict detection to a value greater than 0.
Saving and restoring the DHCP configuration
After you configure all the necessary DHCP settings, you might want to save the DHCP configuration so that you can restore it on the DHCP server. To save the configuration, enter the following command at the command prompt:
netsh dump DHCP > dhcpconfig.dmp
In this example, dhcpconfig.dmp is the name of the configuration script you want to create. By default, the script is created in the current working directory. Alternatively, you can specify the full file path in which to save the script. After you create this script, you can restore the configuration by executing the script. If you saved the script in the current working directory, you can enter the following command at the command prompt:
netsh exec dhcpconfig.dmp
If you saved the script in another directory, you can specify the full path to the script, such as:
netsh exec d:\dhcp\scripts\dhcpconfig.dmp
TIP
You can also use this technique to set up another DHCP server with the same configuration. Just copy the configuration script to a folder on the destination computer, and then execute it.
You can save or restore the DHCP configuration by using the DHCP console as well. To save the configuration, press and hold or right-click the DHCP server entry, tap or click Backup, use the dialog box provided to select the folder for the backup, and then tap or click OK. To restore the configuration, press and hold or right-click the DHCP server entry, tap or click Restore, use the dialog box provided to select the backup folder, and then tap or click OK. When prompted to confirm, tap or click Yes.
At an elevated Windows PowerShell prompt, you use Export-DhcpServer to save the configuration settings. The basic syntax is:
Export-DhcpServer –ComputerName ServerID –File SavePath
Here, ServerID is the DNS name or IP address of the DHCP server, and SavePath is the path and name of the file in which you want to store the configuration settings. If you omit the name of the server to work with, the local server is used. If you don’t specify a save path along with the file name, the configuration file is created in the current working directory. In the following example, you store the configuration settings in the d:\dhcp\scripts directory with the name dhcpconfig.dmp:
Export-DhcpServer–File d:\dhcp\scripts\dhcpconfig.dmp
You can restore the configuration using Import-DhcpServer. The basic syntax is:
Import-DhcpServer –ComputerName ServerID –BackupPath CurrentConfigSavePath
–File SavePath
Here, SavePath is the path and name of the file in which you stored the configuration settings and CurrentConfigSavePath specifies the path where the current configuration should be saved prior to importing and overwriting existing settings. In the following example, you back up the settings to d:\dhcp\backup\origconfig.dmp and then apply the saved configuration from d:\dhcp\scripts\dhcpconfig.dmp:
Import-DhcpServer–BackupPath d:\dhcp\backup\origconfig.dmp
–File d:\dhcp\scripts\dhcpconfig.dmp
Managing DHCP scopes
After you install a DHCP server, you need to configure the scopes that the DHCP server will use. Scopes are pools of IP addresses you can lease to clients. As explained earlier in Understanding scopes, you can create superscopes, normal scopes, multicast scopes, and failover scopes with IPv4 addresses, but you can create only normal scopes with IPv6 addresses.
Creating and managing superscopes
A superscope is a container for IPv4 scopes in much the same way that an organizational unit is a container for Active Directory objects. Superscopes help you manage scopes available on the network by grouping them into a single point of management. For example, with a superscope, you can activate or deactivate multiple scopes through a single action. You can also view statistics for all scopes in the superscope rather than having to check statistics for each scope. Superscopes also support DHCP clients on a single physical network where multiple logical IP networks are used, or put another way, you can create superscopes to distribute IP addresses from different logical networks to the same physical network segment.
Creating superscopes
After you create at least one normal or multicast IPv4 scope, you can create a superscope by following these steps:
1. In the DHCP console, expand the node for the server with which you want to work, press and hold or right-click IPv4, and then tap or click New Superscope to start the New Superscope Wizard. Tap or click Next.
2. Enter a name for the superscope, and then tap or click Next.
3. Select scopes to add to the superscope. Select individual scopes by tapping or clicking their entry in the Available Scopes list. Select multiple scopes by tapping or clicking entries while holding down Shift or Ctrl.
4. Tap or click Next, and then tap or click Finish.
Adding scopes to a superscope
You can add scopes to a superscope when you create it, or you can add the scopes later. To add a scope to a superscope, follow these steps:
1. Press and hold or right-click the scope you want to add to a superscope, and then tap or click Add To Superscope.
2. In the Add Scope To A Superscope dialog box, select a superscope.
3. Tap or click OK. The scope is then added to the superscope.
Removing scopes from a superscope
To remove a scope from a superscope, follow these steps:
1. Press and hold or right-click the scope you want to remove from a superscope, and then tap or click Remove From Superscope.
2. Confirm the action by tapping or clicking Yes when prompted. If this is the last scope in the superscope, the superscope is deleted automatically.
Activating and deactivating a superscope
When you activate or deactivate a superscope, you make all the scopes within the superscope active or inactive. To activate a superscope, press and hold or right-click the superscope, and then select Activate. To deactivate a superscope, press and hold or right-click the superscope, and then select Deactivate.
Deleting a superscope
Deleting a superscope removes the superscope container but doesn’t delete the scopes it contains. If you want to delete the member scopes, you’ll need to do that separately. To delete a superscope, press and hold or right-click the superscope, and then select Delete. When prompted, tap or click Yes to confirm the action.
Creating and managing scopes
Scopes provide a pool of IP addresses for DHCP clients. A normal scope is a scope with class A, B, or C network addresses. A multicast scope is a scope with class D network addresses. Although you create normal scopes and multicast scopes differently, you manage them in much the same way. The key differences are that multicast scopes can’t use reservations, and you can’t set additional options for WINS, DNS, routing, and so forth.
Creating normal scopes for IPv4 addresses
You can create a normal scope for IPv4 addresses by following these steps:
1. In the DHCP console, expand the node for the server with which you want to work, and then press and hold or right-click IPv4. If you want to add the new scope to a superscope automatically, press and hold or right-click the superscope instead.
2. On the shortcut menu, tap or click New Scope to start the New Scope Wizard. Tap or click Next.
3. Enter a name and description for the scope, and then tap or click Next.
4. The Start IP Address and End IP Address boxes define the valid IP address range for the scope. On the IP Address Range page, enter a start address and an end address in these boxes.
NOTE
Generally, the scope doesn’t include the x.x.x.0 and x.x.x.255 addresses, which are usually reserved for network addresses and broadcast messages, respectively. Accordingly, you would use a range such as 192.168.10.1 to 192.168.10.254 rather than 192.168.10.0 to 192.168.10.255.
5. When you enter an IP address range, the bit length and subnet mask are filled in for you automatically (as shown in Figure 8-6). Unless you use subnets, you should use the default values.
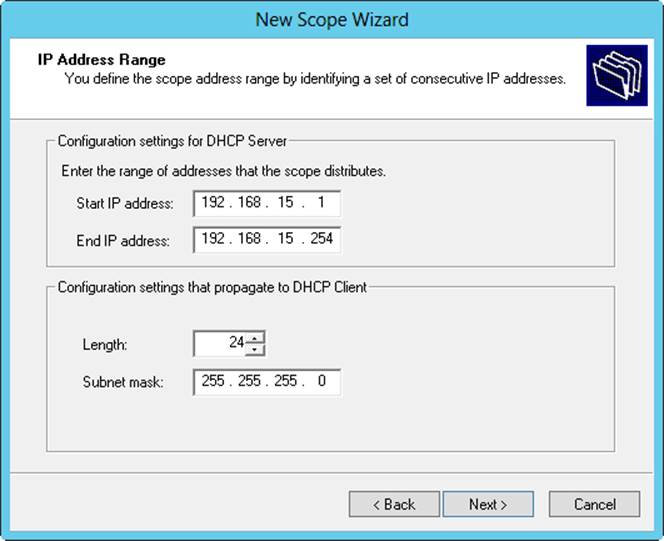
Figure 8-6. In the New Scope Wizard, enter the IP address range for the scope.
6. Tap or click Next. If the IP address range you entered is on multiple networks, you’re given the opportunity to create a superscope that contains separate scopes for each network and, in this case, select the Yes option button to continue, and then move on to step 8. If you make a mistake, tap or click Back, and then modify the IP address range you entered.
7. Use the Start IP Address and End IP Address boxes on the Add Exclusions And Delay page to define IP address ranges that are to be excluded from the scope. You can exclude multiple address ranges as follows:
o To define an exclusion range, enter a start address and an end address in the Exclusion Range’s Start IP Address and End IP Address boxes, and then tap or click Add. To exclude a single IP address, use that address as both the start IP address and the end IP address.
o To track which address ranges are excluded, use the Excluded Address Range list.
To delete an exclusion range, select the range in the Excluded Address Range list, and then tap or click Remove.
8. Tap or click Next. Specify the duration of leases for the scope by using the Day(s), Hour(s), and Minutes boxes. The default duration is eight days. Tap or click Next.
NOTE
A lease duration that’s set too long can reduce the effectiveness of DHCP and might eventually cause you to run out of available IP addresses, especially on networks with mobile users or other types of computers that aren’t fixed members of the network. A good lease duration for most networks is from one to three days.
9. You have the opportunity to configure common DHCP options for DNS, WINS, gateways, and more. If you want to set these options now, select Yes, I Want To Configure These Options Now; otherwise, select No, I Will Configure These Options Later and skip steps 10–15.
10.Tap or click Next. The first option you can configure is the default gateway. In the IP Address box, enter the IP address of the primary default gateway, and then tap or click Add. Repeat this process for other default gateways.
11.The first gateway listed is the one clients try to use first. If the gateway isn’t available, clients try to use the next gateway, and so on. Use the Up and Down buttons to change the order of the gateways, as necessary.
12.Tap or click Next. As shown in Figure 8-7, configure default DNS settings for DHCP clients. Enter the name of the parent domain to use for DNS resolution of computer names that aren’t fully qualified.
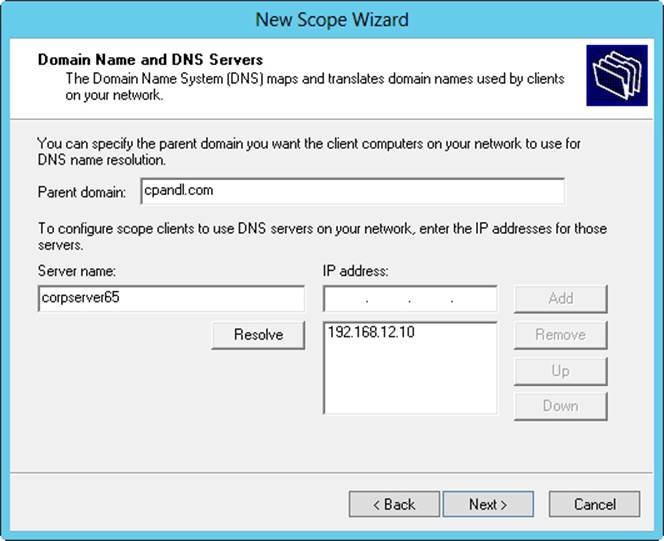
Figure 8-7. Use the Domain Name And DNS Servers page to configure default DNS settings for DHCP clients.
13.In the IP Address box, enter the IP address of the primary DNS server, and then tap or click Add. Repeat this process to specify additional DNS servers. Again, the order of the entries determines which IP address is used first. Change the order as necessary by using the Up and Down buttons. Tap or click Next.
TIP
If you know the name of a server instead of its IP address, enter the name in the Server Name box, and then tap or click Resolve. The IP address is then entered in the IP Address box, if possible. Add the server by tapping or clicking Add. Using this approach helps to ensure that you’ve entered the correct information.
14.Configure default WINS settings for the DHCP clients. The techniques you use are the same as those previously described. Tap or click Next.
15.If you want to activate the scope, select Yes, I Want To Activate This Scope Now, and then tap or click Next. Otherwise, select No, I Will Activate This Scope Later and then tap or click Next.
16.Tap or click Finish to complete the process.
Creating normal scopes for IPv6 addresses
You create normal scopes for IPv6 addresses by using the New Scope Wizard. When you are configuring DHCP for IPv6 addresses, you must enter the network ID and a preference value. Typically, the first 64 bits of an IPv6 address identify the network, and a 64-bit value is what the New Scope Wizard expects you to enter. The preference value sets the priority of the scope relative to other scopes. The scope with the lowest preference value will be used first. The scope with the second-lowest preference will be used second, and so on.
You can create a normal scope for IPv6 addresses by following these steps:
1. In the DHCP console, expand the node for the server with which you want to work and then expand the IPv6 node.
2. Press and hold or right-click IPv6. On the shortcut menu, tap or click New Scope to start the New Scope Wizard. Tap or click Next.
3. Enter a name and description for the scope, and then tap or click Next.
4. On the Scope Prefix page, shown in Figure 8-8, enter the 64-bit network prefix, and then set a preference value. Tap or click Next.
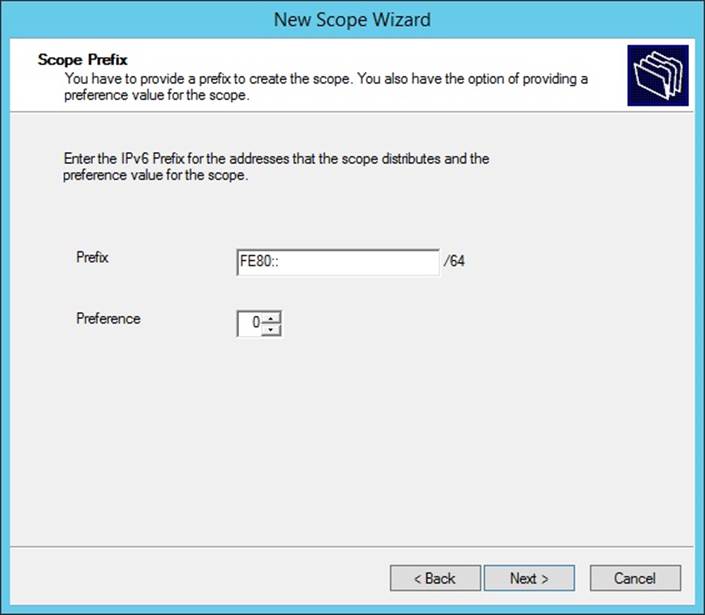
Figure 8-8. In the New Scope Wizard, enter the network prefix and preference value.
5. Use the Start IPv6 Address and End IPv6 Address boxes on the Add Exclusions page to define IPv6 address ranges that are to be excluded from the scope. You can exclude multiple address ranges as follows:
o To define an exclusion range, enter a start address and an end address in the Exclusion Range’s Start IPv6 Address and End IPv6 Address boxes, and then tap or click Add. To exclude a single IPv6 address, use that address as the start IPv6 address, and then tap or click Add.
o To track which address ranges are excluded, use the Excluded Address Range list.
To delete an exclusion range, select the range in the Excluded Address Range list, and then tap or click Remove.
6. Tap or click Next. Dynamic IPv6 addresses can be temporary or nontemporary. A nontemporary address is similar to a reservation. On the Scope Lease page, shown in Figure 8-9, specify the duration of leases for nontemporary addresses by using the Days, Hours, and Minutes boxes under Preferred Life Time and Valid Life Time. The preferred lifetime is the preferred amount of time the lease should be valid. The valid lifetime is the maximum amount of time the lease is valid. Tap or click Next.
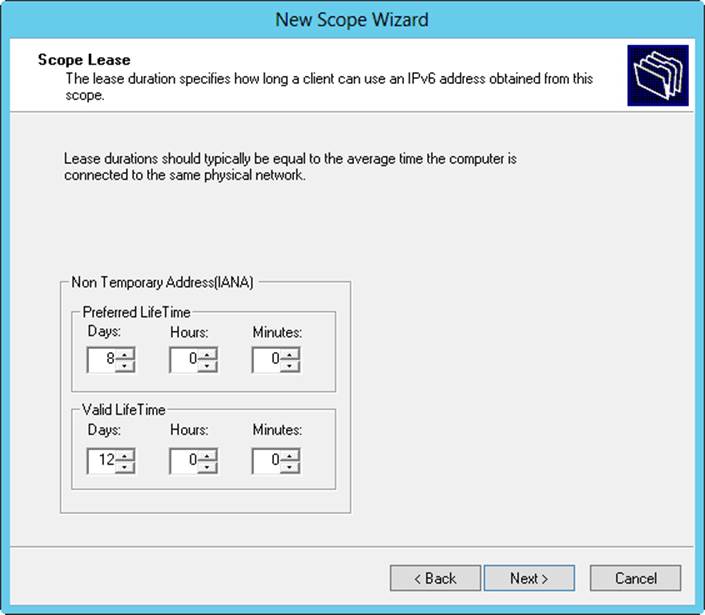
Figure 8-9. Specify the duration of nontemporary leases.
NOTE
A lease lifetime that’s set too long can reduce the effectiveness of DHCP. A good lease duration for nontemporary leases is from 8 to 30 days.
7. If you want to activate the scope, select Yes under Activate Scope Now, and then tap or click Finish. Otherwise, select No under Activate Scope Now, and then tap or click Finish.
Creating multicast scopes
To create a multicast scope, follow these steps:
1. In the DHCP console, expand the node for the server with which you want to work. Select and then press and hold or right-click IPv4. If you want to add the new scope to a superscope, select and then press and hold or right-click the superscope instead.
2. On the shortcut menu, tap or click New Multicast Scope to start the New Multicast Scope Wizard. Tap or click Next.
3. Enter a name and description for the scope, and then tap or click Next.
4. The Start IP Address and End IP Address boxes define the valid IP address range for the scope. Enter a start address and an end address in these boxes. You must define multicast scopes by using Class D IP addresses. This means the valid IP address range is 224.0.0.0 to 239.255.255.255.
5. Messages sent by computers using multicast IP addresses have a specific time-to-live (TTL) value. The TTL value specifies the maximum number of routers the message can go through. The default value is 32, which is sufficient on most networks. If you have a large network, you might need to increase this value to reflect the actual number of routers that might be used.
6. Tap or click Next. If you make a mistake, tap or click Back, and then modify the IP address range you entered.
7. Use the exclusion range to define IP address ranges that are to be excluded from the scope. You can exclude multiple address ranges as follows:
o To define an exclusion range, enter a start address and an end address in the Start IP Address and End IP Address boxes, and then tap or click Add.
o To track which address ranges are excluded, use the Excluded Addresses list.
o To delete an exclusion range, select the range in the Excluded Addresses list, and then tap or click Remove.
8. Tap or click Next. Specify the duration of leases for the scope by using the Day(s), Hour(s), and Minutes boxes. The default duration is 30 days. Tap or click Next.
TIP
If you haven’t worked a lot with multicast, you shouldn’t change the default value. Multicast leases aren’t used in the same way as normal leases. Multiple computers can use a multicast IP address, and all of these computers can have a lease on the IP address. A good multicast lease duration for most networks is from 30 to 60 days.
9. If you want to activate the scope, select Yes, and then tap or click Next. Otherwise, select No, and then tap or click Next.
10.Tap or click Finish to complete the process.
Setting scope options
Scope options enable you to precisely control a scope’s functioning and to set default TCP/IP settings for clients that use the scope. For example, you can use scope options to enable clients to automatically find DNS servers on the network. You can also define settings for default gateways, WINS, and more. Scope options apply only to normal scopes, not to multicast scopes.
You can set scope options in any of the following ways:
§ Globally for all scopes by setting default server options
§ On a per-scope basis by setting scope options
§ On a per-client basis by setting reservation options
§ On a client-class basis by configuring user-specific or vendor-specific classes
IPv4 and IPv6 have different scope options. Scope options use a hierarchy to determine when certain options apply. The previous list shows the hierarchy. Basically, this means the following:
§ Per-scope options override global options
§ Per-client options override per-scope and global options
§ Client-class options override all other options
Viewing and Assigning Server Options
Server options are applied to all scopes configured on a particular DHCP server. You can view and assign server options by following these steps:
1. In the DHCP console, double-tap or double-click the server with which you want to work, and then expand its IPv4 and IPv6 folders in the tree view.
2. To view current settings, select the Server Options node under IPv4 or IPv6, depending on the type of address with which you want to work. Currently configured options are displayed in the right pane.
3. To assign new settings, press and hold or right-click Server Options, and then tap or click Configure Options to open the Server Options dialog box. Under Available Options, select the check box for the first option you want to configure. Then, with the option selected, enter any required information in the Data Entry panel. Repeat this step to configure other options.
4. Tap or click OK to save your changes.
Viewing and Assigning Scope Options
Scope options are specific to an individual scope and override the default server options. You can view and assign scope options by following these steps:
1. In the DHCP console, expand the entry for the scope with which you want to work.
2. To view current settings, select Scope Options. Currently configured options are displayed in the right pane.
3. To assign new settings, press and hold or right-click Scope Options, and then tap or click Configure Options. This opens the Scope Options dialog box. Under Available Options, select the check box for the first option you want to configure. Then, with the option selected, enter any required information in the Data Entry panel, as shown in Figure 8-10. Repeat this step to configure other options.
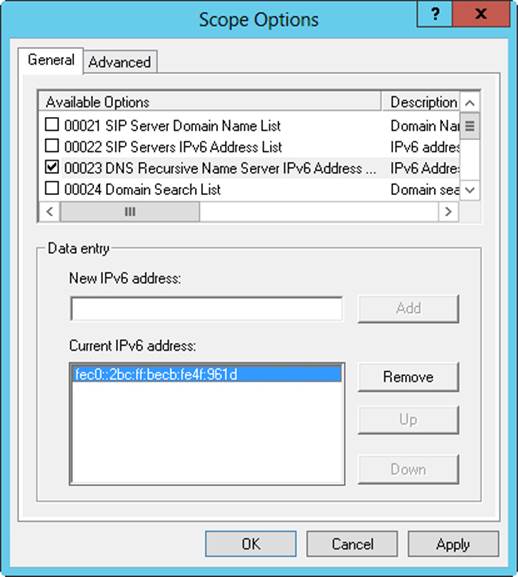
Figure 8-10. Select the option you want to configure in the Scope Options dialog box, and then enter the required information on the Data Entry panel.
4. Tap or click OK.
Viewing and Assigning Reservation Options
You can assign reservation options to a client that has a reserved IPv4 or IPv6 address. These options are specific to an individual client and override server-specific and scope-specific options. To view and assign reservation options, follow these steps:
1. In the DHCP console, expand the entry for the scope with which you want to work.
2. Double-tap or double-click the Reservations folder for the scope.
3. To view current settings, tap or click the reservation you want to examine. Currently configured options are displayed in the right pane.
4. To assign new settings, press and hold or right-click the reservation, and then tap or click Configure Options to open the Reservation Options dialog box. Under Available Options, select the check box for the first option you want to configure. Then, with the option selected, enter any required information in the Data Entry panel. Repeat this step to configure other options.
Modifying scopes
You can modify an existing scope by following these steps:
1. In the DHCP console, double-tap or double-click the server with which you want to work, and then expand its IPv4 and IPv6 folders in the tree view. This should display the currently configured scopes for the server.
2. Press and hold or right-click the scope you want to modify, and then tap or click Properties.
3. You can now modify the scope properties. Keep the following in mind:
o When you modify normal IPv4 scopes, you have the option of setting an unlimited lease expiration time. If you do, you create permanent leases that reduce the effectiveness of pooling IP addresses with DHCP. Permanent leases aren’t released unless you physically release them or deactivate the scope. As a result, you might eventually run out of addresses, especially as your network grows. A better alternative to unlimited leases is to use address reservations, and then only for specific clients that need fixed IP addresses.
o When you modify multicast scopes, you have the option of setting a lifetime for the scope. The scope lifetime determines the amount of time the scope is valid. By default, multicast scopes are valid as long as they’re activated. To change this setting, tap or click the Lifetime tab, select Multicast Scope Expires On, and then set an expiration date.
Activating and deactivating scopes
In the DHCP console, inactive scopes are displayed with an icon showing a red arrow pointing down. Active scopes display the standard folder icon.
You can activate an inactive scope by pressing and holding or right-clicking it in the DHCP console, and then selecting Activate. You can deactivate an active scope by pressing and holding or right-clicking it in the DHCP console, and then selecting Deactivate.
IMPORTANT
Deactivating turns off a scope but doesn’t terminate current client leases. If you want to terminate leases, follow the instructions in Releasing addresses and leases later in this chapter.
Enabling the Bootstrap Protocol
Bootstrap Protocol (BOOTP) is a dynamic IPv4 addressing protocol that predates DHCP. Normal scopes don’t support BOOTP. To enable a scope to support BOOTP, follow these steps:
1. Press and hold or right-click the normal scope for IPv4 addresses that you want to modify, and then tap or click Properties.
2. On the Advanced tab, tap or click Both to support DHCP and BOOTP clients.
3. As necessary, set a lease duration for BOOTP clients, and then tap or click OK.
NOTE
The typical lease duration for a BOOTP address is much longer than for a DHCP address. For BOOTP, the default of 30 days is a good compromise, though some scenarios might lend themselves to an unlimited lease duration.
Removing a scope
Removing a scope permanently deletes the scope from the DHCP server. To remove a scope, follow these steps:
1. In the DHCP console, press and hold or right-click the scope you want to remove, and then tap or click Delete.
2. When prompted to confirm that you want to delete the scope, tap or click Yes.
Configuring multiple scopes on a network
You can configure multiple scopes on a single network. A single DHCP server or multiple DHCP servers can serve these scopes. However, any time you work with multiple scopes, it’s extremely important that the address ranges used by different scopes not overlap. Each scope must have a unique address range. If it doesn’t, the same IP address might be assigned to different DHCP clients, which can cause severe problems on the network.
To understand how you can use multiple scopes, consider the following scenario, in which each server has its respective DHCP scope IP address range on the same subnet:
§ Server A 192.168.10.1 to 192.168.10.99
§ Server B 192.168.10.100 to 192.168.10.199
§ Server C 192.168.10.200 to 192.168.10.254
Each of these servers responds to DHCP discovery messages, and any of them can assign IP addresses to clients. If one of the servers fails, the other servers can continue to provide DHCP services to the network. To introduce fault tolerance and provide redundancy, you can use failover scopes as discussed in the next section.
Creating and managing failover scopes
Failover scopes are split between two DHCP servers to increase fault tolerance, provide redundancy over using a single DHCP server, and enable load balancing. With a failover scope, you identify the two DHCP servers that split the scope. If one of the servers becomes unavailable or overloaded, the other server can take its place by continuing to lease new IP addresses and renew existing leases. A failover scope can also help to balance server loads.
Creating failover scopes
Failover scopes apply only to IPv4 addresses. You can split a single scope or a superscope that contains multiple scopes.
You create a failover scope on the DHCP server that you want to designate as the primary server by splitting an existing scope or superscope. During the failover-scope creation process, you need to specify the partner server with which you want to split the primary server’s scope. This additional server acts as the secondary server for the scope. Because failover scopes are a server-side enhancement, no additional configuration is required for DHCP clients.
The way scope splitting works depends on the failover scope configuration settings. You do one of the following:
§ Optimize for load balancing. A failover scope optimized for load balancing has little or no time delay configured in its scope properties. With no time delay, both the primary and the secondary servers can respond to DHCP DISCOVER requests from DHCP clients. This enables the fastest server to respond to and accept a DHCPOFFER first. Fault tolerance continues to be a part of the scope. If one of the servers becomes unavailable or overloaded and is unable to respond to requests, the other server handles requests and continues distributing addresses until the normal process is restored. For load balancing, set Load Balance as the failover mode.
§ Optimize for fault tolerance. A failover scope optimized for fault tolerance has an extended time delay configured in its scope properties. The time delay on the secondary DHCP server causes the server to respond with a delay to DHCP DISCOVER requests from DHCP clients. The delay on the secondary server enables the primary DHCP server to respond to and accept the DHCPOFFER first. However, if the primary server becomes unavailable or overloaded and is unable to respond to requests, the secondary server handles requests and continues distributing addresses until the primary server is available to service clients again. For fault tolerance, set Hot Standby as the failover mode.
You can create a failover scope by completing the following steps:
1. In the DHCP console, connect to the primary DHCP server for the failover scope. Double-tap or double-click the entry for the primary server, and then expand its IPv4 folder in the tree view.
2. The scope with which you want to work must already be defined. Press and hold or right-click the scope or superscope that you want to configure for failover, and then tap or click Configure Failover to start the Configure Failover Wizard. Tap or click Next.
3. Next, you need to specify the partner server to use for failover. Tap or click Add Server. Use the options in the Add Server dialog box to select the secondary DHCP server for the failover scope, and then tap or click OK. Clear the Reuse Existing Failover Relationships check box, and then tap or click Next to continue.
4. On the Create A New Failover Relationship page, shown in Figure 8-11, use the Mode list to set the failover mode as Load Balance or Hot Standby.
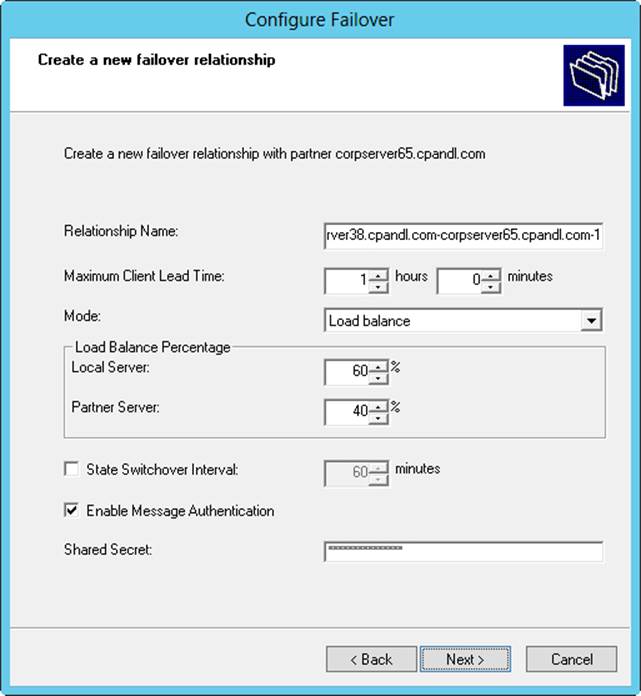
Figure 8-11. Specify the load balance percentage for the local server and the partner server.
5. If you set the failover mode for Load Balance, use the Load Balance Percentage combo boxes to specify the relative percentage for how to allocate the IP addresses to each of the servers. Here are configuration examples:
o An 80/20 split works best when you want one server to handle most of the workload and want another server to be available as needed.
o An 60/40 split works best when you want one server to handle a little more of the workload than the other, but you want both servers to have regular workloads.
o A 50/50 split works best when you want to evenly balance the load between two servers.
6. If you set the failover mode to Hot Standby, set the role of the partner as either Active or Standby and then specify the relative percentage of IP addresses to reserve. By default, 5 percent of the IP addresses are reserved for the standby server.
7. Enter a shared secret for the partners. The shared secret is a password that the partners use when synchronizing the DHCP database and performing other tasks related to maintaining the DHCP failover partnership. When you are ready to continue, tap or click Next.
8. Tap or click Finish. Review the summary of the failover scope configuration. If any errors were encountered, you might need to take corrective action. Tap or click Close.
Modifying or removing failover scopes
Failover scopes are not identified as such in the DHCP console. You can identify a failover scope by its network ID and IP address pool. Generally, you’ll find a scope with the same network ID on two DHCP servers, and the scope properties will include information about the failover partnership. To view this information, press and hold or right-click the scope, and then select Properties. In the Properties dialog box, select the Failover tab.
You can manage the partnership in several ways:
§ If you suspect the configuration details related to the partnership are out of sync, press and hold or right-click the scope, and then select Replicate Partnership.
§ If you suspect the DHCP database that the partners share is out of sync, press and hold or right-click the scope, and then select Replicate Scope.
§ If you no longer want the scope to fail over, you can deconfigure failover by pressing and holding or right-clicking the scope, and then selecting Deconfigure Failover.
You can’t modify the failover settings after the partnership is established; however, you can deconfigure failover and then reconfigure failover.
Managing the address pool, leases, and reservations
Scopes have separate folders for address pools, leases, and reservations. By accessing these folders, you can view current statistics for the related data and manage existing entries.
Viewing scope statistics
Scope statistics provide summary information about the address pool for the current scope or superscope. To view statistics, press and hold or right-click the scope or superscope, and then select Display Statistics.
The primary columns in the Scope Statistics dialog box are used as follows:
§ Total Scopes. Shows the number of scopes in a superscope.
§ Total Addresses. Shows the total number of IP addresses assigned to the scope.
§ In Use. Shows the total number (as a numerical value and as a percentage of the total available addresses) of addresses being used. If the total reaches 85 percent or more, you might want to consider assigning additional addresses or freeing up addresses for use.
§ Available. Shows the total number (as a numerical value and as a percentage of the total available addresses) of addresses available for use.
Enabling and configuring MAC address filtering
MAC address filtering (aka link-layer filtering) is a feature for IPv4 addresses that enables you to include or exclude computers and devices based on their MAC address. When you configure MAC address filtering, you can specify the hardware types that are exempted from filtering. By default, all hardware types defined in RFC 1700 are exempted from filtering. To modify hardware type exemptions, follow these steps:
1. In the DHCP console, press and hold or right-click the IPv4 node, and then tap or click Properties.
2. On the Filters tab, tap or click Advanced. In the Advanced Filter Properties dialog box, select the check box for hardware types to exempt from filtering. Clear the check box for hardware types to filter.
3. Tap or click OK to save your changes.
Before you can configure MAC address filtering, you must do one of the following:
§ Enable and define an explicit allow list. The DHCP server provides DHCP services only to clients whose MAC addresses are in the allow list. Any client that previously received IP addresses is denied address renewal if its MAC address isn’t on the allow list.
§ Enable and define an explicit deny list. The DHCP server denies DHCP services only to clients whose MAC addresses are in the deny list. Any client that previously received IP addresses is denied address renewal if its MAC address is on the deny list.
§ Enable and define an allow list and a block list. The block list has precedence over the allow list. This means that the DHCP server provides DHCP services only to clients whose MAC addresses are in the allow list, if no corresponding matches are in the deny list. If a MAC address has been denied, the address is always blocked even if the address is on the allow list.
To enable an allow list, deny list, or both, follow these steps:
1. In the DHCP console, press and hold or right-click the IPv4 node, and then tap or click Properties.
2. On the Filters tab, you’ll find the current filter configuration details. To use an allow list, select Enable Allow List. To use a deny list, select Enable Deny List.
3. Tap or click OK to save your changes.
NOTE
As an alternative, you can press and hold or right-click the Allow or Deny node, under the Filters node, and then select Enable to enable allow or deny lists. If you press and hold or right-click the Allow or Deny node and then select Disable, you disable allow or deny lists.
After you enable filtering, you define your filters by using the MAC address for the client computer or device’s network adapter. On a client computer, you can obtain the MAC address by entering the command ipconfig /all at the command prompt. The Physical Address entry shows the client’s MAC address. You must enter this value exactly for the address filter to work.
A MAC address is defined by eight pairings of two-digit hexadecimal numbers separated by a hyphen, as shown here:
FE-01-56-23-18-94-EB-F2
When you define a filter, you can specify the MAC address with or without the hyphens. This means that you could enter FE-01-56-23-18-94-EB-F2 or FE0156231894EBF2.
You also can use an asterisk (*) as a wildcard for pattern matching. To allow any value to match a specific part of the MAC address, you can insert * where the values usually would be, as shown here:
FE-01-56-23-18-94-*-F2
FE-*-56-23-18-94-*-*
FE-01-56-23-18-*-*-*
FE01*
To configure a MAC address filter, follow these steps:
1. In the DHCP console, double-tap or double-click the IPv4 node, and then double-tap or double-click the Filters node.
2. Press and hold or right-click Allow or Deny as appropriate for the type of filter you are creating, and then tap or click New Filter.
3. Enter the MAC address to filter, and then if you want to you can enter a comment in the Description text box. Tap or click Add. Repeat this step to add other filters.
4. Tap or click Close when you have finished.
Setting a new exclusion range
You can exclude IPv4 or IPv6 addresses from a scope by defining an exclusion range. Scopes can have multiple exclusion ranges. To define an exclusion range for a scope with IPv4 addresses, follow these steps:
1. In the DHCP console, expand the scope with which you want to work, and then press and hold or right-click the Address Pool folder or Exclusions folder. On the shortcut menu, tap or click New Exclusion Range.
2. Enter a start address and an end address in the Start IP Address and End IP Address boxes, and then tap or click Add. The range specified must be a subset of the range set for the current scope and must not be currently in use. Repeat this step to add other exclusion ranges.
3. Tap or click Close when you have finished.
TIP
To exclude a single IP address, enter a start address and leave the end address blank.
To define an exclusion range for a scope with IPv6 addresses, follow these steps:
1. In the DHCP console, expand the scope with which you want to work, and then press and hold or right-click the Exclusions folder. On the shortcut menu, tap or click New Exclusion Range.
2. Enter a start address and an end address in the Start IPv6 Address and End IPv6 Address boxes, and then tap or click Add. The range specified must be a subset of the range set for the current scope and must not be currently in use. Repeat this step to add other exclusion ranges.
3. Tap or click Close when you have finished.
If you don’t need an exclusion anymore, you can delete it. Select Address Pool or Exclusions as appropriate. In the main pane, press and hold or right-click the exclusion, select Delete, and then tap or click Yes in response to the confirmation message.
Reserving DHCP addresses
DHCP provides several ways to assign permanent addresses to clients. One way is to use the Unlimited setting in the Scope dialog box to assign permanent addresses to all clients that use the scope. Another way is to reserve DHCP addresses on a per-client basis. When you reserve a DHCP address, the DHCP server always assigns the client the same IP address, and you can do so without sacrificing the centralized management features that make DHCP so attractive.
If the client is on the network and has a current IPv4 or IPv6 lease, you can create a reservation by completing the following steps:
1. In the DHCP console, expand the scope with which you want to work, and then select the Address Leases folder.
2. Press and hold or right-click the lease you want to work with. On the shortcut menu, tap or click Add To Reservation.
Otherwise, to manually reserve an IPv4 address for a client, follow these steps:
1. In the DHCP console, expand the scope with which you want to work, and then press and hold or right-click the Reservations folder. On the shortcut menu, tap or click New Reservation.
2. In the Reservation Name text box, enter a short but descriptive name for the reservation. This name is used only for identification purposes.
3. In the IP Address box, enter the IPv4 address you want to reserve for the client.
NOTE
This IP address must be within the valid range of addresses for the currently selected scope.
4. The MAC Address box specifies the MAC address for the client computer’s NIC. You can obtain the MAC address by entering the command ipconfig /all at the command prompt on the client computer. The Physical Address entry shows the client’s MAC address. You must enter this value exactly for the address reservation to work.
5. Enter an optional comment in the Description text box.
6. By default, both DHCP and BOOTP clients are supported. This option is fine, and you need to change it only if you want to exclude a particular type of client.
7. Tap or click Add to create the address reservation. Repeat this step to add other address reservations.
8. Tap or click Close when you have finished.
To manually reserve an IPv6 address for a client, follow these steps:
1. In the DHCP console, expand the scope with which you want to work, and then press and hold or right-click the Reservations folder. On the shortcut menu, tap or click New Reservation.
2. In the Reservation text box, enter a short but descriptive name for the reservation. This information is used only for identification purposes.
3. In the IPv6 Address box, enter the IPv6 address you want to reserve for the client.
NOTE
This IP address must be within the valid range of addresses for the currently selected scope.
4. The device unique identifier (DUID) box specifies the MAC address for the client computer’s NIC. You can obtain the MAC address by entering the command ipconfig /all at the command prompt on the client computer. The Physical Address entry shows the client’s MAC address. You must enter this value exactly for the address reservation to work.
5. The identity association identifier (IAID) sets a unique identifier prefix for the client. Typically, this is a nine-digit value.
6. Enter an optional comment in the Description text box.
7. Tap or click Add to create the address reservation. Repeat this step to add other address reservations.
8. Tap or click Close when you have finished.
Releasing addresses and leases
When you work with reserved addresses, you should take note of a couple caveats:
§ Reserved addresses aren’t automatically reassigned. If the address is already in use, you need to release the address to ensure that the appropriate client can obtain it. You can force a client to release an address by terminating the client’s lease or by logging on to the client and entering the command ipconfig /release at an elevated command prompt.
§ Clients don’t automatically switch to the reserved address. If the client is using a different IP address, you need to force the client to release the current lease and request a new one. You can do this by terminating the client’s lease or by logging on to the client and entering the commandipconfig /renew at an elevated command prompt.
Modifying reservation properties
You can modify the properties of reservations by following these steps:
1. In the DHCP console, expand the scope with which you want to work, and then tap or click the Reservations folder.
2. Press and hold or right-click a reservation, and then tap or click Properties. You can now modify the reservation properties. You can’t modify options that are shaded, but you can modify other options. These options are the same options described in the previous section.
Deleting leases and reservations
You can delete active leases and reservations by following these steps:
1. In the DHCP console, expand the scope with which you want to work, and then tap or click the Address Leases folder or Reservations folder, as appropriate.
2. Press and hold or right-click the lease or reservation you want to delete, and then tap or click Delete.
3. Confirm the deletion by tapping or clicking Yes.
4. The lease or reservation is now removed from DHCP; however, the client isn’t forced to release the IP address. To force the client to release the IP address, log on to the client that holds the lease or reservation and enter the command ipconfig /release at an elevated command prompt.
Backing up and restoring the DHCP database
DHCP servers store DHCP lease and reservation information in database files. By default, these files are stored in the %SystemRoot%\System32\DHCP directory. The key files in this directory are used as follows:
§ Dhcp.mdb. The primary database file for the DHCP server
§ J50.log. A transaction log file used to recover incomplete transactions in case of a server malfunction
§ J50.chk. A checkpoint file used in truncating the transaction log for the DHCP server
§ J50000NN.log A reserved log file for the DHCP server
§ Tmp.edb. A temporary working file for the DHCP server
Backing up the DHCP database
The %SystemRoot%\System32\DHCP\Backup folder contains the backup information for the DHCP configuration and the DHCP database. By default, the DHCP database is backed up every 60 minutes automatically. To manually back up the DHCP database at any time, follow these steps:
1. In the DHCP console, press and hold or right-click the server you want to back up, and then tap or click Backup.
2. In the Browse For Folder dialog box, select the folder that will contain the backup DHCP database, and then tap or click OK.
Registry keys that control the location and timing of DHCP backups, in addition to other DHCP settings, are located under HKEY_LOCAL_MACHINE\SYSTEM \CurrentControlSet\Services\DHCPServer\Parameters.
The following keys control the DHCP database and backup configuration:
§ BackupDatabasePath. Sets the location of the DHCP database. You should set this option through the DHCP Properties dialog box. Tap or click the Advanced tab, and then set the Database Path as appropriate.
§ DatabaseName. Sets the name of the primary DHCP database file. The default value is DHCP.mdb.
§ BackupInterval. Determines how often the DHCP client information database is backed up. The default is 60 minutes.
§ DatabaseCleanupInterval. Determines how often the DHCP service deletes expired records from the DHCP client information database. The default is four hours.
Restoring the DHCP database from backup
In the case of a server crash and recovery, you might need to restore and then reconcile the DHCP database. To force DHCP to restore the database from backup, follow these steps:
1. If necessary, restore a good copy of the %SystemRoot%\System32\DHCP \Backup directory from the archive. Afterward, start the DHCP console, press and hold or right-click the server you want to restore, and then tap or click Restore.
2. In the Browse For Folder dialog box, select the folder that contains the backup you want to restore, and then tap or click OK.
3. During the restoration of the database, the DHCP Server service is stopped. As a result, DHCP clients are temporarily unable to contact the DHCP server to obtain IP addresses.
Using backup and restore to move the DHCP database to a new server
If you need to rebuild a server providing DHCP services, you might want to move the DHCP services to another server prior to rebuilding the server. To do this, you need to perform several tasks on the source and destination servers. On the destination server, do the following:
1. Install the DHCP Server service on the destination server, and then restart the server.
2. Stop the DHCP Server service in the Services console.
3. Delete the contents of the %SystemRoot%\System32\DHCP folder.
On the source server, do the following:
1. Stop the DHCP Server service in the Services console.
2. After the DHCP Server service is stopped, disable the service so that it can no longer be started.
3. Copy the entire contents of the %SystemRoot%\System32\DHCP folder to the %SystemRoot%\System32\DHCP folder on the destination server.
Now all the necessary files are on the destination server. Start the DHCP Server service on the destination server to complete the migration.
Forcing the DHCP Server service to regenerate the DHCP database
If the DHCP database becomes corrupt and Windows is unable to repair the database when you stop and restart the DHCP Server service, you can attempt to restore the database as described in Restoring the DHCP database from backup earlier in this chapter. If this fails or you prefer to start with a fresh copy of the DHCP database, follow these steps:
1. Stop the DHCP Server service in the Services console.
2. Delete the contents of the %SystemRoot%\System32\DHCP folder. If you want to force a complete regeneration of the database and not allow the server to restore from a previous backup, you should also delete the contents of the Backup folder.
CAUTION
Don’t delete DHCP files if the DHCPServer registry keys aren’t intact. These keys must be available to restore the DHCP database.
3. Restart the DHCP Server service.
4. No active leases or other information for scopes are displayed in the DHCP console. To regain the active leases for each scope, you must reconcile the server scopes as discussed in the next section.
5. To prevent conflicts with previously assigned leases, you should enable address conflict detection for the next few days, as discussed in Avoiding IP address conflicts earlier in this chapter.
Reconciling leases and reservations
Reconciling checks the client leases and reservations against the DHCP database on the server. If inconsistencies are found between what is registered in the Windows registry and what is recorded in the DHCP server database, you can select and reconcile any inconsistent entries. After the entries you select are reconciled, DHCP either restores the IP address to the original owner or creates a temporary reservation for the IP address. When the lease time expires, the address is recovered for future use.
You can reconcile scopes individually, or you can reconcile all scopes on a server. To reconcile a scope individually, follow these steps:
1. In the DHCP console, press and hold or right-click the scope with which you want to work, and then tap or click Reconcile.
2. In the Reconcile dialog box, tap or click Verify.
3. Inconsistencies are reported in the status window. Select the displayed addresses, and then tap or click Reconcile to repair inconsistencies.
4. If no inconsistencies are found, tap or click OK.
To reconcile all scopes on a server, follow these steps:
1. In the DHCP console, expand the server entry, press and hold or right-click the IPv4 node, and then tap or click Reconcile All Scopes.
2. In the Reconcile All Scopes dialog box, tap or click Verify.
3. Inconsistencies are reported in the status window. Select the displayed addresses, and then tap or click Reconcile to repair inconsistencies.
4. If no inconsistencies are found, tap or click OK.