Exam Ref 70-417 Upgrading Your Skills to Windows Server 2012 R2 (2014)
Chapter 11. Configure file and storage solutions
The Configure File and Storage Solutions domain includes just a single objective, but it’s a big one: Implement Dynamic Access Control.
Access permissions for files have traditionally been controlled by a combination of share permissions and NTFS permissions. Dynamic Access Control is a set of features new to Windows Server 2012 and Windows Server 2012 R2 that adds to these two traditional access controls an optional third security gate for file access. Dynamic Access Control controls access in a way that is dependent not on user groups or file location, but on object attributes cited in access rules. The advantage of Dynamic Access Control is that it can provide highly customized and simplified management of file security, especially in a large organization.
Objectives in this chapter:
![]() Objective 11.1: Implement Dynamic Access Control
Objective 11.1: Implement Dynamic Access Control
Objective 11.1: Implement Dynamic Access Control
Dynamic Access Control relies on file classifications, on user and device attributes called claims, and on rules and policies built from all of these elements. Dynamic Access Control, admittedly, can be very complex. On the 70-417 exam, it’s likely you will need to understand only the fundamentals about this feature. However, these concepts are new and require some effort to learn even just the fundamentals well enough for the exam.
This section covers the following topics:
![]() Configuring claims-based authentication
Configuring claims-based authentication
![]() Configuring file classification
Configuring file classification
![]() Configuring access policies
Configuring access policies
Introduction to Dynamic Access Control
Dynamic Access Control is a new way to control access to files. It doesn’t replace NTFS and share permissions but is sometimes combined with them. When Dynamic Access Control permissions are combined with the NTFS and share permissions, the most restrictive permissions always apply to the account requesting access.
You can think of Dynamic Access Control as being based on access rules. These rules are if-then statements built on the attributes of files, users, and devices. An example expression to serve as the basis for an access rule could be “If a user is a member of the finance department with an office on Floor 10 and is connecting from a device that is located in the company HQ, then that user can access finance files and folders designated as having a high business impact.” Before you can even create such an access rule, you need to create and assign the needed attributes to all the objects mentioned in that rule. The user and device attributes are called claims. The file attributes are called classifications (or resource properties).
The way these three attribute types relate to an access rule is illustrated in Figure 11-1.
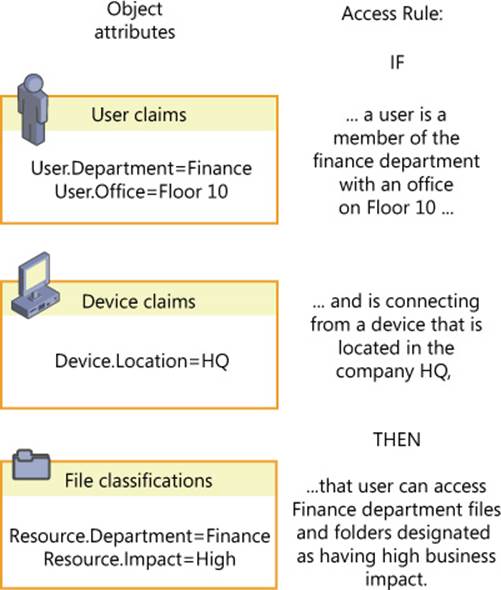
FIGURE 11-1 Access rules refer to the attributes of users, devices, and files
Dynamic Access Control is advantageous for a number of reasons. First, it allows administrators to manage file access centrally, in a way that impacts all file servers in the organization. (It should be noted, however, that you cannot enforce access rules centrally through Dynamic Access Control; you can only make access rules available for enforcement.) Another advantage of Dynamic Access Control is that it allows you to dramatically reduce the number of user groups you would otherwise need to create and manage to implement a particular access policy. A third advantage of Dynamic Access Control is that it allows you to construct access rules in a way that is much more flexible and much more likely to correspond to the needs of your organization. Instead of access control lists (ACLs) based only on user and group accounts, you can create rules based on location, office, country, telephone number, or any other parameter that is most useful to you.
To implement Dynamic Access Control, you need at least one file server running Windows Server 2012 or later, at least one domain controller running Windows Server 2012 or later (one recommended at each site), and clients running Windows 7 or later. In addition, specific features (such as access-denied assistance) require Windows 8 or later. The domain functional level must also be set to Windows Server 2012 or later.
Even more than with most new features that you will be tested on for the 70-417 exam, Dynamic Access Control is best understood by working with it hands-on. It isn’t the easiest of features to master, but without implementing it on a test network, it can seem more complicated than it really is. To prepare for the exam, then, use the following sections as a general walk-through for hands-on configuration, if at all possible. Plan to walk through these steps at least twice, and it will all begin to make sense.
 Exam Tip
Expect to see questions on the 70-417 exam for which you need to remember the exact order of steps necessary to configure Dynamic Access Control. Use this chapter to help understand the concepts in Dynamic Access Control and to learn the main steps as they are presented in each section.
Configuring claims-based authentication
In the Microsoft implementation of the Kerberos authentication protocol, the Kerberos ticket-granting ticket (TGT) includes a special access token that is used to help authorize users for access to domain resources. This access token always contains the user’s ID and his or her group memberships.
Dynamic Access Control, however, relies on an expanded Kerberos access token that includes more than the user’s ID and group memberships. Besides that usual information, the expanded token used in Dynamic Access Control includes certain attribute values—called claims—about the user, about the device to which the user is signed on, and about the same device’s own group memberships. The expanded access token used in Dynamic Access Control is illustrated in Figure 11-2.
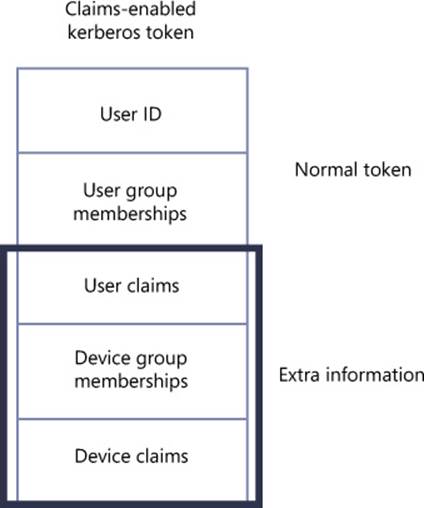
FIGURE 11-2 The Kerberos access token used in Dynamic Access Control
To configure a Dynamic Access Control policy, you need to perform the following steps:
1. Define the types of claims about users and devices you want to include in Kerberos access tokens.
2. Configure Active Directory Domain Services to use the expanded Kerberos access tokens that include these claims.
Step 1: Define user and device claims types
In this step, you choose the specific user and device properties that will be presented as claims in the Kerberos access token whenever access permissions are evaluated. User and device claim types correspond to names of Active Directory attributes (such as “Department” or “City”) for user and computer account objects. The actual claim values included in a token are copied from the corresponding Active Directory attribute values. Because access rules refer to these claim types in their specifications about who is allowed or denied access to a given resource, you want to define claims types you will need later when you create access control rules.
You can use Active Directory Administrative Center to configure the user and device claim types. In the console tree, select tree view and then navigate to Dynamic Access Control\Claim Types. Right-click Claim Types, click New, and then select Claim Type, as shown in Figure 11-3.
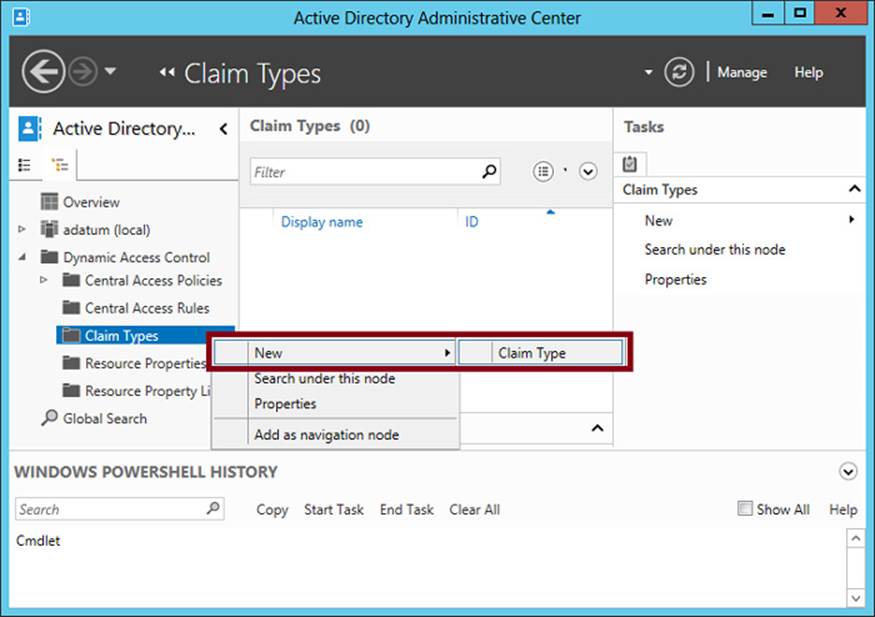
FIGURE 11-3 Creating a new claim type for a user or device
The Create Claim Type page that opens is shown in Figure 11-4.
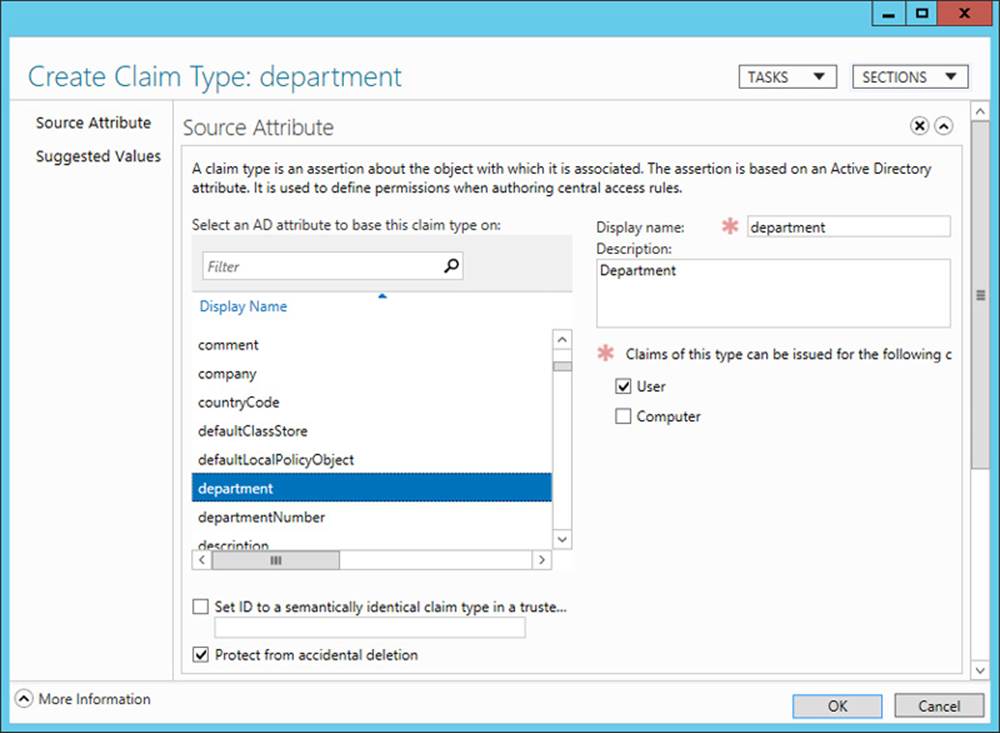
FIGURE 11-4 Creating a claim type for a user object
In the Source Attribute section, click the Active Directory object attribute name that you want to use as the basis of the claim type. You can also specify whether you want this claim type to be issued for users, for computers (devices), or both. For example, if you plan to define rules that include references to the department of either the user or the device to which a user is signed on, you should select both User and Computer when you create the Department claim type.
In the Suggested Values section, you can provide a list of suggested matching values that you will later be able to supply in access rules. For example, if you plan to create access rules that specify user or device Department values such as “Finance,” “Engineering,” “Operations,” “Marketing,” and “Sales,” you can precreate those same strings as suggested values now when you are creating the claim type. Note that if you define any suggested values, those values you supply will be the only ones available to select when you create rules that refer to the claim type.
Step 2: Enable Kerberos support for claims-based access control
In this step, you use Group Policy to enable Kerberos support for claims on domain controllers. This step ensures that Kerberos tokens include claims information and that this information can then be evaluated by domain controllers for access authorization.
In the Group Policy Management Console, create or edit a Group Policy Object (GPO) linked to the domain controllers organizational unit (OU), and then enable the following setting: Computer Configuration/Policies/Administrative Templates/System/KDC/KDC Support For Claims, Compound Authentication, And Kerberos Armoring. (Within the Policy Setting dialog box, leave selected the default option of Supported.)
The requirement that you set this policy for claims-based authorization, and that you should do so at the domain controllers OU level, is one of the most likely aspects about Dynamic Access Control that you’ll be tested on during the 70-417 exam. Learn to recognize not only the full name of this policy, but also the possible ways its name might be shortened. (For example, an answer choice might say simply “Use Group Policy to enable Kerberos armoring on the domain controllers OU.”) The location of this policy setting within a GPO is shown in Figure 11-5.
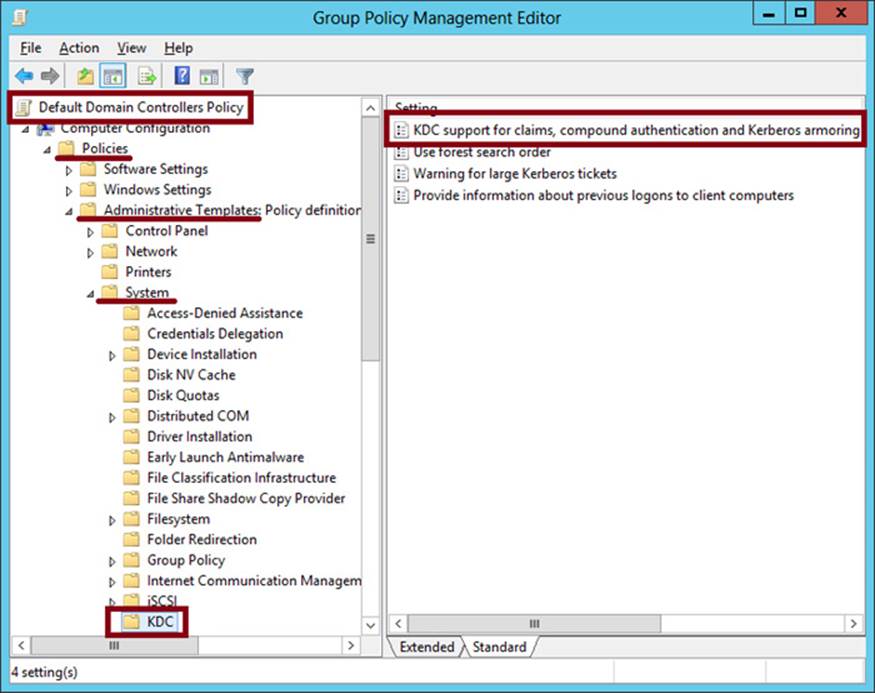
FIGURE 11-5 Enabling Kerberos support for claims
Configuring file classification
File classification refers to the process of adding attributes to the properties of files and folders. These attributes allow you to construct access rules that apply to these resources. Configuring file classification can be broken down into the following four steps:
1. Enable or create selected resource properties.
2. Add resource properties to a resource property list.
3. Update Active Directory file and folder objects.
4. Classify files and folders.
Step 1: Enable or create selected resource properties
You perform this step on a domain controller running Windows Server 2012 or Windows Server 2012 R2, in Active Directory Administrative Center. In the console tree, select tree view (the right tab in the navigation pane) and then the Resource Properties container, as shown in Figure 11-6. To enable a property, select it in the center pane and then click Enable on the Tasks (right) pane.
Resource properties correspond to attribute categories, such as Department, that you can make appear on the Classification tab of the Properties dialog box of files and folders. You make a resource property appear on this Classification tab by first enabling the property and then performing steps 2 and 3 described later in this section. Generally, you should enable only the resource properties you plan to use later in access rules. For example, if your eventual goal is to create and apply the access rule shown in Figure 11-1, you should enable the Department and Impact resource properties.
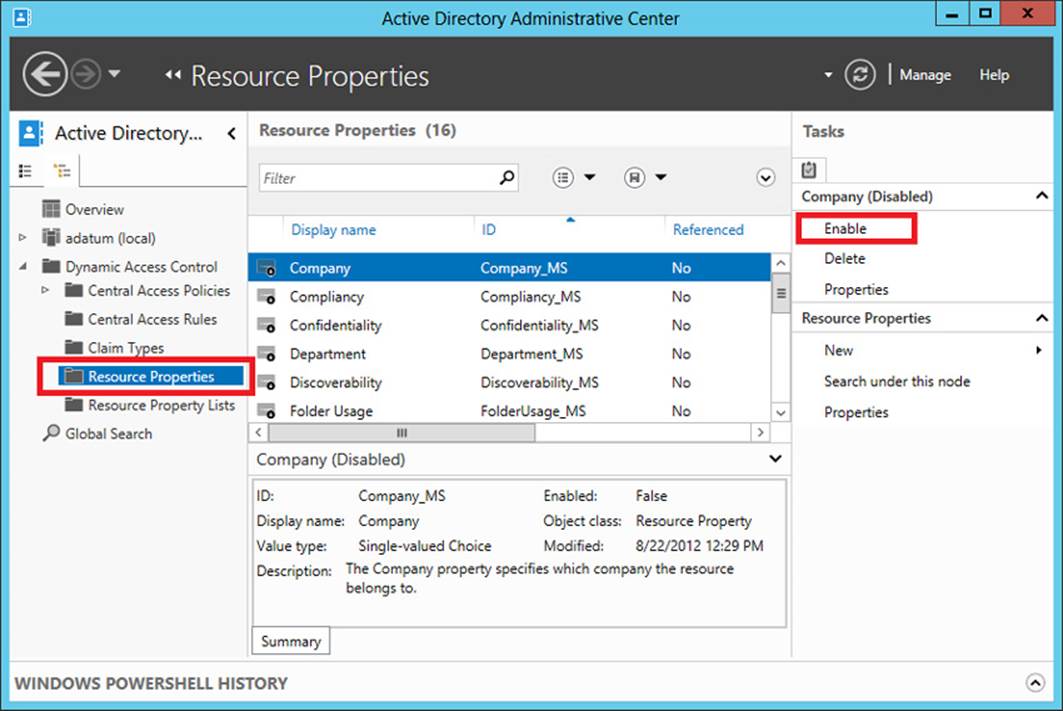
FIGURE 11-6 Enabling a resource property
Windows Server 2012 and Windows Server 2012 R2 include 16 predefined resource properties, including Department, Impact, Compliancy, Intellectual Property, and Confidentiality. These resource properties include predefined suggested values you can eventually assign to objects, values such as the specific names of departments; High, Medium, or Low; and Yes or No. However, if a resource property you need isn’t predefined (such as City or Country), you can create it and define suggested values you need, such as London, New York, UK, US, and so on. Any new resource properties you create are automatically enabled.
Step 2: Add resource properties to a resource property list
After you enable your desired resource properties, you have to add them to a resource property list before they can be applied to objects. Begin by selecting the Resource Property Lists container in Active Directory Administrative Center. One predefined list is available, named Global Resource Property List. If you want the same classifications to be available for all objects, use this list. To add the resource properties you have enabled, right-click the list and select Add Resource Properties, as shown in Figure 11-7. In the Select Resource Properties dialog box that opens, add the desired resource properties that you have enabled, and click OK.
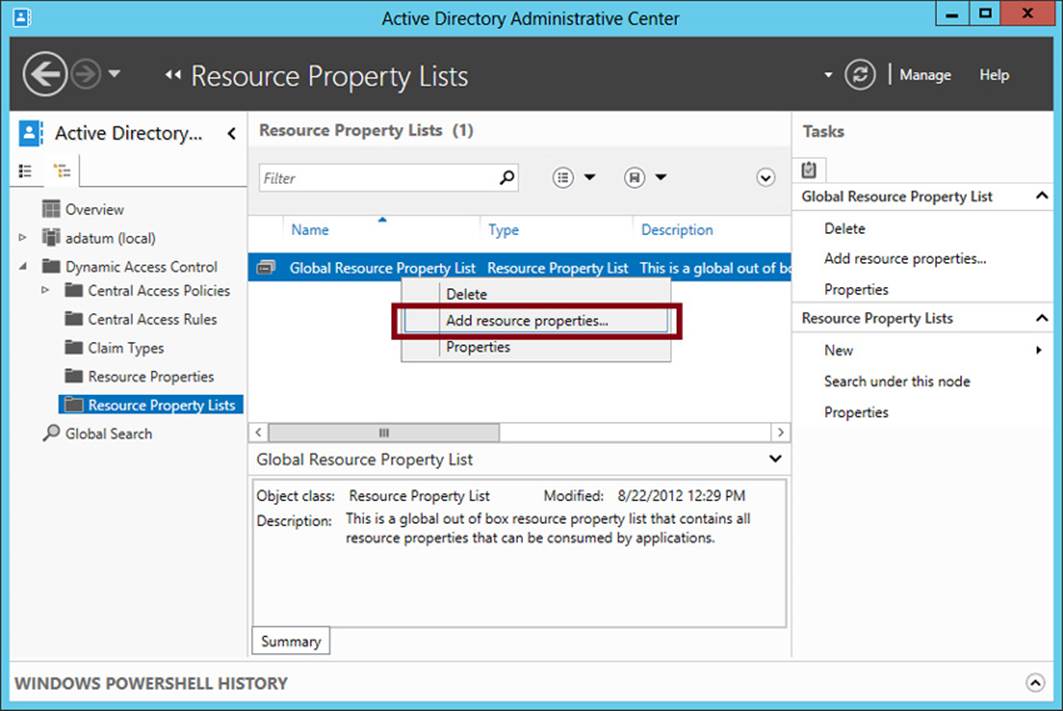
FIGURE 11-7 Adding resource properties to a resource property list
Exam Tip
Beware of incorrect answer choices that suggest you need to create a resource property list when you configure file classification. You don’t need to create a resource property list. You just need to add the resource properties to a list (usually the built-in Global Resource Property List).
Step 3: Update Active Directory file and folder objects
To update Active Directory Domain Services with the new classifiable properties, you now need to run the following cmdlet on a file server on which the File Server Resource Manager (FSRM) component of the File Server role has been installed:
Update-FSRMClassificationPropertyDefinition
After you perform this step, the resource properties you chose in step 1 appear on the Classification tab of every file and folder on that file server. The Classification tab is shown in Figure 11-8.
Note that this cmdlet is one of the most likely items related to Dynamic Access Control to appear on the 70-417 exam. Make sure you understand its function.
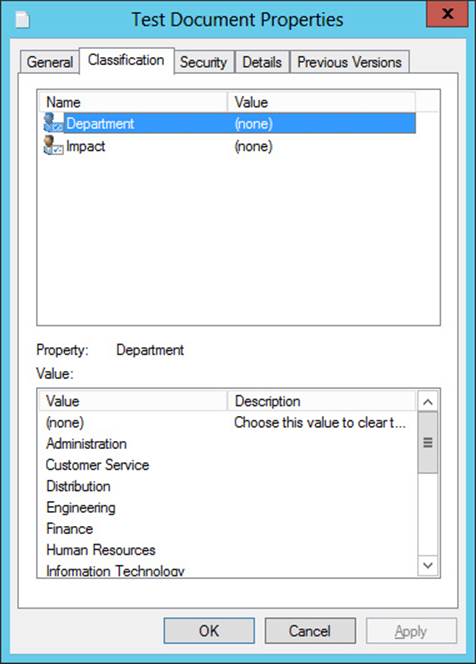
FIGURE 11-8 Resource properties on the Classification tab
Exam Tip
Remember that you need to install File Server Resource Manager in order for the Classification tab to appear in the properties of files and folders.
Step 4: Classify files and folders
Objects in the file structure can be classified manually or automatically. The following sections provide instructions about how to classify files by using both of these strategies.
Manual classification
To classify file objects manually, you can select and apply a resource property value on the Classification tab directly on selected files or on their parent folder. For example, for the folder shown in Figure 11-9, the Finance value and the High value have been selected for the Department and Impact properties, respectively. When you click Apply, these classifications will automatically be applied to all child objects within the folder.
Note that child objects keep these classification settings until they are reapplied. Files do not automatically inherit the values of other parent folders if they are moved into those other folders. In fact, the classifications remain applied to those objects even when you copy them from computer to computer. However, you can only see and read these classifications that have been applied to objects after you install FSRM and run the Update-FSRMClassificationPropertyDefinition cmdlet.
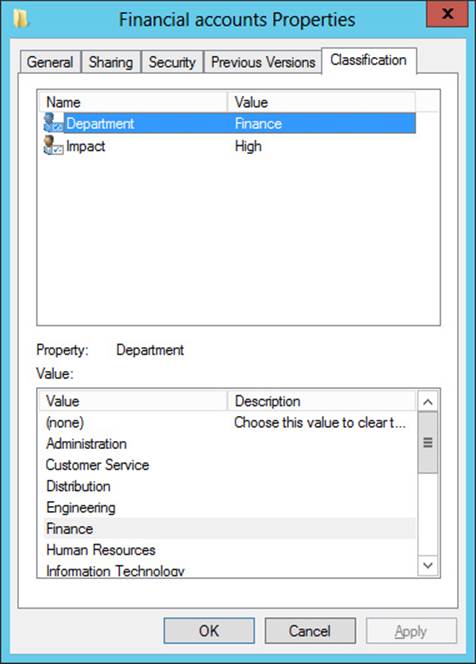
FIGURE 11-9 Classification values set on a parent folder
Automatic classification
Windows Server 2012 and Windows Server 2012 R2 include a built-in file classifier that can be configured to automatically classify files within targeted folders. You can automatically classify all files within targeted folders, or you can restrict this function to a subset of the files, limiting classification to those Microsoft documents with contents that include a match of a specified expression. You can also restrict classification to the files selected by a custom Windows PowerShell script. Besides this built-in functionality, automatic classification (and Dynamic Access Control in general) can be greatly extended through third-party applications.
To start configuring automatic file classification, you first need to install the FSRM component of the File and Storage Services role. Then, in the File Server Resource Manager console tree, navigate to Classification Management\Classification Rules. In the Actions pane, click Create Classification Rule, as shown in Figure 11-10.
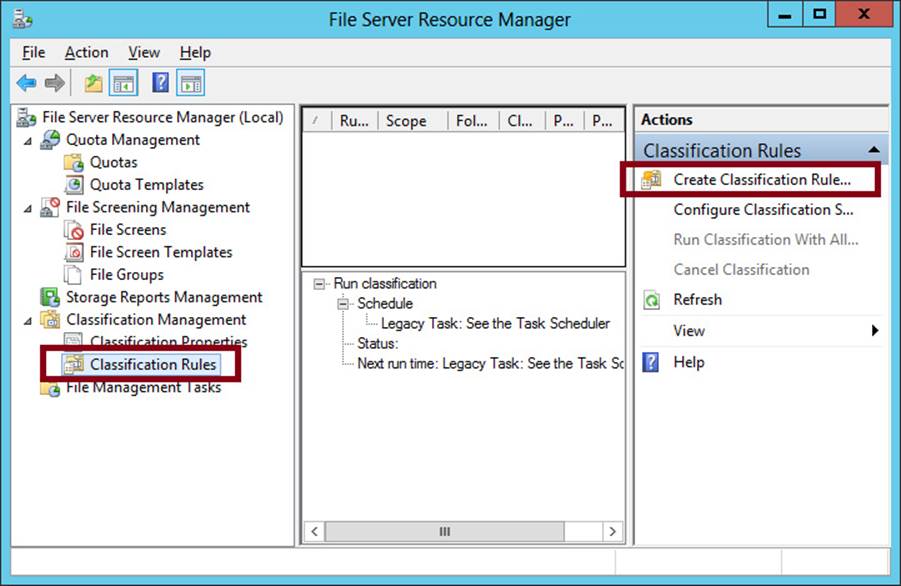
FIGURE 11-10 Creating a classification rule
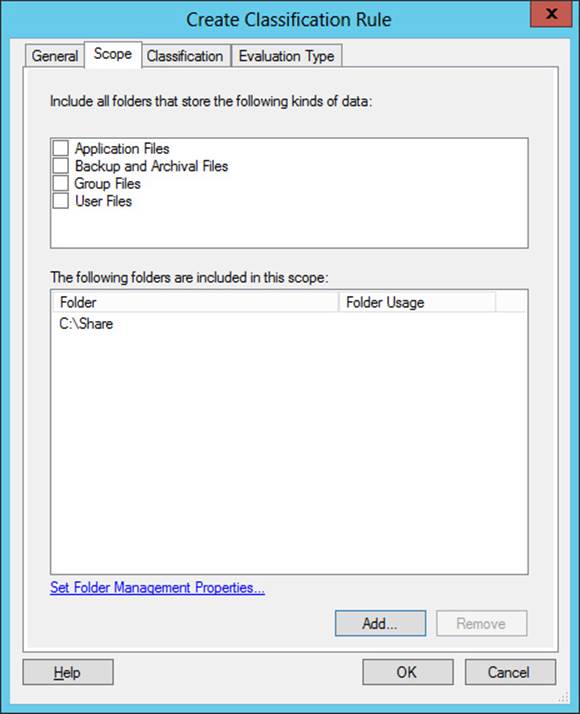
FIGURE 11-11 Setting the scope for a classification rule
This step opens the Create Classification Rule dialog box. On the General tab, enter a name and description for the new rule. The General tab also includes an Enabled check box, which is selected by default.
On the Scope tab, shown in Figure 11-11, click Add to select the folders where this rule will apply. The classification rule applies to all folders and their subfolders in the list. Alternatively, you can target all folders that store any of the following selected classifications of data: Application Files, Backup And Archival Files, Group Files, or User Files.
On the Classification tab, shown in Figure 11-12, choose a classification method along with the classification value for one selected property that the classification rule will assign.
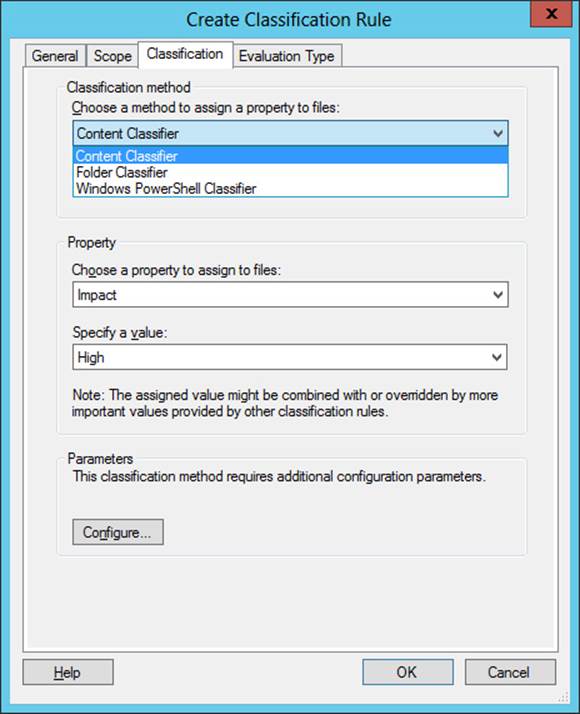
FIGURE 11-12 Configuring a classification method and property value
For a classification method, there are three options:
![]() Content Classifier Searches Microsoft documents for a text or regular expression string.
Content Classifier Searches Microsoft documents for a text or regular expression string.
![]() Folder Classifier Assigns the property value to all files that fall within the scope of the classification rule.
Folder Classifier Assigns the property value to all files that fall within the scope of the classification rule.
![]() Windows PowerShell Classifier Prompts you to specify a script to determine the target files within the scope of the classification rule.
Windows PowerShell Classifier Prompts you to specify a script to determine the target files within the scope of the classification rule.
Click Configure to further configure this option by using the Classification Parameters dialog box, shown in Figure 11-13.
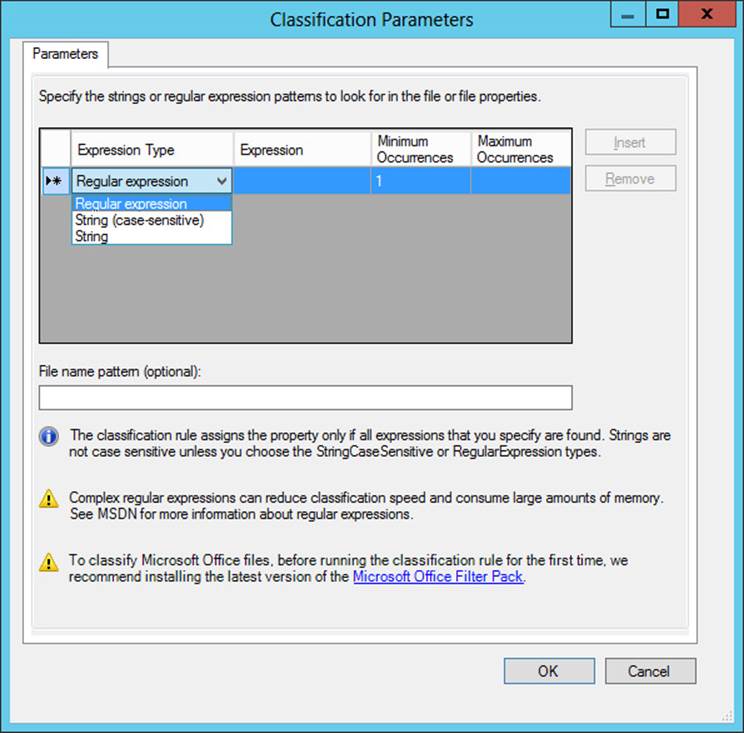
FIGURE 11-13 Configuring a content search for automatic classification
This dialog box lets you specify an expression that will be searched for in the content of Microsoft documents that fall within the scope of the classification rule. If the content search results in a match for the specified expression, the file is tagged with the property value specified on the Classification tab of the Create Classification Rule dialog box.
You can choose one of three expression types to search for: string, case-sensitive string, or regular expression. A regular expression, sometimes called a regex, is used in programming to match patterns of text strings as opposed to exact sequences of specific numbers or letters. A regular expression is often a useful matching mechanism for classifying files that include sensitive numbers such as credit card numbers.
The following is an example of a regular expression. It matches credit card numbers from most vendors:
^((4\d{3})|(5[1-5]\d{2})|(6011)|(34\d{1})|(37\d{1}))-?\d{4}-?\d{4}-?\d{4}|3[4,7]
[\d\s-]{15}$
The Evaluation Type tab is the final tab of the Create Classification Rule dialog box. On this tab, you choose how to handle files that already exist within the scope of the classification rule. By default, the classification rule does not apply to preexisting files. You can choose, however, to run the rule against existing files. If matches are found, you can either overwrite any existing classification that conflicts with the new value, or attempt to aggregate them if possible.
After you create the desired classification rule, click Configure Classification Schedule in File Server Resource Manager to determine how often you want the rule to run. This step opens the File Server Resource Manager Options dialog box. This is the same dialog box that opens when you select Configure Options from the shortcut menu of the main (parent) node in the File Server Resource Manager console tree. On the Automatic Classification tab, shown in Figure 11-14, select the Enable Fixed Schedule check box. You must then specify days and times at which you want the rule to run. In addition, you can select the Allow Continuous Classification For New Files check box to run the rule on newly created or edited files that fall within the scope of the rule, and on existing files that are moved to a new location that falls within the scope of the rule. (For the exam, be sure to remember the option for continuous classification.)
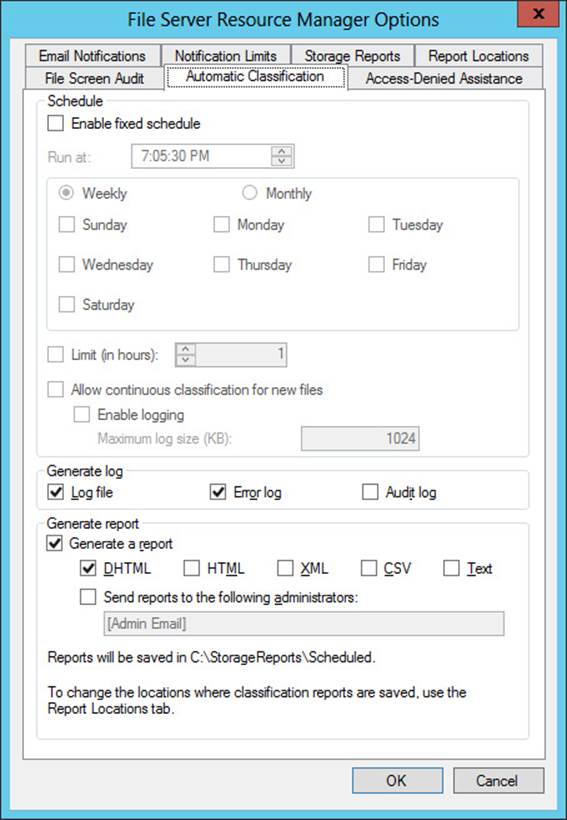
FIGURE 11-14 Configuring a schedule for a classification rule
After configuring the schedule, you can click Run Classification With All Rules Now in the Actions pane of File Server Resource Manager. This step will run all rules immediately and classify the targeted files.
Access-denied assistance
In Windows Server 2012 and Windows Server 2012 R2, you can enable the local file server to provide helpful information to a user whose access to a file or folder has been denied.
To enable this functionality, open the dialog box by right-clicking the parent node of the File Server Resource Manager console tree and then clicking Configure Options. On the Access-Denied Assistance tab of the File Server Resource Manager Options dialog box that opens, select the Enable Access-Denied Assistance check box, as shown in Figure 11-15.
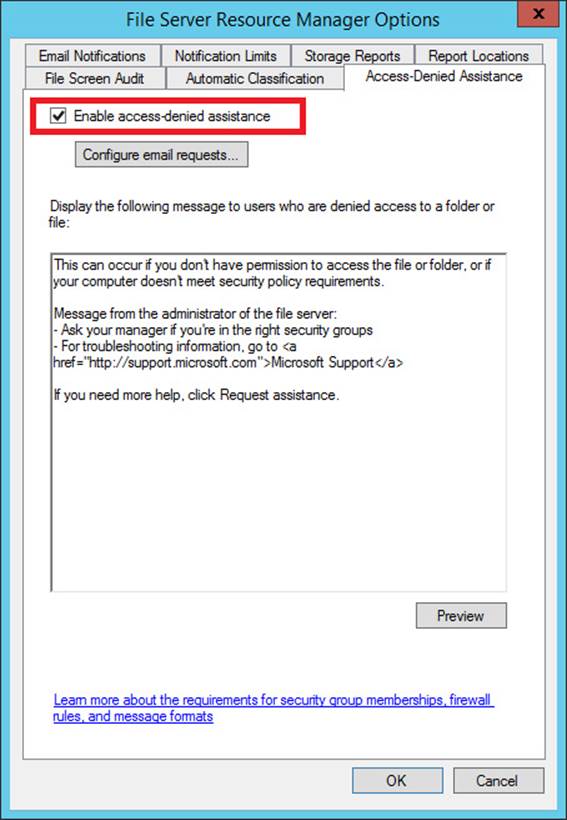
FIGURE 11-15 Enabling access-denied assistance
In the Display The Following Message text box, you can type a custom message that users will see when they are denied access to a file or folder. You can also add certain variables in brackets that will insert customized text, such as:
![]() [Original File Path] The original file path that was accessed by the user.
[Original File Path] The original file path that was accessed by the user.
![]() [Original File Path Folder] The parent folder of the original file path that was accessed by the user.
[Original File Path Folder] The parent folder of the original file path that was accessed by the user.
![]() [Admin Email] The administrator email recipient list.
[Admin Email] The administrator email recipient list.
![]() [Data Owner Email] The data owner email recipient list.
[Data Owner Email] The data owner email recipient list.
You can also configure the file server to provide in access-denied messages a Request Assistance button, which allows the user who was denied access to send an email to a predefined user. To configure this option, click Configure Email Requests, select the Enable Users To Request Assistance check box, and then click OK.
Finally, you can configure access-denied assistance on a per-folder basis. To do that, select Classification Properties in the console tree and then click Set Folder Management Properties in the Actions pane, as shown in Figure 11-16. In the dialog box that opens, use the Add button to specify the folder for which you want to configure access-denied assistance.
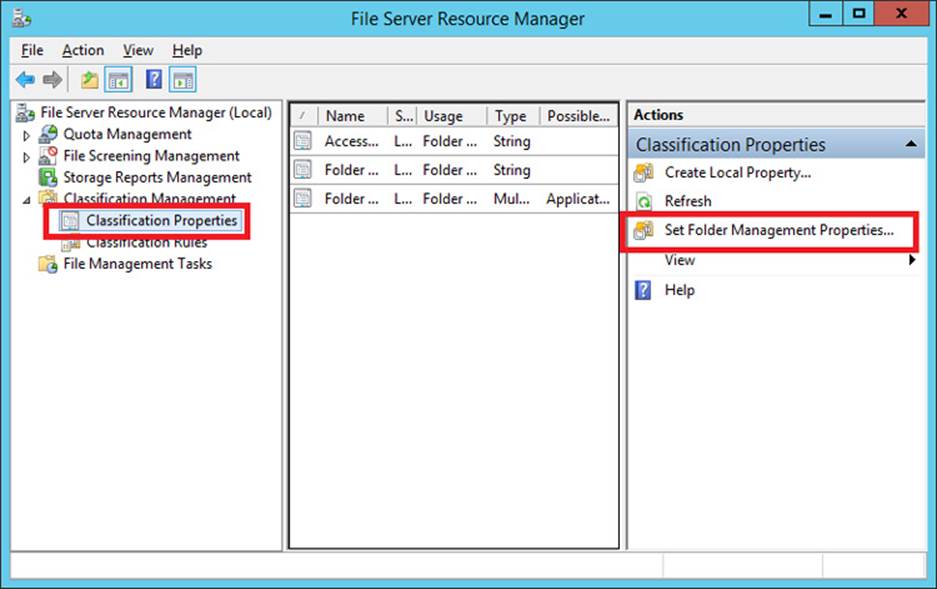
FIGURE 11-16 Configuring access-denied assistance for a specific folder
Exam Tip
You need to remember how to configure access-denied assistance, including how to configure access-denied assistance for a specific folder.
RMS Encryption
If your network environment includes an Active Directory Rights Management Service server, you can use FSRM to automatically apply RMS encryption to files in designated folders. This feature is configured through the File Management tasks node. For more information, visithttp://technet.microsoft.com/en-us/library/hh831572.aspx.
Configuring access policies
Finally, you are ready to create access policies after you have assigned attributes to users, devices, and files. To configure access policies, you need to perform the following steps:
1. Create a claims-based central access policy.
2. Use Group Policy to deploy this central access policy to your file servers.
Step 1: Create a central access policy that includes claims
This step consists of two parts, both of which you can perform in Active Directory Administrative Center. First, you create one or more central access rules that include claims. Then, you add those rules to a central access policy.
Exam Tip
Normally you’d want to create access rules and then create the central access policy to add them to.
Create a new central access rule
A central access rule is similar to an ACL in that it describes which conditions must be met for access to be granted to a resource.
To create a new central access rule, in Active Directory Administrative Center, select tree view in the navigation pane and then select Central Access Rules. In the Tasks pane, click New, and then click Central Access Rule. This step opens the Create Central Access Rule page, shown inFigure 11-17.
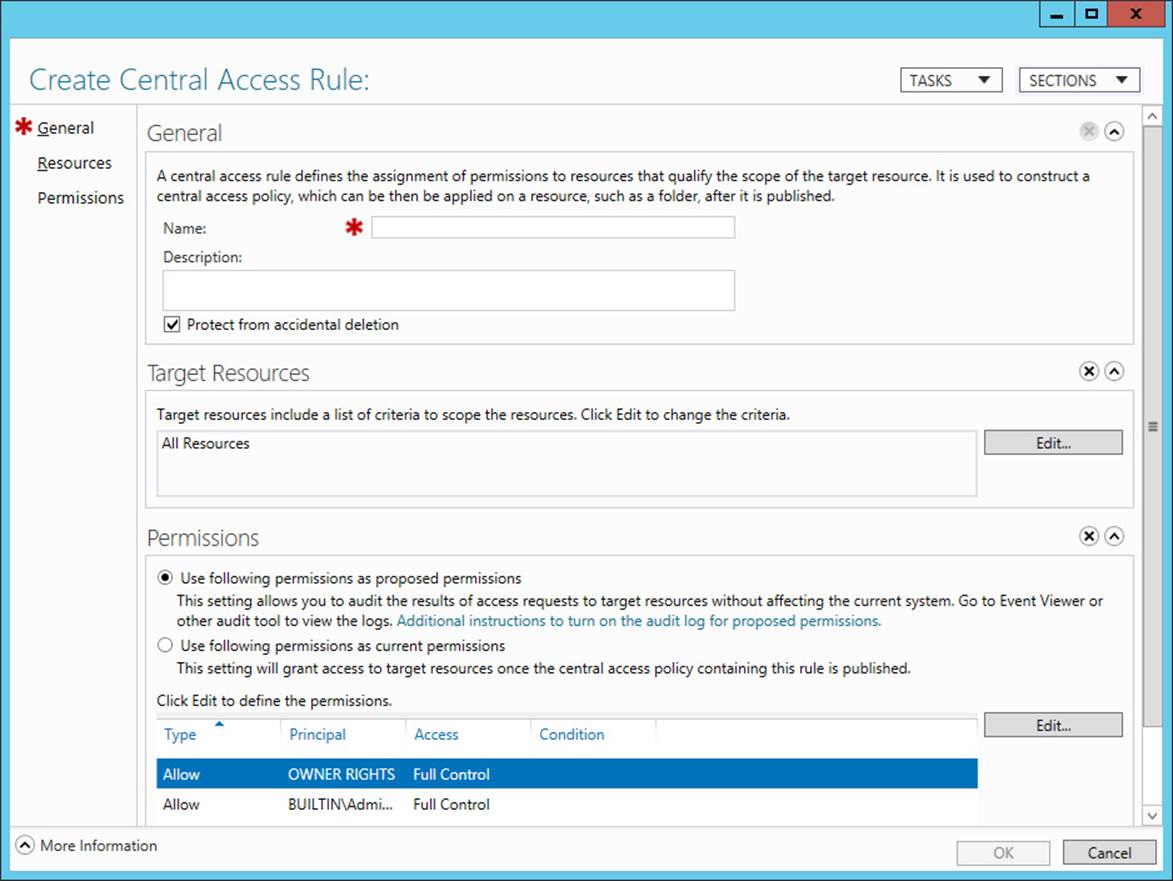
FIGURE 11-17 Creating a new central access rule
Use the following instructions to complete the page:
1. In the Name text box, type the name you want to give to the rule.
2. In the Target Resources section, click Edit, and in the Central Access Rule dialog box, add the conditions that match the target resources for which you want to define access. For example, if your goal is to define access permissions to resources that have been configured both with a Department classification property of Finance and with an Impact classification property of High, then you want to add the two conditions configured as shown in Figure 11-18.
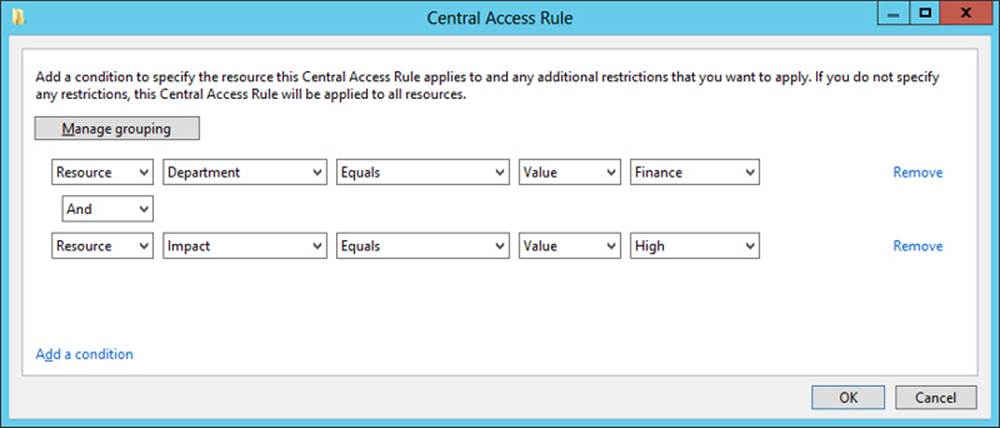
FIGURE 11-18 Configuring matching conditions for target resources
Exam Tip
You need to remember the general syntax of central access rule conditions, such as those shown in Figure 11-18.
3. In the Permissions section of the Create Central Access Rule page, select Use Following Permissions As Current Permissions and then click Edit. In the Advanced Security Settings For Permissions dialog box, click Add to open the Permission Entry For Permissions dialog box, shown in Figure 11-19. In this dialog box, do the following:
A. Near the top of the dialog box, click Select A Principal. A principal is another name for a user or group account. To configure Dynamic Access Control, you normally want to select Authenticated Users as the principal. (Remember this point both for the real world and the exam.)
B. In the middle of the dialog box, beneath Basic Permissions, select the permissions that you want to assign to users who match the conditions in your rule.
C. Near the bottom of the dialog box, add conditions that match the users for whom you want to define access. For example, if you want to provide access only to users whose accounts in Active Directory have defined a Department value of Finance and an Office value of Floor 10, and who are signed on to computers whose accounts in Active Directory have defined a Location value of HQ, then you want to add the three conditions configured as shown in Figure 11-19. Remember that if Authenticated Users attempt to access the target resource and do notmatch these conditions, the users will be completely denied access (with the exception of the file owner).
Exam Tip
As an alternative to step 3, you can leave selected the “Use Following Permissions as Proposed Permissions” option, which you can see in Figure 11-17. This option is used to stage a policy rule. Staging policies can be used to monitor the effects of a new policy entry before you enable it. You can use this option with the Group Policy setting name Audit Central Access Policy Staging. For more information, see the procedure described at http://technet.microsoft.com/en-us/library/hh846167.aspx#BKMK_1_2.
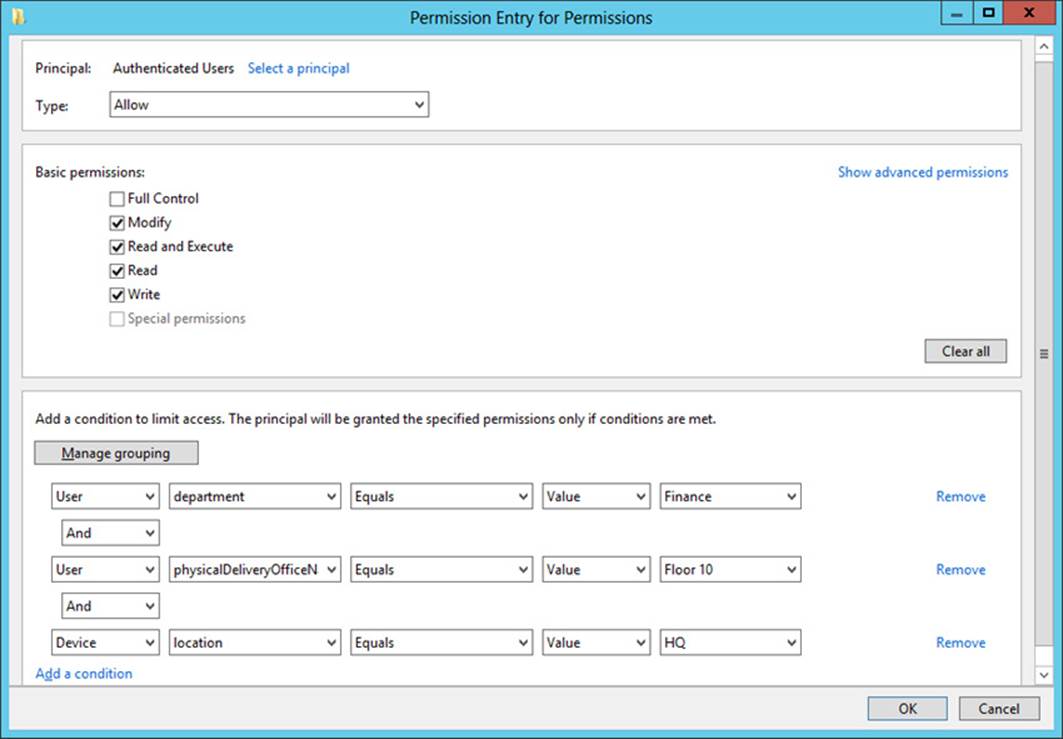
FIGURE 11-19 Configuring permissions and matching conditions for users and devices
4. Click OK three times to finish and return to Active Directory Administrative Center.
add central access ruleS to a central access policy
In the navigation pane of Active Directory Administrative Center, select tree view and then click Central Access Policies. In the Tasks pane, click New, and then click Central Access Policy.
On the Create Central Access Policy page that opens, do the following:
1. In the Name text box, type the name you want to assign to the policy.
2. In Member Central Access Rules, click Add and then add the desired central access rules you have created. Click OK twice to return to Active Directory Administrative Center.
Multiple Central Access Rules
When you include multiple access rules in a policy, all the rules will be applied along with that policy when the policy is applied. The most restrictive access permissions always take effect when two rules provide different levels of access to the same user.
Step 2: Deploy central access policy to file servers
In this step, you configure a policy setting at the domain level that will deliver chosen central access policies to your file servers. Note that you can’t actually enforce a central access policy by using Group Policy. You use Group Policy only to make desired central access policies available for selection in the Advanced Security Settings dialog box of all objects within the folder structure on file servers. The policy must then be applied to the object (usually a folder) manually.
To make your central access policies available to objects on file servers, in a GPO linked to the domain, navigate to Computer Configuration/Policies/Windows Settings/Security Settings/File System, and then click Central Access Policy. On the Action menu, select Manage Central Access Policies. In the Central Access Policies Configuration dialog box, add the central access policies that you want to make available to file servers, and then click OK.
When this Group Policy policy setting is enforced, the central access policies appear on a new Central Policy tab of this dialog box, shown in Figure 11-20. A particular central access policy applies to a folder or file object only when an administrator selects and applies it manually in these advanced security settings.
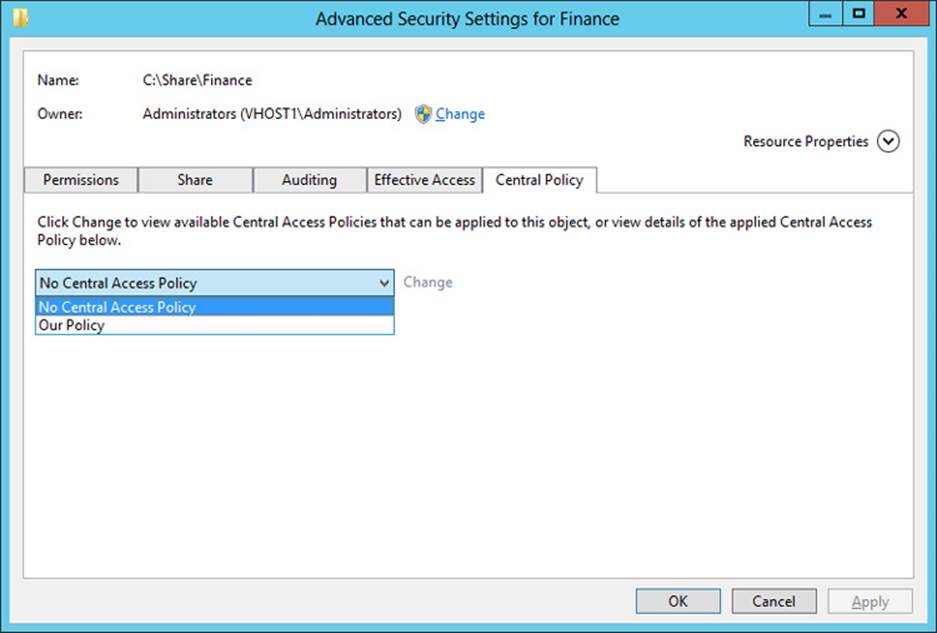
FIGURE 11-20 The Central Policy tab of the Advanced Security Settings dialog box
More Info
For more practice implementing Dynamic Access Control, you can complete the Windows Server 2012 virtual lab “Using Dynamic Access Control to Automatically and Centrally Secure Data” at http://go.microsoft.com/?linkid=9838457 or perform the Dynamic Access Control walkthrough named “Deploy a Central Access Policy (Demonstration Steps)” at http://technet.microsoft.com/en-us/library/hh846167.aspx. (Microsoft virtual labs require Internet Explorer.)
Exam Tip
The Configure and Optimize Storage objective is one of the original objectives in the File and Storage Solutions domain on the 70-412 exam. The Configure and Optimize Storage objective mostly covers iSCSI support in Windows Server 2012 and Windows Server 2012 R2. Although this objective hasn’t been identified as a topic on the 70-417 exam, it’s recommended that you learn the basics about configuring iSCSI in these operating systems anyway. For example, be sure you know the steps required to configure the iSCSI Target and iSCSI Initiator as a way to provide and provision storage in Windows Server 2012 and Windows Server 2012 R2. You should also understand the function of iSNS, a DNS-like feature used for locating iSCSI resources. To practice implementing iSCSI on Windows Server 2012, complete the virtual lab at http://go.microsoft.com/?linkid=9838443. (Microsoft virtual labs require Internet Explorer.)
Objective summary
![]() Dynamic Access Control is a new option for setting access permissions to file and folder objects in Windows Server 2012 and Windows Server 2012 R2. Dynamic Access Control works by assigning file classifications to target resources, configuring user and device claims, and then creating rules that describe conditions for access.
Dynamic Access Control is a new option for setting access permissions to file and folder objects in Windows Server 2012 and Windows Server 2012 R2. Dynamic Access Control works by assigning file classifications to target resources, configuring user and device claims, and then creating rules that describe conditions for access.
![]() Dynamic Access Control relies on a modified form of Kerberos in which user tokens are expanded to include extra information called claims about the user and the device from which the user is connecting. To support this functionality, you need to enable Key Distribution Center support for claims-based authentication in Group Policy at the Domain Controllers OU level. You also need to define the claims types that you will include in the Kerberos token for each user.
Dynamic Access Control relies on a modified form of Kerberos in which user tokens are expanded to include extra information called claims about the user and the device from which the user is connecting. To support this functionality, you need to enable Key Distribution Center support for claims-based authentication in Group Policy at the Domain Controllers OU level. You also need to define the claims types that you will include in the Kerberos token for each user.
![]() To assign file classifications, first enable chosen resource properties in Active Directory and add the properties to a property list. Afterward, run the Update-FSRMClassificationPropertyDefinition cmdlet. Then, configure classification values of desired file or folder objects on the Classification tab of the Properties dialog box. You can also use File Server Resource Manager to configure file classification rules that classify files automatically, for example, on the basis of an expression found in the contents of the file.
To assign file classifications, first enable chosen resource properties in Active Directory and add the properties to a property list. Afterward, run the Update-FSRMClassificationPropertyDefinition cmdlet. Then, configure classification values of desired file or folder objects on the Classification tab of the Properties dialog box. You can also use File Server Resource Manager to configure file classification rules that classify files automatically, for example, on the basis of an expression found in the contents of the file.
![]() A central access rule includes one or more conditional expressions that match target resources and one or more conditional expressions that match users or devices and defines permissions to the target resources. One or more central access rules must be added to a central access policy before it can be deployed to file servers.
A central access rule includes one or more conditional expressions that match target resources and one or more conditional expressions that match users or devices and defines permissions to the target resources. One or more central access rules must be added to a central access policy before it can be deployed to file servers.
![]() You use Group Policy to make central access policies available to file and folder objects. A central policy must be selected and enforced manually on a file or folder.
You use Group Policy to make central access policies available to file and folder objects. A central policy must be selected and enforced manually on a file or folder.
Objective review
Answer the following questions to test your knowledge of the information in this objective. You can find the answers to these questions and explanations of why each answer choice is correct or incorrect in the “Answers” section at the end of the chapter.
1. You are a network administrator for Adatum.com. The Adatum.com network consists of a single domain that spans branch offices in New York and London. Within the Adatum.com domain, the users and computers within the New York office are contained in an OU named US, and the users and computers within the London office are contained in an OU named UK.
You want to be able to classify data as originating from either the New York or the London office. You create a resource property named Country and configure the suggested values “US” and “UK.” You want administrators in both the New York and London offices to see the Country resource property appear on the Classification tab of files and folder properties.
What should you do next?
A. Run the Update-FSRMClassificationPropertyDefinition cmdlet.
B. Enable the Country resource property.
C. Create a classification rule.
D. Add the Country property to a resource property list.
2. Your organization’s network consists of a single Active Directory domain. All servers are running Windows Server 2012 and all clients are running Windows 8.
You want to enable claims-based access authorization for users in your domain. Which of the following steps should you take to take to achieve this goal?
A. Enable the policy setting KDC Support For Claims, Compound Authentication, And Kerberos Armoring in a GPO at the Domain Controllers OU level.
B. Enable the policy setting KDC Support For Claims, Compound Authentication, And Kerberos Armoring in a GPO at the domain level.
C. Enable the policy setting Kerberos Support For Claims, Compound Authentication, And Kerberos Armoring in a GPO at the Domain Controllers OU level.
D. Enable the policy setting Kerberos Support For Claims, Compound Authentication, And Kerberos Armoring in a GPO at the domain level.
3. You are a network administrator for Proseware.com. The Proseware.com network consists of a single Active Directory domain. All servers in the network are running Windows Server 2012, and all clients are running Windows 8.
On a file server named FileSrv1, your manager has created five new file shares named Finance, Marketing, Sales, Operations, and Legal. On each share, your manager has assigned Full Control to Authenticated Users for both the NTFS and share permissions.
Your manager now asks you to configure permissions to the contents of each departmental file share so that Full Control access is restricted to members of the corresponding department, and that no other users are allowed any access. Your manager also wants you to ensure that files within each departmental share can be traced to their origin even when they are moved from their original share location.
Which of the following steps will allow you to meet these stated goals? (Choose two. Each answer represents part of the solution.)
A. On each new shared folder, remove all currently configured NTFS permissions and then grant Full Control NTFS permissions to a security group that includes all the members of the corresponding department only.
B. On each new shared folder, remove all currently configured share permissions and then grant Full Control share permissions to a security group that includes all the members of the corresponding department only.
C. On each department’s shared folder, configure a Department classification property value that corresponds to the name of the department.
D. On each department’s shared folder, apply a central access policy that assigns to members of the appropriate department Full Control permissions on files assigned with a matching Department value classification.
 Thought experiment: Implementing Dynamic Access Control at Adventure Works
You are a network administrator for Adventure Works, Inc., a rapidly growing company based in Seattle that has just opened its first branch office in Denver. The network consists of a single Active Directory domain, Adventureworks.com. All servers are running either Windows Server 2008 R2 or Windows Server 2012, and all clients are running either Windows 7 or Windows 8. The two sites are linked by a site-to-site VPN.
The Seattle and Denver offices each include a main file server, named FSSeattle1 and FSDenver1, respectively, that is shared by all users in the local office location. DFS has been configured so that the same five shares are available to authorized users in both offices. Each share is used by one company-wide department, including Finance, Sales and Marketing, Operations, Human Resources, and Research and Development.
Both office locations include employees from each of the five departments.
A goal for the IT department is to address security concerns about confidential information while making all other information available to members of each department.
With the preceding information in mind, answer the following questions. You can find the answers to these questions in the “Answers” section.
1. If you wanted to limit access to some files within each department share to members of each office site, how can you best achieve this goal by using NTFS file permissions?
2. Given the information provided about the network, what changes might you need to make to ensure that Dynamic Access Control can be implemented on the network?
3. You want to make sure that when employees at one office designate a file in their department share as highly confidential, that the file can be viewed only from computers with account properties in Active Directory that indicate the same physical delivery office name as that of the user. How might you achieve this goal by using Dynamic Access Control permissions only? (Describe or list resource properties, claims types, and the central access rules you would need to create. You can assume that all informational fields are filled out in the properties of both user and computer accounts at both locations.)
4. What changes must you make to the network before you can configure detailed assistance to all users who are denied access to a resource?
Answers
This section contains the answers to the Objective Review and the Thought Experiment.
Objective 11.1: Review
1. Correct answer: D
A. Incorrect: You should run this cmdlet after you add the new resource property to a resource property list.
B. Incorrect: You don’t need to enable new resource properties that you create. They are already enabled when you create them.
C. Incorrect: Optionally, you can create a classification rule to classify files and folders automatically. However, you can take this step only later, after you have updated file and folder objects.
D. Correct: After you create or enable a resource property, you need to add it to a resource property list. Only then can you update file and folder objects so that they include this resource property on the Classification tab.
2. Correct answer: A
A. Correct: To enable claims-based authorization in your domain, you should enable this policy setting at the domain controller level.
B. Incorrect: You should enable this policy setting at the domain controller level, not at the domain level.
C. Incorrect: This policy setting enables computers to request claims. It is used for policy auditing, not for enabling claims-based authorization.
D. Incorrect: This policy setting enables computers to request claims. It is used for policy auditing, not for enabling claims-based authorization.
3. Correct answers: C, D
A. Incorrect: Changing the NTFS permissions will restrict access to members of the appropriate department, but it will not provide any information about files that will allow them to be traced when they are moved outside of the shared folder.
B. Incorrect: Changing the share permissions will restrict access to members of the appropriate department when they connect over the network, but it will not provide any information about files that will allow them to be traced when they are moved outside of the shared folder.
C. Correct: Configuring a Department property value will allow you to classify the files in each departmental shared folder as belonging to that department, even when they leave that folder.
D. Correct: Applying this type of central access policy to each shared folder will configure the files within these folders with appropriate access permissions.
Thought experiment
1. You should create a security group for members of each site-specific department, such as Seattle-Finance and Denver-Finance. Then you could create a folder in each department share to which only members of each site-specific department had access.
2. You might need to install a Windows Server 2012 domain controller at each site.
3. You can configure the following:
![]() Resource property: Confidentiality
Resource property: Confidentiality
![]() Claims types: Office name (Physical-Delivery-Office-Name) for both users and computers
Claims types: Office name (Physical-Delivery-Office-Name) for both users and computers
![]() Access rule, target resource conditional expression: Resource.Confidentiality Equals High
Access rule, target resource conditional expression: Resource.Confidentiality Equals High
![]() Access rule, permissions: Authenticated users = Full Control. Conditional expression: Device.physicalDeliveryOfficeName Equals User.physicalDeliveryOfficeName
Access rule, permissions: Authenticated users = Full Control. Conditional expression: Device.physicalDeliveryOfficeName Equals User.physicalDeliveryOfficeName
4. You must first upgrade all clients to Windows 8.