Exam Ref 70-417 Upgrading Your Skills to Windows Server 2012 R2 (2014)
Chapter 12. Implement business continuity and disaster recovery
This exam domain includes two objectives that, on the 70-417 upgrade exam, each emphasizes one feature new to Windows Server 2012 and Windows Server 2012 R2. For the Configure and Manage Backups objective, the new feature is Windows Azure Backup. (This feature is actually an optional online extension to Windows Server Backup in Windows Server 2012 and Windows Server 2012 R2.) For the Configure Site-level Fault Tolerance objective, the new feature is one of the most interesting Windows Server features ever: Hyper-V Replica.
 Exam Tip
Microsoft has announced that Windows Azure is being renamed Microsoft Azure. You can expect the name change to be reflected in the exams when the exams are updated.
Objectives in this chapter:
![]() Objective 12.1: Configure and manage backups
Objective 12.1: Configure and manage backups
![]() Objective 12.2: Configure site-level fault tolerance
Objective 12.2: Configure site-level fault tolerance
Objective 12.1: Configure and manage backups
Windows Azure Backup (formerly Windows Azure Online Backup) is an online server backup service that was first introduced at approximately the same time as Windows Server 2012. Windows Azure Backup is now much more closely integrated with Windows Azure services than it was when Windows Server 2012 was first released. The original procedures for configuring online server backups to Windows Azure have therefore changed since this feature first appeared.
As with all features new to Windows Server 2012 and Windows Server 2012 R2, Windows Azure Backup is a topic that’s likely to appear in an exam question. Fortunately, it’s also an easy topic to understand, provided you create a trial Windows Azure account and get some hands-on experience with it.
This section covers the following topics:
![]() Configuring online backups
Configuring online backups
![]() Performing Windows Azure Backups in Windows PowerShell
Performing Windows Azure Backups in Windows PowerShell
Certificate requirements for Windows Azure Backup
Before you can configure online backups to Windows Azure, you need to obtain or create a public certificate to upload to Windows Azure when you register your server or servers online. You can use any valid Secure Sockets Layer (SSL) certificate issued by a CA that is trusted by Microsoft, or you can create your own self-signed certificate by using the Makecert.exe tool.
Remember the following details about the certificate requirements. They could easily form the basis of a test question:
![]() It must be an x.509 v3 certificate.
It must be an x.509 v3 certificate.
![]() The key length of the certificate must be at least 2048 bits.
The key length of the certificate must be at least 2048 bits.
![]() The certificate must have a valid ClientAuthentication EKU.
The certificate must have a valid ClientAuthentication EKU.
![]() The certificate must have a validity period that is less than three years.
The certificate must have a validity period that is less than three years.
![]() The certificate should be installed in the Personal certificate store of the computer account of server or servers you want to back up. (You can install the same certificate on multiple servers as long as you configure each server to be backed up to the same backup vault in Windows Azure.)
The certificate should be installed in the Personal certificate store of the computer account of server or servers you want to back up. (You can install the same certificate on multiple servers as long as you configure each server to be backed up to the same backup vault in Windows Azure.)
![]() The certificate uploaded to Windows Azure must be in a .cer format. (This version contains only the public key, not the private key.)
The certificate uploaded to Windows Azure must be in a .cer format. (This version contains only the public key, not the private key.)
Creating a self-signed certificate with Makecert.exe
To access the Makecert.exe utility, you need to download and install the latest version of the Windows Software Development Kit (SDK). At the time of this writing, the latest version is the Windows SDK for Windows 8.1, which you can find at the following address:http://msdn.microsoft.com/en-us/windows/desktop/aa904949.aspx.
To install Makecert.exe, you need only to install one component of the Windows SDK for Windows 8.1: the feature named “Windows Software Development Kit.” After you have installed this component, you are ready to use the Makecert utility. To create a self-signed certificate that meets the requirements defined by Windows Azure, open an elevated command prompt and then (assuming the Windows SDK version is 8.1) navigate to C:\Program Files (x86)\Windows Kits\8.1\bin\x64 by typing the following:
cd C:\Program Files (x86)\Windows Kits\8.1\bin\x64
Then type the following command, replacing CertificateName with the desired name of the certificate and mm/dd/yyyy with a desired expiry date that is less than three years from the present date:
makecert.exe -r -pe -n CN=CertificateName -ss my -sr LocalMachine -eku
1.3.6.1.5.5.7.3.2 -len 2048 -e mm/dd/yyyy CertificateName.cer
For example, the following command installs a certificate named AzureBackup in the Personal certificate store of the local computer account and creates a .cer file named AzureBackup.cer, each with an expiry date of 01/01/2017:
makecert.exe -r -pe -n CN=AzureBackup -ss my -sr localmachine -eku
1.3.6.1.5.5.7.3.2 -len 2048 -e 01/01/2017 AzureBackup.cer
Note
The .cer file created by this running command is stored in the same directory in which the command is run. You might want to move this file to a more convenient location, such as the desktop.
If you want to configure online backups for other servers, make sure you export the new certificate from the Personal certificate store with the private key. The resulting file will be a .pfx file. You can then copy this .pfx file to other servers and install it as needed.
Creating a backup vault in Windows Azure management portal
After you have created the .cer file, the next step in configuring online backups is to create a backup vault in Windows Azure that will use this public certificate. To do so, first navigate to the Windows Azure management portal at https://manage.windowsazure.com/. In the navigation menu on the left, select Recovery Services, as shown in Figure 12-1.
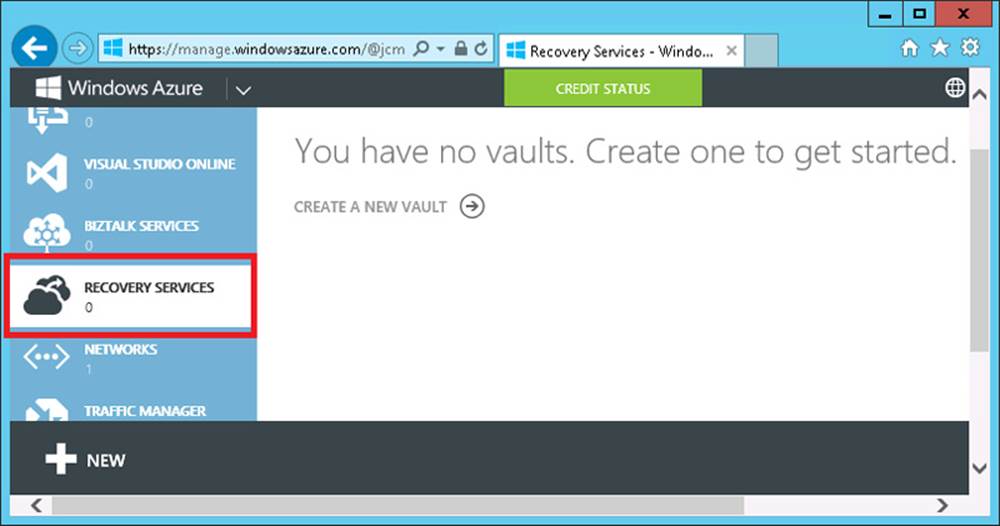
FIGURE 12-1 Creating a new vault in the Windows Azure management portal
Click +NEW and the bottom menu will expand, as shown in Figure 12-2. On the expanded menu, click Backup Vault and then click Quick Create. Enter a name for the vault and then select the most local region. Finally, click Create Vault.
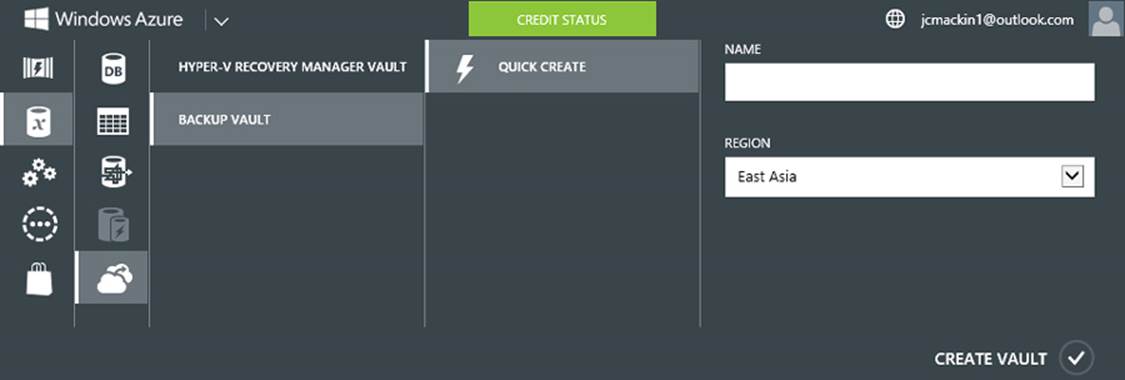
FIGURE 12-2 Creating a new vault in the Windows Azure management portal (continued)
Uploading a certificate to Windows Azure
After the backup vault is created, select the vault in the Windows Azure management portal and then click Manage Certificate. (You can see all of your backup vaults when you click Recovery Services, as shown in Figure 12-1.)
Use the Manage Certificate option to browse to and select the .cer file you either obtained from a CA or created with the Makecert utlility.
Downloading and installing the Windows Azure Backup Agent
After you upload the public certificate, you can download the Windows Azure Backup Agent and install it locally. To find the agent in the Windows Azure management portal, double-click on your backup vault and look for a Download Agent link.
A new Backup node then appears in the navigation pane of the Windows Server Backup console, as shown in Figure 12-3. (An earlier version of the Microsoft Azure Backup Agent made this node appear as "Online Backup" instead of just "Backup," so be prepared to see either name on the exam.)
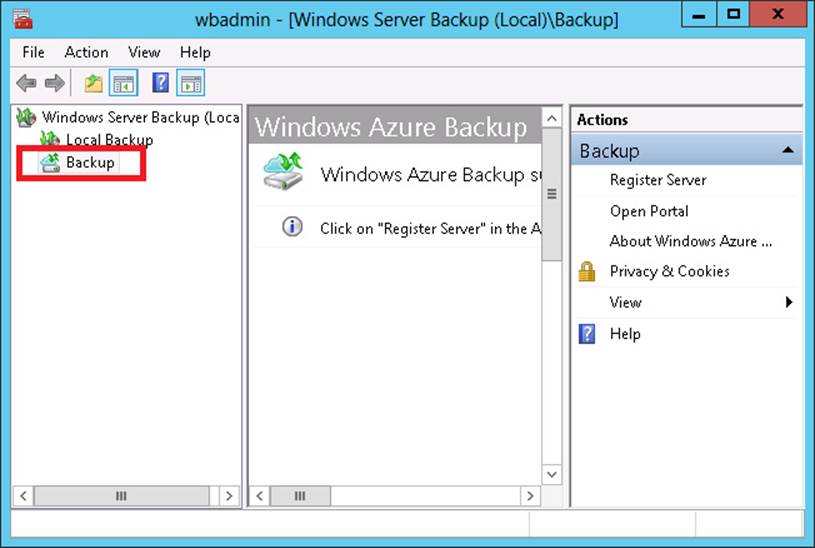
FIGURE 12-3 The Backup node in the Windows Server Backup console
If you prefer, you can also configure online backups from the Windows Azure Backup snap-in, which becomes available through the Microsoft Management Console after you install the agent. The Windows Azure Backup snap-in provides exactly the same set of options as the Backup node in the Windows Server Backup console does.
Registering your server
The next step is to register your server. Registering a server enables you to perform backups from that same server only. (Remember this point for the exam.) To register the server, from the Actions menu, select Register Server.
The Register Server Wizard includes three configuration steps. First, you are given an opportunity to specify a proxy server if desired. Second, you are asked to specify a certificate that you have previously uploaded to a backup vault. (The certificate and backup vault you choose will determine where the backups for the local server will be stored.) Third, you are asked to provide a passphrase that will be used to encrypt your backup data and a location to save this passphrase in a file. You need to provide this passphrase when you perform a restore operation, so it’s essential that you don’t lose it. (Microsoft doesn’t maintain a copy of your passphrase.) A Generate Passphrase option creates the passphrase for you automatically.
After you register a server, new options for Online Backup appear in the Actions pane, including Schedule Backup, Recover Data, Change Properties, and Open Portal.
Exam Tip
Remember this last sequence of steps: Create an account, create a backup vault, upload a certificate, download and install the agent, and then register the server.
Creating an online backup schedule
Here’s an unexpected detail about online backups that could appear on the 70-417 exam: Creating a schedule for your online backup is a requirement. Unlike with local backups in the Windows Server Backup utility, you can’t perform a one-time online backup until you have created an automated backup schedule for the same items first.
To start the Schedule Backup Wizard, click Schedule Backup in the Actions pane, as shown in Figure 12-4.
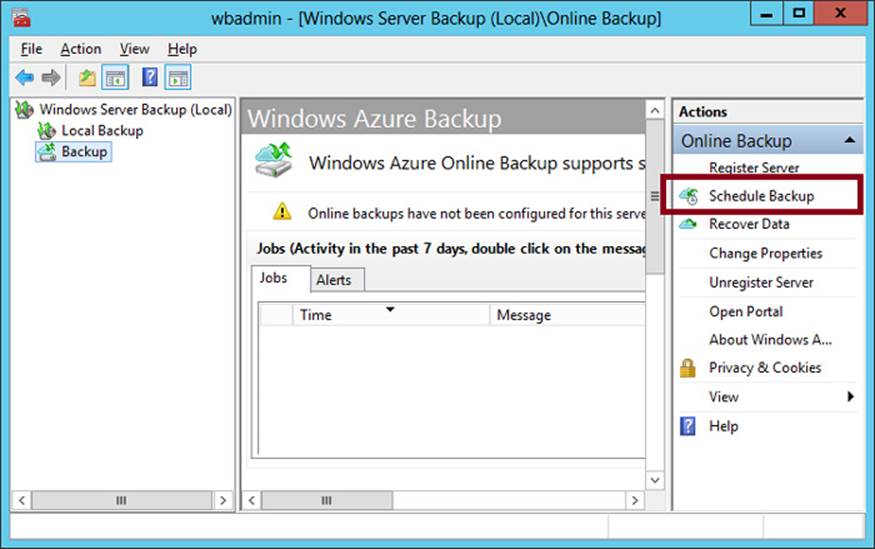
FIGURE 12-4 Scheduling an online backup
Selecting Items for Backup
The items you can select to back up in the Schedule Backup Wizard are shown in Figure 12-5. You remember that in Windows Server 2008, you could back up only entire volumes, not folders or files. That’s changed now. Beginning in Windows Server 2008 R2 and continuing through to Windows Server 2012 R2, you can now back up selected individual volumes, folders, or files. This improved granularity of backup sets might be difficult for the exam writers to use as the basis for a test question, but you should be aware of it both for the exam and your job in the real world.
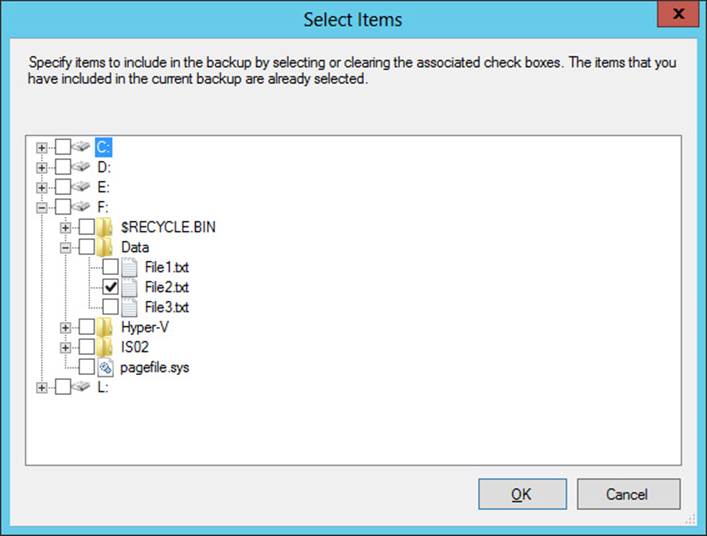
FIGURE 12-5 Backup selection for an online backup
It’s important to point out a certain limitation related to selecting items in online backup sets, compared to local backup sets. The Select Items dialog box for local backups is shown in Figure 12-6. Compare this to Figure 12-5. Notice the local backup lets you select settings that you can’t select for online backups: Bare Metal Recovery, System State, and Hyper-V data (individual VMs or the host component).
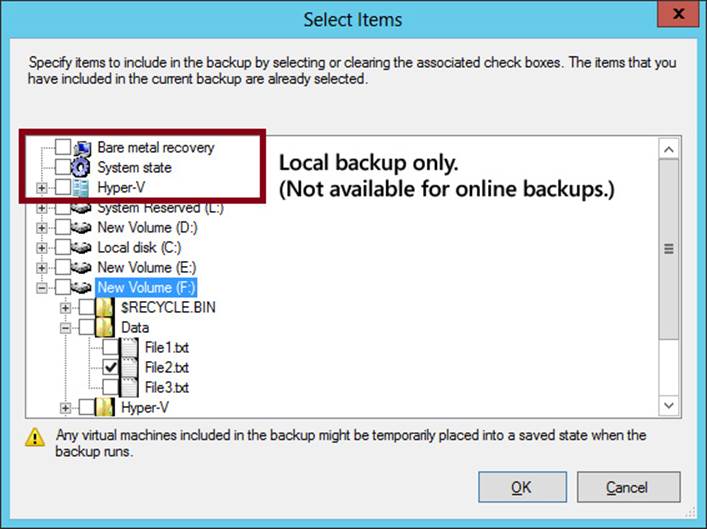
FIGURE 12-6 Backup selection for a local (not online) backup
Exam Tip
Remember that you can’t use Windows Azure Backup for Bare Metal Recovery, System State, or Hyper-V data. There is no restriction on individual folders or files.
Excluding ITEMS from BAcKUP
Beginning in Windows Server 2008 R2 and continuing through to Windows Server 2012 R2, you can exclude files or subfolders from a volume or folder that you have selected for backup. A good example of a folder you might want to exclude from a backup set is a temp folder. When you choose to exclude a folder from your backup set, you are also given an opportunity to exclude its subfolders, as shown in Figure 12-7.

FIGURE 12-7 Excluding a folder and its subfolders from a backup set
It’s possible that you’ll see a question on the 70-417 exam that requires some understanding of backup exclusions. Such a question might set up a scenario in which you need to perform a backup more quickly, with less space, or with less network traffic than the current backup set. The “correct answer” might be to exclude a folder with temporary data in the current backup set.
Specifying retention settings
Another feature especially relevant for the exam can be found on the Specify Retention Setting page of the Schedule Backup Wizard, shown in Figure 12-8. The retention setting, also called the retention range, is simply the number of days that the backup cannot be overwritten or deleted to make space for another backup. You can set the retention range for a backup at 7 days (the default), 15 days, or 30 days.
If your Windows Azure Backup account runs out of free space and your retention settings prevent a new backup from overwriting any of the existing backups, the new backup will fail. For example, imagine that the storage quota for your account is 300 GB and you have scheduled a weekly backup job of 200 GB. If you set the retention range of the backup job for 15 days, the backup will fail in the second week. At the default retention setting of 7 days, however, the backup will succeed every week.
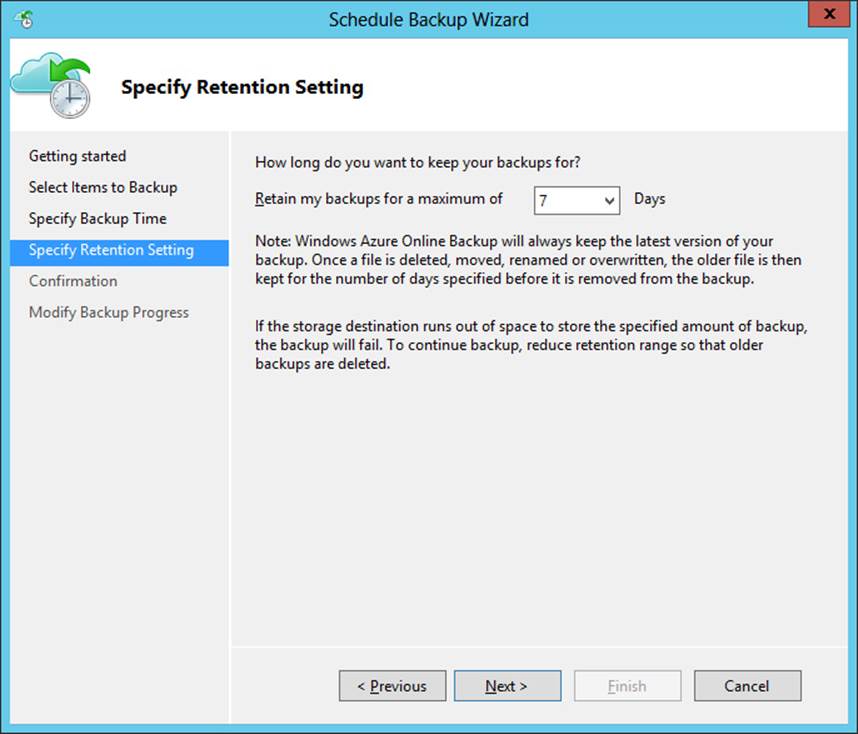
FIGURE 12-8 Backup retention settings
Configuring the Back Up Now option
The Back Up Now option appears in the Actions pane for online backups, as shown in Figure 12-9, but it does so only after you first complete the Schedule Backup Wizard. As stated earlier, Back Up Now for online backups allows you to perform additional online backups only of online backup sets that have been previously defined and scheduled. You cannot use this option to select a new set of volumes, folders, or files and then perform an online backup of that new set.
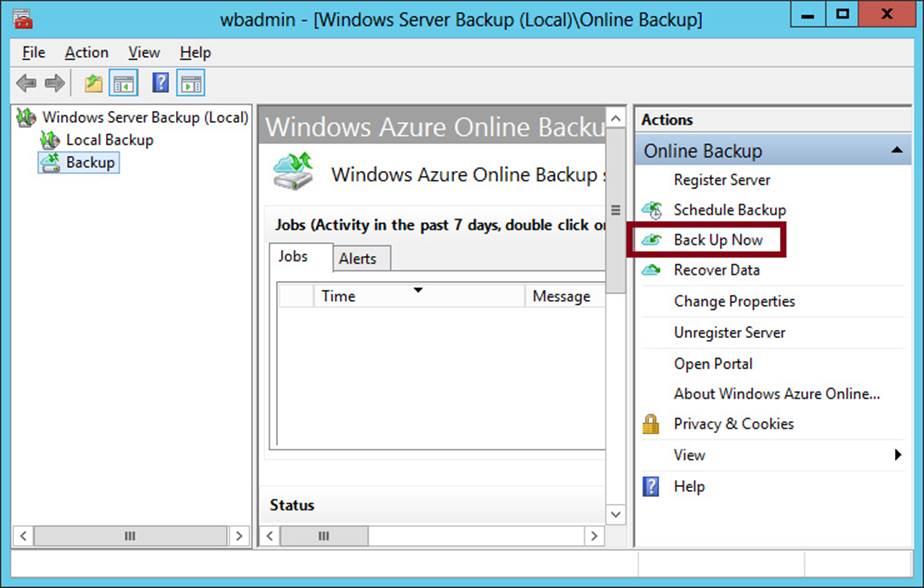
FIGURE 12-9 Performing an additional backup of a scheduled backup
Aside from this critical difference, the Back Up Now option for online backups resembles the Back Up Once option for local backups.
Recovering data
To restore data that has been backed up, choose the Recover Data option in the Actions pane. There isn’t anything new or unusual about this option that would likely confuse you in the real world or the exam world. However, it’s worth remembering that you can restore online backups to an alternate location such as another volume, a file share, or another server.
Enabling bandwidth throttling
You can restrict the amount of bandwidth used during your online backup operations in a way that depends on when the backup occurs. To enable bandwidth throttling, click Change Properties in the Actions pane, click the Throttling tab, and then select the Enable Internet Bandwidth Usage Throttling For Backup Operations check box, as shown in Figure 12-10.
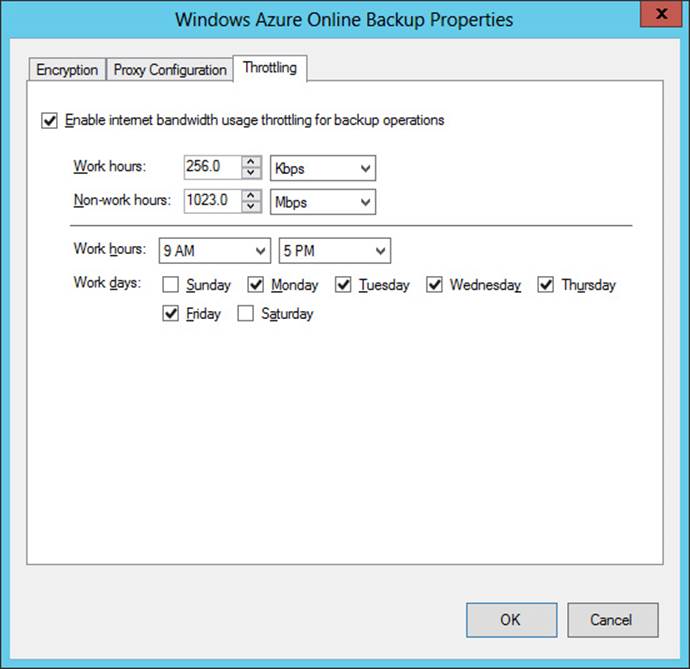
FIGURE 12-10 Configuring bandwidth throttling for online backups
Bandwidth throttling works by letting you set different bandwidth speeds for work and nonwork hours. First you define the hours that should be considered work hours and for which days of the week. You then specify how much Internet bandwidth you want to use for online backup operations during both these work hours and during the remaining nonwork hours.
Bandwidth throttling might be the most likely feature about online backups to appear on the exam. For example, you could see a question that displays the Throttling tab and an accompanying scenario in which you need to adjust the settings in a way that reduces the impact of online backups on your users. In such a case, you might need to redefine the work hours (perhaps by lengthening the work day). Alternatively, you might need to decrease the bandwidth currently assigned to work hours if you want to prevent workday disruption, or increase the bandwidth currently assigned to nonwork hours if you want the online backups to be performed as quickly as possible.
Exam Tip
If your knowledge is rusty, be sure to review topics related to backing up and restoring that have remained the same since Windows Server 2008. For example, remember that when you enable and configure Shadow Copies settings on a file server, users can use the Previous Versions tab to restore older versions of files, and that you can use the VSSAdmin tool to manage this feature. Remember also the function of the Backup Operators group: It grants users not only the right to perform backups, but also the right to restore and shut down the system.
Performing Windows Azure Backups in Windows PowerShell
After you install the Windows Azure Backup Agent, an additional Windows PowerShell module becomes available: MSOnlineBackup. You can use the cmdlets in this module to configure and perform backups to Windows Azure. Some of these cmdlets are likely to appear on the 70-417 exam, so you need to review them.
To see all 35 available cmdlets in the MSOnlineBackup module, type the following Windows PowerShell command:
Get-Command -Module MSOnlineBackup
You’ll notice that the cmdlets in the MSOnlineBackup module all include the letters “OB,” as in Get-OBPolicy, Set-OBMachineSetting, and Start-OBBackup. In case it isn’t obvious, “OB” stands for “online backup.” That information by itself can already help you answer a question correctly. For example, if you see a question asking you for the cmdlet needed to register a server with Windows Azure Backup, you know you can immediately eliminate any cmdlet that doesn’t include “OB.”
Although it’s a good idea to review all 35 cmdlets, it’s essential to emphasize the ones that are most likely to appear on the exam. The most important cmdlets for Windows Azure Backup relate to registering a server, creating an online backup policy, and performing an online backup.
Registering a server with Windows Azure Backup
If you use Windows PowerShell for online backups, you’ll typically use PowerShell scripts.
You don’t actually need to know PowerShell scripting for the 70-417 exam. You just need to know the key cmdlets that are used to perform each function. For example, the following script might be used to register a server with Windows Azure Backup. The key cmdlet you need to know is in the last line: Start-OBRegistration.
$pwd = ConvertTo-SecureString -String <password> -AsPlainText –Force
$cred = New-Object –TypeName System.Management.Automation.PsCredential –ArgumentList
<username>, $pwd
Start-OBRegistration -Credential $cred
After you register the server, you need to use the Set-OBMachineSetting cmdlet to set the encryption passphrase, as in this example:
$pass = ConvertTo-SecureString -String <password> -AsPlainText –Force
Set-OBMachineSetting -EncryptionPassphrase $pass
Exam Tip
Remember the Start-OBRegistration and Set-OBMachineSetting cmdlets for the exam.
Creating an online backup policy
You would normally use Windows PowerShell scripting to configure an online backup policy, which is stored in an OBPolicy object. Fortunately, you don’t need to know how to configure an online backup policy through Windows PowerShell scripting for the 70-417 exam. However, it helps when you understand that to define an online backup policy, you need to define certain parameters (such as the schedule, file storage locations, and a data retention policy). For example, you could use the following commands to set a new online backup policy for a server:
$fspec = New-OBFileSpec –FileSpec C:\test\texttext1.txt
$rpolicy = New-OBRetentionPolicy
$sch = New-OBSchedule
New-OBPolicy | Add-OBFileSpec -FileSPec $fspec | Set-OBRetentionPolicy -RetentionPolicy
$rpolicy | Set-OBSchedule -Schedule $sch | Set-OBPolicy
The most important cmdlets here are New-OBSchedule and New-OBPolicy.
Starting an online backup
After you create an OBPolicy object, you could use the following command to start an online backup immediately by using the values stored in that OBPolicy object:
Get-OBPolicy|Start-OBBackup
Exam Tip
Remember the Get-OBPolicy|Start-OBBackup command for the exam.
Table 12-1 includes nine important cmdlets for Windows Azure Backup, along with their official descriptions.

TABLE 12-1 Names and descriptions of important cmdlets for Backup
More Info
For more information about the cmdlets in the MSOnlineBackup module, see “Windows Azure Online Backup Cmdlets in Windows PowerShell” at http://technet.microsoft.com/en-us/library/hh770400.aspx. For in-depth information about how to use Windows PowerShell to configure and implement an online backup policy, see the post named “Microsoft Online Backup Service” by Jeffrey Snover on the Windows Server Blog at http://blogs.technet.com/b/windowsserver/archive/2012/03/28/microsoft-online-backup-service.aspx.
Objective summary
![]() Windows Server 2012 and Windows Server 2012 R2 let you back up selected volumes, folders, and files of the local server over the Internet to cloud storage on Microsoft-owned premises. This functionality is provided by an optional add-on service called Windows Azure Backup, formerly called Windows Azure Online Backup.
Windows Server 2012 and Windows Server 2012 R2 let you back up selected volumes, folders, and files of the local server over the Internet to cloud storage on Microsoft-owned premises. This functionality is provided by an optional add-on service called Windows Azure Backup, formerly called Windows Azure Online Backup.
![]() To use Windows Azure Backup, you first need to create an account on the Windows Azure Backup website. Then, create a backup vault, upload a public certificate to the vault, and download and install the Windows Azure Backup Agent to desired local servers.
To use Windows Azure Backup, you first need to create an account on the Windows Azure Backup website. Then, create a backup vault, upload a public certificate to the vault, and download and install the Windows Azure Backup Agent to desired local servers.
![]() After you install the Windows Azure Backup Agent, you can administer online backups in either the Windows Server Backup console or the Microsoft Management Console Windows Azure Backup snap-in. The first step to configuring online backups for a particular server is to register that server online.
After you install the Windows Azure Backup Agent, you can administer online backups in either the Windows Server Backup console or the Microsoft Management Console Windows Azure Backup snap-in. The first step to configuring online backups for a particular server is to register that server online.
![]() With online backups, you need to create a backup schedule for any backup sets you define. When you run the Schedule Backup Wizard, you select the volumes, folders, and files in the backup, specify any exclusions, set retention settings, and determine the times during the week you want the backup to run.
With online backups, you need to create a backup schedule for any backup sets you define. When you run the Schedule Backup Wizard, you select the volumes, folders, and files in the backup, specify any exclusions, set retention settings, and determine the times during the week you want the backup to run.
![]() Bandwidth throttling is a feature that lets you limit to the amount of Internet bandwidth you want to consume for your online backups. With bandwidth throttling, you define the hours in the week to be considered work hours and then specify the bandwidth in Kbps or Mbps you want online backups to use during these work hours as well as during the remaining nonwork hours.
Bandwidth throttling is a feature that lets you limit to the amount of Internet bandwidth you want to consume for your online backups. With bandwidth throttling, you define the hours in the week to be considered work hours and then specify the bandwidth in Kbps or Mbps you want online backups to use during these work hours as well as during the remaining nonwork hours.
![]() You can use Windows PowerShell to configure and perform online backups to Windows Azure, typically through scripting.
You can use Windows PowerShell to configure and perform online backups to Windows Azure, typically through scripting.
Objective review
Answer the following questions to test your knowledge of the information in this objective. You can find the answers to these questions and explanations of why each answer choice is correct or incorrect in the “Answers” section at the end of the chapter.
1. You configure a Hyper-V host running Windows Server 2012 named VHost01 to perform a Windows Azure Backup at 11:00 P.M. every Wednesday. The organization’s Internet connection isn’t used for any other operations until 8:00 A.M. the following day. After running the online backup for the first time, you discover that the backup operation completes at 10:00 A.M. Thursday, after the start of the workday. You open the bandwidth throttling settings for the server and see the configuration shown in Figure 12-11.
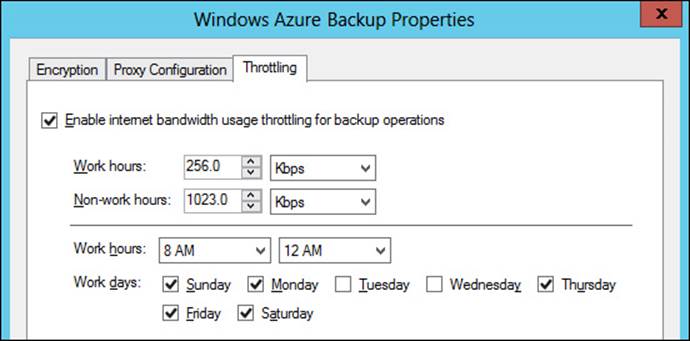
FIGURE 12-11 Bandwidth throttling settings on VHost01
You want the online backup of VHost01 to complete before 8:00 A.M. on Thursday. Which of the following solutions is most likely to help you accomplish your goal with the minimum disruption for workers?
A. Change the bandwidth setting assigned to work hours.
B. Change the bandwidth setting assigned to nonwork hours.
C. Change the hours defined as work hours.
D. Change the days defined as work days.
2. You have a Windows Azure Backup account with a storage quota of 300 GB. You use this account to configure a single weekly backup of a file server named FileSrv01 that is running Windows Server 2012. The total amount of data on FileSrv01 does not significantly change from week to week. No other backups are configured with your account.
The online backup of FileSrv01 completes successfully the first week, but the second week, the backup fails. You receive an error indicating that the usage associated with your Windows Azure Backup account has exceeded its quota.
The Windows Azure Backup console displays the information shown in Figure 12-12 about the backup:

FIGURE 12-12 Backup settings and destination usage
You want to be able to perform the weekly backup of FileSrv01 without failure. Which of the following actions is most likely to allow you to accomplish your goal?
A. Configure an exclusion for C:\Windows\Temp, and choose to exclude its subfolders.
B. Configure an exclusion for C:\Windows\Temp, and choose not to exclude its subfolders.
C. Change the retention range to 7 days.
D. Change the retention range to 30 days.
3. You are a network administrator for a company based in Mumbai, India. You want to configure a local file server named FS02 that is running Windows Server 2012 to perform a daily Windows Azure Backup at 3:00 A.M. You also want to ensure that if the online backup operation extends into the beginning of the next work day at 9:00 A.M., that it will have a minimal impact on network performance for users. The work week in your organization runs from Monday through Friday.
You enable Internet bandwidth usage throttling for backup operations and find the default settings shown in Figure 12-13. What should you do next?
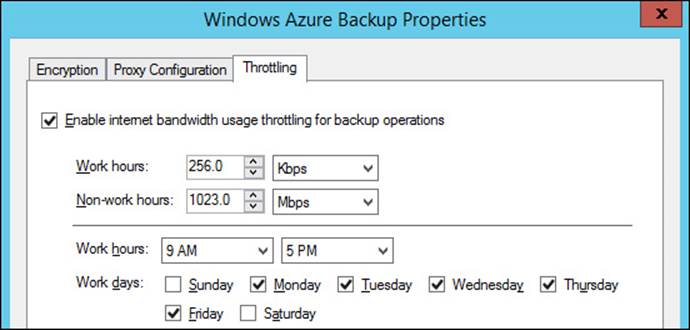
FIGURE 12-13 Bandwidth throttling settings on FS02
A. Leave the default settings.
B. Increase the bandwidth setting assigned to work hours.
C. Increase the bandwidth setting assigned to nonwork hours.
D. Change the selected work days.
Objective 12.2: Configure site-level fault tolerance
Hyper-V Replica is a new feature in Windows Server 2012 and Windows Server 2012 R2 that provides for a virtual machine (VM) a warm standby copy (or replica virtual machine) that can exist anywhere in the world. If the primary VM fails, you can manually fail over to the replica VM. In Windows Server 2012 R2, you can also extend replication to a third VM if desired. Hyper-V Replica in both Windows Server 2012 and Windows Server 2012 R2 can thus provide fault tolerance for a VM even if an entire host site should go offline.
Unlike a failover cluster, Hyper-V Replica doesn’t rely on shared storage between the VMs. The replica VM instead begins with its own copy of the primary VM’s virtual hard disk. The primary VM then sends updates of its changes (called replication data) every few minutes, and this data is repeatedly saved by the replica VM. The replica thus remains up-to-date.
Hyper-V Replica is one of the most important features first introduced in Windows Server 2012, and there’s no doubt that it will appear on the 70-417 exam. In fact, you’ll probably see more than one question about it. Fortunately, it’s not an especially difficult feature to understand or implement, so your study efforts in this area will likely reap large dividends on the test.
This section covers the following topic:
![]() Configure Hyper-V replication
Configure Hyper-V replication
Configuring Hyper-V physical host servers
It’s important to understand the sequence of steps in configuring Hyper-V Replica. The first step is to configure the server-level replication settings for both physical Hyper-V hosts, called the primary server and the replica server. You can access these settings in Hyper-V Manager by right-clicking a host server in the navigation pane, selecting Hyper-V Settings, and then selecting Replication Configuration in the left column of the Hyper-V Settings dialog box, as shown in Figure 12-14. By default, replication is not enabled, and no options are selected or configured.
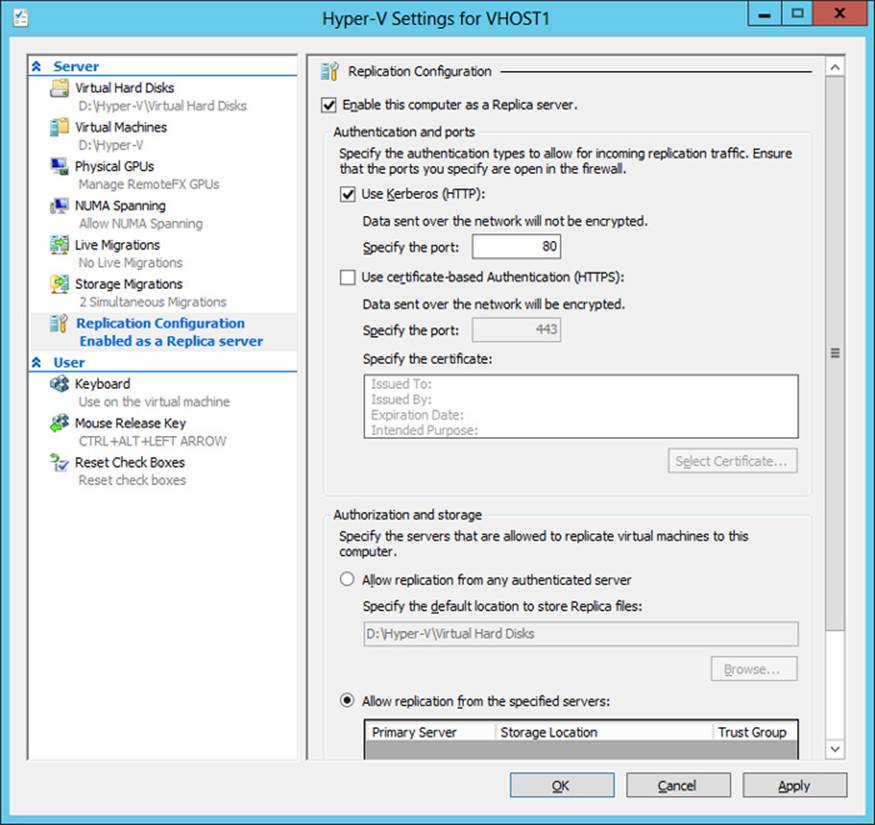
FIGURE 12-14 Host server settings for Hyper-V Replica
To enable a physical host for Hyper-V Replica, first select the Enable This Computer As A Replica Server check box. Then configure the settings in the Authentication And Ports area and the Authorization And Storage area, as shown in Figure 12-14. You need to repeat these configuration steps on both primary and replica servers before configuring a VM for replication.
![]() Authentication And Ports In this area you choose which authentication methods you want to be available later as options when you configure a locally hosted VM for replication. You can enable Kerberos (HTTP), Certificate-Based Authentication (HTTPS), or both.
Authentication And Ports In this area you choose which authentication methods you want to be available later as options when you configure a locally hosted VM for replication. You can enable Kerberos (HTTP), Certificate-Based Authentication (HTTPS), or both.
![]() You can enable Kerberos (HTTP) only if the local server is domain-joined. The advantage of choosing Kerberos is that it requires no further configuration. The two disadvantages are first that it doesn’t encrypt data sent over the network, and second that it can be used for authentication only when the remote host server is located in a trusted domain. Note also that when you choose this authentication protocol, you need to enable the firewall rule named Hyper-V Replica HTTP Listener (TCP-In).
You can enable Kerberos (HTTP) only if the local server is domain-joined. The advantage of choosing Kerberos is that it requires no further configuration. The two disadvantages are first that it doesn’t encrypt data sent over the network, and second that it can be used for authentication only when the remote host server is located in a trusted domain. Note also that when you choose this authentication protocol, you need to enable the firewall rule named Hyper-V Replica HTTP Listener (TCP-In).
![]() You can enable Certificate-Based Authentication (HTTPS) regardless of whether the local server is domain-joined. In fact, when the local server is a standalone server, it is the only authentication protocol option. The two advantages of enabling Certificate-Based Authentication (HTTPS) are first that it encrypts replication data, and second that it allows you to replicate with a remote host when there is no trust relationship with that host through Active Directory. The disadvantage of this authentication method is that it is more difficult to configure: It requires you to provide an X.509v3 certificate for which Enhanced Key Usage (EKU) must support both Client Authentication and Server Authentication (through the Computer certificate template, for example) and that specifies (typically) the fully qualified domain name (FQDN) of the local server in the subject name field. The certificate can be self-signed or issued through a public key infrastructure (PKI). When you choose this authentication protocol, you need to enable the firewall rule named Hyper-V Replica HTTPS Listener (TCP-In).
You can enable Certificate-Based Authentication (HTTPS) regardless of whether the local server is domain-joined. In fact, when the local server is a standalone server, it is the only authentication protocol option. The two advantages of enabling Certificate-Based Authentication (HTTPS) are first that it encrypts replication data, and second that it allows you to replicate with a remote host when there is no trust relationship with that host through Active Directory. The disadvantage of this authentication method is that it is more difficult to configure: It requires you to provide an X.509v3 certificate for which Enhanced Key Usage (EKU) must support both Client Authentication and Server Authentication (through the Computer certificate template, for example) and that specifies (typically) the fully qualified domain name (FQDN) of the local server in the subject name field. The certificate can be self-signed or issued through a public key infrastructure (PKI). When you choose this authentication protocol, you need to enable the firewall rule named Hyper-V Replica HTTPS Listener (TCP-In).
It’s important to remember that Windows Server 2012 and Windows Server 2012 R2 don’t automatically enable the firewall rules you need for the authentication protocols you choose. Depending on which protocol(s) you have enabled, you also need to enable the firewall rule “Hyper-V Replica HTTP Listener (TCP-In)”, “Hyper-V Replica HTTPS Listener (TCP-In)”, or both. You can enable a rule either in Windows Firewall with Advanced Security or by using the Enable-NetFirewallRule -DisplayName command in Windows PowerShell followed by the name of the rule (including quotation marks).
Exam Tip
Remember that encrypted replication of a VM requires the host servers to have installed a certificate including both Client Authentication and Server Authentication extensions for EKU.
More Info
For more information about configuring certificate-based authentication with Hyper-V Replica, search for Hyper-V Replica - Prerequisites for certificate-based deployments or visit http://blogs.technet.com/b/virtualization/archive/2012/03/13/hyper-v-replica-certificate-requirements.aspx.
![]() Authorization And Storage This area allows you to configure security settings on the local server that are used when the local server acts as a replica server. More specifically, your choice here determines the remote primary servers from which the local server will accept replication data. Even if you are configuring your local server as the primary server, the settings here are required so that—if you ever need to fail over to a remote replica—you can later fail back to the local server.
Authorization And Storage This area allows you to configure security settings on the local server that are used when the local server acts as a replica server. More specifically, your choice here determines the remote primary servers from which the local server will accept replication data. Even if you are configuring your local server as the primary server, the settings here are required so that—if you ever need to fail over to a remote replica—you can later fail back to the local server.
You need to choose one of two security options, both of which also provide a default path you can modify to store replication data:
![]() Allow Replication From Any Authenticated Server This option is somewhat less secure. When you choose this option, the local server can receive replication data from any authenticated server.
Allow Replication From Any Authenticated Server This option is somewhat less secure. When you choose this option, the local server can receive replication data from any authenticated server.
![]() Allow Replication From The Specified Servers This option requires you to specify the primary server(s) authorized for the local replica server. You can add multiple entries to authorize different primary servers by DNS name. To add an entry authorizing a primary server address, click Add as shown in Figure 12-15. This step opens the Add Authorization Entry dialog box shown in Figure 12-16.
Allow Replication From The Specified Servers This option requires you to specify the primary server(s) authorized for the local replica server. You can add multiple entries to authorize different primary servers by DNS name. To add an entry authorizing a primary server address, click Add as shown in Figure 12-15. This step opens the Add Authorization Entry dialog box shown in Figure 12-16.
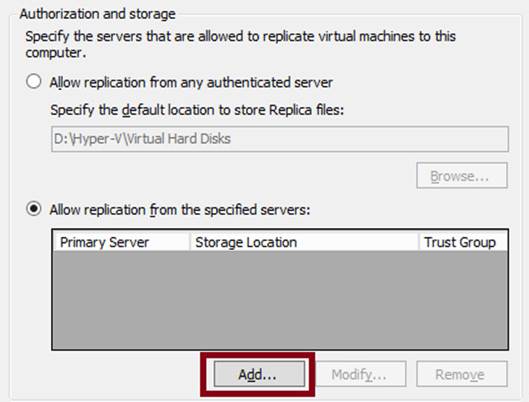
FIGURE 12-15 Authorizing primary servers for the local replica server

FIGURE 12-16 Adding an authorized primary server address
For each entry, a default storage path (the middle field) is already provided, but the other two fields must be filled in manually. In the Specify The Primary Server field, you enter an FQDN that can include a wildcard character (for example, “*.adatum.com”). You also have to provide a tag called a trust group. If you want to allow replication traffic from a set of primary servers, you should assign those primary servers the same trust group name.
How might these settings in the Authorization And Storage area appear on the 70-417 exam? One could imagine a question based on an unsuccessful failover. In such a question, authorization settings might not be configured at all on the replica server. Or the FQDN provided in the Specify The Primary Server field shown in Figure 12-16 might be configured incorrectly; you might be asked to identify the answer that fixes that problem. Another possible question could involve a new organizational requirement that security be tightened on a replica server. Incorrect answer choices might refer to IPSec or other security-tightening methods, but the correct answer will refer to adding an authorization entry on the replica server.
Configuring VMs
After you configure both physical host servers, the next step in configuring Hyper-V Replica is to configure the chosen VM for replication on the primary server. Begin by right-clicking the VM and selecting Enable Replication, as shown in Figure 12-17.
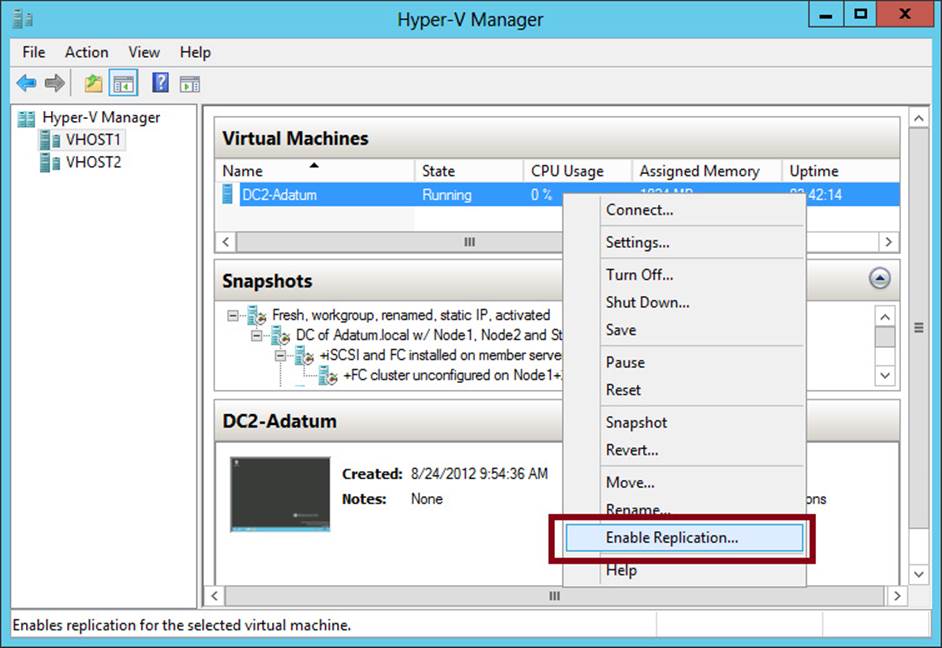
FIGURE 12-17 Creating a replica of a virtual machine
This step opens the Enable Replication Wizard. The wizard includes the following configuration pages:
1. Specify Replica Server page Use this page to specify the remote replica server by name.
2. Specify Connection Parameters page This page, shown in Figure 12-18, asks you to specify which of the authentication types enabled at the server level in Hyper-V Settings you want to use to support this replicated VM. If you have enabled only one of these two authentication methods at the server level, that same method is the only option here. Naturally, the replica server must support the same authentication method.
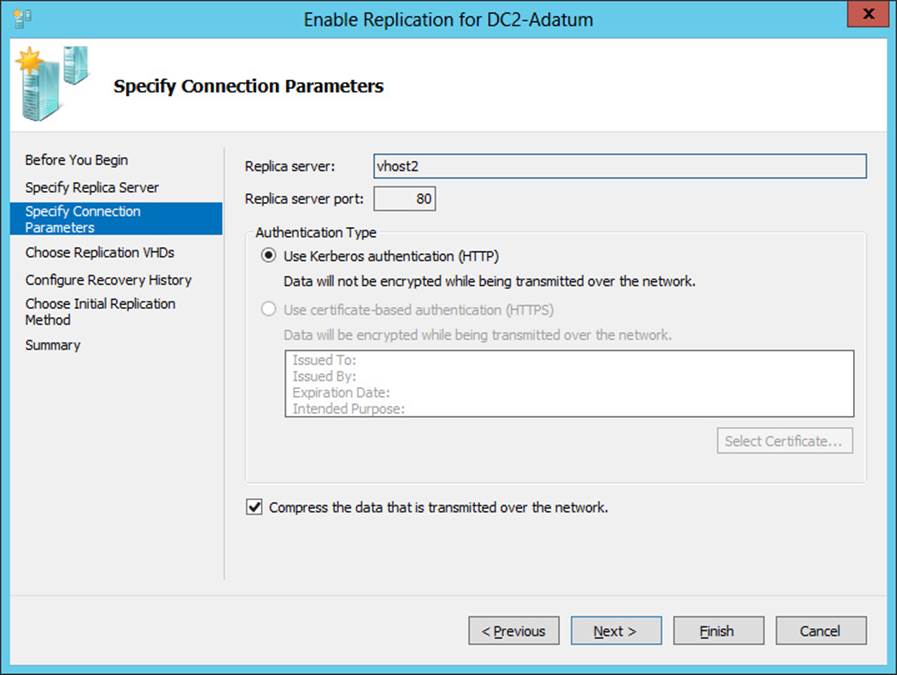
FIGURE 12-18 Selecting authentication and compression settings for a replicated VM
This page also provides an option that lends itself fairly well to an exam question: the Compress The Data That Is Transmitted Over The Network check box. This compression option reduces bandwidth requirements for replication at the expense of increased processor usage. If this option does appear on the exam, this trade-off is likely to be the key to getting the right answer.
Exam Tip
If both authentication types are available for the VM and you want to change the authentication type later, you have to remove replication and complete the Enable Replication Wizard again. Before you do, though, make sure that certificate-based authentication is also enabled in the Hyper-V Settings on the remote host server.
3. Choose Replication VHDs page By default, all virtual hard disks (VHDs) attached to the VM are enabled for replication. You can use this page to deselect any VMs that you don’t want to be replicated.
4. Configure Replication Frequency page (Windows Server 2012 R2 only) In the first release of Windows Server 2012, changes were normally sent from the primary server to the replica server every 5 minutes, an interval that was not configurable. In Windows Server 2012 R2, as shown in Figure 12-19, you can now choose a replication frequency of 30 seconds, 5 minutes, or 15 minutes. With more frequent replication, you can reduce the amount of data that can be lost in case the replicated VM goes down, but at the expense of increased strain on resources (especially bandwidth). With less frequent replication, resources are not used as much, but more data can be lost. (Because this feature is new in Windows Server 2012 R2, you should expect to see an exam question about it. Make sure that you understand the tradeoffs involved when you choose more or less frequent replication.)
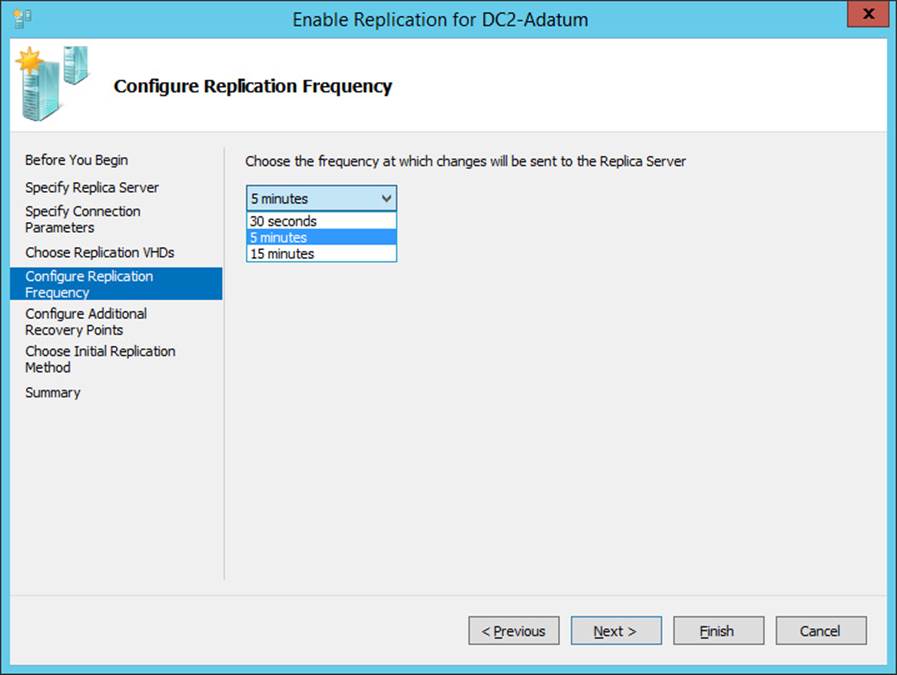
FIGURE 12-19 Configuring replication frequency
5. Configure Additional Recovery Points page This page, shown in Figure 12-20, includes the settings to configure recovery points. By default, the Maintain Only The Latest Recovery Point option is selected, and no other options are enabled or configured.
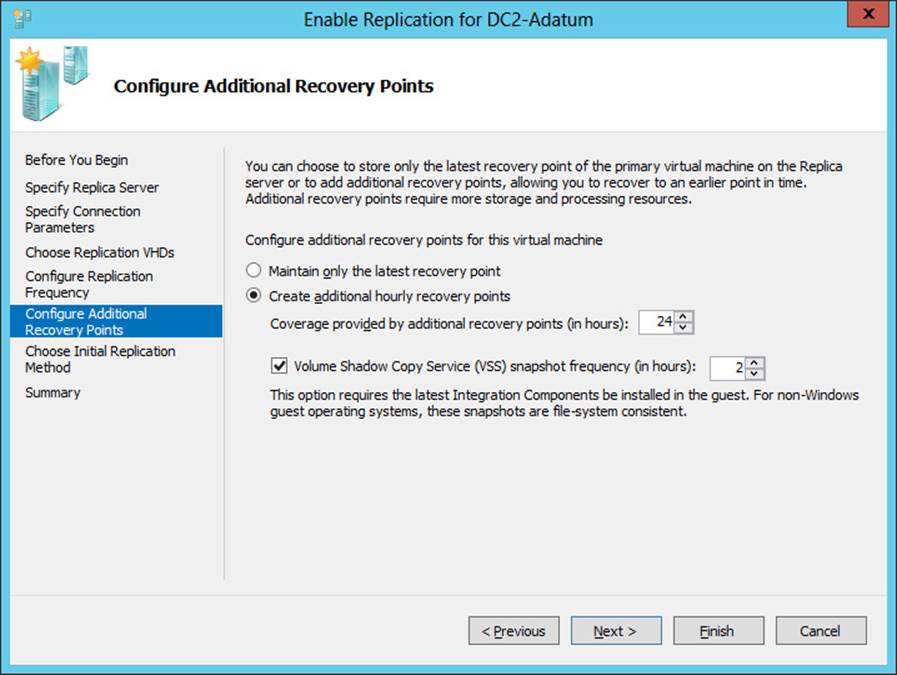
FIGURE 12-20 Configuring additional recovery points.
Recovery points are VM snapshots saved on a replica server. New snapshots are sent from the primary to the replica server according to the replication frequency you’ve configured on the previous page, but only the latest snapshot is saved on the replica by default. Selecting the Create Additional Hourly Recovery Points option configures the replica server to keep one extra snapshot per hour, up to the amount of coverage specified in the next configuration setting, “Coverage Provided By Additional Recovery Points (In Hours).” If you later perform a failover operation at the replica server, you then have the option of recovering either the most recent version of the VM, which is always available, or one of these earlier, hourly snapshots.
A menu of available recovery points on a replica server is shown in Figure 12-21. If the Configure Additional Recovery Points page were left at the default setting (Maintain Only The Latest Recovery Point), only the first option named Latest Recovery Point would appear in this menu.
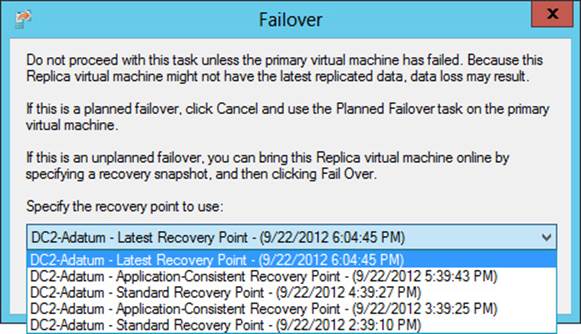
FIGURE 12-21 The latest recovery point and previous hourly snapshots of a VM that can be restored in a failover on the replica server
When you enable the Create Additional Hourly Recovery Points option on the Configure Additional Recovery Points page, the replica server by default will keep an hourly snapshot for each of the past 24 hours in addition to the latest recovery point. However, you can change this setting if you want to store fewer of these recovery points on the replica server. The main drawback to keeping many recovery points is the use of storage resources required to do so.
The last configuration settings on the Configure Additional Recovery Points page relate to incremental Volume Shadow Copy Service (VSS) copies, also known as application-consistent recovery points. These are high-quality snapshots taken during moments in which the VM momentarily “quiesces” (gracefully pauses) activity in VSS-aware applications such as Microsoft Exchange and SQL Server. The advantage of these snapshot types is that they help ensure that the failover will be free of errors in these applications. The disadvantage is that they are more processor-intensive and cause important applications to pause briefly. (However, it should be noted that the pause is normally too brief for users to detect.)
You enable incremental VSS copies by selecting the Volume Shadow Copy Service (VSS) Snapshot Frequency (In Hours) check box, and then selecting the frequency of the application-consistent recovery point. (You can see these options in Figure 12-20.) If you leave the default frequency of 4 hours, then every fourth recovery point will be an application-consistent recovery point. If you select a frequency of 2 hours, then the standard recovery point will be replaced by an application-consistent recovery point every 2 hours, and so on. Figure 12-22 shows the snapshots stored on a replica server for which incremental VSS copies are scheduled every two hours.
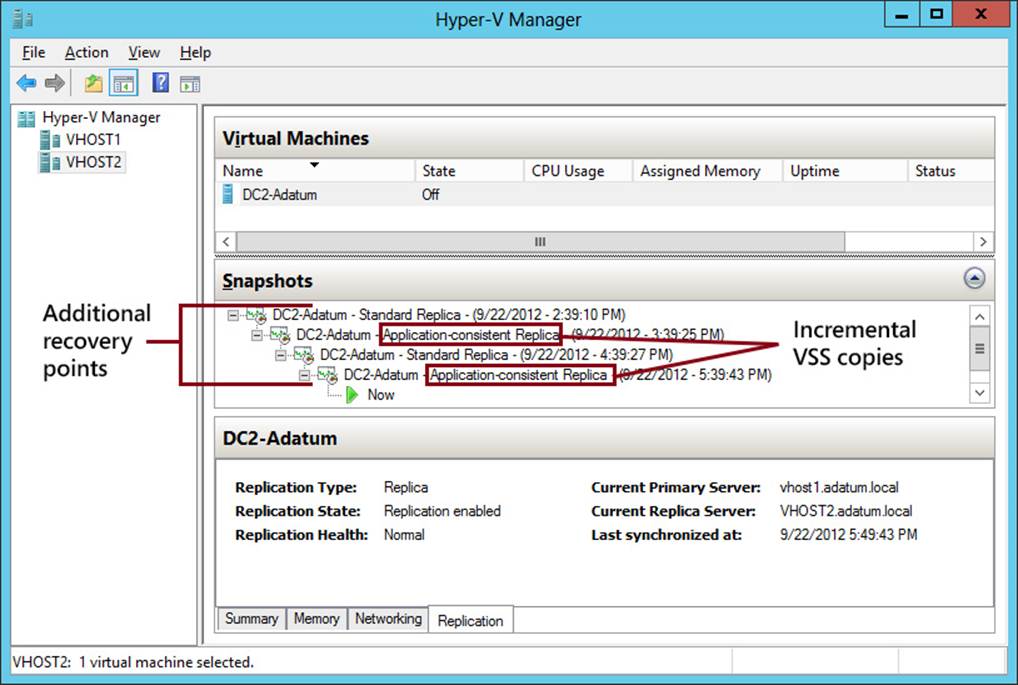
FIGURE 12-22 Incremental VSS copies and standard recovery points
Two final points to note about VSS snapshots: They require Integration Components to be installed in the guest VM, and they are not possible with non-Windows operating systems (such as Linux).
Exam Tip
Expect to see a question about VSS snapshots on the 70-417 exam.
6. Choose Initial Replication Method page This page, shown in Figure 12-23, allows you to specify how the initial copy of the VHDs attached to the primary VM will be sent to the replica server. By default, the VHDs are sent over the network. Sending very large files over a network such as the Internet isn’t always a realistic option, however. As an alternative, you can choose the second option, to export the VHDs to external media (and then physically transport them to the replica server). The final option is to use an existing VM on the replica server as the initial copy. You can choose this option if you have restored an exact copy of the VM and its VHDs on the replica server.
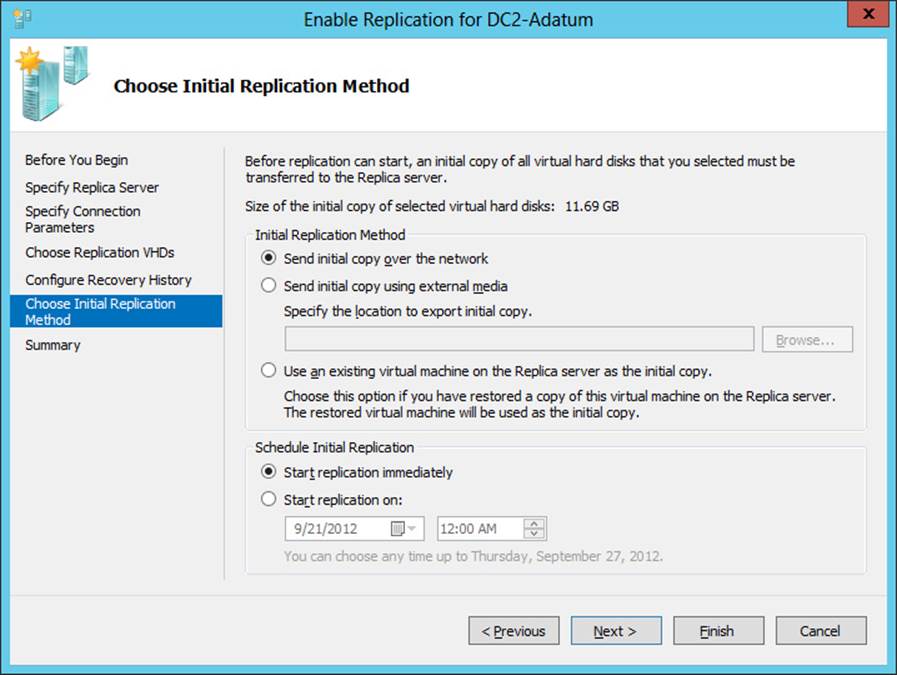
FIGURE 12-23 Determining how to send the base copy of the VHDs attached to a primary VM
This page also allows you to configure the initial network transfer to take place at a specified future time. You can use this option to minimize user disruption.
Note
Typically, the initial transfer of the VHD is far more bandwidth-intensive than the updates sent through replication are. After the initial copies of the VHDs are sent, only the changes (deltas) to these VHDs are sent during replication according to the frequency you have specified.
Configuring failover TCP/IP settings
After you enable replication on a VM, you might need to specify the TCP/IP settings that will apply to the replica VM after failover. By default, the replica VM will inherit the same IPv4 and IPv6 configuration as the primary VM. In many cases, however, the replica VM will need a different IP configuration to communicate in its environment.
To assign a different IP configuration to the replica VM, in Hyper-V Manager on the replica server, right-click the replica VM and select Settings from the shortcut menu. In the Settings dialog box, expand Network Adapter in the left column and then select Failover TCP/IP, as shown inFigure 12-24. In the right pane, assign the new IP configuration as appropriate.
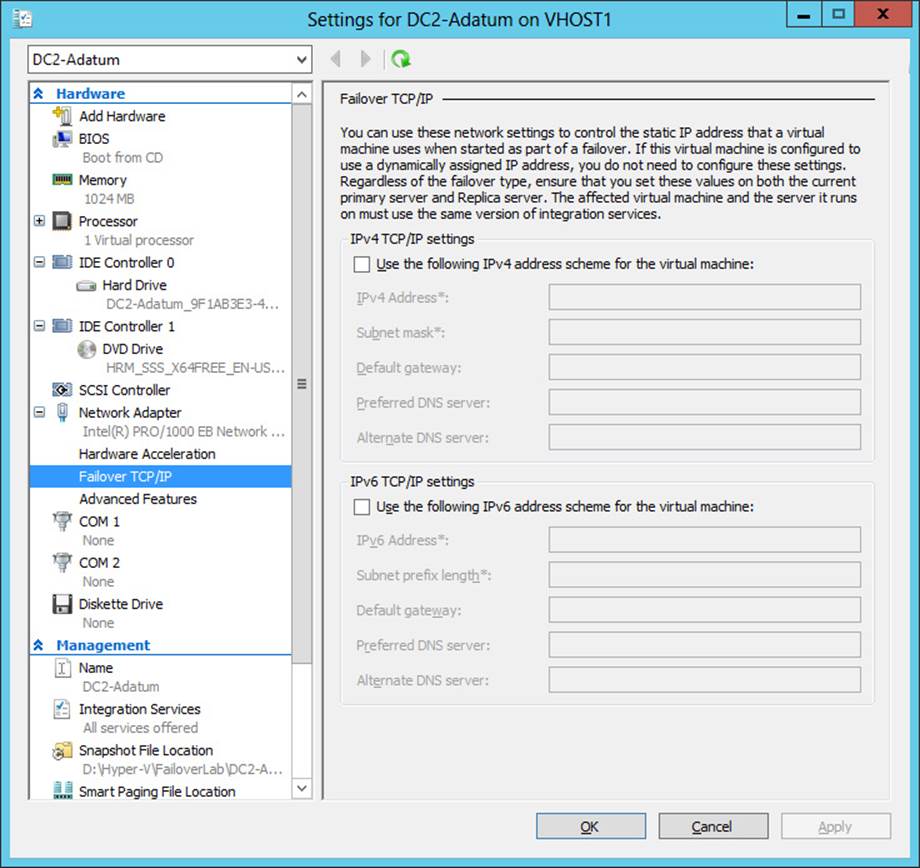
FIGURE 12-24 Assigning a different IP configuration to a replica VM
Then, on the primary server, assign the original IP configuration in the same settings area. Otherwise, the replica settings will persist if you fail back to the original location. (Remember this last point for the exam.)
Resynchronizing the primary and replica VMs
After you complete the Enable Replication Wizard, you can modify the replication settings for a VM in the Settings dialog box for that VM. Replication settings appear in the Management category in the menu on the left, as shown in Figure 12-25.
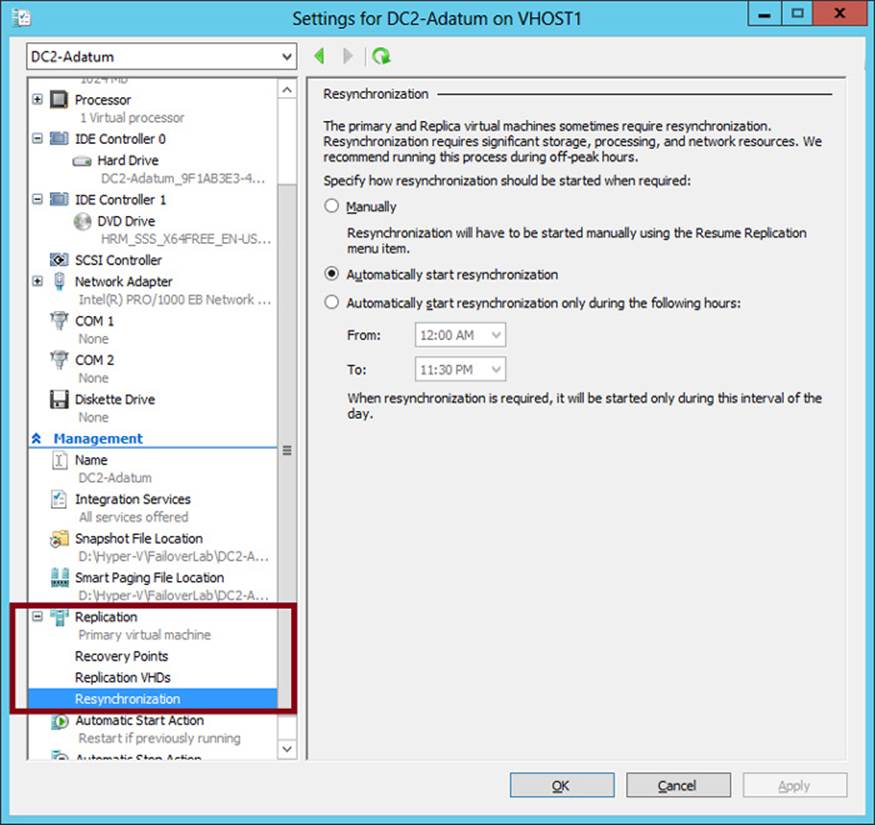
FIGURE 12-25 Replication settings for a VM
One configuration setting appears here that does not appear in the Enable Replication Wizard: Resynchronization. Resynchronization is a highly resource-intensive operation that is performed occasionally between a primary and replica VM. By default, resynchronization can occur at any time. You have the option, however, to restrict resynchronizations to selected off-peak hours. Alternatively, you can opt to perform resynchronization manually.
Performing Hyper-V Replica failover
You can perform three types of failovers with Hyper-V Replica after it is configured: planned failovers, unplanned failovers, and test failovers. It’s likely you’ll see an exam question in which you need to understand the difference among them and when they are used.
![]() Planned failover A planned failover is the only failover you initiate from the primary server. You use this method whenever you can manually shut down the primary VM, and the primary and replica servers can still communicate.
Planned failover A planned failover is the only failover you initiate from the primary server. You use this method whenever you can manually shut down the primary VM, and the primary and replica servers can still communicate.
A planned failover is the preferred failover type because no data is lost. In fact, you cannot even use this option to fail over to the latest recovery point or to any earlier recovery point. With a planned failover, only an exact copy of the current primary VM and its VHDs can be failed over to the replica server.
A planned failover is a good option in the following situations:
![]() You want to perform host maintenance on the primary server and temporarily want to run the VM from the replica.
You want to perform host maintenance on the primary server and temporarily want to run the VM from the replica.
![]() Your primary site is anticipating a possible power outage and you want to move the VM to the replica site.
Your primary site is anticipating a possible power outage and you want to move the VM to the replica site.
![]() You are expecting a weather emergency such as a flood and you want to ensure business continuity.
You are expecting a weather emergency such as a flood and you want to ensure business continuity.
![]() Your compliance requirements mandate that you regularly run your workloads for certain periods of time from the replica site.
Your compliance requirements mandate that you regularly run your workloads for certain periods of time from the replica site.
To perform a planned failover, you begin by shutting down the primary VM. You then right-click the VM in Hyper-V Manager, click Replication, and then click Planned Failover, as shown in Figure 12-26. The latest updates are then sent to the replica server, the VM is failed over, and the replica VM is automatically started on the remote server. At the end of this operation, the replication relationship is reversed, so what was the replica server becomes the primary server, and vice versa.

FIGURE 12-26 Performing a planned failover from the primary server
![]() (Unplanned) failover This type of failover is called an unplanned failover in documentation about the feature, but in the actual interface, it’s called just “failover.” On the 70-417 exam, you might see it referred to either way.
(Unplanned) failover This type of failover is called an unplanned failover in documentation about the feature, but in the actual interface, it’s called just “failover.” On the 70-417 exam, you might see it referred to either way.
An unplanned failover is performed at the replica server. You perform this failover type when the primary VM fails suddenly and cannot be brought back online. An unplanned failover is a good option in the following situations:
![]() Your primary site experiences an unexpected power outage or a natural disaster.
Your primary site experiences an unexpected power outage or a natural disaster.
![]() Your primary site or VM has had a virus attack and you want to restore your business quickly with minimal data loss by restoring your replica VM to the most recent recovery point before the attack.
Your primary site or VM has had a virus attack and you want to restore your business quickly with minimal data loss by restoring your replica VM to the most recent recovery point before the attack.
To perform an unplanned failover, in Hyper-V Manager on the replica server, right-click the replica VM, click Replication, and then click Failover, as shown in Figure 12-27.
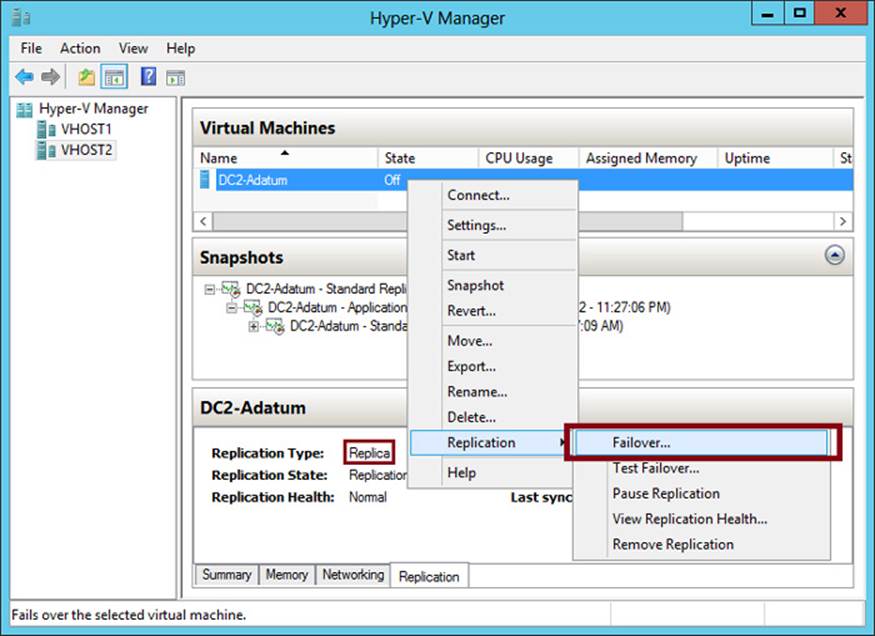
FIGURE 12-27 Performing an unplanned failover on the replica server
When you perform an unplanned failover, you have to choose a recovery point, as shown earlier in Figure 12-21. The VM is then started on the replica server.
After the replica VM is started, the replica relationship with the primary VM is broken and replication stops. If at some later point you can bring the original primary VM online, you can resume replication by reversing the replication relationship. After you perform this operation, the local replica server becomes the new primary and the remote primary becomes the new replica. To reverse replication in this way, right-click the VM on the replica server, click Replication, and then click Reverse Replication, as shown in Figure 12-28. This step starts the Reverse Replication Wizard, which allows you to reenter the settings for the replica.
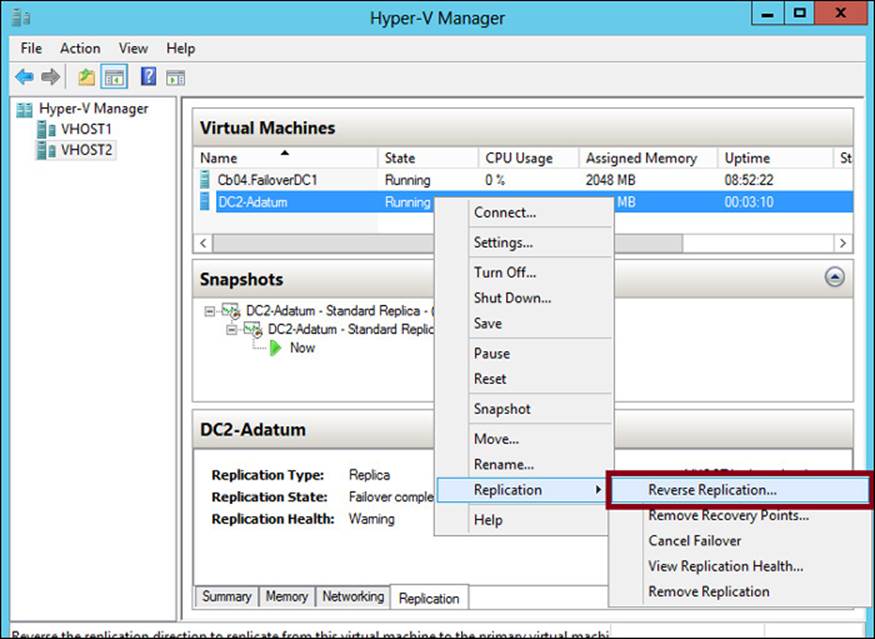
FIGURE 12-28 Reversing replication
Another option you can see on the Replication submenu in Figure 12-28 is Cancel Failover. You can safely choose this option after you perform an unplanned failover as long as no changes have been made to the replica. After you cancel a failover, you have to manually resume replication on the primary VM by right-clicking it and selecting Resume Replication. Cancelling a failover is a good idea if you quickly discover after performing an unplanned failover that the primary VM can be brought online.
Exam Tip
Remember the Reverse Replication option and the Cancel Replication option for the exam.
![]() Test failover A test failover is the only failover operation you can perform while the primary VM is still running. The purpose of this failover type is to simulate an unplanned failover so that you can ensure that it will function as planned in case of an emergency.
Test failover A test failover is the only failover operation you can perform while the primary VM is still running. The purpose of this failover type is to simulate an unplanned failover so that you can ensure that it will function as planned in case of an emergency.
To perform a test failover, in Hyper-V Manager on the replica server, right-click the replica VM, click Replication, and then click Test Failover. You then have to select a recovery point, just as you do with an unplanned failover. Next, a local, disposable copy of the replica VM is created on the replica server. The new copy of the VM appears in Hyper-V Manager in a stopped state with the tag “- Test.” For example, a test failover of a VM named “MyVM1” would result in a new VM called “MyVM1 - Test”. You can then start the new VM manually to see if it works as expected.
By default, the virtual network adapters of the test VM are disconnected from all virtual switches. If desired, you can preattach the adapter(s) of the test VM to a virtual switch of your choice. To do so, open the settings of the base replica VM, expand Network Adapter, and then click Test Failover, as shown in Figure 12-29. Make sure you choose a virtual switch that will not create any conflicts in a production network.
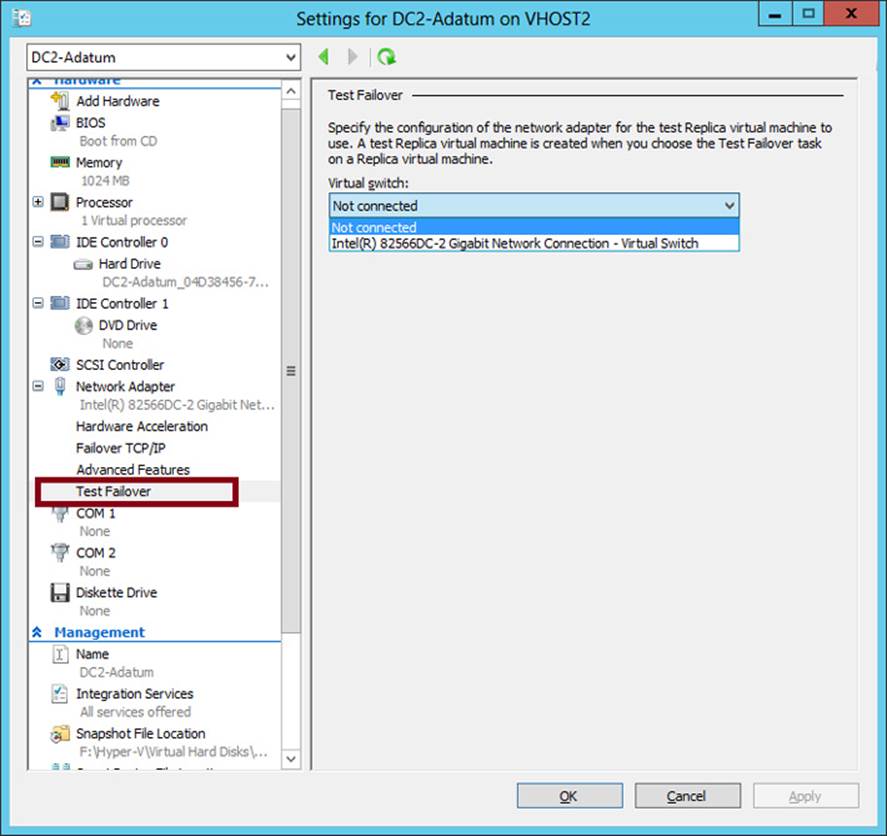
FIGURE 12-29 Preattaching the network adapter of a failover test VM to a virtual switch
After you examine the functioning of the test VM, you can safely delete it in Hyper-V Manager.
Exam Tip
Remember for the exam when you should perform a planned failover, a failover, and a test failover.
Extending replication to a third site in Windows Server 2012 R2
Windows Server 2012 R2 introduces the ability to perform replication of a VM to a third site. The most important thing to understand is that this option extends replication from the replica server only. In other words, you cannot configure the primary VM to be replicated directly to two different sites. Instead, with extended replication, a first site replicates to a second site and the second site replicates to a third site. This concept is illustrated in Figure 12-30.
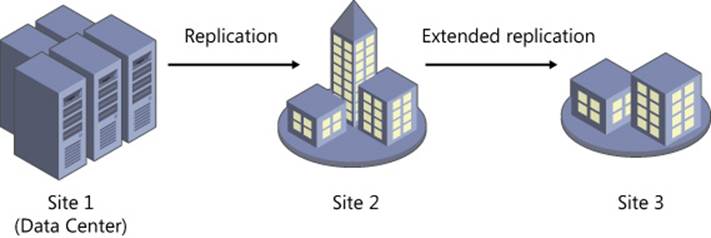
FIGURE 12-30 Windows Server 2012 R2 allows you to extend replication from the replica server to a third server.
Configuring extended replication is easy. You simply right-click the replica VM, select Replication, and then select Extend Replication, as shown in Figure 12-31. This step opens the Extend Replication Wizard, which provides the same set of configuration options as does the Enable Replication Wizard described earlier in this chapter.
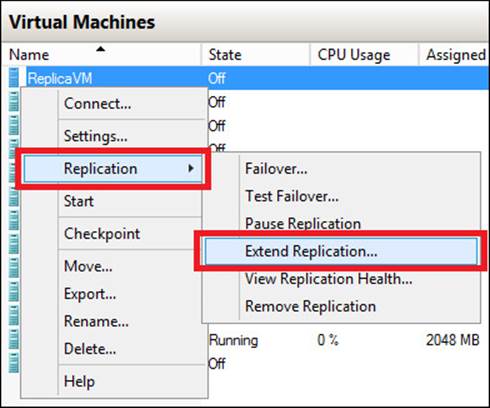
FIGURE 12-31 Extending replication from a replica VM
Using Hyper-V Replica in a failover cluster
The configuration steps previously described apply to VMs that are not hosted in a failover cluster. However, you might want to provide an offsite replica VM for a clustered VM. In this scenario, you would provide two levels of fault tolerance. The failover cluster is used to provide local fault tolerance, for example, if a physical node fails within a functioning data center. The offsite replica VM, on the other hand, could be used to recover only from site-level failures, for example, in case of a power outage, weather emergency, or natural disaster.
The steps to configure a replica VM for a clustered VM differ slightly from the normal configuration, but they aren’t complicated. The first difference is that you begin by opening Failover Cluster Manager, not Hyper-V Manager. In Failover Cluster Manager, you then have to add a failover cluster role named Hyper-V Replica Broker to the cluster. (Remember, the word “role” is now used to describe a hosted service in a failover cluster.)
To add the Hyper-V Replica Broker role, right-click the Roles node in Failover Cluster Manager and select Configure Role. This step opens the High Availability Wizard. In the High Availability Wizard, select Hyper-V Replica Broker, as shown in Figure 12-32.
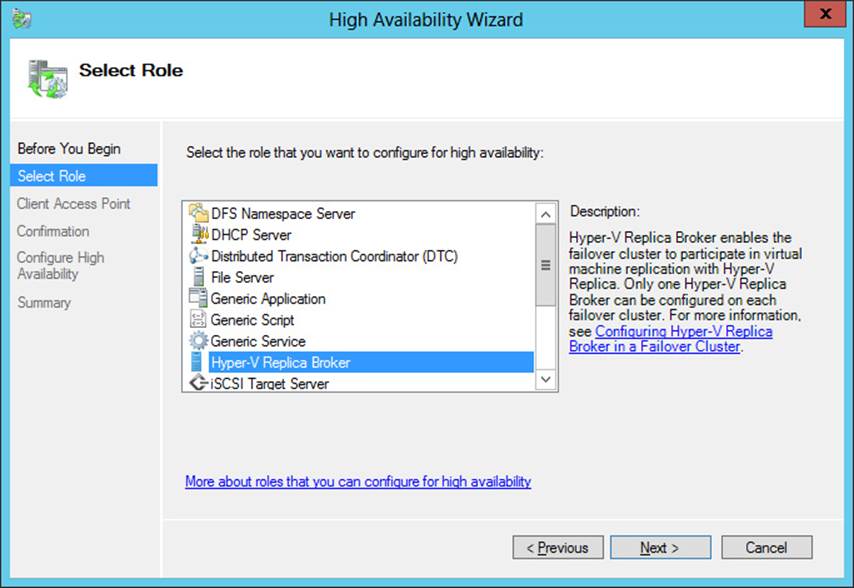
FIGURE 12-32 Adding the Hyper-V Replica Broker role to a failover cluster
When you choose this role, the High Availability Wizard will ask you to provide a NetBIOS name and IP address to be used as the connection point to the cluster (called a client access point, or CAP). This step is shown in Figure 12-33.
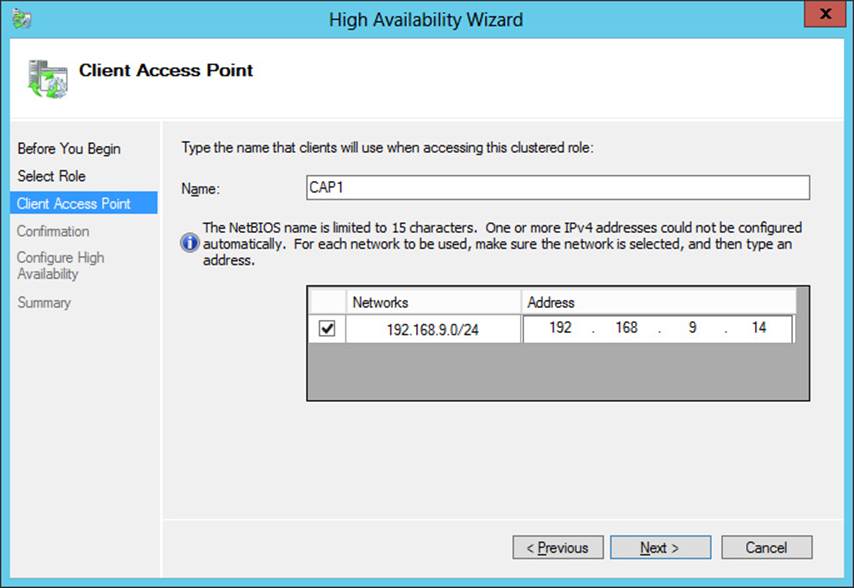
FIGURE 12-33 Providing a name and address for the client access point
Next, you configure the equivalent of the server replication settings shown earlier in Figure 12-14. To do so, right-click the Hyper-V Replica Broker node in Failover Cluster Manager and select Replication Settings from the shortcut menu, as shown in Figure 12-34. The difference between the settings here and the settings in Figure 12-14 is that in this case, the settings apply to the entire cluster as a whole.
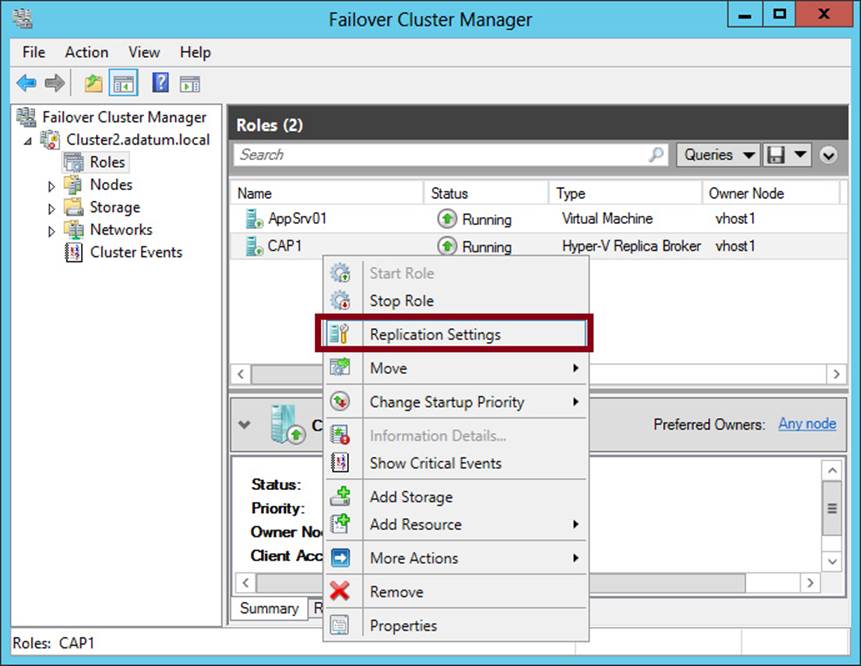
FIGURE 12-34 Configuring replication settings for the cluster
On the remote Replica server, you configure replication as you normally would by configuring Hyper-V Settings in Hyper-V Manager as described in the earlier section named “Configuring Hyper-V physical host servers.” However, if you want the remote Replica also to be a multi-node failover cluster, then you would need to configure that remote failover cluster through Failover Cluster Manager (by adding and configuring the Hyper-V Replica Broker role).
After you configure the host server settings, you can configure replication on the VM in Failover Cluster Manager just as you would in Hyper-V Manager. Right-click the clustered VM, click Replication, and then click Enable Replication, as shown in Figure 12-35.
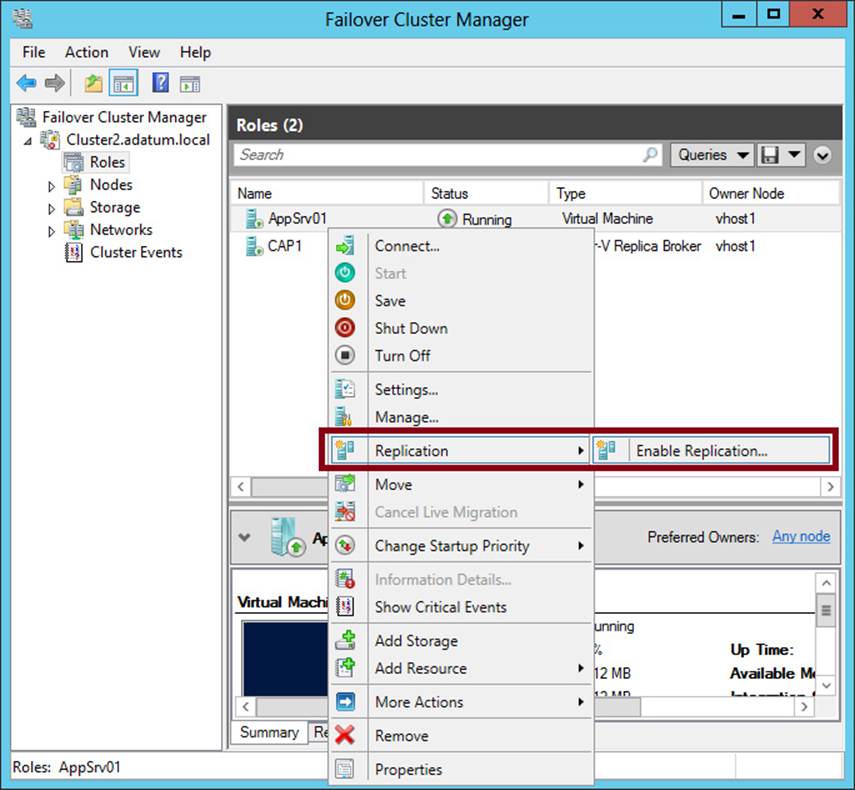
FIGURE 12-35 Enabling replication on a clustered VM
This step opens the same Enable Replication Wizard that you see when you configure replication on a nonclustered VM. The remaining configuration steps are therefore identical. To perform failover to the replica server of a clustered VM, use the same options on the shortcut menu of the VM as you would on a nonclustered VM. The only difference, again, is that you perform the operation in Failover Cluster Manager as opposed to Hyper-V Manager.
For the 70-417 exam, there’s a good chance you’ll be asked about basic concepts related to configuring replication on clustered VMs. Remember, first of all, that you use Failover Cluster Manager to configure replication for a clustered VM at the primary site but still use Hyper-V Manager at the Replica site. Remember that in Failover Cluster Manager at the primary site, you need to add the Hyper-V Replica Broker role to the failover cluster and that this role is used to configure Hyper-V Replica “server” settings for the cluster. Finally, you also need to remember that when you configure Hyper-V Replica in a failover cluster, the CAP name and address are used as the server name and address.
Objective summary
![]() Hyper-V Replica is a new feature in Windows Server 2012 and Windows Server 2012 R2 that creates an offline copy (replica) of a running VM and its storage. This replica can exist anywhere in the world. The online original (called the primary VM) periodically sends the replica updates of any changes. In case the primary VM fails, you can fail over to the replica and bring it online.
Hyper-V Replica is a new feature in Windows Server 2012 and Windows Server 2012 R2 that creates an offline copy (replica) of a running VM and its storage. This replica can exist anywhere in the world. The online original (called the primary VM) periodically sends the replica updates of any changes. In case the primary VM fails, you can fail over to the replica and bring it online.
![]() To configure Hyper-V Replica, you first configure authentication and authorization settings for both physical host servers, called the primary server and replica server. Then, in Hyper-V Manager on the primary server, run the Enable Replication Wizard for the desired VM.
To configure Hyper-V Replica, you first configure authentication and authorization settings for both physical host servers, called the primary server and replica server. Then, in Hyper-V Manager on the primary server, run the Enable Replication Wizard for the desired VM.
![]() In Windows Server 2012 R2, you can choose a replication frequency between the primary and replica VMs from among the options of 30 seconds, 5 minutes, or 15 minutes. (In the first release of Windows Server 2012, replication frequency is 5 minutes and cannot be changed.)
In Windows Server 2012 R2, you can choose a replication frequency between the primary and replica VMs from among the options of 30 seconds, 5 minutes, or 15 minutes. (In the first release of Windows Server 2012, replication frequency is 5 minutes and cannot be changed.)
![]() By default, you can fail over only to the most recent recovery point, which is the point when the most recent updates were received. However, you can choose to store additional, older recovery points that allow you to return to point-in-time snapshots of the primary VM.
By default, you can fail over only to the most recent recovery point, which is the point when the most recent updates were received. However, you can choose to store additional, older recovery points that allow you to return to point-in-time snapshots of the primary VM.
![]() A planned failover is performed on the primary server after you shut down the primary VM. A planned failover brings the replica VM online with no loss of data. You can perform an unplanned failover on the replica server if the primary server fails without warning. With an unplanned failover, the replica VM recovers a copy of the primary VM that is normally no more than 5 to 15 minutes old. Finally, you can also perform a test failover while the primary VM is still running. A test failover brings a copy of the replica VM online in a state that is disconnected from the network.
A planned failover is performed on the primary server after you shut down the primary VM. A planned failover brings the replica VM online with no loss of data. You can perform an unplanned failover on the replica server if the primary server fails without warning. With an unplanned failover, the replica VM recovers a copy of the primary VM that is normally no more than 5 to 15 minutes old. Finally, you can also perform a test failover while the primary VM is still running. A test failover brings a copy of the replica VM online in a state that is disconnected from the network.
![]() Windows Server 2012 R2 also enhances Hyper-V Replica by allowing you to extend replication from the replica server to a third server.
Windows Server 2012 R2 also enhances Hyper-V Replica by allowing you to extend replication from the replica server to a third server.
![]() If you want to configure Hyper-V Replica for a VM that is hosted in a failover cluster, you need to add the Hyper-V Replica Broker role to the cluster. You also need to provide a CAP name and address for the cluster that will act as the server name.
If you want to configure Hyper-V Replica for a VM that is hosted in a failover cluster, you need to add the Hyper-V Replica Broker role to the cluster. You also need to provide a CAP name and address for the cluster that will act as the server name.
Objective review
Answer the following questions to test your knowledge of the information in this objective. You can find the answers to these questions and explanations of why each answer choice is correct or incorrect in the “Answers” section at the end of the chapter.
1. You are configuring Hyper-V Replica on a VM that is hosting Microsoft Exchange. You want to help ensure that if you fail over to the replica VM, the application data will remain in a consistent state.
What should you do? (Choose all that apply.)
A. Configure the replica server to save additional recovery points.
B. Configure the primary server to replicate incremental VSS copies.
C. Configure a resynchronization schedule for the primary and replica VM.
D. Configure Hyper-V Replica Broker.
2. You have configured Hyper-V Replica for a VM named AppSrv1, which is hosted on a primary server named VMhost1 in Cleveland. The replica server is named RepHost1 and is located in Denver.
An unexpected power outage suddenly brings the entire Cleveland site offline. You perform a failover at the Denver site and start the replica VM on RepHost1. Power is returned to the Cleveland site after several hours, but only after changes have been made to AppSrv1.
You are able to bring VMhost1 back online and now want to return AppSrv1 to its original host. Which step should you take next?
A. Perform an unplanned failover.
B. Choose the option to cancel the failover.
C. Perform a planned failover.
D. Choose the option to reverse replication.
3. Within your organization, a clustered VM named SQL1 is hosting SQL Server. The failover cluster hosting SQL1 is named Cluster1 and includes three nodes, named Node1, Node2, and Node3. Node1 is the preferred owner of the SQL1 VM. All three nodes are located in the same data center.
You want to configure an offsite replica of SQL1 to protect the VM in case the entire failover cluster is brought down because of a power outage or other emergency.
You deploy a physical server named RepSrv2 at a remote site. You want to configure RepSrv2 as the replica server. You install Windows Server 2012 and then the Hyper-V role on RepSrv2. You then connect the server to the Internet and establish a VPN connection between the two sites.
Which of the following steps should you take? (Choose two.)
A. At the primary site, configure Hyper-V Replica Broker and provide a CAP name.
B. At the replica site, configure Hyper-V Replica Broker and provide a CAP name.
C. In the replication settings on Cluster1, restrict authorization to the CAP.
D. In the replication settings on RepSrv2, restrict authorization to the CAP.
 Thought experiment: Implementing business continuity and disaster recovery at Adatum
You are a network administrator for Adatum.com, an organization with headquarters in San Francisco and a branch office in Montreal. You are designing fault tolerance and business continuity for a new application server and VM that will be named AppVM1. AppVM1 will be hosted in the San Francisco office.
You want to meet the following goals:
![]() You want to prevent any disruption of service and data loss in case an individual server fails unexpectedly.
You want to prevent any disruption of service and data loss in case an individual server fails unexpectedly.
![]() You want to be able to resume service with minimal data loss in case a catastrophe such as an earthquake brings the main office offline for an extended period.
You want to be able to resume service with minimal data loss in case a catastrophe such as an earthquake brings the main office offline for an extended period.
![]() You always want to retain daily backups from the previous two weeks.
You always want to retain daily backups from the previous two weeks.
With these goals in mind, answer the following questions. You can find the answers to these questions in the “Answers” section.
1. Which feature(s) in Windows Server 2012 can enable you to meet the first goal?
2. How might you design fault tolerance so that you can meet the first goal even after a catastrophe brings the main office offline for an extended period?
3. Describe two ways you might design fault tolerance for AppVM1 so that you can continue to meet the third goal even through a catastrophe that brings the main office offline for an extended period.
Answers
This section contains the answers to the Objective Reviews and the Thought Experiment.
Objective 12.1: Review
1. Correct answer: B
A. Incorrect: Changing the bandwidth assigned to the work hours will not help you achieve your goal of having the backup operation complete before the work day begins at 8:00 A.M.
B. Correct: The bandwidth setting assigned to nonwork hours is restricted to 1023.0 Kbps, which is much lower than the default setting of 1023 Mbps. This low setting could be unnecessarily limiting the bandwidth allowed at night. If you raise this value, the backup operation could proceed much more quickly (assuming more bandwidth is available.)
C. Incorrect: Adjusting the work hours could potentially cause disruption for workers, and it will not help you meet your goal of completing the backup operation before 9:00 A.M.
D. Incorrect: The work days are not currently affecting the backup because the backup is being performed outside of work hours. If you include Wednesday as a work day, you would actually apply bandwidth throttling to the first hour of the backup operation, and slow the procedure down for that hour.
2. Correct answer: C
A. Incorrect: This step would exclude the C:\Windows\Temp folder and its subfolders from the backup set, but it would not meet your goal of allowing the backup to be performed weekly. This folder is too small to reduce the size of the backup in any significant way.
B. Incorrect: This step would exclude the C:\Windows\Temp folder but not its subfolders from the backup set, but it would not meet your goal of allowing the backup to be performed weekly. Too little data is stored in this folder to reduce the size of the backup in any significant way.
C. Correct: This setting would allow the previous week’s backup to be deleted to make space for the current week’s backup. The size of the backup from the previous week is approximately 220 GB, and your storage quota is 300 GB. Consequently, you need to be able to remove the previous week’s backup to make room for the current week’s backup.
D. Incorrect: This setting would not fix your problem. It would require all backups to be kept at least 30 days on Microsoft servers. If there is insufficient space to allow a new backup, as is the case in this scenario, the new backup will fail.
3. Correct answer: A
A. Correct: You don’t need to modify the default settings. The bandwidth of the backup operation will be throttled to 256 Kbps beginning at 9:00 A.M. every weekday.
B. Incorrect: You don’t want to increase the bandwidth settings assigned to work hours because this would increase the impact on network performance for users during work hours.
C. Incorrect: Increasing the default setting would not have any effect. No Internet download speeds currently available are higher than the default setting of 1023.0 Mbps.
D. Incorrect: You don’t need to adjust work days because the current selection reflects the Monday through Friday schedule of the organization.
Objective 12.2: Review
1. Correct answers: A, B
A. Correct: You need to enable the option to save additional recovery points. This step allows you to configure some of these additional recovery points as incremental VSS copies, which are application-consistent.
B. Correct: Incremental VSS copies are snapshots that are application-consistent for VSS-aware applications like Microsoft Exchange.
C. Incorrect: Resynchronization does not affect the consistency of applications within recovery point snapshots.
D. Incorrect: Hyper-V Replica Broker is used for failover clustering, not for application consistency.
2. Correct answer: D
A. Incorrect: You have already performed an unplanned failover. You cannot perform failover to the other site until replication is reestablished between the two servers.
B. Incorrect: It’s too late to cancel the failover because changes have already been made to AppSrv1.
C. Incorrect: You cannot perform a planned or unplanned failover to the other site until replication is reestablished.
D. Correct: Choosing the option to reverse replication starts the Reverse Replication Wizard. This wizard lets you reestablish replication between the two servers, with the local server in Denver acting as the new primary. After you complete this wizard, you can perform a planned failover to return the VM to the site in Cleveland.
3. Correct answers: A, D
A. Correct: You need to configure the Hyper-V Replica Broker role for the failover cluster if you want to add an offsite replica to a clustered VM.
B. Incorrect: To configure the Hyper-V Replica Broker at the replica site, you would need to create a failover cluster at the replica site. This step is unnecessary because you want to configure RepSrv2 as the replica server. Your goal is not to create a replica cluster.
C. Incorrect: In the replication settings for Cluster1, you want to restrict authorization to RepSrv2. However, this step is not immediately necessary. It would be required only if the VM were failed over to the replica site, and you later wanted to fail back to the original site.
D. Correct: The server-level replication settings allow you to limit which remote servers can act as a primary server to the local replica server. In this case, you need to configure the CAP as the name of the primary server.
Thought experiment
1. Only failover clustering can prevent any disruption of service and data loss in case of an individual server failure.
2. You can configure Hyper-V Replica on failover clusters in both the San Francisco and Montreal offices. The failover cluster in the San Francisco office can act as the primary server, and the failover cluster in the Montreal office can act as the replica server.
3. One option is to use a cloud backup service such as Windows Azure Backup to back up AppVM1 daily and specify a retention range of 15 days. Another option is to perform daily backups of AppVM1 to local file storage on a file server that is itself a VM. You can then configure this file server as a primary VM with a replica VM in the replica site (Montreal). In case of site-level failure at the primary site, the replica VMs of AppVM1 and the file server at the replica site will continue to operate as before with no loss of backup data.