Training Guide Installing and Configuring Windows Server 2012 R2 (2014)
Chapter 1. Preparing for Windows Server 2012 R2
Successful execution of any task always begins with planning. If your job involves the migration of your organization’s IT infrastructure to Microsoft Windows Server 2012 R2, you need to prepare both your environment and yourself for this task.
This chapter describes common deployment scenarios and outlines the steps involved in a typical server deployment or migration process. The chapter also examines some approaches and tools you can use for assessing the readiness of your environment for migrating to Windows Server 2012 R2.
Lessons in this chapter:
![]() Lesson 1: Planning for Windows Server 2012 R2
Lesson 1: Planning for Windows Server 2012 R2
![]() Lesson 2: Assessing the readiness of your environment
Lesson 2: Assessing the readiness of your environment
Before you begin
To complete the practice exercises in this chapter
![]() You should have some familiarity with the new features and capabilities found in Windows Server 2012 and Windows Server 2012 R2. If you are not, see the sidebar titled “Additional Learning Resources” below.
You should have some familiarity with the new features and capabilities found in Windows Server 2012 and Windows Server 2012 R2. If you are not, see the sidebar titled “Additional Learning Resources” below.
![]() You need to download an evaluation version (.iso file) of Windows Server 2012 R2 from the TechNet Evaluation Center at http://technet.microsoft.com/en-US/evalcenter/dn205286. The evaluation version provided is Datacenter edition, but you can choose to install it as Standard edition during setup if you prefer. You will need to burn this .iso file to recordable DVD media by using a DVD writer. If your computer’s BIOS supports booting from a USB device, you could also copy the downloaded .iso file to a USB flash drive or USB external hard drive and use these media for installation purposes.
You need to download an evaluation version (.iso file) of Windows Server 2012 R2 from the TechNet Evaluation Center at http://technet.microsoft.com/en-US/evalcenter/dn205286. The evaluation version provided is Datacenter edition, but you can choose to install it as Standard edition during setup if you prefer. You will need to burn this .iso file to recordable DVD media by using a DVD writer. If your computer’s BIOS supports booting from a USB device, you could also copy the downloaded .iso file to a USB flash drive or USB external hard drive and use these media for installation purposes.
![]() You need to download the Microsoft Assessment and Planning (MAP) Toolkit version 9.0. You can download MAP 9.0 from the TechNet Library at http://technet.microsoft.com/en-us/library/bb977556.aspx.
You need to download the Microsoft Assessment and Planning (MAP) Toolkit version 9.0. You can download MAP 9.0 from the TechNet Library at http://technet.microsoft.com/en-us/library/bb977556.aspx.
![]() You need a minimum of one physical server system available for testing purposes. At least one of these servers should meet the minimum hardware requirements for installing Windows Server 2012 R2, as described at http://technet.microsoft.com/en-us/library/dn303418.aspx. The system hardware should also meet the minimum requirements for installing MAP 9.0.
You need a minimum of one physical server system available for testing purposes. At least one of these servers should meet the minimum hardware requirements for installing Windows Server 2012 R2, as described at http://technet.microsoft.com/en-us/library/dn303418.aspx. The system hardware should also meet the minimum requirements for installing MAP 9.0.
![]() You need a client computer that has Microsoft Excel 2013 or Microsoft Excel 2010 installed for viewing the reports generated by MAP. If you have an Office 365 subscription, you can also use the Excel Web App for this purpose.
You need a client computer that has Microsoft Excel 2013 or Microsoft Excel 2010 installed for viewing the reports generated by MAP. If you have an Office 365 subscription, you can also use the Excel Web App for this purpose.
Additional Learning Resources
The starting point for business and technical decision makers to learn about Windows Server 2012 R2 is the high-level overview on the Microsoft Server And Cloud Platform page found at http://www.microsoft.com/en-us/server-cloud/products/windows-server-2012-r2/.
The Windows Server 2012 R2 home page on TechNet at http://technet.microsoft.com/en-us/windowsserver/hh534429 is the starting point for experienced IT pros to learn about the Windows Server 2012 R2 platform. From this page, you can learn how to plan, deploy, manage, and support Windows Server 2012 R2 in your environment. If you’re mainly interested in learning about the new capabilities introduced in Windows Server 2012 R2, you should see the topic “What’s New in Windows Server 2012 R2” and the subtopics linked from that page in the TechNet Library at http://technet.microsoft.com/en-us/library/dn250019.aspx.
IT pros who deploy, maintain, and troubleshoot Windows Server-based environments should also familiarize themselves with the Windows Server home page on TechNet at http://technet.microsoft.com/en-us/windowsserver. From this landing page, you can
![]() Read the latest news about the platform.
Read the latest news about the platform.
![]() Watch videos on TechNet LIVE, Channel 9, and other sites.
Watch videos on TechNet LIVE, Channel 9, and other sites.
![]() Read blog posts on TechNet and from IT pros around the world.
Read blog posts on TechNet and from IT pros around the world.
![]() Post your questions to TechNet Forums and have experts answer them.
Post your questions to TechNet Forums and have experts answer them.
![]() Read technical documentation about different server roles and technologies.
Read technical documentation about different server roles and technologies.
![]() Download evaluation versions of different Windows Server versions.
Download evaluation versions of different Windows Server versions.
![]() Access training materials on the Microsoft Virtual Academy and from other sources.
Access training materials on the Microsoft Virtual Academy and from other sources.
![]() Subscribe to the TechNet Flash Newsletter to keep informed of the latest developments in the platform.
Subscribe to the TechNet Flash Newsletter to keep informed of the latest developments in the platform.
![]() Look up Knowledge Base articles and find other help for troubleshooting problems.
Look up Knowledge Base articles and find other help for troubleshooting problems.
Finally, be sure to download my free ebook, “Introducing Windows Server 2012 R2: Technical Overview,” from the link on the Microsoft Press Blog at http://blogs.msdn.com/b/microsoft_press/archive/2013/11/08/free-ebook-introducing-windows-server-2012-r2-technical-overview.aspx.
Lesson 1: Planning for Windows Server 2012 R2
The success of a deployment project depends on careful planning combined with meticulous execution. First, you need to define the scope of the project so that you know where you want to end up. Then, you need to lay out a project plan that involves pilot testing to familiarize yourself with the new platform and to identify any potential issues that might arise during the process. You also need to perform a thorough assessment of your existing environment to ensure there are no surprises coming and develop a methodology to migrate existing servers and roles. Finally, once deployment is underway, you need to perform continued testing to ensure everything is happening as planned.
After this lesson, you will be able to:
![]() Describe six possible deployment scenarios for organizations that want to take advantage of the new features and capabilities found in Windows Server 2012 R2.
Describe six possible deployment scenarios for organizations that want to take advantage of the new features and capabilities found in Windows Server 2012 R2.
![]() Understand some of the steps involved in a deployment process, including pilot testing, assessment, server migration, and role and feature migration.
Understand some of the steps involved in a deployment process, including pilot testing, assessment, server migration, and role and feature migration.
![]() Explain how to install and use the Windows Server Migration Tools to migrate server roles from earlier Windows Server versions to Windows Server 2012 R2.
Explain how to install and use the Windows Server Migration Tools to migrate server roles from earlier Windows Server versions to Windows Server 2012 R2.
Estimated lesson time: 30 minutes
Deployment scenarios
Deployment projects involving servers can be categorized in a number of ways, depending on whether you are deploying a new infrastructure, upgrading or consolidating an existing infrastructure, or implementing a new infrastructure model such as cloud computing. In addition, deployment can differ depending on whether you are migrating your existing infrastructure or only a portion of it; whether you plan to reuse existing hardware or move to new hardware; whether your environment is managed or unmanaged; whether your existing infrastructure is large or small, centralized or distributed, heterogeneous or homogeneous; and many other factors.
With so many different ways of envisioning and scoping deployment projects, it’s obvious that there is no single approach to planning and executing such projects. However, there are some steps and considerations that are common to all deployment projects, and being aware of such best practices and implementing them can help ensure the project’s success.
I’ll begin by describing six deployment scenarios for organizations that want to take advantage of the new features and capabilities found in Windows Server 2012 R2:
![]() Greenfield
Greenfield
![]() Forest upgrade
Forest upgrade
![]() Existing environment
Existing environment
![]() Server consolidation
Server consolidation
![]() Private cloud
Private cloud
![]() Hybrid cloud
Hybrid cloud
Greenfield

In terms of infrastructure, a greenfield deployment is one in which no infrastructure currently exists. For example, let’s say that Contoso, Ltd., is a new company that needs an on-premises infrastructure deployed for its rapidly growing workforce. A greenfield deployment of an infrastructure based on Windows Server 2012 R2 might include steps like these:
![]() Designing, acquiring, and implementing the underlying network infrastructure of switches, routers, access points, and other networking hardware.
Designing, acquiring, and implementing the underlying network infrastructure of switches, routers, access points, and other networking hardware.
![]() Designing the Active Directory environment using the guidelines and best practices found in the AD DS Design Guide at http://technet.microsoft.com/en-us/library/cc754678(v=WS.10).aspx.
Designing the Active Directory environment using the guidelines and best practices found in the AD DS Design Guide at http://technet.microsoft.com/en-us/library/cc754678(v=WS.10).aspx.
![]() Purchasing system hardware that has been certified for Windows Server 2012 R2.
Purchasing system hardware that has been certified for Windows Server 2012 R2.
![]() Performing a pilot deployment to determine whether the planned infrastructure will meet your business needs and to anticipate any possible problems that might arise during the rollout.
Performing a pilot deployment to determine whether the planned infrastructure will meet your business needs and to anticipate any possible problems that might arise during the rollout.
![]() Rolling out your production infrastructure using whatever deployment tools you’ve decided to use. We examine some of these tools in Chapter 2, “Deploying servers.”
Rolling out your production infrastructure using whatever deployment tools you’ve decided to use. We examine some of these tools in Chapter 2, “Deploying servers.”
The main advantage of a greenfield deployment is that it gives you the opportunity to get it right from the start. However, businesses are always evolving and are rarely static, so even if you carefully plan for future growth you might still be faced with challenges in evolving your infrastructure to address events such as mergers, acquisitions, and spinoffs of business units. And in reality, most readers of this Training Guide who are looking to upgrade their job skills are most likely working at companies that have one or more existing Active Directory forests in place and are contemplating migrating them to Windows Server 2012 R2, which is what the next scenario is about.
Real World: Deploying from scratch
The underlying IT infrastructure of most new businesses generally isn’t one that starts from scratch but instead evolves, rapidly or slowly, until a decision is made to choose a specific infrastructure model and implement it using a formally agreed-upon process.
For example, the founders of Contoso, Ltd., might have started their business in the garage of one of their homes and used free Google Apps running on Apple MacBook laptops via a neighborhood Wi-Fi connection to do all their initial planning, accounting, and communications. Once they lease offices and hire several dozen employees, however, they might decide that it makes business sense for them to deploy an infrastructure that centralizes the management and ensures the security of their IT resources. Depending on how they foresee their business evolving, they might decide to deploy a new Active Directory forest on-premises, implement a private cloud solution, or use a public cloud service provider.
Forest upgrade
Administrators of Active Directory environments have traditionally been cautious, even paranoid, about performing schema upgrades by using the Adprep.exe command-line utility. With the release of each new version of Windows Server comes a new schema version, and in the past, the task of introducing domain controllers running the new version of Windows Server into your existing Active Directory environment has required that you first prepare your forest by upgrading the schema. The reluctance that administrators have about performing such upgrades is based largely on three concerns:
![]() The process of upgrading a forest schema by using Adprep was often a cumbersome one on previous versions of Windows Server and involved using a variety of different credentials to log on to specific domain controllers, copy Adprep files, and run Adprep from the command line with various parameters. The more complex the process, the greater the chance of an error occurring.
The process of upgrading a forest schema by using Adprep was often a cumbersome one on previous versions of Windows Server and involved using a variety of different credentials to log on to specific domain controllers, copy Adprep files, and run Adprep from the command line with various parameters. The more complex the process, the greater the chance of an error occurring.
![]() There was the possibility that something might go wrong during the schema upgrade process, resulting in a corrupt forest that requires you to perform a forest recovery, which can be a difficult and time-consuming process.
There was the possibility that something might go wrong during the schema upgrade process, resulting in a corrupt forest that requires you to perform a forest recovery, which can be a difficult and time-consuming process.
![]() There was the possibility that the schema upgrade might go well but result in side effects, such as enterprise applications that break and no longer function properly.
There was the possibility that the schema upgrade might go well but result in side effects, such as enterprise applications that break and no longer function properly.
The recommended approach to avoiding such problems is to create a test environment that mirrors your production environment in terms of its Active Directory schema, network services, and business applications. By using Adprep to upgrade the schema of your test forest, you can better anticipate any problems that might arise when you upgrade the schema of your production forest. For information on how to mirror your production schema into a test environment so that you can perform such testing, see the article “Export, Compare, and Synchronize Active Directory Schemas” from the April 2009 issue of TechNet Magazine at http://technet.microsoft.com/en-us/magazine/2009.04.schema.aspx.
Clearly, these are not trivial concerns when your job as administrator potentially is at stake. So before you perform a forest upgrade, you need to be well prepared. For example:
![]() You need to understand the schema upgrade process and its possible impact on your environment.
You need to understand the schema upgrade process and its possible impact on your environment.
![]() You need to have a forest recovery plan in place as a backup solution for your worst-case scenario.
You need to have a forest recovery plan in place as a backup solution for your worst-case scenario.
Beginning with Windows Server 2012, however, Microsoft has endeavored to alleviate many of the concerns administrators often have about performing forest upgrades. For example:
![]() Adprep functionality is now integrated into the Active Directory Domain Services (AD DS) installation process. In most cases, this eliminates the need to separately run Adprep prior to introducing domain controllers running the new version of Windows Server into existing AD DS infrastructures running Windows Server 2008 R2.
Adprep functionality is now integrated into the Active Directory Domain Services (AD DS) installation process. In most cases, this eliminates the need to separately run Adprep prior to introducing domain controllers running the new version of Windows Server into existing AD DS infrastructures running Windows Server 2008 R2.
![]() The new AD DS installation process includes prerequisite validation to identify potential errors before installation begins. For example, if the installation process determines that adprep /domainprep needs to be run to prepare the domain, verification is done first to ensure that the user who initiated the process has sufficient rights to perform the operation.
The new AD DS installation process includes prerequisite validation to identify potential errors before installation begins. For example, if the installation process determines that adprep /domainprep needs to be run to prepare the domain, verification is done first to ensure that the user who initiated the process has sufficient rights to perform the operation.
![]() The Windows Server 2012 or Windows Server 2012 R2 forest functional level does not add any new features to a forest. It ensures only that any new domain added to the forest will automatically operate at the Windows Server 2012 R2 domain functional level.
The Windows Server 2012 or Windows Server 2012 R2 forest functional level does not add any new features to a forest. It ensures only that any new domain added to the forest will automatically operate at the Windows Server 2012 R2 domain functional level.
![]() The Windows Server 2012 or Windows Server 2012 R2 domain functional level adds only one new feature to a domain. This new feature relates to Dynamic Access Control (DAC) and therefore is unlikely to affect any existing applications and services in your environment.
The Windows Server 2012 or Windows Server 2012 R2 domain functional level adds only one new feature to a domain. This new feature relates to Dynamic Access Control (DAC) and therefore is unlikely to affect any existing applications and services in your environment.
Despite these improvements to performing schema upgrades and raising forest and domain functional levels, you should use careful planning and due care when completing these tasks. These issues are addressed further in Chapter 4, “Deploying domain controllers,” and in Chapter 5, “Active Directory administration.”
Important: Forest Upgrades and Functional Levels
After upgrading your schema, you might want to raise your forest and domain functional levels. As a best practice, follow these practices:
![]() Before changing your forest functional level, take at least one domain controller offline from each domain in your forest.
Before changing your forest functional level, take at least one domain controller offline from each domain in your forest.
![]() Before changing the domain functional level of any domain, take at least one domain controller offline from the domain.
Before changing the domain functional level of any domain, take at least one domain controller offline from the domain.
In both cases, you should make sure that the domain controllers you take offline do not hold any operations master roles in the forest or domains.
Keep the domain controllers offline for 48 to 72 hours after changing functional levels; if no issues are found, you can return the offline domain controllers to service. If issues are discovered, you can use your offline domain controllers as the source for rebuilding servers if a rollback to a previous functional level is required.
Existing environment
Existing businesses that currently have Windows Server 2008 R2 or earlier deployed and that want to take advantage of the new capabilities of Windows Server 2012 or Windows Server 2012 R2 can do so without ripping out their infrastructure and replacing it with a new one. All they need to do is introduce servers running Windows Server 2012 or Windows Server 2012 R2 into their environment and promote them as domain controllers. Doing this automatically upgrades the schema, and administrators can raise the forest and domain functional levels to Windows Server 2012 or Windows Server 2012 R2 with minimal fear of it having a negative impact on their existing applications and services. Of course, regardless of this, you should still be sure to first test your schema upgrade and functional level changes in a test environment that mirrors your production environment just to make sure there will be no issues that might impact your business.
Some new features of Windows Server 2012 and Windows Server 2012 R2 can be implemented into existing Active Directory environments without making significant changes to the existing forest, such as upgrading the schema or raising the forest or domain functional levels. A situation in which this might be done is when deploying new DHCP servers to take advantage of the new DHCP failover feature of Windows Server 2012 and Windows Server 2012 R2 that ensures continuous availability of DHCP services to clients. For information on how to implement this new capability, see Chapter 6, “Network administration.”
The introduction of member servers running Windows Server 2012 or Windows Server 2012 R2 into an Active Directory forest based on an earlier version of Windows Server results in a mixed environment of servers running different versions of Windows. By not introducing new domain controllers running Windows Server 2012 or Windows Server 2012 R2, administrators can continue to manage their environment by using existing tools and processes. Although this seems like a simpler and less risky approach than upgrading your forest as described previously, there are several disadvantages to following this approach:
![]() Some new features and capabilities of Windows Server 2012 and Windows Server 2012 R2 can be implemented only when your Active Directory environment includes domain controllers running Windows Server 2012 or Windows Server 2012 R2. These features might have limited functionality or might not work at all when your Active Directory schema hasn’t been upgraded to Windows Server 2012 or Windows Server 2012 R2 level. In general, information about such limitations might be buried in the TechNet Library documentation for Windows Server, which means you need to do some research before you try deploying Windows Server 2012 or Windows Server 2012 R2 member servers with roles and features installed in your existing Active Directory environment.
Some new features and capabilities of Windows Server 2012 and Windows Server 2012 R2 can be implemented only when your Active Directory environment includes domain controllers running Windows Server 2012 or Windows Server 2012 R2. These features might have limited functionality or might not work at all when your Active Directory schema hasn’t been upgraded to Windows Server 2012 or Windows Server 2012 R2 level. In general, information about such limitations might be buried in the TechNet Library documentation for Windows Server, which means you need to do some research before you try deploying Windows Server 2012 or Windows Server 2012 R2 member servers with roles and features installed in your existing Active Directory environment.
![]() Some of the server administration tools built into Windows Server 2012 and Windows Server 2012 R2 that are included in the Remote Server Administration Tools (RSAT) for Windows 8 and Windows 8.1 have limited or no functionality when managing servers running earlier versions of Windows Server, such as Windows Server 2008 and Windows Server 2008 R2. You might have to install additional updates on servers running these earlier versions of Windows Server to manage them using the Windows Server 2012 or Windows Server 2012 R2 server administration tools or using RSAT for Windows 8 or RSAT for Windows 8.1. For more information, see KB 2693643 at http://support.microsoft.com/kb/2693643.
Some of the server administration tools built into Windows Server 2012 and Windows Server 2012 R2 that are included in the Remote Server Administration Tools (RSAT) for Windows 8 and Windows 8.1 have limited or no functionality when managing servers running earlier versions of Windows Server, such as Windows Server 2008 and Windows Server 2008 R2. You might have to install additional updates on servers running these earlier versions of Windows Server to manage them using the Windows Server 2012 or Windows Server 2012 R2 server administration tools or using RSAT for Windows 8 or RSAT for Windows 8.1. For more information, see KB 2693643 at http://support.microsoft.com/kb/2693643.
So although rolling out a few Windows Server 2012 R2 member servers with a few roles and features installed might seem like a good idea and less risky than performing a forest upgrade, the gains you experience from following this approach might not be worth the effort involved.
Server consolidation
Server consolidation involves using virtualization to consolidate multiple server workloads onto a single virtualization host. With the greatly increased scalability of the Hyper-V role in Windows Server 2012 and Windows Server 2012 R2, businesses can often migrate much or even all of their existing Active Directory infrastructure based on a previous version of Windows Server and run it on a cluster of Hyper-V hosts running Windows Server 2012 or Windows Server 2012 R2. In other words, they can migrate their existing physical servers into a virtual environment. For more information, see Chapter 7, “Hyper-V virtualization.”
Private cloud
Cloud computing provides organizations with new options to increase efficiencies while reducing costs. The traditional data-center approach, in which the organization deploys and manages its own Active Directory infrastructure on-premises, has known stability and security, but the infrastructure servers involved often run at less than 15 percent utilization. Virtualizing the data center by using server consolidation can increase utilization, reduce cost, and simplify management, but this approach lacks the elasticity to rapidly meet changing demands as your business grows or experiences market changes.
Cloud computing can simplify management and reduce cost even further while providing elasticity and the perception of infinite capacity for the IT services your business uses. Cloud resources are pooled so that they can be allocated on demand as the needs of the business grow or shrink. If additional resources are needed, they can be provisioned without the need for extensive planning and testing beforehand.
Cloud computing can be provisioned according to three possible service models:
![]() Software as a Service (SaaS) The cloud is used to deliver an application to multiple users, regardless of their location or the type of device they are using. Compare this model with the more traditional approach of deploying separate instances of applications to each user’s PC. This approach typically is used to deliver cloud-based applications that have minimal need for customization. Examples include email, Customer Relationship Management (CRM), and productivity software. The advantage of this approach is that application activities can be managed from a single central location to reduce cost and management overhead.
Software as a Service (SaaS) The cloud is used to deliver an application to multiple users, regardless of their location or the type of device they are using. Compare this model with the more traditional approach of deploying separate instances of applications to each user’s PC. This approach typically is used to deliver cloud-based applications that have minimal need for customization. Examples include email, Customer Relationship Management (CRM), and productivity software. The advantage of this approach is that application activities can be managed from a single central location to reduce cost and management overhead.
An example of a SaaS offering from Microsoft is Office 365, which provides users with secure access from anywhere to their email, shared calendars, instant messaging (IM), video conferencing, and tools for document collaboration. For more information on Office 365 for business, see http://office.microsoft.com/en-us/business/.
![]() Platform as a Service (PaaS) The cloud is used to deliver application execution services, such as application runtime, storage, and integration for applications designed for a prespecified, cloud-based architectural framework. This enables you to develop custom cloud-based applications for your business, which you can then host in the cloud so that your users can access them from anywhere over the Internet. PaaS also enables you to create multitenant applications that multiple users can access simultaneously. With support for application-level customization, PaaS enables integration with your older applications and interoperability with your current on-premises systems, although some applications might need to be recoded to work in the new environment.
Platform as a Service (PaaS) The cloud is used to deliver application execution services, such as application runtime, storage, and integration for applications designed for a prespecified, cloud-based architectural framework. This enables you to develop custom cloud-based applications for your business, which you can then host in the cloud so that your users can access them from anywhere over the Internet. PaaS also enables you to create multitenant applications that multiple users can access simultaneously. With support for application-level customization, PaaS enables integration with your older applications and interoperability with your current on-premises systems, although some applications might need to be recoded to work in the new environment.
An example of a PaaS offering from Microsoft is Windows Azure Cloud Services, which enables you to deploy highly scalable web applications built with C#, PHP, Python, Node.js, or Java. An instance of Cloud Services represents a logical container for two types of roles: web role instances and worker role instances. The web role provides an ASP.NET programming model you can use for programmatically provisioning node instances of a web farm. The worker role exposes a programming model you can use for implementing batch processing farms with resources. For more information on Windows Azure Cloud Services, see http://www.windowsazure.com/en-us-/documentation/services/cloud-services/.
![]() Infrastructure as a Service (IaaS) The cloud is used to create pools of computer, storage, and network connectivity resources, which can then be delivered as cloud-based services billed on a per-usage basis. IaaS forms the foundation for the other two cloud service models by providing a standardized, flexible, virtualized environment that presents itself as virtualized server workloads. In this approach, the organization can self-provision these virtualized workloads and fully customize them with the processing, storage, and network resources needed and with the operating system and applications needed. The organization is relieved of the need to purchase and install hardware and can simply spin up new workloads to quickly meet changing demand.
Infrastructure as a Service (IaaS) The cloud is used to create pools of computer, storage, and network connectivity resources, which can then be delivered as cloud-based services billed on a per-usage basis. IaaS forms the foundation for the other two cloud service models by providing a standardized, flexible, virtualized environment that presents itself as virtualized server workloads. In this approach, the organization can self-provision these virtualized workloads and fully customize them with the processing, storage, and network resources needed and with the operating system and applications needed. The organization is relieved of the need to purchase and install hardware and can simply spin up new workloads to quickly meet changing demand.
An example of an IaaS offering from Microsoft is Windows Azure Virtual Machines, which enables you to provision, deploy, and manage virtual machine instances in the Windows Azure public cloud. These virtual machine instances can be provisioned from a gallery of stock virtual hard disks (VHDs) that include different versions of Windows Server, SQL Server, and Linux. For more information on Windows Azure Virtual Machines, see http://www.windowsazure.com/en-us/documentation/services/virtual-machines/.
In the context of Windows Server 2012 R2, the cloud service model under consideration here is the IaaS model, which can be implemented by using the Hyper-V role of Windows Server 2012 R2 with Microsoft System Center 2012 R2.
When IaaS is implemented in such a way that a customer deploys the cloud on-premises in its datacenter, the solution is called a private cloud. There are several ways an organization can implement a private cloud solution:
![]() By having the customer build and host the private cloud in its own datacenter, using Windows Server and the System Center family of products
By having the customer build and host the private cloud in its own datacenter, using Windows Server and the System Center family of products
![]() By having the customer purchase a dedicated private cloud appliance with Windows Server and System Center preinstalled and configured
By having the customer purchase a dedicated private cloud appliance with Windows Server and System Center preinstalled and configured
![]() By having a partner company host the customer’s private cloud
By having a partner company host the customer’s private cloud
Migrating an organization’s existing Active Directory infrastructure into a private cloud sourcing model can be straightforward or complex, depending on a number of different factors. Because of this, it’s often best if you enlist a Microsoft partner to help you design and implement a solution that meets the needs of your organization.
If you want to explore the private cloud approach further, there are several places you can start:
![]() You can download evaluation versions of Windows Server 2012 R2 and System Center 2012 R2 from the Server And Cloud Platform page at http://www.microsoft.com/en-us/server-cloud/solutions/virtualization-private-cloud.aspx. Then you can use these platforms to create a proof of concept private cloud using documentation in the TechNet Library, such as http://technet.microsoft.com/en-us/library/gg610625.aspx.
You can download evaluation versions of Windows Server 2012 R2 and System Center 2012 R2 from the Server And Cloud Platform page at http://www.microsoft.com/en-us/server-cloud/solutions/virtualization-private-cloud.aspx. Then you can use these platforms to create a proof of concept private cloud using documentation in the TechNet Library, such as http://technet.microsoft.com/en-us/library/gg610625.aspx.
![]() You can purchase an IaaS private cloud with a prevalidated configuration from server partners in the Microsoft Private Cloud Fast Track program. These offerings combine Microsoft software, consolidated guidance, validated configurations from original equipment manufacturer (OEM) partners, and other value-added software components. For more information, see http://www.microsoft.com/en-in/server-cloud/fast-track.aspx.
You can purchase an IaaS private cloud with a prevalidated configuration from server partners in the Microsoft Private Cloud Fast Track program. These offerings combine Microsoft software, consolidated guidance, validated configurations from original equipment manufacturer (OEM) partners, and other value-added software components. For more information, see http://www.microsoft.com/en-in/server-cloud/fast-track.aspx.
![]() You can use the Microsoft Pinpoint site to find a partner in the Microsoft Private Cloud Service Provider Program that can host a dedicated private cloud for your organization. For more information, see http://www.microsoft.com/en-in/server-cloud/find-a-partner.aspx.
You can use the Microsoft Pinpoint site to find a partner in the Microsoft Private Cloud Service Provider Program that can host a dedicated private cloud for your organization. For more information, see http://www.microsoft.com/en-in/server-cloud/find-a-partner.aspx.
More Info: Microsoft Private Cloud
For more information on Microsoft private cloud solutions, see http://www.microsoft.com/en-us/server-cloud/solutions/virtualization-private-cloud.aspx.
Hybrid cloud
When IaaS is implemented as a combination of an on-premises private cloud solution and a public cloud service such as Windows Azure Virtual Machines, the solution is called a hybrid cloud. The hybrid cloud approach enables organizations to extend their infrastructure into the cloud for greater flexibility and agility so they can scale on demand to meet rapidly changing business requirements.
Microsoft believes that the hybrid cloud approach is the key to helping organizations cloud optimize their business. Beginning with the R2 release of Windows Server 2012, Microsoft uses the term “Cloud OS” to represent its visionary approach to how IT can deliver innovative new hybrid solutions that can address the needs and challenges that businesses are facing today. These needs and challenges include
![]() The need for new tools to automate datacenter provisioning, management, and monitoring in addition to tasks and workflows both in the datacenter and in the cloud. These tools must be able to manage both physical and virtual workloads on-premises and across public and service-provider clouds. They also need to be scalable, flexible, and secure.
The need for new tools to automate datacenter provisioning, management, and monitoring in addition to tasks and workflows both in the datacenter and in the cloud. These tools must be able to manage both physical and virtual workloads on-premises and across public and service-provider clouds. They also need to be scalable, flexible, and secure.
![]() The challenge of managing diverse mobile devices like tablets and smartphones that are frequently personal devices owned by the users themselves rather than corporate assets. Existing technologies need to be integrated with new platforms that allow device registration and enrollment, policy-based management, and management from the cloud. There is also the challenge of delivering a secure and personalized experience on any device, anywhere and at any time.
The challenge of managing diverse mobile devices like tablets and smartphones that are frequently personal devices owned by the users themselves rather than corporate assets. Existing technologies need to be integrated with new platforms that allow device registration and enrollment, policy-based management, and management from the cloud. There is also the challenge of delivering a secure and personalized experience on any device, anywhere and at any time.
![]() The need to deal with the apps users run on mobile devices. Deploying and managing these apps presents new challenges to accelerate the application life cycle, the handoff from developer to infrastructure specialists.
The need to deal with the apps users run on mobile devices. Deploying and managing these apps presents new challenges to accelerate the application life cycle, the handoff from developer to infrastructure specialists.
![]() The challenge of dealing with greater amounts of data than ever before. Big data needs powerful new tools for business intelligence to unlock the value of data stored both on-premises and in the cloud.
The challenge of dealing with greater amounts of data than ever before. Big data needs powerful new tools for business intelligence to unlock the value of data stored both on-premises and in the cloud.
![]() The challenge of accomplishing all of the above without breaking ever-constrained IT budgets.
The challenge of accomplishing all of the above without breaking ever-constrained IT budgets.
Microsoft’s Cloud OS vision for hybrid computing consists of three key platforms:
![]() Windows Server 2012 R2 Provides the foundation for building enterprise-class datacenter and hybrid cloud solutions that are simple to deploy, cost-effective, application-focused, and user-centric.
Windows Server 2012 R2 Provides the foundation for building enterprise-class datacenter and hybrid cloud solutions that are simple to deploy, cost-effective, application-focused, and user-centric.
![]() System Center 2012 R2 Delivers a unified management experience across on-premises, service provider, and Windows Azure environments in a manner that’s simple, cost-effective, application-focused, and enterprise-class.
System Center 2012 R2 Delivers a unified management experience across on-premises, service provider, and Windows Azure environments in a manner that’s simple, cost-effective, application-focused, and enterprise-class.
![]() Windows Azure Provides an open and flexible cloud platform for building, deploying, and managing applications using almost any language, tool, or framework and running them in a secure public cloud hosted in a global network of Microsoft-managed datacenters. Windows Azure also enables you to integrate your public cloud applications with your existing on-premises IT environment to enable hybrid cloud capabilities.
Windows Azure Provides an open and flexible cloud platform for building, deploying, and managing applications using almost any language, tool, or framework and running them in a secure public cloud hosted in a global network of Microsoft-managed datacenters. Windows Azure also enables you to integrate your public cloud applications with your existing on-premises IT environment to enable hybrid cloud capabilities.
If you want to explore Microsoft’s hybrid cloud approach further, you can complete the following steps:
1. Begin by downloading evaluation versions of Windows Server 2012 R2 and System Center 2012 R2 and getting a trial subscription for Windows Azure from the Server And Cloud Platform page at http://www.microsoft.com/en-us/server-cloud/solutions/hybrid-cloud.aspx.
2. Next, use these platforms to create a proof of concept private cloud using documentation in the TechNet Library, such as http://technet.microsoft.com/en-us/library/gg610625.aspx.
3. After this, you can use Windows Azure Virtual Machines to deploy virtual machine instances running Windows Server 2012 R2 in the Windows Azure public cloud by using the documentation found at http://www.windowsazure.com/en-us/documentation/services/virtual-machines/.
4. Finally, learn how to use System Center 2012 R2 App Controller to manage these virtual machine instances across the private cloud and the Windows Azure platform from a single console by downloading the free ebook Microsoft System Center: Cloud Management with App Controller, which is available from the Microsoft Press blog at http://blogs.msdn.com/b/microsoft_press/archive/2013/11/26/free-ebook-microsoft-system-center-cloud-management-with-app-controller.aspx.
More Info: Microsoft hybrid cloud
For more information on Microsoft hybrid cloud solutions, see http://www.microsoft.com/en-us/server-cloud/solutions/hybrid-cloud.aspx.
![]() Quick check
Quick check
![]() Is Microsoft’s cloud-based Office 365 an example of Software as a Service (SaaS), Platform as a Service (PaaS), or Infrastructure as a Service (IaaS)?
Is Microsoft’s cloud-based Office 365 an example of Software as a Service (SaaS), Platform as a Service (PaaS), or Infrastructure as a Service (IaaS)?
Quick check answer
![]() Office 365 is a SaaS offering in which the cloud is used to deliver an application to multiple users, regardless of their location or the type of device they are using.
Office 365 is a SaaS offering in which the cloud is used to deliver an application to multiple users, regardless of their location or the type of device they are using.
Deployment process
As I said earlier, there is no single approach to planning and executing deployment projects. However, there are some best practices that apply in various degrees to the different scenarios discussed earlier, and from these you can identify some of the key steps that should be involved in any deployment or migration process. I’ll briefly focus on providing some guidance for the following four steps, which are common to most infrastructure projects:
![]() Assessment
Assessment
![]() Pilot testing
Pilot testing
![]() Deployment/migration
Deployment/migration
![]() Role/feature migration
Role/feature migration
Note that to help you use the information in the upcoming sections, some of it is presented in the form of a series of questions that you can use as the basis for creating worksheets for implementing your project.
Assessment
Assessment involves determining the readiness of your organization’s infrastructure, hardware, applications, and personnel for migrating your infrastructure to Windows Server 2012 R2. Although some of this will be examined in more detail in the next lesson, here are some of the key questions that you need to address as part of the assessment process:
![]() Have you inventoried all the hardware in your environment?
Have you inventoried all the hardware in your environment?
![]() Do you have any tools for performing an inventory of your infrastructure?
Do you have any tools for performing an inventory of your infrastructure?
![]() Is your existing server hardware capable of running Windows Server 2012 R2?
Is your existing server hardware capable of running Windows Server 2012 R2?
![]() Is your existing server hardware capable of supporting the various roles and features of Windows Server 2012 R2 that you plan to deploy in your environment?
Is your existing server hardware capable of supporting the various roles and features of Windows Server 2012 R2 that you plan to deploy in your environment?
![]() Will your existing storage hardware work with Windows Server 2012 R2?
Will your existing storage hardware work with Windows Server 2012 R2?
![]() Is your network infrastructure ready for Windows Server 2012 R2?
Is your network infrastructure ready for Windows Server 2012 R2?
![]() Are your various network appliances (for example, firewalls, VPN gateways, and so on) capable of interoperating with Windows Server 2012 R2?
Are your various network appliances (for example, firewalls, VPN gateways, and so on) capable of interoperating with Windows Server 2012 R2?
![]() If you plan to deploy DirectAccess, do your network infrastructure and appliances fully support Internet Protocol version 6 (IPv6)? Does your Internet Service Provider (ISP) support IPv6?
If you plan to deploy DirectAccess, do your network infrastructure and appliances fully support Internet Protocol version 6 (IPv6)? Does your Internet Service Provider (ISP) support IPv6?
![]() Have you inventoried all the operating systems and applications in your environment?
Have you inventoried all the operating systems and applications in your environment?
![]() Are there any operating systems or applications in your environment that have compatibility issues with Windows Server 2012 R2?
Are there any operating systems or applications in your environment that have compatibility issues with Windows Server 2012 R2?
![]() Will you be virtualizing any of your existing operating systems or applications on Hyper-V hosts running Windows Server 2012 R2?
Will you be virtualizing any of your existing operating systems or applications on Hyper-V hosts running Windows Server 2012 R2?
![]() Have you inventoried the server roles on each of the servers of your infrastructure?
Have you inventoried the server roles on each of the servers of your infrastructure?
![]() Is there anything you need to consider with regard to virtualizing any of the server roles currently running on your servers or migrating these roles into the cloud?
Is there anything you need to consider with regard to virtualizing any of the server roles currently running on your servers or migrating these roles into the cloud?
![]() Have you assessed your budget to ensure you have sufficient funding to purchase any hardware or software needed for your project?
Have you assessed your budget to ensure you have sufficient funding to purchase any hardware or software needed for your project?
![]() Have you assessed the potential cost savings and return on investment (ROI) your organization can achieve by migrating to Windows Server 2012 R2?
Have you assessed the potential cost savings and return on investment (ROI) your organization can achieve by migrating to Windows Server 2012 R2?
![]() Are your IT staff members ready for the project? Do they need any additional training?
Are your IT staff members ready for the project? Do they need any additional training?
Pilot testing
Pilot testing involves more than just installing the software and playing around with it. You should start by creating a test plan that defines the scope and objectives of the testing you want to perform. You should also define a testing methodology that describes the architecture of your test environment, your testing tools and techniques, and the type of automation you plan to use for your testing. You then need to identify the resource on which you need to perform your testing and establish a schedule for performing your various tests. Finally, you should have a process for evaluating the results of your testing to see whether the objectives you set have been achieved.
The following are some key questions that you need to address during pilot testing of Windows Server 2012 R2:
![]() Why are you pilot testing Windows Server 2012 R2?
Why are you pilot testing Windows Server 2012 R2?
![]() Who will be performing the testing?
Who will be performing the testing?
![]() What training will the testers need before they can perform their testing?
What training will the testers need before they can perform their testing?
![]() What are the specific objectives of your test process?
What are the specific objectives of your test process?
![]() What scenarios will you be using as the basis for performing your testing?
What scenarios will you be using as the basis for performing your testing?
![]() What roles and features do you plan to test?
What roles and features do you plan to test?
![]() How will you test each of these roles and features?
How will you test each of these roles and features?
![]() What hardware will you require to perform your tests?
What hardware will you require to perform your tests?
![]() What additional software will you require to perform your tests?
What additional software will you require to perform your tests?
![]() Will you be using any scripts or automation as part of the test process?
Will you be using any scripts or automation as part of the test process?
![]() Where will you set up your test environment?
Where will you set up your test environment?
![]() How will you ensure that your test environment will not affect your production environment?
How will you ensure that your test environment will not affect your production environment?
![]() What is the schedule for performing your testing?
What is the schedule for performing your testing?
![]() How will you record your results for later analysis and evaluation?
How will you record your results for later analysis and evaluation?
Deployment/migration
Deployment or migration of Windows servers can take several different paths, depending on the scenario you decide to implement. The choices you make concerning the deployment or migration process can be dictated by various factors, including cost, timeframe, the topology of your organization, the complexity of your infrastructure, and the server roles you currently have deployed in your environment. Some of the key questions that you need to address concerning the process include the following:
![]() Do you have a rollback plan in place in case something goes wrong with the deployment or migration?
Do you have a rollback plan in place in case something goes wrong with the deployment or migration?
![]() Have you performed a full system backup of the servers you’ll be migrating?
Have you performed a full system backup of the servers you’ll be migrating?
![]() Which of the following methods will you be using for deploying or migrating your servers?
Which of the following methods will you be using for deploying or migrating your servers?
![]() New computer, in which you either deploy Windows Server 2012 R2 yourself on bare-metal hardware or purchase preconfigured server systems from your vendor and further configure the servers as desired.
New computer, in which you either deploy Windows Server 2012 R2 yourself on bare-metal hardware or purchase preconfigured server systems from your vendor and further configure the servers as desired.
![]() In-place upgrade, which keeps the current hardware and upgrades the current server operating system to Windows Server 2012 R2. If you follow this approach, make sure you are aware of the supported upgrade paths for your existing server operating systems.
In-place upgrade, which keeps the current hardware and upgrades the current server operating system to Windows Server 2012 R2. If you follow this approach, make sure you are aware of the supported upgrade paths for your existing server operating systems.
![]() Refresh, which keeps the current hardware, saves the state information (operating system and application settings) of the current installation, wipes the hardware to remove the current operating system, performs a clean install of Windows Server 2012 R2, and restores the state.
Refresh, which keeps the current hardware, saves the state information (operating system and application settings) of the current installation, wipes the hardware to remove the current operating system, performs a clean install of Windows Server 2012 R2, and restores the state.
![]() Replace, which saves the state of the current installation to a network location, retires the current hardware, performs a clean install of Windows Server 2012 R2 on new hardware, and restores the state.
Replace, which saves the state of the current installation to a network location, retires the current hardware, performs a clean install of Windows Server 2012 R2 on new hardware, and restores the state.
![]() Have you acquired and learned how to use tools such as Microsoft Deployment Toolkit (MDT) and System Center Configuration Manager (SCCM), which you can use to perform server deployments and migrations? Use of these tools is discussed in Chapter 2.
Have you acquired and learned how to use tools such as Microsoft Deployment Toolkit (MDT) and System Center Configuration Manager (SCCM), which you can use to perform server deployments and migrations? Use of these tools is discussed in Chapter 2.
![]() Will you be migrating any physical servers into virtual environments? If so, you might need System Center Virtual Machine Manager (SCVMM) or other tools for performing the physical-to-virtual (P2V) migrations of your server workloads.
Will you be migrating any physical servers into virtual environments? If so, you might need System Center Virtual Machine Manager (SCVMM) or other tools for performing the physical-to-virtual (P2V) migrations of your server workloads.
![]() Will you be migrating any servers running operating systems that are no longer supported, such as Windows 2000 Server, which might require special procedures such as migrating to an intermediate operating system before migrating to Windows Server 2012 R2? For more information, see Chapter 7.
Will you be migrating any servers running operating systems that are no longer supported, such as Windows 2000 Server, which might require special procedures such as migrating to an intermediate operating system before migrating to Windows Server 2012 R2? For more information, see Chapter 7.
![]() Will you be migrating any servers across processor architectures? For example, migrating a server running a 32-bit version of Windows Server 2003 to Windows Server 2012 R2, which is only available as 64-bit software?
Will you be migrating any servers across processor architectures? For example, migrating a server running a 32-bit version of Windows Server 2003 to Windows Server 2012 R2, which is only available as 64-bit software?
![]() Have you developed plans for migrating the roles on each of your servers? Role migration should be planned concurrently with server migration. See the next section for more information on this topic.
Have you developed plans for migrating the roles on each of your servers? Role migration should be planned concurrently with server migration. See the next section for more information on this topic.
![]() Have you developed plans for migrating any business data stored on any of your servers? Will you be migrating your storage hardware and your servers? Is your business data safely backed up to prevent data loss from occurring during the process?
Have you developed plans for migrating any business data stored on any of your servers? Will you be migrating your storage hardware and your servers? Is your business data safely backed up to prevent data loss from occurring during the process?
![]() Have you developed specific plans for migrating Microsoft server applications, such as Microsoft Exchange, Microsoft SQL Server, and Microsoft SharePoint? The migration of server applications such as these requires special planning and consideration. Search the TechNet Library if you require more information on planning the migration of Microsoft server applications.
Have you developed specific plans for migrating Microsoft server applications, such as Microsoft Exchange, Microsoft SQL Server, and Microsoft SharePoint? The migration of server applications such as these requires special planning and consideration. Search the TechNet Library if you require more information on planning the migration of Microsoft server applications.
![]() Have you discussed your deployment or migration plans with the vendors of any third-party server applications you have deployed in your environment? Will the new operating system require a new version of these applications?
Have you discussed your deployment or migration plans with the vendors of any third-party server applications you have deployed in your environment? Will the new operating system require a new version of these applications?
![]() Have you developed plans to ensure business applications and services remain available to users during the deployment or migration process?
Have you developed plans to ensure business applications and services remain available to users during the deployment or migration process?
![]() Have you informed your user population about any possible service interruptions or problems that might arise during the deployment or migration?
Have you informed your user population about any possible service interruptions or problems that might arise during the deployment or migration?
![]() Have you laid out a schedule for performing your migrations and determined the order in which you’ll be deploying or migrating your servers?
Have you laid out a schedule for performing your migrations and determined the order in which you’ll be deploying or migrating your servers?
![]() Have you assigned responsibilities to different members of your deployment and migration team?
Have you assigned responsibilities to different members of your deployment and migration team?
![]() Have you thoroughly tested your deployment and migration plans in a test environment that mirrors your current production network?
Have you thoroughly tested your deployment and migration plans in a test environment that mirrors your current production network?
Role/feature migration
A key aspect of server deployment is the migration of server roles and features together with configuration settings and data. To migrate roles and features from earlier versions of Windows Server to Windows Server 2012 or Windows Server 2012 R2, you can use the Windows Server Migration Tools. These tools include best-practices documentation and are designed to ensure the role and feature migration process goes smoothly and without errors.
Windows Server Migration Tools can be installed on the following operating systems:
![]() Windows Server 2003 with Service Pack 2
Windows Server 2003 with Service Pack 2
![]() Windows Server 2003 R2
Windows Server 2003 R2
![]() Full installation option of Windows Server 2008
Full installation option of Windows Server 2008
![]() Full installation option of Windows Server 2008 R2
Full installation option of Windows Server 2008 R2
![]() Server Core installation option of Windows Server 2008 R2
Server Core installation option of Windows Server 2008 R2
![]() Server with a GUI installation option of Windows Server 2012
Server with a GUI installation option of Windows Server 2012
![]() Server Core installation option of Windows Server 2012
Server Core installation option of Windows Server 2012
![]() Server with a GUI installation option of Windows Server 2012 R2
Server with a GUI installation option of Windows Server 2012 R2
![]() Server Core installation option of Windows Server 2012 R2
Server Core installation option of Windows Server 2012 R2
The source server is the server from which you are migrating the role or feature, and the destination server is the server to which you are migrating the role or feature. For example, the source server might be running a Full installation option of Windows Server 2008 R2 and the destination server might be running a Server Core installation option of Windows Server 2012 R2. The Migration Tools must be installed on both the source and destination servers, and you must be a member of the Administrators group on both servers.
The following migration paths are supported:
![]() Migrating between 32-bit and 64-bit architectures
Migrating between 32-bit and 64-bit architectures
![]() Migrating between physical machines and virtual machines
Migrating between physical machines and virtual machines
![]() Cross-subnet migrations
Cross-subnet migrations
The following migration paths are not supported:
![]() Migrating between source and destination servers that have different system UI languages.
Migrating between source and destination servers that have different system UI languages.
![]() Roles on the Server Core installation option of Windows Server 2008 cannot be migrated because the Microsoft .NET Framework is not available on this installation option.
Roles on the Server Core installation option of Windows Server 2008 cannot be migrated because the Microsoft .NET Framework is not available on this installation option.
The sections that follow demonstrate how role and feature migration can be performed.
Installing the Migration Tools on the destination server
The following procedure shows how to install and configure the Migration Tools on a destination server running Windows Server 2012 R2. The goal is to be able to migrate a role such as the DHCP Server role or the Windows Server Update Services (WSUS) role from an existing server running Windows Server 2008 R2 to a new server running Windows Server 2012 R2. To install the Migration Tools on the destination server, complete the following steps:
1. Open a Windows PowerShell session with elevated rights on a server running Windows Server 2012 R2 in your environment.
2. Execute the following command to install the Windows Server Migration Tools feature on the remote server running Windows Server 2012 R2 and named SERVER7:
Install-WindowsFeature Migration –ComputerName SERVER7
If the local server running Windows Server 2012 R2 you are logged on to is a Server Core installation, type powershell.exe before executing the Windows PowerShell command just shown.
If the local server running Windows Server 2012 R2 you are logged on to is a Full installation, you can also install the Migration Tools on the remote server by launching the Add Roles And Features Wizard from Server Manager.
3. Open an elevated command prompt by typing cmd in your elevated Windows PowerShell session and change the current directory as follows:
Cd %systemroot%\system32\ServerMigrationTools
4. Create a deployment folder on the destination server by running the SmigDeploy.exe utility. This utility creates an installation package for performing the migration and places it in a new folder named C:\downloads\<subfolder>, where <subfolder> depends on the operating system version and architecture of the source server. For example, if the source computer has AMD64 architecture and is running Windows Server 2008 R2, run SmigDeploy.exe using these parameters:
SmigDeploy.exe /package /architecture amd64 /os WS08R2 /path C:\windows
This creates a new deployment folder named C:\downloads\SMT_ws08R2_amd64 on the destination server and copies the Migration Tool files to the folder.
5. Copy the deployment folder to the local drive of the source computer running Windows Server 2008 R2 by using any appropriate method.
For more information on installing and using the Windows Server Migration Tools on Windows Server 2012 or Windows Server 2012 R2, see http://technet.microsoft.com/en-us/library/jj134202. There are also specific role and feature migration guides available on TechNet athttp://technet.microsoft.com/en-us/library/dn486809.aspx for Windows Server 2012 and at http://technet.microsoft.com/en-us/library/dn486773.aspx for Windows Server 2012 R2.
Installing the Migration Tools on the source server
The following procedure shows how to install and run the Migration Tools on a source server running Windows Server 2008 R2 to which you have already copied the deployment folder from the destination computer. Note that additional steps might be required for migrating certain roles, such as the Hyper-V role, the Routing And Remote Access Services role, and others. To install the Migration Tools on the source server, complete the following steps:
1. Open a Windows PowerShell session with elevated rights and execute the following command to load the Server Manager module:
Import-Module ServerManager
2. Install the Windows Server Migration Tools feature by running this command:
Add-WindowsFeature Migration
3. Note that if your source server is running an earlier operating system such as Windows Server 2008 or Windows Server 2003, you also need to install the Microsoft .NET Framework and Windows PowerShell on the source computer and then run SmigDeploy.exe on it to register the Windows Server Migration Tools cmdlets into Windows PowerShell.
You can now launch the Migration Tools from either the destination server or the source server. For example, to launch them from a destination server running Windows Server 2012 or Windows Server 2012 R2, right-click the Windows Server Migration Tools tile on the Start screen and click Run As Administrator on the app bar, as shown here:

This opens a custom Windows PowerShell session from which you can run the various Windows Server Migration Tools cmdlets, as shown in Figure 1-1.
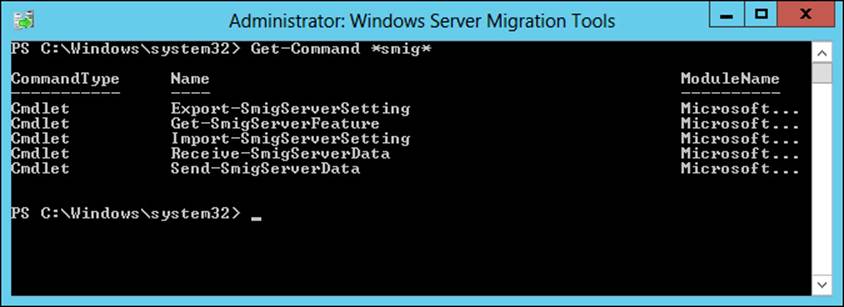
FIGURE 1-1 Display the list of available Windows Server Migration Tools cmdlets.
For help with the syntax of these cmdlets, use the Get-Help cmdlet. For more information on installing the Windows Server Migration Tools on Windows Server 2008 R2 and earlier, see http://technet.microsoft.com/en-us/library/dd379545(v=WS.10).aspx.
Tip: Get your migration questions answered
A good place to get help with your server migration questions is the Migration forum in the Windows Server forums on TechNet at http://social.technet.microsoft.com/forums/en-US/winserverMigration/.
Lesson summary
![]() Each type of infrastructure migration scenario (greenfield, forest upgrade, mixed environment, server consolidation, private cloud, hybrid cloud) has both benefits and challenges for organizations wanting to take advantage of the new features and capabilities found in Windows Server 2012 and Windows Server 2012 R2.
Each type of infrastructure migration scenario (greenfield, forest upgrade, mixed environment, server consolidation, private cloud, hybrid cloud) has both benefits and challenges for organizations wanting to take advantage of the new features and capabilities found in Windows Server 2012 and Windows Server 2012 R2.
![]() Forest upgrades to Windows Server 2012 and Windows Server 2012 R2 are simpler than with previous Windows Server versions because of the integration of Adprep.exe into the AD DS role installation process.
Forest upgrades to Windows Server 2012 and Windows Server 2012 R2 are simpler than with previous Windows Server versions because of the integration of Adprep.exe into the AD DS role installation process.
![]() Four key steps for any infrastructure migration project are pilot testing, assessment, server migration, and role and feature migration.
Four key steps for any infrastructure migration project are pilot testing, assessment, server migration, and role and feature migration.
![]() The Windows Server Migration Tools ease the process of migrating roles and features from previous Windows Server versions to Windows Server 2012 or Windows Server 2012 R2.
The Windows Server Migration Tools ease the process of migrating roles and features from previous Windows Server versions to Windows Server 2012 or Windows Server 2012 R2.
Lesson review
Answer the following questions to test your knowledge of the information in this lesson. You can find the answers to these questions and explanations of why each answer choice is correct or incorrect in the “Answers” section at the end of this chapter.
1. Which of the following are disadvantages of the existing environment deployment scenario? (Choose all that apply.)
A. It gives you an opportunity to get it right from the start when it comes to implementing an infrastructure based on Windows Server 2012 R2.
B. Some new features and capabilities of Windows Server 2012 R2 might have limited functionality or might not work at all when this deployment scenario is implemented.
C. Server management might become more complex because of the need to use separate tools for managing servers running Windows Server 2012 R2 and those running earlier Windows Server operating system versions.
D. It can help your organization improve server utilization and reduce costs.
2. Which of the following is not an enhancement that Microsoft made in Windows Server 2012 and Windows Server 2012 R2 to alleviate some of the concerns administrators often have about performing forest upgrades? (Choose all that apply.)
A. Adprep functionality is now integrated into the AD DS installation process.
B. The new AD DS installation process includes prerequisite validation to identify potential errors before installation begins.
C. The Windows Server 2012 and Windows Server 2012 R2 forest functional levels add several new features to a forest.
D. The Windows Server 2012 and Windows Server 2012 R2 domain functional levels add only one new feature to a domain.
3. Which of the following migration paths is not supported by the Windows Server Migration Tools?
A. Migrating between x86-based and x64-based architectures
B. Migrating between source and destination servers that have different system UI languages
C. Migrating between physical machines and virtual machines
D. Cross-subnet migrations
4. Which Windows PowerShell cmdlet for the Windows Server Migration Tools can you use to get the set of all Windows features that can be migrated from the local server or from a migration store?
A. Export-SmigServerSetting
B. Send-SmigServerData
C. Get-SmigServerFeature
D. Import-SmigServerSetting
Lesson 2: Assessing the readiness of your environment
The assessment phase is an important step of any server migration project. During this phase, you assess the readiness of your environment for the deployment of Windows Server 2012 R2. A key aspect of this phase is determining whether your current server hardware and the hardware you plan to purchase will support running Windows Server 2012 R2 and the various server roles and features you need to deploy in your environment. As this lesson demonstrates, performing such an assessment can be done in various ways, using different types of tools.
After this lesson, you will be able to:
![]() Describe the Windows Server 2012 R2 editions and system requirements.
Describe the Windows Server 2012 R2 editions and system requirements.
![]() Explain how to perform a manual assessment of a server infrastructure and describe some of the tools you would use to do this.
Explain how to perform a manual assessment of a server infrastructure and describe some of the tools you would use to do this.
![]() Describe the capabilities of version 9.0 of the Microsoft Assessment and Planning (MAP) Toolkit for performing inventory and assessment and for generating reports.
Describe the capabilities of version 9.0 of the Microsoft Assessment and Planning (MAP) Toolkit for performing inventory and assessment and for generating reports.
![]() Describe the six phases involved in using MAP to perform an assessment of your environment.
Describe the six phases involved in using MAP to perform an assessment of your environment.
![]() Describe some of the wizards that MAP uses to collect data about your environment.
Describe some of the wizards that MAP uses to collect data about your environment.
![]() Describe the reports that MAP generates.
Describe the reports that MAP generates.
![]() Describe some other tools and methodologies you can use to assess the readiness of your environment for migration to Windows Server 2012 R2.
Describe some other tools and methodologies you can use to assess the readiness of your environment for migration to Windows Server 2012 R2.
Estimated lesson time: 30 minutes
Manual assessment
If your current server infrastructure is very small (only a handful of servers), you can perform a manual assessment by using the documentation that came with your server hardware, viewing and recording server BIOS information, exporting system configuration information by using msinfo32.exe, inventorying roles and features by using the Get-WindowsFeature cmdlet of Windows PowerShell, and performing similar types of procedures. Once you have compiled information about your servers, you can validate them against the hardware requirements for the different Windows Server 2012 R2 editions.
Windows Server 2012 R2 editions
Microsoft has simplified the licensing model with Windows Server 2012 R2 by eliminating the Enterprise edition of previous versions of Windows Server. In addition, the Standard and Datacenter editions that are designed for midsized and large organizations now have feature parity, and they are both licensed by processor plus Client Access License (CAL). The only difference between the Standard and Datacenter editions is the virtualization rights included with the license:
![]() Standard edition This edition provides full Windows Server functionality with two virtual instances.
Standard edition This edition provides full Windows Server functionality with two virtual instances.
![]() Datacenter edition This edition provides full Windows Server functionality with unlimited virtual instances. The Datacenter edition also includes a new feature called Automatic Virtual Machine Activation (AVMA) that helps ensure Windows products are used in accordance with the Product Use Rights and Microsoft Software License Terms. AVMA enables you to install virtual machines on a properly activated Hyper-V host running Windows Server 2012 R2 without having to manage the product keys for each individual virtual machine. AVMA works even in disconnected environments and provides real-time reporting on usage and historical data on the license state of virtual machines.
Datacenter edition This edition provides full Windows Server functionality with unlimited virtual instances. The Datacenter edition also includes a new feature called Automatic Virtual Machine Activation (AVMA) that helps ensure Windows products are used in accordance with the Product Use Rights and Microsoft Software License Terms. AVMA enables you to install virtual machines on a properly activated Hyper-V host running Windows Server 2012 R2 without having to manage the product keys for each individual virtual machine. AVMA works even in disconnected environments and provides real-time reporting on usage and historical data on the license state of virtual machines.
More Info
For more information on AVMA, see http://technet.microsoft.com/en-us/library/dn303421.aspx.
In addition to the Standard and Datacenter editions, two other editions of Windows Server 2012 R2 are available that are designed for more specialized use:
![]() Essentials edition This edition is intended for small business environments and includes a simpler interface, preconfigured connectivity to cloud-based services, a 25-user and 50-device limit, and no virtualization rights.
Essentials edition This edition is intended for small business environments and includes a simpler interface, preconfigured connectivity to cloud-based services, a 25-user and 50-device limit, and no virtualization rights.
![]() Foundation edition This edition is an economical, general-purpose server released through OEM channels only and has a 15-user account limit and no virtualization rights.
Foundation edition This edition is an economical, general-purpose server released through OEM channels only and has a 15-user account limit and no virtualization rights.
Further discussion of these two editions is beyond the scope of this book.
Real World: Windows Server licensing
In the past, the licensing of Windows Server editions has been a complex and confusing subject that often made it difficult for organizations to determine how much they should budget for licensing costs and whether they were in compliance. With Windows Server 2012 and Windows Server 2012 R2, Microsoft has simplified the licensing model for Windows Server so that you can more easily determine how many licenses you need to purchase to run the number of physical and virtual instances of Windows Server 2012 or Windows Server 2012 R2 you need in your environment. For more information and examples of different licensing scenarios, see the information on the Microsoft Volume Licensing site at http://www.microsoft.com/licensing/about-licensing/windowsserver2012-R2.aspx.
System requirements
The minimum system requirements for installing the Standard and Datacenter editions of Windows Server 2012 R2 are as follows:
![]() A 1.4-gigahertz (GHz), 64-bit processor
A 1.4-gigahertz (GHz), 64-bit processor
![]() 512 MB of RAM
512 MB of RAM
![]() 32 GB of available disk space
32 GB of available disk space
![]() A network adapter card
A network adapter card
![]() A graphics adapter that supports Super VGA (1024 × 768) or higher resolution
A graphics adapter that supports Super VGA (1024 × 768) or higher resolution
Bear in mind that performance depends upon hardware, and your servers will need to exceed these minimum requirements to provide acceptable performance in most scenarios. For example, if you plan to install MAP 9.0 on your server to perform an assessment of your environment, you will need system hardware that meets the following minimum requirements:
![]() A dual-core, 1.5 GHz processor
A dual-core, 1.5 GHz processor
![]() 2.0 GB of RAM
2.0 GB of RAM
![]() 1 GB of available disk space
1 GB of available disk space
![]() A network adapter card
A network adapter card
![]() A graphics adapter that supports Super VGA (1024 × 768) or higher resolution
A graphics adapter that supports Super VGA (1024 × 768) or higher resolution
In addition, the inventory, assessment, and reporting performance of MAP are based primarily on the speed of the CPU and the amount of available RAM of the computer on which MAP is installed.
More Info: Recommended system requirements
For more information on the recommended system requirements for Windows Server 2012 R2, see http://technet.microsoft.com/en-us/library/dn303418.aspx.
Windows Server Catalog
If you plan to purchase new system hardware and deploy Windows Server 2012 R2 on such hardware, you can assess the readiness of the new hardware before you purchase it by using the Windows Server Catalog website shown in Figure 1-2, which identifies system and peripheral hardware from different vendors that has been certified for Windows Server 2012 R2. For more information, see http://www.windowsservercatalog.com.
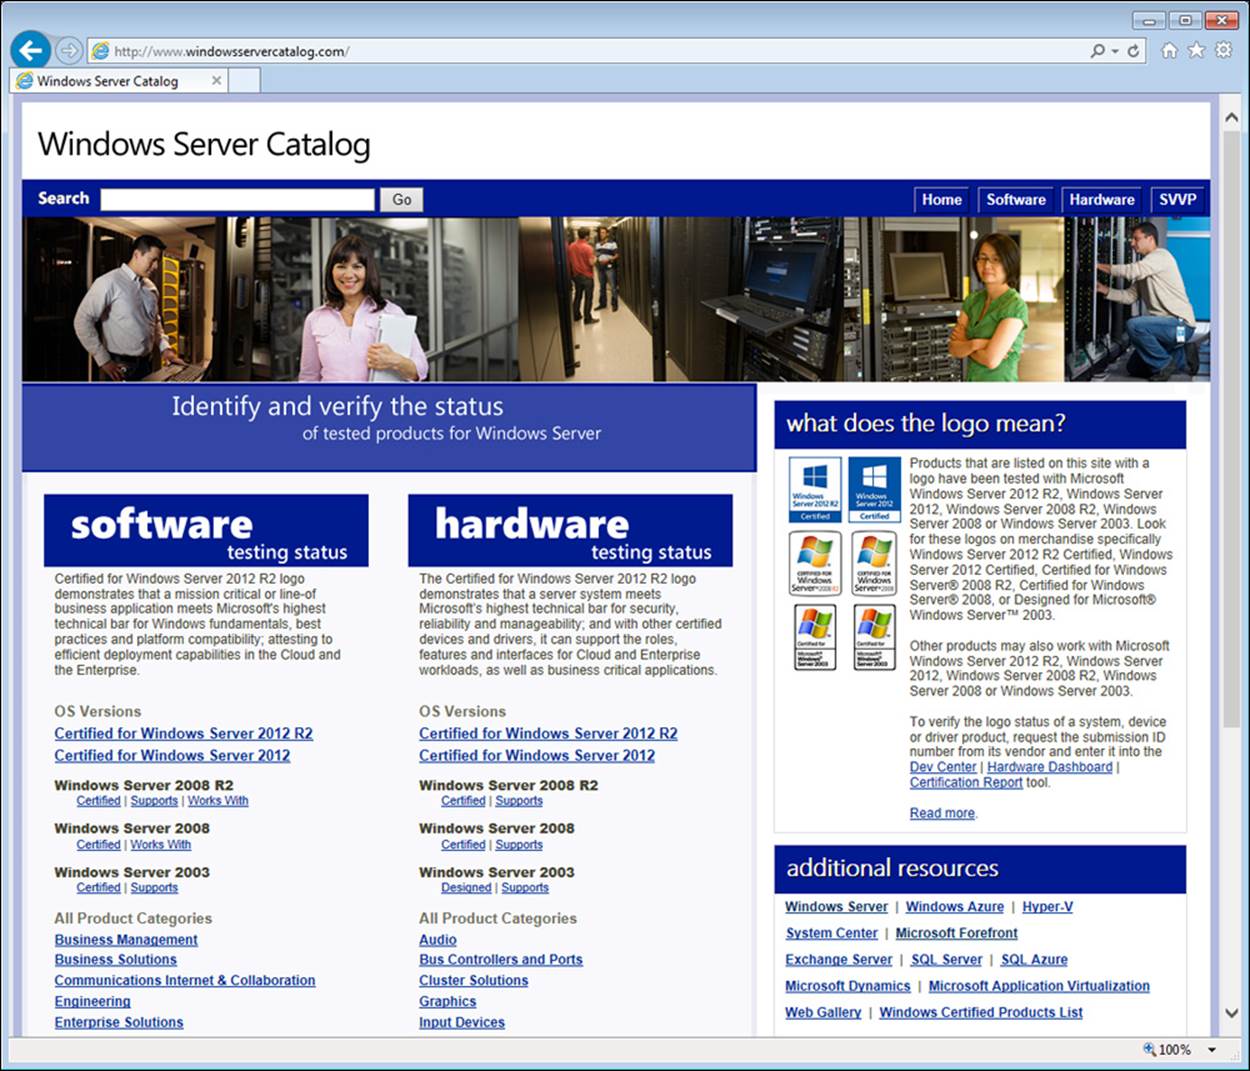
FIGURE 1-2 Use the Windows Server Catalog website to assess whether hardware has been certified for Windows Server 2012 R2.
Using the MAP Toolkit
The Microsoft Assessment and Planning (MAP) Toolkit is an inventory, assessment, and reporting tool you can use to assess your current IT infrastructure and determine the right Microsoft technologies for your business needs. MAP uses Windows Management Instrumentation (WMI), Active Directory Domain Services (AD DS), SMS Provider, and other technologies to collect data from your environment and inventory hardware, software, and operating systems. MAP does this without installing any agent software on the target devices. MAP then provides you with an analysis of the collected data to help you plan for server migration, desktop refresh, server consolidation through virtualization, or cloud-capacity and migration.
The latest version, MAP 9.0, can help simplify the planning process for migration to the following Microsoft platforms:
![]() Windows Server 2012 R2
Windows Server 2012 R2
![]() Windows Server 2012
Windows Server 2012
![]() Windows 8
Windows 8
![]() Windows 7
Windows 7
![]() Microsoft Office 2013
Microsoft Office 2013
![]() Microsoft Office 365
Microsoft Office 365
![]() Windows Volume Licensing usage tracking
Windows Volume Licensing usage tracking
![]() Remote Desktop Services Licensing usage tracking
Remote Desktop Services Licensing usage tracking
![]() Microsoft SharePoint 2013 usage tracking
Microsoft SharePoint 2013 usage tracking
![]() Microsoft Exchange 2013 usage tracking
Microsoft Exchange 2013 usage tracking
![]() Microsoft Lync 2013 usage tracking
Microsoft Lync 2013 usage tracking
![]() Microsoft SQL Server 2012 usage tracking
Microsoft SQL Server 2012 usage tracking
![]() System Center Configuration Manager 2012 usage tracking
System Center Configuration Manager 2012 usage tracking
![]() Windows Azure Virtual Machines
Windows Azure Virtual Machines
![]() Server and Cloud Enrollment (SCE)
Server and Cloud Enrollment (SCE)
![]() Software inventory by means of Software ID tags
Software inventory by means of Software ID tags
As Figure 1-3 shows, there are six phases involved in using MAP to perform an assessment of your environment. The first four phases are steps you need to perform before you run MAP in your environment. The final two phases involve running MAP to perform the assessment and generate a report of the results.
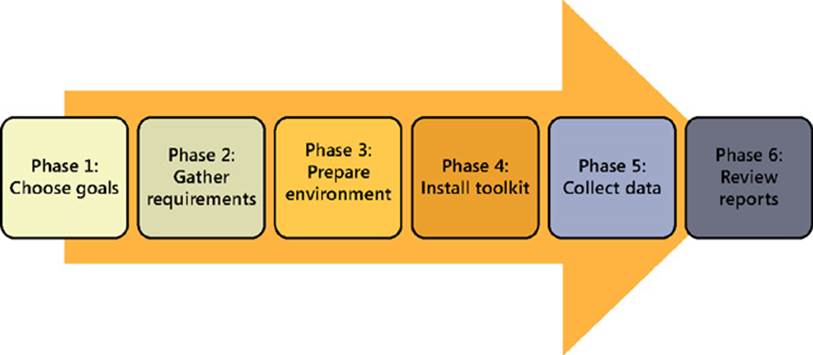
FIGURE 1-3 Six phases are involved in performing an assessment using MAP.
Phase 1: Choose goals
In this phase, you familiarize yourself with the different inventory, assessment, capacity planning, and software-usage tracking scenarios that MAP supports. You decide which wizards to use and what selections to make in these wizards.
Phase 2: Gather requirements
MAP uses various collection protocols to communicate with devices on your network to collect data to use in performing the various assessments. Because the communications performed by these protocols are subject to the administration and security settings of your environment, you must gather the user accounts and passwords needed to connect to and successfully inventory the devices in your environment prior to running MAP. In this phase, you gather this information required to configure MAP.
Phase 3: Prepare environment
MAP uses several different communication protocols based upon your goals and how your environment is configured. These include WMI, Active Directory Domain Services (AD DS), SQL Server commands, VMware Web services, and SSH with remote shell commands. In this phase, you prepare your environment to ensure that MAP can successfully connect to and gather information from the target machines in your environment.
Phase 4: Install the MAP Toolkit
In this phase, you download and install MAP using the options that best suit your environment and goals. The latest version of MAP is available as a free download from the Microsoft Download Center at http://www.microsoft.com/en-us/download/details.aspx?&id=7826.
Phase 5: Collect data

In this phase, you use MAP to gather information about your environment. Figure 1-4 shows the new user interface of MAP, which has been redesigned starting with MAP 8.0. On the left is a navigation pane that enables you to choose from a list of scenario groups. A scenario group is a set of related scenarios for which you can collect inventory data and perform other kinds of assessment tasks.
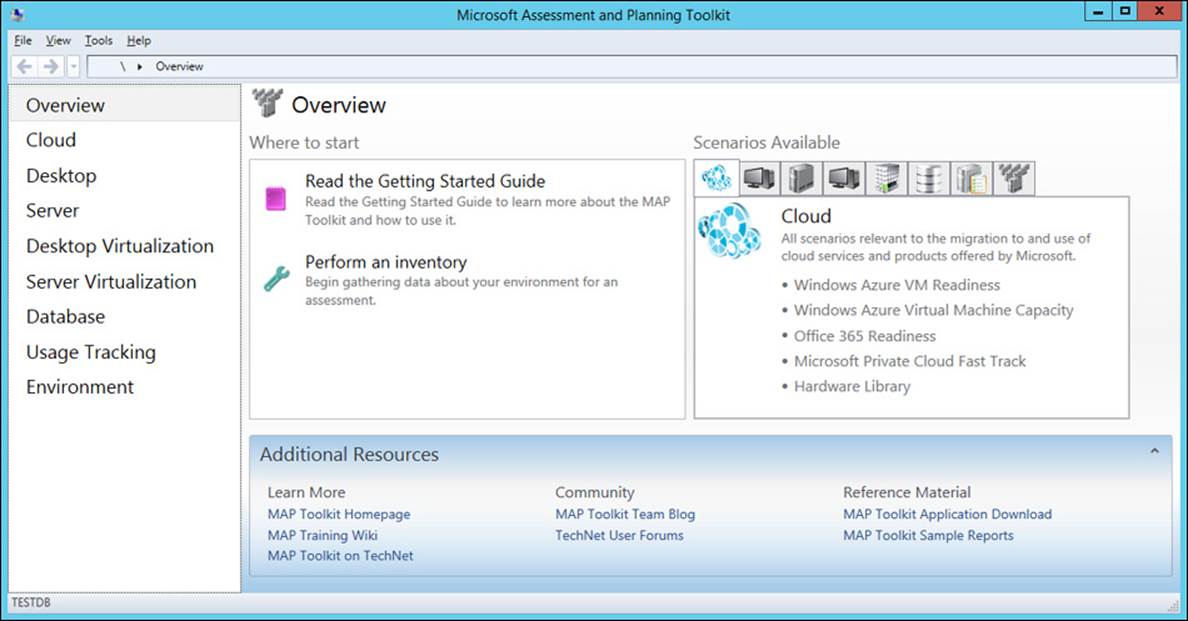
FIGURE 1-4 The Overview screen of MAP shows that no assessment has been run yet for the environment.
The initial item in the navigation pane is called Overview, and it provides a high-level overview of all the data collected in your environment, short descriptions of the different kinds of scenarios for which you can perform assessments, and a list of supporting resources. The Overview screen shown in Figure 1-4 indicates that no assessment has been performed yet. If an assessment had already been performed, an Environment Summary tile would provide a brief summary of the results of the assessment.
To start your first assessment, you can just click the Perform An Inventory item under Where To Start on the Overview page. This launches the Inventory And Assessment Wizard, as shown in Figure 1-5. This wizard walks you through a series of pages on which you can select one or more inventory scenarios, configure discovery methods, specify Active Directory credentials, and perform other actions to configure how the assessment will be performed.
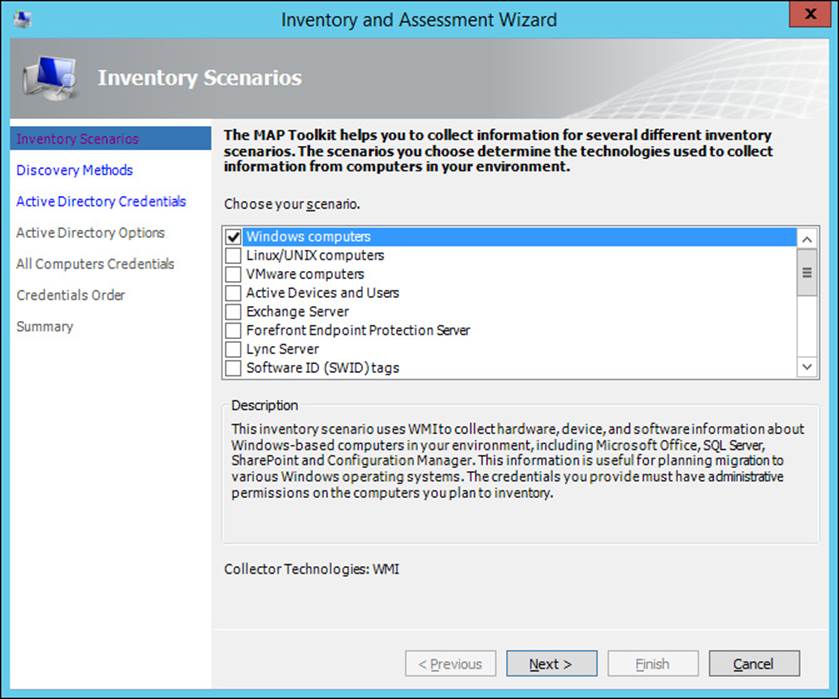
FIGURE 1-5 Select the Windows computers for assessment in the environment.
The Inventory And Assessment Wizard is not the only wizard available to you in MAP. There is also the Performance Metrics Wizard, which you can use to collect performance data such as CPU, memory, network, and disk utilization information. MAP enables you to collect such data for Windows servers and clients and for Linux- or UNIX-based servers. MAP then uses the collected performance data to perform capacity planning for scenarios such as server consolidation and desktop virtualization.
To demonstrate the capabilities of MAP, I’m going to use it to try to discover all of the Windows computers currently present in my test lab. Figure 1-5 shows the Inventory Scenarios page of the Inventory And Assessment Wizard with Windows Computers selected for assessment in my environment.
As the next page called Discovery Methods shows in Figure 1-6, there are a variety of methods MAP can use for discovering Windows computers in an environment. You could import a list of names of computers you want to assess from a text file. You could specify a range of IP addresses on your network and scan these addresses for the presence of Windows computers. Or you could query Active Directory Domain Services (AD DS) for a list of Windows computers in an Active Directory forest. I’ve chosen this last option for this walkthrough.
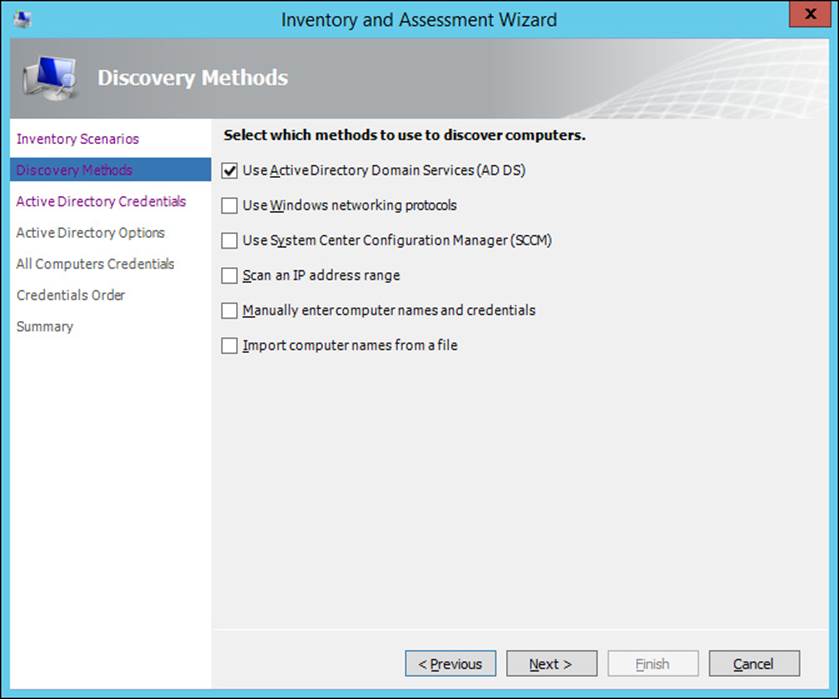
FIGURE 1-6 Query Active Directory for computer names.
The Active Directory Credentials page shown in Figure 1-7 is used to specify credentials that MAP can use to connect to Active Directory to retrieve the names of Windows computers in the forest. The remaining wizard pages may vary depending upon the options selected on previous pages.
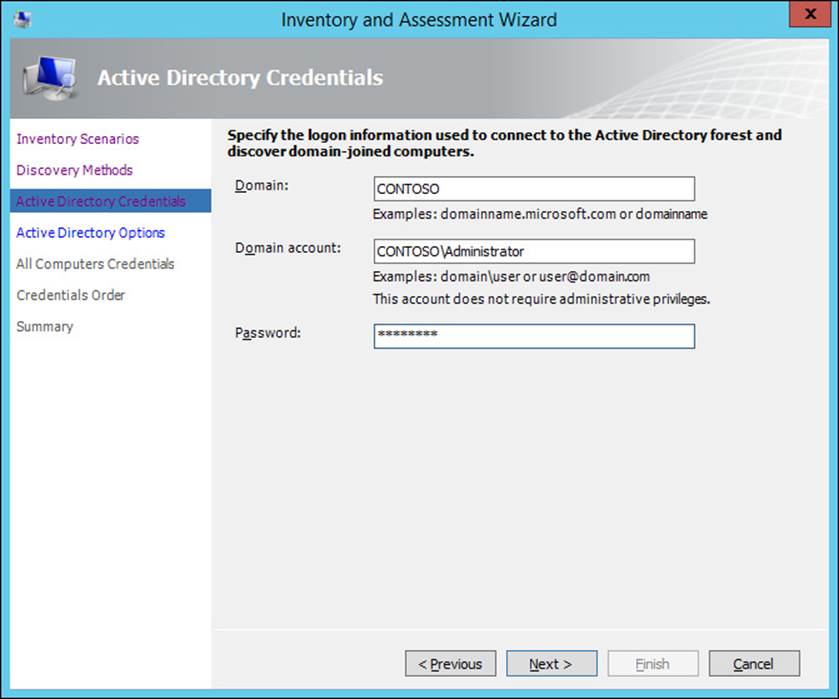
FIGURE 1-7 Specify credentials for connecting to Active Directory.
After you finish the wizard, the process of performing inventory and assessment of the environment takes place. Figure 1-8 shows MAP discovering the Windows computers in my test lab.

FIGURE 1-8 Computer discovery is currently underway.
When the inventory and assessment process finishes, the Environment screen provides summary information concerning the results of the inventory and assessment process. As Figure 1-9 shows, MAP discovered six computers in my test lab and identified three of these as Windows Server machines. MAP was unable to identify the nature of the other three computers because Active Directory was used for discovery and the other computers are not domain-joined.
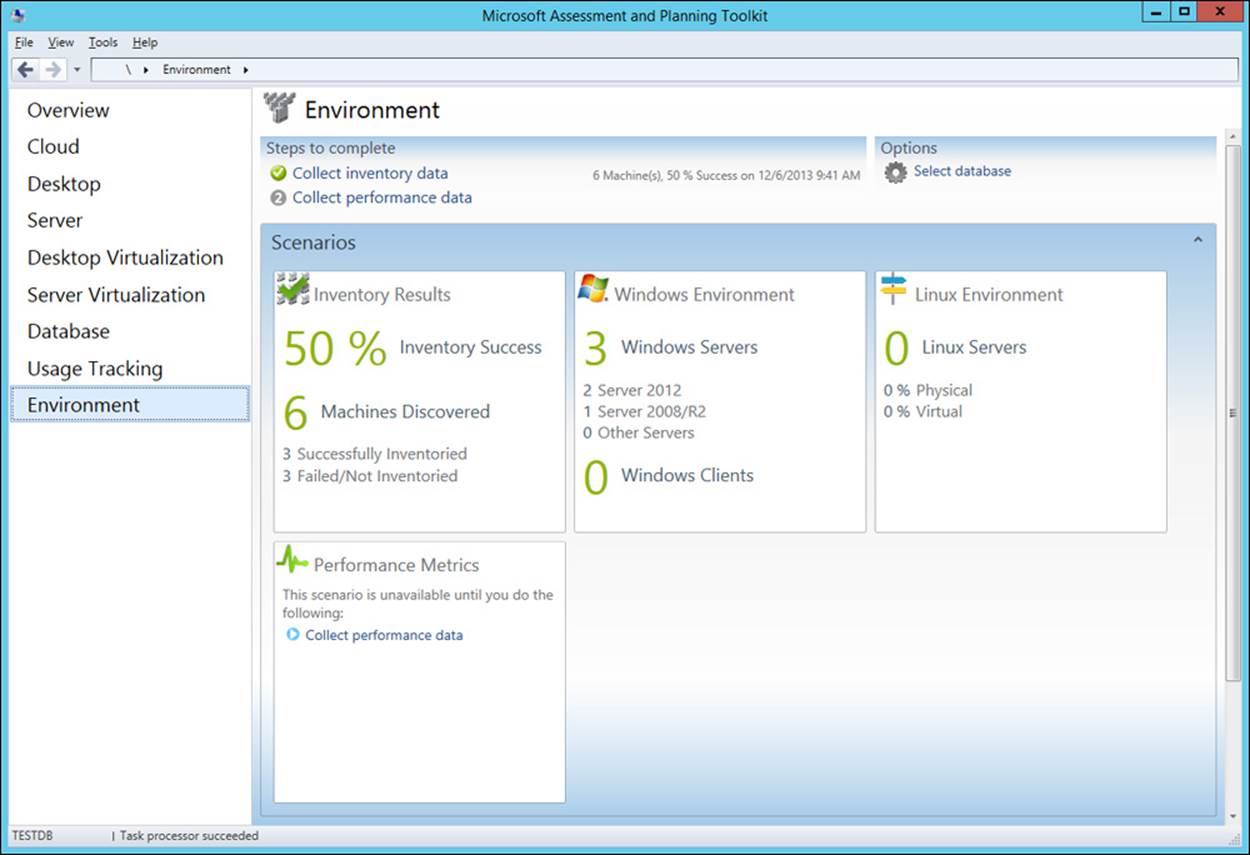
FIGURE 1-9 The Environment screen shows the results of computer discovery.
Clicking the Windows Environment tile, as shown in Figure 1-9, enables you to drill down to view more detail about the Windows computers in my environment. Figure 1-10 shows this as the Windows Environment Summary screen. The pie chart indicates that two of the three Windows servers are physical machines and the third is a virtual machine. However, this screen does not tell which of my servers is running as a virtual machine. I need to generate a report as described next to view that level of detail.
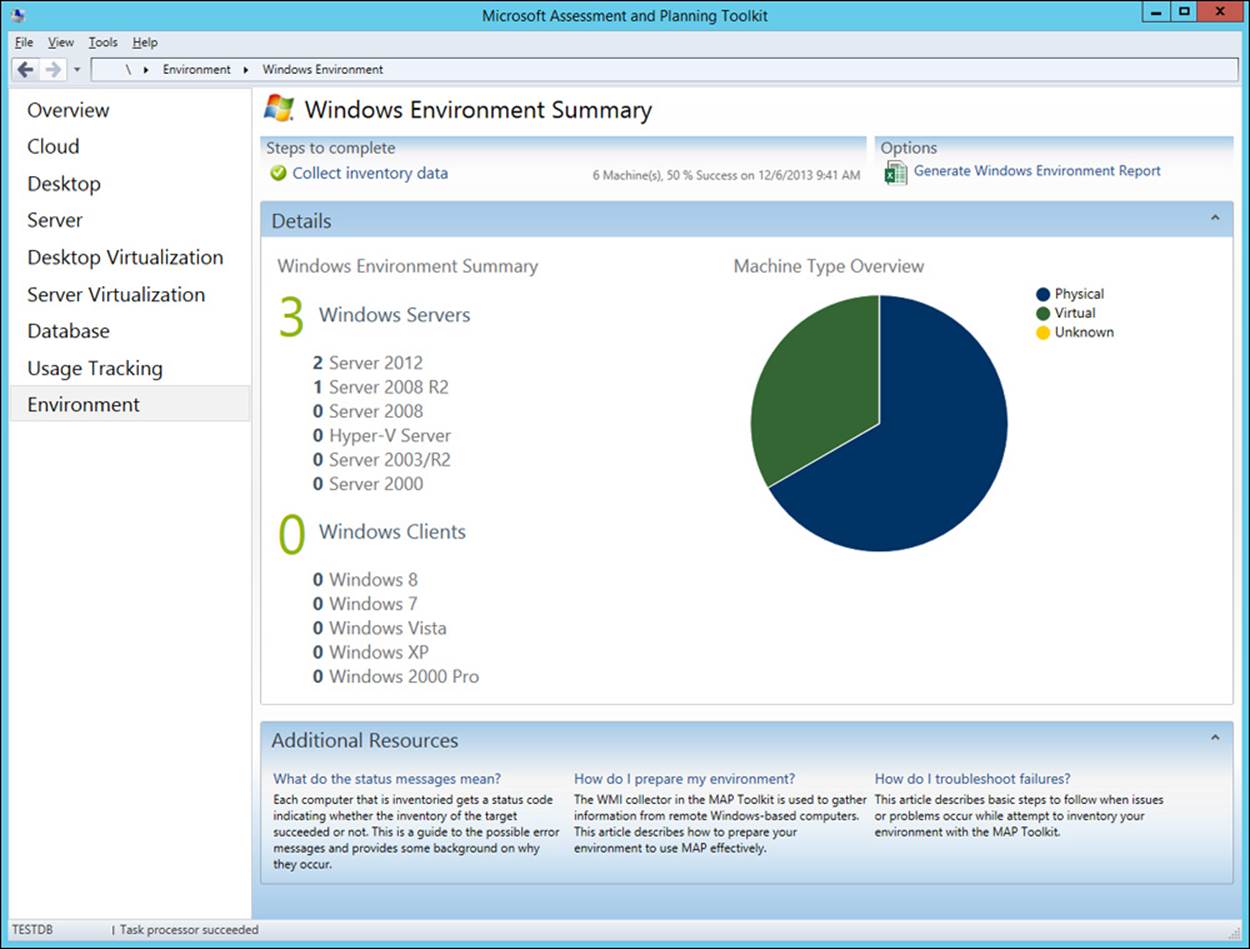
FIGURE 1-10 The environment contains both physical and virtual machines.
Phase 6: Review reports
The final phase of the process is using MAP to generate reports. MAP can generate different kinds of reports depending on the scenario group selected and the way you configure assessment to be performed. For example, clicking the Generate Windows Environment Report option at the top right of Figure 1-10 causes MAP to generate a comma-separated values (.csv) file containing the detailed results of the assessment. This .csv file can then be opened in Microsoft Excel, as shown in Figure 1-11, for review and further analysis. From this figure, I can determine that the server named SRV180 is a virtual machine running Windows Server 2008 R2 Enterprise edition as its guest operating system.
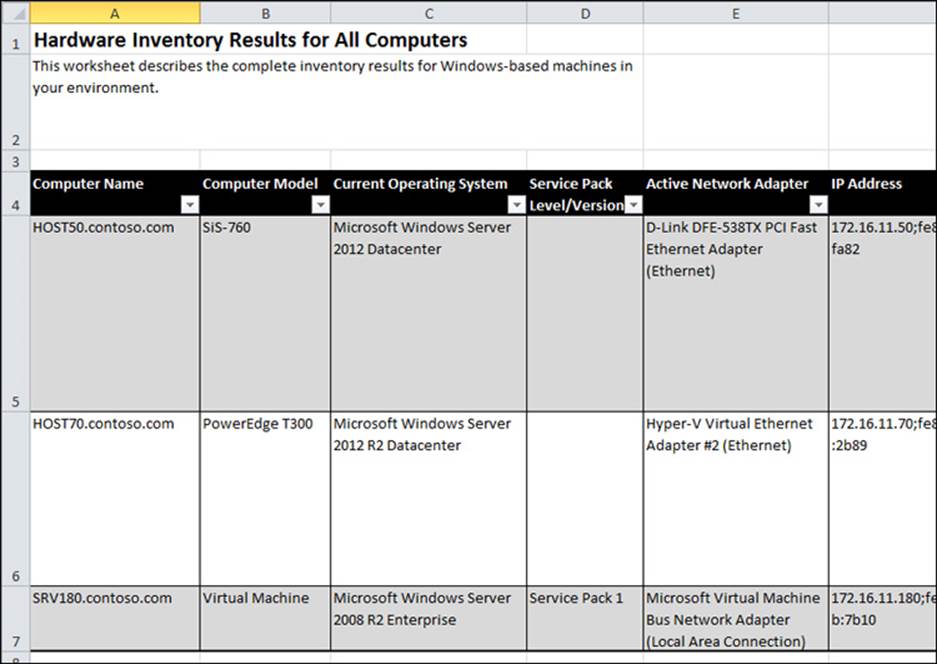
FIGURE 1-11 The highest level of detail is found in the reports MAP generates.
![]() Quick check
Quick check
![]() Which MAP wizard can you use to collect performance data for capacity planning for server consolidation?
Which MAP wizard can you use to collect performance data for capacity planning for server consolidation?
Quick check answer
![]() The Performance Metrics Wizard
The Performance Metrics Wizard
Other tools and methodologies
Besides using MAP or performing a manual assessment, there are other tools and methodologies you can use to assess the readiness of your environment for migration to Windows Server 2012 R2. The tools you can use include the following:
![]() System Center Configuration Manager System Center 2012 R2 Configuration Manager provides a comprehensive solution for change and configuration management for the Microsoft platform. Configuration Manager enables you to deploy operating systems, software applications, and software updates throughout your organization; monitor hardware and software inventory; monitor and remediate computers for compliance settings; and even remotely administer computers. By using Configuration Manager, you can collect detailed information about the hardware of client devices in your organization, including servers managed by Configuration Manager, and then use this information to determine Windows Server 2012 R2 migration readiness. Configuration Manager hardware inventory runs on devices managed by SCCM according to a schedule you specify in the client settings on the device. For more information on performing inventory by using Configuration Manager, see http://technet.microsoft.com/en-us/library/gg682202.
System Center Configuration Manager System Center 2012 R2 Configuration Manager provides a comprehensive solution for change and configuration management for the Microsoft platform. Configuration Manager enables you to deploy operating systems, software applications, and software updates throughout your organization; monitor hardware and software inventory; monitor and remediate computers for compliance settings; and even remotely administer computers. By using Configuration Manager, you can collect detailed information about the hardware of client devices in your organization, including servers managed by Configuration Manager, and then use this information to determine Windows Server 2012 R2 migration readiness. Configuration Manager hardware inventory runs on devices managed by SCCM according to a schedule you specify in the client settings on the device. For more information on performing inventory by using Configuration Manager, see http://technet.microsoft.com/en-us/library/gg682202.
![]() Third-party products If you are using a third-party systems-management product for managing the hardware and software infrastructure of your organization, you will likely be able to use the product to assess the readiness of your environment for migration to Windows Server 2012 R2, provided that your systems-management product is up to date. There are also third-party dedicated inventory and assessment products available from different vendors that you can use if desired.
Third-party products If you are using a third-party systems-management product for managing the hardware and software infrastructure of your organization, you will likely be able to use the product to assess the readiness of your environment for migration to Windows Server 2012 R2, provided that your systems-management product is up to date. There are also third-party dedicated inventory and assessment products available from different vendors that you can use if desired.
![]() Outside help If you feel you need help assessing the readiness of your environment for migration to Windows Server 2012 R2, you can engage Microsoft Consulting Services (MCS) and/or Microsoft Services Premier Support to assist you with this process and also with the migration itself if you feel it’s needed. For more information, see http://www.microsoft.com/microsoftservices/en/us/home.aspx.
Outside help If you feel you need help assessing the readiness of your environment for migration to Windows Server 2012 R2, you can engage Microsoft Consulting Services (MCS) and/or Microsoft Services Premier Support to assist you with this process and also with the migration itself if you feel it’s needed. For more information, see http://www.microsoft.com/microsoftservices/en/us/home.aspx.
Lesson summary
![]() If your current server infrastructure is very small, you can perform a manual assessment of your Windows Server 2012 R2 migration readiness.
If your current server infrastructure is very small, you can perform a manual assessment of your Windows Server 2012 R2 migration readiness.
![]() You can perform a manual assessment by using vendor-supplied documentation, built-in tools, information about Windows Server 2012 R2 editions and system requirements on Microsoft’s website, and the Windows Server Catalog.
You can perform a manual assessment by using vendor-supplied documentation, built-in tools, information about Windows Server 2012 R2 editions and system requirements on Microsoft’s website, and the Windows Server Catalog.
![]() For larger environments, version 9.0 of MAP helps you perform inventory, assessment, and reporting so that you can assess the readiness of your environment for migration to Windows Server 2012 R2.
For larger environments, version 9.0 of MAP helps you perform inventory, assessment, and reporting so that you can assess the readiness of your environment for migration to Windows Server 2012 R2.
![]() Assessing your environment using MAP involves six phases: choosing goals, gathering requirements, preparing your environment, installing MAP, collecting data, and reviewing reports.
Assessing your environment using MAP involves six phases: choosing goals, gathering requirements, preparing your environment, installing MAP, collecting data, and reviewing reports.
![]() You can also use System Center 2012 R2 Configuration Manager, third-party products, and even outside help to assess your Windows Server 2012 R2 migration readiness.
You can also use System Center 2012 R2 Configuration Manager, third-party products, and even outside help to assess your Windows Server 2012 R2 migration readiness.
Lesson review
Answer the following questions to test your knowledge of the information in this lesson. You can find the answers to these questions and explanations of why each answer choice is correct or incorrect in the “Answers” section at the end of this chapter.
1. Which tool can help you ensure that new hardware you purchase will work properly with Windows Server 2012 R2?
A. The msinfo32.exe utility
B. The Get-WindowsFeature cmdlet
C. System Center 2012 R2 Configuration Manager
D. The Windows Server Catalog
2. During which of the six phases of performing an assessment using MAP would you ensure that MAP can successfully connect to and gather information from the target machines in your environment?
A. Phase 2: Gather requirements
B. Phase 3: Prepare environment
C. Phase 4: Install MAP
D. Phase 5: Collect data
3. When you generate reports after performing a Windows Server 2012 R2 readiness assessment using MAP, where can you find information about the IP address and current operating system installed on each system inventoried?
A. On the Overview screen of the MAP user interface
B. On the Environment screen of the MAP user interface
C. On the Windows Environment Summary screen of the MAP user interface
D. In the Windows Environment Report .csv file, which you can open to view in Microsoft Excel
Practice exercises
The goal of this section is to provide you with hands-on practice with the following:
![]() Performing a manual installation of Windows Server 2012 R2 onto a bare-metal server system and familiarizing yourself with the Start screen and desktop
Performing a manual installation of Windows Server 2012 R2 onto a bare-metal server system and familiarizing yourself with the Start screen and desktop
![]() Using MAP 9.0 to perform a readiness assessment of your server
Using MAP 9.0 to perform a readiness assessment of your server
To perform the following exercises, you need the Windows Server 2012 R2 evaluation .iso file that you downloaded from the TechNet Evaluation Center. You should burn the .iso file to recordable DVD media or copy it to a bootable USB device for installation purposes. You also need a physical server system available for testing purposes that meets the minimum hardware requirements for installing Windows Server 2012 R2, as described earlier in this chapter. The server should also meet the following additional requirements:
![]() The server should be a bare-metal system; that is, there should be no operating system installed on it. If the server already has an operating system installed, you should remove it by booting using installation media for any version of Microsoft Windows until you reach the Setup Wizard page that allows you to delete all existing partitions on the hard drives of the server.
The server should be a bare-metal system; that is, there should be no operating system installed on it. If the server already has an operating system installed, you should remove it by booting using installation media for any version of Microsoft Windows until you reach the Setup Wizard page that allows you to delete all existing partitions on the hard drives of the server.
![]() The server hardware should meet the minimum requirements for installing MAP 9.0. See the readme.htm file included in the MAP download for more information on these requirements.
The server hardware should meet the minimum requirements for installing MAP 9.0. See the readme.htm file included in the MAP download for more information on these requirements.
Note: Hardware assessment
You should use a physical server for these exercises, not a virtual machine, so you can see how MAP can identify hardware components of your server.
You also need a client computer that has Microsoft Excel 2013 or Microsoft Excel 2010 installed for viewing the reports generated by MAP. If you have an Office 365 subscription, you can also use the Excel Web App for this purpose.
Note: MAP results
If you have other servers or clients on your test network, these may also be identified when you use MAP to assess your environment.
Exercise 1: Performing a manual installation
In this exercise, you perform a manual installation of Windows Server 2012 R2 onto a bare-metal system. You then use your Windows Server 2012 R2 installation to familiarize yourself with the Start screen (modern UI) and desktop.
1. Start the server and insert the DVD media onto which you burned the Windows Server 2012 R2 evaluation .iso file that you downloaded from the TechNet Evaluation Center.
2. If necessary, press the appropriate keystroke combination to display the boot menu and enable you to boot the system from its optical drive or from the bootable device containing Windows Server 2012 R2 installation media.
3. When the Windows Setup Wizard appears, select the appropriate language to install, the time and currency format, and the keyboard or input method.
4. Click Next and then click Install Now.
5. On the Select The Operating System You Want To Install page, select Windows Server 2012 R2 Datacenter Evaluation (Server With A GUI) and click Next.
6. On the License Terms page, select I Accept The License Terms and click Next.
7. On the Which Type Of Installation Do You Want page, select Custom: Install Windows Only (Advanced).
8. On the Where Do You Want To Install Windows page, click Drive 0 Unallocated Space and click Next.
9. Once the installation has finished and the Settings screen is displayed, type a password for the default Administrator account and then click Finish.
10. Once settings have been finalized and the logon screen is displayed, press Ctrl+Alt+Del and log on using the built-in Administrator account.
11. When Server Manager opens, click Local Server in the Navigation pane and view the properties of your server. Write down the name of your server because you’ll need this information for the next exercise.
12. Move the pointer to the lower-left corner of your screen and click the Start icon to display the modern UI.
13. Click the tile named Desktop to display the Windows desktop.
14. Press the Windows key to display the Start screen.
15. Press the Windows key again to display the desktop.
16. Click the Server Manager icon on the taskbar to maximize Server Manager.
17. Move the pointer to the upper-right corner of the screen until the Search, Start, and Settings charms are displayed and then swipe the pointer downward to display the Charms Bar.
18. Press Esc to make the Charms Bar disappear.
19. Press the Windows key+C to make the Charms Bar appear again.
20. Click the Settings charm to open Settings and then click Server Info. The System Control Panel item opens while the Charms Bar disappears. View the information about your computer and then close it.
21. Press the Windows key+I to open Settings again and then click Help. Take a moment to explore how Help works and then close it.
22. Press the Windows key+Q to open the Search pane with the focus set to Everywhere. Type paint and press Enter to open Microsoft Paint. Close the program.
23. Move the pointer to the lower-left corner of your screen, click Start, type paint, and press Enter to open Microsoft Paint. Close the program.
24. Press the Windows key+Q, type background, press the Down Arrow key until Change Desktop Background is highlighted, then press Enter and change the background of your desktop to the solid color white.
25. Right-click the Start icon and examine the menu options available.
26. Click the Windows PowerShell icon on the taskbar to open a new Windows PowerShell session.
27. Type shutdown –s –t 0 and press Enter to shut down your server.
Exercise 2: Using MAP
In this exercise, you install MAP 9.0 on the server used in Exercise 1 and run MAP to perform an assessment and generate a report.
1. Start your server and log on using your Administrator credentials.
2. Copy the MAP installation files to the Documents folder on your test server and then double-click the MAPSetup.exe file to launch the Setup Wizard.
3. Follow the prompts of the wizard, accepting all the defaults, until installation of MAP is completed.
4. Right-click the taskbar and select Properties.
5. Select the Navigation tab.
6. Select the check box labeled Show The Apps View Automatically When I Go To Start.
7. Select the check box labeled List Desktop Apps First In The Apps View When It’s Sorted By Category.
8. Click OK and then press the Windows key to display the Start screen.
9. Scroll horizontally if needed until you can right-click Microsoft Assessment And Planning Toolkit and then select Pin To Taskbar at the bottom of the screen.
10. Press the Escape key to return to the desktop.
11. Click the MAP icon on the taskbar to launch MAP.
12. In the Microsoft Assessment And Planning Toolkit dialog box, type TESTDB in the Name field and click OK to create an inventory database for MAP.
13. After the inventory database is created, you are returned to the Overview page of the MAP user interface.
14. Click Perform An Inventory under Where To Start on the Overview page to launch the Inventory And Assessment Wizard.
15. On the Inventory Scenarios page, select Windows Computers and click Next.
16. On the Discovery Methods page, clear the Use Active Directory Domain Services (AD DS) check box, select the Scan An IP Address Range check box, and click Next.
17. On the Scan An IP Address Range page, in both the Starting Address and Ending Address fields, enter the IP address you previously assigned to your test server and then click Next.
18. On the All Computers credentials page, click Create, type <servername>\Administrator in the Account Name field, where <servername> is the name of your server.
19. Type the password for the Administrator account in the Password and Confirm Password fields and then click Save.
20. Click Next twice and then click Finish.
21. Watch the progress in the Inventory and Assessment dialog box as it occurs and then click Close when the assessment has completed.
22. Select the Server scenario in the left pane and view whether your server has met the system requirements for installing Windows Server 2012 R2.
23. Click Generate Windows Server 2012 Report on the right side of the page. When the report has been generated, click Close.
24. Open My Documents in Windows Explorer and navigate to the TESTDB folder inside the MAP folder.
25. When My Documents opens in Windows Explorer, copy the report (.xlsx file) that MAP generated to a client computer that has Microsoft Excel installed.
26. Open the report in Microsoft Excel and view its contents.
Suggested practice exercises
The following additional practice exercises are designed to give you more opportunities to practice what you’ve learned and to help you successfully master the lessons presented in this chapter:
![]() Exercise 1 If you have a test environment with Active Directory deployed and with servers and clients running different versions of Windows, install MAP 9.0 on a server or client in the environment and perform some of the other types of assessment and readiness tests in the different scenario groups available.
Exercise 1 If you have a test environment with Active Directory deployed and with servers and clients running different versions of Windows, install MAP 9.0 on a server or client in the environment and perform some of the other types of assessment and readiness tests in the different scenario groups available.
![]() Exercise 2 Try using the Windows Server Migration Tools to migrate a server role from a server running Windows Server 2008 R2 SP1 to another server that has a clean installation of Windows Server 2012 R2.
Exercise 2 Try using the Windows Server Migration Tools to migrate a server role from a server running Windows Server 2008 R2 SP1 to another server that has a clean installation of Windows Server 2012 R2.
Answers
This section contains the answers to the lesson review questions in this chapter.
Lesson 1
1. Correct answers: B and C
A. Incorrect: The opportunity to get it right from the start when it comes to implementing an infrastructure based on Windows Server 2012 R2 is an advantage of the greenfield migration scenario, not the mixed environment scenario.
B. Correct: Some new features and capabilities of Windows Server 2012 R2 can be implemented only when your Active Directory environment includes domain controllers running Windows Server 2012 R2. These features might have limited functionality or might not work at all when implementing a mixed environment migration scenario because your Active Directory schema hasn’t yet been upgraded to Windows Server 2012 R2.
C. Correct: Some of the server administration tools built into Windows Server 2012 R2 and included in the Remote Server Administration Tools (RSAT) for Windows 8.1 will have limited or no functionality when managing servers running previous versions of Windows Server. You might have to install additional updates on servers running previous versions of Windows Server to manage them using the Windows Server 2012 R2 server administration tools or RSAT for Windows 8.1.
D. Incorrect: Improving server utilization and reducing costs is a benefit of the server consolidation approach to server migration and is not relevant to a mixed environment migration scenario.
2. Correct answer: C
A. Incorrect: In Windows Server 2012 and Windows Server 2012 R2, Adprep functionality is integrated into the AD DS installation process, which in most cases eliminates the need to separately run Adprep prior to introducing domain controllers running the new version of Windows Server.
B. Incorrect: The new AD DS installation process includes prerequisite validation to identify potential errors before installation begins. For example, if the installation process determines that adprep /domainprep needs to be run to prepare the domain, verification is done first to ensure that the user who initiated the process has sufficient rights to perform the operation.
C. Correct: The Windows Server 2012 and Windows Server 2012 R2 forest functional levels do not add any new features to a forest. They ensure only that any new domain added to the forest automatically operates at the Windows Server 2012 or Windows Server 2012 R2 domain functional level.
D. Incorrect: The Windows Server 2012 and Windows Server 2012 R2 domain functional levels add only one new feature to a domain. This new feature relates to Dynamic Access Control (DAC) and therefore is unlikely to affect any applications and services in an Active Directory environment based on Windows Server 2008 or Windows Server 2008 R2.
3. Correct answer: B
A. Incorrect: The Windows Server Migration Tools supports migrating between x86-based and x64-based architectures.
B. Correct: The Windows Server Migration Tools does not support migrating between source servers and destination servers that have different system UI languages.
C. Incorrect: The Windows Server Migration Tools supports migrating between physical machines and virtual machines.
D. Incorrect: The Windows Server Migration Tools supports cross-subnet migrations.
4. Correct answer: C
A. Incorrect: The Export-SmigServerSetting cmdlet exports selected Windows features and operating system settings from the local computer, and it stores them in a migration store.
B. Incorrect: The Send-SmigServerData cmdlet migrates folders, files, and associated permissions and share properties from a source server to a destination server through port 7000. The destination server must be in the same subnet as the source server, and the cmdlet Receive-SmigServerData must be run on the destination server at the same time Send-SmigServerData is running on the source server.
C. Correct: The Get-SmigServerFeature cmdlet gets the set of all Windows features that can be migrated from the local server or from a migration store.
D. Incorrect: The Import-SmigServerSetting cmdlet imports selected Windows features and operating system settings from a migration store and applies them to the local computer.
Lesson 2
1. Correct answer: D
A. Incorrect: The msinfo32.exe utility is useful for performing a manual assessment of existing Windows Server installations.
B. Incorrect: The Get-WindowsFeature cmdlet is useful for performing a manual assessment of existing Windows Server installations.
C. Incorrect: System Center 2012 R2 Configuration Manager enables you to deploy operating systems, software applications, and software updates throughout your organization; monitor hardware and software inventory; monitor and remediate computers for compliance settings; and even remotely administer computers.
D. Correct: The Windows Server Catalog identifies system and peripheral hardware from different vendors that has been certified for Windows Server 2012 R2.
2. Correct answer: B
A. Incorrect: During Phase 2: Gather requirements, MAP uses various collection protocols to communicate with devices on your network to collect data to use in performing the various assessments. Because the communications these protocols perform are subject to the administration and security settings of your environment, you must gather the user accounts and passwords needed to connect to and successfully inventory the devices in your environment prior to running MAP.
B. Correct: During Phase 3: Prepare environment, MAP uses several different communication protocols based on your goals and how your environment is configured. These include WMI, Active Directory Domain Services (AD DS), SQL Server commands, VMware Web services, and SSH with remote shell commands. During this phase, you prepare your environment to ensure that MAP can successfully connect to and gather information from the target machines in your environment
C. Incorrect: During Phase 4: Install MAP, you download and install MAP using the options that best suit your environment and goals.
D. Incorrect: During Phase 5: Collect data, you launch MAP and select wizards to begin the data-collection process for your environment.
3. Correct answer: D
A. Incorrect: The Overview screen of the MAP user interface provides a high-level overview of all the data collected in your environment, short descriptions of the different kinds of scenarios for which you can perform assessments, and a list of supporting resources. It does not display the IP addresses of discovered computers.
B. Incorrect: The Environment screen of the MAP user interface has four tiles named Inventory Results, Windows Environment, Linux Environment, and Performance Metrics. None of these tiles displays IP addresses of discovered computers.
C. Incorrect: The Windows Environment Summary screen of the MAP user interface enables you to drill down to view more detail about the Windows computers in the environment. However, it does not display the IP addresses of discovered computers.
D. Correct: The Windows Environment Report .csv file, which you can open to view in Microsoft Excel, includes the IP address and current operating system installed on each system inventoried. Examples of column headers in this .csv file include Computer Name, Computer Model, Current Operating System, Service Pack Level/Version, Active Network Adapter, and IP Address.