Training Guide Installing and Configuring Windows Server 2012 R2 (2014)
Chapter 3. Server remote management
Server management deals with the performance of key operational tasks on servers in your environment. These tasks include occasional or one-time tasks like adding new a new role or feature to a server, periodic tasks such as reviewing event logs, and urgent tasks like troubleshooting alert messages. In small and midsized environments, you can perform many of these tasks manually by using the graphical user interface (GUI) server-management tools included in Microsoft Windows Server platforms. In large environments such as data centers and cloud-computing infrastructures, most operational tasks are automated using scripts.
Windows Server 2012 and Windows Server 2012 R2 include two main tools for remote server management: Server Manager and the Windows PowerShell scripting platform. You can use these two tools to manage both the physical and virtual servers within your organization’s infrastructure. This chapter introduces the capabilities of these tools and shows how you can use them to manage Windows servers across your environment.
Lessons in this chapter:
![]() Lesson 1: Server Manager
Lesson 1: Server Manager
![]() Lesson 2: Server management tasks
Lesson 2: Server management tasks
![]() Lesson 3: Installing roles and features
Lesson 3: Installing roles and features
![]() Lesson 4: Windows PowerShell automation
Lesson 4: Windows PowerShell automation
Before you begin
To complete the practice exercises in this chapter
![]() You need to know how to perform a clean install of Windows Server 2012 R2 and perform initial configuration tasks like configuring the server’s TCP/IP settings for Internet connectivity.
You need to know how to perform a clean install of Windows Server 2012 R2 and perform initial configuration tasks like configuring the server’s TCP/IP settings for Internet connectivity.
![]() You also should have at least rudimentary knowledge of using Windows PowerShell.
You also should have at least rudimentary knowledge of using Windows PowerShell.
Lesson 1: Server Manager
Server Manager was completely redesigned in Windows Server 2012 to make it easier for administrators to simultaneously manage multiple Windows servers remotely. Server Manager is capable of managing large numbers of servers, but it is intended mainly for small and midsized environments that typically have no more than a few dozen servers deployed at a site. This lesson introduces the features of Server Manager in Windows Server 2012 and Windows Server 2012 R2 and demonstrates how to perform some common server management tasks.
After this lesson, you will be able to:
![]() Use Server Manager pages to configure the local server.
Use Server Manager pages to configure the local server.
![]() Use Server Manager to manage multiple remote servers.
Use Server Manager to manage multiple remote servers.
![]() Configure Windows servers for remote management.
Configure Windows servers for remote management.
![]() Deploy the Remote Server Management Tools (RSAT) for Windows 8.1.
Deploy the Remote Server Management Tools (RSAT) for Windows 8.1.
Estimated lesson time: 30 minutes
Navigating Server Manager
To use Server Manager effectively, you need to be able to navigate through its various controls, menus, and pages. This section summarizes the most important things you need to know in this area.
Menus
At the top of Server Manager (shown in Figure 3-1), you find the following controls and menus:
![]() Back and forward buttons you can use to navigate through the history of the pages you previously selected
Back and forward buttons you can use to navigate through the history of the pages you previously selected
![]() A breadcrumb you can use to navigate quickly through any hierarchical views
A breadcrumb you can use to navigate quickly through any hierarchical views
![]() A refresh button you can use to manually refresh Server Manager when its view becomes out of date
A refresh button you can use to manually refresh Server Manager when its view becomes out of date
![]() The Notifications flag, which you can use to view any alerts or information about tasks being performed on the servers you are managing
The Notifications flag, which you can use to view any alerts or information about tasks being performed on the servers you are managing
![]() The Manage menu, which you can use to add roles and features to (or remove them from) the servers you are managing, add servers to the pool of managed servers, create new server groups, and configure Server Manager properties
The Manage menu, which you can use to add roles and features to (or remove them from) the servers you are managing, add servers to the pool of managed servers, create new server groups, and configure Server Manager properties
![]() The Tools menu, which you can use to access other management tools such as Microsoft Management Console (MMC) consoles, the System Information and System Configuration utilities, Windows PowerShell consoles and Integrated Scripting Environments (ISEs), and so on
The Tools menu, which you can use to access other management tools such as Microsoft Management Console (MMC) consoles, the System Information and System Configuration utilities, Windows PowerShell consoles and Integrated Scripting Environments (ISEs), and so on
![]() The View menu, which you can use to zoom your Server Manager view in or out and show or hide the Welcome To Server Manager information on the Dashboard
The View menu, which you can use to zoom your Server Manager view in or out and show or hide the Welcome To Server Manager information on the Dashboard
![]() The Help menu, which includes a link to the Server Manager forums on TechNet
The Help menu, which includes a link to the Server Manager forums on TechNet
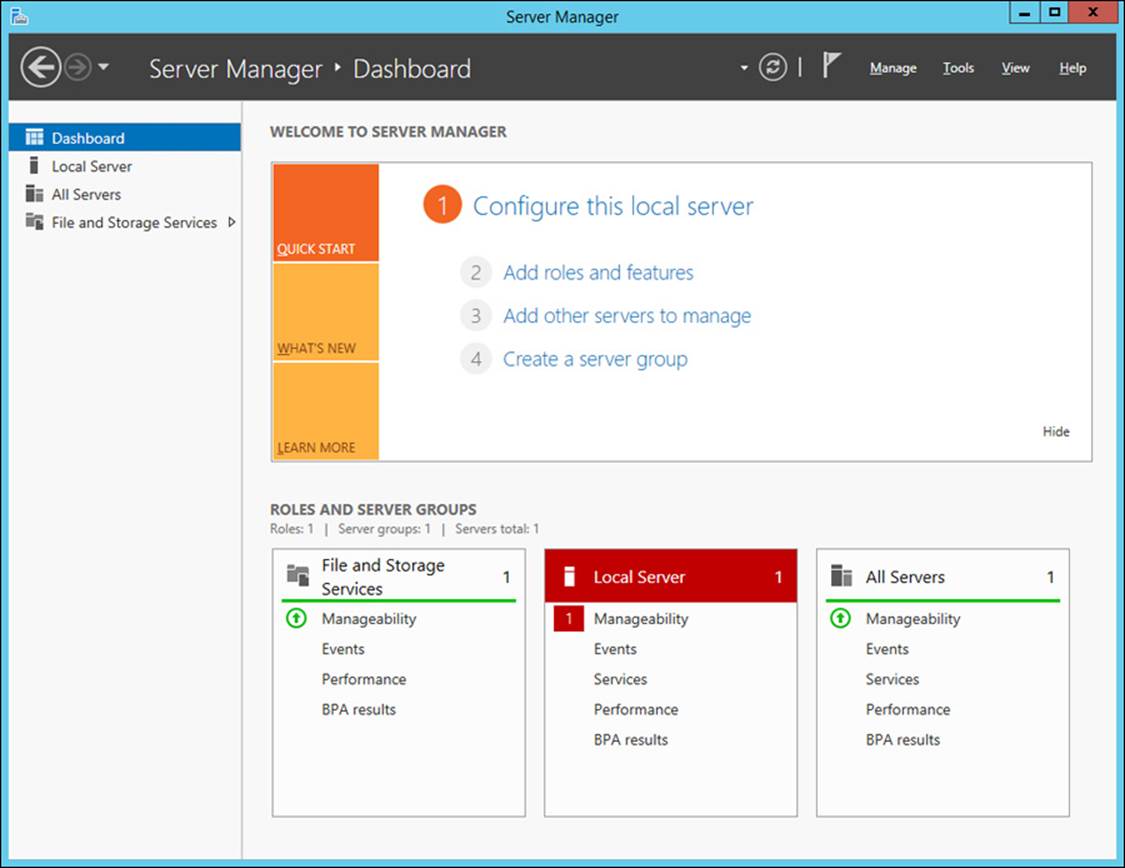
FIGURE 3-1 The Dashboard page of Server Manager includes various controls and menus along the top.
Note: Keyboard shortcuts for Server Manager
You can also quickly navigate Server Manager by using keyboard shortcuts. For a list of Server Manager keyboard shortcuts, see http://technet.microsoft.com/en-us/library/jj134206.
By default, Server Manager refreshes every 10 minutes by collecting updated information for all servers being managed. You can change the refresh interval by opening the Server Manager properties as follows:
1. Click the Manage menu on any page and select Server Manager Properties.
2. In the Server Manager Properties dialog box, specify the desired data refresh period in minutes.
You can also use this dialog box to configure Server Manager to not start automatically at logon.
Real World: Monitoring your servers
Because the refresh interval for Server Manager cannot be configured to be less than one minute, Server Manager does not really provide a real-time view of the status of servers on your network. In addition, if you try to monitor too many types of events on dozens of servers with Server Manager, you might get a delayed response when you try to use Server Manager.
If you need real-time monitoring and easy monitoring of hundreds or even thousands of servers in your environment, your best solution is to use components from the Microsoft System Center suite for this purpose, specifically System Center Operations Manager 2012 R2 and System Center Configuration Manager 2012 R2. For more information on System Center 2012 R2, see http://www.microsoft.com/en-us/server-cloud/products/system-center-2012-r2/default.aspx.
Dashboard

To use Server Manager, you select a page such as the Dashboard, the Local Server page, the All Servers page, or any additional role-specific page that might be available. Figure 3-1 shows the Dashboard page, which displays the following tiles:
![]() Welcome To Server Manager
Welcome To Server Manager
![]() Local Server
Local Server
![]() All Servers
All Servers
![]() Any role-specific tiles like File And Storage Services
Any role-specific tiles like File And Storage Services
![]() Custom pages for servers assigned to server groups you created
Custom pages for servers assigned to server groups you created
Note: Hide or show the Welcome title
If you clicked Hide to hide the Welcome To Server Manager tile, you can show this tile again by selecting Show Welcome Tile from the View menu.
Tiles consist of a title bar with multiple thumbnails beneath. A thumbnail reflects certain data collected about the servers being managed. When something is wrong with a server or server role, an alert is raised on the appropriate thumbnail to enable you to take remedial action to correct the problem. The five types of thumbnails displayed in tiles are as follows:
![]() Manageability Indicates whether servers are online or offline, whether Server Manager is receiving reporting data from specified servers, and any issues with the ability to manage the servers
Manageability Indicates whether servers are online or offline, whether Server Manager is receiving reporting data from specified servers, and any issues with the ability to manage the servers
![]() Events Displays alerts whenever an event is logged that matches the severity levels, event sources, or event IDs on specified servers during specified time intervals
Events Displays alerts whenever an event is logged that matches the severity levels, event sources, or event IDs on specified servers during specified time intervals
![]() Services Displays alerts whenever problems arise with services on managed servers and enables you to attempt to restart the affected services
Services Displays alerts whenever problems arise with services on managed servers and enables you to attempt to restart the affected services
![]() Performance Displays performance alerts for different resource types (CPU or memory) on specified servers during specified time intervals
Performance Displays performance alerts for different resource types (CPU or memory) on specified servers during specified time intervals
![]() BPA Results Displays alerts generated from running the Best Practices Analyzer (BPA) against managed servers
BPA Results Displays alerts generated from running the Best Practices Analyzer (BPA) against managed servers
More Info: Best Practices Analyzer
The Best Practices Analyzer functionality included in Windows Server 2012 and Windows Server 2012 R2 is demonstrated in Chapter 4, “Deploying domain controllers.”
If the title bar of any of the tiles on the Dashboard (with the exception of the Welcome To Server Manager tile) is colored red, one or more alerts have been raised. For example, in Figure 3-1 the title bar of the Local Server tile is colored red. A red box with the number 1 is also displayed next to the Manageability thumbnail in this title to indicate that the alert has to do with the manageability of the local server. To view more information concerning this alert, click the Manageability thumbnail in this tile. To go directly to the Local Server page, click the title bar of the Local Server tile.
Local Server
The Local Server page displays the following tiles:
![]() Properties Enables you to view and configure various settings of the local server, including computer name, domain membership, whether Remote Management or Remote Desktop is enabled, the TCP/IP settings for the server’s network cards, whether Windows Update is enabled, and more. (See Figure 3-2.)
Properties Enables you to view and configure various settings of the local server, including computer name, domain membership, whether Remote Management or Remote Desktop is enabled, the TCP/IP settings for the server’s network cards, whether Windows Update is enabled, and more. (See Figure 3-2.)

FIGURE 3-2 Use the Properties tile on the Local Server page to view and configure various settings.
![]() Events Displays events logged on the local server.
Events Displays events logged on the local server.
![]() Services Enables you to view the services for the local server, start services that are currently stopped, restart running services, and perform other service-related tasks.
Services Enables you to view the services for the local server, start services that are currently stopped, restart running services, and perform other service-related tasks.
![]() Best Practices Analyzer Enables you to initiate a BPA scan to determine whether you need to perform any further configuration for the local server to function properly with all its installed roles.
Best Practices Analyzer Enables you to initiate a BPA scan to determine whether you need to perform any further configuration for the local server to function properly with all its installed roles.
![]() Performance Enables you to configure performance alerts on the local server so that alerts will be raised when CPU usage exceeds a specified threshold or available memory falls below a specified level.
Performance Enables you to configure performance alerts on the local server so that alerts will be raised when CPU usage exceeds a specified threshold or available memory falls below a specified level.
![]() Roles And Features Displays all roles and features installed on the local server and also enables you to install additional roles or remove installed roles.
Roles And Features Displays all roles and features installed on the local server and also enables you to install additional roles or remove installed roles.
Note: More to come
You’ll learn more about working with the tiles just described in the next lesson and also in the practice exercises at the end of this chapter.
All Servers
The All Servers page of Server Manager, shown in Figure 3-3, is where you can simultaneously manage multiple remote servers in your environment. Initially, this page displays only the local server, but you can find other servers in your environment and add them to this page to manage them. How to do this is explained in Lesson 2 of this chapter.
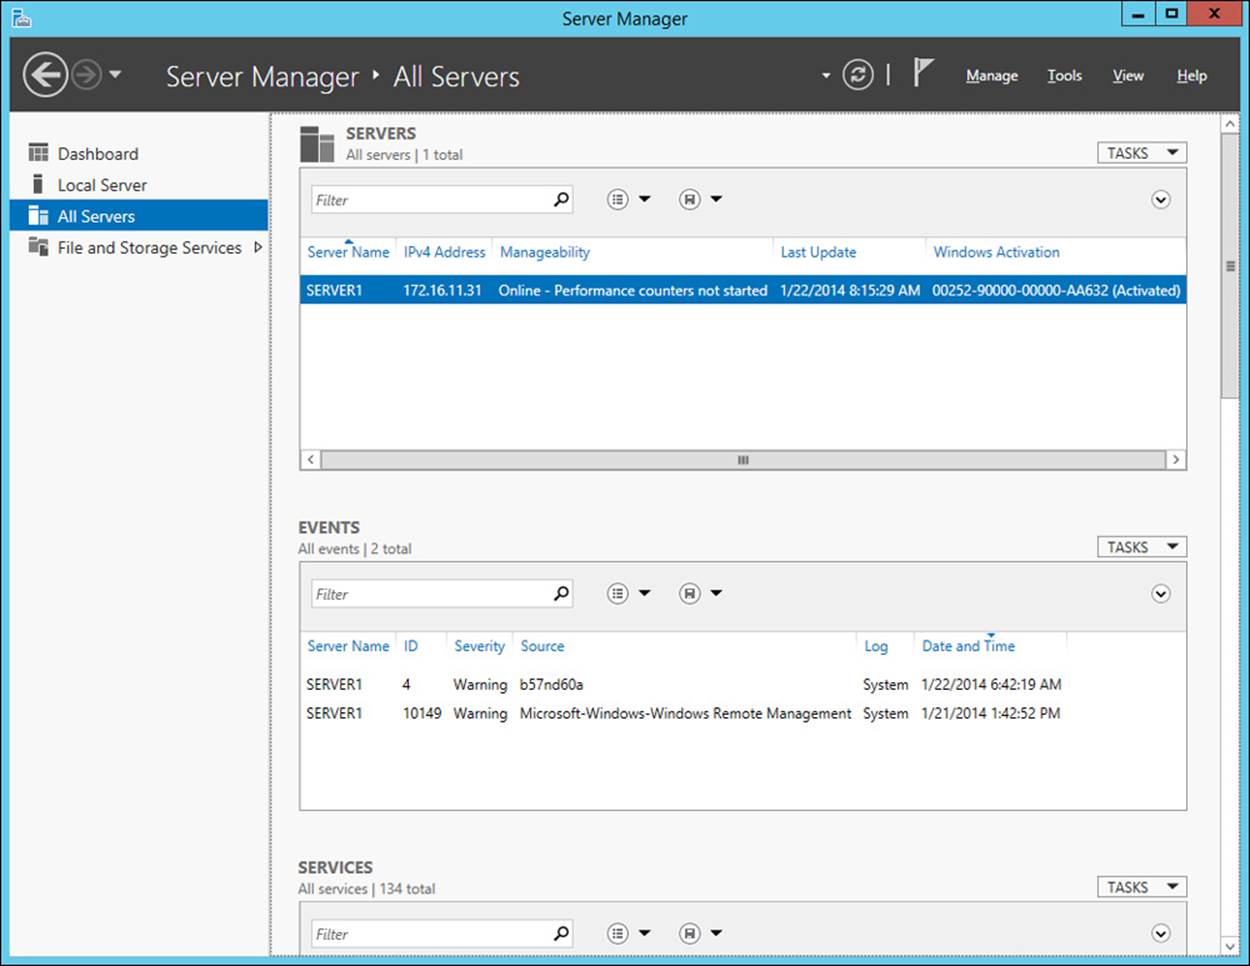
FIGURE 3-3 Use the All Servers page of Server Manager to simultaneously manage multiple remote servers.
The All Servers page displays the same types of tiles displayed on the Local Server page. The difference is that on the All Servers page, the Events tile (for example) shows events logged on all servers being managed, not just the local server.
Role-specific pages
Depending on what additional roles and features you have installed on your server, other pages might be available on the left side of Server Manager. For example, Figure 3-3 shows one role installed on the server named SERVER1—namely, the File and Storage Services role, which is installed by default on a new installation of Windows Server 2012 or Windows Server 2012 R2. If you select the File And Storage Services page (shown in Figure 3-4), Server Manager provides you with a hierarchy of additional pages for managing other servers and for managing the volumes, disks and storage pools on the selected server. By integrating file-server management tools directly into Server Manager, you can manage file servers without the need to separately open the MMC consoles, as you had to do in Windows Server 2008 R2 and earlier.
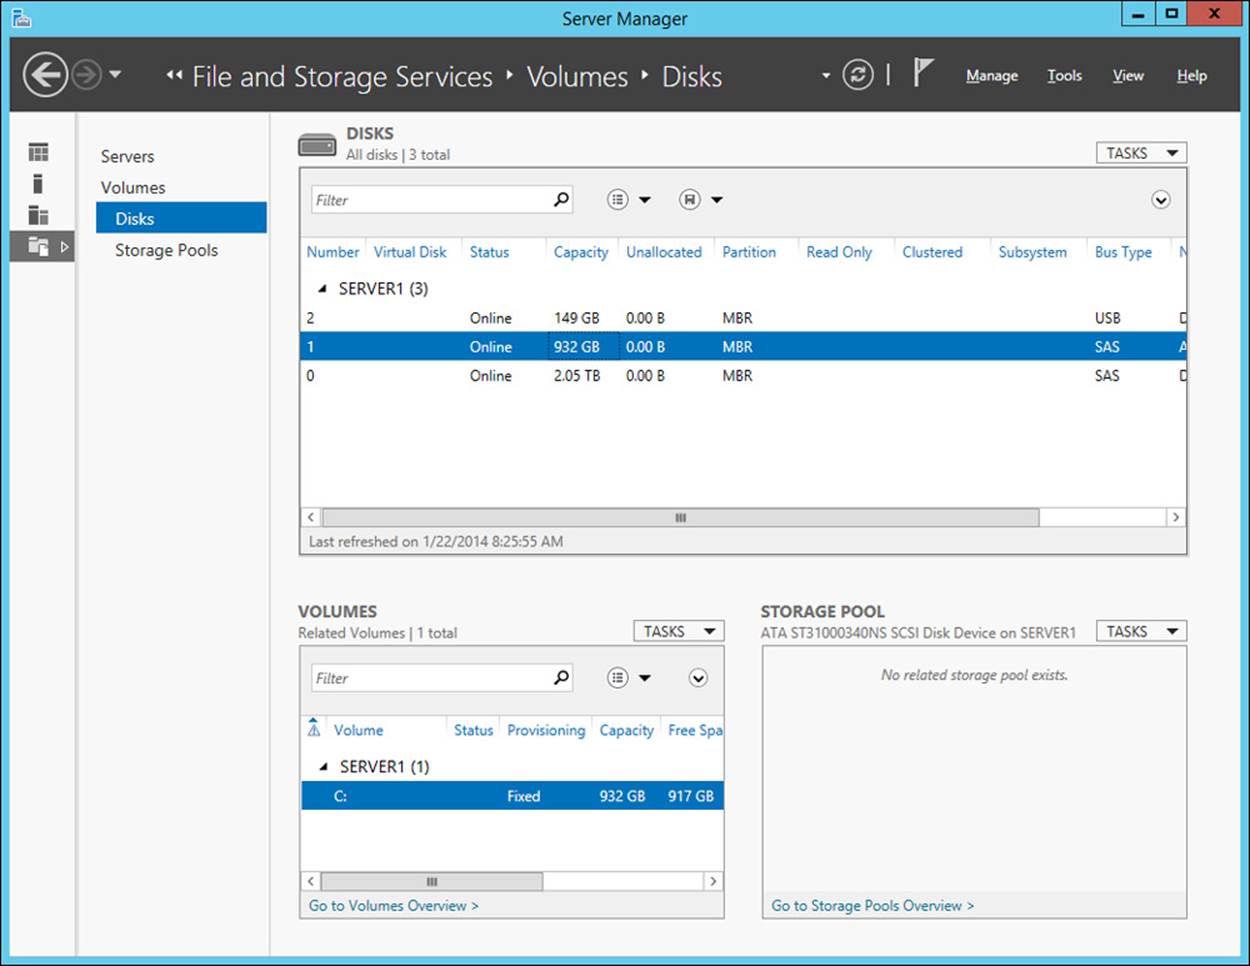
FIGURE 3-4 The File And Storage Services page displays an additional hierarchy of pages for managing Windows Server 2012 and Windows Server 2012 R2 file servers.
Real World: The future of Windows server management
The new Server Manager introduced in Windows Server 2012 probably represents the future of GUI-based management of Windows servers for smaller organizations. In Windows Server 2012 RTM and Windows Server 2012 R2, Microsoft has integrated the management of two roles into Server Manager: File And Storage Services and Remote Desktop Services (RDS). As a result, you don’t need to use separate MMC consoles to manage either file servers or servers running various RDS role services. Instead, you can fully manage these roles from within Server Manager. It’s likely that future releases of the Windows Server platform will include even more roles and features that have their management functionality integrated into Server Manager, and this should provide motivation for you to become thoroughly familiar with how to use Server Manager.
![]() Quick check
Quick check
![]() You want to configure Server Manager so that only critical events are displayed for all the servers you are managing. Which page in Server Manager should you use to do this?
You want to configure Server Manager so that only critical events are displayed for all the servers you are managing. Which page in Server Manager should you use to do this?
![]() Dashboard
Dashboard
![]() Local Server
Local Server
![]() All Servers
All Servers
Quick check answer
![]() Not the Dashboard, because you can use that page only for viewing alerts raised for events, not for configuring the severity level for which types of events should raise alerts. And not the Local Server page, because that enables you to configure alert settings only for events logged on the local server. So the answer is the All Servers page.
Not the Dashboard, because you can use that page only for viewing alerts raised for events, not for configuring the severity level for which types of events should raise alerts. And not the Local Server page, because that enables you to configure alert settings only for events logged on the local server. So the answer is the All Servers page.
Configuring remote management
By default, Windows Server 2012 and Windows Server 2012 R2 are configured to enable remote management by Server Manager running on another computer. This makes it easy to start using Server Manager to remotely manage servers running Windows Server 2012 or Windows Server 2012 R2. When certain prerequisites have been met, you also can remotely manage servers running Windows Server 2008 or Windows Server 2008 R2 by using Server Manager on Windows Server 2012 or Windows Server 2012 R2. However, the remote management capability for managing servers running Windows Server 2003 from these platforms is limited.
Note: Server Manager and workgroup servers
Server Manager is mainly intended for remotely managing Windows servers in a domain environment in which the Active Directory Domain Services (AD DS) role has been deployed. You can remotely manage workgroup servers by using Server Manager, but doing so requires additional configuration to get that functionality working and it has some limitations with regard to management functionality. For more information, see the topic “Add and manage servers in workgroups” on the TechNet page at http://technet.microsoft.com/en-us/library/hh831453.
Configuring remote management on Windows Server 2012 R2
Although remote management is enabled by default in Windows Server 2012 R2, you can choose to disable or re-enable it if desired. To determine whether a server running Windows Server 2012 R2 is enabled for remote management, do one of the following:
![]() Start Server Manager on the local server, select the Local Server page, and view the state of the Remote Management setting in the Properties tile. This setting should display as either Enabled or Disabled, and you can modify the setting by clicking it.
Start Server Manager on the local server, select the Local Server page, and view the state of the Remote Management setting in the Properties tile. This setting should display as either Enabled or Disabled, and you can modify the setting by clicking it.
![]() Run the %windir%\system32\Configure-SMRemoting.exe command-line tool from an elevated command prompt using the appropriate parameter as follows:
Run the %windir%\system32\Configure-SMRemoting.exe command-line tool from an elevated command prompt using the appropriate parameter as follows:
![]() Configure-SMRemoting –get Displays whether remote management is enabled or disabled
Configure-SMRemoting –get Displays whether remote management is enabled or disabled
![]() Configure-SMRemoting –enable Enables remote management if it is currently disabled
Configure-SMRemoting –enable Enables remote management if it is currently disabled
![]() Configure-SMRemoting –disable Disables remote management if it is currently enabled
Configure-SMRemoting –disable Disables remote management if it is currently enabled
Important: Consequences of disabling remote management on servers
Everything you can do by using Server Manager to manage servers running Windows Server 2012 or Windows Server 2012 R2, you can also do by using Windows PowerShell. That’s because Server Manager is just a GUI way of running Windows PowerShell commands against remote servers. So if you disable remote management on a server by using either method just described, any applications or commands that require Windows Management Instrumentation (WMI) or Windows PowerShell remote access for remotely managing the server will fail.
If you have confirmed that a remote server running Windows Server 2012 R2 has remote management enabled but you are still unable to remotely manage the server by using Server Manager, try the following:
![]() If the remote server is on a different subnet, verify that there are no network firewall settings blocking remote management between the two subnets.
If the remote server is on a different subnet, verify that there are no network firewall settings blocking remote management between the two subnets.
![]() Run Server Manager using the built-in Administrator account instead of a different administrator account to ensure sufficient credentials to perform the operation.
Run Server Manager using the built-in Administrator account instead of a different administrator account to ensure sufficient credentials to perform the operation.
Configuring remote management on Windows Server 2012
Although remote management is enabled by default in Windows Server 2012, you can choose to disable or re-enable it if desired. You configure remote management on servers running the RTM version of Windows Server 2012 in the same way you configure remote management on servers running Windows Server 2012 R2.
Configuring remote management on Windows Server 2008 R2
Remote management is disabled by default in Windows Server 2008 R2. To enable remote management, you can use Group Policy, Server Manager, or Windows PowerShell. For detailed information on how to do this, see http://technet.microsoft.com/en-us/library/dd759202.aspx.
Configuring remote management on Windows Server 2008
Remote management is disabled by default in Windows Server 2008. To enable remote management, you must configure the Windows Remote Management (WinRM) service that implements WS-Management on the server. For detailed information on how to do this, seehttp://technet.microsoft.com/en-us/magazine/ff700227.aspx.
Configuring remote management on Windows Server 2003
Remote management is disabled by default in Windows Server 2003. To enable remote management, you must configure Windows Firewall and DCOM on the server. For detailed information on how to do this, see http://msdn.microsoft.com/library/aa389286.aspx.
Note: Remote management of Windows Server 2003
Remote management of Windows Server 2003 computers using Server Manager in Windows Server 2012 or Windows Server 2012 R2 is limited to receiving online or offline status information.
Remotely managing Windows Server 2012 from Windows Server 2012 R2
You can use Server Manager on Windows Server 2012 R2 to remotely manage servers running Windows Server 2012, provided you first install the following features and updates on the remote servers:
![]() Microsoft .NET Framework 4.5, which you can install using the Add Roles And Features Wizard in Server Manager.
Microsoft .NET Framework 4.5, which you can install using the Add Roles And Features Wizard in Server Manager.
![]() Windows Management Framework 4.0, which is available from http://www.microsoft.com/en-us/download/details.aspx?id=40855.
Windows Management Framework 4.0, which is available from http://www.microsoft.com/en-us/download/details.aspx?id=40855.
Remotely managing Windows Server 2012 R2 from Windows Server 2012
You cannot use Server Manager on Windows Server 2012 to remotely manage servers running Windows Server 2012 R2. You must use the version of Server Manager in Windows Server 2012 R2 if you want to remotely manage servers running Windows Server 2012 R2.
Remotely managing Windows Server 2008 or Windows Server 2008 R2 from Windows Server 2012 R2
You can use Server Manager on Windows Server 2012 R2 to remotely manage servers running Windows Server 2008 or Windows Server 2008 R2, provided you first install the following features and updates on the remote servers:
![]() Microsoft .NET Framework 4.0, which is available from http://www.microsoft.com/en-us/download/details.aspx?id=40855 Windows Management Framework 3.0, which is available from http://www.microsoft.com/en-us/download/details.aspx?id=34595
Microsoft .NET Framework 4.0, which is available from http://www.microsoft.com/en-us/download/details.aspx?id=40855 Windows Management Framework 3.0, which is available from http://www.microsoft.com/en-us/download/details.aspx?id=34595
![]() The performance counter hotfix described in Knowledge Base article KB 2682011, which is available from http://support.microsoft.com/kb/2682011
The performance counter hotfix described in Knowledge Base article KB 2682011, which is available from http://support.microsoft.com/kb/2682011
For more information, see the following TechNet Library page: http://technet.microsoft.com/en-us/library/hh921475.
Remotely managing Windows Server 2008 or Windows Server 2008 R2 from Windows Server 2012
You can also use Server Manager on Windows Server 2012 to remotely manage servers running Windows Server 2008 or Windows Server 2008 R2, provided you first install the following features and updates on the remote servers:
![]() Microsoft .NET Framework 4.0, which is available from http://www.microsoft.com/en-us/download/details.aspx?id=17718
Microsoft .NET Framework 4.0, which is available from http://www.microsoft.com/en-us/download/details.aspx?id=17718
![]() Windows Management Framework 3.0, which is available from http://www.microsoft.com/en-us/download/details.aspx?id=34595
Windows Management Framework 3.0, which is available from http://www.microsoft.com/en-us/download/details.aspx?id=34595
![]() The hotfix described in Knowledge Base article KB 2682011, which is available from http://support.microsoft.com/kb/2682011
The hotfix described in Knowledge Base article KB 2682011, which is available from http://support.microsoft.com/kb/2682011
For more information, see the following TechNet Library page: http://technet.microsoft.com/en-us/library/hh921475.
![]() Quick check
Quick check
![]() You are trying to configure a role on a remote server running Windows Server 2012 R2 using Windows PowerShell commands, but they don’t seem to be working. What command should you run on the remote server to verify that remote management is enabled on it?
You are trying to configure a role on a remote server running Windows Server 2012 R2 using Windows PowerShell commands, but they don’t seem to be working. What command should you run on the remote server to verify that remote management is enabled on it?
Quick check answer
![]() Configure-SMRemoting –get
Configure-SMRemoting –get
Running Server Manager on client Windows
You also can run Server Manager from a client computer running Windows 8 or Windows 8.1 by deploying the appropriate version of the Remote Server Administration Tools (RSAT). RSAT was first introduced in Windows Vista. Microsoft provided it to enable administrators to remotely manage Windows servers from their workstations instead of having to enable Remote Desktop on the servers and use Remote Desktop Connection to remotely manage them. In the Windows Vista and Windows 7 versions of RSAT, administrators had to use the Turn Windows Features On Or Off item in Control Panel to enable remote tools after installing RSAT before they could use these tools for managing remote servers. Beginning with the Windows 8 version of RSAT, however, the tools included in RSAT are all enabled by default.
Versions of RSAT
There are two versions of RSAT available for managing servers running Windows Server 2012 and Windows Server 2012 R2:
![]() RSAT for Windows 8.1 You can use the tools in this version of RSAT to remotely manage servers running Windows Server 2012 R2 or Windows Server 2012 from a workstation running Windows 8.1. You can obtain this version of RSAT from the Microsoft Download Center athttp://www.microsoft.com/en-us/download/details.aspx?id=39296.
RSAT for Windows 8.1 You can use the tools in this version of RSAT to remotely manage servers running Windows Server 2012 R2 or Windows Server 2012 from a workstation running Windows 8.1. You can obtain this version of RSAT from the Microsoft Download Center athttp://www.microsoft.com/en-us/download/details.aspx?id=39296.
![]() RSAT for Windows 8 You can use the tools in this version of RSAT to remotely manage servers running Windows Server 2012 from a workstation running Windows 8. You can obtain this version of RSAT from the Microsoft Download Center at http://www.microsoft.com/en-us/download/details.aspx?id=28972.
RSAT for Windows 8 You can use the tools in this version of RSAT to remotely manage servers running Windows Server 2012 from a workstation running Windows 8. You can obtain this version of RSAT from the Microsoft Download Center at http://www.microsoft.com/en-us/download/details.aspx?id=28972.
Both of these versions of RSAT include the following tools for remotely administering servers:
![]() Server Manager
Server Manager
![]() MMC snap-ins and consoles
MMC snap-ins and consoles
![]() Windows PowerShell cmdlets and providers
Windows PowerShell cmdlets and providers
![]() Some additional command-line tools
Some additional command-line tools
Benefits of using RSAT
The benefits of using RSAT for Windows 8 or RSAT for Windows 8.1 for managing servers include the following:
![]() It enables you to remotely manage multiple servers in a data center or in the cloud from a client computer—for example, from an administrator workstation in your office.
It enables you to remotely manage multiple servers in a data center or in the cloud from a client computer—for example, from an administrator workstation in your office.
![]() It reduces licensing costs by eliminating the need to install Windows Server 2012 or Windows Server 2012 R2 on the computer you will use for managing your servers.
It reduces licensing costs by eliminating the need to install Windows Server 2012 or Windows Server 2012 R2 on the computer you will use for managing your servers.
One scenario in which deploying RSAT for Windows 8.1 can be especially helpful is when your servers running Windows Server 2012 or Windows Server 2012 R2 are deployed as Server Core installations, because it can simplify the job of configuring and managing servers that don’t include GUI management tools like Server Manager.
Deploying RSAT for Windows 8.1
To download RSAT for Windows 8.1, go to http://www.microsoft.com/en-us/download/details.aspx?id=39296. After you install RSAT for Windows 8.1 on a client computer running Windows 8.1, Server Manager automatically opens by default on the client computer. If it doesn’t, you can start Server Manager as follows:
1. On the Start screen, click the Administrative Tools tile.
2. In the Administrative Tools folder, double-click the Server Manager tile.
If you don’t see the Server Manager or Administrative Tools tile on the Start screen, hover the mouse pointer over the upper-right corner of the Start screen and click Settings. If Show Administrative Tools is turned off, turn it on.
Important: Uninstall previous versions of RSAT
If you have a previous version of RSAT already installed on your workstation, make sure you remove the earlier RSAT version before you install the latest version. Only one version of RSAT can be installed on a Windows client computer at any time.
Lesson summary
![]() Server Manager is organized into various pages, many of which have similar functionality using tiles and thumbnails.
Server Manager is organized into various pages, many of which have similar functionality using tiles and thumbnails.
![]() The Dashboard provides basic server-monitoring functionality for displaying various kinds of alerts.
The Dashboard provides basic server-monitoring functionality for displaying various kinds of alerts.
![]() Remote management is enabled by default on Windows Server 2012 and Windows Server 2012 R2 to make these servers easier to manage.
Remote management is enabled by default on Windows Server 2012 and Windows Server 2012 R2 to make these servers easier to manage.
![]() Configuring remote management on servers running Windows Server 2008 or Windows Server 2008 R2 requires additional steps.
Configuring remote management on servers running Windows Server 2008 or Windows Server 2008 R2 requires additional steps.
![]() By installing the Remote Server Administration Tools (RSAT) for Windows 8.1 on a secure workstation running Windows 8.1, you can remotely manage servers from a single client computer.
By installing the Remote Server Administration Tools (RSAT) for Windows 8.1 on a secure workstation running Windows 8.1, you can remotely manage servers from a single client computer.
Lesson review
Answer the following questions to test your knowledge of the information in this lesson. You can find the answers to these questions and explanations of why each answer choice is correct or incorrect in the “Answers” section at the end of this chapter.
1. You want to use Server Manager to manage all the Windows servers in your environment that are being used as print servers, but there is no Print Services page available in Server Manager. Why? (Choose all that apply.)
A. All your print servers are currently offline, having been taken down for maintenance.
B. None of your servers have the Print And Document Services role installed on them.
C. None of the servers in your server pool have the Print And Document Services role installed on them.
D. All print servers are running an earlier version of Windows Server and have not been configured for remote management.
2. How can you verify that remote management has been enabled on a server running Windows Server 2012? (Choose all that apply.)
A. By examining the Dashboard of Server Manager running on that server.
B. By examining the Local Server page of Server Manager running on that server.
C. By examining the All Servers page of Server Manager running on that server.
D. By examining the output of the Configure-SMRemoting –get command.
3. Your organization has a mixed environment of servers running Windows Server 2012 R2 and Windows Server 2008 R2. You want to manage your servers from a secure workstation running Windows 8.1, so you install the Remote Server Administration Tools for Windows 8.1 on this workstation. Which of the following statements best describes the management capabilities of this arrangement?
A. You can manage all roles and features on servers running Windows Server 2012 R2 and servers running Windows Server 2008 R2.
B. You can manage all roles and features on servers running Windows Server 2012 R2 and some roles and features on servers running Windows Server 2008 R2.
C. You can manage all roles and features on servers running Windows Server 2012 R2 but no roles and features on servers running Windows Server 2008 R2.
D. You can manage all roles and features on servers running Windows Server 2012 R2, but you need to install the Remote Server Administration Tools for Windows 8.1 on a workstation running Windows 7 to manage roles and features on servers running Windows Server 2008 R2.
Lesson 2: Server management tasks
You can use Server Manager to perform many kinds of server management tasks. This lesson demonstrates how you can perform some key management tasks using Server Manager.
After this lesson, you will be able to:
![]() Perform some common server management tasks using Server Manager.
Perform some common server management tasks using Server Manager.
Estimated lesson time: 30 minutes
Adding servers
To manage remote servers using Server Manager, you first need to add the servers to the server pool. You can add both physical and virtual servers to the server pool. As described in the previous lesson, no additional configuration is needed for adding servers running Windows Server 2012 or Windows Server 2012 R2 to the server pool. Servers running Windows Server 2008 or Windows Server 2008 R2, however, must be configured for remote server management before they can be added to the server pool. Servers running Windows Server 2003 cannot be added to the server pool.
To add servers to the server pool, do the following:
1. From any Server Manager page, click the Manage menu and then click Add Servers to open the Add Servers dialog box.
2. Click the Active Directory tab if you want to search Active Directory for servers you can manage. To search Active Directory, you can limit your search to the following:
![]() Location, which you can use to find servers in the domain or only domain controllers. (See Figure 3-5.)
Location, which you can use to find servers in the domain or only domain controllers. (See Figure 3-5.)
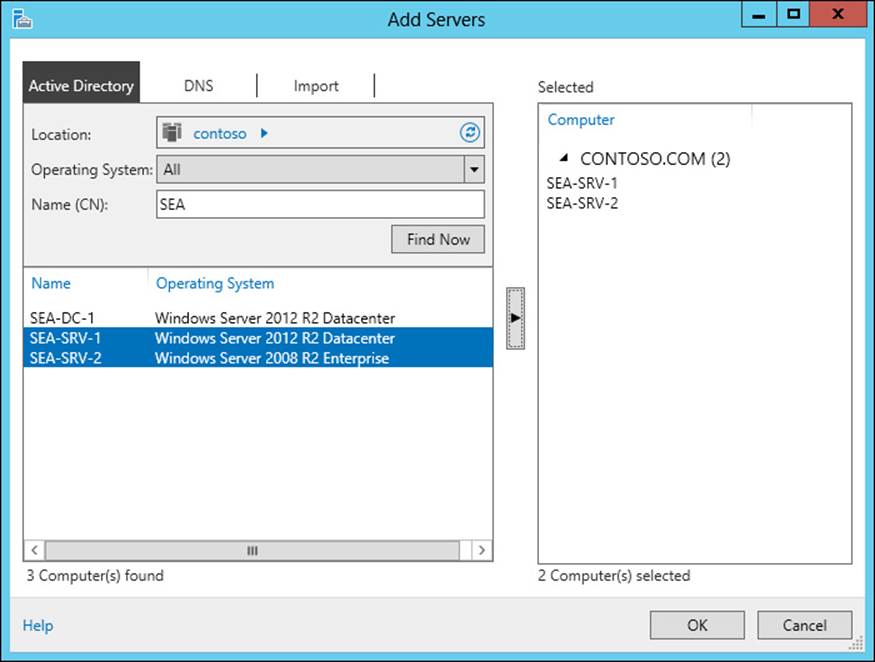
FIGURE 3-5 Add servers to the server pool.
![]() Operating System, which you can use to find servers running a specific operating system.
Operating System, which you can use to find servers running a specific operating system.
![]() Name (CN), which lets you type the name or the first part of the name of the server or servers for which you are searching.
Name (CN), which lets you type the name or the first part of the name of the server or servers for which you are searching.
3. Alternatively, click the DNS tab to query your DNS servers for servers you want to manage by their computer names or IP addresses.
4. Alternatively, click the Import tab to specify a text file containing a list of computer names of servers you want to manage.
5. Whichever approach you use to find the servers you want to manage, when you find them, click the control to add the servers you selected to the server pool. Note that, as shown in Figure 3-5, you can select multiple servers to add.
Creating server groups
After you add all the servers you want to manage to the server pool, the next task you should perform is to create custom server groups for different kinds of servers. A server group is a logical subset of the server pool. You can use various criteria for deciding which server groups you want to create. For example, you could create server groups for grouping your organization’s servers according to any of the following criteria:
![]() Business function (for example, Accounting servers)
Business function (for example, Accounting servers)
![]() Geographical location (for example, Seattle servers)
Geographical location (for example, Seattle servers)
![]() Role (for example, Hyper-V hosts running a particular version of Windows Server)
Role (for example, Hyper-V hosts running a particular version of Windows Server)
![]() Responsibility (for example, Bob’s servers)
Responsibility (for example, Bob’s servers)
To create a new server group, do the following:
1. From any Server Manager page, click the Manage menu and then click Create Server Group to open the Create Server Group dialog box.
2. Type a descriptive name for the new server group.
3. Select the servers you want to add to the new server group from the list of servers in the server pool and click the control to add them to the server group. (See Figure 3-6.)
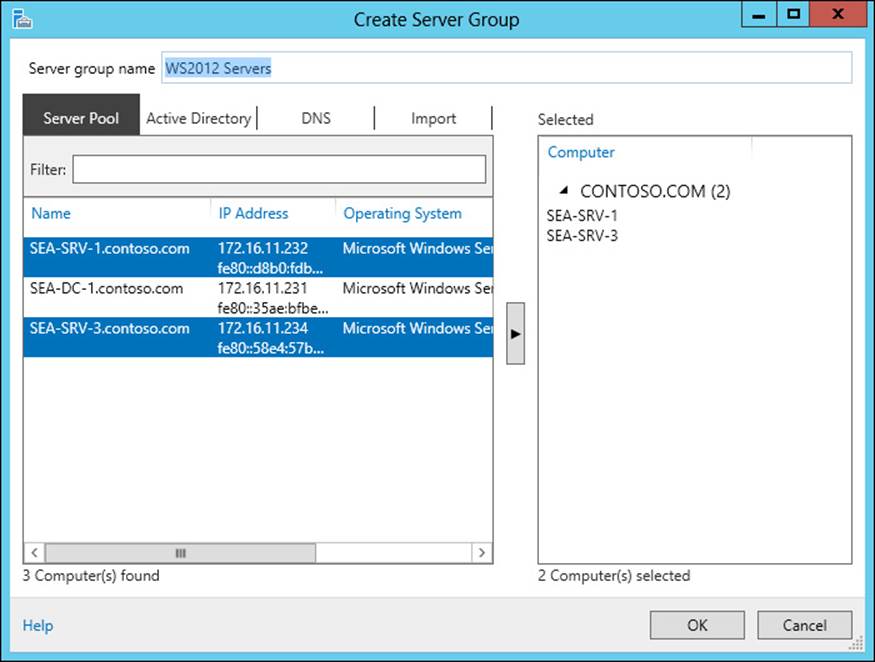
FIGURE 3-6 Add servers in the pool to a server group.
4. Alternatively, you can select servers by searching Active Directory, querying DNS, or importing a text file with a list of computer names as described in the previous topic.
After you create your new server group, it appears as a separate page in Server Manager. (See Figure 3-7 in the next section.) To modify the membership of an existing server group or delete the server group, click the Tasks control in the Servers tile of the page for that server group.
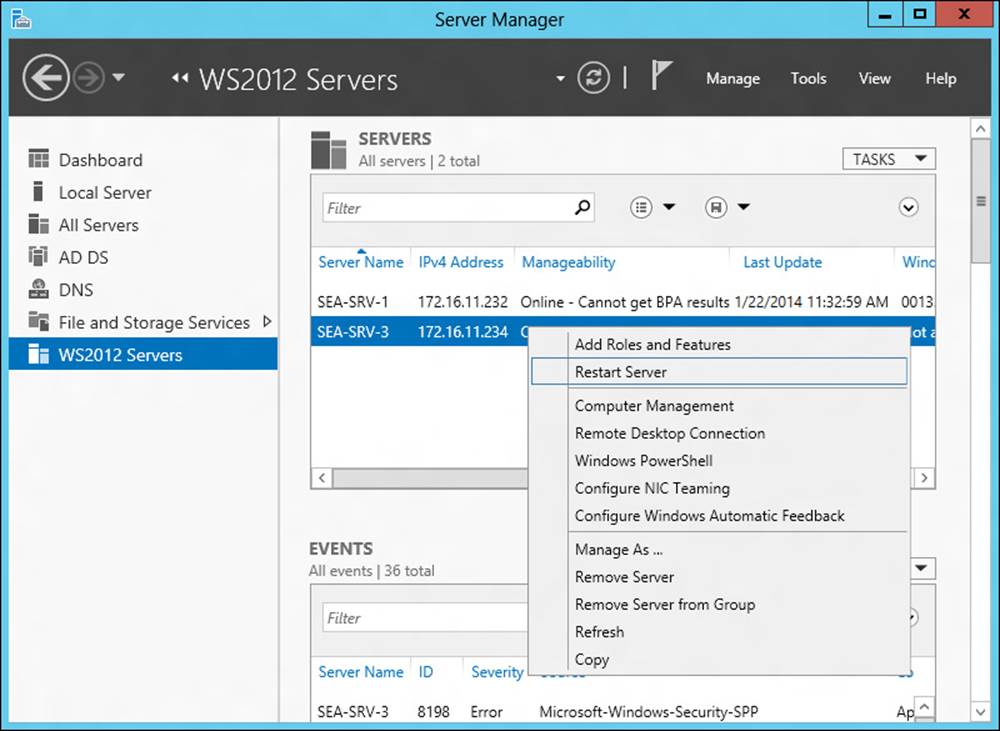
FIGURE 3-7 Restart a server in the selected server group.
Note: Server group membership
A server can belong to more than one server group.
Restarting a server
After you group your servers according to the criteria you’ve decided upon, you can perform various management tasks on these servers directly from within Server Manager. For example, to restart a particular server in a particular server group, do the following:
1. Select the Server Manager page for that server group.
2. Right-click a particular server listed in the Servers tile of that page.
3. Select Restart Server from the context menu. (See Figure 3-7.)
Other management tasks are also available in the context menu, but note that some of these tasks require certain prerequisites before they will work. For example, Remote Desktop must be enabled on the remote server before you can open a Remote Desktop connection to that server.
Collecting events
You can use Server Manager to collect events from the event logs of remote servers and then display alerts on the Dashboard whenever certain event criteria are met.
Configuring event collection
You can configure event collection for the servers listed on any of these pages:
![]() Local Server
Local Server
![]() All Servers
All Servers
![]() Role-specific pages
Role-specific pages
![]() Pages for server groups you created
Pages for server groups you created
For example, to configure event collection for servers listed on the All Servers page, do the following:
1. Select the All Servers page in Server Manager.
2. In the Events tile, click Tasks and select Configure Event Data to open the Configure Event Data dialog box, shown in Figure 3-8.
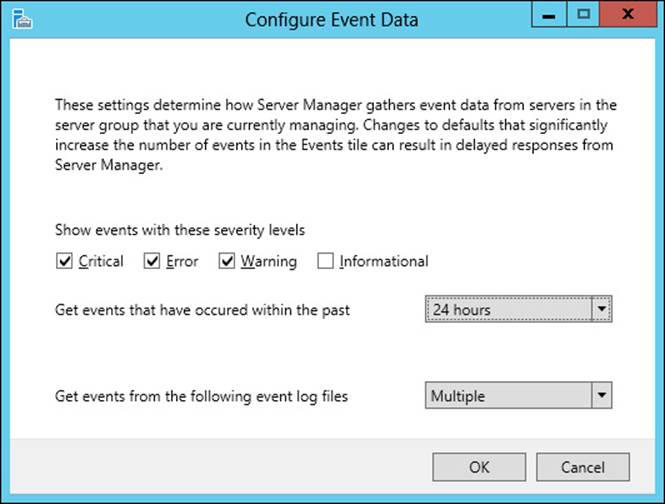
FIGURE 3-8 Configure event collection for servers.
For example, you can do the following:
![]() Choose what types of events to collect according to their severity level
Choose what types of events to collect according to their severity level
![]() Collect events that occurred within the past 24 hours, 3 days, 7 days, or a custom time period expressed in days or hours
Collect events that occurred within the past 24 hours, 3 days, 7 days, or a custom time period expressed in days or hours
![]() Get events from all event logs or only specific event logs on the servers
Get events from all event logs or only specific event logs on the servers
When events have been collected from the servers, they are displayed in the Events tile of the selected Server Manager page. Selecting one server on that page displays all events collected from that server; selecting multiple servers displays all events collected from all selected servers.
By selecting a particular event, you can display a pane, like the one shown in Figure 3-9, with additional information concerning the event.
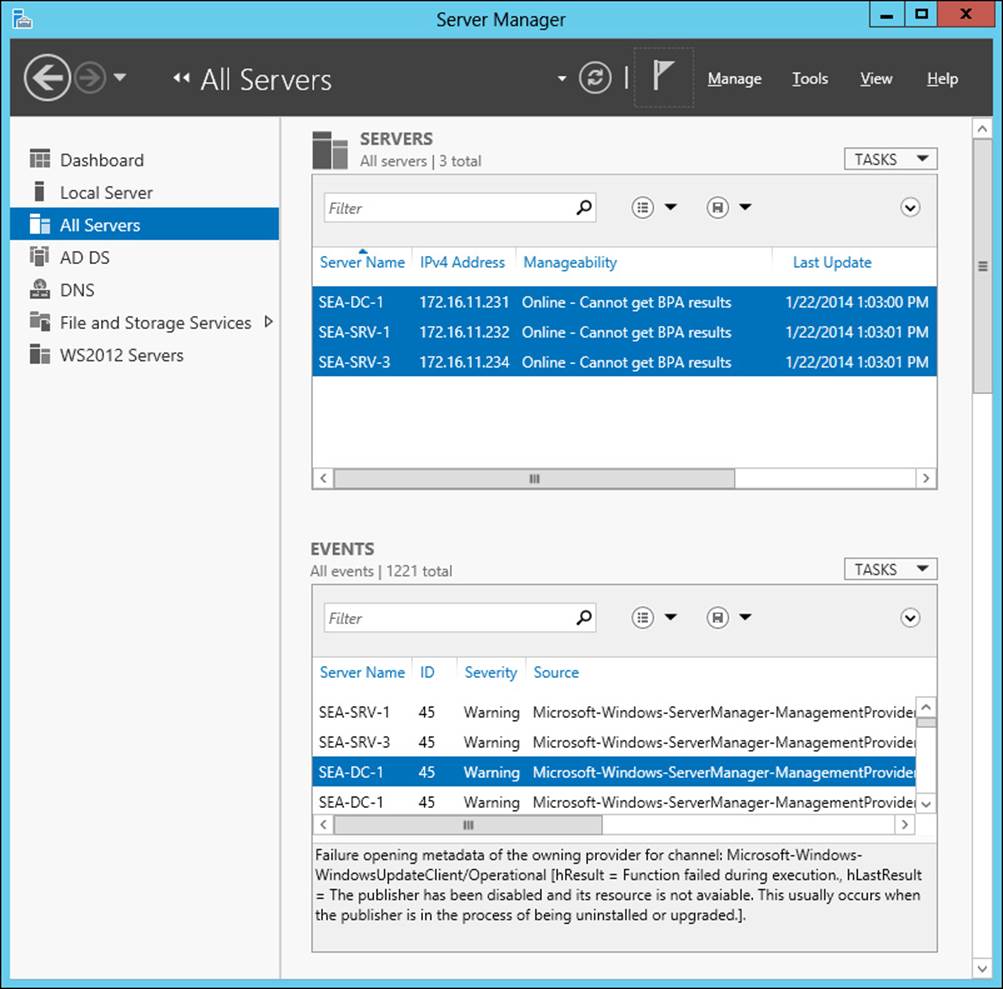
FIGURE 3-9 View information about a specific event.
Configuring alerts for events
When events are being collected for the servers listed on a particular page, you can configure the Dashboard tile for that page to display alerts whenever an event of a particular type has been collected. To continue the preceding example, you can configure the All Servers tile on the Dashboard to display alerts for specific types of events by doing the following:
1. Select the Dashboard in Server Manager.
2. In the All Servers tile, click Events to open the All Servers - Events Detail View dialog box shown in Figure 3-10.
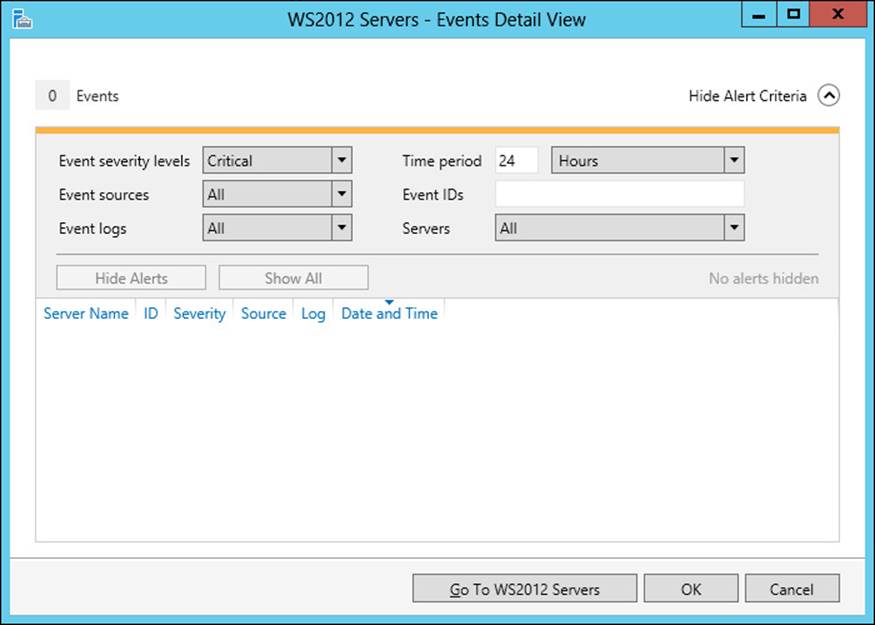
FIGURE 3-10 Configure alerts for events.
3. Specify the conditions for displaying event alerts for collected events by configuring the following:
![]() Whether critical, error, or warning events (or all three) should generate alerts. (By default, only critical events generate alerts.)
Whether critical, error, or warning events (or all three) should generate alerts. (By default, only critical events generate alerts.)
![]() The event sources for the events. (By default, this includes all event sources.)
The event sources for the events. (By default, this includes all event sources.)
![]() The event logs for the events. (By default, this includes all event logs.)
The event logs for the events. (By default, this includes all event logs.)
![]() The time period during which the event occurred. (By default, this is during the last 24 hours.)
The time period during which the event occurred. (By default, this is during the last 24 hours.)
![]() Specific event IDs that should generate alerts. For example, specifying 1–20, –13, 75 generates only alerts that have event IDs of 1–20 (except 13) or 75.
Specific event IDs that should generate alerts. For example, specifying 1–20, –13, 75 generates only alerts that have event IDs of 1–20 (except 13) or 75.
![]() The servers on which the events occurred. (Deselect any servers for which you don’t want to use the Dashboard to generate event alerts.)
The servers on which the events occurred. (Deselect any servers for which you don’t want to use the Dashboard to generate event alerts.)
Event alerts are indicated by red numbers next to the Events thumbnail of tiles on the Dashboard. Click the Events thumbnail of any tile to see more information about the events that generated the alerts.
Monitoring services
You can use Server Manager to monitor services on remote servers and then display alerts on the Dashboard whenever a service meets certain criteria. You can also use Server Manager to start, stop, restart, pause, and resume services on remote servers. To configure other settings for services, open the Services MMC console from Administrative Tools.
Configuring service alerts
You can configure any tile on the Dashboard to display service alerts for the servers the tile represents by doing the following:
1. Select any tile on the Dashboard in Server Manager—for example, the All Servers tile.
2. Click the Services thumbnail in this tile to open the All Servers - Services Detail View dialog box for that server group, as shown in Figure 3-11.
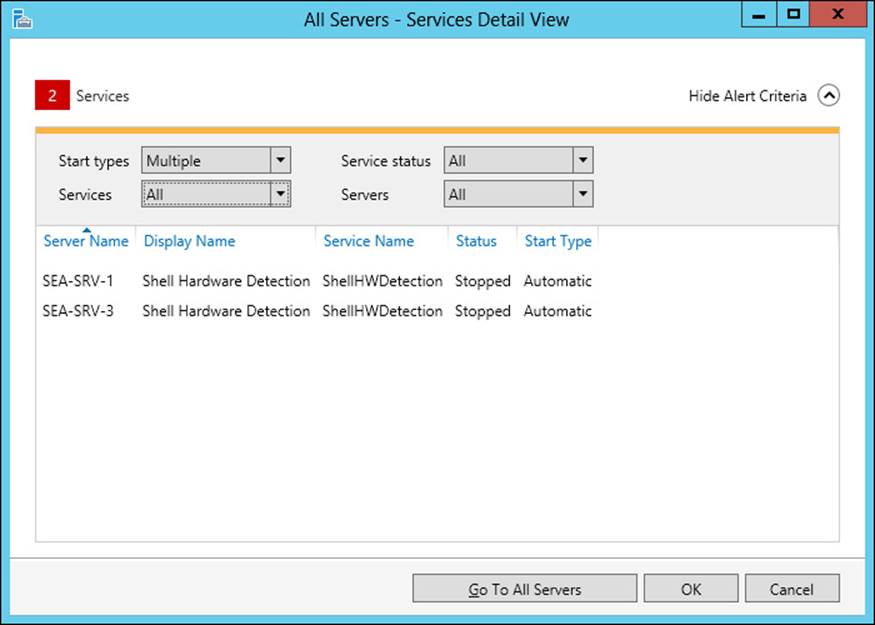
FIGURE 3-11 Configure service alerts for collected events.
3. Specify the conditions for displaying service alerts for collected events by configuring the following:
![]() Which service start types can generate alerts. (By default, only services configured to start automatically, or automatically with delayed start, are selected.)
Which service start types can generate alerts. (By default, only services configured to start automatically, or automatically with delayed start, are selected.)
![]() Which services can generate alerts. (By default, all services can generate alerts.)
Which services can generate alerts. (By default, all services can generate alerts.)
![]() Which service status conditions can generate alerts. (All service status conditions can do this by default.)
Which service status conditions can generate alerts. (All service status conditions can do this by default.)
![]() The servers on which the service issues occurred. (Deselect any servers for which you don’t want to use the Dashboard to generate service alerts.)
The servers on which the service issues occurred. (Deselect any servers for which you don’t want to use the Dashboard to generate service alerts.)
Service alerts are indicated by red numbers next to the Services thumbnail of tiles on the Dashboard. Click the Services thumbnail of any tile to see more information about the services that generated the alerts.
![]() Quick check
Quick check
![]() Can you modify the account logon settings or recovery options for services running on remote servers by using the tiles on the Dashboard?
Can you modify the account logon settings or recovery options for services running on remote servers by using the tiles on the Dashboard?
Quick check answer
![]() No, you can only start, stop, restart, pause, and resume services on remote servers by using the tiles on the Dashboard. To configure other settings for services, open the Services MMC console from Administrative Tools.
No, you can only start, stop, restart, pause, and resume services on remote servers by using the tiles on the Dashboard. To configure other settings for services, open the Services MMC console from Administrative Tools.
Collecting performance data
Server Manager enables you to collect performance data on remote servers and then display alerts on the Dashboard whenever certain performance criteria are met.
Configuring collection of performance data
You can configure collection of performance data for the servers listed on any of these pages:
![]() Local Server
Local Server
![]() All Servers
All Servers
![]() Role-specific pages
Role-specific pages
![]() Pages for server groups you created
Pages for server groups you created
For example, to configure the collection of performance data for servers listed on the All Servers page, do the following:
1. Select the All Servers page in Server Manager.
2. In the Performance tile, right-click any servers that show Counter Status as Off and select Start Performance Counters from the context menu.
3. In the Performance tile, click Tasks and select Configure Performance Alerts to open the All Servers: Configure Performance Alerts dialog box, as shown in Figure 3-12.

FIGURE 3-12 Collect performance data.
4. Specify performance alert thresholds for CPU usage and available memory and configure the graph display period in days.
Configuring performance alerts
When performance data is being collected for the servers listed on a particular page, you can configure the Dashboard tile for that page to display alerts whenever performance meets the specified criteria. To continue the preceding example, you can configure the All Servers tile on the Dashboard to display performance alerts by doing the following:
1. Select the Dashboard in Server Manager.
2. In the All Servers tile, click Performance to open the All Servers - Performance Detail View dialog box shown in Figure 3-13.
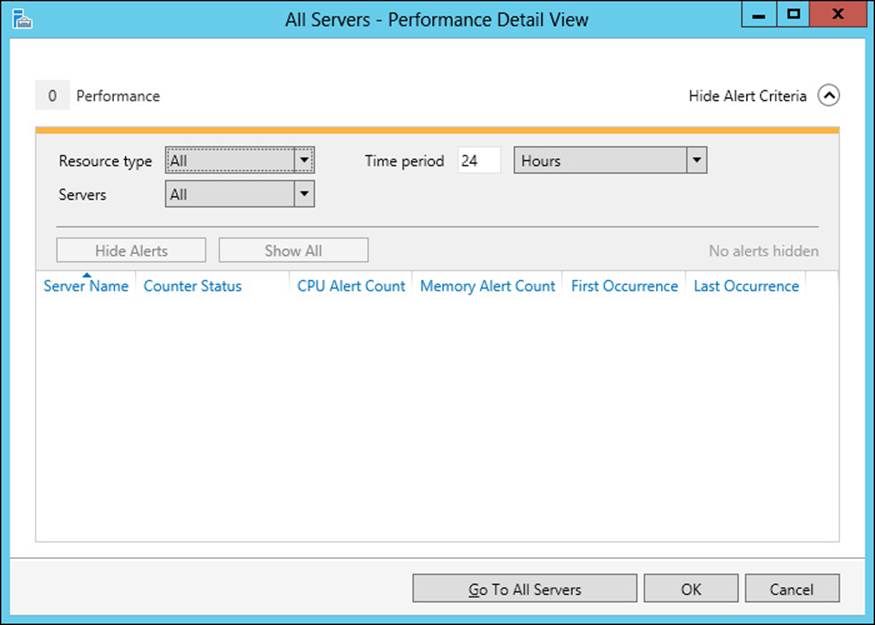
FIGURE 3-13 Configure performance alerts.
3. Specify the conditions for displaying performance alerts by configuring the following:
![]() Whether CPU or Memory can generate an alert. (By default, both can generate alerts.)
Whether CPU or Memory can generate an alert. (By default, both can generate alerts.)
![]() The time period during which the performance condition occurred. (By default, this is during the last 24 hours.)
The time period during which the performance condition occurred. (By default, this is during the last 24 hours.)
![]() The servers on which the performance condition occurred. (Deselect any servers for which you don’t want to use the Dashboard to generate event alerts.)
The servers on which the performance condition occurred. (Deselect any servers for which you don’t want to use the Dashboard to generate event alerts.)
Performance alerts are indicated by red numbers next to the Performance thumbnail of tiles on the Dashboard. Click the Performance thumbnail of any tile to see more information about the condition that generated the alerts.
Viewing status notifications
Status notifications about running tasks are indicated in two places in Server Manager:
![]() By a gray number icon beneath, a yellow warning icon beneath, or a red box around the Notification icon in the menu bar at the top of each page
By a gray number icon beneath, a yellow warning icon beneath, or a red box around the Notification icon in the menu bar at the top of each page
![]() By a yellow or red message bar beneath the title bar of the appropriate tile
By a yellow or red message bar beneath the title bar of the appropriate tile
Figure 3-14 shows an example of both of these types of notifications.
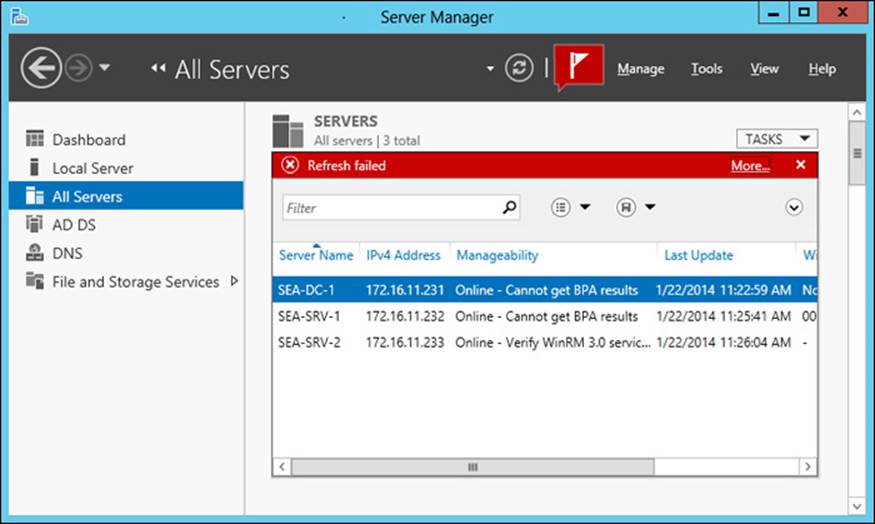
FIGURE 3-14 These are examples of status notifications.
Clicking the message bar in Figure 3-14 displays full details concerning any status notifications in a separate Task Details dialog box, like the one shown in Figure 3-15. Note that the lower pane of this dialog box shows examples of both error and warning notifications.
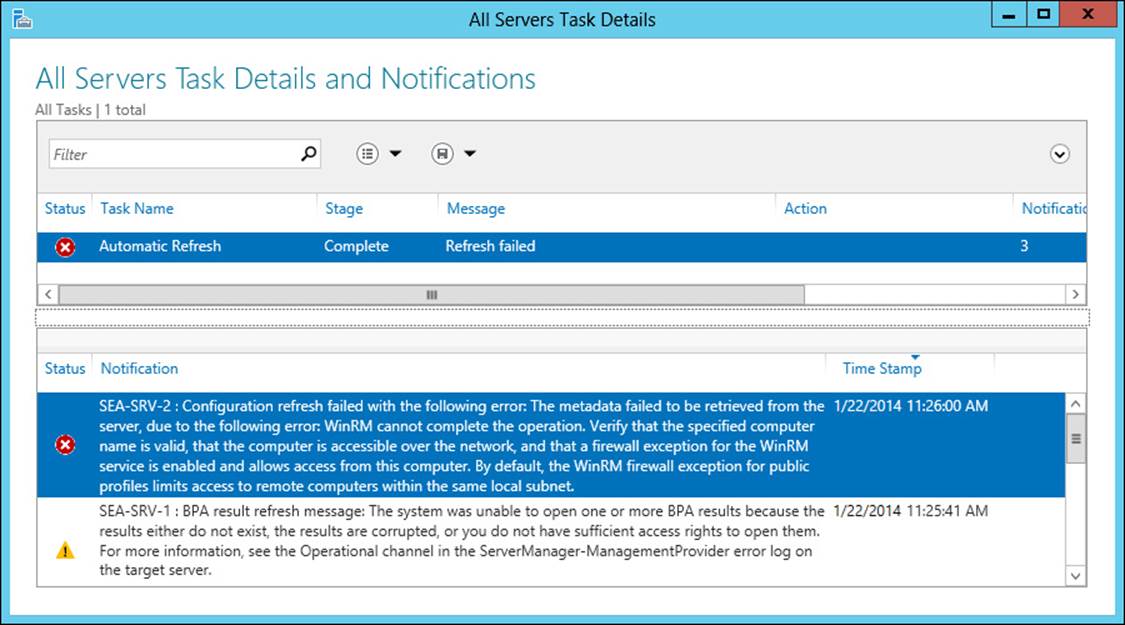
FIGURE 3-15 View full details of status notifications.
Clicking the Notifications flag displays brief summary information concerning any notifications that have been raised, as shown in Figure 3-16. Clicking Task Details at the bottom of this summary information opens the dialog box shown previously in Figure 3-15.
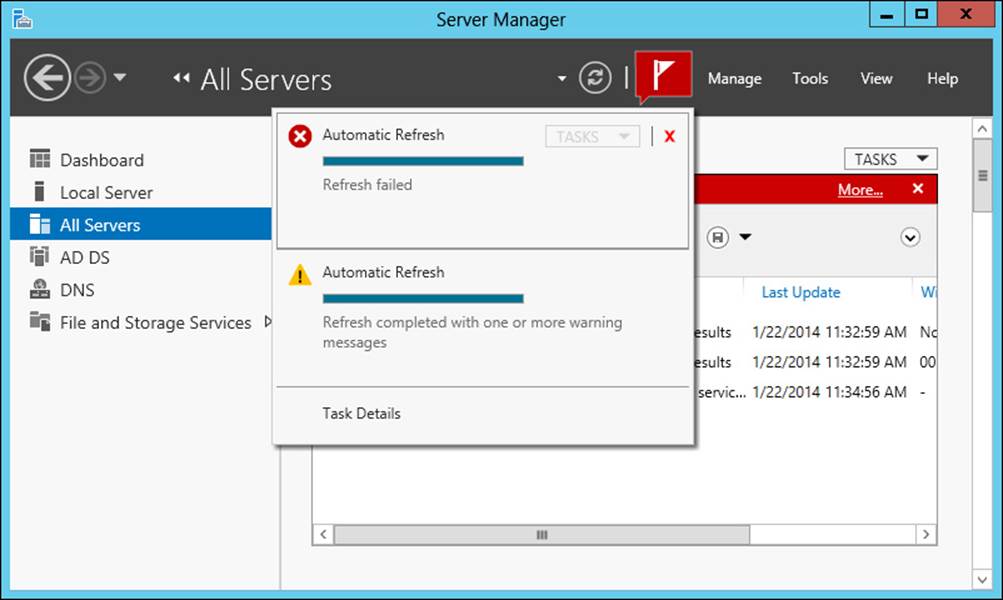
FIGURE 3-16 View brief summary information about status notifications.
![]() Quick check
Quick check
![]() What type of indication does Server Manager display when a task has failed?
What type of indication does Server Manager display when a task has failed?
Quick check answer
![]() The Notifications flag on the menu bar at the top of any Server Manager page displays a red box around it.
The Notifications flag on the menu bar at the top of any Server Manager page displays a red box around it.
Lesson summary
![]() You need to add servers to the server pool before you can manage them using Server Manager.
You need to add servers to the server pool before you can manage them using Server Manager.
![]() Organizing servers into server groups makes them easier to manage in large, distributed environments.
Organizing servers into server groups makes them easier to manage in large, distributed environments.
![]() Server Manager can collect events and performance data from managed servers and display alerts when certain conditions are met.
Server Manager can collect events and performance data from managed servers and display alerts when certain conditions are met.
![]() You can use Server Manager to perform some basic service management tasks.
You can use Server Manager to perform some basic service management tasks.
Lesson review
Answer the following questions to test your knowledge of the information in this lesson. You can find the answers to these questions and explanations of why each answer choice is correct or incorrect in the “Answers” section at the end of this chapter.
1. Your organization has six servers running Windows Server 2012 in a domain environment. Only four of those servers are listed on the All Servers page of Server Manager. What should you do to ensure the remaining two servers are also listed on this page?
A. Create a server group and add the two servers to the group.
B. Create a server pool and add the two servers to the pool.
C. Add the servers to an existing server group.
D. Add the servers to your server pool.
2. Which of the following are not purposes for creating server groups in Server Manager? (Choose all that apply.)
A. You can assign privileges to servers by adding them to server groups.
B. You can use server groups to facilitate managing servers at different geographical locations.
C. You can use server groups to facilitate the delegation of permissions for servers used by different departments in your organization.
D. You can nest server groups to create a hierarchical collection of servers that mirrors the administrative responsibilities of your IT staff.
3. You configured the Performance tile on the All Servers page to set a performance alert threshold for CPU usage of 60 percent because when you opened the Performance tab of Task Manager on those servers, you noticed that several of your managed servers were experiencing heavy load. However, three hours later you notice that no alerts have been raised on the Performance tile of the All Servers page, even though the servers still appear to be under heavy load. Why? (Choose all that apply.)
A. You neglected to enable performance counters on those servers.
B. The minimum graph display period for performance alerts is one day, and that much time has not elapsed yet.
C. You configured Server Manager properties to a refresh period of more than three hours.
D. You have not yet added the servers to a custom server group.
4. Which of the following service management tasks can you not perform on remote servers by using a Services tile on one of the Server Manager pages?
A. Stopping a service
B. Pausing a service
C. Starting a service
D. Changing the Startup Type option of the service
Lesson 3: Installing roles and features
Roles and features provide additional functionality for Windows servers, such as the capability of using the server as a print server on your network. This lesson demonstrates how to install roles and features on a server running Windows Server 2012 or Windows Server 2012 R2 using both Server Manager and Windows PowerShell commands. Later chapters examine how to configure and manage specific roles, such as Active Directory Domain Services, DHCP Server, DNS Server, File And Storage Services, Hyper-V, and Print And Document Services.
After this lesson, you will be able to:
![]() Use Server Manager to install or remove roles and features on remote servers.
Use Server Manager to install or remove roles and features on remote servers.
![]() Use Windows PowerShell to install or remove roles and features on remote servers.
Use Windows PowerShell to install or remove roles and features on remote servers.
Estimated lesson time: 30 minutes
Prerequisites for installing roles and features
To install a role or feature on a server running Windows Server 2012 or Windows Server 2012 R2, the server must have access to the binaries for installing that role or feature. As explained in Chapter 2, “Deploying servers,” a capability called Features On Demand enables administrators to completely remove the binaries for roles and features from a server running Windows Server 2012 or Windows Server 2012 R2 to reduce the amount of disk space the operating system uses.
If the binaries for a particular role or feature you want to install on a server have previously been removed from the server’s system drive, Windows Server 2012 and Windows Server 2012 R2 can obtain these binaries in several ways:
![]() By downloading them directly from Windows Update.
By downloading them directly from Windows Update.
![]() By copying them from the side-by-side store (SxS) folder on a running installation of the same edition and service pack level as your server. To do this, share the SxS folder or a parent folder on the other server and then specify the UNC path to the shared SxS folder when using the Add Roles And Features Wizard or the Install-WindowsFeature cmdlet.
By copying them from the side-by-side store (SxS) folder on a running installation of the same edition and service pack level as your server. To do this, share the SxS folder or a parent folder on the other server and then specify the UNC path to the shared SxS folder when using the Add Roles And Features Wizard or the Install-WindowsFeature cmdlet.
![]() By copying the entire SxS folder of an installation of the same edition and service pack level as your server to a shared folder on a file server on your network. Then specify the UNC path to this shared folder when using the Add Roles And Features Wizard or the Install-WindowsFeature cmdlet.
By copying the entire SxS folder of an installation of the same edition and service pack level as your server to a shared folder on a file server on your network. Then specify the UNC path to this shared folder when using the Add Roles And Features Wizard or the Install-WindowsFeature cmdlet.
![]() By using a mounted Windows image from a Windows Image (WIM) file such as the Install.wim file in the \Sources folder on the Windows Server 2012 or Windows Server 2012 R2 product media (ISO file).
By using a mounted Windows image from a Windows Image (WIM) file such as the Install.wim file in the \Sources folder on the Windows Server 2012 or Windows Server 2012 R2 product media (ISO file).
![]() By using a mounted virtual hard disk file that includes an installation of the same edition and service pack level as your server.
By using a mounted virtual hard disk file that includes an installation of the same edition and service pack level as your server.
You can use the Group Policy Editor to control whether removed binaries are downloaded from Windows Update, and you can specify the path where the binaries can be found if their associated roles or features need to be installed. Browse to the policy setting for controlling this 'margin-top:4.0pt;margin-right:0cm;margin-bottom:4.0pt; margin-left:0cm;text-indent:15.0pt;line-height:normal'>Computer Configuration\Policies\Administrative Templates\System\Specify Settings For Optional Component Installation And Component Repair
Figure 3-17 shows the configuration options for this policy setting.
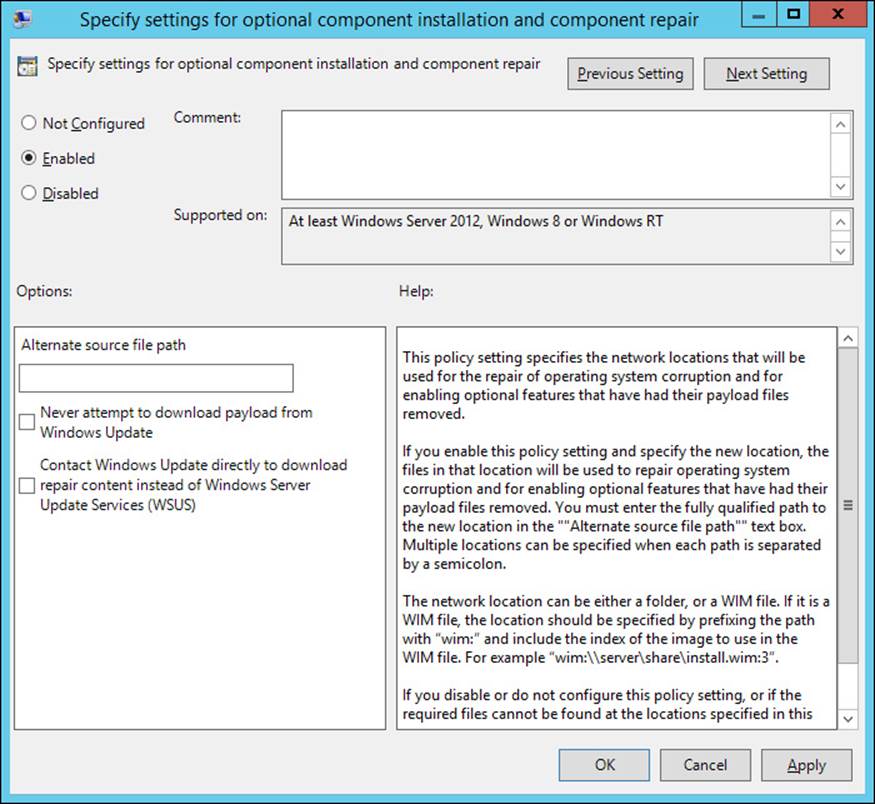
FIGURE 3-17 Specify Group Policy settings for controlling installation of previously removed role and feature binaries.
More Info: Features On Demand capabilities
Refer to Chapter 2 for more information about the Features On Demand capabilities in Windows Server 2012 and Windows Server 2012 R2.
Installing roles and features using Server Manager
In previous versions of Windows Server, you could use the Add Roles Wizard and Add Features Wizard to install roles and features, respectively, on the server. Windows Server 2012 introduced a single redesigned Add Roles And Features Wizard that provides greater flexibility and control for installing roles and features on servers. This wizard provides an easy way for administrators of small to midsized organizations to install roles and features on servers running Windows Server 2012 in their environment.
To use Server Manager to install a role or a feature on a server running Windows Server 2012, begin by clicking the Manage menu and selecting Add Roles And Features to open the Add Roles And Features Wizard. The Select Installation Type page of this wizard shown in Figure 3-18offers two options for installing roles and features on the server:
![]() Role-based or feature-based installation This option is similar to that used in previous versions of Windows Server for installing the specific roles or features you choose.
Role-based or feature-based installation This option is similar to that used in previous versions of Windows Server for installing the specific roles or features you choose.
![]() Remote Desktop Services installation With this option, you can deploy a complete Remote Desktop Services infrastructure, either for session-based desktops or virtual desktops, on either a single server or multiple servers.
Remote Desktop Services installation With this option, you can deploy a complete Remote Desktop Services infrastructure, either for session-based desktops or virtual desktops, on either a single server or multiple servers.
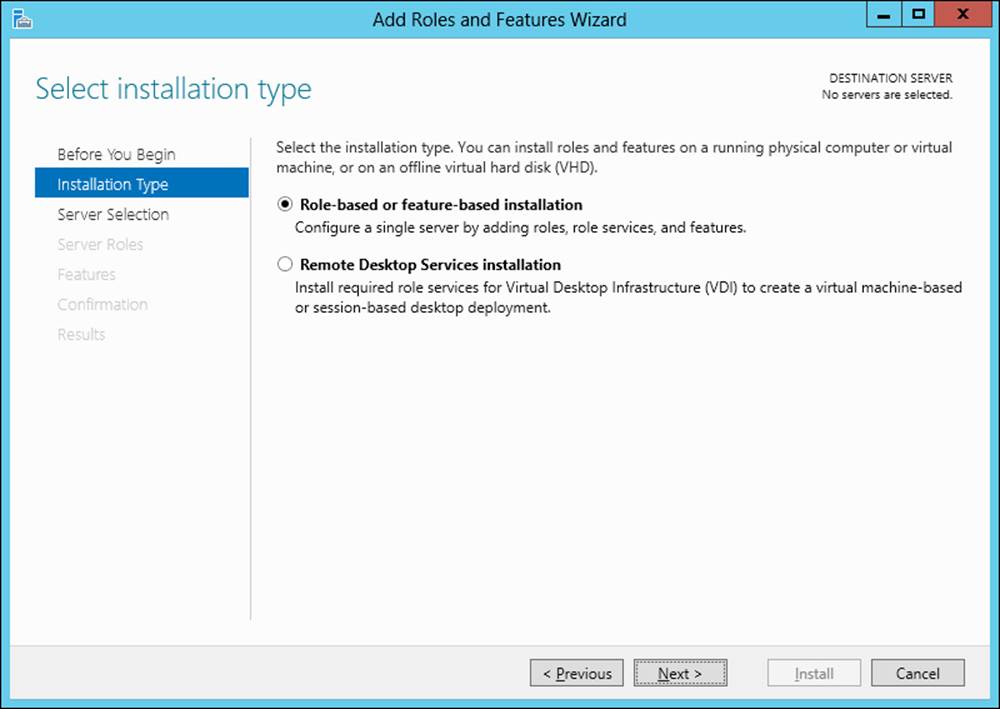
FIGURE 3-18 Windows Server 2012 offers two options for installing roles and features.
Choosing the first option on the Select Installation Type page opens the Select Destination Server page of the wizard (shown in Figure 3-19), which you use to choose a remote server from your server pool on which to install roles and features. Note that this page includes an option for selecting an offline virtual hard disk instead of an online server. In Windows Server 2012, you can install roles and features on offline virtual hard disks, and this capability is described further in Chapter 10, “Implementing Group Policy.”
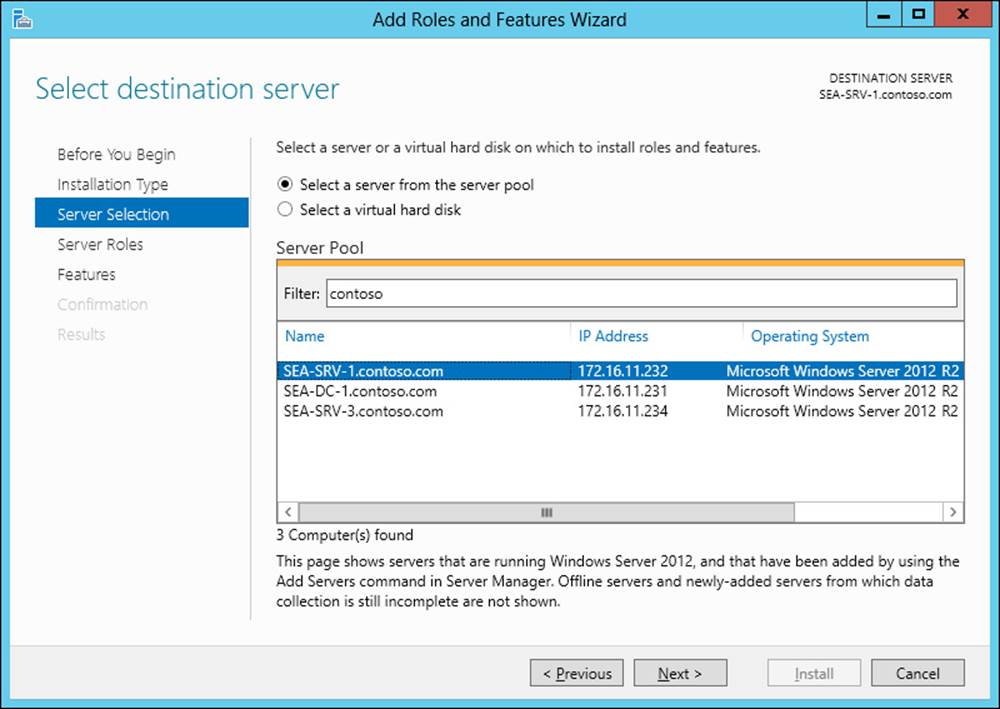
FIGURE 3-19 Select the server on which you want to install roles and features.
On the Select Server Roles page, shown in Figure 3-20, you can choose one or more roles to install on the selected server. When you do this, the wizard might prompt you to install the Remote Server Administration Tools for that role or feature plus any other management tools needed for managing the role or feature.
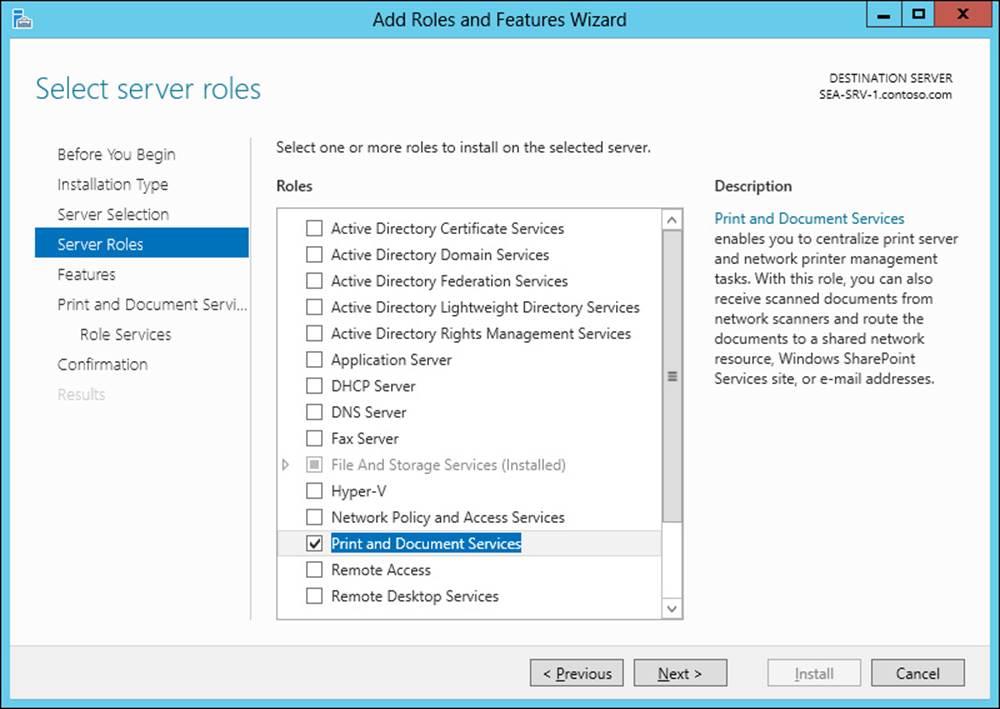
FIGURE 3-20 Select a role to install on the server.
The Select Features Page is next, and you use it to choose features to install on your server. Additional wizard pages might also appear to provide you with additional information or configuration options for the roles and features you decide to install on the server or a list of role services from which to choose for the particular roles you are installing.
When you reach the Confirm Installation Selections page, shown in Figure 3-21, you can select the check box if you want the remote server to be restarted if this is needed to complete installation of the selected roles and features.
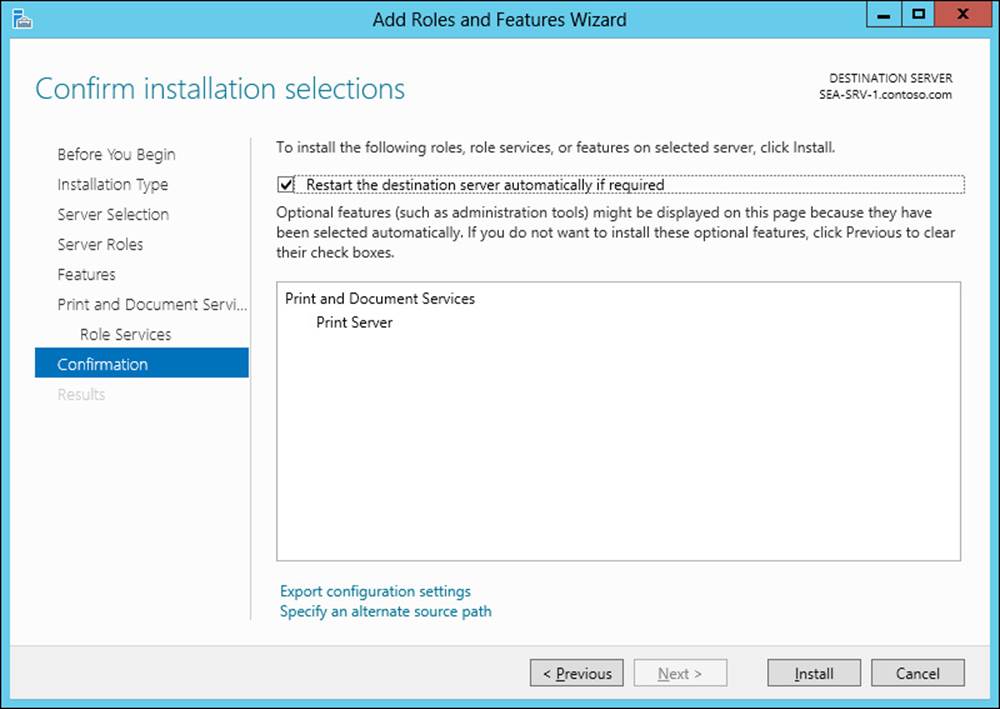
FIGURE 3-21 Confirm your installation selections and choose to restart the destination server if necessary.
At the bottom of the Confirm Installation Selections page shown in Figure 3-21 is a Specify An Alternate Source Path link. Click this link if you previously removed any of the binaries for the roles or features you are installing on the server. Clicking this link opens a Specify Alternate Source Path dialog box for specifying the UNC path to the location where you can find the binaries needed to install the roles or features.
When a new role is installed on the server, a new page for this role is added to Server Manager. For example, Figure 3-22 shows the Print Services page, which appears after the Print And Document Services role has been installed on one or more servers in your server pool. A new tile named Print Services also appears on the Dashboard so that you can monitor events, services, and the performance of your print servers and confirm their manageability.
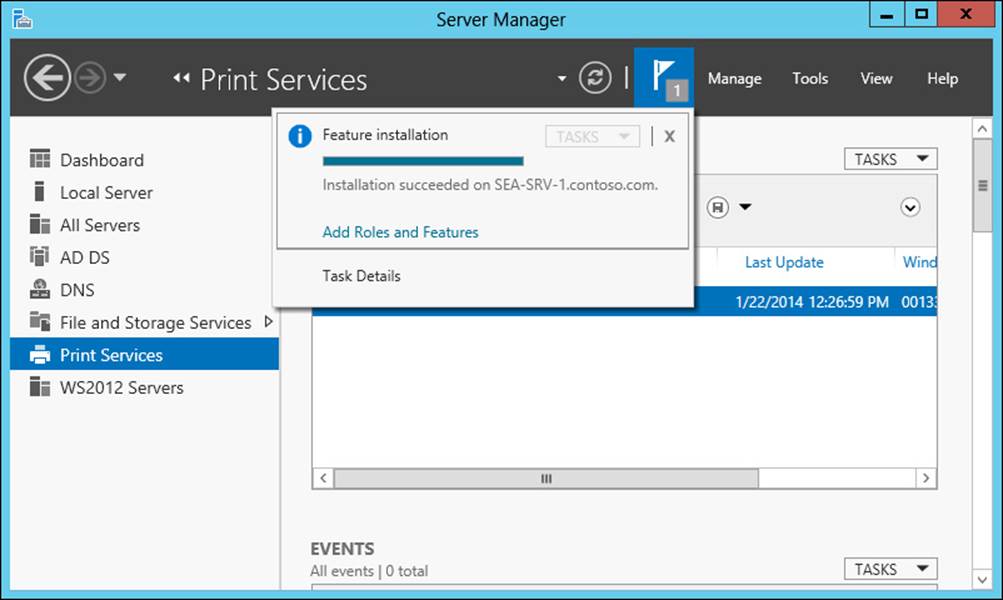
FIGURE 3-22 Each role on a managed server has its associated page in Server Manager.
The Notifications flag in the menu bar of Server Manager in Figure 3-22 indicates that one informational notification has been raised. Clicking this flag provides brief summary information concerning this notification, which indicates that installation of the selected feature has been successful.
![]() Quick check
Quick check
![]() What Group Policy setting can you use to specify an alternate source path for installing features whose binaries have been removed from a server?
What Group Policy setting can you use to specify an alternate source path for installing features whose binaries have been removed from a server?
Quick check answer
![]() Specify Settings For Optional Component Installation And Component Repair, which is found under Computer Configuration\Policies\Administrative Templates\System in Group Policy Editor.
Specify Settings For Optional Component Installation And Component Repair, which is found under Computer Configuration\Policies\Administrative Templates\System in Group Policy Editor.
Installing roles and features using Windows PowerShell
You can also install roles and features on servers running Windows Server 2012 or Windows Server 2012 R2 by using Windows PowerShell commands. This approach can be useful for administrators who work in midsized to large environments that have many servers deployed—for example, in a data center. You can also use Windows PowerShell to install roles and features on offline virtual disks.
You can use the following Server Manager cmdlets for managing roles and features using Windows PowerShell:
![]() Get-WindowsFeature Retrieves information about Windows Server roles, role services, and features that are available
Get-WindowsFeature Retrieves information about Windows Server roles, role services, and features that are available
![]() Install-WindowsFeature Installs one or more Windows Server roles, role services, or features
Install-WindowsFeature Installs one or more Windows Server roles, role services, or features
![]() Uninstall-WindowsFeature Uninstalls and removes specified Windows Server roles, role services, or features
Uninstall-WindowsFeature Uninstalls and removes specified Windows Server roles, role services, or features
Important: Running Server Manager cmdlets
Server Manager cmdlets must be run with elevated permissions.
Retrieving a list of installed roles and features
You can use the Get-WindowsFeature cmdlet to retrieve information about roles, role services, and features available on a remote server. For example, the following command displays a list of all available roles and features and their current install state on server SEA-SRV-1:
Get-WindowsFeature -ComputerName SEA-SRV-1
To display a list of all installed roles and features on the server, pipe the output of the preceding command into the Where-Object cmdlet and use Where-Object to filter out everything except roles and features whose InstallState property is equal to Installed:
Get-WindowsFeature -ComputerName SEA-SRV-1 | Where-Object InstallState -eq Installed
You can narrow your results even further by using the –name parameter of the Get-WindowsFeature cmdlet to select only roles and features that begin with “Print,” like this:
Get-WindowsFeature -Name Print* -ComputerName SEA-SRV-1 | Where-Object InstallState -eq
Installed
The output from running this command against server SEA-SRV-1 verifies that the Print Server role service of the Print And Document Services role is installed:
Display Name Name Install State
------------ ---- -------------
[X] Print and Document Services Print-Services Installed
[X] Print Server Print-Server Installed
Real World: Windows PowerShell 3.0 simplified syntax
One of the improvements introduced in Windows PowerShell 3.0 is the simplification of the syntax for the Where-Object cmdlet. If you are an administrator who already has some familiarity with using Windows PowerShell for managing Windows servers, you might have wondered about the syntax of some of the commands in this section. In particular, you might have wondered why the second example didn’t look like this:
Get-WindowsFeature - ComputerName SEA-SRV-1 | Where-Object {$_.InstallState
-eq Installed}
The reason is because Windows PowerShell 3.0 and later let you eliminate the script block notation (the curly braces), the current object placeholder ($_), and the dot property notation. These improvements make Windows PowerShell code easier to understand.
Installing roles and features
You can use the Install-WindowsFeature cmdlet to install roles, role services, and features available on a remote server. You can also use the alias Add-WindowsFeature to invoke this command. For example, the following command installs the DHCP Server role on server SEA-SRV-1:
Install-WindowsFeature -Name DHCP -ComputerName SEA-SRV-1
The output from running the preceding command looks like this:
Success Restart Needed Exit Code Feature Result
------- -------------- --------- --------------
True No Success {DHCP Server}
To install the DHCP Server role with the management tools for this role, add the –IncludeManagementTools parameter to the preceding command. If a restart is required for the installation of a role or feature to install properly, you can force this to happen by including the –Restartparameter in the command.
To install all of the Remote Server Administration features on this server, use this command:
Install-WindowsFeature -Name RSAT -IncludeAllSubFeature -ComputerName SEA-SRV-1
More Info
For more examples of how to use the Install-WindowsFeature cmdlet, type Get-Help Install-WindowsFeature –examples in the Windows PowerShell console.
Installing roles and features on multiple servers
Although Server Manager can be used to install roles and features only on a single server at a time, you can use Windows PowerShell to install roles and features on multiple servers at the same time. You can do this by using the Invoke-Command cmdlet to run the Install-WindowsFeature command on multiple computers. For example, this command installs the XPS Viewer feature on servers SEA-SRV-1 and SEA-SRV-3:
Invoke-Command -ComputerName SEA-SRV-1,SEA-SRV-3 -ScriptBlock {Install-WindowsFeature
-Name XPS-Viewer}
The output from running the preceding command looks like this:
Success Restart Needed Exit Code Feature Result PSComputerName
------- -------------- --------- -------------- --------------
True No Success {XPS Viewer} SEA-SRV-1
True No Success {XPS Viewer} SEA-SRV-3
Note: Installing and removing roles or features from multiple computers
You can use the Invoke-Command with the Server Manager cmdlets to install or remove roles or features on up to 32 computers at a time. If you specify more than 32 computers, the additional computers will be queued. You can use the –ThrottleLimit parameter to override this behavior.
Installing roles and features for which the payload has been removed
If the binaries for the role or feature you want to install have been removed from the server, you can use the –Source parameter to specify the location of the binaries needed to install the role or feature. If you don’t specify this parameter, the necessary binaries will be downloaded from Windows Update unless this behavior has been disabled using Group Policy. Note that downloading role or feature binaries from Windows Update can take some time.
![]() Quick check
Quick check
![]() What parameter of the Install-WindowsFeature cmdlet should you include if you want to force the targeted server to restart to complete the installation of a role or feature?
What parameter of the Install-WindowsFeature cmdlet should you include if you want to force the targeted server to restart to complete the installation of a role or feature?
Quick check answer
![]() Include the –Restart parameter.
Include the –Restart parameter.
Removing roles and features
You can remove roles and features from a remote server by using either Server Manager or Windows PowerShell:
![]() To remove roles or features by using Server Manager, select Remove Roles And Features from the Manage menu and complete the steps of the Remove Roles And Features Wizard.
To remove roles or features by using Server Manager, select Remove Roles And Features from the Manage menu and complete the steps of the Remove Roles And Features Wizard.
![]() To remove roles or features by using Windows PowerShell, use the Uninstall-WindowsFeature cmdlet or its alias Remove-WindowsFeature. For help on using this cmdlet, type Get-Help Uninstall-WindowsFeature –Detailed at a Windows PowerShell prompt.
To remove roles or features by using Windows PowerShell, use the Uninstall-WindowsFeature cmdlet or its alias Remove-WindowsFeature. For help on using this cmdlet, type Get-Help Uninstall-WindowsFeature –Detailed at a Windows PowerShell prompt.
Lesson summary
![]() If the binaries for roles or features are removed from a server, you can still install the role or feature as long as either Windows Update is available or the needed binaries are made available on your network.
If the binaries for roles or features are removed from a server, you can still install the role or feature as long as either Windows Update is available or the needed binaries are made available on your network.
![]() You can install and remove roles and features by using either Server Manager or Windows PowerShell.
You can install and remove roles and features by using either Server Manager or Windows PowerShell.
![]() If you need to install or remove roles or features from multiple servers at the same time, you can do this by using Windows PowerShell.
If you need to install or remove roles or features from multiple servers at the same time, you can do this by using Windows PowerShell.
Lesson review
Answer the following questions to test your knowledge of the information in this lesson. You can find the answers to these questions and explanations of why each answer choice is correct or incorrect in the “Answers” section at the end of this chapter.
1. Which of the following Windows PowerShell commands will not uninstall the Windows Server Backup feature?
A. Uninstall-WindowsFeature –Name Windows-Server-Backup
B. Remove-WindowsFeature –Name Windows-Server-Backup
C. Get-WindowsFeature –Name *Backup* | Uninstall-WindowsFeature
D. Invoke-Command –ScriptBlock {Delete-WindowsFeature –Name Windows-Server-Backup}
2. What action will the following command perform?
Get-WindowsFeature -Computer SERVER9 | Where-Object InstallState -eq Installed |
Uninstall-WindowsFeature
A. The command will install all available roles and features on the remote server.
B. The command will uninstall all available roles and features on the remote server.
C. The command will uninstall all installed roles and features on the remote server.
D. The command has incorrect syntax and will generate an error.
3. What action will the following command perform?
Add-WindowsFeature -Name Web-Server -IncludeAllSubFeature -ComputerName
SERVER5,SERVER6
A. Because Add-WindowsFeature is an alias for the Install-WindowsFeature cmdlet, this command will install the Web Server (IIS) role on the two remote servers indicated.
B. Because Add-WindowsFeature is an alias for the Install-WindowsFeature cmdlet, this command will install the Web Server (IIS) role and all of its subordinate role services and features on the two remote servers indicated.
C. Because Add-WindowsFeature is an alias for the Install-WindowsFeature cmdlet, this command will install the Web Server (IIS) role, all of its subordinate role services and features, and all applicable management tools for the role and its subordinate role services and features on the two remote servers indicated.
D. The command has incorrect syntax and will generate an error.
4. If the binaries for a feature have been removed from a server, which of the following conditions are likely to prevent the feature from being successfully installed on the server? (Choose all that apply.)
A. Internet connectivity is down, which prevents the needed binaries from being downloaded from Windows Update if no local source for these binaries is present on the network and configured to be used by Server Manager or the Install-WindowsFeature cmdlet.
B. Group Policy has been configured to prevent the needed binaries from being downloaded from Windows Update, and there is no local source for these binaries present on the network and configured to be used by Server Manager or the Install-WindowsFeature cmdlet.
C. Group Policy has been configured to prevent the needed binaries from being downloaded from Windows Update, and a local source for these binaries is present on the network but has been configured incorrectly to be used by Server Manager or the Install-WindowsFeature cmdlet.
D. The server is connected to the Internet, but the Windows Update site is temporarily down, which prevents the needed binaries from being downloaded if no local source for these binaries is present on the network and configured to be used by Server Manager or the Install-WindowsFeature cmdlet.
Lesson 4: Windows PowerShell automation
Automation is essential for managing data-center environments because it simplifies the job of performing and scheduling tasks on multiple servers. Windows PowerShell 2.0, which was introduced with Windows Server 2008 R2, included a feature called background jobs that made it easier to automate server management tasks. Windows PowerShell 3.0, which was included in Windows Server 2012, introduced additional features that made Windows PowerShell a more flexible platform for automating server management. And Windows PowerShell 4.0, which is new in Windows Server 2012 R2, provides even more powerful automation capabilities. This lesson provides an overview of some of the Windows PowerShell features included in Windows Server 2012 and Windows Server 2012 R2 and lists some resources for administrators who are not yet familiar with Windows PowerShell and want to learn more.
After this lesson, you will be able to:
![]() Use the background jobs feature in Windows PowerShell 2.0 and later.
Use the background jobs feature in Windows PowerShell 2.0 and later.
![]() Use some of the automation improvements introduced in Windows PowerShell 3.0 in Windows Server 2012.
Use some of the automation improvements introduced in Windows PowerShell 3.0 in Windows Server 2012.
![]() Use some of the additional automation improvements introduced in Windows PowerShell 4.0 in Windows Server 2012 R2.
Use some of the additional automation improvements introduced in Windows PowerShell 4.0 in Windows Server 2012 R2.
![]() Grow your Windows PowerShell skills with the help of additional resources.
Grow your Windows PowerShell skills with the help of additional resources.
Estimated lesson time: 30 minutes
Background jobs
Windows PowerShell 2.0 introduced a feature called background jobs, which are commands that can run asynchronously in the background. For example, the following command starts a background job that installs the XPS Viewer feature on server SEA-DC-1:
Start-Job -ScriptBlock {Install-WindowsFeature -name XPS-Viewer -ComputerName SEA-DC-1}
The output from this command looks like this:
Id Name PSJobTypeName State HasMoreData Location Command
-- ---- ------------- ----- ----------- -------- -------
4 Job4 BackgroundJob Running True localhost Install-WindowsFeature...
PS C:\Users\Administrator>
Note that once the job is started, it runs in the background and the command prompt returns immediately so that you can run another command.
After a short period of time, you can use the Get-Job cmdlet to verify that the job you started has successfully completed:
Get-Job -Name Job4
The output from this command indicates the state of the job as Completed:
Id Name PSJobTypeName State HasMoreData Location Command
-- ---- ------------- ----- ----------- -------- -------
4 Job4 BackgroundJob Completed True localhost Install-WindowsFeature...
A simpler way to verify that the job has completed is to select the job’s State, like this:
Get-Job -Name Job4 | Select-Object State
State
-----
Completed
Note: The select alias
You can type select as an alias for the Select-Object cmdlet.
If you want to start a background job and also display any output generated by the job’s commands, you can use the Receive-Job cmdlet to accomplish this:
$job = Start-Job -ScriptBlock {Install-WindowsFeature -name XPS-Viewer -ComputerName
SEA-DC-1}
Receive-Job -Job $job
Success Restart Needed Exit Code Feature Result
------- -------------- --------- --------------
True No Success {XPS Viewer}
Scheduled jobs
Windows PowerShell 3.0 introduced the capability of scheduling Windows PowerShell background jobs and managing them either with Windows PowerShell or the Windows Task Scheduler. Like tasks created with Task Scheduler, you can run scheduled jobs on a one-time basis, on a recurrent schedule, or in response to some action or event.
For example, to create a scheduled job that installs the XPS Viewer feature on server SEA-DC-1 at a specific time of the current day, you first use the New-JobTrigger cmdlet to create a job trigger for the scheduled job you’re going to create:
$trigger = New-JobTrigger -Once -At 6:40PM
Then you use the Register-ScheduledJob cmdlet to create the new scheduled job:
Register-ScheduledJob -Name InstallXPS -ScriptBlock {Install-WindowsFeature
-Name XPS-Viewer -ComputerName SEA-DC-1} -Trigger $trigger
The output from the Register-ScheduledJob cmdlet looks like this:
Id Name JobTriggers Command Enabled
-- ---- ----------- ------- -------
1 InstallXPS 1 Install-WindowsFeature -Name XPS-View... True
Figure 3-23 shows the Microsoft\Windows\PowerShell\ScheduledJobs folder in the Task Scheduler after the configured job trigger time has elapsed. The Last Run Result column in the upper-right pane confirms that the job has been successfully executed.
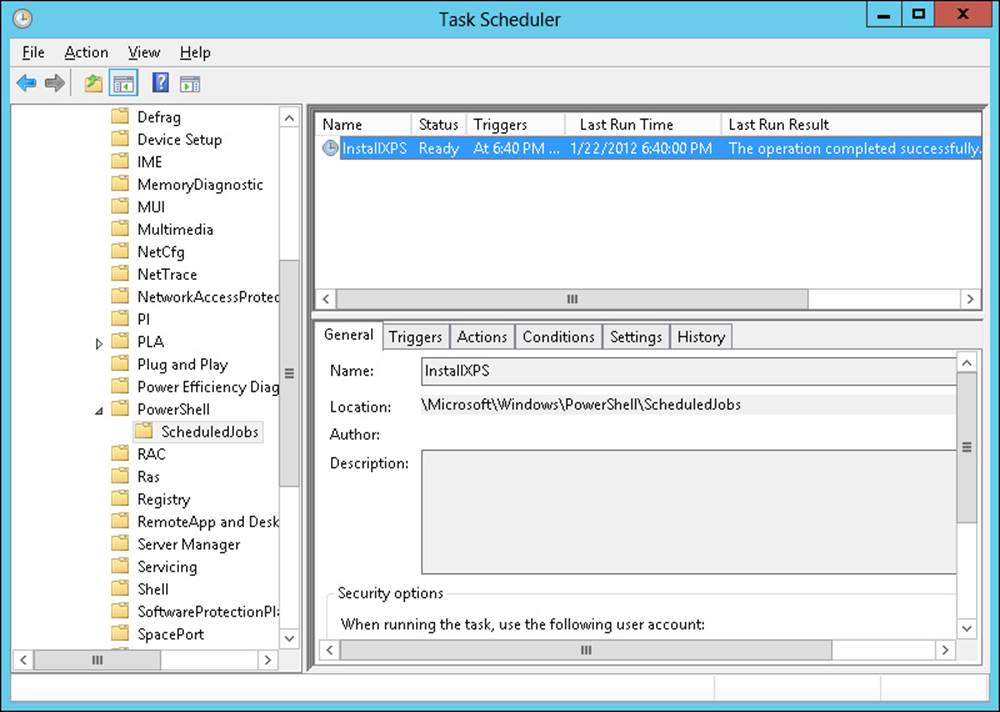
FIGURE 3-23 Use Task Scheduler to confirm the execution of a Windows PowerShell scheduled job.
A new feature of scheduled jobs in Windows PowerShell 4.0 is the –RunNow parameter that enables you to run a scheduled job immediately instead of configuring it to run later.
More Info: Scheduled job cmdlets
For more information about Windows PowerShell scheduled job cmdlets, see http://technet.microsoft.com/en-us/library/hh849778.
Disconnected sessions
In Windows PowerShell 2.0 and earlier, you can use the New-PSSession cmdlet to create a Windows PowerShell session on a remote computer. When you create the new session, Windows PowerShell establishes a persistent connection to the remote computer. These persistent sessions are called PSSessions.
Windows PowerShell 3.0 introduced an enhancement to PSSessions so that any new sessions you create using the New-PSSession cmdlet are saved on the remote computer. Because of this, once you start the remote PSSession you can disconnect from it without disrupting any commands running in the session. You can later reconnect to the remote PSSession from the same computer or a different one.
To illustrate this capability, begin by defining two variables that contain script blocks that start background jobs to install and uninstall the Windows Server Backup feature:
$script = {Start-Job -ScriptBlock {Install-WindowsFeature -Name Windows-Server-Backup}}
$script2 = {Start-Job -ScriptBlock {Uninstall-WindowsFeature
-Name Windows-Server-Backup}}
Note that you haven’t included the –ComputerName parameter for the Install-WindowsFeature or Uninstall-WindowsFeature commands. That’s because you are going to use the New-PSSession cmdlet to create a persistent user-managed session to the remote server on which you want to run these commands—namely, SEA-SRV-1:
$SEASRV1 = New-PSSession -ComputerName SEA-SRV-1
The variable name $SEASRV1 was chosen to make it easy to remember that the PSSession being created will be on the remote computer named SEA-SRV-1.
Now use the Invoke-Command cmdlet to run the first script in the remote session:
Invoke-Command $SEASRV1 $script
Id Name PSJobTypeName State HasMoreData Location Command PSComputerName
-- ---- ------------- ----- ----------- -------- ------- ---
1 Job1 BackgroundJob Running True localhost Install-WindowsFeature... SEA
The output from this command shows that a background job that installs the Windows Server Backup feature is now running on the remote server, so you can use the Disconnect-PSSession cmdlet to disconnect from the remote session while leaving the background job running in it:
Disconnect-PSSession -Name $SEASRV1
At this point, the Get-WindowsFeature cmdlet enables you to confirm that the Windows Server Backup feature has been successfully installed on SEA-SRV-1:
Get-WindowsFeature -Name Windows-Server-Backup -ComputerName SEA-SRV-1
Display Name Name Install State
------------ ---- -------------
[X] Windows Server Backup Windows-Server-Backup Installed
Next, uninstall the feature on the remote server. You begin by using the Connect-PSSession cmdlet to reconnect to the remote session, which is still running on SEA-SRV-1:
Connect-PSSession -Name $SEASRV1
You then use Invoke-Command again, this time to remove the feature from the remote server:
Invoke-Command $SEASRV1 $script2
By using Get-WindowsFeature again, you can confirm that the feature has been successfully removed from the remote computer.
Finally, because you’re now finished managing the remote server, you pipe the output of the Get-PSSession cmdlet, which gets all PSSessions that were created during the current session, into the Remove-PSSession cmdlet, which closes the PSSessions:
Get-PSSession | Remove-PSSession
More Info: cmdlets
For more information about the cmdlets in this section, see http://technet.microsoft.com/en-us/library/hh849695.
![]() Quick check
Quick check
![]() What cmdlet should you use to get all the Windows PowerShell sessions on the local and remote computers?
What cmdlet should you use to get all the Windows PowerShell sessions on the local and remote computers?
Quick check answer
![]() Use the Get-PSSession cmdlet.
Use the Get-PSSession cmdlet.
Desired State Configuration
Probably the biggest new feature in Windows PowerShell 4.0 is Desired State Configuration (DSC), which is designed to enable you to specify what software should be installed on a server and how that software should be configured. DSC is still a work in progress, however, and its real power is likely to be unleashed in the next version of Windows Server.
DSC works as follows. You start by creating a Windows PowerShell script block that defines the desired configuration for the target server. The script block begins with the keyword Configuration followed by an identifier, and the rest of the script block is contained within braces, like this:
Configuration MyServers
{
...
}
Inside the configuration block, you include one or more node blocks that define the desired configuration for each node (server) in your environment. Node blocks start with the keyword Node followed by an identifier and braces:
Configuration MyServers
{
Node "SEA-SRV-1"
{
...
}
Node "SEA-SRV-2"
{
...
}
...
}
Inside each node block, you then define resource blocks that configure specific resources on the node. These resources can include server features, configuration settings, files and folders, registry keys, and more. Resource blocks start with the name of the resource followed by an identifier and braces:
Configuration MyServers
{
Node "SEA-SRV-1"
{
WindowsFeature MyServerFeatures
{
Name = "Windows-Server-Backup"
Ensure = "Present"
}
}
Node "SEA-SRV-2"
{
File MyServerFiles
{
Type = "Directory"
Ensure = "Present"
DestinationPath = "C:\Scripts"
}
}
...
}
In the above example, the configuration block is designed to ensure that server SEA-SRV-1 has the Windows Server Backup feature installed and that a folder named Scripts is present in the root of C drive on server SEA-SRV-2. To invoke this configuration block, you just invoke it by name, like this:
PS C:\> MyServers
Invoking the configuration creates Microsoft Operations Framework (MOF) files that contain the configuration information for the target nodes. The MOF files are then saved in a new child directory of the current directory. The new child directory will have the same name as the configuration block (MyServers in this example).
Once the MOF files have been created, you can enact this configuration by running the following command:
Start-DscConfiguration -Wait -Verbose -Path .\MyServers
The –Wait parameter causes the command to run interactively. If you omit this parameter, the command creates and returns a job instead.
More Info
For more information on DSC, see http://technet.microsoft.com/en-us/library/dn249912.aspx.
Resources for learning Windows PowerShell
If you’re new to Windows PowerShell, you can use its built-in help resources to learn about different cmdlets. There are also a number of helpful books you can learn from.
Using Windows PowerShell help
You can use the Get-Help cmdlet to display the syntax for other cmdlets and examples of how to use those cmdlets. For example, to display basic help for the Connect-PSSession cmdlet, use this command:
Get-Help Connect-PSSession
To show detailed help, use this command:
Get-Help Connect-PSSession -detailed
To show some examples of how to use Connect-PSSession, use this command:
Get-Help Connect-PSSession -examples
To show detailed help and examples, use this command:
Get-Help Connect-PSSession -full
Updatable help
Windows PowerShell 3.0 introduced the capability of downloading updated help files for the cmdlets in Windows PowerShell modules. To download the latest help files, use this command:
Update-Help
You can also use this cmdlet to download updated help files to a shared folder on your network so that you can install them on your servers without needing to allow those servers to connect to the Internet. To learn how to use the Update-Help cmdlet, use this command:
Get-Help Update-Help
Enhanced online help
Windows PowerShell 3.0 also introduced the ability to display the online version of the help for a cmdlet in your default Internet browser. To do this, include the –Online parameter with the Get-Help cmdlet, like this:
Get-Help Connect-PSSession -Online
Save-Help improvements
Windows PowerShell 3.0 introduced a cmdlet called Save-Help that you could use to download and save help content to your local computer. This made it somewhat easier to distribute help content for Windows PowerShell modules because instead of having to download the content to all your servers or workstations, you could just share the folder containing the content on your local machine. The catch, however, was that the Save-Help cmdlet could only download content for Windows PowerShell modules that are installed on the local machine. If you needed to distribute content for a module that wasn’t installed on the local machine, you needed to download it from a server or client computer that already has that module installed and then copy it to your shared folder.
To make downloading and distributing help content easier, Windows PowerShell 4.0 enables you to save help content for modules that are installed on remote computers so you can copy them to your local computer even if your local computer doesn’t have Internet connectivity.
For example, let’s say that a server named SEA-SRV-8 has a Server Core installation of Windows Server 2012 R2 installed. Windows PowerShell 4.0 has a new module called ServerCore that includes two cmdlets not previously available in earlier Windows Server versions:
![]() Get-DisplayResolution Shows the current display resolution for a Server Core server
Get-DisplayResolution Shows the current display resolution for a Server Core server
![]() Set-DisplayResolution Changes the display resolution for a Server Core server
Set-DisplayResolution Changes the display resolution for a Server Core server
You can verify this by using the Get-Command cmdlet on any Windows Server 2012 R2 installation, like this:
PS C:\> Get-Command -Module ServerCore
CommandType Name ModuleName
----------- ---- ----------
Function Get-DisplayResolution ServerCore
Function Set-DisplayResolution ServerCore
Now, let’s say you want to install the help content for these commands on your local machine by copying the content from the remote server SEA-SRV-8. To do this from your local machine, first use the New-PSSession cmdlet to create a persistent connection to the remote server and assign it to a variable, like this:
$a = New-PSSession -computer SEA-SRV-8
Next, use the Get-Module cmdlet to get the ServerCore module from the remote server and assign it to another variable:
$b = Get-Module ServerCore -PSSession $a -ListAvailable
Finally, use the Save-Help cmdlet to copy the help for the ServerCore module from the remote server to a folder on your local machine:
Save-Help -Module $b -DestinationPath C:\PShelp
Recommended books
The following are some books that Windows PowerShell experts at Microsoft have recommended. These are listed in order, starting with books for beginners and ending with books for advanced users:
![]() Learn Windows PowerShell 3 in a Month of Lunches, by Don Jones (Manning Publications, 2012)
Learn Windows PowerShell 3 in a Month of Lunches, by Don Jones (Manning Publications, 2012)
![]() Windows PowerShell 3.0 First Steps, by Ed Wilson (Microsoft Press, 2014)
Windows PowerShell 3.0 First Steps, by Ed Wilson (Microsoft Press, 2014)
![]() Windows PowerShell Cookbook, 3rd Edition, by Lee Holmes (O’Reilly Media, 2013)
Windows PowerShell Cookbook, 3rd Edition, by Lee Holmes (O’Reilly Media, 2013)
![]() PowerShell in Depth: An Administrator’s Guide by Don Jones (Manning Publications, 2013)
PowerShell in Depth: An Administrator’s Guide by Don Jones (Manning Publications, 2013)
More recommendations for learning about Windows PowerShell can be found in the Windows PowerShell Survival Guide in the TechNet Wiki at http://social.technet.microsoft.com/wiki/contents/articles/183.windows-powershell-survival-guide-en-us.aspx.
Lesson summary
![]() You can run Windows PowerShell background jobs asynchronously in the background to execute commands and scripts on remote servers.
You can run Windows PowerShell background jobs asynchronously in the background to execute commands and scripts on remote servers.
![]() You can use Windows PowerShell scheduled jobs to schedule PowerShell execution of commands and scripts on remote servers.
You can use Windows PowerShell scheduled jobs to schedule PowerShell execution of commands and scripts on remote servers.
![]() You can disconnect from a Windows PowerShell session running on a remote server and allow the commands and scripts in the session to continue to execute.
You can disconnect from a Windows PowerShell session running on a remote server and allow the commands and scripts in the session to continue to execute.
![]() You can reconnect to a disconnected Windows PowerShell session on a remote server.
You can reconnect to a disconnected Windows PowerShell session on a remote server.
![]() You can download updated help files for the cmdlets in Windows PowerShell modules.
You can download updated help files for the cmdlets in Windows PowerShell modules.
Lesson review
Answer the following questions to test your knowledge of the information in this lesson. You can find the answers to these questions and explanations of why each answer choice is correct or incorrect in the “Answers” section at the end of this chapter.
1. Which of the following statements is not true about background jobs?
A. You can view them by using the Get-ScheduledJob cmdlet.
B. You can create them by using the Start-Job cmdlet.
C. You can temporarily stop them by using the Suspend-Job cmdlet.
D. You can delete them by using the Remove-Job cmdlet.
2. What action will typing the command New-JobTrigger –Daily –At “4:15 AM” –DaysInterval 3 perform when it is run?
A. It creates a new scheduled job that runs daily at 4:15 A.M. on the third day of each week.
B. It creates a new scheduled job that runs daily at 4:15 A.M. every third day.
C. It creates a new job trigger that can be used to run a scheduled job daily at 4:15 A.M. on the third day of each week.
D. It creates a new job trigger that can be used to run a scheduled job daily at 4:15 A.M. every third day.
3. What two cmdlets would you use to create a scheduled job?
A. New-Job and New-JobTrigger
B. New-Job and New-ScheduledJob
C. New-JobTrigger and New-ScheduledJob
D. New-JobTrigger and Register-ScheduledJob
4. Which of the following is not true concerning PSSessions in Windows PowerShell 3.0?
A. Any new sessions you create using the New-PSSession cmdlet are saved on the remote computer.
B. Once you start the remote PSSession, you can disconnect from it using the Disconnect-PSSession cmdlet without disrupting any commands running in the session.
C. You can later reconnect to a disconnected remote PSSession from the same or a different computer using the Connect-PSSession cmdlet.
D. You should use PSSessions only when you need to run a single command on a remote server, not multiple commands that share data such as a function or the value of a variable.
Practice exercises
The goal of this section is to provide you with hands-on practice with the following:
![]() Installing roles and features
Installing roles and features
![]() Managing alerts with the Dashboard
Managing alerts with the Dashboard
![]() Scheduling tasks using Windows PowerShell jobs
Scheduling tasks using Windows PowerShell jobs
To perform the exercises in this section, you need at least one clean installation of Windows Server 2012 R2 using the Server With A GUI installation option. The server should be a stand-alone server belonging to a workgroup, have Internet connectivity, and have no additional roles or features installed. You should be logged on interactively to the server using a user account that is a member of the local Administrators group but that is not the default Administrator account. For the purpose of these exercises, the name of the server is assumed to be SERVER1.
Exercise 1: Installing roles and features
In this exercise, you use both Server Manager and Windows PowerShell to install and remove roles and features from a server.
1. Open a Windows PowerShell console with administrative privileges using the Run As Administrator option.
2. Pipe the output of Get-WindowsFeature into Where-Object to display a list of currently installed roles and features. Note any roles and features that are installed by default on a clean installation using the Server With A GUI installation option.
3. Start Server Manager, switch to the All Servers page, and scroll down to the Roles And Features tile. Compare what you see in that tile with the output of the command in step 2.
4. Use Server Manager to launch the Add Roles And Features Wizard and install the DHCP Server role on the server, including the administration tools for this role.
5. Click the Notifications flag on the menu bar of the Dashboard to confirm that the feature installed successfully.
6. Run the command Get-WindowsFeature –Name *DHCP* to verify that both the DHCP Server role and DHCP Server Tools feature are now installed.
7. Pipe the output of the previous command into Uninstall-WindowsFeature to uninstall both the DHCP Server role and DHCP Server Tools feature from the server.
8. Notice the warning message that says you must restart the server to finish the removal process. Do not restart the server yet.
9. Run the command Get-WindowsFeature –Name *DHCP* again and examine the Install State of the DHCP Server role and DHCP Server Tools feature.
10. Use the Shutdown command to restart the server.
11. When you log on again, use the command Get-WindowsFeature –Name *DHCP* again and note the Install State of the DHCP Server role and DHCP Server Tools feature.
12. Disconnect your server from the Internet.
13. Launch the Add Roles And Features Wizard again and select .NET Framework 3.5 Features on the Select Features page.
14. Note the yellow warning message on the Confirm Installation Selections page and click Install.
15. Note the error message. The installation of this feature failed because the binaries for .NET Framework 3.5 (which includes .NET Framework 2.0 and .NET Framework 3.0) are not included in a Windows Server 2012 R2 installation and must either be downloaded from Windows Update or made available on your network. Read http://technet.microsoft.com/en-us/library/hh831809#BKMK_FoD for more information.
16. Close the Add Roles And Features Wizard and reconnect your server to the Internet.
Exercise 2: Managing alerts with the Dashboard
In this exercise, you configure and raise alerts on the Dashboard of Server Manager.
1. Open Server Manager and select the Dashboard page.
2. Click the Notifications flag on the menu bar at the top to display any error, warning, or information alerts that have been raised. Read the alerts and dismiss them by clicking Remove Task (the X button) at the upper right of each alert.
3. Switch to the All Servers page and review the events listed in the Events tile.
4. Click the Tasks control in the Events tile and configure the tile to display only Error events that occurred in the System event log during the last six hours.
5. Configure the Events tile again to display only Warning events that occurred in all event logs during the last six hours.
6. Filter the list of events by entering the event ID of one of the listed events into the Filter text box.
7. Click the right-side Query control, type a descriptive name for your query, and save your query.
8. Clear the filter you applied in step 6.
9. Click the left Query control and select your previously saved query.
10. Delete your saved query and clear the filter again.
11. Sort the list of services in the Service tile by Display Name.
12. Verify that the Print Spooler service is running and then right-click the service and stop it.
13. Switch to the Dashboard page and note the alert raised for the Services thumbnail in the Local Server tile.
14. Click on this alert, restart the Print Spooler service, and note that the alert previously raised has been removed.
15. Click on the Services thumbnail in the Local Server tile and configure the tile so that a stopped service will not raise an alert.
16. Return to the All Servers page and use the Services tile to stop the Print Spooler service again.
17. Return to the Dashboard and note that this time no alert has been raised in the Services tile.
18. Return to the All Servers page and restart the Print Spooler service.
Exercise 3: Scheduling tasks using Windows PowerShell jobs
In this exercise, you create a Windows PowerShell scheduled job to install a role on the server.
1. Run the Get-ScheduledJob command and verify that there are currently no Windows PowerShell scheduled jobs on the server.
2. Run the following command to create a new job trigger that will cause a scheduled job to run the next time the user logs on:
$trigger = New-JobTrigger -AtLogon -RandomDelay 00:01:00
3. Find out what the –RandomDelay parameter does in the preceding command by reviewing the syntax of the New-JobTrigger cmdlet at http://technet.microsoft.com/en-us/library/hh849759.
4. Run the following command to create a scheduled job that will install all role services of the Web Server (IIS) role when the trigger condition you created in step 2 occurs:
Register-ScheduledJob -Name MyJob -ScriptBlock {Install-WindowsFeature
-Name Web-Server -IncludeAllSubFeature -IncludeManagementTools}
-Trigger $trigger
5. Run the Get-JobTrigger MyJob command to display the trigger condition for the scheduled job you created in step 4.
6. Use the Tools menu of Server Manager to open Task Scheduler to verify the creation of the Windows PowerShell scheduled job you created and examine its properties. Then answer the following question:
Question: What would happen if you right-clicked MyJob in Task Scheduler and selected Run?
Answer: The job MyJob would run immediately to install the Web Server (IIS) role with all its role services on the server.
7. Close Task Scheduler and return to the Windows PowerShell console.
8. Log off the server and then log on again.
9. Open an elevated Windows PowerShell console and repeatedly run the command Get-Job | Select-Object State until the output shows Running, indicating that the scheduled job has begun to execute. (Hint: Press the Up arrow key followed by Enter to rerun the command without having to retype it.)
10. Continue running the command Get-Job | Select-Object State until the output shows Completed, indicating that the scheduled job has finished.
11. Run the command Get-WindowsFeature –Name *Web* and view the Install State of all role services and features associated with the Web Server (IIS) role.
12. Use Windows PowerShell to uninstall the Web Server (IIS) role and all role services and features associated with it, including the applicable management tools.
Suggested practice exercises
The following additional practice exercises are designed to give you more opportunities to practice what you’ve learned and to help you successfully master the lessons presented in this chapter.
![]() Exercise 1 If you have a domain controller available, join your two Windows Server 2012 R2 servers to the domain and try using the commands in the section “Disconnected sessions” in Lesson 4 to install the Windows Server Backup feature on SERVER2 by running Windows PowerShell commands on SERVER1.
Exercise 1 If you have a domain controller available, join your two Windows Server 2012 R2 servers to the domain and try using the commands in the section “Disconnected sessions” in Lesson 4 to install the Windows Server Backup feature on SERVER2 by running Windows PowerShell commands on SERVER1.
![]() Exercise 2 If you don’t have a domain controller available, try using the information found in the section “Add and manage servers in workgroups” at http://technet.microsoft.com/en-us/library/hh831453 to use Server Manager on SERVER1 to add SERVER2 to the server pool.
Exercise 2 If you don’t have a domain controller available, try using the information found in the section “Add and manage servers in workgroups” at http://technet.microsoft.com/en-us/library/hh831453 to use Server Manager on SERVER1 to add SERVER2 to the server pool.
![]() Exercise 3 If you have a server running Windows Server 2008 or Windows Server 2008 R2 available, try enabling remote management on that server using the information found at http://technet.microsoft.com/en-us/library/hh921475 and then use Server Manager on SERVER1 to add the down-level server to the server pool.
Exercise 3 If you have a server running Windows Server 2008 or Windows Server 2008 R2 available, try enabling remote management on that server using the information found at http://technet.microsoft.com/en-us/library/hh921475 and then use Server Manager on SERVER1 to add the down-level server to the server pool.
![]() Exercise 4 Create a configuration block that ensures a role or feature is installed on your local server and then invoke the configuration by using the Start-DscConfiguration cmdlet.
Exercise 4 Create a configuration block that ensures a role or feature is installed on your local server and then invoke the configuration by using the Start-DscConfiguration cmdlet.
Answers
This section contains the answers to the lesson review questions in this chapter.
Lesson 1
1. Correct answers: B, C, and D
A. Incorrect: The Print Services page will be available in Server Manager as long as at least one of your print servers has been added to your server pool, even if all your print servers are currently offline.
B. Correct: At least one server must be running the Print And Document Services role, and the server must have been added to your server pool for the Print Services page to be available in Server Manager.
C. Correct: At least one server running the Print And Document Services role must be present in your server pool for the Print Services page to be available in Server Manager.
D. Correct: At least one server running the Print And Document Services role must be present in your server pool for the Print Services page to be available in Server Manager, and servers running an earlier version of Windows Server must be configured for remote management before they can be added to the server pool.
2. Correct answers: B and D
A. Incorrect: The Dashboard is used to display alerts and does not indicate whether remote management is enabled on the server.
B. Correct: If the Remote Management setting on the Local Server page displays Enabled, remote management is enabled on the server.
C. Incorrect: The All Servers page is used to add servers to the server pool, create server groups, configure event data, and perform other tasks, but it does not indicate whether remote management is enabled on the server.
D. Correct: The output of this command indicates whether remote management is enabled on the server.
3. Correct answer: B
A. Incorrect: Remote Server Administration Tools for Windows 8.1 includes tools for managing roles and features that run on Windows Server 2012 R2 and Windows Server 2012. In limited cases, you also can use the tools to manage roles and features that are running on Windows Server 2008 R2 or Windows Server 2008. So you won’t be able to manage all roles and features on servers running Windows Server 2008 R2.
B. Correct: Remote Server Administration Tools for Windows 8.1 includes tools for managing roles and features that run on Windows Server 2012 R2 and Windows Server 2012. In limited cases, you also can use the tools to manage roles and features that are running on Windows Server 2008 R2 or Windows Server 2008. So you will be able to manage some roles and features on servers running Windows Server 2008 R2.
C. Incorrect: Remote Server Administration Tools for Windows 8.1 includes tools for managing roles and features that run on Windows Server 2012 R2 and Windows Server 2012. In limited cases, you also can use the tools to manage roles and features that are running on Windows Server 2008 R2 or Windows Server 2008. So you can manage some roles and features on servers running Windows Server 2008 R2.
D. Incorrect: Remote Server Administration Tools for Windows 8.1 must be installed on Windows 8.1 and cannot be installed on earlier Windows versions.
Lesson 2
1. Correct answer: D
A. Incorrect: To add a server to a server group, the server must first be present in your server pool. Because the two servers are not present in the server pool, this action cannot be performed.
B. Incorrect: There is only one server pool, and it represents all the servers that are currently being managed using Server Manager. You cannot create an additional server pool, so this action cannot be performed.
C. Incorrect: To add a server to a server group, the server must first be present in your server pool. Because the two servers are not present in the server pool, this action cannot be performed.
D. Correct: Servers must be added to your server pool before you can manage them using Server Manager. Find the servers by querying Active Directory or your DNS servers or by importing their names in a text file and then add them to your server pool.
2. Correct answers: B
A. Incorrect: Server groups cannot be used to assign privileges. They are simply a means of logically grouping managed servers in your environment.
B. Correct: By creating different server groups for the different geographical locations of your organization, you can facilitate server management by making it easy to determine what servers are located where.
C. Incorrect: Server groups cannot be used to delegate permissions. They are simply a means of logically grouping managed servers in your environment.
D. Incorrect: Server groups cannot be nested.
3. Correct answers: A and C
A. Correct: Performance counters must be started on a server before performance data can be collected from that server.
B. Incorrect: When performance counters have been started on a server, performance data will be collected. It might take several minutes until that data is displayed. After three hours have elapsed, however, you should certainly see some performance data displayed in graph form.
C. Correct: The refresh period for Server Manager can be configured in minutes from 1 minute to 14,400 minutes (10 days). If you configure the refresh period to be more than three hours, the Dashboard display will not change until a refresh occurs and you won’t see any new alerts raised until it refreshes.
D. Incorrect: Server groups are simply a means of logically grouping managed servers in your environment. They have no effect on any configuration you perform on the All Servers page.
4. Correct answer: D
A. Incorrect: One or more running services can be stopped by right-clicking them in a Services tile and selecting Stop Services.
B. Incorrect: One or more running services can be paused by right-clicking them in a Services tile and selecting Pause Services as long as their Startup Type is Manual.
C. Incorrect: One or more stopped services can be started by right-clicking them in a Services tile and selecting Start Services as long as their Startup Type is not Disabled.
D. Correct: You cannot change the Startup Type of services from a Services tile. To do this, you can use the Services MMC console, which you can launch from the Tools menu of Server Manager.
Lesson 3
1. Correct answer: D
A. Incorrect: You can use the Uninstall-WindowsFeature cmdlet to uninstall features.
B. Incorrect: Remove-WindowsFeature is an alias for the Uninstall-WindowsFeature cmdlet added for backward compatibility, and you can use it to uninstall features.
C. Incorrect: Piping the output of the Get-WindowsFeature cmdlet into Uninstall-WindowsFeature like this will uninstall all features that match the wildcard *Backup*.
D. Correct: Delete-WindowsFeature is not a Windows PowerShell cmdlet or standard alias, but if you change Delete to Uninstall, this command will work.
2. Correct answer: C
A. Incorrect: The final command in the pipeline is Uninstall-WindowsFeature, which uninstalls features, not installs them.
B. Incorrect: If a role or feature is available, it can be installed, not uninstalled.
C. Correct: Typing the command Get-WindowsFeature –Computer SERVER9 | Where-Object InstallState –eq Installed will get all roles and features that are currently installed on the remote server. Piping the output of this command into the Uninstall-WindowsFeature cmdlet will then uninstall all installed roles and features on the server
D. Incorrect: The syntax is valid; see answer C for the explanation.
3. Correct answer: B
A. Incorrect: The presence of the –IncludeAllSubFeature parameter in this command indicates that the command will install not only the Web Server (IIS) feature but also all of its subordinate role services and features.
B. Correct: The presence of the –IncludeAllSubFeature parameter in this command indicates that the command will install the Web Server (IIS) feature and all of its subordinate role services and features.
C. Incorrect: The absence of the –IncludeManagementTools parameter in this command indicates that the command will install the Web Server (IIS) feature and all of its subordinate role services and features but none of the applicable management tools for the role and its subordinate role services and features.
D. Incorrect: The syntax is valid; see answer B for the explanation.
4. Correct answers: A, B, and C
A. Correct: If no local source for these binaries is present on the network and configured to be used by Server Manager or the Install-WindowsFeature cmdlet, and if Group Policy has not been configured to prevent the needed binaries from being downloaded from Windows Update, Windows will attempt to download the needed binaries from Windows Update unless Internet connectivity is down, in which case the install will fail.
B. Correct: If Group Policy has been configured to prevent the needed binaries from being downloaded from Windows Update, and if there is no local source for these binaries present on the network and configured to be used by Server Manager or the Install-WindowsFeature cmdlet, the binaries for installing the role are not available and the install will fail.
C. Correct: If Group Policy has been configured to prevent the needed binaries from being downloaded from Windows Update, and if a local source for these binaries is present on the network but has been configured incorrectly to be used by Server Manager or the Install-WindowsFeature cmdlet, the binaries for installing the role cannot be used to install the feature.
D. Incorrect: This scenario is possible but very unlikely because Microsoft tries to ensure that Windows Update is always available.
Lesson 4
1. Correct answer: A
A. Correct: The Get-ScheduledJob cmdlet can be used to manage only scheduled jobs, not manually started background jobs.
B. Incorrect: The Start-Job cmdlet can be used to start background jobs.
C. Incorrect: The Suspend-Job cmdlet can be used to pause background jobs.
D. Incorrect: The Remove-Job cmdlet can be used to delete background jobs.
2. Correct answer: D
A. Incorrect: The New-JobTrigger cmdlet is used to create job triggers, not scheduled jobs.
B. Incorrect: The New-JobTrigger cmdlet is used to create job triggers, not scheduled jobs.
C. Incorrect: The –DaysInterval parameter specifies the number of days between occurrences on a daily schedule, not on a weekly schedule.
D. Correct: The –DaysInterval parameter specifies the number of days between occurrences on a daily schedule. See http://technet.microsoft.com/en-us/library/hh849759.
3. Correct answer: D
A. Incorrect: The New-JobTrigger cmdlet is needed to create a job trigger for your scheduled job, but the New-Job cmdlet can be used to create only background jobs, not scheduled jobs.
B. Incorrect: The New-Job cmdlet can be used to create only background jobs, not scheduled jobs; however, New-ScheduledJob is not a valid Windows PowerShell cmdlet. See http://technet.microsoft.com/en-us/library/hh849778.
C. Incorrect: The New-JobTrigger cmdlet is needed to create a job trigger for your scheduled job, but New-ScheduledJob is not a valid Windows PowerShell cmdlet. See http://technet.microsoft.com/en-us/library/hh849778.
D. Correct: The New-JobTrigger cmdlet is needed to create a job trigger for your scheduled job, and the Register-ScheduledJob cmdlet is then used to create the scheduled job and associate it with the job trigger.
4. Correct answer: D
A. Incorrect: In Windows PowerShell 3.0, any new sessions you create using the New-PSSession cmdlet are saved on the remote computer.
B. Incorrect: You use the Disconnect-PSSession cmdlet to disconnect from a remote PSSession without disrupting any commands running in the session.
C. Incorrect: You use the Connect-PSSession cmdlet to reconnect to a disconnected remote PSSession from the same computer or a different one.
D. Correct: PSSessions can be used to run multiple commands that share data, such as a function or the value of a variable.