Training Guide Installing and Configuring Windows Server 2012 R2 (2014)
Chapter 5. Active Directory administration
The day-to-day job of Active Directory administration involves such tasks as creating, configuring, maintaining, monitoring, and deleting user accounts, groups, computer accounts, and other directory objects. In addition, there are some tasks that need to be performed only infrequently or perhaps only once, such as creating a forest and its various domains; raising forest and domain functional levels; creating hierarchies of organizational units (OUs); delegating administrative control over OUs and the objects they contain; creating and configuring sites, site links, and subjects; and so on.
This chapter demonstrates the capabilities of the two primary tools used for administering Active Directory environments based on Windows Server 2012 or Windows Server 2012 R2. One of these tools is the Active Directory Administrative Center (ADAC), a GUI-based tool intended for tasks that need to be performed only occasionally, for the administration of smaller environments, and for use by administrators who are unfamiliar with command-line scripting. The other tool is the Active Directory module for Windows PowerShell, which enables administrators of large environments, such as data centers, to script Active Directory administration tasks for automation purposes.
Lessons in this chapter:
![]() Lesson 1: Administering Active Directory objects using ADAC
Lesson 1: Administering Active Directory objects using ADAC
![]() Lesson 2: Enabling advanced features using ADAC
Lesson 2: Enabling advanced features using ADAC
![]() Lesson 3: Administering Active Directory using Windows PowerShell
Lesson 3: Administering Active Directory using Windows PowerShell
Before you begin
To complete the practice exercises in this chapter
![]() You need at least one server that has a clean install of Windows Server 2012 R2 and is configured as a domain controller. The server can be either a physical server or a virtual machine, and its TCP/IP settings should be configured to provide connectivity with the Internet.
You need at least one server that has a clean install of Windows Server 2012 R2 and is configured as a domain controller. The server can be either a physical server or a virtual machine, and its TCP/IP settings should be configured to provide connectivity with the Internet.
![]() You should know how to use tools like the Active Directory Users And Computers MMC snap-in to perform common Active Directory administration tasks such as creating users, groups, and organizational units in Active Directory environments based on previous versions of Windows Server.
You should know how to use tools like the Active Directory Users And Computers MMC snap-in to perform common Active Directory administration tasks such as creating users, groups, and organizational units in Active Directory environments based on previous versions of Windows Server.
![]() You also should have at least rudimentary knowledge of using Windows PowerShell.
You also should have at least rudimentary knowledge of using Windows PowerShell.
Lesson 1: Administering Active Directory objects using ADAC
Active Directory Administrative Center (ADAC) is the primary tool for performing day-to-day tasks in the administration of an Active Directory environment. This lesson provides an overview of the ADAC user-interface features and demonstrates how to locate and manage directory objects using ADAC.
After this lesson, you will be able to:
![]() Describe the user-interface features of ADAC.
Describe the user-interface features of ADAC.
![]() Use ADAC to locate Active Directory objects so that you can administer them.
Use ADAC to locate Active Directory objects so that you can administer them.
![]() Create and configure users, groups, computers, organizational units, and other directory objects.
Create and configure users, groups, computers, organizational units, and other directory objects.
![]() Perform additional Active Directory management tasks using ADAC.
Perform additional Active Directory management tasks using ADAC.
![]() Identify some Active Directory management tasks that cannot be performed using ADAC.
Identify some Active Directory management tasks that cannot be performed using ADAC.
Estimated lesson time: 30 minutes
Overview of ADAC
ADAC was first introduced in Windows Server 2008 R2 as a tool for managing directory objects, such as users, groups, computers, organizational units, and domains. ADAC was designed to supersede the Active Directory Users And Computers snap-in for the Microsoft Management Console (MMC) by providing an enhanced management experience that uses a rich graphical user interface (GUI).
Note: Kerberos ticket-granting ticket lifetime
Beginning with Windows Server 2012 R2, you can configure the default lifetime setting of four hours for Kerberos ticket-granting tickets (TGTs) using Authentication Policies and Silos accessed through ADAC. This means that when four hours has passed, the user must authenticate again. This appears to be the only significant change in ADAC in this latest version of Windows Server.
Built upon a foundation of Windows PowerShell, ADAC was enhanced in Windows Server 2012 with new functionality, including the Windows PowerShell History Viewer, which makes it easier to transition from GUI-based administration of Active Directory to automated management using Windows PowerShell scripting.
More info: Windows PowerShell History Viewer
The Windows PowerShell History Viewer is demonstrated in the section “Creating users” later in this chapter.
User-interface features
The different user-interface features of ADAC, shown in Figure 5-1, include the following:
![]() Breadcrumb bar Displays the location of the currently selected object within Active Directory. You can use this bar to quickly navigate to any container within Active Directory by specifying the container’s path in one of the following forms:
Breadcrumb bar Displays the location of the currently selected object within Active Directory. You can use this bar to quickly navigate to any container within Active Directory by specifying the container’s path in one of the following forms:
![]() A Lightweight Directory Access Protocol (LDAP) path, such as LDAP://ou=Seattle Users OU,ou=Seattle OU OU,dc=corp,dc=contoso,dc=com
A Lightweight Directory Access Protocol (LDAP) path, such as LDAP://ou=Seattle Users OU,ou=Seattle OU OU,dc=corp,dc=contoso,dc=com
![]() A distinguished name (DN), such as ou=Seattle Users OU,ou=Seattle OU OU,dc=corp,dc=contoso,dc=com
A distinguished name (DN), such as ou=Seattle Users OU,ou=Seattle OU OU,dc=corp,dc=contoso,dc=com
![]() A hierarchical path, such as Active Directory Domain Services\corp (local)\Seattle OU\Seattle Users OU
A hierarchical path, such as Active Directory Domain Services\corp (local)\Seattle OU\Seattle Users OU
![]() Navigation pane Enables you to browse Active Directory using either the list or tree view, as described in the next sections.
Navigation pane Enables you to browse Active Directory using either the list or tree view, as described in the next sections.
![]() Management list Displays the contents of the container that is currently selected in the navigation pane.
Management list Displays the contents of the container that is currently selected in the navigation pane.
![]() Preview pane Displays various information about the object or container that is currently selected in the management list.
Preview pane Displays various information about the object or container that is currently selected in the management list.
![]() Tasks pane Enables you to perform different tasks on the object or container that is currently selected in the management list.
Tasks pane Enables you to perform different tasks on the object or container that is currently selected in the management list.
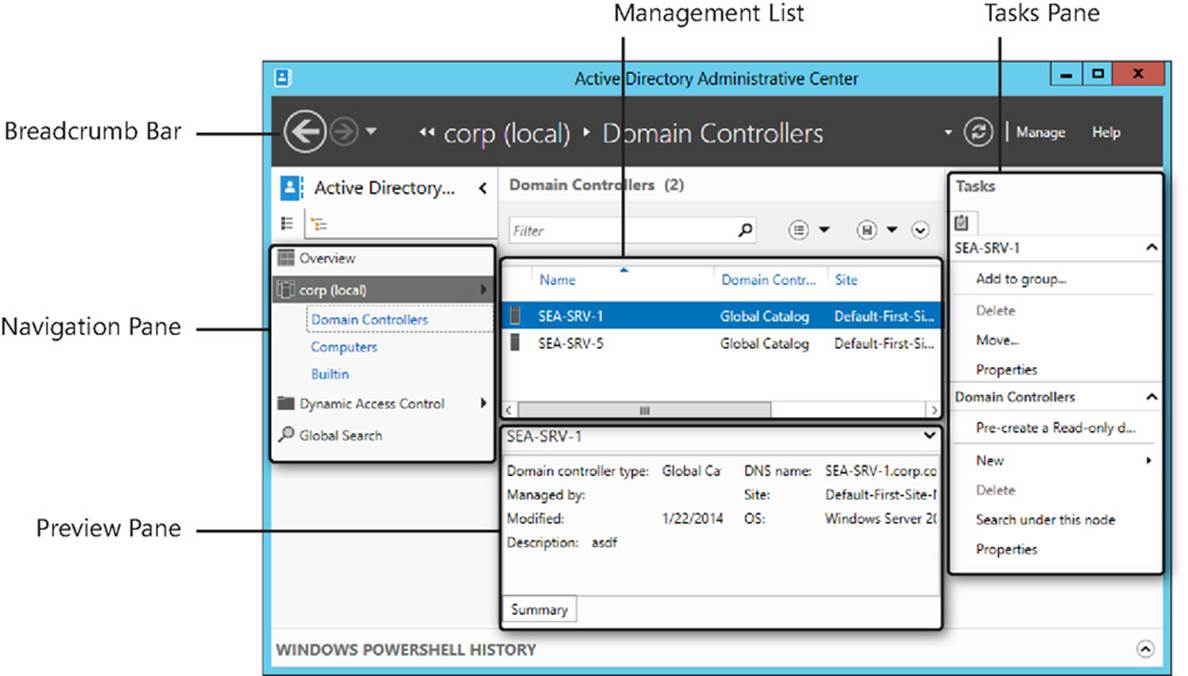
FIGURE 5-1 Active Directory Administrative Center shows various user-interface features.
List view
List view is one of two views available in the ADAC navigation pane. You can use it to browse Active Directory for the objects or containers you want to administer. In list view, you can use Column Explorer, shown in Figure 5-2, to quickly explore the contents of containers within the hierarchical structure of Active Directory.

FIGURE 5-2 You can use Column Explorer in list view in ADAC.
List view also maintains a Most Recently Used (MRU) list of the last three containers you accessed. Figure 5-2 indicates that the most recently accessed container was the Domain Controllers container in the corp.contoso.com domain, followed by the Computers and Builtin containers in the same domain. You can use the MRU list to quickly return to a container in which you were working just by selecting the appropriate MRU list item in the navigation pane.
You can also customize list view by adding nodes you might need to frequently access, similar to how you can use favorites in Internet Explorer or in the File Open/Save dialog box of Windows Explorer. Customizing ADAC list view is demonstrated later in this lesson.
Tree view
Tree view, shown in Figure 5-3, is the other view available in the ADAC navigation pane. Tree view presents a hierarchical representation of directory containers similar to that used in the Active Directory Users And Computers MMC snap-in.
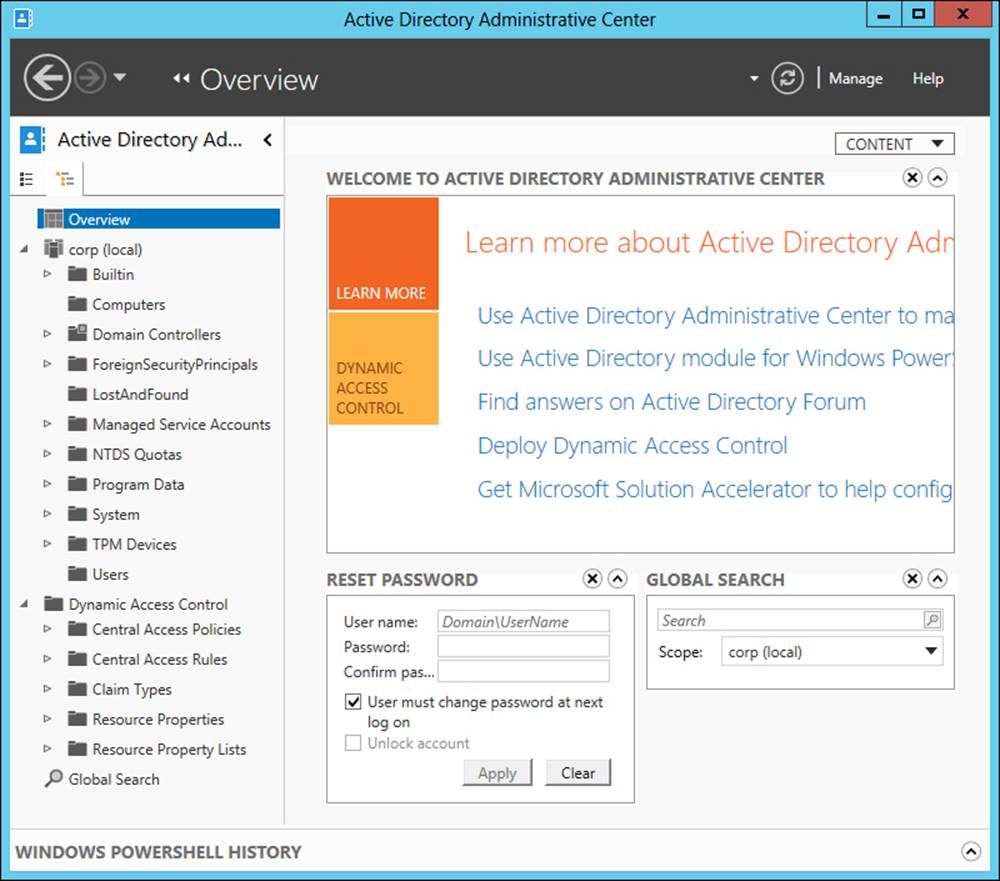
FIGURE 5-3 This is the Overview page of tree view in ADAC.
Figure 5-3 shows the Overview page of ADAC, which includes the following tiles:
![]() Welcome tile Provides links you can click to learn more about using ADAC and administering an Active Directory environment built on Windows Server 2012 or Windows Server 2012 R2, to ask your questions in an online forum on TechNet, and to access other useful resources
Welcome tile Provides links you can click to learn more about using ADAC and administering an Active Directory environment built on Windows Server 2012 or Windows Server 2012 R2, to ask your questions in an online forum on TechNet, and to access other useful resources
![]() Reset Password tile Enables you to quickly reset the password for a user account
Reset Password tile Enables you to quickly reset the password for a user account
![]() Global Search tile Enables you to quickly search the selected container or the global catalog for objects and containers you need to administer
Global Search tile Enables you to quickly search the selected container or the global catalog for objects and containers you need to administer
Searching Active Directory
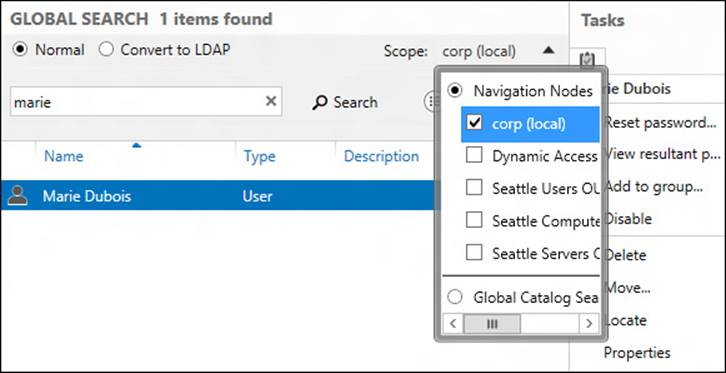
Although using ADAC to browse the hierarchy of containers within Active Directory is one way of locating the objects you need to administer, a more efficient method is to use the query-building search and filtering capabilities that are built into ADAC. For example, say you are the Active Directory administrator for Contoso Ltd. and the Human Resources department has informed you that the user account for Marie Dubois needs to be disabled until further notice. To do this, you might proceed as follows:
1. Launch ADAC and select the Overview page in either list or tree view.
2. Type marie in the search box in the Global Search tile:
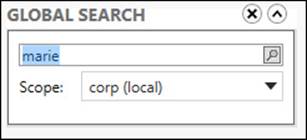
3. Select corp (local) as the scope for your search and press Enter.
The results of this query are shown in Figure 5-4. By right-clicking the user object Marie Dubois and selecting Disable, you can disable Marie’s account.
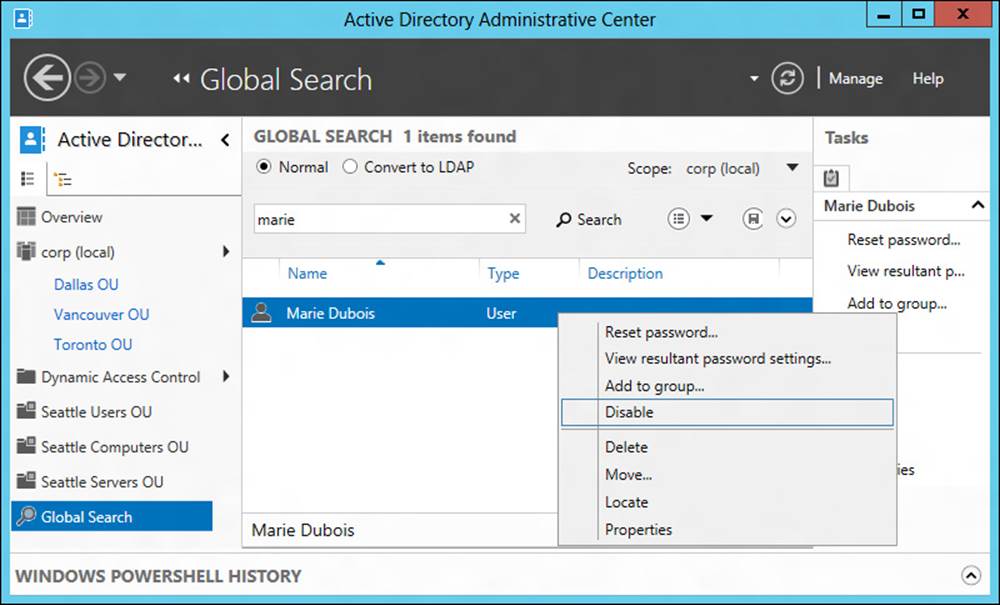
FIGURE 5-4 Disable the user account for a user you located using the Global Search tile.
You can broaden or narrow your search by selecting one or more navigation nodes. To do this, perform the following steps:
1. Click the down arrow at the right of the Scope item on the Global Search tile to display the Navigation Nodes explorer:
2. Select or deselect the nodes you want to include in your query.
You can make your query more specific by including additional search criteria. To do this, perform the following steps:
1. Click the small caret icon (^) beneath the small triangle referenced earlier. Doing this displays the Add Criteria control.
2. Click the Add Criteria control to display a list of criteria you can add to your search:

3. Select the criteria you want to add to your search and click Add.
More Info: Additional search options
For more information on performing advanced queries using ADAC and for instructions on how to filter through the Active Directory data for a selected container, see the topic “Locate Active Directory Objects in Active Directory Administrative Center” in the TechNet Library athttp://technet.microsoft.com/en-us/library/dd560661(v=ws.10).aspx.
Common administration tasks
Common administrative tasks you can perform using ADAC include creating, configuring, and managing the following types of objects:
![]() Organizational units (OUs)
Organizational units (OUs)
![]() User accounts
User accounts
![]() Computer accounts
Computer accounts
![]() Groups
Groups
Note: Bulk management
Although you can use ADAC to perform a few kinds of management actions simultaneously by multiselecting the objects or containers you want to administer, Windows PowerShell is the best way to perform bulk management of Active Directory objects and containers. See Lesson 3 in this chapter, “Administering Active Directory using Windows PowerShell,” for more information on using Windows PowerShell to manage Active Directory.
Creating organizational units
Creating a new organizational unit (OU) using ADAC involves the following steps:
1. Right-click the desired parent domain or OU, select New, and then select Organizational Unit:
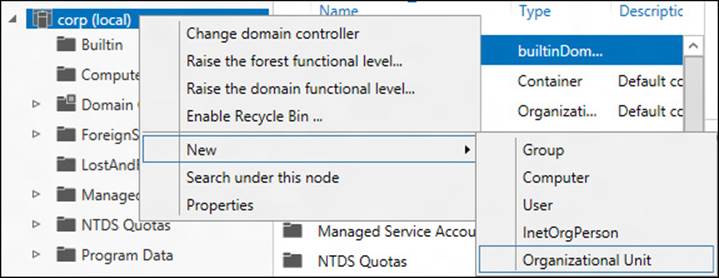
2. Enter the necessary data and make the required selections on the different sections of the Create Organizational Unit properties page, as shown in Figure 5-5.
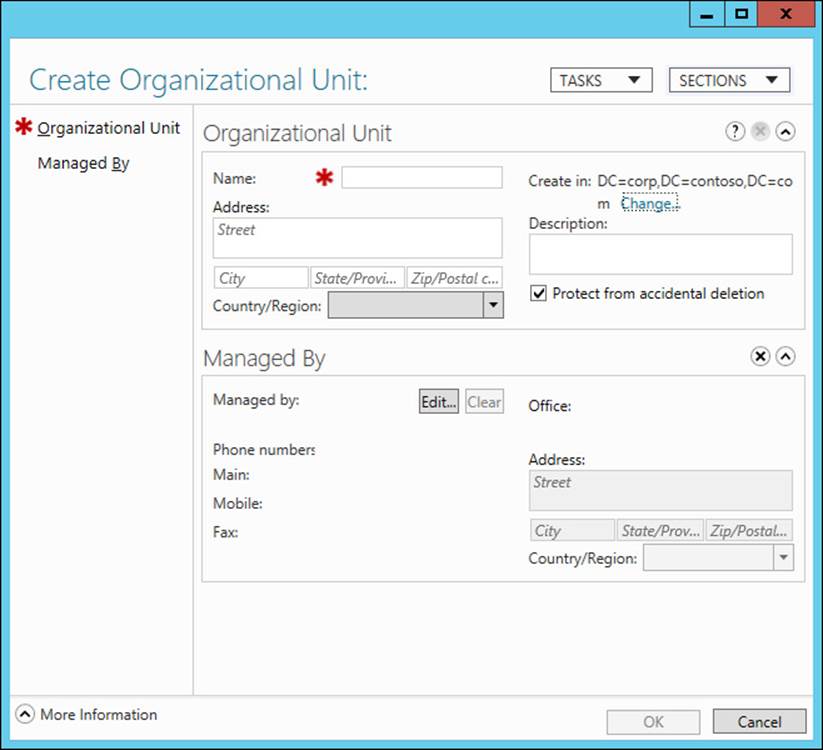
FIGURE 5-5 Make selections on the Create Organizational Unit properties page.
ADAC properties pages like this include several features that make them easy to use:
![]() Required information is indicated with a large red asterisk.
Required information is indicated with a large red asterisk.
![]() You can hide or restore to view different sections in the page by selecting the Sections control at the upper right of the page. By hiding sections you never use, you can make the page easier to navigate.
You can hide or restore to view different sections in the page by selecting the Sections control at the upper right of the page. By hiding sections you never use, you can make the page easier to navigate.
![]() The Tasks control at the upper right of the page enables you to quickly perform certain tasks associated with the object or container type represented by the page. For example, you can move or delete the selected OU by using the Tasks control on the properties page for the OU.
The Tasks control at the upper right of the page enables you to quickly perform certain tasks associated with the object or container type represented by the page. For example, you can move or delete the selected OU by using the Tasks control on the properties page for the OU.
![]() The same properties pages are used for both creating new objects or containers and modifying the properties of existing objects or containers.
The same properties pages are used for both creating new objects or containers and modifying the properties of existing objects or containers.
One of the benefits of using ADAC list view is that you can customize this view by adding nodes representing Active Directory containers you frequently need to access to perform administration tasks on the objects in those containers. For example, consider the following scenario:
Contoso Ltd. has offices in several North American cities, including Seattle, Dallas, and Vancouver. The Active Directory structure for this organization consists of a single domain named corp.contoso.com, with top-level OUs for each city and second-level OUs for users, computers, and servers at each location.
If you are the administrator for the Seattle office, you might want to customize ADAC list view by adding navigation nodes for the following OUs to make them easier to access:
![]() Seattle Users OU
Seattle Users OU
![]() Seattle Computers OU
Seattle Computers OU
![]() Seattle Servers OU
Seattle Servers OU
To do this, you can perform the following steps:
1. Select tree view and expand the corp domain to show the hierarchy of OUs and other containers beneath it. This includes the Seattle OU.
2. Expand the Seattle OU to show the child OUs beneath it. This includes the Seattle Users OU.
3. Right-click the Seattle Users OU and select Add As Navigation Node:
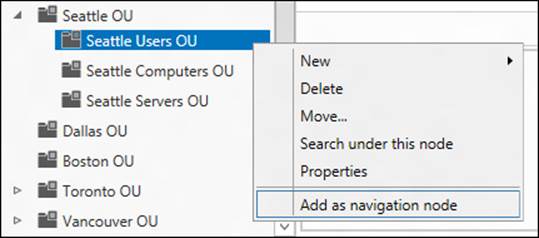
4. Repeat step 3 for the Seattle Computers OU and Seattle Servers OU.
Figure 5-6 shows what list view might look like after you add these three new navigation nodes. Note that you can rearrange your custom nodes by right-clicking them and selecting Move Up or Move Down. Any actions you perform on these navigation nodes have the same effect as acting directly upon the Active Directory containers they represent.
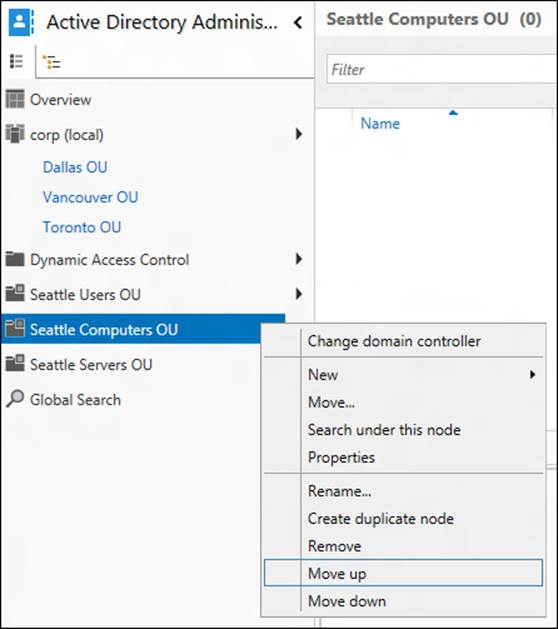
FIGURE 5-6 You can rearrange any custom navigation nodes you add to ADAC list view.
You can also add navigation nodes directly by right-clicking any blank area of the navigation pane in list view and selecting Add Navigation Nodes. Doing this opens the Add Navigation Nodes explorer shown in Figure 5-7.
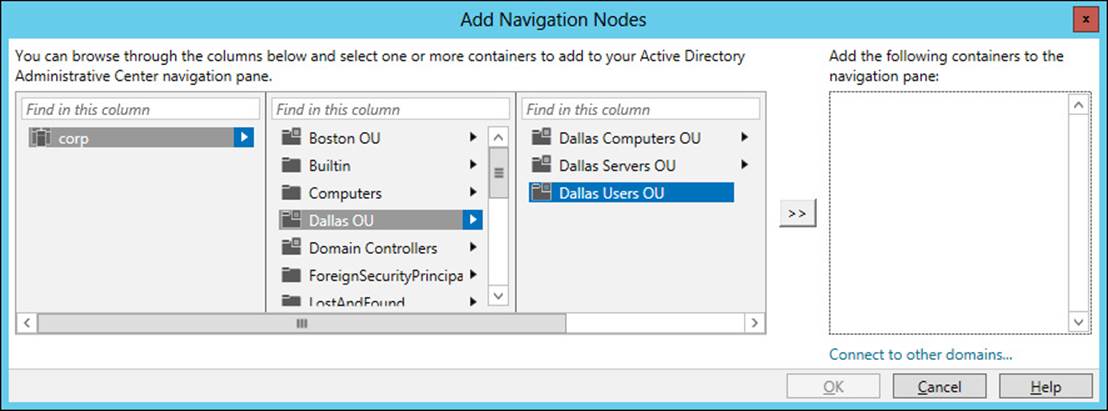
FIGURE 5-7 The Add Navigation Nodes explorer opens.
![]() Quick check
Quick check
![]() Which view in the navigation pane of ADAC can you use to add custom nodes for quickly accessing containers in Active Directory?
Which view in the navigation pane of ADAC can you use to add custom nodes for quickly accessing containers in Active Directory?
Quick check answer
![]() You can use list view to do this, and you can use it to rename and rearrange such nodes to help simplify the administration of your Active Directory environment.
You can use list view to do this, and you can use it to rename and rearrange such nodes to help simplify the administration of your Active Directory environment.
Creating users
A second common Active Directory management task you can perform using ADAC is creating new user accounts and managing existing user accounts. To create a new user account, just right-click the appropriate organizational unit, select New, and then select User. Then fill in the necessary information on the Create User properties page, as shown in Figure 5-8.
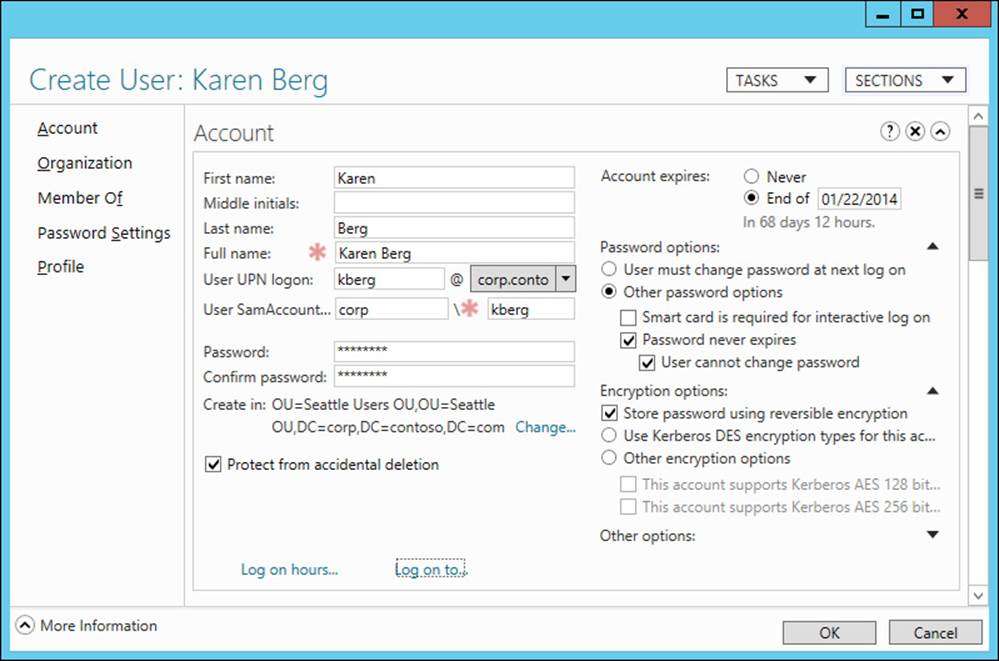
FIGURE 5-8 Create a new user account using ADAC.
After you click OK to create the new user account and return the focus to ADAC, you can click the small caret at the lower right of ADAC to display the Windows PowerShell History Viewer, which enables you to view the actual Windows PowerShell commands that are executed whenever you perform administrative tasks with ADAC. Figure 5-9 shows the commands involved during the creation of the new user account for Karen Berg shown in Figure 5-8. Note that a simple task like creating a single new user might require executing several different Windows PowerShell commands.
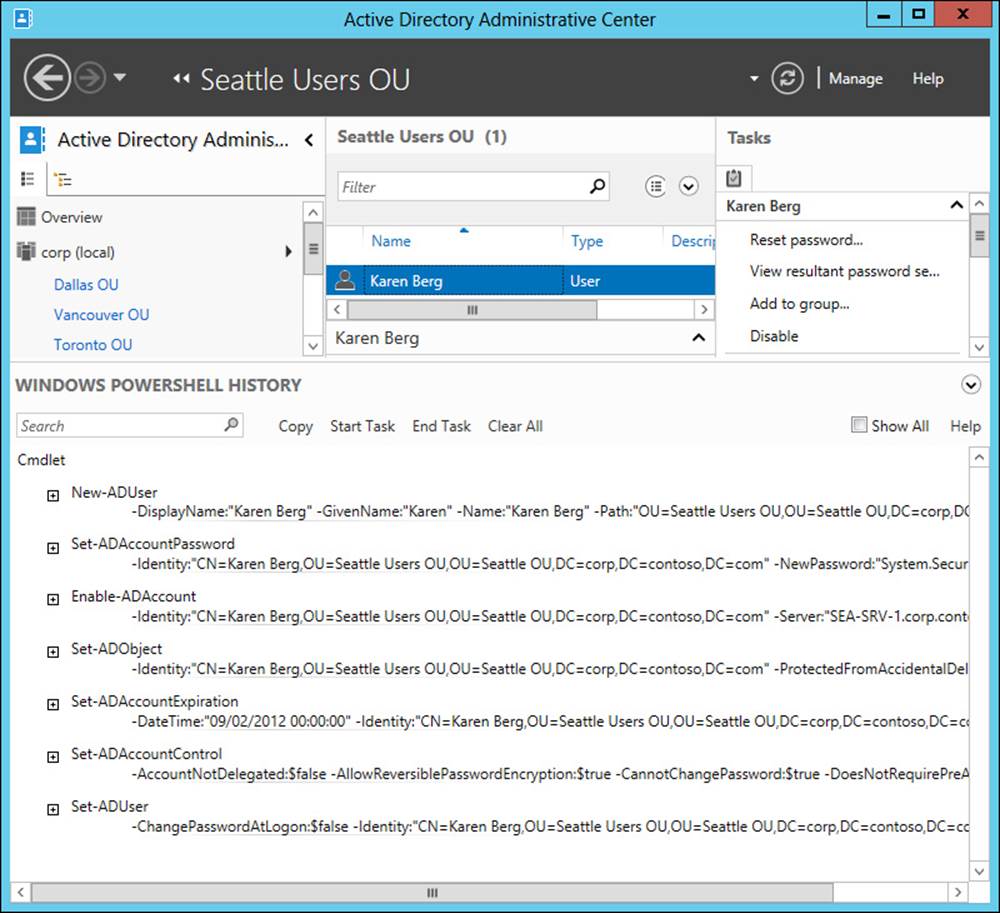
FIGURE 5-9 Review the Windows PowerShell History Viewer contents after creating new user Karen Berg.
The actual Windows PowerShell commands needed to create the new user Karen Berg in the preceding example are as follows:
New-ADUser -DisplayName:"Karen Berg" -GivenName:"Karen" -Name:"Karen Berg"
-Path:"OU=Seattle Users OU,OU=Seattle OU,DC=corp,DC=contoso,DC=com"
-SamAccountName:"kberg" -Server:"SEA-SRV-1.corp.contoso.com"
-Surname:"Berg" -Type:"user" -UserPrincipalName:kberg@corp.contoso.com
Set-ADAccountPassword -Identity:"CN=Karen Berg,OU=Seattle Users OU,
OU=Seattle OU,DC=corp,DC=contoso,DC=com" -NewPassword:"System.Security.SecureString"
-Reset:$null -Server:"SEA-SRV-1.corp.contoso.com"
Enable-ADAccount -Identity:"CN=Karen Berg,OU=Seattle Users OU,
OU=Seattle OU,DC=corp,DC=contoso,DC=com" -Server:"SEA-SRV-1.corp.contoso.com"
Set-ADObject -Identity:"CN=Karen Berg,OU=Seattle Users OU,
OU=Seattle OU,DC=corp,DC=contoso,DC=com" -ProtectedFromAccidentalDeletion:$true
-Server:"SEA-SRV-1.corp.contoso.com"
Set-ADAccountExpiration -DateTime:"09/02/2012 00:00:00" -Identity:"CN=Karen Berg,
OU=Seattle Users OU,OU=Seattle OU,DC=corp,DC=contoso,DC=com"
-Server:"SEA-SRV-1.corp.contoso.com"
Set-ADAccountControl -AccountNotDelegated:$false
-AllowReversiblePasswordEncryption:$true
-CannotChangePassword:$true -DoesNotRequirePreAuth:$false
-Identity:"CN=Karen Berg,OU=Seattle Users OU,OU=Seattle OU,DC=corp,DC=contoso,
DC=com" -PasswordNeverExpires:$true -Server:"SEA-SRV-1.corp.contoso.com"
-UseDESKeyOnly:$false
Set-ADUser -ChangePasswordAtLogon:$false -Identity:"CN=Karen Berg,
OU=Seattle Users OU,OU=Seattle OU,DC=corp,DC=contoso,DC=com"
-Server:"SEA-SRV-1.corp.contoso.com" -SmartcardLogonRequired:$false
To copy the commands shown in the History Viewer to your Clipboard, first click to select them and then click Copy at the top of the Windows PowerShell History pane. You can then paste the commands into an editor like Notepad, customize them as needed, and use them as a basis for performing a bulk creation of new users with the addition of some Windows PowerShell scripting. See Lesson 3 of this chapter for more information on this topic.
Other tasks you can perform using ADAC
Creating new groups, computer accounts, and InetOrgPerson objects is a similar process to the one just shown and therefore requires no further explanation. Here are some other tasks you can perform using ADAC:
![]() Selecting a domain or domain controller on which to perform your administrative tasks
Selecting a domain or domain controller on which to perform your administrative tasks
![]() Raising the forest or domain functional level
Raising the forest or domain functional level
![]() Enabling the Active Directory Recycle Bin
Enabling the Active Directory Recycle Bin
![]() Configuring fine-grained password policies
Configuring fine-grained password policies
![]() Configuring Dynamic Access Control (DAC)
Configuring Dynamic Access Control (DAC)
More Info: Dynamic Access Control
Dynamic Access Control (DAC) is another feature of Active Directory in Windows Server 2012 and Windows Server 2012 R2. You use DAC to implement a claims-based authorization solution. In this type of solution, you use central access policies, rules, and claim types to enable the use of file-classification information in authorization decisions. By using DAC, you can define access and audit policies in a simple and flexible way that can significantly reduce the number of groups you need to manage in your Active Directory environment. For more information on DAC, see the post “Introduction to Windows Server 2012 Dynamic Access Control” on the Windows Server Blog at http://blogs.technet.com/b/windowsserver/archive/2012/05/22/introduction-to-windows-server-2012-dynamic-access-control.aspx.
Tasks you cannot perform using ADAC
There are a number of Active Directory management tasks you cannot perform using ADAC, such as the following:
![]() Delegate administrative control over Active Directory OUs and the objects they contain
Delegate administrative control over Active Directory OUs and the objects they contain
![]() Create and manage sites, site links, subnets, and similar objects
Create and manage sites, site links, subnets, and similar objects
![]() Create trusts between domains or forests
Create trusts between domains or forests
![]() Directly edit the configuration, schema, or application directory partitions
Directly edit the configuration, schema, or application directory partitions
To perform such tasks, you need to use the following familiar tools:
![]() Active Directory Users And Computers
Active Directory Users And Computers
![]() Active Directory Sites And Services
Active Directory Sites And Services
![]() Active Directory Domains And Trusts
Active Directory Domains And Trusts
![]() ADSI Edit
ADSI Edit
Choosing a forest or domain functional level
Functional levels determine the capabilities of an Active Directory environment. The forest functional level specifies the highest functional level available for domains in your forest. Domain functional level is configured on a per-domain basis and cannot be higher than the forest functional level.
Raising the functional level of a domain generally adds new functionality for servers and client computers that are members of the domain. However, it can also result in the loss of certain functionality, such as changes to or loss of support for certain earlier versions of Windows.
Generally, you want to specify the highest possible forest functional level for your environment. You might, however, want to keep the domain functional level for some domains lower than your forest functional level; for example, if you are still running domain controllers running earlier versions of Windows Server like Windows Server 2003.
Lesson summary
![]() Active Directory Administrative Center (ADAC) is the primary GUI-based tool for managing user accounts, groups, computer accounts, and organizational units (OUs).
Active Directory Administrative Center (ADAC) is the primary GUI-based tool for managing user accounts, groups, computer accounts, and organizational units (OUs).
![]() Some of the features that make ADAC a useful tool for managing Active Directory environments include its list and tree views, its search and filtering capabilities, and the Windows PowerShell History Viewer.
Some of the features that make ADAC a useful tool for managing Active Directory environments include its list and tree views, its search and filtering capabilities, and the Windows PowerShell History Viewer.
![]() Because ADAC is built upon a foundation of Windows PowerShell, you can view and customize the Windows PowerShell commands executed when you perform a task using ADAC. By customizing these commands, you can automate many Active Directory management tasks.
Because ADAC is built upon a foundation of Windows PowerShell, you can view and customize the Windows PowerShell commands executed when you perform a task using ADAC. By customizing these commands, you can automate many Active Directory management tasks.
![]() Using the version of ADAC introduced in Windows Server 2012, you also can enable and use the Active Directory Recycle Bin, configure fine-grained password policies, and configure Dynamic Access Control (DAC).
Using the version of ADAC introduced in Windows Server 2012, you also can enable and use the Active Directory Recycle Bin, configure fine-grained password policies, and configure Dynamic Access Control (DAC).
Lesson review
Answer the following questions to test your knowledge of the information in this lesson. You can find the answers to these questions and explanations of why each answer choice is correct or incorrect in the “Answers” section at the end of this chapter.
1. What feature of ADAC enables you to quickly access the last three containers you accessed? (Choose all that apply.)
A. Column Explorer
B. Navigation pane
C. Navigation nodes
D. MRU list
2. Which of the following types of directory objects can you not create using ADAC? (Choose all that apply.)
A. Sites
B. Domains
C. Trusts
D. Groups
3. Which of the following Active Directory administration tasks can you not perform using ADAC? (Choose all that apply.)
A. Raising the forest functional level
B. Delegating administrative control over an OU and the objects it contains
C. Enabling the Active Directory Recycle Bin
D. Configuring fine-grained password policies
Lesson 2: Enabling advanced features using ADAC
Two advanced features for Active Directory administration that you can configure using ADAC in Windows Server 2012 and Windows Server 2012 R2 are the Active Directory Recycle Bin and fine-grained password policies. This lesson demonstrates how to enable and use these two features using ADAC.
After this lesson, you will be able to:
![]() Understand the life cycle for objects in Active Directory forests set to the Windows Server 2012 or Windows Server 2012 R2 functional level.
Understand the life cycle for objects in Active Directory forests set to the Windows Server 2012 or Windows Server 2012 R2 functional level.
![]() Use ADAC to enable the Active Directory Recycle Bin and restore deleted objects.
Use ADAC to enable the Active Directory Recycle Bin and restore deleted objects.
![]() Describe some best practices for implementing fine-grained password policies in Active Directory domains.
Describe some best practices for implementing fine-grained password policies in Active Directory domains.
![]() Use ADAC to configure fine-grained password policies and view the resultant set of policies.
Use ADAC to configure fine-grained password policies and view the resultant set of policies.
Estimated lesson time: 30 minutes
Enabling and using the Active Directory Recycle Bin
Administrators of Active Directory environments sometimes make mistakes—for example, deleting the user account for a user who still needs access to the corporate network. The effects of such mistakes can range from lost end-user productivity to broken network functionality.

Windows Server 2008 R2 introduced a feature called the Active Directory Recycle Bin (AD Recycle Bin) to provide administrators with a way to recover directory objects that were accidentally deleted. However, using the AD Recycle Bin in Windows Server 2008 R2 environments proved difficult for some administrators because enabling and using this feature could be performed only from the command-line, either by using the Ldp.exe utility or Windows PowerShell cmdlets. Windows Server 2012 and Windows Server 2012 R2 simplify this task—now you can use the GUI-based ADAC for both enabling the AD Recycle Bin and recovering deleted objects.
Understanding the AD Recycle Bin
To understand the limitations of the AD Recycle Bin, you need to know how it works. When the AD Recycle Bin feature is enabled in an Active Directory environment, directory objects can be in one of the following four states (illustrated in Figure 5-10):
![]() Live The object is functioning in Active Directory and is located in its proper container within the directory. As an example, a user account object in the live state is one that a user can utilize for logging on to the network.
Live The object is functioning in Active Directory and is located in its proper container within the directory. As an example, a user account object in the live state is one that a user can utilize for logging on to the network.
![]() Deleted The object has been moved to the Deleted Objects container within Active Directory. The object is no longer functioning in Active Directory, but the object’s link-valued and non-link-valued attributes are preserved, allowing the object to be recovered by restoring it from the AD Recycle Bin if the lifetime of the deleted object has not yet expired. (By default, when the AD Recycle Bin is enabled, the deleted object lifetime is configured as 180 days.) For example, a user account in the deleted state cannot be used for logging on to the network, but if the user account is restored to its live state, it can again be used for logon purposes.
Deleted The object has been moved to the Deleted Objects container within Active Directory. The object is no longer functioning in Active Directory, but the object’s link-valued and non-link-valued attributes are preserved, allowing the object to be recovered by restoring it from the AD Recycle Bin if the lifetime of the deleted object has not yet expired. (By default, when the AD Recycle Bin is enabled, the deleted object lifetime is configured as 180 days.) For example, a user account in the deleted state cannot be used for logging on to the network, but if the user account is restored to its live state, it can again be used for logon purposes.
![]() Recycled The deleted object lifetime has expired for the object. The object remains in the Deleted Objects container, but most of its attributes are stripped away. The object can no longer be recovered by restoring it from the AD Recycle Bin or by taking other steps, such as reanimating Active Directory tombstone objects.
Recycled The deleted object lifetime has expired for the object. The object remains in the Deleted Objects container, but most of its attributes are stripped away. The object can no longer be recovered by restoring it from the AD Recycle Bin or by taking other steps, such as reanimating Active Directory tombstone objects.
![]() Removed The recycled object lifetime has expired for the object. The Active Directory garbage collection process has physically removed the object from the directory database.
Removed The recycled object lifetime has expired for the object. The Active Directory garbage collection process has physically removed the object from the directory database.
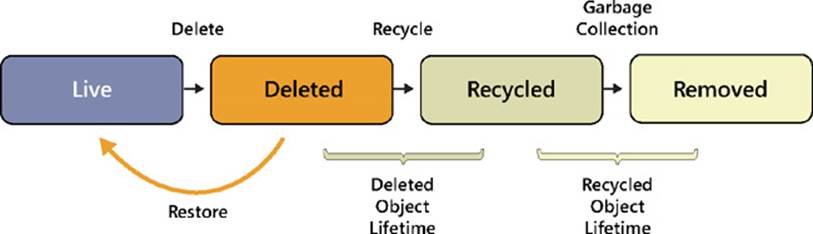
FIGURE 5-10 There are four states of Active Directory objects when the AD Recycle Bin is enabled.
Enabling the AD Recycle Bin
By default, the AD Recycle Bin feature is disabled until you choose to enable it. Enabling the AD Recycle Bin in your environment requires that the forest functional level be Windows Server 2008 R2 or higher. This means that all domain controllers in your forest must be running Windows Server 2008 R2 or later.
To enable the AD Recycle Bin using ADAC, perform the following steps:
1. Log on using credentials of an account that belongs to the Enterprise Admins or Schema Admins group.
2. Right-click the forest root domain in the navigation pane and select Raise The Forest Functional Level:

3. Ensure that the forest functional level for your environment is Windows Server 2008 R2 or higher.
4. Right-click the forest root domain again and select Enable Recycle Bin.
5. Review the warning and click OK to proceed with enabling the AD Recycle Bin.
6. Refresh ADAC and wait until all domain controllers in the forest have replicated the configuration change before attempting to use the AD Recycle Bin to restore deleted objects.
Note: Using Windows PowerShell to enable the AD Recycle Bin
You can also use Windows PowerShell to perform all of the actions required to enable the AD Recycle Bin for your environment. For example, you can use the Set-ADForestMode cmdlet to raise the forest functional level to Windows Server 2008 R2 or higher. You can use the Enable-ADOptionalFeature cmdlet to enable the AD Recycle Bin feature. Use the Get-Help cmdlet to display the syntax and examples for each of these cmdlets.
Important: Enabling the AD Recycle Bin is an irreversible decision
Although enabling the AD Recycle Bin is a recommended best practice for Active Directory administration, after you enable this feature you cannot disable it. So plan carefully before taking this step because you will be unable to roll back the forest functional level after you have done it. For more information on rolling back the forest functional level, see the topic titled “Understanding Active Directory Domain Services (AD DS) Functional Levels” in the TechNet Library at http://technet.microsoft.com/en-us/library/understanding-active-directory-functional-levels(WS.10).aspx.
Using the AD Recycle Bin
After the AD Recycle Bin is enabled, using it to restore deleted directory objects is straightforward as long as the deleted object lifetime of the objects has not expired. For example, Figure 5-11 shows how to restore the user account for Marie Dubois after it was accidentally deleted. The following menu options are available:
![]() Restore Restore the deleted object to its original location within Active Directory.
Restore Restore the deleted object to its original location within Active Directory.
![]() Restore To Restore the deleted object to a container you specify using Column Explorer.
Restore To Restore the deleted object to a container you specify using Column Explorer.
![]() Locate Parent Display the container where the deleted object originally resided.
Locate Parent Display the container where the deleted object originally resided.
![]() Properties Display or modify the properties of the deleted object.
Properties Display or modify the properties of the deleted object.
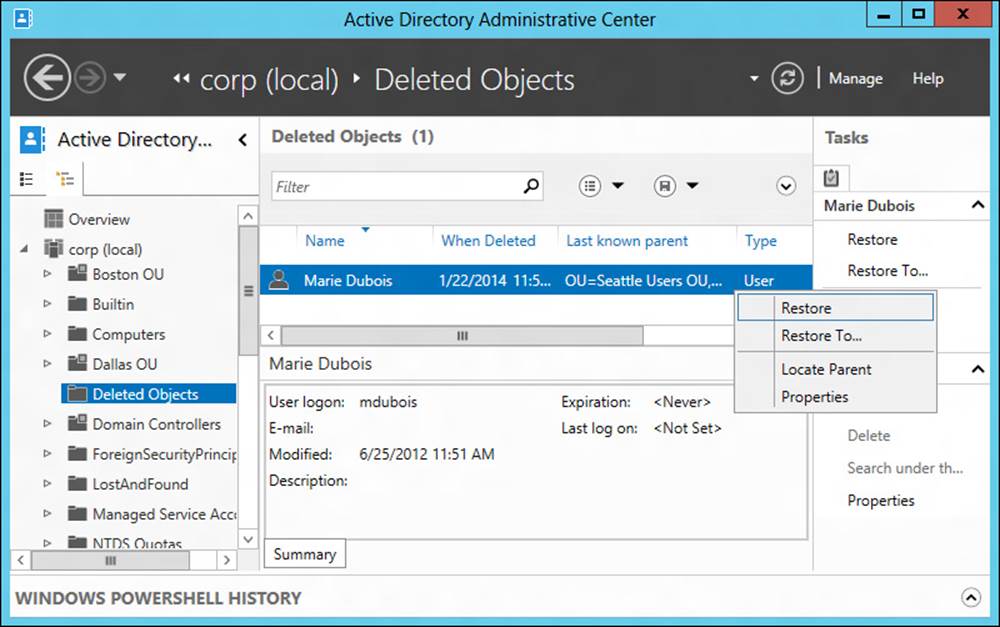
FIGURE 5-11 Restore a deleted object using the AD Recycle Bin.
Note: Restoring multiple deleted objects
You can restore multiple deleted objects in one action by multiselecting them in the Deleted Objects container and choosing the appropriate menu option.
Note: Using Windows PowerShell to restore deleted objects
After you have enabled the AD Recycle Bin for your environment, you can also use Windows PowerShell to restore directory objects you accidentally deleted. You can do this using the Restore-ADObject cmdlet. Use the Get-Help cmdlet to display the syntax and examples for this cmdlet.
![]() Quick check
Quick check
![]() If a directory object is in the Recycled state, can you still recover it using the AD Recycle Bin?
If a directory object is in the Recycled state, can you still recover it using the AD Recycle Bin?
Quick check answer
![]() No. If an object is in the Recycled state, its deleted object lifetime has expired. The object is still in the Deleted Objects container, but because most of its attributes have been stripped away you can no longer recover it by restoring it from the AD Recycle Bin.
No. If an object is in the Recycled state, its deleted object lifetime has expired. The object is still in the Deleted Objects container, but because most of its attributes have been stripped away you can no longer recover it by restoring it from the AD Recycle Bin.
Configuring fine-grained password policies
In Windows Server 2003 and earlier, you could have only a single password policy and account lockout policy governing all user accounts in a domain. You could configure this password policy by editing the Default Domain Policy Group Policy Object (GPO)—specifically, the six policy settings found under
Computer Configuration\Policies\Windows Settings\Security Settings\Account Policies\Password Policy
Each domain also had three account lockout policy settings, found under
Computer Configuration\Policies\Windows Settings\Security Settings\Account Policies\Account Lockout Policy
Windows Server 2008 introduced a feature called fine-grained password policies that you could use to configure multiple password policies and account lockout policies for each domain. This provided Active Directory administrators with greater flexibility because they could create different policies for different groups of users. The problem, however, was that you needed to use ADSI Edit and the Ldifde command-line utility to create fine-grained password policies on the earlier platform. This task is simplified in Windows Server 2012 and Windows Server 2012 R2 because you can use the GUI-based ADAC for creating fine-grained password policies. In addition, you can use ADAC to view the resultant password settings for particular users in your environment to ensure fine-grained password policies have been configured as intended.
Understanding fine-grained password policies
You can assign fine-grained password policies to users or groups. If a user belongs to more than one group that has a fine-grained password policy assigned to it, the precedence value of each policy is used to determine which policy applies to members of the group. The precedence value of a policy must be an integer value of 1 or greater. If multiple policies apply to the same user, the policy having the lowest precedence value takes effect.
Real World: Understanding policy precedence
Consider a scenario in which a user named Karen Berg in the corp.contoso.com domain is a member of two groups: the Marketing group and the Sales group. Fine-grained password policies have been configured as follows:
![]() A fine-grained password policy having a precedence value of 1 has been created and assigned to the Marketing group.
A fine-grained password policy having a precedence value of 1 has been created and assigned to the Marketing group.
![]() A fine-grained password policy having a precedence value of 2 has been created and assigned to the Sales group.
A fine-grained password policy having a precedence value of 2 has been created and assigned to the Sales group.
Because Karen belongs to both groups, both policies apply to her, but the one with the lowest precedence value (the policy assigned to the Marketing group) is the one that takes effect.
Note that if two fine-grained password policies have the same precendence value and both policies are applied to the same user, the policy with the smallest globally unique identifier (GUID) takes effect.
Best practices for implementing fine-grained password policies
When planning to implement fine-grained password policies within your Active Directory environment, you should follow these best practices:
![]() Assign policies to groups instead of individual users for easier management.
Assign policies to groups instead of individual users for easier management.
![]() Assign a unique precedence value to each fine-grained password policy you create within a domain.
Assign a unique precedence value to each fine-grained password policy you create within a domain.
![]() Create a fallback policy for the domain so that users who don’t belong to any groups that specifically have fine-grained password policies assigned to them still have password and account lockout restrictions apply when they try to log on to the network. This fallback policy can be either of the following:
Create a fallback policy for the domain so that users who don’t belong to any groups that specifically have fine-grained password policies assigned to them still have password and account lockout restrictions apply when they try to log on to the network. This fallback policy can be either of the following:
![]() The password and account lockout policies defined in the Default Domain Policy GPO
The password and account lockout policies defined in the Default Domain Policy GPO
![]() A fine-grained password policy that has a higher precedence value than any other policy
A fine-grained password policy that has a higher precedence value than any other policy
Real World: Implementing a fallback policy for your domain
Consider a scenario in which the corp.contoso.com domain has three groups: Marketing, Sales, and Human Resources. Fine-grained password policies have been configured as follows:
![]() A fine-grained password policy having a precedence value of 1 has been created and assigned to the Marketing group.
A fine-grained password policy having a precedence value of 1 has been created and assigned to the Marketing group.
![]() A fine-grained password policy having a precedence value of 2 has been created and assigned to the Sales group.
A fine-grained password policy having a precedence value of 2 has been created and assigned to the Sales group.
![]() No fine-grained password policy has been assigned to the Human Resources group.
No fine-grained password policy has been assigned to the Human Resources group.
To ensure that password and account lockout restrictions apply when members of the Human Resources group try to log on to the network, you can do either of the following:
![]() Configure password and account lockout policy settings in the Default Domain Policy GPO for the domain.
Configure password and account lockout policy settings in the Default Domain Policy GPO for the domain.
![]() Create a fine-grained password policy that has a precedence value of 100 and assign this policy to the Domain Users group.
Create a fine-grained password policy that has a precedence value of 100 and assign this policy to the Domain Users group.
Note that the second option is the recommended approach because Default Domain Policy is a legacy feature dating back to the Windows NT era and fine-grained password policies are the future.
Creating fine-grained password policies
Before you can create fine-grained password policies for a domain, you must ensure that the domain functional level is Windows Server 2008 or higher. You can do this by using either ADAC or Windows PowerShell as described in the previous topic in this lesson.
Note: Domain functional level
Domain Admin credentials or greater are required to raise the domain functional level for a domain.
Fine-grained password policies for a domain are stored in the Password Settings Container, which is found under System, as shown in Figure 5-12.
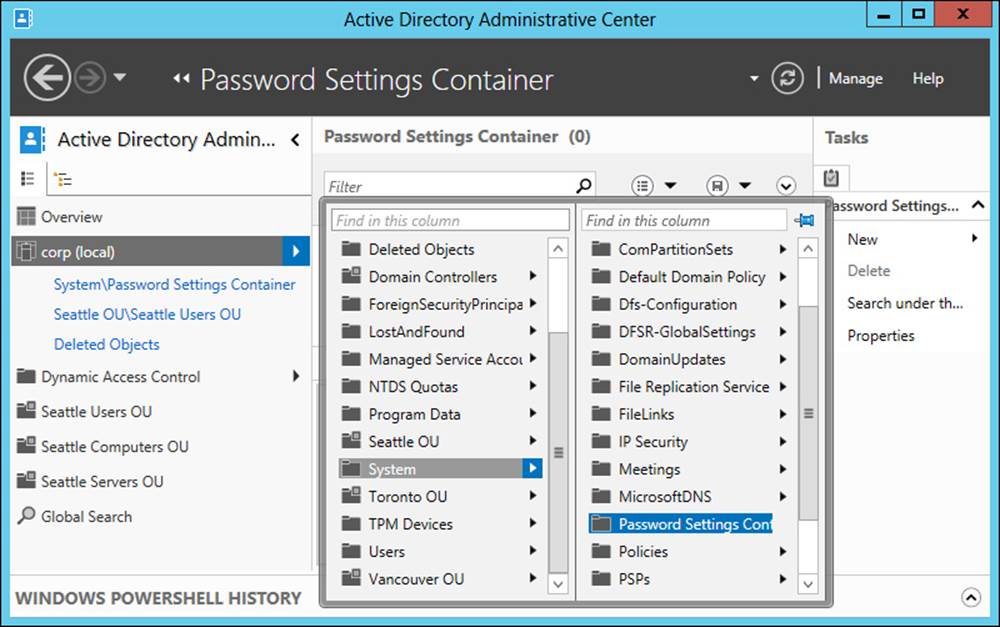
FIGURE 5-12 Fine-grained password policies are stored in the Password Settings Container.
To create a new fine-grained password policy using ADAC, follow these steps:
1. Display the Password Settings Container in either the navigation pane or the management list pane.
2. Right-click the Password Settings Container and select New. Then select Password Settings.
3. Fill in the appropriate information on the Create Password Settings properties page, as shown in Figure 5-13.
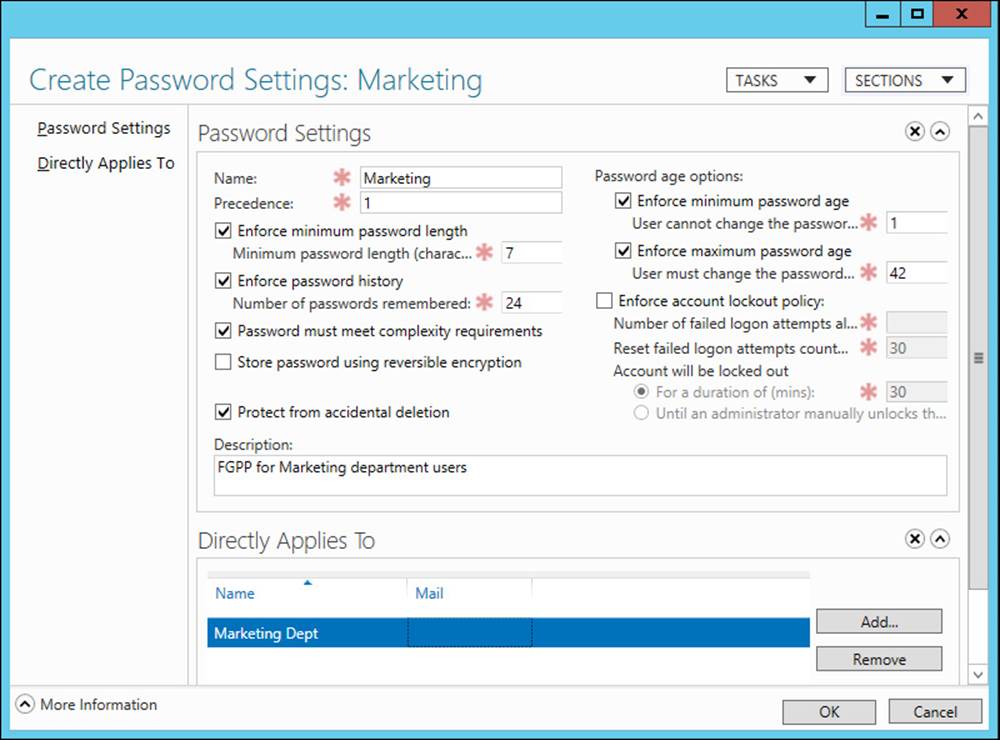
FIGURE 5-13 Create a new fine-grained password policy.
4. Click Add and locate the group or groups to which you want the policy to apply. Then click OK to create the new policy.
5. Repeat the preceding steps to create additional fine-grained password policies as needed for your environment.
Note: Using Windows PowerShell to manage fine-grained password policies
You can also use Windows PowerShell to create, modify, or delete fine-grained password policies for your domain. For example, you can use the New-ADFineGrainedPasswordPolicy cmdlet to create a new fine-grained password policy. You can also use the Set-ADFineGrainedPasswordPolicy cmdlet to modify an existing fine-grained password policy. And you can use the Remove-ADFineGrainedPasswordPolicy cmdlet to delete a fine-grained password policy that is no longer needed in your environment. Use the Get-Help cmdlet to display the syntax and examples for each of these cmdlets.
Viewing the resultant password settings for a user
You can also use ADAC to view the resultant password settings for users in a domain. This is useful both for ensuring that you have created and assigned fine-grained password policies as you intended for your environment and also for troubleshooting problems with policies not being applied as expected.
To view the resultant password settings for a particular user, first locate the user in Active Directory either by browsing using the navigation pane or by using the Global Search tile. Then right-click the user account and select View Resultant Password Settings, as shown in Figure 5-14. The fine-grained password policy that is displayed is the one that applies to the user who has the lowest precedence value.
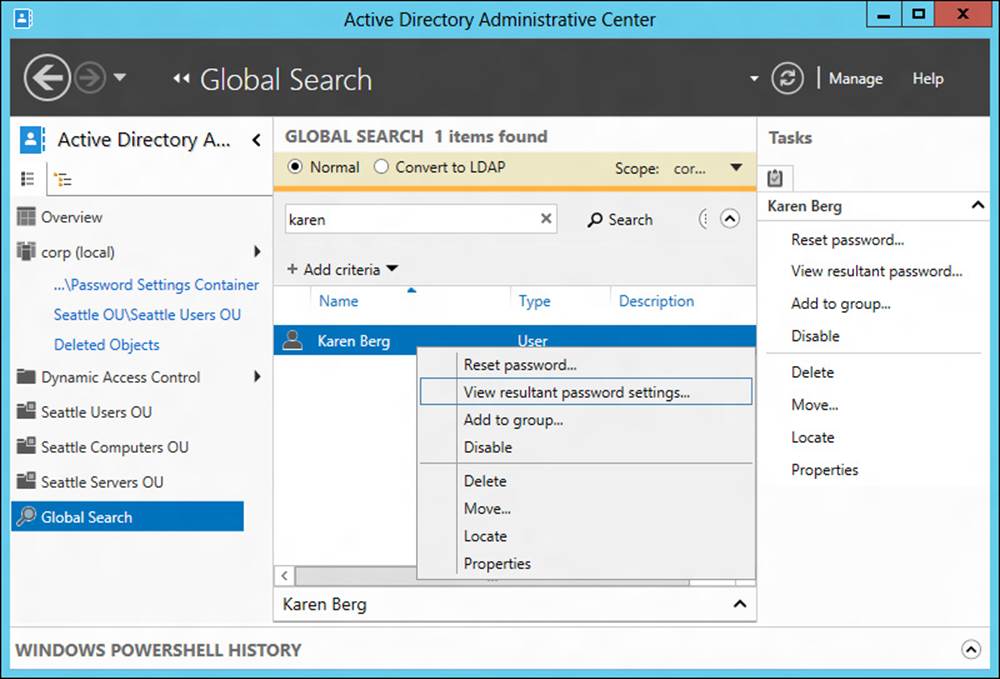
FIGURE 5-14 View the resultant set of policies for a user.
Note: Using Windows PowerShell to view the resultant set of policies
You can also use Windows PowerShell to view the resultant password settings for a user. You can do this using the Get-ADUserResultantPasswordPolicy cmdlet. Use the Get-Help cmdlet to display the syntax and examples for this cmdlet.
Lesson summary
![]() You can use ADAC to enable the Active Directory Recycle Bin and recover deleted objects by restoring them to the same location or a different location in the directory.
You can use ADAC to enable the Active Directory Recycle Bin and recover deleted objects by restoring them to the same location or a different location in the directory.
![]() Directory objects in an Active Directory forest that has been set to the Windows Server 2012 or Windows Server 2012 R2 forest functional level can be in one of four states: Live, Deleted, Recycled, or Removed. Only objects that are still in the Deleted state can be restored from the AD Recycle Bin.
Directory objects in an Active Directory forest that has been set to the Windows Server 2012 or Windows Server 2012 R2 forest functional level can be in one of four states: Live, Deleted, Recycled, or Removed. Only objects that are still in the Deleted state can be restored from the AD Recycle Bin.
![]() You can use ADAC to configure fine-grained password policies for a domain and also view the resultant set of policies.
You can use ADAC to configure fine-grained password policies for a domain and also view the resultant set of policies.
![]() Fine-grained password policies are intended as the replacement for the password and account policy settings found in the Default Domain Policy GPO.
Fine-grained password policies are intended as the replacement for the password and account policy settings found in the Default Domain Policy GPO.
![]() When configuring fine-grained password policies for a domain, you should create a fallback policy to ensure that all user accounts in the domain have a password and account lockout policy applied.
When configuring fine-grained password policies for a domain, you should create a fallback policy to ensure that all user accounts in the domain have a password and account lockout policy applied.
Lesson review
Answer the following questions to test your knowledge of the information in this lesson. You can find the answers to these questions and explanations of why each answer choice is correct or incorrect in the “Answers” section at the end of this chapter.
1. If the recycled object lifetime for a directory object has expired, what state is the object in?
A. Live
B. Deleted
C. Recycled
D. Removed
2. Which Windows PowerShell cmdlet can you use to enable the Active Directory Recycle Bin?
A. Set-ADForestMode
B. Enable-ADRecycleBin
C. Enable-ADOptionalFeature
D. New-ADFineGrainedPasswordPolicy
3. Which of the following are best practices for implementing fine-grained password policies in a domain? (Choose all that apply.)
A. Assign fine-grained password policies to users instead of groups.
B. Ensure that each fine-grained password policy has its own unique preference value.
C. Ensure that each group has at least one fine-grained password policy assigned to it.
D. Make sure you have configured a fallback policy for the domain. This can be either a fine-grained password policy that has a higher precedence value than any other policy or the password and account lockout settings defined in the Default Domain Policy GPO.
Lesson 3: Administering Active Directory using Windows PowerShell
Although ADAC can be useful for performing some Active Directory management tasks, especially in smaller environments, using Windows PowerShell to automate Active Directory administration is the preferred approach when you must repeat such tasks frequently—for example, when you need to create user accounts in bulk. This chapter demonstrates some of the different ways that you can use Windows PowerShell commands to perform common Active Directory management tasks. The chapter also demonstrates some of the more advanced administration tasks you can perform on your Active Directory environment using Windows PowerShell.
After this lesson, you will be able to:
![]() Demonstrate different ways of using Windows PowerShell to perform common Active Directory management tasks, such as creating and managing user accounts singly and in bulk.
Demonstrate different ways of using Windows PowerShell to perform common Active Directory management tasks, such as creating and managing user accounts singly and in bulk.
![]() Find Windows PowerShell cmdlets that you can use for managing different aspects of Active Directory.
Find Windows PowerShell cmdlets that you can use for managing different aspects of Active Directory.
![]() Perform an advanced Active Directory administration task that involves creating a new site and site link followed by moving a domain controller to the new site.
Perform an advanced Active Directory administration task that involves creating a new site and site link followed by moving a domain controller to the new site.
Estimated lesson time: 30 minutes
Managing user accounts with Windows PowerShell
Creating and managing user accounts is a common Active Directory administration task. Windows PowerShell provides considerable flexibility in how this can be done in Windows Server 2012 and Windows Server 2012 R2. Typing Get-Command *ADUser at a Windows PowerShell prompt shows there are four cmdlets for managing user accounts:
![]() New-ADUser Creates a new Active Directory user
New-ADUser Creates a new Active Directory user
![]() Get-ADUser Gets one or more Active Directory users so that you can perform some action with them
Get-ADUser Gets one or more Active Directory users so that you can perform some action with them
![]() Set-ADUser Modifies the properties of an existing Active Directory user
Set-ADUser Modifies the properties of an existing Active Directory user
![]() Remove-ADUser Removes the specified user from Active Directory
Remove-ADUser Removes the specified user from Active Directory
Any administration of user accounts using Windows PowerShell involves using one or more of these cmdlets. The following sections demonstrate some of the ways you can create new user accounts using the New-ADUser cmdlet. The approach you choose depends on the particular needs of your situation.
Example 1: Create a single new user account
To create a new user account for Phil Gibbins using pgibbins for the user’s SAM account name and pgibbins@corp.contoso.com for the user’s UPN logon, you can use the New-ADUser cmdlet as follows:
PS C:\> New-ADUser -Name "Phil Gibbins" -GivenName Phil -Surname Gibbins `
-SamAccountName pgibbins -UserPrincipalName pgibbins@corp.contoso.com
Note that there is no output if the command runs successfully. The resulting properties of the new user account when it is opened in ADAC are shown in Figure 5-15. Note that there are numerous other properties you could have specified when creating the account. Each of these additional properties has a parameter associated with it when using the New-ADUser cmdlet.
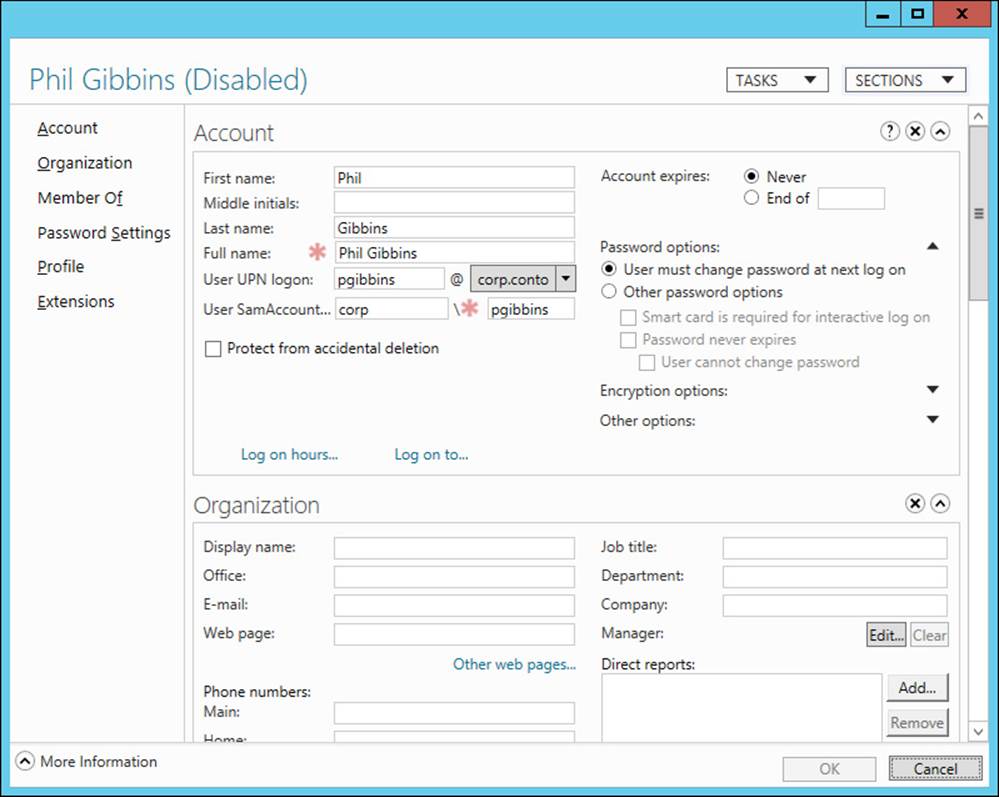
FIGURE 5-15 Create a new user account using the New-ADUser cmdlet.
Note: Where new users are created
If you try the preceding example, you’ll discover that the user account for Phil Gibbins is created in the Users container of the domain. To create a user account in a different location, you must specify the –Path parameter with this command. For example, to create this account in the location ou=Seattle Users OU,ou=Seattle OU OU,dc=corp,dc=contoso,dc=com in Active Directory, you could append –Path “ou=Seattle Users OU,ou=Seattle OU OU,dc=corp,dc=contoso,dc=com” to the command used in the preceding example.
Example 2: Create a new user account and specify a password
To specify a password when you create the user account for Phil Gibbins, you can use the Read-Host cmdlet. With this cmdlet, you enter a password when you run the command, as shown by the highlighted code in the following example:
PS C:\> New-ADUser -Name "Phil Gibbins" -GivenName Phil -Surname Gibbins `
-SamAccountName pgibbins -UserPrincipalName pgibbins@corp.contoso.com `
-AccountPassword (Read-Host -AsSecureString "AccountPassword")
Example 3: Create and enable a new user account
When you use the New-ADUser cmdlet to create a user account, the new account is disabled and cannot be enabled unless either of the following has occurred:
![]() A valid password has been set for the account.
A valid password has been set for the account.
![]() The –PasswordNotRequired parameter has been set to true.
The –PasswordNotRequired parameter has been set to true.
To create a user account for Phil Gibbins, specify a password, and enable the new account, you can use the following command:
PS C:\> New-ADUser -Name "Phil Gibbins" -GivenName Phil -Surname Gibbins `
-SamAccountName pgibbins -UserPrincipalName pgibbins@corp.contoso.com `
-AccountPassword (Read-Host -AsSecureString "AccountPassword") `
-PassThru | Enable-ADAccount
The –PassThru parameter, which has been added to the New-ADUser command just shown, returns the newly created user account object so that it can be piped into the Enable-ADAccount cmdlet to enable the new account.
Example 4: Bulk-create new user accounts
A good example of how you can use Windows PowerShell to automate a common Active Directory management task is the bulk creation of users. For example, you can combine the previous examples with the Import-Csv cmdlet, which enables you to read in data from a comma-separated values (CSV) file to create multiple user accounts in a single operation.
To illustrate this, the file new-users.csv contains a line of header information followed by attributes for three user accounts as follows:
Name,GivenName,Surname,SamAccountName,UserPrincipalName
Arno Bost,Arno,Bost,abost,abost@corp.contoso.com
Peter Fischer,Peter,Fischer,pfischer,pfischer@corp.contoso.com
Manish Chopra,Manish,Chopra,mchopra,mchopra@corp.contoso.com
The following command first reads the CSV file and pipes its contents into the New-ADUser cmdlet, then sets the password for each user account as Pa$$w0rd, and finally enables the accounts:
PS C:\> Import-Csv C:\data\new-users.csv | New-ADUser -PassThru | `
Set-ADAccountPassword -Reset `
-NewPassword (ConvertTo-SecureString -AsPlainText 'Pa$$w0rd' -Force) `
-PassThru | Enable-ADAccount
The highlighted portion of this command takes the string “Pa$$w0rd” and converts it from plain text to a secure string so that it can be used by the –NewPassword parameter of the Set-ADAccountPassword cmdlet. The –Force parameter is needed to suppress the confirmation prompt generated by use of the –AsPlainText parameter.
Real World: Bulk account creation
Bulk creation of user accounts, computer accounts, groups, and other types of directory objects involves two steps:
![]() Creating the source file with the information for the accounts that need to be created
Creating the source file with the information for the accounts that need to be created
![]() Creating the command or script that takes the source file and uses it to bulk-create the new accounts
Creating the command or script that takes the source file and uses it to bulk-create the new accounts
The CSV format used in the example in this section is a universal format supported by numerous applications, including Microsoft Excel, Microsoft Access, and even Microsoft SQL Server. By using a program like Excel to create the source information and save it in CSV format, you can quickly and easily bulk-create accounts in Active Directory.
Example 5: Create new user accounts from a template account
A template account is an account you use as a basis for creating other accounts. By configuring template account properties that are common to the other accounts you need to create, you can reduce the amount of information you need to provide for creating the additional accounts.
For example, you could configure properties like the account expiration date and password options in a template account if these will be the same for the other user accounts you need to create. You may also configure properties like Company, Address, City, and Country in the template account. By doing this, you won’t need to specify these properties when you create the other user accounts.
One of the practice exercises at the end of this chapter demonstrates how you can create a template account and then use it as a basis for creating additional user accounts.
![]() Quick check
Quick check
![]() What is the –UserPrincipalName parameter in the New-ADUser cmdlet used for?
What is the –UserPrincipalName parameter in the New-ADUser cmdlet used for?
Quick check answer
![]() This parameter is used to specify the user’s logon name in the form <username>@<domainname>.
This parameter is used to specify the user’s logon name in the form <username>@<domainname>.
Finding Active Directory administration cmdlets
The Get-Command cmdlet, which is new in Windows PowerShell 3.0, can be helpful when you need to find cmdlets to perform some administration task on Active Directory. For example, typing Get-Command New-AD* lists all cmdlets used for creating new Active Directory objects. The output from running this command looks like this:
CommandType Name ModuleName
----------- ---- ----------
Cmdlet New-ADCentralAccessPolicy ActiveDirectory
Cmdlet New-ADCentralAccessRule ActiveDirectory
Cmdlet New-ADClaimTransformPolicy ActiveDirectory
Cmdlet New-ADClaimType ActiveDirectory
Cmdlet New-ADComputer ActiveDirectory
Cmdlet New-ADDCCloneConfigFile ActiveDirectory
Cmdlet New-ADFineGrainedPasswordPolicy ActiveDirectory
Cmdlet New-ADGroup ActiveDirectory
Cmdlet New-ADObject ActiveDirectory
Cmdlet New-ADOrganizationalUnit ActiveDirectory
Cmdlet New-ADReplicationSite ActiveDirectory
Cmdlet New-ADReplicationSiteLink ActiveDirectory
Cmdlet New-ADReplicationSiteLinkBridge ActiveDirectory
Cmdlet New-ADReplicationSubnet ActiveDirectory
Cmdlet New-ADResourceProperty ActiveDirectory
Cmdlet New-ADResourcePropertyList ActiveDirectory
Cmdlet New-ADServiceAccount ActiveDirectory
Cmdlet New-ADUser ActiveDirectory
The function of each command is self-explanatory, given the names of these commands. To see the syntax and usage examples for each command, use the Get-Help cmdlet.
As a second example of finding Active Directory administration cmdlets, typing Get-Command *ADAccount* displays all cmdlets used for managing Active Directory accounts. The output of this command is as follows:
CommandType Name ModuleName
----------- ---- ----------
Cmdlet Clear-ADAccountExpiration ActiveDirectory
Cmdlet Disable-ADAccount ActiveDirectory
Cmdlet Enable-ADAccount ActiveDirectory
Cmdlet Get-ADAccountAuthorizationGroup ActiveDirectory
Cmdlet Get-ADAccountResultantPasswordReplicationPolicy ActiveDirectory
Cmdlet Search-ADAccount ActiveDirectory
Cmdlet ccountControl ActiveDirectory
Cmdlet Set-ADAccountExpiration ActiveDirectory
Cmdlet Set-ADAccountPassword ActiveDirectory
Cmdlet Unlock-ADAccount ActiveDirectory
Again, the names of these cmdlets provide clear insight into the actions they perform, such as enabling, disabling, and unlocking accounts; setting passwords for accounts; setting and clearing the expiration date for accounts; and so on.
Finally, the Get-Help cmdlet can be useful for both finding cmdlets and learning what you can do with them. For example, typing Get-Help *ADUser* displays some of the cmdlets used for managing Active Directory user accounts and describes what they do. The output of this command is as follows:
Name Category Module Synopsis
---- -------- ------ --------
Get-ADUser Cmdlet ActiveDirectory Gets one or more Active
Directory users.
Get-ADUserResultantPasswordPolicy Cmdlet ActiveDirectory Gets the resultant
password policy for a
user.
New-ADUser Cmdlet ActiveDirectory Creates a new Active
Directory user.
Remove-ADUser Cmdlet ActiveDirectory Removes an Active
Directory user.
Set-ADUser Cmdlet ActiveDirectory Modifies an Active
Directory user.
From the previous examples, you can see that typing Get-Help *ADAccount* provides information about more cmdlets used for managing Active Directory user accounts.
Real World: Learning how to use Windows PowerShell to manage Active Directory
There is a total of 135 different cmdlets in the Active Directory module for Windows PowerShell in Windows Server 2012. In addition, 12 new cmdlets were added in Windows Server 2012 R2 to provide new capabilities for automating Active Directory management tasks using Windows PowerShell. These new cmdlets focus on new credentials protection and management functionalities called authentication policy and authentication policy silos. Active Directory in Windows Server 2012 R2 introduces the concept of forest-based authentication policies that apply to accounts in a domain that is running at Windows Server 2012 R2 domain functional level. These authentication policies enable you to control which hosts a user can use to sign in, and they work in conjunction with the Protect Users security group. You can then apply access control conditions that can isolate accounts to constrain the scope of the network visible to them. The new cmdlets for these functionalities are as follows:
![]() Get-ADAuthenticationPolicy
Get-ADAuthenticationPolicy
![]() New-ADAuthenticationPolicySilo
New-ADAuthenticationPolicySilo
![]() Set-ADAccountAuthenticationPolicySilo
Set-ADAccountAuthenticationPolicySilo
![]() Get-ADAuthenticationPolicySilo
Get-ADAuthenticationPolicySilo
![]() Remove-ADAuthenticationPolicy
Remove-ADAuthenticationPolicy
![]() Set-ADAuthenticationPolicy
Set-ADAuthenticationPolicy
![]() Grant-ADAuthenticationPolicySiloAccess
Grant-ADAuthenticationPolicySiloAccess
![]() Remove-ADAuthenticationPolicySilo
Remove-ADAuthenticationPolicySilo
![]() Set-ADAuthenticationPolicySilo
Set-ADAuthenticationPolicySilo
![]() New-ADAuthenticationPolicy
New-ADAuthenticationPolicy
![]() Revoke-ADAuthenticationPolicySiloAccess
Revoke-ADAuthenticationPolicySiloAccess
![]() Show-ADAuthenticationPolicyExpression
Show-ADAuthenticationPolicyExpression
To learn more about each of these cmdlets, you can review their TechNet pages, such as http://technet.microsoft.com/en-us/library/dn528538.aspx. However, the only way you can learn how to effectively work with all 147 Active Directory cmdlets in Windows Server 2012 R2 is by trying them out to perform different kinds of administration tasks in a safe test environment.
Performing an advanced Active Directory administration task
To conclude this lesson, here is an example of how to perform an advanced Active Directory administration task using Windows PowerShell. The scenario is as follows:
Contoso Ltd. is in the process of rolling out its Active Directory environment at its headquarters in Seattle. So far, two domain controllers have been deployed at this location. A new branch office is going to be set up in Bellevue, and the Contoso administrator has decided to move one of the existing domain controllers to this new location.
Here are the steps that the administrator will perform:
1. Create a new site named Branch-Office-One for the Bellevue location.
2. Create a new site link named Hub-to-Branch-Office-One to enable replication to occur between the two sites.
3. Move one of the two domain controllers from Default-First-Site-Name to Branch-Office-One.
This is how these tasks can be done using Windows PowerShell:
1. List all the sites that currently exist in the domain:
PS C:\> Get-ADReplicationSite -Filter * | ft Name
Name
----
Default-First-Site-Name
2. List all the domain controllers in the domain:
PS C:\> Get-ADDomainController -Filter * | ft Hostname
Hostname
--------
SEA-SRV-1.corp.contoso.com
SEA-SRV-5.corp.contoso.com
3. Create a new site named Branch-Office-One:
PS C:\> New-ADReplicationSite Branch-Office-One
4. Verify the creation of the new site:
PS C:\> Get-ADReplicationSite -Filter * | ft Name
Name
----
Default-First-Site-Name
Branch-Office-One
5. Create a new site link between the two sites and enable the change-notification process for replication:
PS C:\> New-ADReplicationSiteLink 'Hub-to-Branch-Office-One' `
-SitesIncluded Default-First-Site-Name,Branch-Office-One `
-OtherAttributes @{'options'=1}
6. Specify the cost and replication frequency for the new site link:
PS C:\> Set-ADReplicationSiteLink Hub-to-Branch-Office-One `
-Cost 100 -ReplicationFrequencyInMinutes 15
7. Verify the results by viewing the properties of the new site link:
PS C:\> Get-ADReplicationSiteLink -Filter {Name -eq "Hub-to-Branch-Office-One"}
Cost : 100
DistinguishedName : CN=Hub-to-Branch-Office-One,CN=IP,CN=Inter-Site
Transports,CN=Sites,CN=Configuration,
DC=corp,DC=contoso,DC=com
Name : Hub-to-Branch-Office-One
ObjectClass : siteLink
ObjectGUID : f9df8b3c-f8bc-4ca9-b082-09655e14c80b
ReplicationFrequencyInMinutes : 15
SitesIncluded : {CN=Branch-Office-One,CN=Sites,CN=Configuration,
DC=corp,DC=contoso,DC=com,CN=Default-First-
Site-Name,CN=Sites,CN=Configuration,DC=corp,
DC=contoso,DC=com}
8. Move domain controller SEA-SRV-5 from the hub site to the branch office site:
PS C:\> Get-ADDomainController SEA-SRV-5.corp.contoso.com | `
Move-ADDirectoryServer -Site Branch-Office-One
9. Verify that the domain controller has been moved to the branch office site:
PS C:\> Get-ADDomainController -Filter * | ft Hostname,Site
Hostname Site
-------- ----
SEA-SRV-1.corp.contoso.com Default-First-Site-Name
SEA-SRV-5.corp.contoso.com Branch-Office-One
Finally, opening the Active Directory Sites And Services MMC console shows the expected configuration of sites, site links, and domain controllers. (See Figure 5-16.)
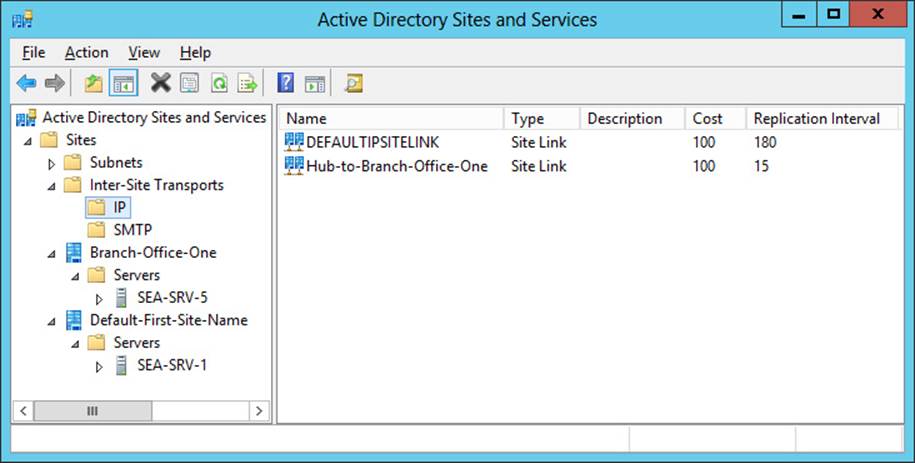
FIGURE 5-16 This MMC console confirms what the Windows PowerShell cmdlets accomplished.
Lesson summary
![]() The Active Directory module in Windows Server 2012 includes 135 Windows PowerShell cmdlets you can use for performing Active Directory administration tasks from the command line or by using scripts. Windows Server 2012 R2 adds 12 more Active Directory cmdlets for a total of 147 cmdlets.
The Active Directory module in Windows Server 2012 includes 135 Windows PowerShell cmdlets you can use for performing Active Directory administration tasks from the command line or by using scripts. Windows Server 2012 R2 adds 12 more Active Directory cmdlets for a total of 147 cmdlets.
![]() You should become familiar with the syntax of cmdlets such as New-ADUser, New-ADOrganizationalUnit, and others in the Active Directory Windows PowerShell module so that you can use them to automate the creation of user accounts, organizational units, and other types of directory objects in your Active Directory environment.
You should become familiar with the syntax of cmdlets such as New-ADUser, New-ADOrganizationalUnit, and others in the Active Directory Windows PowerShell module so that you can use them to automate the creation of user accounts, organizational units, and other types of directory objects in your Active Directory environment.
![]() You can use cmdlets such as New-ADUser in different ways to create user accounts appropriately for the needs of each Active Directory administration scenario. The same is true when using Windows PowerShell to create other types of directory objects like groups, computer accounts, and organizational units.
You can use cmdlets such as New-ADUser in different ways to create user accounts appropriately for the needs of each Active Directory administration scenario. The same is true when using Windows PowerShell to create other types of directory objects like groups, computer accounts, and organizational units.
![]() You can combine cmdlets such as New-ADUser with other Windows PowerShell cmdlets to create user accounts in different ways, such as from a template account or in bulk. The same is true when using Windows PowerShell to create other types of directory objects like groups, computer accounts, and organizational units.
You can combine cmdlets such as New-ADUser with other Windows PowerShell cmdlets to create user accounts in different ways, such as from a template account or in bulk. The same is true when using Windows PowerShell to create other types of directory objects like groups, computer accounts, and organizational units.
![]() You can use the new Get-Command cmdlet to quickly identify the Active Directory administration cmdlets you need to perform a specific task.
You can use the new Get-Command cmdlet to quickly identify the Active Directory administration cmdlets you need to perform a specific task.
![]() You can use Windows PowerShell to perform advanced Active Directory administration tasks that previously required using MMC snap-ins like Active Directory Sites And Services.
You can use Windows PowerShell to perform advanced Active Directory administration tasks that previously required using MMC snap-ins like Active Directory Sites And Services.
Lesson review
Answer the following questions to test your knowledge of the information in this lesson. You can find the answers to these questions and explanations of why each answer choice is correct or incorrect in the “Answers” section at the end of this chapter.
1. Which Windows PowerShell cmdlet can you combine with New-ADUser to bulk-create new user accounts?
A. Get-ADUser
B. Import-Csv
C. Set-ADAccountPassword
D. Where-Object
2. What does the –Force parameter do in the following Windows PowerShell command?
Set-ADAccountPassword -Reset -NewPassword (ConvertTo-SecureString -AsPlainText
"Pa$$w0rd" -Force)
A. It forces the specified password to be converted from plain text to a secure string.
B. It forces the specified password to be encrypted.
C. It suppresses the confirmation prompt that the user normally would have to respond to when performing this action.
D. It forces the user to respond to a confirmation prompt when performing this action.
3. What commands can you use to find Windows PowerShell cmdlets for managing Active Directory groups? (Choose all that apply.)
A. Get-Command –Module ActiveDirectory
B. Get-Command *ADGroup*
C. Get-Help *ADGroup*
D. Get-Help ActiveDirectory
Practice exercises
The goal of this section is to provide you with hands-on practice with the following:
![]() Creating organizational units using Windows PowerShell
Creating organizational units using Windows PowerShell
![]() Creating user accounts using Windows PowerShell
Creating user accounts using Windows PowerShell
To perform the following exercises, you need at least one clean installation of Windows Server 2012 R2 using the Server With A GUI installation option. The server is assumed to be a domain controller in the corp.contoso.com domain and have Internet connectivity. You should be logged on interactively to the server using a user account that is a member of the Domain Administrators group. For the purposes of these exercises, the name of the server is assumed to be DC-1. You can modify the exercises as needed if the name of your server and domain are different from the ones given here.
Exercise 1: Creating organizational units using Windows PowerShell
In this exercise, you create and run a Windows PowerShell script that creates a hierarchy of organizational units in the corp.contoso.com domain.
1. Log on to DC-1 using an account that is a member of the Domain Admins account for the corp.contoso.com domain.
2. Create a folder named Data in the root of your C drive.
3. Open Notepad and type the following lines:
New-ADOrganizationalUnit -Name "Montreal" `
-Path "dc=corp,dc=contoso,dc=com"
New-ADOrganizationalUnit -Name "Montreal Users" `
-Path "ou=Montreal,dc=corp,dc=contoso,dc=com"
New-ADOrganizationalUnit -Name "Montreal Computers" `
-Path "ou=Montreal,dc=corp,dc=contoso,dc=com"
New-ADOrganizationalUnit -Name "Montreal File Servers" `
-Path "ou=Montreal,dc=corp,dc=contoso,dc=com"
New-ADOrganizationalUnit -Name "Montreal Terminal Servers" `
-Path "ou=Montreal,dc=corp,dc=contoso,dc=com"
New-ADOrganizationalUnit -Name "Montreal Administrators" `
-Path "ou=Montreal,dc=corp,dc=contoso,dc=com"
4. Select File, select Save As, and type new-OUs.ps1 as the file name. Click the Save As type control, select All Files, and save the script in your C:\Data folder.
5. Open the Windows PowerShell console using elevated privileges by right-clicking the Windows PowerShell taskbar icon and selecting Run As Administrator.
6. Type Get-ExecutionPolicy to view the current script-execution policy on the server. This will likely be Restricted, which means that no scripts can be run and Windows PowerShell can be used only in interactive mode.
7. Type Set-ExecutionPolicy Unrestricted to change the execution policy on the server to Unrestricted, which means that all Windows PowerShell scripts can be run with no restrictions (that is, both signed and unsigned scripts can be run).
8. Type C:\Data\new-OUs.ps1 to run the script you created earlier.
9. Type the following command to verify that the new organizational units were created as expected:
Get-ADOrganizationalUnit -Filter 'Name -like "Montreal*"' | `
Format-Table Name,DistinguishedName
10. Open ADAC, navigate to the corp.contoso.com domain, and verify that the hierarchy of organizational units was successfully created. You might need to refresh ADAC if it was already open to see the OUs.
11. Add the new OUs as navigation nodes in ADAC list view and rearrange them as desired.
Exercise 2: Creating user accounts using Windows PowerShell
In this exercise, you create a template user account that will be used as a starting point for creating other user accounts. You then create a new user account based on your template account.
1. Log on to DC-1 using an account that is a member of the Domain Admins account for the corp.contoso.com domain.
2. Open the Windows PowerShell console using elevated privileges by right-clicking the Windows PowerShell taskbar icon and selecting Run As Administrator.
3. Use the New-ADOrganizationalUnit cmdlet to create a new OU named “Denver” in the corp.contoso.com domain.
4. Use the New-ADOrganizationalUnit cmdlet again to create a new OU named “Denver Users” in the “Denver” OU you created in the previous step.
5. Run the following command to create a template user named DenverTemplateUser that expires at 2 A.M. on December 30, 2014, and that has its City property set to Denver:
New-ADUser -Name DenverTemplateUser `
-AccountExpirationDate "12/30/2014 2:00:00 AM" -City "Denver"
6. Open ADAC, navigate to the default Users container in the corp.contoso.com domain, and verify that the template user was successfully created. You might need to refresh ADAC if it was already open to see the new user.
7. Open the properties of the template user in ADAC and verify that the Account Expiration Date and City properties were configured properly.
8. Switch back to the Windows PowerShell console and use the Get-ADUser cmdlet to retrieve the default properties of the template user you just created with the two custom properties you configured. Then assign the result to a variable named $templateDenverUser by running this command:
$templateDenverUser = Get-ADUser `
-Identity "cn=DenverTemplateUser,cn=Users,dc=corp,dc=contoso,dc=com" `
-Properties AccountExpirationDate,City
9. Type $templateDenverUser and verify that the properties of the template account are correct.
10. Execute the following command to create a new user account for Tony Madigan that is based on the template user you created earlier. Note that the backtick character is used here to enable you to enter this long command in several lines to make it easier to understand:
New-ADUser -Name "Tony Madigan" `
-GivenName Tony -Surname Madigan `
-SamAccountName tmadigan `
-UserPrincipalName tmadigan@corp.contoso.com `
-Path "ou=Denver Users,ou=Denver,dc=corp,dc=contoso,dc=com" `
-Instance $templateDenverUser `
-AccountPassword (ConvertTo-SecureString -AsPlainText "Pa$$w0rd" -Force)
11. Note the –Instance parameter in the preceding command. This is used to specify an instance of an existing object that is to be used as a template for a new object. Refer to http://technet.microsoft.com/en-us/library/hh852238 if you want to learn more about how to use the –Instanceparameter with the New-ADUser cmdlet.
12. Run the following command to get the configured properties of the new user account with the two custom properties that were retrieved from the template account:
Get-ADUser -Identity tmadigan -Properties `
Name,GivenName,Surname,SamAccountName,UserPrincipalName,AccountExpirationDate,City
13. Verify from the output of the preceding command that the new user account has the correct properties.
14. Switch back to ACAC, navigate to the Denver Users OU beneath the Denver OU, open the properties of Tony Madigan’s user account, and verify that the properties were configured as expected.
Suggested practice exercises
The following additional practice exercises are designed to give you more opportunities to practice what you’ve learned and to help you successfully master the lessons presented in this chapter:
![]() Exercise 1 Create a Windows PowerShell script that takes an existing template account and uses it as a basis for bulk-creating new user accounts whose unique properties have been specified in a CSV file you created using Microsoft Excel.
Exercise 1 Create a Windows PowerShell script that takes an existing template account and uses it as a basis for bulk-creating new user accounts whose unique properties have been specified in a CSV file you created using Microsoft Excel.
![]() Exercise 2 Create a series of Windows PowerShell commands that create three new groups, add some users to each group from the bulk users created in the previous practice, and configure and assign a unique fine-grained password policy to each group.
Exercise 2 Create a series of Windows PowerShell commands that create three new groups, add some users to each group from the bulk users created in the previous practice, and configure and assign a unique fine-grained password policy to each group.
Answers
This section contains the answers to the lesson review questions in this chapter.
Lesson 1
1. Correct answer: D
A. Incorrect: Column Explorer simplifies browsing through the levels of your Active Directory hierarchy by displaying all the child containers of the parent container (the container for which you opened Column Explorer) in a single column. It does not, however, enable you to quickly access the last three containers you accessed.
B. Incorrect: The navigation pane is the left pane of ADAC and enables you to browse through Active Directory by using the tree view, which is similar to the Active Directory Users And Computers console tree, or by using the new list view, which you can customize by adding navigation nodes. It does not, however, enable you to quickly access the last three containers you accessed.
C. Incorrect: Navigation nodes are custom nodes you can add to the new list view of ADAC to provide a quick way of accessing specific containers within the directory. It does not, however, enable you to access the last three containers you accessed.
D. Correct: The Most Recently Used (MRU) list automatically appears under a navigation node when you visit at least one container in this navigation node. The MRU list always contains the last three containers you visited in a particular navigation node. Every time you select a particular container, this container is added to the top of the MRU list and the last container in the MRU list is removed from it.
2. Correct answers: A, B, and C
A. Correct: To create sites, you can use either Windows PowerShell or the Active Directory Sites And Services MMC snap-in.
B. Correct: To create domains in your forest, you can use either Windows PowerShell or Server Manager to install the Active Directory Domain Services role on a server and promote the server as the first domain controller in a new child domain or tree domain.
C. Correct: To create explicit trusts with domains in your forest or in another forest, you can use either Windows PowerShell or the Active Directory Domains And Trusts MMC snap-in.
D. Incorrect: You can use either ADAC or Windows PowerShell to create new groups in Active Directory.
3. Correct answer: B
A. Incorrect: You can use ADAC to raise the forest functional level by right-clicking the forest root domain.
B. Correct: You cannot use ADAC to delegate administrative control over an OU and the objects it contains. You must use the Active Directory Users And Computers MMC snap-in to perform this task.
C. Incorrect: You can use ADAC to enable and use the Active Directory Recycle Bin.
D. Incorrect: You can use ADAC to configure fine-grained password policies and view the results of a policy application on user accounts.
Lesson 2
1. Correct answer: D
A. Incorrect: An object in the Live state is functioning in Active Directory. Its recycled object lifetime has not expired.
B. Incorrect: An object in the Deleted state has been moved to the Deleted Objects container in Active Directory and will remain in this container for the deleted object lifetime, which is configure by default as 180 days. As long as it remains in the Deleted state, its recycled object lifetime has not expired.
C. Incorrect: When an object is in the Recycled state, its deleted object lifetime has expired. It remains in the Recycled state until its recycled object lifetime has expired.
D. Correct: When an object is in the Removed state, its recycled object lifetime has expired. The Active Directory garbage-collection process physically removes such an object from the directory database.
2. Correct answer: C
A. Incorrect: You can use the Set-ADForestMode cmdlet to raise the forest functional level to Windows Server 2008 R2 or higher, which is a requirement before enabling the AD Recycle Bin in your environment. However, this cmdlet does not enable the AD Recycle Bin feature.
B. Incorrect: This is not a Windows PowerShell cmdlet.
C. Correct: You can use the Enable-ADOptionalFeature cmdlet to enable the AD Recycle Bin feature and other optional features of Active Directory.
D. Incorrect: You can use the New-ADFineGrainedPasswordPolicy cmdlet to create a new fine-grained password policy. It has nothing to do with the AD Recycle Bin feature.
3. Correct answers: B and D
A. Incorrect: Assigning fine-grained password policies to individual users is not a best practice. Assigning fine-grained password policies to groups makes such policies much easier to manage.
B. Correct: You should ensure that each fine-grained password policy has its own unique precedence value to prevent policy conflicts that can lead to unexpected results.
C. Incorrect: Although you can choose to ensure that each group has at least one fine-grained password policy assigned to it, this is not necessary if you have a fallback policy configured for the domain.
D. Correct: You should make sure you have configured a fallback policy for the domain. This can be either a fine-grained password policy that has a higher precedence value than any other policy or the password and account lockout settings defined in the Default Domain Policy GPO.
Lesson 3
1. Correct answer: B
A. Incorrect: You can use Get-ADUser to retrieve one or more user accounts. It is useful, for example, when you need to retrieve an existing user account to use as a template account for creating additional user accounts. You also need to use other cmdlets if you want to bulk-create user accounts.
B. Correct: The Import-Csv cmdlet enables you to read in data from a comma-separated values (CSV) file to create multiple user accounts in a single operation.
C. Incorrect: The Set-ADAccountPassword cmdlet enables you to set the password for a user account. You also need to use other cmdlets if you want to bulk-create user accounts.
D. Incorrect: The Where-Object cmdlet enables you to filter data returned by other cmdlets. You also need to use other cmdlets if you want to bulk-create user accounts.
2. Correct answer: C
A. Incorrect: The ConvertTo-SecureString cmdlet converts an encrypted standard string to a secure string. It can also convert plain text to a secure string.
B. Incorrect: The ConvertFrom-SecureString cmdlet converts a secure string to an encrypted standard string.
C. Correct: The –Force parameter confirms that you understand the implications of using the AsPlainText parameter of the ConvertTo-SecureString cmdlet and still want to use it. When the –Force parameter is specified, no confirmation prompt is displayed when you use the ConvertTo-SecureString cmdlet.
D. Incorrect: When the –Force parameter is specified, no confirmation prompt is displayed when you use the ConvertTo-SecureString cmdlet. In other words, the –Force parameter suppresses the prompt instead of displaying it.
3. Correct answers: B and C
A. Incorrect: Get-Command –Module ActiveDirectory lists all of the cmdlets in the Active Directory Windows PowerShell module.
B. Correct: Get-Command *ADGroup* lists cmdlets you can use for managing Active Directory groups.
C. Correct: Get-Help *ADGroup* lists cmdlets you can use for managing Active Directory groups and gives a brief summary of what each cmdlet does.
D. Incorrect: Get-Help ActiveDirectory lists all of the cmdlets in the Active Directory Windows PowerShell module and gives a brief summary of what each cmdlet does.
All materials on the site are licensed Creative Commons Attribution-Sharealike 3.0 Unported CC BY-SA 3.0 & GNU Free Documentation License (GFDL)
If you are the copyright holder of any material contained on our site and intend to remove it, please contact our site administrator for approval.
© 2016-2026 All site design rights belong to S.Y.A.