Training Guide Installing and Configuring Windows Server 2012 R2 (2014)
Chapter 9. Print and document services
Managing printers and print servers isn’t one of the more exciting jobs of the IT administrator, but it’s an important one. The so-called paperless office might never arrive, despite the numerous advances in both computer hardware and software in recent years. As a result, administrators still need to know how to deploy, configure, and manage Microsoft Windows print servers in enterprise environments. And that’s what this chapter is all about.
Lessons in this chapter:
![]() Lesson 1: Deploying and managing print servers
Lesson 1: Deploying and managing print servers
![]() Lesson 2: Managing print servers using Windows PowerShell
Lesson 2: Managing print servers using Windows PowerShell
Before you begin
To complete the practice exercises in this chapter
![]() You need to know how to perform a clean install of Windows Server 2012 R2 and perform initial configuration tasks like configuring the server’s TCP/IP settings for Internet connectivity.
You need to know how to perform a clean install of Windows Server 2012 R2 and perform initial configuration tasks like configuring the server’s TCP/IP settings for Internet connectivity.
![]() You need to know how to promote a server running Windows Server 2012 R2 as a domain controller.
You need to know how to promote a server running Windows Server 2012 R2 as a domain controller.
![]() You also should have at least rudimentary knowledge of using Windows PowerShell.
You also should have at least rudimentary knowledge of using Windows PowerShell.
Lesson 1: Deploying and managing print servers
You can use Server Manager to centralize the deployment of Windows Server 2012 and Windows Server 2012 R2 print servers. Once you have installed the Print And Document Services role on remote servers, you can use the Print Management console to configure and manage your print servers, printers, and printer drivers. You can also use the console to deploy and manage printer connections for clients on your network.
After this lesson, you will be able to:
![]() Use Server Manager to install different role services of the Print And Document Services role.
Use Server Manager to install different role services of the Print And Document Services role.
![]() Use Server Manager to install the role management tools for Print And Document Services.
Use Server Manager to install the role management tools for Print And Document Services.
![]() Use the Print Management console to manage print servers, printer drivers, and printers.
Use the Print Management console to manage print servers, printer drivers, and printers.
![]() Deploy printer connections to users and client computers using Group Policy.
Deploy printer connections to users and client computers using Group Policy.
![]() Understand the tools used for migrating print queues and printer drivers from print servers running earlier versions of Windows Server.
Understand the tools used for migrating print queues and printer drivers from print servers running earlier versions of Windows Server.
Estimated lesson time: 30 minutes
Deploying print servers
Deploying print servers in an enterprise environment involves performing the following tasks:
![]() Installing the Print Server role service and optionally other role services of the Print And Document Services role on target servers in your environment.
Installing the Print Server role service and optionally other role services of the Print And Document Services role on target servers in your environment.
![]() Installing the Print And Document Services Tools feature on the computer or computers you will be using to manage the print servers and printers in your environment.
Installing the Print And Document Services Tools feature on the computer or computers you will be using to manage the print servers and printers in your environment.
The following sections show how to perform these tasks using Server Manager.
Installing the Print Server role service
You can use the Add Roles And Features Wizard to deploy print servers on the local server or on remote servers running Windows Server 2012 or Windows Server 2012 R2. For example, to configure the local server as a print server, perform the following tasks:
1. Launch the Add Roles And Features Wizard from the Manage menu on the Server Manager toolbar.
2. Select Role-Based Or Feature-Based Installation and then select the local server from the server pool.
3. On the Select Server Roles page, select the Print And Document Services role and click OK when prompted to install the management tools for this role.
4. On the Select Role Services page, select the Print Server role service and proceed through the remaining steps of the wizard.
To use Server Manager to configure a remote server as a print server, perform these steps:
1. Make sure the remote server has been added to the server pool on the computer on which you are running Server Manager.
2. Launch the Add Roles And Features Wizard from the Manage menu on the Server Manager toolbar and select Role-Based Or Feature-Based Installation.
3. Select the remote server from the server pool and then proceed through the remaining steps of the wizard.
Note: Deploying remote print servers
When you configure a remote server as a print server, you don’t need to install the management tools for the Print And Document Services role on the remote server if you plan on administering all the print servers in your environment from a central location.
Installing other role services
As Figure 9-1 shows, there are additional role services of the Print And Document Services role that you can install when you configure a server running Windows Server 2012 or Windows Server 2012 R2 as a print server. These other role services are optional and provide the following capabilities:
![]() Distributed Scan Server This role service can receive scanned documents from network scanners and route the documents to their correct destinations. When you install this role service, the Scan Management snap-in is also installed and you can use this snap-in to manage network scanners and configure scan processes. Because a snap-in is installed with this role service, you cannot install Distributed Scan Server on a Server Core installation of Windows Server 2012 or Windows Server 2012 R2.
Distributed Scan Server This role service can receive scanned documents from network scanners and route the documents to their correct destinations. When you install this role service, the Scan Management snap-in is also installed and you can use this snap-in to manage network scanners and configure scan processes. Because a snap-in is installed with this role service, you cannot install Distributed Scan Server on a Server Core installation of Windows Server 2012 or Windows Server 2012 R2.
Distributed Scan Server was introduced in Windows Server 2008 R2 and has not significantly changed in Windows Server 2012 or Windows Server 2012 R2. For more information on this feature, see “Install Distributed Scan Server” at http://technet.microsoft.com/en-us/library/jj134196.
![]() Internet Printing This role service installs the Web Server (IIS) role and creates a new website that users can use to manage their print jobs. Internet Printing also allows users who have the Internet Printing Client installed on their computers to use a web browser to open http://<server_name>/printers to connect and print to shared printers on a Windows print server using the Internet Printing Protocol (IPP). Client computers running Windows 7 and later can install Internet Printing Client as an optional in-box feature.
Internet Printing This role service installs the Web Server (IIS) role and creates a new website that users can use to manage their print jobs. Internet Printing also allows users who have the Internet Printing Client installed on their computers to use a web browser to open http://<server_name>/printers to connect and print to shared printers on a Windows print server using the Internet Printing Protocol (IPP). Client computers running Windows 7 and later can install Internet Printing Client as an optional in-box feature.
Internet Printing and IPP were introduced in Windows Server 2003. The feature was enhanced in Windows Server 2008 and has not significantly changed since then. For more information on this feature, see “Internet Printing and Resulting Internet Communication in Windows 7 and Windows Server 2008 R2” at http://technet.microsoft.com/en-us/library/ee126092(v=WS.10).aspx.
![]() Line Printer Daemon (LPD) Service This role service enables UNIX-based and Linux-based computers to use the Line Printer Remote (LPR) service to print to shared printers on a Windows print server. LPD and LPR were introduced in Windows 2000 Server as part of the Print Services for UNIX component. For information on using LPD and LPR, see “Printing with UNIX Clients and Servers Using LPR/LPD” at http://technet.microsoft.com/en-us/library/cc976747.aspx.
Line Printer Daemon (LPD) Service This role service enables UNIX-based and Linux-based computers to use the Line Printer Remote (LPR) service to print to shared printers on a Windows print server. LPD and LPR were introduced in Windows 2000 Server as part of the Print Services for UNIX component. For information on using LPD and LPR, see “Printing with UNIX Clients and Servers Using LPR/LPD” at http://technet.microsoft.com/en-us/library/cc976747.aspx.
Beginning with Windows Server 2012, the LPD and LPR services are deprecated. This means that support for these services will likely be removed in future versions of Windows Server.
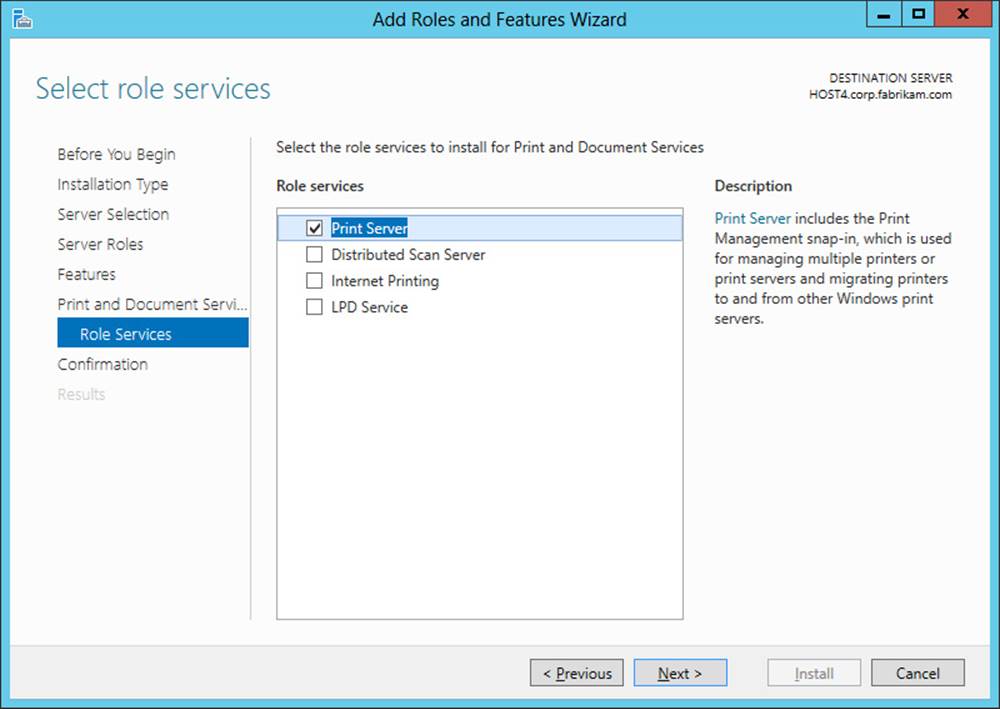
FIGURE 9-1 Configure a server as a print server.
Real World: Deprecated features
An important aspect of the IT administrator’s job is to plan for the future. Because of this, it’s important for you to know which features are deprecated in Windows Server 2012 and Windows Server 2012 R2 so that you can find alternate methods for implementing their functionality if it is still required. For a list of changes, see “Features Removed or Deprecated in Windows Server 2012 R2” at http://technet.microsoft.com/en-us/library/dn303411.aspx.
Installing the Print And Document Services Tools feature
Print And Document Services Tools is a subfeature of the Role Administration Tools section of the Remote Server Administration Tools feature. You don’t need to install the Print And Document Services Tools on the remote servers on which you install the Print Server role. Instead, install the Print And Document Services Tools feature on the computer you will be using to manage all of the print servers in your environment. This computer might be one of the following:
![]() A server running Windows Server 2012 or Windows Server 2012 R2, in which case you can use the Add Roles And Features Wizard, as shown in Figure 9-2, to install the Print And Document Services Tools feature on the server
A server running Windows Server 2012 or Windows Server 2012 R2, in which case you can use the Add Roles And Features Wizard, as shown in Figure 9-2, to install the Print And Document Services Tools feature on the server
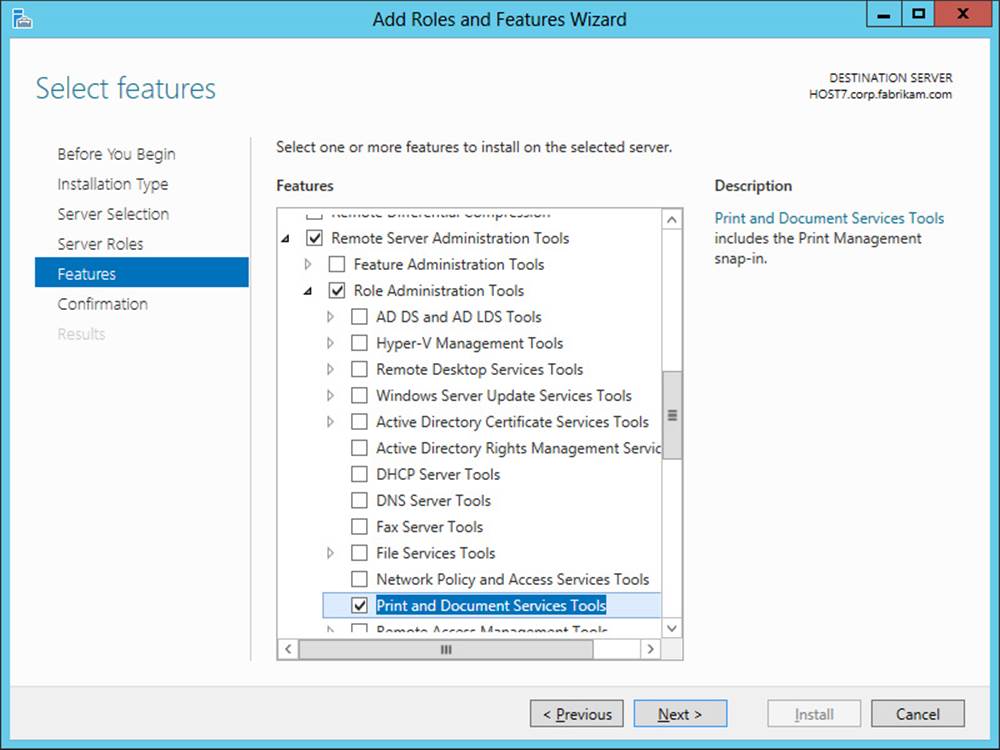
FIGURE 9-2 Install the management tools for print servers.
![]() A client computer running Windows 8 or Windows 8.1, in which case you can install the Remote Server Administration Tools (RSAT) for Windows 8 or RSAT for Windows 8.1 and enable the Print And Document Services Tools feature on the computer
A client computer running Windows 8 or Windows 8.1, in which case you can install the Remote Server Administration Tools (RSAT) for Windows 8 or RSAT for Windows 8.1 and enable the Print And Document Services Tools feature on the computer
Installing the Print And Document Services Tools on a computer installs the following tools for managing print servers and printers:
![]() Print Management Microsoft Management Console (MMC) snap-in
Print Management Microsoft Management Console (MMC) snap-in
![]() PrintManagement module for Windows PowerShell
PrintManagement module for Windows PowerShell
The remainder of this lesson focuses on using the Print Management snap-in to manage the print servers and printers in your environment, and Lesson 2 in this chapter describes how to use the Windows PowerShell cmdlets in the PrintManagement module to do the same.
![]() Quick check
Quick check
![]() You plan on deploying the LPD role service to allow printing with UNIX clients and servers. Is this a good idea?
You plan on deploying the LPD role service to allow printing with UNIX clients and servers. Is this a good idea?
Quick check answer
![]() Not really. The LPD role service is deprecated in Windows Server 2012 and Windows Server 2012 R2 and will therefore likely be removed in the next version of Windows Server. So it’s best if you find another solution that meets your printing needs.
Not really. The LPD role service is deprecated in Windows Server 2012 and Windows Server 2012 R2 and will therefore likely be removed in the next version of Windows Server. So it’s best if you find another solution that meets your printing needs.
Managing printers using Print Management

The Print Management snap-in was introduced in Windows Server 2003 R2. The snap-in was then enhanced with new functionality and performance and scalability improvements, first in Windows Server 2008 and then in Windows Server 2008 R2. The snap-in has not significantly changed in Windows Server 2012 or Windows Server 2012 R2. This is good news for Windows administrators because it means they can use their existing knowledge of how to manage print servers running previous versions of Windows Server. As a result, the following discussion about how to use this snap-in to manage print servers and printers will be concise and will cover only the following tasks:
![]() Launching Print Management
Launching Print Management
![]() Managing print servers
Managing print servers
![]() Managing printer drivers
Managing printer drivers
![]() Managing printers
Managing printers
![]() Deploying printer connections
Deploying printer connections
![]() Migrating print servers
Migrating print servers
Launching Print Management
Installing the Print And Document Services role and its role management tools adds a new page called Print Services to Server Manager. (See Figure 9-3.) Using this new page, you can do the following:
![]() View printing-related events
View printing-related events
![]() Restart the Print Spooler service if needed
Restart the Print Spooler service if needed
![]() Start performance counters on the print server
Start performance counters on the print server
![]() View a list of installed role services for the Print And Document Services role
View a list of installed role services for the Print And Document Services role
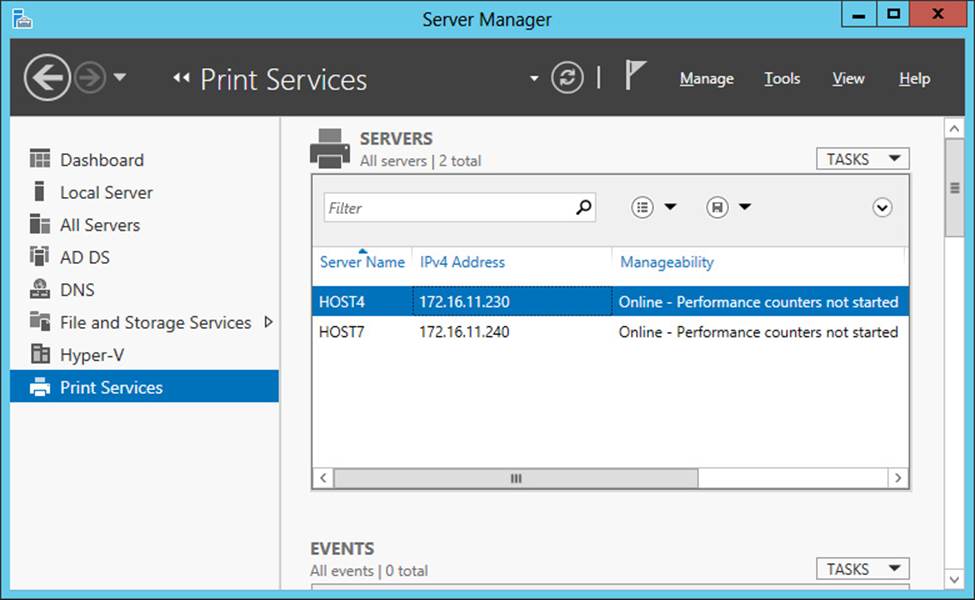
FIGURE 9-3 The Print Services page is added to Server Manager.
You can also launch the Print Management console from the Tools menu in Server Manager. When Print Management is opened on a print server, the local host is visible in the console tree unless it has been removed. You can add other print servers to the console so that you can manage them by doing the following:
1. Right-click the Print Servers node and select Add/Remove Servers to open the Add/Remove Servers dialog box:
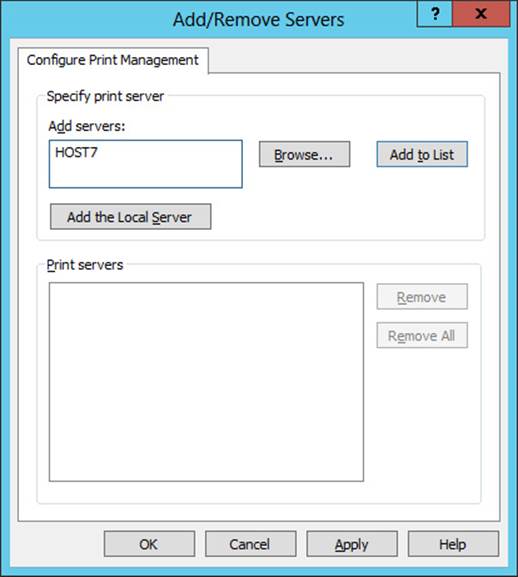
2. If the local server is not visible, click Add The Local Server.
3. In the Add Servers text box, type the name of a remote print server you want to manage and click Add To List. You can also browse for other print servers on the network.
4. Click OK when you are finished.
For example, Figure 9-4 shows Print Management being used to manage two print servers:
![]() The local server named HOST4
The local server named HOST4
![]() A remote server named HOST7
A remote server named HOST7
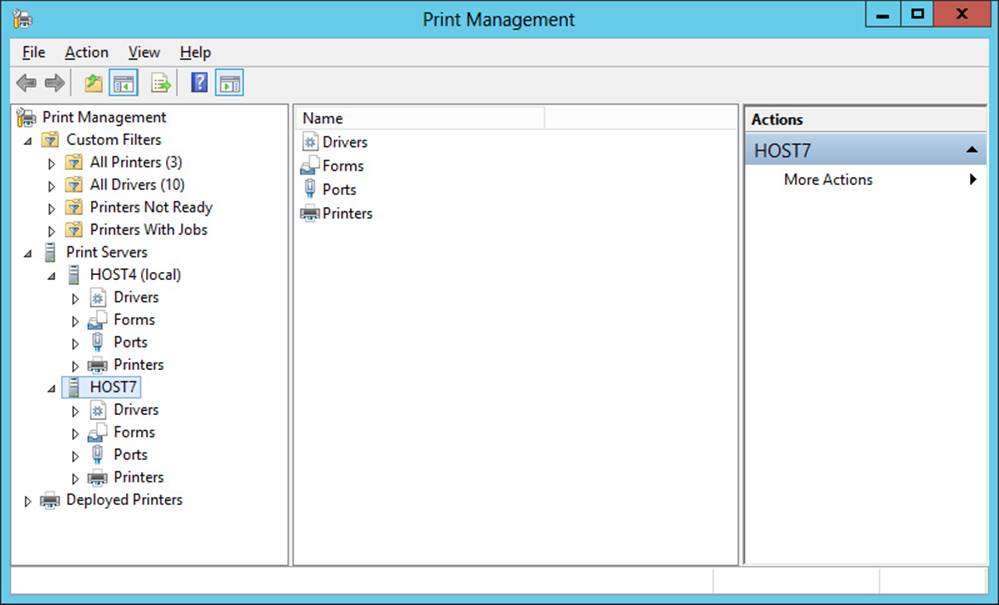
FIGURE 9-4 Manage print servers using the Print Management console.
The console tree of Print Management has the following nodes:
![]() Print Management This root node allows you to add or remove print servers and to migrate printers.
Print Management This root node allows you to add or remove print servers and to migrate printers.
![]() Custom Filters This node allows you to quickly view all printers, all printer drivers, all printers that are not ready to print, or all printers that have pending print jobs. You can also use this node to create new filters for filtering printers or printer drivers according to conditions you specify.
Custom Filters This node allows you to quickly view all printers, all printer drivers, all printers that are not ready to print, or all printers that have pending print jobs. You can also use this node to create new filters for filtering printers or printer drivers according to conditions you specify.
![]() Print Servers This node displays all print servers being managed by the console as subnodes. You can also use this node to add or remove print servers from the console as described previously.
Print Servers This node displays all print servers being managed by the console as subnodes. You can also use this node to add or remove print servers from the console as described previously.
![]() <servername> Each node that displays the name of a print server allows you to manage the print server, add printers to it, and perform other management tasks. Each print server node also has four subnodes that allow you to view and manage printer drivers, printer forms, printer ports, and printers.
<servername> Each node that displays the name of a print server allows you to manage the print server, add printers to it, and perform other management tasks. Each print server node also has four subnodes that allow you to view and manage printer drivers, printer forms, printer ports, and printers.
![]() Deployed Printers This node allows you to view printers that have been deployed using Group Policy.
Deployed Printers This node allows you to view printers that have been deployed using Group Policy.
The sections that follow provide more details about performing some of these tasks.
Managing print servers
By right-clicking a print server and selecting Properties, you can view or modify the print server’s properties. For example, Figure 9-5 shows the Security tab, which you use to configure permissions for different groups and users in your environment to control such things as whether they should be allowed to print to the server. For example, if you wanted to restrict the use of printers on a particular print server to users in a certain department, you could remove the Everyone permissions entry that appears in the Group Or User Names area and add a new entry for a security group to which users in that department belong.
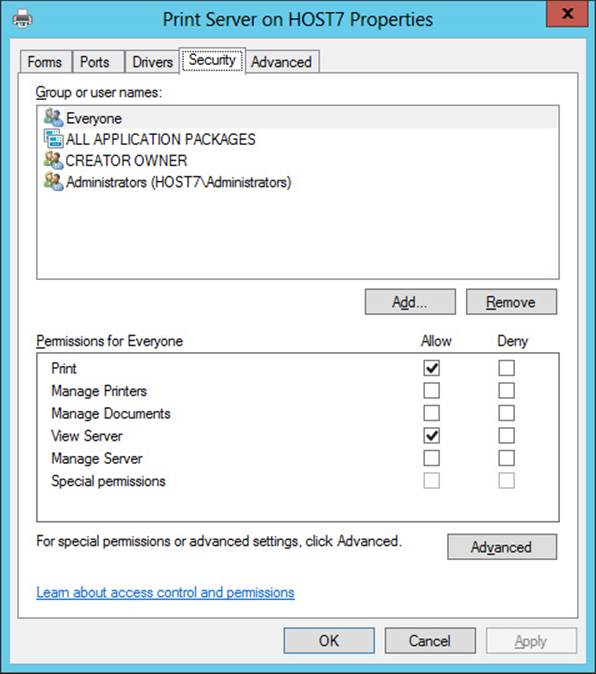
FIGURE 9-5 Configure print permissions for a print server.
Other management tasks you can perform using the Properties page of a print server include:
![]() Creating new forms for special print requirements—for example, for printing to notecards or poster paper.
Creating new forms for special print requirements—for example, for printing to notecards or poster paper.
![]() Adding new printer ports, including local ports and standard TCP/IP ports. For example, before connecting a new network printer you should create a standard TCP/IP port for it.
Adding new printer ports, including local ports and standard TCP/IP ports. For example, before connecting a new network printer you should create a standard TCP/IP port for it.
![]() Adding new printer drivers to the server—for example, when you will be deploying new printers for which Windows Server 2012 and Windows Server 2012 R2 have no in-box drivers.
Adding new printer drivers to the server—for example, when you will be deploying new printers for which Windows Server 2012 and Windows Server 2012 R2 have no in-box drivers.
![]() Changing the location of the spooler folder—for example, if the volume the folder currently is on is almost full.
Changing the location of the spooler folder—for example, if the volume the folder currently is on is almost full.
![]() Displaying or hiding informational notifications for printers.
Displaying or hiding informational notifications for printers.
More Info: Configuring permissions
For detailed information about the different print permissions for a print server and how to configure them, see “Assign Delegated Print Administrator and Printer Permission Settings in Windows Server 2012” at http://technet.microsoft.com/en-us/library/jj190062.
Managing printer drivers
As shown in Figure 9-6, the Drivers node beneath each print server node displays a list of the currently installed printer drivers on the server. Some of the tasks you can perform with installed drivers include:
![]() Deleting the driver, which uninstalls the printer driver but leaves the driver package in the driver store in case you want to reinstall the driver later.
Deleting the driver, which uninstalls the printer driver but leaves the driver package in the driver store in case you want to reinstall the driver later.
![]() Removing the driver package, which uninstalls the printer driver and completely removes the driver package from the driver store. If you later want to reinstall the driver you will need to supply the driver software.
Removing the driver package, which uninstalls the printer driver and completely removes the driver package from the driver store. If you later want to reinstall the driver you will need to supply the driver software.
![]() Displaying additional driver details on the Properties page for the driver—for example, the driver type, driver path, and names of the various driver files.
Displaying additional driver details on the Properties page for the driver—for example, the driver type, driver path, and names of the various driver files.
![]() Configuring driver isolation, which enables printer drivers to run in processes that are separate from the process in which the Print Spooler service runs. Drivers can run in isolation mode only if they have been specifically designed to be able to run in an isolated or shared process separate from the spooler process. The available isolation modes include the following:
Configuring driver isolation, which enables printer drivers to run in processes that are separate from the process in which the Print Spooler service runs. Drivers can run in isolation mode only if they have been specifically designed to be able to run in an isolated or shared process separate from the spooler process. The available isolation modes include the following:
![]() Shared The driver runs in a process shared with other printer drivers but separate from the spooler process.
Shared The driver runs in a process shared with other printer drivers but separate from the spooler process.
![]() Isolated The driver runs in a process separate from other printer drivers and from the spooler process.
Isolated The driver runs in a process separate from other printer drivers and from the spooler process.
![]() None The driver runs in the spooler process.
None The driver runs in the spooler process.
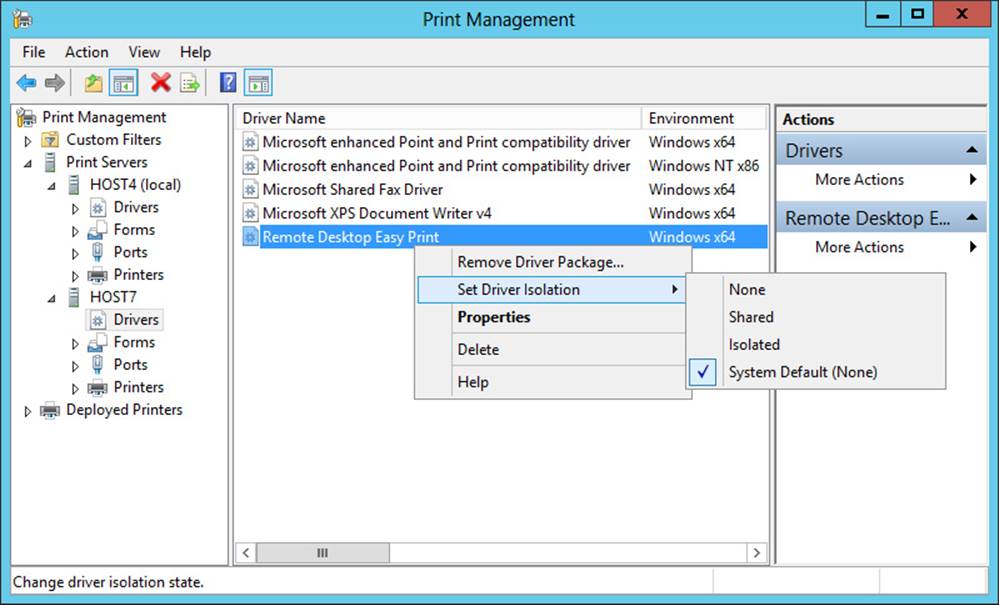
FIGURE 9-6 Configure driver isolation for a printer driver.
You can also right-click the Drivers node for a print server and select one of the following options:
![]() Add Driver Select this option to launch the Add Printer Driver Wizard, which enables you to install new printer drivers from installation media you provide.
Add Driver Select this option to launch the Add Printer Driver Wizard, which enables you to install new printer drivers from installation media you provide.
![]() Manage Drivers Select this option to display the Drivers tab of the print server’s Properties page, as shown in Figure 9-7, which you use to display the name, processor, and type for each installed printer driver on the server.
Manage Drivers Select this option to display the Drivers tab of the print server’s Properties page, as shown in Figure 9-7, which you use to display the name, processor, and type for each installed printer driver on the server.
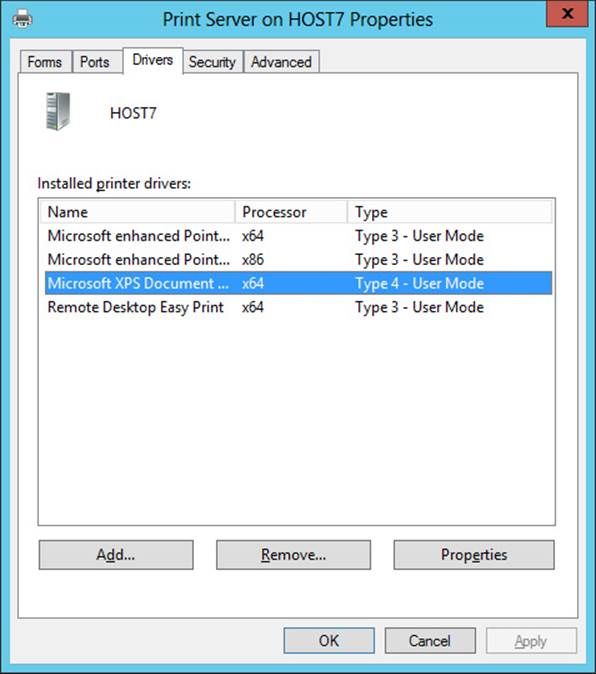
FIGURE 9-7 View the installed drivers on a print server.
Note: Finding updated drivers
Before you search for updated printer drivers on the vendor’s website, try clicking Windows Update on the Printer Driver Selection page of the Add Printer Driver Wizard. Doing this will update the list of printer drivers available for installation from your print server’s driver store.
Windows Server 2012 and Windows Server 2012 R2 print servers support the installation of two types of printer drivers:
![]() v4 printer drivers This type of printer driver was introduced in Windows Server 2012. These drivers have a smaller disk footprint, can support multiple devices, support driver isolation so that they won’t crash the application doing the printing if the printer driver fails, and do not require installing drivers that match the client architecture. The v4 printer drivers come in two subtypes:
v4 printer drivers This type of printer driver was introduced in Windows Server 2012. These drivers have a smaller disk footprint, can support multiple devices, support driver isolation so that they won’t crash the application doing the printing if the printer driver fails, and do not require installing drivers that match the client architecture. The v4 printer drivers come in two subtypes:
![]() Print-Class Drivers These drivers support features for a broad set of devices that use the same printer description language, such as PCL, PS, or XPS.
Print-Class Drivers These drivers support features for a broad set of devices that use the same printer description language, such as PCL, PS, or XPS.
![]() Model-Specific Drivers These drivers are designed for specific printer models.
Model-Specific Drivers These drivers are designed for specific printer models.
![]() v3 printer drivers This type of driver was introduced in Windows 2000 and was used through Windows Server 2008 R2.
v3 printer drivers This type of driver was introduced in Windows 2000 and was used through Windows Server 2008 R2.
Real World: Driver sprawl
One thing that made managing print servers difficult in previous versions of Windows Server was the v3 printer driver model, which required separate drivers for each client architecture (x64 or x86) and for each model of print device. As a result, administrators of large enterprises often had to manage hundreds—or even thousands—of different printer drivers for the broad range of devices deployed throughout their organization.
Beginning with Windows Server 2012, the v4 printer driver model enables a single printer driver to support multiple models of print devices for any client architecture. This will eventually mean fewer printer drivers to manage across an enterprise, though some vendors might not provide updated v4 drivers for some of their older printer devices. This means you might still need to install some v3 drivers on your Windows Server 2012 or Windows Server 2012 R2 print servers. For more information on v4 printer drivers, see “Print and Document Services Architecture” at http://technet.microsoft.com/en-us/library/jj134171.
Managing printers
Right-clicking the Printers node of any print server launches the Network Printer Installation Wizard shown in Figure 9-8. You can use this wizard to search for printers on your network, add a network printer using an existing printer port, or create a new port to add the new printer.
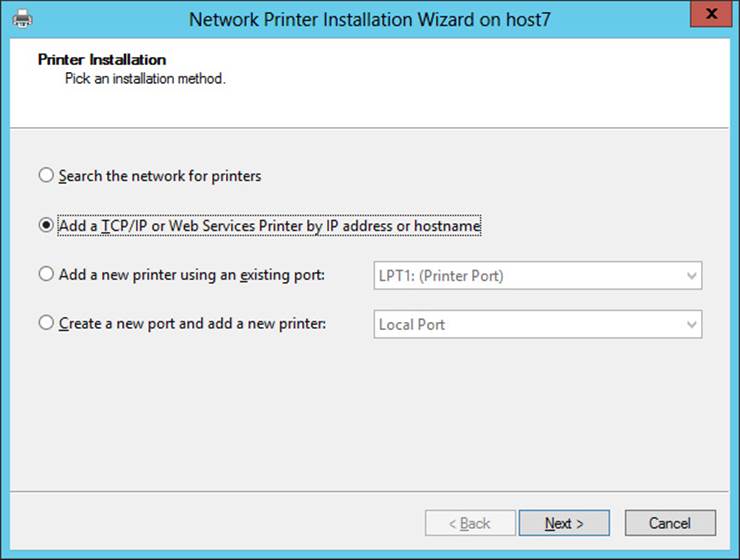
FIGURE 9-8 Install a new TCP/IP network printer.
Selecting the Printers node allows you to view and manage printers that have been installed on the print server. As shown in Figure 9-9, the tasks you can perform on a printer include:
![]() Opening the print queue to view, pause, resume, restart, or cancel pending print jobs on the printer.
Opening the print queue to view, pause, resume, restart, or cancel pending print jobs on the printer.
![]() Listing the printer in Active Directory to make it easier for users to search for printers in the directory.
Listing the printer in Active Directory to make it easier for users to search for printers in the directory.
![]() Deploying the printer for targeted users or computers using Group Policy.
Deploying the printer for targeted users or computers using Group Policy.
![]() Printing a test page to verify the printer is functioning properly.
Printing a test page to verify the printer is functioning properly.
![]() Opening the Properties page of the printer to manage the various settings available.
Opening the Properties page of the printer to manage the various settings available.
![]() Enabling Branch Office Direct Printing, a feature introduced in Windows Server 2012 and enhanced in Windows Server 2012 R2 that helps branch-office sites reduce their wide area network (WAN) usage by printing directly to a print device instead of spooling print jobs to a print queue on the print server. Branch Office Direct Printing requires print servers to be running Windows Server 2012 or Windows Server 2012 R2 and client computers to be running Windows 8 or Windows 8.1. For more information on this feature, see “Branch Office Direct Printing Overview” at http://technet.microsoft.com/en-us/library/jj134156 and “Branch Office Direct Printing Technical Details” at http://technet.microsoft.com/en-us/library/jj134152.aspx.
Enabling Branch Office Direct Printing, a feature introduced in Windows Server 2012 and enhanced in Windows Server 2012 R2 that helps branch-office sites reduce their wide area network (WAN) usage by printing directly to a print device instead of spooling print jobs to a print queue on the print server. Branch Office Direct Printing requires print servers to be running Windows Server 2012 or Windows Server 2012 R2 and client computers to be running Windows 8 or Windows 8.1. For more information on this feature, see “Branch Office Direct Printing Overview” at http://technet.microsoft.com/en-us/library/jj134156 and “Branch Office Direct Printing Technical Details” at http://technet.microsoft.com/en-us/library/jj134152.aspx.

FIGURE 9-9 Manage a printer installed on a print server.
Event Logging for Branch Office Direct Printing
Branch Office Direct Printing has been enhanced in Windows Server 2012 R2 with support for event logging. This means that printing events are written to the print server when Branch Office Direct Printing has been enabled for a print queue. This new functionality makes it easier to identify and fix printing issues at remote office locations. In addition, if connectivity between the branch office (where the user is printing the job) and the main office (where the print server resides) is interrupted, the logged events are automatically cached until connectivity is restored to prevent loss of information.
Event logging is enabled by default for any print queue on which Branch Office Direct Printing has been enabled. For more information on this enhancement, see “Event Logging for Branch Office Direct Printing” at http://technet.microsoft.com/en-us/library/dn434036.aspx#bkmk_log.
As Figure 9-10 shows, the Properties page for a printer has various settings grouped onto different tabs as follows:
![]() General You use this tab to specify the printer’s location, configure printing preferences, and print a test page.
General You use this tab to specify the printer’s location, configure printing preferences, and print a test page.
![]() Sharing You use this tab to share or unshare the printer, specify whether to render print jobs on client computers, and specify whether the printer should be listed in the directory.
Sharing You use this tab to share or unshare the printer, specify whether to render print jobs on client computers, and specify whether the printer should be listed in the directory.
![]() Ports You use this tab to select the printer port for the printer, add new ports, and configure or delete existing ports. (See Figure 9-10.) You can also create a printing pool to automatically distribute print jobs to the next available printer when high-volume printing is needed for your environment. A printing pool consists of a single logical printer connected to multiple physical print devices using multiple ports on the print server. With printer pooling, the physical print device that is idle receives the next document sent to the logical printer.
Ports You use this tab to select the printer port for the printer, add new ports, and configure or delete existing ports. (See Figure 9-10.) You can also create a printing pool to automatically distribute print jobs to the next available printer when high-volume printing is needed for your environment. A printing pool consists of a single logical printer connected to multiple physical print devices using multiple ports on the print server. With printer pooling, the physical print device that is idle receives the next document sent to the logical printer.
![]() Advanced You use this tab to specify when the printer is available, the printer’s priority, how documents should be spooled, separator pages, and miscellaneous other settings for the printer. By creating multiple logical printers that print to the same physical print device, assigning different priorities to each logical printer, creating different groups for users who should have different levels of priority access to the print device, and configuring permissions for each group using the Security tab, you can allow documents printed by users with high-priority access to bypass a queue of lower-priority documents that are waiting to be printed on the device.
Advanced You use this tab to specify when the printer is available, the printer’s priority, how documents should be spooled, separator pages, and miscellaneous other settings for the printer. By creating multiple logical printers that print to the same physical print device, assigning different priorities to each logical printer, creating different groups for users who should have different levels of priority access to the print device, and configuring permissions for each group using the Security tab, you can allow documents printed by users with high-priority access to bypass a queue of lower-priority documents that are waiting to be printed on the device.
![]() Security You use this tab to configure permissions that control how different groups or users can use the printer. By default, the built-in Everyone group has the Print permission configured as Allow and the built-in Administrators group on the server has the Print, Manage This Printer, and Manage Documents permissions configured as Allow.
Security You use this tab to configure permissions that control how different groups or users can use the printer. By default, the built-in Everyone group has the Print permission configured as Allow and the built-in Administrators group on the server has the Print, Manage This Printer, and Manage Documents permissions configured as Allow.
![]() Device Settings You use this tab to specify settings for the print device, such as the form to tray assignment.
Device Settings You use this tab to specify settings for the print device, such as the form to tray assignment.
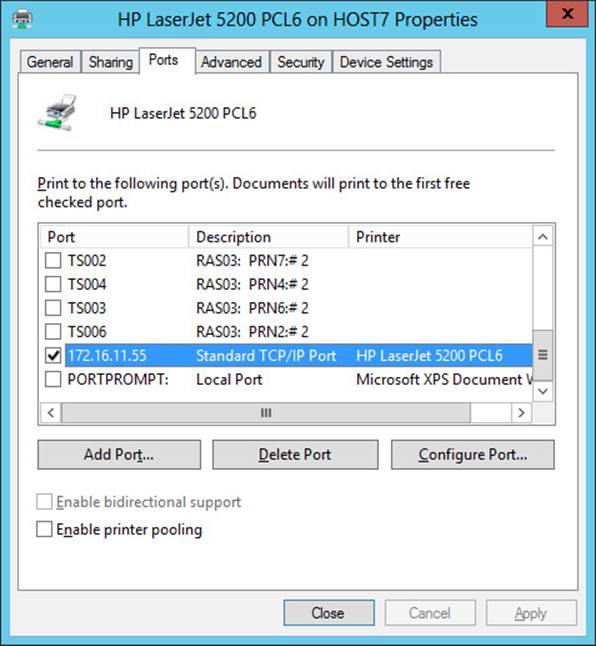
FIGURE 9-10 Configure a standard TCP/IP port for a network printer installed on a print server.
Note: Additional printer properties
Other tabs might be visible on the Properties page of an installed printer. For example, color printers will have a Color Management tab.
Another feature of the Print Management snap-in is Extended View, which you use to view and manage pending print jobs for the selected printer. (See Figure 9-11.) You enable Extended View by right-clicking the Printers node of a print server and selecting Show Extended View from the context menu.
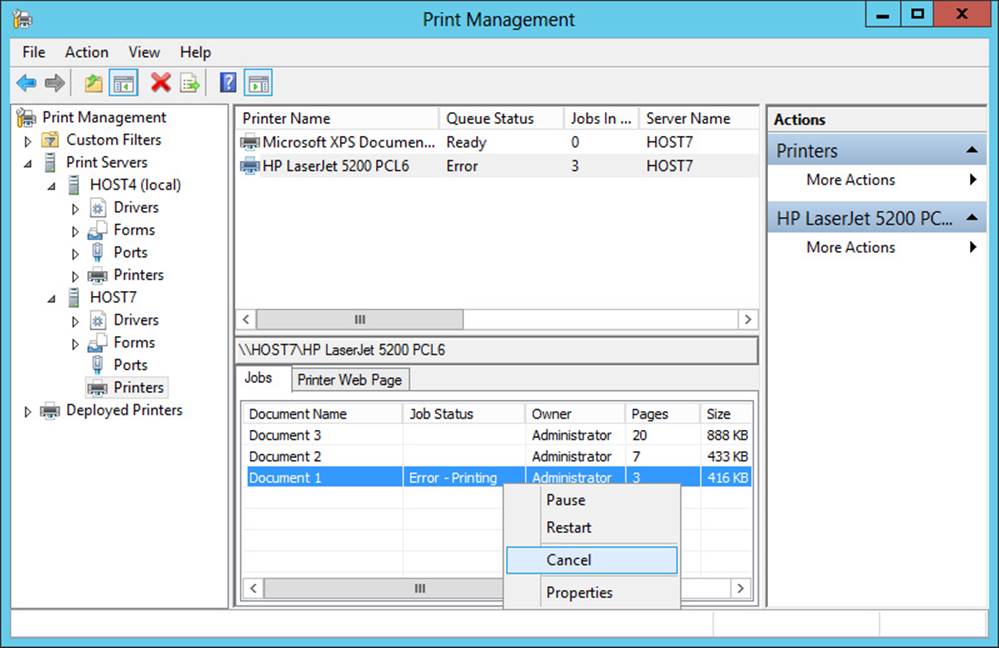
FIGURE 9-11 Cancel a pending print job by using Extended View.
Deploying printer connections
One of the options available in the context menu when you right-click a printer is Deploy With Group Policy. Selecting this option opens the dialog box shown in Figure 9-12, which you use to associate the printer with a specific Group Policy Object (GPO) to enable the printer connection to be deployed automatically to users or computers targeted by the GPO. This method of deploying printers is useful when users of client computers are standard users and not local administrators, because standard users lack sufficient privileges to install printers on their computers.
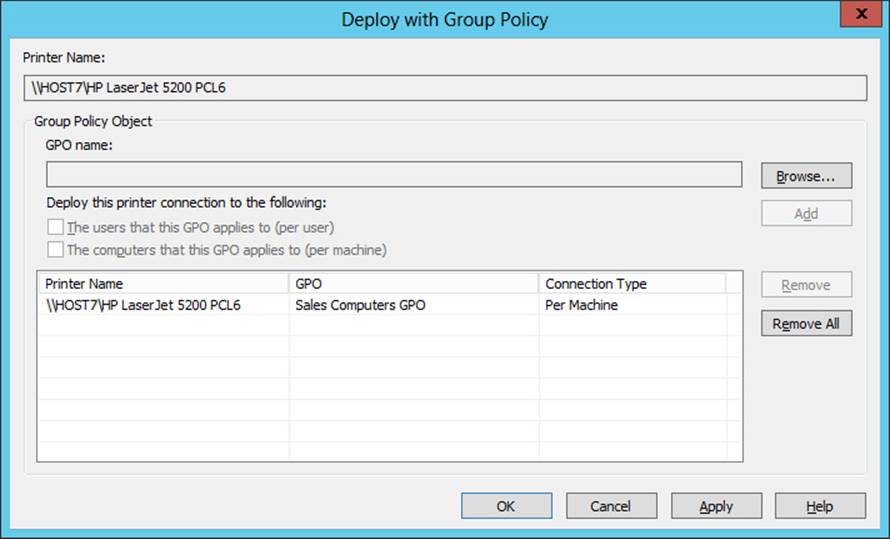
FIGURE 9-12 Deploy a printer connection to a client using Group Policy.
Note: Printer sharing
Windows Server 2012 and Windows Server 2012 R2 support several different ways of enabling the deployment of print shares:
![]() Enhanced Point and Print, which allows the print server to share a printer with any other supported Windows client without the need for additional drivers. This feature is new in Windows Server 2012 and Windows Server 2012 R2 and is available only when v4 print drivers are being used.
Enhanced Point and Print, which allows the print server to share a printer with any other supported Windows client without the need for additional drivers. This feature is new in Windows Server 2012 and Windows Server 2012 R2 and is available only when v4 print drivers are being used.
![]() Package-Aware Point and Print, which allows print servers to distribute signed driver packages to clients. This feature was introduced in Windows Server 2008 to improve security and eliminate the security prompts of the legacy Point and Print method.
Package-Aware Point and Print, which allows print servers to distribute signed driver packages to clients. This feature was introduced in Windows Server 2008 to improve security and eliminate the security prompts of the legacy Point and Print method.
![]() Legacy Point and Print, which was introduced in Windows 2000. With this feature, the server spooler provides the client with just enough information to download the required v3 printer driver files from the server.
Legacy Point and Print, which was introduced in Windows 2000. With this feature, the server spooler provides the client with just enough information to download the required v3 printer driver files from the server.
![]() Internet Printing Protocol (IPP), which was also introduced in Windows 2000 and allows clients to install print shares from a webpage if the proper drivers have been staged on the print server.
Internet Printing Protocol (IPP), which was also introduced in Windows 2000 and allows clients to install print shares from a webpage if the proper drivers have been staged on the print server.
For more information on printer-sharing technologies supported by Windows Server 2012 and Windows Server 2012 R2, see “Printer Sharing Technical Details” at http://technet.microsoft.com/en-us/library/jj590748.
Migrating print servers
Administrators who are migrating their organization’s infrastructure from earlier versions of Windows Server to Windows Server 2012 or Windows Server 2012 R2 will also want to migrate their print servers to the new platform. Installing the Print And Document Services Tools feature provides you with the following tools for migrating from print servers running Windows Server 2003, Windows Server 2003 R2, Windows Server 2008, or Windows Server 2008 R2:
![]() The Printer Migration Wizard shown in Figure 9-13, which you can launch from the Print Management console by right-clicking on the root node in the console tree and selecting Migrate Printers
The Printer Migration Wizard shown in Figure 9-13, which you can launch from the Print Management console by right-clicking on the root node in the console tree and selecting Migrate Printers
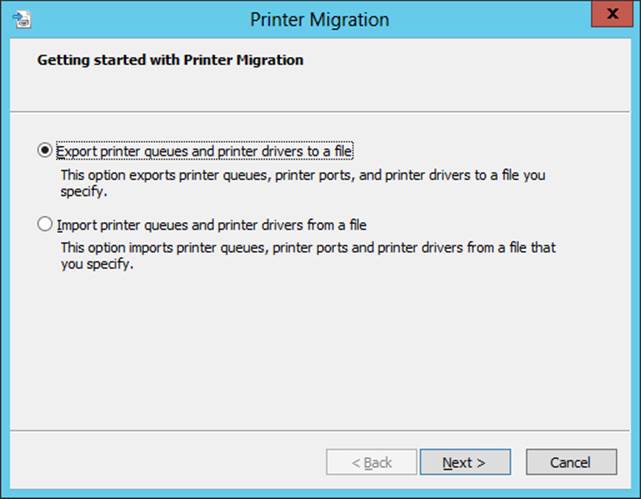
FIGURE 9-13 Use the Printer Migration Wizard.
![]() The Printbrm.exe command-line tool, which is located in the %windir%\System32\spool\tools folder
The Printbrm.exe command-line tool, which is located in the %windir%\System32\spool\tools folder
More Info: Migrating print servers
For detailed guidance on how to migrate print servers to Windows Server 2012 and Windows Server 2012 R2, see “Migrate Print and Document Services to Windows Server 2012” at http://technet.microsoft.com/en-us/library/jj134150.
Lesson summary
![]() You can use Server Manager to install Print And Document Services role services and management tools on the local server or remote servers running Windows Server 2012 or Windows Server 2012 R2.
You can use Server Manager to install Print And Document Services role services and management tools on the local server or remote servers running Windows Server 2012 or Windows Server 2012 R2.
![]() You generally should not deploy features that are deprecated in Windows Server 2012 and Windows Server 2012 R2 because they might be removed in future versions of Windows Server.
You generally should not deploy features that are deprecated in Windows Server 2012 and Windows Server 2012 R2 because they might be removed in future versions of Windows Server.
![]() You can use the Print Management console to deploy, configure, and manage print servers, printer drivers, and printers.
You can use the Print Management console to deploy, configure, and manage print servers, printer drivers, and printers.
![]() You can deploy printer connections to users and client computers using Group Policy.
You can deploy printer connections to users and client computers using Group Policy.
![]() Windows Server 2012 and Windows Server 2012 R2 include tools for migrating print queues and printer drivers from print servers running earlier versions of Windows Server.
Windows Server 2012 and Windows Server 2012 R2 include tools for migrating print queues and printer drivers from print servers running earlier versions of Windows Server.
Lesson review
Answer the following questions to test your knowledge of the information in this lesson. You can find the answers to these questions and explanations of why each answer choice is correct or incorrect in the “Answers” section at the end of this chapter.
1. Which of the following tasks must you perform to be able to manage print servers running Windows Server 2012 R2 from a single workstation running Windows 8.1? (Choose all that apply.)
A. Install RSAT for Windows 8.1 on the workstation and enable the necessary remote-management tools.
B. Make sure Remote Management is enabled on the print servers.
C. Add the print servers to the server pool in Server Manager.
D. Add the print servers to the console tree in Print Management.
2. Which of the following nodes in the console tree of Print Management allows you to install new printer drivers on a print server? (Choose all that apply.)
A. The Print Management node
B. The Print Servers node
C. A node representing a print server
D. The Drivers node beneath a node representing a print server
3. You want to improve the reliability of print services in your environment by running the printer driver for each printer installed on your print server in a separate process that is isolated from the Print Spooler service on the server. Which set of requirements will enable you to achieve this goal? (Choose all that apply.)
A. The printer drivers can be of the v3 type as long as the driver’s INF file indicates that the driver supports driver isolation. After the drivers have been installed, you must use Print Management to configure Set Driver Isolation to the value Shared.
B. The printer drivers can be of the v3 type as long as the driver’s INF file indicates that the driver supports driver isolation. After the drivers have been installed, you must use Print Management to configure Set Driver Isolation to the value Isolated.
C. The printer drivers must be of the v4 type. After the drivers have been installed, you must use Print Management to configure Set Driver Isolation to the value Shared.
D. The printer drivers must be of the v4 type. After the drivers have been installed, you must use Print Management to configure Set Driver Isolation to the value Isolated.
Lesson 2: Managing print servers using Windows PowerShell
Although you can use the Print Management snap-in for managing print servers and printers in all sizes of environments, Windows PowerShell provides something more—namely, the ability to automate the management of print servers and printers from the command line or by using scripts. Administrators who need to repeatedly perform certain management tasks on large numbers of printers will find this capability invaluable. This lesson demonstrates some of the ways you can use Windows PowerShell to manage print servers, printers, and printer drivers.
After this lesson, you will be able to:
![]() Use Windows PowerShell to view information about printers, printer drivers, and print jobs.
Use Windows PowerShell to view information about printers, printer drivers, and print jobs.
![]() Use Windows PowerShell to manage printers, printer drivers, and print jobs.
Use Windows PowerShell to manage printers, printer drivers, and print jobs.
Estimated lesson time: 20 minutes
Viewing information about printers, printer drivers, and print jobs
Windows Server 2012 and Windows Server 2012 R2 include a Windows PowerShell module called PrintManagement that contains cmdlets you can use for viewing and managing printers, printer drivers, and print jobs. You can use the Get-Command cmdlet to display a list of PrintManagement cmdlets as follows:
PS C:\> Get-Command -Module PrintManagement
CommandType Name ModuleName
----------- ---- ----------
Function Add-Printer PrintManagement
Function Add-PrinterDriver PrintManagement
Function Add-PrinterPort PrintManagement
Function Get-PrintConfiguration PrintManagement
Function Get-Printer PrintManagement
Function Get-PrinterDriver PrintManagement
Function Get-PrinterPort PrintManagement
Function Get-PrinterProperty PrintManagement
Function Get-PrintJob PrintManagement
Function Remove-Printer PrintManagement
Function Remove-PrinterDriver PrintManagement
Function Remove-PrinterPort PrintManagement
Function Remove-PrintJob PrintManagement
Function Rename-Printer PrintManagement
Function Restart-PrintJob PrintManagement
Function Resume-PrintJob PrintManagement
Function Set-PrintConfiguration PrintManagement
Function Set-Printer PrintManagement
Function Set-PrinterProperty PrintManagement
Function Suspend-PrintJob PrintManagement
The following sections describe how to
![]() Retrieve a list of printers installed on a print server.
Retrieve a list of printers installed on a print server.
![]() View information about pending print jobs.
View information about pending print jobs.
![]() View information about printers.
View information about printers.
![]() View information about printer drivers and ports.
View information about printer drivers and ports.
Retrieving a list of printers installed on a print server
You can use the Get-Printer cmdlet to display a list of the printers installed on a print server. For example, the following command shows that there are four printers installed on a remote print server named HOST7:
PS C:\> Get-Printer -ComputerName HOST7 | Format-List Name,DriverName
Name : Samsung CLP-410 Series PCL6
DriverName : Samsung CLP-410 Series PCL6
Name : HP LaserJet 4200L PCL6
DriverName : HP LaserJet 4200L PCL6 Class Driver
Name : Microsoft XPS Document Writer
DriverName : Microsoft XPS Document Writer v4
Name : HP LaserJet 5200 PCL6
DriverName : HP LaserJet 5200 PCL6 Class Driver
You can pipe the output from the preceding command into the Where-Object cmdlet to determine which of these printers are shared:
PS C:\> Get-Printer -ComputerName HOST7 | where Shared -eq $true | fl Name
Name : Samsung CLP-410 Series PCL6
Name : HP LaserJet 4200L PCL6
Name : HP LaserJet 5200 PCL6
Viewing information about pending print jobs
Using the Get-Printer cmdlet as follows indicates that one of the printers on HOST7 has Error for its status:
PS C:\> Get-Printer -ComputerName HOST7 | where PrinterStatus -eq Error | `
fl Name,JobCount
Name : HP LaserJet 5200 PCL6
JobCount : 3
To view more information about the cause of this error, you can use the Get-PrintJob cmdlet like this:
PS C:\> Get-PrintJob -ComputerName HOST7 -PrinterName "HP LaserJet 5200 PCL6"
Id ComputerName PrinterName DocumentName SubmittedTime JobStatus
-- ------------ ----------- ------------ ------------- ---------
3 HOST7 HP LaserJet ... Document 3 8/26/2012 2:08:06 PM Error, Print...
4 HOST7 HP LaserJet ... Document 2 8/26/2012 2:08:06 PM Normal
5 HOST7 HP LaserJet ... Document 1 8/26/2012 2:08:06 PM Normal
The first print job in the queue (job #3) is generating the error condition. You can find out more information about this job as follows:
PS C:\> Get-PrintJob -ComputerName HOST7 -PrinterName "HP LaserJet 5200 PCL6" | `
where Id -eq 3 | fl JobStatus,UserName
JobStatus : Error, Printing, Retained
UserName : kberg
The fact that the job status includes Retained suggests that either the print job is corrupted or the print device is offline or out of paper. Either way, user Karen Berg should probably be informed because the print job belongs to her.
You can also use the Windows PowerShell pipeline with certain combinations of cmdlets in the PrintManagement module. For example, you can pipe the output from the Get-Printer cmdlet into the Get-PrintJob cmdlet to view all pending print jobs on all printers installed on a print server:
PS C:\> Get-Printer -ComputerName HOST7 | Get-PrintJob
Id ComputerName PrinterName DocumentName SubmittedTime JobStatus
-- ------------ ----------- ------------ ------------- ---------
2 HOST7 Samsung CLP-... Document 4 8/27/2012 3:54:33 PM Normal
3 HOST7 HP LaserJet ... Document 3 8/26/2012 2:08:06 PM Error, Print...
4 HOST7 HP LaserJet ... Document 2 8/26/2012 2:08:06 PM Normal
5 HOST7 HP LaserJet ... Document 1 8/26/2012 2:08:06 PM Normal
Viewing information about printers
You can use the Get-PrinterConfiguration cmdlet to display the configuration settings for a particular printer:
PS C:\> Get-PrintConfiguration -ComputerName HOST7 -PrinterName "HP LaserJet 5200 PCL6"
PrinterName ComputerName Collate Color DuplexingMode
----------- ------------ ------- ----- -------------
HP LaserJet ... HOST7 True False OneSided
Using the pipeline also enables you to display configuration settings for all printers installed on a remote print server:
PS C:\> Get-Printer -ComputerName HOST7 | Get-PrintConfiguration
PrinterName ComputerName Collate Color DuplexingMode
----------- ------------ ------- ----- -------------
Samsung CLP-... HOST7 False True OneSided
Microsoft XP... HOST7 False True OneSided
HP LaserJet ... HOST7 True False OneSided
HP LaserJet ... HOST7 True False OneSided
If you want to list all color printers installed on HOST7, you can do it like this:
PS C:\> Get-Printer -ComputerName HOST7 | Get-PrintConfiguration | `
where Color -eq $true | fl PrinterName
PrinterName : Microsoft XPS Document Writer
PrinterName : Samsung CLP-410 Series PCL6
The Get-PrinterProperty cmdlet enables you to display additional properties for an installed printer like this:
PS C:\> Get-PrinterProperty -ComputerName HOST7 `
-PrinterName "Samsung CLP-410 Series PCL6"
ComputerName PrinterName PropertyName Type Value
------------ ----------- ------------ ---- -----
HOST7 Samsung CLP-410 S... FormTrayTable String
HOST7 Samsung CLP-410 S... Config:DuplexUnit String FALSE
HOST7 Samsung CLP-410 S... Config:OptTray2 String FALSE
HOST7 Samsung CLP-410 S... Config:OptTray3 String FALSE
HOST7 Samsung CLP-410 S... Config:OptTray4 String FALSE
HOST7 Samsung CLP-410 S... Config:OptTray5 String FALSE
Viewing information about printer drivers and ports
Earlier in this lesson, you used the Get-Printer cmdlet to list the printers installed on print server HOST7:
PS C:\> Get-Printer -ComputerName HOST7 | Format-List Name,DriverName
Name : Samsung CLP-410 Series PCL6
DriverName : Samsung CLP-410 Series PCL6
Name : HP LaserJet 4200L PCL6
DriverName : HP LaserJet 4200L PCL6 Class Driver
Name : Microsoft XPS Document Writer
DriverName : Microsoft XPS Document Writer v4
Name : HP LaserJet 5200 PCL6
DriverName : HP LaserJet 5200 PCL6 Class Driver
The drivers for the two HP printers have “Class Driver” in their names, which indicates they are v4 drivers, and the driver for the Microsoft XPS Document Writer printer is clearly a v4 driver as well. But what about the Samsung driver? The driver for this printer has neither “v4” nor “Class Driver” in its driver name, so could it be a v3 driver instead of a v4 driver?
An easy way to determine this is to use the Get-PrinterDriver cmdlet like this:
PS C:\> Get-PrinterDriver -ComputerName HOST7 -Name "Samsung*"
Name PrinterEnvironment MajorVersion Manufacturer
---- ------------------ ------------ ------------
Samsung CLP-410 Series PCL6 Windows x64 4 Samsung
Clearly, the Samsung driver is of the v4 type.
Another useful cmdlet is Get-PrinterPort, which enables you to retrieve a list of printer ports installed on a print server. For example, the following command displays information about all ports on HOST7 of the Standard TCP/IP Port type:
PS C:\> Get-PrinterPort -ComputerName HOST7 | where Description -like "*TCP*"
Name ComputerName Description PortMonitor
---- ------------ ----------- -----------
172.16.11.55 HOST7 Standard TCP/IP Port TCPMON.DLL
![]() Quick check
Quick check
![]() Which Windows PowerShell cmdlet enables you to view the duplexing mode for a printer?
Which Windows PowerShell cmdlet enables you to view the duplexing mode for a printer?
Quick check answer
![]() The Get-PrintConfiguration cmdlet
The Get-PrintConfiguration cmdlet
Managing printers, printer drivers, and print jobs
You can use Windows PowerShell not only to view information about printers, printer drivers, and print jobs on remote print servers but also to manage printers, print drivers, and print jobs. The following sections demonstrate two examples of this, specifically:
![]() Canceling a print job
Canceling a print job
![]() Installing a network printer
Installing a network printer
Canceling a print job
Earlier in this lesson, you saw that one of the print jobs for the HP LaserJet 5200 printer had Error for its status. To determine which job it is, you can pipe the output from the Get-PrintJob cmdlet into the Where-Object cmdlet to display all jobs whose JobStatus property has “Error” in its value:
PS C:\> Get-PrintJob -ComputerName HOST7 -PrinterName "HP LaserJet 5200 PCL6" | `
where JobStatus -like "Error*"
Id ComputerName PrinterName DocumentName SubmittedTime JobStatus
-- ------------ ----------- ------------ ------------- ---------
3 HOST7 HP LaserJet ... Document 3 8/26/2012 2:08:06 PM Error, Print...
Having determined that job #3 is the problem, you could use the Remove-PrintJob cmdlet to cancel the problem job:
Remove-PrintJob -PrinterName "HP LaserJet 5200 PCL6" -ID 3
But instead of doing this, you can just press the Up arrow key to display the previously executed command and pipe its output into Remove-PrintJob as follows:
PS C:\> Get-PrintJob -ComputerName HOST7 -PrinterName "HP LaserJet 5200 PCL6" | `
where JobStatus -like "Error*" | Remove-PrintJob
Using the Get-PrintJob cmdlet again verifies that the problem has been resolved:
PS C:\> Get-PrintJob -ComputerName HOST7 -PrinterName "HP LaserJet 5200 PCL6"
Id ComputerName PrinterName DocumentName SubmittedTime JobStatus
-- ------------ ----------- ------------ ------------- ---------
4 HOST7 HP LaserJet ... Document 2 8/26/2012 2:08:06 PM Printing
5 HOST7 HP LaserJet ... Document 1 8/26/2012 2:08:06 PM Normal
Installing a network printer
Installing a new network printer using Windows PowerShell generally involves performing the following steps:
1. Installing a printer driver for the new printer
2. Creating a standard TCP/IP port for the printer
3. Installing the printer using the driver and port specified
4. Performing any additional configuration needed for the printer
Note: Possible issues when installing network printers
The procedure outlined in this section generally works when you have a Server With A GUI installation on the remote server. The exception is when you have new printers whose drivers are not included in the default driver store of your Windows Server installation. If this is the case, you might need to update the driver store or even install the full Print Management package on the remote server to successfully install the network printer using Windows PowerShell.
Things get more complicated when the remote server is a Server Core installation because the driver store for this installation option is not as robust as for the Server With A GUI option. For a discussion of the issues involved and some possible workarounds, see “Windows 2012 Server Core Print Server – missing drivers!” at http://social.technet.microsoft.com/Forums/windowsserver/en-US/c64ee652-ab59-4e71-95ce-944ee0c9cccf/windows-2012-server-core-print-server-missing-drivers.
As an example, say you want to install a printer that uses the Dell Color Laser PCL6 Class Driver on your print server. You could begin by using the Add-PrinterDriver cmdlet to install the printer driver on the server:
PS C:\> Add-PrinterDriver -ComputerName HOST7 -Name "Dell Color Laser PCL6 Class Driver"
You could use the Get-PrinterDriver cmdlet to verify the result as follows:
PS C:\> Get-PrinterDriver -ComputerName HOST7
Name PrinterEnvironment MajorVersion Manufacturer
---- ------------------ ------------ ------------
Dell Color Laser PCL6 Class Driver Windows x64 4 Dell
Samsung CLP-410 Series PCL6 Windows x64 4 Samsung
HP LaserJet 4200L PCL6 Class Driver Windows x64 4 HP
...
Next, you could use the Add-PrinterPort cmdlet to add a new port for the printer, like this:
PS C:\> Add-PrinterPort -ComputerName HOST7 -Name "172.16.11.63" `
-PrinterHostAddress "172.16.11.63"
You could use the Get-PrinterPort cmdlet to verify the result:
PS C:\> Get-PrinterPort -ComputerName HOST7
Name ComputerName Description PortMonitor
---- ------------ ----------- -----------
172.16.11.55 HOST7 Standard TCP/IP Port TCPMON.DLL
172.16.11.63 HOST7 Standard TCP/IP Port TCPMON.DLL
COM1: HOST7 Local Port Local Monitor
...
Next, you could use the Add-Printer cmdlet to install, name, and share the new printer using the driver and port previously specified as follows:
PS C:\> Add-Printer -ComputerName HOST7 -Name "Sales Printer" `
-DriverName "Dell Color Laser PCL6 Class Driver" -Shared `
-ShareName "SalesPrint" -PortName "172.16.11.63"
Then, you could use the Get-Printer cmdlet to verify the installation of the new network printer:
PS C:\> Get-Printer -ComputerName HOST7 | ft Name,DriverName,PortName
Name DriverName PortName
---- ---------- --------
Sales Printer Dell Color Laser PCL6 ... 172.16.11.63
HP LaserJet 5200 PCL6 HP LaserJet 5200 PCL6 ... 172.16.11.55
...
Finally, you might want to change the default paper size for the new printer from Letter to Legal, like this:
PS C:\> Set-PrintConfiguration -ComputerName HOST7 -PrinterName "Sales Printer" `
-PaperSize Legal
You could then use the Get-PrintConfiguration cmdlet to verify the result:
PS C:\> Get-PrintConfiguration -ComputerName HOST7 -PrinterName "Sales Printer" | `
fl PaperSize
PaperSize : Legal
Real World: Automating printer installation
You could also put commands such as the ones just shown in a text file, save the file as New Sales Printer.ps1, and run the script from a Windows PowerShell console on your Windows 8.1 administrative workstation to automate the process of installing and configuring new printers on your print servers. Windows PowerShell is a powerful tool for automating many types of Windows Server management tasks.
Lesson summary
![]() You can use the Get-Printer cmdlet to retrieve a list of printers installed on a print server.
You can use the Get-Printer cmdlet to retrieve a list of printers installed on a print server.
![]() You can use the Get-PrintJob cmdlet to view information about pending print jobs.
You can use the Get-PrintJob cmdlet to view information about pending print jobs.
![]() You can use the Get-PrintConfiguration and Get-PrinterProperty cmdlets to view information about printers.
You can use the Get-PrintConfiguration and Get-PrinterProperty cmdlets to view information about printers.
![]() You can use the Get-PrinterDriver and Get-PrinterPort cmdlets to view information about printer drivers and ports.
You can use the Get-PrinterDriver and Get-PrinterPort cmdlets to view information about printer drivers and ports.
![]() You can use the Remove-PrintJob cmdlet to cancel a print job.
You can use the Remove-PrintJob cmdlet to cancel a print job.
![]() You can use different Windows PowerShell cmdlets to install a printer driver, create a printer port, and install and configure a network printer that uses the new driver and port.
You can use different Windows PowerShell cmdlets to install a printer driver, create a printer port, and install and configure a network printer that uses the new driver and port.
Lesson review
Answer the following questions to test your knowledge of the information in this lesson. You can find the answers to these questions and explanations of why each answer choice is correct or incorrect in the “Answers” section at the end of this chapter.
1. Which Windows PowerShell cmdlet enables you to determine whether any printers installed on a print server are shared?
A. Get-Printer
B. Get-PrinterConfiguration
C. Get-PrinterProperty
D. Get-PrintServer
2. Which Windows PowerShell cmdlet can you use to unshare a printer that is currently shared?
A. Set-PrintConfiguration
B. Set-PrinterProperty
C. Set-Printer
D. Get-Printer
3. You want to install a new printer on a print server running Windows Server 2012 R2. The print device uses the HP LaserJet 6L PS Class Driver printer driver and requires a standard TCP/IP printer port. You used Notepad to create a text file named install.ps1 that contains the following Windows PowerShell commands:
Add-PrinterPort -Name "TCP66" -PrintHostAddress "172.16.11.66"
Add-Printer -Name "Printer66" -DriverName "HP LaserJet 6L PS Class Driver" `
-ShareName "Printer66" -PortName "TCP66"
You open a Windows PowerShell prompt on the local print server and run the preceding script, but it generates an error. Which of the following could be the cause of the error? (Choose all that apply.)
A. The required printer driver is not installed on the print server.
B. There is a syntax error in the first line of the script.
C. There is a syntax error in the second line of the script.
D. There is a syntax error in the third line of the script.
4. You modify the install.ps1 script from the previous question so that it no longer generates an error when you run it. After running the script, you use Print Management to verify that the printer driver, printer port, and printer have all been installed successfully and that you can print a test page to the new printer. Unfortunately, your users indicate that they cannot print to the printer. What might be the reason for this?
A. You haven’t yet deployed a printer connection to your users.
B. The printer has not yet been shared.
C. The print device has not yet been turned on.
D. There is a job stuck in the print queue for the printer.
Practice exercises
The goal of this section is to provide you with hands-on practice with the following:
![]() Managing print servers using Print Management
Managing print servers using Print Management
![]() Managing print servers using Windows PowerShell
Managing print servers using Windows PowerShell
To perform the exercises in this section, you need at least two servers running Windows Server 2012 R2, which for the purposes of these exercises are assumed to be named HOST4 and HOST7. HOST4 should be a domain controller for the fabrikam.com domain, and HOST7 should be a member server in the fabrikam.com domain. Both servers should have no additional roles installed and should have Internet connectivity.
All tasks will be performed from HOST4, and you should log on to this server using an account that belongs to the Domain Admins group of fabrikam.com. To ensure you can remotely manage HOST7 from HOST4, make sure HOST7 has been added to the server pool in Server Manager on HOST4.
Exercise 1: Managing print servers using Print Management
In this exercise, you use Server Manager to install the Print Management console on HOST4 and the Print Server role service on HOST7. You then use the Print Management console on HOST4 to manage print queues and printer drivers on HOST7. Both servers should be running the Server With A GUI installation option of Windows Server.
1. Log on to HOST4 using an account that belongs to the Domain Admins group and open Server Manager.
2. Use the Add Roles And Features Wizard to install the Print And Document Services Tools feature on HOST4. This feature is found under Remote Server Administration Tools\Role Administration Tools in the Add Roles And Features Wizard.
3. Use the Add Roles And Features Wizard to install the Print Server role service of the Print And Document Services role on HOST7.
4. Launch the Print Management console and add HOST7 to the list of print servers managed by the console.
5. Install the HP LaserJet 5200 PCL6 Class Driver on HOST7.
6. View the properties of the driver you just installed and verify that the version is Type 4 User Mode.
7. Add a new port of type Standard TCP/IP Port on HOST7 using an IP address on the local subnet. Give the new port a descriptive name so that you can easily identify it and then configure the port to use Hewlett Packard Jet Direct as its device type.
8. Configure the new port to use TCP port number 9109.
9. Install a new network printer using the port you just created and the driver you just installed on the server. Give the new printer the name “Test Printer” and make sure the printer is shared.
10. Print a test page to your new printer.
11. Open the print queue for your new printer, verify that the status of your print job (printing a test page) is Error, and then close the print queue.
12. Enable Extended View for the Printers node and confirm again that the status of the job is Error. Then cancel the print job.
13. Remove the printer named “Test Printer” from HOST7.
14. Remove the driver package for the HP LaserJet 5200 PCL6 Class Driver printer driver from HOST7.
15. Delete the printer port for the printer you removed and close Print Management.
16. Uninstall the Print Server role service from HOST7.
17. Uninstall the Print And Document Services Tools feature from HOST4.
18. You are now ready to proceed to the next exercise.
Exercise 2: Managing print servers using Windows PowerShell
In this exercise, you use Windows PowerShell to install the Print Management console on HOST4 and the Print Server role service on HOST7. You then run Windows PowerShell commands from HOST4 to manage print queues and printer drivers on HOST7.
1. Log on to HOST4 using an account that belongs to the Domain Admins group and open the Windows PowerShell console.
2. Use the Install-WindowsFeature cmdlet to install the RSAT-Print-Services feature locally on HOST4.
3. Use the Install-WindowsFeature cmdlet to install the Print Server role service remotely on HOST7.
4. Use the Add-PrinterDriver cmdlet to install the HP LaserJet 5200 PCL6 Class Driver on HOST7.
5. Use the Get-PrinterDriver cmdlet to verify the result of the preceding command.
6. Use the Add-PrinterPort cmdlet to add a new port of type Standard TCP/IP Port on HOST7 using an IP address on the local subnet.
7. Use the Get-PrinterPort cmdlet to verify the result of the preceding command.
8. Use the Add-Printer cmdlet to install a new network printer using the port you just created and the driver you just installed on the server. Give the new printer the name “Test Printer” and make sure the printer is shared.
9. Type the command mkdir C:\data to create a new directory.
10. Type the command “Hello World” > C:\data\test.txt to create a new text file.
11. Type the command type C:\data\test.txt | Out-Printer –Name “\\HOST7\Test Printer” to send the text file to the printer.
12. Use the Get-PrintJob cmdlet to view information about pending print jobs in the print queue.
13. Use the Remove-PrintJob cmdlet to delete the print job from the print queue.
14. Use Windows PowerShell to uninstall the printer, uninstall the printer driver, delete the printer port, and remove the Print Server role service from HOST7 and the management tools from HOST4.
Suggested practice exercises
The following additional practice exercises are designed to give you more opportunities to practice what you’ve learned and to help you successfully master the lessons presented in this chapter.
![]() Exercise 1 Write a Windows PowerShell script that can be used to install the printer described in Exercise 2 by running a single command.
Exercise 1 Write a Windows PowerShell script that can be used to install the printer described in Exercise 2 by running a single command.
![]() Exercise 2 Modify your script from the Practice 1 exercise so that it installs several printers on several print servers.
Exercise 2 Modify your script from the Practice 1 exercise so that it installs several printers on several print servers.
Answers
This section contains the answers to the lesson review questions in this chapter.
Lesson 1
1. Correct answers: A, B, and D
A. Correct: You must install RSAT for Windows 8.1 on a computer running Windows 8.1 before you can use that computer to remotely manage servers running Windows Server 2012 R2 in your environment.
B. Correct: Managing Windows servers remotely requires that Remote Management be enabled on them.
C. Incorrect: Because you will use the Print Management console and not Server Manager to remotely manage your print servers, you do not need to add the servers to the server pool. However, by adding them to the server pool, you can perform other management tasks on them such as restarting services and viewing alerts raised by event logs on the servers.
D. Correct: Before you can manage a print server using Print Management, you must add the server to the console tree using the Add/Remove Servers dialog box.
2. Correct answers: C and D
A. Incorrect: Right-clicking the Print Management node allows you to add or remove print servers in the console and to migrate printers from print servers running earlier versions of Windows Server.
B. Incorrect: Right-clicking the Print Servers node allows you to add or remove print servers in the console.
C. Correct: Right-clicking a node representing a print server allows you to open the Properties page for the print server. You can then use the Drivers tab on this Properties page to install new printer drivers on the server.
D. Correct: Right-clicking the Drivers node beneath a node representing a print server allows you to install and manage printer drivers on the server.
3. Correct answers: B and D
A. Incorrect: Printer drivers of the v3 type can run in a separate process that is isolated from the Print Spooler service as long as the setting DriverIsolation=2 is included in their INF file. If the setting DriverIsolation=0 is in their INF file, the driver does not support driver isolation. However, using Print Management to configure Set Driver Isolation to the value Shared will cause the driver to run in a process shared with other printer drivers but separate from the spooler process. To configure the driver to run in a process that is separate from other printer drivers and from the spooler process, you must configure Set Driver Isolation to the value Isolated.
B. Correct: Printer drivers of the v3 type can run in a separate process that is isolated from the Print Spooler service as long as the setting DriverIsolation=2 is included in their INF file. If the setting DriverIsolation=0 is in their INF file, the driver does not support driver isolation. Using Print Management to configure Set Driver Isolation to the value Isolated will cause the driver to run in a process that is separate from other printer drivers and from the spooler process.
C. Incorrect: Printer drivers of the v4 type have a smaller disk footprint, can support multiple devices, can support driver isolation so that they won’t crash the application doing the printing if the printer driver fails, and do not require installing drivers that match the client architecture. However, using Print Management to configure Set Driver Isolation to the value Shared will cause the driver to run in a process shared with other printer drivers but separate from the spooler process. To configure the driver to run in a process that is separate from other printer drivers and from the spooler process, you must configure Set Driver Isolation to the value Isolated.
D. Correct: Printer drivers of the v4 type have a smaller disk footprint, can support multiple devices, can support driver isolation so that they won’t crash the application doing the printing if the printer driver fails, and do not require installing drivers that match the client architecture. Using Print Management to configure Set Driver Isolation to the value Isolated will cause the driver to run in a process that is separate from other printer drivers and from the spooler process.
Lesson 2
1. Correct answer: A
A. Correct: You can use Get-Printer | where Shared –eq $true to retrieve the shared printers on a print server.
B. Incorrect: You use the Get-PrintConfiguration cmdlet to display printer configuration settings such as whether the printer supports collation and the printer’s current duplexing mode.
C. Incorrect: You use the Get-PrinterProperty cmdlet to display printer properties such as the currently selected form and output tray.
D. Incorrect: Get-PrintServer is not a valid Windows PowerShell cmdlet in Windows Server 2012 R2.
2. Correct answer: C
A. Incorrect: You use the Set-PrintConfiguration cmdlet to modify printer configuration settings such as whether the printer supports collation and the printer’s current duplexing mode.
B. Incorrect: You use the Set-PrinterProperty cmdlet to modify printer properties such as the currently selected form and output tray.
C. Correct: You can use the Set-Printer cmdlet to update the printer driver, printer port, or permissions of a printer. You can also use Set-Printer to specify whether the printer should be shared.
D. Incorrect: You use the Get-Printer cmdlet to retrieve a list of printers installed on a computer. You can’t use the cmdlet for modifying installed printers.
3. Correct answers: A and B
A. Correct: The following command should be included at the beginning of the script:
Add-PrinterDriver -Name "HP LaserJet 6L PS Class Driver"
You need to include this line to install the driver needed by the printer you are installing.
B. Correct: The first line of the script should look like this:
Add-PrinterPort -Name "TCP66" -PrinterHostAddress "172.16.11.66"
C. Incorrect: The syntax of this line is correct.
D. Incorrect: The syntax of this line is correct.
4. Correct answer: B
A. Incorrect: Your organization might be using Point and Print to allow users to install network printers themselves by browsing the network. If this is the case, you might not need to use Group Policy to deploy printer connections to them.
B. Correct: The printer has not yet been shared so that users can access it from the network. To share the printer when installing it using your script, include the –Shared parameter in the final line of the script.
C. Incorrect: If you can successfully print a test page, the printer must be turned on.
D. Incorrect: If you can successfully print a test page, there is likely no job stuck in the print queue.