Training Guide Installing and Configuring Windows Server 2012 R2 (2014)
Chapter 8. File services and storage
Provisioning and managing storage is a key role for IT administrators in organizations of all sizes. Data is a business asset that must be available, accessible, and secure; otherwise, the business won’t survive in today’s competitive marketplace.
In traditional IT infrastructures, managing storage can be a complex task because data is often stored using a wide range of storage technologies that might include an iSCSI storage area network (SAN), network-attached storage (NAS) devices, direct-attached storage (DAS) devices, Just a Bunch of Disks (JBOD) enclosures, and even removable storage devices such as USB drives. Some of these technologies, such as SANs, might require special expertise to administer, which can further complicate the task of storage administration.
Fortunately, Microsoft Windows Server 2012 and Windows Server 2012 R2 can help alleviate much of the burden and cost of acquiring, deploying, and administering storage by using Storage Spaces. This chapter explains how to deploy Storage Spaces in your environment and how to use Storage Spaces to provision storage for various needs and in different scenarios. The chapter also explains how to configure iSCSI storage using the built-in Internet Small Computer System Interface (iSCSI) Target Server role and iSCSI initiator in Windows Server 2012 and Windows Server 2012 R2.
Lessons in this chapter:
![]() Lesson 1: Deploying Storage Spaces
Lesson 1: Deploying Storage Spaces
![]() Lesson 2: Provisioning and managing shared storage
Lesson 2: Provisioning and managing shared storage
![]() Lesson 3: Configuring iSCSI storage
Lesson 3: Configuring iSCSI storage
Before you begin
To complete the practice exercises in this chapter
![]() You need to know how to perform a clean install of Windows Server 2012 R2 and perform initial configuration tasks, such as configuring the server’s TCP/IP settings for Internet connectivity.
You need to know how to perform a clean install of Windows Server 2012 R2 and perform initial configuration tasks, such as configuring the server’s TCP/IP settings for Internet connectivity.
![]() You also should have at least rudimentary knowledge of using Windows PowerShell.
You also should have at least rudimentary knowledge of using Windows PowerShell.
Lesson 1: Deploying Storage Spaces
Virtualization of storage resources is nothing new to administrators of large enterprises that have SANs deployed within their network infrastructures. Until now, however, storage virtualization has required purchasing proprietary third-party solutions that are expensive and require you to use their own set of management tools. Such solutions not only add to the cost of your network but also require special training to implement, manage, and maintain.
Storage Spaces, introduced in Windows Server 2012 and enhanced in Windows Server 2012 R2, is designed to make storage virtualization affordable, even for small businesses. Storage Spaces is easy to deploy and manage, and it can provide your business with shared storage that can grow on demand to meet your organization’s evolving needs. This lesson explains how Storage Spaces works, describes its capabilities, and demonstrates how to implement it using common, off-the-shelf storage hardware.
After this lesson, you will be able to:
![]() Understand the basic concepts and benefits of Storage Spaces.
Understand the basic concepts and benefits of Storage Spaces.
![]() Explain the difference between fixed and thin provisioning.
Explain the difference between fixed and thin provisioning.
![]() Describe the different resiliency options available with Storage Spaces.
Describe the different resiliency options available with Storage Spaces.
![]() Describe the different considerations involved in planning for a Storage Spaces deployment.
Describe the different considerations involved in planning for a Storage Spaces deployment.
![]() Implement Storage Spaces using both Server Manager and Windows PowerShell.
Implement Storage Spaces using both Server Manager and Windows PowerShell.
Estimated lesson time: 30 minutes
Understanding Storage Spaces

Storage virtualization basically involves doing two things:
![]() Taking physical storage devices and creating virtual pools of storage from them
Taking physical storage devices and creating virtual pools of storage from them
![]() Provisioning shared storage from these pools as the need arises
Provisioning shared storage from these pools as the need arises
For example, a storage virtualization solution might allow you to pool several internal and externally connected hard drives into a single pool of storage. You could then provision portions of this storage for your various file servers without being concerned about which drives are being used by each file server or where on the drives any particular data is being stored. The benefits of this approach are obvious to experienced administrators and include the following:
![]() Increased flexibility You can create new pools and expand existing ones without adding any new physical storage devices.
Increased flexibility You can create new pools and expand existing ones without adding any new physical storage devices.
![]() Increased scalability You can easily add and use physical storage when needed to meet increasing business demands.
Increased scalability You can easily add and use physical storage when needed to meet increasing business demands.
![]() Increased elasticity You can preallocate storage capacity by using thin provisioning. Capacity can be increased to meet growing demand even when the underlying physical storage is insufficient.
Increased elasticity You can preallocate storage capacity by using thin provisioning. Capacity can be increased to meet growing demand even when the underlying physical storage is insufficient.
![]() Increased efficiency You can reclaim storage capacity when it is no longer needed to use physical storage resources more efficiently.
Increased efficiency You can reclaim storage capacity when it is no longer needed to use physical storage resources more efficiently.
![]() Lower cost By using low-cost, commodity-based hard drives, you can create large pools of storage. These pools can easily meet the needs of small and midsized businesses.
Lower cost By using low-cost, commodity-based hard drives, you can create large pools of storage. These pools can easily meet the needs of small and midsized businesses.
Windows Server 2012 introduced support for storage virtualization through a feature called Storage Spaces, which enables you to aggregate internal and external physical disks into pools of low-cost storage that can have different levels of resiliency. These pools are simple to administer, can be allocated either manually or automatically, can be delegated for administration purposes, and can be delivered using either thin or fixed provisioning.
Concepts and terminology
To implement and use Storage Spaces, you first need to understand its basic concepts and terminology. The following is a list of terminology associated with Storage Spaces:
![]() Storage Management Application Programming Interface (SMAPI) A collection of Windows Management Instrumentation (WMI) interfaces for platform-neutral and vendor-neutral management of storage that are included in Windows Server 2012, Windows Server 2012 R2, System Center 2012 Virtual Machine Manager, and System Center 2012 R2 Virtual Machine Manager.
Storage Management Application Programming Interface (SMAPI) A collection of Windows Management Instrumentation (WMI) interfaces for platform-neutral and vendor-neutral management of storage that are included in Windows Server 2012, Windows Server 2012 R2, System Center 2012 Virtual Machine Manager, and System Center 2012 R2 Virtual Machine Manager.
![]() Storage Management Provider (SMP) An interface that provides a mechanism for discovering, managing, and provisioning storage. Windows Server 2012 and Windows Server 2012 R2 include support for the following types of SMPs:
Storage Management Provider (SMP) An interface that provides a mechanism for discovering, managing, and provisioning storage. Windows Server 2012 and Windows Server 2012 R2 include support for the following types of SMPs:
![]() Storage Spaces provider This SMP is used for implementing storage virtualization using Storage Spaces.
Storage Spaces provider This SMP is used for implementing storage virtualization using Storage Spaces.
![]() Storage Management Initiative Specification (SMI-S) providers These providers support the Storage Management Initiative Specification (SMI-S) standard of the Storage Network Industry Association (SNIA) and can be used for platform-neutral and vendor-neutral implementation of storage virtualization using third-party storage solutions such as SANs.
Storage Management Initiative Specification (SMI-S) providers These providers support the Storage Management Initiative Specification (SMI-S) standard of the Storage Network Industry Association (SNIA) and can be used for platform-neutral and vendor-neutral implementation of storage virtualization using third-party storage solutions such as SANs.
![]() Storage subsystem A storage subsystem uses an SMP to expose physical storage devices so that they can be virtualized into storage pools.
Storage subsystem A storage subsystem uses an SMP to expose physical storage devices so that they can be virtualized into storage pools.
![]() Storage pool A collection of physical disks that can be used to create virtual disks. A single storage pool can consist of physical disks having different sizes and using different storage interconnects. For example, you could mix and match Small Computer System Interface (SCSI) and Serial Attached SCSI (SAS) hard drives to create a pool.
Storage pool A collection of physical disks that can be used to create virtual disks. A single storage pool can consist of physical disks having different sizes and using different storage interconnects. For example, you could mix and match Small Computer System Interface (SCSI) and Serial Attached SCSI (SAS) hard drives to create a pool.
You can create and delete storage pools to manage virtualized storage in your environment. Each physical disk can be included in only one storage pool at a time, and once you add a physical disk to a pool the disk is no longer exposed in Disk Management for directly creating partitions or volumes on it.
![]() Primordial storage pool The default pool that contains all physical storage devices in a storage system that the Storage Spaces provider is able to enumerate, regardless of whether these devices have been added to other pools. Physical disks are displayed in the primordial pool only when they have no partitions or volumes created on them. If there are no available unused disks connected to your file server, the primordial pool is not displayed in Server Manager.
Primordial storage pool The default pool that contains all physical storage devices in a storage system that the Storage Spaces provider is able to enumerate, regardless of whether these devices have been added to other pools. Physical disks are displayed in the primordial pool only when they have no partitions or volumes created on them. If there are no available unused disks connected to your file server, the primordial pool is not displayed in Server Manager.
![]() Virtual disk A logical unit number (LUN) that has been provisioned from a storage pool. Virtual disks behave like physical disks but have increased flexibility, scalability, and elasticity because they represent virtualized storage instead of physical storage. Virtual disks are also sometimes referred to as spaces.
Virtual disk A logical unit number (LUN) that has been provisioned from a storage pool. Virtual disks behave like physical disks but have increased flexibility, scalability, and elasticity because they represent virtualized storage instead of physical storage. Virtual disks are also sometimes referred to as spaces.
![]() Volume A portion of a virtual disk that has been formatted with a file system such as NTFS.
Volume A portion of a virtual disk that has been formatted with a file system such as NTFS.
![]() Share A folder in the file system of a volume that has been made accessible over the network to users who have appropriate permissions.
Share A folder in the file system of a volume that has been made accessible over the network to users who have appropriate permissions.
More Info: The SMI-S standard
For more info on the SMI-S standard, see “Introduction to SMI-S” at http://blogs.technet.com/b/filecab/archive/2012/06/25/introduction-to-smi-s.aspx. For information on how to use the Windows Standards-Based Storage Management feature introduced in Windows Server 2012 to implement storage virtualization with third-party SANs and other storage solutions, see “Getting started with SMI-S on Windows Server 2012” at http://blogs.technet.com/b/filecab/archive/2012/07/05/getting-started-with-smi-s-on-windows-server-2012.aspx. For an example of implementing storage virtualization using SMI-S with EMC storage arrays, see “Using the EMC SMI-S provider with Windows Server 2012 and SCVMM” at http://blogs.technet.com/b/filecab/archive/2012/07/16/using-the-emc-smi-s-provider-with-windows-server-2012-and-scvmm.aspx.
Important: Dynamic disks and Storage Spaces
In previous versions of Windows Server, you could use dynamic disks for implementing software RAID 0 or RAID 1 redundancy for the boot volume and data volumes. Dynamic disks were first introduced in Windows Server 2003 and were implemented using the Virtual Disk Service (VDS) API included in that platform. Beginning with Windows Server 2012, however, the VDS API was superseded by SMAPI. This means that dynamic disks are considered deprecated for all usages except mirroring the boot volumes. You should use Storage Spaces instead of dynamic disks when you need to provide resiliency for data volumes. In addition, the following tools that rely on the VDS API should also be considered deprecated:
![]() DiskPart command
DiskPart command
![]() DiskRAID command
DiskRAID command
![]() Disk Management MMC snap-in
Disk Management MMC snap-in
Note that you can still use these commands on Windows Server 2012 and Windows Server 2012 R2, but they will not work with Storage Spaces or with any SMAPI components or tools. For more information, see “Virtual Disk Service is transitioning to Windows Storage Management API” at http://msdn.microsoft.com/en-us/library/windows/desktop/hh848071(v=vs.85).aspx.
Fixed vs. thin provisioning
Once you’ve aggregated physical disks into a storage pool, you can provision storage from that pool by creating virtual disks. Storage Spaces supports two ways of provisioning virtual disks:
![]() Fixed provisioning The size of the virtual disk is the actual amount of physical storage space allocated from the pool.
Fixed provisioning The size of the virtual disk is the actual amount of physical storage space allocated from the pool.
![]() Thin provisioning The size of the virtual disk represents the maximum amount of physical storage space that can be allocated from the pool. No space is actually used until data is stored on a volume on the virtual disk, and the amount of space used will grow or shrink as data is written to or deleted from the disk.
Thin provisioning The size of the virtual disk represents the maximum amount of physical storage space that can be allocated from the pool. No space is actually used until data is stored on a volume on the virtual disk, and the amount of space used will grow or shrink as data is written to or deleted from the disk.
The difference between these two types of provisioning can be explained using the following example. Figure 8-1 shows a storage pool named Storage Pool 1 that has been created from three 2-terabyte (TB) physical hard drives. If you use fixed provisioning to create virtual disks from this pool, you could create, for example, one virtual disk that is 4 TBs in size and a second virtual disk that is 2 TBs in size for a total of 6 TBs, which equals the physical storage space available in the pool. At this point, because all available storage in the pool has been provisioned, no new virtual disks can be created unless additional physical disks are added to the pool.
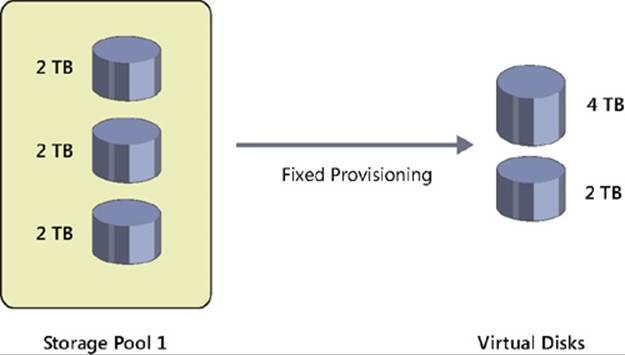
FIGURE 8-1 Create virtual disks from a storage pool using fixed provisioning.
In contrast, Figure 8-2 shows thin provisioning being used to create virtual disks from the same storage pool of physical disks. Two virtual disks have been created: one 20 TBs in size and the other 10 TBs in size for a total of 30 TBs. You could now create volumes on these virtual disks and use the volumes to store data. For example, you could create three volumes of sizes 10 TBs, 5 TBs, and 5 TBs on the 20 TB virtual disk and create a single 10 TB volume on the 10 TB virtual disk. If you discover that the volumes you created are insufficient to meet the needs of your environment, you could perform either of the following actions:
![]() Create additional thinly provisioned virtual disks from the same storage pool
Create additional thinly provisioned virtual disks from the same storage pool
![]() Extend one (or more) of your existing virtual disks to create more room on it and then create additional volumes on the extended disk (or disks)
Extend one (or more) of your existing virtual disks to create more room on it and then create additional volumes on the extended disk (or disks)
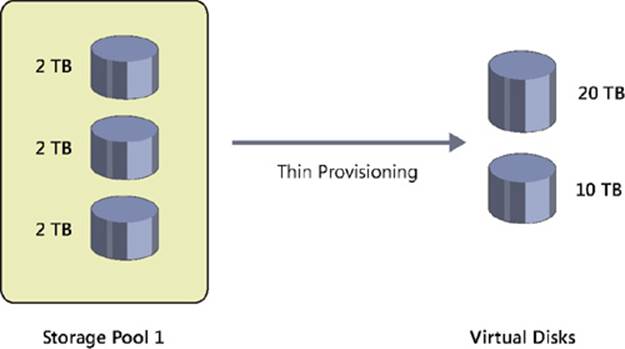
FIGURE 8-2 Create virtual disks from a storage pool using thin provisioning.
How can 6 TBs of physical storage space be used to create 30 TBs of NTFS-formatted volumes for storing data? With fixed provisioning, this is not possible. However, with thin provisioning, the data volumes use space on the physical disks only when you store some data on the volumes.
What happens, then, if you begin copying large amounts of data onto the two volumes shown in Figure 8-2? Once you begin to approach the actual available physical capacity of the storage pool, a notification message will be displayed to alert you to the situation. At that point, you can either stop copying data to the volumes or add more physical disks to your storage pool.
Note: How Storage Space stores data on physical disks
Storage Space stores data for a volume on a virtual disk by striping the data across all physical disks in the pool. Data is interleaved in 256 MB segments called slabs. Storage Spaces then keeps track of which slab on which disk corresponds to which portion of each volume on each virtual disk provisioned from the pool. For detailed information on how this works, see “Virtualizing storage for scale, resiliency, and efficiency” at http://blogs.msdn.com/b/b8/archive/2012/01/05/virtualizing-storage-for-scale-resiliency-and-efficiency.aspx.
Resiliency
You can use Storage Spaces to provide resilient storage similar (but not identical) to RAID 0 (disk striping) and RAID 1 (mirroring) that you can implement using hardware RAID solutions. As long as your storage pool has a sufficient number of physical disks in it, you can use Storage Spaces to create virtual disks whose storage layout is any of the following three types:
![]() Simple The data on volumes created on this type of virtual disk is striped across all physical disks in the pool. You can use simple virtual disks to provision the maximum amount of storage from the pool, but they provide no resiliency against physical disk failure.
Simple The data on volumes created on this type of virtual disk is striped across all physical disks in the pool. You can use simple virtual disks to provision the maximum amount of storage from the pool, but they provide no resiliency against physical disk failure.
![]() Mirror The data on volumes created on this type of virtual disk is striped across all physical disks in the pool. Each segment of data is also duplicated on either two or three physical disks, as specified when the mirrored virtual disk is created, so that a copy of all data will still be available if a physical disk fails in the pool. Mirror virtual disks provide resiliency to help protect you from data loss arising from the failure of a physical disk in the pool. The degree of resiliency provided depends on the number of physical disks in the pool—for example:
Mirror The data on volumes created on this type of virtual disk is striped across all physical disks in the pool. Each segment of data is also duplicated on either two or three physical disks, as specified when the mirrored virtual disk is created, so that a copy of all data will still be available if a physical disk fails in the pool. Mirror virtual disks provide resiliency to help protect you from data loss arising from the failure of a physical disk in the pool. The degree of resiliency provided depends on the number of physical disks in the pool—for example:
![]() You can use a pool containing two physical disks to create mirror virtual disks that are resilient against the failure of a single physical disk.
You can use a pool containing two physical disks to create mirror virtual disks that are resilient against the failure of a single physical disk.
![]() You can use a pool containing five physical disks to create mirror virtual disks that are resilient against the failure of two physical disks.
You can use a pool containing five physical disks to create mirror virtual disks that are resilient against the failure of two physical disks.
![]() Parity The data on volumes created on this type of virtual disk, with parity information that you can use to facilitate automatic reconstruction of data in the event of a physical disk failure, is striped across all physical disks in the pool. Parity virtual disks also provide resiliency to help protect you from data loss arising from the failure of a physical disk in the pool, but they perform better with large sequential disk writes than with random I/O.
Parity The data on volumes created on this type of virtual disk, with parity information that you can use to facilitate automatic reconstruction of data in the event of a physical disk failure, is striped across all physical disks in the pool. Parity virtual disks also provide resiliency to help protect you from data loss arising from the failure of a physical disk in the pool, but they perform better with large sequential disk writes than with random I/O.
Note: Requirement for provisioning resilient virtual disks
If your storage pool has only one physical disk in it, you will only be able to provision simple virtual disks from it. To provision mirror or parity virtual disks from a storage pool, the pool must have at least two physical disks in it.
When a physical disk fails in a pool being used to provision resilient (mirror or parity) virtual disks, Storage Spaces will continue to provide access to data stored on volumes on the virtual disk and will automatically regenerate data copies for all affected virtual disks as long as there are sufficient alternate physical disks available in the pool. When you add a physical disk to a storage pool, you have a choice of two ways to allocate the disk to the pool:
![]() Automatic The pool will automatically use the disk for storing data written to any volumes created on the disk.
Automatic The pool will automatically use the disk for storing data written to any volumes created on the disk.
![]() Hot-spare The pool will hold the disk in reserve so that it can be used if another physical drive in the pool fails.
Hot-spare The pool will hold the disk in reserve so that it can be used if another physical drive in the pool fails.
Note: Quorum
In the event of a simultaneous failure of multiple physical drives in a pool, you will still be able to access data stored on volumes created on resilient virtual disks in the pool as long as a simple majority (quorum) of physical disks in your pool are still healthy.
![]() Quick check
Quick check
![]() You need to create a 5 TB file share for archiving your company’s presentations and media files. Your file server is running Windows Server 2012 R2, but you currently have only two data disks in your file server with each disk having a capacity of 2 TBs. You’ve ordered an external SATA (eSATA) card and a Serial Advanced Technology Attachment (SATA) JBOD with four 2 TB disks, but the shipment is on backorder and is not expected to arrive for several weeks. Is there anything you can do in the meantime that will enable you to begin archiving your content?
You need to create a 5 TB file share for archiving your company’s presentations and media files. Your file server is running Windows Server 2012 R2, but you currently have only two data disks in your file server with each disk having a capacity of 2 TBs. You’ve ordered an external SATA (eSATA) card and a Serial Advanced Technology Attachment (SATA) JBOD with four 2 TB disks, but the shipment is on backorder and is not expected to arrive for several weeks. Is there anything you can do in the meantime that will enable you to begin archiving your content?
Quick check answer
![]() Yes! If you implemented Storage Spaces, you can use thin provisioning to create a virtual disk 5 TBs in size even though you currently have only 4 TBs of available physical storage for your file server. You can then create a 5 TB volume on this virtual disk and start archiving content to the volume. When the extra storage hardware you ordered arrives, you can add the new storage to the storage pool on your server and finish archiving your content.
Yes! If you implemented Storage Spaces, you can use thin provisioning to create a virtual disk 5 TBs in size even though you currently have only 4 TBs of available physical storage for your file server. You can then create a 5 TB volume on this virtual disk and start archiving content to the volume. When the extra storage hardware you ordered arrives, you can add the new storage to the storage pool on your server and finish archiving your content.
Planning a Storage Spaces deployment
Successful deployment requires careful planning to ensure problems don’t arise during or after the deployment process. You should consider the following issues when planning the deployment of Storage Spaces for your organization:
![]() Hardware
Hardware
![]() Performance
Performance
![]() Resiliency
Resiliency
![]() Availability
Availability
![]() Management
Management
![]() Scalability
Scalability
Hardware
The hardware requirements for implementing Storage Spaces define the kinds of physical storage devices and formats that you can use for creating storage pools. These hardware requirements vary depending on whether the Failover Clustering feature is being used to provide high availability for your storage pools.
If you are deploying Storage Spaces without Failover Clustering, the supported types of physical storage devices are as follows:
![]() Serial ATA (SATA) hard drives, including solid state drives (SSDs)
Serial ATA (SATA) hard drives, including solid state drives (SSDs)
![]() Serial Attached SCSI (SAS) hard drives, including SSDs
Serial Attached SCSI (SAS) hard drives, including SSDs
Note: USB drives and Storage Spaces
Although using USB 2.0 hard drives with Storage Spaces is supported, it is not recommended because of the performance limitations of using USB 2.0 to perform simultaneous reads and writes to multiple connected USB drives.
In addition, you can connect these devices to a server running Windows Server 2012 or Windows Server 2012 R2 in the following ways:
![]() Internal connection using SATA or SAS controllers
Internal connection using SATA or SAS controllers
![]() External connection to a JBOD enclosure of SATA disks
External connection to a JBOD enclosure of SATA disks
![]() External connection to a SAS storage array
External connection to a SAS storage array
If you are deploying a highly available (HA) Storage Spaces solution, the requirements are as follows:
![]() Two servers running Windows Server 2012 or Windows Server 2012 R2 with the Failover Clustering feature installed and configured to use Cluster Shared Volumes (CSVs).
Two servers running Windows Server 2012 or Windows Server 2012 R2 with the Failover Clustering feature installed and configured to use Cluster Shared Volumes (CSVs).
![]() SAS-connected JBODs that comply with the Certified for Windows Server 2012 or Windows Server 2012 R2 logo requirements.
SAS-connected JBODs that comply with the Certified for Windows Server 2012 or Windows Server 2012 R2 logo requirements.
![]() You cannot use iSCSI storage devices for an HA Storage Spaces solution.
You cannot use iSCSI storage devices for an HA Storage Spaces solution.
Note: Storage Spaces and hardware RAID
You cannot use Storage Spaces in conjunction with hardware RAID. Choosing between hardware RAID and Storage Spaces depends on several factors:
![]() Choose Storage Spaces when you want to be able to virtualize and deploy shared storage of data using thin provisioning and save money by using low-cost, commodity hard drives and ensuring a level of resiliency similar to what RAID can provide.
Choose Storage Spaces when you want to be able to virtualize and deploy shared storage of data using thin provisioning and save money by using low-cost, commodity hard drives and ensuring a level of resiliency similar to what RAID can provide.
![]() Choose a hardware RAID solution for a server when you need to ensure data integrity, fault tolerance, and high performance—for example, a RAID 5 or RAID 6 solution implemented using a RAID controller card. You should also choose hardware RAID when you want to ensure data integrity and fault tolerance for a server’s boot volume—for example, by configuring the boot volume as a RAID 1 or RAID 10 volume.
Choose a hardware RAID solution for a server when you need to ensure data integrity, fault tolerance, and high performance—for example, a RAID 5 or RAID 6 solution implemented using a RAID controller card. You should also choose hardware RAID when you want to ensure data integrity and fault tolerance for a server’s boot volume—for example, by configuring the boot volume as a RAID 1 or RAID 10 volume.
If a server has a RAID controller card and multiple hard drives and you want to use Storage Spaces to pool these drives, you need to configure the RAID card to expose each drive separately to the operating system.
Real World: SES SAS JBODs
SCSI Enclosure Services (SES) is a protocol that allows the controller to send diagnostic information to and receive it from connected storage devices. For example, a SAS JBOD enclosure that supports SES has a series of LED lights on the enclosure, with each LED corresponding to one of the SAS hard drives in the enclosure. When Storage Spaces is implemented using SAS JBODs that support SES, Storage Spaces can use SES to light up the LED of a drive that has failed so that you can quickly determine which drive needs to be replaced in the enclosure when Storage Spaces notifies you that a drive in a storage pool has failed.
Search the Windows Server Catalog at http://windowsservercatalog.com to find Certified for Windows Server 2012 or Windows Server 2012 R2 SAS JBODs that support the SES version 3 protocol. Then go to the vendor’s website and confirm that the devices support SES.
Performance
To ensure optimal performance of Storage Spaces, make sure you consider the following:
![]() Use enterprise-level SAS disks if you can afford them to get optimum performance from your Storage Spaces solution. Make sure you also use top-quality SAS controller cards. Most SAS controller cards are backward compatible for connecting to SATA disks, so you can use these if your budget is limited. If top performance is needed and money is no object, consider using SSDs.
Use enterprise-level SAS disks if you can afford them to get optimum performance from your Storage Spaces solution. Make sure you also use top-quality SAS controller cards. Most SAS controller cards are backward compatible for connecting to SATA disks, so you can use these if your budget is limited. If top performance is needed and money is no object, consider using SSDs.
![]() Create different storage pools for the different performance needs of your environment and populate the pools with appropriate kinds of physical disks. For example, a storage pool for a high-speed file server might contain a mix of SSDs and 15,000 RPM SAS disks, and another storage pool used mainly for archiving multimedia presentations could use cheaper 7200 RPM SATA disks.
Create different storage pools for the different performance needs of your environment and populate the pools with appropriate kinds of physical disks. For example, a storage pool for a high-speed file server might contain a mix of SSDs and 15,000 RPM SAS disks, and another storage pool used mainly for archiving multimedia presentations could use cheaper 7200 RPM SATA disks.
Resiliency
Provisioning the right type of virtual disk from a storage pool involves the following considerations:
![]() For general-purpose file servers and similar uses, use mirror virtual disks to ensure resiliency against the failure of one or two physical disks in the pool.
For general-purpose file servers and similar uses, use mirror virtual disks to ensure resiliency against the failure of one or two physical disks in the pool.
![]() For archival data and streaming media, use parity virtual disks. Because of the higher overhead they require when performing random I/O, do not use parity virtual disks for general-purpose file servers.
For archival data and streaming media, use parity virtual disks. Because of the higher overhead they require when performing random I/O, do not use parity virtual disks for general-purpose file servers.
![]() For temporary storage such as scratch files for data-editing applications, you can implement simple virtual disks.
For temporary storage such as scratch files for data-editing applications, you can implement simple virtual disks.
Note: Resilient File System
You can gain additional resiliency by formatting volumes using the Resilient File System (ReFS) in Windows Server 2012 and Windows Server 2012 R2. ReFS provides automatic data-integrity maintenance and can be used to add a layer of resiliency beyond what mirror or parity virtual disks can provide. For more information on ReFS, see “Building the next generation file system for Windows: ReFS” at http://blogs.msdn.com/b/b8/archive/2012/01/16/building-the-next-generation-file-system-for-windows-refs.aspx.
Note that some storage features of Windows Server 2012 and Windows Server 2012 R2—such as data deduplication, which enables greater amounts of data to be stored on disks—are not supported by ReFS-formatted volumes. For more information on this aspect of ReFS, see “Plan to Deploy Data Deduplication” at http://technet.microsoft.com/en-us/library/hh831700.aspx.
Availability
You can deploy Storage Spaces with the Failover Clustering feature of Windows Server 2012 and Windows Server 2012 R2. You can use such a scenario to deliver continuously available shared storage for your environment by allowing shared storage to transparently fail over to a different node in a clustered file server when necessary. You can also integrate Storage Spaces with CSVs to implement a Scale-Out File Server that incorporates the benefits of using Storage Spaces.
You should keep the following considerations in mind when deploying Storage Spaces with Failover Clustering:
![]() You need a minimum of three physical disks.
You need a minimum of three physical disks.
![]() Physical disks must be SAS, not SATA.
Physical disks must be SAS, not SATA.
![]() Physical disks must support persistent reservations.
Physical disks must support persistent reservations.
![]() Physical disks must pass the failover cluster validation tests.
Physical disks must pass the failover cluster validation tests.
![]() Only fixed provisioning can be used, not thin provisioning.
Only fixed provisioning can be used, not thin provisioning.
More Info: Implementing Storage Spaces with Failover Clustering
For more information on how to configure Storage Spaces with Failover Clustering, see “How to Configure a Clustered Storage Space in Windows Server 2012” at http://blogs.msdn.com/b/clustering/archive/2012/06/02/10314262.aspx.
Management
After you have implemented Storage Spaces in your environment, you can manage it in the following ways:
![]() Using the File And Storage Services role page in Server Manager
Using the File And Storage Services role page in Server Manager
![]() Using cmdlets in the Storage module of Windows PowerShell
Using cmdlets in the Storage module of Windows PowerShell
For smaller deployments, Server Manager offers a simple way of managing storage pools, virtual disks, volumes, and shares. For larger deployments—for example, when Storage Spaces is used for Hyper-V shared storage in a data center or cloud environment—Windows PowerShell provides a way to automate management tasks using scripts.
Note: Storage Spaces and WMI
You can also use WMI directly to manage Storage Spaces using SMAPI—for example, by writing a utility that does this.
Scalability
The scalability of Storage Spaces makes it suitable for various scenarios, ranging from deploying file servers for small businesses to implementing a private-cloud solution for a midsized organization. For example, a single stand-alone file server using Storage Spaces with a dozen connected physical disks might be used for any of the following purposes:
![]() A general-purpose file server for a small business or department
A general-purpose file server for a small business or department
![]() An archival storage solution for infrequently accessed documents or media files
An archival storage solution for infrequently accessed documents or media files
![]() Virtual machine storage for a Hyper-V host used for test or development
Virtual machine storage for a Hyper-V host used for test or development
As a second example, you can combine Storage Spaces with Failover Clustering to deploy a highly available, two-node, clustered file server that you can use to provide shared storage for virtual machines running on clustered Hyper-V hosts in your production environment. Such a scenario is possible because the Windows Server 2012 and Windows Server 2012 R2 versions of Hyper-V support host-clustering using Server Message Block (SMB) 3.0 shares for storing your virtual machine files. The file server in this scenario could conceivably scale up to using several hundred disks deployed in rack-mounted SATA or SAS enclosures, and you could use such a file server as the storage for your organization’s private-cloud solution.
Real World: Scaling beyond Storage Spaces
If your organization’s storage requirements are very large, you can implement Windows Server 2012 or Windows Server 2012 R2 file server clusters that use Fibre Channel for shared storage to take advantage of advanced storage-networking features such as SMB Scale-Out and SMB Direct. You could use such an infrastructure to provide shared storage for dozens, or even hundreds, of Hyper-V host clusters. If you use Fibre Channel for connectivity between the storage array and the file-server clusters, you should also use 10 gigabyte Ethernet (GbE) or InfiniBand for connectivity between the Hyper-V host clusters and the file-server clusters to ensure optimal performance. For more information on the SMB 3.0 capabilities included in Windows Server 2012 and Windows Server 2012 R2, see “Server Message Block overview” athttp://technet.microsoft.com/en-us/library/hh831795.aspx.
Implementing Storage Spaces
Implementing a stand-alone Storage Spaces solution in your environment basically involves doing two things:
![]() Installing the File Server role service
Installing the File Server role service
![]() Connecting additional physical storage to your server if needed
Connecting additional physical storage to your server if needed
You can perform the first step by using either Server Manager or Windows PowerShell, as the following sections demonstrate. You can add physical storage at any time, either by installing more internal disks in the server or by connecting external storage enclosures to the server. You can also add more physical storage either before or after you install the File Server role service.
Note: Implementing HA Storage Spaces
Implementing a highly available Storage Spaces solution using Failover Clustering is beyond the scope of this book. Search the TechNet Library for more information on this scenario if it is necessary for your organization.
Using Server Manager
You can use Server Manager to implement Storage Spaces on a server running Windows Server 2012 or Windows Server 2012 R2. To do this, launch the Add Roles And Features Wizard from the Manage menu on the Server Manager toolbar. Then select the File Server role service, which is located under the File And iSCSI Services role services in the File And Storage Services role as shown in Figure 8-3.
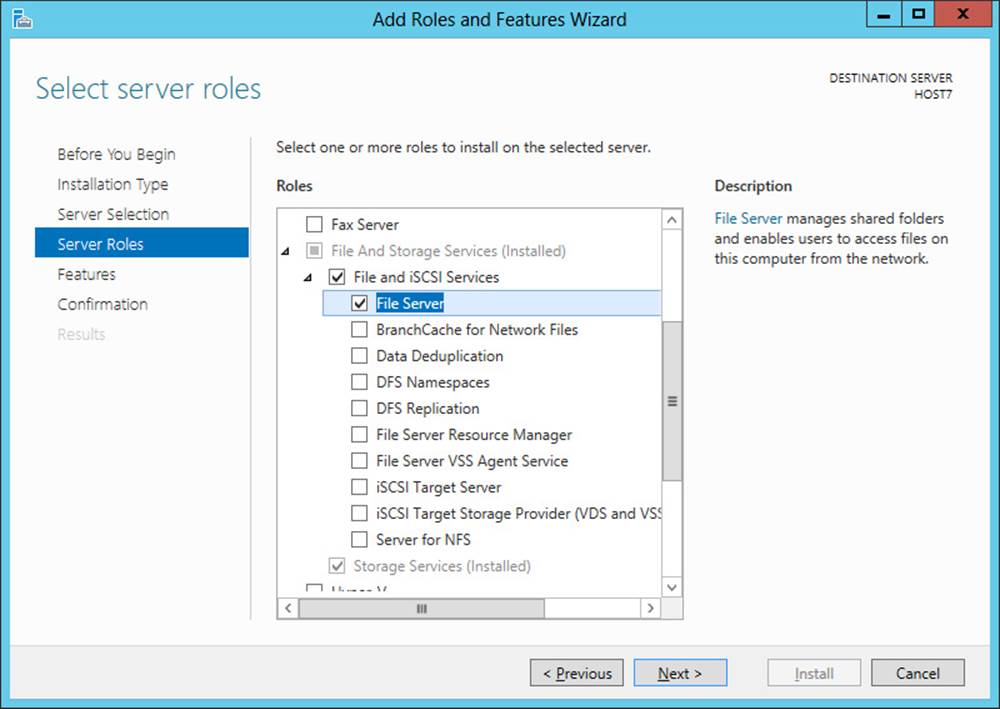
FIGURE 8-3 Installing the File Server role service implements Storage Spaces on the server.
Note: Storage Services
The Storage Services role service of the File And Storage Services role is always installed by default whenever you install Windows Server 2012 or Windows Server 2012 R2 on a server. This is because the Storage Services role service provides storage-management functionality that is needed by any other roles you might install on the server.
Using Windows PowerShell
You can also use Windows PowerShell to implement Storage Spaces on a server running Windows Server 2012 or Windows Server 2012 R2. You can use the Get-WindowsFeature cmdlet to display the install state of the different role services of the File And Storage Services role on a clean install of Windows Server 2012 or Windows Server 2012 R2 as follows:
[X] File And Storage Services FileAndStorage-Services Installed
[ ] File and iSCSI Services File-Services Available
[ ] File Server FS-FileServer Available
[ ] BranchCache for Network Files FS-BranchCache Available
[ ] Data Deduplication FS-Data-Deduplication Available
[ ] DFS Namespaces FS-DFS-Namespace Available
[ ] DFS Replication FS-DFS-Replication Available
[ ] File Server Resource Manager FS-Resource-Manager Available
[ ] File Server VSS Agent Service FS-VSS-Agent Available
[ ] iSCSI Target Server FS-iSCSITarget-Server Available
[ ] iSCSI Target Storage Provider (... iSCSITarget-VSS-VDS Available
[ ] Server for NFS FS-NFS-Service Available
[X] Storage Services Storage-Services Installed
For example, you can use the following command to implement Storage Spaces on server HOST7 by installing the File Server role service:
Install-WindowsFeature -Name FS-FileServer -ComputerName HOST7 - Restart
Afterward, you can use the following command to verify installation of the role service:
PS C:\> Get-WindowsFeature -ComputerName HOST7 | where DisplayName -eq "File Server"
Display Name Name Install State
------------ ---- -------------
[X] File Server FS-FileServer Installed
Lesson summary
![]() Storage Spaces enables you to virtualize commodity physical disks into pools from which you can provision volumes and shares for different purposes.
Storage Spaces enables you to virtualize commodity physical disks into pools from which you can provision volumes and shares for different purposes.
![]() Storage Spaces supports both thin and fixed provisioning of storage.
Storage Spaces supports both thin and fixed provisioning of storage.
![]() Storage Spaces can provide resiliency similar to hardware RAID 0 and RAID 1 solutions.
Storage Spaces can provide resiliency similar to hardware RAID 0 and RAID 1 solutions.
![]() When planning the deployment of Storage Spaces, you should consider hardware, performance, resiliency, availability, management, and scalability.
When planning the deployment of Storage Spaces, you should consider hardware, performance, resiliency, availability, management, and scalability.
![]() You can implement Storage Spaces using either Server Manager or Windows PowerShell.
You can implement Storage Spaces using either Server Manager or Windows PowerShell.
Lesson review
Answer the following questions to test your knowledge of the information in this lesson. You can find the answers to these questions and explanations of why each answer choice is correct or incorrect in the “Answers” section at the end of this chapter.
1. Which of the following might be true if the primordial pool is not visible in the Storage Pools tile on the Storage Pools subpage of the File And Storage Services page of Server Manager? (Choose all that apply.)
A. A new storage pool has been created on the server.
B. The server has only one connected physical disk (the boot disk).
C. The physical disks are already allocated to storage pools on the server.
D. The physical disks already have volumes on them.
2. Which of the following storage-management utilities is deprecated as of Windows Server 2012 R2? (Choose all that apply.)
A. DiskPart
B. DiskRAID
C. The Disk Management MMC snap-in
D. WMI
3. You have used Windows PowerShell to create two 5 TB data volumes on your file server. The total free space on all connected physical disks is only 2 TBs. What feature of Storage Spaces makes this possible?
A. Thin provisioning
B. Fixed provisioning
C. Mirror resiliency
D. Parity resiliency
4. Which of the following is not true when deploying Storage Spaces with Failover Clustering? (Choose all that apply.)
A. A minimum of two physical disks is required.
B. Physical disks must be SATA disks.
C. Physical disks must pass the failover cluster validation tests.
D. Thin provisioning must be used.
Lesson 2: Provisioning and managing shared storage
Provisioning and managing shared storage is an important part of the system administrator’s job. In the previous lesson, you learned how Storage Spaces, which was introduced in Windows Server 2012, can enable you to implement low-cost, flexible storage solutions using commodity-based disk hardware. This lesson demonstrates how to use Storage Spaces to provision, manage, and maintain shared storage using both Server Manager and Windows PowerShell.
After this lesson, you will be able to:
![]() Create storage pools using Server Manager or Windows PowerShell.
Create storage pools using Server Manager or Windows PowerShell.
![]() Create virtual disks using Server Manager or Windows PowerShell.
Create virtual disks using Server Manager or Windows PowerShell.
![]() Create volumes using Server Manager or Windows PowerShell.
Create volumes using Server Manager or Windows PowerShell.
![]() Describe the different types of SMB shares you can create and their various configuration options.
Describe the different types of SMB shares you can create and their various configuration options.
![]() Create SMB shares using Server Manager or Windows PowerShell.
Create SMB shares using Server Manager or Windows PowerShell.
![]() Manage storage pools, virtual disks, volumes, and SMB shares using Server Manager or Windows PowerShell.
Manage storage pools, virtual disks, volumes, and SMB shares using Server Manager or Windows PowerShell.
Estimated lesson time: 30 minutes
Provisioning shared storage
Provisioning shared storage using Storage Spaces involves performing the following steps:
1. Create one or more storage pools.
2. Create virtual disks from your storage pools.
3. Create volumes on your virtual disks.
Once you complete the preceding steps, you are ready to create SMB file shares on the volumes you created. Provisioning SMB file shares is covered in the section titled “Provisioning SMB shares” later in this chapter.
Creating a storage pool
The first step in provisioning storage is to create one or more storage pools. Before you create a new storage pool, make sure that you have
![]() At least one available physical disk in your primordial pool if you plan on creating simple volumes.
At least one available physical disk in your primordial pool if you plan on creating simple volumes.
![]() At least two available physical disks in your primordial pool if you plan on creating resilient volumes.
At least two available physical disks in your primordial pool if you plan on creating resilient volumes.
![]() At least three available physical disks in your primordial pool if you plan on creating resilient volumes in a failover cluster containing two file servers.
At least three available physical disks in your primordial pool if you plan on creating resilient volumes in a failover cluster containing two file servers.
Figure 8-4 shows the primordial storage pool on a server named HOST7 in Server Manager. The Physical Disks tile of the Storage Pools page indicates that there are three physical disks available. These disks are SAS disks, and each one has a capacity of 233 GBs. You could create different pool configurations from these disks—for example:
![]() Three storage pools, with each pool created using a single physical disk. This configuration would allow you to create only simple (nonresilient) volumes.
Three storage pools, with each pool created using a single physical disk. This configuration would allow you to create only simple (nonresilient) volumes.
![]() Two storage pools, with one pool using two of the physical disks and the second pool using the remaining physical disk. In this configuration, the first pool would allow you to create both simple and resilient volumes and the second pool would allow you to create only simple volumes.
Two storage pools, with one pool using two of the physical disks and the second pool using the remaining physical disk. In this configuration, the first pool would allow you to create both simple and resilient volumes and the second pool would allow you to create only simple volumes.
![]() One storage pool that uses all three physical disks to support the creation of simple or resilient volumes.
One storage pool that uses all three physical disks to support the creation of simple or resilient volumes.
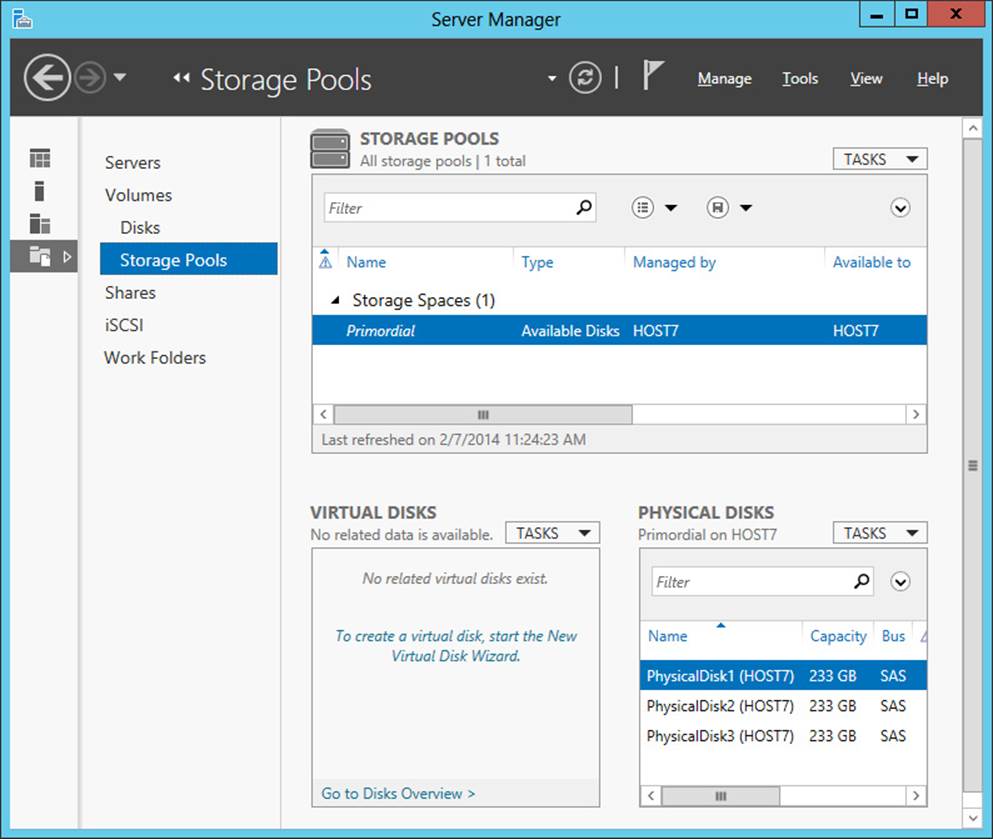
FIGURE 8-4 The primordial storage pool on this server has three physical disks.
To create a new storage pool using Server Manager, perform the following steps:
1. Launch the New Storage Pool Wizard—for example, by right-clicking the Primordial storage pool item shown as selected in Figure 8-4.
2. Give your new storage pool a descriptive name, such as “Archive Pool,” that identifies the purpose of the new pool—for example, to provide archival storage for presentations and media files for your company.
3. Select the physical disks in the primordial pool that you want to assign to your new pool. When you select a physical disk, you have the option of choosing Automatic, Hot Spare, or Manual as the allocation method for the disk. The configuration shown in Figure 8-5 will make two physical disks available for the creation of new virtual disks from the pool and keep an additional physical disk in reserve as a hot spare in case one of the other two disks fails.
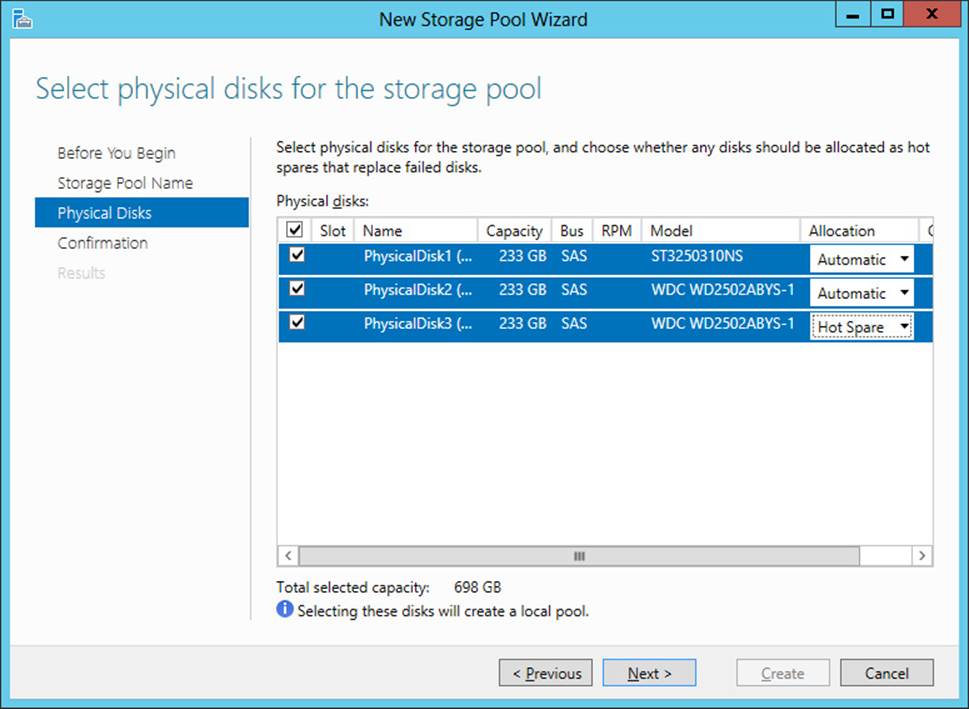
FIGURE 8-5 Assign physical disks to a new storage pool.
4. Click Next and then Create to create the new pool.
Alternatively, you could use Windows PowerShell to create the same storage pool. Begin by using the Get-StoragePool cmdlet to display a list of storage pools on the server:
PS C:\> Get-StoragePool
FriendlyName OperationalStatus HealthStatus IsPrimordial IsReadOnly
------------ ----------------- ------------ ------------ ----------
Primordial OK Healthy True False
Next, use the Get-PhysicalDisk cmdlet to display a list of physical disks connected to the server:
PS C:\> Get-PhysicalDisk
FriendlyName CanPool OperationalStatus HealthStatus Usage Size
------------ ------- ----------------- ------------ ----- ----
PhysicalDisk0 False OK Healthy Auto-Select 232.83 GB
PhysicalDisk1 True OK Healthy Auto-Select 232.83 GB
PhysicalDisk2 True OK Healthy Auto-Select 232.83 GB
PhysicalDisk3 True OK Healthy Auto-Select 232.83 GB
Only disks that have their CanPool property set to True are available for assigning to new storage pools you create. Use Get-PhysicalDisk again to assign such disks to a variable:
PS C:\> $phydisks = (Get-PhysicalDisk | where CanPool -eq True)
Next, use the Get-StorageSubSystem cmdlet to display the available storage subsystem on the server:
PS C:\> Get-StorageSubSystem
FriendlyName HealthStatus OperationalStatus
------------ ------------ -----------------
Storage Spaces on HOST7 Healthy OK
Assign the object that is the output from this command to another variable:
PS C:\> $subsystem = (Get-StorageSubSystem)
Now use the New-StoragePool cmdlet to create the new storage pool as follows:
PS C:\> New-StoragePool -FriendlyName "Archive Pool" `
-StorageSubSystemFriendlyName $subsystem.FriendlyName -PhysicalDisks $phydisks
FriendlyName OperationalStatus HealthStatus IsPrimordial IsReadOnly
------------ ----------------- ------------ ------------ ----------
Archive Pool OK Healthy False False
Note that the $subsystem.FriendlyName in the preceding command represents the value of the FriendlyName property of the $subsystem variable. In other words, it represents the friendly name of the storage subsystem.
Finally, you can use Get-StoragePool again to verify the result:
PS C:\> Get-StoragePool
FriendlyName OperationalStatus HealthStatus IsPrimordial IsReadOnly
------------ ----------------- ------------ ------------ ----------
Primordial OK Healthy True False
Archive Pool OK Healthy False False
And if you want detailed information about the new storage pool, you can use this command:
PS C:\> Get-StoragePool -FriendlyName "Archive Pool" | fl *
Usage : Other
OperationalStatus : OK
HealthStatus : Healthy
ProvisioningTypeDefault : Fixed
SupportedProvisioningTypes : {Thin, Fixed}
...
Creating virtual disks
Before you can create a virtual disk, you must create at least one storage pool on your file server. Continuing the procedure that was started in the previous section, Figure 8-6 shows that file server HOST7 now has a storage pool named Archive Pool that has a capacity of 696 GBs but no virtual disks yet.
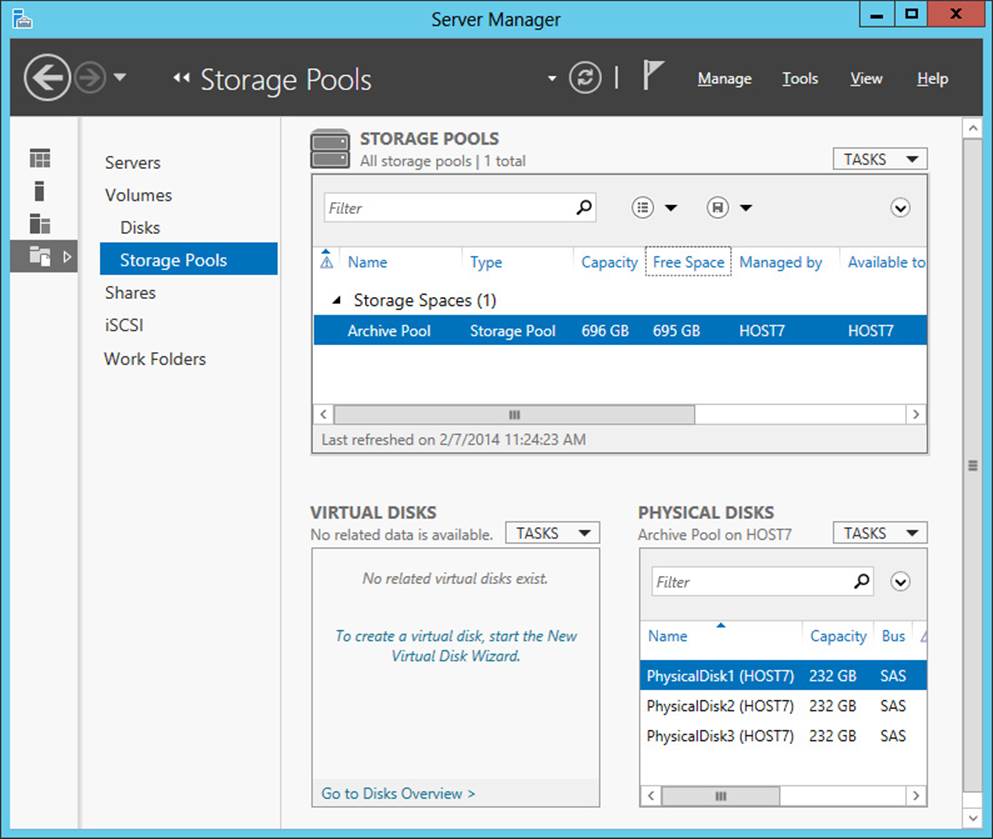
FIGURE 8-6 The storage pool named Archive Pool has no virtual disks yet.
Note: Storage-pool capacity
When the storage pool named Archive Pool was created in this lesson’s example, one of the three physical disks was assigned the Hot Spare role. One might expect, then, that the total capacity of the pool would be displayed as 2 × 232 GBs = 464 GBs, not as 696 GBs as shown inFigure 8-6. However, because the Hot Spare disk can be reallocated as Automatic if needed, the capacity of the pool is displayed as 696 GBs, not 464 GBs.
To create a new virtual disk from a storage pool using Server Manager, perform the following steps:
1. Launch the New Virtual Disk Wizard—for example, by right-clicking the Archive Pool item shown as selected in Figure 8-6. Alternatively, you can select “Create a virtual disk when this wizard closes” at the end of the New Storage Pool wizard.
2. Select the storage pool from which you want to create your new virtual disk. In this example, you are using Archive Pool.
3. Give your new virtual disk a descriptive name, such as “Archive Disk,” that identifies the purpose of the new disk, which in this case will be long-term storage of archival information for Contoso, Ltd.
4. If you want to use storage tiers to enable automatic movement of the most frequently accessed files to faster storage, select the check box labeled Create Storage Tiers On This Virtual Disk. This check box will be unavailable (grayed out) if the storage pool you selected does not have at least one physical disk of each media type (SSD and HDD), as is the case in this walkthrough in which only SAS HDDs are being used.
5. Select the storage layout you want to use for the new virtual disk. Because Archive Pool has three physical disks with one being reserved as a hot spare, you can choose either Simple or Mirror as the storage layout for your new virtual disk. To choose Parity, you would need a minimum of three physical disks available, in which case you would need to have configured the third physical disk as Automatic instead of Hot Spare when you created your pool. Because the disk in this example will be used to archive valuable company information, select Mirror for its storage layout as shown in Figure 8-7.
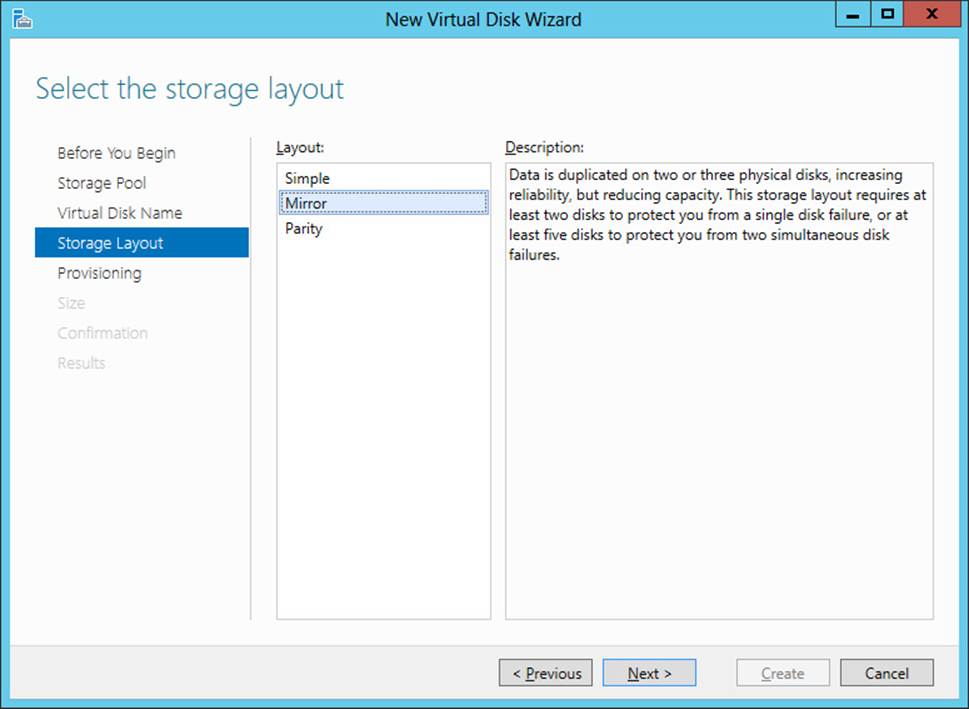
FIGURE 8-7 Specify the storage layout for the new virtual disk.
6. Select the provisioning type you want to use for the new virtual disk. Because the disk in this example will be used for archival storage of company information that might grow over time, select Thin for the provisioning type.
7. Specify the size of the new virtual disk you are creating as shown in Figure 8-8. The possible size you can specify depends on the type of provisioning, as follows:

FIGURE 8-8 Specify the size of the new virtual disk.
![]() If you selected Fixed as the provisioning type, you can either select Maximum Size to allow Storage Spaces to create a virtual disk that has the maximum capacity of the storage pool or you can specify your desired disk size in MBs, GBs, or TBs. Note that the virtual disk you are creating might use additional space from the pool to create a write-back cache.
If you selected Fixed as the provisioning type, you can either select Maximum Size to allow Storage Spaces to create a virtual disk that has the maximum capacity of the storage pool or you can specify your desired disk size in MBs, GBs, or TBs. Note that the virtual disk you are creating might use additional space from the pool to create a write-back cache.
![]() If you selected Thin as the provisioning type, you only have the option of specifying your desired disk size in MBs, GBs, or TBs. Once again, your virtual disk might take additional space to create a write-back cache.
If you selected Thin as the provisioning type, you only have the option of specifying your desired disk size in MBs, GBs, or TBs. Once again, your virtual disk might take additional space to create a write-back cache.
In this example, specify 2 TBs as the maximum size of the new virtual disk. This large value is possible for this server only because you selected Thin as the provisioning type.
8. Click Create to create the new virtual disk.
Alternatively, you could use Windows PowerShell to create the same virtual disk. Begin by using the New-VirtualDisk cmdlet to create the new virtual disk:
PS C:\> New-VirtualDisk -StoragePoolFriendlyName "Archive Pool" `
-FriendlyName "Archive Disk" -ResiliencySettingName Mirror -ProvisioningType Thin `
-Size 2TB
FriendlyName ResiliencySettingName OperationalStatus HealthStatus IsManualAttach Size
------------ ------------------- ----------------- ------------ -------------- ----
Archive Disk Mirror OK Healthy False 2 TB
Any new virtual disk created this way must then be initialized (brought online) before it can be used. You can use the Get-Disk cmdlet to display more information about the disks (physical and virtual) on the server:
PS C:\> Get-Disk
Number Friendly Name OperationalStatus Total Size Partition Style
------ ------------- ----------------- ---------- ---------------
0 ATA ST3250310NS SCSI Disk Device Online 232.83 GB MBR
4 Microsoft Storage Space Device Offline 2 TB RAW
From the command output just shown, you can see that the number of the new virtual disk is 4. You use this information with the Initialize-Disk cmdlet as follows:
PS C:\> Initialize-Disk -Number 4
By default, the Initialize-Disk cmdlet creates a GUID Partition Table (GPT) type of disk:
PS C:\> Get-Disk -Number 4
Number Friendly Name OperationalStatus Total Size Partition Style
------ ------------- ----------------- ---------- ---------------
4 Microsoft Storage Space Device Online 2 TB GPT
If you want, you can use the –PartitionStyle parameter of the Initialize-Disk cmdlet to create virtual disks of the Master Boot Record (MBR) type; however, for virtual disks larger than 2 TBs, you must use the GPT type.
Creating volumes
Before you can create a new volume, you must create at least one virtual disk from a storage pool on your file server. Continuing the procedure from the previous section, Figure 8-9 shows that file server HOST7 now has a virtual disk named Archive Disk that has a capacity of 2 TBs but no volumes on it yet.
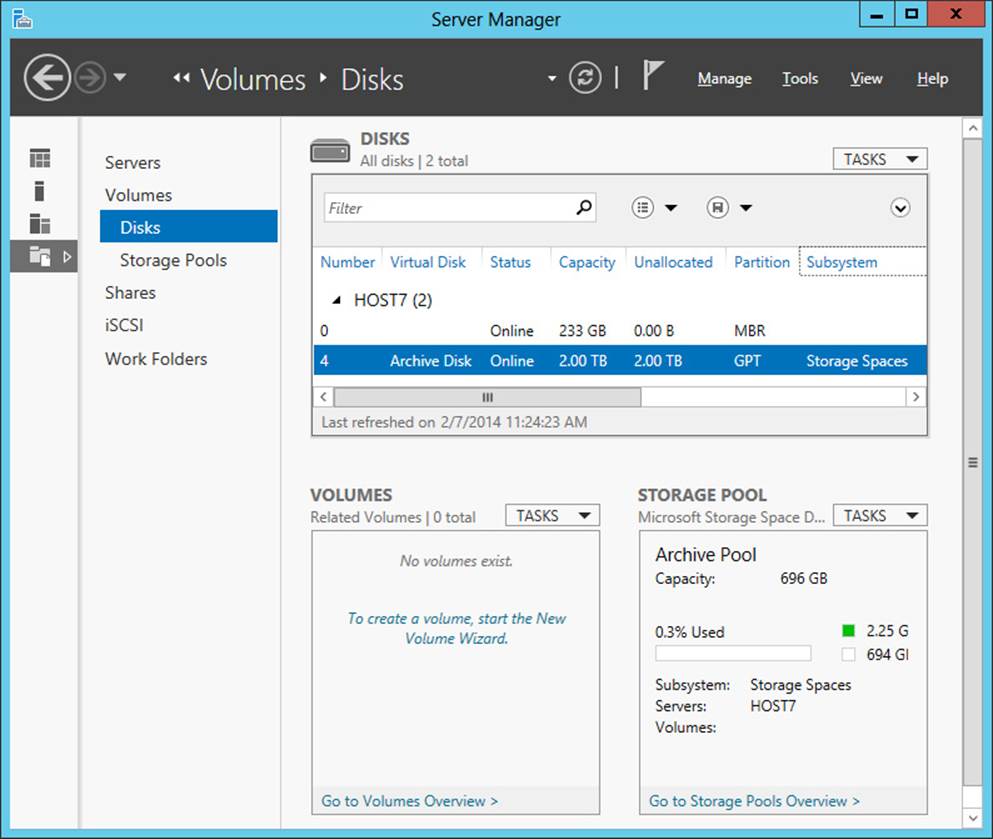
FIGURE 8-9 The virtual disk named Archive Disk has no volumes on it yet.
To create a new volume from a virtual disk using Server Manager, perform the following steps:
1. Launch the New Volume Wizard—for example, by right-clicking the Archive Disk item shown as selected in Figure 8-9. Alternatively, you can select “Create A Volume When This Wizard Closes” at the end of the New Virtual Disk wizard.
2. Select the virtual disk from which you want to create your new volume and the server to which you want to provision the volume. In this example, you are using Archive Disk to provision a new volume to HOST7.
3. Specify the size of the new volume you are creating as shown in Figure 8-10. The maximum size you can select here is the size of the virtual disk you selected in the previous step.
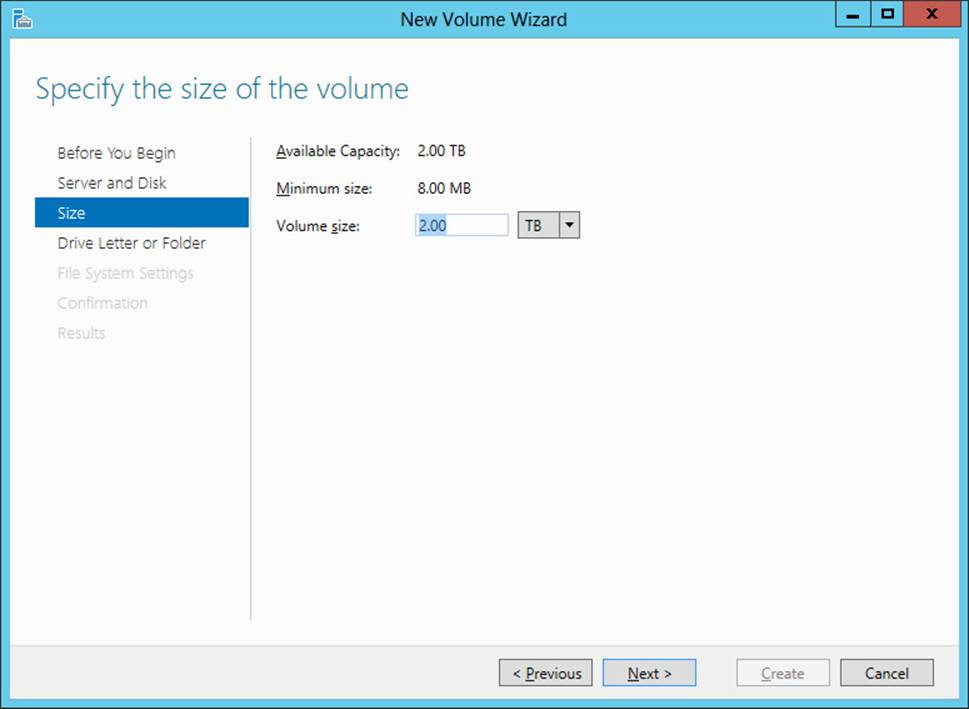
FIGURE 8-10 Specify the size for the new volume.
4. Assign the new volume a drive letter, a folder, or neither. If you assign a folder (for example, C:\Data), the volume will appear in the file system as a folder (Data) within a drive (C:).
5. Select the file system (NTFS or ReFS) for the new volume.
6. Either leave the allocation unit size for the file system as Default or select one of the available values.
7. Specify a descriptive volume name for the new volume.
8. Specify whether to generate short (8.3) file names for the new volume. Short file names are usually needed only to support legacy applications, such as 16-bit programs. Generating short file names is not recommended because it will make file operations slower.
9. Click Create to create the new volume.
Alternatively, you could use Windows PowerShell to create the same volume. Begin by using the Get-Volume cmdlet to display a list of volumes on the file server:
PS C:\> Get-Volume
DriveLetter FileSystemLabel FileSystem DriveType HealthStatus SizeRemaining Size
----------- --------------- ---------- --------- ------------ ------------- ----
System Reserved NTFS Fixed Healthy 108.69 MB 350 MB
C NTFS Fixed Healthy 219.48 GB 232.49 GB
D CD-ROM Healthy 0 B 0 B
To create a new volume on your virtual disk, which you saw in the previous section is disk number 4 on the server, you use the New-Partition cmdlet as follows:
PS C:\> New-Partition -DiskNumber 4 -UseMaximumSize -AssignDriveLetter
Disk Number: 4
PartitionNumber DriveLetter Offset Size Type
--------------- ----------- ------ ---- ----
2 E 135266304 2 TB Basic
Once you create the new volume, you can use the Format-Volume cmdlet to format it as follows:
PS C:\> Format-Volume -DriveLetter E -FileSystem NTFS
Confirm
Are you sure you want to perform this action?
Warning, all data on the volume will be lost!
[Y] Yes [A] Yes to All [N] No [L] No to All [S] Suspend [?] Help (default is "Y"): y
DriveLetter FileSystemLabel FileSystem DriveType HealthStatus SizeRemaining Size
----------- --------------- ---------- --------- ------------ ------------- ----
E NTFS Fixed Healthy 2 TB 2 TB
More Info: Storage module for Windows PowerShell
For more information about New-StoragePool, New-VirtualDisk, and other cmdlets in the Storage module for Windows PowerShell, see “Storage Cmdlets in Windows PowerShell” at http://technet.microsoft.com/en-us/library/hh848705.aspx.
![]() Quick check
Quick check
![]() Why should you usually initialize your virtual disks as GPT disks instead of MBR disks?
Why should you usually initialize your virtual disks as GPT disks instead of MBR disks?
Quick check answer
![]() GPT disks support volumes larger than 2 TBs. For more information about the advantages of using GPT rather than MBR, see “Using GPT Drives” at http://msdn.microsoft.com/en-us/library/windows/hardware/gg463524.aspx.
GPT disks support volumes larger than 2 TBs. For more information about the advantages of using GPT rather than MBR, see “Using GPT Drives” at http://msdn.microsoft.com/en-us/library/windows/hardware/gg463524.aspx.
Provisioning SMB shares
After you create volumes using Storage Spaces, you can create shared storage for various purposes by provisioning new file shares. Storage Spaces supports the provisioning of two types of shares:
![]() SMB shares Server Message Block (SMB) is a network file-sharing protocol that allows SMB clients to read and write to files and to request services from SMB servers on the network. Windows Server 2012 and Windows Server 2012 R2 support version 3.0 of the SMB protocol, which includes numerous enhancements in performance, security, and scalability. Using SMB 3.0 enables you to implement new file-server scenarios, such as storing Hyper-V virtual machines and Microsoft SQL Server databases on SMB file shares. SMB 3.0 also helps reduce latency over branch-office wide area network (WAN) connections and can help protect data from eavesdropping attacks. For more information on SMB 3.0 in Windows Server 2012 and Windows Server 2012 R2, see “Server Message Block overview” athttp://technet.microsoft.com/en-us/library/hh831795.
SMB shares Server Message Block (SMB) is a network file-sharing protocol that allows SMB clients to read and write to files and to request services from SMB servers on the network. Windows Server 2012 and Windows Server 2012 R2 support version 3.0 of the SMB protocol, which includes numerous enhancements in performance, security, and scalability. Using SMB 3.0 enables you to implement new file-server scenarios, such as storing Hyper-V virtual machines and Microsoft SQL Server databases on SMB file shares. SMB 3.0 also helps reduce latency over branch-office wide area network (WAN) connections and can help protect data from eavesdropping attacks. For more information on SMB 3.0 in Windows Server 2012 and Windows Server 2012 R2, see “Server Message Block overview” athttp://technet.microsoft.com/en-us/library/hh831795.
![]() NFS shares Network File System (NFS) enables file sharing in heterogeneous environments that include both Windows and non-Windows computers. Windows Server 2012 and Windows Server 2012 R2 include two NFS components:
NFS shares Network File System (NFS) enables file sharing in heterogeneous environments that include both Windows and non-Windows computers. Windows Server 2012 and Windows Server 2012 R2 include two NFS components:
![]() Server for NFS This component enables Windows Server 2012 or Windows Server 2012 R2 to act as a file server for non-Windows client computers.
Server for NFS This component enables Windows Server 2012 or Windows Server 2012 R2 to act as a file server for non-Windows client computers.
![]() Client for NFS This component enables Windows Server 2012 or Windows Server 2012 R2 to access files that are stored on a non-Windows NFS server.
Client for NFS This component enables Windows Server 2012 or Windows Server 2012 R2 to access files that are stored on a non-Windows NFS server.
Server for NFS has also been enhanced in Windows Server 2012 and Windows Server 2012 R2 to support continuous availability. This makes possible new scenarios, such as running VMware ESX virtual machines from file-based storage over the NFS protocol instead of using more expensive SAN storage. This improvement enables Windows Server 2012 and Windows Server 2012 R2 to provide continuous availability for VMware virtual machines, making it easier for organizations to integrate their VMware infrastructure with the Windows platform. Using Server for NFS as a data store for VMware virtual machines requires using VMware ESX 4.1. You also need a management server with VMware vSphere Client version 4.1 installed. You can use PowerShell to provision and configure shared files on your Server for NFS data store. For more information, see “Server for NFS Data Store” at http://technet.microsoft.com/en-us/library/hh831653.
Because NFS is useful only for certain types of scenarios, the remainder of this section focuses on provisioning SMB shares.
Configuration options for SMB shares
When you create a new SMB share, you can select from the following configuration options:
![]() Enable Access-Based Enumeration When you enable this option, users who access a share can see only files and folders they have permission to access. When you disable access-based enumeration for a share, users can see all of the files and folders in the share even if they don’t have permission to read or modify the files and folders. Implementing access-based enumeration helps reduce user confusion that might be caused when users are unable to access some of the files and folders in a share.
Enable Access-Based Enumeration When you enable this option, users who access a share can see only files and folders they have permission to access. When you disable access-based enumeration for a share, users can see all of the files and folders in the share even if they don’t have permission to read or modify the files and folders. Implementing access-based enumeration helps reduce user confusion that might be caused when users are unable to access some of the files and folders in a share.
![]() Allow Caching Of Share Enabling this option makes the contents of the share available to offline users. This ensures that users can access the files in the share even when they are working offline without access to the network.
Allow Caching Of Share Enabling this option makes the contents of the share available to offline users. This ensures that users can access the files in the share even when they are working offline without access to the network.
![]() Enable BranchCache By enabling this option, you allow computers in a branch office to use BranchCache to cache any files downloaded from the shared folder. The computers can then securely serve the files to other computers in the branch office. You can enable this option only if you also have enabled the Allow Caching Of Share option.
Enable BranchCache By enabling this option, you allow computers in a branch office to use BranchCache to cache any files downloaded from the shared folder. The computers can then securely serve the files to other computers in the branch office. You can enable this option only if you also have enabled the Allow Caching Of Share option.
![]() Encrypt Data Access Enabling this option causes remote file access to the share to be encrypted to protect against eavesdropping attacks.
Encrypt Data Access Enabling this option causes remote file access to the share to be encrypted to protect against eavesdropping attacks.
![]() Folder Usage You can use this option to specify the purpose of the share and the kinds of files stored in it. Folder Usage is used by data-management policies, such as when specifying the classification rules for the new File Classification Infrastructure feature of Windows Server 2012 and Windows Server 2012 R2.
Folder Usage You can use this option to specify the purpose of the share and the kinds of files stored in it. Folder Usage is used by data-management policies, such as when specifying the classification rules for the new File Classification Infrastructure feature of Windows Server 2012 and Windows Server 2012 R2.
![]() Quota You can use this option to limit the space allowed for a volume or folder. You can also define quota templates that can be automatically applied to new volumes or folders.
Quota You can use this option to limit the space allowed for a volume or folder. You can also define quota templates that can be automatically applied to new volumes or folders.
Note: File Server Resource Manager
Configuring the Folder Usage and Quota options requires that the File Server Resource Manager feature be installed on a Windows Server 2012 or Windows Server 2012 R2 file server in your environment.
Types of SMB shares
You can provision new SMB shares in your environment using either Server Manager or Windows PowerShell. As Figure 8-11 shows, you have three options from which to choose when creating SMB shares by using the New Share Wizard:
![]() Quick Choose this option if you need to create a general-purpose SMB share for file sharing. This option enables caching of the share by default and allows you to enable access-based enumeration and to encrypt data access if desired. You can also enable BranchCache on the share if the BranchCache feature is installed on the server.
Quick Choose this option if you need to create a general-purpose SMB share for file sharing. This option enables caching of the share by default and allows you to enable access-based enumeration and to encrypt data access if desired. You can also enable BranchCache on the share if the BranchCache feature is installed on the server.
![]() Advanced Choose this option if you need to configure quotas on your share or implement file classification. This option also enables caching of the share by default and allows you to enable access-based enumeration and to encrypt data access if desired. You can also enable BranchCache on the share if the BranchCache feature is installed on the server.
Advanced Choose this option if you need to configure quotas on your share or implement file classification. This option also enables caching of the share by default and allows you to enable access-based enumeration and to encrypt data access if desired. You can also enable BranchCache on the share if the BranchCache feature is installed on the server.
![]() Applications Choose this option if the share will be used by Hyper-V hosts for shared storage, by a database application, or by other server applications. This option allows you to encrypt data access if desired, but you cannot enable caching or enable access-based enumeration on the share.
Applications Choose this option if the share will be used by Hyper-V hosts for shared storage, by a database application, or by other server applications. This option allows you to encrypt data access if desired, but you cannot enable caching or enable access-based enumeration on the share.
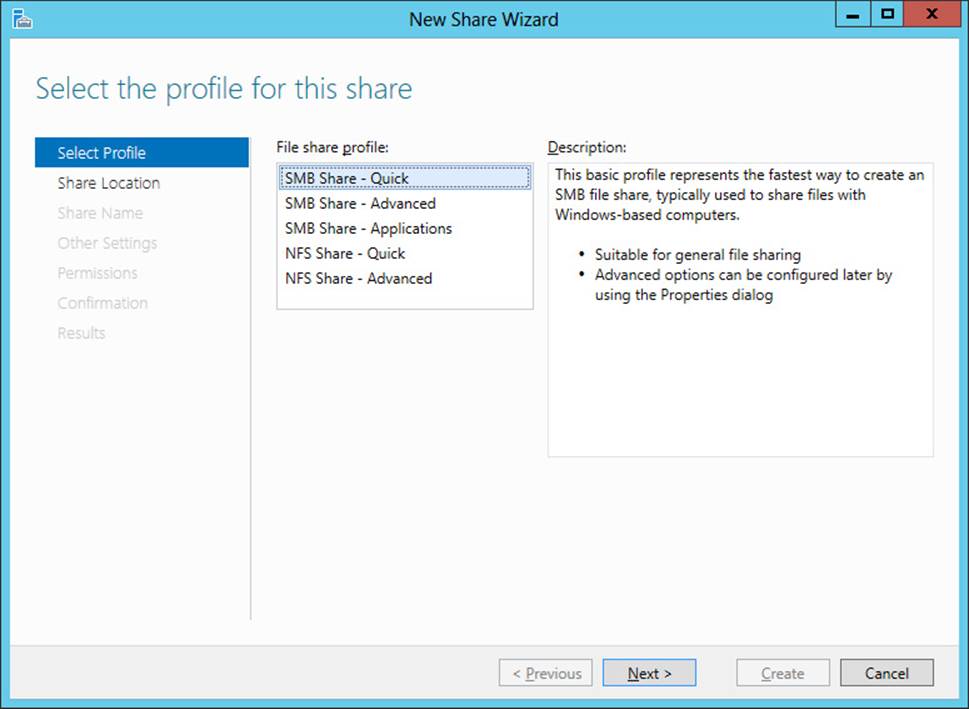
FIGURE 8-11 Choose the type of SMB share to create.
Creating general-purpose SMB shares
To create a new general-purpose SMB share on a volume by using Server Manager, perform the following steps:
1. Launch the New Share Wizard—for example, by right-clicking the volume named Archive Volume in Figure 8-12.
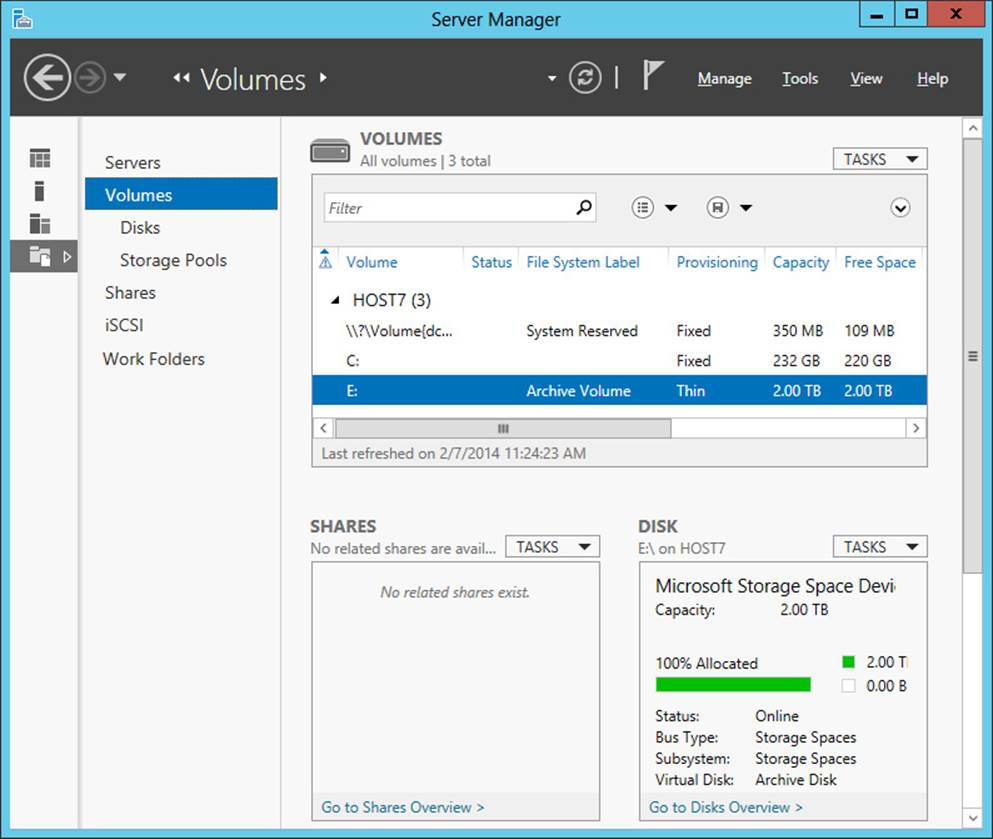
FIGURE 8-12 You can right-click volume E to create a new share on the volume.
2. Select the SMB Share - Quick option shown previously in Figure 8-11.
3. Select a volume on a file server—for example, the 2 TB volume named Archive Volume that was provisioned using Storage Spaces in the previous section of this lesson.
4. Type a name for the new share. By default, a new local folder will be created for the share in the following location:
<volume>\Shares\<share_name>
For example, if you specify Archive Share as the name for the new share being created on the E volume, the following local folder will be created for the new share:
E:\Shares\Archive Share
5. If access-based enumeration is desired, enable it on the share.
6. If you want, disable caching on the share. (Caching is enabled by default.) If you leave caching enabled and the BranchCache feature is installed on the server, you can enable BranchCache on the share if desired.
7. If you want, enable encrypted data access on the share.
8. Review the permissions for the new share. If you want, open the Advanced Security Settings dialog box and modify the permissions as needed.
9. Click Next and then click Create to create the new share.
You can also use Windows PowerShell to create new general-purpose SMB shares on a volume. For example, you could start by using the New-Item cmdlet to create a local folder named E:\Shares\Archived Content for your new share:
PS C:\> New-Item -Path "E:\Shares\Archived Content" -ItemType Directory
Directory: E:\Shares
Mode LastWriteTime Length Name
---- ------------- ------ ----
d---- 8/20/2012 8:55 PM Archived Content
You could then use the New-SmbShare cmdlet to create a new share named Archive Share that maps to the local folder and assign the shared folder permission Change to the CONTOSO\Sales group as follows:
PS C:\> New-SmbShare -Name "Archive Share" -Path "E:\Shares\Archived Content" `
-ChangeAccess CONTOSO\Sales
Name ScopeName Path Description
---- --------- ---- -----------
Archive Share * E:\Shares\Archived Content
If you later decide you want to enable access-based enumeration on your new share, you could use the Set-SmbShare cmdlet as follows:
PS C:\> Set-SmbShare -Name "Archive Share" -FolderEnumerationMode AccessBased `
-Confirm:$false
The –Confirm:$false portion of the preceding command suppresses the “Are you sure you want to perform this action?” confirmation prompt that the Set-SmbShare cmdlet usually displays.
You can then use the Get-SmbShare cmdlet to verify that access-based enumeration has been enabled on the share:
PS C:\> Get-SmbShare -Name "Archive Share" | select FolderEnumerationMode | fl
FolderEnumerationMode : AccessBased
Creating advanced SMB shares
The procedure for creating an advanced SMB share by using Server Manager is similar to creating a general-purpose share but includes the following additional steps:
![]() You must have the File Server Resource Manager (FSRM) role service installed on the server before you can create an advanced SMB share.
You must have the File Server Resource Manager (FSRM) role service installed on the server before you can create an advanced SMB share.
![]() You can use the options on the Management Properties page to specify the type of usage for the folder. You can select one or more of the following values:
You can use the options on the Management Properties page to specify the type of usage for the folder. You can select one or more of the following values:
![]() User Files
User Files
![]() Group Files
Group Files
![]() Application Files
Application Files
![]() Backup And Archival Files
Backup And Archival Files
![]() You can also specify one or more email addresses for the folder owner or owners.
You can also specify one or more email addresses for the folder owner or owners.
The Quota page shown in Figure 8-13 lets you apply a quota to the folder by selecting from a list of available templates.
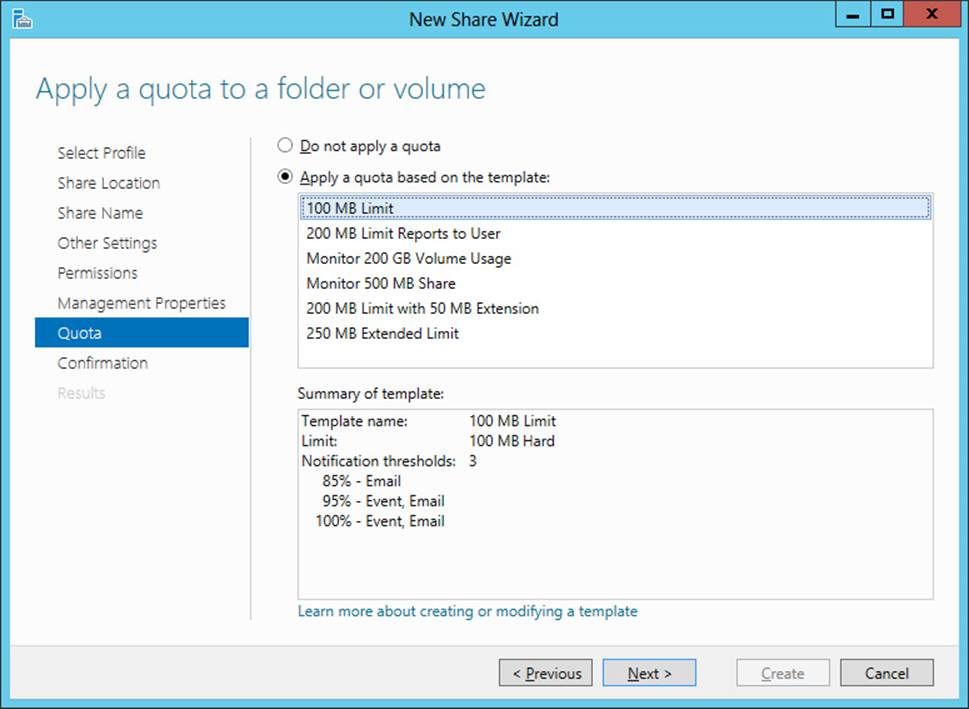
FIGURE 8-13 Configure a quota on a new share.
Managing shared storage
After you provision shared storage using Storage Spaces, you need to manage your shared storage. You can use both Server Manager and Windows PowerShell to manage shared storage in your environment. Your management tasks will include the following:
![]() Managing storage pools
Managing storage pools
![]() Managing virtual disks
Managing virtual disks
![]() Managing volumes
Managing volumes
![]() Managing shares
Managing shares
The sections that follow focus on using Server Manager for managing shared storage. For help with using Windows PowerShell to manage shared storage, see “Storage Cmdlets in Windows PowerShell” at http://technet.microsoft.com/en-us/library/hh848705.
Managing storage pools
You can use the Storage Pools subpage of the File And Storage Services page in Server Manager to manage your storage pools—for example:
![]() Clicking the Tasks control of the Storage Pools tile or right-clicking open space in the Storage Pools tile (see Figure 8-14) allows you to create new storage pools, refresh the current view, or rescan storage on managed file servers. Selecting the Rescan Storage option causes all storage providers on all managed servers to rescan their storage and update their caches. Note that this operation can take some time to finish, and Server Manager won’t be able to enumerate or modify storage until the rescan has completed.
Clicking the Tasks control of the Storage Pools tile or right-clicking open space in the Storage Pools tile (see Figure 8-14) allows you to create new storage pools, refresh the current view, or rescan storage on managed file servers. Selecting the Rescan Storage option causes all storage providers on all managed servers to rescan their storage and update their caches. Note that this operation can take some time to finish, and Server Manager won’t be able to enumerate or modify storage until the rescan has completed.
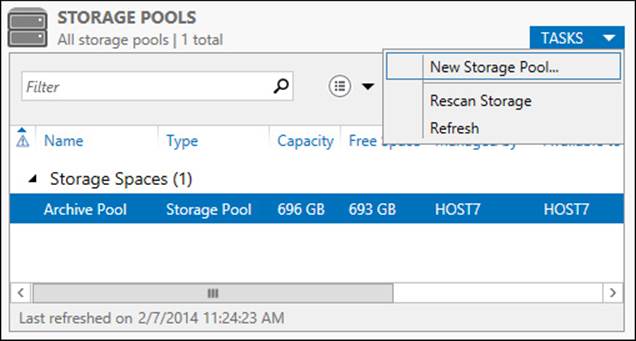
FIGURE 8-14 Manage a storage pool by using Server Manager.
![]() Right-clicking an existing storage pool in the Storage Pools tile lets you view the properties of the pool, add more physical disks to the pool if available, create a new virtual disk from the pool, upgrade the storage pool version, create a new storage pool, or delete the selected storage pool if all of its virtual disks have been deleted.
Right-clicking an existing storage pool in the Storage Pools tile lets you view the properties of the pool, add more physical disks to the pool if available, create a new virtual disk from the pool, upgrade the storage pool version, create a new storage pool, or delete the selected storage pool if all of its virtual disks have been deleted.
You can also use the Storage Pool tile on the Disks subpage to quickly determine how much capacity has been used in a storage pool.
Managing virtual disks
You can use the Storage Pools subpage of the File And Storage Services page in Server Manager to manage your virtual disks. For example, by right-clicking a virtual disk in the Virtual Disks tile as shown in Figure 8-15, you can perform tasks such as creating a new volume on the disk, repairing the disk, extending the disk, or deleting the disk. Some options might be unavailable, depending on such things as the status of the disk and the availability of free space on the disk.
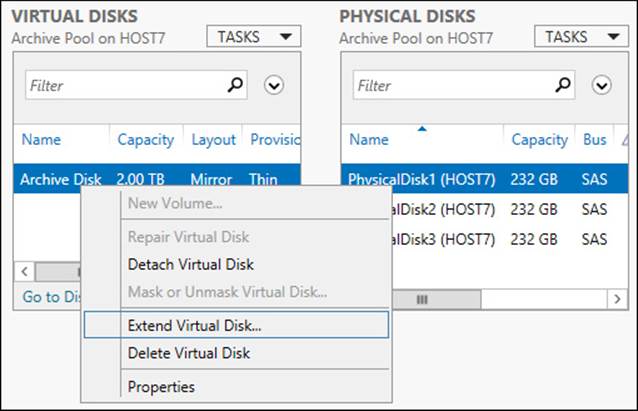
FIGURE 8-15 Extend a virtual disk from the Storage Pools subpage.
You can use the Disks subpage of the File And Storage Services page to manage both physical and virtual disks connected to the file server. For example, right-clicking a virtual disk in the Disks tile as shown in Figure 8-16 lets you take the disk offline, bring it back online, or reset the disk. The Disk tile also lets you view the status of your physical disks and their capacity, partition format, and other information.
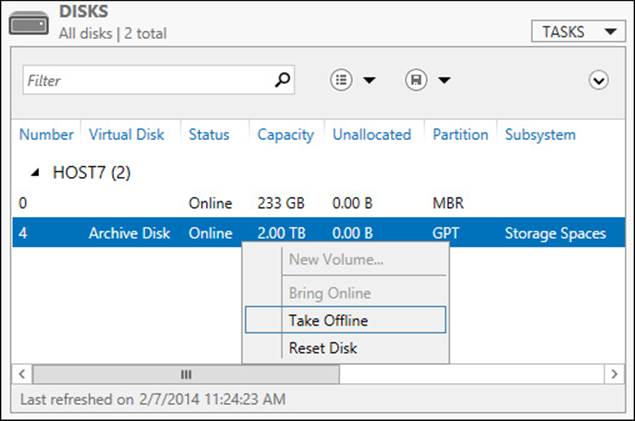
FIGURE 8-16 Take a virtual disk offline from the Disks subpage.
You can also use the Disk tile on the Volumes subpage to quickly determine how much capacity has been allocated on a physical or virtual disk.
Managing volumes
You can use the Volumes subpage of the File And Storage Services page in Server Manager to manage your volumes. For example, by right-clicking a volume in the Volumes tile as shown in Figure 8-17, you can perform tasks such as creating a new share on the volume, formatting the volume, extending the volume, or scanning the volume’s file system for errors.
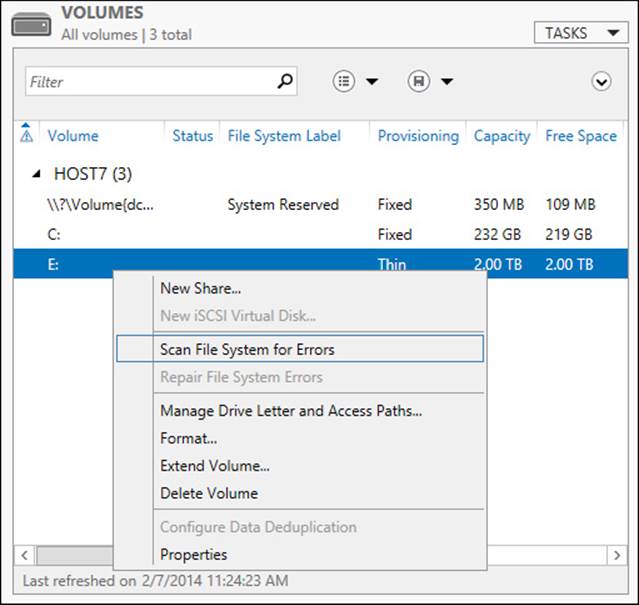
FIGURE 8-17 Scan the file system on a volume for errors.
You can also perform the same tasks from the Volumes tile on the Disks subpage. In addition, you can use the Volume tile on the Shares subpage to quickly determine how much capacity has been used on a volume.
Managing shares
You can use the Shares subpage of the File And Storage Services page in Server Manager to manage your shares. For example, by right-clicking a share in the Shares tile as shown in Figure 8-18, you can perform tasks such as stopping the sharing of the folder (this does not delete the underlying folder for the share), opening the share in File Explorer, or viewing and modifying the properties for the share. Opening the properties for the share lets you further configure the share by modifying its permissions, enabling access-based enumeration, configuring folder usage, and so on.
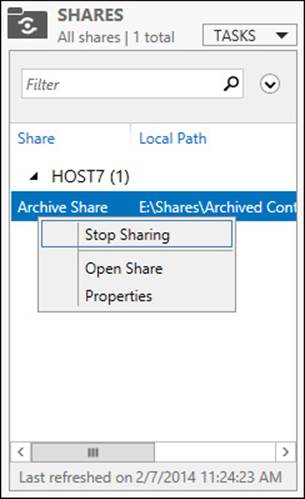
FIGURE 8-18 Manage a share.
Lesson summary
![]() You can create and manage storage pools, virtual disks, volumes, and shares by using both Server Manager and Windows PowerShell.
You can create and manage storage pools, virtual disks, volumes, and shares by using both Server Manager and Windows PowerShell.
![]() You can create both SMB and NFS shares with Storage Spaces.
You can create both SMB and NFS shares with Storage Spaces.
![]() SMB shares have various configuration options, some of which are available only when additional components such as File Server Resource Manager (FSRM) are installed on a file server.
SMB shares have various configuration options, some of which are available only when additional components such as File Server Resource Manager (FSRM) are installed on a file server.
Lesson review
Answer the following questions to test your knowledge of the information in this lesson. You can find the answers to these questions and explanations of why each answer choice is correct or incorrect in the “Answers” section at the end of this chapter.
1. What is the minimum number of physical disks required for a storage pool that will be used to provision resilient volumes for a failover cluster consisting of two file servers?
A. One
B. Two
C. Three
D. Four
2. Which Windows PowerShell cmdlet can you use to view the health status for Storage Spaces on your file server?
A. Get-StoragePool
B. Get-VirtualDisk
C. Get-PhysicalDisk
D. Get-StorageSubSystem
3. Which of the following tasks cannot be performed on a virtual disk by using either Server Manager or Windows PowerShell?
A. Extending the virtual disk
B. Shrinking the virtual disk
C. Detaching the virtual disk
D. Deleting the virtual disk
4. Which of the following profiles should you select when using the New Shares Wizard to create a share for storing Hyper-V virtual machine files on the network? (Choose all that apply.)
A. SMB Share - Quick
B. SMB Share - Advanced
C. SMB Share - Application
D. NFS Share
Lesson 3: Configuring iSCSI storage
Businesses are always looking for ways to keep costs under control. This can be especially true of departments like IT that are often viewed as cost centers more than as sources of revenue. Part of your role, then, as an administrator is to find innovative ways to cut costs in your department while maintaining services and quality. The built-in iSCSI storage features of Windows Server 2012 and Windows Server 2012 R2 are one avenue to explore in this direction.
After this lesson, you will be able to:
![]() Understand iSCSI storage benefits, uses, concepts, and terminology.
Understand iSCSI storage benefits, uses, concepts, and terminology.
![]() Understand the management tools and deployment considerations for implementing iSCSI storage using Windows Server 2012 or Windows Server 2012 R2.
Understand the management tools and deployment considerations for implementing iSCSI storage using Windows Server 2012 or Windows Server 2012 R2.
![]() Configure a server running Windows Server 2012 or Windows Server 2012 R2 as an iSCSI Target server.
Configure a server running Windows Server 2012 or Windows Server 2012 R2 as an iSCSI Target server.
![]() Create iSCSI targets and iSCSI virtual disks on a target server.
Create iSCSI targets and iSCSI virtual disks on a target server.
![]() Configure the iSCSI initiator on a server running Windows Server 2012 or Windows Server 2012 R2.
Configure the iSCSI initiator on a server running Windows Server 2012 or Windows Server 2012 R2.
![]() Use the iSCSI initiator to connect to a target on a target server and provision storage by creating volumes on the initiator computer.
Use the iSCSI initiator to connect to a target on a target server and provision storage by creating volumes on the initiator computer.
Estimated lesson time: 30 minutes
Understanding iSCSI storage
The Internet Small Computer System Interface (iSCSI) protocol is an industry-standard protocol that enables sharing of block storage over a TCP/IP network. iSCSI is designed to transmit and receive Small Computer System Interface (SCSI) commands and data encapsulated as TCP packets. This enables computers to utilize storage on an iSCSI-based storage device such as an iSCSI storage area network (SAN) even when the computers and SAN are located a long distance apart.
Benefits and uses
A key benefit of iSCSI-based storage is cost. A typical Fibre Channel SAN can be prohibitively expensive as a storage solution for a small or midsized business. In contrast with Fibre Channel, iSCSI technology requires no special-purpose cabling because the storage can be transmitted and received over a simple Ethernet network. This enables iSCSI storage to be deployed using an organization’s existing network infrastructure, which helps keep the cost of this solution low.
A second advantage of iSCSI-based storage is that it allows administrators to locate the storage in a data center where it can be centrally managed and easily backed up. From the perspective of the user on the computer consuming iSCSI storage, however, the storage appears as a locally installed drive even though it is actually located on an iSCSI SAN or storage server located in a remote data center. Users can thus copy and save files to iSCSI storage in the same way they would to hard drives installed in their computers, which leads to the third benefit of iSCSI-based storage—namely, transparency and ease of use.
Windows Server 2012 and Windows Server 2012 R2 include a built-in role service (iSCSI Target Server) and client component (iSCSI Initiator) that you can use to implement an iSCSI-based storage solution without the need to deploy a third-party iSCSI SAN. By using these features, you can gain the benefits of iSCSI storage without the need to purchase any additional hardware or software. Some of the possible uses of iSCSI storage include
![]() Deploying diskless servers that boot from iSCSI virtual disks over the network.
Deploying diskless servers that boot from iSCSI virtual disks over the network.
![]() Providing block storage to applications that require or can benefit from it.
Providing block storage to applications that require or can benefit from it.
![]() Creating iSCSI storage test environments in which you can validate applications before deploying them onto a third-party iSCSI SAN.
Creating iSCSI storage test environments in which you can validate applications before deploying them onto a third-party iSCSI SAN.
Because Microsoft iSCSI technologies are based on industry standards, you can also deploy Microsoft iSCSI storage solutions with third-party solutions in a heterogeneous environment.
Concepts and terminology
Before you can deploy a Microsoft iSCSI storage solution based on Windows Server 2012 or Windows Server 2012 R2 technologies, you first need to understand the following iSCSI concepts and terminology (which are illustrated in Figure 8-19):
![]() iSCSI target server This is the server or device (for example, SAN) that shares the storage so that users or applications running on a different computer can consume it. A target server is sometimes called a target portal or simply a portal. In Windows Server 2012 and Windows Server 2012 R2, a role service named iSCSI Target Server is used to implement this functionality.
iSCSI target server This is the server or device (for example, SAN) that shares the storage so that users or applications running on a different computer can consume it. A target server is sometimes called a target portal or simply a portal. In Windows Server 2012 and Windows Server 2012 R2, a role service named iSCSI Target Server is used to implement this functionality.
![]() iSCSI target This is an object created on the target server that allows an iSCSI initiator to establish a connection. The target also keeps track of the initiators that are allowed to connect to it and any iSCSI virtual disks that are associated with it.
iSCSI target This is an object created on the target server that allows an iSCSI initiator to establish a connection. The target also keeps track of the initiators that are allowed to connect to it and any iSCSI virtual disks that are associated with it.
![]() iSCSI virtual disk This refers to storage backed by a virtual hard disk (VHD) file on the target server. The virtual disk appears as locally attached storage on the target server. The disk can also be mounted by the iSCSI initiator on the computer consuming the storage so that new volumes can be provisioned from it. An iSCSI virtual disk is sometimes called an iSCSI LUN (logical unit number) or simply a LUN.
iSCSI virtual disk This refers to storage backed by a virtual hard disk (VHD) file on the target server. The virtual disk appears as locally attached storage on the target server. The disk can also be mounted by the iSCSI initiator on the computer consuming the storage so that new volumes can be provisioned from it. An iSCSI virtual disk is sometimes called an iSCSI LUN (logical unit number) or simply a LUN.
![]() iSCSI initiator This is a service running on a computer that enables users or applications to consume storage shared by a target server. In Windows Server 2012 and Windows Server 2012 R2, a built-in feature named iSCSI Initiator provides this functionality by a Windows service called the Microsoft iSCSI Service.
iSCSI initiator This is a service running on a computer that enables users or applications to consume storage shared by a target server. In Windows Server 2012 and Windows Server 2012 R2, a built-in feature named iSCSI Initiator provides this functionality by a Windows service called the Microsoft iSCSI Service.
![]() Connection This is a TCP connection between an initiator and a target. Connections transmit and receive control messages, SCSI commands, parameters, and data. Typically, an initiator can establish a connection with only one target. This limitation is in place to prevent multiple simultaneous read/writes from corrupting the file system on a volume provisioned from a virtual disk associated with the target. However, in clustering scenarios it is common for multiple initiators to form connections with the same target, although only one initiator is allowed to access the virtual disk at any one time.
Connection This is a TCP connection between an initiator and a target. Connections transmit and receive control messages, SCSI commands, parameters, and data. Typically, an initiator can establish a connection with only one target. This limitation is in place to prevent multiple simultaneous read/writes from corrupting the file system on a volume provisioned from a virtual disk associated with the target. However, in clustering scenarios it is common for multiple initiators to form connections with the same target, although only one initiator is allowed to access the virtual disk at any one time.
![]() Session This refers to the collection of TCP connections linking an initiator with a target. A session can have one or more connections, and you can add or remove connections from a session.
Session This refers to the collection of TCP connections linking an initiator with a target. A session can have one or more connections, and you can add or remove connections from a session.
![]() IQN The iSCSI Qualified Name (IQN) is a unique identifier for a target or initiator. In the Windows Server 2012 and Windows Server 2012 R2 implementation of an iSCSI target server, a target IQN looks like this:
IQN The iSCSI Qualified Name (IQN) is a unique identifier for a target or initiator. In the Windows Server 2012 and Windows Server 2012 R2 implementation of an iSCSI target server, a target IQN looks like this:
iqn.1991-05.com.microsoft:<target_server_name>-<target-name>-target
For example, if a target named fabrikam-db is created on a target server named HOST7, the IQN for this target would be
iqn.1991-05.com.microsoft:host7-fabrikam-db-target
Similarly, in the Windows Server 2012 and Windows Server 2012 R2 implementation of iSCSI initiator, an initiator IQN looks like this:
iqn.1991-05.com.microsoft:<initiator_server_FQDN>
For example, if the iSCSI initiator is running on a server named HOST4.corp.fabrikam.com, the IQN for this initiator would be
iqn.1991-05.com.microsoft:host4.corp.fabrikam.com
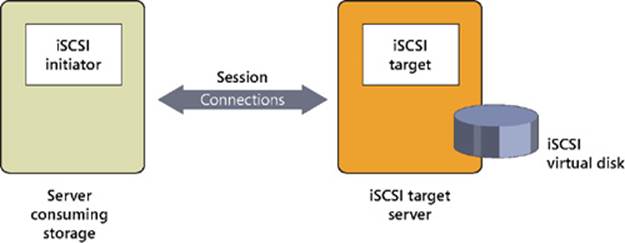
FIGURE 8-19 Understand basic iSCSI concepts and terminology.
iSCSI Target Server enhancements
iSCSI Target Server role service has been enhanced in several important ways in Windows Server 2012 R2:
![]() VHDX support is now included, which enables the provisioning of larger LUNs, up to 64 TB in size. VHDX support also means you can expand or shrink iSCSI LUNs while they are online and dynamically grow them for greater scalability and flexibility. VHDX is now the default virtual disk format when creating new iSCSI LUNs.
VHDX support is now included, which enables the provisioning of larger LUNs, up to 64 TB in size. VHDX support also means you can expand or shrink iSCSI LUNs while they are online and dynamically grow them for greater scalability and flexibility. VHDX is now the default virtual disk format when creating new iSCSI LUNs.
![]() iSCSI Target Server can be fully managed using SMI-S. This means that you can perform end-to-end management of your iSCSI storage system by using System Center 2012 R2 Virtual Machine Manager.
iSCSI Target Server can be fully managed using SMI-S. This means that you can perform end-to-end management of your iSCSI storage system by using System Center 2012 R2 Virtual Machine Manager.
For more information on using iSCSI Target Server with Virtual Machine Manager, see the post titled “iSCSI Target Server in Windows Server 2012 R2 for VMM Rapid Provisioning” on the File Cabinet Blog of the Storage Team at Microsoft athttp://blogs.technet.com/b/filecab/archive/2013/10/08/iscsi-target-server-in-windows-server-2012-r2-for-vmm-rapid-provisioning.aspx.
Management tools
Windows Server 2012 and Windows Server 2012 R2 include the following tools for managing the built-in iSCSI initiator and the iSCSI Target Server role services:
![]() Server Manager, specifically the File And Storage Services page and subpages. This is the same user interface used to manage the Storage Spaces feature described earlier in this chapter.
Server Manager, specifically the File And Storage Services page and subpages. This is the same user interface used to manage the Storage Spaces feature described earlier in this chapter.
![]() Windows PowerShell, specifically the cmdlets included in the following two modules:
Windows PowerShell, specifically the cmdlets included in the following two modules:
![]() iscsitarget This module includes commands for configuring and managing iSCSI target servers, targets, and virtual disks.
iscsitarget This module includes commands for configuring and managing iSCSI target servers, targets, and virtual disks.
![]() iscsi This module includes commands for configuring and managing iSCSI initiators, connections, and sessions.
iscsi This module includes commands for configuring and managing iSCSI initiators, connections, and sessions.
You can use the Get-Command –Module command to display a list of cmdlets for each of these modules.
Important: Managing heterogeneous environments
Organizations that have previously downloaded and deployed the free Microsoft iSCSI Software Target 3.3 for Windows Server 2008 R2 need to be aware that if you need to manage a heterogeneous environment that includes target servers and initiators for Windows Server 2012 R2, Windows Server 2012, and Windows Server 2008 R2, you might need to use separate management tools for doing this. For example, you cannot use the iSCSI Target MMC snap-in for Windows Server 2008 R2 to manage target servers running Windows Server 2012 or Windows Server 2012 R2. Furthermore, you might need to modify Windows PowerShell commands and Windows Management Instrumentation (WMI) scripts used for managing the Microsoft iSCSI Software Target 3.3 if you want to use these commands and scripts to manage the iSCSI Target Server capabilities in Windows Server 2012 or Windows Server 2012 R2.
Deployment considerations
Although enabling iSCSI Target Server to provide block storage for your environment requires no hardware other than your existing Ethernet network and a server running Windows Server 2012 or Windows Server 2012 R2, there are some additional considerations you need to be aware of:
![]() You cannot host iSCSI virtual disks on physical disks that have been added to a storage pool on the server. In other words, iSCSI Target Server in Windows Server 2012 and Windows Server 2012 R2 is not compatible with Storage Spaces.
You cannot host iSCSI virtual disks on physical disks that have been added to a storage pool on the server. In other words, iSCSI Target Server in Windows Server 2012 and Windows Server 2012 R2 is not compatible with Storage Spaces.
![]() iSCSI virtual disks can be backed only by VHD files, not by the newer VHDX files that Hyper-V uses by default in Windows Server 2012 and Windows Server 2012 R2.
iSCSI virtual disks can be backed only by VHD files, not by the newer VHDX files that Hyper-V uses by default in Windows Server 2012 and Windows Server 2012 R2.
![]() You can create new iSCSI virtual disks only on NTFS volumes, not on volumes formatted using the new Resilient File System (ReFS) in Windows Server 2012 and Windows Server 2012 R2.
You can create new iSCSI virtual disks only on NTFS volumes, not on volumes formatted using the new Resilient File System (ReFS) in Windows Server 2012 and Windows Server 2012 R2.
Configuring iSCSI Target Server
This section describes how to perform the following tasks for iSCSI Target Server on Windows Server 2012 and Windows Server 2012 R2:
![]() Enabling iSCSI Initiator
Enabling iSCSI Initiator
![]() Installing the iSCSI Target Server role service
Installing the iSCSI Target Server role service
![]() Creating iSCSI virtual disks
Creating iSCSI virtual disks
The section shows how to perform these tasks using both Server Manager and Windows PowerShell.
Enabling iSCSI Initiator
Before you configure iSCSI Target Server, you should enable the iSCSI Initiator feature on the computer that will be connecting to the Target server. The following procedure shows how to enable the iSCSI Initiator feature on a server running Windows Server 2012 or Windows Server 2012 R2:
1. Open Server Manager and select iSCSI Initiator from the Tools menu.
2. When the Microsoft iSCSI dialog box appears, click Yes to start the Microsoft iSCSI Service and close the dialog box:
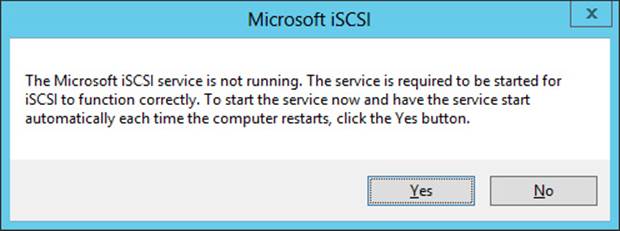
3. When the iSCSI Initiator Properties dialog box opens, click OK to close it.
You can also enable the iSCSI initiator by using Windows PowerShell to start the Microsoft iSCSI Service and change the service startup type to Automatic by running these two commands:
Start-Service msiscsi
Set-Service msiscsi -startuptype "automatic"
Installing the iSCSI Target Server role
As you saw in the previous lesson in this chapter, installing the File And iSCSI Services role service of the File And Storage Services role on a server running Windows Server 2012 or Windows Server 2012 R2 introduces a new File And Storage Services page to Server Manager. Selecting this page displays a number of subpages, including one named iSCSI, but if you select this iSCSI page you will see a message in the iSCSI Virtual Disks tile as shown in Figure 8-20. This message indicates you must install iSCSI Target Server before you can use the page to manage iSCSI storage.
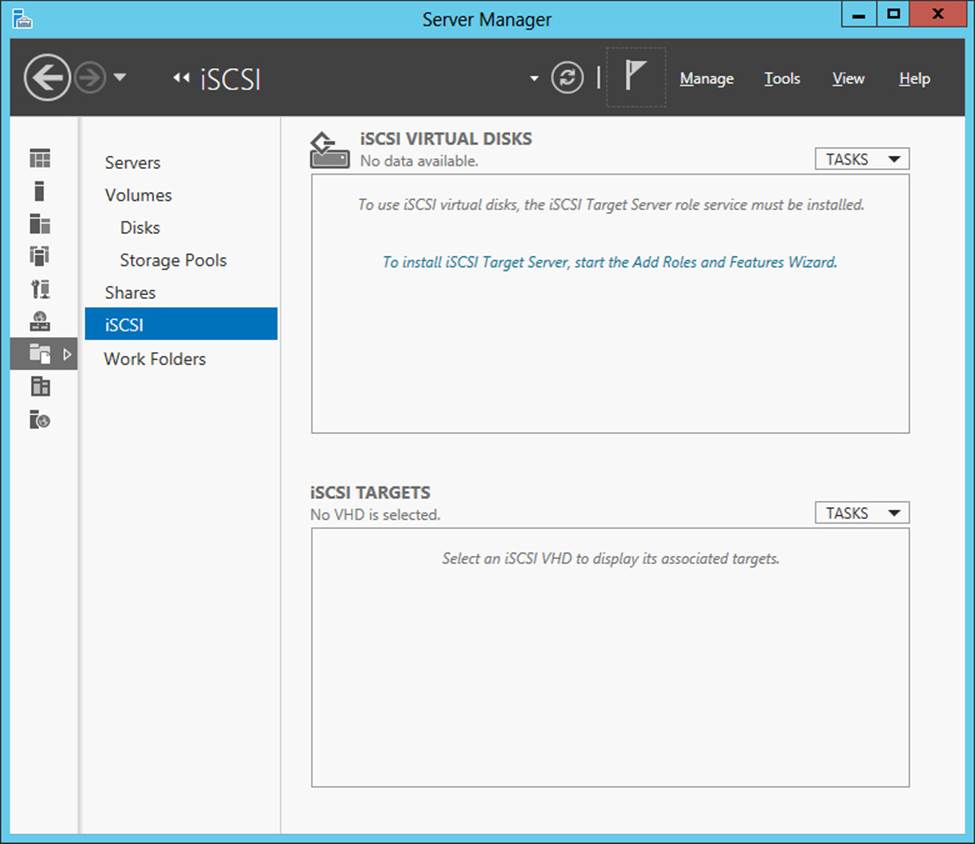
FIGURE 8-20 The iSCSI Target Server role service has not yet been installed on this server.
You can install the iSCSI Target Server role by using either Server Manager or Windows PowerShell. To install iSCSI Target Server by using Server Manager, launch the Add Roles And Features Wizard from the Manage menu. On the Select Server Roles page of this wizard, you will see two iSCSI role services as shown in Figure 8-21:
![]() iSCSI Target Server Installing this role service installs services and management tools for iSCSI Targets.
iSCSI Target Server Installing this role service installs services and management tools for iSCSI Targets.
![]() iSCSI Target Storage Provider (VDS And VSS Hardware Providers) Installing this role service enables applications on a server that is connected to an iSCSI target to perform volume shadow copies of data on iSCSI virtual disks.
iSCSI Target Storage Provider (VDS And VSS Hardware Providers) Installing this role service enables applications on a server that is connected to an iSCSI target to perform volume shadow copies of data on iSCSI virtual disks.
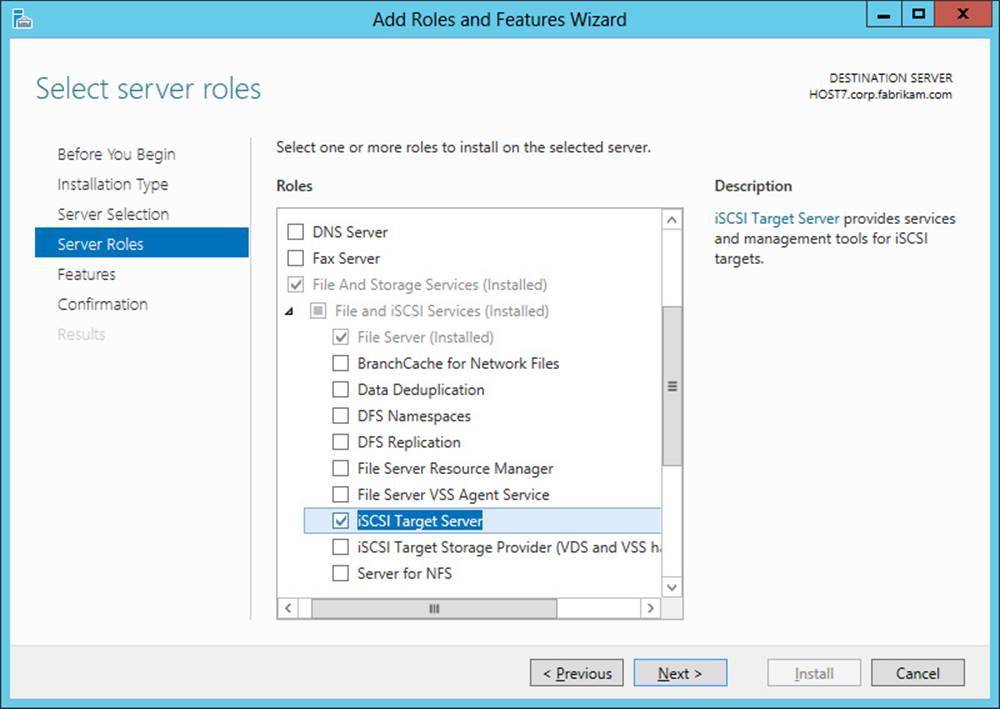
FIGURE 8-21 Add the iSCSI Target Server role service to the server.
Note: iSCSI Target Storage Provider and VDS
Installing the iSCSI Target Storage Provider (VDS And VSS Hardware Providers) role service also enables you to manage iSCSI virtual disks using management tools that use the deprecated Virtual Disk Service (VDS). Such tools include the Disk Management MMC snap-in, the Diskpart command, and the Diskraid command.
Important: Where to install iSCSI Target Storage Provider
You should not install the iSCSI Target Storage Provider role service on a server that has the iSCSI Target Server role service installed. Instead, install the iSCSI Target Storage Provider on the server you use to centrally manage storage for your environment.
You can also use Windows PowerShell to install iSCSI Target Server. You can do this by using the Add-WindowsFeature cmdlet like this:
Add-WindowsFeature -Name FS-iSCSITarget-Server
No restart is needed after installing this role service.
Creating iSCSI virtual disks
Once you finish installing the iSCSI Target Server role service by using the Add Roles And Feature Wizard, the message in the iSCSI Virtual Disks tile on the iSCSI page of Server Manager indicates that you can now create an iSCSI virtual disk. (See Figure 8-22.) Creating iSCSI virtual disks is the first step in provisioning iSCSI storage to applications that require or can use block storage.
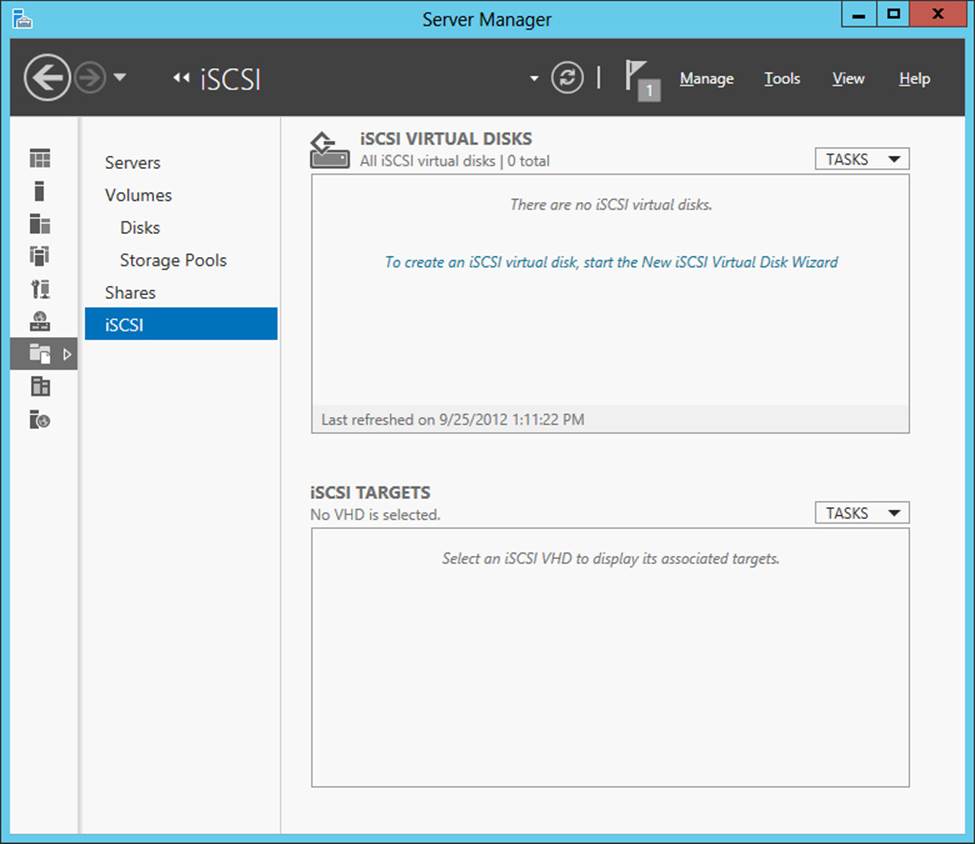
FIGURE 8-22 After installing the iSCSI Target Server role service you can create iSCSI virtual disks.
You can create a new iSCSI virtual disk by using either Server Manager or Windows PowerShell. To create a new iSCSI virtual disk by using Server Manager, do any of the following:
![]() Click the message in the iSCSI Virtual Disks tile on the iSCSI page.
Click the message in the iSCSI Virtual Disks tile on the iSCSI page.
![]() Select New iSCSI Virtual Disk from the Tasks menu of this iSCSI Virtual Disks tile on the iSCSI page.
Select New iSCSI Virtual Disk from the Tasks menu of this iSCSI Virtual Disks tile on the iSCSI page.
![]() Right-click any NTFS volume in the Volumes tile on the Disks page or the Volumes page and select New iSCSI Virtual Disk.
Right-click any NTFS volume in the Volumes tile on the Disks page or the Volumes page and select New iSCSI Virtual Disk.
Performing any of these actions will launch the New iSCSI Virtual Disk Wizard, which you can use to create your new iSCSI virtual disk as follows:
1. On the Select iSCSI Virtual Disk Location page, select a target server. The list of available servers shows those on which Server Manager has determined that the iSCSI Target Server role has been installed.
2. After you select an iSCSI Target server, select an NTFS-formatted volume on the server that has sufficient free space to host your new iSCSI virtual disk:
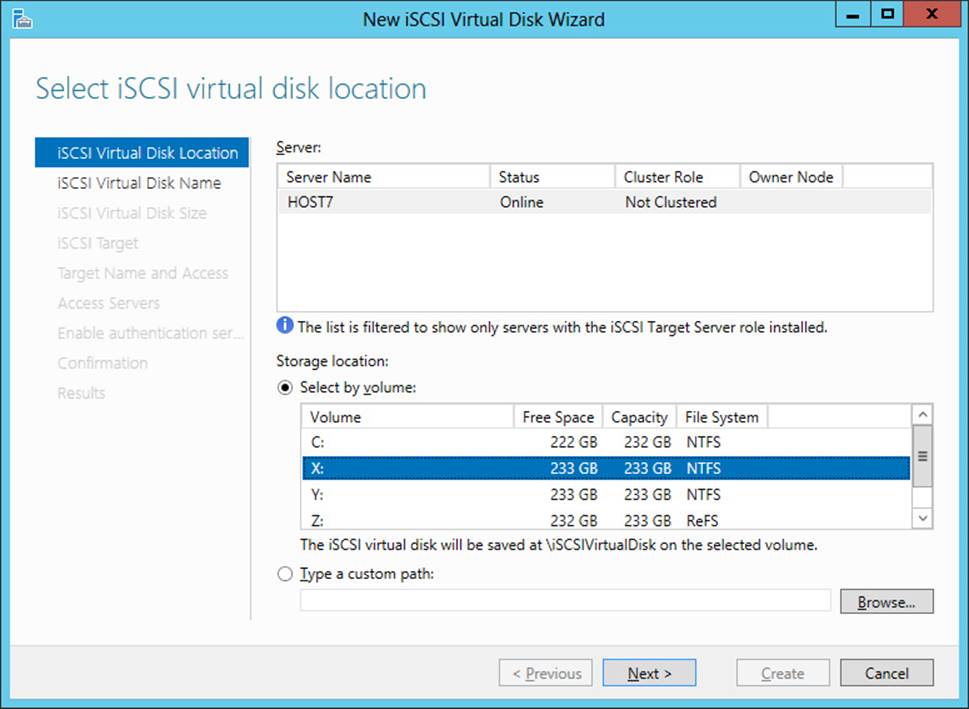
3. In the preceding screenshot, volume X on server HOST7 is selected for hosting the new iSCSI virtual disk. The new disk will be backed by a VHD file that will be stored in a folder named iSCSIVirtualDisks in the root of X drive.
4. On the Specify iSCSI Virtual Disk Name page, type a name and optional description for the new iSCSI virtual disk. For example, if you name the disk “Database,” a file named Database.vhd will be created in the location X:\iSCSIVirtualDisks on HOST7. This VHD file will be used to back the new iSCSI virtual disk you are creating.
5. On the Specify iSCSI Virtual Disk Size page, specify a size for the new iSCSI virtual disk. The maximum possible size of the disk depends on the amount of free space available on the selected volume.
6. On the Assign iSCSI Target page, select New iSCSI Target because this is the first iSCSI virtual disk you are creating. You can also assign the new disk to an existing target if any already exist in your environment.
7. On the Specify Target Name page, type a name and optional description for the new target:
8. On the Specify Access Servers page, click Add to specify the iSCSI initiator that will access your iSCSI virtual disk. Doing this opens the Add Initiator ID dialog box, which provides three ways of identifying iSCSI initiators:
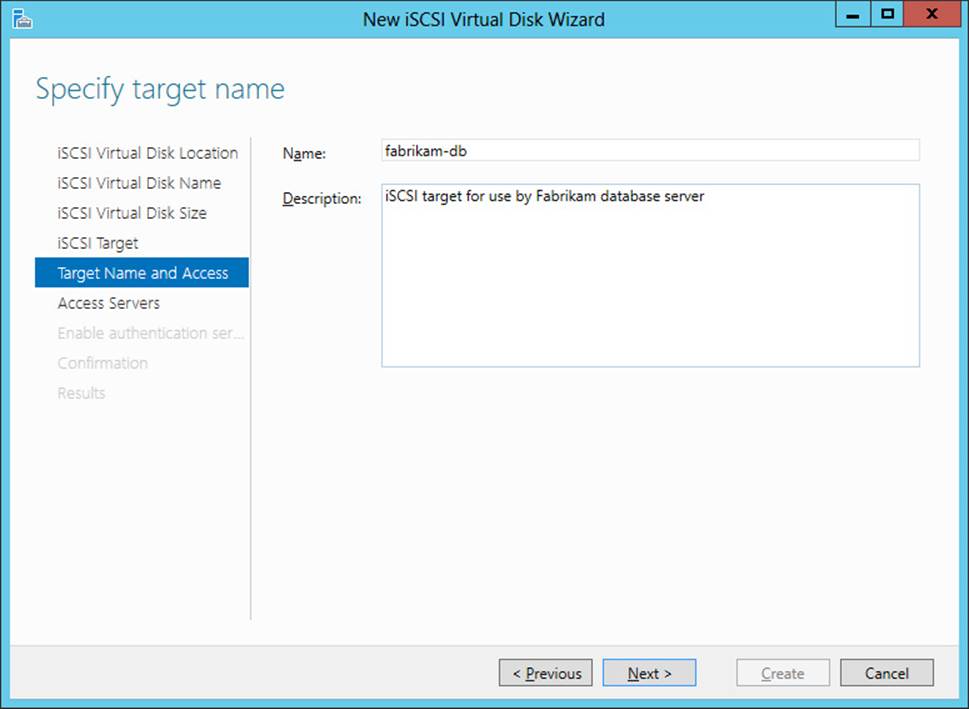
![]() By querying a computer on which the iSCSI initiator has been enabled for its Initiator ID. This method is supported only in Windows Server 2012, Windows Server 2012 R2, Windows 8, and Windows 8.1.
By querying a computer on which the iSCSI initiator has been enabled for its Initiator ID. This method is supported only in Windows Server 2012, Windows Server 2012 R2, Windows 8, and Windows 8.1.
![]() By selecting an available Initiator ID from the list of cached IDs on the Target server. This method works only if there are entries in the initiator cache on the Target server.
By selecting an available Initiator ID from the list of cached IDs on the Target server. This method works only if there are entries in the initiator cache on the Target server.
![]() By manually specifying the IQN for the initiator.
By manually specifying the IQN for the initiator.
For example, say that the initiator computer is a server named HOST4 that is running Windows Server 2012 R2. To query for the Initiator ID on HOST4, select the first option in the preceding list and either type HOST4 or click Browse to search Active Directory for the initiator computer and then click OK to return to the Specify Access Servers page of the New iSCSI Virtual Disk Wizard. At this point, the IQN for the initiator will be displayed as shown here:
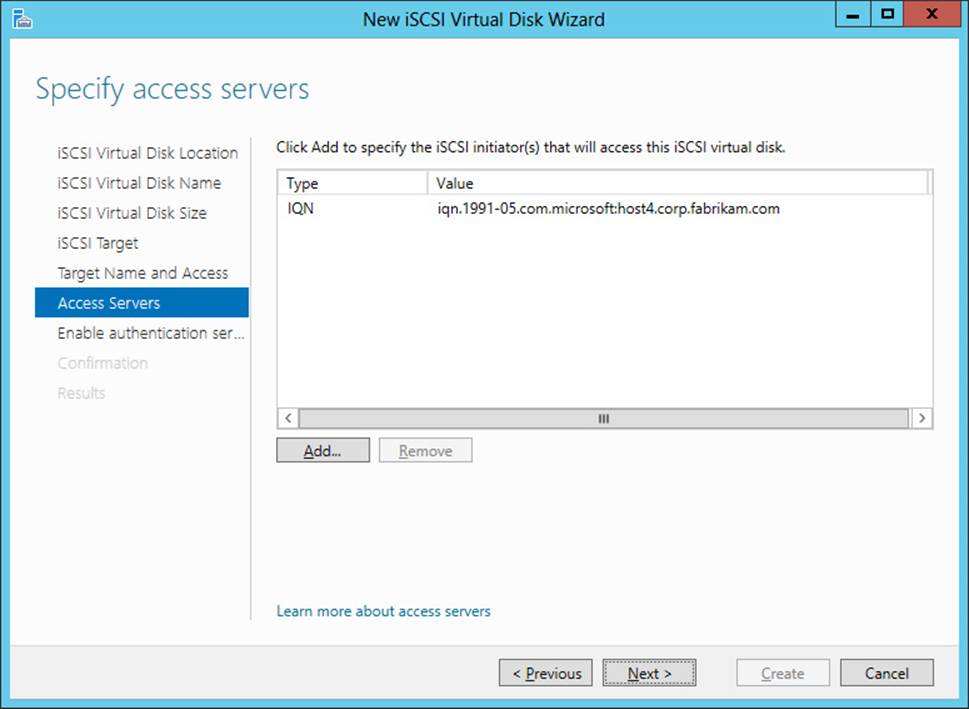
Note: Allowing any initiator to connect to the target
If you want to allow any iSCSI initiator to connect to the target, select the third option on the Specify Access Servers page and type IQN:* as the initiator IQN.
9. On the Enable Authentication page, you can optionally enable one or both of the following authentication protocols:
![]() CHAP You can use the Challenge Handshake Authentication Protocol (CHAP) to authenticate initiator connections.
CHAP You can use the Challenge Handshake Authentication Protocol (CHAP) to authenticate initiator connections.
![]() Reverse CHAP You can use this protocol to allow the initiator to authenticate the iSCSI target.
Reverse CHAP You can use this protocol to allow the initiator to authenticate the iSCSI target.
10. If you enable either of these protocols, you must specify a user name and password for each of them.
At this point, you should review the information on the Confirm Selections page to make sure you don’t need to change anything. Once you are satisfied, click Create to create the new iSCSI virtual disk, create the target (if needed), and assign the disk to the target.
After you create your iSCSI virtual disk and target, you can view and manage them on the iSCSI subpage of the File And Storage Services page of Server Manager as shown in Figure 8-23.
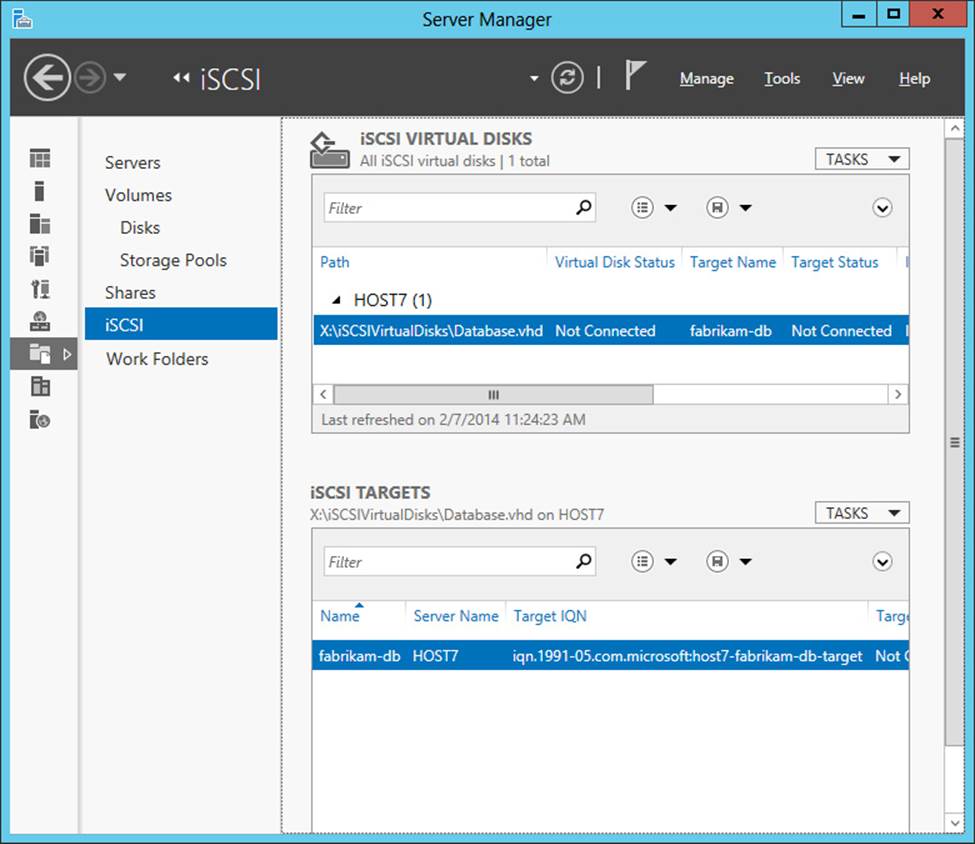
FIGURE 8-23 The new iSCSI target and virtual disk are displayed in Server Manager.
You can also use Windows PowerShell to create new iSCSI virtual disks and iSCSI targets and to assign iSCSI virtual disks to targets. For example, you can begin by opening a Windows PowerShell console on the iSCSI Target server HOST7 and using the Get-IscsiVirtualDisk cmdlet to display a list of existing iSCSI virtual disks on the server:
PS C:\> Get-IscsiVirtualDisk
ClusterGroupName :
ComputerName : HOST7.corp.fabrikam.com
Description : iSCSI virtual disk for Fabrikam database server
DiskType : Fixed
HostVolumeId : {DD1FDED1-3C51-4A33-850A-23C06A555FE5}
LocalMountDeviceId :
OriginalPath :
ParentPath :
Path : X:\iSCSIVirtualDisks\Database.vhd
SerialNumber : C9EACA53-B17D-4BCF-836B-9EF16867B866
Size : 161061273600
SnapshotIds :
Status : NotConnected
VirtualDiskIndex : 1795469856
Note that the value of the Path property in the preceding command output is what you would expect based on what you saw earlier in the iSCSI Virtual Disks tile in Figure 8-23.
Next you can use the New-IscsiVirtualDisk cmdlet to create a new iSCSI virtual disk that is 50 GBs in size and is backed by a file named data.vhd:
PS C:\> New-IscsiVirtualDisk -Path X:\iSCSIVirtualDisks\data.vhd -Size 50GB
ClusterGroupName :
ComputerName : HOST7.corp.fabrikam.com
Description :
DiskType : Fixed
HostVolumeId : {DD1FDED1-3C51-4A33-850A-23C06A555FE5}
LocalMountDeviceId :
OriginalPath :
ParentPath :
Path : X:\iSCSIVirtualDisks\data.vhd
SerialNumber : A6403147-E3E0-433E-88B4-403549244CB4
Size : 53687091200
SnapshotIds :
Status : NotConnected
VirtualDiskIndex : 1884425455
Now you can either assign this new iSCSI virtual disk to the existing target you created earlier using Server Manager or you can create a new target and assign the disk to it. In this example, use the second approach but first use the Get-IscsiServerTarget cmdlet to display a list of targets on the iSCSI Target server:
PS C:\> Get-IscsiServerTarget
ChapUserName :
ClusterGroupName :
ComputerName : HOST7.corp.fabrikam.com
Description : iSCSI target for use by Fabrikam database server
EnableChap : False
EnableReverseChap : False
EnforceIdleTimeoutDetection : True
FirstBurstLength : 65536
IdleDuration : 00:15:00
InitiatorIds : {Iqn:iqn.1991-05.com.microsoft:host4.corp.fabrikam.com}
LastLogin :
LunMappings : {TargetName:fabrikam-db;VHD:"X:\iSCSIVirtualDisks\
Database.vhd";LUN:0}
MaxBurstLength : 262144
MaxReceiveDataSegmentLength : 65536
ReceiveBufferCount : 10
ReverseChapUserName :
Sessions : {}
Status : NotConnected
TargetIqn : iqn.1991-05.com.microsoft:host7-fabrikam-db-target
TargetName : fabrikam-db
Note that the value of the TargetName property in the preceding command output is what you would expect based on what you saw earlier in the iSCSI Targets tile in Figure 8-23.
Now use the New-IscsiServerTarget cmdlet to create a new target named fabrikam-data that will use the same Initiator ID used by your existing fabrikam-db target:
PS C:\> New-IscsiServerTarget -TargetName fabrikam-data `
-InitiatorIds "IQN:iqn.1991-05.com.microsoft:host4.corp.fabrikam.com"
ChapUserName :
ClusterGroupName :
ComputerName : HOST7.corp.fabrikam.com
Description :
EnableChap : False
EnableReverseChap : False
EnforceIdleTimeoutDetection : True
FirstBurstLength : 65536
IdleDuration : 00:00:00
InitiatorIds : {Iqn:iqn.1991-05.com.microsoft:host4.corp.fabrikam.com}
LastLogin :
LunMappings : {}
MaxBurstLength : 262144
MaxReceiveDataSegmentLength : 65536
ReceiveBufferCount : 10
ReverseChapUserName :
Sessions : {}
Status : NotConnected
TargetIqn : iqn.1991-05.com.microsoft:host7-fabrikam-data-target
TargetName : fabrikam-data
Note that the LunMappings property in the preceding command indicates that no iSCSI virtual disks have yet been assigned to this target. You can assign your data.vhd virtual disk to your fabrikam-data target by using the Add-IscsiVirtualDiskTargetMapping cmdlet like this:
PS C:\> Add-IscsiVirtualDiskTargetMapping -TargetName fabrikam-data `
-Path X:\iSCSIVirtualDisks\data.vhd
Finally, to verify that the mapping was created, you can use the Get-IScsiServerTarget cmdlet again, like this:
PS C:\> Get-IscsiServerTarget -TargetName fabrikam-data | fl LunMappings
LunMappings: {TargetName:fabrikam-data;VHD:"X:\iSCSIVirtualDisks\data.vhd";LUN:0}
![]() Quick check
Quick check
![]() How does the IQN of an iSCSI target differ from the IQN of an iSCSI initiator?
How does the IQN of an iSCSI target differ from the IQN of an iSCSI initiator?
Quick check answer
![]() A target IQN includes the hostname of the iSCSI target server hosting the target and the name you assigned when you created the target. An initiator IQN includes the fully qualified domain name (FQDN) of the computer on which the initiator resides.
A target IQN includes the hostname of the iSCSI target server hosting the target and the name you assigned when you created the target. An initiator IQN includes the fully qualified domain name (FQDN) of the computer on which the initiator resides.
Work Folders
As Figure 8-23 and a number of other figures in this lesson indicate, you can use Server Manager to manage a number of different file server and storage features, including storage pools, physical and virtual disks, volumes, shares, iSCSI targets and virtual disks, and something else: Work Folders. Work Folders is a new storage feature introduced in Windows Server 2012 R2 that can help organizations address the Bring Your Own Device (BYOD) scenario that so many of them are currently facing as the workplace evolves.
Work Folders provides a consistent way for users to access their work files from their personal computers and devices anywhere from centrally managed file servers on the corporate network. Work Folders can be also deployed alongside existing deployments of other Microsoft data synchronization solutions such as Folder Redirection (FR), Offline Files (also known as client-side caching or CSC), and even home folders.
The table below compares Work Folders with other Microsoft sync solutions including FR/CSC, OneDrive (formerly SkyDrive), and OneDrive for Business (formerly SkyDrive Pro):
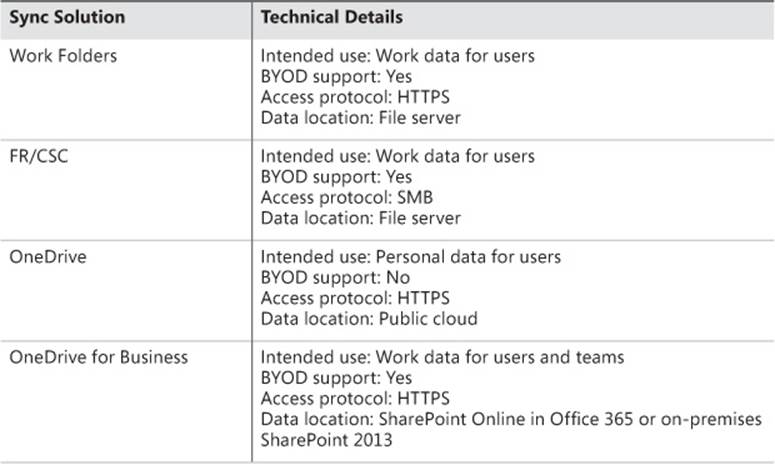
For more information on how to set up and configure Work Folders, see the series of posts on the File Cabinet Blog from the Storage Team at Microsoft starting with “Introducing Work Folders on Windows Server 2012 R2” athttp://blogs.technet.com/b/filecab/archive/2013/07/09/introducing-work-folders-on-windows-server-2012-r2.aspx.
Using iSCSI Initiator
This section describes how to perform the following tasks for iSCSI Initiator on Windows Server 2012 and Windows Server 2012 R2:
![]() Configuring iSCSI Initiator
Configuring iSCSI Initiator
![]() Discovering targets
Discovering targets
![]() Establishing a connection
Establishing a connection
![]() Creating volumes
Creating volumes
The section shows how to perform these tasks using both Server Manager and Windows PowerShell.
Configuring iSCSI Initiator
Before you can connect to an iSCSI target to provision and use iSCSI storage, you must configure the iSCSI initiator on your computer. To configure the initiator on a server running Windows Server 2012 or Windows Server 2012 R2, open Server Manager and select iSCSI Initiator from the Tools menu to open the iSCSI Initiator Properties dialog box as shown in Figure 8-24. Note that if you haven’t previously enabled the initiator on the computer, you will first be prompted to start the Microsoft iSCSI Service as described in the section “Enabling iSCSI Initiator” earlier in this lesson.
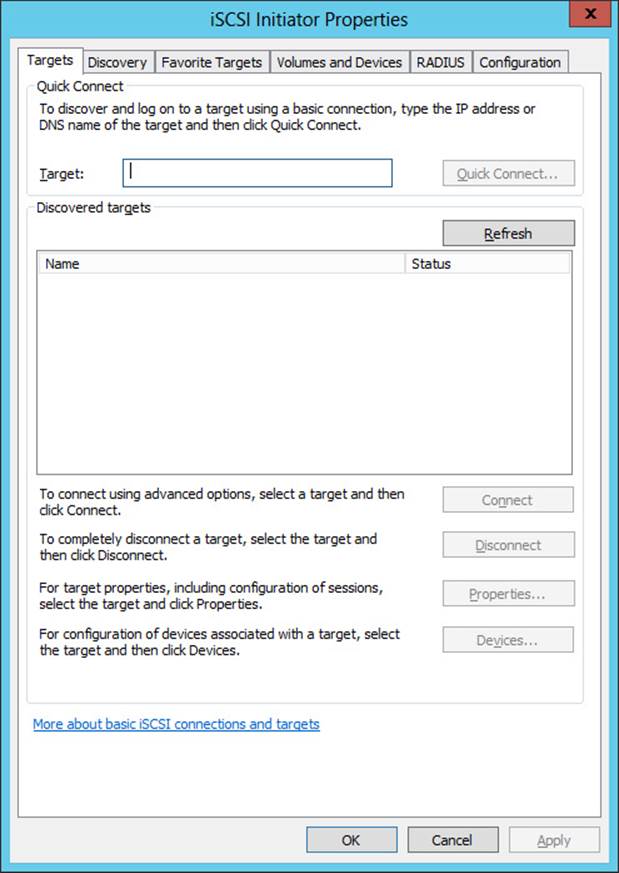
FIGURE 8-24 The iSCSI Initiator Properties dialog box has six tabs of settings for configuring the iSCSI initiator.
You can use the different settings on the six tabs of the iSCSI Initiator Properties dialog box to configure the initiator. Configuration might be required before you can connect your computer to iSCSI targets in your environment. The following list describes the six tabs that are available:
![]() Targets You use this tab to view and connect to discovered targets, configure advanced connection settings, disconnect from targets, view session configuration settings, or view the configuration of devices associated with a target. You can also use Quick Connect to discover and log on to a target and add it to your list of favorite targets.
Targets You use this tab to view and connect to discovered targets, configure advanced connection settings, disconnect from targets, view session configuration settings, or view the configuration of devices associated with a target. You can also use Quick Connect to discover and log on to a target and add it to your list of favorite targets.
![]() Discovery You can use this tab to discover, view, or remove target portals (iSCSI target devices) and Internet Storage Name Service (iSNS) servers in your environment. An iSNS server functions similarly to a Domain Name System (DNS) server. The computer running initiator asks the iSNS server for available iSCSI targets. Adding an iSNS server enables automatic discovery of all iSCSI targets available to the computer.
Discovery You can use this tab to discover, view, or remove target portals (iSCSI target devices) and Internet Storage Name Service (iSNS) servers in your environment. An iSNS server functions similarly to a Domain Name System (DNS) server. The computer running initiator asks the iSNS server for available iSCSI targets. Adding an iSNS server enables automatic discovery of all iSCSI targets available to the computer.
![]() Favorite Targets You use this tab to add a target to the list of favorite targets, view details of a target, or remove a target from the favorites list. When you do this, the initiator uses saved login information to always attempt to reconnect to a target whenever the computer is rebooted.
Favorite Targets You use this tab to add a target to the list of favorite targets, view details of a target, or remove a target from the favorites list. When you do this, the initiator uses saved login information to always attempt to reconnect to a target whenever the computer is rebooted.
![]() Volumes And Devices You use this tab to view a list of the volumes and devices bound by the initiator. If a volume in the list is currently mounted, the drive letter and mount point are shown. You can also use this tab to automatically configure all available devices and to manually add or remove devices.
Volumes And Devices You use this tab to view a list of the volumes and devices bound by the initiator. If a volume in the list is currently mounted, the drive letter and mount point are shown. You can also use this tab to automatically configure all available devices and to manually add or remove devices.
![]() RADIUS You use this tab to configure Remote Authentication Dial-In User Service (RADIUS) authentication by adding a RADIUS server. Unlike CHAP authentication, which is performed between peers, RADIUS authentication is performed between a RADIUS server and a RADIUS client. To use RADIUS, you must have a RADIUS server on your network.
RADIUS You use this tab to configure Remote Authentication Dial-In User Service (RADIUS) authentication by adding a RADIUS server. Unlike CHAP authentication, which is performed between peers, RADIUS authentication is performed between a RADIUS server and a RADIUS client. To use RADIUS, you must have a RADIUS server on your network.
![]() Configuration This tab displays the IQN for the initiator, and you can use its settings to modify the initiator name, configure a CHAP secret for the initiator, configure IPsec tunnel mode addresses for the initiator, or generate a report of all connected targets and devices on the system.
Configuration This tab displays the IQN for the initiator, and you can use its settings to modify the initiator name, configure a CHAP secret for the initiator, configure IPsec tunnel mode addresses for the initiator, or generate a report of all connected targets and devices on the system.
You can also use Windows PowerShell cmdlets such as Set-IscsiChapSecret and Register-IscsiSession to configure certain aspects of the iSCSI initiator.
Discovering targets
After you configure your iSCSI initiator, the next step is to discover available iSCSI targets in your environment. You can do this by performing the following steps:
1. Click the Discover tab of the iSCSI Initiator Properties dialog box and click Discover Portal to open the Discover Target Portal dialog box:
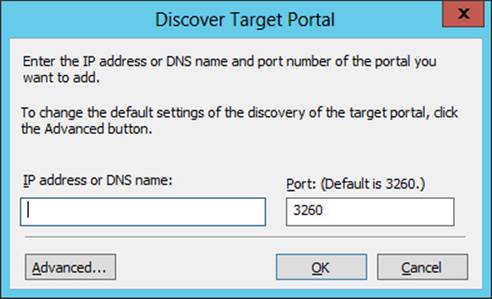
2. Type the IP address or DNS name (hostname or FQDN) for the target portal (iSCSI Target Server) that hosts the target to which you want to connect and then click OK. If additional configuration is required to discover the target portal, click Advanced.
3. After you click OK, the target portal you specified will be displayed in the Target Portals list on the Discover tab.
If you now switch to the Targets tab, the Discovered Targets list should display all the available targets to which the initiator can connect on the portal. (See Figure 8-25.)

FIGURE 8-25 Two targets have been discovered on the target portal named HOST7.
Real World: Troubleshooting iSCSI target discovery
If your attempt to discover an iSCSI target fails, it is usually for one of the following reasons:
![]() The wrong target portal IP address or DNS name was configured on the initiator.
The wrong target portal IP address or DNS name was configured on the initiator.
![]() The wrong IQN for the initiator was assigned when the target was created.
The wrong IQN for the initiator was assigned when the target was created.
![]() There are problems with network connectivity between the initiator and target computers.
There are problems with network connectivity between the initiator and target computers.
Troubleshooting the first issue is straightforward. To see if the second issue is the cause of the problem, try assigning IQN* as the target, which allows any initiator to connect to it. Of course, you can troubleshoot the third issue using standard network troubleshooting procedures.
Establishing a connection
After you discover the targets available on a target portal, you can use the initiator to connect to a target so that you can provision storage from the target. For example, Figure 8-25 shows two targets available on HOST7. To connect to the first target in this list, do the following:
1. Select the first target listed on the Targets tab of your initiator and click Connect. This displays the Connect To Target dialog box, which displays the name (IQN) of the target:
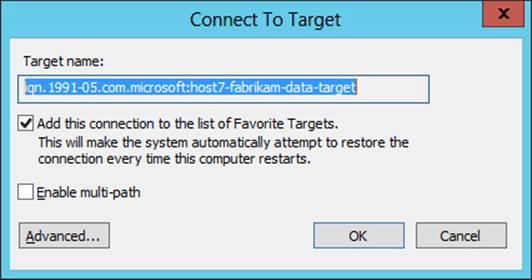
Note that by default, connecting to the target will also add the connection to the list of targets on the Favorite Targets tab so that each time the initiator computer starts, it will automatically attempt to restore the connection to the target.
2. Selecting the Enable Multi-Path option in the Connect To Target dialog box allows the initiator to use MultiPath IO (MPIO), which allows the use of multiple paths to iSCSI storage for redundancy and fault tolerance.
3. Clicking Advanced opens the Advanced Settings dialog box, which allows you to specify or configure the following:
![]() The local adapter or initiator IP address
The local adapter or initiator IP address
![]() CRC/Checksum settings for data or the header digest
CRC/Checksum settings for data or the header digest
![]() CHAP logon information, including whether to use RADIUS
CHAP logon information, including whether to use RADIUS
![]() IPsec settings
IPsec settings
When you are ready to connect to the target, click OK. If the connection attempt is successful, the Status column will display Connected for the selected target. (See Figure 8-26.)
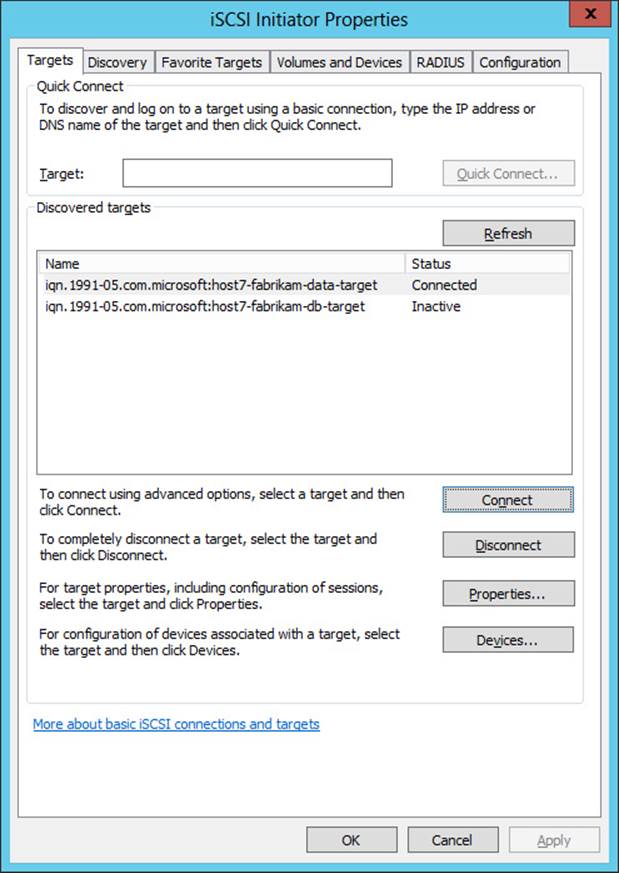
FIGURE 8-26 The initiator has established a connection with one of the targets on HOST7.
You can also use Windows PowerShell to establish a connection between an initiator and a target. As an example, start by using the Get-IscsiConnection cmdlet to display a list of active connections on the initiator computer:
PS C:\> Get-IscsiConnection
ConnectionIdentifier : fffffa80144a8020-1
InitiatorAddress : 0.0.0.0
InitiatorPortNumber : 34815
TargetAddress : 172.16.11.240
TargetPortNumber : 3260
PSComputerName :
To view information about the session for this connection, you can get the connection using the Get-IscsiConnection cmdlet and pipe the connection into the Get-IscsiSession cmdlet like this:
PS C:\> Get-IscsiConnection -ConnectionIdentifier "fffffa80144a8020-1" | `
Get-IscsiSession
AuthenticationType : NONE
InitiatorInstanceName : ROOT\ISCSIPRT\0000_0
InitiatorNodeAddress : iqn.1991-05.com.microsoft:host4.corp.fabrikam.com
InitiatorPortalAddress : 0.0.0.0
InitiatorSideIdentifier : 400001370000
IsConnected : True
IsDataDigest : False
IsDiscovered : False
IsHeaderDigest : False
IsPersistent : True
NumberOfConnections : 1
SessionIdentifier : fffffa80144a8020-4000013700000002
TargetNodeAddress : iqn.1991-05.com.microsoft:host7-fabrikam-data-target
TargetSideIdentifier : 0100
PSComputerName :
Note that the value of the TargetNodeAddress property in the preceding command output is what you would expect based on what you saw earlier in the Discovered Targets list in Figure 8-26.
Now establish a connection to the second target shown in Figure 8-26. To do this, begin by using the Get-IscsiTarget cmdlet to display a list of available targets that have been discovered on the target portal:
PS C:\> Get-IscsiTarget | fl
IsConnected : False
NodeAddress : iqn.1991-05.com.microsoft:host7-fabrikam-db-target
PSComputerName :
IsConnected : True
NodeAddress : iqn.1991-05.com.microsoft:host7-fabrikam-data-target
PSComputerName :
You already established a connection with the target named fabrikam-data, so try to establish a connection with target fabrikam-db instead. To do this, use the Connect-IscsiTarget cmdlet and specify the IQN of target fabrikam-db like this:
PS C:\> Connect-IscsiTarget -NodeAddress `
"iqn.1991-05.com.microsoft:host7-fabrikam-db-target"
AuthenticationType : NONE
InitiatorInstanceName : ROOT\ISCSIPRT\0000_0
InitiatorNodeAddress : iqn.1991-05.com.microsoft:host4.corp.fabrikam.com
InitiatorPortalAddress : 0.0.0.0
InitiatorSideIdentifier : 400001370000
IsConnected : True
IsDataDigest : False
IsDiscovered : False
IsHeaderDigest : False
IsPersistent : False
NumberOfConnections : 1
SessionIdentifier : fffffa80144a8020-4000013700000003
TargetNodeAddress : iqn.1991-05.com.microsoft:host7-fabrikam-db-target
TargetSideIdentifier : 0200
PSComputerName :
The IsConnected property in the preceding command output indicates that your connection attempt succeeded, but the value of the IsPersistent property indicates that your connection won’t persist across reboots. To fix this, you can use the Register-IscsiSession cmdlet with theSessionIdentifier taken from the preceding command output:
PS C:\> Register-IscsiSession -SessionIdentifier "fffffa80144a8020-4000013700000003"
If you now view the value of the IsPersistent property for this session, you can see that the session has been configured to persist across reboots:
PS C:\> Get-IscsiSession -SessionIdentifier "fffffa80144a8020-4000013700000003" | `
fl IsPersistent
IsPersistent : True
Creating volumes
Once you have configured your iSCSI targets and created iSCSI virtual disks on them, enabled and configured your iSCSI initiators, and established connections and sessions between initiators and targets, you are ready to provision iSCSI storage by creating new volumes. I’ll conclude this lesson by walking you through an example of how to create a new volume on HOST4 (the server that has the initiator) from a target and virtual disk on HOST7 (the server with the iSCSI Target Server installed):
1. Begin by opening Server Manager on HOST4 and selecting the File And Storage Services page.
2. Because previously in this lesson you created two iSCSI virtual disks that are 50 and 150 GBs in size, these disks are displayed in the Disks tile on the Disks subpage. To create a new volume on HOST4 from the 50 GB iSCSI virtual disk on HOST7, you begin by right-clicking the 50 GB disk and selecting New Volume:
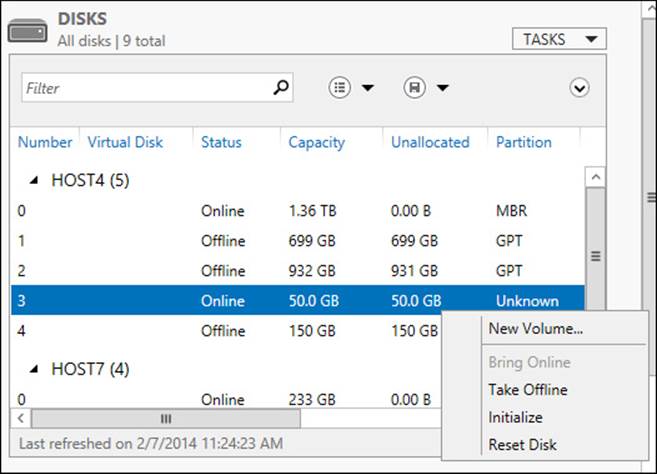
3. Doing this launches the New Volume Wizard, which was demonstrated previously in Lesson 2 of this chapter. Because you want the new volume to appear as a local drive on your initiator server (HOST4), you select HOST4 in the Server list on the Select The Server And Disk page of this wizard:
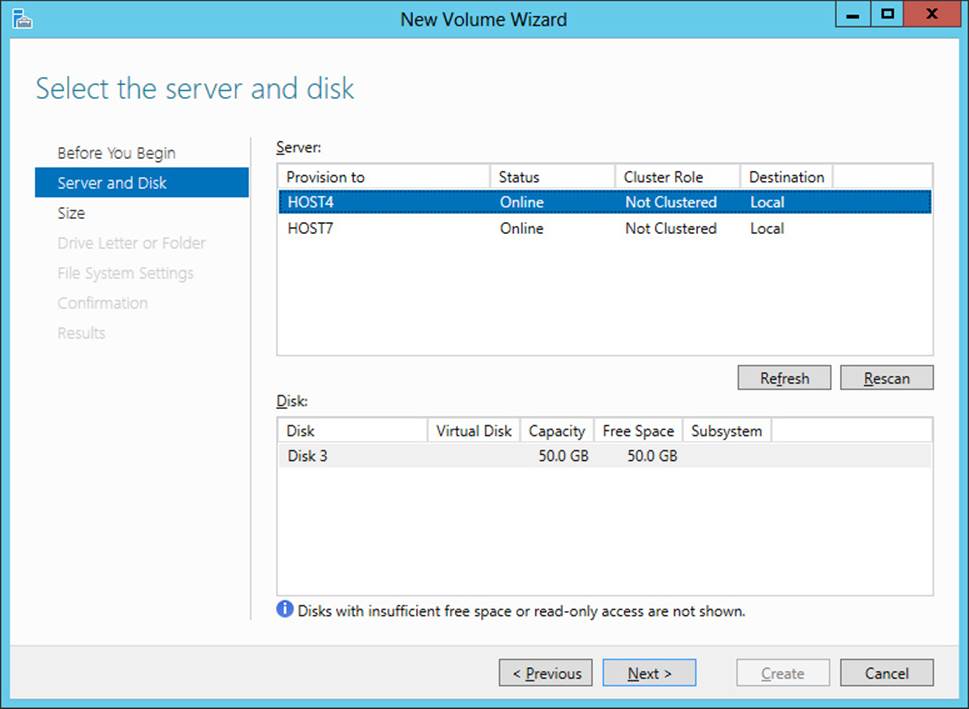
4. Proceed through the remaining steps of the wizard until you have clicked Create. At this point, an Offline Or Uninitialized Disk dialog box appears because the selected disk (the disk selected in the earlier screenshot of the Disks tile) has Unknown as its partition style. Clicking OK in this dialog box brings the disk online and initializes it as a GPT disk.
Once the new volume has been created, opening File Explorer on HOST4 shows the disk as a local volume even though the actual iSCSI storage is located elsewhere on HOST7. You can now copy or save files to the new volume as if it were a locally installed disk on the computer.
You can also create new volumes by using Windows PowerShell as described previously in Lesson 2 of this chapter.
Storage QoS
Storage Quality of Service (QoS) is another new feature of file-based storage introduced in Windows Server 2012 R2. Storage QoS is enabled at the VHDX layer and allows you to limit the maximum IOPS allowed to a virtual disk on a Hyper-V host. It can also allow you to set triggers to send notifications when a specified minimum IOPS is not met for a virtual disk. Possible usage scenarios for this feature include the following:
![]() Configuring different service-level agreements (SLAs) for different types of storage operations within your infrastructure. For example, a hoster might use this feature to configure Bronze, Silver, and Gold SLAs for storage performance available for different classes of tenants. You can even set alerts that trigger when virtual machines are not getting enough IOPS for storage access.
Configuring different service-level agreements (SLAs) for different types of storage operations within your infrastructure. For example, a hoster might use this feature to configure Bronze, Silver, and Gold SLAs for storage performance available for different classes of tenants. You can even set alerts that trigger when virtual machines are not getting enough IOPS for storage access.
![]() Restricting the disk throughput for overactive or disruptive virtual machines within your environment that are saturating the storage array. Hosting providers will especially love this capability because it means they won’t have to worry about one tenant consuming excessive storage fabric resources at the expense of other tenants.
Restricting the disk throughput for overactive or disruptive virtual machines within your environment that are saturating the storage array. Hosting providers will especially love this capability because it means they won’t have to worry about one tenant consuming excessive storage fabric resources at the expense of other tenants.
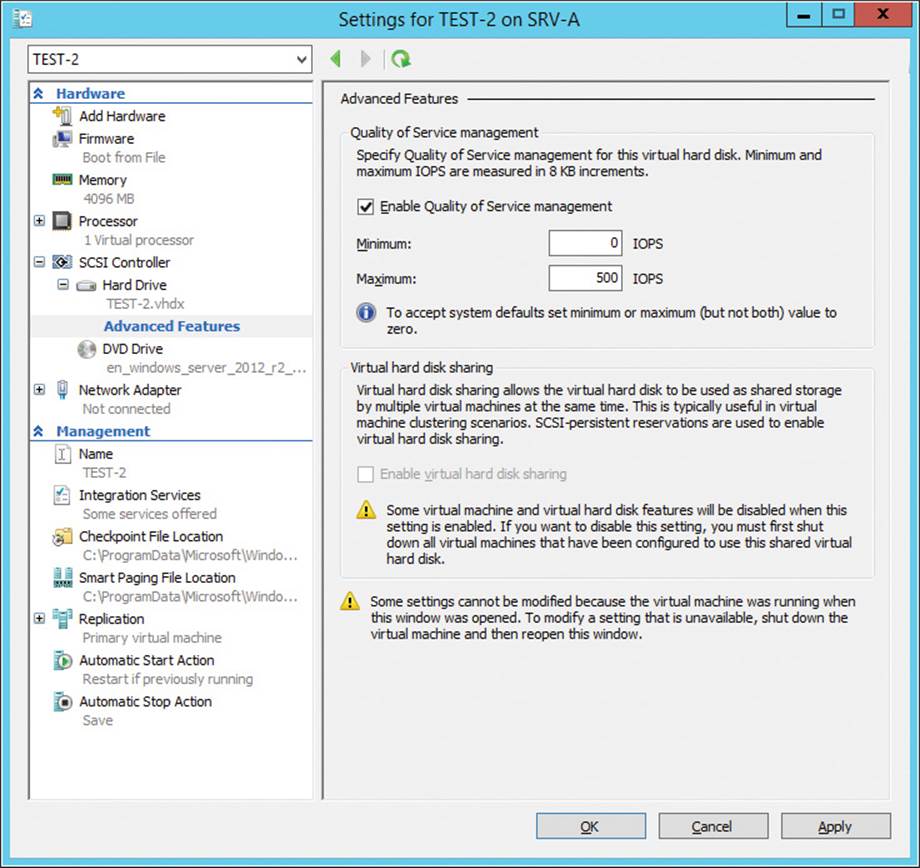
As the above screenshot shows, you can configure Storage QoS by using Hyper-V manager even while the virtual machine is running. This gives organizations a lot of flexibility in how they manage access to the storage fabric from workloads running in their cloud environments.
Lesson summary
![]() To provision iSCSI storage, the iSCSI initiator on a computer must establish a connection to an iSCSI target on an iSCSI target server.
To provision iSCSI storage, the iSCSI initiator on a computer must establish a connection to an iSCSI target on an iSCSI target server.
![]() iSCSI initiators and targets in an environment can be uniquely identified by their iSCSI Qualified Name (IQN).
iSCSI initiators and targets in an environment can be uniquely identified by their iSCSI Qualified Name (IQN).
![]() Configuring iSCSI Target Server involves installing the iSCSI Target Server role service and creating iSCSI virtual disks.
Configuring iSCSI Target Server involves installing the iSCSI Target Server role service and creating iSCSI virtual disks.
![]() Provisioning storage using an iSCSI initiator involves configuring the initiator, discovering targets, establishing connections, and creating volumes.
Provisioning storage using an iSCSI initiator involves configuring the initiator, discovering targets, establishing connections, and creating volumes.
Lesson review
Answer the following questions to test your knowledge of the information in this lesson. You can find the answers to these questions and explanations of why each answer choice is correct or incorrect in the “Answers” section at the end of this chapter.
1. In an environment in which the iSCSI Target Server role service of Windows Server 2012 R2 has been deployed, what might the following string mean?
iqn.1991-05.com.microsoft:srv4-finance-target
A. This is the IQN of the iSCSI initiator on a computer named srv4.
B. This is the IQN of the iSCSI initiator on a computer named finance.
C. This is the IQN of an iSCSI target on a target portal named srv4.
D. This is the IQN of an iSCSI target on a target portal named finance.
2. What steps can you take to make your iSCSI storage environment more secure? (Choose all that apply.)
A. Enable and configure CHAP and Reverse CHAP on your iSCSI targets.
B. Deploy a RADIUS server and configure your iSCSI initiators to use it for authentication.
C. Configure IPsec tunnel mode addresses for the initiator.
D. Configure your iSCSI targets to allow connections from initiators with an IQN of IQN:*.
3. Which of the following Windows PowerShell cmdlets produces output that you can use to determine the LUN mapping for an iSCSI target?
A. Get-IscsiConnection
B. Get-IscsiServerTarget
C. Register-IscsiSession
D. Get-IscsiTarget
Practice exercises
The goal of this section is to provide you with hands-on practice with the following:
![]() Provisioning and managing shared storage using Server Manager
Provisioning and managing shared storage using Server Manager
![]() Provisioning and managing shared storage using Windows PowerShell
Provisioning and managing shared storage using Windows PowerShell
To perform the following exercises, you need at least one clean installation of Windows Server 2012 using the Server With A GUI installation option. The server should be a stand-alone server belonging to a workgroup, have Internet connectivity, and have no additional roles or features installed. In addition to the boot volume, the server should have at least two additional physical disks (either internally or externally connected) of a type supported by the Storage Spaces feature (for example, SAS or SATA disks). These disks should initially have no volumes on them.
You should be logged on interactively to the server using a user account that is a member of the local Administrators group but that is not the default Administrator account. You should also create a second user account named Test User that is a member of the built-in Users local group on the server. For the purposes of these exercises, the name of the server is assumed to be HOST7.
If you want, you can perform these exercises remotely from another computer by enabling Remote Desktop on HOST4 and using Remote Desktop Connection on your computer. If you do this, note that certain actions, such as creating new virtual switches, might temporarily disrupt Remote Desktop connectivity with the remote host.
Exercise 1: Provisioning and managing shared storage using Server Manager
In this exercise, you use Server Manager to create a new storage pool, create virtual disks from the pool, create volumes on the virtual disks, create SMB shares on the volumes, and manage various aspects for your shared storage.
1. Launch the Add Roles And Features Wizard from Server Manager and install the File Server role service of the File And Storage Services role on your server.
2. Select the Storage Pools subpage of the File And Storage Services page in Server Manager and verify that you have at least two available physical disks in the primordial pool on your server. If you have fewer than two physical disks in the primordial pool, connect additional physical disks to your server.
3. Click the Tasks control in the Physical Disks tile of the Storage Pools subpage and select New Storage Pool to launch the New Storage Pool Wizard.
4. Specify Pool 1 as the name for the new pool.
5. Add the first physical disk to the new pool, leaving the Allocation option as Automatic.
6. Complete the remaining steps of the New Storage Pool Wizard to create the new pool.
7. Right-click Pool 1 in the Storage Pools tile on the Storage Pools subpage and select New Virtual Disk to launch the New Virtual Disk Wizard.
8. Select Pool 1 as the storage pool from which you will create the new virtual disk.
9. Type Simple Disk as the name for the new virtual disk.
10. Select Simple as the storage layout for the new virtual disk.
11. Select Thin as the provisioning type for the new virtual disk.
12. Specify a value equal to 10 times the amount of free space in Pool 1 for the size of the new virtual disk.
13. Complete the remaining steps of the New Virtual Disk Wizard to create the new virtual disk. The New Volume Wizard will launch automatically.
14. Select Simple Disk as the virtual disk on which you will create the new volume.
15. Specify a value equal to half the available capacity of Simple Disk as the size for the new volume.
16. Specify S as the drive letter for the new volume.
17. Specify NTFS as the file system for the new volume.
18. Type Simple Volume as the label for the new volume.
19. Complete the remaining steps of the New Volume Wizard to create the new volume.
20. Right-click Simple Disk in the Virtual Disks tile on the Storage Pools subpage and select Extend Virtual Disk.
21. Specify a new size that will double the current size of Simple Disk.
22. Right-click Pool 1 in the Storage Pools tile on the Storage Pools subpage and select Add Physical Disk.
23. Select an available physical disk and add it to Pool 1, leaving the Allocation option set to Automatic.
24. Right-click Pool 1 in the Storage Pools tile on the Storage Pools subpage and select New Virtual Disk to launch the New Virtual Disk Wizard.
25. Select Pool 1 as the storage pool from which you will create the new virtual disk.
26. Type Mirror Disk as the name for the new virtual disk.
27. Select Mirror as the storage layout for the new virtual disk.
28. Select Fixed as the provisioning type for the new virtual disk.
29. Select Maximum Size for the size of the new virtual disk.
30. Complete the remaining steps of the New Virtual Disk Wizard to create the new virtual disk. The New Volume Wizard will launch automatically.
31. Select Mirror Disk as the virtual disk on which you will create the new volume.
32. Specify a value equal to the available capacity of Simple Disk as the size for the new volume.
33. Specify W as the drive letter for the new volume.
34. Specify ReFS as the file system for the new volume.
35. Type Mirror Volume as the label for the new volume.
36. Complete the remaining steps of the New Volume Wizard to create the new volume.
37. Select Simple Disk in the Disks tile on the Disks subpage. Verify that volume S is displayed in the Volumes tile on this page.
38. Select Mirror Disk in the Disks tile on the Disks subpage. Verify that volume W is displayed in the Volumes tile on this page.
39. Read the information displayed in the Storage Pool tile on the Disks subpage.
40. Select volume S in the Volumes tile on the Volumes subpage. Read the information displayed in the Disk tile on this page.
41. Select volume W in the Volumes tile on the Volumes subpage. Read the information displayed in the Disk tile on this page.
42. Right-click S in the Volumes tile on the Volumes subpage and select Extend Volume.
43. Specify a new size equal to half the maximum possible size for the volume.
44. Right-click S in the Volumes tile on the Volumes subpage and select New Share.
45. Select SMB Share - Quick as the profile for the new share.
46. Select S as the volume on which the new share will be created.
47. Type Simple Share as the name for the new share.
48. Select the check box to enable access-based enumeration for the new share.
49. Complete the remaining steps of the New Share Wizard to create the new share.
50. Press Windows key + R and type S:\Shares\Simple Share to open the folder in File Explorer.
51. Right-click in the open folder, select New Folder, and type ABE_TEST as the name for the new folder.
52. Right-click the ABE_TEST folder and select Properties, select the Security tab, and click Advanced to open the Advanced Security Settings For ABE_TEST dialog box.
53. On the Permissions tab, click Disable Inheritance and select Convert Inherited Permissions Into Explicit Permissions On This Object.
54. Select the two permission entries for the built-in Users local group and click Remove to remove them. Then click Apply.
55. Click the Effective Access tab, click Select A User, type Administrator, click OK, and click View Effective Access. Note the effective access that the built-in Administrator account will have when accessing the share both locally and over the network.
56. Click Select A User again, type Test User, click OK, and click View Effective Access. Note the effective access that Test User will have when accessing the share both locally and over the network.
57. Close File Explorer, press Windows logo key+R, and type \\HOST7\Simple Share to access the share using File Explorer. Verify that Administrator can open the ABE_TEST folder but cannot create new files in it because the share permissions for Simple Share are configured as Everyone has Read permission.
58. Log off as Administrator and log on as Test User.
59. Press Windows key+R and type \\HOST7\Simple Share to access the share using File Explorer. Verify that Test User cannot see the ABE_TEST folder because access-based enumeration has been configured on Simple Share and the Users group has no permission to access the ABE_TEST folder.
60. Log off as Test User and log on as an administrator.
61. Right-click Simple Share in the Shares tile on the Shares subpage and select Stop Sharing.
62. Right-click S in the Volumes tile on the Volumes subpage and select Delete Volume. Repeat this step to delete W.
63. Right-click Simple Disk in the Virtual Disks tile on the Storage Pools subpage and select Delete Virtual Disk. Repeat this step to delete Mirror Disk.
64. Right-click Pool 1 in the Storage Pools tile on the Storage Pools subpage and select Delete Storage Pool. Verify that the primordial pool is displayed and that there are at least two physical disks available in the Physical Disks tile. You are now ready to begin the next practice exercise.
Exercise 2: Provisioning and managing shared storage using Windows PowerShell
In this exercise, you use Windows PowerShell to create a new storage pool, create virtual disks from the pool, create volumes on the virtual disks, and create SMB shares on the volumes.
1. Use the Get-PhysicalDisk cmdlet to verify that at least two physical disks connected to your server have the CanPool property set to True.
2. Type (Get-StorageSubsystem).FriendlyName to display the value of the FriendlyName property of the storage subsystem on the server.
3. Type the following command to create a new storage pool named Pool 2 that includes all available physical disks in the primordial pool and uses both thin provisioning and mirror resiliency by default when creating new virtual disks:
New-StoragePool `
-FriendlyName "Pool 2" `
-StorageSubSystemFriendlyName (Get-StorageSubSystem).FriendlyName `
-PhysicalDisks (Get-PhysicalDisk | where CanPool -eq True) `
-ProvisioningTypeDefault Thin `
-ResiliencySettingNameDefault Mirror
4. Type the following command to create a new virtual disk named vDisk 1 that is 5 TBs in size and uses the default provisioning and resiliency settings for Pool 2:
New-VirtualDisk `
-FriendlyName "vDisk 1" `
-StoragePoolFriendlyName "Pool 2" `
-Size 5TB
5. Use the New-VirtualDisk cmdlet again to create a second virtual disk named vDisk 2 that is 10 TBs in size and uses the default provisioning and resiliency settings for Pool 2.
6. Use the Get-VirtualDisk cmdlet to verify that the virtual disks are 5 TBs and 10 TBs in size, respectively.
7. Type Get-Disk | where Bustype –eq Spaces to display information about the two virtual disks. Note that the virtual disks are both offline and have the partition style RAW.
8. Use the following command to initialize both virtual disks and set their partition style to GPT:
(Get-Disk | where BusType -eq Spaces) | Initialize-Disk -PartitionStyle GPT
9. Use Get-Disk to verify that the two disks are now online and have the partition style GPT.
10. Use the following command to create a new volume on each virtual disk, with each new volume being as large as possible and having a drive letter automatically assigned to it:
New-Partition `
-DiskNumber (Get-Disk | where BusType -eq Spaces).Number `
-UseMaximumSize -AssignDriveLetter | Format-Volume `
-FileSystem NTFS -Confirm:$false
11. Verify the result from the output of the preceding command and note the drive letters assigned to the new volumes.
12. Use the New-Item cmdlet to create a folder named Shares on each new volume and subfolders named Folder 1 and Folder 2, respectively, on each volume.
13. Use the New-SmbShare cmdlet to create new SMB shares named Share 1 and Share 2 that map to the two local folders you created in the previous step.
14. Use the Set-SmbShare cmdlet to enable access-based enumeration on Share 2.
15. Refresh the view in Server Manager and verify that all of the tasks you performed using Windows PowerShell achieved their intended result.
Suggested practice exercises
The following additional practice exercises are designed to give you more opportunities to practice what you’ve learned and to help you successfully master the lessons presented in this chapter.
![]() Exercise 1 Use the SMB Share - Advanced option in the New Share Wizard to create a share that has a quota assigned. Verify the quota settings by copying files to the share until a notification is issued.
Exercise 1 Use the SMB Share - Advanced option in the New Share Wizard to create a share that has a quota assigned. Verify the quota settings by copying files to the share until a notification is issued.
![]() Exercise 2 Create a Windows PowerShell script (.ps1 file) that performs all the tasks in the second exercise in this chapter. Run the script to provision a storage pool, virtual disks, volumes, and shares.
Exercise 2 Create a Windows PowerShell script (.ps1 file) that performs all the tasks in the second exercise in this chapter. Run the script to provision a storage pool, virtual disks, volumes, and shares.
![]() Exercise 3 Remove all shares, volumes, virtual disks, and storage pools you created in exercises 1 and 2 of this chapter. Then use your setup to deploy an iSCSI storage solution as described in Lesson 3 and configure and manage the environment using both Server Manager and Windows PowerShell.
Exercise 3 Remove all shares, volumes, virtual disks, and storage pools you created in exercises 1 and 2 of this chapter. Then use your setup to deploy an iSCSI storage solution as described in Lesson 3 and configure and manage the environment using both Server Manager and Windows PowerShell.
Answers
This section contains the answers to the lesson review questions in this chapter.
Lesson 1
1. Correct answers: B, C, and D
A. Incorrect: You can create a new storage pool using one, several, or all of the physical disks in the primordial pool on the server.
B. Correct: If there are no available unused disks connected to your file server, the primordial pool is not displayed in Server Manager.
C. Correct: If there are no available unused disks connected to your file server, the primordial pool is not displayed in Server Manager.
D. Correct: Physical disks are displayed in the primordial pool only when they have no partitions or volumes created on them.
2. Correct answers: A, B, and C
A. Correct: DiskPart relies on the Virtual Disk Service (VDS), which is deprecated beginning with Windows Server 2012. You can still use this utility in Windows Server 2012 and Windows Server 2012 R2, but it will not work with Storage Spaces or with any SMAPI components or tools.
B. Correct: DiskRAID relies on the Virtual Disk Service (VDS), which is deprecated beginning with Windows Server 2012. You can still use this utility in Windows Server 2012 and Windows Server 2012 R2, but it will not work with Storage Spaces or with any SMAPI components or tools.
C. Correct: The Disk Management MMC snap-in relies on the Virtual Disk Service (VDS), which is deprecated beginning with Windows Server 2012. You can still use this utility in Windows Server 2012 and Windows Server 2012 R2, but it will not work with Storage Spaces or with any SMAPI components or tools.
D. Incorrect: The v1 namespace for WMI is deprecated beginning with Windows Server 2012. You should use WMIv2-based Windows Storage Management APIs and utilities for managing storage in Windows Server 2012 and Windows Server 2012 R2.
3. Correct answer: A
A. Correct: With thin provisioning, the size of the virtual disk represents the maximum amount of physical storage space that can be allocated from the pool. No space is actually used, however, until data is stored on a volume on the virtual disk, and the amount of space used will grow or shrink as data is written to or deleted from the disk.
B. Incorrect: With fixed provisioning, the size of the virtual disk is the actual amount of physical storage space allocated from the pool.
C. Incorrect: With mirror resiliency, the data on volumes created on this type of virtual disk is striped across all physical disks in the pool. Each segment of data is also duplicated on either two or three physical disks, as specified when the mirrored virtual disk is created, so that a copy of all data will still be available if a physical disk in the pool fails.
D. Incorrect: With parity resiliency, the data on volumes created on this type of virtual disk and parity information that can be used to facilitate automatic reconstruction of data if a physical disk fails is striped across all physical disks in the pool.
4. Correct answers: A, B, and D
A. Correct: You must use a minimum of three physical disks when deploying Storage Spaces twith Failover Clustering.
B. Correct: Physical disks must be SAS when deploying Storage Spaces with Failover Clustering.
C. Incorrect: Physical disks must pass the failover cluster validation tests when deploying Storage Spaces with Failover Clustering.
D. Correct: You can use only fixed provisioning when deploying Storage Spaces with Failover Clustering.
Lesson 2
1. Correct answer: C
A. Incorrect: With one physical disk in the pool, you can provision only simple volumes. At least three physical disks are needed if you plan on creating resilient volumes in a failover cluster containing two file servers.
B. Incorrect: With two physical disks in the pool, you can provision resilient volumes, but at least three physical disks are needed if you plan on creating resilient volumes in a failover cluster containing two file servers.
C. Correct: At least three physical disks are needed if you plan on creating resilient volumes in a failover cluster containing two file servers.
D. Incorrect: At least three physical disks are needed if you plan on creating resilient volumes in a failover cluster containing two file servers. The fourth volume can be used but is not required.
2. Correct answer: D
A. Incorrect: The Get-StoragePool cmdlet returns either a specific storage pool or a set of StoragePool objects from all storage subsystems across all storage providers. Optionally, it returns a filtered subset based on specific parameters.
B. Incorrect: The Get-VirtualDisk cmdlet returns a list of VirtualDisk objects across all storage pools and across all providers. Optionally, it returns a filtered subset based on provided criteria.
C. Incorrect: The Get-PhysicalDisk cmdlet returns a list of all PhysicalDisk objects visible across any available Storage Management providers. Optionally, it returns a filtered list.
D. Correct: The Get-StorageSubsystem cmdlet returns a single StorageSubsystem object or a set of Subsystem objects, depending on the parameters given. The returned information includes the friendly name, health status, and operational status of each storage subsystem on the server.
3. Correct answers: A, C, and D
A. Correct: You can use either Server Manager or Windows PowerShell to extend a virtual disk.
B. Incorrect: You cannot shrink a virtual disk.
C. Correct: You can use either Server Manager or Windows PowerShell to detach a virtual disk.
D. Correct: You can use either Server Manager or Windows PowerShell to delete a virtual disk.
4. Correct answer: C
A. Incorrect: Use the SMB Share - Quick option if you need to create a general-purpose SMB share for file sharing.
B. Incorrect: Use the SMB Share - Advanced option if you need to configure quotas on your share or implement file classification.
C. Correct: Use the SMB Share - Application option if the share will be used by Hyper-V hosts for shared storage, by a database application, or by other server applications.
D. Incorrect: Create an NFS share if you need to use file sharing in heterogeneous environments that include both Windows and non-Windows computers.
Lesson 3
1. Correct answer: C
A. Incorrect: In the Windows Server 2012 implementation of an iSCSI initiator, the initiator IQN looks like this:
iqn.1991-05.com.microsoft:<initiator_server_FQDN>
Because srv4-finance-target is not in the proper form for a FQDN, the string cannot be the IQN of the iSCSI initiator.
B. Incorrect: In the Windows Server 2012 implementation of iSCSI Initiator, the initiator IQN looks like this:
iqn.1991-05.com.microsoft:<initiator_server_FQDN>
Because srv4-finance-target is not in the proper form for a FQDN, the string cannot be the IQN of the iSCSI initiator.
C. Correct: In the Windows Server 2012 implementation of an iSCSI target server, the target IQN looks like this:
iqn.1991-05.com.microsoft:<target_server_name>-<target-name>-target
Because srv4-finance-target is of this form, the string is the IQN of an iSCSI target named finance on a target portal named srv4.
D. Incorrect: In the Windows Server 2012 implementation of an iSCSI target server, the target IQN looks like this:
iqn.1991-05.com.microsoft:<target_server_name>-<target-name>-target
Because srv4-finance-target is of this form, the string is the IQN of an iSCSI target. However, finance is the name of the target, not the target portal.The name of the target portal is srv4.
2. Correct answers: A, B, and C
A. Correct: Challenge Handshake Authentication Protocol (CHAP) is a basic level of iSCSI security that is used to authenticate the peer of a connection and is based on the peers sharing a secret.
B. Correct: Remote Authentication Dial-In User Service (RADIUS) is a standard used for maintaining and managing user authentication and validation. Unlike CHAP, authentication with RADIUS is not performed between peers but between a RADIUS server and a client. To use this level of security with iSCSI, either you must have a RADIUS server running on your network or you must deploy one.
C. Correct: Internet Protocol security (IPsec) is a protocol that enforces authentication and data encryption at the IP packet layer. You can use IPsec in addition to CHAP or RADIUS authentication to provide an added level of security for iSCSI.
D. Incorrect: Configuring your iSCSI targets to allow connections from initiators with an IQN of IQN:* actually weakens the security of your environment because it allows any initiator to access the target.
3. Correct answer: B
A. Incorrect: The Get-IscsiConnection cmdlet gets information about connected iSCSI initiator connections. The output of this command does not include the LUN mapping for an iSCSI target.
B. Correct: The Get-IscsiServerTarget cmdlet obtains iSCSI targets and their associated properties from the local server or specified computer. The output of this command includes the LUN mapping for the iSCSI targets on the target server.
C. Incorrect: The Register-IscsiSession cmdlet registers an active iSCSI session to be persistent using the session identifier as input. The output of this command does not include the LUN mapping for an iSCSI target.
D. Incorrect: The Get-IscsiTarget cmdlet returns information about connected iSCSI targets. The output of this command does not include the LUN mapping for an iSCSI target.