Programming Windows Store Apps with HTML CSS and JavaSript(2014)
Appendix C Additional Networking Topics
In this appendix:
• XMLHttpRequest and WinJS.xhr
• Breaking up large files (background transfer API)
• Multipart uploads (background transfer API)
• Notes on Encryption, Decryption, Data Protection, and Certificates
• Syndication: RSS and AtomPub APIs in WinRT
• Sockets
• The Credential Picker UI
• Other Networking SDK Samples
XMLHttpRequest and WinJS.xhr
Transferring data to and from web services through HTTP requests is a common activity for Windows Store apps, especially those written in JavaScript for which handling XML and/or JSON is straight-forward. For this purpose there is the Windows.Web.Http.HttpClient API, but apps can also use the XMLHttpRequest object as well as the WinJS.xhr wrapper that turns the XMLHttpRequest structure into a simple promise. For the purposes of this section I’ll refer to both of these together as just XHR.
To build on what we already covered in the “HTTP Requests” section in Chapter 4, “Web Content and Services,” I need to make a few other points where XHR is concerned, most of which come from the section in the documentation entitled Connecting to a web service.
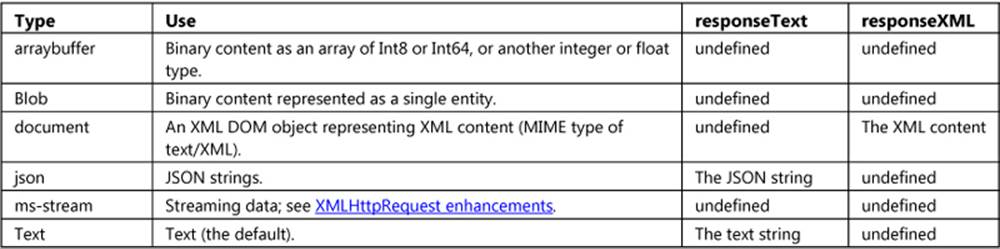
First, Downloading different types of content provides the details of the different content types supported by XHR for Windows Store apps, summarized here:
Second, know that XHR responses can be automatically cached, meaning that later requests to the same URI might return old data. To resend the request despite the cache, add an If-Modified-Since HTTP header, as shown on How to ensure that WinJS.xhr resends requests.
Along similar lines, you can wrap a WinJS.xhr operation in another promise to encapsulate automatic retries if there is an error in any given request. That is, build your retry logic around the core XHR operation, with the result stored in some variable. Then place that whole block of code within WinJS.Promise.as (or a new WinJS.Promise) and use that elsewhere in the app.
In each XHR attempt, remember that you can also use WinJS.Promise.timeout in conjunction with WinJS.Xhr, as described on Setting timeout values with WinJS.xhr., because WinJS.xhr doesn’t have a timeout notion directly. You can, of course, set a timeout in the raw XMLHttpRequestobject, but that would mean rebuilding everything that WinJS.xhr already does or copying it from the WinJS source code and making modifications.
Generally speaking, XHR headers are accessible to the app with the exception of cookies (the set-cookie and set-cookie2 headers)—these are filtered out by design for XHR done from a local context. They are not filtered for XHR from the web context. Of course, access to cookies is one of the benefits of Windows.Web.Http.HttpClient.
Finally, avoid using XHR for large file transfers because such operations will be suspended when the app is suspended. Use the Background Transfer API instead (see Chapter 4), which uses HTTP requests under the covers, so your web services won’t know the difference anyway!
Tips and Tricks for WinJS.xhr
Without opening the whole can of worms that is XMLHttpRequest, it’s useful to look at just a couple of additional points around WinJS.xhr. This section is primarily provided for developers who might still be targeting Windows 8.0 where the preferred WinRT HttpClient API is not available.
First, notice that the single argument to WinJS.xhr is an object that can contain a number of properties. The url property is the most common, of course, but you can also set the type (defaults to “GET”) and the responseType for other sorts of transactions, supply user and passwordcredentials, set headers(such as If-Modified-Since with a date to control caching), and provide whatever other additional data is needed for the request (such as query parameters for XHR to a database). You can also supply a customRequestInitializer function that will be called with theXMLHttpRequest object just before it’s sent, allowing you to perform anything else you need at that moment.
The second tip is setting a timeout on the request. You can use the customRequestInitializer for this purpose, setting the XMLHttpRequest.timeout property and possibly handling the ontimeout event. Alternately, use the WinJS.Promise.timeout function to set a timeout period after which the WinJS.xhr promise (and the async operation connected to it) will be canceled. Canceling is accomplished by simply calling a promise’s cancel method. Refer to “The WinJS.Promise Class” in Appendix A, “Demystifying Promises,” for details on timeout.
You might have need to wrap WinJS.xhr in another promise, perhaps to encapsulate other intermediate processing with the request while the rest of your code just uses the returned promise as usual. In conjunction with a timeout, this can also be used to implement a multiple retry mechanism.
Next, if you need to coordinate multiple requests together, you can use WinJS.Promise.join, which is again covered in Chapter 3 in the section “Joining Parallel Promises.”
Finally, for Windows Store apps, using XHR with localhost: URIs (local loopback) is blocked by design. During development, however, this is very useful for debugging a service without deploying it. You can enable local loopback in Visual Studio by opening the project properties dialog (Project menu ><project> Properties…), selecting Debugging on the left side, and setting Allow Local Network Loopback to Yes. Using the localhost is discussed also in Chapter 4.
Breaking Up Large Files (Background Transfer API)
Because the outbound (upload) transfer rates of most broadband connections are significantly slower than the inbound (download) rates and might have other limitations, uploading a large file to a server (generally using the background transfer API) is typically a riskier operation than a large download. If an error occurs during the upload, it can invalidate the entire transfer—a frustrating occurrence if you’ve already been waiting an hour for that upload to complete!
For this reason, a cloud service might allow a large file to be transferred in discrete chunks, each of which is sent as a separate HTTP request, with the server reassembling the single file from those requests. This minimizes, or at least reduces, the overall impact of connectivity hiccups.
From the client’s point of view, each piece would be transferred with an individual UploadOperation; that much is obvious. The tricky part is breaking up a large file in the first place. With a lot of elbow grease—and what would likely end up being a complex chain of nested async operations—it is possible to create a bunch of temporary files from the single source. If you’re up to a challenge, I invite to you write such a routine and post it somewhere for the rest of us to see!
But there is an easier path: BackgroundUploader.createUploadFromStreamAsync, through which you can create separate UploadOperation objects for different segments of the stream. Given a StorageFile for the source, start by calling its openReadAsync method, the result of which is anIRandomAccessStreamWithContentType object. Through its getInputStreamAt method you then obtain an IInputStream for each starting point in the stream (that is, at each offset depending on your segment size). You then create an UploadOperation with each input stream by usingcreateUploadFromStreamAsync. The last requirement is to tell that operation to consume only some portion of that stream. You do this by calling its setRequestHeader("content-length", <length>) where <length> is the size of the segment plus the size of other data in the request; you’ll also want to add a header to identify the segment for that particular upload. After all this, call each operation’s startAsync method to begin its transfer.
Multipart Uploads (Background Transfer API)
In addition to the createUpload and createUploadFromStreamAsync methods, the BackgroundUploader provides another method, called createUploadAsync (with three variants), which handles what are called multipart uploads.
From the server’s point of view, a multipart upload is a single HTTP request that contains various pieces of information (the parts), such as app identifiers, authorization tokens, and so forth, along with file content, where each part is possibly separated by a specific boundary string. Such uploads are used by online services like Flickr and YouTube, each of which accepts a request with a multipart Content-Type. (See Content-type: multipart for a reference.) For example, as shown on Uploading Photos – POST Example, Flickr wants a request with the content type ofmultipart/form-data, followed by parts for api_key, auth_token, api_sig, photo, and finally the file contents. With YouTube, as described on YouTube API v2.0 – Direct Uploading, it wants a content type of multipart/related with parts containing the XML request data, the video content type, and then the binary file data.
The background uploader supports all this through the BackgroundUploader.createUploadAsync method. (Note the Async suffix that separates this from the synchronous createUpload.) There are three variants of this method. The first takes the server URI to receive the upload and an array of BackgroundTransferContentPart objects, each of which represents one part of the upload. The resulting operation will send a request with a content type of multipart/form-data with a random GUID for a boundary string. The second variation of createUploadAsync allows you to specify the content type directly (through the sub-type, such as related), and the third variation then adds the boundary string. That is, assuming parts is the array of parts, the methods look like this:
var uploadOpPromise1 = uploader.createUploadAsync(uri, parts);
var uploadOpPromise2 = uploader.createUploadAsync(uri, parts, "related");
var uploadOpPromise3 = uploader.createUploadAsync(uri, parts, "form-data", "-------123456");
To create each part, first create a BackgroundTransferContentPart by using one of its three constructors:
• new BackgroundContentPart() Creates a default part.
• new BackgroundContentPart(<name>) Creates a part with a given name.
• new BackgroundContentPart(<name>, <file>) Creates a part with a given name and a local filename.
In each case you further initialize the part with a call to its setText, setHeader, and setFile methods. The first, setText, assigns a value to that part. The second, setHeader, can be called multiple times to supply header values for the part. The third, setFile, is how you provide theStorageFile to a part created with the third variant above.
Scenario 2 of the Background transfer sample shows the latter using an array of random files that you choose from the file picker, but probably few services would accept a request of this nature. Let’s instead look at how we’d create the multipart request for Flickr shown on Uploading Photos – POST Example. For this purpose I’ve created the MultipartUpload example in the appendices’ companion content. Here’s the code from js/uploadMultipart.js that creates all the necessary parts for the tinyimage.jpg file in the app package:
// The file and uri variables are already set by this time. bt is a namespace shortcut
var bt = Windows.Networking.BackgroundTransfer;
var uploader = new bt.BackgroundUploader();
var contentParts = [];
// Instead of sending multiple files (as in the original sample), we'll create those parts that
// matchthe POST example for Flickr on http://www.flickr.com/services/api/upload.example.html
var part;
part = new bt.BackgroundTransferContentPart();
part.setHeader("Content-Disposition", "form-data; name=\"api_key\"");
part.setText("3632623532453245");
contentParts.push(part);
part = new bt.BackgroundTransferContentPart();
part.setHeader("Content-Disposition", "form-data; name=\"auth_token\"");
part.setText("436436545");
contentParts.push(part);
part = new bt.BackgroundTransferContentPart();
part.setHeader("Content-Disposition", "form-data; name=\"api_sig\"");
part.setText("43732850932746573245");
contentParts.push(part);
part = new bt.BackgroundTransferContentPart();
part.setHeader("Content-Disposition", "form-data; name=\"photo\"; filename=\"" + file.name + "\"");
part.setHeader("Content-Type", "image/jpeg");
part.setFile(file);
contentParts.push(part);
// Create a new upload operation specifying a boundary string.
uploader.createUploadAsync(uri, contentParts,
"form-data", "-----------------------------7d44e178b0434")
.then(function (uploadOperation) {
// Start the upload and persist the promise
upload = uploadOperation;
promise = uploadOperation.startAsync().then(complete, error, progress);
}
);
The resulting request will look like this, very similar to what’s shown on the Flickr page (just with some extra headers):
POST /website/multipartupload.aspx HTTP/1.1
Cache-Control=no-cache
Connection=Keep-Alive
Content-Length=1328
Content-Type=multipart/form-data; boundary="-----------------------------7d44e178b0434"
Accept=*/*
Accept-Encoding=gzip, deflate
Host=localhost:60355
User-Agent=Mozilla/5.0 (compatible; MSIE 10.0; Windows NT 6.2; Win64; x64; Trident/6.0; Touch)
UA-CPU=AMD64
-------------------------------7d44e178b0434
Content-Disposition: form-data; name="api_key"
3632623532453245
-------------------------------7d44e178b0434
Content-Disposition: form-data; name="auth_token"
436436545
-------------------------------7d44e178b0434
Content-Disposition: form-data; name="api_sig"
43732850932746573245
-------------------------------7d44e178b0434
Content-Disposition: form-data; name="photo"; filename="tinysquare.jpg"
Content-Type: image/jpeg
{RAW JFIF DATA}
-------------------------------7d44e178b0434--
To run the sample and also see how this request is received, you’ll need two things. First, set up your localhost server as described in “Sidebar: Using the Localhost” in Chapter 4. Then install Visual Studio Express for Web (which is free) through the Web Platform Installer. Now go to the MultipartUpload-Server folder in appendices’ companion content, load website.sln into Visual Studio Express for Web, open MultipartUploadServer.aspx, and set a breakpoint on the first if statement inside the Page_Load method. Start the site in the debugger (which runs it in Internet Explorer), which opens that page on a localhost debugging port (and click Continue in Visual Studio when you hit the breakpoint). Copy that page’s URI from Internet Explorer for the next step.
Switch to the MultipartUpload example running in Visual Studio for Windows, paste that URI into the URI field, and click the Start Multipart Transfer. When the upload operation’s startAsync is called, you should hit the server page breakpoint in Visual Studio for Web. You can step through that code if you want and examine the Request object; in the end, the code will copy the request into a file named multipart-request.txt on that server. This will contain the request contents as above, where you can see the relationship between how you set up the parts in the client and how they’re received by the server.
Notes on Encryption, Decryption, Data Protection, and Certificates
The documentation on the Windows Developer Center along with APIs in the Windows.Security namespace are helpful to know about where protecting user credentials and other data is concerned. One key resource is the How to secure connections and authenticate requests topic; another is the Banking with strong authentication sample, which demonstrates secure authentication and communication over the Internet. A full writeup on this sample is found on Tailored banking app code walkthrough.
As for WinRT APIs, first is Windows.Security.Cryptography. Here you’ll find the CryptographicBuffer class that can encode and decode strings in hexadecimal and base64 (UTF-8 or UTF-16) and also provide random numbers and a byte array full of such randomness. Refer to scenario 1 of the CryptoWinRT sample for some demonstrations, as well as scenarios 2 and 3 of the Web authentication broker sample. WinRT’s base64 encoding is fully compatible with the JavaScript atob and btoa functions.
Next is Windows.Security.Cryptography.Core, which is truly about encryption and decryption according to various algorithms. See the Encryption topic, scenarios 2–8 of the CryptoWinRT sample, and again scenarios 2 and 3 of the Web authentication broker sample.
Third is Windows.Security.Cryptography.DataProtection, whose single class, DataProtectionProvider, deals with protecting and unprotecting both static data and a data stream. This applies only to apps that declare the Enterprise Authentication capability. For details, refer to Data protection API along with scenarios 9 and 10 of the CryptoWinRT sample.
Fourth, Windows.Security.Cryptography.Certificates provides several classes through which you can create certificate requests and install certificate responses. Refer to Working with certificates and the Certificate enrollment sample for more.
Fifth, some of the early W3C cryptography APIs have made their way into the app host, accessed through the window.msCrypto object.
And lastly it’s worth at least listing the API under Windows.Security.ExchangeActiveSync-Provisioning for which there is the EAS policies for mail clients sample. I’m assuming that if you know why you’d want to look into this, well, you’ll know!
Syndication: RSS, AtomPub, and XML APIs in WinRT
When we first looked at doing HTTP requests in Chapter 4, we grabbed the RSS feed from the Windows Developer Blog with the URI http://blogs.msdn.com/b/windowsappdev/rss.aspx. We learned then that WinJS.xhr returned a promise, the result of which contained a responseXMLproperty, which is itself a DomParser through which you can traverse the DOM structure and so forth.
Working with syndicated feeds by using straight HTTP requests is completely supported for Windows Store apps. In fact, the How to create a mashup topic in the documentation describes exactly this process, components of which are demonstrated in the Integrating content and controls from web services sample.
That said, WinRT offers additional APIs for dealing with syndicated content in a more structured manner, which could be better suited for some programming languages. One, Windows.Web.-Syndication, offers a more structured way to work with RSS feeds. The other,Windows.Web.AtomPub, provides a means to publish and manage feed entries.
There is also an API for dealing with XML in Windows.Data.Xml.Dom (see the Windows Runtime XML data API sample), but this API is somewhat redundant with the built-in XML/DOM APIs present in JavaScript.
Reading RSS Feeds
The primary class within Windows.Web.Syndication is the SyndicationClient. To work with any given feed, you create an instance of this class and set any necessary properties. These are serverCredential (a PasswordCredential), proxyCredential (another PasswordCredential), timeout (in milliseconds; default is 30000 or 30 seconds), maxResponseBufferSize (a means to protect from potentially malicious servers), and bypassCacheOnRetrieve (a Boolean to indicate whether to always obtain new data from the server). You can also make as many calls to its setRequestHeadermethod (passing a name and value) to configure the HTTP request header.
The final step is to then call the SyndicationClient.retrieveFeedAsync method with the URI of the desired RSS feed (a Windows.Foundation.Uri). Here’s an example derived from the Syndication sample, which retrieves the RSS feed for the Building Windows 8 blog:
uri = new Windows.Foundation.Uri("http://blogs.msdn.com/b/b8/rss.aspx");
var client = new Windows.Web.Syndication.SyndicationClient();
client.bypassCacheOnRetrieve = true;
client.setRequestHeader("User-Agent",
"Mozilla/5.0 (compatible; MSIE 10.0; Windows NT 6.2; WOW64; Trident/6.0)");
client.retrieveFeedAsync(uri).done(function (feed) {
// feed is a SyndicationFeed object
}
The result of retrieveFeedAsync is a Windows.Web.Syndication.SyndicationFeed object; that is, the SyndicationClient is what you use to talk to the service, and when you retrieve the feed you get an object though which you can then process the feed itself. If you take a look atSyndication-Feed by using the link above, you’ll see that it’s wholly stocked with properties that represent all the parts of the feed, such as authors, categories, items, title, and so forth. Some of these are represented themselves by other classes in Windows.Web.Syndication, or collections of them, where simpler types aren’t sufficient: SyndicationAttribute, SyndicationCategory, SyndicationContent, SyndicationGenerator,SyndicationItem, SyndicationLink, SyndicationNode, SyndicationPerson, and SyndicationText. I’ll leave the many details to the documentation.
We can see some of this in the sample, picking up from inside the completed handler for retrieveFeedAsync. Let me offer a more annotated version of that code:
client.retrieveFeedAsync(uri).done(function (feed) {
currentFeed = feed;
var title = "(no title)";
// currentFeed.title is a SyndicationText object
if (currentFeed.title) {
title = currentFeed.title.text;
}
// currentFeed.items is a SyndicationItem collection (array)
currentItemIndex = 0;
if (currentFeed.items.size > 0) {
displayCurrentItem();
}
}
// ...
function displayCurrentItem() {
// item will be a SyndicationItem
var item = currentFeed.items[currentItemIndex];
// Display item number.
document.getElementById("scenario1Index").innerText = (currentItemIndex + 1) + " of "
+ currentFeed.items.size;
// Display title (item.title is another SyndicationText).
var title = "(no title)";
if (item.title) {
title = item.title.text;
}
document.getElementById("scenario1ItemTitle").innerText = title;
// Display the main link (item.links is a collection of SyndicationLink objects).
var link = "";
if (item.links.size > 0) {
link = item.links[0].uri.absoluteUri;
}
var scenario1Link = document.getElementById("scenario1Link");
scenario1Link.innerText = link;
scenario1Link.href = link;
// Display the body as HTML (item.content is a SyndicationContent object, item.summary is
// a SyndicationText object).
var content = "(no content)";
if (item.content) {
content = item.content.text;
}
else if (item.summary) {
content = item.summary.text;
}
document.getElementById("scenario1WebView").innerHTML = window.toStaticHTML(content);
// Display element extensions. The elementExtensions collection contains all the additional
// child elements withinthe current element that do not belong to the Atom or RSS standards
// (e.g., Dublin Core extension elements). By creating an array of these, we can create a
// WinJS.Binding.List that's easily displayed in a ListView.
var bindableNodes = [];
for (var i = 0; i < item.elementExtensions.size; i++) {
var bindableNode = {
nodeName: item.elementExtensions[i].nodeName,
nodeNamespace: item.elementExtensions[i].nodeNamespace,
nodeValue: item.elementExtensions[i].nodeValue,
};
bindableNodes.push(bindableNode);
}
var dataList = new WinJS.Binding.List(bindableNodes);
var listView = document.getElementById("extensionsListView").winControl;
WinJS.UI.setOptions(listView, {itemDataSource: dataList.dataSource});
}
It’s probably obvious that the API, under the covers, is probably just using the XmlDocument API to retrieve all these properties. In fact, its getXmlDocument returns that XmlDocument if you want to access it yourself.
You can also create a SyndicationFeed object around the XML for a feed you might already have. For example, if you obtain the feed contents by using WinJS.xhr, you can create a new Syndication-Feed object and call its load method with the request’s responseXML. Then you can work with the feed through the class hierarchy. When using the Windows.Web.AtomPub API to manage a feed, you also create a new or updated SyndicationItem to send across the wire, settings its values through the other objects in its hierarchy. We’ll see this in the next section.
If retrieveFeedAsync throws an exception, by the way, which would be picked up by an error handler you provide to the promise’s done method, you can turn the error code into a SyndicationErrorStatus value. Here’s how it’s used in the sample’s error handler:
function onError(err) {
// Match error number with a SyndicationErrorStatus value. Use
// Windows.Web.WebErrorStatus.getStatus() to retrieve HTTP error status codes.
var errorStatus = Windows.Web.Syndication.SyndicationError.getStatus(err.number);
if (errorStatus === Windows.Web.Syndication.SyndicationErrorStatus.invalidXml) {
displayLog("An invalid XML exception was thrown. Please make sure to use a URI that"
+ "points to a RSS or Atom feed.");
}
}
As a final note, the Feed reader sample in the SDK provides another demonstration of the Windows.Web.Syndication API. Its operation is fully described on the Feed reader sample page in the documentation.
Using AtomPub
On the flip side of reading an RSS feed, as we’ve just seen, is the need to possibly add, remove, and edit entries on a feed, as with an app that lets the user actively manage a specific blog or site.
The API for this is found in Windows.Web.AtomPub and demonstrated in the AtomPub sample. The main class is the AtomPubClient that encapsulates all the operations of the AtomPub protocol. It has methods like createResourceAsync, retrieveResourceAsync, updateResourceAsync, anddeleteResourceAsync for working with those entries, where each resource is identified with a URI and a SyndicationItem object, as appropriate. Media resources for entries are managed through createMediaResourceAsync and similarly named methods, where the resource is provided as anIInputStream.
The AtomPubClient also has retrieveFeedAsync and setRequestHeader methods that do the same as the SyndicationClient methods of the same names, along with a few similar properties like serverCredential, timeout, and bypassCacheOnRetrieve. Another method, retrieveService-DocumentAsync, provides the workspaces/service documents for the feed (in the form of a Windows.Web.AtomPub.ServiceDocument object).
Again, the AtomPub sample demonstrates the different operations: retrieve (Scenario 1), create (Scenario 2), delete (Scenario 3), and update (Scenario 4). Here’s how it first creates the AtomPubClient object (see js/common.js), assuming there are credentials:
function createClient() {
client = new Windows.Web.AtomPub.AtomPubClient();
client.bypassCacheOnRetrieve = true;
var credential = new Windows.Security.Credentials.PasswordCredential();
credential.userName = document.getElementById("userNameField").value;
credential.password = document.getElementById("passwordField").value;
client.serverCredential = credential;
}
Updating an entry (js/update.js) then looks like this, where the update is represented by a newly created SyndicationItem:
function getCurrentItem() {
if (currentFeed) {
return currentFeed.items[currentItemIndex];
}
return null;
}
var resourceUri = new Windows.Foundation.Uri(/* service address */ );
createClient();
var currentItem = getCurrentItem();
if (!currentItem) {
return;
}
// Update the item
var updatedItem = new Windows.Web.Syndication.SyndicationItem();
var title = document.getElementById("titleField").value;
updatedItem.title = new Windows.Web.Syndication.SyndicationText(title,
Windows.Web.Syndication.SyndicationTextType.text);
var content = document.getElementById("bodyField").value;
updatedItem.content = new Windows.Web.Syndication.SyndicationContent(content,
Windows.Web.Syndication.SyndicationTextType.html);
client.updateResourceAsync(currentItem.editUri, updatedItem).done(function () {
displayStatus("Updating item completed.");
}, onError);
Error handling in this case works with the Window.Web.WebError class (see js/common.js):
function onError(err) {
displayError(err);
// Match error number with a WebErrorStatus value, in order to dealwith a specific error.
var errorStatus = Windows.Web.WebError.getStatus(err.number);
if (errorStatus === Windows.Web.WebErrorStatus.unauthorized) {
displayLog("Wrong username or password!");
}
}
Sockets
Sockets are a fundamental transport for networking and devices. Unlike HTTP requests, where a client sends a request to a server and the server responds—essentially an isolated transaction—sockets are a connection between client and server IP ports such that either one can send information to the other at any time. A similar mechanism can be found in the Windows Push Notification Service (WNS, see Chapter 16, “Alive with Activity”), but WNS is limited to notifications and is specifically designed to issue tile updates or notifications for apps that aren’t running. Sockets, on the other hand, are for ongoing data exchange between a server (or a device acting as one)and a running client.
Sockets are generally used when there isn’t a higher-level API or other abstraction for your particular scenario, when there’s a custom protocol involved, when you need two-way communication, or when it makes sense to minimize the overhead of each exchange. Consider HTTP, a protocol that is itself built on lower-level sockets. A single HTTP request generally includes headers and lots of other information beyond just the bit of data involved, so it’s an inefficient transport when you need to send lots of little bits. It’s better to connect directly with the server and exchange data with a minimized custom protocol. VoIP is another example where sockets work well, as are multicast scenarios like multiplayer games. In the latter, one player’s machine, acting as a server within a local subnet, can broadcast a message to all the other players, and vice versa, again with minimal overhead.
In the world of sockets, exchanging data can happen in two ways: as discrete packets/messages (like water balloons) or as a continuous stream (like water running through a hose). These are called datagram sockets and stream sockets, respectively, and both are supported through the WinRT API. WinRT also supports both forms of exchange through the WebSocket protocol, a technology originally created for web browsers and web servers that has become increasingly interesting for general purpose use within apps. All of the applicable classes can be found in theWindows.Networking.Sockets API (or occasionally in the parent Windows.Networking namespace), as we’ll see in the following sections. Note that because some overlap between the different types of sockets exists, these sections are meant to be read in sequence so that I don’t have to repeat myself too much!
Suspend and resume with sockets As a general note, always close an open socket when your app is suspended, and reopen it when the app is resumed.
Datagram Sockets
In the language of sockets, a water balloon is called a datagram, a bundle of information sent from one end of the socket to the other—even without a prior connection—according to the User Datagram Protocol (UDP) standard. UDP, as I summarize here from its description on Wikipedia, is simple, stateless, unidirectional, and transaction-oriented. It has minimal overhead and lacks retransmission delays, and for these reasons it cannot guarantee that a datagram will actually be delivered. Thus, it’s used where error checking and correction aren’t necessary or where they are done by the apps involved rather than at the network interface level. In a VoIP scenario, for example, this allows data packets to just be dropped if they cannot be delivered, rather than having everything involved wait for a delayed packet. As a result, the quality of the audio might suffer, but it won’t start stuttering or make your friends and colleagues sound like they’re from another galaxy. In short, UDP might be unreliable, but it minimizes latency. Higher-level protocols like the Real-time Transport Protocol (RTP) and the Real Time Streaming Protocol (RTSP) are built on UDP.
A Windows Store app works with this transport—either as a client or a server—using the DatagramSocket class, which you instantiate with the new operator to set up a specific connection and listen for messages:
var listener = new Windows.Networking.Sockets.DatagramSocket();
On either side of the conversation, the next step is to listen for the object’s messagereceived event:
// Event from WinRT: remember to call removeEventListener as needed
listener.addEventListener("messagereceived", onMessageReceived);
When data arrives, the handler receives a—wait for it!—DatagramSocketMessageReceived-ventArgs object (that’s a mouthful). This contains localAddress and remoteAddress properties, both of which are a Windows.Networking.HostName object that contains the IP address, a display name, and a few other bits. See the “Network Information (the Network Object Roster)” section early in Chapter 4 for details. The event args also contains a remotePort string. More importantly, though, are the two methods from which you extract the data. One is getDataStream, which returns anIInputStream through which you can read sequential bytes. The other is getDataReader, which returns a Windows.Storage.Streams.DataReader object. As discussed in Chapter 10, “The Story of State, Part 1” in the section “Folders, Files, and Streams,” this is a higher-level abstraction built on top of the IInputStream that helps you read specific data types directly. Clearly, if you know the data structure you expect to receive in the message, using the DataReader will relieve you from doing type conversions yourself.
Of course, to get any kind of data from a socket, you need to connect it to something. For this purpose DatagramSocket includes a few methods for establishing and managing a connection:
• connectAsync Starts a connection operation given a HostName object and a service name (or UDP port, a string) of the remote network destination. This is used to create a one-way client to server connection.
• Another form of connectAsync takes a Windows.Networking.EndpointPair object that specifies host and service names for both local and remote endpoints. This is used to create a two-way client/server connection, as the local endpoint implies a call to bindEndpointAsync as below.
• bindEndpointAsync For a one-way server connection—that is, to only listen to but not send data on the socket—this method just binds a local endpoint given a HostName and a service name/port. Binding the service name by itself can be done with bindServiceNameAsync.
• joinMulticastGroup Given a HostName, connects the Datagram socket to a multicast group.
• close Terminates the connection and aborts any pending operations.
Tip To open a socket to a localhost port for debugging purposes, use connectAsyncas follows:
var socket = new Windows.Networking.Sockets.DatagramSocket();
socket.connectAsync(new Windows.Networking.Sockets.DatagramSocket("localhost",
"12345", Windows.Networking.Sockets.SocketProtectionLevel.plainSocket)
.done(function () {
// ...
}, onError);
Note that any given socket can be connected to any number of endpoints—you can call connect-Async multiple times, join multiple multicast groups, and bind multiple local endpoints with bindEnd-pointAsync and bindServiceNameAsync. The close method, mind you, closes everything at once!
Once the socket has one or more connections, connection information can be retrieved with the DatagramSocket.information property (a DatagramSocketInformation). Also, note that the static DatagramSocket.getEndpointPairsAsync method provides (as the async result) a vector of available EndpointPair objects for a given remote hostname and service name. You can optionally indicate that you’d like the endpoints sorted according to the optimizeForLongConnections flag. See the documentation page linked here for details, but it basically lets you control which endpoint is preferred over others based on whether you want to optimize for a high-quality and long-duration connection that might take longer to connect to initially (as for video streaming) or for connections that are easiest to acquire (the default).
Control data can also be set through the DatagramSocket.control property, a Datagram-SocketControl object with qualityOfService and outputUnicastHopLimit properties.
All this work, of course, is just a preamble to sending data on the socket connection. This is done through the DatagramSocket.outputStream property, an IOutputStream to which you can write whatever data you need using its writeAsync and flushAsync methods. This will send the data on every connection within the socket. Alternately, you can use one of the variations of getOutputStreamAsync to specify a specific EndpointPair or HostName/port to which to send the data. The result of both of these async operations is again an IOutputStream. And in all cases you can create a higher-level DataWriter object (see Chapter 10) around that stream:
var dataWriter = new Windows.Storage.Streams.DataWriter(socket.outputStream)
Here’s how it’s all demonstrated in the DatagramSocket sample, a little app in which you need to run each of the scenarios in turn. Scenario 1, for starters, sets up the server-side listener of the relationship on the localhost, using port number 22112 (the service name) by default. To do this, it creates the sockets, adds the listener, and calls bindServiceNameAsync (js/startListener.js):
socketsSample.listener = new Windows.Networking.Sockets.DatagramSocket();
// Reminder: call removeEventListener as needed; this can be common with socket relationships
// that can come and go through the lifetime of the app.
socketsSample.listener.addEventListener("messagereceived", onServerMessageReceived);
socketsSample.listener.bindServiceNameAsync(serviceName).done(function () {
// ...
}, onError);
When a message is received, this server-side component takes the contents of the message and writes it to the socket’s output stream so that it’s reflected in the client side. This looks a little confusing in the code, so I’ll show the core path of this process with added comments:
function onServerMessageReceived(eventArgument) {
// [Code here checks if we already got an output stream]
socketsSample.listener.getOutputStreamAsync(eventArgument.remoteAddress,
eventArgument.remotePort).done(function (outputStream) {
// [Save the output stream with some other info, omitted]
socketsSample.listenerOutputStream = outputStream;
}
// This is a helper function
echoMessage(socketsSample.listenerOutputStream, eventArgument);
});
}
// eventArgument here is a DatagramSocketMessageReceivedEventArgs with a getDataReader method function
echoMessage(outputStream, eventArgument) {
// [Some display code omitted]
// Get the message stream from the DataReader and send it to the output stream
outputStream.writeAsync(eventArgument.getDataReader().detachBuffer()).done(function () {
// Do nothing - client will print out a message when data is received.
});
}
In most apps using sockets, the server side would do something more creative with the data than just send it back to the client! But this just changes what you do with the data in the input stream.
Scenario 2 sets up a listener to the localhost on the same port. On this side we also create a DatagramSocket and set up a listener for messagereceived. Those messages—such as the one written to the output stream on the server side, as we’ve just seen—are picked up in the event handler below (js/connectToListener.js), which uses the DataReader to extract and display the message:
function onMessageReceived(eventArgument) {
try {
var messageLength = eventArgument.getDataReader().unconsumedBufferLength;
var message = eventArgument.getDataReader().readString(messageLength);
socketsSample.displayStatus("Client: receive message from server \"" + message + "\"");
} catch (exception) {
status = Windows.Networking.Sockets.SocketError.getStatus(exception.number);
// [Display error details]
}
}
Note that when an error occurs on a socket connection, you can pass the error number to the getStatus method of the SocketError object and get back a more actionable SocketErrorStatus value. There are many possible errors here, so see its reference page for details.
Even with all the work we’ve done so far, nothing has yet happened because we’ve sent no data! So switching to scenario 3, pressing its Send ‘Hello’ Now button does the honors from the client side (js/sendData.js):
// [This comes after a check on the socket's validity]
socketsSample.clientDataWriter =
new Windows.Storage.Streams.DataWriter(socketsSample.clientSocket.outputStream);
var string = "Hello World";
socketsSample.clientDataWriter.writeString(string);
socketsSample.clientDataWriter.storeAsync().done(function () {
socketsSample.displayStatus("Client sent: " + string + ".");
}, onError);
The DataWriter.storeAsync call is what actually writes the data to the stream in the socket. If you set a breakpoint here and on both messagereceived event handlers, you’ll then see that storeAsync generates a message to the server side, hitting onServerMessageReceived in js/startListener.js. This will then write the message back to the socket, which will hit onMessageReceived in js/connectToListener.js, which displays the message. (And to complete the process, scenario 4 gives you a button to call the socket’s close method.)
The sample does everything with the same app on localhost to make it easier to see how the process works. Typically, the server will be running on another machine entirely, but the steps of setting up a listener apply just the same. As noted in Chapter 4, localhost connections work only on a machine with a developer license and will not work for apps acquired through the Windows Store.
Stream Sockets
In contrast to datagram sockets, streaming data over sockets uses the Transmission Control Protocol (TCP). The hallmark of TCP is accurate and reliable delivery—it guarantees that the bytes received are the same as the bytes that were sent: when a packet is sent across the network, TCP will attempt to retransmit the packet if there are problems along the way. This is why it’s part of TCP/IP, which gives us the World Wide Web, email, file transfers, and lots more. HTTP, SMTP, and the Session Initiation Protocol (SIP) are also built on TCP. In all cases, clients and servers just see a nice reliable stream of data flowing from one end to the other.
Unlike datagram sockets, for which we have a single class in WinRT for both sides of the relationship, stream sockets are more distinctive to match the unique needs of the client and server roles. On the client side is Windows.Networking.Sockets.StreamSocket; on the server it’sStreamSocketListener.
Starting with the latter, the StreamSocketListener object looks quite similar to the DatagramSocket we’ve just covered, with these methods, properties, and events:
• information Provides a StreamSocketListenerInformation object containing a localPort string.
• control Provides a StreamSocketListenerControl object with a qualityOfService property.
• connectionreceived A WinRT event that’s fired when a connection is made to the listener. Its event arguments are a StreamSocketListenerConnectionReceivedEventArgs that contains a single property, socket. This is the StreamSocket for the client, in which is an outputStream property where the listener can obtain the data stream.
• bindEndpointAsync and bindServiceNameAsync Binds the listener to a HostName and service name, or binds just a service name.
• close Terminates connections and aborts pending operations.
On the client side, StreamSocket again looks like parts of the DatagramSocket. In addition to the control (StreamSocketControl) and information properties (StreamSocketInformation) and the ubiquitous close method, we find a few other usual suspects and one unusual one:
• connectAsync Connects to a HostName/service name or to an EndpointPair. In each case you can also provide an optional SocketProtectionLevel object that can be plainSocket, ssl, or sslAllowNullEncryption. There are, in other words, four variations of this method.
• inputStream The IInputStream that’s being received over the connection.
• outputStream The IOutputStream into which data is written.
• upgradeToSslAsync Upgrades a plainSocket connection (created through connectAsync) to use SSL as specified by either SocketProtectionLevel.ssl or sslAllowNullEncryption. This method also required a HostName that validates the connection.
For more details on using SSL, see How to secure socket connections with TLS/SSL.
In any case, you can see that for one-way communications over TCP, an app creates either a StreamSocket or a StreamSocketListener, depending on its role. For two-way communications an app will create both.
The StreamSocket sample, like the DatagramSocket sample, has four scenarios that are meant to be run in sequence on the localhost: first to create a listener (to receive a message from a client, scenario 1), then to create the StreamSocket (scenario 2) and send a message (scenario 3), and then to close the socket (scenario 4). With streamed data, the app implements a custom protocol for how the data should appear, as we’ll see. Also note that scenario 5 demonstrates evaluating certificate validity and displaying certificate properties, which you’d need to do when making connections over SSL.
Starting in scenario 1 (js/startListener.js), here’s how we create the listener and event handler. Processing the incoming stream data is trickier than with a datagram because we need to make sure the data we need is all there. This code shows a good pattern of waiting for one async operation to finish before the function calls itself recursively. Also note how it creates a DataReader on the input stream for convenience:
socketsSample.listener = new Windows.Networking.Sockets.StreamSocketListener(serviceName);
// Match with removeEventListener as needed
socketsSample.listener.addEventListener("connectionreceived", onServerAccept);
socketsSample.listener.bindServiceNameAsync(serviceName).done(function () {
// ...
}, onError);
}
// This has to be a real function; it will "loop" back on itself with the call to
// acceptAsync at the very end.
function onServerAccept(eventArgument) {
socketsSample.serverSocket = eventArgument.socket;
socketsSample.serverReader =
new Windows.Storage.Streams.DataReader(socketsSample.serverSocket.inputStream);
startServerRead();
}
// The protocol here is simple: a four-byte 'network byte order' (big-endian) integerthat
// says how long a string is, and then a string that is that long.We wait for exactly 4 bytes,
// read in the count value, and then wait forcount bytes, and then display them.
function startServerRead() {
socketsSample.serverReader.loadAsync(4).done(function (sizeBytesRead) {
// Make sure 4 bytes were read.
if (sizeBytesRead !== 4) {/* [Show message] */ }
// Read in the 4 bytes count and then read in that many bytes.
var count = socketsSample.serverReader.readInt32();
return socketsSample.serverReader.loadAsync(count).then(function (stringBytesRead) {
// Make sure the whole string was read.
if (stringBytesRead !== count) {/* [Show message] */ }
// Read in the string.
var string = socketsSample.serverReader.readString(count);
socketsSample.displayOutput("Server read: " + string);
// Restart the read for more bytes. We could just call startServerRead() but in
// the case subsequent read operations complete synchronously we start building
// up the stack and potentially crash. We use WinJS.Promise.timeout() to invoke
// this function after the stack for current call unwinds.
WinJS.Promise.timeout().done(function () { return startServerRead(); });
}); // End of "read in rest of string" function.
}, onError);
}
This code is structured to wait for incoming data that isn’t ready yet, but you might have situations in which you want to know if there’s more data available that you haven’t read. This value can be obtained through the DataReader.unconsumedBufferLength property.
In scenario 2, the data-sending side of the relationship is simple: create a StreamSocket and call connectAsync (js/connectToListener.js; note that onError uses StreamSocketError.-getStatus again):
socketsSample.clientSocket = new Windows.Networking.Sockets.StreamSocket();
socketsSample.clientSocket.connectAsync(hostName, serviceName).done(function () {
// ...
}, onError);
Sending data in scenario 3 takes advantage of a DataWriter built on the socket’s output stream (js/sendData.js):
var writer = new Windows.Storage.Streams.DataWriter(socketsSample.clientSocket.outputStream);
var string = "Hello World";
var len = writer.measureString(string); // Gets the UTF-8 string length.
writer.writeInt32(len);
writer.writeString(string);
writer.storeAsync().done(function () {
writer.detachStream();
}, onError);
And closing the socket in scenario 4 is again just a call to StreamSocket.close.
As with the DatagramSocket sample, setting breakpoints within openClient (js/connectTo-Listener.js), onServerAccept (js/startListener.js), and sendHello (js/sendData.js) will let you see what’s happening at each step of the process.
Web Sockets: MessageWebSocket and StreamWebSocket
Having now seen both Datagram and Stream sockets in action, we can look at their equivalents on the WebSocket side. As you might already know, WebSockets is a standard created to use HTTP (and thus TCP) to set up an initial connection after which the data exchange happens through sockets over TCP. This provides the simplicity of using HTTP requests for the first stages of communication and the efficiency of sockets afterwards.
As with regular sockets, the WebSocket side of WinRT supports both water balloons and water hoses: the MessageWebSocket class provides for discrete packets as with datagram sockets (though it uses TCP and not UDP), and StreamWebSocket clearly provides for stream sockets. Both classes are similar to their respective DatagramSocket and StreamSocket counterparts, so much so that their interfaces are very much the same (with distinct secondary types like MessageWebSocketControl):
• Like DatagramSocket, MessageWebSocket has control, information, and outputStream properties, a messagereceived event, and methods of connectAsync and close. It adds a closed event along with a setRequestHeader method.
• Like StreamSocket, StreamWebSocket has control, information, inputStream, and outputStream properties, and methods of connectAsync and close. It adds a closed event and a setRequestHeader method.
Notice that there isn’t an equivalent to StreamSocketListener here. This is because the process of establishing that connection is handled through HTTP requests, so such a distinct listener class isn’t necessary. This is also why we have setRequestHeader methods on the classes above: so that you can configure those HTTP requests. Along these same lines, you’ll find that the connectAsync methods take a Windows.Foundation.Uri rather than hostnames and service names. But otherwise we see the same kind of activity going on once the connection is established, with streams,DataReader, and DataWriter.
Sidebar: Comparing W3C and WinRT APIs for WebSockets
Standard WebSockets, as they’re defined in the W3C API, are entirely supported for Windows Store apps. However, they support only a transaction-based UDP model like DatagramSocket and only text content. The MessageWebSocket in WinRT, however, supports both text and binary, plus you can use the StreamWebSocket for a streaming TCP model as well. The WinRT APIs also emit more detailed error information and so are generally preferred over the W3C API.
Let’s look more closely at these in the context of the Connecting with WebSockets sample. This sample is dependent upon an ASP.NET server page running in the localhost, so you must first go into its Server folder and run powershell.exe -ExecutionPolicy unrestricted -file setupserver.ps1from an Administrator command prompt. (For more on setting up Internet Information Services and the localhost, refer to the “Using the localhost” sidebar in the “Using Windows.Web.Http.HttpClient” section in Chapter 4.) If the script succeeds, you’ll see a WebSocketSample folder in c:\inetpub\wwwroot that contains an EchoWebService.ashx file. Also, as suggested in Chapters 4 and 16, you can run the Web platform installer to install Visual Studio Express for Web that will allow you to run the server page in a debugger. Always a handy capability!
Within EchoWebService.ashx you’ll find an EchoWebSocket class written in C#. It basically has one method, ProcessRequest, that handles the initial HTTP request from the web socket client. With this request it acquires the socket, writes an announcement message to the socket’s stream when the socket is opened, and then waits to receive other messages. If it receives a text message, it echoes that text back through the socket with “You said” prepended. If it receives a binary message, it echoes back a message indicating the amount of data received.
Going to scenario 1 of the Connecting with WebSockets sample, we can send a message to that server page by using MessageWebSocket and get back a message of our own as shown below. In this case the output in the sample reflects information known to the app and nothing from the service itself.
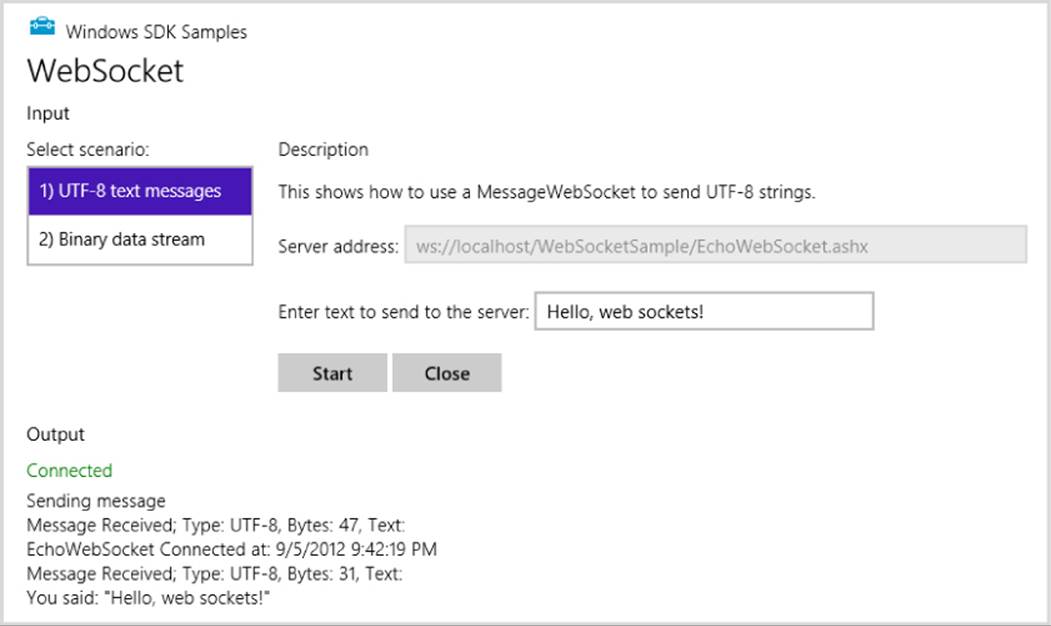
In the sample, we first create a MessageWebSocket, call its connectAsync, and then use a DataWriter to write some data to the socket. It also listens for the messagereceived event to output the result of the send, and it listens to the closed event from the server so that it can do the close from its end. The code here is simplified from js/scenario1.js:
var messageWebSocket;
var messageWriter;
var webSocket = new Windows.Networking.Sockets.MessageWebSocket();
webSocket.control.messageType = Windows.Networking.Sockets.SocketMessageType.utf8;
webSocket.onmessagereceived = onMessageReceived;
webSocket.onclosed = onClosed;
// The server URI is obtained and validated here, and stored in a variable named uri.
webSocket.connectAsync(uri).done(function () {
messageWebSocket = webSocket;
// The default DataWriter encoding is utf8.
messageWriter = new Windows.Storage.Streams.DataWriter(webSocket.outputStream);
sendMessage(); // Helper function, see below
}, function (error) {
var errorStatus = Windows.Networking.Sockets.WebSocketError.getStatus(error.number);
// [Output error message]
});
function onMessageReceived(args) {
var dataReader = args.getDataReader();
// [Output message contents]
}
function sendMessage() {
// Write message in the input field to the socket
messageWriter.writeString(document.getElementById("inputField").value);
messageWriter.storeAsync().done("", sendError);
}
function onClosed(args) {
// Close our socket if the server closes [simplified from actual sample; it also closes
// the DataWriter it might have opened.]
messageWebSocket.close();
}
Similar to what we saw in previous sections, when an error occurs you can turn the error number into a SocketErrorStatus value. In the case of WebSockets you do this with the getStatus method of Windows.Networking.Sockets.WebSocketError. Again, see its reference page for details.
Scenario 2, for its part, uses a StreamWebSocket to send a continuous stream of data packets, a process that will continue until you close the connection:
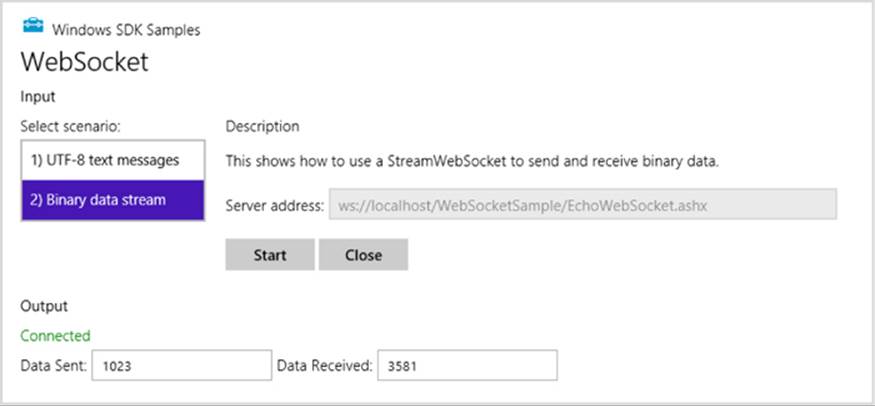
Here’s the process in code, simplified from js/scenario2.js, where we see a similar pattern to what we just saw for MessageWebSocket, only sending a continuous stream of data:
var streamWebSocket;
var dataWriter;
var dataReader;
var data = "Hello World";
var countOfDataSent;
var countOfDataReceived;
var webSocket = new Windows.Networking.Sockets.StreamWebSocket();
webSocket.onclosed = onClosed;
// The server URI is obtained and validated here, and stored in a variable named uri.
webSocket.connectAsync(uri).done(function () {
streamWebSocket = webSocket;
dataWriter = new Windows.Storage.Streams.DataWriter(webSocket.outputStream);
dataReader = new Windows.Storage.Streams.DataReader(webSocket.inputStream);
// When buffering, return as soon as any data is available.
dataReader.inputStreamOptions = Windows.Storage.Streams.InputStreamOptions.partial;
countOfDataSent = 0;
countOfDataReceived = 0;
// Continuously send data to the server
writeOutgoing();
// Continuously listen for a response
readIncoming();
}, function (error) {
var errorStatus = Windows.Networking.Sockets.WebSocketError.getStatus(error.number);
// [Output error message]
});
function writeOutgoing() {
try {
var size = dataWriter.measureString(data);
countOfDataSent += size;
}
dataWriter.writeString(data);
dataWriter.storeAsync().done(function () {
// Add a 1 second delay so the user can see what's going on.
setTimeout(writeOutgoing, 1000);
}, writeError);
}
catch (error) {
// [Output error message]
}
}
function readIncoming(args) {
// Buffer as much data as you require for your protocol.
dataReader.loadAsync(100).done(function (sizeBytesRead) {
countOfDataReceived += sizeBytesRead;
// [Output count]
var incomingBytes = new Array(sizeBytesRead);
dataReader.readBytes(incomingBytes);
// Do something with the data.Alternatively you can use DataReader to
// read out individual booleans,ints, strings, etc.
// Start another read.
readIncoming();
}, readError);
}
function onClosed(args) {
// [Other code omitted, including closure of DataReader and DataWriter]
streamWebSocket.close();
}
As with regular sockets, you can exercise additional controls with WebSockets, including setting credentials and indicating supported protocols through the control property of both MessageWebSocket and StreamWebSocket. For details, see How to use advanced WebSocket controlsin the documentation. Similarly, you can set up a secure/encrypted connection by using the wss:// URI scheme instead of ws:// as used in the sample. For more, see How to secure WebSocket connections with TLS/SSL.
The ControlChannelTrigger Background Task
In Chapter 16 in the “Lock Screen Dependent Tasks and Triggers” section, we took a brief look at the Windows.Networking.Sockets.ControlChannelTrigger class that can be used to set up a background task for real-time notifications as would be used by VoIP, IM, email, and other “always reachable” scenarios. To repeat, working with the control channel is not something that can be done from JavaScript, so refer to How to set background connectivity options in the documentation along with the following C#/C++ samples:
• ControlChannelTrigger StreamSocket sample
• ControlChannelTrigger XmlHttpRequest sample
• ControlChannelTrigger StreamWebSocket sample
• ControlChannelTrigger HTTP client sample
The Credential Picker UI
For enterprise scenarios where the Web Authentication Broker won’t suffice for authentication, WinRT provides a built-in, enterprise-ready UI for entering credentials: Windows.Security.Credentials.-UI.CredentialsPicker. When you instantiate this object and call its pickAsync method, as does the Credential Picker sample, you’ll see the UI shown below. This UI provides for domain logins, supports, and smart cards (I have two smart card readers on my machine, as you can see), and it allows for various options such as authentication protocols and automatic saving of the credential.

The result from pickAsync, as given to your completed handler, is a CredentialPickerResultsobject with the following properties (when you enter some credentials in the sample, you’ll see these values reflected in the sample’s output):
• credentialuserName A string containing the entered username.
• credentialPassword A string containing the password (typically encrypted depending on the authentication protocol option).
• credentialDomainName A string containing a domain if entered with the username (as in <domain>\<username>).
• credentialSaved A Boolean indicating whether the credential was saved automatically; this depends on picker options, as discussed below.
• credentialSavedOption A CredentialSavedOption value indicating the state of the Remember My Credentials check box: unselected, selected, or hidden.
• errorCode Contains zero if there is no error, otherwise an error code.
• credential An IBuffer containing the credential as an opaque byte array. This is what you can save in your own persistent state if need be and pass back to the picker at a later time. We’ll see how at the end of this section.
The three scenarios in the sample demonstrate the different options you can use to invoke the credential picker. For this there are three separate variants of pickAsync. The first variant accepts a target name (which is ignored) and a message string that appears in the place of “Please enter your credentials” shown in the previous screenshot:
Windows.Security.Credentials.UI.CredentialPicker.pickAsync(targetName, message)
.done(function (results) {
}
The second variant accepts the same arguments plus a caption string that appears in the place of “Credential Picker Sample” in the screenshot:
Windows.Security.Credentials.UI.CredentialPicker.pickAsync(targetName, message, caption)
.done(function (results) {
}
The third variant accepts a CredentialPickerOptions object that has properties for the same targetName, message, and caption strings, along with the following:
• previousCredential An IBuffer with the opaque credential information as provided by a previous invocation of the picker (see CredentialPickerResults.credential above).
• alwaysDisplayDialog A Boolean indicating whether the picker is displayed. The default is false, but this applies only if you also populate previousCredential (with an exception for domain-joined machines—see table below). The purpose here is to show the dialog when a stored credential might be incorrect and the user is expected to provide a new one.
• errorCode The numerical value of a Win32 error code (default is ERROR_SUCCESS) that will be formatted and displayed in the dialog box. You would use this when you obtain credentials from the picker initially but find that those credentials don’t work and need to invoke the picker again. Instead of providing your own message, you just choose an error code and let the system do the rest. The most common values for this are 1326 (login failure), 1330 (password expired), 2202 (bad username), 1907 or 1938 (password must change/password change required), 1351 (can’t access domain info), and 1355 (no such domain). There are, in fact, over 15,000 Win32 error codes, but that means you’ll have to search the reference linked above (or search within the winerror.h file typically found in your Program Files (x86)\Windows Kits\8.0\Include\sharedfolder). Happy hunting!
• callerSavesCredential A Boolean indicating that the app will save the credential and that the picker should not. The default value is false. When set to true, credentials are saved to a secure system location (not the credential locker) if the app has the Enterprise Authenticationcapability (see below).
• credentialSaveOption A CredentialSaveOption value indicating the initial state of the Remember My Credentials check box:unselected, selected, or hidden.
• authenticationProtocol A value from the AuthenticationProtocol enumeration: basic, digest, ntlm, kerberos, negotiate (the default), credSsp, and custom (in which case you must supply a string in the customAuthenticationProcotol property). Note that with basic and digest, theCredentialPickerResults.credentialPassword will not be encrypted and is subject to the same security needs as a plain text password you collect from your own UI.
Here’s an example of invoking the picker with an errorCode indicating a previous failed login:
var options = new Windows.Security.Credentials.UI.CredentialPickerOptions();
options.message = "Please enter your credentials";
options.caption = "Sample App";
options.targetName = "Target";
options.alwaysDisplayDialog = true;
options.errorCode = 1326; // Shows "The username or password is incorrect."
options.callerSavesCredential = true;
options.authenticationProtocol =
Windows.Security.Credentials.UI.AuthenticationProtocol.negotiate;
options.credentialSaveOption = Windows.Security.Credentials.UI.CredentialSaveOption.selected;
Windows.Security.Credentials.UI.CredentialPicker.pickAsync(options)
.done(function (results) {
}
To clarify the relationship between the callerSavesCredential, credentialSaveOption, and the credentialSaved properties, the following table lists the possibilities:
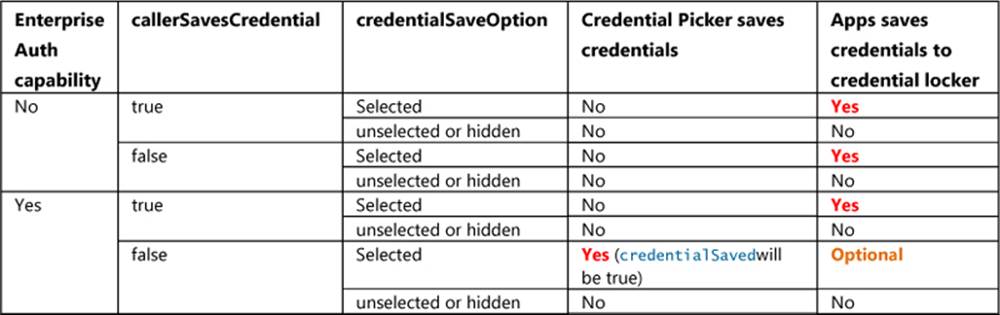
The first column refers to the Enterprise Authentication capability in the app’s manifest, which indicates that the app can work with Intranet resources that require domain credentials (and assumes that the app is also running on the Enterprise Edition of Windows). In such cases the credential picker has a separate secure location (apart from the credential locker) in which to store credentials, so the app need not save them itself. Furthermore, if the picker saves a credential and the app invokes the picker with alwaysDisplayDialog set to false, previousCredential can be empty because the credential will be loaded automatically. But without a domain-joined machine and this capability, the app must supply a previousCredential to avoid having the picker appear.
This brings us to the question about how, exactly, to persist a CredentialPickerResults.-credential and load it back into CredentialPickerOptions.previousCredential at another time. The credential is an IBuffer, and if you look at the IBuffer documentation you’ll see that it doesn’t in itself offer any useful methods for this purpose (in fact, you’ll really wonder just what the heck it’s good for!). Fortunately, other APIs understand buffers. To save a buffer’s content, pass it to the writeBufferAsync method in either Windows.Storage.FileIO or Windows.Storage.PathIO. To load it later, use the readBufferAsync methods of the FileIO and PathIO objects.
This is demonstrated in the modified Credential Picker sample in the appendices’ companion content. In js/scenario3.js we save credential within the completed handler for CredentiaPicker.-pickAsync:
//results.credential will be null if the user cancels
if (results.credential != null) {
//Having retrieved a credential, write the opaque buffer to a file
var option = Windows.Storage.CreationCollisionOption.replaceExisting;
Windows.Storage.ApplicationData.current.localFolder.createFileAsync("credbuffer.dat",
option).then(function (file) {
return Windows.Storage.FileIO.writeBufferAsync(file, results.credential);
}).done(function () {
//No results for this operation
console.log("credbuffer.dat written.");
}, function (e) {
console.log("Could not create credbuffer.dat file.");
});
}
I’m using the local appdata folder here; you could also use the roaming folder if you want the credential to roam (securely) to other devices as if it were saved in the Credential Locker.
To reload, we modify the launchCredPicker' function to accept a buffer and use that for previousCredential if given:
function launchCredPicker(prevCredBuffer) {
try {
var options = new Windows.Security.Credentials.UI.CredentialPickerOptions();
//Set the previous credential if provided
if (prevCredBuffer != null) {
options.previousCredential = prevCredBuffer;
}
We then point the click handler for button1 to a new function that looks for and loads the credbuffer.dat file and calls launchCredPicker accordingly:
function readPrevCredentialAndLaunch() {
Windows.Storage.ApplicationData.current.localFolder.getFileAsync("credbuffer.dat")
.then(function (file) {
return Windows.Storage.FileIO.readBufferAsync(file);
}).done(function (buffer) {
console.log("Read from credbuffer.dat");
launchCredPicker(buffer);
}, function (e) {
console.log("Could not reopen credbuffer.dat; launching default");
launchCredPicker(null);
});
}
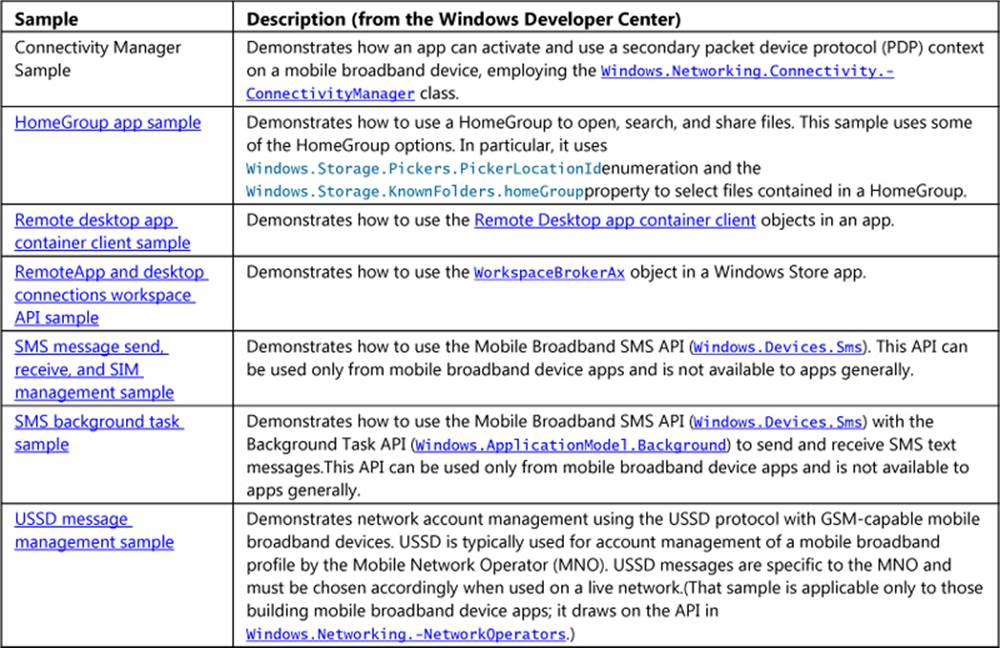
Other Networking SDK Samples