WINDOWS 10 TIPS AND TRICKS (2016)
10. Enjoying Music, Photos, and Videos
In This Chapter
![]() Setting up Windows Media Player for privacy
Setting up Windows Media Player for privacy
![]() Playing media and working with media libraries
Playing media and working with media libraries
![]() Importing photos and watching videos and DVDs
Importing photos and watching videos and DVDs
Windows 10 includes apps to help you enjoy music, photos, and videos on your computer—and share them with others. In this chapter, we’ll look at how to set up Windows Media Player without compromising your privacy, how you can put your existing music on your computer, and how to watch videos and DVDs. We’ll also explore the Groove Music app and the Groove music service.
Understanding Windows Media Player and Groove Music
Windows comes with two main apps that you can use for playing music:
![]() Windows Media Player. Windows Media Player is the main music tool for Windows. Windows Media Player enables you to rip songs from your CDs, organize your songs into a music library, and play back music or burn it to CD. Windows Media Player also enables you to organize and view your photos and your video files.
Windows Media Player. Windows Media Player is the main music tool for Windows. Windows Media Player enables you to rip songs from your CDs, organize your songs into a music library, and play back music or burn it to CD. Windows Media Player also enables you to organize and view your photos and your video files.
![]() Groove Music. Groove Music is an app that connects to Microsoft’s Groove online service. Groove Music can also play your music both from your computer and from your account on Microsoft’s OneDrive storage service.
Groove Music. Groove Music is an app that connects to Microsoft’s Groove online service. Groove Music can also play your music both from your computer and from your account on Microsoft’s OneDrive storage service.
We’ll look at Windows Media Player in detail and then quickly go over the key features of Groove Music.
Using Windows Media Player
Windows Media Player enables you to manage your music, photos, and videos in a single app. This section covers the most widely useful features of Windows Media Player and those that cause the most problems—starting with the configuration choices you must make before you can use Windows Media Player at all.
To get started, choose Start, All Apps, Windows Media Player to launch Windows Media Player.
Setting Up Windows Media Player to Protect Your Privacy
The first time you run Windows Media Player, you have to go through its setup routine. The Welcome to Windows Media Player screen appears (see Figure 10.1), offering you the choice between the Recommended Settings option button and the Custom Settings option button.
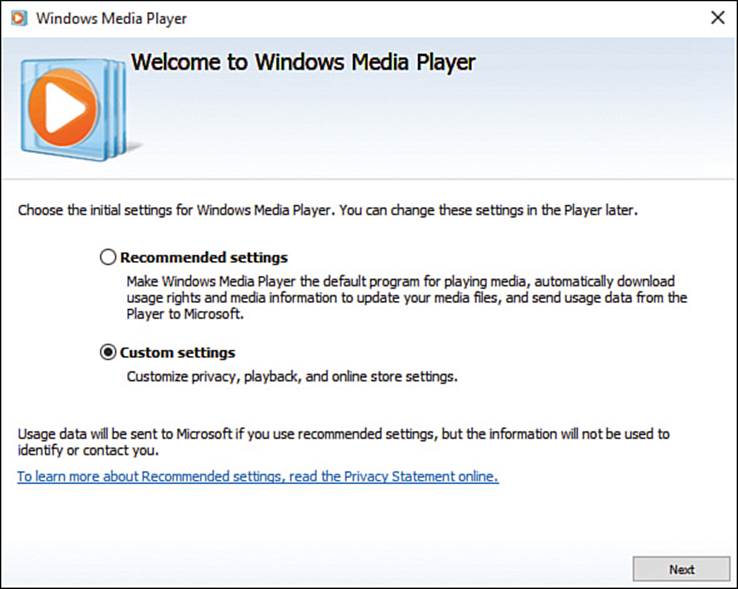
FIGURE 10.1 In the Welcome to Windows Media Player dialog box, select the Custom Settings option button if you want to reduce the amount of personally identifiable information you share with Microsoft and its business partners.
![]() Note
Note
If you have already set up Windows Media Player, you can change the privacy settings by choosing Organize, Options and then working on the Privacy tab in the Options dialog box.
If you select the Recommended Settings option button, you simply need to click the Finish button to finish setting up Windows Media Player. But usually you’ll do better to select the Custom Settings option button and click the Next button (the Next button replaces the Finish button when you select the Custom Settings option button) so that you can choose settings that suit you.
In the Select Privacy Options dialog box that appears (see Figure 10.2), you can configure the following settings:
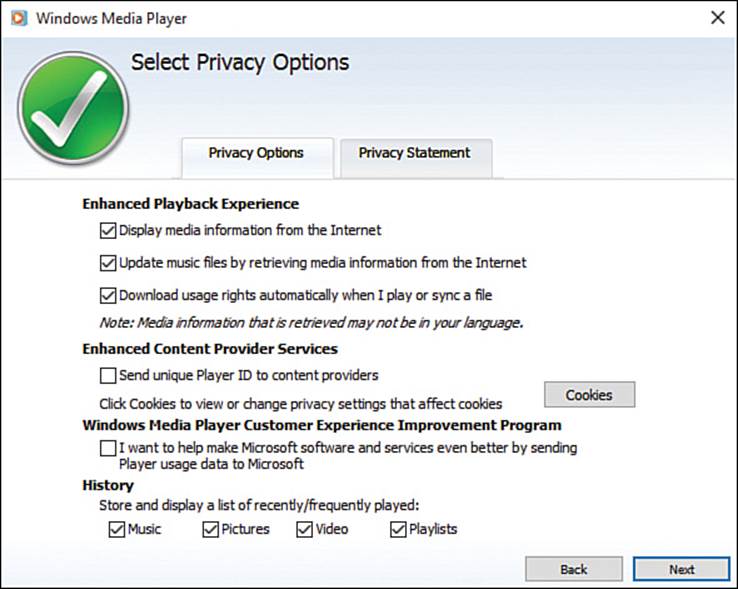
FIGURE 10.2 Choose settings on the Privacy Options tab of the Select Privacy Options dialog box. Click the Privacy Statement tab if you want to read the privacy statement.
![]() Display Media Information from the Internet. Uncheck this check box unless you want Windows Media Player to attempt to retrieve information from the Internet for every song you play and every video you watch. Retrieving this information gives Microsoft or its business partners not only the details of the media you play but also your identifying information.
Display Media Information from the Internet. Uncheck this check box unless you want Windows Media Player to attempt to retrieve information from the Internet for every song you play and every video you watch. Retrieving this information gives Microsoft or its business partners not only the details of the media you play but also your identifying information.
![]() Caution
Caution
If you check the Display Media Information from the Internet check box, Windows Media Player may display ads containing offers for the song or video you’re playing or for related items.
![]() Note
Note
If you want to read the privacy statements for Windows Media Player and for Microsoft’s WindowsMedia.com site (which provides Internet radio stations), click the Privacy Statement tab of the Select Privacy Options dialog box, and then click the upper View Statement button (for Windows Media Player) or the lower View Statement button (for WindowsMedia.com). You can also read the Windows Media Player privacy statement online by clicking the Read the Privacy Statement Online link on the Privacy tab of the Options dialog box for Windows Media Player.
![]() Update Music Files by Retrieving Media Information from the Internet. Check this check box if you want Windows Media Player to download tag information about music files you import (rip) from CD or add directly to your media library. This option is usually helpful, because otherwise you must type in the tag information for CDs manually.
Update Music Files by Retrieving Media Information from the Internet. Check this check box if you want Windows Media Player to download tag information about music files you import (rip) from CD or add directly to your media library. This option is usually helpful, because otherwise you must type in the tag information for CDs manually.
![]() Download Usage Rights Automatically When I Play or Sync a File. Check this check box if you want Windows Media Player to automatically download a usage rights license when you try to play a song or a video that has restricted usage permissions.
Download Usage Rights Automatically When I Play or Sync a File. Check this check box if you want Windows Media Player to automatically download a usage rights license when you try to play a song or a video that has restricted usage permissions.
![]() Tip
Tip
Uncheck the Download Usage Rights Automatically When I Play or Sync a File check box. Windows Media Player then prompts you to download usage rights when you try to play a file that needs them. You can then decide whether to download the usage rights, simply not play the file, or perhaps get rid of the file.
![]() Send Unique Player ID to Content Providers. Check this check box only if you want Windows Media Player to send a number that uniquely identifies your Windows account and your computer to Microsoft and its partners when Windows Media Player retrieves information from them.
Send Unique Player ID to Content Providers. Check this check box only if you want Windows Media Player to send a number that uniquely identifies your Windows account and your computer to Microsoft and its partners when Windows Media Player retrieves information from them.
![]() Caution
Caution
The Send Unique Player ID to Content Providers feature is highly intrusive. Normally, you would want to make sure this check box is unchecked.
![]() I Want to Help Make Microsoft Software and Services Even Better by Sending Player Usage Data to Microsoft. Check this check box if you want Windows Media Player to share details of how you use the app to Microsoft. This information uniquely identifies your Windows account and your computer.
I Want to Help Make Microsoft Software and Services Even Better by Sending Player Usage Data to Microsoft. Check this check box if you want Windows Media Player to share details of how you use the app to Microsoft. This information uniquely identifies your Windows account and your computer.
![]() Caution
Caution
The “I Want to Help...” option is neatly phrased to encourage you to share information with Microsoft, but bear in mind that doing so intrudes fairly heavily on your privacy.
![]() Store and Display a List of Recently/Frequently Played. In this area, check or uncheck the Music check box, the Pictures check box, the Video check box, and the Playlists check box, as needed. You might want to try checking these check boxes and seeing whether you find the list of recently played and frequently played items useful; if the list isn’t useful to you, open the Options dialog box, click the Privacy tab, and then turn off this tracking.
Store and Display a List of Recently/Frequently Played. In this area, check or uncheck the Music check box, the Pictures check box, the Video check box, and the Playlists check box, as needed. You might want to try checking these check boxes and seeing whether you find the list of recently played and frequently played items useful; if the list isn’t useful to you, open the Options dialog box, click the Privacy tab, and then turn off this tracking.
After making your choices in the Select Privacy Options dialog box, click the Next button to display the Select the Default Music and Video Player dialog box (see Figure 10.3). Here, you can choose whether to make Windows Media Player the default player for all the music and video file types it can handle or whether to choose specific file types for Windows Media Player.
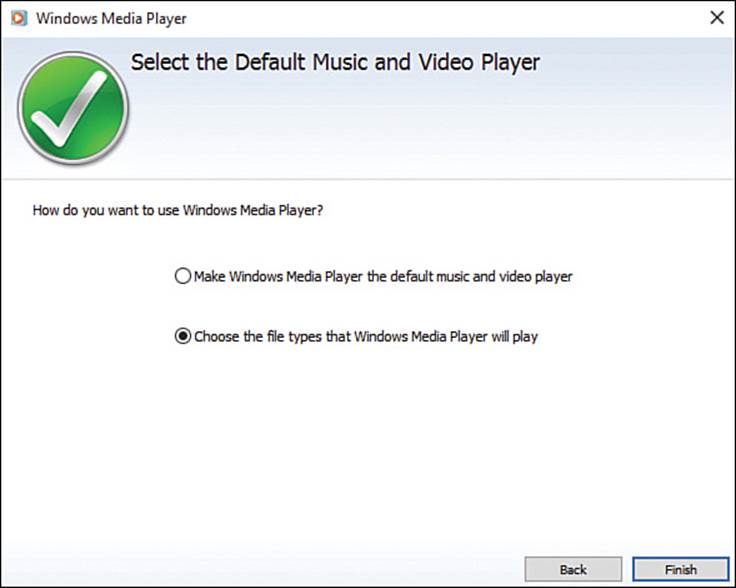
FIGURE 10.3 In the Select the Default Music and Video Player dialog box, choose whether to use Windows Media Player for all the music and video file types it can handle or only for those you specify.
If you want to use Windows Media Player for all the file types, select the Make Windows Media Player the Default Music and Video Player option button, and then click the Finish button. Windows Media Player then opens.
If you want to use other media players as well, select the Choose the File Types That Windows Media Player Will Play option button, and then click the Finish button. Windows then displays a dialog box telling you to choose Settings, System, Default Apps to change your default apps; click the OK button to dismiss the dialog box. You’ll then see the Windows Media Player window.
![]() Note
Note
See the section “Setting the Default Apps You Need” in Chapter 9 for instructions on setting default apps. The subsection called “Choosing Default Apps by Apps” explains the procedure you would use to set the file types for which you want to use Windows Media Player as the default player.
Navigating Windows Media Player
After you’ve finished the initial setup routine, the Windows Media Player window appears (see Figure 10.4). Most likely, you’ll find this easy to navigate. These are the main features:
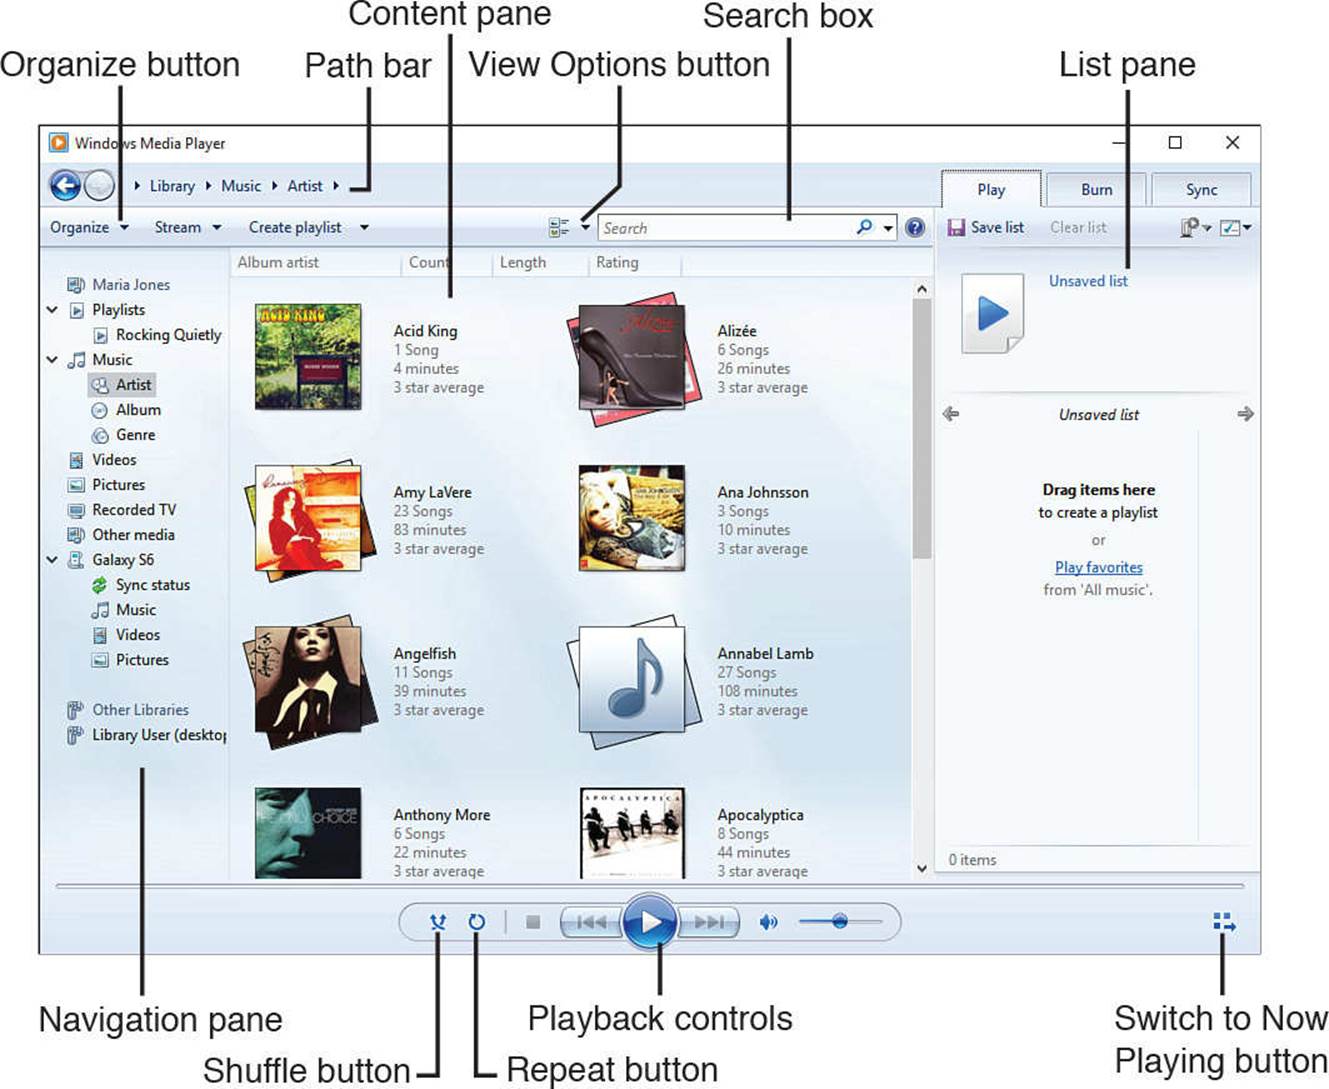
FIGURE 10.4 Windows Media Player has a straightforward interface.
![]() Path bar. This bar shows your current location, such as Library > Music > Artist > Angelfish. As in a File Explorer window, you can click an earlier item in the path to return to it; for example, here you can click Artist to display the Artist screen, click Music to display the Music library, or click Library to display the Library folder.
Path bar. This bar shows your current location, such as Library > Music > Artist > Angelfish. As in a File Explorer window, you can click an earlier item in the path to return to it; for example, here you can click Artist to display the Artist screen, click Music to display the Music library, or click Library to display the Library folder.
![]() Organize button. This button gives you access to the main menu, which includes commands for managing libraries, changing the layout, and opening the Options dialog box.
Organize button. This button gives you access to the main menu, which includes commands for managing libraries, changing the layout, and opening the Options dialog box.
![]() View Options button. This button enables you to choose the view to use for the Content pane. For example, with the Music library selected, you can choose between Expanded Tile view (which shows CD covers with brief details and the track list) and Details view (which shows a more straightforward list of tracks).
View Options button. This button enables you to choose the view to use for the Content pane. For example, with the Music library selected, you can choose between Expanded Tile view (which shows CD covers with brief details and the track list) and Details view (which shows a more straightforward list of tracks).
![]() Navigation pane. This pane enables you to navigate among libraries and through their contents. Your own library appears at the top of the pane, with the Playlists category, the Music category, the Videos category, and the Pictures category below it. You can click an item to display its contents in the Content pane.
Navigation pane. This pane enables you to navigate among libraries and through their contents. Your own library appears at the top of the pane, with the Playlists category, the Music category, the Videos category, and the Pictures category below it. You can click an item to display its contents in the Content pane.
![]() Tip
Tip
You can customize the Navigation pane to contain the items you want. For example, you can add columns such as Year or Composer for music items, Genre or Rating for videos, and Tags or Date Taken for photos. Choose Organize, Customize Navigation Pane to open the Customize Navigation Pane dialog box, check the box for each column you want to show, and then click the OK button.
![]() Content pane. This pane shows the contents of the item you have selected in the Navigation pane.
Content pane. This pane shows the contents of the item you have selected in the Navigation pane.
![]() List pane. This pane displays the current list for playing, burning, or syncing, depending on whether the Play tab, the Burn tab, or the Sync tab is displayed.
List pane. This pane displays the current list for playing, burning, or syncing, depending on whether the Play tab, the Burn tab, or the Sync tab is displayed.
![]() Note
Note
You can toggle the display of the List pane by choosing Organize, Layout, Show List (either placing a check mark next to the Show List item or removing the existing check mark). You can also hide the List pane by clicking the List Options button (the button with the check mark icon and a drop-down arrow, on the right side of the bar across the top of the List pane) and then clicking Hide List on the drop-down menu.
![]() Search box. Click here and type your search terms to search the current selection.
Search box. Click here and type your search terms to search the current selection.
![]() Shuffle button. Click this button to play the items in a random order.
Shuffle button. Click this button to play the items in a random order.
![]() Repeat button. Click this button to turn repeating on or off.
Repeat button. Click this button to turn repeating on or off.
![]() Playback controls. Use these controls to manage playback as usual.
Playback controls. Use these controls to manage playback as usual.
![]() Switch to Now Playing button. Click this button to switch to Now Playing view, which provides a compact interface to enable you to focus on other apps while enjoying music. The left screen in Figure 10.5 shows Now Playing view as it first appears; the right screen shows the controls that appear when you move the mouse pointer over the Now Playing window.
Switch to Now Playing button. Click this button to switch to Now Playing view, which provides a compact interface to enable you to focus on other apps while enjoying music. The left screen in Figure 10.5 shows Now Playing view as it first appears; the right screen shows the controls that appear when you move the mouse pointer over the Now Playing window.
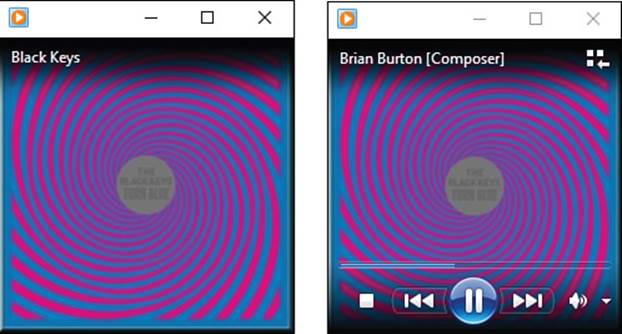
FIGURE 10.5 You can switch Windows Media Player to Now Playing view (left) when you want to focus on other apps. When you need the playback controls, move the mouse pointer over the Now Playing window (right).
Adding Your Music to Windows Media Player
Before you can listen to your music in Windows Media Player, you must add your music to your Music library. Windows Media Player automatically loads all the files in your Music library, but you can also import files from other locations if needed.
Where is Your Music Library?
Your Music library is normally stored in the Music folder within your account, which itself is stored in the Users folder on your computer’s system drive. For example, if your account is named Maria and your computer’s system drive is drive C:, your Music library would be stored in the C:\Users\Maria\Music folder.
If you use OneDrive, the local OneDrive folder is usually stored in your account’s folder, with the OneDrive Music folder inside it. So continuing the preceding example, your OneDrive Music folder would be stored in the C:\Users\Maria\OneDrive\Music folder.
If you have set up a OneDrive account on your computer, the Music library includes the OneDrive Music folder as well. So any songs you have stored in your OneDrive Music folder appear in Windows Media Player.
Adding Your Existing Music Files to Windows Media Player
The normal way to add music files to Windows Media Player is to place those files in your Music library. You can place the files in the library in two ways:
![]() Add the files to a folder in the Music library. The most straightforward way is to put the files in a folder that already belongs to the Music library. For example, because your Music library is stored in the \Music\ folder in your user account, any subfolder you create in the \Music\folder also becomes part of your Music library.
Add the files to a folder in the Music library. The most straightforward way is to put the files in a folder that already belongs to the Music library. For example, because your Music library is stored in the \Music\ folder in your user account, any subfolder you create in the \Music\folder also becomes part of your Music library.
![]() Add the files’ folder to the Music library. You can also add other folders to the Music library using the technique you’ll learn in a moment. This technique is useful for folders you can’t easily place within the \Music\ folder—for example, folders on an external drive connected to your computer.
Add the files’ folder to the Music library. You can also add other folders to the Music library using the technique you’ll learn in a moment. This technique is useful for folders you can’t easily place within the \Music\ folder—for example, folders on an external drive connected to your computer.
To add a folder to the Music library, follow these steps in Windows Media Player:
1. Choose Organize, Manage Libraries, Music to open the Music Library Locations dialog box (see Figure 10.6).
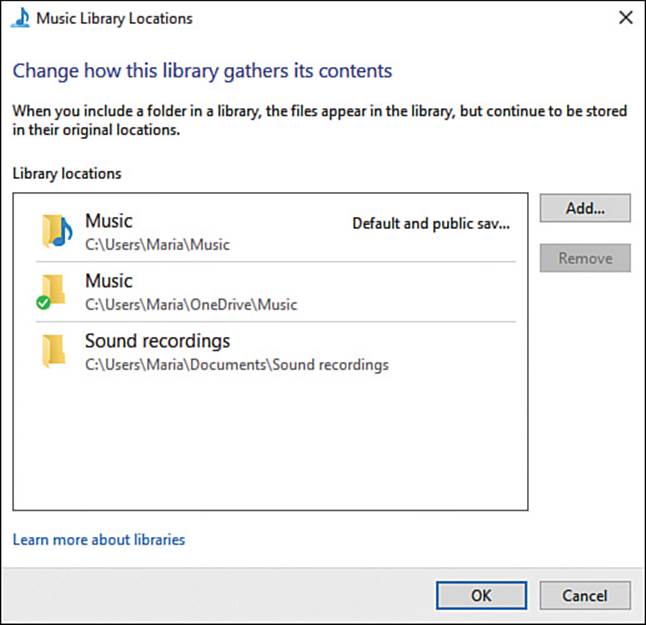
FIGURE 10.6 Click the Add button in the Music Library Locations dialog box to add a folder to your Music library.
2. Click the Add button to open the Include Folder in Music dialog box.
3. Navigate to the folder that contains the folder you want to add, and then click the folder.
4. Click the Include Folder button. Windows Media Player closes the Include Folder in Music dialog box, and the folder appears in the Music Library Locations dialog box.
![]() Note
Note
You can also use the Music Library Locations dialog box to remove folders from your Music Library. Just click the folder in the Library Locations list box and then click the Remove button.
5. Click the OK button to close the Music Library Locations dialog box.
![]() Tip
Tip
You can also add music files that are stored in folders that are not included in your Music library. To do so, open a File Explorer window to the folder that contains the files, select the files, and then drag them to the Windows Media Player window. (You can also drag files from the desktop to the Windows Media Player window.) This technique is sometimes useful for adding stray files, but in general, you may find it better to keep your music files in the folders you include in your Music library.
Choosing Which Music Format to Use For Ripping From CD
You can choose among eight audio file formats for your music in Windows Media Player. It’s important to make the right choice so that you get the audio quality you need, file sizes that are acceptable, and music that will play on all the devices you want to use.
Of the eight formats in which Windows Media Player can create audio files, the first four formats are from Microsoft and are close relations to each other:
![]() Windows Media Audio. This is Microsoft’s standard format for compressed audio. It uses lossy audio compression (see the nearby tip) to produce files that have good sound quality but only moderate file size.
Windows Media Audio. This is Microsoft’s standard format for compressed audio. It uses lossy audio compression (see the nearby tip) to produce files that have good sound quality but only moderate file size.
![]() Tip
Tip
Most audio formats use either lossless compression or lossy compression to reduce the amount of space needed for an audio file. Lossless compression retains the full audio quality, whereas lossy compression loses some of the details—preferably the details that the human ear would normally miss anyway because they’re masked by other sounds. Lossy compression is adjustable, so you can choose the quality, but typically it can compress audio far more than lossless compression.
![]() Windows Media Audio Pro. This sounds like a professional version of Windows Media Audio, but it’s actually designed to create smaller files for devices with less storage.
Windows Media Audio Pro. This sounds like a professional version of Windows Media Audio, but it’s actually designed to create smaller files for devices with less storage.
![]() Windows Media Audio (Variable Bit Rate). This is the same as the Windows Media Audio format except that it uses a variable bit rate (see the nearby note) instead of a constant bit rate.
Windows Media Audio (Variable Bit Rate). This is the same as the Windows Media Audio format except that it uses a variable bit rate (see the nearby note) instead of a constant bit rate.
![]() Note
Note
Audio encoders use several settings to determine the quality and—indirectly—the file size. The key setting is the bit rate, which is the number of bits (individual pieces) of data per second. The bit rate can be either constant or variable. Variable bit rate (VBR) gives better quality than constant bit rate (CBR) at the same bit rate because it can use the bits more intelligently to store the data.
![]() Windows Media Audio Lossless. If there were a professional version of Windows Media Audio, this would be it. The lossless compression gives full audio quality, but the file size is correspondingly large.
Windows Media Audio Lossless. If there were a professional version of Windows Media Audio, this would be it. The lossless compression gives full audio quality, but the file size is correspondingly large.
The four remaining audio formats are more or less industry standards:
![]() MP3. Technically, MP3 stands for “MPEG-1 Audio Layer III” or “MPEG-2 Audio Layer III,” where “MPEG” stands for “Moving Pictures Expert Group.” Most people simply use the abbreviation. MP3 is a lossy audio format that sounds okay for music at bit rates of 128Kbps and pretty good at higher bit rates, such as 256Kbps or 320Kbps.
MP3. Technically, MP3 stands for “MPEG-1 Audio Layer III” or “MPEG-2 Audio Layer III,” where “MPEG” stands for “Moving Pictures Expert Group.” Most people simply use the abbreviation. MP3 is a lossy audio format that sounds okay for music at bit rates of 128Kbps and pretty good at higher bit rates, such as 256Kbps or 320Kbps.
![]() WAV (Lossless). Waveform Audio File Format (WAVE or WAV, after the three-letter file extension) is an uncompressed audio format. This means it delivers full-quality audio, but because the file sizes are huge, you would normally want to use a different lossless format instead.
WAV (Lossless). Waveform Audio File Format (WAVE or WAV, after the three-letter file extension) is an uncompressed audio format. This means it delivers full-quality audio, but because the file sizes are huge, you would normally want to use a different lossless format instead.
![]() Caution
Caution
Apart from the file size, the WAV format has another disadvantage: It doesn’t have containers for the tag information in which the other formats store the artist, album, song name, and so on. This means that the only way to identify WAV files is by their filenames.
![]() ALAC (Lossless). Apple Lossless Audio Coding, also known as Apple Lossless Encoding, is a lossless compressed audio format developed by Apple. Like other lossless audio formats, ALAC gives full quality at the cost of a large file size.
ALAC (Lossless). Apple Lossless Audio Coding, also known as Apple Lossless Encoding, is a lossless compressed audio format developed by Apple. Like other lossless audio formats, ALAC gives full quality at the cost of a large file size.
![]() Tip
Tip
As you might expect, Apple’s hardware and software products all support ALAC. So if you use an iPhone, an iPad, or an iPod, ALAC is a fine choice—provided that you’re prepared to sacrifice quantity of music for quality of music. Even the iPod shuffle, which has space for only around four hours’ worth of ALAC files, can play back ALAC.
![]() FLAC. Free Lossless Audio Codec (FLAC) is a lossless compression format. FLAC delivers full-quality sound, but its files are large.
FLAC. Free Lossless Audio Codec (FLAC) is a lossless compression format. FLAC delivers full-quality sound, but its files are large.
![]() Note
Note
FLAC is an open-source format, which means that anyone can use it without paying licensing fees. By contrast, MP3 and the Windows Media Audio formats are proprietary and require the payment of licensing fees. Usually, the manufacturers of the devices pay these fees, so you, as the user of a device, don’t need to pay.
Configuring Windows Media Player to Rip CDs
Before you use Windows Media Player to rip audio files from your CDs, take a minute to choose suitable settings. Follow these steps:
1. In Windows Media Player, choose Organize, Options to display the Options dialog box.
2. Click the Rip Music tab to display its contents (shown on the left in Figure 10.7).

FIGURE 10.7 Choose settings on the Rip Music tab of the Options dialog box (left) before you rip your CDs with Windows Media Player. Use the File Name Options dialog box (right) to tell Windows Media Player how to name the song files.
3. Look at the folder shown in the Rip Music to This Location box. Normally, the folder will be the Music folder in your user account. If you want to change the location, click the Change button to open the Browse for Folder dialog box, navigate to and select the appropriate folder, and then click the OK button.
4. Click the File Name button to display the File Name Options dialog box (shown on the right in Figure 10.7). Use its controls to specify how you want Windows Media Player to name the ripped files, and then click OK to close it.
5. In the Rip Settings area, open the Format drop-down menu and choose the format you want: Windows Media Audio, Windows Media Audio Pro, Windows Media Audio (Variable Bit Rate), Windows Media Audio Lossless, MP3, WAV (Lossless), ALAC (Lossless), or FLAC (Lossless). Look back to the preceding section, “Choosing Which Music Format to Use for Ripping from CD,” for details on these formats and advice about which to use.
![]() Note
Note
For any of the Windows Media Audio formats, you can check the Copy Protect Music check box if you need to prevent yourself from inadvertently sharing the music files with other people without having authorization to do so. Checking this check box makes Windows Media Player apply digital-rights management (DRM) to the files you rip. The other four formats, such as MP3 and FLAC, do not support DRM, so this check box is unavailable when you select one of these formats.
6. Check the Rip CD Automatically check box if you want Windows Media Player to rip each audio CD automatically when you insert it.
![]() Tip
Tip
The Rip CD Automatically feature can be useful for building your music library quickly, but it prevents you from verifying that the CD’s information is correct before ripping the files. If you want to verify the CD’s information (for example, to fix any incorrect song names), uncheck this check box.
7. Check the Eject CD After Ripping check box if you want Windows Media Player to make your CD drive eject the CD when it finishes the ripping.
![]() Caution
Caution
Check the Eject CD After Ripping check box only if your computer’s optical drive always has enough space to open safely. On a laptop, it’s best to uncheck this check box in case the optical drive may sometimes be obstructed.
8. Drag the Audio Quality slider along the Smallest Size–Best Quality axis to the point that suits you best.
![]() Tip
Tip
If time permits, try ripping the same set of songs at different audio qualities, listen to them using your normal listening device (such as headphones), and see which quality you prefer.
9. Click the OK button to apply your changes and close the Options dialog box.
Ripping CDs with Windows Media Player
After you’ve configured Windows Media Player with suitable settings for ripping CDs, you can insert a CD and rip music files from it.
Click the entry for the optical drive in the Navigation pane on the left of the Windows Media Player window to display the CD’s tracks (see Figure 10.8). Windows Media Player automatically checks the check box for each track by default. You can uncheck the check box for any track you don’t want to rip, or uncheck the check box in the Album column heading to uncheck all the check boxes if you want to check just a few.
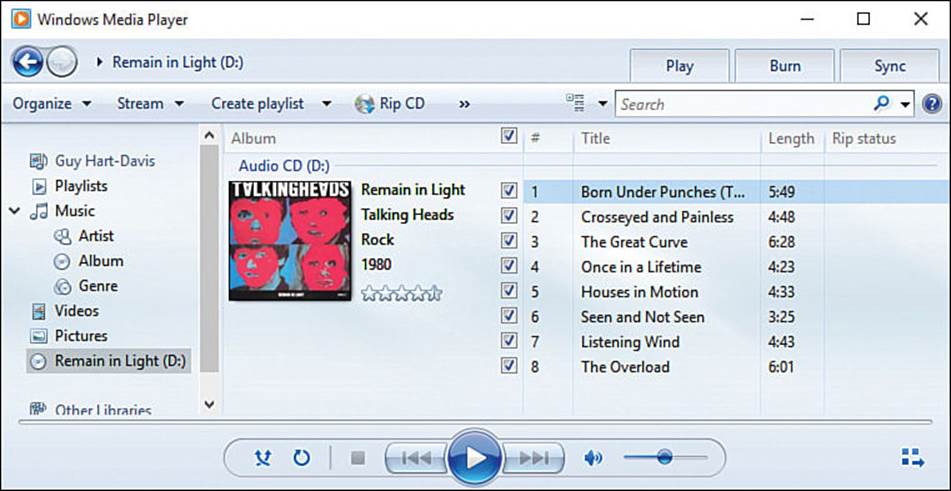
FIGURE 10.8 Insert a CD, choose which songs to rip in Windows Media Player, and then click the Rip CD button on the toolbar to start ripping.
![]() Tip
Tip
You can adjust your ripping settings by using the Rip Settings drop-down menu on the Windows Media Player toolbar after selecting an audio CD in the Navigation pane. (If you don’t see the Rip Settings drop-down menu, click the arrows to the right of the Rip CD button.) Use the Format submenu to change the format, or use the Audio Quality to change the bit rate within that format. Click Rip CD Automatically, placing a check mark next to this item, to turn on automatic ripping as soon as you insert the CD. Click Eject CD After Ripping, placing a check mark next to this item, to eject the CD automatically after ripping.
After choosing the songs you want to rip, click the Rip CD button on the toolbar to start ripping.
Having Trouble Powering an External USB Drive?
If your computer’s USB port doesn’t deliver enough power for an external optical drive, here are five solutions to try.
First, if your computer is a laptop or a tablet, try connecting it to power. Doing so may increase the amount of power the USB port delivers.
Second, if your computer has multiple USB ports, try another port. Depending on the computer, some ports may deliver more power than others.
Third—again for a computer with multiple USB ports—try using a Y cable, one that has two USB connectors at the end that connects to the computer. Two ports may deliver enough power when one doesn’t. If your optical drive didn’t come with a Y cable, you’ll need to get one.
Fourth, connect a powered USB hub to your computer, and connect the optical drive to the hub. Read the hub’s documentation to find out whether some ports deliver more power than others.
Fifth, connect a powered USB hub and use a Y cable.
Playing Music with Windows Media Player
After you’ve added your music to your Music library, playing music is easy: Navigate to the music you want to play, by using the Navigation pane and the Content pane, and then double-click a song to set it playing. You can then control playback using the controls at the bottom of the Windows Media Player window.
To play songs in your preferred order, you can create playlists. To create a playlist, follow these steps:
1. Click the Play tab to display its controls. (If the List pane was hidden, clicking the Play tab displays it.)
2. If the Play tab already contains songs, click the Clear List button at the top of the List pane (unless you want to keep the songs).
3. Drag songs from the Content pane to the List pane.
4. Drag songs up and down the List pane to get them into the order you want.
5. Click the Save List button, type the name for the list in the text box that appears, and then press Enter or click elsewhere.
Windows Media Player adds the playlist to the Playlists list in the Navigation pane, and you can play it from there.
Syncing Music with Your Phone or Tablet
If your phone or tablet comes with an app for syncing media and other content from a PC, you’ll normally do best to use that app for adding music to the device. For example, if you have an iPhone, you’ll normally want to use Apple’s iTunes app to sync music. iTunes is free, and you can download the latest version from the Apple website (www.apple.com/itunes/download). Similarly, Samsung provides an app called Smart Switch (www.samsung.com/smartswitch) for syncing content to its latest phones and tablets and an app called Kies (go to www.samsung.com and search for Kies) for older phones and tablets.
If your device’s manufacturer doesn’t offer such an app, you can use Windows Media Player to sync music to your device. Connect the device to your computer, turn it on (or wake it if it’s dozing), and unlock it if it’s locked. Open Windows Media Player and wait for it to identify the device.
After Windows Media Player has recognized the device, you can click the Sync tab to display the Sync pane and set up the list of files you want to sync to the device (see Figure 10.9). Drag files from the Content pane to the List pane as usual, and then drag them into the order you want. When the list is ready for syncing, click the Start Sync button on the toolbar at the top of the List pane to start the sync.
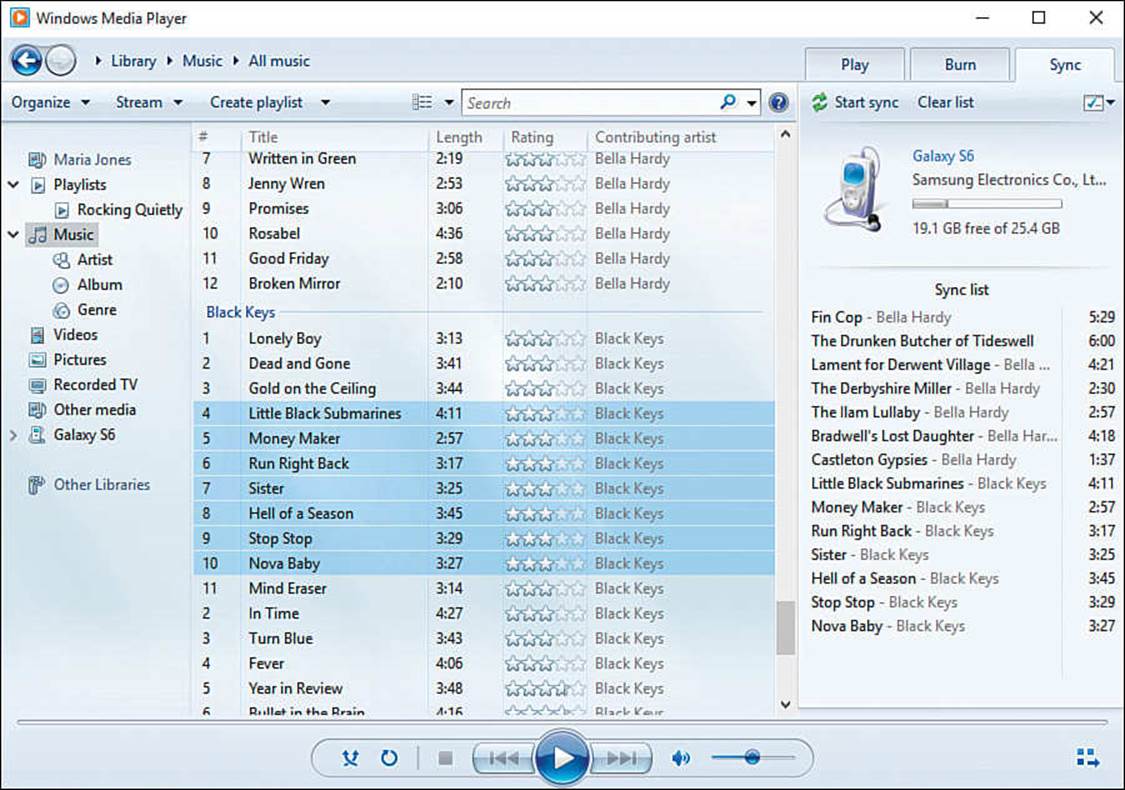
FIGURE 10.9 After connecting your phone or tablet to your computer, you can set up the list of files to sync on the Sync tab. Click the Start Sync button to start the sync running.
Squeezing More Music and Video onto Your Phone or Tablet
To pack more music and video files on your phone or tablet, you can select a maximum quality level for music or a maximum quality level for videos and TV shows.
To do so, connect the device; choose Organize, Options to display the Options dialog box; and then click the Devices tab to display its controls. In the Devices box, double-click the device (or, if you prefer, click the device and then click the Properties button) to display the Properties dialog box for the device.
Click the Quality tab to display its controls. Then, in the Music box, click the Select Maximum Quality Level option button and drag the slider to the appropriate position on the Smallest Size—Best Quality axis. Next, go to the Videos and TV Shows box, click the Select Maximum Quality Level option button there too, and drag this box’s slider to the appropriate position. Click the OK button to close the Properties dialog box, and then click the OK button to close the Options dialog box.
Importing Photos and Videos Using Windows Media Player
After Windows Media Player has established a connection to your phone or tablet, you can use Windows Media Player to import photos and videos from the device into your Pictures library and your Videos library. Follow these steps to import pictures; the process for videos is similar but (as you’d expect) involves the Videos collection instead of the Pictures collection:
1. Connect your device to your computer.
2. Open Windows Media Player if it’s not already open; if it is open, make it active.
3. In the Navigation pane, double-click the entry for your device to display its contents.
4. Click the Picture item under your device. The Content pane displays thumbnails, tiles, or details of the pictures on the device, depending on the view you are using. (To change the view, click the View Options button to the left of the Search box and then click Icon, Tile, or Details on the menu.)
5. Click the Sync tab of the List pane to display its controls.
6. Drag the appropriate pictures to the Sync List area on the Sync tab.
7. Click the Copy to Device button on the toolbar at the top of the List pane. Windows Media Player copies the pictures to your Pictures library.
Sharing Media Libraries
Windows Media Player enables you to share your media libraries with other people on your network, such as your family members. Similarly, you can connect to the media libraries that other people share.
Sharing Your Media Library
To share your media library with other people on your network, you need to turn on media streaming. You do this by working on the Advanced Sharing Settings screen in Control Center. Follow these steps:
1. Right-click or long-press the Network icon in the notification area to display the shortcut menu.
![]() Note
Note
You can also open the Network and Sharing Center screen by right-clicking or long-pressing Start, clicking Control Panel, clicking Network and Internet, and then clicking Network and Sharing Center.
2. Click Open Network and Sharing Center to open a Control Panel window showing the Network and Sharing Center screen.
3. In the left column, click the Change Advanced Sharing Settings link to display the Advanced Sharing Settings screen.
4. Click the All Networks heading to expand its contents (see Figure 10.10).
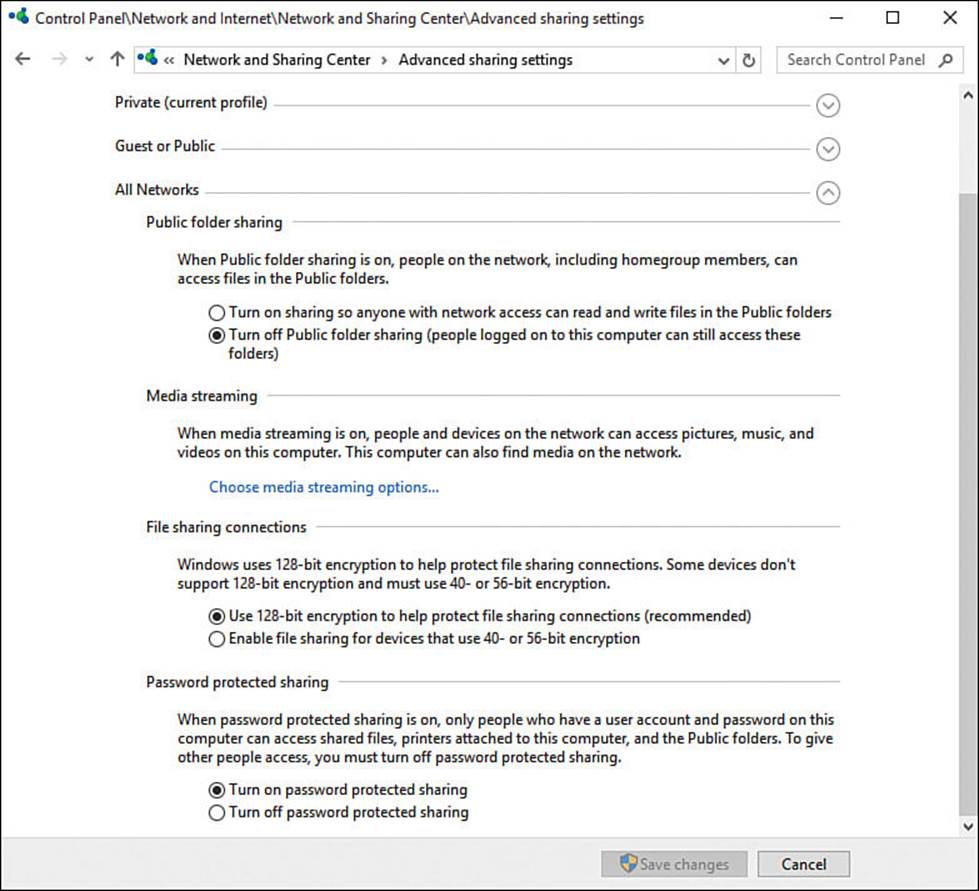
FIGURE 10.10 On the Advanced Sharing Settings screen, expand the All Networks section, and then click the Choose Media Streaming Options link.
5. Click the Choose Media Streaming Options link to display the Media Streaming Options screen (see Figure 10.11).
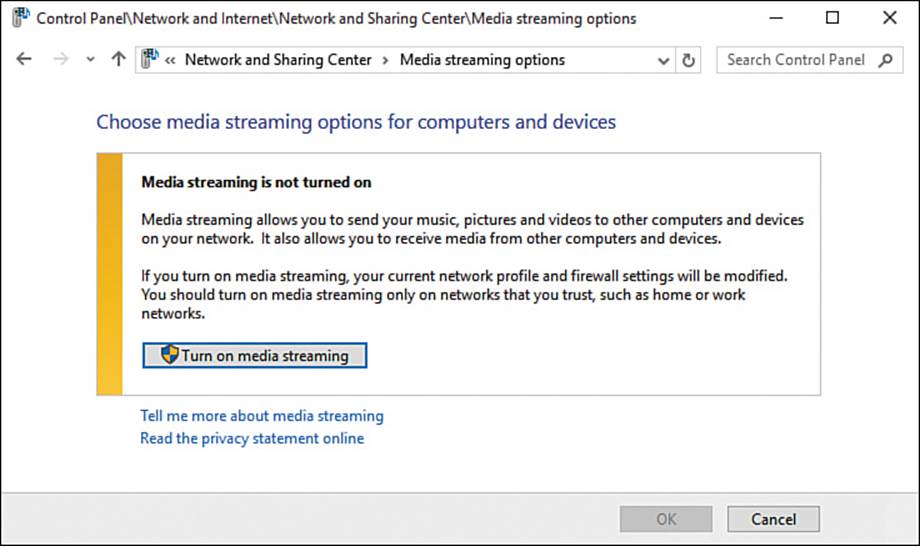
FIGURE 10.11 On the Media Streaming Options screen, click the Turn On Media Streaming button.
6. Click the Turn On Media Streaming button. The Media Streaming Options screen displays the Choose Media Streaming Options for Computers and Devices controls (see Figure 10.12).
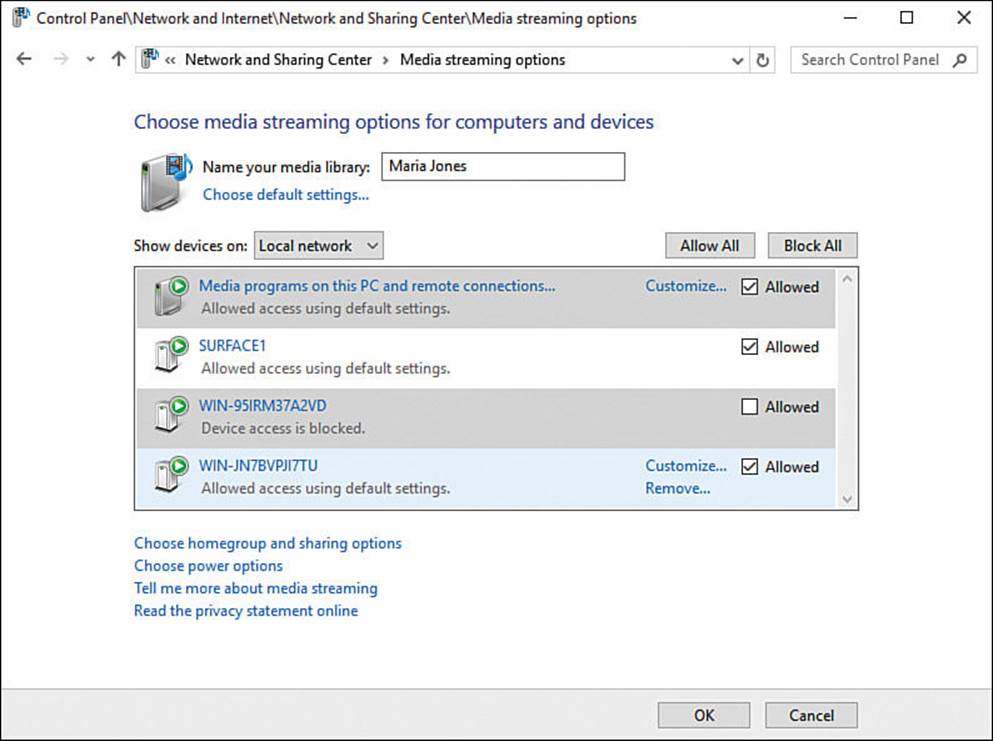
FIGURE 10.12 Use the Choose Media Streaming Options for Computers and Devices controls to specify which devices may access your media library.
7. In the Name Your Media Library box, type the name under which you want your media library to appear on the network. You might want to use your name for easy identification, or you might prefer a brief description of the types of content you’re sharing.
![]() Note
Note
Make sure the Show Devices On drop-down list is set to Local Network rather than All Networks if you’re choosing settings for your local network.
![]() Tip
Tip
By default, your computer shares all its media. If you want to change the default sharing settings, click the Choose Default Settings link and work in the Default Media Streaming Settings dialog box. Apart from its name, this dialog box is the same as the Customize Media Streaming Settings dialog box, which you’ll meet shortly.
8. In the large list box, choose which devices may access your content. You can click the Allow All button to check the check box for each device, or click the Block All button to block all of them; or you can check or uncheck each individual computer’s Allowed check box as needed.
9. If you need to customize the content available to a particular device, click it (or hold the mouse pointer over it) and then click the Customize link that appears. In the Customize Media Streaming Settings dialog box that opens (see Figure 10.13), uncheck the Use Default Settings check box, and then use the other controls to specify which content to share. When you finish, click the OK button to close the Customize Media Streaming Settings dialog box.
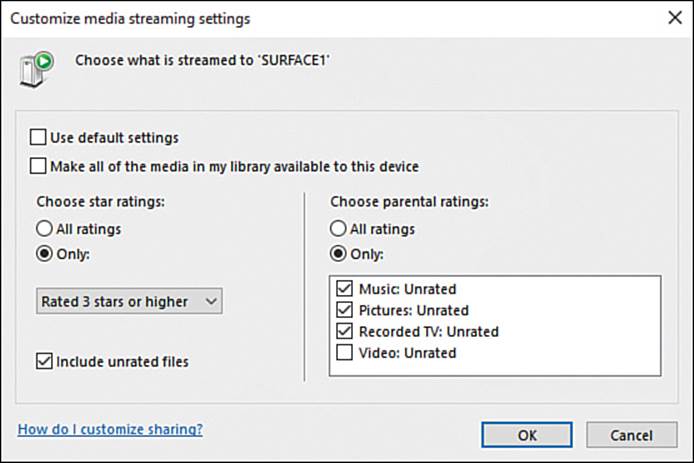
FIGURE 10.13 Use the controls in the Customize Media Streaming Settings dialog box to specify which content a particular device can access.
10. Click the OK button to finish working on the Media Streaming Options screen.
11. Click the Close button (the × button at the right end of the title bar) to close the Advanced Sharing Settings window.
Other computers on the network can now access the media you’re sharing—provided that media streaming is enabled on them.
Using Shared Media Libraries
After you enable media streaming, you can connect to and use the media libraries that other computers are sharing on your network.
To connect to a shared library, simply double-click its name in the Other Libraries section of the Navigation pane in Windows Media Player. You can then click the collection you want to browse (such as Music), and then explore and play its content.
Sharing Media Files via Network Attached Storage
Sharing your media via Windows Media Player works well provided that the sharing computers are always connected to the network and always powered on when people want to enjoy the media files. But if the computers involved are laptops or tablets, or if they’re desktops that you don’t want to leave running all the time, you may want to look at the alternative, which is to share your files via a network attached storage (NAS) device. This device is essentially a minimalist computer with plenty of storage, usually spinning hard drives rather than solid-state devices (which cost much more for the same capacity).
Many types of NAS devices are available to suit different needs and pockets. Some come with custom setup software, but most enable you to configure them via a web browser.
One quick warning: Take a few minutes to configure the security settings on your NAS device. Many NAS devices allow you to access your content remotely via the Internet. This can be a great feature, but you must secure it with a strong password or passcode so that would-be intruders cannot access it too.
Out of the box, some NAS devices may be accessible from the Internet without any security. Unless you’re certain you need Internet access, it’s much safer to disable it, allowing only devices on your local network to connect to the NAS device.
Exploring the Groove Music App and the Groove Service
Groove Music is an app included with most versions of Windows 10. Groove Music enables you to play music in three ways:
![]() Stream music from the Groove service. Groove is a streaming music service run by Microsoft. You can play any of a wide range of music genres by streaming it across the Internet, but you must sign up for a subscription to Groove. You can get a 30-day trial to see whether Groove suits you.
Stream music from the Groove service. Groove is a streaming music service run by Microsoft. You can play any of a wide range of music genres by streaming it across the Internet, but you must sign up for a subscription to Groove. You can get a 30-day trial to see whether Groove suits you.
![]() Play music stored on your computer. If you have added music files to your computer, you can use Groove to play them.
Play music stored on your computer. If you have added music files to your computer, you can use Groove to play them.
![]() Play music you’ve stored on OneDrive. You can upload your music files to your storage on OneDrive to make the files available to any of your devices anytime those devices have an Internet connection.
Play music you’ve stored on OneDrive. You can upload your music files to your storage on OneDrive to make the files available to any of your devices anytime those devices have an Internet connection.
![]() Note
Note
The Groove streaming service started off as Zune Music, and then changed to Xbox Music before becoming Groove.
Getting Started with Groove Music
To get started with Groove Music, launch the app by clicking Start and then clicking the Groove Music tile. If there’s no Groove Music tile, choose Start, All Apps, Groove Music.
The first time you launch Groove Music, the app displays the Welcome to Groove screen (see Figure 10.14). From here, you can click three buttons:
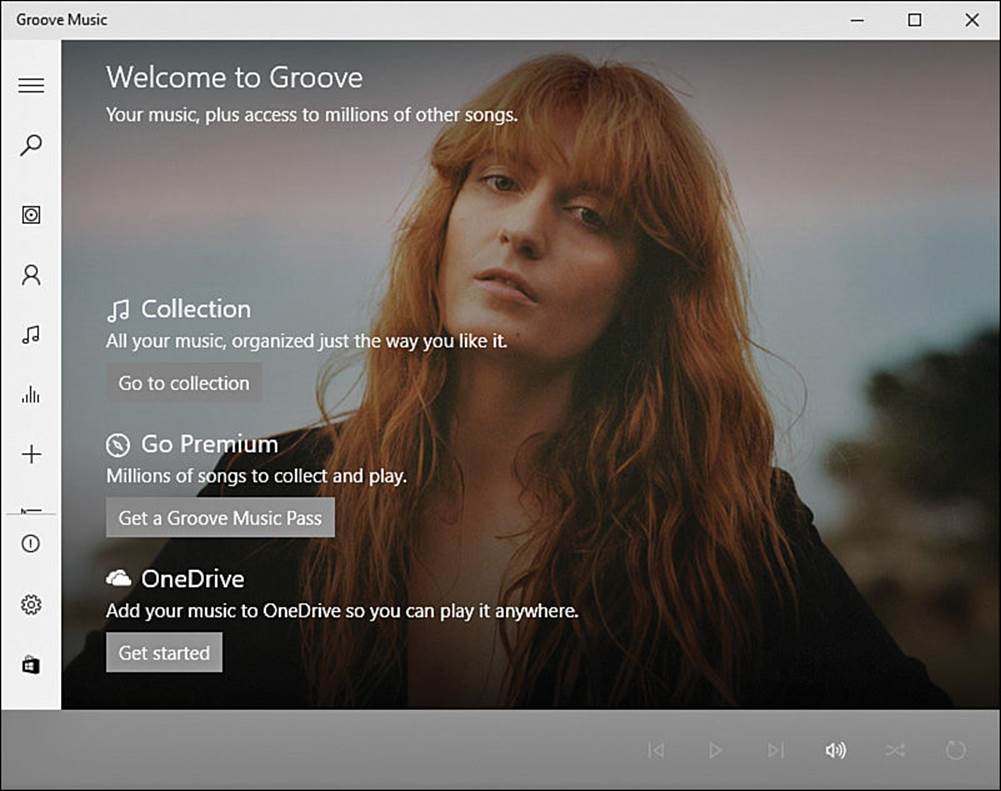
FIGURE 10.14 From the Welcome to Groove screen, you can access your local music collection, sign up for a Groove Music Pass, or upload your music to OneDrive.
![]() Go to Collection. Click this button to go to the music you’ve added to Groove. Likely enough, there’ll be no music at first, but you can fix this. See the section “Adding Music to Your Groove Music Collection,” later in this chapter, for details.
Go to Collection. Click this button to go to the music you’ve added to Groove. Likely enough, there’ll be no music at first, but you can fix this. See the section “Adding Music to Your Groove Music Collection,” later in this chapter, for details.
![]() Get a Groove Music Pass. Click this button to launch the Store app, which displays the Groove Music Pass screen. Click the Start a Free Trial button to begin the process of signing up for a free 30-day trial subscription. You then sign in with your Microsoft account and choose the payment method you want to impoverish after the free trial ends.
Get a Groove Music Pass. Click this button to launch the Store app, which displays the Groove Music Pass screen. Click the Start a Free Trial button to begin the process of signing up for a free 30-day trial subscription. You then sign in with your Microsoft account and choose the payment method you want to impoverish after the free trial ends.
![]() Caution
Caution
The same caution applies to Groove as to any free trial that requires you to provide a payment method: When signing up, make a note in your calendar to review your subscription before the end of the trial period, and cancel in good time if you don’t want to start paying.
![]() Note
Note
If you’re considering signing up for Groove, you may want to investigate other online music services, such as Spotify (www.spotify.com) or Apple Music (www.apple.com/music). Some services, such as Spotify, offer free, ad-supported levels as well as subscription plans.
![]() Get Started. Click this button to open a Microsoft Edge window to the Groove area in OneDrive so that you can upload songs from your computer to OneDrive. Click the Add Songs to OneDrive button to display the Music folder. You can then drag music files from a File Explorer window to the Microsoft Edge window to add the files to OneDrive.
Get Started. Click this button to open a Microsoft Edge window to the Groove area in OneDrive so that you can upload songs from your computer to OneDrive. Click the Add Songs to OneDrive button to display the Music folder. You can then drag music files from a File Explorer window to the Microsoft Edge window to add the files to OneDrive.
Adding Music to Your Groove Music Collection
To add your existing music to your Groove Music collection, click the Go to Collection button. Groove Music automatically searches through the folders in your Music library and displays the screen shown in Figure 10.15.
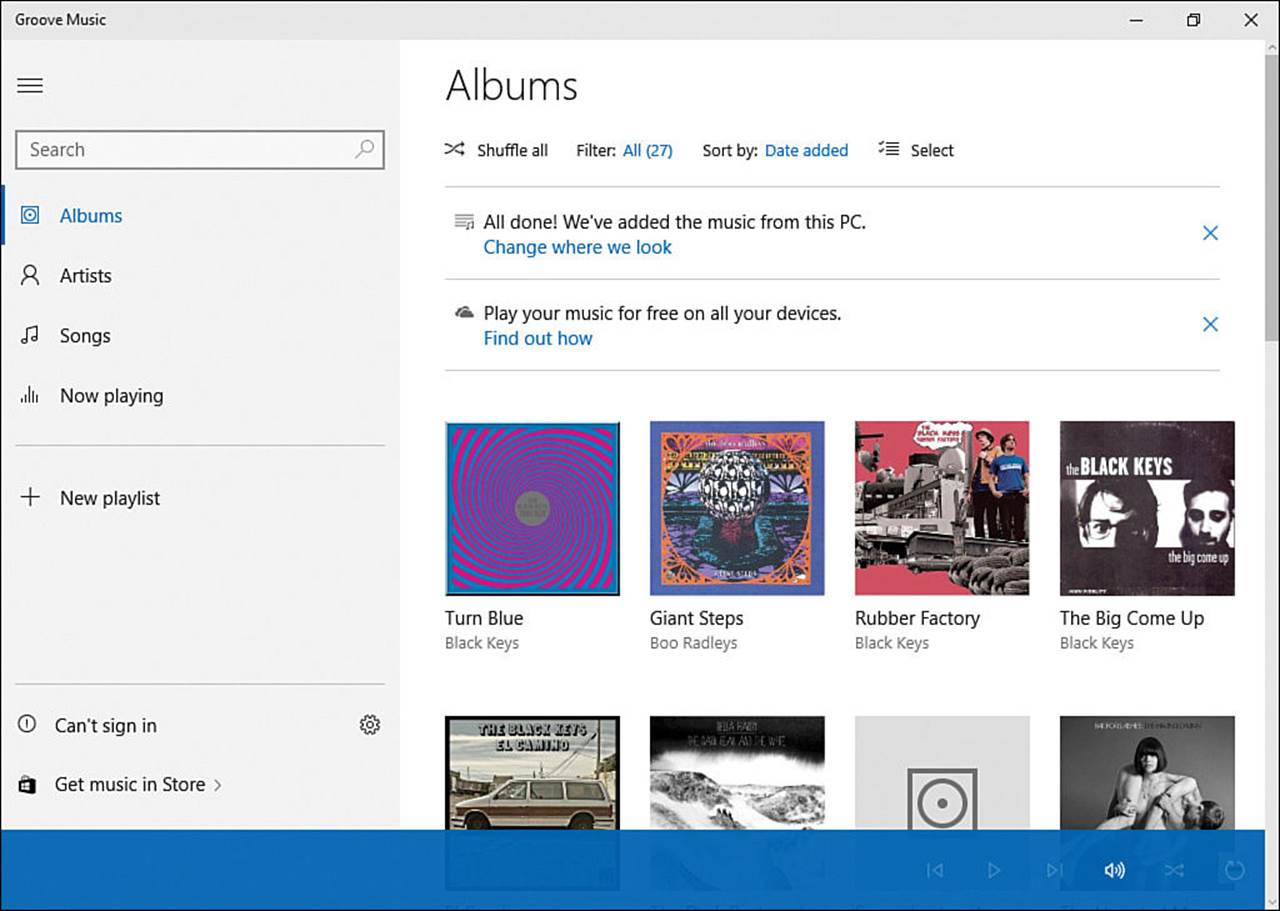
FIGURE 10.15 On the Music screen, you can click the Change Where We Look link to change the folders included in your Music library.
If you need to add other folders, follow these steps:
1. Click the Change Where We Look link to display the Build Your Collection from Your Local Music Files dialog box (see Figure 10.16).

FIGURE 10.16 In the Build Your Collection from Your Local Music Files dialog box, click the Add (+) button to add a folder to your Music library.
2. Click the Add (+) button to display the Select Folder dialog box.
3. Navigate to the folder you want to add, and then click it.
4. Click the Add This Folder to Music button to add the folder to your Music library.
![]() Note
Note
To remove a folder from your Music library, click its Delete (×) button in the Build Your Collection from Your Local Music Files dialog box, and then click the Remove Folder button in the Remove This Folder? dialog box that opens.
5. Click the Done button to close the Build Your Collection from Your Local Music Files dialog box.
![]() Note
Note
Groove Music doesn’t include a feature for ripping songs from CD. Instead, use Windows Media Player to rip CDs, as explained in the section “Ripping CDs with Windows Media Player,” earlier in this chapter.
Playing Music with Groove Music
After you’ve added all your music files to Groove Music, you can easily play the music.
In the Navigation pane, click the Albums button, the Artists button, or the Songs button to change to the view by which you want to browse. You can then double-click an artist or an album to display the available tracks, and double-click a track to start it playing. After that, you can use the controls at the bottom of the Groove Music window (see Figure 10.17) to control playback.
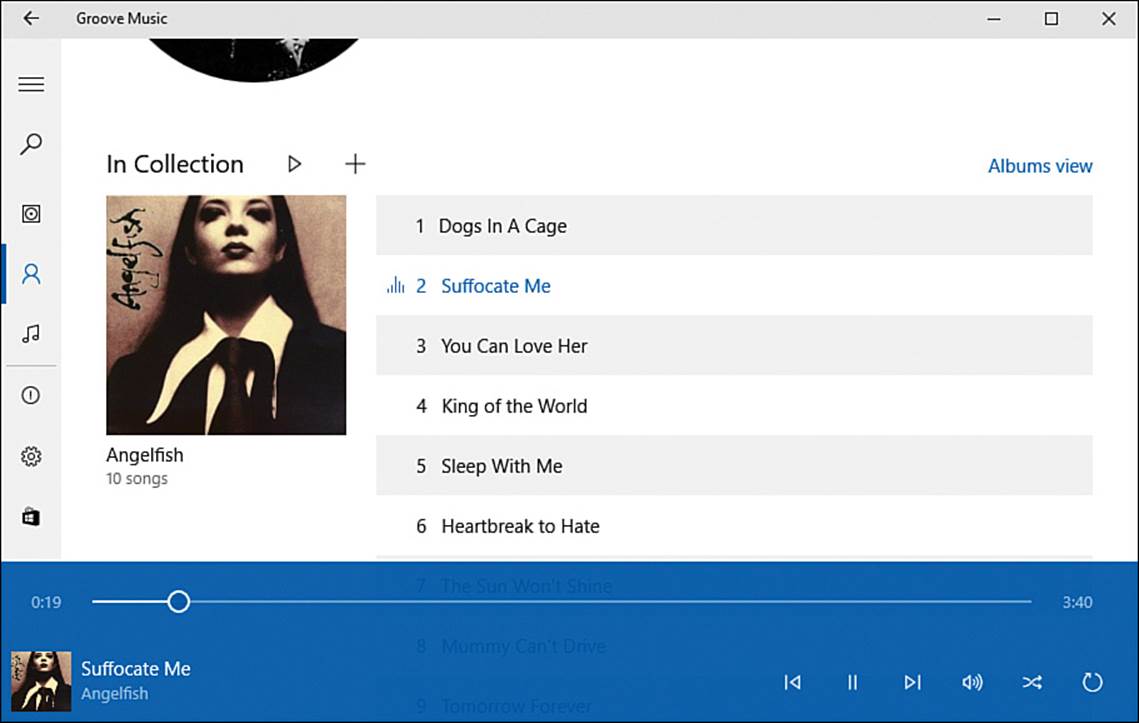
FIGURE 10.17 After starting a song playing, use the controls at the bottom of the Groove Music window to control playback.
Creating Playlists in Groove Music
Groove Music enables you to create playlists to play back songs in your preferred order. Follow these steps to start a playlist:
1. Navigate to the first song you want to include.
2. Right-click or long-press the song to display the shortcut menu.
3. Click or highlight Add To on the shortcut menu, and then click New Playlist on the Add To submenu. The Name This Playlist dialog box opens.
4. Type the name for the new playlist.
5. Click the Save button.
Now that you’ve created the playlist, it appears on the Add To submenu, so you can easily add another song to it by right-clicking or long-pressing the song, clicking or highlighting Add To on the shortcut menu, and then clicking the playlist’s name.
To play the playlist, click its name in the Navigation pane, and then double-click the song you want to start playing.
![]() Tip
Tip
If you have playlists in iTunes, you can import them into Groove Music. To do so, click the Settings button (the gear icon) in the Navigation pane, and then click the Import iTunes Playlists link in the Settings pane.
Watching Videos and DVDs
You can use Windows Media Player to watch videos: Simply click the Videos collection in the Navigation pane, locate the video you want to play, and then double-click it to start it playing.
Windows Media Player doesn’t play DVDs—in fact, Windows 10 doesn’t include an app for playing DVDs. Given that fewer and fewer computers now have a built-in optical drive, this is arguably fair enough, but the main reason Windows lacks a DVD-playing app is more likely the cost of licensing one.
Microsoft’s solution for playing DVDs is the app called Windows DVD Player, which costs $14.99 from the Microsoft Store. At this writing, Windows DVD Player provides only minimal features, so you may prefer to look elsewhere.
![]() Note
Note
If you upgrade to Windows 10 from a version of Windows that includes Windows Media Center, you should get DVD Player free as part of the upgrade. Check to see if it’s available for your version of Windows—or if Microsoft is offering it for free, as it sometimes does.
Generally speaking, you’re better off using the third-party app called VLC for playing back DVDs—and perhaps other video files, because VLC can play back an impressively wide range of formats. You can download VLC free from the VideoLAN Organization website (http://www.videolan.org).
Connecting Your Computer to Your Tv
If you have a large-screen TV, you likely want to connect your computer to your TV so that you can watch your movies and DVDs on it. Windows 10 makes this easy as long as you have the right type of cable, so check the inputs on the TV and the outputs on your computer and then dig in the box where you keep your cables and converters.
If you have a choice of connection types, HDMI is usually the best bet, because it carries both a high-definition video signal and the accompanying audio. For other connection types, such as DVI or VGA, you will need to run a separate audio cable to carry the audio from the computer to the TV.
When you connect your computer to your TV, Windows automatically detects your TV as a display. You can configure the TV as explained in the section “Sorting Out Your Displays” in Chapter 4.
All materials on the site are licensed Creative Commons Attribution-Sharealike 3.0 Unported CC BY-SA 3.0 & GNU Free Documentation License (GFDL)
If you are the copyright holder of any material contained on our site and intend to remove it, please contact our site administrator for approval.
© 2016-2026 All site design rights belong to S.Y.A.