WINDOWS 10 TIPS AND TRICKS (2016)
13. Updating and Troubleshooting Windows
In This Chapter
![]() Configuring Windows Update and applying updates
Configuring Windows Update and applying updates
![]() Backing up and restoring key files with File History
Backing up and restoring key files with File History
![]() Using System Restore and the recovery tools
Using System Restore and the recovery tools
To keep your computer running at its best and to protect it from online threats, you should apply updates to Windows soon after Microsoft makes them available. Updates may include fixes for existing problems—such as patches that fix newly discovered security threats—or new features. You can configure the Windows Update tool to get updates the way you prefer.
To keep your data and settings safe, you can set up the File History tool to back up your essentials to an external drive. If problems occur, you can recover files from File History.
To protect your computer’s system configuration and restore it to the state it was in before problems occurred, you can use the System Restore feature. And when things go seriously wrong, you can use the recovery tools that Windows includes.
Making Windows Update Work Your Way
Most versions of Windows come set to install updates automatically—so if you don’t want the updates installed, you should change the settings.
![]() Note
Note
The Home edition of Windows 10 comes set to download updates automatically. You can’t change this setting, but you can choose between having Windows install the updates automatically and having Windows notify you before installing them.
Configuring Windows Update
To check or change your Windows Update settings, display the Windows Update pane in the Settings app. Follow these steps:
1. Choose Start, Settings to open the Settings window.
2. Click Update & Security to display the Update & Security screen. Windows automatically selects the Windows Update item in the left column, so the Windows Update pane appears (see Figure 13.1).
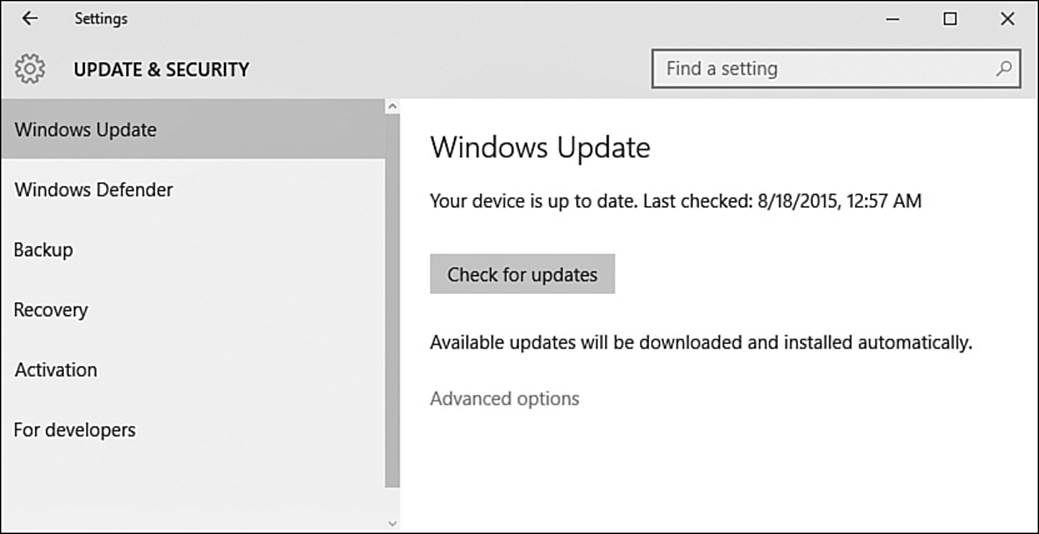
FIGURE 13.1 The Windows Update pane on the Update & Security screen of the Settings app shows any available updates. You can click the Check for Updates button to force a check for any updates released since Windows last checked.
Now look at the readouts in the Windows Update pane:
![]() Status. At the top of the Windows Update pane, you’ll see a status summary, such as “Your device is up to date” followed by the date and time Windows last checked for updates, or “Updates are available” followed by a summary of the updates.
Status. At the top of the Windows Update pane, you’ll see a status summary, such as “Your device is up to date” followed by the date and time Windows last checked for updates, or “Updates are available” followed by a summary of the updates.
![]() Available updates. This readout shows your current setting, such as “Available updates will be downloaded and installed automatically.”
Available updates. This readout shows your current setting, such as “Available updates will be downloaded and installed automatically.”
If you want to change your settings, click the Advanced Options link at the bottom of the Windows Update pane. In the Advanced Options pane that appears (see Figure 13.2), you can choose the following settings:
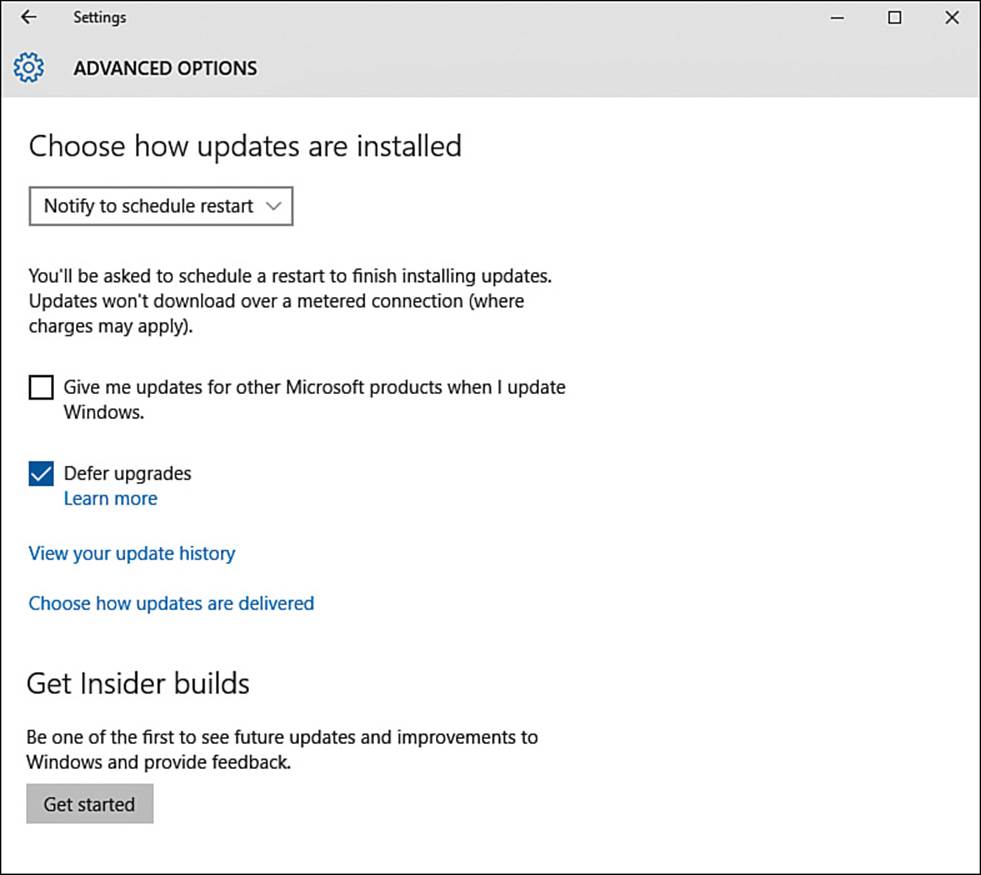
FIGURE 13.2 In the Advanced Options pane, choose how to receive updates for Windows.
![]() Choose How Updates Are Installed. In this drop-down menu, choose Automatic (Recommended) if you want to install updates automatically. Choose Notify to Schedule Restart if you prefer to control when Windows installs the updates.
Choose How Updates Are Installed. In this drop-down menu, choose Automatic (Recommended) if you want to install updates automatically. Choose Notify to Schedule Restart if you prefer to control when Windows installs the updates.
![]() Note
Note
The Defer Upgrades check box doesn’t appear in Windows 10 Home Version.
![]() Caution
Caution
Windows Update tries to avoid downloading updates over a metered Internet connection, such as a 3G connection or an LTE connection on a cellular-capable tablet or laptop. This limitation is eminently sensible but may not always work as intended. If your computer sometimes uses a metered Internet connection (whether cellular or not), you may find it wise to check for updates manually when your computer is safely using a nonmetered connection.
![]() Give Me Updates for Other Microsoft Products When I Update Windows. Check this check box if you want your computer to download updates for other Microsoft software installed on your computer when it gets updates for Windows.
Give Me Updates for Other Microsoft Products When I Update Windows. Check this check box if you want your computer to download updates for other Microsoft software installed on your computer when it gets updates for Windows.
![]() Note
Note
When installing updates automatically, Windows tries to select a time that you don’t normally use your computer, such as 3:00 a.m. This usually works pretty well, but if you need to have your computer available at all hours of the day and night, you may prefer to install updates only at times that suit you.
![]() Defer Upgrades. Check this check box if you want to delay the downloading and installation of new features.
Defer Upgrades. Check this check box if you want to delay the downloading and installation of new features.
![]() Note
Note
The Defer Upgrades feature applies only to new features. Even if you check the Defer Upgrades check box, Windows still downloads and installs security upgrades.
![]() Get Started. Click the Get Started button in the Get Insider Builds section if you would like to test future updates and improvements to Windows. Insider builds enable you to see fixes and new features and to provide feedback on them before Microsoft unleashes them on the wider world. Once you’ve signed up for this program, the Stop Insider Builds button appears in place of the Get Insider Builds button, giving you an escape route.
Get Started. Click the Get Started button in the Get Insider Builds section if you would like to test future updates and improvements to Windows. Insider builds enable you to see fixes and new features and to provide feedback on them before Microsoft unleashes them on the wider world. Once you’ve signed up for this program, the Stop Insider Builds button appears in place of the Get Insider Builds button, giving you an escape route.
![]() Caution
Caution
Don’t use Insider builds of Windows on any computer whose contents you value or that you require for day-to-day use.
Why Might You Not Want to Install Updates Automatically?
Installing updates as soon as possible can help not only keep your computer running smoothly but also eliminate existing bugs and keep it protected against online threats. So in general, allowing Microsoft to check for and install updates automatically is a great boon—especially if you’re more interested in getting things done with your computer than spending time coping and configuring it.
The downside to installing updates automatically is that some updates can sometimes cause problems on some computers. Microsoft works hard to make sure updates work, both for altruistic reasons and because updates causing problems rather than fixing them produces a publicity nightmare for the company. But given the extreme variety of computers that run Windows, it’s impossible for Microsoft to check everything.
So if your computer contains data and apps you can’t do without, you may prefer to wait a few days after Microsoft releases an update before installing it. If you hear howls of distress from the Twittersphere, social media, or your colleagues, wait until Microsoft releases a fix for any problems the update causes. But if the update installs without fuss—as most updates do—install it on your computer as soon as is convenient, because waiting longer may mean leaving your computer open to any threats against which the update provides protection.
Applying an Update
If you find Windows has scheduled a restart to apply an update, as in Figure 13.3, look at the time and date to make sure they suit you. If so, leave the We’ll Schedule a Restart During a Time You Usually Don’t Use Your Device option button selected. If not, click the Select a Restart Time option button, set the time in the Time box, and choose the day in the Day drop-down menu.

FIGURE 13.3 If Windows has scheduled a restart to apply an update it has downloaded, you can change the time and day or simply click Restart Now to install the updates without waiting.
Alternatively, save any documents that contain unsaved changes, and then click the Restart Now button to apply the updates now.
![]() Caution
Caution
Interrupting Windows while it’s applying updates can prevent your computer from running stably—so don’t apply updates just before you have to grab your computer and head for work or for the airport. Instead, look at the length of time that appears in the paragraph of text under the A Restart Has Been Scheduled heading (such as “The install may take 10–20 minutes”), and allow yourself plenty of time beyond that just to be safe.
Backing Up Key Files with File History
File History is a powerful feature that enables you to save copies of your files to an external drive or a network share so that you can recover them after disaster strikes. File History tracks files in the folders you specify and automatically backs up any file to which you make changes.
File History is not enabled by default, so you must enable it.
![]() Note
Note
File History requires an external drive or a network share so that it provides protection even if your computer suffers a serious mishap. If you use an external drive, it is best to dedicate that drive to File History rather than using the drive for other purposes as well. If you are buying a new drive for File History, get one with several terabytes of storage so that you will be able to keep File History for several months.
Enabling File History
After attaching an external drive or connecting to a network share, follow these steps to enable File History:
1. Choose Start, Settings to open the Settings window.
2. Click Update & Security to display the Update & Security screen.
3. In the left column, click Backup to display the Backup pane (see Figure 13.4).
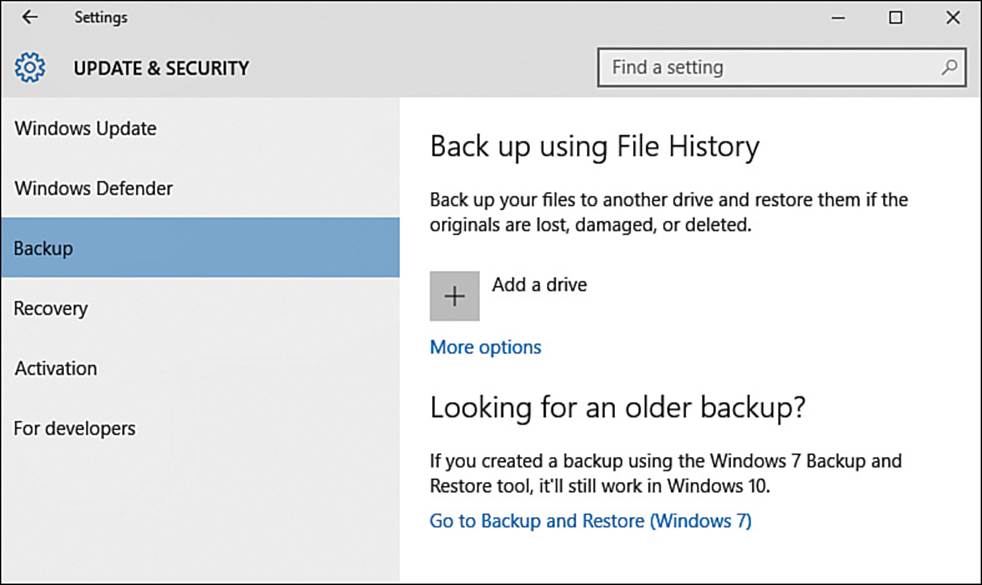
FIGURE 13.4 In the Backup pane in the Settings app, click Add a Drive to add the drive you will use for File History.
4. Click Add a Drive to display the pop-up panel for adding a drive.
5. Click the drive you want to use. The Automatically Back Up My Files switch appears in the Backup pane, set to On (see Figure 13.5).

FIGURE 13.5 After you select the drive, the Backup pane displays the Automatically Back Up My Files switch and sets it to On.
6. Click the More Options link to display the Backup Options screen. The left screen in Figure 13.6 shows the top part of the screen, and the right screen shows the bottom part.
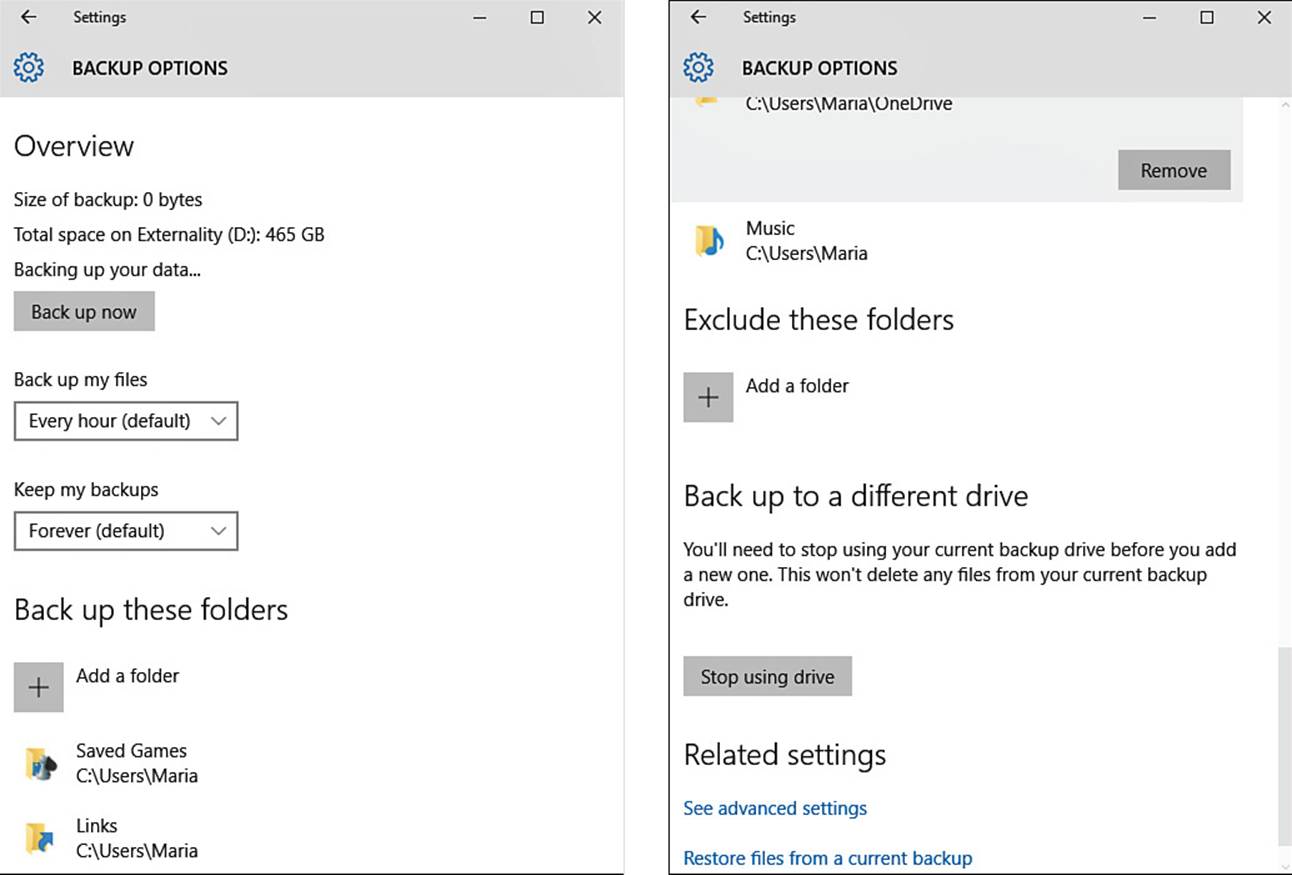
FIGURE 13.6 On the Backup Options screen, you can choose how frequently to back up your files, how long to keep the backups, and which folders to back up.
7. Open the Back Up My Files drop-down menu and select the backup frequency. Your options run from Every 10 Minutes to Daily; the default is Every Hour, which works well for general use.
8. Open the Keep My Backups drop-down menu and choose how long to keep the backups: Until Space Is Needed; a length of time ranging from 1 Month to 2 Years; or Forever, which is the default.
9. Use the controls in the Back Up These Folders list to specify which folders to back up. You can click the Add a Folder button to add a folder. To remove a folder, click its button, and then click the Remove button that appears.
10. Use the Add a Folder button in the Exclude These Folders list to specify any folders you want to exclude from the backups. For example, you might exclude folders containing music or movies that you have stored elsewhere; this would keep down the size of backups and allow more backups to fit on the backup drive.
11. If you want to back up your files now rather than waiting for the next interval you specified in step 7, click the Back Up Now button near the top of the window.
File History is now set to back up your files.
Using History to Restore Files
After enabling File History, you can use it to restore the files you need. To do so, follow these steps:
1. Choose Start, Settings to open the Settings window.
2. Click Update & Security to display the Update & Security screen.
3. In the left column, click Backup to display the Backup pane.
4. Click More Options to display the Backup Options screen.
5. In the Related Settings section at the bottom of the screen, click the Restore Files from a Current Backup link to open the File History window (see Figure 13.7).
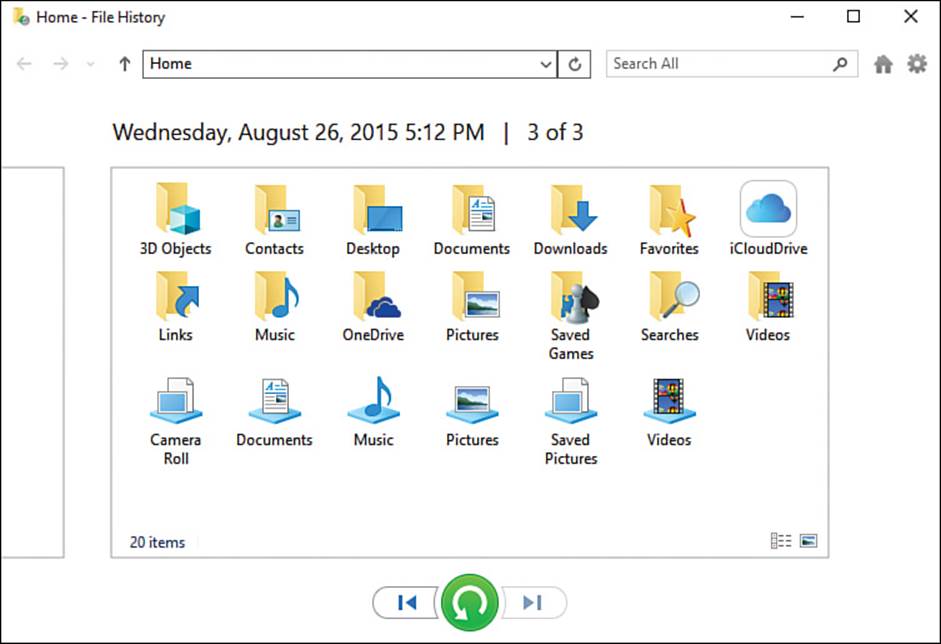
FIGURE 13.7 In the File History window, navigate to the backup you want to use, select the item you want to recover, and then click the green Restore to Original Location button.
6. At the bottom of the window, click the Previous Version button (the left arrow) or the Next Version button (the right arrow) to move to the version you want.
![]() Tip
Tip
You can press Ctrl+left arrow to display the previous version or Ctrl+right arrow to display the next version.
7. Navigate to the folder that contains the item or items you want to recover.
8. Click the item or items.
9. Click the Restore to Original Location button (the green button with the curling arrow) to restore the item.
10. If the Replace or Skip Files dialog box opens, click the Replace the File in the Destination button, the Skip This File button, or the Compare Info for Both Files button, as appropriate.
11. When you finish restoring files, click the Close button (the × button at the right end of the title bar) to close the File History window.
Resolving Issues in Action Center
Windows monitors your computer’s system to identify any problems. When it discovers issues you need to deal with, it displays a message in the Action Center pane to let you know. For example, in Figure 13.8, the Security and Maintenance section contains a recommendation to disable three apps that are starting automatically, because such automatic startup may sap performance.

FIGURE 13.8 In the Action Center pane, you can click a message such as the Security and Maintenance message shown here to go directly to the Windows tool for dealing with the issue.
![]() Note
Note
The Action Center icon in the notification area appears white when you have new notifications and dark when you have none. You can open Action Center by clicking the Action Center icon in the notification area or by swiping in from the right side of a touchscreen.
Click a message to open or activate the Windows tool that enables you to deal with the issue. For example, if you click the Disable Apps message shown in this example, Windows opens Task Manager and displays the Startup tab (see Figure 13.9) so that you can disable the apps that are set to start automatically.
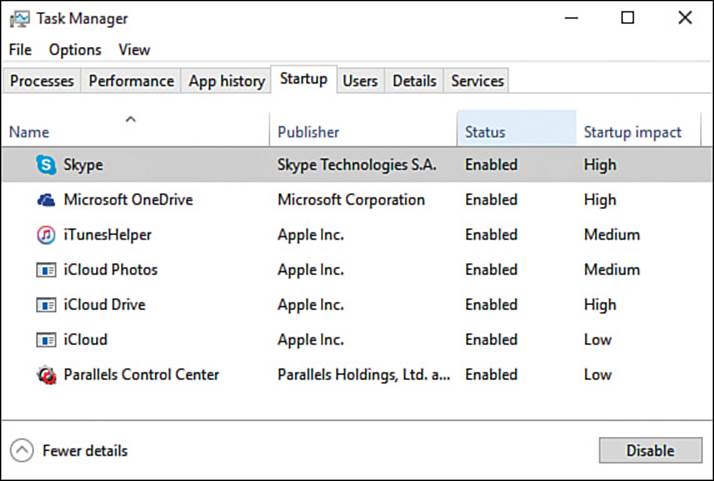
FIGURE 13.9 You can use the Startup tab of Task Manager to disable apps that are set to start automatically.
![]() Note
Note
See the section “Reducing the Number of Startup Items” in Chapter 8 and the section “Managing the Apps You’re Running” in Chapter 9 for detailed coverage of Task Manager.
Reviewing Security and Maintenance Issues
To check the status of your computer, you can review messages and resolve problems on the Security and Maintenance screen in Control Panel. Follow these steps to open Control Panel and display the Security and Maintenance screen:
1. Right-click or long-press Start to display the shortcut menu.
2. Click Control Panel to open a Control Panel window.
3. Under the System and Security heading, click the Review Your Computer’s Status link to display the Security and Maintenance screen (see Figure 13.10).
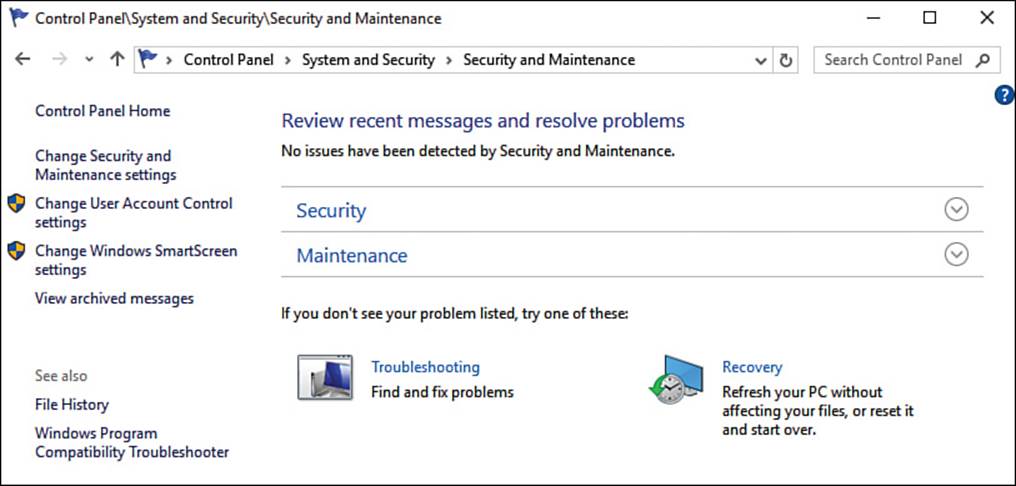
FIGURE 13.10 On the Security and Maintenance screen, see if the Review Recent Messages and Resolve Problems section contains any messages or problems. If not, you can expand the Security section or the Maintenance section to browse the settings.
4. Look at the Review Recent Messages and Resolve Problems section to see whether Windows has identified any issues that need your attention.
5. After dealing with any issues, click the Security heading or the Maintenance heading, depending on which section you want to expand. The section’s settings appear. Figure 13.11 shows the Security section expanded.
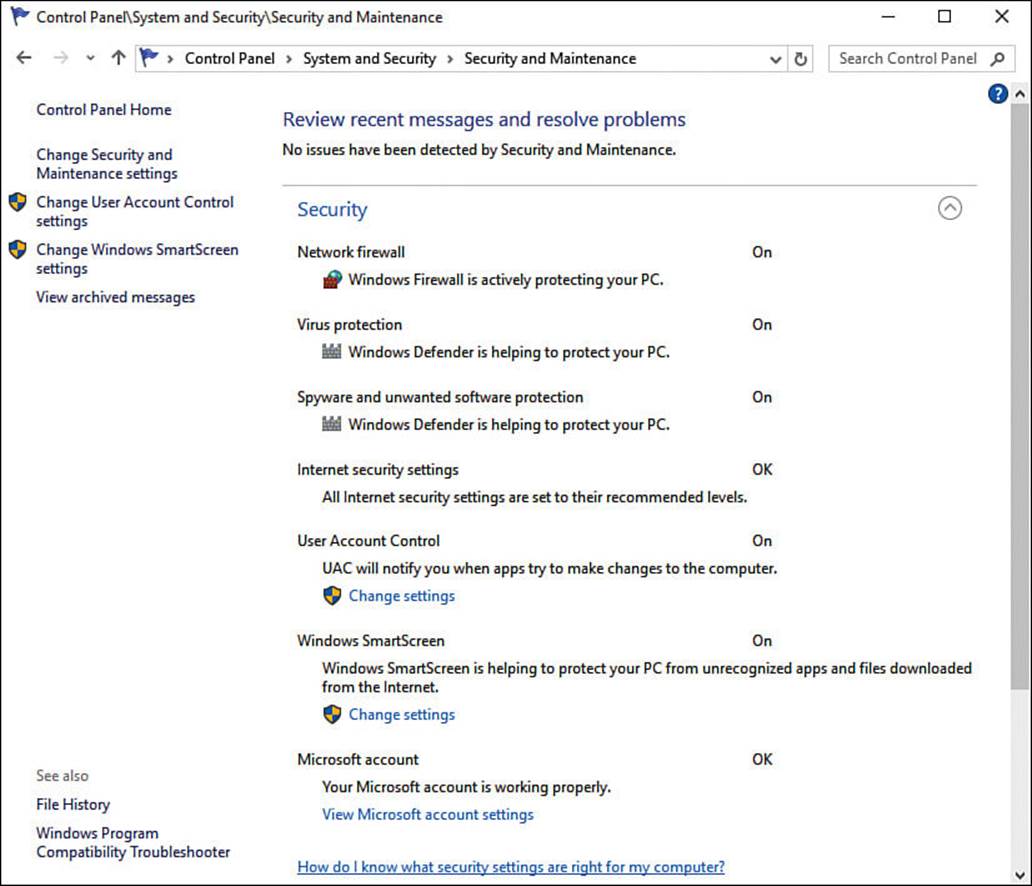
FIGURE 13.11 Review the Security settings to make sure your computer is protected against viruses, spyware, and other threats.
6. Look through the settings to see whether you need to change any. You can click a Change Settings link (such as the one for Windows SmartScreen in Figure 13.11) to change the settings.
Creating and Using System Restore Points
System Restore enables you to save snapshots of your computer’s configuration so that you can restore it to an earlier configuration after a problem occurs. For example, if you install a driver that causes Windows to crash, you may be able to recover by restoring Windows to an earlier configuration.
![]() Caution
Caution
System Restore protects your Windows configuration and enables you to restore it when things go wrong. System Restore doesn’t protect your documents and files at all. So even if you configure System Restore, you must also use File History or another backup tool to protect your documents and files.
Creating System Restore Points
Windows can create system restore points automatically, but you can also create them manually as needed. If System Restore is not enabled on your computer, you need to enable it.
Displaying the System Protection Tab of the System Properties Dialog Box
To work with System Restore, first display the System Protection tab of the System Properties dialog box by following these steps:
1. Right-click or long-press Start to display the shortcut menu.
2. Click System to open a Control Panel window to the System window.
![]() Tip
Tip
You can open the System window from the keyboard by pressing Windows Key+Break.
3. In the left pane, click System Protection to display the System Protection tab of the System Properties dialog box (see Figure 13.12).
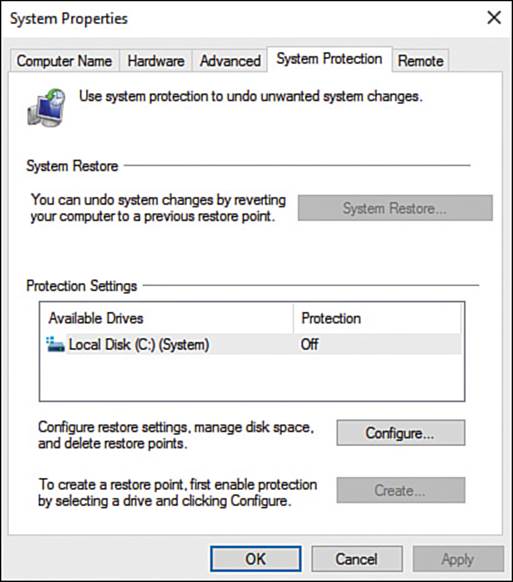
FIGURE 13.12 You can configure System Restore from the System Protection tab of the System Properties dialog box.
Configuring System Restore to Suit Your Needs
Now that you’ve displayed the System Protection tab of the System Properties dialog box, you can configure System Restore to meet your needs. Follow these steps:
1. In the Protection Settings box, click the drive you want to affect. For most computers, you’ll want to protect the system drive, which is usually the C: drive.
2. Click the Configure button to display the System Protection for Local Disk dialog box for the drive (see Figure 13.13).
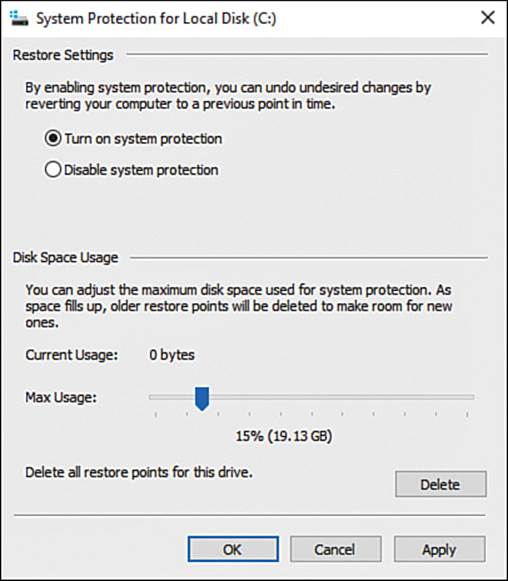
FIGURE 13.13 In the System Protection for Local Disk dialog box, select the Turn On System Protection option button and drag the Max Usage slider to the appropriate point.
3. In the Restore Settings area at the top of the dialog box, select the Turn On System Protection option button instead of the Disable System Protection option button.
4. In the Disk Space Usage area, drag the Max Usage slider to the appropriate point on the scale—for example, 15%.
![]() Note
Note
You can click the Delete button in the System Protection for Local Disk dialog box to delete all the restore points that System Restore has created. Normally, you’d do this only if you’ve run out of space on the drive and you’ve exhausted all your other options for reclaiming space.
5. Click the OK button to apply your changes and close the System Protection dialog box.
Now that you’ve set up System Restore, it creates restore points automatically on its own schedule and when you take actions that may destabilize Windows, such as installing unapproved third-party software. You can also create restore points manually as explained in the next section.
Creating System Restore Points Manually
You can create system restore points manually at any time you want. Normally, you’d create a restore point before taking an action that might cause Windows to become unstable, such as updating the driver software for a device or installing an app from a source other than the Microsoft Store.
To create a restore point manually, follow these steps:
1. Display the System Protection tab of the System Properties dialog box. For example, press Windows Key+Break and then click System Protection in the left pane of the System window.
2. Click the Create button to display the System Protection: Create a Restore Point dialog box (see Figure 13.14).
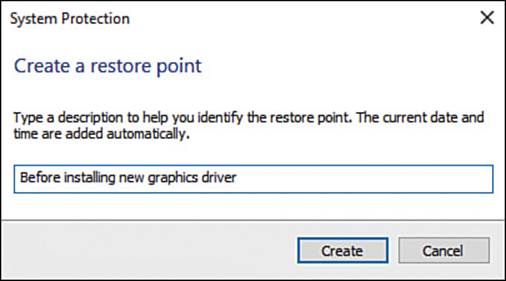
FIGURE 13.14 In the System Protection: Create a Restore Point dialog box, type the name or description for the restore point, and then click the Create button.
3. Type a description for the restore point, such as Before installing new graphics driver. Windows automatically adds the date and time to the restore point name, so you don’t need to include those details.
4. Click the Create button. Windows creates the restore point and then displays a System Protection dialog box saying that it was created successfully.
5. Click the Close button to close the System Protection dialog box.
6. Click the OK button to close the System Properties dialog box.
Restoring Windows to a System Restore Point
When you need to restore Windows to an earlier configuration, you can use System Restore to go back to a restore point. You can use System Restore in either of two ways, depending on how well (or otherwise) your computer is running:
![]() Launch System Restore from the System Properties dialog box. If Windows is running well enough for you to open the System Properties dialog box, you can launch the System Restore Wizard from there.
Launch System Restore from the System Properties dialog box. If Windows is running well enough for you to open the System Properties dialog box, you can launch the System Restore Wizard from there.
![]() Launch System Restore from the Advanced Options screen in the recovery tools. See the section “Using the Advanced Startup Tools,” later in this chapter.
Launch System Restore from the Advanced Options screen in the recovery tools. See the section “Using the Advanced Startup Tools,” later in this chapter.
Follow these steps to launch the System Restore Wizard when Windows is running normally:
1. Display the System Protection tab of the System Properties dialog box. For example, right-click or long-press Start, click System, and then click System Protection in the left pane of the System window.
2. In the System Restore area, click the System Restore button to launch the System Restore Wizard.
3. On the first screen, click the Next button to display the Restore Your Computer to the State It Was In Before the Selected Event screen of the wizard (see Figure 13.15).
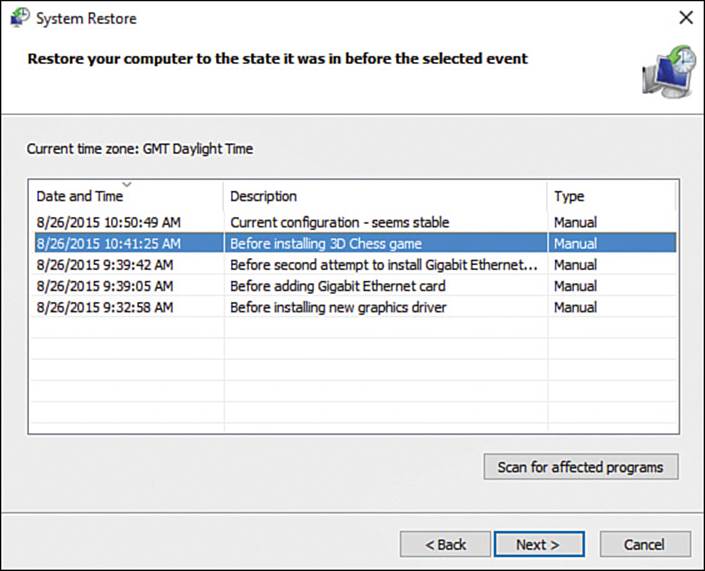
FIGURE 13.15 On the Restore Your Computer to the State It Was In Before the Selected Event screen of the System Restore Wizard, click the restore point you want to use.
4. Click the restore point you want to use.
5. Click the Scan for Affected Programs button to see which apps (if any) will be affected by your restoring Windows to the selected restore point. Windows displays the System Restore dialog box shown in Figure 13.16.
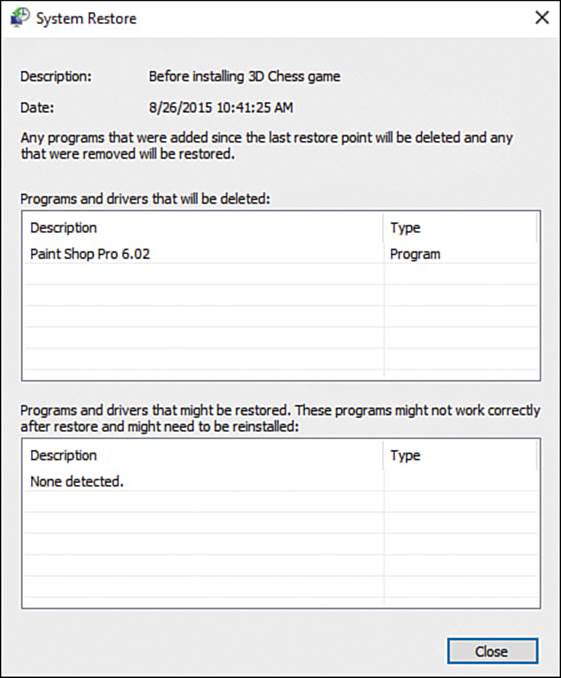
FIGURE 13.16 In this System Restore dialog box, review the Programs and Drivers That Will Be Deleted list box to see which apps and drivers you might need to reinstall after using the restore point.
6. Look at the Programs and Drivers That Will Be Deleted list box to see which apps and drivers Windows will remove when restoring your computer to the restore point you chose. If you need these apps and drivers, you will need to reinstall them.
![]() Note
Note
One or more of the apps or drivers shown in the Programs and Drivers That Will Be Deleted list box might be the cause of whatever problems have prompted you to use System Restore—so you might not need (or want) to install all of them.
7. Similarly, look at the Programs and Drivers That Might Be Restored list box to see which (if any) apps and drivers you may need to reinstall.
8. Click the Close button to close the System Restore dialog box, returning to the Restore Your Computer to the State It Was In Before the Selected Event screen of the wizard.
![]() Note
Note
If the System Restore dialog box shows a long list of apps and drivers that you will need to reinstall, you might want to click the Back button in the System Restore Wizard and try a more recent restore point—if there is one.
9. When you’ve chosen the restore point, click the Next button. The wizard displays the Confirm Your Restore Point screen (see Figure 13.17).
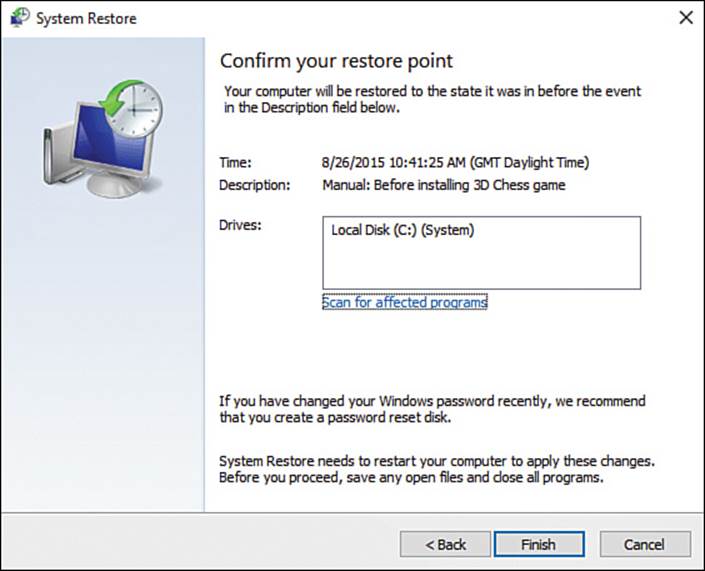
FIGURE 13.17 On the Confirm Your Restore Point screen, verify your choices and then click the Finish button.
10. Look through the details and make sure you’ve chosen the right restore point.
11. Click the Finish button. The wizard displays a warning dialog box (see Figure 13.18).
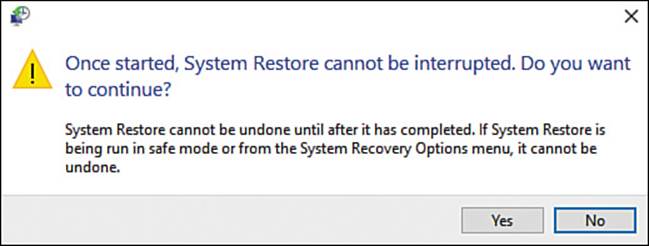
FIGURE 13.18 Click the Yes button in this dialog box to proceed with the System Restore operation; click No if you decide not to run System Restore.
12. Click the Yes button. The wizard closes. System Restore then restarts your computer, displaying progress information as it does so (see Figure 13.19).
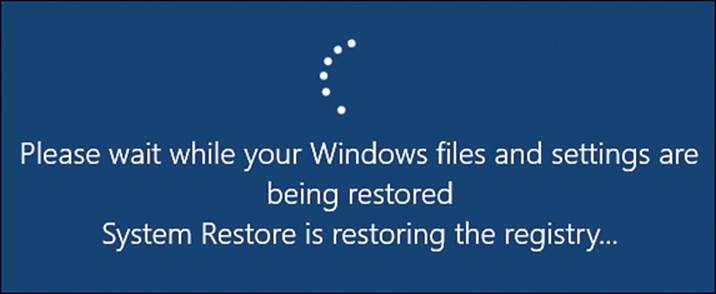
FIGURE 13.19 Wait while System Restore restores the Registry to its previous state.
13. When the lock screen appears, log in as usual. A System Restore dialog box then appears (see Figure 13.20), confirming that the system has been restored to its earlier state.
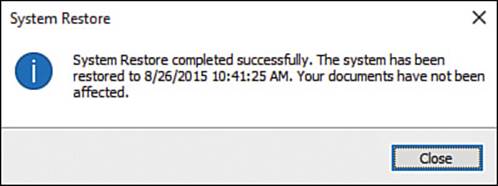
FIGURE 13.20 Windows displays this System Restore dialog box to confirm that it has restored the system to its earlier state.
14. Click the Close button to close the System Restore dialog box. You can then resume using Windows.
Undoing a System Restore Operation
If restoring the system to a restore point doesn’t fix the problems your computer was exhibiting, you can undo the System Restore operation.
![]() Caution
Caution
If you’re going to undo a System Restore operation, you must do so before you make other changes to the system.
To undo the last System Restore operation, follow these steps:
1. Display the System Protection tab of the System Properties dialog box. For example, press Windows Key+Break and then click System Protection in the left pane of the System window.
2. In the System Restore area, click the System Restore button. The System Restore Wizard appears, displaying the Restore System Files and Settings screen (see Figure 13.21).
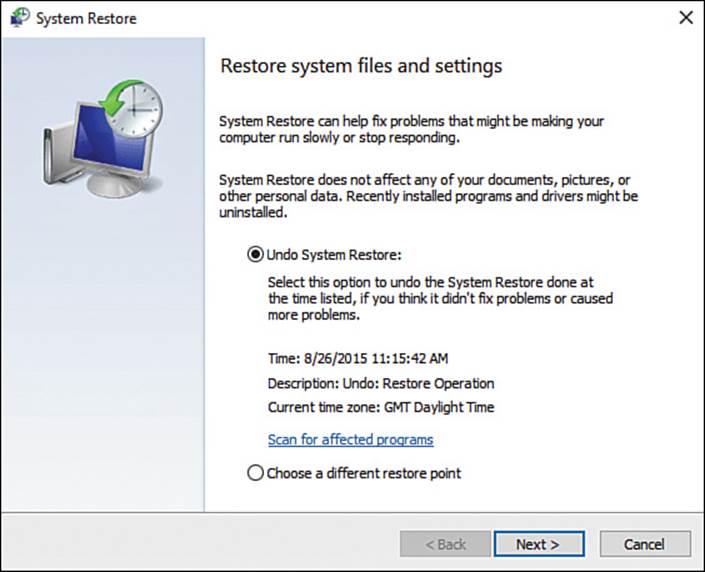
FIGURE 13.21 To undo a System Restore operation, click the Undo System Restore button in this System Restore dialog box.
3. Click the Undo System Restore option button.
![]() Note
Note
Alternatively, you can select the Choose a Different Restore Point option button and see whether you can get better results from another restore point.
4. Click the Next button. The wizard displays the Confirm Your Restore Point screen.
5. Verify that the Description readout is “Undo: Restore Operation.”
6. Click the Finish button. The wizard displays a warning dialog box (shown in Figure 13.18, earlier in this chapter).
7. Click the Yes button, and then wait while System Restore restores your system to the condition it was in before you reverted to the restore point.
Solving Problems with the Recovery Tools
Windows includes several recovery tools that you can use to solve serious problems that occur on your computer:
![]() Reset your PC. You can reset your PC by reinstalling Windows.
Reset your PC. You can reset your PC by reinstalling Windows.
![]() Revert to an earlier build of Windows. If you have updated Windows to a new build that seems to be causing problems, you might be able to go back to the earlier build.
Revert to an earlier build of Windows. If you have updated Windows to a new build that seems to be causing problems, you might be able to go back to the earlier build.
![]() Start up from a USB drive or a DVD drive. If Windows won’t run normally, you can start up from another device to troubleshoot problems or to reinstall Windows.
Start up from a USB drive or a DVD drive. If Windows won’t run normally, you can start up from another device to troubleshoot problems or to reinstall Windows.
![]() Change your PC’s firmware settings. You may sometimes need to change settings in your PC’s firmware, the software that runs the PC’s hardware.
Change your PC’s firmware settings. You may sometimes need to change settings in your PC’s firmware, the software that runs the PC’s hardware.
![]() Change Windows startup settings. If Windows won’t start correctly, you may need to adjust startup settings to enable it to start.
Change Windows startup settings. If Windows won’t start correctly, you may need to adjust startup settings to enable it to start.
![]() Repair Windows startup files. If Windows won’t start correctly, you may need to repair the startup files.
Repair Windows startup files. If Windows won’t start correctly, you may need to repair the startup files.
![]() Restore Windows from a system image. If Windows becomes corrupted, you may be able to restore it from a file that contains an image of how the system was configured.
Restore Windows from a system image. If Windows becomes corrupted, you may be able to restore it from a file that contains an image of how the system was configured.
This section shows you how to use the recovery tools, starting with how to find them.
![]() Tip
Tip
The tools discussed here are the standard Windows tools. Your computer may include other recovery tools that you can invoke by giving a particular command at startup. Read your computer’s documentation to find out about such tools.
Accessing the Recovery Tools
Follow these steps to access the recovery tools:
1. Choose Start, Settings to open the Settings window.
2. Click Update & Security to display the Update & Security screen.
3. In the left pane, click Recovery to display the Recovery pane (see Figure 13.22).
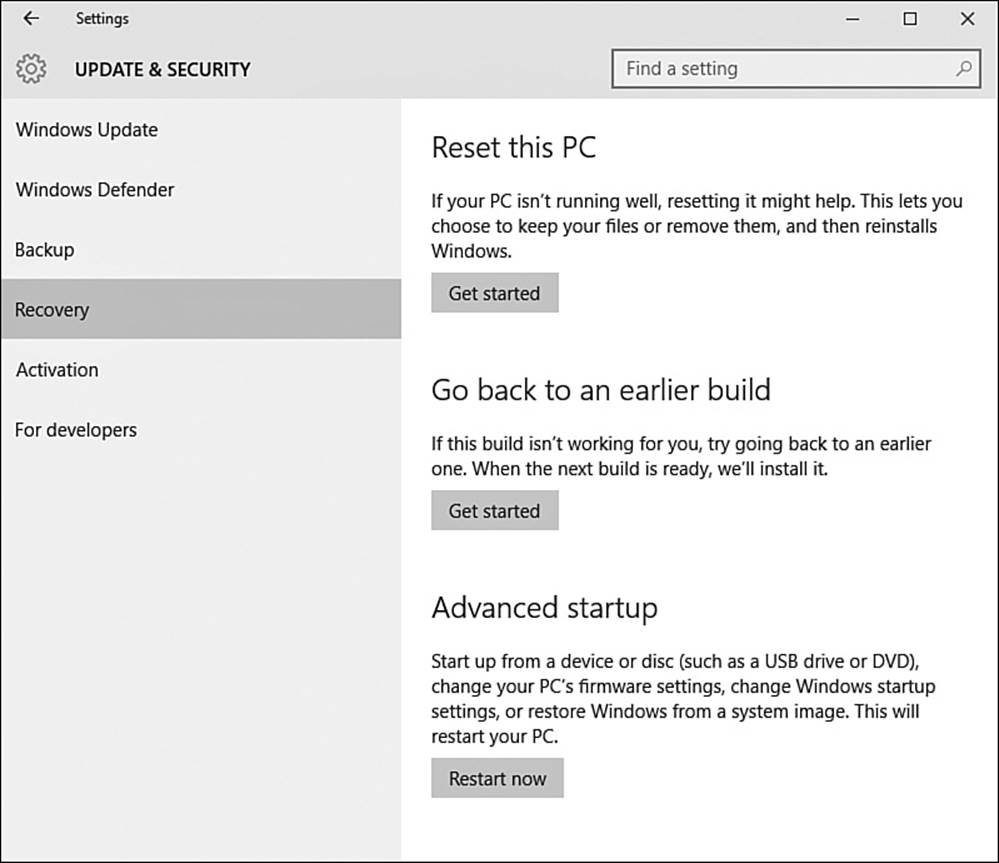
FIGURE 13.22 From the Recovery pane in the Settings app, you can reset your PC, go back to an earlier build of Windows, or perform an advanced startup.
4. Click the button for the tool you want to use. We’ll look at the details in the following sections.
Resetting Your PC
The everyday meaning of “resetting” your PC is to restart it (or, in tech terms, to “power-cycle” it). In the recovery tools offered by Windows, resetting has a different meaning: to reinstall Windows, either keeping your files in place or wiping them out.
To reset your PC, follow these steps from the Recovery pane in the Settings app:
1. Click the Get Started button under the Reset This PC heading. The Choose an Option dialog box opens (see Figure 13.23).
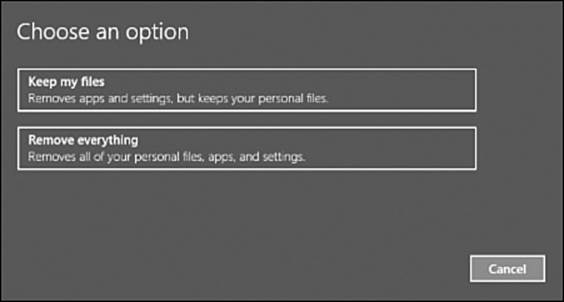
FIGURE 13.23 In the Choose an Option dialog box, choose whether to keep your files when reinstalling Windows or to remove all your files.
2. Click the Keep My Files button if you want to keep your files. Click the Remove Everything button if you’ve backed up your files and you want to wipe the slate clean.
3. Click the Continue button, and wait while the reinstallation completes.
Going Back to an Earlier Build of Windows
If you’ve updated Windows to a new build and find that it doesn’t work well enough, you can go back to the earlier build. To do so, follow these steps from the Recovery pane in the Settings app:
1. Click the Get Started button under the Go Back to an Earlier Build heading. The Why Are You Going Back? dialog box opens.
![]() Note
Note
As you might expect, you can use the Go Back to an Earlier Build feature only if your computer contains an earlier build to which Windows can revert. If you’ve deleted the Previous Version of Windows files on the System and Reserved screen in the Settings app (for example, to recover precious disk space), you won’t be able to go back to that earlier version.
![]() Caution
Caution
To help avoid your computer running low on storage, Windows 10 may delete the files for your earlier version of Windows 30 days after you install the new version. So if you upgrade and wish you hadn’t, revert to the earlier version soon rather than waiting to see if the new version grows on you.
2. Check the check box for each of the preset reasons that apply, such as My Apps or Devices Don’t Work on This Build, or check the For Another Reason check box and vent your frustrations in the Tell Us More box.
3. Click the Next button. The What You Need to Know dialog box appears (see Figure 13.24).
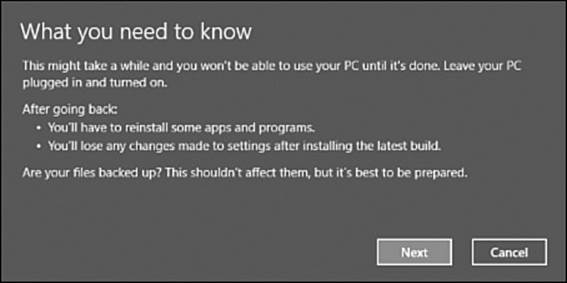
FIGURE 13.24 When going back to an earlier build of Windows, read the information in the What You Need to Know dialog box, and then click the Next button.
4. Read the dialog box information and click the Next button if you want to continue. The Don’t Get Locked Out dialog box opens, prompting you to make sure you know the password for your earlier version of Windows.
5. Click the Next button. The Thanks for Trying Out This Build dialog box opens.
6. Click the Go Back to Earlier Build button, and then wait while Windows rolls itself back to the previous version.
Using the Advanced Startup Tools
If you want to use any of the other startup tools, such as starting your computer from a USB drive or changing Windows startup settings, click the Restart Now button under the Advanced Startup heading on the Recovery screen in the Settings app.
Your computer restarts and then displays the Choose an Option screen (see Figure 13.25).
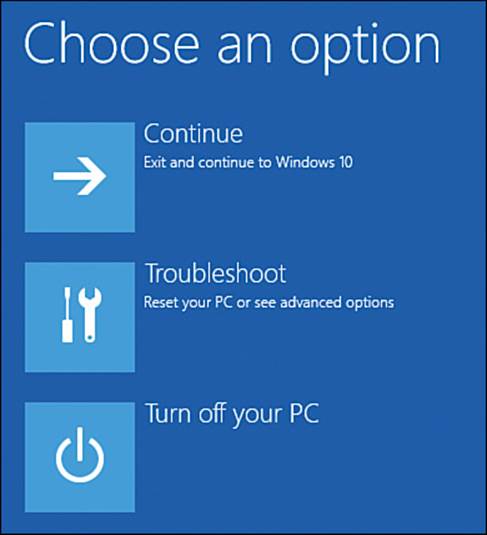
FIGURE 13.25 On the Choose an Option screen, click the Troubleshoot button to access the advanced startup tools.
![]() Caution
Caution
On your computer, the Choose an Option screen, the Troubleshoot screen, and the Advanced Options screen may show different options than those shown here. In case that’s not confusing enough, the options shown here may appear on different screens—so move deliberately and keep your wits about you.
Click the Troubleshoot button. The Troubleshoot screen appears (see Figure 13.26).
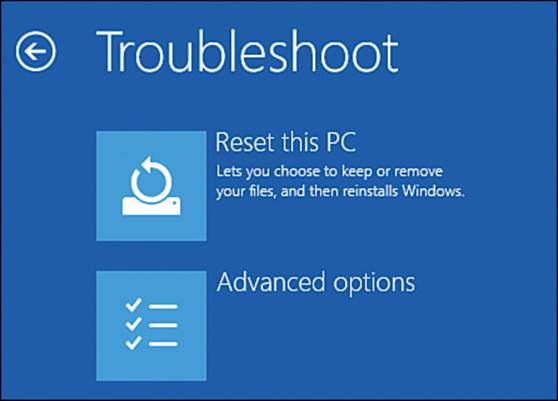
FIGURE 13.26 On the Troubleshoot screen, click the Advanced Options button to display the Advanced Options screen.
Click the Advanced Options button to display the Advanced Options screen (see Figure 13.27).
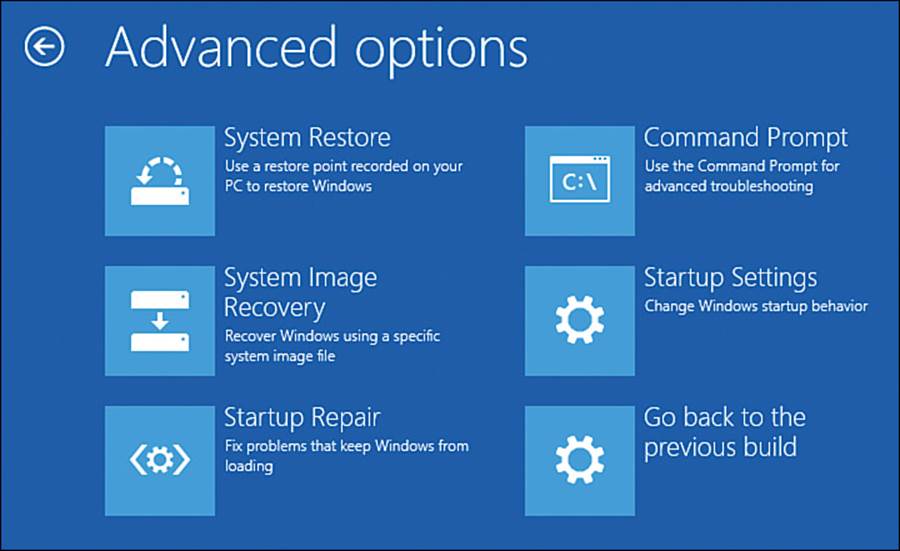
FIGURE 13.27 On the Advanced Options screen, click the button for the advanced startup tool you want to use.
Going Back to an Earlier Restore Point with System Restore
To use System Restore to restore your computer’s system to an earlier restore point, follow these steps:
1. Click System Restore on the Advanced Options screen to display the System Restore screen.
2. In the Choose an Account to Continue list, click your user account.
3. Type the password for your user account when prompted.
![]() Note
Note
The System Restore screen for entering your password shows the keyboard layout that’s currently set. You can click the Change Keyboard Layout button to switch to another keyboard layout if necessary.
4. Click the Continue button. The System Restore Wizard launches and displays its first screen.
5. Continue from step 3 in the section “Restoring Windows to a System Restore Point,” earlier in this chapter.
Restoring Windows from a System Image
If your computer contains a system image that you can use to restore the system, click System Image Recovery on the Advanced Options screen. The Re-Image Your Computer dialog box opens, presenting a list of the available images. Click the image you want to use, and then follow the prompts to restore Windows from it.
![]() Note
Note
The Re-Image Your Computer dialog box also enables you to use a system image that’s available on the network. To do so, select the Use the Latest Available System Image (Recommended) option button, and then specify the details of the system image.
Starting Up from a Usb Drive or a Dvd Drive
If you have a USB drive or a DVD drive containing a bootable image of Windows, you can use it to repair problems in your computer’s system or to reinstall Windows.
To start up from a USB drive or a DVD drive, connect the device before clicking Restart Now. When the Choose an Option screen appears, click the Use a Device button. On the Use a Device screen, click the USB Drive button or the DVD Drive button (as appropriate), and then follow the prompts to start Windows from the device.
![]() Note
Note
On some computers, the Use a Device button may appear on the Advanced Options screen instead of the Choose an Option screen.
Changing Windows Startup Settings
To change Windows startup settings, click the Startup Settings button on the Advanced Options screen, and then click the Restart button on the Startup Settings screen that appears.
After Windows restarts, the Startup Settings screen shown in Figure 13.28 appears. Look at the list of options and press the corresponding number key or function key for the option you want to use. For example, press 4 to enable Safe Mode.
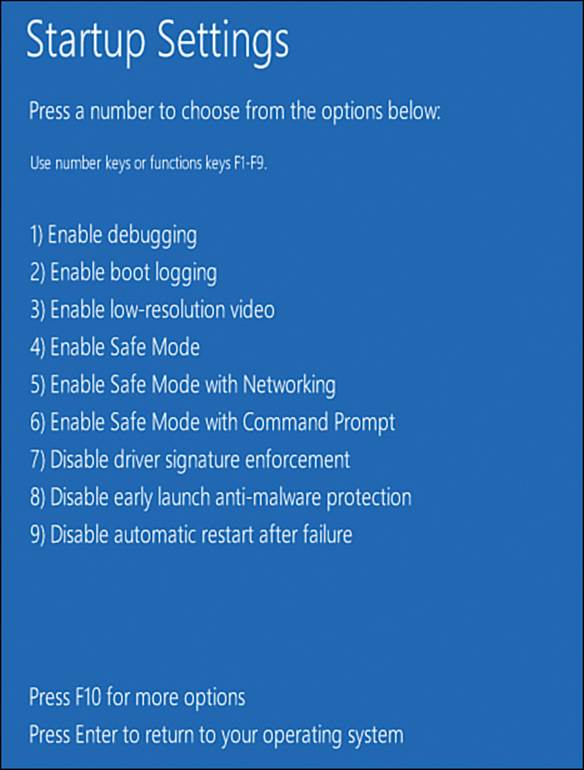
FIGURE 13.28 On the Startup Settings screen, press the number key or function key for the setting you want to use.
![]() Tip
Tip
Safe Mode starts Windows with a limited set of files and drivers and without launching any apps set to run at startup. Safe Mode is especially useful for recovering from misconfigured apps set to run at startup.
Repairing Windows Startup Files
To repair Windows startup files, click the Startup Repair button on the Advanced Options screen. Windows then diagnoses problems with the startup files and repairs them automatically.
When the repair is complete, Windows prompts you to restart your computer. Do so.
Changing Your Computer’s Firmware Settings
To change your computer’s firmware settings, follow these steps:
1. On the Advanced Options screen, click the button with a name such as UEFI Firmware Settings (the name varies depending on the hardware).
2. On the screen that appears, click the Restart button. Your computer restarts and displays the screen for configuring the firmware settings.
3. Change the settings as needed.
![]() Caution
Caution
Before making changes to your computer’s firmware settings, make sure you know what you’re doing. If you don’t have experience with firmware settings, consult an expert, either in person or online.
4. Give the command for committing the changes and restarting your computer.