WINDOWS 10 TIPS AND TRICKS (2016)
12. Communicating via Email and Skype
In This Chapter
![]() Setting up your email accounts
Setting up your email accounts
![]() Communicating via email
Communicating via email
![]() Communicating via Skype
Communicating via Skype
Windows 10 comes with strong features for communicating via email and via text, audio, and video across the Internet. In this chapter, we start out by looking at how to set up your email accounts in the Mail app and how to use Mail to send, receive, and manage email messages. We then move on to installing and setting up Skype, configuring the most important of its many settings, and using it to communicate with your contacts across the Internet.
Communicating via Email
Windows includes the Mail app for sending, receiving, and managing email. In this section, we’ll look at how to set up your email accounts in Mail, how to navigate the app’s interface, and how to configure your email accounts and the Mail app itself.
Setting Up Your Email Accounts
To start working with email, add your email accounts to the Mail app.
Which Email Account Types Can You Use in the Mail App?
The Mail app can check a wide range of account types. As you’d likely expect, Mail can handle Outlook.com accounts—which include accounts from Live.com, Hotmail, and MSN, as well as Outlook.com itself—and Exchange accounts, which include Exchange Server accounts and Office 365 accounts.
Mail can also check Google accounts, such as Gmail and Google Apps accounts; Yahoo! Mail accounts; accounts on Apple’s iCloud service; and accounts that use the standard POP3 and IMAP mail protocols.
If you used a Microsoft account to set up your Windows account, that account will already be set up in the Mail app. You can then add your other email accounts to Mail.
Launch Mail by clicking Start and then clicking Mail. Mail usually appears as a live tile on the Start menu; if not, you can find it in the All Apps list.
The first time you launch Mail, the app displays the Welcome screen. Click Get Started to display the Accounts screen (see Figure 12.1), which shows the accounts you have already set up.
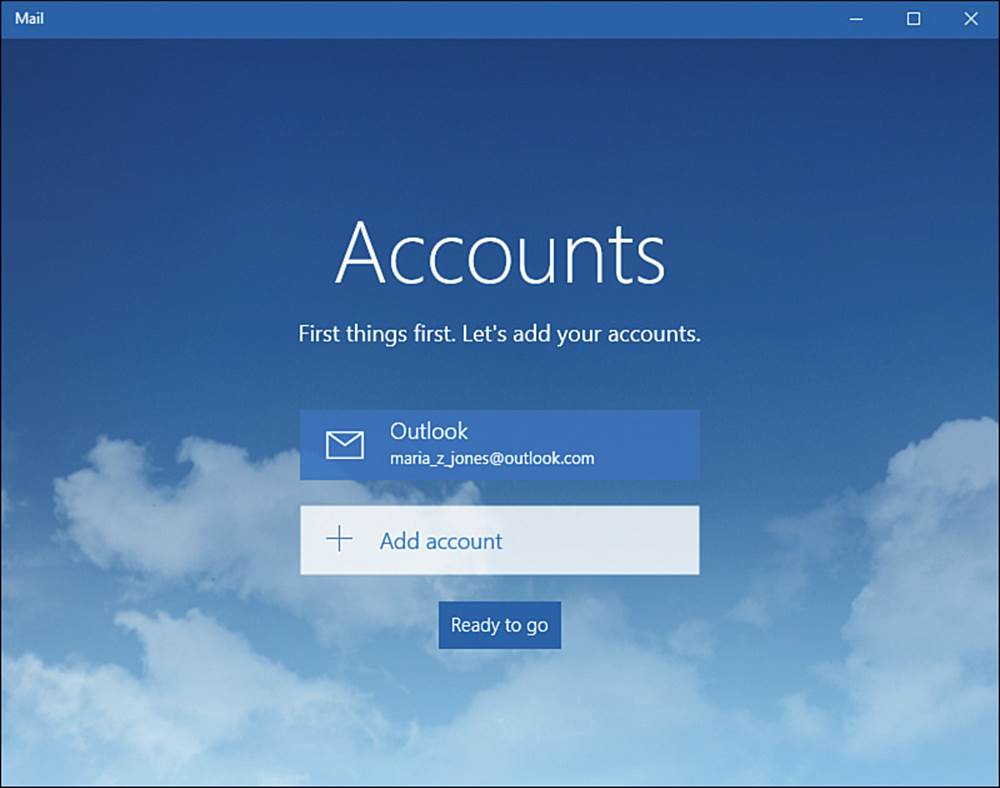
FIGURE 12.1 The Accounts screen shows the accounts you have set up so far in Mail. Click the Add Account button to add another account.
If the list shows all the email accounts you need to use in Mail, you can click the Ready to Go button to start working with Mail; skip ahead to the next section, “Navigating in the Mail App.” But if you have other email accounts, click the Add Account button instead and continue with this section.
When you click Add Account, Mail displays the Choose an Account dialog box (see Figure 12.2). Click the appropriate account type, and then follow the steps in the corresponding subsection that follows.
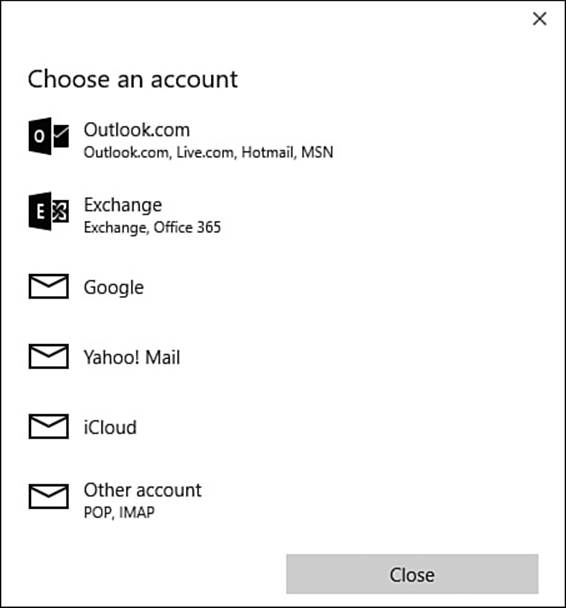
FIGURE 12.2 In the Choose an Account dialog box, click the type of account you want to set up.
Mail makes setting up email accounts as straightforward as possible—but the variety of account types and the occasional balkiness of mail servers means you have to stay on your toes. The following subsections tell you what you need to know to set up the various account types.
Setting Up an Outlook.com Account
If your email account is on Outlook.com, Live.com, Hotmail, or MSN, set it up using the Outlook.com account type. Follow these steps:
1. In the Choose an Account dialog box, click the Outlook.com button. The Add Your Microsoft Account dialog box opens (see Figure 12.3).
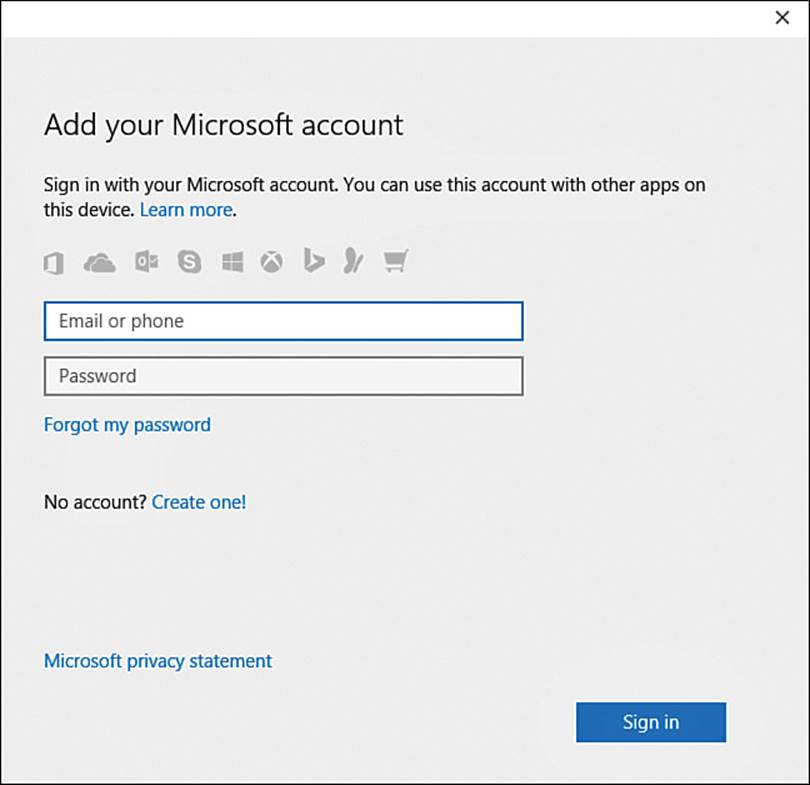
FIGURE 12.3 In the Add Your Microsoft Account dialog box, enter your email address or phone number, type your password, and click the Sign In button.
2. Type your email address or your phone number in the Email or Phone box.
3. Type your password in the Password box.
4. Click Sign In. Mail verifies the account information and then displays the All Done! dialog box to tell you that your account was set up successfully.
5. Click Done. Your account appears in the Accounts screen.
Click the Ready to Go button if you want to start using Mail now, or click the Add Account button if you need to add another account now.
Setting Up an Exchange Account
Exchange Server systems tend to be complex, so you may run into some complications when setting up an Exchange account in Mail.
The account can be either a regular Exchange account, such as you might have for your workplace, logging in to an Exchange Server system; or an Office 365 account, which you might have either as a personal account or as a work account. (Office 365 uses Exchange Server for mail behind the scenes.)
After you click the Exchange button in the Choose an Account dialog box, the Exchange dialog box (see Figure 12.4) prompts you only for your email address instead of asking for your email address and password. When you click the Next button, Mail looks up your account and tries to determine what other information you need to provide for it to set up the account.
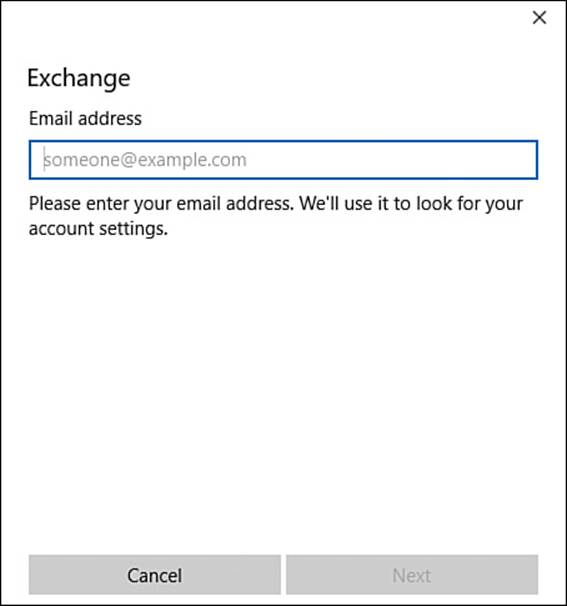
FIGURE 12.4 In the Exchange dialog box, type your email address and then click the Next button. Mail then works out which account details you need to provide.
![]() Note
Note
The information needed to set up an Exchange account varies depending on the account type and the configuration of the Exchange Server system.
Next, Mail normally prompts you for your password. After you provide the password and click the Next button, Mail displays the Heads Up dialog box (see Figure 12.5). This dialog box warns you that “your organization might collect information about you” and that it might “install or remove apps, change settings or disable features, delete content, or reset your device.”
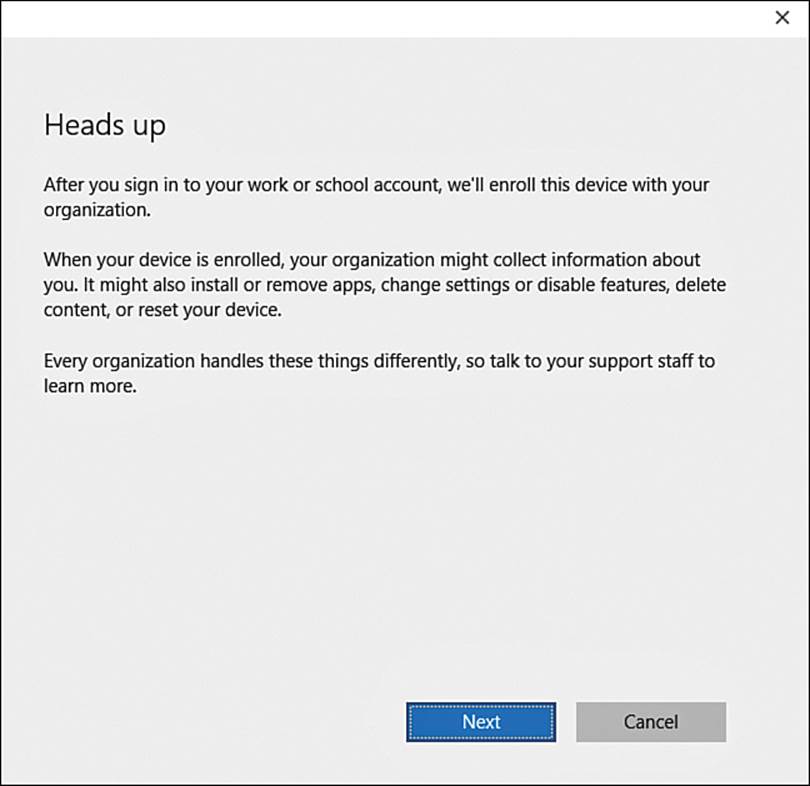
FIGURE 12.5 When you see the Heads Up dialog box, read the warning carefully, and make sure you understand its implications before you click the Next button.
![]() Caution
Caution
It’s vital you understand the implications of the Heads Up warning before you finish setting up the Exchange account. Connecting your computer to an Exchange system enables the Exchange administrator to make changes remotely to your computer. The administrator’s powers include removing apps you need, disabling features you rely on, deleting files you’ve created, and even wiping out all the content on your computer by resetting it.
Under normal circumstances, an administrator would take drastic actions with your computer only if the computer belongs to the company or organization and it goes missing. But if you set up an Exchange account on your personal computer, the administrator has the same powers over it. So you would be well advised to ensure your backup system is working, and to use it regularly.
Assuming you bite the bullet and click the Next button in the Heads Up dialog box, Mail tries to set up the Exchange account. Often this works (as it should do), but sometimes it doesn’t. Mail may prompt you to check your information and try again; if this happens, make sure you’ve entered the email address and the password correctly, and then click Sign-in again.
If Mail displays the Something Went Wrong dialog box shown in Figure 12.6 when you’re trying to set up an Exchange account, you can click the Try Again button to try again with the same information. This sometimes works if the problem is that the server was too busy to respond to Mail’s request. But in most cases the appearance of this Something Went Wrong dialog box indicates that you need to enter more information in order for Mail to be able to set up the account.
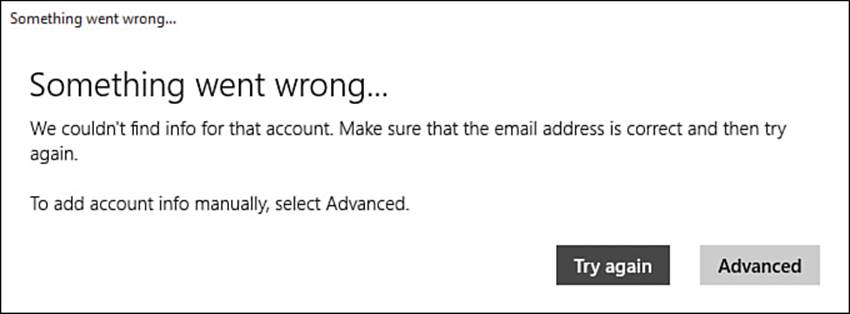
FIGURE 12.6 If the Something Went Wrong dialog box appears when you’re setting up an Exchange account, you usually need to click the Advanced button and provide more information.
To enter this information, click the Advanced button in the Something Went Wrong dialog box. The Exchange dialog box then appears again, but with many more fields for you to fill in (see Figure 12.7). These are the fields:
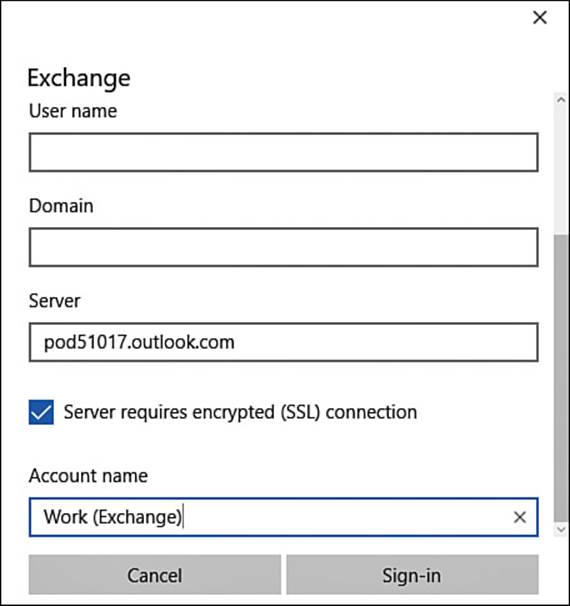
FIGURE 12.7 For some Exchange accounts, you may need to enter further details, such as the full user name, the Exchange domain, and the Exchange server hostname or IP address.
![]() Email Address. This is the email address you entered in the first place. You shouldn’t need to change it.
Email Address. This is the email address you entered in the first place. You shouldn’t need to change it.
![]() Password. This is the password you entered already. You shouldn’t need to change this either.
Password. This is the password you entered already. You shouldn’t need to change this either.
![]() User Name. Type in your user name for the Exchange Server system. Ask the system’s administrator for your user name if you’re not sure what it is. The user name may or may not be the same as your email address.
User Name. Type in your user name for the Exchange Server system. Ask the system’s administrator for your user name if you’re not sure what it is. The user name may or may not be the same as your email address.
![]() Tip
Tip
For some systems, you may need to enter in the User Name box the domain followed by a backslash and your full email address. For example, if your email address is john@surrealmacs.com, you would enter surrealmacs.com\john@surrealmacs.com. This looks awkward, especially if it’s too long to fit in the User Name text box, but it is correct and it does work.
![]() Domain. The domain is an area in the Exchange Server system. Ask your administrator whether you need to enter a domain and (if so) which domain.
Domain. The domain is an area in the Exchange Server system. Ask your administrator whether you need to enter a domain and (if so) which domain.
![]() Note
Note
Using the right domain can be crucial to getting your Exchange Server account to work. Exchange Server systems tend to be complex, and it is hard to guess the domain name. What’s especially awkward is that you may not need to enter a domain name at all, but usually only the administrator can tell you whether to enter it.
![]() Server. Type the host name (such as server1.surrealmacs.com) or the IP address (such as 217.44.81.100) in this box.
Server. Type the host name (such as server1.surrealmacs.com) or the IP address (such as 217.44.81.100) in this box.
![]() Server Requires Encrypted (SSL) Connection. Usually, you’ll need to check this check box in order to connect to the Exchange system.
Server Requires Encrypted (SSL) Connection. Usually, you’ll need to check this check box in order to connect to the Exchange system.
![]() Account Name. Type the descriptive name you want to assign to the Exchange account.
Account Name. Type the descriptive name you want to assign to the Exchange account.
After you’ve entered all this information correctly, click the Sign-in button. When Mail is able to set up the account, it displays the All Done! dialog box; click Done to return to the Accounts screen, where you can set up another account if necessary.
Setting Up a Google Account
Setting up a Google account in the Mail app is usually straightforward. When you click Google in the Choose an Account dialog box, Mail displays the Connecting to a Service dialog box (see Figure 12.8).
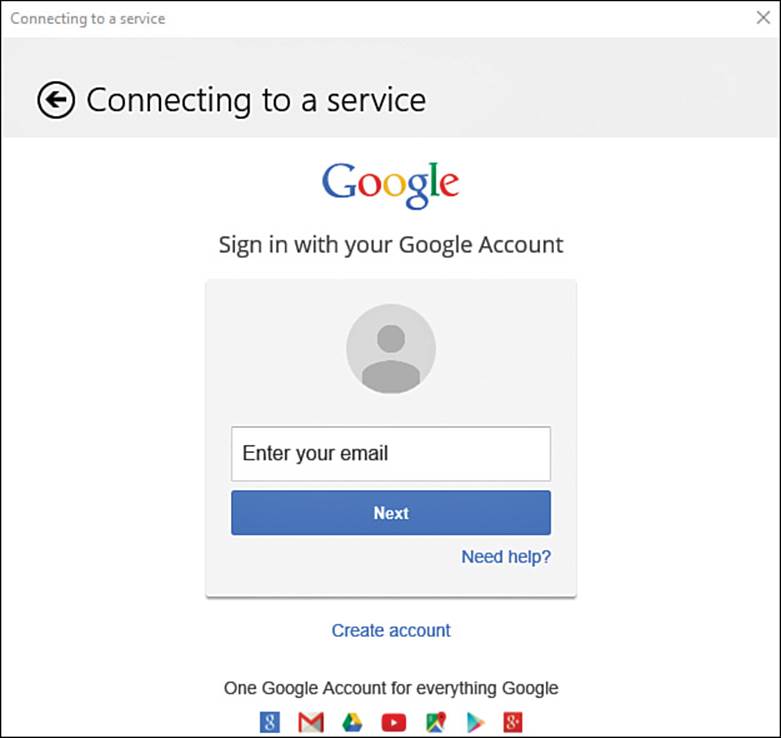
FIGURE 12.8 In the Connecting to a Service dialog box, type the email address for your Google account, and then click the Next button.
Click in the Enter Your Email box, type your email address into it, and then click the Next button. The Connecting to a Service dialog box then prompts you for the authentication information needed. Normally, you just need to type your password in the Password box, and then click the Sign In button.
The Connecting to a Service dialog box then displays a list of what Mail and Windows are asking to do (see Figure 12.9):
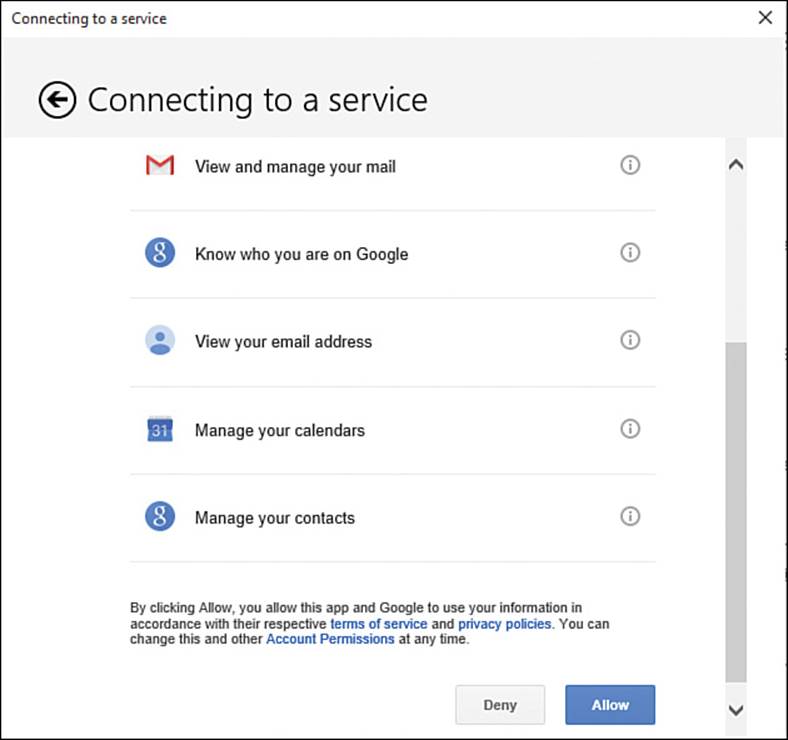
FIGURE 12.9 In this Connecting to a Service dialog box, review the permissions you’re granting to Mail and Windows, and then click the Allow button.
![]() View and Manage Your Mail. You’re allowing Mail to view your email, delete messages and send messages, delete labels, and so on.
View and Manage Your Mail. You’re allowing Mail to view your email, delete messages and send messages, delete labels, and so on.
![]() Know Who You Are on Google. You’re allowing Mail to associate you with your public Google profile.
Know Who You Are on Google. You’re allowing Mail to associate you with your public Google profile.
![]() View Your Email Address. You’re allowing Mail to view your email address.
View Your Email Address. You’re allowing Mail to view your email address.
![]() Manage Your Calendars. You’re allowing Mail to view your calendars in Google Calendar and make changes to them.
Manage Your Calendars. You’re allowing Mail to view your calendars in Google Calendar and make changes to them.
![]() Manage Your Contacts. You’re allowing Mail to view your contacts in Google Contacts and make changes to them.
Manage Your Contacts. You’re allowing Mail to view your contacts in Google Contacts and make changes to them.
All of this is pretty straightforward. You can click an Information button (the i icon) to display a More Info dialog box that shows some more information about the item.
If you’re happy to assign Mail and Windows these permissions, click the Allow button (if not, click the Deny button). Mail sets up the Google account and displays the All Done! dialog box, and you can click the Done button to return to the Accounts screen.
Setting Up a Yahoo! Mail Account or an Icloud Account
Setting up a Yahoo! Mail account or an iCloud account usually presents no problems.
Click the Yahoo! Mail button in the Choose an Account dialog box to display the Yahoo! Mail dialog box, or click the iCloud button to display the iCloud dialog box.
After you enter your email address and password and click the Sign-in button, Mail checks that the credentials are valid. Mail then displays the Your Name dialog box, in which you enter your name the way you want it to appear on messages you send.
Setting Up a POP3 Account or an IMAP Account
When setting up a POP3 account or an IMAP account, you usually need to provide the names of the mail servers to use. Click the Other Account button in the Choose an Account dialog box, enter your email address and password in the Other Account dialog box that opens, and then click the Sign-in button.
Understanding POP3, IMAP, SMTP, and Exchange
POP3, IMAP, SMTP, and Exchange are four technologies widely used for mail servers. POP3 and IMAP are protocols that email clients (such as the Mail app on your computer) use to communicate with incoming mail servers—the servers from which you receive your messages. SMTP is a protocol used for many outgoing mail servers—the servers that send your messages for you. Exchange is Microsoft’s Exchange Server technology for email, scheduling, and calendars.
POP is the acronym for Post Office Protocol, and POP3 is version 3 of Post Office Protocol. IMAP is the acronym for Internet Mail Access Protocol, a newer protocol than POP3. SMTP is the abbreviation for Simple Mail Transfer Protocol, a protocol for sending mail.
The main difference between POP3 and IMAP is that POP3 is mostly designed to download your messages to your email client, removing them from the server, whereas IMAP is designed to enable you to view and manage your messages on the server without downloading them to your email client.
The advantage of IMAP is that, with your messages on the server, you can view and manage them from multiple devices. So if you view a message on your computer, the message is marked as having been read on your other computers and devices as well. And if you delete a message on (say) your tablet, it disappears from your computer’s mailbox too.
Your email provider will tell you which account type—POP3, IMAP, or Exchange—to specify when setting up your account. If your email provider gives you the choice between POP3 and IMAP, you’ll normally want to choose IMAP in Mail on your computer so that you can access your messages on other computers and devices as well.
Mail then tries to look up the email account. If it cannot locate the account, it displays the Other Account dialog box again, prompting you to check the email address. Click the Try Again button.
After another failure or two, Mail displays the Advanced button in place of the Try Again button. Click the Advanced button to display the Internet Email Account dialog box (see Figure 12.10), in which you enter the following details:
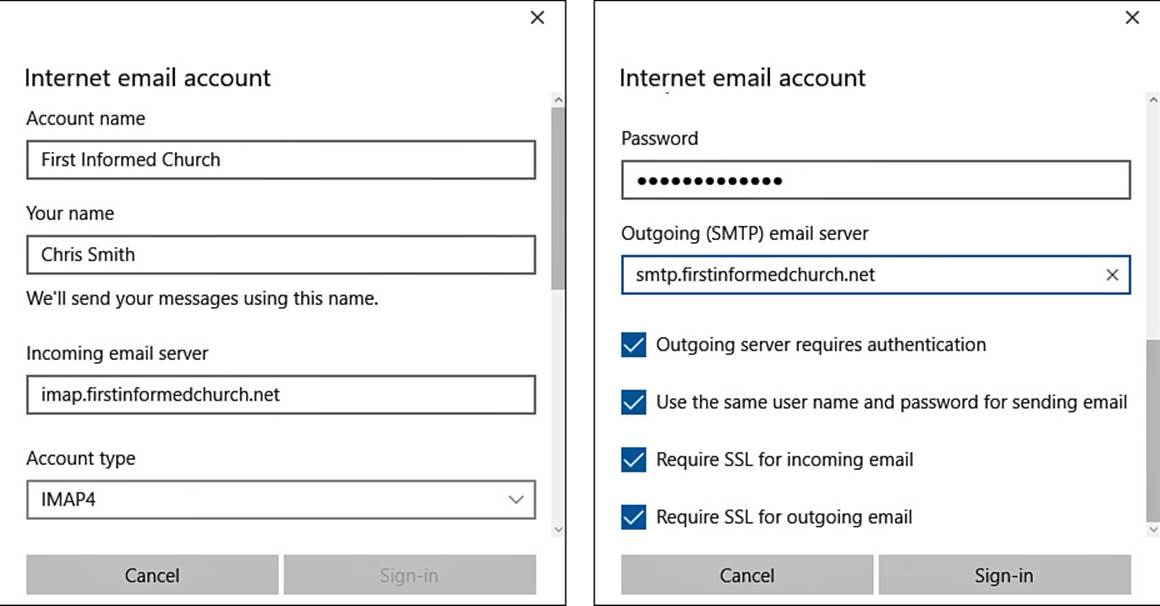
FIGURE 12.10 Enter the details of your POP3 account or IMAP account in the Internet Email Account dialog box.
![]() Account Name. Type the descriptive name you want to see for the account in Mail.
Account Name. Type the descriptive name you want to see for the account in Mail.
![]() Your Name. Type your name the way you want it to appear on messages you send.
Your Name. Type your name the way you want it to appear on messages you send.
![]() Incoming Email Server. Type the address of the incoming mail server, such as pop3.surrealmacs.com or imap.firstinformedchurch.net.
Incoming Email Server. Type the address of the incoming mail server, such as pop3.surrealmacs.com or imap.firstinformedchurch.net.
![]() Account Type. Open this drop-down menu and choose POP3 or IMAP4, depending on your account type.
Account Type. Open this drop-down menu and choose POP3 or IMAP4, depending on your account type.
![]() User Name. Type your email address in this box.
User Name. Type your email address in this box.
![]() Password. Enter your password for the email account. Mail carries over the password you entered in the Other Account dialog box, so you shouldn’t need to enter it again.
Password. Enter your password for the email account. Mail carries over the password you entered in the Other Account dialog box, so you shouldn’t need to enter it again.
![]() Outgoing (SMTP) Email Server. Type the address of the outgoing mail server, such as smtp.surrealmacs.com or imap.firstinformedchurch.net.
Outgoing (SMTP) Email Server. Type the address of the outgoing mail server, such as smtp.surrealmacs.com or imap.firstinformedchurch.net.
![]() Outgoing Server Requires Authentication. Check this check box to use authentication for the outgoing server.
Outgoing Server Requires Authentication. Check this check box to use authentication for the outgoing server.
![]() Note
Note
Most outgoing mail servers require authentication. This security measure helps prevent people from sending junk email messages (spam).
![]() Use the Same User Name and Password for Sending Email. If you check the Outgoing Server Requires Authentication check box, check this check box if your email provider’s system requires you to use the same user name for sending email as for receiving it. If you need to use a different user name or password, uncheck this check box, and then enter the user name and password in the boxes in the Outgoing Server Login Info area, which appears when you uncheck the check box.
Use the Same User Name and Password for Sending Email. If you check the Outgoing Server Requires Authentication check box, check this check box if your email provider’s system requires you to use the same user name for sending email as for receiving it. If you need to use a different user name or password, uncheck this check box, and then enter the user name and password in the boxes in the Outgoing Server Login Info area, which appears when you uncheck the check box.
![]() Require SSL for Incoming Email. Check this check box to use Secure Sockets Layer (SSL) encryption for receiving incoming email. You’ll almost always need to do this.
Require SSL for Incoming Email. Check this check box to use Secure Sockets Layer (SSL) encryption for receiving incoming email. You’ll almost always need to do this.
![]() Require SSL for Outgoing Email. Check this check box to use SSL encryption for outgoing email. Most email systems require you to use SSL.
Require SSL for Outgoing Email. Check this check box to use SSL encryption for outgoing email. Most email systems require you to use SSL.
After entering all this information, click the Sign-in button. After you’ve gotten everything right, the All Done! dialog box opens, and you can click the Done button to return to the Accounts screen.
Closing the Accounts Screen
When you finish adding your email accounts to Mail, click the Ready to Go button in the Accounts screen. The Mail window then appears, and you can start working with email.
Navigating in the Mail App
The Mail app has an easy-to-navigate interface. The following list explains its main components, which are labeled in Figure 12.11.
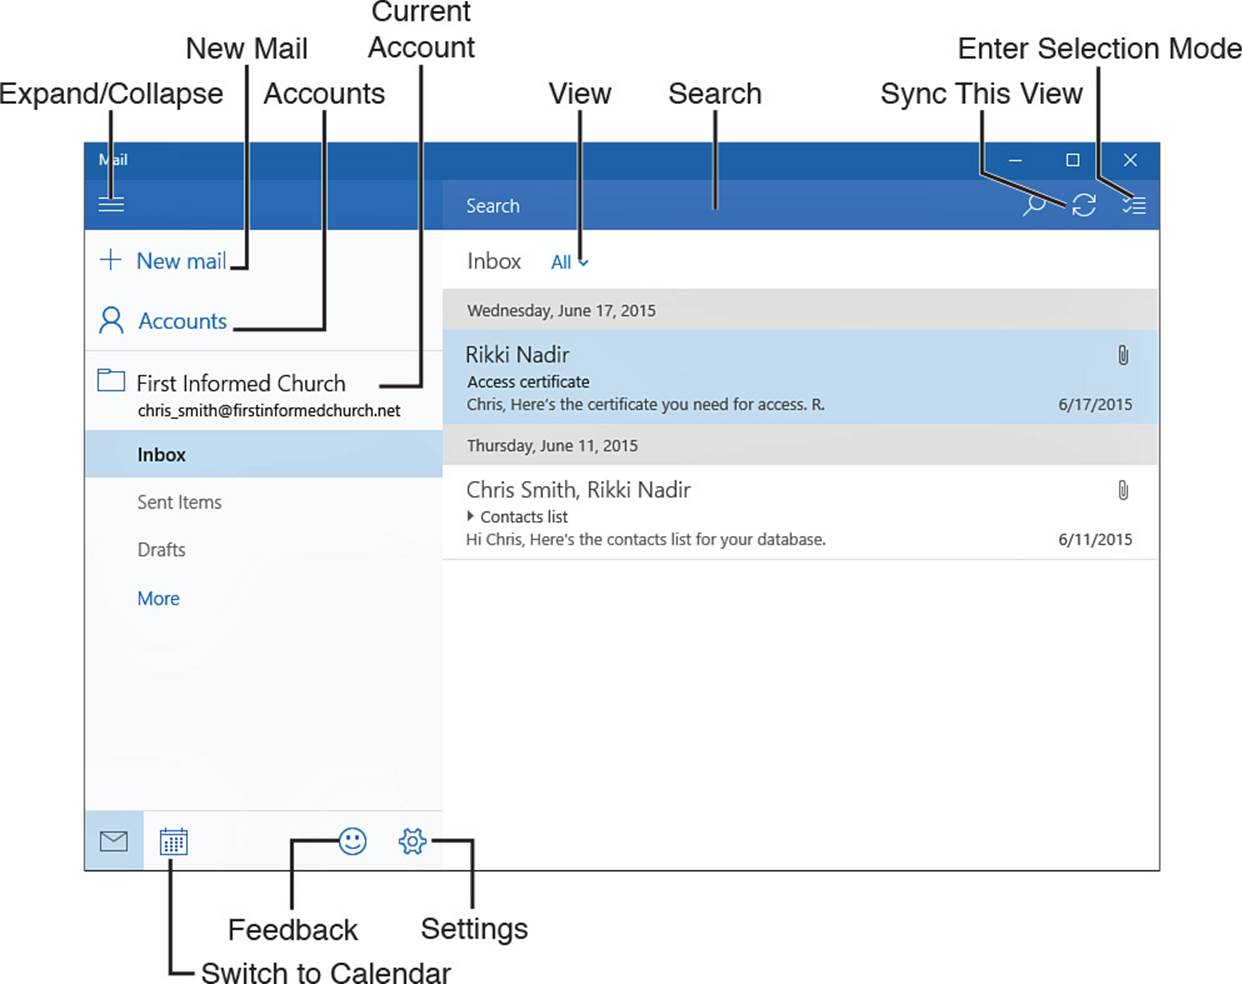
FIGURE 12.11 Mail’s interface is easy to navigate.
![]() Expand/Collapse. Click this button to expand or collapse the sidebar.
Expand/Collapse. Click this button to expand or collapse the sidebar.
![]() New Mail. Click this button to start a new message.
New Mail. Click this button to start a new message.
![]() Search. Click this box, type your search terms, and press Enter.
Search. Click this box, type your search terms, and press Enter.
![]() Sync This View. Click this button to sync the folder you’re viewing.
Sync This View. Click this button to sync the folder you’re viewing.
![]() Enter Selection Mode. Click this button to switch to Selection Mode, which displays a check box to the left of each message so that you can easily select the messages you want to work with.
Enter Selection Mode. Click this button to switch to Selection Mode, which displays a check box to the left of each message so that you can easily select the messages you want to work with.
![]() View. Click this drop-down menu and then click All, Unread, or Flagged to control which messages the view displays.
View. Click this drop-down menu and then click All, Unread, or Flagged to control which messages the view displays.
![]() Accounts. Click this button to display the Accounts pane (see Figure 12.12), in which you can click the account you want to display.
Accounts. Click this button to display the Accounts pane (see Figure 12.12), in which you can click the account you want to display.
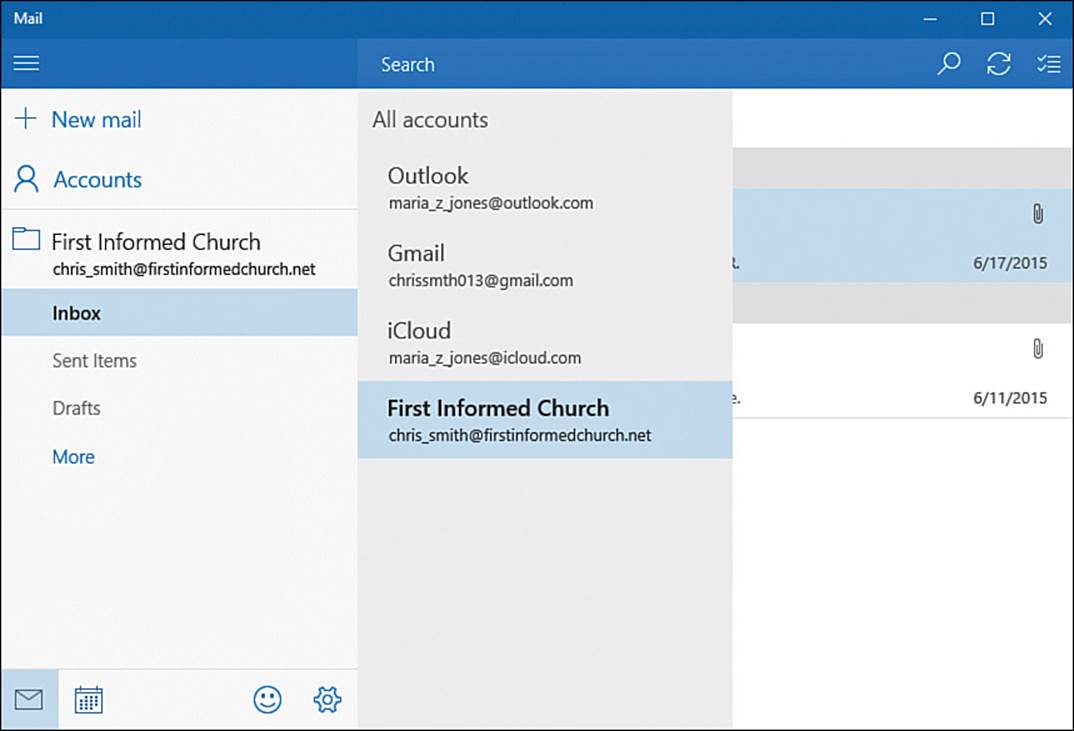
FIGURE 12.12 Click the Accounts button to display the Accounts pane when you want to switch from one email account to another.
![]() Tip
Tip
If you need instant access to an account, right-click or long-press it in either the Accounts pane or the left pane, and then click Pin to Start on the shortcut menu.
![]() Current Account. Click this button to display the folders in the account you’re currently working with. You can then click the folder you want to view.
Current Account. Click this button to display the folders in the account you’re currently working with. You can then click the folder you want to view.
![]() Switch to Calendar. Click this button to switch to the Calendar window. The Calendar window has a corresponding Switch to Mail button that you can click to switch back to the Mail window.
Switch to Calendar. Click this button to switch to the Calendar window. The Calendar window has a corresponding Switch to Mail button that you can click to switch back to the Mail window.
![]() Feedback. Click this button to send Microsoft feedback about Mail.
Feedback. Click this button to send Microsoft feedback about Mail.
![]() Settings. Click this button to display the Settings pane. We’ll dig into the settings later in this chapter.
Settings. Click this button to display the Settings pane. We’ll dig into the settings later in this chapter.
Reading Messages
After you’ve navigated to the account and mailbox you want to view, you see the messages the mailbox contains. As you can see in Figure 12.13, each message has a preview that shows the sender’s name, the message title, and the first part of the message—as much as will fit on a single line in the preview. You can move the mouse pointer over a message to display three action icons—Archive, Delete, and Flag—in the upper-right corner of a message preview, as in the first message in the figure.
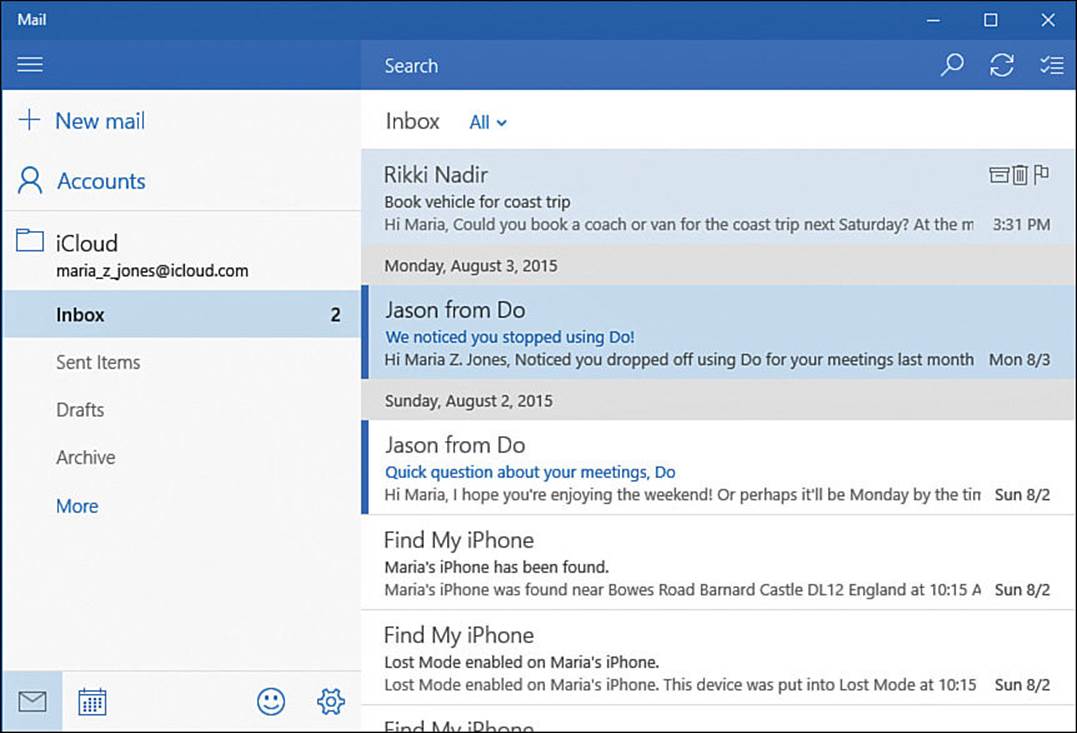
FIGURE 12.13 You can click a message to open it, or simply manage the message directly in the mailbox.
The following list explains the actions you can take with a message from the mailbox. Depending on the account type you’re using, only some of the actions may be available.
![]() Archive the message. Move the mouse pointer over the message, and then click the Archive icon in the upper-right corner.
Archive the message. Move the mouse pointer over the message, and then click the Archive icon in the upper-right corner.
![]() Tip
Tip
If you enable swipe actions, as discussed in the section “Choosing Options for Mail,” later in this chapter, you can swipe left or right to take actions on the message. (You get to choose one action for swiping left and one action for swiping right.)
![]() Delete the message. Move the mouse pointer over the message, and then click the Delete icon in the upper-right corner. Alternatively, right-click or long-press the message, and then click Delete on the shortcut menu.
Delete the message. Move the mouse pointer over the message, and then click the Delete icon in the upper-right corner. Alternatively, right-click or long-press the message, and then click Delete on the shortcut menu.
![]() Set a flag on the message. Move the mouse pointer over the message, and then click the Flag icon in the upper-right corner. Alternatively, right-click or long-press the message, and then click Set Flag on the shortcut menu.
Set a flag on the message. Move the mouse pointer over the message, and then click the Flag icon in the upper-right corner. Alternatively, right-click or long-press the message, and then click Set Flag on the shortcut menu.
![]() Mark the message as read or unread. Right-click or long-press the message, and then click the Mark as Unread item or the Mark as Read item on the shortcut menu. (If you’ve read the message, the Mark as Unread item appears on the shortcut menu; if you haven’t read the message, the Mark as Read item appears.)
Mark the message as read or unread. Right-click or long-press the message, and then click the Mark as Unread item or the Mark as Read item on the shortcut menu. (If you’ve read the message, the Mark as Unread item appears on the shortcut menu; if you haven’t read the message, the Mark as Read item appears.)
![]() Move the message to a folder. Right-click or long-press the message, click Move on the shortcut menu, and then click the appropriate folder in the Move To panel that appears in the middle of the Mail window.
Move the message to a folder. Right-click or long-press the message, click Move on the shortcut menu, and then click the appropriate folder in the Move To panel that appears in the middle of the Mail window.
![]() Tip
Tip
You can also move a message to a folder by clicking the message and dragging it to the left. When the Move To panel appears, drag the message to the appropriate folder and then drop it there.
Dealing with the Make My PC More Secure Dialog Box
If the Make My PC More Secure dialog box (see Figure 12.14) opens, you’ll know that the Exchange account you’ve set up in Mail isn’t fully configured yet. Click the Enforce These Policies button if you want to go ahead and grant the Exchange system the rights it needs in order to administer your computer.
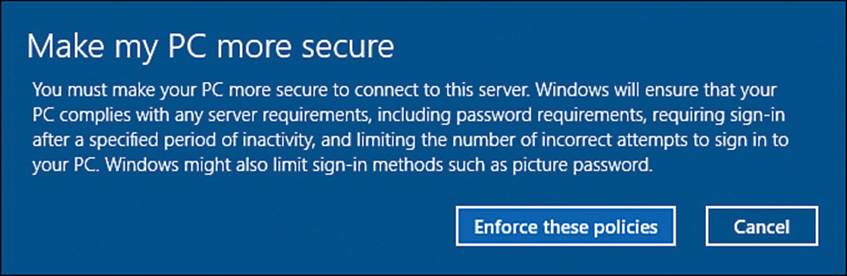
FIGURE 12.14 The Make My PC More Secure dialog box opens if you have set up an Exchange account but not granted the Exchange system the rights to administer your computer.
![]() Note
Note
If you decide you don’t want the Exchange system to administer your computer after all, you’ll need to remove the Exchange account from Mail. Click the Cancel button to close the Make My PC More Secure dialog box, and then follow the instructions in the section “Removing an Email Account from Mail,” later in this chapter.
Configuring Your Email Accounts and the Mail App
To make Mail work your way, you can configure its many settings. Your options include choosing sync settings for an account, setting a background picture, customizing the view so you can read your messages easily, and choosing settings for the Mail app as a whole.
Opening an Account to Change Settings
To start configuring your email accounts, open the account you want to affect. Follow these steps:
1. Click the Settings button in the Mail window to display the Settings pane.
2. Click Accounts at the top of the Settings pane to display the Accounts pane.
3. Click the account to open the dialog box for configuring it.
![]() Tip
Tip
To go straight to the Settings dialog box for an account, right-click or long-press that account in either the Accounts pane or the left pane, and then click Account Settings on the shortcut menu.
Choosing Sync Settings
Click the Change Mailbox Sync Settings button in the Account Settings pane for an account to display the Sync Settings dialog box for the account (see Figure 12.15). You can then configure these settings:
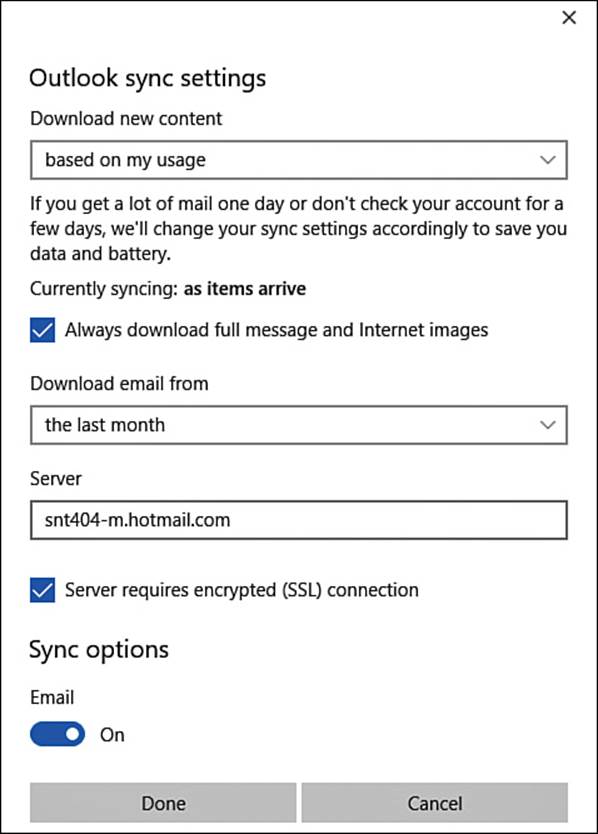
FIGURE 12.15 In the Sync Settings pane for an email account, you can choose how frequently to download new messages, whether to download full messages and images, and how much email to download.
![]() Download New Content. Open this drop-down menu and choose the frequency for downloading new content: As Items Arrive, Based on My Usage, Every 15 Minutes, Every 30 Minutes, Hourly, or Daily. Your account may offer different options.
Download New Content. Open this drop-down menu and choose the frequency for downloading new content: As Items Arrive, Based on My Usage, Every 15 Minutes, Every 30 Minutes, Hourly, or Daily. Your account may offer different options.
What Frequency Should You Choose for Downloading New Content?
How frequently you should download new content depends on the email account and how you use it. For example, for your primary email account, you’ll likely want to choose either the As Items Arrive setting or the Every 15 Minutes setting. For a secondary account you keep for social media, the Daily setting might be more suitable.
You may want to try the Based on My Usage setting for an account you use only occasionally. But in general, choosing a specific interval—even if it is Daily—is clearer for most accounts.
The As Items Arrive setting is great for making sure you get your important messages as soon as possible, but you may find that it chews through battery life on tablets and laptop computers. If you need to dial down the frequency, console yourself with the thought that productivity gurus mostly recommend checking email less frequently so as not to become distracted from the tasks you should be prioritizing.
![]() Always Download Full Message and Internet Images. Check this check box if you want to download the full content of each message, including any attachments, and any images stored on the Internet.
Always Download Full Message and Internet Images. Check this check box if you want to download the full content of each message, including any attachments, and any images stored on the Internet.
![]() Caution
Caution
Checking the Always Download Full Message and Internet Images check box can increase your data usage, which may be a concern on metered connections. But it also has another problem: A sender can include in a message a link to an image on the Internet in order to find out whether and when you receive the message. The sender can receive this information when Mail retrieves the image from the Internet server.
If you uncheck the Always Download Full Message and Internet Images check box, you can look at the content of messages and decide which images to retrieve.
![]() Download Email From. Open this drop-down menu and choose the period of time you want to sync: The Last 3 Days, The Last 7 Days, The Last 2 Weeks, The Last Month, or Any Time. Your account may offer different options.
Download Email From. Open this drop-down menu and choose the period of time you want to sync: The Last 3 Days, The Last 7 Days, The Last 2 Weeks, The Last Month, or Any Time. Your account may offer different options.
![]() Note
Note
Only you know how many days’ worth of email you need to sync for any particular account—but keep in mind that the more email you sync, the longer syncing will take, and the more data Mail will need to transfer across your Internet connection. Both are more of a concern for a laptop or tablet computer you use on a metered Internet connection than for a desktop you use on an all-you-can-eat connection.
![]() Server. You can enter a different server in this box if necessary. Normally, you won’t need to change the server.
Server. You can enter a different server in this box if necessary. Normally, you won’t need to change the server.
![]() Note
Note
To choose server settings for some account types, you need to click Advanced Mailbox Settings.
![]() Server Requires Encrypted (SSL) Connection. Check this check box if the server requires you to use SSL to secure the connection, as most servers do.
Server Requires Encrypted (SSL) Connection. Check this check box if the server requires you to use SSL to secure the connection, as most servers do.
![]() Sync Options area. Set the Email switch and each other switch to On if you want to sync the item. The switches in this area depend on the email account and its capabilities; for some accounts, the Email switch may be the only switch.
Sync Options area. Set the Email switch and each other switch to On if you want to sync the item. The switches in this area depend on the email account and its capabilities; for some accounts, the Email switch may be the only switch.
When you finish working in the Sync Settings dialog box, click the Done button to close it. Mail returns you to the Account Settings dialog box for the account, where you need to click Save to save the changes you’ve made.
Removing an Email Account From Mail
Follow these steps to remove an email account from Mail:
1. In the Mail app, click the Settings button to display the Settings panel.
2. Click Accounts to display the Accounts pane.
3. Click the account you want to remove. The Account Settings dialog box for the account opens.
4. Click Delete Account. The Delete This Account? dialog box opens, warning you that deleting the account will remove all the account’s content—as you would likely expect.
5. Click Delete. Mail removes the account and displays the Accounts pane again.
![]() Note
Note
You can’t remove the email account associated with your Windows account from Mail.
Setting a Background Picture
You can change the background picture for Mail by clicking the Background Picture button in the Settings pane, clicking Browse in the Background Picture pane, and then using the Open dialog box to select the picture you want to use.
Customizing the View for Easy Reading
To customize the view in Mail for easy reading of your messages, click the Reading button in the Settings pane. You can then configure the following settings in the Reading pane:
![]() Auto-Open Next Item. Set this switch to On if you want Mail to automatically open the next item when you finish dealing with the current item—for example, by filing it or by deleting it. Auto-opening the next item is usually helpful for working through your messages.
Auto-Open Next Item. Set this switch to On if you want Mail to automatically open the next item when you finish dealing with the current item—for example, by filing it or by deleting it. Auto-opening the next item is usually helpful for working through your messages.
![]() Mark Item as Read. In this area, select the appropriate option button to specify when Mail should mark a message as having been read. Your options are the When Selection Changes option button, the Don’t Automatically Mark Item as Read option button, and the When Viewed in the Reading Pane option button. If you select the When Viewed in the Reading Pane option button, enter the number of seconds to wait in the Seconds to Wait box.
Mark Item as Read. In this area, select the appropriate option button to specify when Mail should mark a message as having been read. Your options are the When Selection Changes option button, the Don’t Automatically Mark Item as Read option button, and the When Viewed in the Reading Pane option button. If you select the When Viewed in the Reading Pane option button, enter the number of seconds to wait in the Seconds to Wait box.
![]() Caret Browsing. In this area, set the Use the Caret to Navigate the Reading Pane switch to On if you want to be able to use the arrow keys to move through your mailboxes.
Caret Browsing. In this area, set the Use the Caret to Navigate the Reading Pane switch to On if you want to be able to use the arrow keys to move through your mailboxes.
When you finish choosing settings in the Reading pane, click the Back (<) button to return to the Settings pane. Or you can simply click in the main part of the Mail window to close the Reading pane (and the Settings pane) and get back to your messages.
Choosing Options For Mail
To choose options for Mail, click the Options button in the Settings pane to display the Options pane. The left and right screens in Figure 12.16 show the Options pane, in which you can configure the following settings:
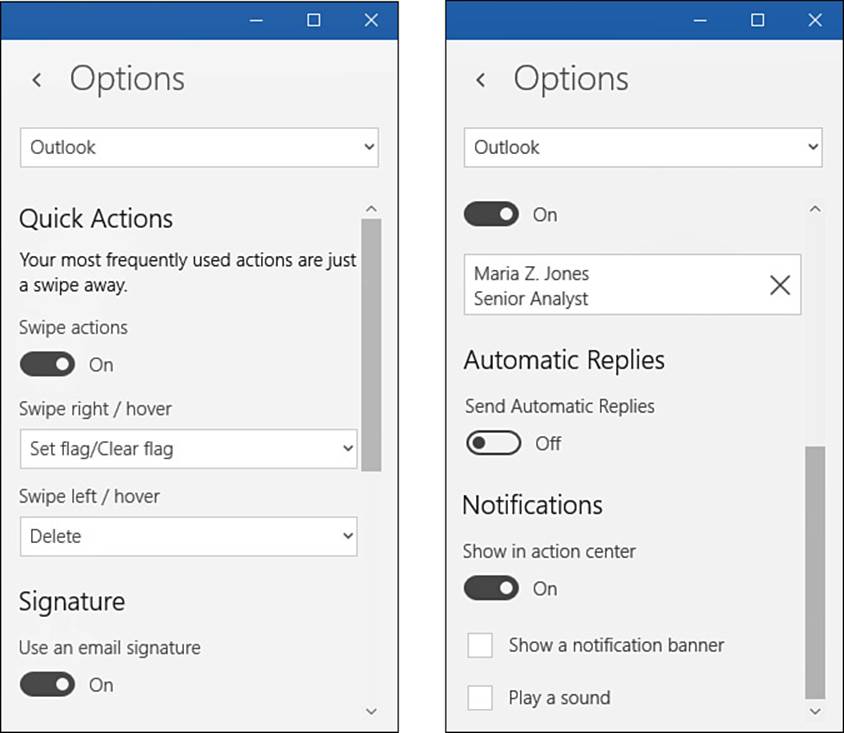
FIGURE 12.16 Choose the account you want to configure in the drop-down menu at the top of the Options pane. You can then configure settings in the Quick Actions, Signature, Automatic Replies, and Notifications areas.
![]() Account. Open this drop-down menu at the top of the pane and then click the account for which you want to configure options.
Account. Open this drop-down menu at the top of the pane and then click the account for which you want to configure options.
![]() Swipe Actions. Set this switch to On if you want to be able to use swipe actions in your mailboxes.
Swipe Actions. Set this switch to On if you want to be able to use swipe actions in your mailboxes.
![]() Swipe Right/Hover. If you set the Swipe Actions switch to On, you can open this drop-down menu and choose the action you want to take by swiping right on a touchscreen or hovering the mouse pointer over a regular screen. Your choices are Set Flag/Clear Flag, Mark as Read/Unread, Delete, and Move.
Swipe Right/Hover. If you set the Swipe Actions switch to On, you can open this drop-down menu and choose the action you want to take by swiping right on a touchscreen or hovering the mouse pointer over a regular screen. Your choices are Set Flag/Clear Flag, Mark as Read/Unread, Delete, and Move.
![]() Swipe Left/Hover. If you set the Swipe Actions switch to On, you can open this drop-down menu and choose the action you want to take by swiping left on a touchscreen or hovering the mouse pointer over a regular screen. As with Swipe Right/Hover, your choices are Set Flag/Clear Flag, Mark as Read/Unread, Delete, and Move.
Swipe Left/Hover. If you set the Swipe Actions switch to On, you can open this drop-down menu and choose the action you want to take by swiping left on a touchscreen or hovering the mouse pointer over a regular screen. As with Swipe Right/Hover, your choices are Set Flag/Clear Flag, Mark as Read/Unread, Delete, and Move.
![]() Use an Email Signature. Set this switch to On if you want Mail to automatically enter your signature text at the end of each message you create or forward. Type the text in the box that appears; press Enter to create multiple lines.
Use an Email Signature. Set this switch to On if you want Mail to automatically enter your signature text at the end of each message you create or forward. Type the text in the box that appears; press Enter to create multiple lines.
![]() Send Automatic Replies. Set this switch to On when you want Mail to reply automatically to incoming messages. This feature is useful for out-of-office messages or vacation messages. Type your message in the box that appears. Normally, you’ll want to check the Send Replies Only to My Contacts check box to limit the number of automatic responses.
Send Automatic Replies. Set this switch to On when you want Mail to reply automatically to incoming messages. This feature is useful for out-of-office messages or vacation messages. Type your message in the box that appears. Normally, you’ll want to check the Send Replies Only to My Contacts check box to limit the number of automatic responses.
![]() Show in Action Center. Set this switch to On if you want messages sent to this account to appear in Action Center. If you need to keep right on top of messages sent to this account, check the Show a Notification Banner check box, the Play a Sound check box, or both.
Show in Action Center. Set this switch to On if you want messages sent to this account to appear in Action Center. If you need to keep right on top of messages sent to this account, check the Show a Notification Banner check box, the Play a Sound check box, or both.
When you finish choosing options for one account, you can go back to the top of the pane and choose another account for which to set options. When you’re done in the Options pane, click the Back (<) button to return to the Settings pane, or click the main part of the Mail window to return to your messages.
Configuring Trust Center
Mail and the Office apps can connect to Microsoft’s online services to get what Microsoft calls “locally relevant content”—information related to your current location that may be relevant to the way you use the apps.
To choose whether Mail and the Office apps fetch this locally relevant content for you, click the Trust Center button in the Settings pane to display the Trust Center pane. You can then set the Enable Locally Relevant Content switch to On or Off, as needed.
Communicating via Skype
Skype is a communications service that enables you to do the following:
![]() Chat via text. You can chat via text with multiple people. You can run multiple chats at once.
Chat via text. You can chat via text with multiple people. You can run multiple chats at once.
![]() Share files. You can share files with other people, either while chatting or separately.
Share files. You can share files with other people, either while chatting or separately.
![]() Make voice calls. You can make calls either to other computers running Skype or to the regular telephone system. You can talk either to a single person or to multiple people in a conference call.
Make voice calls. You can make calls either to other computers running Skype or to the regular telephone system. You can talk either to a single person or to multiple people in a conference call.
![]() Make video calls. You can make video calls to other computers. As with voice, a video call can be either with one other person or with multiple people.
Make video calls. You can make video calls to other computers. As with voice, a video call can be either with one other person or with multiple people.
Getting the Skype App
First, see whether Skype is installed on your computer. Windows doesn’t include Skype itself, but it does include the Get Skype app, a Windows Store app that enables you to download the Skype installer if Skype isn’t installed.
![]() Note
Note
The Get Skype app doesn’t download Skype from the Windows Store—it just helps you download the Skype installer. So unlike with a Windows Store app, which handles the installation automatically for you, you have to run the Skype installer.
Click Start, type skype in the Search box, and see which search results you get. If the Skype for Desktop result appears, your computer has Skype installed and you’re in business; click this result to launch the Skype app. If just the Get Skype result appears, click it to launch the Get Skype app, and then click the Download Skype button to download the Skype installer.
Installing Skype is mostly straightforward. Here’s what you need to know:
![]() Running the installer. When your browser finishes downloading the Skype installer, click the Run button to launch the installer.
Running the installer. When your browser finishes downloading the Skype installer, click the Run button to launch the installer.
![]() Note
Note
If clicking Run in Microsoft Edge crashes the browser and fails to fully launch the Skype installer, open a File Explorer window to your Downloads folder and double-click the SkypeSetup.exe file.
![]() Choose whether to install Skype Click to Call. Click to Call scans open documents and web pages and identifies phone numbers that Skype should be able to call, some free but most using Skype credit. If you don’t want to use this feature, uncheck the Install Skype Click to Call check box on the Skype Click to Call page.
Choose whether to install Skype Click to Call. Click to Call scans open documents and web pages and identifies phone numbers that Skype should be able to call, some free but most using Skype credit. If you don’t want to use this feature, uncheck the Install Skype Click to Call check box on the Skype Click to Call page.
![]() Sign in to Skype. On the Sign In screen (see Figure 12.17), choose how to sign in. You have three options: Click Skype Name to sign in with your existing Skype account; click Microsoft Account to sign in with your existing Microsoft account, such as an Outlook.com account, a Hotmail account, an Xbox Live account, or a Windows Live account; or click Sign In with Facebook to log in using Facebook so that you can use your Facebook account with Skype.
Sign in to Skype. On the Sign In screen (see Figure 12.17), choose how to sign in. You have three options: Click Skype Name to sign in with your existing Skype account; click Microsoft Account to sign in with your existing Microsoft account, such as an Outlook.com account, a Hotmail account, an Xbox Live account, or a Windows Live account; or click Sign In with Facebook to log in using Facebook so that you can use your Facebook account with Skype.
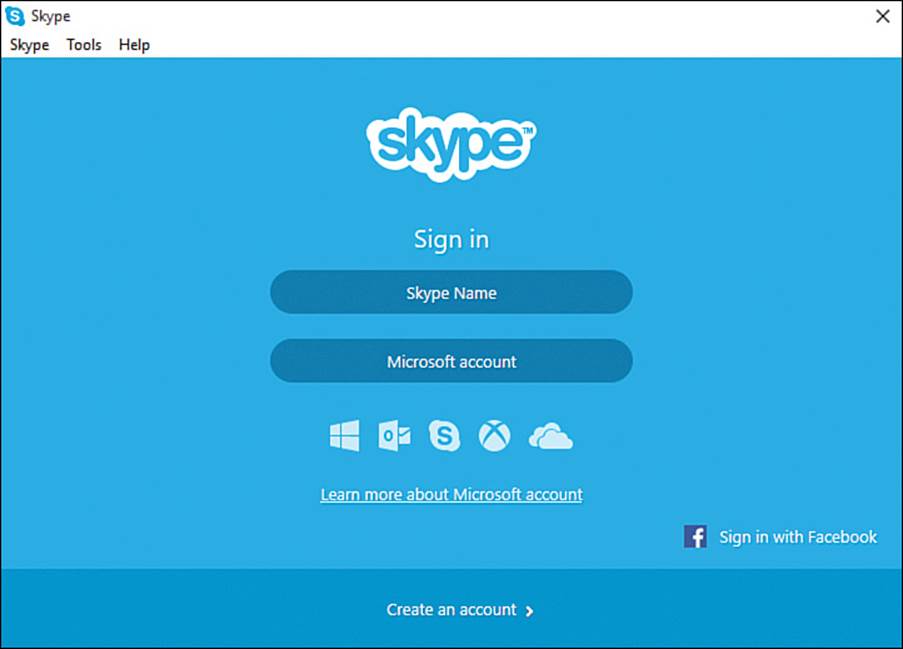
FIGURE 12.17 On the Sign In screen, click Skype Name or Microsoft Account to choose how to sign in to Skype. If you need a new account, click Create an Account.
![]() Note
Note
You can click Create an Account to open the Create an Account or Sign In page on the Skype website in your default browser. Here, you have three choices: You can create a standalone Skype account; you can create a Skype account linked to your existing Microsoft account; or you can create a Skype account linked to your existing Facebook account.
Completing the Initial Setup Routine
The first time you run Skype, the app runs you through a brief setup routine to make sure that everything is working and add a profile picture to your account. When the Setting Up Skype screen appears (see Figure 12.18), check that your speakers or headphones, microphone, and video are working:
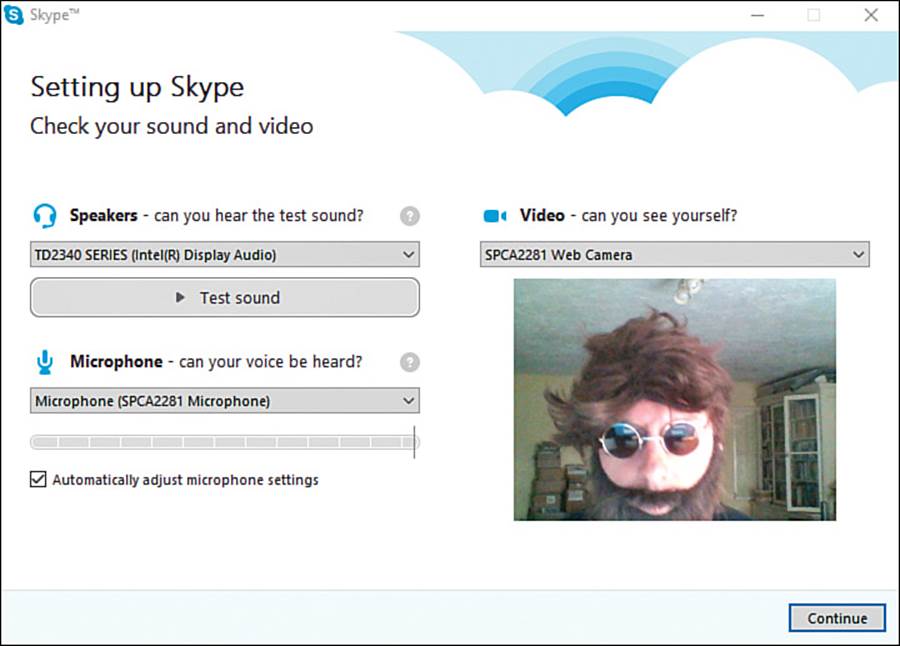
FIGURE 12.18 On the Setting Up Skype screen, make sure that your speakers, microphone, and video are working, and then click the Continue button.
![]() Speakers or headphones. Make sure the drop-down menu in the Speakers area shows the right speakers or headphones. Then click the Test Sound button and verify that the sound comes through loud (enough) and clear.
Speakers or headphones. Make sure the drop-down menu in the Speakers area shows the right speakers or headphones. Then click the Test Sound button and verify that the sound comes through loud (enough) and clear.
![]() Microphone. Make sure the drop-down menu in the Microphone area shows the microphone you want to use. Then verify that the level indicator shows green bars to about halfway across when you speak at a normal volume. Check the Automatically Adjust Microphone Settings check box if you want Skype to be able to adjust the volume to compensate for changes.
Microphone. Make sure the drop-down menu in the Microphone area shows the microphone you want to use. Then verify that the level indicator shows green bars to about halfway across when you speak at a normal volume. Check the Automatically Adjust Microphone Settings check box if you want Skype to be able to adjust the volume to compensate for changes.
![]() Tip
Tip
The Automatically Adjust Microphone Settings option usually works well for quiet and moderately noisy environments. But if you’re making calls in a boiler factory, you’ll probably need to control the microphone sensitivity manually.
![]() Video. Check that the drop-down menu in the Video area shows the webcam or other video input you want to use for Skype. Then look at the preview and adjust the camera—or reposition yourself—as needed.
Video. Check that the drop-down menu in the Video area shows the webcam or other video input you want to use for Skype. Then look at the preview and adjust the camera—or reposition yourself—as needed.
Click the Continue button to move along. The Setting Up Skype: Add a Profile Picture screen appears. You can either click the Continue button and follow the prompts to add a profile picture, either by taking it on your webcam or by selecting an existing photo on your computer; or click the Add Later button if you need to fix your hair, your face, or other aspects of reality before immortalizing yourself online.
![]() Tip
Tip
You can change your profile picture at any time by choosing Skype, Profile, Change Your Picture and then working on the Set Your Profile Picture screen. This screen gives you access to your previous profile pictures, enabling you to swap quickly among them. So you can give yourself a different look—professional, casual, suave—for different calls, as needed.
Navigating the Skype Screen
When you finish the initial setup routine, the Skype window appears (see Figure 12.19). Skype has an easy-to-use interface, in which these are the main features:
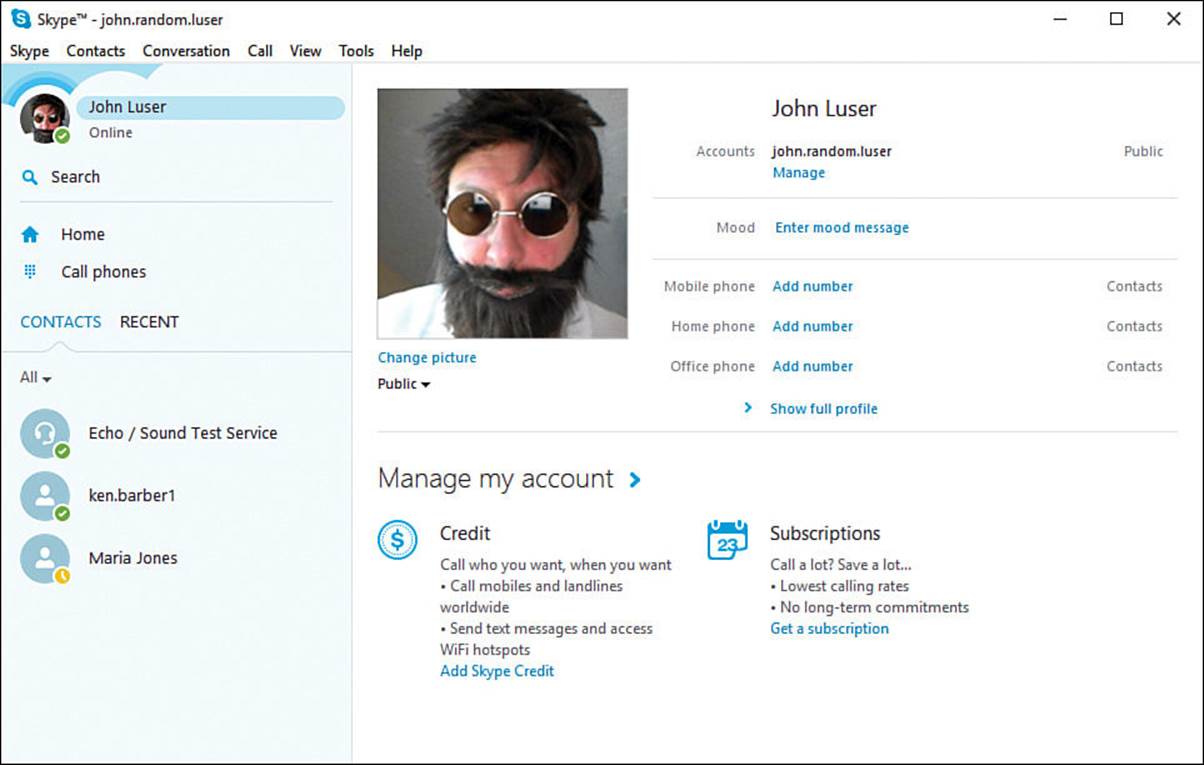
FIGURE 12.19 Skype has an easy-to-use interface.
![]() Menu bar. The menu bar gives you access to the Skype menus, as usual.
Menu bar. The menu bar gives you access to the Skype menus, as usual.
![]() Your account and status. This button shows your name, profile picture, and status. You can change your status by moving the mouse pointer over the status icon (such as the green circle with the white check mark shown here), clicking the drop-down menu that appears, and then clicking the status in the drop-down menu.
Your account and status. This button shows your name, profile picture, and status. You can change your status by moving the mouse pointer over the status icon (such as the green circle with the white check mark shown here), clicking the drop-down menu that appears, and then clicking the status in the drop-down menu.
![]() Search. Click this button to search by name or keyword.
Search. Click this button to search by name or keyword.
![]() Home. Click this button to display the Home screen.
Home. Click this button to display the Home screen.
![]() Call Phones. Click this button to display the Call Phones screen, which enables you to make voice calls to landline phones or cellular phones.
Call Phones. Click this button to display the Call Phones screen, which enables you to make voice calls to landline phones or cellular phones.
![]() Contacts. Click this tab to display the Contacts list, which shows your contacts and their status.
Contacts. Click this tab to display the Contacts list, which shows your contacts and their status.
![]() Recent. Click this tab to display the Recent list, which shows your recent conversations.
Recent. Click this tab to display the Recent list, which shows your recent conversations.
Skype has seven menus, positioned at the top of the screen as normal:
![]() Skype menu. This menu includes commands for changing your online status, editing your profile, changing privacy settings, accessing your account, buying Skype Credit, changing your password, signing out of the service, and closing the app.
Skype menu. This menu includes commands for changing your online status, editing your profile, changing privacy settings, accessing your account, buying Skype Credit, changing your password, signing out of the service, and closing the app.
![]() Contacts menu. This menu includes commands for adding contacts and creating groups; managing your contact lists; sorting and hiding contacts; and backing up contacts, restoring them, and managing your blocked contacts.
Contacts menu. This menu includes commands for adding contacts and creating groups; managing your contact lists; sorting and hiding contacts; and backing up contacts, restoring them, and managing your blocked contacts.
![]() Conversation menu. This menu contains commands for starting and managing conversations, such as sending an instant message, a video message, or an SMS message to a contact; adding people to a conversation, or blocking people; and leaving a conversation. You can also search your conversations by keywords and view old messages.
Conversation menu. This menu contains commands for starting and managing conversations, such as sending an instant message, a video message, or an SMS message to a contact; adding people to a conversation, or blocking people; and leaving a conversation. You can also search your conversations by keywords and view old messages.
![]() Call menu. This menu includes commands for starting a voice call or video call, and for answering an incoming call; changing audio and video settings; sharing screens; and taking actions such as putting a call on hold, muting your microphone, and hanging up.
Call menu. This menu includes commands for starting a voice call or video call, and for answering an incoming call; changing audio and video settings; sharing screens; and taking actions such as putting a call on hold, muting your microphone, and hanging up.
![]() View menu. This menu includes commands for switching among views; displaying your profile; and moving to split window view, which enables you to view separate conversations simultaneously by using multiple windows.
View menu. This menu includes commands for switching among views; displaying your profile; and moving to split window view, which enables you to view separate conversations simultaneously by using multiple windows.
![]() Tools menu. This menu contains commands for changing the language, setting up Skype Wi-Fi, and displaying the Options dialog box, which you use for configuring Skype (see the next section).
Tools menu. This menu contains commands for changing the language, setting up Skype Wi-Fi, and displaying the Options dialog box, which you use for configuring Skype (see the next section).
![]() Help menu. This menu contains commands for getting help for Skype.
Help menu. This menu contains commands for getting help for Skype.
Communicating via Skype
After you’ve set up Skype, communicating with your contacts is straightforward. On the Contacts tab (see Figure 12.20), click the contact with whom you want to communicate, and then choose the means of communication:
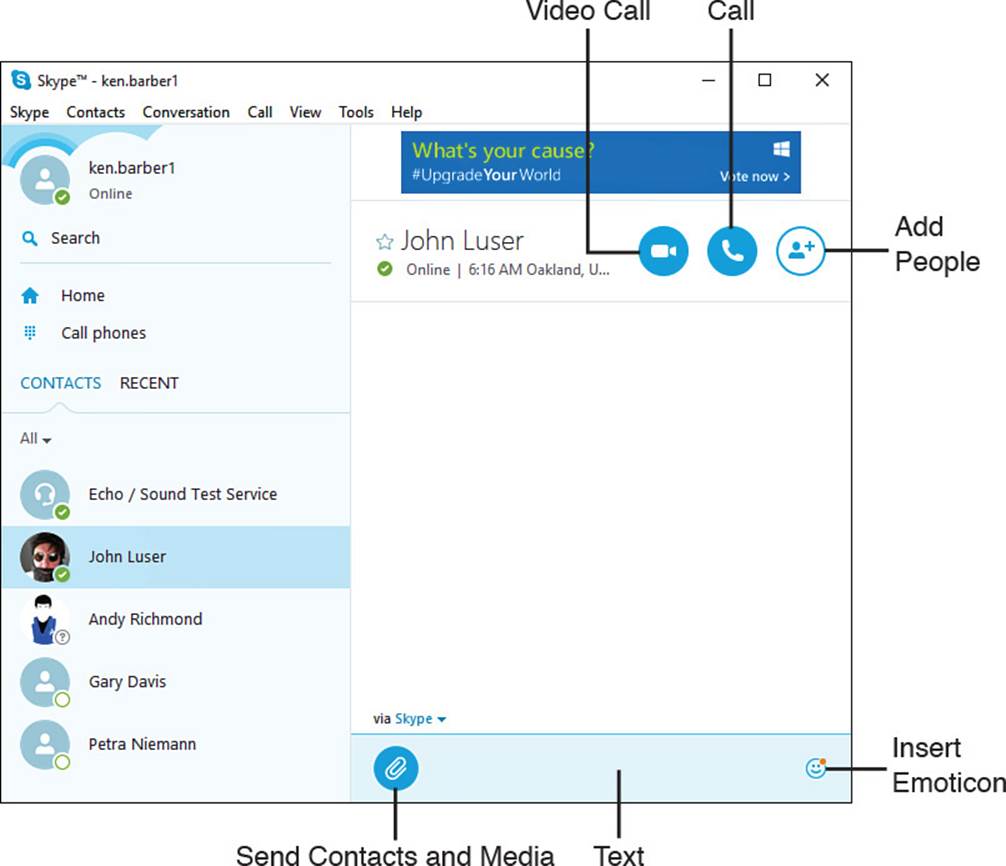
FIGURE 12.20 To communicate with a contact, click the contact, and then click the appropriate button.
![]() Call. Click this button to place an audio call.
Call. Click this button to place an audio call.
![]() Video Call. Click this button to place a video call.
Video Call. Click this button to place a video call.
![]() Send Contacts and Media. Click this button to send a photo, a file, a video message, or contact information.
Send Contacts and Media. Click this button to send a photo, a file, a video message, or contact information.
![]() Text. Click in this box and type the text you want to send. Press Enter to send it.
Text. Click in this box and type the text you want to send. Press Enter to send it.
![]() Insert Emoticon. Click this button to display the Emoticon panel. You can then click an emoticon to insert it in the Text box. Type any text needed and press Enter to send the message.
Insert Emoticon. Click this button to display the Emoticon panel. You can then click an emoticon to insert it in the Text box. Type any text needed and press Enter to send the message.
![]() Add People. Click this button to add other people to the conversation or call to the contact.
Add People. Click this button to add other people to the conversation or call to the contact.
Skype places the call or sends the text or file. It then displays controls for managing the call or conversation.
Configuring Skype to Work Your Way
Skype has a ton of settings, and you should plan to go through them before you use the app extensively, because changing some of the settings is essential to avoiding nuisance calls and protecting your privacy.
The following subsections take you through the most important settings, making sure you know which settings are available and what your options are. I’ll leave you to investigate some of the less vital settings on your own—but please do investigate them, for two reasons. First, you may disagree with my assessment of what’s important. Second, Skype may have changed or added settings.
Opening the Options Dialog Box
To get started configuring Skype, choose Tools, Options to display the Options dialog box. As you can see in Figure 12.21, the sidebar on the left side of the Options dialog box contains six category buttons. These are the mid-gray buttons: General, Privacy, Notifications, Calls, IM & SMS, and Advanced. Each of these category buttons contains two or more subcategories. For example, the General category (which is expanded in Figure 12.21) contains five subcategories: General Settings, Audio Settings, Sounds, Video Settings, and Skype WiFi.
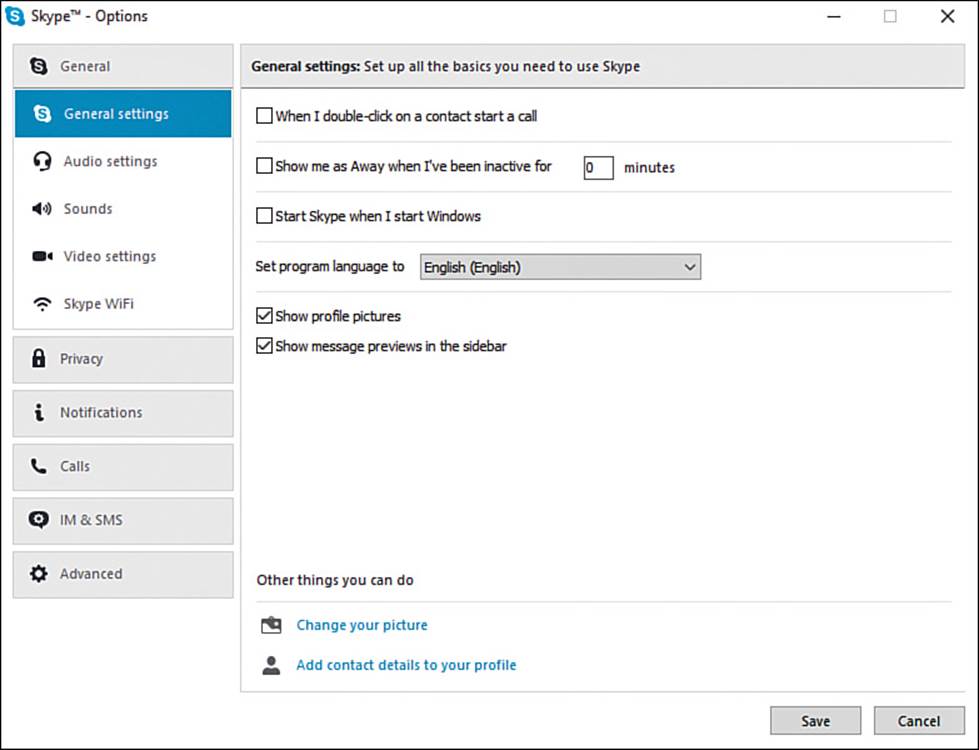
FIGURE 12.21 To configure Skype, work in the Options dialog box.
Choosing Options on the General Settings Screen
Start by clicking the General category in the sidebar and then clicking the General Settings subcategory. Here, you should set the following settings:
![]() When I Double-Click on a Contact Start a Call. Check this check box if you want to be able to start a call by double-clicking a contact.
When I Double-Click on a Contact Start a Call. Check this check box if you want to be able to start a call by double-clicking a contact.
![]() Show Me as Away When I’ve Been Inactive for N Minutes. Check this check box if you want Skype to change your status to Away after the number of minutes you specify of inactivity.
Show Me as Away When I’ve Been Inactive for N Minutes. Check this check box if you want Skype to change your status to Away after the number of minutes you specify of inactivity.
![]() Start Skype When I Start Windows. Check this check box if you want to launch Skype automatically each time you sign in to Windows. This setting is handy if you use Skype all the time, or even frequently.
Start Skype When I Start Windows. Check this check box if you want to launch Skype automatically each time you sign in to Windows. This setting is handy if you use Skype all the time, or even frequently.
![]() Show Profile Pictures. Check this check box if you want to see profile pictures. They’re usually helpful, but you run into the occasional eyesore.
Show Profile Pictures. Check this check box if you want to see profile pictures. They’re usually helpful, but you run into the occasional eyesore.
![]() Show Message Previews in the Sidebar. Check this check box if you want Skype to display message previews in the sidebar. Previews are usually helpful for seeing what’s going on.
Show Message Previews in the Sidebar. Check this check box if you want Skype to display message previews in the sidebar. Previews are usually helpful for seeing what’s going on.
Choosing Options on the Audio Settings Screen
The Audio Settings screen enables you to configure your microphone, speakers, and ringing. These settings are all straightforward.
You can click the Show Advanced Options button to display the Advanced Options screen, which lets you specify the order in which to use your microphones and speakers or headphones. For example, if you use a headset sometimes and your laptop’s built-in microphone the rest of the time, you’d drag the entry for the headset’s microphone above the entry for the laptop’s microphone in the Microphone list.
Choosing Options on the Sounds Screen
The Sounds screen enables you to choose which events Skype plays sounds for and which sounds it plays for those events.
In the Select Which Events Play a Sound box, work your way through the list of events—Ringtone, Dial Tone, Busy Signal, and so on. Check the check box for each event for which you want a sound to play. With the event still selected, go to the Choose Which Sound to Play drop-down menu and select the ringtone you want.
You can click the Import Sounds button to import your own sound files to the My Custom Sounds box. You can then use these sounds for events.
Choosing Options on the Video Settings Screen
The Video Settings screen has two settings you’ll likely want to set:
![]() Webcam Settings. Click this button to display the Video Capture Filter Properties dialog box, in which you can adjust the picture your webcam is producing. For example, if the picture looks like twilight in a coal sack, you could turn up the Brightness setting and play with the Backlight Comp setting.
Webcam Settings. Click this button to display the Video Capture Filter Properties dialog box, in which you can adjust the picture your webcam is producing. For example, if the picture looks like twilight in a coal sack, you could turn up the Brightness setting and play with the Backlight Comp setting.
![]() Automatically Receive Video and Share Screens With. In this area, select the Anyone option button, the People in My Contact List Only option button (the default), or the No One button, as needed.
Automatically Receive Video and Share Screens With. In this area, select the Anyone option button, the People in My Contact List Only option button (the default), or the No One button, as needed.
Choosing Options on the Skype Wifi Screen
On the Skype WiFi screen, check the Enable Skype WiFi check box if you want to allow your computer to use Skype WiFi. Skype WiFi lets you use your Skype credit to pay for the use of public Wi-Fi hotspots, so it can be handy for a laptop or tablet you carry with you.
Choosing Options on the Privacy Settings Screen
Click the Privacy button in the sidebar to display the Privacy category, and then click the Privacy Settings button to display the Privacy Settings screen. Here, you can configure the following settings:
![]() Allow Calls From. In this area, select the Anyone option button or the People in My Contact List Only option button, as needed.
Allow Calls From. In this area, select the Anyone option button or the People in My Contact List Only option button, as needed.
![]() Automatically Receive Video and Share Screens With. In this area, select the Anyone option button, the People in My Contact List Only option button (the default), or the No One button, as needed.
Automatically Receive Video and Share Screens With. In this area, select the Anyone option button, the People in My Contact List Only option button (the default), or the No One button, as needed.
![]() Note
Note
The Automatically Receive Video and Share Screens With setting appears on both the Privacy Settings screen and the Video Settings screen.
![]() Allow IMs From. In this area, first select the Anyone option button or the People in My Contact List Only option button, as appropriate. Then open the Keep History For drop-down menu and choose the length of time: No History, 2 Weeks, 1 Month, 3 Months, or Forever.
Allow IMs From. In this area, first select the Anyone option button or the People in My Contact List Only option button, as appropriate. Then open the Keep History For drop-down menu and choose the length of time: No History, 2 Weeks, 1 Month, 3 Months, or Forever.
![]() Caution
Caution
Keep your IM history forever only if you must—for example, for legal reasons. You can clear your IM history at any point by clicking the Clear History button in the Allow IMs From area of the Privacy Settings screen.
![]() Accept Skype Browser Cookies. Check this check box if you are prepared to allow Skype to store cookies (small text files) on your computer to track your preferences. You can click the Clear Skype Cookies button to get rid of all the Skype cookies at any point.
Accept Skype Browser Cookies. Check this check box if you are prepared to allow Skype to store cookies (small text files) on your computer to track your preferences. You can click the Clear Skype Cookies button to get rid of all the Skype cookies at any point.
![]() Allow Microsoft Targeted Ads, Including Use of Skype Profile Age and Gender. Uncheck this check box unless you want to allow Microsoft to use some of your Skype information to try to serve you targeted ads.
Allow Microsoft Targeted Ads, Including Use of Skype Profile Age and Gender. Uncheck this check box unless you want to allow Microsoft to use some of your Skype information to try to serve you targeted ads.
Working on the Blocked Contacts Screen
The Blocked Contacts screen in the Privacy category of Skype options enables you to manage your list of blocked contacts. The controls here are straightforward:
![]() Block a contact. When you want to prevent a contact from contacting you via Skype, open the drop-down menu and click the contact’s name. Then click the Block This Person button. Skype adds the contact’s name to the Blocked People box.
Block a contact. When you want to prevent a contact from contacting you via Skype, open the drop-down menu and click the contact’s name. Then click the Block This Person button. Skype adds the contact’s name to the Blocked People box.
![]() Unblock a contact. When you’re ready to bring a contact back in from the cold, click the contact in the Blocked People box, and then click the Unblock This Person button.
Unblock a contact. When you’re ready to bring a contact back in from the cold, click the contact in the Blocked People box, and then click the Unblock This Person button.
Choosing Options on the Notification Settings Screen
Click the Notifications button in the sidebar to display the Notifications category, and then click the Notification Settings button to display the Notification Settings screen (see Figure 12.22). Here, you can configure the following settings:
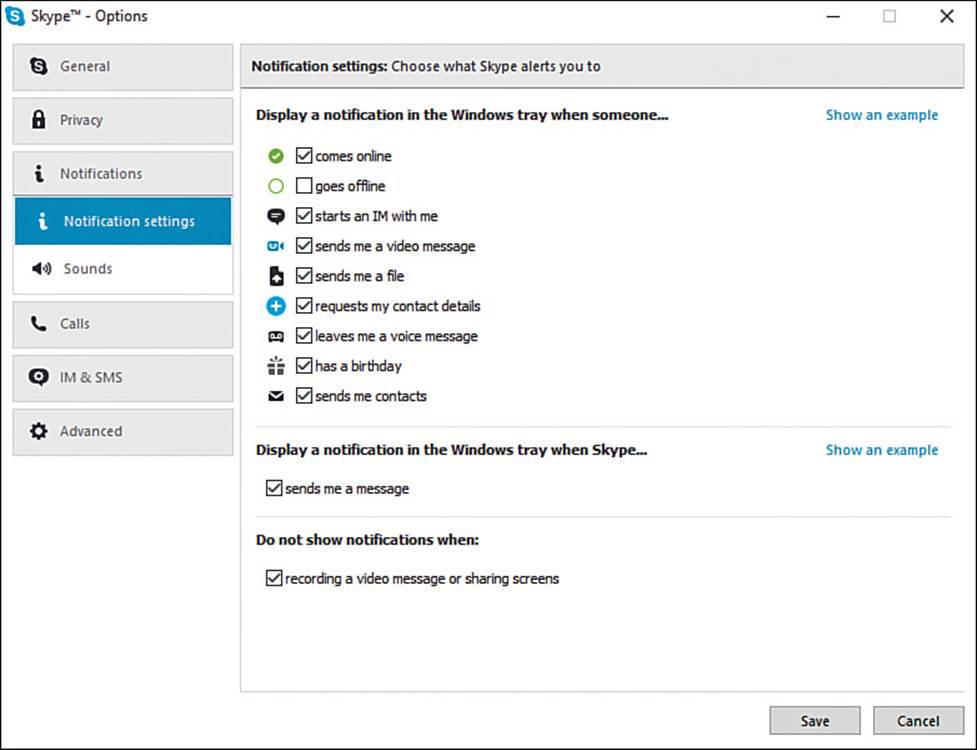
FIGURE 12.22 On the Notification Settings screen, specify which notifications you want by checking and unchecking the check boxes.
![]() Display a Notification in the Windows Tray When Someone.... In this area, check the check boxes for the events for which you want notifications and uncheck the check boxes for those you don’t need brought to your attention. The events are Comes Online, Goes Offline, Starts an IM with Me, Sends Me a Video Message, Sends Me a File, Requests My Contact Details, Leaves Me a Voice Message, Has a Birthday, and Sends Me Contacts.
Display a Notification in the Windows Tray When Someone.... In this area, check the check boxes for the events for which you want notifications and uncheck the check boxes for those you don’t need brought to your attention. The events are Comes Online, Goes Offline, Starts an IM with Me, Sends Me a Video Message, Sends Me a File, Requests My Contact Details, Leaves Me a Voice Message, Has a Birthday, and Sends Me Contacts.
![]() Display a Notification in the Windows Tray When Skype.... In this area, check the Sends Me a Message check box if you want to receive a notification when Skype sends you a message.
Display a Notification in the Windows Tray When Skype.... In this area, check the Sends Me a Message check box if you want to receive a notification when Skype sends you a message.
![]() Do Not Show Notifications When. In this area, you can check the Recording a Video Message or Sharing Screens check box if you want to suppress notifications when you’re recording or sharing.
Do Not Show Notifications When. In this area, you can check the Recording a Video Message or Sharing Screens check box if you want to suppress notifications when you’re recording or sharing.
![]() Note
Note
The Sounds screen in the Notifications category of the Options dialog box contains the same controls and fulfills the same purpose as the Sounds screen in the General category. Look back to the section “Choosing Options on the Sounds Screen,” earlier in this chapter, for coverage of sounds.
Choosing Options on the Call Settings Screen
Click the Calls button in the sidebar to display the Calls category, and then click the Call Settings button to display the Call Settings screen.
On the Basic Options part of this screen (which appears at first), select the Allow Anyone to Call Me option button or the Only Allow People in My Contact List to Call Me option button, as appropriate.
Then click the Show Advanced Options button to display the Advanced Options part of the screen, which contains these settings you’ll probably want to set:
![]() Show Call Controls When Skype Is in the Background. Check this check box if you want the Skype controls to be visible when an app other than Skype is in the foreground. This option is helpful, especially if you use Skype extensively.
Show Call Controls When Skype Is in the Background. Check this check box if you want the Skype controls to be visible when an app other than Skype is in the foreground. This option is helpful, especially if you use Skype extensively.
![]() Answer Incoming Calls Automatically. Check this check box if you want Skype to pick up incoming calls automatically. After checking this check box, you can check the Start My Video Automatically When I Am in a Call check box if you want Skype to start your video automatically as well.
Answer Incoming Calls Automatically. Check this check box if you want Skype to pick up incoming calls automatically. After checking this check box, you can check the Start My Video Automatically When I Am in a Call check box if you want Skype to start your video automatically as well.
![]() Caution
Caution
Enable the Answer Incoming Calls Automatically feature only if you’re convinced it’ll be helpful. Usually, it’s easy enough to pick up calls manually when you’re at your computer—and when you’re not at your computer, you might not want Skype to pick up calls for you.
![]() For Emergency Calls, My Default Location Is. Open this drop-down menu and select your location in case you need to place emergency calls using Skype.
For Emergency Calls, My Default Location Is. Open this drop-down menu and select your location in case you need to place emergency calls using Skype.
Setting Up Call Forwarding
The options on the Call Forwarding screen enable you to forward your Skype calls to a landline phone, a mobile phone, or another Skype account. Click the Call Forwarding Options link to display the controls for setting up call forwarding. You can then check the Forward My Calls To check box, specify the destination in the drop-down menu under it, and set the delay in the Forward Calls if I Do Not Answer Within N Seconds box.
![]() Note
Note
To use call forwarding, you must either buy Skype Credit or pay for a Skype subscription. After using call forwarding, remember to turn it off when you no longer need it.
Click the Add More Phone Numbers link if you want to set up two or three numbers or Skype accounts for call forwarding.
![]() Caution
Caution
When you set up multiple numbers or Skype accounts for call forwarding, Skype forwards calls to all the numbers or accounts at the same time. As of this writing, you can’t set up multiple numbers or accounts and then choose which to use at any given point—you can only enable or disable forwarding to all the numbers or accounts at once.
Setting Up Voice Messages
The Voice Messages screen contains only the Set Up Voice Messaging link, which you can click to open the Skype website in your default browser, such as Microsoft Edge. After logging in to your account, you can set the Enable Voice Messaging and Never Miss a Call Again switch to On.
![]() Tip
Tip
After enabling voice messaging, set up email alerts or SMS alerts for voice messages you receive. These alerts help you avoid missing vital messages by forgetting to check your voice messages.
![]() Note
Note
The Video Settings screen in the Calls category contains the same controls and has the same effect as the Video Settings screen in the General category. Look back to the section “Choosing Options on the Video Settings Screen,” earlier in this chapter, for coverage of these options.
Choosing Options on the IM Settings Screen
Click the IM & SMS button in the sidebar to display the IM & SMS category, and then click the IM Settings button to display the IM Settings screen.
At first, the IM Settings screen displays only one option, which bashfully hides its name:
![]() Allow IMs From. Select the Allow Anyone to Send IMs to Me option button or the Only Allow People in My Contact List to Send Me Instant Messages option button, as needed.
Allow IMs From. Select the Allow Anyone to Send IMs to Me option button or the Only Allow People in My Contact List to Send Me Instant Messages option button, as needed.
Next, click the Show Advanced Options button to display options for choosing how long to keep your IM history, configuring the effects of pressing Enter and Ctrl+V (separately), and choosing where to store files you receive via Skype.
Choosing Options on the IM Appearance Screen
The IM Appearance screen enables you to configure the way instant messaging appears in Skype. Your options include setting a font and size that you like; choosing whether to display images and other media previews; and choosing whether to display emoticons, advanced text formatting, and timestamps.
![]() Note
Note
The SMS Settings screen contains links for learning more about sending SMS (basically, text messages to phone numbers) on your computer and for buying Skype Credit to enable you to send SMS to mobile phones.
Choosing Options on the Advanced Settings Screen
Click the Advanced button in the sidebar to display the Advanced category, and then click the Advanced Settings button to display the Advanced Settings screen. Here, you can configure the following settings:
![]() Use Skype to Call callto: Links on the Web. Check this check box if you want to be able to start a Skype call by clicking a web page link that uses the callto: protocol.
Use Skype to Call callto: Links on the Web. Check this check box if you want to be able to start a Skype call by clicking a web page link that uses the callto: protocol.
![]() Use Skype to call tel: Links on the Web. Check this check box if you want to be able to start a Skype call by clicking a web page link that uses the tel: protocol.
Use Skype to call tel: Links on the Web. Check this check box if you want to be able to start a Skype call by clicking a web page link that uses the tel: protocol.
![]() Keep Skype in the Taskbar While I’m Signed In. Check this check box to keep the Skype button visible in the Taskbar all the time you’re signed into Skype. Provided you’re not desperate for space on the taskbar, having the button there is handy for access to Skype.
Keep Skype in the Taskbar While I’m Signed In. Check this check box to keep the Skype button visible in the Taskbar all the time you’re signed into Skype. Provided you’re not desperate for space on the taskbar, having the button there is handy for access to Skype.
![]() Show Skype Watermark During Calls. Uncheck this check box if you want to remove the Skype watermark that appears on video calls.
Show Skype Watermark During Calls. Uncheck this check box if you want to remove the Skype watermark that appears on video calls.
Turning Off Automatic Updates for Skype
The Automatic Updates screen in the Options dialog box contains only a Turn Off Automatic Updates button. If you have administrator permissions, you can click this button to turn off automatic updating for Skype on your computer. If you don’t turn off automatic updating, Skype upgrades itself—without consulting you—when updates are available.
![]() Caution
Caution
Turning off automatic Skype updates on your account turns them off for all users of the computer. There’s no in-between setting. Because updates may fix vulnerabilities in Skype that could expose your computer to attack across the Internet, it’s normally best to let Skype apply the updates.
Choosing Options on the Connection Screen
The Connection screen in the Options dialog box enables you to control how Skype connects to the Internet. These are the options on the Connection screen:
![]() Use Port N for Incoming Connections. This box shows the port Skype is using for incoming connections. Usually, you should leave the default setting; in some configurations, you can’t change it anyway.
Use Port N for Incoming Connections. This box shows the port Skype is using for incoming connections. Usually, you should leave the default setting; in some configurations, you can’t change it anyway.
![]() Use Port 80 and 443 for Additional Incoming Connections. Check this check box if you want to let Skype use these two ports for extra incoming connections, as needed. This is normally a good idea.
Use Port 80 and 443 for Additional Incoming Connections. Check this check box if you want to let Skype use these two ports for extra incoming connections, as needed. This is normally a good idea.
![]() Proxy. In this drop-down menu, choose Automatic Proxy Detection (the default), HTTPS, or SOCKS5, as needed. For HTTPS or SOCKS5, enter the proxy’s hostname or IP address in the Host box and the port number in the Port box.
Proxy. In this drop-down menu, choose Automatic Proxy Detection (the default), HTTPS, or SOCKS5, as needed. For HTTPS or SOCKS5, enter the proxy’s hostname or IP address in the Host box and the port number in the Port box.
![]() Enable Proxy Authentication. Check this check box if the proxy server requires Skype to authenticate your computer, and then enter the user name in the Username box and the password in the Password box.
Enable Proxy Authentication. Check this check box if the proxy server requires Skype to authenticate your computer, and then enter the user name in the Username box and the password in the Password box.
![]() Enable uPnP. Check this check box if you want Skype to use the Universal Plug and Play (usually abbreviated to UPnP, although Skype uses uPnP) to detect network settings. This is a good idea for home networks.
Enable uPnP. Check this check box if you want Skype to use the Universal Plug and Play (usually abbreviated to UPnP, although Skype uses uPnP) to detect network settings. This is a good idea for home networks.
![]() Allow Direct Connections to Your Contacts Only. Check this check box if you want to restrict Skype to using direct connections only for people who are in your contacts list. For other connections, Skype establishes the connection through its servers and hides your computer’s IP address, which is good for security but means Skype may take longer to set up your calls.
Allow Direct Connections to Your Contacts Only. Check this check box if you want to restrict Skype to using direct connections only for people who are in your contacts list. For other connections, Skype establishes the connection through its servers and hides your computer’s IP address, which is good for security but means Skype may take longer to set up your calls.
Configuring Keyboard Shortcuts on the Hotkeys Screen
The Hotkeys screen in the Options dialog box (see Figure 12.23) lets you enable or disable keyboard shortcuts as a whole. If you enable keyboard shortcuts, you can choose which ones to use, and you can customize the keyboard shortcuts for different actions.
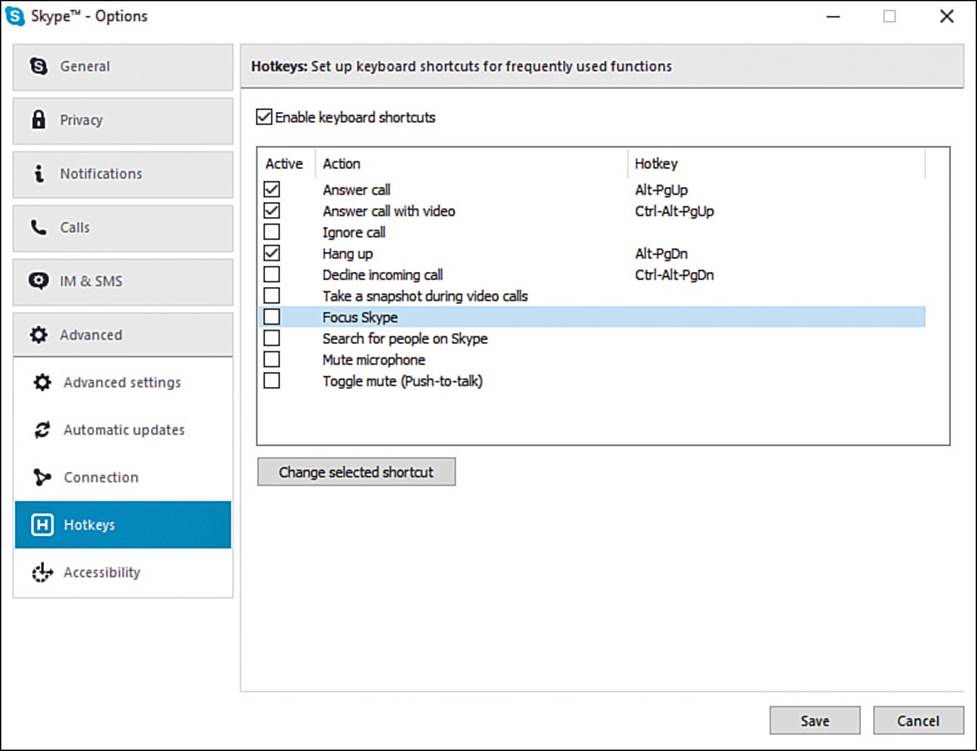
FIGURE 12.23 On the Hotkeys screen in the Options dialog box, check the Enable Keyboard Shortcuts check box, and then choose which keyboard shortcuts to use.
Check the Enable Keyboard Shortcuts check box at the top, and then check the check box in the Active column for each shortcut you want to use.
To change the keys used for a shortcut, click the shortcut in the list, and then click the Change Selected Shortcut button. In the Set Hotkey For dialog box that opens (see Figure 12.24), check the Shift check box, the Ctrl check box, or the Alt check box as needed; type the key in the box on the right; and then click the OK button.
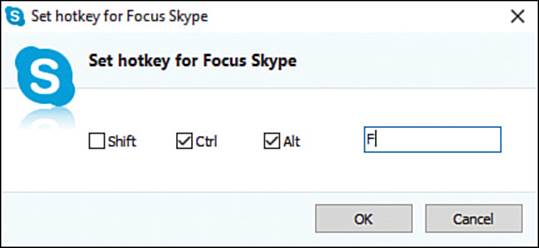
FIGURE 12.24 Use the Set Hotkey For dialog box to create custom keyboard shortcuts for controlling Skype easily.
Choosing Options on the Accessibility Screen
The Accessibility screen in the Options dialog box contains only one setting, the Enable Accessible Mode check box. Check this check box to turn on Accessible Mode, which enables screen reader apps to work in Skype—for example, to read your messages aloud.
Saving Your Configuration Changes
When you finish configuring Skype, click the Save button. Skype saves your changes and closes the Options dialog box.
All materials on the site are licensed Creative Commons Attribution-Sharealike 3.0 Unported CC BY-SA 3.0 & GNU Free Documentation License (GFDL)
If you are the copyright holder of any material contained on our site and intend to remove it, please contact our site administrator for approval.
© 2016-2026 All site design rights belong to S.Y.A.