WINDOWS 10 TIPS AND TRICKS (2016)
8. Optimizing Your Computer’s Performance
In This Chapter
![]() Configuring your computer for better performance
Configuring your computer for better performance
![]() Optimizing and defragmenting the hard drive
Optimizing and defragmenting the hard drive
![]() Getting rid of useless apps and extending runtime on the battery
Getting rid of useless apps and extending runtime on the battery
This chapter details steps you can take to improve your computer’s performance. You may be able to add memory to give your computer more headroom. You can definitely turn off unnecessary visual effects, which tend to sap performance.
You can change the size of the paging file, which Windows uses for virtual memory; control Data Execution Prevention; turn off the Superfetch and Prefetch features; and stop any Windows services that you don’t need. You can defragment and optimize your computer’s hard drive manually or configure Windows to defragment and optimize it automatically on a schedule.
At the end of the chapter, we’ll also dig into ways to extend your computer’s runtime on its battery and look at other actions you can take to improve performance when playing games.
Adding Memory If You Can
Generally speaking, having more memory (random access memory, or RAM) enables a computer to run better. So if your computer doesn’t already contain as much RAM as it can, you may be able to boost performance by adding memory.
Understanding Windows 10’s Memory Requirements
As you know, Windows 10 comes in two versions: a 32-bit version and a 64-bit version. The 32-bit version requires a minimum of 1 gigabyte (GB) of RAM. The 64-bit version requires a minimum of 2GB.
These amounts are the absolute minimum needed to install and run Windows. With these amounts of RAM, performance tends to be disappointing, and if you run more than a handful of apps, lags will occur when you’re switching among apps.
Consider 2GB as a practical minimum for 32-bit Windows. If your computer can take 4GB, go for that instead. Windows won’t actually be able to use the full 4GB of RAM, because 4GB is the limit of the addressable memory area in 32-bit operating systems, and the computer’s video RAM and other memory components take up some of the addressable area. But Windows will use as much of the RAM as possible.
Consider 4GB as a practical minimum for 64-bit Windows. If your computer can go to 8GB, 16GB, or more, you will get much better performance.
![]() Tip
Tip
To see how much memory your computer has, right-click or long-press the Start button and click System on the shortcut menu. In the System window that opens, look at the Installed Memory (RAM) readout in the System section.
If you need to find out which memory modules your computer contains, you can use a tool such as CPU-Z (free from www.cpuid.com). After downloading and installing CPU-Z, run the app, and then click the SPD tab. In the Memory Slot Selection area, click the drop-down menu and choose the slot you want to inspect. You can then look at the Module Size readout to see the size (such as “1024 MBytes,” which is 1GB) and the Max Bandwidth readout to see the type and speed, such as “PC2-5300 (333 MHz).” Figure 8.1 shows an example from an aging computer.
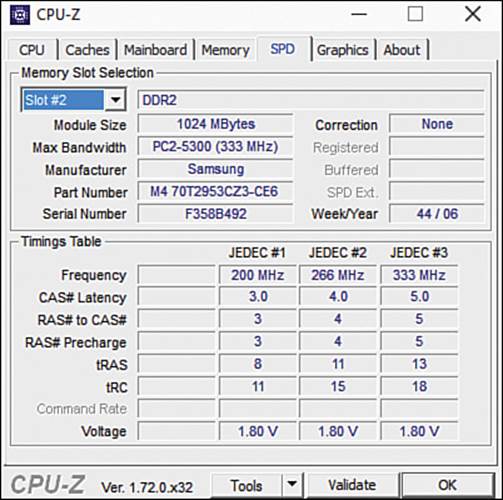
FIGURE 8.1 Use the controls on the SPD tab of the free CPU-Z app to learn the details of the memory modules your computer contains.
Armed with this information, you can start exploring your options for adding memory. But you might also want to use a memory manufacturer’s scanner tool to probe your computer’s memory and see what upgrades the manufacturer offers. For example, Micron Technology, Inc.’s Crucial division (www.crucial.com) provides a memory scanner that displays information about your computer including the memory modules it contains, the maximum memory it can contain, and available memory modules with which you can upgrade. Such scanners can be an easy way to find upgrades, but it’s wise to compare the prices with other sites before you buy.
The other main factor in deciding whether to upgrade your computer’s RAM is how difficult the operation actually is. Most tablets and many laptops are designed to be opened only by trained technicians, often with specialized tools. By contrast, most desktops and some laptops are designed to be user-upgradable with only a screwdriver and modest amounts of gumption.
![]() Tip
Tip
To find instructions on opening your computer and installing RAM, look at the computer manufacturer’s website, repair sites such as iFixit (www.ifixit.com), and YouTube.
After installing RAM, open the System window and verify that the Installed Memory (RAM) readout shows the correct amount.
![]() Tip
Tip
If you’re planning to buy a new computer, max out its RAM when you buy it. This is almost always the best time to add RAM, and you will seldom regret adding it. If the computer you’re considering has only a small amount of RAM and can’t take more, look for a better model.
Turning Off Eye Candy to Boost Performance
Windows includes many graphical effects to make the user interface look more attractive. Generally speaking, the more graphical effects your computer has to run, the more effort it has to put in—and the more it may slow down. So if your computer is crawling rather than flying, you might want to turn off some or all of these effects to stop them from sapping its performance.
Follow these steps to turn off graphical effects:
1. Right-click or long-press the Start button, and then click System on the shortcut menu. The System window opens.
2. In the left column, click Advanced System Settings to display the Advanced tab of the System Properties dialog box (see Figure 8.2).
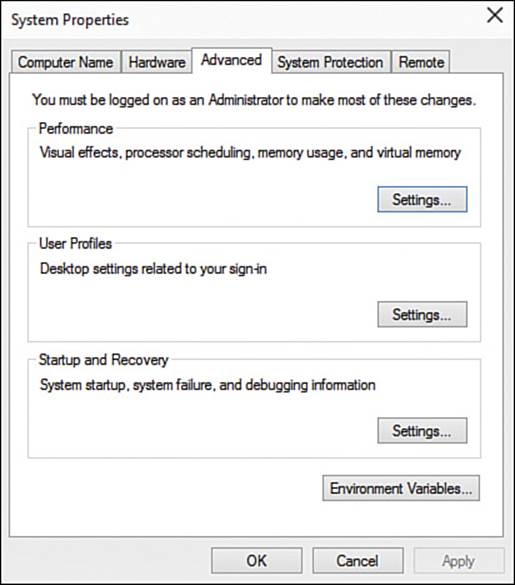
FIGURE 8.2 Click Settings in the Performance box on the Advanced tab of the System Properties dialog box.
3. Click Settings in the Performance box to display the Performance Options dialog box. This dialog box has three tabs, as you can see in Figure 8.3: the Visual Effects tab, which is usually displayed first; the Advanced tab; and the Data Execution Prevention tab.
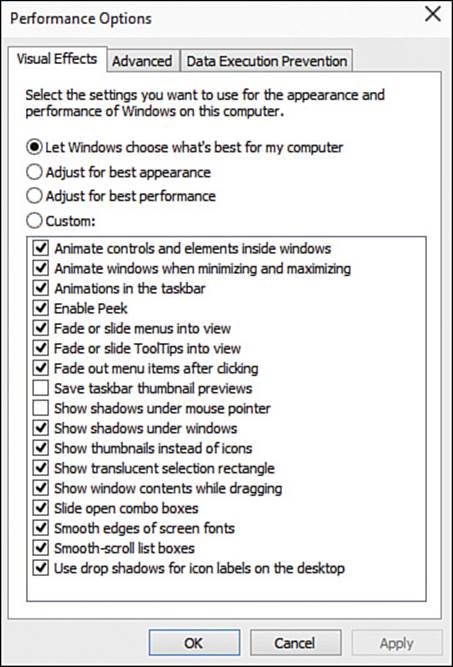
FIGURE 8.3 You can turn off some or all eye candy on the Visual Effects tab of the Performance Options dialog box.
4. In the top section of the Visual Effects tab, you’ll normally find that the Let Windows Choose What’s Best for My Computer option button is selected. If this is the case, and all the check boxes in the list box are selected, Windows considers your computer powerful enough to handle all the visual effects.
![]() Note
Note
You can select the Adjust for Best Appearance option button to check all the check boxes in the list box at once. You can click the Adjust for Best Performance option button to uncheck all the check boxes.
5. To improve performance, either select the Adjust for Best Performance option button (which unchecks all the check boxes) or select the Custom option button and then check or uncheck the check boxes as needed. Table 8.1 explains the visual effects.
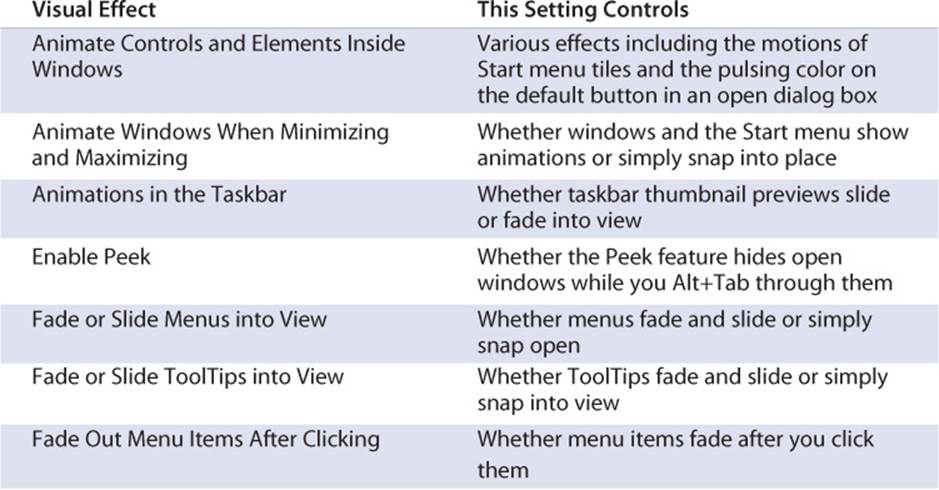
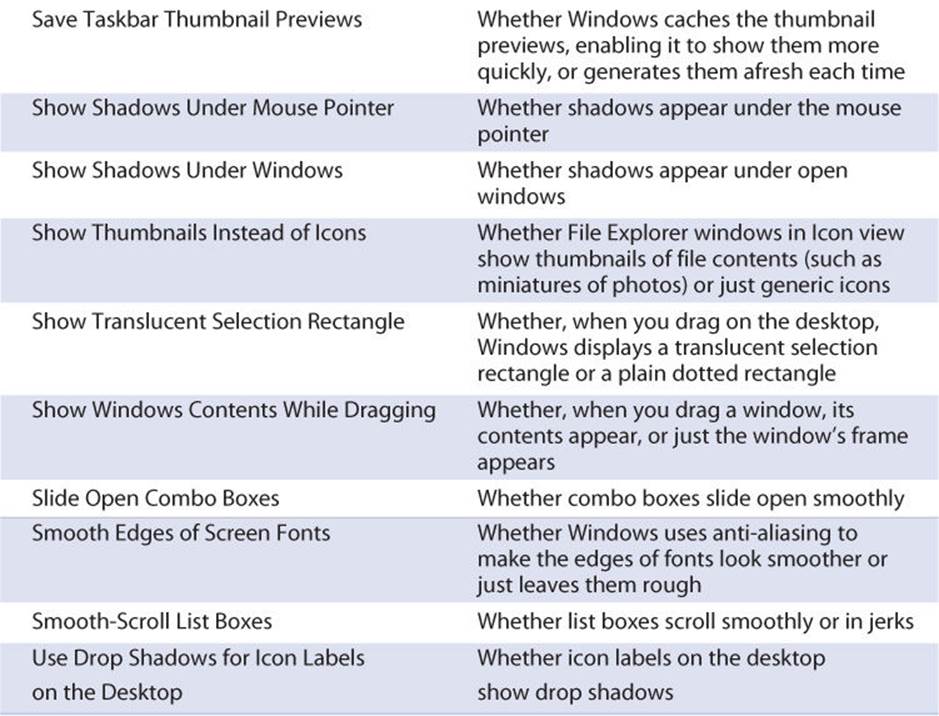
Table 8.1 Visual Effects in the Performance Options Dialog Box
6. After making changes, you can click Apply to apply them without closing the Performance Options dialog box. For example, you may want to test the settings you’ve chosen.
7. When you’re satisfied with your choices, click OK to close the Performance Options dialog box.
8. Click OK to close the System Properties dialog box.
![]() Tip
Tip
If you need to increase performance without sacrificing too much in the way of looks, select the Adjust for Best Performance option button (unchecking all the check boxes), but then select the Enable Peek check box, the Show Thumbnails Instead of Icons check box, and the Smooth Edges of Screen Fonts check box.
Configuring the Paging File
The paging file is a file that Windows uses as virtual memory to supplement RAM. When Windows runs low on RAM, it moves some data from RAM to the paging file so as to free up the RAM. Windows tries to identify data in RAM that you and your apps aren’t currently using, because retrieving data from the paging file is much slower than retrieving data from RAM. When Windows gets this right, there’s little or no performance hit to your running apps; but when you request data stored in the paging file rather than in RAM, you may notice a lag.
![]() Note
Note
Virtual memory normally chugs along in the background without advertising itself. If your computer’s performance is adequate or better, you can simply leave Windows to manage virtual memory. But if Windows starts displaying messages warning you that virtual memory is low, you’ll know you need to increase the size of the paging file.
Windows automatically sets the size and location of the paging file, but you may be able to improve performance by configuring it manually. There are three main parameters you can set:
![]() Minimum size. Windows automatically sets the minimum size to the same as the amount of RAM in your computer. So if your computer has 4GB of RAM, the minimum paging file size is 4096MB.
Minimum size. Windows automatically sets the minimum size to the same as the amount of RAM in your computer. So if your computer has 4GB of RAM, the minimum paging file size is 4096MB.
![]() Maximum size. Windows automatically sets the maximum size to three times the amount of RAM. So if your computer has 4GB of RAM, the maximum page file size is 12,288MB.
Maximum size. Windows automatically sets the maximum size to three times the amount of RAM. So if your computer has 4GB of RAM, the maximum page file size is 12,288MB.
![]() Location. Windows automatically puts the paging file on your computer’s boot drive. This is mostly because many computers have only one drive, so the boot drive is the only option. If your computer has multiple drives, you can move the paging file to another drive. You can also set a separate paging file for each drive if you want.
Location. Windows automatically puts the paging file on your computer’s boot drive. This is mostly because many computers have only one drive, so the boot drive is the only option. If your computer has multiple drives, you can move the paging file to another drive. You can also set a separate paging file for each drive if you want.
![]() Tip
Tip
If your computer has multiple physical drives, put the paging file on a drive separate from the boot drive. Windows uses the boot drive a lot for system files, so you may be able to improve performance by moving the paging file to a different drive.
![]() Caution
Caution
If your computer has a single physical drive divided into two (or more) logical drives, don’t bother moving the paging file from the boot drive to another drive. Because both logical drives are using the same physical drive, moving the paging file won’t improve performance enough to be worthwhile.
You can also turn off the paging file altogether. In theory, this might be a good idea if your computer contains so much RAM that it will never need virtual memory. But in practice, turning off the paging file isn’t wise. First, some apps are incredibly greedy for RAM, some by design and others through inept memory management, so Windows may end up needing virtual memory. And second, some apps assume that virtual memory will be available and will throw errors if it is not.
![]() Note
Note
The normal reason for configuring the paging file is to improve performance. But if your device is severely short of storage, you may need to reduce the size of the paging file to make more space for other files. This is effective, but you should treat it as a short-term measure. As soon as you can, free up some more space on the drive so that you can restore the paging file to its normal size.
Follow these steps to configure the paging file:
1. Right-click or long-press the Start button, and then click System on the shortcut menu. The System window opens.
2. In the left column, click Advanced System Settings to display the Advanced tab of the System Properties dialog box.
3. Click Settings in the Performance box to display the Performance Options dialog box.
4. Click the Advanced tab to display its contents (see Figure 8.4).
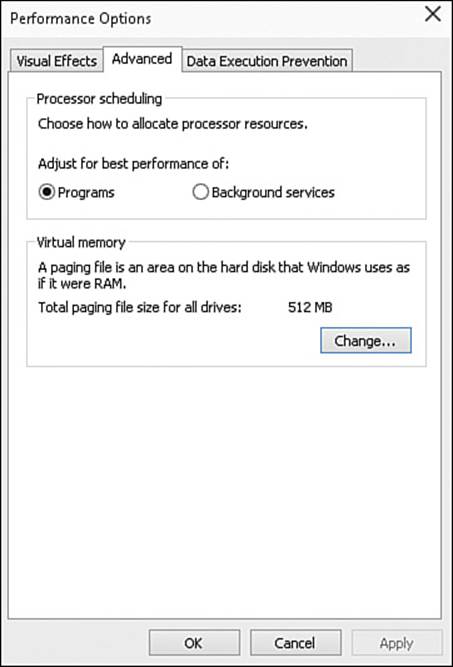
FIGURE 8.4 On the Advanced tab of the Performance Options dialog box, make sure the Programs option button is selected. Then click the Change button in the Virtual Memory box.
5. In the Processor Scheduling box at the top, make sure the Programs option button is selected instead of the Background Services option button (which is for servers).
6. Click the Change button to display the Virtual Memory dialog box (see Figure 8.5).
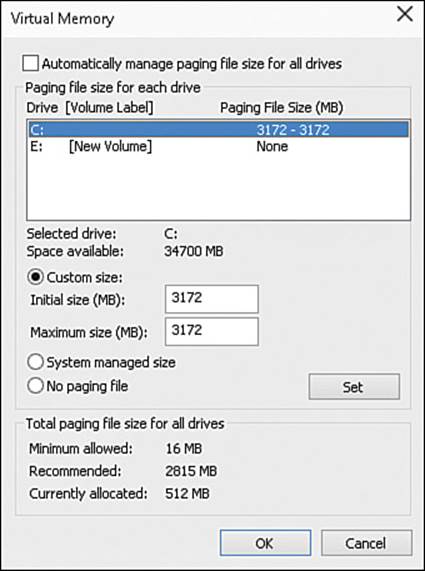
FIGURE 8.5 In the Virtual Memory dialog box, uncheck the Automatically Manage Paging File Size for All Drives check box to enable the other controls.
7. Uncheck the Automatically Manage Paging File Size for All Drives check box if you want to take control of the paging file manually. When you do this, the other controls in the dialog box become available.
8. In the Paging File Size for Each Drive box, click the drive you want to affect. Normally, you’ll want to start with the C: drive.
9. Select the Custom Size option button.
10. Type the starting size in megabytes in the Initial Size box. For example, enter 2048 to make the paging file’s initial size 2GB.
11. Type the largest size in megabytes in the Maximum Size box. For example, enter 3072 to make the paging file’s largest size 3GB.
![]() Tip
Tip
Some Windows experts recommend setting the initial size and maximum size to the same figure to fix the size of the paging file. Doing this ensures that Windows doesn’t waste time resizing the paging file, which may involve writing parts of it to far-flung sectors on a hard disk.
![]() Note
Note
When you need to change back from using a custom size (or using no paging file) to having Windows manage the paging file for you, select the System Managed Size option button.
12. Click Set. The size appears in the Paging File Size column of the Paging File Size for Each Drive box.
13. If necessary, repeat steps 8 through 12 to set the size of paging files for other hard drives or SSDs in your computer.
14. Click OK to close the Virtual Memory dialog box.
15. If the System Properties dialog box appears, telling you that you need to restart your computer to make the changes take effect, click OK.
16. Click OK to close the Performance Options dialog box.
17. Click OK to close the System Properties dialog box.
18. If the System Properties dialog box appeared in step 15, restart Windows now.
![]() Note
Note
Windows needs to restart if you decrease the size of the paging file or move it to another drive, but not if you increase its size.
Controlling Data Execution Prevention
Windows includes a feature called Data Execution Prevention (DEP) that attempts to prevent viruses and malware from running. DEP works by blocking programs from executing code in system memory locations that are reserved for Windows and authorized apps.
DEP is turned on by default for what Windows calls “essential Windows programs and services.” Normally, you’re pretty safe leaving this default setting. But if you want to crank up the level of protection, you can turn on DEP for all apps and services except for those you specify. Doing this may result in DEP blocking a bona fide app or service you need to run. If this happens, you add the app or service to the list of exceptions.
Follow these steps to configure DEP:
1. Right-click or long-press the Start button, and then click System on the shortcut menu. The System window opens.
2. In the left column, click Advanced System Settings to display the Advanced tab of the System Properties dialog box.
3. Click Settings in the Performance box to display the Performance Options dialog box.
4. Click the Data Execution Prevention tab to display its contents (see Figure 8.6).
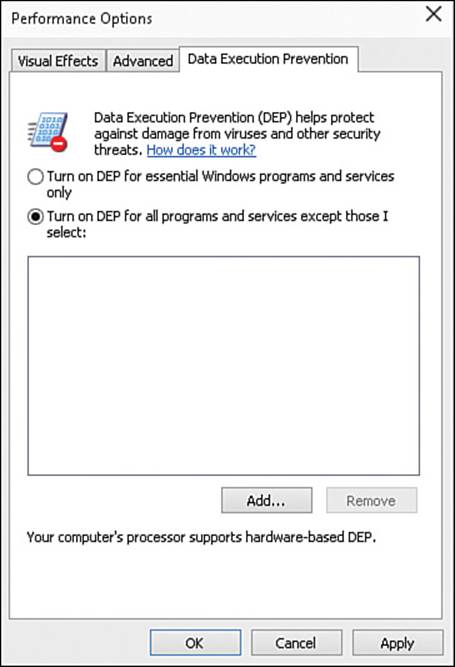
FIGURE 8.6 On the Data Execution Prevention tab of the Performance Options dialog box, you can specify any apps or services you want to exempt from DEP blocking.
5. Select the Turn On DEP for All Programs and Services Except Those I Select option button instead of the Turn On DEP for Essential Windows Programs and Services Only option button (the default setting).
6. If you need to create an exception for an app or a service, click the Add button, navigate to and select the app or service in the resulting Open dialog box, and then click the Open button. Windows adds the app or service to the list box, from where you can subsequently remove it by using the Remove button if necessary.
7. Click OK to close the Performance Options dialog box.
8. If the System Properties dialog box appears, telling you that you need to restart your computer to make the changes take effect, click OK.
9. Click OK to close the System Properties dialog box.
10. If the System Properties dialog box appeared in step 8, restart Windows now.
Stopping Unnecessary Services
Under the hood, Windows runs many services, system processes that perform particular actions. For example, the Computer Browser service keeps a list of the computers on the network to which your computer is connected, and the DHCP Client service registers and updates IP addresses and DNS records for your computer.
Many services (including those two) are essential to Windows, so stopping them may cause problems. But there are other services that you may not need and that you can turn off to improve your computer’s performance. Table 8.2 lists services that you may want to disable.
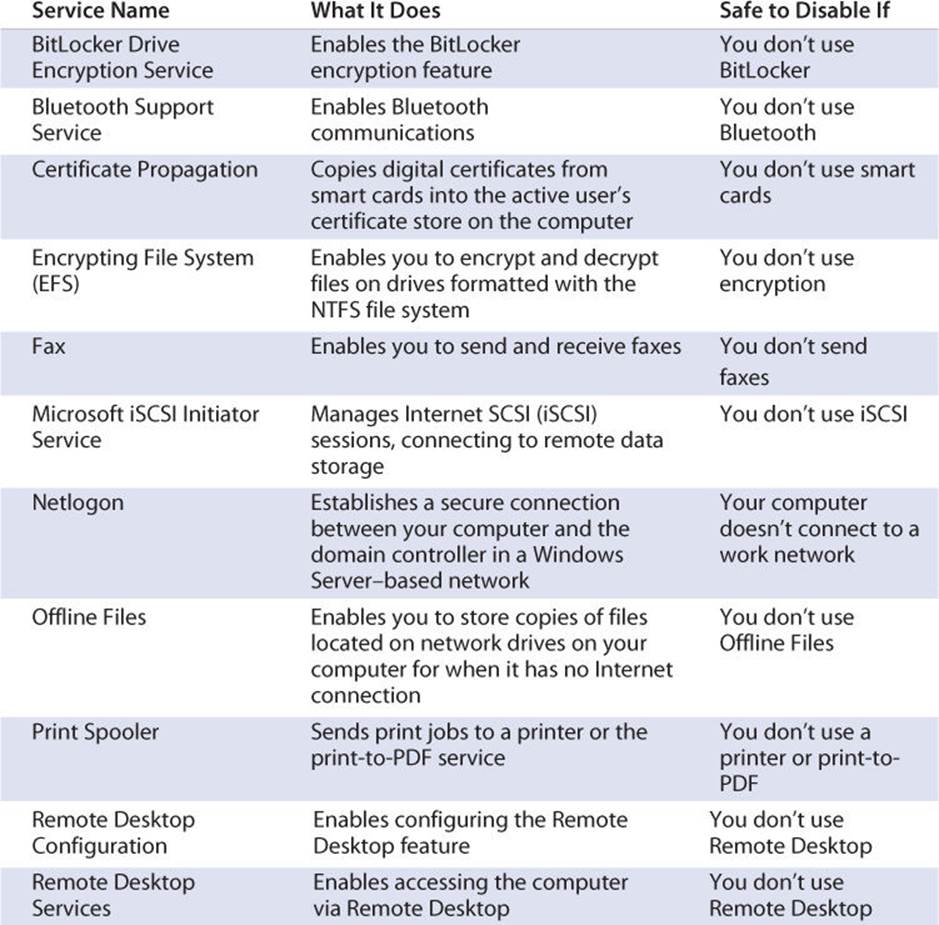
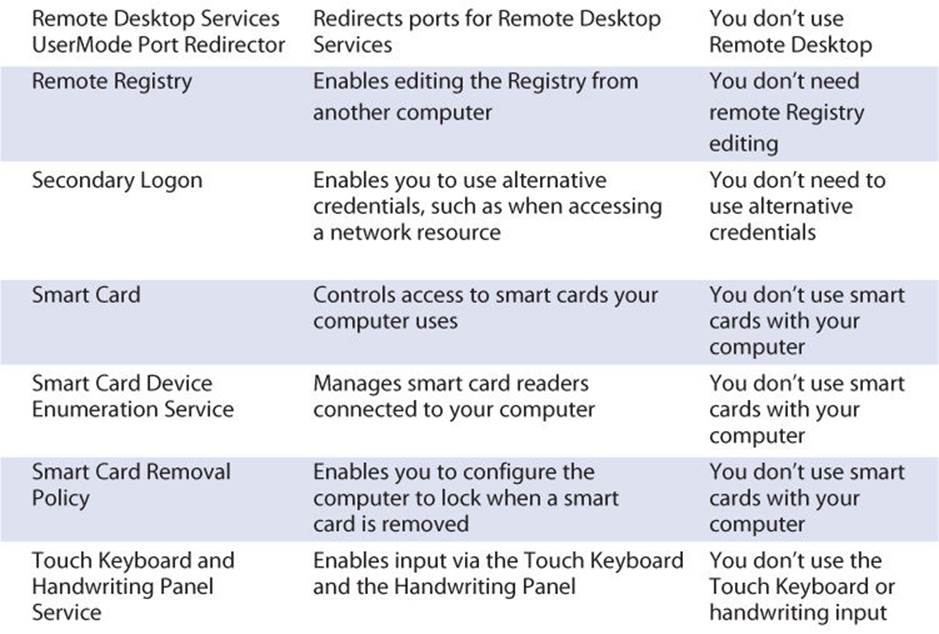
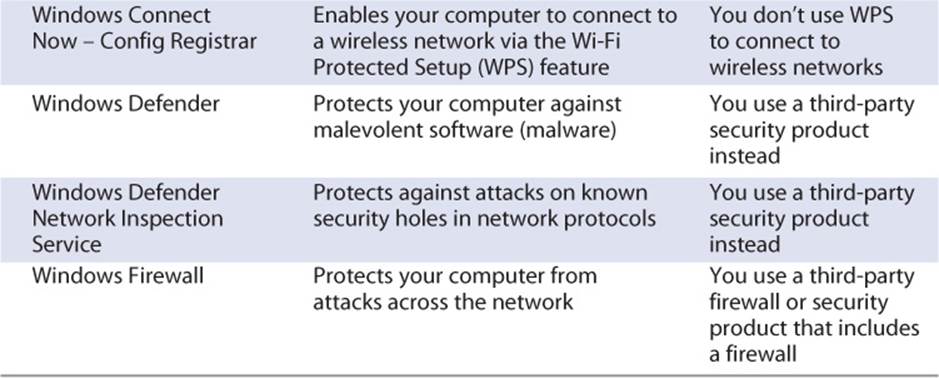
Table 8.2 Windows Services You May Want to Disable
![]() Note
Note
Some of the services listed in Table 8.2 may not be running. For example, the Fax service is typically set to Manual startup because most people send few faxes these days.
Follow these steps to stop a service:
1. Right-click or long-press the Start button to open the shortcut menu.
2. Click Computer Management to open a Computer Management window. This window shows the console tree on the left, enabling you to navigate among the different items you can manage, and the current console in the main part of the window.
3. In the console tree, double-click Services and Applications (or click the arrow to its left) to expand the Services and Applications category if it is collapsed. (If you can already see Services and WMI Control under Services and Applications, the category is already expanded.)
4. In the console tree, click Services to display the Services console in the main part of the window (see Figure 8.7).
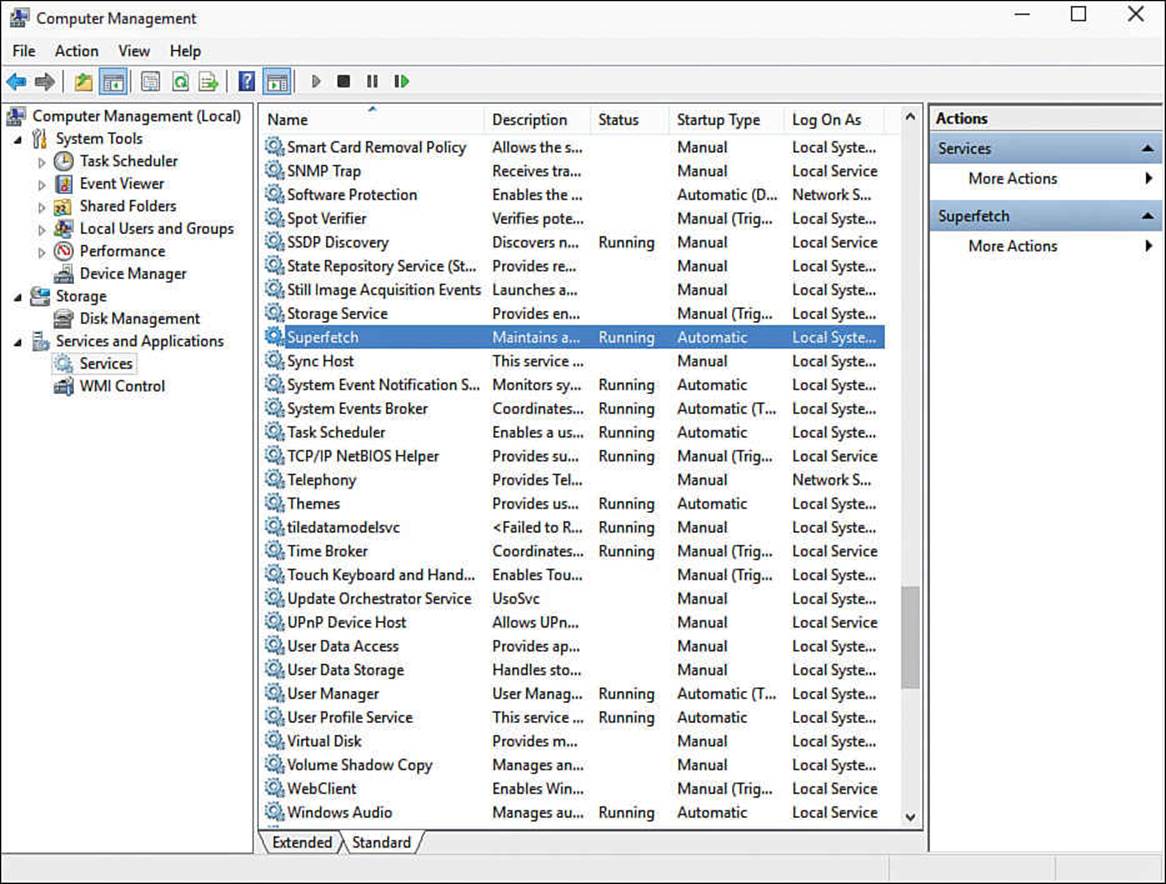
FIGURE 8.7 In the Computer Management window, expand the Services and Applications category in the left pane and then click Services to display the Services console.
![]() Tip
Tip
If you’re working in a small window, as in the screens shown here, make sure the Standard tab is selected in the lower-left corner of the Services console rather than the Extended tab. The Extended tab includes a column on the left of the Services console that shows the name of the selected service, links for stopping and restarting the service, and a description of what it does. This column is handy when you have plenty of space, but if you don’t, it prevents some of the other columns from appearing in the window, making it harder to see what you’re doing. You can also click Show/Hide Console Tree, the fourth button from the left on the toolbar, to hide the console tree to give yourself more space.
5. Double-click the service you want to stop. This example uses Superfetch, which you may want to stop on a computer that has a solid-state device rather than a rotating hard drive. The Properties dialog box for the service opens—in this case, the Superfetch Properties dialog box (seeFigure 8.8).
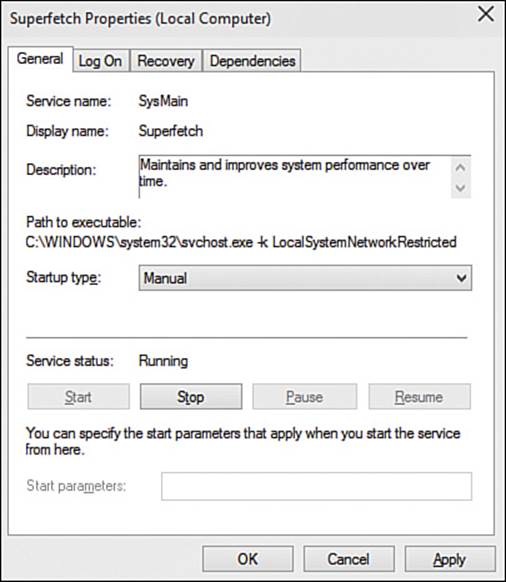
FIGURE 8.8 In the Properties dialog box for the service you’re stopping, set the Startup Type to Disabled and click the Stop button.
6. Click the Startup Type drop-down menu and then click Disabled to prevent Windows from running the service automatically in the future. Most services have the Automatic startup type or the Automatic (Delayed Start) startup type, which allows Windows to start them when it thinks they’re needed.
7. Click the Stop button to stop the service. Windows displays a progress dialog box briefly while it stops the service.
8. Click OK to close the Properties dialog box for the service.
9. Stop any other services by repeating steps 5–8.
10. Close the Computer Management window by clicking the Close (×) button, pressing Alt+F4, or choosing File, Exit.
Turning Off Superfetch and Prefetch
Windows includes features called Superfetch and Prefetch that try to make your computer more responsive by anticipating the apps you will run and loading those apps into memory. Superfetch and Prefetch are usually helpful if your computer has a regular hard drive, the kind that contains spinning platters. If your computer has a solid-state device (SSD) rather than a hard drive, however, Superfetch and Prefetch not only may deliver no improvement but also may contribute to wearing out the SSD by writing extra data to it unnecessarily. (SSDs have a limited number of read and write operations.)
Windows tries to analyze your computer’s storage to determine whether it will benefit from Superfetch and Prefetch. If your computer has an SSD, or multiple SSDs, or it mixes SSDs and hard drives, you should check whether Superfetch and Prefetch are running. If they are, you may want to try disabling them to see whether doing so changes your computer’s performance.
Turning Off Superfetch
Superfetch is a service, so to turn it off, you use the Services window as explained in the section “Stopping Unnecessary Services,” earlier in this chapter: Open the Services window and double-click the Superfetch service; set the service’s Startup type to Disabled, and click the Stop button; and then click the OK button.
Turning Off Prefetch
To turn off Prefetch, you use the Registry Editor. Follow these steps:
1. Right-click or long-press the Start button to open the shortcut menu.
![]() Caution
Caution
Before making changes using Registry Editor, you should back up the Registry. See the section “Making Advanced Changes by Editing the Registry” in Chapter 14 for more information.
2. Click Run to display the Run dialog box.
3. Type regedit and press Enter or click OK to open Registry Editor. If the User Account Control dialog box opens, verifying that you want to run Registry Editor, click Yes.
4. Navigate to this location: HKEY_LOCAL_MACHINE\SYSTEM\CurrentControlSet\Control\Session Manager\Memory Management\PrefetchParameters. The easiest way to do this is by double-clicking each folder in turn in the left pane—double-click HKEY_LOCAL_MACHINE, double-click SYSTEM, double-click CurrentControlSet, and so on—and then click PrefetchParameters when you reach the Memory Management folder. Alternatively, you can click the triangular arrow to the left of each folder to expand it. The right pane shows the keys in the folder (see Figure 8.9).
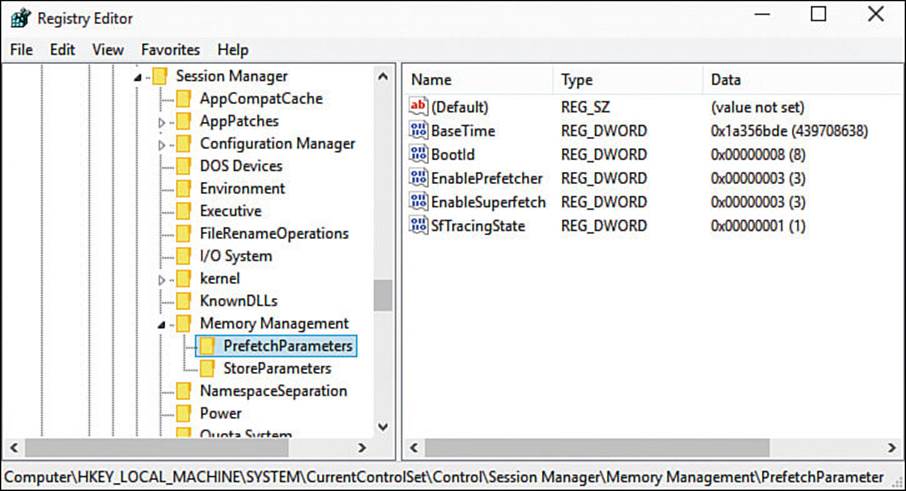
FIGURE 8.9 To turn off Prefetch, navigate to the PrefetchParameters folder in Registry Editor.
5. In the right pane, double-click EnablePrefetcher to open the Edit DWORD dialog box (see Figure 8.10).
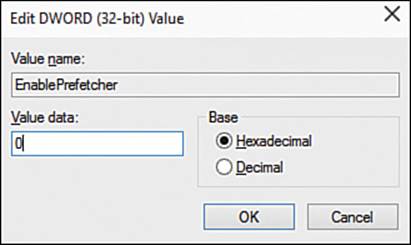
FIGURE 8.10 In the Edit DWORD dialog box, type the value you want to use for EnablePrefetcher.
6. In the Value Data box, type the appropriate value (see Table 8.3).

Table 8.3 EnablePrefetcher Values for Controlling Prefetch
7. Click the OK button to close the Edit DWORD dialog box.
8. Close Registry Editor unless you need to make further changes in it.
Reducing the Number of Startup Items
You might well have noticed that the more software you install on your computer, the more slowly it tends to run. Often, this is because software you install configures itself to run automatically when Windows starts.
Running software automatically can be helpful, especially for software that enables Windows to communicate with hardware devices you sometimes connect to your computer. But running too much software automatically at startup can slow down your computer. So it’s a good idea to check which items are running at startup and remove any that you don’t need to run.
To see which items are running automatically at startup, you can use the Startup tab in Task Manager. Follow these steps:
1. Right-click or long-press Start to display the shortcut menu.
![]() Tip
Tip
You can also open Task Manager by right-clicking or long-pressing open space or the clock on the taskbar and then clicking Task Manager on the shortcut menu.
2. Click Task Manager to open Task Manager.
![]() Note
Note
If Task Manager opens as a small window, click More Details to expand it.
3. Click the Startup tab to display its contents (see Figure 8.11).
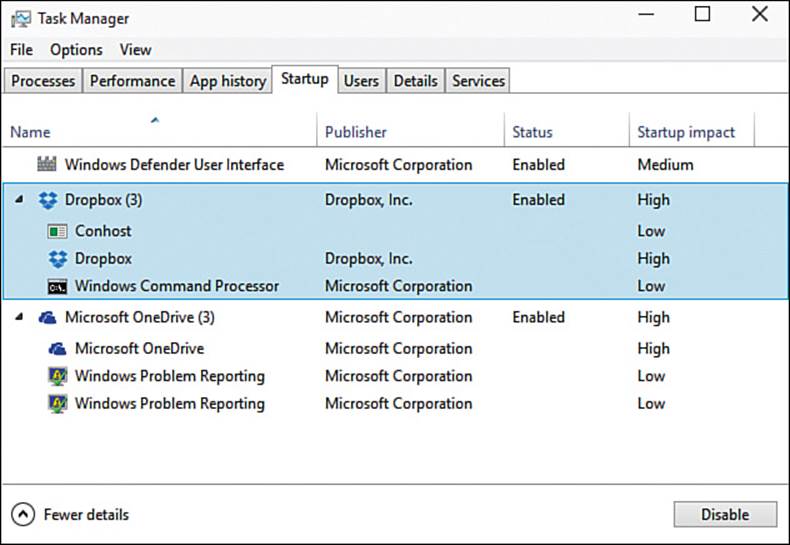
FIGURE 8.11 Use the Startup tab in Task Manager to see which items are running at startup and their startup impact. You can disable an item if necessary.
![]() Tip
Tip
If you’re not sure what a startup item is, right-click or long-press it in the list on the Startup tab and then click Search Online on the shortcut menu to look up what it is and does.
4. If necessary, click the right-pointing arrow to the left of an item that shows a number after its name—such as Dropbox (3) in this example—to display the individual items it is running.
5. To disable an item, click it, and then click Disable.
![]() Tip
Tip
If you want to dig deeper into your computer’s startup items, try the AutoRuns for Windows app. You can download this free from the Microsoft website. Go to www.microsoft.com; search for “AutoRuns for Windows”; and then download it, extract the files, and double-click the file named AutoRuns. The AutoRuns app rounds up all the items that are running automatically and presents them on tabs such as Logon, Explorer, Scheduled Tasks, Services, and Drivers, enabling you to see exactly what’s running (and, if necessary, stop any item).
Optimizing and Defragmenting Your Computer’s Hard Drive
Another way to improve performance is to optimize and defragment your computer’s hard drive. Fragmentation occurs when the operating system saves files to sectors located in different parts of the disk rather than sectors next to each other. This means that the drive’s read head has to travel farther to retrieve the various parts of the file, which takes longer. Defragmenting the drive rewrites sectors to put related information in adjacent or nearby sectors as much as possible.
![]() Caution
Caution
Only hard drives with spinning platters need defragmenting. Don’t defragment an SSD—doing so won’t help performance but will gradually wear out the SSD.
As well as defragmenting the drive, Windows can optimize it by putting frequently needed files in quickly accessible locations.
![]() Tip
Tip
Some computer security and maintenance suites include defragmentation features that disable Windows’ built-in defragmentation tools. If you use such a suite, check whether it includes defragmentation.
Windows can optimize drives automatically on a schedule. You might want to adjust the schedule to suit your needs. You might also want to optimize and defragment a drive right now to try to cure performance problems.
Checking Free Space and Opening the Optimize Drives Window
Follow these steps to check the amount of free space on a drive and to open the Optimize Drives window:
1. Open a File Explorer window. For example, click the File Explorer button on the Taskbar, or choose Start, File Explorer.
2. Click This PC in the Navigation pane to display the computer’s contents.
3. In the Devices and Drives list, right-click or long-press the hard drive—normally called Local Disk (C:)—to display the shortcut menu.
4. Click Properties to display the Properties dialog box for the drive. The General tab appears at the front (see Figure 8.12).
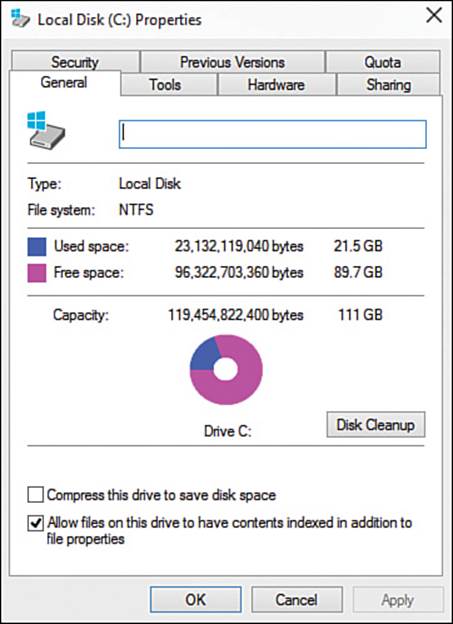
FIGURE 8.12 On the General tab of the Properties dialog box for your computer’s hard drive, make sure the drive has plenty of free space.
5. Look at the readout in the middle to make sure that the drive has plenty of free space. If less than 20% of the drive is free, you might want to free up some space before defragmenting the drive. One way to free up space is by using the Disk Cleanup tool, which you can run by clicking Disk Cleanup on the General tab.
![]() Tip
Tip
The defragmenter can rearrange files more efficiently if your hard drive has plenty of space free.
6. Click the Tools tab to display its contents (see Figure 8.13).
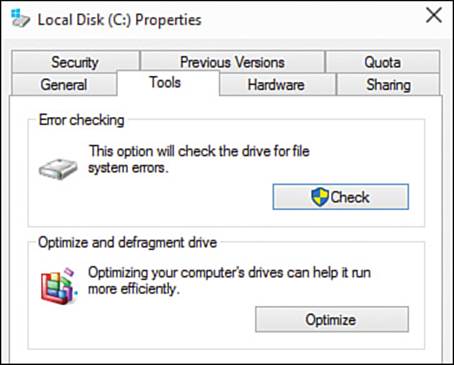
FIGURE 8.13 Click Optimize on the Tools tab of the Properties dialog box for your computer’s hard drive.
7. Click Optimize to open the Optimize Drives window (see Figure 8.14).
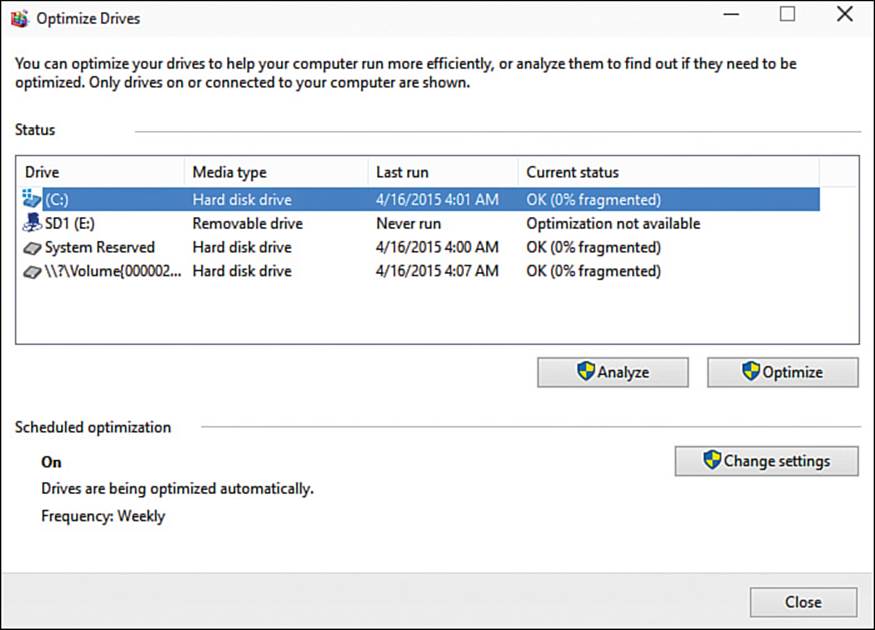
FIGURE 8.14 From the Optimize Drives window, you can analyze a drive, optimize a drive, or change settings for scheduled optimization.
Analyzing and Optimizing a Drive
After opening the Optimize Drives window, you can analyze a drive by clicking Analyze or optimize a drive by clicking Optimize. Analyzing the drive simply gives you a readout showing the amount of fragmentation on the drive, so normally you’ll want to click Optimize, which makes Optimize Drives analyze the drive and then optimize it.
In the old days, the Drive Defragmenter tool, which was the predecessor of Optimize Drives, used to display a highly colorful screen showing which blocks of data it was relocating and where. These days, Optimize Drives simply displays a readout in the Current Status column saying what it is doing: analyzing the drive, performing the first pass, performing the second pass, and so on.
When optimization is complete for the drive you chose, you can optimize another hard drive if your computer has another, or simply click Close to close the Optimize Drives window.
![]() Note
Note
If the Current Status readout shows that the drive is still fragmented, click Optimize again to run optimization once more. Depending on the state of the drive, you may not be able to get it down to 0% fragmentation.
Choosing Settings for Scheduled Optimization
From the Optimize Drives window, you can also choose which drives to optimize automatically and how frequently to optimize them. To do so, follow these steps:
1. Click Change Settings in the Optimize Drives window to display the Optimize Drives dialog box (see Figure 8.15).
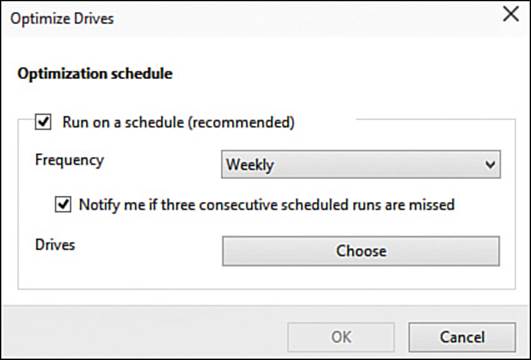
FIGURE 8.15 In this Optimize Drives dialog box, set up the schedule on which to optimize your computer’s drives.
2. Check the Run on a Schedule (Recommended) check box if you want to schedule optimization. This is normally a good idea. (If you uncheck this check box, go to step 9, because you can’t choose any other settings.)
3. Click the Frequency drop-down menu and choose the frequency: Daily, Weekly, or Monthly. Weekly is the default setting and usually works pretty well.
4. Check the Notify Me If Three Consecutive Scheduled Runs Are Missed check box if you want to receive a notification if Windows repeatedly misses the scheduled optimization. (This might happen because you turn off your computer at night.)
5. Click the Choose button to display another Optimize Drives dialog box (see Figure 8.16). This one shows the drives that Windows can optimize automatically.
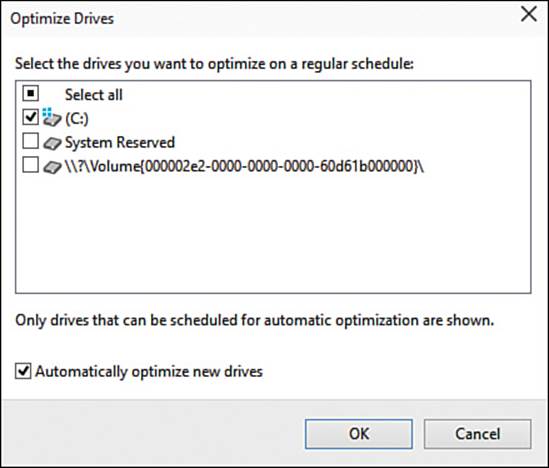
FIGURE 8.16 In this Optimize Drives dialog box, choose which drives to optimize automatically.
6. Check the check box for each drive you want to optimize automatically. Uncheck each other drive’s check box.
7. Check the Automatically Optimize New Drives check box if you want Windows to automatically optimize new drives you connect to your computer.
8. Click OK to close this Optimize Drives dialog box and return to the Optimize Drives dialog box for the schedule.
9. Click OK to close the other Optimize Drives dialog box.
10. Click Close to close the Optimize Drives window.
Getting Rid of Useless Apps
To keep your computer running well, spend a few minutes getting rid of any useless apps installed on it. Many computer manufacturers include extra apps on PCs, ostensibly to provide extra functionality but more usually because they get paid for including them; and you may well be tempted to install free apps or trial versions of apps in order to get things done or simply have fun. In either case, your computer may well contain a bunch of apps that you don’t use and—worse—that are taking up disk space and sapping performance.
![]() Note
Note
Windows gives you two tools for removing apps: Apps & Features in the Settings app, which you use for apps from the Windows Store; and Programs and Features in Control Panel, which you use for apps from other sources. This section shows you how to use Programs and Features. See Chapter 9, “Installing, Running, and Managing Apps,” for coverage of Apps & Features.
Follow these steps to remove apps you don’t need:
1. Right-click or long-press the Start button to display the shortcut menu.
2. Click Programs and Features to display the Programs and Features screen in Control Panel (see Figure 8.17).
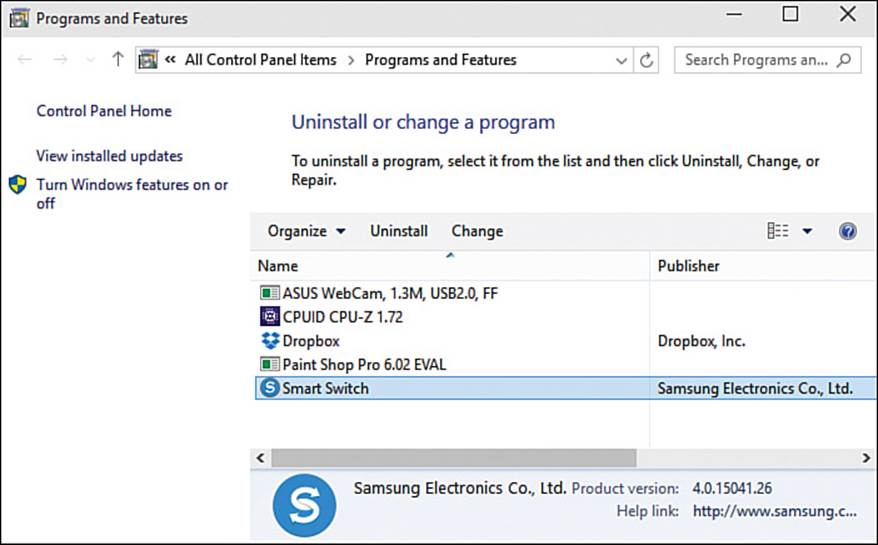
FIGURE 8.17 On the Programs and Features screen in Control Panel, click the app you want to remove, and then click Uninstall.
3. Click the app you want to uninstall.
4. Click Uninstall.
5. In the confirmation dialog box, choose any options available, and then click the button to proceed. For example, in the Smart Switch – InstallShield Wizard dialog box shown in Figure 8.18, you can select or uncheck the Delete Temporary Save File check box before you click the Yes button to proceed.

FIGURE 8.18 In the confirmation dialog box, choose any options, and then click the button for proceeding, such as the Yes button here.
Extending Runtime on the Battery
If your computer is a laptop or a tablet, you likely want to get the maximum possible runtime on the battery at least sometimes. To maximize runtime, you need to reduce power consumption to an acceptable minimum. What that means depends on the computer, what you’re doing with it, and how many features you’re prepared to sacrifice for the sake of power.
To reduce the amount of power your computer consumes, you should turn on Battery Saver and set a sensible power plan, use Airplane mode or turn off Wi-Fi and Bluetooth individually when possible, and avoid using power-hungry apps. The following subsections have the details.
Setting a Sensible Power Plan
To configure your computer’s power use, you’ll probably want to use both the Settings app and Control Panel. Follow these steps:
1. Click Start and then click Settings to open the Settings app.
2. Click System to display the System screen.
3. Click Battery Saver in the left column to display the Battery Saver controls.
4. In the Battery Saver area, set the Battery Saver Is Currently switch to On to turn on Battery Saver.
5. Look at the text below the switch, which shows the power-remaining percentage below which Battery Saver will turn on automatically. If necessary, change the level by clicking Battery Saver Settings and dragging the slider on the Battery Saver Settings screen; then click the Back arrow to return to the System screen.
6. In the left column, click Power & Sleep to display the Power & Sleep controls (see Figure 8.19).
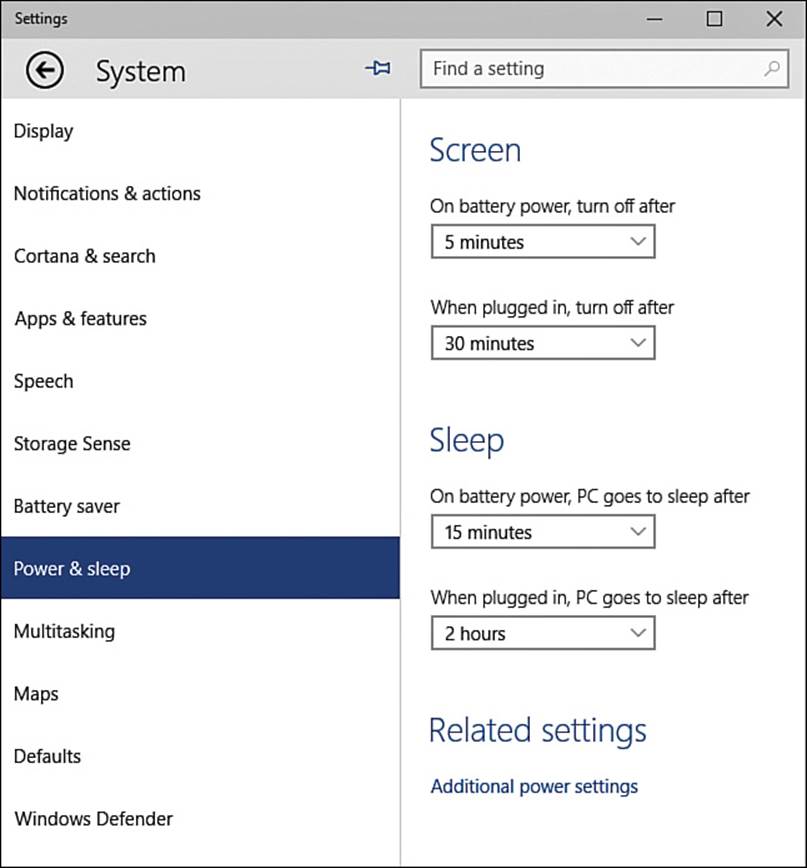
FIGURE 8.19 Use the Power & Sleep controls on the System screen to set short screen-off and sleep settings when your PC is running on the battery.
7. In the Screen area, open the On Battery Power, Turn Off After drop-down menu and choose a short time, such as 1 Minute or 2 Minutes.
8. In the Sleep area, open the On Battery Power, PC Goes to Sleep After drop-down menu and set a short time, such as 3 Minutes or 5 Minutes.
![]() Note
Note
The sleep timeout cannot be shorter than the screen-off timeout. If you set the sleep timeout shorter than the screen-off timeout, Windows adjusts the screen-off timeout to match the sleep timeout.
9. In the Related Settings area, click Additional Power Settings. The Power Options screen in Control Panel appears, showing the Choose or Customize a Power Plan pane (see Figure 8.20).
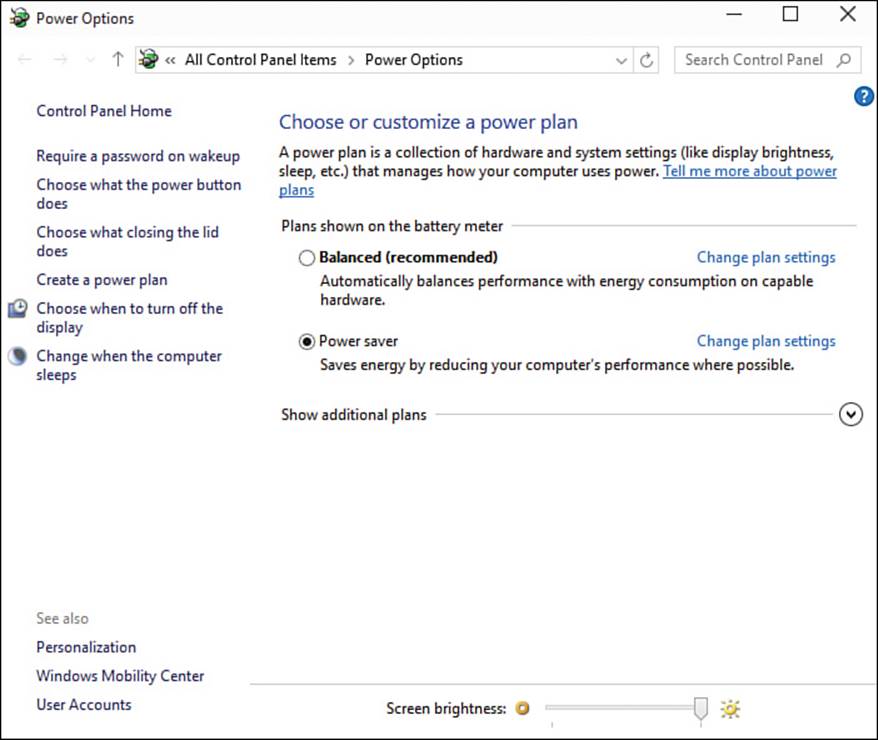
FIGURE 8.20 In the Choose or Customize a Power Plan pane in the Power Options screen in Control Panel, you can choose the Power Saver plan and customize its settings.
10. In the Plans Shown on the Battery Meter area, click the Power Saver option button, if it is available. The options shown here might vary depending on your computer system.
11. Click Change Plan Settings on the Power Saver line to display the Edit Plan Settings screen (see Figure 8.21).
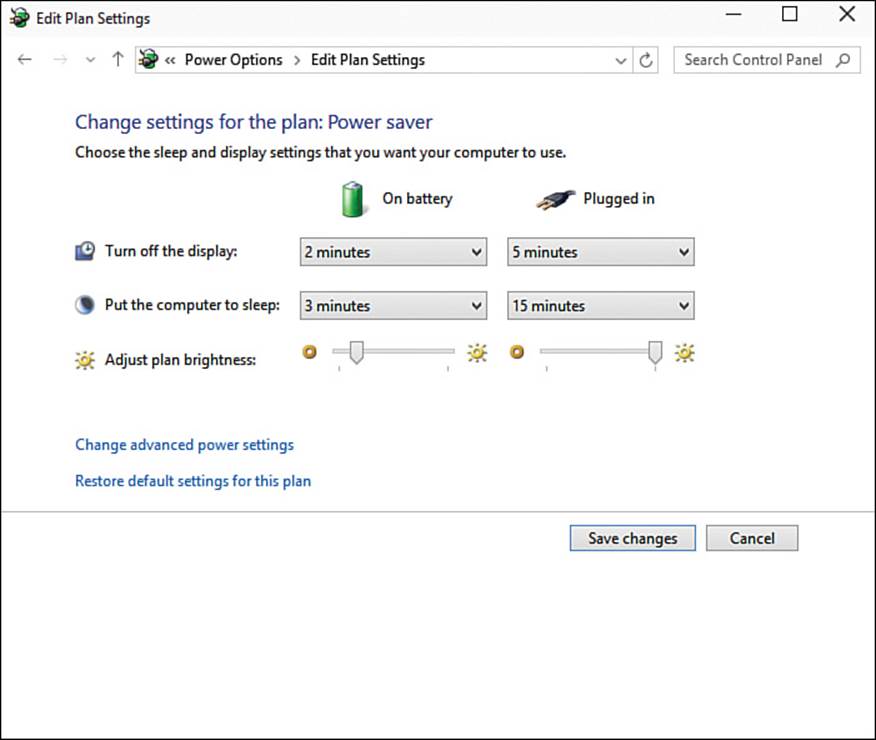
FIGURE 8.21 On the Edit Plan Settings screen, customize the Turn Off the Display setting, the Put the Computer to Sleep setting, and the Adjust Plan Brightness setting in the On Battery column.
12. If necessary, open the Turn Off the Display drop-down menu in the On Battery column and choose a shorter time.
13. If necessary, open the Put the Computer to Sleep drop-down menu in the On Battery column and choose a shorter time for this too.
14. Drag the Adjust Plan Brightness slider in the On Battery column as far to the left as you can bear.
15. Click Save Changes to save the changes you’ve made.
Saving More Power by Changing Advanced Power Settings
From the Edit Plan Settings screen, you can click Change Advanced Power Settings to display the Advanced Settings tab of the Power Options dialog box. Here, you can configure various other settings to save power and secure your computer. This sidebar explains the settings you’ll typically benefit most from changing, leaving you to explore the other settings on your own.
In the Power Saver category at the top, expand the Require a Password on Wakeup item. You can then set Yes or No as needed for On Battery and for Plugged In. Requiring a password on wakeup helps keep your computer secure.
In the Hard Disk category, you can configure the Maximum Power Level setting and the Turn Off Hard Disk After setting. For example, you might choose a Maximum Power Level of 20% for On Battery and a Turn Off Hard Disk After setting of 5 Minutes for On Battery to save power.
In the Wireless Adapter Settings category, expand the Power Saving Mode item and make sure On Battery is set to Maximum Power Saving. For Plugged In, you’ll normally want one of the other settings—Maximum Performance, Low Power Saving, or Medium Power Saving.
In the Sleep category, the Sleep After setting is the setting you’ve already set—either the On Battery Power, PC Goes to Sleep After setting in Settings or the Put the Computer to Sleep setting in Control Panel. The Allow Hybrid Sleep setting enables you to choose whether your computer uses hybrid sleep. Hybrid sleep is mostly designed for desktop computers to protect you against losing work if the power goes out; you wouldn’t normally want to use it on a mobile computer unless it’s a laptop that you always run from an outlet because the battery is dead or missing. The Hibernate After setting enables you to decide how quickly to put your computer into hibernation; hibernation saves battery power but means that it takes longer to wake your computer and start using it after it has sunk into a coma. The Allow Wake Timers setting enables you to control whether timed events can wake the computer from sleep; normally, you’d want to set this to Disable for On Battery.
In the Battery category, set up what happens when the battery runs low. Windows lets you configure three levels: first, the Low Battery Level, at which point you’d normally receive a warning; second, the Reserve Battery Level, at which point Windows displays an alert telling you that it is switching to Reserve Power mode and prompts you to connect the computer to power; and third, the Critical Battery Level, at which point Windows would normally put the computer to sleep, make it hibernate, or make it shut down.
First, expand the Critical Battery Action setting and choose the appropriate action—Sleep, Hibernate, or Shut Down—for On Battery. Then expand the Critical Battery Level and change the battery percentage for On Battery if necessary. The default is 5%, but if you trust your battery, you could go a little lower. If you choose Sleep rather than Hibernate or Shut Down, use a higher level, because your computer still consumes some power while asleep.
After choosing what happens when the battery hits the critical level, choose what to do at the low level. Expand the Low Battery Level setting and set the percentage; you’ll normally want it at least 5% higher than the Critical Battery Level. Then expand the Low Battery Notification setting and make sure both On Battery and Plugged In are set to On—you don’t want to turn off the notification unless you set the Low Battery Action to Sleep, Hibernate, or Shut Down. Normally, you’re better off setting the Low Battery Action to Do Nothing, taking action yourself when you receive the notification, or having the Critical Battery Action take action for you if you’re not present.
Last, expand the Reserve Battery Level setting and set the percentage you want to use. The default setting is 7%. You’ll normally want to keep the Reserve Battery Level setting below the Low Battery Level but above the Critical Battery Level.
Using Airplane Mode and Turning Off Wi-Fi or Bluetooth
Your computer’s capability to stay in touch wirelessly is great when you need it, but when you want to work offline, you can save power by turning off wireless hardware. You can either use Airplane mode, cutting off all wireless communications, or turn off Wi-Fi and Bluetooth separately.
You can control Airplane mode, Wi-Fi, and Bluetooth easily from the Settings app:
![]() Airplane mode and Wi-Fi. Click Start, Settings, Network & Internet, and then click Airplane Mode. You can then either set the Airplane Mode switch to On or set the Wi-Fi switch to Off.
Airplane mode and Wi-Fi. Click Start, Settings, Network & Internet, and then click Airplane Mode. You can then either set the Airplane Mode switch to On or set the Wi-Fi switch to Off.
![]() Bluetooth. Click Start, Settings, Devices, Bluetooth, and then set the Bluetooth switch to Off.
Bluetooth. Click Start, Settings, Devices, Bluetooth, and then set the Bluetooth switch to Off.
Avoiding Power-Hungry Apps
If you’re trying to conserve battery power so that you can get more work done, avoid running power-hungry apps that aren’t part of your work. Videos and games tend to be the worst offenders here, especially any that involve using a disc in an optical drive, but regular apps can chew through power as well. If you find that your laptop or tablet tends to run hot while playing a particular highly demanding game or running a complex app, you’ve likely identified a battery hog.
Choosing Settings for Playing Games
If you use your computer for playing demanding games, you’ll likely want to work your way through this chapter configuring your computer for performance. All the items in the chapter can help improve game performance—apart from extending runtime on the battery, which tends to detract from performance.
But if you’ve already added memory, turned off eye candy and unnecessary services, stripped your startup items to a lean and hungry group, junked any useless apps, configured the paging file, and optimized and defragmented the hard drive, what else can you do to improve performance?
Here are seven things you can do to improve performance:
![]() Close other apps. While you’re playing the game, you don’t need to have your email app, productivity app, music app, and other apps running. You certainly don’t want your BitTorrent client taking processor power and hogging your Internet connection. You don’t need Skype unless you’re using it to talk to other people in the game.
Close other apps. While you’re playing the game, you don’t need to have your email app, productivity app, music app, and other apps running. You certainly don’t want your BitTorrent client taking processor power and hogging your Internet connection. You don’t need Skype unless you’re using it to talk to other people in the game.
![]() Disconnect any peripherals you don’t need for the game.
Disconnect any peripherals you don’t need for the game.
![]() On a laptop or tablet, set the power settings for performance rather than for battery life. Run the device on the charger rather than on the battery. Get a laptop cooler if necessary.
On a laptop or tablet, set the power settings for performance rather than for battery life. Run the device on the charger rather than on the battery. Get a laptop cooler if necessary.
![]() If your laptop has both integrated graphics and dedicated graphics, such as NVIDIA Optimus, make sure it’s using the dedicated graphics for anything demanding. Or use dedicated graphics for anything if you can take the hit to battery life.
If your laptop has both integrated graphics and dedicated graphics, such as NVIDIA Optimus, make sure it’s using the dedicated graphics for anything demanding. Or use dedicated graphics for anything if you can take the hit to battery life.
![]() Update your drivers to the latest versions.
Update your drivers to the latest versions.
![]() Tip
Tip
If your computer has NVIDIA graphics, you can use NVIDIA’s GeForce Experience to keep your graphics drivers updated automatically and to apply optimal settings for games.
![]() Disable hibernation.
Disable hibernation.
![]() Make sure your computer’s drive has plenty of free space. You can free up space by running Disk Cleanup.
Make sure your computer’s drive has plenty of free space. You can free up space by running Disk Cleanup.
And here are three performance-enhancers to avoid:
![]() Beta drivers. Beta (prerelease) drivers may provide extra features or promise better performance, but you risk making your computer unstable. Unless this is a dedicated gaming machine, beta drivers are not a sensible choice.
Beta drivers. Beta (prerelease) drivers may provide extra features or promise better performance, but you risk making your computer unstable. Unless this is a dedicated gaming machine, beta drivers are not a sensible choice.
![]() Registry cleaners. Some Registry cleaners can be helpful because they remove unnecessary information from the Registry. Others can cause disaster. So if you must use one, research it carefully, and back up the Registry before using it. See the section “Making Advanced Changes by Editing the Registry” in Chapter 14 for instructions on backing up the Registry.
Registry cleaners. Some Registry cleaners can be helpful because they remove unnecessary information from the Registry. Others can cause disaster. So if you must use one, research it carefully, and back up the Registry before using it. See the section “Making Advanced Changes by Editing the Registry” in Chapter 14 for instructions on backing up the Registry.
![]() Game boosters. Game boosters promise to make games run faster by restricting background tasks and making more resources available to the game. As of this writing, most game boosters seem not to be effective. Here, too, do some in-depth research before trying a game booster.
Game boosters. Game boosters promise to make games run faster by restricting background tasks and making more resources available to the game. As of this writing, most game boosters seem not to be effective. Here, too, do some in-depth research before trying a game booster.
All materials on the site are licensed Creative Commons Attribution-Sharealike 3.0 Unported CC BY-SA 3.0 & GNU Free Documentation License (GFDL)
If you are the copyright holder of any material contained on our site and intend to remove it, please contact our site administrator for approval.
© 2016-2026 All site design rights belong to S.Y.A.