WINDOWS 10 TIPS AND TRICKS (2016)
7. Securing and Sharing Your Computer
In This Chapter
![]() Configuring accounts for practicality and security
Configuring accounts for practicality and security
![]() Tightening your computer’s security
Tightening your computer’s security
![]() Configuring sharing
Configuring sharing
Even if you are the only person to use your computer, you’ll need to configure your user account and your unlock methods. If you share your computer with others, you’ll need to set up an account for each person.
To keep your computer safe against intruders, you can take various steps, such as applying a startup password, setting the device to lock automatically, and implementing the Secure Sign-In feature.
To share items with others, you can either use the Windows homegroup feature or configure Advanced Sharing manually.
Configuring Accounts for Practicality and Security
In this section, we’ll look at four actions you will likely need to take with user accounts:
![]() Setting your profile picture
Setting your profile picture
![]() Connecting a local account to a Microsoft account
Connecting a local account to a Microsoft account
![]() Securing your account with a password, picture password, PIN, or Windows Hello
Securing your account with a password, picture password, PIN, or Windows Hello
![]() Creating accounts for other people
Creating accounts for other people
Setting Your Profile Picture
To help identify your account, you can set a profile picture for it. Follow these steps:
1. Click Start to open the Start menu, and then click your account name to display the drop-down menu.
2. Click Change Account Settings to display the Your Account pane in the Accounts screen in Settings.
3. To use an existing picture, click Browse, select a picture in the Open dialog box, and then click Choose Picture.
![]() Tip
Tip
You can add two other pictures by repeating step 3. The current picture appears as a large circle, with the previous pictures appearing in smaller circles to the right. You can click one of the previous pictures to make it the current picture.
4. To take a photo with your computer’s camera, click Camera, and then follow the prompts to shoot a satisfactory picture.
Connecting a Local Account to a Microsoft Account
Windows enables you to create both local accounts and Microsoft accounts on your computer:
![]() Local Account. A local account is one that exists only on your computer. You use the account to sign in to Windows.
Local Account. A local account is one that exists only on your computer. You use the account to sign in to Windows.
![]() Microsoft Account. A Microsoft account consists of an email address and password. You use the Microsoft account both to sign in to Windows and to access apps and services online. For example, if your Microsoft account is an Outlook.com account, you use the account to access your email on Outlook.com as well as to sign in to your computer. You can also sync your settings and files automatically via the Internet.
Microsoft Account. A Microsoft account consists of an email address and password. You use the Microsoft account both to sign in to Windows and to access apps and services online. For example, if your Microsoft account is an Outlook.com account, you use the account to access your email on Outlook.com as well as to sign in to your computer. You can also sync your settings and files automatically via the Internet.
![]() Tip
Tip
If you’re not sure whether you’re signed in using a local account or a Microsoft account, click Start, click your account name, and then click Change Account Settings on the drop-down menu. At the top of the Your Account pane in the Accounts screen in Settings, look at the readout below your name. If it shows an email address, you’re using a Microsoft account, and there’s a Sign In with a Local Account Instead link you can click to create a local account and sign in to it; if it shows Local Account, you’re using a local account.
![]() Note
Note
If your computer connects to a network that uses Windows domains, you’ll use a domain account. This has the format domain\username.
If you’re using a local account, you can connect it to your Microsoft account by following these steps:
1. Click Start to open the Start menu, and then click your account name to display the drop-down menu.
2. Click Change Account Settings to display the Your Account pane in the Accounts screen in Settings.
3. Click Sign In with a Microsoft Account Instead to display the Switch to a Microsoft Account on This PC dialog box.
4. Type the password for the account you’re currently using, and then click Next. The Sign In to Your Microsoft Account dialog box appears.
5. Type the email address and password for your Microsoft account, and then click Next.
![]() Note
Note
Depending on the security arrangement for your Microsoft account, you may have to provide an alternative email address or cell phone number, receive a code sent to that address or number, and then enter the code on your computer to authorize connecting your local account to your Microsoft account.
6. When the final Switch to a Microsoft Account on This PC dialog box opens, announcing that your existing account will be changed to a Microsoft account, click Switch.
Securing Your Account with a Password, Picture Password, PIN, or Windows Hello
To keep your computer and your data safe, you must secure your account against intrusion. Windows lets you choose which of four unlock methods to use:
![]() Password. A password is a string of characters—preferably including uppercase and lowercase letters, numbers, and symbols (such as $, ^, or @). This is the essential unlock method, and you can use it when other unlock methods fail.
Password. A password is a string of characters—preferably including uppercase and lowercase letters, numbers, and symbols (such as $, ^, or @). This is the essential unlock method, and you can use it when other unlock methods fail.
![]() PIN. A PIN is a code consisting of four or more numbers. You can use the PIN as an alternative to the password—entering a PIN can be easier than entering a password, especially on a touchscreen device. You can also use the PIN to sign in to apps and services.
PIN. A PIN is a code consisting of four or more numbers. You can use the PIN as an alternative to the password—entering a PIN can be easier than entering a password, especially on a touchscreen device. You can also use the PIN to sign in to apps and services.
![]() Tip
Tip
Every extra digit you add to your PIN makes it 10 times harder to crack. A 4-digit PIN is convenient but provides only modest security. Use 8 digits for stronger security; use 12 or more digits to make the PIN really hard to crack. Memorize a longer PIN by breaking it into groups of 3 or 4 digits like a phone number—but don’t use your actual phone number as the PIN!
![]() Windows Hello. Windows Hello uses biometrics—measurements of your (preferably) living body—to authenticate you. Depending on the capabilities of your computer, you can set up Windows Hello to use your face, your iris, or your fingerprint as the biometric.
Windows Hello. Windows Hello uses biometrics—measurements of your (preferably) living body—to authenticate you. Depending on the capabilities of your computer, you can set up Windows Hello to use your face, your iris, or your fingerprint as the biometric.
![]() Picture Password. A picture password is a security device for touchscreen PCs. To set up the picture password, you choose a picture and then draw a pattern on it using circles, straight lines, and taps. To unlock your computer using the picture password, you replicate that pattern on the picture.
Picture Password. A picture password is a security device for touchscreen PCs. To set up the picture password, you choose a picture and then draw a pattern on it using circles, straight lines, and taps. To unlock your computer using the picture password, you replicate that pattern on the picture.
![]() Note
Note
The Password and PIN unlock methods work on any Windows device. The Windows Hello method works on any Windows device that has the hardware needed to recognize the appropriate biometric—for example, a camera to scan your face or your iris, or a fingerprint reader to capture your fingerprint.
To set up your unlock methods, you work on the Sign-In Options screen (see Figure 7.1). Follow these steps to display the Sign-In Options screen:
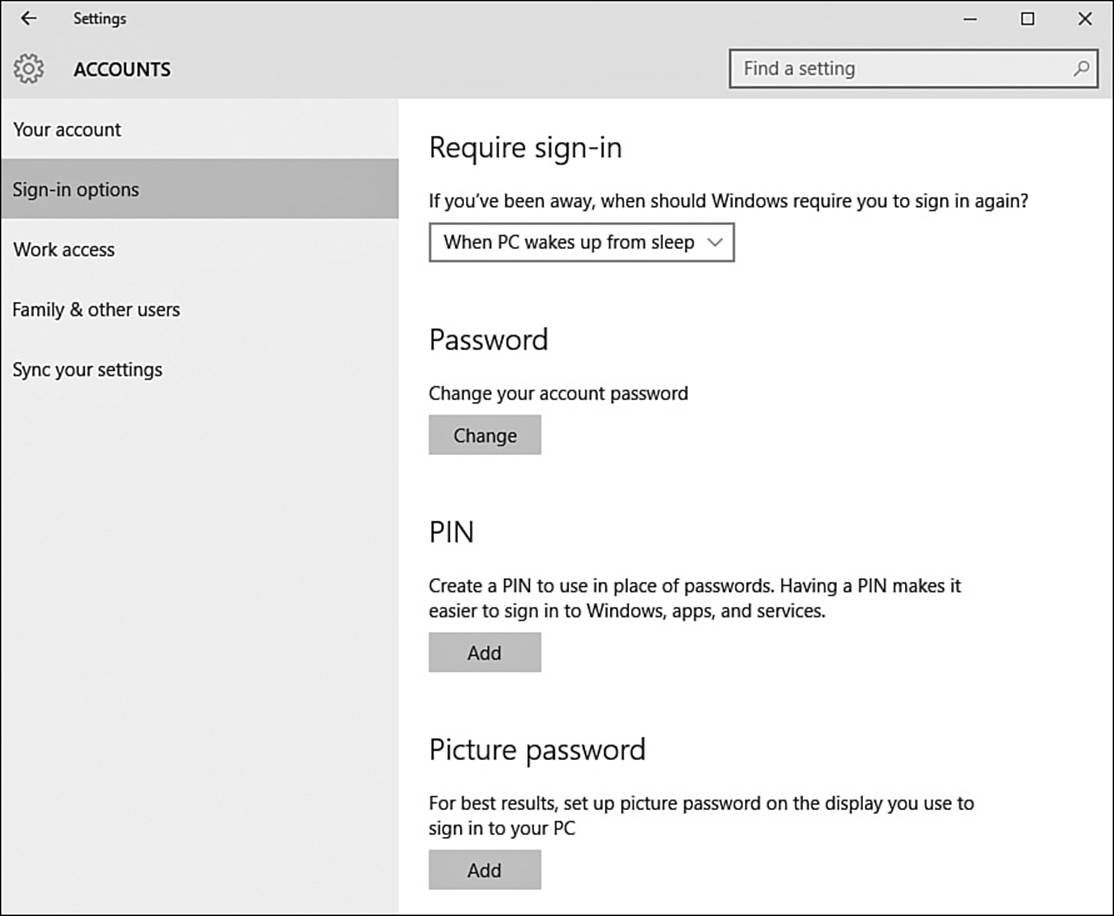
FIGURE 7.1 On the Sign-In Options screen in the Settings app, you can configure your means of unlocking Windows and signing in to apps and services.
1. Click Start to open the Start menu, click your account name, and then click Change Account Settings on the drop-down menu. The Settings app opens, showing the Your Account pane on the Accounts screen.
2. Click Sign-In Options in the left column to display the Sign-In Options screen.
You can now add an unlock method by clicking the Add button below its heading, or change an existing unlock method by clicking the Change button below its heading.
![]() Tip
Tip
Set up multiple unlock methods so that you can use whichever method is most convenient for the device you happen to be using. But make sure each unlock method is secure.
![]() Caution
Caution
In the “If You’ve Been Away, When Should Windows Require You to Sign In Again?” drop-down menu in the Require Sign-in area, do not choose Never—this setting means that anyone who wakes your computer from sleep can start using it without having to provide any authentication. Instead, choose When PC Wakes Up from Sleep if this choice appears on your computer; if not, choose either Every Time or a specific time, such as 1 Minute.
Use a Non-Administrator Account for Everyday Computing
Chances are that you’ve set yourself up with an administrator account so that you can manage your computer. This is fine and normal—but you can make your computer more secure by creating a second account, a standard account, for yourself. You can then use the standard account for everyday computing and keep the administrator account strictly for administration.
To be honest, most people don’t bother to do this, but that’s no reason why you shouldn’t. Having a second account also has another benefit: If your standard account becomes corrupted or has startup items that prevent it from loading correctly, you can use your administrator account to sort out the problems.
Creating Accounts for Others
If other people will use your computer regularly, create an account for each of them. That way, each person can have a separate area for his own files, can keep his email private, and can customize his desktop and settings without other people changing them.
![]() Note
Note
Previous versions of Windows included a Guest account suitable for use by anyone who needed to use your computer only once. As of this writing, the Guest account is disabled and not functional in Windows 10. There are ways to enable it, but even if you do so, it is not currently usable. This situation may well change.
Windows provides different features for adding family members than for adding people who are not part of your family. You create both types of accounts from the Your Family pane in the Settings app.
![]() Note
Note
Windows uses Microsoft accounts to set up user accounts. When setting up the account on your computer, you provide the email address for the Microsoft account. The user can then log in by providing the password for the Microsoft account, so you do not have to set even a temporary password for the user.
Opening the Your Family Pane in the Settings App
Follow these steps to create an account for someone else:
1. Choose Start, Settings to open a Settings window.
2. Click Accounts to display the Accounts screen.
3. Click Family & Other Users in the left pane to display the Your Family pane.
You can now create accounts as explained in the next two subsections.
![]() Note
Note
Windows creates each new user account as a standard account. If you want to make the new user an administrator, see the section “Changing an Existing Account to an Administrator Account,” later in this chapter.
Creating an Account for a Family Member
Follow these steps to create an account for a family member:
1. In the Your Family pane, click Add a Family Member. Windows displays the Add a Child or an Adult? dialog box.
2. Click the Add a Child option button or the Add an Adult option button.
3. Click in the Enter Their Email Address box and type the person’s email address.
4. Click Next. The Add This Person? dialog box opens.
5. Look to make sure you’ve gotten the email address right, and then click Confirm. Windows adds the user account.
Creating an Account for Someone Who Isn’t a Family Member
Follow these steps to create an account for someone who isn’t a family member:
1. In the Your Family pane, click Add Someone Else to This PC. Windows displays the How Will This Person Sign In? dialog box.
2. Click the box and type the person’s email address.
3. Click Next. The Good to Go! screen appears.
4. Click Finish. The user’s new account appears in the Other Users list.
Changing an Existing Account to an Administrator Account
Sometimes you may need to promote an existing user account to an administrator account so that that user can help administer the computer. To promote an account to administrator, follow these steps:
1. Click Start to open the Start menu, and then click your account name to display the drop-down menu.
2. Click Change Account Settings to display the Your Account pane in the Accounts screen in Settings.
3. Click Family & Other Users in the left pane to display the Your Family pane.
4. In the Other Users list, click the account you will promote. The Change Account Type button and Remove button appear under the account.
5. Click Change Account Type to display the Change Account Type dialog box (see Figure 7.2).
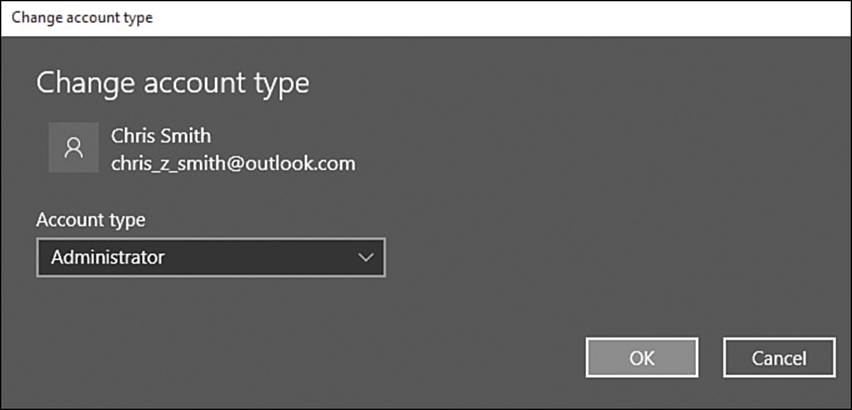
FIGURE 7.2 You can promote a standard account to an administrator account by choosing Administrator in the Account Type drop-down menu in the Change Account Type dialog box and then clicking OK.
6. Click the Account Type drop-down menu, and then click Administrator.
7. Click OK. Windows changes the account type.
![]() Note
Note
As you’d imagine, you can use the same technique to demote an administrator account to a standard account—for example, because you find that the user misuses the administrator powers.
Tightening Your Computer’s Security
This section shows you how to tighten your computer’s security by applying a startup password, setting your computer to lock automatically after a period of inactivity, and implementing the Secure Sign-In feature. You also learn how to configure User Account Control to a level that suits you, disable recent app switching, and use the Assigned Access feature to limit a particular user account to using a single app.
Locking Your Computer with a Startup Password
For an extra level of security, you can set Windows to demand a startup password each time your computer starts. Figure 7.3 shows the Startup Password dialog box.
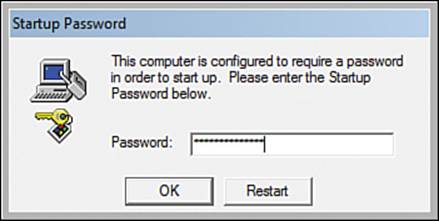
FIGURE 7.3 You can set Windows to display the Startup Password dialog box before the logon screen.
Follow these steps to set a startup password:
1. Click Start to display the Start menu.
2. Type syskey in the Search box. Windows displays a list of search results.
3. Click the “syskey: Run Command” result. It normally appears at the top of the list.
4. If the User Account Control dialog box appears, verify that the Program Name readout shows SAM Lock Tool and that the Verified Publisher readout shows Microsoft Windows. If so, click Yes. The Securing the Windows Account Database dialog box appears (see Figure 7.4).
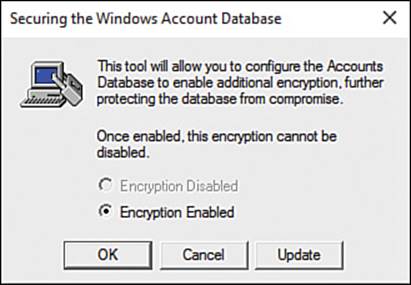
FIGURE 7.4 In the Securing the Windows Account Database dialog box, click Update to display the Startup Key dialog box.
5. Click Update to display the Startup Key dialog box (see Figure 7.5).

FIGURE 7.5 In the Startup Key dialog box, select the Password Startup option button, type a strong password twice, and then click OK.
6. Select the Password Startup option button.
7. Type a strong password in the Password box and in the Confirm box.
![]() Note
Note
A strong password is one that combines uppercase and lowercase letters, numbers, and symbols; is at least 8 characters long, and preferably 12 characters or longer; and is not a real word or a combination of real words in any language.
8. Click OK. The Success dialog box appears, telling you that “the Account Database Startup Key was changed.”
9. Click OK to close the Success dialog box. Both the Startup Key dialog box and the Securing the Windows Account Database dialog box also close.
![]() Note
Note
To remove the startup password, open the Startup Key dialog box and select the System Generated Password option button. In the System Generated Password box, select the Store Startup Key Locally option button. Click OK and then enter the startup password to prove you know it.
Setting Your Computer to Lock Automatically
To protect your data, you should lock your computer every time you step away from the keyboard. But because it’s easy to forget, especially in a busy office situation, you should set your computer to lock itself automatically. You can do this by configuring a screensaver to kick in after a period of inactivity and specifying that Windows display the logon screen when someone interrupts the screensaver.
![]() Tip
Tip
Normally, you can lock your computer by pressing Windows Key+L. You may find that administrators disable this keyboard shortcut on some computers.
Follow these steps to set your computer to lock itself automatically:
1. Right-click or long-press Start to display the shortcut menu.
2. Click Control Panel to open a Control Panel window.
3. Click Appearance and Personalization to display the Appearance and Personalization screen.
4. Click Change Screen Saver to display the Screen Saver Settings dialog box (see Figure 7.6).
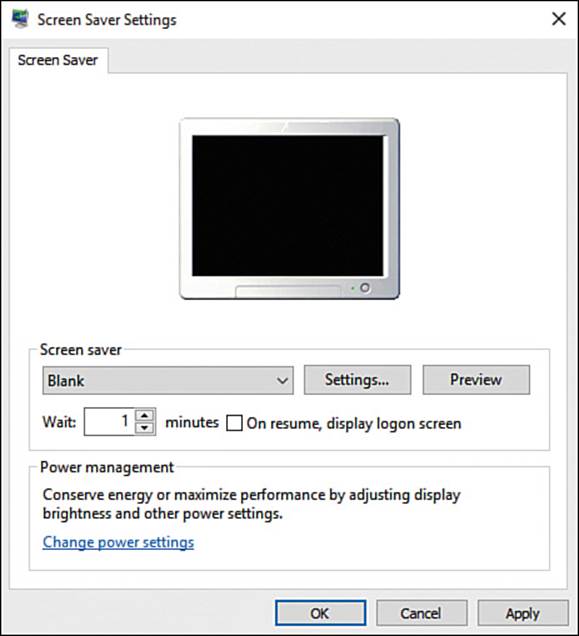
FIGURE 7.6 In the Screen Saver Settings dialog box, choose a screensaver, set a short Wait time, and check the On Resume, Display Logon Screen check box.
5. Click the Screen Saver drop-down menu and choose the screensaver you want to use. The Blank screensaver is the most eco-friendly one, not to mention the easiest on anyone who happens to have your computer screen in her line of vision.
6. Depending on the screensaver you chose, click Settings and choose settings for it. The Blank screensaver has no settings.
7. In the Wait box, set the number of minutes of inactivity you want to elapse before Windows turns on the screensaver. The smaller the number you choose here, the more secure your computer will be—but the more frequently you will have to log on after even the briefest of breaks from the keyboard.
8. Check the On Resume, Display Logon Screen check box. You must check this check box for the security to be any use—if you leave this check box unchecked, any touch to your computer’s keyboard, mouse, or screen displays your work immediately.
9. Click OK to close the Screen Saver Settings dialog box.
Increasing Login Security with Secure Sign-In
To help increase your computer’s security level, you can enable the Secure Sign-In feature.
![]() Note
Note
Secure Sign-In forces anyone logging on to the computer to press the Ctrl+Alt+Delete system command to display the sign-in screen. This extra step helps prevent users from entering their user names and passwords at a fake sign-in screen designed to harvest credentials and share them with malefactors.
To enable Secure Sign-In, follow these steps:
1. Click Start to display the Start menu.
2. Type netplwiz in the Search box and press Enter. Windows displays the User Accounts dialog box.
3. Click the Advanced tab to display its controls (see Figure 7.7).
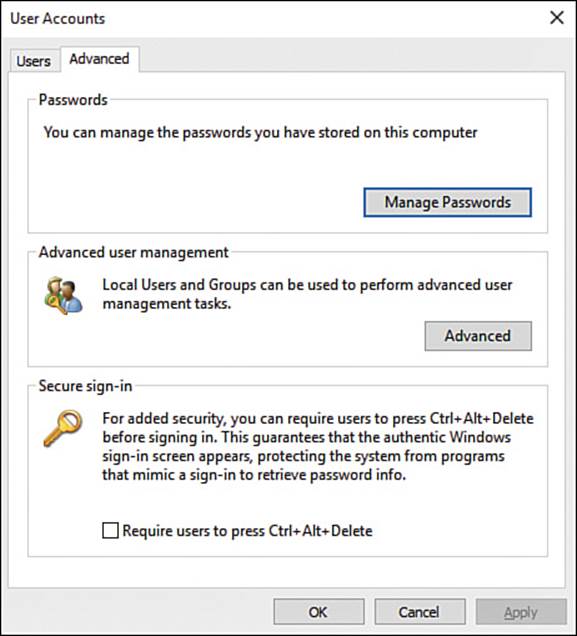
FIGURE 7.7 To turn on Secure Sign-In, check the Require Users to Press Ctrl+Alt+Delete check box on the Advanced tab of the User Accounts dialog box.
4. Check the Require Users to Press Ctrl+Alt+Delete check box.
5. Click OK to close the User Accounts dialog box.
From now on, when the computer is locked, the screen displays the message Press Ctrl+Alt+Delete to Unlock. When you press the key combination, the sign-in screen appears, and you can sign in as usual.
Configuring User Account Control
User Account Control is one of the Windows security mechanisms. User Account Control attempts to detect when an app tries to make changes to your computer or when you make changes to Windows settings.
Dealing with User Account Control Queries
When User Account Control detects an action that could result in a serious change, you see a User Account Control dialog box (see Figure 7.8) that prevents you from taking any other action on your computer until you deal with it.
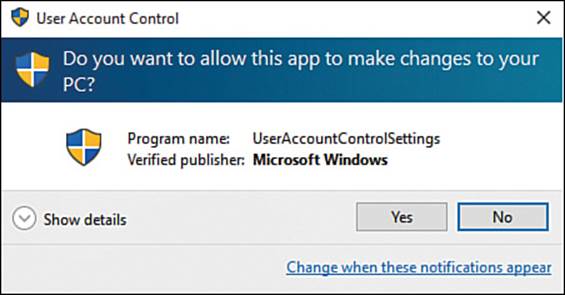
FIGURE 7.8 User Account Control warns you if an app tries to make changes to your computer or if you change certain Windows settings.
![]() Note
Note
As you can see in Figure 7.8, User Account Control can detect the changes that User Account Control itself is trying to make—and can refuse them automatically.
When a User Account Control dialog box opens, look at three things:
![]() The color of the dialog box. The User Account Control dialog box changes the color of the bar below the title bar to give you a rough idea of the severity of the warning. A blue bar indicates the program is considered safe; a yellow bar indicates mild danger; an orange bar indicates greater danger; and a red bar indicates severe danger.
The color of the dialog box. The User Account Control dialog box changes the color of the bar below the title bar to give you a rough idea of the severity of the warning. A blue bar indicates the program is considered safe; a yellow bar indicates mild danger; an orange bar indicates greater danger; and a red bar indicates severe danger.
![]() The Program Name readout. This name may enable you to identify the program immediately, such as the UserAccountControlSettings program in the example; if not, you might look it up on the Internet after clicking No in the User Account Control dialog box.
The Program Name readout. This name may enable you to identify the program immediately, such as the UserAccountControlSettings program in the example; if not, you might look it up on the Internet after clicking No in the User Account Control dialog box.
![]() The Verified Publisher readout. This readout shows the publisher responsible for the digital certificate used to sign the program. In the example, the verified publisher is Microsoft Windows, indicating that UserAccountControlSettings is part of Windows.
The Verified Publisher readout. This readout shows the publisher responsible for the digital certificate used to sign the program. In the example, the verified publisher is Microsoft Windows, indicating that UserAccountControlSettings is part of Windows.
![]() Note
Note
You can click Show Details in the User Account Control dialog box to display the details section. The details section shows the program location (including the app name and any command parameters used) and a Show Information About This Publisher’s Certificate link that you can click to display the digital certificate used to sign the program.
If you don’t respond to the User Account Control dialog box within a couple of minutes, User Account Control cancels the change that prompted the query. The User Account Control dialog box then closes automatically.
Configuring User Account Control
You can set User Account Control to any of four sensitivity levels to control—very approximately—how many User Account Control dialog boxes appear.
![]() Note
Note
Normally, your motivation for configuring User Account Control would be to ratchet down the feature’s sensitivity after receiving a barrage of User Account Control dialog boxes. But if you haven’t had such a barrage, it’s a good idea to check your User Account Control settings anyway and make sure that User Account Control isn’t set too low.
To configure User Account Control, follow these steps:
1. Right-click or long-press Start to display the shortcut menu.
2. Click Control Panel to open a Control Panel window.
3. Click System and Security to display the System and Security pane.
4. Under the Security and Maintenance heading, click Change User Account Control Settings to display the User Account Control Settings dialog box (see Figure 7.9).
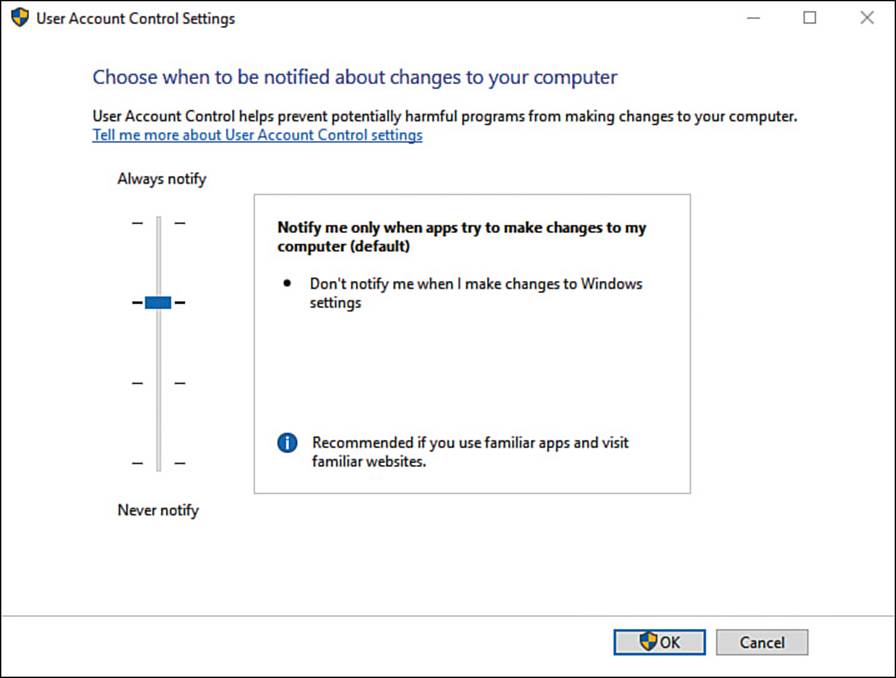
FIGURE 7.9 In the User Account Control Settings dialog box, drag the slider up or down the Never Notify–Always Notify axis to choose the types of changes for which you want to receive notifications.
5. Drag the slider on the left up or down to set the level. The box to the right of the slider shows the details for the current level, together with information explaining whether Microsoft recommends the setting (and if so, for which users) or not.
![]() Caution
Caution
Receiving frequent User Account Control dialog boxes can be disruptive and annoying, but never choose the lowest level of notification, because doing so risks compromising the security of your computer and your data. Even the second-lowest setting is risky, so normally you should choose either the top level or second level of notifications.
6. Click OK to close the User Account Control Settings dialog box.
7. If you chose either the top level or the second level of notifications, click Yes in the User Account Control dialog box that appears.
Controlling Recent App Switching
As you know, Windows enables you to switch quickly among your recent apps by using Task view. This feature is normally not only helpful but also a time-saver, but in some cases you may want to disable it—for example, to minimize distractions.
To disable recent app switching, follow these steps:
1. Click the Start button to display the Start menu.
2. Type group policy to display a list of suggestions.
3. Click the Edit Group Policy, Control Panel suggestion. Windows displays a Local Group Policy Editor window. Figure 7.10 shows the Local Group Policy Editor window expanded to the setting you need to change.

FIGURE 7.10 In some versions of Windows, you can use Local Group Policy Editor to turn off recent app switching.
4. In the left pane, expand the User Configuration item to display its contents if necessary. You can either click the arrow to its left or (easier) double-click the item itself.
5. Still in the left pane, expand the Administrative Templates item.
6. Still in the left pane, expand the Windows Components item.
7. Click the Edge UI item to display its controls in the main part of the window.
8. Double-click the Turn Off Switching Between Recent Apps item to display the Turn Off Switching Between Recent Apps window (see Figure 7.11).
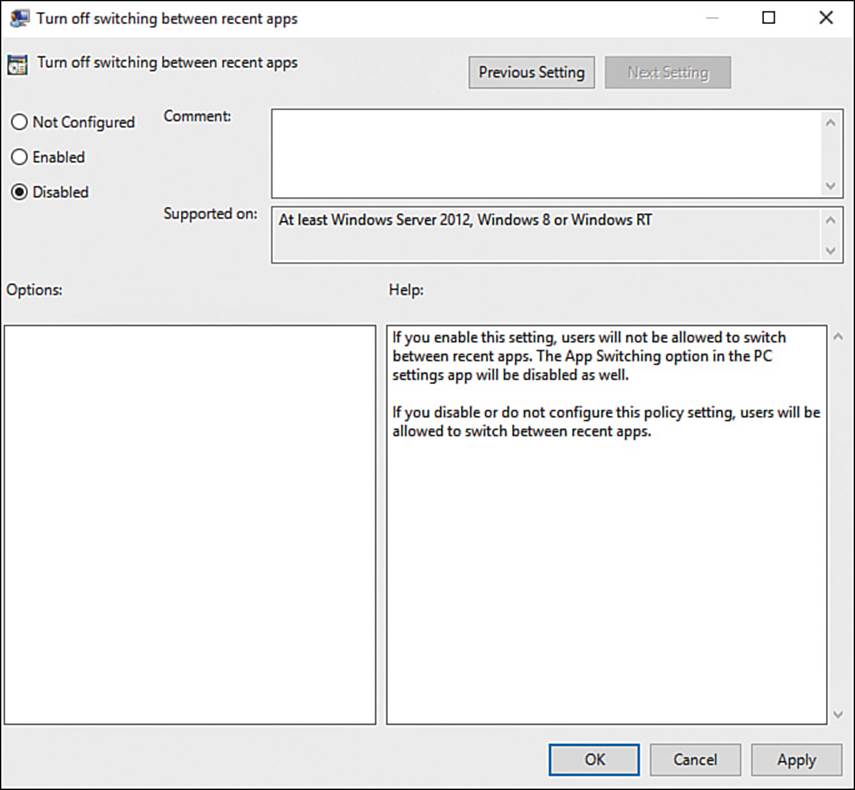
FIGURE 7.11 In the Turn Off Switching Between Recent Apps dialog box, select the Enabled option button and then click OK.
9. Click the Enabled option button to select it. (You’re enabling the Turn Off Switching feature, not disabling switching.)
10. Click OK to close the Turn Off Switching Between Recent Apps dialog box. You can then close the Local Group Policy Editor window.
Setting Up Assigned Access
Sometimes you may need to limit a particular user to using only one app acquired from the Windows Store. For example, you may need to allow someone to use your PC to perform a particular task, such as editing photos or videos. For when you need to do this, Windows provides the Assigned Access feature.
To set up Assigned Access, follow these steps:
1. Click Start to open the Start menu, and then click your account name to display the drop-down menu.
2. Click Change Account Settings to display the Your Account pane in the Accounts screen in Settings.
3. Click Family & Other Users in the left pane to display the Your Family pane.
4. At the bottom of the pane, click Set Up Assigned Access to display the Set Up Assigned Access screen (see Figure 7.12).
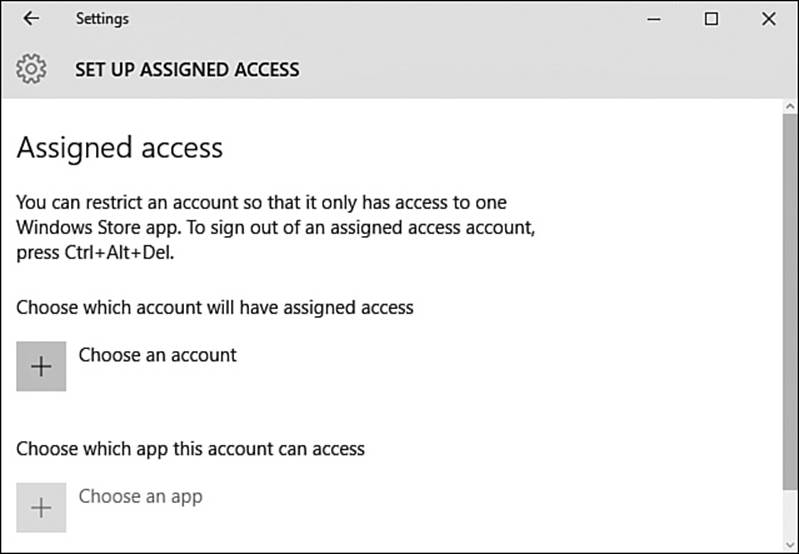
FIGURE 7.12 On the Set Up Assigned Access screen, choose the account you want to restrict, and then choose the app to which you want to restrict the account.
5. Click Choose an Account to display the Choose an Account dialog box, and then click the appropriate account.
6. Click Choose an App to display the Choose an App dialog box, and then click the app the account will use.
7. Restart your PC when Windows prompts you to do so.
Configuring Sharing
Windows enables you to share folders, printers, and devices with other computers on the same network. You’ll want to configure sharing carefully to ensure you do not expose your computer or your data to attack across the network.
Sharing via a Homegroup
If you’ve used Windows in a work environment, you may have encountered the workgroup features that Windows provides for sharing on small networks. For sharing in home situations, Windows provides the homegroup feature, which works in a similar way.
A homegroup is simply a group of PCs on your home network. The homegroup provides features that enable you to share files (such as documents and media files) and printers more easily.
![]() Note
Note
You can share items on your home network without creating a homegroup. But given that a homegroup simplifies sharing, it’s usually best to try using a homegroup and see whether it meets your needs.
Creating Your Homegroup
Windows sometimes sets up a homegroup automatically during installation; or, if you’ve upgraded your computer to Windows 10 from Windows 7, Windows 8, or Windows 8.1, you may already have a homegroup set up. If not, you can set up a homegroup quickly and easily.
Follow these steps to create a homegroup:
1. Right-click or long-press Start to display the shortcut menu.
2. Click Control Panel to open a Control Panel window.
3. Click Network and Internet to display the Network and Internet screen.
4. Click Homegroup to display the Homegroup screen (see Figure 7.13).
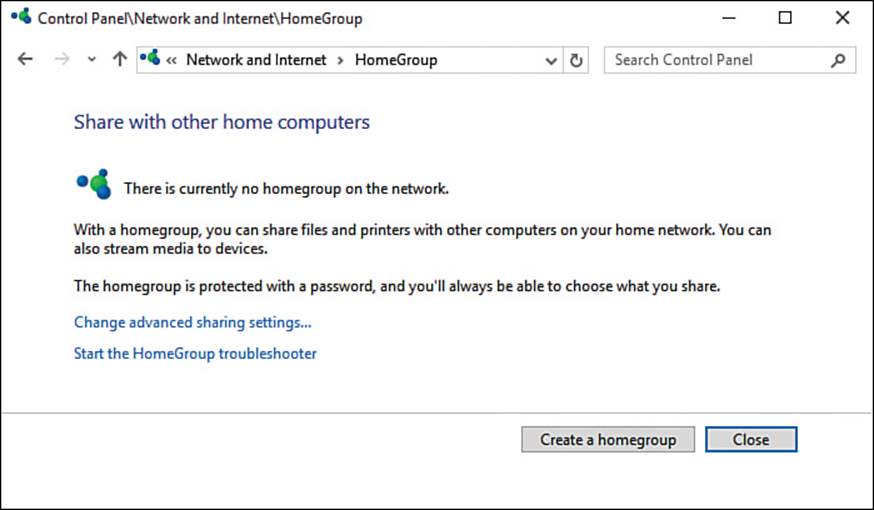
FIGURE 7.13 If the Homegroup screen in Control Panel shows the message “There is currently no homegroup on the network,” click Create a Homegroup to start creating a homegroup.
5. Click Create a Homegroup to launch the Create a Homegroup Wizard.
6. Click Next to display the Share with Other Homegroup Members screen of the Create a Homegroup Wizard (see Figure 7.14).
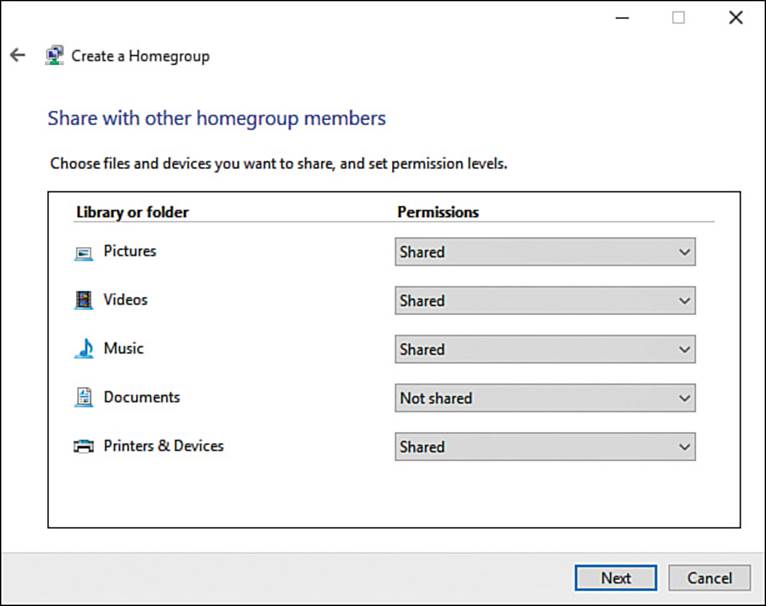
FIGURE 7.14 On the Share with Other Homegroup Members screen of the Create a Homegroup Wizard, choose which items to share.
7. Specify which items to share by setting the Permissions drop-down menu for each library or folder—Pictures, Videos, Music, Documents, and Printers & Devices—to Shared or Not Shared.
![]() Caution
Caution
Any items you share with the homegroup will also be available to any children who use the computers in the homegroup. If a library contains items that are not child-friendly, do not share the library. Instead, you can share particular folders. See the section “Changing the Items Your Computer Is Sharing with the Homegroup,” later in this chapter, for instructions on sharing individual folders.
8. Click Next. Windows sets up the homegroup and then displays the Use This Password to Add Other Computers to Your Homegroup screen.
9. Write down the password somewhere handy. You may also want to click the Print Password and Instructions link and print the password.
![]() Tip
Tip
Another way to save the password is to open Snipping Tool and take a screen capture of the Use This Password to Add Other Computers to Your Homegroup screen. You can also view the homegroup password at any time from the Homegroup screen in Control Panel.
10. Click Finish to close the Create a Homegroup Wizard. The homegroup appears on the Homegroup screen, showing what you’re sharing and displaying controls for managing the homegroup (see Figure 7.15).
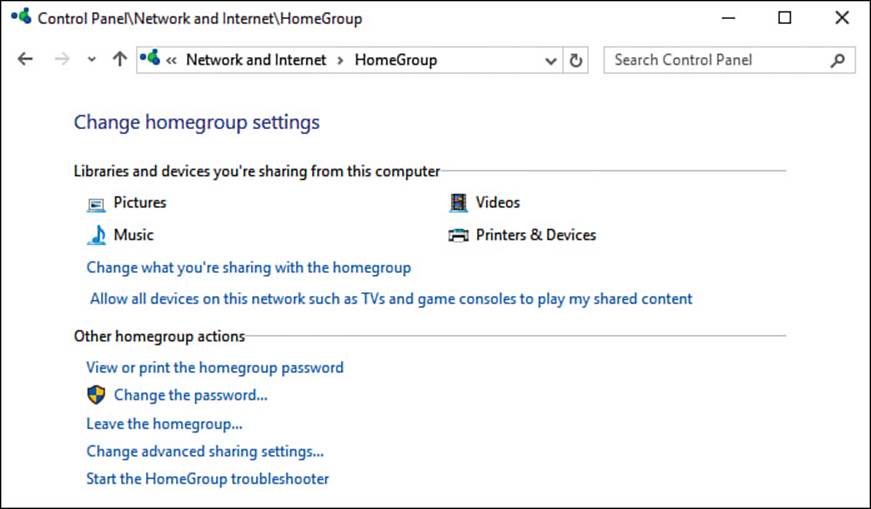
FIGURE 7.15 The homegroup appears on the Homegroup screen in Control Panel. You can see which items your computer is sharing, and you can take other actions with the homegroup.
Adding Another Computer to the Homegroup
Now that you’ve set up the homegroup, you can add another computer to it by following these steps on that computer:
1. Right-click or long-press Start to display the shortcut menu.
2. Click Control Panel to open a Control Panel window.
3. Click Network and Internet to display the Network and Internet screen.
4. Click Homegroup to display the Homegroup screen.
![]() Note
Note
If the Homegroup screen doesn’t show a homegroup you’ve just created on another computer, click Start the HomeGroup Troubleshooter to force Windows to search for the homegroup. Usually, Windows then locates the homegroup. Failing that, restart both computers and try again.
5. Click Join Now to launch the Join a Homegroup Wizard. This is the Create a Homegroup Wizard in drag.
6. Click Next to display the Share with Other Homegroup Members screen. Look back to Figure 7.14 to see the Create a Homegroup Wizard’s version of this screen.
7. Specify which items to share by setting the Permissions drop-down menu for each library or folder—Pictures, Videos, Music, Documents, and Printers & Devices—to Shared or Not Shared.
8. Click Next. The Type the Homegroup Password screen appears.
9. Type the password and click Next. Your computer joins the homegroup, and the You Have Joined the Homegroup screen appears.
10. Click Finish. You can now start using the homegroup.
![]() Note
Note
You can remove a computer from the homegroup by clicking Leave the Homegroup in the Other Homegroup Actions area of the Homegroup screen in Control Panel. The Leave the Homegroup Wizard walks you through the process of leaving. If all the computers leave the homegroup, Windows removes the homegroup.
Accessing Files in the Homegroup
Now that you have multiple computers in the homegroup, you can access files and devices in the homegroup by navigating through the Homegroup item in your computer’s file system. For example, open a File Explorer window and then click Homegroup in the Navigation pane to display the computers in the homegroup. You can then double-click a computer to view the libraries and other items it is sharing.
Changing the Items Your Computer Is Sharing with the Homegroup
You can change the items your computer is sharing with the homegroup in three ways:
![]() Change the libraries you’re sharing. Open the Homegroup screen in Control Panel and then click Change What You’re Sharing with the Homegroup to display the Share with Other Homegroup Members screen in the Change Homegroup Sharing Settings Wizard. For each library or folder, open the Permissions drop-down menu and choose Shared or Not Shared, as needed. Click Next and then click Finish.
Change the libraries you’re sharing. Open the Homegroup screen in Control Panel and then click Change What You’re Sharing with the Homegroup to display the Share with Other Homegroup Members screen in the Change Homegroup Sharing Settings Wizard. For each library or folder, open the Permissions drop-down menu and choose Shared or Not Shared, as needed. Click Next and then click Finish.
![]() Share individual files or folders with the entire homegroup. Open a File Explorer window to the folder that contains the file or folder you want to share. Right-click or long-press the file or folder, click Share With on the shortcut menu, and then click Homegroup (View) to share the item so that other homegroup users can open and view it. If you want homegroup users to be able to change the item, choose Share With, Homegroup (View and Edit) on the shortcut menu instead of Homegroup (View).
Share individual files or folders with the entire homegroup. Open a File Explorer window to the folder that contains the file or folder you want to share. Right-click or long-press the file or folder, click Share With on the shortcut menu, and then click Homegroup (View) to share the item so that other homegroup users can open and view it. If you want homegroup users to be able to change the item, choose Share With, Homegroup (View and Edit) on the shortcut menu instead of Homegroup (View).
![]() Caution
Caution
Give View and Edit access or the Read/Write permission (which is the same thing by a different name) only to people you trust with your files. Use View access or Read permission (again, these are the same thing) for most sharing.
![]() Share individual files or folders with specific people. Open a File Explorer window to the folder that contains the file or folder you want to share. Right-click or long-press the file or folder, click Share With on the shortcut menu, and then click Specific People to display the File Sharing dialog box (see Figure 7.16). Type the person’s account name or email address in the box and then click Add. You can then click the Permission Level drop-down menu for the person and choose Read or Read/Write, as needed. After choosing the people and permissions, click Share.
Share individual files or folders with specific people. Open a File Explorer window to the folder that contains the file or folder you want to share. Right-click or long-press the file or folder, click Share With on the shortcut menu, and then click Specific People to display the File Sharing dialog box (see Figure 7.16). Type the person’s account name or email address in the box and then click Add. You can then click the Permission Level drop-down menu for the person and choose Read or Read/Write, as needed. After choosing the people and permissions, click Share.
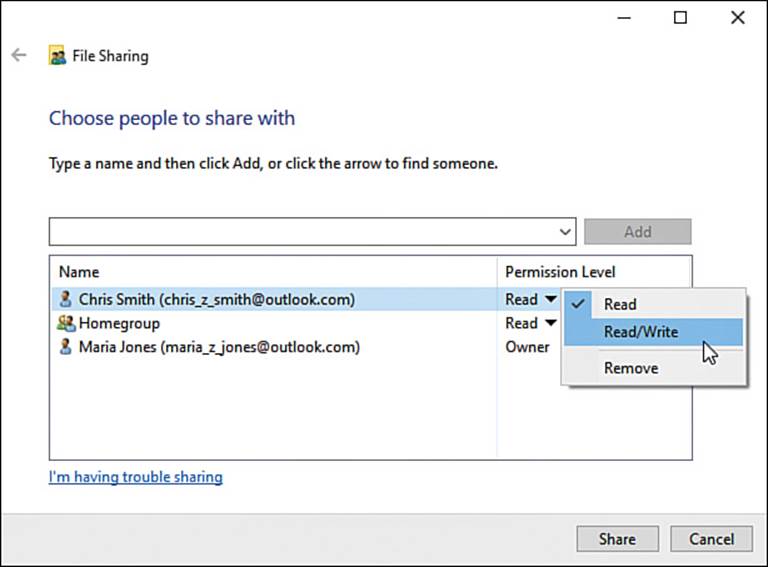
FIGURE 7.16 Use the File Sharing dialog box to share a particular file or folder with specific people and to set their type of access to it.
Using Advanced Sharing
As you saw in the preceding section, a homegroup gives you an easy way to set up and manage sharing. But you can also use advanced sharing settings if you need to or if you simply prefer to have full control over sharing.
Enabling Advanced Sharing
First, you need to enable Advanced Sharing by following these steps:
1. Open a File Explorer window.
2. Choose File, Change Folder and Search Options to display the Folder Options dialog box.
3. Click the View tab to display its controls.
4. Near the bottom of the Advanced Settings box, uncheck the Use Sharing Wizard (Recommended) check box.
5. Click OK to close the Folder Options dialog box. Leave the File Explorer window open for now so that you can use it in the next section.
Configuring Advanced Sharing for a Folder or Drive
Now that you’ve enabled Advanced Sharing, you can use it like this:
1. In a File Explorer window, navigate to the folder or view that contains the folder or drive you want to share.
2. Right-click or long-press the folder or drive to display the shortcut menu, and then click Share With, Advanced Sharing to display the Properties dialog box for the item.
![]() Tip
Tip
You can also start configuring advanced sharing from the Ribbon. Select the file or folder and then choose Share, Share With, Advanced Sharing.
3. Click the Sharing tab to display its controls (shown on the left in Figure 7.17).
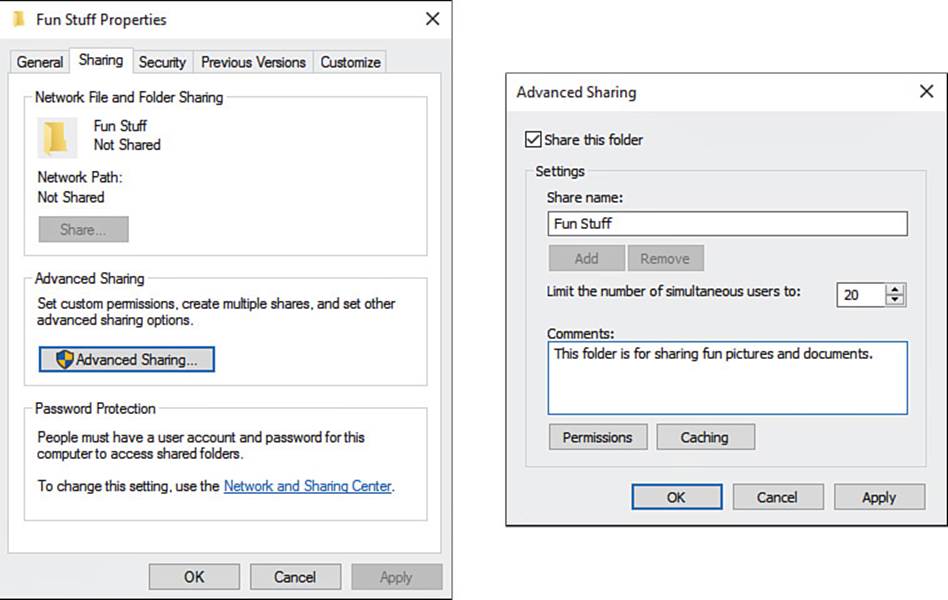
FIGURE 7.17 On the Sharing tab of the Properties dialog box for a folder or drive (left), click the Advanced Sharing button. In the Advanced Sharing dialog box (right), check the Share This Folder check box, edit the share name as needed, and add a comment if necessary.
4. Click Advanced Sharing to display the Advanced Sharing dialog box (shown on the right in Figure 7.17).
5. Check the Share This Folder check box.
6. If necessary, edit the name in the Share Name box. For example, you might add the computer’s name (such as Fun Stuff on Maria’s PC) so that people can easily see where the folder is located.
7. If necessary, adjust the number in the Limit the Number of Simultaneous Users To box. The default setting is 20.
8. If you want, type a comment in the Comments box to explain what the shared folder is for.
9. Click Permissions to display the Permissions dialog box (see Figure 7.18).
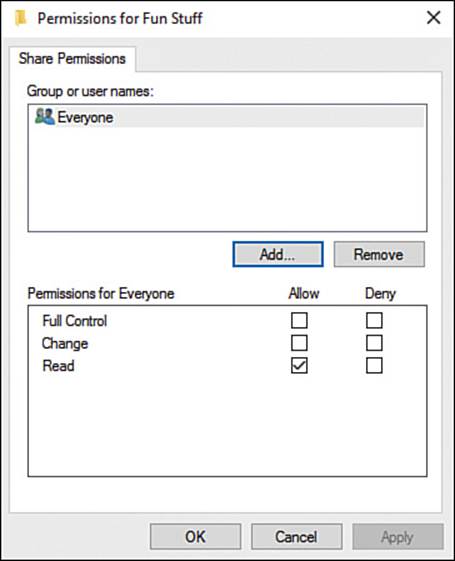
FIGURE 7.18 Use the Permissions dialog box to specify which users and groups can access the shared folder.
10. If the user or group for which you want to set permissions doesn’t appear in the Group or User Names box, click Add; otherwise, go to step 14. The Select Users or Groups dialog box appears (see Figure 7.19).
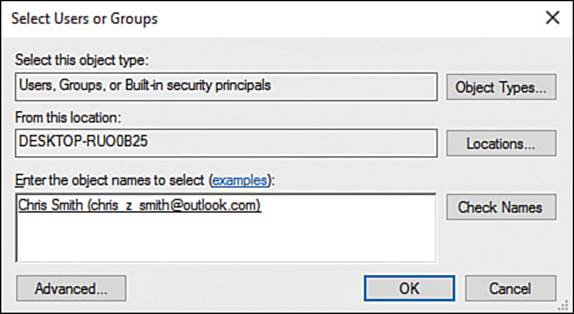
FIGURE 7.19 In the Select Users or Groups dialog box, enter the name of the user or group you want to add.
11. In the Enter the Object Names to Select box, type the name or email address of the user you want to add.
12. Click Check Names. Windows verifies the name and displays the object’s full name (such as the personal name and email pair shown in the figure) with the full name underlined.
13. Click OK. The user name appears in the Group or User Names box in the Permissions dialog box.
14. In the Group or User Names box, click the user or group for which you want to set permissions.
15. In the Permissions box, check the Read check box in the Allow column to enable the user or group to view the folder and its contents.
16. In the Permissions box, check the Change check box in the Allow column if you want to enable the user or group to change the folder and its contents.
![]() Caution
Caution
The Change permission enables someone to create new items, change existing items, or delete existing items. Grant this permission only if you are sure you want the user or group to be able to take these actions.
17. When you finish setting permissions, click OK to close the Permissions dialog box.
![]() Caution
Caution
The Full Control permission enables someone to take any action with the folder, including setting permissions for other users and groups. Normally, you would not want to grant Full Control for a folder that you own.
18. Click OK to close the Advanced Sharing dialog box.
19. Click OK to close the Properties dialog box for the folder or drive.
Hiding a Drive from Other Users
If you share your computer with others, you might want to prevent them from seeing a particular drive—for example, so that they don’t fill it up with their files.
You can do this by removing the drive letter. This is not secure, but it can be effective if you’re dealing with people who aren’t computer savvy.
To remove the drive letter, right-click or long-press the Start button, and then click Disk Management on the shortcut menu.
Right-click or long-press the drive and then click Change Drive Letter and Paths to display the Change Drive Letter and Paths dialog box. With the drive letter selected (as it is by default), click Remove, and then click Yes in the Disk Management dialog box that opens. Windows removes the drive letter, and the drive disappears from File Explorer windows.