Exam Ref 70-688 Supporting Windows 8.1 (2014)
Chapter 2. Support resource access
Your employees must be able to access resources. That’s what networking is all about, to be brief. Users access resources to do and save work. A resource can be a piece of hardware in an office, such as a printer, a removable drive, or a USB stick. A resource also can be data users store on their own computers, network-attached storage (NAS), or a storage location in the cloud. Users often need to access resources from external venues such as hotels, conference rooms, and home computers, and you must ensure that the applicable protocols are in place to secure and configure those connections for users.
Beyond that, a network administrator must make the resources users need available, and make sure that those who need access have access. You also must ensure that users can access only the resources they need and no more. That’s a lot to consider and plan for. And after you create a plan, you can begin to configure and manage what you’ve decided on, and such management is a long-term, ever-changing commitment as technologies evolve. This chapter starts at the beginning, with network connectivity.
Objectives in this chapter:
![]() Objective 2.1: Support network connectivity
Objective 2.1: Support network connectivity
![]() Objective 2.2: Support remote access
Objective 2.2: Support remote access
![]() Objective 2.3: Support authentication and authorization
Objective 2.3: Support authentication and authorization
![]() Objective 2.4: Support data storage
Objective 2.4: Support data storage
![]() Objective 2.5: Support data security
Objective 2.5: Support data security
Objective 2.1: Support network connectivity
Networks are what enable users to access resources. Small companies often create single networks that consist of a handful of computers configured as a workgroup. Larger enterprises generally create networks configured as domains. Corporations might create multiple domains and connect them by using various types of trusts. No matter what kind of network is used, though, the same TCP/IP addressing technologies are available and employed to define the computers on the network, the network itself, and any existing subnetworks. In this objective you’ll learn how IPv4 and IPv6 are incorporated into networks, how resource names are resolved to IP addresses, how to support wireless networks, and how to apply network security.
This objective covers how to:
![]() Understand IPv4 and IPv6, including transition technologies
Understand IPv4 and IPv6, including transition technologies
![]() Support names resolution, including Peer Name Resolution Protocol (PNRP) and Domain Name System Security Extensions (DNSSECs)
Support names resolution, including Peer Name Resolution Protocol (PNRP) and Domain Name System Security Extensions (DNSSECs)
![]() Support wireless networks and connections
Support wireless networks and connections
![]() Support network security, including Windows Firewall and IP security
Support network security, including Windows Firewall and IP security
Understanding IPv4 and IPv6
A protocol suite is a set of protocols that define the rules that must be used and incorporated for a specific group, technology, or other entity to function. Protocols are necessary so that all participants can use the same rules to work together and so that no one questions how or why something will and should happen. For networks, Transmission Control Protocol/IP Protocol (TCP/IP) is the suite of agreed-on protocols that is used over the Internet and within almost all kinds of computer networks. Internet Protocol (IP), the key protocol in this suite, is used to address data packets and to help get them to their destination. The TCP/IP suite, as a unit, defines the rules for how data packets are sent over a network. This includes rules for how data is packaged, formatted, sequenced, and so on, and also defines what happens when data packets are lost or incur errors in transmission.
Entire books, conferences, and training classes exist to fully explain TCP/IP. This objective can’t offer such comprehensive information. However, you must have a firm grasp on the generalities of IPv4 and IPv6, and how they are applied and used in an enterprise. Beyond that, you need to understand the various transition technologies, when IPv4 and IPv6 are both used or required for network connectivity, and specific types of connections.
Exploring IPv4
An IPv4 address is a 32-bit number that consists of four octets of 8 bits each. It looks like this when written with the base 10 numbering system: 124.205.15.2, with the highest number in any octet 255 or less. The computer doesn’t see this number; instead, it sees four octets of 1s and 0s: 01111100 011001101 00001111 00000010. The largest number in any octet is 255 because that’s what 11111111 adds up to when you convert it from binary to base 10.
Although you shouldn’t be asked to convert a binary octet to a base 10 number on the exam, you still must understand how a conversion would be calculated, so that you can fully understand how subnets are used (and named) to further define a network.
To get started, think about the base 10 numbering system. A number such as 3,253 can be broken up into 3000 + 200 + 50 + 3, which can be further expanded to (3 × 10^3) + (2 × 10^2) + (5 × 10^1) + (3 × 10^0). To expand even further, consider (3 × 10 × 10 × 10) + (2 × 10 × 10) + (5 × 10) + (3 × 1). Here, you’re thinking in terms of 10s.
With binary, you have to think in terms of 2s rather than 10s. So 124, which you already defined as 01111100 (used in the first paragraph in this section and in the first octet), is (0 × 2^7) + (1 × 2^6) + (1 × 2^5) + (1 × 2^4) + (1 × 2^3) + (1 × 2^2) + (0 × 2^1) + (0 × 2^0). When you add this up, you get the following:
(0 × 2^7) = 0 × 128 = 0
+ (1 × 2^6) = 1 × 64 = 64
+ (1 × 2^5) = 1 × 32 = 32
+ (1 × 2^4) = 1 × 16 = 16
+ (1 × 2^3) = 1 × 8 = 8
+ (1 × 2^2) = 1 × 4 = 4
+ (0 × 2^1) = 0 × 2 = 0
+ (0 × 2^0) = 1 × 0 = 0
And when you add 0 + 64 + 32 + 16 + 8 + 4 + 0+ 0, you get 124. That’s how 124 equals 01111100.
You must use these unique IP addresses to define specific devices on a network and the network on which it resides. The address given to the resource defines both and is used with a subnet mask. The default subnet mask defines the network by using 1s and 0s, as shown in Table 2-1. The three default subnet masks align with each of the three types of IPv4 addresses that you should be familiar with: Class A, Class B, and Class C. (Class D and Class E also exist but aren’t relevant here.)
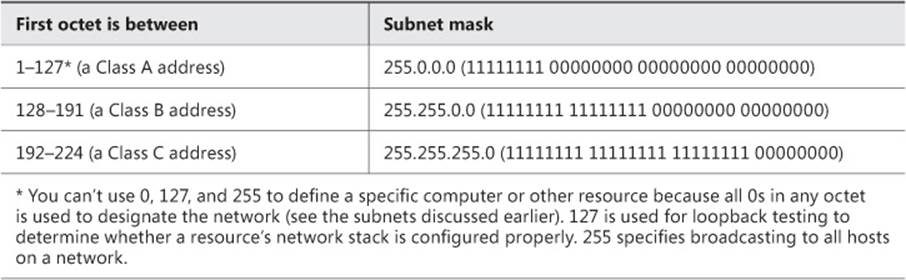
TABLE 2-1 TCP/IP v4 address classes
You can create your own unique subnet masks to define your address space by changing the subnet mask to meet your needs. If you define the subnet mask by changing 11111111 11111111 11111111 00000000 to 11111111 11111111 1111000 00000000, for example, the subnet mask becomes 255.255.240.0/20. The /20 defines the number of 1s in the mask. You might see a question related to this on the exam.
Beyond this, the IPv4 address defines the network ID and the host ID of the resource, as well as the number of networks and hosts available in that class of addresses. Although the mathematics is beyond the scope of this text, Table 2-2 defines these parameters.
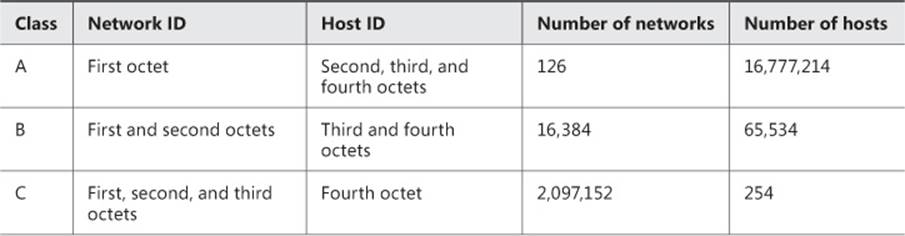
TABLE 2-2 TCP/IP v4 network and host ID definitions
Finally, you can use some reserved IP address spaces with network resources that don’t directly connect to the Internet. Instead, they sit virtually behind a router that connects the intranet to an outside network such as the Internet. This requires the use of Network Address Translation (NAT). The purpose of this technology is to reduce the number of unique IP addresses needed for an organization. These private network ranges are as follows:
![]() The Internet Assigned Network Authority (IANA) has defined these reserved private network ranges:
The Internet Assigned Network Authority (IANA) has defined these reserved private network ranges:
![]() 10.0.0.0 – 10.255.255.254
10.0.0.0 – 10.255.255.254
![]() 172.16.0.0 – 172.31.255.254
172.16.0.0 – 172.31.255.254
![]() 192.168.0.0 – 192.168.255.254
192.168.0.0 – 192.168.255.254
![]() The Automatic Private IP Addressing (APIPA) range is 169.254.0.1 to 169.254.255.254.
The Automatic Private IP Addressing (APIPA) range is 169.254.0.1 to 169.254.255.254.
These addresses are never used on computers, routers, servers, or any other resource that connects directly to the Internet.
Understanding automatic IP address assignment
Network administrators can manually assign IP addresses for each resource on a network but don’t generally do so. Instead, they use Dynamic Host Configuration Protocol (DHCP) to assign IP addresses to network resources. These addresses are assigned from a pool of available addresses, and DHCP can assign both IPv4 and IPv6 addresses. The DHCP server also provides the IP addresses of other important network resources, including the gateway and Domain Name Service (DNS) server. If you aren’t familiar with how DHCP works or the command-line tools you can use to manage it (such as ipconfig /release and ipconfig /renew) read this Tech-Net article before continuing: http://technet.microsoft.com/en-us/library/hh831825.aspx. This chapter covers more on DHCP later as it applies to IPv6.
To find the IP address assigned to a host, and to see other entries such as the subnet mask and default gateway, type ipconfig at a command prompt or in a Windows PowerShell session (see Figure 2-1). Notice the entries, specifically the IPv4, IPv6, and Link-local IPv6 addresses as applicable.
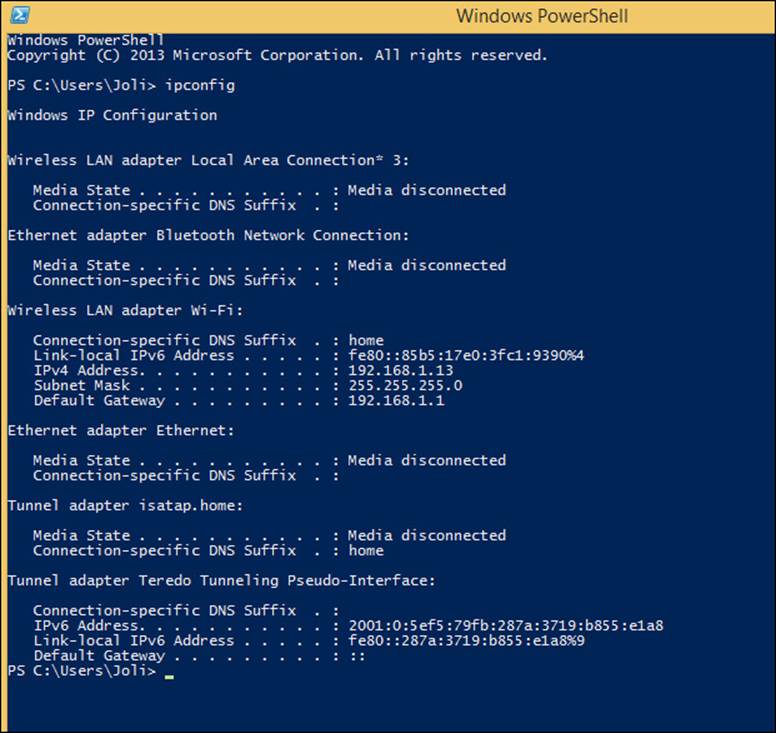
FIGURE 2-1 The command or cmdlet ipconfig shows IP addressing information.
Exploring IPv6
Unfortunately for the future of IPv4, IP addresses are running low because many more resources need their own address than was imagined when the addressing scheme was created. In the beginning, even the most complex networks consisted only of desktop computers, routers, gateways, and so on. Now, though, many more devices require unique IPv4 addresses, including Internet service provider (ISP) servers that provide Internet access to consumers, among other things. The future promises even more. Personal, wearable technologies and medical data or GPS devices embedded under the skin are only a few things that will require their own unique addresses. More than likely each of these personal items will also need a “real” IP address, not one that’s applied behind a router and offered via NAT or APIPA. Thus, a larger IP address space was created.
An IPv6 address is a 128-bit number separated into eight blocks that are 16 bits each, which is a lot larger than an IPv4 address, which is a 32-bit number separated into four octets of 8 bits each. An IPv6 address can look something like this:
2001:db8:89a3::8a7e:370:7934
If two consecutive blocks are 0s, the address can be shortened by putting two colons together with nothing in between. If you think about the number of bits available (16) and how you would represent each of those unique bits, you can understand why the 16 bits must be created from numbers 0–9, with the remaining 6 bits given letters A–F. Like the IPv4 address, the IPv6 address also defines the network ID and the host ID. However, those IDs aren’t defined by subnet masks. Instead, the first 64 bits define the network, and the remaining bits define the host. The latter is created by using the host’s Media Access Control (MAC) address. When DHCP is used to manage IPv6 hosts, it uses DHCP for IPv6 (DHCPv6).
More Info: Understanding the MAC Address
A MAC address is one assigned by the manufacturer of the device used to access the network, such as the Network Interface Card (NIC). Every unit has a unique MAC address hard-coded into it, which makes it a desirable number to use for addressing.
An important feature of IPv6 is that devices (hosts) can configure themselves autonomously. The ability to do this, especially when an enterprise supports many mobile devices such as smartphones and tablets, is essential to effective network management. Devices can maintain their existing connections while they go through the process required to change their location to your IPv6 network. Autoconfiguration comes in two types: stateful and stateless.
Stateful configuration uses DHCPv6 to centrally manage hosts on a network, and the DHCP clients use stateful DHCP to obtain IP addresses. The DHCPv6 server maintains information about the hosts, their current state, and the IP addresses available to them, as well as what addresses have been applied. It’s similar to how DHCP works with IPv4. In the case of IPv6, the host (tablet, smartphone, and so on) uses its own autoconfigured link-local address (IPv6) to send out a multicast message to locate the applicable DHCP server. After it finds the DHCP server, it can obtain its own network IPv6 address. (If a request fails, subsequent requests are sent every 5 minutes.)
More Info: Understanding Link-Local Addresses
A link-local address assigned to a mobile device is the device’s “home” address. This address (and subsequent connection) is always accessible from there. Link-local addresses in an IPv4 configuration start with 169.254.x.x; link-local addresses in an IPv6 configuration start with FE80.
Stateless configuration clients get both their link-local and non–link local addresses (the latter of which isn’t an IP address) from a network that’s configured to give this information to compatible clients. In essence, it enables each host to determine and configure its address from “advertisements” offered by nearby routers. A DHCP server configured as stateless doesn’t give any host an IP address, but instead only the information the client needs to connect to the network. The parameters can include DNS servers and IPv6 prefixes.
More Info: Supporting IPv6
Windows 8 (and later) and Windows Server 2012 support IPv6 without any additional configuration. Windows Server 2012 also provides support for the Dynamic Host Configuration Protocol for IPv6 (DHCPv6), IPv6 addresses in the DNS server, and the transition technologies discussed in the following section.
Understanding transition technologies
You know that protocols define rules very specific to how data is sent over networks and to and from dissimilar networks. With TCP/IP, those rules can include how data packets are encapsulated, addressed, and moved among various systems. When you make changes to the underlying protocols, problems are bound to happen.
IPv6 is designed to replace IPv4, and someday that will happen. For now, though, IPv4 is still used on intranets and the Internet to facilitate the exchange of data. IPv6 is incorporated; in fact, when you look at the ipconfig results, notice that an IPv6 address is listed for the host (at least, on newer machines and devices). However, IPv4 is still the actual protocol.
IPv4 and IPv6 behave well together, assuming that IPv6 isn’t required for the technology you want to use (and IPv4 can’t be used). Consider this, for example: DirectAccess uses IPv6 with IP Security (Ipsec) to create a secure connection between DirectAccess clients and the internal enterprise network. This works well as long as the enterprise has an IPv6 infra-structure in place, but issues arise when the enterprise hasn’t yet started deploying IPv6. In this case, you must use transition technologies. With the applicable technology in place, in this example, DirectAccess clients can access IPv6 resources across an IPv4-only network. Although DirectAccess is only one scenario—and note that there are many other reasons and scenarios for using IPv6—DirectAccess is mentioned here because it is specifically listed in the objectives for this exam. Whatever the case or condition though, a mechanism must be in place to enable IPv6 messages to move over IPv4 networks when it is a requirement for transmission.
Before you select a transition technology, decide what kind of network you have. Your network either has:
![]() No existing IPv6 infrastructure
No existing IPv6 infrastructure
![]() An existing Intra-Site Automatic Tunnel Addressing Protocol (ISATAP)–based IPv6 infrastructure
An existing Intra-Site Automatic Tunnel Addressing Protocol (ISATAP)–based IPv6 infrastructure
![]() A native IPv6 infrastructure
A native IPv6 infrastructure
Using 6to4 Tunneling
When no existing IPv6 infrastructure exists, you can use 6to4 transition technology. These transmissions occur over the Internet (which uses IPv4), and 6to4 is applied when clients have a public IP address. A 6to4 tunnel adapter is configured automatically on the IPv6 client when necessary. The IPv6 messages are sent out through this adapter, and data packets are encapsulated with an IPv4 header.
Using the Intra-Site Automatic Tunnel Addressing Protocol (ISATAP)
If you have an existing ISATAP IPv6 infrastructure, you can use this protocol. This transition technology allows ISATAP hosts to communicate with one another using IPv6. This is achieved with an ISATAP tunnel adapter that has an IPv6 address bound to it. The data packets are then wrapped inside an IPv4 header so that the packets can be sent over the intranet. At the destination server, the IPv4 header is removed and the original IPv6 data packets are uncovered.
Using the Teredo Tunneling Technology
Teredo is another type of transition technology. It is used when the client is sitting behind a NAT device and has been assigned a private IP address. Like other technologies, communications are sent through a tunnel adapter that’s automatically configured on the client. With Teredo, the data packets are encapsulated with an IPv6 header first, and then encapsulated again with a User Datagram Protocol (UDP) header.
Using the IP-HTTPS Transition Technology
This transition technology, created by Microsoft, is used by clients who can’t connect to a Forefront UAG DirectAccess server using any other IPv6 connectivity method. It is also used if force tunneling is configured. For example, this is applied when a DirectAccess client has been assigned a private IP address, and the NAT device or firewall is configured to allow only HTTP/HTTPS outbound traffic. In these instances, the client will use IP-HTTPS.
Like other technologies, a tunnel adapter is created first. The messages are encapsulated with an IPv4 header, and then encapsulated in an HTTP header by using Transport Layer Security (TLS)/Secure Sockets Layer (SSL) encryption. This amount of overhead requires that many extra packets be created, and transmission rates will suffer for it. Using a web proxy server causes even more overhead because this server can’t require authorization for multiple reasons (to begin with, the client doesn’t have a way to enter authentication information that can be used by the web proxy server). The netsh command also must be used to configure the IP-HTTPS to use the applicable web proxy server.
Summarizing the Four Transition Technologies
The four transition technologies can be summarized like so:
![]() 6to4 Tunnels IPv6 traffic over IPv4 networks and is used by clients that are assigned public IP addresses.
6to4 Tunnels IPv6 traffic over IPv4 networks and is used by clients that are assigned public IP addresses.
![]() ISATAP Tunnels IPv6 traffic over IPv4 networks and allows communication between ISATAP clients.
ISATAP Tunnels IPv6 traffic over IPv4 networks and allows communication between ISATAP clients.
![]() Teredo Tunnels IPv6 traffic over IPv4 networks and is used by clients that have been assigned private IP addresses and that sit behind a NAT device. Any client assigned a private IP address will try to use Teredo first. If it can’t, it will use IP-HTTPS.
Teredo Tunnels IPv6 traffic over IPv4 networks and is used by clients that have been assigned private IP addresses and that sit behind a NAT device. Any client assigned a private IP address will try to use Teredo first. If it can’t, it will use IP-HTTPS.
![]() IP-HTTPS Tunnels IPv6 traffic over IPv4 networks and is used by clients that can’t use the other transition technologies. This incurs the most overhead and should be used as a last resort.
IP-HTTPS Tunnels IPv6 traffic over IPv4 networks and is used by clients that can’t use the other transition technologies. This incurs the most overhead and should be used as a last resort.
Supporting names resolution
You know that every computer or network resource that’s connected directly to the Internet must have a unique IP address. Resources on local networks must also have one unique to their network. DNS is used in TCP/IP networks to enable users to type a resource name to access it, such ashttp://www.microsoft.com or RWDCO1_Server01.contoso.com, instead of the actual IP address. DNS servers handle the task of resolving names to addresses in both scenarios. On a personal or enterprise network, internal DNS servers exist for this purpose; in fact, the first server that you promote to a domain controller is often a DNS server.
DNS servers function by routing data to the appropriate top-level domain first, then to any subdomains, and then to the applicable host. When fully qualified domain names are mapped to IP addresses, the process is called DNS name resolution and is referred to as “resolving an IP address.” Table 2-3 lists the top-level domains you’ll find on the Internet. Note that companies have their own domain names, such as contoso.com.

TABLE 2-3 Common top-level Internet domains
Note: Root Domain Management
The root domain is managed by the Internet Corporation for Assigned Names and Numbers (ICANN) and is under the auspices of the U.S. Department of Commerce. Root servers have a “zone file” that maintains a list of the names and IP addresses of the DNS servers for the top-level domains.
So if .com is a top-level domain name, Microsoft.com is an extension of that. Addresses also include subdomains. To continue the example, a website name could include something like this: technet.microsoft.com. Finally, the leftmost name in an address is the host name. Many hosts are named www, mail, www2, and so on. DNS servers dissect this information a piece at a time to route data to the applicable host.
DNS servers are usually offered to the general public by an ISP. Enterprises maintain and manage their own DNS servers and then depend on outside DNS servers to manage outside DNS tasks. When DNS is applied at a high level, resolving a friendly name to an IP address is achieved like so:
1. If the name that needs to be resolved lies on the same domain as the resolution request, the local DNS server attempts to resolve it by using its own database of names and IP addresses.
2. If the local DNS server doesn’t have the domain name and IP address in its database, it contacts another DNS server such as a forwarder. That DNS server might continue the process, forwarding requests to other DNS servers until the name is resolved.
3. Generally, the address is resolved and the connection is made. However, sometimes it can’t be resolved because the name was typed incorrectly or doesn’t (or no longer) exists.
4. If after a reasonable amount of time the name can’t be resolved, the DNS server returns an error (and possibly a suggestion). Figure 2-2 shows the error received after typing www.bing.gom instead of www.bing.com.
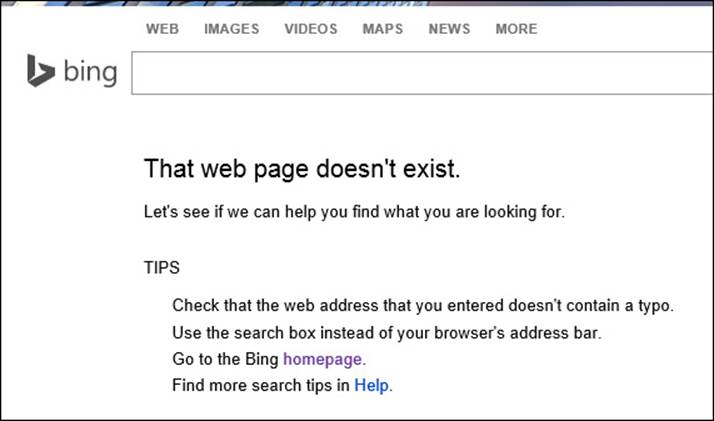
FIGURE 2-2 When a name can’t be resolved to an IP address, an error occurs.
In both the TCP/IPv4 and TCP/IPv6 properties dialog boxes, no DNS servers are specifically named. For both, like DHCP, the option Obtain DNS Server Address Automatically is selected. However, if you need to name a specific DNS server to use, or perhaps two or three, you can.
To name a specific DNS server to use, follow these steps:
1. Open the Network And Sharing Center.
2. Click Change Adapter Settings.
3. Right-click the default connection and select Properties. (You might have to repeat this step for other optional connections.)
4. Choose either Internet Protocol Version 6 (TCP/ IPv6) or Internet Protocol Version 4 (TCP/IPv4) and click Properties.
5. On the General tab of the TCP/IPv4 Properties page, type the desired DNS addresses. You can configure alternate connections from the Alternate Configuration tab.
6. On the General tab of the TCP/IPv6 Properties page, type the desired DNS addresses. (To add others, click Advanced, and on the DNS tab, click Add. Type the DNS server to use.)
Figure 2-3 shows the applicable dialog boxes for IPv6.
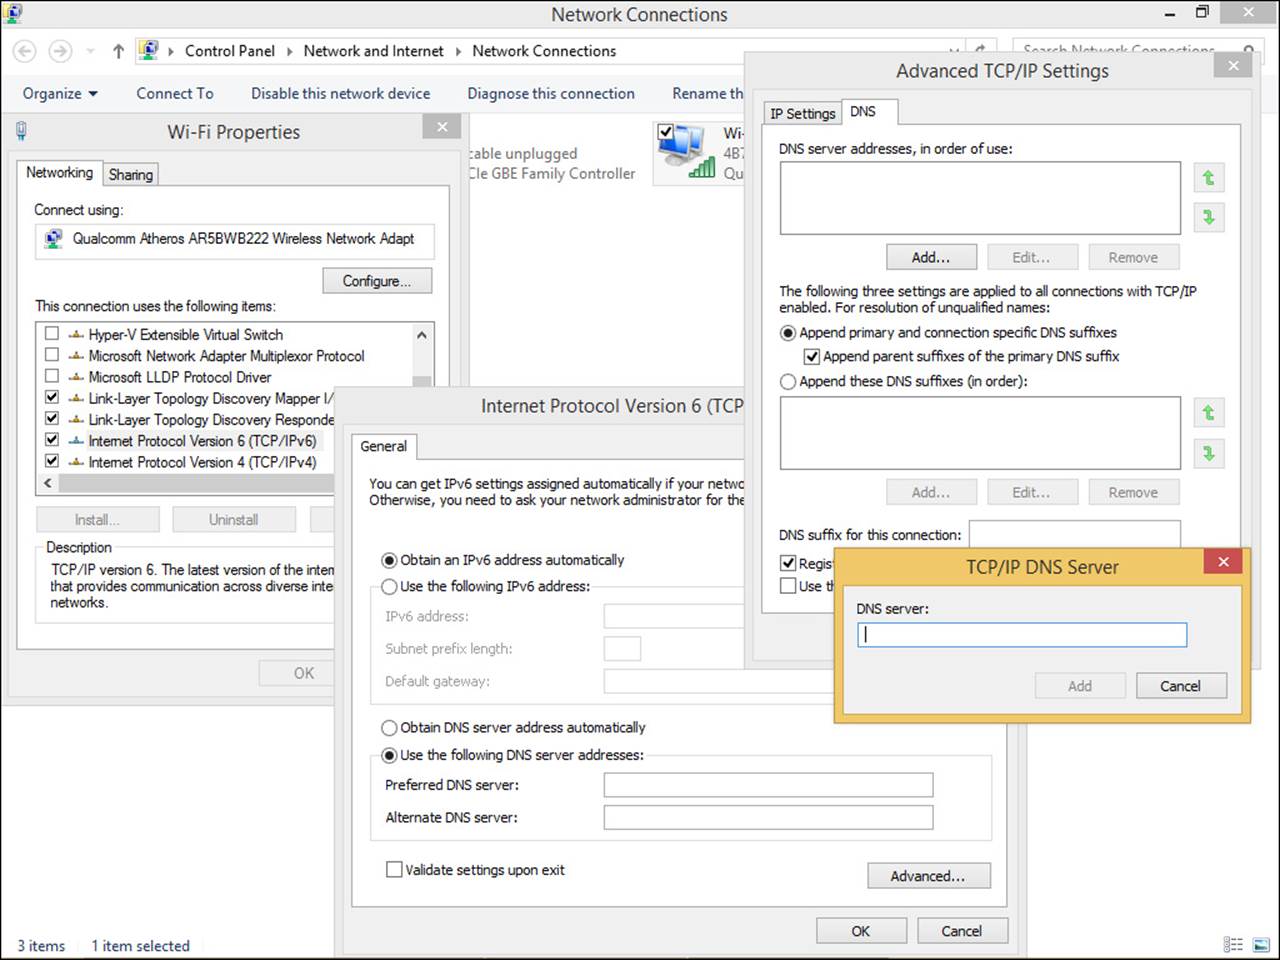
FIGURE 2-3 You can enter your own DNS server information.
Although you should try to learn quite a bit more about DNS, this exam specifically calls out two types of name resolution with which you should be familiar: Peer Name Resolution Protocol (PNRP) and Domain Name System Security Extensions (DNSSECs).
 Exam Tip
You might possibly see questions regarding how to incorporate Windows PowerShell cmdlets with DNS. Refer to this TechNet article to learn more: http://technet.microsoft.com/en-us/library/jj649850.aspx.
Using Peer Name Resolution Protocol (PNRP)
In peer-to-peer environments, name resolution is handled by peers that rely on other peers to resolve addresses, protocols, and ports. The process is complicated partly because of DNS limitations and connectivity issues. The Windows peer-to-peer networking platform is included with Windows Server 2012 R2 and previous server versions, as well as Windows 8.1, Windows 7, and previous Windows editions. It helps address the current issues with DNS. The solution includes Peer Name Resolution Protocol (PNRP), a name-resolution solution that’s scalable (to the billions), secure (uses public key cryptography), and dynamic (instantaneous publication). Here are a few of the advantages of PNRP over previous name-resolution configurations:
![]() PNRP uses minimal server resources.
PNRP uses minimal server resources.
![]() It’s fault-tolerant, and no gridlocks or logjams occur.
It’s fault-tolerant, and no gridlocks or logjams occur.
![]() Name publication is free and doesn’t require any interaction with a server administrator.
Name publication is free and doesn’t require any interaction with a server administrator.
![]() Because PNRP doesn’t rely on caching like DNS does, updates are processed in real time, eliminating problems associated with addresses that are no longer valid.
Because PNRP doesn’t rely on caching like DNS does, updates are processed in real time, eliminating problems associated with addresses that are no longer valid.
![]() PNRP is a great way to access mobile devices, computers, and even services because the information includes an address, a port, and perhaps more related data.
PNRP is a great way to access mobile devices, computers, and even services because the information includes an address, a port, and perhaps more related data.
![]() Names can be protected against spoofing because they can be published as secure or non-secure and include public cryptography.
Names can be protected against spoofing because they can be published as secure or non-secure and include public cryptography.
![]() Networking applications can access data via an application programming interface (API). Much of the information required to access the name and address is automatically determined.
Networking applications can access data via an application programming interface (API). Much of the information required to access the name and address is automatically determined.
PNRP uses “clouds” of computers that can locate one another. The sole global cloud represents computers on the IPv6 Internet. A link-local address cloud is generally a local, connected subnet that represents IPv6 computers in an IPv6 link-local space. You can have many link-local clouds. The local computer must have a default identity as well as the required permissions to interact properly with the cloud.
Using Domain Name System Security Extensions (DNSSECs)
DNS isn’t ultra-secure. When a local DNS server sends out a request for name resolution from another DNS server, nothing is in place to let the requesting DNS server know whether the answer it receives is coming from a trusted, valid DNS server or from somewhere else. The resolver simply accepts the first answer it receives. Something had to be done to ensure that the server sending the response back could be trusted. This is how Domain Name System Security Extensions (DNSSECs) came to be.
To sum up the technology, DNSSEC allows for a DNS zone and all records in it to be cryptographically signed. Thus, when a DNS server that hosts a signed zone receives a name-resolution inquiry, that DNS server returns digital signatures along with the requested records. A name resolver or another server can validate that the responses are accurate and haven’t been altered using these signatures. It does this by obtaining the public key of the public/private key pair. Signing is important because DNS is often subject to spoofing attacks (and other attacks, such as man-in-the-middle), and managing this issue is a critical part of securing enterprise networks as well as the Internet.
More Info: DNSSEC
You might see one or two questions on the exam regarding DNSSEC. You might be asked about the technology in general terms or asked something specific about security requirements, the types of resource records used, example DNS queries, or even DNSSEC scenarios. The best I can offer here is to recommend that you read, in its entirety, the TechNet article “Overview of DNSSEC,” published in February 2014 and found at http://technet.microsoft.com/en-us/library/jj200221.aspx.
You should be familiar with a few terms:
![]() DNS servers These servers perform name-resolution tasks. DNS servers support DNSSEC. This technology has been greatly enhanced on the latest version of Windows Server 2012 R2. For more information about DNS servers, visit http://technet.microsoft.com/en-us/library/dn593674.aspx.
DNS servers These servers perform name-resolution tasks. DNS servers support DNSSEC. This technology has been greatly enhanced on the latest version of Windows Server 2012 R2. For more information about DNS servers, visit http://technet.microsoft.com/en-us/library/dn593674.aspx.
![]() DNS clients Clients running Windows 7 and later are DNSSEC-aware and can be configured to require DNSSEC validation. Previous operating systems weren’t. For more information about DNS clients, visit http://technet.microsoft.com/en-us/library/dn305899.aspx.
DNS clients Clients running Windows 7 and later are DNSSEC-aware and can be configured to require DNSSEC validation. Previous operating systems weren’t. For more information about DNS clients, visit http://technet.microsoft.com/en-us/library/dn305899.aspx.
![]() DNS zones and signing zones A zone is a group of computers. It can be large or small. For example, secure.contoso.com is a zone that might contain only 100 computers. A root zone is very large. Signing a zone with DNSSEC protects it from all kinds of attacks, including spoofing attacks. To sign a zone, you must specify various options and parameters with Windows PowerShell or the Zone Signing Wizard provided in the DNS Manager console. For more information about DNS zones, visit http://technet.microsoft.com/en-us/library/dn593642.aspx.
DNS zones and signing zones A zone is a group of computers. It can be large or small. For example, secure.contoso.com is a zone that might contain only 100 computers. A root zone is very large. Signing a zone with DNSSEC protects it from all kinds of attacks, including spoofing attacks. To sign a zone, you must specify various options and parameters with Windows PowerShell or the Zone Signing Wizard provided in the DNS Manager console. For more information about DNS zones, visit http://technet.microsoft.com/en-us/library/dn593642.aspx.
![]() Trust anchors A trust anchor is a public cryptographic key that enables a DNS server to validate DNS responses. Trust anchors must be updated every time you sign a zone. For more information about trust anchors, visit http://technet.microsoft.com/en-us/library/dn593672.aspx.
Trust anchors A trust anchor is a public cryptographic key that enables a DNS server to validate DNS responses. Trust anchors must be updated every time you sign a zone. For more information about trust anchors, visit http://technet.microsoft.com/en-us/library/dn593672.aspx.
![]() The NRPT The Name Resolution Policy Table (NRPT) contains namespaces and other settings stored in the Windows Registry. This information is used to determine how the DNS client will behave when it asks for and receives responses. This way, you can create security-aware DNS clients that will require validation of DNS responses before accepting those responses. For more information about the NRPT, visit http://technet.microsoft.com/en-us/library/dn593632.aspx.
The NRPT The Name Resolution Policy Table (NRPT) contains namespaces and other settings stored in the Windows Registry. This information is used to determine how the DNS client will behave when it asks for and receives responses. This way, you can create security-aware DNS clients that will require validation of DNS responses before accepting those responses. For more information about the NRPT, visit http://technet.microsoft.com/en-us/library/dn593632.aspx.
Exam Tip
To guarantee that communications are secure, DNSSEC uses SSL. This enables the DNS client to verify, by validating the server’s certificate, that the DNS server is trustworthy. Also, if you have a domain IPsec policy in place, you have to exempt TCP/UDP port 53 traffic (DNS traffic) from it. Otherwise, the domain IPsec policy is applied and the authentication of certificates isn’t performed.
Supporting wireless networks and connections
More and more workers are mobile than ever before. Their mobility doesn’t just occur when users are out of the office on a cellular or Wi-Fi connection. Mobility occurs in offices too, via your enterprise’s Wi-Fi configuration. Supporting wireless networks and connections in an organization involves many things, including configuring encryption, selecting an infrastructure option, and managing compatibility among devices and technology standards.
Connecting users and managing Wi-Fi connections
Users can join a wireless network from a Windows 8.1 client in several ways. If they’re configured to do so, mobile devices such as Windows 8.1 phones and Windows 8.1 tablets will prompt users to join available networks. On laptops, desktops, and similar devices, if users aren’t prompted, they can join an available network from the Settings charm. The network must be broadcasting its Service Set Identifier (SSID) to be accessed here. If the network isn’t broadcasting its SSID, users can manually join it, again from the Settings charm or from the Network And Sharing Center. Users can also disconnect from these places. Finally, users can connect and disconnect from wireless networks from PC Settings, from the Network tab, and view information about the network to which they are joined.
First look at the Settings charm. You access the charms by pressing Windows logo key+C, by flicking in from the right side of a touch-compatible device, or by moving the cursor to the bottom or top right corner of the screen. Click Settings to see what’s shown in Figure 2-4. Here, device is connected to a network named 4B7QL.
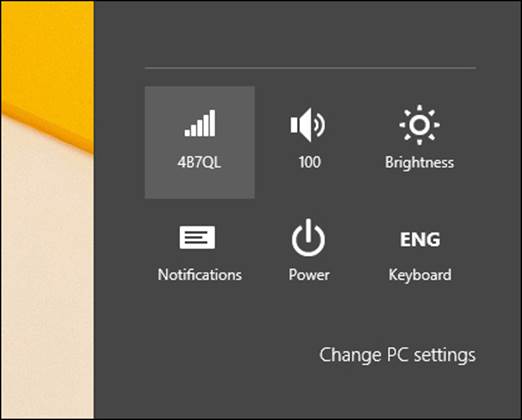
FIGURE 2-4 The Settings charm offers information about the connected network.
If you click the icon for the connected network (or a similar icon that shows you’re not connected to any network), a list of nearby networks appears. You can then click the appropriate network name from the list and click Connect. (You can also check Connect Automatically if you desire.) Optionally, if you are connected, you can click the network to which you’re connected and click Disconnect. When joining a secure network, you need to type the password before you can join.
Another way to manage connected networks is from PC Settings. From the charms, click Settings and then Change PC Settings. When PC Settings opens, click any back arrows that appear first and then click Network. From the Network list, click Connections. Now, click the network to which you are connected to see the statistics shown in Figure 2-5. From here you can see such settings as the SSID, the protocol used, the security type, and the IPv4 and IPv6 addresses. (Take note of the protocol and security type if you’re following along on your own computer. I’ll talk about both of those things shortly.)
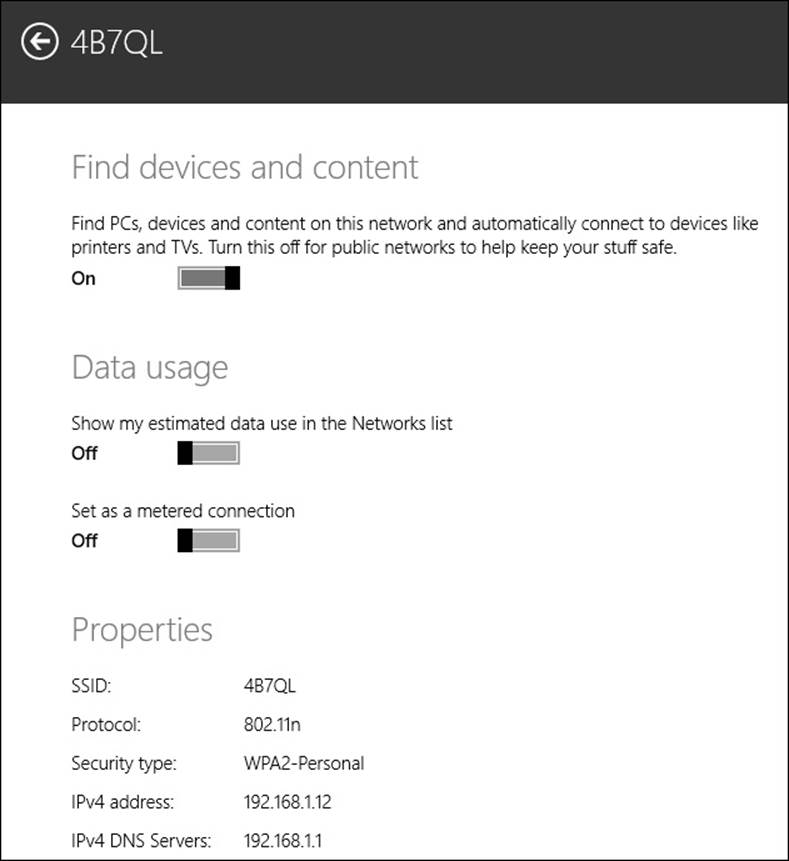
FIGURE 2-5 PC Settings, from Network, and from Connections, offers information about the connected network.
Finally, look at the Wi-Fi Properties dialog box to see even more information about the connected Wi-Fi network:
1. From the taskbar’s Notification area of the Desktop, right-click the Network icon and click Open Network And Sharing Center.
2. Click Change Adapter Settings.
3. Double-click the icon that represents the connected Wi-Fi network.
4. From the Wi-Fi Status dialog box shown in Figure 2-6, click Wireless Properties.
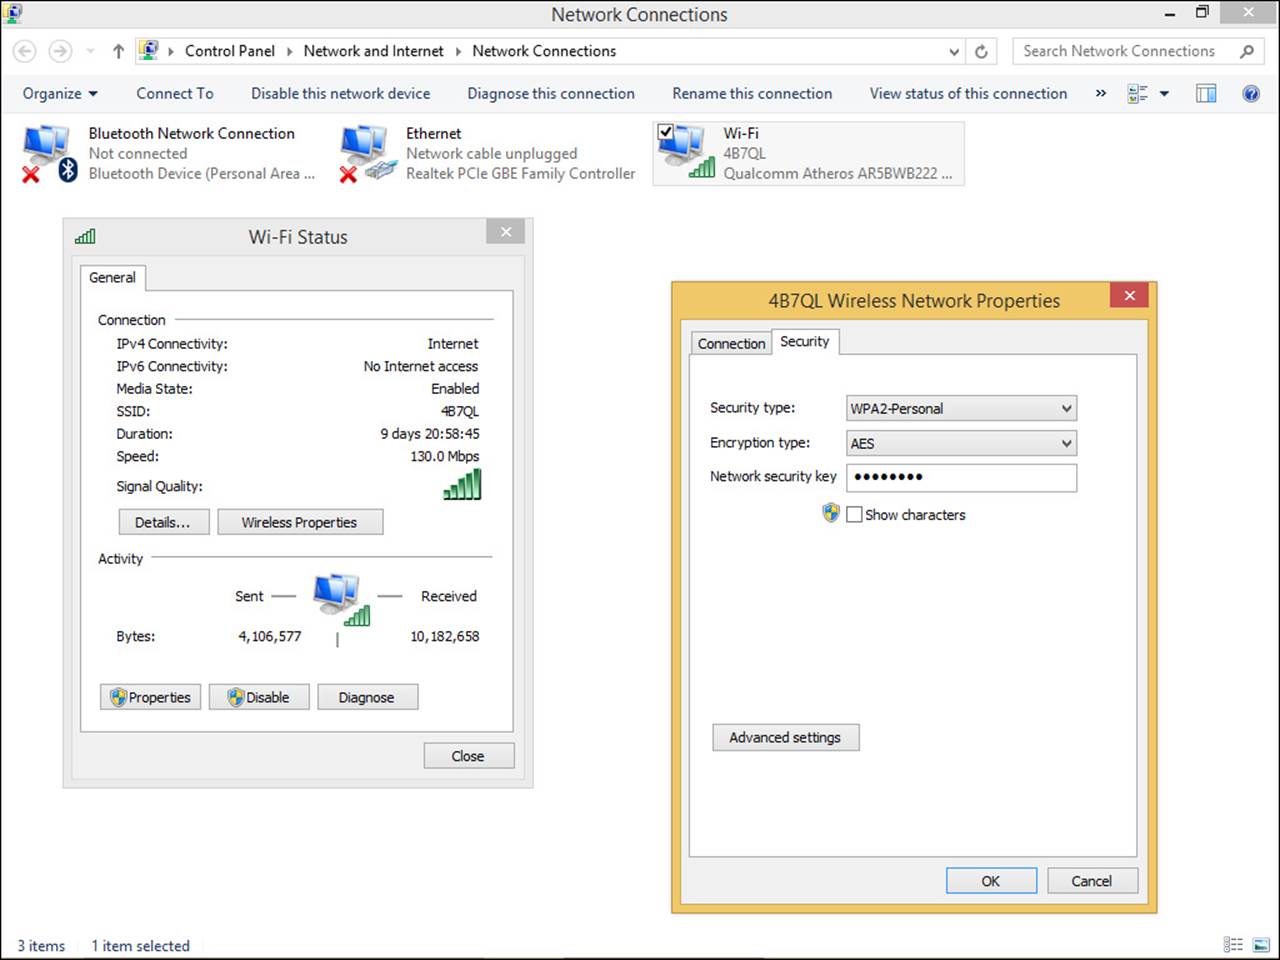
FIGURE 2-6 Wi-Fi Status and Wireless Network Properties dialog boxes offer information about the connected network.
5. Note what is shown on the Connection tab of the Wireless Network Properties dialog box and then click the Security tab. The Security tab is shown in Figure 2-6.
6. Note the security type and the encryption type. Leave this dialog box open while you read the next section.
Note: Configuring Advanced Wi-Fi Settings
From the Wi-Fi Status and Wireless Network Properties dialog boxes you can disable a Wi-Fi adapter, diagnose a problematic connection, view advanced security settings (to enable Federal Information Processing Standards (FIPS) compliance for the connected network), opt to look for other wireless networks while connected to the present one, and connect even if the network isn’t broadcasting its SSID, among other things. Explore each of these dialog boxes carefully before continuing.
You can also view detailed information about the network connection by clicking Details in the Wi-Fi Status dialog box (where you clicked Wireless Properties in step 4 of the preceding steps). From there you can access even more information, including but not limited to:
![]() Connection-specific DNS Suffix value
Connection-specific DNS Suffix value
![]() Description of the wireless network adapter, which includes the manufacturer and model number
Description of the wireless network adapter, which includes the manufacturer and model number
![]() The MAC address
The MAC address
![]() Whether the connection is enabled for DHCP and when the lease was obtained and expires
Whether the connection is enabled for DHCP and when the lease was obtained and expires
![]() The IPv4 and IPv4 subnet mask, default gateway, DHCP server, DNS server, and so on
The IPv4 and IPv4 subnet mask, default gateway, DHCP server, DNS server, and so on
![]() The IPv6 default gateway and DNS server, as applicable
The IPv6 default gateway and DNS server, as applicable
![]() Any other pertinent information regarding the connection
Any other pertinent information regarding the connection
Exam Tip
You might be asked how to connect to a wireless network that’s not broadcasting its SSID. You do this from the Network And Sharing Center, from Set Up A New Connection Or Network. From there, click Manually Connect To A Wireless Network. You’ll need to input the network name, choose a security and encryption type (detailed in the next section), and type the security key. You can also configure options to start the connection automatically or to connect even if the network isn’t broadcasting its name.
Understanding Wi-Fi technology standards
You saw in the last section that clients that connect to a wireless network are configured with a type of security (such as No Authentication or Open) and a type of encryption (such as None). What can be configured and/or used on any client depends on how your wireless network is configured, what kind of equipment you’re using, what kinds of technologies and standards the network and the client are compatible with, and more. Thus, you must be careful when designing a wireless network from scratch and must make sure that what you implement will support and be compatible with every element of your network.
These types of wireless technology standards are available to you and your clients:
![]() 802.11b This technology standard supports transmission rates of up to 11 Mbps, the slowest of the available Wi-Fi standards, and uses the 2.5 gigahertz (GHz) frequency. However, because this frequency is also used with cordless phones, microwaves, and other electronic devices, interference from them can cause problems. This standard can be used with the Wireless Equivalent Privacy (WEP) and Wireless Protected Access (WPA) encryption protocols, as detailed in the next section.
802.11b This technology standard supports transmission rates of up to 11 Mbps, the slowest of the available Wi-Fi standards, and uses the 2.5 gigahertz (GHz) frequency. However, because this frequency is also used with cordless phones, microwaves, and other electronic devices, interference from them can cause problems. This standard can be used with the Wireless Equivalent Privacy (WEP) and Wireless Protected Access (WPA) encryption protocols, as detailed in the next section.
![]() 802.11a This technology standard is faster than 802.11b, up to 54 Mbps, and uses the 5 GHz frequency. Thus, 802.11a and 802.11b are incompatible. Although this frequency reduces the chance of interference with household devices such as cordless phones and microwaves, you should note that the higher a frequency is, the shorter the transmission can travel. The transmission also has a harder time traveling through objects such as walls. Like 802.11b though, 802.11a is WEP and WPA compatible.
802.11a This technology standard is faster than 802.11b, up to 54 Mbps, and uses the 5 GHz frequency. Thus, 802.11a and 802.11b are incompatible. Although this frequency reduces the chance of interference with household devices such as cordless phones and microwaves, you should note that the higher a frequency is, the shorter the transmission can travel. The transmission also has a harder time traveling through objects such as walls. Like 802.11b though, 802.11a is WEP and WPA compatible.
![]() 802.11g This technology standard is backward compatible with 802.11b. It uses the 2.5 GHz frequency and supports transmission rates (bandwidth) of up to 54 Mbps, combining the two strengths of 802.11a and 802.11b. It is WEP and WPA compatible.
802.11g This technology standard is backward compatible with 802.11b. It uses the 2.5 GHz frequency and supports transmission rates (bandwidth) of up to 54 Mbps, combining the two strengths of 802.11a and 802.11b. It is WEP and WPA compatible.
![]() 802.11i This technology standard is compatible with 802.11a, 802.11b, and 802.11g and provides enhanced encryption for improved security. The standard supports new protocols as well: Temporal Key Integrity Protocol (TKIP) and Advanced Encryption Standard (AES). You saw AES in Figure 2-6.
802.11i This technology standard is compatible with 802.11a, 802.11b, and 802.11g and provides enhanced encryption for improved security. The standard supports new protocols as well: Temporal Key Integrity Protocol (TKIP) and Advanced Encryption Standard (AES). You saw AES in Figure 2-6.
![]() 802.11n This technology standard is slated to replace 802.11a, 802.11b, and 802.11g, and supports Wi-Fi Protected Access version 2 (WPA v2), as detailed in the next section. It can be used to replace the listed previous standards because it uses two frequencies: 2.5 GHz and 5 GHz. It supports transmission rates of up to 200 Mbps.
802.11n This technology standard is slated to replace 802.11a, 802.11b, and 802.11g, and supports Wi-Fi Protected Access version 2 (WPA v2), as detailed in the next section. It can be used to replace the listed previous standards because it uses two frequencies: 2.5 GHz and 5 GHz. It supports transmission rates of up to 200 Mbps.
![]() 802.1x This technology standard supports all 802.11 networks that also use Remote Authentication Dial-In User Service (RADIUS) for authentication. The RADIUS networking protocol provides centralized authentication, authorization, and accounting for users who connect remotely. It’s often used by ISPs and enterprises to secure all kinds of connections: Internet, intranet, wireless networks, integrated email services, and so on.
802.1x This technology standard supports all 802.11 networks that also use Remote Authentication Dial-In User Service (RADIUS) for authentication. The RADIUS networking protocol provides centralized authentication, authorization, and accounting for users who connect remotely. It’s often used by ISPs and enterprises to secure all kinds of connections: Internet, intranet, wireless networks, integrated email services, and so on.
![]() 802.11ac This technology was approved in January 2014 and provides throughput of up to 1 gigabit per second on the 5 GHz band. This band resolves issues of wireless interference common to 2.4 GHz bands that so many other devices use. It offers something new called beamforming, which can improve communications in crowded areas because of the ability to target signals in a specific direction. To use the new technology both user devices and Wi-Fi access points must be equipped with 802.11ac chips.
802.11ac This technology was approved in January 2014 and provides throughput of up to 1 gigabit per second on the 5 GHz band. This band resolves issues of wireless interference common to 2.4 GHz bands that so many other devices use. It offers something new called beamforming, which can improve communications in crowded areas because of the ability to target signals in a specific direction. To use the new technology both user devices and Wi-Fi access points must be equipped with 802.11ac chips.
Understanding encryption protocols
In addition to technology standards for wireless connections are encryption protocols. Three types of encryption secure and protect data sent over wireless connections:
![]() WEP This type of encryption is easily broken. Initially created to provide the same data protection afforded to wired networks, it was at one time widely accepted and implemented but has since been found to permit even simple attacks, like brute-force password attacks. WPA is preferred over the outdated WEP. WEP supports two methods of authentication: Open System and Shared Key. WEP uses a stream cipher which includes plain text digits and an encryption scheme called RC4. Encryption keys are not changed automatically or on a schedule. You can learn more about WEP on TechNet or MSDN.
WEP This type of encryption is easily broken. Initially created to provide the same data protection afforded to wired networks, it was at one time widely accepted and implemented but has since been found to permit even simple attacks, like brute-force password attacks. WPA is preferred over the outdated WEP. WEP supports two methods of authentication: Open System and Shared Key. WEP uses a stream cipher which includes plain text digits and an encryption scheme called RC4. Encryption keys are not changed automatically or on a schedule. You can learn more about WEP on TechNet or MSDN.
![]() WPA The successor to WEP and predecessor of WPA2, this encryption protocol protects data by using TKIP and AES to provide integrity and encryption. It also incorporates Extensible Authentication Protocol (EAP) to enhance the WEP authentication mechanism. EAP supports passwords that can be used only one time, certificates, smart cards, public-key encryption, and forwards authentication requests to a RADIUS server (which authenticates the user) for even more security and protection.
WPA The successor to WEP and predecessor of WPA2, this encryption protocol protects data by using TKIP and AES to provide integrity and encryption. It also incorporates Extensible Authentication Protocol (EAP) to enhance the WEP authentication mechanism. EAP supports passwords that can be used only one time, certificates, smart cards, public-key encryption, and forwards authentication requests to a RADIUS server (which authenticates the user) for even more security and protection.
![]() WPA2 This encryption protocol is widely accepted and currently used. It incorporates an improved AES and doesn’t use TKIP, which was found to have security issues of its own. Encryption keys are changed automatically. WPA2 is compatible with 802.11a, 802.11b, 802.11g, and 802.11n.
WPA2 This encryption protocol is widely accepted and currently used. It incorporates an improved AES and doesn’t use TKIP, which was found to have security issues of its own. Encryption keys are changed automatically. WPA2 is compatible with 802.11a, 802.11b, 802.11g, and 802.11n.
Exploring connection options and modes
You can enable devices to connect to wireless networks in various ways. One is quite common: Infrastructure mode. With this mode, you can configure a wireless network access point that broadcasts the wireless signal, which clients in turn use to connect. This type of connection is used in homes, small businesses, and large enterprises. This network includes a router to connect it to other networks, perhaps the Internet or subnetworks in an organization. When a Windows 8.1 device is within range of the access point (and thus the network) and is authorized to connect to it, users can connect and have the encryption settings automatically configured for them.
The other type of network is ad hoc. In this scenario, devices connect to each other wirelessly and don’t require a router or wireless access point to do so. This type of connection is generally used with very small groups of computers and mobile devices to share a connection to the Internet. To begin to configure a shared, ad hoc network, one user in the group must share an Internet connection with others from the Sharing tab of the Wi-Fi Properties dialog box, shown in Figure 2-7.
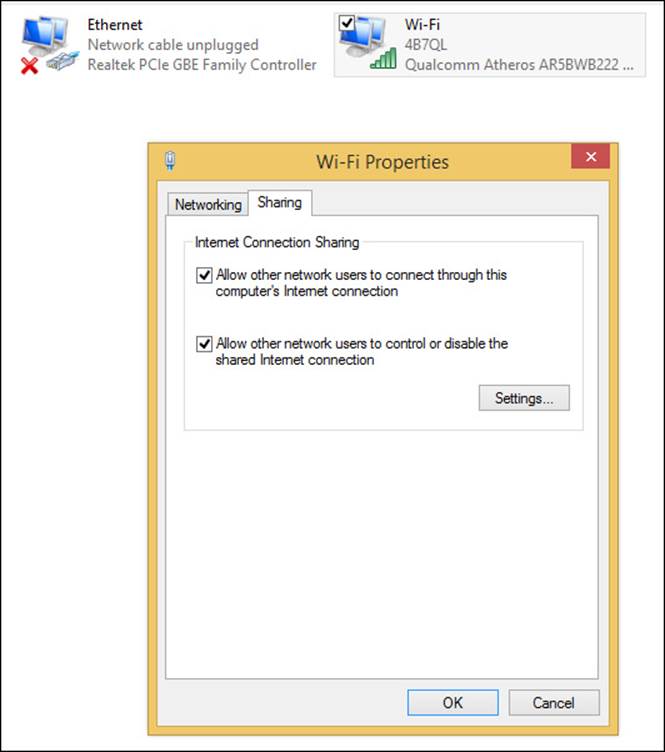
FIGURE 2-7 You can create an ad hoc network to share an Internet connection.
Now, from the computer that shared the connection, work through the following steps to complete the setup of the ad hoc network:
1. Open an administrator command prompt.
2. Type the following command and press Enter (see Figure 2-8):
netsh wlan set hosted network mode=allow ssid=<network name: use "hosted">
key=<8-63 character key: use 123cls45>
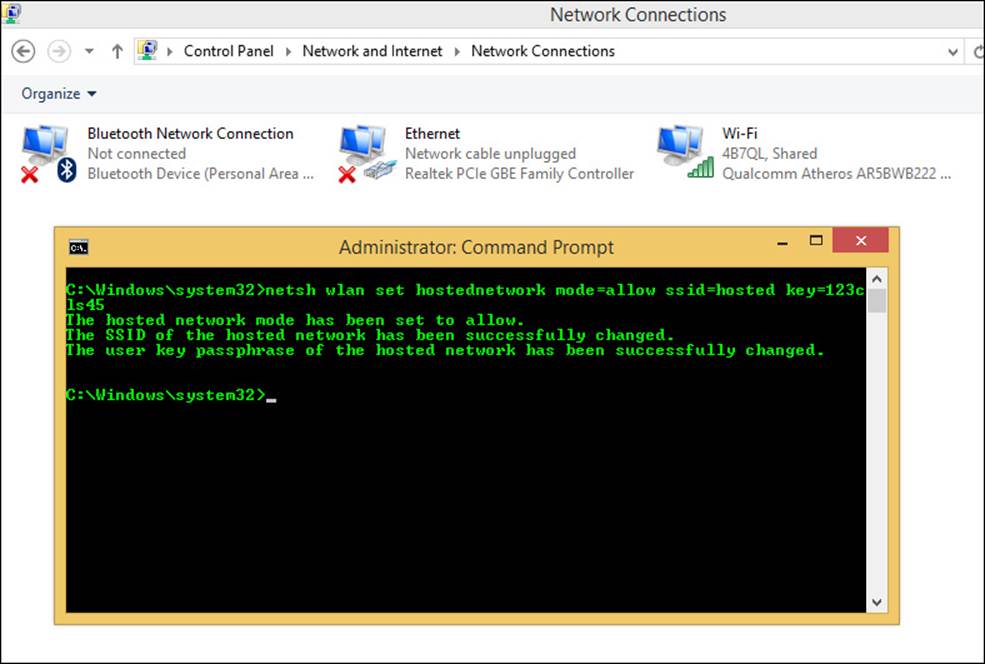
FIGURE 2-8 Manually creating an ad hoc network.
3. At the command prompt, type the following and press Enter:
netsh wlan start <network name>
Notice that the network has been started.
4. From any nearby compatible wireless device, try to connect to the new hosted network. Figure 2-9 shows the network “hosted” from a Windows 8 phone. (You’ll also see the new network listed in the host’s Network Connections window.)
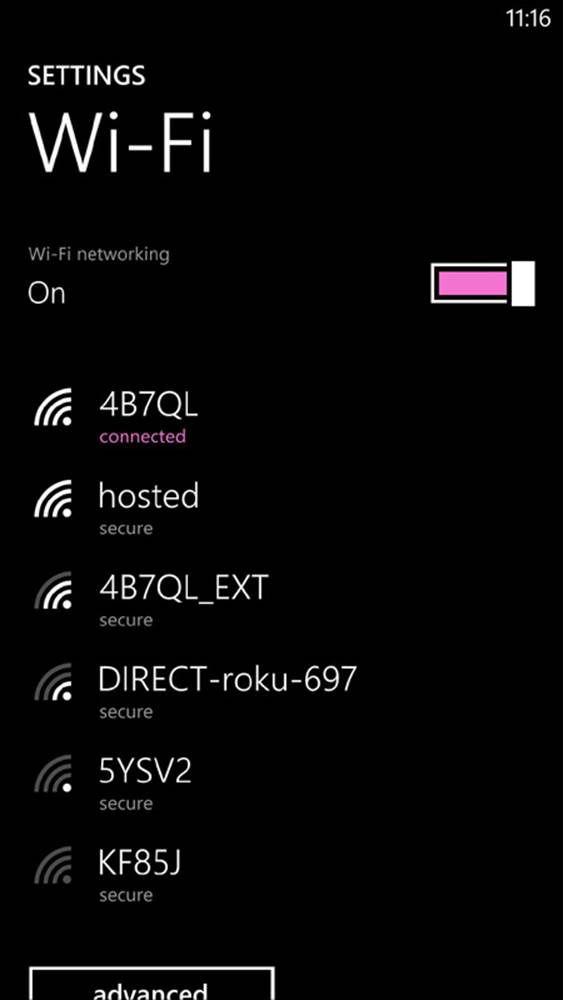
FIGURE 2-9 Connecting to the new network from a mobile device.
You also need to consider two modes when creating a network when you use WPA devices: Personal and Enterprise. With WPA-Personal (WPA-PSK or “preshared key”) mode, a password, or a master or preshared key, is used to secure the access point. Users are provided this key, which they use to connect. After the connection is made, the client computer uses that key to generate its own key, called a session key, which changes automatically and regularly to maintain the security of the connection. No authentication server is needed for this option, and it’s suitable for small and home networks. This is the type of network with which you are already familiar.
The other mode is WPA-Enterprise (WPA-802.1x, RADIUS). This is like Personal mode in that a master key and a session key are used. The difference here is that both keys are changed regularly and are generated automatically. This improves security greatly. If you opt for Enterprise mode, you need to use EAP, 802.11x, and a RADIUS server. The RADIUS server is used as a central database to add users. This mode is complex and suitable for larger enterprises.
Exam Tip
I’m not sure how much you’ll need to know about protocols, RADIUS servers, modes, and so on, but being overprepared is better than being underprepared. TechNet hosts many articles that deal with the various encryption protocols outlined here, as well as the various requirements and uses of WPA-PSK and WPA-802.11x modes.
Supporting network security
You already know that securing a network involves more than just choosing an encryption type, setting up a router and wireless access point, and giving users the password. It also involves securing the network perimeter, perhaps with several lines of defense to provide protection from outside hackers. One defense built into Windows 8.1 is the Windows Firewall.
Briefly, a firewall creates a virtual barrier between a computer and the network to which it’s connected for the purpose of protecting the computer from unwanted incoming data and to protect the network from unwanted outgoing data. The firewall allows specific types of data to enter and exit the computer and blocks others, and settings are configured by default for each network option—Domain, Private, and Public—to make using the firewall under typical circumstances easy (but the settings can be changed).
Monitoring the Windows Firewall
You can monitor the state of the Windows Firewall in Control Panel. You can easily tell whether the firewall is on or off, what incoming connections are blocked by default, the active network, and how you are currently notified when the firewall takes action. It’s all available in the main window. To make basic changes to the state of the firewall, in the left pane click Turn Windows Firewall On Or Off. From there you can change settings for both private and public networks. Two options are available for the private and public settings:
![]() Turn On Windows Firewall (this is selected by default)
Turn On Windows Firewall (this is selected by default)
![]() Block All Incoming Connections, Including Those In The List Of Allowed Apps
Block All Incoming Connections, Including Those In The List Of Allowed Apps
![]() Notify Me When Windows Firewall Blocks A New App (this is selected by default)
Notify Me When Windows Firewall Blocks A New App (this is selected by default)
![]() Turn Off Windows Firewall (not recommended)
Turn Off Windows Firewall (not recommended)
Note: Firewall Settings in a Domain
If you are a member of a domain, some firewall settings are likely unavailable. This happens because your network administrator is controlling them through Group Policy. You can see the Domain Profile using the Windows Firewall with Advanced Security on a local computer though, by clicking Advanced Settings in the Windows Firewall window. By default that profile is set to On, with inbound connections that do not match a rule blocked and with outbound connections that do not match a rule blocked. You can make changes to the domain profile with Windows Firewall with Advanced Security, as you’ll learn later in this chapter.
Although Control Panel and the Windows Firewall window is a good place for general home users to manage the firewall or to ensure that it’s enabled, what you’ll be most interested in as a network administrator are the options available in the left pane—specifically, Allow An App Or Feature Through Windows Firewall and Advanced Settings. Allowing an app through the firewall is covered in the book, Exam Ref 70-687: Configuring Windows 8.1, as is turning on or off the firewall, creating exceptions, and performing other tasks.
Exploring filters and rules
Although you can configure a few options in the main Windows Firewall window, the real power lies with Windows Firewall with Advanced Security, shown in Figure 2-10. You can open this window in various ways, one of which is to click Advanced Settings from the Windows Firewall window detailed in the previous section. Here you can, for example, create filters (rules) for the kinds of data that can pass through the firewall. The filters are generally based on IP addresses, ports, and protocols:
![]() IP Address IP addresses are assigned to every computer and network resource connected directly to the network. The firewall can block or allow traffic based on an IP address of a resource (or a scope of addresses).
IP Address IP addresses are assigned to every computer and network resource connected directly to the network. The firewall can block or allow traffic based on an IP address of a resource (or a scope of addresses).
![]() Port Port numbers identify the application that’s running on the computer. For example, Port 21 is associated with the File Transfer Protocol (FTP), Port 25 with Simple Mail Transfer Protocol (SMTP), Port 53 with DNS, Port 80 with Hypertext Transfer Protocol (HTTP), and Port 443 with HTTPS (HTTP Secure). You can create filters to allow or disallow these kinds of data and others. As you work through this book, notice that some features require a specific port be opened. This is where you do it.
Port Port numbers identify the application that’s running on the computer. For example, Port 21 is associated with the File Transfer Protocol (FTP), Port 25 with Simple Mail Transfer Protocol (SMTP), Port 53 with DNS, Port 80 with Hypertext Transfer Protocol (HTTP), and Port 443 with HTTPS (HTTP Secure). You can create filters to allow or disallow these kinds of data and others. As you work through this book, notice that some features require a specific port be opened. This is where you do it.
![]() Protocol Protocols define the type of packet being sent or received. Common protocols are Transmission Control Protocol (TCP), Telnet, FTP, HTTP, HTTPS, Post Office Protocol 3 (POP3), Internet Message Access Protocol (IMAP), and User Datagram Protocol (UDP). You should be familiar with the most common protocols before taking the exam.
Protocol Protocols define the type of packet being sent or received. Common protocols are Transmission Control Protocol (TCP), Telnet, FTP, HTTP, HTTPS, Post Office Protocol 3 (POP3), Internet Message Access Protocol (IMAP), and User Datagram Protocol (UDP). You should be familiar with the most common protocols before taking the exam.
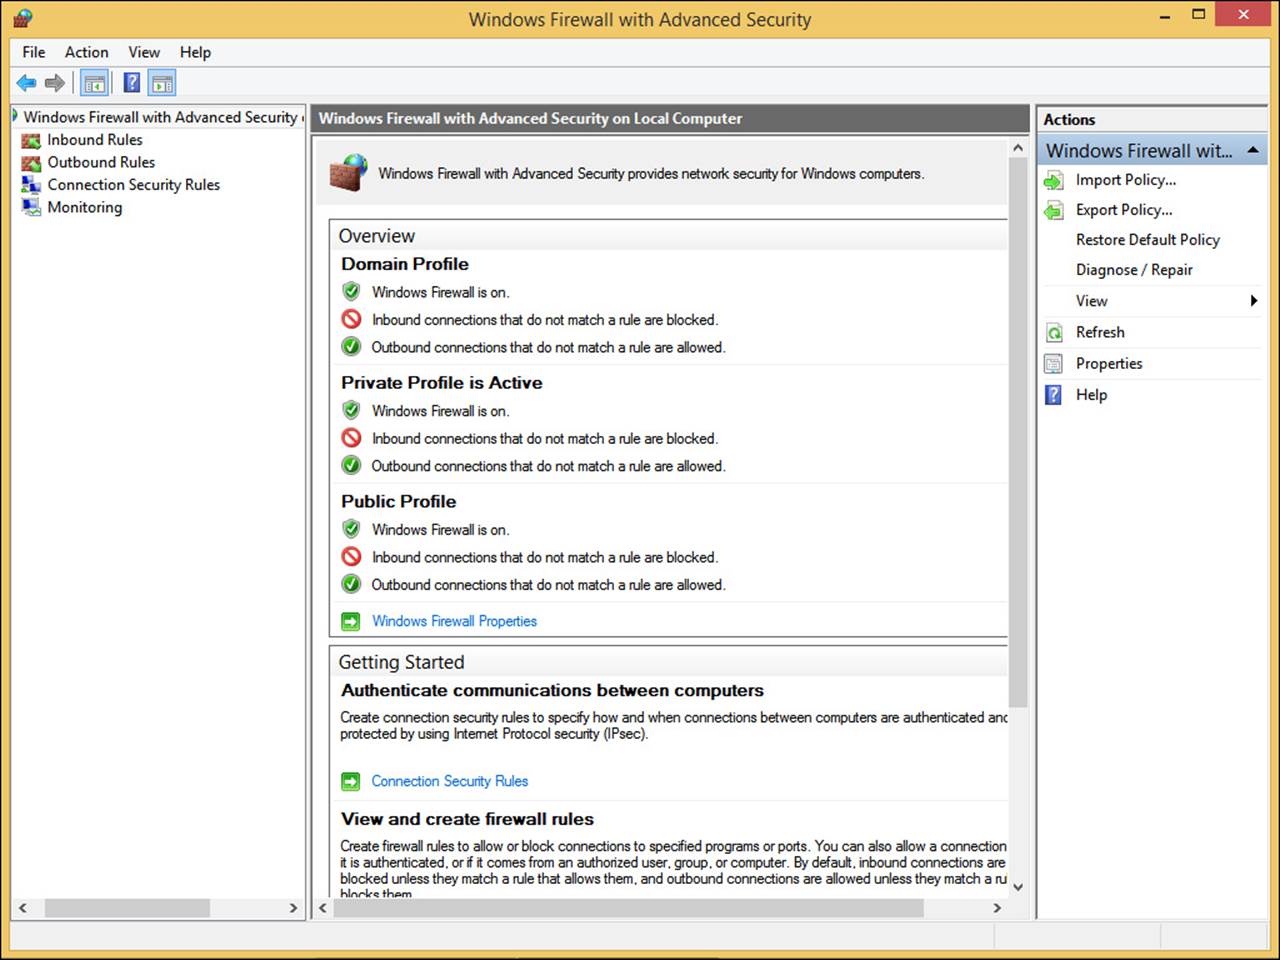
FIGURE 2-10 Windows Firewall with Advanced Security offers many more options than the Windows Firewall.
Although plenty of rules (that filter data) are already configured for the firewall, you can create your own inbound and outbound rules based on whatever ports, protocols, programs, and more that you feel you need to configure. Thus, you can uniquely construct the firewall to suit your exact needs.
The left pane contains the following (and the items in the middle and right panes change based on what you select here):
![]() Inbound Rules This lists all configured inbound rules. You can double-click any item in the list and reconfigure it as desired. Some app rules are predefined and can’t be modified much, but they can be disabled. You can also right-click Inbound Rules in the left pane and create your own custom rule. Rule types include Program, Port, Predefined, and Custom. Exam Ref 70-687: Configuring Windows 8.1 explains how to create these rules.
Inbound Rules This lists all configured inbound rules. You can double-click any item in the list and reconfigure it as desired. Some app rules are predefined and can’t be modified much, but they can be disabled. You can also right-click Inbound Rules in the left pane and create your own custom rule. Rule types include Program, Port, Predefined, and Custom. Exam Ref 70-687: Configuring Windows 8.1 explains how to create these rules.
![]() Outbound Rules This offers the same options as Inbound Rules, but these options apply to outgoing data. You can also right-click Outbound Rules in the left pane and create your own custom rule. Rule types include Program, Port, Predefined, and Custom. Exam Ref 70-687: Configuring Windows 8.1 explains how to create these rules.
Outbound Rules This offers the same options as Inbound Rules, but these options apply to outgoing data. You can also right-click Outbound Rules in the left pane and create your own custom rule. Rule types include Program, Port, Predefined, and Custom. Exam Ref 70-687: Configuring Windows 8.1 explains how to create these rules.
![]() Connection Security Rules Connection security rules that you create manually appear here. These rules establish how computers must authenticate before any data can be sent. IPsec standards define how data is secured while it’s in transit over a TCP/IP network, and you can require a connection use this type of authentication before computers can send data, if you want. Exam Ref 70-687: Configuring Windows 8.1 covered how to create this type of rule.
Connection Security Rules Connection security rules that you create manually appear here. These rules establish how computers must authenticate before any data can be sent. IPsec standards define how data is secured while it’s in transit over a TCP/IP network, and you can require a connection use this type of authentication before computers can send data, if you want. Exam Ref 70-687: Configuring Windows 8.1 covered how to create this type of rule.
![]() Monitoring This offers information about the active firewall status, state, general settings, and more for both private and public profile types.
Monitoring This offers information about the active firewall status, state, general settings, and more for both private and public profile types.
The right pane displays the following (what you see depends on what you select in the left pane):
![]() Import/Export/Restore/Diagnose/Repair Policies This section enables you to manage the settings you’ve configured for your firewall. Polices use the .wfw extension. A common task is to export policies from one computer and import them to another. Exporting is a simple task and involves only saving the policy file. Importing is more difficult but can be achieved by importing it to a Group Policy Object (GPO).
Import/Export/Restore/Diagnose/Repair Policies This section enables you to manage the settings you’ve configured for your firewall. Polices use the .wfw extension. A common task is to export policies from one computer and import them to another. Exporting is a simple task and involves only saving the policy file. Importing is more difficult but can be achieved by importing it to a Group Policy Object (GPO).
![]() New Rules This section enables you to start the applicable Rule Wizard to create a new rule. You can also do this from the Action menu when Inbound Rules or Outbound Rules is selected in the left pane.
New Rules This section enables you to start the applicable Rule Wizard to create a new rule. You can also do this from the Action menu when Inbound Rules or Outbound Rules is selected in the left pane.
![]() Filter By This section enables you to filter rules by Domain Profile, Private Profile, or Public Profile. You can also filter by state: Enabled or Disabled. Use this section to narrow the rules listed to only those you want to view.
Filter By This section enables you to filter rules by Domain Profile, Private Profile, or Public Profile. You can also filter by state: Enabled or Disabled. Use this section to narrow the rules listed to only those you want to view.
![]() View This section enables you to customize how and what you view in the middle pane of the Windows Firewall With Advanced Security window.
View This section enables you to customize how and what you view in the middle pane of the Windows Firewall With Advanced Security window.
When you opt to create your own inbound or outbound rule, you can choose from four rule types. A wizard walks you through the process, and the process changes depending on the type of rule you want to create:
![]() Program A program rule sets firewall behavior for a specific program you choose or all programs that match the rule properties you set. You can’t control apps, but you can configure traditional programs whose file format ends in .exe. You can’t change items distributed through AppLocker either. After you select the program to create the rule for, you can allow the connection, allow the connection but only if the connection is secure and has been authenticated using IPsec, or block the connection. You can also choose the profiles the rule will be applied to (domain, private, or public) and name the rule.
Program A program rule sets firewall behavior for a specific program you choose or all programs that match the rule properties you set. You can’t control apps, but you can configure traditional programs whose file format ends in .exe. You can’t change items distributed through AppLocker either. After you select the program to create the rule for, you can allow the connection, allow the connection but only if the connection is secure and has been authenticated using IPsec, or block the connection. You can also choose the profiles the rule will be applied to (domain, private, or public) and name the rule.
![]() Port A port rule sets firewall behavior for TCP and UDP port types and specifies which ports are allowed or blocked. You can apply the rule to all ports or only ports you specify. As with other rules you can allow the connection, allow the connection but only if the connection is secured with IPsec, or, block the connection. You can also choose the profiles the rule will be applied to (domain, private, public) and name the rule.
Port A port rule sets firewall behavior for TCP and UDP port types and specifies which ports are allowed or blocked. You can apply the rule to all ports or only ports you specify. As with other rules you can allow the connection, allow the connection but only if the connection is secured with IPsec, or, block the connection. You can also choose the profiles the rule will be applied to (domain, private, public) and name the rule.
Note: Creating Rules and IPsec
When you create inbound and outbound rules, and when you opt to allow the connection only if the connection is secured by authenticating the connection with IPsec, the connections are secured by using the settings in the IPsec properties and applicable rules in the Connection Security Rules node.
![]() Predefined A predefined rule sets firewall behavior for a program or service that you select from a list of rules already defined by Windows.
Predefined A predefined rule sets firewall behavior for a program or service that you select from a list of rules already defined by Windows.
![]() Custom A custom rule is one you create from scratch, defining every aspect of the rule. You use this if the first three don’t offer the kind of rule you need.
Custom A custom rule is one you create from scratch, defining every aspect of the rule. You use this if the first three don’t offer the kind of rule you need.
Note: Configuring Inactive Profiles
When you are working inside the Windows Firewall With Advanced Security window and subsequent dialog boxes, you have access to and can configure rules for every profile, even if they aren’t active. This includes Private, Public, and Domain.
You can explore other areas by selecting Windows Firewall With Advanced Security in the left pane and using the Overview section of the middle pane, click Windows Firewall Properties. From there you can make changes to the firewall and the profiles, even if you aren’t connected to the type of network you want to configure.
Exam Tip
You might be asked how to administer Windows Firewall with Advanced Security via Windows PowerShell. You can find more information about that at http://technet.microsoft.com/en-us/library/hh831755.aspx.
In Figure 2-11 and Figure 2-12, the Domain Profile tab and IPsec Settings tab are selected. On the Domain Profile tab you can configure the firewall to be turned off when connected to a domain network. On the IPsec Settings tab you can configure IPsec defaults, exemptions, and tunnel authorization. You’ll learn a little bit more about this later. You also can strengthen the settings for the public profile and customize settings for the private profile.
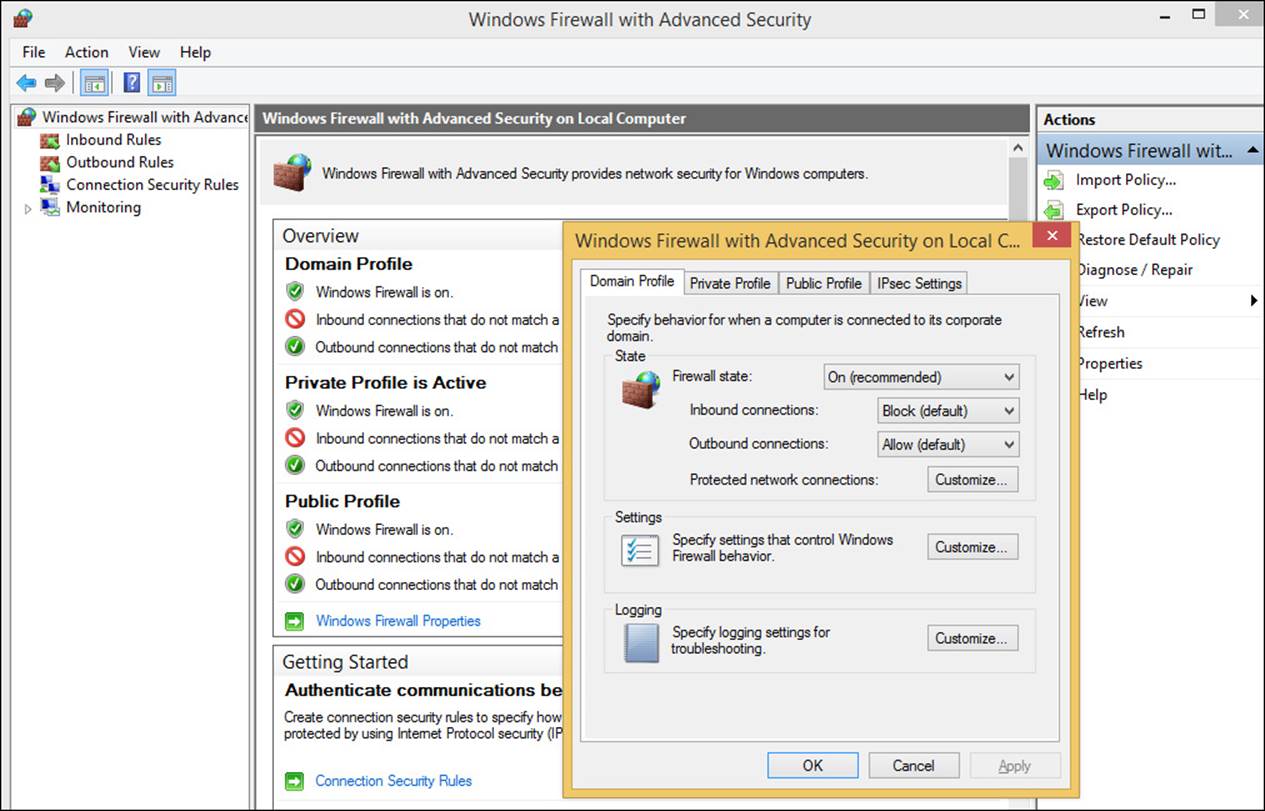
FIGURE 2-11 You can change the domain profile defaults from the Windows Firewall With Advanced Security dialog box.
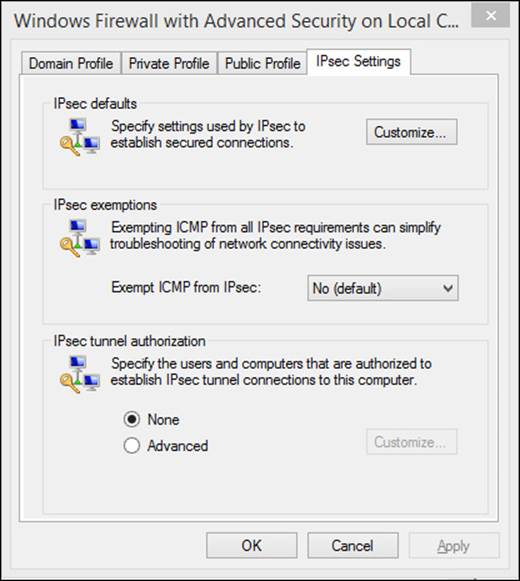
FIGURE 2-12 You can configure IPsec rules on the IPsec Settings tab.
More Info: Using the IPsec Settings Tab
Before going further, read this Tech-Net article on what you can achieve from the IPsec Settings tab shown in Figure 2-12: http://technet.microsoft.com/en-us/library/cc753002.aspx. Although this article refers to its use in Windows 7, the information is also applicable here.
Understanding IPsec
IPsec ensures private, secure communications over IP networks. To achieve this, it uses available cryptographic security services. You create IPsec policies to configure these services, and those policies consist of settings and rules that determine the key exchange settings and methods. IPsec rules also determine what kinds of traffic IPsec must examine and how that traffic is handled, among other things. Policies you create can be applied to a domain, an Organization Unit (OU), or locally.
You can review the options set as defaults for IPsec by clicking Customize in the IPsec Defaults area of the Windows Firewall With Advanced Security dialog box shown earlier in Figure 2-12. The options there are configured with defaults separated into three sections:
![]() Key Exchange (Main Mode)
Key Exchange (Main Mode)
![]() Data Protection (Quick Mode)
Data Protection (Quick Mode)
![]() Authentication Method
Authentication Method
Configuring Key Exchange (Main Mode)
Before two computers or devices can exchange secured data, a trust must be established between them. This security association is an agreement between the two regarding how they will exchange the data securely. A key (created via a mathematical algorithm) is used for this purpose in this example. For Key Exchange (Main Mode), a shared master key is generated that the two parties can use to exchange additional keying information securely.
You can dive deeper into the options for configuring Key Exchange (Main Mode) settings and click Advanced and then Customize (see Figure 2-13) to get an idea of how complex key exchange is. The encryption methods include SHA-1 AES-CBC 128 Diffie-Hellmann Group 2 and SHA-1 3DES Diffie-Hellmann Group 2. You can add your own algorithms, too. For more information, refer to the article at http://technet.microsoft.com/en-us/library/cc731752.aspx.
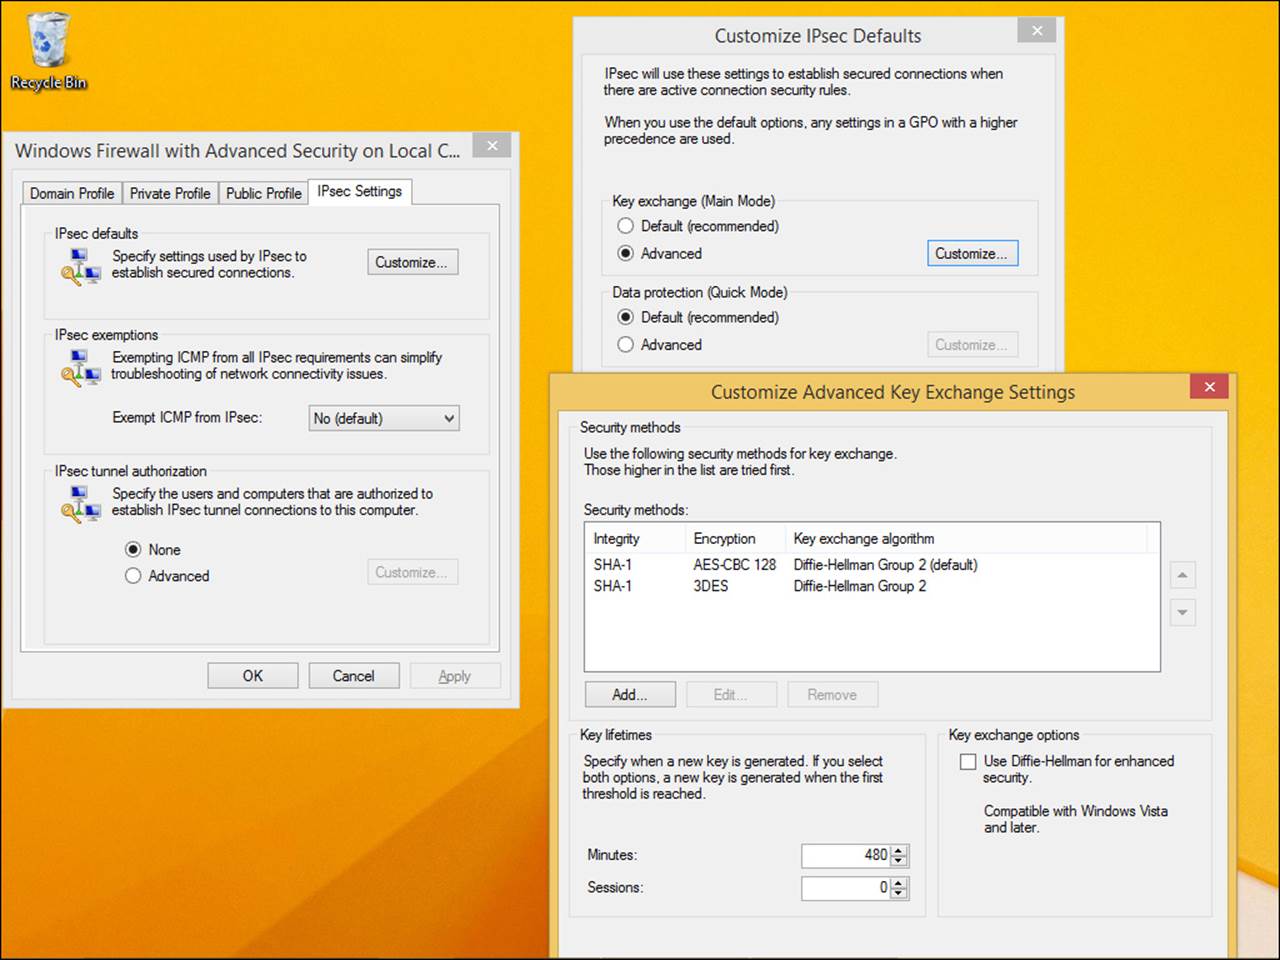
FIGURE 2-13 Key Exchange settings are configured by using defaults, but you can add your own.
Exam Tip
You must be familiar with the terms you see here. Be sure to review these terms via TechNet or other sources before taking the exam.
Configuring Data Protection (Quick Mode)
Data Protection settings are used by connection security rules to protect network traffic. You can opt to require encryption for all connection security rules that use the configured settings here if desired, but that’s not the default setting. You need to review two areas in this section of the Customize IPsec Defaults dialog box when you opt to customize: Data Integrity Algorithms and Data Integrity And Encryption Algorithms. You can add your own to both areas. The protocols you’ll be required to know here include Authentication Headers (AH) and Encapsulating Security Payload (ESP).
AH is a member of the IPsec protocol suite and ensures the integrity and authentication of the entire IP packet. ESP is also a member of the IPsec protocol suite and ensures the authenticity, integrity, and confidentiality protection of IP packets. ESP also supports encryption-only configurations (which are discouraged) and authentication-only configurations. Unlike AH, though, ESP doesn’t provide security for the entire IP packet unless in tunnel mode (where the entire original IP packet is encapsulated).
Understanding Authentication Methods
You should have an idea of what each of the listed Kerberos v5 Authentication methods offer. You can choose from three options: Computer And User (Kerberos V5), Computer (Kerberos V5), and User (Kerberos V5). Also, an Advanced option includes Kerberos options and settings.
The Kerberos V5 authentication protocol uses “tickets” to allow devices to communicate over nonsecure networks. The tickets help the nodes identify themselves, and the client/server model provides for mutual authentication. Kerberos protects against eavesdropping and other security risks, uses cryptography, and requires a trusted third party. It is the default security method for Windows 8.1. To learn more about Kerberos, refer to the TechNet article at http://technet.microsoft.com/en-us/library/hh831553.aspx.
Configuring connection security rules (IPsec)
Because IPsec deals with connections, to configure an IPsec rule, you need to create a connection security rule. You can do so in Windows Firewall with Advanced Security. You can create inbound and outbound rules that use the settings you’ve configured and opt to allow the connection only if it’s secured with IPsec. To begin, you right-click Connection Security Rules (located just below Outbound Rules) in the left pane and click New Rule (see Figure 2-14).
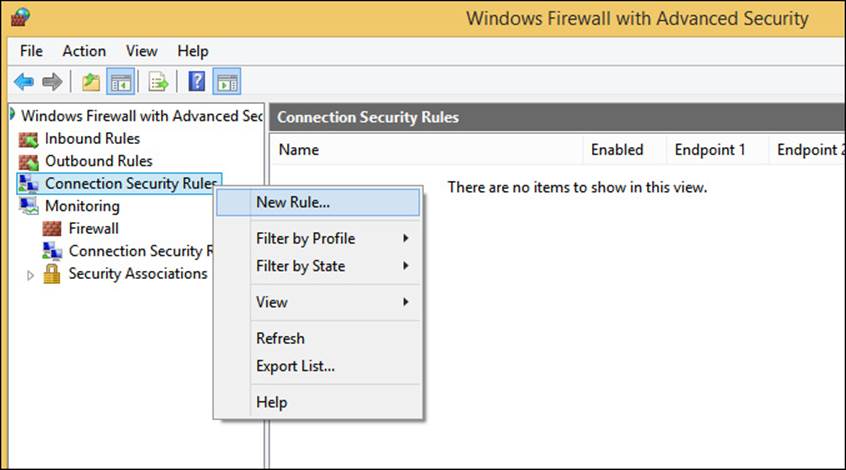
FIGURE 2-14 Create a new connection security rule.
Creating a rule involves several steps, and a wizard is available to guide you. The wizard pages that appear depend on the choices you make on the prior page. For instance, if you choose an Isolation rule type on the first page, you have to work through four additional steps: set the requirements, choose the authentication method, choose the profiles to apply the rule to, and name the rule. However, if you choose to create an Authentication Exemption rule, you’ll be prompted to add the remote computers you want configure authentication requirements for, before you can continue.
Note: IPsec Protection
IPsec securely transmits data between computers. The primary benefit of securing information using IPsec is that all programs and services using IP for data transport can be protected.
More Info: Options and Rules
Because rule types and options can be combined in numerous ways, this book can’t possibly go through every scenario. However, you should be familiar with the options, as well as the rule types. See http://technet.microsoft.com/en-us/library/cc754873(v=ws.10).aspx for more information.
There are many types of connection security rules:
![]() Isolation Used to create a rule restricting connections based on credentials, such as domain membership, computer status or health, or compliance with policies. You can opt to request authentication for inbound and outbound connections, require authentication for inbound and request for outbound, or, require authentication for all connections. Following that, you select the type of authentication to use. You can choose from the defaults already configured or use the appropriate Kerberos or advanced authentication method.
Isolation Used to create a rule restricting connections based on credentials, such as domain membership, computer status or health, or compliance with policies. You can opt to request authentication for inbound and outbound connections, require authentication for inbound and request for outbound, or, require authentication for all connections. Following that, you select the type of authentication to use. You can choose from the defaults already configured or use the appropriate Kerberos or advanced authentication method.
![]() Authentication Exemption Used to create a rule to state what connection types can be excluded from authentication. You can apply the rule to a single IP address, a subnet, an IP address range, or a predefined set of computers (such as DHCP or DNS servers). With that done, you can choose the profiles to apply the rule to (domain, private, or public) and name the rule.
Authentication Exemption Used to create a rule to state what connection types can be excluded from authentication. You can apply the rule to a single IP address, a subnet, an IP address range, or a predefined set of computers (such as DHCP or DNS servers). With that done, you can choose the profiles to apply the rule to (domain, private, or public) and name the rule.
![]() Server-to-server Used to create a rule that applies to named IP addresses or all IP addresses; to request authentication for inbound and outbound connections; to require authentication for inbound and request for outbound; and to require authentication for all connections. You also choose the authentication method, which can be a certificate from a certificate authority or a health certificate issued from Network Access Protection (NAP). You can do this to protect specific servers from interacting with each other.
Server-to-server Used to create a rule that applies to named IP addresses or all IP addresses; to request authentication for inbound and outbound connections; to require authentication for inbound and request for outbound; and to require authentication for all connections. You also choose the authentication method, which can be a certificate from a certificate authority or a health certificate issued from Network Access Protection (NAP). You can do this to protect specific servers from interacting with each other.
![]() Tunnel Used to create a rule that authenticates connections between two computers by using tunnel mode in IPsec, perhaps between two computers such as client-to-gateway or gateway-to-client. You also can opt to exempt IPsec-protected connections and choose the authentication requirements.
Tunnel Used to create a rule that authenticates connections between two computers by using tunnel mode in IPsec, perhaps between two computers such as client-to-gateway or gateway-to-client. You also can opt to exempt IPsec-protected connections and choose the authentication requirements.
![]() Custom Used to create a custom rule if the previous options don’t offer what you need.
Custom Used to create a custom rule if the previous options don’t offer what you need.
Note: Allow a Connection
Connection security rules specify how and when authentication occurs, but they don’t allow those connections. To allow a connection, you must create an inbound or outbound rule. When creating the inbound or outbound rule, you choose the required conditions for the connection, including requiring that the connections have been authenticated by using IPsec. When you do, connections are secured by using the settings in the IPsec properties and rules in the Connection Security Rules node.
Exam Tip
This book covers the exam objectives that Microsoft posts on the exam website. However, the Microsoft certification page for this exam clearly states, “Please note that the questions may test on, but will not be limited to, the topics described in the bulleted text.” This means that you’ll see questions on items that aren’t addressed here, and no one can even guess at what those might be. However, as an example, you might see questions that ask you about the different types of Wi-Fi authentication, including Temporal Key Integrity Protocol (TKIP), Advanced Encryption System (AES), and the various WPA options. Likewise, you might be faced with questions that require you know a specific file extension, such as .wfw, which is the file type used when you export a Windows Firewall policy. You also might be expected to know a little about BranchCache or DirectAccess.
Because a single book can’t address all these things, you must study and prepare for aspects other than what’s offered here. To find out where to access additional resources, visit http://www.microsoft.com/learning/en-us/exam-70-688.aspx and click Show All under Skills Measured. For each objective is a list of additional preparation resources. Review that list and become familiar with the options presented.
Here are two more articles to review before you move on to the next section:
![]() “Windows Firewall with Advanced Security Design Guide” at http://technet.microsoft.com/en-us/library/jj721516.aspx
“Windows Firewall with Advanced Security Design Guide” at http://technet.microsoft.com/en-us/library/jj721516.aspx
![]() “IP Security (IPsec)” at http://technet.microsoft.com/en-us/network/bb531150.aspx
“IP Security (IPsec)” at http://technet.microsoft.com/en-us/network/bb531150.aspx
 Thought experiment: Configuring network security
In this thought experiment, apply what you’ve learned about this objective. You can find answers to these questions in the “Answers” section at the end of this chapter.
You manage the wireless network for a small company. Currently the company has a router that connects to the Internet, and it’s configured to share its connection with the network clients. For now, that connection is shared via a 16-port Ethernet switch. You plan to install a wireless access point and position it in the middle of the building, and you also want to secure this network against eavesdropping and hacking. In fact, the owner wants you to secure this network using the best means possible. The mobile devices are all Windows 7 or later, except for one very old netbook that is running Windows XP.
1. Which of the three wireless standards detailed in this section offers the best protection, including improved AES and the elimination of TKIP?
2. After using the standard selected in question 1 to configure the network, you attempt to connect the mobile clients. Everyone can connect except the netbook. The netbook supports only one very old standard, WEP. What should you do?
3. You’ve read about RADIUS servers and how they can be used to further secure a network. Should you consider a RADIUS server in this instance?
Objective summary
![]() To identify network resources, a DHCP server is generally used to dole out IP addresses. DHCP can be used to offer IPv4 and IPv6 addresses.
To identify network resources, a DHCP server is generally used to dole out IP addresses. DHCP can be used to offer IPv4 and IPv6 addresses.
![]() The IPv4 address space is broken up into classes. Each class has a default subnet mask that further defines it.
The IPv4 address space is broken up into classes. Each class has a default subnet mask that further defines it.
![]() Private IP addressing is used for resources behind a router that don’t connect directly to the Internet.
Private IP addressing is used for resources behind a router that don’t connect directly to the Internet.
![]() When IPv6 must be used over an IPv4 network, transition technologies are used.
When IPv6 must be used over an IPv4 network, transition technologies are used.
![]() Names can be resolved to IP addresses in various ways, including using DNS. Improvements to DNS have been made with PNRP and DNSSEC.
Names can be resolved to IP addresses in various ways, including using DNS. Improvements to DNS have been made with PNRP and DNSSEC.
![]() Various Wi-Fi standards support wireless clients in different ways and at different speeds and frequencies. Not all standards are compatible with one another or all resources or clients.
Various Wi-Fi standards support wireless clients in different ways and at different speeds and frequencies. Not all standards are compatible with one another or all resources or clients.
![]() Encryption and authentication protocols help secure a network.
Encryption and authentication protocols help secure a network.
![]() You can use Windows Firewall and Windows Firewall with Advanced Security to fine-tune network security.
You can use Windows Firewall and Windows Firewall with Advanced Security to fine-tune network security.
Objective review
Answer the following questions to test your knowledge of the information in this objective. You can find the answers to these questions and explanations of why each answer choice is correct or incorrect in the “Answers” section at the end of this chapter.
1. An IPv4 address is a _________ number that consists of _____ octets that are _____ bits each.
A. 32-bit; 4; 8
B. 64-bit; 4; 16
C. 32-bit; 8; 16
D. 128-bit; 8; 16
2. In a Class B IPv4 address, which part of a resource’s IP address represents the network ID?
A. First octet
B. First and second octets
C. First, second, and third octets
D. You can’t tell from the octets; you must convert all the numbers in the address to 1s and 0s and use the 1s to determine the network ID.
3. Which of the following are true statements when discussing DHCP servers that run on Windows Server 2012?
A. They can assign both IPv4 and IPv6 addresses to hosts on a network.
B. They can provide clients the necessary IP addresses of the applicable DNS server and gateway.
C. DHCP must be used in large enterprises for all resources.
D. All of the above
4. Which of the following transition technologies can be used to allow DirectAccess clients that use a public IP address to transmit data via the Internet?
A. 6to4
B. ISATAP
C. Teredo
D. IP-HTTPS
E. None of the above
5. DNS servers handle the task of resolving names to addresses but _________________ is a name resolution solution that’s better because it’s scalable (to the billions), secure (uses public key cryptography), and dynamic (instantaneous publication).
A. DNS zones
B. trust anchors
C. NRPT
D. PNRP
E. DNSSEC
6. Which Wi-Fi technology standard matches this description: Is meant to replace 802.11a, b, and g but doesn’t support other standards like 802.1x; is compatible with (supports) Wi-Fi Protected Access version 2 (WPA v2); uses two frequencies, 2.5 GHz and 5 GHz; supports transmission rates of up to 200 Mbps?
A. 802.11a
B. 802.11b
C. 802.11n
D. 802.11i
E. 802.1x
7. You want to set up an ad hoc network from your Windows 8.1 laptop so that you can share its Internet connection with another device you own. You’ve shared the Internet connection from the adapter’s Properties dialog box. What do you do next?
A. Open an administrator command prompt and enter the following command:
netsh wlan start hosted network
B. On the second device, work through the steps to connect. The shared connection is ready.
C. Create an inbound rule in Windows Firewall with Advanced Security to allow the second device access.
D. Open an administrator command prompt and enter the following command:
netsh wlan set hosted network mode=allow ssid=<networkname> key=<password>
8. Which of the following are types of inbound and outbound rules you can create to further secure Windows Firewall?
A. Program
B. Port
C. Predefined
D. Custom
E. All of the above
9. Which encryption method(s) describe(s) what’s included with IPsec Key Exchange (Main Mode) custom settings?
A. SHA-1 AES-CBC 128 Diffie-Hellmann Group 2 and SHA-1 3DES Diffie-Hellmann Group 2
B. Data Integrity Algorithms and Data Integrity And Encryption Algorithms
C. Kerberos V5
D. None of the above
Objective 2.2: Support remote access
Your users will need to connect to internal resources when they are away from the office. You can set this up in several ways, and you must initiate the process. You can create and manage VPNs, use DirectAccess, and manage users remotely, among other things.
This objective covers how to:
![]() Construct a virtual private network (VPN), including Connection Manager Administration Kit (CMAK)
Construct a virtual private network (VPN), including Connection Manager Administration Kit (CMAK)
![]() Understand Remote Desktop Protocol (RDP), including Remote Desktop Services Gateway access
Understand Remote Desktop Protocol (RDP), including Remote Desktop Services Gateway access
![]() Configure and manage DirectAccess
Configure and manage DirectAccess
![]() Explore remote administration
Explore remote administration
![]() Support Network Access Protection (NAP)
Support Network Access Protection (NAP)
Constructing a virtual private network (VPN)
Exam 70-687, Configuring Windows 8.1, includes two objectives related to creating virtual private networks:
![]() Configure virtual private network (VPN) connections and authentication
Configure virtual private network (VPN) connections and authentication
![]() Enable VPN reconnect
Enable VPN reconnect
Because those objectives were covered there, they aren’t repeated here. However, you need to know how to create a VPN and have a client connect, so if you’ve never done it before review the information at http://technet.microsoft.com/library/jj613767.aspx. This section will cover the objective listed for VPNs for the 70-688 exam, specifically how to construct a VPN with CMAK.
Understanding VPN and authentication protocols
Before diving into the objective itself, you need to review the VPN protocols. You might see questions about these on the exam. Windows 8.1 supports many protocols, and the ones listed here are used with VPNs (loosely listed from oldest to newest and least secure to most secure):
![]() Point-to-Point Protocol (PPP) When a dial-up connection is used to connect a client to a server, a dedicated link is used, and that connection is maintained throughout the session. This PPP link is a notably secure connection because dial-up makes it difficult to hack into. You can also use PPP with a VPN over the Internet. This is less secure than a dial-up connection, because a hacker can more easily get to the data transmitted over the Internet. This isn’t a recommended VPN protocol for these reasons and more, and should be used only when no other options exist.
Point-to-Point Protocol (PPP) When a dial-up connection is used to connect a client to a server, a dedicated link is used, and that connection is maintained throughout the session. This PPP link is a notably secure connection because dial-up makes it difficult to hack into. You can also use PPP with a VPN over the Internet. This is less secure than a dial-up connection, because a hacker can more easily get to the data transmitted over the Internet. This isn’t a recommended VPN protocol for these reasons and more, and should be used only when no other options exist.
![]() Point-to-Point Tunneling Protocol (PPTP) Another of the less-secure VPN protocols, PPTP doesn’t require the use of certificates to ensure security. It’s a better option than PPP, however, because the packets are encapsulated via tunneling technologies and are better protected during transmission. PPTP supports only the Microsoft Challenge Handshake Authentication Protocol version 1 and version 2 (MS-CHAP v1 and MS-CHAP v2), Extensible Authentication Protocol (EAP), and Protected Extensible Authentication Protocol (PEAP).
Point-to-Point Tunneling Protocol (PPTP) Another of the less-secure VPN protocols, PPTP doesn’t require the use of certificates to ensure security. It’s a better option than PPP, however, because the packets are encapsulated via tunneling technologies and are better protected during transmission. PPTP supports only the Microsoft Challenge Handshake Authentication Protocol version 1 and version 2 (MS-CHAP v1 and MS-CHAP v2), Extensible Authentication Protocol (EAP), and Protected Extensible Authentication Protocol (PEAP).
![]() Layer 2 Tunneling Protocol (L2TP) This protocol uses IPsec for encryption and encapsulation. It encrypts with Data Encryption Standard (DES) or Triple DES (3DES) with keys obtained from Internet Key Exchange (IKE) from IPsec. L2TP/IPsec uses preshared keys or certificates and offers data integrity checks. L2TP/IPsec is supported by Windows XP, Windows Vista, Windows 7, Windows 8, Windows 8.1, Windows Server 2003, and Windows Server 2008.
Layer 2 Tunneling Protocol (L2TP) This protocol uses IPsec for encryption and encapsulation. It encrypts with Data Encryption Standard (DES) or Triple DES (3DES) with keys obtained from Internet Key Exchange (IKE) from IPsec. L2TP/IPsec uses preshared keys or certificates and offers data integrity checks. L2TP/IPsec is supported by Windows XP, Windows Vista, Windows 7, Windows 8, Windows 8.1, Windows Server 2003, and Windows Server 2008.
![]() Secure Socket Tunneling Protocol (SSTP) This protocol encapsulates PPP traffic through the SSL protocol, and uses certificates for authentication. Authentication involves Extensible Authentication Protocol-Transport Layer Security (EAP-TLS) and provides integrity checks. SSTP is supported on Windows Vista SP 1, Windows 7, Windows 8, Windows 8.1, Windows Server 2008 R2, and Windows Server 2012. SSTP uses port 443.
Secure Socket Tunneling Protocol (SSTP) This protocol encapsulates PPP traffic through the SSL protocol, and uses certificates for authentication. Authentication involves Extensible Authentication Protocol-Transport Layer Security (EAP-TLS) and provides integrity checks. SSTP is supported on Windows Vista SP 1, Windows 7, Windows 8, Windows 8.1, Windows Server 2008 R2, and Windows Server 2012. SSTP uses port 443.
![]() Internet Key Exchange, Version 2 (IKEv2) This protocol supports IPv6 and VPN Reconnect, authentication with EAP, PEAP, EAP-MSCHAPv2, and smart cards. It doesn’t support Password Authentication Protocol (PAP) and CHAP as authentication methods. IKEv2 is useful when a user moves from one type of connection to another (wireless to wired, for example) and in many other scenarios. Windows 8.1 clients try to use this protocol first when connecting to remote servers. IKEv2 is supported on Windows 7, Windows 8, Windows 8.1, Windows Server 2008 R2, and Windows Server 2012.
Internet Key Exchange, Version 2 (IKEv2) This protocol supports IPv6 and VPN Reconnect, authentication with EAP, PEAP, EAP-MSCHAPv2, and smart cards. It doesn’t support Password Authentication Protocol (PAP) and CHAP as authentication methods. IKEv2 is useful when a user moves from one type of connection to another (wireless to wired, for example) and in many other scenarios. Windows 8.1 clients try to use this protocol first when connecting to remote servers. IKEv2 is supported on Windows 7, Windows 8, Windows 8.1, Windows Server 2008 R2, and Windows Server 2012.
Clients must be authenticated before they can access network resources. Here are the most common authentication protocols:
![]() PAP This protocol—the least secure—uses plain-text passwords and is used as a last resort when other authentication methods can’t be negotiated. It’s not enabled by default on a Windows 8-based client.
PAP This protocol—the least secure—uses plain-text passwords and is used as a last resort when other authentication methods can’t be negotiated. It’s not enabled by default on a Windows 8-based client.
![]() CHAP This protocol uses a three-way handshake between the client and server, using a key for encryption. This is best used for legacy connections, and is better than PAP, but other methods are preferred.
CHAP This protocol uses a three-way handshake between the client and server, using a key for encryption. This is best used for legacy connections, and is better than PAP, but other methods are preferred.
![]() MS-CHAP v2 This protocol uses a two-way mutual authentication and is stronger than CHAP. Still, better protocols exist, including EAP.
MS-CHAP v2 This protocol uses a two-way mutual authentication and is stronger than CHAP. Still, better protocols exist, including EAP.
![]() EAP-MS-CHAPv2 This protocol authenticates using EAP, which offers the strongest and most flexible security option. With it, authentication can be negotiated using something other than passwords, including certificates and smart cards. This is the default selection for new connections on Windows 8-based machines.
EAP-MS-CHAPv2 This protocol authenticates using EAP, which offers the strongest and most flexible security option. With it, authentication can be negotiated using something other than passwords, including certificates and smart cards. This is the default selection for new connections on Windows 8-based machines.
Installing and using Connection Manager Administration Kit (CMAK)
Clients use Connection Manager (not CMAK) on their own computers to connect to available VPNs. Connection Manager is available from the Network And Sharing Center on any Windows 8-based machine (click Set Up A New Connection Or Network, and then click Connect To A Workplace to connect to a VPN). Connection Manager uses profiles to assist clients with connections and to make managing those VPN connections easier for everyone involved. The profiles contain the settings necessary to allow the clients to connect. You use CMAK to create those profiles and make them available to users, and users install the profiles you create.
Here are some facts to remember regarding CMAK:
![]() CMAK is a tool that you can use to create predefined connections to remote servers and networks for your clients. To do this you use the CMAK Wizard. You can create profiles for Windows server-based operating systems and Windows client-based operating systems. Connection profiles you create must match the architecture (32-bit or 64-bit) of the client that will use them to connect.
CMAK is a tool that you can use to create predefined connections to remote servers and networks for your clients. To do this you use the CMAK Wizard. You can create profiles for Windows server-based operating systems and Windows client-based operating systems. Connection profiles you create must match the architecture (32-bit or 64-bit) of the client that will use them to connect.
![]() You save the profile to a location you name, perhaps C:\Program Files\CMAK\Profiles\Windows Vista And Above.
You save the profile to a location you name, perhaps C:\Program Files\CMAK\Profiles\Windows Vista And Above.
![]() The profile is an executable (.exe) file.
The profile is an executable (.exe) file.
Using a profile and making a connection on a client machine
The user profiles you create in CMAK are executable files. This means that a client can install the profile in many ways, including but not limited to:
![]() Removable media
Removable media
![]() Network share
Network share
![]() Email
Email
![]() Website download
Website download
![]() Software distribution system
Software distribution system
More Info: Understanding CMAK
For more information on CMAK, read this Tech-Net article at http://technet.microsoft.com/en-us/library/hh831675.aspx.
Clients can opt to create a desktop icon for the profile during its installation and use that shortcut to start the connection process. Another common way to connect is through the Connection Manager. Briefly, the process is as follows:
1. From the Network And Sharing Center, click Set Up A New Connection Or Network.
2. Select Connect To A Workplace, click Next, and then click Use My Internet Connection (VPN).
3. Enter the address of the Remote Access server and the name of the destination and click Create.
4. Locate the new VPN connection from the Settings charm (click the Network icon). It’s listed under Connections (see Figure 2-15).
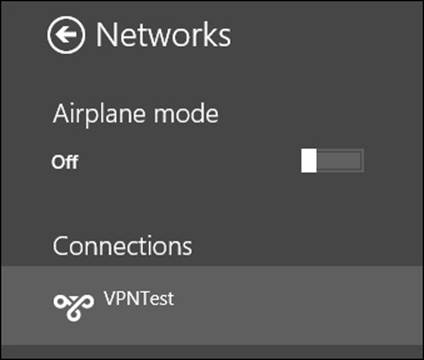
FIGURE 2-15 You can locate the VPN from the Settings charm.
5. Enter credentials and click OK.
You can also view the connection’s properties. When you do, you’ll see five tabs, as shown in Figure 2-16:
![]() General Host name, IP address of VPN server
General Host name, IP address of VPN server
![]() Options Credentials, idle time, PPP settings
Options Credentials, idle time, PPP settings
![]() Security Data encryption, authentication, tunneling and protocols
Security Data encryption, authentication, tunneling and protocols
![]() Networking IPv6, IPv4, File and Printer Sharing, Client for Microsoft Networks
Networking IPv6, IPv4, File and Printer Sharing, Client for Microsoft Networks
![]() Sharing Share the connection
Sharing Share the connection
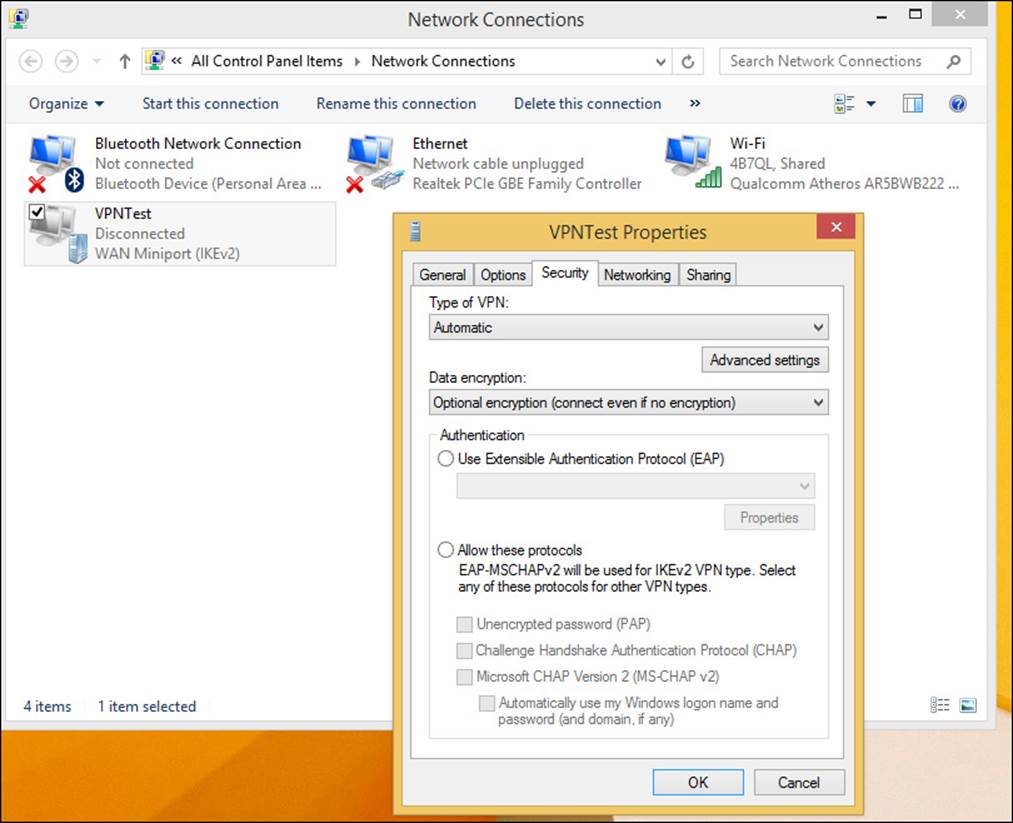
FIGURE 2-16 The VPNTest Properties dialog box offers a way to configure the connection.
Exam Tip
You can create and manage VPN connections and clients using Windows PowerShell. You might see questions about this on the exam, and you’ll be asked to identify the proper Windows PowerShell command to use to perform a task, perhaps to retrieve a specific VPN profile or to change the configuration settings of an existing VPN connection. There is an excellent list of cmdlets at http://technet.microsoft.com/en-us/library/jj554820.aspx.
Understanding Remote Desktop Protocol (RDP), including Remote Desktop Services Gateway access
Remote Desktop Services (RDS) lets users connect to remote servers for the purpose of accessing remote desktops and applications. You learned about this in the Objective 1.2 section titled “Supporting desktop application coexistence.” In this section you’ll learn about one part of RDS, Remote Desktop Protocol (RDP), and the Remote Desktop (RD) Gateway.
Note: RD Gateway
One element that makes RDS work is the RD Gateway, which enables users to connect securely from any device connected to the Internet, assuming it can run the Remote Desktop Connection (RDC) client. RD Gateway uses the Remote Desktop Protocol (RDP) over HTTPS to establish a secure, encrypted connection between the client and server.
Opening Remote Desktop Connection on the client
For users to access the RD Gateway, they (or you) must configure the applicable settings on their computers. When they have access, they can then be authenticated and allowed access to the features and settings you’ve made available to them. You configure these settings from the Remote Desktop Connection window. To open the Remote Desktop Connection window, type mstsc.exe at a command prompt. You can see both in Figure 2-17.
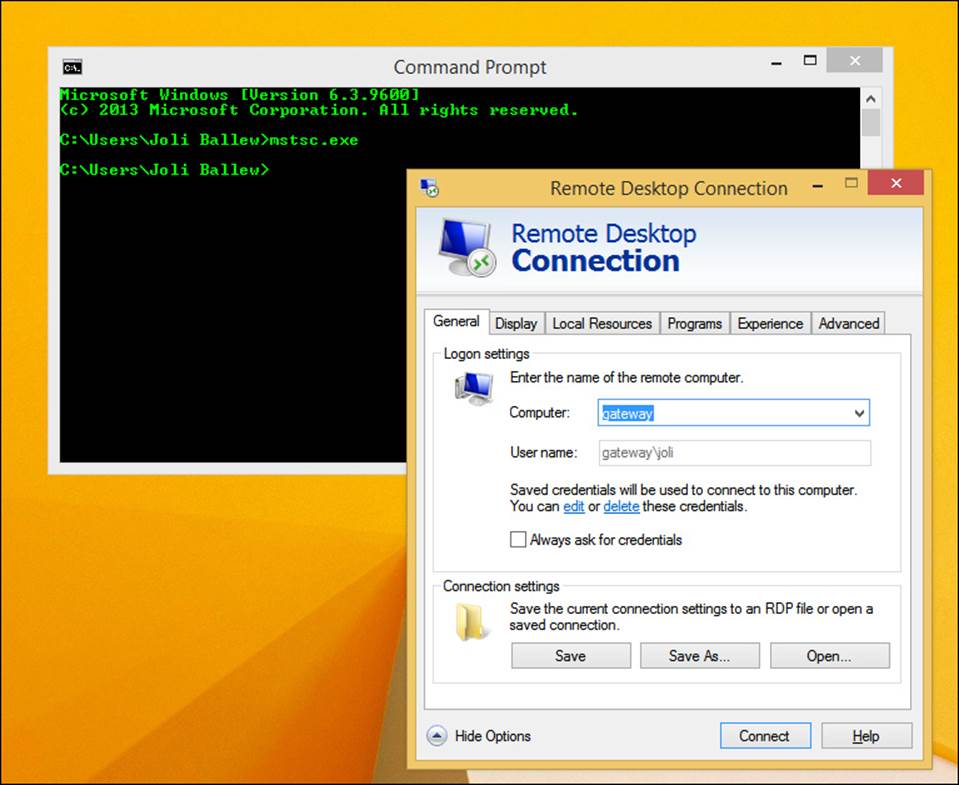
FIGURE 2-17 Use the command-line tool Mstsc.exe to open the Remote Desktop Connection window.
Note: More Uses for Remote Desktop
Remote Desktop is used by network administrators to remotely administer computers and servers, often from another company computer in the same building or in another one close by. Users can connect to a remote desktop from almost any type of computer, including those running Windows XP, Windows Vista, Windows 7, Windows 8, Windows 8.1, or Windows RT. The host computer must be running Windows XP Professional, Windows Vista Enterprise, Windows Vista Ultimate, Windows Vista Business, Windows 7 Ultimate, Windows 7 Enterprise, Windows 7 Professional, Windows 8 Pro, Windows 8.1 Pro, Windows 8 Enterprise, or Windows 8.1 Enterprise.
As a side note, here are parameters you can use with the command Mstsc.exe when using Remote Desktop:
![]() <connection file> Specifies the name of an .rdp file for the connection.
<connection file> Specifies the name of an .rdp file for the connection.
![]() /edit <connection file> Opens the specified .rdp file for editing.
/edit <connection file> Opens the specified .rdp file for editing.
![]() /v:<Server[:<Port>] Specifies the remote computer and (optionally) the port number to which you want to connect.
/v:<Server[:<Port>] Specifies the remote computer and (optionally) the port number to which you want to connect.
![]() /admin Connects you to a session for administering the server.
/admin Connects you to a session for administering the server.
![]() /f Starts Remote Desktop Connection in full-screen mode.
/f Starts Remote Desktop Connection in full-screen mode.
![]() /w:<Width> Specifies the width of the Remote Desktop window.
/w:<Width> Specifies the width of the Remote Desktop window.
![]() /h:<Height> Specifies the height of the Remote Desktop window.
/h:<Height> Specifies the height of the Remote Desktop window.
![]() /public Runs Remote Desktop in public mode. In public mode, passwords and bitmaps aren’t cached.
/public Runs Remote Desktop in public mode. In public mode, passwords and bitmaps aren’t cached.
![]() /span Matches the Remote Desktop width and height with the local virtual desktop, spanning across multiple monitors if necessary.
/span Matches the Remote Desktop width and height with the local virtual desktop, spanning across multiple monitors if necessary.
![]() /migrate Migrates legacy connection files that were created with Client Connection Manager to new .rdp connection files.
/migrate Migrates legacy connection files that were created with Client Connection Manager to new .rdp connection files.
Entering RD Gateway server settings and connecting
You configure the RD Gateway server settings from the Remote Desktop Connection window, from the Advanced tab, as follows:
1. With the Remote Desktop Connection window open, click the Advanced tab.
2. Under Connect From Anywhere, click Settings.
3. To input RD Gateway server settings manually, select Use These RD Gateway Server Settings (see Figure 2-18).
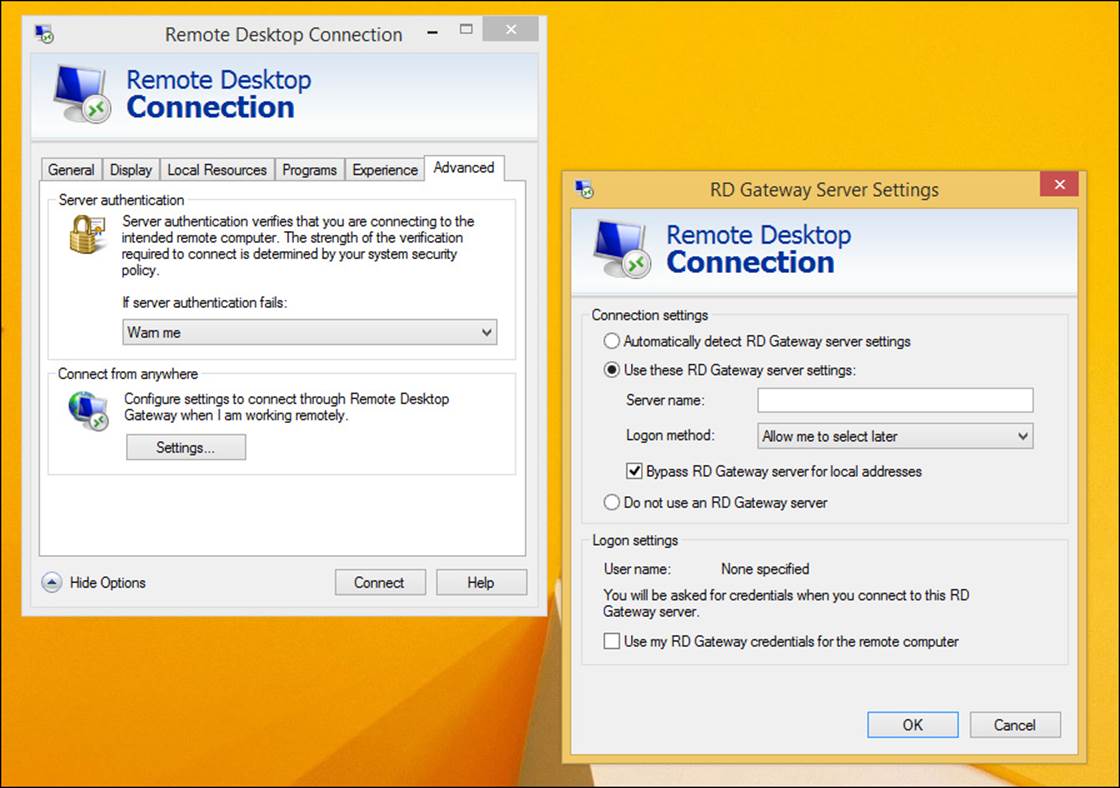
FIGURE 2-18 Configuring RD Gateway server settings.
4. Input the desired settings by selecting from the following options and then click OK:
![]() Automatically Detect RD Gateway Server Settings (default) Use this option if the RDS client should attempt to use the Group Policy settings you’ve preconfigured to make the connection.
Automatically Detect RD Gateway Server Settings (default) Use this option if the RDS client should attempt to use the Group Policy settings you’ve preconfigured to make the connection.
![]() Use These RD Gateway Server Settings Select this option if an RD Gateway server is available and you want to specify the name of the server to use. Use a fully qualified domain name (FQDN).
Use These RD Gateway Server Settings Select this option if an RD Gateway server is available and you want to specify the name of the server to use. Use a fully qualified domain name (FQDN).
![]() Bypass RD Gateway Server For Local Addresses (default) Use this if you want the RDS client to automatically detect when an RD Gateway is required. If computers are always connected to your local network, RD Gateway isn’t used. If computers aren’t on the local network and need to connect to it, RD Gateway is used. For mobile computers, use this option to enhance performance and minimize latency.
Bypass RD Gateway Server For Local Addresses (default) Use this if you want the RDS client to automatically detect when an RD Gateway is required. If computers are always connected to your local network, RD Gateway isn’t used. If computers aren’t on the local network and need to connect to it, RD Gateway is used. For mobile computers, use this option to enhance performance and minimize latency.
![]() Do Not Use An RD Gateway Server Select this option if you know you won’t need to use an RD Gateway. This might be because the computer is always connected to the LAN or is on this side of the internal network firewall.
Do Not Use An RD Gateway Server Select this option if you know you won’t need to use an RD Gateway. This might be because the computer is always connected to the LAN or is on this side of the internal network firewall.
5. To connect, click Connect. Enter credentials when prompted.
Exam Tip
You might be expected to know what’s new in Remote Access for Windows Server 2012 R2. To prepare, read the article at http://technet.microsoft.com/en-us/library/dn383589.aspx.
More Info: Understanding RDP
RDP is a proprietary protocol developed by Microsoft. It provides your clients with a way to connect easily to another computer over a network. The client uses the RDP client software, and the other computer must run the RDP server software. You can learn more about RDP and Remote Desktop Services in general at http://blogs.msdn.com/b/rds/archive/2013/03/14/what-s-new-in-windows-server-2012-remote-desktop-gateway.aspx.
Configuring and managing DirectAccess
DirectAccess allows remote users to access your internal network securely without connecting to it through a VPN. When they are connected and authenticated, users can access whatever they’re allowed to, including but not limited to network shares, intranet websites, applications, virtual desktops, personal files, and printers. You learned a little about DirectAccess earlier in Objective 2.1, in the section “Understanding transition technologies.”
After the initial connection is made, DirectAccess clients establish a connection with the internal network every time they connect to the Internet. As a result, users don’t have to manage the connection (or worry about it in any way), and administrators can manage the computers from virtually anywhere. For administrators, this means they can apply Group Policy, install updates, and perform similar tasks just about anytime they like.
The objective for DirectAccess appears under the heading “Support,” which you can take to mean a few specific things: understanding how DirectAccess works, what’s new, how it can be deployed in an enterprise, and how Windows 8.1 users access the connections you create.
Understanding how DirectAccess works
Domain clients that run Windows 7 Enterprise, Windows 7 Ultimate, and Windows 8 Enterprise and later can use DirectAccess. It can also be configured to work on Windows Server 2008 R2 and Windows Server 2012 machines. For clients that aren’t compatible, traditional VPNs are used.
DirectAccess originally established two tunnels to connect the user to the DirectAccess server, and those tunnels used IPsec to protect the transmission. One tunnel accessed the network’s DNS server to obtain authentication requirements from the AD DS domain controller; the second tunnel handled the actual network authentication and access to intranet resources such as websites, network shares, and other application servers. The Windows Server 2008 R2 DirectAccess server required two network adapters to handle this load. One was used to connect to the Internet, the other to the intranet. These adapters also needed two consecutive public IP addresses and sat at the network edge. Now though, a DirectAccess server can be deployed behind a Network Address Translation (NAT) device, using only a single network interface and without a public IP address. This is just one improvement from the older version of DirectAccess.
DirectAccess also uses a network location server (NLS) to detect whether DirectAccess client computers are located in the enterprise network (this is discussed in more detail later). Clients on an enterprise network don’t use DirectAccess to reach network resources; instead, they connect to those resources directly. Clients not located on the enterprise network use DirectAccess to connect. The network location server can be installed on the DirectAccess server or on another server.
Finally, DirectAccess uses IPv6. When clients must communicate over IPv4-only networks, data is encapsulated by using the application transition technologies discussed earlier. By default, only certain network traffic (data) can be transported through a DirectAccess tunnel; however, you can use force tunneling to change this behavior.
Note: DirectAccess and VPNs
DirectAccess doesn’t use a traditional VPN connection. However, a VPN connection is created for clients that can’t use DirectAccess, such as third-party VPN clients, nondomain clients, and legacy clients. Routing and Remote Access Services (RRAS) can be incorporated when this is the case.
Seeing what’s new in DirectAccess for Windows Server 2012
Since the release of Windows Server 2012, DirectAccess and RRAS have been combined so that they create a combined Remote Access role. (It used to be that both couldn’t reside on the same server.) The reasons they couldn’t be combined before is complex, but briefly it was because DirectAccess relied on IPv6 and RRAS implemented IKEv2 IPsec. This caused problems with the DirectAccess traffic being blocked when a single server was configured. That problem has been resolved in Windows Server 2012.
In Windows Server 2008 R2, a Public Key Infrastructure (PKI) was required to issue the certificates that were used to manage server and client certificate-based authentication. Windows Server 2012 no longer requires this. Now, client authentication requests are sent to a Kerberos proxy service, which then sends requests to domain controllers. Windows Server 2008 R2 didn’t have complete support for scripting either. Windows Server 2012 offers full Windows PowerShell support. You can now use Windows PowerShell to set up, configure, manage, monitor, and even troubleshoot remote access.
Here are a few more enhancements:
![]() Support for a DirectAccess server behind a NAT device, which means that only one network interface is required and no public IP address is necessary.
Support for a DirectAccess server behind a NAT device, which means that only one network interface is required and no public IP address is necessary.
![]() Load-balancing support for better scalability and network availability.
Load-balancing support for better scalability and network availability.
![]() Support for multiple domains to allow remote clients from different domains to connect.
Support for multiple domains to allow remote clients from different domains to connect.
![]() Support for multiple sites so that you can configure multiple entry points. Users can access the device closest to them.
Support for multiple sites so that you can configure multiple entry points. Users can access the device closest to them.
![]() Support for One-Time Password (OTP) (token-based authentication) for enterprises that require a specific security level such as RSA SecurID or a domain policy that requires multifactor authentication.
Support for One-Time Password (OTP) (token-based authentication) for enterprises that require a specific security level such as RSA SecurID or a domain policy that requires multifactor authentication.
![]() Automated support for force tunneling via a setup wizard.
Automated support for force tunneling via a setup wizard.
![]() User and server health monitoring to obtain data related to the number of clients and users connected, totals for active DirectAccess and VPN clients, total amount of data transferred, and more.
User and server health monitoring to obtain data related to the number of clients and users connected, totals for active DirectAccess and VPN clients, total amount of data transferred, and more.
Choosing deployment options
Planning for DirectAccess involves three areas to consider: where you’ll place the DirectAccess server (behind or in front of a firewall/router/NAT device); where you’ll install the NLS (on the DirectAccess server or another server); and what users you want to have access. You’ll have additional options for deployment if you have multiple sites or domains to connect and manage, need OTP Authentication, or need to force clients to meet “health requirements” before they can connect to your network (NAP).
More Info: Supporting DirectAccess
How much you’ll need to know about this part of supporting DirectAccess isn’t certain. All of the preceding tasks (listed here in the introduction) are done on the server, not on the client. Because this exam is about supporting Windows 8.1, rather than discuss these options here, I suggest that you read the following TechNet articles and view the available videos:
![]() Video, “DEMO: DirectAccess,” which shows how to install DirectAccess on Windows Server 2012: http://channel9.msdn.com/Events/IT-Camps/IT-Camps-On-Demand-Windows-Server-2012/ITCamp-WS2012-05a
Video, “DEMO: DirectAccess,” which shows how to install DirectAccess on Windows Server 2012: http://channel9.msdn.com/Events/IT-Camps/IT-Camps-On-Demand-Windows-Server-2012/ITCamp-WS2012-05a
![]() Article, “Manage remote access”: http://technet.microsoft.com/en-us/library/hh831539.aspx
Article, “Manage remote access”: http://technet.microsoft.com/en-us/library/hh831539.aspx
![]() Article, “Configure DirectAccess in Windows Server Essentials”: http://technet.microsoft.com/en-us/library/jj204618.aspx
Article, “Configure DirectAccess in Windows Server Essentials”: http://technet.microsoft.com/en-us/library/jj204618.aspx
![]() Video, “Windows Server 2012 DirectAccess - How to Quickly and Easily Deploy Your Next Generation Remote Access Experience”: http://channel9.msdn.com/Events/TechEd/Europe/2012/WSV302
Video, “Windows Server 2012 DirectAccess - How to Quickly and Easily Deploy Your Next Generation Remote Access Experience”: http://channel9.msdn.com/Events/TechEd/Europe/2012/WSV302
Understanding what Windows 8.1 users needs to know
Your end users understand the problems that occur with VPNs (if they’ve used them in the past). They are responsible for initiating the connection; they must log on, and sometimes connections can be blocked inside hotels or similar places. Connections can also be dropped and must be reconnected. Users might also have to change their passwords often. Administrators have their own set of problems, one of which is supporting these users when they can’t connect. Another problem is not having any way to initiate a connection to a remote user when it’s necessary.
As soon as DirectAccess is set up and configured on a client computer, these problems go away. After that, users are connected each time they establish a connection to the Internet. Users might also be required to insert a Smart Card or virtual PIN, but they generally know how to do this and rarely have problems with it. When connected to the corporate network via DirectAccess, users can access the network just as they would if they were onsite. When connected to the Internet, they can:
![]() Use Federated Search. This allows them to search for items from their computers and get results from local network resources.
Use Federated Search. This allows them to search for items from their computers and get results from local network resources.
![]() Access their personal work folders via Folder Redirection and not worry about syncing manually on their return to the office.
Access their personal work folders via Folder Redirection and not worry about syncing manually on their return to the office.
![]() Get a replacement computer quickly, if necessary, and get it up and running in a matter of minutes.
Get a replacement computer quickly, if necessary, and get it up and running in a matter of minutes.
If users want more information, the Microsoft DirectAccess Connectivity Assistant (DCA) is available for free download from the Microsoft Download Center. This requires .NET Framework 3.5, which users will be prompted to install during the DCA installation if it isn’t already available on their computers. When installed, a DCA icon appears in the taskbar’s Notification area. This also makes tools available for end users if problems occur with the connection. It also offers connection status. You can use CMAK (discussed earlier in this objective) to create the profiles the clients need.
For more information on Connection Manager, refer to this TechNet article and the links to the left of it: http://technet.microsoft.com/en-us/library/hh831583.aspx.
Exploring remote administration
As an administrator, you can remotely manage your DirectAccess clients from a Windows Server 2012 machine. This enables you to perform all kinds of management tasks, including upgrading features or applying security updates even if the machine isn’t on site. Some of these advanced tasks (like updating) require you also have System Center Configuration Manager or something similar.
Many prerequisites must be met by the server and the client for you to successfully manage remote clients, and they are outlined at http://technet.microsoft.com/en-us/library/jj574200.aspx. You’ll possibly see exam questions that ask why a client can’t be administered remotely or why DirectAccess can’t be used on a client (or some similar scenario). The answer is probably that one of these prerequisites hasn’t been met. Thus, you must read through the preceding link. Here are some of the highlights:
![]() Windows Firewall must be enabled on all profiles.
Windows Firewall must be enabled on all profiles.
![]() ISATAP in the enterprise network isn’t supported. You must use native IPv6.
ISATAP in the enterprise network isn’t supported. You must use native IPv6.
![]() DirectAccess clients must be installed with Windows 8.1, Windows 8, and Windows 7. Remember, legacy clients use VPNs. They all must be domain members. Because Windows RT machines can’t join domains, they can’t be included here.
DirectAccess clients must be installed with Windows 8.1, Windows 8, and Windows 7. Remember, legacy clients use VPNs. They all must be domain members. Because Windows RT machines can’t join domains, they can’t be included here.
![]() DirectAccess and VPN clients are managed in the same console.
DirectAccess and VPN clients are managed in the same console.
![]() When you change policies, you must use the DirectAccess management console or Windows PowerShell cmdlets.
When you change policies, you must use the DirectAccess management console or Windows PowerShell cmdlets.
![]() If you don’t want to use self-signed certificates for IP-HTTPS or the network location server, a CA server is required. This is also required if you want to use client certificates for client IPsec authentication. However, you can request certificates from a public CA, if you’d prefer to go that route.
If you don’t want to use self-signed certificates for IP-HTTPS or the network location server, a CA server is required. This is also required if you want to use client certificates for client IPsec authentication. However, you can request certificates from a public CA, if you’d prefer to go that route.
![]() A DNS server is required. That server must be running Windows Server 2008 SP2, Windows Server 2008 R2, or Windows Server 2012.
A DNS server is required. That server must be running Windows Server 2008 SP2, Windows Server 2008 R2, or Windows Server 2012.
![]() The Remote Access server must be a domain member, and the server can be deployed at the edge of the internal network or behind an edge firewall or similar device.
The Remote Access server must be a domain member, and the server can be deployed at the edge of the internal network or behind an edge firewall or similar device.
When all these and other prerequisites are met, you can remotely manage the clients through the DirectAccess connection. You’ll learn about two ways you can do this next: using Remote Server Administration Tools (RSAT) and using Windows PowerShell.
Using Remote Server Administration Tools
You can remotely manage computers in your enterprise from a Windows 8.1 computer using the applicable Remote Server Administration Tool (RSAT). This allows you to manage servers and clients from your own laptop or personal desktop computer and reduces the number of servers that you have to connect to via RDP.
This free download, when installed, offers Server Manager, Microsoft Management Console (MMC) snap-ins, consoles, and Windows PowerShell cmdlets and command-line tools, among other things. RSAT for Windows 8.1 can be installed only on computers running Windows 8.1 Pro or Windows 8.1 Enterprise and are compatible with x86- and x64-based editions. Remote Server Administration Tools can’t be installed on computers running Windows RT 8.1.
More Info: Installing RSAT
Quite a bit of information is available about how to install RSAT, important notes regarding installation, and how to get started with the available tools at http://technet.microsoft.com/en-us/library/hh831501.aspx. Because this book has only a limited number of pages to devote to this topic, I suggest that you read this article before taking the exam, along with the supporting papers also available at this link.
After you install RSAT, you might notice that it doesn’t appear on the Start screen. Instead, you’ll find it in Control Panel, under Administrative Tools. You might want to create a shortcut to RSAT if you plan to use it often.
Note: Using RSAT Tools
You can’t use the RSAT tools for Windows 8.1 to manage the local computer on which the tools are installed. Instead, you must specify what server(s) you want to manage.
You can start Server Manager on the client from the Administrative Tools folder by double-clicking Server Manager. As shown in Figure 2-19, a Quick Start section is available to help you connect to a server to manage, add roles and features, and create a server group that contains multiple servers. To add a remote server, click Add Other Servers To Manage. Your computer must be domain-joined. From the Active Directory tab, select the server to manage, click the right arrow to add it, and click OK. You can now begin managing that server from your Windows 8.1 computer.
FIGURE 2-19 Server Manager is one tool you can use to manage computers remotely.
If possible, explore the other areas of Server Manager—specifically, the Manage and Tools options listed at the top. From there you can add and remove roles and features and access other tools including Event Viewer, Active Directory Administrative Center, and Hyper-V Manager.
Using Windows PowerShell
When you install RSAT, you also install the tools necessary to run Windows PowerShell cmdlets and command-line commands. Remotely managing computers with PowerShell is called Windows PowerShell Remoting. This means you can run PowerShell commands on remote computers just as you would if you were sitting in front of them.
More Info: Performing Remote Tasks without Establishing a Remoting Session
You can perform a lot of remote administration tasks without remoting, using Windows PowerShell cmdlets. These cmdlets can be directed at a remote computer without establishing a remoting session first. You can find more information about this from Ed Wilson, “The Scripting Guy,” at http://technet.microsoft.com/en-us/scriptcenter/dd901334.aspx.
To get started, at the Windows 8.1 computer you want to manage remotely, open an elevated Windows PowerShell session, type Enable-PSRemoting, and then type A to enable the required Windows Remote Management configuration tasks to run, as shown in Figure 2-20. (Windows PowerShell Remoting is enabled by default on Windows Server 2012 computers. Also, you don’t need to run this command on a Windows 8.1 computer that’s sending the commands.)
FIGURE 2-20 Enabling Windows PowerShell Remoting from an elevated Windows PowerShell session.
Now you can begin managing a remote computer with Windows PowerShell using one-to-one remoting. To get started, type enter-pssession –computername -<computername>. For example
PS c:\>enter-pssession –computername DC003
When you press Enter and make the connection, the prompt changes to look like this
[DC003]: PS C:\>
Finally, you can use dozens of core cmdlets. Related commands include Get-Command, Out-Default, and Exit-PSSession. You can view these commands and others, as well as their available parameters, at http://technet.microsoft.com/en-us/library/hh849695.aspx. You can also manage multiple computers at one time by using one-to-many remoting. However, this is much more complex; TechNet has many articles about this.
More Info: The Script Center
You’ll find a ton of information about remoting and Windows PowerShell from The Scripting Center at http://technet.microsoft.com/en-US/scriptcenter/default.
Supporting Network Access Protection (NAP)
Network Access Protection (NAP) was mentioned earlier, albeit briefly. This section expands on that topic. To summarize, NAP lets you enhance network security by requiring that remote clients meet the “health requirements” you’ve previously set before they can connect to your protected internal network. Health requirements might include up-to-date virus protection and a running firewall. When you incorporate NAP, you can verify the remote computer’s health before the client is granted access to your network and, if a problem is found, offer a solution to remediate it. Generally, this involves letting the computer into some kind of quarantined area of your network where remediation can be achieved. When the computer is considered healthy (perhaps its firewall is now enabled), it’s then deemed compliant, and network access is granted.
Exam Tip
Microsoft has stated in the TechNet article at http://technet.microsoft.com/en-us/library/dn303411.aspx that NAP has been deprecated in Windows Server 2012 R2, and you can assume that it will be deprecated in future editions of Windows. But because NAP is listed as an objective on this exam, you need to be sure you understand it.
Using NAP on the server
When enterprise administrators decide to incorporate NAP, they first have to decide what a healthy computer is. Health requirements can include the items listed earlier (firewall and antivirus) but they can also require that the computer has installed the latest critical updates from Microsoft, has the latest malware definitions, or has the updates you’ve provided for your own clients via your own enterprise. When the requirements are known, the infrastructure can be built.
Here are a few of the requirements and items to consider:
![]() NAP Agent This collects and manages health information on the NAP client computers.
NAP Agent This collects and manages health information on the NAP client computers.
![]() NAP client computer This computer has the NAP agent installed, running, and reporting. This type of computer runs Windows Server 2008 and higher, Windows XP with SP3, Windows Vista, Windows 7, and Windows 8.
NAP client computer This computer has the NAP agent installed, running, and reporting. This type of computer runs Windows Server 2008 and higher, Windows XP with SP3, Windows Vista, Windows 7, and Windows 8.
![]() Compliant computer and noncompliant computer These computers meet the health requirements or don’t meet the health requirements, respectively.
Compliant computer and noncompliant computer These computers meet the health requirements or don’t meet the health requirements, respectively.
![]() Health status A NAP client computer provides health status updates called statements of health (SoH) to the server that manages computer compliance.
Health status A NAP client computer provides health status updates called statements of health (SoH) to the server that manages computer compliance.
![]() NAP health policy server A server that runs the Network Policy Server (NPS) role, it evaluates the health of NAP client computers when they request network access, and knows when their health state changes based on the SoH it receives. This server’s job is to determine whether a computer is healthy enough to join the network.
NAP health policy server A server that runs the Network Policy Server (NPS) role, it evaluates the health of NAP client computers when they request network access, and knows when their health state changes based on the SoH it receives. This server’s job is to determine whether a computer is healthy enough to join the network.
As the enterprise administrator, you can also decide how to enforce the health rules. The decision you make determines what type of infrastructure you’ll have to build and maintain. For instance, if you want to use NAP with IPsec enforcement, you’ll need an AD DS domain controller, a Network Policy Server, a Certification Authority, and a Health Registration Authority, and the computer must have the required IPsec certificate. You must also configure NAP health registration authority settings when you deploy IPsec-based enforcement.
If you want to use NAP with 802.1X enforcement, you’ll have to build an infrastructure that includes compliant 802.1X wired Ethernet switches and compliant wireless access points. You’ll also need an NPS, server certificates, and EAP or EAP-Tunneled Transport Layer Security (EAP-TTLS) authentication.
If you want to use NAP with VPN enforcement, you’ll need to configure Routing and Remote Access as a VPN server running the NPS role, or the server must be able to communicate with an NPS. The Network Policy Server needs to be configured as the primary RADIUS server, and you’ll need to configure related policies, configure system health agents, and so on.
If you want to use NAP with DHCP enforcement, you’ll need a DHCP server, and the various policies configured.
Finally, based on these options, a computer that isn’t compliant with a network you’ve configured will be handled as follows:
![]() NAP with IPsec enforcement The computer might be allowed to communicate with the resources it needs to become compliant on the network, but nothing else. Like with other options, you choose not to restrict access, not to create a remediation zone, and so on. You can simply use the associated reports to manage remediation yourself. Of course, you can also deny access.
NAP with IPsec enforcement The computer might be allowed to communicate with the resources it needs to become compliant on the network, but nothing else. Like with other options, you choose not to restrict access, not to create a remediation zone, and so on. You can simply use the associated reports to manage remediation yourself. Of course, you can also deny access.
![]() NAP with 802.1X enforcement The computer can be restricted to a remediation zone.
NAP with 802.1X enforcement The computer can be restricted to a remediation zone.
![]() NAP with VPN enforcement The computer also can be restricted to a remediation zone.
NAP with VPN enforcement The computer also can be restricted to a remediation zone.
![]() NAP with DHCP enforcement The computer can be assigned an IP address that allows it to enter the remediation zone but not the protected network.
NAP with DHCP enforcement The computer can be assigned an IP address that allows it to enter the remediation zone but not the protected network.
More Info: Network Policy and Access Services Overview
To learn more, read the TechNet article at http://technet.microsoft.com/en-us/library/hh831683.aspx.
Using NAP on the client
Before you can use NAP on your client computers, you need to configure their NAP settings through the NAP Client Configuration console. This console helps you configure the desired user interface settings, enforcement settings, and Health Registration Authority (HRA) settings. You can use other options, though; you can configure settings with the applicable netsh commands or you can use the Group Policy Management Console (GPMC). If you use Group Policy, the settings you apply are automatically configured on all your domain-joined, NAP-capable client computers the next time Group Policy is refreshed.
If you can’t use Group Policy, don’t like to use netsh, or want to manage only a small number of computers, you should opt for the NAP Client Configuration console. Group Policy is better for larger organizations, though, and netsh can certainly be incorporated.
Using the NAP Client Configuration Console
You can open the NAP Client Configuration console by typing napclcfg.msc at the Start screen or in a Run window. Figure 2-21 shows the dialog box and the three steps required to completely configure the interface for clients.
FIGURE 2-21 Configure the NAP clients using the NAP Client Configuration console.
One of the simpler things to do is change the properties of the user interface. To do this, click User Interface Settings in the left pane; in the middle pane, right-click User Interface and then click Properties. From there you can type a title, description, and add an image (see Figure 2-22).
FIGURE 2-22 Personalize the User Interface settings on the NAP Client Configuration console.
Exam Tip
You can configure the NAP Client Configuration console using netsh. For example, to set a title for the interface, type this at a command prompt:
netsh nap client set userinterface title = <title>
Be sure to familiarize yourself with the available netsh commands as outlined in the following section, because you’ll likely see something about netsh on the exam.
Here are some other things you can do inside this interface:
![]() Enable and disable NAP enforcement clients, including the built-in clients and any compatible non-Microsoft clients.
Enable and disable NAP enforcement clients, including the built-in clients and any compatible non-Microsoft clients.
![]() Identify the HRA servers you want your NAP clients to use.
Identify the HRA servers you want your NAP clients to use.
![]() Specify how you want to secure communications from the client to the HRA server by configuring a request policy. You can specify only one asymmetric key algorithm, hash algorithm, and cryptographic service provider on a client computer.
Specify how you want to secure communications from the client to the HRA server by configuring a request policy. You can specify only one asymmetric key algorithm, hash algorithm, and cryptographic service provider on a client computer.
![]() Enable and disable NAP tracing.
Enable and disable NAP tracing.
![]() Specify the level of detail you want to capture in a tracing log file.
Specify the level of detail you want to capture in a tracing log file.
![]() Import and export NAP client settings. You can do this with an .xml-based configuration file.
Import and export NAP client settings. You can do this with an .xml-based configuration file.
A NAP client configuration checklist is available on TechNet at http://technet.microsoft.com/en-us/library/cc732527.aspx. From here, you can find links to guide you through processes such as how you could:
![]() Import a NAP configuration file.
Import a NAP configuration file.
![]() Configure NAP clients.
Configure NAP clients.
![]() Configure a NAP client request policy.
Configure a NAP client request policy.
![]() Configure trusted server groups for clients.
Configure trusted server groups for clients.
![]() Configure NAP tracing.
Configure NAP tracing.
![]() Export NAP configuration settings.
Export NAP configuration settings.
More Info: Learning More about NAP
TechNet offers a full spectrum of papers on NAP configuration. You can access the first of those at http://technet.microsoft.com/en-us/library/cc754803.aspx. Use the links on the left side of the page to access related documents. You’ll find “Export NAP Client Configuration Settings” at http://technet.microsoft.com/en-us/library/cc732315%28v=ws.10%29.aspx and “Import NAP Client Configuration Settings” at http://technet.microsoft.com/en-us/library/cc753594%28v=ws.10%29.aspx.
Using Netsh
As noted earlier, you can use netsh at a command line to perform many of the tasks associated with NAP. Table 2-4 details the commands you should be familiar with that are associated with netsh nap client. For the parameters these commands offer, type the command in full and press Enter. For example, you could type netsh nap client show, and the resulting list would offer available parameters, including but not limited to show configuration, show hashes, show state, and show trustedservergroup. The parameter add would offer these two parameter options: add serverand add trustedservergroup. Finally, a command like netsh nap client import would produce an error, and you’d be prompted to correct the command by adding a parameter: filename=<path to filename.xml>.
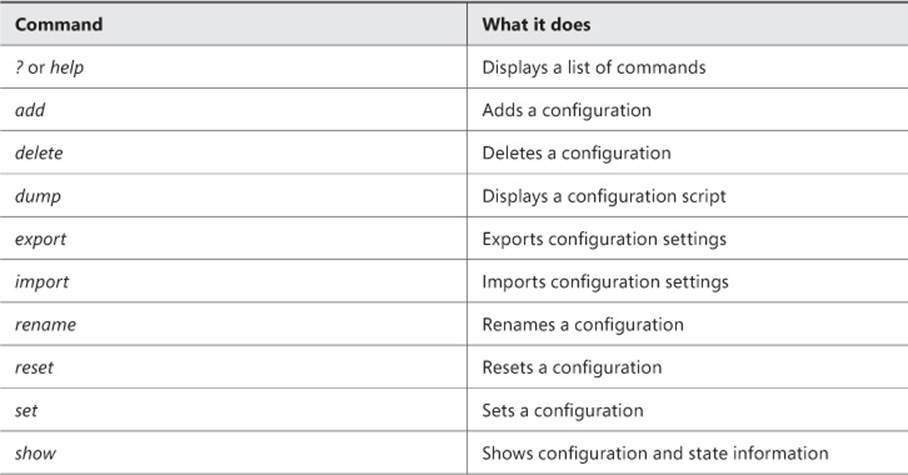
TABLE 2-4 Commands for netsh nap client
Explore the netsh nap client command as follows:
1. Open a command prompt.
2. Type netsh nap client help and press Enter. Note the list of commands.
3. Type netsh nap client add and press Enter. Note that you are prompted to add a parameter to specify what to add.
4. Type netsh nap client rename and press Enter.
5. Continue until you’ve typed each of the entries in Table 2-4 (see Figure 2-23).
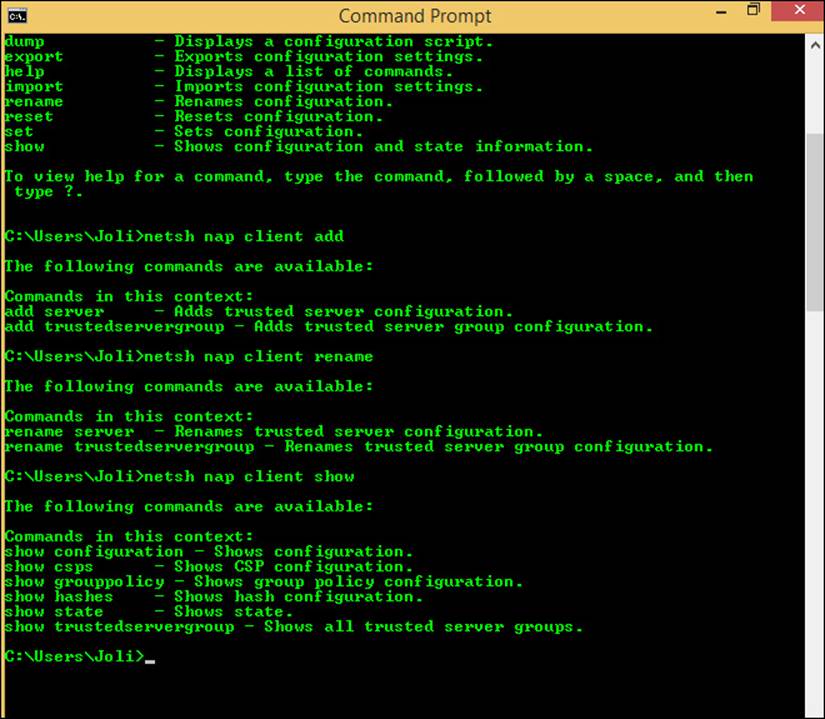
FIGURE 2-23 Exploring the netsh nap client command.
Configuring Group Policy Settings in the GPMC
Finally, you can manage NAP from the applicable Group Policy settings. You do this in the GPMC on the appropriate domain controller. The following steps configure the NAP client service to start automatically on NAP client computers:
1. In the applicable GPMC, open Group Policy Objects, right-click the name of the GPO you want to edit, and click Edit.
2. Navigate to Computer Configuration, Policies, Windows Settings, Security Settings, System Services.
3. In the details pane, double-click Network Access Protection Agent.
4. In the Network Access Protection Agent Properties dialog box, select Define This Policy setting, choose Automatic, and then click OK.
Many other settings are available, as you can imagine. You can configure trusted server groups here:
Computer Configuration, Policies, Windows Settings, Security Settings, Network Access Protection, NAP Client Configuration, Health Registration Settings, Trusted Server Groups
You can configure wireless authentication settings here:
Computer Configuration, Policies, Windows Settings, Security Settings, Wireless Network (IEEE 802.11) Policies
Even more settings are available, so take a moment to explore them.
Thought experiment: Designing a remote connection
In this thought experiment, apply what you’ve learned about this objective. You can find answers to these questions in the “Answers” section at the end of this chapter.
You want to design a remote connection for your remote clients that enables them to connect to your network automatically. You don’t want to field troubleshooting calls from users who can’t connect because of a limiting hotel firewall or any other common problem associated with VPNs. All your clients run Windows 8.1 Enterprise and you have a Windows Server 2012 domain controller on a domain named Contoso.
1. What type of connection would you design that will enable clients to connect to your internal network automatically anytime they connect to the Internet?
2. The required authenticating server sits on the network side of your enterprise firewall. Will you need to obtain one public IP address, two public IP addresses, or none at all?
3. What type of device will you need to help you determine whether clients are on the enterprise network or away from it?
4. If at a later date you add to your network clients that can’t be connected via DirectAccess, what do you need to incorporate to let those clients connect via VPN?
Objective summary
![]() Many types of VPN and authentication protocols are available, each offering different levels of features and security. You should use the protocol with the most security for your network infrastructure.
Many types of VPN and authentication protocols are available, each offering different levels of features and security. You should use the protocol with the most security for your network infrastructure.
![]() You use CMAK to create VPN profiles and make them available to users, and users install the profiles you create.
You use CMAK to create VPN profiles and make them available to users, and users install the profiles you create.
![]() Remote Desktop Services (RDS) lets users connect to remote servers for the purpose of accessing remote desktops and applications. A Remote Desktop Gateway helps you manage those users and their access to resources.
Remote Desktop Services (RDS) lets users connect to remote servers for the purpose of accessing remote desktops and applications. A Remote Desktop Gateway helps you manage those users and their access to resources.
![]() DirectAccess allows remote users to securely access your internal network without connecting to it through a VPN. It also lets them connect automatically anytime they connect to the Internet.
DirectAccess allows remote users to securely access your internal network without connecting to it through a VPN. It also lets them connect automatically anytime they connect to the Internet.
![]() DirectAccess has been improved from its first emanation in Windows Server 2008 and includes many new features.
DirectAccess has been improved from its first emanation in Windows Server 2008 and includes many new features.
![]() You can remotely administer clients and servers through RSAT and Windows PowerShell.
You can remotely administer clients and servers through RSAT and Windows PowerShell.
![]() NAP lets you assess a computer’s health before letting it connect to your network. Noncompliant computers can be quarantined and remediated.
NAP lets you assess a computer’s health before letting it connect to your network. Noncompliant computers can be quarantined and remediated.
Objective review
Answer the following questions to test your knowledge of the information in this objective. You can find the answers to these questions and explanations of why each answer choice is correct or incorrect in the “Answers” section at the end of this chapter.
1. Which of the following protocols supports the use of a preshared key for authentication?
A. PPP
B. SSTP
C. L2TP
D. EAP
E. RDP
2. How does a client computer connect to a VPN?
A. CMAK
B. Connection Manager
C. Via the Windows PowerShell command Get-VpnConnection
D. RSAT
3. The RD Gateway uses which of the following to establish a secure, encrypted connection between the client and server?
A. Internet Key Exchange, Version 2 (IKEv2) protocol
B. Secure Socket Tunneling Protocol (SSTP) protocol
C. Applicable and compatible transition protocols
D. Remote Desktop Protocol (RDP) over HTTPS
4. DirectAccess clients can run which of the following operating systems? (Choose all that apply.)
A. Windows 7 Enterprise
B. Windows 7 Ultimate
C. Windows 8 Enterprise
D. Windows 8.1 Enterprise
E. Windows XP with SP3
F. Windows Vista Business
5. You want to administer your DirectAccess clients remotely. Which of the following requirements must be met before you can do this? (Choose all that apply.)
A. Clients must be joined to the domain or a local workgroup.
B. Windows Firewall must be enabled on all profiles.
C. You must install and configure a DNS server.
D. All of the above.
6. Which Windows PowerShell command lets you start a remote, interactive PowerShell session by using one-to-one remoting?
A. enter-pssession
B. enable-psremoting
C. start-job
D. set-pssessionconfiguration
7. You want to use NAP with IPsec enforcement. Which of the following must your network infrastructure include? (Choose all that apply.)
A. Active Directory domain controller
B. Network Policy Server
C. Certification Authority
D. RRAS
8. Which netsh command lets you display a configuration script for a NAP client?
A. netsh nap client reset
B. netsh nap client set
C. netsh nap client dump
D. netsh nap client show
Objective 2.3: Support authentication and authorization
Authentication is the process of entering the credentials required to gain access to a computer, device, or network. What happens after that is called authorization. Users must be authenticated to access a computer or network before they can be authorized to access the resources on it. In the first section, you’ll learn about this first part, authentication.
This objective covers how to:
![]() Understand and support multifactor authentication, including certificates, virtual smart cards, picture passwords, and biometrics
Understand and support multifactor authentication, including certificates, virtual smart cards, picture passwords, and biometrics
![]() Distinguish among workgroup versus domain, homegroup, computer, and user authentication, including Secure Channel, account policies, credential caching, and Credential Manager
Distinguish among workgroup versus domain, homegroup, computer, and user authentication, including Secure Channel, account policies, credential caching, and Credential Manager
![]() Know when to use a local account versus a Microsoft account
Know when to use a local account versus a Microsoft account
![]() Configure Workplace Join
Configure Workplace Join
Understanding and supporting multifactor authentication
For the most part, the concepts on this exam are fairly difficult to grasp, and you must have had experience in the field to really understand what’s going on with all the features discussed so far. This section isn’t like that; for the most part, the concepts we review next and how you configure them are pretty straightforward. For example, configuring a picture password for a client who uses a stand-alone computer isn’t difficult, nor is connecting a biometric device (such as a fingerprint reader) and configuring it for use.
Understanding multifactor authentication
Multifactor authentication requires two (or more) types of authentication to gain access to a device or network. Most often, one type is a password, and the other is something else, such as a smart card, fingerprint, or digital certificate. This section focuses a little more on certificates as a means for achieving authentication, but this book has covered this topic in various places and you should review those entries when you can. (For the most part, certificates have been associated with apps, because apps must be signed to ensure that they can be trusted.)
A digital certificate is issued by a Certificate Authority (CA) such as Verisign or Active Directory Certificate Services (AD CS) in Windows Server 2012 R2. The certificate can be used to provide proof that the identity asking for authentication is trusted and true, and that the identity offering it is also. Authentication with certificates involves a public key and a private key that can be matched up to provide that authentication. If no match occurs, no authentication (access) is provided. (You can learn more about Certificate Authorities at http://technet.microsoft.com/en-us/library/cc732368.aspx.)
AD CS can issue and manage public key infrastructure (PKI) in a domain, provides public key cryptography and the ability to create digital certificates, and offers digital signature capabilities. For the purposes here, AD CS provides authentication by associating certificate keys with computers, users, and device accounts on a network. This is called binding.
Note: Windows 8.1 Certificates
Windows 8.1 creates its own certificates, including the self-signed certificates used with EFS, as discussed later in this chapter.
For the exam you might be asked how to allow users to access a network resource and be given a specific scenario. A scenario that includes AD CS will note that the network has its own PKI infrastructure. You must understand that the required certificates must be available to the computer and the user, and they must be stored in the proper location for authentication to be granted. Client certificates are stored in the personal certificate store for the applicable user account on the client’s computer. Computer accounts need trusted root certificates to be stored in the Trusted Root Certification Authorities store, again on the client’s computer. You can explore many other certificate folders as well. To view these stores on a local computer, type certmgr.msc in a Run dialog box and click OK. Open this console and review the available certificate folders before moving on. Figure 2-24 shows a local computer, not connected to a domain, and the related personal certificates. You’ll see more certificates than this, generally.
FIGURE 2-24 Use CertMgr to review certificate stores and the certificates in them.
Note that certificates are also associated with secure, encrypted communications. ActiveSync, Exchange Server, Outlook Web App, and Internet Information Services use SSL certificates to authenticate the server’s identity to the mobile devices that need access. You’ll find other uses for certificates elsewhere and as you work as a network administrator.
More Info: The Certificate Enrollment Policy Web Service
When you employ AD CS, you can use Server Manager to configure additional role services. The Network Device Enrollment Service (NDES) offers certificates to routers and similar network devices that don’t have domain accounts. The Certificate Enrollment Policy Web Service offers enrollment policy information to users and computers. The Certificate Enrollment Web Service offers certification enrollment to users and computers by using the HTTPS protocol. Additional roles are detailed at http://technet.microsoft.com/library/hh831740.aspx.
Note: Using Windows PowerShell Cmdlets to Back Up and Restore a CA
You can use two new Windows PowerShell cmdlets to back up and restore a CA database: Backup-CARoleService and Restore-CARoleService.
Understanding virtual smart cards
You’ve already learned a little about smart cards in this book. A virtual smart card works in the same general manner as a physical smart card does but doesn’t require a connected or installed smart card reader. Instead, the virtual smart card works with a Trusted Platform Module (TPM) chip installed on the computer that’s used to protect the virtual card information through encryption. As with other more advanced security options, you’ll need a PKI domain infrastructure, complete with certificates and the ability to create and manage them, to incorporate this technology. Virtual smart cards offer the following:
![]() Authentication protection
Authentication protection
![]() Confidentiality of the machine and its contents
Confidentiality of the machine and its contents
![]() Private keys for security
Private keys for security
![]() Encrypted card information that can’t be mined or removed (that is, it can’t be exported)
Encrypted card information that can’t be mined or removed (that is, it can’t be exported)
![]() Protection from rogue software that attacks at startup
Protection from rogue software that attacks at startup
![]() Multifactor protection (smart card and PIN)
Multifactor protection (smart card and PIN)
To use virtual smart cards, you must meet more requirements than when you opt to use physical ones. These requirements include but aren’t limited to the following:
![]() Computers must be running Windows 8 or higher and Windows Server 2012 or higher.
Computers must be running Windows 8 or higher and Windows Server 2012 or higher.
![]() A compatible TPM must be installed on those computers that adheres to TPM 1.2 or higher standards.
A compatible TPM must be installed on those computers that adheres to TPM 1.2 or higher standards.
![]() A limit of 10 smart cards (virtual or physical) can be used on a single computer.
A limit of 10 smart cards (virtual or physical) can be used on a single computer.
![]() The PIN and the PIN Unlock Key must be a minimum of eight characters. These can include numbers, letters, and special characters.
The PIN and the PIN Unlock Key must be a minimum of eight characters. These can include numbers, letters, and special characters.
One very important thing to know for the exam is Tpmvscmgr.exe, the command-line tool you use to configure a virtual smart card. You can use the command locally or remotely. Parameters you can use include Create and Delete. Examples include /name (the name of the smart card),/admin key (administrator key), /PIN (the PIN), /generate (to create the files in storage necessary for the card to function), and others listed at http://technet.microsoft.com/en-us/library/dn593707.aspx.
To configure a virtual smart card environment from scratch in a domain, you must follow these steps:
1. Create a certificate template, a 16-step process performed on a Windows server in a domain that’s installed with and running a CA, as outlined at http://technet.microsoft.com/en-us/library/dn579260.aspx#BKMK_Step1.
2. Create the virtual TPM smart card, a four-step process that uses the Tpmvscmgr.exe command with parameters such as the following, as outlined at http://technet.microsoft.com/en-us/library/dn579260.aspx#BKMK_Step2:
tpmvscmgr.exe create /name tpmvsc /pin default /adminkey random /generate
3. Enroll the certificate on the TMP virtual smart card, a six-step process, by using the CertMgr.msc console (refer to Figure 2-24) to add the certificate to the Personal store as outlined at http://technet.microsoft.com/en-us/library/dn579260.aspx#BKMK_Step3.
More Info: Virtual Smart Cards
Learn more about virtual smart cards and be sure to explore the additional links on the left side of this page: http://technet.microsoft.com/en-us/library/dn593708.aspx
To configure a Windows 8.1 virtual smart card on a stand-alone computer if you have the required technology and credentials available follow these steps:
1. Open an elevated command prompt.
2. Type TPM.msc.
3. Verify that a compatible TPM can be found that’s at least a 1.2 or later. If you receive an error instead but are sure a compatible module is available, enable it in the system BIOS before continuing.
4. Close the TPM management console.
5. At the command prompt, enter
TpmVscMgr create /name MyVSC /pin default /adminkey random /generate
To provide a custom PIN value when creating the virtual smart card, use /pin prompt instead.
Configuring a picture password
A picture password is a way to log on to a computer by using a series of three movements consisting of lines, circles, and/or taps. You can pick any picture you want. Picture passwords can’t be used to log on to domains; they are used to log on only to stand-alone computers. Picture password combinations are limitless because the pictures that can be used are limitless. Although picture passwords are considered more secure for stand-alone computers than typing a PIN or password, a hacker can get into a device by holding the screen up to light to see where most of the gestures are (by following the smudges on the screen). This is especially true if the user touches the screen only to input the password and rarely uses touch for anything else.
You create a picture password (or a 4-digit PIN) from PC Settings:
1. Open the charms by swiping in from the right or pressing Windows logo key+C.
2. Click Settings, and then click Change PC Settings.
3. If applicable, click any back arrows and then click Accounts.
4. Click Sign-in Options.
5. Under Picture Password, click Add.
6. Input your current password, and then click Choose Picture to browse to and select the picture to use.
7. Follow the instructions in the resulting wizard to configure the picture password.
Exploring biometrics
Biometrics, like picture passwords, provides infinite possibilities for securing a computer and can be used as part of a multifactor authentication plan (using it on its own isn’t recommended). Biometric options are generally configured by incorporating a person’s fingerprint and using a fingerprint reader (you “enroll” the user when configuring this), but you can also use a person’s face, eye, or even their voice. Biometrics usually aren’t configured as the only form of authentication, though, because the technology isn’t that reliable yet. You might have experienced the flaws if you’ve ever configured a smartphone to unlock using face recognition; often almost any face will unlock it.
Microsoft has made using biometrics easier than ever by including native support for biometrics through the Windows Biometric Framework (WBF), which includes an option in PC Settings for configuring the device on Windows 8.1 and Windows RT machines. Windows now also includes Group Policy settings related to biometrics, and you can enable or disable this feature as desired. I doubt you’ll see much on the exam regarding this, but you should review the information at http://technet.microsoft.com/en-us/library/dn344916.aspx and locate the available Group Policy settings just in case. You can find Local Group Policy options here (and follow the same general path in Group Policy): Computer Configuration, Administrative Templates, Windows Components, Biometrics, as shown in Figure 2-25.
FIGURE 2-25 Using Group Policy to enable, disable, or limit the use of biometrics.
Distinguishing among workgroup vs. domain, homegroup, computer, and user authentication
In this section, you’ll learn more about the differences among some similar technologies and network configurations, such as workgroup versus homegroup, workgroup versus domain, and credential caching versus Credential Manager.
Distinguishing among homegroups, workgroups, and domains
In almost all instances and scenarios, using a computer to complete tasks involves connecting to a network of some sort, even if it’s just to access the Internet or to back up your work someplace other than your own PC. In homes, networked computers are often configured as homegroups. In a small business, the configuration is generally a workgroup. The purpose of both of these types of networks is frequently to share an Internet connection as well as files, folders, printers, and other resources. Domains are used in larger enterprises, which require more control and good protection of resource access. Domains are the only one of these three that employ AD DS to manage users, computers, and resources.
Understanding Homegroups
A homegroup lets home users easily share documents, printers, and media with others on their private, local network. This is the simplest kind of network sharing and is limited in what permissions and restrictions can be placed on the data shared. By default, all users that join a homegroup (only one per network) have read-only access to what’s already shared by others. Users can reconfigure this, however, allowing both read and write access, if desired.
When opting for a homegroup, users can:
![]() Create or join a homegroup from the prompt offered by Windows, assuming the network is configured as Private.
Create or join a homegroup from the prompt offered by Windows, assuming the network is configured as Private.
![]() Create or join a homegroup from the Network And Sharing Center, assuming the computers that want to join are Windows 7-based or Windows 8-based.
Create or join a homegroup from the Network And Sharing Center, assuming the computers that want to join are Windows 7-based or Windows 8-based.
![]() Work through the applicable homegroup wizard to create or join a homegroup. Windows generates a random password other users will need to use to join.
Work through the applicable homegroup wizard to create or join a homegroup. Windows generates a random password other users will need to use to join.
![]() Share files from their original locations and their default libraries.
Share files from their original locations and their default libraries.
![]() Grant read-only or read/write access to the data they’ve shared.
Grant read-only or read/write access to the data they’ve shared.
![]() Limit access to only those network users who also have an account and password on their computers.
Limit access to only those network users who also have an account and password on their computers.
![]() Configure the same permissions for all network users, or set different permissions for individual users.
Configure the same permissions for all network users, or set different permissions for individual users.
Note: Unable to Create or Enable a Homegroup?
A homegroup might not be able to be created or enabled for several reasons, and one reason is that IPv6 isn’t enabled on a particular network computer. If a network is created, a user successfully types the password and joins, but if that user can’t access any shared resources, more than likely the time set for the user’s computer isn’t the same as other homegroup computers. You resolve this problem by configuring the time properly.
Because you can create and join a homegroup using a wizard, detailing the steps in this text isn’t really necessary. However, you should create a homegroup on your own local network and let other computers join it just so that you are familiar with the process. Note that users might already be joined to a homegroup because Windows detects and will prompt you to join existing homegroups automatically during setup.
Understanding Workgroups
In businesses where a little more control is required and a homegroup isn’t the ideal configuration, a workgroup is used. A workgroup is a manual grouping of computers (almost any operating system will do, including Windows RT) that doesn’t include an Active Directory domain controller but still offers security options. A workgroup exists on a single network segment. Securing data here is a distributed concept similar to a homegroup; each user decides what to share, how to share it, and with whom to share. Note that Windows doesn’t create a password for joining the workgroup, nothing is shared automatically by default (except possibly the Public folders), and users join the workgroup from the System Properties dialog box from the Computer Name tab (see Figure 2-26). Click Change in System Properties and then enter the workgroup name in the Computer Name/Domain Changes dialog box.
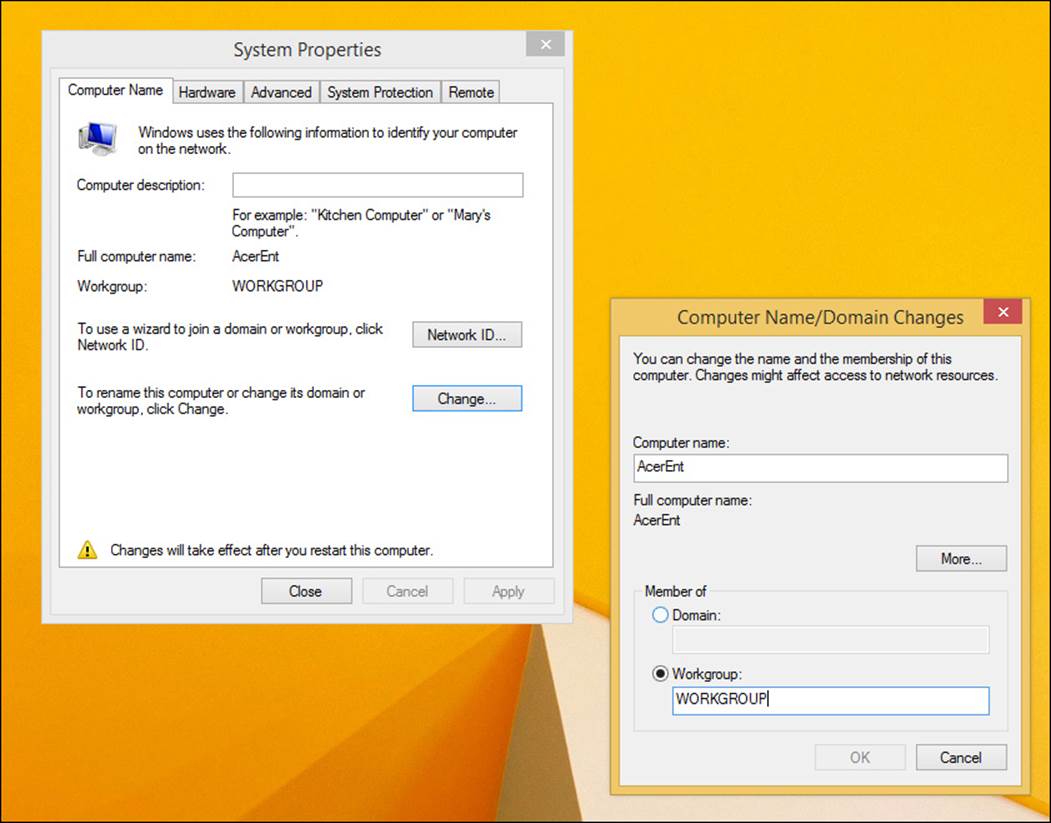
FIGURE 2-26 Joining a workgroup from the Computer Name/Domain Changes dialog box.
Because this section is about authorization, you need to consider that concept with regard to a workgroup. Users decide what to share, and then share it. The person who wants access to shared items must have an account on the sharing computer (or be given one). Accounts are stored in the sharing computer’s Security Account Manager (SAM) database. Because each computer maintains its own local database, users who need to access resources on multiple workgroup computers must be authenticated on each. The problem with this is that as the network grows, so does the amount of work required to maintain and manage these accounts.
Here is an overview of how authorization works:
1. The first time a user tries to access a shared resource, he or she is asked for a user name and password.
2. The user name and password that are entered must be from an approved account on the sharing computer and must be listed in the SAM database. The user can opt to have Windows remember the password for next time.
3. The Local Security Authority (LSA) looks to the SAM database to see whether the account that was entered is valid.
4. If the account is valid, the user is granted access.
5. The same user who wants to access another shared resource on the same computer during the same session can do so without reentering the password.
6. If this same user wants to access a shared resource on another computer in the workgroup, the process must be repeated.
Understanding Domains
Companies and enterprises configure networks as domains. You couldn’t successfully manage 100 computers by using a homegroup or workgroup, so a domain is an obvious choice for enterprise networks. Domain computers must be running a compatible Windows Professional, Business, Ultimate, or Enterprise edition to join the domain (for Windows 8.1, that’s Windows 8.1 Pro or Enterprise). Windows RT devices can’t join a domain.
Domains are configured with at least one AD DS domain controller that authenticates users centrally and secures network resources. These larger networks can contain additional servers that manage data storage, email, faxes, and printers; maintain database replications; and so on. Managing all resources as a whole is important to keeping everything secure and available for users and enables a simpler management solution for administrators. A large enterprise can have more than one domain. When multiple domains exist, a Global Catalog is used to locate objects on other domains.
Exam Tip
No one’s sure just how much you’ll need to know about multiple domain configurations. To be safe, you should be familiar with what trees and forests are and how trusts can be created among the forests and domains.
Authentication in a domain is handled by AD DS, a database that contains objects such as user accounts, computers, groups, and so on. In this case, a network administrator creates user accounts, almost always puts those accounts into groups, and then assigns the desired permissions to the group. This makes managing users simpler than trying to manage users one at a time, and it enables administrators to deal with newly hired or recently fired employees. The authentication process includes and uses the Kerberos v5 authentication protocol to identify the user or the host. The Kerberos Key Distribution Center (KDC) uses the domain’s AD DS as its security account database. AD DS is required for default Kerberos implementations within the domain or forest. If you aren’t familiar with Kerberos v5, the TechNet article “Kerberos Authentication Overview” athttp://technet.microsoft.com/en-us/library/hh831553.aspx offers a good explanation of how this works and offers links to additional resources.
Distinguishing between computer authentication and user authentication
The previous section discusses AD DS and authentication with regard to user accounts. Network administrators create these accounts. Users input their account credentials to log on to the domain, and authentication is handled by the applicable AD DS server and Kerberos v5. Computers that join domains automatically acquire a computer account. Like user accounts, computer accounts are used to authenticate the computer to allow it to access network and domain resources. Each computer account must be unique. A user doesn’t have to do anything to cause the computer to be authenticated. Note that computers have passwords, that passwords are automatically managed, and if a computer password on a client is out of sync with AD DS then the computer can’t authenticate.
Computer accounts are necessary for auditing, for control, and for grouping purposes. You can apply changes to computer accounts that affect whoever logs on to the computer and not the individual users. For instance, you can force policies regarding the desktop appearance, how updates are applied, and so on, and those policies will affect the computer and anyone who uses it.
Administrators can manage computer accounts in the same way they can user accounts—by adding, deleting, resetting, and disabling them in the Active Directory Users And Computers snap-in.
Understanding Secure Channel
When applications need network or Internet access, you have to ensure that the connection is secure. This is especially true if you are transmitting data over an untrusted network. You can use Transport Layer Security (TLS)/Secure Sockets Layer (SSL) security to authenticate servers and client computers and then use it to encrypt messages between them. These two protocols are included in the Secure Channel set of security protocols. TLS and SSL aren’t interchangeable and SSL is the predecessor to TLS, but both protect against tampering and eavesdropping.
Secure Channel can authenticate an identity as well as provide a secure and private connection to another host by using encryption. It’s also called Schannel and is mostly used for applications that require secure HTTP communications. Schannel is a Security Support Provider (SSP), and the TLS/SSL protocol uses a client/server model that’s based on certificate authentication. This means you must also have a Public Key Infrastructure configured and available.
More Info: Discovering Secure Channel
You can learn more about this feature on TechNet at http://technet.microsoft.com/en-us/library/hh831381.aspx.
Exploring account policies
The weakest link when protecting computers that use a password as part of the authentication process is most often the password itself. The password could be nonexistent (not likely, especially with the advent of the Microsoft account for stand-alone computers), too short, too simple, too predictable, or the user might simply never change it. Often, users create and use the same password for multiple user IDs. This is a secondary weak link. To protect authentication in both workgroups and domains, you can create local policies and GPOs defining how passwords should be created, how often they can or must be changed, and what happens when a user fails to log on after attempting a specific number of times that you set. You can configure account policies in the Local Security Policy for a stand-alone computer or computers in a workgroup, and in Group Policy for domains. In Local Security Policy, Account Policies is listed first; click it and click Account Lockout Policy to see the options.
You can consider three account lockout policies, and in most instances they must be configured together:
![]() Account Lockout Duration If you’ve configured an account lockout threshold and if that threshold is met, this setting defines how long (in minutes) the user will be locked out of the computer. A setting of 5 to 15 minutes is usually fine.
Account Lockout Duration If you’ve configured an account lockout threshold and if that threshold is met, this setting defines how long (in minutes) the user will be locked out of the computer. A setting of 5 to 15 minutes is usually fine.
![]() Account Lockout Threshold You must configure this to use the other options. This setting defines how many times a user can try to log on to the computer and fail before being locked out.
Account Lockout Threshold You must configure this to use the other options. This setting defines how many times a user can try to log on to the computer and fail before being locked out.
![]() Reset Account Counter After This setting defines the number of minutes that must pass after a failed logon attempt before the failed logon attempt counter is reset to zero. If an account lockout threshold is defined, this must be less than or equal to the number of minutes set there.
Reset Account Counter After This setting defines the number of minutes that must pass after a failed logon attempt before the failed logon attempt counter is reset to zero. If an account lockout threshold is defined, this must be less than or equal to the number of minutes set there.
Understanding credential caching
Read-only domain controllers (RODCs) host replicated read-only copies of a domain’s AD DS database and the contents of the SYSVOL folder. RODCs aren’t writable domain controllers. One purpose of an RODC is to selectively cache credentials to resolve issues that can arise when users try to authenticate from remote offices or behind perimeter networks. You need to be able to let users authenticate from a branch office if the writeable domain controller isn’t available over a WAN link or other connection. You might also opt for cached credentials to resolve security issues that can occur in branch offices and over WAN links.
By default, an RODC doesn’t store user credentials or computer credentials, except for its own computer account and one specialty account. If you want to use an RODC to cache credentials, you must configure it to do so. To do this, you configure a Password Replication Policy (PRP) for the RODC to allow for passwords to be cached. When cached, the RODC can authenticate those users when they can’t authenticate in another way. To cache the credentials for the first time, a user must request authentication, and the RODC must get those credentials from the AD DC (to cache them).
Here is how it works:
1. When a user needs to authenticate with an RODC, the RODC can’t perform the validation by default.
2. The RODC forwards the request to a writeable domain controller.
3. If the proper PRPs are configured, the RODC obtains the credentials from the authenticating domain controller.
4. The user is authenticated.
5. The next time the same user requests authentication, the RODC can authenticate from the cached credentials.
Note: Cached Credentials
Note that, by default, user account credentials are cached on the applicable computer. This is configurable via Group Policy. In high security environments, policy can dictate that users cannot sign into their computers unless they can contact a domain controller (thus no credential caching allowed).
Exploring Credential Manager
Using user names and passwords is a common way to authenticate users. Windows 8.1 comes with Credential Manager to help manage and maintain those passwords. Credential Manager saves the credentials users enter when they use their own computers to access network servers and resources on local networks (Windows Credentials) and can be used to back up and restore them. When prompted, users have to check the box Remember My Credentials, though, or else the credential won’t be saved. Credential Manager also offers Credential Locker, which saves usernames and passwords associated with websites and Windows apps (Web Credentials). It saves all of these in an area called the Windows Vault.
Note: Saving Credentials
Credentials are saved in encrypted folders on the computer under the user’s profile. Applications that support this feature, such as web browsers and Windows 8 apps, can automatically offer up the correct credentials to other computers and websites during the sign-in process.
If the username or password has been changed since the last time it was saved and access is unsuccessful, the user is prompted to type the new credentials. When access to the resource or website is successful, Credential Manager and Credential Locker overwrites what was there.
The saved usernames and passwords follow users when they move from one computer to another in a workgroup or homegroup, presuming they log on with their Microsoft accounts. However, this feature isn’t enabled on domains for security reasons. You can open Credential Manager from Control Panel. Figure 2-27 shows Credential Manager.
Here are a few more things to know about Credential Manager:
![]() You can program Windows Store apps to use Credential Locker.
You can program Windows Store apps to use Credential Locker.
![]() Credential roaming requires the Microsoft account for synchronization.
Credential roaming requires the Microsoft account for synchronization.
![]() Credential roaming is enabled by default on non-domain–joined computers, and it is disabled on domain-joined computers.
Credential roaming is enabled by default on non-domain–joined computers, and it is disabled on domain-joined computers.
![]() Credential Locker supports seamless sign in by using Windows Store apps that use Web Authentication Broker and remember passwords for services such as Twitter and LinkedIn.
Credential Locker supports seamless sign in by using Windows Store apps that use Web Authentication Broker and remember passwords for services such as Twitter and LinkedIn.
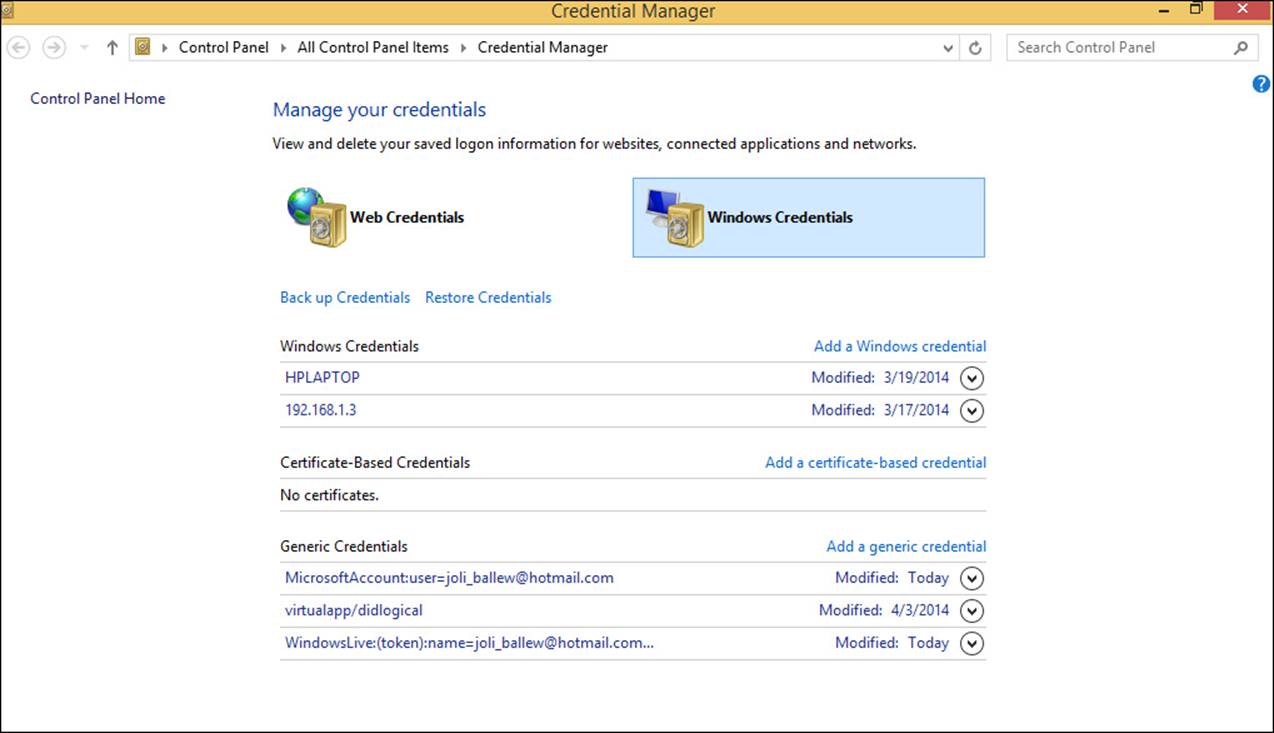
FIGURE 2-27 Using Credential Manager to cache passwords.
Note: Storing a Credential at a Command Line
To store a credential at a command line, use the command-line tool cmdkey /add.
Notice in Figure 2-27 that options exist to back up and restore credentials, but these options are available only when Windows Credentials is selected. When you click Back Up Credentials, you are prompted first to browse to a location to save the credentials to, name the file (it has a .crd extension), and then to press Ctrl+Alt+Del to continue the backup process on the Secure Desktop. There, you create a password for the file so that only you can access it.
Note: Backing Up Credentials
You must understand that you can’t back up credentials you’ve saved in your web browser from inside Credential Manager. Those credentials are saved as part of your Microsoft account and are synchronized with it. (Those credentials do roam, assuming that you’ve logged on with the Microsoft account you used to create them.)
To back up a single certificate, right-click the certificate, click All Tasks, and then click Export. Work through the wizard to select the format to use. This is the only way to back up a certificate and have the options shown in Figure 2-27 available. If you select more than one certificate, you’ll have to choose from Personal Information Exchange or Microsoft Serialized Certificate Store.
Certificate import and export operations support four file formats:
![]() Personal Information Exchange (PKCS #12) This format supports secure storage of certificates, private keys, and all certificates in a certification path. The PKCS #12 format is the only file format that you can use to export a certificate and its private key.
Personal Information Exchange (PKCS #12) This format supports secure storage of certificates, private keys, and all certificates in a certification path. The PKCS #12 format is the only file format that you can use to export a certificate and its private key.
![]() Cryptographic Message Syntax Standard (PKCS #7) This format supports storage of certificates and all certificates in the certification path.
Cryptographic Message Syntax Standard (PKCS #7) This format supports storage of certificates and all certificates in the certification path.
![]() Distinguished Encoding Rules (DER)-encoded binary X.509 This format supports storage of a single certificate. It doesn’t support storage of the private key or certification path.
Distinguished Encoding Rules (DER)-encoded binary X.509 This format supports storage of a single certificate. It doesn’t support storage of the private key or certification path.
![]() Base64-encoded X.509 This format supports storage of a single certificate. It doesn’t support storage of the private key or certification path.
Base64-encoded X.509 This format supports storage of a single certificate. It doesn’t support storage of the private key or certification path.
Knowing when to use a local account vs. a Microsoft account
The Microsoft account (what used to be called Windows Live ID) is a new way to log on to a Windows 8-based computer. This type of account enables users to sync specific settings to the cloud for the purpose of having access to those settings from other computers that they can log on to using that same Microsoft account. With a Microsoft account, users can also access their own cloud space, called OneDrive. Windows 8.1 comes with a OneDrive app, and OneDrive can be accessed from compatible applications, various web browsers, and File Explorer.
Users are prompted to create a Microsoft account when they set up their Windows 8-based computers. They can opt to do that, or they can decline and create a local account instead. A user might also create a local account if the computer can’t access the Internet during setup (because they can’t create or confirm the Microsoft account if no Internet access is available). Child accounts can also be created. Users generally opt to create a Microsoft account later even when they start with a local account, because many apps are inaccessible if the user is logged on with a local account. Users also can’t get apps from the Store without a Microsoft account.
After a Microsoft account is created, users don’t need to be connected to the Internet to log on in subsequent sessions. The account information is saved locally. If an Internet connection isn’t available, the last saved settings are also applied because they are cached locally. You can switch from a local account to a Microsoft account from PC Settings.
Note: Blocking Microsoft Accounts
Use the Accounts: Block Microsoft Accounts setting in Security Policy (local or domain) to block the use of Microsoft accounts. You can find this setting here: Security Settings, Local Policies, Security Options.
A Microsoft account can be used in a domain, if it isn’t restricted through Group Policy. If possible at your place of business, when connected, users will see the same desktop background, app settings, browser history, and so on that they see on their main computers at home (or in another office). Again, you make the change through PC Settings. There, you’ll opt to connect your Microsoft account and work through the setup process.
Note: Logging on to a Windows 8-Based Computer
As explained earlier, you can log on to a Windows 8-based computer in various ways beyond typing a Microsoft account name or local account name and password. You can also create a four-digit PIN or a picture password. You can set these up from PC Settings, Accounts, Sign-In. Know the three gestures for a picture password: tap, circle, and line.
Configuring Workplace Join
Personal devices have become part of the enterprise landscape, and if you don’t already, at some point you need to be able to allow users to access network resources from them. This is how Workplace Join came about. Workplace Join enables users to have a single-sign-on experience and enables them to get to the resources they need. You also can manage and secure the devices. In Windows Server 2012 R2, you can use Workplace Join with Windows 8.1 and iOS devices.
Workplace Join uses the Device Registration Service (DRS), part of the Active Directory Federation Services role in Windows Server 2012 R2, to create a device object in AD DS and use a certificate to identify the device in the future. If you add Web Application Proxy, users can join your enterprise from any Internet-enabled location.
Various walkthrough guides are available on TechNet to help you use this technology to join devices. Here are two of those:
![]() “Walkthrough Guide: Workplace Join with a Windows Device”: http://technet.microsoft.com/en-us/library/dn280938.aspx
“Walkthrough Guide: Workplace Join with a Windows Device”: http://technet.microsoft.com/en-us/library/dn280938.aspx
![]() “Walkthrough Guide: Workplace Join with an iOS Device”: http://technet.microsoft.com/en-us/library/dn280933.aspx
“Walkthrough Guide: Workplace Join with an iOS Device”: http://technet.microsoft.com/en-us/library/dn280933.aspx
 Thought experiment: Creating and configuring authentication solutions
In this thought experiment, apply what you’ve learned about this objective. You can find answers to these questions in the “Answers” section at the end of this chapter.
You’ve been asked to create and configure a multifactor authentication solution that can be used to validate users in an enterprise domain. You’ve also been instructed to include digital certificates in that solution. Your client doesn’t want to rely on a third-party CA, and instead wants to use the Active Directory Certificate Services (AD CS) in Windows Server 2012 R2. Answer the following questions regarding this task.
1. The network currently doesn’t include a PKI infrastructure. Will you need to add it?
2. Where will the client certificates you create be stored?
3. Where will the trusted root certificates you create be stored?
4. What command can you run on a client computer in a Run dialog box to view the certificates stored on that machine?
Objective summary
![]() Multifactor authentication lets you further secure the authentication process with certificates, virtual smart cards, picture passwords, and biometrics by requiring more than one method of authentication before access is granted.
Multifactor authentication lets you further secure the authentication process with certificates, virtual smart cards, picture passwords, and biometrics by requiring more than one method of authentication before access is granted.
![]() Different networks exist for different needs. Homegroups enable simple sharing for home networks; workgroups let you share and manage shared data in a nondomain setting; and domains are used by larger enterprises and include Active Directory Domain Services (AD DS) to secure and manage authentication.
Different networks exist for different needs. Homegroups enable simple sharing for home networks; workgroups let you share and manage shared data in a nondomain setting; and domains are used by larger enterprises and include Active Directory Domain Services (AD DS) to secure and manage authentication.
![]() You can further secure authentication by including Secure Channel, account policies, credential caching, and Credential Manager to help control access and manage logon credentials.
You can further secure authentication by including Secure Channel, account policies, credential caching, and Credential Manager to help control access and manage logon credentials.
![]() Local accounts are good for homegroups and workgroups, but now even those networks rely on Microsoft accounts for authorization management. Microsoft accounts can also be incorporated into domains to sync settings such as desktop backgrounds.
Local accounts are good for homegroups and workgroups, but now even those networks rely on Microsoft accounts for authorization management. Microsoft accounts can also be incorporated into domains to sync settings such as desktop backgrounds.
![]() Workplace Join lets you enroll and control mobile devices on your domain for the purpose of letting your users bring their own devices to work.
Workplace Join lets you enroll and control mobile devices on your domain for the purpose of letting your users bring their own devices to work.
Objective review
Answer the following questions to test your knowledge of the information in this objective. You can find the answers to these questions and explanations of why each answer choice is correct or incorrect in the “Answers” section at the end of this chapter.
1. Which two of the following Windows PowerShell commands can you use to manage a CA database?
A. Backup-CARoleService
B. Restore-CARoleService
C. Backup-CACertStore
D. Restore-CACertStore
2. Which two of the following technologies offers authentication protection, confidentiality of the machine and its contents, private keys for security, and encrypted card information that can’t be mined or removed?
A. Physical smart card
B. A compatible TPM chip
C. Virtual smart card
D. A biometric fingerprint reader
E. BitLocker Drive Encryption
3. You create a homegroup on one computer and join it from another. This process goes smoothly. However, when you try to access data shared with the homegroup from the second computer, you can’t. What’s most likely the problem?
A. You aren’t connected to the network.
B. You aren’t using BitLocker Drive Encryption.
C. The time is configured incorrectly on the second computer.
D. You aren’t running a compatible version of Windows.
4. Which of the following network types is a distributed concept, in which users manage their own data sharing?
A. Workgroup
B. Homegroup
C. Domain
D. Workgroup or domain
5. You want to secure communications over an untrusted network for applications that need Internet access. You want to use TLS and SSL to achieve this. Which of the following technologies offers this? Must the solution include a PKI infrastructure?
A. VPN; no
B. Remote Desktop Services; yes
C. App-V; no
D. Secure Channel; yes.
6. You are trying to configure Group Policy to set an account lockout duration when users try and fail to authenticate at their computers after a specific number of events. The options are grayed out. Why?
A. You must first configure the policy Account Lockout Threshold.
B. You must first configure the policy Reset Account Counter After.
C. You are trying to configure the policy for a workgroup computer, but these policies are available only in domains.
D. You are in the Group Security Policy console and need to be in the Group Policy Editor.
7. Your users sometimes have problems when trying to authenticate from a branch office because they can’t access the domain controller in the main office that’s used to perform authentication tasks. Which of the following items should you configure?
A. Account Policies
B. Credential caching
C. Password Replication Policies
D. An RODC server
E. Secure Channel
8. Can Credential Manager and Credential Locker be used to store passwords for Windows Store apps? What about for passwords saved for local network resources?
A. Yes; no
B. No; yes
C. Yes; yes
D. No; no
9. You want to allow your domain users to access the same desktop background, app settings, browser history, and so on that they see on their main computers at home (or in another office). What should you do?
A. A Microsoft account would be optimal, but can’t be used in a domain.
B. Let the users associate their Microsoft accounts with their domain accounts.
C. Use Workplace Join.
D. Incorporate a Web Application Proxy server onto your network.
Objective 2.4: Support data storage
When users store their data, it must be secure and available. You can achieve this goal in many ways, from local to server storage, to storage in the cloud, to storage created from multiple places in the form of a pool or group. In this objective you’ll learn about a few of these, including storage spaces, BranchCache, and OneDrive. But first, look at Distributed File System (DFS).
This objective covers how to:
![]() Support Distributed File System (DFS) clients, including caching settings
Support Distributed File System (DFS) clients, including caching settings
![]() Understand storage spaces, including capacity and fault tolerance
Understand storage spaces, including capacity and fault tolerance
![]() Optimize data access by using BranchCache
Optimize data access by using BranchCache
![]() Support OneDrive
Support OneDrive
Supporting Distributed File System (DFS)
When you require your clients to save data on multiple drives, the process involved in saving and accessing that data can become quite cumbersome for them. If this is the case and if you want to simplify things, and you also want to maintain multiple copies of the data easily, you can use Distributed File System (DFS). DFS enables you to share folders that you want to use for client data storage from the various servers in your enterprise, and then group those folders into a single logical unit. When users save to this group of folders, it appears to them as though they are accessing only one folder (with subfolders as applicable). This enables you to make use of free data storage space available anywhere in your enterprise (and elsewhere) and doesn’t confuse users or require them to know where you want them to store their data if multiple options are available to them.
Real World: Using DFS
Suppose you work in a company that has three file servers, and each of those servers has shared folders that users access to save and retrieve data. Normally accessing the three servers means going to \\server1 or \\server2 or \\server3, which can be difficult for those users who are not tech-savvy. In another scenario, perhaps you have three mapped drives such as S:\ and T:\ and U:\, again, places where your users can save data. Whatever the case, you need to simplify this configuration for users.
You can with DFS. Instead of requiring users to know the paths to these folders or drives, you can provide users a single Universal Naming Convention (UNC) path such as \\corp that they can use to access all of the folders or mapped drives from a single place. This allows you to simplify things and to also maintain multiple copies of the data easily.
Don’t confuse DFS with folder redirection, offline files, Storage Spaces, or roaming user profiles though; DFS is different from those in many ways.
You should be familiar with a few terms regarding DFS:
![]() DFS Namespaces (DFSN or DFS-N) Users see this folder namespace when they need to access the location they use to store files. It’s a virtual view of the folders you’ve grouped. The file shares can be on different servers and in different sites. Each namespace you create appears to users as a single shared folder with subfolders.
DFS Namespaces (DFSN or DFS-N) Users see this folder namespace when they need to access the location they use to store files. It’s a virtual view of the folders you’ve grouped. The file shares can be on different servers and in different sites. Each namespace you create appears to users as a single shared folder with subfolders.
![]() DFS Replication (DFSR or DFS-R) This is what enables you to synchronize folder contents between servers. This replication can occur across LAN or WAN network connections. DFS Replication uses a compression algorithm known as remote differential compression (RDC), which detects changes to a file’s data and replicates only the changed file blocks, rather than the entire file.
DFS Replication (DFSR or DFS-R) This is what enables you to synchronize folder contents between servers. This replication can occur across LAN or WAN network connections. DFS Replication uses a compression algorithm known as remote differential compression (RDC), which detects changes to a file’s data and replicates only the changed file blocks, rather than the entire file.
![]() Link Target This is the mapping destination of a link, which can be a UNC path, and is a link to a shared folder or another DFS path.
Link Target This is the mapping destination of a link, which can be a UNC path, and is a link to a shared folder or another DFS path.
![]() Referral This is a list of targets (which users can’t see) sent to a DFS client from DFS when users access a root or a link in the DFS namespace (see the next two bullets for more on this). The referral information is cached on the client for a specific amount of time that you can specify in the DFS configuration.
Referral This is a list of targets (which users can’t see) sent to a DFS client from DFS when users access a root or a link in the DFS namespace (see the next two bullets for more on this). The referral information is cached on the client for a specific amount of time that you can specify in the DFS configuration.
![]() Link Referral This referral contains a list of link targets for a specific link.
Link Referral This referral contains a list of link targets for a specific link.
![]() Root Referral This referral contains a list of root targets for a particular root.
Root Referral This referral contains a list of root targets for a particular root.
![]() Referral cache After a target is found, the referral is cached to the user’s computer for subsequent requests. The entries here have a specified Time To Live, and clients won’t ask for a new referral until this period has passed.
Referral cache After a target is found, the referral is cached to the user’s computer for subsequent requests. The entries here have a specified Time To Live, and clients won’t ask for a new referral until this period has passed.
Note: DFS Namespaces and DFS Replication
DFS Namespaces and DFS Replication are services in the File And Storage Services role for Windows Server 2012. No additional hardware or software is required for running DFS Management or using DFS Namespaces.
The objective for this exam includes a note about “client caching” and DFS, so take a look at that. You already know that referral information is cached on the client for a specific amount of time that you can set in the DFS configuration. You can make that specification in many ways including through the DFS Management MMC (part of the DFS Management Tools in RSAT). You can also use the command-line tool Dfsutil.exe. Here are some of the parameters you should be familiar with:
![]() /Cache Use this to view or flush the Referral cache.
/Cache Use this to view or flush the Referral cache.
![]() /Target Use this to display, create, or modify the link target.
/Target Use this to display, create, or modify the link target.
![]() /diag Use this to perform diagnostics.
/diag Use this to perform diagnostics.
![]() /pktflush Use this to clear the DFS cache.
/pktflush Use this to clear the DFS cache.
Understanding Storage Spaces
New to Windows 8-based computers, Storage Spaces lets you combine free space from multiple disks to create a new type of virtual disk for storing data. It does this by using the unallocated space on those disks to create a storage pool. This makes expanding the storage space easy simply by adding disks.
When you create a new storage pool, you create a new virtual disk. When you create that disk, you specify the size. With thin provisioning, the specified size can be greater than the size of the storage pool and you’ll be prompted when additional space is needed. However, when you use fixed provisioning, the specified size cannot exceed the size of the storage pool.
Here are a few things to know before you get started:
![]() You can’t use the disk that contains the operating system as part of the storage pool.
You can’t use the disk that contains the operating system as part of the storage pool.
![]() Serial Advanced Technology Attachment (Serial ATA or SATA) or Serial Attached SCSI (SAS) connected disks are acceptable.
Serial Advanced Technology Attachment (Serial ATA or SATA) or Serial Attached SCSI (SAS) connected disks are acceptable.
![]() RAID adapters, if used, must have all RAID functionality disabled.
RAID adapters, if used, must have all RAID functionality disabled.
![]() You can use USB drives, but USB 3.0 drives are recommended for best performance.
You can use USB drives, but USB 3.0 drives are recommended for best performance.
![]() USB 2.0 drives should be plugged directly into different USB controllers on your computer; don’t use USB hubs.
USB 2.0 drives should be plugged directly into different USB controllers on your computer; don’t use USB hubs.
![]() Various kinds of storage layouts for storage pools are available, including simple (no fault tolerance), mirror, and parity. A two-way mirror mirrors data on two drives; a three-way mirrors on three. Parity enables two drives to hold data and a third to hold parity information for fault tolerance. You can create a storage space from one disk, but you lose fault tolerance when you do.
Various kinds of storage layouts for storage pools are available, including simple (no fault tolerance), mirror, and parity. A two-way mirror mirrors data on two drives; a three-way mirrors on three. Parity enables two drives to hold data and a third to hold parity information for fault tolerance. You can create a storage space from one disk, but you lose fault tolerance when you do.
![]() You can use Windows PowerShell to manage storage pools and disks. Review common PowerShell commands including Set-PhysicalDisk, Repair-VirtualDisk, and Remove-PhysicalDisk.
You can use Windows PowerShell to manage storage pools and disks. Review common PowerShell commands including Set-PhysicalDisk, Repair-VirtualDisk, and Remove-PhysicalDisk.
![]() You can use Storage Spaces in place of more expensive Storage Area Network (SAN) devices under the right circumstances.
You can use Storage Spaces in place of more expensive Storage Area Network (SAN) devices under the right circumstances.
![]() If you move a storage pool, you must keep the pool together.
If you move a storage pool, you must keep the pool together.
![]() If you remove and then try to reuse a disk used in a storage pool, you must format it first.
If you remove and then try to reuse a disk used in a storage pool, you must format it first.
More Info: Learning About Storage Spaces
Refer to this TechNet article to learn more about Storage Spaces: http://technet.microsoft.com/en-us/library/hh831739. To learn more about Storage Spaces in Windows 8.1, go to http://windows.microsoft.com/en-us/windows-8/storage-spaces-pools.
To use Storage Spaces, you must first create a storage pool:
1. Connect the disks to use. Format them before setup. (Or, make sure you’re willing to let Windows do it during setup.)
2. Open Control Panel, click System And Security, and click Storage Spaces.
3. Click Create A New Pool And Storage Space (see Figure 2-28).
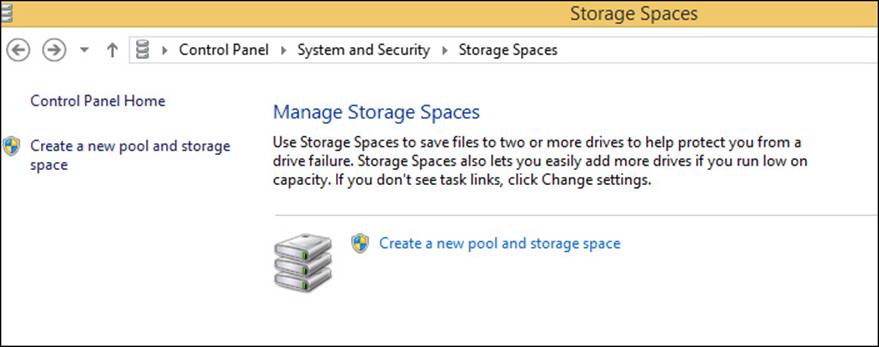
FIGURE 2-28 Creating a storage pool.
4. Select the drives to use and click Create Pool.
5. In the Create A Storage Space window, make additional configurations, such as the name of the pool, resilience type, capacity, and so on. Click Create Storage Space.
Note: Creating a Storage Space
When creating a storage space, create a capacity larger than the installed drives to use a feature known as thin provisioning. When you do, you’ll be prompted when more space is required.
For the types of storage spaces and pools you can create, make sure that you understand the differences among them and know when to use them to meet specific requirements (such as providing fault tolerance or limiting the amount of unused space) before taking the exam:
![]() Simple spaces increase performance, but provide no fault tolerance. They’re best for storing and managing temporary data and require at least one drive. (Two drives are required to increase performance.)
Simple spaces increase performance, but provide no fault tolerance. They’re best for storing and managing temporary data and require at least one drive. (Two drives are required to increase performance.)
![]() Mirror spaces increase performance and provide fault tolerance by replicating your data to more than one drive. Two-way mirrors protect you if one drive fails; three-way mirrors protect you if two of the three drives fail. Two-way mirror spaces require at least two drives, and three-way mirror spaces require at least five. This is because the file in its entirety is stored on three drives, and you’ll need two more to provide fault tolerance.
Mirror spaces increase performance and provide fault tolerance by replicating your data to more than one drive. Two-way mirrors protect you if one drive fails; three-way mirrors protect you if two of the three drives fail. Two-way mirror spaces require at least two drives, and three-way mirror spaces require at least five. This is because the file in its entirety is stored on three drives, and you’ll need two more to provide fault tolerance.
![]() Parity spaces are designed for efficiency. If you’re asked about efficiency on the exam, check to see whether parity meets the other requirements. You’ll need at least three drives. If you opt for a parity drive and one fails, make sure that the new drive is added before you remove the failed one.
Parity spaces are designed for efficiency. If you’re asked about efficiency on the exam, check to see whether parity meets the other requirements. You’ll need at least three drives. If you opt for a parity drive and one fails, make sure that the new drive is added before you remove the failed one.
 Exam Tip
Expect to see questions on the exam about Storage Spaces. Before taking the exam, be sure to read all the supplemental links provided in this section.
Optimizing data access by using BranchCache
BranchCache is employed only when you have a main office and at least one branch office and when you also want to optimize how data passes between/among them. Using this technology to optimize involves transmitting data (think about very large files) from the main office to a branch office, and then caching the data somewhere at the branch office for others to access should they need it. This reduces traffic but also makes for a better end-user experience because cached data can be acquired more quickly than data traveling over a slow WAN link or a VPN. A system in place checks to see whether the data has changed since being cached to keep the cache current. This system involves the client authenticating at the BranchCache server in the main office and using metadata and hashes to determine whether the data is available and current and/or needs to be sent/resent. BranchCache also stores the data in the cache with encryption to secure it.
To configure BranchCache, you need to put a few things in place. For one, you need a server enabled for BranchCache at the main office. This is often referred to as a content server. You can use various servers for this, including various web servers, application servers, and even file servers. With that server in place, you need some way to cache the data at the branch office. You could do so by configuring a Windows Server 2012 server at the branch office (which you generally do for 50 or more clients), or you could allow your client computers to cache the information locally on their own systems (which you generally do for 50 or less). For the latter, the system that holds the cache for the branch office is the first client to download it. Creating a BranchCache server is called hosted mode. Enabling clients to cache the data is called distributed mode. You must configure Group Policy as applicable so that clients can use BranchCache and know where to get the cached data. (You can use a mix of hosted and distributed, choosing the desired option at each of your branch offices.)
You can enable BranchCache on a Windows Server 2012 server. You can also enable it by using this Windows PowerShell command:
Install-WindowsFeature BranchCache
Using Windows Server 2012, Windows 8, and Windows 8.1 clients here is important for many reasons, of which the following are just a few:
![]() Client configuration is automatic with this configuration.
Client configuration is automatic with this configuration.
![]() You can remotely manage BranchCache servers.
You can remotely manage BranchCache servers.
![]() Because Windows 7 clients require a special certificate that’s compatible with TLS, they require more management and setup.
Because Windows 7 clients require a special certificate that’s compatible with TLS, they require more management and setup.
More Info: BranchCache Improvements in Windows Server 2012
Learn more about the BranchCache improvements for Windows Server 2012 at http://technet.microsoft.com/en-us/library/jj127252.aspx.
You’ll likely opt for Windows PowerShell when managing BranchCache. You should be familiar with a few commands listed in Table 2-5.
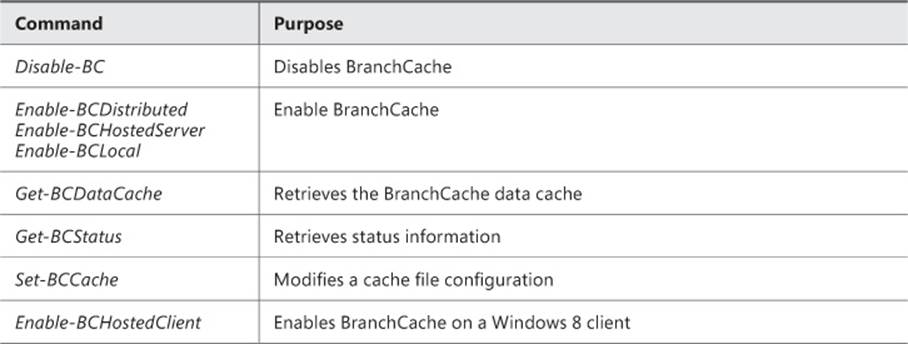
TABLE 2-5 Commands for managing BranchCache
You can view other commands at http://technet.microsoft.com/library/hh848392.aspx.
More Info: Using netsh with BranchCache
You can use the netsh command-line tool to work with BranchCache if you prefer it over Windows PowerShell. The set service parameter offers several options, including mode, which includes options to configure the mode as Local, Distributed, HostedServer, and HostedClient. An example looks like this:
netsh branchcache set service mode=DISTRIBUTED
You can also use the commands show hostedcache and show localcache to manage cache. Learn more about netsh at http://technet.microsoft.com/en-us/library/dd637805(v=WS.10).aspx.
The BranchCache Group Policy settings are available from Computer Configuration, Policies, Administrative Templates, Network, BranchCache. Figure 2-29 shows the setting Turn On BranchCache. Note the others.
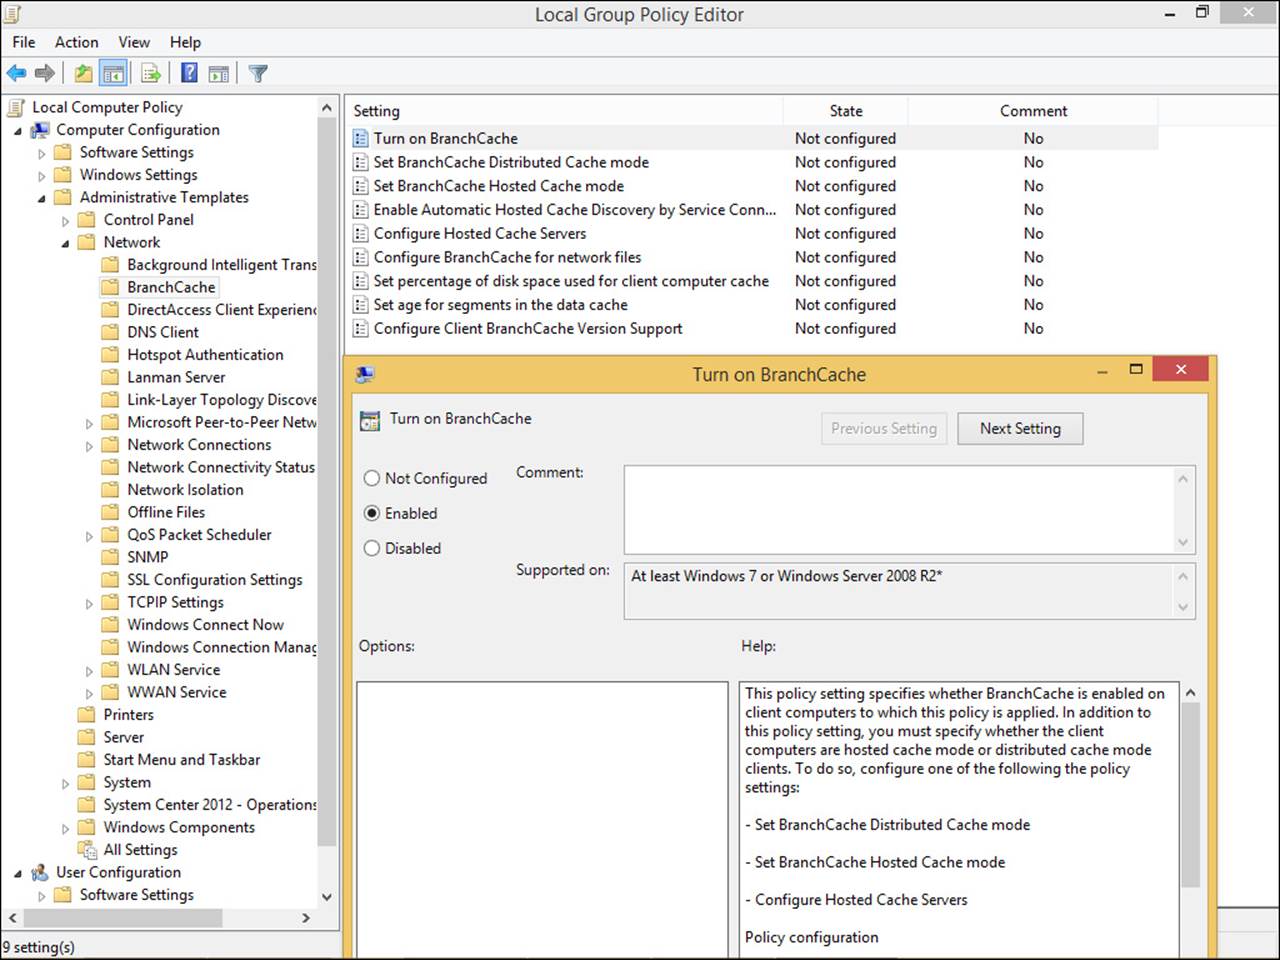
FIGURE 2-29 Use Group Policy to enable BranchCache clients.
Note: Understanding BranchCache
Spend some time reviewing BranchCache. You can find a good TechNet article that covers just about everything you’ll need to know at http://technet.microsoft.com/en-us/library/hh831696.aspx.
Supporting OneDrive
When you create and sign in with a Microsoft account, you can sync settings related to your Start screen, desktop, web browser, some passwords, language preferences, and so on to servers in the cloud. Whatever you opt to sync is applied to any computer you log on to later by using that account (although in a domain setting you’ll have to connect the account first, with the blessing of your network administrator). You configure what to sync in PC Settings, OneDrive, Sync Settings (see Figure 2-30). Make sure that you are familiar with what can be synced here; you might be tested on it. (OneDrive is the new name for SkyDrive.)
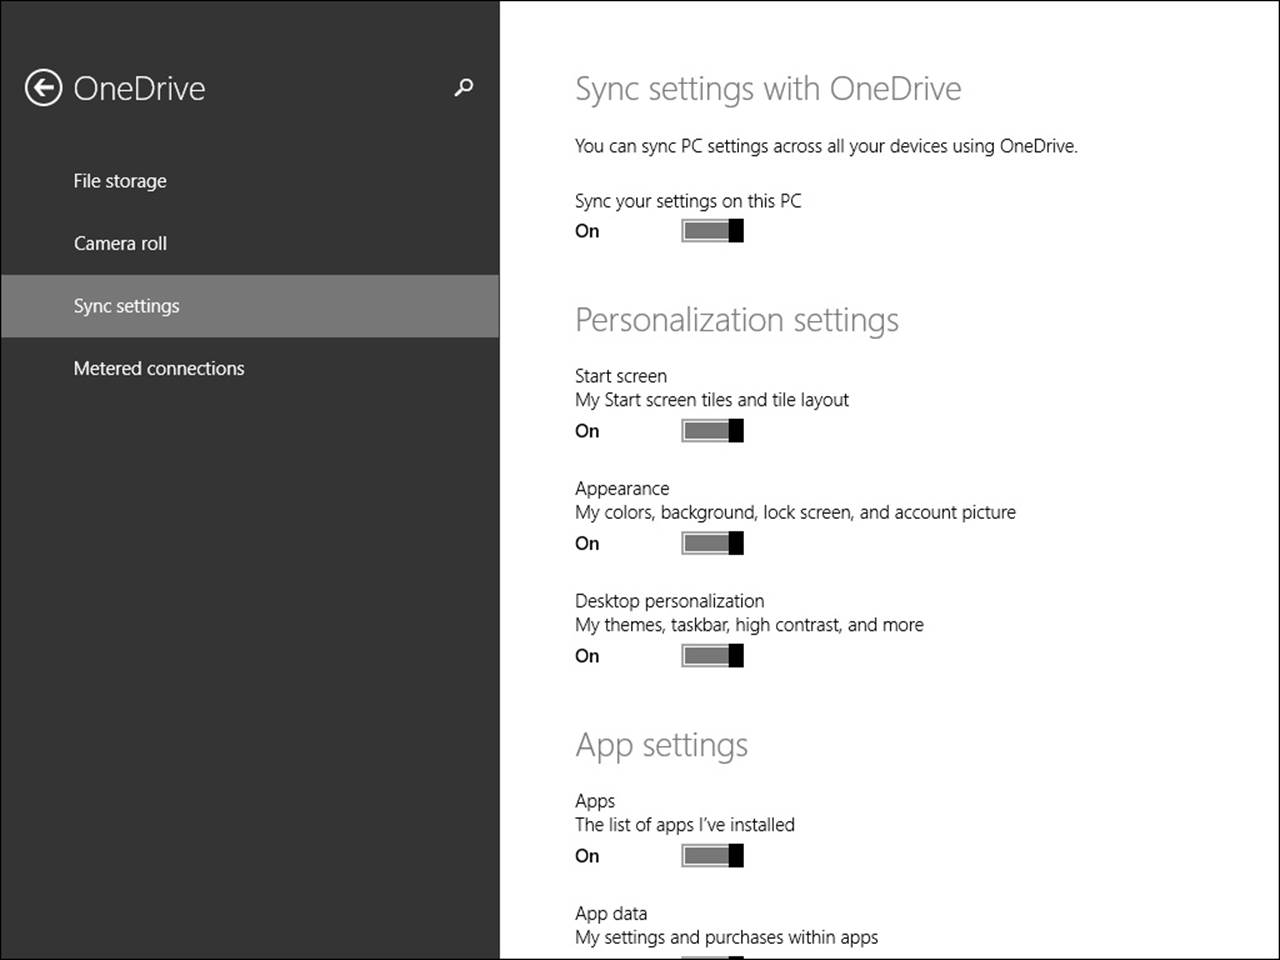
FIGURE 2-30 Clients can choose what to sync to OneDrive.
OneDrive lets users store data in the cloud almost seamlessly from their Windows 8.1 computers. OneDrive is an app on the Start screen and an option in the Navigation tab of File Explorer. Users can access data stored in OneDrive from virtually any device that has an Internet connection. Users can also share any part of what they’ve stored there with others, allowing them to read or read/edit the data. They need a Microsoft account and the applicable app or browser to access the data. Users can also access the files locally, when a connection isn’t available.
Users can access OneDrive in a number of ways:
![]() Via a web browser Browse to http://onedrive.com and log on to access, upload, share, and otherwise manage files and folders. You can also create and edit documents, presentations, notebooks, and so on here.
Via a web browser Browse to http://onedrive.com and log on to access, upload, share, and otherwise manage files and folders. You can also create and edit documents, presentations, notebooks, and so on here.
![]() By using the OneDrive app in Windows Open the OneDrive app from the Start screen to access, upload, open, and manage files, and to create new folders.
By using the OneDrive app in Windows Open the OneDrive app from the Start screen to access, upload, open, and manage files, and to create new folders.
![]() By using the OneDrive app on smartphones You can view and open files, view recently accessed files, view and access shared files, and upload files. You can also create new folders and configure a few settings for uploading photos.
By using the OneDrive app on smartphones You can view and open files, view recently accessed files, view and access shared files, and upload files. You can also create new folders and configure a few settings for uploading photos.
![]() Via a desktop application You can access OneDrive from an application such as Microsoft Office 2013.
Via a desktop application You can access OneDrive from an application such as Microsoft Office 2013.
Setting up OneDrive involves simply logging on to the Windows 8-based computer with a Microsoft account; Windows does the rest. You should look at some configuration options right away, though. You can configure the option to access all files offline from the Settings charm (click Options) from inside the OneDrive app. This might be the first thing you’ll want to configure if you have the available OneDrive space. (By default, users get 7 gigabytes (GB) of storage space, but you can buy more if you need it.)
Exam Tip
For the exam, you need to know what can and can’t be saved to OneDrive. You can save Windows settings, application settings, and some credentials, but you can’t save your Xbox music purchases, apps, or even entire folders (such as your Documents or Pictures folder). You must upload files one at a time, although you can upload compressed folders.
Finally, you can configure OneDrive settings from the OneDrive website. Log on at http://OneDrive.com, click the Tools icon (see Figure 2-31) in the top-right corner, and then click Options (see Figure 2-31). Note the options that appear on the left side:
![]() Storage Use this to view available storage space and buy more.
Storage Use this to view available storage space and buy more.
![]() Plans Use this to view storage plans and select one.
Plans Use this to view storage plans and select one.
![]() Office File Formats Use this to choose a default format for Office documents: Microsoft Office Open XML Format (.docx, .pptx, .xlsx) or OpenDocumentFormat (.odt, .odp,. ods).
Office File Formats Use this to choose a default format for Office documents: Microsoft Office Open XML Format (.docx, .pptx, .xlsx) or OpenDocumentFormat (.odt, .odp,. ods).
![]() People Tagging This option lets you specify how people can tag you on OneDrive (Your Friends or Just You) and configure who can add people tags (Your Friends Who Can View Your Photo Albums or Don’t Allow Anyone To Add People Tags).
People Tagging This option lets you specify how people can tag you on OneDrive (Your Friends or Just You) and configure who can add people tags (Your Friends Who Can View Your Photo Albums or Don’t Allow Anyone To Add People Tags).
![]() Device Backups Use this to see all your devices and the date those devices where last backed up.
Device Backups Use this to see all your devices and the date those devices where last backed up.
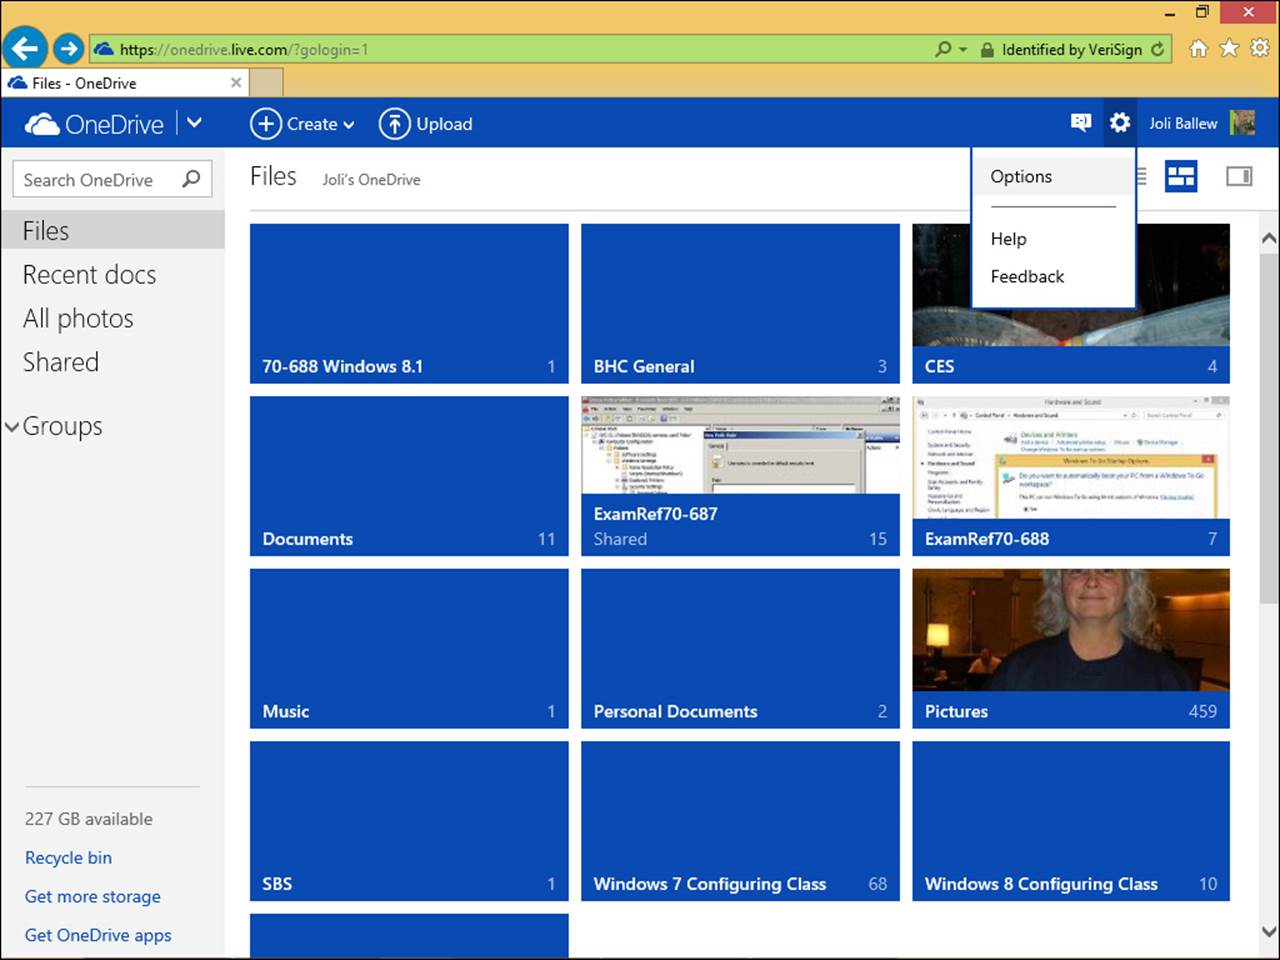
FIGURE 2-31 Users might prefer to access OneDrive from Internet Explorer.
Thought experiment: Creating the best storage space
In this thought experiment, apply what you’ve learned about this objective. You can find answers to these questions in the “Answers” section at the end of this chapter.
You have five USB 2.0 drives that are all the same size and type that you aren’t using, and you want to create a storage space with them. You are more interested in using the disks efficiently than anything else, although you do want to configure them to offer fault tolerance. Answer the following questions about how you should set up Storage Spaces.
1. Should you choose simple, mirrored, three-way mirror, or parity?
2. How many of the five USB disks do you need to use, at the least?
3. Can you use a USB hub with these drives or do you need to have enough USB ports on your computer to house them all separately?
Objective summary
![]() You can use DFS to group shared folders on domain servers for the purpose of combining free space while minimizing the work users must do to save their files there. You configure DFS on servers.
You can use DFS to group shared folders on domain servers for the purpose of combining free space while minimizing the work users must do to save their files there. You configure DFS on servers.
![]() Storage Spaces lets you combine free space from multiple disks to create a virtual disk for storing data. It’s used on Windows 8.1 clients. This makes expanding the storage space easy, simply by adding disks.
Storage Spaces lets you combine free space from multiple disks to create a virtual disk for storing data. It’s used on Windows 8.1 clients. This makes expanding the storage space easy, simply by adding disks.
![]() You can use BranchCache when you have a main office and at least one branch office and you often send large files across the VPN or WAN link between them. BranchCache enables you to cache files on either a branch server or branch clients to minimize transmissions.
You can use BranchCache when you have a main office and at least one branch office and you often send large files across the VPN or WAN link between them. BranchCache enables you to cache files on either a branch server or branch clients to minimize transmissions.
![]() A Microsoft account lets a user sync settings related to the Start screen, desktop, web browser, some passwords, language preferences, and so on to servers in the cloud. Whatever you opt to sync is applied to any computer you log on to later with that account. This must be made available to clients by administrators in a domain.
A Microsoft account lets a user sync settings related to the Start screen, desktop, web browser, some passwords, language preferences, and so on to servers in the cloud. Whatever you opt to sync is applied to any computer you log on to later with that account. This must be made available to clients by administrators in a domain.
Objective review
Answer the following questions to test your knowledge of the information in this objective. You can find the answers to these questions and explanations of why each answer choice is correct or incorrect in the “Answers” section at the end of this chapter.
1. What command would you use with fsutil.exe to clear the DFS cache on a client computer?
A. /cacheflush
B. /cache
C. /pktflush
D. /clearcache
2. Which of the following are suitable disk types that you can use with Storage Spaces?
A. USB 2.0
B. USB 3.0
C. Serial ATA
D. Serial Attached SCSI
E. All of the above
3. You are configuring BranchCache and have about 30 computers in one of your branch offices. The computers in that office are running Windows 8.1, are equipped with large hard drives, and have lots of RAM. How should you configure BranchCache?
A. In hosted mode
B. In distributed mode
C. In ad hoc mode
D. None of the above
4. Which command-line tool (command) would you use to configure BranchCache in distributed mode?
A. netsh branchcache set service mode=DISTRIBUTED
B. netsh branchcache mode=DISTRIBUTED
C. Enable-BCDistributed
D. Enable-BCLocal
5. Your clients want to use their smartphones and tablets to access OneDrive. Which of the following would you suggest they use to access documents and other files?
A. The OneDrive app for Windows and a web browser
B. The OneDrive app for smartphones and a web browser
C. A web browser and a desktop application
D. The OneDrive app for smartphones and a desktop application
Objective 2.5: Support data security
This last objective focuses on data security. Here you’ll learn about securing data through share permissions, NTFS, and Dynamic Access Control, as well as using EFS, controlling access to removable media, and using technologies such as BitLocker and BitLocker To Go.
This objective covers how to:
![]() Manage permissions, including Share, NTFS, and Dynamic Access Control (DAC)
Manage permissions, including Share, NTFS, and Dynamic Access Control (DAC)
![]() Support Encrypting File System (EFS), including Data Recovery Agent
Support Encrypting File System (EFS), including Data Recovery Agent
![]() Control access to removable media
Control access to removable media
![]() Support BitLocker and BitLocker To Go, including Data Recovery Agent and Microsoft BitLocker Administration and Monitoring (MBAM)
Support BitLocker and BitLocker To Go, including Data Recovery Agent and Microsoft BitLocker Administration and Monitoring (MBAM)
Managing permissions
In this section you’ll learn about three kinds of permissions: Share, NTFS, and Dynamic Access Control (DAC). Share and NTFS were also covered in Exam Ref 70-687: Configuring Windows 8.1 under the “Configure file and folder access” objective; here, they are listed under the “Support data security” objective, so I’m not sure how much the objectives vary. That said, what you’ll see here regarding Share and NTFS is the same thing discussed in the other book, but condensed. DAC is new to this exam.
If any of this isn’t familiar to you, make sure you review the concepts on TechNet before taking the exam.
Applying Share permissions
You apply Share permissions when the operating system is configured with FAT or FAT32, or anytime you share a folder on a computer. Only three shared permissions—Read, Change, and Full Control—are available from the Sharing tab of the resource’s Properties dialog box. These sharing options don’t offer a lot of control, but they do offer some. Share permissions help you manage user access to network resources but offer no security when a user logs on locally.
Share permissions have the following characteristics:
![]() They apply only to users who gain access to the resource over the network; they don’t apply to users who log on locally. To protect a resource in these cases, you must use NTFS to set permissions.
They apply only to users who gain access to the resource over the network; they don’t apply to users who log on locally. To protect a resource in these cases, you must use NTFS to set permissions.
![]() Share permissions are the only way to secure network resources on FAT and FAT32 volumes, because NTFS permissions aren’t available on those volumes.
Share permissions are the only way to secure network resources on FAT and FAT32 volumes, because NTFS permissions aren’t available on those volumes.
![]() They specify the maximum number of users who are allowed to access the shared resource or folder over the network.
They specify the maximum number of users who are allowed to access the shared resource or folder over the network.
![]() When both Share and NTFS permissions are applied, the cumulative permissions for both sets are compared, and the most restrictive permission is applied.
When both Share and NTFS permissions are applied, the cumulative permissions for both sets are compared, and the most restrictive permission is applied.
Table 2-6 shows the Share permissions and their descriptions.
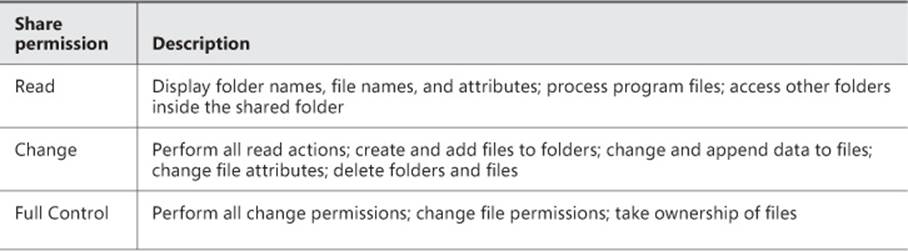
TABLE 2-6 Share permissions and their descriptions
Here are a few more things to know about share permissions:
![]() Share permissions are completely separate from NTFS permissions.
Share permissions are completely separate from NTFS permissions.
![]() Share permissions are the simplest permissions you can configure.
Share permissions are the simplest permissions you can configure.
![]() On networks that employ NTFS, most often you simply grant the Share permission Full Control to Everyone, and then configure the desired NTFS permissions as desired. When both Share and NTFS are applied, the most restrictive wins—in this case, the NTFS permission.
On networks that employ NTFS, most often you simply grant the Share permission Full Control to Everyone, and then configure the desired NTFS permissions as desired. When both Share and NTFS are applied, the most restrictive wins—in this case, the NTFS permission.
![]() NTFS permissions on a subfolder inherit the permissions assigned to the parent folder. Share permissions don’t combine in the same way. Succinctly, Share permissions applied to a folder that sits inside another folder don’t inherit the parent folder’s permissions. They use the permissions explicitly assigned to the folder in question.
NTFS permissions on a subfolder inherit the permissions assigned to the parent folder. Share permissions don’t combine in the same way. Succinctly, Share permissions applied to a folder that sits inside another folder don’t inherit the parent folder’s permissions. They use the permissions explicitly assigned to the folder in question.
Applying NTFS permissions
Because NTFS permissions are so much more robust than Share permissions, when the file system is NTFS, administrators make the most of it. They generally set the Share permissions for Everyone to Full Control and configure the NTFS permissions as desired. You configure NTFS from the Security tab of the resource’s Properties dialog box. Remember, the more restrictive of the two types of permissions is applied to the resource when both exist, so it doesn’t matter that the Share permissions gives everyone unlimited access as long as NTFS is configured not to. NTFS also offers the ability to assign disk quotas, encrypt files and folders, and audit object access. These features aren’t available on FAT or FAT32 drives. Note that if Deny permission is applied, it overrides other permissions for a resource.
Understanding Permission Terminology and Rules
Any protected element or resource has an access control list (ACL). This is basically just a list of permissions that have been applied to the element or resource. The individual permissions applied are access control entries (ACEs). Every ACE has at least one security principal, which is the user, group, or computer given permissions, along with the permissions that have been configured for it or them. This means that permissions are stored with the protected resource; they aren’t stored with the user, group, or computer that’s granted access.
You can use the basic permissions to create very specific access options to a shared resource. You can grant a single user full control to a resource and at the same time grant all users in the Users group only Read access. You can configure it so that a specific person or group of persons can’t access the resource at all, or that an entire group, such as HomeUsers, can read, write, list folder contents, and read and process while using the resource but can’t modify or take ownership of it. The scenarios are almost endless.
If a user is configured permissions to a resource from more than one place, the permissions granted are cumulative. For example, if Bob is a member of the Users group, which has only the NTFS permission Read, but he’s also a member of the Sales group, which has the NTFS permission Modify, Bob can both read and modify. Remember, Share permissions are cumulative and NTFS permissions are cumulative, and if both exist, the more restrictive of the results of these are applied. If Deny is assigned to user from anywhere though, they can’t access the resource.
Exam Tip
Allow permissions are cumulative. Deny permissions override Allow permissions. Explicit permissions take precedence over inherited permissions. You will likely see a question on the exam that outlines a scenario that includes all of these factors, so make sure you know how to calculate the effective permissions when multiple permissions exist.
Understanding Basic and Advanced Permissions
Basic permissions are combinations of advanced permissions. Table 2-7 shows the six basic permissions from the Security tab of any NTFS resource’s Properties dialog box, shown in Figure 2-32.
TABLE 2-7 Basic permissions
FIGURE 2-32 The Security tab of a resource offers options to personalize security options.
You can view all 14 advanced permissions by navigating to the Advanced Security Settings For window for any NTFS resource. You should know the names of these advanced permissions, how to find them, and how they protect the element. From this window you can also view the assigned permissions, including Share permissions, and you can view the calculated “effective access” from the same-named tab. To get to this window and view these settings and options, follow these steps:
1. Right-click any shared folder and click Properties.
2. Click the Security tab.
3. Click Advanced.
4. Click any permission entry and click View. (Notice the option to disable inheritance. Keep this location in mind when you read the next section.)
5. From the resulting Permissions Entry For window you can view the basic permissions assigned to this group.
6. Click Show Advanced Properties. A list of assigned advanced permissions appears.
Understanding Inheritance
Permissions generally run from top to bottom of any folder hierarchy. So if you grant the NTFS Read access to a folder for a user group and then create a subfolder there, the same permissions are applied to it for the same user group. If it didn’t work this way, assigning permissions would be nearly impossible.
Sometimes you might need to turn off inheritance for a folder or other element. Disable Inheritance is an option. If you would prefer not to disable inheritance but instead need to deny access to a specific person or group, you can assign the Deny permission as applicable.
Note: Assigning Contradicting Explicit Permissions
You can assign contradicting explicit permissions when inheritance causes a problem. For example, if the entire Sales group is denied access to a folder but a single member of the group should have access to it (perhaps the CFO of Sales), you can explicitly assign that one user account the Allow permission for Full Control on the resource. Explicit permissions like these override inherited permissions and thus resolve the problem quite easily.
Understanding Move, Copy, and Permission Inheritance
Sometimes you need to copy or move an NTFS-protected element. When you do, depending on the circumstances, permissions are sometimes retained and sometimes not. In most cases, the resource inherits the NTFS permission assigned to the parent folder.
Table 2-8 explains how inheritance and move and copy work.
TABLE 2-8 How inheritance works with move and copy
Using Icacls.exe
The Icacls.exe command lets you configure basic and advanced permissions from an elevated command prompt. You can view all Icalcs.exe parameters on TechNet at http://technet.microsoft.com/en-us/library/cc753525.aspx. You should be ready for exam questions based on this, so it’s a good idea to review this article.
Generally, the Icacls.exe command is used as follows:
icacls.exe <file name> /grant
or
Icalcs.exe <file name> /deny
This command uses various parameters, including but not limited to the following:
![]() F for full access
F for full access
![]() M for modify
M for modify
![]() RX for read and execute
RX for read and execute
![]() R for read only
R for read only
![]() W for write
W for write
![]() MA for maximum allowed
MA for maximum allowed
![]() T to process the command on all files and subfolders inside the <file name>
T to process the command on all files and subfolders inside the <file name>
![]() C to continue, even if errors occur
C to continue, even if errors occur
Understanding Resource Ownership
Locking everyone out of a resource is possible. When that happens, the resource is said to be orphaned. A resource might also be orphaned if the user who originally created it is no longer available to provide access (perhaps to a confidential file or folder). To access the resource, you need to take ownership of it as an administrator. To do so, click Change in the Advanced Security Settings For window.
Exam Tip
You might be asked on the exam what you should do if you lock yourself out of an element, and the answers might only include doing so with icacls. First you must open an elevated command prompt, then you can use the command icacls <file name> /reset along with additional parameters as desired (perhaps /C to ignore errors).
Using Dynamic Access Control (DAC)
Windows Server 2012 and Windows 8 introduced Dynamic Access Control (DAC) and its associated elements. DAC lets administrators apply permissions and restrictions in new ways, which can vary for each device from which they access a resource. For example, it might be okay with you if a user who’s sitting at her desk and using her desktop computer has access to sensitive corporate data. However, it might not be okay if that same user wants to access the data from a tablet over a VPN, the Internet, or even DirectAccess. You might not want users to access a sensitive resource if they are using devices that don’t meet your security requirements either. Thus, DAC lets you dynamically control user access based on various factors, including what kind of device a person is using.
Features and concepts of Dynamic Access Control include the following:
![]() Central access rules These rules can be created for groups, user claims, device claims, and resource properties. Rules protect resources.
Central access rules These rules can be created for groups, user claims, device claims, and resource properties. Rules protect resources.
![]() Central access policies These policies contain conditional expressions (as discussed shortly in “Expressions” just below). Expressions can be almost anything from the current security state of the device, group membership, location, and more, and you can create polices based on these to protect resources.
Central access policies These policies contain conditional expressions (as discussed shortly in “Expressions” just below). Expressions can be almost anything from the current security state of the device, group membership, location, and more, and you can create polices based on these to protect resources.
![]() Claims A claim is simply a single bit of information about a user, such as an AD DS attribute associated with a user, a computer, a device, or a resource. Multiple claims can be used to protect resources.
Claims A claim is simply a single bit of information about a user, such as an AD DS attribute associated with a user, a computer, a device, or a resource. Multiple claims can be used to protect resources.
![]() Expressions You set these conditions to control access management. They can include the state of the device, its location, and the groups the user belongs to.
Expressions You set these conditions to control access management. They can include the state of the device, its location, and the groups the user belongs to.
![]() Proposed permissions These let you propose permissions before actually applying them so that you can more accurately determine the effect of those changes before you apply them.
Proposed permissions These let you propose permissions before actually applying them so that you can more accurately determine the effect of those changes before you apply them.
Learn more about DAC at http://technet.microsoft.com/en-us/library/dn408191.aspx.
Supporting Encrypting File System (EFS)
You can use both Encrypting File System (EFS) and Data Recovery Agents to protect sensitive data. EFS can protect data, and a Data Recovery Agent (DRA) can help you recover it if the encryption key is lost or the machine compromised.
More Info: Planning for the DRA
A DRA has its own certificate and that certificate is added to all encrypted content when the DRA is created. It is important to plan ahead when using a DRA and understand what happens in specific scenarios. For instance, problems ensue when a scenario like this occurs: You deploy EFS and users begin encrypting data. You later realize that you forgot to add a DRA and you add the DRA after the fact. A week later, a user leaves the company and you try to recover the user’s EFS data but you can’t. This is because the DRA was created after the data was encrypted. To resolve this, you’d need to go out and touch every single encrypted file with the command cipher.exe /u. There’s more on the Cipher.exe command later in this chapter.
Using encryption
Encryption protects data from unauthorized access when other security measures fail. Often, failure has to do with someone gaining physical access to a machine and having the knowledge and time to figure out how to access its data. This type of breach can occur in many ways; however, with Encrypting File System (EFS), the public and private keys generated during encryption ensure that only the user who encrypted the file can decrypt it. Technically, encrypted data can be decrypted only if the user’s personal encryption certificate is available, which is generated through the private key. Another user can’t access this key, nor can anyone who tries to access data to copy or move it who doesn’t have the proper credentials.
Note: PKI and AES
The public and private keys generated when data is encrypted are the basis of Windows Public Key Infrastructure (PKI). For more information about PKI, search for PKI on TechNet. Also, EFS uses the Advanced Encryption Standard (AES), which uses a 256-bit key algorithm, an industry standard, and can be used to encrypt non-system volumes or only selected files and folders.
Here’s a little more about EFS:
![]() The process of encryption and decryption happens on the fly and is invisible to users. Encryption occurs when you close files; decryption occurs when you open them.
The process of encryption and decryption happens on the fly and is invisible to users. Encryption occurs when you close files; decryption occurs when you open them.
![]() EFS can be used only on NTFS volumes and isn’t available on any form of FAT.
EFS can be used only on NTFS volumes and isn’t available on any form of FAT.
![]() EFS keys aren’t assigned to a computer; instead, they are assigned to a specific user. This means another user logging on to the computer using his or her own user account has no access to the other user’s private key and can’t access the other user’s data.
EFS keys aren’t assigned to a computer; instead, they are assigned to a specific user. This means another user logging on to the computer using his or her own user account has no access to the other user’s private key and can’t access the other user’s data.
![]() Even a hacker who can sit down at a computer and access an option to copy protected files will receive an Access Denied message.
Even a hacker who can sit down at a computer and access an option to copy protected files will receive an Access Denied message.
![]() You can’t use EFS and compression together. It’s one or the other.
You can’t use EFS and compression together. It’s one or the other.
![]() After a file or folder is encrypted, File Explorer displays it in green.
After a file or folder is encrypted, File Explorer displays it in green.
Configuring EFS is an objective on Exam 70-687, Configuring Windows 8.1, so I’ll discuss it only briefly here. To encrypt a shared folder, right-click it, click Properties, and click Advanced on the General tab of the Properties dialog box. Select the option to encrypt the folder. You can use this same dialog box to remove encryption if you want to later. Be sure to back up your encryption key when prompted.
Performing backup and recovery
You can use CertMgr to recover your EFS-encrypted files by importing your EFS certificate backup. Like with exporting certificates, you use a wizard to do so. To get started from the CertMgr window, select the Personal folder, click Action, and then click All Tasks. From there, select Import. Work through the prompts to import the required data.
You also can use the command line to manage encryption. Use Cipher.exe to perform encryption and decryption tasks (you might see this command on the exam). For more information about Cipher.exe, refer to http://technet.microsoft.com/en-us/library/cc771346.aspx. Here are a few of the most common parameters used with the command:
![]() /d to decrypt specified files and directories.
/d to decrypt specified files and directories.
![]() /s:<directory> to perform the specified operation on all subdirectories in the specified directory.
/s:<directory> to perform the specified operation on all subdirectories in the specified directory.
![]() /c to display information about an encrypted file.
/c to display information about an encrypted file.
![]() /u to touch all encrypted files on the local drives.
/u to touch all encrypted files on the local drives.
![]() /u /n to find encrypted files.
/u /n to find encrypted files.
![]() /? to display help.
/? to display help.
![]() /x to back up your encryption keys (see Figure 2-33). Click OK here to type the name to give the new file and a password. The file has a .pfx entension. (To restore your EFS key, double-click the .pfx file and run the resulting wizard.)
/x to back up your encryption keys (see Figure 2-33). Click OK here to type the name to give the new file and a password. The file has a .pfx entension. (To restore your EFS key, double-click the .pfx file and run the resulting wizard.)
FIGURE 2-33 Use the Cipher.exe command to back up encryption keys.
![]() /r:<nameof recoveryagent> to create a new recovery data agent. This creates two files ending in .CER and .PFX.
/r:<nameof recoveryagent> to create a new recovery data agent. This creates two files ending in .CER and .PFX.
To create a recovery agent using the Cipher.exe command on a non-domain joined Windows 8 Enterprise computer, follow these steps:
1. Open an elevated command prompt.
2. Type cipher.exe /x and press Enter.
3. Follow the prompts to name the file and apply a password.
4. Type cipher.exe /r:IamARecoveryAgent (or something similar) and press Enter.
5. Follow the prompts to complete the process by creating a password.
6. Locate the file that contains your recovery keys. Look in C:\Windows\System32 if a search doesn’t provide results quickly.
7. Double-click the file and follow the prompts to complete the certificate import process. Click Finish when complete, taking note of what’s listed (see Figure 2-34).
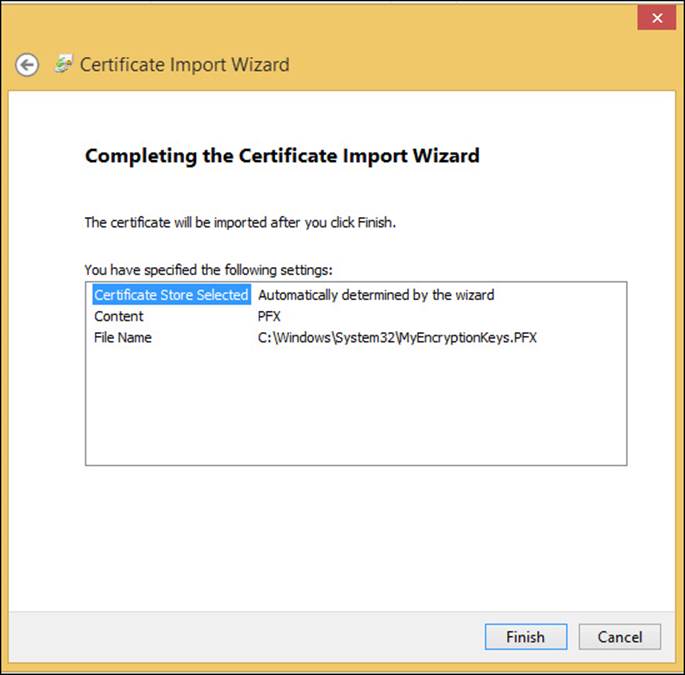
FIGURE 2-34 Work through the wizard to complete the import process.
8. Using an Administrator account, open the Local Group Policy Editor.
9. Navigate to Local Computer Policy, Windows Settings, Security Settings, Public Key Policies, Encrypting File System.
10. Right-click Encrypting File System and click Add Data Recovery Agent.
11. Work through the wizard and click Browse Folders when prompted to locate the .cer file you created earlier.
12. Click Open and Yes, click Next, and click Finish. You’ll see the new certificate, as shown in Figure 2-35.
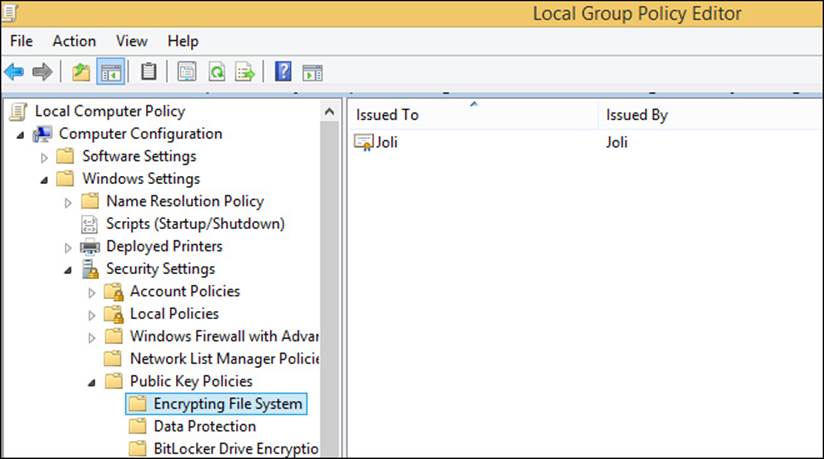
FIGURE 2-35 A new data recovery agent has been added.
Controlling access to removable media
Users commonly carry USB flash drives with them everywhere they go. Having access to a portable drive means users can easily take data with them without having to carry a laptop, connect to a network or domain, transfer data to a tablet, or access a cloud drive. Unfortunately, this is also a common way for viruses to spread and for sensitive data to be taken off premises (and potentially lost or stolen). In an even worse scenario, a malicious user could access another’s computer and copy data without anyone knowing, if the opportunity arises because a workstation was left unattended or unlocked. Beyond USB drives, users can also copy data to CDs, DVDs, and even memory cards.
Deciding who can use these kinds of drives to transfer data is difficult. Some employees will need this ability; some won’t. You’ll have to take careful inventory and decide which employees fit into these two groups and configure your GPOs accordingly. Whatever you decide, the option to configure settings for removable storage access, whether on a local machine or on a domain server, is available in the Group Policy Management Editor.
To access removable access policies, follow these steps:
1. Open the Group Policy Management Editor (gpedit.msc).
2. Navigate to Computer Configuration, Policies, Administrative Templates, System, Removable Storage Access. Notice the options.
Alternatively, to configure this for an individual user, navigate to User Configuration, Policies, Administrative Templates, System, Removable Storage Access.
3. Double-click the setting to configure. To enable the setting, click Enable.
4. Click OK.
 Exam Tip
What can a remotely logged on user access with regard to removable media? Read from USB and DVD only. Of course, on the exam the scenario will be much longer and more complex, but the end question (and answer) will be the same.
Take some time now to review the available GPOs for removable media, and double-click each entry to see what each offers. You need to be able to name the policies and know what they do if you enable them. For instance, the setting All Removable Storage Classes: Deny All Access lets you block access to all classes of removable storage devices, and this policy takes precedence over all policy settings for individual classes. Similarly, CD And DVD: Deny Read/Write/Execute Access, if enabled, prevents users from all access to the CD or DVD drivers in the computer, or, only the access you specifically allow or deny.
Supporting BitLocker and BitLocker To Go
BitLocker Drive Encryption lets you encrypt entire hard disks and disk volumes, which includes the Windows operating system drive, user files, and system files. You can use BitLocker to protect 32-bit and 64-bit computers running Windows 7 or later client operating systems (Professional and higher) and Windows server-based operating systems (Windows Server 2008 R2 and later). On computers with Trusted Platform Module (TPM) version 1.2 or 2.0, BitLocker can also ensure that data is accessible only if the computer’s startup features and settings haven’t been compromised (altered) and if the disk is still installed in the original computer.
BitLocker To Go lets you protect removable USB devices with BitLocker Drive Encryption. These devices can be flash drives; Secure Digital (SD) cards; removable hard disks formatted with NTFS; or Fat16, FAT32, or exFat file systems. Just like BitLocker, users must input a password or a smart card with a PIN to unlock the drive. It also can be unlocked automatically, with administrator approval. TPM isn’t required for these kinds of drives because there’s no such thing as a “startup” device like there is on a laptop, tablet, or desktop computer.
After you incorporate BitLocker or BitLocker To Go into your enterprise, you need to be able to recover protected disks and devices when the need arises, and you need to have something in place to administer and manage those disks and devices. This is where recovery agents and Microsoft BitLocker Administration and Monitoring (MBAM) come into play.
Using BitLocker
BitLocker provides one more level of protection for your users and their devices. When using BitLocker, you can require users to enter a password to unlock the drive when they want to use it. However, you also can require multifactor authentication, perhaps by adding a smart card or a USB drive with a startup key on it, on computers with a compatible TPM. You can manage BitLocker through Group Policy. For instance, you can require that BitLocker be enabled before the computer can be used to store data.
Note: Enabling BitLocker Before Deploying the Operating System
You can enable BitLocker before you deploy the operating system. When you do, you can opt to encrypt used disk space only or encrypt the entire drive.
Two partitions are required to run BitLocker because pre-startup authentication and system integrity confirmation must occur on a separate partition from the drive that is encrypted.
You need to read all you can about BitLocker on TechNet, because this chapter doesn’t have enough room to discuss everything. You can start with an overview at http://technet.microsoft.com/en-us/library/hh831507.aspx#BKMK_Overview. Concentrate on the following:
![]() The requirements for hardware and software These include TPM versions, BIOS configuration, firmware requirements, drive size, and so on.
The requirements for hardware and software These include TPM versions, BIOS configuration, firmware requirements, drive size, and so on.
![]() How to tell whether your computer has a TPM As administrator, you can enter TPM.msc in a Run dialog box. End users can access Control Panel and click All Items, open BitLocker Drive Encryption, and see if they can turn on BitLocker. If a TPM isn’t found, you have to set the required Group Policy setting (Require Additional Authentication At Setup), which is located in Computer Configuration, Policies, Administrative Templates, Windows Components, BitLocker Drive Encryption, Operating System Drives. You must enable this, and then select the Allow BitLocker Without A Compatible TPM check box (see Figure 2-36).
How to tell whether your computer has a TPM As administrator, you can enter TPM.msc in a Run dialog box. End users can access Control Panel and click All Items, open BitLocker Drive Encryption, and see if they can turn on BitLocker. If a TPM isn’t found, you have to set the required Group Policy setting (Require Additional Authentication At Setup), which is located in Computer Configuration, Policies, Administrative Templates, Windows Components, BitLocker Drive Encryption, Operating System Drives. You must enable this, and then select the Allow BitLocker Without A Compatible TPM check box (see Figure 2-36).
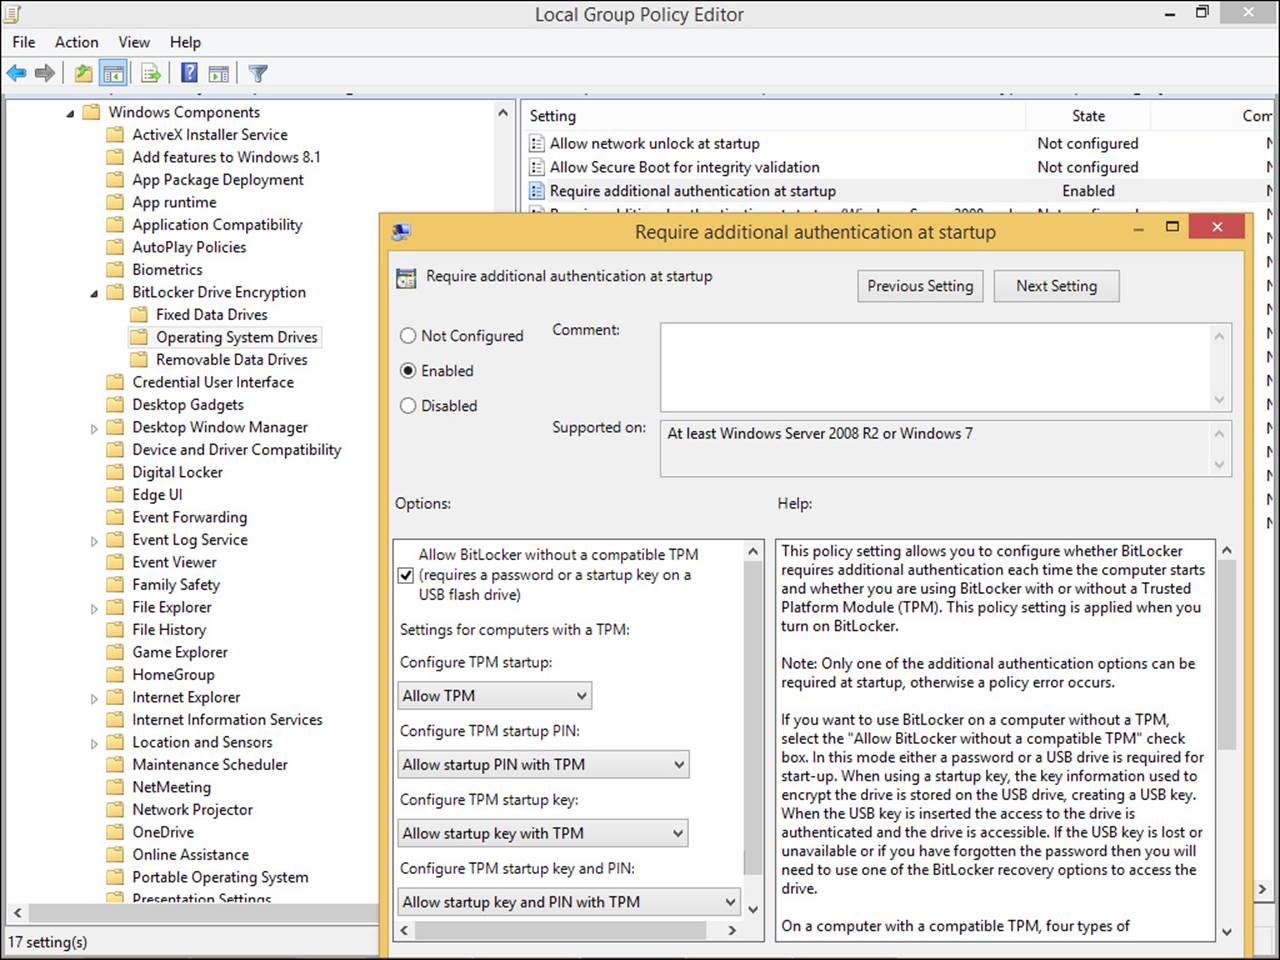
FIGURE 2-36 You can configure BitLocker settings from the Local Group Policy Editor on a local machine.
Note: Enabling BitLocker on an Operating System Drive without a Compatible TPM
You can enable BitLocker on an operating system drive without a compatible TPM only if the BIOS or Unified Extensible Firmware Interface (UEFI) can read from a USB flash drive in the startup environment. This is because BitLocker requires a startup key. If you do this, though, you can’t take advantage of the pre-startup system integrity verification or multifactor authentication.
![]() The credentials required to configure BitLocker Only administrators can manage fixed data drives, but standard users can manage removable data drives (the latter can be disabled in Group Policy). Standard users can also change the PIN or password on operating system drives they have access to via BitLocker.
The credentials required to configure BitLocker Only administrators can manage fixed data drives, but standard users can manage removable data drives (the latter can be disabled in Group Policy). Standard users can also change the PIN or password on operating system drives they have access to via BitLocker.
![]() How to automate BitLocker deployment in an enterprise One way is to use the command-line tool Manage-bde.exe. Using this tool in your own work is detailed later in this section. Other ways include using WMI and Windows PowerShell scripts.
How to automate BitLocker deployment in an enterprise One way is to use the command-line tool Manage-bde.exe. Using this tool in your own work is detailed later in this section. Other ways include using WMI and Windows PowerShell scripts.
![]() The reasons BitLocker might start in recovery mode Reasons include disabling the TPM, making changes to the TPM firmware, making changes to the master boot record, not setting the PIN after enabling on a drive and PC with a TPM, and so on.
The reasons BitLocker might start in recovery mode Reasons include disabling the TPM, making changes to the TPM firmware, making changes to the master boot record, not setting the PIN after enabling on a drive and PC with a TPM, and so on.
![]() How to manage recovery keys Recovery keys let you access a computer if BitLocker won’t allow access. You can store these keys for fixed drives in many ways, including saving them to a folder, saving them to your Microsoft account online, printing them, and storing the keys on multiple USB drives. Active Directory can be used too and is the most important storage location.
How to manage recovery keys Recovery keys let you access a computer if BitLocker won’t allow access. You can store these keys for fixed drives in many ways, including saving them to a folder, saving them to your Microsoft account online, printing them, and storing the keys on multiple USB drives. Active Directory can be used too and is the most important storage location.
Configuring BitLocker from Control Panel
You need to know a few more things before you configure BitLocker. The first time you enable BitLocker, you’ll be prompted to create a startup key, which is used to encrypt and decrypt the drive. This key can be stored on a USB drive or the TPM chip. If you opt for USB, every time you want to access the computer you’ll have to insert that USB drive and enter the key. If a compatible TPM chip is used, the key retrieval is automatic. You can also opt for a PIN, which can be created only after BitLocker is enabled. If you lose the startup key, you’ll have to use a recovery key to unlock the drive. This is a 48-digit number that can be stored in numerous ways, including on a USB drive.
Protecting encrypted data via BitLocker involves five authentication methods, which consist of various combinations of TPM, startup PIN, and startup keys, or just a TPM or just a startup key:
![]() TPM + startup PIN + startup key This is the most secure combination but requires three authentication tasks. The encryption key is stored on the TPM chip, but an administrator must type a PIN and insert the startup key (available on a USB drive).
TPM + startup PIN + startup key This is the most secure combination but requires three authentication tasks. The encryption key is stored on the TPM chip, but an administrator must type a PIN and insert the startup key (available on a USB drive).
![]() TPM + startup key The encryption key is stored on the TPM chip. An administrator must insert a USB flash drive that contains a startup key.
TPM + startup key The encryption key is stored on the TPM chip. An administrator must insert a USB flash drive that contains a startup key.
![]() TPM + startup PIN The encryption key is stored on the TPM chip. An administrator must enter a PIN.
TPM + startup PIN The encryption key is stored on the TPM chip. An administrator must enter a PIN.
![]() Startup key only An administrator must insert a USB flash drive with the startup key on it. The computer doesn’t have to have a TPM chip. The BIOS must support access to the USB flash drive before the operating system loads.
Startup key only An administrator must insert a USB flash drive with the startup key on it. The computer doesn’t have to have a TPM chip. The BIOS must support access to the USB flash drive before the operating system loads.
![]() TPM only The encryption key is stored on the TPM chip, and no administrator logon is required. TPM requires that the startup environment hasn’t been modified or compromised.
TPM only The encryption key is stored on the TPM chip, and no administrator logon is required. TPM requires that the startup environment hasn’t been modified or compromised.
Also, the drive that contains the operating system must have two partitions, the system partition and the operating system partition, both of which must be formatted with NTFS.
To configure BitLocker and encrypt the operating system drive on a Windows 8.1 computer, follow these steps:
1. Open Control Panel, change the view to Small Icons or Large Icons, and click BitLocker Drive Encryption.
2. Click Turn On BitLocker. (If you receive an error that no TPM chip is available, enable the required Group Policy setting, as shown earlier in Figure 2-35.)
3. Choose how to unlock your drive at startup. For this example, choose Enter A Password (see Figure 2-37).
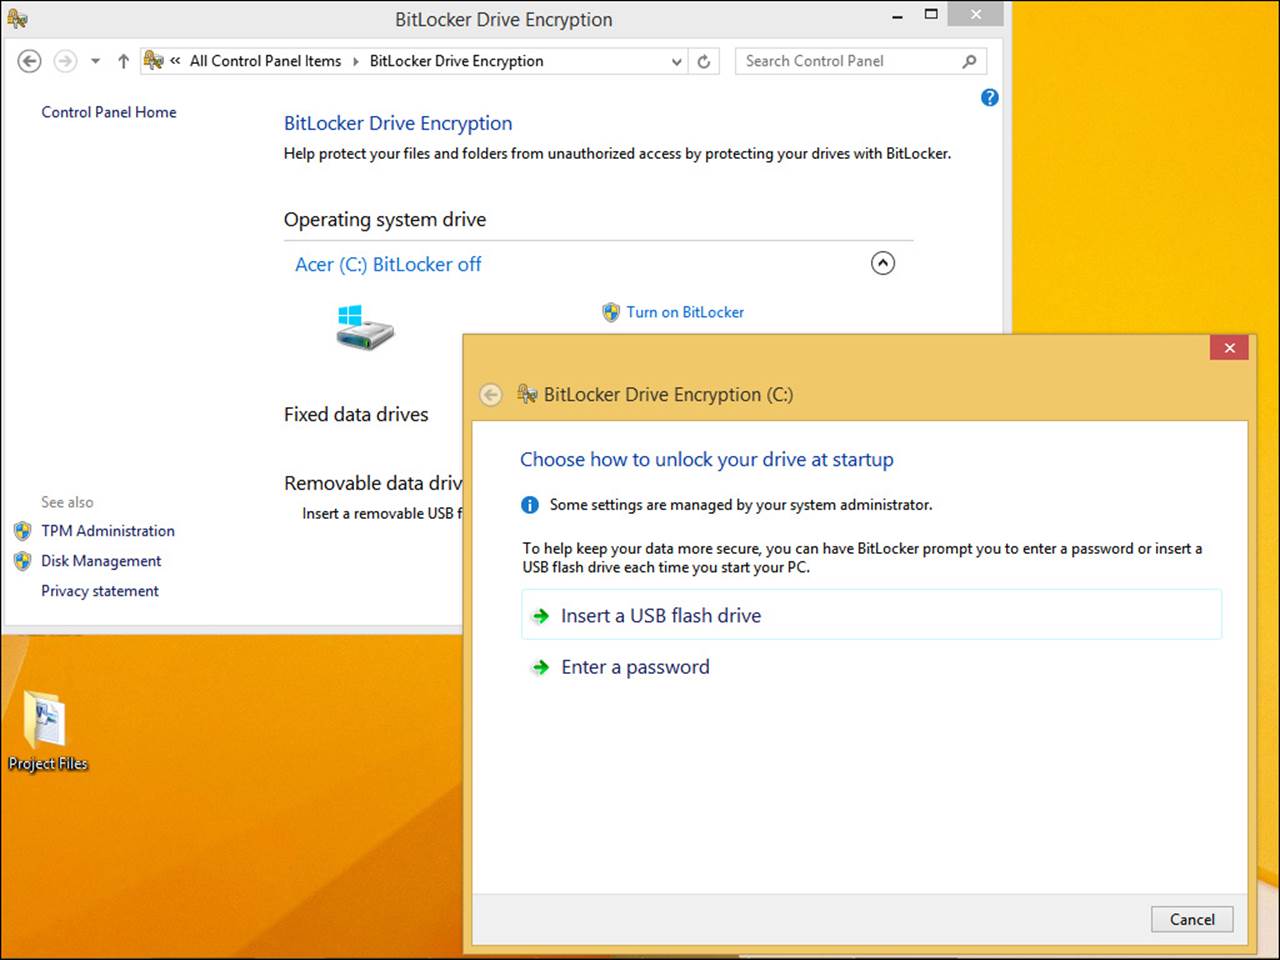
FIGURE 2-37 Enabling BitLocker on a fixed drive.
4. Enter the password and reenter to confirm, and then click Next.
5. Choose to save the password. For this example, choose Save To Your Microsoft Account. Click Next. (In this instance, you can perform this step again to perform a secondary backup before moving on.)
6. Choose to either encrypt the used disk space or the entire drive. Click Next.
7. Leave Run BitLocker System Check selected, and click Continue.
8. Restart your computer if prompted; otherwise click Start Encrypting.
Once encryption has started (or completed), return to the Control Panel and review the BitLocker window. From there you can perform additional tasks, including backing up your recovery key, changing your password, removing the passwords, and turning off BitLocker. The icon next to the options indicate which require administrator approval.
Exam Tip
I’m not sure how many, if any, questions you’ll see on the exam about the available Group Policy settings for BitLocker and BitLocker To Go. However, being prepared is wise. Be sure at least to scan the available options from a Local Group Policy Editor console: Computer Configuration, Administrative Templates, Windows Components, BitLocker Drive Encryption. You’ll find three folders—Fixed Data Drives, Operating System Drives, and Removable Data Drives—as well as a few stand-alone options when the BitLocker Drive Encryption container is selected.
Configuring BitLocker using Command-Line Tools
You don’t have to use Control Panel to manage BitLocker Drive Encryption: you can work from a command line. A few commands you can use turn BitLocker on or off, specify unlock mechanisms, update recovery methods, and unlock BitLocker-protected data drives. Many of these commands are used in large enterprises and not applicable to this objective; however, you might use several parameters with the manage-BDE command, including but not limited to the following:
![]() -status Use this for information about the attached drives, including their BitLocker status, size, BitLocker version, key protector, and lock status.
-status Use this for information about the attached drives, including their BitLocker status, size, BitLocker version, key protector, and lock status.
![]() -on This parameter encrypts the drive and turns on BitLocker. It’s used with a drive letter such as C: that follows the -on parameter.
-on This parameter encrypts the drive and turns on BitLocker. It’s used with a drive letter such as C: that follows the -on parameter.
![]() -off This parameter decrypts and then turns off BitLocker. It’s used with a drive letter such as C: that follows the -off parameter.
-off This parameter decrypts and then turns off BitLocker. It’s used with a drive letter such as C: that follows the -off parameter.
![]() -pause and -resume Use -pause with a drive letter to pause encryption; use -resume with a drive letter to resume encryption.
-pause and -resume Use -pause with a drive letter to pause encryption; use -resume with a drive letter to resume encryption.
![]() -lock and -unlock Use these parameters with a drive letter to lock and unlock.
-lock and -unlock Use these parameters with a drive letter to lock and unlock.
![]() -changepin Use this to change the PIN for the BitLocker-protected drive.
-changepin Use this to change the PIN for the BitLocker-protected drive.
![]() -recoverypassword Use this to add a numerical password protector.
-recoverypassword Use this to add a numerical password protector.
![]() -recoverykey Use this to add an external key protector for recovery.
-recoverykey Use this to add an external key protector for recovery.
![]() -password Use this to add a password key protector.
-password Use this to add a password key protector.
More Info: Manage-BDE Parameters
To see all the available parameters, refer to the TechNet article at http://technet.microsoft.com/en-us/library/dd875513(v=WS.10).aspx (or at a command prompt, type manage-bde /? to see a list on your own computer).
You can also use Windows PowerShell to manage BitLocker. There is a BitLocker PowerShell module with 13 cmdlets available. For more information refer to this article on TechNet: http://technet.microsoft.com/en-us/library/jj649829.aspx.
Configuring BitLocker To Go
BitLocker To Go lets you protect removable USB devices with BitLocker Drive Encryption. These devices can be flash drives, Secure Digital (SD) cards, or removable hard disks formatted with NTFS, Fat16, FAT32, or exFat file systems. The process to create a BitLocker To Go drive is similar to the process used to encrypt a fixed disk using BitLocker. Just insert the USB drive, open Control Panel, access the BitLocker window, and then under Removable Data Drives – BitLocker To Go, work through the setup process.
As noted in an Exam Tip earlier, you should familiarize yourself with the available BitLocker and BitLocker To Go Group Policy settings. You can locate them in the Group Policy Management Editor in Computer Configuration, Policies, Administrative Templates, Windows Components, BitLocker Drive Encryption. The BitLocker To Go options are available in the Removable Data Drives container. The eight items listed are summarized in Table 2-9.
TABLE 2-9 BitLocker To Go options
Exploring startup key storage and recovery options
One aspect of the BitLocker technology is to apply the startup key storage options. However, to understand what a startup key is, you must first understand what it isn’t. You need to contend with several key management terms:
![]() TPM owner password You must initialize the TPM before you can use it with BitLocker Drive Encryption. When you do, you create a TPM owner password that’s associated only with the TPM. You supply the TPM owner password when you need to enable or disable the TPM or reset the TPM lockout.
TPM owner password You must initialize the TPM before you can use it with BitLocker Drive Encryption. When you do, you create a TPM owner password that’s associated only with the TPM. You supply the TPM owner password when you need to enable or disable the TPM or reset the TPM lockout.
![]() Recovery password and recovery key The first time you set up BitLocker, you are prompted to configure how to access BitLocker-protected drives if access is denied. This involves creating a recovery key. You need the recovery key if the TPM can’t validate the startup features and settings, but most of the time a failure to access a BitLocker drive occurs because an end user has forgotten the PIN or password.
Recovery password and recovery key The first time you set up BitLocker, you are prompted to configure how to access BitLocker-protected drives if access is denied. This involves creating a recovery key. You need the recovery key if the TPM can’t validate the startup features and settings, but most of the time a failure to access a BitLocker drive occurs because an end user has forgotten the PIN or password.
![]() Password You can use a password to protect fixed, removable, and operating system drives. You can also use a password with operating system drives that don’t have a TPM. The password can consist of 8 to 255 characters as specified by the following Group Policy settings: Configure Use Of Passwords For Operating System Drives, Configure Use Of Passwords For Removable Data Drives, and Configure Use Of Passwords For Fixed Data Drives.
Password You can use a password to protect fixed, removable, and operating system drives. You can also use a password with operating system drives that don’t have a TPM. The password can consist of 8 to 255 characters as specified by the following Group Policy settings: Configure Use Of Passwords For Operating System Drives, Configure Use Of Passwords For Removable Data Drives, and Configure Use Of Passwords For Fixed Data Drives.
![]() PIN and enhanced PIN If you use a TPM, you can configure BitLocker with a PIN that the user must type to gain access to the computer. The PIN can consist of 4 to 20 digits as specified by the Configure Minimum PIN Length For Startup Group Policy setting. Enhanced PINs use the full keyboard character set in addition to the numeric set to allow for more possible PIN combinations. You must enable the Allow Enhanced PINs For Startup Group Policy setting before adding the PIN to the drive.
PIN and enhanced PIN If you use a TPM, you can configure BitLocker with a PIN that the user must type to gain access to the computer. The PIN can consist of 4 to 20 digits as specified by the Configure Minimum PIN Length For Startup Group Policy setting. Enhanced PINs use the full keyboard character set in addition to the numeric set to allow for more possible PIN combinations. You must enable the Allow Enhanced PINs For Startup Group Policy setting before adding the PIN to the drive.
![]() Startup key You use a startup key that’s stored on a USB flash drive, with or without a TPM. The USB flash drive must be inserted every time the computer starts. The USB flash drive must be formatted by using the NTFS, FAT, or FAT32 file system.
Startup key You use a startup key that’s stored on a USB flash drive, with or without a TPM. The USB flash drive must be inserted every time the computer starts. The USB flash drive must be formatted by using the NTFS, FAT, or FAT32 file system.
Now that you know what a startup key is, you can better understand your storage options. To save a computer’s startup key on a USB flash drive, follow these steps:
1. Right-click a BitLocker-protected drive.
2. Select Manage BitLocker.
3. Select Back Up Your Recovery Key.
4. Insert a removable drive, choose it from the list as applicable, and click Save.
Exam Tip
BitLocker Network Unlock simplifies management of BitLocker-enabled TPM + PIN workstations and servers in a domain. Network Unlock allows the PIN entry prompt to be bypassed when a domain-connected computer restarts. The computer is automatically unlocked by using a trusted key that’s provided by the Windows Deployment Services server as its secondary authentication method. For more information and to review the requirements, refer to this TechNet article: http://technet.microsoft.com/en-us/library/jj574173.aspx.
Understanding BitLocker and BitLocker To Go data recovery
BitLocker or BitLocker To Go might enter recovery mode for many reasons after it’s applied to a device. Some reasons include meeting a threshold set in Group Policy (such as MaxFailedLogonAttempts), changing the startup order of the device, changing the NTFS partition table, entering the PIN incorrectly too many times, and turning off or disabling the TPM; changes found in the Master Boot Record. You can see the entire list at http://technet.microsoft.com/en-us/library/dn383583.aspx#BKMK_WhatIsRecovery. When BitLocker recovery mode is engaged, something or someone must be ready to restore access to the drive.
You can recover drives in various ways, including the following:
![]() Let the user supply the 48-digit recovery password.
Let the user supply the 48-digit recovery password.
![]() Use a data recovery agent to unlock the drive.
Use a data recovery agent to unlock the drive.
![]() Let a domain administrator obtain the recovery password from AD DS.
Let a domain administrator obtain the recovery password from AD DS.
![]() Use another method, such as Windows PowerShell.
Use another method, such as Windows PowerShell.
Self-recovery is an option if the user has saved the password or recovery key to a USB flash drive. This isn’t considered the best method for many reasons, one of which is that many users forget to perform the backup, lose the USB flash drive, or keep the drive with their computer (compromising the security of the computer as well as the BitLocker key). Non-domain users can store their passwords on OneDrive if they want.
Beyond self-recovery, you can consider a few other ways to recover a locked drive. One way to force recovery for a local or remote computer involves a command prompt:
1. Right-click Start and click Command Prompt (Admin).
2. To recover a local computer, at the command prompt, enter the following command:
manage-bde -forcerecovery <Volume>
3. To recover a remote computer, at the command prompt enter the following command:
manage-bde. -ComputerName <ComputerName> -forcerecovery <Volume>
If a user has forgotten the PIN and you want to reset it, follow these steps:
1. Use the recovery password to unlock the computer.
2. Right-click the drive and click Change PIN.
3. Click Reset A Forgotten PIN.
4. Type and confirm the new PIN and click Finish.
Use the following Windows PowerShell commands:
1. Remove the previous recovery password:
Manage-bde –protectors –delete C: –type RecoveryPassword
2. Add a new recovery password:
Manage-bde –protectors –add C: -RecoveryPassword
3. Get the ID of the new recovery password:
Manage-bde –protectors –get C: -Type RecoveryPassword
4. Back up the new recovery password to AD CS:
Manage-bde –protectors –adbackup C: -id {EXAMPLE6-5507-4924-AA9E-AFB2EB003692}
Finally, if you’ve decided to back up passwords to an AD DS, you must also configure the appropriate Group Policy settings in the Local Group Policy Editor or the Group Policy Management Console under Computer Configuration, Policies, Administrative Templates, Windows Components, BitLocker Drive Encryption. You’ll need to make decisions about and configure the following:
![]() Choose how BitLocker-Protected Operating System Drives Can Be Recovered
Choose how BitLocker-Protected Operating System Drives Can Be Recovered
![]() Choose how BitLocker-Protected Fixed Drives Can Be Recovered
Choose how BitLocker-Protected Fixed Drives Can Be Recovered
![]() Choose how BitLocker-Protected Removable Drives Can Be Recovered
Choose how BitLocker-Protected Removable Drives Can Be Recovered
You can also select the Do Not Enable BitLocker Until Recovery Information Is Stored In AD DS check box to keep users from enabling BitLocker unless the computer is connected to the domain and until the backup of BitLocker recovery information is successful.
All these options have their place in various types of businesses and enterprises. However, large enterprises should consider managing BitLocker and BitLocker To Go with the Microsoft BitLocker Administration and Monitoring (MBAM) Tool version 2.0, which is included in the Microsoft Desktop Optimization Pack (MDOP) for Microsoft Software Assurance. With it, network administrators can protect computers and removable drives running Windows 7, Windows 8, and Windows To Go.
Understanding Microsoft BitLocker Administration and Monitoring
As your enterprise grows, you’ll find that you spend more and more time managing BitLocker and BitLocker To Go clients and devices. You have to recover lost PINs, ensure that users and computers are in compliance with network policies, and so on. Microsoft BitLocker Administration and Monitoring (MBAM) enables end users to recover their own PINs and recover their devices when they go into recovery mode, perhaps due to a change in the BIOS or the boot record. MBAM offers a self-service portal they can use as well. MBAM can also help you manage compliance by simplifying how to review the status of your inventory, provision BitLocker, integrate with System Center, and prohibit certain types of devices, among other things. Note that MBAM comes with MDOP which requires Software Assurance (SA) licensing.
Here are a few more things the latest edition of MBAM offers:
![]() Support is available for managing Windows To Go devices.
Support is available for managing Windows To Go devices.
![]() BitLocker pre-provisioning with Windows PE includes the use of Used Disk Space Only Encryption on Windows 8 devices.
BitLocker pre-provisioning with Windows PE includes the use of Used Disk Space Only Encryption on Windows 8 devices.
![]() MBAM can take ownership of the TPM without requiring a restart (if TPM is turned on in BIOS).
MBAM can take ownership of the TPM without requiring a restart (if TPM is turned on in BIOS).
![]() Devices left in “protection suspended” mode automatically resume protection after restart.
Devices left in “protection suspended” mode automatically resume protection after restart.
![]() Windows 8 Operating System Drives can be protected with the Password protector.
Windows 8 Operating System Drives can be protected with the Password protector.
![]() You can deploy MBAM with less infrastructure.
You can deploy MBAM with less infrastructure.
To deploy MBAM, you’ll need to plan for the following:
![]() Administration and Monitoring Server
Administration and Monitoring Server
![]() Self-Service Server
Self-Service Server
![]() Recovery Database
Recovery Database
![]() Compliance and Audit Database
Compliance and Audit Database
![]() Compliance and Audit Reports
Compliance and Audit Reports
![]() Policy Template
Policy Template
More Info: Using MBAM
This great article on MBAM offers links for learning more: http://blogs.windows.com/windows/b/springboard/archive/2013/04/10/get-ready-to-deploy-mbam-2-0.aspx.
 Thought experiment: Protecting data conditionally
In this thought experiment, apply what you’ve learned about this objective. You can find answers to these questions in the “Answers” section at the end of this chapter.
You need to support users that access data in your enterprise from various devices and locations. You want them to be able to access the data from their laptops and desktop computers, but you don’t want them to access the data from their phones or tablet computers. Answer the following questions regarding how you would set this up.
1. What kind of the technology can you use to dynamically control user access based on various factors, including the kind of device being used?
2. What types of policies should you create to protect a resource based on the current security state of the device, group membership, or location?
3. How can you test these rules and policies before deploying them in your enterprise?
Objective summary
![]() You can apply Share permissions when the operating system is configured with FAT or FAT32 or anytime you share a folder on a computer. The three Share permissions offer minimal protection: Read, Change, and Full Control.
You can apply Share permissions when the operating system is configured with FAT or FAT32 or anytime you share a folder on a computer. The three Share permissions offer minimal protection: Read, Change, and Full Control.
![]() NTFS permissions are much more robust than Share permissions and are used in enterprises to protect resources.
NTFS permissions are much more robust than Share permissions and are used in enterprises to protect resources.
![]() DAC lets administrators apply permissions and restrictions conditionally based on various factors, including what type of device the user is working from, what group the user is part of, and where the user is located.
DAC lets administrators apply permissions and restrictions conditionally based on various factors, including what type of device the user is working from, what group the user is part of, and where the user is located.
![]() Encryption protects data from unauthorized access when the machine has been compromised, including if the hard drive has been removed and attached elsewhere.
Encryption protects data from unauthorized access when the machine has been compromised, including if the hard drive has been removed and attached elsewhere.
![]() You use CertMgr to back up and recover your EFS-encrypted files. You can also use the command-line tool cipher.exe to manage encryption at an elevated command prompt.
You use CertMgr to back up and recover your EFS-encrypted files. You can also use the command-line tool cipher.exe to manage encryption at an elevated command prompt.
![]() Use Group Policy to configure settings for removable storage access.
Use Group Policy to configure settings for removable storage access.
![]() BitLocker Drive Encryption lets you encrypt entire hard disks and disk volumes. On computers with TPM, BitLocker can also ensure that data is accessible only if the computer’s startup features and settings haven’t been compromised.
BitLocker Drive Encryption lets you encrypt entire hard disks and disk volumes. On computers with TPM, BitLocker can also ensure that data is accessible only if the computer’s startup features and settings haven’t been compromised.
![]() BitLocker To Go lets you protect removable USB devices with BitLocker Drive Encryption.
BitLocker To Go lets you protect removable USB devices with BitLocker Drive Encryption.
![]() You can recover protected disks and devices in many ways when BitLocker recovery is engaged, including self-service, pulling the password from AD DS, using MBAM, and using Windows PowerShell.
You can recover protected disks and devices in many ways when BitLocker recovery is engaged, including self-service, pulling the password from AD DS, using MBAM, and using Windows PowerShell.
Objective review
Answer the following questions to test your knowledge of the information in this objective. You can find the answers to these questions and explanations of why each answer choice is correct or incorrect in the “Answers” section at the end of this chapter.
1. Which of the following are true of Share permissions?
A. They apply to users who gain access to the resource over the network and to users who log on locally.
B. They are the only way to secure network resources on FAT and FAT32 volumes.
C. Three permissions are available: Read, Write, and Full Control.
D. All of the above.
2. If a user is a member of a group with the Share permission Full Control to a folder named Resources, and if that same user is a member of a group with the NTFS permission Read, as well as a member of a third group with the NTFS permission Modify, what is the user’s effective permission to the folder?
A. Read
B. Modify
C. Full Control
D. None of the above
3. What command can you use at an elevated command prompt to find all encrypted files on a local drive?
A. Cipher.exe /c
B. Cipher.exe /x
C. Cipher.exe /r
D. Cipher.exe /u /n
4. You need to block access to all classes of removable storage devices, and the policy should take precedence over all policy settings for those classes of devices. What Group Policy should you enable?
A. CD And DVD: Deny Read/Write/Execute Access
B. Prevent Installation Of Devices That Match Any Of These Device IDs
C. Set All Removable Storage Classes: Deny
D. Prevent Installation Of Devices Using Drivers That Match These Device Setup Classes
5. Which of the following is true with regard to BitLocker? (Choose all that apply.)
A. You can use BitLocker to protect 32-bit and 64-bit computers running Windows 8.1 Pro, Windows 8.1 Enterprise, and Windows Server 2012.
B. On computers that have a TPM version 1.2 or 2.0, BitLocker can ensure that data is accessible only if the computer’s startup features and settings haven’t been compromised (altered) and if the disk is still installed in the original computer.
C. You can enable BitLocker before you deploy the operating system. When you do, you can opt to encrypt used disk space only or encrypt the entire drive.
D. You can automate deployment of BitLocker in an enterprise with the command-line tool Manage-bde.exe.
E. All of the above.
6. You want to encrypt data by using BitLocker on a computer that has a TPM. You also want to store the encryption key on the TPM chip. Which of the following options are available to you?
A. TPM + startup PIN + startup key
B. TPM + startup key
C. TPM + startup PIN
D. Startup key only
E. TPM only
F. Any option above can store the encryption key on the TPM chip.
7. A user has forgotten his PIN that he uses to unlock his BitLocker-enabled computer. He can’t find his 48-digit recovery password. Which of the following can you use to unlock the drive without physically visiting his office?
A. At a command prompt, enter the following command:
manage-bde -ComputerName <ComputerName> -forcerecovery <Volume>
B. From the Start screen, type and then click Manage BitLocker, click Duplicate Start Up Key, insert the clean USB drive on which you will write the key, and then click Save.
C. Inform the user how to access the MBAM Self-Service Center (assuming you have that set up in your enterprise).
D. Use the following PowerShell cmdlet:
Manage-bde –protectors –ComputerName –delete C: –type RecoveryPassword
Answers
This section contains the solutions to the thought experiments and answers to the lesson review questions in this chapter.
Objective 2.1: Thought experiment
1. WPA v2 offers AES and eliminates TKIP.
2. The best thing to do is to retire the netbook. You don’t want to downgrade the entire network’s security to support this one device.
3. No. A RADIUS server is best incorporated into larger enterprises and isn’t recommended for small networks.
Objective 2.1: Review
1. Correct answer: A
A. Correct: An IPv4 address is a 32-bit number that consists of four octets that are 8 bits each. It looks like this when written in the base 10 numbering system: 124.205.15.2, with the highest number in any octet 255 or less.
B. Incorrect: An IPv4 address is a 32-bit number, not a 64-bit number.
C. Incorrect: Although an IPv4 address is a 32-bit number, it consists of four octets that are 8 bits each.
D. Incorrect: An IPv6 address is a 128-bit number separated into eight blocks that are 16 bits each.
2. Correct answer: B
A. Incorrect: If the first octet defined the network ID, it would be a Class A address.
B. Correct: The first two octets define the network ID in a Class B address.
C. Incorrect: If the first three octets defined the network ID, it would be a Class C address.
D. Incorrect: A subnet mask (perhaps 255.255.0.0) can be converted to binary (11111111 11111111 00000000 00000000), and this particular subnet mask does coincide with a Class B network but doesn’t define the network ID for a resource.
3. Correct answers: A, B
A. Correct: DHCP servers can assign both IPv4 and IPv6 addresses to hosts on a network.
B. Correct: DHCP servers can provide clients the necessary IP addresses of the applicable DNS server and gateway.
C. Incorrect: DHCP doesn’t have to be used for all network resources in any instance. Although not using DHCP in large enterprises would be nearly impossible, static addresses are still needed for specific hosts, including network printers, gateways, and DNS servers.
D. Incorrect: Because C is incorrect, all of the above can’t be the correct answer.
4. Correct answer: A
A. Correct: 6to4 is used with clients that are sending data from a public IP address.
B. Incorrect: ISATAP is used to connect to other ISATAP clients.
C. Incorrect: Teredo is used when the DirectAccess client is sitting behind a NAT device and has been assigned a private IP address.
D. Incorrect: IP-HTTPS is used when the client is sitting behind a limiting firewall.
E. Incorrect: 6to4 is used when a client is sending from a public IP address.
5. Correct answer: D
A. Incorrect: DNS zones represent groups of computers that can use DNS to perform name-resolution tasks.
B. Incorrect: A trust anchor is a public cryptographic key. This key is what enables a DNS server to validate DNS responses.
C. Incorrect: NRPT is the Name Resolution Policy Table, which contains namespaces and other settings that are stored in the Windows Registry. This information is used to determine how the DNS client will behave when it asks for responses and receives them.
D. Correct: PNRP is defined as suggested here. PNRP uses “clouds” of computers that can locate one another.
E. Incorrect: DNSSEC allows for a DNS zone and all the records in it to be cryptographically signed. Thus, when a DNS server that hosts a signed zone receives a name-resolution inquiry, that server returns digital signatures along with the requested records. A name resolver or another server can validate that the responses are accurate and haven’t been altered using these signatures.
6. Correct answer: C
A. Incorrect: 802.11a runs on the 5 GHz frequency, for one.
B. Incorrect: 802.11b has transmission rates of 11 Mbps, for one.
C. Correct: 802.11n will replace 802.11a, b, and g, and supports Wi-Fi Protected Access version 2 (WPA v2). It can be used on two frequencies: 2.5 GHz and 5 GHz. It supports transmission rates of up to 200 Mbps.
D. Incorrect: 802.11i provides enhanced encryption but doesn’t meet the requirements listed here.
E. Incorrect: 802.1x must be used with a RADIUS server and is compatible with all other listed standards.
7. Correct answer: D
A. Incorrect: You type this command after you type what’s listed in answer D.
B. Incorrect: The shared connection isn’t ready yet. You must create the network and start it first.
C. Incorrect: You don’t need to create an inbound rule in Windows Firewall with Advanced Security to allow the second device access.
D. Correct: You must open an administrator command prompt and enter the following:
netsh wlan set hosted network mode=allow ssid=<networkname> key=<password>
8. Correct answer: E
A. Incorrect: Program is correct, but the other answers are too.
B. Incorrect: Port is correct, but so are the other answers.
C. Incorrect: Predefined is correct, but the other answers are too.
D. Incorrect: Custom is correct, but so are the other answers.
E. Correct: All of the above is correct.
9. Correct answer: A
A. Correct: SHA-1 AES-CBC 128 Diffie-Hellmann Group 2 and SHA-1 3DES Diffie-Hellmann Group 2 are the proper options.
B. Incorrect: Data Integrity Algorithms and Data Integrity And Encryption Algorithms are used with Data Protection (Quick Mode).
C. Incorrect: Kerberos V5 is used for authentication.
D. Incorrect: None of the above is incorrect because A is correct.
Objective 2.2: Thought experiment
1. DirectAccess offers the features you require.
2. You don’t need any public IP addresses if the DirectAccess server sits behind a NAT device.
3. A Network Location Server determines this.
4. RRAS.
Objective 2.2: Review
1. Correct answer: C.
A. Incorrect: This protocol doesn’t support the use of a preshared key.
B. Incorrect: This protocol doesn’t support the use of a preshared key.
C. Correct: This is the only protocol listed that supports a preshared key.
D. Incorrect: This protocol doesn’t support the use of a preshared key.
E. Incorrect: This is Remote Desktop Protocol and isn’t correct.
2. Correct answer: B
A. Incorrect: Administrators use CMAK to create VPN profiles, among other things.
B. Correct: Connection Manager is a feature that lets a user connect to a VPN.
C. Incorrect: This command retrieves only the specified VPN connection profile information.
D. Incorrect: RSAT is used to manage servers and clients from your own laptop or personal desktop computer.
3. Correct answer: D
A. Incorrect: Internet Key Exchange, Version 2 (IKEv2) protocol supports IPv6 and VPN Reconnect, authentication with EAP, PEAP, EAP-MSCHAPv2, and smart cards and isn’t used with RD Gateway.
B. Incorrect: Secure Socket Tunneling Protocol (SSTP) encapsulates PPP traffic through the Secure Sockets Layer (SSL) protocol, uses certificates for authentication, and isn’t used with RD Gateway.
C. Incorrect: Applicable and compatible transition protocols are used with DirectAccess clients who need to communicate IPv6 data over IPv4 networks but aren’t applicable here.
D. Correct: Remote Desktop Protocol (RDP) over HTTPS is the proper protocol.
4. Correct answers: A, B, C, D
A. Correct: Windows 7 Enterprise can be used.
B. Correct: Windows 7 Ultimate can be used.
C. Correct: Windows 8 Enterprise can be used.
D. Correct: Windows 8.1 Enterprise can be used.
E. Incorrect: Windows XP with SP3 can’t be used.
F. Incorrect: Windows Vista Business can’t be used.
5. Correct answers: B, C
A. Incorrect: Clients must be joined to the domain; a workgroup won’t do.
B. Correct: Windows Firewall must be enabled on all profiles.
C. Correct: You must install and configure a DNS server.
D. Incorrect: All of the above isn’t correct because answer A isn’t correct.
6. Correct answer: A
A. Correct: enter -pssession is the proper command.
B. Incorrect: enable-psremoting configures the computer to receive remote commands.
C. Incorrect: start-job starts a Windows PowerShell background job.
D. Incorrect: set-pssessionconfiguration changes the properties of a registered session configuration.
7. Correct answers: A, B, C
A. Correct: An AD DS domain controller is required on the domain for clients to be authenticated, authorized, and so on.
B. Correct: A Network Policy Server evaluates the health of each client.
C. Correct: A Certification Authority is required to manage IPsec certificates.
D. Incorrect: RRAS is used with NAP and VPN enforcement.
8. Correct answer: C
A. Incorrect: Netsh nap client reset resets a configuration.
B. Incorrect: Netsh nap client set sets a configuration.
C. Correct: Netsh nap client dump lets you display a configuration script.
D. Incorrect: Netsh nap client show shows configuration and state information.
Objective 2.3: Thought experiment
1. Yes. AC CS in Windows Server 2012 requires an existing PKI infrastructure.
2. Client certificates are stored in the personal certificate store for the applicable user account on the client’s computer.
3. Trusted root certificates are stored in the Trusted Root Certification Authorities store on the client’s computer.
4. CertMgr.msc can be used to open the CertMgr window.
Objective 2.3: Review
1. Correct answers: A, B
A. Correct: Backup-CARoleService is the correct command for backing up the CA database.
B. Correct: Restore-CARoleService is the correct command for restoring the CA database.
C. Incorrect: This isn’t a valid Windows PowerShell command.
D. Incorrect: This isn’t a valid Windows PowerShell command.
2. Correct answers: B, C
A. Incorrect: A physical smart card can be removed.
B. Correct: The solution here requires a compatible TPM chip and a virtual smart card.
C. Correct: The solution here requires a compatible TPM chip and a virtual smart card.
D. Incorrect: A biometric fingerprint reader doesn’t offer private keys for security.
E. Incorrect: BitLocker Drive Encryption is used to protect data on the drive and isn’t for authentication purposes.
3. Correct answer: C
A. Incorrect: If you’ve joined the homegroup, you are connected to the network.
B. Incorrect: BitLocker Drive Encryption isn’t required to join a homegroup.
C. Correct: The time is configured incorrectly on the second computer.
D. Incorrect: If you have joined the homegroup, you are running a compatible version of Windows.
4. Correct answers: A, B
A. Correct: A workgroup uses a distributed method for sharing data.
B. Correct: A homegroup uses a distributed method for sharing data.
C. Incorrect: A domain uses a centralized method of sharing and managing data and uses AD DS for authentication and user access.
D. Incorrect: Although a workgroup is a distributed sharing method, a domain isn’t.
5. Correct answer: D
A. Incorrect: A VPN enables users to access your local network when they are away from the office. VPNs might use PPTP or L2TP to secure the connection.
B. Incorrect: Remote Desktop Services enables users to access session-based desktops, virtual machine-based desktops, or applications from both within a network and from the Internet.
C. Incorrect: App-V enables the application to run in a virtualized environment without having to install or configure it on the local machine.
D. Correct: Secure Channel is a Security Support Provider (SSP), and the TLS/SSL protocol uses a client/server model that’s based on certificate authentication. It does require a PKI infrastructure.
6. Correct answer: A
A. Correct: You must first configure the policy Account Lockout Threshold to state how many times a user can try to authenticate before additional measures are taken.
B. Incorrect: The policy Reset Account Counter After is optional.
C. Incorrect: These policies are available in both workgroups and domains.
D. Incorrect: The Group Security Policy console is the appropriate place to create these policies.
7. Correct answers: B, C, D
A. Incorrect: Account Policies don’t provide the desired results; these are Group Policy settings and aren’t used to address issues with authentication over a WAN.
B. Correct: Credential caching can be used to store credentials on a local RODC server.
C. Correct: Password Replication Policies are used to determine that credential caching can be used (and how to use it).
D. Correct: An RODC server is required to manage credential caching in the branch office.
E. Incorrect: Secure Channel is a technology used to secure connections used by applications over untrusted networks.
8. Correct answer: C
A. Incorrect: Credential Manager can store Windows Store passwords as well as local ones.
B. Incorrect: Credential Manager can store Windows Store passwords as well as those input for local resources.
C. Correct: Credential Manager can store Windows Store passwords and passwords for local resources.
D. Incorrect: Credential Manager can store both Windows Store passwords and local use passwords.
9. Correct answer: B
A. Incorrect: A Microsoft account can be used in a domain if it isn’t restricted through Group Policy.
B. Correct: Allow the user to associate their own Microsoft account to achieve this.
C. Incorrect: Workplace Join allows users to connect to your domain with their own personal devices.
D. Incorrect: If you add Web Application Proxy, users can join your enterprise from any Internet-enabled location by using a device you’ve allowed using Workplace Join.
Objective 2.4: Thought experiment
1. You should choose a parity option. This offers fault tolerance and makes efficient use of the disk space.
2. To create a three-way parity solution, you should use five.
3. You shouldn’t use a USB hub with USB 2.0 ports. You can use a hub with USB 3.0 ports, though.
Objective 2.4: Review
1. Correct answer: C
A. Incorrect: /cacheflush isn’t a valid command.
B. Incorrect: /cache is used to flush the cache, not clear it.
C. Correct: /pktflush is used to clear the DFS cache.
D. Incorrect: /clearcache isn’t a valid command.
2. Correct answer: E
A. Incorrect: USB 2.0 is a valid option, but so are all the others listed.
B. Incorrect: USB 3.0 is a valid option, but so are all the others listed.
C. Incorrect: Serial ATA is a valid option, but so are all the others listed.
D. Incorrect: Serial Attached SCSI is a valid option, but so are all the others listed.
E. Correct: All of the above is correct.
3. Correct answer: B
A. Incorrect: Hosted mode is best used when the branch office has 50 or more computers.
B. Correct: Distributed mode is best here because the branch office has fewer than 50 computers and they all can cache the applicable files.
C. Incorrect: Ad Hoc mode isn’t a valid mode.
D. Incorrect: Distributed mode is the best choice.
4. Correct answer: A
A. Correct: netsh branchcache set service mode=DISTRIBUTED is the applicable command.
B. Incorrect: The netsh branchcache command must include set service.
C. Incorrect: Enable-BCDistributed is a Windows PowerShell command.
D. Incorrect: Enable-BCLocal is a Windows PowerShell command.
5. Correct answer: B
A. Incorrect: The OneDrive app for Windows is for tablets, laptops, and desktops not for smartphones. A web browser would be fine for a tablet.
B. Correct: The OneDrive app for smartphones is a good choice. A web browser on a tablet is a good choice (as is the Windows app).
C. Incorrect: A Web browser on a smartphone would be too difficult to see. A desktop application on a tablet would allow you to open documents and other files but might or might not be the best option for your clients.
D. Incorrect: The OneDrive app for smartphones is a desirable option. A desktop application isn’t the best option for a tablet; a Web browser or the Windows app most likely is.
Objective 2.5: Thought experiment
1. DAC enables you to support users that access data in your enterprise from various devices and from various places.
2. Central Access Policies contain conditional expressions that you can use to protect resources as determined by their current state, group, or location.
3. Proposed permissions let you more accurately determine the effect of the changes before you apply them.
Objective 2.5: Review
1. Correct answer: B
A. Incorrect: They apply to users who gain access to the resource over the network but don’t apply to users who log on locally.
B. Correct: They are the only way to secure network resources on FAT and FAT32 volumes.
C. Incorrect: Three permissions are available, but they are Read, Change, and Full Control.
D. Incorrect: Only B is correct.
2. Correct answer: B
A. Incorrect: The Share permission applied to the folder for the user is Full Control; however, the NTFS cumulative permission is Modify. The most restrictive of the two is applied, which is Modify.
B. Correct: When a user is a member of multiple groups, the cumulative Share and NTFS permissions are calculated and the most restrictive is applied. So Share (Full Control) and NTFS (Modify) equate to an effective permission of Modify.
C. Incorrect: The Share permission applied to the folder for the user is Full Control; however, the NTFS cumulative permission is Modify. The most restrictive of the two is applied, which is Modify. Full Control would be the least restrictive.
D. Incorrect: B is the correct answer.
3. Correct answer: D
A. Incorrect: Cipher.exe /c displays information about an encrypted file.
B. Incorrect: Cipher.exe /x backs up your encryption keys.
C. Incorrect: Cipher.exe /r creates a new data recovery agent.
D. Correct: Cipher.exe /u /n finds all encrypted files on a local drive.
4. Correct answer: C
A. Incorrect: CD And DVD: Deny Read/Write/Execute Access applies only to CDs and DVDs, not all classes.
B. Incorrect: Prevent Installation Of Devices That Match Any Of These Device IDs is an additional Group Policy setting you can configure but doesn’t fit the scenario here.
C. Correct: Set All Removable Storage Classes: Deny is the proper policy.
D. Incorrect: Prevent Installation Of Devices Using Drivers That Match These Device Setup Classes is a valid policy but isn’t the correct answer here.
5. Correct answer: E
A. Incorrect: You can use BitLocker to protect 32-bit and 64-bit computers running Windows 8.1 Pro, Windows 8.1 Enterprise, and Windows Server 2012. However, the other answers are also correct.
B. Incorrect: On computers that have a TPM version 1.2 or 2.0, BitLocker can also ensure that data is accessible only if the computer’s startup features and settings haven’t been compromised and if the disk is still installed in the original computer. However, the other answers are also correct.
C. Incorrect: You can enable BitLocker before you deploy the operating system. When you do, you can opt to encrypt used disk space only or encrypt the entire drive. However, the other answers are also correct.
D. Incorrect: You can automate deployment of BitLocker in an enterprise with the command-line tool Manage-bde.exe. However, the other answers are also correct.
E. Correct: All of the above is correct.
6. Correct answers: A, B, C, E
A. Correct: The encryption key is stored on the TPM chip, but an administrator must type a PIN and insert the startup key (available on a USB drive).
B. Correct: The encryption key is stored on the TPM chip, and an administrator must insert a USB flash drive that contains a startup key.
C. Correct: The encryption key is stored on the TPM chip, and an administrator must enter a PIN.
D. Incorrect: An administrator must insert a USB flash drive with the startup key on it. The computer doesn’t have to have a TPM chip, but this one does and you want to use it.
E. Correct: The encryption key is stored on the TPM chip, and no administrator log on is required.
F. Incorrect: D doesn’t fit the suggested scenario.
7. Correct answer: A
A. Correct: You can recover a remote computer at a command prompt by entering the following command:
manage-bde. -ComputerName <ComputerName> -forcerecovery <Volume>
B. Incorrect: To perform this task, you need to be at the client’s computer. (This answer mentions nothing about remotely accessing the computer.)
C. Incorrect: You can tell the user to access the MBAM Self-Service Center if you have that set up in your enterprise.
D. Incorrect: The following Windows PowerShell cmdlet is valid:
Manage-bde –protectors–delete C: –type RecoveryPassword
However, the cmdlet shown with this answer isn’t correct and can’t be used to access a computer remotely.
All materials on the site are licensed Creative Commons Attribution-Sharealike 3.0 Unported CC BY-SA 3.0 & GNU Free Documentation License (GFDL)
If you are the copyright holder of any material contained on our site and intend to remove it, please contact our site administrator for approval.
© 2016-2026 All site design rights belong to S.Y.A.