Word 2016 For Dummies (2016)
Part II
Your Basic Word
Chapter 9
Publish Your Document
In This Chapter
![]() Previewing your document before printing
Previewing your document before printing
![]() Printing a specific part of a document
Printing a specific part of a document
![]() Printing multiple copies of a document
Printing multiple copies of a document
![]() Canceling a print job
Canceling a print job
![]() Making a document compatible for sharing
Making a document compatible for sharing
![]() Sending a document as an attachment
Sending a document as an attachment
![]() Exporting a document as a PDF
Exporting a document as a PDF
After writing, editing, formatting, and proofing (with lots of document saving along the way), the final step in document preparation is publishing. Don’t get all excited: Publishing in Word has nothing to do with seeing your book on the New York Times bestseller list (although it could). Publishing is a general topic that includes printing a document to paper but also generating an electronic document you can share online. Times have changed.
Your Document on Paper
The word processor, the best writing tool ever invented. It’s also the first writing tool that avoids paper until your document is complete. At that point, if you desire, you can generate a dead-tree version of the document, also called a printout or a hard copy.
· Configuring the printer is done in Windows, not Word. Use the Control Panel or Settings app to control the printer.
· I assume that your computer has a printer attached or available on a network and that everything is set up just peachy. That setup includes stocking the printer with ink or toner and plenty of paper.
Previewing before printing
 Before you print, preview the look of the final document. Yeah, even though your document is supposed to look the same on the screen as it does on paper, you may still see surprises: missing page numbers, blank pages, screwy headers, and other jaw-dropping blunders, for example.
Fortunately, a print preview of your document appears as part of the Print screen, as shown in Figure 9-1.
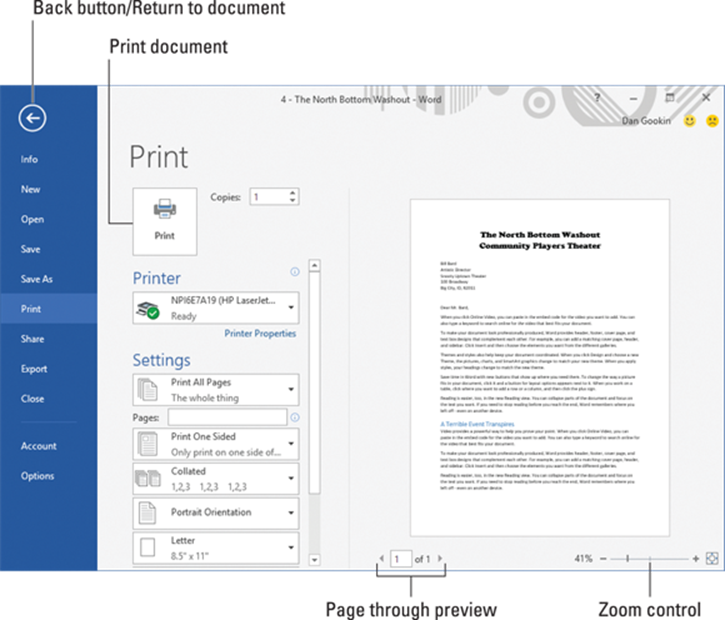
Figure 9-1: The Print screen.
To preview your document, follow these steps:
1. Save your document.
Yep — always save. Saving before printing is a good idea.
2. Click the File tab.
3. Chose the Print item from the left side of the File screen.
The Print screen appears, similar to what’s shown in Figure 9-1.
4. Use the buttons at the bottom of the screen to page through your document.
You can use the Zoom control (refer to Figure 9-1) to enlarge or reduce the image. Look at the margins. If you’re using footnotes, headers, or footers, look at how they lay out. The idea is to spot anything that’s dreadfully wrong before you print.
When you’re ready, you can print the document. Details are offered in the next section, but basically you click the big Print button, labeled in Figure 9-1. Or when things need to be repaired, click the Back button to return to your document.
Printing the whole document
Printing the document is easy:
1. Make sure that the printer is on and ready to print.
Printing works fastest when the printer is on.
2. Save your document.
Click the little Save button on the Quick Access toolbar for a quickie save.
3. Click the File tab.
4. Choose the Print command from the File tab’s window.
The Print screen appears (refer to Figure 9-1).
5. Click the big Print button.
The Print screen closes, and the document spews forth from the printer.
Printing speed depends on the complexity of the document and how dumb the printer is. Fortunately, you can continue working while the document prints.
· The keyboard shortcut to display the Print screen (Steps 3 and 4) is Ctrl+P.
· Obligatory Ctrl+P joke goes here.
·  If nothing prints, don’t use the Print command again! Most likely nothing is awry; the computer is still thinking or sending information to the printer. If you don’t see an error message, everything will probably print, eventually.
· The computer prints one copy of your document for every Print command you incant. If the printer is just being slow and you impatiently click the Print button ten times, you'll end up printing ten copies of your document. (See the section “Canceling a print job,” later in this chapter.)
· When the document format specifies a unique paper size, the printer prompts you to load that paper size. Stand by to produce and load the proper paper when the printer prompts you.
 Delete that extra blank page at the end of a document
Occasionally, you may be surprised when your document prints one extra page — a blank page. And you're not only bothered because you forgot to preview before printing (which I recommend in this chapter) but also vexed because you cannot get rid of it! Until now.
To remove the ugly, blank page that often roots at the end of your document, press Ctrl+End. With the insertion pointer at the end of your document, press the Backspace key repeatedly until the extra page is gone. How can you tell? Keep an eye on the total page count on the status bar. When the page count decreases by one, you know that the extra page is gone.
Printing a specific page
Follow these steps to print only one page of your document:
1. Move the insertion pointer so that it’s sitting somewhere on the page you want to print.
Check the page number on the status bar to ensure that you’re on the correct page.
2. Press Ctrl+P.
3. Click the Print Range button below the Settings heading.
Refer to Figure 9-2 for the button’s location.
4. Choose Print Current Page from the menu.
5. Click the Print button.

Figure 9-2: Specific buttons on the Print screen.
The single page prints with all the formatting you applied, including footnotes and page numbers and everything else, just as though you plucked that page from a complete printing of the entire document.
Printing a single page in this manner is useful when the printer goofs up one page in a document and you need to reprint only that page.
Printing a range of pages
Word enables you to print a range of pages, odd pages, even pages, or a hodgepodge combination of random pages from within your document. To print a range or group of pages, summon the Print screen: Press Ctrl+P.
On the Print screen, look for the Pages text box, illustrated in Figure 9-2. Here are some suggestions for what to type in that text box:
· To print pages 3 through 5, type 3-5.
· To print pages 1 through 7, type 1-7.
· To print pages 2 and 6, type 2,6.
· To print page 3, pages 5 through 9, pages 15 through 17, and page 19 (boy, that coffee went everywhere, didn’t it?), type 3, 5-9, 15-17, 19.
Click the big Print button when you’re ready to print. Only the pages you specify churn from the printer.
Leave the Pages box blank to print all pages in the document.
Printing on both sides of the page
If your printer is capable of duplex printing, you can direct Word to print your document on both sides of a sheet of paper. If your printer is so blessed, follow these steps:
1. Press Ctrl+P when you’re ready to print the document.
I’ll assume that the document has just been saved.
2. Click the Duplex Printing button on the Print screen.
Refer to Figure 9-2 for the button’s location.
3. Choose Print on Both Sides, Flip Pages on Long Sides.
Don’t bother with the Short Sides option unless you plan on binding your document that way.
If you don’t see the Print on Both Sides options, you have to manually print. See the next section.
4. Make other settings as necessary on the Print screen.
5. Click the big Print button to print your document.
Both sides of the page are printed.
I’ve discovered that Word (Windows actually) isn’t that smart when it comes to knowing which printers are duplex and which aren’t. Alas, when Windows doesn’t recognize your duplex printer as such, there’s little you can do.
Printing odd and even pages
Say you have a printer that doesn’t print on both sides of the page. If so, print all the odd pages in your document. Flip the paper and reinsert it in the printer. Then print all the even pages. The end result is printing on both sides of the page.
To print all odd pages or all even pages, follow these steps:
1. Press Ctrl+P to summon the Print screen.
2. Click the Print Range button below the Settings heading.
Refer to Figure 9-2 for the button’s location.
3. Choose Only Print Odd Pages from the menu.
4. Click the Print button to print odd pages in your document.
To print even pages, repeat these steps, but in Step 3 choose Only Print Even Pages.
Remove the Document Properties sheet
A printing problem that can potentially annoy you is finding the Document Properties sheet printing with your document. This extra sheet of paper prints first, listing information about the document. The Document Properties sheet isn’t printed unless its option is set, and for some reason the option gets set on some folks’ computers.
To prevent the Document Properties sheet from printing, click the File tab and choose the Options command. In the Word Options dialog box, click the Display item on the left side of the window. In the Printing Options area on the Display screen, remove the check mark by the item Print Document Properties. Click OK.
Printing a block
After you mark a block of text in your document, you can beg the Print command to print only that block. Here’s how:
1. Mark the block of text you want to print.
See Chapter 6 for all the block-marking instructions in the world.
2. Press Ctrl+P to summon the Print screen.
3. Click the Print Range button below the Settings heading.
4. From the menu, choose the item Print Selection.
The Print Selection item is available only when a block is selected in your document.
5. Click the Print button.
The block you selected prints at the same position, with the same formatting (headers and footers) as though you had printed the entire document.
Printing more than one copy of something
When it comes time to provide a copy of your report to all five members of the cult and the photocopier is broken, just print multiple copies. Here's how:
1. Press Ctrl+P on the keyboard to summon the Print screen.
2. Enter the number of copies in the Copies text box.
To print five copies, for example, click the box and type 5.
3. Click the big Print button to print your copies.
Under normal circumstances, Word prints each copy of the document one after the other. This process is known as collating. However, if you’re printing five copies of a document and you want Word to print seven copies of page 1 and then seven copies of page 2 (and so on), choose the option Uncollated from the Collated menu button, found under the Settings heading on the Print screen.
Choosing another printer
When the computer has more than one printer available, ensure that you’re using the proper one. Or perhaps you want to use another printer, such as that fancy color printer that is available on the network even though Ed has hidden it in his office. Either way, follow these steps:
1. Press Ctrl+P to summon the Print screen.
2. Click the Select Printer button below the Printer heading.
The button shows the name of the currently selected printer, which is usually the one set by Windows as the default.
3. Choose another printer from the list.
4. Click the Print button to print your document on the selected printer.
Unfortunately, not every printer features a clear and descriptive name.
Also, not every printer listed is a physical printer. Some are document printers, such as Microsoft Print to PDF, which is covered later in this chapter.
 Adding and managing printers falls under the domain of Windows, not Word. To add printers, rename them, or set the default printer, use Windows.
Canceling a print job
The fastest, easiest way to cancel a print job is to rush up to the printer and set it on fire. Lamentably, this method is frequently met with frowns by local fire officials.
If your printer features a Cancel button, use it to stop a print job run amok. The Cancel button typically features an X, often colored red. Touch that button, and the printer stops — maybe not at once, but the button cancels the rest of the document from printing.
For slow printers, or those without a Cancel button, you can attempt to use Windows to halt a print job run amok. Obey these steps
1.  Look on the far right end of the taskbar for the li’l printer icon.
If you don’t see the li’l printer icon, it’s too late to cancel the print job. Otherwise, you see the printer’s control window, which lists any queued printing jobs.
2. Click the name of your Word document job in the list.
3. Choose either the Document ⇒ Cancel command or the Document ⇒ Cancel Printing command.
4. Click Yes or OK to terminate the job.
5. Close the printer’s control window.
This method frequently meets with failure simply because the printer is fast and working these steps takes time. Still, it’s worth a try, especially when the printer lacks a Cancel button.
· It may take a while for the printer to stop printing. That’s because printers have their own memory, and a few pages of the document may be stored and continue to print even after you tell the printer to stop.
· Stopping a print job is a Windows task, not one that Word has control over.
Electronically Publishing Your Document
Not every document needs to hit paper. For example, I never print my books. They’re sent electronically to the publisher and even edited right on the screen. eBooks don’t need to be printed. And sometimes documents can be more effectively distributed by email than any other means. It’s all part of electronically publishing your document.
Preparing a document for sharing
Lots of interesting things can be put in your Word document that you don’t want published. These items include comments, revision marks, hidden text, and other items useful to you or your collaborators, which would mess up a document you share with others. The solution is to use Word’s Check for Issues tool, like this:
1. Ensure that your document is finished, finalized, and saved.
2. Click the File tab.
On the File screen, the Info area should be selected. If not, click the word Info.
3. Click the Check for Issues button.
4. Choose Inspect Document.
The Document Inspector window shows up. All items are selected.
5. Click the Inspect button.
After a few moments, the Document Inspector window shows up again, listing any issues with your document. The issues shown are explained, which allows you to cancel the Document Inspector to fix individual items.
6. (Optional) Click the Remove All button next to any issues you want to clear up.
Now that you know what the issues are, you can always click the Close button and return to your document to manually inspect them.
7. Click the Close button, or click Reinspect to give your document another once-over.
You can go forward with publishing your document or continue working.
Sending a Word document via email
Emailing your Word document is a snap — as long as you’re using Microsoft Outlook as your email program. If not, you need to save your document as you normally would, and then use your email program (which isn’t Outlook) to create a new message with the document chosen as a file attachment.
If you do use Outlook as your email program, and it’s all set up and actually works, follow these steps in Word to send a document via email:
1. Save your document one more time.
2. Click the File tab.
3. Choose the Share command.
4. Choose the E-Mail item found under the Share heading.
5. Click the Send As Attachment button.
At this point, Outlook takes over and you compose your email message. When you send the message, your Word document is sent along as well.
Documents saved to your OneDrive cloud storage can be shared with others on the Internet. See chapter 26 for details.
Making a PDF
Word document files are considered a standard. Therefore, it’s perfectly acceptable to send one of your document files as an email attachment or make it available for sharing on cloud storage.
It’s also possible to save your document in the Adobe Acrobat document format, also known as a PDF file. This type of electronic publishing is secretly a form of printing your document. Obey these steps:
1. Finish your document.
Yes, that includes saving it one last time.
2. Press Ctrl+P to summon the Print screen.
3. Click the Printer button.
A list of available printers appears.
4. Choose Microsoft Print to PDF.
5. Click the Print button.
Nothing is printed on paper, but the document is “printed” to a new PDF file. That requires the use of the special Save Print Output As dialog box.
6. Choose a location for the PDF file.
Use the dialog box’s controls to locate the proper folder.
7. Type a filename.
8. Click the Save button.
The PDF file is created. The original document remains in the Word window, unchanged by the print-to-PDF operation.
You need a copy of the Adobe Reader program to view PDF files. Don’t worry: It’s free. Go to get.adobe.com/reader.
Exporting your document
Beyond the Word document format and PDF, you can export your document into other, common file formats. These formats allow for easy document sharing, although they’re not as common as they once were.
To export your document into another file format, follow these steps:
1. Click the File tab.
2. Choose Export from the items on the left side of the screen.
3. Choose Change File Type.
A list of available file types appears on the right side of the screen. These types include Word formats and other file types such as Plain Text, Rich Text Format (RTF), and web page (HTML).
4. Click to select a file type.
5. Click the Save As icon.
You may have to scroll down the list to find the Save As icon.
The Save As dialog box appears. It’s the same Save As dialog box as covered in Chapter 8, although the Save As Type menu lists the file type you selected in Step 3.
6. Work the dialog box to set a folder or other location for the file, or to change its name.
7. Click the Save button to export the document by using the alien file type.
It may look like the document hasn’t changed, but it has! The title bar now specifies that you’re working on the exported document, not the original Word document.
8. Close the document.
Press Ctrl+W or otherwise dismiss the document.
By closing the document, you ensure that any changes you make aren’t made to the exported copy. To continue working on the original document, open it again in Word.
All materials on the site are licensed Creative Commons Attribution-Sharealike 3.0 Unported CC BY-SA 3.0 & GNU Free Documentation License (GFDL)
If you are the copyright holder of any material contained on our site and intend to remove it, please contact our site administrator for approval.
© 2016-2026 All site design rights belong to S.Y.A.