CCNP Security SISAS 300-208 Official Cert Guide (2015)
Part VI: Safely Deploying in the Enterprise
Chapter 20. Deploying Safely
This chapter covers the following exam topics:
![]() 802.1X phasing (monitor mode, low impact, closed mode)
802.1X phasing (monitor mode, low impact, closed mode)
Throughout this book, you have examined quite a bit of configuration detail about ISE and about the network access devices (NADs) themselves. You have explored the technical merit of policy creation, guest lifecycle management, posture assessment, and much more. There is obviously a great deal to consider when you deploy a system such as this one; it is not something you should just enable overnight with the flip of a switch.
This chapter focuses on the recommended approach to deploying the Secure Access system. We will review some of the challenges that were seen in the past and why certain technologies were enhanced to provide a more prescriptive approach to deployment.
“Do I Know This Already?” Quiz
The “Do I Know This Already?” quiz enables you to assess whether you should read this entire chapter thoroughly or jump to the “Exam Preparation Tasks” section. If you are in doubt about your answers to these questions or your own assessment of your knowledge of the topics, read the entire chapter. Table 20-1 lists the major headings in this chapter and their corresponding “Do I Know This Already?” quiz questions. You can find the answers in Appendix A, “Answers to the ‘Do I Know This Already?’ Quizzes.”

Table 20-1 “Do I Know This Already?” Section-to-Question Mapping
Caution
The goal of self-assessment is to gauge your mastery of the topics in this chapter. If you do not know the answer to a question or are only partially sure of the answer, you should mark that question as wrong for purposes of the self-assessment. Giving yourself credit for an answer you correctly guess skews your self-assessment results and might provide you with a false sense of security.
1. What is Monitor Mode?
a. Using the authentication open interface configuration command on 802.1X enabled interfaces
b. A setting in ISE to record actions but not take them
c. A method for identifying which device would have failed authentication and correcting the root cause prior to it taking effect
d. A method for alerting the administrator of failed authentications, so the end user may be called and manually granted network access
2. What is Low-Impact Mode?
a. One of the two end states of authentication that limits access but still uses the authentication open interface configuration command
b. One of the two end states of authentication that limits access but is less secure than closed mode
c. A method to ensure authentications occur, but the authorizations are ignored, so as not to cause a denial of service
d. A method for identifying which device would have failed authentication and correcting the root cause prior to it taking effect
3. What is the primary benefit of a phased deployment approach?
a. It allows an endpoint to go through multiple phases of authentication prior to gaining network access, including dual-factor authentication.
b. It permits you to use Cisco proprietary technology and therefore increase Cisco’s stock value.
c. It enables additional security protocols to extend authentications, such as the use of smart cards.
d. To ensure that a port, switch, or location is fully ready to be successful before enabling enforcement and specific authorization results.
4. True or False? The authentication open command performs EAP authentications but ignores authorization results.
a. True
b. False
5. True of False? authentication open allows all traffic to pass through the switch port before the authentication result is received from the AAA server.
a. True
b. False
6. What is the ISE configuration that will allow different groups of authentication and authorization policies?
a. Policy groupings
b. Policy sets
c. Service selection rules
d. Service sets
7. Where is Monitor Mode configured for wireless LANs?
a. It is configured on the WLC, under the security properties for the WLAN.
b. It is configured in the Wireless Monitor Mode policy set within ISE.
c. It is configured in ISE by enabling wireless monitor mode under the system settings.
d. Monitor Mode is not possible with wireless LANs.
8. Using policy sets as described in this chapter, how would a switch be transitioned from Monitor Mode to one of the end state modes?
a. Move the NAD from the Monitor Mode NDG to the final state NDG.
b. Remove the authentication open command from the switch interface.
c. Enter the low-impact or closed keyword for the radius server definition in the switch.
d. Enable enforcement mode on the client supplicants.
9. True or False? A wired port must have a single configuration that supports authenticating supplicants, guests, and nonauthenticating devices.
a. True
b. False
10. Which of the modes is most closely related to the default of 802.1X?
a. Closed Mode
b. Monitor Mode
c. Low-Impact Mode
d. Cisco Enhanced Security Mode
Foundation Topics
Why Use a Phased Approach?
Back in the early 2000s, a new technology was emerging that would revolutionize networking as we knew it. This technology was IEEE 802.1X, which enabled authentication of a network access port prior to allowing devices on to the network. The concept was simple, and it was predicted that within five years there would not be any “hot ports” in the world that wouldn’t first authenticate the user, and no unauthorized users would be getting onto networks anymore.
802.1X was originally created to be very binary in nature. A device is either authenticated and gets access or fails authentication and is denied. Figure 20-1 illustrates the intended behavior of 802.1X.
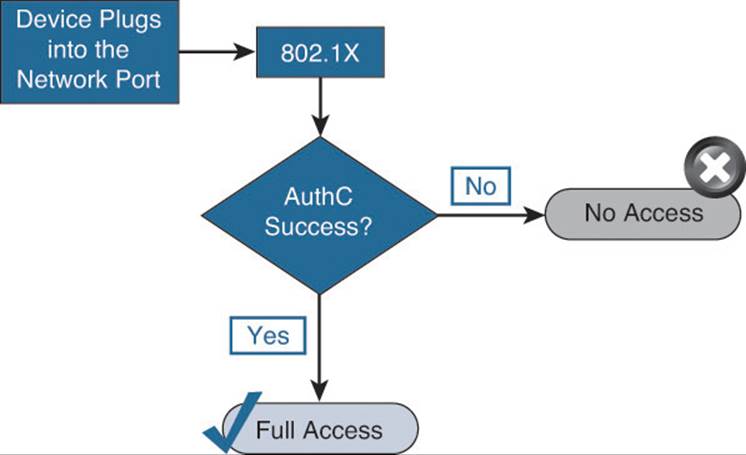
Figure 20-1 802.1X intended behavior.
However, there are many moving parts to this authentication process that must all be aligned properly to prevent causing a denial of service on the user population. Supplicants must be configured on devices; lists of MAC addresses must be created to allow MAB devices; profiling probes must be enabled and must be collecting data about endpoints to help build that list of MAC addresses; certificates must be trusted; guest accounts must be created; and much more.
If you just flip the switch and enable 802.1X on all access-layer switch ports all at once, there would most likely be a swarm of angry users converging on the IT department demanding that people lose their jobs. This is often called a “career limiting event,” or CLE for short.
Not long ago, there was an 802.1X implementation at a financial organization with 2,000 switch ports in their campus building. Due to an audit requirement, network authentication had to be enabled by a certain date; otherwise, they would be subject to fines. The mandate came down from above, the project received its funding, and away the deployment went. They lab tested everything and proved it all would work using Cisco Catalyst 6513 switches and the native Windows XP (service pack 3) supplicant configured for EAP-TLS machine authentication with the Active-Directory-issued machine certificate.
It was beautiful. Everything was working perfectly on the test systems in the lab, the desktop team assured everyone that the Group Policy (GPO) was sent properly, and all the Windows XP systems were ready to authenticate. All the network team should have been required to do was turn on the authentication on the switch ports (theoretically).
The advice was still to deploy in Monitor Mode first and then change over to Closed Mode (the end state). This meant that the authentication open command needed to be applied to the switch port, which would enable the team to validate that authentications would all be successful before they truly enforced access to the network.
The security oversight committee nixed the idea immediately because the word open was in the command. Based on the short time requirements and politics, the team was not allowed to use the command. Not ever. Never mind that all 2,000 ports were wide open currently, and this was not making matters worse at all—they simply were not allowed to use that command.
So, the big day arrived; 10 p.m. on a Sunday night was the change control window. It was time to run the scripts and enable Closed Mode authentication across 2,000 switch ports in a matter of minutes. Of those 2,000 ports, a whopping 10 were authenticating successfully and the team had accomplished exactly what they were warned about: They had created a denial of service for all other systems.
Why did this happen? The policies were all correct. The certificates had all been pushed out to the desktops. The supplicants were configured. However, no one realized that the supplicant configuration would not take effect prior to rebooting the Windows systems! Of course, the team did not know that was the root cause until the next afternoon when the desktop team researched it some more, but at that point it no longer mattered. The team created a nice problem for all the users when they came into the office that Monday morning.
The story has a happy ending. Not only is there a fun story to write about in this book, but after the desktop team pushed out a job to reboot all the systems, the team reenabled authentication at the next change-control window and had 99% of the systems authenticating successfully.
However, not all deployments are that lucky, or that well planned-out in advance. This is why a phased approach to deploying identity solutions is always a good idea.
A Phased Approach
By using a phased approach to deployment, you are able to start in Monitor Mode and gradually transition into the end state of either Low-Impact Mode or Closed Mode. By doing so, you can avoid the denial of service as illustrated in that story. With a monitoring phase, you have time to build your list of endpoints with profiling; you can manually import the MAC addresses that will be MAB’d without profiling; and you can ensure that you know exactly what will happen, before it happens.
Then you can gradually move into a final state of enforcement. Figure 20-2 illustrates the phased deployment concept.
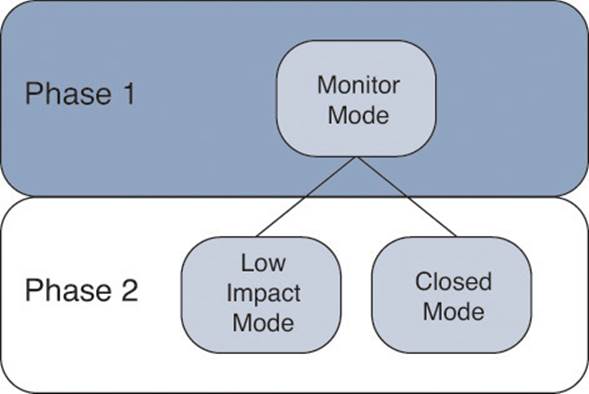
Figure 20-2 Phased deployments.
Comparing Authentication Open to Standard 802.1X
Per the IEEE standard, a port that is protected with 802.1X will not allow network traffic to flow without a successful authentication. Figure 20-3 illustrates that an 802.1X-controlled port normally allows only EAP, CDP, and LLDP traffic to enter the port (all three are Layer-2 protocols); no other traffic is permitted. When 802.1X is enabled on a port, it is said to be a “supplicant authenticator.” That is a complex way of stating that the port will communicate with EAP at Layer-2 and the switch will broker that authentication to the RADIUS server.
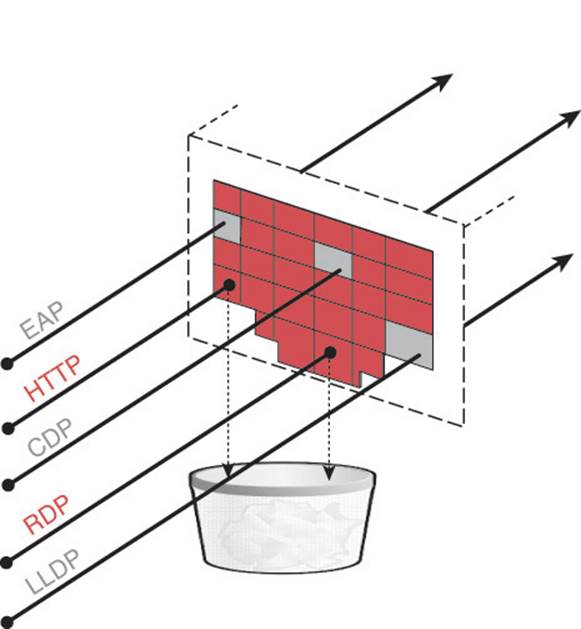
Figure 20-3 Default port behavior with 802.1X.
Figure 20-3 illustrates the default port behavior of an 802.1X-enabled switch port.
Cisco created an enhancement to standard 802.1X ports that enables the port to be a supplicant authenticator; however, it also allows all traffic to flow normally through the switch port even without an authentication occurring. This allows the supplicant to process an authentication correctly if it’s configured, but if the device does not have a supplicant configured or the switch received an Access-Reject message from the RADIUS server, the Access-Reject message is ignored.
Figure 20-4 illustrates that regardless of authentication, the switch port will allow all traffic to flow, but it will also authenticate the supplicant and perform MAB just like a standard 802.1X-enabled switch port.
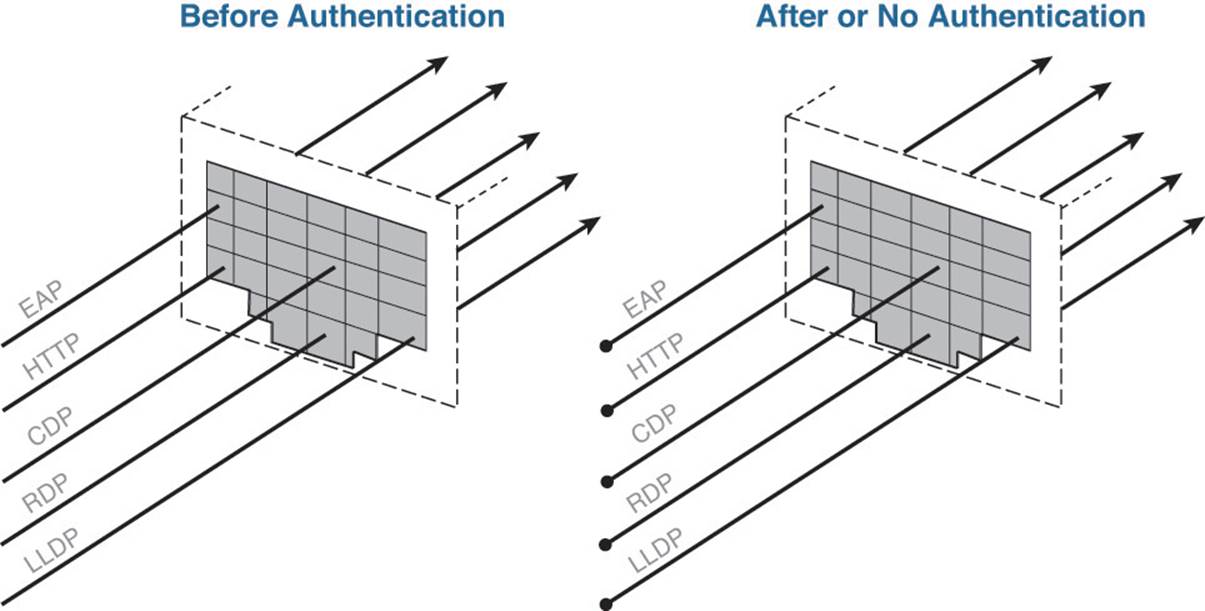
Figure 20-4 Port behavior with open authentication.
The creation of this authenticator enhancement is what truly made Monitor Mode possible. It is, of course, not the only necessary component of Monitor Mode, but it is certainly the catalyst (pardon the pun).
Preparing ISE for a Staged Deployment
One of the primary ways to differentiate modes within your ISE policies is with the use of network device groups (NDGs) and policy sets. Configure the NDGs to have a top-level group named Stage, and then configure subgroups for Monitor Mode, Low-Impact Mode, and Closed Mode. Then the authorization policies can be configured to have different policies for each of the network devices that are assigned to particular stages of deployment. Although you could do this all in a single authorization policy, using a separate policy set for each stage of deployment will keep the policies nice, clean, small, and organized.
Start by enabling policy sets under Administration > System > Settings > Policy Sets, as shown in Figure 20-5.
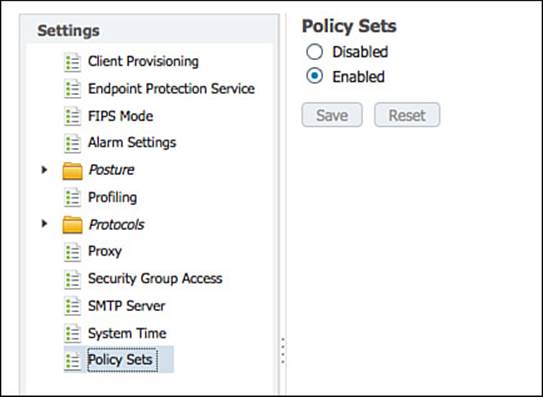
Figure 20-5 Enabling policy sets.
All the existing authentication and authorization policies are preserved in the Default Policy Set, and all authentications and authorizations will proceed as they used to.
From within the ISE GUI, do the following:
Step 1. Navigate to Administration > Network Resources > Network Device Groups.
Step 2. Click Add.
Step 3. Name the NDG Stage.
Step 4. Set the Type to be Stage.
Step 5. Click Submit.
Figure 20-6 shows the creation of the top-level NDG.
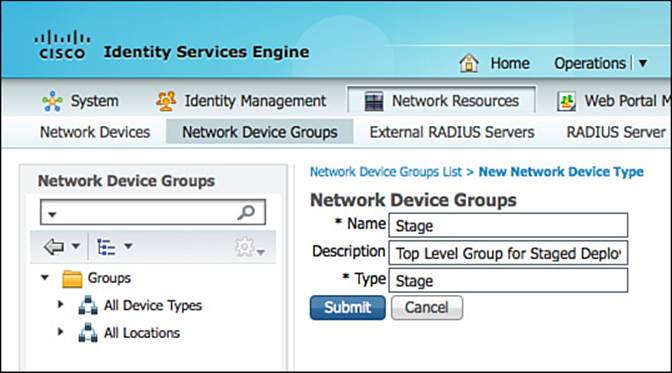
Figure 20-6 Add a stage NDG.
Step 6. Click the new Stage NDG on the left side.
Step 7. Repeat steps 2-5 and create a new subgroup for each of the deployment modes (as shown in Figure 20-7):
![]() Monitor Mode
Monitor Mode
![]() Low-Impact Mode
Low-Impact Mode
![]() Closed Mode
Closed Mode
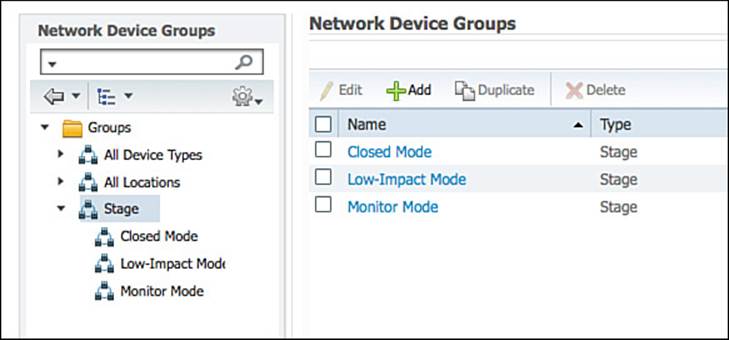
Figure 20-7 Final stage NDGs.
Monitor Mode
Monitor Mode is a process, not just a command on a switch. The process is to enable authentication (with authentication open), see exactly which devices fail and which ones succeed, and correct the failed authentications before they cause any problems.
Figure 20-8 shows a high-level flow diagram describing the Monitor Mode.
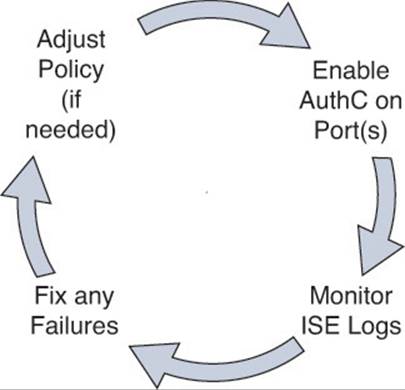
Figure 20-8 Monitor Mode operational flow.
One key point to understand about Monitor Mode is that it is applicable to wired environments only. If you have ever configured a device to connect to a wireless network, you will recognize that configuring a network manager (which is considered a client and contains a supplicant) is expected behavior when using Wi-Fi. You must tell the Wi-Fi-capable endpoint to which network to connect and provide credentials for that network. It’s common, it’s expected, and it’s well known.
On a wired network, however, there is no such concept of an SSID, so there is no pop-up on the endpoint asking to which network you would like to connect. It’s just assumed that you are physically connected and therefore are attached to the correct network. With wireless, if you don’t have a supplicant, you do not connect. Wired environments are expected to always work, supplicant or not.

The wired port must be able to handle the following:
![]() A device that has a supplicant (802.1X)
A device that has a supplicant (802.1X)
![]() A corporate device that doesn’t have a supplicant but does belong on the network (IP phone, printer, and so on)
A corporate device that doesn’t have a supplicant but does belong on the network (IP phone, printer, and so on)
![]() Guest users
Guest users
Thus, there is quite a bit to audit when in Monitor Mode.
Another important thing to understand about Monitor Mode is that authorization results from the RADIUS server will absolutely be honored (Access-Reject is the only command that is ignored). So, if your authorization result from ISE includes dVLAN assignment or dACLs, those will be honored and applied to the port.
For a phased deployment approach, it is highly recommend to use NDGs in ISE. Using these NDGs, you can build specific policies that send the basic authorization results (Access-Accept and Access-Reject) only to switches that are part of a Monitor Mode NDG.
Figure 20-9 shows a high-level flow diagram describing the Monitor Mode.
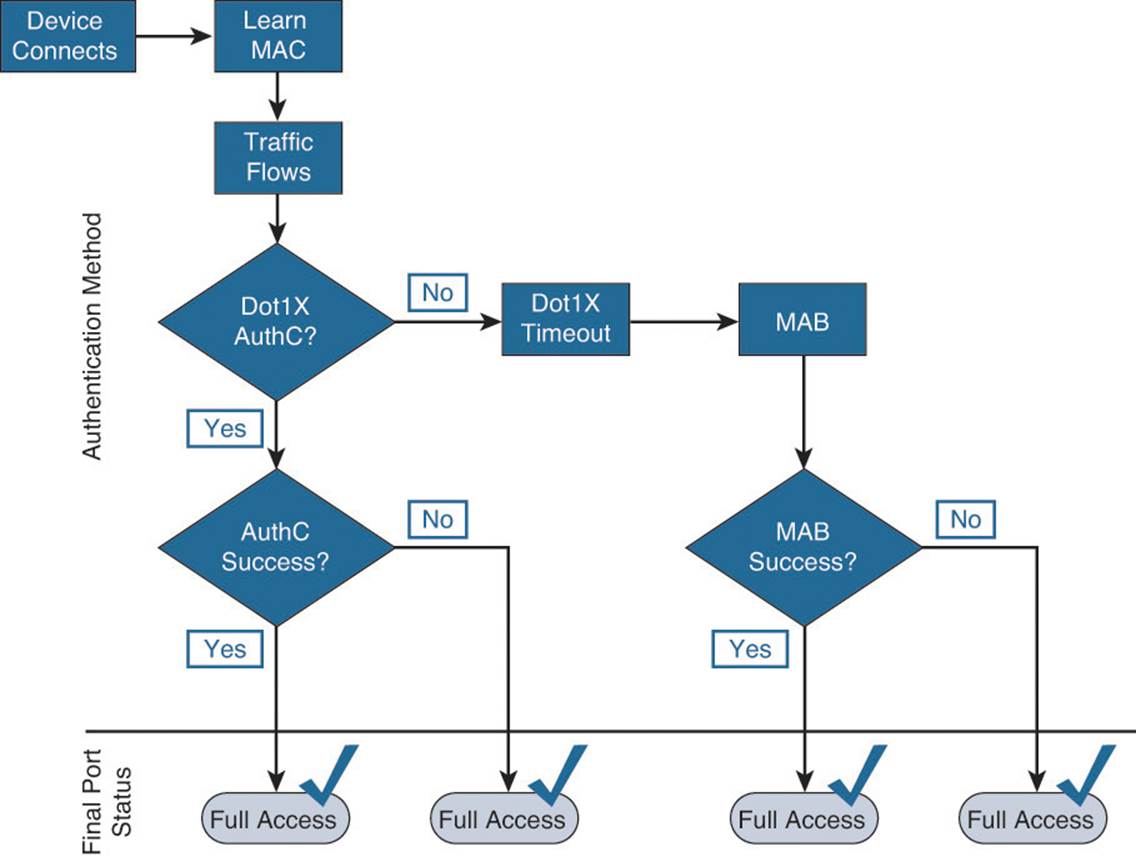
Figure 20-9 Monitor Mode flow diagram.
Now that you have the NDGs configured for the different stages of the deployment, you can move on to creating the policy sets themselves.
To create the policy set for Monitor Mode, do the following:
Step 1. Navigate to Policy > Policy Set.
Step 2. Ensure that your default policy is selected on the left side (as shown in Figure 20-10), and then click the plus sign (+) in the upper-left corner.
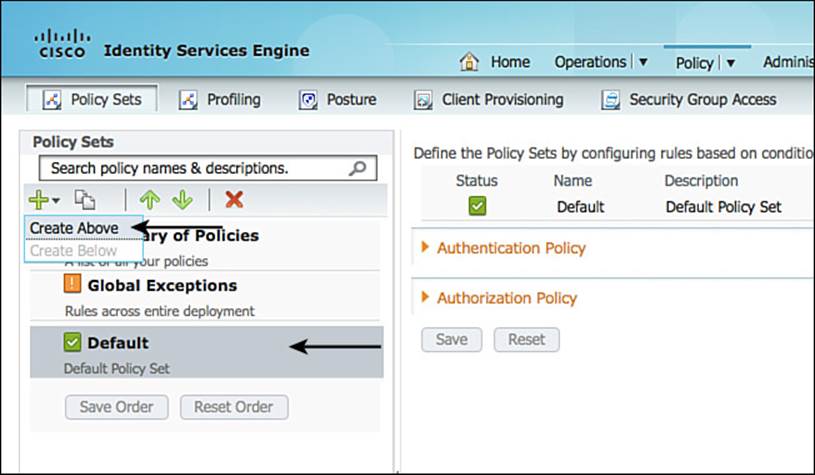
Figure 20-10 Default policy set selected, create above.
Step 3. Select Create Above.
Step 4. In the upper-right side of the policy window, double-click the text Enter Policy Name, as shown in Figure 20-11.
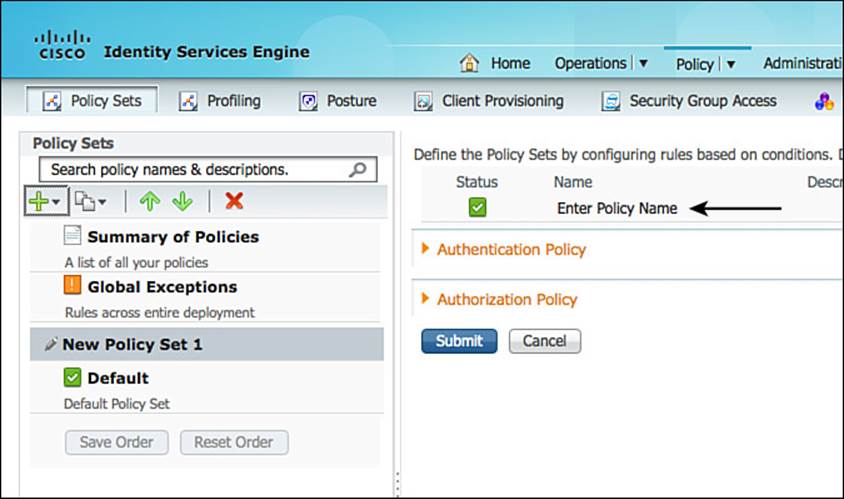
Figure 20-11 Enter Policy Name.
Step 5. Name the new policy set Monitor_Mode and provide a description.
Step 6. Create a new condition of DEVICE :: Stage Equals Stage#Monitor Mode.
Step 7. Click Done.
Step 8. Click Submit.
Figure 20-12 shows the policy set selection rule for Monitor Mode.
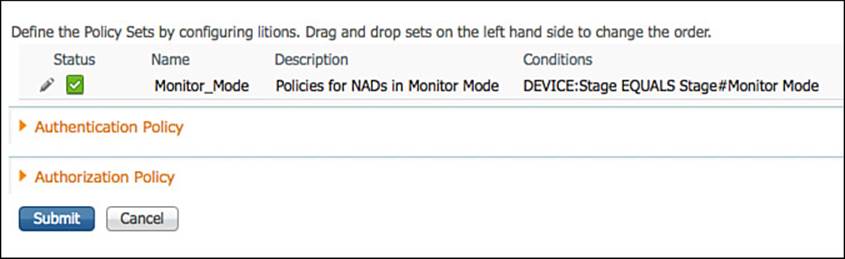
Figure 20-12 Monitor Mode policy set.
At this point, any network device that is a member of the NDG named Monitor Mode will use this policy set. All authentication and authorizations with those network devices will occur with this set of policies, and all other network devices will still use the default policy set.
It is up to you, the administrator of ISE policies, to ensure that any authorization results for Monitor Mode switches are only Access-Accept and Access-Reject. Always remember that other authorization results will be accepted and applied to the switch port, so you must ensure that web authentication, access lists, and VLAN assignments do not occur for these switches. The only exception to that rule is the AV-pair for IP phones that grants a phone permission to use the voice VLAN.
Low-Impact Mode
As described previously in this chapter, Low-Impact Mode is one of the end state choices for your deployment. Closed Mode is the other final stage. There is no specific best practice for which mode is better to deploy; it is entirely dependent on the organization and the needs.
A number of large organizations use a variety of technologies to reimage desktop systems that use the Pre-eXecutable Environment (PXE) to boot into a pseudo-OS and then connect to an imaging server that reimages the company computer. Those PXE environments can be time sensitive and might not have the ability to authenticate to the network infrastructure. However, it has to seamlessly be able to boot, connect to the reimaging server, and update the desktop to the latest corporate image—and do so without any additional user interaction. Low-Impact Mode was the only way to make this work feasibly in these environments.
Another example is a retail organization that uses thin clients in its retail stores. These thin clients must be able to boot using PXE, gain limited access to the network, download their operating systems (OSes) from the local store server, and have that access before the DHCP timers expire. After that OS is loaded into memory and takes over the system, its supplicant would send an EAPoL start message into the network and authenticate with 802.1X. Low-Impact Mode allowed the thin client to boot automatically and have the appropriate levels of access to the store server to download the OS.
Low-Impact Mode adds security on top of the framework that was built in Monitor Mode. It continues to use the authentication open capabilities of the switch port, which allows traffic to enter the switch prior to an authorization result. This permits the DHCP clients to be assigned an IP address before their DHCP timers run out (for example).
With Low-Impact Mode, you add security right from the get-go by putting a port-based ACL (pACL) on the switch interface. This is a traffic-filtering ACL that gets applied to the port as part of the switch configuration and is then overridden by the downloadable ACL (dACL) sent down from ISE.
Figure 20-13 shows the operational flow intended for Low-Impact Mode. This mode is one of the two possible end states (closed mode being the second), and as such, very specific access can be provided per user, device, or any other condition that you want to use in the ISE authorization policies. Remember the goal of Low-Impact Mode is to provide very limited network access to devices without authentication and then provide very specific access to those who have been authorized (security principle of least privilege).

Figure 20-13 Low-Impact Mode operational flow.
As with any other security solution, tuning the authorization results is something that can take a lot of operational hours. Therefore, it is always recommended to deploy authorization results in stages as well. For example, begin with a policy that permits full access to any device that has authenticated successfully. Ensure that the environment is fully functional, and then begin to decrease the security. Make the dACLs more specific, and so on.
Figure 20-14 shows that the pACL is applied prior to authentication, which allows only specific traffic into the port. After the authentication occurs, the authorization will need to include a dACL that selectively permits and/or denies traffic. Other authorization results also can be applied at the port, such as URL redirection, VLAN assignment, MACSec encryption, security group tags (SGTs), and more.
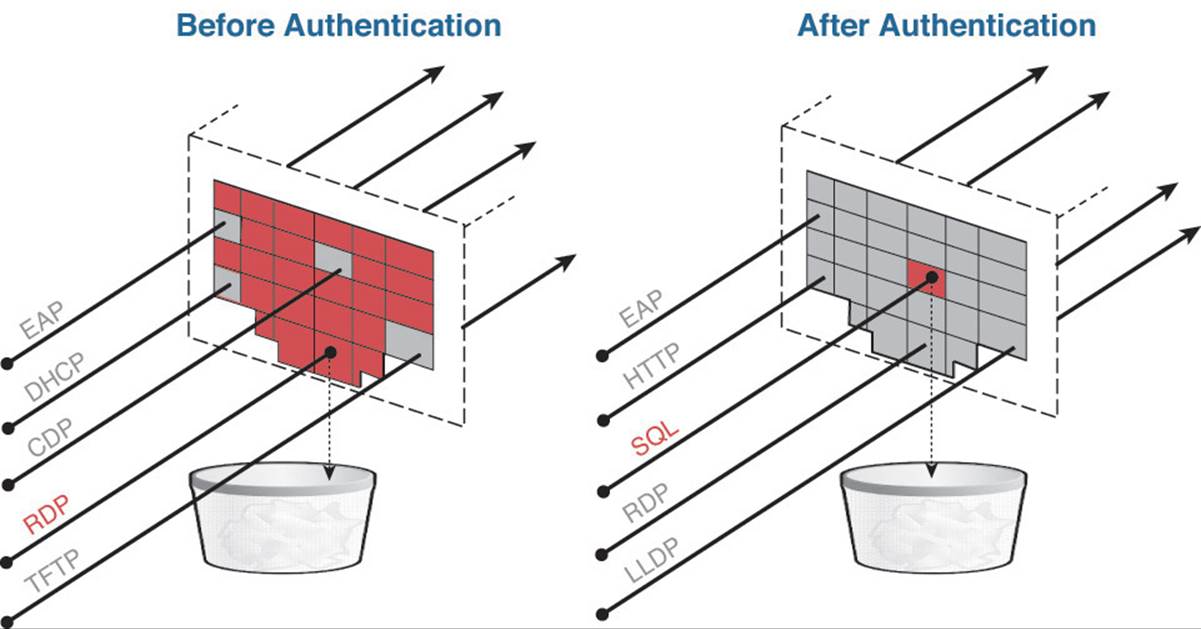
Figure 20-14 Low-Impact Mode port behavior.
Always keep in mind that VLAN assignment should be used only on devices that use supplicants. Without a supplicant, the device will most likely not be able to identify the VLAN change and might end up with the wrong IP address for its final VLAN assignment.
To create the policy set for Low-Impact Mode, do the following:
Step 1. Navigate to Policy > Policy Set.
Step 2. Select the default policy on the left side, and click the plus sign (+) in the upper-left corner.
Step 3. Select Create Above.
Step 4. In the upper-right side of the policy window, double-click the text Enter Policy Name, as you did in the Monitor Mode section.
Step 5. Name the new policy set Low_Impact_Mode and provide a description.
Step 6. Create a new condition of DEVICE > Stage Equals Stage#Low-Impact Mode.
Step 7. Click Done.
Step 8. Click Submit.
Figure 20-15 shows the policy set selection rule for Low-Impact Mode.
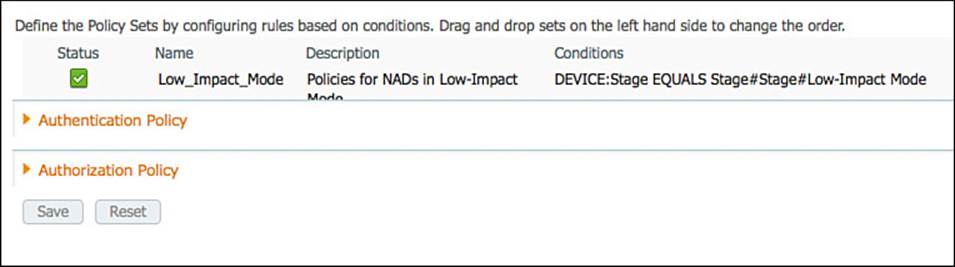
Figure 20-15 Low-Impact Mode policy set.
Closed Mode
Closed Mode is similar to the default behavior of 802.1X. As shown in Figure 20-3, the port does not allow any traffic before the authentication (except for EAP, CDP, and LLDP), and then the port will be assigned to specific authorization results after the authentication.
Note
Closed Mode was once called High-Security Mode, but it was renamed due to the perception that it was more secure than Low-Impact Mode. In truth, both modes are equally secure. The security level of either end state is truly dependent on the configuration of the devices and the policies on ISE, not the mode of operation. In other words, an admin can make Closed Mode very insecure or very secure, depending on the implementation.
As shown previously in Figure 20-1, the operational model of 802.1X was always designed to deny access to any device that does not authenticate successfully. This is a perfectly understandable model for wireless network access, where a human is required to interact with the device and configure a wireless client (supplicant) to connect to a specific SSID with specific credentials.
However, in a wired world there are so many devices that require network access without any user interaction. Consider devices such as IP cameras, IP phones, printers, fax machines, badge readers, and so much more. Therefore, MAC Authentication Bypass (MAB) had to be added to the process flow.
The concept of completely denying access to the network if authentication were to fail, or if a supplicant was not configured, proved to have operational difficulties. Some level of access was needed. Originally, the switch itself would have a Failed Authentication VLAN, where it would make a local decision to authorize access to a specific VLAN when a device failed authentication. Additionally, if authentication were to time out (meaning there was no supplicant on the endpoint), then it would authorize access to a locally configured guest VLAN.
One of the problems with that original logic is the lack of centralized knowledge and control. As far as the policy server was concerned, the access was denied. Yet the device was still on the network because the NAD made a local decision in spite of what the policy server said.
Figure 20-16 shows the operational flow of Closed Mode. Notice it is nearly exactly the same as Low-Impact Mode. All the same authorization results are available for use, but Closed Mode does not allow any of the PXE-type traffic into the port prior to the authorization result, unlike Low-Impact Mode.
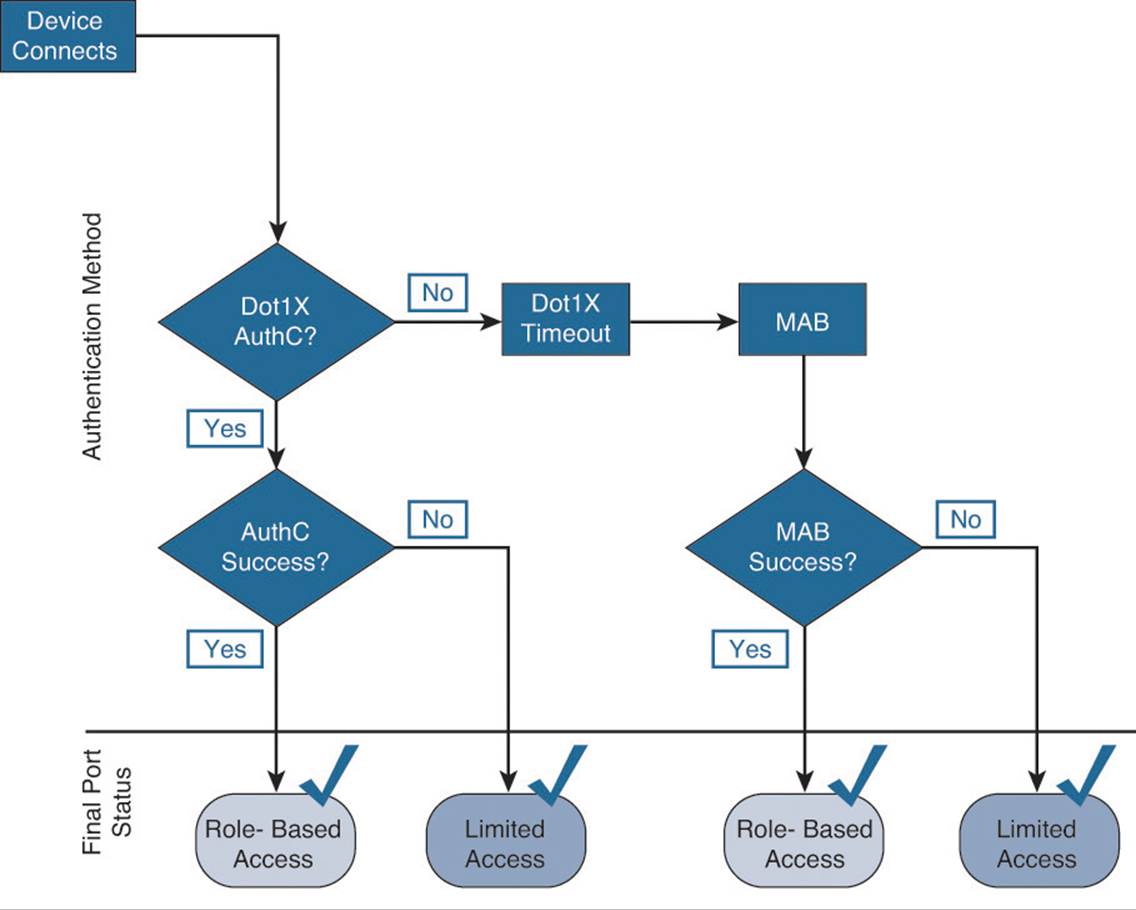
Figure 20-16 Closed Mode flow.
Figure 20-17 shows the port behavior in Closed Mode. Virtually zero traffic is allowed into the port before the authentication. After the session is authorized, very specific authorization results can be applied to the port, such as VLAN assignment, dACL, URL redirection, MACSec encryption, and SGTs.
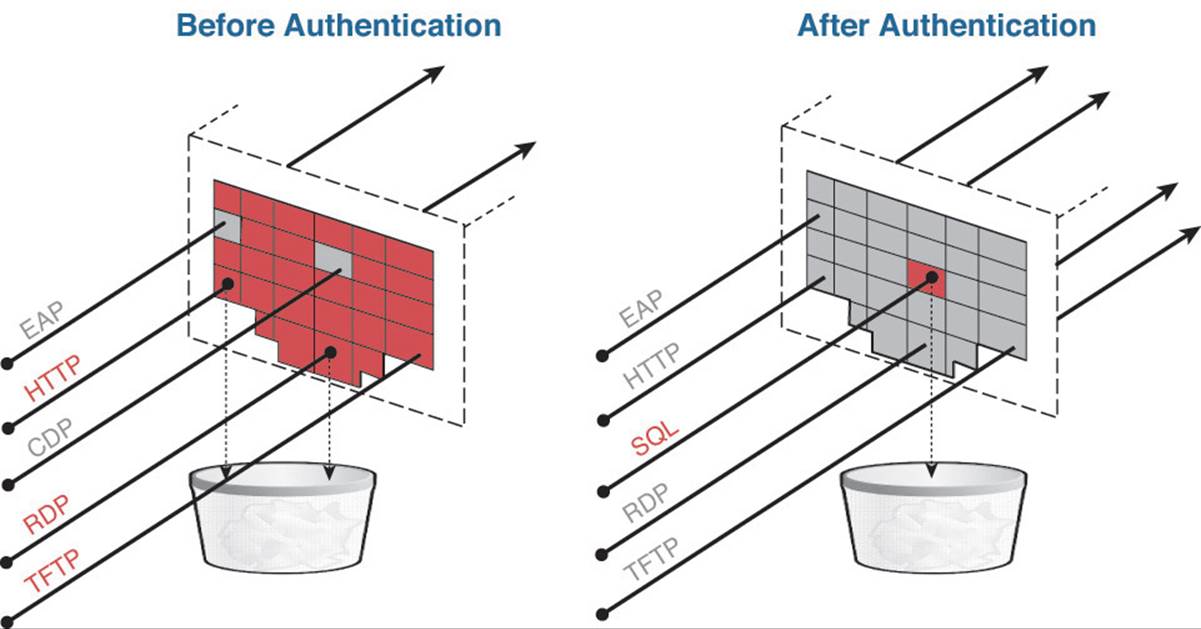
Figure 20-17 Closed Mode port behavior.
To create the policy set for Closed Mode, do the following:
Step 1. Navigate to Policy > Policy Set.
Step 2. Select the default policy on the left side, and click the plus sign (+) in the upper-left corner.
Step 3. Select Create Above.
Step 4. In the upper-right side of the policy window, double-click the text Enter Policy Name, as you did in the Monitor Mode and Low-Impact Mode sections.
Step 5. Name the new policy set Closed_Mode and provide a description.
Step 6. Create a new condition of DEVICE :: Stage Equals Stage#Closed Mode.
Step 7. Click Done.
Step 8. Click Submit.
Figure 20-18 shows the policy set selection rule for Closed Mode.
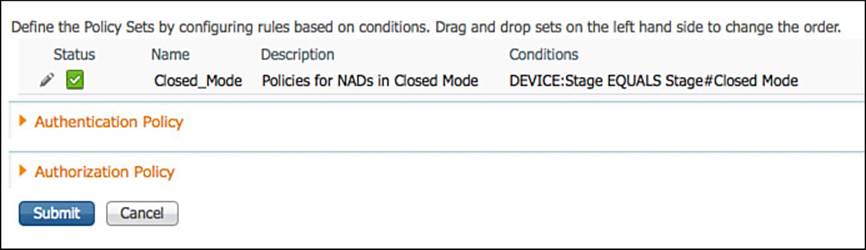
Figure 20-18 Closed Mode policy set.
Transitioning from Monitor Mode to Your End State
The key to successfully using a phased deployment approach is understanding how to transition from Monitor Mode to the end state chosen (Low-Impact or Closed Mode). This is why you built out NDGs and policy sets previously in this chapter.
With Monitor Mode, you must ensure that only Access-Accept and Access-Reject authorizations are used. With Low-Impact and Closed modes, you can send the other authorization results, such as sending a URL redirection for centralized web authentication (CWA).
The purpose of Monitor Mode is to ensure the endpoints are all authenticating correctly either via 802.1X with their supplicants or via MAB with profiling or even statically. If we get the first pilot switch ready, and all the devices are prepared for authentication and everything looks good, we flip the switch and change the default authorization policy to send a CWA result instead of just the basic accept or reject message. That first switch will be fine, all the devices will be working correctly, and life looks easy.
However, we wouldn’t want to push the CWA result to the switch port if we have not fully prepared the supplicants and educated the users on a possible change of experience when logging in to the network. That would be another career limiting event.
That is why we use NDGs. We ensure with the NAD’s membership of the stage NDG that we are sending the correct results to the correct network devices.
Imagine rolling out ISE to thousands of branch locations. You prepare a branch by putting it into Monitor Mode. When you are certain that branch is fully ready and all the devices are recognized and authenticating successfully, you can then move the switch from the Monitor Mode NDG to the end state NDG and make a few command modifications to the switches.
Wireless Networks
Wireless networks behave differently than wired networks do. With the creation of a WLAN, the administrator must define the security for that LAN. When using 802.1X, you must set the security to use WPA2 for key management. This setting cannot be mixed with an open authentication, and there are no fallback options.
For a guest authentication, the guest will need to connect to a different SSID. This is fundamentally a much different model from a wired network, which needs to handle all different user, device, and authentication types on a single switch port configuration.
Even though wireless behaves differently, the authorization results in ISE can be configured to send the responses to wired devices and wireless devices, providing a unified access strategy. This permits wireless networks to be managed as part of your Low-Impact Mode or Closed Mode deployments.
Some ISE installations will use a separate policy set for wireless authentications and authorizations, whereas others will assign their wireless NADs to the Low-Impact Mode or Closed Mode NDG.
Exam Preparation Tasks
Review All Key Topics
Review the most important topics in the chapter, noted with the key topics icon in the outer margin of the page. Table 20-2 lists a reference of these key topics and the page numbers on which each is found.

Table 20-2 Key Topics for Chapter 20