Juniper QFX5100 Series (2015)
Chapter 6. Network Automation
Automating a network means many things to many people. It’s like ordering a pizza, no one can agree on anything. That’s because network automation is so personalized and specific to the problem that each person is solving, everyone’s answer is different and focused on solving their own problem.
For the scope of this chapter, network automation will focus on the task of automating network functions. For simplicity, you can break down network functions into three simple categories:
Build
The build stage focuses on the initial installation and bootstrapping of the networking equipment. As soon as the switch is racked and powered on, the build stage begins.
Configure
After you’ve built the network, there are day-to-day changes that you need to implement to enable new services and applications to run; this is the configuration phase of network automation.
Collect
Now that you have successfully built the network and have a good handle on the day-to-day operations, the last phase is to collect information about the network. Being able to understand what’s happening on the network makes it possible for you to increase the availability of the network and quickly troubleshoot problems.
You can think of network automation as the purpose-built glue that brings your data center together. Some network automation tools offer more turnkey functionality than others; this is simply because of the scope. For example, to automatically configure a networking switch when it first powers on is a relatively simple thing to do; such automation can be very turnkey. However, there are other examples such as deploying specific switch settings (Virtual Local Area Networks (VLAN) membership, interface tagging, and routing protocol changes in response to outside events including application provisioning or updates). Such specific examples require purpose-built programming that uses the switch’s libraries and APIs in order to get the desired result—providing turnkey functionality is nearly impossible for such customized requirements.
This chapter will briefly go through the major automation tools that the Juniper QFX5100 supports. The problem with network automation is that an entire book can be written on each subject; so I’ve elected to give you a walking tour through the automation abilities of the Juniper QFX5100 series and references to where you can find additional information.
Overview
The Juniper QFX5100 family is chock full of network automation features with which you can carry out network-related activities faster. This chapter covers the key network automation tools that come standard on Juniper QFX5100 switches and describes how to use each tool. Following is an quick introduction:
Zero Touch Provisioning
The first tool we cover is Zero Touch Provisioning; this tool makes it possible for you to bootstrap your switch when it first powers on and get it up and running automatically.
Chef and Puppet
One of the most common tasks in a data center is making changes. Chef and Puppet are tools that enable engineers to provision changes across the entire data center, including the networking equipment.
Network Configuration Protocol and Device Management Interface
The Network Configuration Protocol (NETCONF) is an IETF standard that’s based on XML by which you can edit a network configuration over remote procedure calls (RPC). The Device Management Interface (DMI) is a Juniper-specific schema that defines all of the RPCs available within Junos that you can use.
Junos Python Easy Library
The Junos Python Easy (PyEZ) library is a Python library that uses NETCONF and the Juniper DMI to automate Juniper devices. The best part is that the PyEZ library hides all of the NETCONF and DMI from the programmer and simply exposes standard Python functions as a replacement.
The Juniper QFX5100 series has many points of user interaction that are available for network automation, as shown in Figure 6-1. Chapter 1 describes how even the Junos CLI uses standard XML RPC commands in the background and displays formatted ASCII in the terminal. All of the other network automation points in Figure 6-1 are designed to be used by programming languages or automation tools.
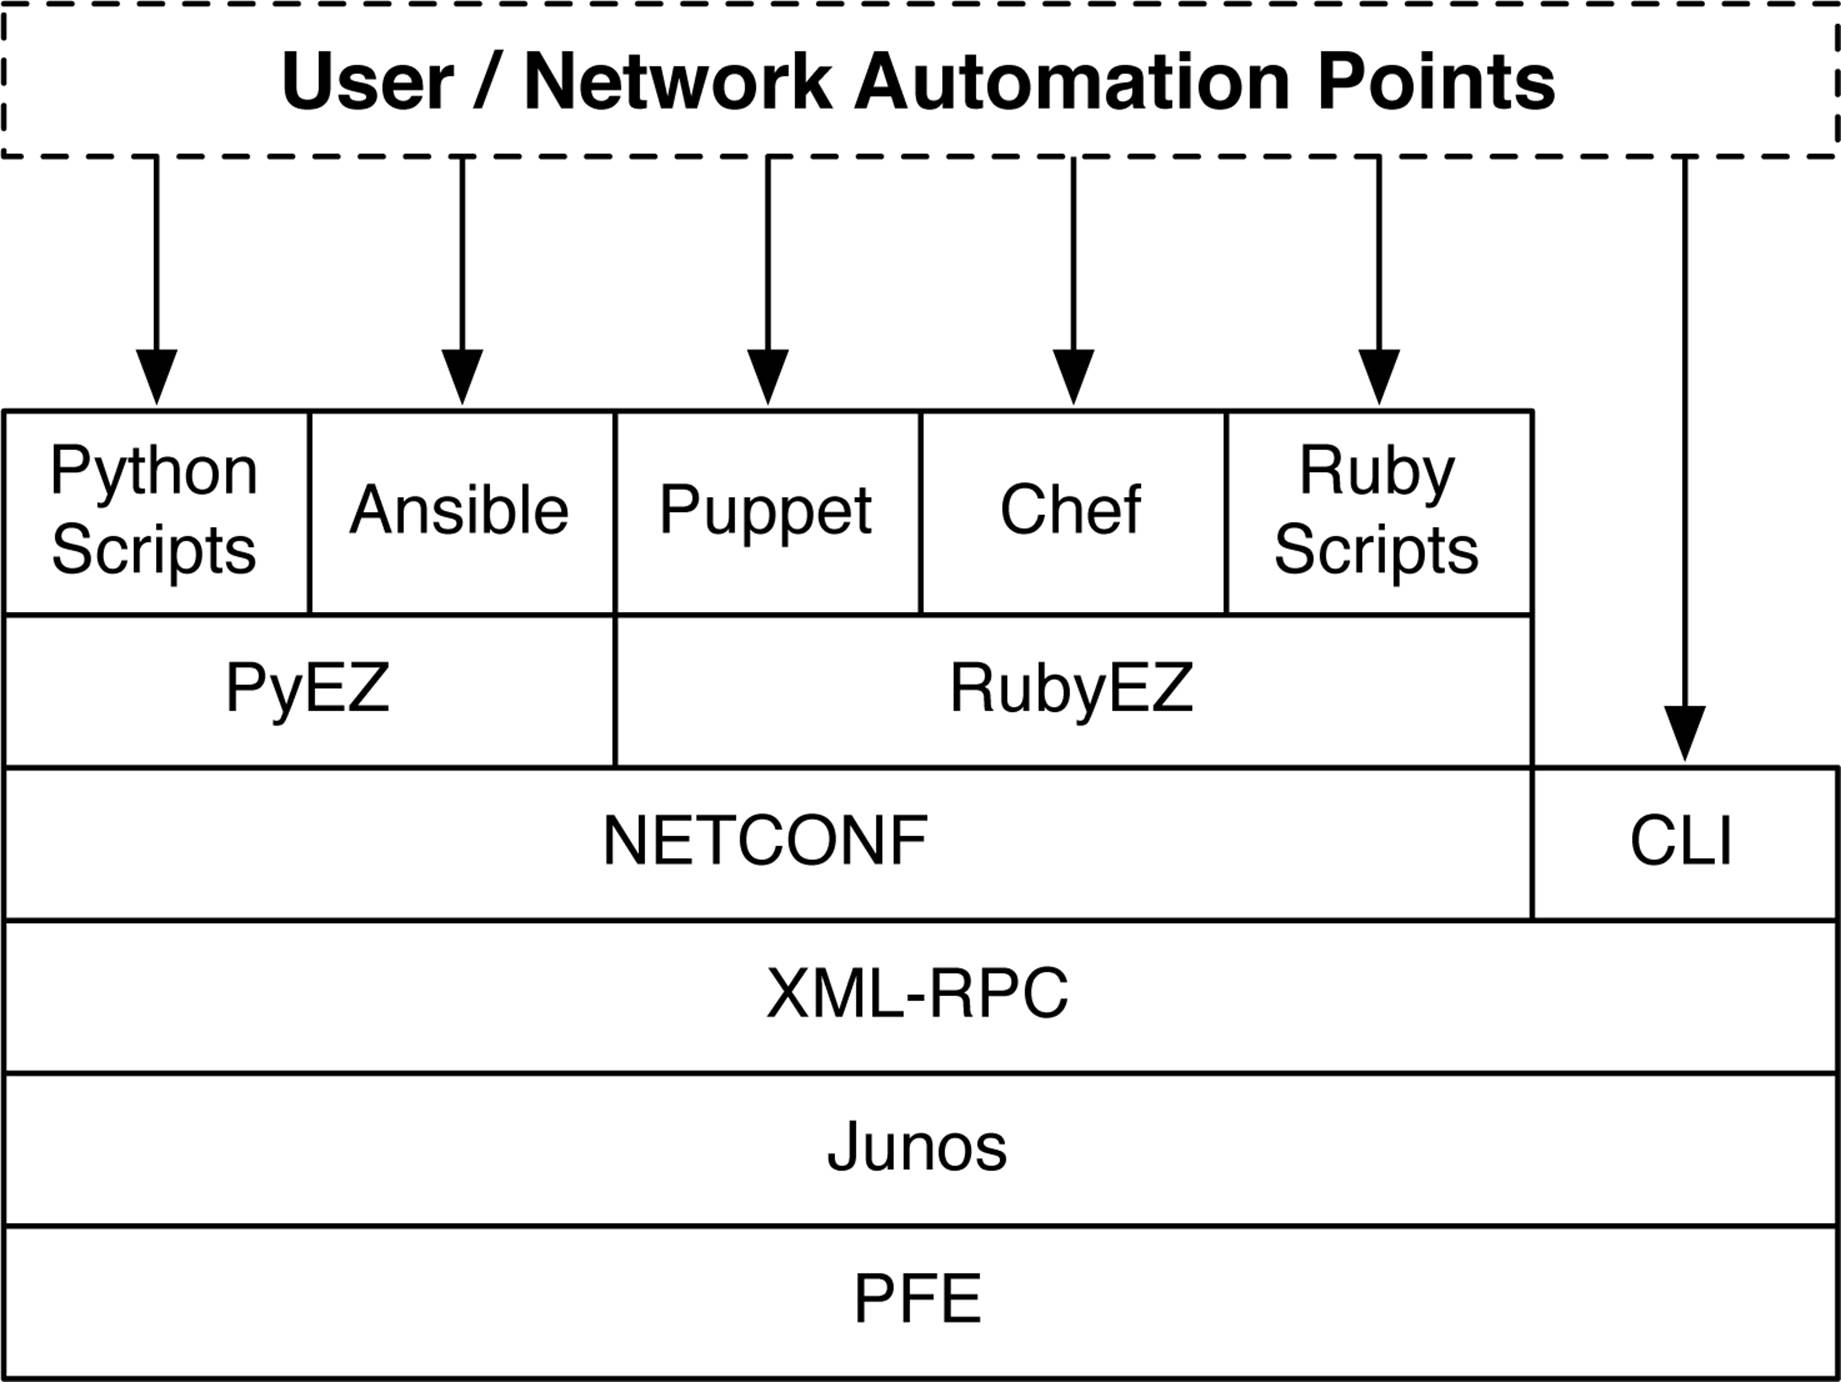
Figure 6-1. User and network automation points in Junos
All of the major network automation tools utilize the NETCONF protocol. However Junos isn’t limited to the tools shown in Figure 6-1, and you can directly program the NETCONF protocol itself by using any of the following programming languages and libraries:
§ Python (ncclient)
§ Perl (netconf-perl)
§ Ruby (net-netconf)
§ Go (go-netconf)
Armed with your favorite programming language, there’s no task too large or too small when it comes to network automation. The Juniper QFX5100 family supports a wide variety of programming languages and lends itself nicely to the DevOps community. The best way to learn is by doing. Later in the chapter, we’ll get our hands dirty with the Junos PyEZ library.
Junos Enhanced Automation
As network automation is becoming more prevalent in the data center, Juniper Networks has created a new software package for the Juniper QFX5100 series of switches that comes preinstalled, offering additional programming and automation tools. The Junos Enhanced Automation software packages use the prefix “flex” to distinguish them from the standard Junos software packages. For example, jinstall-qfx-5-flex-13.2X51-D20.2-domestic-signed.tgz denotes Junos Enhanced Automation. The following changes have been made to Junos Enhanced Automation:
§ It now maintains full-feature parity with the standard version of Junos.
§ The factory default configuration is Layer 3 instead of Layer 2.
§ Safeguards are in place to prevent changes to essential Junos files.
§ ZTP is preconfigured for all management and server ports.
§ A new 1 GB /user partition is available to store binaries and additional packages.
§ The /user partition is never modified during an upgrade or downgrade.
§ Python is preinstalled into /usr/bin/python.
§ Ruby is preinstalled into /opt/sdk/juniper/bin/ruby.
§ The Puppet agent is preinstalled into /opt/sdk/juniper/bin/puppet.
§ The Chef agent is preinstalled into /opt/sdk/chef/bin/chef.
Network automation with Juniper QFX5100 devices is now as easy as pie when paired with Junos Enhanced Automation. Everything ships preinstalled so you don’t have to worry about signed binaries from Juniper Networks and other headaches. As you begin building up a personal programming library and script repository, keep them installed in the /user partition. As you upgrade the switch in the future, this guarantees that all of your files are never deleted.
Zero Touch Provisioning
So, you just received a large pallet of Juniper QFX5100 switches in the data center shipping department. You’ve removed all of the equipment from their boxes and installed them into the racks. Now what? Most network engineers power up everything and begin programming each switch by hand. The more experienced engineer is too savvy for this; he simply configures the first switch and saves the configuration to a text file. Every other switch in the network is configured by using this as a template, copying and pasting it into the RS-232 terminal.
If you do this, stop. There are much better ways to bootstrap networking equipment in the data center: Zero Touch Provisioning (ZTP)
Seriously, it does exactly what it says. ZTP configures the switch without you having to touch it. You simply power up the switch, connect its cable, and it will automatically configure itself as Figure 6-2 demonstrates.
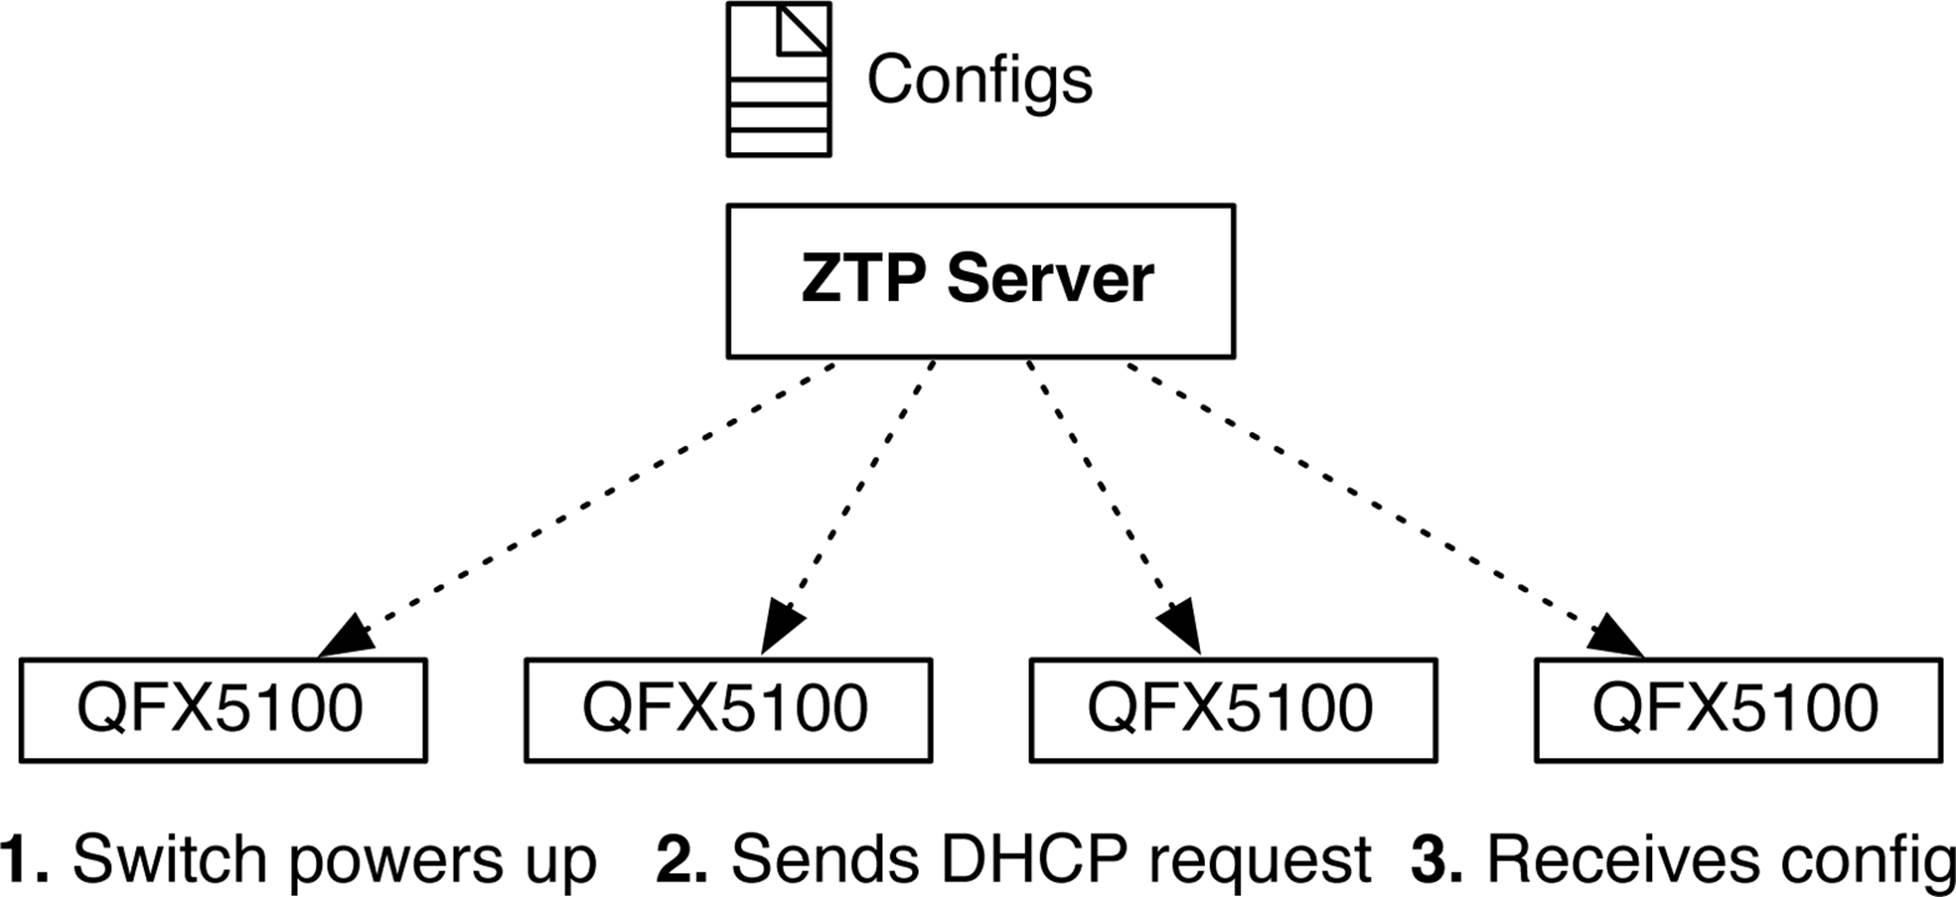
Figure 6-2. Illustration of ZTP
As each Juniper QFX5100 switch powers up, it contacts the ZTP server and requests its configuration. The great benefit of ZTP is that it doesn’t matter if you have 10 switches or 100,000; each switch can interact with ZTP in parallel, which means you can quickly bring up an entire data center within minutes. That sure beats logging in to the console of each switch.
The other great benefit of ZTP is that it allows you to automatically upgrade the switch’s software in addition to applying a configuration. As you install new switches into the data center, you don’t have to worry about software upgrades; ZTP takes care of it all.
ZTP Server
The ZTP server is a simple DHCP server. One of the most popular options for a ZTP server is running a Linux server with the Internet Systems Consortium (ISC) DHCP server, which you can download from the ISC’s website. The first step to setting up the ZTP server is to understand what DHCP options you must enable and what they do. Table 6-1 will help out with that task.
|
DHCP option |
DHCP suboption |
Description |
|
07 |
N/A |
Configure one or more syslog servers |
|
12 |
N/A |
Hostname of switch |
|
42 |
N/A |
Configure one or more NTP servers |
|
43 |
00 |
Software image filename |
|
43 |
01 |
Filename of the configuration file |
|
43 |
02 |
Symbolic link flag for software image |
|
43 |
03 |
Transfer mode (options include http, ftp, tftp) |
|
43 |
04 |
Alternate software image filename |
|
66 |
N/A |
Specify DNS of HTTP/FTP/TFTP host |
|
150 |
N/A |
Specify IP of HTTP/FTP/TFTP host |
|
Table 6-1. ZTP server DHCP options list |
||
Being an astute reader, you probably noticed that there are two ways to specify the software image filename; this is done to provide the most portability between different DHCP servers. Some implementations of DHCP do not support DHCP suboption 00, and therefore you must use suboption 04, instead. DHCP suboption 02 might seem a bit confusing, as well. This suboption is a flag that simply informs the DHCP that the filename referenced in suboption 01 is either a real file or a symbolic link to a file. For example, if DHCP suboption 01 points to a symbolic link on a file system, you need to set DHCP suboption 02 to the value “symlink” to indicate that it isn’t a real file, but a pointer to a real file. By using a symbolic link, you can always use the same DHCP suboption 01 filename, such as junos-qfx5100-current.tgz, and it would always link to the most current software install image, such as jinstall-qfx-5-13.2X51-D25.2-domestic-signed.tgz.
When specifying the HTTP/FTP/TFTP server, there are also two DHCP options: 66 and 150. For DHCP servers that support DNS, you can use option 66; otherwise, DHCP option 150 allows you to specify the IP address directly. If both DHCP options 66 and 150 are specified, DHCP option 150 takes precedence.
With DHCP option 43 suboption 03, you can specify the file transfer method. The supported values are “http,” “ftp,” or “tftp.” If DHCP suboption 03 isn’t specified, the DHCP server will default to TFTP.
The Juniper QFX5100 also supports additional network automation through DHCP suboption 01, which is traditionally reserved to specify the configuration filename. The Juniper QFX5100 switch downloads this file and then takes a look at the first line in the file to determine its file type. If the line begins with a she-bang (#!), the Juniper QFX5100 device will execute the filename as if it were a script. For example, you can use DHCP suboption 01 to specify a Python, shell, or Junos automation script instead of a traditional configuration file. Imagine all of the possibilities that would be afforded to you by executing a Python script when bootstrapping a switch.
ISC DHCP Configuration
Let’s use our new knowledge of the ZTP server DHCP options and begin setting up a new ZTP server. For this laboratory, we’ll use the ISC DHCP server, which you can download from the ISC’s website. We’ll also use the ZTP settings presented in Table 6-2.
|
DHCP option and suboption |
Value |
|
DHCP option 43, suboption 00 |
/jinstall-qfx-5-flex-13.2X51-D20.2-domestic-signed.tgz |
|
DHCP option 43. suboption 01 |
/template.conf |
|
DHCP option 43, suboption 03 |
http |
|
DHCP option 150 |
172.32.32.254 |
|
Table 6-2. ISC DHCP configuration values |
|
The first step is to create a ztp-ops state to which all of our values can be set. After the state is defined, we’ll inform ISC as to what type of value to expect; in this case it’s either an IP address or text. The final step is to set up a subnet to accept DHCP requests and associate the ztp-opsconfiguration to this range. The result is that the dhcpd.conf looks like this:
option ztp-file-server code 150 = { ip-address };
option space ztp-ops;
option ztp-ops.image-file-name code 0 = text;
option ztp-ops.config-file-name code 1 = text;
option ztp-ops.image-file-type code 2 = text;
option ztp-ops.transfer-mode code 3 = text;
option ztp-ops-encap code 43 = encapsulate ztp-ops;
subnet 172.32.32.0 netmask 255.255.255.0 {
range 172.32.32.20 172.32.32.200;
option domain-name "provisioning.oob.local";
option routers 172.32.32.1;
option broadcast-address 172.32.32.255;
default-lease-time 600;
max-lease-time 7200;
option host-name "netboot";
option ztp-file-server 172.32.32.254;
option ztp-ops.image-file-name "/jinstall-qfx-5-flex-13.2X51-D20.2-domestic-
signed.tgz";
option ztp-ops.transfer-mode "http";
option ztp-ops.config-file-name "/template.conf";
}
Now, we’re ready to handle ZTP requests from any switch in the 172.32.32.0/24 network. Let’s use an existing switch in our network that’s running an older version of Junos. You can simulate a factory configuration by using the request system zeroize command, which will delete all configuration and cause the switch to reboot.
Take note of the version before zeroing out the switch:
dhanks@qfx5100> show version
fpc0:
--------------------------------------------------------------------------
Hostname: qfx5100
Model: qfx5100-48s-6q
JUNOS Base OS Software Suite [13.2X51-D15.5]
Note that the Juniper QFX5100 switch is running Junos 13.2X51-D15.5. Next, let’s go ahead and zero-out the switch and force it to reboot and come back up in a factory default state. After it reboots, it will perform a DHCP request and the newly configured ZTP server will respond, upgrade the software, and push a new configuration to the switch:
dhanks@qfx5100> request system zeroize
warning: System will be rebooted and may not boot without configuration
Erase all data, including configuration and log files? [yes,no] (no) yes
warning: ipsec-key-management subsystem not running - not needed by configuration.
warning: zeroizing fpc0
{master:0}
dhanks@qfx5100> Jul 28 06:42:03 init: chassis-control (PID 35331) stopped by signal
17
Jul 28 06:42:03 init: tnp-process (PID 35329) stopped by signal 17
Terminated
root@temp-leaf-01:RE:0% Jul 28 06:42:09 init: event-processing (PID 977) exited
with status=0 Normal Exit
Waiting (max 60 seconds) for system process `vnlru_mem' to stop...done
Waiting (max 60 seconds) for system process `vnlru' to stop...done
Waiting (max 60 seconds) for system process `bufdaemon' to stop...done
Waiting (max 60 seconds) for system process `syncer' to stop...
Syncing disks, vnodes remaining...0 0 0 0 done
syncing disks... All buffers synced.
Uptime: 5m51s
recorded reboot as normal shutdown
unloading fpga driver
unloading host-dev
Shutting down ACPI
Rebooting...
The Juniper QFX5100 switch has rebooted and come back up into a factory default state as shown in the following:
Mon Jul 28 06:43:47 UTC 2014
Amnesiac (ttyd0)
login:
The next step is that the Juniper QFX5100 switch downloads the software image and configuration file from the ZTP server and reboots again to begin the software installation process:
Amnesiac (ttyd0)
login: Terminated
Poweroff for hypervisor to respawn
Jul 28 06:48:54 init: event-processing (PID 1094) exited with status=1
Jul 28 06:48:54 init: packet-forwarding-engine (PID 1357) exited with status=8
Jul 28 06:48:55 init: dhcp-service (PID 1535) exited with status=0 Normal Exit
.
Waiting (max 60 seconds) for system process `vnlru_mem' to stop...done
Waiting (max 60 seconds) for system process `vnlru' to stop...done
Waiting (max 60 seconds) for system process `bufdaemon' to stop...done
Waiting (max 60 seconds) for system process `syncer' to stop...
Syncing disks, vnodes remaining...0 0 0 0 done
syncing disks... All buffers synced.
Uptime: 6m5s
recorded reboot as normal shutdown
unloading fpga driver
unloading host-dev
Powering system off using ACPI
Let’s check out the logs from the ZTP server to verify that the switch is pulling the correct files:
pi@pi /usr/share/nginx/www $ sudo tail -f /var/log/nginx/access.log
172.32.32.176 - - [28/Jul/2014:06:48:48 +0000] "GET //template.conf HTTP/1.1" 200
4919 "-" "fetch libfetch/2.0"
172.32.32.176 - - [28/Jul/2014:06:49:58 +0000] "GET //jinstall-qfx-5-flex-13.2X51-
D20.2-domestic-signed.tgz HTTP/1.1" 200 449262025 "-" "fetch libfetch/2.0"
We can see that the Juniper QFX5100 downloaded /template.conf first and then 50 seconds later downloaded the new Junos software. The Juniper QFX5100 device has now rebooted and come back online, the new software has been installed, and the new configuration has been applied:
Mon Jul 28 06:53:53 UTC 2014
temp-leaf-01 (ttyd0)
login: root
Password:
--- JUNOS 13.2X51-D20.2 built 2014-04-29 08:35:21 UTC
root@temp-leaf-01:RE:0% cli
{master:0}
root@temp-leaf-01> show system uptime
fpc0:
--------------------------------------------------------------------------
Current time: 2014-07-27 23:58:15 PDT
System booted: 2014-07-27 23:50:03 PDT (00:08:12 ago)
Protocols started: 2014-07-27 23:53:56 PDT (00:04:19 ago)
Last configured: 2014-07-27 23:54:18 PDT (00:03:57 ago) by root
11:58PM up 8 mins, 1 user, load averages: 0.08, 0.64, 0.46
{master:0}
root@temp-leaf-01> show version
fpc0:
--------------------------------------------------------------------------
Hostname: temp-leaf-01
Model: qfx5100-48s-6q
JUNOS Base OS Software Suite [13.2X51-D20.2]
Notice the update of the switch is only 8 minutes and the new software version is Junos 13.2X51-D20.2. Also note that the hostname has changed because the configuration has been applied, as well.
ISC DHCP Review
ZTP is a great way to quickly build the switching fabric of your data center. As soon as the management network is set up, the entire infrastructure required for ZTP is ready. You simply define the standardized Junos software version and configuration, and then you can quickly deploy 1,000s of switches within minutes.
Puppet
When it comes to automating the data center, Puppet represents one of the most common automation products that’s used in large-scale deployments. When you need to make changes across a large set of systems, it quickly becomes a burden to do it manually, and automation is required. Puppet is built on abstraction, so you can use it across a large variety of servers and networking equipment.
The Puppet architecture is very simple. Devices that are to be managed are called Nodes and the Puppet Master acts as the global catalog and change authority for all Nodes. Puppet-specific devices are called Nodes on purpose; this is to completely abstract the device that is being managed. For the exercise in this chapter, the Node shall represent the Juniper QFX5100 switch. The Puppet Node and Master exchange three types of information, as shown in Figure 6-3.
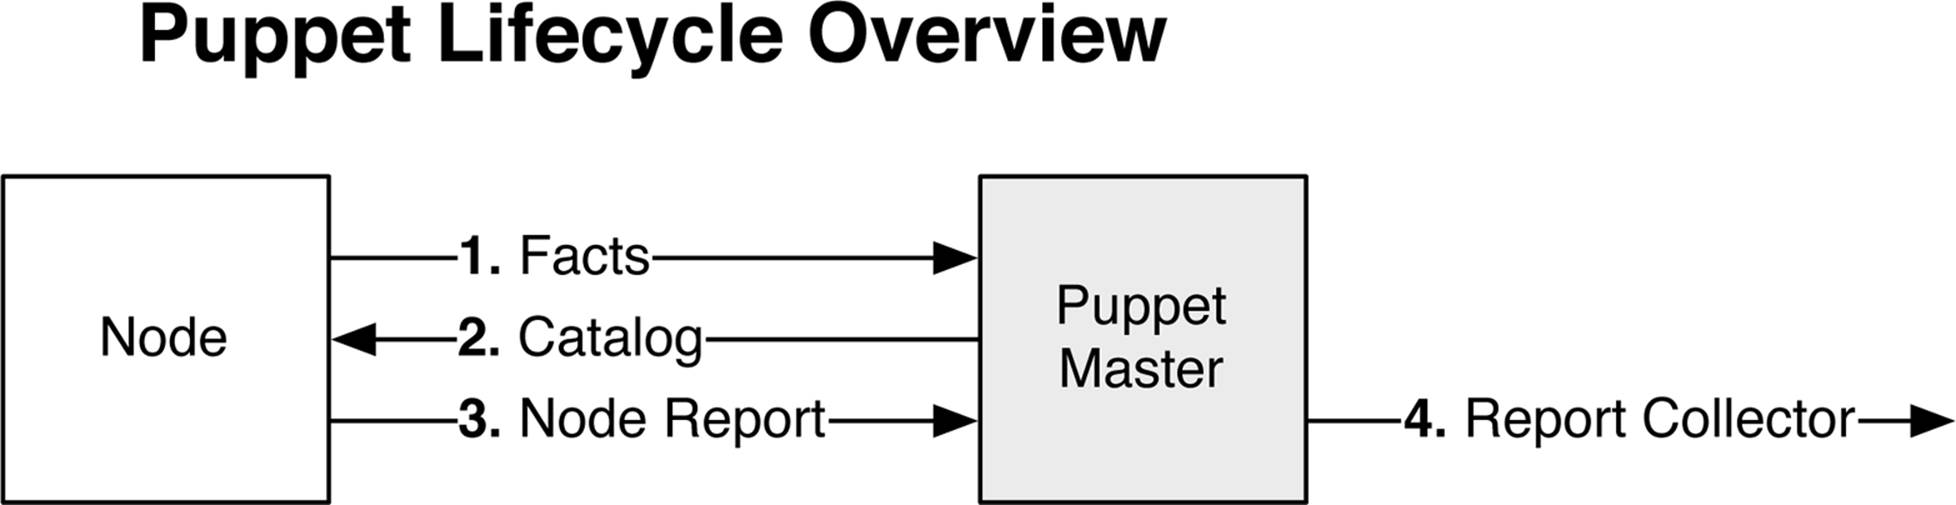
Figure 6-3. Puppet lifecycle overview
The Puppet lifecycle is very simple:
Facts
The first step is that the Puppet Node reports a list of facts to the Puppet Master. Facts are simply a collection of key/value pairs. In the example (the Juniper QFX5100 switch), a list of facts could include interface names, interface descriptions, and VLAN memberships. The Puppet Node reports a list of facts to the Puppet Master to inform it of the Node’s current state. If the current state doesn’t match the Puppet Master’s catalog, the Node is out-of-date and needs to be updated.
Catalog
The Puppet Master compiles a catalog based on the facts provided by the Puppet Node. The Puppet Node takes the catalog and applies all changes.
Node Report
The Puppet Node completes all of the changes specified in the catalog and reports back to the Puppet Master.
Report Collector
You can use Puppet’s open API to send data to third-party collectors and reporting tools to create data center change reports.
So that’s Puppet in a nutshell. It’s a great way to get started with data center automation, because you can use Puppet across all of your servers, applications, and networking equipment.
Let’s take a look at how the Juniper QFX5100 series implements Puppet and turns itself into a Puppet Node that’s capable of being managed by the Puppet Master, as depicted in Figure 6-4.
The Juniper QFX5100 family requires that the Juniper SDK JPuppet package be installed before you can use it as a Puppet Node.
NOTE
Juniper QFX5100 switches also support a new Junos software image called Enhanced Automation that ships preinstalled with the Puppet agent. It’s recommended that you use the Enhanced Automation package if you’re looking to automate your data center.

Figure 6-4. The Juniper QFX5100 architecture with the Junos SDK and JPuppet package
The Puppet agent on the Juniper QFX5100 is simply a Ruby daemon that uses the standard NetDev module on the Puppet Master. The Puppet agent is installed into the /opt/sdk/juniper/bin/ directory.
Puppet Agent
The first step in configuring Puppet on the Juniper QFX5100 is to drop into the shell and begin setting up the puppet.conf file, as follows:
% setenv PATH ${PATH}:/opt/sdk/juniper/bin
We’ll need to create a couple of directories and start creating our new puppet.conf.
% mkdir -p $HOME/.puppet/var/run
% mkdir -p $HOME/.puppet/var/log
% vi $HOME/.puppet/puppet.conf
The puppet.conf file should look something like this:
[main]
libdir = $vardir/lib
logdir = $vardir/log/puppet
rundir = $vardir/run/puppet
ssldir = $vardir/ssl
factpath = $libdir/facter
moduledir = $libdir
pluginsync = true
[agent]
server = 172.32.32.254
classfile = $vardir/classes.txt
localconfig = $vardir/localconfig
daemonize = false
Be sure to change the server to the correct IP address that hosts the Puppet Master. At this point, we should be good to go. The next step is to run the Puppet agent for the first time on the Juniper QFX5100 switch:
% puppet agent --test
warning: iconv couldn't be loaded, which is required for UTF-8/UTF-16 conversions
info: Creating a new SSL key for qfx5100
info: Caching certificate for ca
info: Creating a new SSL certificate request for qfx5100
info: Certificate Request fingerprint (md5):
B3:EF:11:56:04:B1:9F:52:C6:4F:46:13:99:BC:B1:5C
err: Could not request certificate: Could not intern from s: header too long
Exiting; failed to retrieve certificate and waitforcert is disabled
%
No need to fret; the first time you run the Puppet agent, it creates a new SSL certificate and submits it to the Puppet Master. The Puppet agent cannot continue until the Puppet Master has signed the Secure Sockets Layer (SSL) certificate. Let’s log in to the Puppet Master and see what certificates are available for signing:
root@puppet-master:~$ puppet cert list
"qfx5100" (MD5) B3:EF:11:56:04:B1:9F:52:C6:4F:46:13:99:BC:B1:5C
We can see the new SSL certificate from the Juniper QFX5100 switch; sign it and give it back to the switch:
root@puppet-master:~$ puppet cert sign qfx5100
Notice: Signed certificate request for qfx5100
Notice: Removing file Puppet::SSL::CertificateRequest qfx5100 at
'/var/lib/puppet/ssl/ca/requests/qfx5100.pem'
root@puppet-master:~$
Now that you have signed the Juniper QFX5100 certificate, you can go back to the switch and rerun the Puppet agent:
% puppet agent --test
info: Retrieving plugin
info: Caching certificate_revocation_list for ca
notice: /File[/var/home/puppet/.puppet/var/lib/puppet]/ensure: created
notice: /File[/var/home/puppet/.puppet/var/lib/puppet/provider]/ensure: created
notice: /File[/var/home/puppet/.puppet/var/lib/puppet/provider/netdev_lag]/ensure:
...snip...
info: Caching catalog for qfx5100
info: Applying configuration version '1406526155'
info: Creating state file /var/home/puppet/.puppet/var/state/state.yaml
notice: Finished catalog run in 0.11 seconds
%
The Puppet agent has successfully run the first time on the switch now that the SSL certificate has been signed by the Puppet Master. There are a few options to invoke on the Puppet agent on the Juniper QFX5100 switch:
Daemon
If you want to run the Puppet agent as a daemon on the Juniper QFX5100 device, modify the puppet.conf on the switch and change the daemonize value to true. Now, when you execute the command puppet agent (without the --test), it will automatically turn into a daemon and return you back to the command prompt. By default, it does this every 30 minutes.
Crontab
You can set up the /etc/crontab in the FreeBSD shell to execute /opt/sdk/juniper/bin/puppet agent --onetime at any interval you wish.
SSH
If you don’t like pulling changes from the Puppet Master, you can use Secure Shell (SSH) to log in to the Juniper QFX5100 and remotely execute the command /opt/sdk/juniper/bin/puppet agent --onetime whenever you need.
Ensure that each switch in the network is connected to an NTP so that as the switch insforms the Puppet Master about its facts, the time is synchronized and doesn’t cause any issues.
Puppet Master
At this juncture, let’s start making some changes to the Juniper QFX5100 switch. All changes in Puppet are defined in the Puppet Master. Let’s begin by adding the Juniper QFX5100 device to the Puppet Master site manifest (site.pp). We’ll add into the manifest the information listed inTable 6-3.
|
NetDev object |
Key |
Value |
|
netdev_device |
$hostname |
|
|
netdev_vlan “blue” |
vlan_id |
100 |
|
netdev_vlan “blue” |
description |
"the blue VLAN" |
|
netdev_vlan “green” |
vlan_id |
200 |
|
netdev_vlan “green” |
description |
"the green VLAN" |
|
netdev_vlan “red” |
vlan_id |
300 |
|
netdev_vlan “red” |
description |
"the red VLAN" |
|
netdev_interface “xe-0/0/14” |
untagged_vlan |
blue |
|
netdev_interface “xe-0/0/14” |
description |
"belongs to the blue VLAN" |
|
netdev_interface “xe-0/0/15” |
untagged_vlan |
green |
|
netdev_interface “xe-0/0/15” |
description |
"belongs to the green VLAN" |
|
netdev_interface “xe-0/0/16” |
untagged_vlan |
red |
|
netdev_interface “xe-0/0/16” |
description |
"belongs to the red VLAN" |
|
netdev_lag “ae0” |
ensure |
present |
|
netdev_lag “ae0” |
active |
true |
|
netdev_lag “ae0” |
links |
xe-0/0/10, xe-0/0/11 |
|
netdev_lag “ae0” |
lacp |
active |
|
netdev_lag “ae0” |
minimum_links |
1 |
|
netdev_interface “ae0” |
tagged_vlans |
blue, green, red |
|
netdev_interface “ae0” |
description |
"core to trunk" |
|
Table 6-3. Puppet Master manifest settings |
||
The values in Table 6-3 represent a simple setup of a core switch with a tagged interface connecting to the Juniper QFX5100 switch with three VLANs, as shown in Figure 6-5.
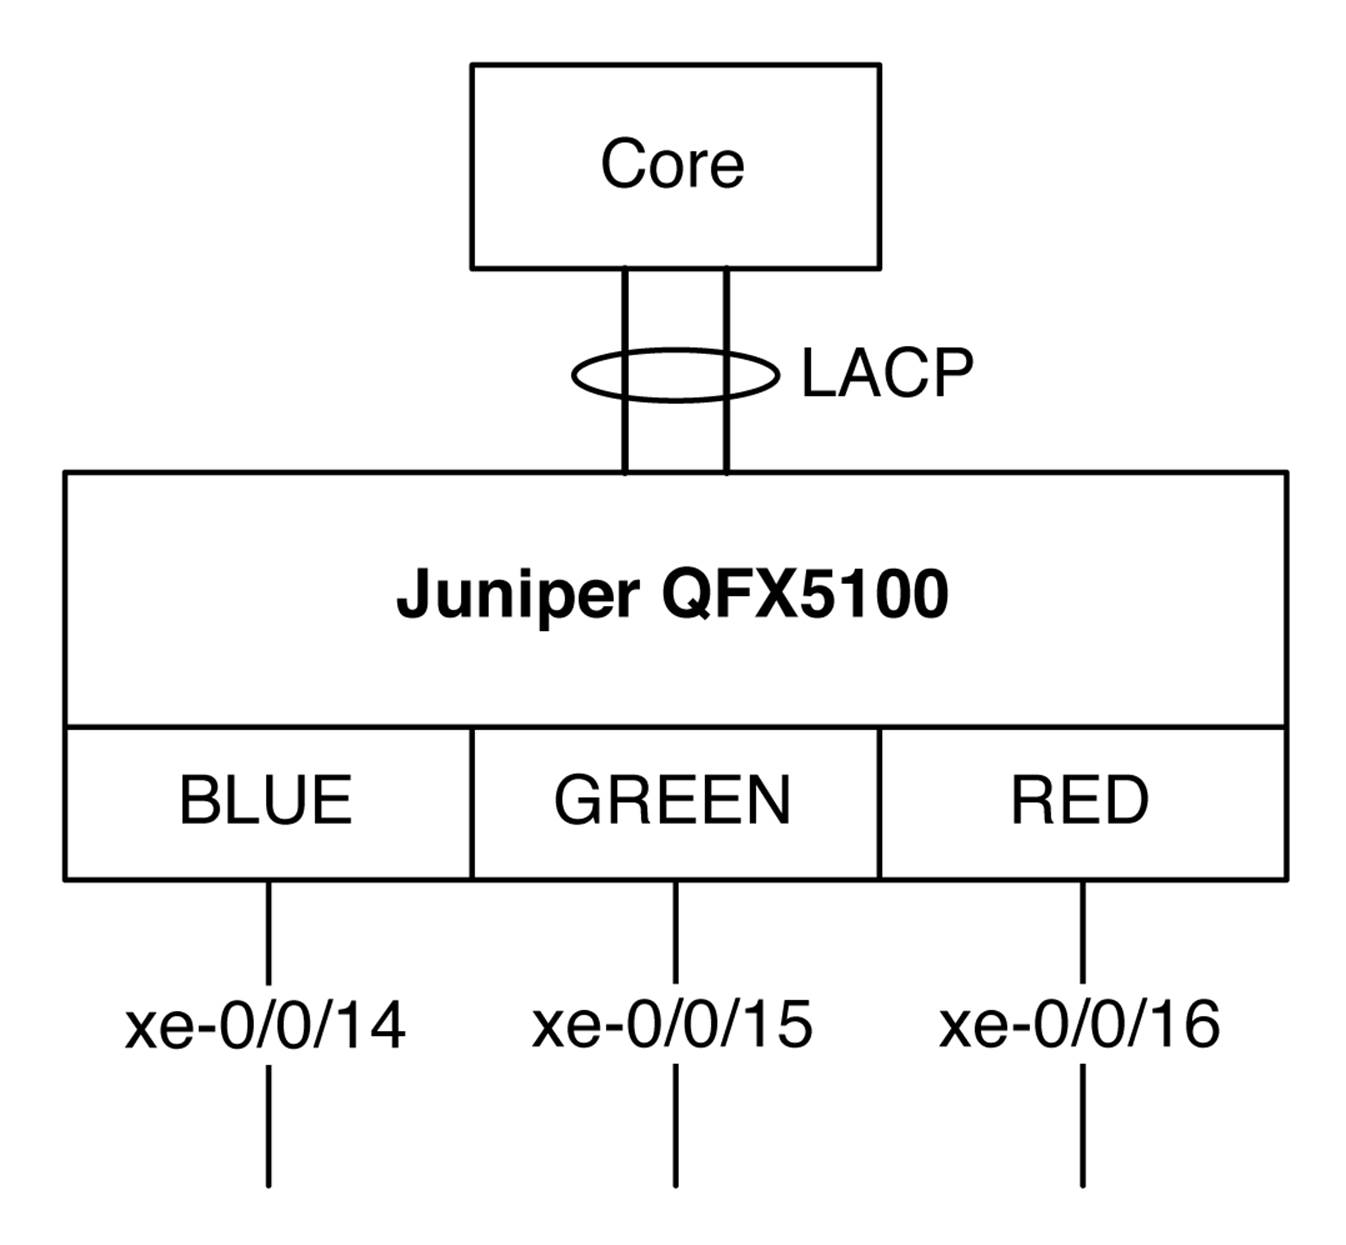
Figure 6-5. Test topology with the Juniper QFX5100 switch and Puppet Master manifest
Now that you understand the topology and what needs to be changed, take the Puppet Master manifest values from Table 6-3 and install them into the site.pp on the Puppet Master:
node "qfx5100" {
netdev_device { $hostname: }
netdev_vlan { "blue":
vlan_id => 100,
description => "the blue VLAN",
}
netdev_vlan { "green":
vlan_id => 200,
description => "the green VLAN"
}
netdev_vlan { "red":
vlan_id => 300,
description => "the red VLAN",
}
netdev_l2_interface { 'xe-0/0/14':
untagged_vlan => blue,
description => "belongs to the blue VLAN"
}
netdev_l2_interface { 'xe-0/0/15':
untagged_vlan => green,
description => "belongs the green VLAN"
}
netdev_l2_interface { 'xe-0/0/16':
untagged_vlan => red,
description => "belongs to the red VLAN"
}
netdev_lag { "ae0":
ensure => present,
active => true,
links => (['xe-0/0/10','xe-0/0/11']),
lacp => active,
minimum_links => 1
}
netdev_l2_interface { 'ae0':
tagged_vlans => [ blue, green, red ],
description => "Trunk to Core"
}
}
With the Puppet Master manifest updated, let’s go back to the Juniper QFX5100 swtich and execute the Puppet agent manually to pull the change into the system:
% puppet agent --test
info: Retrieving plugin
info: Caching catalog for qfx5100
info: Applying configuration version '1406527872'
notice: /Stage[main]//Node[qfx5100]/Netdev_vlan[blue]/ensure: created
notice: /Stage[main]//Node[qfx5100]/Netdev_vlan[green]/ensure: created
notice: /Stage[main]//Node[qfx5100]/Netdev_lag[ae0]/ensure: created
notice: /Netdev_l2_interface[xe-0/0/15]/ensure: created
notice: /Netdev_l2_interface[xe-0/0/14]/ensure: created
notice: /Stage[main]//Node[qfx5100]/Netdev_vlan[red]/ensure: created
notice: /Netdev_l2_interface[ae0]/ensure: created
notice: /Netdev_l2_interface[xe-0/0/16]/ensure: created
info: JUNOS: Committing 8 changes.
We can see that the Puppet agent has found all of the new netdev components and has committed eight changes. Don’t forget that the Puppet agent also sends a report back to the Puppet Master; here is the rest of the output from the puppet agent --test command:
notice: JUNOS:
[edit interfaces]
+ xe-0/0/10 {
+ ether-options {
+ 802.3ad ae0;
+ }
+ }
+ xe-0/0/11 {
+ ether-options {
+ 802.3ad ae0;
+ }
+ }
+ xe-0/0/14 {
+ unit 0 {
+ description "belongs to the blue VLAN";
+ family ethernet-switching {
+ interface-mode access;
+ vlan {
+ members 100;
+ }
+ }
+ }
+ }
+ xe-0/0/15 {
+ unit 0 {
+ description "belongs the green VLAN";
+ family ethernet-switching {
+ interface-mode access;
+ vlan {
+ members 200;
+ }
+ }
+ }
+ }
+ xe-0/0/16 {
+ unit 0 {
+ description "belongs to the red VLAN";
+ family ethernet-switching {
+ interface-mode access;
+ vlan {
+ members 300;
+ }
+ }
+ }
+ }
+ ae0 {
+ apply-macro "netdev_lag[:links]" {
+ xe-0/0/10;
+ xe-0/0/11;
+ }
+ aggregated-ether-options {
+ minimum-links 1;
+ lacp {
+ active;
+ }
+ }
+ unit 0 {
+ description "Trunk to Core";
+ family ethernet-switching {
+ interface-mode trunk;
+ vlan {
+ members [ 100 200 300 ];
+ }
+ }
+ }
+ }
[edit vlans]
+ blue {
+ description "the blue VLAN";
+ vlan-id 100;
+ }
+ green {
+ description "the green VLAN";
+ vlan-id 200;
+ }
+ red {
+ description "the red VLAN";
+ vlan-id 300;
+ }
notice: JUNOS: OK: COMMIT success!
notice: Finished catalog run in 2.30 seconds
The output above is directly from the Junos configuration change control by running the show compare command. Each addition is prefixed with a + and each deletion is prefixed with a - just like the Linux diff -u command.
Puppet Review
Puppet is a very powerful data center automation tool for servers and networking devices. Although we only showed the basics, Puppet offers many more features such as using variables and modules to create classes of switches and configure them based upon a certain function such as access switch or core switch.
For more information about Puppet for the Juniper QFX5100 series, visit the Puppet documentation.
For more information about Puppet, go to http://puppetlabs.com/.
Chef
The other popular software tool for data center automation is Chef. The Juniper QFX5100 series uses the same architecture for Chef as it does with Puppet, as illustrated in Figure 6-6.
Figure 6-6. The Juniper QFX5100 architecture and Chef agent package
The Chef agent is written as a Ruby program and uses the NETCONF libraries to communicate with Junos. The Junos Enhanced Automation software image comes preinstalled with a Chef agent.
The Chef example we’ll use here will be the core switch with a tagged trunk interface going to the Juniper QFX5100 device with three VLANs. To create a working example of Chef with the Juniper QFX5100 switch, we’ll use the same data from the Puppet example that’s presented inTable 6-3 and Figure 6-5.
Chef Server
The first step is to add the Juniper QFX5100 device to the Chef server. You can choose to do it manually, but Juniper Networks and Chef have created a bootstrap process that takes advantage of Chef automation and makes life much easier. The first step is to pull the bootstrap file from GitHub on our Chef server:
root@chef-server:~/chef-repo$ wget https://github.com/opscode/junos-
chef/blob/master/bootstrap/junos-minimal.erb
Next, use this bootstrap file as a template and load it into Chef. In this example, our switch IP address is 10.0.0.16:
root@chef-server:~/chef-repo$ knife bootstrap 10.0.0.16 --template-file junos-
minimal.erb -x root
Connecting to 10.0.0.16
Password: <Enter the switch's password>
10.0.0.16
10.0.0.16 ------------------------------------------------------------------------
10.0.0.16 -----> Creating required Chef configuration
10.0.0.16 ------------------------------------------------------------------------
10.0.0.16
10.0.0.16 ------------------------------------------------------------------------
10.0.0.16 -----> Performing the initial chef-client run!
10.0.0.16 ------------------------------------------------------------------------
10.0.0.16
10.0.0.16 Starting Chef Client, version 11.10.4
10.0.0.16 Creating a new client identity for qfx5100 using the validator key.
10.0.0.16 Synchronizing Cookbooks:
10.0.0.16 Compiling Cookbooks...
10.0.0.16 Converging 0 resources
10.0.0.16
10.0.0.16 Running handlers:
10.0.0.16 Running handlers complete
10.0.0.16
10.0.0.16 Chef Client finished, 0/0 resources updated in 2.36510424 seconds
root@chef-server:~/chef-repo$
When the bootstrap process finishes, you can double-check the Chef server to ensure that you see the Juniper QFX5100 in the client list:
root@chef-server:~/chef-repo$ knife client list
chef-validator
chef-webui
qfx5100
The Juniper QFX5100 shows up in the client list as expected. To check out additional details, use the following command:
root@chef-server:~/chef-repo$ knife node show qfx5100
Node Name: qfx5100
Environment: _default
FQDN:
IP:
Run List:
Roles:
Recipes:
Platform: junos 13.2X51-D21.1
Tags:
root@chef-server:~/chef-repo$
Right now, you only have the basic information for the Juniper QFX5100 switch. The next step is to take the netdev data from Table 6-3 and create a Chef recipe. The first step is to create a netdev Chef cookbook.
root@chef-server:~/chef-repo$ knife cookbook site download netdev
Downloading netdev from the cookbooks site at version 2.0.0 to /home/root/netdev-
2.0.0.tar.gz
Cookbook saved: /home/root/netdev-2.0.0.tar.gz
root@chef-server:~/chef-repo$ tar zxvf ./netdev-2.0.0.tar.gz -C cookbooks
root@chef-server:~/chef-repo$ mkdir ~/chef-repo/cookbooks/netdev/recipes
Now that you have the netdev cookbook and associated directories ready to go, it’s time to create some Chef recipes. Let’s start with the ~/chef-repo/cookbooks/netdev/recipes/vlan_create.rb recipe:
#
# Cookbook Name:: netdev
# Recipe:: vlan_create
netdev_vlan "blue" do
vlan_id 100
description "the blue VLAN"
action :create
end
netdev_vlan "green" do
vlan_id 200
description "the green VLAN"
action :create
end
netdev_vlan "red" do
vlan_id 300
description "the red VLAN"
action :create
end
Now onto the ~/chef-repo/cookbooks/netdev/recipes/access_interface_create.rb recipe:
#
# Cookbook Name:: netdev
# Recipe:: access_interface_create
#
# Physical interface creation using the following defaults:
# auto-negotiation on, MTU 1500, administratively up
netdev_interface "xe-0/0/14" do
description "access interface"
action :create
end
netdev_interface "xe-0/0/15" do
description "access interface"
action :create
end
netdev_interface "xe-0/0/16" do
description "access interface"
action :create
end
# Logical interface creation, setting port mode to access (vlan_tagging false)
# and assigning interface to a VLAN
netdev_l2_interface "xe-0/0/14" do
description "belongs to blue VLAN"
untagged_vlan "blue"
vlan_tagging false
action :create
end
netdev_l2_interface "xe-0/0/15" do
description "belongs to green VLAN"
untagged_vlan "green"
vlan_tagging false
action :create
end
netdev_l2_interface "xe-0/0/16" do
description "belongs to red VLAN"
untagged_vlan "red"
vlan_tagging false
action :create
end
Now onto the ~/chef-repo/cookbooks/netdev/recipes/uplink_interface_create.rb recipe:
#
# Cookbook Name:: netdev
# Recipe:: uplink_interface_create
#
netdev_l2_interface "xe-0/0/10" do
action :delete
end
netdev_l2_interface "xe-0/0/11" do
action :delete
end
# Create the LAGs
netdev_lag "ae0" do
links [ "xe-0/0/10", "xe-0/0/11" ]
minimum_links 1
lacp "active"
action :create
end
# Configure Layer 2 switching on the LAGs. Define the port modeas trunk
# (vlan_tagging true), with membership in the blue, green,and red VLANs.
netdev_l2_interface "ae0" do
description "Uplink interface"
tagged_vlans [ "blue", "green", "red" ]
vlan_tagging true
action :create
end
After you save the three recipes into ~/chef-repo/cookbooks/netdev/recipes/, you’re ready to upload the cookbook into Chef:
root@chef-server:~/chef-repo/cookbooks/netdev/recipes$ cd ~/chef-repo/
root@chef-server:~/chef-repo$ knife cookbook upload netdev
Uploading netdev [2.0.0]
Uploaded 1 cookbook.
With the cookbook uploaded, you can associate the recipes with the Juniper QFX5100 switch. You’ll need to edit the node by using the following command:
root@chef-server:~/chef-repo$ knife node edit qfx5100
Saving updated run_list on node qfx5100
Enter the following information into the editor and save it:
# Node Runlist
{
"name": "qfx5100",
"chef_environment": "_default",
"normal": {
},
"run_list": [
"recipe[netdev::vlan_create]",
"recipe[netdev::access_interface_create]",
"recipe[netdev::uplink_interface_create]"
]
}
The QFX5100 device is now registered with the three recipes and is ready to create VLANs and assign the access and uplink interfaces.
Chef Agent
For the Juniper QFX5100 switch to pull the new Chef recipes, you’ll need to log in to the switch and execute the following command:
root@qfx5100:RE:0% /opt/sdk/chef/bin/ruby /opt/sdk/chef/bin/chef-client -c
/var/db/chef/client.rb
Starting Chef Client, version 11.10.4
resolving cookbooks for run list: ["netdev::vlan_create",
"netdev::access_interface_create", "netdev::uplink_interface_create"]
Synchronizing Cookbooks:
- netdev
Compiling Cookbooks...
Converging 13 resources
Recipe: netdev::vlan_create
* netdev_vlan[blue] action create
- create vlan blue with values: vlan_id: 100, description: the blue VLAN
* netdev_vlan[green] action create
- create vlan green with values: vlan_id: 200, description: the green VLAN
* netdev_vlan[red] action create
- create vlan red with values: vlan_id: 300, description: the red VLAN
Recipe: netdev::access_interface_create
* netdev_interface[xe-0/0/14] action create
- create interface xe-0/0/14 with values: description: access interface
* netdev_interface[xe-0/0/15] action create
- create interface xe-0/0/15 with values: description: access interface
* netdev_interface[xe-0/0/16] action create
- create interface xe-0/0/16 with values: description: access interface
* netdev_l2_interface[xe-0/0/14] action create
- create layer 2 interface xe-0/0/14 with values: vlan_tagging: false,
description: belongs to blue VLAN, untagged_vlan: blue
* netdev_l2_interface[xe-0/0/15] action create
- create layer 2 interface xe-0/0/15 with values: vlan_tagging: false,
description: belongs to green VLAN, untagged_vlan: green
* netdev_l2_interface[xe-0/0/16] action create
- create layer 2 interface xe-0/0/16 with values: vlan_tagging: false,
description: belongs to red VLAN, untagged_vlan: red
Recipe: netdev::uplink_interface_create
* netdev_l2_interface[xe-0/0/10] action delete (up to date)
* netdev_l2_interface[xe-0/0/11] action delete (up to date)
* netdev_lag[ae0] action create
- create link aggregation group ae0 with values: links: ["xe-
0/0/10", "xe-0/0/11"], minimum_links: 1, lacp: active
* netdev_l2_interface[ae0] action create
- create layer 2 interface ae0 with values: description: Uplink interface,
tagged_vlans: ["blue", "green", "red"], vlan_tagging: true
Running handlers:
- JunosCommitTransactionHandler
Running handlers complete
Chef Client finished, 11/13 resources updated in 16.496483965 seconds
root@qfx5100:RE:0%
The Juniper QFX5100 device successfully downloaded the cookbook and applied the three recipes to the Junos configuration.
Let’s log back in to the Chef server and take a look at the Juniper QFX5100 node details and see what has changed:
root@chef-server:~/chef-repo$ knife node show qfx5100
Node Name: qfx5100
Environment: _default
FQDN:
IP:
Run List: recipe[netdev::vlan_create], recipe[netdev::access_interface_create],
recipe[netdev::uplink_interface_create]
Roles:
Recipes: netdev::vlan_create, netdev::access_interface_create,
netdev::uplink_interface_create
Platform: junos 13.2X51-D21.1
Tags:
root@chef-server:~/chef-repo$
Much better! Aside from the previous basic information, we can now see that the run list includes all three recipes from the NetDev cookbook.
Just like with Puppet, it’s critical that the Juniper QFX5100 and Chef server use NTP to synchronize time so that you don’t run into issues when making changes in your data center.
Chef Review
Our Juniper QFX5100 switch has been automated by Chef, utilizing the same configuration data from our previous Puppet laboratory. No matter what your software preference is for automating the data center, the Juniper QFX5100 series helps you quickly deploy changes within seconds. Creating changes is as simple as creating cookbooks and recipes and then applying them to switches in your network.
For more information about how to use Chef with the Juniper QFX5100, visit the Chef documentation.
For more information about Chef, go to http://www.getchef.com/.
Junos PyEZ
One of the latest editions to the Juniper QFX5100 network automation toolset is a Python framework called Junos PyEZ. It’s designed to provide both programmers and nonprogrammers with the ability to easily automate the Juniper QFX5100 series by using native Python scripting or a simple templating system. You can install Junos PyEZ on any host that supports Python and uses the NETCONF protocol to remotely connect to a Juniper QFX5100 device to make changes or gather data, as shown in Figure 6-7.
Because Junos PyEZ is designed for both programmers and nonprogrammers alike, there are two methods to handle data from Juniper QFX5100 switches:
Structured
Programmers enjoy using structured data; this simply means that you can take the data received from the Juniper QFX5100 device and load it into native Python data structures, such as lists, sets, and dictionaries.
Unstructured
There are two types of unstructured data: snippets and templates. The snippets are native Junos output in the forms of text, set, or XML format. The template makes it possible for you to use variables and combine them with the well-known Python Jinja2 templating engine.
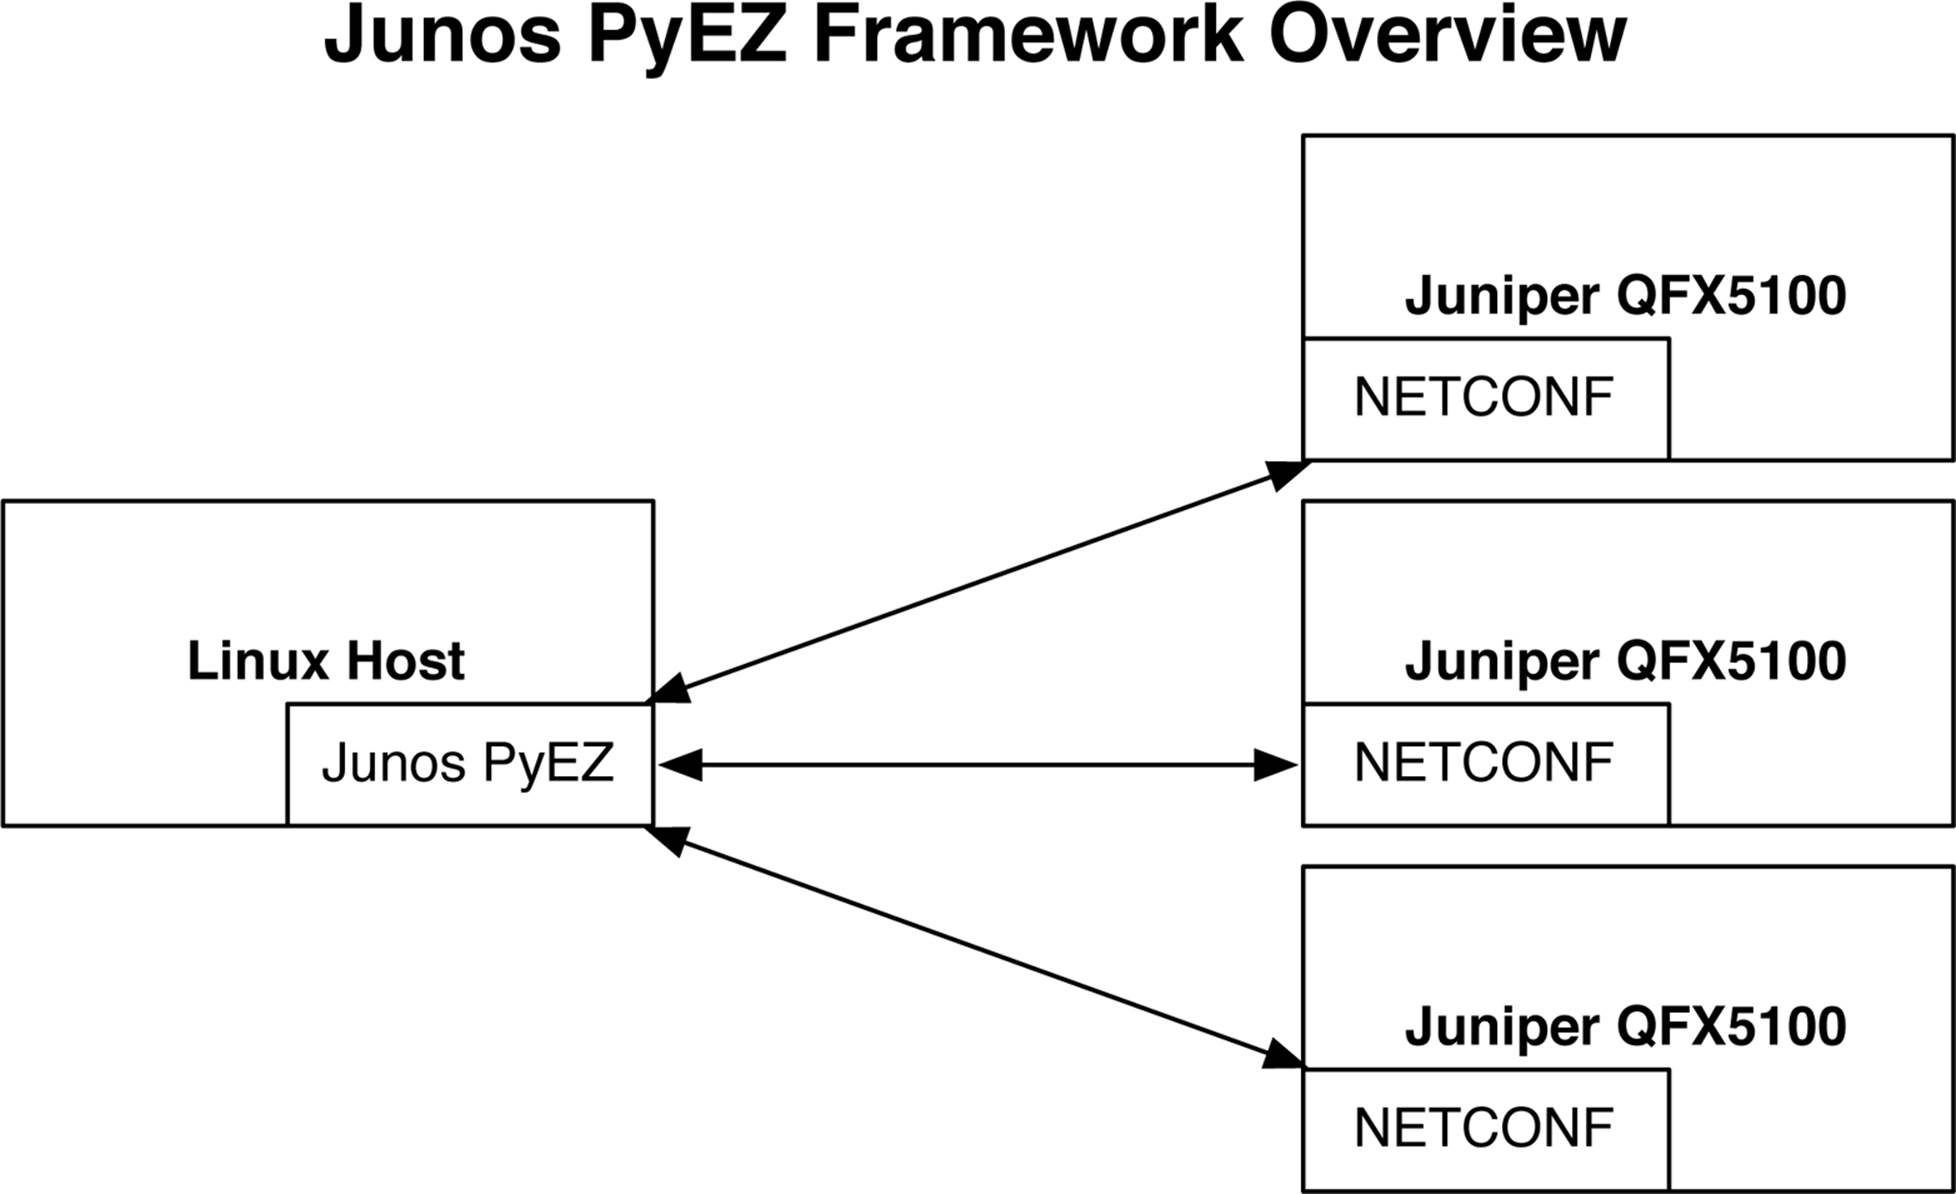
Figure 6-7. Junos PyEZ framework overview
In short, Junos PyEZ allows programmers to use native Python data structures when automating the Juniper QFX5100 family, but also allows nonprogrammers to use a templating system using Jinja2.
The best way to learn Junos PyEZ is to get your hands dirty. Let’s get started.
Installation
The installation of Junos PyEZ is straight forward. The best place to install the tools is on any Linux host with IP connectivity to the Juniper QFX5100 switch. The first step is to install a few packages. I’m using an Ubuntu Linux distribution with the APT package manager:
root@linux:~$ apt-get install -y python-pip python-dev libxml2-dev
libxslt-dev zlib1g-dev
Reading package lists... Done
Building dependency tree
Reading state information... Done
After the prerequisites are installed, you can install the Junos PyEZ package.
root@linux:~$ pip install junos-eznc
Downloading/unpacking junos-eznc
Downloading junos-eznc-1.0.0.tar.gz (54kB): 54kB downloaded
Running setup.py (path:/tmp/pip_build_root/junos-eznc/setup.py) egg_info for
package junos-eznc
That’s it; just two commands. Now let’s get started with our first script.
Hello, World!
As the programming gods dictate, we must start with a traditional Hello, world! Open your favorite text editor and create the following helloEZ.py file:
#!/usr/bin/python
from jnpr.junos import Device
dev = Device( user='netconf-test', host='lab-switch', password='lab123' )
dev.open()
print dev.facts
dev.close()
The first step is to import the Device class from the jnpr.junos library. Now, you can make a new Device called dev; the only requirement is that you specify the username, hostname, and a password to which to connect.
The next step is to simply open a connection to the device, get the facts, and then close the connection. Take a look at the output and see what’s included in the facts:
root@linux:~/qfxbook$ python ./helloEZ.py
{'domain': None, 'hostname': 'qfx5100', 'ifd_style': 'SWITCH', 'version_info':
junos.version_info(major=(13, 2), type=X, minor=(51, 'D', 15), build=5),
'version_RE0': '13.2X51-D15.5', '2RE': True, 'serialnumber': 'VB3714190366',
'fqdn': 'qfx5100', 'switch_style': 'VLAN', 'version': '13.2X51-D15.5', 'master':
'RE0', 'HOME': '/var/home/netconf-test', 'model': 'QFX5100-96S-8Q', 'RE0':
{'status': 'OK', 'last_reboot_reason': '0x400:bios auto recovery reset ', 'model':
'QFX Routing Engine', 'up_time': '2 hours, 6 minutes, 29 seconds',
'mastership_state': 'master'}, 'personality': 'SWITCH'}
The output from the script is returned in a native Python data structure called a dictionary; these are simple key/value pairs. The facts pertaining to the Juniper QFX5100 switch include basic elements such as the hostname, version, and uptime, as shown in the preceding output.
Configuration Management
Using the same laboratory from the Chef and Puppet examples, let’s use the Junos PyEZ library to provision the same configuration changes in Table 6-3 and Figure 6-5. To accomplish this, we’ll use the Jinja2 templating system. We’ll need to create the following files to accomplish this:
demo-template.yml
The demo-template.yml file is a simple template that contains a series of variables to represent a list of the three VLANs and their associated interfaces.
demo-template.j2
The demo-template.j2 file is the Jinja2 template file that’s used to take the variable input from demo-template.yml and create a Junos-formatted configuration file using the variables from demo-template.yml.
demo.py
This is the Python code that employs the Jinja2 templating system and uses demo-template.yml and demo-template.j2 to import the VLAN and interface data and create a Junos configuration file that can be applied to the Juniper QFX5100 device.
Let’s get started. The first step it to create the demo-template.yml file that contains the following data:
---
vlans:
blue:
vlan_id: 100
desc: "the BLUE vlan"
interfaces:
- name: xe-0/0/14
green:
vlan_id: 200
desc: "the GREEN vlan"
interfaces:
- name: xe-0/0/15
red:
vlan_id: 300
desc: "the RED vlan"
interfaces:
- name: xe-0/0/16
uplinks:
ae0:
interfaces:
- name: xe-0/0/10
- name: xe-0/0/11
min_links: 1
lacp_mode: active
Next, create the demo-template.j2 file that contains the following data:
vlans {
}
interfaces {
}
The final step is to create the Python script that utilizes both of the demo-template files and connects to the Juniper QFX5100 switch, making the appropriate changes. Create the following demo.py file:
from jnpr.junos.utils.config import Config
from jnpr.junos import Device
import yaml
dev = Device( user='netconf-test', host='lab-switch', password='lab123' )
dev.open()
dev.bind(cu=Config)
dev.cu
tvars = yaml.load(open("demo-template.yml").read())
dev.cu.load(template_path="demo-template.j2", template_vars=tvars, format="text")
commit_diff = dev.cu.diff()
print commit_diff
dev.cu.commit()
dev.close()
As you can see, the demo.py script looks similar to the initial helloPY.py script that we created earlier. You begin by defining a class for the Juniper QFX5100 switch and opening a connection to it. The next step is to open the demo-template.yml file, which contains the simple VLAN and interface variables, and apply it to the Jinja2 templating system. Now, you print the delta between the current running configuration and the candidate configuration loaded by Jinja2. Finally, commit the changes to the Juniper QFX5100 device and close the connection.
The idea behind the two demo-template files is that a user only needs to modify the simple demo-template.yml file to make changes to a switch. The demo-template.j2 file is only a definition file that applies the data from demo-template.yml and makes sure the output is in a Junos configuration format.
For more information about PyEZ and templates, visit https://github.com/Juniper/community-NCE.
Operational Automation
You can also use Junos PyEZ to operationally interact with the Juniper QFX5100 series without having to make configuration changes. For example, you can create a custom Python script that queries the Juniper QFX5100 device and only returns the interface flap information. Let’s give it a shot. Create the following port-report.py file:
from jnpr.junos.op.phyport import *
from jnpr.junos import Device
dev = Device( user='netconf-test', host='lab-switch', password='lab123' )
dev.open()
ports = PhyPortTable(dev).get()
print "Port,Status,Flapped" #Print Header for CSV
for port in ports:
print("%s,%s,%s" % (port.key, port.oper, port.flapped))
Just as before, you create a Device class, give it the login information for the Juniper QFX5100 switch, and then open a NETCONF session to the switch. The next step is to get information about the physical interfaces on the Juniper QFX5100 by using the PhyPortTable(dev).get()function and assign it to the ports variable.
You can now can loop through the ports variable and print the interface flap information for each port. Take a look at the output of the script:
root@linux:~$ python ./port-report.py
Port,Status,Flapped
ge-0/0/12,up,2012-01-01 00:25:32 UTC (00:04:27 ago)
ge-0/0/14,up,2012-01-01 00:25:32 UTC (00:04:28 ago)
ge-0/0/16,up,2012-01-01 00:25:42 UTC (00:04:18 ago)
ge-0/0/18,up,2012-01-01 00:25:42 UTC (00:04:18 ago)
ge-0/0/47,down,2012-01-01 00:03:05 UTC (00:26:55 ago)
Easy peasy! You can imagine how easy this would be to do across a set of 1,000 switches. We could simply loop through a list of IP addresses and globally see the interface flap information across the entire data center. Any type of information you need to get access to that isn’t natively provided by Junos can now be quickly programmed by using the Junos PyEZ framework.
Further Reading
The PyEZ library is under constant development by Juniper Networks and members of the community. At of this writing, the best places for up-to-date information on the project is over on the project’s GitHub page. You can also find active library documentation drawn directly from the code itself on the ReadTheDocs website.
To engage with our active project community, be sure to join our Google Group. We would like to hear feedback from people using our PyEZ library in the form of feature requests, but also by active development from the community. We regularly take GitHub “Pull Requests” from the community, and community members have contributed several key pieces of the project.
The author has also setup a GitHub repository for configurations and other bonus material. Please visit https://github.com/Juniper/qfx5100-book for more information.
Summary
In this chapter we covered the highlights of the network automation that’s available on the Juniper QFX5100 family of switches. We first reviewed the architecture of the Juniper QFX5100 series and how all of the components take advantage of the NETCONF/DMI interfaces to enable network automation. We then took a look at how to quickly get the switch up and running from a factory default configuration by using the ZTP feature. We configured a ZTP server via the vendor DHCP options and were able to quickly upgrade the software of the switch as well as install a new configuration.
Next, we took a look at how to use Puppet and Chef with the Juniper QFX5100 family. Puppet and Chef represent the most popular IT automation tools in the industry; you can use these tools across a wide variety of servers and networking equipment. The end result is that you can use the same IT automation tool when deploying applications and servers to ensure that the network is set up correctly, as well.
We explored the Junos PyEZ framework and created our first Hello, world! script. We then took the previous laboratory data from the Chef and Puppet sections and provisioned the same VLAN and interface configuration changes by using the Junos PyEZ framework. Finally we showed a simple operational script that looks at the interface flap information on a Juniper QFX5100 switch. Using the Junos PyEZ framework is a great way to quickly gain access to the information you need to operate a data center.
Network automation in the data center is an important topic, and the Juniper QFX5100 series delivers in spades. From ZTP to Junos Enhanced Automation, the Juniper QFX5100 supports all of the major programming languages:
§ Python
§ Go
§ Ruby
§ Perl
Juniper Networks has invested heavily in the open source community with the Puppet and Chef NetDev framework and the Junos PyEZ framework. Do you have a project that could benefit from network automation? Go get busy!