Learning Bitcoin (2015)
Chapter 5. Installing a Bitcoin Node
|
"Right now Bitcoin feels like the Internet before the browser." |
||
|
--Wences Casares, founder and CEO of Xapo |
||
Bitcoin was officially launched to the public with the release of its first client, Bitcoin-QT. The software is a fully functional Bitcoin node and implements the necessary functionality to bootstrap the Bitcoin network.
Note
Since version 0.9.0, it has been renamed Bitcoin Core.
In this chapter, we will set up and install our own copy of Bitcoin Core, the official client. Several other fully functional clients exist, but we'll use the official client in this chapter. Through the process we will cover the following areas:
· Understanding a Bitcoin node
· Installing Bitcoin Core
· Using Bitcoin Core
· Executing Bitcoin operations
Understanding a Bitcoin node
Satoshi Nakamoto first released the Bitcoin whitepaper in October of 2008. Shortly after that, he released the first software implementation of a Bitcoin node. The software functions as an independent node that connects other nodes. On account of how it connects to the network, we will often refer to the software as the client. With a centralized network design, we often hear the terms client and server. Clients make a connection with a server to submit requests and to post data. As a classic example, an internet browser functions as a client that connects to a server to retrieve a webpage.
Note
Bitcoin uses a decentralized network design. There is no central server to connect to, rather, clients connect directly to other clients. Nodes then broadcast or relay messages between themselves.
The client was open sourced to the world in 2009, allowing developers to independently improve the source code. Through online discussions, developers are able to coordinate bug fixes and improvements to the software. Revisions are tested and validated, and, if accepted, they are released to the official repository.
Initially, Satoshi Nakamoto contributed to the discussions but later disappeared. His early involvement with the development was crucial for the core team to understand the technology.
Bitcoin Core
Originally called Bitcoin-QT, the official Bitcoin client is named Bitcoin Core. When installed, a service is started called bitcoind. Bitciond implements the protocols needed to connect to the Bitcoin network. Once connected to the client's user interface, Bitcoin Core can respond to the user input and perform actions such as broadcasting the transactions.
Bitcoin Core is publicly available on Github, a service that hosts public and private repositories of code. The Bitcoin Core source code is available at http://github.com/bitcoin/bitcoin.
Note
Github is a source code repository service. The service implements a git server which manages and stores the source code and tracks the developers' contributions.
Developers run a client to push/pull their changes. Branching allows a developer to make changes to a parallel version of the source code. This allows them to experiment with various changes. The changes can then be merged back with the original branch.
Many developers have "forked" the source code to build their own versions of Bitcoin. The source code version control software, called Git, allows users to fork the source code. Forking the source code produces a new branch that separates its set of changes from the original branch. These changes can then be managed by a separate team of developers for their own use. Most of the new alternative coins were started as forks of Bitcoin.
Forking source code allows developers to merge commitments from various branches. Changes that are useful for other developers can be shared and merged between the branches. By selectively merging the commits, a software project can progress rapidly, as it can choose from a variety of submissions.
Today, the Bitcoin Core project has over 8,000 commits, selected from over 300 active developers.
Internals of a node
Once connected to the Bitcoin network, independent nodes can participate in processing Bitcoin transactions. To function as a valid Bitcoin node, a client will often perform the following operations:
· Finding and connecting to other nodes
· Exchanging transactions with other nodes
· Exchanging blocks with other nodes
· Validating and exchanging transactions
· Maintaining its copy of the blockchain
· Managing private keys and a Bitcoin wallet (optional)
· Displaying a user interface (Bitcoin-QT/Core)
Node discovery
To connect to a decentralized network, a node must first discover a list of the other active nodes. The primary piece of information necessary is the IP address or the domain name of the node. Usually, the client comes with a list of root nodes or well known nodes that can handle lots of connections. From there, various algorithms are used to find and share the list of active nodes on the network. The lists are actively maintained by the nodes and are freely shared.
A node is connected to the network as soon as a connection is open between it and another node. Connections to other nodes can be used to increase its bandwidth to the network. Typically, the client can open and maintain 6-10 connections.
Once connected, the node will be able to freely exchange messages with the Bitcoin network.
Messaging
Once connected to the peer-to-peer network, nodes can send and receive transaction messages. This is the basic foundation from which all the Bitcoin operations are able to function.
New messages are broadcasted to each connecting node. If the node is able to respond, a message is sent back and processed by the client. Nodes can also relay messages to other nodes. For example, when a transaction is broadcasted to a node, it will validate and store the transaction. Then it will rebroadcast the transaction to all its connecting nodes. In effect, a transaction can be fully propagated through the network in only a few seconds.
Nodes also use messaging to exchange and relay validated blocks. Sharing blocks is how a node is able to construct a local version of the blockchain.
Maintaining a Blockchain
By design, each node must validate and maintain its own version of the blockchain. Through this process, nodes are able to form a consensus about which version of the blockchain is the most valid. This is indicated by the length of the chain.
When a new client is initially installed, it has to reconstruct and validate the longest chain before it can validate new transactions. To catch up to the longest chain, the client requests each block, one by one, with the nodes it's connected to. Connected nodes with a current blockchain are then able to share their blocks with the client.
The client always performs a validation on the block and its transactions before accepting the chain.
Transaction relaying
New transactions are programmatically sent to a node. The node validates the transaction against its local blockchain, checking for signatures and bitcoin balances. When accepted, the client adds the transaction to its list and then broadcasts it to all the connecting nodes.
Connecting nodes then validate the transaction against their blockchain. If valid, the node then broadcasts the transaction to all its neighbor nodes. The exponential effects result in the quick propagation of the transaction throughout the network.
Bitcoin wallets
On top of the basic network operations, the client also maintains a Bitcoin wallet for the user. The wallet is able to generate unlimited addresses to send and receive the Bitcoin transactions. The private keys for each address are stored and encrypted by password.
When sending a payment, the client is able to combine multiple addresses as inputs to fulfill a payment amount. The client also generates an additional address for the change amount. Before sending the transaction, the client will prompt for the user's password and sign the transaction with the private keys.
We will demonstrate this process both with the graphical user interface and by hand using the command line interface.
Installing the client
Bitcoin Core is publicly available for free from the official Bitcoin site (www.bitcoin.org). Installations are available for Windows, Mac, and Linux.
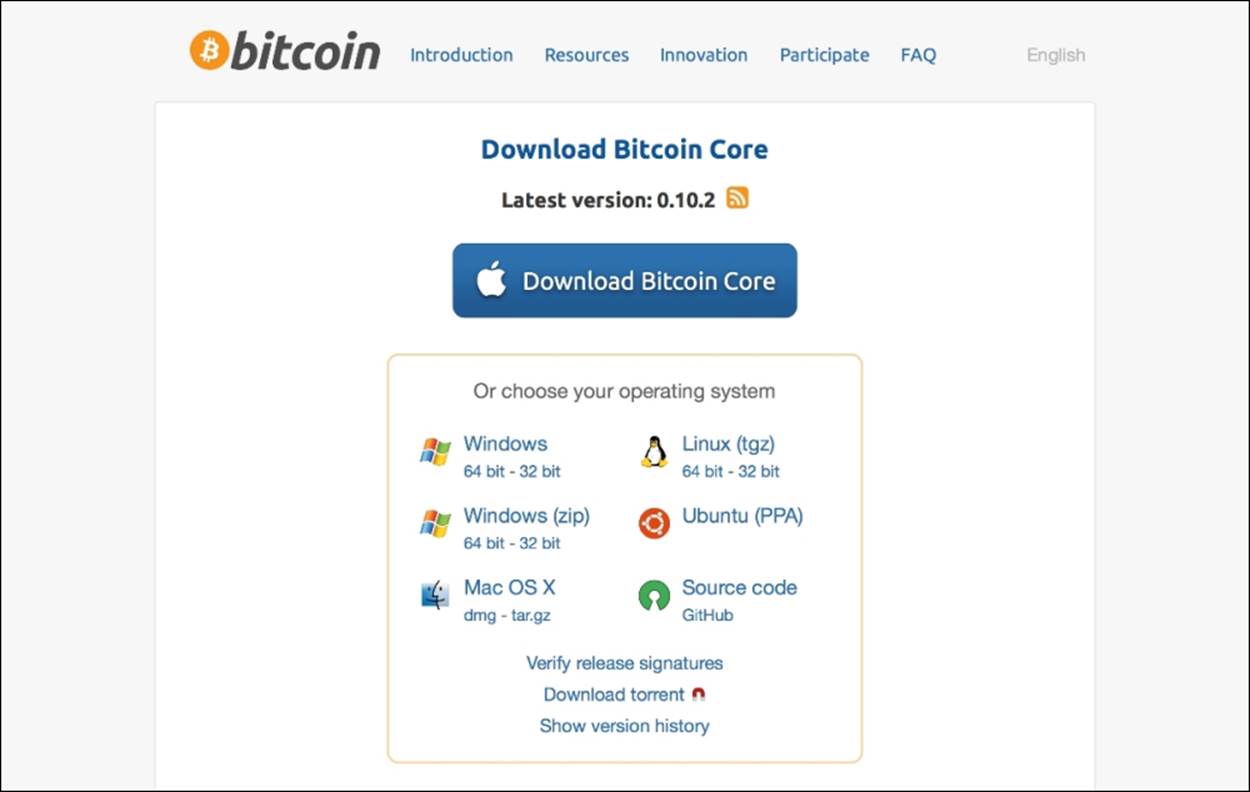
Figure 5.1 - Downloading the client
You can download the client from https://bitcoin.org/en/download. The site gives detailed instructions on how to install the client on each operating system (Windows, OS/X, and Linux).With the client installed, you'll be able to execute commands on the network using command-line scripts or with other development tools.
Requirements
Due to the heavy use of processing and storage, several requirements must be met for proper performance:
· At least 100GB of storage is recommended: The client will need to download the entire blockchain and validate it locally on disk. Today, the blockchain size is about 50GB. This will grow at a linear and predictable rate.
· Adequate bandwidth is necessary for performance and accessibility: Some administrators may block ports on the network. Without access to the other nodes, the client will not be able to function properly, or at all. Make sure port 8333 is open.
· Network speed should be sufficient and stable for proper performance: Most home networks have high download speeds with slower upload speeds. The client will best serve the network if it has higher upload speeds.
· It is desirable to have the node operating continuously for the best performance: The node can only operate efficiently if it is in sync with the longest blockchain. Downtime of the node delays in blockchain synchronization leading to delayed operations.
· The client may cause antivirus software to block access: Make sure that you configure your antivirus software to allow access to port 8333. Be aware that your node may become an attack target simply by being part of the network. One type of attack may deny service to your node for a period of time.
· Finally, check the legal aspects of your jurisdiction: Some users may be forbidden from using alternative forms of currency. Operating a public Bitcoin node could lead to legal notice or confiscation of equipment.
Note
Wikipedia has more information on Bitcoin legality by country, at http://en.wikipedia.org/wiki/Legality_of_bitcoin_by_country.
Starting the client
When opened the first time, the client will ask you to confirm a location for your data. The client will use that location to store the blockchain and your wallet.
It is not required that you back up the full blockchain. Only your wallet file should be encrypted and backed up. Later, we will explore how to properly back up your wallet specifically without the blockchain data.
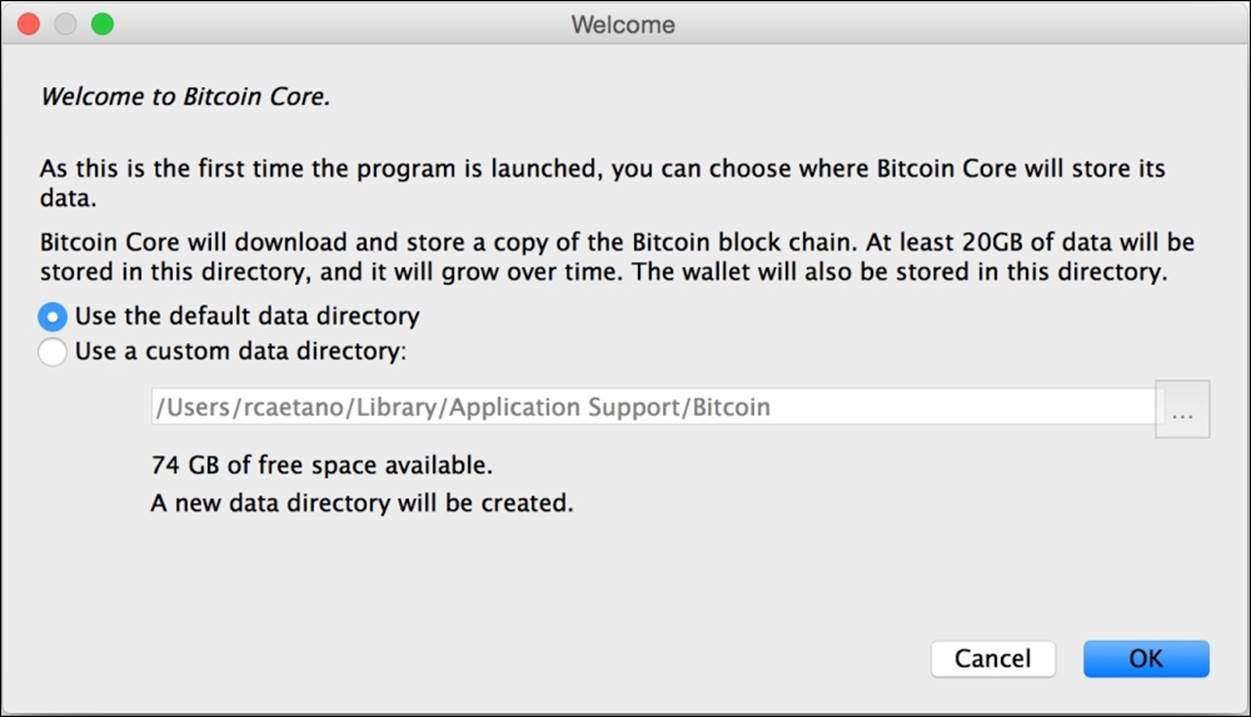
Figure 5.2 - Select a storage location with at least 50GB of available space
After the setup, the client will start running. Its first task is to search for other nodes on the Bitcoin network.
Connecting to the network
Once started, the client will begin searching for nodes to connect to. If you meet the network requirements, this should be a quick task for the client.
![]()
Figure 5.3 - Bitcoin client status bar showing connection status and synchronization progress.
As shown in figure 5.3, the client has a status bar showing connection status as a set of bars. The colors red, yellow, and green are used to indicate the connection quality. Quality is measured by the number of connected nodes, and the bandwidth rates.
If your client can't connect, make sure that you check your antivirus software, firewall, and network conditions. Check with the administrator that you have the required network access.
Downloading the blockchain
After its first installation, Bitcoin Core could take several days to download the full blockchain. It is best to keep the computer running continuously in a cool environment.
Tip
The client will use lots of processing power to validate the blocks, which will often generate lots of heat. Without sufficient ventilation, the computer can quickly overheat, leading to a shutdown or physical damage of the equipment.
Some operations will not be available until the full blockchain has been synchronized. For example, current balances cannot be verified without a full blockchain. Therefore, the client will not be able to process any new transactions.
Using the client
Once started, you'll be prompted with the Overview screen. As shown next in figure 5.4, the Overview shows your current balances, the amounts pending, and any recent transactions.
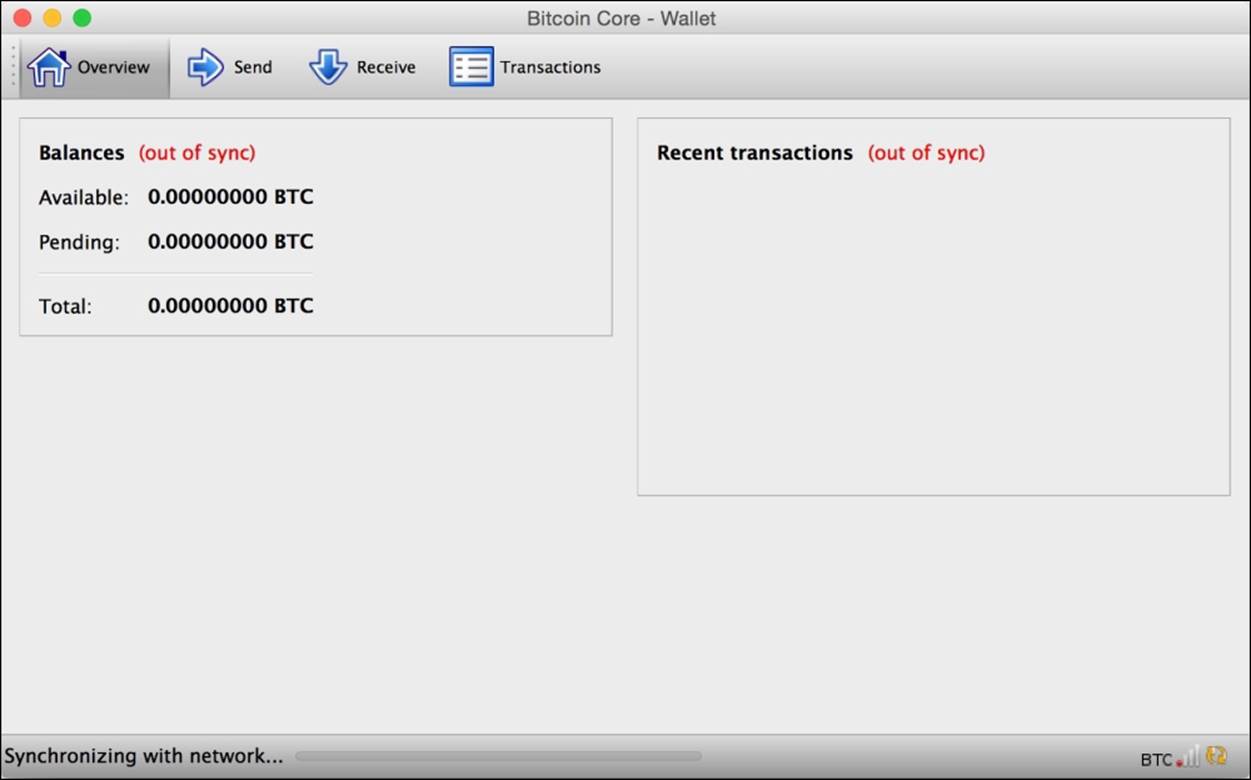
Figure 5.4 - Bitcoin Core's overview screen after first installed.
Before receiving any Bitcoin, you should be familiar with some basic preliminaries to help protect your Bitcoin wallet.
Encrypting your wallet
When first installed, your wallet will be stored unencrypted on the disk. Malicious software can access your wallet and steal the private keys. To protect your wallet, you'll need to encrypt it with a passphrase, or a long password.
By selecting Encrypt Wallet from the File menu, you will be prompted to enter a new password. After you set it, you can change it by selecting Change Password under the same menu.
Note
Be sure to protect your password. There is no recovery mechanism. Losing your password will result in the loss of your bitcoin.
As a tip, you could back up your wallet before encrypting it. Make sure that you protect it in a secure location. With an unencrypted copy, you can recover your wallet in case you lose your password.
Backing up your wallet
Bitcoin Core automatically creates a pool of 100 new addresses which are used to receive bitcoin. When sending bitcoin, the client may also use an address for the change address of a transaction. You should regularly backup your wallet, especially if you've used the 100 addresses from the initial pool.
If you are using automated backup software, you can include just the wallet.dat under the location provided during the installation. It is not necessary to backup the blockchain data as it can be downloaded again.
Note
Before accepting any bitcoin in your wallet, make sure that you have a backup saved in a location not on your computer. If your wallet.dat file becomes lost or corrupt, you will not have access to your private keys.
To restore your wallet, simply copy the backup file to the location used to store your Bitcoin data. During the initial setup, the system prompts you to confirm the location. By default the locations are:
· OS/X: ~/Library/Application Support/Bitcoin/wallet.dat
· Windows XP: C:\Documents and Settings\username\Application data\Bitcoin\wallet.dat
· Windows Vista and 7: C:\Users\username\Appdata\Roaming\Bitcoin\wallet.dat
· Linux: ~/ .bitcoin/
Balance and history
Referring back to figure 5.4, we can find our balances and transaction history. The Available balance includes all the confirmed transactions. Any unconfirmed transactions are listed under Pending.
Tip
Note that, in the client, the bitcoin amounts are shown in BTC by default. You can change the unit by opening Preferences… under OS/X, or Settings | Options on Windows. In the Options dialog, you have a choice between BTC, mBTC, or μBTC.
Receiving transactions
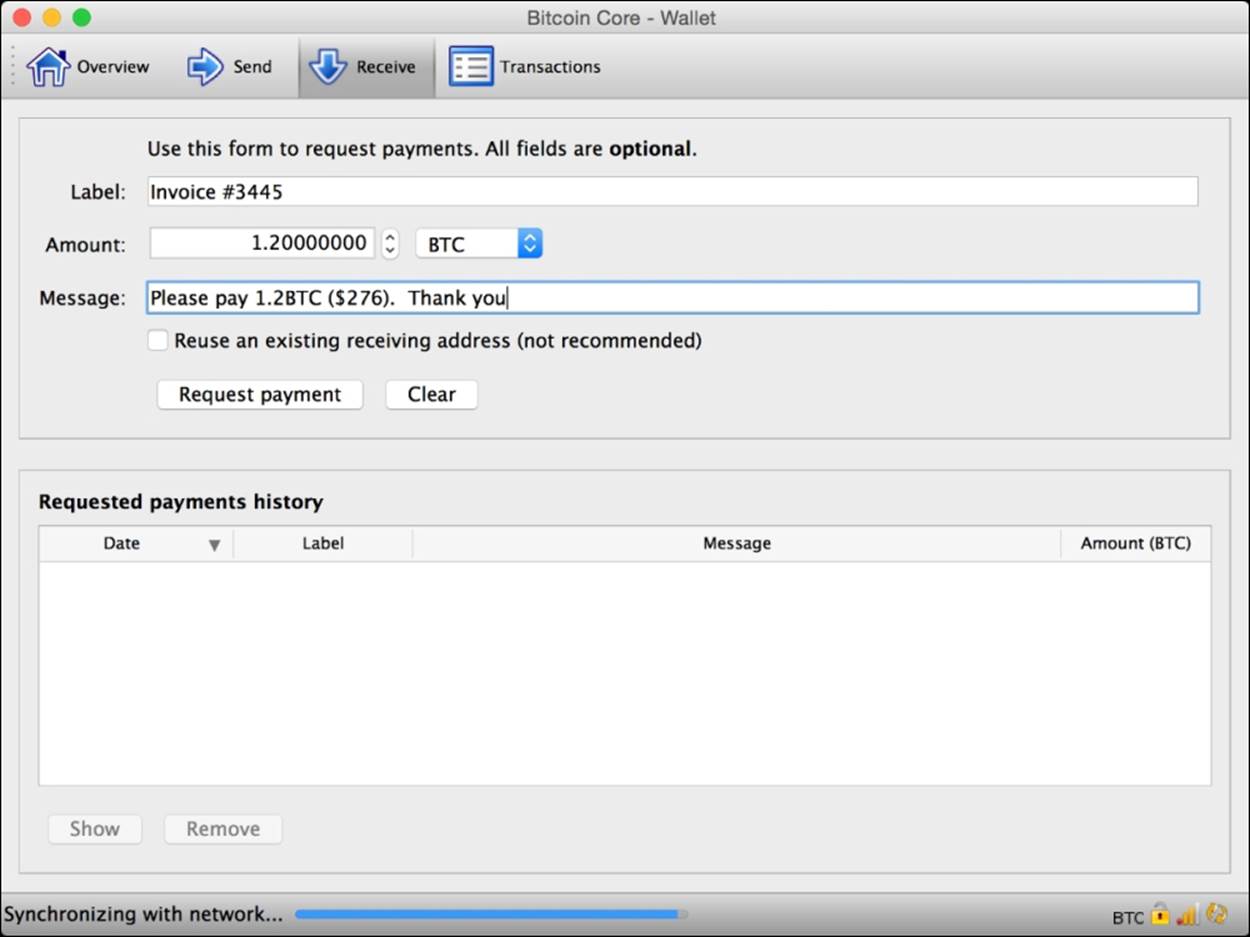
Figure 5.5 - Creating a request to receive bitcoin.
Shown in figure 5.5 is the request screen. Requests to receive bitcoin can be initiated here and later sent as an e-mail or posted on a website.
Starting at the top, the Label field is used to set an Account, which can contain multiple Bitcoin addresses. Accounts are useful for grouping multiple addresses together. Balances are maintained separately by the account. Later in the chapter, we'll discuss how to list accounts along with their addresses and balances. Labels will appear in the receiver Bitcoin client when prompted to pay.
The Amount(BTC) field is the number of bitcoin to received, optionally in units of BTC, mBTC, or μBTC.
The Message field is sent along with the request, and will also appear in the receiver's Bitcoin client.
You can optionally choose to reuse an existing Bitcoin address. This is not recommended for most requests. To keep your bitcoin as anonymous as possible, it's recommended that you use a new address for each payment. If selected, you'll be prompted to choose an address from your wallet.
When submitted, your request will appear in a window, as shown in figure 5.6:
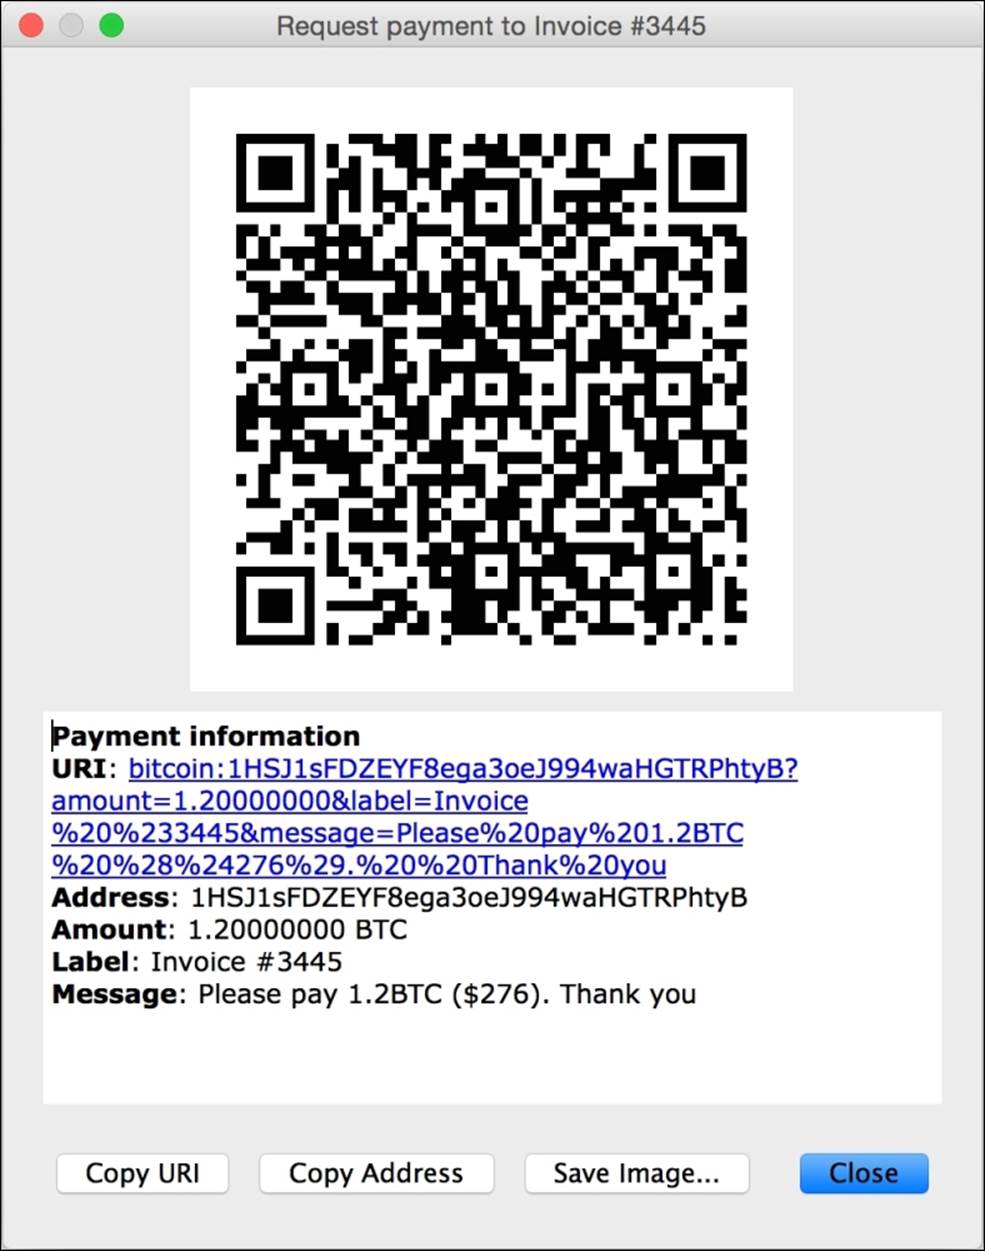
Figure 5.6 - The bitcoin request form
The payment request window automatically displays a QR code, which can be scanned by a mobile Bitcoin wallet.
The URL can be copied and pasted, and sent via an email to your recipient. When clicked, their default Bitcoin wallet software will open, repopulated with the amount and the message.
The URL can also be embedded on a webpage as a hyperlink. Simply copy and paste the URL into an anchor link:
<a href="bitcoin:16ZZypJ7MZQqqwZAC5uaN7Ng6bRWzDcjJZ?amount=2.3">
The history of your requests is displayed below the entry form. The history gives you access to the previous requests. Removing a request from the list does not remove the Bitcoin address from your wallet.
Sending transactions
Figure 5.7 shows the send payment screen. Note how we can specify multiple recipients based on Bitcoin addresses. Each address can be assigned a specific label and amount.
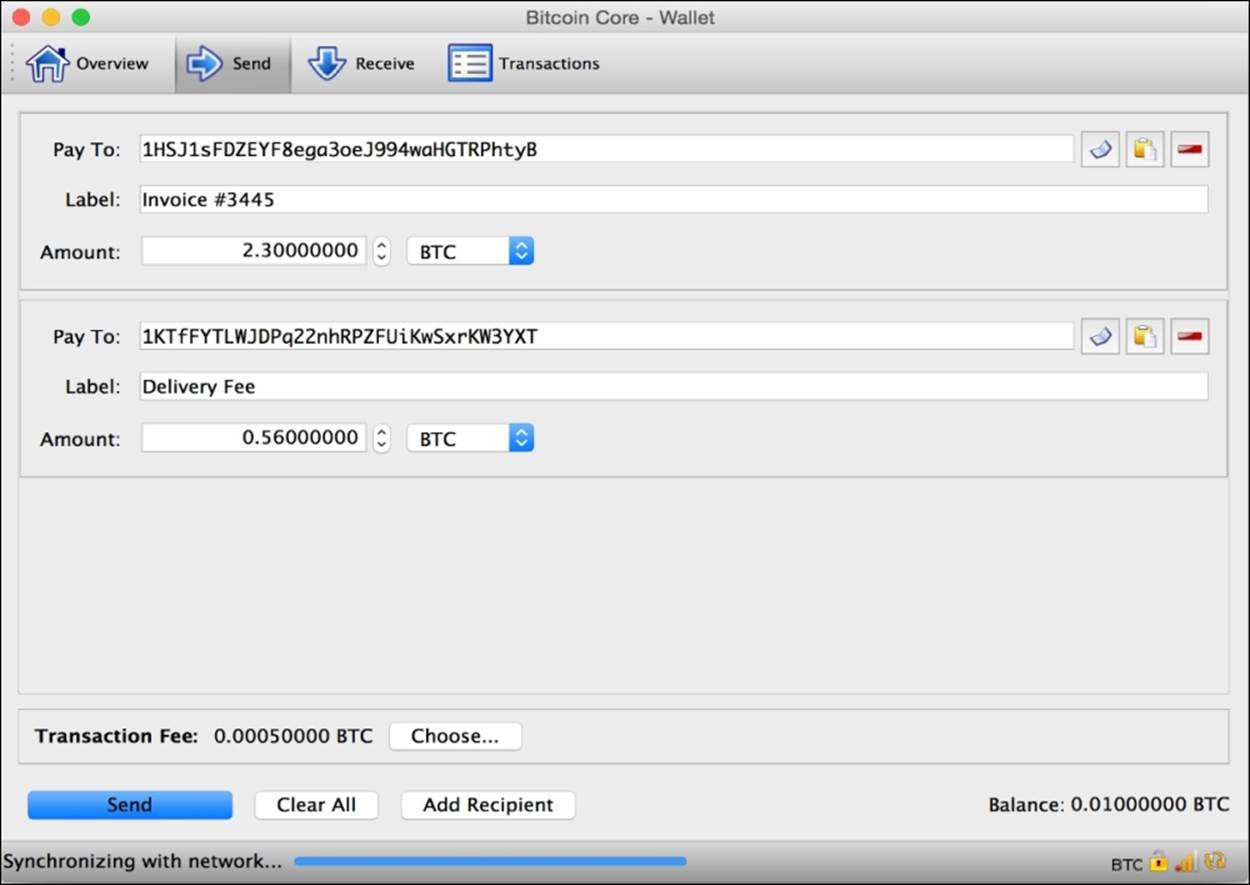
Figure 5.7 - Send Bitcoin payment screen.
If the Bitcoin address you enter already exists in your wallet, the label will be repopulated with the address's account.
You can change the parameters for the transaction fee by clicking on the Choose… button next to the transaction fee amount.
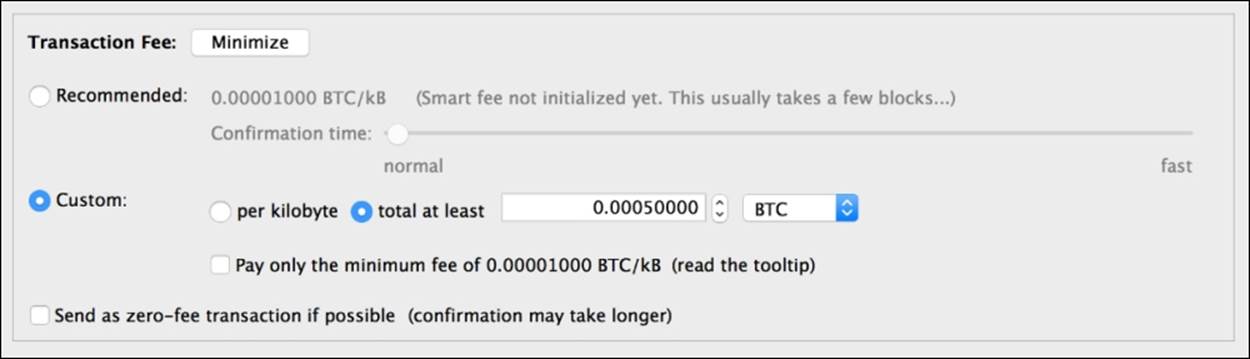
Figure 5.8 - Transaction fee parameters
The default option is set to Custom, which specifies a fee based on a fixed amount or the size of your transaction. This can be useful if you have a large or complex transaction.
The recommended method for calculating a fee analyzes the most recent transactions. Using statistics based on the fees paid and the time needed to confirm, an algorithm is able to suggest an amount.
Executing Bitcoin operations
Bitcoin Core has a Console which allows you to execute commands directly. The backend engine, called bitcoind, will execute the command and interact with the wallet, the blockchain, or the network, as requested. The results are returned as standard JSON text.
Note
JSON stands for Javascript Object Notation. Developers can use the JSON format as a way of encoding data that's easily read by both humans and computers. Following is an example of using JSON to describe a company and address:
{
"title" : "ACME Manufacturing","address" : "1234 Main Street, Anywhere, CA"}
Curly braces, {}, are used to group key/value pairs. Keys are used to reference a piece of data. Each pair is separated by a colon, ":" . JSON uses quotes, "", to define strings of characters.
Bitcoin Core accepts and responds with JSON.
Opening the console
To open the window, select Debug window under the Help menu, and then select the Console tab. You will be prompted with a window similar to the example shown next in figure 5.5.
The console accepts the commands from the input box on the bottom. Results are displayed above. Pressing the up or down arrow will scroll through the history of the commands entered.
Clicking on the minus button will clear the history. It is useful to do this after executing sensitive commands involving private keys.
At any time, you can type the following command:
> help
A list of commands, as shown in figure 5.5, will be displayed. Each command will have listed its accepted parameters.
We will explore the console with some basic commands to manage our wallet.
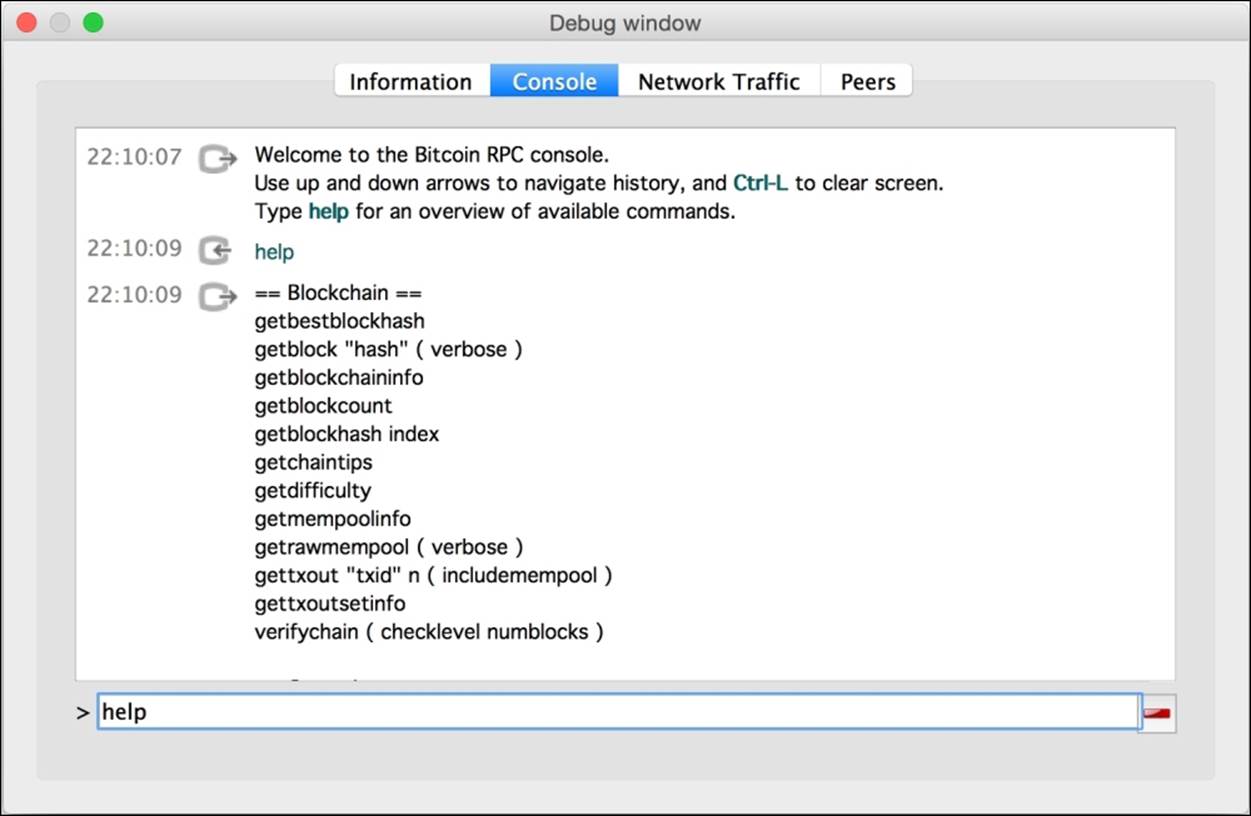
Figure 5.5 - Bitcoin Core's Debug window accepts commands
Working with an encrypted wallet
If your wallet has been encrypted with a password, you'll have to provide the console with the password in order to execute the commands against your wallet:
> walletpassphrase "your-password" 600
The command walletpassphrase will validate your password and use it for the number of seconds specified, 10 minutes in the preceding example. The console will prompt you for the password after the time specified has passed.
If you would like to encrypt a new wallet, simply execute the following command:
> encryptwallet "your-password"
To lock your wallet again, you can execute the following command:
> walletlock
Update your password by executing the walletpassphrasechange command:
> walletpassphrasechange "oldpassphrase" "newpassphrase"
Once opened, you can access your wallet's info:
> getwalletinfo
The command will return several metrics on your wallet, including its available balance:
{
"walletversion" : 60000,
"balance" : 0.00000000,
"txcount" : 0,
"keypoololdest" : 1433284498,
"keypoolsize" : 101,
"unlocked_until" : 0
}
To access just your balance, use the following command:
> getbalance
0.00000000
Working with Bitcoin addresses
Once you have access to your wallet, you can manage the Bitcoin addresses and their private keys within your wallet. Bitcoin Core maintains a pool of addresses used to send and receive bitcoin. To generate a new address, simply run the following:
> getnewaddress
1Mc1ws7Jq9giGdNNtbA2asFjAj4dxnsvqz
To view the private key of the address, execute the dumpprivkey command:
> dumpprivkey 1Mc1ws7Jq9giGdNNtbA2asFjAj4dxnsvqz
KzwfuMZw6fq9uZLrDeVSECfcaEYeGQSXc4JpCmoQ2G4eYMHVJ8Ht
Note
When a password is set on the wallet, the private keys are always encrypted. To access the keys, you will always be required to provide a password. However, inspection of some of Bitcoin Core's data files will show your public addresses listed in plain text.
Bitcoin addresses are grouped into Accounts. The default account is just an empty string, noted as "". Some commands require an account to be specified. In our examples, we'll use the default account, " ".
Note
Accounts are used to group your Bitcoin addresses. By grouping the addresses, you can send money from a specific set of addresses.
By default, all the addresses are created under an account with the empty title, "". To assign your address to a specific account, use setaccount:
> setaccount ''1MHT4tit3Nas3RnejfgmZWZBTY23k4CEwp'', ''account-name''
To display a list of all the accounts and their balances, execute the listaccounts command:
>listaccounts
{
"" : 1.30000000,
"Personal" : 2.34000000,
"Savings" : 120.3345770000
}
You can list all the addresses using the getaddressesbyaccount command. We'll list the addresses in the default account as follows, "".
> getaddressesbyaccount ""
[
"1CbcUGpQ4cx6DrnuJ1Jx8UyD8g6EPCcs4",
"1Mc1ws7Jq9giGdNNtbA2asFjAj4dxnsvqz",
"1MHT4tit3Nas3RnejfgmZWZBTY23k4CEwp"
]
To retrieve the balance of a Bitcoin address, we can use the getreceivedbyaddress command. The command accepts an address and an optional confirmation count. Transaction confirmations have a variable interval, with the average being around 10 minutes.
Bitcoin Core will only include a transaction in the balance if a sufficient number of confirmations have been made.
To check the balance immediately after a transaction was sent and prior to any confirmations, we can execute the following:
> getreceivedbyaddress 1BQGrTbpp7RnPrSVMXbQ1j9kCf71DZBtfC 0
0.01000000
Retrieving Transactions
To view a list of transactions from all the addresses, simply execute the following:
> listtransactions
[
{
"account" : "",
"address" : "1BQGrTbpp7RnPrSVMXbQ1j9kCf71DZBtfC",
"amount" : 0.01000000,
"vout" : 0,
"confirmations" : 554,
"blockhash" : "0000000000000000003079ed4b12dd0…",
"txid" : "ca6383333a3640e7c6564d6702a3cd5bbef2e…",
"time" : 1433891570,
…
}
]
Note that in the result, a transaction ID is provided by txid. This is a hash of the actual transaction. It uniquely identifies the transaction and can be used to retrieve the transaction at a later time.
To retrieve a single transaction, use the gettransaction command:
> gettransaction ca6383333a3640e7c6564d6702a3cd5bbef2e…
Creating and sending a transaction
To send bitcoin from the console, we'll need to gather some information about the outputs we'll be using to fund the transaction.
To fund our new transaction, we'll start by listing all the Bitcoin addresses that have an unspent balance from a previous transaction. From our list we can choose which address, or addresses, to use as the input.
Generating a destination address
To start, let's create a new Bitcoin address that we can use to send a small amount of money back to ourselves. Normally, this will be your recipient's address.
> getnewaddress
1MWJRUPkfaXpAPLSn7pZfVxdSNXZfmN9Uo
You can list a number of destination addresses. To keep this example simple, we'll limit ourselves to just one.
Selecting a funding source
To fund the transaction, we'll need to select the outputs from one or more transactions that contain an unspent balance. As described in Chapter 4, Understanding the Blockchain, the inputs to a new transaction always reference a previously confirmed transaction.
Using the listunspent command, we can view the possible funding sources for our new transaction:
> listunspent
[
{
"txid" : "ca6383333a3640e7c6564d6702a3cd5bbef2ea5e38…",
"vout" : 0,
"address" : "1BQGrTbpp7RnPrSVMXbQ1j9kCf71DZBtfC",
"account" : "",
"scriptPubKey" : "76a91472180ee34a0b1a7661eb0d176cb0ccc63a…",
"amount" : 0.01000000,
"confirmations" : 554,
"spendable" : true
}
]
From the results we can see that we have a Bitcoin address with a balance of 10mBTC (0.01BTC). We will use the txid to select this transaction as a funding source to our new transaction.
Specifying a change address
The full balance of the address we're referencing has to be spent. Therefore, we will have to create a change address in our wallet to hold the unspent balance. In our example, we'll send only 2mBTC to our new address. We will send the remaining amount to the new change address:
> getnewaddress
14egKB8ybvRupSAgsA17Z5Gr17yadaHuKA
Including a transaction fee
The last aspect of our transaction is the small miner's fee. We'll send a small fee to the miner. The amount of the transaction fee will be 0.5mBTC. We'll use the following table to illustrate the anatomy of the transaction:
|
Inputs |
Outputs |
|||
|
1hvzSo… |
0.01BTC |
1MWJRU… |
0.0020BTC |
|
|
1MJZH5E… |
0.0075BTC |
|||
|
Totals |
0.01BTC |
0.0095BTC |
||
Note the small difference in the amounts between the inputs and the outputs. The unaccounted amount of 0.5mBTC will be paid to the miner whose confirmed block is accepted by the network.
Defining the transaction in JSON
Next, we'll have to create a small snippet of JSON to define our transaction for the console. Starting with the input, we'll reference the txid from our unspent transaction:
[
{
"txid" : "ca6383333a3640e7c6564d6702a3cd5bbef2e…" ,
"vout" : 0
}
]
The value vout refers to a sequential index, starting with 0, and is unique for each input. Thus, if there was a second input defined, the vout value would be 1.
Next, we'll list the address that will receive our bitcoin:
{
"1MWJRUPkfaXpAPLSn7pZfVxdSNXZfmN9Uo": 0.002, "14egKB8ybvRupSAgsA17Z5Gr17yadaHuKA": 0.0075
}
For clarity of illustration, we've expanded the JSON by brackets and tabs. However, we'll need to collapse it down into one line without the tabs and the breaks.
Encoding and signing the transaction
The next step will involve creating an encoded version of the transaction. With an encoded version of the transaction, we can apply a digital signature.
Using the command createrawtransction, we'll encode the transaction so that the network can interpret it. The command accepts two JSON parameters, the input and the output we previously defined. We'll have to wrap them in ''' and specify it on one line:
> createrawtransaction '''[{"txid" :"ca6383333a3640e7c6564d6702a3cd5bbef2ea5e380670bd2e5fc2bce1ee6ac3","vout" : 0}]''' '''{"1MWJRUPkfaXpAPLSn7pZfVxdSNXZfmN9Uo": 0.002,"14egKB8ybvRupSAgsA17Z5Gr17yadaHuKA": 0.0075}'''
0100000001c36aeee1bcc25f2ebd7006385eeaf2be5bcda302674d56c6e740363a338363ca0000000000ffffffff02400d0300000000001976a914e0ed1f2593a7314e4d00fe6b8eea8e2617c70af488acb0710b00000000001976a914280895c791b2e923f070e05199ed4f7b16416f4988ac00000000
The transaction is compiled into a hex format that can be easily shared with the Bitcoin network. However, this transaction is unsigned and will be rejected by the nodes.
To sign the encoded transactions, we'll first have to make sure that we have access to the private keys by providing the console with our encrypted wallet's password. If your wallet is unencrypted, you can skip this step.
> walletpassphrase 'your-password', 6000
Now, we can sign the encoded transaction with the signtransaction command (note that the text has been abbreviated):
> signrawtransaction 0100000001c36aeee1bcc25f2ebd7006385ee…
{
"hex" : "0100000001c36aeee1bcc25f2ebd7006385eeaf2be5bcda302674d56c6e740363a338363ca000000006b483045022100c09b5f830aacaeba474c5d5c018a20204a05afb78fd2759ba5db1f7476e6fc8302202332922f9effcb972023da8ed4facdae24d341e9901f48e637edf93e8a358bfe0121026f3ac6ee47afb4f52ef6ccfcd43b4b9caf3d4fd97a9faa970f532c608e9f825affffffff02400d0300000000001976a914e0ed1f2593a7314e4d00fe6b8eea8e2617c70af488acb0710b00000000001976a914280895c791b2e923f070e05199ed4f7b16416f4988ac00000000",
"complete" : true
}
Note the complete key. In our example, it's set to true, meaning that we've successfully signed the encoded transaction. If your result is false, check to make sure that you have the necessary private keys in your wallet and that your passphrase has been set.
Reviewing the transaction
Now that the transaction has been signed, it's ready to be broadcasted to the network.
Before sending the encoded and signed transaction, we can run a simple command to verify the details.
Using the decodetransaction command, we can see how our transaction is configured. We will execute the command with the hex codes from the signrawtransaction results:
> decoderawtransaction 0100000001c36aeee1bcc25f2ebd7006385eeaf2be5bcda302674d56c6e740363a338363ca000000006b483045022100c09b5f830aacaeba474c5d5c018a20204a05afb78fd2759ba5db1f7476e6fc8302202332922f9effcb972023da8ed4facdae24d341e9901f48e637edf93e8a358bfe0121026f3ac6ee47afb4f52ef6ccfcd43b4b9caf3d4fd97a9faa970f532c608e9f825affffffff02400d0300000000001976a914e0ed1f2593a7314e4d00fe6b8eea8e2617c70af488acb0710b00000000001976a914280895c791b2e923f070e05199ed4f7b16416f4988ac00000000
{
"txid" : "e953e6b6c69f158d2710d1b3436257a1bd2a063...",
"version" : 1,
"locktime" : 0,
"vin" : [{
"txid" : "ca6383333a3640e7c6564d6702a3cd5bbef2e...",
"vout" : 0,
"scriptSig" : {
"asm" : "3045022100c09b5f830aacaeba474c5d5c018aafb78...",
"hex" : "483045022100c09b5f830aacaeba474c5d5c018a202..."},
"sequence" : 4294967295}],
"vout" : [{
"value" : 0.00200000,
"n" : 0,
"scriptPubKey" : {
"asm" : "OP_DUP OP_HASH160 e0ed1f2593a7314e4d00fe6b8eea8e2617c70af4 OP_EQUALVERIFY OP_CHECKSIG",
"hex" : "76a914e0ed1f2593a7314e4d00fe6b8eea8e2617c70af488ac",
"reqSigs" : 1,
"type" : "pubkeyhash",
"addresses" : ["1MWJRUPkfaXpAPLSn7pZfVxdSNXZfmN9Uo"]}}, {
"value" : 0.00750000,
"n" : 1,
"scriptPubKey" : {
"asm" : "OP_DUP OP_HASH160 280895c791b2e923f070e05199ed4f7b16416f49 OP_EQUALVERIFY OP_CHECKSIG",
"hex" : "76a914280895c791b2e923f070e05199ed4f7b16416f4988ac",
"reqSigs" : 1,
"type" : "pubkeyhash",
"addresses" : ["14egKB8ybvRupSAgsA17Z5Gr17yadaHuKA"]}}]}
Note the scriptPubKey key. That's the digital signature of the transaction. Using this signature, the nodes can verify that this transaction was signed with the original key(s) of the listed inputs.
Broadcasting the transaction
We are now ready to broadcast the transaction to the network. We can simply use the sendrawtransaction command (note that the encoded transaction has been shortened for readability):
> sendrawtransaction "0100000001c36aeee1bcc25f2ebd7006385e…"
e953e6b6c69f158d2710d1b3436257a1bd2a063e7cb3db4580cab69d23bd0397
The command will return the txid of our newly submitted transaction. At any time, we can use that value to reference our transaction:
> gettransaction ae74538baa914f3799081ba78429d5d84f36…
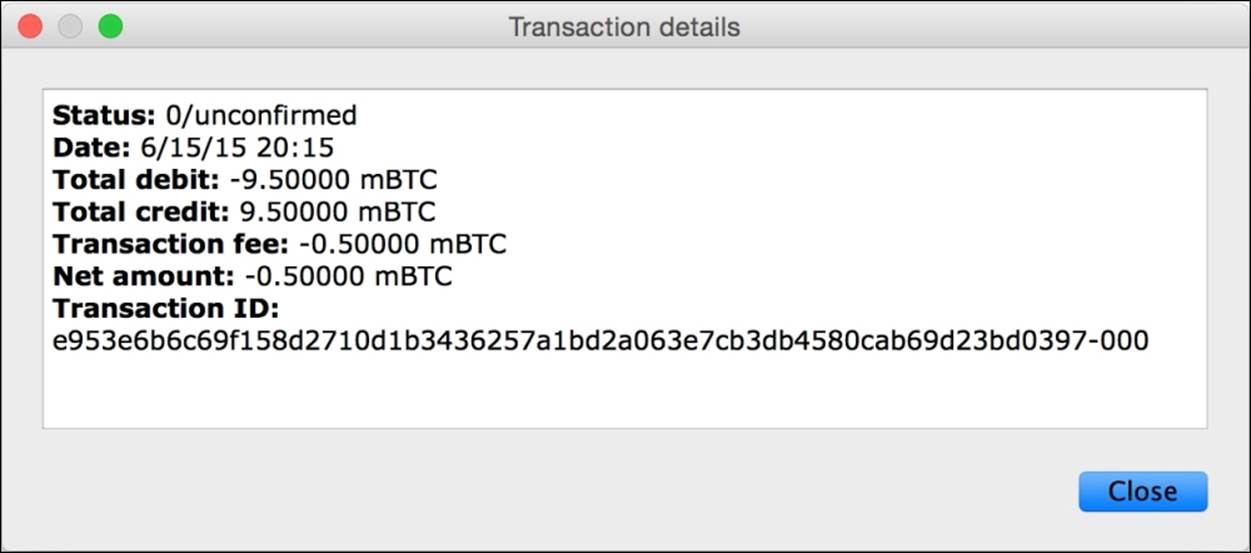
Figure 5.11 - Our newly broadcasted and unconfirmed transaction.
Bravo! Our newly created transaction has been broadcasted to the network and will be confirmed shortly.
Note
Other services are available to help decode and push transactions to the network. For example, blockchain.info provides these features.
To decode a raw transaction, simply open https://blockchain.info/decode-tx.
To broadcast a transaction, open https://blockchain.info/pushtx.
Summary
In this chapter, we explored how a Bitcoin node operates on the network. We installed Bitcoin Core, the official client, and used it to send and receive money. Lastly, we learned about some basic operations and how to execute them programmatically by hand.
In the next chapter, we'll explore the Bitcoin mining process.
All materials on the site are licensed Creative Commons Attribution-Sharealike 3.0 Unported CC BY-SA 3.0 & GNU Free Documentation License (GFDL)
If you are the copyright holder of any material contained on our site and intend to remove it, please contact our site administrator for approval.
© 2016-2026 All site design rights belong to S.Y.A.