PHP Advanced and Object-Oriented Programming (2013)
Visual Quickpro Guide
6. More Advanced OOP
In This Chapter
Abstract Classes and Methods
Interfaces
Traits
Type Hinting
Namespaces
Review and Pursue
The previous chapter explored some advanced OOP concepts, with a particular emphasis on those related to inheritance. In this chapter, you’ll learn even more advanced OOP concepts, including some introduced in more recent versions of PHP. Tip: make sure you know what version of PHP you’re working with before proceeding.
The topics in this chapter get to be more esoteric, and won’t always be necessary in a Web application, but these concepts should be on your radar as you become more comfortable with OOP as a programming approach. As with the past two chapters, a fair amount of OOP theory will be covered as well.
Abstract Classes and Methods
In some situations where inheritance applies, it would never be appropriate to create an instance of a parent class. For instance, in the Pet example, the intention would be to create a specific subclass for each pet type and never really create an object of type Pet. In such cases, it would be more appropriate to define an abstract base class, instead of a standard base class.
Abstract classes are template versions of a parent class. By defining an abstract class, you can indicate the general behavior that subclasses should have. Put another way, an abstract class defines the interfaces: how derived classes of this base type are to be used. The subclasses are then responsible for defining the actual implementations of those interfaces.
Abstract classes differ from normal classes in that attempting to create an object of an abstract class’s type results in a fatal error  . Instead, abstract classes are meant to be extended, and then you create an instance of that extended class.
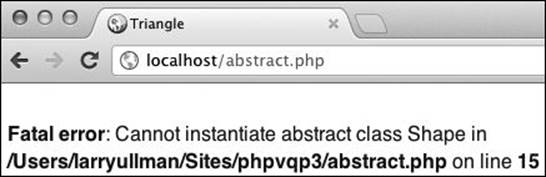
 The fatal error created by trying to make an object of an abstract class.
This approach starts with the keyword abstract:
abstract class ClassName {
}
Abstract classes normally have abstract methods. These are defined like so:
abstract function methodName();
abstract function methodName ($var1, $var2);
The _ _toString() Method
If you define a _ _toString() method in a class, PHP will invoke that method automatically when an object of that type is used as a string. For example, it would be called if you attempted to do this:
$a = new SomeClass();
echo $a;
Objects are, by definition, complex variable types, not intended to be used as if they were scalar variables. However, it is common enough for developers to add _ _toString() methods, at the very least as a simple and useful debugging tool.
As a developer, by defining a _ _ toString() method for a class, you get to decide exactly what happens should an object of that class be used as a string, instead of just letting PHP generate an error.
That’s it! You do not define the functionality of the method; instead, that functionality will be determined by the class that extends the abstract class. If you want to add visibility to the definition, add the corresponding keyword after the word abstract:
abstract public function methodName();
Here is how part of Pet might look:
abstract class Pet {
protected $_name;
abstract public function getName();
}
Then Cat would contain
class Cat extends Pet {
function getName() {
return $this->_name;
}
}
Note that the implementation of the abstract method in the extended class—e.g., Cat::getName()—must abide by the same visibility or weaker. If the abstract function is public, the extended version must also be public. If the abstract function is protected, then the extended version can only be protected or public. You would never make an abstract method private, since a private method cannot be inherited. In all cases, the implemented version of the method must also have the same number of arguments as the abstract definition (i.e., the same signature).
Note that if a class has even one abstract method, the class itself must be abstract. However, an abstract class can have non-abstract methods, as well as attributes, all of which would also be inherited by the derived class.
To put this into action, let’s return to geometry examples, like Rectangle. That class could be an extension of a more generic Shape class  . Let’s institute the Shape abstract class and a child, Triangle.
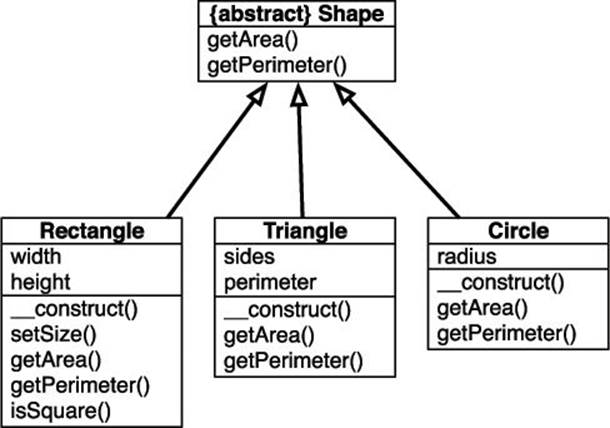
The abstract Shape class can be the parent to many types of (two-dimensional) shapes.
To create abstract classes and methods
1. Begin a new PHP script in your text editor or IDE, to be named Shape.php (Script 6.1):
<?php # Script 6.1 - Shape.php
2. Start defining the Shape class:
abstract class Shape {
Remember that when a class is abstract, it means you’ll never create an object of that type. Hence, you wouldn’t make an abstract Rectangle class because you do need to occasionally make rectangles.
3. Define the first abstract method:
abstract protected function getArea();
This line says that any class that extends Shape needs to define a getArea() method. Furthermore, this method should not take any arguments and have either public or protected visibility (the same visibility or weaker). Defining this as an abstract method makes sense, as every two-dimensional shape should have the ability to calculate its own area (three-dimensional shapes have volumes, not areas).
4. Define the second abstract method:
abstract protected function getPerimeter();
5. Complete the class:
} // End of Shape class.
6. Save the file as Shape.php and place it in your Web directory.
To create the Triangle class
1. Begin a new PHP script in your text editor or IDE, to be named Triangle.php (Script 6.2):
<?php # Script 6.2 - Triangle.php
2. Begin declaring the Triangle class:
class Triangle extends Shape {
Script 6.1. The abstract Shape class, with two abstract methods, will be the template for more specific shapes, like Triangle (Script 6.2).
1 <?php # Script 6.1 - Shape.php
2 /* This page defines the Shape abstract
class.
3 * The class contains no attributes.
4 * The class contains two abstract
methods:
5 * - getArea()
6 * - getPerimeter()
7 */
8
9 abstract class Shape {
10 // No attributes to declare.
11 // No constructor or destructor
defined here.
12
13 // Method to calculate and return the
area.
14 abstract protected function
getArea();
15
16 // Method to calculate and return the
perimeter.
17 abstract protected function
getPerimeter();
18
19 } // End of Shape class.
Script 6.2. The Triangle class is an extension of Shape. It is therefore responsible for defining how the getArea() and getPerimeter() methods work.
1 <?php # Script 6.2 - Triangle.php
2 /* This page defines the Triangle class.
3 * The class contains two attributes:
4 * - private $_sides (array)
5 * - private $_perimeter (number)
6 * The class contains three methods:
7 * - _ _construct()
8 * - getArea()
9 * - getPerimeter()
10 */
11
12 class Triangle extends Shape {
13
14 // Declare the attributes:
15 private $_sides = array();
16 private $_perimeter = NULL;
17
18 // Constructor:
19 function _ _construct($s0 = 0, $s1 = 0, $s2 = 0) {
20
21 // Store the values in the array:
22 $this->_sides[] = $s0;
23 $this->_sides[] = $s1;
24 $this->_sides[] = $s2;
25
26 // Calculate the perimeter:
27 $this->_perimeter = array_sum($this->_sides);
28
29 } // End of constructor.
30
31 // Method to calculate and return the area:
32 public function getArea() {
33
34 // Calculate and return the area:
35 return (SQRT(
36 ($this->_perimeter/2) *
37 (($this->_perimeter/2) - $this->_sides[0]) *
38 (($this->_perimeter/2) - $this->_sides[1]) *
39 (($this->_perimeter/2) - $this->_sides[2])
40 ));
41
42 } // End of getArea() method.
43
44 // Method to return the perimeter:
45 public function getPerimeter() {
46 return $this->_perimeter;
47 } // End of getPerimeter() method.
48
49 } // End of Triangle class.
3. Declare the attributes:
private $_sides = array();
private $_perimeter = NULL;
The first attribute will store the size of the three sides (alternatively, you could make three separate variables). The second variable will store the perimeter. I’m only adding this attribute because the perimeter will be used in calculating the area (a lot), so it’s nice to have it in a variable instead of retrieving it through a method call.
All the attributes are private, as they shouldn’t be accessed outside of any class and I can’t imagine how a Triangle class would be inherited (in which case they may need to be protected).
4. Define the constructor:
function _ _construct($s0 = 0, $s1 = 0, $s2 = 0) {
$this->_sides[] = $s0;
$this->_sides[] = $s1;
$this->_sides[] = $s2;
$this->_perimeter = array_sum($this->_sides);
}
The constructor takes three arguments for the three sides of the triangle. Those values are placed in the $_sides array, and then the perimeter is calculated. The array_sum() function adds up all the values of all the elements in an array.
5. Create the getArea() method:
public function getArea() {
return (SQRT(
($this->_perimeter/2) *
(($this->_perimeter/2) - $this->_sides[0]) *
(($this->_perimeter/2) - $this->_sides[1]) *
(($this->_perimeter/2)
- $this->_sides[2])
));
}
If you remember your geometry, you know that the area of a triangle is equal to one-half the base times the height  . Of course, to make that calculation, the class would need to determine the base (the longest side, not a problem) and the height (requiring trigonometry, yikes!). So instead I’ll use the formula in
  . This code implements that formula in PHP.
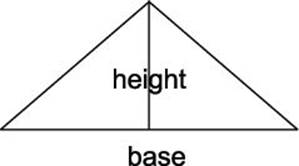
 To calculate the area of a triangle the easy way, you would need to know the height value.

 Heron’s Formula says that the area of a triangle is equal to the square root of z times z minus a times z minus b times z minus c, where z is half the perimeter and a, b, and c are the three sides. (And no, I didn’t know this offhand; Mr. Friendly Internet helped out.)
Script 6.3. This script makes an object of type Triangle, which is derived from the abstract Shape class.
1 <!doctype html>
2 <html lang="en">
3 <head>
4 <meta charset="utf-8">
5 <title>Triangle</title>
6 <link rel="stylesheet" href="style.css">
7 </head>
8 <body>
9 <?php # Script 6.3 - abstract.php
10 // This page uses the Triangle class (Script 6.2), which is derived from Shape (Script 6.1).
11
12 // Load the class definitions:
13 require('Shape.php');
14 require('Triangle.php');
15
16 // Set the triangle's sides:
17 $side1 = 5;
18 $side2 = 10;
19 $side3 = 13;
20
21 // Print a little introduction:
22 echo "<h2>With sides of $side1, $side2, and $side3...</h2>";
23
24 // Create a new triangle:
25 $t = new Triangle($side1, $side2, $side3);
26
27 // Print the area.
28 echo '<p>The area of the triangle is ' . $t->getArea() . '</p>';
29
30 // Print the perimeter.
31 echo '<p>The perimeter of the triangle is ' . $t->getPerimeter() . '</p>';
32
33 // Delete the object:
34 unset($t);
35
36 ?>
37 </body>
38 </html>
6. Create the getPerimeter() method:
public function getPerimeter() {
return $this->_perimeter;
} // End of getPerimeter() method.
This is the second of the abstract methods in Shape that must be implemented here. For this example, it simply returns the perimeter attribute. Had I not created a perimeter attribute, this method would instead return array_sum($this->_sides).
7. Complete the class:
} // End of Triangle class.
8. Save the file as Triangle.php and place it in your Web directory.
To use the Triangle class
1. Begin a new PHP script in your text editor or IDE, to be named abstract.php, starting with the HTML (Script 6.3):
<!doctype html>
<html lang="en">
<head>
<meta charset="utf-8">
<title>Triangle</title>
<link rel="stylesheet" href="style.css">
</head>
<body>
<?php # Script 6.3 - abstract.php
2. Load the class definitions:
require('Shape.php');
require('Triangle.php');
3. Set the sides of the triangle:
$side1 = 5;
$side2 = 10;
$side3 = 13;
Technically, a valid triangle abides by a certain rule regarding the three sides: the sum of any two sides has to be greater than the third side (I seriously brushed up on my geometry skills for this).
4. Print an introduction and create a new triangle:
echo "<h2>With sides of $side1, $side2, and $side3...</h2>";
$t = new Triangle($side1, $side2, $side3);
5. Print the area:
echo '<p>The area of the triangle is ' . $t->getArea() . '</p>';
This code is much like the Square and Rectangle examples already demonstrated (usage redundancy is a hallmark of OOP).
6. Print the perimeter:
echo '<p>The perimeter of the triangle is ' . $t->getPerimeter() . '</p>';
7. Complete the page:
unset($t);
?>
</body>
</html>
8. Save the file as abstract.php, place it in your Web directory, and test in your Web browser  .
.
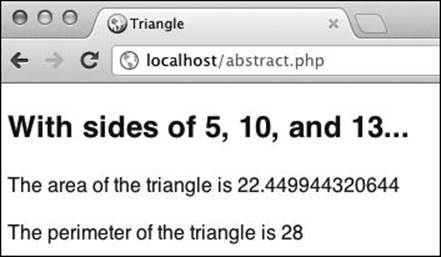
 The use of the Triangle class.
Tip
In UML, a class is marked as abstract by either italicizing its name, or by placing {abstract} next to its name  .
.
Tip
Arguably, you could have Triangle.php include Shape.php.
Interfaces
Similar to the abstract class is an interface. Interfaces, like abstract classes, identify the functionality (i.e., the methods) that must be defined by a specific class.
To create an interface, use the interface keyword. Then, within the curly brackets, define the method signatures, not their actual implementation:
interface iSomething {
public function someFunction($var);
}
(Conventionally, interface names often begin with a lowercase i, but this is not required.)
Note that all methods in an interface must be public. Also, interfaces only identify methods; they never include attributes.
To associate a class with an interface, use the implements operator in the class definition:
class Someclass implements iSomething {}
The class must then define all of the methods listed in the interface, or a fatal error will occur  .
.
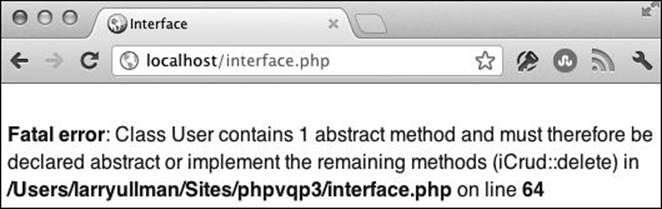
 The fatal error created by having a class implement an interface without implementing all of the interface’s methods.
Abstract Class vs. Interface
The difference between an interface and an abstract class may seem subtle. Remember that an abstract class is meant to be extended by a more specific class, of which you’ll probably create an object instance. As you’ve already seen, an abstract class might define a generic object, such as a shape.
Conversely, an interface is not inherited by a class, so you should not think of an interface as a way of loosely defining an entire object. Instead, an interface establishes a contract for the functionality that a class must have, regardless of the class type. For example, in Chapter 8, “Using Existing Classes,” you’ll learn about the Iterator interface defined within the Standard PHP Library (SPL). The Iterator interface dictates the methods that must exist in a class in order for PHP to be able to loop through an instance of that class.
Another way of distinguishing between abstract classes and interfaces is that abstract classes still have an “is a” relationship with the derived class. Interfaces do not have “is a” relationships with derived classes, although you could say that the derived class has a “has the same behaviors as” relationship with an interface.
In the next example, let’s create an interface for standard CRUD functionality. The acronym CRUD refers to the ability to Create, Read, Update, and Delete data—the four basic actions required for many different types of content used in sites and applications. Any class you use in an application that requires CRUD functionality could then implement this interface, whether it’s a User, Page, or Rectangle.
To use interfaces
1. Begin a new PHP script in your text editor or IDE, to be named interface.php, starting with the HTML (Script 6.4):
<!doctype html>
<html lang="en">
<head>
<meta charset="utf-8">
<title>Interface</title>
<link rel="stylesheet" href="style.css">
</head>
<body>
<?php # Script 6.4 - interface.php
For simplicity’s sake, this one script will define and use an interface and class.
2. Declare the iCrud interface:
interface iCrud {
public function create($data);
public function read();
public function update($data);
public function delete();
}
The iCrud interface identifies four necessary methods. Two of the methods expect to take data as their lone argument. The other two methods take no arguments. You’ll see in a usage of this interface how this plays out. All the methods are public, which is required.
Script 6.4. The iCrud interface dictates the methods that must exist for a class to have full CRUD functionality.
1 <!doctype html>
2 <html lang="en">
3 <head>
4 <meta charset="utf-8">
5 <title>Interface</title>
6 <link rel="stylesheet" href="style.css">
7 </head>
8 <body>
9 <?php # Script 6.4 - interface.php
10 // This page defines and uses the iCrud interface.
11
12 /* The iCrud interface.
13 * The interface identifies four methods:
14 * - create()
15 * - read()
16 * - update()
17 * - delete()
18 */
19 interface iCrud {
20 public function create($data);
21 public function read();
22 public function update($data);
23 public function delete();
24 }
25
26 /* The User class implements the iCrud interface.
27 * The class contains two attributes:
28 * - private $_userId
29 * - private $_username
30 * The class contains the four interface methods, plus a constructor.
31 */
32 class User implements iCrud {
33
34 private $_userId = NULL;
35 private $_username = NULL;
36
37 // Constructor takes an array of data:
38 function _ _construct($data) {
39 $this->_userId = uniqid();
40 $this->_username = $data['username'];
41 } // End of constructor.
42
43 // This method also takes an array of data:
44 function create($data) {
45 self::_ _construct($data);
46 }
47
48 // Function for returning information about the current object:
49 function read() {
50 return array('userId' => $this->_userId, 'username' => $this->_username);
51 }
52
53 // Function for updating the current object:
54 function update($data) {
55 $this->_username = $data['username'];
56 }
57
58 // Function for getting rid of the current object:
59 public function delete() {
60 $this->_username = NULL;
61 $this->_userId = NULL;
62 }
63
64 } // End of User class.
65
66 // Identify the user information:
67 $user = array('username' => 'trout');
68
69 // Print a little introduction:
70 echo "<h2>Creating a New User</h2>";
71
72 // Create a new User:
73 $me = new User($user);
74
75 // Get the user's ID:
76 $info = $me->read();
77 echo "<p>The user ID is {$info['userId']}.</p>";
78
79 // Change the user's name:
80 $me->update(array('username' => 'troutster'));
81
82 // Confirm the updated name:
83 $info = $me->read();
84 echo "<p>The user name is now {$info['username']}.</p>";
85
86 // Delete the record:
87 $me->delete();
88
89 // Delete the object:
90 unset($me);
91
92 ?>
93 </body>
94 </html>
3. Begin defining the User class:
class User implements iCrud {
private $_userId = NULL;
private $_username = NULL;
The User class implements iCrud, which means it must define the four methods identified in the interface. To demonstrate this concept, without overwhelming you with code, I’m going to define just two attributes in the class, both of which will be private.
4. Define the constructor:
function _ _construct($data) {
$this->_userId = uniqid();
$this->_username = $data['username'];
} // End of constructor.
The constructor is going to take an array of data as its lone argument. It will use this data to assign values to the internal private variables. Logically, you’d want to add some validation to the provided data here, too.
The constructor also creates a unique user ID value by invoking the PHP uniqid() function.
In a real-world application, the constructor might instead create a new user record in a database and assign the automatically generated primary key value to the internal attribute.
5. Define the create() method:
function create($data) {
self::_ _construct($data);
}
By implementing the iCrud interface, this class is forced to have a create() method that takes a single argument. However, the constructor already does what’s required to create a new object of this type, so this method can just call the constructor (using the keyword self, which refers to the current class, plus the scope resolution operator), passing along the provided data.
This method would be used in situations where a new User object is created (perhaps thereby creating a new record in the database) and later reused to create a new record.
6. Define the read() method:
function read() {
return array('userId' => $this->_userId, 'username' => $this->_username);
}
The read() method takes no arguments and returns an array of information. In this hypothetical example, the information is represented by internal variables. In a real-world application, the read() method might fetch the associated information from the database, using the internal, private ID value to know which record to fetch.
7. Define the update() method:
function update($data) {
$this->_username = $data['username'];
}
Presumably, the user ID value cannot be updated, so the update() method as written only updates a single internal attribute. Again, you’d want to use proper validation here, instead of assuming that $data['username'] exists.
8. Define the delete() method and complete the class:
public function delete() {
$this->_username = NULL;
$this->_userId = NULL;
}
} // End of User class.
The delete() method clears out the values of the attributes. In a real-world example, it might delete the corresponding record from the database instead.
9. Create a new User object:
$user = array('username' => 'trout');
echo "<h2>Creating a New User</h2>";
$me = new User($user);
To make the interface more useful, two of its methods expect to receive a single argument, which would be an array of data. If the User class also stored an email address and password, those would be represented in this one array, too.
10. Get the user’s ID:
$info = $me->read();
echo "<p>The user ID is {$info['userId']}.</p>";
The read() method fetches the object’s information, returned as an array.
11. Change the user’s name and then confirm the change:
$me->update(array('username' => 'troutster'));
$info = $me->read();
echo "<p>The user name is now {$info['username']}.</p>";
12. Delete the record:
$me->delete();
Note that this line does not get rid of the User object. It only clears out the internally stored values.
13. Complete the page:
unset($me);
?>
</body>
</html>
14. Save the file as interface.php, place it in your Web directory, and test in your Web browser  .
.
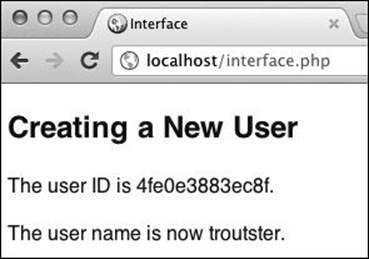
The output from using a User object that implements the iCrud interface.
Tip
Interface is a word with multiple meanings. Generically, interface refers to the kinds of information about classes and methods reflected by a UML diagram. In other words, an interface explains how a class or method is used. Alternatively, interface can refer to a contract that a class can be bound to, as in this section of the chapter.
Tip
Another benefit that interfaces have over using abstract classes and inheritance is that classes in PHP cannot inherit from multiple parents. Classes, however, can implement multiple interfaces by separating each by a comma:
class SomeClass implements iA, iB {
Tip
The instanceof operator can also be used to test if a class implements an interface.
Tip
In UML, an interface is indicated by prefacing its name with <<interface>>  .
.
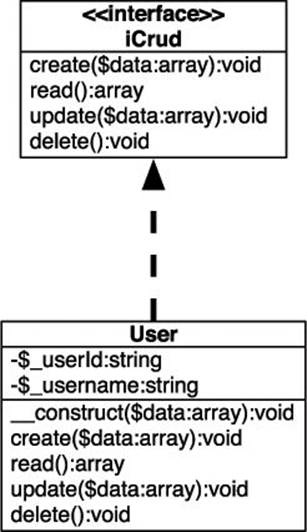
 How the User class could be modeled.
Tip
In UML, to indicate that a class implements an interface, draw a dashed arrow from the class to the interface (so that the arrow is pointing to the interface).
Copying and Cloning Objects
In PHP 5, when you create a copy of an object, PHP actually creates a new reference to that object, not an entirely new object. In other words, both variables will point to the same thing, and changes made through one object will be reflected by the other:
$a = new SomeClass();
$a->val = 1;
$b = $a;
$b->val = 2;
echo $a->val; // 2
More formally put, this means that PHP assigns objects by reference, not by value. PHP does this for performance reasons, as having multiple copies of entire objects, when not needed, is expensive.
If you actually want two separate, individual objects, you need to create a clone:
$a = new SomeClass();
$a->val = 1;
$b = clone $a; // Separate
objects!
$b->val = 2;
echo $a->val; // 1
When the clone operator is used, PHP will perform what’s called a “shallow copy.” If you want to change how a clone of an object is made, you can define a _ _clone() method within the class. That method would be called whenever a clone is made, and would handle the cloning as you see fit. See the PHP manual for details.
Traits
New to PHP 5.4 is support for traits. Traits are used to solve a problem in OOP languages such as PHP that only allow for single inheritance. For example, say you’re designing a Web site that has several different classes: User, Page, ContactForm, etc. While you’re developing the Web site, it’ll help to have a debugging tool that will print out information about a given object, regardless of its type:
function dumpObject() {
// Print out the information.
}
You could add this definition to each class, but that’d be unnecessarily redundant (and a hurdle to overcome should you want to change the definition). Normally, when you have a method that would be needed in multiple classes, inheritance is the solution. However, in PHP each class can only inherit from a single parent class, and there is no common parent class that each of them would have. The solution, then, is traits. Traits allow you to add functionality to a class without using inheritance.
To create a trait, use the trait keyword, followed by the name and definition:
trait tSomeTrait {
// Attributes
function someFunction() {
// Do whatever.
}
}
(Stylistically, you could begin your trait with a lowercase “t,” but that is not required.)
Like an abstract class and an interface, traits cannot be instantiated (i.e., you can’t make an object from a trait). Instead, you add a trait to a class via the use keyword inside the class definition:
class SomeClass {
use tSomeTrait;
// Rest of class.
}
Just as including an external PHP script makes that script’s code usable in the current one, adding a use TraitName statement makes that trait’s code available to the class.
Now, when you create an object of type SomeClass, that object has a someFunction() method:
$obj = new SomeClass();
$obj->someFunction();
In this next example, let’s implement the debugging trait example and use it with a class. In doing so, I’m going to use three PHP functions not previously mentioned but that are virtually self-explanatory.
To use traits
1. Begin a new PHP script in your text editor or IDE, to be named tDebug.php (Script 6.5):
<?php # Script 6.5 - tDebug.php
For this example, one script will define the trait itself. Another script will create an object that uses the trait.
2. Begin defining the trait:
trait tDebug {
That’s all there is to it! The name of the trait is tDebug.
Script 6.5. The tDebug trait defines a useful dumpObject() method that can help in debugging any object type.
1 <?php # Script 6.5 - tDebug.php
2 // This page defines the tDebug trait.
3
4 /* The tDebug trait.
5 * The trait defines one method: dumpObject():
6 */
7 trait tDebug {
8
9 // Method dumps out a lot of data about the current object:
10 public function dumpObject() {
11
12 // Get the class name:
13 $class = get_class($this);
14
15 // Get the attributes:
16 $attributes = get_object_vars($this);
17
18 // Get the methods:
19 $methods = get_class_methods($this);
20
21 // Print a heading:
22 echo "<h2>Information about the $class object</h2>";
23
24 // Print the attributes:
25 echo '<h3>Attributes</h3><ul>';
26 foreach ($attributes as $k => $v) {
27 echo "<li>$k: $v</li>";
28 }
29 echo '</li></ul>';
30
31 // Print the methods:
32 echo '<h3>Methods</h3><ul>';
33 foreach ($methods as $v) {
34 echo "<li>$v</li>";
35 }
36 echo '</li></ul>';
37
38 } // End of dumpObject() method.
39
40 } // End of tDebug trait.
3. Begin defining the dumpObject() method:
public function dumpObject() {
$class = get_class($this);
The method will take no arguments but will consistently refer to $this, which always represents the current object.
The first thing this method does is find the class name of the current object. That’s possible by invoking the get_ class() function, providing it with the object whose class name you’re trying to determine.
4. Get the object’s attributes and methods:
$attributes = get_object_vars($this);
$methods = get_class_methods($this);
These are the other two new functions I’m using in this trait. The first gets the attributes for a given object: both the attribute names and their respective values. The second function retrieves the methods defined in the associated class. There is no get_object_methods() function, which is why the two have slightly different names.
5. Print a heading:
echo "<h2>Information about the $class object</h2>";
This debugging method is going to be heavy on the amount of HTML it outputs, but that shouldn’t be a problem as it’s for debugging purposes only. And, of course, you can edit the output as needed.
6. Print the attributes:
echo '<h3>Attributes</h3><ul>';
foreach ($attributes as $k => $v) {
echo "<li>$k: $v</li>";
}
echo '</li></ul>';
The foreach loop will run through the array of attributes (even if there is only one attribute, $attributes will still be an array). Within the loop, each attribute name and value is printed within a list.
7. Print the methods:
echo '<h3>Methods</h3><ul>';
foreach ($methods as $v) {
echo "<li>$v</li>";
}
echo '</li></ul>';
This is a replication of the code in Step 6, although the methods don’t have values to be printed.
8. Complete the method and the trait:
} // End of dumpObject() method.
} // End of tDebug trait.
9. Save the file as tDebug.php and place it in your Web directory.
To use the tDebug trait
1. Open Rectangle.php (Script 4.5) in your text editor or IDE.
By design, you can use the trait with any class.
2. Within the class definition, add in the trait (Script 6.6):
use tDebug;
That's all there is to it!
3. Save the file as Rectangle.php and place it in your Web directory.
Interfaces vs. Traits
Traits may seem a lot like interfaces, but the two are effectively opposite approaches. An interface enforces stricter programming, ensuring that classes are designed to implement specific methods. Conversely, a trait makes methods available to a class that the class itself does not define.
As I mention in the introduction to the topic, traits can be useful in solving the occasional OOP design problem. But traits can also be mistakenly used to provide an easy solution to a problem best solved in other ways (such as rethinking your inheritance tree). Well-written traits should also avoid making assumptions about the classes that will use them.
Script 6.6. This updated version of the Rectangle class makes use of the tDebug trait.
1 <?php # Script 6.6 - Rectangle.php
2 /* This page defines the Rectangle class.
3 * The class contains two attributes: width and height.
4 * The class contains five methods:
5 * - _ _construct()
6 * - setSize()
7 * - getArea()
8 * - getPerimeter()
9 * - isSquare()
10 */
11
12 class Rectangle {
13
14 // Use the debug trait:
15 use tDebug;
16
17 // Declare the attributes:
18 public $width = 0;
19 public $height = 0;
20
21 // Constructor:
22 function _ _construct($w = 0, $h = 0) {
23 $this->width = $w;
24 $this->height = $h;
25 }
26
27 // Method to set the dimensions:
28 function setSize($w = 0, $h = 0) {
29 $this->width = $w;
30 $this->height = $h;
31 }
32
33 // Method to calculate and return the area:
34 function getArea() {
35 return ($this->width * $this->height);
36 }
37
38 // Method to calculate and return the perimeter:
39 function getPerimeter() {
40 return ( ($this->width + $this->height) * 2 );
41 }
42
43 // Method to determine if the rectangle
44 // is also a square.
45 function isSquare() {
46 if ($this->width == $this->height)
{
47 return true; // Square
48 } else {
49 return false; // Not a square
50 }
51
52 }
53
54 } // End of Rectangle class.
Script 6.7. This script prints out debugging information about a Rectangle object, made possible by the class’s use of the tDebug trait (Script 6.6).
1 <!doctype html>
2 <html lang="en">
3 <head>
4 <meta charset="utf-8">
5 <title>Trait</title>
6 <link rel="stylesheet" href="style.css">
7 </head>
8 <body>
9 <?php # Script 6.7 - trait.php
10 // This page uses the tDebug trait through the Rectangle object.
11
12 // Include the trait definition:
13 require('tDebug.php');
14
15 // Include the class definition:
16 require('Rectangle.php');
17
18 // Create a new object:
19 $r = new Rectangle(42, 37);
20
21 // Dump the information:
22 $r->dumpObject();
23
24 // Delete the object:
25 unset($r);
26
27 ?>
28 </body>
29 </html>
To use the new Rectangle class
1. Begin a new PHP script in your text editor or IDE, to be named trait.php, starting with the HTML (Script 6.7):
<!doctype html>
<html lang="en">
<head>
<meta charset="utf-8">
<title>Trait</title>
<link rel="stylesheet" href="style.css">
</head>
<body>
<?php # Script 6.7 - trait.php
2. Load the trait and class definitions:
require('tDebug.php');
require('Rectangle.php');
Because the class references the trait, the two files must be included in this order.
3. Create and debug an object:
$r = new Rectangle(42, 37);
$r->dumpObject();
The Rectangle class does not define the dumpObject() method, but it’s available to the object because of the use of the trait.
4. Complete the page:
unset($r);
?>
</body>
</html>
5. Save the file as trait.php, place it in your Web directory, and test in your Web browser  .
.
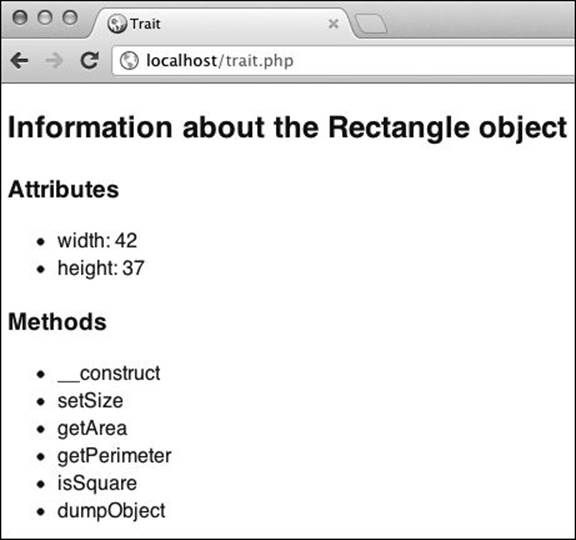
 The output generated by the dumpObject() method.
Tip
If you get a parse error when you run this script, it could be because you’re not using PHP 5.4 or later, and PHP does not recognize the trait keyword.
Tip
To incorporate multiple traits into a class, separate each trait by a comma:
use tTrait1, tTrait2;
Tip
Traits can have abstract methods that must then be implemented by any class that uses the trait.
Tip
Again, you could arguably include the tDebug.php script within Rectangle.php instead of the main script.
Trait Precedence
If a trait used by a class has a method with the same name as a method in the class, PHP has to decide which method takes precedence (i.e., which one will be executed when that method is called). If the method is defined in the class, that version will take precedence over the trait method. If the method defined in the class is actually inherited from another class, then the trait method takes precedence.
Composition
Thus far in the book, the relationship between two classes has been one of simple inheritance: “is a” relationships (e.g., a Dog is a type of Pet). But inheritance itself is not the cornerstone of OOP; rather code reuse is the key concept. Inheritance is just one way you can reuse code. Another way is to implement composition.
Composition represents a “has a” relationship, where one class’s property values are objects of another class type. For example, Employee is not a subtype of Department (i.e., a child), but rather a part of a Department’s composition.
In UML, composition is indicated by drawing a line with a diamond at one end from the included class (e.g., Employee) to the composite class (e.g., Department).
Type Hinting
Type hinting is the programming act of indicating what type of value is expected. For example, what type of value a function expects to receive for a parameter.
Type hinting doesn’t play much of a role in procedural PHP code because you cannot hint simple types (e.g., integers or strings). But you can hint object types, which is more useful.
To perform type hinting, preface the parameter variable name with the expected class type:
class SomeClass {
function doThis(OtherClass $var) {
}
}
If the argument passed to the doThis() method is not of type OtherClass, or of a derived subclass, PHP will generate a fatal error  :
:
class OtherClass {}
$some = new SomeClass();
$other = new OtherClass();
$some->doThis($other);
$some->doThis($some);

The error message when an inappropriate type of value is sent to a function that uses type hinting.
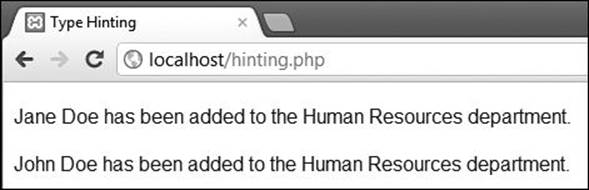
For an example of type hinting, this next script will define a Department class with an addEmployee() method. That method will be used to add a new employee to the list of the department employees. The method will only accept a parameter of type Employee.
To use type hinting
1. Begin a new PHP script in your text editor or IDE, to be named hinting.php, starting with the HTML (Script 6.8):
<!doctype html>
<html lang="en">
<head>
<meta charset="utf-8">
<title>Type Hinting</title>
<link rel="stylesheet" href="style.css">
</head>
<body>
<?php # Script 6.8 - hinting.php
2. Begin declaring the Department class:
class Department {
private $_name;
private $_employees;
function _ _construct($name) {
$this->_name = $name;
$this->_employees = array();
}
The Department class has two private attributes: one to store the department name, and the other to store an array of employees in that department. The constructor assigns the value to the private $_name variable and then makes $_employees an empty array.
Script 6.8. Type hinting is used in this script to restrict the addEmployee() method to only accepting arguments of type Employee.
1 <!doctype html>
2 <html lang="en">
3 <head>
4 <meta charset="utf-8">
5 <title>Type Hinting</title>
6 <link rel="stylesheet" href="style.css">
7 </head>
8 <body>
9 <?php # Script 6.8 - hinting.php
10 // This page defines and uses the Department and Employee classes.
11
12 # ***** CLASSES ***** #
13
14 /* Class Department.
15 * The class contains two attribute: name and employees[].
16 * The class contains two methods:
17 * - _ _construct()
18 * - addEmployee()
19 */
20 class Department {
21 private $_name;
22 private $_employees;
23 function _ _construct($name) {
24 $this->_name = $name;
25 $this->_employees = array();
26 }
27 function addEmployee(Employee $e) {
28 $this->_employees[] = $e;
29 echo "<p>{$e->getName()} has been added to the {$this->_name} department.</p>";
30 }
31 } // End of Department class.
32
33 /* Class Employee.
34 * The class contains one attribute: name.
35 * The class contains two methods:
36 * - _ _construct()
37 * - getName()
38 */
39 class Employee {
40 private $_name;
41 function _ _construct($name) {
42 $this->_name = $name;
43 }
44 function getName() {
45 return $this->_name;
46 }
47 } // End of Employee class.
48
49 # ***** END OF CLASSES ***** #
50
51 // Create a department:
52 $hr = new Department('Human Resources');
53
54 // Create employees:
55 $e1 = new Employee('Jane Doe');
56 $e2 = new Employee('John Doe');
57
58 // Add the employees to the department:
59 $hr->addEmployee($e1);
60 $hr->addEmployee($e2);
61
62 // Delete the objects:
63 unset($hr, $e1, $e2);
64
65 ?>
66 </body>
67 </html>
3. Define the addEmployee() method and complete the class:
function addEmployee(Employee
$e) {
$this->_employees[] = $e;
echo "<p>{$e->getName()} has been added to the {$this->_name} department.</p>";
}
} // End of Department class.
This method will be called to add an employee to the current department object. It takes one argument, which, thanks to type hinting, must be of type Employee. If an appropriately typed argument is received, it will be added to the internal, private $employees array. For confirmation purposes (and to have the final script output something), verification of the added employee is printed.
Note that because $e will be an object of type Employee, it can invoke any of the Employee methods, such as getName().
4. Define the Employee class:
class Employee {
private $_name;
function _ _construct($name) {
$this->_name = $name;
}
function getName() {
return $this->_name;
}
} // End of Employee class.
I’m defining the Employee class in a fairly minimal way. Its constructor takes an employee’s name as an argument, which will be assigned to its internal private attribute. The getName() method is public, and it is the proper way to fetch the name of the employee.
5. Create a Department:
$hr = new Department('Human Resources');
6. Create two Employee objects:
$e1 = new Employee('Jane Doe');
$e2 = new Employee('John Doe');
7. Add the employees to the department:
$hr->addEmployee($e1);
$hr->addEmployee($e2);
Because these two objects are of type Employee, they can be passed to the addEmployee() method.
8. Complete the page:
unset($hr, $e1, $e2);
?>
</body>
</html>
9. Save the file as hinting.php, place it in your Web directory, and test in your Web browser .
The script result when the addEmployee() method is properly invoked.
Tip
The errors triggered when the proper argument type is not submitted  are exceptions, which means they can be “caught”, a more graceful way of handling this problem. This will mean more in Chapter 8.
Tip
Type hinting can be used in functions, too (i.e., in non-methods: functions defined outside of any class).
Tip
You can also hint for interfaces, arrays (as of PHP 5.1), and functions (i.e., callables, as of PHP 5.4).
Namespaces
Added in version 5.3 of PHP is support for namespaces. Namespaces provide a solution to a common OOP problem: as you begin utilizing more and more classes, including those defined by other developers and in third-party libraries, conflicts can occur if multiple classes have the same name. Namespaces prevent these conflicts by letting you organize your code into groups. This has the effect of allowing you to safely use descriptive names without concern for conflicts.
An apt analogy (which the PHP manual also uses) is to compare namespaces to creating a directory structure on your computer. You cannot place two files named functions.php within the same folder. However, you can place one in the MyUtilities folder and another in the YourUtilities folder, thereby making both versions of functions.php available.
There are limits as to what you can place in a namespace, specifically:
• Classes
• Interfaces
• Functions
• Constants
You couldn’t, for example, create a namespace just to hold some variables.
To define a namespace, you’ll want to create a new file that will only store the namespaced code. This is both a virtual requirement of PHP and a best design practice. Within that file, you create a namespace by using the namespace key-word, followed by the identifier:
namespace SomeNamespace;
Note that this should be the first line of PHP code in a file, and that the file cannot even have any HTML before that PHP code (although, from a design perspective, you wouldn’t want to mix HTML and a namespace anyway). You can have PHP comments before that line, however.
Any code that follows that line will automatically be placed within that namespace:
namespace SomeNamespace;
class SomeClass {}
Namespaces can have subnamespaces, just as you’d have levels of directories on your computer. To do that, indicate a subnamespace using the backslash:
namespace MyUtilities\UserManagement;
class Login {}
Once you’ve defined a namespace, you can reference it by using the backslashes again. First, though, you’d need to include the file that defines the namespace:
require('SomeNameSpace.php');
then use backslashes to indicate a namespace is being used:
$obj = new \SomeNameSpace\SomeClass();
Or:
require('MyUtilities\User\User.php');
$obj = new \MyUtilities\User\Login();
As a stylistic choice, one suggestion is to use your name or organization as the top-level namespace:
namespace MyName\Util\User;
Another suggestion is that you organize the files themselves using the same structure . This isn’t required, but doing so makes a lot of sense, in my mind.
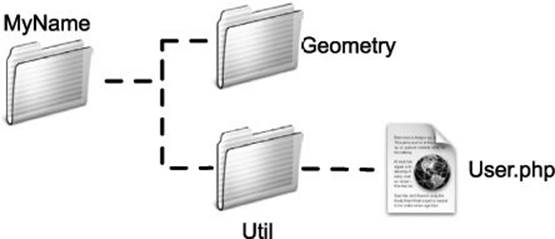
A suggested file structure for organizing a library of code.
As a practical example of this, let’s place the Directory and Employee classes within a MyNamespace\Company namespace.
To use namespaces
1. Begin a new PHP script in your text editor or IDE, to be named Company.php (Script 6.9):
<?php # Script 6.9 - Company.php
This script will only define a namespace, and it will not contain any HTML.
Script 6.9. The two company-related classes are now defined within their own namespace, which in turn is a subnamespace of MyNamespace.
1 <?php # Script 6.9 - Company.php
2 // This script defines the Company namespace, with two classes.
3
4 // Declare the namespace:
5 namespace MyNamespace\Company;
6
7 # ***** CLASSES ***** #
8 class Department {
9 private $_name;
10 private $_employees;
11 function _ _construct($name) {
12 $this->_name = $name;
13 $this->_employees = array();
14 }
15 function addEmployee(Employee $e) {
16 $this->_employees[] = $e;
17 echo "<p>{$e->getName()} has been added to the {$this->_name} department.</p>";
18 }
19 } // End of Department class.
20
21 class Employee {
22 private $_name;
23 function _ _construct($name) {
24 $this->_name = $name;
25 }
26 function getName() {
27 return $this->_name;
28 }
29 } // End of Employee class.
30
31 # ***** END OF CLASSES ***** #
2. Declare the MyNamespace\Company namespace:
namespace MyNamespace\Company;
The premise here is that all of your reusable code would go into the MyNamespace namespace, whose name you would make more unique. Within that entire library, all of the classes and code related to creating company-based projects would go in the Company namespace, declared here.
3. Define the Department class:
class Department {
private $_name;
private $_employees;
function _ _construct($name) {
$this->_name = $name;
$this->_employees = array();
}
function addEmployee(Employee $e) {
$this->_employees[] = $e;
echo "<p>{$e->getName()} has been added to the {$this->_name} department.</p>";
}
} // End of Department class.
This is the same code already explained in the type-hinting section.
Design Approaches
Through three chapters, this book has introduced the fundamental, and even the more advanced, concepts and theories when it comes to object-oriented programming in PHP. As with all application development, the key is the underlying design, and that is a skill only really learned through practice. Chapter 8 and Chapter 9, “Example—CMS with OOP,” will provide more practice, but here are a few tips in the meantime.
First, by this point in time you probably have a good amount of experience in designing normalized databases. And while the comparison isn’t perfect, some aspects of that design process apply to designing classes. In particular, you want to avoid redundancies among your classes, and try to design classes to be as small and specific as possible. Use inheritance and composition so that multiple classes together fulfill all of the application needs. And, also as with database design, understand that you won’t necessarily get it right from the get-go; changes sometimes have to be made after the fact.
Toward that end, however, remember the difference between the interface—how a method or class is used—and the implementation: what the class or method does internally. A well-designed class or method can have its implementation changed without affecting any code that uses the class, as the interface should remain unchanged.
Similarly, classes, even in a complex application, should be loosely coupled. This means that classes should be written so they are not too strongly dependent on the design or functionality of another class.
Finally, be in the habit of using constructors that guarantee the generated object is in a safe state to be used. This means initializing internal attributes and performing any necessary setup.
4. Define the Employee class:
class Employee {
private $_name;
function _ _construct($name) {
$this->_name = $name;
}
function getName() {
return $this->_name;
}
} // End of Employee class.
Again, no changes here.
5. Save the file as Company.php, and then place it in your Web directory within a MyNamespace/Company directory.
To use the namespace class
1. Begin a new PHP script in your text editor or IDE, to be named namespace.php, starting with the HTML (Script 6.10):
<!doctype html>
<html lang="en">
<head>
<meta charset="utf-8">
<title>Namespace</title>
<link rel="stylesheet" href="style.css">
</head>
<body>
<?php # Script 6.10 - namespace.php
2. Include the namespace file:
require('MyNamespace/Company/Company.php');
If you did not use the directory structure recommended in Step 5 of the previous sequence, change the path accordingly.
Script 6.10. This variation on Script 6.8 references two classes defined within a namespace.
1 <!doctype html>
2 <html lang="en">
3 <head>
4 <meta charset="utf-8">
5 <title>Namespace</title>
6 <link rel="stylesheet" href="style.css">
7 </head>
8 <body>
9 <?php # Script 6.10 - namespace.php
10 // This page defines and uses the Department and Employee classes.
11
12 // Include the PHP script:
13 require('MyNamespace/Company/Company.php');
14
15 // Create a department:
16 $hr = new \MyNamespace\Company\Department('Accounting');
17
18 // Create employees:
19 $e1 = new \MyNamespace\Company\Employee('Holden Caulfield');
20 $e2 = new \MyNamespace\Company\Employee('Jane Gallagher');
21
22 // Add the employees to the department:
23 $hr->addEmployee($e1);
24 $hr->addEmployee($e2);
25
26 // Delete the objects:
27 unset($hr, $e1, $e2);
28
29 ?>
30 </body>
31 </html>
3. Create a Department object:
$hr = new \MyNamespace\Company\Department('Accounting');
This is the same code used in the type hinting example, although now a full namespace reference to the Department class is used.
4. Create two employees:
$e1 = new \MyNamespace\Company\Employee('Holden Caulfield');
$e2 = new \MyNamespace\Company\Employee('Jane Gallagher');
Again, the references to the Employee class just need to include the full namespace, starting with a backslash.
5. Add the employees to the department:
$hr->addEmployee($e1);
$hr->addEmployee($e2);
6. Complete the page:
unset($hr, $e1, $e2);
?>
</body>
</html>
7. Save the file as namespace.php, place it in your Web directory, and test in your Web browser .
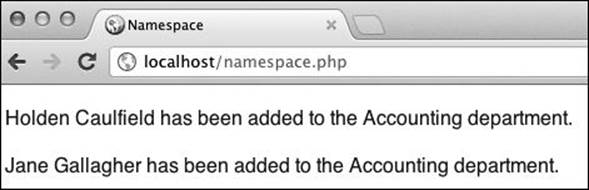
The output is more or less the same as in the previous script, although the underlying code is now better organized thanks to namespaces.
Tip
You can use the same namespace in multiple files, which will allow you to put multiple classes, each defined in separate scripts, within the same namespace.
Tip
Technically, the namespace keyword can come after one particular line of PHP code: a declare() statement.
Tip
You can define multiple namespaces within a single file, but I recommend against doing so.
Tip
The _ _NAMESPACE_ _ constant represents the current namespace.
Tip
PHP allows you to more quickly reference a namespace by bringing it into current scope via the use keyword:
use MyNamespace\Company;
Having done that, you can now create an object by just referencing classes within the Company namespace:
$obj = new Department();
I tend to avoid these kinds of heavy-handed approaches, though, as the purpose of namespaces is to be specific.
Tip
The PHP manual goes into a lot of detail about how namespaces are resolved considering various scopes. If you begin using namespaces on a regular basis, read through that section of the PHP manual.
Review and Pursue
If you have any problems with these sections, either in answering the questions or pursuing your own endeavors, turn to the book’s supporting forum (www.LarryUllman.com/forums/).
Review
• What is an abstract class? How do you create and use one? (See page 184.)
• What is an abstract method? How do you create and use one? (See pages 184 and 185.)
• When a class inherits an abstract method, what visibility can the subclass assign to that method? (See page 185.)
• What is an interface? How do you create one? How do you use one? (See page 191.)
• What visibility must interface methods have? (See page 191.)
• What is a trait? How do you create one? How do you use one? (See page 197.)
• What is type hinting? How do you perform type hinting? (See page 203.)
• What are namespaces? Why are they useful? How do you crate a namespace? How do you reference namespaced code? (See page 207.)
Pursue
• In situations where a class, interface, or trait is both defined and used in the same script, break it into two (or more) scripts, separating the definitions from their usage.
• Complete the UML diagrams for any of the examples in this chapter.
• Add phpDocumentor-style comments to any of the definitions and scripts in this chapter.
• Implement Pet as an abstract class.
• Create other classes such as Circle and Rectangle that extend Shape.
• If you want more practice, create abstract Shape2D and Shape3D classes. Then extend these in logical directions, including new classes like Sphere.
• Flesh out the User class used in the interface example, adding other attributes (such as email address and password) and methods (such as login and logout).
• Rewrite the User class so that it interacts with a database instead of using internal attributes. Hint: Keep only the $_userId attribute and have it store the associated primary key value.
• Test out the tDebug trait on other object types.
• Flesh out the Department and Employee classes.
• Check out the PHP manual’s documentation for more on namespaces.
• Look up cloning in the PHP manual.
All materials on the site are licensed Creative Commons Attribution-Sharealike 3.0 Unported CC BY-SA 3.0 & GNU Free Documentation License (GFDL)
If you are the copyright holder of any material contained on our site and intend to remove it, please contact our site administrator for approval.
© 2016-2026 All site design rights belong to S.Y.A.
In This Chapter
Abstract Classes and Methods
Interfaces
Traits
Type Hinting
Namespaces
Review and Pursue
The previous chapter explored some advanced OOP concepts, with a particular emphasis on those related to inheritance. In this chapter, you’ll learn even more advanced OOP concepts, including some introduced in more recent versions of PHP. Tip: make sure you know what version of PHP you’re working with before proceeding.
The topics in this chapter get to be more esoteric, and won’t always be necessary in a Web application, but these concepts should be on your radar as you become more comfortable with OOP as a programming approach. As with the past two chapters, a fair amount of OOP theory will be covered as well.
Abstract Classes and Methods
In some situations where inheritance applies, it would never be appropriate to create an instance of a parent class. For instance, in the Pet example, the intention would be to create a specific subclass for each pet type and never really create an object of type Pet. In such cases, it would be more appropriate to define an abstract base class, instead of a standard base class.
Abstract classes are template versions of a parent class. By defining an abstract class, you can indicate the general behavior that subclasses should have. Put another way, an abstract class defines the interfaces: how derived classes of this base type are to be used. The subclasses are then responsible for defining the actual implementations of those interfaces.
Abstract classes differ from normal classes in that attempting to create an object of an abstract class’s type results in a fatal error ![]() . Instead, abstract classes are meant to be extended, and then you create an instance of that extended class.
. Instead, abstract classes are meant to be extended, and then you create an instance of that extended class.
![]() The fatal error created by trying to make an object of an abstract class.
The fatal error created by trying to make an object of an abstract class.
This approach starts with the keyword abstract:
abstract class ClassName {
}
Abstract classes normally have abstract methods. These are defined like so:
abstract function methodName();
abstract function methodName ($var1, $var2);
The _ _toString() Method
If you define a _ _toString() method in a class, PHP will invoke that method automatically when an object of that type is used as a string. For example, it would be called if you attempted to do this:
$a = new SomeClass();
echo $a;
Objects are, by definition, complex variable types, not intended to be used as if they were scalar variables. However, it is common enough for developers to add _ _toString() methods, at the very least as a simple and useful debugging tool.
As a developer, by defining a _ _ toString() method for a class, you get to decide exactly what happens should an object of that class be used as a string, instead of just letting PHP generate an error.
That’s it! You do not define the functionality of the method; instead, that functionality will be determined by the class that extends the abstract class. If you want to add visibility to the definition, add the corresponding keyword after the word abstract:
abstract public function methodName();
Here is how part of Pet might look:
abstract class Pet {
protected $_name;
abstract public function getName();
}
Then Cat would contain
class Cat extends Pet {
function getName() {
return $this->_name;
}
}
Note that the implementation of the abstract method in the extended class—e.g., Cat::getName()—must abide by the same visibility or weaker. If the abstract function is public, the extended version must also be public. If the abstract function is protected, then the extended version can only be protected or public. You would never make an abstract method private, since a private method cannot be inherited. In all cases, the implemented version of the method must also have the same number of arguments as the abstract definition (i.e., the same signature).
Note that if a class has even one abstract method, the class itself must be abstract. However, an abstract class can have non-abstract methods, as well as attributes, all of which would also be inherited by the derived class.
To put this into action, let’s return to geometry examples, like Rectangle. That class could be an extension of a more generic Shape class ![]() . Let’s institute the Shape abstract class and a child, Triangle.
. Let’s institute the Shape abstract class and a child, Triangle.
![]() The abstract Shape class can be the parent to many types of (two-dimensional) shapes.
The abstract Shape class can be the parent to many types of (two-dimensional) shapes.
To create abstract classes and methods
1. Begin a new PHP script in your text editor or IDE, to be named Shape.php (Script 6.1):
<?php # Script 6.1 - Shape.php
2. Start defining the Shape class:
abstract class Shape {
Remember that when a class is abstract, it means you’ll never create an object of that type. Hence, you wouldn’t make an abstract Rectangle class because you do need to occasionally make rectangles.
3. Define the first abstract method:
abstract protected function getArea();
This line says that any class that extends Shape needs to define a getArea() method. Furthermore, this method should not take any arguments and have either public or protected visibility (the same visibility or weaker). Defining this as an abstract method makes sense, as every two-dimensional shape should have the ability to calculate its own area (three-dimensional shapes have volumes, not areas).
4. Define the second abstract method:
abstract protected function getPerimeter();
5. Complete the class:
} // End of Shape class.
6. Save the file as Shape.php and place it in your Web directory.
To create the Triangle class
1. Begin a new PHP script in your text editor or IDE, to be named Triangle.php (Script 6.2):
<?php # Script 6.2 - Triangle.php
2. Begin declaring the Triangle class:
class Triangle extends Shape {
Script 6.1. The abstract Shape class, with two abstract methods, will be the template for more specific shapes, like Triangle (Script 6.2).
1 <?php # Script 6.1 - Shape.php
2 /* This page defines the Shape abstract
class.
3 * The class contains no attributes.
4 * The class contains two abstract
methods:
5 * - getArea()
6 * - getPerimeter()
7 */
8
9 abstract class Shape {
10 // No attributes to declare.
11 // No constructor or destructor
defined here.
12
13 // Method to calculate and return the
area.
14 abstract protected function
getArea();
15
16 // Method to calculate and return the
perimeter.
17 abstract protected function
getPerimeter();
18
19 } // End of Shape class.
Script 6.2. The Triangle class is an extension of Shape. It is therefore responsible for defining how the getArea() and getPerimeter() methods work.
1 <?php # Script 6.2 - Triangle.php
2 /* This page defines the Triangle class.
3 * The class contains two attributes:
4 * - private $_sides (array)
5 * - private $_perimeter (number)
6 * The class contains three methods:
7 * - _ _construct()
8 * - getArea()
9 * - getPerimeter()
10 */
11
12 class Triangle extends Shape {
13
14 // Declare the attributes:
15 private $_sides = array();
16 private $_perimeter = NULL;
17
18 // Constructor:
19 function _ _construct($s0 = 0, $s1 = 0, $s2 = 0) {
20
21 // Store the values in the array:
22 $this->_sides[] = $s0;
23 $this->_sides[] = $s1;
24 $this->_sides[] = $s2;
25
26 // Calculate the perimeter:
27 $this->_perimeter = array_sum($this->_sides);
28
29 } // End of constructor.
30
31 // Method to calculate and return the area:
32 public function getArea() {
33
34 // Calculate and return the area:
35 return (SQRT(
36 ($this->_perimeter/2) *
37 (($this->_perimeter/2) - $this->_sides[0]) *
38 (($this->_perimeter/2) - $this->_sides[1]) *
39 (($this->_perimeter/2) - $this->_sides[2])
40 ));
41
42 } // End of getArea() method.
43
44 // Method to return the perimeter:
45 public function getPerimeter() {
46 return $this->_perimeter;
47 } // End of getPerimeter() method.
48
49 } // End of Triangle class.
3. Declare the attributes:
private $_sides = array();
private $_perimeter = NULL;
The first attribute will store the size of the three sides (alternatively, you could make three separate variables). The second variable will store the perimeter. I’m only adding this attribute because the perimeter will be used in calculating the area (a lot), so it’s nice to have it in a variable instead of retrieving it through a method call.
All the attributes are private, as they shouldn’t be accessed outside of any class and I can’t imagine how a Triangle class would be inherited (in which case they may need to be protected).
4. Define the constructor:
function _ _construct($s0 = 0, $s1 = 0, $s2 = 0) {
$this->_sides[] = $s0;
$this->_sides[] = $s1;
$this->_sides[] = $s2;
$this->_perimeter = array_sum($this->_sides);
}
The constructor takes three arguments for the three sides of the triangle. Those values are placed in the $_sides array, and then the perimeter is calculated. The array_sum() function adds up all the values of all the elements in an array.
5. Create the getArea() method:
public function getArea() {
return (SQRT(
($this->_perimeter/2) *
(($this->_perimeter/2) - $this->_sides[0]) *
(($this->_perimeter/2) - $this->_sides[1]) *
(($this->_perimeter/2)
- $this->_sides[2])
));
}
If you remember your geometry, you know that the area of a triangle is equal to one-half the base times the height ![]() . Of course, to make that calculation, the class would need to determine the base (the longest side, not a problem) and the height (requiring trigonometry, yikes!). So instead I’ll use the formula in
. Of course, to make that calculation, the class would need to determine the base (the longest side, not a problem) and the height (requiring trigonometry, yikes!). So instead I’ll use the formula in ![]() . This code implements that formula in PHP.
. This code implements that formula in PHP.
![]() To calculate the area of a triangle the easy way, you would need to know the height value.
To calculate the area of a triangle the easy way, you would need to know the height value.
![]() Heron’s Formula says that the area of a triangle is equal to the square root of z times z minus a times z minus b times z minus c, where z is half the perimeter and a, b, and c are the three sides. (And no, I didn’t know this offhand; Mr. Friendly Internet helped out.)
Heron’s Formula says that the area of a triangle is equal to the square root of z times z minus a times z minus b times z minus c, where z is half the perimeter and a, b, and c are the three sides. (And no, I didn’t know this offhand; Mr. Friendly Internet helped out.)
Script 6.3. This script makes an object of type Triangle, which is derived from the abstract Shape class.
1 <!doctype html>
2 <html lang="en">
3 <head>
4 <meta charset="utf-8">
5 <title>Triangle</title>
6 <link rel="stylesheet" href="style.css">
7 </head>
8 <body>
9 <?php # Script 6.3 - abstract.php
10 // This page uses the Triangle class (Script 6.2), which is derived from Shape (Script 6.1).
11
12 // Load the class definitions:
13 require('Shape.php');
14 require('Triangle.php');
15
16 // Set the triangle's sides:
17 $side1 = 5;
18 $side2 = 10;
19 $side3 = 13;
20
21 // Print a little introduction:
22 echo "<h2>With sides of $side1, $side2, and $side3...</h2>";
23
24 // Create a new triangle:
25 $t = new Triangle($side1, $side2, $side3);
26
27 // Print the area.
28 echo '<p>The area of the triangle is ' . $t->getArea() . '</p>';
29
30 // Print the perimeter.
31 echo '<p>The perimeter of the triangle is ' . $t->getPerimeter() . '</p>';
32
33 // Delete the object:
34 unset($t);
35
36 ?>
37 </body>
38 </html>
6. Create the getPerimeter() method:
public function getPerimeter() {
return $this->_perimeter;
} // End of getPerimeter() method.
This is the second of the abstract methods in Shape that must be implemented here. For this example, it simply returns the perimeter attribute. Had I not created a perimeter attribute, this method would instead return array_sum($this->_sides).
7. Complete the class:
} // End of Triangle class.
8. Save the file as Triangle.php and place it in your Web directory.
To use the Triangle class
1. Begin a new PHP script in your text editor or IDE, to be named abstract.php, starting with the HTML (Script 6.3):
<!doctype html>
<html lang="en">
<head>
<meta charset="utf-8">
<title>Triangle</title>
<link rel="stylesheet" href="style.css">
</head>
<body>
<?php # Script 6.3 - abstract.php
2. Load the class definitions:
require('Shape.php');
require('Triangle.php');
3. Set the sides of the triangle:
$side1 = 5;
$side2 = 10;
$side3 = 13;
Technically, a valid triangle abides by a certain rule regarding the three sides: the sum of any two sides has to be greater than the third side (I seriously brushed up on my geometry skills for this).
4. Print an introduction and create a new triangle:
echo "<h2>With sides of $side1, $side2, and $side3...</h2>";
$t = new Triangle($side1, $side2, $side3);
5. Print the area:
echo '<p>The area of the triangle is ' . $t->getArea() . '</p>';
This code is much like the Square and Rectangle examples already demonstrated (usage redundancy is a hallmark of OOP).
6. Print the perimeter:
echo '<p>The perimeter of the triangle is ' . $t->getPerimeter() . '</p>';
7. Complete the page:
unset($t);
?>
</body>
</html>
8. Save the file as abstract.php, place it in your Web directory, and test in your Web browser ![]() .
.
![]() The use of the Triangle class.
The use of the Triangle class.
Tip
In UML, a class is marked as abstract by either italicizing its name, or by placing {abstract} next to its name ![]() .
.
Tip
Arguably, you could have Triangle.php include Shape.php.
Interfaces
Similar to the abstract class is an interface. Interfaces, like abstract classes, identify the functionality (i.e., the methods) that must be defined by a specific class.
To create an interface, use the interface keyword. Then, within the curly brackets, define the method signatures, not their actual implementation:
interface iSomething {
public function someFunction($var);
}
(Conventionally, interface names often begin with a lowercase i, but this is not required.)
Note that all methods in an interface must be public. Also, interfaces only identify methods; they never include attributes.
To associate a class with an interface, use the implements operator in the class definition:
class Someclass implements iSomething {}
The class must then define all of the methods listed in the interface, or a fatal error will occur ![]() .
.
![]() The fatal error created by having a class implement an interface without implementing all of the interface’s methods.
The fatal error created by having a class implement an interface without implementing all of the interface’s methods.
Abstract Class vs. Interface
The difference between an interface and an abstract class may seem subtle. Remember that an abstract class is meant to be extended by a more specific class, of which you’ll probably create an object instance. As you’ve already seen, an abstract class might define a generic object, such as a shape.
Conversely, an interface is not inherited by a class, so you should not think of an interface as a way of loosely defining an entire object. Instead, an interface establishes a contract for the functionality that a class must have, regardless of the class type. For example, in Chapter 8, “Using Existing Classes,” you’ll learn about the Iterator interface defined within the Standard PHP Library (SPL). The Iterator interface dictates the methods that must exist in a class in order for PHP to be able to loop through an instance of that class.
Another way of distinguishing between abstract classes and interfaces is that abstract classes still have an “is a” relationship with the derived class. Interfaces do not have “is a” relationships with derived classes, although you could say that the derived class has a “has the same behaviors as” relationship with an interface.
In the next example, let’s create an interface for standard CRUD functionality. The acronym CRUD refers to the ability to Create, Read, Update, and Delete data—the four basic actions required for many different types of content used in sites and applications. Any class you use in an application that requires CRUD functionality could then implement this interface, whether it’s a User, Page, or Rectangle.
To use interfaces
1. Begin a new PHP script in your text editor or IDE, to be named interface.php, starting with the HTML (Script 6.4):
<!doctype html>
<html lang="en">
<head>
<meta charset="utf-8">
<title>Interface</title>
<link rel="stylesheet" href="style.css">
</head>
<body>
<?php # Script 6.4 - interface.php
For simplicity’s sake, this one script will define and use an interface and class.
2. Declare the iCrud interface:
interface iCrud {
public function create($data);
public function read();
public function update($data);
public function delete();
}
The iCrud interface identifies four necessary methods. Two of the methods expect to take data as their lone argument. The other two methods take no arguments. You’ll see in a usage of this interface how this plays out. All the methods are public, which is required.
Script 6.4. The iCrud interface dictates the methods that must exist for a class to have full CRUD functionality.
1 <!doctype html>
2 <html lang="en">
3 <head>
4 <meta charset="utf-8">
5 <title>Interface</title>
6 <link rel="stylesheet" href="style.css">
7 </head>
8 <body>
9 <?php # Script 6.4 - interface.php
10 // This page defines and uses the iCrud interface.
11
12 /* The iCrud interface.
13 * The interface identifies four methods:
14 * - create()
15 * - read()
16 * - update()
17 * - delete()
18 */
19 interface iCrud {
20 public function create($data);
21 public function read();
22 public function update($data);
23 public function delete();
24 }
25
26 /* The User class implements the iCrud interface.
27 * The class contains two attributes:
28 * - private $_userId
29 * - private $_username
30 * The class contains the four interface methods, plus a constructor.
31 */
32 class User implements iCrud {
33
34 private $_userId = NULL;
35 private $_username = NULL;
36
37 // Constructor takes an array of data:
38 function _ _construct($data) {
39 $this->_userId = uniqid();
40 $this->_username = $data['username'];
41 } // End of constructor.
42
43 // This method also takes an array of data:
44 function create($data) {
45 self::_ _construct($data);
46 }
47
48 // Function for returning information about the current object:
49 function read() {
50 return array('userId' => $this->_userId, 'username' => $this->_username);
51 }
52
53 // Function for updating the current object:
54 function update($data) {
55 $this->_username = $data['username'];
56 }
57
58 // Function for getting rid of the current object:
59 public function delete() {
60 $this->_username = NULL;
61 $this->_userId = NULL;
62 }
63
64 } // End of User class.
65
66 // Identify the user information:
67 $user = array('username' => 'trout');
68
69 // Print a little introduction:
70 echo "<h2>Creating a New User</h2>";
71
72 // Create a new User:
73 $me = new User($user);
74
75 // Get the user's ID:
76 $info = $me->read();
77 echo "<p>The user ID is {$info['userId']}.</p>";
78
79 // Change the user's name:
80 $me->update(array('username' => 'troutster'));
81
82 // Confirm the updated name:
83 $info = $me->read();
84 echo "<p>The user name is now {$info['username']}.</p>";
85
86 // Delete the record:
87 $me->delete();
88
89 // Delete the object:
90 unset($me);
91
92 ?>
93 </body>
94 </html>
3. Begin defining the User class:
class User implements iCrud {
private $_userId = NULL;
private $_username = NULL;
The User class implements iCrud, which means it must define the four methods identified in the interface. To demonstrate this concept, without overwhelming you with code, I’m going to define just two attributes in the class, both of which will be private.
4. Define the constructor:
function _ _construct($data) {
$this->_userId = uniqid();
$this->_username = $data['username'];
} // End of constructor.
The constructor is going to take an array of data as its lone argument. It will use this data to assign values to the internal private variables. Logically, you’d want to add some validation to the provided data here, too.
The constructor also creates a unique user ID value by invoking the PHP uniqid() function.
In a real-world application, the constructor might instead create a new user record in a database and assign the automatically generated primary key value to the internal attribute.
5. Define the create() method:
function create($data) {
self::_ _construct($data);
}
By implementing the iCrud interface, this class is forced to have a create() method that takes a single argument. However, the constructor already does what’s required to create a new object of this type, so this method can just call the constructor (using the keyword self, which refers to the current class, plus the scope resolution operator), passing along the provided data.
This method would be used in situations where a new User object is created (perhaps thereby creating a new record in the database) and later reused to create a new record.
6. Define the read() method:
function read() {
return array('userId' => $this->_userId, 'username' => $this->_username);
}
The read() method takes no arguments and returns an array of information. In this hypothetical example, the information is represented by internal variables. In a real-world application, the read() method might fetch the associated information from the database, using the internal, private ID value to know which record to fetch.
7. Define the update() method:
function update($data) {
$this->_username = $data['username'];
}
Presumably, the user ID value cannot be updated, so the update() method as written only updates a single internal attribute. Again, you’d want to use proper validation here, instead of assuming that $data['username'] exists.
8. Define the delete() method and complete the class:
public function delete() {
$this->_username = NULL;
$this->_userId = NULL;
}
} // End of User class.
The delete() method clears out the values of the attributes. In a real-world example, it might delete the corresponding record from the database instead.
9. Create a new User object:
$user = array('username' => 'trout');
echo "<h2>Creating a New User</h2>";
$me = new User($user);
To make the interface more useful, two of its methods expect to receive a single argument, which would be an array of data. If the User class also stored an email address and password, those would be represented in this one array, too.
10. Get the user’s ID:
$info = $me->read();
echo "<p>The user ID is {$info['userId']}.</p>";
The read() method fetches the object’s information, returned as an array.
11. Change the user’s name and then confirm the change:
$me->update(array('username' => 'troutster'));
$info = $me->read();
echo "<p>The user name is now {$info['username']}.</p>";
12. Delete the record:
$me->delete();
Note that this line does not get rid of the User object. It only clears out the internally stored values.
13. Complete the page:
unset($me);
?>
</body>
</html>
14. Save the file as interface.php, place it in your Web directory, and test in your Web browser ![]() .
.
![]() The output from using a User object that implements the iCrud interface.
The output from using a User object that implements the iCrud interface.
Tip
Interface is a word with multiple meanings. Generically, interface refers to the kinds of information about classes and methods reflected by a UML diagram. In other words, an interface explains how a class or method is used. Alternatively, interface can refer to a contract that a class can be bound to, as in this section of the chapter.
Tip
Another benefit that interfaces have over using abstract classes and inheritance is that classes in PHP cannot inherit from multiple parents. Classes, however, can implement multiple interfaces by separating each by a comma:
class SomeClass implements iA, iB {
Tip
The instanceof operator can also be used to test if a class implements an interface.
Tip
In UML, an interface is indicated by prefacing its name with <<interface>> ![]() .
.
![]() How the User class could be modeled.
How the User class could be modeled.
Tip
In UML, to indicate that a class implements an interface, draw a dashed arrow from the class to the interface (so that the arrow is pointing to the interface).
Copying and Cloning Objects
In PHP 5, when you create a copy of an object, PHP actually creates a new reference to that object, not an entirely new object. In other words, both variables will point to the same thing, and changes made through one object will be reflected by the other:
$a = new SomeClass();
$a->val = 1;
$b = $a;
$b->val = 2;
echo $a->val; // 2
More formally put, this means that PHP assigns objects by reference, not by value. PHP does this for performance reasons, as having multiple copies of entire objects, when not needed, is expensive.
If you actually want two separate, individual objects, you need to create a clone:
$a = new SomeClass();
$a->val = 1;
$b = clone $a; // Separate
objects!
$b->val = 2;
echo $a->val; // 1
When the clone operator is used, PHP will perform what’s called a “shallow copy.” If you want to change how a clone of an object is made, you can define a _ _clone() method within the class. That method would be called whenever a clone is made, and would handle the cloning as you see fit. See the PHP manual for details.
Traits
New to PHP 5.4 is support for traits. Traits are used to solve a problem in OOP languages such as PHP that only allow for single inheritance. For example, say you’re designing a Web site that has several different classes: User, Page, ContactForm, etc. While you’re developing the Web site, it’ll help to have a debugging tool that will print out information about a given object, regardless of its type:
function dumpObject() {
// Print out the information.
}
You could add this definition to each class, but that’d be unnecessarily redundant (and a hurdle to overcome should you want to change the definition). Normally, when you have a method that would be needed in multiple classes, inheritance is the solution. However, in PHP each class can only inherit from a single parent class, and there is no common parent class that each of them would have. The solution, then, is traits. Traits allow you to add functionality to a class without using inheritance.
To create a trait, use the trait keyword, followed by the name and definition:
trait tSomeTrait {
// Attributes
function someFunction() {
// Do whatever.
}
}
(Stylistically, you could begin your trait with a lowercase “t,” but that is not required.)
Like an abstract class and an interface, traits cannot be instantiated (i.e., you can’t make an object from a trait). Instead, you add a trait to a class via the use keyword inside the class definition:
class SomeClass {
use tSomeTrait;
// Rest of class.
}
Just as including an external PHP script makes that script’s code usable in the current one, adding a use TraitName statement makes that trait’s code available to the class.
Now, when you create an object of type SomeClass, that object has a someFunction() method:
$obj = new SomeClass();
$obj->someFunction();
In this next example, let’s implement the debugging trait example and use it with a class. In doing so, I’m going to use three PHP functions not previously mentioned but that are virtually self-explanatory.
To use traits
1. Begin a new PHP script in your text editor or IDE, to be named tDebug.php (Script 6.5):
<?php # Script 6.5 - tDebug.php
For this example, one script will define the trait itself. Another script will create an object that uses the trait.
2. Begin defining the trait:
trait tDebug {
That’s all there is to it! The name of the trait is tDebug.
Script 6.5. The tDebug trait defines a useful dumpObject() method that can help in debugging any object type.
1 <?php # Script 6.5 - tDebug.php
2 // This page defines the tDebug trait.
3
4 /* The tDebug trait.
5 * The trait defines one method: dumpObject():
6 */
7 trait tDebug {
8
9 // Method dumps out a lot of data about the current object:
10 public function dumpObject() {
11
12 // Get the class name:
13 $class = get_class($this);
14
15 // Get the attributes:
16 $attributes = get_object_vars($this);
17
18 // Get the methods:
19 $methods = get_class_methods($this);
20
21 // Print a heading:
22 echo "<h2>Information about the $class object</h2>";
23
24 // Print the attributes:
25 echo '<h3>Attributes</h3><ul>';
26 foreach ($attributes as $k => $v) {
27 echo "<li>$k: $v</li>";
28 }
29 echo '</li></ul>';
30
31 // Print the methods:
32 echo '<h3>Methods</h3><ul>';
33 foreach ($methods as $v) {
34 echo "<li>$v</li>";
35 }
36 echo '</li></ul>';
37
38 } // End of dumpObject() method.
39
40 } // End of tDebug trait.
3. Begin defining the dumpObject() method:
public function dumpObject() {
$class = get_class($this);
The method will take no arguments but will consistently refer to $this, which always represents the current object.
The first thing this method does is find the class name of the current object. That’s possible by invoking the get_ class() function, providing it with the object whose class name you’re trying to determine.
4. Get the object’s attributes and methods:
$attributes = get_object_vars($this);
$methods = get_class_methods($this);
These are the other two new functions I’m using in this trait. The first gets the attributes for a given object: both the attribute names and their respective values. The second function retrieves the methods defined in the associated class. There is no get_object_methods() function, which is why the two have slightly different names.
5. Print a heading:
echo "<h2>Information about the $class object</h2>";
This debugging method is going to be heavy on the amount of HTML it outputs, but that shouldn’t be a problem as it’s for debugging purposes only. And, of course, you can edit the output as needed.
6. Print the attributes:
echo '<h3>Attributes</h3><ul>';
foreach ($attributes as $k => $v) {
echo "<li>$k: $v</li>";
}
echo '</li></ul>';
The foreach loop will run through the array of attributes (even if there is only one attribute, $attributes will still be an array). Within the loop, each attribute name and value is printed within a list.
7. Print the methods:
echo '<h3>Methods</h3><ul>';
foreach ($methods as $v) {
echo "<li>$v</li>";
}
echo '</li></ul>';
This is a replication of the code in Step 6, although the methods don’t have values to be printed.
8. Complete the method and the trait:
} // End of dumpObject() method.
} // End of tDebug trait.
9. Save the file as tDebug.php and place it in your Web directory.
To use the tDebug trait
1. Open Rectangle.php (Script 4.5) in your text editor or IDE.
By design, you can use the trait with any class.
2. Within the class definition, add in the trait (Script 6.6):
use tDebug;
That's all there is to it!
3. Save the file as Rectangle.php and place it in your Web directory.
Interfaces vs. Traits
Traits may seem a lot like interfaces, but the two are effectively opposite approaches. An interface enforces stricter programming, ensuring that classes are designed to implement specific methods. Conversely, a trait makes methods available to a class that the class itself does not define.
As I mention in the introduction to the topic, traits can be useful in solving the occasional OOP design problem. But traits can also be mistakenly used to provide an easy solution to a problem best solved in other ways (such as rethinking your inheritance tree). Well-written traits should also avoid making assumptions about the classes that will use them.
Script 6.6. This updated version of the Rectangle class makes use of the tDebug trait.
1 <?php # Script 6.6 - Rectangle.php
2 /* This page defines the Rectangle class.
3 * The class contains two attributes: width and height.
4 * The class contains five methods:
5 * - _ _construct()
6 * - setSize()
7 * - getArea()
8 * - getPerimeter()
9 * - isSquare()
10 */
11
12 class Rectangle {
13
14 // Use the debug trait:
15 use tDebug;
16
17 // Declare the attributes:
18 public $width = 0;
19 public $height = 0;
20
21 // Constructor:
22 function _ _construct($w = 0, $h = 0) {
23 $this->width = $w;
24 $this->height = $h;
25 }
26
27 // Method to set the dimensions:
28 function setSize($w = 0, $h = 0) {
29 $this->width = $w;
30 $this->height = $h;
31 }
32
33 // Method to calculate and return the area:
34 function getArea() {
35 return ($this->width * $this->height);
36 }
37
38 // Method to calculate and return the perimeter:
39 function getPerimeter() {
40 return ( ($this->width + $this->height) * 2 );
41 }
42
43 // Method to determine if the rectangle
44 // is also a square.
45 function isSquare() {
46 if ($this->width == $this->height)
{
47 return true; // Square
48 } else {
49 return false; // Not a square
50 }
51
52 }
53
54 } // End of Rectangle class.
Script 6.7. This script prints out debugging information about a Rectangle object, made possible by the class’s use of the tDebug trait (Script 6.6).
1 <!doctype html>
2 <html lang="en">
3 <head>
4 <meta charset="utf-8">
5 <title>Trait</title>
6 <link rel="stylesheet" href="style.css">
7 </head>
8 <body>
9 <?php # Script 6.7 - trait.php
10 // This page uses the tDebug trait through the Rectangle object.
11
12 // Include the trait definition:
13 require('tDebug.php');
14
15 // Include the class definition:
16 require('Rectangle.php');
17
18 // Create a new object:
19 $r = new Rectangle(42, 37);
20
21 // Dump the information:
22 $r->dumpObject();
23
24 // Delete the object:
25 unset($r);
26
27 ?>
28 </body>
29 </html>
To use the new Rectangle class
1. Begin a new PHP script in your text editor or IDE, to be named trait.php, starting with the HTML (Script 6.7):
<!doctype html>
<html lang="en">
<head>
<meta charset="utf-8">
<title>Trait</title>
<link rel="stylesheet" href="style.css">
</head>
<body>
<?php # Script 6.7 - trait.php
2. Load the trait and class definitions:
require('tDebug.php');
require('Rectangle.php');
Because the class references the trait, the two files must be included in this order.
3. Create and debug an object:
$r = new Rectangle(42, 37);
$r->dumpObject();
The Rectangle class does not define the dumpObject() method, but it’s available to the object because of the use of the trait.
4. Complete the page:
unset($r);
?>
</body>
</html>
5. Save the file as trait.php, place it in your Web directory, and test in your Web browser ![]() .
.
![]() The output generated by the dumpObject() method.
The output generated by the dumpObject() method.
Tip
If you get a parse error when you run this script, it could be because you’re not using PHP 5.4 or later, and PHP does not recognize the trait keyword.
Tip
To incorporate multiple traits into a class, separate each trait by a comma:
use tTrait1, tTrait2;
Tip
Traits can have abstract methods that must then be implemented by any class that uses the trait.
Tip
Again, you could arguably include the tDebug.php script within Rectangle.php instead of the main script.
Trait Precedence
If a trait used by a class has a method with the same name as a method in the class, PHP has to decide which method takes precedence (i.e., which one will be executed when that method is called). If the method is defined in the class, that version will take precedence over the trait method. If the method defined in the class is actually inherited from another class, then the trait method takes precedence.
Composition
Thus far in the book, the relationship between two classes has been one of simple inheritance: “is a” relationships (e.g., a Dog is a type of Pet). But inheritance itself is not the cornerstone of OOP; rather code reuse is the key concept. Inheritance is just one way you can reuse code. Another way is to implement composition.
Composition represents a “has a” relationship, where one class’s property values are objects of another class type. For example, Employee is not a subtype of Department (i.e., a child), but rather a part of a Department’s composition.
In UML, composition is indicated by drawing a line with a diamond at one end from the included class (e.g., Employee) to the composite class (e.g., Department).
Type Hinting
Type hinting is the programming act of indicating what type of value is expected. For example, what type of value a function expects to receive for a parameter.
Type hinting doesn’t play much of a role in procedural PHP code because you cannot hint simple types (e.g., integers or strings). But you can hint object types, which is more useful.
To perform type hinting, preface the parameter variable name with the expected class type:
class SomeClass {
function doThis(OtherClass $var) {
}
}
If the argument passed to the doThis() method is not of type OtherClass, or of a derived subclass, PHP will generate a fatal error ![]() :
:
class OtherClass {}
$some = new SomeClass();
$other = new OtherClass();
$some->doThis($other);
$some->doThis($some);
![]() The error message when an inappropriate type of value is sent to a function that uses type hinting.
The error message when an inappropriate type of value is sent to a function that uses type hinting.
For an example of type hinting, this next script will define a Department class with an addEmployee() method. That method will be used to add a new employee to the list of the department employees. The method will only accept a parameter of type Employee.
To use type hinting
1. Begin a new PHP script in your text editor or IDE, to be named hinting.php, starting with the HTML (Script 6.8):
<!doctype html>
<html lang="en">
<head>
<meta charset="utf-8">
<title>Type Hinting</title>
<link rel="stylesheet" href="style.css">
</head>
<body>
<?php # Script 6.8 - hinting.php
2. Begin declaring the Department class:
class Department {
private $_name;
private $_employees;
function _ _construct($name) {
$this->_name = $name;
$this->_employees = array();
}
The Department class has two private attributes: one to store the department name, and the other to store an array of employees in that department. The constructor assigns the value to the private $_name variable and then makes $_employees an empty array.
Script 6.8. Type hinting is used in this script to restrict the addEmployee() method to only accepting arguments of type Employee.
1 <!doctype html>
2 <html lang="en">
3 <head>
4 <meta charset="utf-8">
5 <title>Type Hinting</title>
6 <link rel="stylesheet" href="style.css">
7 </head>
8 <body>
9 <?php # Script 6.8 - hinting.php
10 // This page defines and uses the Department and Employee classes.
11
12 # ***** CLASSES ***** #
13
14 /* Class Department.
15 * The class contains two attribute: name and employees[].
16 * The class contains two methods:
17 * - _ _construct()
18 * - addEmployee()
19 */
20 class Department {
21 private $_name;
22 private $_employees;
23 function _ _construct($name) {
24 $this->_name = $name;
25 $this->_employees = array();
26 }
27 function addEmployee(Employee $e) {
28 $this->_employees[] = $e;
29 echo "<p>{$e->getName()} has been added to the {$this->_name} department.</p>";
30 }
31 } // End of Department class.
32
33 /* Class Employee.
34 * The class contains one attribute: name.
35 * The class contains two methods:
36 * - _ _construct()
37 * - getName()
38 */
39 class Employee {
40 private $_name;
41 function _ _construct($name) {
42 $this->_name = $name;
43 }
44 function getName() {
45 return $this->_name;
46 }
47 } // End of Employee class.
48
49 # ***** END OF CLASSES ***** #
50
51 // Create a department:
52 $hr = new Department('Human Resources');
53
54 // Create employees:
55 $e1 = new Employee('Jane Doe');
56 $e2 = new Employee('John Doe');
57
58 // Add the employees to the department:
59 $hr->addEmployee($e1);
60 $hr->addEmployee($e2);
61
62 // Delete the objects:
63 unset($hr, $e1, $e2);
64
65 ?>
66 </body>
67 </html>
3. Define the addEmployee() method and complete the class:
function addEmployee(Employee
$e) {
$this->_employees[] = $e;
echo "<p>{$e->getName()} has been added to the {$this->_name} department.</p>";
}
} // End of Department class.
This method will be called to add an employee to the current department object. It takes one argument, which, thanks to type hinting, must be of type Employee. If an appropriately typed argument is received, it will be added to the internal, private $employees array. For confirmation purposes (and to have the final script output something), verification of the added employee is printed.
Note that because $e will be an object of type Employee, it can invoke any of the Employee methods, such as getName().
4. Define the Employee class:
class Employee {
private $_name;
function _ _construct($name) {
$this->_name = $name;
}
function getName() {
return $this->_name;
}
} // End of Employee class.
I’m defining the Employee class in a fairly minimal way. Its constructor takes an employee’s name as an argument, which will be assigned to its internal private attribute. The getName() method is public, and it is the proper way to fetch the name of the employee.
5. Create a Department:
$hr = new Department('Human Resources');
6. Create two Employee objects:
$e1 = new Employee('Jane Doe');
$e2 = new Employee('John Doe');
7. Add the employees to the department:
$hr->addEmployee($e1);
$hr->addEmployee($e2);
Because these two objects are of type Employee, they can be passed to the addEmployee() method.
8. Complete the page:
unset($hr, $e1, $e2);
?>
</body>
</html>
9. Save the file as hinting.php, place it in your Web directory, and test in your Web browser ![]() .
.
![]() The script result when the addEmployee() method is properly invoked.
The script result when the addEmployee() method is properly invoked.
Tip
The errors triggered when the proper argument type is not submitted ![]() are exceptions, which means they can be “caught”, a more graceful way of handling this problem. This will mean more in Chapter 8.
are exceptions, which means they can be “caught”, a more graceful way of handling this problem. This will mean more in Chapter 8.
Tip
Type hinting can be used in functions, too (i.e., in non-methods: functions defined outside of any class).
Tip
You can also hint for interfaces, arrays (as of PHP 5.1), and functions (i.e., callables, as of PHP 5.4).
Namespaces
Added in version 5.3 of PHP is support for namespaces. Namespaces provide a solution to a common OOP problem: as you begin utilizing more and more classes, including those defined by other developers and in third-party libraries, conflicts can occur if multiple classes have the same name. Namespaces prevent these conflicts by letting you organize your code into groups. This has the effect of allowing you to safely use descriptive names without concern for conflicts.
An apt analogy (which the PHP manual also uses) is to compare namespaces to creating a directory structure on your computer. You cannot place two files named functions.php within the same folder. However, you can place one in the MyUtilities folder and another in the YourUtilities folder, thereby making both versions of functions.php available.
There are limits as to what you can place in a namespace, specifically:
• Classes
• Interfaces
• Functions
• Constants
You couldn’t, for example, create a namespace just to hold some variables.
To define a namespace, you’ll want to create a new file that will only store the namespaced code. This is both a virtual requirement of PHP and a best design practice. Within that file, you create a namespace by using the namespace key-word, followed by the identifier:
namespace SomeNamespace;
Note that this should be the first line of PHP code in a file, and that the file cannot even have any HTML before that PHP code (although, from a design perspective, you wouldn’t want to mix HTML and a namespace anyway). You can have PHP comments before that line, however.
Any code that follows that line will automatically be placed within that namespace:
namespace SomeNamespace;
class SomeClass {}
Namespaces can have subnamespaces, just as you’d have levels of directories on your computer. To do that, indicate a subnamespace using the backslash:
namespace MyUtilities\UserManagement;
class Login {}
Once you’ve defined a namespace, you can reference it by using the backslashes again. First, though, you’d need to include the file that defines the namespace:
require('SomeNameSpace.php');
then use backslashes to indicate a namespace is being used:
$obj = new \SomeNameSpace\SomeClass();
Or:
require('MyUtilities\User\User.php');
$obj = new \MyUtilities\User\Login();
As a stylistic choice, one suggestion is to use your name or organization as the top-level namespace:
namespace MyName\Util\User;
Another suggestion is that you organize the files themselves using the same structure ![]() . This isn’t required, but doing so makes a lot of sense, in my mind.
. This isn’t required, but doing so makes a lot of sense, in my mind.
![]() A suggested file structure for organizing a library of code.
A suggested file structure for organizing a library of code.
As a practical example of this, let’s place the Directory and Employee classes within a MyNamespace\Company namespace.
To use namespaces
1. Begin a new PHP script in your text editor or IDE, to be named Company.php (Script 6.9):
<?php # Script 6.9 - Company.php
This script will only define a namespace, and it will not contain any HTML.
Script 6.9. The two company-related classes are now defined within their own namespace, which in turn is a subnamespace of MyNamespace.
1 <?php # Script 6.9 - Company.php
2 // This script defines the Company namespace, with two classes.
3
4 // Declare the namespace:
5 namespace MyNamespace\Company;
6
7 # ***** CLASSES ***** #
8 class Department {
9 private $_name;
10 private $_employees;
11 function _ _construct($name) {
12 $this->_name = $name;
13 $this->_employees = array();
14 }
15 function addEmployee(Employee $e) {
16 $this->_employees[] = $e;
17 echo "<p>{$e->getName()} has been added to the {$this->_name} department.</p>";
18 }
19 } // End of Department class.
20
21 class Employee {
22 private $_name;
23 function _ _construct($name) {
24 $this->_name = $name;
25 }
26 function getName() {
27 return $this->_name;
28 }
29 } // End of Employee class.
30
31 # ***** END OF CLASSES ***** #
2. Declare the MyNamespace\Company namespace:
namespace MyNamespace\Company;
The premise here is that all of your reusable code would go into the MyNamespace namespace, whose name you would make more unique. Within that entire library, all of the classes and code related to creating company-based projects would go in the Company namespace, declared here.
3. Define the Department class:
class Department {
private $_name;
private $_employees;
function _ _construct($name) {
$this->_name = $name;
$this->_employees = array();
}
function addEmployee(Employee $e) {
$this->_employees[] = $e;
echo "<p>{$e->getName()} has been added to the {$this->_name} department.</p>";
}
} // End of Department class.
This is the same code already explained in the type-hinting section.
Design Approaches
Through three chapters, this book has introduced the fundamental, and even the more advanced, concepts and theories when it comes to object-oriented programming in PHP. As with all application development, the key is the underlying design, and that is a skill only really learned through practice. Chapter 8 and Chapter 9, “Example—CMS with OOP,” will provide more practice, but here are a few tips in the meantime.
First, by this point in time you probably have a good amount of experience in designing normalized databases. And while the comparison isn’t perfect, some aspects of that design process apply to designing classes. In particular, you want to avoid redundancies among your classes, and try to design classes to be as small and specific as possible. Use inheritance and composition so that multiple classes together fulfill all of the application needs. And, also as with database design, understand that you won’t necessarily get it right from the get-go; changes sometimes have to be made after the fact.
Toward that end, however, remember the difference between the interface—how a method or class is used—and the implementation: what the class or method does internally. A well-designed class or method can have its implementation changed without affecting any code that uses the class, as the interface should remain unchanged.
Similarly, classes, even in a complex application, should be loosely coupled. This means that classes should be written so they are not too strongly dependent on the design or functionality of another class.
Finally, be in the habit of using constructors that guarantee the generated object is in a safe state to be used. This means initializing internal attributes and performing any necessary setup.
4. Define the Employee class:
class Employee {
private $_name;
function _ _construct($name) {
$this->_name = $name;
}
function getName() {
return $this->_name;
}
} // End of Employee class.
Again, no changes here.
5. Save the file as Company.php, and then place it in your Web directory within a MyNamespace/Company directory.
To use the namespace class
1. Begin a new PHP script in your text editor or IDE, to be named namespace.php, starting with the HTML (Script 6.10):
<!doctype html>
<html lang="en">
<head>
<meta charset="utf-8">
<title>Namespace</title>
<link rel="stylesheet" href="style.css">
</head>
<body>
<?php # Script 6.10 - namespace.php
2. Include the namespace file:
require('MyNamespace/Company/Company.php');
If you did not use the directory structure recommended in Step 5 of the previous sequence, change the path accordingly.
Script 6.10. This variation on Script 6.8 references two classes defined within a namespace.
1 <!doctype html>
2 <html lang="en">
3 <head>
4 <meta charset="utf-8">
5 <title>Namespace</title>
6 <link rel="stylesheet" href="style.css">
7 </head>
8 <body>
9 <?php # Script 6.10 - namespace.php
10 // This page defines and uses the Department and Employee classes.
11
12 // Include the PHP script:
13 require('MyNamespace/Company/Company.php');
14
15 // Create a department:
16 $hr = new \MyNamespace\Company\Department('Accounting');
17
18 // Create employees:
19 $e1 = new \MyNamespace\Company\Employee('Holden Caulfield');
20 $e2 = new \MyNamespace\Company\Employee('Jane Gallagher');
21
22 // Add the employees to the department:
23 $hr->addEmployee($e1);
24 $hr->addEmployee($e2);
25
26 // Delete the objects:
27 unset($hr, $e1, $e2);
28
29 ?>
30 </body>
31 </html>
3. Create a Department object:
$hr = new \MyNamespace\Company\Department('Accounting');
This is the same code used in the type hinting example, although now a full namespace reference to the Department class is used.
4. Create two employees:
$e1 = new \MyNamespace\Company\Employee('Holden Caulfield');
$e2 = new \MyNamespace\Company\Employee('Jane Gallagher');
Again, the references to the Employee class just need to include the full namespace, starting with a backslash.
5. Add the employees to the department:
$hr->addEmployee($e1);
$hr->addEmployee($e2);
6. Complete the page:
unset($hr, $e1, $e2);
?>
</body>
</html>
7. Save the file as namespace.php, place it in your Web directory, and test in your Web browser ![]() .
.
![]() The output is more or less the same as in the previous script, although the underlying code is now better organized thanks to namespaces.
The output is more or less the same as in the previous script, although the underlying code is now better organized thanks to namespaces.
Tip
You can use the same namespace in multiple files, which will allow you to put multiple classes, each defined in separate scripts, within the same namespace.
Tip
Technically, the namespace keyword can come after one particular line of PHP code: a declare() statement.
Tip
You can define multiple namespaces within a single file, but I recommend against doing so.
Tip
The _ _NAMESPACE_ _ constant represents the current namespace.
Tip
PHP allows you to more quickly reference a namespace by bringing it into current scope via the use keyword:
use MyNamespace\Company;
Having done that, you can now create an object by just referencing classes within the Company namespace:
$obj = new Department();
I tend to avoid these kinds of heavy-handed approaches, though, as the purpose of namespaces is to be specific.
Tip
The PHP manual goes into a lot of detail about how namespaces are resolved considering various scopes. If you begin using namespaces on a regular basis, read through that section of the PHP manual.
Review and Pursue
If you have any problems with these sections, either in answering the questions or pursuing your own endeavors, turn to the book’s supporting forum (www.LarryUllman.com/forums/).
Review
• What is an abstract class? How do you create and use one? (See page 184.)
• What is an abstract method? How do you create and use one? (See pages 184 and 185.)
• When a class inherits an abstract method, what visibility can the subclass assign to that method? (See page 185.)
• What is an interface? How do you create one? How do you use one? (See page 191.)
• What visibility must interface methods have? (See page 191.)
• What is a trait? How do you create one? How do you use one? (See page 197.)
• What is type hinting? How do you perform type hinting? (See page 203.)
• What are namespaces? Why are they useful? How do you crate a namespace? How do you reference namespaced code? (See page 207.)
Pursue
• In situations where a class, interface, or trait is both defined and used in the same script, break it into two (or more) scripts, separating the definitions from their usage.
• Complete the UML diagrams for any of the examples in this chapter.
• Add phpDocumentor-style comments to any of the definitions and scripts in this chapter.
• Implement Pet as an abstract class.
• Create other classes such as Circle and Rectangle that extend Shape.
• If you want more practice, create abstract Shape2D and Shape3D classes. Then extend these in logical directions, including new classes like Sphere.
• Flesh out the User class used in the interface example, adding other attributes (such as email address and password) and methods (such as login and logout).
• Rewrite the User class so that it interacts with a database instead of using internal attributes. Hint: Keep only the $_userId attribute and have it store the associated primary key value.
• Test out the tDebug trait on other object types.
• Flesh out the Department and Employee classes.
• Check out the PHP manual’s documentation for more on namespaces.
• Look up cloning in the PHP manual.
All materials on the site are licensed Creative Commons Attribution-Sharealike 3.0 Unported CC BY-SA 3.0 & GNU Free Documentation License (GFDL)
If you are the copyright holder of any material contained on our site and intend to remove it, please contact our site administrator for approval.
© 2016-2026 All site design rights belong to S.Y.A.