PHP Advanced and Object-Oriented Programming (2013)
Visual Quickpro Guide
8. Using Existing Classes
In This Chapter
Catching Exceptions
Extending the Exception Class
Using PDO
Using the Standard PHP Library
Review and Pursue
The preceding four chapters discuss object-oriented programming, discussing both syntax and theory. The majority of the examples in those chapters tend to be as much demonstrative as practical (e.g., the Rectangle, Square, Shape, and Triangle classes are useful, but only if you’re doing geometric work). Philosophical examples are best for teaching OOP, I believe, but real-world object-oriented programming hammers the points home. And nothing best demonstrates real-world OOP than using some of the many existing classes created by other developers.
All of the examples in this chapter are based on classes that are already defined in PHP. This includes the Exception class, PHP Data Objects (PDO), and the Standard PHP Library (SPL). In using these classes, not only will you learn about some valuable resources, but you’ll also see variations on many of the design ideas already explained.
Catching Exceptions
While introducing the concept of OOP in Chapter 4, “Basic Object-Oriented Programming,” I explained that programming is entirely about nouns and verbs. Procedural programming focuses on the verbs and OOP focuses on the nouns. Another difference is that procedural code createserrors, while OOP has exceptions.
The difference between errors and exceptions is structural, but both represent problems with your code. (As you’ll see, an exception is really just an error in an object form.) Instead of using conditionals in procedural code to watch for errors, OOP has the try and catch statements for handling exceptions.
The premise is that you try to do certain things in your PHP code, specifically the kinds of things that might fail (like connecting to a database or including a file). If an error occurs, an exception is thrown. Your code will then catch the exception and respond accordingly.
The basic syntax is
try {
// Do something.
// An exception is thrown on error.
} catch (exception) {
// Do whatever now.
}
This is a more sophisticated version of
if (/* Do something. */) {
} else {
/* Do whatever because a problem occurred. */
}
One benefit that exception handling has over the conditional is that it further separates the functionality and logic from the error handling. Furthermore, multiple errors can be handled without having to use lots of nested conditionals.
Exceptions are thrown using the syntax
throw new Exception('error message');
This code throws an object of type Exception, a class defined in PHP. To catch this exception, you would have
catch (Exception $e)
where $e is an object of the Exception type.
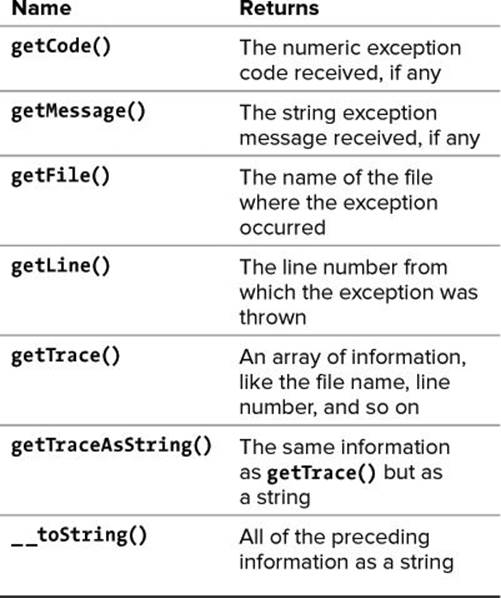
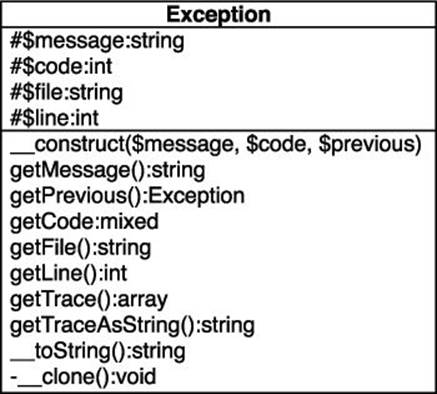
The Exception class contains the methods indicated in Table 8.1, which you can use to access information about the error. A try...catch example might therefore look like this:
try {
// Do something.
} catch (Exception $e) {
echo $e->getMessage();
}
Table 8.1. Exception Class Methods
You should note that any code within a try block after an exception is thrown will never run. Conversely, if no exception ever occurs, the code in the catch block will never be executed.
For an example of this, let’s create a class used to write some data to a file. If a problem occurs, an exception will be thrown.
Script 8.1. If any of three different steps in this class cannot be completed, exceptions are thrown.
1 <?php # Script 8.1 - WriteToFile.php
2 // This page defines a WriteToFile class.
3
4 /* The WriteToFile class.
5 * The class contains one attribute: $_fp.
6 * The class contains three methods: _ _construct(), write(), close(), and _ _destruct().
7 */
8 class WriteToFile {
9
10 // For storing the file pointer:
11 private $_fp = NULL;
12
13 // Constructor opens the file for writing:
14 function _ _construct($file) {
15
16 // Check that the file exists and is a file:
17 if (!file_exists($file) || !is_file($file)) {
18 throw new Exception('The file does not exist.');
19 }
20
21 // Open the file:
22 if (!$this->_fp = @fopen($file, 'w')) {
23 throw new Exception('Could not open the file.');
24 }
25
26 } // End of constructor.
27
28 // This method writes data to the file:
29 function write($data) {
30
31 // Confirm the write:
32 if (@!fwrite($this->_fp, $data . "\n")) {
33 throw new Exception('Could not write to the file.');
34 }
35
36 } // End of write() method.
37
38 // This method closes the file:
39 function close() {
40
41 // Make sure it's open:
42 if ($this->_fp) {
43 fclose($this->_fp);
44 $this->_fp = NULL;
45 }
46
47 } // End of close() method.
48
49 // The destructor calls close(), just in case:
50 function _ _destruct() {
51 $this->close();
52 } // End of destructor.
53
54 } // End of WriteToFile class.
To define the WriteToFile class
1. Begin a new PHP script in your text editor or IDE, to be named WriteToFile.php (Script 8.1):
<?php # Script 8.1 - WriteToFile.php
2. Start defining the WriteToFile class:
class WriteToFile {
private $_fp = NULL;
This class will define all the functionality for writing data to a file. The attribute will act as the file pointer and is made private as it need not (in fact, shouldn’t) be available outside of this class.
3. Begin defining the constructor:
function _ _construct($file) {
if (!file_exists($file) || !is_file($file)) {
throw new Exception('The file does not exist.');
}
The constructor is called when a new WriteToFile object is created. It takes one argument: the file to be used. The purpose of the constructor is to confirm that the file exists and is writable, and then to open that file for writing.
As you can see, the first conditional within the constructor checks if the file does not exist or if it is not a file (file_exists() will return true for directories, too). If either of these conditions is true, an exception is thrown.
4. Complete the constructor:
if (!$this->_fp = @fopen($file, 'w')) {
throw new Exception('Could not open the file.');
}
} // End of constructor.
The next conditional throws an exception if the file could not be opened for writing. The mode is assumed to be “w,” but you’ll make this class more flexible in just a couple of pages.
If you’re not familiar with how to write data to a file in PHP, see the PHP manual.
Note that the fopen() call is prefaced with the error suppression operator so that PHP itself does not generate any errors should a problem occur (because the class should throw an exception instead).
5. Define the write() method:
function write($data) {
if (@!fwrite($this->_fp, $data . "\n")) {
throw new Exception('Could not write to the file.');
}
} // End of write() method.
This method will be called to write data to the opened file. It takes the data to be written as its lone argument. If the data cannot be written, another exception is thrown.
Again, the error suppression operator prefaces the function call.
6. Define the close() method:
function close() {
if ($this->_fp) {
fclose($this->_fp);
$this->_fp = NULL;
}
} // End of close() method.
This method closes the open file.
7. Define the destructor and complete the class:
function _ _destruct() {
$this->close();
} // End of destructor.
} // End of WriteToFile class.
In case the code that uses this class never formally closes the file, this code will call the close() method when the object is deleted.
8. Save the file as WriteToFile.php and place it in your Web directory.
To use the WriteToFile class
1. Begin a new PHP script in your text editor or IDE, to be named write_to_file.php, starting with the HTML (Script 8.2):
<!doctype html>
<html lang="en">
<head>
<meta charset="utf-8">
<title>Handling Exceptions</title>
<link rel="stylesheet" href="style.css">
</head>
<body>
<?php # Script 8.2 - write_to_file.php
2. Load the class definition:
require('WriteToFile.php');
Script 8.2. Exceptions thrown by the code in the try block will be caught and displayed by the catch.
1 <!doctype html>
2 <html lang="en">
3 <head>
4 <meta charset="utf-8">
5 <title>Handling Exceptions</title>
6 <link rel="stylesheet" href="style.css">
7 </head>
8 <body>
9 <?php # Script 8.2 - write_to_file.php
10 // This page uses the WriteToFile class (Script 8.1).
11
12 // Load the class definition:
13 require('WriteToFile.php');
14
15 // Start the try...catch block:
16 try {
17
18 // Create the object:
19 $fp = new WriteToFile('data.txt');
20
21 // Write the data:
22 $fp->write('This is a line of data.');
23
24 // Close the file:
25 $fp->close();
26
27 // Delete the object:
28 unset($fp);
29
30 // If we got this far, everything worked!
31 echo '<p>The data has been written.</p>';
32
33 } catch (Exception $e) {
34 echo '<p>The process could not be completed because the script: ' . $e->getMessage() . '</p>';
35 }
36
37 echo '<p>This is the end of the script.</p>';
38
39 ?>
40 </body>
41 </html>
3. Begin a try block:
try {
The bulk of the functionality of the script will go within this block.
4. Create the object:
$fp = new WriteToFile('data.txt');
This code will not only create the object but also attempt to open the file for writing. Opening a file for writing is a common cause of problems, most likely because the file doesn’t exist, the file’s name and path are incorrect, or the file does not have the proper permissions. If the file could not be opened in writing mode, an exception is thrown with the message could not open the file (see the class’s constructor).
Note that the provided file value should represent the full path (relative or absolute) to the text file.
5. Attempt to write data to the file:
$fp->write('This is a line of data.');
This piece of code will only be executed if no exception was thrown by the code in Step 4. Logically, if the file could be opened for writing, the object should be able to use fwrite() without complaint.
6. Close the file and delete the object:
$fp->close();
unset($fp);
7. Print a message indicating success of the operation:
echo '<p>The data has been written.</p>';
This line of code will be executed only if no exceptions were thrown prior to this point.
8. Catch, and handle, the exception:
} catch (Exception $e) {
echo '<p>The process could not be completed because the script: ' . $e->getMessage() . '</p>';
}
The variable $e will be an object of Exception type, matching the kinds of exceptions thrown by the WriteToFile object. Within this block, the received message is printed (by calling the getMessage() method) within context.
9. Print another message:
echo '<p>This is the end of the script.</p>';
This code, outside of the try...catch block, will always be executed, even if exceptions occur. I’ve included this statement just to demonstrate that.
10. Complete the page:
?>
</body>
</html>
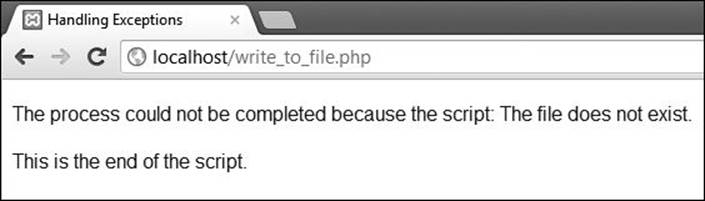
11. Save the file as write_to_file.php, place it in your Web directory, and test in your Web browser  .
.
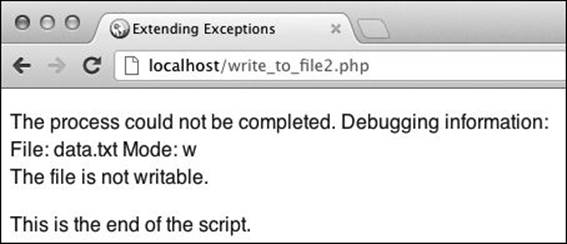
Without first creating a text file called data.txt, with the proper permissions, you’ll see something like  .
.
 Although it may not be apparent in the end result, this script uses a try...catch block to throw, and then catch, an object of Exception type.
12. Create a file called data.txt in the same directory as write_to_file.php, and adjust its permissions if necessary. Then rerun the PHP page in your Web browser  .
.
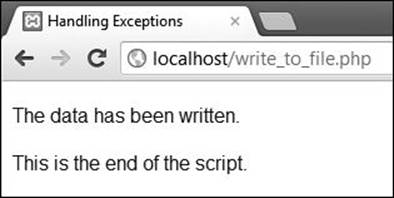
If no problems occurred, this is the end result.
Tip
To see the other exception error messages, you’ll need to introduce errors into the code. For example, changing the fopen() mode to r will create an exception in the write() method.
Tip
Failure to catch a thrown exception results in a fatal error  .
.
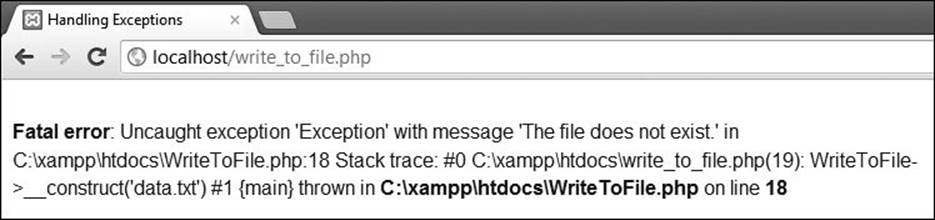
 When using try, you must ensure that all exceptions are caught, lest you’re left with ugly fatal errors like this one.
Tip
The Exception class’s constructor can take anywhere from zero to two arguments. The first argument is an error message, and the second is an error code.
Tip
As constructors, by definition, cannot return anything (such as an error or error code), it’s appropriate to have constructors throw errors upon improper use.
Tip
A catch block can also throw an exception to be caught by a subsequent catch block. The object thrown can be new or the current exception object:
try {
// Code.
} catch (Exception $e) {
// Do whatever.
throw $e;
} catch (Exception $e) {
// Now do this.
}
Extending the Exception Class
The preceding example demonstrates basic usage of a try...catch block by using a class that throws standard exceptions. The basic PHP Exception class is very simple , designed to be extended so that you can add, or change, functionality as needed.
 A UML representation of PHP’s built-in Exception class.
Extending the Exception class is accomplished just like extending any class (see Chapter 5, “Advanced OOP”):
class MyException extends Exception {
Note that only the Exception constructor and _ _toString() methods can be overridden, because the others are all defined as final.
To use your extended class, you would write
throw new MyException('error message');
Thanks to type hinting, introduced in Chapter 6, “More Advanced OOP,” you can catch different kinds of exceptions from the same try block:
try {
// Some code.
throw new MyException1('error message');
// Some more code.
throw new MyException2('error message');
} catch (MyException1 $e) {
} catch (MyException2 $e) {
}
Using this new information, the next script will update the preceding example, but now the WriteToFile class will throw exceptions of a specific type.
To extend the Exception class
1. Open WriteToFile.php (Script 8.1) in your text editor or IDE, if it is not already.
2. Before the WriteToFile definition, begin defining an extension to the Exception class (Script 8.3):
class FileException extends Exception {
This class, called FileException, will specifically handle file opening, writing, and closing errors. It will add one method to the inherited Exception methods.
3. Begin defining the getDetails() method:
function getDetails() {
switch ($this->code) {
case 0:
return 'No filename was provided';
break;
Any time an exception occurs, up to two arguments can be passed to the Exception class: the message and the error code. The WriteToFile class, to be updated shortly, will generate its own error codes. This class, FileException, will associate those error codes with more specific error messages. This getDetails() method returns the message that goes with each code, using a switch.
4. Complete the switch:
case 1:
return 'The file does not exist.';
break;
case 2:
return 'The file is not a file.';
break;
case 3:
return 'The file is not writable.';
break;
case 4:
return 'An invalid mode was provided.';
break;
case 5:
return 'The data could not be written.';
break;
case 6:
return 'The file could not be closed.';
break;
default:
return 'No further information is available.';
break;
} // End of SWITCH.
Each of these messages will mean more once you see the updated WriteToFile class.
Script 8.3. This script extends the Exception class to create a more specific type of exception handler. Exceptions of this new type are thrown by the WriteToFile class.
1 <?php # Script 8.3 - WriteToFile.php
2 // This page defines a WriteToFile and a FileException class.
3
4 /* The FileException class.
5 * The class creates one new method: getDetails().
6 */
7 class FileException extends Exception {
8
9 // For returning more detailed error messages:
10 function getDetails() {
11
12 // Return a different message based upon the code:
13 switch ($this->code) {
14 case 0:
15 return 'No filename was provided';
16 break;
17 case 1:
18 return 'The file does not exist.';
19 break;
20 case 2:
21 return 'The file is not a file.';
22 break;
23 case 3:
24 return 'The file is not writable.';
25 break;
26 case 4:
27 return 'An invalid mode was provided.';
28 break;
29 case 5:
30 return 'The data could not be written.';
31 break;
32 case 6:
33 return 'The file could not be closed.';
34 break;
35 default:
36 return 'No further information is available.';
37 break;
38 } // End of SWITCH.
39
40 } // End of getDetails() method.
41
42 } // End of FileException class.
43
44 /* The WriteToFile class.
45 * The class contains one attribute: $_fp.
46 * The class contains three methods: _ _construct(), write(), close(), and _ _destruct().
47 */
48 class WriteToFile {
49
50 // For storing the file pointer:
51 private $_fp = NULL;
52
53 // For storing an error message:
54 private $_message = '';
55
56 // Constructor opens the file:
57 function _ _construct($file = null, $mode = 'w') {
58
59 // Assign the file name and mode
60 // to the message attribute:
61 $this->_message = "File: $file Mode: $mode";
62
63 // Make sure a file name was provided:
64 if (empty($file)) throw new FileException($this->_message, 0);
65
66 // Make sure the file exists:
67 if (!file_exists($file)) throw new FileException($this->_message, 1);
68
69 // Make sure the file is a file:
70 if (!is_file($file)) throw new FileException($this->_message, 2);
71
72 // Make sure the file is writable, when necessary
73 if (!is_writable($file)) throw new FileException($this->_message, 3);
74
75 // Validate the mode:
76 if (!in_array($mode, array('a', 'a+', 'w', 'w+'))) throw new FileException($this->_message,
4);
77
78 // Open the file:
79 $this->_fp = fopen($file, $mode);
80
81 } // End of constructor.
82
83 // This method writes data to the file:
84 function write($data) {
85
86 // Confirm the write:
87 if (@!fwrite($this->_fp, $data . "\n")) throw new FileException($this->_message . " Data: $data", 5);
88
89 } // End of write() method.
90
91 // This method closes the file:
92 function close() {
93
94 // Make sure it's open:
95 if ($this->_fp) {
96 if (@!fclose($this->_fp)) throw new FileException($this->_message, 6);
97 $this->_fp = NULL;
98 }
99
100 } // End of close() method.
101
102 // The destructor calls close(), just in case:
103 function _ _destruct() {
104 $this->close();
105 } // End of destructor.
106
107 } // End of WriteToFile class.
5. Complete the getDetails() method and the FileException class:
} // End of getDetails() method.
} // End of FileException class.
6. Within the WriteToFile class, add a new private attribute:
private $_message = '';
This new attribute will be assigned an error message, built up over the course of several methods.
7. Begin replacing the existing constructor with this new definition:
function _ _construct($file = null, $mode = 'w') {
$this->message = "File: $file Mode: $mode";
The constructor now takes two arguments: the file and the mode. The mode’s default value is w. The constructor will also start building an error message, which, for debugging purposes, will contain the filename and the mode.
8. Make sure that a filename was provided:
if (empty($file)) throw new FileException($this->message, 0);
The first validation routine checks that some filename was passed to the class. If not, an exception of type FileException is thrown, using the default message and an error code of 0. This error code matches the more specific message in the FileException getDetails() method.
Note that I rarely use conditionals without the curly braces, but this is a reasonable exception (pun!).
9. Make sure that the file exists and that it is a file:
if (!file_exists($file)) throw new FileException ($this->message, 1);
if (!is_file($file)) throw new FileException($this->message, 2);
For more specific exceptions, the class now checks each possible problem separately. If either of these checks fails, an exception is thrown, providing different error codes accordingly.
10. Confirm that the file is writable:
if (!is_writable($file)) throw new FileException($this->message, 3);
11. Confirm that a valid mode was used:
if (!in_array($mode, array('a', 'a+', 'w', 'w+'))) throw new FileException($this->message, 4);
Because I don’t want to try to open the file in an invalid mode, this check is necessary. I’ve omitted some valid modes (like ab) and all reading modes (because I’m creating a write-specific class) to keep it simple.
12. Open the file and complete the constructor:
$this->_fp = fopen($file, $mode);
} // End of constructor.
If all of the validation tests were passed, the file is opened in the given mode, assigning the result to the attribute.
13. Update the write() method:
function write ($data) {
if (@!fwrite($this->_fp, $data . "\n")) throw new FileException($this->message . " Data: $data", 5);
} // End of writeData() method.
This method now throws its own exception code.
14. Update the close() method:
function close() {
if ($this->_fp) {
if (@!fclose($this->_fp)) throw new FileException ($this->message, 6);
$this->_fp = NULL;
}
} // End of close() method.
15. Save the file.
16. Open write_to_file.php in your text editor or IDE, if it is not already.
17. Change the catch statement to read (Script 8.4) as follows:
} catch (FileException $e) {
echo '<p>The process could not be completed. Debugging information:<br>' . $e->getMessage() . '<br>' . $e->getDetails() . '</p>';
}
Script 8.4. Now the script is written to catch a specific type of exception.
1 <!doctype html>
2 <html lang="en">
3 <head>
4 <meta charset="utf-8">
5 <title>Extending Exceptions</title>
6 <link rel="stylesheet" href="style.css">
7 </head>
8 <body>
9 <?php # Script 8.4 - write_to_file.php #2
10 // This page uses the WriteToFile class (Script 8.3).
11
12 // Load the class definition:
13 require('WriteToFile.php');
14
15 // Start the try...catch block:
16 try {
17
18 // Create the object:
19 $fp = new WriteToFile('data.txt', 'w');
20
21 // Write the data:
22 $fp->write('This is a line of data.');
23
24 // Close the file:
25 $fp->close();
26
27 // Delete the object:
28 unset($fp);
29
30 // If we got this far, everything worked!
31 echo '<p>The data has been written.</p>';
32
33 } catch (FileException $e) {
34 echo '<p>The process could not be completed. Debugging information: <br>' . $e->getMessage() . '<br>' . $e->getDetails() . '</p>';
35 }
36
37 echo '<p>This is the end of the script.
</p>';
38
39 ?>
40 </body>
41 </html>
This catch expects exceptions of type FileException, which will be thrown by the WriteToFile object. Within the catch, debugging information is printed using both the Exception getMessage() method (which should print the file, mode, and possibly data) and the FileException get_details() method.
18. Save the file, place it in your Web directory, and test in your Web browser .
The result if the file exists but is not writable. The first line of debugging information comes from the Exception getMessage() class. The rest comes from FileException getDetails().
19. Introduce some errors and retest  .
.
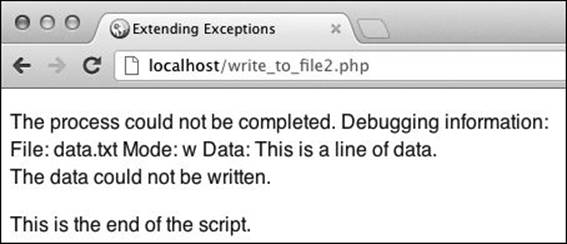
If the data cannot be written to the file, the debugging information also shows what data was received.
Tip
Because PHP generates an ugly error should an uncaught exception occur, you can create your own exception handler to handle this situation more gracefully:
function my_ex_handler(Exception $e) {
// Do whatever.
}
set_exception_handler('my_ex_handler');
Tip
Every try statement requires at least one catch. You can have multiple catch statements, each catching a different exception type:
try {
} catch (SomeType $e) {
} catch (Exception $e) {
}
Note that you should always catch Exception types last, as it’s the most generic type.
Tip
If your extended Exception class has its own constructor, it should also call the Exception constructor using parent::_ _construct().
Using PDO
New in this edition of this book is a discussion of PHP Data Objects (PDO), an alternative way to interact with a database. Built into PHP as of version 5.1, PDO provide a consistent way to execute queries regardless of the database application in use.
At the time of this writing, PDO works with MySQL (of course), PostgreSQL, SQLite, Oracle, Microsoft SQL Server, and more. Once you’ve embraced PDO on a project, changing literally one line of code will allow you to seamlessly switch to another database application, should the need arise.
To confirm what applications are supported with your PHP installation, invoke the getAvailableDrivers() method of the PDO class  :
:
print_r(PDO::getAvailableDrivers());
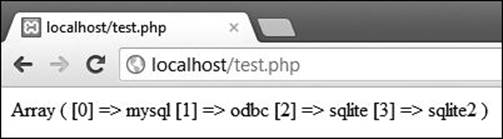
Test for PDO support on your installation, prior to running any code.
Over the next several pages, I’ll cover how to perform several fundamental tasks using PDO, rewriting one of the book’s existing examples in the process.
Tip
To use PDO, your PHP installation must have the PDO extension enabled, and you must have the proper PDO driver for the database application you intend to use  .
.
Connecting to the database
All of the customization of the PDO experience comes when making a connection to the database. The connection is made by creating a new object of type PDO. As you would expect, this is done via the new keyword. You should provide to the PDO constructor three values:
$pdo = new PDO('dsn', 'username', 'password');
Technically, the username and password are optional, but most database applications should always be requiring them anyway. The DSN, short for Data Source Name, is the important part. The DSN is a string that indicates several things:
• The database driver to use
• The database name
• In the case of SQLite, the location of the database file
• Optionally, the hostname
• Optionally, the port
You can also put the username and password in the DSN, if you’d prefer, as opposed to providing them to the PDO constructor.
To create the DSN, first you indicate the database driver. Then, after a colon, use name=value pairs, each separated by a semicolon:
driver:name1=value1;name2=value2
For example, with MySQL, accessing the test database on localhost, the proper DSN is mysql:dbname=test;host=localhost.
Thus, this is how you use PDO to connect to MySQL:
$pdo = new PDO('mysql:dbname=test;host=localhost', 'username', 'password');
If you’re using, for example, SQLite, that connection could be
$pdo = new PDO('sqlite:/path/to/somedb.sq3');
Note that SQLite connections are made to specific files on the server and do not require usernames and passwords.
To close the database connection, simply unset the PDO object:
unset($pdo);
Or set it to null:
$pdo = null;
Tip
See the PHP manual for the correct DSN value to use with other database applications, should you have that need.
Catching exceptions
Before getting into how you’d use PDO to execute queries, let’s first look at how you handle any database-related errors that might occur when using PDO. This includes a range of possible problems, from an inability to connect to the database to an error in a query’s syntax.
Being a class, PDO does not generate errors but rather throws exceptions. Specifically, PDO throws exceptions of type PDOException.
With this in mind, to interact with the database, you’ll want to use a try...catch block like :
try {
$pdo = new PDO('mysql:dbname=test;host=localhost', 'username', 'password');
// Execute queries.
// Do whatever else.
} catch (PDOException $e) {
// Use $e and $e->getMessage().
}

An exception thrown by PDO’s inability to connect to the database.
Let’s put all this together and start creating a PHP script that connects to the database. For this example, I’ll rewrite the add_task2.php file (Script 1.7) from Chapter 1.
To use PDO
1. Begin a new PHP script in your text editor or IDE, to be named add_task.php, starting with the HTML (Script 8.5):
<!doctype html>
<html lang="en">
<head>
<meta charset="utf-8">
<title>Add a Task</title>
<link rel="stylesheet" href="style.css">
</head>
<body>
<?php # Script 8.5 - add_task.php
2. Begin a try block:
try {
All of the database interactions will go within this try block of the script.
3. Create the PDO object:
$pdo = new PDO('mysql:dbname=test;host=localhost', 'username', 'password');
Naturally, you’ll need to change these particulars to match your environment.
4. Close the connection:
unset($pdo);
This isn’t formally required—PHP will close the connection when the script terminates—but it makes for good form.
5. Catch any exceptions:
} catch (PDOException $e) {
Again, PDO throws exceptions of type PDOException, so that’s what this block tries to catch.
Script 8.5. To start writing the add_task.php script, first a database connection is made within a try... catch block.
1 <!doctype html>
2 <html lang="en">
3 <head>
4 <meta charset="utf-8">
5 <title>Add a Task</title>
6 <link rel="stylesheet" href="style.css">
7 </head>
8 <body>
9 <?php # Script 8.5 - add_task.php
10 // This page adds tasks to the tasks table using PDO.
11
12 // Try to connect to the database:
13 try {
14
15 // Create the object:
16 $pdo = new PDO('mysql:dbname=test;host=localhost', 'username', 'password');
17
18 // Unset the object:
19 unset($pdo);
20
21 } catch (PDOException $e) { // Report the error!
22 echo '<p class="error">An error occurred: ' . $e->getMessage() . '</p>';
23 }
24
25 ?>
26 </body>
27 </html>
6. Report the error and complete the catch:
echo '<p class="error">An error occurred: ' . $e->getMessage() . '</p>';
}
Showing the exceptions message is good for debugging, but it’s not something you’d want to do on a live site. On a live site, you’d probably show a generic message to the user and log the specific error message.
7. Complete the page:
?>
</body>
</html>
8. Save the file as add_task.php, place it in your Web directory, and test in your Web browser .
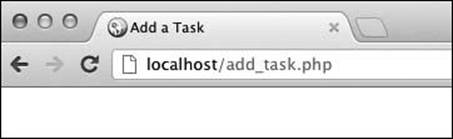
At this point, a blank page is good (i.e., nothing bad happened).
If you see a blank page, then no problems occurred. You may need to introduce an error to see a message as in  .
.
Tip
You can change the level of database error reporting using the PDO setAttribute() method and the proper constants. See the PHP manual for details.
Executing simple queries
Once you’ve established a database connection (and a PDO object), you can run queries on the database. Doing so requires one of two methods, depending on the type of query being executed.
For simple queries that do not return results—INSERT, UPDATE, and DELETE, for example, use the exec() method. It takes the query to be run as its argument (which I’ll represent as $q):
$q = 'DELETE FROM tablename';
$pdo->exec($q);
For these simple queries, exec() will return the number of rows affected by the query:
$num = $pdo->exec($q);
// Use $num.
If you just ran an INSERT query and need to know the dynamically generated primary key value, call the lastInsertId() method:
$id = $pdo->lastInsertId();
This is equivalent to calling mysqli_ insert_id() when using the MySQL Improved extension.
The last thing to be aware of when running simple queries is how to prevent SQL injection attacks. When you use the MySQL Improved extension, data can be made safe to use in a query by running it through mysqli_real_escape_string() first:
$data = mysqli_real_escape_string ($dbc, $unsafe_data);
For PDO, call the quote() method:
$data = $pdo->quote($unsafe_data);
This method not only prevents SQL injection attacks, but it also wraps the strings in quotes so you don’t have to in your query:
$data = $pdo->quote($unsafe_data);
$pdo->exec("INSERT INTO tablename (column1) VALUES ($data)");
Given all that, you should instead use prepared statements, as explained in just a couple of pages.
Tip
If the query ran through the exec() method affects no records, the number 0 is returned. If the query generates an error, false is returned.
Tip
The quote() method relies on the data-base’s default character set being established.
Executing select queries
Simple queries—those that don’t return records—are run through the exec() method. Queries that do return results (such as SELECT) should be run using the query() method, assigning the results to a new variable:
$results = $pdo->query($q);
To see how many records were returned by the query, invoke the new variable’s rowCount() method:
$results->rowCount();
This is equivalent to calling mysqli_num_rows().
Interestingly, the $results variable will be an object of type PDOStatement, which is one of the three most important PDO classes, along with PDO and PDOException.
Once you have executed a query that returned some results, you can fetch those results using the fetch() method of the PDOStatement object (e.g., $results). First, though, you should tell PHP how you want to fetch the records. This is accomplished by providing the setFetchMode() method with a constant. The most commonly used ones are:
• PDO::FETCH_ASSOC, for an associative array
• PDO::FETCH_NUM, for a numerically indexed array
• PDO::FETCH_OBJ, for a generic object
• PDO::FETCH_CLASS, for a specific type of object
Fetching Results Directly
The query() method allows you to fetch results directly in a loop without using fetch(). That syntax is
foreach ($pdo->query($q) as $row) {
// Use $row.
}
Although it might seem like the query would be executed with each iteration of the loop, that’s not actually the case. Still, I prefer the more overt strategy of using the fetch() method.
For example:
$results = $pdo->query('SELECT id, username FROM users');
$results->setFetchMode(PDO::FETCH_NUM);
while ($row = $results->fetch()) {
// Use $row[0] for the id.
// Use $row[1] for the username.
}
A more interesting option is to have the returned records be turned into specific types of objects, logically, objects you’re already using in your application. For example, say you’ve defined a User class:
class User {
private $id;
private $username;
public getUsername() {
return $this->username;
}
}
Now you can fetch database records into new User objects:
$results = $pdo->query('SELECT id, username FROM users');
$results->setFetchMode (PDO::FETCH_CLASS, 'User');
while ($row = $results->fetch()) {
echo $row->getUsername();
}
As you can see in that code, $row will be a User object, and it can invoke the User methods.
This approach can be beneficial in an object-based site. The thing to watch out for is that PHP directly maps the returned column names to matching class attributes. If no comparable class attribute exists, PHP will create the column name as a new public attribute. For this reason, I had to use$id as the private class attribute instead of $_id.
Let’s use this information to update add_task.php so that it now shows a form for adding new tasks. Per the example in Chapter 1, the form will display the current tasks in a menu so that a new task can be created as a subtask  .
.
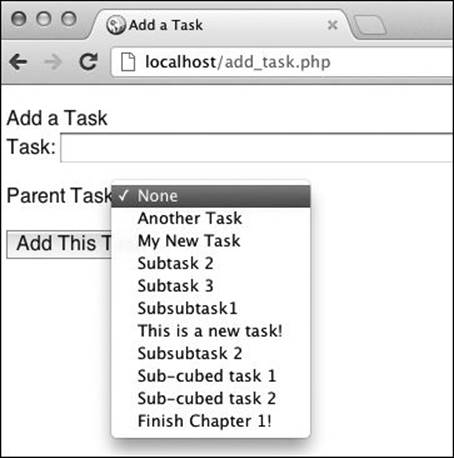
A SELECT query is used to fetch all the currently incomplete tasks shown in the form.
To run a SELECT query
1. Open add_task.php (Script 8.5) in your text editor or IDE, if it is not already.
2. Within the try block, after the PDO object has been created, start the form (Script 8.6):
echo '<form action="add_task.php" method="post">
<fieldset>
<legend>Add a Task</legend>
<p>Task: <input name="task" type="text" size="60" maxlength="100"></p>
<p>Parent Task: <select name="parent_id"><option value="0">None</option>';
This code comes verbatim from Chapter 1. See that chapter if you need any explanations.
Note that this code is being added within the try block, because that’s where the database connection is made, and all database interactions will occur.
3. Run the query:
$q = 'SELECT task_id, task FROM tasks WHERE date_completed="0000-00-00 00:00:00" ORDER BY date_added ASC';
$r = $pdo->query($q);
The SQL query is the same as in Chapter 1, but now it is run through a PDO instance.
4. Set the fetch mode:
$r->setFetchMode(PDO::FETCH_NUM);
The rows will be fetched as numerically indexed arrays.
5. Show the results:
while ($row = $r->fetch()) {
echo "<option
value=\"$row[0]\">$row[1]</option>\n";
}
Again, aside from the new PDO code, this is the same idea as in Chapter 1.
6. Complete the form:
echo '</select></p>
<input name="submit" type="submit" value="Add This Task">
</fieldset>
</form>';
7. Save the file, place it in your Web directory, and test in your Web browser  .
.
There’s no point in submitting the form, though, as no code has yet been written to handle form submissions.
Tip
By default, PHP will call the class constructor after mapping column values to the class attributes. This behavior can be changed by altering the setFetchMode() invocation. See the PHP manual for details.
Script 8.6. The next step in developing this script is to use a SELECT query to populate a menu in the form.
1 <!doctype html>
2 <html lang="en">
3 <head>
4 <meta charset="utf-8">
5 <title>Add a Task</title>
6 <link rel="stylesheet" href="style.css">
7 </head>
8 <body>
9 <?php # Script 8.6 - add_task.php #2 (in this chapter)
10 // This page adds tasks to the tasks table using PDO.
11
12 // Try to connect to the database:
13 try {
14
15 // Create the object:
16 $pdo = new PDO('mysql:dbname=test;host=localhost', 'username', 'password');
17
18 // Start the form:
19 echo '<form action="add_task.php" method="post">
20 <fieldset>
21 <legend>Add a Task</legend>
22 <p>Task: <input name="task" type="text" size="60" maxlength="100"></p>
23 <p>Parent Task: <select name="parent_id"><option value="0">None</option>';
24
25 // Run the query:
26 $q = 'SELECT task_id, task FROM tasks WHERE date_completed="0000-00-00 00:00:00" ORDER BY date_added ASC';
27 $r = $pdo->query($q);
28
29 // Set the fetch mode:
30 $r->setFetchMode(PDO::FETCH_NUM);
31
32 // Show the results:
33 while ($row = $r->fetch()) {
34 echo "<option value=\"$row[0]\">$row[1]</option>\n";
35 }
36
37 // Complete the form:
38 echo '</select></p>
39 <input name="submit" type="submit" value="Add This Task">
40 </fieldset>
41 </form>';
42
43 // Unset the object:
44 unset($pdo);
45
46 } catch (PDOException $e) { // Report the error!
47 echo '<p class="error">An error occurred: ' . $e->getMessage() . '</p>';
48 }
49
50 ?>
51 </body>
52 </html>
Prepared statements
The final concept I want to introduce is how to use prepared statements through PDO. Using prepared statements, in case you’re not familiar with them, is a different way of running queries. Most queries aren’t static but rather contain a combination of SQL keywords, specific table and column references, and some data that changes on the fly, such as that provided by users. Traditionally, the whole query is assembled and sent to the database as one step:
$results = $pdo->query("SELECT * FROM users WHERE email='$email' AND pass=SHA1('$pass')");
With prepared statements, the query is sent as one step and the specific data is sent separately. The end result can be much better performance and easier security management: because the data is sent separately from the query, it does not need to be protected against SQL injection attacks.
To use prepared statements with PDO, start with the prepare() method. Provide to this method the query, with the dynamic data represented by placeholders (question marks):
$stmt = $pdo->prepare('SELECT * FROM users WHERE email=? AND pass=SHA1(?)');
Note that even though the two pieces of data in this query are strings, the placeholders do not need to be within quotation marks (as in the original query).
This method returns a PDOStatement object, which will be used in subsequent steps.
Next, invoke the execute() method of the PDOStatement object, providing to it an array of actual values:
$stmt->execute(array('me@example.com', 'mypass'));
The values should be supplied in the same order as they’ll be used in the query.
Using the question marks as placeholders is one option. A more overt alternative is to use named placeholders. Named placeholders start with a colon, followed by a label:
$stmt = $pdo->prepare('SELECT * FROM users WHERE email=:email AND pass=SHA1(:pass)');
Then, use the named placeholders as keys in the array passed to the execute() method:
$stmt->execute(array(':email' => 'me@example.com', ':pass' => 'mypass'));
The net effect is the same, but using named placeholders is more obvious and less likely to mix up the placeholders and values.
Let’s use prepared statements to complete the add_task.php script, adding form validation and an INSERT query.
To use prepared statements
1. Open add_task.php (Script 8.6) in your text editor or IDE, if it is not already.
2. Within the try block, after the PDO object has been created, start validating the form data (Script 8.7):
if (($_SERVER['REQUEST_METHOD'] == 'POST') && !empty($_POST['task'])) {
if (isset($_POST['parent_id']) &&
filter_var($_POST['parent_id'], FILTER_VALIDATE_INT, array('min_range' => 1)) ) {
$parent_id = $_POST['parent_id'];
} else {
$parent_id = 0;
}
Again, this code comes verbatim from Chapter 1. See that chapter if you need any explanations.
3. Prepare the query:
$q = 'INSERT INTO tasks (parent_id, task) VALUES (:parent_id, :task)';
$stmt = $pdo->prepare($q);
The SQL query is the same as from Chapter 1, but it now uses named placeholders for the two dynamic values.
4. Execute the query and report on the results:
if ($stmt->execute(array (':parent_id' => $parent_id, ':task' => $_POST['task']))) {
echo '<p>The task has been added!</p>';
} else {
echo '<p>The task could not be added!</p>';
}
The execute() method returns a Boolean indicating its success, so it can be used in a conditional as in this code.
Script 8.7. Finally, the script performs a minimal amount of validation, and then adds the new task to the database, using prepared statements.
1 <!doctype html>
2 <html lang="en">
3 <head>
4 <meta charset="utf-8">
5 <title>Add a Task</title>
6 <link rel="stylesheet" href="style.css">
7 </head>
8 <body>
9 <?php # Script 8.7 - add_task.php #3 (in this chapter)
10 // This page adds tasks to the tasks table using PDO.
11
12 // Try to connect to the database:
13 try {
14
15 // Create the object:
16 $pdo = new PDO('mysql:dbname=test;host=localhost', 'username', 'password');
17
18 // Check for a form submission:
19 if (($_SERVER['REQUEST_METHOD'] == 'POST') && !empty($_POST['task'])) {
20
21 // Minimal validation:
22 if (isset($_POST['parent_id']) &&
23 filter_var($_POST['parent_id'], FILTER_VALIDATE_INT, array('min_range' => 1)) ) {
24 $parent_id = $_POST['parent_id'];
25 } else {
26 $parent_id = 0;
27 }
28
29 // Add the task to the database:
30 $q = 'INSERT INTO tasks (parent_id, task) VALUES (:parent_id, :task)';
31 $stmt = $pdo->prepare($q);
32
33 // Confirm the results:
34 if ($stmt->execute(array(':parent_id' => $parent_id, ':task' => $_POST['task']))) {
35 echo '<p>The task has been added!</p>';
36 } else {
37 echo '<p>The task could not be added!</p>';
38 }
39
40 } // End of submission IF.
41
42 // Start the form:
43 echo '<form action="add_task.php" method="post">
44 <fieldset>
45 <legend>Add a Task</legend>
46 <p>Task: <input name="task" type="text" size="60" maxlength="100"></p>
47 <p>Parent Task: <select name="parent_id"><option value="0">None</option>';
48
49 // Run the query:
50 $q = 'SELECT task_id, task FROM tasks WHERE date_completed="0000-00-00 00:00:00" ORDER BY date_added ASC';
51 $r = $pdo->query($q);
52
53 // Set the fetch mode:
54 $r->setFetchMode(PDO::FETCH_NUM);
55
56 // Show the results:
57 while ($row = $r->fetch()) {
58 echo "<option value=\"$row[0]\">$row[1]</option>\n";
59 }
60
61 // Complete the form:
62 echo '</select></p>
63 <input name="submit" type="submit" value="Add This Task">
64 </fieldset>
65 </form>';
66
67 // Unset the object:
68 unset($pdo);
69
70 } catch (PDOException $e) { // Report the error!
71 echo '<p class="error">An error occurred: ' . $e->getMessage() . '</p>';
72 }
73
74 ?>
75 </body>
76 </html>
5. Complete the conditional begun in Step 2:
} // End of submission IF.
6. Save the file, place it in your Web directory, and test in your Web browser  and
and  .
.
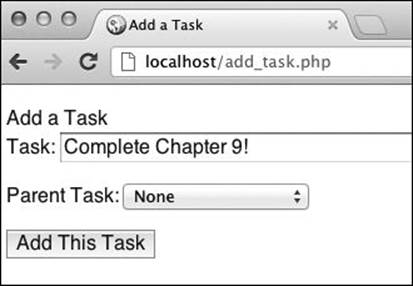
 Filling out the form...
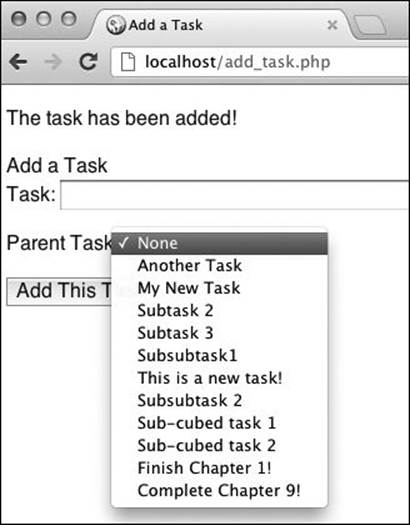
 and the new task has been added (as also shown in the select menu).
Tip
Prepared statements will have the largest performance benefits in scripts that execute the same query multiple times with only the data changing on each execution.
Tip
PDO also supports transactions, assuming that the database application does.
Using the Standard PHP Library
A key component to the success of the C programming language over the years has been its C Standard Library: a collection of commonly needed tools that can easily be used in your own programs. Because PHP is written in C, it’s only logical that it would eventually have its own counterpart: the Standard PHP Library (SPL), built into PHP as of version 5.0.
The initial focus of the SPL was on iterators (to be explained shortly) and exceptions. Version 5.3 of the language added even more classes, in particular a host of new data structures (think of them like new variable types). There are also classes for working with files and directories, as well as some useful OOP-related functions.
Through the rest of the chapter, I’ll demonstrate some of the range of things that the SPL has to offer.
Tip
The SPL also implements many Gang of Four design patterns, such as Iterator and Observer. For this reason, I purposefully did not cover those in Chapter 7, “Design Patterns.”
Tip
As of PHP 5.3, SPL cannot be disabled. This means that if you’re using PHP 5.3 or greater, you have support for SPL.
The SessionHandlerInterface Class
Added in version 5.4 of PHP is the SessionHandlerInterface class. This interface identifies what functionality is required to create your own session-handling object. Chapter 3, “Advanced Database Concepts,” explained how to do this procedurally. To use objects instead, you would create a class that implements SessionHandlerInterface:
class SessionHandler implements SessionHandlerInterface {
The class would need to define these methods:
• open()
• read()
• write()
• close()
• destroy()
• gc()
Those methods would do the same things that the procedural functions covered in Chapter 3 do. Then you’d use this class like so:
$sh = new SessionHandler();
session_set_save_handler($sh, true);
And that’s it!
File handling
To start with some easy examples, the SPL has defined a few classes for working with files and directories. First, there’s the SplFileInfo class, which creates an object from a file reference:
$file = new SplFileInfo ('filename.ext');
Once you have created that object, you can invoke various methods to get information about the file:
• getBasename()
• getExtension()
• getMTime()
• getPathname()
• getSize()
• getType()
• isDir()
• isFile()
• isWritable()
This is just a sampling of the available methods; see the PHP manual for the full list. For example  :
:
$file = new SplFileInfo('test.php');
echo "<p>Extension: {$file->getExtension()}</p>";
echo "<p>Size (bytes): {$file->getSize()}</p>";
echo "<p>Real path: {$file->getRealPath()}</p>";
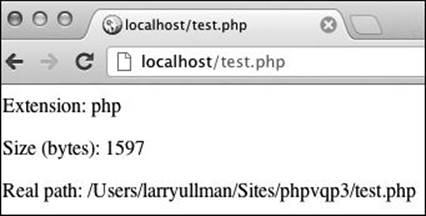
A sampling of the available information for a specific file.
If you also want file manipulation functionality, such as the ability to write to or read from a file, you can use SplFileObject. This class inherits from SplFileInfo. Hence, you have all of the previous methods, plus some new ones like fgets() and fwrite(), which correspond to the procedural equivalents.
To create a new object of type SplFileObject, provide the filename (and path, if needed) as the first argument and the mode as the second:
$file = new SplFileObject ('somefile.txt', 'r');
Now, for example, you can read the file’s data:
while (!$file->eof()) {
echo $file->fgets();
}
With this in mind, let’s create a new version of the write_to_file.php example that uses SPL.
To use SplFileObject
1. Open write_to_file.php (Script 8.2), in your text editor or IDE.
Note that I’m going to be editing the first version of the write_to_file.php script. This is because that script handles generic exceptions, which is what SplFileObject will throw in case of problems.
2. Remove the inclusion of the WriteToFile class (Script 8.8).
3. Change the creation of the $fp object to
$fp = new SplFileObject ('data.txt', 'w');
Instead of creating an object of type WriteToFile, now the script will create one of type SplFileObject.
4. Change the data writing line to
$fp->fwrite("This is a line of data.\n");
There are two changes here. First, the method to invoke is now fwrite(), not write(). Second, the newline character, which the original class added automatically, must now be part of the data to be written.
5. Remove the call to the close() method.
The SplFileObject does not have a close() or fclose() method. The file will be closed when the object is deleted.
6. Save the file as write_to_file3.php, place it in your Web directory, and test in your Web browser .
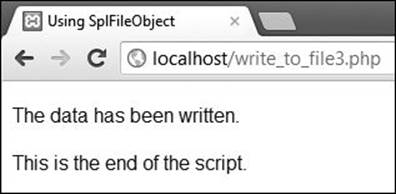
Unbeknownst to the end user, the script now uses an object of type SplFileObject.
Tip
The SplTempFileObject class provides a way to create and work with a temporary file.
Script 8.8. This updated version of write_to_ file.php now uses the SPL SplFileObject class.
1 <!doctype html>
2 <html lang="en">
3 <head>
4 <meta charset="utf-8">
5 <title>Using SplFileObject</title>
6 <link rel="stylesheet" href="style.css">
7 </head>
8 <body>
9 <?php # Script 8.8 - write_to_file3.php
10 // This page uses the SplFileObject class.
11
12 // Start the try...catch block:
13 try {
14
15 // Create the object:
16 $fp = new SplFileObject ('data.txt', 'w');
17
18 // Write the data:
19 $fp->fwrite("This is a line of data.\n");
20
21 // Delete the object:
22 unset($fp);
23
24 // If we got this far, everything worked!
25 echo '<p>The data has been written.</p>';
26
27 } catch (Exception $e) {
28 echo '<p>The process could not be completed because the script: ' . $e->getMessage() . '</p>';
29 }
30
31 echo '<p>This is the end of the script.</p>';
32
33 ?>
34 </body>
35 </html>
SPL Exceptions
The SPL defines more than a dozen different types of exception classes. Each of these extends the Exception base class, covered earlier in the chapter.
Using the SPL exceptions instead of your own custom extensions makes more sense as you start creating libraries that other people might use, or start using other people’s libraries in your code. The SPL exceptions provide a common set of exception types that everyone can use reliably, and in the same manner.
For example, you can have your classes throw InvalidArgumentExceptions when methods do not receive the proper arguments:
function someMethod($arg) {
if (!isset($arg)) {
throw new
InvalidArgumentException('An argument must be provided to someMethod().');
}
}
If the argument had to be of a certain type or match a certain pattern, those details could be included in the exception, too.
Iterators
Iterator is a design pattern that makes it possible to access the components of any kind of complex data structure using a loop. That probably sounds more complicated than it really is.
For example, as you know, the foreach loop can iterate through an array, a while loop is used to fetch query results, and PHP has functions for iterating through directory and file contents. Although the underlying data structure is different in each of these cases, the premise for looping through them is the same.
An iterator, then, is just a “one ring to rule them all” solution: regardless of the data being iterated, you can use the same code (normally, foreach).
There are more than a dozen types of iterators defined in the SPL, including these:
• ArrayIterator
• RecursiveArrayIterator
• LimitIterator
• DirectoryIterator
For example, to loop through a directory of files, you can use the DirectoryIterator class:
// Reference to current directory:
$dir = new DirectoryIterator('.');
foreach ($dir as $item) {
// Use $item.
}
A nice thing about this example is that DirectoryIterator returns each item in the loop as an SplFileObject. This means that within the loop, you can use the methods just explained.
Of course, since they are classes, you can extend any of these iterators to create your own variations on them. If you look online, you’ll find examples that extend DirectoryIterator.
As an easy example, let’s start with the basic Iterator interface. As an interface (see Chapter 6), Iterator identifies the methods needed by a class in order for PHP to be able to loop through instances of that class. Those methods are as follows:
• current(), which returns the current item
• key(), which returns the current key, or position in the list
• next(), which increments the key or position
• rewind(), which resets the key or position
• valid(), which returns a Boolean indicating if a value exists at the current key or position
Once you’ve defined these methods (assuming you’ve defined them correctly), PHP will have the knowledge it needs to iterate through objects of that class type.
For an example of this, let’s take the Department and Employee classes from Chapter 6 and make Department implement Iterator, so that a loop can be used to access the employees in a department.
To use the Iterator interface
1. Open hinting.php (Script 6.8) in your text editor or IDE.
This one script both defined and used the two classes, so it only needs to be edited here.
2. Change the Department class so that it implements Iterator (Script 8.9):
class Department implements Iterator {
Now that this class implements that interface, it must define the five methods already identified, or an error will occur (again, see Chapter 6 for details).
3. Within the class, add a new private attribute:
private $_position = 0;
This private attribute will be used to track iterations through the $_employees array.
4. Within the constructor, set $_position to 0:
$this->_position = 0;
This isn’t absolutely necessary—the code in Step 3 also does this—but it makes for good programming form.
5. Define the current() method:
function current() {
return $this->_employees [$this->_position];
}
The current() method should return the current item. The “items” for a Department are stored in the $_employees array, so this method just needs to return the element in that array indexed at the current position.
Script 8.9. By implementing Iterator, a Department object can now be used in a loop, to fetch every employee in that department.
1 <!doctype html>
2 <html lang="en">
3 <head>
4 <meta charset="utf-8">
5 <title>Iterators</title>
6 <link rel="stylesheet" href="style.css">
7 </head>
8 <body>
9 <?php # Script 8.9 - iterator.php
10 // This page defines and uses the Department and Employee classes.
11
12 # ***** CLASSES ***** #
13
14 /* Class Department.
15 * The class contains two attribute: name and employees[].
16 * The class contains seven methods now!
17 */
18 class Department implements Iterator {
19 private $_name;
20 private $_employees;
21
22 // For tracking iterations:
23 private $_position = 0;
24
25 function _ _construct($name) {
26 $this->_name = $name;
27 $this->_employees = array();
28 $this->_position = 0;
29 }
30 function addEmployee(Employee $e) {
31 $this->_employees[] = $e;
32 echo "<p>{$e->getName()} has been added to the {$this->_name} department.</p>";
33 }
34
35 // Required by Iterator; returns the current value:
36 function current() {
37 return $this->_employees[$this->_position];
38 }
39
40 // Required by Iterator; returns the current key:
41 function key() {
42 return $this->_position;
43 }
44
45 // Required by Iterator; increments the position:
46 function next() {
47 $this->_position++;
48 }
49
50 // Required by Iterator; returns the position to the first spot:
51 function rewind() {
52 $this->_position = 0;
53 }
54
55 // Required by Iterator; returns a Boolean indiating if a value is indexed at this position:
56 function valid() {
57 return (isset($this->_employees[$this->_position]));
58 }
59
60 } // End of Department class.
61
62 class Employee {
63 private $_name;
64 function _ _construct($name) {
65 $this->_name = $name;
66 }
67 function getName() {
68 return $this->_name;
69 }
70 } // End of Employee class.
71
72 # ***** END OF CLASSES ***** #
73
74 // Create a department:
75 $hr = new Department('Human Resources');
76
77 // Create employees:
78 $e1 = new Employee('Jane Doe');
79 $e2 = new Employee('John Doe');
80
81 // Add the employees to the department:
82 $hr->addEmployee($e1);
83 $hr->addEmployee($e2);
84
85 // Loop through the department:
86 echo "<h2>Department Employees</h2>";
87 foreach ($hr as $e) {
88 echo "<p>{$e->getName()}</p>";
89 }
90
91 // Delete the objects:
92 unset($hr, $e1, $e2);
93
94 ?>
95 </body>
96 </html>
6. Define the key() method:
function key() {
return $this->_position;
}
The key() method returns the current position.
7. Define the next() method:
function next() {
$this->_position++;
}
The next() method should increment the position indicator so that it will point to the next item.
8. Define the rewind() method:
function rewind() {
$this->_position = 0;
}
The rewind() method resets the position indicator back to its original value.
9. Define the valid() method:
function valid() {
return (isset($this->_employees [$this->_position]));
}
This method needs to return a Boolean indicating if a value exists at the current position. If this method returns false, then the iterating structure (i.e., the foreach loop) will know to stop looping through the data.
10. Outside of the class, after creating all the objects, loop through the department:
echo "<h2>Department Employees</h2>";
foreach ($hr as $e) {
echo "<p>{$e->getName()}</p>";
}
Since Department implements Iterator, a Department object can be passed to a foreach loop. Since each item within the foreach loop is an Employee object—because that’s what the Department::current() method returns—you can call getName() on the $e object within the loop.
11. Save the file as iterator.php, place it in your Web directory, and test in your Web browser .

 The employees are easily listed at the bottom of the page because Department now implements the Iterator pattern.
Tip
The FilterIterator can be used with a DirectoryIterator to limit what kinds of files are iterated.
Tip
The LimitIterator allows you to page through a list, similar to using a LIMIT clause in a SQL command.
Tip
The SPL defines a couple of recursive iterators that make it easier to navigate nested lists (such as directories or multidimensional arrays).
Data structures
In more recent versions of PHP, the SPL also has classes that define new data structures. Most of these use objects to create more specific, limited variations on arrays. You might think that would be bad, but the flexibility and openness of PHP arrays can have adverse performance effects and allow for sloppier coding.
As an example, take SplFixedArray. This array type has the following characteristics:
• Has a fixed number of elements
• Only uses integers greater than or equal to 0 for its keys
• Cannot use any of the existing array functions
That may all sound like a bad deal, but what the SplFixedArray provides is better performance than a traditional array. In situations where you know the number of array elements in advance and are using numeric indexes, this is a reasonable trade-off. And, wisely, SplFixedArray implementsIterator, so you can access the entire array using a loop, as you would a standard array. (Technically, you can change the number of elements in an SplFixedArray after you’ve created it, but doing so eradicates any performance benefits of using the format in the first place.)
As another example, the stack is a commonly used structure in programming. A stack is a list of items that has a last-in, first-out (LIFO) order. In other words, the only item in the stack that is available is the one added most recently:
$names = new SplStack();
// Add items:
$names->push('Lucian');
$names->push('Priscilla');
$names->push('Travis');
$names->push('Greta');
$names->pop(); // Greta
Again, this is just a more restricted type of array, but restrictions are sometimes for the best. For example, if you have an array that stores a sequence of steps, you might only let the user go back a step, not to any random step. That kind of restriction can be enforced with a stack, but not a standard array.
Similar to the stack is the queue, implemented in SPL as SplQueue. This list type uses the first-in, first-out (FIFO) structure.
Autoloading classes
With OOP, a logical way to modularize the files in an application is to place each class definition in its own file. You’ve done this multiple times over by now. In such examples, the class file has to be required by the script that needs to create an object of that type:
require('Rectangle.php');
$r = new Rectangle(43, 902);
When including just one class file, this isn’t much of a hardship, but as your programs use more and more objects, including all the requisite files can become tedious. Thankfully, the developers behind PHP created a workaround to the tiresome process of always including class definition files.
To start, define a function that will know how to include class files for you:
function class_loader($class) {
require('classes/' . $class . '.php');
}
That code assumes that all class files are in the classes subdirectory. Now you can load a class file using
class_loader('Rectangle');
However, the point of creating a class loading function isn’t to call it directly but rather to have PHP call it for you when a class definition is required. This is known as autoloading.
To enable autoloading, register your loading function with PHP:
spl_autoload_register ('class_loader');
For each new object type created in the following code, the function will be invoked:
$obj = new Class();
$me = new Human();
$r = new Rectangle();
Other Interfaces
There are a couple of SPL interfaces that do not fit neatly into any of the chapter’s categories of SPL topics. For example, the Countable interface dictates the method signature that a class must have in order to use the PHP count() method on objects of that class type. Specifically, Countable needs you to create a method called count() that takes no arguments, and returns an integer:
class Department implements Iterator, Countable {
// Attributes.
// Other methods.
function count() {
return count($this->_employees);
}
} // End of Department class.
echo count($hr);
Another interface, ArrayAccess, allows you to make an object treatable like it was an array. To implement it, you define four methods that then let you add, reference, and remove object components using array notation.
Thanks to the autoloader function, those three lines will automatically include Class.php, Human.php, and Rectangle.php (within the classes directory). Note that this does assume that the classes and class files use the same exact names (minus the extensions).
Notice that the class_loader() function and the spl_autoload_register() call are defined outside of any class. Instead, you would place those lines of code in a script that instantiates objects.
As an example of this, let’s rewrite factory.php (Script 7.4) to autoload the class definitions. The factory example is particularly good for autoloading because the specific Shape type—e.g., Rectangle or Triangle—will only be known at runtime. By using the autoloader, instead of automatically loading all the classes that could be used, no memory will be wasted by loading unused classes.
To autoload class definition files
1. Open factory.php (Script 7.4) in your text editor or IDE.
2. Remove the four require() lines (Script 8.10).
3. Add the definition of the class_loader() function:
function class_loader($class) {
require($class . '.php');
}
This assumes that all class files will be in the same directory as this script, which has been how I’ve been doing things in this book, for simplicity’s sake.
4. Tell PHP to use the function:
spl_autoload_register ('class_loader');
5. Save the file as autoload.php, place it in your Web directory along all the necessary class files, and test in your Web browser  .
.
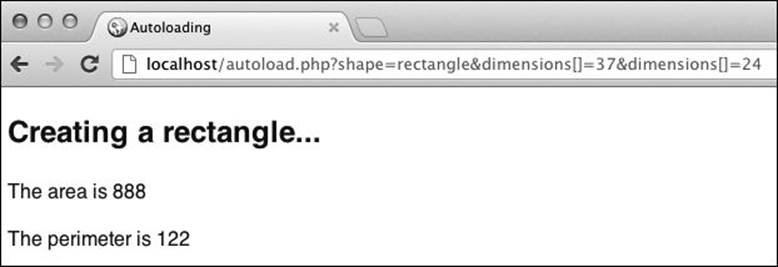
The script seems to work exactly the same as before, but now class definition files are loaded on an as-needed basis.
Remember that you have to pass certain values along in the URL in order for the script to work. See Chapter 7 for details.
Tip
In earlier versions of PHP, before the spl_autoload_register() function was added, the _ _autoload() function was used for this same purpose.
Tip
Although class names in PHP are case-insensitive, some operating systems use case-sensitive file structures. If your class is called MyClass, you’ll be better off naming the file exactly MyClass.php and creating objects using
$obj = new MyClass();
Script 8.10. Using the SPL autoloading capability, this script no longer has to manually include each class file that it may need.
1 <!doctype html>
2 <html lang="en">
3 <head>
4 <meta charset="utf-8">
5 <title>Autoloading</title>
6 <link rel="stylesheet" href="style.css">
7 </head>
8 <body>
9 <?php # Script 8.10 - autoload.php
10 // This page uses the ShapeFactory class (Script 7.2).
11
12 // Create the autoloader:
13 function class_loader($class) {
14 require($class . '.php');
15 }
16 spl_autoload_register('class_loader');
17
18 // Minimal validation:
19 if (isset($_GET['shape'], $_GET['dimensions'])) {
20
21 // Create the new object:
22 $obj = ShapeFactory::Create($_GET['shape'], $_GET['dimensions']);
23
24 // Print a little introduction:
25 echo "<h2>Creating a {$_GET['shape']}...</h2>";
26
27 // Print the area:
28 echo '<p>The area is ' . $obj->getArea() . '</p>';
29
30 // Print the perimeter:
31 echo '<p>The perimeter is ' . $obj->getPerimeter() . '</p>';
32
33 } else {
34 echo '<p class="error">Please provide a shape type and size.</p>';
35 }
36
37 // Delete the object:
38 unset($obj);
39
40 ?>
41 </body>
42 </html>
Review and Pursue
If you have any problems with these sections, either in answering the questions or pursuing your own endeavors, turn to the book’s supporting forum (www.LarryUllman.com/forums/).
Review
• What is an exception? How do exceptions differ from errors? (See page 244.)
• What exception methods will you commonly use? (See page 245.)
• What is the try...catch syntax? (See page 244.)
• How do you create different exception types? (See page 251.)
• What is PDO? What are the benefits of using PDO? (See page 258.)
• How do you connect to a database using PDO? (See pages 258 and 259.)
• How do you execute a simple query using PDO? (See page 261.)
• How do you execute a query that returns results, and fetch those results, using PDO? (See page 262.)
• What are prepared statements? How do you execute them using PDO? (See page 266.)
• What is the SPL? (See page 270.)
• What SPL classes exist for working with files? (See page 271.)
• What is an iterator? (See page 273.)
• What are some of the new data structures added in the SPL? What advantages are there in using them? (See page 278.)
• What are the benefits of having PHP autoload class files for you? How do you set that up? (See page 279.)
Pursue
• If you’re not familiar with how to write data to a file in PHP, see the PHP manual.
• Introduce errors into the WriteTo-File class in order to see some other exceptions.
• Check out the PHP manual’s pages on PDO. Specifically investigate how to
• Change the level of error reporting.
• Perform transactions.
• If you’re unfamiliar with what SQL injection attacks are, look them up online.
• If you’ve never used prepared statements, do more research on what they are and why they’re beneficial.
• Update the add_task.php example to create a Task class. Then fetch existing tasks from the database into Task objects.
• If you’re using PHP 5.4 or later, rewrite the db_sessions.inc.php script from Chapter 3, this time using an extension of the SessionHandlerInterface class.
• Try implementing the Directory Iterator example, using the SplFileObject within the loop to print out information about each file.
• Try having the Department class also implement Countable, so that you can apply the count() function to Department objects.
• Check out the PHP manual examples for the ArrayAccess interface.
• Spend an afternoon (or two) reading up on the Standard PHP Library, both in the PHP manual and in various tutorials and articles online.
In This Chapter
Catching Exceptions
Extending the Exception Class
Using PDO
Using the Standard PHP Library
Review and Pursue
The preceding four chapters discuss object-oriented programming, discussing both syntax and theory. The majority of the examples in those chapters tend to be as much demonstrative as practical (e.g., the Rectangle, Square, Shape, and Triangle classes are useful, but only if you’re doing geometric work). Philosophical examples are best for teaching OOP, I believe, but real-world object-oriented programming hammers the points home. And nothing best demonstrates real-world OOP than using some of the many existing classes created by other developers.
All of the examples in this chapter are based on classes that are already defined in PHP. This includes the Exception class, PHP Data Objects (PDO), and the Standard PHP Library (SPL). In using these classes, not only will you learn about some valuable resources, but you’ll also see variations on many of the design ideas already explained.
Catching Exceptions
While introducing the concept of OOP in Chapter 4, “Basic Object-Oriented Programming,” I explained that programming is entirely about nouns and verbs. Procedural programming focuses on the verbs and OOP focuses on the nouns. Another difference is that procedural code createserrors, while OOP has exceptions.
The difference between errors and exceptions is structural, but both represent problems with your code. (As you’ll see, an exception is really just an error in an object form.) Instead of using conditionals in procedural code to watch for errors, OOP has the try and catch statements for handling exceptions.
The premise is that you try to do certain things in your PHP code, specifically the kinds of things that might fail (like connecting to a database or including a file). If an error occurs, an exception is thrown. Your code will then catch the exception and respond accordingly.
The basic syntax is
try {
// Do something.
// An exception is thrown on error.
} catch (exception) {
// Do whatever now.
}
This is a more sophisticated version of
if (/* Do something. */) {
} else {
/* Do whatever because a problem occurred. */
}
One benefit that exception handling has over the conditional is that it further separates the functionality and logic from the error handling. Furthermore, multiple errors can be handled without having to use lots of nested conditionals.
Exceptions are thrown using the syntax
throw new Exception('error message');
This code throws an object of type Exception, a class defined in PHP. To catch this exception, you would have
catch (Exception $e)
where $e is an object of the Exception type.
The Exception class contains the methods indicated in Table 8.1, which you can use to access information about the error. A try...catch example might therefore look like this:
try {
// Do something.
} catch (Exception $e) {
echo $e->getMessage();
}
Table 8.1. Exception Class Methods
You should note that any code within a try block after an exception is thrown will never run. Conversely, if no exception ever occurs, the code in the catch block will never be executed.
For an example of this, let’s create a class used to write some data to a file. If a problem occurs, an exception will be thrown.
Script 8.1. If any of three different steps in this class cannot be completed, exceptions are thrown.
1 <?php # Script 8.1 - WriteToFile.php
2 // This page defines a WriteToFile class.
3
4 /* The WriteToFile class.
5 * The class contains one attribute: $_fp.
6 * The class contains three methods: _ _construct(), write(), close(), and _ _destruct().
7 */
8 class WriteToFile {
9
10 // For storing the file pointer:
11 private $_fp = NULL;
12
13 // Constructor opens the file for writing:
14 function _ _construct($file) {
15
16 // Check that the file exists and is a file:
17 if (!file_exists($file) || !is_file($file)) {
18 throw new Exception('The file does not exist.');
19 }
20
21 // Open the file:
22 if (!$this->_fp = @fopen($file, 'w')) {
23 throw new Exception('Could not open the file.');
24 }
25
26 } // End of constructor.
27
28 // This method writes data to the file:
29 function write($data) {
30
31 // Confirm the write:
32 if (@!fwrite($this->_fp, $data . "\n")) {
33 throw new Exception('Could not write to the file.');
34 }
35
36 } // End of write() method.
37
38 // This method closes the file:
39 function close() {
40
41 // Make sure it's open:
42 if ($this->_fp) {
43 fclose($this->_fp);
44 $this->_fp = NULL;
45 }
46
47 } // End of close() method.
48
49 // The destructor calls close(), just in case:
50 function _ _destruct() {
51 $this->close();
52 } // End of destructor.
53
54 } // End of WriteToFile class.
To define the WriteToFile class
1. Begin a new PHP script in your text editor or IDE, to be named WriteToFile.php (Script 8.1):
<?php # Script 8.1 - WriteToFile.php
2. Start defining the WriteToFile class:
class WriteToFile {
private $_fp = NULL;
This class will define all the functionality for writing data to a file. The attribute will act as the file pointer and is made private as it need not (in fact, shouldn’t) be available outside of this class.
3. Begin defining the constructor:
function _ _construct($file) {
if (!file_exists($file) || !is_file($file)) {
throw new Exception('The file does not exist.');
}
The constructor is called when a new WriteToFile object is created. It takes one argument: the file to be used. The purpose of the constructor is to confirm that the file exists and is writable, and then to open that file for writing.
As you can see, the first conditional within the constructor checks if the file does not exist or if it is not a file (file_exists() will return true for directories, too). If either of these conditions is true, an exception is thrown.
4. Complete the constructor:
if (!$this->_fp = @fopen($file, 'w')) {
throw new Exception('Could not open the file.');
}
} // End of constructor.
The next conditional throws an exception if the file could not be opened for writing. The mode is assumed to be “w,” but you’ll make this class more flexible in just a couple of pages.
If you’re not familiar with how to write data to a file in PHP, see the PHP manual.
Note that the fopen() call is prefaced with the error suppression operator so that PHP itself does not generate any errors should a problem occur (because the class should throw an exception instead).
5. Define the write() method:
function write($data) {
if (@!fwrite($this->_fp, $data . "\n")) {
throw new Exception('Could not write to the file.');
}
} // End of write() method.
This method will be called to write data to the opened file. It takes the data to be written as its lone argument. If the data cannot be written, another exception is thrown.
Again, the error suppression operator prefaces the function call.
6. Define the close() method:
function close() {
if ($this->_fp) {
fclose($this->_fp);
$this->_fp = NULL;
}
} // End of close() method.
This method closes the open file.
7. Define the destructor and complete the class:
function _ _destruct() {
$this->close();
} // End of destructor.
} // End of WriteToFile class.
In case the code that uses this class never formally closes the file, this code will call the close() method when the object is deleted.
8. Save the file as WriteToFile.php and place it in your Web directory.
To use the WriteToFile class
1. Begin a new PHP script in your text editor or IDE, to be named write_to_file.php, starting with the HTML (Script 8.2):
<!doctype html>
<html lang="en">
<head>
<meta charset="utf-8">
<title>Handling Exceptions</title>
<link rel="stylesheet" href="style.css">
</head>
<body>
<?php # Script 8.2 - write_to_file.php
2. Load the class definition:
require('WriteToFile.php');
Script 8.2. Exceptions thrown by the code in the try block will be caught and displayed by the catch.
1 <!doctype html>
2 <html lang="en">
3 <head>
4 <meta charset="utf-8">
5 <title>Handling Exceptions</title>
6 <link rel="stylesheet" href="style.css">
7 </head>
8 <body>
9 <?php # Script 8.2 - write_to_file.php
10 // This page uses the WriteToFile class (Script 8.1).
11
12 // Load the class definition:
13 require('WriteToFile.php');
14
15 // Start the try...catch block:
16 try {
17
18 // Create the object:
19 $fp = new WriteToFile('data.txt');
20
21 // Write the data:
22 $fp->write('This is a line of data.');
23
24 // Close the file:
25 $fp->close();
26
27 // Delete the object:
28 unset($fp);
29
30 // If we got this far, everything worked!
31 echo '<p>The data has been written.</p>';
32
33 } catch (Exception $e) {
34 echo '<p>The process could not be completed because the script: ' . $e->getMessage() . '</p>';
35 }
36
37 echo '<p>This is the end of the script.</p>';
38
39 ?>
40 </body>
41 </html>
3. Begin a try block:
try {
The bulk of the functionality of the script will go within this block.
4. Create the object:
$fp = new WriteToFile('data.txt');
This code will not only create the object but also attempt to open the file for writing. Opening a file for writing is a common cause of problems, most likely because the file doesn’t exist, the file’s name and path are incorrect, or the file does not have the proper permissions. If the file could not be opened in writing mode, an exception is thrown with the message could not open the file (see the class’s constructor).
Note that the provided file value should represent the full path (relative or absolute) to the text file.
5. Attempt to write data to the file:
$fp->write('This is a line of data.');
This piece of code will only be executed if no exception was thrown by the code in Step 4. Logically, if the file could be opened for writing, the object should be able to use fwrite() without complaint.
6. Close the file and delete the object:
$fp->close();
unset($fp);
7. Print a message indicating success of the operation:
echo '<p>The data has been written.</p>';
This line of code will be executed only if no exceptions were thrown prior to this point.
8. Catch, and handle, the exception:
} catch (Exception $e) {
echo '<p>The process could not be completed because the script: ' . $e->getMessage() . '</p>';
}
The variable $e will be an object of Exception type, matching the kinds of exceptions thrown by the WriteToFile object. Within this block, the received message is printed (by calling the getMessage() method) within context.
9. Print another message:
echo '<p>This is the end of the script.</p>';
This code, outside of the try...catch block, will always be executed, even if exceptions occur. I’ve included this statement just to demonstrate that.
10. Complete the page:
?>
</body>
</html>
11. Save the file as write_to_file.php, place it in your Web directory, and test in your Web browser ![]() .
.
Without first creating a text file called data.txt, with the proper permissions, you’ll see something like ![]() .
.
![]() Although it may not be apparent in the end result, this script uses a try...catch block to throw, and then catch, an object of Exception type.
Although it may not be apparent in the end result, this script uses a try...catch block to throw, and then catch, an object of Exception type.
12. Create a file called data.txt in the same directory as write_to_file.php, and adjust its permissions if necessary. Then rerun the PHP page in your Web browser ![]() .
.
![]() If no problems occurred, this is the end result.
If no problems occurred, this is the end result.
Tip
To see the other exception error messages, you’ll need to introduce errors into the code. For example, changing the fopen() mode to r will create an exception in the write() method.
Tip
Failure to catch a thrown exception results in a fatal error ![]() .
.
![]() When using try, you must ensure that all exceptions are caught, lest you’re left with ugly fatal errors like this one.
When using try, you must ensure that all exceptions are caught, lest you’re left with ugly fatal errors like this one.
Tip
The Exception class’s constructor can take anywhere from zero to two arguments. The first argument is an error message, and the second is an error code.
Tip
As constructors, by definition, cannot return anything (such as an error or error code), it’s appropriate to have constructors throw errors upon improper use.
Tip
A catch block can also throw an exception to be caught by a subsequent catch block. The object thrown can be new or the current exception object:
try {
// Code.
} catch (Exception $e) {
// Do whatever.
throw $e;
} catch (Exception $e) {
// Now do this.
}
Extending the Exception Class
The preceding example demonstrates basic usage of a try...catch block by using a class that throws standard exceptions. The basic PHP Exception class is very simple ![]() , designed to be extended so that you can add, or change, functionality as needed.
, designed to be extended so that you can add, or change, functionality as needed.
![]() A UML representation of PHP’s built-in Exception class.
A UML representation of PHP’s built-in Exception class.
Extending the Exception class is accomplished just like extending any class (see Chapter 5, “Advanced OOP”):
class MyException extends Exception {
Note that only the Exception constructor and _ _toString() methods can be overridden, because the others are all defined as final.
To use your extended class, you would write
throw new MyException('error message');
Thanks to type hinting, introduced in Chapter 6, “More Advanced OOP,” you can catch different kinds of exceptions from the same try block:
try {
// Some code.
throw new MyException1('error message');
// Some more code.
throw new MyException2('error message');
} catch (MyException1 $e) {
} catch (MyException2 $e) {
}
Using this new information, the next script will update the preceding example, but now the WriteToFile class will throw exceptions of a specific type.
To extend the Exception class
1. Open WriteToFile.php (Script 8.1) in your text editor or IDE, if it is not already.
2. Before the WriteToFile definition, begin defining an extension to the Exception class (Script 8.3):
class FileException extends Exception {
This class, called FileException, will specifically handle file opening, writing, and closing errors. It will add one method to the inherited Exception methods.
3. Begin defining the getDetails() method:
function getDetails() {
switch ($this->code) {
case 0:
return 'No filename was provided';
break;
Any time an exception occurs, up to two arguments can be passed to the Exception class: the message and the error code. The WriteToFile class, to be updated shortly, will generate its own error codes. This class, FileException, will associate those error codes with more specific error messages. This getDetails() method returns the message that goes with each code, using a switch.
4. Complete the switch:
case 1:
return 'The file does not exist.';
break;
case 2:
return 'The file is not a file.';
break;
case 3:
return 'The file is not writable.';
break;
case 4:
return 'An invalid mode was provided.';
break;
case 5:
return 'The data could not be written.';
break;
case 6:
return 'The file could not be closed.';
break;
default:
return 'No further information is available.';
break;
} // End of SWITCH.
Each of these messages will mean more once you see the updated WriteToFile class.
Script 8.3. This script extends the Exception class to create a more specific type of exception handler. Exceptions of this new type are thrown by the WriteToFile class.
1 <?php # Script 8.3 - WriteToFile.php
2 // This page defines a WriteToFile and a FileException class.
3
4 /* The FileException class.
5 * The class creates one new method: getDetails().
6 */
7 class FileException extends Exception {
8
9 // For returning more detailed error messages:
10 function getDetails() {
11
12 // Return a different message based upon the code:
13 switch ($this->code) {
14 case 0:
15 return 'No filename was provided';
16 break;
17 case 1:
18 return 'The file does not exist.';
19 break;
20 case 2:
21 return 'The file is not a file.';
22 break;
23 case 3:
24 return 'The file is not writable.';
25 break;
26 case 4:
27 return 'An invalid mode was provided.';
28 break;
29 case 5:
30 return 'The data could not be written.';
31 break;
32 case 6:
33 return 'The file could not be closed.';
34 break;
35 default:
36 return 'No further information is available.';
37 break;
38 } // End of SWITCH.
39
40 } // End of getDetails() method.
41
42 } // End of FileException class.
43
44 /* The WriteToFile class.
45 * The class contains one attribute: $_fp.
46 * The class contains three methods: _ _construct(), write(), close(), and _ _destruct().
47 */
48 class WriteToFile {
49
50 // For storing the file pointer:
51 private $_fp = NULL;
52
53 // For storing an error message:
54 private $_message = '';
55
56 // Constructor opens the file:
57 function _ _construct($file = null, $mode = 'w') {
58
59 // Assign the file name and mode
60 // to the message attribute:
61 $this->_message = "File: $file Mode: $mode";
62
63 // Make sure a file name was provided:
64 if (empty($file)) throw new FileException($this->_message, 0);
65
66 // Make sure the file exists:
67 if (!file_exists($file)) throw new FileException($this->_message, 1);
68
69 // Make sure the file is a file:
70 if (!is_file($file)) throw new FileException($this->_message, 2);
71
72 // Make sure the file is writable, when necessary
73 if (!is_writable($file)) throw new FileException($this->_message, 3);
74
75 // Validate the mode:
76 if (!in_array($mode, array('a', 'a+', 'w', 'w+'))) throw new FileException($this->_message,
4);
77
78 // Open the file:
79 $this->_fp = fopen($file, $mode);
80
81 } // End of constructor.
82
83 // This method writes data to the file:
84 function write($data) {
85
86 // Confirm the write:
87 if (@!fwrite($this->_fp, $data . "\n")) throw new FileException($this->_message . " Data: $data", 5);
88
89 } // End of write() method.
90
91 // This method closes the file:
92 function close() {
93
94 // Make sure it's open:
95 if ($this->_fp) {
96 if (@!fclose($this->_fp)) throw new FileException($this->_message, 6);
97 $this->_fp = NULL;
98 }
99
100 } // End of close() method.
101
102 // The destructor calls close(), just in case:
103 function _ _destruct() {
104 $this->close();
105 } // End of destructor.
106
107 } // End of WriteToFile class.
5. Complete the getDetails() method and the FileException class:
} // End of getDetails() method.
} // End of FileException class.
6. Within the WriteToFile class, add a new private attribute:
private $_message = '';
This new attribute will be assigned an error message, built up over the course of several methods.
7. Begin replacing the existing constructor with this new definition:
function _ _construct($file = null, $mode = 'w') {
$this->message = "File: $file Mode: $mode";
The constructor now takes two arguments: the file and the mode. The mode’s default value is w. The constructor will also start building an error message, which, for debugging purposes, will contain the filename and the mode.
8. Make sure that a filename was provided:
if (empty($file)) throw new FileException($this->message, 0);
The first validation routine checks that some filename was passed to the class. If not, an exception of type FileException is thrown, using the default message and an error code of 0. This error code matches the more specific message in the FileException getDetails() method.
Note that I rarely use conditionals without the curly braces, but this is a reasonable exception (pun!).
9. Make sure that the file exists and that it is a file:
if (!file_exists($file)) throw new FileException ($this->message, 1);
if (!is_file($file)) throw new FileException($this->message, 2);
For more specific exceptions, the class now checks each possible problem separately. If either of these checks fails, an exception is thrown, providing different error codes accordingly.
10. Confirm that the file is writable:
if (!is_writable($file)) throw new FileException($this->message, 3);
11. Confirm that a valid mode was used:
if (!in_array($mode, array('a', 'a+', 'w', 'w+'))) throw new FileException($this->message, 4);
Because I don’t want to try to open the file in an invalid mode, this check is necessary. I’ve omitted some valid modes (like ab) and all reading modes (because I’m creating a write-specific class) to keep it simple.
12. Open the file and complete the constructor:
$this->_fp = fopen($file, $mode);
} // End of constructor.
If all of the validation tests were passed, the file is opened in the given mode, assigning the result to the attribute.
13. Update the write() method:
function write ($data) {
if (@!fwrite($this->_fp, $data . "\n")) throw new FileException($this->message . " Data: $data", 5);
} // End of writeData() method.
This method now throws its own exception code.
14. Update the close() method:
function close() {
if ($this->_fp) {
if (@!fclose($this->_fp)) throw new FileException ($this->message, 6);
$this->_fp = NULL;
}
} // End of close() method.
15. Save the file.
16. Open write_to_file.php in your text editor or IDE, if it is not already.
17. Change the catch statement to read (Script 8.4) as follows:
} catch (FileException $e) {
echo '<p>The process could not be completed. Debugging information:<br>' . $e->getMessage() . '<br>' . $e->getDetails() . '</p>';
}
Script 8.4. Now the script is written to catch a specific type of exception.
1 <!doctype html>
2 <html lang="en">
3 <head>
4 <meta charset="utf-8">
5 <title>Extending Exceptions</title>
6 <link rel="stylesheet" href="style.css">
7 </head>
8 <body>
9 <?php # Script 8.4 - write_to_file.php #2
10 // This page uses the WriteToFile class (Script 8.3).
11
12 // Load the class definition:
13 require('WriteToFile.php');
14
15 // Start the try...catch block:
16 try {
17
18 // Create the object:
19 $fp = new WriteToFile('data.txt', 'w');
20
21 // Write the data:
22 $fp->write('This is a line of data.');
23
24 // Close the file:
25 $fp->close();
26
27 // Delete the object:
28 unset($fp);
29
30 // If we got this far, everything worked!
31 echo '<p>The data has been written.</p>';
32
33 } catch (FileException $e) {
34 echo '<p>The process could not be completed. Debugging information: <br>' . $e->getMessage() . '<br>' . $e->getDetails() . '</p>';
35 }
36
37 echo '<p>This is the end of the script.
</p>';
38
39 ?>
40 </body>
41 </html>
This catch expects exceptions of type FileException, which will be thrown by the WriteToFile object. Within the catch, debugging information is printed using both the Exception getMessage() method (which should print the file, mode, and possibly data) and the FileException get_details() method.
18. Save the file, place it in your Web directory, and test in your Web browser ![]() .
.
![]() The result if the file exists but is not writable. The first line of debugging information comes from the Exception getMessage() class. The rest comes from FileException getDetails().
The result if the file exists but is not writable. The first line of debugging information comes from the Exception getMessage() class. The rest comes from FileException getDetails().
19. Introduce some errors and retest ![]() .
.
![]() If the data cannot be written to the file, the debugging information also shows what data was received.
If the data cannot be written to the file, the debugging information also shows what data was received.
Tip
Because PHP generates an ugly error should an uncaught exception occur, you can create your own exception handler to handle this situation more gracefully:
function my_ex_handler(Exception $e) {
// Do whatever.
}
set_exception_handler('my_ex_handler');
Tip
Every try statement requires at least one catch. You can have multiple catch statements, each catching a different exception type:
try {
} catch (SomeType $e) {
} catch (Exception $e) {
}
Note that you should always catch Exception types last, as it’s the most generic type.
Tip
If your extended Exception class has its own constructor, it should also call the Exception constructor using parent::_ _construct().
Using PDO
New in this edition of this book is a discussion of PHP Data Objects (PDO), an alternative way to interact with a database. Built into PHP as of version 5.1, PDO provide a consistent way to execute queries regardless of the database application in use.
At the time of this writing, PDO works with MySQL (of course), PostgreSQL, SQLite, Oracle, Microsoft SQL Server, and more. Once you’ve embraced PDO on a project, changing literally one line of code will allow you to seamlessly switch to another database application, should the need arise.
To confirm what applications are supported with your PHP installation, invoke the getAvailableDrivers() method of the PDO class ![]() :
:
print_r(PDO::getAvailableDrivers());
![]() Test for PDO support on your installation, prior to running any code.
Test for PDO support on your installation, prior to running any code.
Over the next several pages, I’ll cover how to perform several fundamental tasks using PDO, rewriting one of the book’s existing examples in the process.
Tip
To use PDO, your PHP installation must have the PDO extension enabled, and you must have the proper PDO driver for the database application you intend to use ![]() .
.
Connecting to the database
All of the customization of the PDO experience comes when making a connection to the database. The connection is made by creating a new object of type PDO. As you would expect, this is done via the new keyword. You should provide to the PDO constructor three values:
$pdo = new PDO('dsn', 'username', 'password');
Technically, the username and password are optional, but most database applications should always be requiring them anyway. The DSN, short for Data Source Name, is the important part. The DSN is a string that indicates several things:
• The database driver to use
• The database name
• In the case of SQLite, the location of the database file
• Optionally, the hostname
• Optionally, the port
You can also put the username and password in the DSN, if you’d prefer, as opposed to providing them to the PDO constructor.
To create the DSN, first you indicate the database driver. Then, after a colon, use name=value pairs, each separated by a semicolon:
driver:name1=value1;name2=value2
For example, with MySQL, accessing the test database on localhost, the proper DSN is mysql:dbname=test;host=localhost.
Thus, this is how you use PDO to connect to MySQL:
$pdo = new PDO('mysql:dbname=test;host=localhost', 'username', 'password');
If you’re using, for example, SQLite, that connection could be
$pdo = new PDO('sqlite:/path/to/somedb.sq3');
Note that SQLite connections are made to specific files on the server and do not require usernames and passwords.
To close the database connection, simply unset the PDO object:
unset($pdo);
Or set it to null:
$pdo = null;
Tip
See the PHP manual for the correct DSN value to use with other database applications, should you have that need.
Catching exceptions
Before getting into how you’d use PDO to execute queries, let’s first look at how you handle any database-related errors that might occur when using PDO. This includes a range of possible problems, from an inability to connect to the database to an error in a query’s syntax.
Being a class, PDO does not generate errors but rather throws exceptions. Specifically, PDO throws exceptions of type PDOException.
With this in mind, to interact with the database, you’ll want to use a try...catch block like ![]() :
:
try {
$pdo = new PDO('mysql:dbname=test;host=localhost', 'username', 'password');
// Execute queries.
// Do whatever else.
} catch (PDOException $e) {
// Use $e and $e->getMessage().
}
![]() An exception thrown by PDO’s inability to connect to the database.
An exception thrown by PDO’s inability to connect to the database.
Let’s put all this together and start creating a PHP script that connects to the database. For this example, I’ll rewrite the add_task2.php file (Script 1.7) from Chapter 1.
To use PDO
1. Begin a new PHP script in your text editor or IDE, to be named add_task.php, starting with the HTML (Script 8.5):
<!doctype html>
<html lang="en">
<head>
<meta charset="utf-8">
<title>Add a Task</title>
<link rel="stylesheet" href="style.css">
</head>
<body>
<?php # Script 8.5 - add_task.php
2. Begin a try block:
try {
All of the database interactions will go within this try block of the script.
3. Create the PDO object:
$pdo = new PDO('mysql:dbname=test;host=localhost', 'username', 'password');
Naturally, you’ll need to change these particulars to match your environment.
4. Close the connection:
unset($pdo);
This isn’t formally required—PHP will close the connection when the script terminates—but it makes for good form.
5. Catch any exceptions:
} catch (PDOException $e) {
Again, PDO throws exceptions of type PDOException, so that’s what this block tries to catch.
Script 8.5. To start writing the add_task.php script, first a database connection is made within a try... catch block.
1 <!doctype html>
2 <html lang="en">
3 <head>
4 <meta charset="utf-8">
5 <title>Add a Task</title>
6 <link rel="stylesheet" href="style.css">
7 </head>
8 <body>
9 <?php # Script 8.5 - add_task.php
10 // This page adds tasks to the tasks table using PDO.
11
12 // Try to connect to the database:
13 try {
14
15 // Create the object:
16 $pdo = new PDO('mysql:dbname=test;host=localhost', 'username', 'password');
17
18 // Unset the object:
19 unset($pdo);
20
21 } catch (PDOException $e) { // Report the error!
22 echo '<p class="error">An error occurred: ' . $e->getMessage() . '</p>';
23 }
24
25 ?>
26 </body>
27 </html>
6. Report the error and complete the catch:
echo '<p class="error">An error occurred: ' . $e->getMessage() . '</p>';
}
Showing the exceptions message is good for debugging, but it’s not something you’d want to do on a live site. On a live site, you’d probably show a generic message to the user and log the specific error message.
7. Complete the page:
?>
</body>
</html>
8. Save the file as add_task.php, place it in your Web directory, and test in your Web browser ![]() .
.
![]() At this point, a blank page is good (i.e., nothing bad happened).
At this point, a blank page is good (i.e., nothing bad happened).
If you see a blank page, then no problems occurred. You may need to introduce an error to see a message as in ![]() .
.
Tip
You can change the level of database error reporting using the PDO setAttribute() method and the proper constants. See the PHP manual for details.
Executing simple queries
Once you’ve established a database connection (and a PDO object), you can run queries on the database. Doing so requires one of two methods, depending on the type of query being executed.
For simple queries that do not return results—INSERT, UPDATE, and DELETE, for example, use the exec() method. It takes the query to be run as its argument (which I’ll represent as $q):
$q = 'DELETE FROM tablename';
$pdo->exec($q);
For these simple queries, exec() will return the number of rows affected by the query:
$num = $pdo->exec($q);
// Use $num.
If you just ran an INSERT query and need to know the dynamically generated primary key value, call the lastInsertId() method:
$id = $pdo->lastInsertId();
This is equivalent to calling mysqli_ insert_id() when using the MySQL Improved extension.
The last thing to be aware of when running simple queries is how to prevent SQL injection attacks. When you use the MySQL Improved extension, data can be made safe to use in a query by running it through mysqli_real_escape_string() first:
$data = mysqli_real_escape_string ($dbc, $unsafe_data);
For PDO, call the quote() method:
$data = $pdo->quote($unsafe_data);
This method not only prevents SQL injection attacks, but it also wraps the strings in quotes so you don’t have to in your query:
$data = $pdo->quote($unsafe_data);
$pdo->exec("INSERT INTO tablename (column1) VALUES ($data)");
Given all that, you should instead use prepared statements, as explained in just a couple of pages.
Tip
If the query ran through the exec() method affects no records, the number 0 is returned. If the query generates an error, false is returned.
Tip
The quote() method relies on the data-base’s default character set being established.
Executing select queries
Simple queries—those that don’t return records—are run through the exec() method. Queries that do return results (such as SELECT) should be run using the query() method, assigning the results to a new variable:
$results = $pdo->query($q);
To see how many records were returned by the query, invoke the new variable’s rowCount() method:
$results->rowCount();
This is equivalent to calling mysqli_num_rows().
Interestingly, the $results variable will be an object of type PDOStatement, which is one of the three most important PDO classes, along with PDO and PDOException.
Once you have executed a query that returned some results, you can fetch those results using the fetch() method of the PDOStatement object (e.g., $results). First, though, you should tell PHP how you want to fetch the records. This is accomplished by providing the setFetchMode() method with a constant. The most commonly used ones are:
• PDO::FETCH_ASSOC, for an associative array
• PDO::FETCH_NUM, for a numerically indexed array
• PDO::FETCH_OBJ, for a generic object
• PDO::FETCH_CLASS, for a specific type of object
Fetching Results Directly
The query() method allows you to fetch results directly in a loop without using fetch(). That syntax is
foreach ($pdo->query($q) as $row) {
// Use $row.
}
Although it might seem like the query would be executed with each iteration of the loop, that’s not actually the case. Still, I prefer the more overt strategy of using the fetch() method.
For example:
$results = $pdo->query('SELECT id, username FROM users');
$results->setFetchMode(PDO::FETCH_NUM);
while ($row = $results->fetch()) {
// Use $row[0] for the id.
// Use $row[1] for the username.
}
A more interesting option is to have the returned records be turned into specific types of objects, logically, objects you’re already using in your application. For example, say you’ve defined a User class:
class User {
private $id;
private $username;
public getUsername() {
return $this->username;
}
}
Now you can fetch database records into new User objects:
$results = $pdo->query('SELECT id, username FROM users');
$results->setFetchMode (PDO::FETCH_CLASS, 'User');
while ($row = $results->fetch()) {
echo $row->getUsername();
}
As you can see in that code, $row will be a User object, and it can invoke the User methods.
This approach can be beneficial in an object-based site. The thing to watch out for is that PHP directly maps the returned column names to matching class attributes. If no comparable class attribute exists, PHP will create the column name as a new public attribute. For this reason, I had to use$id as the private class attribute instead of $_id.
Let’s use this information to update add_task.php so that it now shows a form for adding new tasks. Per the example in Chapter 1, the form will display the current tasks in a menu so that a new task can be created as a subtask ![]() .
.
![]() A SELECT query is used to fetch all the currently incomplete tasks shown in the form.
A SELECT query is used to fetch all the currently incomplete tasks shown in the form.
To run a SELECT query
1. Open add_task.php (Script 8.5) in your text editor or IDE, if it is not already.
2. Within the try block, after the PDO object has been created, start the form (Script 8.6):
echo '<form action="add_task.php" method="post">
<fieldset>
<legend>Add a Task</legend>
<p>Task: <input name="task" type="text" size="60" maxlength="100"></p>
<p>Parent Task: <select name="parent_id"><option value="0">None</option>';
This code comes verbatim from Chapter 1. See that chapter if you need any explanations.
Note that this code is being added within the try block, because that’s where the database connection is made, and all database interactions will occur.
3. Run the query:
$q = 'SELECT task_id, task FROM tasks WHERE date_completed="0000-00-00 00:00:00" ORDER BY date_added ASC';
$r = $pdo->query($q);
The SQL query is the same as in Chapter 1, but now it is run through a PDO instance.
4. Set the fetch mode:
$r->setFetchMode(PDO::FETCH_NUM);
The rows will be fetched as numerically indexed arrays.
5. Show the results:
while ($row = $r->fetch()) {
echo "<option
value=\"$row[0]\">$row[1]</option>\n";
}
Again, aside from the new PDO code, this is the same idea as in Chapter 1.
6. Complete the form:
echo '</select></p>
<input name="submit" type="submit" value="Add This Task">
</fieldset>
</form>';
7. Save the file, place it in your Web directory, and test in your Web browser ![]() .
.
There’s no point in submitting the form, though, as no code has yet been written to handle form submissions.
Tip
By default, PHP will call the class constructor after mapping column values to the class attributes. This behavior can be changed by altering the setFetchMode() invocation. See the PHP manual for details.
Script 8.6. The next step in developing this script is to use a SELECT query to populate a menu in the form.
1 <!doctype html>
2 <html lang="en">
3 <head>
4 <meta charset="utf-8">
5 <title>Add a Task</title>
6 <link rel="stylesheet" href="style.css">
7 </head>
8 <body>
9 <?php # Script 8.6 - add_task.php #2 (in this chapter)
10 // This page adds tasks to the tasks table using PDO.
11
12 // Try to connect to the database:
13 try {
14
15 // Create the object:
16 $pdo = new PDO('mysql:dbname=test;host=localhost', 'username', 'password');
17
18 // Start the form:
19 echo '<form action="add_task.php" method="post">
20 <fieldset>
21 <legend>Add a Task</legend>
22 <p>Task: <input name="task" type="text" size="60" maxlength="100"></p>
23 <p>Parent Task: <select name="parent_id"><option value="0">None</option>';
24
25 // Run the query:
26 $q = 'SELECT task_id, task FROM tasks WHERE date_completed="0000-00-00 00:00:00" ORDER BY date_added ASC';
27 $r = $pdo->query($q);
28
29 // Set the fetch mode:
30 $r->setFetchMode(PDO::FETCH_NUM);
31
32 // Show the results:
33 while ($row = $r->fetch()) {
34 echo "<option value=\"$row[0]\">$row[1]</option>\n";
35 }
36
37 // Complete the form:
38 echo '</select></p>
39 <input name="submit" type="submit" value="Add This Task">
40 </fieldset>
41 </form>';
42
43 // Unset the object:
44 unset($pdo);
45
46 } catch (PDOException $e) { // Report the error!
47 echo '<p class="error">An error occurred: ' . $e->getMessage() . '</p>';
48 }
49
50 ?>
51 </body>
52 </html>
Prepared statements
The final concept I want to introduce is how to use prepared statements through PDO. Using prepared statements, in case you’re not familiar with them, is a different way of running queries. Most queries aren’t static but rather contain a combination of SQL keywords, specific table and column references, and some data that changes on the fly, such as that provided by users. Traditionally, the whole query is assembled and sent to the database as one step:
$results = $pdo->query("SELECT * FROM users WHERE email='$email' AND pass=SHA1('$pass')");
With prepared statements, the query is sent as one step and the specific data is sent separately. The end result can be much better performance and easier security management: because the data is sent separately from the query, it does not need to be protected against SQL injection attacks.
To use prepared statements with PDO, start with the prepare() method. Provide to this method the query, with the dynamic data represented by placeholders (question marks):
$stmt = $pdo->prepare('SELECT * FROM users WHERE email=? AND pass=SHA1(?)');
Note that even though the two pieces of data in this query are strings, the placeholders do not need to be within quotation marks (as in the original query).
This method returns a PDOStatement object, which will be used in subsequent steps.
Next, invoke the execute() method of the PDOStatement object, providing to it an array of actual values:
$stmt->execute(array('me@example.com', 'mypass'));
The values should be supplied in the same order as they’ll be used in the query.
Using the question marks as placeholders is one option. A more overt alternative is to use named placeholders. Named placeholders start with a colon, followed by a label:
$stmt = $pdo->prepare('SELECT * FROM users WHERE email=:email AND pass=SHA1(:pass)');
Then, use the named placeholders as keys in the array passed to the execute() method:
$stmt->execute(array(':email' => 'me@example.com', ':pass' => 'mypass'));
The net effect is the same, but using named placeholders is more obvious and less likely to mix up the placeholders and values.
Let’s use prepared statements to complete the add_task.php script, adding form validation and an INSERT query.
To use prepared statements
1. Open add_task.php (Script 8.6) in your text editor or IDE, if it is not already.
2. Within the try block, after the PDO object has been created, start validating the form data (Script 8.7):
if (($_SERVER['REQUEST_METHOD'] == 'POST') && !empty($_POST['task'])) {
if (isset($_POST['parent_id']) &&
filter_var($_POST['parent_id'], FILTER_VALIDATE_INT, array('min_range' => 1)) ) {
$parent_id = $_POST['parent_id'];
} else {
$parent_id = 0;
}
Again, this code comes verbatim from Chapter 1. See that chapter if you need any explanations.
3. Prepare the query:
$q = 'INSERT INTO tasks (parent_id, task) VALUES (:parent_id, :task)';
$stmt = $pdo->prepare($q);
The SQL query is the same as from Chapter 1, but it now uses named placeholders for the two dynamic values.
4. Execute the query and report on the results:
if ($stmt->execute(array (':parent_id' => $parent_id, ':task' => $_POST['task']))) {
echo '<p>The task has been added!</p>';
} else {
echo '<p>The task could not be added!</p>';
}
The execute() method returns a Boolean indicating its success, so it can be used in a conditional as in this code.
Script 8.7. Finally, the script performs a minimal amount of validation, and then adds the new task to the database, using prepared statements.
1 <!doctype html>
2 <html lang="en">
3 <head>
4 <meta charset="utf-8">
5 <title>Add a Task</title>
6 <link rel="stylesheet" href="style.css">
7 </head>
8 <body>
9 <?php # Script 8.7 - add_task.php #3 (in this chapter)
10 // This page adds tasks to the tasks table using PDO.
11
12 // Try to connect to the database:
13 try {
14
15 // Create the object:
16 $pdo = new PDO('mysql:dbname=test;host=localhost', 'username', 'password');
17
18 // Check for a form submission:
19 if (($_SERVER['REQUEST_METHOD'] == 'POST') && !empty($_POST['task'])) {
20
21 // Minimal validation:
22 if (isset($_POST['parent_id']) &&
23 filter_var($_POST['parent_id'], FILTER_VALIDATE_INT, array('min_range' => 1)) ) {
24 $parent_id = $_POST['parent_id'];
25 } else {
26 $parent_id = 0;
27 }
28
29 // Add the task to the database:
30 $q = 'INSERT INTO tasks (parent_id, task) VALUES (:parent_id, :task)';
31 $stmt = $pdo->prepare($q);
32
33 // Confirm the results:
34 if ($stmt->execute(array(':parent_id' => $parent_id, ':task' => $_POST['task']))) {
35 echo '<p>The task has been added!</p>';
36 } else {
37 echo '<p>The task could not be added!</p>';
38 }
39
40 } // End of submission IF.
41
42 // Start the form:
43 echo '<form action="add_task.php" method="post">
44 <fieldset>
45 <legend>Add a Task</legend>
46 <p>Task: <input name="task" type="text" size="60" maxlength="100"></p>
47 <p>Parent Task: <select name="parent_id"><option value="0">None</option>';
48
49 // Run the query:
50 $q = 'SELECT task_id, task FROM tasks WHERE date_completed="0000-00-00 00:00:00" ORDER BY date_added ASC';
51 $r = $pdo->query($q);
52
53 // Set the fetch mode:
54 $r->setFetchMode(PDO::FETCH_NUM);
55
56 // Show the results:
57 while ($row = $r->fetch()) {
58 echo "<option value=\"$row[0]\">$row[1]</option>\n";
59 }
60
61 // Complete the form:
62 echo '</select></p>
63 <input name="submit" type="submit" value="Add This Task">
64 </fieldset>
65 </form>';
66
67 // Unset the object:
68 unset($pdo);
69
70 } catch (PDOException $e) { // Report the error!
71 echo '<p class="error">An error occurred: ' . $e->getMessage() . '</p>';
72 }
73
74 ?>
75 </body>
76 </html>
5. Complete the conditional begun in Step 2:
} // End of submission IF.
6. Save the file, place it in your Web directory, and test in your Web browser ![]() and
and ![]() .
.
![]() Filling out the form...
Filling out the form...
![]() and the new task has been added (as also shown in the select menu).
and the new task has been added (as also shown in the select menu).
Tip
Prepared statements will have the largest performance benefits in scripts that execute the same query multiple times with only the data changing on each execution.
Tip
PDO also supports transactions, assuming that the database application does.
Using the Standard PHP Library
A key component to the success of the C programming language over the years has been its C Standard Library: a collection of commonly needed tools that can easily be used in your own programs. Because PHP is written in C, it’s only logical that it would eventually have its own counterpart: the Standard PHP Library (SPL), built into PHP as of version 5.0.
The initial focus of the SPL was on iterators (to be explained shortly) and exceptions. Version 5.3 of the language added even more classes, in particular a host of new data structures (think of them like new variable types). There are also classes for working with files and directories, as well as some useful OOP-related functions.
Through the rest of the chapter, I’ll demonstrate some of the range of things that the SPL has to offer.
Tip
The SPL also implements many Gang of Four design patterns, such as Iterator and Observer. For this reason, I purposefully did not cover those in Chapter 7, “Design Patterns.”
Tip
As of PHP 5.3, SPL cannot be disabled. This means that if you’re using PHP 5.3 or greater, you have support for SPL.
The SessionHandlerInterface Class
Added in version 5.4 of PHP is the SessionHandlerInterface class. This interface identifies what functionality is required to create your own session-handling object. Chapter 3, “Advanced Database Concepts,” explained how to do this procedurally. To use objects instead, you would create a class that implements SessionHandlerInterface:
class SessionHandler implements SessionHandlerInterface {
The class would need to define these methods:
• open()
• read()
• write()
• close()
• destroy()
• gc()
Those methods would do the same things that the procedural functions covered in Chapter 3 do. Then you’d use this class like so:
$sh = new SessionHandler();
session_set_save_handler($sh, true);
And that’s it!
File handling
To start with some easy examples, the SPL has defined a few classes for working with files and directories. First, there’s the SplFileInfo class, which creates an object from a file reference:
$file = new SplFileInfo ('filename.ext');
Once you have created that object, you can invoke various methods to get information about the file:
• getBasename()
• getExtension()
• getMTime()
• getPathname()
• getSize()
• getType()
• isDir()
• isFile()
• isWritable()
This is just a sampling of the available methods; see the PHP manual for the full list. For example ![]() :
:
$file = new SplFileInfo('test.php');
echo "<p>Extension: {$file->getExtension()}</p>";
echo "<p>Size (bytes): {$file->getSize()}</p>";
echo "<p>Real path: {$file->getRealPath()}</p>";
![]() A sampling of the available information for a specific file.
A sampling of the available information for a specific file.
If you also want file manipulation functionality, such as the ability to write to or read from a file, you can use SplFileObject. This class inherits from SplFileInfo. Hence, you have all of the previous methods, plus some new ones like fgets() and fwrite(), which correspond to the procedural equivalents.
To create a new object of type SplFileObject, provide the filename (and path, if needed) as the first argument and the mode as the second:
$file = new SplFileObject ('somefile.txt', 'r');
Now, for example, you can read the file’s data:
while (!$file->eof()) {
echo $file->fgets();
}
With this in mind, let’s create a new version of the write_to_file.php example that uses SPL.
To use SplFileObject
1. Open write_to_file.php (Script 8.2), in your text editor or IDE.
Note that I’m going to be editing the first version of the write_to_file.php script. This is because that script handles generic exceptions, which is what SplFileObject will throw in case of problems.
2. Remove the inclusion of the WriteToFile class (Script 8.8).
3. Change the creation of the $fp object to
$fp = new SplFileObject ('data.txt', 'w');
Instead of creating an object of type WriteToFile, now the script will create one of type SplFileObject.
4. Change the data writing line to
$fp->fwrite("This is a line of data.\n");
There are two changes here. First, the method to invoke is now fwrite(), not write(). Second, the newline character, which the original class added automatically, must now be part of the data to be written.
5. Remove the call to the close() method.
The SplFileObject does not have a close() or fclose() method. The file will be closed when the object is deleted.
6. Save the file as write_to_file3.php, place it in your Web directory, and test in your Web browser ![]() .
.
![]() Unbeknownst to the end user, the script now uses an object of type SplFileObject.
Unbeknownst to the end user, the script now uses an object of type SplFileObject.
Tip
The SplTempFileObject class provides a way to create and work with a temporary file.
Script 8.8. This updated version of write_to_ file.php now uses the SPL SplFileObject class.
1 <!doctype html>
2 <html lang="en">
3 <head>
4 <meta charset="utf-8">
5 <title>Using SplFileObject</title>
6 <link rel="stylesheet" href="style.css">
7 </head>
8 <body>
9 <?php # Script 8.8 - write_to_file3.php
10 // This page uses the SplFileObject class.
11
12 // Start the try...catch block:
13 try {
14
15 // Create the object:
16 $fp = new SplFileObject ('data.txt', 'w');
17
18 // Write the data:
19 $fp->fwrite("This is a line of data.\n");
20
21 // Delete the object:
22 unset($fp);
23
24 // If we got this far, everything worked!
25 echo '<p>The data has been written.</p>';
26
27 } catch (Exception $e) {
28 echo '<p>The process could not be completed because the script: ' . $e->getMessage() . '</p>';
29 }
30
31 echo '<p>This is the end of the script.</p>';
32
33 ?>
34 </body>
35 </html>
SPL Exceptions
The SPL defines more than a dozen different types of exception classes. Each of these extends the Exception base class, covered earlier in the chapter.
Using the SPL exceptions instead of your own custom extensions makes more sense as you start creating libraries that other people might use, or start using other people’s libraries in your code. The SPL exceptions provide a common set of exception types that everyone can use reliably, and in the same manner.
For example, you can have your classes throw InvalidArgumentExceptions when methods do not receive the proper arguments:
function someMethod($arg) {
if (!isset($arg)) {
throw new
InvalidArgumentException('An argument must be provided to someMethod().');
}
}
If the argument had to be of a certain type or match a certain pattern, those details could be included in the exception, too.
Iterators
Iterator is a design pattern that makes it possible to access the components of any kind of complex data structure using a loop. That probably sounds more complicated than it really is.
For example, as you know, the foreach loop can iterate through an array, a while loop is used to fetch query results, and PHP has functions for iterating through directory and file contents. Although the underlying data structure is different in each of these cases, the premise for looping through them is the same.
An iterator, then, is just a “one ring to rule them all” solution: regardless of the data being iterated, you can use the same code (normally, foreach).
There are more than a dozen types of iterators defined in the SPL, including these:
• ArrayIterator
• RecursiveArrayIterator
• LimitIterator
• DirectoryIterator
For example, to loop through a directory of files, you can use the DirectoryIterator class:
// Reference to current directory:
$dir = new DirectoryIterator('.');
foreach ($dir as $item) {
// Use $item.
}
A nice thing about this example is that DirectoryIterator returns each item in the loop as an SplFileObject. This means that within the loop, you can use the methods just explained.
Of course, since they are classes, you can extend any of these iterators to create your own variations on them. If you look online, you’ll find examples that extend DirectoryIterator.
As an easy example, let’s start with the basic Iterator interface. As an interface (see Chapter 6), Iterator identifies the methods needed by a class in order for PHP to be able to loop through instances of that class. Those methods are as follows:
• current(), which returns the current item
• key(), which returns the current key, or position in the list
• next(), which increments the key or position
• rewind(), which resets the key or position
• valid(), which returns a Boolean indicating if a value exists at the current key or position
Once you’ve defined these methods (assuming you’ve defined them correctly), PHP will have the knowledge it needs to iterate through objects of that class type.
For an example of this, let’s take the Department and Employee classes from Chapter 6 and make Department implement Iterator, so that a loop can be used to access the employees in a department.
To use the Iterator interface
1. Open hinting.php (Script 6.8) in your text editor or IDE.
This one script both defined and used the two classes, so it only needs to be edited here.
2. Change the Department class so that it implements Iterator (Script 8.9):
class Department implements Iterator {
Now that this class implements that interface, it must define the five methods already identified, or an error will occur (again, see Chapter 6 for details).
3. Within the class, add a new private attribute:
private $_position = 0;
This private attribute will be used to track iterations through the $_employees array.
4. Within the constructor, set $_position to 0:
$this->_position = 0;
This isn’t absolutely necessary—the code in Step 3 also does this—but it makes for good programming form.
5. Define the current() method:
function current() {
return $this->_employees [$this->_position];
}
The current() method should return the current item. The “items” for a Department are stored in the $_employees array, so this method just needs to return the element in that array indexed at the current position.
Script 8.9. By implementing Iterator, a Department object can now be used in a loop, to fetch every employee in that department.
1 <!doctype html>
2 <html lang="en">
3 <head>
4 <meta charset="utf-8">
5 <title>Iterators</title>
6 <link rel="stylesheet" href="style.css">
7 </head>
8 <body>
9 <?php # Script 8.9 - iterator.php
10 // This page defines and uses the Department and Employee classes.
11
12 # ***** CLASSES ***** #
13
14 /* Class Department.
15 * The class contains two attribute: name and employees[].
16 * The class contains seven methods now!
17 */
18 class Department implements Iterator {
19 private $_name;
20 private $_employees;
21
22 // For tracking iterations:
23 private $_position = 0;
24
25 function _ _construct($name) {
26 $this->_name = $name;
27 $this->_employees = array();
28 $this->_position = 0;
29 }
30 function addEmployee(Employee $e) {
31 $this->_employees[] = $e;
32 echo "<p>{$e->getName()} has been added to the {$this->_name} department.</p>";
33 }
34
35 // Required by Iterator; returns the current value:
36 function current() {
37 return $this->_employees[$this->_position];
38 }
39
40 // Required by Iterator; returns the current key:
41 function key() {
42 return $this->_position;
43 }
44
45 // Required by Iterator; increments the position:
46 function next() {
47 $this->_position++;
48 }
49
50 // Required by Iterator; returns the position to the first spot:
51 function rewind() {
52 $this->_position = 0;
53 }
54
55 // Required by Iterator; returns a Boolean indiating if a value is indexed at this position:
56 function valid() {
57 return (isset($this->_employees[$this->_position]));
58 }
59
60 } // End of Department class.
61
62 class Employee {
63 private $_name;
64 function _ _construct($name) {
65 $this->_name = $name;
66 }
67 function getName() {
68 return $this->_name;
69 }
70 } // End of Employee class.
71
72 # ***** END OF CLASSES ***** #
73
74 // Create a department:
75 $hr = new Department('Human Resources');
76
77 // Create employees:
78 $e1 = new Employee('Jane Doe');
79 $e2 = new Employee('John Doe');
80
81 // Add the employees to the department:
82 $hr->addEmployee($e1);
83 $hr->addEmployee($e2);
84
85 // Loop through the department:
86 echo "<h2>Department Employees</h2>";
87 foreach ($hr as $e) {
88 echo "<p>{$e->getName()}</p>";
89 }
90
91 // Delete the objects:
92 unset($hr, $e1, $e2);
93
94 ?>
95 </body>
96 </html>
6. Define the key() method:
function key() {
return $this->_position;
}
The key() method returns the current position.
7. Define the next() method:
function next() {
$this->_position++;
}
The next() method should increment the position indicator so that it will point to the next item.
8. Define the rewind() method:
function rewind() {
$this->_position = 0;
}
The rewind() method resets the position indicator back to its original value.
9. Define the valid() method:
function valid() {
return (isset($this->_employees [$this->_position]));
}
This method needs to return a Boolean indicating if a value exists at the current position. If this method returns false, then the iterating structure (i.e., the foreach loop) will know to stop looping through the data.
10. Outside of the class, after creating all the objects, loop through the department:
echo "<h2>Department Employees</h2>";
foreach ($hr as $e) {
echo "<p>{$e->getName()}</p>";
}
Since Department implements Iterator, a Department object can be passed to a foreach loop. Since each item within the foreach loop is an Employee object—because that’s what the Department::current() method returns—you can call getName() on the $e object within the loop.
11. Save the file as iterator.php, place it in your Web directory, and test in your Web browser ![]() .
.
![]() The employees are easily listed at the bottom of the page because Department now implements the Iterator pattern.
The employees are easily listed at the bottom of the page because Department now implements the Iterator pattern.
Tip
The FilterIterator can be used with a DirectoryIterator to limit what kinds of files are iterated.
Tip
The LimitIterator allows you to page through a list, similar to using a LIMIT clause in a SQL command.
Tip
The SPL defines a couple of recursive iterators that make it easier to navigate nested lists (such as directories or multidimensional arrays).
Data structures
In more recent versions of PHP, the SPL also has classes that define new data structures. Most of these use objects to create more specific, limited variations on arrays. You might think that would be bad, but the flexibility and openness of PHP arrays can have adverse performance effects and allow for sloppier coding.
As an example, take SplFixedArray. This array type has the following characteristics:
• Has a fixed number of elements
• Only uses integers greater than or equal to 0 for its keys
• Cannot use any of the existing array functions
That may all sound like a bad deal, but what the SplFixedArray provides is better performance than a traditional array. In situations where you know the number of array elements in advance and are using numeric indexes, this is a reasonable trade-off. And, wisely, SplFixedArray implementsIterator, so you can access the entire array using a loop, as you would a standard array. (Technically, you can change the number of elements in an SplFixedArray after you’ve created it, but doing so eradicates any performance benefits of using the format in the first place.)
As another example, the stack is a commonly used structure in programming. A stack is a list of items that has a last-in, first-out (LIFO) order. In other words, the only item in the stack that is available is the one added most recently:
$names = new SplStack();
// Add items:
$names->push('Lucian');
$names->push('Priscilla');
$names->push('Travis');
$names->push('Greta');
$names->pop(); // Greta
Again, this is just a more restricted type of array, but restrictions are sometimes for the best. For example, if you have an array that stores a sequence of steps, you might only let the user go back a step, not to any random step. That kind of restriction can be enforced with a stack, but not a standard array.
Similar to the stack is the queue, implemented in SPL as SplQueue. This list type uses the first-in, first-out (FIFO) structure.
Autoloading classes
With OOP, a logical way to modularize the files in an application is to place each class definition in its own file. You’ve done this multiple times over by now. In such examples, the class file has to be required by the script that needs to create an object of that type:
require('Rectangle.php');
$r = new Rectangle(43, 902);
When including just one class file, this isn’t much of a hardship, but as your programs use more and more objects, including all the requisite files can become tedious. Thankfully, the developers behind PHP created a workaround to the tiresome process of always including class definition files.
To start, define a function that will know how to include class files for you:
function class_loader($class) {
require('classes/' . $class . '.php');
}
That code assumes that all class files are in the classes subdirectory. Now you can load a class file using
class_loader('Rectangle');
However, the point of creating a class loading function isn’t to call it directly but rather to have PHP call it for you when a class definition is required. This is known as autoloading.
To enable autoloading, register your loading function with PHP:
spl_autoload_register ('class_loader');
For each new object type created in the following code, the function will be invoked:
$obj = new Class();
$me = new Human();
$r = new Rectangle();
Other Interfaces
There are a couple of SPL interfaces that do not fit neatly into any of the chapter’s categories of SPL topics. For example, the Countable interface dictates the method signature that a class must have in order to use the PHP count() method on objects of that class type. Specifically, Countable needs you to create a method called count() that takes no arguments, and returns an integer:
class Department implements Iterator, Countable {
// Attributes.
// Other methods.
function count() {
return count($this->_employees);
}
} // End of Department class.
echo count($hr);
Another interface, ArrayAccess, allows you to make an object treatable like it was an array. To implement it, you define four methods that then let you add, reference, and remove object components using array notation.
Thanks to the autoloader function, those three lines will automatically include Class.php, Human.php, and Rectangle.php (within the classes directory). Note that this does assume that the classes and class files use the same exact names (minus the extensions).
Notice that the class_loader() function and the spl_autoload_register() call are defined outside of any class. Instead, you would place those lines of code in a script that instantiates objects.
As an example of this, let’s rewrite factory.php (Script 7.4) to autoload the class definitions. The factory example is particularly good for autoloading because the specific Shape type—e.g., Rectangle or Triangle—will only be known at runtime. By using the autoloader, instead of automatically loading all the classes that could be used, no memory will be wasted by loading unused classes.
To autoload class definition files
1. Open factory.php (Script 7.4) in your text editor or IDE.
2. Remove the four require() lines (Script 8.10).
3. Add the definition of the class_loader() function:
function class_loader($class) {
require($class . '.php');
}
This assumes that all class files will be in the same directory as this script, which has been how I’ve been doing things in this book, for simplicity’s sake.
4. Tell PHP to use the function:
spl_autoload_register ('class_loader');
5. Save the file as autoload.php, place it in your Web directory along all the necessary class files, and test in your Web browser ![]() .
.
![]() The script seems to work exactly the same as before, but now class definition files are loaded on an as-needed basis.
The script seems to work exactly the same as before, but now class definition files are loaded on an as-needed basis.
Remember that you have to pass certain values along in the URL in order for the script to work. See Chapter 7 for details.
Tip
In earlier versions of PHP, before the spl_autoload_register() function was added, the _ _autoload() function was used for this same purpose.
Tip
Although class names in PHP are case-insensitive, some operating systems use case-sensitive file structures. If your class is called MyClass, you’ll be better off naming the file exactly MyClass.php and creating objects using
$obj = new MyClass();
Script 8.10. Using the SPL autoloading capability, this script no longer has to manually include each class file that it may need.
1 <!doctype html>
2 <html lang="en">
3 <head>
4 <meta charset="utf-8">
5 <title>Autoloading</title>
6 <link rel="stylesheet" href="style.css">
7 </head>
8 <body>
9 <?php # Script 8.10 - autoload.php
10 // This page uses the ShapeFactory class (Script 7.2).
11
12 // Create the autoloader:
13 function class_loader($class) {
14 require($class . '.php');
15 }
16 spl_autoload_register('class_loader');
17
18 // Minimal validation:
19 if (isset($_GET['shape'], $_GET['dimensions'])) {
20
21 // Create the new object:
22 $obj = ShapeFactory::Create($_GET['shape'], $_GET['dimensions']);
23
24 // Print a little introduction:
25 echo "<h2>Creating a {$_GET['shape']}...</h2>";
26
27 // Print the area:
28 echo '<p>The area is ' . $obj->getArea() . '</p>';
29
30 // Print the perimeter:
31 echo '<p>The perimeter is ' . $obj->getPerimeter() . '</p>';
32
33 } else {
34 echo '<p class="error">Please provide a shape type and size.</p>';
35 }
36
37 // Delete the object:
38 unset($obj);
39
40 ?>
41 </body>
42 </html>
Review and Pursue
If you have any problems with these sections, either in answering the questions or pursuing your own endeavors, turn to the book’s supporting forum (www.LarryUllman.com/forums/).
Review
• What is an exception? How do exceptions differ from errors? (See page 244.)
• What exception methods will you commonly use? (See page 245.)
• What is the try...catch syntax? (See page 244.)
• How do you create different exception types? (See page 251.)
• What is PDO? What are the benefits of using PDO? (See page 258.)
• How do you connect to a database using PDO? (See pages 258 and 259.)
• How do you execute a simple query using PDO? (See page 261.)
• How do you execute a query that returns results, and fetch those results, using PDO? (See page 262.)
• What are prepared statements? How do you execute them using PDO? (See page 266.)
• What is the SPL? (See page 270.)
• What SPL classes exist for working with files? (See page 271.)
• What is an iterator? (See page 273.)
• What are some of the new data structures added in the SPL? What advantages are there in using them? (See page 278.)
• What are the benefits of having PHP autoload class files for you? How do you set that up? (See page 279.)
Pursue
• If you’re not familiar with how to write data to a file in PHP, see the PHP manual.
• Introduce errors into the WriteTo-File class in order to see some other exceptions.
• Check out the PHP manual’s pages on PDO. Specifically investigate how to
• Change the level of error reporting.
• Perform transactions.
• If you’re unfamiliar with what SQL injection attacks are, look them up online.
• If you’ve never used prepared statements, do more research on what they are and why they’re beneficial.
• Update the add_task.php example to create a Task class. Then fetch existing tasks from the database into Task objects.
• If you’re using PHP 5.4 or later, rewrite the db_sessions.inc.php script from Chapter 3, this time using an extension of the SessionHandlerInterface class.
• Try implementing the Directory Iterator example, using the SplFileObject within the loop to print out information about each file.
• Try having the Department class also implement Countable, so that you can apply the count() function to Department objects.
• Check out the PHP manual examples for the ArrayAccess interface.
• Spend an afternoon (or two) reading up on the Standard PHP Library, both in the PHP manual and in various tutorials and articles online.