PHP, MySQL, JavaScript & HTML5 All-in-One For Dummies (2013)
Book I: Getting Started with PHP & MySQL
Chapter 5: Setting Up Your Web Development Environment with the XAMPP Package
In This Chapter
![]() Downloading and installing XAMPP
Downloading and installing XAMPP
![]() Testing and configuring your development environment
Testing and configuring your development environment
![]() Troubleshooting your XAMPP installation
Troubleshooting your XAMPP installation
XAMPP is a popular all-in-one kit that installs Apache, MySQL, and PHP in one procedure. XAMPP also installs phpMyAdmin, a web application you can use to administer your MySQL databases.
XAMPP can greatly simplify the installation process. The XAMPP installation installs all the software you need for the applications discussed in this book.
 According to the XAMPP website, XAMPP is intended as a development environment on a local computer. As a development environment, XAMPP is configured to be as open as possible. XAMPP isn’t intended for production use — it isn’t secure as a production environment. Before using XAMPP to make a website available to the public, you need to tighten the security. Security is discussed in detail in Book IV.
XAMPP has stable versions available for Windows, Mac, and several versions of Linux. Because XAMPP installs Apache, MySQL, and PHP, it is appropriate to use for installation only on a computer that doesn’t have any of the three packages already installed.
Because Apache is preinstalled on many Linux and Mac computers and often MySQL and/or PHP are as well, you’re most likely to use XAMPP for installation in a Windows environment. For that reason, this chapter provides instructions only for Windows installations.
Obtaining XAMPP
You can download XAMPP for Windows from www.apachefriends.org/en/xampp-windows.html. As of this writing, the current version of XAMPP installs the following:
![]() MySQL
MySQL
![]() PHP
PHP
![]() Apache
Apache
![]() phpMyAdmin
phpMyAdmin
Scroll down the web page until you come to the Download section. Under the listing for XAMPP for Windows, click the Installer link to download the Installer version.
The downloaded file is named xampp-win32-, followed by the version and library number, followed by -installer.exe, such as xampp-win32-1.8.0-VC9-installer.exe. Save the downloaded file on your hard drive in an easy-to-find place, such as the desktop.
Installing XAMPP
After you’ve downloaded XAMPP, follow these steps to install it:
1. Navigate to the location where you saved the downloaded XAMPP file.
The file is named something like xampp-win32-1.8.0-VC9-installer.exe.
2. Double-click the file.
The Setup Wizard starts.
If you’re installing on Windows Vista, 7, or 8, you cannot install in the Program Files folder because of a protection problem. Also, PHP sometimes has a problem running if it’s installed in a folder with a space in the path or filename, such as Program Files.
3. Read and click through the next few screens until the Choose Install Location screen appears, as shown in Figure 5-1.
It's best to accept the default location (c:\xampp) unless you have a really good reason to choose another location. You can click Browse to select another install folder.
4. When you’ve chosen the install folder, click Next.
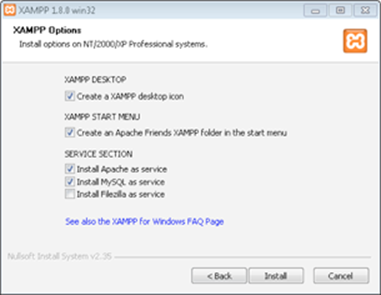
The XAMPP Options screen appears, as shown in Figure 5-2.
5. Under Service Section, select the Install Apache as Service and the Install MySQL as Service check boxes.
This installs the tools as Windows services, which causes them to start automatically when the computer starts.
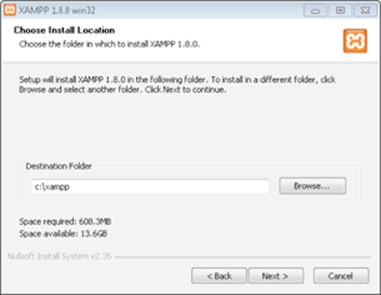
Figure 5-1: The Choose Install Location screen of the Setup Wizard.
Figure 5-2: The XAMPP Options screen of the Setup Wizard.
6. Click the Install button.
The installation process takes a few minutes to complete. As the installation proceeds, you see various files and components being installed on your system, in the location you specified. A status bar shows the installation progress.
When the installation is complete, the Installation Complete screen appears.
7. Click Finish.
A small window opens, and additional messages are displayed. When this part of the installation is finished, a screen displays a message letting you know that the service installation is finished.
8. Click OK.
The following question is displayed:
Start the XAMPP Control Panel now?
The screen displays a Yes and a No button.
9. Click Yes.
The XAMPP Control Panel appears.
Using the XAMPP Control Panel
XAMPP provides a Control Panel for efficient management of the software in the XAMPP package. You can use the Control Panel to determine whether Apache and MySQL are currently running and to start or stop them. Before you can use your development environment, Apache and MySQL must be running. This section tells you how to use the Control Panel to start and stop Apache and MySQL.
The XAMPP Control Panel can run continuously, ready for you to use at all times. When the Control Panel is running, you see an orange icon in the system tray at the bottom right of your computer screen, as shown in Figure 5-3.
![]()
Figure 5-3: The XAMPP Control Panel icon.
If the XAMPP icon is in your system tray, you can click it to open the Control Panel. If you don’t have the icon in your system tray, you can open the Control Panel by choosing Start⇒All Programs⇒Apache Friends⇒XAMPP⇒XAMPP Control Panel. If you attempt to open the Control Panel when it’s already running, an error message is displayed.
Figure 5-4 shows the open Control Panel with Apache and MySQL running. If the installation went smoothly, your control panel will appear like this when you open it after installation. Both Apache and MySQL are shown as running, and the Service check boxes are selected. Your development environment is ready to go.
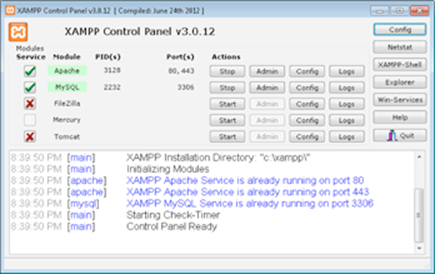
Figure 5-4: The XAMPP Control Panel.
Occasionally, XAMPP isn’t able to start either Apache or MySQL as a service during installation. The Control Panel lists the software, showing that it was installed, but the status does not display as running. Both Apache and MySQL must be running before you can use your development environment.
To start Apache or MySQL when they are not running, select the Service check box and click the Start button. If XAMPP is successful in starting the software, the status will display as running. If XAMPP is unsuccessful in starting the software as a service, you may need to start the software without selecting the Service check box. See the Troubleshooting section at the end of this chapter for more information on starting Apache and MySQL when you have a problem.
A Stop button is displayed for each software package that’s running. You can stop the software, appropriately enough, by clicking the Stop button. You sometimes need to stop the software, such as when you need to upgrade it.
You need to restart Apache whenever you make changes to your PHP configuration, as described throughout this book. To restart Apache, click the Stop button and then, after Apache is stopped, click the Start button.
If you close the Control Panel by clicking Exit, the program ends, and you don’t have a XAMPP Control Panel icon in your system tray. If you just close the Control Panel window by clicking the X in the upper-right corner of the window, the Control Panel icon remains available in your system tray.
Testing Your Development Environment
After you install the XAMPP package and start Apache and MySQL, your environment should be ready to go. You can test your installation by performing the following in any order:
![]() Opening the XAMPP web page
Opening the XAMPP web page
![]() Opening phpMyAdmin
Opening phpMyAdmin
![]() Running a test PHP script
Running a test PHP script
Opening the XAMPP web page
To test the XAMPP installation, follow these steps:
1. Open a browser.
2. Type localhost in the browser’s address bar.
 In some cases, if your local machine isn’t set up to recognize localhost, you might need to type 127.0.0.1 instead.
An XAMPP web page displays, providing a choice of languages. In some cases, XAMPP has already set your language choice and doesn’t ask again. In this case, you don’t need to do Step 3 because your browser is already at the page shown in Figure 5-5.
3. Click your preferred language.
The XAMPP Welcome page displays, as shown in Figure 5-5.
If the web page doesn’t display, Apache may not be running. Use your Control Panel to manage Apache, as described in the preceding section.
4. Click the Status link in the panel on the left side of the page.
A list of software appears, showing which software is activated. MySQL and PHP should be listed as activated. Apache isn’t listed because if Apache isn’t running, you can’t see this page at all.
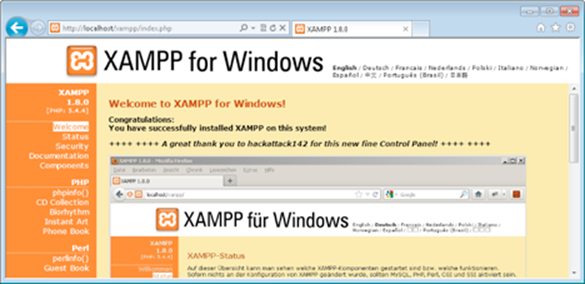
Figure 5-5: The XAMPP Welcome page.
Testing phpMyAdmin
From the XAMPP Welcome page (see the preceding section), you can open phpMyAdmin to test whether it’s installed. Click the phpMyAdmin link in the Tools section toward the bottom of the left panel. If phpMyAdmin is installed, it opens in your browser.
If the phpMyAdmin page doesn’t open, be sure Apache is started. You can manage Apache as described in the Using the XAMPP Control Panel section, earlier in this chapter.
Testing PHP
To test whether PHP is installed and working, follow these steps:
1. Locate the directory in which your PHP scripts need to be saved.
This directory and the subdirectories within it are your web space. This is the space where Apache looks for your scripts when you type localhost. This directory is called htdocs and is located in the directory where you installed XAMPP, such as c:\xampp\htdocs.
You can change the location of your web space in the Apache configuration file. Changing Apache configuration is described in the section, Configuring Apache, later in this chapter.
2. Create a text file in your web space with the name test.php.
The file should contain the following content:
<html>
<head><title>PHP test</title></head>
<body>
<?php
phpinfo();
?>
</body>
</html>
3. Open a browser and type localhost/test.php into the address bar.
The output from this PHP script is a long list of settings and variables for your PHP installation, as shown in Figure 5-6.
4. Scroll down the list to find a section of settings for MySQL.
The software sections are listed in alphabetical order, starting with bcmath. The MySQL sections are located about halfway down the list. You find two blocks, one headed mysql and one headed mysqli. The difference between mysql and mysqli is explained in Chapter 4 of this minibook.
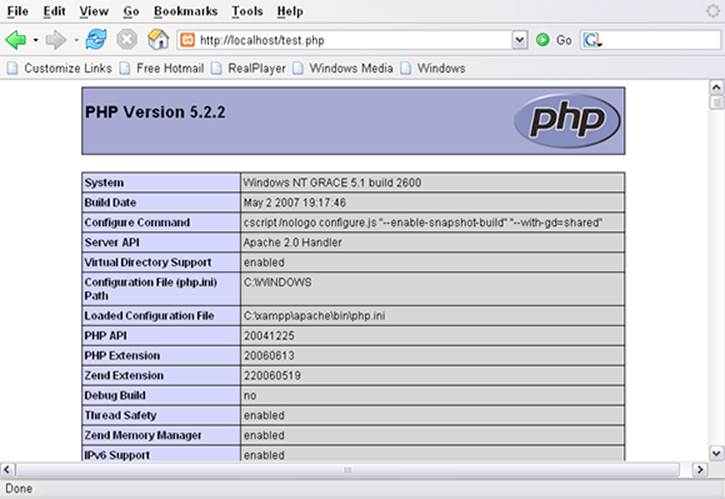
Figure 5-6: Output from the PHP script.
When your PHP script runs correctly and the output includes a block of settings for MySQL support, your environment is ready for your development work.
If the PHP script doesn’t run, be sure Apache is started. You can manage Apache as described in the Using the XAMPP Control Panel section, earlier in this chapter.
Configuring Your Development Environment
Apache, MySQL, and PHP can be configured. Their configuration settings are stored in text files, which you can edit. When XAMPP installs the software, it creates configuration files with default settings so that the software runs with common settings. However, you might need to change the configuration for various reasons. Configuration settings are described throughout the book when the particular feature being configured is discussed.
 XAMPP installs all the software in the directory you designated during installation, such as c:\xampp, which is the default directory. XAMPP configures the software to look for the configuration files in this directory. If you need to change any configuration settings, you must edit the configuration files in this directory, not in the directories that are mentioned in help files or other documentation for the individual software.
Configuring PHP
PHP uses settings in a file named php.ini to control some of its behavior. PHP looks for php.ini when it begins and uses the settings that it finds. If PHP can't find the file, it uses a set of default settings.
XAMPP stores the php.ini file in the apache\bin directory in the main XAMPP folder. For example, if XAMPP is located in the default directory, you edit the file c:\xampp\apache\bin\php.ini to change PHP configuration settings.
To configure PHP, follow these steps:
1. Open the php.ini file for editing in a text editor.
2. Edit the settings you want to change.
Steps 3 and 4 mention some specific settings that you should always change if you’re using the specified environment.
3. Only if you’re using PHP 5 or earlier, turn off magic quotes.
Look for the following line:
magic-quotes-gpc On
Change On to Off.
4. Only if you’re using PHP 5 or later, set your local time zone.
Find the line:
;date.timezone =
Remove the semicolon from the beginning of the line. Add the code for your local time zone after the equals sign. For instance, the line might be
date.timezone = America/Los_Angeles
You can find a list of time zone codes at www.php.net/manual/en/timezones.php.
5. Save the php.ini file.
6. Restart Apache so that the new settings go into effect.
In general, the remaining default settings allow PHP to run okay, but you might need to edit some of these settings for specific reasons. We discuss settings in the php.ini file throughout this book when we discuss a topic that might require you to change settings.
Configuring Apache
The Apache configuration settings are stored in a file named httpd.conf. This file needs some directives in order for PHP to work. XAMPP adds these directives when it installs the software so you don't need to configure Apache to make PHP work.
However, you can change some of Apache's behavior with directives in the httpd.conf file. For instance, you can change where Apache looks for web page files and what port number Apache listens on. Some of the directives you can change are described in Chapter 2 of this minibook. All the Apache directives are described in the Apache website at httpd.apache.org.
To change the configuration for Apache that was installed using XAMPP, you need to find the httpd.conf file in the apache\conf folder in the main folder where XAMPP was installed. For instance, if XAMPP is installed in the default directory, the Apache configuration file isc:\xampp\apache\conf\httpd.conf.
Configuring MySQL
MySQL creates a configuration file when it’s installed. Most people don’t need to change the MySQL configuration. However, you might want to change it in order to store your MySQL databases somewhere other than the default location. In fact, the XAMPP installation configures MySQL to look for the data directory in the XAMPP directory, which isn’t the default location for MySQL, so XAMPP configures its data directory setting for you. If you want to store your data in a different location, you can change the setting yourself. Instructions for changing the configuration for MySQL are provided in Chapter 4 of this minibook.
To change the configuration for MySQL that was installed using XAMPP, you need to find the my.cnf file in the mysql\bin folder in the main folder where XAMPP was installed. For instance, if XAMPP is installed in the default directory, the MySQL configuration file isc:\xampp\mysql\bin\my.cnf.
Uninstalling and Reinstalling XAMPP
If you feel you’ve made an error and want to install XAMPP again, you need to uninstall it before reinstalling. To uninstall and then reinstall XAMPP, follow these steps:
1. Stop both Apache and MySQL in the XAMPP Control Panel.
See the section, Using the XAMPP Control Panel, earlier in this chapter.
If you don’t stop Apache and MySQL before you uninstall XAMPP, you might encounter difficulties when you reinstall XAMPP. This is especially true if you started Apache and MySQL as services.
2. Start the uninstall by choosing Start⇒All Programs⇒Apache Friends⇒XAMPP⇒Uninstall.
The first screen of the uninstall procedure opens.
3. Move through the screens and answer the questions.
Click the Next button to move through the screens; answer the questions by selecting the appropriate options.
You can save any databases or web pages you have created by selecting the appropriate options.
A message is displayed when XAMPP is completely uninstalled.
4. Start the installation procedure again from the beginning.
See the earlier section, Installing XAMPP, for details.
Troubleshooting
Occasionally, when you look in the XAMPP Control Panel, you find Apache and/or MySQL listed but not running, and the Service check box isn’t selected. This means that XAMPP was not able to start Apache or MySQL as a service during installation.
It’s best to run MySQL and Apache as a service, but not necessary. You can start them without selecting the Service check box and your development environment will work okay. You just need to restart MySQL and Apache in the Control Panel whenever you start your computer. When MySQL and Apache are both running as a service, they start automatically when your computer starts. In most cases, you can start them as a service in the Control Panel using the methods described in this section.
First, try selecting the Service check box and clicking the Start button. XAMPP attempts to start the software as a service. If XAMPP is unsuccessful, you will see a message displayed in the bottom box, stating that it isn’t started or that it stopped. A second or third try might be successful.
When XAMPP is unsuccessful starting the software as a service over several tries, click the Start button with the Service check box deselected. The software will start. Then, stop the software by clicking the Stop button. Then, start the software again with the Service check box selected. Usually, XAMPP is now able to successfully start both packages as a service.
If you are unable to start MySQL and/or Apache as a service even after starting them without selecting the Service check box and then stopping them, you can run them without running them as services. They will run okay and your development environment will work — you’ll just have to remember to start them again when you start your computer.