Apache Hadoop YARN: Moving beyond MapReduce and Batch Processing with Apache Hadoop 2 (2014)
10. Apache Hadoop YARN Application Example
In describing how to write a YARN application, it can be helpful to review a bit of YARN’s architecture. YARN is a platform for allowing distributed applications to take full advantage of the resources that YARN has deployed. Currently, resources can be things like CPU, memory, and data. Many developers coming from a server-side application development background or from a classic MapReduce developer background may be accustomed to a certain flow in the development and deployment cycle. In this chapter, the application development life cycle in YARN will be described and the unique requirements of a YARN application will be demonstrated. YARN applications can launch containers encapsulating virtually any application written in any language; however, for the initial releases of YARN, application clients and ApplicationMasters are only demonstrated in Java. Toward this end, we assume familiarity with basic Java programming methods.
To illustrate writing a working YARN application, we’ll walk through the process of writing an application that creates a cluster of JBoss Application Servers (JBoss AS). JBoss AS is an open-source Java EE server that is itself a Java application. It can operate in what it calls “domain mode,” meaning there is a defined cluster of JBoss AS instances. To run in this mode, we not only need to deploy and run JBoss AS, but we also need to configure each JBoss AS instance. In YARN terminology, a JBoss AS instance is under the control of a single YARN container.
As depicted in Figure 10.1, the JBoss client requests resources from the ResourceManager, by providing a container request in the form of an ApplicationSubmissionContext, starting the application on the cluster.
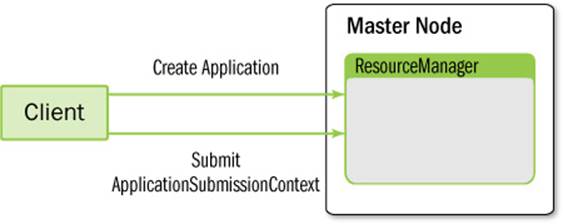
Figure 10.1 Communication pathways between the client submitting the application and the ResourceManager
The YARN Client
We’ll also need to write a YARN client. First, however, let’s discuss what a YARN client actually does. The YARN client is a plain Java object that does not extend any class or implement any interface. It is a main-method runnable class that learns about the YARN environment by instantiating an org.apache.hadoop.yarn.conf.YarnConfiguration object. The YarnConfiguration object depends on finding the yarn-default.xml and yarn-site.xml files in its class path. If these requirements are met, there should be no problems with running your YARN client.
Once a YarnConfiguration object is created in your client, you’ll use that object to create an org.apache.hadoop.client.api.YarnClient. This YarnClient object will do much of the heavy lifting in your YARN application’s client, as suggested by some of its tasks:
![]() Instantiate a YarnClient object
Instantiate a YarnClient object
![]() Initialize itself with the YarnConfiguration object
Initialize itself with the YarnConfiguration object
![]() Start a YarnClient
Start a YarnClient
![]() Get YARN cluster metrics
Get YARN cluster metrics
![]() Get YARN node reports
Get YARN node reports
![]() Get queue information
Get queue information
![]() Get ACL information for the user running the client
Get ACL information for the user running the client
![]() Create the client application
Create the client application
![]() Submit the application to the YARN ResourceManager
Submit the application to the YARN ResourceManager
![]() Get application reports after submitting the application
Get application reports after submitting the application
In addition to providing this core functionality, a YARN client will prepare your application for the YARN cluster by propagating environment variables and whatever resources your application needs—resources like dependent libraries and archive files that can be automatically unarchived by YARN. The YARN client will also create contexts for application submission and for AM container’s launch.
As a runnable Java object, the YARN client generally takes command-line arguments or, at the very least, parse a configuration file that the client users can supply. A number of options are available for parsing command-line options with Java, ranging from using thejava.util.Scanner class as a foundation to build your own parser to using a library specifically built for this use-case. In this chapter’s example, we’ll use the Apache Commons CLI library.
Let’s start to see what a client looks like by examining the first part of the code example, shown in Listing 10.1.
Listing 10.1 YARN client main method
public class JBossClient {
private static final Logger LOG =
Logger.getLogger(JBossClient.class.getName());
private Configuration conf;
private YarnClient yarnClient;
private String appName;
private int amPriority;
private String amQueue = "";
private int amMemory;
private String appJar = "";
private final String appMasterMainClass =
JBossApplicationMaster.class
.getName();
private int priority;
private int containerMemory;
private int numContainers;
private String adminUser;
private String adminPassword;
private String jbossAppUri;
private String log4jPropFile = "";
boolean debugFlag = false;
private Options opts;
public static void main(String[] args) {
boolean result = false;
try {
JBossClient client = new JBossClient();
try {
boolean doRun = client.init(args);
if (!doRun) {
System.exit(0);
}
} catch (IllegalArgumentException e) {
client.printUsage();
System.exit(-1);
}
result = client.run();
} catch (Throwable t) {
System.exit(1);
}
if (result) {
System.exit(0);
}
System.exit(2);
}
. . . .
}
The package and import statements are omitted for brevity, as are the logging statements. We’ll focus on building key pieces of the application, with the entire example available in the book repository (see Appendix A). In Listing 10.1, we see a standard main-method class structure with global variables, most of which will be assigned values from command-line arguments. The conf variable is the object that will have its values populated from the YarnConfiguration object instantiation mentioned earlier. The yarnClient variable is, as its name suggests, the variable that references the YarnClient object also discussed earlier. The opts variable references an org.apache.commons.cli.Options object, which is the object we will use to hold the command-line argument names and their values.
After creating the client object that will represent our JBossClient, we initialize the object with the command-line arguments and then run the client with the method named run(). Let’s take a look at each of these steps in greater detail by adding to the class we’re building. When we create the JBossClient object, we’re using the default constructor. In the constructor, we instantiate a YarnClient, as shown in Listing 10.2.
Listing 10.2 YARN client constructor
public JBossClient() throws Exception {
this.conf = new YarnConfiguration();
yarnClient = YarnClient.createYarnClient();
yarnClient.init(conf);
opts = new Options();
opts.addOption("appname", true,
"Application Name. Default value - JBoss on YARN");
opts.addOption("priority", true, "Application Priority. Default 0");
opts.addOption("queue", true,
"RM Queue in which this application is to be submitted");
opts.addOption("timeout", true, "Application timeout in milliseconds");
opts.addOption("master_memory", true,
"Amount of memory in MB to be requested to run the application master");
opts.addOption("jar", true,
"JAR file containing the applicationmaster");
opts.addOption("container_memory", true,
"Amount of memory in MB to be requested to run the shell command");
opts.addOption("num_containers", true,
"No. of containers on which the shell command needs to be executed");
opts.addOption("admin_user", true,
"User id for initial administrator user");
opts.addOption("admin_password", true,
"Password for initial administrator user");
opts.addOption("debug", false, "Dump out debug information");
opts.addOption("help", false, "Print usage");
}
In the constructor, the first step is to make sure that the environment for YARN is available to our client. The YarnConfiguration class is a subclass of the org.apache.hadoop.conf.Configuration class. The Configuration class should be familiar to MapReduce programmers: It is the class used in MapReduce version 1 as an argument in creating the org.apache.hadoop.mapreduce.Job object. Similarly, the YarnConfiguration object is used during the creation of the YarnClient object. Creating a YarnConfiguration object successfully and without unexpected results requires you to ensure the appropriate XML configuration files are correctly configured and in the client’s class path, particularly yarn-site.xml and yarn-default.xml. You can avoid a lot of wasted time by making sure duplicate and conflicting configuration files aren’t in your class path. The yarn-site.xml file is typically found in the standard configuration directory for Hadoop installations: ~/etc/hadoop. The yarn-default.xml file will provide default values for any property not explicitly configured in yarn-site.xml. The yarn-default.xml file is found in the hadoop-yarn-common-<version>.jar file, which normally resides in a directory that is in the default Hadoop class path.
Once a YarnConfiguration object is successfully created, it’s a simple process to create a YarnClient object. The YarnClient object is created through a factory method of the YarnClient class itself. Once the YarnClient is instantiated, it’s initialized with the YarnConfiguration object. The YarnClient needs the configuration because a YarnClient is one of many so-called YARN services. YARN has built into its core architecture the notion of services. For instance, the log aggregation service, node status and health services, and the MapReduce version 2 shuffle handler are all examples of services shipped with YARN. Services have as their functionality life-cycle methods like init, start, and stop, as well as methods to determine the service state and, in the case of a service failure, to determine the cause of the failure. Services also have the capability of registering listeners that will receive callbacks from YARN on certain events.
The initialization of the YarnClient first determines the ResourceManager’s IP address and port. These values are taken from the yarn-site.xml or yarn-default.xml file mentioned earlier. They are specified by the yarn.resourcemanager.address property. Next, the YarnClient looks for the interval in which it should poll for the application’s state. The property yarn.client.app-submission.poll-interval is used to determine this value in milliseconds; the default value is 1000.
Once the YarnClient is initialized, it creates a ResourceManager client proxy that is internal to the YarnClient object. This proxy is intended to be abstracted from the YARN application developer. A YarnClient method is the preferred means for the developer to code YARN client operations.
After the YARN client objects have been properly created, we use the Options class to add command-line options. For each option, we must add has three arguments that are passed to the Options.addOption method: (1) the argument name, (2) an indicator whether the argument is required, and (3) a description of the argument that we can have as console output when the user requests help or when we want to display the usage of the command after detecting bad command-line input.
The command-line options we will create for our sample application are basic in nature. We can specify the application’s name, a priority, the queue in the scheduler, and the memory we’ll request for the ApplicationMaster as well as the containers. Most of the arguments are specific to the YARN environment. A few options we specify are specific to the JBoss AS instances we set up—namely, the user ID and password of the initial JBoss AS admin user.
Next, we will create the initialization process by adding a method to our class, as shown in Listing 10.3. This init method is where we’ll parse the command-line arguments entered by the user.
Listing 10.3 YARN client initialization
public boolean init(String[] args) throws ParseException {
CommandLine cliParser =
new GnuParser().parse(opts, args);
if (args.length == 0) {
throw new IllegalArgumentException(
"No args specified for client to initialize");
}
if (cliParser.hasOption("help")) {
printUsage();
return false;
}
if (cliParser.hasOption("debug")) {
debugFlag = true;
}
appName = cliParser.getOptionValue(
"appname", "JBoss on YARN");
amPriority = Integer
.parseInt(cliParser.getOptionValue("priority",
"0"));
amQueue = cliParser.getOptionValue(
"queue", "default");
amMemory = Integer.parseInt(
cliParser.getOptionValue("master_memory",
"1024"));
if (amMemory < 0) {
throw new IllegalArgumentException(
"Invalid memory specified for application
master exiting." + " Specified memory=" +
amMemory);
}
if (!cliParser.hasOption("jar")) {
throw new IllegalArgumentException(
"No jar file specified for application master");
}
appJar = cliParser.getOptionValue("jar");
containerMemory = Integer.parseInt(
cliParser.getOptionValue(
"container_memory", "1024"));
numContainers = Integer.parseInt(
cliParser.getOptionValue("num_containers", "2"));
adminUser = cliParser.getOptionValue(
"admin_user", "yarn");
adminPassword = cliParser.getOptionValue(
"admin_password", "yarn");
if (containerMemory < 0 || numContainers < 1) {
throw new IllegalArgumentException(
"Invalid no. of containers or container memory
specified, exiting." + " Specified
containerMemory=" + containerMemory
+ ", numContainer=" + numContainers);
}
return true;
}
The creation of an org.apache.commons.cli.CommandLine object is fairly simple and a good reason to use this library to handle command-line input. It takes the options we created in our constructor and the entire input from the command line and does the parsing for us. To assign values to the global variables we created in Listing 10.1, we get the values from the CommandLine object; in the event the user forgot or didn’t specify a required argument, we can identify a default value. As with any command-line application, here is where we’ll do our validation to make sure that the user has not entered any values that would cause problems (e.g., problems like specifying the number of containers to run on as 0 or less). After the initialization, we need to actually submit the application to YARN (Listing 10.4).
Listing 10.4 Submit an application to YARN
public boolean run() throws IOException, YarnException {
yarnClient.start();
YarnClientApplication app =
yarnClient.createApplication();
GetNewApplicationResponse appResponse =
app.getNewApplicationResponse();
int maxMem =
appResponse.getMaximumResourceCapability()
.getMemory();
if (amMemory > maxMem) {
amMemory = maxMem;
}
ApplicationSubmissionContext appContext =
app.getApplicationSubmissionContext();
ApplicationId appId =
appContext.getApplicationId();
appContext.setApplicationName(appName);
ContainerLaunchContext amContainer =
Records.newRecord(ContainerLaunchContext.class);
Map<String, LocalResource> localResources =
new HashMap<String, LocalResource>();
FileSystem fs = FileSystem.get(conf);
Path src = new Path(appJar);
String pathSuffix = appName + File.separator +
appId.getId() + File.separator + "JBossApp.jar";
Path dst = new Path(fs.getHomeDirectory(),
pathSuffix);
jbossAppUri = dst.toUri().toString();
fs.copyFromLocalFile(false, true, src, dst);
FileStatus destStatus = fs.getFileStatus(dst);
LocalResource amJarRsrc =
Records.newRecord(LocalResource.class);
amJarRsrc.setType(LocalResourceType.FILE);
amJarRsrc.setVisibility(
LocalResourceVisibility.APPLICATION);
amJarRsrc.setResource(
ConverterUtils.getYarnUrlFromPath(dst));
amJarRsrc.setTimestamp(
destStatus.getModificationTime());
amJarRsrc.setSize(destStatus.getLen());
localResources.put("JBossApp.jar", amJarRsrc);
amContainer.setLocalResources(localResources);
Map<String, String> env =
new HashMap<String, String>();
StringBuilder classPathEnv = new StringBuilder(
Environment.CLASSPATH.$()).append(
File.pathSeparatorChar).append("./*");
for (String c : conf.getStrings(
YarnConfiguration.YARN_APPLICATION_CLASSPATH,
YarnConfiguration.DEFAULT_YARN_APPLICATION_CLASSPATH))
{
classPathEnv.append(File.pathSeparatorChar);
classPathEnv.append(c.trim());
}
env.put("CLASSPATH", classPathEnv.toString());
amContainer.setEnvironment(env);
Vector<CharSequence> vargs = new
Vector<CharSequence>(30);
vargs.add(Environment.JAVA_HOME.$() + "/bin/java");
vargs.add("-Xmx" + amMemory + "m");
vargs.add(appMasterMainClass);
vargs.add("--container_memory " +
String.valueOf(containerMemory));
vargs.add("--num_containers " +
String.valueOf(numContainers));
vargs.add("--priority " + String.valueOf(priority));
vargs.add("--admin_user " + adminUser);
vargs.add("--admin_password " + adminPassword);
vargs.add("--jar " + jbossAppUri);
if (debugFlag) {
vargs.add("--debug");
}
vargs.add("1>" +
JBossConstants.JBOSS_CONTAINER_LOG_DIR
+ "/JBossApplicationMaster.stdout");
vargs.add("2>" +
JBossConstants.JBOSS_CONTAINER_LOG_DIR
+ "/JBossApplicationMaster.stderr");
StringBuilder command = new StringBuilder();
for (CharSequence str : vargs) {
command.append(str).append(" ");
}
List<String> commands = new ArrayList<String>();
commands.add(command.toString());
amContainer.setCommands(commands);
Resource capability =
Records.newRecord(Resource.class);
capability.setMemory(amMemory);
appContext.setResource(capability);
appContext.setAMContainerSpec(amContainer);
Priority pri = Records.newRecord(Priority.class);
pri.setPriority(amPriority);
appContext.setPriority(pri);
appContext.setQueue(amQueue);
yarnClient.submitApplication(appContext);
return monitorApplication(appId);
}
The run method shown in Listing 10.4 is rather long, but we show the functionality in a single method to keep the example client’s steps of client creation, initialization, and execution easy to follow. Let’s take the code in Listing 10.4 and break it down. As we described earlier, a YarnClient is a YARN service that has life-cycle methods. We called the init method in our client’s constructor, so now we’ll call the start method in the run method.
Once the YarnClient is started, we use the object to create an org.apache.hadoop.yarn.client.api.YarnClientApplication. This YarnClientApplication object will be populated for us with a couple of key objects—namely,org.apache.hadoop.yarn.api.protocolrecords.GetNewApplicationResponse and org.apache.hadoop.yarn.api.records.ApplicationSubmissionContext. The GetNewApplicationResponse will let us get the maximum resources available, such as the maximum memory and maximum virtual cores. The ApplicationSubmissionContext will give us a unique application ID for the YARN cluster; in addition, it will be the object where we will define the specification for the application’s ApplicationMaster. The code that follows illustrates the beginning of this flow in our run method.
yarnClient.start();
YarnClientApplication app =
yarnClient.createApplication();
GetNewApplicationResponse appResponse =
app.getNewApplicationResponse();
The first thing we’ll use from the YarnClientApplication is the GetNewApplicationResponse object, which we’ll use to determine the maximum memory available on any given node in the cluster. One of the command-line options we gave the user was to specify how much memory to give the ApplicationMaster through the master_memory option. If the user specifies more memory than the amount available, we simply give the ApplicationMaster the maximum amount available instead of the requested amount.
Next, we’ll use the ApplicationSubmissionContext to get the application ID that we’ll use a little later. The first value we give the ApplicationSubmissionContext is the application’s name. This name is used in a few places, including in the built-in YARN web application, where we can see it displayed. The following snippet from the run method shows what we’ve described.
int maxMem =
appResponse.getMaximumResourceCapability()
.getMemory();
if (amMemory > maxMem) {
amMemory = maxMem;
}
ApplicationSubmissionContext appContext =
app.getApplicationSubmissionContext();
ApplicationId appId =
appContext.getApplicationId();
appContext.setApplicationName(appName);
The next value we give to the ApplicationSubmissionContext is the Container-LaunchContext. The ApplicationMaster is itself a YARN container, albeit a special kind of container, often referred to as “container 0.” So that the ApplicationMaster container can launch, we create an object of type org.apache.hadoop.yarn.api.records.ContainerLaunchContext. The ContainerLaunchContext for an ApplicationMaster typically has resources it needs for its run time, with the most obvious one being the jar file with the ApplicationMaster class. The ContainerLaunch-Context takes a map of resources with a java.lang.String as the key and an org.apache.hadoop.yarn.api.records.LocalResource as the value. The map key is translated into a symbolic link in the file system visible to the container. More details on this aspect will follow, but for now, let’s describe the code in Listing 10.4 that builds the map of LocalResources for the ApplicationMaster ContainerLaunch-Context. First, we create the ContainerLaunchContext as a YARN record.
ContainerLaunchContext amContainer =
Records.newRecord(ContainerLaunchContext.class);
Map<String, LocalResource> localResources =
new HashMap<String, LocalResource>();
One of the command-line options allows the user to give a path on the local file system where the ApplicationMaster jar file is located. This path is on the local file system where the user invokes the client. The problem we immediately face is that a YARN cluster doesn’t have visibility to the client’s local file system; thus we have to put the jar file in a location where each container has access. The best way to do so is to use HDFS. The first thing we do after creating the map of LocalResources is to have our client copy the jar file from the local file system to HDFS. The LocalResource object for the ApplicationMaster jar file is defined as LocalResourceType.FILE so that it will be copied to a container’s file system without being unarchived.
After defining the resource type, we define the resource visibility by exposing the resource as LocalResourceVisibility.APPLICATION, which means only the application will have access to this resource. We could define other visibility settings to make the resource available to all the applications on the container’s node or to all the applications of the same user on the node, but in our example, we’ll take the most secure approach and limit the use of the jar file to our own application.
After defining resource visibility, for verification purposes, we let YARN know the timestamp of the file as well as the file size. The resource is then added to the LocalResource map, with the map subsequently being added to the ContainerLaunch-Context. The section of Listing 10.4 that handles these tasks is shown next.
FileSystem fs = FileSystem.get(conf);
Path src = new Path(appJar);
String pathSuffix = appName + File.separator +
appId.getId() + File.separator + "JBossApp.jar";
Path dst = new Path(fs.getHomeDirectory(),
pathSuffix);
jbossAppUri = dst.toUri().toString();
fs.copyFromLocalFile(false, true, src, dst);
FileStatus destStatus = fs.getFileStatus(dst);
LocalResource amJarRsrc =
Records.newRecord(LocalResource.class);
amJarRsrc.setType(LocalResourceType.FILE);
amJarRsrc.setVisibility(
LocalResourceVisibility.APPLICATION);
amJarRsrc.setResource(
ConverterUtils.getYarnUrlFromPath(dst));
amJarRsrc.setTimestamp(
destStatus.getModificationTime());
amJarRsrc.setSize(destStatus.getLen());
localResources.put("JBossApp.jar", amJarRsrc);
amContainer.setLocalResources(localResources);
After adding the local resources to the ContainerLaunchContext, we add optional environment settings and the command to launch the ApplicationMaster. In setting the environment for the ApplicationMaster, we get the class path of the client, get the class path of the client’s YARN environment, and build the class path string from those values. The environment variables to set consist of a map of java.lang.Strings to which we add the class path we just built with the key of CLASSPATH.
Map<String, String> env =
new HashMap<String, String>();
StringBuilder classPathEnv = new StringBuilder(
Environment.CLASSPATH.$()).append(
File.pathSeparatorChar).append("./*");
for (String c : conf.getStrings(
YarnConfiguration.YARN_APPLICATION_CLASSPATH,
YarnConfiguration.DEFAULT_YARN_APPLICATION_CLASSPATH))
{
classPathEnv.append(File.pathSeparatorChar);
classPathEnv.append(c.trim());
}
env.put("CLASSPATH", classPathEnv.toString());
amContainer.setEnvironment(env);
Next, we build the command to launch the ApplicationMaster; many of the options we pass to that command are the options the user specified on the client’s command line. As you can see from the example, we build a standard Java command. In doing so, YARN provides a convenience method with the org.apache.hadoop.yarn.api.ApplicationConstants.Environment class. Through the use of Environment.JAVA_HOME.$(), YARN formats the environment variable appropriately for a Windows environment by using the “%” character before and after the environment variable; it uses the “$” character before the variable in a Linux environment. The rest of the parameters for the Java command are what we would expect. The command is appended with log files to which we redirect stdout and stderr. Here we can define any directory and file to which the YARN application has write permissions. Using our example, we hard-code a directory but we could use the YarnConfiguration object to get the yarn.log.dir value with conf.get("yarn.log.dir");.
A ContainerLaunchContext can take a java.util.List of commands from which YARN will build the shell script to launch the container. For the ApplicationMaster, we need only a single command. Thus, after adding the Java command we just built to the list, we use the list to specify the ContainerLaunchContext commands. The following code segment from Listing 10.4 builds the ApplicationMaster launch command and adds the command to the ContainerLaunchContext.
Vector<CharSequence> vargs = new
Vector<CharSequence>(30);
vargs.add(Environment.JAVA_HOME.$() + "/bin/java");
vargs.add("-Xmx" + amMemory + "m");
vargs.add(appMasterMainClass);
vargs.add("--container_memory " +
String.valueOf(containerMemory));
vargs.add("--num_containers " +
String.valueOf(numContainers));
vargs.add("--priority " + String.valueOf(priority));
vargs.add("--admin_user " + adminUser);
vargs.add("--admin_password " + adminPassword);
vargs.add("--jar " + jbossAppUri);
if (debugFlag) {
vargs.add("--debug");
}
vargs.add("1>" +
JBossConstants.JBOSS_CONTAINER_LOG_DIR
+ "/JBossApplicationMaster.stdout");
vargs.add("2>" +
JBossConstants.JBOSS_CONTAINER_LOG_DIR
+ "/JBossApplicationMaster.stderr");
StringBuilder command = new StringBuilder();
for (CharSequence str : vargs) {
command.append(str).append(" ");
}
List<String> commands = new ArrayList<String>();
commands.add(command.toString());
amContainer.setCommands(commands);
After we set the commands on the ContainerLaunchContext, we’re ready to let the ApplicationSubmissionContext know that the ContainerLaunchContext we just built is the ApplicationMaster container. Recall that the ApplicationMaster is launched as a container. Because there is only one, however, YARN has a specific method for defining this ContainerLaunchContext as the ApplicationMaster.
appContext.setAMContainerSpec(amContainer);
After defining the ContainerLaunchContext and adding it to the ApplicationSubmissionContext, we’re ready to turn our attention back to the remaining configuration of the ApplicationSubmissionContext. One of the important tasks in building the ApplicationSubmissionContext is to specify the resource capability of the application. Typically, one of the most important resources in a YARN application is memory. The example illustrates the standard way to define a memory resource and to add that resource to the ApplicationSubmissionContext. Other important parts of the ApplicationSubmissionContext are the queue and priority for the application. These values go somewhat hand-in-hand. YARN, like MapReduce version 1, supports the concept of schedulers—for example, the Capacity scheduler. Schedulers are pluggable and definable in yarn-site.xml and help to manage the concurrent job environment of a typical YARN cluster. If your YARN cluster is a typical cluster, you’ll have many YARN applications running simultaneously, which in turn means managing those jobs above and beyond assigning resources will be an administrative concern. Schedulers help with this management by providing queues to which YARN applications are submitted and priority values that the queue will assign the application. Chapter 8, “Capacity Scheduler in YARN,” addresses this functionality in greater detail. The code to make these settings is shown in the following snippet.
Resource capability =
Records.newRecord(Resource.class);
capability.setMemory(amMemory);
appContext.setResource(capability);
Priority pri = Records.newRecord(Priority.class);
pri.setPriority(amPriority);
appContext.setPriority(pri);
appContext.setQueue(amQueue);
After we finish defining the scheduler queue and priority of the application, we’re ready for the YarnClient to actually submit the application. In the client code, the method call to submit the application blocks until the ResourceManager returns an application state of ACCEPTED.
yarnClient.submitApplication(appContext);
The last thing we show in the sample application is how to monitor the application from a client perspective (Listing 10.5).
Listing 10.5 Monitoring a YARN application
private boolean monitorApplication(ApplicationId appId)
throws YarnException, IOException {
while (true) {
try {
Thread.sleep(1000);
} catch (InterruptedException e) {
}
ApplicationReport report =
yarnClient.getApplicationReport(appId);
LOG.info("Got application report from ASM for" + ",
appId=" + appId.getId() + ", clientToAMToken=" +
report.getClientToAMToken() + ", appDiagnostics="
+ report.getDiagnostics() + ", appMasterHost="
+ report.getHost() + ", appQueue=" +
report.getQueue() + ", appMasterRpcPort=" +
report.getRpcPort() + ", appStartTime=" +
report.getStartTime() + ", yarnAppState="
+ report.getYarnApplicationState().toString()
+ ", distributedFinalState="
+ report.getFinalApplicationStatus().toString()
+ ", appTrackingUrl=" + report.getTrackingUrl()
+ ", appUser=" + report.getUser());
YarnApplicationState state =
report.getYarnApplicationState();
FinalApplicationStatus jbossStatus = report
.getFinalApplicationStatus();
if (YarnApplicationState.FINISHED == state) {
if (FinalApplicationStatus.SUCCEEDED ==
jbossStatus) {
LOG.info("Application has completed successfully. Breaking monitoring loop");
return true;
} else {
LOG.info("Application did finished
unsuccessfully."
+ " YarnState=" + state.toString()
+ ", JBASFinalStatus="
+ jbossStatus.toString()
+ ". Breaking monitoring loop");
return false;
}
} else if (YarnApplicationState.KILLED ==
state || YarnApplicationState.FAILED == state)
{
LOG.info("Application did not finish." + "
YarnState=" + state.toString() + ",
JBASFinalStatus=" + jbossStatus.toString() +
". Breaking monitoring loop");
return false;
}
}
}
In the monitoring method, shown in Listing 10.5, we simply get the metadata of the application through the YarnClient. The application metadata is encapsulated in an object of type ApplicationReport that we get every second. The ApplicationReport has various convenience methods to get metadata like the application ID, but also more interesting data like the application’s state and final status. These metadata values are logged to the console until the application either finishes successfully or is killed by the ResourceManager.
The ApplicationMaster
After creating the client to manage the YARN application submission and application monitoring, we can turn our attention to writing the ApplicationMaster. A newly created application registers itself with the ResourceManager. The ApplicationMaster then performs data processing by requesting resources that are issued as containers from the ResourceManager. The ApplicationMaster then communicates with the NodeManager to start the containers and then to monitor running containers that were previously requested for data processing. This process is described inFigure 10.2.
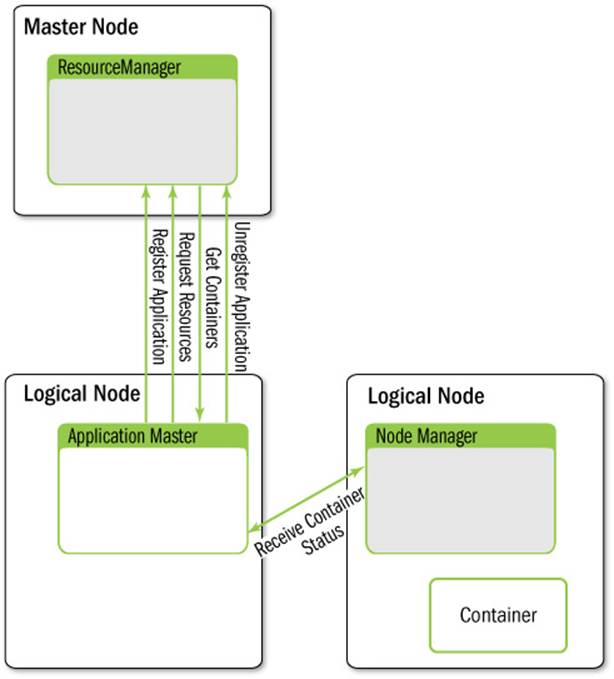
Figure 10.2 ApplicationMaster communication pathways between the ResourceManager and the NodeManagers
Like the client, our ApplicationMaster is a Java main method class. Almost identical to the way we set up the YARN application client, we can specify global variables and a main method to kick off the ApplicationMaster, as shown in Listing 10.6.
Listing 10.6 Developing a YARN ApplicationMaster
public class JBossApplicationMaster {
private static final Logger LOG =
Logger.getLogger(
JBossApplicationMaster.class.getName());
private Configuration conf;
private AMRMClientAsync resourceManager;
private NMClientAsync nmClientAsync;
private NMCallbackHandler containerListener;
private ApplicationAttemptId appAttemptID;
private String appMasterHostname = "";
private int appMasterRpcPort = 0;
private String appMasterTrackingUrl = "";
private int numTotalContainers;
private int containerMemory;
private int requestPriority;
private String adminUser;
private String adminPassword;
private AtomicInteger numCompletedContainers =
new AtomicInteger();
private AtomicInteger numAllocatedContainers =
new AtomicInteger();
private AtomicInteger numFailedContainers =
new AtomicInteger();
private AtomicInteger numRequestedContainers =
new AtomicInteger();
private Map<String, String> shellEnv =
new HashMap<String, String>();
private String jbossHome;
private String appJar;
private String domainController;
private volatile boolean done;
private volatile boolean success;
private List<Thread> launchThreads =
new ArrayList<Thread>();
private Options opts;
public static void main(String[] args) {
boolean result = false;
try {
JBossApplicationMaster appMaster =
new JBossApplicationMaster();
boolean doRun = appMaster.init(args);
if (!doRun) {
System.exit(0);
}
result = appMaster.run();
} catch (Throwable t) {
LOG.log(Level.SEVERE, "Error running
JBossApplicationMaster", t);
System.exit(1);
}
if (result) {
LOG.info("Application Master completed
successfully. exiting");
System.exit(0);
} else {
LOG.info("Application Master failed.
exiting");
System.exit(2);
}
}
. . .
}
As was the case with the client, we have a default constructor for our JBossApplicationMaster that we use in the main method (Listing 10.7). Also, as was the case with the client constructor, we do some ApplicationMaster setup in the constructor.
Listing 10.7 YARN ApplicationMaster constructor
public JBossApplicationMaster() throws Exception {
conf = new YarnConfiguration();
opts = new Options();
opts.addOption("admin_user", true,
"User id for initial administrator user");
opts.addOption("admin_password", true,
"Password for initial administrator user");
opts.addOption("container_memory", true,
"Amount of memory in MB to be requested to run
the shell command");
opts.addOption("num_containers", true,
"No. of containers on which the shell command
needs to be executed");
opts.addOption("jar", true,
"JAR file containing the application");
opts.addOption("priority", true,
"Application Priority. Default 0");
opts.addOption("debug", false,
"Dump out debug information");
opts.addOption("help", false, "Print usage");
}
Like the development flow in the client, the ApplicationMaster flow follows a constructor, initialization, and run sequence. We show the similarity with the client constructor by creating a YarnConfiguration object that encapsulates the YARN environment where the ApplicationMaster container is launched, and by defining command-line options. As with the client, after the constructor, we add a method to do some initialization (Listing 10.8).
Listing 10.8 YARN ApplicationMaster initialization
public boolean init(String[] args) throws ParseException, IOException {
CommandLine cliParser =
new GnuParser().parse(opts, args);
if (args.length == 0) {
printUsage(opts);
throw new IllegalArgumentException(
"No args specified for application master to
initialize");
}
if (cliParser.hasOption("help")) {
printUsage(opts);
return false;
}
if (cliParser.hasOption("debug")) {
dumpOutDebugInfo();
}
containerMemory =
Integer.parseInt(cliParser.getOptionValue(
"container_memory", "1024"));
numTotalContainers = Integer.parseInt(
cliParser.getOptionValue("num_containers", "2"));
adminUser = cliParser.getOptionValue(
"admin_user", "yarn");
adminPassword = cliParser.getOptionValue(
"admin_password", "yarn");
appJar = cliParser.getOptionValue("jar");
if (numTotalContainers == 0) {
throw new IllegalArgumentException(
"Cannot run JBoss Application Master with no
containers");
}
requestPriority = Integer.parseInt(
cliParser.getOptionValue("priority", "0"));
return true;
}
Thus far, the pattern follows much of what we did with the client. In the init method shown in Listing 10.8, we code the same type of logic as was used in the client to parse the command-line options. Remember, these are the command-line options for the command you built in the client. Accordingly, you can include some error checking and other validation for the command in the ApplicationMaster code. It’s probably best to do the bulk of that validation in the client, because your client code should be the only thing to invoke the ApplicationMaster’s command, any command line errors should be caught prior to this step.
The code to run the ApplicationMaster has some significant differences from the code to run the client and introduces a few key concepts of YARN application development. To start, the following code is the run method we’ll add to our ApplicationMaster in Listing 10.7.
Listing 10.9 Running a YARN ApplicationMaster
public boolean run() throws YarnException, IOException {
AMRMClientAsync.CallbackHandler allocListener =
new RMCallbackHandler();
resourceManager =
AMRMClientAsync.createAMRMClientAsync(
1000, allocListener);
resourceManager.init(conf);
resourceManager.start();
containerListener = new NMCallbackHandler();
nmClientAsync =
new NMClientAsyncImpl(containerListener);
nmClientAsync.init(conf);
nmClientAsync.start();
RegisterApplicationMasterResponse response =
resourceManager.registerApplicationMaster(
appMasterHostname, appMasterRpcPort,
appMasterTrackingUrl);
int maxMem = response.getMaximumResourceCapability()
.getMemory();
if (containerMemory > maxMem) {
containerMemory = maxMem;
}
for (int i = 0; i < numTotalContainers; ++i) {
ContainerRequest containerAsk =
setupContainerAskForRM();
resourceManager.addContainerRequest(containerAsk);
}
numRequestedContainers.set(numTotalContainers);
while (!done) {
try {
Thread.sleep(200);
} catch (InterruptedException ex) {
}
}
finish();
return success;
}
Let’s break down the flow of the run logic into some easily digested steps. Here’s what needs to happen in your application code to have a fully functional ApplicationMaster:
![]() Develop a callback handler to listen for ResourceManager events
Develop a callback handler to listen for ResourceManager events
![]() Create an object using the YARN APIs that will encapsulate the YARN ResourceManager client in the ApplicationMaster
Create an object using the YARN APIs that will encapsulate the YARN ResourceManager client in the ApplicationMaster
![]() Develop a callback handler to listen for NodeManager events
Develop a callback handler to listen for NodeManager events
![]() Create an object using the YARN APIs that will encapsulate the YARN NodeManager client in the ApplicationMaster
Create an object using the YARN APIs that will encapsulate the YARN NodeManager client in the ApplicationMaster
![]() Develop a class to launch a container
Develop a class to launch a container
In Listing 10.9, we see references to the objects that we need to either instantiate or develop on our own. The code snippet that follows instantiates our ResourceManager callback handler and then uses that object to create a client object that is a YARN library for asynchronous communication between the ApplicationMaster and the ResourceManager. The class to launch the container will be used by our ResourceManager callback handler. Thus, when we review the steps we need to develop that functionality, we’ll show how to develop that class.
AMRMClientAsync.CallbackHandler allocListener = new RMCallbackHandler();
resourceManager = AMRMClientAsync.createAMRMClientAsync(1000, allocListener);
resourceManager.init(conf);
resourceManager.start();
We saw the same YARN service life cycle in developing the client—that is, call an init method using a YarnConfiguration object as the argument followed by the start method call. Likewise, the code snippet from Listing 10.9 that follows shows the instantiation of a NodeManager callback handler. This object will be used to create the client object for asynchronous communication between the NodeManagers of the application and the ApplicationMaster. Again, note the YARN service life-cycle method invocation.
containerListener = new NMCallbackHandler();
nmClientAsync = new NMClientAsyncImpl(containerListener);
nmClientAsync.init(conf);
nmClientAsync.start();
After setting up the callback handlers and the asynchronous clients, it’s time to register the ApplicationMaster with the ResourceManager.
RegisterApplicationMasterResponse response = resourceManager.registerApplicationMaster(appMasterHostname, appMasterRpcPort, appMasterTrackingUrl);
When you register your ApplicationMaster with the ResourceManager, you supply it with basic information such as the ApplicationMaster hostname, the RPC port, and a tracking URL. The tracking URL can be defined by the programmer and is used in several places—most notably the built-in YARN web user interface that will display a link to this URL. After a successful registration, the heartbeat thread between the ResourceManager and the ApplicationManager begins.
The rest of the code in Listing 10.9 should look familiar, as we needed to put similar logic in our client (e.g., code to validate the requested memory for the containers and code to set up the container resource requests).
In the beginning of the run thread, we introduced the callback handlers and the container launch code. One of the first callbacks in the ApplicationMaster’s run method is a reference to RMCallbackHandler. Listing 10.10 shows the code we need to create such a handler. We have added this class as a private class to the ApplicationMaster we’re building, but it could just as easily be a standard external class.
Listing 10.10 ResourceManager callback handler
private class RMCallbackHandler implements
AMRMClientAsync.CallbackHandler {
public void onContainersCompleted(
List<ContainerStatus> completedContainers) {
for (ContainerStatus containerStatus :
completedContainers) {
assert (containerStatus.getState() ==
ContainerState.COMPLETE);
int exitStatus =
containerStatus.getExitStatus();
if (0 != exitStatus) {
if (ContainerExitStatus.ABORTED
!= exitStatus) {
numCompletedContainers.incrementAndGet();
numFailedContainers.incrementAndGet();
} else {
numAllocatedContainers.decrementAndGet();
numRequestedContainers.decrementAndGet();
}
} else {
numCompletedContainers.incrementAndGet();
}
}
int askCount = numTotalContainers –
numRequestedContainers.get();
numRequestedContainers.addAndGet(askCount);
if (askCount > 0) {
for (int i = 0; i < askCount; ++i) {
ContainerRequest containerAsk =
setupContainerAskForRM();
resourceManager.
addContainerRequest(containerAsk);
}
}
if (numCompletedContainers.get() ==
numTotalContainers) {
done = true;
}
}
public void onContainersAllocated(
List<Container> allocatedContainers) {
numAllocatedContainers.addAndGet(
allocatedContainers.size());
for (Container allocatedContainer :
allocatedContainers) {
LaunchContainerRunnable
runnableLaunchContainer =
new LaunchContainerRunnable(
allocatedContainer, containerListener);
Thread launchThread = new
Thread(runnableLaunchContainer);
launchThreads.add(launchThread);
launchThread.start();
}
}
public void onShutdownRequest() {
done = true;
}
public void onNodesUpdated(
List<NodeReport> updatedNodes) {
}
public void onError(Throwable e) {
done = true;
resourceManager.stop();
}
}
The methods that we use here are all specified in the AMRMClientAsync.CallbackHandler interface that the RMCallbackHandler implements. The methods are easy enough to follow, but let’s focus on the onContainersAllocated method. Once a container has been allocated by the ResourceManager, we’ll start that container with the LaunchContainerRunnable class that we develop as a thread by implementing java.lang.Runnable. This class is shown in Listing 10.11.
Listing 10.11 Launching a container
private class LaunchContainerRunnable implements Runnable {
Container container;
NMCallbackHandler containerListener;
public LaunchContainerRunnable(Container lcontainer, NMCallbackHandler containerListener) {
this.container = lcontainer;
this.containerListener = containerListener;
}
public void run() {
String containerId = container.getId().toString();
ContainerLaunchContext ctx =
Records.newRecord(ContainerLaunchContext.class);
Map<String, LocalResource> localResources = new HashMap<String, LocalResource>();
String applicationId = container.getId().getApplicationAttemptId().getApplicationId().toString();
try {
FileSystem fs = FileSystem.get(conf);
LocalResource jbossDist =
Records.newRecord(LocalResource.class);
jbossDist.setType(LocalResourceType.ARCHIVE);
jbossDist.setVisibility(
LocalResourceVisibility.APPLICATION);
Path jbossDistPath = new Path(new URI(
JBossConstants.JBOSS_DIST_PATH));
jbossDist.setResource(ConverterUtils
.getYarnUrlFromPath(jbossDistPath));
jbossDist.setTimestamp(
fs.getFileStatus(jbossDistPath)
.getModificationTime());
jbossDist.setSize(
fs.getFileStatus(jbossDistPath).getLen());
localResources.put(JBossConstants.JBOSS_SYMLINK,
jbossDist);
LocalResource jbossConf =
Records.newRecord(LocalResource.class);
jbossConf.setType(LocalResourceType.FILE);
jbossConf.setVisibility(
LocalResourceVisibility.APPLICATION);
Path jbossConfPath = new Path(new URI(appJar));
jbossConf.setResource(
ConverterUtils.getYarnUrlFromPath(
jbossConfPath));
jbossConf.setTimestamp(
fs.getFileStatus(jbossConfPath).
getModificationTime());
jbossConf.setSize(
fs.getFileStatus(jbossConfPath).getLen());
localResources.put(
JBossConstants.JBOSS_ON_YARN_APP, jbossConf);
} catch (Exception e) {
LOG.log(Level.SEVERE,
"Problem setting local resources", e);
numCompletedContainers.incrementAndGet();
numFailedContainers.incrementAndGet();
return;
}
ctx.setLocalResources(localResources);
List<String> commands = new ArrayList<String>();
String host = container.getNodeId().getHost();
String containerHome =
conf.get("yarn.nodemanager.local-dirs")
+ File.separator + ContainerLocalizer.USERCACHE
+ File.separator +
System.getenv().get(Environment.USER.toString())
+ File.separator + ContainerLocalizer.APPCACHE
+ File.separator + applicationId + File.separator
+ containerId;
jbossHome = containerHome + File.separator
+ JBossConstants.JBOSS_SYMLINK + File.separator
+ JBossConstants.JBOSS_VERSION;
String jbossPermissionsCommand =
String.format("chmod -R 777 %s", jbossHome);
int portOffset = 0;
int containerCount =
containerListener.getContainerCount();
if (containerCount > 1) {
portOffset = containerCount * 150;
}
String domainControllerValue;
if (domainController == null) {
domainControllerValue = host;
} else {
domainControllerValue = domainController;
}
String jbossConfigurationCommand =
String.format("%s/bin/java -cp %s %s --home %s --server_group %s --server %s --port_offset %s --admin_user %s --admin_password %s --domain_controller %s --host %s",
Environment.JAVA_HOME.$(),
"/opt/hadoop-2.2.0/share/hadoop/common/lib/*" + File.pathSeparator
+ containerHome + File.separator +
JBossConstants.JBOSS_ON_YARN_APP,
JBossConfiguration.class.getName(),
jbossHome,
applicationId, containerId,
portOffset, adminUser,
adminPassword, domainControllerValue, host);
String jbossCommand =
String.format("%s%sbin%sdomain.sh
-Djboss.bind.address=%s
-Djboss.bind.address.management=%s
-Djboss.bind.address.unsecure=%s",
jbossHome, File.separator, File.separator,
host, host, host);
commands.add(jbossPermissionsCommand);
commands.add(JBossConstants.COMMAND_CHAIN);
commands.add(jbossConfigurationCommand);
commands.add(JBossConstants.COMMAND_CHAIN);
commands.add(jbossCommand);
ctx.setCommands(commands);
containerListener.addContainer(
container.getId(), container);
nmClientAsync.startContainerAsync(
container, ctx);
}
}
In general, the ApplicationMaster sets up the containers environment, commands, and local resources before submitting it as a ContainerLaunchContext to the NodeManager. Once these steps are complete, the NodeManager then launches the provided container, as shown in Figure 10.3.
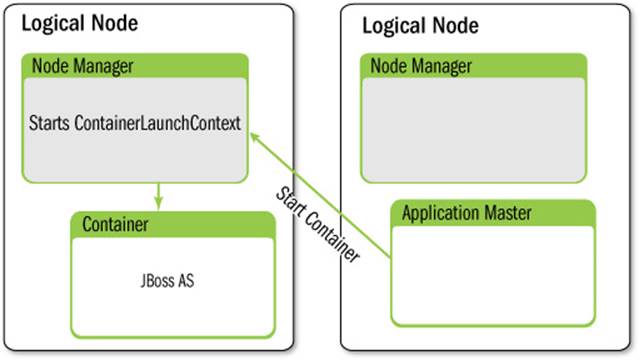
Figure 10.3 ApplicationManager communication with the NodeManager starting a container for data processing
The container launcher contains many steps. The following is a list of the actions that take place when we start our JBoss application:
![]() We create a map of LocalResources in the same way we did with the client.
We create a map of LocalResources in the same way we did with the client.
![]() The LocalResource map has two resources added to it: the JBoss AS distribution and the jar file that contains our entire YARN application.
The LocalResource map has two resources added to it: the JBoss AS distribution and the jar file that contains our entire YARN application.
![]() We create commands to change the permissions of the unarchived JBoss AS file, do some editing of the JBoss AS configuration files, and run the JBoss AS instance.
We create commands to change the permissions of the unarchived JBoss AS file, do some editing of the JBoss AS configuration files, and run the JBoss AS instance.
![]() We start the container.
We start the container.
Each of these steps will now be discussed in greater detail. The map of Local-Resources has the JBoss AS distribution as a tar.gz file. This file is automatically unarchived by YARN and given the symbolic link as the string specified as the map key. Using our example, the JBoss AS distribution can be found in HDFS at the following location: hdfs://yarn1.apps.hdp:9000/apps/jboss/dist/jboss-as-7.1.1.Final.tar.gz.
If the file is in HDFS, we can create a LocalResource with the convenience method ConverterUtils.getYarnUrlFromPath. The code from Listing 10.11 to accomplish all this is shown in the following snippet.
LocalResource jbossDist =
Records.newRecord(LocalResource.class);
jbossDist.setType(LocalResourceType.ARCHIVE);
jbossDist.setVisibility(
LocalResourceVisibility.APPLICATION);
Path jbossDistPath = new Path(
new URI("hdfs://yarn1.apps.hdp:9000/apps/jboss/dist/jboss-as-7.1.1.Final.tar.gz"));
jbossDist.setResource(ConverterUtils
.getYarnUrlFromPath(jbossDistPath));
jbossDist.setTimestamp(fs.getFileStatus(jbossDistPath)
.getModificationTime());
jbossDist.setSize(
fs.getFileStatus(jbossDistPath).getLen());
localResources.put("jboss", jbossDist);
We also add the application jar file to the container’s LocalResource map and then begin building our commands to work with the container. To accomplish this, we need to define the location of our unarchived JBoss AS distribution.
The root of each container’s local file system is defined by the property yarn.nodemanager.local-dirs, which is specified in yarn-site.xml. In our example, we’ve given this property the value of /var/data/yarn. From this base directory, the NodeManager will create subdirectories where each container will have its own file system. Notably, this directory structure will be deleted once the container is stopped, which can make application development difficult. Fortunately, YARN lets us configure how long a container’s local directory structure can live before it is deleted by the NodeManager. By specifying the yarn.nodemanager.delete.debug-delay-sec property in yarn-site.xml, we can give a value in seconds defining how long the container’s directory will live before being deleted. For debugging YARN applications, it’s best to set this property to a suitably high value so you monitor your container’s file system.
Next we need the command to start the JBoss AS instances. The code includes some logic to do a couple of things specific to JBoss AS. Although a complete description of JBoss AS configuration is beyond the scope of this book, we note that we need to configure port numbers and a domain mode. JBoss AS is a server process that will open specific sockets on a number of ports. With YARN, we always have the possibility of running more than one instance of an application container on the same host. Thus, if your application launches a container that might conflict with another running container on the same host, some tweaks are needed. In our case, we need to increment port numbers in the JBoss AS instance if another container is launched by the same NodeManager. Fortunately, JBoss AS offers a quick and easy way to do this—simply specify the value by which to increment all ports in a configuration file.
Also, JBoss AS supports the concept of a domain mode, which means that all server instances in the same domain can be managed by a single UI instance. Since YARN is by nature a clustered application platform, we will take advantage of JBoss AS’s domain mode and configure each instance of JBoss AS accordingly. In domain mode, one server instance acts as the domain controller; the remaining instances are slave nodes that communicate to the domain controller with configurable RPC and security settings. All of this configuration takes place before the actual JBoss AS server instance is launched, and all of the source code for this configuration can be found at this book’s repository (see Appendix A).
The first command added to the ContainerLaunchContext is easy to understand. It changes the permissions in the container’s file system so we can easily write the configuration. The next commands are shown in the following snippet.
String jbossConfigurationCommand =
String.format("%s/bin/java -cp %s %s --home %s --server_group %s --server %s --port_offset %s --admin_user %s --admin_password %s --domain_controller %s --host %s",
Environment.JAVA_HOME.$(),
"/opt/hadoop-2.2.0/share/hadoop/common/lib/*"
+ File.pathSeparator + containerHome
+ File.separator + JBossConstants.JBOSS_ON_YARN_APP,
JBossConfiguration.class.getName(), jbossHome,
applicationId, containerId, portOffset, adminUser,
adminPassword, domainControllerValue, host);
String jbossCommand =
String.format("%s%sbin%sdomain.sh
-Djboss.bind.address=%s
-Djboss.bind.address.management=%s
-Djboss.bind.address.unsecure=%s",
jbossHome, File.separator, File.separator,
host, host, host);
These commands configure and launch JBoss AS, respectively. When they are added to the ContainerLaunchContext, the only thing left for our container launch class to do is to start the container. Let’s start the container by wrapping everything we’ve created into a single jar file and enter command-line options so that we can parse with the client and propagate to the ApplicationMaster.
# java -cp $(hadoop classpath):/etc/hadoop/*:/opt/jboss-on-yarn-0.0.1-SNAPSHOT.jar org.yarnbook.JBossClient -jar /opt/jboss-on-yarn-0.0.1-SNAPSHOT.jar -admin_user yarn -admin_password yarn -num_containers 2
When we enter this command, the steps described previously begin execution. Communication with the ResourceManager begins, our jar file is copied to the appropriate location, a certain number of containers are allocated and prepared, and a container directory structure is created on the local file system as shown in Figure 10.4.
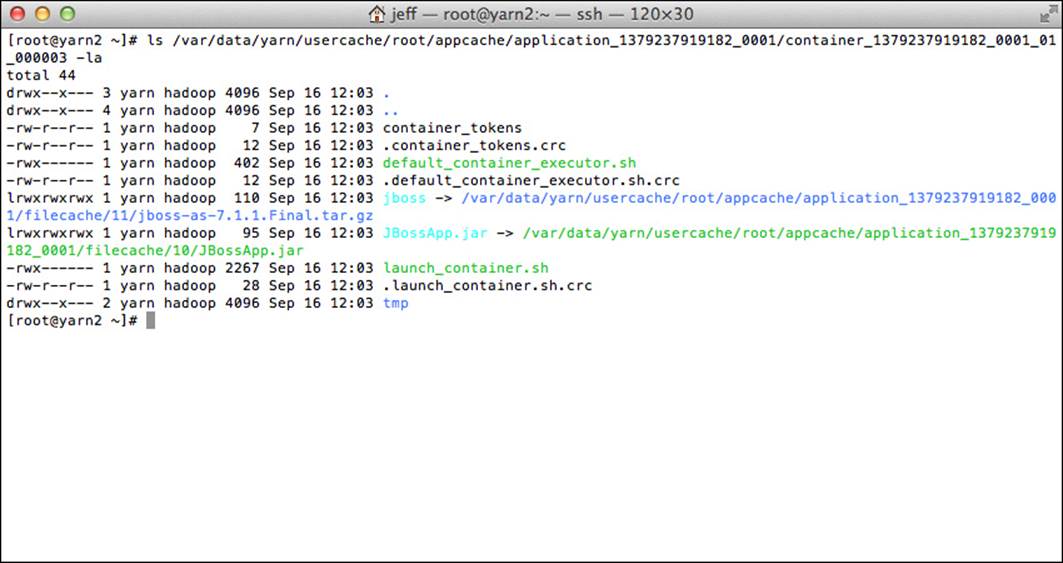
Figure 10.4 Application container directory structure
Notice the symbolic links representing the LocalResource map that we created for the container and the directory naming convention that we created as the variable containerHome in the LaunchContainerRunnable.run method. If we list the directory contents of the jbosssymbolic link, we can see the unarchived contents of the JBoss AS tar.gz file distribution as well as the directory and file permission change we performed with the first command added to the ContainerLaunchContext. An example is given in Figure 10.5.
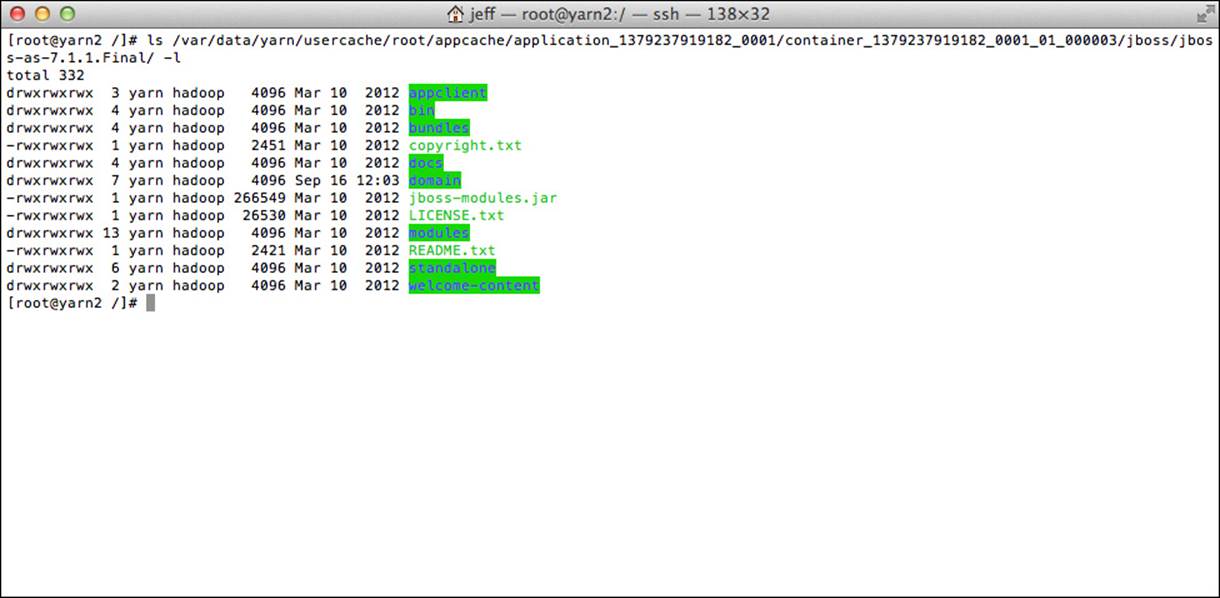
Figure 10.5 Unarchived resource directory structure
Continuing to examine Figure 10.4, we also see a script called launch_containter.sh. A listing of this script is provided in Figure 10.6.
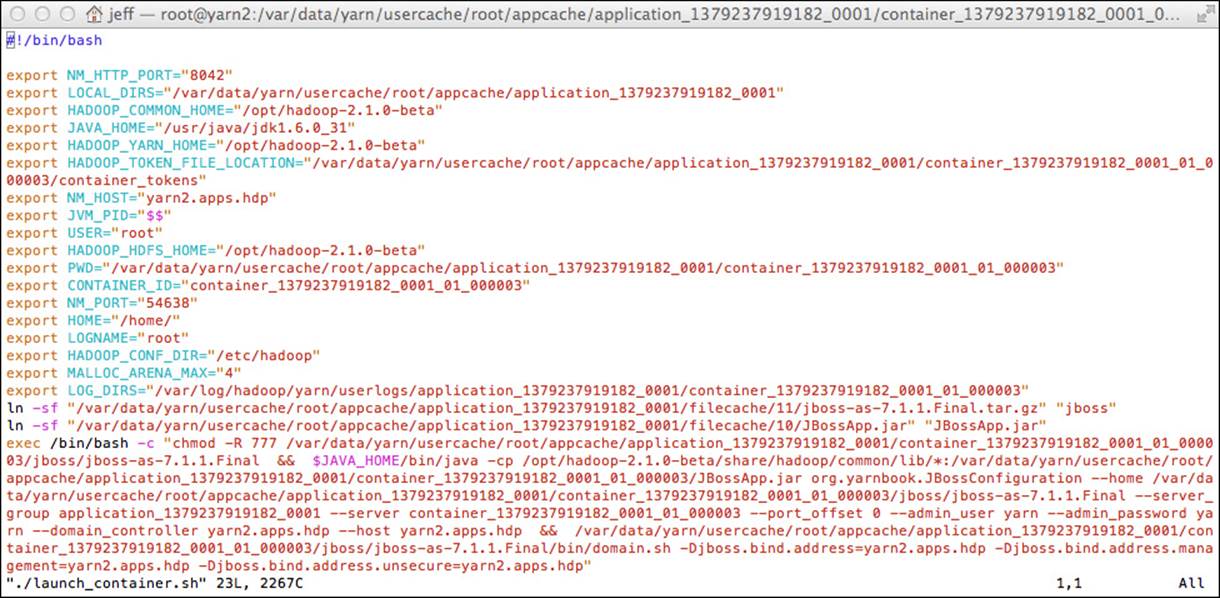
Figure 10.6 Contents of launch_container.sh script
The launch_container.sh file sets environment variables and the commands that we propagate to the containers. YARN generates and places the commands into this shell script and, after the container successfully transitions to a state called LOCALIZED, executes the shell script to start the container. In our case, we have a container that launches JBoss AS server instances. The use of a run script illustrates that YARN can manage virtually any application written in any language. Figure 10.7 shows what our application, JBoss on YARN, looks like in the YARN web user interface.
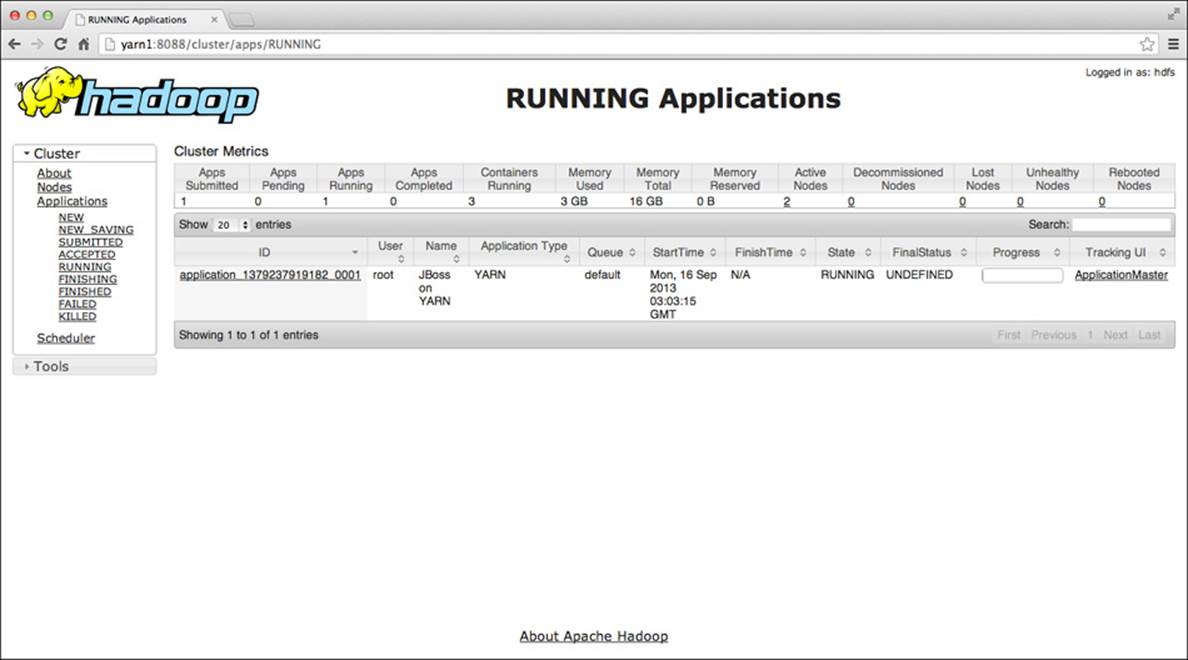
Figure 10.7 JBoss AS YARN application in the YARN web user interface
Next, let’s take a look at the JBoss AS domain controller user interface (Figure 10.8) and make sure we have the two instances of JBoss AS up and running—the two instances we specified with the num_containers argument to our client. We should have one master and one slave.
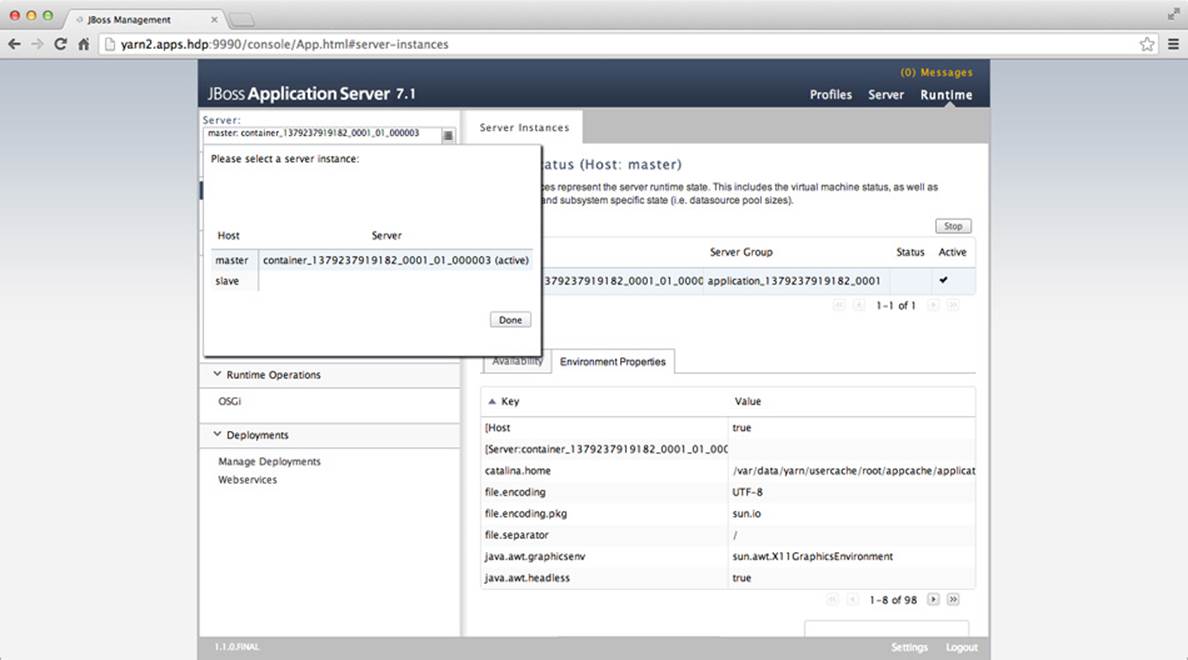
Figure 10.8 JBoss AS domain controller user interface
We can see from the JBoss AS UI that we have a master and a slave, and by virtue of their visibility in the management console, we know that we’ve configured the communication between the two instances correctly. Note that we used the YARN application ID as the JBoss AS server group name and the container ID as the JBoss AS server name.
Wrap-up
YARN application development involves creating both a client and an ApplicationMaster. As illustrated in this chapter, creating a non-MapReduce application takes some coding, but much of the code can be reused for other applications. The example developed in this chapter can be easily expanded to a larger number of containers by adjusting the command-line arguments. A full code listing is available from the book code repository mentioned in Appendix A.
All materials on the site are licensed Creative Commons Attribution-Sharealike 3.0 Unported CC BY-SA 3.0 & GNU Free Documentation License (GFDL)
If you are the copyright holder of any material contained on our site and intend to remove it, please contact our site administrator for approval.
© 2016-2026 All site design rights belong to S.Y.A.