SQL Server Integration Services Design Patterns, Second Edition (2014)
Chapter 9. XML Patterns
XML is a popular format for exchanging data between systems. SSIS provides an XML Source adapter, but because of the flexible nature of XML, it can sometimes be tricky to get your data to fit into the tabular format that the SSIS data flow expects. This chapter describes the formats that work best with the XML Source and two alternative patterns for reading XML data with SSIS.
Using the XML Source
Like most Data Flow components, the XML Source component requires column metadata to be set at design time. This is done using an XML schema file (.xsd). The XML Source component uses the XML structure defined in the schema to create one or more outputs, and it also uses the element and attribute data types to set the column metadata. Changing the schema file will refresh the component’s metadata and may cause validation errors if you have already mapped some of its outputs.
If you don’t already have an XML schema defined for your document, SSIS can generate one for you. Click the Generate Schema button on the XML Source editor UI, and the component will infer the schema from the current document. Note that although this schema is guaranteed to work with the current XML file, it might not work for others if optional elements or values are longer than expected. You may need to modify the generated schema file by hand to ensure that the minOccurs and maxOccurs attribute values are correct for each element and that the data types were set correctly.
The XML Source is easiest to use when your input file has a simple element/subelement structure. Listing 9-1 shows an example of that structure.
Listing 9-1. Simple XML Format Using Elements
<root>
<node>
<subnode>value</subnode>
<anothersubnode>1</anothersubnode>
</node>
<node>
<subnode>value</subnode>
<anothersubnode>2</anothersubnode>
</node>
</root>
Alternatively, the XML Source works well when values are listed as attributes, as shown in Listing 9-2. This format is similar to the output you would get from a SELECT ... FROM XML RAW statement in SQL Server.
Listing 9-2. Simple XML Format Using Attributes
<root>
<row CustomerID="1" TerritoryID="1" AccountNumber="AW00000001" />
<row CustomerID="2" TerritoryID="1" AccountNumber="AW00000002" />
</root>
Dealing with Multiple Outputs
The XML samples in Listings 9-1 and 9-2 will produce a single output in the XML Source. If your XML format has multiple levels of nested elements, the XML Source will start to produce more than one output. These outputs will be linked by automatically generated _Id columns, which you may need to join further downstream using a Merge Join transform.
![]() Note This pattern works well if you have a single level of nested XML elements that you need to join. If you have multiple levels of XML elements and you need to join more than two of the XML Source outputs, you’ll need to use the Sort transform.
Note This pattern works well if you have a single level of nested XML elements that you need to join. If you have multiple levels of XML elements and you need to join more than two of the XML Source outputs, you’ll need to use the Sort transform.
Listing 9-3 contains an XML document with customer information. We’ll use this document as our example for the remainder of the chapter.
Listing 9-3. Sample XML Document
<?xml version="1.0" encoding="utf-8"?>
<Extract Date="2011-07-04">
<Customers>
<Customer Key="11000">
<Name>
<FirstName>Jon</FirstName>
<LastName>Yang</LastName>
</Name>
<BirthDate>1966-04-08</BirthDate>
<Gender>M</Gender>
<YearlyIncome>90000</YearlyIncome>
</Customer>
<Customer Key="11001">
<Name>
<FirstName>Eugene</FirstName>
<LastName>Huang</LastName>
</Name>
<BirthDate>1965-05-14</BirthDate>
<Gender>M</Gender>
<YearlyIncome>60000</YearlyIncome>
</Customer>
</Customers>
</Extract>
The XML Source component will generate a separate output for each nested XML element. There will be three outputs for the XML document in Listing 9-3: Customers, Customer, and Name. Each output contains the elements and attributes that were defined in the schema, as well as an <element_name>_Id column, which acts as a primary key for the row. Outputs generated for child elements will contain an _Id column for their parent element’s output, which allows the data to be joined later in your data flow if needed.
Figure 9-1 shows the outputs and column names generated by the XML Source component for the XML document in Listing 9-3.
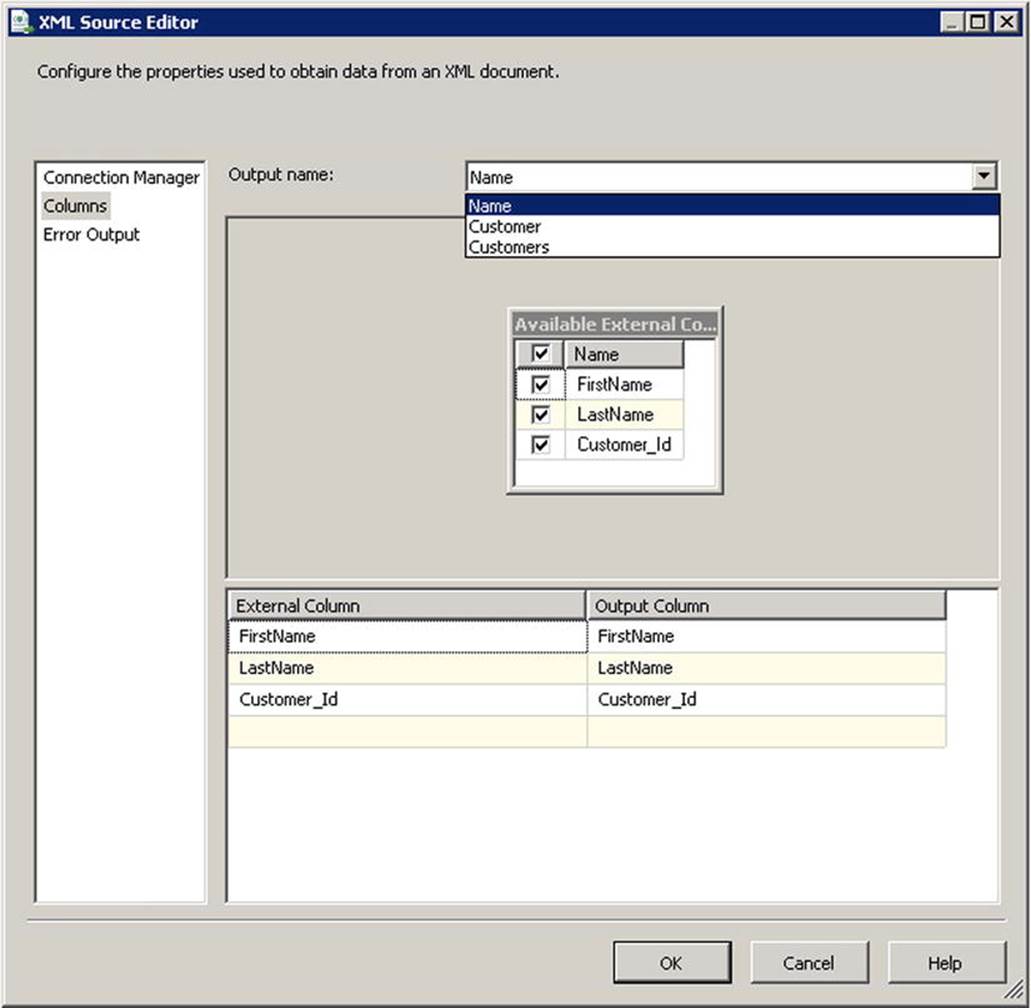
Figure 9-1. Outputs and columns generated for the Name element
![]() Note The XML Source will not pick up any attribute values found on the root element of the document. To include this value in your output, you’ll need to reformat the document to include a new root element node.
Note The XML Source will not pick up any attribute values found on the root element of the document. To include this value in your output, you’ll need to reformat the document to include a new root element node.
Figure 9-2 shows the schema of the destination table we will be storing the customer data in. As you can see, the table wants all of the columns shown in a single row, which means we’ll have to merge the Customer and Name outputs before we can insert the data. The Merge Join transform is well suited for this, but it requires that both of its inputs are sorted the same way. We could add a Sort transform on each path before the Merge Join, but performing a sort can adversely affect performance and we should try to avoid doing so.
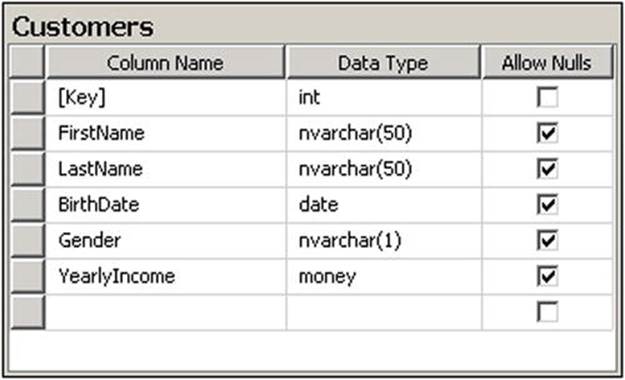
Figure 9-2. Customers database table schema
Although the XML Source component doesn’t set any sort information on the columns it produces, the output is already sorted on the generated _Id columns. To get the Merge Join to accept these inputs without using the Sort transform, we’ll have to manually set the IsSorted andSortKeyPosition properties using the Advanced Editor for XML Source component, as follows:
1. Right-click the XML Source component and select Show Advanced Editor.
2. Select the Input and Output Properties tab.
3. Select the Name output and set the IsSorted property to True, as shown in Figure 9-3.
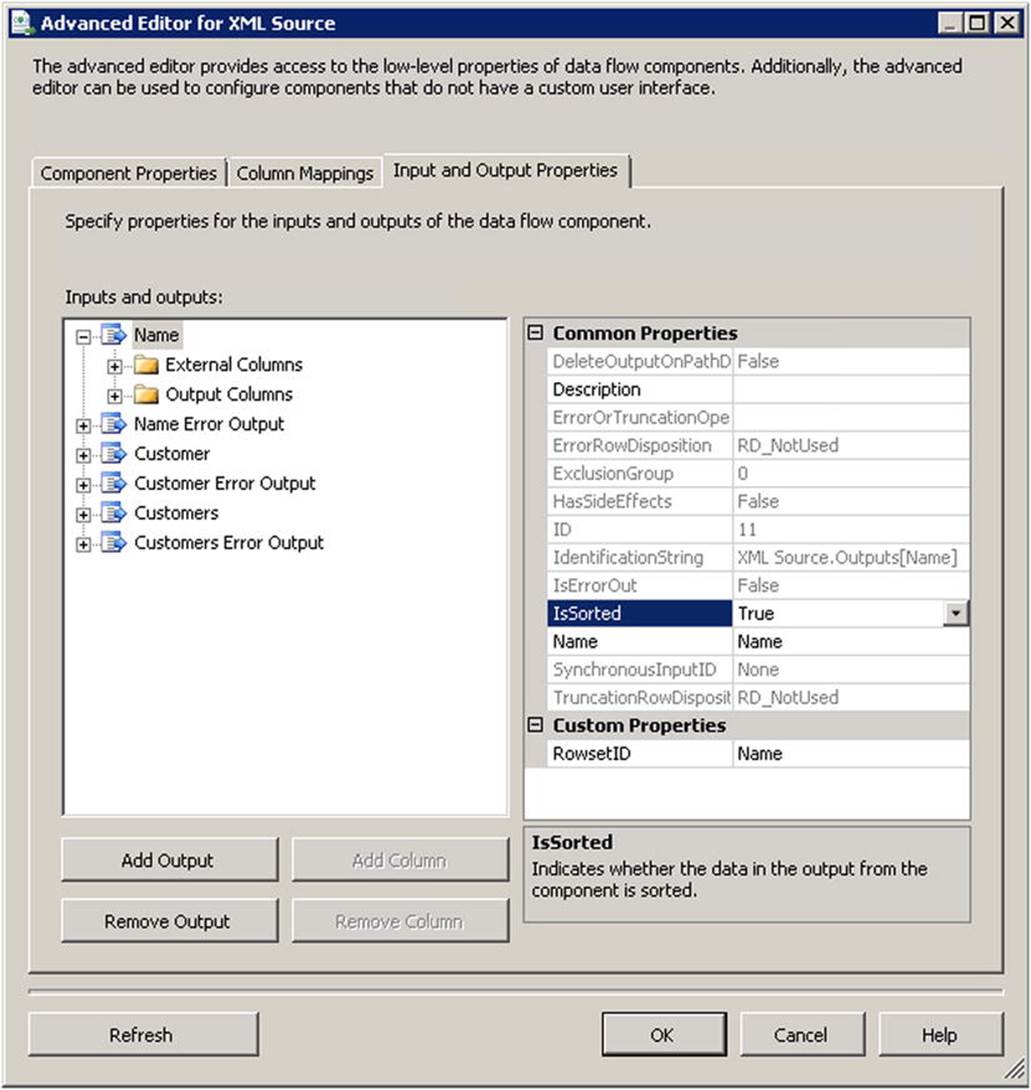
Figure 9-3. Setting the IsSorted property value in the Advanced Editor for XML Source
4. Expand the Name output and then expand the Output Columns folder.
5. Select the Customer_Id field and set the SortKeyPosition property to 1, as shown in Figure 9-4.
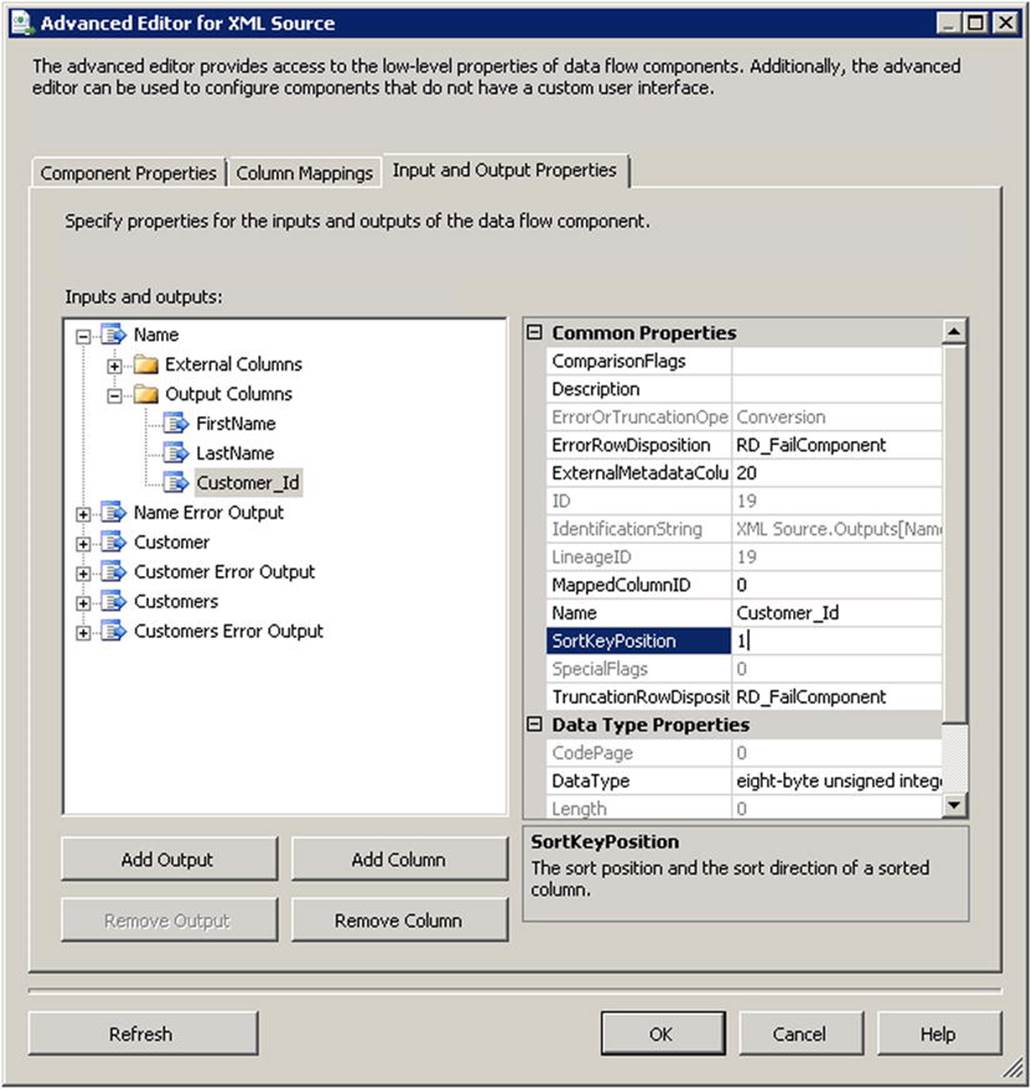
Figure 9-4. Setting the SortKeyPosition property value in the Advanced Editor for XML Source
6. Repeat steps 3–5 for the Customer output.
7. Click OK to save the changes and return to the designer.
By setting the SortKeyPosition value for the Customer_Id columns in the Name and Customer outputs, we’ve told SSIS that the rows will be sorted. We can now map both outputs directly to the Merge Join transform (as shown in Figure 9-5), and select the columns we want for our destination table (as shown in Figure 9-6).
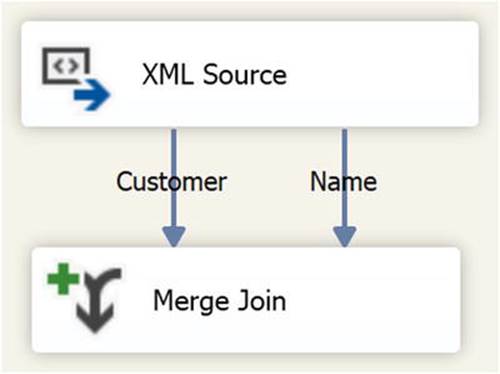
Figure 9-5. Connecting the XML Source component to a Merge Join transform
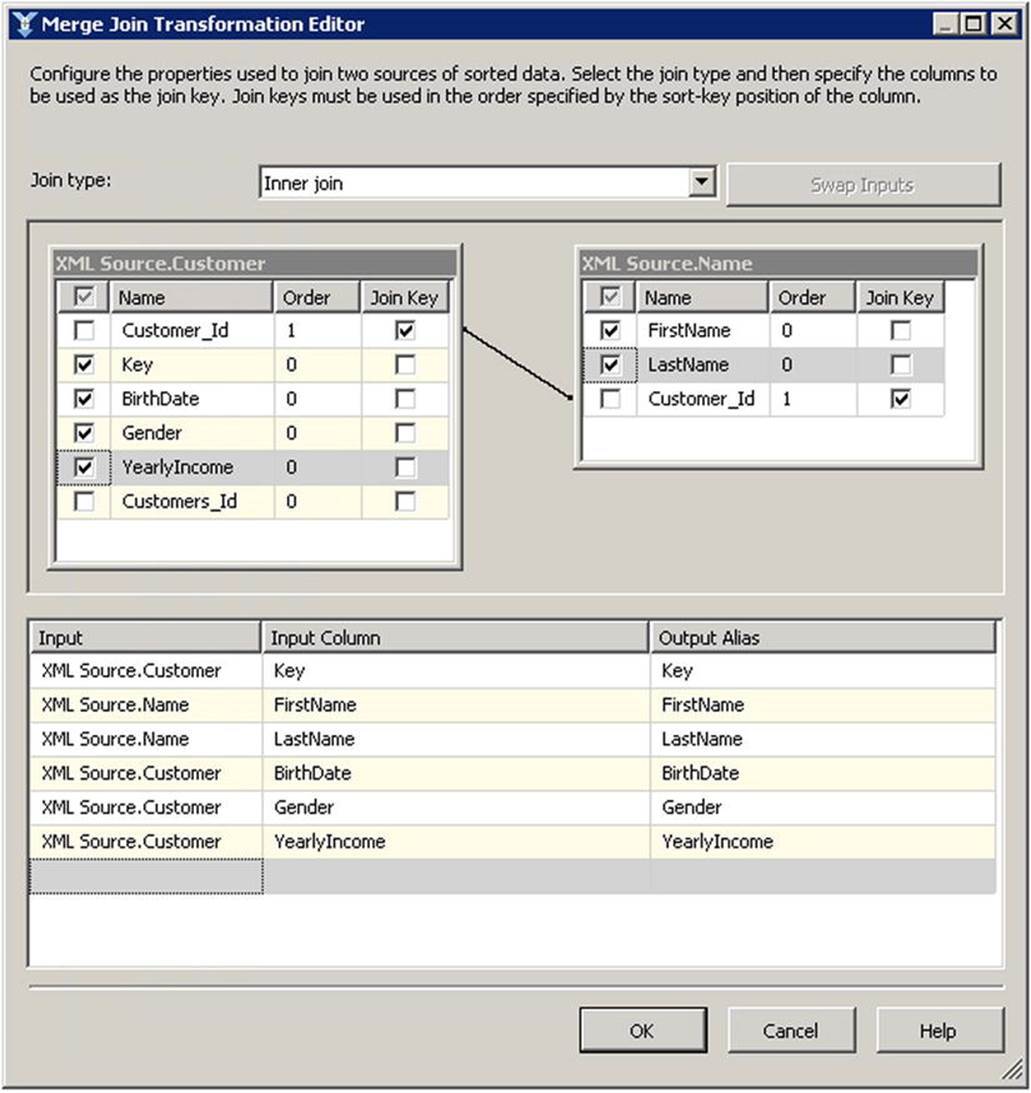
Figure 9-6. Mapping columns from the Merge Join transform
Making Things Easier with XSLT
You can simplify the handling of complex XML documents by preprocessing a source file with XSLT. Using XSLT, you can shape the XML to a format that closely resembles the destination schema, remove the fields that you don’t need to capture, or transform it into a simple format that is easily handled by the XML Source component.
The sample XML from Listing 9-3 produced three separate outputs for the XML Source component. To insert the data into our destination, we had to merge the outputs into the format we wanted. Using the XSLT script in Listing 9-4, we can “flatten” or denormalize the data so that the XML Source component will have a single output.
Listing 9-4. XSLT Script to Simplify Our XML Sample
<?xml version="1.0" encoding="utf-8"?>
<xsl:stylesheet version="1.0" xmlns:xsl="http://www.w3.org/1999/XSL/Transform">
<xsl:output method="xml" indent="yes"/>
<xsl:template match="/Extract">
<Customers>
<xsl:for-each select="Customers/Customer">
<Customer>
<Key>
<xsl:value-of select="@Key"/>
</Key>
<FirstName>
<xsl:value-of select="Name/FirstName"/>
</FirstName>
<LastName>
<xsl:value-of select="Name/LastName"/>
</LastName>
<BirthDate>
<xsl:value-of select="BirthDate"/>
</BirthDate>
<Gender>
<xsl:value-of select="Gender"/>
</Gender>
<YearlyIncome>
<xsl:value-of select="YearlyIncome"/>
</YearlyIncome>
</Customer>
</xsl:for-each>
</Customers>
</xsl:template>
</xsl:stylesheet>
We can apply this XSLT using an XML task. Here is the process for doing that:
1. Save your XSLT script to a file.
2. Add an XML task to your package.
3. Double-click the task to open the editor.
4. Set the OperationType property to XSLT and the SaveOperationResult property to True.
5. Set the SecondOperandType and SecondOperand properties to point to your XSLT script file.
6. Enter the appropriate connection information for SourceType, Source, DestinationType, and Destination, similar to what is shown in Figure 9-7.
Figure 9-7. XML task configuration
![]() Note The XML task was updated in the SQL Server 2012 release to use the latest .NET XML technologies. The performance of applying XSLT scripts is much better than in previous versions.
Note The XML task was updated in the SQL Server 2012 release to use the latest .NET XML technologies. The performance of applying XSLT scripts is much better than in previous versions.
Listing 9-5 shows us what our sample XML document looks like after applying the XSLT script from Listing 9-4. We can see that all of the fields we need to extract are now under a single parent element. The schema for this new XML format gives us a single output with the XML Source component, removing the need to join outputs later on in the data flow.
Listing 9-5. Simplified XML Document
<?xml version="1.0" encoding="utf-8"?>
<Customers>
<Customer>
<Key>11000</Key>
<FirstName>Jon</FirstName>
<LastName>Yang</LastName>
<BirthDate>1966-04-08</BirthDate>
<Gender>M</Gender>
<YearlyIncome>90000</YearlyIncome>
</Customer>
<Customer>
<Key>11001</Key>
<FirstName>Eugene</FirstName>
<LastName>Huang</LastName>
<BirthDate>1965-05-14</BirthDate>
<Gender>M</Gender>
<YearlyIncome>60000</YearlyIncome>
</Customer>
</Customers>
Using a Script Component
An alternatve to processing an XML document with the XML Source is to use a script component. This pattern requires some custom coding, but it gives you full control over the way the data is output. The .NET Framework provides a number of ways to parse and load an XML document, each with their own strengths and performance characteristics. This section describes two separate patterns for processing XML documents with a script component.
The first pattern uses the XML Schema Definition Tool (Xsd.exe) to generate a set of .NET classes that can be used by an SSIS script component. It uses the XmlSerializer class to convert the source XML document into a set of easy-to-use .NET objects. AlthoughXmlSerializer is not the fastest way to process an XML document in .NET, the strongly typed classes allow for code that is straightforward and easy to maintain. This approach is a recommended alternative to the XML Source when you’re working with complex XML documents that can easily fit into memory (for example, smaller than 100MB).
The second pattern uses a combination of LINQ to XML and the XmlReader class to process XML documents in a streaming manner. This approach is more sensitive to changes to the XML format; it may be harder to maintain, but it will output scripts that use the XmlSerializerclass. This pattern is recommended when you are processing very large XML documents or when performance is critical.
Configuring the Script Component
The script components in both patterns are configured the same way, but they will contain different code. Both will use a file connection manager to locate the source XML file at runtime, and both will define the same set of output columns. Use the following steps to configure your script component:
1. Add a file connection manager to your package.
2. Set Usage Type to Existing File and set the path to our XML source file as shown in Figure 9-8.
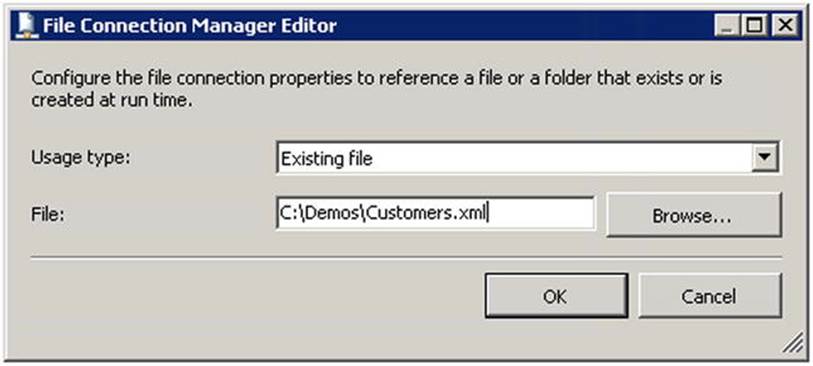
Figure 9-8. Configure the File Connection Manager editor
3. Add a data flow to your package, and drag a Script Component transform from the toolbox.
4. Select Source from the Select Script Component Type dialog as shown in Figure 9-9.
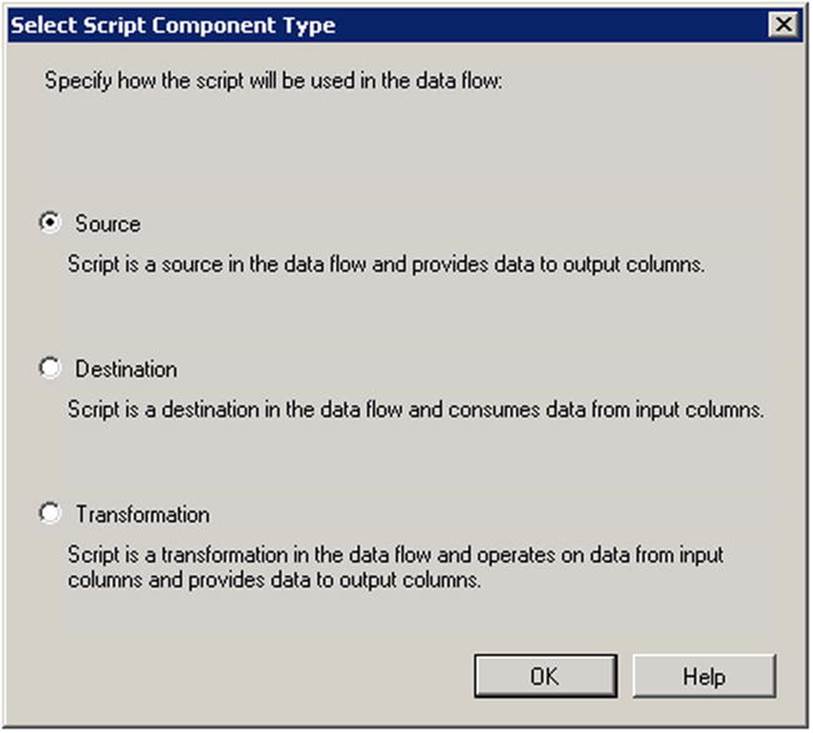
Figure 9-9. Creating a new script component source
5. Double-click the component to bring up the Script Transform editor.
6. Click the Inputs and Outputs page.
7. Rename your output from Output 0 to something more meaningful. Since our sample XML is outputting a set of Customers, that is the name we’ll use for this example.
8. Define the columns as you’d like them to be output. Make sure the data types for the columns match what has been defined in your schema. Table 9-1 shows the column-to-data-type mappings you would use for the sample defined in Listing 9-3. Your column definition should look similar to Figure 9-10 when you are done.
Table 9-1. Column Data Ttype Mapping for the XML Sample
|
Column |
Data Type |
|
Key |
DT_UI4 |
|
FirstName |
DT_WSTR(255) |
|
LastName |
DT_WSTR(255) |
|
BirthDate |
DT_DBTIMESTAMP |
|
Gender |
DT_WSTR(255) |
|
YearlyIncome |
DT_UI4 |
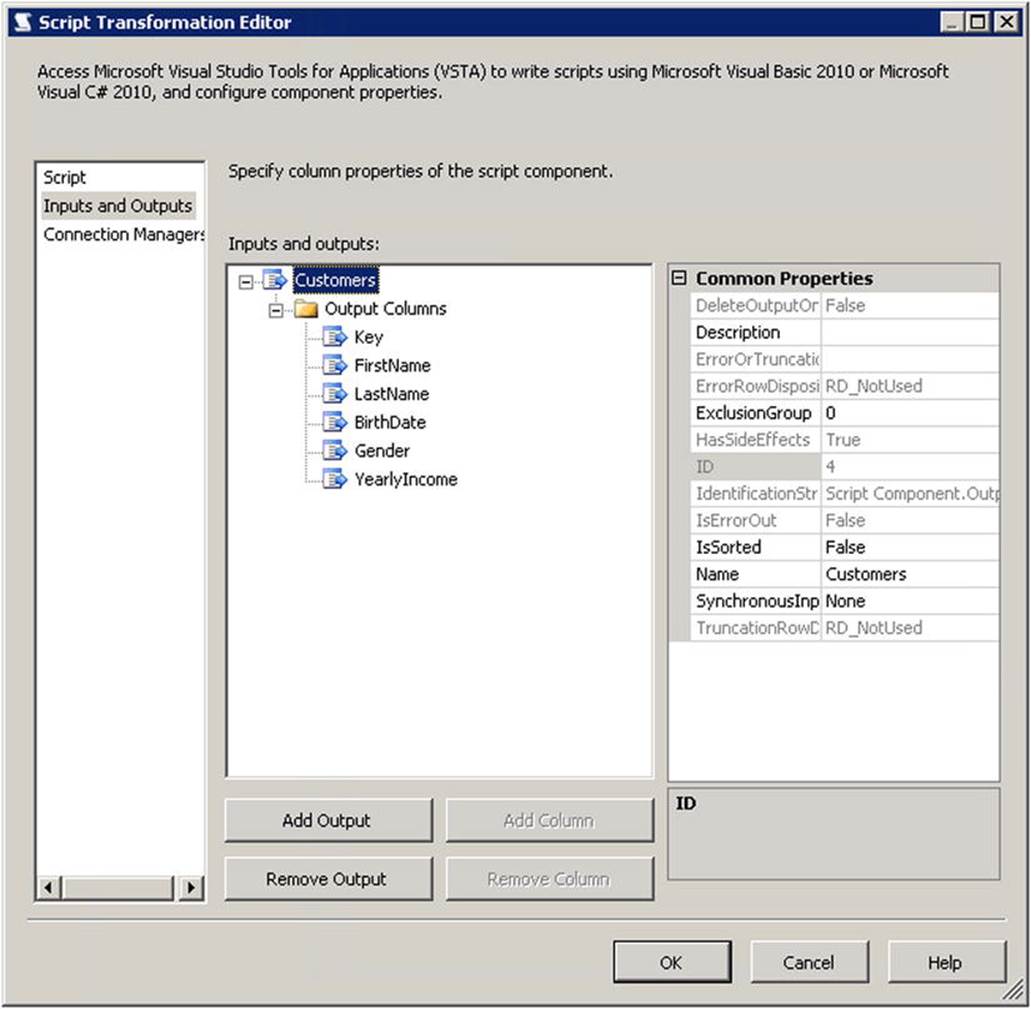
Figure 9-10. Configured output columns
9. Go to the Connection Managers page and add a reference to the file connection manager you created in step 1.
10.Give the connection manager a meaningful name, such as CustomerFile. The page will look similar to Figure 9-11.
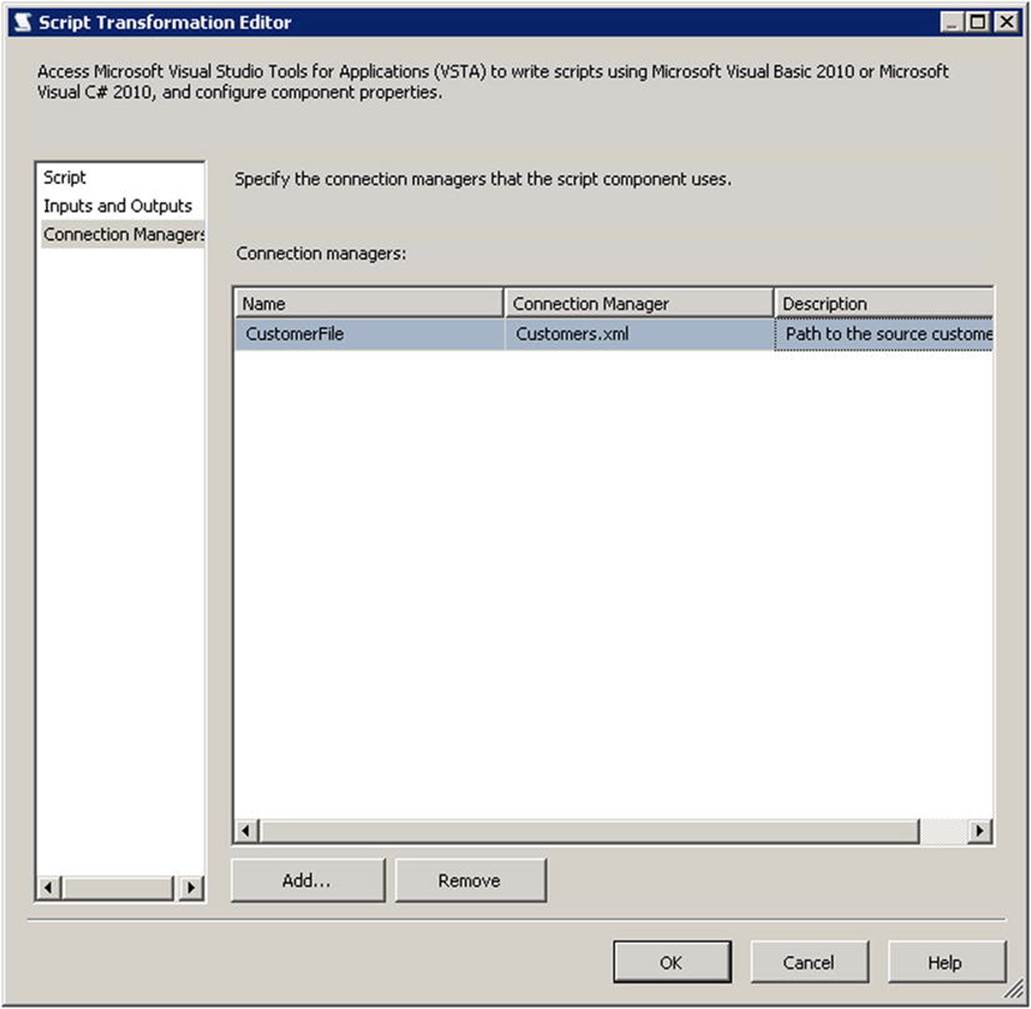
Figure 9-11. Configured connection manager
11.Go to the Script page and click the Edit Script button to launch the VSTA script editor.
We’ll be adding code to the PreExecute and CreateNewOutputRows methods of the ScriptMain class, as well as overriding two additional methods from the base class: AcquireConnection and ReleaseConnection.
The AcquireConnection method will retrieve the path to our XML file from the connection manager we configured in step 10.
The PreExecute method will verify that the file actually exists, and it will raise an error if it is not found.
The CreateNewOutputRows method does the majority of the script’s work. It is responsible for extracting data from our source document and outputting it to the data flow. The code that goes in here will depend on which pattern you select.
Finally, the ReleaseConnection method will release the file connection, indicating to the runtime that we are finished with it.
![]() Note Although you don’t need to call ReleaseConnection for a file connection manager, it’s good to get into the habit of calling ReleaseConnection anytime you have a matching call to AcquireConnection. Certain connection managers, such as the OLE DB connection manager, will leave the underlying database connections open and keep resources in memory until the connection object has been released.
Note Although you don’t need to call ReleaseConnection for a file connection manager, it’s good to get into the habit of calling ReleaseConnection anytime you have a matching call to AcquireConnection. Certain connection managers, such as the OLE DB connection manager, will leave the underlying database connections open and keep resources in memory until the connection object has been released.
Listing 9-6 shows the code that we will be using for both script component patterns.
Listing 9-6. Full Source Code Listing
using System;
using System.Data;
using Microsoft.SqlServer.Dts.Pipeline.Wrapper;
using Microsoft.SqlServer.Dts.Runtime.Wrapper;
using System.IO;
using System.Xml.Serialization;
using System.Xml;
[Microsoft.SqlServer.Dts.Pipeline.SSISScriptComponentEntryPointAttribute]
public class ScriptMain : UserComponent
{
string pathToXmlFile;
public override void AcquireConnections(object Transaction)
{
// Call the base class
base.AcquireConnections(Transaction);
// The file connection manager's AcquireConnection() method returns us the path as a string.
pathToXmlFile = (string)Connections.CustomerFile.AcquireConnection(Transaction);
}
public override void PreExecute()
{
// Call the base class
base.PreExecute();
// Make sure the file path exists
if (!File.Exists(pathToXmlFile))
{
string errorMessage = string.Format("Source XML file does not exist. Path: {0}", pathToXmlFile);
bool bCancel;
ComponentMetaData.FireError(0, ComponentMetaData.Name, errorMessage, string.Empty, 0, out bCancel);
}
}
public override void CreateNewOutputRows()
{
// TODO - This is where we will load our XML document
}
public override void ReleaseConnections()
{
// Call the base class
base.ReleaseConnections();
// Release our connection
Connections.CustomerFile.ReleaseConnection(pathToXmlFile);
}
}
Once your script component is configured, you can plug in the CreateNewOutputRows logic from one of the following patterns.
Processing XML with XmlSerializer
To process the XML file using the XmlSerializer class, we’ll use the XML Schema Definition tool to generate a set of .NET classes from our XML schema file. From the command line, we’ll specify that we want to generate classes (/classes), the language we’d like to use (in this example, we’ll use C#, but VB could be used as well), the namespace of the resulting class, and the path to our schema file. We’ll use the schema file (Customer.xsd) for the customer data XML from Listing 9-3. The command line and xsd.exe output is shown in Listing 9-7.
Listing 9-7. XML Schema Definition Tool Command Line
C:\demos>xsd.exe /classes /language:CS /namespace:DesignPatterns.Samples Customer.xsd
Microsoft (R) Xml Schemas/DataTypes support utility
[Microsoft (R) .NET Framework, Version 2.0.50727.3038]
Copyright (C) Microsoft Corporation. All rights reserved.
Writing file 'Customer.cs'.
![]() Note The XML Schema Definition tool is part of the Windows SDK. On most machines, it will be found in the C:\Program Files (x86)\Microsoft SDKs\Windows\v7.0A\Bin directory. For more information on the XML Schema Definition tool, see its MSDN entry athttp://msdn.microsoft.com/en-us/library/x6c1kb0s.aspx.
Note The XML Schema Definition tool is part of the Windows SDK. On most machines, it will be found in the C:\Program Files (x86)\Microsoft SDKs\Windows\v7.0A\Bin directory. For more information on the XML Schema Definition tool, see its MSDN entry athttp://msdn.microsoft.com/en-us/library/x6c1kb0s.aspx.
The resulting Customer.cs file will have the classes we’ll use in our script component. When used with the XmlSerializer class, we can read the entire XML Source file into an easy-to-manipulate set of objects.
Before we begin writing the CreateNewOutputRows logic, we’ll need to include the Customer.cs file that we generated using xsd.exe. To do this, perform the following steps from within the VSTA script editor environment:
1. Right-click the project node in the Solution Explorer (this will start with “sc_”, followed by a string of numbers) and choose Add Existing Item.
2. Browse to the Customer.cs file that you generated with xsd.exe.
3. Open main.cs from the Solution Explorer.
4. Include the namespace for the Extract class by adding using DesignPatterns.Samples; to the top of the file.
Once the file has been added to your project, you can write the code in CreateNewOutputRows that will read and manipulate the XML data. The source code for the CreateNewOutputRows function is in Listing 9-8.
Listing 9-8. Script Logic for Using the XmlSerializer Class
public override void CreateNewOutputRows()
{
// Load our XML document
Extract extract = (Extract) new XmlSerializer(typeof(Extract)).Deserialize(XmlReader.
Create(pathToXmlFile));
// Output a new row for each Customer in our file
foreach (ExtractCustomer customer in extract.Customers)
{
CustomersBuffer.AddRow();
CustomersBuffer.Key = customer.Key;
CustomersBuffer.FirstName = customer.Name.FirstName;
CustomersBuffer.LastName = customer.Name.LastName;
CustomersBuffer.BirthDate = customer.BirthDate;
CustomersBuffer.Gender = customer.Gender;
CustomersBuffer.YearlyIncome = customer.YearlyIncome;
}
}
Processing XML with XmlReader and LINQ to XML
This pattern makes use of the XmlReader class to stream in an XML document, as well as LINQ to XML functionality to extract the values you want to keep. It is ideal for processing large XML documents, since it does not require the entire document to be read into memory. It is also well suited for scenarios where you want to extract certain fields from the XML document and ignore the rest.
![]() Note The idea for this pattern came from a post from SQL Server MVP, Simon Sabin. Sample code and other great SSIS content can be found on his blog at http://sqlblogcasts.com/blogs/simons/.
Note The idea for this pattern came from a post from SQL Server MVP, Simon Sabin. Sample code and other great SSIS content can be found on his blog at http://sqlblogcasts.com/blogs/simons/.
The key to this pattern is the use of the XmlReader class. Instead of using the XDocument class to read our source XML file (which is the typical approach when using LINQ to XML), we’ll create a special function that returns the XML as a collection of XElements. This allows us to make use of the LINQ syntax while taking advantage of the streaming functionality provided by XmlReader.
Before adding the code, you’ll need to add the following namespaces to your using statements:
· System.Collections.Generic
· System.Linq
· System.Xml.Linq
Listing 9-9 contains the code for the XmlReader function (StreamReader), as well as the CreateNewOutputRows logic to consume the XML document.
Listing 9-9. Script Logic for Using the XmlReader Class
public override void CreateNewOutputRows()
{
foreach (var xdata in (
from customer in StreamReader(pathToXmlFile, "Customer")
select new
{
Key = customer.Attribute("Key").Value,
FirstName = customer.Element("Name").Element("FirstName").Value,
LastName = customer.Element("Name").Element("LastName").Value,
BirthDate = customer.Element("BirthDate").Value,
Gender = customer.Element("Gender").Value,
YearlyIncome = customer.Element("YearlyIncome").Value,
}
))
{
try
{
CustomersBuffer.AddRow();
CustomersBuffer.Key = Convert.ToInt32(xdata.Key);
CustomersBuffer.FirstName = xdata.FirstName;
CustomersBuffer.LastName = xdata.LastName;
CustomersBuffer.BirthDate = Convert.ToDateTime(xdata.BirthDate);
CustomersBuffer.Gender = xdata.Gender;
CustomersBuffer.YearlyIncome = Convert.ToDecimal(xdata.YearlyIncome);
}
catch (Exception e)
{
string errorMessage = string.Format("Error retrieving data. Exception message: {0}",
e.Message);
bool bCancel;
ComponentMetaData.FireError(0, ComponentMetaData.Name, errorMessage, string.Empty, 0,
out bCancel);
}
}
}
static IEnumerable<XElement> StreamReader(String filename, string elementName)
{
using (XmlReader xr = XmlReader.Create(filename))
{
xr.MoveToContent();
while (xr.Read())
{
while (xr.NodeType == XmlNodeType.Element && xr.Name == elementName)
{
XElement node = (XElement)XElement.ReadFrom(xr);
yield return node;
}
}
xr.Close();
}
}
Conclusion
The XML Source component lets you process XML documents from an SSIS data flow without writing any code. Although it can handle most XML schemas, it tends to work best with simple XML documents. When dealing with complex XML formats, consider using XSLT to reformat the source document to a format that is easily parsed. If you don’t mind writing and maintaining .NET code, consider using one of the script component patterns described in this chapter when you need more control over how a document is parsed, are working with large XML documents, or have specific performance requirements.