SQL Server Integration Services Design Patterns, Second Edition (2014)
Chapter 2. Execution Patterns
To fully understand SQL Server 2014 Integration Services execution, you must first understand the different deployment models. There are two: the package deployment model and the project deployment model. Each exposes and supports a different functionality. The package deployment model primarily supports legacy functionality. It is the model used in SSIS 2005 through SSIS 2008 R2. The new way of doing things involves the project deployment model. Certain execution methods, but not all, are available to both deployment models.
You can build awesome SQL Server Integration Services (SSIS) packages, but they do you no good until you execute them! SSIS provides several methods for package execution. In this chapter, we will examine the following:
· Debug execution
· Command-line execution
· The Execute Package utility
· SQL Server 2014 Integration Services
· Integration Services catalogs
· Integration Services catalog stored procedures
· Scheduling SSIS package execution
· The Execute Package task
· Metadata-driven execution
· Execution from managed code
We’ll begin by creating a simple SSIS package to use for demonstration purposes.
Building the Demonstration SSIS Package
Create a new SSIS solution named Chapter2. Rename the SSIS package, changing the name from Package.dtsx to Chapter2.dtsx.
![]() Tip For more information on creating SSIS solutions and packages, see Professional SQL Server 2014 Integration Services by Michael Coles and Francis Rodrigues (Apress, 2012).
Tip For more information on creating SSIS solutions and packages, see Professional SQL Server 2014 Integration Services by Michael Coles and Francis Rodrigues (Apress, 2012).
Drag a script component onto the control flow canvas and open the editor. Choose your language of choice in the ScriptLanguage property on the Script page. Select the System::PackageName variable in ReadOnlyVariables, and then click the Edit Script button.
If you selected Microsoft Visual Basic 2010 as the ScriptLanguage property setting for the Script task, replace the code in Public Sub Main() with the following:
Public Sub Main()
Dim sPackageName As String = Dts.Variables("PackageName").Value.ToString
Dim sMsg As String = "Package Name: "& sPackageName
MsgBox(sMsg, , sPackageName)
Dts.TaskResult = ScriptResults.Success
End Sub
If you selected Microsoft Visual C# 2010 as the ScriptLanguage property setting for the Script task, replace the code in public void Main() with the following :
public void Main()
{
string sPackageName = Dts.Variables["PackageName"].Value.ToString();
string sMsg = "Package Name: " + sPackageName;
MessageBox.Show(sMsg, sPackageName);
Dts.TaskResult = (int)ScriptResults.Success;
}
Save the package, project, and solution. You’re ready to run!
Debug Execution
Executing the package from within SQL Server Business Intelligence Development Studio (BIDS) is straightforward. It works the same regardless of the deployment model selected. However, as with everything in the Visual Studio Integrated Development Environment (VS IDE), you have several ways to accomplish this.
When you execute an SSIS package inside BIDS, you are invoking the SSIS debugger. The SSIS debugger file is named DtsDebugHost.exe and it’s stored in the <drive>:\Program Files\Microsoft SQL Server\120\DTS\Binn folder. It’s important to realize you’re executing the SSIS package inside a debug host process. Why? There is overhead associated with debugging— those boxes don’t change color for free!
To execute the Chapter2.dtsx package in BIDS, press the F5 key. The debug host loads, then it loads the package and executes it. You should see a message box proclaiming the package name. When you click the OK button on the message box, the Script task in the Chapter2 package control flow turns from yellow to green. A link appears beneath the Connections Managers tab to indicate package execution has completed. However, the DtsDebugHost.exe process is still executing. It continues executing until the BIDS debugger is stopped.
Here are some ways to start the BIDS debugger:
· Press the F5 key.
· Click the VCR Play button (the green arrow pointing right) on the toolbar.
· Click the Debug drop-down menu and select Start Debugging.
![]() Note Actually, selecting Step Into or Step Over from the Debug drop-down menu also starts the BIDS debugger.
Note Actually, selecting Step Into or Step Over from the Debug drop-down menu also starts the BIDS debugger.
· In Solution Explorer, right-click the package and select Execute Package from the menu.
· When the package has completed execution in Debug mode, restart the package in one of these ways:
· By holding Ctrl+Shift and pressing the F5 key
· Using the VCR Restart button on the toolbar
· Clicking the Debug drop-down menu and clicking Restart
Here are some ways to stop the debugger once the package execution completes (or whenever a Debug mode Stop is desired):
· Hold Shift and press the F5 key.
· Click the VCR Stop button (the square) on the toolbar.
· Click the Debug drop-down menu and select Stop Debugging.
· Click the Debug drop-down menu and select Terminate All.
· Click the Package Execution Completed link beneath the Connection Managers tab.
Command-Line Execution
Command-line SSIS package execution uses the DTEXEC utility (DtExec.exe). DTEXEC supports project and package deployment models. You can manually invoke DTEXEC from inside BIDS by clicking the Debug drop-down menu and selecting Start Without Debugging (or by holding the Ctrl key and pressing F5). You can also manually start DTEXEC from a command prompt.
DTEXEC isn’t often invoked manually. Instead it’s common to see DTEXEC command lines used with scheduling software to execute SSIS packages in production environments. For example, when you schedule an SSIS package using SQL Server Agent (covered later in this chapter), DTEXEC is instantiated.
To execute the Chapter2.dtsx SSIS package using DTEXEC, open a command prompt and enter the following command:
dtexec /FILE "G:\Projects\SSIS Design Patterns\SSIS Design Patterns\Chapter2.dtsx"
This command executes the Chapter2.dtsx SSIS package located in the G:\Projects\SSIS Design Patterns\SSIS Design Patterns folder. Edit the command line to reflect the location of your SSIS package if you’re playing along at home.
When you execute the package from the command line, the message box displays the package name—as it does when the package is executed from inside the BIDS debugger.
If the SSIS package is deployed to the new SSIS catalog, you can still execute it from the command line using a command similar to this one:
dtexec.exe /ISSERVER "\"\SSISDB\Chapter2\Chapter2\Chapter2.dtsx\"" /SERVER "\"SSISMVP-RC0\"" /Par "\"$ServerOption::SYNCHRONIZED(Boolean)\"";True /REPORTING E /CALLERINFO Andy
Execute Package Utility
The Execute Package Utility (DtExecUI) runs in its own process and executes SSIS packages. I like using the Execute Package Utility to build DTEXEC command lines, but it only supports the package deployment model. You can invoke the Execute Package Utility in at least three ways:
· Click Start ![]() All Programs
All Programs ![]() Microsoft SQL Server
Microsoft SQL Server ![]() Integration Services
Integration Services ![]() Execute Package Utility.
Execute Package Utility.
· Click Start ![]() Run and type dtexecui in the Open text box.
Run and type dtexecui in the Open text box.
· Double-click on a dtsx file (if you haven’t remapped the default application settings for dtsx files).
My favorite option is double-clicking the dtsx file. This not only opens the Execute Package Utility, but it sets the General page settings to indicate that the package source is the file system and configures the package path text box with the full path of the dtsx file I double-clicked. Neat.
If I execute Package2.dtsx using the Execute Package Utility, the Package Execution Progress form displays, informing me of the package’s execution progress (how appropriate) and the message box appears as it did when I executed using the BIDS debugger and the command line.
![]() Note See Professional SQL Server 11 Integration Services by Michael Coles and Francis Rodrigues (Apress, 2012) for more information about the Execute Package Utility.
Note See Professional SQL Server 11 Integration Services by Michael Coles and Francis Rodrigues (Apress, 2012) for more information about the Execute Package Utility.
The SQL Server 2014 Integration Services Service
The SQL Server Integration Services 11.0 service installs with SQL Server 2014. To connect, open SQL Server Management Studio (SSMS). If prompted to connect with the Connect To Server window at SSMS startup, make sure Server Type is set to Integration Services. Enter the name of the server in the Server Name drop-down. Please note there aren’t named instances of SSIS: there’s one per server (for now, anyway). You can also enter localhost to connect to the local server’s default instance of SSIS.
Once the connection is configured, click the Connect button. Navigate to the package you desire to execute. SSIS packages stored in the file system or the MSDB database can be executed from the SSIS 2014 service.
SQL Server 2014 provides a new way to manage and execute Integration Services packages: Integration Services catalogs. We explore this method next.
Integration Services Catalogs
You can only manage SSIS projects that use the project deployment model in Integration Services catalogs. To execute a package in the catalog, use SSMS to connect to the instance of SQL Server hosting the SSISDB database. Expand the Integration Services Catalogs node and then expand the SSISDB node. Drill into the folder containing the SSIS project and package(s). Right-click the package you wish to execute and click Execute, as shown in Figure 2-1.
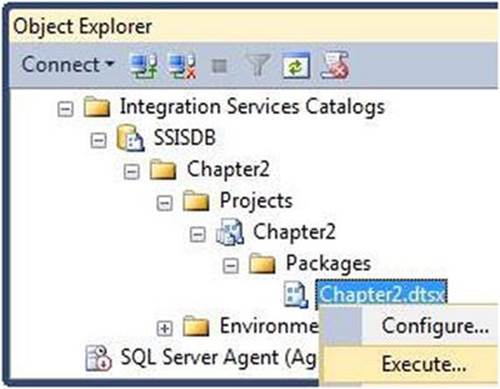
Figure 2-1. Executing an SSIS package deployed to the SSIS Catalog
The Execute Package window displays, as shown in Figure 2-2. It allows you to override parameter values, ConnectionString properties of connection managers built at design-time, or any other externalize-able property accessible from a package path (via the Advanced tab) for this execution instance of the SSIS package stored in the SSIS Catalog.
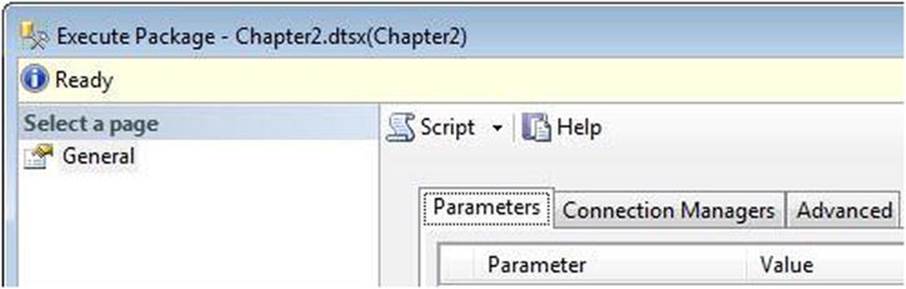
Figure 2-2. Execute Package window
Integration Server Catalog Stored Procedures
Please note the Script button above the Parameters tab in Figure 2-2. This button allows you to generate Transact-SQL (T-SQL) statements that will execute the SSIS package. For the Chapter2.dtsx package stored in the SSIS Catalog, the scripts will appear similar to those in Listing 2-1.
Listing 2-1. T-SQL Script Generated from the Execute Package Window
Declare @execution_id bigint
EXEC [SSISDB].[catalog].[create_execution]
@package_name=N'Chapter2.dtsx'
,@execution_id=@execution_id OUTPUT
,@folder_name=N'Chapter2'
,@project_name=N'Chapter2'
,@use32bitruntime=False
,@reference_id=Null
Select @execution_id
DECLARE @var0 smallint = 1
EXEC [SSISDB].[catalog].[set_execution_parameter_value]
@execution_id
,@object_type=50
,@parameter_name=N'LOGGING_LEVEL'
,@parameter_value=@var0
EXEC [SSISDB].[catalog].[start_execution] @execution_id
GO
You can use these same stored procedures to execute SSIS packages in the SSIS Catalog! In fact, I designed a script to create a wrapper-stored procedure that will call the T-SQL statements executed when an SSIS package is executed in the SSIS Catalog. You can see that script in Listing 2-2.
Listing 2-2. Script to Build a Wrapper-Stored Procedure for Executing SSIS Packages in the SSIS Catalog
/* Select the SSISDB database */
Use SSISDB
Go
/* Create a parameter (variable) named @Sql */
Declare @Sql varchar(2000)
/* Create the Custom schema if it does not already exist */
print 'Custom Schema'
If Not Exists(Select name
From sys.schemas
Where name = 'custom')
begin
/* Create Schema statements must occur first in a batch */
print ' - Creating custom schema'
Set @Sql = 'Create Schema custom'
Exec(@Sql)
print ' - Custom schema created'
end
Else
print ' - Custom Schema already exists.'
print ''
/* Drop the Custom.execute_catalog_package Stored Procedure if it already exists */
print 'Custom.execute_catalog_package Stored Procedure'
If Exists(Select s.name + '.' + p.name
From sys.procedures p
Join sys.schemas s
On s.schema_id = p.schema_id
Where s.name = 'custom'
And p.name = 'execute_catalog_package')
begin
print ' - Dropping custom.execute_catalog_package'
Drop Procedure custom.execute_catalog_package
print ' - Custom.execute_catalog_package dropped'
end
/* Create the Custom.execute_catalog_package Stored Procedure */
print ' - Creating custom.execute_catalog_package'
go
/*
Stored Procedure: custom.execute_catalog_package
Author: Andy Leonard
Date: 4 Mar 2012
Description: Creates a wrapper around the SSISDB Catalog procedures
used to start executing an SSIS Package. Packages in the
SSIS Catalog are referenced by a multi-part identifier
- or path - that consists of the following hierarchy:
Catalog Name: Implied by the database name in Integration Server 2014
|-Folder Name: A folder created before or at Deployment to contain the SSIS project
|-Project Name: The name of the SSIS Project deployed
|-Package Name: The name(s) of the SSIS Package(s) deployed
Parameters:
@FolderName [nvarchar(128)] {No default} –
contains the name of the Folder that holds the SSIS Project
@ProjectName [nvarchar(128)] {No default} –
contains the name of the SSIS Project that holds the SSIS Package
@PackageName [nvarchar(260)] {No default} –
contains the name of the SSIS Package to be executed
@ExecutionID [bigint] {Output} –
Output parameter (variable) passed back to the caller
@LoggingLevel [varchar(16)] {Default} –
contains the (case-insensitive) name of the logging level
to apply to this execution instance
@Use32BitRunTime [bit] {Default} –
1 == Use 64-bit run-time
0 == Use 32-bit run-time
@ReferenceID [bigint] {Default} –reference to Execution Environment
@ObjectType [smallint] –identifier related to PackageType property
Guessing: @ObjectType == PackageType.ordinal (1-based-array) * 10
Must be 20, 30, or 50 for catalog.set_execution_parameter_value
stored procedure
Test:
1. Create and deploy an SSIS Package to the SSIS Catalog.
2. Exec custom.execute_catalog_package and pass it the
following parameters: @FolderName, @ProjectName, @PackageName, @ExecutionID Output
@LoggingLevel, @Use32BitRunTime, @ReferenceID, and @ObjectType are optional and
defaulted parameters.
Example:
Declare @ExecId bigint
Exec custom.execute_catalog_package
'Chapter2'
,'Chapter2'
,'Chapter2.dtsx'
,@ExecId Output
3. When execution completes, an Execution_Id value should be returned.
View the SSIS Catalog Reports to determine the status of the execution
instance and the test.
*/
Create Procedure custom.execute_catalog_package
@FolderName nvarchar(128)
,@ProjectName nvarchar(128)
,@PackageName nvarchar(260)
,@ExecutionID bigint Output
,@LoggingLevel varchar(16) = 'Basic'
,@Use32BitRunTime bit = 0
,@ReferenceID bigint = NULL
,@ObjectType smallint = 50
As
begin
Set NoCount ON
/* Call the catalog.create_execution stored procedure
to initialize execution location and parameters */
Exec catalog.create_execution
@package_name = @PackageName
,@execution_id = @ExecutionID Output
,@folder_name = @FolderName
,@project_name = @ProjectName
,@use32bitruntime = @Use32BitRunTime
,@reference_id = @ReferenceID
/* Populate the @ExecutionID parameter for OUTPUT */
Select @ExecutionID As Execution_Id
/* Create a parameter (variable) named @Sql */
Declare @logging_level smallint
/* Decode the Logging Level */
Select @logging_level = Case
When Upper(@LoggingLevel) = 'BASIC'
Then 1
When Upper(@LoggingLevel) = 'PERFORMANCE'
Then 2
When Upper(@LoggingLevel) = 'VERBOSE'
Then 3
Else 0 /* 'None' */
End
/* Call the catalog.set_execution_parameter_value stored
procedure to update the LOGGING_LEVEL parameter */
Exec catalog.set_execution_parameter_value
@ExecutionID
,@object_type = @ObjectType
,@parameter_name = N'LOGGING_LEVEL'
,@parameter_value = @logging_level
/* Call the catalog.start_execution (self-explanatory) */
Exec catalog.start_execution
@ExecutionID
end
GO
If you execute this script to create the custom schema and stored procedure in your instance of the SSISDB database, you can test it using the statement in Listing 2-3.
Listing 2-3. Testing the SSISDB.custom.execute_catalog_package Stored Procedure
Declare @ExecId bigint
Exec SSISDB.custom.execute_catalog_package 'Chapter2','Chapter2','Chapter2.dtsx',
@ExecId Output
Adding a Data Tap
The SSISDB.custom.execute_catalog_package stored procedure can be modified slightly to create a data tap— a new feature for packages executed from the SSISDB Catalog in SSIS 2014. Adding a few parameters and some T-SQL to the stored procedure allows it to execute an SSIS package and export a comma-separated values (CSV) file filled with some or all of the rows that flowed through a point in a Data Flow task. Data taps provide a much-needed window on the state of data as they move through an SSIS data flow, facilitating root-cause analysis and troubleshooting in production environments without altering the package code. Data taps are one of the most important enhancements to Integration Services 2014. Listing 2-4 contains the script to build SSISDB.custom.execute_catalog_package_with_data_tap:
Listing 2-4. Script to Build a Wrapper-Stored Procedure for Executing SSIS Packages in the SSIS Catalog
/* Select the SSISDB database */
Use SSISDB
Go
/* Create a parameter (variable) named @Sql */
Declare @Sql varchar(2000)
/* Create the Custom schema if it does not already exist */
print 'Custom Schema'
If Not Exists(Select name
From sys.schemas
Where name = 'custom')
begin
/* Create Schema statements must occur first in a batch */
print ' - Creating custom schema'
Set @Sql = 'Create Schema custom'
Exec(@Sql)
print ' - Custom schema created'
end
Else
print ' - Custom Schema already exists.'
print ''
/* Drop the Custom.execute_catalog_package_with_data_tap
Stored Procedure if it already exists */
print 'Custom.execute_catalog_package_with_data_tap Stored Procedure'
If Exists(Select s.name + '.' + p.name
From sys.procedures p
Join sys.schemas s
On s.schema_id = p.schema_id
Where s.name = 'custom'
And p.name = 'execute_catalog_package_with_data_tap')
begin
print ' - Dropping custom.execute_catalog_package_with_data_tap'
Drop Procedure custom.execute_catalog_package_with_data_tap
print ' - Custom.execute_catalog_package_with_data_tap dropped'
end
/* Create the Custom.execute_catalog_package_with_data_tap Stored Procedure */
print ' - Creating custom.execute_catalog_package_with_data_tap'
go
/*
Stored Procedure: custom.execute_catalog_package_with_data_tap
Author: Andy Leonard
Date: 4 Apr 2012
Description: Creates a wrapper around the SSISDB Catalog procedures
used to start executing an SSIS Package and create a
data tap. Packages in the
SSIS Catalog are referenced by a multi-part identifier
- or path - that consists of the following hierarchy:
Catalog Name: Implied by the database name in Integration Server 2014
|-Folder Name: A folder created before or at Deployment to contain the SSIS project
|-Project Name: The name of the SSIS Project deployed
|-Package Name: The name(s) of the SSIS Package(s) deployed
Parameters:
@FolderName [nvarchar(128)] {No default} - contains the name of the
Folder that holds the SSIS Project
@ProjectName [nvarchar(128)] {No default} - contains the name of the
SSIS Project that holds the SSIS Package
@PackageName [nvarchar(260)] {No default} - contains the name of the
SSIS Package to be executed
@ExecutionID [bigint] {Output} - Output parameter (variable) passed back
to the caller
@LoggingLevel [varchar(16)] {Default} - contains the (case-insensitive)
name of the logging level to apply to this execution instance
@Use32BitRunTime [bit] {Default} - 1 == Use 64-bit run-time
0 == Use 32-bit run-time
@ReferenceID [bigint] {Default} - contains a reference to an Execution Environment
@ObjectType [smallint] - contains an identifier that appears to be related
to the SSIS PackageType property
Guessing: @ObjectType == PackageType.ordinal (1-based-array) * 10
Must be 20, 30, or 50 for catalog.set_execution_parameter_value
stored procedure
@DataFlowTaskName [nvarchar(255)] - contains the name of the Data Flow Task in which to
to apply the data tap.
@IdentificationString [nvarchar(255)] - contains the Data Flow Path Identification string
in which to apply the data tap.
@DataTapFileName [nvarchar(4000)] - contains the name of the file to create to contain
the rows captured from the data tap.
Saved in the <drive>:\Program Files\Microsoft SQL Server\120\DTS\DataDumps folder.
@DataTapMaxRows [int] - contains the maximum number of rows to send to the data tap file.
Test:
1. Create and deploy an SSIS Package to the SSIS Catalog.
2. Exec custom.execute_catalog_package_with_data_tap and pass it the
following parameters: @FolderName, @ProjectName, @PackageName,
@DataFlowTaskName, @IdentificationString, @DataTapFileName,
@ExecutionID Output
@LoggingLevel, @Use32BitRunTime, @ReferenceID, @ObjectType,
and @DataTapMaxRows are optional and defaulted parameters.
Example:
Declare @ExecId bigint
Exec custom.execute_catalog_package_with_data_tap
'SSISConfig2014','SSISConfig2014','Child1.dtsx',
'Data Flow Task', 'OLESRC Temperature.OLE DB Source Output',
'Child1_DataFlowTask_OLESRCTemperature_OLEDBSourceOutput.csv',@ExecId Output
3. When execution completes, an Execution_Id value should be returned.
View the SSIS Catalog Reports to determine the status of the
execution instance and the test.
*/
Create Procedure [custom].[execute_catalog_package_with_data_tap]
@FolderName nvarchar(128)
,@ProjectName nvarchar(128)
,@PackageName nvarchar(260)
,@DataFlowTaskName nvarchar(255)
,@IdentificationString nvarchar(255)
,@DataTapFileName nvarchar(4000)
,@ExecutionID bigint Output
,@LoggingLevel varchar(16) = 'Basic'
,@Use32BitRunTime bit = 0
,@ReferenceID bigint = NULL
,@ObjectType smallint = 50
,@DataTapMaxRows int = NULL
As
begin
Set NoCount ON
/* Call the catalog.create_execution stored procedure
to initialize execution location and parameters */
Exec catalog.create_execution
@package_name = @PackageName
,@execution_id = @ExecutionID Output
,@folder_name = @FolderName
,@project_name = @ProjectName
,@use32bitruntime = @Use32BitRunTime
,@reference_id = @ReferenceID
/* Populate the @ExecutionID parameter for OUTPUT */
Select @ExecutionID As Execution_Id
/* Configure Data Tap parameters */
If (Left(@DataFlowTaskName, 9) <> '\Package\')
Set @DataFlowTaskName = '\Package\' + @DataFlowTaskName
If Left(@IdentificationString,6) <> 'Paths['
Set @IdentificationString = 'Paths[' + @IdentificationString + ']'
/* Create the Data Tap */
EXEC [SSISDB].[catalog].add_data_tap @ExecutionID, @DataFlowTaskName,
@IdentificationString, @DataTapFileName, @DataTapMaxRows
/* Create a parameter (variable) named @Sql */
Declare @logging_level smallint
/* Decode the Logging Level */
Select @logging_level = Case
When Upper(@LoggingLevel) = 'BASIC'
Then 1
When Upper(@LoggingLevel) = 'PERFORMANCE'
Then 2
When Upper(@LoggingLevel) = 'VERBOSE'
Then 3
Else 0 /* 'None' */
End
/* Call the catalog.set_execution_parameter_value stored
procedure to update the LOGGING_LEVEL parameter */
Exec catalog.set_execution_parameter_value
@ExecutionID
,@object_type = @ObjectType
,@parameter_name = N'LOGGING_LEVEL'
,@parameter_value = @logging_level
/* Call the catalog.start_execution (self-explanatory) */
Exec catalog.start_execution
@ExecutionID
end
Testing the Data Tap Procedure
Before we begin this exercise, please visit http://andyweather.com/data/WeatherData_Dec08.zip to obtain some real-world temperature and humidity weather data collected at my weather station in Farmville, Virginia. The compressed file (WeatherData_Dec08.zip) contains a single CSV file named sensor1-all.csv. The file is two folders down, located at Dec08\TH\sensor1-all.csv. Unzip the compressed file and store it in your file system. I prefer to store data related to test projects inside a folder named Data in the SSIS solution directory. It doesn’t matter where you store the file as long as you remember where you put it.
Add a new SSIS package to the Chapter2 project and rename it DataTapTest.dtsx. Drag a Data Flow task onto the control flow and rename it DFT Load Temperature Data. Open the Data Flow Editor (tab) and drag a Flat File source adapter onto the design surface. Rename the Flat File source adapter FFSrc Temperature. Open the Flat File Source Adapter Editor and click the New button to the right of the Flat File Connection Manager drop-down. Clicking the New button does a couple things for you:
1. It creates a new Flat File connection manager.
2. It opens the new Flat File Connection Manager Editor.
Set the name of the Flat File connection manager to FFCM Temperature. Click the Browse button and navigate to the folder containing the sensor1-all.csv file (remember to change the extension filter in the Open dialog from *.txt to *.csv. Select the sensor1-all.csvfile and then click the OK button on the Open dialog since we are accepting the Flat File connection manager defaults for the purposes of this demo. Click the OK button to close the Flat File Source Adapter Editor.
Before we proceed, open SQL Server Management Studio (SSMS), connect to an instance of SQL Server 2014, and create a database named TestDB.
Return to SQL Server Data Tools - Business Intelligence (SSDT-BI) and drag an OLE DB destination adapter onto the Data Flow task surface. Rename the OLE DB destination adapter OLEDBDest TemperatureStage and connect a data flow path (blue arrow) between the FFSrc Temperature Flat File source adapter and the OLEDBDest TemperatureStage OLE DB destination adapter. Open the OLEDBDest TemperatureStage OLE DB Destination Adapter Editor and click the New button to the right of the OLE DB Connection Manager drop-down to create a new OLE DB connection manager and open its editor. When the Configure OLE DB Connection Manager window displays, click the New button to open the Connection Manager Editor window. Enter the server name and user login credentials, then enter or select the TestDB database in the Select or Enter a Database Name drop-down. Close the editor and the Configure OLE DB Connection Manager window to return to the OLEDBDest TemperatureStage OLE DB destination adapter.
Click the New button to the right of the Name of the Table or the View drop-down in the OLEDBDest TemperatureStage OLE DB destination adapter. Modify the contents of the Create Table window to match the data definition language (DDL) statement in Listing 2-5.
Listing 2-5. Data Definition Language (DDL) Create Table Statement for Destination
CREATE TABLE [TemperatureStage] (
[Date] varchar(50),
[Time] varchar(50),
[MinT] varchar(50),
[MaxT] varchar(50),
[AverageT] varchar(50),
[MinH] varchar(50),
[MaxH] varchar(50),
[AverageH] varchar(50),
[ComfortZone] varchar(50),
[MinDP] varchar(50),
[MaxDP] varchar(50),
[AverageDP] varchar(50),
[MinHI] varchar(50),
[MaxHI] varchar(50),
[AverageHI] varchar(50)
)
This statement modifies the supplied statement by removing the OLEDBDest prefix from the table name and by removing the spaces from the column names. Click the OK button to create the table and close the Create Table window. Click the Mappings page and map the available input columns to their matching available destination columns. Close the OLEDBDest TemperatureStage OLE DB Destination Adapter Editor.
Double-click the data flow path to open its editor. From the General page, copy the IdentificationString property value. The IdentificationString property should be Paths[FFSrc Temperature.Flat File Source Output]. We will need this value and the value of the PackagePath property of the Data Flow task (\Package\DFT Load Temperature Data) to execute this package with a data tap.
First, save the SSIS package and deploy it to the catalog. Next, execute the statement in Listing 2-6 to execute the SSIS package with a data tap.
Listing 2-6. Executing an SSIS Package with a Data Tap
Declare @ExecId bigint
Exec SSISDB.custom.execute_catalog_package_with_Data_tap
@FolderName = 'Chapter2'
,@ProjectName = 'Chapter2'
,@PackageName = 'DataTapTest.dtsx'
,@DataFlowTaskName = '\Package\DFT Load Temperature Data'
,@IdentificationString = 'Paths[FFSrc Temperature.Flat File Source Output]'
,@DataTapFileName = 'TemperatureRows.csv'
,@ExecutionID = @ExecId Output
,@DataTapMaxRows = 25
Once the package executes (and you can test for rows in the TestDB.dbo.TemperatureStage table), you should find a CSV file named TemperatureRows.csv in the <drive>:\Program Files\Microsoft SQL Server\120\DTS\DataDumps directory, and that file should contain the first 25 rows of data that flowed through the "FFSrc Temperature.Flat File Source Output" data flow path in the "DFT Load Temperature Data" in the DataTapTest.dtsx SSIS package.
Creating a Custom Execution Framework
SSIS execution frameworks support repeatable and reliable SSIS package execution. The SSISDB.custom.execute_catalog_package stored procedure can be used as the centerpiece for an SSIS execution framework. To create the tables to support this framework, execute the statements in Listing 2-7.
Listing 2-7. Tables to Support a Custom SSIS Execution Framework
/* Switch to SSISDB database */
Use SSISDB
Go
/* Build custom Schema */
print 'Custom Schema'
/* Check for existence of custom Schema */
If Not Exists(Select name
From sys.schemas
Where name = 'custom')
begin
/* Build and execute custom Schema SQL
if it does not exist */
print ' - Creating custom schema'
declare @CustomSchemaSql varchar(32) = 'Create Schema custom'
exec(@CustomSchemaSql)
print ' - Custom schema created'
end
Else
/* If the custom schema exists, tell us */
print ' - Custom schema already exists.'
print ''
Go
/* Build custom.Application table */
print 'Custom.Application Table'
/* Check for existence of custom.Application table */
If Not Exists(Select s.name + '.' + t.name
From sys.tables t
Join sys.schemas s
On s.schema_id = t.schema_id
Where s.name = 'custom'
And t.name = 'Application')
begin
/* Create custom.Application table
if it does not exist */
print ' - Creating custom.Application Table'
Create Table custom.Application
(
ApplicationID int identity(1,1)
Constraint PK_custom_Application Primary Key Clustered
,ApplicationName nvarchar(256) Not Null
Constraint U_custom_ApplicationName Unique
,ApplicationDescription nvarchar(512) Null
)
print ' - Custom.Application Table created'
end
Else
/* If the custom.Application table exists, tell us */
print ' - Custom.Application Table already exists.'
print ''
/* Build custom.Package table */
print 'Custom.Package Table'
/* Check for existence of custom.Package table */
If Not Exists(Select s.name + '.' + t.name
From sys.tables t
Join sys.schemas s
On s.schema_id = t.schema_id
Where s.name = 'custom'
And t.name = 'Package')
begin
/* Create custom.Package table
if it does not exist */
print ' - Creating custom.Package Table'
Create Table custom.Package
(
PackageID int identity(1,1)
Constraint PK_custom_Package Primary Key Clustered
,FolderName nvarchar(128) Not Null
,ProjectName nvarchar(128) Not Null
,PackageName nvarchar(256) Not Null
,PackageDescription nvarchar(512) Null
)
print ' - Custom.Package Table created'
end
Else
/* If the custom.Package table exists, tell us */
print ' - Custom.Package Table already exists.'
print ''
/* Build custom.ApplicationPackage table */
print 'Custom.ApplicationPackage Table'
/* Check for existence of custom.ApplicationPackage table */
If Not Exists(Select s.name + '.' + t.name
From sys.tables t
Join sys.schemas s
On s.schema_id = t.schema_id
Where s.name = 'custom'
And t.name = 'ApplicationPackage')
begin
/* Create custom.ApplicationPackage table
if it does not exist */
print ' - Creating custom.ApplicationPackage Table'
Create Table custom.ApplicationPackage
(
ApplicationPackageID int identity(1,1)
Constraint PK_custom_ApplicationPackage Primary Key Clustered
,ApplicationID int Not Null
Constraint FK_custom_ApplicationPackage_Application
Foreign Key References custom.Application(ApplicationID)
,PakcageID int Not Null
Constraint FK_custom_ApplicationPackage_Package
Foreign Key References custom.Package(PackageID)
,ExecutionOrder int Not Null
Constraint DF_custom_ApplicationPackage_ExecutionOrder
Default(10)
,ApplicationPackageEnabled bit Not Null
Constraint DF_custom_ApplicationPackage_ApplicationPackageEnabled
Default(1)
)
print ' - Custom.ApplicationPackage Table created'
end
Else
/* If the custom.ApplicationPackage table exists, tell us */
print ' - Custom.ApplicationPackage Table already exists.'
print ''
/* Build custom.GetApplicationPackages stored procedure */
print 'Custom.GetApplicationPackages'
/* Check for existence of custom.GetApplicationPackages stored procedure */
If Exists(Select s.name + '.' + p.name
From sys.procedures p
Join sys.schemas s
On s.schema_id = p.schema_id
Where s.name = 'custom'
And p.name = 'GetApplicationPackages')
begin
/* If custom.GetApplicationPackages stored procedure
exists, drop it */
print ' - Dropping custom.GetApplicationPackages Stored Procedure'
Drop Procedure custom.GetApplicationPackages
print ' - custom.GetApplicationPackages Stored Procedure dropped'
end
print ' - Creating custom.GetApplicationPackages Stored Procedure'
go
/*
Procedure: custom.GetApplicationPackages
Author: Andy Leonard
Parameter(s): ApplicationName [nvarchar(256)]
- contains the name of the SSIS Application
for which to retrieve SSIS Packages.
Description: Executes against the custom.ApplicationPackages
table joined to the custom.Application
and custom.Packages tables. Returns a
list of enabled Packages related to the
Application ordered by ExecutionOrder.
Example: exec custom.GetApplicationPackages 'TestSSISApp'
*/
Create Procedure custom.GetApplicationPackages
@ApplicationName nvarchar(256)
As
begin
Set NoCount On
Select p.FolderName, p.ProjectName, p.PackageName, ap.ExecutionOrder
From custom.ApplicationPackage ap
Join custom.Package p
On p.PackageID = ap.PackageID
Join custom.Application a
On a.ApplicationID = ap.ApplicationID
Where a.ApplicationName = @ApplicationName
And ap.ApplicationPackageEnabled = 1
Order By ap.ExecutionOrder
end
go
print ' - Custom.GetApplicationPackages Stored Procedure created.'
print ''
/* Build custom.AddApplication stored procedure */
print 'Custom.AddApplication'
If Exists(Select s.name + '.' + p.name
From sys.procedures p
Join sys.schemas s
On s.schema_id = p.schema_id
Where s.name = 'custom'
And p.name = 'AddApplication')
begin
/* If custom.AddApplication stored procedure
exists, drop it */
print ' - Dropping custom.AddApplication Stored Procedure'
Drop Procedure custom.AddApplication
print ' - custom.AddApplication Stored Procedure dropped'
end
print ' - Creating custom.AddApplication Stored Procedure'
go
/*
Procedure: custom.AddApplication
Author: Andy Leonard
Parameter(s): ApplicationName [nvarchar(256)]
- contains the name of the SSIS Application
to add to the Framework database.
ApplicationDescription [nvarchar(512)]
- contains a description of the SSIS Application.
Description: Stores an SSIS Application.
Example: exec custom.AddApplication 'TestSSISApp', 'A test SSIS Application.'
*/
Create Procedure custom.AddApplication
@ApplicationName nvarchar(256)
,@ApplicationDescription nvarchar(512) = NULL
As
begin
Set NoCount On
Insert Into custom.Application
(ApplicationName
,ApplicationDescription)
Output inserted.ApplicationID
Values
(@ApplicationName
,@ApplicationDescription)
end
go
print ' - Custom.AddApplication Stored Procedure created.'
print ''
/* Build custom.AddPackage stored procedure */
print 'Custom.AddPackage'
If Exists(Select s.name + '.' + p.name
From sys.procedures p
Join sys.schemas s
On s.schema_id = p.schema_id
Where s.name = 'custom'
And p.name = 'AddPackage')
begin
/* If custom.AddPackage stored procedure
exists, drop it */
print ' - Dropping custom.AddPackage Stored Procedure'
Drop Procedure custom.AddPackage
print ' - custom.AddPackage Stored Procedure dropped'
end
print ' - Creating custom.AddPackage Stored Procedure'
go
/*
Procedure: custom.AddPackage
Author: Andy Leonard
Parameter(s): FolderName [nvarchar(128)]
- contains the name of the SSISDB Catalog
folder containing the SSIS Package.
ProjectName [nvarchar(128)]
- contains the name of the SSISDB Catalog
project containing the SSIS Package.
PackageName [nvarchar(128)]
- contains the name of the SSISDB Catalog
SSIS Package.
PackageDescription [nvarchar(512)]
- contains a description of the SSIS Package.
Description: Stores an SSIS Package.
Example: exec custom.AddPackage 'Chapter2', 'Chapter2'
, 'Chapter2.dtsx', 'A test SSIS Package.'
*/
Create Procedure custom.AddPackage
@FolderName nvarchar(128)
,@ProjectName nvarchar(128)
,@PackageName nvarchar(256)
,@PackageDescription nvarchar(512) = NULL
As
begin
Set NoCount On
Insert Into custom.Package
(FolderName
,ProjectName
,PackageName
,PackageDescription)
Output inserted.PackageID
Values
(@FolderName
,@ProjectName
,@PackageName
,@PackageDescription)
end
go
print ' - Custom.AddPackage Stored Procedure created.'
print ''
/* Build custom.AddApplicationPackage stored procedure */
print 'Custom.AddApplicationPackage'
If Exists(Select s.name + '.' + p.name
From sys.procedures p
Join sys.schemas s
On s.schema_id = p.schema_id
Where s.name = 'custom'
And p.name = 'AddApplicationPackage')
begin
/* If custom.AddApplicationPackage stored procedure
exists, drop it */
print ' - Dropping custom.AddApplicationPackage Stored Procedure'
Drop Procedure custom.AddApplicationPackage
print ' - custom.AddApplicationPackage Stored Procedure dropped'
end
print ' - Creating custom.AddApplicationPackage Stored Procedure'
go
/*
Procedure: custom.AddApplicationPackage
Author: Andy Leonard
Parameter(s): ApplicationID [int]
- contains the ID returned from the execution
of custom.AddApplication.
PackageID [int]
- contains the ID returned from the execution
of custom.AddPackage.
ExecutionOrder [int]
- contains the order the package will execute
within the SSIS Application.
ApplicationPackageEnabled [bit]
- 1 == Enabled and will run as part of the SSIS Application.
0 == Disabled and will not run as part of the SSIS Application.
Description: Links an SSIS Package to an SSIS Application
Example: exec custom.AddApplicationPackage 1, 1, 10, 1
*/
Create Procedure custom.AddApplicationPackage
@ApplicationID int
,@PackageID int
,@ExecutionOrder int = 10
,@ApplicationPackageEnabled bit = 1
As
begin
Set NoCount On
Insert Into custom.ApplicationPackage
(ApplicationID
,PackageID
,ExecutionOrder
,ApplicationPackageEnabled)
Values
(@ApplicationID
,@PackageID
,@ExecutionOrder
,@ApplicationPackageEnabled)
end
go
print ' - Custom.AddApplicationPackage Stored Procedure created.'
print ''
Create a new SSIS Package in the Chapter2 project and rename it Parent.dtsx. Click the Parameters tab on the package—it’s the third tab from the left (Control Flow, Data Flow, Parameters). Click the Add Parameter button and create a parameter named ApplicationName, String data type, with a default value of testSSISApp. Set the Required property to True.
Add an Execute SQL task to the control flow and rename it Get Packages. Open the editor and set the ConnectionType property to ADO.NET. In the Connection property drop-down, select (or create a connection to) the SSISDB database. In the SQLStatement property, entercustom.GetApplicationPackages. Set the IsQueryStoredProcedure property to True. Change the ResultSet property to Full result set.
Navigate to the Parameter Mapping page and click the Add button. Click the Variable Name drop-down and select $Package::ApplicationName at the very top of the list. Change the Data Type to String and the Parameter Name to ApplicationName. This maps the value in the parent package parameters into the ApplicationName parameter sent to the custom.GetApplicationPackages stored procedure when it is called by the Execute SQL task.
Navigate to the Result Set page and click the Add button. If the Add button is disabled, you did not change the ResultSet property on the General page from the default setting (None). If ResultSet is set to any other setting, the Add button is enabled. Enter 0 for the Result Name. In the Variable Name drop-down, create a variable named Packages. For this variable, set the Value Type property to Object.
![]() Note Object is an interesting data type. Akin to a variant, Object can contain a scalar like a date or integer. It can also hold a collection or string array. In this example, Object will contain an ADO.Net Dataset value. If we had set the ConnectionType property to OLEDB (the default), this result set variable would be populated with an ADO Recordset. Yes, that is a COM object—in 2014. COM (and COBOL) will never die....
Note Object is an interesting data type. Akin to a variant, Object can contain a scalar like a date or integer. It can also hold a collection or string array. In this example, Object will contain an ADO.Net Dataset value. If we had set the ConnectionType property to OLEDB (the default), this result set variable would be populated with an ADO Recordset. Yes, that is a COM object—in 2014. COM (and COBOL) will never die....
Let’s review. First, the task will use an ADO.NET connection to the SSISDB database to execute the custom.GetApplicationPackages stored procedure we created earlier. Because we set the IsQueryStoredProcedure to True, we do not need to add placeholders for parameters or the exec command. Since we used ADO.NET, we can address parameters by name instead of ordinal (ApplicationName instead of 0) on the Parameter Mapping page. Finally, we configured the Execute SQL task to push the results of the stored procedure execution into an object variable named Packages.
Click the OK button to close the Execute SQL Task Editor. Drag a Foreach Loop container onto the control flow surface and open its editor. On the General page, change the Name property to Foreach Package in Packages. On the Collection page, select the Foreach ADO Enumerator. In the ADO Object Source Variable drop-down, select the Packages variable. Leave the Enumeration Mode default option Rows in the First Table selected.
I can hear you thinking, “So what would I need to do if I had an ADO Recordset in the Packages object variable?” That is an excellent question. The answer is, “Nothing different.” Even though object variables can hold ADO Recordsets and ADO.NET datasets (and other collections and scalars), the Foreach ADO Enumerator is smart enough to detect the type of object inside the SSIS object variable— and then read it. Isn’t that cool? I thought so too.
Navigate to the Variable Mappings page. Create four variables at package scope. These variables match the fields returned from the custom.GetApplicationPackages stored procedure; and subsequently loaded into the first table in an ADO.NET dataset now housed inside thePackages SSIS variable. If you didn’t get that sentence, reread it (I’ll wait). That’s a lot to take in, but it is vital to understanding what we’re doing here. Got it? Good.
I will walk you through creating the first variable listed as follows using the method I prefer for variable creation. Click the Variable drop-down and select <New variable...> at the very top of the list. When the Add Variable window displays, make sure the Container property is set to Parent (the name of the package). This ensures the variable has package scope. Enter FolderName in the Name text box. Click the OK button and change the Index property to 0. Leave the Value Type property set to String. I almost always create SSIS variables in this fashion. I have more control over scope, and I am creating and configuring the variable where it will be used. This functionality saves time and simply rocks.
Create the variables in the following order:
Container: Parent
Name: FolderName
Namespace: User
Value Type: String
Value:
Container: Parent
Name: ProjectName
Namespace: User
Value Type: String
Value:
Container: Parent
Name: ChildPackageName
Namespace: User
Value Type: String
Value:
Container: Parent
Name: ExecutionOrder
Namespace: User
Value Type: Int32
Value: 0
Make sure the index values align as shown here:
FolderName: 0
ProjectName: 1
ChildPackageName: 2
ExecutionOrder: 3
The fields do not have to be listed in this order, but the index values have to align with the (zero-based) ordinal value of the fields returned by the custom.GetApplicationPackages.
Click the OK button to close the Foreach Loop Container Editor. Drag an Execute SQL task into the Foreach Loop container and rename it Execute Package. Set the ConnectionType to ADO.NET and select the SSISDB connection you created earlier. Set theIsQueryStoredProcedure property to True and the SQL Statement property to custom.execute_catalog_package. On the Parameter Mapping page, add and create a new variable named ExecutionID, Int32 data type, package scope, default value: 0. Change the Direction of the parameter to Output and couple the SSIS variable you just created to the ExecutionID parameter by supplying the Parameter Name: ExecutionID. Add three more parameter mappings—one each for FolderName, ProjectName, and ChildPackageName. Map them to the stored procedure parameters FolderName, ProjectName, and PackageName; respectively. The custom.execute_catalog_package stored procedure accepts other parameters: LoggingLevel, Use32BitRunTime, ReferenceID, and ObjectType; but these parameters all contain default values that will serve our purposes. Click the OK button to close the Execute SQL Task Editor.
Your Parent.dtsx SSIS package should appear as shown in Figure 2-3.
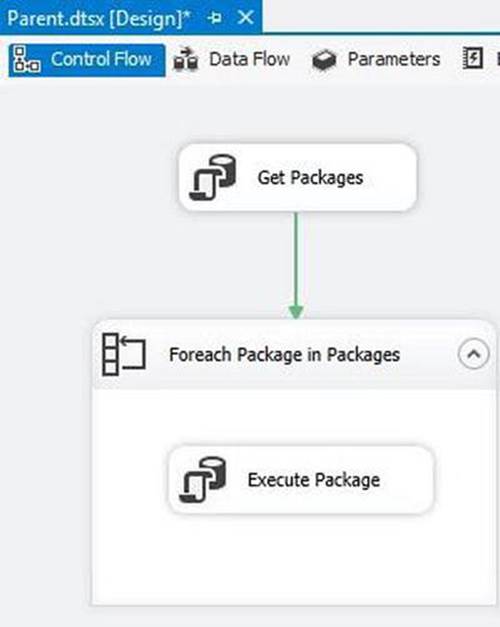
Figure 2-3. Parent package control flow
Return to SSMS. Let’s provide our simple execution framework with metadata to execute. Execute the T-SQL statements in Listing 2-8.
Listing 2-8. Building the Metadata for an SSIS Application
Use SSISDB
Go
Set NoCount On
Declare @ApplicationName nvarchar(256)
Declare @ApplicationDescription nvarchar(512)
Declare @ApplicationID int
Declare @FolderName nvarchar(256)
Declare @ProjectName nvarchar(256)
Declare @PackageName nvarchar(256)
Declare @PackageDescription nvarchar(512)
Declare @PackageID int
Declare @ExecutionOrder int
Declare @ApplicationPackageEnabled bit
Declare @ApplicationTbl table(ApplicationID int)
Declare @PackageTbl table(PackageID int)
begin tran
-- Build Application --
Select @ApplicationName = 'TestSSISApp'
,@ApplicationDescription = 'A test SSIS application'
Insert Into @ApplicationTbl
Exec custom.AddApplication
@ApplicationName
,@ApplicationDescription
Select @ApplicationID = ApplicationID
From @ApplicationTbl
-- Build Package --
Select @FolderName = 'Chapter2'
,@ProjectName = 'Chapter2'
,@PackageName = 'Chapter2.dtsx'
,@PackageDescription = 'A test SSIS package'
Insert Into @PackageTbl
Exec custom.AddPackage
@FolderName
,@ProjectName
,@PackageName
,@PackageDescription
Select @PackageID = PackageID
From @PackageTbl
-- Build ApplicationPackage --
Select @ExecutionOrder = 10
,@ApplicationPackageEnabled = 1
Exec custom.AddApplicationPackage
@ApplicationID
,@PackageID
,@ExecutionOrder
,@ApplicationPackageEnabled
Delete @PackageTbl
-- Build Package --
Select @FolderName = 'Chapter2'
,@ProjectName = 'Chapter2'
,@PackageName = 'Chapter2.dtsx'
,@PackageDescription = 'Another test SSIS package'
Insert Into @PackageTbl
Exec custom.AddPackage
@FolderName
,@ProjectName
,@PackageName
,@PackageDescription
Select @PackageID = PackageID
From @PackageTbl
-- Build ApplicationPackage --
Select @ExecutionOrder = 20
,@ApplicationPackageEnabled = 1
Exec custom.AddApplicationPackage
@ApplicationID
,@PackageID
,@ExecutionOrder
,@ApplicationPackageEnabled
Delete @PackageTbl
Commit
The T-SQL in Listing 2-8 builds a simple SSIS application in the execution framework. It calls our Chapter2.dtsx SSIS package twice. If you return to SSDT-BI and execute the parent package, you will note the Chapter2.dtsx SSIS package executes twice in quick succession. You can see that execution in Figure 2-4.
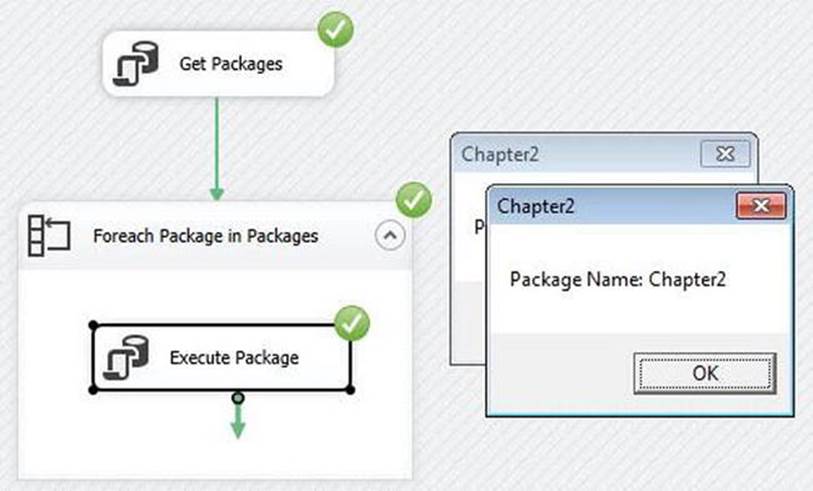
Figure 2-4. Chapter2.dtsx executing twice without waiting
It is important to understand that the framework is a “fire and forget” design. The screenshot in Figure 2-4 shows both instances of Chapter2.dtsx showing their respective message boxes, yet the tasks in the background have completed. This approach works well if your SSIS packages can be executed in parallel. But what if there are dependencies between packages? This framework does not facilitate dependent package execution, but I will show you a way to couple the framework with the SQL Server Agent Job scheduler in the next section. Coupling will allow you to execute the parent package for each “step” of a process, calling an SSIS application each step, and in turn, calling one or more SSIS packages in parallel.
![]() Note Appendix A contains information on building a serial SSIS framework that was originally built for SSIS 2005. It works in SSIS 2014 if you use the package deployment model.
Note Appendix A contains information on building a serial SSIS framework that was originally built for SSIS 2005. It works in SSIS 2014 if you use the package deployment model.
Scheduling SSIS Package Execution
There are many commercially available software execution schedulers on the market. They range from relatively simple to highly complex, allowing time- or event-based execution. Many include metadata collection capabilities that track metrics such as execution time. SQL Server Agent is a fairly robust job scheduling application included with SQL Server. We will use SQL Server Agent to schedule the execution of our demo package.
![]() Caution Before proceeding, deploy the Chapter2 project to the SSIS Catalog. Doing so will deploy Chapter2.dtsx and Parent.dtsx.
Caution Before proceeding, deploy the Chapter2 project to the SSIS Catalog. Doing so will deploy Chapter2.dtsx and Parent.dtsx.
Scheduling an SSIS Package
Open SSMS and connect to an instance of SQL Server 2014. Open Object Explorer and expand the SQL Server Agent node, if possible. Why might expanding the SQL Server Agent node not be possible? By default, SQL Server Agent is installed as a manual startup service.
Right-click the Jobs virtual folder and click New ![]() Job. When the New Job window displays, name the job Ch2. Click on the Steps page and click the New button. Name the new step Execute Chapter 2 Package and select SQL Server Integration Services Package from the Type drop-down.
Job. When the New Job window displays, name the job Ch2. Click on the Steps page and click the New button. Name the new step Execute Chapter 2 Package and select SQL Server Integration Services Package from the Type drop-down.
Select a Package Source from the drop-down. These are the options:
· SQL Server
· File system
· SSIS Package Store
· SSIS Catalog
Let’s schedule an SSIS package from the catalog to start. Type localhost, or the name of the SSIS server that contains the SSIS Catalog, into the Server drop-down. Click the ellipsis beside the Package text box and navigate to the demonstration package, Chapter2.dtsx, as shown inFigure 2-5.
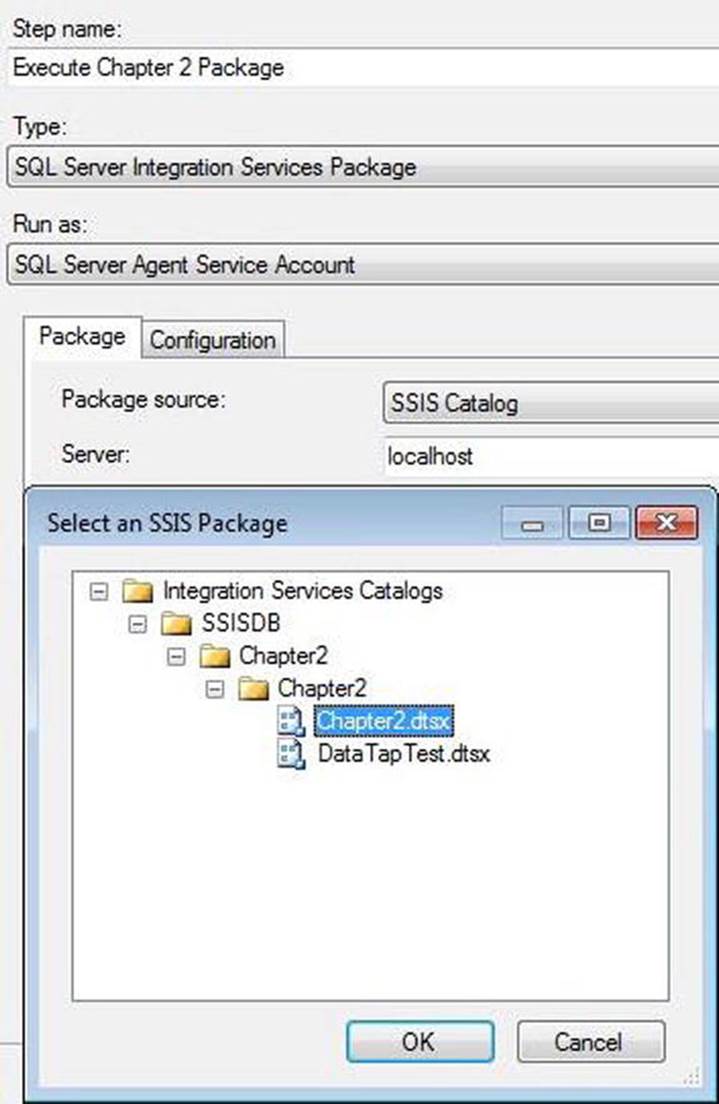
Figure 2-5. Configuring a SQL Server Agent Job to execute an SSIS package in the SSIS Catalog
Clicking the OK button will complete the package selection procedure.
Scheduling a File System Package
To schedule a package stored in the file system, select File System in the Package Source drop-down. Click the ellipsis beside the Package text box and navigate to the desired SSIS package file. Once configured, the step will appear as shown in Figure 2-6.
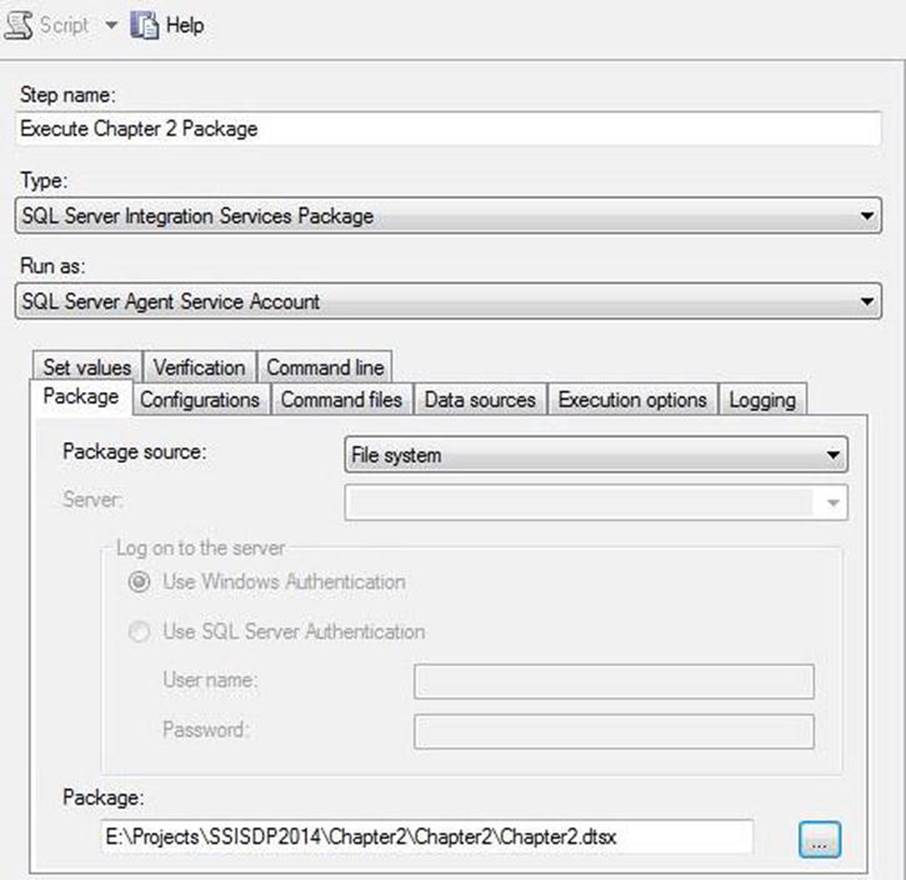
Figure 2-6. SQL Server Agent job step configured to execute an SSIS package from the file system
You can test the job by right-clicking the job name in SSMS and then clicking Start Job at Step. But the job execution may fail. Why? Because the Chapter2.dtsx package displays a message box, SQL Server Agent jobs are usually started by a service account, and service accounts are not allowed to display message boxes. If your SQL Server Agent service is started by a User account (or any account acting with the InteractWithDesktop role). This is discussed more in the next section.
Running SQL Server Agent Jobs with the Custom Execution Framework
We can run a SQL Server Agent job with our custom execution framework. To demonstrate, create a new SQL Server Agent job named Framework Execution. On the Steps page, add a new step named TestSSISApp Framework Execution. Select the SSIS Package Step Type and accept the default Package Source property of SSIS Catalog. Enter or select the name of your server in the Server drop-down and click the ellipsis beside the Package text box to open the Select an SSIS Package window. Navigate to the Parent.dtsx SSIS package, and then click the OK button.
Click the Configuration tab on the New Job Step window. The package parameter ApplicationName should appear in the Parameters list. To enter a value for this parameter, click the ellipsis beside the Value text box, and then enter TestSSISApp. Click the OK button to close and save the New Job Step window, and then click the OK button again to close and save the New Job window.
To test, right-click the framework execution SQL Server Agent job and click Start Job at Step. The SQL Server Agent job will execute and succeed, but I have bad news: the package executions will fail. I can hear you thinking, “Wait, what?” I kid you not. Remember about this being a “fire and forget” execution framework? That fact haunts us here— and elsewhere in SSIS execution. It’s better for you to become aware of this now—trust me on this. The other way to gain this knowledge involves arguing with your boss (or worse, your client) that “the job succeeded!” and being wrong.
How do you know the package execution failed? Let’s go look. Expand the Integration Services Catalog’s virtual folder in SSMS Object Explorer. Right-click SSISDB and hover over Reports, then Standard Reports, and click Integration Services Dashboard. If you have followed my instructions, you will see a large, reddish-colored “2” above the word Failed. If you click the “2,” the reports will take you to a page containing a list of failed executions. If you then click the All Messages link, you will see an error message informing you that the Script task experienced an error (Exception has been thrown by the target of an invocation). That message means (among other things) that you used a message box in a Script task. No, I am not making this up.
![]() Note “Are message boxes bad?” Absolutely not! In fact, they’re the only way to troubleshoot a certain class of errors in SSIS. I use them all the time, but I qualify the message box calls in an If/Then statement. If you don’t do this, the message box calls will execute and cause SQL Server Agent jobs to either fail or lie to you about execution success.
Note “Are message boxes bad?” Absolutely not! In fact, they’re the only way to troubleshoot a certain class of errors in SSIS. I use them all the time, but I qualify the message box calls in an If/Then statement. If you don’t do this, the message box calls will execute and cause SQL Server Agent jobs to either fail or lie to you about execution success.
All is not lost. The problem here is that a service account is providing the security context for the execution. The account used to start the SQL Server Agent service is the account used to execute the packages from SQL Server Agent jobs. That account typically does not have theInteractWithDesktop role assigned, and you have to admit—a desktop is handy for displaying message boxes. The caveat is this: you cannot include unqualified calls to message box displays in SSIS packages. Use a parameter or variable (I use one called Debug) and make sure its value is external to the package so you can turn it on and off when you want to display message boxes.
You can also execute the Parent.dtsx package from the SSIS Catalog. In SSMS Object Explorer, continue drilling into the Chapter2 folder. Open Projects, then Chapter2, then Packages, and right-click the Parent.dtsx package. Click Execute and supply TestSSISApp for theApplicationName parameter. When you click the OK button, the package executes and the two message boxes appear. Why? Because you are no longer running the security context of the service account that starts the SQL Server Agent service; you are running in the security context with which you connected to SSMS Object Explorer. This is most likely a domain or machine account that uses Windows Authentication and your personal credentials. If you’ve been watching a desktop all this time, you (and all the other users in your domain or machine) have theInteractWithDesktop role assigned. But almost all service accounts do not participate in the InteractWithDesktop role.
Running the Custom Execution Framework with SQL Server Agent
You can run SQL Server Agent jobs with the custom execution framework. You just cannot pop up message boxes. For example, you can create an SSIS application for each “step” in your process. The SSIS application can contain SSIS packages that can execute in parallel. You then build a SQL Server Agent job with several job steps—one for each SSIS application. A SQL Server Agent job executes its steps serially, waiting for one to succeed (by default) before starting the next.
Most data warehouses require an extraction step that stages all data—from dimension and fact sources— to a staging database. Next, dimension data are loaded into the data warehouse. Finally, fact data are loaded from the staging database into the data warehouse.
The precedence of operations is as follows: extract fact and extract dimensions can run concurrently (in parallel). You can design one package for each dimension and fact source table extract operation, add them to the extract SSIS application, and execute that SSIS application as Step 1 of your DW ETL job. Once that completes, Step 2 can load the dimension data from the stage database to the data warehouse. Once that completes, Step 3 can load the fact data from the staging database to the data warehouse. So while relatively simple and somewhat limited, our custom execution framework can facilitate configurable parallel and serial ETL operations.
Execute Package Task
The Execute Package task is best understood in action. To demonstrate, create a new SSIS package and rename it Parent2.dtsx. Add an Execute Package task to the control flow. Open the editor and observe the selections for the ReferenceType property as shown in Figure 2-7.
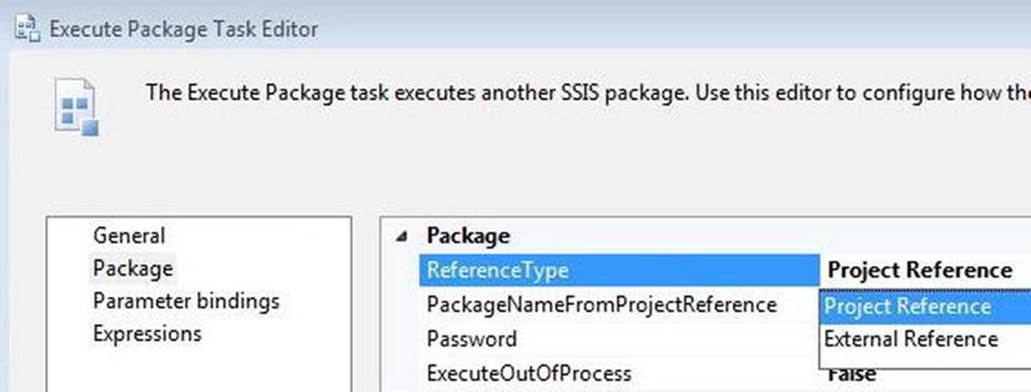
Figure 2-7. The Execute Package Task Reference Property
If the ReferenceType package is set to Project Reference, the Execute Package task can be used to start packages in the SSIS project, supporting the project deployment model. Setting this property to External Reference allows executing SSIS packages to be stored in either the MSDB database or file system, supporting the package deployment model. Figure 2-8 shows the Execute Package task configured to execute the Chapter2.dtsx package.
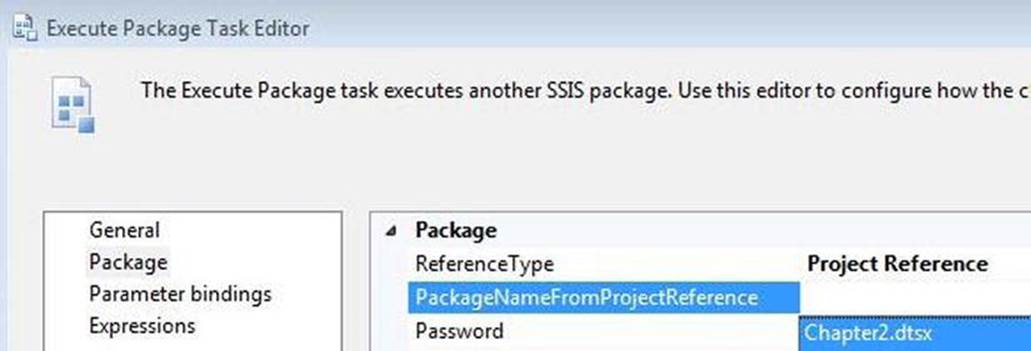
Figure 2-8. Selecting the Project Reference Package
You can close the editor after selecting the package. Test it by executing Parent2.dtsx in the SSIS debugger.
METADATA-DRIVEN EXECUTION
I have used all of the methods for SSIS package execution listed in this chapter. They each have advantages and disadvantages. How then, do you select which method to use? That is an excellent question and I’m glad you asked! I consider the following:
· Troubleshooting: At some time in the future, someone will have to figure out why a package failed to execute. Facilitating troubleshooting is not something to be tacked onto the end of a data integration development project; you need to consider it up front. It is as important as security. I select an SSIS package execution method that supports troubleshooting in each enterprise.
· Code maintenance: The SSIS project will possibly be modified in the future. This means the packages, projects, and execution methodology need to be documented. It also means I need to consider the skills and comfort levels of the individuals or team maintaining this code. If the individuals or team are skilled .NET developers, I lean toward using the Script task and component for complex operations. I also attempt to develop in the .NET language of their choice, if this is the case. If they found their way to SSIS via a role as a database administrator, I use more T-SQL in Execute SQL tasks and OLE DB Source adapters when developing the solution. If they have DTS, SSIS, or other ETL development platform experience, I develop packages slightly differently to match their comfort zones. Again, this is different for different enterprises.
· Enterprise requirements: I often encounter “best practices” at enterprises. I enclose the terms in quotations because, well, some of them aren’t actually best. They exist because something bad happened and someone reacted. Sometimes the reactions make sense from an SSIS point of view, sometimes they are security matters that vex the SSIS developers, and sometimes they just do not make good sense for anyone.
· Complexity: I do not like complex solutions. I tolerate them if they are the only way to accomplish what needs to be done, but I strive to keep solutions as simple as possible. Fewer moving parts means there is less to break, less to troubleshoot, and less to maintain. That said, flexibility and complexity are often proportional. That means highly flexible solutions are likely to be complex solutions.
I write this here, especially the bullet about complexity, to introduce execution from managed code. Complexity is the only disadvantage of executing SSIS from .NET. Executing SSIS from managed code offers maximum flexibility: If you can think it, you can find a way to build it in .NET. In my opinion, knowing a .NET language is no longer optional for the data integration developer in the Microsoft space.
Execution from Managed Code
There is a ton (or tonne, if you prefer) of benefit from executing SSIS packages from .NET managed code. There are various limitations to executing SSIS in other ways. Without exception, they can all be overcome by controlling execution from .NET. In this section, we will demonstrate the basics of using VB.NET to execute SSIS packages.
The Demo Application
For this demonstration, I used Visual Basic 2013 and the .NET Framework 4.5.1. I downloaded a copy from www.microsoft.com/en-us/download/details.aspx?id=40787. Unless otherwise specified, I accepted the default settings for VB applications in the Visual Studio 2013 Integrated Development Environment (IDE).
To begin, create a new VB Windows Forms project in Visual Studio 2013. Add references for the following assemblies:
· Microsoft.SqlServer.ConnectionInfo
· Microsoft.SqlServer.DTSRuntimeWrap
· Microsoft.SqlServer.Management.IntegrationServices
· Microsoft.SqlServer.Management.Sdk.Sfc
· Microsoft.SqlServer.Smo
You will have to search for Microsoft.SqlServer.Management.IntegrationServices and Microsoft.SqlServer.SMO in the global assembly cache (GAC). The GAC is located in the Windows\Assembly folder, and these libraries are in the MSIL folder. Click Browse when adding references to the Visual Studio project.
The frmMain Form
Rename Form1 to frmMain. Add two GroupBox controls to the form, arranged with one over the other as shown in Figure 2-9. Change the Text property of the top group box to SSIS Package in the File System and the Text property of the lower group box to SSIS Package in the Catalog. In the upper group box, add a label, text box, and two buttons. Change the Text property of the label to Package Path. Name one of the buttons btnOpenSSISPkg and change its Text property to “...”. Name the other button btnStartFile and set its Text property to Start.
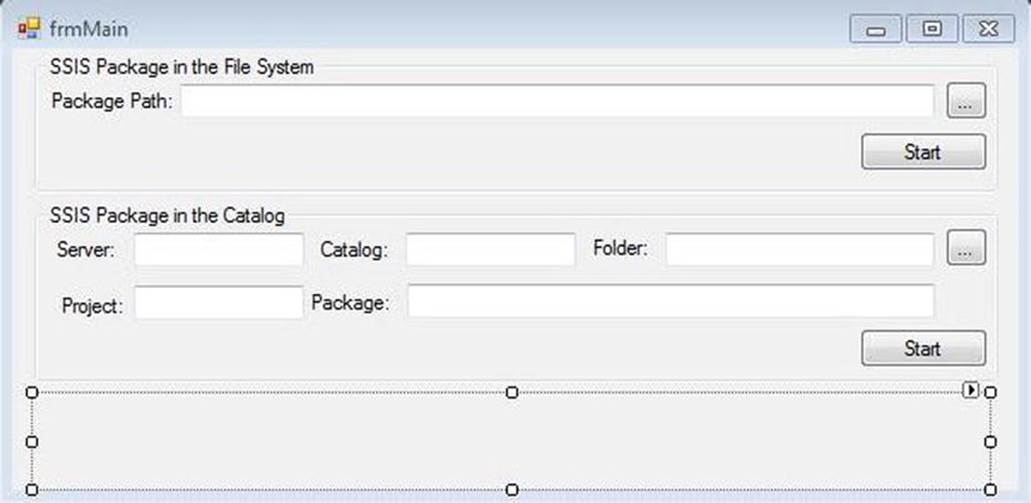
Figure 2-9. The frmMain controls layout
In the SSIS Package in the Catalog group box, add five labels, five textboxes, and two buttons. Change the Text properties of the labels to Server:, Catalog:, Folder:, Project:, and Package:. Position each text box to the right of each labels and name them txtSSISCatalogServer,txtCatalog, txtFolder, txtCatalogProject, and txtCatalogPackage, respectively. Name one of the buttons btnOpenSSISPkgInCatalog and set its Text property to “...”. Name the other button btnStartCatalog and set its Text property to Start.
Add a text box beneath the SSIS Package in the Catalog group box. Name it txtStatus, set the MultiLine property to True, BackColor to ButtonFace, and the BorderStyle to None. Position the controls similar to the way shown in Figure 2-9. Finally, add a FileOpenDialogcontrol to the form, leaving it configured to defaults.
It will likely surprise no one to learn that I was first exposed to design patterns while a software developer. The pattern I use in this application puts a minimum amount of code behind the form. The code that is in the form calls code in a form-specific module. You can view the code for frmMain by right-clicking frmMain in Solution Explorer and selecting View Code. Replace the code displayed with the following:
'
' frmMain code
'
' I use a Helper Pattern when developing interfaces.
' Each form is named frm_____ and there is a corresponding module named frm_____Helper.vb.
' Each event method calls a subroutine in the Helper module.
'
Public Class frmMain
Private Sub frmMain_Load(ByVal sender As System.Object, ByVal e As System.EventArgs) _ Handles MyBase.Load
InitFrmMain()
End Sub
Private Sub btnStartFile_Click(ByVal sender As System.Object, _
ByVal e As System.EventArgs) Handles btnStartFile.Click
btnStartFileClick()
End Sub
Private Sub btnOpenSSISPkg_Click(ByVal sender As System.Object, _
ByVal e As System.EventArgs) Handles _ btnOpenSSISPkg.Click
btnOpenSSISPkgClick()
End Sub
Private Sub btnStartCatalog_Click(ByVal sender As System.Object, _
ByVal e As System.EventArgs) Handles _ btnStartCatalog.Click
btnStartCatalogClick()
End Sub
Private Sub btnOpenSSISPkgInCatalog_Click(ByVal sender As System.Object, _
ByVal e As System.EventArgs) Handles _ btnOpenSSISPkgInCatalog.Click
btnOpenSSISPkgInCatalogClick()
End Sub
End Class
Again, the code behind the form is sparse. Most of the real work is done elsewhere. Let’s build that part now.
Add a module to the solution and name it frmMainHelper. Add the following code to the new module:
'
' frmMainHelper module
'
' I use a Helper Pattern when developing interfaces.
' Each form is named frm_____ and there is a corresponding module named frm_____Helper.vb.
' Each event method calls a subroutine in the Helper module.
'
' This module supports frmMain.
'
Imports System
Imports System.Windows
Imports System.Windows.Forms
Imports Microsoft.SqlServer.Dts.Runtime.Wrapper
Imports Microsoft.SqlServer.Management.IntegrationServices
Imports Microsoft.SqlServer.Management.Smo
Module frmMainHelper
Public Sub InitFrmMain()
' initialize and load frmISTree
' define the version
Dim sVer As String = System.Windows.Forms.Application.ProductName & " v" & _
System.Windows.Forms.Application.ProductVersion
' display the version and startup status
With frmMain
.Text = sVer
.txtStatus.Text = sVer & ControlChars.CrLf & "Ready"
End With
End Sub
Public Sub btnStartFileClick()
' configure an SSIS application and execute the selected SSIS package file
With frmMain
.Cursor = Cursors.WaitCursor
.txtStatus.Text = "Executing " & .txtSSISPkgPath.Text
.Refresh()
Dim ssisApp As New Microsoft.SqlServer.Dts.Runtime.Wrapper.Application
Dim ssisPkg As Package = ssisApp.LoadPackage(.txtSSISPkgPath.Text, _
AcceptRejectRule.None, Nothing)
ssisPkg.Execute()
.Cursor = Cursors.Default
.txtStatus.Text = .txtSSISPkgPath.Text & " executed."
End With
End Sub
Public Sub btnOpenSSISPkgClick()
' allow the user to navigate to an SSIS package file
With frmMain
.OpenFileDialog1.DefaultExt = "dtsx"
.OpenFileDialog1.ShowDialog()
.txtSSISPkgPath.Text = .OpenFileDialog1.FileName
.txtStatus.Text = .txtSSISPkgPath.Text & " package path loaded."
End With
End Sub
Sub btnOpenSSISPkgInCatalogClick()
' allow the user to navigate to an SSIS package stored in a catalog
frmISTreeInit()
Dim sTmp As String = sFullSSISPkgPath
Dim sServerName As String = Strings.Left(sTmp, Strings.InStr(sTmp, ".") - 1)
Dim iStart As Integer = Strings.InStr(sTmp, ".") + 1
Dim iEnd As Integer = Strings.InStr(sTmp, "\")
Dim iLen As Integer
Dim sCatalogName As String
Dim sFolderName As String
Dim sProjectName As String
Dim sPackageName As String
If iEnd > iStart Then
iLen = iEnd - iStart
sCatalogName = Strings.Mid(sTmp, iStart, iLen)
sTmp = Strings.Right(sTmp, Strings.Len(sTmp) - iEnd)
iStart = 1
iEnd = Strings.InStr(sTmp, "\")
If iEnd > iStart Then
iLen = iEnd - iStart
sFolderName = Strings.Mid(sTmp, iStart, iLen)
sTmp = Strings.Right(sTmp, Strings.Len(sTmp) - iEnd)
iStart = 1
iEnd = Strings.InStr(sTmp, "\")
If iEnd > iStart Then
iLen = iEnd - iStart
sProjectName = Strings.Mid(sTmp, iStart, iLen)
sTmp = Strings.Right(sTmp, Strings.Len(sTmp) - iEnd)
sPackageName = sTmp
End If
End If
End If
With frmMain
.txtSSISCatalogServer.Text = sServerName
.txtCatalog.Text = sCatalogName
.txtFolder.Text = sFolderName
.txtCatalogProject.Text = sProjectName
.txtCatalogPackage.Text = sPackageName
.txtStatus.Text = sFullSSISPkgPath & " metadata loaded and parsed."
End With
End Sub
Sub btnStartCatalogClick()
' configure an SSIS application and execute the selected SSIS package from the
' catalog
With frmMain
.Cursor = Cursors.WaitCursor
.txtStatus.Text = "Loading " & sFullSSISPkgPath
.Refresh()
Dim oServer As New Server(.txtSSISCatalogServer.Text)
Dim oIS As New IntegrationServices(oServer)
Dim cat As Catalog = oIS.Catalogs(.txtCatalog.Text)
Dim fldr As CatalogFolder = cat.Folders(.txtFolder.Text)
Dim prj As ProjectInfo = fldr.Projects(.txtCatalogProject.Text)
Dim pkg As PackageInfo = prj.Packages(.txtCatalogPackage.Text)
.txtStatus.Text = sFullSSISPkgPath & " loaded. Starting validation..."
.Refresh()
pkg.Validate(False, PackageInfo.ReferenceUsage.UseAllReferences, Nothing)
.txtStatus.Text = sFullSSISPkgPath & " validated. Starting execution..."
.Refresh()
pkg.Execute(False, Nothing)
.txtStatus.Text = sFullSSISPkgPath & " execution started."
.Cursor = Cursors.Default
End With
End Sub
End Module
Let’s walk through the portion of this code that executes an SSIS package in the file system. In Figure 2-9, we are looking at the functionality represented in the upper group box.
The application works when the user either enters the full path to an SSIS package in the file system or clicks the ellipsis to browse to a SSIS package (dtsx) file. After selecting a file, the full path will display in the Package Path text box. To execute the package, click the Start button in the SSIS Package in the File System group box. When the Start button is clicked, the form code in the btnStartFile_Click subroutine is executed, and it executes a single line of code that calls the btnStartFileClick subroutine in the frmMainHelper module.
The btnStartFileClick subroutine first changes the form cursor to a WaitCursor. Next it updates the txtStatus text box to display the text Executing followed by the full path of the SSIS package in the Package Path text box. The Refresh statement causes the form to update, displaying the WaitCursor and the message in txtStatus. The code then creates an instance of an SSIS application (Microsoft.SqlServer.Dts.Runtime.Wrapper.Application) in the form of the ssisApp variable. ssisPkg is an instance of an SSIS Package object. It is created by calling the LoadPackage method of the SSIS Application object (ssisApp). We use the Package object’s Execute method to start the SSIS package. The remainder of the subroutine resets the form cursor and updates the txtStatus message to indicate the package executed.
Were I to harden this code for production, I would wrap much of the code in this subroutine in a large Try-Catch block. In the Catch section, I would reset the cursor and update txtStatus with the error message. I like logging— a lot. In a Production-hardened version, I would log my intention to execute the package and include the full path displayed in the Package Path text box. I would also log the result of the attempted execution, whether it succeeded or failed.
The code that executes an SSIS package stored in the SSIS Catalog is found in the frmMainHelper module’s btnStartCatalogClick subroutine. The code that manages the cursor and messaging to the txtStatus text box is comparable to that found in the btnStartFileClicksubroutine.
There are a few more moving parts to an SSIS package stored in the SSIS Catalog, shown in Figure 2-10.
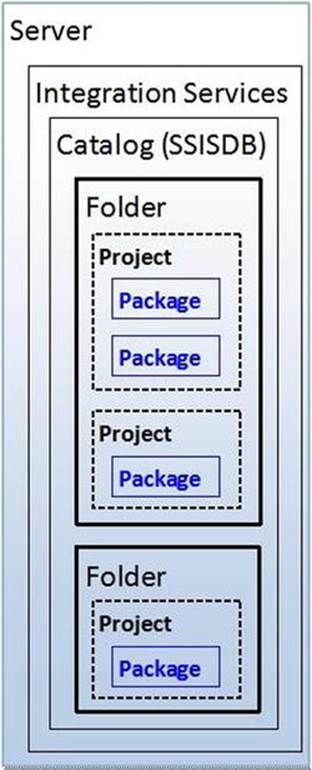
Figure 2-10. A representation of the SSIS Catalog
Integration Services is contained by a server and, in turn, it contains a catalog. In SQL Server 2014, Integration Services contains a single catalog named SSISDB. SSISDB is also the name of the database used to manage SSIS metadata in the catalog. A catalog contains one or more folders. Folders contain one or more projects, which contain one or more packages.
In the btnStartCatalogClick subroutine, the code declares variables for the objects in this hierarchy (using Dim statements) and sets their value based on the names supplied in the five text boxes: txtSSISCatalogServer, txtCatalog, txtFolder, txtCatalogProject, and txtCatalogPackage. As you can see by comparing the names of the text boxes to Figure 2-10, an SSIS package stored in the catalog can be uniquely identified using this hierarchy. How are the text boxes populated? The user can enter the information manually if desired. But the application contains a second form, launched by the ellipsis in the SSIS Package in the Catalog group box, to facilitate SSIS catalog navigation.
To build it, add a second form to the application and name it frmISTree. Add a GroupBox control to the form and position it near the top. Change the Text property of the group box to Connection. Add a label, text box, and button to the group box. Change the Text property of the label to Server:. Name the text box txtServer. Name the button btnConnect and change its Text property to Connect. Add a TreeView control to the lower portion of the form and name it tvCatalog. Add a button just below the treeview, name it btnSelect, and change its Text property toSelect. Add an ImageList control and name it ilSSDB. You will either have to rustle up your own images or download the demo project containing the four images I used for treeview node levels. Set the treeview’s ImageList property to ilSSDB. The form should appear as shown in Figure 2-11.
Figure 2-11. ISTree Form
Replace the code behind the form with the following code:
'
' frmISTree code
'
' I use a Helper Pattern when developing interfaces.
' Each form is named frm_____ and there is a corresponding module named frm_____Helper.vb.
' Each event method calls a subroutine in the Helper module.
'
Public Class frmISTree
Private Sub btnConnect_Click(ByVal sender As System.Object, _
ByVal e As System.EventArgs) Handles btnConnect.Click
btnConnectClick()
End Sub
Private Sub btnSelect_Click(ByVal sender As System.Object, _
ByVal e As System.EventArgs) Handles btnSelect.Click
btnSelectClick()
End Sub
Private Sub tvCatalog_AfterSelect(ByVal sender As System.Object, _
ByVal e As System.Windows.Forms.TreeViewEventArgs) _
Handles tvCatalog.AfterSelect
End Sub
Private Sub tvCatalog_DoubleClick(ByVal sender As Object, _
ByVal e As System.EventArgs) _
Handles tvCatalog.DoubleClick
tvCatalogDoubleClick()
End Sub
End Class
Again, this code merely points to the Helper module, in this case frmISTreeHelper. Add a new module, so named, and replace it with the following code:
'
' frmISTreeHelper module
'
' I use a Helper Pattern when developing interfaces.
' Each form is named frm_____ and there is a corresponding module named frm_____Helper.vb.
' Each event method calls a subroutine in the Helper module.
'
' This module supports frmISTree.
'
Imports Microsoft.SqlServer.Management.IntegrationServices
Imports Microsoft.SqlServer.Management.Smo
Module frmISTreeHelper
' variables
Public sFullSSISPkgPath As String
Sub frmISTreeInit()
' initialize and load frmISTree
With frmISTree
.Text = "Integration Services"
.txtServer.Text = "localhost"
.ShowDialog()
End With
End Sub
Sub btnConnectClick()
' connect to the server indicated in the txtServer textbox
' hook into the SSISDB catalog
' build out the SSISDB node by iterating the objects stored therein
' load the node and display it
With frmISTree
Dim oServer As New Server(.txtServer.Text)
Dim oIS As New IntegrationServices(oServer)
Dim cat As Catalog = oIS.Catalogs("SSISDB")
Dim L1Node As New TreeNode("SSISDB")
L1Node.ImageIndex = 0
Dim L2Node As TreeNode
Dim L3Node As TreeNode
Dim L4Node As TreeNode
For Each f As CatalogFolder In cat.Folders
L2Node = New TreeNode(f.Name)
L2Node.ImageIndex = 1
L1Node.Nodes.Add(L2Node)
'.tvCatalog.Nodes.Add(L2Node)
For Each pr As ProjectInfo In f.Projects
L3Node = New TreeNode(pr.Name)
L3Node.ImageIndex = 2
L2Node.Nodes.Add(L3Node)
'.tvCatalog.Nodes.Add(L3Node)
For Each pkg As PackageInfo In pr.Packages
L4Node = New TreeNode(pkg.Name)
L4Node.ImageIndex = 3
L3Node.Nodes.Add(L4Node)
'.tvCatalog.Nodes.Add(L4Node)
Next
Next
Next
.tvCatalog.Nodes.Add(L1Node)
End With
End Sub
Sub btnSelectClick()
' if the image index level indicates a package,
' select this node, populate the sFullSSISPkgPath variable,
' and close the form
With frmISTree
If Not .tvCatalog.SelectedNode Is Nothing Then
If .tvCatalog.SelectedNode.ImageIndex = 3 Then
sFullSSISPkgPath = .txtServer.Text & "." & _
.tvCatalog.SelectedNode.FullPath
.Close()
End If
End If
End With
End Sub
Sub tvCatalogDoubleClick()
' run the Select Click logic
With frmISTree
btnSelectClick()
End With
End Sub
End Module
All the action in this module happens in the subroutines that populate the TreeView control (btnConnectClick) and select the node (btnSelectClick). The code defaults the name of the server to “localhost”. The user can change it before clicking the Connect button. Once the button is clicked, the code calls btnConnectClick.
The btnConnectClick subroutine creates objects for the Server, Integration Services, and Catalog objects in the model. Next, it builds a hierarchy of four levels of nodes starting with the catalog. The variables— L1Node, L2Node, L3Node, and L4Node— represent the Catalog, Folder, Project, and Package levels of the hierarchy. The code uses a series of nested For Each loops to iterate the SSIS Catalog and populate the subnodes under L1Node (Catalog), and then the L1Node is added to the tvCatalog treeview.
The btnSelectClick subroutine builds a string the represents the unique path to the SSIS package in the catalog hierarchy. The code checks to see if a node is selected and then checks to see if the selected node is at the package level. If all is right with the treeview, the variablesFullSSISPkgPath is populated with the path to the SSIS package in the catalog. Immediately thereafter, the frmISTree form closes. Users can also double-click on a package node in the treeview and invoke the btnSelectClick subroutine.
Execute the application to test it! You should see results as in Figure 2-12.
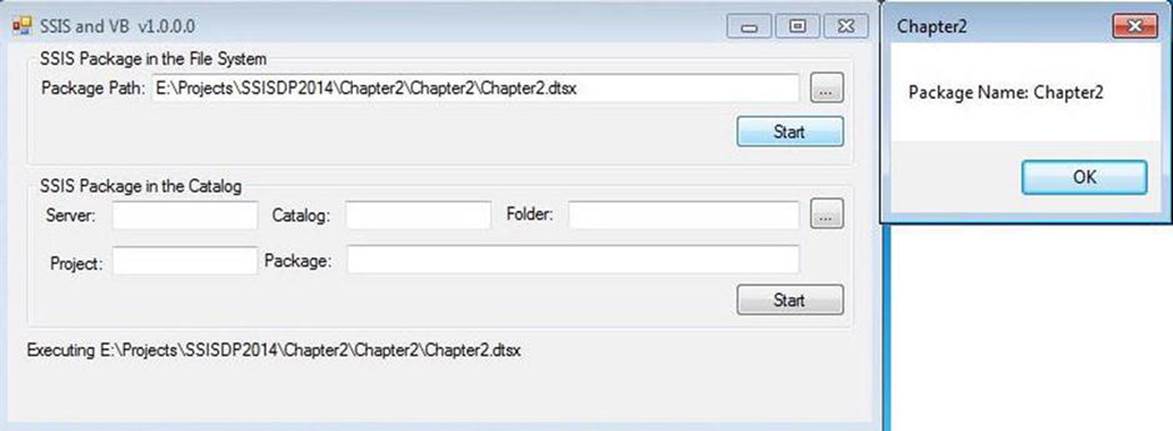
Figure 2-12. Executing a package from the file system
Selection of a package in the SSIS Catalog appears as shown in Figure 2-13.
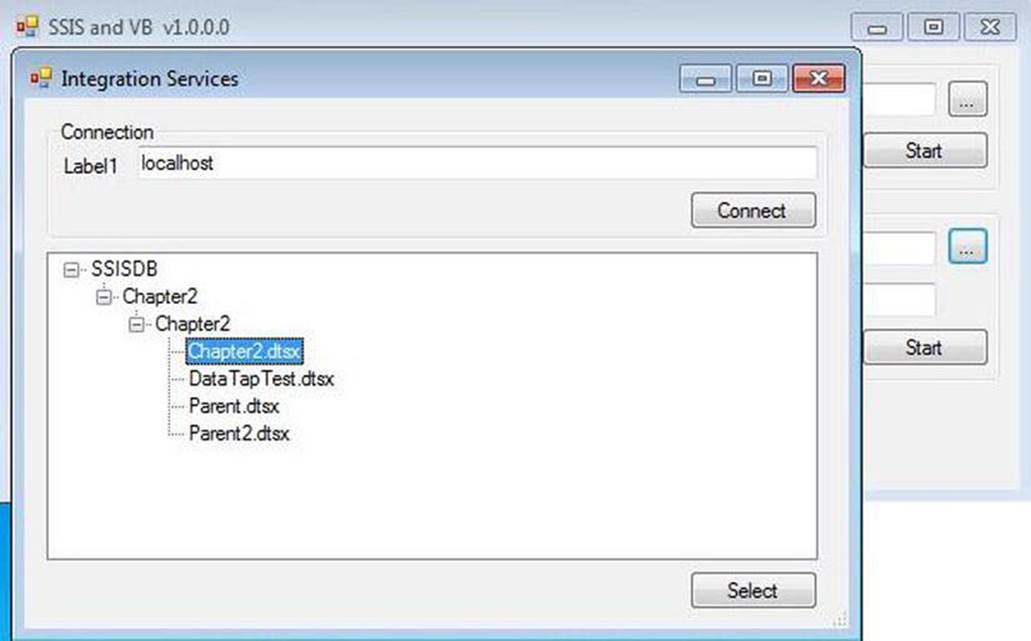
Figure 2-13. Selecting a package in the SSIS Catalog
Execute a package selected from the SSIS Catalog as illustrated in Figure 2-14.
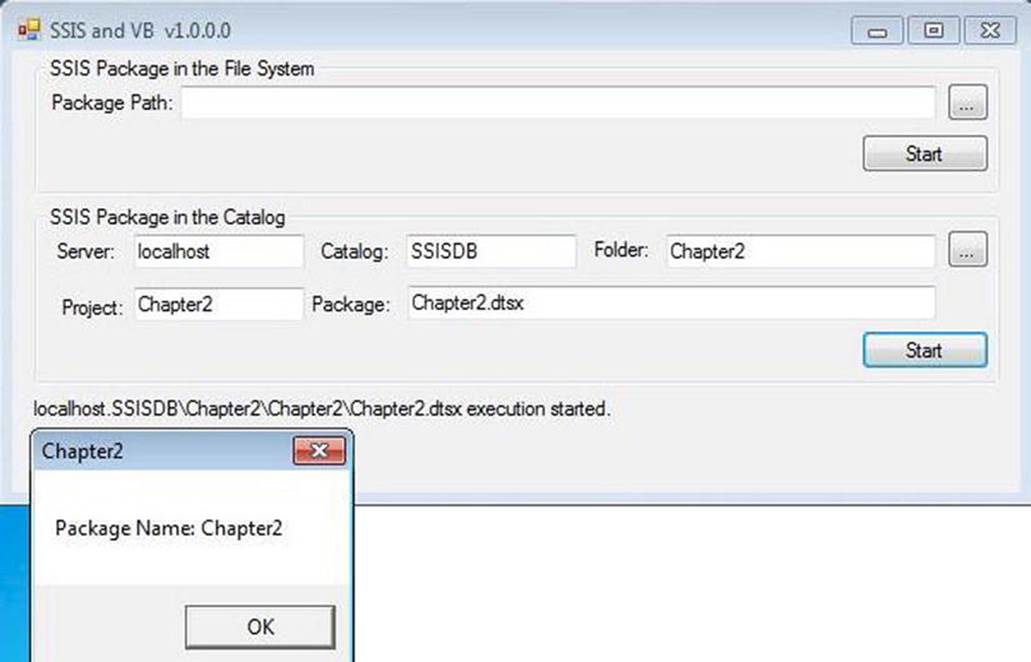
Figure 2-14. Executing an SSIS Package stored in the SSIS Catalog
Conclusion
In this chapter, we surveyed many ways to execute an SSIS package. We examined the many built-in ways for convenient execution of SSIS packages. Then we kicked things up a notch by extending the SSISDB functionality. In the end, we produced a simple, yet functional, custom execution framework and demonstrated how to couple it to the scheduling capabilities of SQL Server Agent jobs to produce a custom parallel-/serial-capable execution engine. We built a .NET application to demonstrate the flexibility (and complexity) of executing SSIS packages from managed code.