SQL Server Integration Services Design Patterns, Second Edition (2014)
Chapter 7. Flat File Source Patterns
A common way to transfer data between systems is to export the source data to a flat file and then import the contents of this file into the destination database. Flat files come in all shapes, sizes, and types. There are no row-length limitations. File size is limited by the maximum size allowed by the operating system. When examining flat file types, there are two initial considerations: file format and schema. Common file formats of flat file sources include these:
· Comma-separated values (CSV)
· Tab-delimited file (TDF)
· Fixed-width file
In a flat file, as in a database, schema includes columns and data types. Schema options also allow for more exotic file format options such as “ragged right” and “variable-length rows” flat files.
In this chapter, we’ll examine a common pattern for loading a vanilla flat file source into SQL Server; then we’ll expand that pattern to load a variable-length row flat file source. We will next examine creating and consuming flat file header rows, which are found in some flat file formats. Finally, we will construct an extremely useful SSIS design pattern: Archive File.
Flat File Sources
Let’s begin with a simple flat file source. You can copy and paste the data below into a text editor such as Notepad and save it as MyFlatFile.csv:
RecordType,Name,Value
A,Simple One,11
B,Simple Two,22
C,Simple Three,33
A,Simple Four,44
C,Simple Five,55
B,Simple Six,66
The column names are in the first row. This is convenient, but you don’t always get column names in the first row—or anywhere inside a source flat file, for that matter.
Before leaving the setup phase of our demo project, let’s create a database named StagingDB that we can use as a destination. I use the re-executable T-SQL script in Listing 7-1 to create the StagingDB database.
Listing 7-1. Create StagingDB
use master
go
If Not Exists(Select name
From sys.databases
Where name='StagingDB')
begin
print 'Creating StagingDB database'
Create Database StagingDB
print 'StagingDB database created'
end
Else
print 'StagingDb database already exists.'
Execute this script on a server you can use for testing and development. Now you’re all set to begin building the demo!
Moving to SSIS!
Open SQL Server Data Tools - Business Intelligence (SSDT-BI) and create a new SSIS project named Chapter 7 and rename the initial package to Chapter7.dtsx. Drag a Data Flow task onto the control flow canvas and double-click it to open the Editing tab.
There are a couple ways to create a flat file source for the data flow: you can use the Source Assistant or you can you can expand Other Sources in the Data Flow SSIS Toolbox and configure a Flat File source adapter. Let’s utilize the latter method: drag a Flat File source adapter from the Data Flow toolbox onto the data flow canvas and open the editor. Figure 7-1 shows the Connection Manager page for the Flat File Source Editor.
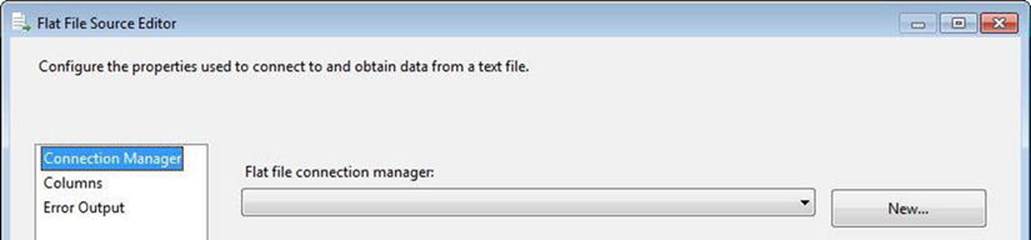
Figure 7-1. Flat File Source Editor Connection Manager configuration
Since there are no connection managers defined in this new SSIS project, click the New button beside the Flat File Connection Manager drop-down to open the Flat File Source Editor. On the General page, name the connection manager My Flat File. Click the Browse button beside the File Name textbox and navigate to the location where you saved MyFlatFile.csv.
Be aware that, by default, the File Name textbox shows only .txt files. Change the filter to *.csv in order to see and select MyFlatFile.csv.
As shown in Figure 7-2, check the Column Names in the First Data Row checkbox:
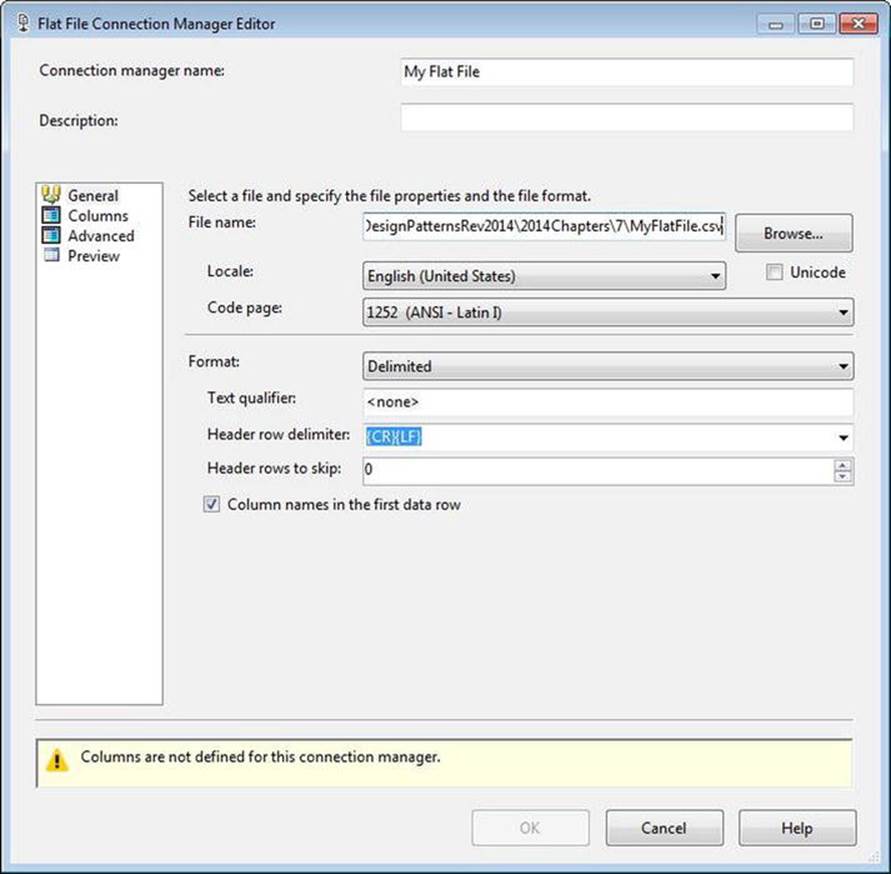
Figure 7-2. Configuring the My Flat File connection manager
Note the warning near the bottom of the window: Columns Are Not Defined for This Connection Manager. For a properly formatted simple CSV file, SSIS now has enough information to read the schema of the flat file and complete the mapping for the connection manager. Figure 7-3shows the Columns page used to define the column and row delimiters.
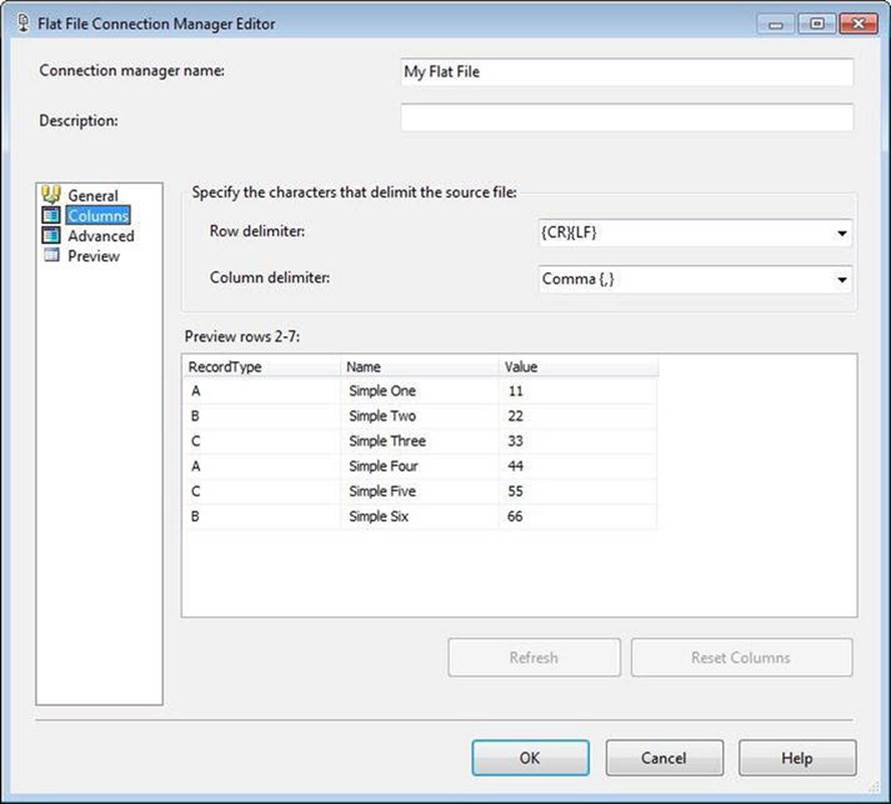
Figure 7-3. The Flat File Connection Manager Editor’s Columns page
All data in a flat file are text by default.
Click the OK button to close the Flat File Connection Manager Editor, and then click the OK button to close the Flat File Source Editor.
Strong-Typing the Data
Why would you want to use strongly typed data? Consider the Value column in our example. Right now, Value is a DT_STR data type but the column contains numeric data. In fact, the numeric data is integers. In SQL Server, the INT data type consumes 4 bytes and covers the range from –2^31 (–2,147,483,648) through 2^31 – 1 (2,147,483,647) according to Books Online. If you wanted to store the integer value –2,147,483,600 as text, this would consume at least 1 byte per character. In this case, that’s a minimum of 11 bytes (not counting the commas), and it could be more bytes depending on the data type chosen. Converting these data to the DT_I4 data type allows me to store that value in 4 bytes. As an added bonus, the data are numeric, so sorts on this field will outperform sorts on a string data type.
Let’s manipulate the data types provided by the Flat File connection manager and source adapter. Drag a Derived Column transformation onto the data flow canvas and connect a data flow path from the flat file source to the new Derived Column transformation. Double-click it to open the editor.
Expand the Type Casts virtual folder in the SSIS Expression Language functions provided in the listbox in the upper-right section of the Derived Column Editor. Drag a DT_STR type cast into the Expression cell of the first row of the Derived Column grid in the lower section of the editor. The Derived Column column of the grid defaults to “<add as new column>” but allows you to choose to replace the value in any of the rows flowing through the transformation. You can make changes to the values as rows flow through the Derived Column transformation, but you cannot change the data type (which is precisely what you’re going to do here), so you need to add a new column to the data flow. The default derived column name is Derived Column n, where n is a one-based array of columns configured in the transformation. Change the default derived column name to strRecordType. Return to the Expression cell and complete the DT_STR cast function by replacing the «length» placeholder text with the desired length of the field: 1. Next, replace the «code_page» placeholder with the number that matches your Window Code Page identifier. For U.S. English, this number is 1252. To complete the configuration, expand the Columns virtual folder in the Available Inputs listbox located in the upper-left section of the Derived Column Transformation Editor, and drag the RecordType column into the Expression cell to the right of the DT_STR cast function that you just configured.
When you click anywhere else in the editor, the logic of the transformation validates the expression. This has been happening all along; the text color was being changed to red in the Expression when an issue was encountered with the state of the expression. When you navigate off theExpression cell now, the expression (DT_STR, 1, 1252) [RecordType] should pass muster. The text should return to black to indicate a valid expression.
You can similarly create additional columns with casting expressions to manipulate the data types of the other fields moving through the data flow. Figure 7-4 shows how my example looks when I’ve completed editing the Derived Column transformation.
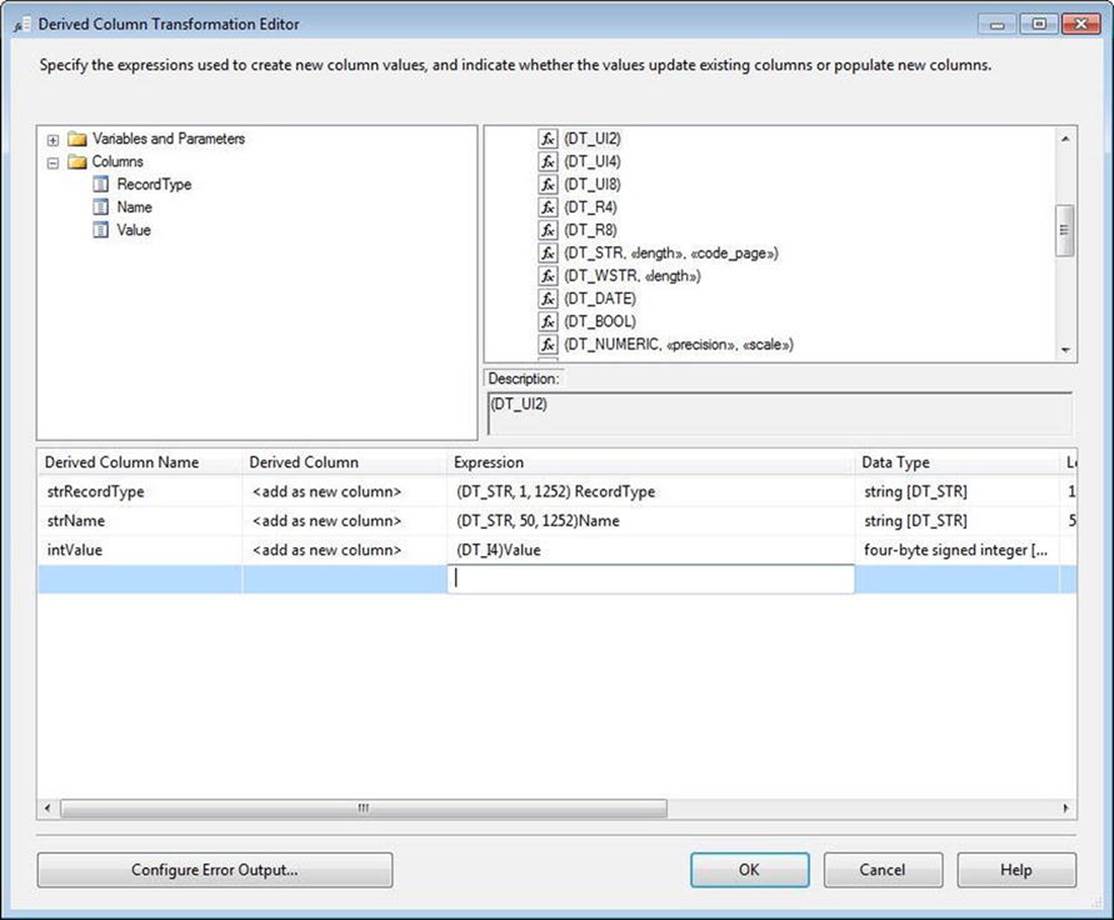
Figure 7-4. Derived Column transformation, configured
Introducing a Data-Staging Pattern
Data staging is an important concept. Every ETL developer has thoughts and opinions about the best way to stage data, and each thinks their way is best! (This is as it should be . . . we want and need confident ETL developers). In my opinion, the data integration requirements drive the amount and type of staging.
For flat files, copying all the data into staging tables represents one pattern. Once the data are captured in a query-able format (a relational database), they can be manipulated and shaped by numerous transformations before they are loaded into the destination data warehouse or data mart.
Beyond flat files, staging supports a key tenet of the Extraction phase of any ETL solution: impact the source system-of-record as little as possible. Often, an important business driver for building an ETL solution in the first place is the difficulty of querying data in the system-of-record for reporting purposes. ETL’s first goal is similar to that of the Hippocratic Oath: “Primum non nocere” (First, do no harm).
Staging requirements for some ETL lend themselves to storing a copy of all source data, whether from flat files or not. Other requirements allow for applying some transformative logic prior to staging. Which is the correct answer? “It depends.” In my opinion, the very act of copying data from a text source and landing it in a relational database represents a transformation.
This, then, becomes a pattern of staging data: copying data straight from a flat file into a database. To that end, let’s complete the example we’ve started.
Drag an OLE DB Destination adapter onto the data flow canvas and connect a data flow path from the Derived Column transformation to the OLE DB destination. Before you proceed, double-click on the data flow path to open its editor, and then click on the Metadata page. You’ll see something that looks like Figure 7-5.
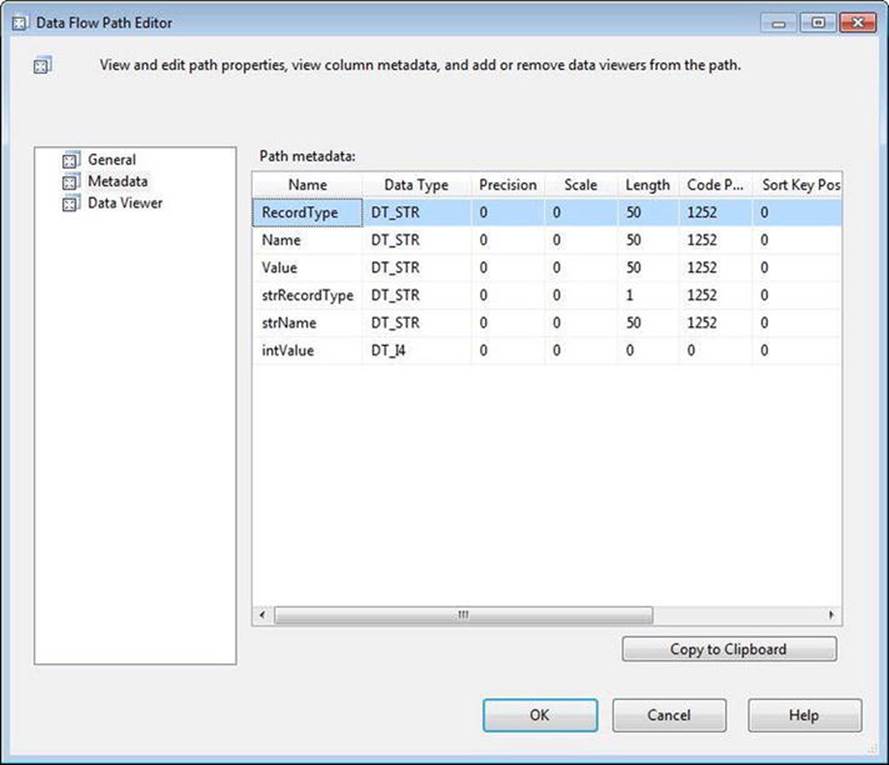
Figure 7-5. Inside the data flow path
I often describe the buffers inside the data flow as “table-ish.” It’s an adjective I made up, but it fits. This peek under the hood of a data flow path is evidence. We’ll come back to this diversion shortly. Click OK to close the Data Flow Path Editor.
Rename the OLE DB destination adapter FlatFileDest. Open the OLE DB Destination Editor and click the New button beside the OLE DB Connection Manager drop-down to configure an OLE DB connection manager. When the Configure OLE DB Connection Manager window displays, click the New button to create a new OLE DB connection manager. Add the name of your testing and development server/instance (the same server/instance you used earlier to create the StagingDB database) in the Server Name drop-down. In the Select or Enter a Database Name drop-down, select StagingDB. Click the OK button to complete the OLE DB connection manager configuration, and click the next OK button to select this new connection manager for use with the OLE DB destination adapter. Set the Data Access Mode property to Table or View – Fast Load and accept the default properties configured. Click the New button beside the Name of the Table or the View drop-down. The Create Table window displays the T-SQL data definition language (DDL) statement shown in Listing 7-2.
Listing 7-2. The CREATE TABLE Statement Generated from the Data Flow Path Metadata
CREATE TABLE [FlatFileDest] (
[RecordType] varchar(50),
[Name] varchar(50),
[Value ] varchar(50),
[strRecordType] varchar(1),
[strName] varchar(50),
[intValue] int
)
The name of the table the OLE DB destination is going to create is FlatFileDest—the name you gave the OLE DB destination adapter. Where did the column names come from? That’s right! From the data flow path metadata we viewed earlier. This functionality is pretty cool, when you think about it.
You don’t need all these columns to store your data in your StagingDB. Since you are using this table to stage data from the flat file, use the same column names you found in the source file. However, you should also use the strong data types you created in our Derived Column transformation. Fortunately for you, our naming convention makes these changes relatively painless. Simply delete the DDL for the first three columns (RecordType, Name, and Value), and then remove the first three letters of the remaining columns, which will rename them toRecordType, Name, and Value. Listing 7-3 shows the result.
Listing 7-3. The Modified CREATE TABLE Statement
CREATE TABLE [FlatFileDest] (
[RecordType] varchar(1),
[Name] varchar(50),
[Value] int
)
When you click the OK button, the DDL statement is executed against StagingDB—creating the FlatFileDest table. That’s a good thing, because your OLE DB destination adapter is warning you that you need to complete Input-to-Output mappings (shown in Figure 7-6).

Figure 7-6. The columns have not been mapped
As shown in Figure 7-7, when you click on the Mappings page to begin this mapping, auto-mapping kicks in and finds it can auto-complete some of the mappings:
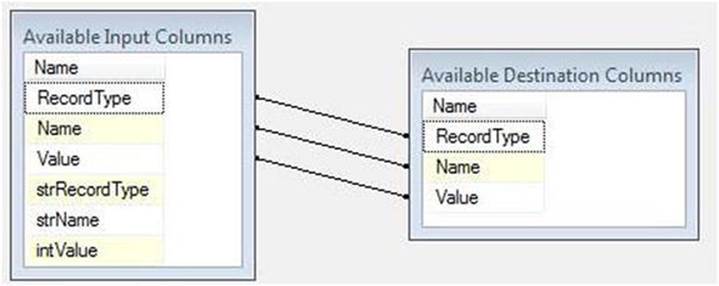
Figure 7-7. OLE DB destination auto-mapping
One issue is that these fields don’t contain the data you want to load. You want to load the derived columns instead. There a couple ways to correct the mapping, but I like dragging and dropping the fields I want mapped to the columns where I wish them to be mapped. Since mapping is, by definition, field-to-field, the existing (auto-) mappings will be overwritten by the new. Try it! Drag the strRecordType field from Available Input Columns to the RecordType cell in Available Output Columns. See? The old mapping is updated. Now map strName to Name anditnValue to Value, as shown in Figure 7-8:
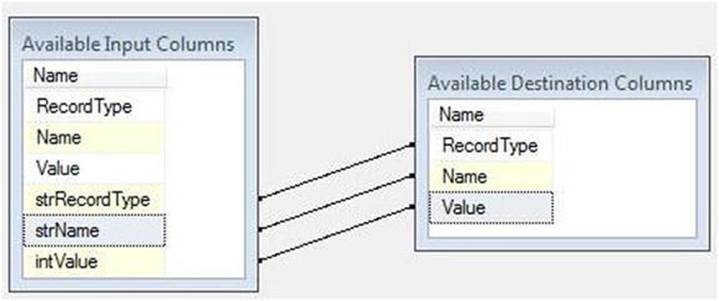
Figure 7-8. Overwriting the auto-mappings
Click the OK button; you’re finished configuring the OLE DB destination adapter. Press the F5 key to execute the SSIS package in the SSDT debugger. Hopefully, your Data Flow task succeeds and appears as in Figure 7-9.

Figure 7-9. A successful data flow!
In this introductory section, I’ve introduced concepts of staging and we built a pattern to stage data from a flat file into a database table. Along the way, we delved into some data warehousing thinking and peeked under the hood of the Data Flow task. Next up: loading another format of flat file—one with variable-length rows.
Variable-Length Rows
A variable-length row flat file is a text source file. It can be a comma-separated values (CSV) file or a tab-delimited file (TDF). It can be a fixed-length file where columns are identified positionally or by ordinal. The major difference between a “normal” flat file and a variable-length row flat file is that the number of text positions is fixed in a normal flat file, and that number can change with each row in a variable-length flat file.
Let’s look at an example of a variable-length flat file:
RecordType,Name1,Value1,Name2,Value2,Name3,Value3
A,Multi One,11
B,Multi Two,22,Multi Two A,23
C,Multi Three,33,Multi Three A,34,Multi Three B,345
A,Multi Four,44
C,Multi Five,55,Multi Five A,56,Multi Five B,567
B,Multi Six,66,Multi Six A,67
There are seven potential columns: RecordType, Name1, Value1, Name2, Value2, Name3, and Value3. Not all rows contain seven values. In fact, the first row contains only three values:
A, Multi One,11
In this format, the RecordType is in the first column and this indicates how many columns of data to expect in the row. Rows of RecordType A contain three values, rows of RecordType B contain five values, and those of RecordType C contain seven values.
Reading into a Data Flow
It’s typical to load data from a flat file into an SSIS data flow using a Flat File connection manager. Let’s walk through configuring a Flat File connection manager for this file.
If you want to sing along, add a new SSIS package named VariableLengthRows.dtsx to your SSIS project. Add a Data Flow task to the control flow and open the Data Flow Editor (tab). Drag a Flat File source adapter onto the Data Flow task canvas and open its editor. Click the New button to create a new Flat File connection manager.
I named my Flat File connection manager Variable-Length File. I created a text file with the data from the example above and named it VarLenRows.csv. I saved it and browsed to that location for the File Name property. I also checked the Column Names in the First Data Row checkbox. When I click on the Columns page, the Flat File Connection Manager Editor appears as shown in Figure 7-10.
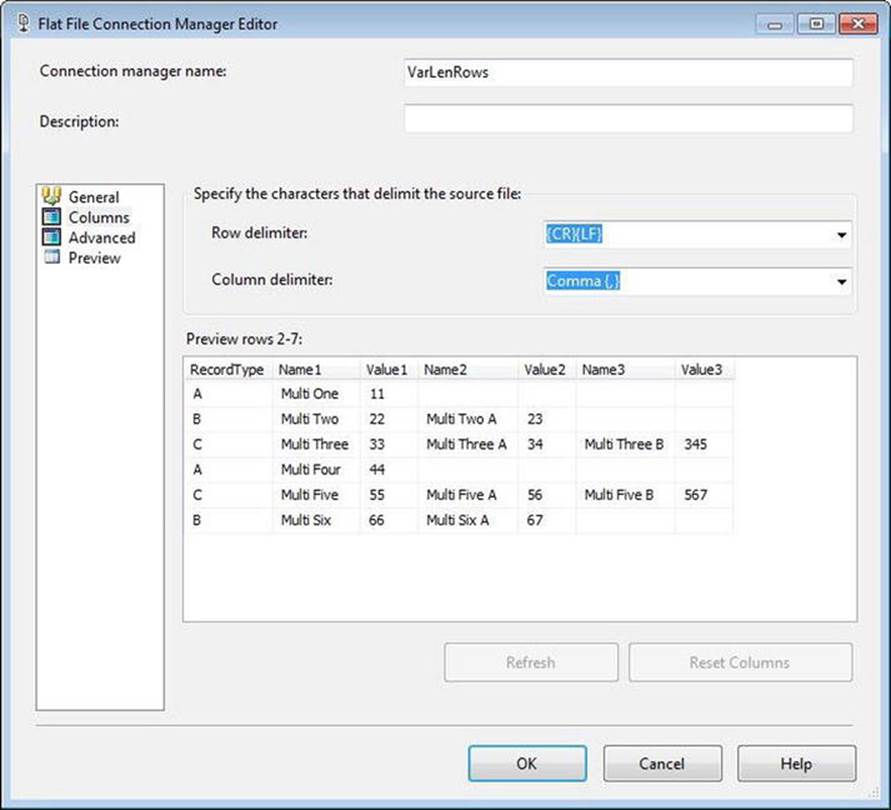
Figure 7-10. Configuring the Flat File connection manager for a flat file with variable-length rows
This behavior is different from earlier editions of SSIS. In previous versions, the Flat File connection manager would raise an error. I blogged about this in a post entitled SSIS Design Pattern: Loading Variable-Length Rows(http://sqlblog.com/blogs/andy_leonard/archive/2010/05/18/ssis-design-pattern-loading-variable-length-rows.aspx). That post inspired this chapter.
Splitting Record Types
Thanks to the new functionality in the SSIS 2014 version of the Flat File connection manager, we have all the data coming in as separate rows. But the data rows contain information of different types. The rows need to be filtered based on record type. I can hear you thinking, “Great, Andy. Now what?” I’m glad you asked! Now we need to parse the data as it flows through the Data Flow task. There are a couple ways to approach this, but I like the conditional split.
Drag a Conditional Split transformation onto the Data Flow task canvas and connect a data flow path from the Flat File source adapter to the conditional split. Open the editor for the transformation. In the Output Name column of the grid, enter TypeA. Into the correspondingCondition, drag (or type) the RecordType column, appending the text == “A” (note that the “A” is in double-quotes). Repeat this for each record type, == “B” and == “C”, as shown in Figure 7-11.

Figure 7-11. Configuring the Script component inputs
Click the OK button to close the Conditional Split Transformation Editor. It is important to note that this would have required a Script component in earlier versions of SSIS because the Flat File connection manager in previous versions couldn’t parse files containing rows with a varying number of columns.
Terminating the Streams
You can use several data flow components to terminate a data flow path. In a production environment, this would likely be an OLE DB destination adapter. In a development or test environment, you may want to terminate with a component that doesn’t require database connectivity or database object creation.
You can use any component that doesn’t require configuration to execute and succeed in the Data Flow task, such as a Derived Column or Multicast transformation. Here, I will use Multicast transformations to terminate the data flow path streams.
Drag three Multicast transformations onto the Data Flow task canvas. Connect an output from the Script component to the TypeA multicast. When prompted, select the TypeA output buffer for the Script component, as shown in Figure 7-12.
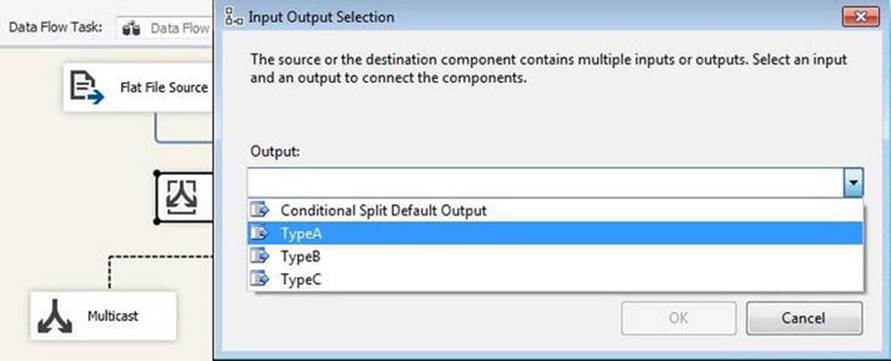
Figure 7-12. Terminating the TypeA output from the Script component
Repeat this process for TypeB and TypeC connections. When you’ve finished, your data flow could appear as shown in Figure 7-13.
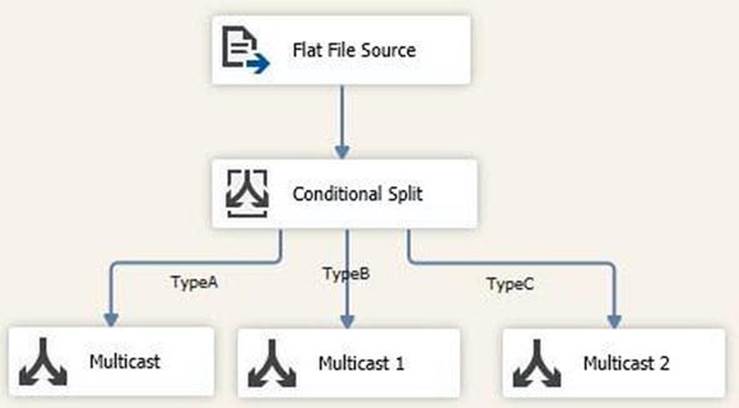
Figure 7-13. The Script component’s outputs, terminated
Let’s run it! Execution should succeed, and when it does, the results will be the green checkmarks that you see in Figure 7-14.
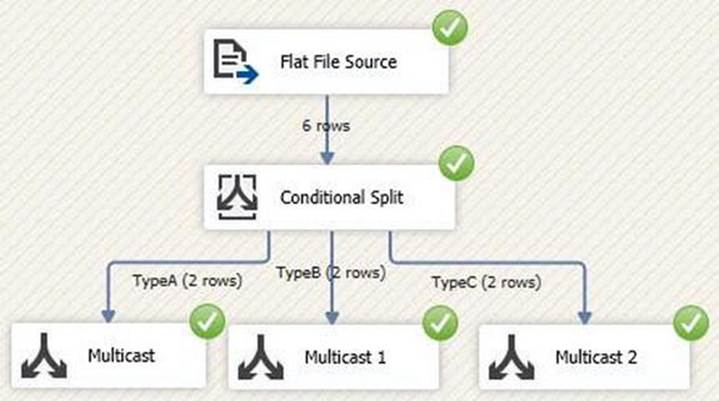
Figure 7-14. Happiness is green checks
This isn’t the only way to address loading files of this format. It is one way, and it has the advantage of offering a lot of flexibility.
Header and Footer Rows
Header and footer rows are included in extract files from many sources. I regularly see these rows in flat files delivered from mainframe-based database systems.
A header row contains metadata about the contents of the extract file—a summary of information of the extract. At a minimum, it will include the extract date. Usually a field contains a row count for the extract. When you think about it, this is very practical instrumentation—it provides a way to check for the proper number of rows. This check can be performed immediately after the extract or immediately after loading the extract—both are valid uses of this metadata.
A footer row is identical in concept. The only difference is location: header rows appear first in a file; footer rows appear last. If you’re including row counts to validate that the correct number of rows have been written or read, writing this information first is a good way to increase fault tolerance. Why? Imagine a failure: the write operation is interrupted or the extract ends abnormally. The header row may indicate 100 rows, for example, but only 70 rows of data follow. If the row count metadata is included in the header row, it’s possible to calculate exactly how many data rows are missing. In contrast, a footer row would simply be missing. Although a missing footer would indicate that the extract had failed, that’s all it would indicate. Having the row count metadata present would allow you to glean more and better information regarding the failure.
In this section, we will look at creating and consuming header and footer rows using SQL Server 2014 Integration Services.
Consuming a Footer Row
We begin by looking at how to consume a footer row. To start, create a file containing a footer row. My file looks like this:
ID,Name,Value
11,Andy,12
22,Christy,13
33,Stevie Ray,14
44,Emma Grace,15
55,Riley Cooper,16
5 rows, extracted 10/5/2011 10:22:12 AM
To demonstrate, create your own file and name it MyFileFooterSource.csv. Create a new SSIS package and rename it ParseFileFooter.dtsx. Add a Data Flow task and switch to the Data Flow tab. Add a Flat File source adapter and double-click it to open the Flat File Source Editor. On the Connection Manager page, click the New button to create a new Flat File connection manager and open the editor. Name the Flat File connection manager My File Footer Source File and set the File Path property to the location of MyFileFooterSource.csv. Check the Column Names in the First Data Row checkbox. Navigate to the Columns page to verify your configuration matches, as shown here in Figure 7-15.
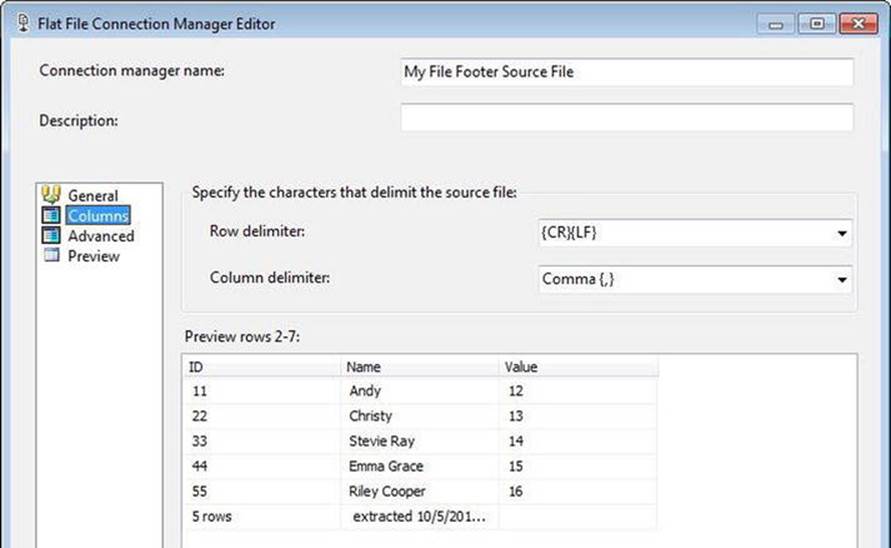
Figure 7-15. Flat File connection manager Columns page for a file containing a footer row
You can see the footer row contents in the preview shown in Figure 7-15. You may or may not be able to view the footer row on the Columns page of the Flat File Connection Manager Editor.
The next step is to separate the footer row from the data rows. To accomplish this, you will use a Conditional Split transformation to isolate the footer row. There are a lot of different ways to detect the footer row, but the trick is to pick something unique about that row. In the SSIS Expression Language expression I define in Figure 7-16, I search for the term "rows" in the ID column. This condition will work as long as there’s never a chance that the term "rows" will legitimately show up in the ID column of the data rows. Never is a very long time.
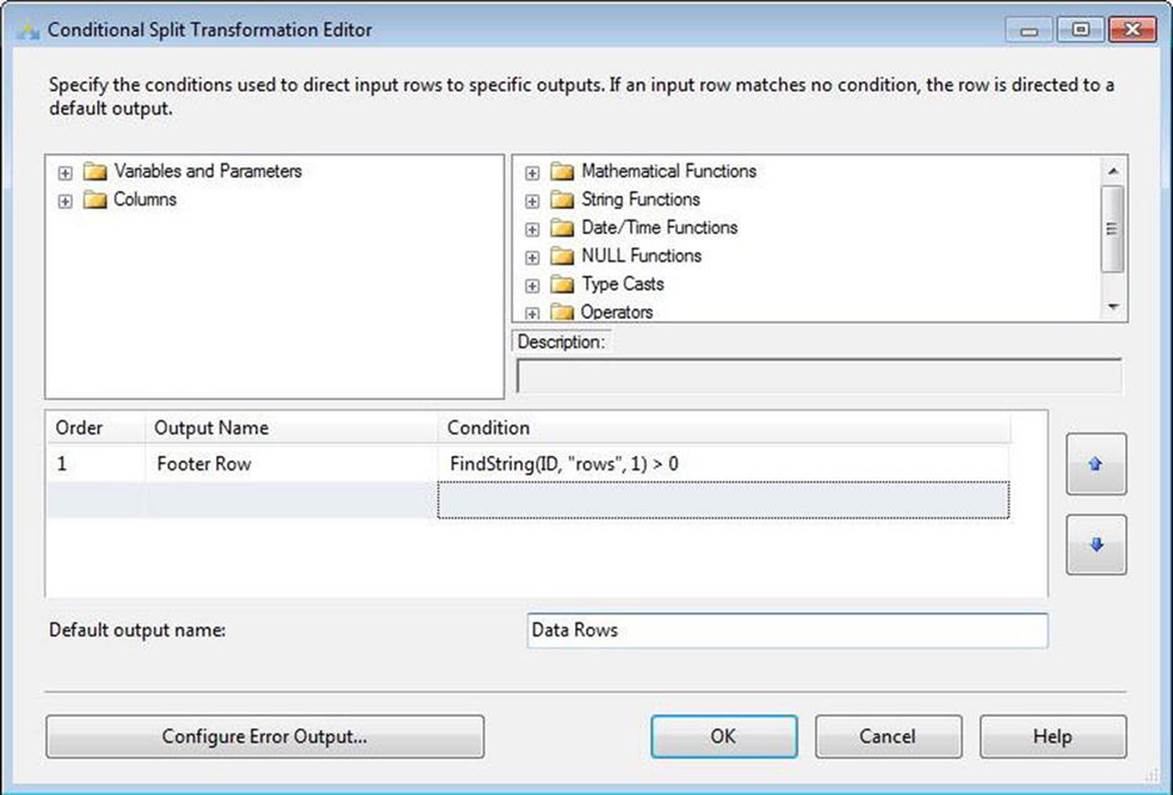
Figure 7-16. Configuring the Conditional Split transformation
To terminate the data rows pipeline—which flows from the Conditional Split transformation’s default output—I use a Derived Column transformation.
The footer row output requires more parsing. We send it to another Derived Column transformation named der Parse Footer.
![]() Note Jamie Thomson wrote a great post entitled “SSIS: Suggested Best Practices and Naming Conventions” (http://sqlblog.com/blogs/jamie_thomson/archive/2012/01/29/suggested-best-practises-and-naming-conventions.aspx). I often use Jamie’s naming conventions.
Note Jamie Thomson wrote a great post entitled “SSIS: Suggested Best Practices and Naming Conventions” (http://sqlblog.com/blogs/jamie_thomson/archive/2012/01/29/suggested-best-practises-and-naming-conventions.aspx). I often use Jamie’s naming conventions.
We want the number of rows and the datetime of the extraction. I use the expressions in Figure 7-17 to parse the footer row count and footer extract datetime:

Figure 7-17. Parsing the row count and extract date
Now we have the footer row metadata in the data flow pipeline. We can terminate this branch of the pipeline using another Derived Column transformation, der Trash Destination Footer. Connect der Parse Footer to der Trash Destination Footer. Right-click the data flow path and click Enable Data Viewer. Execute the package in the debugger to view the contents of the footer row, as shown in Figure 7-18.
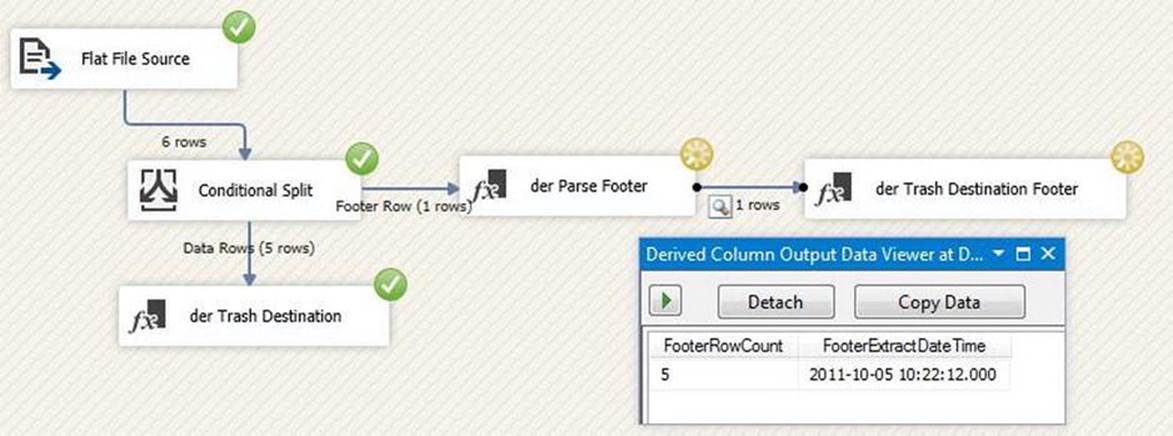
Figure 7-18. Footer row, parsed
You can see from Figure 7-18 that five (5) data rows exited the Conditional Split transformation. We can observe the contents of the footer row after parsing in the Data Viewer.
Consuming a Header Row
Header rows are even easier to read. Let’s start with a look at the source file named MyFileHeaderSource.csv:
5 rows, extracted 10/5/2011 10:22:12 AM
---------------
ID,Name,Value
11,Andy,12
22,Christy,13
33,Stevie Ray,14
44,Emma Grace,15
55,Riley Cooper,16
You can read header rows a few different ways. In this solution, we utilize one Flat File connection manager and one data flow to parse the header row of the data. We rely heavily on Script component logic for parsing and buffering operations.
Begin by creating a new SSIS package. I named mine ParseFileHeader.dtsx.
Add a Data Flow task and open the Data Flow Task Editor. Add a Flat File source adapter and open its editor. Use the New button to create a new Flat File connection manager aimed at MyFileHeaderSource.csv. Uncheck the Column Names in the First Data Row checkbox. Be sure to click the Advanced page of the Connection Manager Editor and change the names of Column 0 and Column 1 to ID and Name, respectively.
Close the Connection Manager and Source Adapter Editors and drag a Script component onto the data flow canvas. When prompted, select Transformation as the use of this Script component. Open the Script Component Editor and change the Name property to scr Parse Header and Data. Click the Input Columns page and select both columns (ID and Name). Click on the Inputs and Outputs page. Rename Output 0 to Header and change the SynchronousInputID property to None. Expand the Header output and click the Output Columns virtual folder. Click the Add Column button, name it ExtractDateTime, and change the data type to database timestamp [DT_DBTIMESTAMP]. Click the Add Column button again, name this new column RowCount, and leave the data type set to the default (four-byte signed integer [DT_I4]).
Click the Add Output button and name this new output Data. Expand the output virtual folder and select the Output Columns virtual folder. As you did for the header output, create two columns with the following properties:
· ID, four-byte signed integer [DT_I4]
· Name, string [DT_STR]
Return to the Script page and set the ScriptLanguage property to Microsoft Visual Basic 2012. Click the Edit Script button. When the editor opens, add a variable declaration at the top of the class (see Listing 7-4).
Listing 7-4. Adding iRowNum Integer Variable
Public Class ScriptMain
Inherits UserComponent
Dim iRowNum As Integer = 0
Replace the code in the Input0_ProcessInputRow subroutine with the code in Listing 7-5.
Listing 7-5. Building Input0_ProcessInputRow Subroutine
Public Overrides Sub Input0_ProcessInputRow(ByVal Row As Input0Buffer)
' increment rownum
iRowNum += 1
Select Case iRowNum
Case 1
' parse
Dim sTmpCount As String = Row.ID
sTmpCount = Strings.Trim(Strings.Left(Row.ID, Strings.InStr(Row.ID, " ")))
Dim sTmpDate As String = Row.Name
sTmpDate = Strings.Replace(Row.Name, " extracted ", "")
' header row
With HeaderBuffer
.AddRow()
.RowCount = Convert.ToInt32(sTmpCount)
.ExtractDateTime = Convert.ToDateTime(sTmpDate)
End With
Case 2
' ignore
Case 3
'column names
Case Else
' data rows
With DataBuffer
.AddRow()
.ID = Convert.ToInt32(Row.ID)
.Name = Row.Name
End With
End Select
End Sub
This script counts the rows flowing through the Script component and uses the number of the row to decide the disposition of the output row. A Select Case statement is driven by row number detection and each row increments the row number incrementor (iRowNum). The first row is the header row and it contains the extract metadata. The next two rows contain a scratch row of dashes and the column names, respectively. The remainder of the file contains data rows and is addressed in the Select Case Else condition of the Select Case statement.
Close the VSTA Projects Script Editor and click the OK button on the Script Component Editor. Terminate the Header and Data pipelines with the data flow component of your choice (I use Derived Column transformations named der Header and der Data).
Test the package by executing it in the debugger. Your results should be similar to those shown in Figure 7-19.
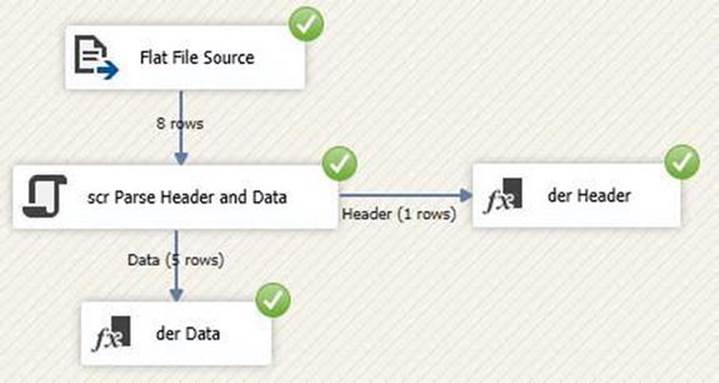
Figure 7-19. Green checks rock!
Producing a Footer Row
Let’s look at producing a footer row and adding it to the data file. For this pattern, we will leverage project and package parameters. We will also leverage the Parent-Child pattern, which is discussed in detail in Chapter 16. We are not going to build the package that creates a flat file containing data. We will start with the assumptions that an extract file exists and we know the number of rows and the extract date. We will use parameters to transmit metadata from the parent package to the child package. Let’s get started!
Create a new SSIS package and name it WriteFileFooter.dtsx. Click on the Parameters tab and add the following package parameters:
Name Data Type Value Required
AmountSum Decimal 0 False
DateFormat String True
Debug Boolean True False
Delimiter String , True
ExtractFilePath String True
LastUpdateDateTime DateTime 1/1/1900 True
RecordCount Int32 0 True
The parameters, when entered, appear as shown in Figure 7-20.
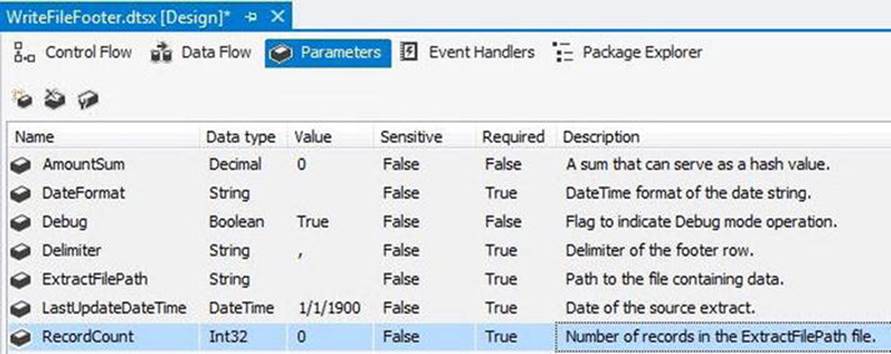
Figure 7-20. Parameters for the WriteFileFooter.dtsx package
The Sensitive property for each parameter is set to False. The Description is optional and available in the image.
We’re going to do the heavy lifting in a Script task. Return to the control flow and drag a Script task onto the canvas. Change the name to scr Append File Footer and open the editor. On the Script page, click the ellipsis in the ReadOnlyVariables property’s Value textbox. When the Select Variables window displays, select the following variables:
· System::PackageName
· System::TaskName
· $Package::AmountSum
· $Package::DateFormat
· $Package::Debug
· $Package::Delimiter
· $Package::ExtractFilePath
· $Package::LastUpdateDateTime
· $Package::RecordCount
The Select Variables window will not appear exactly as shown in Figure 7-21, but these are the variables you need to select for use inside the scr Append File Footer Script task.
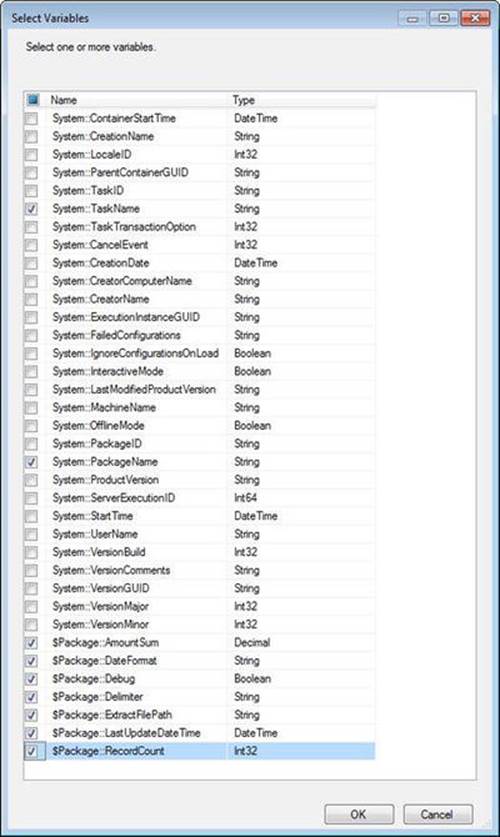
Figure 7-21. Selecing variables for the footer file
Click the OK button to close the Select Variables window. Set the ScriptLanguage property to Microsoft Visual Basic 2012. Click the Edit Script button to open the VstaProjects window. At the top of the ScriptMain.vb code window, you will find an Import region. Add the lines from Listing 7-6 to that region.
Listing 7-6. Adding Imports Statements to the VB.Net Script
Imports System.IO
Imports System.Text
Just after the partial class declaration, add the variable declaration for the bDebug variable. It’s the Dim statement given in Listing 7-7.
Listing 7-7. Declaring the Debug Variable
Partial Public Class ScriptMain
Inherits Microsoft.SqlServer.Dts.Tasks.ScriptTask.VSTARTScriptObjectModelBase
Dim bDebug As Boolean
Replace the code in Public Sub Main with that from Listing 7-8.
Listing 7-8. Code for the Main() Subroutine
Public Sub Main()
' 1: detect Debug setting...
bDebug = Convert.ToBoolean(Dts.Variables("Debug").Value)
' 2: declare and initialize variables...
' 2a: generic variables...
Dim sPackageName As String = Dts.Variables("PackageName").Value.ToString
Dim sTaskName As String = Dts.Variables("TaskName").Value.ToString
Dim sSubComponent As String = sPackageName & "." & sTaskName
Dim sMsg As String
' 2b: task-specific variables...
Dim sExtractFilePath As String = Dts.Variables("ExtractFilePath").Value.ToString
Dim iRecordCount As Integer = Convert.ToInt32(Dts.Variables("RecordCount").Value)
Dim sAmountSum As String = Dts.Variables("AmountSum").Value.ToString
Dim sDateFormat As String = Dts.Variables("DateFormat").Value.ToString
Dim sDelimiter As String = Dts.Variables("Delimiter").Value.ToString
Dim sLastUpdateDateTime As String= _
Strings.Format(Dts.Variables("LastUpdateDateTime").Value, sDateFormat) _
'"yyyy/MM/dd hh:mm:ss.fff")
Dim sFooterRow As String
Dim s As Integer = 0
' 3: log values...
sMsg = "Package Name.Task Name: " & sSubComponent & ControlChars.CrLf & _
ControlChars.CrLf & _
"Extract File Path: " & sExtractFilePath & ControlChars.CrLf & _
ControlChars.CrLf & _
"Record Count: " & iRecordCount.ToString & ControlChars.CrLf & _
ControlChars.CrLf & _
"Amount Sum: " & sAmountSum & ControlChars.CrLf & ControlChars.CrLf & _
"Date Format: " & sDateFormat & ControlChars.CrLf & ControlChars.CrLf & _
"Delimiter: " & sDelimiter & ControlChars.CrLf & ControlChars.CrLf & _
"LastUpdateDateTime: " & sLastUpdateDateTime & ControlChars.CrLf & _
ControlChars.CrLf & _
"Debug: " & bDebug.ToString
Dts.Events.FireInformation(0, sSubComponent, sMsg, "", 0, True)
If bDebug Then MsgBox(sMsg)
' 4: create footer row...
sFooterRow = iRecordCount.ToString & sDelimiter & sAmountSum & sDelimiter & _
sLastUpdateDateTime
' 5: log...
sMsg = "Footer Row: " & sFooterRow
Dts.Events.FireInformation(0, sSubComponent, sMsg, "", 0, True)
If bDebug Then MsgBox(sMsg)
' 6: check if the file is in use...
While FileInUse(sExtractFilePath)
' 6a: if file is in use, sleep for a second...
System.Threading.Thread.Sleep(1000)
' 6b: incrementor...
s += 1
' 6c: if incrementor reaches 10 (10 seconds),
If s > 10 Then
' exit the loop...
Exit While
End If 's > 10
End While 'FileInUse(sExtractFilePath)
' 7: log...
If s = 1 Then
sMsg = "File was in use " & s.ToString & " time."
Else ' s = 1
sMsg = "File was in use " & s.ToString & " times."
End If ' s = 1
Dts.Events.FireInformation(0, sSubComponent, sMsg, "", 0, True)
If bDebug Then MsgBox(sMsg)
' 8: if the file exists...
If File.Exists(sExtractFilePath) Then
Try
' 8a: open it for append, encoded as built, using a streamwriter...
Dim writer As StreamWriter = New StreamWriter(sExtractFilePath, True, _
Encoding.Default)
' 8b: add the footer row...
writer.WriteLine(sFooterRow)
' 8c: clean up...
writer.Flush()
' 8d: get out...
writer.Close()
' 8e: log...
sMsg = "File " & sExtractFilePath & " exists and the footer row has " & _
"been appended."
Dts.Events.FireInformation(0, sSubComponent, sMsg, "", 0, True)
If bDebug Then MsgBox(sMsg)
Catch ex As Exception
' 8f: log...
sMsg = "Issue with appending footer row to " & sExtractFilePath & _
" file: " & ControlChars.CrLf & ex.Message
Dts.Events.FireInformation(0, sSubComponent, sMsg, "", 0, True)
If bDebug Then MsgBox(sMsg)
End Try
Else
' 8g: log...
sMsg = "Cannot find file: " & sExtractFilePath
Dts.Events.FireInformation(0, sSubComponent, sMsg, "", 0, True)
If bDebug Then MsgBox(sMsg)
End If ' File.Exists(sExtractFilePath)
' 9: return success...
Dts.TaskResult = ScriptResults.Success
End Sub
Then add the function from Listing 7-9 after Public Sub Main().
Listing 7-9. Code for the FileInUse Function
Function FileInUse(ByVal sFile As String) As Boolean
If File.Exists(sFile) Then
Try
Dim f As Integer = FreeFile()
FileOpen(f, sFile, OpenMode.Binary, OpenAccess.ReadWrite, _
OpenShare.LockReadWrite)
FileClose(f)
Catch ex As Exception
Return True
End Try
End If
End Function
The script now builds the footer row and appends it to the Extract file. The first thing we do—at the comment labeled 1—is assign a value to the Debug variable. I use the Debug variable to control message boxes displaying variable values and other pertinent information. I describe why in Chapter 2 on execution patterns.
At comment 2, we declare and initialize variables. I break variables into two categories: generic and task-specific variables. At comment 3, we build a message in the variable sMsg. This message contains the values of each variable used in the script thus far. If we are running in Debug mode (if bDebug is True), the code displays a message box (via the MsgBox function) containing the contents of sMsg. Whether we’re running in Debug mode or not, I use the Dts.Events.FireInformation method to raise an OnInformation event, passing it the contents ofsMsg. This means the information is always logged and is optionally displayed by a message box. I like options (a lot).
Comment 4 has us constructing the actual footer row and placing its text in the String variable sFooterRow. Note the delimiter is also dynamic. The String variable sDelimiter contains the value passed to the WriteFileFooter into the Package parameter named$Package::Delimiter. At comment 5, we log the contents of the footer row.
At comment 6, we initiate a check to make sure the extract file is not marked as “in use” by the operating system. There are many ways to detect the state of the file in the file system, so I created a Boolean function named FileInUse to encapsulate this test. If the function I created doesn’t work for you, you can construct your own. If the file is in use, the code initiates a While loop that sleeps the thread for one second. Each iteration through the loop causes the variable s (the incrementor in this example) to increment at comment 6b. If s exceeds ten, the loop exits. We will only wait 10 seconds for the file to be usable. Note that if the file remains in use at this juncture, we still move on. We’ll deal with the file-in-use matter later, but we will not hang ourselves in a potentially endless loop waiting for the file’s availability. We will instead fail. Whether the file is in use or not in use, the script logs its state at comment 7.
At comment 8, we check for the existence of the file and begin a Try-Catch. If the file doesn’t exist, I opt to log a status message (via Dts.Events.FireInformation) and continue (see comment 8g). The Try-Catch enforces the final test of the file’s usability. If the file remains in use here, the Catch fires and logs the status message at comment 8f. At 8f and/or 8g, you may very well decide to raise an error using the Dts.Events.FireError method. Raising an error causes the Script task to fail, and you may want this to happen. At comments 8a through 8d, we open the file, append the footer row, close the file, and clean up. At comment 8e, the code logs a status message. If anything fails when we are executing 8a through 8e, code execution jumps to the Catch block.
If all goes well, the code returns Success to the SSIS control flow via the Dts.TaskResult function (comment 9).
The Script task does all the work in this pattern. Close the Script Task Editor. Click OK. Then save the package.
I created a test package called TestParent.dtsx to test this package. The package has variables that align with the parameters of the WriteFileFooter.dtsx package, as shown in Figure 7-22.
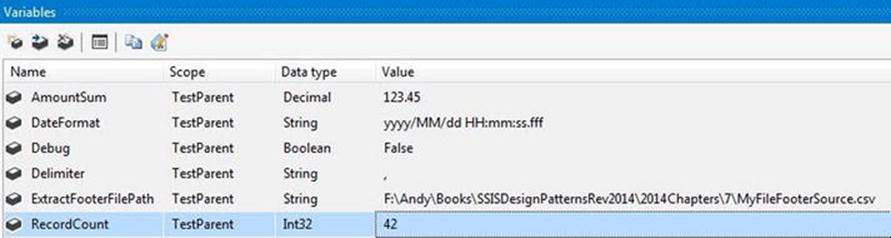
Figure 7-22. Variables in the TestParent.dtsx package
If you’re playing along at home, you should adjust the path of the ExtractFooterFilePath variable.
I added a Sequence container named seq Test WriteFileFooter and included an Execute Package task named ept Execute WriteFileFooter Package. On the Package page of the Execute Package Task Editor, set the ReferenceType property to Project Reference and selectWriteFileFooter.dtsx from the PackageNameFromProjectReference property drop-down. Map the TestParent package variables to the WriteFileFooter package parameters as shown in Figure 7-23.
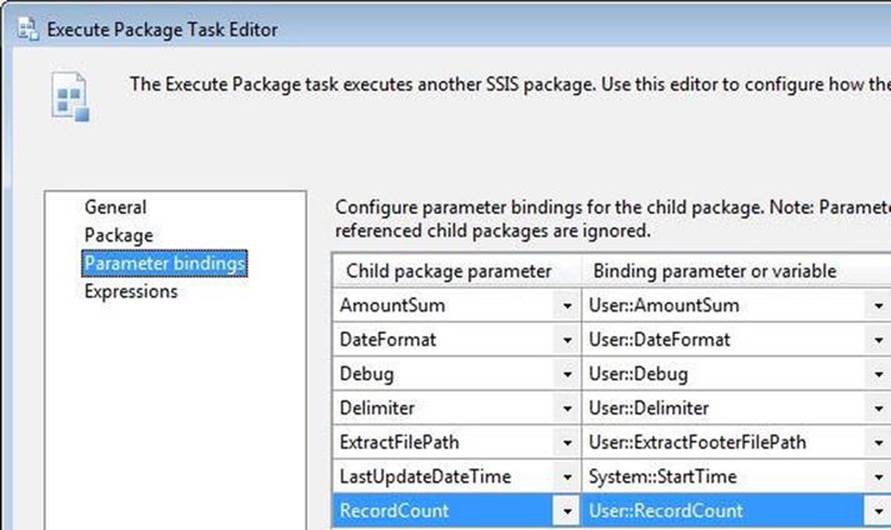
Figure 7-23. Mapping package parameters
Execute TestParent.dtsx to test the functionality. The package executes successfully and the footer row is appended to the file as shown in Figure 7-24.
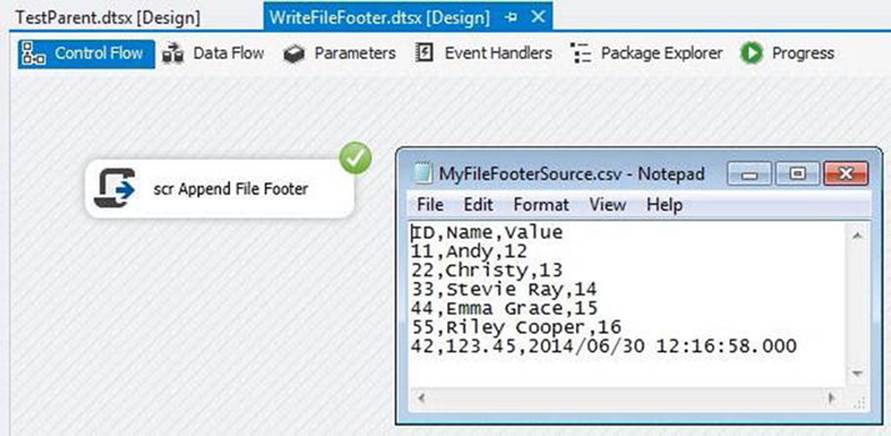
Figure 7-24. Mission accomplished
Producing a Header Row
Producing a header row is a very simple operation in SSIS 2014, provided you know the number of rows to be loaded in advance. You simply load the destination flat file with the header row in one Data Flow task, and then load the data rows to the same flat file in a subsequent Data Flow task. As we say in Farmville, Virginia: “dog simple.” There are some subtle complexities in this design, though.
We’ll start with a simple file named MyFileHeaderExtract.csv that contains the following data:
ID,Name,Value
11,Andy,12
22,Christy,13
33,Stevie Ray,14
44,Emma Grace,15
55,Riley Cooper,16
Add a new SSIS package named WriteFileHeader.dtsx to your SSIS project. Add the package parameters shown in Figure 7-25.
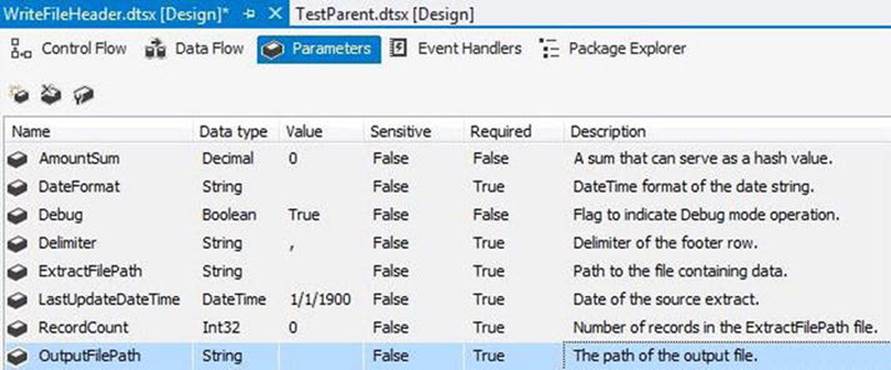
Figure 7-25. WriteFileHeader.dtsx parameters
Add two Data Flow tasks to the control flow. Name the first dft Write Header Row and the second dft Write Data Rows. Open the editor for dft Write Header Row and add a Script component named scrc Build Header Row to the Data Flow task. When prompted, configure the Script component to act as a source. Open the editor and set the ScriptLanguage property to Microsoft Visual Basic 2012. Set the ReadOnlyVariables property to reference the following:
· $Package::AmountSum
· $Package::Delimiter
· $Package::LastUpdateDateTime
· $Package::RecordCount
On the Inputs and Outputs page, ensure the SynchronousInputID property of Output 0 is set to None and add an output column named HeaderRow (String data type, 500 length) to Output 0. Click the Script page and the Edit Script button. Replace the code in theCreateNewOutputRows() subroutine with that from Listing 7-10.
Listing 7-10. Code for the CreateNewOutputRows Subroutine
Public Overrides Sub CreateNewOutputRows()
' create header row... ' Get variable values...
Dim iRecordCount As Integer = Me.Variables.RecordCount
Dim sDelimiter As String = Me.Variables.Delimiter
Dim dAmountSum As Decimal = Convert.ToDecimal(Me.Variables.AmountSum)
Dim dtLastUpdateDateTime As DateTime = _
Convert.ToDateTime(Me.Variables.LastUpdateDateTime)
Dim sHeaderRow As String = iRecordCount.ToString & sDelimiter & _
dAmountSum.ToString & sDelimiter & _
dtLastUpdateDateTime.ToString
With Output0Buffer
.AddRow()
.HeaderRow = sHeaderRow
End With
End Sub
Add a Flat File destination adapter and connect a data flow path from the Script component to it. Open the Flat File Destination Editor and click the New button beside the Flat File Connection Manager drop-down. When the Flat File Format window displays, select Delimited and click the OK button. Name the Flat File connection manager Flat File Header Output and supply (or select) a file path. On the Columns page, configure a landing column for the HeaderRow column from the scrc Build Header Row Script component. Click the OK button to return to the Flat File Destination Editor. Make sure the Overwrite Data in the File checkbox (in the Connection Manager page) is checked. It should be; this is the default. Click on the Mappings page and complete the destination configuration. This Data Flow task will construct and load the header row.
On the control flow, add a Success Precedence constraint from dft Write Header Row to the dft Write Data Rows Data Flow task. Open the editor for dft Write Data Rows and add a Flat File source adapter. Open the Flat File Source Editor and click the New button to create a new Flat File connection manager. When prompted, select Delimited. Name it Extract File Input and navigate to the MyFileHeaderExtract.csv file you created earlier. On the Columns page, delete the value in the Column Delimiter drop-down. To refresh the view, click the Refresh button. On the Advanced page, rename the column from ID,Name,Value to Row and set the OutputColumnWidth property to 500. Click the OK buttons to close the Flat File Connection Manager Editor and the Flat File Source Editor.
Add a Flat File destination adapter and connect a data flow path from the Flat File source adapter to the Flat File destination adapter. Open the Flat File destination adapter and set its connection manager to the flat file header output. Be sure to uncheck the Overwrite the Data in the File checkbox on the Connection Manager page. On the Mappings page, map the Row column from the Available Input Columns to the HeaderRow in the Available Destination Columns. Close the Flat File Destination Editor.
Let’s make these connection managers dynamic! Click the Extract File Input Flat File Connection Manager, and then press the F4 key to display properties. Click the Expressions property and click the ellipsis in the Value textbox. Click the drop-down in the Property column of the first row and click ConnectionString. In the corresponding Expression value textbox, click the ellipsis to display the Expression Builder. Expand the Variables and Parameters virtual folder in Expression Builder and drag $Package::ExtractFilePath into the Expression textbox. Click the OK button to close the Expression Builder. The Property Expressions Editor window will appear, as shown in Figure 7-26.
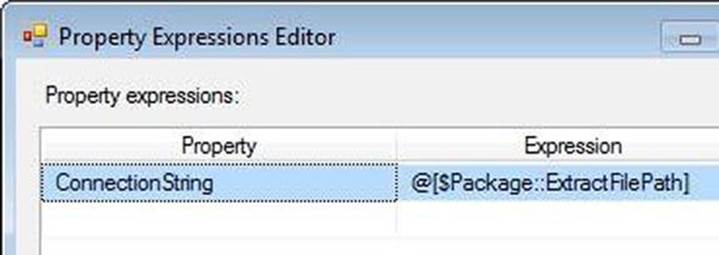
Figure 7-26. Dynamic ConnectionString property
Close the Property Expressions Editor. You have now assigned the ConnectionString property to the value passed to the ExtractFilePath package parameter passed to this package when it is called from another package. Repeat this process to dynamically assign the value of the $Package::OutputFilePath package parameter to the ConnectionString property of the Flat File Header Output Flat File Connection Manager.
To test this package, return to TestParent.dtsx. Let’s add a couple of variables to use with the parameters we just mapped to connection manager expressions: ExtractHeaderFilePath and OutputPath. Supply a value for the OutputPath variable that represents the location of the file you want to create. (Note: this file may not exist!) Also, supply the path to the MyFileHeaderExtract.csv as the default value for the ExatrctHeaderFilePath variable. On the control flow, add a Sequence container and rename it seq Test WriteHeader. Add an Execute Package task to the Sequence container and rename it ept Execute WriteFileHeader Package. Open the Execute Package Task Editor and configure a project reference to execute the WriteFileHeader.dtsx package. Configure the Parameter Bindings page as shown inFigure 7-27.
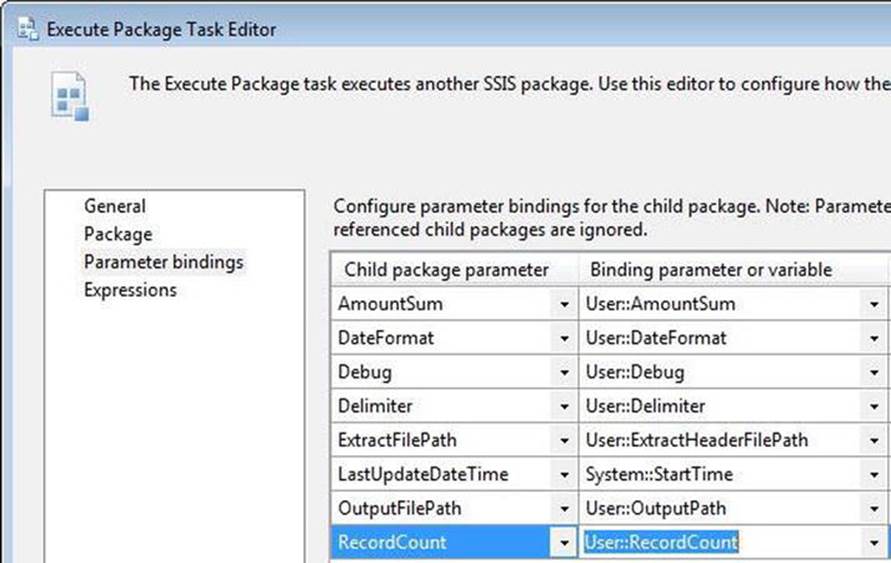
Figure 7-27. Parameter mapping in the Execute Package task
Close the Execute Package Task Editor and disable the seq Test WriteFileFooter Sequence container. Execute the package and observe the results. You should get results like those shown in Figure 7-28.
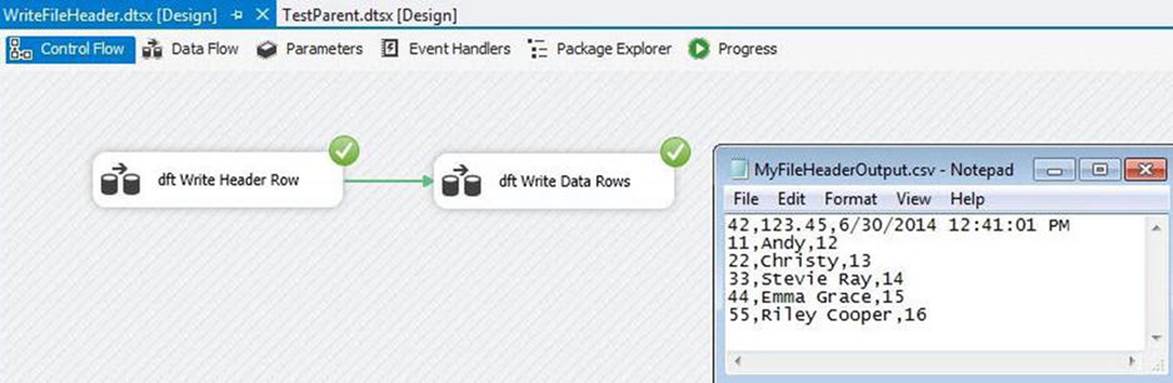
Figure 7-28. Success!
I like this pattern because it utilizes SSIS components without resorting to too much scripting. I don’t like everything about this pattern, though. I need to know the number of rows before calling this package, which isn’t hard to acquire—I can simply add a Row Count transformation to a data flow and count the rows as they are loaded into the extract file. But then I must reload the extract file, after the fact. For large files and scalability, I would attempt to ascertain the number of rows before loading the file and then integrate the functionality demonstrated in this package into the loader package. For smaller loads of data that will not scale, this package is acceptable.
The Archive File Pattern
The Archive File pattern is largely responsible for the book you are now reading. How? It was the first widely adopted design pattern package that I built. After re-using this pattern in several locations, I became convinced SSIS lent itself to design pattern-based architectures. Shortly after this realization, I discussed the idea over dinner in Bellevue, Washington with friends who work with SSIS and who also write books. We agreed design patterns offer interesting solutions to many data integration problems.
The ArchiveFile package is designed to copy a flat data file from one directory to another, appending a datetime stamp to the original file name. The full path of the original file is supplied in the SourceFilePath parameter, the format of the datetime stamp in theDateStampFormat parameter. The destination, or Archive, directory is supplied to the ArchiveDirectory parameter. Should the target file already exist, you can control overwrites of the destination file via the OverwriteDestination parameter. The package usually deletes the original file, but the CopyOnly parameter controls this function. If the SourceFilePath is not found, you can raise an error or simply log this condition. The ExceptionOnFileNotFound parameter controls whether the package raises an error if the source file is not found. Finally, the Debug parameter controls whether the package is being executed in Debug mode (something I cover in more detail in Chapter 2). The ArchiveFile package parameters, when configured, will appear as in Figure 7-29.
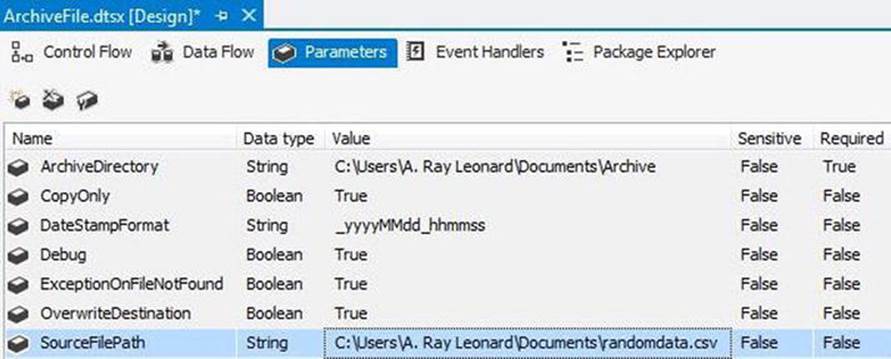
Figure 7-29. ArchiveFile package parameters
Be sure you include default values for an existing folder for the ArchiveDirectory parameter and a path to a valid file for the SourceFilePath parameter. For all other parameter default values, use what I have supplied in Figure 7-29.
There are a couple ways to design this package. You can rely heavily on scripting or utilize the File System task. Which should you choose? When consulting, I ask questions to determine the comfort-level of those charged with maintaining the packages. Some data integration developers are comfortable with .NET coding; others are not. Since SSIS gives me a choice, I build packages so they are easily maintained by the team charged with maintenance.
In this package, I am choosing a hybrid of scripting and the File System task, leaning away from scripting. Let’s add the following variables to the package:
· User::FormattedFileName [String]
· User::OkToProceed [Boolean]
· User::SourceFileDirectory [String]
· User::WorkingCopyFileName [String]
Add a Script task to the control flow and name it scr Apply Format. Open the editor and change the ScriptLanguage property to Microsoft Visual Basic 2012. Add the following variables and parameters to the ReadOnlyVariables property:
· System::TaskName
· System::PackageName
· $Package::CopyOnly
· $Package::DateStampFormat
· $Package::Debug
· $Package::ExceptionOnFileNotFound
· $Package::SourceFilePath
Add the following variables and parameters to the ReadWriteVariables property:
· User::FormattedFileName
· User::OkToProceed
· User::SourceFileDirectory
· User::WorkingCopyFileName
Click the Edit Script button to open the VSTAProjects script editor. At the top of the ScriptMain.vb file, add the statement from Listing 7-11 to the Imports region.
Listing 7-11. Declaring a Reference to the System.IO Namspace
Imports System.IO
Replace the code in Public Sub Main() with that from Listing 7-12.
Listing 7-12. Code for the Main() Subroutine
Public Sub Main()
' 1: declare bDebug
Dim bDebug As Boolean
' 2: detect Debug mode...
bDebug = Convert.ToBoolean(Dts.Variables("Debug").Value)
' 3:variables declaration...
Dim sPackageName As String = Dts.Variables("System::PackageName").Value.ToString
Dim sTaskName As String = Dts.Variables("System::TaskName").Value.ToString
Dim sSubComponent As String = sPackageName & "." & sTaskName
Dim sDateStampFormat As String = _
Dts.Variables("$Package::DateStampFormat").Value.ToString
Dim sSourceFilePath As String = _
Dts.Variables("$Package::SourceFilePath").Value.ToString
Dim bExceptionOnFileNotFound As Boolean = _
Convert.ToBoolean(Dts.Variables("ExceptionOnFileNotFound").Value)
Dim bCopyOnly As Boolean = Convert.ToBoolean(Dts.Variables("CopyOnly").Value)
Dim sFileName As String
Dim sBaseFileName As String
Dim sExtension As String
Dim sSourceFileDirectory As String
Dim sWorkingCopyFileName As String
Dim sFormattedFileName As String
Dim sMsg As String
' 4: work with the file
Try
' 4a: parse the source file directory...
sSourceFileDirectory = Strings.Trim(Strings.Left(sSourceFilePath, _
Strings.InStrRev(sSourceFilePath, "\")))
' 4b: parse the filename...
sFileName = Strings.Trim(Strings.Right(sSourceFilePath, _
Strings.Len(sSourceFilePath) - Strings.InStrRev(sSourceFilePath, "\")))
' 4c: parse the filepath minus the extension...
sBaseFileName = Strings.Left(sSourceFilePath, Strings.InStrRev(sSourceFilePath, _
".") - 1)
' 4d: build working copy file name...
sWorkingCopyFileName = sSourceFileDirectory & "_" & sFileName
' 4e: parse extension...
sExtension = Strings.Trim(Strings.Right(sSourceFilePath, _
Strings.Len(sSourceFilePath) - Strings.InStrRev(sSourceFilePath, ".")))
' 4f: apply formatting to filename and set the output value of FormattedFileName
sFormattedFileName = sBaseFileName & _
Strings.Format(Date.Now, sDateStampFormat) & "." & sExtension
' 4g: assign external varables...
Dts.Variables("User::FormattedFileName").Value = sFormattedFileName
Dts.Variables("SourceFileDirectory").Value = sSourceFileDirectory
Dts.Variables("WorkingCopyFileName").Value = sWorkingCopyFileName
' 4h: check for valid file...
If File.Exists(sSourceFilePath) Then
' 4i: set OkToProceed flag...
Dts.Variables("OkToProceed").Value = True
Else
' 4j: if raising an exception on file not found...
If bExceptionOnFileNotFound Then
' 4k: fire an error...
Dts.Events.FireError(1001, sSubComponent, "cannot locate file " & _
sSourceFilePath, "", 0)
End If
' 4l: set OkToProceed flag...
Dts.Variables("OkToProceed").Value = False
sMsg = "file " & sSourceFilePath & " not found."
If bDebug Then MsgBox(sMsg, MsgBoxStyle.OkOnly, sSubComponent)
' 4m: log file not found, exception or not...
Dts.Events.FireInformation(2001, sSubComponent, sMsg, "", 0, True)
End If
Catch ex As Exception
' 4n: log error message...
Dts.Events.FireError(1001, sSubComponent, ex.Message, "", 0)
End Try
' 5: log information
sMsg = "DateStampFormat: " & sDateStampFormat & ControlChars.CrLf & _
ControlChars.CrLf & _
"ExceptionOnFileNotFound: " & bExceptionOnFileNotFound.ToString & _
ControlChars.CrLf & ControlChars.CrLf & _
"CopyOnly: " & bCopyOnly.ToString & ControlChars.CrLf & ControlChars.CrLf & _
"OkToProceed: " & Dts.Variables("OkToProceed").Value.ToString & _
ControlChars.CrLf & ControlChars.CrLf & _
"SourceFileDirectory: " & sSourceFileDirectory & ControlChars.CrLf & _
ControlChars.CrLf & _
"FileName: " & sFileName & ControlChars.CrLf & ControlChars.CrLf & _
"Extension: " & sExtension & ControlChars.CrLf & ControlChars.CrLf & _
"BaseFileName: " & sBaseFileName & ControlChars.CrLf & ControlChars.CrLf & _
"FormattedFileName: " & sFormattedFileName & ControlChars.CrLf & _
ControlChars.CrLf & _
"WorkingCopyFileName: " & sWorkingCopyFileName & ControlChars.CrLf & _
ControlChars.CrLf
If bDebug Then MsgBox(sMsg, MsgBoxStyle.OkOnly, sSubComponent)
Dts.Events.FireInformation(2001, sSubComponent, sMsg, "", 0, True)
' 6: output
Dts.TaskResult = ScriptResults.Success
End Sub
As in other scripts, we declare (Dim) a variable named bDebug to detect whether the package is executing in Debug mode at comments 1 and 2. At comment 3, the script declares the remainder of the variables used, assigning some values passed in from SSIS package variables and parameters. At comments 4a through 4c, the code picks the Source File Path variable apart, parsing the source directory, the filename with extension, and the filename without extension. At comments 4d through 4f, the filename extension is parsed and a filename for a “working copy” is created and formatted with the datetime stamp supplied from the SSIS package parameters. At comment 4g, the script assigns variable values to SSIS package variables. The code between comments 4h and 4m tests and responds to the existence of the source file. If an exception is encountered in any of the steps between comments 4a and 4m, the Catch block at comment 4n is executed and logs the exception as an error, which halts the execution of the Script task. The code at comment 5 builds, displays (if running in Debug mode), and logs a message containing the variable values inside the Script task. This is extremely useful information when troubleshooting. At comment 6, the script returns a Success result to the Dts.TaskResult object.
The remaining steps in the file archive process are as follows:
1. Create a working copy of the source file.
2. Rename the working copy to the Formatted File Name (including the datetime stamp).
3. Move the newly-renamed file to the archive directory.
4. Delete the original file (unless this is a CopyOnly operation).
If the OkToProceed (Boolean) package variable is set to True (this is accomplished in the script code at comment 4i), the remaining steps in the process are managed by File System tasks.
Drag four File System tasks onto the control flow canvas. Rename the first fsys Copy Working File and open its editor. Change the Operation property to Copy File. Set the IsSourcePathVariable property to True and the SourceVariable property to$Package::SourceFilePath. Set the IsDestinationPathVariable to True and set the DestinationVariable property to User::WorkingCopyFileName. Set the OverwriteDestination property to True. Close the File System Task Editor.
![]() Note Because we did not set a value for User::WorkingCopyFileName, there will be a red X on the task. Do not worry about that.
Note Because we did not set a value for User::WorkingCopyFileName, there will be a red X on the task. Do not worry about that.
Rename the second File System task fsys Rename File and open its editor. Set the Operation property to Rename File. Set the IsSourcePathVariable property to True and the SourceVariable property to User::WorkingCopyFileName. Set theIsDestinationPathVariable to True and set the DestinationVariable property to User::FormattedFileName. Set the OverwriteDestination property to True. Close the File System Task Editor.
Rename the third File System task fsys Move File and open its editor. Set the Operation property to Move File. Set the IsSourcePathVariable property to True and the SourceVariable property to User::FormattedFileName. Set theIsDestinationPathVariable to True and set the DestinationVariable property to $Package::ArchiveDirectory. Set the OverwriteDestination property to True. Close the File System Task Editor.
Rename the fourth File System task fsys Delete Original File and open its editor. Set the Operation property to Delete File. Set the IsSourcePathVariable property to True and the SourceVariable property to $Package::SourceFilePath. Close the File System Task Editor.
Use a Success Precedence constraint to connect the scr Apply Format Script task to the fsys Copy Working File File System task. Double-click the Precedence constraint to open the editor and set the Evaluation Option property to Expression and Constraint. Set theValue property to Success and the Expression property to @[User::OkToProceed]. This constraint will only fire if the scr Apply Format Script task completes execution successfully and sets the OkToProceed (Boolean) variable to True. Connect Success Precedence constraints between the fsys Copy Working File File System task and the fsys Rename File File System task, the fsys Rename File File System task and the fsys Move File File System task, and the fsys Move File File System task and the fsys Delete Original File File System task. Double-click the Precedence constraint between the fsys Move File File System task and the fsys Delete Original File File System task to open the editor. Set the Evaluation Option property to Expression and Constraint. Set the Value property to Success and the Expressionproperty to !@[$Package::CopyOnly] (this equates to NOT [!] $Package::CopyOnly, or when $Package::CopyOnly is False). For the fsys Delete Original File File System task to fire, the fsys Move File File System task must succeed and the $Package::CopyOnlypackage parameter must be False. This makes sense, if you only want to copy the file to the archive directory; you don’t want to delete the original.
In many versions of this design pattern, I also “variable-ize” the OverwriteDestination properties of the various File System tasks, managing these values on the Expressions pages by setting the OverwriteDestinationFile dynamic property expressions with Boolean package parameters. I do this because some enterprises have requirements regarding keeping or discarding data files regardless of whether they are temporary or not.
Your File System tasks may be marked with error indicators (red circles containing white Xs). Hovering over a task so marked will display the error. For example, in Figure 7-30 the error: “Variable ‘WorkingCopyFileName’ is used as a source or destination and is empty.”

Figure 7-30. The WorkingCopyFileName Variable is empty
At issue is the content of the WorkingCopyFileName variable. The error is correct; the variable value is currently empty. However, since I wrote the code, I know that, in section 4d of the code listing, the script will populate the content of an internal string variable namedsWorkingCopyFile. In section 4g of the code, the content of this internal variable will be assigned to the value of the SSIS package variable named WorkingCopyFileName. I know that, but the SSIS Package does not. It is doing its best to inform me of this issue. In fact, I cannot execute the package in its current state without raising an error message, as shown in Figure 7-31.
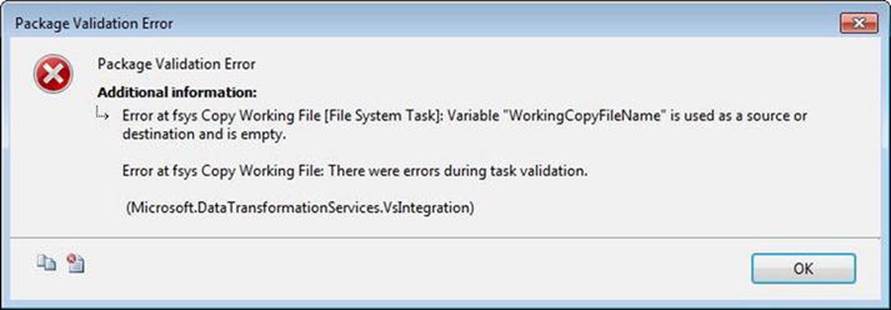
Figure 7-31. Package validation error
The validation is accurate. Now what? There’s a clue in the error, near the very top. This is a Package Validation Error. To address this, click on the fsys Copy Working File File System task and press the F4 key to display Properties. In the Execution group of properties, at the top of the list, you will find the DelayValidation property. This property’s default setting is False and that makes sense. There is a lot of design-time validation in SSIS and it is mostly a good thing. Change this property value to True. Change DelayValidation to True for the fsys Rename File and fsys Move File File System tasks as well.
Now, try executing the ArchiveFile.dtsx SSIS package. My results are shown in Figure 7-32.
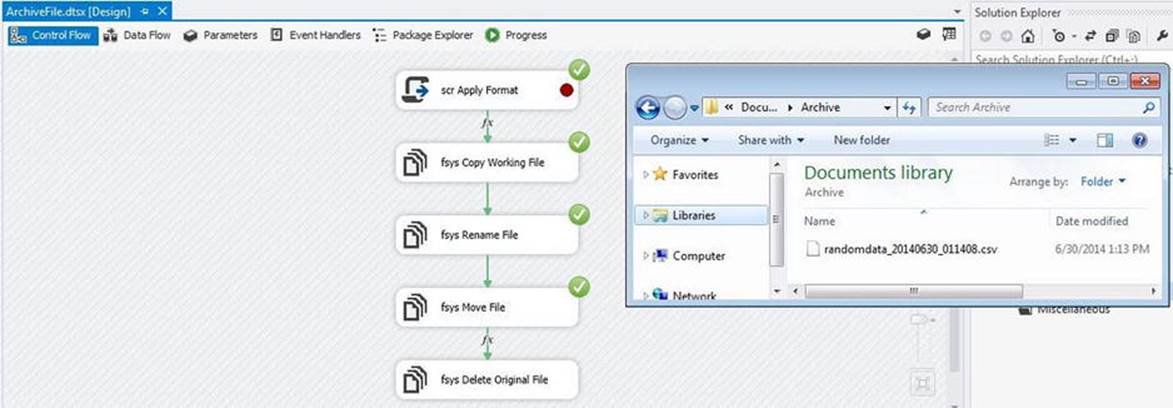
Figure 7-32. Successful execution of the ArchiveFile.dtsx SSIS package
Summary
In this chapter, we examined a common pattern for loading a basic flat source file into SQL Server, a pattern for loading variable-length rows, patterns for creating and consuming flat file header and footer rows, and an extremely useful SSIS design pattern for archiving flat files.