Jump Start PHP Environment (2015)
Chapter 8 Learn by Example: A Web App from Scratch
It's time to put everything we've learned so far to use―and then some! In this chapter, we'll build a simple database-powered PHP application and deploy it online. We'll explore different approaches to each aspect while keeping it all as newbie-friendly as possible.
Some aspects, such as databases and frameworks, are yet to be covered in the book, so they'll be briefly introduced in this chapter. As usual, the end of the chapter will list links that are useful for further expanding one's knowledge of modern web app development practices.
This chapter is the whole point of the book―demonstration of an app-building process―so skipping it is not an option.
Note that the content you'll encounter throughout this chapter is likely to make you feel overwhelmed―even frustrated if you're entirely unfamiliar with PHP code. That's fine. In programming it's called the hump, and you just have to power through it. You're just encountering it a little earlier than most newbies, but avoid letting it frighten you. If you struggle to understand the code, go through it again and try to comprehend what it does based on the explanations under the code snippets, but don't force it. Take it for granted for now, and return when it becomes a little clearer. No one understood everything on the first go. Besides, the point of this chapter is to demonstrate the initialization of a development environment and the deployment of an app. Everything learned in between is what I'd call collateral profit.
What will we be building?
We'll craft a guestbook application. If you're a young millennial, you might not know what a guestbook application is. A guestbook application was, in the ancient times of the simpler Web, a way to leave feedback on a site; it applied to the site in general, rather than being comments on a particular article or post, like it is today.
Guestbooks are rarely encountered these days, but the principles used to build a guestbook app apply to building comment systems for per-post usage, hand-crafted forums, and more.
Our app (seen in Figure 8.1) will have the following features:
· a common HTML input form for comments
· display previously entered comments above the input form

Figure 8.1. The complete app
The guestbook app will be accessible in our development environment (see Chapter 2) via http://guestbook.app.
Note that .app is a valid TLD (see Chapter 1 for an explanation of top-level domains), so be careful with adding new etc/hosts entries under it; you might block access to real .app websites if they start appearing. To be completely safe, use any of the following suffixes instead: .test, .example, .localhost and .invalid.
Setting Up the Environment
Let's set up our environment (this process is described in detail in Chapter 4). Before proceeding, please make sure you have installed the following:
· Vagrant, from https://www.vagrantup.com/
· VirtualBox, from https://www.virtualbox.org/
· Git, from http://git-scm.com/downloads
If you followed along through all the previous chapters, particularly Chapter 4, you're all set.
To set up the environment:
1. Add the line 192.168.10.10 guestbook.app to our /etc/hosts file. See the Chapter 3 for details on how and why to do this.
2. If your operating system is Windows, open the Git Bash program, which is available after installing Git tools from the link at the start of the section. Otherwise, open the Terminal app on Linux or OS X.
3. Change directory (by typing cd) into the folder where you'd like to develop your project. A good place is your user's home folder: cd ~.
4. Enter the following commands:
5. git clone https://github.com/swader/homestead_improved hi_guestapp
6. cd hi_guestapp
7. bin/folderfix.sh
8. mkdir -p guestbook/public
9. mkdir guestbook/storage
10.touch guestbook/public/index.php
The last three commands create the folders our application will need, and an empty index.php file into which we'll later put some PHP code.
11.Open the file Homestead.yaml in that folder and add a new sites pairing so that the final version looks like:
12.sites:
13. - map: homestead.app
14. to: /home/vagrant/Code/Project/public
15. - map: guestbook.app
16. to: /home/vagrant/Code/guestbook/public
17.After saving the file, in the terminal run:
18.vagrant up; vagrant ssh
Notice how we're using ; between commands? This chains them so that they are executed one after the other without us having to wait for one's output to proceed with the other.
Finally, we need to open the folder guestbook in our code editor of choice. Figure 8.2 shows it in PhpStorm.
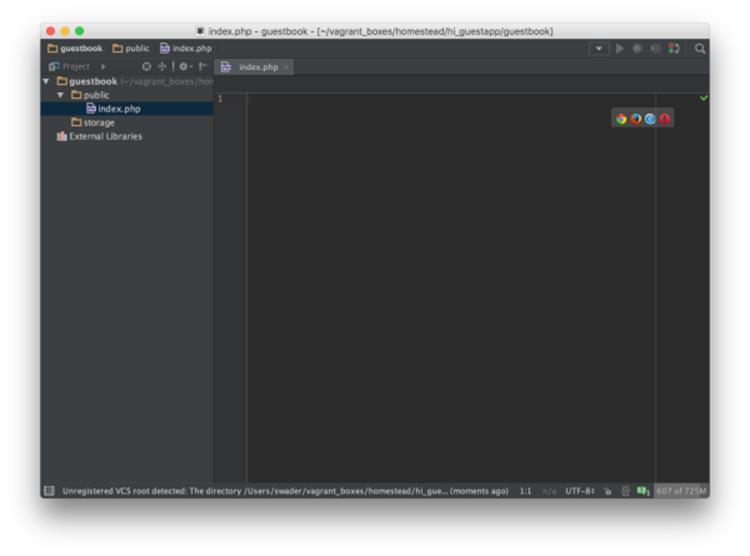
Figure 8.2. Our project open in PhpStorm
It's completely empty right now, but that's about to change.
Bootstrapping the App
Bootstrapping means establishing a setup for future work. In the context of web app development, it means laying the foundation for development and getting the common preparatory steps out of the way.
Before we do this, there are some terms we need to cover.
Testing
In programming, there is a concept known as testing. While testing is outside the scope of this book (see the end of the chapter for links to further reading), I'll explain it briefly.
Whenever you make a change in one of your apps, you usually refresh the app in the browser to ensure the changes have been applied. This is called manual testing.
There are tools that automate this process. By writing a specific set of instructions (tests), your application can test itself after every change. Writing these instructions can be complicated and time-consuming, but as an application grows, the time invested in writing tests pays off several times over. No longer does one need to, for example, click every link of a web page to make sure it works; the tests do this automatically, and outside of the traditional browser (with programs that simulate a browser behind the scenes). This makes them much faster than humans and less error-prone (due to removing the human element).
We'll skip automatic testing in this chapter, as it would be too complex to explain (again, see the links at the end of the chapter for resources on testing). In general, no application―regardless of complexity―should be without tests if its purpose is to live longer than a few days or a few visitors (our demo app does not have these constraints).
Our first manual test will be making sure we receive a blank page if we go to the http://guestbook.app URL in the browser, as shown in Figure 8.3.
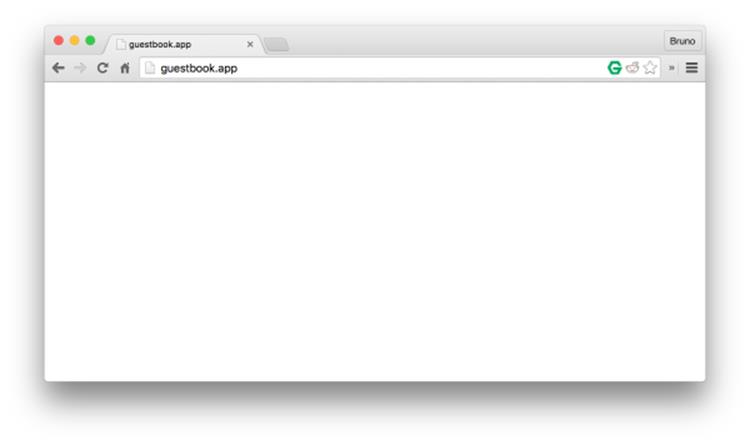
Figure 8.3. No news is good news
No errors is a good sign. It means that our empty PHP file was reached, and gave the browser its content. In this case, the content is literally nothing.
Frameworks versus Packages
Chapter 7 mentioned packages: they are sets of reusable code. There is, however, another level beyond packages: PHP frameworks.
A framework is a predefined set of packages designed to quickly bootstrap an application; the traditional process of setting up database connections, login systems, and more are dealt with by having it all pre-built. This means most frameworks are either very opinionated (that is, they enforce their particular way of doing things, such as Laravel) or incredibly extensible and hyper-configurable, but over-engineered (thousands of lines of code handling what could be done in a dozen lines, all for the sake of remaining fully configurable, such as Symfony).
These days, frameworks are often the default starting point for a project. They can be a quick way to skip coding elements that are minor to your project. Some developers shy away from using frameworks because they see them either as too complex or too restrictive. Still, when contracts are at stake, being able to focus on programming the business logic in a matter of hours rather than days can make or break a job.
In our case, while a framework would get some hurdles out of the way, it would introduce more. Frameworks are complex beasts consisting of hundreds of classes, and we're yet to even touch on object-oriented programming or design patterns―broad disciplines essential to taming a framework (see the links in the section called “For Those Who Want More”). Therefore, we'll be doing it old-school and pulling in just the packages we need, as we need them, with Composer, which we saw in Chapter 7.
To begin bootstrapping our app, we'll first execute:
cd ~/Code/guestbook
composer init
This command is generally used for bootstrapping new packages (as in when we intend to develop a reusable package and host it on Packagist―discussed in Chapter 7). It is, however, useful for bootstrapping a new app as well, as it helps the developer define metadata about the project. Once executed, Composer will ask for some information, which should be answered like so:
vagrant@homestead:~/Code/guestbook$ composer init
Welcome to the Composer config generator
This command will guide you through creating your composer.json
↵ config.
Package name (<vendor>/<name>) [root/guestbook]: sitepoint/guestbook
Description []: A guestbook app
Author []: Your Name Here <your@email.here>
Minimum Stability []:
Package Type []: project
License []: MIT
Define your dependencies.
Would you like to define your dependencies (require) interactively
↵ [yes]? no
Would you like to define your dev dependencies (require-dev)
↵ interactively [yes]? no
Minimum stability allows the developer to lower the safety barrier for the stability of packages. For example, a package we want to use may be without a stable version; it might be in beta mode. To be able to install it, we'd have to set beta under that option. In this case, we're just hittingEnter to leave it at the default.
Package type tells Composer that this is a project rather than a reusable package. This has little to no effect on our app per se. License is rather well-explained on the GitHub blog, and you can find out about the rest of the available options in composer.json (which the command composer init generated) in Composer's documentation.
The final two questions ask us to define which packages we'll need. We don't know yet, so we'll skip them.
Finally, we generate the autoload file:
composer install
As there are no dependencies defined in either the require or the require-dev block of composer.json, there is nothing to install; the command merely generates an autoload file that will automatically load classes we'll install later. Let's use that file. Give public/index.php this content:
<?php
require_once '../vendor/autoload.php';
echo "Hello World";
Time for another manual test. Revisiting http://guestbook.app in the browser should produce the message "Hello World" as shown in Figure 8.4. If it does, the PHP code was successfully executed past the require_once point, indicating that our autoload file was loaded without problems.
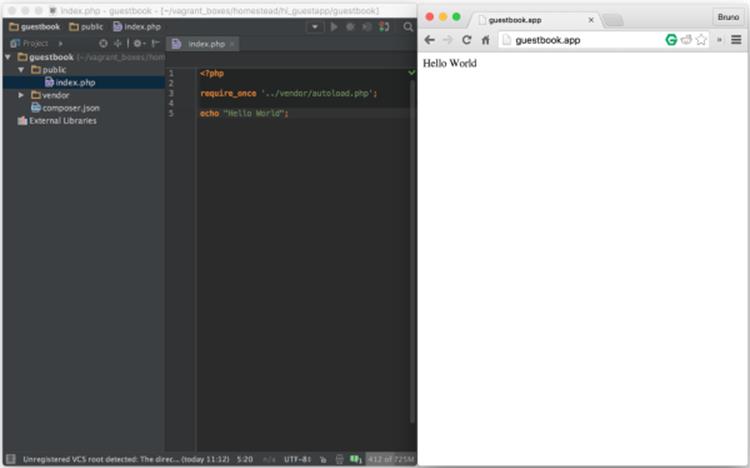
Figure 8.4. "Hello World" loads with ease
require_once (see http://php.net/manual/en/function.require-once.php) is a statement telling PHP to "Take the contents of this file and put them into the current one. Crash if you cannot find it!" The require part makes sure of this. There are other versions of this statement, all explained on the manual's page.
Developing the App
At last, the fun part! Or is it?
Var Dumper
We'll begin by pulling in the var-dumper package, a tool from the Symfony framework (see the section called “Frameworks versus Packages”).
Like many other frameworks, Symfony is a collection of packages for solving common web application development problems. When used as a set, they form a solid (albeit complex) starting point for highly customizable web applications. These various Symfony components are also designed to be used standalone, so if users adopt a custom approach or different framework, they can benefit from Symfony packages.
var-dumper is one such component. PHP has a built-in function called var_dump that outputs the contents of a variable onscreen. The var_dumper component provides a dump function that does the same, but in a more readable manner and with collapser/expander buttons. We'll demonstrate this shortly; for now, let's install it:
composer require symfony/var-dumper --dev
The --dev option tells Composer to place it in the require-dev block of composer.json. This is because debugging helpers of this kind are typically used in development, rather than production. For packages that are required in production, we simply omit the --dev flag and they'll end up in the require block, not require-dev. The rule of thumb is: if a package is meant to be used only during the development phase of an app or another package, put it in require-dev. Otherwise, we can put it in require (by omitting the --dev option). Then, when we deploy our app to production, we'll be able to tell Composer to install with composer install --no-dev, making the installation process much faster.
As we've mentioned, PHP has a built-in "variable dumper"―the function var_dump. Let's try it out on a PHP array. If you're unsure what an array is, imagine a box that can contain a variety of items. In index.php, add the following:
$array = [1, "apple", 2, "foo", "bar"];
var_dump($array);
The square brackets in the code are the edges of our hypothetical box―everything between them is placed into the array.
Then, refresh the http://guestbook.app page, and you should see a similar sight to Figure 8.5.
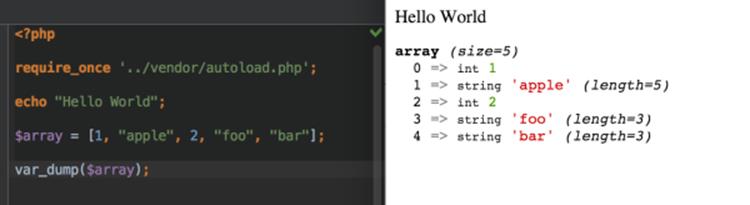
Figure 8.5. Our var_dump example
The output is on the right, under "Hello World." It's not exactly unreadable―as Homestead Improved comes with Xdebug installed, a PHP add-on that makes these types of output prettier by default―but it could be better. Let's add in a call to dump. The result can be seen in Figure 8.6.
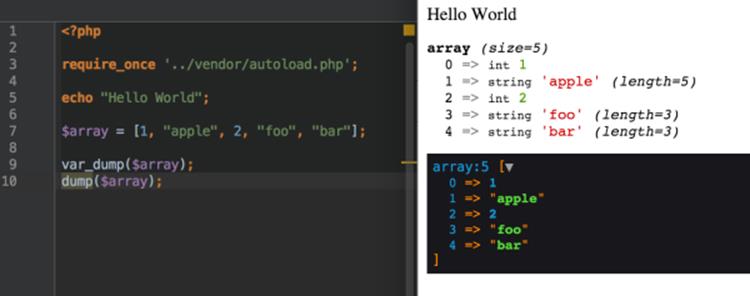
Figure 8.6. An example of dump
Better, no? The collapser/expander button alone is worth it―you can imagine this being tremendously useful when dealing with huge trees of nested arrays (an array can contain an array, which can contain another array, and so on ...).[2]
With dump available, we've prepared our development environment for debugging. Should any errors arise, we'll be able to output the information we need in an easily navigable manner.
Database Connection
There are many databases available: MySQL, OracleDB, PostreSQL, MSSQL, SQLite, and so on. The most popular one to use in tandem with PHP is MySQL. Introducing SQL is outside the scope of this book, but it's unnecessary for our purposes anyway―we'll be using a library thatabstracts database communication for us.
To understand abstraction, imagine a power socket in the EU. It looks like a pig snout, and we call it the Schuko socket, seen in Figure 8.7.

Figure 8.7. Schuko socket, common to the EU
Then imagine a power socket in the US, seen in Figure 8.8. It has two vertical slits and a screaming mouth that is completely incompatible with the EU one.

Figure 8.8. US socket
Every part of the world has its own standard, and if you're a world traveler, carrying a separate power brick for each country you visit would quickly take you past the airline's baggage weight limit (and your budget). Luckily there are items such as socket adapters.

Figure 8.9. A universal socket adapter
One beast such as the one in Figure 8.9 handles most of the world's power sockets. Is it heavier than just carrying one laptop power brick and hoping your destination supports the required socket? Yes, but for a few additional grams, you have all the convenience of ten power bricks with a fraction of the weight. The adapter is an abstract for a power-providing service.
The same happens with abstraction in software. We could learn how to communicate with PostreSQL, SQLite, MySQL, MSSQL, and others, sure. It would take a while, but it's possible―just like lugging around ten power bricks. Or we could rely on abstraction―letting the authors of the package we put between the database and us do the heavy lifting while we focus on usage.
One such database abstraction layer is the very lightweight Medoo package. At only 20KB in file size added to our project, we have the power to communicate with several database engines in exactly the same way.
We'll demonstrate this in an example soon. For now, let's install Medoo:
composer require catfan/medoo
Change the index.php file so that instead of the $array, var_dump and dump lines we added before we now have:
$database = new medoo([
'database_type' => 'sqlite',
'database_file' => '../storage/database.db'
]);
The variable $database is there to hold a new instance of the Medoo class. The class needs a type and a filepath as the constructor arguments―the values required for a class to build its instance properly―so we pass them along in an array. (Notice the square brackets―just like in the array example earlier). The arrows between the left and right column indicate assignment between keys and values―just as in algebra x = 3, so too database_type = sqlite. For links on crash courses in object-oriented programming, please see the end of chapter.
I understand this may feel a bit frustrating if you struggle to fully comprehend the code here and what follows. However, rest assured that understanding the code itself is not all that important; the main aim of this book is to see an example app being started and deployed the right way.
Refresh the browser and if there are no errors, we're good, as seen in Figure 8.10.
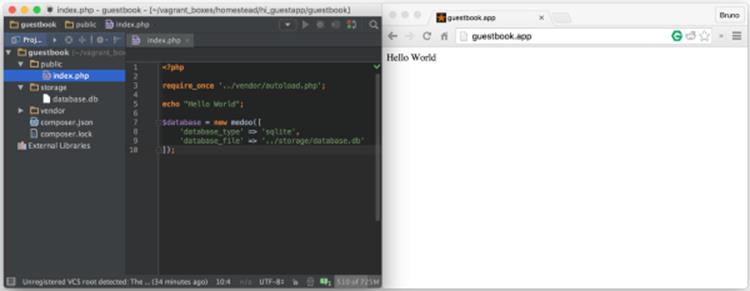
Figure 8.10. Our database now exists
Additionally, notice how in the storage subfolder of the project a new file appeared: database.db. This is because we're using SQLite in this example (there's a good introduction to SQLite on SitePoint), which creates a database file if it doesn't exist.
We could just as easily have put mysql or postgresql under database_type and used that, as they're both pre-installed on Homestead Improved, but that would require additional configuration and wouldn't be as clear outside of Homestead; those database engines need to be installed, after all.
SQLite, on the other hand, is present on almost all operating systems by default, and can be used out of the box. It's not as fast as MySQL and lacks some advanced features, but we need neither this speed nor the complexity in our current project.
The database_file value tells Medoo where to create the SQLite file to hold all our saved data. We told it to go "up one folder, and into storage/database.db" ; hence, the database.db file was created. The $database variable is now our adapter, plugged into a wall socket―our access to the data storage.
Try dumping it, just to see what it's made of (Figure 8.11).
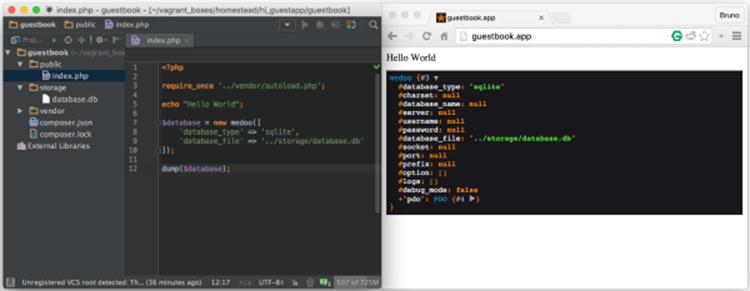
Figure 8.11. Medoo instance
Obviously, there's more beneath the surface, but we needn't concern ourselves with this. The database access works, and that's all that matters right now.
Repo and First Push
At this point, we might as well put our project into version control and upload it to GitHub. Not only will this allow us to share our code with others, but also provide a layer of protection from critical hardware failures.
First, create a repo on GitHub as done in Chapter 5. In my case, that'll be https://github.com/spbooks/phpenv1-example.
Then, in the root folder of our project (inside guestbook), run:
git init
Next, set up a basic .gitignore file by downloading the contents of http://bit.ly/spignore or running:
curl http://bit.ly/spignore -L > .gitignore
If you're curious about the above, curl is a program we use to retrieve the contents of a remote URL, like visiting web pages in the terminal. Next comes the URL the contents of which we want to retrieve, then the -L flag which tells curl to "follow redirects" in case the URL leads to another URL rather than to the end content, and then > .gitignore tells it "write the output you get into .gitignore".
Then, we need to add a remote ― we need to let the local repo know where its online home is. In my case, the command is:
git remote add origin git@github.com:spbooks/phpenv1-example.git
Alter the URL accordingly.
Note: Adding Vagrant-powered Projects to Version Control
There are two schools of thought regarding committing Vagrant-powered projects to version control. The first one, which matches the general consensus and the official Vagrant docs, is that the Vagrantfile and all its accompanying scripts should be committed to version control alongside a project's source code. If you choose this path, you first remove all traces of version control from the Homestead Improved clone by running rm -rf .git inside hi_guestapp, and then run git init and everything else we describe here from within that folder. Proceed as usual ― your whole team now also has your Vagrant setup. This is very handy for teams developing commercial, closed-source apps, because the setup can be dictated for the team.
The second approach, the one I personally favor and that, for the sake of simplicity, we will take in this chapter, is committing only the source code of the project ― not its surroundings, such as the Vagrantfile, Homestead.yaml, etc. This makes sure it's usable in anyone's development machine, even those who don't use Vagrant or those who use a different box for running test projects. Hence, this approach is best for open source projects where you want to give contributors the freedom to choose their own development environment. This approach is also a bit more lightweight, in terms of filesize. Regardless of the approach you choose, you're not wrong. Pick whatever feels better, or what ever the team you're working with prefers.
On fresh VMs, Git ― when used from inside the VM ― won't know who's using it. To make yourself known, optionally execute:
git config --global user.name "Your Name"
git config --global user.email you@example.com
If you're using Git outside the VM to commit the project files (doesn't matter which approach you take, both are just fine), you can skip this step.
To add the files and folders we created so far to the repo and push them online, we execute:
git add -A; git commit -m "First commit"; git push -u origin master
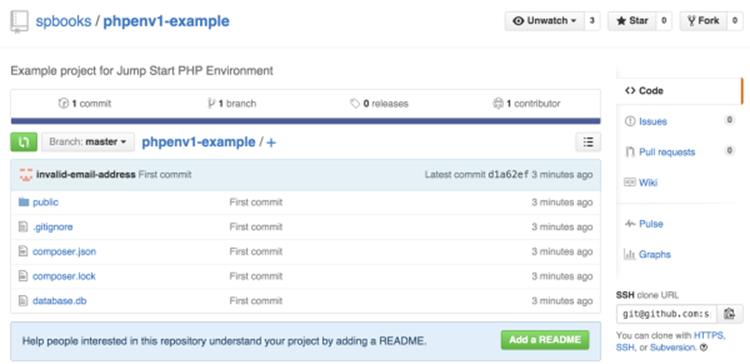
Figure 8.12. Pushed files
All the files we created thus far (including the database) are now online, as you can see in Figure 8.12. Please note that when developing applications with databases that contain sensitive information (like usernames, passwords, or emails), the database files should never be committed into the repository for obvious reasons.
HTML Form
When starting new web projects, there is a useful "boilerplate" we can use with some best practices already built in. While using it is optional, it's preferred purely because when one starts from scratch and implements best practices manually, one tends to eventually end up at the point of this pre-made boilerplate. That boilerplate is called HTML5 Boilerplate or H5BP and can be downloaded at https://html5boilerplate.com/.
Unzip its contents into the public folder of our project, so that it now looks like Figure 8.13.

Figure 8.13. New folder structure
As you can see, a whole bunch of new files and folders was added. If you'd like to know more about all these additions, please see H5BP's documentation.
index.php vs index.html
Most servers are configured to first look for an index.html file, then for a index.php one. Indeed, if you refresh http://guestbook.app now, you'll see the greeting page of H5BP, rather than our output from before.
We could just delete index.html and the server would once again serve index.php, but then we'd lose the advantages of H5BP. To get our content back, we:
· open index.php, and end the file with ?>. That's the PHP closing tag, and it's how PHP knows it needs to process no more programming logic. It's how it knows that from that point on, all it does is print the stuff it encounters out to the screen. In pure PHP files, the closing tag is usually omitted because it serves no purpose and can cause bugs, but when using PHP and HTML in the same file, it's necessary.
· select all contents of index.php, and place them in index.html, at the very top, before <doctype>. Save the file.
· execute the commands:
· cd public; rm index.php; mv index.html index.php; cd ..
The above deletes the old PHP file and turns the HTML file into a PHP one. This way, the server moves directly to index.php again, but this time it also prints out all the H5BP content (the various HTML tags that are invisible to us, but useful to the browser and mobile devices). Refreshing the app now produces our old content again.
The HTML Form
Finally, we can build the comment submission form.
In place of <p>Hello world! This is HTML5 Boilerplate.</p>, we need to put the following:
<form method="post">
<input type="submit" value="Save">
</form>
This is the beginning and end of our form. The method attribute on the opening form tag means "send a POST request". The default is GET which, when a form is submitted, puts all the values of the various form elements into the URL (e.g. http://guestbook.app?name=bruno&email=bruno.skvorc@sitepoint.com&comment=...) which is not something we want. GET is typically used for reading data from an app; a URL you visit in a regular fashion, by clicking a link for example, is a GET request. POST requests are usually used for saving some data to the server, such as creating new data in a database. For a refresher on requests and responses, see Chapter 1.
The input element is the button we'll click to save the comment ― the value attribute is what is written on the button, while the type is there to make sure this button is used for submitting the form.
If you refresh http://guestbook.app now, you should see a Save button at the bottom of the screen. Clicking it will do nothing but refresh the screen (the button submits the form, but since there's no PHP logic to process the form, we're just redirected to the same page we were on).
Above the input, but still inside the form element, we add the following:
<label>Name: <input type="text" name="name" placeholder="Your
↵ name"></label>
<label>Email: <input type="text" name="email" placeholder="your@
↵email.com"></label>
<label>Comment: <textarea name="comment" cols="30" rows="10">
↵</textarea></label>
HTML forms usually have labels for various form fields describing what's supposed to be entered into the field. A label often wraps an element―a tag goes on either side of it, like in the code above. The type attribute tells the browser it's a regular text field, the name is there so we can identify the value in the PHP code, and the placeholder is there to serve as an example of possible inputs. A textarea is a different kind of element with no type, just dimensions expressed in the form of columns (cols) and rows.
If we also remove the dummy outputs from the PHP part, we get a final result that looks like this:
<?php
require_once '../vendor/autoload.php';
$database = new medoo([
'database_type' => 'sqlite',
'database_file' => '../storage/database.db'
]);
?>
…
<form method="post">
<label>Name: <input type="text" name="name" placeholder="Your
↵ name"></label>
<label>Email: <input type="text" name="email" placeholder="your@
↵email.com"></label>
<label>Comment: <textarea name="comment" cols="30" rows="10">
↵</textarea></label>
<input type="submit" value="Save">
</form>
It looks like Figure 8.14 when seen in the browser.
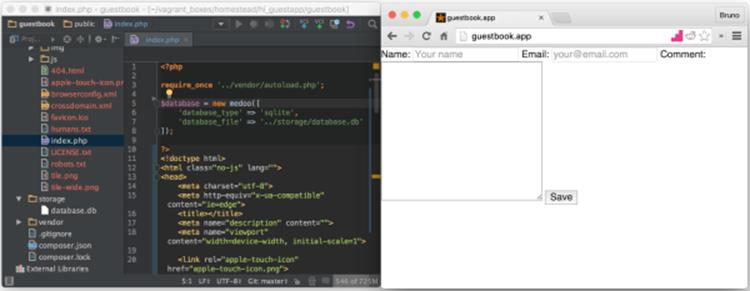
Figure 8.14. Form created
It's quite ugly, but we can deal with that later.
Second Push
With some additional files in the mix and our form built, it's time to do another Git push:
git add -A
git commit -m "Added HTML5 Boilerplate and built submission form"
git push origin master
Creating the Comment Class and the Database Table
Developing the Comment class from scratch with object oriented syntax, how ever simple it may be, is outside the scope of this book. There are plenty of other books you can look at for guidance on basic OOP ― the links at the end of the chapter will be helpful. Right now, just to get some PHP muscle memory, I would recommend you type the code below into a new file called Comment.php which you should create in the src subfolder of the root folder of our project (the src folder will need to be created, too). Alternatively, if you really don't feel like it, the full code is copy-pasteable at: http://bit.ly/sp-book-comment.
<?php
namespace SitePoint;
class Comment
{
protected $database;
protected $name;
protected $email;
protected $comment;
protected $submissionDate;
public function __construct(\medoo $medoo)
{
$this->database = $medoo;
}
public function findAll()
{
$collection = [];
$comments = $this->database->select('comments', '*',
["ORDER" => "comments.submissionDate DESC"]);
if ($comments) {
foreach ($comments as $array) {
$comment = new self($this->database);
$collection[] = $comment
->setComment($array['comment'])
->setEmail($array['email'])
->setName($array['name'])
->setSubmissionDate($array['submissionDate']);
}
}
return $collection;
}
public function setName($name)
{
$this->name = (string)$name;
return $this;
}
public function setEmail($email)
{
if (filter_var($email, FILTER_VALIDATE_EMAIL)) {
$this->email = $email;
} else {
throw new \InvalidArgumentException('Not a valid
↵ email!');
}
return $this;
}
public function setComment($comment)
{
if (strlen($comment) < 10) {
throw new \InvalidArgumentException('Comment too
↵ short!');
} else {
$this->comment = $comment;
}
return $this;
}
protected function setSubmissionDate($date)
{
$this->submissionDate = $date;
return $this;
}
public function getName()
{
return $this->name;
}
public function getEmail()
{
return $this->email;
}
public function getComment()
{
return $this->comment;
}
public function getSubmissionDate()
{
return $this->submissionDate;
}
public function save()
{
if ($this->getName() && $this->getEmail() && $this->
↵getComment()) {
$this->setSubmissionDate(date('Y-m-d H:i:s'));
return $this->database->insert('comments', [
'name' => $this->getName(),
'email' => $this->getEmail(),
'comment' => $this->getComment(),
'submissionDate' => $this->getSubmissionDate()
]);
}
throw new \Exception("Failed to save!");
}
}
Note: Explanation of the Code Above
An in-depth explanation of this class and all the functionality its code allows, along with upgrades to the app's functionality that go beyond what we're covering in the book, will be covered in bonus posts published on SitePoint.com. To find links to this bonus content, please see the repository with the source code of the guestbook app we're building at https://github.com/spbooks/phpenv1-example.
Before the Comment class can be used by our application, the app needs to know where the class is. Remember the namespaces section from Chapter 7? This is the part where we bind the namespace of the Comment class (namespace SitePoint;) to a physical location on the hard drive (thesrc folder). We must edit the composer.json file in our project's root folder and add the section:
"autoload": {
"psr-4": {
"SitePoint\\": "src"
}
}
For reference, Figure 8.15 what the whole file now looks like:
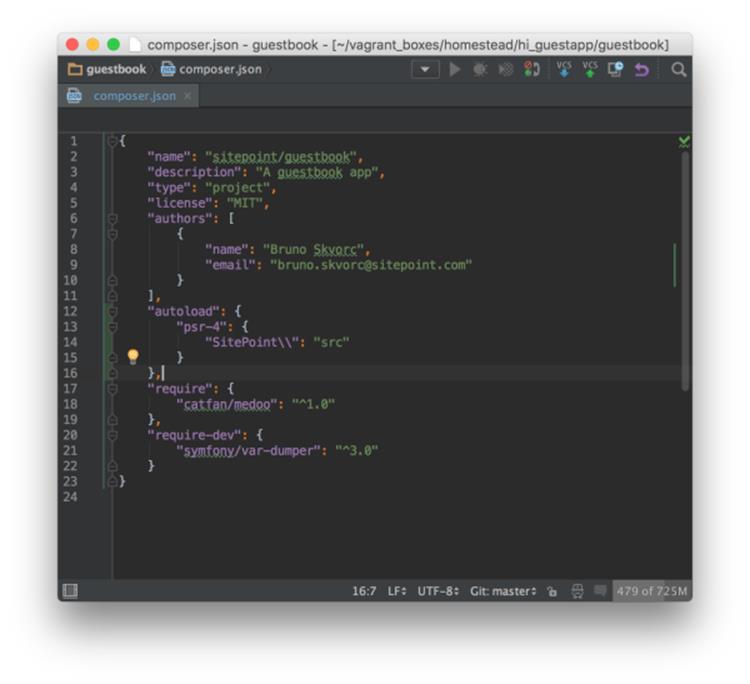
Figure 8.15. The current contents of composer.json
To apply these changes, we run composer dump-autoload so that the script which auto-includes classes is regenerated with the src folder in mind.
One last step: before we can save data into the database, we need to create a table into which the data will go. In the terminal, inside the root folder, execute:
sqlite3 storage/database.db
This enters the database in CLI mode, allowing for live execution of SQL commands. To create the table we want, we need to execute the following statement while inside the database engine:
CREATE TABLE comments (
id INTEGER NOT NULL PRIMARY KEY AUTOINCREMENT,
name TEXT NOT NULL,
email TEXT NOT NULL,
comment TEXT NOT NULL,
submissionDate TEXT NOT NULL);
This will create a table called comments with an auto-incrementing integer ID (meaning the ID number will rise automatically as new records are inserted, we don't need to provide this value), a name field, an email field, a comment field, and our submissionDate field for saving the date of creation. Typing .tables after the command above is executed should show that the table was created. Exit the prompt by typing .quit.
How about we test everything we made so far? In index.php, under the $database = new medoo... block put the following:
$comment = new SitePoint\Comment($database);
$comment->setEmail('bruno@skvorc.me')
->setName('Bruno Skvorc')
->setComment('It works!')
->setComment('Hooray! Saving comments works!')
->save();
Refresh http://guestbook.app, and there shouldn't be any changes.
However, if we look inside our database, we should be able to see the saved comment, as shown in Figure 8.16.
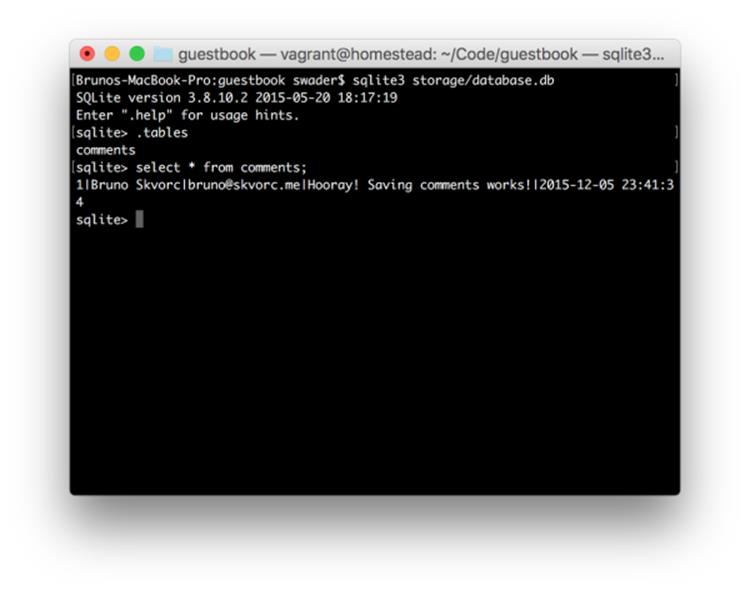
Figure 8.16. The comment is saved!
If by some chance the save didn't go through, this is where a call to the var-dumper might be helpful. After the call to ->save();, in a new line, put:
dump($database->error());
If there were errors, this command will output them on the screen and you'll know exactly what went wrong.
Third Push
It's time to add, commit and push again. Try to recall the commands without looking them up. If you get stuck, they're a couple of pages back.
Development vs Production Database
It would be rather silly if we did all our testing on a real database, and then that ended up live for our users to see. We need a "development" database which will be in use while developing, and a "production" database which we'll deploy alongside our app. See the Application Environment chapter for clarifications on these terms.
There are many ways to do this, but one of the easiest is:
· app checks if a file called database.local.db exists
· if the file exists, it is used as the database
· if the file does not exist, the file database.db is used
The file database.local.db can be put into the .gitignore file so it never ends up being shared with other team members, and so that it cannot end up in the repo (thus never getting deployed via Git). By default, this will make the production version of our app use the production database, and the local version of our app use the development database.
First, let's empty the database of dummy data.
sqlite3 storage/database.db
delete from comments;
delete from sqlite_sequence where name='comments';
The first delete deletes all test rows we may have inserted. The second one resets the auto-incrementing ID field back to 0. Now, let's turn this database file into a template for future ones, then create the databases we need:
cd storage
cp database.db database.tpl.db
cp database.tpl.db database.local.db
cd ..
cp is a terminal command for "Copy".
There should now be three files: database.tpl.db, database.db and database.local.db.
We can now add database.local.db to our .gitignore file, which will make sure it never ends up in the repository:
echo -e "\ndatabase.local.db" >> .gitignore
Finally, let's edit index.php. We'll replace the Medoo initialization:
$database = new medoo([
'database_type' => 'sqlite',
'database_file' => '../storage/database.db'
]);
with:
$file = '../storage/database.db';
if (is_writable('../storage/database.local.db')) {
$file = '../storage/database.local.db';
}
$database = new medoo([
'database_type' => 'sqlite',
'database_file' => $file
]);
The above translates into "If there is a writable file called database.local.db in the folder one level above the current one, use that. Otherwise, use database.db".
If we now refresh http://guestbook.app (and the dummy comment creation code is still there), we should see the comment appear in database.local.db, but not in database.db, as shown in Figure 8.17.
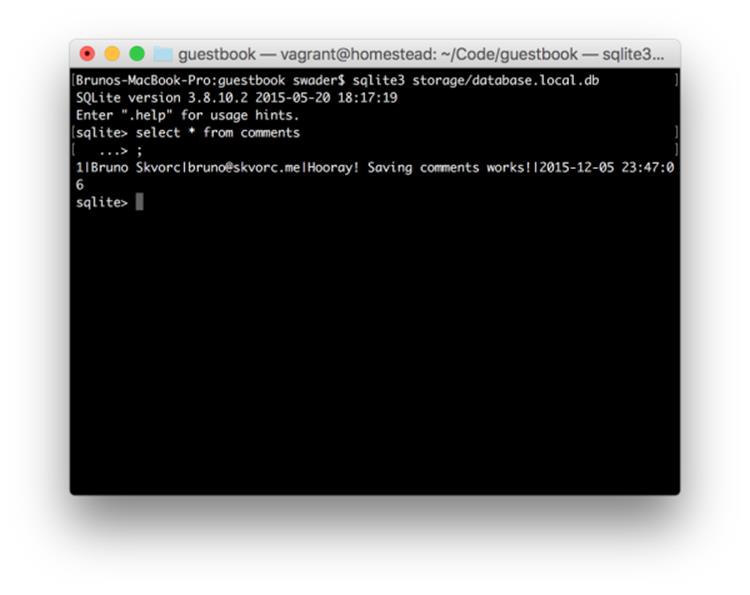
Figure 8.17. Local database populated
Fourth Push
Again, add, commit, and push. Don't look up the commands. If you can't remember them, rather than look them up on the previous pages, try Googling for them. Finding solutions by simply searching for them will become a daily ordeal for you in the very near future. True skill is not in knowing something, but in knowing where to find that knowledge (though, in all honesty, you'll probably end up on StackOverflow).
Posting and Displaying Comments
First, let's modify index.php by removing the dummy Comment creation logic. The PHP section and, thus, our new starting point, looks like this now:
<?php
require_once '../vendor/autoload.php';
$file = '../storage/database.db';
if (is_writable('../storage/database.local.db')) {
$file = '../storage/database.local.db';
}
$database = new medoo([
'database_type' => 'sqlite',
'database_file' => $file
]);
$comment = new SitePoint\Comment($database);
?>
At this point, we have autoloading set up, we have a database instance configured, and we have an instance of the Comment class with the database connection injected into it..
First up, let's make it possible to post new comments.
Posting
As we said earlier, when we visit a URL in a browser, we issue a GET request. GET requests are for reading, they're not supposed to alter data. This is why our submission form is using method="post", so that the request we send to our app after submitting the form is a POST one. In PHP, there are constructs called superglobals ― variables (usually arrays) accessible at any level of the application. Two such superglobals are $_GET and $_POST.
When we visit a URL like http://some.url.com/?var=something&name=something-else, the $_GET superglobal array will look like this:
$_GET = [
'var' => 'something',
'name' => 'something-else'
];
In other words, we'll be able to access var and name from the URL in any part of the application with an approach like $username = $_GET['name'].
$_POST does the same thing, but for values submitted via a POST request, such as from a form. When a form has an input field with the name name, then the $_POST superglobal will also have a name key which will contain the value of said field. Thus, the fields we defined in our form will have their values represented in $_POST after the form has been submitted, as we'll soon see.
First, we need to detect we're dealing with a form submission. Under the $comment line, but before the closing ?> PHP tag, we put the following:
if ($_SERVER['REQUEST_METHOD'] === 'POST') {
echo "Form was submitted!";
}
The first line detects that we're dealing with a form submission. Remember how we used method='post' in our HTML on the <form> element? $_SERVER is another superglobal in PHP containing information about the current request that's coming in (it gets filled automatically). In this case, we're dealing with the request that was submitted via a form, thus using the POST method.
If we refresh http://guestbook.app now, we should see nothing new. But if we press the Save button on the form, we should see "Form was submitted!". There's a small problem, though. If we try to refresh the page after a form submission, we'll get a strange warning, shown in Figure 8.18.

Figure 8.18. Form resubmission
In Chrome's universe, a refresh means a complete redo―the repeat of the last step, rather than re-rendering the URL we're on. It wants to re-send the form information in its entirety when we try to refresh. This doesn't happen if we punch in the http://guestbook.app URL manually and re-visit it that way, but refreshing it after a form submission will always produce this warning. You'll encounter this on other websites, too. We don't want to scare our visitors with this message, so we'll work around it. For now, let's process the submission.
Replace echo "Form was submitted!"; with:
dump($_POST);
Then, enter some data into the comment form and submit it. You should see something similar to Figure 8.19.
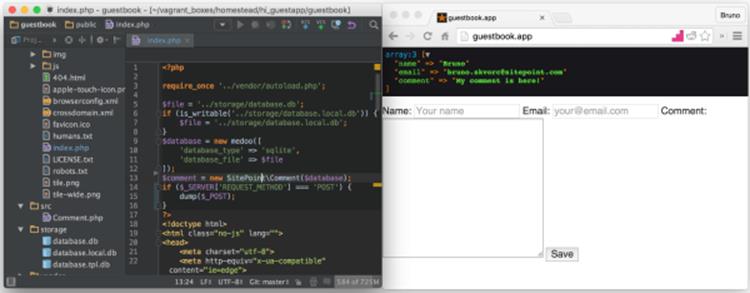
Figure 8.19. Dump of post data
Notice how all three fields were dumped (the dump function is the functionality of the symfony/var-dumper package we installed at the beginning of this chapter), and have the same names as the fields from which they originate.
An important aspect of receiving data from untrusted users in systems like the ones we're building is input validation.
Validation: Never Trust User Input!
The golden rule of validation is never trust user input, because you never know when someone well versed in coding will stumble upon your app and attempt to enter malicious information into the fields in an attempt to break your app (by, for example, entering data which triggers commands in the database, also known as SQL injection).
There are many ways to validate input data, and in this case we'll be using a minimalist package called particle/validator. Let's install it.
composer require particle/validator
Above the require_once line, put:
use Particle\Validator\Validator;
This imports the class so we can use its shorter name. Then, replace dump($_POST) with:
$v = new Validator();
$v->required('name')->lengthBetween(1, 100)->alnum(true);
$v->required('email')->email()->lengthBetween(5, 255);
$v->required('comment')->lengthBetween(10, null);
$result = $v->validate($_POST);
if ($result->isValid()) {
echo "Submission is good!";
} else {
dump($result->getMessages());
}
The Validator package in question uses rules to define some constraints on certain values in an array. In this case, we made all three fields required with required(), we set a limit on their length with lengthBetween, we forced the name to be alphanumeric (so no miscellaneous characters, like punctuation ― but spaces are allowed, indicated by the true we passed in) and we forced the email to be verified as an email format. Just for testing, we dump the errors we get if something goes wrong, or output "Submission is good" if all fields are OK. Figure 8.20 shows what I get when I enter an invalid email address:
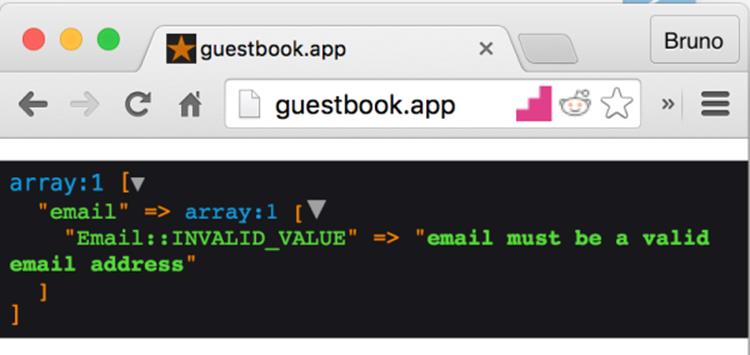
Figure 8.20. Invalid email address
With our input data validated, we're ready to save the comment into the database. Replace echo "Submission is good!"; with:
try {
$comment
->setName($_POST['name'])
->setEmail($_POST['email'])
->setComment($_POST['comment'])
->save();
header('Location: /');
return;
} catch (\Exception $e) {
die($e->getMessage());
}
The try/catch block is another advanced construct. Suffice it to say that anything thrown can be caught. In the Comment class, we tend to throw new exceptions of different types. When an exception is thrown (throwing an exception in PHP basically means "making PHP crash with a specific error message), it bubbles up, which means that the whole application can detect it, all the way up to the root index.php file. This is why, in index.php, we put the try safeguard around all the $comment method calls; if one of them throws an exception, the catch block will trigger. The logic in the catch block will simply kill PHP with the function die() and output the message that was passed via the \Exception that was caught (e.g. "Failed to save!" in the save() method in the Comment class).
If the saving executes flawlessly, we call the header() function and pass in the location for where we want the browser to redirect us to. The "path" / means "root of this website", which is http://guestbook.app in our case. The return makes sure PHP's code execution stops there. Why did we do this? Because of the aforementioned "form resubmission on refresh" problem.[3]
If we now enter valid information into the form and press submit, we'll be sent back to http://guestbook.app, the comment will appear in the database, and the page will be refreshable without the warning.
Try it out. Enter a couple of comments and take a look inside the database with:
sqlite3 database.local.db
select * from comments;
Reading
All we need to do now is add the listing logic to our app; we want to list the currently saved comments.
Above the entire form block in index.php, put the following:
<?php foreach ($comment->findAll() as $comment) : ?>
<div class="comment">
<h3>On <?= $comment->getSubmissionDate() ?>, <?= $comment->
↵getName() ?> wrote:</h3>
<p><?= $comment->getComment(); ?></p>
</div>
<?php endforeach; ?>
When mixing PHP and HTML, we can use colon (:) and the appropriate block closer instead of using curly braces { }. This helps maintain sanity when dealing with big files ― one doesn't have to strain one's eyes looking for closing braces. Every for has its endfor, if has its endif, foreachhas an endforeach, and so on. It's a convenience, a bit of syntactic sugar.
In the code above, we call the findAll method on $comment, the method which fetches all the comments from the database in reverse order of submission (newest to oldest). Then, we create an HTML div block to contain our comment. Inside it we have an h3 element for the comment's "title" (information on who wrote the comment and when) followed by a p element, which will contain our comment's text.
The structure <?= $variable ?> is short for <?php echo $variable ?>, and is available in all modern PHP version at all times (note that this is not the same as short open tags).
That's it ― it was that simple. Let's test our code by refreshing http://guestbook.app, as shown in Figure 8.21.
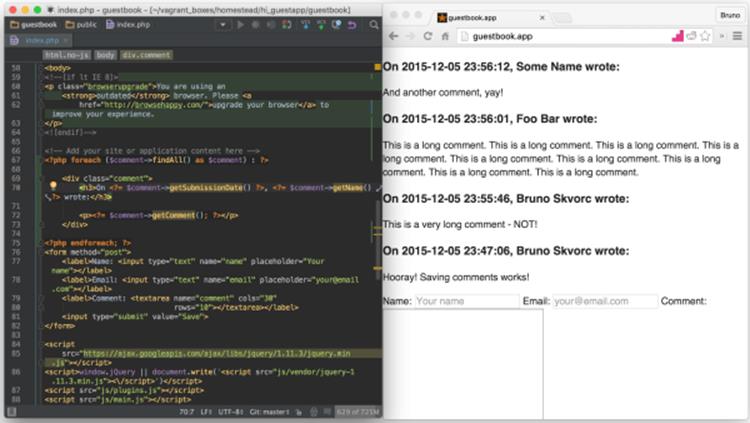
Figure 8.21. It works!
CSS
Throughout all this the only thing we haven't paid any attention to was the design. Let's drop in some rudimentary CSS, just to make everything prettier. Under the line <link rel="stylesheet" href="css/main.css">, add this one:
<link rel="stylesheet" href="css/custom.css">
Then, create the file public/css/custom.css and give it the following contents (or paste from http://bit.ly/envbook-style):
body {
padding: 10px;
}
form {
width: 500px;
border: 1px solid silver;
border-radius: 3px;
padding: 10px 10px 10px 4px;
}
form > input {
width: 100%;
margin-left:4px;
height: 35px;
border: 1px solid silver;
background: #cccccc;
}
form > input:hover {
background: whitesmoke;
}
label {
display: block;
margin: 5px;
color: grey;
}
label > input {
line-height: 30px;
}
label > * {
display: block;
width: 100%;
}
.comment {
width: 500px;
border: 1px solid silver;
border-radius: 3px;
margin: 10px 0;
background-color: lemonchiffon;
}
.comment > h3 {
margin: 0;
border-bottom: 1px solid silver;
background-color: lightblue;
padding: 3px;
}
.comment > p {
margin: 10px;
}
This turns our ugly app into something marginally easier to look at, as shown in Figure 8.22.
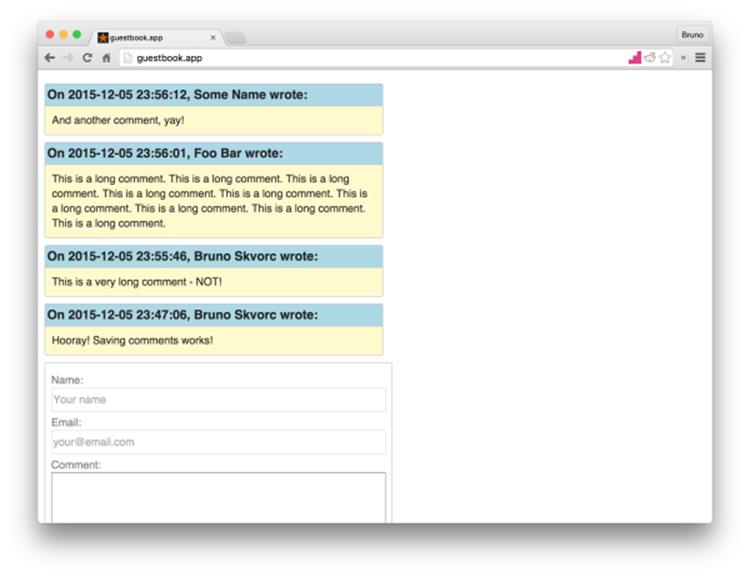
Figure 8.22. A prettier app
Final Push
By now, you should be a master of the push flow. Do one final push, and our application is in the repository in its final form.
Deployment
In this section, we'll deploy our most excellent app. For more theory behind deployment, see Chapter 6.
Deploying on a Shared Host (Hostgator)
Like we discussed in Chapter 6, shared hosting isn't really a good option. It's insecure, often very limited in resources (despite the unlimited claims) and these days not all that cheaper than VPS. Still, it might be the only thing you have access to, so it only makes sense we cover an old school FTP deployment procedure.
Shared hosts will often have cPanel as a means of managing one's server, not unlike the one shown in Figure 8.23.
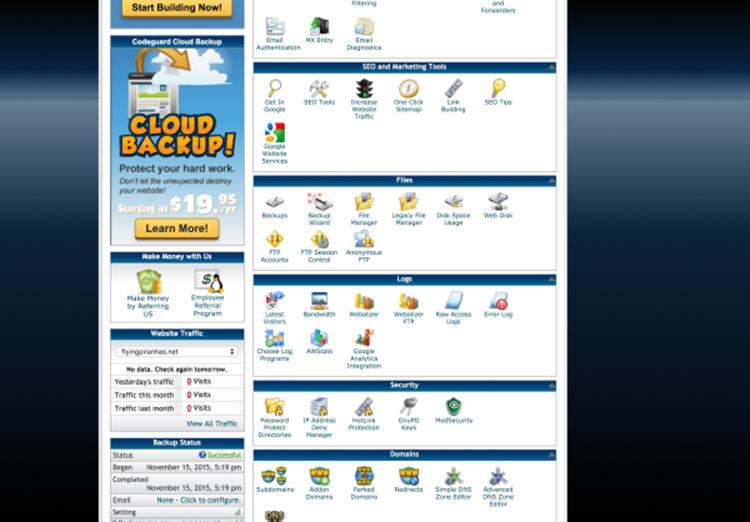
Figure 8.23. cPanel
In this case, we're using Hostgator, but the procedure is almost identical on every shared host.
To deploy an app, you'll need a domain. Domains can be purchased (or rather, rented) on websites like http://namecheap.com or http://name.com, and can range from $2 per year to $2000 per year and more. I'll pick one of my own domains that I'm not using for this example: caimeo.com. Add your domain to your shared host via the Addon domains dialog:
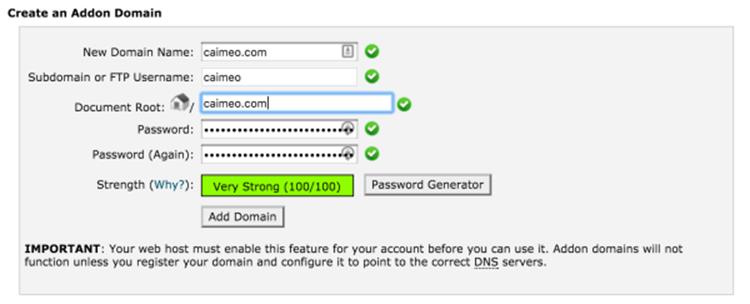
Figure 8.24. Adding a new domain
Each shared host will also instruct you how to configure DNS settings for the domain to respond to the shared host's servers. Note that it might take up to 24 hours for a DNS change to propagate (apply) across the web.
Adding a new domain will automatically create an FTP account for it, as shown in Figure 8.25.
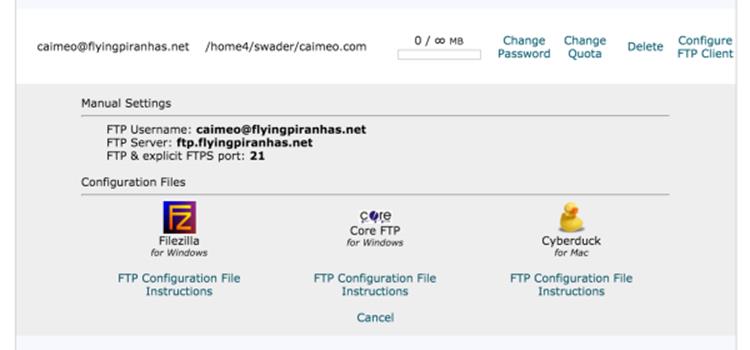
Figure 8.25. New FTP account created
Note that the core domain behind the FTP account is different purely because my Hostgator account was originally opened on it. There are ways to change a primary domain, but the process is too time consuming and intense to be worth the effort.
The next step is downloading an FTP client; this example will use Filezilla, but you can use whichever clientyou prefer. In the Site Manager window, we add a new site and enter the credentials given to us by Hostgator, as shown in Figure 8.26.
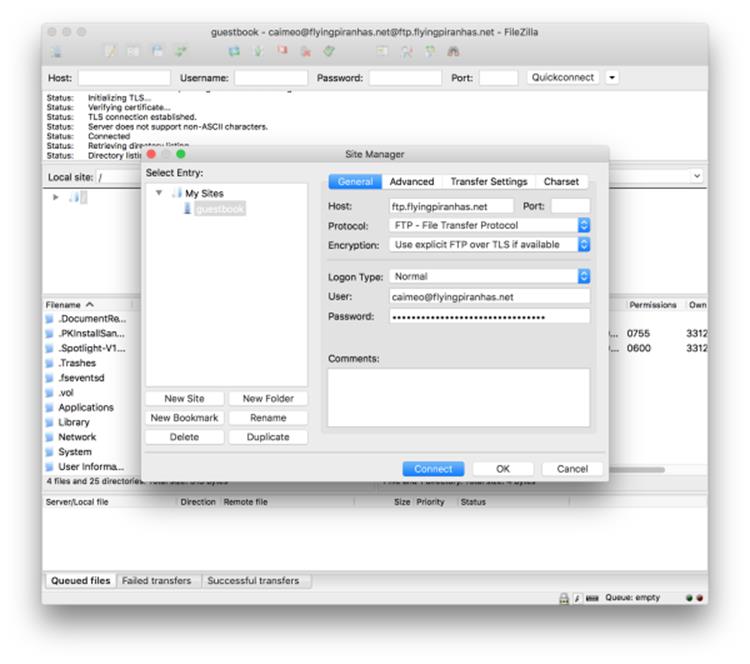
Figure 8.26. Configured in Filezilla
You might be asked to "trust a certificate" when connecting. If so, just confirm.
Once the connection goes through, the right side indicating Remote will show an empty folder ― in reality, the location is a subfolder of your home folder on the shared host's server. To begin, we'll first upload our app by finding it in the left frame, and dragging it over into the right one.
Due to having to copy the entire vendor folder and everything we used in development, this might take a while ― there's no proper way to cherry pick what gets copied, really. When this is done, we'll need to delete some of the development files and folders (.git,, .gitignore,database.local.db, etc.) manually.
We then modify the document root of the domain to lead to caimeo.com/guestbook/public rather than the default caimeo.com, as shown in Figure 8.27, because otherwise our app won't run at http://caimeo.com, but rather at http://caimeo.com/guestbook/public.
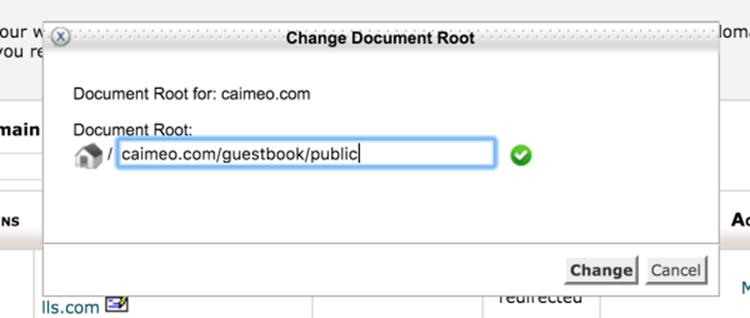
Figure 8.27. Modify docroot
After the changes apply (it might take a while), we should be able to visit our app at the main domain, and we'll be able to enter new comments, too!
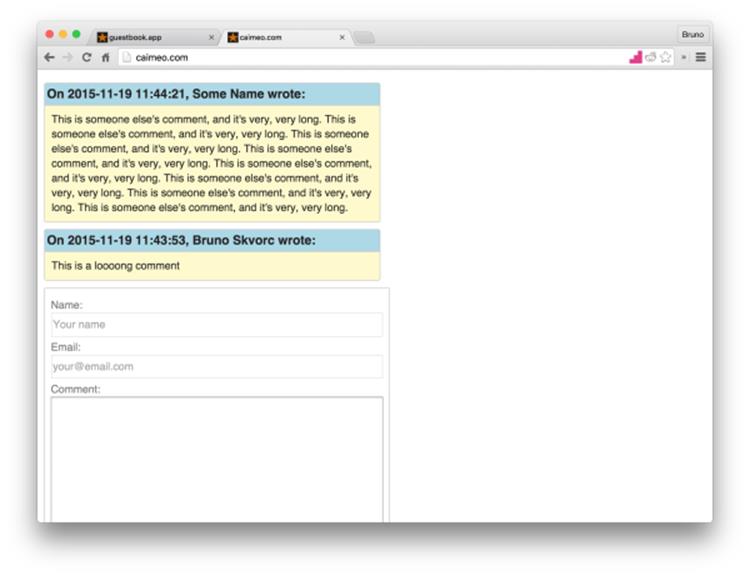
Figure 8.28. Caimeo.com with comments
Victory!
The app is now deployed live on a shared host and works like a charm. It's a bit tedious to have to reupload all changed files manually, and the app isn't all that secure, but it's good enough for demos and proof-of-concept apps.
Deploying on DigitalOcean
Time for the good stuff.
On DigitalOcean, a VPS provider, you're given the ability to create droplets. A droplet is a virtual private server that's very easy to tear down and rebuild, much like a Vagrant box, only performing much better. DigitalOcean bills you according to the resources a droplet spends, so unless you intend to host a long running application, it makes sense to tear it down after you're done with it to conserve credits.
An added benefit of this type of setup is that you don't have to get a domain just to launch a site ― DigitalOcean supports (as do most VPS hosts, as a matter of fact) IP-based access, so you can access your app by punching in an IP bound to your droplet. Additionally, if you don't want to use DigitalOcean, the procedure is nearly identical on every VPS; in all cases, you're dealing with a typical blank server!
Droplets can be as cheap as $5 per month and by using someone's referral link, you can get $10 instantly. Here's my link if you'd like to give the deployment procedure below a try: http://bit.ly/doref.[4]
New Droplet
Assuming you've set up a new account and have some credits, let's create a new droplet by going to https://cloud.digitalocean.com/droplets/new, giving it a name, and selecting:
· $5 per month
· the region nearest to you
· Ubuntu 14.04 image (it's the same OS that Homestead Improved uses, helping development-production parity and providing us with a familiar environment)
· No SSH key. We'll receive a root password via email which we'll use for remotely logging into the server (very similar to vagrant ssh). We'll use the latter approach, considering most readers will likely be without SSH keys. For additional information on setting up SSH keys and proper security measures, Digital Ocean's tutorial will be invaluable.
Once the droplet has been created, you should have access to its main dashboard, shown in Figure 8.29.
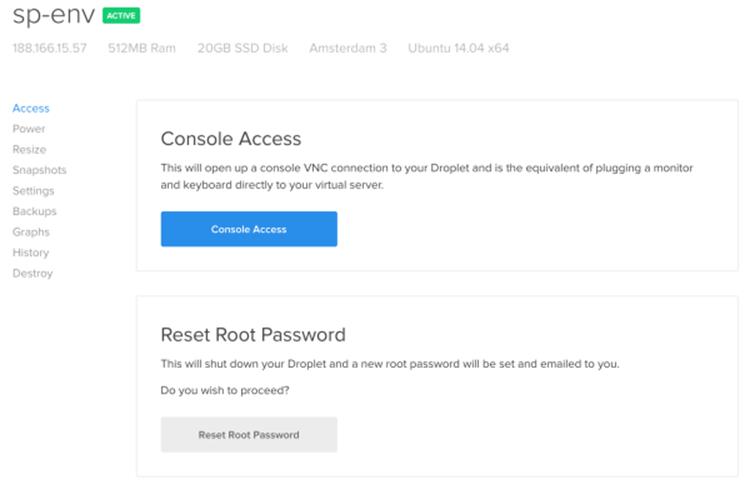
Figure 8.29. Droplet dashboard
Notice the IP address right underneath its name. Right now, it won't lead anywhere if it's put in your browser's URL field. We can, however, use it to log into our server (whenever you see IP-ADDRESS below, substitute for the IP of your own droplet):
ssh root@IP-ADDRESS
Use the password from the email when prompted. As soon as you're logged in, you will be asked to change the root password. Change it to something familiar but not easily guessable. My recommendation would be using a password manager to generate a random one, and then just paste from there in the future.
Once you're in the server, a welcome message might display a warning about locales. This can be fixed by running:
sudo locale-gen en_US en_US.UTF-8
export LANG=en_US.UTF-8
export LC_ALL=en_US.UTF-8
What this does is tell the OS on the droplet (Ubuntu Linux) which language we're using (US English), and the type of encoding used to display its characters. UTF-8 is a type of encoding which makes possible the use of letters of different alphabets and similar miscellaneous characters. UTF-8 is outside the scope of this book and chapter, but if you're curious, there's an absolutely essential (and newbie-friendly) bit of writing from 2003 about it at the following link: http://www.joelonsoftware.com/articles/Unicode.html
If your local computer is running OS X or Linux, there might be another setting you might need to modify. Exit the droplet with exit, then edit the file ssh_config in /etc/ssh/, and comment out the following line by putting a hash in front:
# SendEnv LANG LC_*
This is due to a common remote access bug.
Now we're ready to install prerequisite software.
Prerequisites
First, we need to have Ubuntu pull in a list of the newly available Ubuntu packages. While you're logged into the droplet, run:
sudo apt-get update
With the list updated, let's start by installing Git, SQLite3, and Nginx:
sudo apt-get install git sqlite3 nginx
Suddenly, our IP address is live! (Figure 8.30).
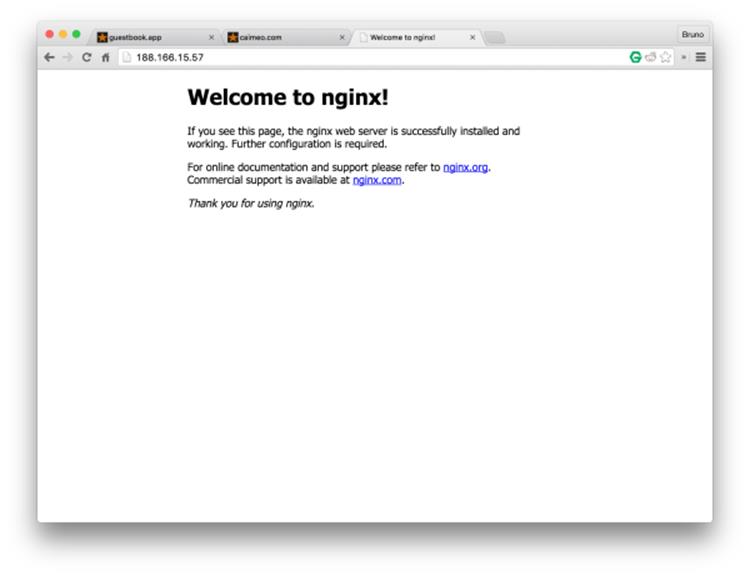
Figure 8.30. Nginx welcome page
Next, we need to install PHP.
PHP and Composer
To install PHP, we run:
sudo add-apt-repository ppa:ondrej/php5-5.6
sudo apt-get update
sudo apt-get install php5 php5-fpm php5-cli php5-sqlite
php5 is the core PHP program. php5-fpm is the web interface through which a server like Nginx passes PHP files and gets back a response. php5-cli is the command line interface, so we can use PHP in the terminal, without the browser. This is what Composer uses to work. php5-sqlite is, of course, a PHP extension for communication with SQLite3, which we know we'll be needing.
To install Composer globally, like on Homestead Improved, we execute:
curl -sS https://getcomposer.org/installer | php
sudo mv composer.phar /usr/local/bin/composer
Server Configuration
To configure Nginx, we can just grab the configuration from our VM! Open a new terminal tab or window on the host machine, enter the Vagrant VM we developed the app on with vagrant ssh as usual, and execute:
cp /etc/nginx/sites-available/guestbook.app ~/Code/guestbook-nginx.
↵txt
This will make the server configuration file immediately available in the VM's main folder. Open it, select its contents (but be careful to ignore or just delete the two bottom lines ― those mentioning SSL), copy the selection to the clipboard, and then while connected to the droplet (switch back to the window / terminal connected to it) run:
vim /etc/nginx/sites-available/guestbook.app
Press the i key to enter insert mode, and paste the contents in there with Ctrl + V (CMD + V on a Mac). Then, edit the following lines:
· change the value of server_name from a name (guestbook.app) to the IP of the droplet
· change the value of root to /var/www/guestbook/public
The var/www/ folder is the location that's typically used to host applications on Linux. Exit insert mode with Esc, then exit the file by typing :x and pressing Enter.
Then, reboot Nginx with:
sudo service nginx restart
Note: Encountering Issues
If you run into problems like a fully white screen, or a cryptic error, check the error logs by running tail -f /var/log/nginx/guestbook.app-error.log. Tail outputs the "tail" of a file (its last 10 lines) and -f tells it to "watch this file and update output as it changes", meaning that as new errors come in, they'll immediately show up on screen. Feel free to open another terminal window, connect to the droplet through it just like above, and run the tail there; that way, you still have full control over the main terminal window to run commands in, and the second will monitor errors for you.
Pulling With Git
At last! We're ready to deploy our app!
cd /var/www
git clone https://github.com/spbooks/phpenv1-example guestbook
cd guestbook
composer install --no-dev -o
Notice how we used --no-dev to prevent installing the dev packages and make the installation faster. On an application of this size, it hardly matters, but on bigger projects, the difference is obvious. We also used the option -o which is short for --optimize-autoloader and builds a classmap - a special file which turns all namespace-to-classes combinations (from the autoload section of composer.json) into a fixed pre-calculated array, which in most cases significantly speeds up autoloading. Read more about these command line options in the docs.
Seeing as we did all this with the root account (we logged in with root@IP-ADDRESS, remember?), our application is "owned" by the root user because that user created it. This is okay in most cases, but not when PHP needs to do some reading and writing on the hard drive; PHP is running as a separate user, and a user cannot modify a super-user's (root's) files. As a final step, we need to modify permissions:
d /var/www/guestbook
sudo chown -R :www-data .
sudo chmod -R 775 storage
The chown command gives ownership of the folder to the www-data group of users: a special subset of user accounts on the server in charge of serving web pages (PHP and Nginx belong to this group). The chmod option gives writing permissions on the entire storage folder to its owner (root) and owning group (www-data). In both cases -R means "recursive", which means "apply to all subfolders as well".[5]
If we test our app now, we should see that everything is working fine, as shown in Figure 8.31.
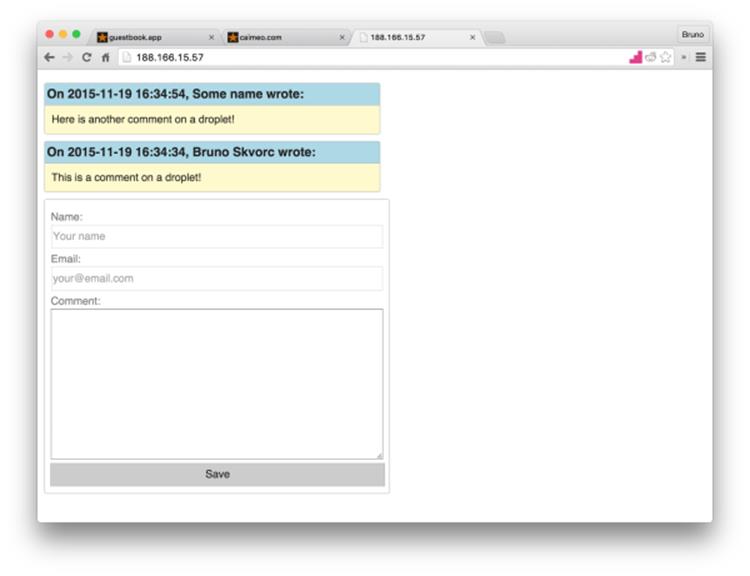
Figure 8.31. A working droplet
Conclusion
This chapter put to practice all the theory we covered before. Pretty much every term we discussed and every code snippet we tried out were used in one way or another through the creation of our little app.
The final application (downloadable / cloneable here), while nothing to admire, is a fine introduction to the modern development workflow. Of course, this is the mere bottom of the basics, and your mission, should you choose to accept it, will be to consume countless courses and tutorials more before even beginning to feel ready. Thanks to this book, however, you should have a solid foundation on which to build.
I encourage you to go through this chapter a couple more times. Start from scratch, follow the procedure, try to skip reading a step now and then and recall how it was done. Try to understand what the code does, really read into it. Once you've got it down and the guestbook is almost muscle memory, try and introduce a change. Look into styling your form with CSS, check out the links below to find out about OOP, unit testing, login systems. Build on this sample app and use it as your Frankenstein's monster, glue on new features, staple an arm or two onto its forehead. Most importantly: have fun! The more fun you have, the more you'll want to learn, experiment, and explore, and that's all becoming a programmer really is. Additionally, for bonus content, code explanations and tutorials on how to implement some other, more advanced features, please see the README file of the aforementioned repository.
For Those Who Want More
To learn about HTML and CSS:
· https://developer.mozilla.org/en-US/docs/Web/Guide/HTML/Introduction
· https://www.sitepoint.com/premium/courses/introduction-to-html-2897
· http://www.csstutorial.net/css-intro/introductioncss-part1.php
· http://www.sitepoint.com/web-foundations/introduction-css-selectors/
· https://www.sitepoint.com/premium/books/jump-start-css/online/ch01
To learn about modern PHP and MySQL:
· https://www.codecademy.com/learn/php
· http://knpuniversity.com/tracks/php
· https://laracasts.com/series/object-oriented-bootcamp-in-php
· https://laracasts.com/series/solid-principles-in-php
To learn about the basics of automatic testing:
· https://leanpub.com/mlaphp
· http://www.sitepoint.com/tag/phpunit
· https://knpuniversity.com/screencast/behat
· http://www.sitepoint.com/php-continuous-integration-travis-ci/
To learn about the Laravel framework, it's best if you look at https://laracasts.com/, while for Symfony, you'd best check out what http://knpuniversity.com has to offer.
Finally, to automate the last step of this chapter ― deployment ― and set it up so it happens every time you, for example, push to the master branch (and for the various names these procedures share), see:
· http://stackoverflow.com/questions/28608015/
· http://www.sitepoint.com/whats-continuous-deployment/
· http://www.sitepoint.com/php-continuous-integration-travis-ci/
· http://www.sitepoint.com/deploying-php-apps-digitalocean-dploy-io/
· http://www.sitepoint.com/deploy-symfony-apps-capifony/
· http://www.sitepoint.com/one-click-app-deployment-server-side-git-hooks/
For a constantly updated version of this list, see the README file of the example's repository at https://github.com/spbooks/phpenv1-example, or read http://phptherightway.com.
[2] If you're curious, read more about var-dumper in this SitePoint post:
[3] The header function can only work if it comes before any HTML output. Thus, we've put all our PHP code at the top of the file.
[4] Full disclosure: the owner of the referral link (that's me!) will receive $25 as soon as a person they referred spends $25 of their own, not counting the initial free $10.
[5] 775 is a file/folder access code―read more about them in this LinuxQuestions forum post: http://www.linuxquestions.org/questions/linux-software-2/chmod-codes-list-142654/.
All materials on the site are licensed Creative Commons Attribution-Sharealike 3.0 Unported CC BY-SA 3.0 & GNU Free Documentation License (GFDL)
If you are the copyright holder of any material contained on our site and intend to remove it, please contact our site administrator for approval.
© 2016-2026 All site design rights belong to S.Y.A.