Learning PHP, MySQL, JavaScript, CSS & HTML5 (2014)
Chapter 9. Mastering MySQL
Chapter 8 provided you with a good grounding in the practice of using relational databases with structured query language. You’ve learned about creating databases and the tables they comprise, as well as inserting, looking up, changing, and deleting data.
With that knowledge under your belt, we now need to look at how to design databases for maximum speed and efficiency. For example, how do you decide what data to place in which table? Well, over the years, a number of guidelines have been developed that—if you follow them—ensure your databases will be efficient and capable of growing as you feed them more and more data.
Database Design
It’s very important that you design a database correctly before you start to create it; otherwise, you are almost certainly going to have to go back and change it by splitting up some tables, merging others, and moving various columns about in order to achieve sensible relationships that MySQL can easily use.
Sitting down with a sheet of paper and a pencil and writing down a selection of the queries that you think you and your users are likely to ask is an excellent starting point. In the case of an online bookstore’s database, some of your questions could be:
§ How many authors, books, and customers are in the database?
§ Which author wrote a certain book?
§ Which books were written by a certain author?
§ What is the most expensive book?
§ What is the best-selling book?
§ Which books have not sold this year?
§ Which books did a certain customer buy?
§ Which books have been purchased together?
Of course, there are many more queries that you could make on such a database, but even this small sample will begin to give you insights into how to lay out your tables. For example, books and ISBNs can probably be combined into one table, because they are closely linked (we’ll examine some of the subtleties later). In contrast, books and customers should be in separate tables, because their connection is very loose. A customer can buy any book, and even multiple copies of a book, yet a book can be bought by many customers and be ignored by still more potential customers.
When you plan to do a lot of searches on something, it can often benefit by having its own table. And when couplings between things are loose, it’s best to put them in separate tables.
Taking into account those simple rules of thumb, we can guess we’ll need at least three tables to accommodate all these queries:
Authors
There will be lots of searches for authors, many of whom have collaborated on titles, and many of whom will be featured in collections. Listing all the information about each author together, linked to that author, will produce optimal results for searches—hence an authors table.
Books
Many books appear in different editions. Sometimes they change publisher and sometimes they have the same titles as other, unrelated books. So the links between books and authors are complicated enough to call for a separate table.
Customers
It’s even more clear why customers should get their own table, as they are free to purchase any book by any author.
Primary Keys: The Keys to Relational Databases
Using the power of relational databases, we can define information for each author, book, and customer in just one place. Obviously, what interests us is the links between them—such as who wrote each book and who purchased it—but we can store that information just by making links between the three tables. I’ll show you the basic principles, and then it just takes practice for it to feel natural.
The magic involves giving every author a unique identifier. Do the same for every book and for every customer. We saw the means of doing that in the previous chapter: the primary key. For a book, it makes sense to use the ISBN, although you then have to deal with multiple editions that have different ISBNs. For authors and customers, you can just assign arbitrary keys, which the AUTO_INCREMENT feature that you saw in the last chapter makes easy.
In short, every table will be designed around some object that you’re likely to search for a lot—an author, book, or customer, in this case—and that object will have a primary key. Don’t choose a key that could possibly have the same value for different objects. The ISBN is a rare case for which an industry has provided a primary key that you can rely on to be unique for each product. Most of the time, you’ll create an arbitrary key for this purpose, using AUTO_INCREMENT.
Normalization
The process of separating your data into tables and creating primary keys is called normalization. Its main goal is to make sure each piece of information appears in the database only once. Duplicating data is very inefficient, because it makes databases larger than they need to be and therefore slows down access. But, more importantly, the presence of duplicates creates a strong risk that you’ll update only one row of duplicated data, creating inconsistencies in a database and potentially causing serious errors.
Thus, if you list the titles of books in the authors table as well as the books table, and you have to correct a typographic error in a title, you’ll have to search through both tables and make sure you make the same change every place the title is listed. It’s better to keep the title in one place and use the ISBN in other places.
But in the process of splitting a database into multiple tables, it’s important not to go too far and create more tables than is necessary, which would also lead to inefficient design and slower access.
Luckily, E. F. Codd, the inventor of the relational model, analyzed the concept of normalization and split it into three separate schemas called First, Second, and Third Normal Form. If you modify a database to satisfy each of these forms in order, you will ensure that your database is optimally balanced for fast access, and minimum memory and disk space usage.
To see how the normalization process works, let’s start with the rather monstrous database in Table 9-1, which shows a single table containing all of the author names, book titles, and (fictional) customer details. You could consider it a first attempt at a table intended to keep track of which customers have ordered books. Obviously this is inefficient design, because data is duplicated all over the place (duplications are highlighted), but it represents a starting point.
Table 9-1. A highly inefficient design for a database table
|
Author 1 |
Author 2 |
Title |
ISBN |
Price $US |
Customer Name |
Customer Address |
Purchase Date |
|
David Sklar |
Adam Trachtenberg |
PHP Cookbook |
0596101015 |
44.99 |
Emma Brown |
1565 Rainbow Road, Los Angeles, CA 90014 |
Mar 03 2009 |
|
Danny Goodman |
Dynamic HTML |
0596527403 |
59.99 |
Darren Ryder |
4758 Emily Drive, Richmond, VA 23219 |
Dec 19 2008 |
|
|
Hugh E Williams |
David Lane |
PHP and MySQL |
0596005436 |
44.95 |
Earl B. Thurston |
862 Gregory Lane, Frankfort, KY 40601 |
Jun 22 2009 |
|
David Sklar |
Adam Trachtenberg |
PHP Cookbook |
0596101015 |
44.99 |
Darren Ryder |
4758 Emily Drive, Richmond, VA 23219 |
Dec 19 2008 |
|
Rasmus Lerdorf |
Kevin Tatroe & Peter MacIntyre |
Programming PHP |
0596006815 |
39.99 |
David Miller |
3647 Cedar Lane, Waltham, MA 02154 |
Jan 16 2009 |
In the following three sections, we will examine this database design, and you’ll see how we can improve it by removing the various duplicate entries and splitting the single table into multiple tables, each containing one type of data.
First Normal Form
For a database to satisfy the First Normal Form, it must fulfill three requirements:
§ There should be no repeating columns containing the same kind of data.
§ All columns should contain a single value.
§ There should be a primary key to uniquely identify each row.
Looking at these requirements in order, you should notice straightaway that the Author 1 and Author 2 columns constitute repeating data types. So we already have a target column for pulling into a separate table, as the repeated Author columns violate Rule 1.
Second, there are three authors listed for the final book, Programming PHP. I’ve handled that by making Kevin Tatroe and Peter MacIntyre share the Author 2 column, which violates Rule 2—yet another reason to transfer the Author details to a separate table.
However, Rule 3 is satisfied, because the primary key of ISBN has already been created.
Table 9-2 shows the result of removing the Authors columns from Table 9-1. Already it looks a lot less cluttered, although there remain duplications that are highlighted.
Table 9-2. The result of stripping the Authors columns from Table 9-1
|
Title |
ISBN |
Price $US |
Customer Name |
Customer Address |
Purchase Date |
|
PHP Cookbook |
0596101015 |
44.99 |
Emma Brown |
1565 Rainbow Road, Los Angeles, CA 90014 |
Mar 03 2009 |
|
Dynamic HTML |
0596527403 |
59.99 |
Darren Ryder |
4758 Emily Drive, Richmond, VA 23219 |
Dec 19 2008 |
|
PHP and MySQL |
0596005436 |
44.95 |
Earl B. Thurston |
862 Gregory Lane, Frankfort, KY 40601 |
Jun 22 2009 |
|
PHP Cookbook |
0596101015 |
44.99 |
Darren Ryder |
4758 Emily Drive, Richmond, VA 23219 |
Dec 19 2008 |
|
Programming PHP |
0596006815 |
39.99 |
David Miller |
3647 Cedar Lane, Waltham, MA 02154 |
Jan 16 2009 |
The new Authors table shown in Table 9-3 is small and simple. It just lists the ISBN of a title along with an author. If a title has more than one author, additional authors get their own rows. At first, you may feel ill at ease with this table, because you can’t tell which author wrote which book. But don’t worry: MySQL can quickly tell you. All you have to do is tell it which book you want information for, and MySQL will use its ISBN to search the Authors table in a matter of milliseconds.
Table 9-3. The new Authors table
|
ISBN |
Author |
|
0596101015 |
David Sklar |
|
0596101015 |
Adam Trachtenberg |
|
0596527403 |
Danny Goodman |
|
0596005436 |
Hugh E Williams |
|
0596005436 |
David Lane |
|
0596006815 |
Rasmus Lerdorf |
|
0596006815 |
Kevin Tatroe |
|
0596006815 |
Peter MacIntyre |
As I mentioned earlier, the ISBN will be the primary key for the Books table, when we get around to creating that table. I mention that here in order to emphasize that the ISBN is not, however, the primary key for the Authors table. In the real world, the Authors table would deserve a primary key, too, so that each author would have a key to uniquely identify him or her.
So, in the Authors table, the ISBN is just a column for which—for the purposes of speeding up searches—we’ll probably make a key, but not the primary key. In fact, it cannot be the primary key in this table, because it’s not unique: the same ISBN appears multiple times whenever two or more authors have collaborated on a book.
Because we’ll use it to link authors to books in another table, this column is called a foreign key.
NOTE
Keys (also called indexes) have several purposes in MySQL. The fundamental reason for defining a key is to make searches faster. You’ve seen examples in Chapter 8 in which keys are used in WHERE clauses for searching. But a key can also be useful to uniquely identify an item. Thus, a unique key is often used as a primary key in one table, and as a foreign key to link rows in that table to rows in another table.
Second Normal Form
The First Normal Form deals with duplicate data (or redundancy) across multiple columns. The Second Normal Form is all about redundancy across multiple rows. In order to achieve Second Normal Form, your tables must already be in First Normal Form. Once this has been done, we achieve Second Normal Form by identifying columns whose data repeats in different places and then removing them to their own tables.
So let’s look again at Table 9-2. Notice how Darren Ryder bought two books and therefore his details are duplicated. This tells us that the Customer columns need to be pulled into their own tables. Table 9-4 shows the result of removing the Customer columns from Table 9-2.
Table 9-4. The new Titles table
|
ISBN |
Title |
Price |
|
0596101015 |
PHP Cookbook |
44.99 |
|
0596527403 |
Dynamic HTML |
59.99 |
|
0596005436 |
PHP and MySQL |
44.95 |
|
0596006815 |
Programming PHP |
39.99 |
As you can see, all that’s left in Table 9-4 are the ISBN, Title, and Price columns for four unique books, so this now constitutes an efficient and self-contained table that satisfies the requirements of both the First and Second Normal Forms. Along the way, we’ve managed to reduce the information to data closely related to book titles. This table could also include years of publication, page counts, numbers of reprints, and so on, as these details are also closely related. The only rule is that we can’t put in any column that could have multiple values for a single book, because then we’d have to list the same book in multiple rows and would thus violate Second Normal Form. Restoring an Author column, for instance, would violate this normalization.
However, looking at the extracted Customer columns, now in Table 9-5, we can see that there’s still more normalization work to do, because Darren Ryder’s details are still duplicated. And it could also be argued that First Normal Form Rule 2 (all columns should contain a single value) has not been properly complied with, because the addresses really need to be broken into separate columns for Address, City, State, and Zip code.
Table 9-5. The Customer details from Table 9-2
|
ISBN |
Customer Name |
Customer Address |
Purchase Date |
|
0596101015 |
Emma Brown |
1565 Rainbow Road, Los Angeles, CA 90014 |
Mar 03 2009 |
|
0596527403 |
Darren Ryder |
4758 Emily Drive, Richmond, VA 23219 |
Dec 19 2008 |
|
0596005436 |
Earl B. Thurston |
862 Gregory Lane, Frankfort, KY 40601 |
Jun 22 2009 |
|
0596101015 |
Darren Ryder |
4758 Emily Drive, Richmond, VA 23219 |
Dec 19 2008 |
|
0596006815 |
David Miller |
3647 Cedar Lane, Waltham, MA 02154 |
Jan 16 2009 |
What we have to do is split this table further to ensure that each customer’s details are entered only once. Because the ISBN is not and cannot be used as a primary key to identify customers (or authors), a new key must be created.
Table 9-6 is the result of normalizing the Customers table into both First and Second Normal Forms. Each customer now has a unique customer number called CustNo, which is the table’s primary key and will most likely have been created via AUTO_INCREMENT. All the parts of customer addresses have also been separated into distinct columns to make them easily searchable and updateable.
Table 9-6. The new Customers table
|
CustNo |
Name |
Address |
City |
State |
Zip |
|
1 |
Emma Brown |
1565 Rainbow Road |
Los Angeles |
CA |
90014 |
|
2 |
Darren Ryder |
4758 Emily Drive |
Richmond |
VA |
23219 |
|
3 |
Earl B. Thurston |
862 Gregory Lane |
Frankfort |
KY |
40601 |
|
4 |
David Miller |
3647 Cedar Lane |
Waltham |
MA |
02154 |
At the same time, in order to normalize Table 9-6, we had to remove the information on customer purchases, because otherwise, there would be multiple instances of customer details for each book purchased. Instead, the purchase data is now placed in a new table called Purchases (seeTable 9-7).
Table 9-7. The new Purchases table
|
CustNo |
ISBN |
Date |
|
1 |
0596101015 |
Mar 03 2009 |
|
2 |
0596527403 |
Dec 19 2008 |
|
2 |
0596101015 |
Dec 19 2008 |
|
3 |
0596005436 |
Jun 22 2009 |
|
4 |
0596006815 |
Jan 16 2009 |
Here the CustNo column from Table 9-6 is reused as a key to tie both the Customers and the Purchases tables together. Because the ISBN column is also repeated here, this table can be linked with either of the Authors or the Titles tables, too.
The CustNo column can be a useful key in the Purchases table, but it’s not a primary key. A single customer can buy multiple books (and even multiple copies of one book), so the CustNo column is not a primary key. In fact, the Purchases table has no primary key. That’s all right, because we don’t expect to need to keep track of unique purchases. If one customer buys two copies of the same book on the same day, we’ll just allow two rows with the same information. For easy searching, we can define both CustNo and ISBN as keys—just not as primary keys.
NOTE
There are now four tables, one more than the three we had initially assumed would be needed. We arrived at this decision through the normalization processes, by methodically following the First and Second Normal Form rules, which made it plain that a fourth table called Purchases would also be required.
The tables we now have are Authors (Table 9-3), Titles (Table 9-4), Customers (Table 9-6), and Purchases (Table 9-7), and we can link each table to any other using either the CustNo or the ISBN keys.
For example, to see which books Darren Ryder has purchased, you can look him up in Table 9-6, the Customers table, where you will see his CustNo is 2. Armed with this number, you can now go to Table 9-7, the Purchases table; looking at the ISBN column here, you will see that he purchased titles 0596527403 and 0596101015 on December 19, 2008. This looks like a lot of trouble for a human, but it’s not so hard for MySQL.
To determine what these titles were, you can then refer to Table 9-4, the Titles table, and see that the books he bought were Dynamic HTML and PHP Cookbook. Should you wish to know the authors of these books, you could also use the ISBNs you just looked up on Table 9-3, the Authorstable, and you would see that ISBN 0596527403, Dynamic HTML, was written by Danny Goodman, and that ISBN 0596101015, PHP Cookbook, was written by David Sklar and Adam Trachtenberg.
Third Normal Form
Once you have a database that complies with both the First and Second Normal Forms, it is in pretty good shape and you might not have to modify it any further. However, if you wish to be very strict with your database, you can ensure that it adheres to the Third Normal Form, which requires that data that is not directly dependent on the primary key but is dependent on another value in the table should also be moved into separate tables, according to the dependence.
For example, in Table 9-6, the Customers table, it could be argued that the State, City, and Zip code keys are not directly related to each customer, because many other people will have the same details in their addresses, too. However, they are directly related to each other, in that the streetAddress relies on the City, and the City relies on the State.
Therefore, to satisfy Third Normal Form for Table 9-6, you would need to split it into Tables 9-8 through 9-11.
Table 9-8. Third Normal Form Customers table
|
CustNo |
Name |
Address |
Zip |
|
1 |
Emma Brown |
1565 Rainbow Road |
90014 |
|
2 |
Darren Ryder |
4758 Emily Drive |
23219 |
|
3 |
Earl B. Thurston |
862 Gregory Lane |
40601 |
|
4 |
David Miller |
3647 Cedar Lane |
02154 |
Table 9-9. Third Normal Form Zip codes table
|
Zip |
CityID |
|
90014 |
1234 |
|
23219 |
5678 |
|
40601 |
4321 |
|
02154 |
8765 |
Table 9-10. Third Normal Form Cities table
|
CityID |
Name |
StateID |
|
1234 |
Los Angeles |
5 |
|
5678 |
Richmond |
46 |
|
4321 |
Frankfort |
17 |
|
8765 |
Waltham |
21 |
Table 9-11. Third Normal Form States table
|
StateID |
Name |
Abbreviation |
|
5 |
California |
CA |
|
46 |
Virginia |
VA |
|
17 |
Kentucky |
KY |
|
21 |
Massachusetts |
MA |
So, how would you use this set of four tables instead of the single Table 9-6? Well, you would look up the Zip code in Table 9-8, then find the matching CityID in Table 9-9. Given this information, you could then look up the city Name in Table 9-10 and then also find the StateID, which you could use in Table 9-11 to look up the State’s Name.
Although using the Third Normal Form in this way may seem like overkill, it can have advantages. For example, take a look at Table 9-11, where it has been possible to include both a state’s name and its two-letter abbreviation. It could also contain population details and other demographics, if you desired.
NOTE
Table 9-10 could also contain even more localized demographics that could be useful to you and/or your customers. By splitting up these pieces of data, you can make it easier to maintain your database in the future, should it be necessary to add columns.
Deciding whether to use the Third Normal Form can be tricky. Your evaluation should rest on what data you may need to add at a later date. If you are absolutely certain that the name and address of a customer is all that you will ever require, you probably will want to leave out this final normalization stage.
On the other hand, suppose you are writing a database for a large organization such as the U.S. Postal Service. What would you do if a city were to be renamed? With a table such as Table 9-6, you would need to perform a global search and replace on every instance of that city. But if you have your database set up according to the Third Normal Form, you would have to change only a single entry in Table 9-10 for the change to be reflected throughout the entire database.
Therefore, I suggest that you ask yourself two questions to help you decide whether to perform a Third Normal Form normalization on any table:
§ Is it likely that many new columns will need to be added to this table?
§ Could any of this table’s fields require a global update at any point?
If either of the answers is yes, you should probably consider performing this final stage of normalization.
When Not to Use Normalization
Now that you know all about normalization, I’m going to tell you why you should throw these rules out of the window on high-traffic sites. That’s right—you should never fully normalize your tables on sites that will cause MySQL to thrash.
Normalization requires spreading data across multiple tables, and this means making multiple calls to MySQL for each query. On a very popular site, if you have normalized tables, your database access will slow down considerably once you get above a few dozen concurrent users, because they will be creating hundreds of database accesses between them. In fact, I would go so far as to say you should denormalize any commonly looked-up data as much as you can.
You see, if you have data duplicated across your tables, you can substantially reduce the number of additional requests that need to be made, because most of the data you want is available in each table. This means that you can simply add an extra column to a query and that field will be available for all matching results.
Of course, you have to deal with the downsides previously mentioned, such as using up large amounts of disk space, and ensuring that you update every single duplicate copy of data when one of them needs modifying.
Multiple updates can be computerized, though. MySQL provides a feature called triggers that make automatic changes to the database in response to changes you make. (Triggers are, however, beyond the scope of this book.) Another way to propagate redundant data is to set up a PHP program to run regularly and keep all copies in sync. The program reads changes from a “master” table and updates all the others. (You’ll see how to access MySQL from PHP in the next chapter.)
However, until you are very experienced with MySQL, I recommend that you fully normalize all your tables (at least to First and Second Normal Form), as this will instill the habit and put you in good stead. Only when you actually start to see MySQL logjams should you consider looking atdenormalization.
Relationships
MySQL is called a relational database management system because its tables store not only data, but the relationships among the data. There are three categories of relationships.
One-to-One
A one-to-one relationship is like a (traditional) marriage: each item has a relationship to only one item of the other type. This is surprisingly rare. For instance, an author can write multiple books, a book can have multiple authors, and even an address can be associated with multiple customers. Perhaps the best example in this chapter so far of a one-to-one relationship is the relationship between the name of a state and its two-character abbreviation.
However, for the sake of argument, let’s assume that there can only ever be one customer at any address. In such a case, the Customers–Addresses relationship in Figure 9-1 is a one-to-one relationship: only one customer lives at each address, and each address can have only one customer.
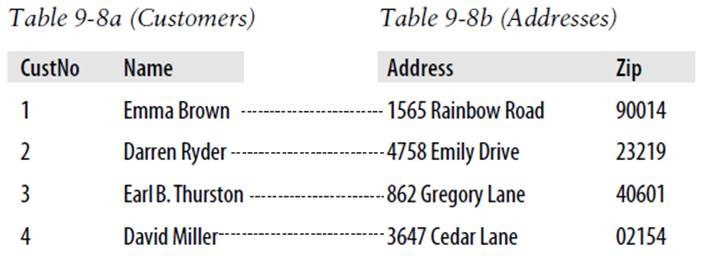
Figure 9-1. The Customers table, Table 9-8, split into two tables
Usually, when two items have a one-to-one relationship, you just include them as columns in the same table. There are two reasons for splitting them into separate tables:
§ You want to be prepared in case the relationship changes later.
§ The table has a lot of columns and you think that performance or maintenance would be improved by splitting it.
Of course, when you come to build your own databases in the real world, you will have to create one-to-many Customer–Address relationships (one address, many customers).
One-to-Many
One-to-many (or many-to-one) relationships occur when one row in one table is linked to many rows in another table. You have already seen how Table 9-8 would take on a one-to-many relationship if multiple customers were allowed at the same address, which is why it would have to be split up if that were the case.
So, looking at Table 9-8a within Figure 9-1, you can see that it shares a one-to-many relationship with Table 9-7 because there is only one of each customer in Table 9-8a. However Table 9-7, the Purchases table, can (and does) contain more than one purchase from customers. Therefore onecustomer has a relationship with many purchases.
You can see these two tables alongside each other in Figure 9-2, where the dashed lines joining rows in each table start from a single row in the lefthand table but can connect to more than one row on the righthand table. This one-to-many relationship is also the preferred scheme to use when describing a many-to-one relationship, in which case you would normally swap the left and right tables to view them as a one-to-many relationship.
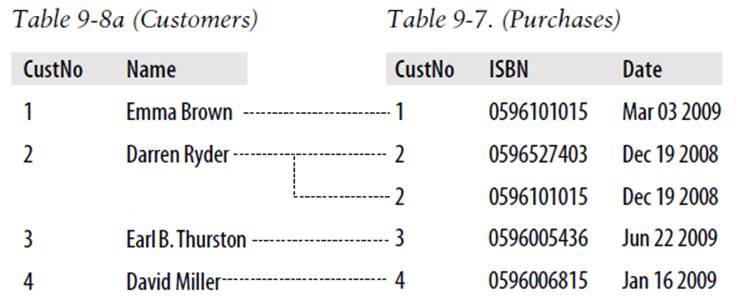
Figure 9-2. Illustrating the relationship between two tables
Many-to-Many
In a many-to-many relationship, many rows in one table are linked to many rows in another table. To create this relationship, add a third table containing the same key column from each of the other tables. This third table contains nothing else, as its sole purpose is to link up the other tables.
Table 9-12 is just such a table. It was extracted from Table 9-7, the Purchases table, but omits the purchase date information. It contains a copy of the ISBN of every title sold, along with the customer number of each purchaser.
Table 9-12. An intermediary table
|
Customer |
ISBN |
|
1 |
0596101015 |
|
2 |
0596527403 |
|
2 |
0596101015 |
|
3 |
0596005436 |
|
4 |
0596006815 |
With this intermediary table in place, you can traverse all the information in the database through a series of relations. You can take an address as a starting point and find out the authors of any books purchased by the customer living at that address.
For example, let’s suppose that you want to find out about purchases in the 23219 zip code. Look that zip code up in Table 9-8b, and you’ll find that customer number 2 has bought at least one item from the database. At this point, you can use Table 9-8a to find out his or her name, or use the new intermediary Table 9-12 to see the book(s) purchased.
From here, you will find that two titles were purchased and can follow them back to Table 9-4 to find the titles and prices of these books, or to Table 9-3 to see who the authors were.
If it seems to you that this is really combining multiple one-to-many relationships, then you are absolutely correct. To illustrate, Figure 9-3 brings three tables together.
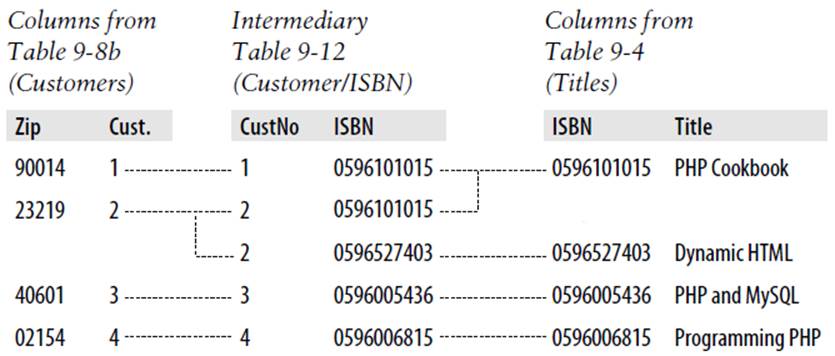
Figure 9-3. Creating a many-to-many relationship via a third table
Follow any zip code in the lefthand table to associated customer IDs. From there, you can link to the middle table, which joins the left and right tables by linking customer IDs and ISBNs. Now all you have to do is follow an ISBN over to the righthand table to see which book it relates to.
You can also use the intermediary table to work your way backward from book titles to zip codes. The Titles table can tell you the ISBN, which you can use in the middle table to find ID numbers of customers who bought the books, and finally, the Customers table matches the customer ID numbers to the customers’ zip codes.
Databases and Anonymity
An interesting aspect of using relations is that you can accumulate a lot of information about some item—such as a customer—without actually knowing who that customer is. Note that in the previous example we went from customers’ zip codes to customers’ purchases, and back again, without finding out the name of a customer. Databases can be used to track people, but they can also be used to help preserve people’s privacy while still finding useful information.
Transactions
In some applications, it is vitally important that a sequence of queries runs in the correct order and that every single query successfully completes. For example, suppose that you are creating a sequence of queries to transfer funds from one bank account to another. You would not want either of the following events to occur:
§ You add the funds to the second account, but when you try to subtract them from the first account the update fails, and now both accounts have the funds.
§ You subtract the funds from the first bank account, but the update request to add them to the second account fails, and the funds have now disappeared into thin air.
As you can see, not only is the order of queries important in this type of transaction, but it is also vital that all parts of the transaction complete successfully. But how can you ensure this happens, because surely after a query has occurred, it cannot be undone? Do you have to keep track of all parts of a transaction and then undo them all one at a time if any one fails? The answer is absolutely not, because MySQL comes with powerful transaction handling features to cover just these types of eventualities.
In addition, transactions allow concurrent access to a database by many users or programs at the same time. MySQL handles this seamlessly by ensuring that all transactions are queued and that users or programs take their turns and don’t tread on each other’s toes.
Transaction Storage Engines
To be able to use MySQL’s transaction facility, you have to be using MySQL’s InnoDB storage engine. This is easy to do, as it’s simply another parameter that you use when creating a table. So go ahead and create a table of bank accounts by typing the commands in Example 9-1. (Remember that to do this you will need access to the MySQL command line, and must also have already selected a suitable database in which to create this table.)
Example 9-1. Creating a transaction-ready table
CREATE TABLE accounts (
number INT, balance FLOAT, PRIMARY KEY(number)
) ENGINE InnoDB;
DESCRIBE accounts;
The final line of this example displays the contents of the new table so you can ensure that it was correctly created. The output from it should look like this:
+---------+---------+------+-----+---------+-------+
| Field | Type | Null | Key | Default | Extra |
+---------+---------+------+-----+---------+-------+
| number | int(11) | NO | PRI | 0 | |
| balance | float | YES | | NULL | |
+---------+---------+------+-----+---------+-------+
2 rows in set (0.00 sec)
Now let’s create two rows within the table so that you can practice using transactions. Enter the commands in Example 9-2.
Example 9-2. Populating the accounts table
INSERT INTO accounts(number, balance) VALUES(12345, 1025.50);
INSERT INTO accounts(number, balance) VALUES(67890, 140.00);
SELECT * FROM accounts;
The third line displays the contents of the table to confirm that the rows were correctly inserted. The output should look like this:
+--------+---------+
| number | balance |
+--------+---------+
| 12345 | 1025.5 |
| 67890 | 140 |
+--------+---------+
2 rows in set (0.00 sec)
With this table created and prepopulated, you are now ready to start using transactions.
Using BEGIN
Transactions in MySQL start with either a BEGIN or a START TRANSACTION statement. Type the commands in Example 9-3 to send a transaction to MySQL.
Example 9-3. A MySQL transaction
BEGIN;
UPDATE accounts SET balance=balance+25.11 WHERE number=12345;
COMMIT;
SELECT * FROM accounts;
The result of this transaction is displayed by the final line, and should look like this:
+--------+---------+
| number | balance |
+--------+---------+
| 12345 | 1050.61 |
| 67890 | 140 |
+--------+---------+
2 rows in set (0.00 sec)
As you can see, the balance of account number 12345 was increased by 25.11 and is now 1050.61. You may also have noticed the COMMIT command in Example 9-3, which is explained next.
Using COMMIT
When you are satisfied that a series of queries in a transaction has successfully completed, issue a COMMIT command to commit all the changes to the database. Until it receives a COMMIT, MySQL considers all the changes you make to be merely temporary. This feature gives you the opportunity to cancel a transaction by not sending a COMMIT but by issuing a ROLLBACK command instead.
Using ROLLBACK
Using the ROLLBACK command, you can tell MySQL to forget all the queries made since the start of a transaction and to end the transaction. See this in action by entering the funds transfer transaction in Example 9-4.
Example 9-4. A funds transfer transaction
BEGIN;
UPDATE accounts SET balance=balance-250 WHERE number=12345;
UPDATE accounts SET balance=balance+250 WHERE number=67890;
SELECT * FROM accounts;
Once you have entered these lines, you should see the following result:
+--------+---------+
| number | balance |
+--------+---------+
| 12345 | 800.61 |
| 67890 | 390 |
+--------+---------+
2 rows in set (0.00 sec)
The first bank account now has a value that is 250 less than before, and the second has been incremented by 250; you have transferred a value of 250 between them. But let’s assume that something went wrong and you wish to undo this transaction. All you have to do is issue the commands inExample 9-5.
Example 9-5. Canceling a transaction using ROLLBACK
ROLLBACK;
SELECT * FROM accounts;
You should now see the following output, showing that the two accounts have had their previous balances restored, due to the entire transaction being canceled via the ROLLBACK command:
+--------+---------+
| number | balance |
+--------+---------+
| 12345 | 1050.61 |
| 67890 | 140 |
+--------+---------+
2 rows in set (0.00 sec)
Using EXPLAIN
MySQL comes with a powerful tool for investigating how the queries you issue to it are interpreted. Using EXPLAIN, you can get a snapshot of any query to find out whether you could issue it in a better or more efficient way. Example 9-6 shows how to use it with the accounts table you created earlier.
Example 9-6. Using the EXPLAIN command
EXPLAIN SELECT * FROM accounts WHERE number='12345';
The results of this EXPLAIN command should look like the following:
+--+-----------+--------+-----+-------------+-------+-------+-----+----+-----+
|id|select_type|table |type |possible_keys|key |key_len|ref |rows|Extra|
+--+-----------+--------+-----+-------------+-------+-------+-----+----+-----+
| 1|SIMPLE |accounts|const|PRIMARY |PRIMARY|4 |const| 1| |
+--+-----------+--------+-----+-------------+-------+-------+-----+----+-----+
1 row in set (0.00 sec)
The information that MySQL is giving you here is as follows:
select_type
The selection type is SIMPLE. If you were joining tables together, this would show the join type.
table
The current table being queried is accounts.
type
The query type is const. From worst to best, the possible values can be ALL, index, range, ref, eq_ref, const, system, and NULL.
possible_keys
There is a possible PRIMARY key, which means that accessing should be fast.
key
The key actually used is PRIMARY. This is good.
key_len
The key length is 4. This is the number of bytes of the index that MySQL will use.
ref
The ref column displays which columns or constants are used with the key. In this case, a constant key is being used.
rows
The number of rows that needs to be searched by this query is 1. This is good.
Whenever you have a query that seems to be taking longer than you think it should to execute, try using EXPLAIN to see where you can optimize it. You will discover which keys (if any) are being used, their lengths, and so on, and will be able to adjust your query or the design of your table(s) accordingly.
NOTE
When you have finished experimenting with the temporary accounts table, you may wish to remove it by entering the following command:
DROP TABLE accounts;
Backing Up and Restoring
Whatever kind of data you are storing in your database, it must have some value to you, even if it’s only the cost of the time required for reentering it should the hard disk fail. Therefore, it’s important that you keep backups to protect your investment. Also, there will be times when you have to migrate your database over to a new server; the best way to do this is usually to back it up first. It is also important that you test your backups from time to time to ensure that they are valid and will work if they need to be used.
Thankfully, backing up and restoring MySQL data is easy with the mysqldump command.
Using mysqldump
With mysqldump, you can dump a database or collection of databases into one or more files containing all the instructions necessary to re-create all your tables and repopulate them with your data. It can also generate files in CSV (Comma-Separated Values) and other delimited text formats, or even in XML format. Its main drawback is that you must make sure that no one writes to a table while you’re backing it up. There are various ways to do this, but the easiest is to shut down the MySQL server before mysqldump and start up the server again after mysqldump finishes.
Or you can lock the tables you are backing up before running mysqldump. To lock tables for reading (as we want to read the data), issue the following command from the MySQL command line:
LOCK TABLES tablename1 READ, tablename2 READ ...
Then, to release the lock(s), enter:
UNLOCK TABLES;
By default, the output from mysqldump is simply printed out, but you can capture it in a file through the > redirect symbol.
The basic format of the mysqldump command is:
mysqldump -u user -ppassword database
However, before you can dump the contents of a database, you must make sure that mysqldump is in your path, or that you specify its location as part of your command. Table 9-13 shows the likely locations of the program for the different installations and operating systems covered inChapter 2. If you have a different installation, it may be in a slightly different location.
NOTE
If you are using OS X with mysqldump and receive the error 2002: Can't connect to local MySQL server through socket '/tmp/mysql.sock' (2) when trying to connect, you may be able to remedy this by issuing the following instruction:
ln -s /usr/local/zend/mysql/tmp/mysql.sock /tmp/mysql.sock
Table 9-13. Likely locations of mysqldump for different installations
|
Operating System & Program |
Likely folder location |
|
Windows 32-bit Zend Server |
C:\Program Files\Zend\MySQL55\bin |
|
Windows 64-bit Zend Server |
C:\Program Files (x86)\Zend\MySQL55\bin |
|
OS X Zend Server |
/usr/local/zend/mysql/bin |
|
Linux Zend Server |
/usr/local/zend/mysql/bin |
So, to dump the contents of the publications database that you created in Chapter 8 to the screen, enter mysqldump (or the full path if necessary) and the command in Example 9-7.
Example 9-7. Dumping the publications database to screen
mysqldump -u user -ppassword publications
Make sure that you replace user and password with the correct details for your installation of MySQL. If there is no password set for the user, you can omit that part of the command, but the -u user part is mandatory—unless you have root access without a password and are executing as root (not recommended). The result of issuing this command will look something like Figure 9-4.
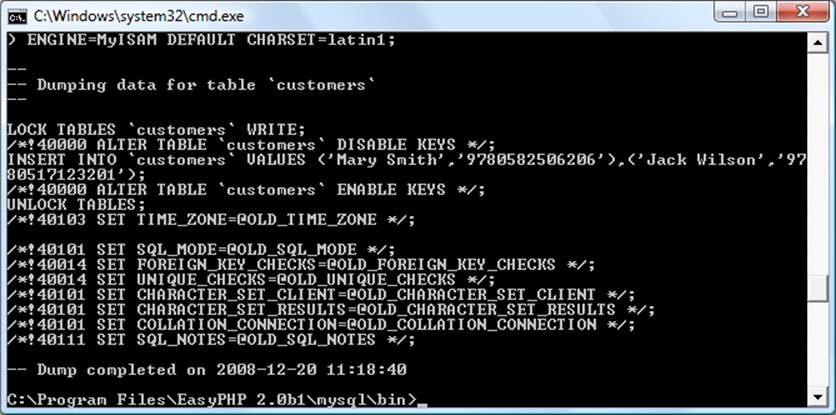
Figure 9-4. Dumping the publications database to screen
Creating a Backup File
Now that you have mysqldump working, and have verified it outputs correctly to the screen, you can send the backup data directly to a file using the > redirect symbol. Assuming that you wish to call the backup file publications.sql, type the command in Example 9-8 (remembering to replaceuser and password with the correct details).
Example 9-8. Dumping the publications database to file
mysqldump -u user -ppassword publications > publications.sql
NOTE
The command in Example 9-8 stores the backup file into the current directory. If you need it to be saved elsewhere, you should insert a file path before the filename. You must also ensure that the directory you are backing up to has the right permissions set to allow the file to be written.
If you echo the backup file to screen or load it into a text editor, you will see that it comprises sequences of SQL commands such as the following:
DROP TABLE IF EXISTS `classics`;
CREATE TABLE `classics` (
`author` varchar(128) default NULL,
`title` varchar(128) default NULL,
`category` varchar(16) default NULL,
`year` smallint(6) default NULL,
`isbn` char(13) NOT NULL default '',
PRIMARY KEY (`isbn`),
KEY `author` (`author`(20)),
KEY `title` (`title`(20)),
KEY `category` (`category`(4)),
KEY `year` (`year`),
FULLTEXT KEY `author_2` (`author`,`title`)
) ENGINE=MyISAM DEFAULT CHARSET=latin1;
This is smart code that can be used to restore a database from a backup, even if it currently exists, because it will first drop any tables that need to be re-created, thus avoiding potential MySQL errors.
Backing up a single table
To back up only a single table from a database (such as the classics table from the publications database), you should first lock the table from within the MySQL command line, by issuing a command such as the following:
LOCK TABLES publications.classics READ;
This ensures that MySQL remains running for read purposes, but writes cannot be made. Then, while keeping the MySQL command line open, use another terminal window to issue the following command from the operating system command line:
mysqldump -u user -ppassword publications classics > classics.sql
You must now release the table lock by entering the following command from the MySQL command line in the first terminal window, which unlocks all tables that have been locked during the current session:
UNLOCK TABLES;
Backing up all tables
If you want to back up all your MySQL databases at once (including the system databases such as mysql), you can use a command such as the one in Example 9-9, which would enable you to restore an entire MySQL database installation. Remember to use locking where required.
Example 9-9. Dumping all the MySQL databases to file
mysqldump -u user -ppassword --all-databases > all_databases.sql
NOTE
Of course, there’s a lot more than just a few lines of SQL code in backed-up database files. I recommend that you take a few minutes to examine a couple in order to familiarize yourself with the types of commands that appear in backup files and how they work.
Restoring from a Backup File
To perform a restore from a file, call the mysql executable, passing it the file to restore from using the < symbol. So, to recover an entire database that you dumped using the --all-databases option, use a command such as that in Example 9-10.
Example 9-10. Restoring an entire set of databases
mysql -u user -ppassword < all_databases.sql
To restore a single database, use the -D option followed by the name of the database, as in Example 9-11, where the publications database is being restored from the backup made in Example 9-8.
Example 9-11. Restoring the publications database
mysql -u user -ppassword -D publications < publications.sql
To restore a single table to a database, use a command such as that in Example 9-12, where just the classics table is being restored to the publications database.
Example 9-12. Restoring the classics table to the publications database
mysql -u user -ppassword -D publications < classics.sql
Dumping Data in CSV Format
As previously mentioned, the mysqldump program is very flexible and supports various types of output, such as the CSV format. Example 9-13 shows how you can dump the data from the classics and customers tables in the publications database to the files classics.txt and customers.txt in the folder c:/temp. By default, on Zend Server the user should be root and no password is used. On OS X or Linux systems, you should modify the destination path to an existing folder.
Example 9-13. Dumping data to CSV format files
mysqldump -u user -ppassword --no-create-info --tab=c:/temp
--fields-terminated-by=',' publications
This command is quite long and is shown here wrapped over several lines, but you must type it all as a single line. The result is the following:
Mark Twain (Samuel Langhorne Clemens)','The Adventures
of Tom Sawyer','Classic Fiction','1876','9781598184891
Jane Austen','Pride and Prejudice','Classic Fiction','1811','9780582506206
Charles Darwin','The Origin of Species','Non-Fiction','1856','9780517123201
Charles Dickens','The Old Curiosity Shop','Classic Fiction','1841','9780099533474
William Shakespeare','Romeo and Juliet','Play','1594','9780192814968
Mary Smith','9780582506206
Jack Wilson','9780517123201
Planning Your Backups
The golden rule to backing up is to do so as often as you find practical. The more valuable the data, the more often you should back it up, and the more copies you should make. If your database gets updated at least once a day, you should really back it up on a daily basis. If, on the other hand, it is not updated very often, you could probably get by with less frequent backups.
NOTE
You should also consider making multiple backups and storing them in different locations. If you have several servers, it is a simple matter to copy your backups between them. You would also be well advised to make physical backups of removable hard disks, thumb drives, CDs or DVDs, and so on, and to keep these in separate locations—preferably somewhere like a fireproof safe.
Once you’ve digested the contents of this chapter, you will be proficient in using both PHP and MySQL; the next chapter will show you how to bring these two technologies together.
Questions
1. What does the word relationship mean in reference to a relational database?
2. What is the term for the process of removing duplicate data and optimizing tables?
3. What are the three rules of the First Normal Form?
4. How can you make a table satisfy the Second Normal Form?
5. What do you put in a column to tie together two tables that contain items having a one-to-many relationship?
6. How can you create a database with a many-to-many relationship?
7. What commands initiate and end a MySQL transaction?
8. What feature does MySQL provide to enable you to examine how a query will work in detail?
9. What command would you use to back up the database publications to a file called publications.sql?
See Chapter 9 Answers in Appendix A for the answers to these questions.
Chapter 8. Introduction to MySQL
With well over 10 million installations, MySQL is probably the most popular database management system for web servers. Developed in the mid-1990s, it’s now a mature technology that powers many of today’s most-visited Internet destinations.
One reason for its success must be the fact that, like PHP, it’s free to use. But it’s also extremely powerful and exceptionally fast—it can run on even the most basic of hardware, and it hardly puts a dent in system resources.
MySQL is also highly scalable, which means that it can grow with your website (for the latest benchmarks, see http://mysql.com/why-mysql/benchmarks).
MySQL Basics
A database is a structured collection of records or data stored in a computer system and organized in such a way that it can be quickly searched and information can be rapidly retrieved.
The SQL in MySQL stands for Structured Query Language. This language is loosely based on English and also used in other databases such as Oracle and Microsoft SQL Server. It is designed to allow simple requests from a database via commands such as:
SELECT title FROM publications WHERE author = 'Charles Dickens';
A MySQL database contains one or more tables, each of which contains records or rows. Within these rows are various columns or fields that contain the data itself. Table 8-1 shows the contents of an example database of five publications detailing the author, title, type, and year of publication.
Table 8-1. Example of a simple database
|
Author |
Title |
Type |
Year |
|
Mark Twain |
The Adventures of Tom Sawyer |
Fiction |
1876 |
|
Jane Austen |
Pride and Prejudice |
Fiction |
1811 |
|
Charles Darwin |
The Origin of Species |
Non-Fiction |
1856 |
|
Charles Dickens |
The Old Curiosity Shop |
Fiction |
1841 |
|
William Shakespeare |
Romeo and Juliet |
Play |
1594 |
Each row in the table is the same as a row in a MySQL table, and each element within a row is the same as a MySQL field.
To uniquely identify this database, I’ll refer to it as the publications database in the examples that follow. And, as you will have observed, all these publications are considered to be classics of literature, so I’ll call the table within the database that holds the details classics.
Summary of Database Terms
The main terms you need to acquaint yourself with for now are:
Database
The overall container for a collection of MySQL data
Table
A subcontainer within a database that stores the actual data
Row
A single record within a table, which may contain several fields
Column
The name of a field within a row
I should note that I’m not trying to reproduce the precise terminology used in academic literature about relational databases, but just to provide simple, everyday terms to help you quickly grasp basic concepts and get started with a database.
Accessing MySQL via the Command Line
There are three main ways in which you can interact with MySQL: using a command line, via a web interface such as phpMyAdmin, and through a programming language like PHP. We’ll start doing the third of these in Chapter 10, but for now, let’s look at the first two.
Starting the Command-Line Interface
The following sections describe relevant instructions for Windows, OS X, and Linux.
Windows users
If you installed the Zend Server Free Edition WAMP (as explained in Chapter 2), you will be able to access the MySQL executable from one of the following directories (the first on 32-bit computers, and the second on 64-bit machines):
C:\Program Files\Zend\MySQL55\bin
C:\Program Files (x86)\Zend\MySQL55\bin
NOTE
If you installed Zend Server in a place other than \Program Files (or \Program Files (x86)), you will need to use that directory instead.
By default, the initial MySQL user will be root and will not have had a password set. Seeing as this is a development server that only you should be able to access, we won’t worry about creating one yet.
So, to enter MySQL’s command-line interface, select Start→Run, enter CMD into the Run box, and press Return. This will call up a Windows Command Prompt. From there, enter one of the following (making any appropriate changes as just discussed):
"C:\Program Files\Zend\MySQL55\bin\mysql" -u root
"C:\Program Files (x86)\Zend\MySQL55\bin\mysql" -u root
NOTE
Note the quotation marks surrounding the path and filename. These are present because the name contains spaces, which the Command Prompt doesn’t correctly interpret, and the quotation marks group the parts of the filename into a single string for the command program to understand.
This command tells MySQL to log you in as user root, without a password. You will now be logged into MySQL and can start entering commands. So, to be sure everything is working as it should be, enter the following (the results should look similar to the output shown in Figure 8-1):
SHOW databases;
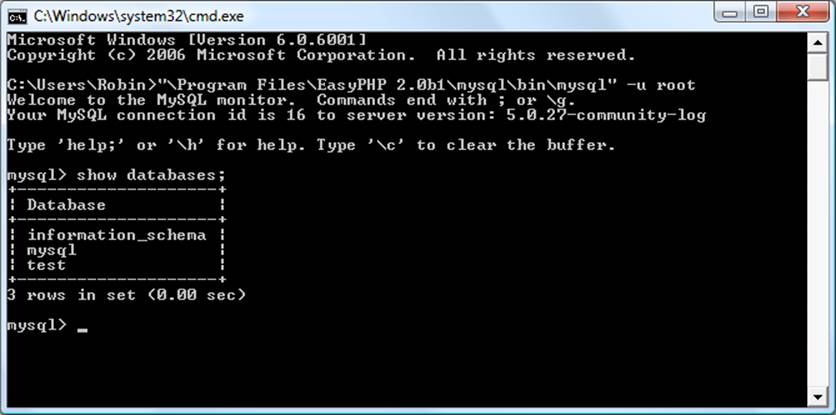
Figure 8-1. Accessing MySQL from a Windows Command Prompt
If this has not worked and you get an error, make sure that you have correctly installed MySQL along with Zend Server (as described in Chapter 2). Otherwise, you are ready to move on to the next section, Using the Command-Line Interface.
OS X users
To proceed with this chapter, you should have installed Zend Server as detailed in Chapter 2. You should also have the web server already running and the MySQL server started.
To enter the MySQL command-line interface, start the Terminal program (which should be available in Finder→Utilities). Then call up the MySQL program, which will have been installed in the directory /usr/local/zend/mysql/bin.
By default, the initial MySQL user is root, and it will have a password of root too. So, to start the program, type the following:
/usr/local/zend/mysql/bin/mysql -u root
This command tells MySQL to log you in as user root and not to request your password. To verify that all is well, type the following (the result should look like the output shown in Figure 8-2):
SHOW databases;
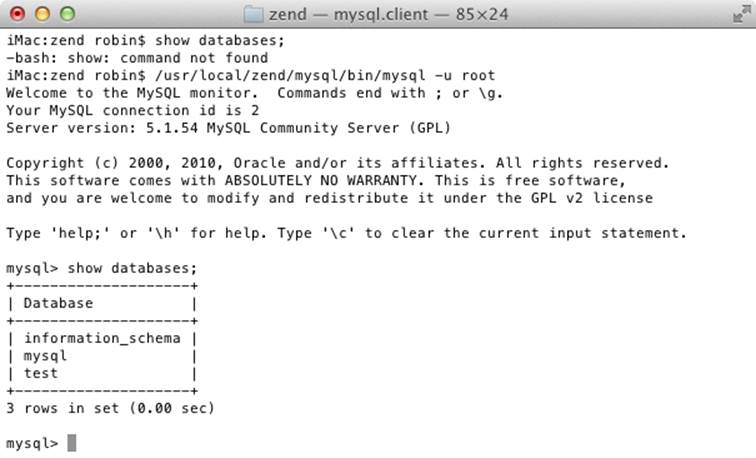
Figure 8-2. Accessing MySQL from the OS X Terminal program
If you receive an error such as Can't connect to local MySQL server through socket, you haven’t started up the MySQL server, so make sure you followed the advice in Chapter 2 about configuring MySQL to start when OS X starts.
You should now be ready to move on to the next section, Using the Command-Line Interface.
Linux users
On a system running a Unix-like operating system such as Linux, you will almost certainly already have PHP and MySQL installed and running, and you will be able to enter the examples in the next section. But first you should type the following to log into your MySQL system:
mysql -u root -p
This tells MySQL to log you in as the user root and to request your password. If you have a password, enter it; otherwise, just press Return.
Once you are logged in, type the following to test the program (you should see something like Figure 8-3 in response):
SHOW databases;
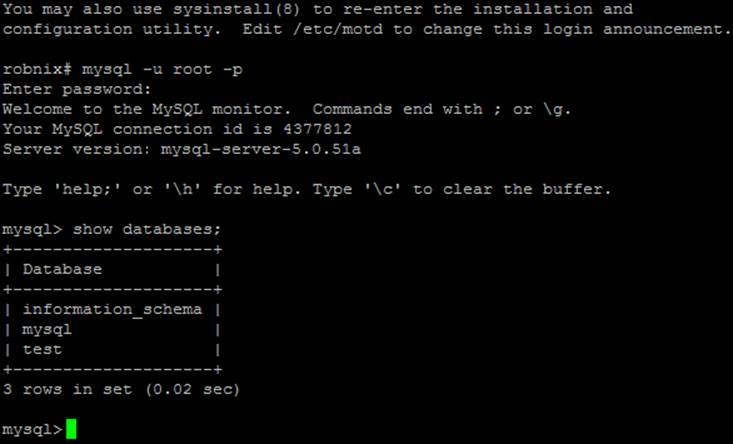
Figure 8-3. Accessing MySQL using Linux
If this procedure fails at any point, refer to the section Installing a LAMP on Linux in Chapter 2 to ensure that you have MySQL properly installed. Otherwise, you should now be ready to move on to the next section, Using the Command-Line Interface.
MySQL on a remote server
If you are accessing MySQL on a remote server, you should Telnet (or preferably, for security, use SSH) into the remote machine, which will probably be a Linux/FreeBSD/Unix type of box. Once in there, you might find that things are a little different, depending on how the system administrator has set the server up, especially if it’s a shared hosting server. Therefore, you need to ensure that you have been given access to MySQL and that you have your username and password. Armed with these, you can then type the following, where username is the name supplied:
mysql -u username -p
Enter your password when prompted. You can then try the following command, which should result in something like Figure 8-3:
SHOW databases;
There may be other databases already created, and the test database may not be there.
Bear in mind also that system administrators have ultimate control over everything and that you can encounter some unexpected setups. For example, you may find that you are required to preface all database names that you create with a unique identifying string to ensure that you do not conflict with databases created by other users.
Therefore, if you have any problems, talk with your system administrator, who will get you sorted out. Just let the sysadmin know that you need a username and password. You should also ask for the ability to create new databases or, at a minimum, to have at least one database created for you ready to use. You can then create all the tables you require within that database.
Using the Command-Line Interface
From here on out, it makes no difference whether you are using Windows, Mac OS X, or Linux to access MySQL directly, as all the commands used (and errors you may receive) are identical.
The semicolon
Let’s start with the basics. Did you notice the semicolon (;) at the end of the SHOW databases; command that you typed? The semicolon is used by MySQL to separate or end commands. If you forget to enter it, MySQL will issue a prompt and wait for you to do so. The required semicolon was made part of the syntax to let you enter multiple-line commands, which can be convenient because some commands get quite long. It also allows you to issue more than one command at a time by placing a semicolon after each one. The interpreter gets them all in a batch when you press the Enter (or Return) key and executes them in order.
NOTE
It’s very common to receive a MySQL prompt instead of the results of your command; it means that you forgot the final semicolon. Just enter the semicolon and press the Enter key, to get what you want.
There are six different prompts that MySQL may present you with (see Table 8-2), so you will always know where you are during a multiline input.
Table 8-2. MySQL’s six command prompts
|
MySQL prompt |
Meaning |
|
mysql> |
Ready and waiting for a command |
|
-> |
Waiting for the next line of a command |
|
'> |
Waiting for the next line of a string started with a single quote |
|
"> |
Waiting for the next line of a string started with a double quote |
|
`> |
Waiting for the next line of a string started with a backtick |
|
/*> |
Waiting for the next line of a comment started with /* |
Canceling a command
If you are partway through entering a command and decide you don’t wish to execute it after all, whatever you do don’t press Control-C! That will close the program. Instead, you can enter \c and press Return. Example 8-1 shows how to use it.
Example 8-1. Canceling a line of input
meaningless gibberish to mysql \c
When you enter that line, MySQL will ignore everything you typed and issue a new prompt. Without the \c, it would have displayed an error message. Be careful, though: if you have opened a string or comment, close it first before using the \c or MySQL will think the \c is just part of the string. Example 8-2 shows the right way to do this.
Example 8-2. Canceling input from inside a string
this is "meaningless gibberish to mysql" \c
Also note that using \c after a semicolon will not work, as it is then a new statement.
MySQL Commands
You’ve already seen the SHOW command, which lists tables, databases, and many other items. The commands you’ll probably use most often are listed in Table 8-3.
Table 8-3. A selection of common MySQL commands
|
Command |
Action |
|
ALTER |
Alter a database or table |
|
BACKUP |
Backup a table |
|
\c |
Cancel input |
|
CREATE |
Create a database |
|
DELETE |
Delete a row from a table |
|
DESCRIBE |
Describe a table’s columns |
|
DROP |
Delete a database or table |
|
EXIT (CTRL-C) |
Exit |
|
GRANT |
Change user privileges |
|
HELP (\h, \?) |
Display help |
|
INSERT |
Insert data |
|
LOCK |
Lock table(s) |
|
QUIT (\q) |
Same as EXIT |
|
RENAME |
Rename a table |
|
SHOW |
List details about an object |
|
SOURCE |
Execute a file |
|
STATUS (\s) |
Display the current status |
|
TRUNCATE |
Empty a table |
|
UNLOCK |
Unlock table(s) |
|
UPDATE |
Update an existing record |
|
USE |
Use a database |
I’ll cover most of these as we proceed, but first, you need to remember a couple of points about MySQL commands:
§ SQL commands and keywords are case-insensitive. CREATE, create, and CrEaTe all mean the same thing. However, for the sake of clarity, the recommended style is to use uppercase.
§ Table names are case-sensitive on Linux and OS X, but case-insensitive on Windows. So for portability purposes, you should always choose a case and stick to it. The recommended style is to use lowercase for tables.
Creating a database
If you are working on a remote server and have only a single user account and access to a single database that was created for you, move on to the section Creating a table. Otherwise, get the ball rolling by issuing the following command to create a new database called publications:
CREATE DATABASE publications;
A successful command will return a message that doesn’t mean much yet—Query OK, 1 row affected (0.00 sec)—but will make sense soon. Now that you’ve created the database, you want to work with it, so issue:
USE publications;
You should now see the message Database changed and will then be set to proceed with the following examples.
Creating users
Now that you’ve seen how easy it is to use MySQL, and created your first database, it’s time to look at how you create users, as you probably won’t want to grant your PHP scripts root access to MySQL; it could cause a real headache should you get hacked.
To create a user, issue the GRANT command, which takes the following form (don’t type this in; it’s not an actual working command):
GRANT PRIVILEGES ON database.object TO 'username'@'hostname'
IDENTIFIED BY 'password';
All this should be pretty straightforward, with the possible exception of the database.object part, which refers to the database itself and the objects it contains, such as tables (see Table 8-4).
Table 8-4. Example parameters for the GRANT command
|
Arguments |
Meaning |
|
*.* |
All databases and all their objects |
|
database.* |
Only the database called database and all its objects |
|
database.object |
Only the database called database and its object called object |
So let’s create a user who can access just the new publications database and all its objects, by entering the following (replacing the username jim and the password mypasswd with ones of your choosing):
GRANT ALL ON publications.* TO 'jim'@'localhost' IDENTIFIED BY 'mypasswd';
What this does is allow the user jim@localhost full access to the publications database using the password mypasswd. You can test whether this step has worked by entering quit to exit and then rerunning MySQL the way you did before, but instead of entering -u root -p, type -u jim -p, or whatever username you created. See Table 8-5 for the correct command for your operating system. Modify it as necessary if the mysql client program is installed in a different directory on your system.
Table 8-5. Starting MySQL and logging in as jim@localhost
|
OS |
Example command |
|
Windows |
"C:\Program Files\Zend\MySQL55\bin\mysql" -u jim -p |
|
Mac OS X |
/Applications/MAMP/Library/bin/mysql -u jim -p |
|
Linux |
mysql -u jim –p |
All you have to do now is enter your password when prompted and you will be logged in. By the way, if you prefer, you can place your password immediately following the -p (without any spaces) to avoid having to enter it when prompted. But this is considered a poor practice, because if other people are logged into your system, there may be ways for them to look at the command you entered and find out your password.
NOTE
You can grant only privileges that you already have, and you must also have the privilege to issue GRANT commands. There is a whole range of privileges you can choose to grant if you are not granting all privileges. For further details, visit http://tinyurl.com/mysqlgrant, which also covers the REVOKE command, which can remove privileges once granted.
Also be aware that if you create a new user but do not specify an IDENTIFIED BY clause, the user will have no password, a situation that is very insecure and should be avoided.
Creating a table
At this point, you should now be logged into MySQL with ALL privileges granted for the database publications (or a database that was created for you), so you’re ready to create your first table. Make sure the correct database is in use by typing the following (replacing publications with the name of your database if it is different):
USE publications;
Now enter the commands in Example 8-3 one line at a time.
Example 8-3. Creating a table called classics
CREATE TABLE classics (
author VARCHAR(128),
title VARCHAR(128),
type VARCHAR(16),
year CHAR(4)) ENGINE MyISAM;
NOTE
You could also issue this command on a single line like this:
CREATE TABLE classics (author VARCHAR(128), title VARCHAR(128),
type VARCHAR(16), year CHAR(4)) ENGINE MyISAM;
but MySQL commands can be long and complicated, so I recommend one line per instruction until you are comfortable with longer lines.
MySQL should then issue the response Query OK, 0 rows affected, along with how long it took to execute the command. If you see an error message instead, check your syntax carefully. Every parenthesis and comma counts, and typing errors are easy to make. In case you are wondering, the ENGINE MyISAM tells MySQL the type of database engine to use for this table.
To check whether your new table has been created, type:
DESCRIBE classics;
All being well, you will see the sequence of commands and responses shown in Example 8-4, where you should particularly note the table format displayed.
Example 8-4. A MySQL session: creating and checking a new table
mysql> USE publications;
Database changed
mysql> CREATE TABLE classics (
-> author VARCHAR(128),
-> title VARCHAR(128),
-> type VARCHAR(16),
-> year CHAR(4)) ENGINE MyISAM;
Query OK, 0 rows affected (0.03 sec)
mysql> DESCRIBE classics;
+--------+--------------+------+-----+---------+-------+
| Field | Type | Null | Key | Default | Extra |
+--------+--------------+------+-----+---------+-------+
| author | varchar(128) | YES | | NULL | |
| title | varchar(128) | YES | | NULL | |
| type | varchar(16) | YES | | NULL | |
| year | char(4) | YES | | NULL | |
+--------+--------------+------+-----+---------+-------+
4 rows in set (0.00 sec)
The DESCRIBE command is an invaluable debugging aid when you need to ensure that you have correctly created a MySQL table. You can also use it to remind yourself about a table’s field or column names and the types of data in each one. Let’s look at each of the headings in detail:
Field
The name of each field or column within a table.
Type
The type of data being stored in the field.
Null
Whether a field is allowed to contain a value of NULL.
Key
MySQL supports keys or indexes, which are quick ways to look up and search for data. The Key heading shows what type of key (if any) has been applied.
Default
The default value that will be assigned to the field if no value is specified when a new row is created.
Extra
Additional information, such as whether a field is set to auto-increment.
Data Types
In Example 8-3, you may have noticed that three of the table’s fields were given the data type of VARCHAR, and one was given the type CHAR. The term VARCHAR stands for VARiable length CHARacter string, and the command takes a numeric value that tells MySQL the maximum length allowed for a string stored in this field.
This data type is very useful, as MySQL can then plan the size of databases and perform lookups and searches more easily. The downside is that if you ever attempt to assign a string value longer than the length allowed, it will be truncated to the maximum length declared in the table definition.
The year field, however, has more predictable values, so instead of VARCHAR we use the more efficient CHAR(4) data type. The parameter of 4 allows for four bytes of data, supporting all years from −999 to 9999; a byte comprises 8 bits and can have the values 00000000 through 11111111, which are 0 to 255 in decimal.
You could, of course, just store two-digit values for the year, but if your data is going to still be needed in the following century, or may otherwise wrap around, it will have to be sanitized first—much like the “millennium bug” that would have caused dates beginning on January 1, 2000, to be treated as 1900 on many of the world’s biggest computer installations.
NOTE
The reason I didn’t use the YEAR data type in the classics table is because it supports only the year 0000, and years 1901 through 2155. This is because MySQL stores the year in a single byte for reasons of efficiency, but it also means that only 256 years are available, and the publication years of the titles in the classics table are well before this.
Both CHAR and VARCHAR accept text strings and impose a limit on the size of the field. The difference is that every string in a CHAR field has the specified size. If you put in a smaller string, it is padded with spaces. A VARCHAR field does not pad the text; it lets the size of the field vary to fit the text that is inserted. But VARCHAR requires a small amount of overhead to keep track of the size of each value. So CHAR is slightly more efficient if the sizes are similar in all records, whereas VARCHAR is more efficient if sizes can vary a lot and get large. In addition, the overhead causes access to VARCHAR data to be slightly slower than to CHAR data.
The CHAR data type
Table 8-6 lists the CHAR data types. All these types offer a parameter that sets the maximum (or exact) length of the string allowed in the field. As the table shows, each type has a built-in maximum number of bytes it can occupy.
Table 8-6. MySQL’s CHAR data types
|
Data type |
Bytes used |
Examples |
|
CHAR(n) |
exactly n (< 256) |
CHAR(5) “Hello” uses 5 bytes CHAR(57) “Goodbye” uses 57 bytes |
|
VARCHAR(n) |
up to n (< 65,536) |
VARCHAR(7) “Morning” uses 7 bytes VARCHAR(100) “Night” uses 5 bytes |
The BINARY data type
The BINARY data type is used for storing strings of full bytes that do not have an associated character set. For example, you might use the BINARY data type to store a GIF image (see Table 8-7).
Table 8-7. MySQL’s BINARY data types
|
Data type |
Bytes used |
Examples |
|
BINARY(n) or BYTE(n) |
exactly n (< 256) |
As CHAR but contains binary data |
|
VARBINARY(n) |
up to n (< 65,536) |
As VARCHAR but for binary data |
The TEXT and VARCHAR data types
The differences between TEXT and VARCHAR are small:
§ Prior to version 5.0.3, MySQL would remove leading and trailing spaces from VARCHAR fields.
§ TEXT fields cannot have default values.
§ MySQL indexes only the first n characters of a TEXT column (you specify n when you create the index).
What this means is that VARCHAR is the better and faster data type to use if you need to search the entire contents of a field. If you will never search more than a certain number of leading characters in a field, you should probably use a TEXT data type (see Table 8-8).
Table 8-8. MySQL’s TEXT data types
|
Data type |
Bytes used |
Attributes |
|
TINYTEXT(n) |
up to n (< 256) |
Treated as a string with a character set |
|
TEXT(n) |
up to n (< 65,536) |
Treated as a string with a character set |
|
MEDIUMTEXT(n) |
up to n (< 1.67e+7) |
Treated as a string with a character set |
|
LONGTEXT(n) |
up to n (< 4.29e+9) |
Treated as a string with a character set |
The BLOB data type
The term BLOB stands for Binary Large OBject and therefore, as you would think, the BLOB data type is most useful for binary data in excess of 65,536 bytes in size. The main other difference between the BLOB and BINARY data types is that BLOBs cannot have default values (see Table 8-9).
Table 8-9. MySQL’s BLOB data types
|
Data type |
Bytes used |
Attributes |
|
TINYBLOB(n) |
up to n (< 256) |
Treated as binary data—no character set |
|
BLOB(n) |
up to n (<= 65,536) |
Treated as binary data—no character set |
|
MEDIUMBLOB(n) |
up to n (< 1.67e+7) |
Treated as binary data—no character set |
|
LONGBLOB(n) |
up to n (< 4.29e+9) |
Treated as binary data—no character set |
Numeric data types
MySQL supports various numeric data types from a single byte up to double-precision floating-point numbers. Although the most memory that a numeric field can use up is 8 bytes, you are well advised to choose the smallest data type that will adequately handle the largest value you expect. Your databases will be small and quickly accessible.
Table 8-10 lists the numeric data types supported by MySQL and the ranges of values they can contain. In case you are not acquainted with the terms, a signed number is one with a possible range from a minus value, through 0, to a positive one, and an unsigned one has a value ranging from 0 to a positive one. They can both hold the same number of values; just picture a signed number as being shifted halfway to the left so that half its values are negative and half are positive. Note that floating-point values (of any precision) may only be signed.
Table 8-10. MySQL’s numeric data types
|
Data type |
Bytes used |
Minimum value |
Maximum value |
||
|
Signed |
Unsigned |
Signed |
Unsigned |
||
|
TINYINT |
1 |
−128 |
0 |
127 |
255 |
|
SMALLINT |
2 |
−32,768 |
0 |
32,767 |
65,535 |
|
MEDIUMINT |
3 |
−8.38e+6 |
0 |
8.38e+6 |
1.67e+7 |
|
INT or INTEGER |
4 |
−2.15e+9 |
0 |
2.15e+9 |
4.29e+9 |
|
BIGINT |
8 |
−9.22e+18 |
0 |
9.22e+18 |
1.84e+19 |
|
FLOAT |
4 |
−3.40e+38 |
n/a |
3.40e+38 |
n/a |
|
DOUBLE or REAL |
8 |
−1.80e+308 |
n/a |
1.80e+308 |
n/a |
To specify whether a data type is signed or unsigned, use the UNSIGNED qualifier. The following example creates a table called tablename with a field in it called fieldname of the data type UNSIGNED INTEGER:
CREATE TABLE tablename (fieldname INT UNSIGNED);
When creating a numeric field, you can also pass an optional number as a parameter, like this:
CREATE TABLE tablename (fieldname INT(4));
But you must remember that, unlike BINARY and CHAR data types, this parameter does not indicate the number of bytes of storage to use. It may seem counterintuitive, but what the number actually represents is the display width of the data in the field when it is retrieved. It is commonly used with the ZEROFILL qualifier like this:
CREATE TABLE tablename (fieldname INT(4) ZEROFILL);
What this does is cause any numbers with a width of less than four characters to be padded with one or more zeros, sufficient to make the display width of the field four characters long. When a field is already of the specified width or greater, no padding takes place.
DATE and TIME
The main remaining data types supported by MySQL relate to the date and time and can be seen in Table 8-11.
Table 8-11. MySQL’s DATE and TIME data types
|
Data type |
Time/date format |
|
DATETIME |
'0000-00-00 00:00:00' |
|
DATE |
'0000-00-00' |
|
TIMESTAMP |
'0000-00-00 00:00:00' |
|
TIME |
'00:00:00' |
|
YEAR |
0000 (Only years 0000 and 1901–2155) |
The DATETIME and TIMESTAMP data types display the same way. The main difference is that TIMESTAMP has a very narrow range (from the years 1970 through 2037), whereas DATETIME will hold just about any date you’re likely to specify, unless you’re interested in ancient history or science fiction.
TIMESTAMP is useful, however, because you can let MySQL set the value for you. If you don’t specify the value when adding a row, the current time is automatically inserted. You can also have MySQL update a TIMESTAMP column each time you change a row.
The AUTO_INCREMENT data type
Sometimes you need to ensure that every row in your database is guaranteed to be unique. You could do this in your program by carefully checking the data you enter and making sure that there is at least one value that differs in any two rows, but this approach is error-prone and works only in certain circumstances. In the classics table, for instance, an author may appear multiple times. Likewise, the year of publication will also be frequently duplicated, and so on. It would be hard to guarantee that you have no duplicate rows.
The general solution is to use an extra column just for this purpose. In a while, we’ll look at using a publication’s ISBN (International Standard Book Number), but first I’d like to introduce the AUTO_INCREMENT data type.
As its name implies, a column given this data type will set the value of its contents to that of the column entry in the previously inserted row, plus 1. Example 8-5 shows how to add a new column called id to the table classics with auto-incrementing.
Example 8-5. Adding the auto-incrementing column id
ALTER TABLE classics ADD id INT UNSIGNED NOT NULL AUTO_INCREMENT KEY;
This is your introduction to the ALTER command, which is very similar to the CREATE command. ALTER operates on an existing table, and can add, change, or delete columns. Our example adds a column named id with the following characteristics:
INT UNSIGNED
Makes the column take an integer large enough for you to store more than 4 billion records in the table.
NOT NULL
Ensures that every column has a value. Many programmers use NULL in a field to indicate that the field doesn’t have any value. But that would allow duplicates, which would violate the whole reason for this column’s existence. So we disallow NULL values.
AUTO_INCREMENT
Causes MySQL to set a unique value for this column in every row, as described earlier. We don’t really have control over the value that this column will take in each row, but we don’t care: all we care about is that we are guaranteed a unique value.
KEY
An auto-increment column is useful as a key, because you will tend to search for rows based on this column, as explained in the section Indexes.
Each entry in the column id will now have a unique number, with the first starting at 1 and the others counting upward from there. And whenever a new row is inserted, its id column will automatically be given the next number in sequence.
Rather than applying the column retroactively, you could have included it by issuing the CREATE command in slightly different format. In that case, the command in Example 8-3 would be replaced with Example 8-6. Check the final line in particular.
Example 8-6. Adding the auto-incrementing id column at table creation
CREATE TABLE classics (
author VARCHAR(128),
title VARCHAR(128),
type VARCHAR(16),
year CHAR(4),
id INT UNSIGNED NOT NULL AUTO_INCREMENT KEY) ENGINE MyISAM;
If you wish to check whether the column has been added, use the following command to view the table’s columns and data types:
DESCRIBE classics;
Now that we’ve finished with it, the id column is no longer needed, so if you created it using Example 8-5, you should now remove the column using the command in Example 8-7.
Example 8-7. Removing the id column
ALTER TABLE classics DROP id;
Adding data to a table
To add data to a table, use the INSERT command. Let’s see this in action by populating the table classics with the data from Table 8-1, using one form of the INSERT command repeatedly (Example 8-8).
Example 8-8. Populating the classics table
INSERT INTO classics(author, title, type, year)
VALUES('Mark Twain','The Adventures of Tom Sawyer','Fiction','1876');
INSERT INTO classics(author, title, type, year)
VALUES('Jane Austen','Pride and Prejudice','Fiction','1811');
INSERT INTO classics(author, title, type, year)
VALUES('Charles Darwin','The Origin of Species','Non-Fiction','1856');
INSERT INTO classics(author, title, type, year)
VALUES('Charles Dickens','The Old Curiosity Shop','Fiction','1841');
INSERT INTO classics(author, title, type, year)
VALUES('William Shakespeare','Romeo and Juliet','Play','1594');
After every second line, you should see a Query OK message. Once all lines have been entered, type the following command, which will display the table’s contents (the result should look like Figure 8-4):
SELECT * FROM classics;
Don’t worry about the SELECT command for now—we’ll come to it in the section Querying a MySQL Database. Suffice it to say that, as typed, it will display all the data you just entered.
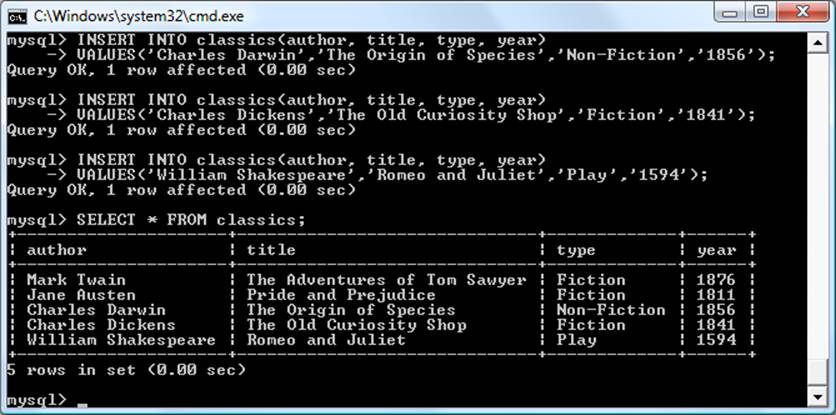
Figure 8-4. Populating the classics table and viewing its contents
Let’s go back and look at how we used the INSERT command. The first part, INSERT INTO classics, tells MySQL where to insert the following data. Then, within parentheses, the four column names are listed—author, title, type, and year—all separated by commas. This tells MySQL that these are the fields into which the data is to be inserted.
The second line of each INSERT command contains the keyword VALUES followed by four strings within parentheses, and separated by commas. This supplies MySQL with the four values to be inserted into the four columns previously specified. (As always, my choice of where to break the lines was arbitrary.)
Each item of data will be inserted into the corresponding column, in a one-to-one correspondence. If you accidentally listed the columns in a different order from the data, the data would go into the wrong columns. And the number of columns must match the number of data items.
Renaming a table
Renaming a table, like any other change to the structure or meta information about a table, is achieved via the ALTER command. So, for example, to change the name of table classics to pre1900, use the following command:
ALTER TABLE classics RENAME pre1900;
If you tried that command, you should revert the table name by entering the following, so that later examples in this chapter will work as printed:
ALTER TABLE pre1900 RENAME classics;
Changing the data type of a column
Changing a column’s data type also makes use of the ALTER command, this time in conjunction with the MODIFY keyword. So to change the data type of column year from CHAR(4) to SMALLINT (which requires only two bytes of storage and so will save disk space), enter the following:
ALTER TABLE classics MODIFY year SMALLINT;
When you do this, if the conversion of data type makes sense to MySQL, it will automatically change the data while keeping the meaning. In this case, it will change each string to a comparable integer, and so on, as the string is recognizable as referring to an integer.
Adding a new column
Let’s suppose that you have created a table and populated it with plenty of data, only to discover you need an additional column. Not to worry. Here’s how to add the new column pages, which will be used to store the number of pages in a publication:
ALTER TABLE classics ADD pages SMALLINT UNSIGNED;
This adds the new column with the name pages using the UNSIGNED SMALLINT data type, sufficient to hold a value of up to 65,535—hopefully that’s more than enough for any book ever published!
And, if you ask MySQL to describe the updated table using the DESCRIBE command, as follows, you will see the change has been made (see Figure 8-5):
DESCRIBE classics;
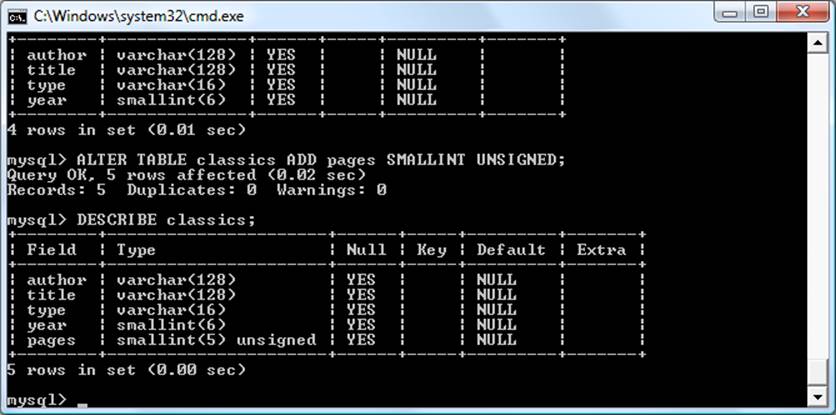
Figure 8-5. Adding the new pages column and viewing the table
Renaming a column
Looking again at Figure 8-5, you may decide that having a column named type can be confusing, because that is the name used by MySQL to identify data types. Again, no problem—let’s change its name to category, like this:
ALTER TABLE classics CHANGE type category VARCHAR(16);
Note the addition of VARCHAR(16) on the end of this command. That’s because the CHANGE keyword requires the data type to be specified, even if you don’t intend to change it, and VARCHAR(16) was the data type specified when that column was initially created as type.
Removing a column
Actually, upon reflection, you might decide that the page count column pages isn’t actually all that useful for this particular database, so here’s how to remove that column using the DROP keyword:
ALTER TABLE classics DROP pages;
WARNING
Remember that DROP is irreversible and you should always use it with caution, because you could inadvertently delete entire tables (and even databases) with it if you are not careful!
Deleting a table
Deleting a table is very easy indeed. But, because I don’t want you to have to reenter all the data for the classics table, let’s quickly create a new table, verify its existence, and then delete it by typing the commands in Example 8-9. The result of these four commands should look like Figure 8-6.
Example 8-9. Creating, viewing, and deleting a table
CREATE TABLE disposable(trash INT);
DESCRIBE disposable;
DROP TABLE disposable;
SHOW tables;

Figure 8-6. Creating, viewing, and deleting a table
Indexes
As things stand, the table classics works and can be searched without problem by MySQL—until it grows to more than a couple of hundred rows, that is. At that point, database accesses will get slower and slower with every new row added, because MySQL has to search through every row whenever a query is issued. This is like searching through every book in a library whenever you need to look something up.
Of course, you don’t have to search libraries that way, because they have either a card index system or, most likely, a database of their own. And the same goes for MySQL, because at the expense of a slight overhead in memory and disk space, you can create a “card index” for a table that MySQL will use to conduct lightning-fast searches.
Creating an Index
The way to achieve fast searches is to add an index, either when creating a table or at any time afterward. But the decision is not so simple. For example, there are different index types such as a regular INDEX, PRIMARY KEY, and FULLTEXT. Also, you must decide which columns require an index, a judgment that requires you to predict whether you will be searching any of the data in that column. Indexes can also get complicated, because you can combine multiple columns in one index. And even when you’ve decided that, you still have the option of reducing index size by limiting the amount of each column to be indexed.
If we imagine the searches that may be made on the classics table, it becomes apparent that all of the columns may need to be searched. However, if the pages column created in the section Adding a new column had not been deleted, it would probably not have needed an index, as most people would be unlikely to search for books by the number of pages they have. Anyway, go ahead and add an index to each of the columns, using the commands in Example 8-10.
Example 8-10. Adding indexes to the classics table
ALTER TABLE classics ADD INDEX(author(20));
ALTER TABLE classics ADD INDEX(title(20));
ALTER TABLE classics ADD INDEX(category(4));
ALTER TABLE classics ADD INDEX(year);
DESCRIBE classics;
The first two commands create indexes on both the author and title columns, limiting each index to only the first 20 characters. For instance, when MySQL indexes the following title:
The Adventures of Tom Sawyer
It will actually store in the index only the first 20 characters:
The Adventures of To
This is done to minimize the size of the index, and to optimize database access speed. I chose 20 because it’s likely to be sufficient to ensure uniqueness for most strings in these columns. If MySQL finds two indexes with the same contents, it will have to waste time going to the table itself and checking the column that was indexed to find out which rows really matched.
With the category column, currently only the first character is required to identify a string as unique (F for Fiction, N for Non-Fiction, and P for Play), but I chose an index of four characters to allow for future category types that may be unique only after four characters. You can also re-index this column later, when you have a more complete set of categories. And finally, I set no limit to the year column’s index, because it’s an integer, not a string.
The results of issuing these commands (and a DESCRIBE command to confirm that they worked) can be seen in Figure 8-7, which shows the key MUL for each column. This key means that multiple occurrences of a value may occur within that column, which is exactly what we want, as authors may appear many times, the same book title could be used by multiple authors, and so on.
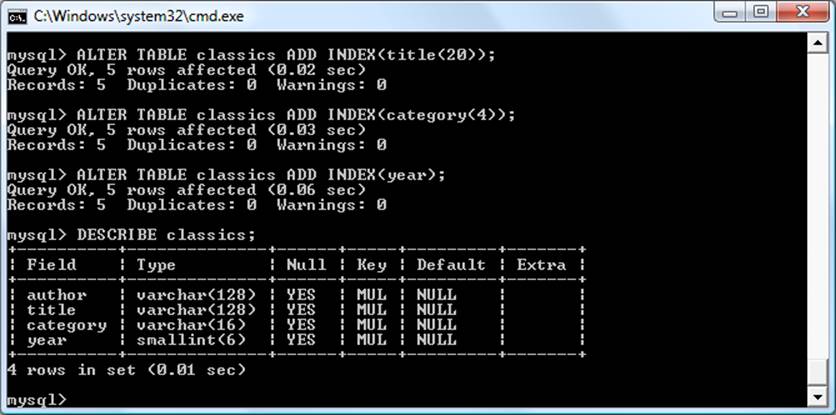
Figure 8-7. Adding indexes to the classics table
Using CREATE INDEX
An alternative to using ALTER TABLE to add an index is to use the CREATE INDEX command. They are equivalent, except that CREATE INDEX cannot be used to create a PRIMARY KEY (see the section Primary keys). The format of this command is shown in the second line of Example 8-11.
Example 8-11. These two commands are equivalent
ALTER TABLE classics ADD INDEX(author(20));
CREATE INDEX author ON classics (author(20));
Adding indexes when creating tables
You don’t have to wait until after creating a table to add indexes. In fact, doing so can be time consuming, as adding an index to a large table can take a very long time. Therefore, let’s look at a command that creates the table classics with indexes already in place.
Example 8-12 is a reworking of Example 8-3 in which the indexes are created at the same time as the table. Note that to incorporate the modifications made in this chapter, this version uses the new column name category instead of type and sets the data type of year to SMALLINT instead ofCHAR(4). If you want to try it out without first deleting your current classics table, change the word classics in line 1 to something else like classics1, then drop classics1 after you have finished with it.
Example 8-12. Creating the table classics with indexes
CREATE TABLE classics (
author VARCHAR(128),
title VARCHAR(128),
category VARCHAR(16),
year SMALLINT,
INDEX(author(20)),
INDEX(title(20)),
INDEX(category(4)),
INDEX(year)) ENGINE MyISAM;
Primary keys
So far, you’ve created the table classics and ensured that MySQL can search it quickly by adding indexes, but there’s still something missing. All the publications in the table can be searched, but there is no single unique key for each publication to enable instant accessing of a row. The importance of having a key with a unique value for each row will come up when we start to combine data from different tables.
The section The AUTO_INCREMENT data type briefly introduced the idea of a primary key when creating the auto-incrementing column id, which could have been used as a primary key for this table. However, I wanted to reserve that task for a more appropriate column: the internationally recognized ISBN number.
So let’s go ahead and create a new column for this key. Now, bearing in mind that ISBNs are 13 characters long, you might think that the following command would do the job:
ALTER TABLE classics ADD isbn CHAR(13) PRIMARY KEY;
But it doesn’t. If you try it, you’ll get the error Duplicate entry for key 1. The reason is that the table is already populated with some data and this command is trying to add a column with the value NULL to each row, which is not allowed, as all values must be unique in any column having a primary key index. However, if there were no data already in the table, this command would work just fine, as would adding the primary key index upon table creation.
In our current situation, we have to be a bit sneaky and create the new column without an index, populate it with data, and then add the index retrospectively using the commands in Example 8-13. Luckily, each of the years is unique in the current set of data, so we can use the year column to identify each row for updating. Note that this example uses the UPDATE and WHERE keywords, which are explained in more detail in the section Querying a MySQL Database.
Example 8-13. Populating the isbn column with data and using a primary key
ALTER TABLE classics ADD isbn CHAR(13);
UPDATE classics SET isbn='9781598184891' WHERE year='1876';
UPDATE classics SET isbn='9780582506206' WHERE year='1811';
UPDATE classics SET isbn='9780517123201' WHERE year='1856';
UPDATE classics SET isbn='9780099533474' WHERE year='1841';
UPDATE classics SET isbn='9780192814968' WHERE year='1594';
ALTER TABLE classics ADD PRIMARY KEY(isbn);
DESCRIBE classics;
Once you have typed these commands, the results should look like Figure 8-8. Note that the keywords PRIMARY KEY replace the keyword INDEX in the ALTER TABLE syntax (compare Examples 8-10 and 8-13).
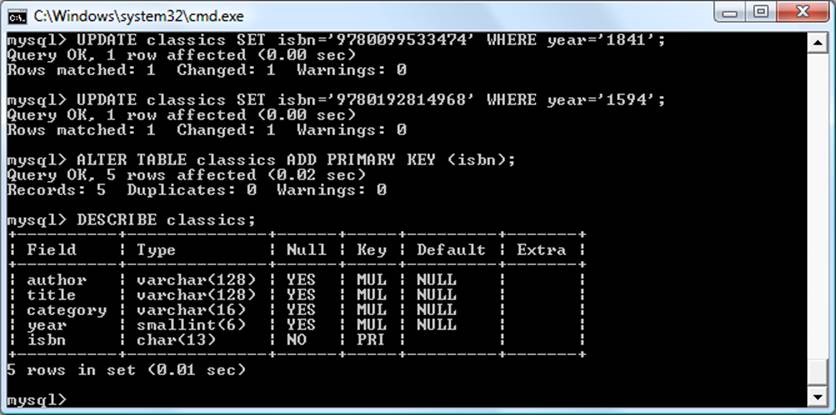
Figure 8-8. Retrospectively adding a primary key to the classics table
To have created a primary key when the table classics was created, you could have used the commands in Example 8-14. Again, rename classics in line 1 to something else if you wish to try this example for yourself, and then delete the test table afterward.
Example 8-14. Creating the table classics with a primary key
CREATE TABLE classics (
author VARCHAR(128),
title VARCHAR(128),
category VARCHAR(16),
year SMALLINT,
isbn CHAR(13),
INDEX(author(20)),
INDEX(title(20)),
INDEX(category(4)),
INDEX(year),
PRIMARY KEY (isbn)) ENGINE MyISAM;
Creating a FULLTEXT index
Unlike a regular index, MySQL’s FULLTEXT allows super-fast searches of entire columns of text. It stores every word in every data string in a special index that you can search using “natural language,” in a similar manner to using a search engine.
NOTE
Actually, it’s not strictly true that MySQL stores all the words in a FULLTEXT index, because it has a built-in list of more than 500 words that it chooses to ignore because they are so common that they aren’t very helpful for searching anyway. This list, called stopwords, includes the, as, is, of, and so on. The list helps MySQL run much more quickly when performing aFULLTEXT search and keeps database sizes down. Appendix C contains the full list of stopwords.
Here are some things that you should know about FULLTEXT indexes:
§ FULLTEXT indexes can be used only with MyISAM tables, the type used by MySQL’s default storage engine (MySQL supports at least 10 different storage engines). If you need to convert a table to MyISAM, you can usually use the MySQL command ALTER TABLE tablename ENGINE = MyISAM;.
§ FULLTEXT indexes can be created for CHAR, VARCHAR, and TEXT columns only.
§ A FULLTEXT index definition can be given in the CREATE TABLE statement when a table is created, or added later using ALTER TABLE (or CREATE INDEX).
§ For large data sets, it is much faster to load your data into a table that has no FULLTEXT index and then create the index than to load data into a table that has an existing FULLTEXT index.
To create a FULLTEXT index, apply it to one or more records as in Example 8-15, which adds a FULLTEXT index to the pair of columns author and title in the table classics (this index is in addition to the ones already created and does not affect them).
Example 8-15. Adding a FULLTEXT index to the table classics
ALTER TABLE classics ADD FULLTEXT(author,title);
You can now perform FULLTEXT searches across this pair of columns. This feature could really come into its own if you could now add the entire text of these publications to the database (particularly as they’re out of copyright protection) and they would be fully searchable. See the sectionMATCH ... AGAINST for a description of searches using FULLTEXT.
NOTE
If you find that MySQL is running slower than you think it should be when accessing your database, the problem is usually related to your indexes. Either you don’t have an index where you need one, or the indexes are not optimally designed. Tweaking a table’s indexes will often solve such a problem. Performance is beyond the scope of this book, but in Chapter 9 I give you a few tips so you know what to look for.
Querying a MySQL Database
So far, we’ve created a MySQL database and tables, populated them with data, and added indexes to make them fast to search. Now it’s time to look at how these searches are performed, and the various commands and qualifiers available.
SELECT
As you saw in Figure 8-4, the SELECT command is used to extract data from a table. In that section, I used its simplest form to select all data and display it—something you will never want to do on anything but the smallest tables, because all the data will scroll by at an unreadable pace. Let’s now examine SELECT in more detail.
The basic syntax is:
SELECT something FROM tablename;
The something can be an * (asterisk) as you saw before, which means “every column,” or you can choose to select only certain columns. For instance, Example 8-16 shows how to select just the author and title and just the title and isbn. The result of typing these commands can be seen inFigure 8-9.
Example 8-16. Two different SELECT statements
SELECT author,title FROM classics;
SELECT title,isbn FROM classics;
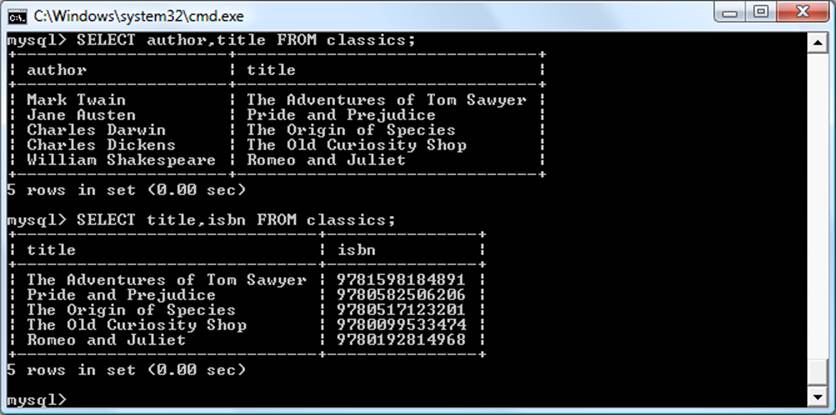
Figure 8-9. The output from two different SELECT statements
SELECT COUNT
Another replacement for the something parameter is COUNT, which can be used in many ways. In Example 8-17, it displays the number of rows in the table by passing * as a parameter, which means “all rows.” As you’d expect, the result returned is 5, as there are five publications in the table.
Example 8-17. Counting rows
SELECT COUNT(*) FROM classics;
SELECT DISTINCT
This qualifier (and its synonym DISTINCTROW) allows you to weed out multiple entries when they contain the same data. For instance, suppose that you want a list of all authors in the table. If you select just the author column from a table containing multiple books by the same author, you’ll normally see a long list with same author names over and over. But by adding the DISTINCT keyword, you can show each author just once. So let’s test that out by adding another row that repeats one of our existing authors (Example 8-18).
Example 8-18. Duplicating data
INSERT INTO classics(author, title, category, year, isbn)
VALUES('Charles Dickens','Little Dorrit','Fiction','1857', '9780141439969');
Now that Charles Dickens appears twice in the table, we can compare the results of using SELECT with and without the DISTINCT qualifier. Example 8-19 and Figure 8-10 show that the simple SELECT lists Dickens twice, and the command with the DISTINCT qualifier shows him only once.
Example 8-19. With and without the DISTINCT qualifier
SELECT author FROM classics;
SELECT DISTINCT author FROM classics;
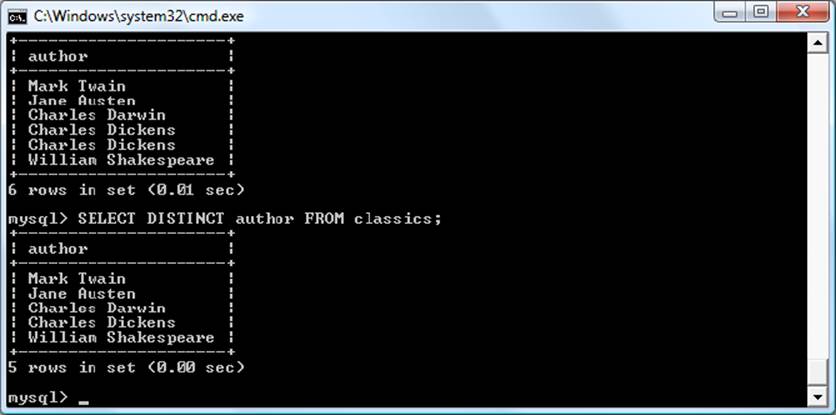
Figure 8-10. Selecting data with and without DISTINCT
DELETE
When you need to remove a row from a table, use the DELETE command. Its syntax is similar to the SELECT command and allows you to narrow down the exact row or rows to delete using qualifiers such as WHERE and LIMIT.
Now that you’ve seen the effects of the DISTINCT qualifier, if you entered Example 8-18, you should remove Little Dorrit by entering the commands in Example 8-20.
Example 8-20. Removing the new entry
DELETE FROM classics WHERE title='Little Dorrit';
This example issues a DELETE command for all rows whose title column contains the string Little Dorrit.
The WHERE keyword is very powerful, and important to enter correctly; an error could lead a command to the wrong rows (or have no effect in cases where nothing matches the WHERE clause). So now we’ll spend some time on that clause, which is the heart and soul of SQL.
WHERE
The WHERE keyword enables you to narrow down queries by returning only those where a certain expression is true. Example 8-20 returns only the rows where the column exactly matches the string Little Dorrit, using the equality operator =. Example 8-21 shows a couple more examples of using WHERE with =.
Example 8-21. Using the WHERE keyword
SELECT author,title FROM classics WHERE author="Mark Twain";
SELECT author,title FROM classics WHERE isbn="9781598184891 ";
Given our current table, the two commands in Example 8-21 display the same results. But we could easily add more books by Mark Twain, in which case the first line would display all titles he wrote and the second line would continue (because we know the ISBN is unique) to display The Adventures of Tom Sawyer. In other words, searches using a unique key are more predictable, and you’ll see further evidence later of the value of unique and primary keys.
You can also do pattern matching for your searches using the LIKE qualifier, which allows searches on parts of strings. This qualifier should be used with a % character before or after some text. When placed before a keyword, % means “anything before” and after a keyword it means “anything after.” Example 8-22 performs three different queries, one for the start of a string, one for the end, and one for anywhere in a string. You can see the results of these commands in Figure 8-11.
Example 8-22. Using the LIKE qualifier
SELECT author,title FROM classics WHERE author LIKE "Charles%";
SELECT author,title FROM classics WHERE title LIKE "%Species";
SELECT author,title FROM classics WHERE title LIKE "%and%";
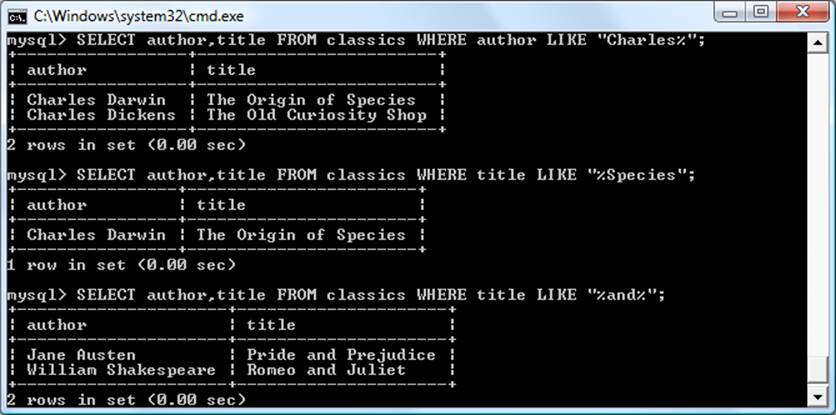
Figure 8-11. Using WHERE with the LIKE qualifier
The first command outputs the publications by both Charles Darwin and Charles Dickens because the LIKE qualifier was set to return anything matching the string Charles followed by any other text. Then just The Origin of Species is returned, because it’s the only row whose column ends with the string Species. Last, both Pride and Prejudice and Romeo and Juliet are returned, because they both matched the string and anywhere in the column.
The % will also match if there is nothing in the position it occupies; in other words, it can match an empty string.
LIMIT
The LIMIT qualifier enables you to choose how many rows to return in a query, and where in the table to start returning them. When passed a single parameter, it tells MySQL to start at the beginning of the results and just return the number of rows given in that parameter. If you pass it two parameters, the first indicates the offset from the start of the results where MySQL should start the display, and the second indicates how many to return. You can think of the first parameter as saying, “Skip this number of results at the start.”
Example 8-23 includes three commands. The first returns the first three rows from the table. The second returns two rows starting at position 1 (skipping the first row). The last command returns a single row starting at position 3 (skipping the first three rows). Figure 8-12 shows the results of issuing these three commands.
Example 8-23. Limiting the number of results returned
SELECT author,title FROM classics LIMIT 3;
SELECT author,title FROM classics LIMIT 1,2;
SELECT author,title FROM classics LIMIT 3,1;
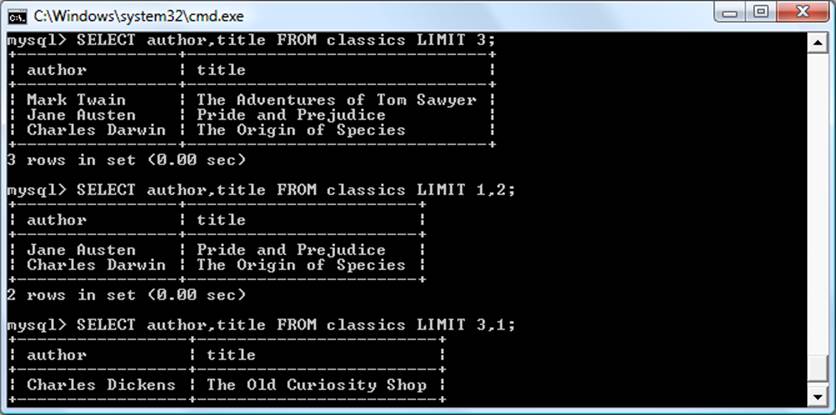
Figure 8-12. Restricting the rows returned with LIMIT
WARNING
Be careful with the LIMIT keyword, because offsets start at 0, but the number of rows to return starts at 1. So LIMIT 1,3 means return three rows starting from the second row.
MATCH ... AGAINST
The MATCH ... AGAINST construct can be used on columns that have been given a FULLTEXT index (see the section Creating a FULLTEXT index). With it, you can make natural-language searches as you would in an Internet search engine. Unlike the use of WHERE ... = or WHERE ... LIKE, MATCH ... AGAINST lets you enter multiple words in a search query and checks them against all words in the FULLTEXT columns. FULLTEXT indexes are case-insensitive, so it makes no difference what case is used in your queries.
Assuming that you have added a FULLTEXT index to the author and title columns, enter the three queries shown in Example 8-24. The first asks for any of these columns that contain the word and to be returned. Because and is a stopword, MySQL will ignore it and the query will always produce an empty set—no matter what is stored in the columns. The second query asks for any rows that contain both of the words old and shop anywhere in them, in any order, to be returned. And the last query applies the same kind of search for the words tom and sawyer. Figure 8-13shows the results of these queries.
Example 8-24. Using MATCH ... AGAINST on FULLTEXT indexes
SELECT author,title FROM classics
WHERE MATCH(author,title) AGAINST('and');
SELECT author,title FROM classics
WHERE MATCH(author,title) AGAINST('old shop');
SELECT author,title FROM classics
WHERE MATCH(author,title) AGAINST('tom sawyer');
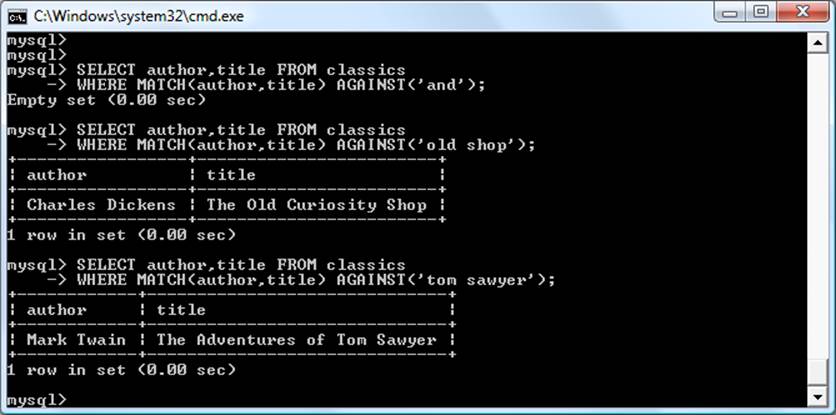
Figure 8-13. Using MATCH ... AGAINST on a FULLTEXT index
MATCH ... AGAINST ... IN BOOLEAN MODE
If you wish to give your MATCH ... AGAINST queries even more power, use Boolean mode. This changes the effect of the standard FULLTEXT query so that it searches for any combination of search words, instead of requiring all search words to be in the text. The presence of a single word in a column causes the search to return the row.
Boolean mode also allows you to preface search words with a + or − sign to indicate whether they must be included or excluded. If normal Boolean mode says, “Any of these words will do,” a plus sign means “This word must be present; otherwise, don’t return the row.” A minus sign means “This word must not be present; its presence disqualifies the row from being returned.”
Example 8-25 illustrates Boolean mode through two queries. The first asks for all rows containing the word charles and not the word species to be returned. The second uses double quotes to request that all rows containing the exact phrase origin of be returned. Figure 8-14 shows the results of these queries.
Example 8-25. Using MATCH ... AGAINST ... IN BOOLEAN MODE
SELECT author,title FROM classics
WHERE MATCH(author,title)
AGAINST('+charles -species' IN BOOLEAN MODE);
SELECT author,title FROM classics
WHERE MATCH(author,title)
AGAINST('"origin of"' IN BOOLEAN MODE);
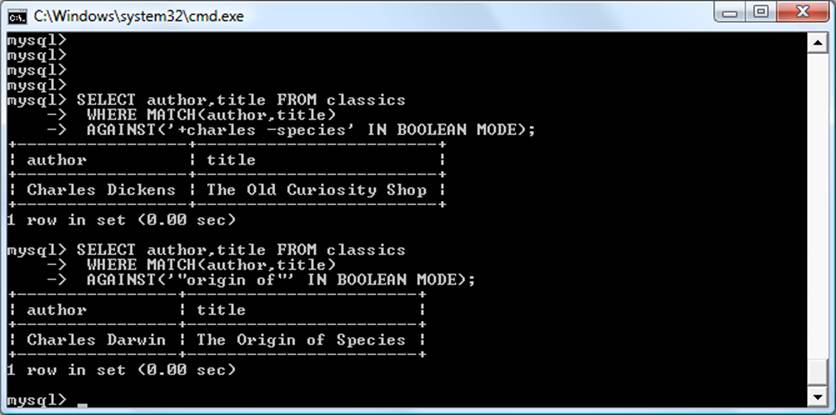
Figure 8-14. Using MATCH ... AGAINST ... IN BOOLEAN MODE
As you would expect, the first request returns only The Old Curiosity Shop by Charles Dickens, because any rows containing the word species have been excluded, so Charles Darwin’s publication is ignored.
NOTE
There is something of interest to note in the second query: the stopword of is part of the search string, but is still used by the search because the double quotation marks override stopwords.
UPDATE ... SET
This construct allows you to update the contents of a field. If you wish to change the contents of one or more fields, you need to first narrow in on just the field or fields to be changed, in much the same way you use the SELECT command. Example 8-26 shows the use of UPDATE ... SET in two different ways. You can see the results in Figure 8-15.
Example 8-26. Using UPDATE ... SET
UPDATE classics SET author='Mark Twain (Samuel Langhorne Clemens)'
WHERE author='Mark Twain';
UPDATE classics SET category='Classic Fiction'
WHERE category='Fiction';
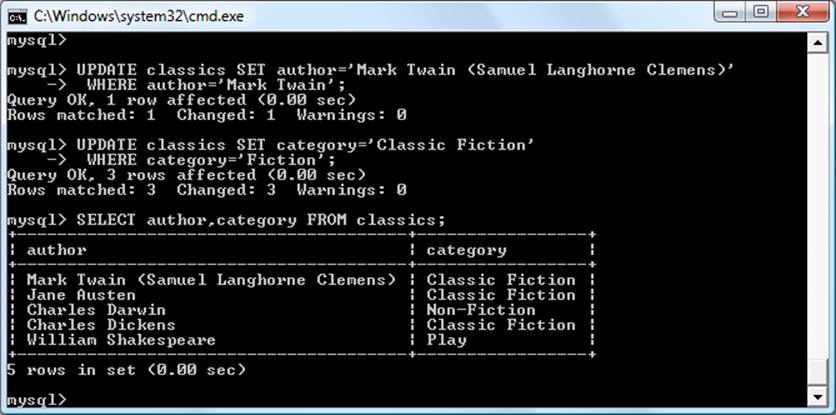
Figure 8-15. Updating columns in the classics table
In the first query, Mark Twain’s real name of Samuel Langhorne Clemens was appended to his pen name in brackets, which affected only one row. The second query, however, affected three rows, because it changed all occurrences of the word Fiction in the category column to the termClassic Fiction.
When performing an update, you can also make use of the qualifiers you have already seen, such as LIMIT, and the following ORDER BY and GROUP BY keywords.
ORDER BY
ORDER BY sorts returned results by one or more columns in ascending or descending order. Example 8-27 shows two such queries, the results of which can be seen in Figure 8-16.
Example 8-27. Using ORDER BY
SELECT author,title FROM classics ORDER BY author;
SELECT author,title FROM classics ORDER BY title DESC;
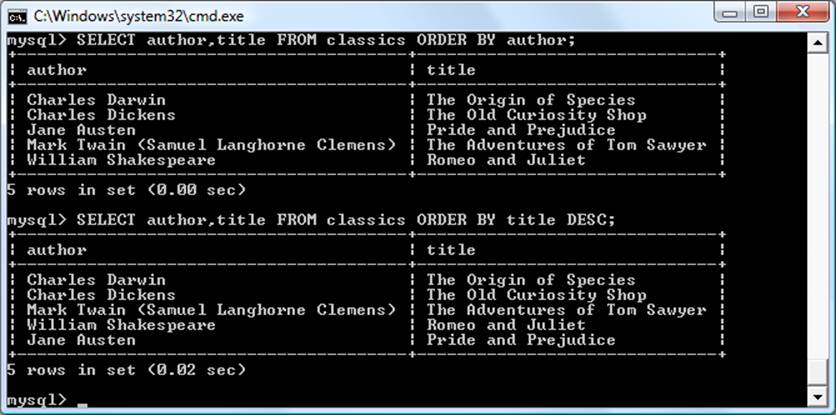
Figure 8-16. Sorting the results of requests
As you can see, the first query returns the publications by author in ascending alphabetical order (the default), and the second returns them by title in descending order.
If you wanted to sort all the rows by author and then by descending year of publication (to view the most recent first), you would issue the following query:
SELECT author,title,year FROM classics ORDER BY author,year DESC;
This shows that each ascending and descending qualifier applies to a single column. The DESC keyword applies only to the preceding column, year. Because you allow author to use the default sort order, it is sorted in ascending order. You could also have explicitly specified ascending order for that column, with the same results:
SELECT author,title,year FROM classics ORDER BY author ASC,year DESC;
GROUP BY
In a similar fashion to ORDER BY, you can group results returned from queries using GROUP BY, which is good for retrieving information about a group of data. For example, if you want to know how many publications there are of each category in the classics table, you can issue the following query:
SELECT category,COUNT(author) FROM classics GROUP BY category;
which returns the following output:
+-----------------+---------------+
| category | COUNT(author) |
+-----------------+---------------+
| Classic Fiction | 3 |
| Non-Fiction | 1 |
| Play | 1 |
+-----------------+---------------+
3 rows in set (0.00 sec)
Joining Tables Together
It is quite normal to maintain multiple tables within a database, each holding a different type of information. For example, consider the case of a customers table that needs to be able to be cross-referenced with publications purchased from the classics table. Enter the commands in Example 8-28 to create this new table and populate it with three customers and their purchases. Figure 8-17 shows the result.
Example 8-28. Creating and populating the customers table
CREATE TABLE customers (
name VARCHAR(128),
isbn VARCHAR(13),
PRIMARY KEY (isbn)) ENGINE MyISAM;
INSERT INTO customers(name,isbn)
VALUES('Joe Bloggs','9780099533474');
INSERT INTO customers(name,isbn)
VALUES('Mary Smith','9780582506206');
INSERT INTO customers(name,isbn)
VALUES('Jack Wilson','9780517123201');
SELECT * FROM customers;
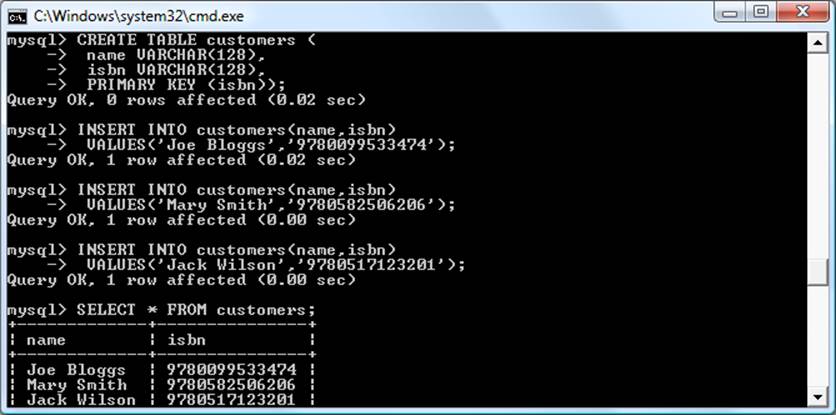
Figure 8-17. Creating the customers table
NOTE
There’s also a shortcut for inserting multiple rows of data, as in Example 8-28, in which you can replace the three separate INSERT INTO queries with a single one listing the data to be inserted, separated by commas, like this:
INSERT INTO customers(name,isbn) VALUES
('Joe Bloggs','9780099533474'),
('Mary Smith','9780582506206'),
('Jack Wilson','9780517123201');
Of course, in a proper table containing customers’ details there would also be addresses, phone numbers, email addresses, and so on, but they aren’t necessary for this explanation. While creating the new table, you should have noticed that it has something in common with the classics table: a column called isbn. Because it has the same meaning in both tables (an ISBN refers to a book, and always the same book), we can use this column to tie the two tables together into a single query, as in Example 8-29.
Example 8-29. Joining two tables into a single SELECT
SELECT name,author,title from customers,classics
WHERE customers.isbn=classics.isbn;
The result of this operation is the following:
+-------------+-----------------+------------------------+
| name | author | title |
+-------------+-----------------+------------------------+
| Joe Bloggs | Charles Dickens | The Old Curiosity Shop |
| Mary Smith | Jane Austen | Pride and Prejudice |
| Jack Wilson | Charles Darwin | The Origin of Species |
+-------------+-----------------+------------------------+
3 rows in set (0.00 sec)
See how this query has neatly tied both tables together to show the publications purchased from the classics table by the people in the customers table?
NATURAL JOIN
Using NATURAL JOIN, you can save yourself some typing and make queries a little clearer. This kind of join takes two tables and automatically joins columns that have the same name. So, to achieve the same results as from Example 8-29, you would enter:
SELECT name,author,title FROM customers NATURAL JOIN classics;
JOIN...ON
If you wish to specify the column on which to join two tables, use the JOIN ... ON construct, as follows, to achieve results identical to those of Example 8-29:
SELECT name,author,title FROM customers
JOIN classics ON customers.isbn=classics.isbn;
Using AS
You can also save yourself some typing and improve query readability by creating aliases using the AS keyword. Follow a table name with AS and the alias to use. The following code, therefore, is also identical in action to Example 8-29. Aliases can be particularly useful when you have long queries that reference the same table names many times.
SELECT name,author,title from
customers AS cust, classics AS class
WHERE cust.isbn=class.isbn;
The result of this operation is the following:
+-------------+-----------------+------------------------+
| name | author | title |
+-------------+-----------------+------------------------+
| Joe Bloggs | Charles Dickens | The Old Curiosity Shop |
| Mary Smith | Jane Austen | Pride and Prejudice |
| Jack Wilson | Charles Darwin | The Origin of Species |
+-------------+-----------------+------------------------+
3 rows in set (0.00 sec)
Using Logical Operators
You can also use the logical operators AND, OR, and NOT in your MySQL WHERE queries to further narrow down your selections. Example 8-30 shows one instance of each, but you can mix and match them in any way you need.
Example 8-30. Using logical operators
SELECT author,title FROM classics WHERE
author LIKE "Charles%" AND author LIKE "%Darwin";
SELECT author,title FROM classics WHERE
author LIKE "%Mark Twain%" OR author LIKE "%Samuel Langhorne Clemens%";
SELECT author,title FROM classics WHERE
author LIKE "Charles%" AND author NOT LIKE "%Darwin";
I’ve chosen the first query, because Charles Darwin might be listed in some rows by his full name, Charles Robert Darwin. Thus, the query returns publications as long as the author column starts with Charles and ends with Darwin. The second query searches for publications written using either Mark Twain’s pen name or his real name, Samuel Langhorne Clemens. The third query returns publications written by authors with the first name Charles but not the surname Darwin.
MySQL Functions
You might wonder why anyone would want to use MySQL functions when PHP comes with a whole bunch of powerful functions of its own. The answer is very simple: the MySQL functions work on the data right there in the database. If you were to use PHP, you would first have to extract raw data from MySQL, manipulate it, and then perform the database query you first wanted.
Having functions built into MySQL substantially reduces the time needed for performing complex queries, as well as their complexity. If you wish to learn more about the available string and date/time functions, you can visit the following URLs:
§ http://tinyurl.com/mysqlstrings
§ http://tinyurl.com/mysqldates
However, to get you started, Appendix D describes a subset containing the most useful of these functions.
Accessing MySQL via phpMyAdmin
Although to use MySQL you have to learn these main commands and how they work, once you understand them, it can be much quicker and simpler to use a program such as phpMyAdmin to manage your databases and tables.
However, you will need to install phpMyAdmin before you can use it. To do this, call up the Zend UI by entering the following into your browser, and log in (as shown in Figure 8-18):
http://localhost:10081/ZendServer/
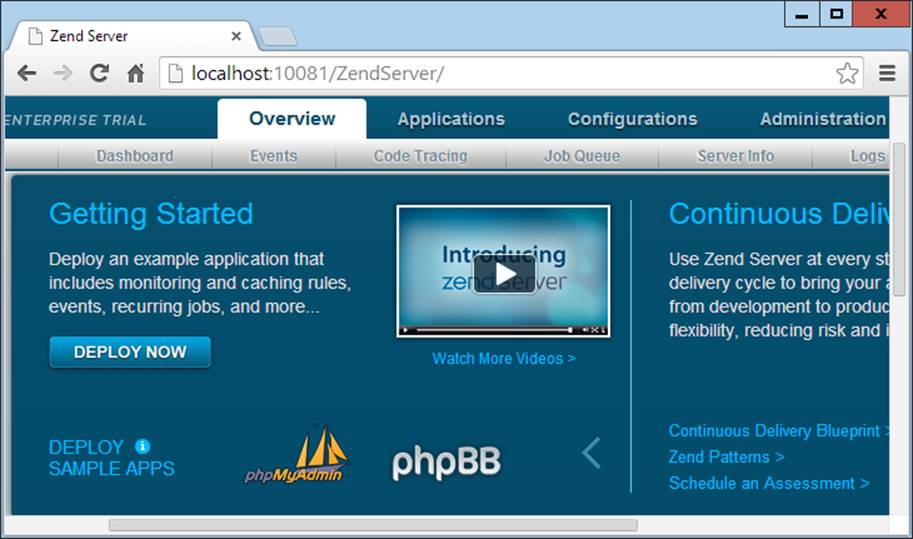
Figure 8-18. The Zend Dashboard
Now click on the left and right arrows to the right of the DEPLOY SAMPLE APPS section until you see the phpMyAdmin logo and click it to initiate the download; then click Next when you’re finished. Click Next again, after you have viewed the README information, to call up the Application Details screen (see Figure 8-19).
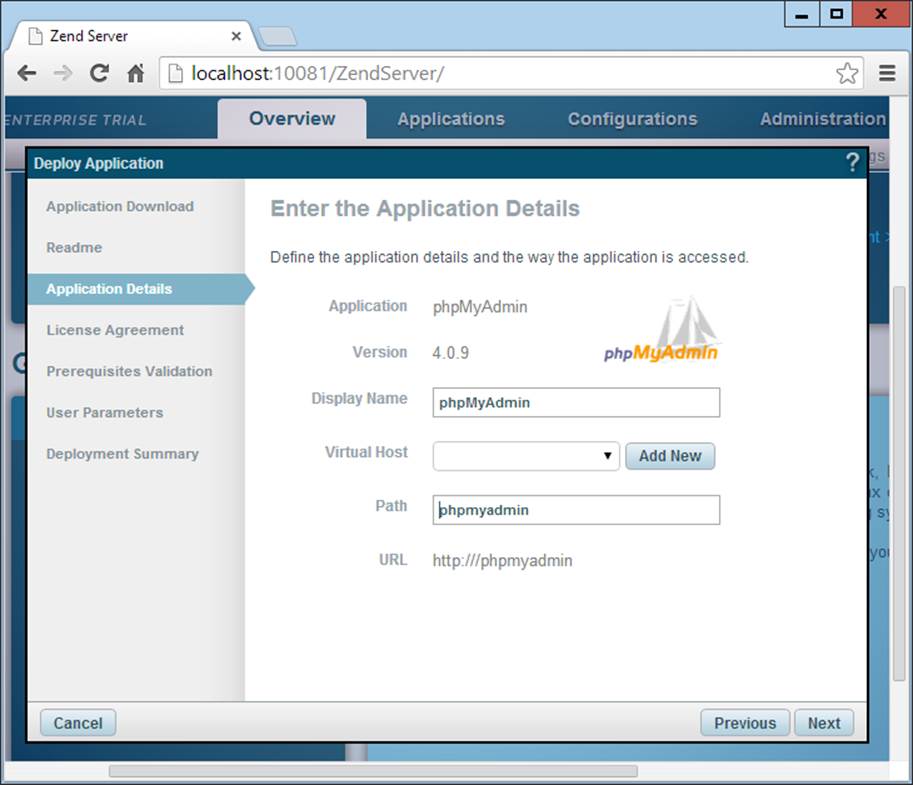
Figure 8-19. Configuring phpMyAdmin for Zend
Here you should probably accept the defaults for Display Name and Virtual Host, but will need to specify a directory name for phpMyAdmin in order to keep it away from your document root files. I have entered the name phpmyadmin (all in lowercase so that I won’t have to enter any capital letters whenever I type the URL to call it up).
Continue clicking Next and accepting any license agreements until you get to the screen in Figure 8-20. Here you should select the “Use HTTP (Apache) Basic Authentication?” checkbox and supply a login and password. The default login is DBadmin, but I have chosen to use simply admin; your login and password are up to you. Unless you have configured them differently, you can probably leave the IP, Port, Database User, and Password as displayed.

Figure 8-20. Entering phpMyAdmin user parameters
Now click Next, review the summary displayed, and when ready, click the Deploy button. After a few seconds, you should see that the application was successfully deployed, at which point you’ll be ready to access phpMyAdmin by entering the following into your browser:
http://localhost/phpmyadmin
This will bring up the dialog shown in Figure 8-21, where you should enter your username and password before clicking the Log In button.
Figure 8-21. Logging into phpMyAdmin
Your browser should now look like Figure 8-22, and you’re ready to use phpMyAdmin in place of the MySQL command line.
Figure 8-22. The phpMyAdmin main screen
NOTE
Full details on this installation process are on the Zend website at the following (shortened) URL: http://tinyurl.com/installpma.
Using phpMyAdmin
In the lefthand pane of the main phpMyAdmin screen, you can click on the drop-down menu that says “(Databases)” to select any database you wish to work with. This will open the database and display its tables.
From here you can perform all the main operations, such as creating new databases, adding tables, creating indexes, and much more. To read the supporting documentation for phpMyAdmin, visit https://docs.phpmyadmin.net.
If you worked with me through the examples in this chapter, congratulations—it’s been quite a long journey. You’ve come all the way from learning how to create a MySQL database through issuing complex queries that combine multiple tables, to using Boolean operators and leveraging MySQL’s various qualifiers.
In the next chapter, we’ll start looking at how to approach efficient database design, advanced SQL techniques, and MySQL functions and transactions.
Questions
1. What is the purpose of the semicolon in MySQL queries?
2. Which command would you use to view the available databases or tables?
3. How would you create a new MySQL user on the local host called newuser with a password of newpass and with access to everything in the database newdatabase?
4. How can you view the structure of a table?
5. What is the purpose of a MySQL index?
6. What benefit does a FULLTEXT index provide?
7. What is a stopword?
8. Both SELECT DISTINCT and GROUP BY cause the display to show only one output row for each value in a column, even if multiple rows contain that value. What are the main differences between SELECT DISTINCT and GROUP BY?
9. Using the SELECT ... WHERE construct, how would you return only rows containing the word Langhorne somewhere in the author column of the classics table used in this chapter?
10.What needs to be defined in two tables to make it possible for you to join them together?
See Chapter 8 Answers in Appendix A for the answers to these questions.
All materials on the site are licensed Creative Commons Attribution-Sharealike 3.0 Unported CC BY-SA 3.0 & GNU Free Documentation License (GFDL)
If you are the copyright holder of any material contained on our site and intend to remove it, please contact our site administrator for approval.
© 2016-2026 All site design rights belong to S.Y.A.