Learning PHP, MySQL, JavaScript, CSS & HTML5 (2014)
Chapter 18. Using Ajax
The term Ajax was first coined in 2005. It stands for Asynchronous JavaScript and XML, which, in simple terms, means using a set of methods built into JavaScript to transfer data between the browser and a server in the background. An excellent example of this technology is Google Maps (see Figure 18-1), in which new sections of a map are downloaded from the server when needed, without requiring a page refresh.
Using Ajax not only substantially reduces the amount of data that must be sent back and forth, it also makes web pages seamlessly dynamic—allowing them to behave more like self-contained applications. The results are a much improved user interface and better responsiveness.
What Is Ajax?
The beginnings of Ajax as used today started with the release of Internet Explorer 5 in 1999, which introduced a new ActiveX object, XMLHttpRequest. ActiveX is Microsoft’s technology for signing plug-ins that install additional software to your computer. Other browser developers later followed suit, but rather than using ActiveX, they all implemented the feature as a native part of the JavaScript interpreter.
However, even before then, an early form of Ajax had already surfaced that used hidden frames on a page that interacted with the server in the background. Chat rooms were early adopters of this technology, using it to poll for and display new message posts without requiring page reloads.
So let’s see how to implement Ajax using JavaScript.

Figure 18-1. Google Maps is an excellent example of Ajax in action
Using XMLHttpRequest
Due to the differences between browser implementations of XMLHttpRequest, you must create a special function in order to ensure that your code will work on all major browsers.
To do this, you must understand the three ways of creating an XMLHttpRequest object:
§ IE 5: request = new ActiveXObject("Microsoft.XMLHTTP")
§ IE 6+: request = new ActiveXObject("Msxml2.XMLHTTP")
§ All others: request = new XMLHttpRequest()
This is the case because Microsoft chose to implement a change with the release of Internet Explorer 6, while all other browsers use a slightly different method. Therefore, the code in Example 18-1 will work for all major browsers released over the last few years.
Example 18-1. A cross-browser Ajax function
<script>
function ajaxRequest()
{
try // Non IE Browser?
{ // Yes
var request = new XMLHttpRequest()
}
catch(e1)
{
try // IE 6+?
{ // Yes
request = new ActiveXObject("Msxml2.XMLHTTP")
}
catch(e2)
{
try // IE 5?
{ // Yes
request = new ActiveXObject("Microsoft.XMLHTTP")
}
catch(e3) // There is no AJAX Support
{
request = false
}
}
}
return request
}
</script>
You may remember the introduction to error handling in the previous chapter, using the try ... catch construct. Example 18-1 is a perfect illustration of its utility, because it uses the try keyword to execute the non-IE Ajax command, and upon success, jumps on to the final returnstatement, where the new object is returned.
Otherwise, a catch traps the error and the subsequent command is executed. Again, upon success, the new object is returned; otherwise, the final of the three commands is tried. If that attempt fails, then the browser doesn’t support Ajax and the request object is set to false; otherwise, the object is returned. So there you have it: a cross-browser Ajax request function that you may wish to add to your library of useful JavaScript functions.
OK, so now you have a means of creating an XMLHttpRequest object, but what can you do with these objects? Well, each one comes with a set of properties (variables) and methods (functions), which are detailed in Tables 18-1 and 18-2.
Table 18-1. An XMLHttpRequest object’s properties
|
Properties |
Description |
|
onreadystatechange |
Specifies an event handling function to be called whenever the readyState property of an object changes. |
|
readyState |
An integer property that reports on the status of a request. It can have any of these values: 0 = Uninitialized, 1 = Loading, 2 = Loaded, 3 = Interactive, and 4 = Completed. |
|
responseText |
The data returned by the server in text format. |
|
responseXML |
The data returned by the server in XML format. |
|
status |
The HTTP status code returned by the server. |
|
statusText |
The HTTP status text returned by the server. |
Table 18-2. An XMLHttpRequest object’s methods
|
Methods |
Description |
|
abort() |
Aborts the current request. |
|
getAllResponseHeaders() |
Returns all headers as a string. |
|
getResponseHeader(param) |
Returns the value of param as a string. |
|
open('method', 'url', 'asynch') |
Specifies the HTTP method to use (GET or POST), the target URL, and whether the request should be handled asynchronously (true or false). |
|
send(data) |
Sends data to the target server using the specified HTTP method. |
|
setRequestHeader('param', 'value') |
Sets a header with a parameter/value pair. |
These properties and methods give you control over what data you send to the server and receive back, as well as a choice of send and receive methods. For example, you can choose whether to request data in plain text (which could include HTML and other tags) or in XML format. You can also decide whether you wish to use the POST or GET method to send to the server.
Let’s look at the POST method first by creating a very simple pair of documents: a combination of HTML and JavaScript, and a PHP program to interact via Ajax with the first. Hopefully you’ll enjoy these examples, because they illustrate just what Web 2.0 and Ajax are all about. With a few lines of JavaScript, they request a web document from a third-party web server, which is then returned to the browser by your server and placed within a section of the current document.
Your First Ajax Program
Type and save the code in Example 18-2 as urlpost.html, but don’t load it into your browser yet.
Example 18-2. urlpost.html
<!DOCTYPE html>
<html>
<head>
<title>AJAX Example</title>
</head>
<body style='text-align:center'>
<h1>Loading a web page into a DIV</h1>
<div id='info'>This sentence will be replaced</div>
<script>
params = "url=amazon.com/gp/aw"
request = new ajaxRequest()
request.open("POST", "urlpost.php", true)
request.setRequestHeader("Content-type",
"application/x-www-form-urlencoded")
request.setRequestHeader("Content-length", params.length)
request.setRequestHeader("Connection", "close")
request.onreadystatechange = function()
{
if (this.readyState == 4)
{
if (this.status == 200)
{
if (this.responseText != null)
{
document.getElementById('info').innerHTML =
this.responseText
}
else alert("Ajax error: No data received")
}
else alert( "Ajax error: " + this.statusText)
}
}
request.send(params)
function ajaxRequest()
{
try
{
var request = new XMLHttpRequest()
}
catch(e1)
{
try
{
request = new ActiveXObject("Msxml2.XMLHTTP")
}
catch(e2)
{
try
{
request = new ActiveXObject("Microsoft.XMLHTTP")
}
catch(e3)
{
request = false
}
}
}
return request
}
</script>
</body>
</html>
Let’s go through this document and look at what it does, starting with the first six lines, which simply set up an HTML document and display a heading. The next line creates a DIV with the ID info, containing the text This sentence will be replaced by default. Later on, the text returned from the Ajax call will be inserted here.
The next six lines are required for making an HTTP POST Ajax request. The first sets the variable params to a parameter=value pair, which is what we’ll send to the server. Then the Ajax object request is created. After this, the open method is called to set the object to make a POSTrequest to urlpost.php in asynchronous mode. The last three lines in this group set up headers that are required for the receiving server to know that a POST request is coming.
The readyState property
Now we get to the nitty-gritty of an Ajax call, which all hangs on the readyState property. The “asynchronous” aspect of Ajax allows the browser to keep accepting user input and changing the screen, while our program sets the onreadystatechange property to call a function of our choice each time readyState changes. In this case, a nameless (or anonymous) inline function has been used, as opposed to a separate, named function. This type of function is known as a callback function, as it is called back each time readyState changes.
The syntax to set up the callback function using an inline, anonymous function is as follows:
request.onreadystatechange = function()
{
if (this.readyState == 4)
{
// do something
}
}
If you wish to use a separate, named function, the syntax is slightly different:
request.onreadystatechange = ajaxCallback
function ajaxCallback()
{
if (this.readyState == 4)
{
// do something
}
}
Looking at Table 18-1, you’ll see that readyState can have five different values. But only one of them concerns us: value 4, which represents a completed Ajax call. Therefore, each time the new function gets called, it returns without doing anything until readyState has a value of 4. When our function detects that value, it next inspects the status of the call to ensure it has a value of 200, which means that the call succeeded. If it’s not 200, an alert pop up displays the error message contained in statusText.
NOTE
You will notice that all of these object properties are referenced using this.readyState, this.status, and so on, rather than the object’s current name, request, as in request.readyState or request.status. This is so that you can easily copy and paste the code and it will work with any object name, because the this keyword always refers to the current object.
So, having ascertained that the readyState is 4 and the status is 200, we test the responseText value to see whether it contains a value. If not, an error message is displayed in an alert box. Otherwise, the inner HTML of the DIV is assigned the value of responseText, like this:
document.getElementById('info').innerHTML = this.responseText
In this line, the element info is referenced via the getElementByID method, and then its innerHTML property is assigned the value that was returned by the Ajax call.
After all this setting up and preparation, the Ajax request is finally sent to the server via the following command, which passes the parameters already defined in the variable params:
request.send(params)
After that, all the preceding code is activated each time readyState changes.
The remainder of the document is the ajaxRequest function from Example 18-1, and the closing script and HTML tags.
The server half of the Ajax process
Now we get to the PHP half of the equation, which you can see in Example 18-3. Type it and save it as urlpost.php.
Example 18-3. urlpost.php
<?php // urlpost.php
if (isset($_POST['url']))
{
echo file_get_contents('http://' . SanitizeString($_POST['url']));
}
function SanitizeString($var)
{
$var = strip_tags($var);
$var = htmlentities($var);
return stripslashes($var);
}
?>
As you can see, this is short and sweet, and as should be done with all posted data, it also makes use of the ever-important SanitizeString function. In this instance, unsanitized data could result in the user gaining an advantage over your code.
This program uses the file_get_contents PHP function to load in the web page at the URL supplied to it in the POST variable $_POST['url']. The file_get_contents function is versatile in that it loads in the entire contents of a file or web page from either a local or a remote server; it even takes into account moved pages and other redirects.
Once you have typed the program, you are ready to call up urlpost.html into your web browser and, after a few seconds, you should see the contents of the Amazon mobile front page loaded into the DIV that we created for that purpose. It won’t be as fast as directly loading the web page, because it is transferred twice: once to the server and again from the server to your browser. The result should look like Figure 18-2.
Not only have we succeeded in making an Ajax call and having a response returned to JavaScript, we’ve also harnessed the power of PHP to enable the merging in of a totally unrelated web object. Incidentally, if we had tried to find a way to fetch the Amazon mobile web page directly via Ajax (without recourse to the PHP server-side module), we wouldn’t have succeeded, because there are security blocks preventing cross-domain Ajax. So this little example also illustrates a handy solution to a very practical problem.
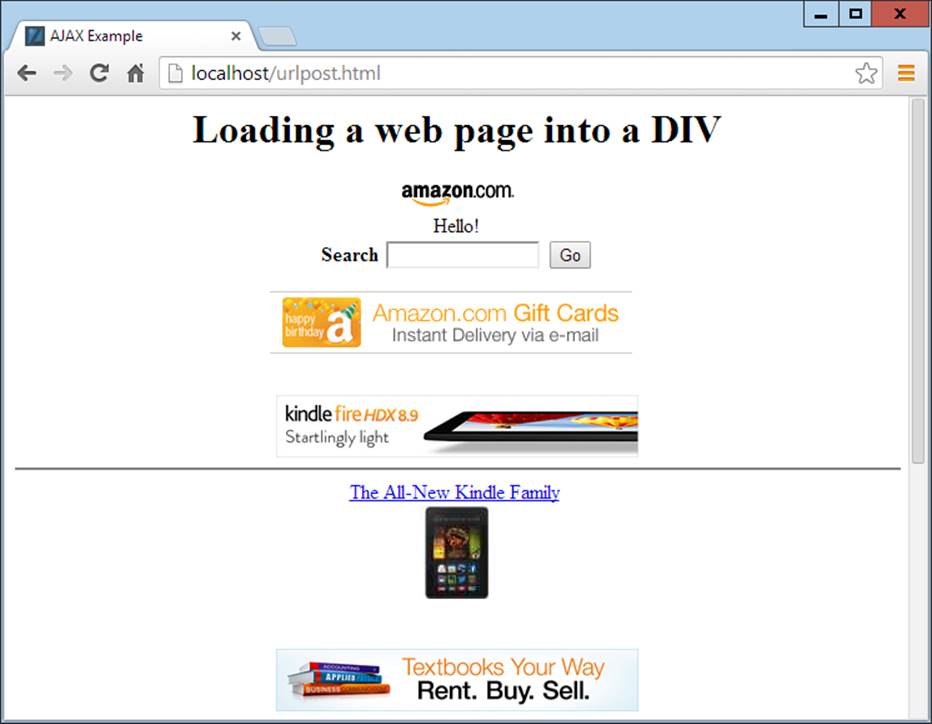
Figure 18-2. The Amazon mobile website has been loaded into a DIV
Using GET Instead of POST
As with submitting any form data, you have the option of submitting your data in the form of GET requests, and you will save a few lines of code if you do so. However, there is a downside: some browsers may cache GET requests, whereas POST requests will never be cached. You don’t want to cache a request, because the browser will just redisplay what it got the last time instead of going to the server for fresh input. The solution to this is to use a workaround that adds a random parameter to each request, ensuring that each URL requested is unique.
Example 18-4 shows how you would achieve the same result as with Example 18-2, but using an Ajax GET request instead of POST.
Example 18-4. urlget.html
<!DOCTYPE html>
<html>
<head>
<title>AJAX Example</title>
</head>
<body style='text-align:center'>
<h1>Loading a web page into a DIV</h1>
<div id='info'>This sentence will be replaced</div>
<script>
nocache = "&nocache=" + Math.random() * 1000000
request = new ajaxRequest()
request.open("GET", "urlget.php?url=amazon.com/gp/aw" + nocache, true)
request.onreadystatechange = function()
{
if (this.readyState == 4)
{
if (this.status == 200)
{
if (this.responseText != null)
{
document.getElementById('info').innerHTML =
this.responseText
}
else alert("Ajax error: No data received")
}
else alert( "Ajax error: " + this.statusText)
}
}
request.send(null)
function ajaxRequest()
{
try
{
var request = new XMLHttpRequest()
}
catch(e1)
{
try
{
request = new ActiveXObject("Msxml2.XMLHTTP")
}
catch(e2)
{
try
{
request = new ActiveXObject("Microsoft.XMLHTTP")
}
catch(e3)
{
request = false
}
}
}
return request
}
</script>
</body>
</html>
The differences to note between the two documents are highlighted in bold, and described as follows:
§ It is not necessary to send headers for a GET request.
§ We call the open method using a GET request, supplying a URL with a string comprising a ? symbol followed by the parameter/value pair url=amazon.com/gp/aw.
§ We start a second parameter/value pair using an & symbol, then set the value of the parameter nocache to a random value between 0 and a million. This is used to ensure that each URL requested is different, and therefore that no requests will be cached.
§ The call to send now contains only a parameter of null, as no parameters are being passed via a POST request. Note that leaving the parameter out is not an option, as it would result in an error.
To accompany this new document, the PHP program must be modified to respond to a GET request, as in Example 18-5, urlget.php.
Example 18-5. urlget.php
<?php
if (isset($_GET['url']))
{
echo file_get_contents("http://".sanitizeString($_GET['url']));
}
function sanitizeString($var)
{
$var = strip_tags($var);
$var = htmlentities($var);
return stripslashes($var);
}
?>
All that’s different between this and Example 18-3 is that the references to $_POST have been replaced with $_GET. The end result of calling up urlget.html in your browser is identical to loading in urlpost.html.
Sending XML Requests
Although the objects we’ve been creating are called XMLHttpRequest objects, so far we have made absolutely no use of XML. This is where the Ajax term is a bit of a misnomer, because the technology actually allows you to request any type of textual data, only one of which is XML. As you have seen, we have requested an entire HTML document via Ajax, but we could equally have asked for a text page, a string or number, or even spreadsheet data.
So let’s modify the previous example document and PHP program to fetch some XML data. To do this, first take a look at the PHP program, xmlget.php, shown in Example 18-6.
Example 18-6. xmlget.php
<?php
if (isset($_GET['url']))
{
header('Content-Type: text/xml');
echo file_get_contents("http://".sanitizeString($_GET['url']));
}
function sanitizeString($var)
{
$var = strip_tags($var);
$var = htmlentities($var);
return stripslashes($var);
}
?>
This program has been very slightly modified (shown in bold highlighting) to output the correct XML header before returning a fetched document. No checking is made here, as it is assumed that the calling Ajax will request an actual XML document.
Now on to the HTML document, xmlget.html, shown in Example 18-7.
Example 18-7. xmlget.html
<!DOCTYPE html>
<html>
<head>
<title>AJAX Example</title>
</head>
<body>
<h1>Loading a web page into a DIV</h1>
<div id='info'>This sentence will be replaced</div>
<script>
nocache = "&nocache=" + Math.random() * 1000000
url = "rss.news.yahoo.com/rss/topstories"
out = "";
request = new ajaxRequest()
request.open("GET", "xmlget.php?url=" + url + nocache, true)
request.onreadystatechange = function()
{
if (this.readyState == 4)
{
if (this.status == 200)
{
if (this.responseText != null)
{
titles = this.responseXML.getElementsByTagName('title')
for (j = 0 ; j < titles.length ; ++j)
{
out += titles[j].childNodes[0].nodeValue + '<br>'
}
document.getElementById('info').innerHTML = out
}
else alert("Ajax error: No data received")
}
else alert( "Ajax error: " + this.statusText)
}
}
request.send(null)
function ajaxRequest()
{
try
{
var request = new XMLHttpRequest()
}
catch(e1)
{
try
{
request = new ActiveXObject("Msxml2.XMLHTTP")
}
catch(e2)
{
try
{
request = new ActiveXObject("Microsoft.XMLHTTP")
}
catch(e3)
{
request = false
}
}
}
return request
}
</script>
</body>
</html>
Again, the changes have been highlighted in bold, so you can see that this code is substantially similar to previous versions, except that the URL now being requested, rss.news.yahoo.com/rss/topstories, contains an XML document, the Yahoo! News Top Stories feed.
The other big difference is the use of the responseXML property, which replaces the responseText property. Whenever a server returns XML data, responseXML will contain the XML returned.
However, responseXML doesn’t simply contain a string of XML text: it is actually a complete XML document object that we can examine and parse using DOM tree methods and properties. This means it is accessible, for example, by the JavaScript getElementsByTagName method.
About XML
An XML document will generally take the form of the RSS feed shown in Example 18-8. However, the beauty of XML is that we can store this type of structure internally in a DOM tree (see Figure 18-3) to make it quickly searchable.
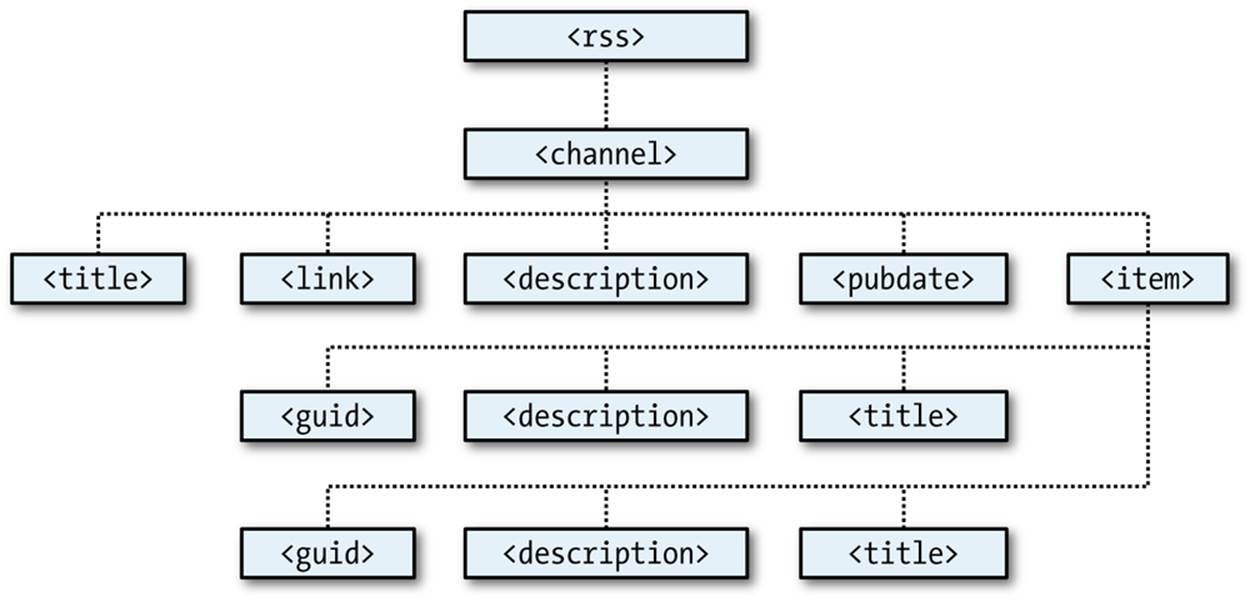
Figure 18-3. The DOM tree of Example 18-8
Example 18-8. An XML document
<?xml version="1.0" encoding="UTF-8"?>
<rss version="2.0">
<channel>
<title>RSS Feed</title>
<link>http://website.com</link>
<description>website.com's RSS Feed</description>
<pubDate>Mon, 11 May 2020 00:00:00 GMT</pubDate>
<item>
<title>Headline</title>
<guid>http://website.com/headline</guid>
<description>This is a headline</description>
</item>
<item>
<title>Headline 2</title>
<guid>http://website.com/headline2</guid>
<description>The 2nd headline</description>
</item>
</channel>
</rss>
Therefore, using the getElementsByTagName method, you can quickly extract the values associated with various tags without a lot of string searching. This is exactly what we do in Example 18-7, where the following command is issued:
titles = this.responseXML.getElementsByTagName('title')
This single command has the effect of placing all the values of the title elements into the array titles. From there, it is a simple matter to extract them with the following expression (where j is the title to access):
titles[j].childNodes[0].nodeValue
All the titles are then appended to the string variable out and, once all have been processed, the result is inserted into the empty DIV at the document start. When you call up xmlget.html in your browser, the result will be something like Figure 18-4.
NOTE
As with all form data, you can use either the POST or the GET method when requesting XML data; your choice will make little difference to the result.
Why use XML?
You may ask why you would use XML other than for fetching XML documents such as RSS feeds. Well, the simple answer is that you don’t have to, but if you wish to pass structured data back to your Ajax applications, it could be a real pain to send a simple, unorganized jumble of text that would need complicated processing in JavaScript.
Instead, you can create an XML document and pass that back to the Ajax function, which will automatically place it into a DOM tree, as easily accessible as the HTML DOM object with which you are now familiar.
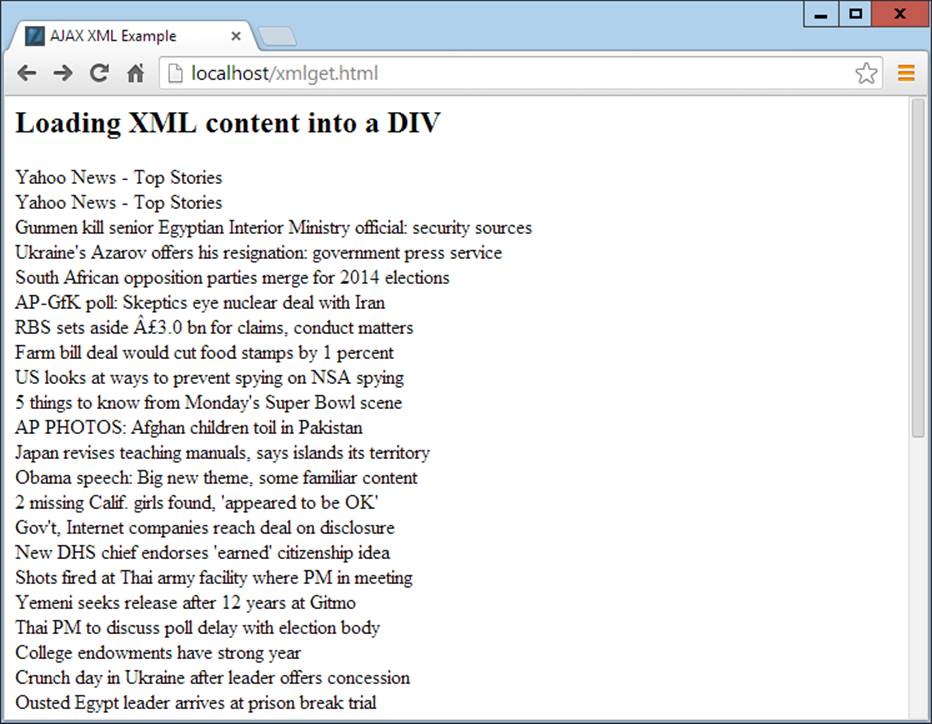
Figure 18-4. Fetching a Yahoo! XML news feed via Ajax
Using Frameworks for Ajax
Now that you know how to code your own Ajax routines, you might like to investigate some of the free frameworks that are available to make it even easier, as they offer many more advanced features. In particular, I would suggest you check out jQuery, which is probably the most commonly used framework.
You can download it (and get full documentation) from http://jquery.com, but be aware that there’s an initially steep learning curve, as you have to familiarize yourself with the $ function it provides, which is used extensively for accessing jQuery’s features. That said, once you understand how jQuery works, you’ll find it can make your web development much easier and quicker due to the large number of ready-made features it offers.
Questions
1. Why is it necessary to write a function for creating new XMLHttpRequest objects?
2. What is the purpose of the try ... catch construct?
3. How many properties and how many methods does an XMLHttpRequest object have?
4. How can you tell when an Ajax call has completed?
5. How do you know whether an Ajax call completed successfully?
6. What XMLHttpRequest object’s property returns an Ajax text response?
7. What XMLHttpRequest object’s property returns an Ajax XML response?
8. How can you specify a callback function to handle Ajax responses?
9. What XMLHttpRequest method is used to initiate an Ajax request?
10.What are the main differences between an Ajax GET and POST request?
See Chapter 18 Answers in Appendix A for the answers to these questions.