PHP & MySQL: Novice to Ninja, 5th Edition (2012)
Chapter 11. Advanced SQL Queries
As you’ve worked through the construction of the Internet Joke Database website, you’ve had opportunities to explore most aspects of Structured Query Language (SQL). From the basic form of a CREATE TABLE query to the two syntaxes of INSERT queries, you probably know many of these commands by heart now. In an effort to tie up some loose ends in this chapter, we’ll look at a few more SQL tricks that we’ve yet to come across—some having been a bit too advanced to delve into before now. As is typical, most of these will expand on your knowledge of what’s already the most complex and potentially confusing SQL command available to you: the SELECT query.
Sorting SELECT Query Results
Long lists of information are always easier to use when they’re presented in some kind of order. To find a single author in a list from your author table, for example, could become an exercise in frustration if you had more than a few dozen registered authors in your database. Fortunately, there’s an optional part of the SELECT query that lets you specify a column by which your table of results should be sorted. Let’s say you wanted to print out a listing of the entries in your author table for future reference. Here’s a short list of a table of authors, with the result in Figure 11.1:
SELECT id, name, email FROM author
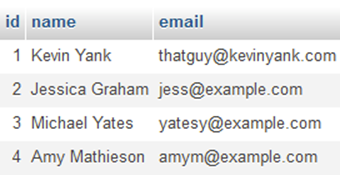
Figure 11.1. An unsorted list of authors
The entries are unsorted, which is fine for a short list like this; it would be easier, though, to find a particular author’s email address (that of Amy Mathieson, for example) in a very long list of authors—say a few hundred or so—if the authors’ names appeared in alphabetical order. Here’s how you’d create that ordering (as seen in Figure 11.2):
SELECT id, name, email FROM author ORDER BY name
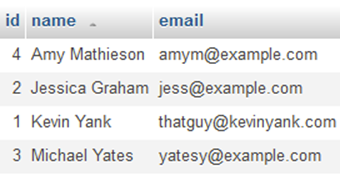
Figure 11.2. Authors sorted by name
The entries now appear sorted alphabetically by their names. Just as you can add a WHERE clause to a SELECT statement to narrow down the list of results, you can also add an ORDER BY clause to specify a column by which a set of results should be sorted. Adding the keyword DESC after the name of the column allows you to sort the entries in descending order, as shown in Figure 11.3:
SELECT id, name, email FROM author ORDER BY name DESC
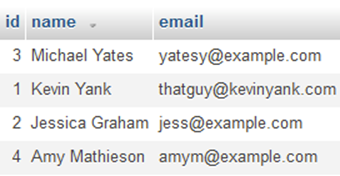
Figure 11.3. Authors in descending name order
You can actually use a comma-separated list of several column names in the ORDER BY clause to have MySQL sort the entries by the first column, then sort any sets of tied entries by the second, and so on. Any of the columns listed in the ORDER BY clause may use the DESC keyword to reverse the sort order. Obviously in a large table, MySQL must do a lot of work to sort the result set. You can ease this burden by setting up indexes for columns (or sets of columns) that you expect to use to sort result sets, as we learned in Chapter 10.
Setting LIMITs
Often, you might work with a large database table but only be interested in a few entries within it. Let’s say you wanted to track the popularity of different jokes on your site. You could add a column named timesviewed to your joke table. Start it with a value of zero for new jokes, and add one to the value of the requested joke every time the joke is viewed, to keep count of the number of times each joke in your database has been read. The query that adds one to the timesviewed column of a joke with a given ID is as follows:
try
{
$sql = 'UPDATE joke SET
timesviewed = timesviewed + 1
WHERE id = :id';
$s = $pdo->prepare($sql);
$s->bindValue(':id', $id);
$s->execute();
}
catch (PDOException $e)
{
$error = 'Error updating joke view count.';
include 'error.html.php';
exit();
}
You might use this joke view counter to present a “Top 10 Jokes” list on the front page of your site, for example. Using ORDER BY timesviewed DESC to list the jokes from highest timesviewed to lowest, you’d just have to pick the first ten values from the top of the list. But if you have thousands of jokes in your database, retrieving that entire list to gain a mere ten results would be quite wasteful in terms of the processing time and server system resources required, such as memory and CPU load. However, if you use a LIMIT clause, you can specify a certain number of results to be returned. As stated, in this example you need only the first ten:
$sql = 'SELECT joke.id, joketext, name, email
FROM joke INNER JOIN author
ON authorid = author.id
ORDER BY timesviewed DESC
LIMIT 10';
Although it’s much less interesting, you could eliminate the word DESC and retrieve the ten least popular jokes in the database. Often, you’ll want to let users view a long list of entries—for example, the results of a search—but display only a few at a time.[59] Think of the last time you went looking through pages of search engine results to find a particular website. You can use a LIMIT clause to do this sort of action; simply specify the result with which the list will begin, and the maximum number of results to display. The query below, for example, will list the 21st to 25th most popular jokes in the database:
$sql = 'SELECT joke.id, joketext, name, email
FROM joke INNER JOIN author
ON authorid = author.id
ORDER BY timesviewed DESC
LIMIT 20, 5';
Remember, the first entry in the list of results is entry number zero. Thus, the 21st entry in the list is entry number 20.
Database Transactions
In some situations, you may wish to perform a series of multiple SQL queries and have them take effect all at once. An advanced feature called transactions makes this possible. Let’s say your site’s database contained tables listing the products for sale on your site, the number of each product available in inventory, and the orders placed by visitors to your site. When a visitor places an order, you’d like to update your inventory to reflect the purchased item(s) at the same time as you add to the list of orders. If one of these updates occurred before the other, there’s a risk that another visitor to your site might view a page and see an inconsistent state: for example, your site might show that the ten widgets you had for sale are now sold out, but only nine have been ordered. Transactions let you perform complex multiquery operations as a group to take effect simultaneously. To begin a transaction, just send a START TRANSACTION SQL command:
START TRANSACTION
You can then perform your series of SQL queries as you normally would. When you’re done and ready for all the changes to be committed to the database at once, send a COMMIT SQL command:
COMMIT
Transactions also let you change your mind. If you’re partway through your group of queries and decide you don’t want to perform the queries after all, just use a ROLLBACK command:
ROLLBACK
ROLLBACK is especially useful for dealing with errors. If you’ve run a first query in a transaction successfully but the second one gives you an error, you can use ROLLBACK to cancel the effects of the first query, in order to rethink your strategy. In a PHP script, your PDO object offers methods to make working with transactions very convenient. Begin a transaction with the beginTransaction method, then commit it with the commit method or cancel it with the rollBack method:
try
{
$pdo->beginTransaction();
… perform a series of queries…
$pdo->commit();
}
catch (PDOException $e)
{
$pdo->rollBack();
$error = 'Error performing the transaction.';
include 'error.html.php';
exit();
}
Note: Transactions Require InnoDB
Support for transactions is one of the reasons we’ve always used the newer InnoDB table type (ENGINE=InnoDB) when creating database tables in this book. MySQL’s older MyISAM table type does not support transactions.
Column and Table Name Aliases
In some situations, it may be more convenient to refer to MySQL columns and tables using different names. Let’s take the example of a database used by an airline’s online booking system; this example actually came up in the SitePoint Forums when I was first writing this book. The database structure can be found in airline.sql in the code archive if you want to follow along. To represent the flights offered by the airline, the database contains two tables: flight and city. Each entry in the flight table represents an actual flight between two cities—the origin and destination of the flight. Obviously, origincityid and destinationcityid are columns in the flight table; other columns record information like the date and time of the flight, the type of aircraft, the flight numbers, and the various fares. The city table contains a list of all the cities to which the airline flies. Thus, both the origincityid and destinationcityid columns in the flight table will just contain IDs referring to entries in the city table. Now, consider these queries. To retrieve a list of flights with their origins, here’s what you do:
SELECT flight.number, city.name
FROM flight INNER JOIN city
ON flight.origincityid = city.id
Figure 11.4 shows the results.
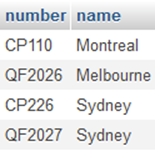
Figure 11.4. Flights with their origins
To obtain a list of flights with their destinations, the query is very similar:
SELECT flight.number, city.name
FROM flight INNER JOIN city
ON flight.destinationcityid = city.id
Again, Figure 11.5 shows the results.
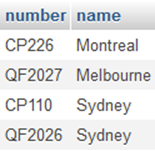
Figure 11.5. Flights with their destinations
Now, what if you wanted to list both the origin and destination of each flight with a single query? That’s reasonable, right? Here’s a query you might try:
SELECT flight.number, city.name, city.name
FROM flight INNER JOIN city
ON flight.origincityid = city.id
INNER JOIN city
ON flight.destinationcityid = city.id
Try this query, and phpMyAdmin will display an error: #1066 - Not unique table/alias 'city'. Why does this fail? Have another look at the query, and this time focus on what it actually says, rather than what you expect it to do. It tells MySQL to join the flight, city, and city (yes, twice!) tables. This attempt at joining the same table twice is what produces the error message. But even without this error, the query lacks sense. It attempts to list the flight number, city name, and city name (twice again) of all entries obtained, by matching up the origincityid with the city id, and the destinationcityid with the city id. In other words, the origincityid, destinationcityid, and city id must all be equal. Even if this query worked, it would result in a list of all flights where the origin and the destination are the same. Unless your airline offers scenic flights, it’s unlikely there’ll be any entries that match this description. What we need is a way to use the city table twice without confusing MySQL. We want to be able to return two different entries from the city table—one for the origin and one for the destination—for each result. If we had two copies of the table—one called origin and one called destination—this would be much easier to do, but why maintain two tables that contain the same list of cities? The solution is to give the city table two unique aliases (temporary names) for the purposes of this query. If we follow the name of a table with AS alias in the FROM portion of the SELECT query, we can give it a temporary name by which we can refer to it elsewhere in the query. Here’s that first query again (to display flight numbers and origins only), but this time we’ve given the city table origin as its alias:
SELECT flight.number, origin.name
FROM flight INNER JOIN city AS origin
ON flight.origincityid = origin.id
The query still works the same way and the results remain unchanged, but for long table names it can save some typing. Consider, for example, if we’d given aliases of f and o to flight and origin, respectively. The query would be much shorter as a result. Let’s now return to our problem query. If we refer to the city table twice using different aliases, we can use a three-table join (in which two of the tables are actually one and the same) to achieve the effect we want:
SELECT flight.number, origin.name, destination.name
FROM flight INNER JOIN city AS origin
ON flight.origincityid = origin.id
INNER JOIN city AS destination
ON flight.destinationcityid = destination.id
You can see the expected results in Figure 11.6.
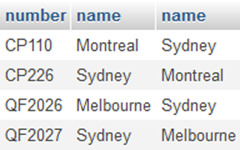
Figure 11.6. Flights with origins and destinations
You can also define aliases for column names. We could use this to differentiate the two name columns in our table of results:
SELECT f.number, o.name AS origin, d.name AS destination
FROM flight AS f INNER JOIN city AS o
ON f.origincityid = o.id
INNER JOIN city AS d
ON f.destinationcityid = d.id
The very readable result is in Figure 11.7.
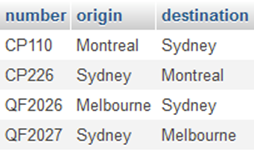
Figure 11.7. Flights with origins and destinations clearly labeled
You could use this same technique to add a messaging system to the Internet Joke Database website, whereby one author could send a message to another author on the site. The table of sent messages would reference the author table twice: once for the sender of the message, and another for the recipient. If you’re keen for a fresh challenge, try building this system.
GROUPing SELECT Results
In Chapter 2, you saw the following query, which tells you how many jokes are stored in your joke table:
SELECT COUNT(*) FROM joke
The MySQL function COUNT used in this query belongs to a special class of functions called aggregate functions or group-by functions , depending on where you look. A complete list of these functions is provided in Chapter 11 of the MySQL Manual and in Appendix C. Unlike other functions, which affect each entry individually in the result of the SELECT query, summary functions group together all the results and return a single result. In the aforementioned example, for instance, COUNT returns the total number of result rows. Let’s say you want to display a list of authors along with the number of jokes they have to their names. Your first instinct might be to retrieve a list of all the authors’ names and IDs, then use COUNT to count the number of results when you SELECT the jokes with each author’s ID. The PHP code (presented without error handling, for simplicity) would look a little like this:
// Get a list of all the authors
$result = $pdo->query('SELECT id, name FROM author');
// Read all of the authors
foreach ($result as $row)
{
$authors[] = array(
'id' => $row['id'],
'name' => $row['name']
);
}
// Get count of jokes attributed to an author
$sql = 'SELECT COUNT(*) AS numjokes FROM joke WHERE authorid = :id';
$s = $pdo->prepare($sql);
// Process each author
foreach ($authors as $author)
{
$s->bindValue(':id', $author['id']);
$s->execute();
$row = $s->fetch();
$numjokes = $row['numjokes'];
// Display the author & number of jokes
$output .= htmlspecialchars($author['name'], ENT_QUOTES, 'UTF-8')
. " ($numjokes jokes)<br>";
}
Note the use of AS in the second query to give a friendlier name (numjokes) to the result of COUNT(*). This technique will work, but will require n+1 separate queries (where n is the number of authors in the database). Having the number of queries depend on a number of entries in the database is always worth avoiding, as a large number of authors would make this script unreasonably slow and resource-intensive. Fortunately, another advanced feature of SELECT comes to the rescue! If you add a GROUP BY clause to a SELECT query, you can tell MySQL to group the query results into sets, the results in each set sharing a common value in the specified column. Aggregate functions like COUNT then operate on those groups, rather than the entire result set as a whole. The next query, for example, lists the number of jokes attributed to each author in the database:
SELECT author.name, COUNT(*) AS numjokes
FROM joke INNER JOIN author
ON authorid = author.id
GROUP BY authorid
The results shown in Figure 11.8 confirm that we’ve obtained our per-author joke count with a single SELECT query.

Figure 11.8. Number of jokes per author
Note that you could have specified GROUP BY author.id and achieved the same result (since, as stipulated in the FROM clause, these columns must be equal). GROUP BY author.name would also work in most cases, but as there’s always the possibility, however slight, that two different authors might have the same name (in which case their results would be lumped together), it’s best to stick to the ID columns, which are guaranteed to be unique for each author.
LEFT JOINs
You can see from the results just shown that Kevin Yank has three jokes to his name, and Jessica Graham has one. What they conceal is that there’s a third and fourth author, Amy Mathieson and Michael Yates, who have no jokes. Since there are no entries in the joke table with authoridvalues that match either of the absent authors’ ID, there will be no results that satisfy the ON clause in the aforementioned query and they’ll be excluded from the table of results. About the only practical way to overcome this challenge with the tools we’ve seen so far would be to add another column to the author table and store the number of jokes attributed to each author in that column. Keeping that column up to date, however, would be a real pain, because we’d have to remember to update it each time a joke was added, removed, or changed (for example, if the value ofauthorid was changed) in the joke table. To keep it all synchronized, we’d have to use transactions whenever we made such changes as well. Quite a mess, to say the least! Besides the INNER JOINs we’ve used so far, MySQL provides another type of join. Called a left join, it’s designed for this type of situation. To understand how left joins differ from standard joins, we must first recall how inner joins work. As shown in Figure 11.9, MySQL performs a standard join of two tables by listing all possible combinations of the rows of those tables. In a simple case, a standard join of two tables with two rows apiece will contain four rows: row 1 of table 1 with row 1 of table 2, row 1 of table 1 with row 2 of table 2, row 2 of table 1 with row 1 of table 2, and row 2 of table 1 with row 2 of table 2. With all these result rows calculated, MySQL then looks to the ON condition for guidance on which rows should be kept (for example, those where the id column from table 1 matches the authorid column from table 2).
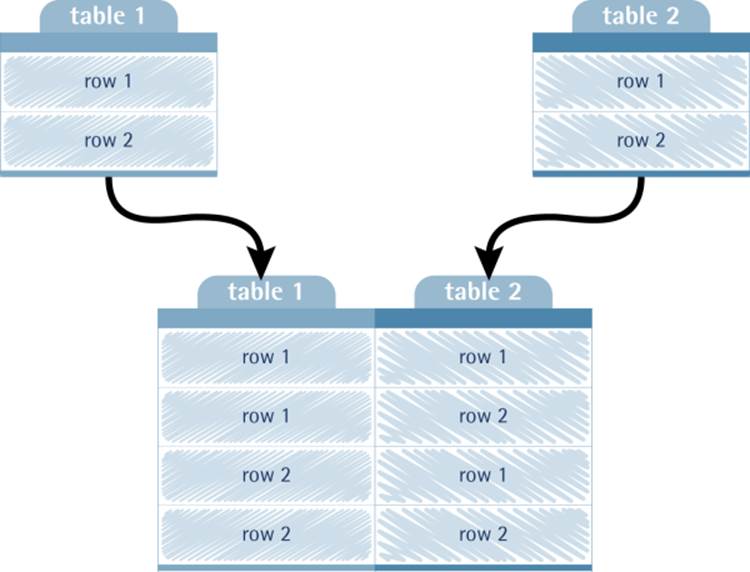
Figure 11.9. Inner joins take all possible combinations of rows
The reason why this solution is unsuitable for our purposes is that we’d like to also include rows in table 1 (that is, author) that don’t match any rows in table 2 (joke). A left join does exactly what we need: it forces a row to appear in the results for each row in the first (left-hand) table, even if no matching entries are found in the second (right-hand) table. Such forced rows are given NULL values for all columns in the right-hand table. To perform a left join between two tables in MySQL, simply type LEFT JOIN instead of INNER JOIN within the FROM clause. Here’s our revised query for listing authors and the number of jokes to their credit:
SELECT author.name, COUNT(*) AS numjokes
FROM author LEFT JOIN joke
ON authorid = author.id
GROUP BY author.id
A couple of important points to note about this query:
· We must type author LEFT JOIN joke, rather than joke LEFT JOIN author. The order in which we list the tables to be joined is significant. A LEFT JOIN will only force all rows from the table on the left to appear in the results. In this example, we want every row in the author table to appear in the results.
· We must use GROUP BY author.id, rather than GROUP BY authorid. author.id is the id field of the author table, whereas authorid is the authorid field of the joke table. In all previous SELECT queries, our join has guaranteed that these would always have matching values; however, when the LEFT JOIN creates a forced row based on a row in the author table that has no matching row in the joke table, it assigns a value of NULL to all columns in the joke table. This includes the authorid field. If we used GROUP BY authorid, the query would group all our authors with no jokes together, since they all share an authorid value of NULL following the LEFT JOIN.[60]
If you type that query right, you should achieve the results shown in Figure 11.10.
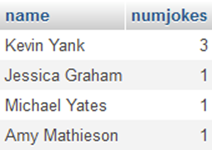
Figure 11.10. Something’s not quite right …
Wait just a minute! Suddenly Amy Mathieson and Michael Yates have one joke apiece. That can’t be right, surely? In fact, it is—but only because the query is still wrong. COUNT(*) counts the number of rows returned for each author. If we look at the ungrouped results of the LEFT JOIN, we can see what’s happened:
SELECT author.name, joke.id AS jokeid
FROM author LEFT JOIN joke
ON authorid = author.id
Figure 11.11 reveals that Amy Mathieson and Michael Yates do have rows—the rows that are forced because there are no matching rows in the right-hand table of the LEFT JOIN (joke). The fact that the joke ID value is NULL has no effect on COUNT(*); it still counts it as a row.
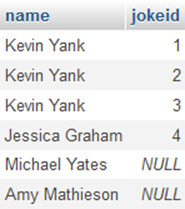
Figure 11.11. Ungrouped results
If, instead of *, you specify an actual column name (say, joke.id) for the COUNT function to look at, it will ignore NULL values in that column and give us the count we want:
SELECT author.name, COUNT(joke.id) AS numjokes
FROM author LEFT JOIN joke
ON authorid = author.id
GROUP BY author.id
The long-awaited results are shown in Figure 11.12.
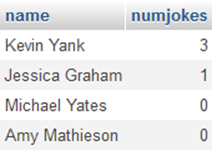
Figure 11.12. At last!
Limiting Results with HAVING
What if we wanted a list of only those authors that had no jokes to their name? Once again, let’s look at the query that many developers would try first:
SELECT author.name, COUNT(joke.id) AS numjokes
FROM author LEFT JOIN joke
ON authorid = author.id
WHERE numjokes = 0
GROUP BY author.id
This will cause phpMyAdmin to spit out the error #1054 - Unknown column 'numjokes' in 'where clause'. By now, you’re probably unfazed that it failed to work as expected. The reason why WHERE numjokes = 0 caused an error has to do with the way MySQL processes result sets. First, MySQL produces the raw, combined list of authors and jokes from the author and joke tables. Next, it processes the ON portion of the FROM clause and the WHERE clause so that only the relevant rows in the list are returned (in this case, rows that match authors with their jokes, and which have anumjokes value of 0). Finally, MySQL processes the GROUP BY clause by grouping the results according to their authorid, COUNTing the number of entries in each group that have non-NULL joke.id values, and producing the numjokes column as a result. Notice that the numjokes column is actually created after the GROUP BY clause is processed, and that happens only after the WHERE clause does its stuff. Hence the error message—the WHERE clause is looking for a numjokes column that is yet to be created. If you wanted to exclude jokes that contained the word “chicken” from the count, you could use the WHERE clause without a problem, because that exclusion doesn’t rely on a value that the GROUP BY clause is responsible for producing. Conditions that affect the results after grouping takes place, however, must appear in a special HAVING clause. Here’s the corrected query:
SELECT author.name, COUNT(joke.id) AS numjokes
FROM author LEFT JOIN joke
ON authorid = author.id
GROUP BY author.id
HAVING numjokes = 0
The expected results are shown in Figure 11.13.
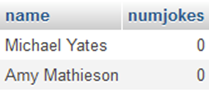
Figure 11.13. Our least prolific authors
Some conditions work both in the HAVING and the WHERE clauses. For example, if we wanted to exclude a particular author by name, we could do this by using author.name != 'Author Name' in either the WHERE or HAVING clause; that’s because, regardless of whether you filter out the author before or after you group the results, the same results are returned. In such cases, it’s always best to use the WHERE clause, because MySQL is better at optimizing such queries internally so they happen faster.
Further Reading
In this chapter, you rounded out your knowledge of Structured Query Language (SQL) as supported by MySQL. We focused predominantly on features of SELECT that allow you to view information stored in a database with an unprecedented level of flexibility and power. With judicious use of the advanced features of SELECT, you can have MySQL do what it does best, lightening the load on PHP in the process. There are still a few isolated query types that we’ve yet to see, and MySQL offers a whole library of built-in functions to do tasks like calculate dates and format text strings (see Appendix C). To become truly proficient with MySQL, you should also have a firm grasp on the various column types offered by MySQL. The TIMESTAMP type, for example, can be a real time-saver (no pun intended). All of these are fully documented in the MySQL Manual, and briefly covered in Appendix D. For more detailed coverage of the features of SQL covered in this chapter—and a whole lot more that wasn’t—I highly recommend the book Simply SQL by Rudy Limeback.
[59] I’ve written an article that explores this technique in greater detail at sitepoint.com, entitled Object Oriented PHP: Paging Result Sets.
[60] You may find you have to read this a few times to understand it. That’s because this is by far the subtlest aspect of the SQL language you’ll find in the book.