Sams Teach Yourself PHP, MySQL and Apache All in One (2012)
Part V. Basic Projects
Chapter 23. Creating a Shopping Cart Mechanism
In this chapter, you learn the following:
• How to create relational tables for the shopping cart and checkout portion of an online store
• How to create the scripts to add and remove cart items
• Some methods for processing transactions, and how to create your checkout sequence
In this chapter, you integrate a shopping cart mechanism and checkout procedure into the basic storefront display that you created in Chapter 22, “Creating an Online Storefront.” You learn the methods for creating relevant database tables as well as what goes into scripts for adding and deleting cart items. The examples used in this chapter again represent only a few of an infinite number of possibilities to complete these tasks and are meant as working examples rather than the definitive guide for building an online store.
Planning and Creating the Database Tables
Because the goal of this chapter is to provide the user with a way to select and order items, you can imagine what the tables will be—first and foremost, you need a table to hold the shopping cart information. In addition to the cart table, you need a table to store orders, along with one to store the items purchased as part of each order.
The following SQL statements were used to create the three new tables, starting with the store_shoppertrack table. This is the table used to hold items as users add them to their shopping cart.
Note
The field lengths used to define these tables were chosen arbitrarily to accommodate several possible inputs. Feel free to modify the lengths to meet your specific needs.
CREATE TABLE store_shoppertrack (
id INT NOT NULL PRIMARY KEY AUTO_INCREMENT,
session_id VARCHAR (32),
sel_item_id INT,
sel_item_qty SMALLINT,
sel_item_size VARCHAR(25),
sel_item_color VARCHAR(25),
date_added DATETIME
);
In this table, the only key is the id field for the record. The session_id cannot be unique; otherwise, users could order only one item from your store, which is not a good business practice.
The value stored in the session_id field identifies the user; it matches the value of the PHP session ID assigned to that particular user. The sel_* fields hold the selections by the user: the selected item, the selected quantity of the item, and the selected color and size of the item. Finally, there’s a date_added field. Many times, users place items in their cart and never go through the checkout process. This practice leaves straggling items in your tracking table, which you might want to clear out periodically. For example, you might want to delete all cart items more than a week old—this is where the date_added field is helpful.
The next table holds the order information:
CREATE TABLE store_orders (
id INT NOT NULL PRIMARY KEY AUTO_INCREMENT,
order_date DATETIME,
order_name VARCHAR (100),
order_address VARCHAR (255),
order_city VARCHAR (50),
order_state CHAR(2),
order_zip VARCHAR(10),
order_tel VARCHAR(25),
order_email VARCHAR(100),
item_total FLOAT(6,2),
shipping_total FLOAT(6,2),
authorization VARCHAR (50),
status ENUM('processed', 'pending')
);
The only key field in the store_orders table is the id. For the sake of brevity in this chapter, we make an assumption that the billing and shipping addresses of the user are the same and that this store sells only to U.S. addresses. It’s simple enough for you to add another block of fields for shipping address information, if you want to do so. If this were a live example, you certainly would want to; otherwise, you would lose business from shoppers who purchase items for gifts, for instance.
Also, this table assumes that you are not storing credit card information, which you absolutely should not do unless you have super-encrypted the information and are sure that your firewalled server is secure. Instead, this table is based on the idea of real-time, credit card processing. You learn about a few real-time transaction options at the end of this chapter.
The final table holds the line items in each order, store_orders_items:
CREATE TABLE store_orders_items (
id INT NOT NULL PRIMARY KEY AUTO_INCREMENT,
order_id INT,
sel_item_id INT,
sel_item_qty SMALLINT,
sel_item_size VARCHAR(25),
sel_item_color VARCHAR(25),
sel_item_price FLOAT(6,2)
);
The sel_* fields should look familiar. With the exception of sel_item_price, they are the same fields that appear in the store_shoppertrack table because what you are tracking in that table are the line items that people want to purchase. The primary key in this table is the id field, and theorder_id field ties each line item to the appropriate record in store_orders.
The sel_item_price field is included here, as opposed to simply relating to the item record, because you might have occasion to change the pricing in your item record. If you change the price in the item record, and you relate the sold line items to the current catalog price, your line item prices won’t reflect what the user actually paid.
With your tables all squared away, we can move on to adding an item to the user’s shopping cart.
Integrating the Cart with Your Storefront
In this section, you make modifications to the showitem.php script from Chapter 22. The goal is to transform the item information page into an item information page with a form for selecting colors, sizes, and quantities.
In the original script, insert the following before line 2:
session_start();
Because the shopping cart elements are attached to the user through a session ID, the session must be started. The next changes do not occur until what was line 39 of the showitem.php script from Chapter 22, so that’s where we start in Listing 23.1.
Listing 23.1 New Lines in showitem.php
39: <p><strong>Price:</strong> \$$item_price</p>
40: <form method="post" action="addtocart.php">
41: END_OF_TEXT;
42:
43: //free result
44: mysqli_free_result($get_item_res);
45:
46: //get colors
47: $get_colors_sql = "SELECT item_color FROM store_item_color WHERE
48: item_id = '".$safe_item_id."' ORDER BY item_color";
49: $get_colors_res = mysqli_query($mysqli, $get_colors_sql)
50: or die(mysqli_error($mysqli));
51:
52: if (mysqli_num_rows($get_colors_res) > 0) {
53: $display_block .= "<p><label for=\"sel_item_color\">
54: Available Colors:</label><br/>
55: <select id=\"sel_item_color\" name=\"sel_item_color\">";
56:
57: while ($colors = mysqli_fetch_array($get_colors_res)) {
58: $item_color = $colors['item_color'];
59: $display_block .= "<option value=\"".$item_color."\">".
60: $item_color."</option>";
61: }
62: $display_block .= "</select></p>";
63: }
64:
65: //free result
66: mysqli_free_result($get_colors_res);
67:
68: //get sizes
69: $get_sizes_sql = "SELECT item_size FROM store_item_size WHERE
70: item_id = ".$safe_item_id." ORDER BY item_size";
71: $get_sizes_res = mysqli_query($mysqli, $get_sizes_sql)
72: or die(mysqli_error($mysqli));
73:
74: if (mysqli_num_rows($get_sizes_res) > 0) {
75: $display_block .= "<p><label for=\"sel_item_size\">
76: Available Sizes:</label><br/>
77: <select id=\"sel_item_size\" name=\"sel_item_size\">";
78:
79: while ($sizes = mysqli_fetch_array($get_sizes_res)) {
80: $item_size = $sizes['item_size'];
81: $display_block .= "<option value=\"".$item_size."\">".
82: $item_size."</option>";
83: }
84: }
85:
86: $display_block .= "</select></p>";
87:
88: //free result
89: mysqli_free_result($get_sizes_res);
90:
91: $display_block .= "
92: <p><label for=\"sel_item_qty\">Select Quantity:</label>
93: <select id=\"sel_item_qty\" name=\"sel_item_qty\">";
94:
95: for($i=1; $i<11; $i++) {
96: $display_block .= "<option value=\"".$i."\">".$i."</option>";
97: }
98:
99: $display_block .= <<<END_OF_TEXT
100: </select></p>
101: <input type="hidden" name="sel_item_id"
102: value="$_GET[item_id]" />
103: <button type="submit" name="submit" value="submit">
104: Add to Cart</button>
105: </form>
106: </div>
107: END_OF_TEXT;
108: }
109:
110: //close connection to MySQL
111: mysqli_close($mysqli);
112: ?>
113: <!DOCTYPE html>
114: <html>
115: <head>
116: <title>My Store</title>
117: <style type="text/css">
118: label {font-weight: bold;}
119: </style>
120: </head>
121: <body>
122: <?php echo $display_block; ?>
123: </body>
124: </html>
The first change is at the new line 40, where the $display_block string is continued to include the beginning <form> element. The action of the form is a script called addtocart.php, which you create in the next section.
The next change occurs at line 55, where the $display_block string is continued to include the opening tag of a <select> element named sel_item_color (and the “Available Colors” text is now surrounded by a <label> tag in lines 53–54, because it is labeling a form element). In lines 58–60, the colors are put into <option> elements for the user to choose from instead of simply printing on the screen. Line 62 closes the <select> element.
The same types of changes are made for item sizes. Lines 75–77 reflect the continuation of the $display_block string to include the <select> element, named sel_item_size. Lines 80–82 write the colors in <option> elements, and line 86 closes the <select> element.
Lines 91–97 are additions to the script. These lines create a <select> element, called sel_item_qty, for the user to pick how many items to purchase (a for loop iterates through numbers from 1 to 10 to create the <option> elements). Line 100 closes this <select> element, and lines 101–102 adds a hidden field for the item_id. Lines 103–104 adds the submit button, and line 105 closes the form. We close the connection to MySQL in line 111, and the remaining lines include the bits of HTML used to render the page, with the addition of a stylesheet entry for the <label> tag to make it bold like the nonlabels used in the display.
When viewing the baseball hat item using the new version of showitem.php, you would see Figure 23.1, reflecting the addition of the form elements.
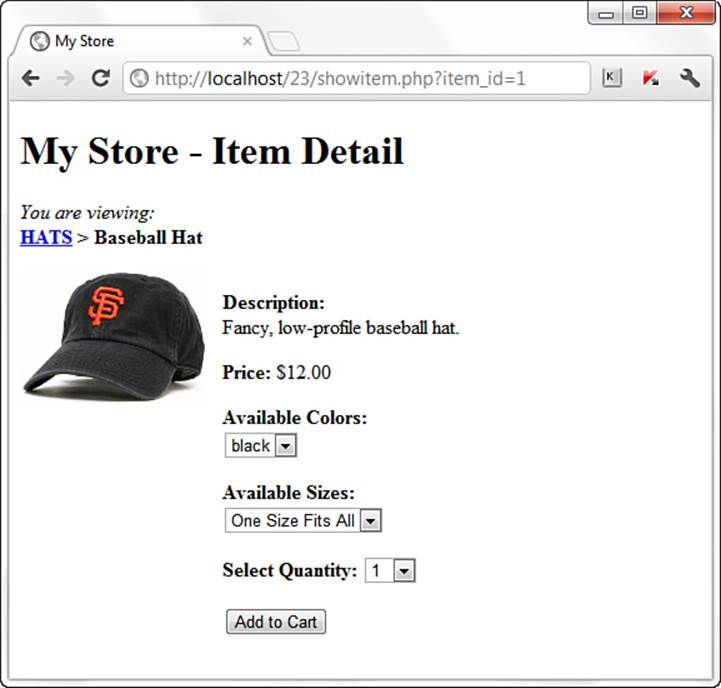
Figure 23.1 The new baseball hat item page.
The next step is to create the addtocart.php script so that the form you just created actually does something.
Adding Items to Your Cart
The addtocart.php script simply writes information to the store_shoppertrack table and redirects the user to the view of the shopping cart. We create the addtocart.php script first in Listing 23.2, and then tackle the showcart.php script next.
Listing 23.2 The addtocart.php Script
1: <?php
2: session_start();
3:
4: if (isset($_POST['sel_item_id'])) {
5: //connect to database
6: $mysqli = mysqli_connect("localhost", "joeuser", "somepass", "testDB");
7:
8: //create safe values for use
9: $safe_sel_item_id = mysqli_real_escape_string($mysqli,
10: $_POST['sel_item_id']);
11: $safe_sel_item_qty = mysqli_real_escape_string($mysqli,
12: $_POST['sel_item_qty']);
13: $safe_sel_item_size = mysqli_real_escape_string($mysqli,
14: $_POST['sel_item_size']);
15: $safe_sel_item_color = mysqli_real_escape_string($mysqli,
16: $_POST['sel_item_color']);
17:
18: //validate item and get title and price
19: $get_iteminfo_sql = "SELECT item_title FROM store_items WHERE
20: id = '".$safe_sel_item_id."'";
21: $get_iteminfo_res = mysqli_query($mysqli, $get_iteminfo_sql)
22: or die(mysqli_error($mysqli));
23:
24: if (mysqli_num_rows($get_iteminfo_res) < 1) {
25:
26: //free result
27: mysqli_free_result($get_iteminfo_res);
28:
29: //close connection to MySQL
30: mysqli_close($mysqli);
31:
32: //invalid id, send away
33: header("Location: seestore.php");
34: exit;
35: } else {
36: //get info
37: while ($item_info = mysqli_fetch_array($get_iteminfo_res)) {
38: $item_title = stripslashes($item_info['item_title']);
39: }
40:
41: //free result
42: mysqli_free_result($get_iteminfo_res);
43:
44: //add info to cart table
45: $addtocart_sql = "INSERT INTO store_shoppertrack
46: (session_id, sel_item_id, sel_item_qty,
47: sel_item_size, sel_item_color, date_added)
48: VALUES ('".$_COOKIE['PHPSESSID']."',
49: '".$safe_sel_item_id."',
50: '".$safe_sel_item_qty."',
51: '".$safe_sel_item_size."',
52: '".$safe_sel_item_color."', now())";
53: $addtocart_res = mysqli_query($mysqli, $addtocart_sql)
54: or die(mysqli_error($mysqli));
55:
56:
57: //close connection to MySQL
58: mysqli_close($mysqli);
59:
60: //redirect to showcart page
61: header("Location: showcart.php");
62: exit;
63: }
64:
65: } else {
66: //send them somewhere else
67: header("Location: seestore.php");
68: exit;
69: }
70: ?>
Line 2 continues the user session, which is important because you need to capture the user’s session ID to write to the store_shoppertrack table.
In line 4, the script verifies that a value is present in $_POST['sel_item_id'], meaning that the user came to this script after submitting the proper form. If there is no value, the script jumps down to line 51 and sends the user away in line 53, and that’s it for the script.
However, if there is a value in $_POST['sel_item_id'], line 6 makes the database connection, lines 9–16 create safe versions of the form information, and line 17 issues a query to verify that the selected item ID is for a valid item. Lines 19–22 create and issue a SQL query to gather the title of the selected item. Line 24 checks for a result; if there is no result, the user is again redirected away in line 33 because the item selection was not valid.
If the item selection is valid, the script continues to line 38 and extracts this value from the resultset. The script now has enough information to add the item selection to the store_shoppertrack table, which it does in lines 45–54.
After the query has been issued, the user is redirected to showcart.php, which contains all cart items. You create this script in the next section.
Viewing the Cart
Now that you can add items to a cart, you want to see them! Listing 23.3 shows the code for showcart.php.
Listing 23.3 The showcart.php Script
1: <?php
2: session_start();
3:
4: //connect to database
5: $mysqli = mysqli_connect("localhost", "joeuser", "somepass", "testDB");
6:
7: $display_block = "<h1>Your Shopping Cart</h1>";
8:
9: //check for cart items based on user session id
10: $get_cart_sql = "SELECT st.id, si.item_title, si.item_price,
11: st.sel_item_qty, st.sel_item_size, st.sel_item_color FROM
12: store_shoppertrack AS st LEFT JOIN store_items AS si ON
13: si.id = st.sel_item_id WHERE session_id =
14: '".$_COOKIE['PHPSESSID']."'";
15: $get_cart_res = mysqli_query($mysqli, $get_cart_sql)
16: or die(mysqli_error($mysqli));
17:
18: if (mysqli_num_rows($get_cart_res) < 1) {
19: //print message
20: $display_block .= "<p>You have no items in your cart.
21: Please <a href=\"seestore.php\">continue to shop</a>!</p>";
22: } else {
23: //get info and build cart display
24: $display_block .= <<<END_OF_TEXT
25: <table>
26: <tr>
27: <th>Title</th>
28: <th>Size</th>
29: <th>Color</th>
30: <th>Price</th>
31: <th>Qty</th>
32: <th>Total Price</th>
33: <th>Action</th>
34: </tr>
35: END_OF_TEXT;
36:
37: while ($cart_info = mysqli_fetch_array($get_cart_res)) {
38: $id = $cart_info['id'];
39: $item_title = stripslashes($cart_info['item_title']);
40: $item_price = $cart_info['item_price'];
41: $item_qty = $cart_info['sel_item_qty'];
42: $item_color = $cart_info['sel_item_color'];
43: $item_size = $cart_info['sel_item_size'];
44: $total_price = sprintf("%.02f", $item_price * $item_qty);
45:
46: $display_block .= <<<END_OF_TEXT;
47: <tr>
48: <td>$item_title <br></td>
49: <td>$item_size <br></td>
50: <td>$item_color <br></td>
51: <td>\$ $item_price <br></td>
52: <td>$item_qty <br></td>
53: <td>\$ $total_price</td>
54: <td><a href="removefromcart.php?id=$id">remove</a></td>
55: </tr>
56: END_OF_TEXT;
57: }
58: $display_block .= "</table>";
59: }
60: //free result
61: mysqli_free_result($get_cart_res);
62:
63: //close connection to MySQL
64: mysqli_close($mysqli);
65: ?>
66: <!DOCTYPE html>
67: <html>
68: <head>
69: <title>My Store</title>
70: <style type="text/css">
71: table {
72: border: 1px solid black;
73: border-collapse: collapse;
74: }
75: th {
76: border: 1px solid black;
77: padding: 6px;
78: font-weight: bold;
79: background: #ccc;
80: text-align: center;
81: }
82: td {
83: border: 1px solid black;
84: padding: 6px;
85: vertical-align: top;
86: text-align: center;
87: }
88: </style>
89: </head>
90: <body>
91: <?php echo $display_block; ?>
92: </body>
93: </html>
Line 2 continues the user session, which is important because you need to match the user’s session ID with the records in the store_shoppertrack table. Line 5 makes the database connection, and line 7 begins the $display_block string, with a heading for the page.
Lines 10–14 represent a joined query, in which the user’s saved items are retrieved. The id, sel_item_qty, sel_item_size, and sel_item_color fields are extracted from store_shoppertrack, and the item_title and item_price fields are retrieved from the store_items table based on the matching information from store_shoppertrack. In other words, instead of printing 2 for the selected item, Baseball Hat is shown as the title. Lines 15–16 issue the query, and line 18 checks for results.
If there are no results, the user has no items in the store_shoppertrack table. A message is written to the $display_block string, and the script exits and shows the message.
If there are indeed results, the beginning of an HTML table is created in lines 24–34, with columns defined for all the information in the cart (plus one column for an action link). Line 37 begins the while loop to extract each item from the store_shoppertrack, and this loop continues until line 56, printing the information in the proper table cell.
In line 54, you see a link created for an item removal script, which you create in the next section. Line 58 closes the table, and the script finishes and prints HTML to the screen in lines 66–93, including some stylesheet entries for your table headings and other cells.
Now, go back to an item page and add the item to your cart. After the items are written to the store_shoppertrack table, you should be redirected to the showcart.php page, and your newly selected items should be displayed. Figure 23.2 shows my cart after adding some items.
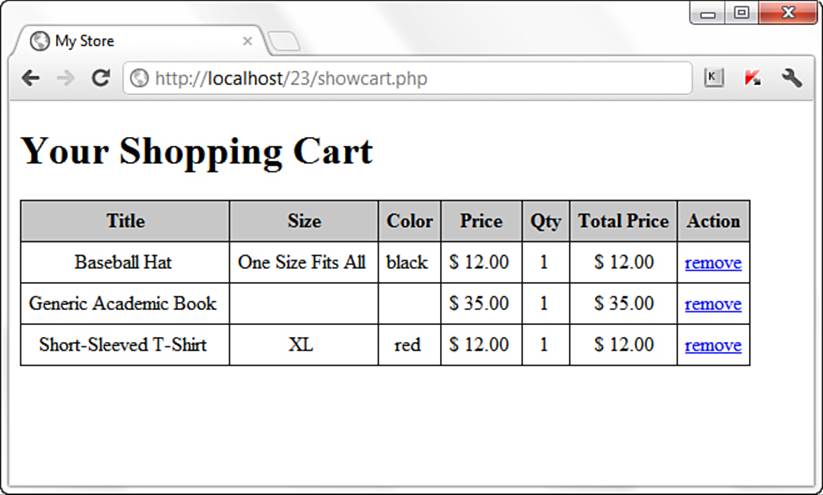
Figure 23.2 Items added to cart.
The next step is to create the removefromcart.php script.
Removing Items from Your Cart
The removefromcart.php script is short because all it does is issue a query and redirect the user to another script. Inevitably, a user will want to weed items out of his cart, and this script enables him to do just that. Listing 23.4 shows the complete script.
Listing 23.4 The removefromcart.php Script
1: <?php
2: session_start();
3:
4: if (isset($_GET['id'])) {
5: //connect to database
6: $mysqli = mysqli_connect("localhost", "joeuser", "somepass", "testDB");
7:
8: //create safe values for use
9: $safe id = mysqli_real_escape_string($mysqli, $_GET['id']);
10:
11: $delete_item_sql = "DELETE FROM store_shoppertrack WHERE
12: id = '".$safe_id."' and session_id =
13: '".$_COOKIE['PHPSESSID''";
14: $delete_item_res = mysqli_query($mysqli, $delete_item_sql)
15: or die(mysqli_error($mysqli));
16:
17: //close connection to MySQL
18: mysqli_close($mysqli);
19:
20: //redirect to showcart page
21: header("Location: showcart.php");
22: exit;
23: } else {
24: //send them somewhere else
25: header("Location: seestore.php");
26: exit;
27: }
28: ?>
Line 2 continues the user session because you need to match the user’s session ID with the records in the store_shoppertrack table. Line 4 checks for a value in $_GET['id']. If a value does not exist in $_GET['id'], the user is not clicking the link from her cart and, therefore, is sent away in line 22.
If a value exists in $_GET['id'], line 6 makes the database connection, line 9 creates a database-safe version of the variable, and a SQL query (lines 11–13) is issued (lines 14–15), and the user is redirected to the showcart.php script (line 21), where the item should no longer be displayed in the user’s shopping cart. Try it and see!
Payment Methods and the Checkout Sequence
Several commerce methods exist when it comes time to pay for the purchases in the shopping cart. The “right” method for you depends on your business—merchant accounts through banking institutions often require you to have a business license, a reseller’s permit, and other pieces of paper proving that you’re a legitimate business. If you’re simply a person who has a few items to sell, you might not want to go through all that paperwork. However, you still have options.
Regardless of the payment method you choose, one thing is certain: If you are passing credit card information over the Web, you must do so over an SSL (Secure Sockets Layer) connection. Obtaining an SSL certificate and installing it on your system is covered in Chapter 30, “Setting Up a Secure Web Server.” You do not have to use this secure connection during the user’s entire shopping experience, just from the point at which sensitive information will be captured, such as when you send the user to the checkout form.
Creating the Checkout Form
At this point in the book, you should be well versed in creating a simple form. At the beginning of this chapter, you created the store_orders table with fields to use as a guideline for your form:
• order_name
• order_address
• order_city
• order_state
• order_zip
• order_tel
• order_email
In addition, your form needs fields for the credit card number, expiration date, and the name on the credit card. Another nice feature is to repeat the user’s shopping cart contents with an item subtotal so that the customer remembers what he’s paying for and approximately how much the order will cost. Also at this point of the checkout sequence, you offer any shipping options you might have. Shipping and sales tax would be calculated in the next step of the process.
From the point of clicking the submit button on the form, the checkout sequence depends on the payment method you are using. The next section goes through the basic steps and offers suggestions on various methods of payment processing.
Performing the Checkout Actions
If you have obtained a merchant account through your bank, you can utilize real-time payment services such as Authorize.Net’s payment gateway services or PayPal’s PayFlo product. For more information about these services, see http://www.authorize.net andhttps://www.paypal.com/webapps/mpp/merchant, respectively.
PHP does not contain built-in functions that enable direct access to these payment gateways, but when you have an account with merchant services of these types, you can download scripts that you can use in your own applications, or you are given information on an API for application developers.
Authorize.Net and PayPal are two of several transaction-processing gateways that exist for use by merchants—I include them here because I have personally (and successfully) used both gateway services since their inception. However, be aware that your bank will usually provide a list of merchants it prefers you to use. So if you stray from your bank’s list of preferred vendors, be sure to research your selected vendor thoroughly to avoid any delays with deposits and to ensure that you’re getting the best deal.
After you have selected a transaction processor, your checkout script should follow a path such as the following:
1. Total the items, add tax, and add shipping. This gives you the total amount to authorize from the credit card.
2. Perform credit card authorization for the total amount.
3. You receive either a success or failure response from your card-processing routine. If the response is a failure, print a message to the user and the transaction is over. If the response is a success, continue to step 4.
4. Write the basic order information to a table such as store_orders, including the authorization code you receive on successful authorization. Get the id value of this record using mysql_insert_id().
5. For each item in the shopping cart tied to this user, insert a record into store_orders_itemmap. Each record references the id (as order_id) gathered in the previous step.
6. Delete the shopping cart items for this user.
7. Display the order with the authorization code in place of the credit card information on the screen so that the user can print it and hold it as a receipt. You can also send this information via email to the user.
The steps listed here—with the exception of the actual payment authorization code—are the same simple steps you have been using throughout this book, and there’s no reason to make them more difficult than they need to be.
Summary
In this chapter, you applied your basic PHP and MySQL knowledge to the integration of a shopping cart into the storefront from Chapter 22. Included were the database table creation, modifications to the item detail page, and new scripts for adding and removing cart items.
Q&A
Q. How can users be sure that an item is in stock when they add it to their cart?
A. If the store_items table were modified to contain a field for the current quantity, and when a user completed the checkout sequence that quantity was decreased by the number of items that the user ordered, then in the showitem.php script you could generate a drop-down list that had a maximum selection of the number of items remaining in inventory. Of course, if you are working with thousands of items in inventory it shouldn’t matter if your drop-down selector only allows the purchase of 10 at a time. However, for a better user experience you would want the user to be able to add as many to their cart as possible, and in that case you might also add an inventory check before finishing the add-to-cart sequence, and disallow the addition of a quantity greater than the quantity in stock.
Workshop
The workshop is designed to help you review what you’ve learned and begin putting your knowledge into practice.
Quiz
1. When removing an item from the cart, why do you suppose that the query validates the session ID of the user against the record?
2. What would be a reason not to store the price in a hidden field when adding to the cart?
3. What would you do to the database and form to handle the need for different shipping and billing addresses?
Answers
1. Users should be able to remove only their own items.
2. If you stored the price in a hidden field, a rogue user could change that value before posting the form (writing whatever price he wanted into the store_shoppertrack table as opposed to the actual price).
3. Modify the existing address-related fields in the store_orders table so that it is clear they are either for shipping or billing addresses, then duplicate the set of fields in the table (and give them a name indicating they’re for either shipping or billing—whichever you didn’t use already) and also the form and the eventual INSERT statement.
Activities
1. Even if you do not have a merchant account, set up the checkout form as described in the “Creating the Checkout Form” section. Don’t forget to add a link to the shopping cart (or any other page in the store) to this “checkout” functionality.
2. After creating the checkout form, save the order information and line items to the database tables created at the beginning of this chapter. Don’t worry about the merchant account or payment processing at this point. Just get the process going that allows users to save items in their shopping cart, check out by giving you some dummy credit card and address information, and then store that basic order information in the store_orders table and the items in the order in the store_orders_items table.