Introducing Microsoft SQL Server 2014: Technical Overview, 1st Edition (2014)
PART I. Database administration
CHAPTER 3. High-availability, hybrid-cloud, and backup enhancements
Microsoft SQL Server 2014 delivers significant enhancements to well-known critical capabilities such as high availability and disaster recovery and provides an integrated hybrid-cloud platform. These enhancements promise to assist organizations in achieving their highest level of confidence to date in their data platform environments and offer new innovative solutions and business models via the cloud.
This chapter aims to bring readers up to date on the high-availability, hybrid-cloud, and backup capabilities that are fully integrated into SQL Server 2014 and Windows Azure. In addition, this chapter showcases how the cloud is rapidly changing the world of information technology and the way organizations innovate and do business, which may one day render many of the traditional approaches and methodologies used today obsolete.
Figure 3-1 illustrates the Microsoft Cloud OS vision, which allows organizations to achieve the benefits of scale, speed, and agility while protecting existing investments. This means that organizations can rapidly build and deploy database applications and support real-time analytics across all forms of data with a consistent experience, whether on-premises, off-premises, or through hybrid-cloud solutions.
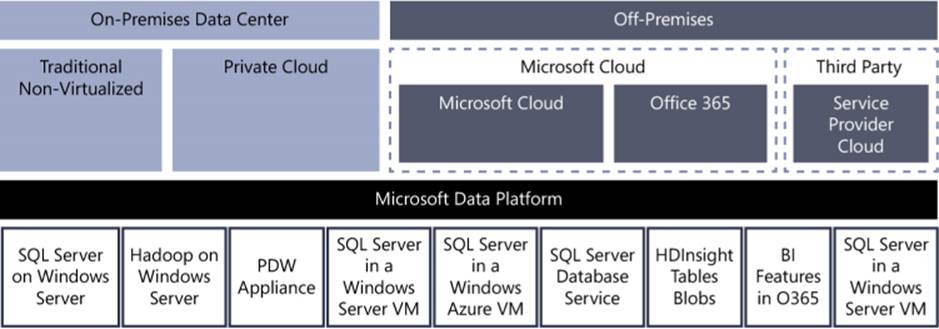
FIGURE 3-1 The elements of the Microsoft Cloud OS vision as they relate to the Microsoft data platform to achieve a consistent experience on-premises, off-premises, or on hybrid-cloud solutions.
We’ll focus first on the high-availability and disaster-recovery enhancements, specifically AlwaysOn Availability Groups and AlwaysOn Failover Cluster Instances. The chapter then showcases hybrid-cloud solutions with Windows Azure and backup enhancements.
SQL Server high-availability and disaster-recovery enhancements
Every organization’s success and service reputation is built on ensuring that its data is always accessible and protected. In the IT world, this means delivering a product that achieves the highest level of availability and disaster recovery while simultaneously minimizing data loss and downtime. In SQL Server 2012, Microsoft introduced a new capability known as AlwaysOn, which provided customers superior availability and disaster-recovery alternatives. The AlwaysOn brand included two features for achieving high availability and disaster recovery: AlwaysOn Availability Groups and AlwaysOn Failover Cluster Instances (FCIs). The next few sections discuss the AlwaysOn enhancements in SQL Server 2014.
AlwaysOn Availability Groups enhancements
AlwaysOn Availability Groups gave organizations the ability to automatically or manually fail over a group of databases as a single unit with support for up to four secondary replicas. The solution was integrated with SQL Server Management Studio and provided high availability and disaster recovery with zero data loss. It could be deployed on local storage or shared storage, and it supported both synchronous and asynchronous data movement. The application failover was very fast and supported automatic page repair, and the secondary replicas could be used to offload reporting and a number of maintenance tasks such as backups. Figure 3-2 depicts an AlwaysOn Availability Groups deployment strategy that is based on SQL Server 2012. The illustration shows one primary replica and three secondary replicas.
AlwaysOn Availability Groups was a great success, yet the SQL Server product group wanted to expand its capabilities and provide increased availability, greater efficiency, and easier deployment and management. Similarly, the product group wanted to provide tighter integration with Windows Azure for hybrid-cloud opportunities and innovations. The next sections explore the results of the product group’s efforts.
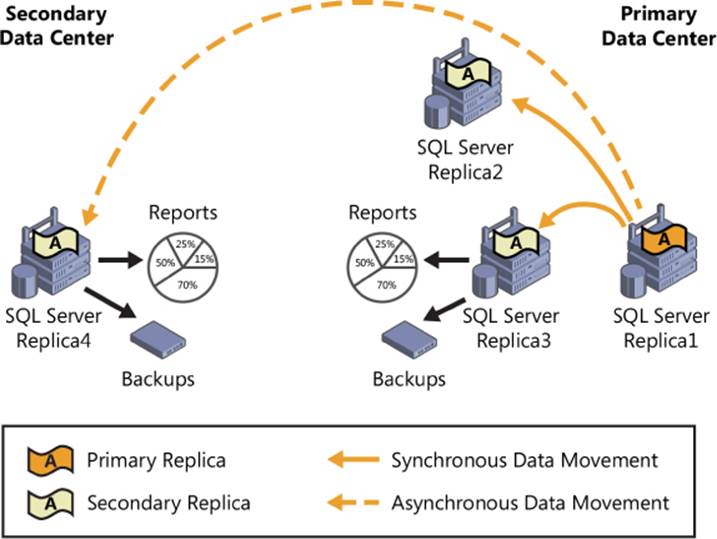
FIGURE 3-2 An AlwaysOn Availability Groups deployment running SQL Server 2012 with four replicas spanning two data centers for high availability and disaster recovery.
Additional secondary replicas
To provide additional offloading capabilities, the maximum number of secondary replicas was increased from four to eight in SQL Server 2014. Some readers may ask why more replicas were needed. Additional replicas can be distributed around the world, which positively affects high availability and disaster-recovery efforts for any organization. New wizards have also been included that can be used to provide integrated hybrid-cloud scenarios in which replicas can be easily deployed in Windows Azure. Likewise, additional replicas can also be used to offload read workloads such as scale-out operations, reporting backups, and maintenance tasks. It is worth keeping in mind that eight secondaries, two of which can be configured as synchronous secondaries, can be used for high availability.
Figure 3-3 illustrates an AlwaysOn Availability Groups deployment with SQL Server 2014. Here, the deployment uses a primary replica and seven secondary replicas. The secondary replicas provide maximum high availability and disaster-recovery protection because they reside in the primary data center, the secondary data center, and in the Windows Azure cloud.
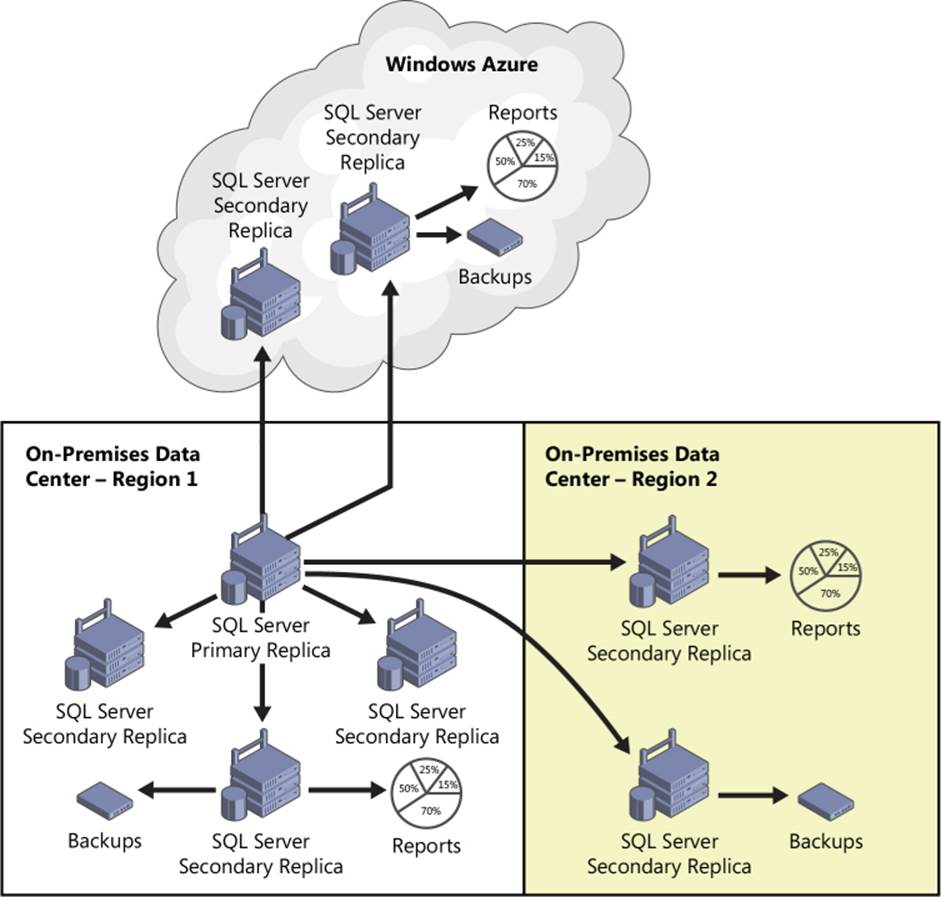
FIGURE 3-3 An AlwaysOn Availability Groups deployment running SQL Server 2014 with a total of eight replicas. Two of these replicas reside in Windows Azure to provide disaster-recovery capabilities in the cloud.
Increased availability
In SQL Server 2012, read workloads on a secondary replica failed if a network failure occurred between the primary replica and the secondary replicas. This type of situation arose more often in geo-distributed environments or hybrid deployments because of their increased susceptibility to network equipment failures, network upgrades, or ISP failures. With SQL Server 2014, the availability of readable secondary replicas has been increased and read workloads are no longer affected during network failures, if the primary is down or if the cluster quorum is lost. To make use of this enhancement, a direct connection to a readable secondary is required. In addition, as indicated earlier, whether initiated manually or automatically, a failover of multiple databases can occur concurrently, leading to higher availability. Figure 3-4 details the benefits of increased availability in SQL Server 2014. In the figure, two secondary replicas are used for reporting and backups even though the network connection to the primary is no longer available.
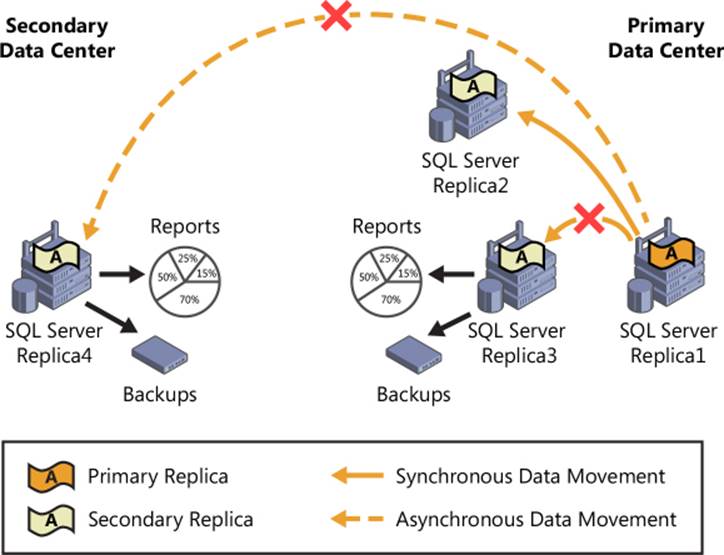
FIGURE 3-4 Increased availability and functionality of secondary replicas with SQL Server 2014.
Add Azure Replica wizard
Disaster-recovery and business-continuity planning are important requirements for many organizations, both from a customer-service and a regulatory perspective. Data loss and system disasters can negatively impact an organization or even permanently shut it down. Hence, the need for disaster-recovery sites. Regrettably, many organizations still do not have a disaster-recovery site because of the high costs and maintenance challenges. To address these challenges, SQL Server 2012 supported secondary replicas on Windows Azure Virtual Machines. This meant that organizations could manage disaster recovery by building hybrid platforms using Microsoft’s cloud platform, known as Windows Azure. Organizations indicated that this opportunity addressed their disaster-recovery requirements, but it also created another issue. The configuration process for database administrators was manual and cumbersome at times. The product group responded to the feedback and has introduced the Add Azure Replica wizard in SQL Server 2014. The wizard automates and simplifies the deployment of on-premises replicas to Windows Azure. When configuring the replicas, a database administrator can choose any Windows Azure data center around the world; however, when a location is considered primarily in terms of latency and politics, the best location for the replicas is near the data center.
AlwaysOn Failover Cluster Instances enhancements
Now that we’ve explored the development efforts in engineering the new capabilities of AlwaysOn Availability Groups for high availability and disaster recovery, it’s time to move on to another important matter: enhancements to AlwaysOn Failover Cluster Instances (FCIs).
Support for Cluster Shared Volumes
In conjunction with Windows Server 2012 and later releases, SQL Server 2014 now supports Cluster Shared Volumes (CSVs) as clustered shared disks for AlwaysOn Failover Cluster Instances. Why is this important? CSVs reduce the number of logical unit numbers (LUNs), or disks, required for FCIs, which increases the number of FCIs that can be hosted on a single Windows Server Failover Cluster (WSFC). Previously, the maximum number of instances supported was 24 because a LUN was the unit of failover. CSVs remove this limitation. CSVs also improve storage area network (SAN) utilization and disk space and increase I/O resiliency and failover resiliency because disks no longer need to be unmounted and mounted.
The following sections outline how to add a CSV on a Windows Server Failover Cluster and how to use it during a SQL Server installation.
Add a disk to a CSV on a Windows Server Failover Cluster
In Windows Server 2012 R2, the CSV feature is enabled by default when the failover cluster feature is installed. To add a disk to a CSV, the disk must be added to the Available Storage group of the cluster before it is added to the CSV on the cluster. You can use Failover Cluster Manager or the Failover Clustering cmdlets in Windows PowerShell to perform these procedures.
To add a disk to the Available Storage group, follow these steps:
1. In the console tree in Failover Cluster Manager, expand the name of the cluster, and then expand Storage.
2. Right-click Disks, and then click Add Disk. A list appears showing the disks that can be added for use in a failover cluster.
3. Select the disk or disks you want to add, and then click OK.
The next steps add the disk or disks in the Availability Storage group to the CSV:
1. In the console tree in Failover Cluster Manager, expand the name of the cluster, expand Storage, and then click Disks.
2. Select one or more disks that are assigned to Available Storage, right-click the selection, and then click Add To Cluster Shared Volumes.
The disks are now assigned to the Cluster Shared Volume group in the cluster. The disks are exposed to each cluster node as numbered volumes (mount points) under the %SystemDisk%ClusterStorage folder. The volumes appear in the CSVFS file system.
Figure 3-5 shows two 100-GB CSVs (named Cluster Disk 2-CSV1 and Cluster Disk 3-CSV2) that have been allocated to a Windows Server Failover Cluster named AlwaysOn-FC01.
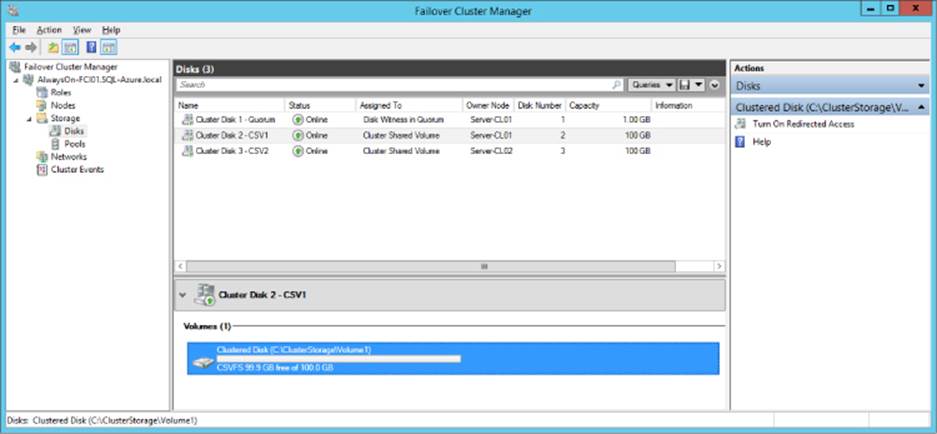
FIGURE 3-5 Adding available storage to Cluster Shared Volumes in Failover Cluster Manager.
The next step is installing the SQL Server failover cluster instance and leveraging the CSVs. Launch SQL Server setup and choose New SQL Server Failover Cluster Installation to invoke the Install A SQL Server Failover Cluster wizard. When you get to the Cluster Disk Selection page, select the Cluster Shared Volume to use as the shared cluster disk resources for your SQL Server failover cluster. As illustrated in Figure 3-6, Cluster Disk 2-CSV1, which was created in the preceding procedure, is used as the CSV on which to install the FCI.
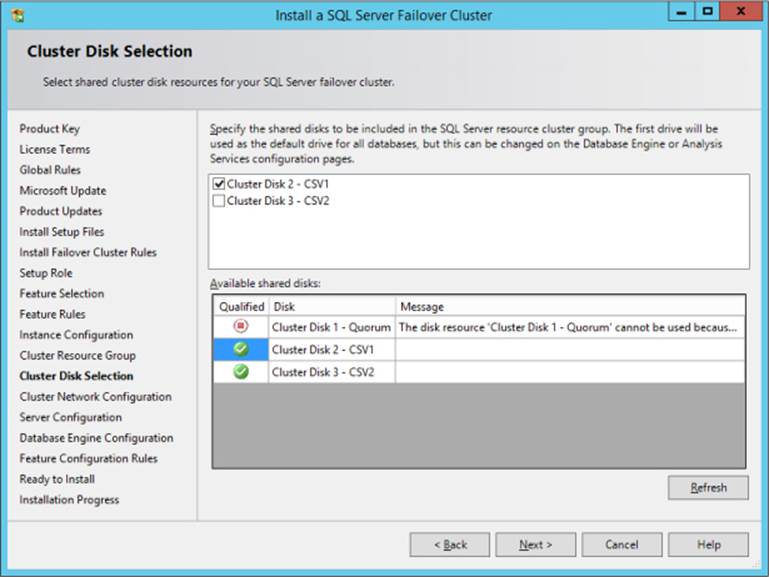
FIGURE 3-6 Using a Cluster Shared Volume to install a SQL Server failover cluster instance.
New dynamic management views (DMVs)
New dynamic management views (DMVs) have been introduced and existing ones optimized to return server state information that can be used to monitor and diagnose FCIs:
![]() sys.dm_hadr_cluster Returns information pertaining to the Windows Server Failover Cluster (WSFC) cluster name and quorum, provided that the cluster has a quorum. It can also be used on AlwaysOn Availability Groups.
sys.dm_hadr_cluster Returns information pertaining to the Windows Server Failover Cluster (WSFC) cluster name and quorum, provided that the cluster has a quorum. It can also be used on AlwaysOn Availability Groups.
![]() sys.dm_hadr_cluster_members Determines which nodes are currently running on the WSFC cluster and how many failures the WSFC can sustain before losing a quorum. This is a very important DMV. Use it to ensure that the majority-node quorum is set up correctly to guard against unexpected failure.
sys.dm_hadr_cluster_members Determines which nodes are currently running on the WSFC cluster and how many failures the WSFC can sustain before losing a quorum. This is a very important DMV. Use it to ensure that the majority-node quorum is set up correctly to guard against unexpected failure.
![]() sys.dm_hadr_cluster_networks Returns a row for every WSFC cluster member that is participating in an availability group’s subnet configuration. Use this DMV to validate the network virtual IP that is configured for each availability replica.
sys.dm_hadr_cluster_networks Returns a row for every WSFC cluster member that is participating in an availability group’s subnet configuration. Use this DMV to validate the network virtual IP that is configured for each availability replica.
![]() sys.dm_io_cluster_valid_path_names A new DMV used to return information on all valid shared disks, including CSVs.
sys.dm_io_cluster_valid_path_names A new DMV used to return information on all valid shared disks, including CSVs.
Platform for hybrid cloud
SQL Server 2014 is meeting the increasing demands of organizations to reduce operation and hardware costs, provide high availability, and scale their businesses (among other requests) by offering a hybrid-cloud environment with tailored hybrid-cloud solutions such as backing up data to the cloud. SQL Server 2014 also makes it simple for SQL Server workloads to be deployed and later managed by DBAs who lack experience with Windows Azure. In addition to providing companies with more options and enabling easier administration, Microsoft is standardizing its tools so that users have a reliable and consistent experience regardless of the location from which an organization runs its data platform.
SQL Server 2014 enables hybrid solutions for data virtualization, data movement, security and availability, low-cost maintenance for high availability, and elastic scaling. The next few sections describe these new investments.
Cloud disaster recovery
As mentioned earlier, disaster recovery is easily managed by using Windows Azure. The new Add Azure Replica wizard can be used to extend an on-premises implementation of AlwaysOn Availability Groups by adding secondary replicas to Windows Azure Virtual Machines running an instance of SQL Server. Windows Azure Virtual Machines (VMs) with SQL Server can also help lower high-availability and disaster-recovery costs.
Figure 3-7 shows a hybrid IT database solution where part of the SQL Server environment runs in Windows Azure and part of the environment runs within an organization’s on-premises data center. Some of the AlwaysOn availability replicas are running in Windows Azure VMs and others are running on-premises for cross-site disaster recovery. Because all availability replicas must be in the same WSFC cluster, the WSFC cluster must span both networks and requires a VPN connection between Windows Azure and the on-premises network.
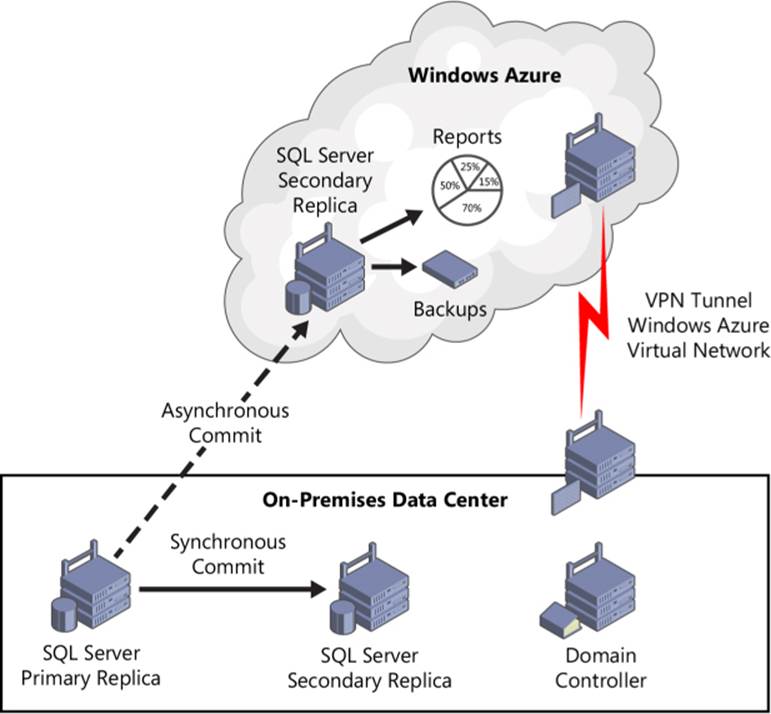
FIGURE 3-7 Using Windows Azure Virtual Machines to extend SQL Server secondary replicas in the cloud for disaster-recovery purposes.
Using the Add Azure Replica wizard
The purpose of this book is to describe the new capabilities and investments of SQL Server 2014, so we don’t include step-by-step instructions for how to deploy a replica in a Windows Azure Virtual Machine. In this section, however, we provide the high-level strategy for doing so, including the prerequisites.
Prerequisites
The following prerequisites must be met to successfully deploy a replica in a Windows Azure Virtual Machine:
![]() The configuration requires a site-to-site VPN between Windows Azure and the on-premises network because all the replicas must be part of the same domain and multi-subnet Windows Server Failover Cluster.
The configuration requires a site-to-site VPN between Windows Azure and the on-premises network because all the replicas must be part of the same domain and multi-subnet Windows Server Failover Cluster.
![]() The Add Azure Replica wizard must be invoked from the SQL Server instance that is hosting the primary replica.
The Add Azure Replica wizard must be invoked from the SQL Server instance that is hosting the primary replica.
![]() A replica domain controller should be implemented in Windows Azure if you plan to use the replica as a disaster-recovery site. This is a requirement because the primary site that hosts the domain controller would not be available in the event of a primary site failure, and authentication would fail.
A replica domain controller should be implemented in Windows Azure if you plan to use the replica as a disaster-recovery site. This is a requirement because the primary site that hosts the domain controller would not be available in the event of a primary site failure, and authentication would fail.
![]() The availability group must contain on-premises availability replicas.
The availability group must contain on-premises availability replicas.
![]() A Windows Azure subscription is required to generate the Windows Azure Virtual Machine and site-to-site VPN. A network share is required for the wizard to create and access backups for the initial full data synchronization. The account used to start the Database Engine must have read and write permissions to commence the operation, whereas the account used by the secondary replicas needs only read permissions.
A Windows Azure subscription is required to generate the Windows Azure Virtual Machine and site-to-site VPN. A network share is required for the wizard to create and access backups for the initial full data synchronization. The account used to start the Database Engine must have read and write permissions to commence the operation, whereas the account used by the secondary replicas needs only read permissions.
![]() Clients must have Internet access to connect to the replicas in Windows Azure in the event the primary data center fails or the operations are manually failed over from on-premises to the cloud.
Clients must have Internet access to connect to the replicas in Windows Azure in the event the primary data center fails or the operations are manually failed over from on-premises to the cloud.
High-level deployment steps
Follow these steps to invoke the Add Azure Replica wizard in SQL Server Management Studio:
1. In SQL Server Management Studio, connect to the primary replica.
2. Launch the Add Azure Replica wizard by running the Availability Group wizard or the Add Replicas To Availability Group wizard.
3. On the Add Azure Replica page, click the Download button to obtain a management certificate for the Windows Azure subscription.
4. You are prompted to sign in to Windows Azure to download a management certificate. After you are authenticated, the wizard installs a management certificate on your local machine.
5. Click Connect to populate the drop-down lists with the values for the Windows Azure Virtual Network and Virtual Network Subnet options.
6. Specify settings for the new Windows Azure VM that will host the new secondary replica. The settings include:
• Image Select a SQL Server image to use.
• VM Size Specify the size of the Windows Azure VM.
• VM Name Enter the name of the Windows Azure VM.
• VM Username Enter the VM user name.
• VM Administrator Password Enter the administrator password for the Windows Azure VM.
• Confirm Password Confirm the password for the Windows Azure VM.
7. On the same page, enter information in the On-Premise Domain area:
• Domain The Active Directory (AD) domain to which the Windows Azure VM will be joined.
• Domain User Name The AD user name used to join the Windows Azure VM to the domain.
• Password The password used to join the Windows Azure VM to the domain.
8. Click OK to start the deployment, as illustrated in Figure 3-8.
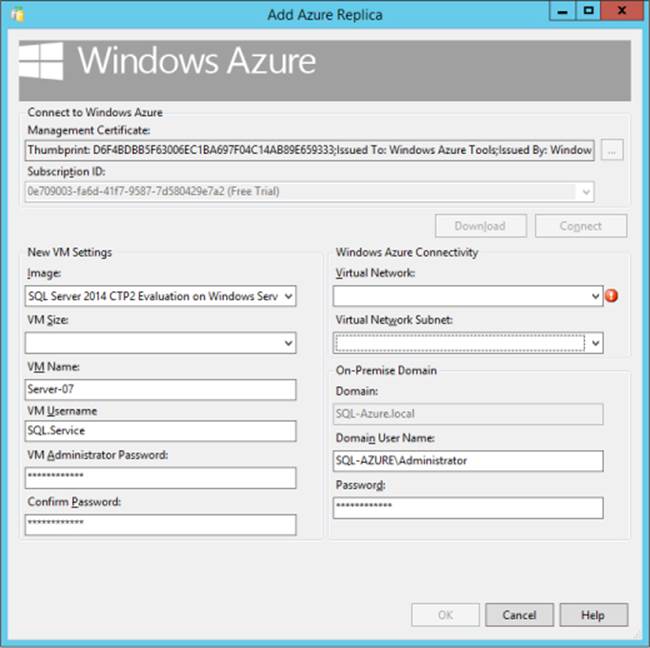
FIGURE 3-8 Using the new Add Azure Replica wizard to create a secondary replica in Windows Azure.
9. Continue through the wizard to complete the steps on the Specify Replicas page. The steps are the same as for creating a new replica.
After you run the Availability Group wizard or the Add Replica To Availability Group wizard, a new VM is created, connected to the Active Directory domain, and added to the Windows cluster. AlwaysOn is enabled, and the new replica is added to the availability group.
Deploy a database to a Windows Azure Virtual Machine
The Deploy Database To A Windows Azure Virtual Machine wizard is another feature new in SQL Server 2014 that enhances the hybrid-cloud experience for organizations. The wizard is invoked directly from SQL Server Management Studio and used to transition databases from on-premises SQL Server instances to a Windows Azure Virtual Machine running an instance of SQL Server in the Windows Azure cloud. The wizard is fairly easy to use and requires only a few steps. Databases based on SQL Server 2008, SQL Server 2008 R2, SQL Server 2012, or SQL Server 2014 can be deployed to a Windows Azure VM by invoking the wizard from SQL Server Management Studio for SQL Server 2014. This operation has a 1-terabyte database size limitation.
Prerequisites
To deploy a database to a Windows Azure Virtual Machine, the following prerequisites must be met:
![]() Windows Azure subscription.
Windows Azure subscription.
![]() Windows Azure publishing profile.
Windows Azure publishing profile.
![]() A management certificate uploaded to your Windows Azure subscription.
A management certificate uploaded to your Windows Azure subscription.
![]() The management certificate must be saved in the personal certificate store on the computer on which the wizard is run.
The management certificate must be saved in the personal certificate store on the computer on which the wizard is run.
![]() A temporary storage location.
A temporary storage location.
High-level deployment steps
In SQL Server Management Studio, connect to an instance of SQL Server and then right-click the database you want to deploy to a Windows Azure Virtual Machine. Then follow these steps:
1. Select Tasks, and then select Deploy Database To A Windows Azure VM.
2. Review the notes and prerequisites on the Introduction page.
3. On the Source Settings page, specify the name of the instance of the SQL Server and the name of the database that will be deployed to the Windows Azure VM. Also specify a temporary location for the backup files.
4. On the Windows Azure Sign-in page, do one of the following:
• Specify a management certificate to use when connecting to Windows Azure
• Use a publishing profile if you already have it downloaded to your computer.
• Click Sign In to connect to Windows Azure by using a Microsoft account to generate and download a new management certificate.
5. In the Subscription section, select or enter the Windows Azure subscription ID that matches the certificate from the local certificate store or publishing profile.
6. On the Deployment Settings page, shown in Figure 3-9, specify the Windows Azure VM that will host the database or provide a name to create a new virtual machine. In the Target Database section, select the name of the SQL Server instance you want to use and enter the name of the database. In this example, a virtual machine named SQLAzure-SQLVM is specified.
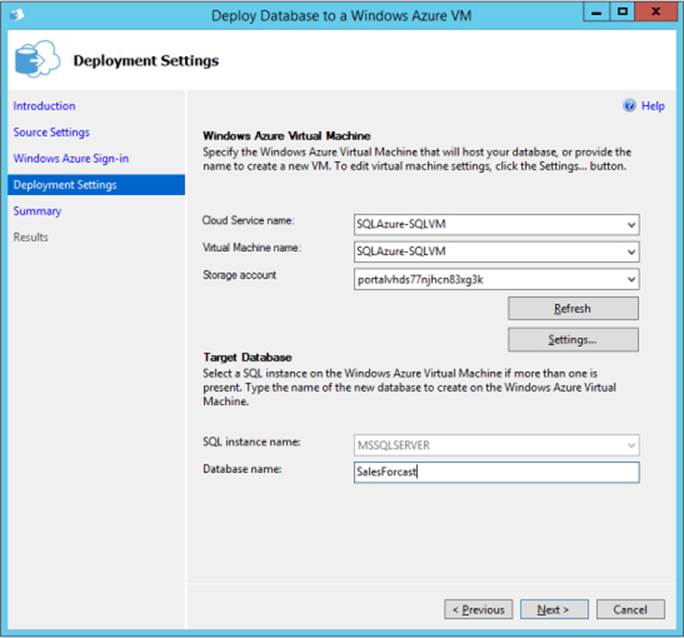
FIGURE 3-9 Specifying a Windows Azure Virtual Machine in the Deploy Database To A Windows Azure VM wizard.
7. On the Summary page, verify the choices made by the wizard, and then click Finish to commence the operations. Review the success and failure report on the Results page, and then click Finish again to close the wizard.
Storing SQL Server data files in Windows Azure
Another way for an organization to use the hybrid-cloud is to store SQL Server data and log files as blobs in Windows Azure. This approach allows SQL Server 2014 instances to be hosted within an organization’s on-premises data center while SQL Server data and log files are stored in Windows Azure Blob Storage. It is worth noting that the SQL Server instances are also supported in a Windows Azure Virtual Machine and not just in on-premises data centers.
So why is this important, and what are the benefits of using Windows Azure Blob Storage? First, you can easily use the Attach and Detach functionality to move databases between SQL Server instances because the data is permanently available in the cloud. Second, Windows Azure provides unlimited storage capacity and includes built-in high availability and geo-disaster recovery. Third, for those concerned with security, the data stored in the cloud is fully encrypted through the transparent data encryption (TDE) functionality that’s built in to SQL Server. Finally, a restore operation is fairly quick—it is simply an Attach operation and can be conducted on an on-premises instance of SQL Server or an instance running on a Windows Azure Virtual Machine.
Figure 3-10 illustrates a hybrid-cloud platform where an instance of SQL Server 2014 is running in an on-premises data center while the SQL Server data and log files are stored in Windows Azure Blob Storage.
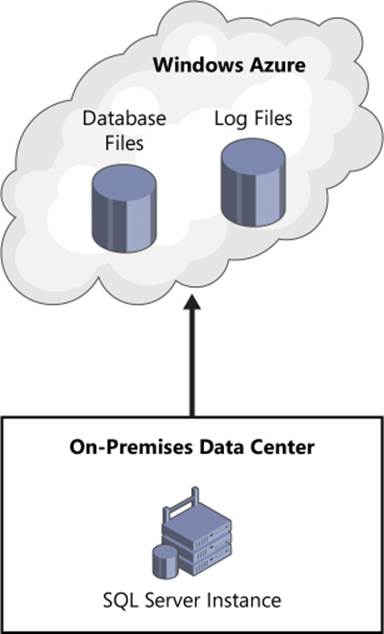
FIGURE 3-10 On-premises SQL Server instances using the Windows Azure storage service for data and log files.
Extending on-premises apps to the cloud
Another use case for building hybrid scenarios is extending on-premises SQL Server applications to the cloud. For example, an e-commerce organization that sells pizzas may want to scale its applications and infrastructure strictly for its busiest week of the year. Scaling out its on-premises applications and infrastructure for just one week might not make sense because it would significantly increase overall capital and operational expenditures, especially if the on-premises applications and infrastructure would be idle at other times throughout the remainder of the year.
In this scenario, the business would benefit from building a hybrid-cloud solution for additional scale with Windows Azure. For example, the organization could use its on-premises SQL Server and supporting infrastructure to continue to service on-site business transactions and use Windows Azure infrastructure or platform services to support online sales.
In Figure 3-11, the on-premises domain controller is used to authenticate all users (both on-premises and cloud) and is using a secure VPN tunnel to connect with the cloud instances. Also, you can use the Linked Server feature in SQL Server to make a secure connection between two instances of SQL Server and pass a transaction or a query from one SQL Server instance to another regardless of whether it is on-premises or in the cloud.
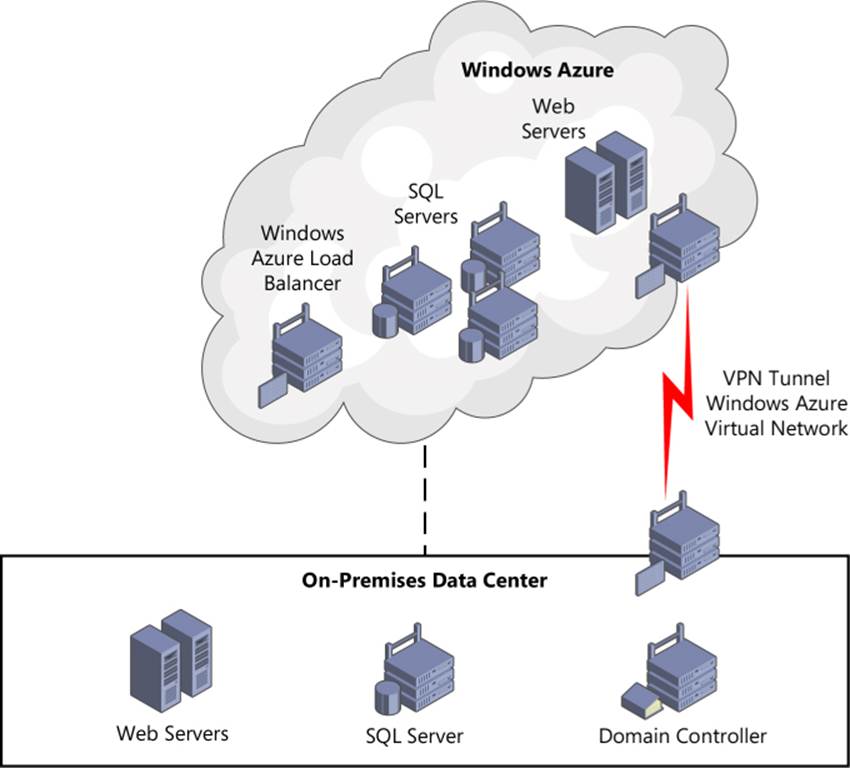
FIGURE 3-11 Extending on-premises applications to the cloud.
Backup and restore enhancements
A robust backup strategy is always required even if an organization employs high-availability, disaster-recovery, and hybrid-cloud strategies to protect its mission-critical data. SQL Server 2014 makes several investments to backup operations, including using Windows Azure for simplified backups and native encryption to protect both on-premises or cloud backups.
SQL Server backup to a URL
SQL Server 2012 SP1 CU2 enabled SQL Server backup and restore functionality to Windows Azure Blob Storage. Unfortunately, this feature was available only when issuing BACKUP and RESTORE statements with Transact-SQL, PowerShell, or SQL Server Management Objects (SMOs). In SQL Server 2014, the ability to back up to and restore from Windows Azure Blob Storage has been added to SQL Server Management Studio via the Backup And Restore wizard and the Maintenance Plan wizard. Transact-SQL and PowerShell can still be used if you prefer them.
Figure 3-12 illustrates an on-premises SQL Server backup to Windows Azure Blob Storage by using a URL.
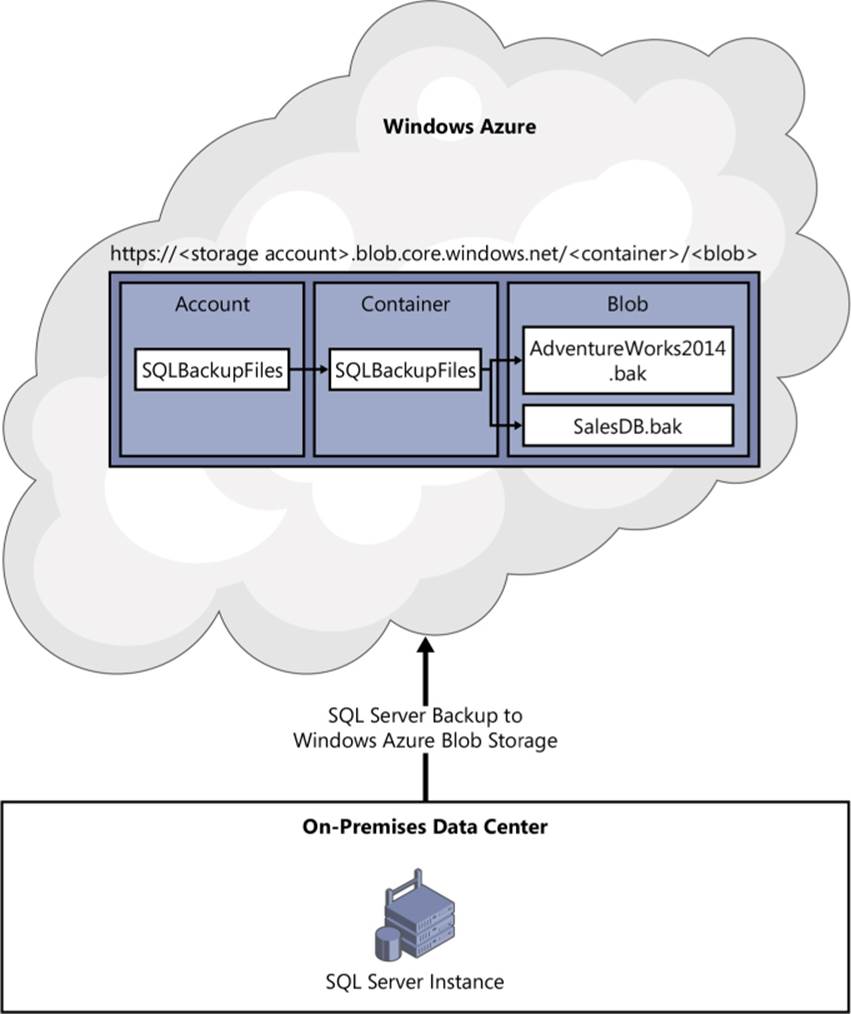
FIGURE 3-12 Leveraging the Windows Azure Blob Storage service to back up an on-premises database to Windows Azure.
Backing up SQL Server databases to the cloud offers a tremendous number of benefits to organizations, including:
![]() Limitless offsite storage.
Limitless offsite storage.
![]() No need for backup media management.
No need for backup media management.
![]() No hardware management overhead.
No hardware management overhead.
![]() Three copies of the data are stored in Windows Azure for redundancy, with the option for data to be replicated to a secondary location, resulting in geo-replicated offsite storage.
Three copies of the data are stored in Windows Azure for redundancy, with the option for data to be replicated to a secondary location, resulting in geo-replicated offsite storage.
![]() Data can be quickly restored to a Windows Azure Virtual Machine in the event of a primary site disaster.
Data can be quickly restored to a Windows Azure Virtual Machine in the event of a primary site disaster.
![]() Encryption keys can be stored on-premises, while the backup files are in the cloud.
Encryption keys can be stored on-premises, while the backup files are in the cloud.
![]() No need to enable transparent data encryption or use third-party solutions to encrypt backups.
No need to enable transparent data encryption or use third-party solutions to encrypt backups.
To use Windows Azure Blob Storage for backups, a Windows Azure subscription is required. You need to create a storage account and a container in Windows Azure and then create a SQL Server credential that holds critical information, such as the container’s policy information and an access signature that is shared. The next section illustrates how to back up to a URL by using the Backup Task in SQL Server Management Studio. Later, we show how to perform the same operation with Transact-SQL.
Backup to URL with Backup Task in SQL Server Management Studio
1. In SQL Server Management Studio, expand Databases, and then select a user database that you want to back up.
2. Right-click the database, point to Tasks, and then click Back Up.
3. On the General page, specify the backup options you would usually select, such as backup type and backup component. To use Windows Azure Blob Storage, select URL in the Backup To list in the Destination section.
4. For the additional URL options on the page, enter the following information, as illustrated in Figure 3-13:
• File Name Enter the name of the backup file, such as SaleForcast_Backup.bak
• SQL Credential Enter or select an existing SQL Server credential, or create a new one by clicking Create.
• Azure Storage Container Specify the name of the Windows Azure storage container where you will store the backup files, such as SalesForcastDB
• URL Prefix The URL prefix is built automatically using the information specified in the fields described earlier. If you edit this value, be sure it matches the other information you provided. For example, if you modify the storage URL, be sure that SQL Credential is set to authenticate to the same storage account.
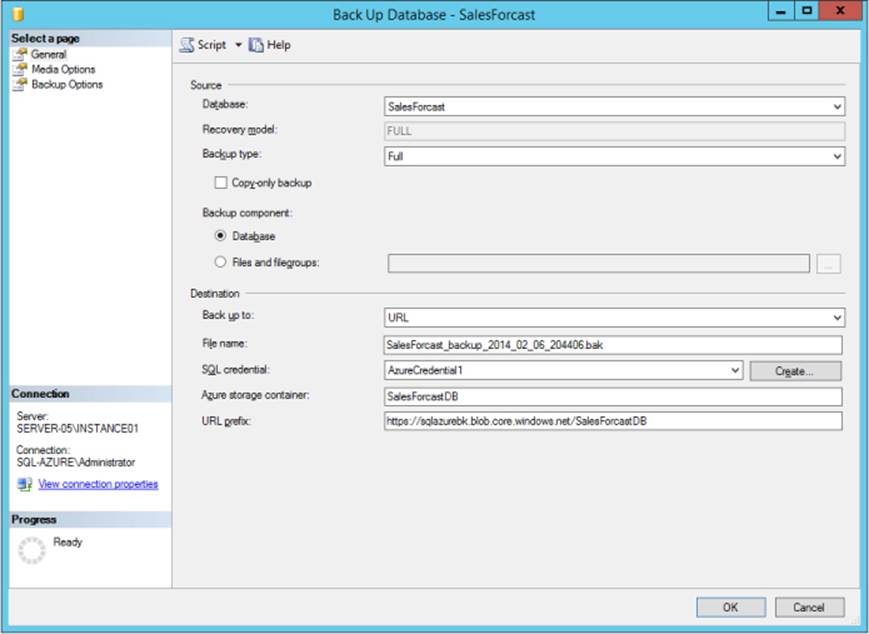
FIGURE 3-13 Using the Back Up Database wizard to backup an on-premises database to Windows Azure using a URL prefix.
5. On the Media Options and Backup Options pages, enter additional backup information, such as reliability options, compression, and encryption.
Backing up to a URL by using Transact-SQL
The following Transact-SQL example illustrates how to back up a SQL Server database to a URL.
BACKUP DATABASE [SalesForcast]
TO URL =
N’https://sqlazurebk.blob.core.windows.net/SalesForcastDB/SalesForcast_backup_2014_02_06_204406.bak’ WITH CREDENTIAL = N’AzureCredential1’ , NOFORMAT, NOINIT, NAME = N’SalesForcast-Full Database Backup’, NOSKIP, NOREWIND, NOUNLOAD, STATS = 10
GO
Encryption for backups
For many years, organizations and customers have requested that native encryption for backups be included with SQL Server. In the past, encryption for backups could be achieved through third-party solutions or with transparent data encryption (TDE). Third-party solutions added additional costs to the overall solution, and TDE would encrypt not only the backup but the whole database, which was not always a requirement of an organization or practical, given the additional administrative and performance overhead.
In SQL Server 2014, organizations can encrypt data while creating a backup. This is achieved by specifying the encryption algorithm and the encryptor when you create the backup. Encrypted backups are supported whether you create the backup on-premises or with Windows Azure. In addition, encryption can be applied when you use the Back Up Database wizard, the Maintenance Plan wizard, or with Transact-SQL.
Creating a database master key
The first step in successfully encrypting a backup file is to create a database master key. The following Transact-SQL example creates a database master key and stores the complex password in the database.
-- Creates a database master key.
-- The key is encrypted using the password “<master key password<”
USE master;
GO
CREATE MASTER KEY ENCRYPTION BY PASSWORD = ‘2.48h]zD>qJ~NfL_L6dh’;
GO
Creating a backup certificate
The next step is to create the backup certificate in the master database. The following Transact-SQL example creates a certificate named MyDBBackupEncryptCert.
Use Master
GO
CREATE CERTIFICATE MyDBBackupEncryptCert
WITH SUBJECT = ‘MyDB Backup Encryption Certificate’;
GO
Encrypting the backup by using the Backup Database wizard in SQL Server Management Studio
Follow these steps to encrypt a database by using the Backup Database wizard:
1. In SQL Server Management Studio, expand Databases, and then select the user database you want to back up. In this example, the database named SalesForcast is used.
2. Right-click the database, point to Tasks, and then click Back Up.
3. On the General page, specify the backup options you would usually select, such as backup type, backup component, and destination. For this example, a full database backup will be conducted and the destination will be disk.
4. On the Backup Options page, set Encrypt Backup to true. Please note that the encryption option is available only when Back Up To A New Media set is selected in Media Options.
5. Select an encryption algorithm to use for the encryption step, and provide a certificate or an asymmetric key from a list of existing certificates or asymmetric keys. For this example, AES 128 and the certificate MyDBBackupEncryptCert, which was created in the previous example, are selected, as shown in Figure 3-14.
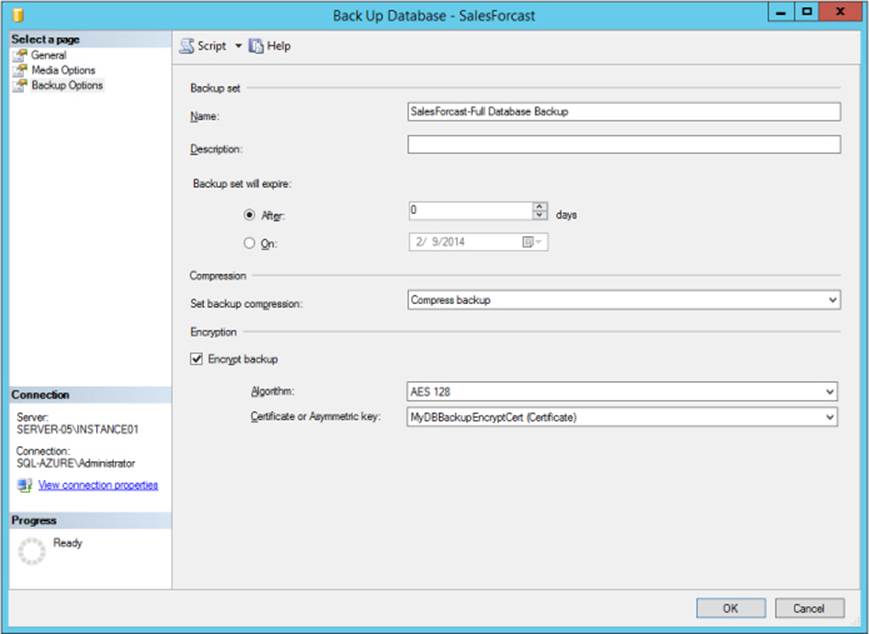
FIGURE 3-14 Specifying the encryption type and certificate or asymmetric key to encrypt a database backup.
Encrypting the backup by using Transact-SQL
The following Transact-SQL statement would encrypt the backup based on the inputs specified in the preceding example:
BACKUP DATABASE [SalesForcast]
TO DISK = N’C:\Temp\db_backup_cxvirmpz.wtq.bak’
WITH FORMAT, INIT,
MEDIANAME = N’SalesForcastMediaSet’,
NAME = N’SalesForcast-Full Database Backup’,
SKIP, NOREWIND, NOUNLOAD,
COMPRESSION,
ENCRYPTION(ALGORITHM = AES_128,
SERVER CERTIFICATE = [MyDBBackupEncryptCert]), STATS = 10
GO
SQL Server Managed Backup to Windows Azure
SQL Server 2014 introduces SQL Server Managed Backup to Windows Azure to further save on storage and administration while achieving additional offsite data protection with the Windows Azure Blob Storage service. SQL Server Managed Backup to Windows Azure is a SQL Server feature that automates database backup and maintains the backups based on the retention period. When using this new functionality, there isn’t a need to manage backup policies, and the backup strategy measures database usage patterns to set the frequency of backups to Windows Azure. The main differentiators and benefits for SQL Server Managed Backup to Windows Azure compared with traditional backups to the cloud include the following:
![]() Currently automating backups for multiple databases requires developing a backup strategy, writing custom code, and scheduling backups.
Currently automating backups for multiple databases requires developing a backup strategy, writing custom code, and scheduling backups.
![]() SQL Server Managed Backup to Windows Azure can be configured at the database or instance level. If configured at the instance level, the settings are applicable to any database created thereafter.
SQL Server Managed Backup to Windows Azure can be configured at the database or instance level. If configured at the instance level, the settings are applicable to any database created thereafter.
![]() Additional granular control can be achieved for each database backup because you can override default instance-level settings when creating policies at the database level. For example, setting the retention period at the database level allows you to override the default settings at the instance level
Additional granular control can be achieved for each database backup because you can override default instance-level settings when creating policies at the database level. For example, setting the retention period at the database level allows you to override the default settings at the instance level
![]() You specify the retention period, and SQL Server Managed Backup to Windows Azure determines the type and frequency of backups for a database and stores the backups on the Windows Azure Blob Storage service. The supported values are in the range of 1-30 days.
You specify the retention period, and SQL Server Managed Backup to Windows Azure determines the type and frequency of backups for a database and stores the backups on the Windows Azure Blob Storage service. The supported values are in the range of 1-30 days.
![]() When a backup is configured to use encryption, you have additional security for the backedup data.
When a backup is configured to use encryption, you have additional security for the backedup data.
Enabling SQL Server Managed Backup to Windows Azure at the instance level
The system stored procedure smart_backup.set_instance_backup is used to enable SQL Server Managed Backup to Windows Azure and configure the default settings at the instance level. The value 1 must be specified for the @enable_backup parameter to enable backups and set the default configurations. As indicated earlier, once the settings have been configured at the instance level, the settings will be applied to all new databases created on this same instance. The following items need to be specified as well: retention period (from 1 to 30 days), the SQL credential used to authenticate to the Windows Azure storage account, and whether to use encryption.
The following Transact-SQL syntax can be used to enable SQL Server Managed Backup to Windows Azure at the instance level. A retention period of 30 days and AES 128 encryption have been specified.
Use msdb;
Go
EXEC smart_admin.sp_set_instance_backup
@storage_url = ‘https://mystorageaccount.blob.core.windows.net’
,@retention_days=30
,@credential_name=’MyCredential’
,@encryption_algorithm =’AES_128’
,@encryptor_type= ‘Certificate’
,@encryptor_name=’MyBackupCert’
,@enable_backup=1;
GO
Enabling SQL Server Managed Backup to Windows Azure for a database
The system stored procedure smart_admin.sp_set_db_backup is used to enable SQL Server Managed Backup to Windows Azure for a specific database. The following items need to be specified along with enabling the backup: the name of the database, the retention period from 1 to 30 days, the SQL credential used to authenticate to the Windows Azure storage account, and whether to encrypt the backups.
The following Transact-SQL syntax can be used to enable SQL Server Managed Backup to Windows Azure at the database level. A retention period of 30 days and AES 256 encryption have been specified.
Use msdb;
GO
EXEC smart_admin.sp_set_db_backup
@database_name=’TestDB’
,@enable_backup=1,
,@storage_url = ‘https://mystorageaccount.blob.core.windows.net’
,@retention_days =30
,@credential_name =’MyCredential’
,@encryption_algorithm =’AES_256’
,@encryptor_type= ‘Certificate’
,@encryptor_name=’MyBackupCert’
GO
All materials on the site are licensed Creative Commons Attribution-Sharealike 3.0 Unported CC BY-SA 3.0 & GNU Free Documentation License (GFDL)
If you are the copyright holder of any material contained on our site and intend to remove it, please contact our site administrator for approval.
© 2016-2026 All site design rights belong to S.Y.A.