PHP Solutions: Dynamic Web Design Made Easy, Third Edition (2014)
Chapter 4. Lightening Your Workload with Includes
The ability to include the contents of one file inside another is one of the most powerful features of PHP. It’s also one of the easiest to implement.
Most pages in a website share common elements, such as a header, footer, and navigation menu. You can alter the look of those elements throughout the site by changing the style rules in an external style sheet. But CSS has only a limited ability to change the content of page elements. If you want to add a new item to your menu, you need to edit the HTML for every page that displays it. Web-authoring tools, such as Dreamweaver, have templating systems that automatically update all pages connected to a master file, but you would still need to upload all the files to your remote server.
That’s not necessary with PHP, which supports server-side includes (SSI). A server-side include is an external file which contains dynamic code or HTML (or both) that you want to incorporate into multiple pages. PHP merges the content into each webpage on the server. Because each page uses the same external file, you can update a menu or other common element by editing and uploading a single file—a great timesaver.
As you work through this chapter, you’ll learn how PHP includes work, where PHP looks for include files, and how to prevent error messages when an include file can’t be found. In addition, you’ll learn to do some cool tricks with PHP, such as creating a random image generator.
This chapter covers the following topics:
· Understanding the different include commands
· Telling PHP where to find your include files
· Using PHP includes for common page elements
· Protecting sensitive information in include files
· Automating a “you are here” menu link
· Generating a page’s title from its filename
· Automatically updating a copyright notice
· Displaying random images complete with captions
· Handling errors with include files
· Changing your web server’s include_path
Figure 4-1 shows how four elements of a page benefit from a little PHP magic with include files.
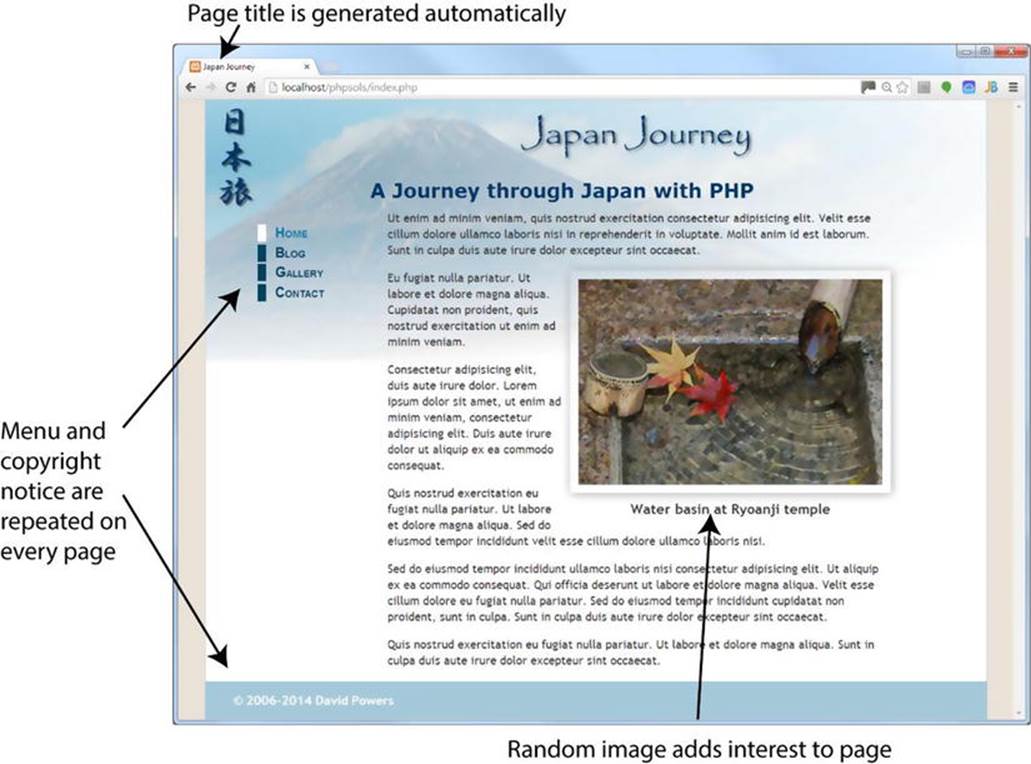
Figure 4-1. Identifying elements of a static webpage that could be improved with PHP
The menu and copyright notice appear on each page. By turning them into include files, you can make changes to just one page and see them propagate throughout the site. With PHP’s conditional logic, you can also get the menu to display the correct style to indicate which page the visitor is currently on. Similar PHP wizardry automatically changes the date on the copyright notice and the text in the page title. PHP can also add variety by displaying a random image and caption. The images don’t need to be the same size; a PHP function inserts the correct width andheight attributes in the <img> tag.
Including Code from External Files
The ability to include code from other files is a core part of PHP. All that’s necessary is to use one of PHP’s include commands and tell the server where to find the file.
Introducing the PHP Include Commands
PHP has four commands that can be used to include code from an external file, namely:
· include
· include_once
· require
· require_once
They all do basically the same thing, so why have four? The fundamental difference is that include attempts to continue processing a script, even if the external file is missing, whereas require is used in the sense of mandatory: if the file is missing, the PHP engine stops processing and throws a fatal error. In practical terms, this means you should use include if your page would remain usable even without the contents of the external file. Use require if the page depends on the external file.
The other two commands, include_once and require_once, work the same way, but they prevent the same file from being included more than once in a page. This is particularly important when including files that define functions or classes. Attempting to define a function or class more than once in a script triggers a fatal error. So, using include_once or require_once ensures that functions and classes are defined only once, even if the script tries to include the external file more than once, as might happen if the commands are in conditional statements.
![]() Tip Use include for external files that aren’t mission critical and require_once for files that define functions and classes.
Tip Use include for external files that aren’t mission critical and require_once for files that define functions and classes.
Where PHP Looks for Include Files
To include an external file, use one of the four include commands followed by the file path as a string—in other words, the file path must be in quotes (single or double, it doesn’t matter). The file path can be either absolute or relative to the current document. For example, any of the following will work (as long as the target file exists):
include 'includes/menu.php';
include 'C:/xampp/htdocs/phpsols/includes/menu.php';
include '/Applications/MAMP/htdocs/phpsols/includes/menu.php';
![]() Note PHP accepts forward slashes in Windows file paths.
Note PHP accepts forward slashes in Windows file paths.
You can optionally use parentheses with the include commands, so the following would also work:
include('includes/menu.php');
include('C:/xampp/htdocs/phpsols/includes/menu.php');
include('/Applications/MAMP/htdocs/phpsols/includes/menu.php');
When using a relative file path, it’s recommended to use ./ to indicate that the path begins in the current folder. Thus, it’s more efficient to rewrite the first example like this:
include './includes/menu.php'; // path begins in current folder
What doesn’t work is using a file path relative to the site root, like this:
include '/includes/menu.php'; // THIS WILL NOT WORK
PHP also looks in the include_path as defined in your PHP configuration. I’ll return to this subject later in this chapter. Before that, let’s put PHP includes to practical use.
PHP Solution 4-1: Moving the Menu and Footer to Include Files
Let’s convert the page shown in Figure 4-1 to use include files. Because the menu and footer appear on every page of the Japan Journey site, they’re prime candidates for include files. Listing 4-1 shows the code for the body of the page with the menu and footer highlighted in bold.
Listing 4-1. The static version of index.php
<header>
<h1>Japan Journey</h1>
</header>
<div id="wrapper">
<ul id="nav">
<li><a href="index.php" id="here">Home</a></li>
<li><a href="blog.php">Journal</a></li>
<li><a href="gallery.php">Gallery</a></li>
<li><a href="contact.php">Contact</a></li>
</ul>
<main>
<h2>A journey through Japan with PHP</h2>
<p>One of the benefits of using PHP . . .</p>
<figure>
<img src="images/water_basin.jpg" alt="Water basin at Ryoanji temple"
width="350" height="237">
<figcaption>Water basin at Ryoanji temple</figcaption>
</figure>
<p>Ut enim ad minim veniam, quis nostrud . . .</p>
<p>Eu fugiat nulla pariatur. Ut labore et dolore . . .</p>
<p>Sed do eiusmod tempor incididunt ullamco . . .</p>
</main>
<footer>
<p>© 2006–2014 David Powers</p>
</footer>
</div>
1. Copy index_01.php from the ch04 folder to the phpsols site root and rename it index.php. If you are using a program like Dreamweaver that offers to update the page links, don’t update them. The relative links in the download file are correct. Check that the CSS and images are displaying properly by loading index.php into a browser. It should look the same as Figure 4-1.
2. Copy blog.php, gallery.php, and contact.php from the ch04 folder to your site root folder. These pages won’t display correctly in a browser yet because the necessary include files still haven’t been created. That’ll soon change.
3. In index.php, highlight the nav unordered list as shown in bold in Listing 4-1, then cut (Ctrl+X/Cmd+X) it to your computer clipboard.
4. Create a new file called menu.php in the includes folder. Remove any code inserted by your editing program; the file must be completely blank.
5. Paste (Ctrl+V/Cmd+V) the code from your clipboard into menu.php and save the file. The contents of menu.php should look like this:
<ul id="nav">
<li><a href="index.php" id="here">Home</a></li>
<li><a href="blog.php">Journal</a></li>
<li><a href="gallery.php">Gallery</a></li>
<li><a href="contact.php">Contact</a></li>
</ul>
Don’t worry that your new file doesn’t have a DOCTYPE declaration or any <html>, <head>, or <body> tags. The other pages that include the contents of this file will supply those elements.
6. Open index.php and insert the following in the space left by the nav unordered list:
<?php require './includes/menu.php'; ?>
This uses a document-relative path to menu.php. Using ./ at the beginning of the path is more efficient because it explicitly indicates that the path starts in the current folder.
![]() Tip I’m using the require command because the navigation menu is mission critical. Without it, there would be no way to navigate around the site.
Tip I’m using the require command because the navigation menu is mission critical. Without it, there would be no way to navigate around the site.
7. Save index.php and load the page into a browser. It should look exactly the same as before. Although the menu and the rest of the page are coming from different files, PHP merges them before sending any output to the browser.
![]() Note Don’t forget that PHP code needs to be processed by a web server. If you have stored your files in a subfolder of your server’s document root called phpsols, you should access index.php using the URLhttp://localhost/phpsols/index.php. See “Where to locate your PHP files (Windows & Mac)” in Chapter 2 if you need help finding the server’s document root.
Note Don’t forget that PHP code needs to be processed by a web server. If you have stored your files in a subfolder of your server’s document root called phpsols, you should access index.php using the URLhttp://localhost/phpsols/index.php. See “Where to locate your PHP files (Windows & Mac)” in Chapter 2 if you need help finding the server’s document root.
8. Do the same with the footer. Cut the lines highlighted in bold in Listing 4-1 and paste them into a blank file called footer.php in the includes folder. Then insert the command to include the new file in the gap left by the <footer>:
<?php include './includes/footer.php'; ?>
This time, I’ve used include rather than require. The <footer> is an important part of the page, but the site remains usable if the include file can’t be found.
9. Save all pages and reload index.php in your browser. Again, it should look identical to the original page. If you navigate to other pages in the site, the menu and footer should appear on every page. The code in the include files is now serving all pages.
10.To prove that the menu is being drawn from a single file, change the text in the Journal link in menu.php, like this:
<li><a href="blog.php">Blog</a></li>
11.Save menu.php and reload the site. The change is reflected on all pages. You can check your code against index_02.php, menu_01.php, and footer_01.php in the ch04 folder.
As Figure 4-2 shows, there’s a problem with the code at the moment. Even when you navigate away from the home page, the style that indicates which page you’re on doesn’t change (it’s controlled by the here ID in the <a> tag).

Figure 4-2. The current page indicator still points to the Home page
Fortunately, that’s easily fixed with a little PHP conditional logic. Before doing so, let’s take a look at how the web server and the PHP engine handle include files.
Choosing the Right Filename Extension for Includes
As you have just seen, an include file can contain raw HTML. When the PHP engine encounters an include command, it stops processing PHP at the beginning of the external file and resumes again at the end. If you want the external file to use PHP code, the code must be enclosed in PHP tags. Because the external file is processed as part of the PHP file that includes it, an include file can have any filename extension.
Some developers use .inc as the filename extension to make it clear that the file is intended to be included in another file. However, most servers treat .inc files as plain text. This poses a security risk if the file contains sensitive information, such as the username and password to your database. If the file is stored within your website’s root folder, anyone who discovers the name of the file can simply type the URL in a browser address bar, and the browser will obligingly display all your secret details!
On the other hand, any file with a .php extension is automatically sent to the PHP engine for parsing before it’s sent to the browser. As long as your secret information is inside a PHP code block and in a file with a .php extension, it won’t be exposed. That’s why some developers use.inc.php as a double extension for PHP includes. The .inc part reminds you that it’s an include file, but servers are only interested in the .php on the end, which ensures that all PHP code is correctly parsed.
For a long time, I followed the convention of using .inc.php for include files. But since I store all my include files in a separate folder called includes, I’ve decided that the double extension is superfluous. I now use just .php.
Which naming convention you choose is up to you, but using .inc on its own is the least secure.
PHP Solution 4-2: Testing the Security of Includes
This solution demonstrates the difference between using .inc and .php (or .inc.php) as the filename extension for an include file. Use index.php and menu.php from the previous section. Alternatively, use index_02.php and menu_01.php from the ch04 folder. If you use the download files, remove the _02 and _01 from the filenames before using them.
1. Rename menu.php to menu.inc and edit index.php accordingly to include it:
<?php require './includes/menu.inc'; ?>
2. Load index.php into a browser. You should see no difference.
3. Amend the code inside menu.inc to store a password inside a PHP variable, like this:
<ul id="nav">
<li><a href="index.php" id="here">Home</a></li>
<?php $password = 'topSecret'; ?>
<li><a href="blog.php">Blog</a></li>
<li><a href="gallery.php">Gallery</a></li>
<li><a href="contact.php">Contact</a></li>
</ul>
4. Reload the page. As Figure 4-3 shows, the password remains hidden in the source code. Although the include file doesn’t have a .php filename extension, its contents have been merged with index.php, so the PHP code is processed.
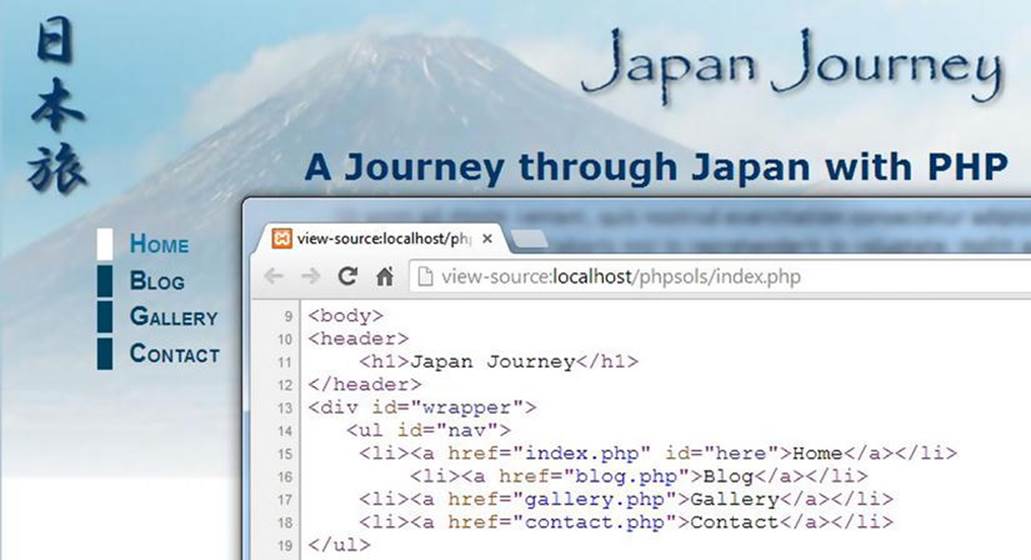
Figure 4-3. There’s no output from the PHP code, so only the HTML is sent to the browser
5. Now load menu.inc directly in the browser. Figure 4-4 shows what happens.
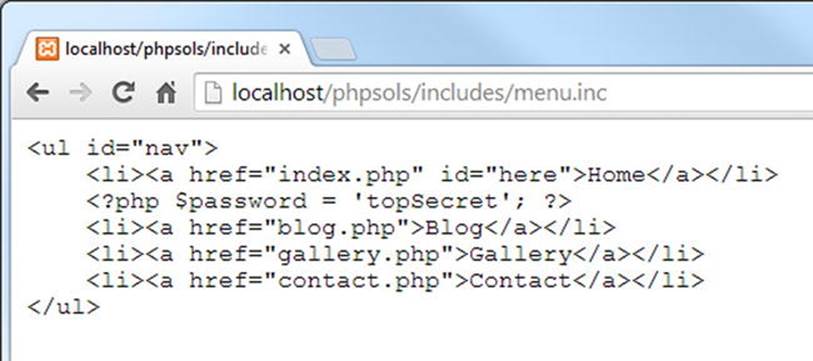
Figure 4-4. Loading menu.inc directly in a browser exposes the PHP code
Neither the server nor the browser knows how to deal with an .inc file, so the entire contents are displayed onscreen: raw HTML, your secret password, everything.
6. Change the name of the include file to menu.inc.php and load it directly into your browser by adding .php to the end of the URL you used in the previous step. This time, you should see an unordered list of links. Inspect the browser’s source view. The PHP isn’t exposed.
7. Change the name back to menu.php and test the include file by loading it directly in your browser and viewing the source code again.
8. Remove the password PHP code you added to menu.php in step 3 and change the include command inside index.php back to its original setting, like this:
<?php require './includes/menu.php'; ?>
PHP Solution 4-3: Automatically Indicating the Current Page
Now that you have seen the difference between using .inc and .php as filename extensions, let’s fix the problem with the menu not indicating the current page. The solution involves using PHP to find out the filename of the current page and then using conditional statements to insert an ID in the corresponding <a> tag.
Continue working with the same files. Alternatively, use index_02.php, contact.php, gallery.php, blog.php, menu_01.php, and footer_01.php from the ch04 folder, making sure to remove the _01 and _02 from any filenames.
1. Open menu.php. The code currently looks like this:
<ul id="nav">
<li><a href="index.php" id="here">Home</a></li>
<li><a href="blog.php">Blog</a></li>
<li><a href="gallery.php">Gallery</a></li>
<li><a href="contact.php">Contact</a></li>
</ul>
The style that indicates the current page is controlled by the id="here" highlighted in line 2. You need PHP to insert id="here" into the blog.php <a> tag if the current page isblog.php, into the gallery.php <a> tag if the page is gallery.php, and into thecontact.php <a> tag if the page is contact.php.
Hopefully, you have got the hint by now—you need an if statement see “Making decisions” in Chapter 3) in each <a> tag. Line 2 needs to look like this:
<li><a href="index.php" <?php if ($currentPage == 'index.php') {
echo 'id="here"'; } ?>>Home</a></li>
The other links should be amended in a similar way. But how does $currentPage get its value? You need to find out the filename of the current page.
2. Leave menu.php to one side for the moment and create a new PHP page called get_filename.php. Insert the following code between a pair of PHP tags (alternatively, use get_filename.php in the ch04 folder):
echo $_SERVER['SCRIPT_FILENAME'];
3. Save get_filename.php and view it in a browser. On a Windows system, you should see something like the following screenshot. (The version in the ch04 folder contains the code for this step and the next, together with text indicating which is which.)
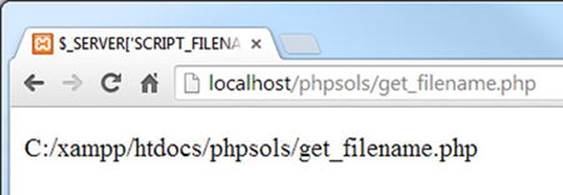
On Mac OS X, you should see something similar to this:
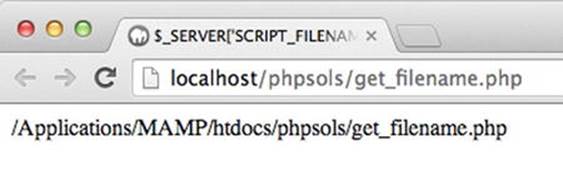
$_SERVER['SCRIPT_FILENAME'] comes from one of PHP’s built-in superglobal arrays, and it always gives you the absolute file path for the current page. What you need now is a way of extracting just the filename.
4. Amend the code in the previous step like this:
echo basename($_SERVER['SCRIPT_FILENAME']);
5. Save get_filename.php and click the Reload button in your browser. You should now see just the filename: get_filename.php.
The built-in PHP function basename() takes a file path as an argument and extracts the filename. So there you have it—a way of finding the filename of the current page.
6. Amend the code in menu.php like this (the changes are highlighted in bold):
<?php $currentPage = basename($_SERVER['SCRIPT_FILENAME']); ?>
<ul id="nav">
<li><a href="index.php" <?php if ($currentPage == 'index.php') {
echo 'id="here"';} ?>>Home</a></li>
<li><a href="blog.php" <?php if ($currentPage == 'blog.php') {
echo 'id="here"';} ?>>Blog</a></li>
<li><a href="gallery.php" <?php if ($currentPage == 'gallery.php') {
echo 'id="here"';} ?>>Gallery</a></li>
<li><a href="contact.php" <?php if ($currentPage == 'contact.php') {
echo 'id="here"';} ?>>Contact</a></li>
</ul>
![]() Caution Make sure you get the combination of single and double quotes correct. Although HTML makes quotes optional around the value of attributes, it’s considered best practice to use them. Since I used double quotes around here, I wrapped the string'id="here"' in single quotes. I could have written "id=\"here\"", but a mixture of single and double quotes is easier to read.
Caution Make sure you get the combination of single and double quotes correct. Although HTML makes quotes optional around the value of attributes, it’s considered best practice to use them. Since I used double quotes around here, I wrapped the string'id="here"' in single quotes. I could have written "id=\"here\"", but a mixture of single and double quotes is easier to read.
7. Save menu.php and load index.php into a browser. The menu should look no different from before. Use the menu to navigate to other pages. This time, as shown in Figure 4-5, the border alongside the current page should be white, indicating your location within the site. If you inspect the page’s source view in the browser, you’ll see that the here ID has been automatically inserted into the correct link.
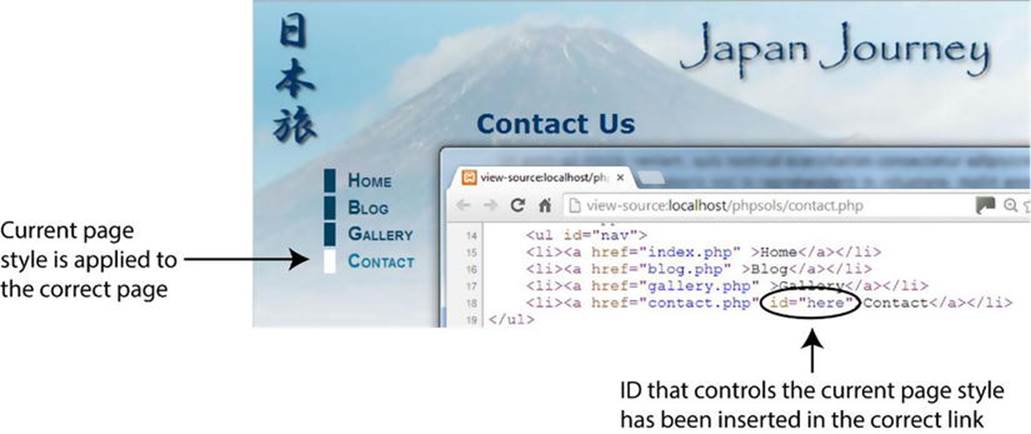
Figure 4-5. Conditional code in the include file produces different output for each page
8. If necessary, compare your code with menu_02.php in the ch04 folder.
PHP Solution 4-4: Generating a Page’s Title From its Filename
Now that you know how to find the filename of the current page, you might also find it useful to automate the <title> tag of each page. This solution uses basename() to extract the filename and then uses PHP string functions to format the name ready for insertion in the <title> tag.
This works only with filenames that tell you something about the page’s contents, but since that’s a good practice anyway, it’s not really a restriction. Although the following steps use the Japan Journey website, you can try this out with any page.
1. Create a new PHP file called title.php and save it in the includes folder.
2. Strip out any code inserted by your script editor and type in the following code:
<?php
$title = basename($_SERVER['SCRIPT_FILENAME'], '.php');
![]() Tip Because this file contains only PHP code, do not add a closing PHP tag at the end. The closing PHP tag is optional when nothing follows the PHP code in the same file. Omitting the tag helps avoid a common error with include files known as “headers already sent.” You’ll learn more about this error in PHP Solution 4-8.
Tip Because this file contains only PHP code, do not add a closing PHP tag at the end. The closing PHP tag is optional when nothing follows the PHP code in the same file. Omitting the tag helps avoid a common error with include files known as “headers already sent.” You’ll learn more about this error in PHP Solution 4-8.
The basename() function used in PHP Solution 4-3 takes an optional second argument: a string containing the filename extension preceded by a leading period. Adding the second argument extracts the filename and strips the filename extension from it. So, this code finds the filename of the current page, strips the .php filename extension, and assigns the result to a variable called $title.
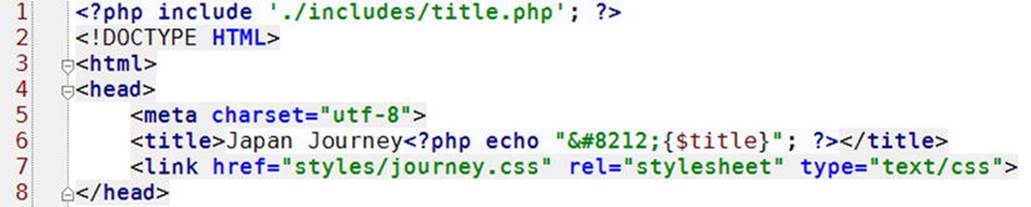
3. Open contact.php and include title.php by typing this above the DOCTYPE:
<?php include './includes/title.php'; ?>
4. Amend the <title> tag like this:
<title>Japan Journey<?php echo "—{$title}"; ?></title>
This uses echo to display — (the numerical entity for an em dash) followed by the value of $title. Because the string is enclosed in double quotes, PHP displays the value of $title. The variable $title has been enclosed in curly braces because there is no space between the em dash and $title. Although not always necessary, it’s a good idea to enclose variables in braces when using them without any whitespace in a double-quoted string. It makes the variable clear to both you and the PHP engine.
I’m not using the shorthand version of echo (<?=) because we’ll be adding more script to this block.
The first few lines of your page should look like this:
![]() Note Normally, nothing should precede the DOCTYPE declaration in a webpage. However, this doesn’t apply to PHP code, as long as it doesn’t send any output to the browser. The code in title.php only assigns a value to $title, so the DOCTYPE declaration remains the first output the browser sees.
Note Normally, nothing should precede the DOCTYPE declaration in a webpage. However, this doesn’t apply to PHP code, as long as it doesn’t send any output to the browser. The code in title.php only assigns a value to $title, so the DOCTYPE declaration remains the first output the browser sees.
5. Save both pages and load contact.php into a browser. The filename without the .php extension has been added to the browser tab, as shown in Figure 4-6.
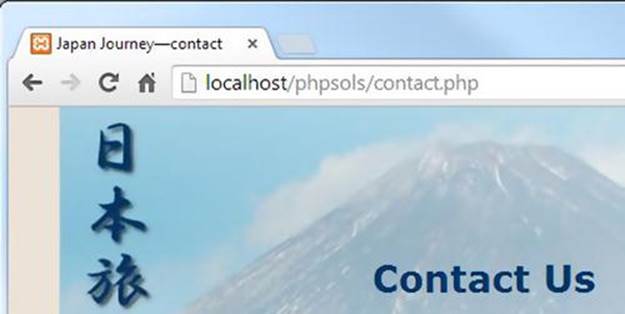
Figure 4-6. Once you extract the filename, you can generate the page title dynamically
6. Not bad, but what if you prefer an initial capital letter for the part of the title derived from the filename? PHP has a neat little function called ucfirst(), which does exactly that (the name is easy to remember once you realize that uc stands for “uppercase”). Add another line to the code in step 2, like this:
<?php
$title = basename($_SERVER['SCRIPT_FILENAME'], '.php');
$title = ucfirst($title);
If you’re new to programming, this might look confusing, but it’s actually quite simple once you analyze it: the first line of code after the PHP tag gets the filename, strips the .php off the end, and stores it as $title. The next line takes the value of $title, passes it to ucfirst() to capitalize the first letter, and stores the result back in $title. So, if the filename is contact.php, $title starts out as contact, but by the end of the following line, it has become Contact.
![]() Tip You can shorten the code by combining both lines into one, like this:
Tip You can shorten the code by combining both lines into one, like this:
$title = ucfirst(basename($_SERVER['SCRIPT_FILENAME'], '.php'));
When you nest functions like this, PHP processes the innermost one first and passes the result to the outer function. It makes your code shorter, but it’s not so easy to read.
7. A drawback with this technique is that filenames consist of only one word—at least they should. Spaces are not allowed in URLs, which is why most web design software replaces spaces with %20, which looks ugly and unprofessional in a URL. You can get around this problem by using an underscore.
Change the filename of contact.php to contact_us.php.
8. Amend the code in title.php like this:
<?php
$title = basename($_SERVER['SCRIPT_FILENAME'], '.php');
$title = str_replace('_', ' ', $title);
$title = ucwords($title);
The middle line uses a function called str_replace() to look for every underscore and replace it with a space. The function takes three arguments: the character(s) you want to replace, the replacement character(s), and the string you to change.
![]() Tip You can also use str_replace() to remove character(s) by using an empty string (a pair of quotes with nothing between them) as the second argument. This replaces the string in the first argument with nothing, effectively removing it.
Tip You can also use str_replace() to remove character(s) by using an empty string (a pair of quotes with nothing between them) as the second argument. This replaces the string in the first argument with nothing, effectively removing it.
Instead of ucfirst(), the final line of code uses the related function ucwords(), which gives each word an initial cap.
9. Save title.php and load the renamed contact_us.php into a browser. Figure 4-7 shows the result. (Google Chrome truncates the title in the tab, but you can see the complete title as a tooltip.)
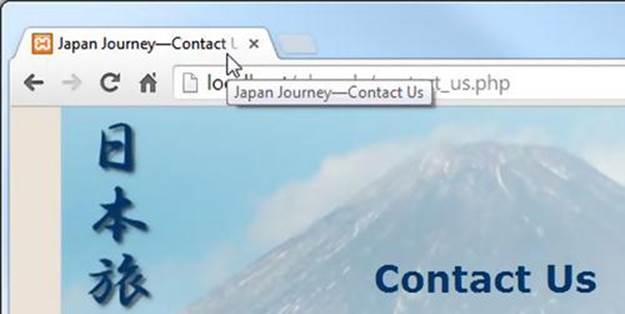
Figure 4-7. The underscore has been removed, and both words have been given initial caps
10.Change the name of the file back to contact.php and reload the file into a browser. The script in title.php still works. There are no underscores to replace, so str_replace() leaves the value of $title untouched, and ucwords() converts the first letter to uppercase, even though there’s only one word.
11.Repeat steps 3 and 4 with index.php, blog.php, and gallery.php.
12.The home page of the Japan Journey site is called index.php. As Figure 4-8 shows, applying the current solution to this page doesn’t seem quite right.
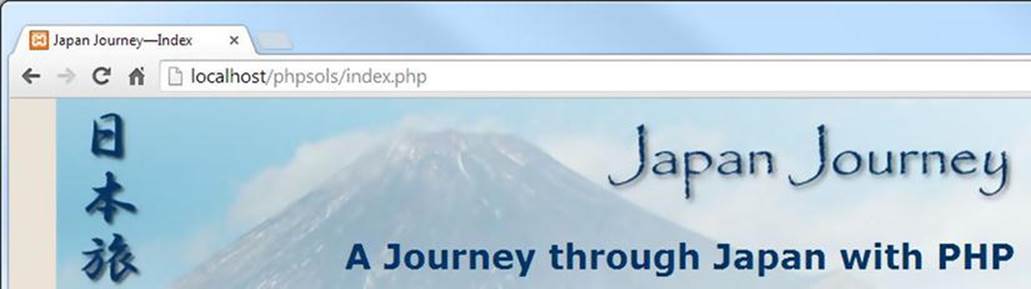
Figure 4-8. Generating the page title from index.php produces an unsatisfactory result
There are two solutions: either don’t apply this technique to such pages or use a conditional statement (an if statement) to handle special cases. For instance, to display Home instead of Index, amend the code in title.php like this:
<?php
$title = basename($_SERVER['SCRIPT_FILENAME'], '.php');
$title = str_replace('_', ' ', $title);
if ($title == 'index') {
$title = 'home';
}
$title = ucwords($title);
The first line of the conditional statement uses two equal signs to check the value of $title. The following line uses a single equal sign to assign the new value to $title. If the page is called anything other than index.php, the line inside the curly braces is ignored, and $title keeps its original value.
![]() Tip PHP is case-sensitive, so this solution works only if “index” is all lowercase. To do a case-insensitive comparison, change the fourth line of the preceding code like this:
Tip PHP is case-sensitive, so this solution works only if “index” is all lowercase. To do a case-insensitive comparison, change the fourth line of the preceding code like this:
if (strtolower($title) == 'index') {
The function strtolower() converts a string to lowercase—hence its name—and is frequently used to make case-insensitive comparisons. The conversion to lowercase is not permanent, because strtolower($title) isn’t assigned to a variable; it’s only used to make the comparison. To make a change permanent, you need to assign the result back to a variable, as in the final line, when ucwords($title) is assigned back to $title.
To convert a string to uppercase, use strtoupper().
13.Save title.php and reload index.php into a browser. The page title now looks more natural, as shown in Figure 4-9.
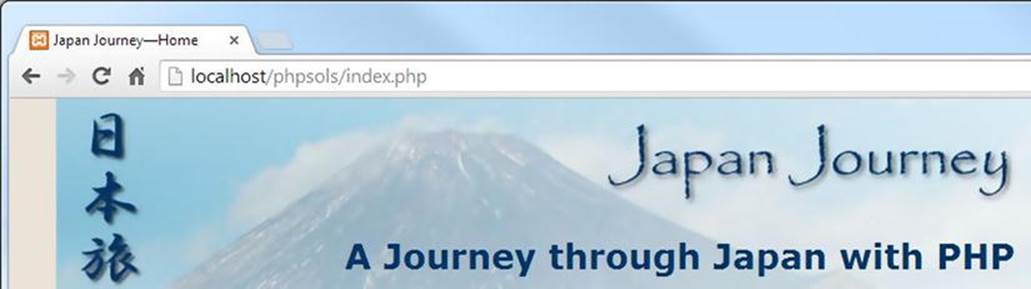
Figure 4-9. The conditional statement changes the title on index.php to Home
14.Navigate back to contact.php, and you’ll see that the page title is still derived correctly from the page name.
There’s one final refinement you should make. The PHP code inside the <title> tag relies on the existence of the variable $title, which won’t be set if there’s a problem with the include file. Before attempting to display the contents of a variable that comes from an external source, it’s always a good idea to check that it exists, using a function called isset().
Wrap the echo command inside a conditional statement and test for the variable’s existence, like this:
<title>Japan Journey<?php if (isset($title)) {echo "—{$title}";} ?>
</title>
If $title doesn’t exist, the rest of the code is ignored, leaving the default site title, Japan Journey. You need to apply this change to all four pages: index.php, blog.php, gallery.php, and contact.php.
You can check your code against title.php and updated versions of the other files in index_03.php, blog_02.php, gallery_02.php, and contact_02.php in the ch04 folder.
Creating Pages with Changing Content
So far, you’ve used PHP to generate different output depending on the page’s filename. The next two solutions generate content that changes independently of the filename: a copyright notice that updates the year automatically on January 1 and a random image generator.
PHP Solution 4-5: Automatically Updating a Copyright Notice
At the moment, the copyright notice in footer.php contains only static HTML. This PHP solution shows how to use the date() function to generate the current year automatically. The code also specifies the first year of copyright and uses a conditional statement to determine whether the current year is different. If it is, both years are displayed.
Continue working with the files from PHP Solution 4-4. Alternatively, use index_03.php and footer_01.php from the ch04 folder, and remove the numbers from the filenames. If using the files from the ch04 folder, make sure you have copies of title.php and menu.phpin the includes folder.
1. Open footer.php. It contains the following HTML:
<footer>
<p>© 2006–2014 David Powers</p>
</footer>
The – between the dates is the character entity for an en dash.
The advantage of using an include file is that you can update the copyright notice throughout the site by changing this one file. However, it would be much more efficient to increment the year automatically, doing away with the need for annual updates altogether.
2. The PHP date() function takes care of this very neatly. Change the code in the paragraph like this:
<p>© 2006–<?php echo date('Y'); ?> David Powers</p>
This replaces the second date and displays the current year using four digits. Make sure you pass an uppercase Y as the argument to date().
3. Save footer.php and load index.php into a browser. The copyright notice at the foot of the page should look the same as before—unless, of course, you’re reading this in 2015 or later, in which case the current year will be displayed.
4. Like most copyright notices, this covers a range of years, indicating when a site was first launched. Since the first date is in the past, it can be hard-coded. But if you’re creating a new website, you need only the current year. The range of years isn’t needed until January 1.
You don’t want to have to break away from the New Year revelries just to update the copyright notice. There needs to be a better way. Thanks to PHP, you can party to your heart’s content on New Year’s Eve.
To display a range of years, you need to know the start year and the current year. If both years are the same, display only the current year; if they’re different, display both with an en dash between them. It’s a simple if. . .else situation. Change the code in the paragraph in footer.php like this:
<p>©
<?php
$startYear = 2006;
$thisYear = date('Y');
if ($startYear == $thisYear) {
echo $startYear;
} else {
echo "{$startYear}–{$thisYear}";
}
?>
David Powers</p>
As in PHP Solution 4-4, I’ve used curly braces around the variables in the else clause because they’re in a double-quoted string that contains no whitespace.
5. Save footer.php and reload index.php in a browser. The copyright notice should look the same as before.
6. Change the argument passed to the date() function to a lowercase y, like this:
$thisYear = date('y');
7. Save footer.php and click the Reload button in your browser. The second year is displayed using only the last two digits, as shown in the following screenshot:

![]() Tip This should serve as a reminder that PHP is case-sensitive. Uppercase Y and lowercase y produce different results with the date() function. Forgetting about case sensitivity is one of the most common causes of errors in PHP.
Tip This should serve as a reminder that PHP is case-sensitive. Uppercase Y and lowercase y produce different results with the date() function. Forgetting about case sensitivity is one of the most common causes of errors in PHP.
8. Change the argument passed to date() back to an uppercase Y. Set the value of $startYear to the current year and reload the page. This time, you should see only the current year displayed.
You now have a fully automated copyright notice. The finished code is in footer_02.php in the ch04 folder.
PHP Solution 4-6: Displaying a Random Image
Displaying a random image is very easy. All you need is a list of available images, which you store in an indexed array (see “Creating arrays” in Chapter 3). Since indexed arrays are numbered from 0, you can select one of the images by generating a random number between 0 and one less than the length of the array. All this is accomplished by a few lines of code . . .
Continue using the same files. Alternatively, use index_03.php from the ch04 folder and rename it index.php. Since index_03.php uses title.php, menu.php, and footer.php, make sure all three files are in your includes folder. The images are already in theimages folder.
1. Create a blank PHP page in the includes folder and name it random_image.php. Insert the following code (it’s also in random_image_01.php in the ch04 folder):
<?php
$images = ['kinkakuji', 'maiko', 'maiko_phone', 'monk', 'fountains',
'ryoanji', 'menu', 'basin'];
$i = rand(0, count($images)-1);
$selectedImage = "images/{$images[$i]}.jpg";
This is the complete script: an array of image names minus the .jpg filename extension (there’s no need to repeat shared information—they’re all JPEG), a random number generator, and a string that builds the correct path name for the selected file.
![]() Note This script uses the shorthand array syntax that was introduced in PHP 5.4.
Note This script uses the shorthand array syntax that was introduced in PHP 5.4.
To generate a random number within a range, pass the minimum and maximum numbers as arguments to the rand() function. Since there are eight images in the array, you need a number between 0 and 7. The simple way to do this would be to use rand(0, 7)—simple, but inefficient. Every time you change the $images array, you need to count how many elements it contains and change the maximum number passed to rand().
It’s much easier to get PHP to count them for you, and that’s exactly what the count() function does: it counts the number of elements in an array. You need a number one less than the number of elements in the array, so the second argument passed to rand()becomes count($images)-1, and the result is stored in $i.
The random number is used in the final line to build the correct path name for the selected file. The variable $images[$i] is embedded in a double-quoted string with no whitespace separating it from surrounding characters, so it’s enclosed in curly braces. Arrays start at 0, so if the random number is 1, $selectedImage is images/maiko.jpg.
If you’re new to PHP, you may find it difficult to understand code like this:
$i = rand(0, count($images)-1);
All that’s happening is that the second argument passed to rand() is an expression rather than a number. If it makes it easier for you to follow, rewrite the code like this:
$numImages = count($images); // $numImages is 8
$max = $numImages – 1; // $max is 7
$i = rand(0, $max); // $i = rand(0, 7)
2. Open index.php and include random_image.php by inserting the command in the same code block as title.php, like this:
<?php include './includes/title.php';
include './includes/random_image.php'; ?>
Since random_image.php doesn’t send any direct output to the browser, it’s safe to put it above the DOCTYPE.
3. Scroll down inside index.php, and locate the code that displays the image in the figure element. It looks like this:
<figure>
<img src="images/basin.jpg" alt="Water basin at Ryoanji temple"
width="350" height="237">
<figcaption>Water basin at Ryoanji temple</figcaption>
</figure>
4. Instead of using images/basin.jpg as a fixed image, replace it with $selectedImage. All the images have different dimensions, so delete the width and height attributes and use a generic alt attribute. Also remove the text in the figcaption element. The code in step 3 should now look like this:
<figure>
<img src="<?= $selectedImage; ?>" alt="Random image">
<figcaption></figcaption>
</figure>
![]() Note The PHP block displays only a single value, so you can use the shortcut <?=.
Note The PHP block displays only a single value, so you can use the shortcut <?=.
5. Save both random_image.php and index.php, then load index.php into a browser. The image should now be chosen at random. Click the Reload button in your browser; you should see a variety of images, as shown in Figure 4-10.
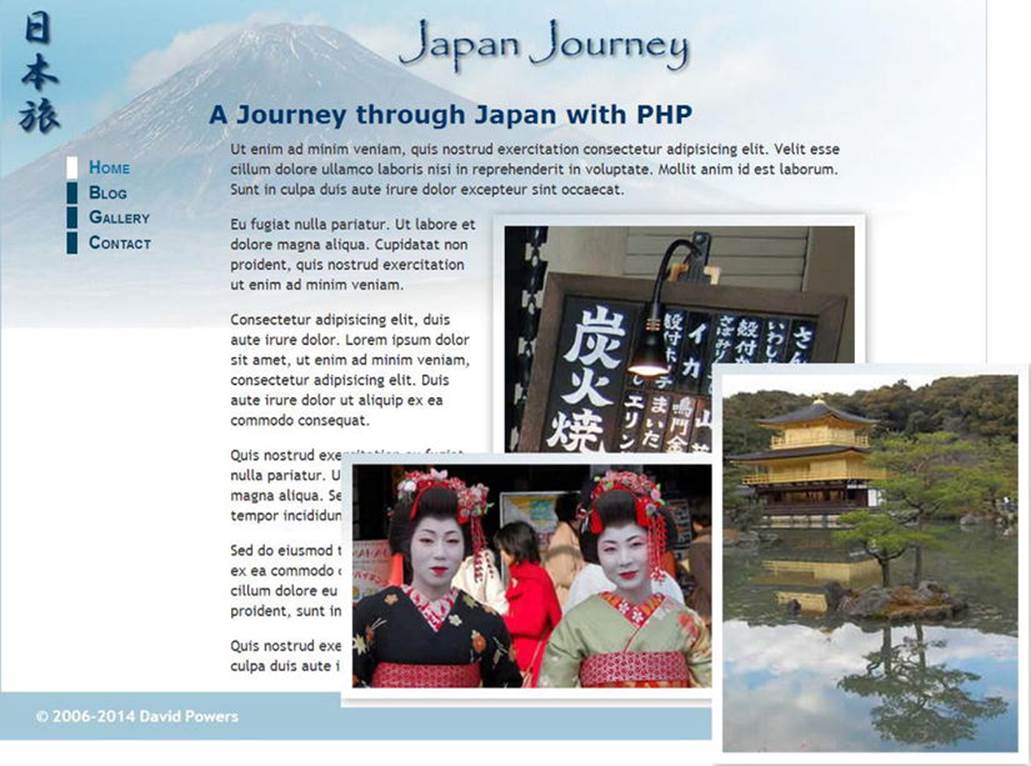
Figure 4-10. Storing image filenames in an indexed array makes it easy to display a random image
You can check your code against index_04.php and random_image_01.php in the ch04 folder.
This is a simple and effective way of displaying a random image, but it would be much better if you could set the width and height for different-sized images dynamically, as well as add a caption to describe the image.
PHP Solution 4-7: Adding a Caption to the Random Image
This solution uses a multidimensional array—or an array of arrays—to store the filename and caption for each image. If you find the concept of a multidimensional array difficult to understand in abstract terms, think of it as a large box with a lot of envelopes inside, and inside each envelope is a photo and its caption. The box is the top-level array, and the envelopes inside are the subarrays.
The images are different sizes, but PHP conveniently provides a function called getimagesize(). Guess what it does.
This PHP solution builds on the previous one, so continue working with the same files.
1. Open random_image.php and change the code as follows:
<?php
$images = [
['file' => 'kinkakuji',
'caption' => 'The Golden Pavilion in Kyoto'],
['file' => 'maiko',
'caption' => 'Maiko—trainee geishas in Kyoto'],
['file' => 'maiko_phone',
'caption' => 'Every maiko should have one—a mobile, of course'],
['file' => 'monk',
'caption' => 'Monk begging for alms in Kyoto'],
['file' => 'fountains',
'caption' => 'Fountains in central Tokyo'],
['file' => 'ryoanji',
'caption' => 'Autumn leaves at Ryoanji temple, Kyoto'],
['file' => 'menu',
'caption' => 'Menu outside restaurant in Pontocho, Kyoto'],
['file' => 'basin',
'caption' => 'Water basin at Ryoanji temple, Kyoto']
];
$i = rand(0, count($images)-1);
$selectedImage = "images/{$images[$i]['file']}.jpg";
$caption = $images[$i]['caption'];
![]() Caution You need to be careful with the code. Each subarray is enclosed in a pair of square brackets and is followed by a comma, which separates it from the next subarray. You’ll find it easier to build and maintain multidimensional arrays if you align the array keys and values as shown.
Caution You need to be careful with the code. Each subarray is enclosed in a pair of square brackets and is followed by a comma, which separates it from the next subarray. You’ll find it easier to build and maintain multidimensional arrays if you align the array keys and values as shown.
Although the code looks complicated, it’s an ordinary indexed array that contains eight items, each of which is an associative array containing definitions for 'file' and 'caption'. The definition of the multidimensional array forms a single statement, so there are no semicolons until line 19. The closing bracket on that line matches the opening one on line 2.
The variable used to select the image also needs to be changed, because $images[$i] no longer contains a string, but rather an array. To get the correct filename for the image, you need to use $images[$i]['file']. The caption for the selected image is contained in $images[$i]['caption'] and stored in a shorter variable.
2. You now need to amend the code in index.php to display the caption, like this:
<figure>
<img src="<?= $selectedImage; ?>" alt="Random image">
<figcaption><?= $caption; ?></figcaption>
</figure>
3. Save index.php and random_image.php and load index.php into a browser. Most images will look fine, but there’s an ugly gap to the right of the image of the trainee geisha with a mobile phone, as shown in Figure 4-11.
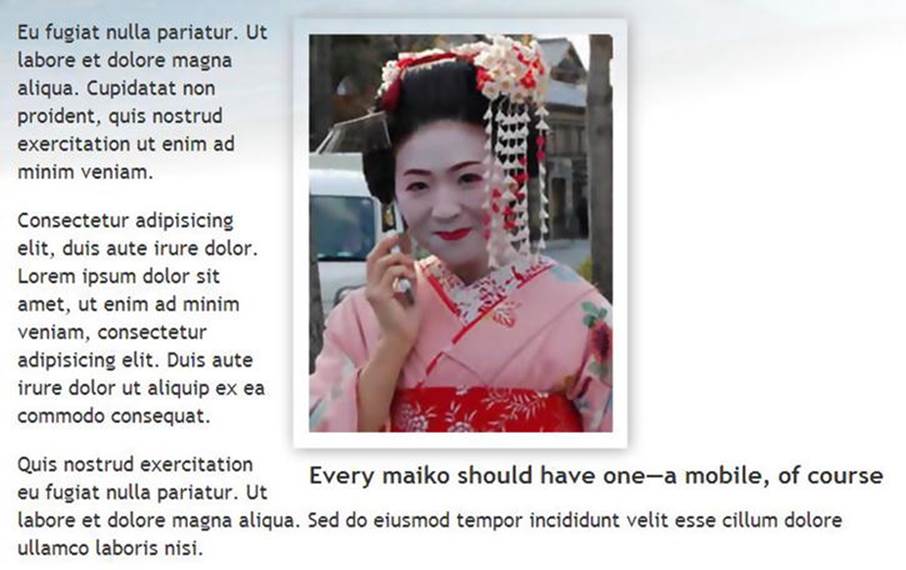
Figure 4-11. The long caption protrudes beyond the image and shifts it too far left
4. Add the following code at the end of random_image.php:
if (file_exists($selectedImage) && is_readable($selectedImage)) {
$imageSize = getimagesize($selectedImage);
}
The if statement uses two functions, file_exists() and is_readable(), to make sure $selectedImage not only exists but also that it’s accessible (it may be corrupted or have the wrong permissions). These functions return Boolean values (true orfalse), so they can be used directly as part of the conditional statement.
The single line inside the if statement uses the function getimagesize() to get the image’s dimensions and stores them in $imageSize. You’ll learn more about getimagesize() in Chapter 8. At the moment, you’re interested in the following two pieces of information:
· $imageSize[0]: The width of the image in pixels
· $imageSize[3]: A string containing the image’s height and width formatted for inclusion in an <img> tag
5. First of all, let’s fix the code in the <img> tag. Change it like this:
<img src="<?= $selectedImage; ?>" alt="Random image" <?= $imageSize[3]; ?>>
This inserts the correct width and height attributes inside the <img> tag.
6. Although this sets the dimensions for the image, you still need to control the width of the caption. You can’t use PHP inside an external style sheet, but there’s nothing stopping you from creating a <style> block in the <head> of index.php. Insert the following code just before the closing </head> tag.
<?php if (isset($imageSize)) { ?>
<style>
figcaption {
width: <?= $imageSize[0]; ?>px;
}
</style>
<?php } ?>
This code consists of only seven short lines, but it’s an odd mix of PHP and HTML. Let’s start with the first and final lines. If you strip away the PHP tags and replace the HTML <style> block with a comment, this is what you end up with:
if (isset($imageSize)) {
// do something if $imageSize has been set
}
In other words, if the variable $imageSize hasn’t been set (defined), the PHP engine ignores everything between the curly braces. It doesn’t matter that most of the code between the braces is HTML and CSS. If $imageSize hasn’t been set, the PHP engine skips to the closing brace, and the intervening code isn’t sent to the browser.
![]() Tip Many inexperienced PHP coders wrongly believe that they need to use echo or print to create HTML output inside a conditional statement. As long as the opening and closing braces match, you can use PHP to hide or display sections of HTML like this. It’s a lot neater and involves a lot less typing than using echo all the time.
Tip Many inexperienced PHP coders wrongly believe that they need to use echo or print to create HTML output inside a conditional statement. As long as the opening and closing braces match, you can use PHP to hide or display sections of HTML like this. It’s a lot neater and involves a lot less typing than using echo all the time.
If $imageSize has been set, the <style> block is created and $imageSize[0] is used to set the correct width for the paragraph that contains the caption.
7. Save random_image.php and index.php, then reload index.php into a browser. Click the Reload button until the image of the trainee geisha with the mobile phone appears. This time, it should look like Figure 4-12. If you view the browser’s source code, the style rule uses the correct width for the image.

Figure 4-12. The ugly gap is removed by creating a style rule directly related to the image size
![]() Note If the caption still protrudes, make sure there’s no gap between the closing PHP tag and px in the <style> block. CSS does not permit whitespace between the value and unit of measurement.
Note If the caption still protrudes, make sure there’s no gap between the closing PHP tag and px in the <style> block. CSS does not permit whitespace between the value and unit of measurement.
8. The code in random_image.php and the code you have just inserted prevent errors if the selected image can’t be found, but the code that displays the image is devoid of similar checks. Temporarily change the name of one of the images, either inrandom_image.php or in the images folder. Reload index.php several times. Eventually, you should see an error message like that in Figure 4-13. It looks very unprofessional.
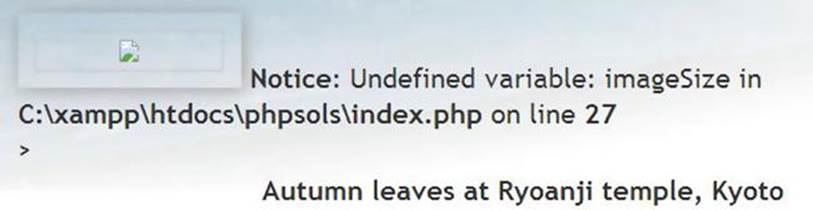
Figure 4-13. An error in an include file can destroy the look of your page
9. The conditional statement at the foot of random_image.php sets $imageSize only if the selected image both exists and is readable, so if $imageSize has been set, you know it’s all systems go. Add the opening and closing blocks of a conditional statement around the figure element that displays the image in index.php, like this:
<?php if (isset($imageSize)) { ?>
<figure>
<img src="<?= $selectedImage; ?>" alt="Random image"
<?= $imageSize[3]; ?>>
<figcaption><?= $caption; ?></figcaption>
</figure>
<?php } ?>
Images that exist will display normally, but you’ll avoid any embarrassing error messages in case of a missing or corrupt file—a much more professional look. Don’t forget to restore the name of the image you changed in the previous step.
You can check your code against index_05.php and random_image_02.php in the ch04 folder.
Preventing Errors with Include Files
Many hosting companies turn off error reporting for notices, so you probably wouldn’t be aware of the problem shown in Figure 4-13 if you did all your testing on your remote server. However, it’s important to eliminate all errors before deploying PHP pages on the Internet. Just because you can’t see the error message doesn’t mean your page is okay.
Pages that use a server-side technology such as PHP deal with a lot of unknowns, so it’s wise to code defensively, checking values before using them. This section describes measures you can take to prevent and troubleshoot errors with include files.
Checking the Existence of Variables
The lesson that can be drawn from PHP Solution 4-7 is that you should always use isset() to verify the existence of a variable that comes from an include file and wrap any code that uses it in a conditional statement. In this particular case, you know there’s no image to display if$imageSize doesn’t exist, so the figure element is dropped. However, in other cases you might be able to assign a default value to the variable, like this:
if (!isset($someVariable)) {
$someVariable = default value;
}
This uses the logical Not operator (see Table 3-6 in Chapter 3) to check whether $someVariable has not been set. If $someVariable doesn’t exist, it’s assigned a default value, which can then be used later in your script. If it does exist, the code inside the conditional statement is skipped, and the original value is used.
Checking Whether a Function or Class has Been Defined
Include files are frequently used to define custom functions or classes. Attempting to use a function or class that hasn’t been defined triggers a fatal error. To check whether a function has been defined, pass the name of the function as a string to function_exists(). When passing the name of the function to function_exists(), omit the parentheses at the end of function name. For example, you check whether a function called doubleIt() has been defined like this:
if (function_exists('doubleIt')) {
// use doubleIt()
}
To check whether a class has been defined, use class_exists() in the same way, passing a string containing the class name as the argument:
if (class_exists('MyClass')) {
// use MyClass
}
Assuming you want to use the function or class, a more practical approach is to use a conditional statement to include the definition file if the function or class hasn’t already been defined. For example, if the definition for doubleIt() is in a file called utilities.php:
if (!function_exists('doubleIt')) {
require_once './includes/utilities.php';
}
Suppressing Error Messages on a Live Website
Assuming that your include files are working normally on your remote server, the measures outlined in the previous sections are probably all the error checking you need. However, if your remote server displays error messages, you should take steps to suppress them. The following techniques hide all error messages, not only those related to include files.
Using the Error Control Operator
A rather crude, but effective, technique is to use the PHP error control operator (@), which suppresses error messages associated with the line in which it’s used. You place @ either at the beginning of the line or directly in front of the function or command that you think might generate an error, like this:
@ include './includes/random_image.php';
The problem with the error control operator is that it hides errors rather than working around them. It’s only one character, so it’s easy to forget you have used it. Consequently, you can waste a lot of time looking for errors in the wrong part of your script. If you use the error control operator, the @ mark should be the first thing you remove when troubleshooting a problem.
The other drawback is that you need to use the error control operator in every line that might generate an error message, because it affects only the current line.
Turning Off display_errors in the PHP Configuration
A better way of suppressing error messages in a live website is to turn off the display_errors directive in the web server’s configuration. The most effective way to do this is to edit php.ini if your hosting company gives you control over its settings. Locate the display_errorsdirective and change On to Off.
If you don’t have control of php.ini, many hosting companies allow you to change a limited range of configuration settings using a file called either .htaccess or .user.ini. The choice of file depends on how PHP was installed on the server, so check with your hosting company to find out which to use.
If your server supports .htaccess files, add the following command to the .htaccess file in the server root folder:
php_flag display_errors Off
In a .user.ini file, the command is simply this:
display_errors Off
Both .htaccess and .user.ini are plain text files. Like php.ini, each command should be on a separate line. If the file doesn’t already exist on your remote server, you can simply create it in a text editor. Make sure your editor doesn’t automatically add .txt to the end of the filename. Then upload the file to your website’s server root folder.
![]() Tip Mac OS X hides files with names that begin with a dot, so you won’t be able to see them in the Mac Finder. However, you should be able to open them with a dedicated script editor. In the File
Tip Mac OS X hides files with names that begin with a dot, so you won’t be able to see them in the Mac Finder. However, you should be able to open them with a dedicated script editor. In the File ![]() Open dialog box, select “Enable: Everything” and the “Show hidden items” check box.
Open dialog box, select “Enable: Everything” and the “Show hidden items” check box.
Turning Off display_errors in an Individual File
If you don’t have control over the server configuration, you can prevent error messages from being displayed by adding the following line at the top of any script:
<?php ini_set('display_errors', '0'); ?>
PHP Solution 4-8: Redirecting when an Include File Can’t be Found
All the techniques suggested so far only suppress error messages if an include file can’t be found. If a page would be meaningless without the include file, you should redirect the user to an error page if the include file is missing.
One way to do so is to throw an exception, like this:
$file = './includes/menu.php';
if (file_exists($file) && is_readable($file)) {
include $file;
} else {
throw new Exception("$file can't be found");
}
When using code that might throw an exception, you need to wrap it in a try block and create a catch block to handle the exception (see “Handling Exceptions” in Chapter 3). This PHP solution shows how to do this, using the catch block to redirect users to a different page if an include file can’t be found.
If you have designed and tested your site thoroughly, this technique should not be necessary on most pages that use include files. However, this is by no means a pointless exercise. It demonstrates several important features of PHP: how to throw and catch exceptions and how to redirect to another page. As you’ll see from the following instructions, redirection isn’t always straightforward. This PHP solution shows how to overcome the most common problem.
Continue working with index.php from PHP Solution 4-7. Alternatively, use index_05.php from the ch04 folder.
1. Copy error.php from the ch04 folder to the site root. Don’t update the links in the page if your editing program prompts you to do so. This is a static page that contains a generic error message and links back to the other pages.
2. Open index.php in your editing program. The navigation menu is the most indispensable include file, so edit the require command in index.php like this:
$file = './includes/menu.php';
if (file_exists($file) && is_readable($file)) {
require $file;
} else {
throw new Exception("$file can't be found");
}
![]() Tip Storing the path of the include file in a variable like this avoids the need to retype it four times, reducing the likelihood of spelling
Tip Storing the path of the include file in a variable like this avoids the need to retype it four times, reducing the likelihood of spelling
3. To redirect the user to another page, use the header() function. However, redirection doesn’t work if any output has been sent to the browser before you call header(). Unless there’s a syntax error, the PHP engine normally processes a page from the top, outputting the HTML until it reaches a problem. This means that output will have already begun by the time the PHP engine gets to this code. To prevent this from happening, start the try block before any output is generated. (This actually won’t work on many setups, but bear with me, because it demonstrates an important point.)
Scroll to the top of the page and edit the opening PHP code block like this:
<?php try {
include './includes/title.php';
include './includes/random_image.php'; ?>
This opens the try block.
4. Scroll down to the bottom of the page and add the following code after the closing </html> tag:
<?php } catch (Exception $e) {
header('Location: http://localhost/phpsols/error.php');
} ?>
This closes the try block and creates a catch block to handle the exception. The code in the catch block uses header() to redirect the user to error.php.
The header() function sends an HTTP header to the browser. It takes as its argument a string containing the header and its value separated by a colon. In this case, it uses the Location header to redirect the browser to the page specified by the URL following the colon. Adjust the URL to match your own setup if necessary.
5. Save index.php and test the page in a browser. It should display as normal.
6. Change the value of $file, the variable you created in step 2, to point to a nonexistent include file, such as men.php.
7. Save index.php and reload it in your browser. If you’re using XAMPP in your testing environment, you’ll probably be correctly redirected to error.php. With MAMP (and probably other testing setups) you’re likely to see the message in Figure 4-14.
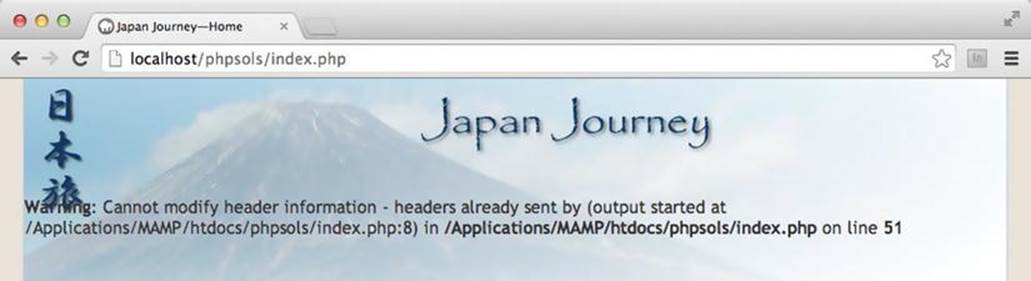
Figure 4-14. The header() function won’t work if output has already been sent to the browser
The error message in Figure 4-14 is probably responsible for more heads being banged against keyboards than any other. (I, too, bear the scars.) As mentioned earlier, the header() function cannot be used if output has been sent to the browser. So, what’s happened?
The answer is in the error message, but it’s not immediately obvious. It says the error happened on line 51, which is where the header() function is called. What you really need to know is where the output was generated. That information is buried here:
(output started at /Applications/MAMP/htdocs/phpsols/index.php:8)
The number 8 after the colon is the line number. So, what’s on line 8 of index.php? As you can see from the following screenshot, line 8 uses echo to display the value of $title.

Because there’s no error in the code up to this point, the PHP engine has already output the HTML. Once that has happened, header() can’t redirect the page.
Even if you remove this line of PHP, the error message simply reports that output started on the next line that contains a PHP block. What’s happening is that the web server is outputting all the HTML following the DOCTYPE, but the PHP engine needs to process a PHP code block before it can report a line number. This poses the problem of how to redirect a page after output has been sent to the browser. Fortunately, PHP provides the answer by allowing you to store the output in a buffer (the web server’s memory).
![]() Note The reason you don’t get this error message in XAMPP and some other setups is because output buffering has been turned on in the PHP configuration. XAMPP sets the value to 4096, which means that 4 KB of output is stored in the buffer before the HTTP headers are sent to the browser. Although useful, this gives you a false sense of security because output buffering might not be enabled on your remote server. So, keep reading even if you were correctly redirected.
Note The reason you don’t get this error message in XAMPP and some other setups is because output buffering has been turned on in the PHP configuration. XAMPP sets the value to 4096, which means that 4 KB of output is stored in the buffer before the HTTP headers are sent to the browser. Although useful, this gives you a false sense of security because output buffering might not be enabled on your remote server. So, keep reading even if you were correctly redirected.
8. Edit the code block at the top of index.php like this:
<?php ob_start();
try {
include './includes/title.php';
include './includes/random_image.php'; ?>
The ob_start() function turns on output buffering, preventing any output from being sent to the browser before the header() function is called.
9. The PHP engine automatically flushes the buffer at the end of the script, but it’s better to do so explicitly. Edit the PHP code block at the foot of the page like this:
<?php } catch (Exception $e) {
ob_end_clean();
header('Location: http://localhost/phpsols/error.php');
}
ob_end_flush();
?>
Two different functions have been added here. When redirecting to another page, you don’t want the HTML stored in the buffer. So, inside the catch block, a call is made to ob_end_clean(), which turns off the buffer and discards its contents.
However, if an exception isn’t thrown, you want to display the contents of the buffer, so ob_end_flush() is called at the end of the page after both the try and catch blocks. This flushes the contents of the buffer and sends it to the browser.
10.Save index.php and reload it in a browser. This time, you should be redirected to the error page, as shown in Figure 4-15.
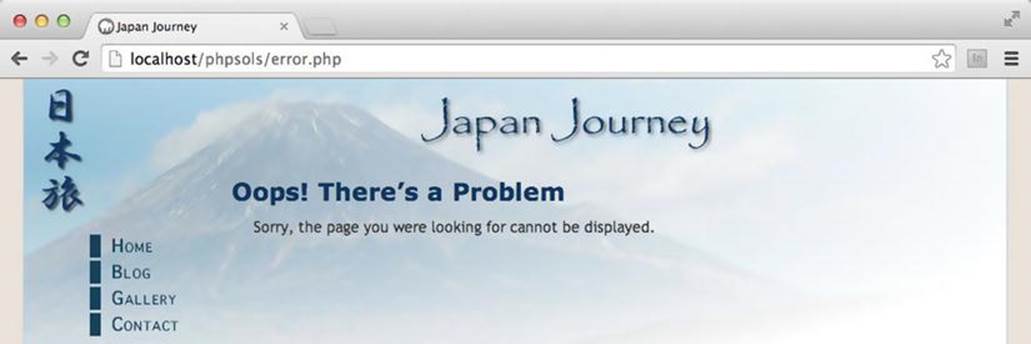
Figure 4-15. Buffering the output enables the browser to redirect to the error page
11.Change the value of $file back to ./includes/menu.php and save index.php. When you click the Home link on the error page, index.php should display normally.
You can compare your code with index_06.php in the ch04 folder.
Choosing where to Locate your Include Files
A useful feature of PHP include files is that they can be located anywhere, as long as the page with the include command knows where to find them. Include files don’t even need to be inside your web server root. This means that you can protect include files that contain sensitive information, such as passwords, in a private directory (folder) that cannot be accessed through a browser. So, if your hosting company provides a storage area outside your server root, you should seriously consider locating some, if not all, of your include files there.
An include command expects either a relative path or a fully qualified path. If neither is given, PHP automatically looks in the include_path specified in your PHP configuration. The following section explains how to change the folders in which PHP automatically searches for include files.
Adjusting your include_path
The advantage of locating include files in a folder specified in your web server’s include_path is that you don’t need to worry about getting the relative or absolute path correct. All you need is the filename. This can be very useful if you use a lot of includes or you have a site hierarchy several levels deep. There are three ways to change the include_path:
· Edit the value in php.ini: If your hosting company gives you access to php.ini, this is the best way to add a custom includes folder.
· Use .htaccess or .user.ini: If your hosting company allows changes to the configuration with an .htaccess or .user.ini file, this is a good alternative.
· Use set_include_path(): Use this only if the previous options are not available to you, because it affects the include_path only for the current file.
The value of the include_path for your web server is listed in the Core section of the configuration details when you run phpinfo(). It normally begins with a period, which indicates the current folder, and is followed by the absolute path of each folder to be searched. On Linux and Mac OS X, each path is separated by a colon. On Windows, the separator is a semicolon. On a Linux or Mac server your existing include_path directive might look like this:
.:/php/PEAR
On a Windows server, the equivalent would look like this:
.;C:\php\PEAR
Editing the include_path in php.ini or .user.ini
In php.ini, locate the include_path directive. To add a folder called includes in your own site, add a colon or semicolon—depending on your server’s operating system—at the end of the existing value, followed by the absolute path to the includes folder.
On a Linux or Mac server, use a colon like this:
include_path=".:/php/PEAR:/home/mysite/public_html/includes"
On a Windows server, use a semicolon:
include_path=".;C:\php\PEAR;C:\sites\mysite\www\includes"
The commands are the same for a .user.ini file. The value in .user.ini overrides the default, so make sure you copy the existing value from phpinfo() and add the new path to it.
Using .htaccess to Change the include_path
The value in an .htaccess file overrides the default, so copy the existing value from phpinfo() and add the new path to it. On a Linux or Mac server, the value should be similar to this:
php_value include_path ".:/php/PEAR:/home/mysite/public_html/includes"
The command is the same on Windows, except that you separate the paths with a semicolon:
php_value include_path ".;C:\php\PEAR;C:\sites\mysite\www\includes"
![]() Caution In .htaccess, do not insert an equal sign between include_path and the list of path names.
Caution In .htaccess, do not insert an equal sign between include_path and the list of path names.
Using set_include_path( )
Although set_include_path() affects only the current page, you can easily create a code snippet and paste it into pages in which you want to use it. PHP also makes it easy to get the existing include_path and combine it with the new one in a platform-neutral way.
Store the new path in a variable and then combine it with the existing value, like this:
$includes_folder = '/home/mysite/public_html/includes';
set_include_path(get_include_path() . PATH_SEPARATOR . $includes_folder);
It looks as though three arguments are being passed to set_include_path(), but it’s only one; the three elements are joined by the concatenation operator (a period), not commas.
· get_include_path() gets the existing include_path.
· PATH_SEPARATOR is a PHP constant that automatically inserts a colon or semicolon depending on the operating system.
· $includes_folder adds the new path.
The problem with this approach is that the path to the new includes folder won’t be the same on your remote and local testing servers. You can fix that with a conditional statement. The superglobal variable $_SERVER['HTTP_HOST'] contains the domain name of the website. If your domain is www.example.com, you can set the correct path for each server like this:
if ($_SERVER['HTTP_HOST'] == 'www.example.com') {
$includes_folder = '/home/example/public_html/includes';
} else {
$includes_folder = 'C:/xampp/htdocs/phpsols/includes';
}
set_include_path(get_include_path() . PATH_SEPARATOR . $includes_folder);
Using set_include_path() is probably not worthwhile for small websites that don’t use many include files. However, you might find it useful on more complex projects.
Why can’t I Use Site-root-relative Links with PHP Includes?
Well, you can and you can’t. For the sake of clarity, I’ll begin by explaining the distinction between links relative to the document and to the site root.
Document-relative Links
When you click a link to go to another page, the path in the <a> tag tells the browser how to get from the current page to the next one. Most web-authoring tools specify the path relative to the current document. If the target page is in the same folder, just the filename is used. If it’s one level higher than the current page, the filename is preceded by ../. This is known as a document-relative path or link. If you have a site with many levels of folders, this type of link can be difficult to understand—at least for humans.
Links Relative to the Site Root
The other type of link always begins with a forward slash, which is shorthand for the site root. The advantage of a site-root-relative path is that it doesn’t matter how deep the current page is in the site hierarchy, the forward slash at the beginning guarantees the web server will start looking from the top level of the site. Although site-root-relative links are much easier to read, PHP include commands can’t handle them. You must use a document-relative path, an absolute path, or specify the includes folder in your include_path directive.
You can convert a site-root-relative path to an absolute one by concatenating the superglobal variable $_SERVER['DOCUMENT_ROOT'] to the beginning of the path, like this:
include $_SERVER['DOCUMENT_ROOT'] . '/includes/filename.php';
Most servers support $_SERVER['DOCUMENT_ROOT'], but you should check the PHP Variables section at the bottom of the configuration details displayed by phpinfo() to make sure.
Links Inside Include Files
This is the point that tends to confuse many people. Although the PHP include commands don’t understand site-root-relative links, the links inside an include file should normally be relative to the site root. This is because an include file can be included at any level of the site hierarchy, so document-relative links break when a file is included at a different level.
![]() Note The navigation menu in menu.php uses document-relative links rather than ones relative to the site root. They have been deliberately left like that because, unless you have created a virtual host, the site root is localhost, not phpsols. This is a disadvantage of testing a site in a subfolder of the web server’s document root. The Japan Journey site used throughout this book has only one level, so the document-relative links work. When developing a site that uses multiple levels of folders, use site-root-relative links inside your include files and consider setting up a virtual host for testing (see Chapter 2 for details).
Note The navigation menu in menu.php uses document-relative links rather than ones relative to the site root. They have been deliberately left like that because, unless you have created a virtual host, the site root is localhost, not phpsols. This is a disadvantage of testing a site in a subfolder of the web server’s document root. The Japan Journey site used throughout this book has only one level, so the document-relative links work. When developing a site that uses multiple levels of folders, use site-root-relative links inside your include files and consider setting up a virtual host for testing (see Chapter 2 for details).
Nesting Include Files
Once a file has been included in another, relative paths are calculated from the parent file, not from the included file. This presents problems for functions or class definitions in an external file that need to include another external file.
If both external files are in the same folder, you include a nested file with just the filename, like this:
require_once 'Thumbnail.php';
In this case, the relative path should not begin with ./ because ./ means “start from this folder.” With an include file, “this folder” means the parent file’s folder, not the include file’s folder, resulting in an incorrect path to the nested file.
When the include files are in different folders, you can build an absolute path to the target file using the PHP constant __DIR__. This constant returns the absolute path of the include file’s directory (folder) without a trailing slash. Concatenating __DIR__, a forward slash, and a document-relative path converts the relative path into an absolute one. For example, let’s say this is the relative path from one include file to another:
'../File/Upload.php'
You convert it into an absolute path like this:
__DIR__ . '/../File/Upload.php'
For convenience, the forward slash is added to the beginning of the document-relative path. This has the effect of finding the parent folder of the include file, then going back up one level to find the correct path.
You’ll see an example of this in use in Chapter 8, where an include file needs to include another file that’s in a different folder.
Security Considerations with Includes
Include files are a very powerful feature of PHP. With that power come security risks. As long as the external file is accessible, PHP includes it and incorporates any code into the main script. But, as mentioned earlier in this chapter, include files can be located anywhere. Technically speaking, they can even be on a different server. However, this was considered such a security risk that a new configuration directive, allow_url_include, was introduced in PHP 5.2. The default setting is Off, so it’s now impossible to include files from a different server unless you have complete control over your server’s configuration. Unlike include_path, the allow_url_include directive cannot be overridden except by the server administrator.
Even if you control both servers yourself, you should never include a file from a different server. It’s possible for an attacker to spoof the address and try to execute a malicious script on your site.
Chapter Review
This chapter has plunged you headlong into the world of PHP, using includes, arrays, and multidimensional arrays. It has shown you how to extract the name of the current page, display a random image, and get the image’s dimensions. You have also learned how to throw and catch exceptions and to redirect to a different page. There’s a lot to absorb, so don’t worry if it doesn’t all sink in the first time. The more you use PHP, the more familiar you’ll become with the basic techniques. In the next chapter you’ll learn how PHP processes input from online forms and will use that knowledge to send feedback from a website to your email inbox.