PHP Solutions: Dynamic Web Design Made Easy, Third Edition (2014)
Chapter 5. Bringing Forms to Life
Forms lie at the very heart of working with PHP. You use forms for logging in to restricted pages, registering new users, placing orders with online stores, entering and updating information in a database, sending feedback . . . and the list goes on. The same principles lie behind all these uses, so the knowledge you gain from this chapter will have practical value in most PHP applications. To demonstrate how to process information from a form, I’m going to show you how to gather feedback from visitors to your site and send it to your mailbox.
Unfortunately, user input can expose your site to malicious attacks. It’s important to check data submitted from a form before accepting it. Although HTML5 form elements validate user input in the most recent browsers, you still need to check the data on the server. HTML5 validation helps legitimate users avoid submitting a form with errors, but malicious users can easily sidestep checks performed in the browser. Server-side validation is not optional, but essential. The PHP solutions in this chapter show you how to filter out or block anything suspicious or dangerous. It doesn’t take a lot of effort to keep marauders at bay. It’s also a good idea to preserve user input and redisplay it if the form is incomplete or errors are discovered.
These solutions build a complete mail-processing script that can be reused in different forms, so it’s important to read them in sequence.
In this chapter, you’ll learn about the following:
· Understanding how user input is transmitted from an online form
· Displaying errors without losing user input
· Validating user input
· Sending user input by email
How PHP Gathers Information from a Form
Although HTML contains all the necessary tags to construct a form, it doesn’t provide any means to process the form when submitted. For that, you need a server-side solution, such as PHP.
The Japan Journey website contains a simple feedback form (see Figure 5-1). Other elements—such as radio buttons, check boxes, and drop-down menus—will be added later.
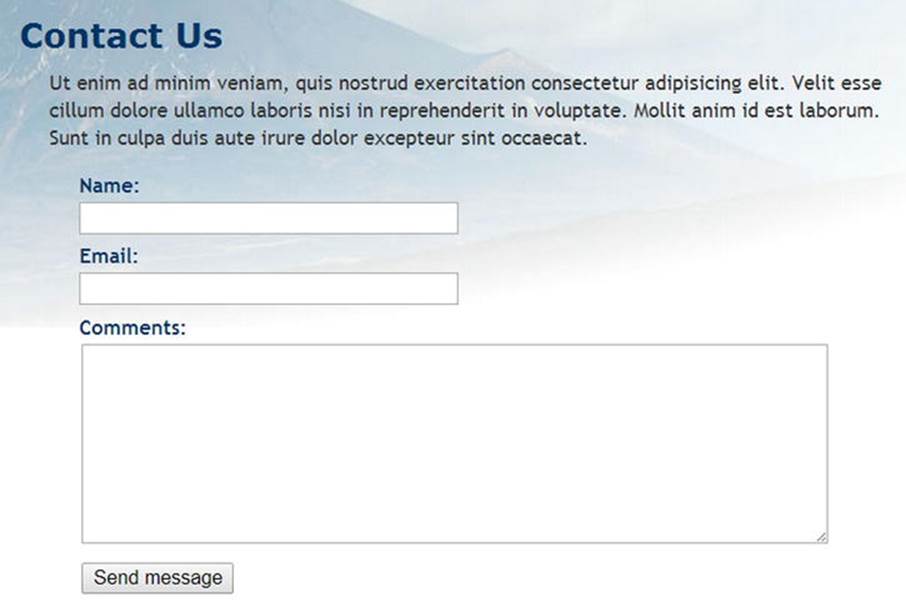
Figure 5-1. Processing a feedback form is one of the most popular uses of PHP
First, let’s take a look at the HTML code for the form (it’s in contact_01.php in the ch05 folder):
<form method="post" action="">
<p>
<label for="name">Name:</label>
<input name="name" id="name" type="text">
</p>
<p>
<label for="email">Email:</label>
<input name="email" id="email" type="text">
</p>
<p>
<label for="comments">Comments:</label>
<textarea name="comments" id="comments"></textarea>
</p>
<p>
<input name="send" type="submit" value="Send message">
</p>
</form>
The first two <input> tags and the <textarea> tag contain both name and id attributes set to the same value. The reason for this duplication is that HTML, CSS, and JavaScript all refer to the id attribute. Form-processing scripts, however, rely on the name attribute. So, although the id attribute is optional, you must use the name attribute for each element that you want to be processed.
Two other things to notice are the method and action attributes inside the opening <form> tag. The method attribute determines how the form sends data. It can be set to either post or get. The action attribute tells the browser where to send the data for processing when the Submit button is clicked. If the value is left empty, as here, the page attempts to process the form itself.
![]() Note I have deliberately avoided using any of the new HTML5 form features, such as type="email" and the required attribute. This makes it easier to test the PHP server-side validation scripts. After testing, you can update your forms to use the HTML5 validation features. Validation in the browser is mainly a courtesy to the user to prevent incomplete information from being submitted, so it’s optional. Server-side validation should never be skipped.
Note I have deliberately avoided using any of the new HTML5 form features, such as type="email" and the required attribute. This makes it easier to test the PHP server-side validation scripts. After testing, you can update your forms to use the HTML5 validation features. Validation in the browser is mainly a courtesy to the user to prevent incomplete information from being submitted, so it’s optional. Server-side validation should never be skipped.
Understanding the Difference Between Post and get
The best way to demonstrate the difference between the post and get methods is with a real form. If you completed the previous chapter, you can continue working with the same files.
Otherwise, the ch05 folder contains a complete set of files for the Japan Journey site with all the code from Chapter 4 incorporated in them. Copy contact_01.php to the site root and rename it contact.php. Also copy the contents of the ch05/includes folder to theincludes folder in the site root.
1. Locate the opening <form> tag in contact.php and change the value of the method attribute from post to get, like this:
<form method="get" action="">
2. Save contact.php and load the page in a browser. Type your name, email address, and a short message into the form, then click Send message.
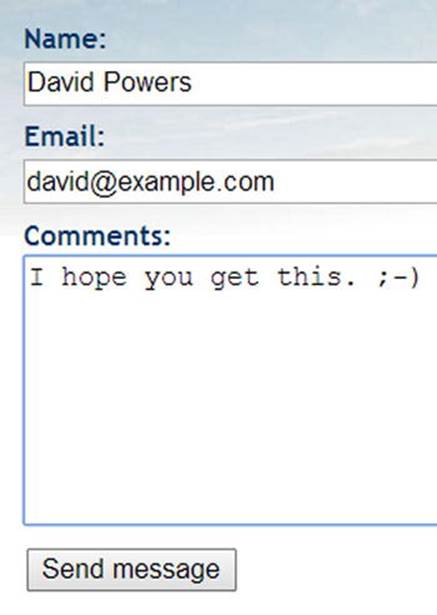
3. Look in the browser address bar. You should see the contents of the form attached to the end of the URL, like this:

If you break up the URL, it looks like this:
http://localhost/phpsols/contact.php
?name=David+Powers
&email=david%40example.com
&comments=I+hope+you+get+this.+%3B-%29
&send=Send+message
Each line after the basic URL begins with the name attribute of one of the form elements, followed by an equal sign and the contents of the input fields. URLs cannot contain spaces or certain characters (such as my smiley), so the browser encodes them as hexadecimal values, a process known as URL encoding (for a full list of values, see www.w3schools.com/tags/ref_urlencode.asp).
The first name attribute is preceded by a question mark (?) and the others by an ampersand (&). You’ll see this type of URL when using search engines, which helps explain why everything after the question mark is known as a query string.
4. Go back into the code of contact.php and change method back to post, like this:
<form method="post" action="">
5. Save contact.php and reload the page in your browser. Type another message and click Send message. Your message should disappear, but nothing else happens. It hasn’t been lost, but you haven’t done anything to process it yet.
6. In contact.php, add the following code immediately below the closing </form> tag:
<pre>
<?php if ($_POST) { print_r($_POST); } ?>
</pre>
This displays the contents of the $_POST superglobal array if any post data has been sent. As explained in Chapter 3, the print_r() function allows you to inspect the contents of arrays; the <pre> tags simply make the output easier to read.
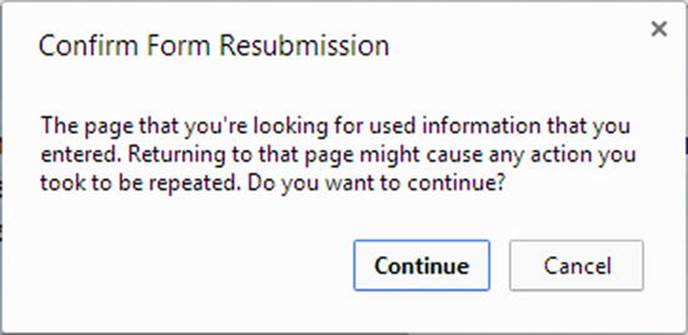
7. Save the page and click the Refresh button in your browser. You’ll probably see a warning similar to the following. This tells you that the data will be resent, which is exactly what you want. Confirm that you want to send the information again.
8. The code from step 6 should now display the contents of your message below the form, as shown in Figure 5-2. Everything has been stored in one of PHP’s superglobal arrays, $_POST, which contains data sent using the post method. The name attribute of each form element is used as the array key, making it easy to retrieve the content.
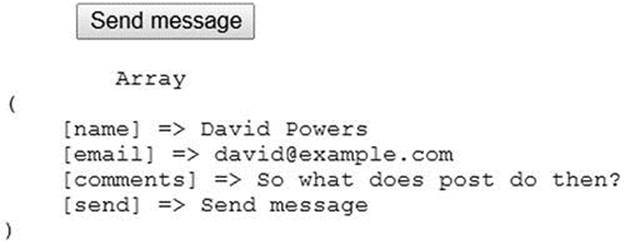
Figure 5-2. The $_POST array uses the form’s name attributes to identify each element of data
As you have just seen, the get method sends your data in a very exposed way, making it vulnerable to alteration. Also, some browsers limit the maximum length of a URL to about 2,000 characters, so the get method can be used only for small amounts of data. The post method is more secure and can be used for much larger amounts of data. By default, PHP permits up to 8 MB of post data, although hosting companies may set a different limit.
Consequently, you should normally use the post method with forms. The get method is used mainly in conjunction with database searches; bookmarking your search result is useful because all the search criteria are in the URL. We’ll return to the get method later in the book. This chapter concentrates on the post method and its associated superglobal array, $_POST.
![]() Caution Although the post method is more secure than get, you shouldn’t assume that it’s 100% safe. For secure transmission, you need to use encryption or the Secure Sockets Layer (SSL) with a URL that begins with https://.
Caution Although the post method is more secure than get, you shouldn’t assume that it’s 100% safe. For secure transmission, you need to use encryption or the Secure Sockets Layer (SSL) with a URL that begins with https://.
Getting form Data with PHP Superglobals
The $_POST superglobal array contains data sent using the post method. It should come as no surprise that data sent by the get method is in the $_GET array.
To access values submitted by a form, just put the name attribute of the form element in quotes between square brackets after $_POST or $_GET, depending on the form’s method attribute. So email becomes $_POST['email'] if sent by the post method, and$_GET['email'] if sent by the get method. That’s all there is to it.
You may come across scripts that use $_REQUEST, which avoids the need to distinguish between $_POST or $_GET. It’s less secure. Always use $_POST or $_GET.
Old scripts may use $HTTP_POST_VARS or $HTTP_GET_VARS, which have the same meaning as $_POST and $_GET. The old versions don’t work on most servers. Use $_POST and $_GET instead.
![]() Caution Ignore any “advice” you see about making it easier to get form data by enabling register_globals in the PHP configuration. The register_globals directive was permanently disabled in PHP 5.4 to improve security. You cannot turn it back on.
Caution Ignore any “advice” you see about making it easier to get form data by enabling register_globals in the PHP configuration. The register_globals directive was permanently disabled in PHP 5.4 to improve security. You cannot turn it back on.
Processing and Validating User Input
The ultimate aim of this chapter is to send the input from the form in contact.php by email to your inbox. Using the PHP mail() function is relatively simple. It takes a minimum of three arguments: the address(es) the email is being sent to, a string containing the subject line, and a string containing the body of the message. You build the body of the message by concatenating (joining) the contents of the input fields into a single string.
Security measures implemented by most Internet service providers (ISPs) make it difficult if not impossible to test the mail() function in a local testing environment. Instead of jumping straight into the use of mail(), PHP Solutions 5-1 through 5-4 concentrate on validating user input to make sure required fields are filled in and displaying error messages. Implementing these measures makes your online forms more user friendly and secure.
For many years, web designers have used JavaScript to check user input when the Submit button is clicked. That role is being gradually taken over by browsers that support HTML5. This is called client-side validation because it happens on the user’s computer (or client). It’s useful because it’s almost instantaneous and can alert the user to a problem without making an unnecessary round trip to the server. However, you should never rely on client-side validation alone because it’s too easy to sidestep. All a malicious user has to do is to submit data from a custom script and your checks are rendered useless. It’s vital to check user input on the server side with PHP, too.
Creating a Reusable Script
The ability to reuse the same script—perhaps with only a few edits—for multiple websites is a great timesaver. However, sending the input data to a separate file for processing makes it difficult to alert users to errors without losing their input. To get around this problem, the approach taken in this chapter is to use what’s known as a self-processing form.
When the form is submitted, the page reloads and a conditional statement runs the processing script. If the server-side validation detects errors, the form can be redisplayed with error messages while preserving the user’s input.
Parts of the script that are specific to the form will be embedded above the DOCTYPE declaration. The generic, reusable parts of the script will be in a separate file that can be included in any page that requires an email-processing script.
PHP Solution 5-1: Making Sure Required Fields aren’t Blank
When required fields are left blank, you don’t get the information you need and the user may never get a reply, particularly if contact details have been omitted.
Continue using the file from the previous exercise. Alternatively, use contact_02.php from the ch05 folder and remove _02 from the filename.
1. The processing script uses two arrays called $errors and $missing to store details of errors and required fields that haven’t been filled in. These arrays will be used to control the display of error messages alongside the form labels. There won’t be any errors when the page first loads, so initialize $errors and $missing as empty arrays in the PHP code block at the top of contact.php, like this:
<?php
include './includes/title.php';
$errors = [];
$missing = [];
?>
2. The email-processing script should run only if the form has been submitted. As Figure 5-2 shows, the $_POST array contains a name/value pair for the Submit button, which is called send in contact.php. The value of $_POST['send'] will be defined (set) only if the form has been submitted. So you can use a conditional statement and the isset() function to control whether to run the processing script. Add the code highlighted in bold to the PHP block at the top of the page.
<?php
include './includes/title.php';
$errors = [];
$missing = [];
// check if the form has been submitted
if (isset($_POST['send'])) {
// email processing script
}
?>
![]() Note The name attribute of the Submit button in this form is send. If you give your Submit button a different name, you need to use that name.
Note The name attribute of the Submit button in this form is send. If you give your Submit button a different name, you need to use that name.
3. Although you won’t be sending the email just yet, define two variables to store the destination address and subject line of the email. The following code goes inside the conditional statement that you created in the previous step:
if (isset($_POST['send'])) {
// email processing script
$to = 'david@example.com'; // use your own email address
$subject = 'Feedback from Japan Journey';
}
4. Next, create two arrays: one listing the name attribute of each field in the form and the other listing all required fields. For the sake of this demonstration, make the email field optional, so that only the name and comments fields are required. Add the following code inside the conditional block immediately after the code that defines the subject line:
$subject = 'Feedback from Japan Journey';
// list expected fields
$expected = ['name', 'email', 'comments'];
// set required fields
$required = ['name', 'comments'];
}
![]() Tip Why is the $expected array necessary? It’s to prevent an attacker from injecting other variables into the $_POST array in an attempt to overwrite your default values. By processing only those variables that you expect, your form is much more secure. Any spurious values are ignored.
Tip Why is the $expected array necessary? It’s to prevent an attacker from injecting other variables into the $_POST array in an attempt to overwrite your default values. By processing only those variables that you expect, your form is much more secure. Any spurious values are ignored.
5. The next section of code is not specific to this form, so it should go in an external file that can be included in any email-processing script. Create a new PHP file called processmail.php in the includes folder. Then include it in contact.php immediately after the code you entered in the previous step, like this:
$required = ['name', 'comments'];
require './includes/processmail.php';
}
6. The code in processmail.php begins by checking the $_POST variables for required fields that have been left blank. Strip any default code inserted by your editor and add the following to processmail.php:
<?php
foreach ($_POST as $key => $value) {
// assign to temporary variable and strip whitespace if not an array
$temp = is_array($value) ? $value : trim($value);
// if empty and required, add to $missing array
if (empty($temp) && in_array($key, $required)) {
$missing[] = $key;
${$key} = '';
} elseif (in_array($key, $expected)) {
// otherwise, assign to a variable of the same name as $key
${$key} = $temp;
}
}
In simple terms, this foreach loop goes through the $_POST array, strips out any whitespace from text fields, and assigns the field’s contents to a variable with the same name (so $_POST['email'] becomes $email, and so on). If a required field is left blank, its name attribute is added to the $missing array and the related variable is set to an empty string. Only elements in the $_POST array with keys listed in the $required and $expected arrays are processed.
Removing leading and trailing whitespace prevents anyone from pressing the space bar several times in an attempt to avoid filling in a required field. We also get a list of required fields that haven’t been filled in, and all the values from the form are assigned to simplified variables. This makes them easier to handle later.
If you don’t need to know the details of how the code works, skip to step 7. But if you want to understand the code in depth, read on.
The first line of code inside the loop uses the ternary operator (see “Using the ternary operator” in Chapter 3). This is a convenient shorthand way of assigning a value depending on whether a condition is true or false. The same line of code could be rewritten like this:
if (is_array($value) {
$temp = $value;
} else {
$temp = trim($value);
}
The is_array() function checks whether the current value is an array. If it is, the value is assigned, unchanged, to a variable called $temp. But if it’s not an array, the trim() function strips leading and trailing whitespace from the value before assigning it to$temp.
The rest of the loop uses a conditional statement to process both the key and value of each element in the $_POST array. The first condition uses the empty() function to check whether $temp still contains a value after any leading and trailing whitespace was stripped off in the previous line. If empty() returns true, the in_array() function checks if the current array key is in the $required array. If that also returns true, it means that no value has been set for a required field. So, the two lines of code in the ifblock add the key to the $missing array and then dynamically create a variable based on the key’s name and set its value to an empty string.
The elseif part of the conditional statement checks if the key is in the $expected array. If it is, a variable based on the key’s name is created dynamically, and the value of $temp is assigned to it.
![]() Note For a detailed explanation of how the array key is used to create a new variable with the same name, see “Creating new variables dynamically” in Chapter 3.
Note For a detailed explanation of how the array key is used to create a new variable with the same name, see “Creating new variables dynamically” in Chapter 3.
7. Save processmail.php. You’ll add more code to it later, but let’s turn now to the main body of contact.php. You need to display a warning if anything is missing. Add a conditional statement at the top of the page content between the <h2> heading and the first paragraph, like this:
<h2>Contact us</h2>
<?php if ($missing || $errors) { ?>
<p class="warning">Please fix the item(s) indicated.</p>
<?php } ?>
<p>Ut enim ad minim veniam . . . </p>
This checks $missing and $errors, which you initialized as empty arrays in step 1. As explained in “The truth according to PHP” in Chapter 3, an empty array is treated as false, so the paragraph inside the conditional statement isn’t displayed when the page first loads. However, if a required field hasn’t been filled in when the form is submitted, its name is added to the $missing array. An array with at least one element is treated as true. The || means “or,” so this warning paragraph will be displayed if a required field is left blank or if an error is discovered. (The $errors array comes into play in PHP Solution 5-3.)
8. To make sure it works so far, save contact.php and load it normally in a browser (don’t click the Refresh button). The warning message is not displayed. Click Send message without filling in any of the fields. You should now see the message about missing items, as shown in the following screenshot.

9. To display a suitable message alongside each missing required field, use a PHP conditional statement to insert a <span> inside the <label> tag, like this:
<label for="name">Name:
<?php if ($missing && in_array('name', $missing)) { ?>
<span class="warning">Please enter your name</span>
<?php } ?>
</label>
The first condition checks the $missing array. If it’s empty, the conditional statement fails and the <span> is never displayed. But if $missing contains any values, the in_array() function checks if the $missing array contains the value name. If it does, the<span> is displayed.
10.Insert similar warnings for the email and comments fields like this:
<label for="email">Email:
<?php if ($missing && in_array('email', $missing)) { ?>
<span class="warning">Please enter your email address</span>
<?php } ?>
</label>
<input name="email" id="email" type="text">
</p>
<p>
<label for="comments">Comments:
<?php if ($missing && in_array('comments', $missing)) { ?>
<span class="warning">Please enter your comments</span>
<?php } ?>
</label>
The PHP code is the same except for the value you are looking for in the $missing array. It’s the same as the name attribute for the form element.
11.Save contact.php and test the page again, first by entering nothing into any of the fields. The form labels should look like Figure 5-3.
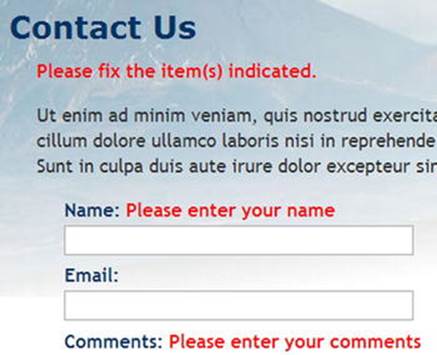
Figure 5-3. By validating user input, you can display warnings about required fields
Although you added a warning to the <label> for the email field, it’s not displayed because email hasn’t been added to the $required array. As a result, it’s not added to the $missing array by the code in processmail.php.
12.Add email to the $required array in the code block at the top of comments.php, like this:
$required = ['name', 'comments', 'email'];
13.Click Send message again without filling in any fields. This time, you’ll see a warning message alongside each label.
14.Type your name in the Name field. In the Email and Comments fields, just press the spacebar several times, then click Send message. The warning message alongside the Name field disappears, but the other two warning messages remain. The code inprocessmail.php strips whitespace from text fields, so it rejects attempts to bypass required fields by entering a series of spaces.
If you have any problems, compare your code with contact_02.php and includes/processmail_01.php in the ch05 folder.
All that needs to be done to change the required fields is to change the names in the $required array and add a suitable alert inside the <label> tag of the appropriate input element inside the form. It’s easy to do because you always use the name attribute of the form input element.
Preserving User Input when a Form is Incomplete
Imagine you have spent ten minutes filling in a form. You click the Submit button, and back comes the response that a required field is missing. It’s infuriating if you have to fill in every field all over again. Since the content of each field is in the $_POST array, it’s easy to redisplay it when an error occurs.
PHP Solution 5-2: Creating Sticky form fields
This PHP solution shows how to use a conditional statement to extract the user’s input from the $_POST array and redisplay it in text input fields and text areas.
Continue working with the same files as before. Alternatively, use contact_02.php and includes/processmail_01.php from the ch05 folder.
1. When the page first loads, you don’t want anything to appear in the input fields, but you do want to redisplay the content if a required field is missing or there’s an error. That’s the key: if the $missing or $errors arrays contain any values, the content of each field should be redisplayed. You set default text for a text input field with the value attribute of the <input> tag, so amend the <input> tag for name like this:
<input name="name" id="name" type="text"
<?php if ($missing || $errors) {
echo 'value="' . htmlentities($name) . '"';
} ?>>
The line inside the curly braces contains a combination of quotes and periods that might confuse you. The first thing to realize is that there’s only one semicolon—right at the end—so the echo command applies to the whole line. As explained in Chapter 3, a period is called the concatenation operator, which joins strings and variables. You can break down the rest of the line into three sections, as follows:
· 'value="' .
· htmlentities($name)
· . '"'
The first section outputs value=" as text and uses the concatenation operator to join it to the next section, which passes $name to a function called htmlentities(). I’ll explain what the function does in a moment, but the third section uses the concatenation operator again to join the next section, which consists solely of a double quote. So, if $missing or $errors contain any values, and $_POST['name'] contains Joe, you’ll end up with this inside the <input> tag:
<input name="name" id="name" type="text" value="Joe">
The $name variable contains the original user input, which was transmitted through the $_POST array. The foreach loop that you created in processmail.php in PHP Solution 5-1 processes the $_POST array and assigns each element to a variable with the same name. This allows you to access $_POST['name'] simply as $name.
So, what’s the htmlentities() function for? As the function name suggests, it converts certain characters to their equivalent HTML character entities. The one you’re concerned with here is the double quote. Let’s say Elvis really is still alive and decides to send feedback through the form. If you use $name on its own, Figure 5-4 shows what happens when a required field is omitted and you don’t use htmlentities().
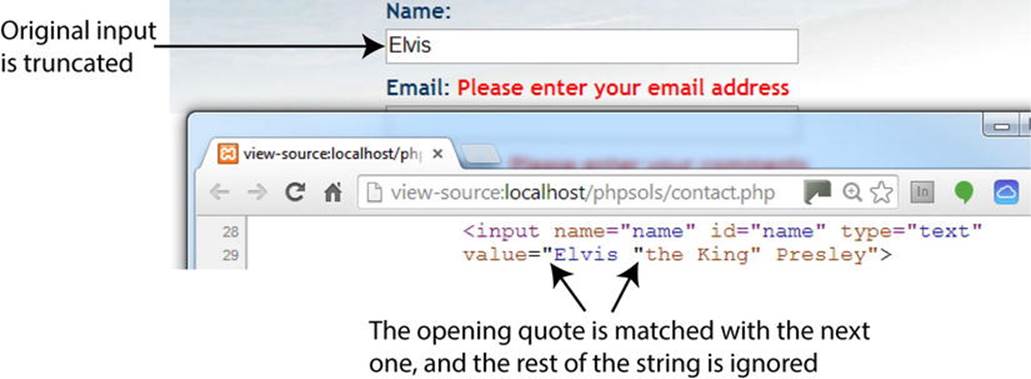
Figure 5-4. Quotes need special treatment before form fields can be redisplayed
Passing the content of the $_POST array element to the htmlentities(), however, converts the double quotes in the middle of the string to ". And, as Figure 5-5 shows, the content is no longer truncated.
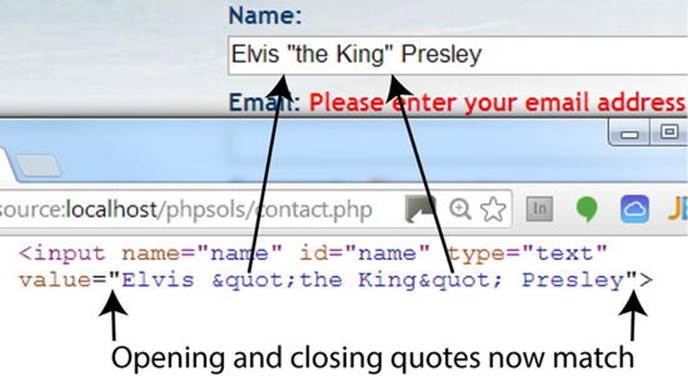
Figure 5-5. Passing the value to htmlentities() before it’s displayed solves the problem
What’s cool about this is that the character entity " is converted back to double quotes when the form is resubmitted. As a result, there’s no need for further conversion before the email can be sent.
![]() Note Prior to PHP 5.4, htmlentities() used ISO-8859-1 (Western European) as the default encoding for conversion. This was changed to UTF-8 in PHP 5.4. It changed again in PHP 5.6 to the value of default_charset in the server’s PHP configuration. This latest change won’t affect most people because UTF-8 is the default value for default_charset. But it does mean you can set your own default encoding if you have particular requirements.
Note Prior to PHP 5.4, htmlentities() used ISO-8859-1 (Western European) as the default encoding for conversion. This was changed to UTF-8 in PHP 5.4. It changed again in PHP 5.6 to the value of default_charset in the server’s PHP configuration. This latest change won’t affect most people because UTF-8 is the default value for default_charset. But it does mean you can set your own default encoding if you have particular requirements.
If htmlentities() corrupts your text, you can set the encoding directly within a script by passing the second and third optional arguments to the function. For example, to set the encoding to Simplified Chinese, use htmlentities($name, ENT_COMPAT, 'GB2312'). For details, see the documentation at http://php.net/manual/en/function.htmlentities.php.
2. Edit the email field the same way, using $email instead of $name.
3. The comments text area needs to be handled slightly differently because <textarea> tags don’t have a value attribute. You must place the PHP block between the opening and closing tags of the text area, like this (new code is shown in bold):
<textarea name="comments" id="comments"><?php
if ($missing || $errors) {
echo htmlentities($comments);
} ?></textarea>
It’s important to position the opening and closing PHP tags right up against the <textarea> tags. If you don’t, you’ll get unwanted whitespace inside the text area.
4. Save contact.php and test the page in a browser. If any required fields are omitted, the form displays the original content along with any error messages.
You can check your code with contact_03.php in the ch05 folder.
![]() Caution Using this technique prevents a form’s reset button from clearing any fields that have been changed by the PHP script. This is a minor inconvenience in comparison with the greater usability offered by preserving existing content when an incomplete form is submitted.
Caution Using this technique prevents a form’s reset button from clearing any fields that have been changed by the PHP script. This is a minor inconvenience in comparison with the greater usability offered by preserving existing content when an incomplete form is submitted.
Filtering Out Potential Attacks
A particularly nasty exploit known as email header injection seeks to turn online forms into spam relays. A simple way of preventing this is to look for the strings “Content-Type:”, “Cc:”, and “Bcc:”, as these are email headers that the attacker injects into your script to trick it into sending HTML email with copies to many people. If you detect any of these strings in user input, it’s a pretty safe bet that you’re the target of an attack, so you should block the message. An innocent message may also be blocked, but the advantages of stopping an attack outweigh that small risk.
PHP Solution 5-3: Blocking Emails that Contain Specific Phrases
This PHP solution checks the user input for suspect phrases. If one is detected, a Boolean variable is set to true. This will be used later to prevent the email from being sent.
Continue working with the same page as before. Alternatively, use contact_03.php and includes/processmail_01.php from the ch05 folder.
1. PHP conditional statements rely on a true/false test to determine whether to execute a section of code. The way to filter out suspect phrases is to create a Boolean variable that is switched to true as soon as one of those phrases is detected. The detection is done using a search pattern or regular expression. Add the following code at the top of processmail.php before the existing foreach loop:
// assume nothing is suspect
$suspect = false;
// create a pattern to locate suspect phrases
$pattern = '/Content-Type:|Bcc:|Cc:/i';
foreach ($_POST as $key => $value) {
The string assigned to $pattern will be used to perform a case-insensitive search for any of the following: “Content-Type:”, “Bcc:”, or “Cc:”. It’s written in a format called Perl-compatible regular expression (PCRE). The search pattern is enclosed in a pair of forward slashes, and the i after the final slash makes the pattern case-insensitive.
![]() Tip For a basic introduction to regular expressions (regex), see my tutorial at www.adobe.com/devnet/dreamweaver/articles/regular_expressions_pt1.html. For a more in-depth treatment, Regular Expressions Cookbook, 2nd Edition by Jan Goyvaerts and Steven Levithan (O’Reilly, 2012, ISBN: 978-1-4493-1943-4) is excellent.
Tip For a basic introduction to regular expressions (regex), see my tutorial at www.adobe.com/devnet/dreamweaver/articles/regular_expressions_pt1.html. For a more in-depth treatment, Regular Expressions Cookbook, 2nd Edition by Jan Goyvaerts and Steven Levithan (O’Reilly, 2012, ISBN: 978-1-4493-1943-4) is excellent.
2. You can now use the PCRE stored in $pattern to filter out any suspect user input from the $_POST array. At the moment, each element of the $_POST array contains only a string. However, multiple-choice form elements, such as check-box groups, return an array of results. So you need to tunnel down any subarrays and check the content of each element separately. That’s what the following custom-built function isSuspect() does. Insert it immediately after the $pattern variable from step 1:
$pattern = '/Content-Type:|Bcc:|Cc:/i';
// function to check for suspect phrases
function isSuspect($val, $pattern, &$suspect) {
// if the variable is an array, loop through each element
// and pass it recursively back to the same function
if (is_array($val)) {
foreach ($val as $item) {
isSuspect($item, $pattern, $suspect);
}
} else {
// if one of the suspect phrases is found, set Boolean to true
if (preg_match($pattern, $val)) {
$suspect = true;
}
}
}
foreach ($_POST as $key => $value) {
The isSuspect() function is a piece of code that you may want to just copy and paste without delving too deeply into how it works. The important thing to notice is that the third argument has an ampersand (&) in front of it (&$suspect). This means that any changes made to the variable passed as the third argument to isSuspect() will affect the value of that variable elsewhere in the script. This technique is known as passing by reference (see “Passing by reference—changing the value of an argument” in Chapter 3).
The other feature of this function is that it’s what’s known as a recursive function. It keeps on calling itself until it finds a value that it can compare against the regex using the preg_match() function, which returns true if it finds a match.
3. To call the function, pass it as arguments the $_POST array, the pattern, and the $suspect Boolean variable. Insert the following code immediately after the function definition:
// check the $_POST array and any subarrays for suspect content
isSuspect($_POST, $pattern, $suspect);
![]() Note You don’t put an ampersand in front of $suspect this time. The ampersand is required only when you define the function in step 2, not when you call it.
Note You don’t put an ampersand in front of $suspect this time. The ampersand is required only when you define the function in step 2, not when you call it.
4. If suspect phrases are detected, the value of $suspect changes to true. There’s also no point in processing the $_POST array any further. Wrap the code that processes the $_POST variables in a conditional statement like this:
if (!$suspect) {
foreach ($_POST as $key => $value) {
// assign to temporary variable and strip whitespace if not an array
$temp = is_array($value) ? $value : trim($value);
// if empty and required, add to $missing array
if (empty($temp) && in_array($key, $required)) {
$missing[] = $key;
${$key} = '';
} elseif (in_array($key, $expected)) {
// otherwise, assign to a variable of the same name as $key
${$key} = $temp;
}
}
}
This processes the variables in the $_POST array only if $suspect is not true.
Don’t forget the extra curly brace to close the conditional statement.
5. Edit the PHP block after the <h2> heading in contact.php to add a new warning message above the form, like this:
<h2>Contact Us</h2>
<?php if ($_POST && $suspect) { ?>
<p class="warning">Sorry, your mail could not be sent.
Please try later.</p>
<?php } elseif ($missing || $errors) { ?>
<p class="warning">Please fix the item(s) indicated.</p>
<?php } ?>
This sets a new condition that takes priority over the original warning message by being considered first. It checks if the $_POST array contains any elements—in other words, the form has been submitted—and if $suspect is true. The warning is deliberately neutral in tone. There’s no point in provoking attackers. More important, it avoids offending anyone who may have innocently used a suspect phrase.
6. Save contact.php and test the form by typing one of the suspect phrases in one of the fields. You should see the second warning message, but your input won’t be preserved.
You can check your code against contact_04.php and includes/processmail_02.php in the ch05 folder.
Sending Email
Before proceeding any further, it’s necessary to explain how the PHP mail() function works, because it will help you understand the rest of the processing script.
The PHP mail() function takes up to five arguments, all of them strings, as follows:
· The address(es) of the recipient(s)
· The subject line
· The message body
· A list of other email headers (optional)
· Additional parameters (optional)
Email addresses in the first argument can be in either of the following formats:
'user@example.com'
'Some Guy <user2@example.com>'
To send to more than one address, use a comma-separated string like this:
'user@example.com, another@example.com, Some Guy <user2@example.com>'
The message body must be presented as a single string. This means that you need to extract the input data from the $_POST array and format the message, adding labels to identify each field. By default, the mail() function supports only plain text. New lines must use both a carriage return and newline character. It’s also recommended to restrict the length of lines to no more than 78 characters. Although it sounds complicated, you can build the message body automatically with about 20 lines of PHP code, as you’ll see in PHP Solution 5-5.
Adding other email headers is covered in detail in the next section.
Many hosting companies now make the fifth argument a requirement. It ensures that the email is sent by a trusted user, and it normally consists of your own email address prefixed by -f (without a space in between), all enclosed in quotes. Check your hosting company’s instructions to see whether this is required and the exact format it should take.
Using Additional Email Headers Safely
You can find a full list of email headers at www.faqs.org/rfcs/rfc2076, but some of the most well-known and useful ones enable you to send copies of an email to other addresses (Cc and Bcc) or to change the encoding. Each new header, except the final one, must be on a separate line terminated by a carriage return and new line character. This means using the \r and \n escape sequences in double-quoted strings (see Table 3-4 in Chapter 3).
By default, mail() uses Latin1 (ISO-8859-1) encoding, which doesn’t support accented characters. Webpage editors these days frequently use Unicode (UTF-8), which supports most written languages, including the accents commonly used in European languages, as well as nonalphabetic scripts, such as Chinese and Japanese. To ensure that email messages aren’t garbled, use the Content-Type header to set the encoding to UTF-8, like this:
$headers = "Content-Type: text/plain; charset=utf-8\r\n";
You also need to add UTF-8 as the charset attribute in a <meta> tag in the <head> of your webpages like this in HTML5:
<meta charset="utf-8">
If you’re still using HTML 4.01, the <meta> tag is more verbose:
<meta http-equiv="Content-Type" content="text/html; charset=utf-8">
Let’s say you also want to send copies of messages to other departments, plus a copy to another address that you don’t want the others to see. Email sent by mail() is often identified as coming from nobody@yourdomain (or whatever username is assigned to the web server), so it’s a good idea to add a more user-friendly “From” address. This is how you build those additional headers, using the combined concatenation operator (.=) to add each one to the existing variable:
$headers .= "From: Japan Journey<feedback@example.com>\r\n";
$headers .= "Cc: sales@example.com, finance@example.com\r\n";
$headers .= 'Bcc: secretplanning@example.comSPI_AMP#x0027;;
After building the set of headers you want to use, you pass the variable containing them as the fourth argument to mail(), like this (assuming that the destination address, subject, and message body have already been stored in variables):
$mailSent = mail($to, $subject, $message, $headers);
Hard-coded additional headers like this present no security risk, but anything that comes from user input must be filtered before it’s used. The biggest danger comes from a text field that asks for the user’s email address. A widely used technique is to incorporate the user’s email address into a From or Reply-To header, which enables you to reply directly to incoming messages by clicking the Reply button in your email program. It’s very convenient, but attackers frequently try to pack an email input field with a large number of spurious headers.
Although email fields are the prime target for attackers, the destination address and subject line are both vulnerable if you let users change the value. User input should always be regarded as suspect. PHP Solution 5-3 performs only a basic test for suspect phrases. Before using external input directly in a header you need to apply a more rigorous test, as seen in PHP Solution 5-4.
PHP Solution 5-4: Adding Headers and Automating the Reply Address
This PHP solution adds three headers to the email: From, Content-Type (to set the encoding to UTF-8), and Reply-To. Before adding the user’s email address to the final header, it uses a built-in PHP filter to verify that the submitted value conforms to the format of a valid email address.
Continue working with the same page as before. Alternatively, use contact_04.php and includes/processmail_02.php from the ch05 folder.
1. Headers are often specific to a particular website or page, so the From and Content-Type headers will be added to the script in contact.php. Add the following code to the PHP block at the top of the page just before processmail.php is included:
$required = ['name', 'comments', 'email'];
// create additional headers
$headers = "From: Japan Journey<feedback@example.com>\r\n";
$headers .= 'Content-Type: text/plain; charset=utf-8';
require './includes/processmail.php';
The \r\n at the end of the From header is an escape sequence that inserts a carriage return and newline character, so the string must be in double quotes. At the moment, Content-Type is the final header, so it isn’t followed by a carriage return or newline character, and the string is in single quotes.
2. The purpose of validating the email address is to make sure it’s in a valid format, but the field might be empty because you decide not to make it required or because the user simply ignored it. If the field is required but empty, it will be added to the $missing array, and the warning you added in PHP Solution 5-1 will be displayed. If the field isn’t empty, but the input is invalid, you need to display a different message.
Switch to processmail.php and add this code at the bottom of the script:
// validate the user's email
if (!$suspect && !empty($email)) {
$validemail = filter_input(INPUT_POST, 'email', FILTER_VALIDATE_EMAIL);
if ($validemail) {
$headers .= "\r\nReply-To: $validemail";
} else {
$errors['email'] = true;
}
}
This begins by checking that no suspect phrases have been found and that the email field isn’t empty. Both conditions are preceded by the logical Not operator (!), so they return true if $suspect and empty($email) are both false. The foreach loop you added in PHP Solution 5-1 assigns all expected elements in the $_POST array to simpler variables, so $email contains the same value as $_POST['email'].
The next line uses filter_input() to validate the email address. The first argument is a PHP constant, INPUT_POST, which specifies that the value must be in the $_POST array. The second argument is the name of the element you want to test. The final argument is another PHP constant that specifies you want to check that the element conforms to the valid format for an email.
The filter_input() function returns the value being tested if it’s valid. Otherwise, it returns false. So, if the value submitted by the user looks like a valid email address, $validemail contains the address. If the format is invalid, $validemail is false. The FILTER_VALIDATE_EMAIL constant accepts only a single email address, so any attempt to insert multiple email addresses will be rejected.
![]() Note FILTER_VALIDATE_EMAIL checks the format, not whether the address is genuine.
Note FILTER_VALIDATE_EMAIL checks the format, not whether the address is genuine.
If $validemail isn’t false, it’s safe to incorporate into a Reply-To email header. Since the last value added to $headers in step 1 doesn’t end with a carriage return and newline character, they’re added before Reply-To. When building the $headersstring, it doesn’t matter whether you put the \r\n at the end of a header or at the beginning of the next one, as long as a carriage return and newline character separate them.
If $validemail is false, $errors['email'] is added to the $errors array.
3. You now need to amend the <label> for the email field in contact.php, like this:
<label for="email">Email:
<?php if ($missing && in_array('email', $missing)) { ?>
<span class="warning">Please enter your email address</span>
<?php } elseif (isset($errors['email'])) { ?>
<span class="warning">Invalid email address</span>
<?php } ?>
</label>
This adds an elseif clause to the first conditional statement and displays a different warning if the email address fails validation.
4. Save contact.php and test the form by leaving all fields blank and clicking Send message. You’ll see the original error message. Test it again by entering a value that isn’t an email address in the Email field. This time, you’ll see the invalid message. The same happens if you enter two email addresses.
You can check your code against contact_05.php and includes/processmail_03.php in the ch05 folder.
PHP Solution 5-5: Building the message Body and Sending the Mail
Many PHP tutorials show how to build the message body manually like this:
$message = "Name: $name\r\n\r\n";
$message .= "Email: $email\r\n\r\n";
$message .= "Comments: $comments";
This adds labels to identify which field the input comes from and inserts two carriage returns and newline characters between each one. This is fine for a small number of fields, but it soon becomes tedious with more fields. As long as you give your form fields meaningful nameattributes, you can build the message body automatically with a foreach loop, which is the approach taken in this PHP solution.
![]() Caution The name attribute must not contain spaces. To use multiple words to name form fields, join them with an underscore or hyphen; for example, first_name or first-name.
Caution The name attribute must not contain spaces. To use multiple words to name form fields, join them with an underscore or hyphen; for example, first_name or first-name.
Continue working with the same files as before. Alternatively, use contact_05.php and includes/processmail_03.php from the ch05 folder.
1. Add the following code at the bottom of the script in processmail.php:
$mailSent = false;
This initializes a variable that will be used to redirect the user to a thank you page after the mail has been sent. It needs to be set to false until you know the mail() function has succeeded.
2. Now add the code that builds the message. It goes immediately after the variable you just initialized:
// go ahead only if not suspect, all required fields OK, and no errors
if (!$suspect && !$missing && !$errors) {
// initialize the $message variable
$message = '';
// loop through the $expected array
foreach($expected as $item) {
// assign the value of the current item to $val
if (isset(${$item}) && !empty(${$item})) {
$val = ${$item};
} else {
// if it has no value, assign 'Not selected'
$val = 'Not selected';
}
// if an array, expand as comma-separated string
if (is_array($val)) {
$val = implode(', ', $val);
}
// replace underscores and hyphens in the label with spaces
$item = str_replace(['_', '-'], ' ', $item);
// add label and value to the message body
$message .= ucfirst($item).": $val\r\n\r\n";
}
// limit line length to 70 characters
$message = wordwrap($message, 70);
$mailSent = true;
}
This is another complex block of code that you might prefer to just copy and paste. Still, you need to know what it does. In brief, the code checks that $suspect, $missing, and $errors are all false. If they are, it builds the message body by looping through the $expected array, storing the result in $message as a series of label/value pairs.
The key to understanding how this code works lies in the following conditional statement:
if (isset(${$item}) && !empty(${$item})) {
$val = ${$item};
}
The rather odd-looking ${$item} dynamically creates a variable based on the value of $item. This is another example of using a variable variable (see “Creating new variables dynamically” in Chapter 3). Each time the loop runs, $item contains the value of the current element in the $expected array. The first element is name, so ${$item} dynamically creates a variable called $name. In effect, the conditional statement becomes this:
if (isset($name) && !empty($name)) {
$val = $name;
}
On the next pass through the loop, ${$item} creates a variable called $email, and so on.
![]() Caution The vital point about this script is that it builds the message body only from items in the $expected array. You must list the names of all form fields in the $expected array for it to work.
Caution The vital point about this script is that it builds the message body only from items in the $expected array. You must list the names of all form fields in the $expected array for it to work.
If a field that’s not specified as required is left empty, its value is set to “Not selected.” The code also processes values from multiple-choice elements, such as check-box groups and <select> lists, which are transmitted as subarrays of the $_POST array. Theimplode() function converts the subarrays into comma-separated strings.
Each label is derived from the input field’s name attribute in the current element of the $expected array. The first argument to str_replace() is an array containing an underscore and a hyphen. If either character is found in the name attribute, it’s replaced by the second argument, a string consisting of a single space. The first letter is then set to uppercase by ucfirst().
After the message body has been combined into a single string, it’s passed to the wordwrap() function to limit the line length to 70 characters. The code that sends the email still needs to be added, but for testing purposes, $mailSent has been set to true.
3. Save processmail.php. Locate this code block at the bottom of contact.php:
<pre>
<?php if ($_POST) {print_r($_POST);} ?>
</pre>
Change it to this:
<pre>
<?php if ($_POST && $mailSent) {
echo "Message body\n\n";
echo htmlentities($message) . "\n";
echo 'Headers: '. htmlentities($headers);
} ?>
</pre>
This checks that the form has been submitted and the mail is ready to send. It then displays the values in $message and $headers. Both values are passed to htmlentities() to ensure they display correctly in the browser.
4. Save contact.php, and test the form by entering your name, email address, and a brief comment. When you click Send message, you should see the message body and headers displayed at the bottom of the page, as shown in Figure 5-6.
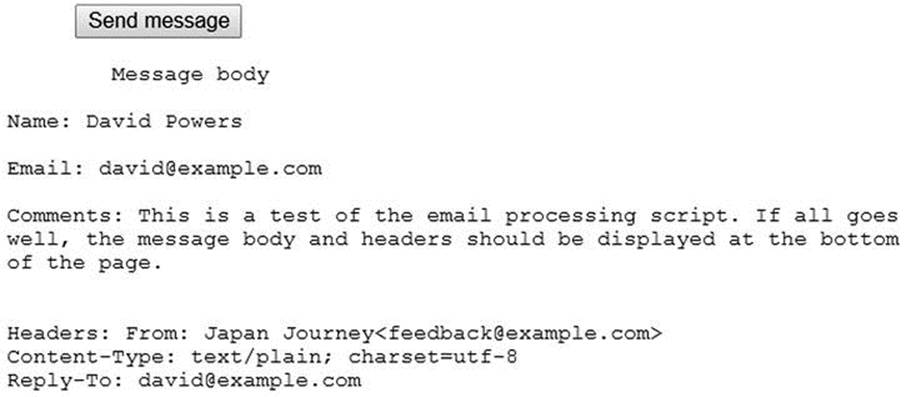
Figure 5-6. Verifying that the message body and headers are correctly formed
Assuming that the message body and headers display correctly at the bottom of the page, you’re ready to add the code to send the email. If your code didn’t work, check it against contact_06.php and includes/processmail_04.php in the ch05 folder.
5. In processmail.php, add the code to send the mail. Locate the following line:
$mailSent = true;
Change it to this:
$mailSent = mail($to, $subject, $message, $headers);
if (!$mailSent) {
$errors['mailfail'] = true;
}
This passes the destination address, subject line, message body, and headers to the mail() function, which returns true if it succeeds in handing the email to the web server’s mail transport agent (MTA). If it fails—perhaps because the mail server is down—$mailSent is set to false, and the conditional statement adds an element to the $errors array, allowing you to preserve the user’s input when the form is redisplayed.
6. In the PHP block at the top of contact.php, add the following conditional statement immediately after the command that includes processmail.php:
require './includes/processmail.php';
if ($mailSent) {
header('Location:http://www.example.com/thank_you.php');
exit;
}
}
?>
Replace www.example.com with your own domain name. This checks if $mailSent is true. If it is, the header() function redirects the user to thank_you.php, a page acknowledging that the message has been sent. The exit command on the following line ensures that the script is terminated after the page has been redirected.
There’s a copy of thank_you.php in the ch05 folder.
7. If $mailSent is false, contact.php is redisplayed; you need to warn the user that the message couldn’t be sent. Edit the conditional statement just after the <h2> heading, like this:
<h2>Contact Us </h2>
<?php if (($_POST && $suspect) || ($_POST && isset($errors['mailfail']))) { ?>
<p class="warning">Sorry, your mail could not be sent. . . .
The original and new conditions have been wrapped in parentheses, so each pair is considered as a single entity. The warning about the message not being sent is displayed if the form has been submitted and suspect phrases have been found, or if the form has been submitted and $errors['mailfail'] has been set.
8. Delete the code block (including the <pre> tags) that displays the message body and headers at the bottom of contact.php.
9. Testing this locally is likely to result in the thank you page being shown, but the email never arriving. This is because most testing environments don’t have an MTA. Even if you set one up, most mail servers reject mail from unrecognized sources. Uploadcontact.php and all related files, including processmail.php and thank_you.php, to your remote server and test the contact form there. Don’t forget that processmail.php needs to be in a subfolder called includes.
You can check your code with contact_07.php and includes/processmail_05.php in the ch05 folder.
Troubleshooting mail()
It’s important to understand that mail() isn’t an email program. PHP’s responsibility ends as soon as it passes the address, subject, message, and headers to the MTA. It has no way of knowing if the email is delivered to its intended destination. Normally, email arrives instantaneously, but network logjams can delay it by hours or even a couple of days.
If you’re redirected to the thank you page after sending a message from contact.php, but nothing arrives in your inbox, check the following:
· Has the message been caught by a spam filter?
· Have you checked the destination address stored in $to? Try an alternative email address to see if it makes a difference.
· Have you used a genuine address in the From header? Using a fake or invalid address is likely to cause the mail to be rejected. Use a valid address that belongs to the same domain as your web server.
· Check with your hosting company to see if the fifth argument to mail() is required. If so, it should normally be a string composed of -f followed by your email address. For example, david@example.com becomes '-fdavid@example.com'.
If you still don’t receive messages from contact.php, create a file with this script:
<?php
ini_set('display_errors', '1');
$mailSent = mail('you@example.com', 'PHP mail test', 'This is a test email');
if ($mailSent) {
echo 'Mail sent';
} else {
echo 'Failed';
}
Replace you@example.com with your own email address. Upload the file to your website and load the page into a browser.
If you see an error message about there being no From header, add one as a fourth argument to the mail() function, like this:
$mailSent = mail('you@example.com', 'PHP mail test', 'This is a test email',
'From: me@example.com');
It’s usually a good idea to use a different address from the destination address in the first argument.
If your hosting company requires the fifth argument, adjust the code like this:
$mailSent = mail('you@example.com', 'PHP mail test', 'This is a test email', null,
'-fme@example.com');
Using the fifth argument normally replaces the need to supply a From header, so using null (without quotes) as the fourth argument indicates that it has no value.
If you see “Mail sent” and no mail arrives, or you see “Failed” after trying all five arguments, consult your hosting company for advice.
If you receive the test email from this script but not from contact.php, it means you have made a mistake in the code or that you have forgotten to upload processmail.php. Also turn on the display of errors temporarily, as described in “Why is my page blank?” in Chapter 3, to check that contact.php is able to find processmail.php.
Handling Multiple-Choice Form Elements
The form in contact.php uses only text input fields and a text area. To work successfully with forms, you also need to know how to handle multiple-choice elements, namely:
· Radio buttons
· Check boxes
· Drop-down option menus
· Multiple-choice lists
The principle behind them is the same as the text input fields you have been working with: the name attribute of the form element is used as the key in the $_POST array. However, there are some important differences:
· Check-box groups and multiple-choice lists store selected values as an array, so you need to add an empty pair of square brackets at the end of the name attribute for these types of input. For example, for a check-box group called interests, the name attribute in each<input> tag should be name="interests[]". If you omit the square brackets, only the last item selected is transmitted through the $_POST array.
· The values of selected items in a check-box group or multiple-choice list are transmitted as a subarray of the $_POST array. The code in PHP Solution 5-5 automatically converts these subarrays to comma-separated strings. However, when using a form for other purposes, you need to extract the values from the subarrays. You’ll see how to do so in later chapters.
· Radio buttons, check boxes, and multiple-choice lists are not included in the $_POST array if no value is selected. Consequently, it’s vital to use isset() to check for their existence before attempting to access their values when processing the form.
The remaining PHP solutions in this chapter show how to handle multiple-choice form elements. Rather than go through each step in detail, I’ll just highlight the important points. Bear the following points in mind when working through the rest of this chapter:
· Processing these elements relies on the code in processmail.php.
· You must add the name attribute of each element to the $expected array for it to be added to the message body.
· To make a field required, add its name attribute to the $required array.
· If a field that’s not required is left blank, the code in processmail.php sets its value to “Not selected.”
Figure 5-7 shows contact.php with each type of input added to the original design.
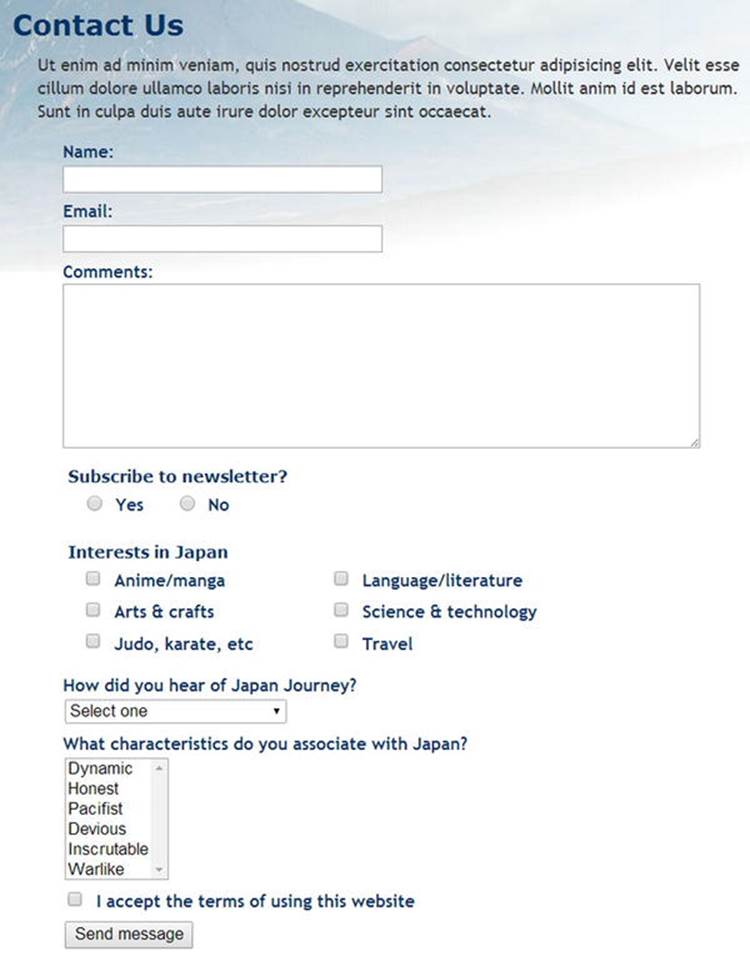
Figure 5-7. The feedback form with examples of multiple-choice form elements
![]() Tip HTML5 adds many new types of form input. They all use the name attribute and send values as text or as a subarray of the $_POST array, so you should be able to adapt the code accordingly.
Tip HTML5 adds many new types of form input. They all use the name attribute and send values as text or as a subarray of the $_POST array, so you should be able to adapt the code accordingly.
PHP Solution 5-6: Handling Radio-Button Groups
Radio-button groups let you pick only one value. Although it’s common to set a default value in the HTML markup, it’s not obligatory. This PHP solution shows how to handle both scenarios.
1. The simple way to deal with radio buttons is to make one of them the default. The radio group is always included in the $_POST array because a value is always selected.
The code for a radio group with a default value looks like this (the name attributes and PHP code are highlighted in bold):
<fieldset id="subscribe">
<h2>Subscribe to newsletter?</h2>
<p>
<input name="subscribe" type="radio" value="Yes" id="subscribe-yes"
<?php
if ($_POST && $_POST['subscribe'] == 'Yes') {
echo 'checked';
} ?>>
<label for="subscribe-yes">Yes</label>
<input name="subscribe" type="radio" value="No" id="subscribe-no"
<?php
if (!$_POST || $_POST['subscribe'] == 'No') {
echo 'checked';
} ?>>
<label for="subscribe-no">No</label>
</p>
</fieldset>
All members of the radio group share the same name attribute. Because only one value can be selected, the name attribute does not end with a pair of empty brackets.
The conditional statement related to the Yes button checks $_POST to see if the form has been submitted. If it has and the value of $_POST['subscribe'] is “Yes,” the checked attribute is added to the <input> tag.
In the No button, the conditional statement uses || (or). The first condition is !$_POST, which is true when the form hasn’t been submitted. If true, the checked attribute is added as the default value when the page first loads. If false, it means the form has been submitted, so the value of $_POST['subscribe'] is checked.
2. When a radio button doesn’t have a default value, it’s not included in the $_POST array, so it isn’t detected by the loop in processmail.php that builds the $missing array. To ensure that the radio button element is included in the $_POST array, you need to test for its existence after the form has been submitted. If it isn’t included, you need to set its value to an empty string, like this:
$required = ['name', 'comments', 'email', 'subscribe'];
// set default values for variables that might not exist
if (!isset($_POST['subscribe'])) {
$_POST['subscribe'] = '';
}
3. If the radio-button group is required but not selected, you need to display an error message when the form reloads. You also need to change the conditional statements in the <input> tags to reflect the different behavior.
The following listing shows the subscribe radio-button group from contact_08.php, with all the PHP code highlighted in bold:
<fieldset id="subscribe">
<h2>Subscribe to newsletter?
<?php if ($missing && in_array('subscribe', $missing)) { ?>
<span class="warning">Please make a selection</span>
<?php } ?>
</h2>
<p>
<input name="subscribe" type="radio" value="Yes" id="subscribe-yes"
<?php
if ($_POST && $_POST['subscribe'] == 'Yes') {
echo 'checked';
} ?>>
<label for="subscribe-yes">Yes</label>
<input name="subscribe" type="radio" value="No" id="subscribe-no"
<?php
if ($_POST && $_POST['subscribe'] == 'No') {
echo 'checked';
} ?>>
<label for="subscribe-no">No</label>
</p>
</fieldset>
The conditional statement that controls the warning message in the <h2> tag uses the same technique as for the text input fields. The message is displayed if the radio group is a required item and it’s in the $missing array.
The conditional statement surrounding the checked attribute is the same in both radio buttons. It checks if the form has been submitted and displays the checked attribute only if the value in $_POST['subscribe'] matches.
PHP Solution 5-7: Handling Check-Box Groups
Check boxes can be used individually or in groups. The method of handling them is slightly different. This PHP solution shows how to deal with a check-box group called interests. PHP Solution 5-10 explains how to handle a single check box.
When used as a group, all check boxes in the group share the same name attribute, which needs to end with an empty pair of square brackets in order for PHP to transmit the selected values as an array. To identify which check boxes have been selected, each one needs a unique valueattribute.
If no items are selected, the check-box group is not included in the $_POST array. After the form has been submitted, you need to check the $_POST array to see if it contains a subarray for the check-box group. If it doesn’t, you need to create an empty subarray as the default value for the script in processmail.php.
1. To save space, just the first two check boxes of the group are shown. The name attribute and PHP sections of code are highlighted in bold.
<fieldset id="interests">
<h2>Interests in Japan</h2>
<div>
<p>
<input type="checkbox" name="interests[]" value="Anime/manga"
id="anime"
<?php
if ($_POST && in_array('Anime/manga', $_POST['interests'])) {
echo 'checked';
} ?>>
<label for="anime">Anime/manga</label>
</p>
<p>
<input type="checkbox" name="interests[]" value="Arts & crafts"
id="art"
<?php
if ($_POST && in_array('Arts & crafts', $_POST['interests'])) {
echo 'checked';
} ?>>
<label for="art">Arts & crafts</label>
</p>
. . .
</div>
</fieldset>
Each check box shares the same name attribute, which ends with an empty pair of square brackets, so the data is treated as an array. If you omit the brackets, $_POST['interests'] contains the value of only the first check box selected.
![]() Note Although the brackets must be added to the name attribute for multiple selections, the subarray of selected values is in $_POST['interests'], not $_POST['interests[]'].
Note Although the brackets must be added to the name attribute for multiple selections, the subarray of selected values is in $_POST['interests'], not $_POST['interests[]'].
The PHP code inside each check-box element performs the same role as in the radio-button group, wrapping the checked attribute in a conditional statement. The first condition checks that the form has been submitted. The second condition uses the in_array()function to check whether the value associated with that check box is in the $_POST['interests'] subarray. If it is, it means the check box was selected.
2. After the form has been submitted, you need to check for the existence of $_POST['interests']. If it hasn’t been set, you must create an empty array as the default value for the rest of the script to process. The code follows the same pattern as for the radio group:
$required = ['name', 'comments', 'email', 'subscribe', 'interests'];
// set default values for variables that might not exist
if (!isset($_POST['subscribe'])) {
$_POST['subscribe'] = '';
}
if (!isset($_POST['interests'])) {
$_POST['interests'] = [];
}
3. To set a minimum number of required check boxes, use the count() function to confirm the number of values transmitted from the form. If it’s less than the minimum required, add the group to the $errors array, like this:
if (!isset($_POST['interests'])) {
$_POST['interests'] = [];
}
// minimum number of required check boxes
$minCheckboxes = 2;
if (count($_POST['interests']) < $minCheckboxes) {
$errors['interests'] = true;
}
The count() function returns the number of elements in an array, so this creates $errors['interests'] if fewer than two check boxes have been selected. You might be wondering why I have used a variable instead of the number like this:
if (count($_POST['interests']) < 2) {
This certainly works and it involves less typing, but $minCheckboxes can be reused in the error message. Storing the number in a variable means this condition and the error message always remain in sync.
4. The error message in the body of the form looks like this:
<h2>Interests in Japan
<?php if (isset($errors['interests'])) { ?>
<span class="warning">Please select at least <?= $minCheckboxes;?></span>
<?php } ?>
</h2>
PHP Solution 5-8: Using a Drop-down Option Menu
Drop-down option menus created with the <select> tag are similar to radio-button groups in that they normally allow the user to pick only one option from several. Where they differ is one item is always selected in a drop-down menu, even if it’s only the first item inviting the user to select one of the others. As a result, the $_POST array always contains an element referring to a <select> menu, whereas a radio-button group is ignored unless a default value is preset.
1. The following code shows the first two items from the drop-down menu in contact_08.php, with the PHP code highlighted in bold. As with all multiple-choice elements, the PHP code wraps the attribute that indicates which item has been chosen. Although this attribute is called checked in both radio buttons and check boxes, it’s called selected in <select> menus and lists. It’s important to use the correct attribute to redisplay the selection if the form is submitted with required items missing. When the page first loads, the $_POST array contains no elements, so you can select the first <option> by testing for !$_POST. Once the form is submitted, the $_POST array always contains an element from a drop-down menu, so you don’t need to test for its existence.
<p>
<label for="howhear">How did you hear of Japan Journey?</label>
<select name="howhear" id="howhear">
<option value="No reply"
<?php
if (!$_POST || $_POST['howhear'] == 'No reply') {
echo 'selected';
} ?>>Select one</option>
<option value="Apress"
<?php
if (isset($_POST && $_POST['howhear'] == 'Apress') {
echo 'selected';
} ?>>Apress</option>
. . .
</select>
</p>
2. Even though an option is always selected in a drop-down menu, you might want to force users to make a selection other than the default. To do so, add the name attribute of the <select> menu to the $required array, then set the value attribute and the $_POSTarray element for the default option to an empty string, like this:
<option value=""
<?php
if (!$_POST || $_POST['howhear'] == '') {
echo 'selected';
} ?>>Select one</option>
The value attribute is not required in the <option> tag, but if you leave it out, the form uses the text between the opening and closing tags as the selected value. Therefore, it’s necessary to set the value attribute explicitly to an empty string. Otherwise, “Select one” is transmitted as the selected value.
3. The code that displays a warning message if no selection has been made follows a familiar pattern:
<label for="select">How did you hear of Japan Journey?
<?php if ($missing && in_array('howhear', $missing)) { ?>
<span class="warning">Please make a selection</span>
<?php } ?>
</label>
PHP Solution 5-9: Handling a Multiple-choice List
Multiple-choice lists are similar to check-box groups: they allow the user to choose zero or more items, so the result is stored in an array. If no items are selected, the multiple-choice list is not included in the $_POST array, so you need to add an empty subarray in the same way as with a check-box group.
1. The following code shows the first two items from the multiple-choice list in contact_08.php, with the name attribute and PHP code highlighted in bold. The square brackets appended to the name attribute ensure that it stores the results as an array. The code works in an identical way to the check-box group in PHP Solution 5-7.
<p>
<label for="characteristics">What characteristics do you associate with
Japan?</label>
<select name="characteristics[]" size="6" multiple="multiple"
id="characteristics">
<option value="Dynamic"
<?php
if ($_POST && in_array('Dynamic', $_POST['characteristics'])) {
echo 'selected';
} ?>>Dynamic</option>
<option value="Honest"
<?php
if ($_POST && in_array('Honest', $_POST['characteristics'])) {
echo 'selected';
} ?>>Honest</option>
. . .
</select>
</p>
2. In the code that processes the message, set a default value for a multiple-choice list in the same way as for an array of check boxes:
if (!isset($_POST['interests'])) {
$_POST['interests'] = [];
}
if (!isset($_POST['characteristics'])) {
$_POST['characteristics'] = [];
}
3. To make a multiple-choice list required and to set a minimum number of choices, use the same technique used for a check-box group in PHP Solution 5-7.
PHP Solution 5-10: Handling a Single Check Box
The way you handle a single check box is slightly different from a check-box group. With an individual check box, you don’t append square brackets to the name attribute because it doesn’t need to be processed as an array. Also, the value attribute is optional. If you don’t set the valueattribute, it defaults to “On” if the check box is selected. However, if the check box isn’t selected, its name isn’t included in the $_POST array, so you need to test for its existence.
This PHP solution shows how to add a single check box that seeks confirmation that the site’s terms have been accepted. It assumes that selecting the check box is required.
1. The following code shows the single check box, with the name attribute and PHP code highlighted in bold.
<p>
<input type="checkbox" name="terms" value="accepted" id="terms"
<?php
if ($_POST && !isset($errors['terms'])) {
echo 'checked';
} ?>>
<label for="terms">I accept the terms of using this website
<?php if (isset($errors['terms'])) { ?>
<span class="warning">Please select the check box</span>
<?php } ?></label>
</p>
The PHP block inside the <input> element inserts the checked attribute only if the $_POST array contains values and $errors['terms'] hasn’t been set. This ensures that the check box is not selected when the page first loads. It also remains unchecked if the user submitted the form without confirming acceptance of the terms.
The second PHP block displays an error message alongside the label if $errors['terms'] has been set.
2. In addition to adding terms to the $expected and $required arrays, you need to set a default value for $_POST['terms']; then set $errors['terms'] in the code that processes the data when the form is submitted:
if (!isset($_POST['characteristics'])) {
$_POST['characteristics'] = [];
}
if (!isset($_POST['terms'])) {
$_POST['terms'] = '';
$errors['terms'] = true;
}
You need to create $errors['terms'] only if the check box is required. For an optional check box, just set the value to an empty string if it’s not included in the $_POST array.
Chapter Review
A lot of work has gone into building processmail.php, but the beauty of this script is that it works with any form. The only parts that need changing are the $expected and $required arrays and details specific to the form, such as the destination address, headers, and default values for multiple-choice elements that won’t be included in the $_POST array if no value is selected.
I’ve avoided talking about HTML email because the mail() function handles only plain-text email. The PHP online manual at www.php.net/manual/en/function.mail.php shows a way of sending HTML mail by adding an additional header. However, it’s not a good idea, as HTML mail should always contain an alternative text version for email programs that don’t accept HTML. If you want to send HTML mail or attachments, try PHPMailer (https://github.com/Synchro/PHPMailer/).
As you’ll see in later chapters, online forms lie at the heart of just about everything you do with PHP. They’re the gateway between the browser and the web server. You’ll come back time and again to the techniques that you have learned in this chapter.